

Page 1
MARVEL BEVERAGE CENTER
life. luxury. marvel™.
Installation
Operation
and
Maintenance
Instructions
Beverage
Center
6SBARE
Page 2

Page 3
STARTING OUT
2
Remove Packaging
Your beverage center has been packed for
shipment with all parts that could be damaged by
movement securely fastened. Before using, be sure
all packing materials and tape have been removed.
Important
Keep your carton packaging until your beverage
center has been thoroughly inspected and found to
be in good condition. If there is damage, the
packaging will be needed as proof of damage in
transit.
Note to Customer
This merchandise was carefully packed and
thoroughly inspected before leaving our plant.
Responsibility for its safe delivery was assumed by
the carrier upon acceptance of the shipment. As
directed on the side of your packing carton, claims
for loss or damage sustained in transit must be
made on the carrier as follows:
Exterior Damage
Make thorough damage notation on your
delivery receipt and have driver acknowledge
by signature and date. Send a written request
asking for an inspection report from carrier.
Include the name of carrier representative and
the date the inspection was requested. Retain
inspection report and receipt for filing of a claim.
Concealed Damage
This must be reported to the carrier within fifteen
days. Obtain inspection report from the carrier.
Retain the inspection report for filing the claim.
DO NOT RETURN DAMAGED MERCHANDISE TO
THE MANUFACTURER – FILE THE CLAIM WITH THE
CARRIER.
Undercounter 6SBARE Beverage Specifications
Dimensions WxHxD (in.) 237/8 x 34 x 241/4
Weight 152 lbs.
Temperature 40–65°F
Power Supply 115V
supplied with a 15 amp plug
IT IS IMPORTANT THAT YOU SEND IN
YOUR WARRANTY RECORD CARD
IMMEDIATELY AFTER TAKING DELIVERY
OF YOUR REFRIGERATION APPLIANCE.
Page 4

Page 5
OPERATION
Start Your Appliance
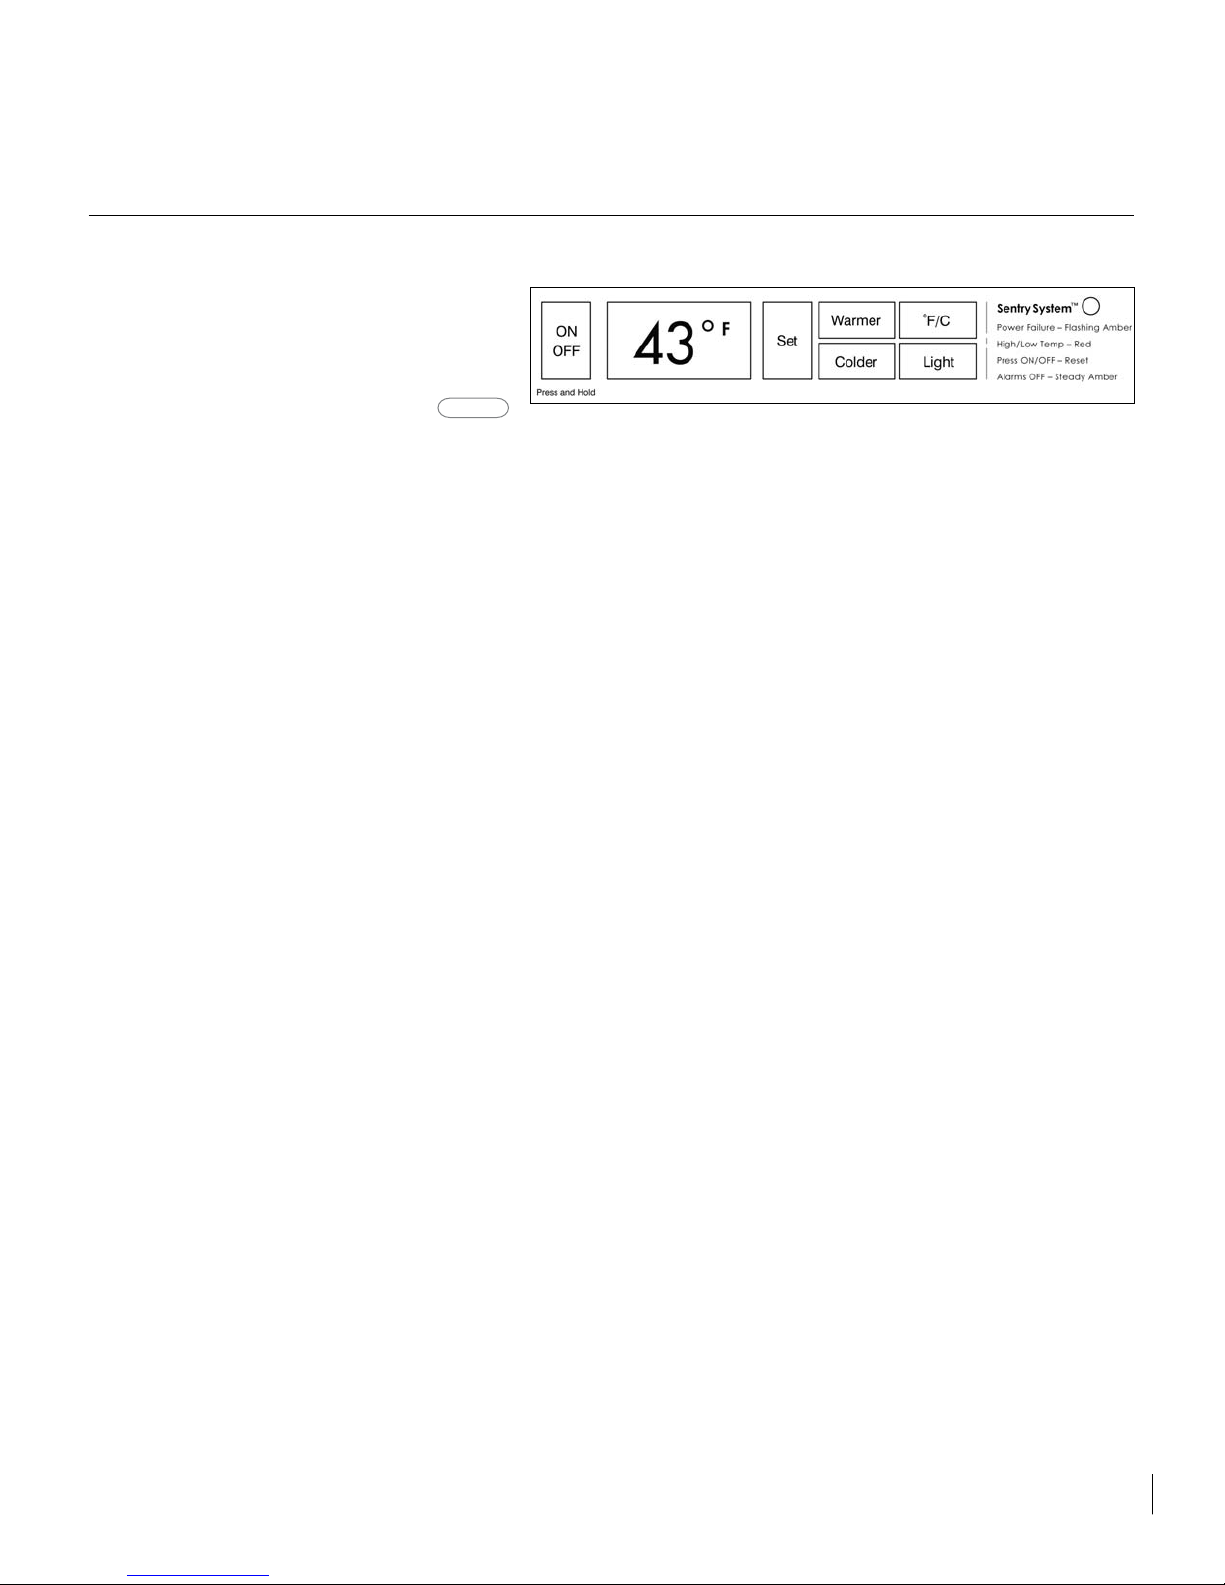
Your appliance will start upon initial plug-in. The LED
will flash amber upon initial plug-in due to your unit
being powered-on at the factory to verify performance
and then powered-off. The Sentry system senses a
power outage has occurred and relays this
information to you when you initially power-up your
appliance. This is normal and pressing the
“ON/OFF” button will reset this alarm function.
If your appliance’s control has been shut-off i.e., unit
plugged in, interior lights operate, display blank,
unit must be turned on. To turn on your appliance,
push and hold for 5 seconds, the “ON/OFF” button
located on the display panel. (See figure 3) Once
loaded with wine bottles, allow at least 48 hours for
the unit to stabilize before making any adjustments
to the initial setting.
Set Your Temperature Mode
This product can display either Fahrenheit or Celsius.
To do this press the ”°F/C“ button on display panel.
Set the Controls
The available temperature range of the unit is from
40° to 65°F. The temperature set-point is initially set
in the factory at 43°F. The temperature set-point can
be lowered or raised by first pushing the “Set” button
on the display pad. A “SET” icon will be displayed.
This icon will turn off 10 second after completing
your adjustments. Pushing either the “Warmer” or
“Colder” buttons located on the inside of the unit on
the display pad will raise or lower the set
temperature by one degree F or C (depending on
your setting). As with any refrigeration product, there
is a slight temperature variance at different locations
within the cabinet.
Adjustable Temperature Control
The temperature control is fully adjustable from 40°
to 65°F. The range allows flexibility of temperature
preferences and provides the ideal wine aging,
storing and serving temperatures. Temperature
range will average between 50 to mid 60’s in the
upper section and 40 to 50’s in the lower section.
Adjusting the “Warmer” or “Colder” buttons will
affect both zones accordingly. The display
temperature will be reflective of temperatures in the
middle section of the unit. See “Loading Tips and
Suggestions” on the next page for information
regarding glass shelf and wine rack configuration.
Interior Light and Switch
The interior light makes it easy to view your wine
labels and enhances the display of your collection.
To engage the display light, press the “Light” button
on the display panel. The light will come on and stay
on with the door closed. To disable the display light,
press the “Light” button again. The light will always
come on when the door is opened.
Warning Alarms
Your beverage center has been fitted with a Sentry
system. This sentry will let you know if your unit is not
functioning properly for optimum wine storage.
Door Ajar Alarm
If the door has been left open for over 5 minutes the
alarm will sound and the LED will flash green. This
will stop as soon as the door is closed.
High and Low Temperature
If your unit reaches temperatures outside normal
operating temperatures for your set point for about
one (1) hour duration, an alarm will sound and the
LED will flash red. This will warn you that your wines
have seen temperatures that may not be conducive
for long term storage.
Power Failure
If your unit experiences a power failure the LED will
flash amber until the alarm is reset.
Reset Alarms
Press the “ON/OFF” button for approximately one
second. This will reset all audible and display alarms.
Sabbath Mode
Your appliance is equipped with a Sabbath mode.
By activating this mode you will be disabling all
displays, audible alarms and lights. The system will
be overridden with a random control. To activate the
Sabbath mode press and hold the “Set” button while
pressing the ”°F/C“ button 7 times within 7 seconds.
To disable the Sabbath mode repeat the process.
The Sabbath mode will deactivate after 96 hours.
4
figure 3
Page 6

Page 7

CARE AND CLEANING OF YOUR BEVERAGE CENTER
6
Condenser
The condenser tubing inside the cabinet does not
require frequent cleaning; however, satisfactory
cooling depends on adequate ventilation over the
coils. Be sure that nothing obstructs the required air
flow openings in front of the cabinet. At least once
or twice a year brush or vacuum lint and dirt from the
condenser for efficient performance by unscrewing
the grille on the bottom front of the cabinet.
Cabinet
The painted cabinet can be washed with mild soap
and water and thoroughly rinsed with clear water.
Never use abrasive scouring cleaners.
Interior
Wash interior compartment with mild soap and
water. Do not use an abrasive cleaner, solvent, polish
cleaner or undiluted detergent.
Glass Door
Use a glass cleaner or mild soap and water and
soft cloth to clean the glass door model. Do not use
any abrasive cleaners.
Door Gasket
The vinyl gasket may be cleaned with mild soap
and water, a baking soda solution or a mild scouring powder.
Light Tube Replacement
WARNING! DISCONNECT THE POWER CORD
BEFORE ATTEMPTING LIGHT TUBE REPLACEMENT. Failure to do so may result in an electrical
shock that could severely injure you.
This product uses two, 6 watt light tubes to illuminate the interior of the wine cellar. The light tube is
a very reliable electrical component, but should it
not function properly, please call the dealer you
purchased your wine cellar from for a replacement
light tube. Use only an original equipment light
tube from your dealer or manufacturer.
To replace a light tube, use a hex-head driver,
remove the two hex-head screws that hold a cover
plate over the back section of the light tube. Set the
screws and cover plate aside for re-assembly later.
Using a small flat-blade screwdriver, gently lever
the front section of the light tube down to allow it
to be pulled clear of the light housing.
Disconnect the two insulated electrical connectors
from the cabinet’s electrical cable and discard the
old light tube. Reconnect the electrical connector of
the new light tube to the cabinet’s electrical cable
connectors. Make sure it is secure and fully
installed.
Carefully realign the light tube’s electrical terminal
back into the rear of the light enclosure channel
making sure not to crimp them. Gently insert the
light tube along the length of the light enclosure
channel. Press the light tube gently into the light
enclosure channel. Only a small part of the light
tube should project below the ceiling of the
wine cellar. DO NOT USE A HAMMER TO FIT
THE LIGHT TUBE.
Place the light tube terminal cover plate back in the
original position on the light enclosure’s flange. Reuse the original two screws to secure it in place.
Plug the wine cellar into the electrical socket.
Check to see if the light tubes operate properly.
Your light tube’s replacement is complete.
The light tubes are not covered by your warranty.
Replacement tubes can be obtained from your
service provider or from Marvel Industries.
In the Event of a Power Failure
Most power failures are corrected within two hours
and will not affect the unit’s temperature providing
you minimize the number of door openings while
the power is off. A gradual rise in temperature
should not have any adverse effect on your wine if
power is out for a longer period. If it is extremely
hot, you may want to move your wines to the
coolest location you can find until power is
restored.
Page 8

Page 9

If You Do Need Service
If you do need service, contact your dealer or the
manufacturer. In any correspondence, refer to the
model number and serial number of your unit
which is located on the upper left hand side of the
wall liner. Retain you proof of purchase. You may
want to record these numbers in the space below.
How to Obtain Service
Your beverage center requires little service because
the best and most up to date materials, equipment
and quality methods are employed throughout the
manufacturing process.
If trouble occurs during normal operation, first
check the troubleshooting chart on the opposite
page to see if any of these simple steps may correct
the problem. If service becomes necessary:
1. If the product is within the first year warranty
period, please call Marvel Customer Service
at 800-428-6644 for directions on how to
obtain warranty coverage in your area.
2. If the product is outside of the first year
warranty period, Marvel Customer Service
can provide recommendations of service
centers in your area. A listing of authorized
service centers is also available at
www.marvelindustries.com under the service
and support option.
3. In all correspondence regarding service, be
sure to give the model number, serial number
and proof of purchase.
4. Try to have information or description of the
nature of the problem, how long the unit has
been running, the room temperature, water
temperatures, and any additional information
that may be helpful in quickly solving the
problem.
OBTAINING SERVICE
8
For Your Records
Date of purchase
Dealer’s Name
Dealer’s Address
Dealer’s City Dealer’s State Zip
Appliance Serial Number
Model Number Date Warranty Card Sent (Must be within 10 Days of Purchase)
Page 10

Page 11

NOTES
Page 12

 Loading...