

Page 1
Read this manual first.
Please read this manual before operating this product.
After you finish reading this manual, store it in a safe place for future reference.
User's Manual
Page 2

MARV User Manual
2
Contents
Using Safe Mode 22
How to turn off [Safe Mode] at the
machine
How to turn [Safe Mode] OFF → ON
at the machine
Handling an Object after Printing 23
Removing the object from the
print bed
Removing the raft and support
structures (if necessary)
Using the MARV Software 24
Main screen
Editing functions
Settings
MARV Maintenance 29
Replacing a Filament 29
Replacing the Filament
while Printing 30
Calibrating the Nozzle 31
Cleaning the machine 32
Cleaning the Nozzle 32
Cleaning method 1: Cleaning the
nozzle via a computer software.
Cleaning method 2: Cleaning the
nozzle without a computer software.
Updating the Firmware 34
Specications 37
Troubleshooting 38
The Machine Does Not Turn On 38
The Software Will Not Install 38
A File Cannot Be Located after
an SD Card Is Inserted 39
Files Will Not Print 40
The Printer Is Not Working 40
Printing Quality Is Not Satisfactory 41
The Filament Does Not
Extrude During Printing 44
The Printed Object Cannot Be
Removed from the Print Bed 44
How to use the manual 3
Symbols used in the manual 3
Legal Notices 4
Model Names 4
Disclaimers 4
Copyright 4
Trademarks 4
FCC (Federal Communications
Commission) 5
FCC WARNING 5
AC Adapter 6
Important safety instructions 7
Supplied Accessories 8
Machine and Installation
Information 9
Installation Space 9
Names of parts 10
Exterior
Interior
Removing the Packing Materials 12
Installing the Software and
Connecting the USB Cable 13
Basic Operation 14
Filament Installation 14
Print Bed Preparation 18
Connecting Power 19
Printing from the Computer 20
Printing from the SD Card 21
Canceling Printing 22
Page 3
MARV User Manual
3
How to use the manual
Symbols used in the manual
Caution
Caution indicates a potentially hazardous situation that may result in injury to the user
of the machine or others, or the loss of property.
Note
Notes indicate useful tips or additional information for procedures and product use.
[ ]
This symbol represents control buttons on the computer screen and the machine.
e.g., [Import], [OK]
Page 4

MARV User Manual
4
Legal Notices
Model Names
MARV: MW10EU1, MW10EU2, MW10EU3, MW10EU4, MW10EU5, MW10U1, MW10U2
Disclaimers
The content of the manual is subject to change without prior notice.
CANON KOREA BUSINESS SOLUTIONS INC. MAKES NO WARRANTY OF ANY KIND
WITH REGARD TO THIS MATERIAL, EITHER EXPRESS OR IMPLIED, EXCEPT AS
PROVIDED HEREIN, INCLUDING WITHOUT LIMITATION, THEREOF, WARRANTIES AS
TO MARKETABILITY, MERCHANTABILITY, FITNESS FOR A PARTICULAR PURPOS OF
USE OR NON-INFRINGEMENT. CANON KOREA BUSINESS SOLUTIONS INC. SHALL
NOT BE LIABLE FOR ANY DIRECT, INCIDENTAL, OR CONSEQUENTIAL DAMAGES OR
LOSSES, ARISING FROM OR RELATED TO YOUR USE OF THIS MANUAL.
Copyright
No part of this manual may be reproduced, transmitted, or duplicated in any form or by any
means electronic, mechanical, magnetic, optical, chemical, manual or otherwise, be stored
in a retrieval system, or converted into any computer languages without written permission
from Canon Korea Business Solutions INC.
Trademarks
Microsoft, Windows, Windows XP, Windows 7, Windows 8 and Windows 8.1 are either
registered trademarks or trademarks of Microsoft Corporation in the United States and/or
other countries.
All other brand and product names are trademarks, registered trademarks, or service
marks of their respective companies.
Page 5
MARV User Manual
5
FCC (Federal Communications Commission)
MARV: MW10U1, MW10U2
This device complies with Part 15 of the FCC Rules. Operation is subject to the following
two conditions:
1. This device may not cause harmful interference, and
2. This device must accept any interference received, including interference that may
cause undesired operation.
FCC WARNING
Changes or modications not expressly approved by the party responsible for compliance
could void the user’s authority to operate the equipment.
Note
This equipment has been tested and found to comply with the limits for a class B digital device,
pursuant to Part 15 of the FCC Rules. These limits are designed to provide reasonable protection
against harmful interference in a residential installation. This equipment generates, uses and can
radiate radio frequency energy and, if not installed and used in accordance with the instructions,
may cause harmful interference to radio communications. However, there is no guarantee
that interference will not occur in a particular installation. If this equipment does cause harmful
interference to radio or television reception, which can be determined by turning the equipment
off and on, the user is encouraged to try to correct the interference by one or more of the
following measures:
• Reorient or relocate the receiving antenna.
• Increase the separation between the equipment and receiver.
• Connect the equipment to an outlet on a circuit different from that to which the receiver is
connected.
• Consult the dealer or an experienced radio/TV technician for help.
Use of shielded cable is required to comply with class B limits in Subpart B of Part 15 of the FCC
Rules. Do not make any changes or modi cations to the equipment unless otherwise speci
ed in this manual. If you make such changes or modi cations, you could be required to stop
operation of the equipment.
CANON KOREA BUSINESS SOLUTIONS INC.
607, Teheran-ro, Gangnam-gu, Seoul, Korea
TEL No.1588-2500
Note
• This equipment complies with the Canadian ICES-003 Class B limits.
• Respecte les limites de la classe B de la NMB-003 du Canada.
Page 6

MARV User Manual
6
AC Adapter
• Connect only to a power outlet of the rated voltage and power supply frequency
(50/60 Hz depending on your region).
• Do not connect other electrical equipment to the same power outlet to which printer is
connected. Also, when using an extension cord, make sure that the extension cord is
rated for the current requirements of the printer.
• Never disassemble or modify the AC adapter, as it is dangerous.
• The power cord may become damaged if it is often stepped on or if heavy objects are
placed on it. Continued use of a damaged power cord and AC adapter can lead to an
accident, such as a re or electrical shock.
• Do not use the power cord while it is coiled.
• Do not pull directly on the power cord. When disconnecting the power cord, grasp the
plug and remove it from the outlet.
• Keep the area around the power cord clear of objects so that the power cord can be
disconnected easily in an emergency.
• Do not use an AC adapter other than the one provided with the printer.
Do not use the AC adapter provided with the printer with other products.
• If you have any questions regarding the power supply, contact your local authorized or
service representative for further information.
Page 7

MARV User Manual
7
Important safety instructions
Please read this entire section before using the machine. These instructions are
intended to prevent any potential damage to the machine and injury to the user
or others. Failure to adhere to these instructions may result in injury to the user or
others, or may cause damage to the machine or operation errors.
• Do not install the machine on an unstable surface, such as an unstable shelf or uneven
oor.
• Do not damage the power cord or any cables.
• Be sure to use the designated voltage only.
• Use manufacturer-supplied components and accessories only. We are not liable for
performance degradation, breakdowns, or accidents caused by third-party products.
• Using manufacturer-supplied laments is recommended for achieving the best printing
quality. Using third-party laments may result in unsatisfactory printing quality and a
blocked nozzle, and prevent the device from printing at full capacity.
• For the best printing results, allow the nozzle to cool down before printing.
• Do not shake or cause physical impacts to the machine.
• Do not disassemble or modify the machine.
• Be sure to turn off the power and disconnect the power cord and cables when moving
the machine.
• Do not turn off the power or load or remove the lament during printing.
• Do not turn off the software or open machine covers during printing. It can interrupt
printing or cause a system failure.
• Do not touch the nozzle during installation, operation, or immediately after the operation
is complete. Doing so may cause burns.
• Do not forcefully move or cause physical impacts to the nozzle unit. It may cause the
machine to malfunction or damage the sensors.
• Calibrate the gap between the print bed and the nozzle before printing.
• Do not insert or drop objects inside the printer (lament, etc.). Doing so may cause re
or damage.
• After use, open laments should be sealed and kept in a dry environment and out of
direct sunlight.
• Be sure there is adequate lament on the lament before printing.
• When printing stops due to a shortage of lament, replace the lament. If a printing job
is discontinued, it cannot be resumed. Before using the machine, check that there is
enough material available on the lament.
Page 8
MARV User Manual
8
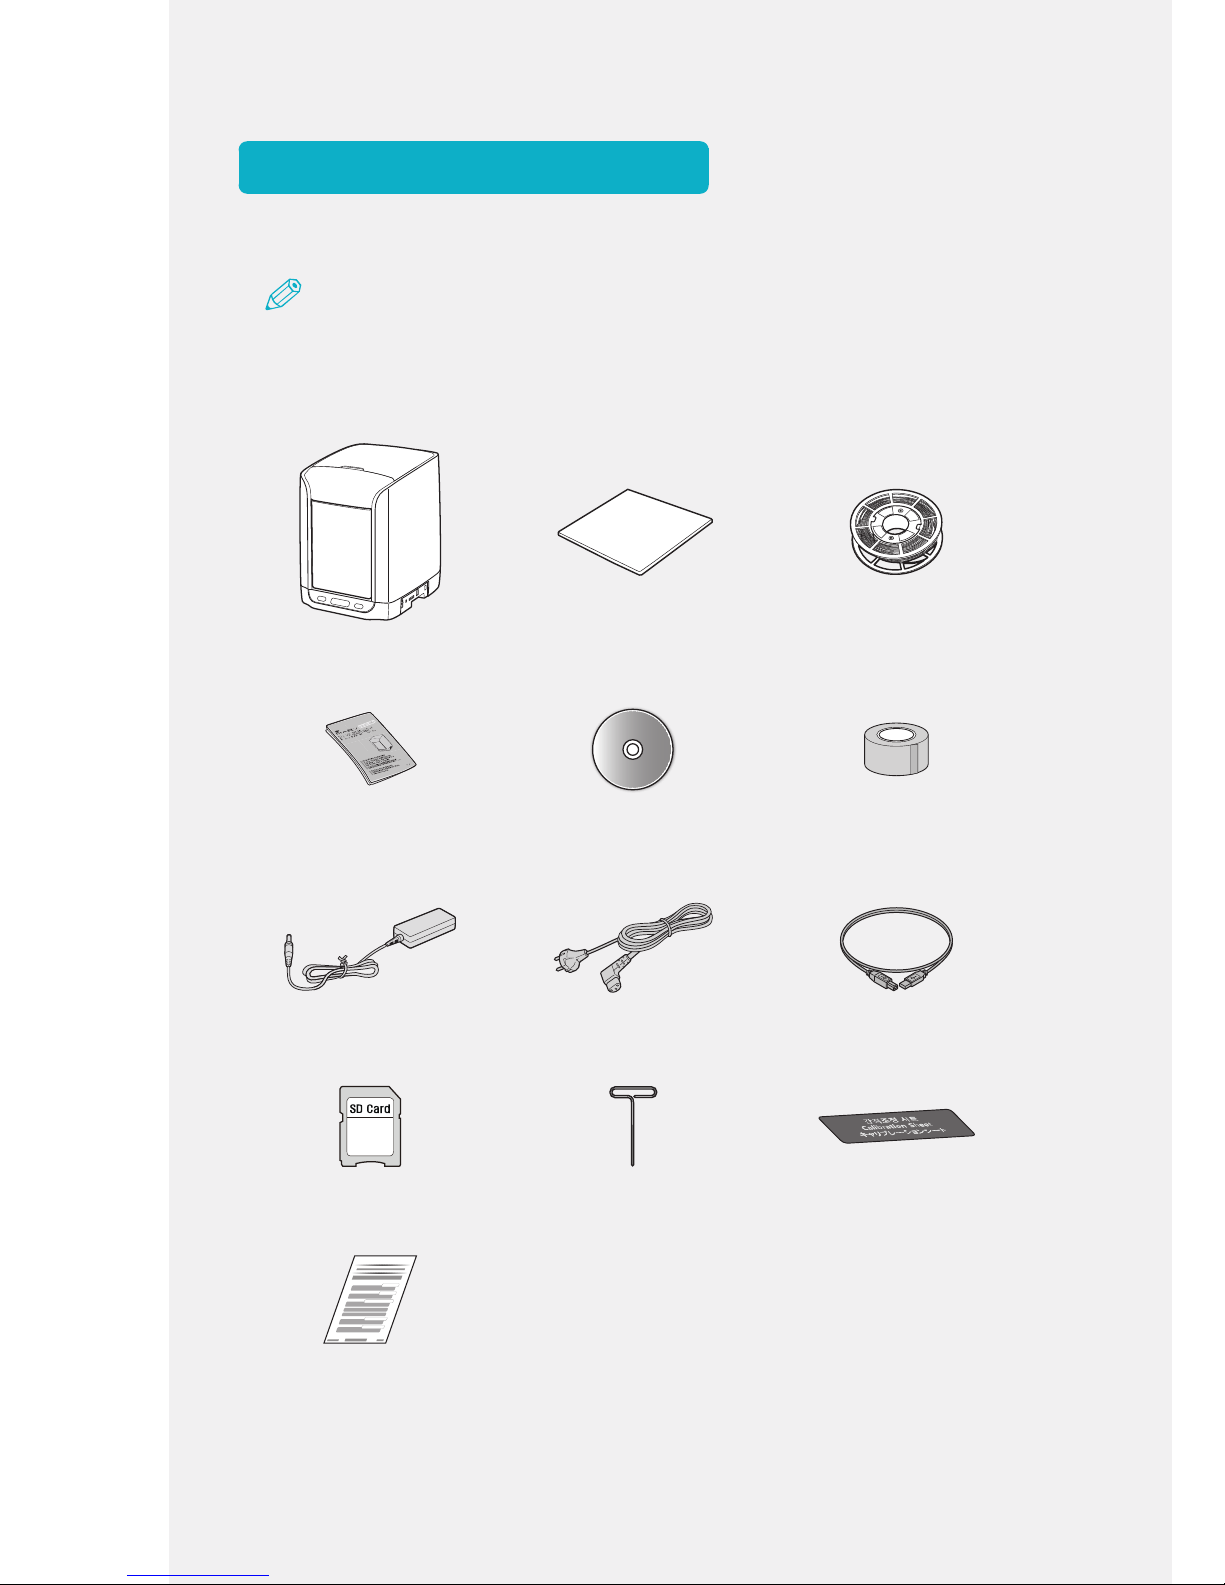
Supplied Accessories
Check that all of the pictured components and accessories are present before
installing the machine. If any items are missing or damaged, contact your retailer.
Note
• Use manufacturer-supplied components and accessories only. We are not liable for performance
degradation, breakdowns, or accidents caused by third-party products.
• The shape, positioning, and quantity of packing materials may change without prior notice for
quality improvement purposes.
ON
SD CARD
OFF
Machine Print bed Filament
Quick Setup Guide
Manual and driver
CD-ROM
Adhesive tape
Adapter Power cable USB cable
SD card Nozzle maintenance pin Calibration sheet
Warranty card
Page 9
MARV User Manual
9
Machine and Installation Information
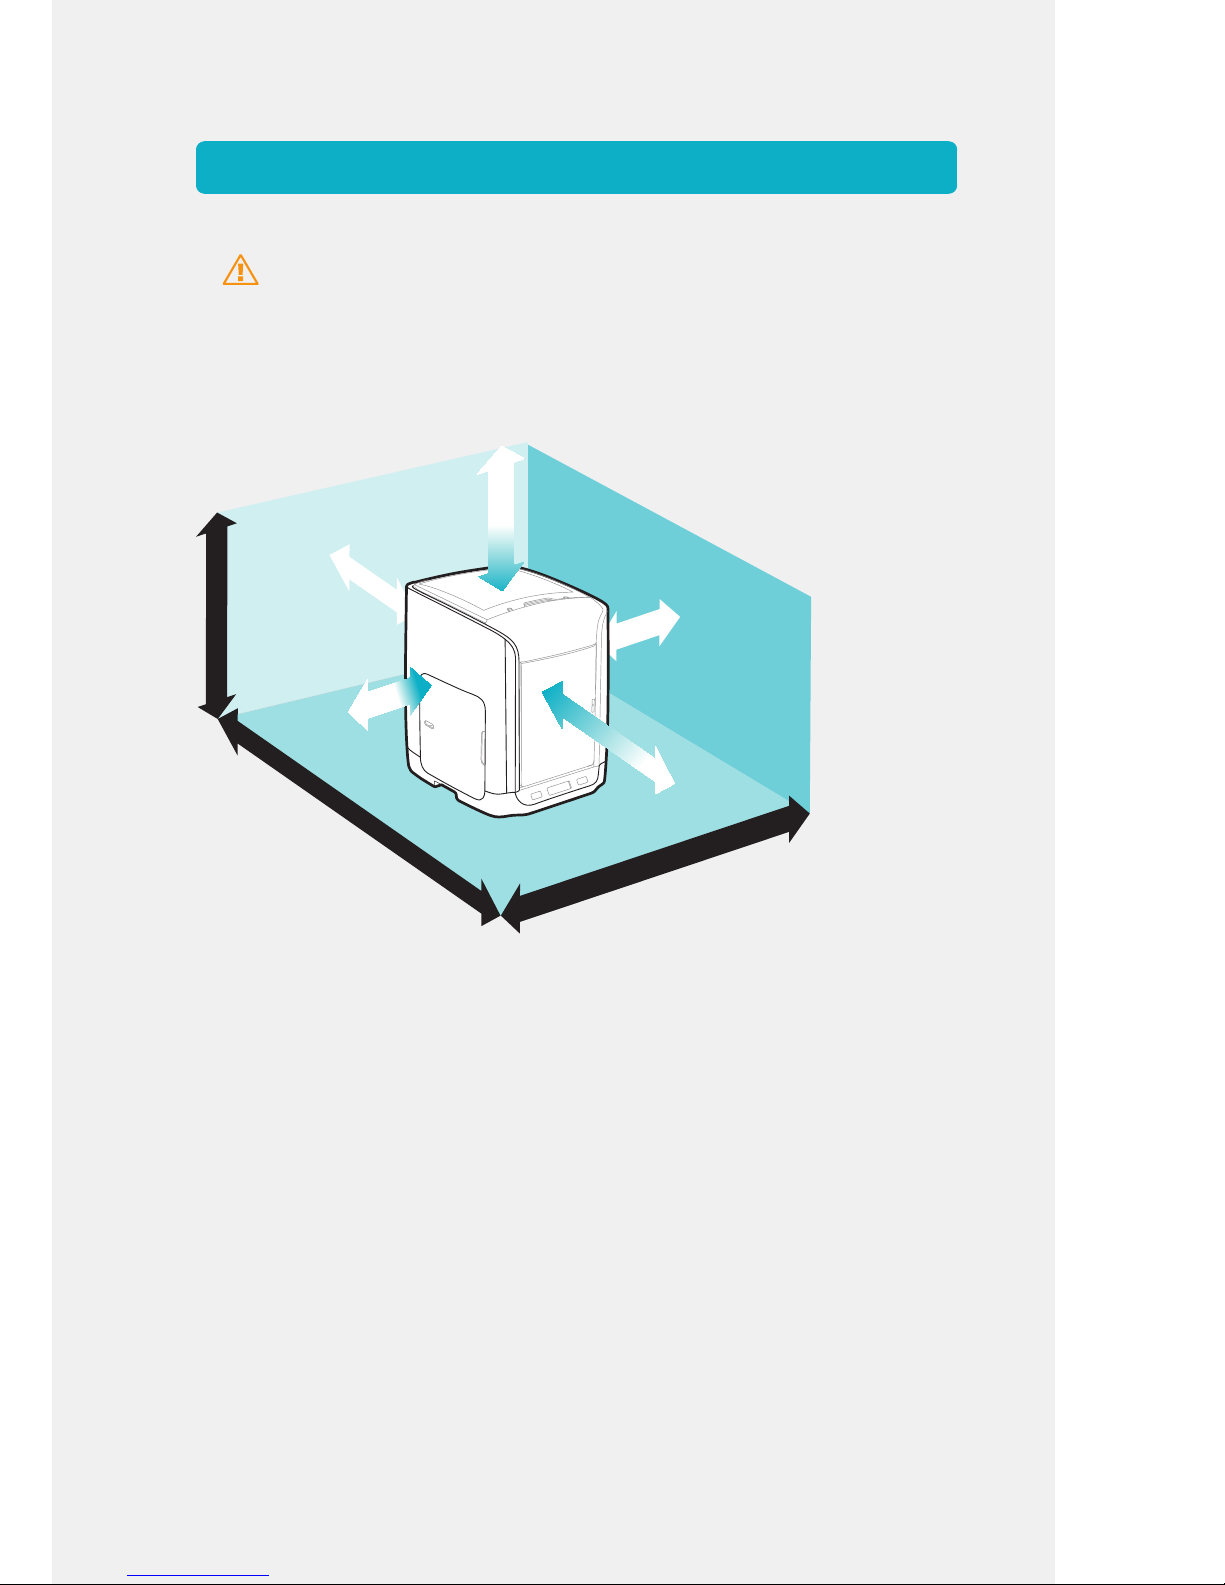
Make sure there is sufcient space to install the device.
Caution
Do not install the machine on an unstable surface, such as an unstable shelf or uneven oor.
Installation Space
100mm
100mm
850mm
586mm
146mm
357mm
385mm
820mm
Page 10
MARV User Manual
10
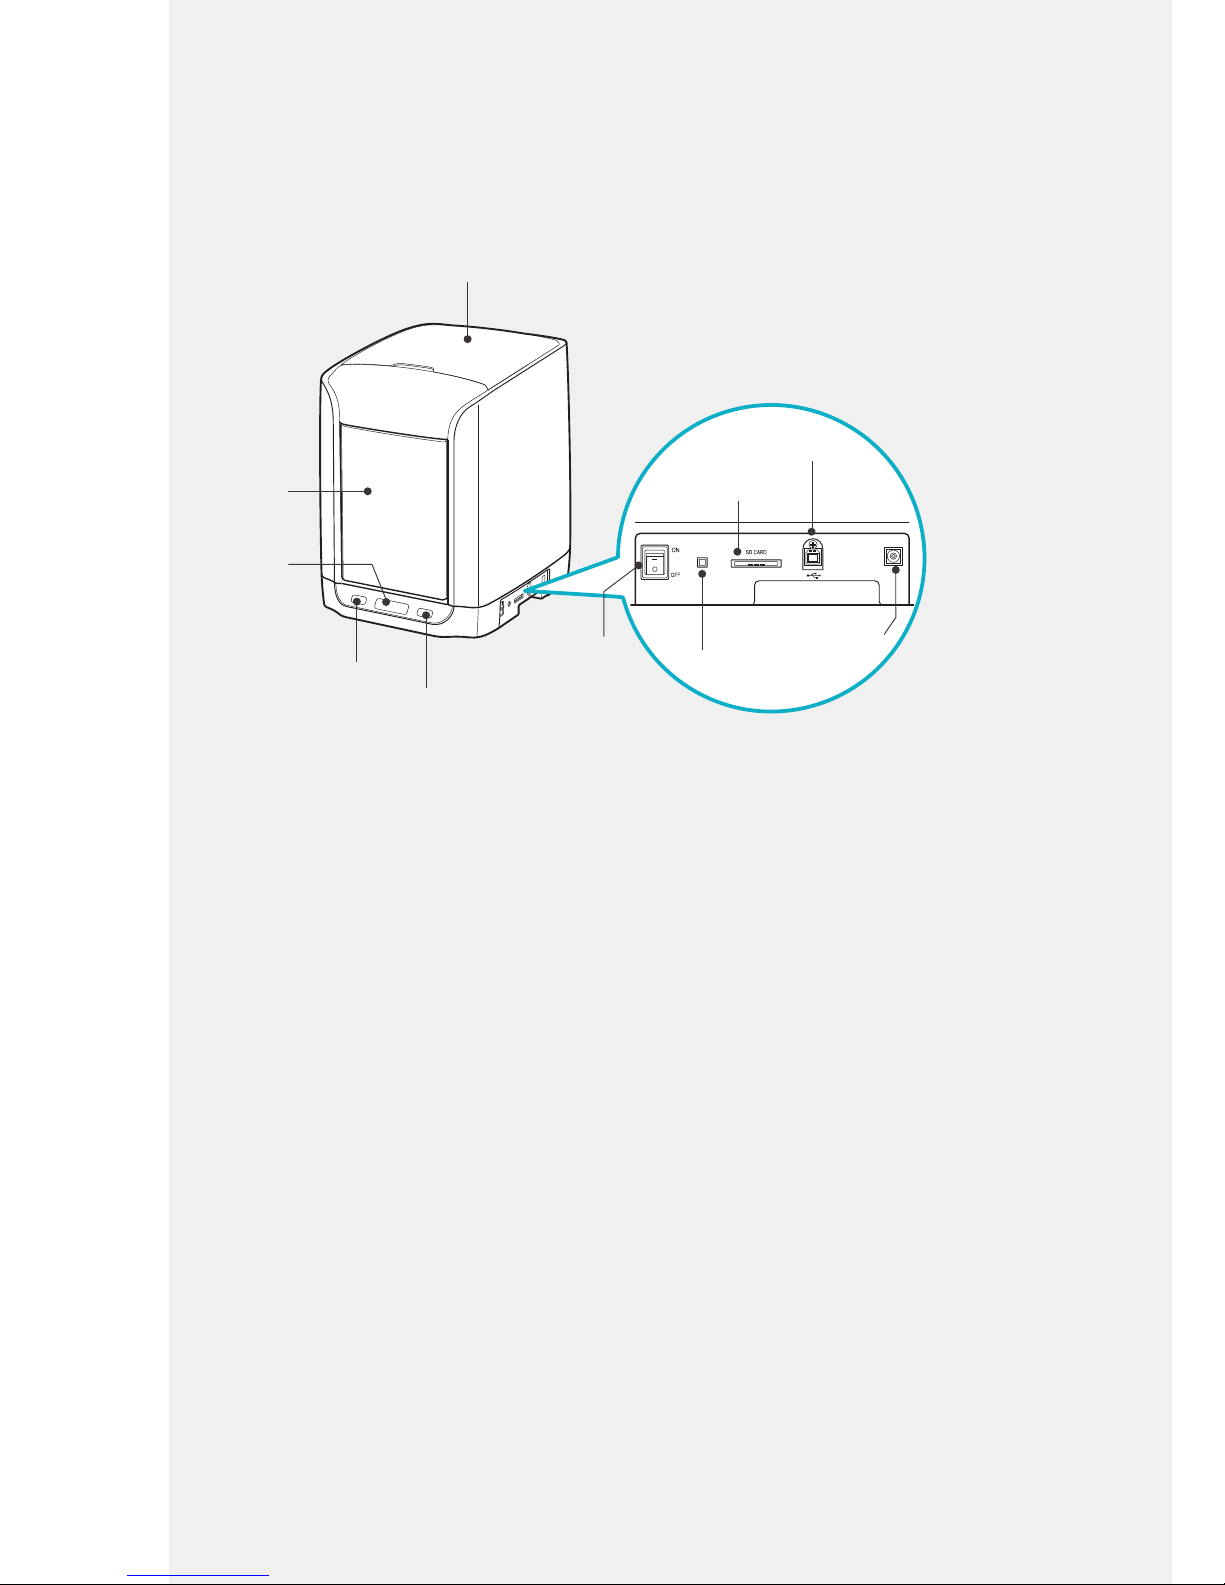
Names of parts
Exterior
ON
SD CARD
OFF
Top cover
LCD
Front
cover
[OK] button
[▼] button
USB port
SD card slot
Power switch
Firmware switch
Power plug-in
Page 11
MARV User Manual
11
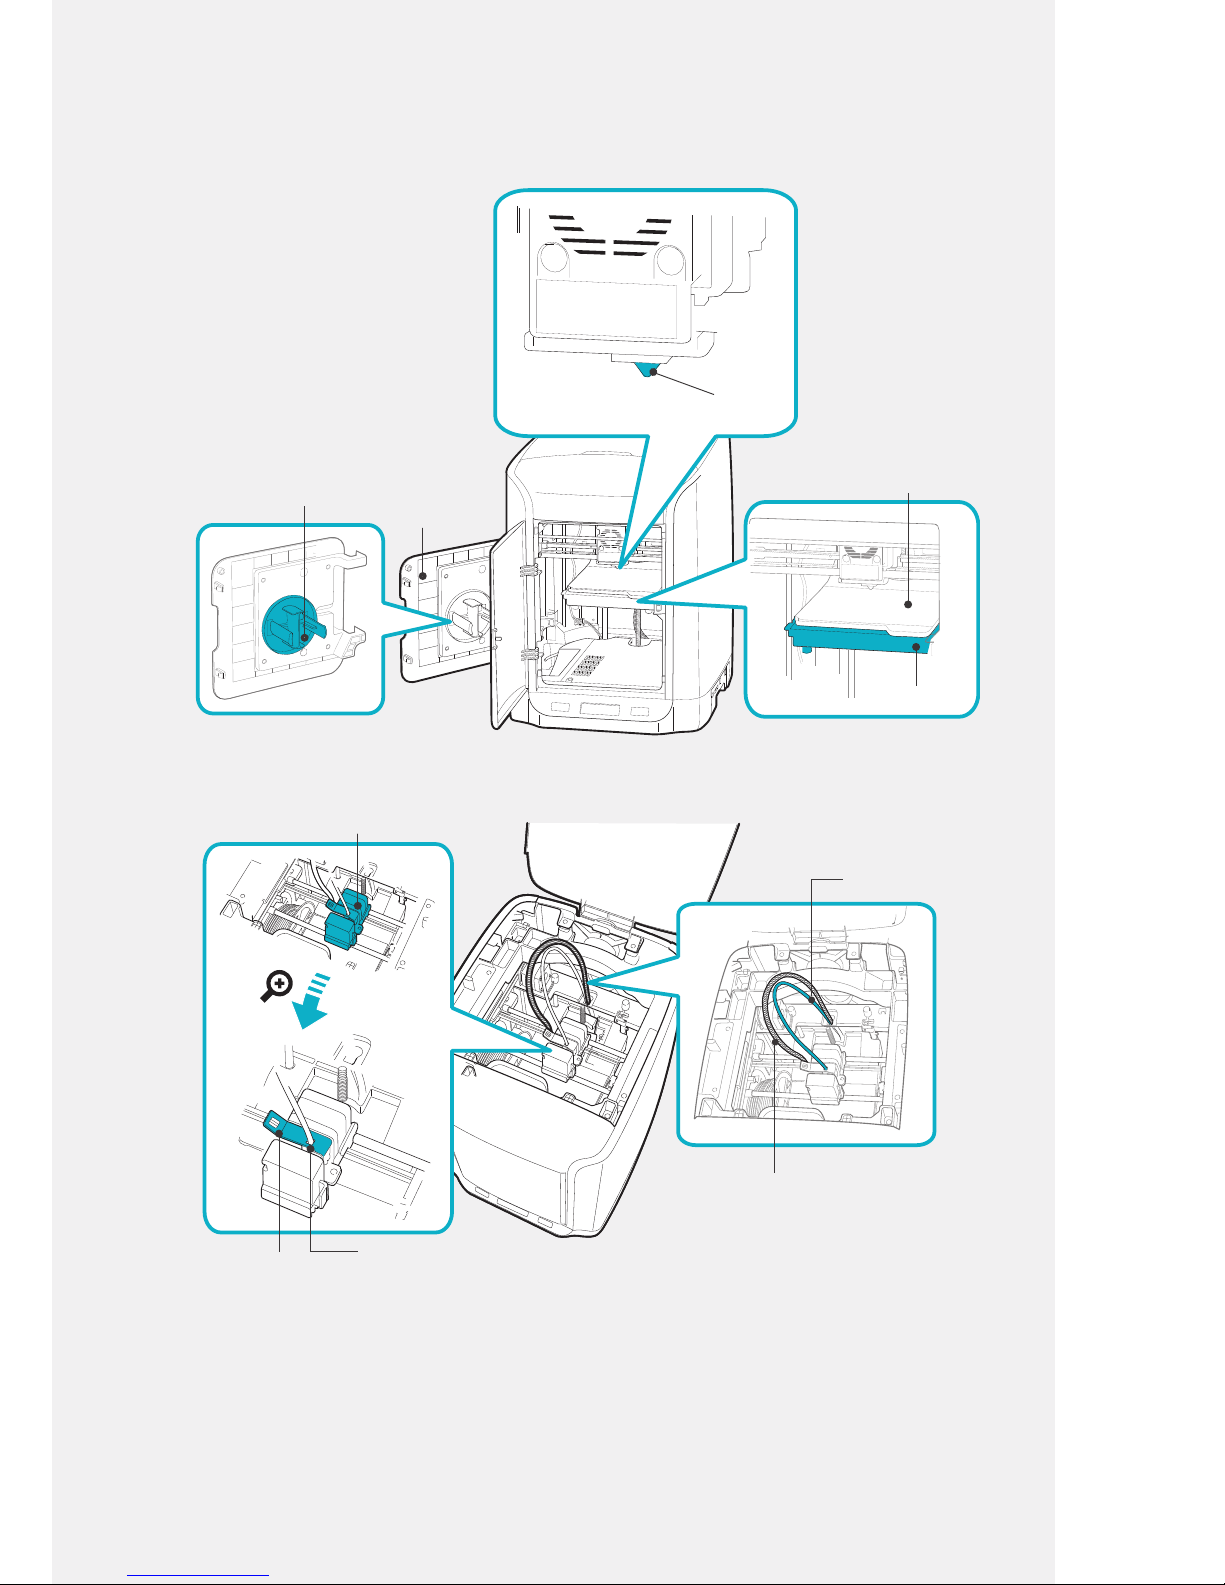
Interior
Left cover
Filament mount
Print bed
Staging bracket
Nozzle
Feeding
tube
Cable
Filament
insertion lever
Nozzle unit
Filament
insertion hole
Page 12
MARV User Manual
12
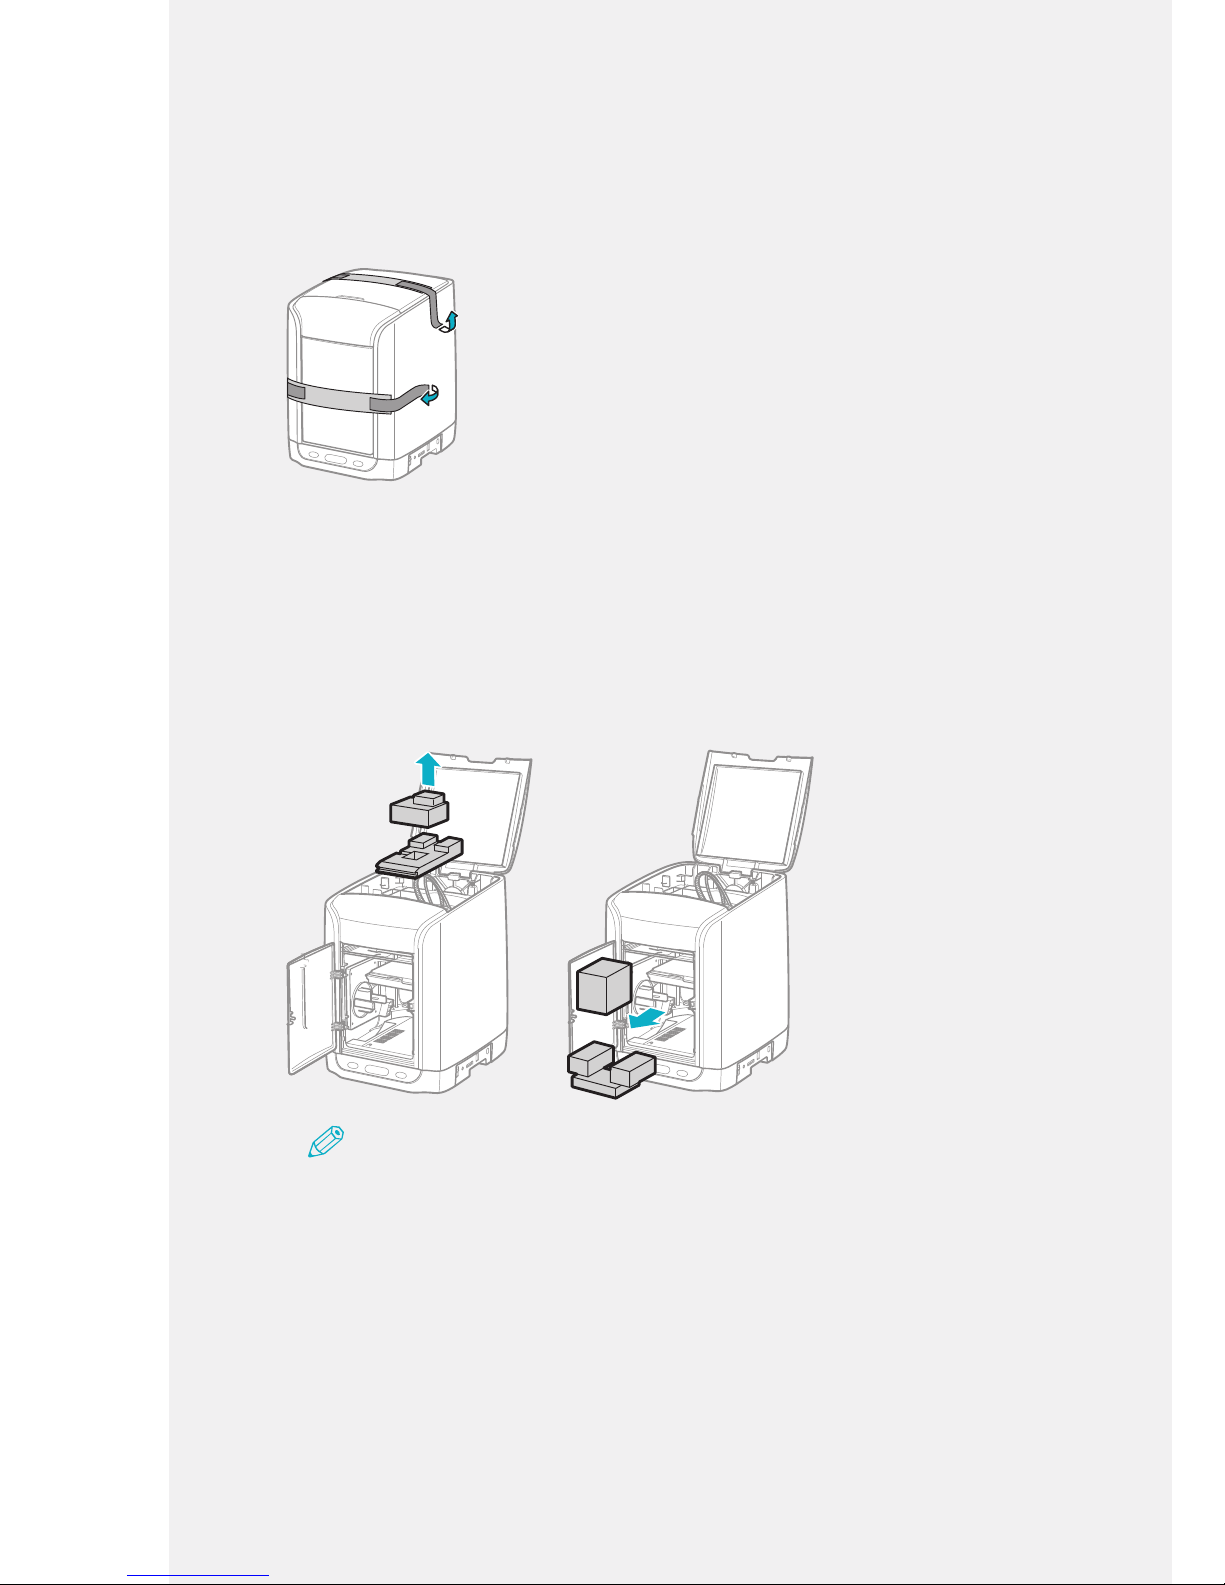
Removing the Packing Materials
1.
Remove the orange adhesive tape. Remove the machine's external packing
material.
2.
Open the top cover.
3.
To open the front cover, press [PUSH] on the right-hand side of the front
cover.
4.
Remove the components and packing materials from the inside of the
machine.
Note
• When disposing the packing material, take care not to accidentally discard any machine
parts.
• When removing components and packing materials,do not move the nozzle unit inside the
machine by force in any means.
It may cause the machine to malfunction or damage sensors.
5.
Close the front cover.
Push the front cover in until you hear a click from the right side.
6.
Close the top cover.
Push the top cover to make sure it is completely closed.
Page 13
MARV User Manual
13
Installing the Software and Connecting the USB Cable
The software must be installed to use all MARV functions.
Install the software on your computer using the enclosed CD-ROM.
Note
Supported operating systems
• Windows XP 32 bit SP3
• Windows 7 (32 bit/64 bit)
• Windows 8 (32 bit/64 bit)
• Windows 8.1 (32 bit/64 bit)
1.
Insert the enclosed CD-ROM into the computer.
2.
When the installation software begins, follow the instructions to install the
software.
3.
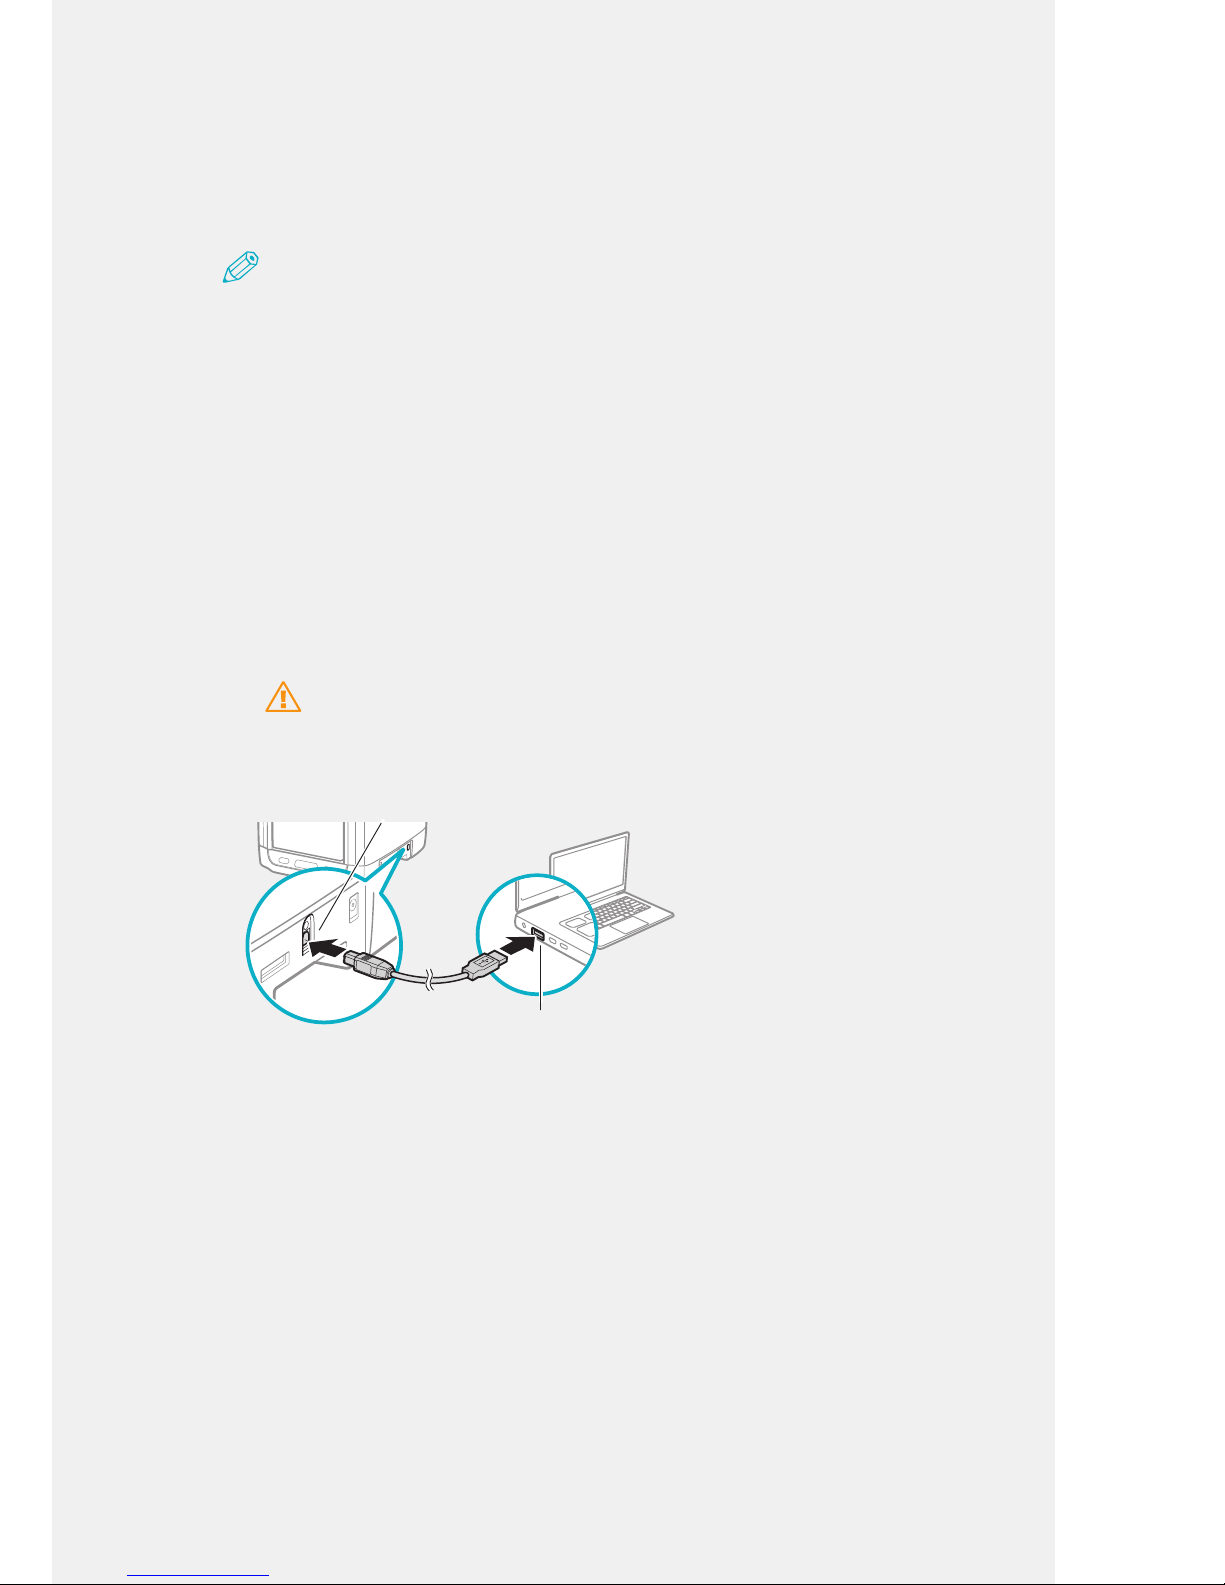
When the software is installed, connect the printer to your computer via the
USB cable.
Caution
You must install the software prior to USB connection.
Flat Connector
Connect to the computer.
Square Connector
Connect to the machine.
Page 14
MARV User Manual
14
Basic Operation
Caution
The nozzle may become excessively hot during the device installation and printing. Avoid touching
the nozzle. Doing so may cause burns.
Note
• It is recommended to use manufacturer-supplied laments to achieve the best printing results.
Using third-party laments may result in unsatisfactory printing quality and nozzle clogging, and
preventing the device from printing at full capacity.
• After use, open laments should be sealed and kept in a dry environment and out of direct sunlight.
• Straighten any tangled lament on the lament. Tangled lament may cause device malfunctions
and printing errors.
Filament Installation
1.
Remove the lament from the package.
2.
Remove the tape from the lament package then unwind the lament for
installation.
3.
Open the left and top covers.
4.
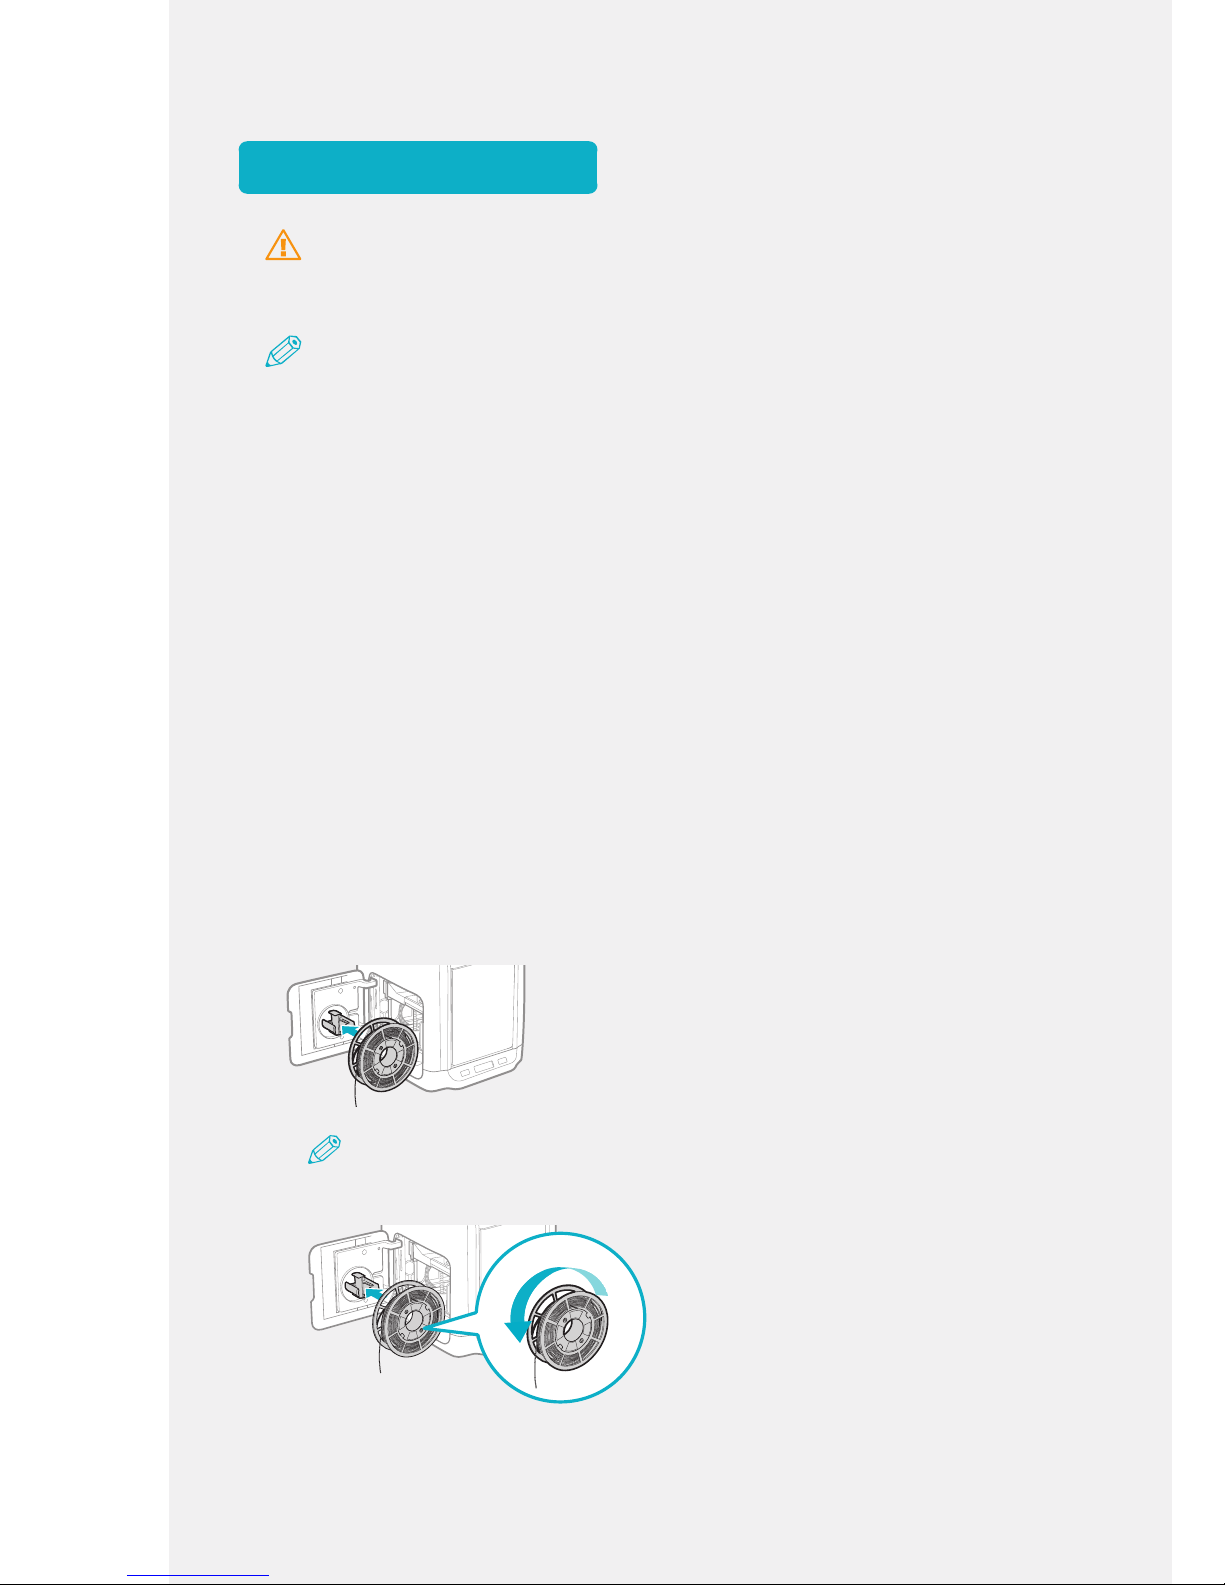
Mount the lament with the lament's label facing front.
Push in the cartridge until you hear a click to make sure that it is xed on the
cartridge mount.
Note
Install the laments so that lament will release in a left direction. If installed in the reverse
direction, the lament may not feed properly.
Left direction
Page 15
MARV User Manual
15
5.
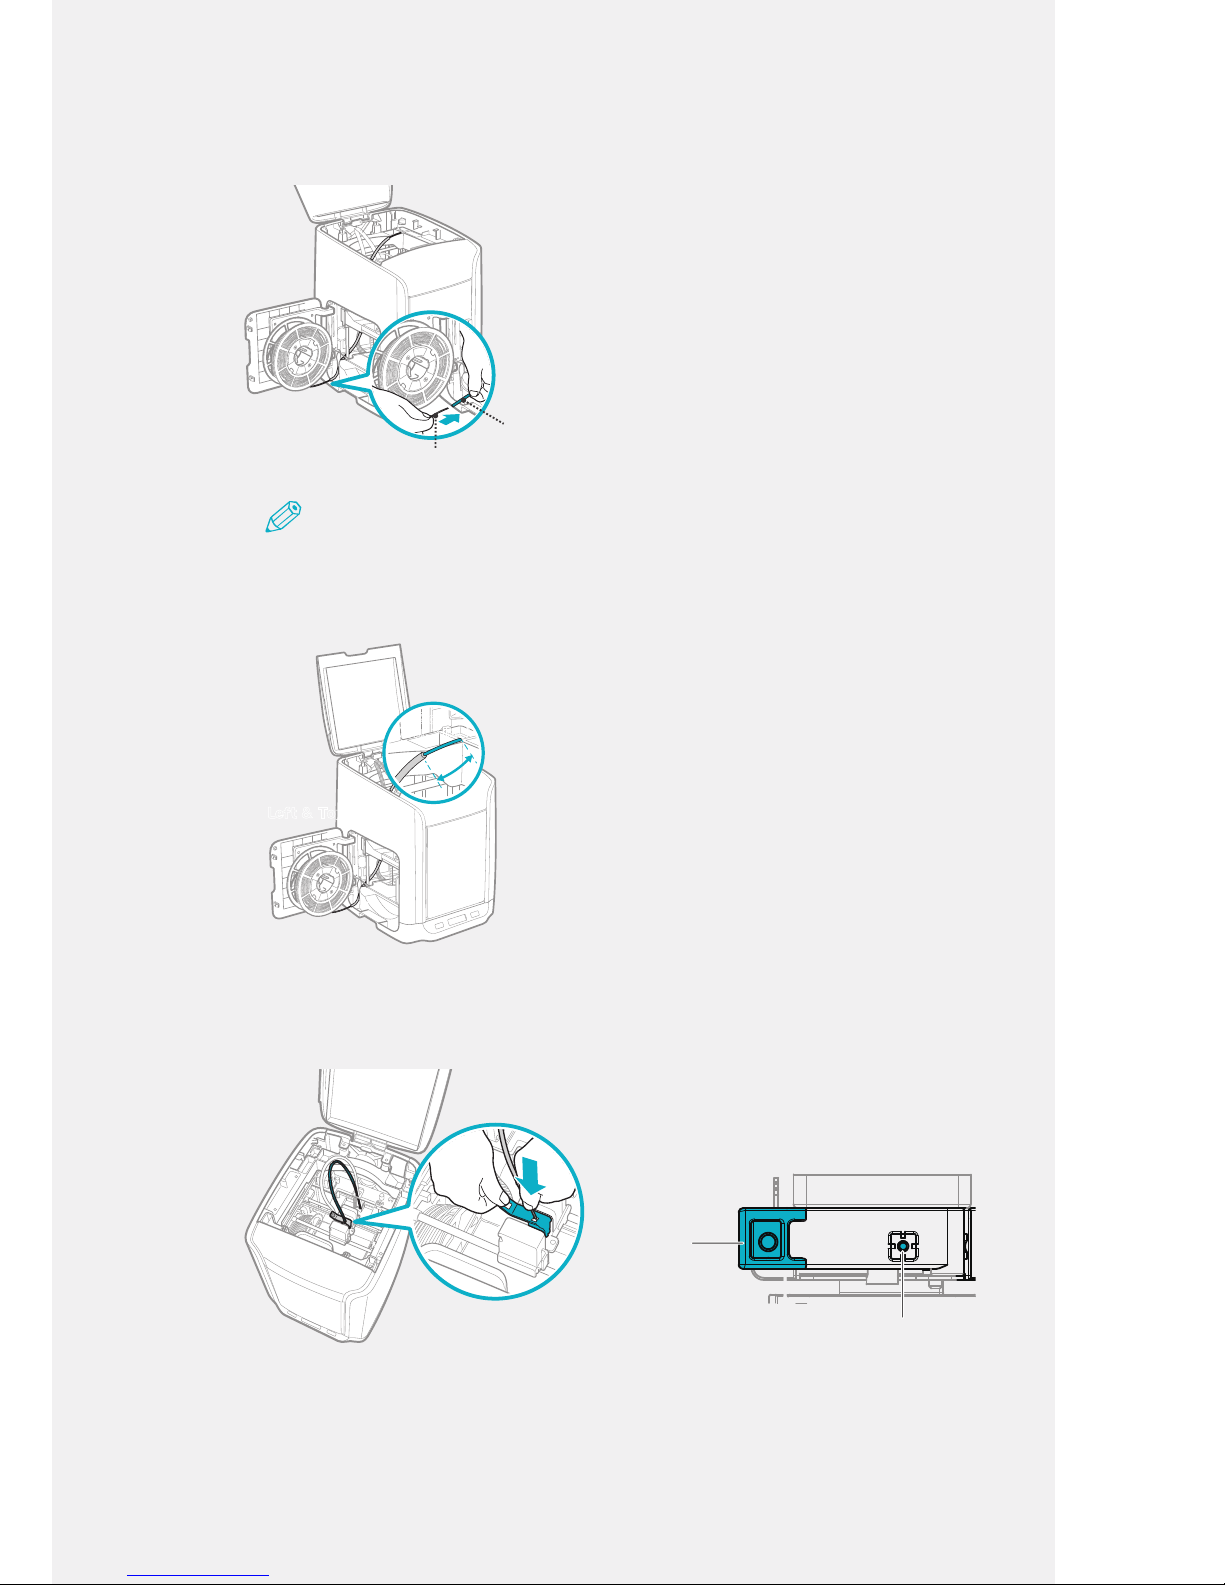
After installing the lament, insert the lament into the feeding tube.
Filament
Feeding
tube
Note
• If the end of the lament is deformed or bent, cut it cleanly so that it will t into the insertion
hole in the nozzle.
• Push the lament through the feeding tube until it extends approximately 8 cm from the
other end of the feeding tube.
8cm
(appr. 3 inch)
Left & Top covers open
6.
While pressing down on the insertion lever of the lament nozzle unit with
one hand, insert the end of the lament into the insertion hole.
Filament
Insertion
lever
Page 16
MARV User Manual
16
7.
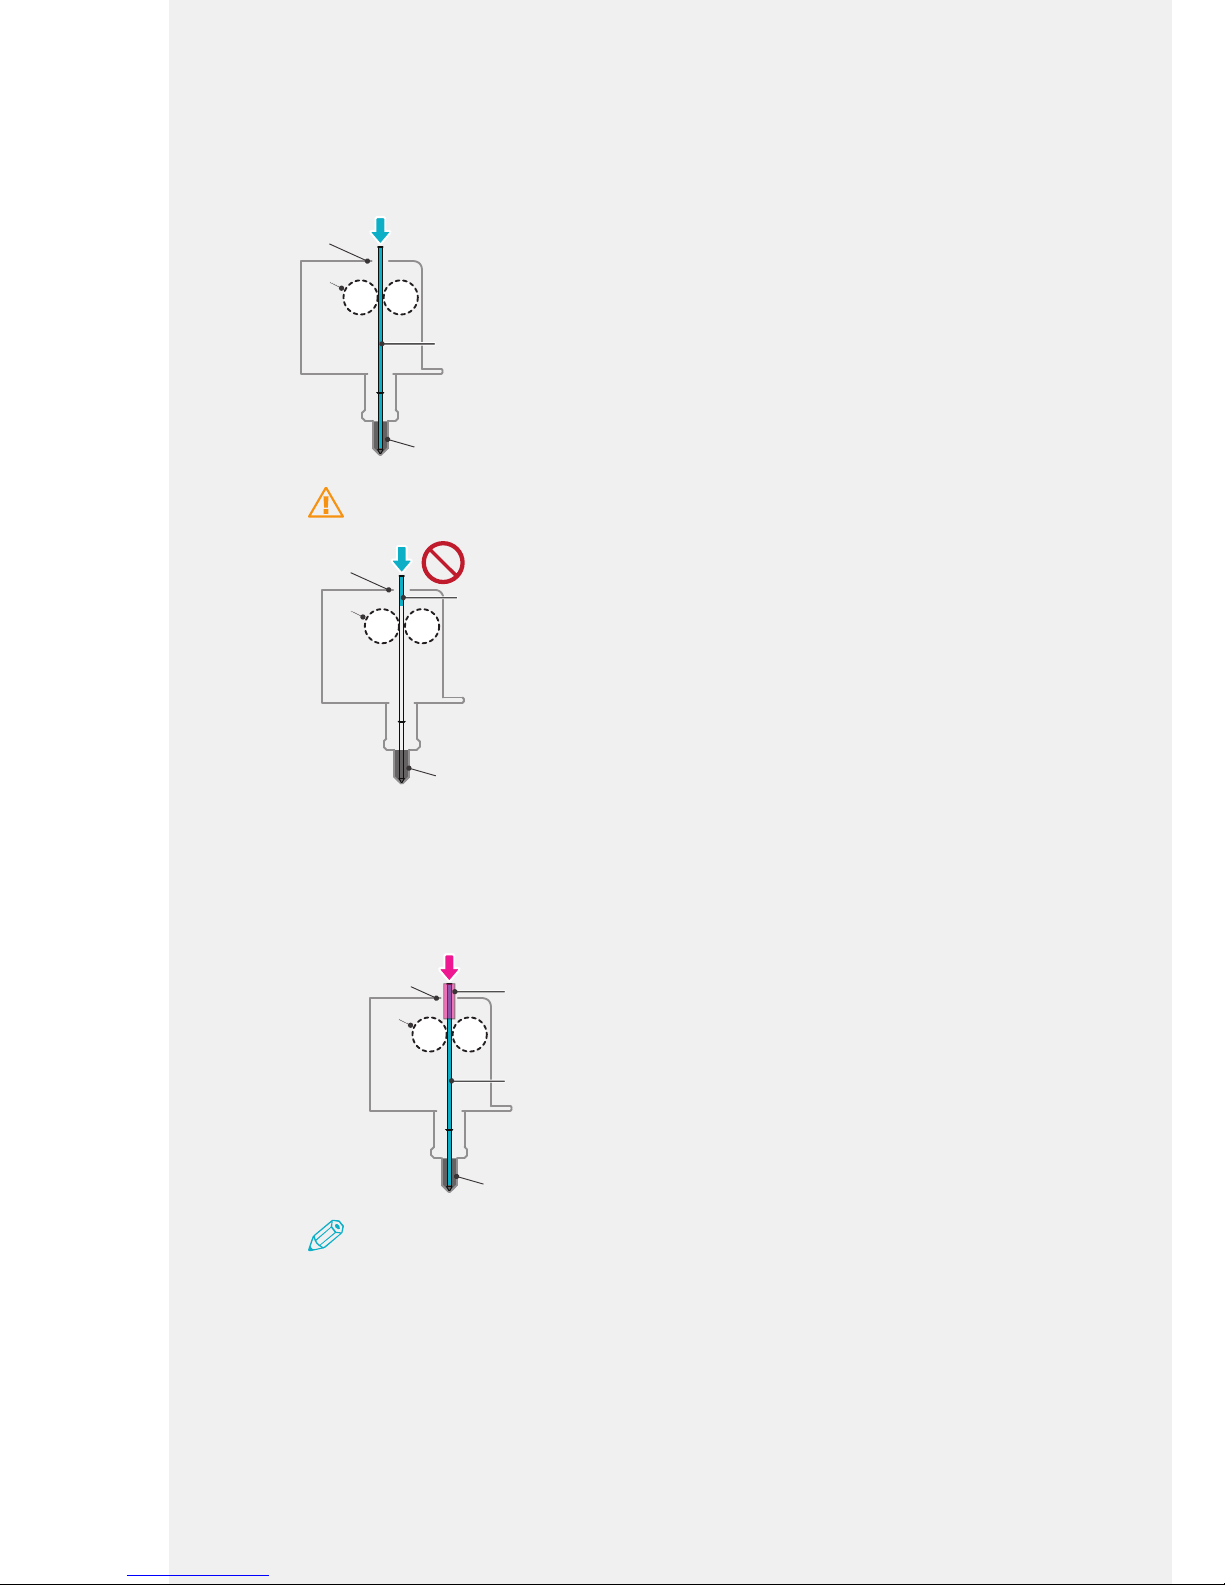
Push the lament into the nozzle until it will go no further (about 5 cm).
Refer to the cross section view of a lament being inserted.
Nozzle
Insertion
hole
Roller
Filament
Caution
Nozzle
Insertion
hole
Roller
Filament
If the lament is not inserted fully, as shown in the cross section above, the lament may not
feed properly and cause the nozzle to clog or printing failure.
8.
Insert the lament fully and push the feeding tube into the insertion hole.
Refer to the cross section view of the feeding tube being inserted.
Nozzle
Insertion hole
Roller
Filament
Feeding
tube
Note
• Printing may not work if the lament is not fully inserted into the nozzle unit.
• If the end of the lament is deformed or bent, cut it cleanly so that it will t into the insertion
hole in the nozzle.
Page 17
MARV User Manual
17
9.
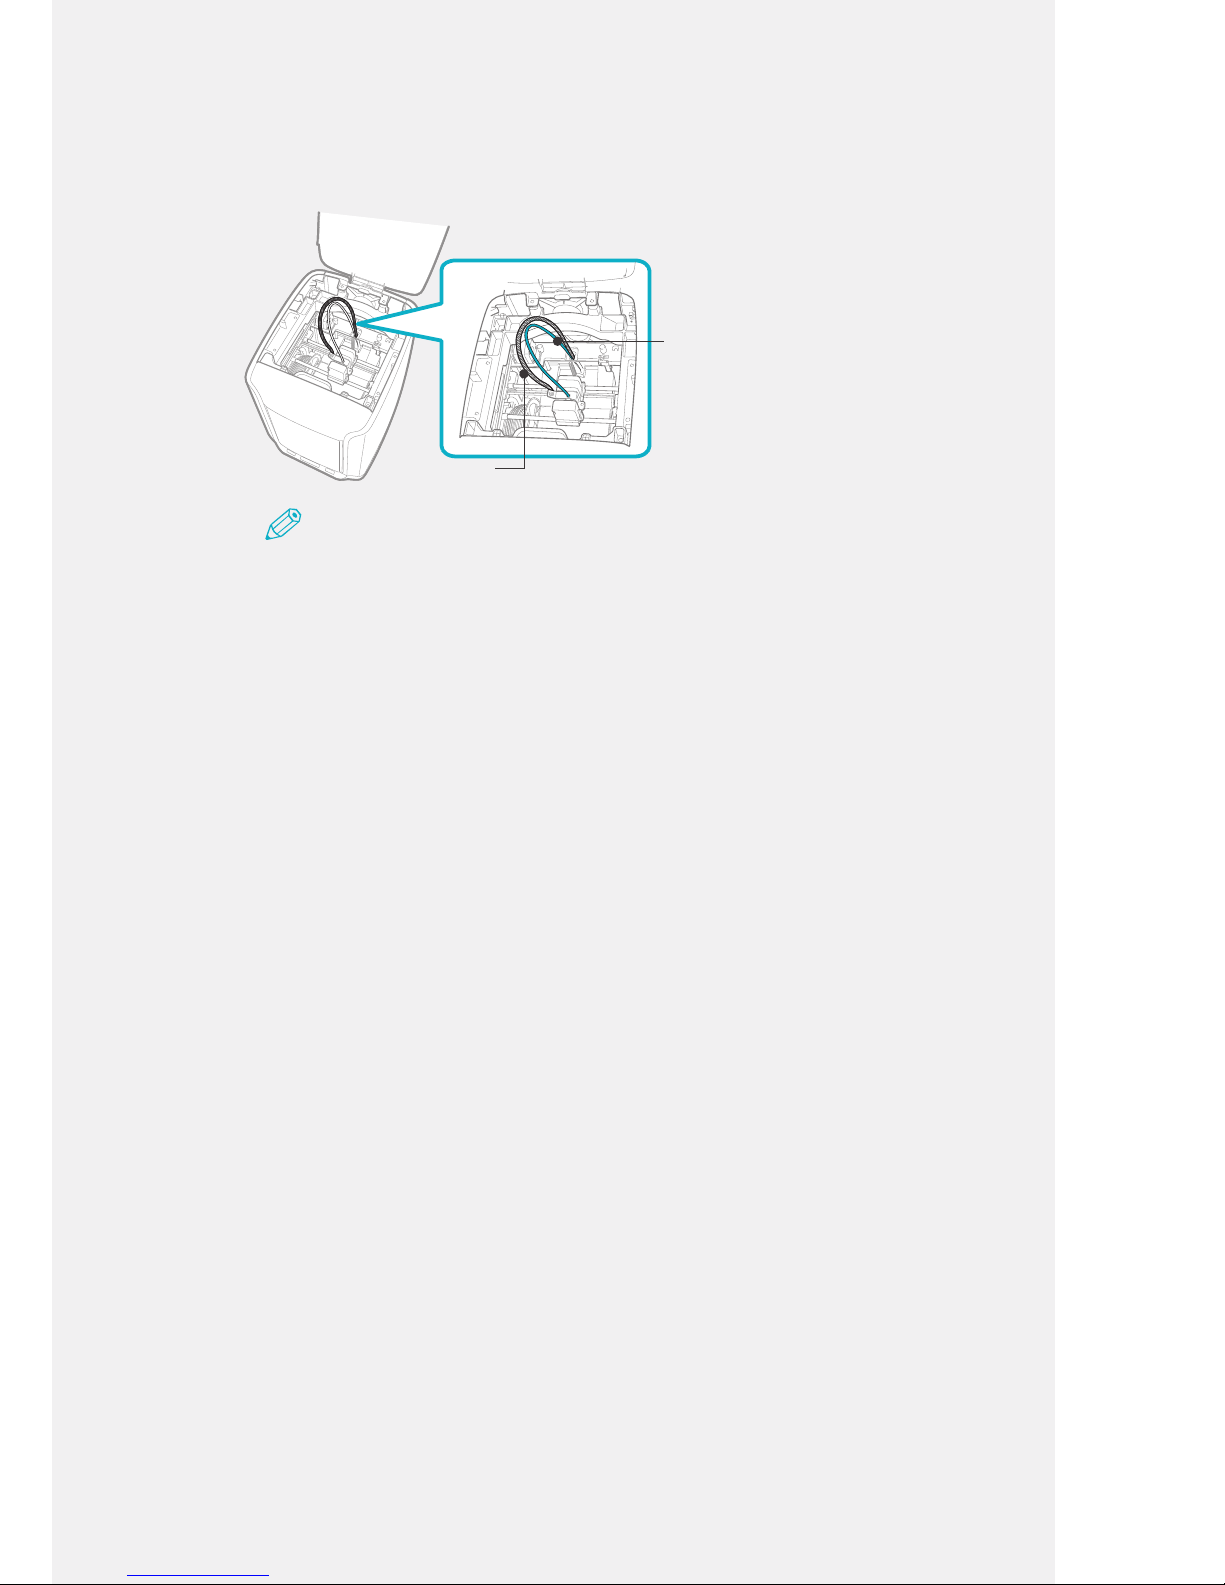
After inserting the feeding tube, make sure that the feeding tube and the
cable are at the same height.
Feeding
tube
Cable
Note
If the feeding tube is higher or lower than the cable, this may affect printing quality.
10.
Make sure the height of the feeding tube and the cable are the same and
close the top cover.
Page 18
MARV User Manual
18
Print Bed Preparation
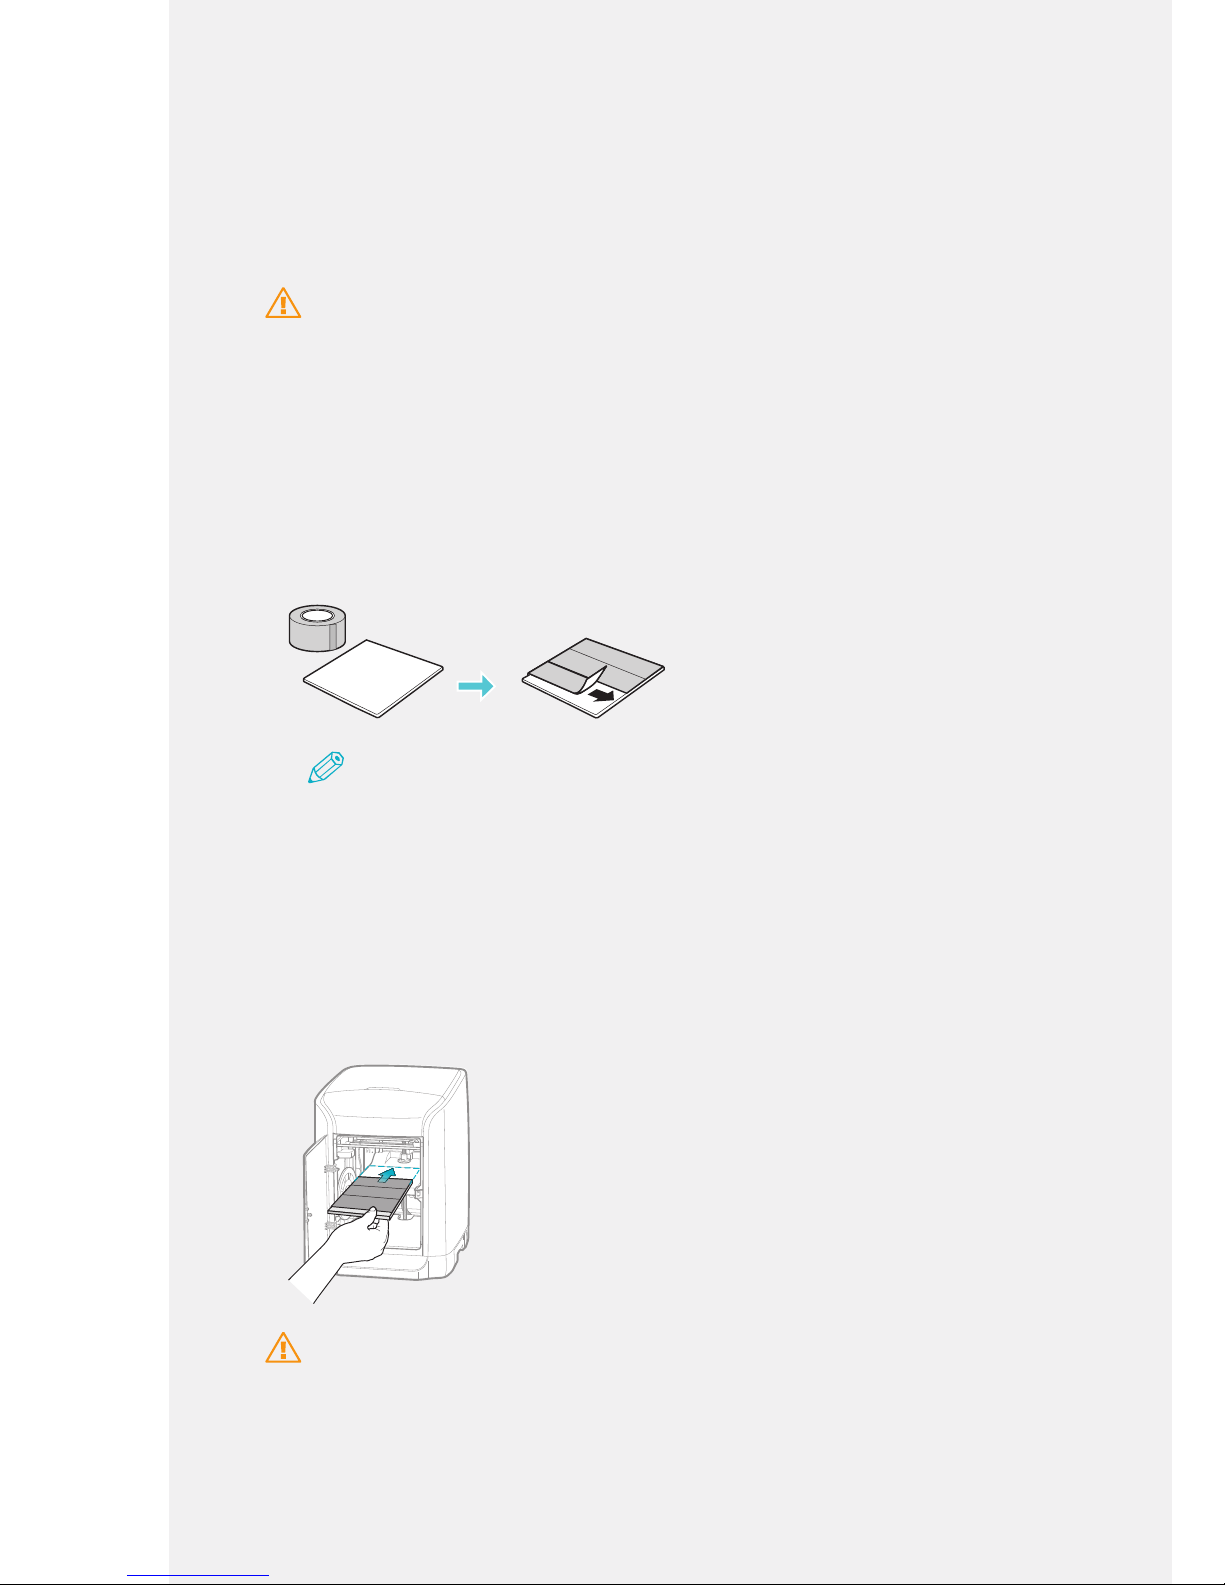
Prepare the adhesive tape and print bed provided with the machine.
Apply the adhesive tape to secure the object to the print bed. For enhanced printing
results, we recommend that you use new tape each time you print an object.
Caution
• Install the print bed in the machine before printing.
• If tape is not applied to the print bed, the lament will not be secure and may affect printing quality.
• Do not forcefully move or cause physical impacts to the machine's nozzle unit. Doing so may cause
the machine to malfunction or damage the sensors.
• The nozzle may become excessively hot during the device installation and printing. Avoid touching
the nozzle. Doing so may cause burns.
1.
Apply the adhesive tape to the print bed.
Apply the tape evenly over the surface of the print bed to make sure that it does
not overlap.
Note
• If the tape is applied unevenly or overlaps, it may cause a nozzle calibration error and affect
printing quality.
• Apply tape to the print bed only and not beyond the edges of the print bed.
2.
Press [PUSH] to open the front cover.
3.
Insert the print bed with the adhesive tape facing upwards.
Place the print bed on the left and right staging brackets and push the print bed
until it meets the back of the machine.
Caution
Insert the print bed securely on the left and right staging brackets. Failure to do so may result in an
uneven printing bed.
Page 19
MARV User Manual
19
4.
Close the front cover.
Push in the front cover until you hear a click.
Connecting Power
After installing the print bed, refer to the instructions below and connect the adapter
and power cable. Then, turn on the power.
Caution
• Do not damage the power cord or any cables.
• Be sure to use the designated voltage only.
• Use manufacturer-supplied components and accessories only. We are not liable for performance
degradation, breakdowns, or accidents caused by third-party products.
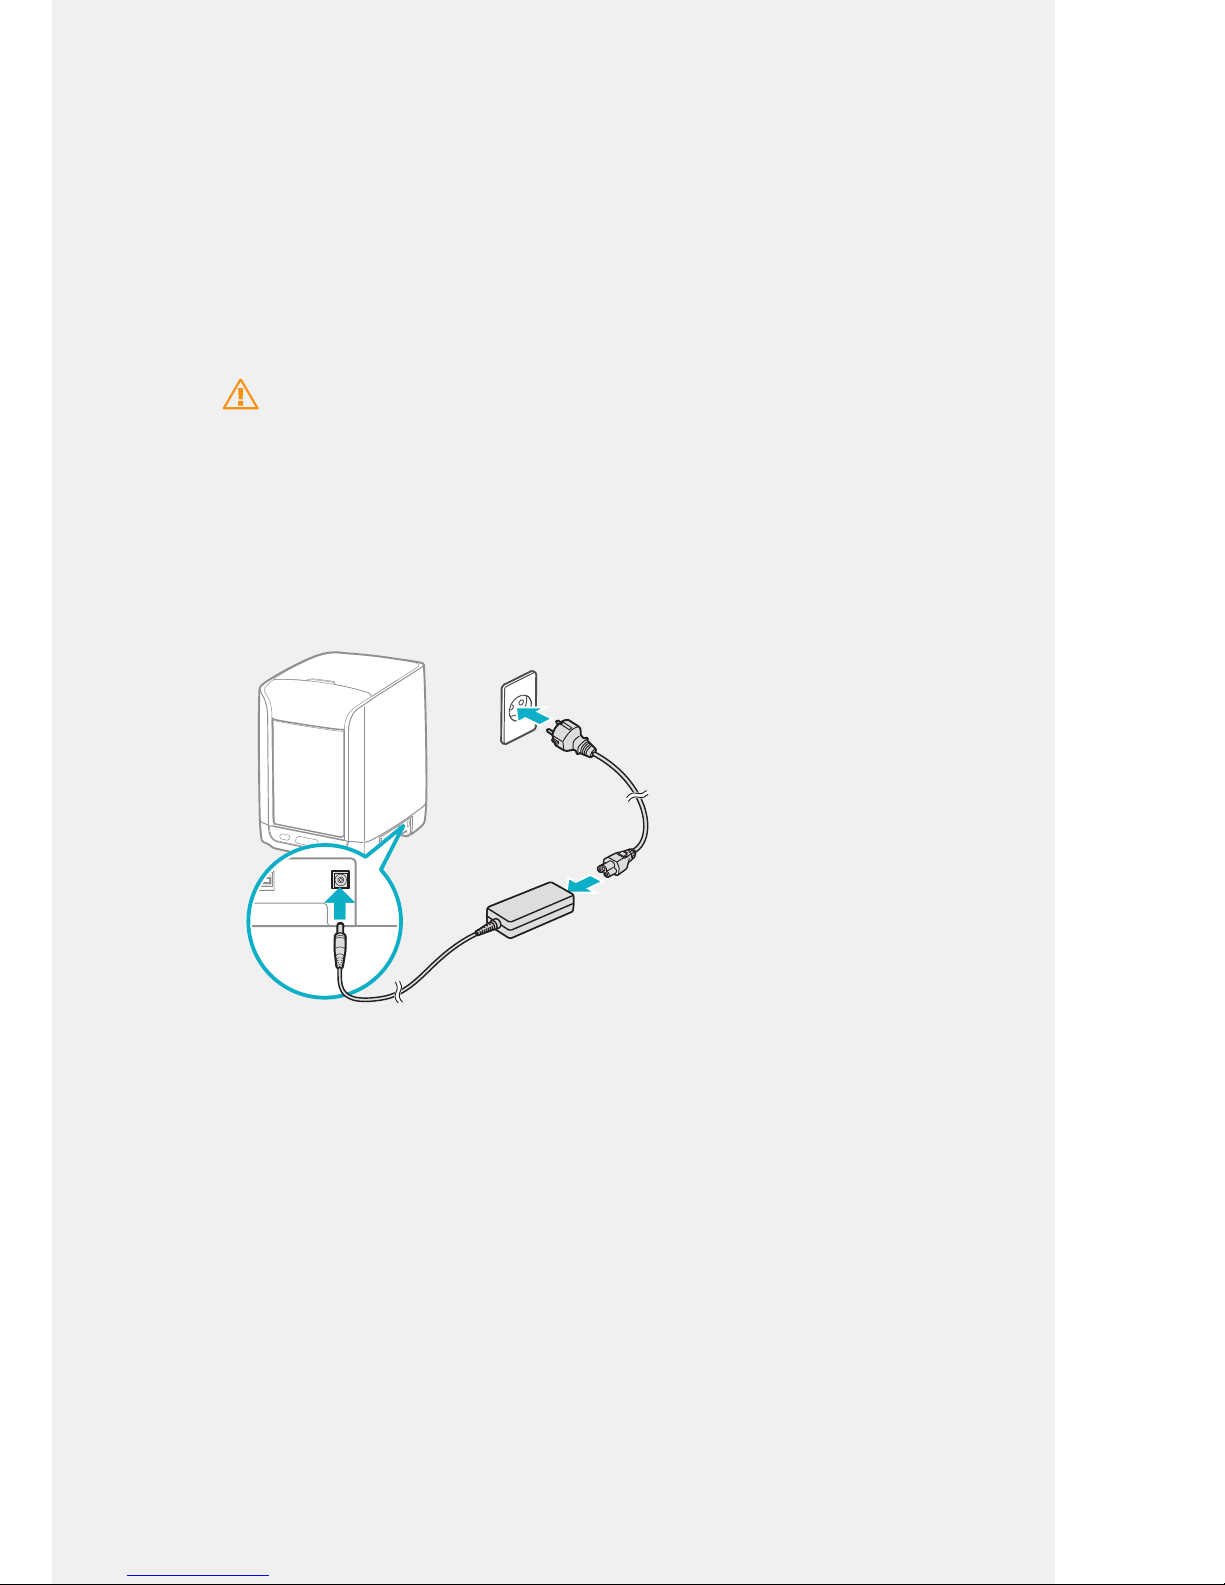
1.
Assemble power cable.
2.
Connect MARV to an electric outlet.
ON
SD CARD
OFF
3.
And then turn on the power.
After the power is on, the LCD screen turns on and the machine starts to
initialize. After the initialization is complete, [MARV is Ready] appears on the
screen.
Page 20
MARV User Manual
20
Printing from the Computer
Print settings can be changed using the MARV software installed on the computer.
For more information about the functions of the MARV software, refer to 'Using the
MARV Software' on P.24.
Caution
If the computer enters Sleep Mode during printing, printing stops. If a print job stops, it cannot
resume. Sleep Mode should be turned off or adjusted before printing an object. It is recommended
that Sleep Mode on the computer be disabled before running the MARV software.
1.
Click [Open] in the software window.
2.
Click .stl le to print.
3.
To edit the le click [Edit].
For more information about the [Edit] menu, refer to 'Editing functions' on P.26.
4.
Click [Save].
Select an extension, enter a lename, and save the le. (If you print from the
machine using an SD card, select the .marv extension.)
5.
Click [Settings] to designate the output settings.
For more information about the [Settings] menu, refer to 'Settings' on P.27.
6.
Click [Print].
When the nozzle is heated, printing begins. (nozzle preheating time:
approximately 3 minutes)
Note
When an object is printed, the nozzle moves to the edge of the print bed and discharges a small
quantity of lament and then continues printing. When the object is printed, remove the object
and the discharged lament.
Page 21
MARV User Manual
21
Printing from the SD Card
Use an SD card to easily print without a computer or a software software.
Note
• With an SD card, les with a .marv extension only can be printed. Convert .stl les to .marv les in
the MARV software and store them in the SD card.
• Use manufacturer-supplied SD cards only. We are not liable for performance degradation,
breakdowns, or errors caused by the use of non-approved SD cards.
• LCD screen language and le name limitations:
① For le names, only numbers, English letters and some special symbols are displayed on the
LCD screen;
② File names exceeding 17 characters will not appear on the LCD screen.
• When using the SD card for printing, remove the card after the object has printed. Removing the
SD card during printing may result in data loss.
1.
Turn on the machine.
2.
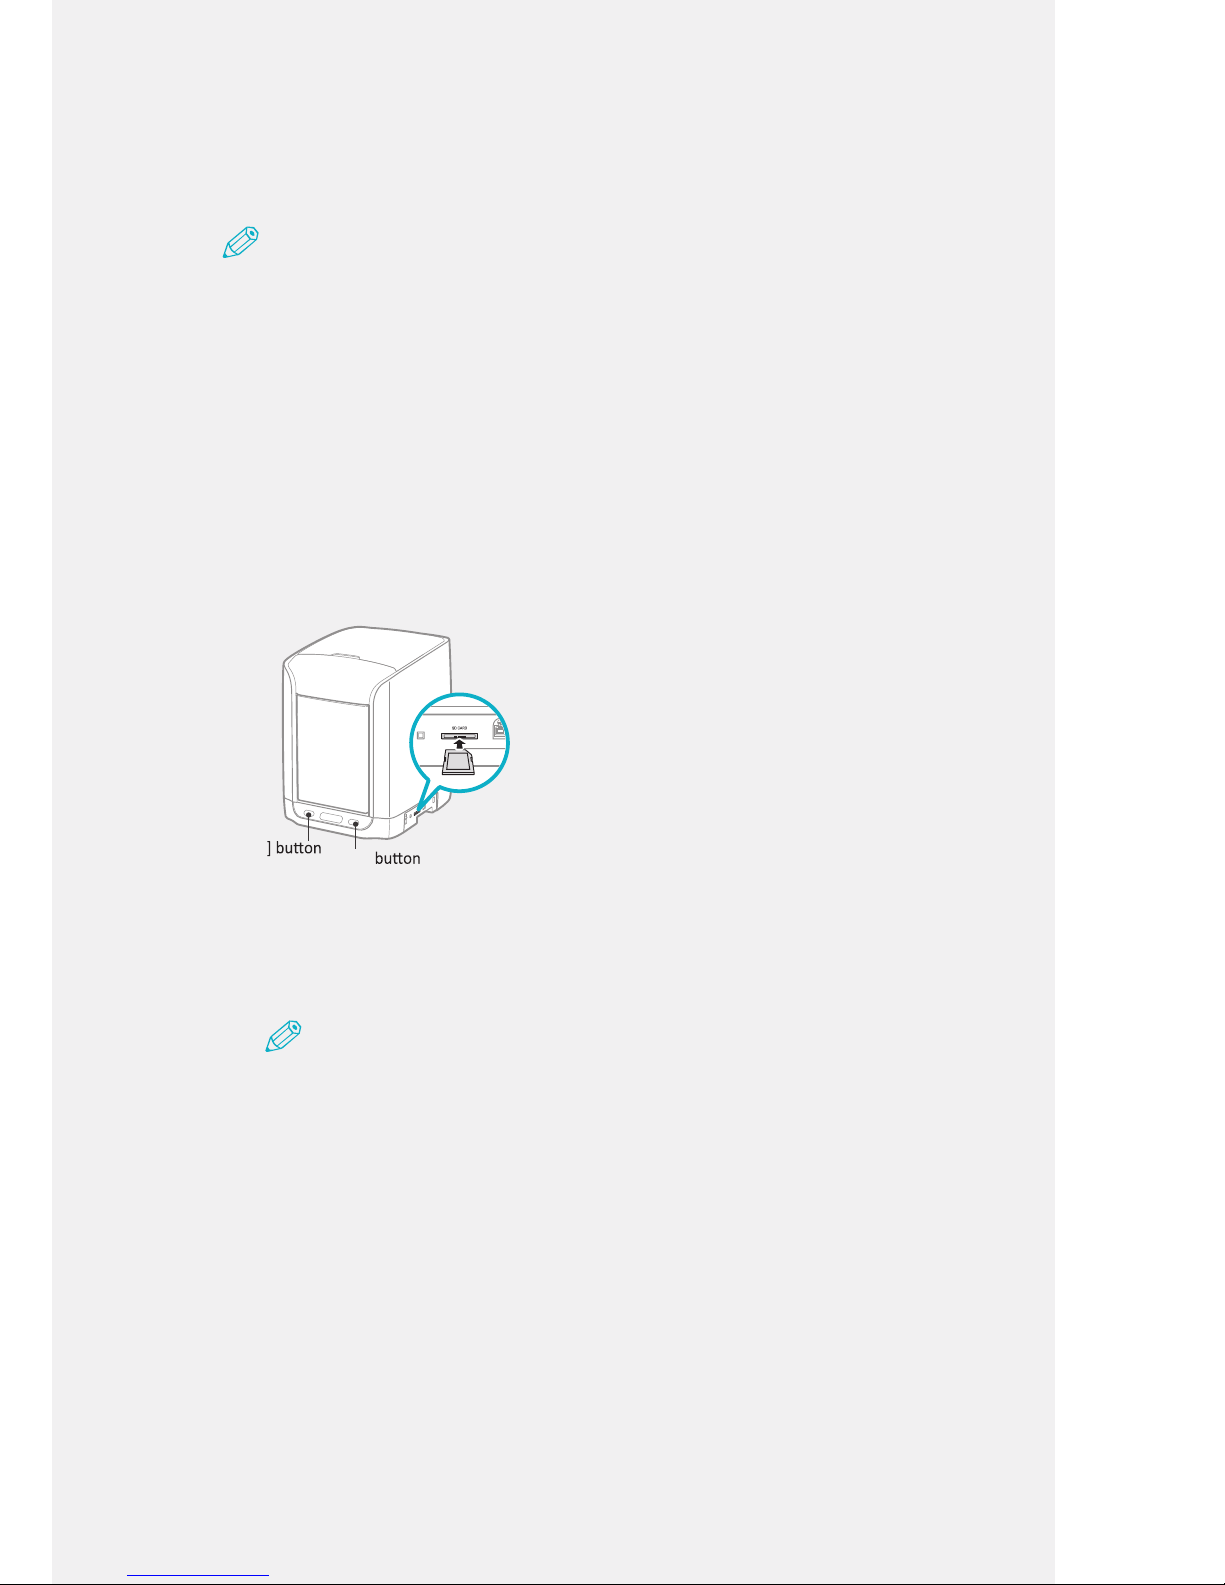
Insert the SD card into the SD card slot.
[OK]
[
▼
3.
Press [▼] until 'Print M File' is displayed on the LCD screen and press [OK].
4.
Select the .marv le you want to print and press [OK].
Note
Press the key repeatedly to cycle through the le list in one direction. When you reach the last
le, the list will display again in the same order. If you accidentally skip the le you wanted to
select, keep pressing [▼] until the lename appears again.
5.
Load the le.
6.
The nozzle heats up. (approximately 3 mins.)
7.
When the nozzle is heated, printing begins.
Page 22
MARV User Manual
22
Canceling Printing
To cancel printing, press [OK] on the machine for approximately three seconds.
Print job will stop and the print bed and the staging brackets lower and [MARV is
Ready] is displayed on the LCD screen, put on gloves when removing the output
results to prevent burns.
Caution
• A canceled print job cannot be resumed.
• Do not touch the nozzle as it will remain hot for some time after printing has been canceled. Doing
so may cause burns. Always wear gloves.
Using Safe Mode
For your safety, it is recommended that you use Safe Mode while printing. Safe Mode
is a function that stops printing when the front cover opens. Select to activate or
deactivate Safe Mode in the machine or the software.
The default setting is ON. If Safe Mode is set to "Off," printing will not stop even when
the cover is open.
How to turn off [Safe Mode] at the machine
1.
When [MARV is Ready] is displayed on the LCD screen, press [OK].
2.
Safe Mode is set to OFF.
3.
[MARV is Ready] appears again on the LCD screen.
How to turn [Safe Mode] OFF → ON at the machine
1.
When [MARV is Ready] is displayed on the LCD screen, press [OK].
2.
Safe Mode is set to ON.
3.
[MARV is Ready] appears again on the LCD screen.
Note
• The OFF setting for [Safe Mode] can be applied during nozzle preheating or printing only. When
Safe Mode is set to OFF, the machine will still function in normal situations (including "Ready")
other than nozzle preheating or printing.
• When the device is restarted, [Safe Mode] is automatically set to ON.
• For [Safe Mode] settings/cancelation in the software, refer to 'Settings' on P.27.
Caution
To avoid burns, do not touch the product, nozzle, or the print bed during printing. For your safety, it is
recommended that you use Safe Mode while printing.
Page 23
MARV User Manual
23
Handling an Object after Printing
Removing the object from the print bed
When the print bed and the staging brackets lower and [MARV is Ready] is displayed
on the LCD screen, put on gloves and remove the product from the print bed. Remove
the object from the print bed.
Caution
• Do not touch the nozzle during printing and after printing has been canceled. The nozzle becomes
hot during printing and remains hot for a period after it stops. To avoid burns, ensure that you wear
gloves.
• When you remove the printed object from the print bed, wear gloves to prevent hand injuries from
any sharp edges on the object.
Removing the raft and support structures (if necessary)
If you use a raft or other structure to support the object during printing, remove them
from the printed object when you separate it from the print bed. Wear gloves when
removing supports from the object to protect your hands from sharp edges. Use tools
to remove the supports, such as tweezers and nippers.
Page 24
MARV User Manual
24
Using the MARV Software
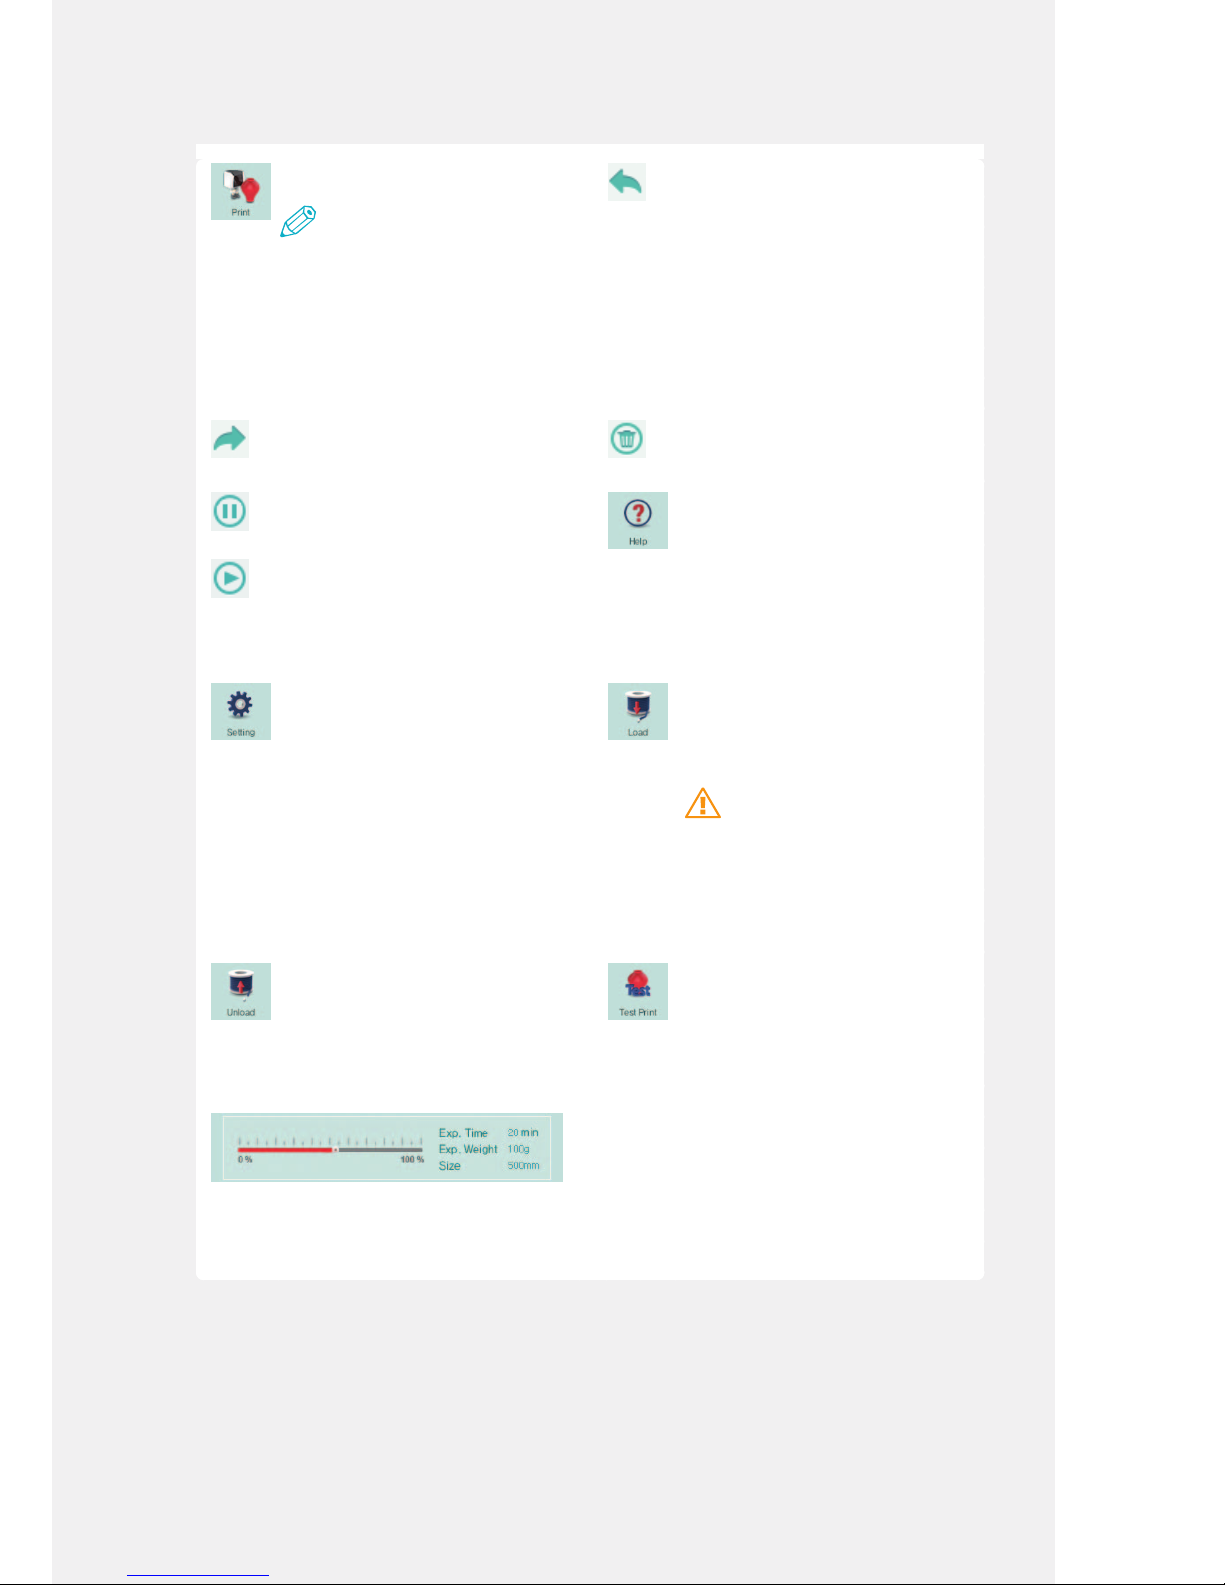
Main screen
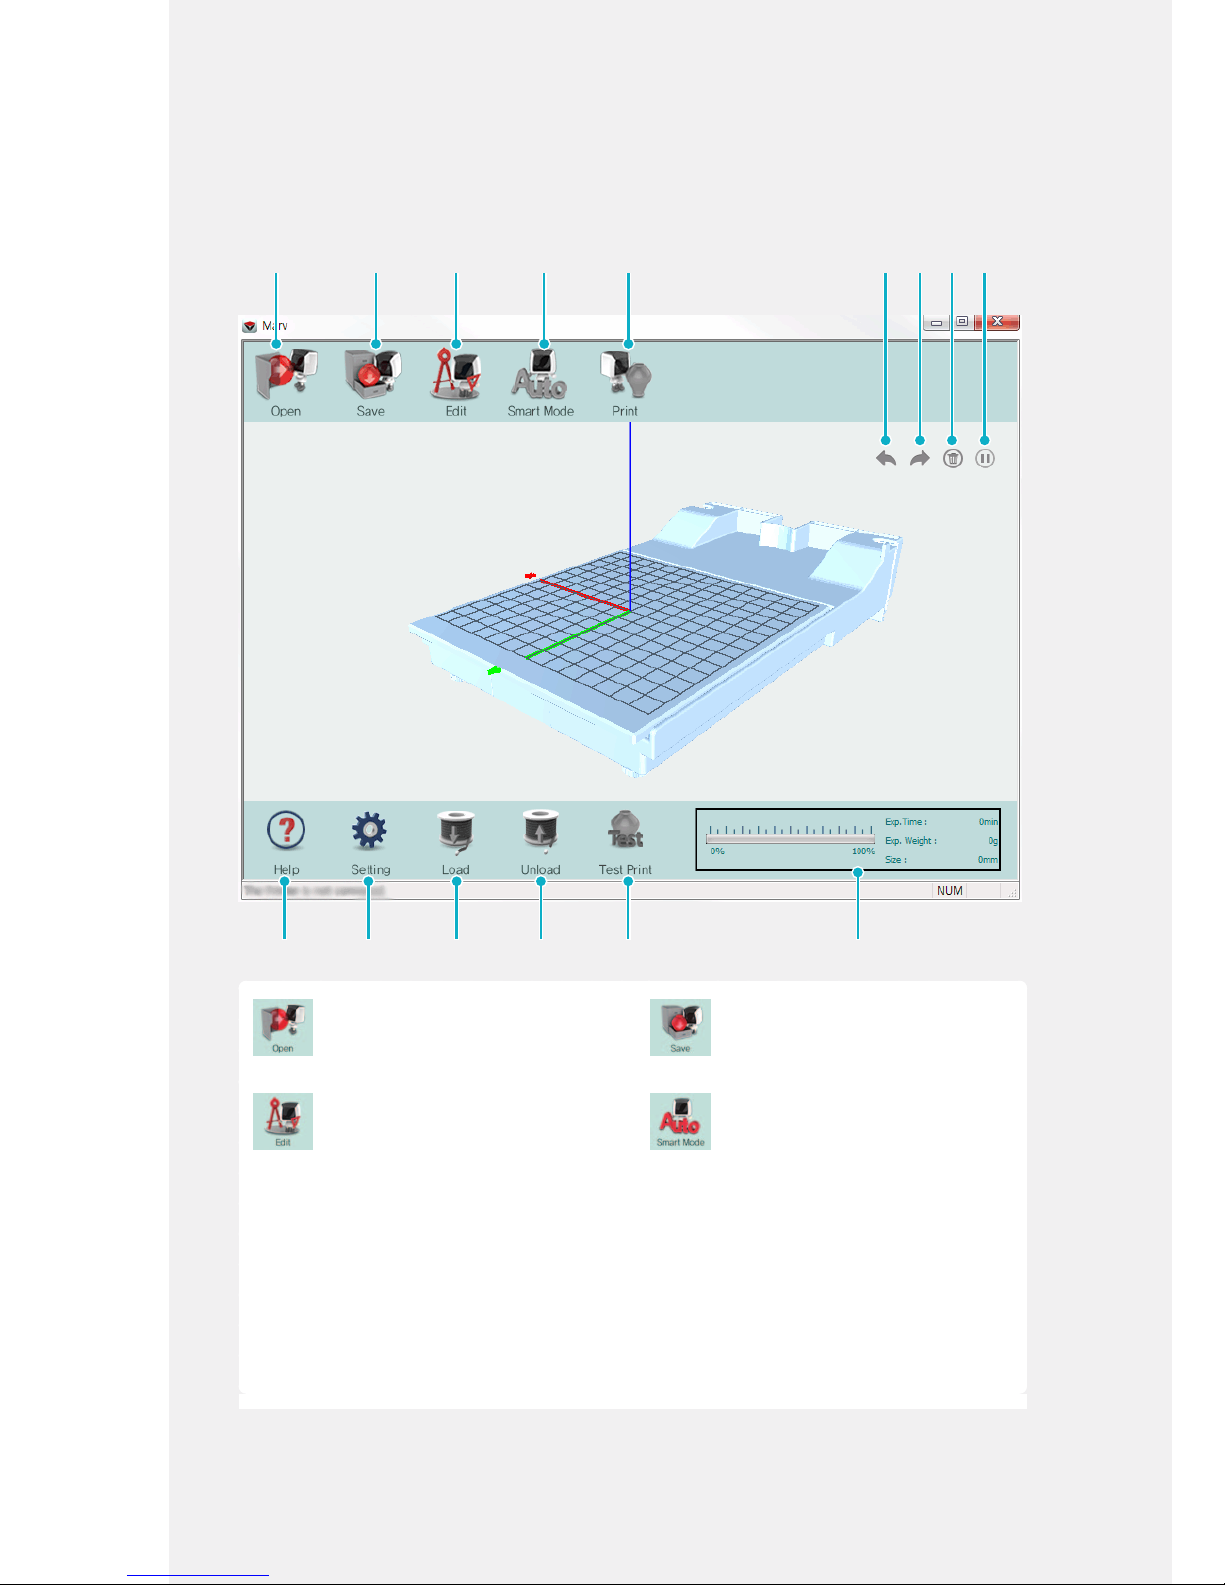
[Open]
Opens the .stl le to be edited and
printed.
You can import up to ve les.
[Save]
Saves the edited les.
[Edit]
Edits the imported le.
For more information about the [Edit]
menu, refer to 'Editing functions' on
P.26.
[Smart Mode]
In this mode, the software
automatically analyzes and adjusts
the location and direction of the le
for stable printing. For a large model
with a complex shape, use [Smart
Mode] and check the results on the
screen. This function does not apply
to multiple models.
Click [Smart Mode] to move the print
target to the center of the print bed
after opening a design le. This mode
is also used to center the object to
the center if it is in a corner or leaning
towards one side.
Page 25
MARV User Manual
25
[Print]
Prints the design les.
Note
• If any two objects are overlapping, a
warning message appears.
• Since the software software
recognizes any four points as a cube,
the monitor may display an overlap
warning even when the objects are
not overlapping.
Ignore any irrelevant warnings and
continue with printing.
[Undo]
Even after conrming your edit by
pressing [Apply], you can cancel the
previous step by pressing the [Undo]
button. You can undo one step each
time you click this button. (Maximum
number of cancelations: 5 times)
[Redo]
Redo the canceled job. (Maximum
number of cancelations: 5 times)
[Delete]
Use your mouse to select the le to
be deleted and click [Delete].
/
[Pause/Resume]
Pressing [Pause/Resume] can pause
the machine for up to 10 minutes
when the lament needs to be
replaced while printing. (Allowed time
before resuming: 10 minutes)
For more information about [Pause/
Resume], refer to 'Replacing the
Filament while Printing' on P.30.
[Help]
Open the user manual.
To view the user manual, you must
have Adobe PDF Viewer installed on
your computer.
[Setting]
Congure the machine's print settings.
For more information about the
[Setting] menu, refer to 'Settings' on
P.27.
[Load]
Mount the lament on the machine
and press [Load], the nozzle is
heated. When the nozzle is warm, the
lament starts to feed into the nozzle.
Caution
As the lament is fed into the nozzle
it melts and extrudes onto the print
bed. When you have nished printing,
the lament that remains in the nozzle
will be hot. To protect your hands,
use gloves and tweezers to remove
the lament from the nozzle.
[Unload]
To change the lament, press
[Unload]. The staging brackets will
lower and the nozzle will be heated.
When the nozzle is warm, the lament
can be removed from the nozzle unit.
[Test Print]
Prints a test 3D design.
[Print Information]
Displays information about the design being
printed, the completion time, and dimensions
of the nished object. This information is for
reference only and may not be precise.
Page 26
MARV User Manual
26
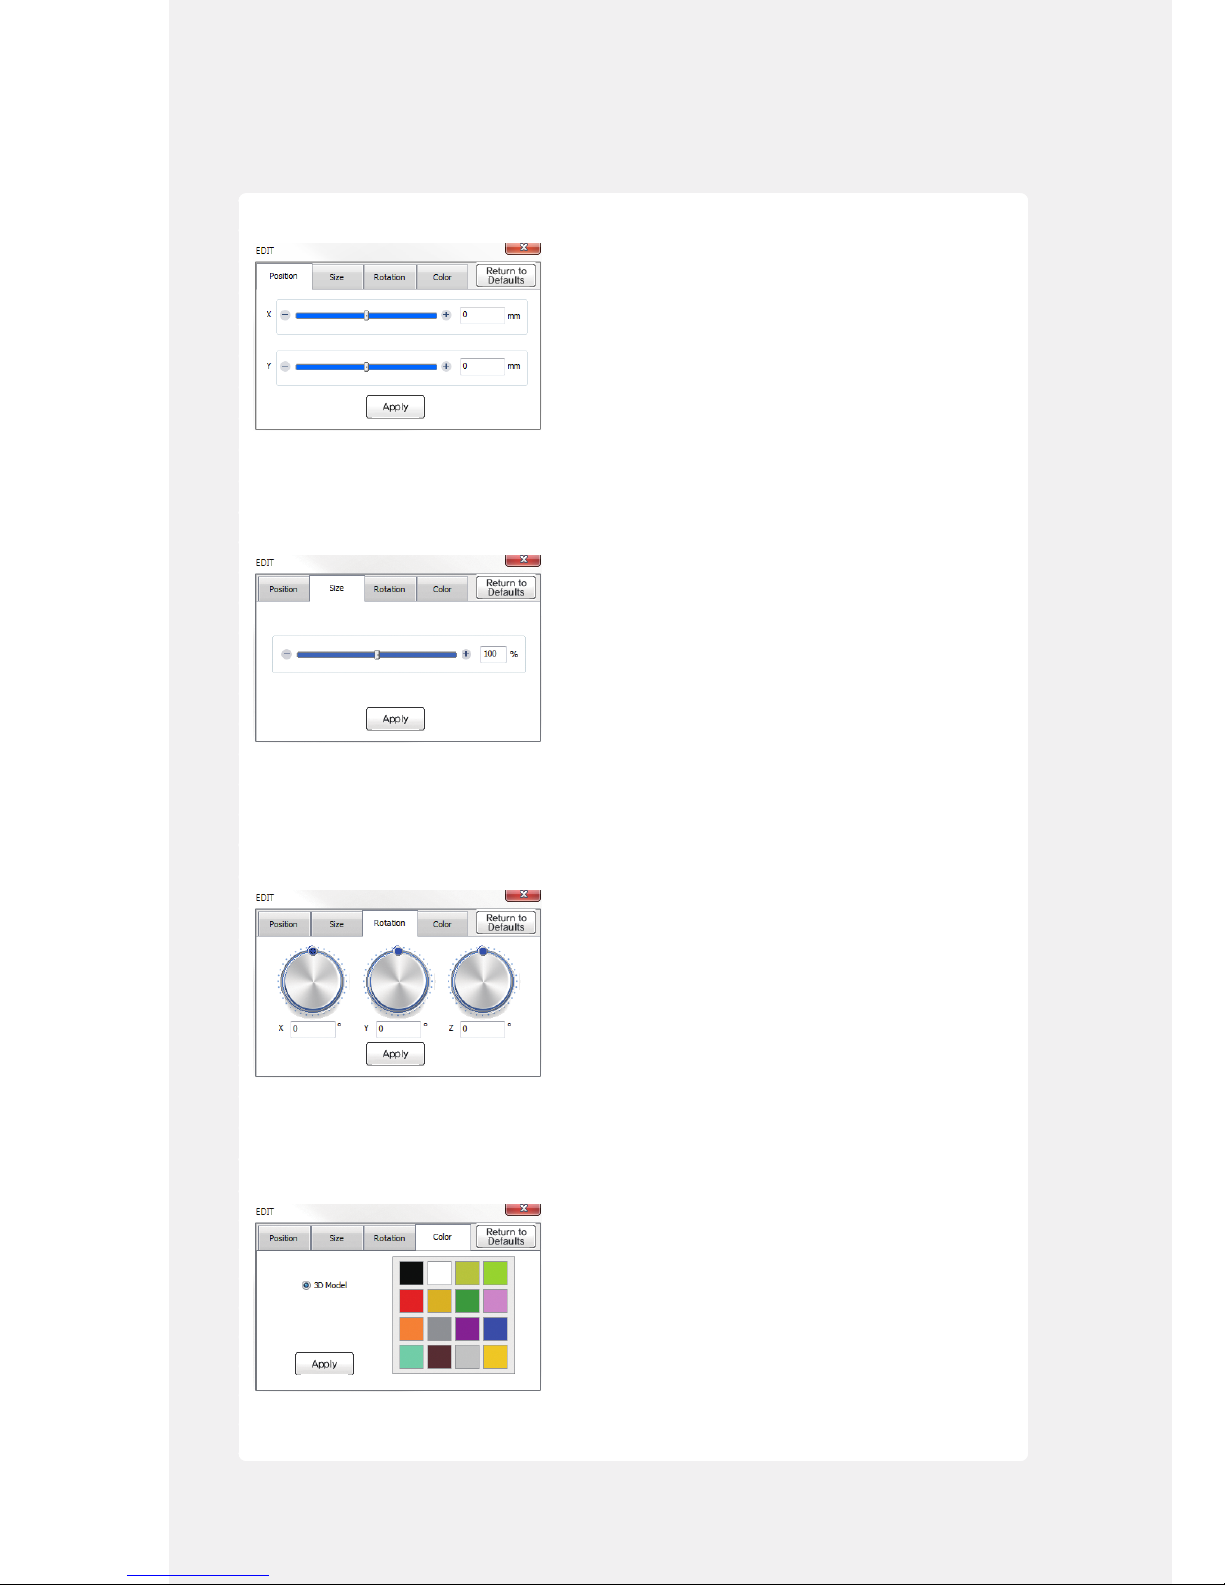
Editing functions
[Position] tab
Use this tab to calibrate the position of the object. You can move the slide bar or enter the X and Y
axis values to specify the position. Click [Apply] to conrm the settings or click [Return to Details] to
cancel them.
[Size] tab
Use this tab to calibrate the size of the object. You can move the slide bar or enter the X and Y axis
values to calibrate the size of the nished object. The object becomes smaller if you move the bar
towards "-" or larger if you move the bar towards "+". Click [Apply] to conrm the settings or click
[Return to Details] to cancel them.
[Rotate] tab
Use this tab to rotate the 3D model. You can rotate the position of the bar or enter the X, Y, and Z
axis values to specify the axis of rotation. Click [Apply] to conrm the settings or click [Return to
Details] to cancel them.
[Color] tab
Use this tab to change the color of the 3D object. Click [Apply] to conrm the settings or click [Return
to Details] to cancel them.
Page 27
MARV User Manual
27
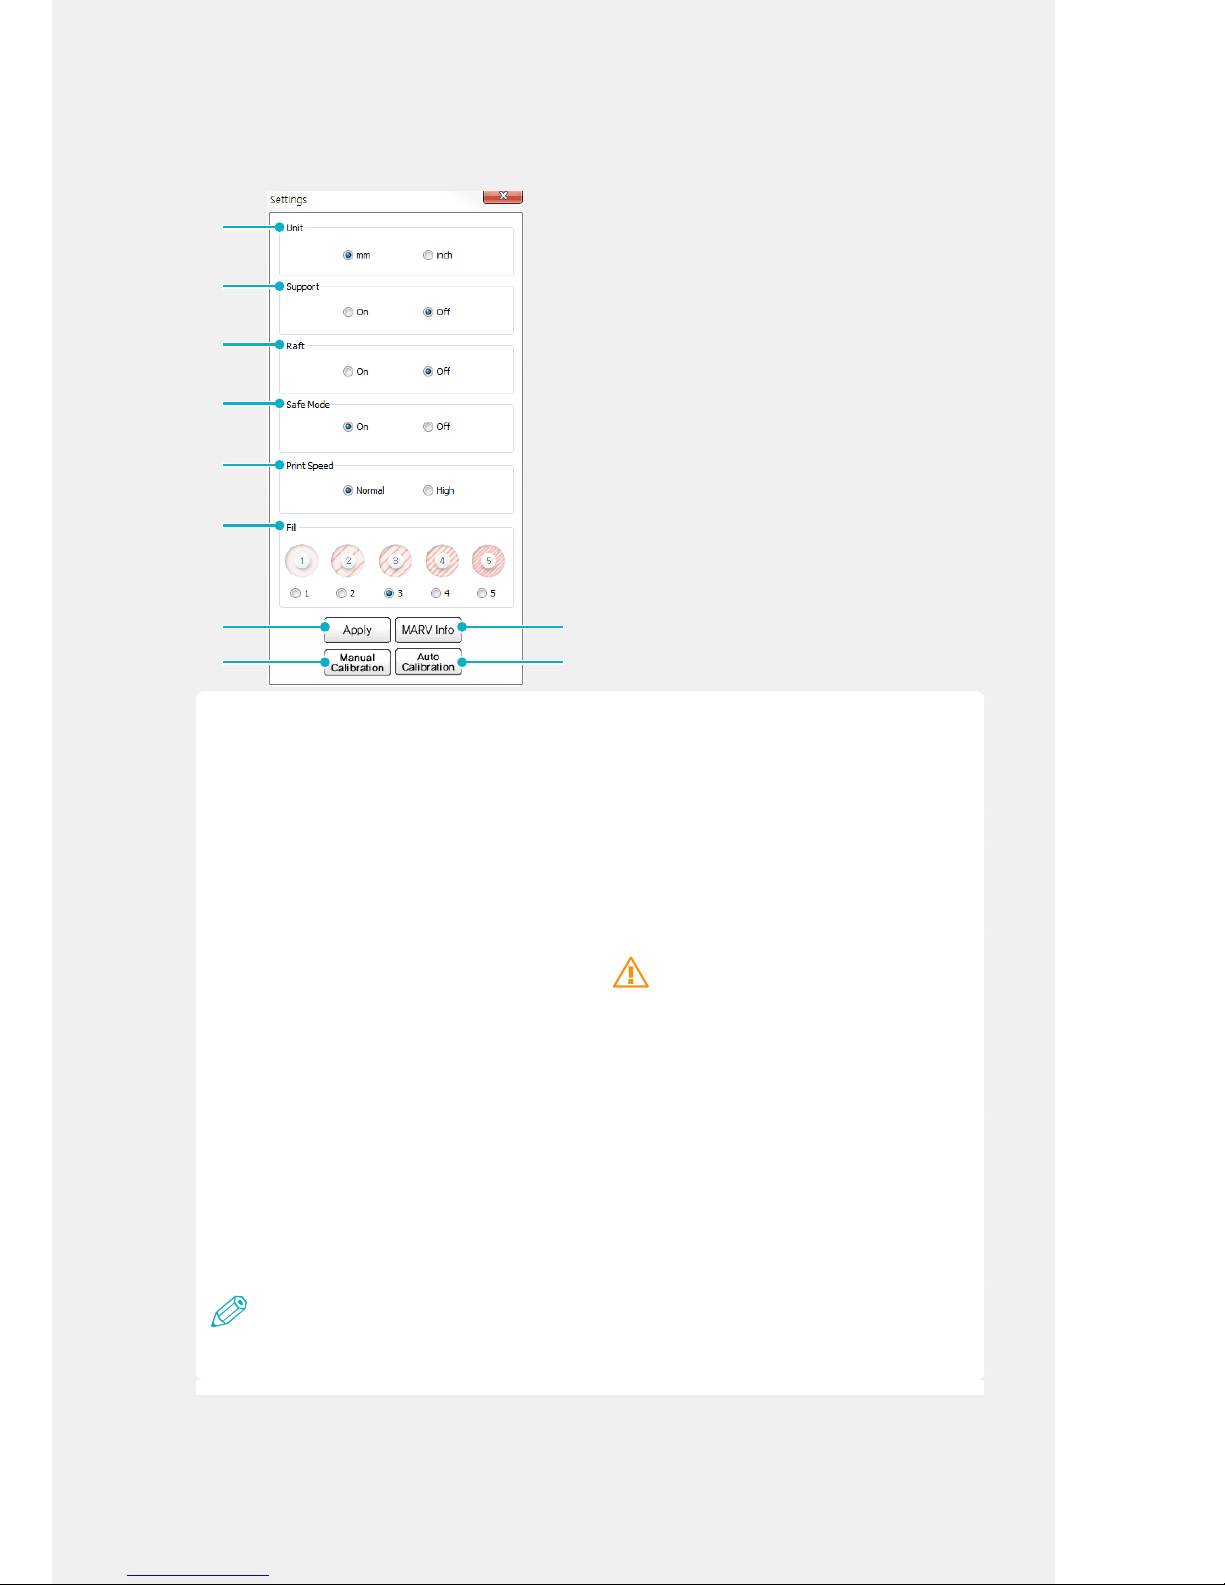
Settings
➐
[Unit]
Set the dimensions displayed in the output
information as millimeters (mm) or inches. The
default setting is mm.
[Support]
Use this option to add a support structure
to your 3D object. If any part of the object is
suspended and needs support while you are
building it, add a support. The default setting is
OFF.
[Raft]
Use this option to add a raft to your 3D object.
If the bottom surface of the object is very small
or uneven, it may fall over during printing or not
adhere to the print bed. If the object is not stable
on the print bed, add a raft. The default setting
is OFF.
[Safe Mode]
Safe Mode is a function that stops printing
when the front cover opens. Select to activate
or deactivate Safe Mode. The default setting is
ON.
Caution
To avoid burns, do not touch the product,
nozzle, or the print bed during printing. For your
safety, it is recommended that you use Safe
Mode while printing.
To turn [Safe Mode] on or off, refer to 'Using
Safe Mode' on P.22.
[Print Speed]
Set the printing speed. The default setting is
[Standard].
Set the print speed to [Standard] to achieve a
good print quality.
If you set the print speed to [Fast], the machine
prints 2 or 3 times faster than the [Standard]
setting depending on the model.
Note
Printing at Fast speed may reduce the print
quality. The slower the printing speed, the better
the quality of the parts.
[Fill]
Set the density of the lling used in the object.
A low value setting reduces the amount
of lament used and a high value setting
increases the amount of lament used. The
default setting is 2.
Page 28
MARV User Manual
28
[Apply]
Use this button to apply the changed settings.
[MARV Info]
Use this button to display the information for
the MARV software.
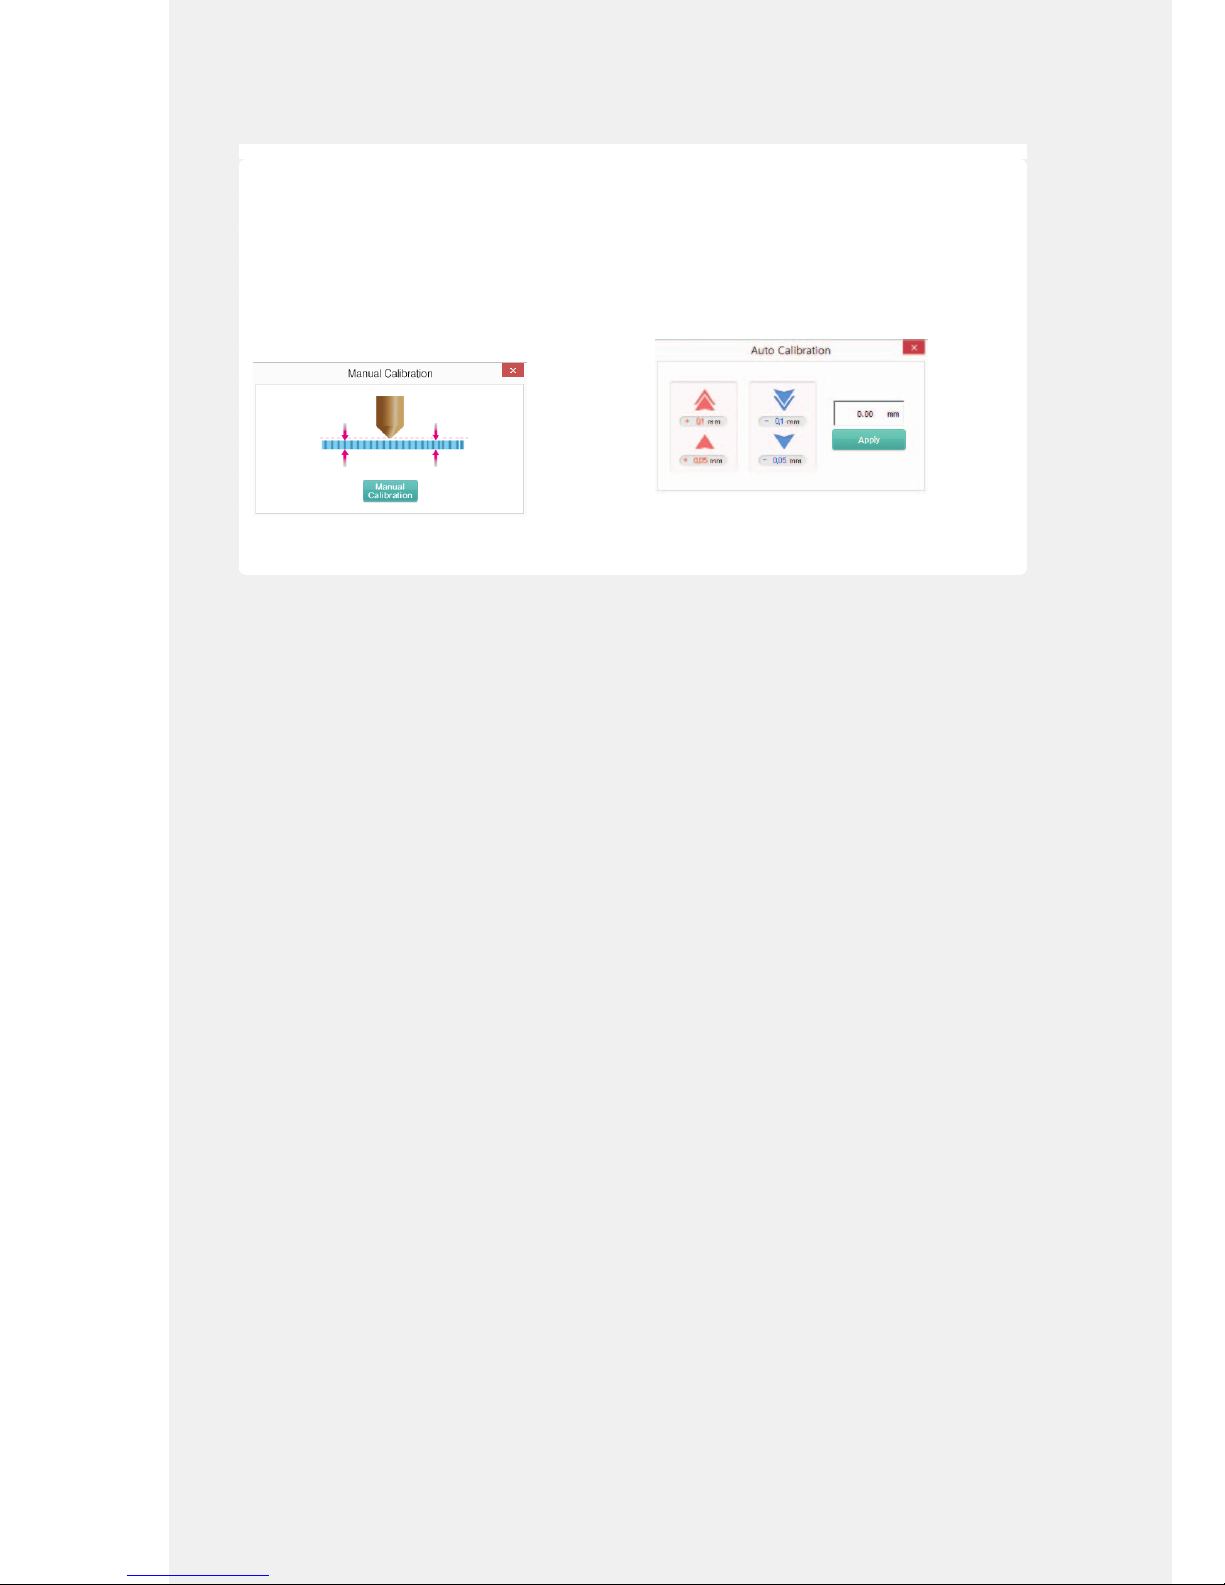
[Manual Calibration]
If the stage is not level, use this feature, use this
feature and manually rotate the bolts to adjust
the stage.
It is not necessary to use this feature if the stage
is already level.
For details about [Manual Calibration], refer to
the following page. (P. 42)
➓ [Auto Calibration]
This feature adjusts the distance between
the stage and the nozzle by using the MARV
software. The applied value is saved and the
next printing job uses the same position.
For details about [Auto Calibration], refer to the
following page. (P. 31)
Page 29
MARV User Manual
29
MARV Maintenance
Replacing a Filament
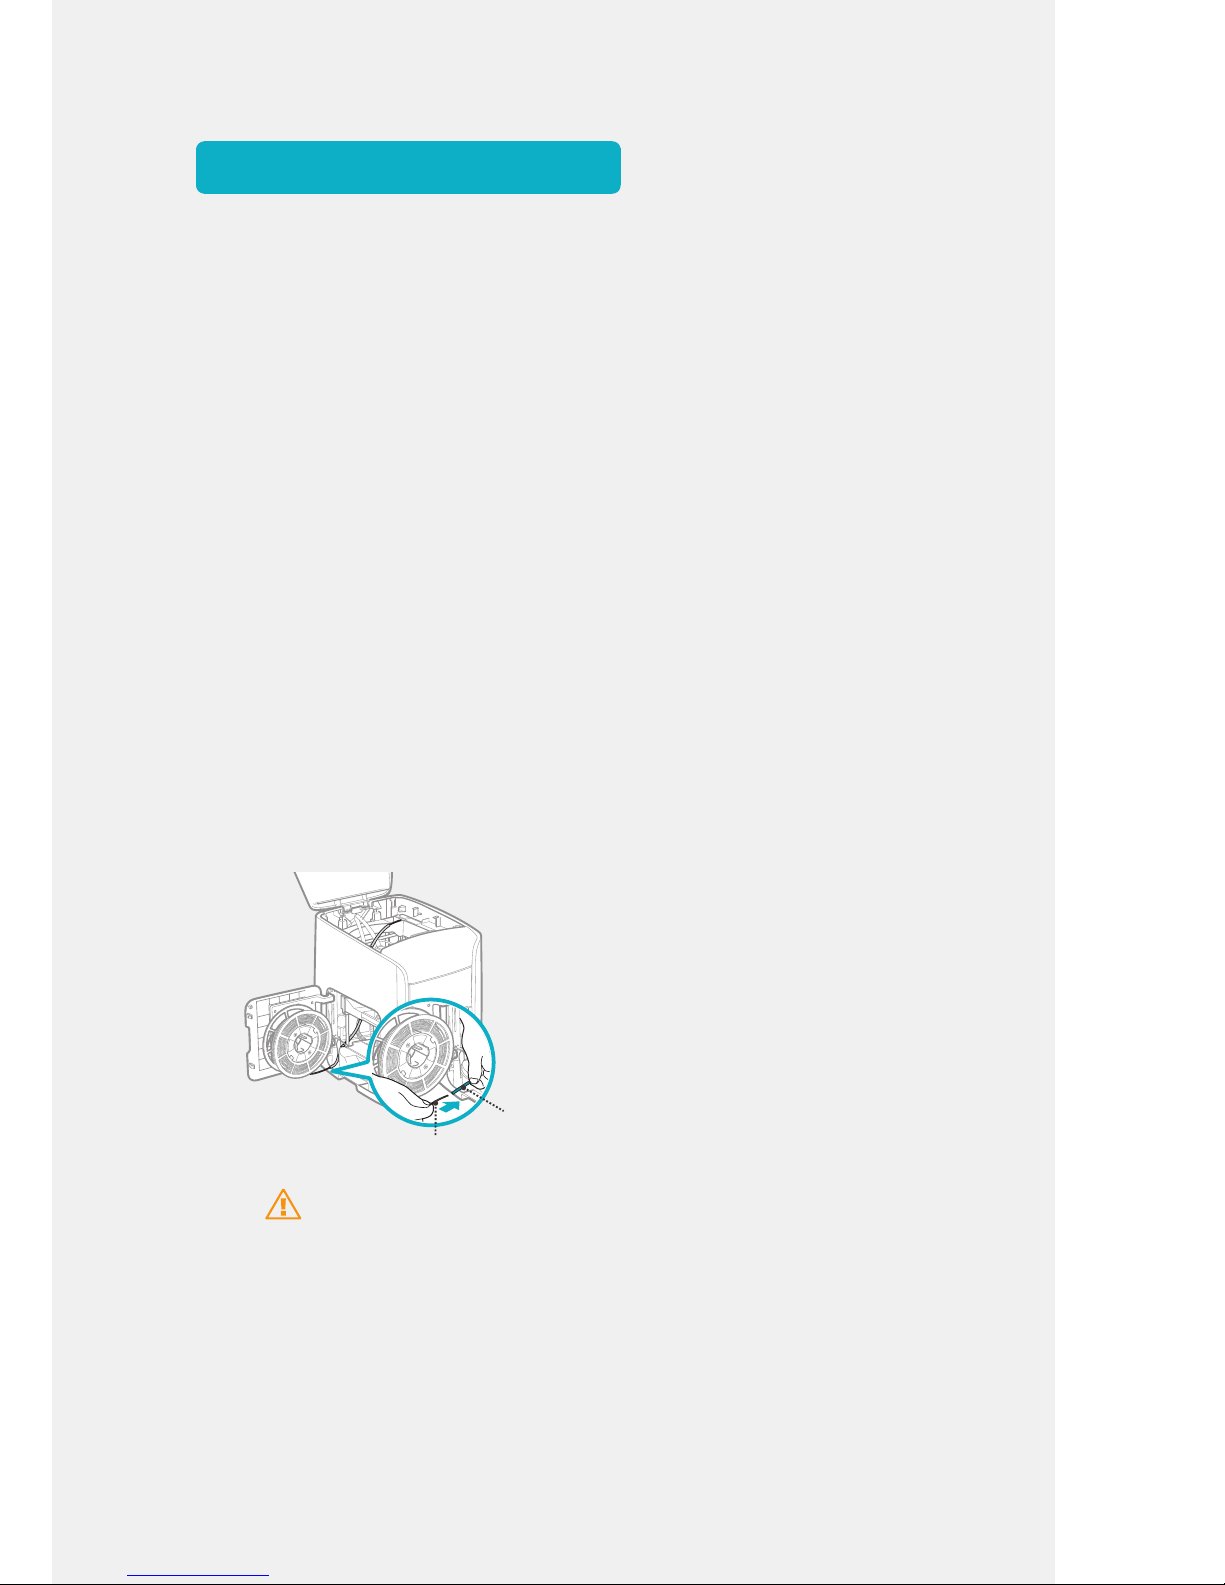
If a cartridge runs out of lament, replace it with a new one.
When you change the color of the lament, use the nozzle maintenance pin to remove
the remaining lament from the nozzle before replacing the lament. If the lament is
not fully removed, the previous color can affect the new color.
1.
Open the left cover.
2.
Open the top cover.
3.
Turn on the machine.
4.
Press and hold the [OK] button for at least 3 seconds.
The nozzle is heated for approximately 3 minutes and the roller rotates to feed
the lament from the nozzle unit.
5.
Remove the lament from the feeding tube.
If the lament is difcult to remove, press the lever and remove the lament out of
the feeding tube.
Filament
Feeding
tube
Caution
To prevent burns, use gloves and tweezers when you remove the lament from the nozzle
unit.
6.
Remove the lament from the machine.
7.
Mount the new lament on the machine.
For more information about replacing a cartridge, refer to 'Filament Installation' on
P.14.
Page 30

MARV User Manual
30
Replacing the Filament while Printing
If a lament runs out of lament while printing, replace it with a new one after pressing
[Pause ] on the display. (Allowed time before resuming: 10 minutes)
Note
• If you select Pause, the surface of the printing output may be uneven.
• Be sure to use [Pause] only when needed, such as when changing the lament becomes
necessary.
• To prevent a machine malfunction, printing will be canceled if it is not resumed within 10 minutes.
• Pause is available only for printing objects with height of 135 mm or less.
• While the printing is paused, do not touch or move the object on the stage.
• [Load] and [Unload] cannot be used when printing is paused. Remove the lament from the nozzle
and insert the material manually.
1.
From the MARV software, press [Pause ].
Printing will stop and the stage will lower.
2.
Remove the lament from the nozzle. Press [Pause ] and remove the
lament immediately.
Note
• After you select Pause, remove the lament before the nozzle cools down.
• [Load] and [Unload] cannot be used when printing is paused. Remove the lament from the
nozzle and insert the material manually.
3.
Replace the lament with a new one.
4.
Insert the lament into the nozzle unit.
5.
Press [Resume ] to resume printing.
Page 31
MARV User Manual
31
Calibrating the Nozzle
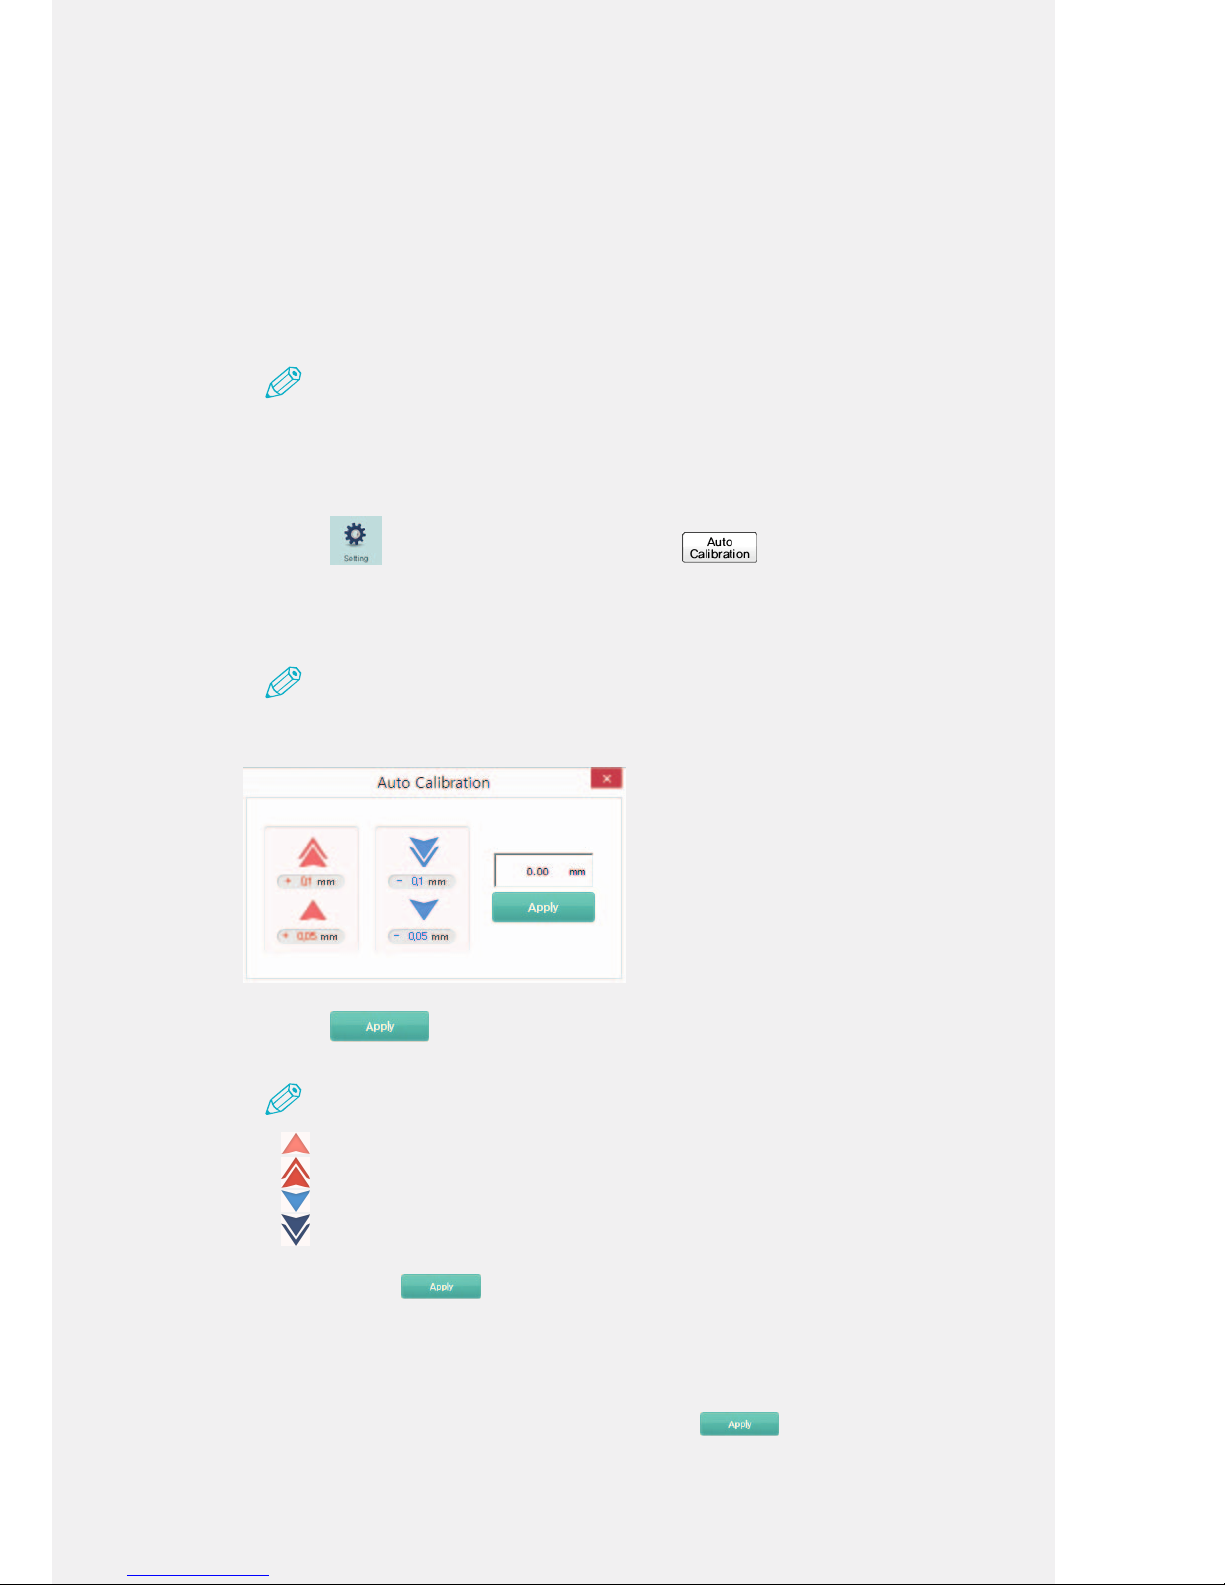
If the gap between the nozzle and the stage is not approximately 0.3 mm, you can
conduct this process by using the MARV software’s ‘Auto Calibration’ feature. If you
use this feature, the modied value is saved and the same gap between the stages is
automatically used for the next printing job.
1.
With the adhesive tape facing up on the print bed, mount the print bed on
the stage.
Note
Adjust the gap between the nozzle and the print bed after it is installed on the staging brackets.
2.
With the printer connected to your computer, run the MARV software.
3.
Click the menu icon, and then click the button.
4.
Adjust the stage’s height using the arrow buttons.
Fine-tune by checking the value that appears in the white box.
Note
The count for the number of times the arrow buttons have been pressed is displayed in the
white box.
5.
Click the button.
The printing job is executed where the stage level is indicated.
Note
• button: Click once to raise the stage level by 0.05 mm.
•
button: Click once to raise the stage level by 0.1 mm.
•
button: Click once to lower the stage level by 0.05 mm.
•
button: Click once to lower the stage level by 0.1 mm.
• The maximum adjustable range for automatic nozzle calibration is +/-2 mm
• If you press the
button, the stage moves to the position where it was adjusted to
when the printing job completes. The stage does not immediately move while pushing the
button.
• When calibrating the nozzle, make sure that there are no obstructions on the print bed. If
there are obstructions on the print bed, the machine can malfunction when the print bed rises.
• If you press the button after you calibrate the nozzle, the previous value is reset to the
default. If you do not want to calibrate the nozzle, press
to exit the window. Then, it
will maintain previous gap.
• If the stage is not level after you conduct the calibration, perform a ‘Manual Calibration’. For
information about the ‘Manual Calibration’ feature, refer to the following page. (P. 42)
Page 32
MARV User Manual
32
Cleaning the machine
1.
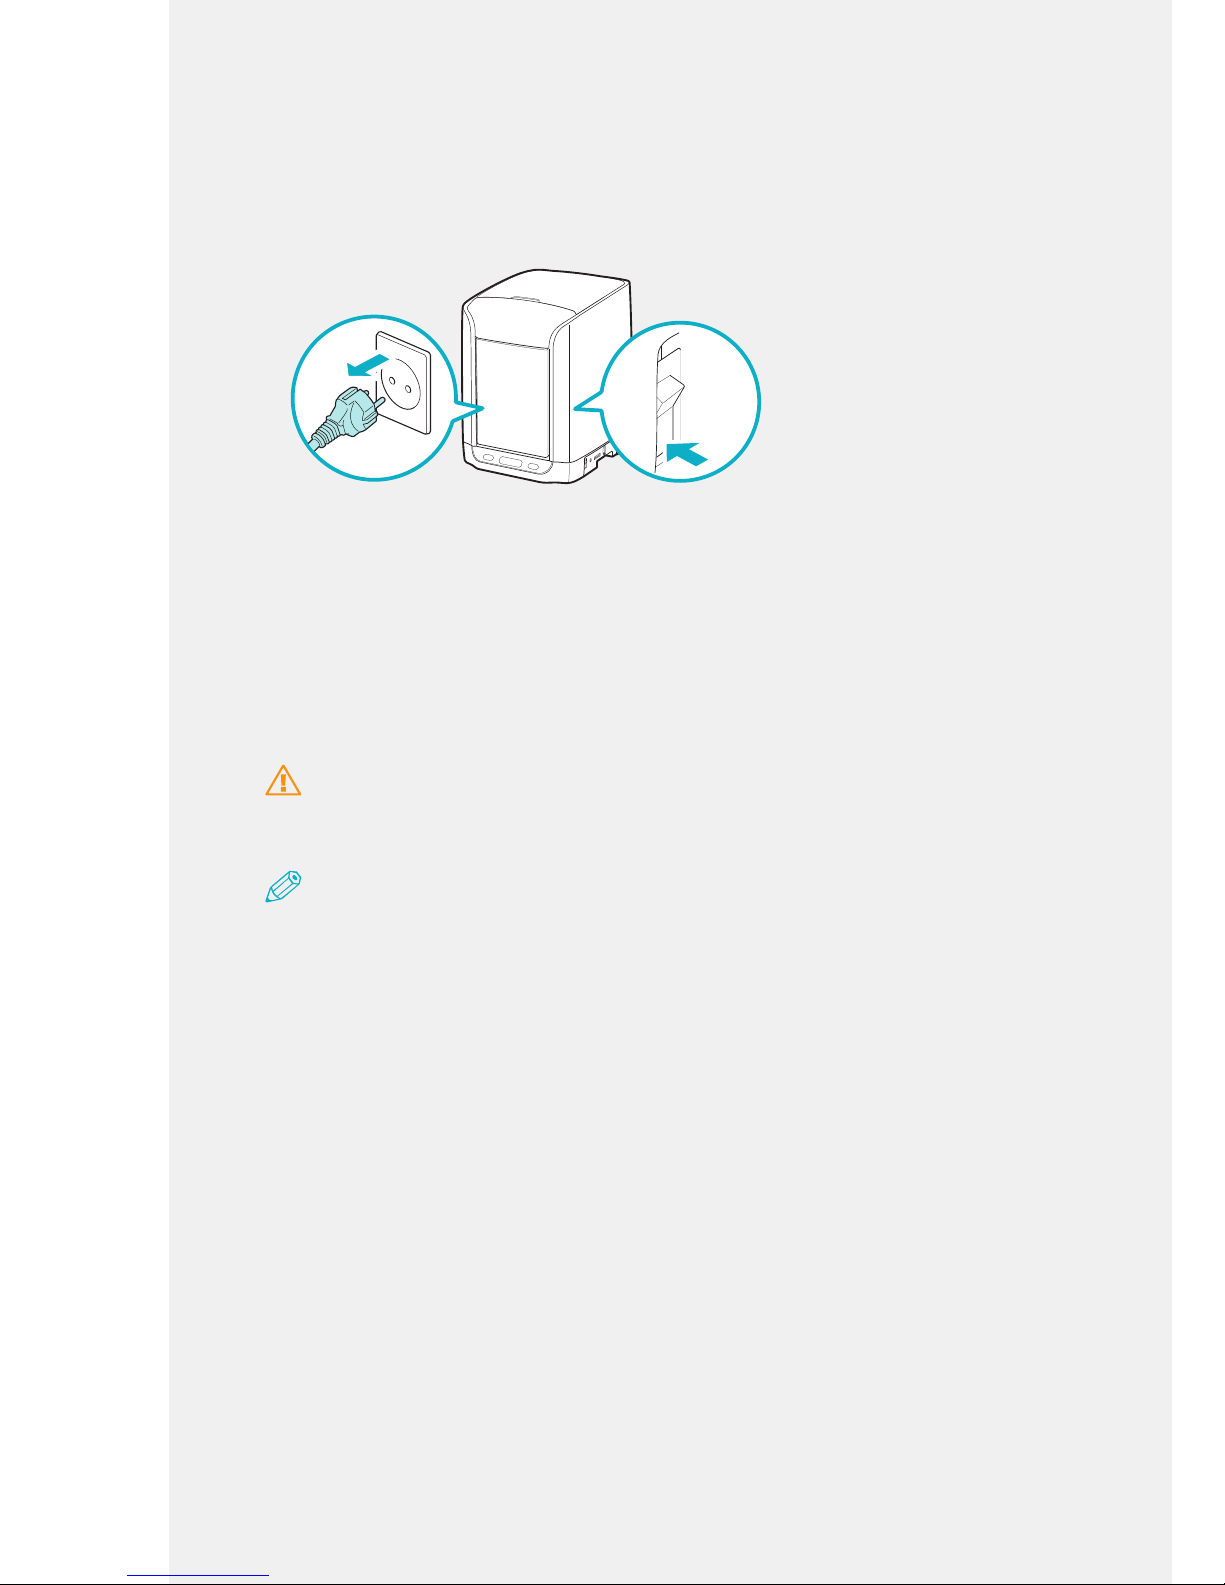
Before you clean the machine, turn off the power switch and unplug the
power cable from the electric socket.
ON
SD CARD
OFF
ON
OFF
2.
Clean the surfaces of the machine with a soft, dry cloth.
Cleaning the Nozzle
Filament residue may remain in the nozzle when the printer is used for extended
periods. Clean excess lament from the nozzle to prevent it from contaminating other
colors used in the object.
Caution
To prevent burns, use gloves and tweezers or nozzle maintenance pins when you remove the
lament from the nozzle unit.
Note
Before you clean the nozzle, connect the machine to an electric socket to enable the nozzle to be
heated.
Cleaning method 1: Cleaning the nozzle via a computer
software.
1.
Turn on the machine.
2.
Open the top cover.
3.
Run the software and click [Unload].
The staging brackets lower, the nozzle is heated, and then the lament inside the
nozzle extrudes automatically. (This method takes approximately 3 minutes.)
4.
After the lament is extruded from the nozzle, remove the lament from the
insertion hole while pressing the insertion lever.
Page 33
MARV User Manual
33
5.
Remove the lament residue from the nozzle using gloves and the nozzle
maintenance pin or tweezers.
Caution
Do not touch the nozzle as it can become very hot. To prevent burning your hands when
you remove lament residue from the nozzle, use gloves and the nozzle maintenance pin or
tweezers.
Cleaning method 2: Cleaning the nozzle without a computer
software.
If a computer software is not installed, follow these steps to clean the nozzle .
1.
Turn on the machine.
2.
Press [OK] to heat the nozzle. (This method takes approximately 3 minutes.)
When the nozzle is warm enough, [MARV is Ready.] is displayed on the LCD and
the lament extrudes from the nozzle.
3.
Open the top cover.
4.
Press the lever on the nozzle unit and remove the lament from the
insertion hole.
5.
Remove the lament residue from the nozzle using gloves and the nozzle
maintenance pin or tweezers.
To prevent burns, wear gloves when you clean the machine.
Caution
Do not touch the nozzle as it can become very hot. To prevent burning your hands when
you remove lament residue from the nozzle, use gloves and the nozzle maintenance pin or
tweezers.
Page 34
MARV User Manual
34
Updating the Firmware
1.
From the website below, download FLIP 3.4.7 (Java Runtime Environment
included) to your computer and install it.
http://www.atmel.com/tools/ip.aspx
2.
Download the latest rmware from our website.
You can access the latest rmware here:
http://www.canon-bs.co.kr/cs/download.aspx
3.
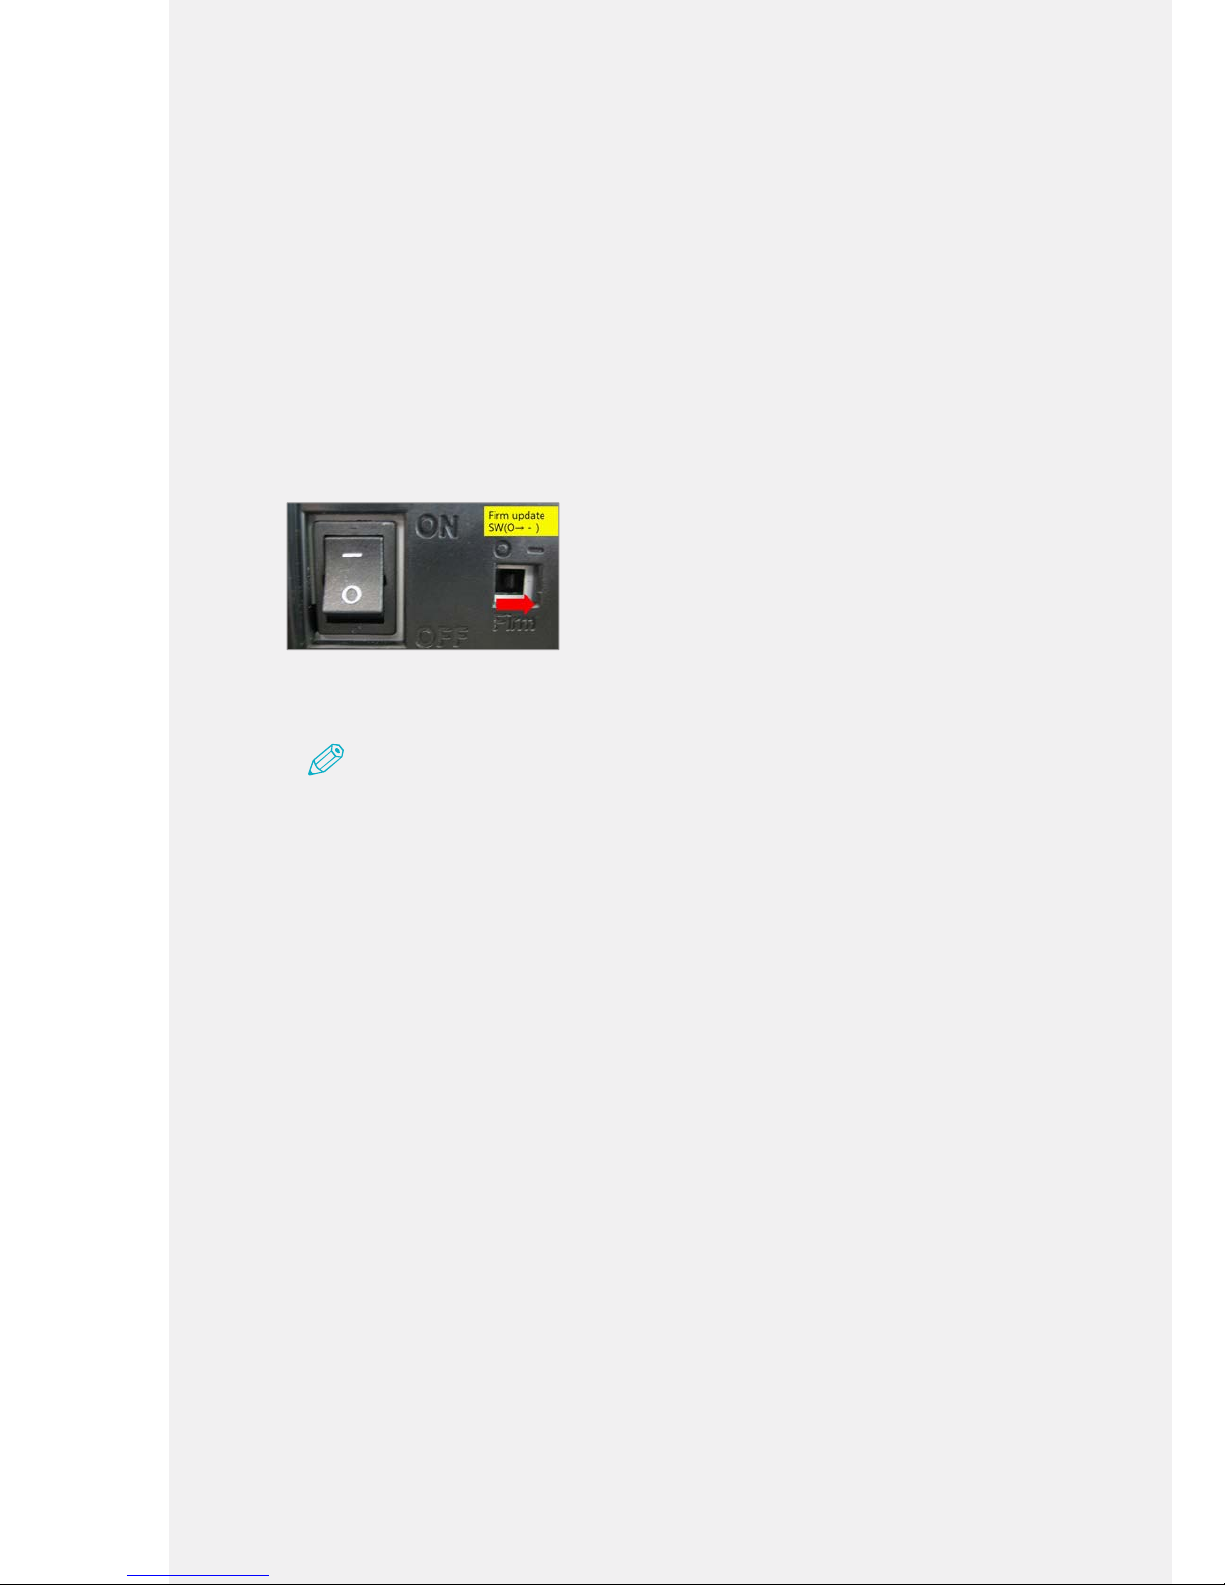
Locate the 'Firm update SW' on the right side of the machine, and slide the
switch to the right. (O → –)
4.
Turn on the machine.
Note
Ensure you slide the 'Firm update SW' switch to the right before you update the rmware.
5.
On your computer, click [System Properties] - [Hardware] - [Device
manager].
6.
Go to [Atmel USB Devices] and right-click on [AT90USB128]. Click
[Property] - [Hardware] - [Driver] - [Update Driver], and then select [Search
manually].
7.
Browse through the list that is displayed, select C:\Software Files\Atmel\
Flip 3.4.7, and then click [Install driver].
8.
Run Flip 3.4.7.
9.
When Flip 3.4.7 is running, connect your computer to the machine via the
USB cable.
Page 35
MARV User Manual
35
10.
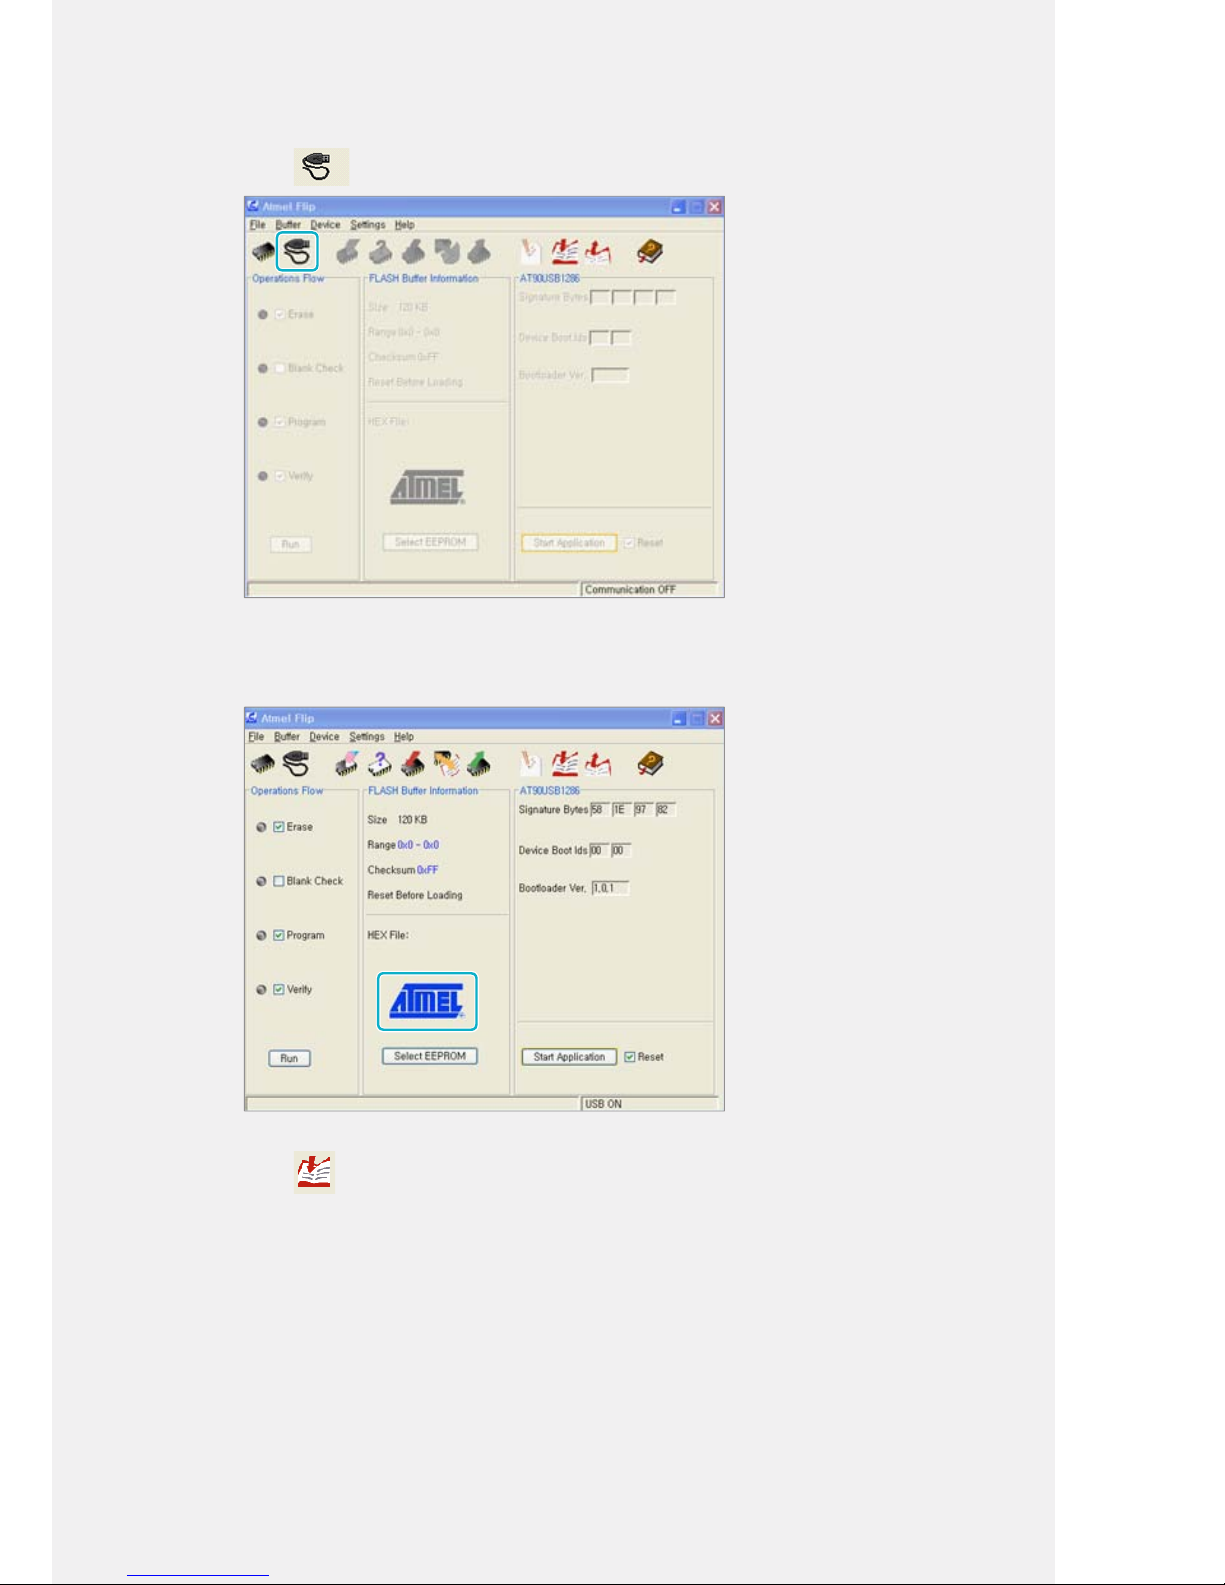
Click to search for the connected machine.
11.
When the computer has detected the machine, the display changes:
(The Atmel logo changes to blue.)
12.
Click .
13.
Open and run the rmware update le that you saved in step 6.
Page 36
MARV User Manual
36
14.
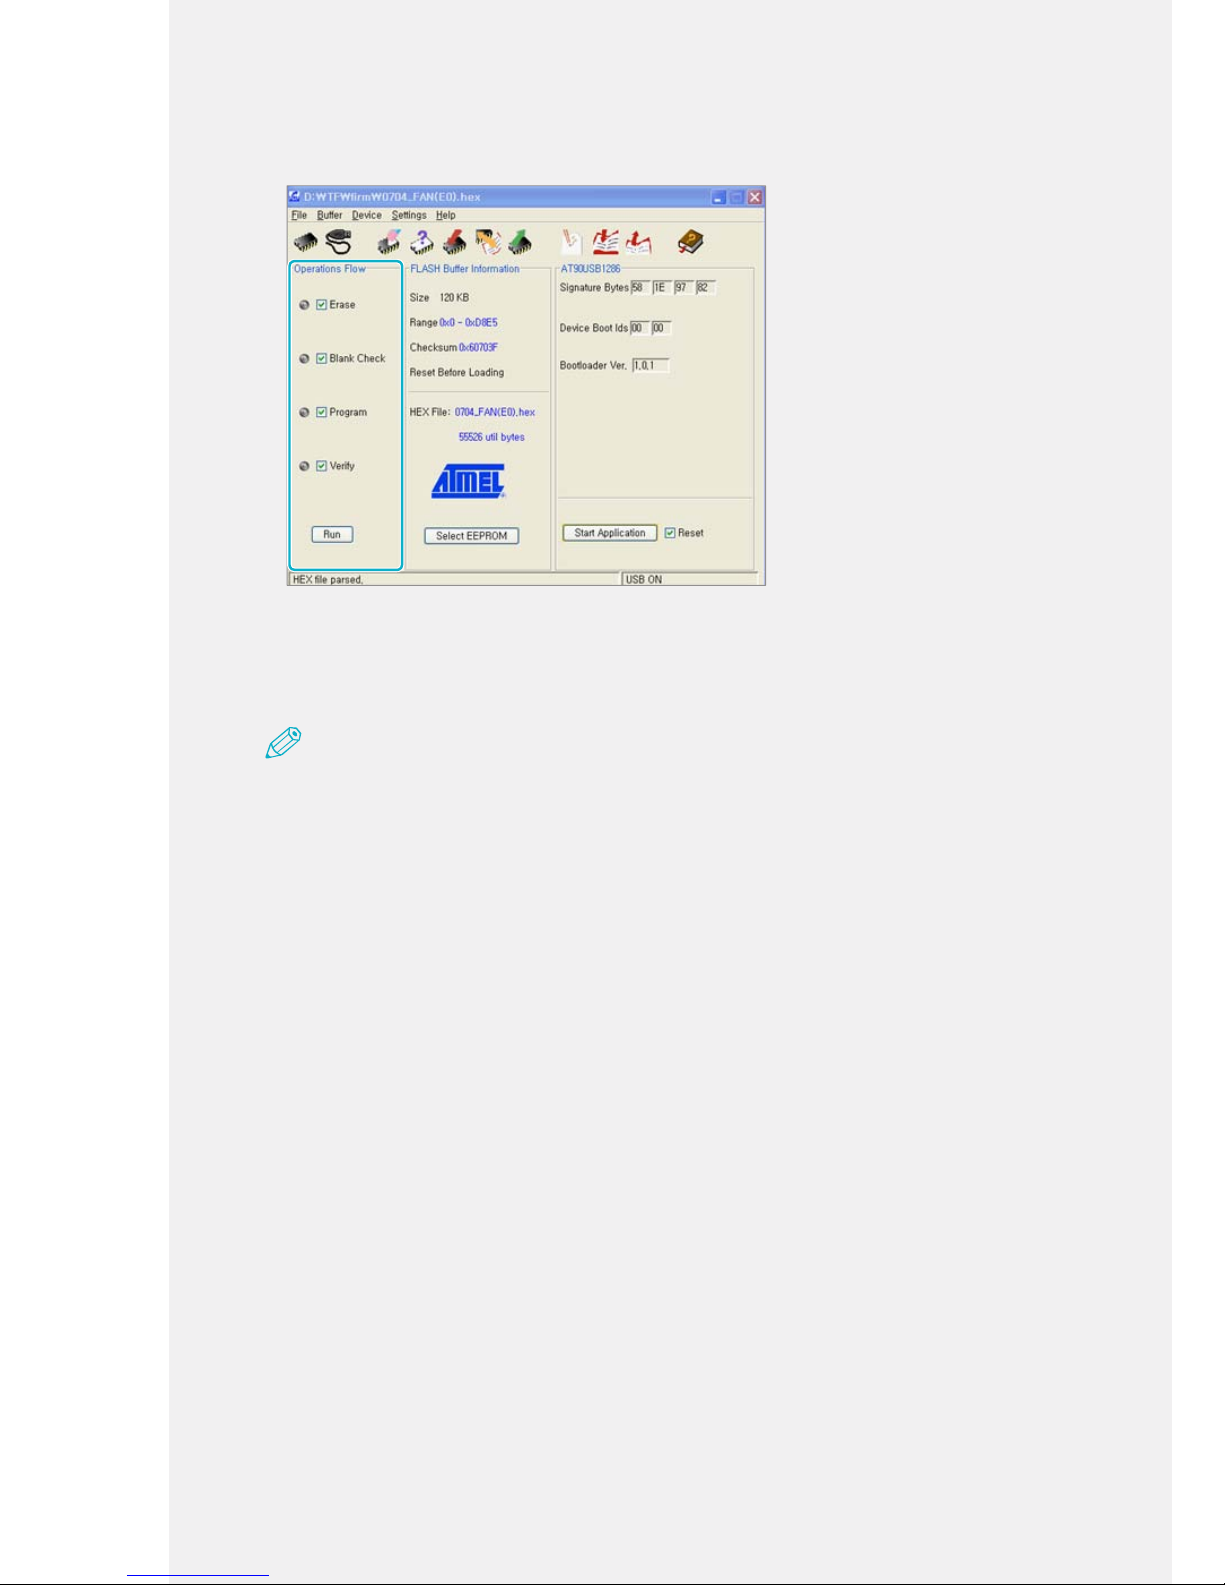
Check all of the boxes listed under Operation Flows and click [Run].
This product includes a software program distributed under the GPL license. The program's source code can be downloaded from this website:
http://www.canon-bs.co.kr/cs/download.aspx
15.
When the update nishes, close the software and slide the 'Firm update
SW' switch to the left. (O ← -)
Note
Slide the 'Firm update SW' switch to the right only while the rmware is updating. When you slide the
switch to the right, the power turns off and the machine cannot be used.
Page 37
MARV User Manual
37
Specications
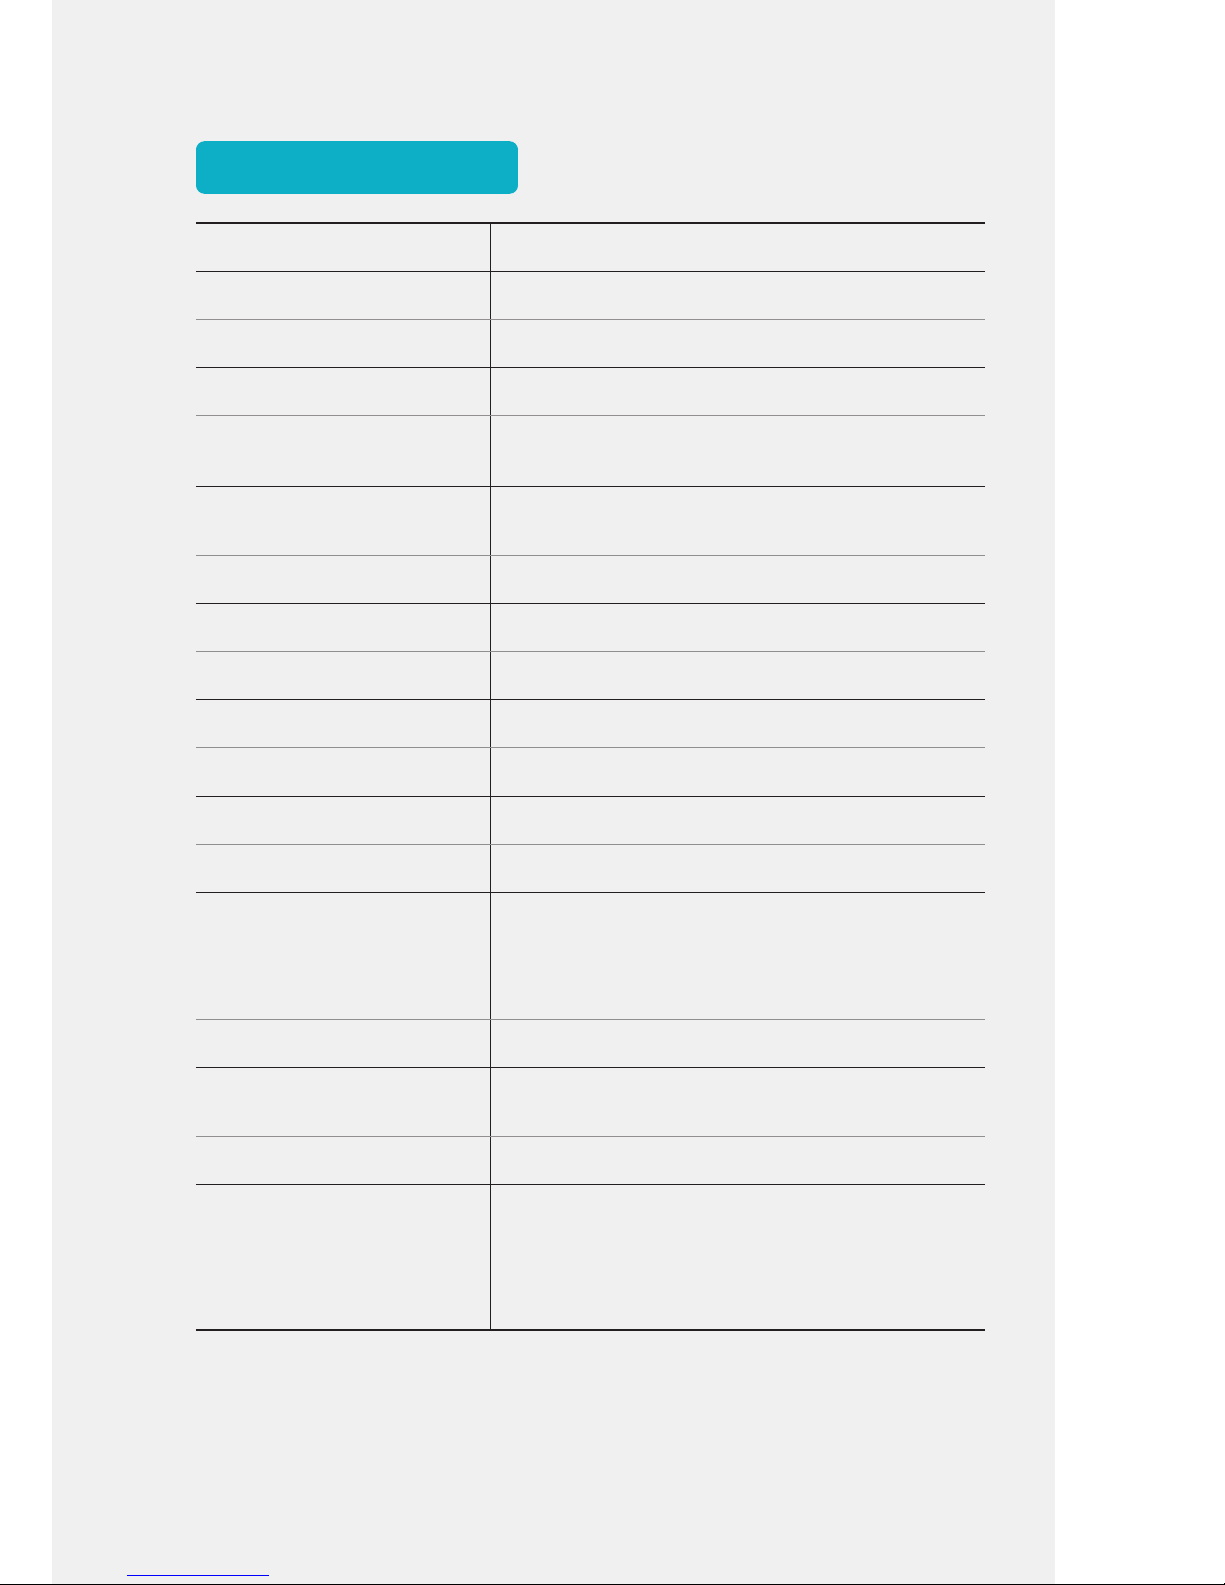
Printing method FDM (Fused Deposition Modeling)
Nozzle conguration Single
Filament Heat-resistant PLA
Layer thickness 0.2 mm
Machine dimensions
(W x D x H)
340 mm x 393 mm x 435 mm
Maximum dimensions of
printed objects (W x D x H)
140 mm x 140 mm x 150 mm
Machine weight
8 kg (excluding lament)
Communication protocol
USB cable
Power adapter
60W (DC 12 V, 5 A)
Power supply requirements
AC 100 V - 240 V
Internal density
5 stages
Noise intensity
< 50 dB
Warranty period
One year
Windows requirements
● Windows XP: 32 bit SP3
● Windows 7: 32 bit/64 bit
● Windows 8: 32 bit/64 bit
● Windows 8.1: 32 bit/64 bit
Printing speed modes
Standard/Fast
Installation clearances
(W x D x H)
586 mm x 850 mm x 820 mm
Ambient temperature 15
- 30
AC Adapter Specications ● Adapter Type: AC Adapter (100 to 240 V type)
● Model Number: KPL-060F
● Manufacturer: Channel Well Technology Co., Ltd.
● Input: AC 100 to 240V, 50/60Hz 1.7A
● Output: DC +12V 5.0A
Page 38
MARV User Manual
38
Troubleshooting
If you experience a machine fault, check the following tips before contacting our
service center.
The Machine Does Not Turn On
Check that the 'Firm update SW' switch is set to the left position.
If the 'Firm update SW' switch is set to the right position, the machine turns off. Set
the switch to the left position before you turn the machine on.
(O ← –)
Check that power switch is turned on and that the power and adapter cables
are connected properly.
Connect the power and adapter cables to the machine and then turn the power on.
Are the cables and the power adapter connected to the machine
manufacturer supplied items?
Make sure you use the power cord and the adapter cable supplied with the
machine. Use manufacturer supplied components and accessories only. We are
not liable for performance degradation, machine breakdowns or accidents if thirdparty items are used.
The Software Will Not Install
Ensure the USB cable is not connected to your computer.
Do not connect the USB cable until the software installation is complete.
If the USB cable is connected, remove it and then continue with the installation.
For Windows XP, if "Found New Hardware" is displayed, disconnect the USB cable
from the computer. Then, click [Cancel] and wait until the message disappears
before you continue the installation.
Page 39
MARV User Manual
39
Software installation does not start automatically when the CD-ROM is
inserted.
Note
In this manual, the CD-ROM drive is referred to as "D:".
For Windows XP
Click [Start] → [Run] → enter [D:\MInst.exe*] → [OK], and then follow the onscreen instructions for the installation.
For Windows 7
Click [Start] → [Search programs and les] or [Start Search] → enter [D:\MInst.
exe*] → [Enter], and then follow the on-screen instructions for the installation.
For Windows 8
Right-click the lower-left corner of the screen → select [Run] → enter "D:\MInst.
exe" → click [OK], and then follow the on screen instructions for the installation.
For Windows 8.1
Right-click [Start] → select [Run] → enter "D:\MInst.exe" → click [OK], and then
follow the on screen instructions for the installation.
A File Cannot Be Located after an SD Card Is Inserted
Check the SD card is inserted correctly.
If the SD card is not inserted correctly, remove it and then insert it correctly.
Check the SD card's software is fully loaded.
If the SD card software is not fully loaded, wait until it is loaded.
Check that the le extension is .marv.
Files with an extension other than .marv are not displayed on the screen. If you
want to use a customized or downloaded .stl le, run the MARV software to read
the le. Or, save the le to the SD card and then open it.
Are you using a le name that contains characters other than numbers,
letters, or certain special characters?
The LCD screen cannot recognize characters that are not numbers, letters, or
certain special characters.
Check that all of the le name is visible.
File names that contain more than 17 characters are only partially visible on the
LCD screen.
Check that manufacturer supplied SD cards been used.
SD cards with 4 GB and 8 GB memory capacity can be used with the machine.
The machine may not recognize some SD cards that exceed 8 GB.
The machine may not recognize some third-party SD cards.
Page 40

MARV User Manual
40
Files Will Not Print
Make sure the le extension is .marv.
The MARV software can only read .stl les. Save the le to the SD card as a
.marv le and then print it. The software cannot read or print les with other le
extensions.
How are .stl les used?
Files with .stl extensions are read-only when opened in MARV. To print a .stl le,
save to the SD card as a .marv le.
To edit a .marv le, change the le extension to .stl.
The Printer Is Not Working
Check that power switch is turned on and that the power and adapter cables
are connected properly.
Connect the power and adapter cables to the machine and then turn the power on.
Can the computer be turned off during printing?
If the computer is turned off or the software is closed while you are printing a le
from the computer, printing will stop immediately. Do not close the software on the
computer until the printing job is nished.
Did the computer software close while the object was printing?
If the computer is turned off or the software is closed while you are printing a le
from the computer, printing will stop immediately. Do not close the software on the
computer until the printing job is nished.
Can the SD card be removed during printing?
If the SD card is removed while you are printing a le on the card, printing will stop
immediately. Do not remove the SD card until the printing job is nished.
What happens when the computer goes into Sleep Mode?
If the computer goes into Sleep Mode while you are printing an object, printing will
stop immediately. Turn off Sleep Mode or adjust the period before the computer
goes to sleep. Alternatively, use the machine's SD card to print objects. To prevent
printing interruptions, it is recommended that you turn off sleep mode when you
run the MARV software.
Page 41
MARV User Manual
41
How do I know if Safe Mode is turned on?
If Safe Mode is activated, printing stops when the front cover is opened. You can
activate or deactivate Safe Mode in the Marv software via the [Settings] tab.
Note
Safe Mode is the default mode. You can turn off Safe Mode during nozzle preheating or object
printing processes only.
How do I check that the software is congured correctly?
Refer to 'Settings' on P.27.
Refer to 'Editing functions' on P.26.
There are error messages displayed on the machine's LCD.
The message informs you that there has been an error.
If you contact our service center, advise us of the error code contained in the
message. We will use it to quickly determine the cause of and solution to the
problem.
Printing Quality Is Not Satisfactory
Check that the print bed is clean and does not have any used tape attached
to it.
The print bed consists of a glass platform. Use new adhesive tape on the print
bed for each new object that you print. Doing so ensures that the object will be
securely xed to the print bed.
If adhesive tape is unavailable, use glue or a glue stick on the print bed before
printing an object.
Apply the adhesive tape properly and evenly to the print bed.
If the adhesive tape overlaps or is wrinkled, an uneven surface is created on
the print bed. This results in an irregular distance between the print bed and the
nozzle that can affect the quality of the printed object. Make sure that you apply
the adhesive tape without overlapping or wrinkling it.
Page 42
MARV User Manual
42
Is the nozzle calibrated correctly?
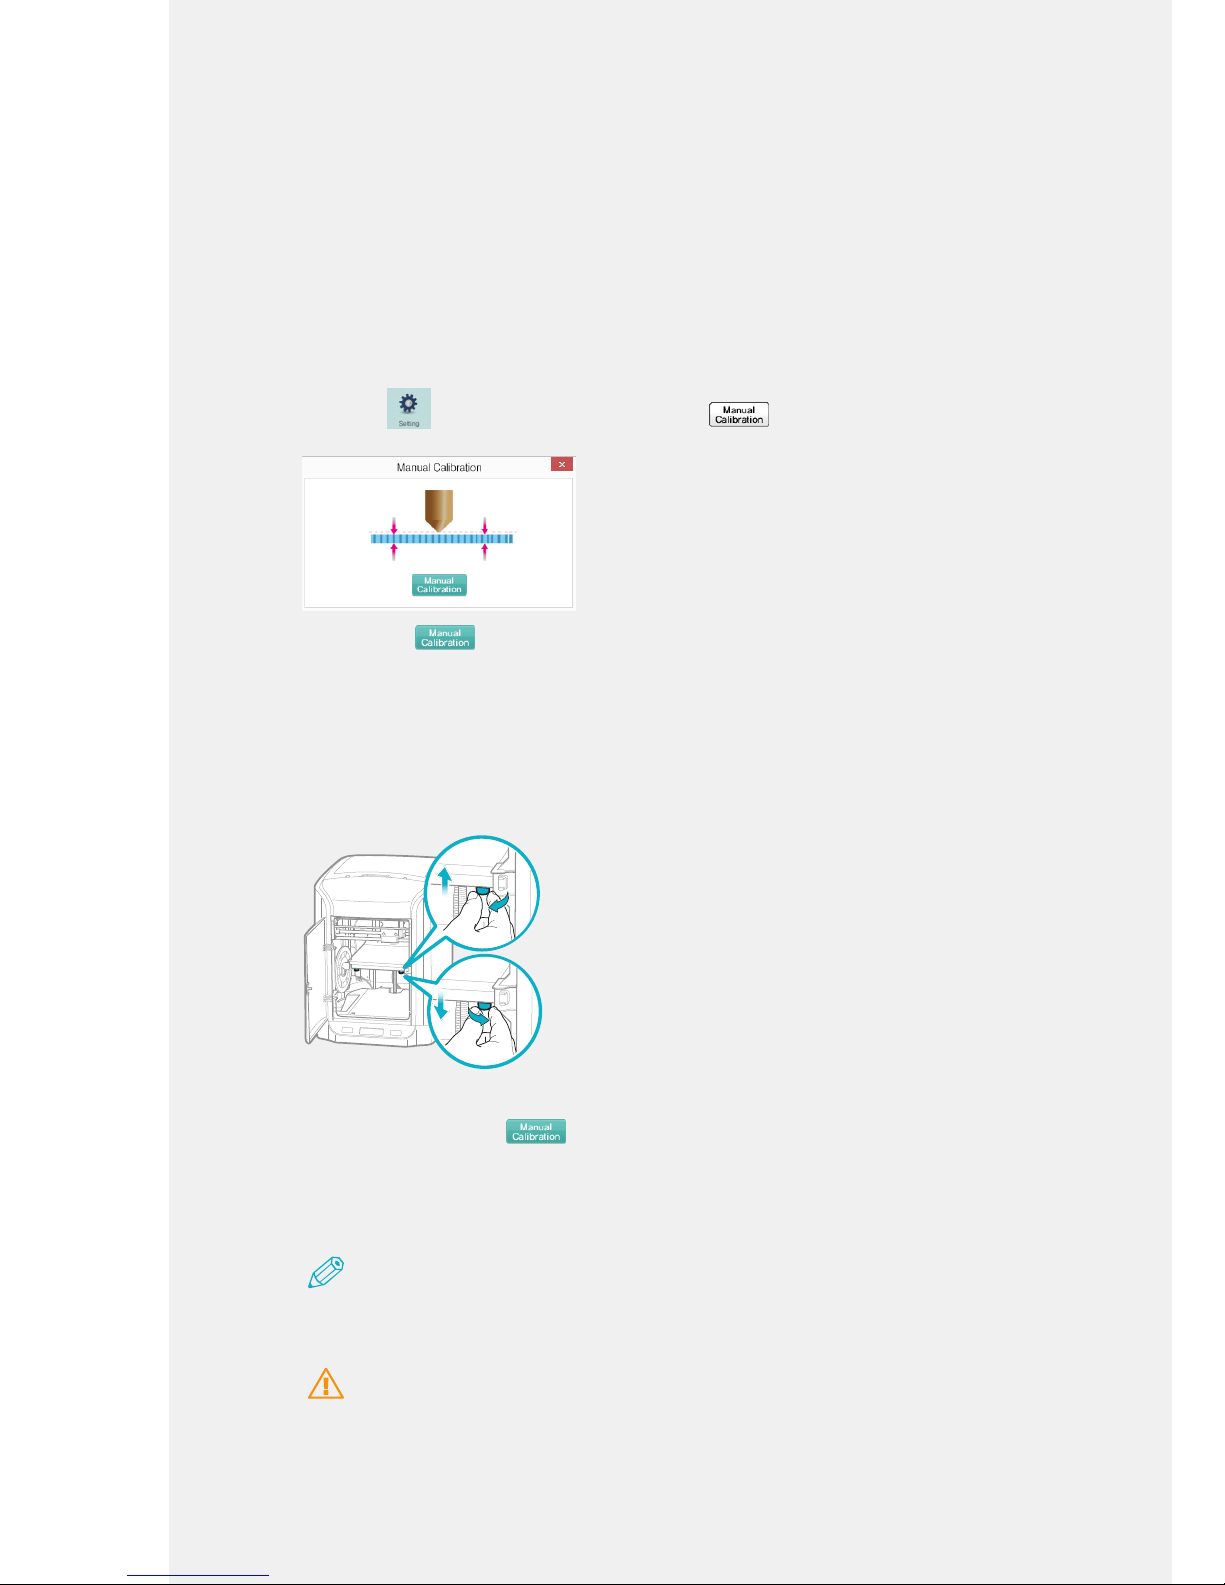
If the stage is not level, use the ‘Manual Calibration’ feature to manually calibrate
the nozzle. ‘Manual Calibration’ changes the distance between the 4 corners of
the print bed and the nozzle so that the correct distance (approximately 0.3 mm) is
available for proper printing.
1. With the adhesive tape facing up on the print bed, mount the print bed on the
stage.
2. With the printer connected to your computer, run the MARV software.
3. Click the
menu icon, and then click the button to use the ‘Manual
Calibration’ feature.
4. Clicking the button moves the nozzle to the 4 corners of the print bed.
5. Fine -tune the gap between the print bed and the nozzle.
Adjust the bolts to maintain a 0.3 mm gap (a gap that allows the calibration
sheet to meet the nozzle while still being movable) between the print bed
and the nozzle.
Turn bolts right: the gap narrows.*
1
Turn bolts left: the gap widens.*
2
*1
*2
6. Double check the calibration of the print bed.
Each time you click , the nozzle moves to a different corner. Adjust the
gap between the print bed and the nozzle at each corner.
When you have nished the adjustments, double check all the gaps.
7. Close the front cover.
Note
When using the ‘Manual Calibration’ feature, the modied value is not saved.
The modied value is saved when performing the ‘Auto Calibration’ procedure. (P. 31)
Caution
Calibrate the nozzle after the nozzle has sufciently cooled down. Failure to do so may cause
burns.
Page 43

MARV User Manual
43
Was the position and orientation of the printed object correct?
The printed object can be affected by unstable or uneven placement. For
enhanced printing results, rotate the model in the le before you import it so that
the largest or attest surface is the bottom side of the printed object.
"Is the size or the surface thickness of the model less than 2mm?"
For enhanced printing results, the surface thickness must be at least 2 mm.
Ensure that the object's surfaces are at least 2 mm thick before printing it.
How do I print my object if the bottom side can't support the object while it
is printing?
For enhanced printing results, the bottom side of the object must be stable on
the print bed. Edit the object's model to enlarge the bottom side or add a support
structure.
Do I have to use manufacturer supplied laments?
Using third-party laments may reduce printing quality and block the nozzle. For
enhanced printing results and to prevent machine breakdown, It is recommended
to use manufacturer supplied laments. The machine's warranty does not cover
breakdowns that are caused by using third-party laments.
When should I replace the lament?
Always replace a lament with a new one. The performance of a lament
deteriorates if it is left open for extended periods. An open lament should be used
as soon as possible.
How does moisture affect the lament?
If moisture enters the lament, it may affect the way that the lament extrudes from
the nozzle and affect the quality if the printed object. When you notice lament
extrusion and print quality issues, replace the lament. If you open a lament and
don't use it immediately, seal it and then store it in a cool, dark, and dry location.
The color of the printed object is not what I expected.
When a lament is replaced, the nozzle may contain lament residue of a different
color. The new color can be contaminated by the residual color. To avoid color
contamination when you change the lament, remove the lament residue from
the nozzle using the supplied nozzle maintenance pin. To prevent burns, wear
gloves when you clean the machine and replace the lament.
Does the color of the printed object vary?
When a lament is replaced, the nozzle may contain lament residue of a different
color. The new color can be contaminated by the residual color. To avoid color
contamination when you change the lament, remove the lament residue from
the nozzle using the supplied nozzle maintenance pin. To prevent burns, wear
gloves when you clean the machine and replace the lament.
Page 44
MARV User Manual
44
The Filament Does Not Extrude During Printing
Is there sufcient material on the lament?
Check the quantity of material on the lament. If the lament is running out
of lament, replace the lament. If a printing job is discontinued it cannot be
resumed. Before using the machine, check that there is enough material available
on the lament.
Is the lament installed and operating correctly?
The lament should be inserted so that it can rotate freely and supply lament to
the nozzle.
Check that the lament can move freely by ensuring it is not obstructed. Also,
ensure that the feeding tube and lament that is attached to it do not become
tangled.
Install the lament so that the lament will release in a counterclockwise direction.
The Printed Object Cannot Be Removed from the Print Bed
Is the printed object xed to the printing bed?
If it is difcult to remove the printed object from the print bed, soak the print bed
in warm water (at approximately 50) for about 1 minute. Then, try to remove the
object from the print bed again.
Caution
When you remove the printed object from the print bed, wear gloves to prevent hand injuries
from any sharp edges on the object.
Page 45

Customer Care Center TEL 1588-2500 / FAX (031) 499-0371
Website http://www.canon-bs.co.kr
Cyber Service Center http://svc.canon-bs.co.kr
6F6-0004-010
http://www.canon-bs.co.kr
 Loading...