

Page 1
DISTRIBUTED BY:
Maruyama U.S., Inc.
3570 Shelby Lane
Denton, Texas 76207
940-383-7400 940-383-7466 (Fax)
Website: www.maruyama-us.com
GUARANTEE
Our products are guaranteed for one year from the purchase
date against defects in material and workmanship. This warranty
is limited to the free replacement of parts recognized as
defective by our service department. The warranty does not
apply for damage due to improper use, disassembly or
modification, nor from normal wear and tear. Warranty does not
apply in case of negligence, imprudence and, improper use of
the equipment. The user may be required to show a copy of
invoice or bill of sale to establish date of purchase..
GENERAL PRECAUTIONS
IMPORTANT: Strictly follow all warnings and
recommendations on the labels for chemical products marked
“dangerous” and “poisonous”. Comply with the application time
and expiration date of each product. Avoid chemical
application during extremely hot periods. Use extreme caution
when spraying near electrical installations. Never use
alkaline, acids, flammable materials or products which
may a fire hazard. This sprayer is intended to be used
only with herbicides, insecticides and fungicides for
plants. Do not expose chemicals to the sun. This sprayer
must be safety tested annually by experienced personnel. The
sprayer hose must be the original from the manufacturer.
SAFETY AND HANDLING STANDARDS
Storage. Place the products in a dedicated, well ventilated and
locked room out of the reach of children and pets. Store the
product in its original packing. Use the same room to store
chemical mixing, preparation and application utensils.
Product Preparation. Verify that that the chemical and
equipment are not expired and are in good condition. Read and
follow the instructions provided in the product labels and
manuals. Use proper utensils for mixing and preparing and mark
them correctly. After preparation, wash your hands and face.
Dispose properly of empty packages and leftover products.
Safe Procedure. Use suitable protective equipment. Avoid
contact with the skin and eyes and do not eat, drink or smoke.
Do not apply under windy conditions or against the wind. Avoid
any product drifting into adjacent land and crops. Avoid any drift
into neighboring springs, rivers, streams, lakes, etc.
After Application. Destroy empty packaging and bottles by
burning or burying them 30 cm deep, away from streams or
wells. Thoroughly clean the treatment machinery. Wash yourself
and your clothes.
Advice in case of poisoning. Go to the doctor with the
product label or take the affected person to the nearest hospital.
Avoid use of home medicines and, in all cases wash the
affected skin areas with plenty of fresh water.
START-UP
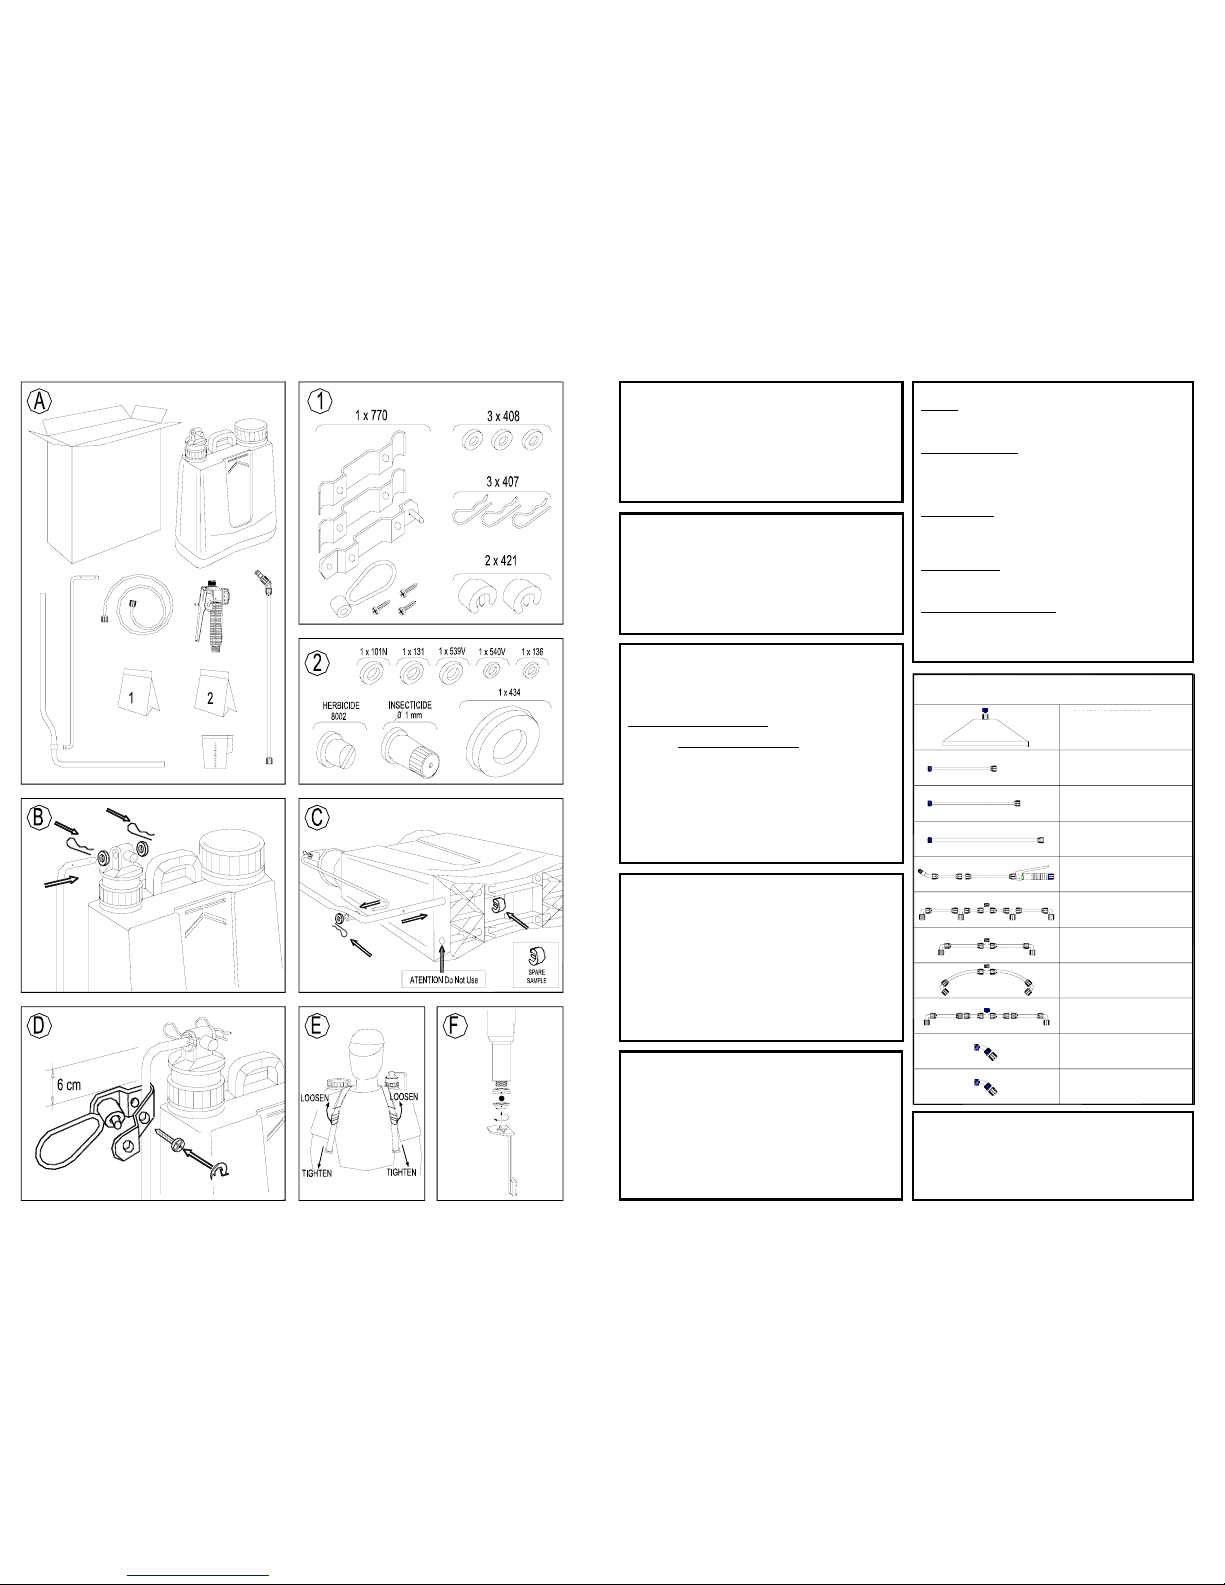
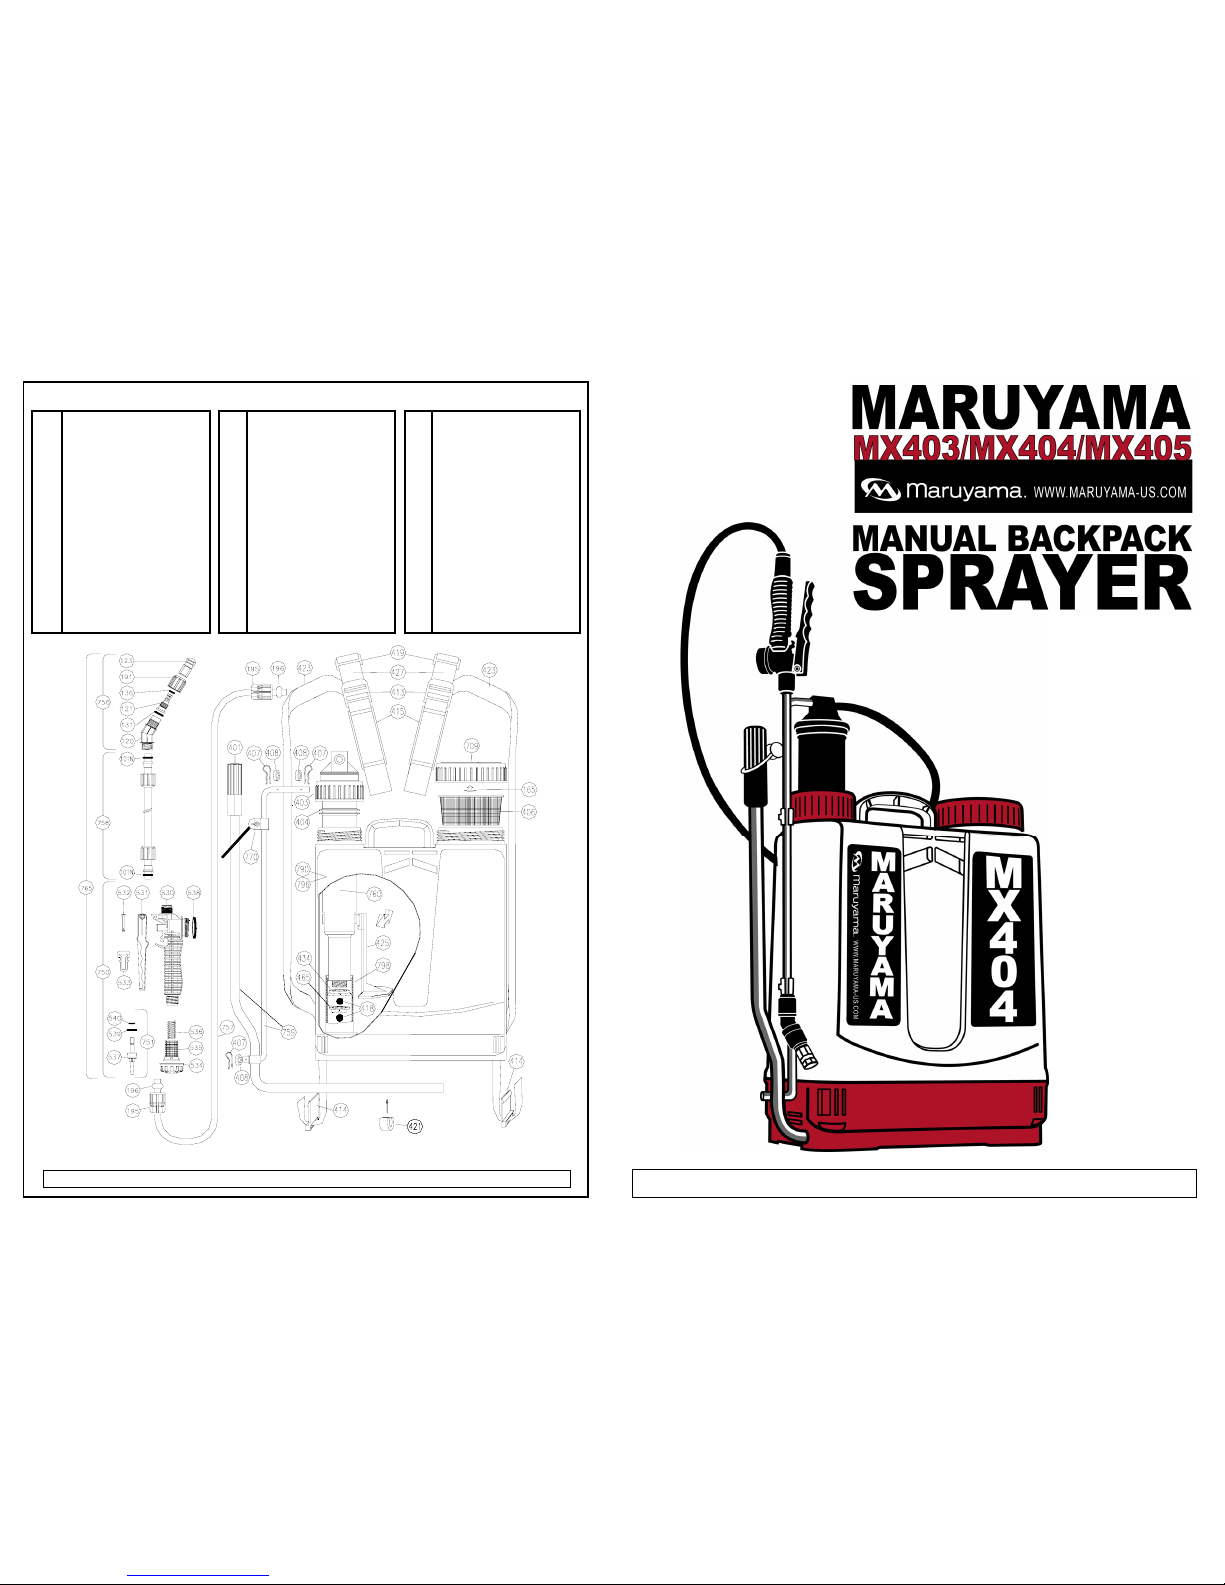
Couple the hose (757) to the lance (765) and to the chamber
(760). Unscrew the tank cover without taking out the filter and
pour the liquid to be mixed. Adjust the straps as indicated in
Image E. Pump the lever some 8 - 10 times to build pressure.
Press the trigger (750) and regulate the nozzle (123) rotating it
towards one side and the other to get the desired spray
pattern. Bear in mind that 6 to 8 strokes per minute gives a
flow output of 24 oz./ 0.7 liters to 27 oz./ 0.8 liters/min.
MAINTENANCE & TROUBLESHOOTING
Clean the equipment and internal components, including the
filter at the end of the workday. Clean water and liquid
detergents will assist this process. NEVER LEAVE THE
SPRAYER PRESSURIZED OR STORE WITH CHEMICALS IN
TANK. Release pressure and rinse thoroughly.
NOZZLE OBSTRUCTION (123) Clean nozzle with water
pressure or non metallic instruments taking care not to damage
the orifice. RETAINER CHANGE (434): loosen the bolt (407)
taking care not to miss the washer (408), take out the agitator
horizontally (425), remove the pressure chamber (760). Use the
agitator as in figure F, fit the cross on the stirrer blade into the
channels or slots in the valve (465) and, unscrew it. Pick up the
ball. Replace the retainer (434) with a new one and screw up
again the valve. Do not forget to place the ball inside it. With the
help of the stirrer in the indicated position, tighten the valve (465)
firmly into the chamber. Proceed to mount the chamber, washer
and the agitator.
PERIODICALLY LUBRICATE THE GASKETS (404S).
INITIAL ASSEMBLY
Image A indicates packaging contents.
Drawing 1 indicates the mounting kit contents and 2 is the kit
of spare parts and replacing nozzle. Both are inside the tank.
Place the lever arm on top of the pump and fit it with pieces
(408) and (407) as s hown in image B. Lay down the tank with
the straps on the bottom and fix the lever to the upper base
hole, by joining in coincidence the bearing with the bottom of
the arm. Fix with pieces (407), (408) and (421) as per Image
C. Place the lever shutter as shown in Image D.
ACCESSORIES
LIME PREPARATION ELBOW
842627
HERBICIDE ELBOW
842626
DOUBLE EXTENSION NOZZLE
842624
DOUBLE FLEXIBLE NOZZLE
842633
QUADRUPLE FRONT NOZZLE
842618
DOUBLE FIXED NOZZLE
842623
TELESCOPIC LANCE
842625
20”/ 0.5 M EXTENSION
842622
40”/ 1.0 M EXTENSION
842621
60”/1.5 M EXTENSION
842620
RECTANGULAR PROTECTOR BELL
WITH HERBICIDE NOZZLE
Page 2
MARUYAMA RESERVES THE RIGHT TO CHANGE PRODUCT SPECIFICATIONS WITHOUT NOTICE.
539
540
709
750
751
756
757
758
759
760
765
770
790
796
798
1501
842552 2-109 VITON GASKET
842553 2-107 VITON GASKET
842607 TANK COVER WITH VALVE
842558 COMPLETE HANDLE
842559 COMPLETE SHUTTER
842610 ELB O W - CHROMED N O Z Z LE
842560 COMPLETE HOSE
842612 CHROMED TUBE W/ NUTS
842648 ARM-LEVER SET 16/20L
842614 CHAMBER ASSY 16/20L
842615 LANCE ASSEMBLY
842617 WAND HOLDER (CLAMP)
842597 20 LITER TANK
842598 16 LITER TANK
842599 12 mm BALL CYLINDER
842651 REPAIR KIT (842521,
842528, 842591, 842552,
842553)
842585 SHOULDER
842586 12 mm. DIAMETER BALL
842600 FITTING SUSPENDER
842587 BASE BUSHING
842595 0.90 M STRAP
842590 AGITATOR
842596 0.60 M STRAP
842591 SYNTHETIC RETAINER
842592 SEALING VALVE
842543 HANDLE BODY
842544 BUTTON
842545 BUTTON BOLT
842546 HANDLE CLIP
842547 HANDLE NUT
842548 HANDLE FILTER
842549 HANDLE SPRING
842550 SHUTTER
842551 2-121 NITRILE GASKET
415
418
419
421
423
425
427
434
465
530
531
532
533
534
535
536
537
538
101N
120
121
123
131
136N
165N
191
195
196
401
403
404
406
407
408
413
414
842521 AN-8 NITRILE GASKET
842523 ELBOW
842524 MIXER VALVER
842567 1.5 mm BRASS NOZZLE
842527 16x2 FLAT GASKET
842528 AN-5 NITRILE GASKET
842570 TANK COVER VALVE
842540 NOZZLE NUT
842541 HOSE NUT
842542 HOSE BUSHING
842574 LEVER GRIP
842575 CHAMBER NUT LID
842576 SYNTHETIC GASKETS
842578 TANK FILTER
842579 BOLT
842580 LEVER WASHER
842594 LOSSEN RING
842584 STRAP RING
MX404
–
16 L / 4 GAL
MX405
–
20 L /
5 GAL
READ INSTRUCTIONS THOROUGHLY BEFORE USING
 Loading...