

Page 1
Owner’s/Operator’s Manual
Completely read and understand this manual before using this product.
HT230D, HT230DL
HT230DS, HT230DLS
HT230D-R, HT230DL-R
HT230DS-R, HT230DLS-R
HT230, HT230S
HT230L, HT230LS
Page 2

— 1 —
FOREWORD
This Owner’s/Operator’s Manual is designed to familiarize the operator with the various features
and component parts of the equipment and to assist you with the operation and maintenance of
your new Hedge Trimmer.
It is essential that any operator of this Hedge Trimmer product reads and understands the
contents of this manual before using the Hedge Trimmer.
Important safety instructions will be identified by the following safety symbol:
Failure to comply with the instructions in this manual may result in serious injury or death.
For additional assistance, contact any local authorized Maruyama dealer or Maruyama MFG., Inc.
TABLE OF CONTENTS
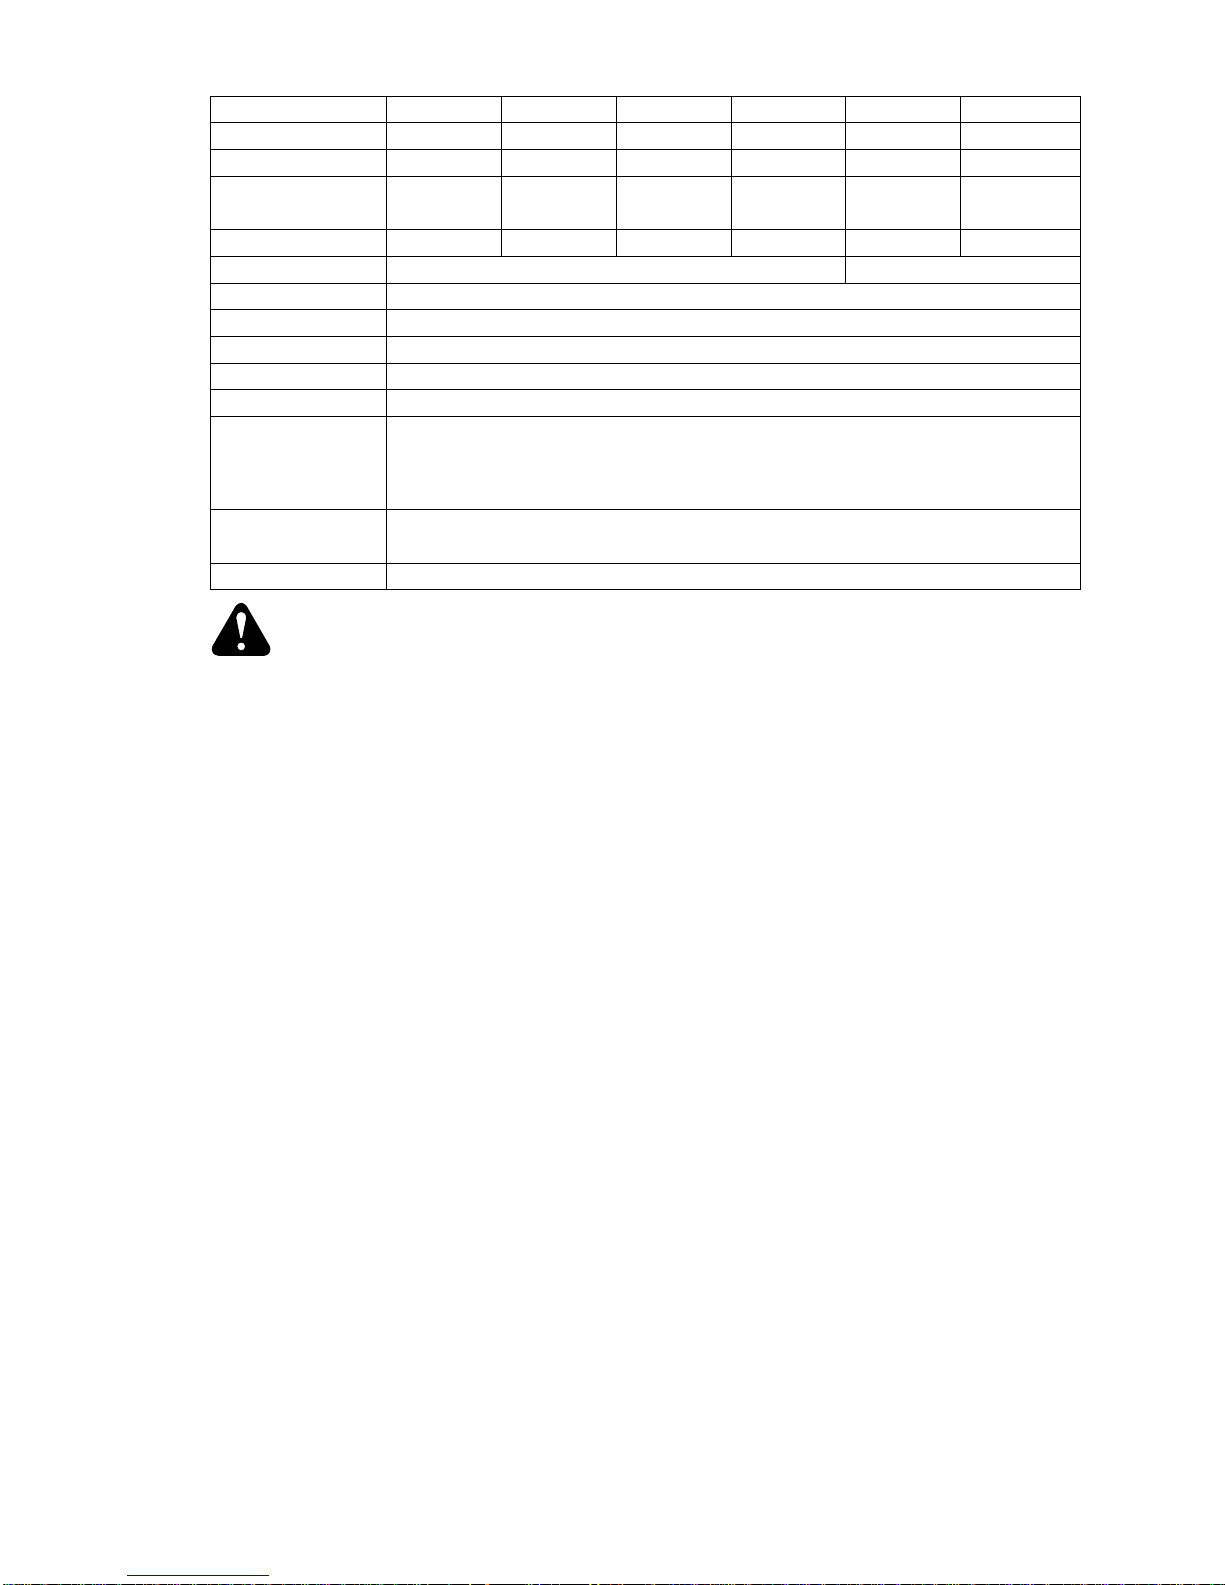
SPECIFICATIONS
Foreword·························································1 Before operation··············································8
Specifications·················································· 1 Starting and stopping procedure·················· 11
Product description········································· 3 Carburetor adjustment·································· 12
Marking···························································· 4 Operating the P ow er Hedge Trimmer··········· 12
Symbol Explanation········································ 4 Regular maintenance···································· 13
Safety instructions··········································· 5 Storage··························································15
Models
Length×Width×Height
Dry Weight
Blade Length
Rear Handle
Engine Model
Engine Displacement
Fuel Tank Capacity
Carburetor
Ignition System
HT230D
1025×245×220mm
5.1 kg
5.5 kg
600mm
Use only non-leaded regular gasoline.
2-Cycle oil mix 25:1 ratio must be approved for air-cooled engines.
LE230
22.5cm
3
0.5
R
Walbro Diaphragm Type
Solid State
NGK
BPMR6Y
0.6
〜
0.7mm
RotationalFixed
Fuel Mixture:
Normal
Starter
HT230DL
1160×245×220mm
5.3 kg
5.8 kg
750mm
HT230
1045×245×260mm
5.3 kg
5.8 kg
750mm
HT230L
1390×245×260mm
5.9 kg
6.4 kg
1000mm
HT230D-R
1035×245×225mm
5.2 kg
5.6 kg
600mm
HT230DL-R
1175×245×225mm
5.4 kg
5.9 kg
750mm
Total Weight
(With fuel and cover)
Spark Plug:
Make
Type
Electrode Gap
Page 3
— 2 —
SPECIFICATIONS
Models
Length×Width×Height
Dry Weight
Blade Length
Rear Handle
Engine Model
Engine Displacement
Fuel Tank Capacity
Carburetor
Ignition System
HT230DS
1025×245×225mm
5.2 kg
5.6 kg
600mm
Use only non-leaded regular gasoline.
2-Cycle oil mix 25:1 ratio must be approved for air-cooled engines.
LE230
22.5cm
3
0.5
R
Walbro Diaphragm Type
Solid State
NGK
BPMR6Y
0.6〜0.7mm
RotationalFixed
Fuel Mixture:
Reverse2 Start
※
Starter
HT230DLS
1160×245×225mm
5.4 kg
5.9 kg
750mm
HT230S
1045×245×260mm
5.4 kg
5.9 kg
750mm
HT230LS
1390×245×260mm
6.0 kg
6.5 kg
1000mm
HT230DS-R
1035×245×230mm
5.3 kg
5.7 kg
600mm
HT230DLS-R
1170×245×230mm
5.5 kg
6.0 kg
750mm
Total Weight
(With fuel and cover)
Spark Plug:
Make
Type
Electrode Gap
※
Reverse2 Starter(HT230DS, HT230DLS, HT230S, HT230LS, HT230DS-R, HT230DLS-R)
CAUTION ! Please do not disassemble recoil starter by yourself. For service, please contact to appointed dealer.
Page 4
— 3 —
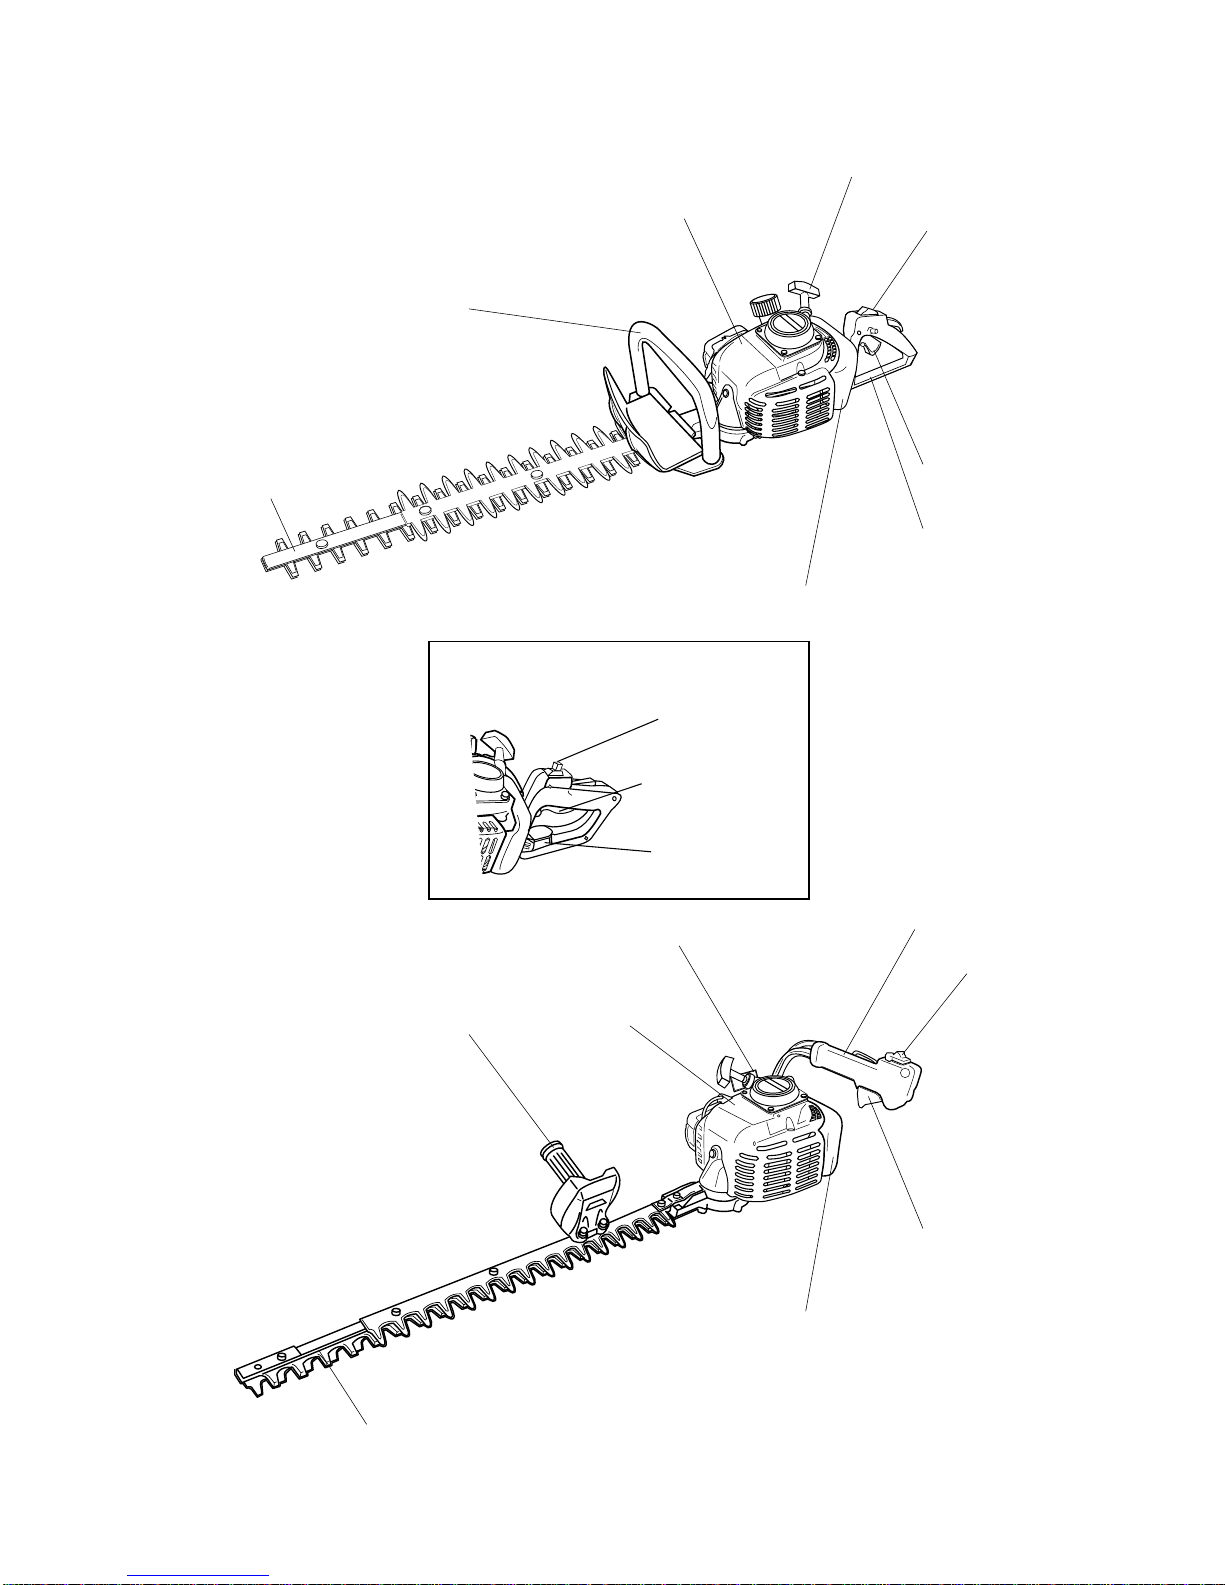
PRODUCT DESCRIPTION
FUEL TANK
THROTTLE
TRIGGER
REAR
HANDLE
STOP
SWITCH
STARTER GRIP
BLADE
FRONT HANDLE
ENGINE
FUEL TANK
THROTTLE
TRIGGER
STOP
SWITCH
STARTER GRIP
LEFT HANDLE
BLADE
RIGHT HANDLE
MODEL:HT230, HT230L, HT230S, HT230LS
MODELS:HT230D, HT230DL, HT230D-R, HT230DL-R
HT230DS, HT230DLS, HT230DS-R, HT230DLS-R
ENGINE
HT230D-R, HT230DL-R
HT230DS-R, HT230DLS-R
REAR HANDLE
STOP
SWITCH
THROTTLE
TRIGGER
LOCK LEVER
Page 5
— 4 —
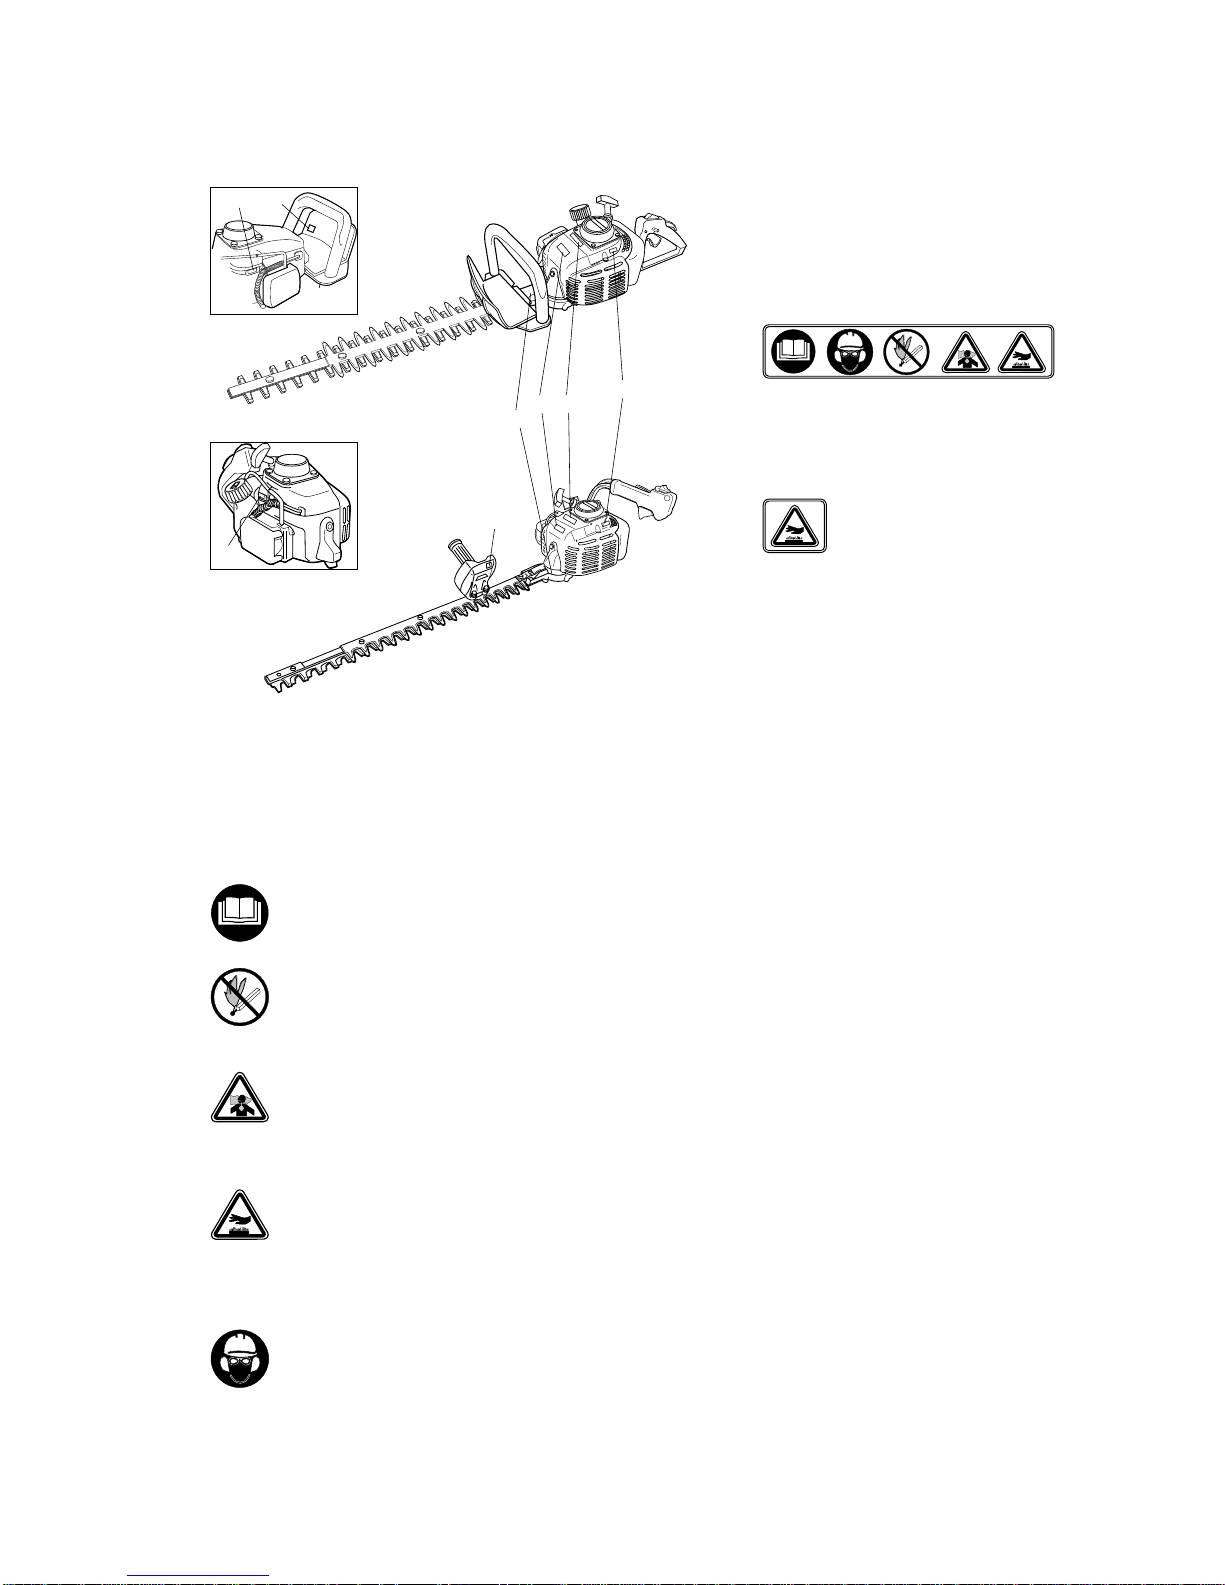
MARKING
q
MODEL NAME
w
SERIAL No. (STAMPED)
e
See SYMBOL EXPLANATION
r
See SYMBOL EXPLANATION
t
SOUND PRESSURE LEVEL
y
C-Tick
SYMBOL EXPLANATION
Read and understand this Owner’s/Oper ator’s Manual before using this product.
Fire Danger: Gasoline is highly flammable. Never add fuel to the Hedge Trimmer
with a running or hot engine. Do not smoke or place any sources of heat in the
vicinity of the fuel.
Breathing exhaust fumes can cause death. Never start or r un the engine inside a
close room or building.
Hot Surface War ning: Contact may cause burns. During use and for some time
after stopping the engine, the engine and the gearcase are very hot. Do not touch
engine components such a cylinder, muffler and engine covers and gearcase until
the engine has cooled to ambient temperature.
Always use:
• A protective helmet.
• Ear protection.
• Protective glasses or visor.
t
w
r
e
q
y
w
t
Page 6
— 5 —
SAFETY INSTRUCTIONS
Operator safety
1. Read and understand this Owner’s/Operator’s Manual before using this product. Be thoroughly
familiar with the proper use of this product.
2. Alwa ys w ear eye protection.
3. Wear hearing protection.
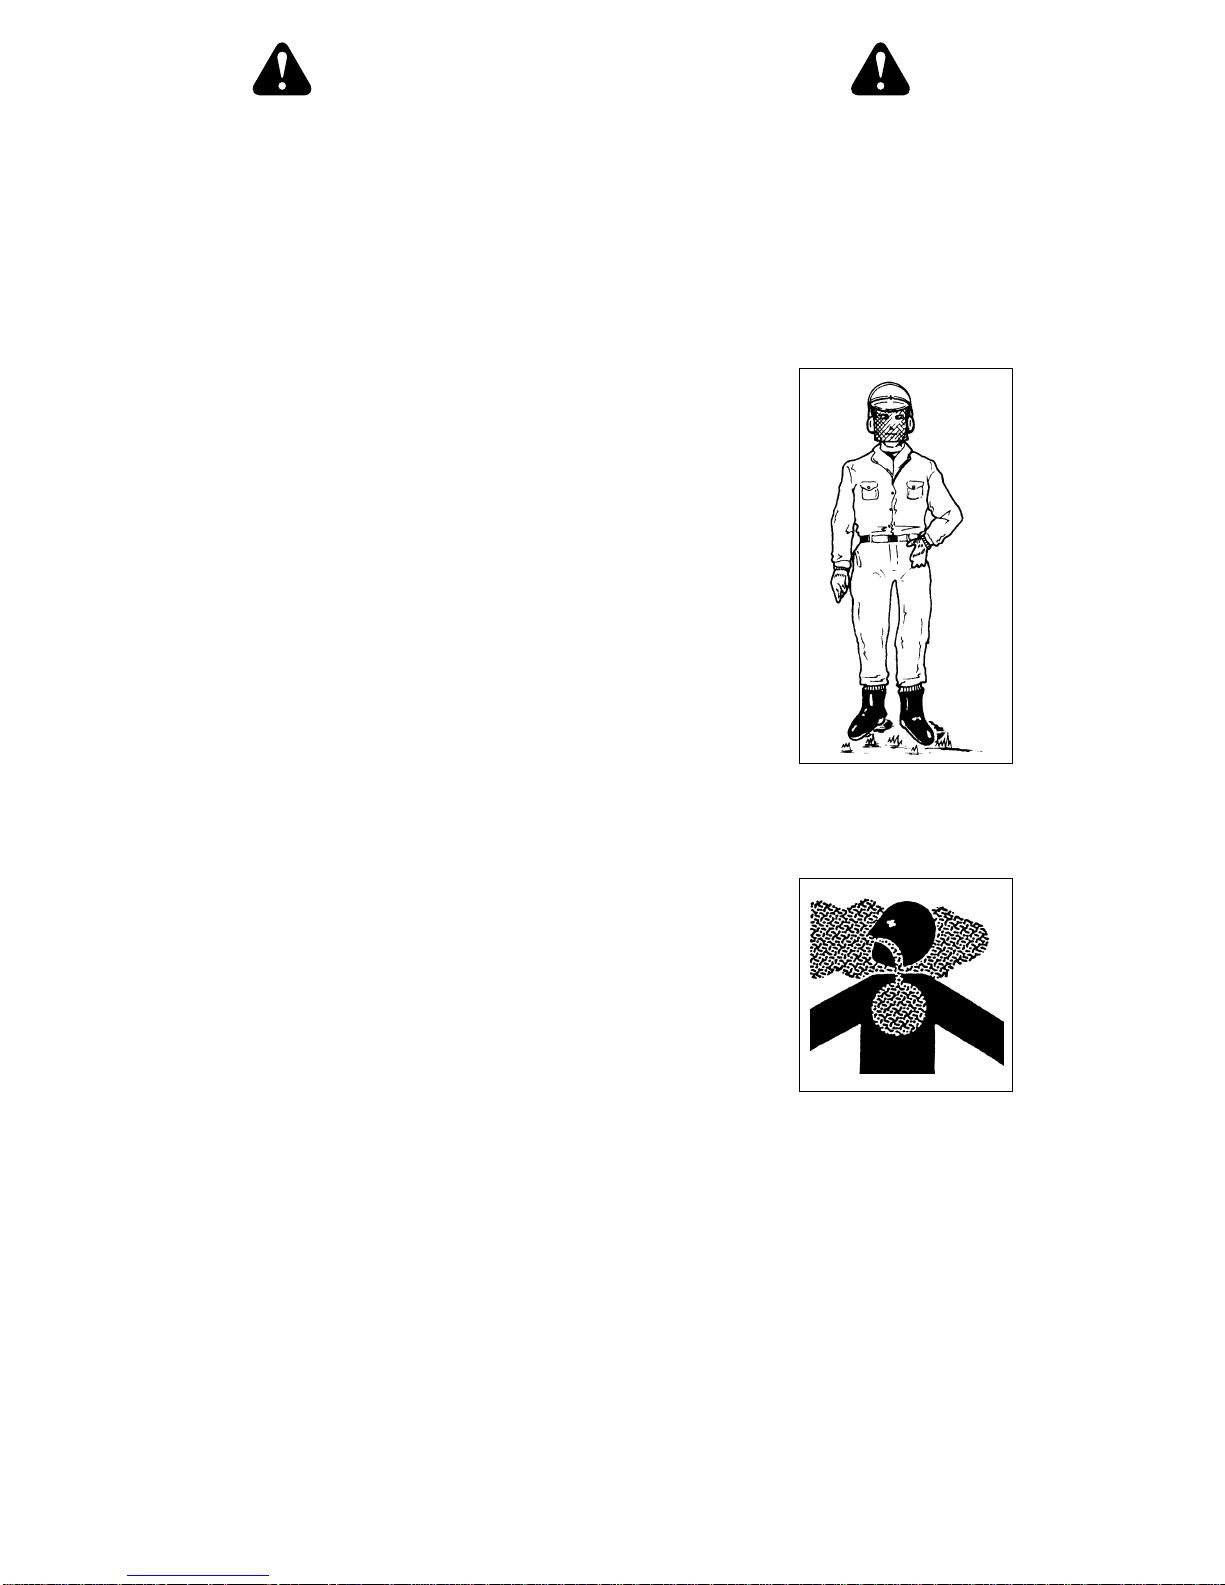
4. Always wear heavy long pants, boots and gloves. Do not wear
loose clothing, jewelry, shor t pants, sandals or go barefoot.
Secure hair so it is above shoulder length.
5. Never operate this Hedge Trimmer when you are tired, ill, under the influence of alcohol, drugs or
medication.
6. Never start or r un the engine inside a closed room or building.
Breathing exhaust fumes can cause death.
7. Keep handles clean of oil, fuel and dirt.
Page 7
— 6 —
Power Hedge Trimmer safety
1. Shut off the engine and wait unit the cutting blades have completely stopped moving before
checking, maintenance or working on the Hedge Trimmer .
2. Inspect the Hedge Trimmer before each use. Replace damaged parts. Check for fuel leaks.
Make sure all fasteners are in place and tightened securely. Follow the maintenance instructions provided on page 13 to 15 of this manual.
3. Inspect the Hedge Trimmer cutting blades and guide. Replace any parts that are cracked,
chipped, or damaged before using the Power Hedge Trimmer.
4. Nev er use replacement parts that are not approved by Maruyama.
5. Maintain the Hedge Trimmer in accordance with the recommended maintenance intervals and
procedures in the maintenance section, pages 13 to 15.
6. If running problems or excessive vibration occur, stop immediately and inspect the unit for the
cause. If the cause cannot be determined or is beyond your ability to correct, return the Hedge
Trimmer to your servicing dealer for repair .
7. Nev er use the hedge trimmer if handles are damaged or handle fasteners are loose.
Always mak e sure all fasteners (nuts and bolts) are installed and properly tightened.
8. Never use a machine that has been modified so that it no longer corresponds with the original
design.
9. Do not attempt to repair the Hedge Trimmer unless you are qualified to do so.
10. When transporting or storing the Hedge Trimmer always fit the blade shield.
Fuel safety
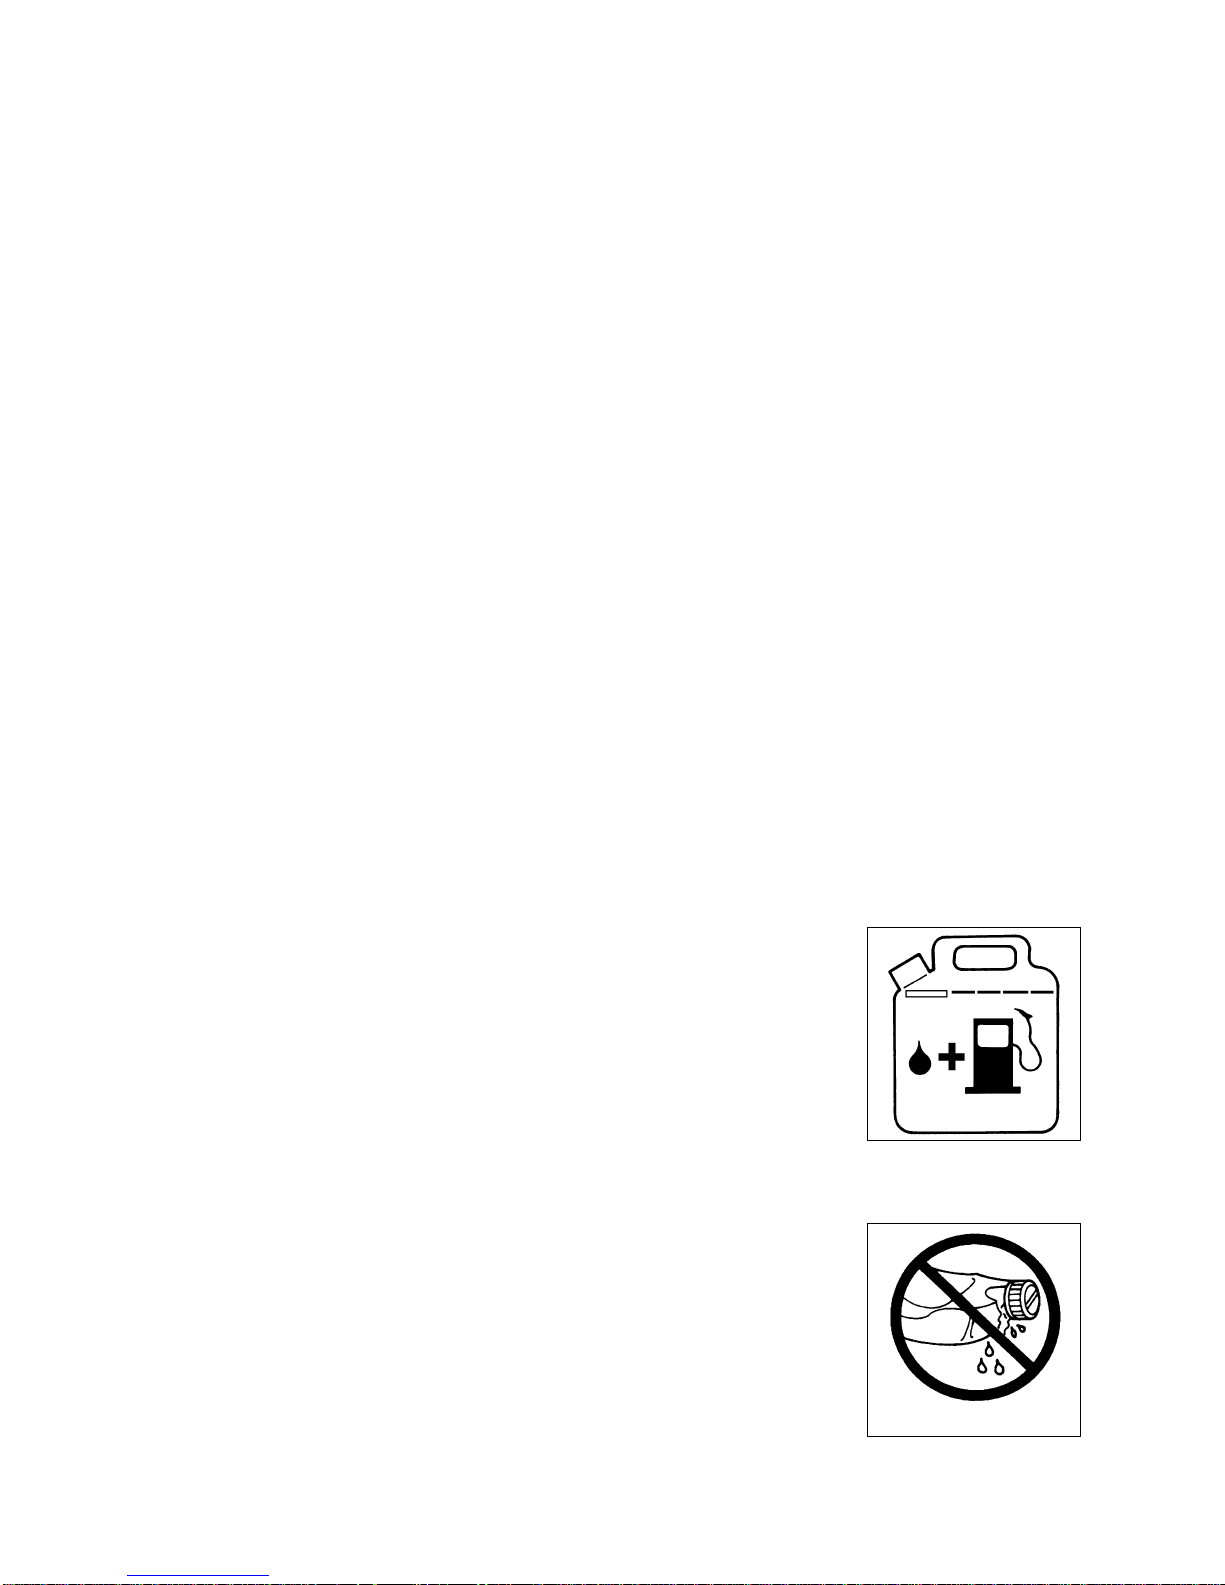
1. Gasoline is highly flammable and must be handled and stored
carefully. Use a container approved for storing gasoline and/or
fuel/oil mixture.
2. Mix and pour fuel outdoors and where there are no sparks or flames.
3. Do not smoke near fuel or the Hedge Trimmer or while using the
Hedge Trimmer.
4. Do not overfill the fuel tank. Stop filling 10 ~ 20 mm from the top of
the tank.
5. Wipe up any spilled fuel before starting the engine.
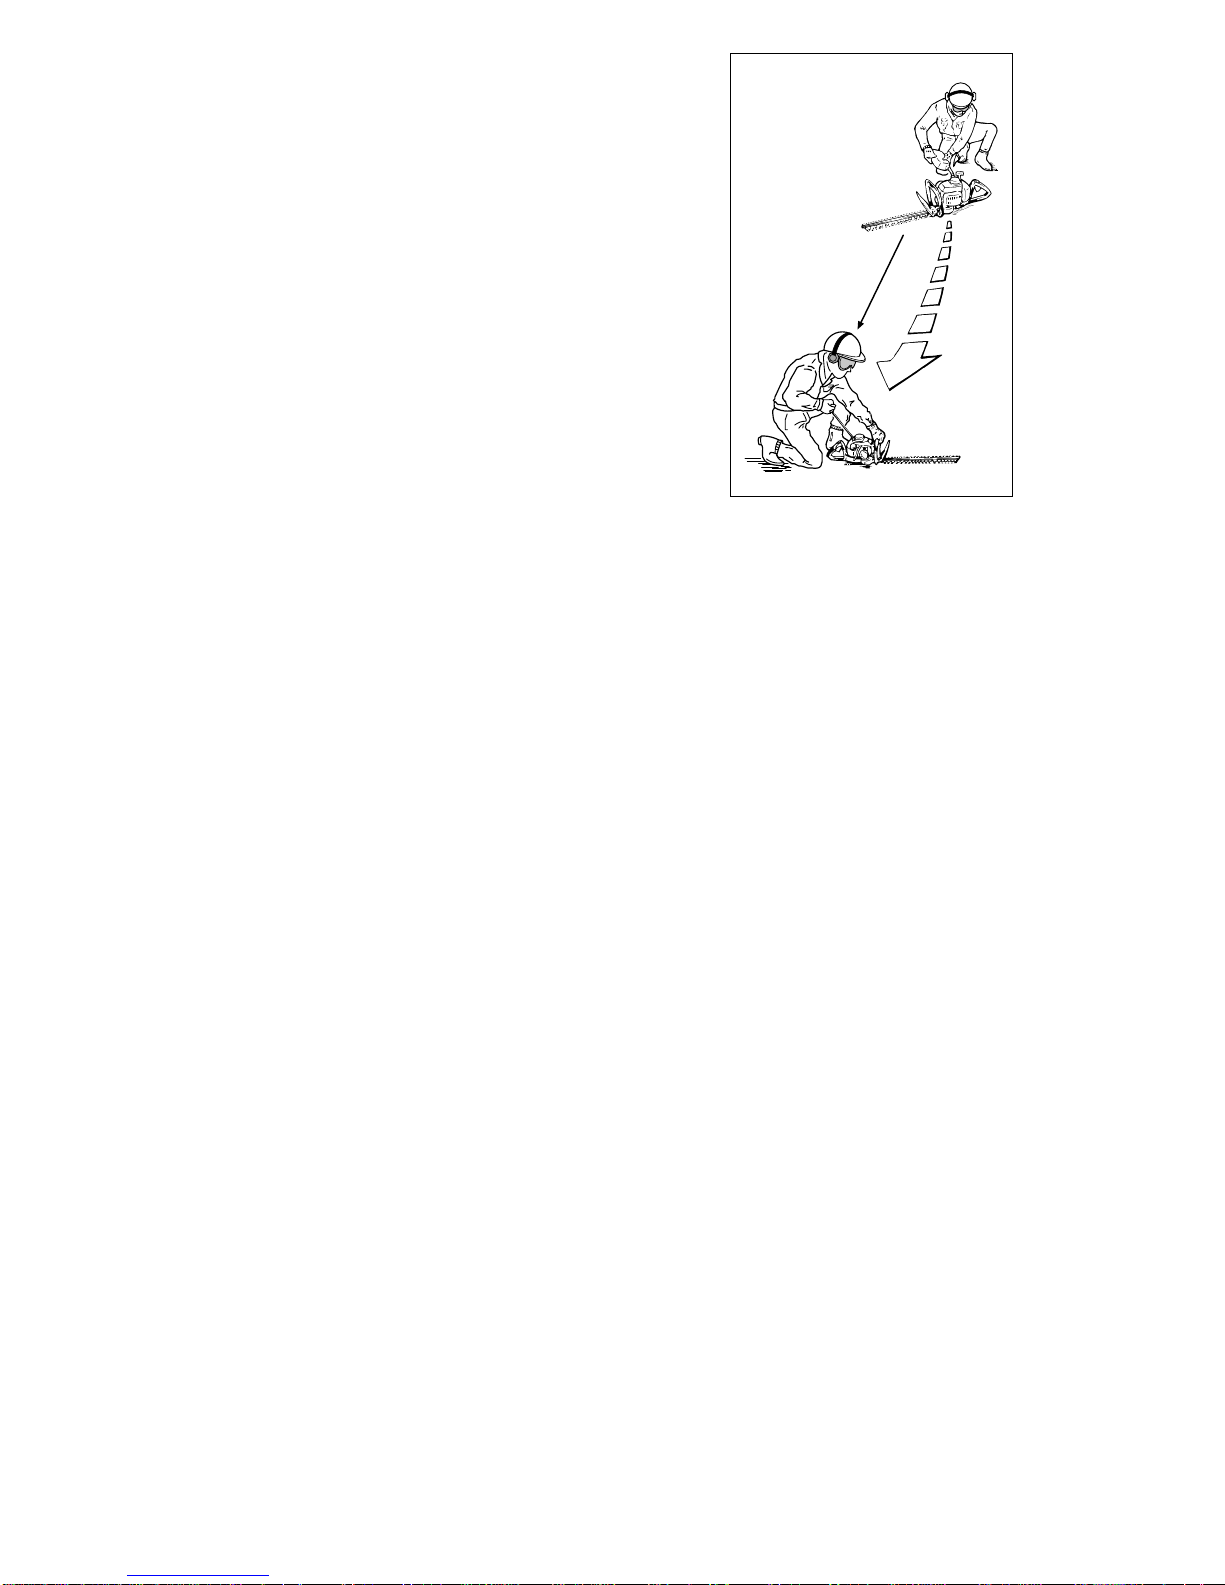
WIPE UP ANY FUEL SPILLAGE
Page 8
— 7 —
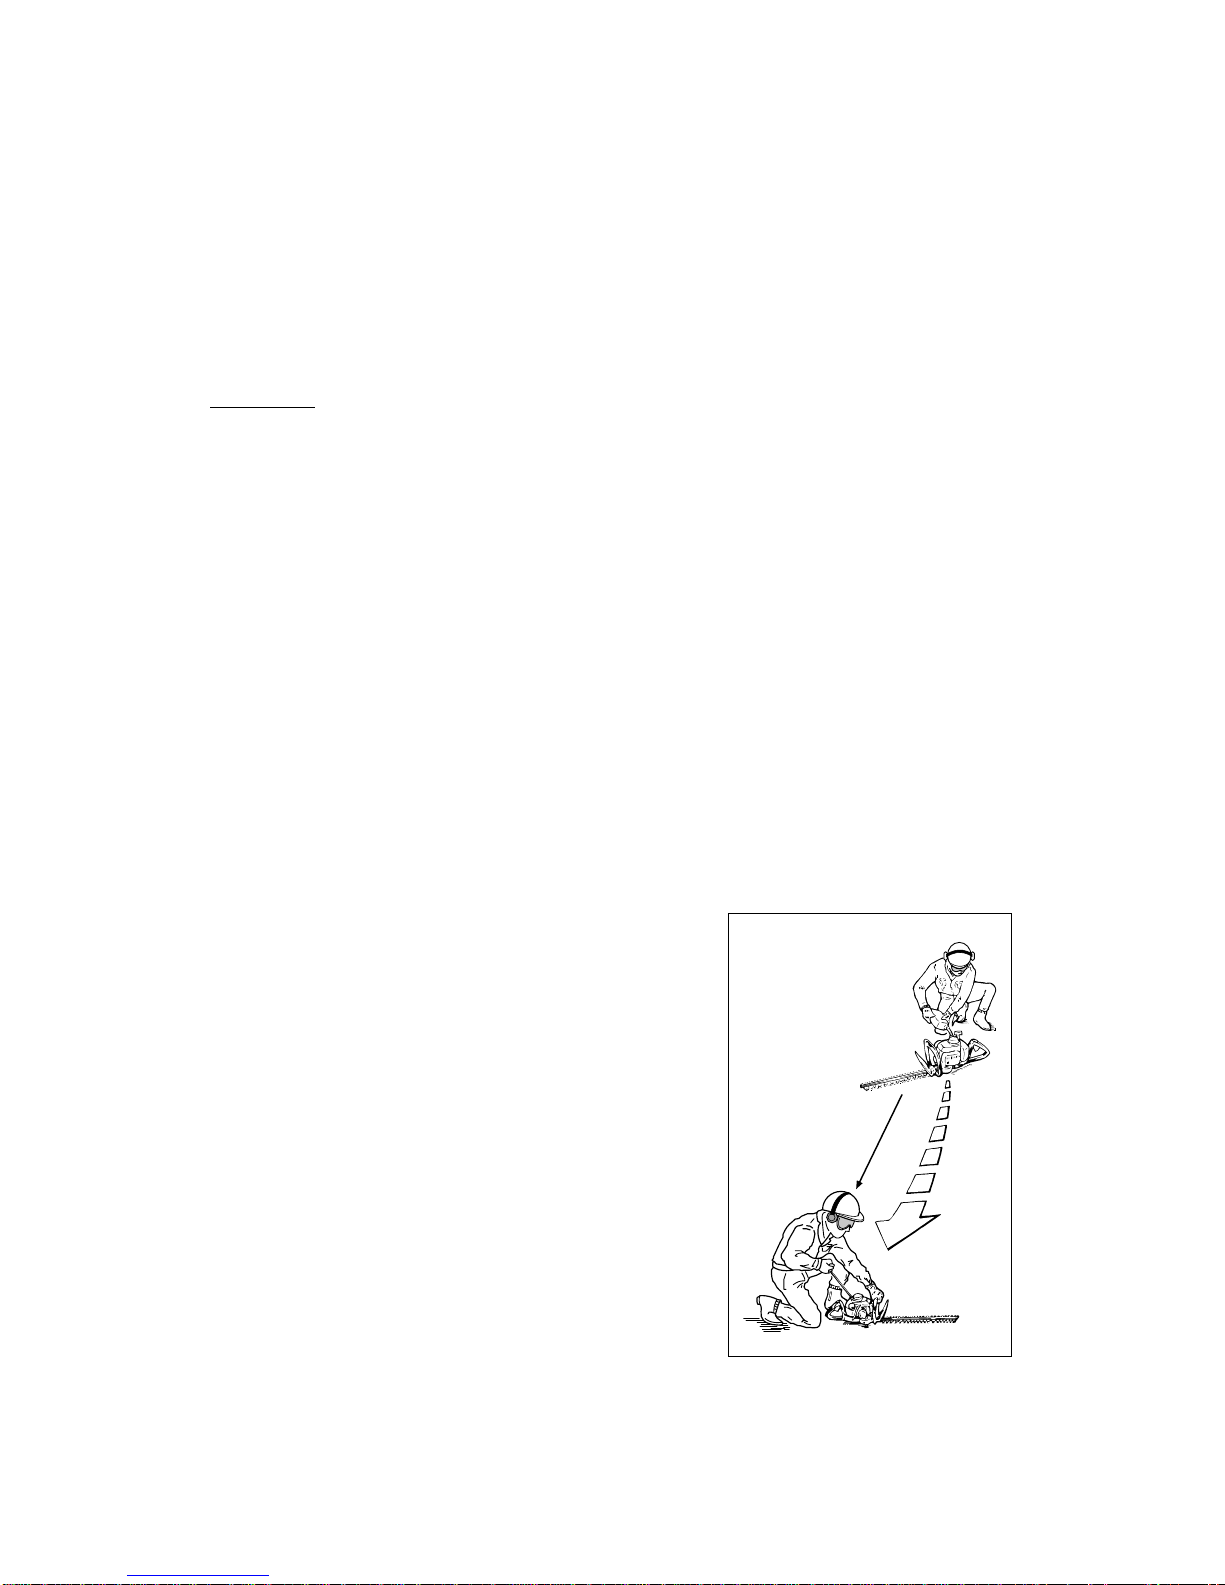
6. Move the Hedge Trimmer at least 3 m away from the fueling
location before starting the engine.
7.
Do not remove the Hedge Trimmer fuel tank cap while the
engine is running or immediately after stopping the engine.
8. Allow the engine to cool before refueling.
9. Empty the fuel tank before storing the Hedge Trimmer.
Fuel should be emptied after each use. Fuel left in the tank
may leak during storage .
10. Store fuel and Hedge Trimmer away from open flame,
sparks and excessive heat. Make sure fuel vapors cannot reach sparks or open flames from water heaters, furnaces, electric motors, etc.
Power Hedge Trimmer operating safety
1. THIS HEDGE TRIMMER CAN CA USE SERIOUS INJURIES .
Read the instructions carefully. Be familiar with all controls and the proper use of the Hedge
Trimmer.
2. Nev er allo w children to oper ate the Hedge Trimmer . It is not a toy .
3. Keep the area of oper ation clear of all persons , particularly small children and pets.
4. The Hedge Trimmer blades are extremely sharp. Do not put hands or feet near or under any
moving parts. Keep body clear at all times.
5. Use the Hedge Trimmer only in daylight or good artificial light.
6. Inspect your work area before you begin. Remove string, rope or similar materials which can
become entangled in the Hedge Trimmer blades.
7. Avoid hidden hazards. Watch for hidden objects within your working area, such as chain link
fencing, cables , wires , telephone and po w er lines .
8. Never operate the Hedge Trimmer without proper guards or other protective safety devices in
place.
9. Keep a firm footing and balance. Do not over-reach. Do not operate the Hedge Trimmer while
standing on a ladder or similar temporary support.
10. Use the right tool for the job. Do not use the Hedge Trimmer for any job that is not recommended by the manuf acturer.
11. While operating the Hedge Trimmer be always sure of a safe and secure operating position.
Do not over reach.
12. To reduce fire hazard keep engine and silencer free of debris, leaves, and dry materials.
Always wipe a w a y spilled fuel and excessive lubricant before starting.
Min. 3 m
Page 9
— 8 —
13. Always use two hands to oper ate the Hedge Trimmer .
14. Always be aware of your surroundings and stay alert for possible hazards that you may not
hear due to the noise of the machine.
15. Know how to stop the machine quickly in an emergency. (See to stop the engine in STARTING
AND STOPPING PR OCEDURE SECTION.)
BEFORE OPERATION
FUELING
WARNING! The following precautions will lessen the risk of fire.
1. Do not smoke near fuel.
2. Mix and pour fuel outdoors and where there are no sparks or flames.
3. Always shut off the engine before refueling. Never remove the Hedge Trimmer fuel tank cap
while the engine is running or immediately after stopping the engine.
4. Always open the fuel tank cap slo wly to release any possible pressure inside the tank.
5. Do not overfill the fuel tank. Stop filling 10 ~ 20 mm from the top of the tank.
6. Tighten the tank fuel cap carefully but firmly after refilling.
7. Wipe up any spilled fuel before starting the engine.
8. Move the Hedge Tr immer at least 3 m away from
the fueling location and fuel storage container
before starting the engine.
Min. 3 m
Page 10
— 9 —
FUEL; MIXING GASOLINE AND OIL
WARNING! The engine used on this Hedge Trimmer is of a 2-cycle design. The inter nal moving
parts of the engine, i.e., crankshaft bearings, piston pin bearings and piston to cylinder wall contact
surfaces, require oil mixed with the gasoline for lubrication. Failure to add oil to the gasoline or failure to mix oil with the gasoline at the appropriate ratio will cause major engine damage which will
void your warranty. For your fuel premix, only use a quality oil designed for 2-cycle air-cooled
engine.
FUEL MIXTURE: Always use a good quality 2-cycle , air-cooled engine oil mixed at a ratio of 25:1.
FUEL MIXTURE CHART :
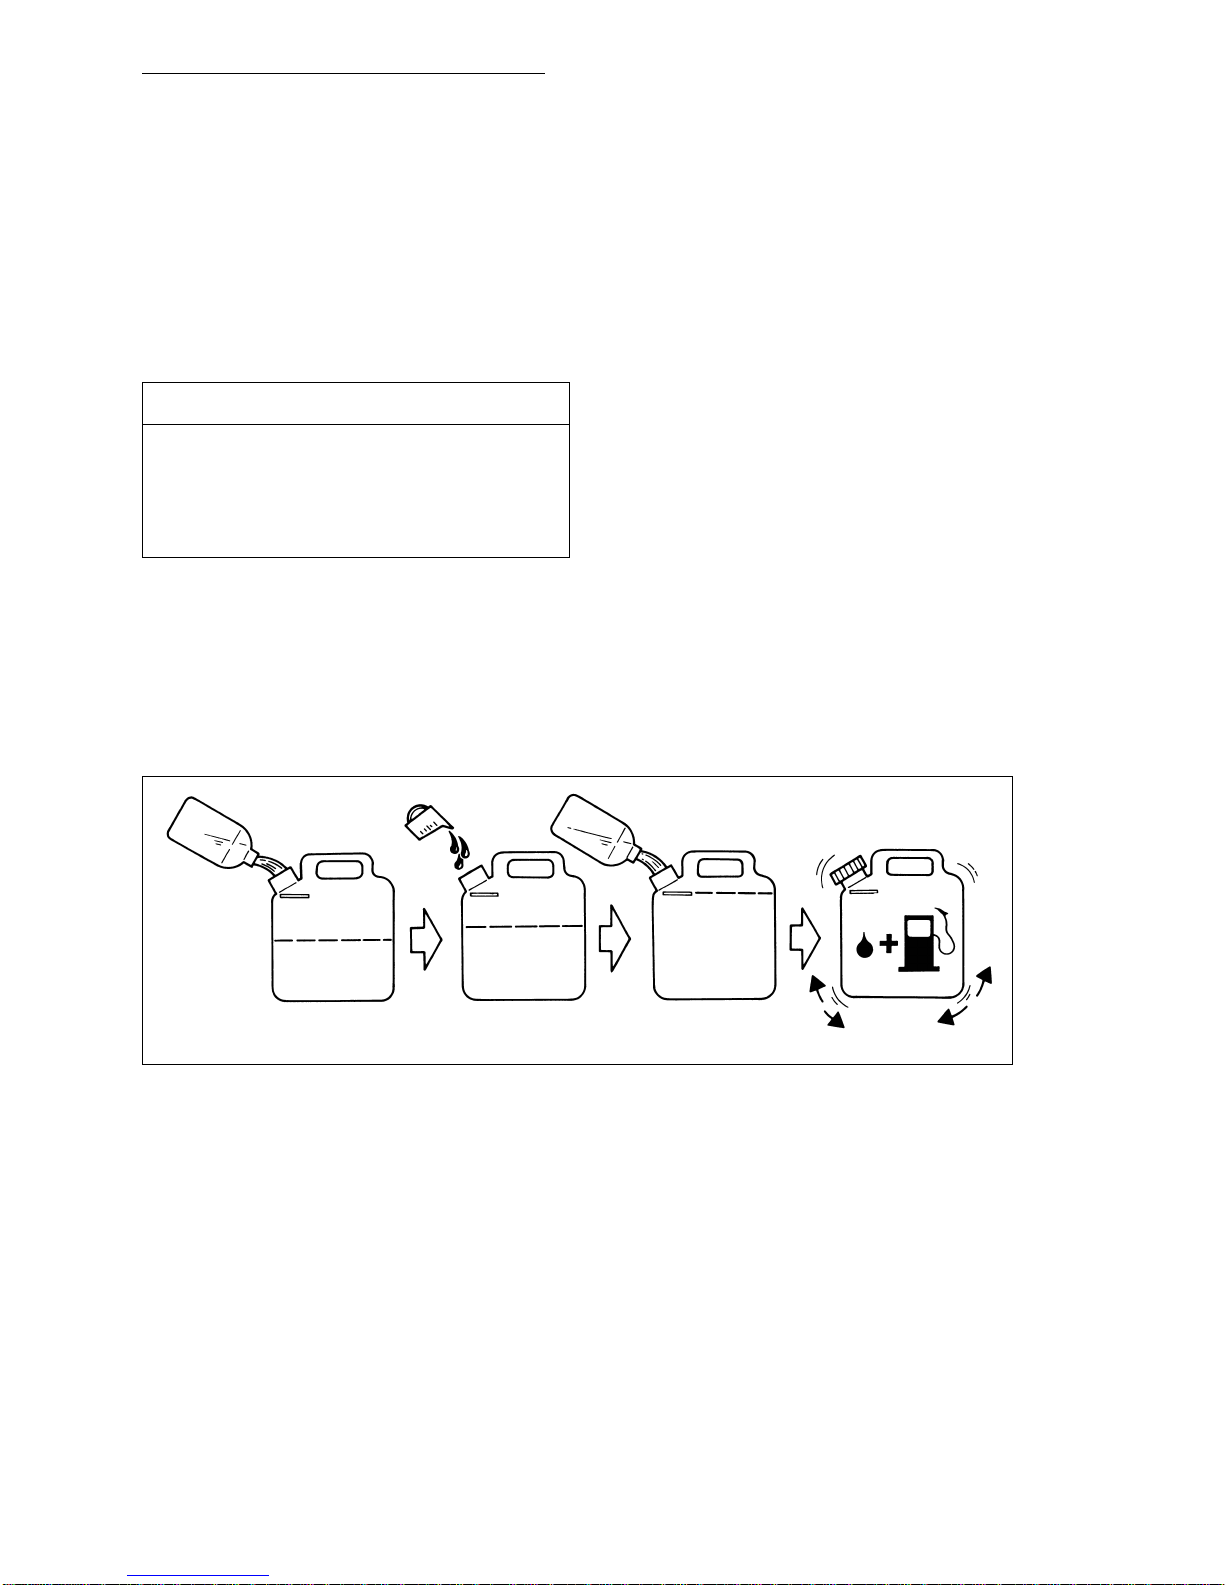
MIXING INSTRUCTIONS: Always mix fuel and oil in a clean container approved for gasoline.
Mark the container to identify it as fuel mix for the Hedge Trimmer. Use regular unleaded gasoline and fill the container with half the required amount of gasoline. Pour the correct amount of
oil in to the container then add the remaining amount of gasoline. Close the container tightly and
shake it momentarily to evenly mix the oil and the gasoline before filling the fuel tank on the
Hedge Trimmer.
When refilling the Hedge Trimmer fuel tank, clean around the fuel tank cap to prevent dirt and
debris for entering the tank during cap removal. Always shake the premix fuel container momentarily before filling the fuel tank.
Always use a spout or funnel when fueling to reduce fuel spillage. Only fill the tank to within 10 ~
20 mm from the top of the tank. Av oid filling to the top of the tank filler neck.
NOTE:
1. Nev er mix gasoline and oil directly in the Hedge Trimmer fuel tank.
2. Do not use National Marine Manufacturer’s Association (NMMA) or BIA certified oils. This type
of 2-cycle engine oil does not have the proper additives for air-cooled, 2-cycle engines and can
cause engine damages.
2-Cycle Oil (25:1)
With 1 liter gasoline mix 40 mRoil
2 liter 80 m
R
5 liter 200 m
R
GAS GAS
FILL MARK
HALF GASOLINE ADD OIL ADD REMAINING
GASOLINE
SHAKE
(MIX OIL AND GASOLINE)
OIL
Page 11
— 10 —
3. Do not use automotive motor oil. This type of oil does not have the proper additives for aircooled, 2-cycle engines and can cause engine damage.
ADJUSTING THE CUTTING BLADES
CAUTION–DO NOT TOUCH THE SHARPENED EDGES OF THE CUTTING
BLADES. THE CUTTING BLADES ARE EXTREMELY SHARP AND DANGEROUS AT ALL TIMES. ALWAYS WEAR GLOVES TO HELP PROTECT YOUR
HANDS AND FINGERS FROM INJUR Y.
Before operating the Hedge Trimmer it is necessary to check the adjustment of the cutting
blades. Blades that are too loose ma y vibrate , and will not pro vide a clean, smooth cut.
CAUTION-BLADES THAT ARE TOO TIGHT CAN CAUSE OVERLOADING
WHICH MAY DAMA GE THE EQUIPMENT.
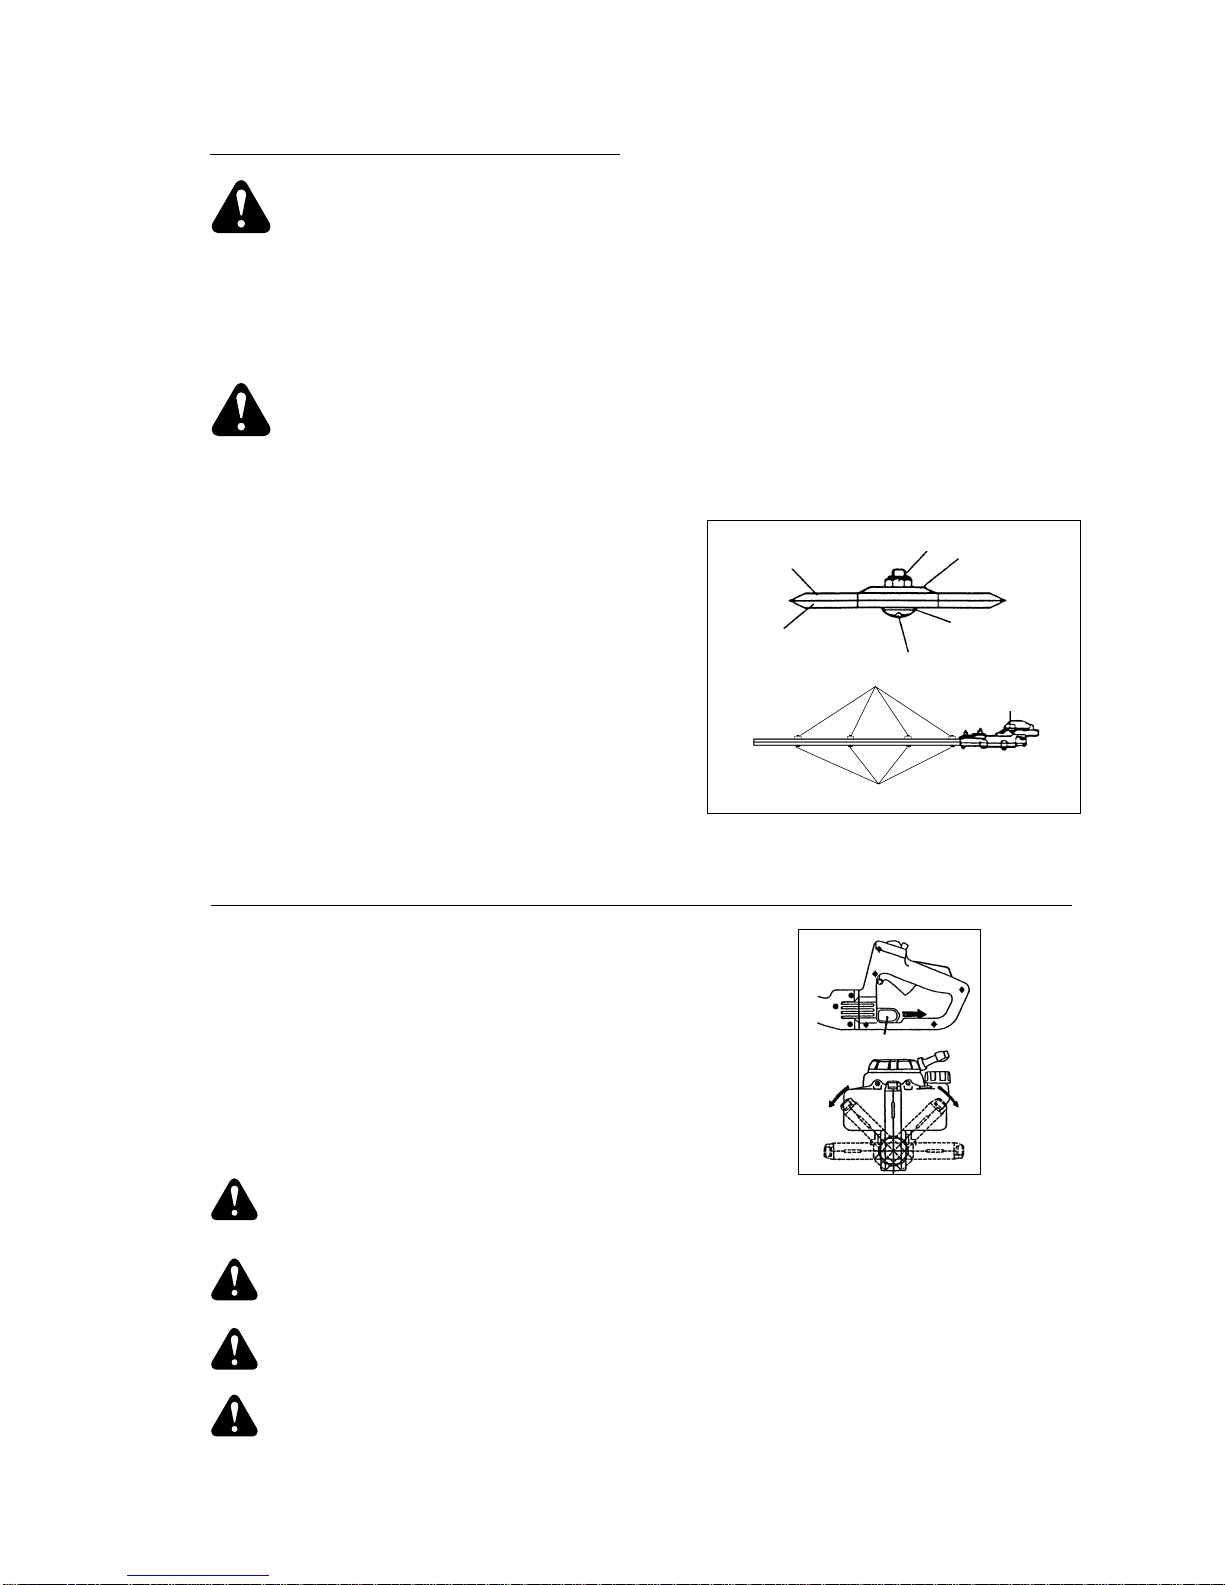
To adjust the cutting blades, refer to the illustration and locate the screws.
Loosen the nuts.
Gently turn the screws in until snug, then turn
the screws back out one-four th to a half. While
holding the screws in place, tighten the nuts.
Liberally coat the cutting blades with light oil.
Start the engine and operate the Hedge Trimmer
at full speed for at least one minute. Stop the
engine, and when the blades are motionless,
touch the blades with your hand.
The blades should be warm, but if they are too
hot to touch, loosen the screws another 1/8 turn.
R
OTA
TIONAL REAR HANDLE (HT230D-R, HT230DL-R, HT230DS-R, HT230DLS-R)
Rear handle is adjustable to five different positions by
pulling the lock lev er and turn the rear handle. Pull the lock
lever directly in line with the handle (following the arrow in
fig), then turn the rear handle.It is extremely important that
the handle is completely located and correctly locked in
the selected position.
Do not adjust the rear handle to any other position
than specified five positions.
(Throttle lever does not w ork when the rear handle is unlock ed)
Stop the engine before change the rear handle position.
Make sure the rear handle is locked before start the engine.
During operation, hold the rear handle with upright regardless the blade
direction.
Select the proper handle position to be always sure of a saf e and secure
operating position.
NUT
GUIDE BAR
WASHER
SCREW
NUTS
LOWER BLADE
UPPER BLADE
SCREWS
LOCK LEVER
Page 12
— 11 —
STARTING AND ST OPPING PR OCEDURE
Before Starting The Engine: Fill the fuel tank as instructed in the BEFORE OPERATION section
of this manual. Rest the Hedge Trimmer on the ground. Make sure that the cutting blades are
clear of branches, shrubs, debris, etc. Keep all bystanders, children and animals away from the
working area.
STARTING THE ENGINE(for the carburetor with primer b ulb)
The carburetors on MARUYAMA engines contain a choke system and are designed to start at
IDLE speed.
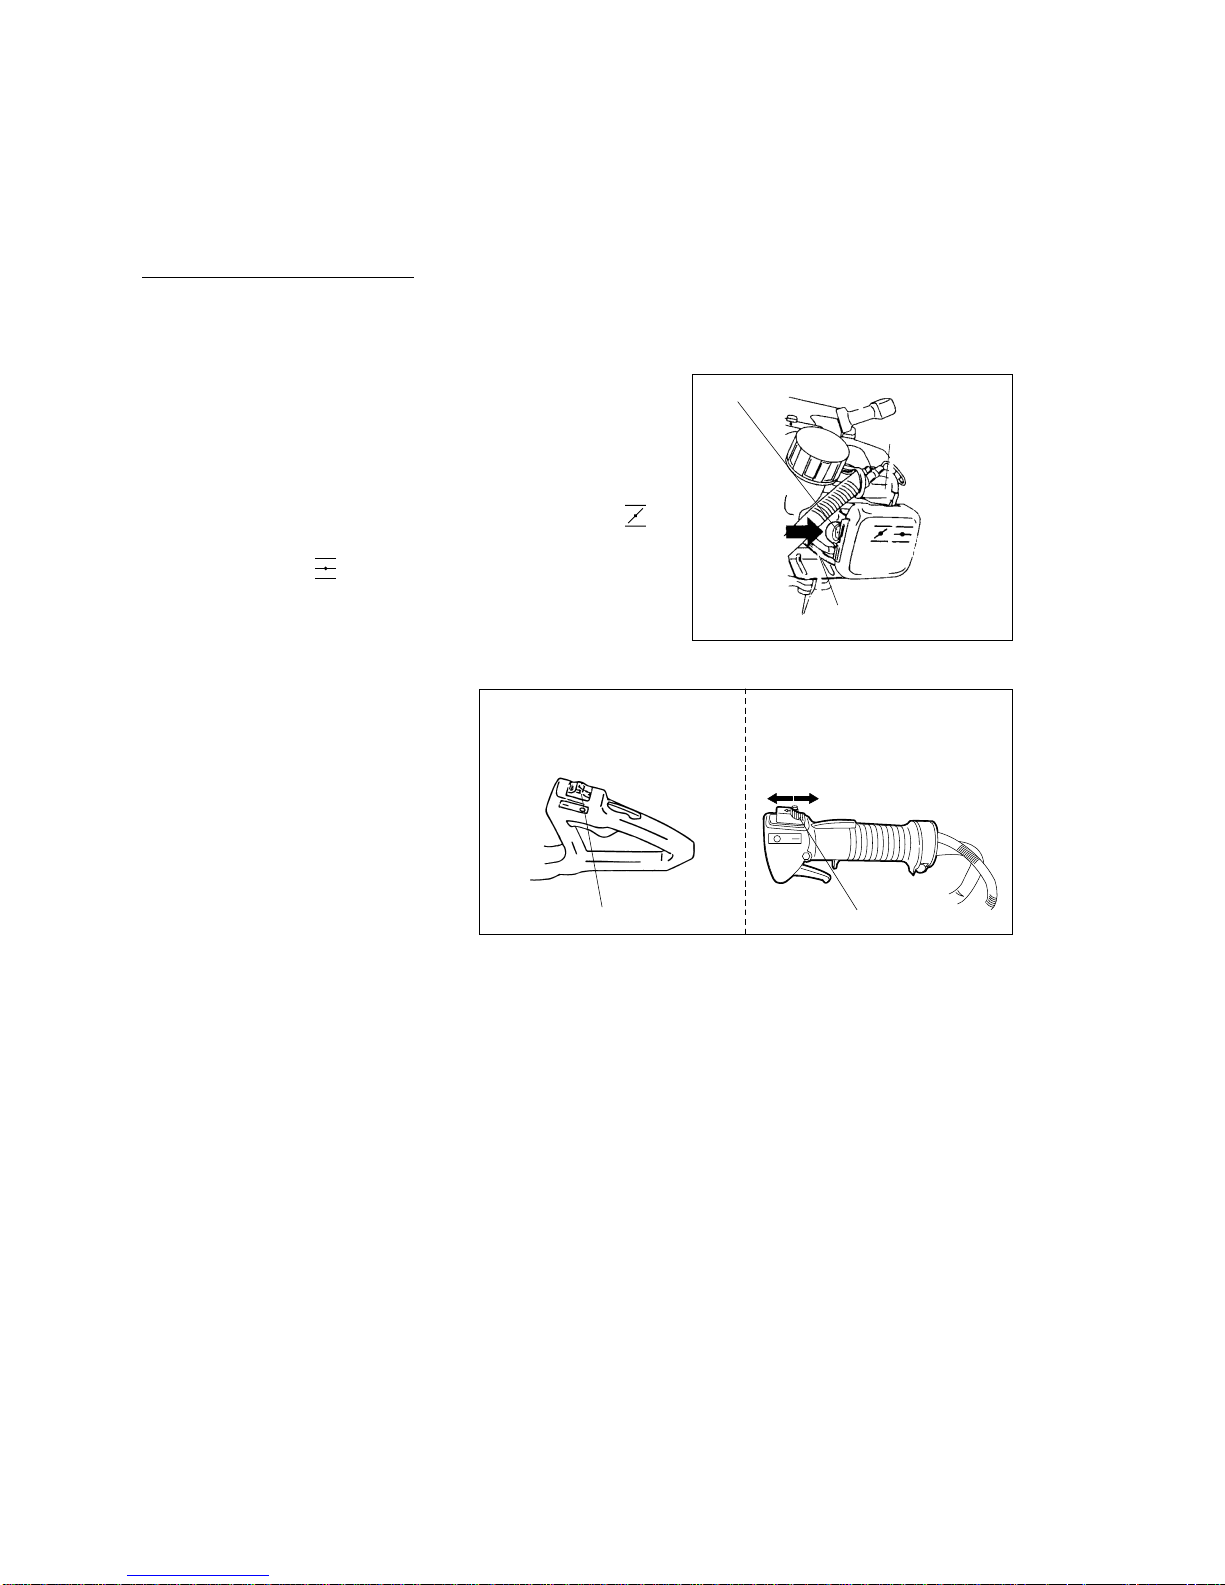
1. Push and release the fuel primer bulb located on the
bottom of the carburetor until air bubble free fuel is
seen flowing through the clear fuel return hose back to
the fuel tank.
2. Move the choke lever to the closed position “ ”.
When the engine is warm, move the choke lever to the
open position “ ”.
3. Set the engine stop switch to
the “ON ( | )” position. The
throttle trigger positioned at
IDLE.
4. Grasp the star ter grip and
slowly pull the starter cord out until you feel some resistance, then pull the cord quickly and
powerfully. Pull the starter grip until the engine starts. After the engine is star ted, move the
choke lev er to the open position.
5. After starting, allow the engine to run a few minutes to warm it up bef ore using.
NOTE:
1. Do not pull the starter cord out completely.
2. Do not release the starter cord from the fully extended position.
3. Do not star t the engine without rear handle locked. (HT230D-R, HT230DL-R, HT230DS-R,
HT230DLS-R)
T o Stop The Engine:
1. Release the throttle trigger.
2. Slide the stop switch to the “STOP ( O )” position.
HT230D, HT230DL, HT230D-R
HT230DL-R, HT230DS, HT230DLS
HT230DS-R, HT230DLS-R
ON ( | )
←→
STOP ( O )
STOP SWITCH STOP SWITCH
STOP ( O ) ←→ON ( | )
HT230, HT230S
HT230L, HT230LS
CHOKE LEVER
PRIMER BULB
PUMP
FUEL-RETURN LINE
Page 13
— 12 —
CARBURET OR ADJUSTMENT
This Hedge Trimmer is equipped with non-adjustable fuel mixture carburetor. The engine idle
speed is the only adjustment to the Operator .
The cutting blades may be mo ving during idle speed adjustment. Wear the recommended personal protective equipment and observe all safety instructions . K eep hands and body away from blade
area.
Engine Idle Speed:
When the throttle trigger is released the engine should return to an idle speed which is 2700 ~3300
rpm or just below clutch engagement speed. The cutting blades must not move and the engine
should not stall (stop running) at engine idle speed.
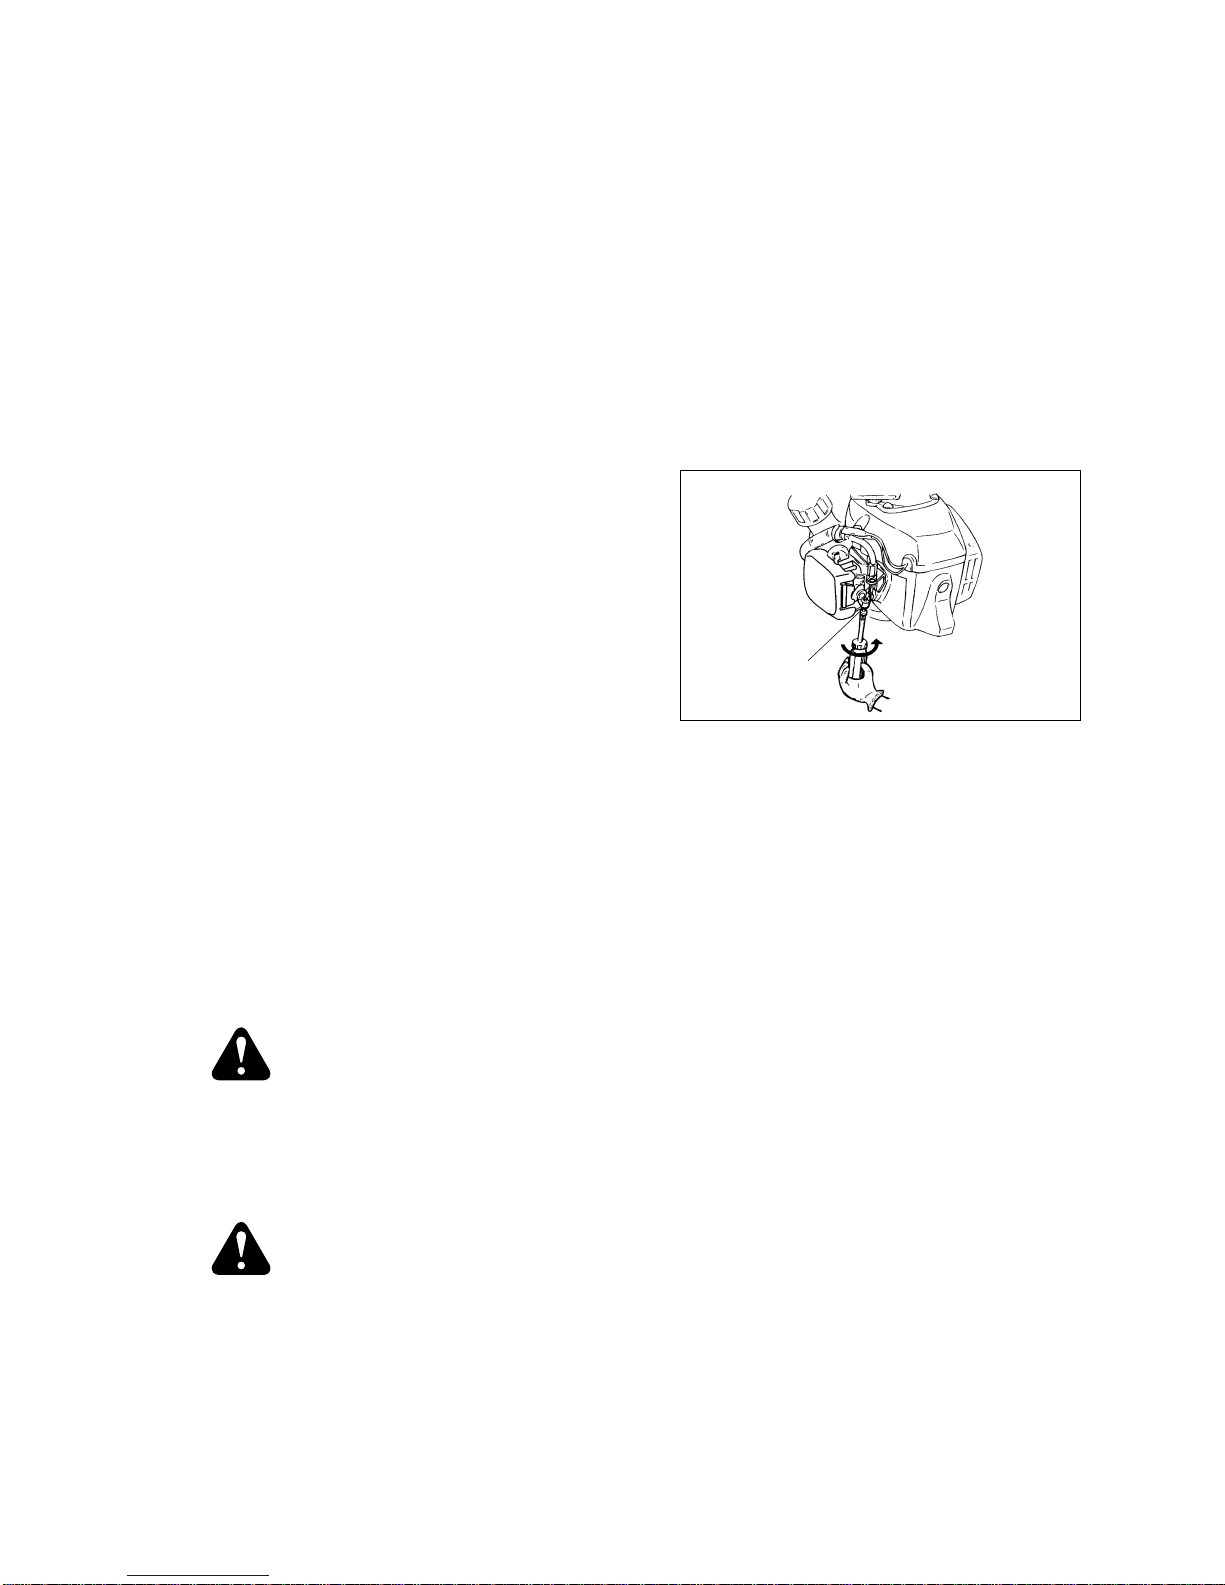
The engine idle speed is adjusted by rotating the
idle speed screw on the carburetor. Turning the
idle speed screw in (clockwise) increases engine
speed while turning the screw out decreases
engine speed.
If idle speed adjustment is necessary and after adjustment the cutting blades move or the engine
stalls, stop using the Hedge Trimmer immediately!
Contact your local authorized Maruyama Dealer f or assistance and servicing.
OPERATING THE PO WER HEDGE TRIMMER
CAUTION—Read the SAFETY INSTRUCTIONS on page (5) concerning the proper use
of the Hedge Trimmer.
The MARUYAMA Hedge Trimmers is designed f or cutting and trimming foliage and small branches
up to 5 mm in diameter. Although the MARUYAMA Hedge Trimmer is capable of cutting larger
diameter branches, wear and tear of the machine would be proportionally increased.
CAUTION—Always wear gloves and protective clothing when operating the Hedge
Trimmer.
If the cutting blades become jammed, stop the engine immediately. Make certain all moving parts
have stopped and disconnect the spark plug before inspecting the equipment for damage. Never
use a Po wer Hedge Trimmer that has chipped, crack ed, or broken cutting blades.
IDLE SPEED
ADJUSTMENT
SCREW
INCREASE
Page 14
— 13 —
REGULAR MAINTENANCE
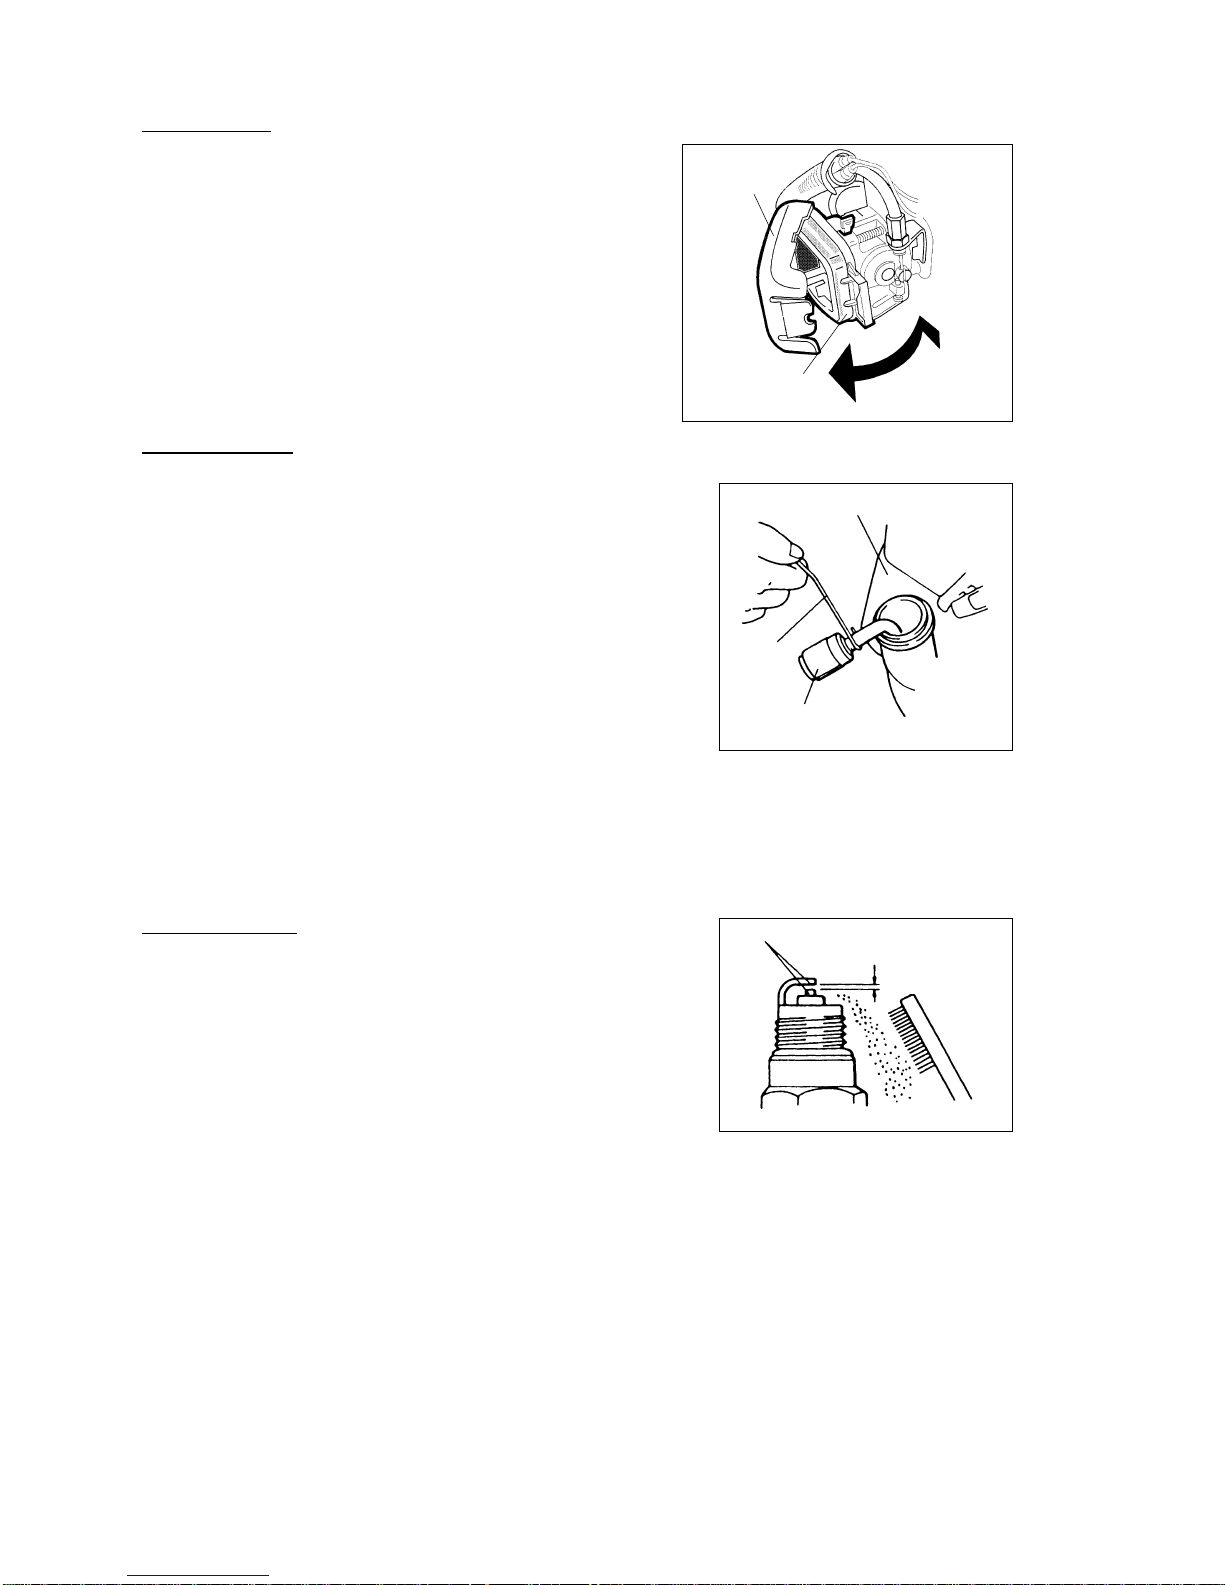
AIR FILTER
Maintenance Interval: The air filter should be cleaned
daily or more often when working in extremely dusty conditions and replaced after every 100 hours of operation.
Maintenance: Push and open the air filter cover.
Remove the foam filter. Clean the filter with warm, soapy
water. Let the filter completely dr y. Lightly apply SAE 30
motor oil to the foam filter and squeeze out all excess oil.
Reassemble the filter and filter cov er.
FUEL FIL
TER
Maintenance Interval: The fuel filter should be replaced after
every 100 hours of operation.
Maintenance: The fuel filter is attached to the end of the fuel
pick-up hose inside the fuel tank. To replace the fuel filter, first
make sure the fuel tank is empty. Remove the fuel cap. Using
a wire hook, gently pull the fuel filter out though the fuel filter
opening. Grasp the fuel hose next to the fuel filter fitting and
remove the filter but do not release the hose. While still
holding on to the fuel hose, attach the new fuel filter. Drop the
fuel filter back into the fuel tank. Make sure that the fuel filter
is not stuck in a corner of the tank and that the fuel hose is not doubled over (kinked) bef ore refueling.
SPARK PLUG
Maintenance Interval: The spark plug should be removed
from the engine and checked after each 25 hours of oper ation
and replaced after every 100 hours of operation.
Maintenance: With the engine at ambient (room) temperature, remove the one screw retaining the muffler cover, then
remove the muffler cover. Loosen the cylinder cover screw
and lift off the cylinder cover. (Refer to the illustration shown in the following CYLINDER COOLING
FINS section.) Twist the high tension lead boot on the spark plug back and forth a couple of times
to loosen boot then pull the boot off of the spark plug. Remove the spark plug. The electrodes can
be cleaned with a stiff brush. Adjust the electrode air gap to 0.6−0.7 mm (0.024−0.028 in.).
Replace the spark plug if it is oil-fouled, damaged or if the electrodes are worn down. Do not
overtighten the spark plug when installing. The tightening torque is 10.7−16.6Nm (95−148 in.
lbs.). Reinstall the cylinder and muffler cov ers .
TIPS
0.6 −0.7 mm
(0.024−0.028 inches)
FOAM FILTER
AIR FILTER
COVER
OPEN
PUSH
FUEL TANK
WIRE
FUEL FILTER
Page 15
— 14 —
CYLINDER COOLING FINS
Maintenance Interval: The cylinder cooling fins should be cleaned after every 25 hours of opera-
tion or once a week which ever comes first. Air must flow freely around and through the cylinder
cooling fins to prevent engine overheating. Leaves, grass, dir t and debris buildup on the fins will
increase the operating temperature of the engine which can reduce engine perf ormance and shorten engine life.
Maintenance: With the engine at ambient (room) temperature, loosen the cylinder cover screw
(knob) and lift off the cylinder cover. Clean all dirt and debris from the cooling fins and from around
the cylinder base. Reinstall the cylinder cov er.
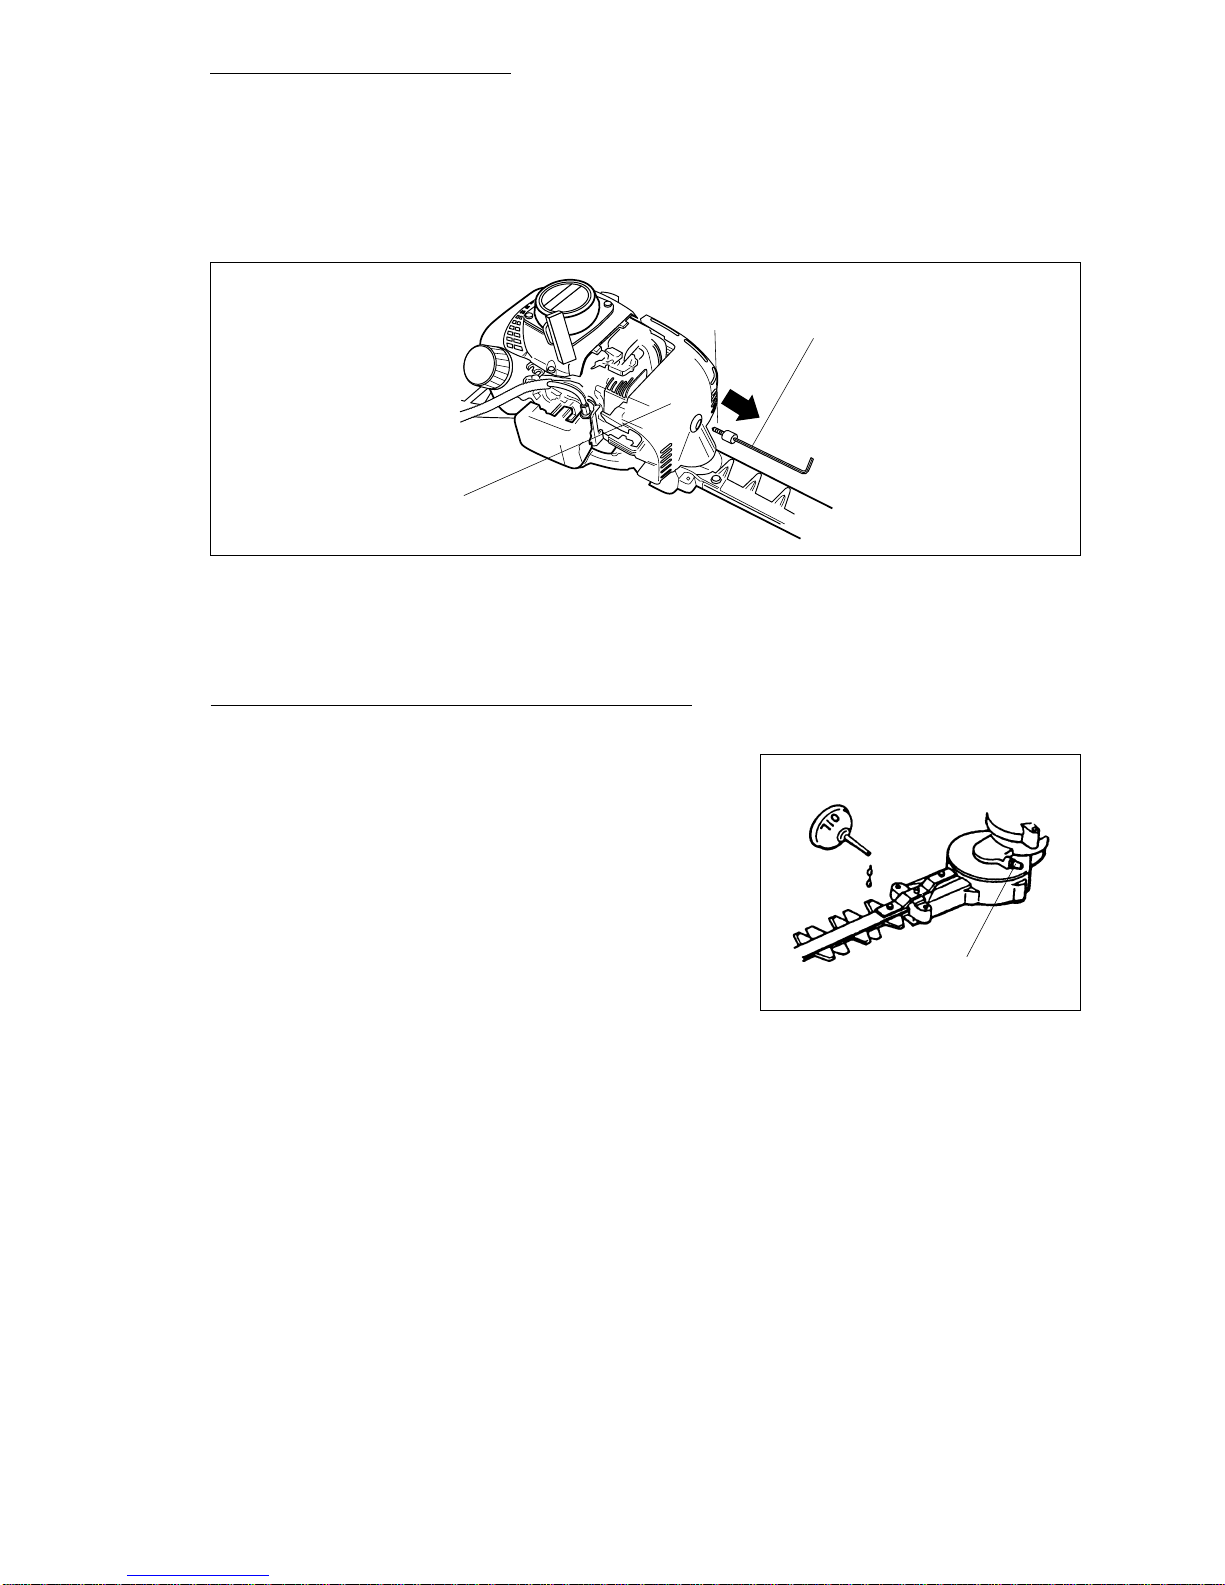
LUBRICA
TION : GEARCASE AND BLADES
The gearcase has a felt wick located at the blade opening. As the Hedge Trimmer is used, the
grease within gearcase becomes very soft. The reciprocating blades constantly draw small amounts of grease
between the blade contact surfaces for additional lubrication. If the gearcase is not lubricated at the recommended
intervals, a gearcase failure will occur due to a lack of
lubrication.
Gearcase failures due to improper maintenance are not co v ered b y Maruyama warranty.
The gearcase and blades should be lubricated after each 10 hours of use.
NOTE: If the Hedge Trimmer is used under severe conditions such as high ambient temperatures
(above 25°C) or for extended continuous periods of operation, the gearcase and blades must be
lubricated every 2 hours.
Lubricate the gearcase at the grease fitting with a good quality #2 lithium-base grease. Lubricate
the blades using a light (#10 wt.) oil.
GREASE FITTING
FOR GEAR CASE
4 mm ALLEN WRENCH
SUPPLIED IN TOOL KIT
KNOB
CYLINDER COVER
Page 16
— 15 —
GENERAL CLEANING AND TIGHTENING
The MARUYAMA Hedge Trimmer will provide maximum performance for many, many hours if it is
maintained properly. Good maintenance includes regular checking of all fasteners f or correct tightness, and cleaning of the entire machine. Pitch and gum deposits should be remo v ed from the cutting blades daily. Adjustment of the cutting blade tension should be checked regularly. Refer to
page (10) for instructions to adjust cutting blades .
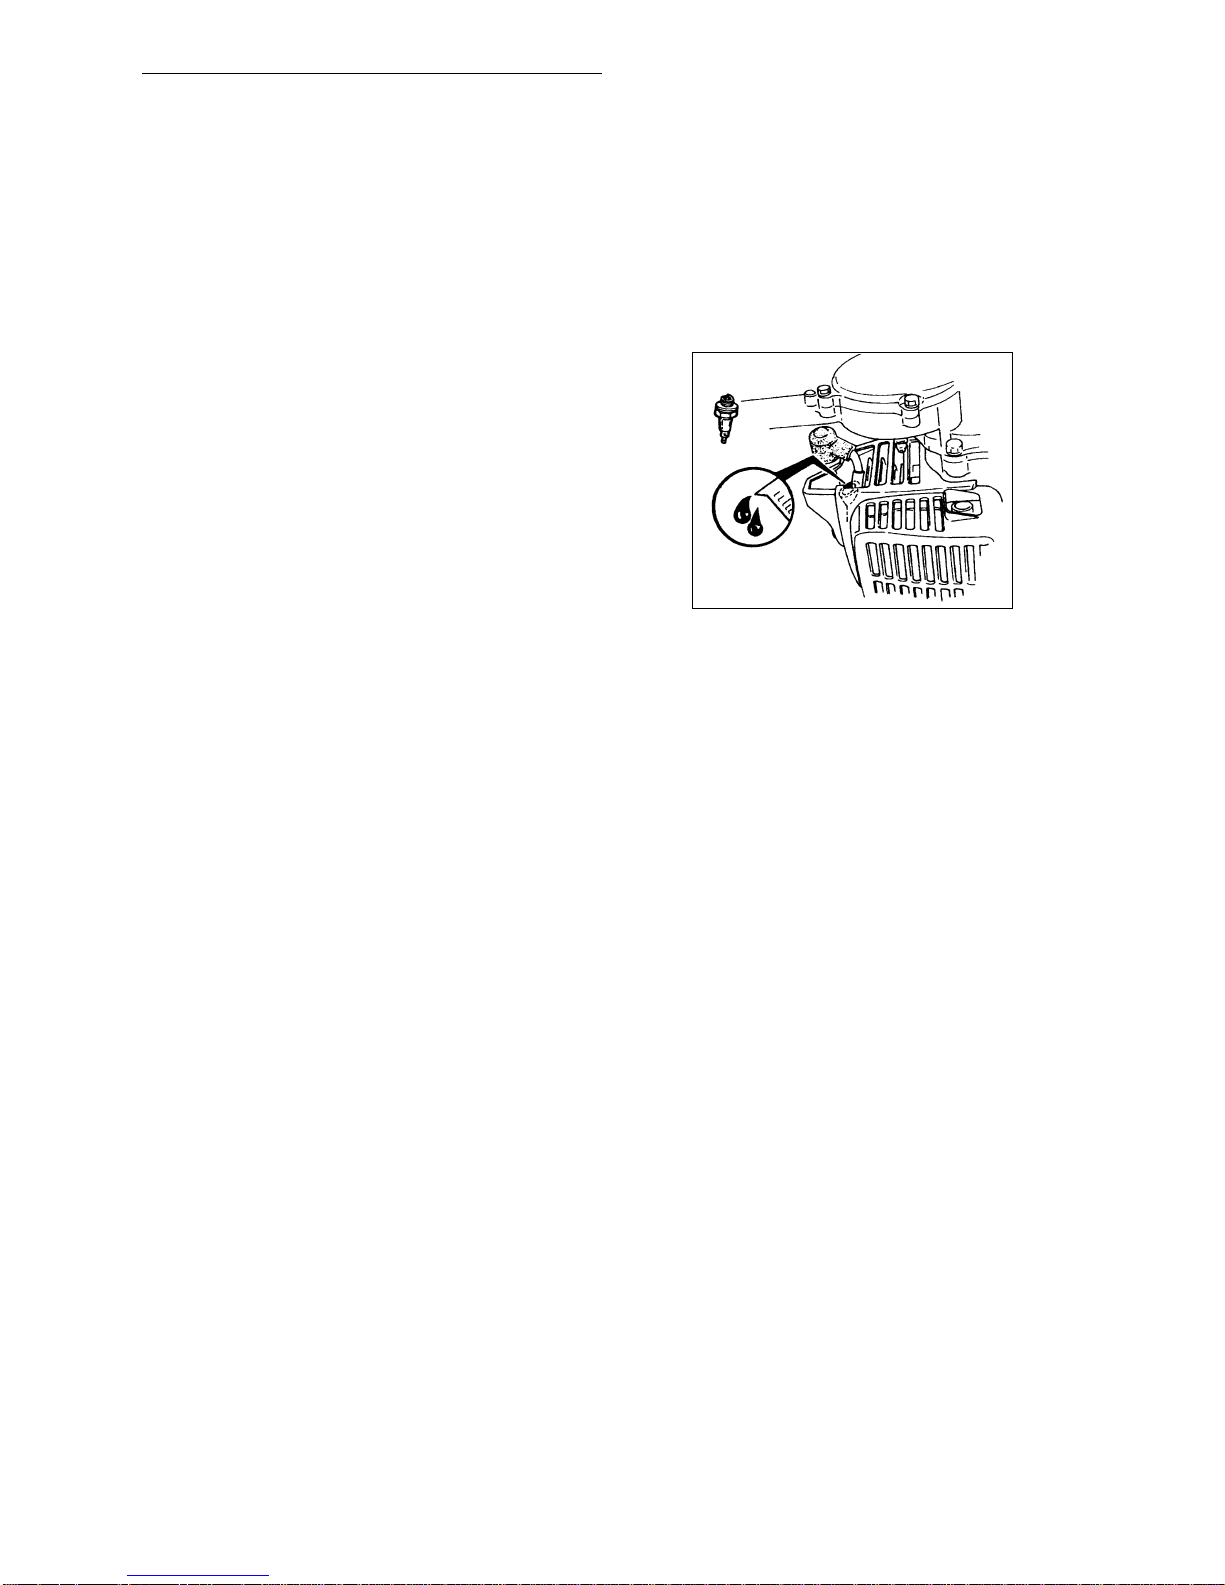
ST ORAGE
For long-term storage of the Hedge Trimmer, empty the
fuel tank into a suitable fuel storage container. Pump the
primer bulb on the carburetor until all fuel is discharged
through the clear fuel return hose. Run the engine to
remove any fuel that may remain in the caburetor.
Perform all regular maintenance procedures and any
needed repairs. Remove the spark plug and squirt a
very small amount of oil into the cylinder. Pull the starter
cord once.
CAUTION: Oil may squir t out of the spark plug opening while pulling the starter cord. Protect
your eyes and keep your face away from the spark plug opening. Slowly pull the star ter cord to
bring the piston to the top of the cylinder (TDC). Reinstall the spark plug. Liberally lubricated
the blades with a light (#10 wt.) oil Store the Hedge Trimmer in a dry place away from excessive
heat, sparks or open flame.
OIL
Page 17

P/N 271589-00
09.08 TAP/M
 Loading...