

Page 1

Kids’ Dual Art Center Assembly Instructions
Model # U9102
Parts List
A) 1 ea Black Tray
B) 1 ea. Wooden Dowel Rod
D) 1 ea. Paper Roll - not pictured
E) 4 ea. Bottom Legs
F) 4 ea. 3/16” x 2 “ Bolts
G) 4 ea. 3/16” x 2 1/2” Bolt
H) 8 ea. 3/16” Flat Washer
I) 8 ea. 3/16” Wing Nut
J) 2 ea. Brackets
K) 4 ea. 5/8” Phillip Head Screws
L) 1 ea. Upper Easel Assembly
PLEASE NOTE:
All holes drilled to close tolerances for
maximum rigidity. It may be necessary to
tap bolts in place with a hammer.
PERIODIC RE-TIGHTENING WILL
ASSURE A STURDY PRODUCT.
(F) 3/16” x 2”
Bolts
4 each
(A) Black Tray
1 each
(B) Wooden
Dowel Rod
1 each
(G) 3/16” x 2-1/2 ”
Bolts
4 each
I M P O R T A N T !
If you have any difculty assembling your Kids’ Dual
Art Centers or need customer service assistance,
Please call: Martin Universal Design, Inc.
Customer Service Hot Line at (313)895-0700
If you need additional parts, it is not necessary to
contact your dealer, our Customer Service Rep. will
forward them to you immediately.
Made in China
!
WARNING:
CHOKING HAZARD - small parts
Not for children under 6 years
4444 Lawton Avenue, Detroit, MI 48208 USA • Tel:(313)895-0700/Fax:(313)895-0709
Email: CustservMUD@gmail.com • visit us at www.MartinUniversalDesign.com
(E) Bottom
1
Legs
4 each
(H) 3/16”
Flat Washer
8 each
(K) 5/8” Phillip
Head Screws
4 each
(L) Upper Easel
Assembly
1 each
(I) 3/16”
Wing Nut
8 each
(J)
Bracket
2 each
09/2011- RPI
Page 2
Kids’ Dual Art Center Assembly Instructions
Model # U9102
Enclosed are all the components necessary to assemble your new Deluxe Kids’
Dual Art Center #U-9102. Prior to assembly make sure all your parts are enclosed
by checking them against the parts list. Tools needed to assemble are a Phillips
Screwdriver and a Hammer.
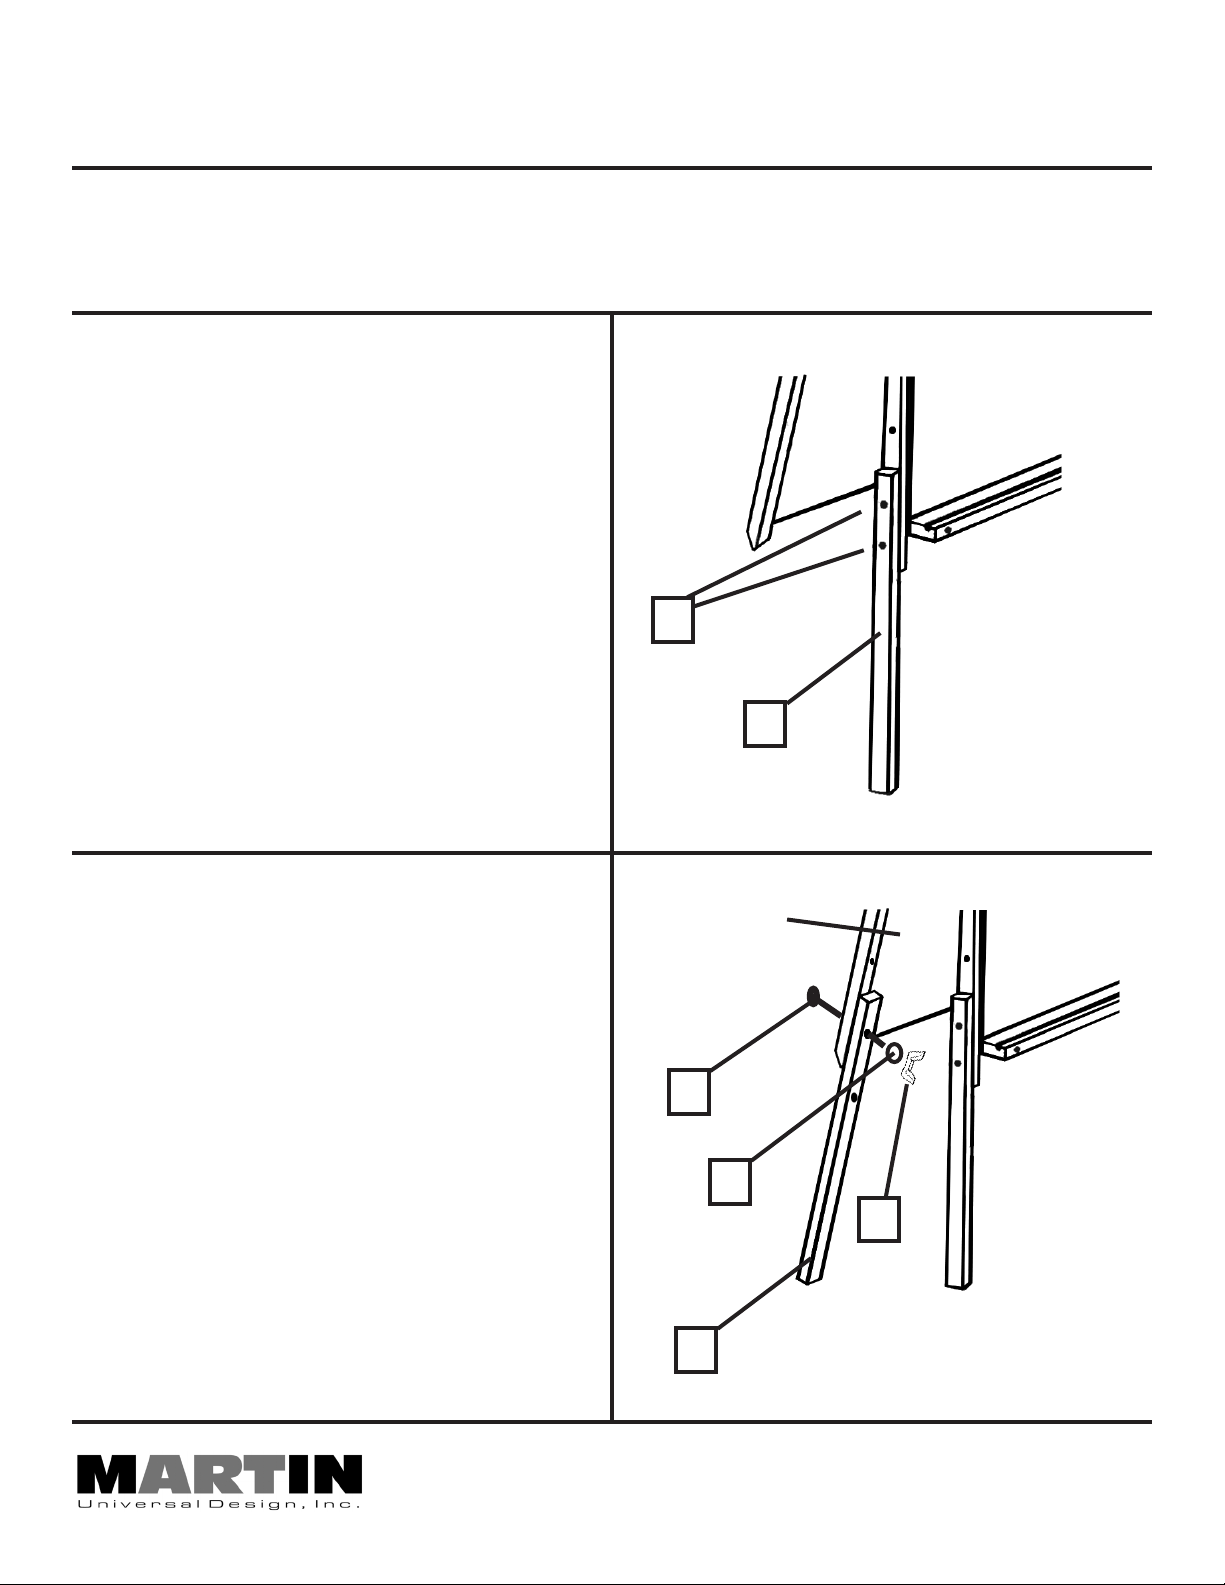
TO ASSEMBLE:
1. Attach 2 bottom legs (E) to green
chalkboard side of upper easel
assembly (L), using 4 ea. 3/16” x 2”
bolts (F) and tighten with washers
(H) and wing nuts (I). See FIG 1.
NOTE: Make sure the same hole
is used on each leg for proper
height. i.e. if you use the middle
hole on one leg use the middle
hole on all legs.
2. Attach 2 bottom legs (E) to white
board side of upper easel assembly
(L), using 2 ea. 3/16” x 2 1/2” bolts
green
chalkboard
side
F
E
FIG 1.
White
Drawing
Board Side
(G), insert these bolts into holes near
bottom of white board, tighten with
washers (H) and wing nuts (I).
See FIG 1B.
NOTE: Make sure the same hole
is used on each leg for proper
height. i.e. if you use the middle
hole on one leg use the middle
hole on all legs.
4444 Lawton Avenue, Detroit, MI 48208 USA • Tel:(313)895-0700/Fax:(313)895-0709
Email: CustservMUD@gmail.com • visit us at www.MartinUniversalDesign.com
G
H
I
E
2
FIG 1B.
09/2011- RPI
Page 3

Kids’ Dual Art Center Assembly Instructions
Model # U9102
3. Attach plastic tray (A) to white
board side, using 2 ea.
3/16” x 2 1/2” bolts (G) into holes
below white board, rst insert bolt
through black plastic tray, then
through upper and lower leg and
then attach washer (H) onto bolt
and tighten wing nut (I).
Repeat with other side.
See FIG 2.
4. Attach brackets (J) to both sides
of easel using 4 ea. 5/8” phillip head
screws (K) into pre-drilled holes and
tighten.
Note: 2 screws per bracket.
White
Drawing
Board Side
A
G
I
H
FIG 2.
K
See FIG 3.
5. Insert dowel rod (B) through
paper roll (D), then insert dowel rod
through top of easel holes in easel
side frame. See FIG 4.
See FIG 5 on last page for
exploded large view with part
identication & completed easel
illustrations.
Your child is now ready for hours of
Creative Enjoyment!
FIG 4.
D
K
J
FIG 3.
B
4444 Lawton Avenue, Detroit, MI 48208 USA • Tel:(313)895-0700/Fax:(313)895-0709
Email: CustservMUD@gmail.com • visit us at www.MartinUniversalDesign.com
3
09/2011- RPI
Page 4

Kids’ Dual Art Center Assembly Instructions
Model # U9102
Complete easel with part
identication FIG 5.
D
F
B
I
Complete easel illustration.
FIG 6.
J
K
H
G
A
E
E
E
!
WARNING:
CHOKING HAZARD - small parts
Not for children under 6 years
F
FIG 6.FIG 5.
I M P O R T A N T !
If you have any difculty assembling your Kids’ Dual
Art Centers or need customer service assistance,
Please call: Martin Universal Design, Inc.
Customer Service Hot Line at (313)895-0700
If you need additional parts, it is not necessary to
contact your dealer, our Customer Service Rep. will
forward them to you immediately.
4444 Lawton Avenue, Detroit, MI 48208 USA • Tel:(313)895-0700/Fax:(313)895-0709
Email: CustservMUD@gmail.com • visit us at www.MartinUniversalDesign.com
4
09/2011- RPI
 Loading...