

Page 1

®
Page 2
IMPORTANT SAFETY AND OPERATING INSTRUCTIONS.
PLEASE READ BEFORE USING YOUR HEADPHONES.
Before placing headphones over ears, set volume to the lowest level then gradually
increase until desired volume level is reached. • Avoid listening at high volume
levels for long periods of time. Noise levels are measured in decibels (dB). Regular
exposure to noise at or above 85dB can cause hearing loss. Monitor your listening as hearing loss happens over time. Refer to the guidelines on the Consumer
Electronics Association’s website relating to safe listening levels: http://www.
ce.org/PDF/ListenLifetime_spread.pdf • Do not use headphones at
times when your attention is required—such as driving, operating heavy machinery, bicycling, or jogging. It is dangerous and in many jurisdictions illegal to drive
wearing noise-isolating headphones because it dramatically decreases your chance
of hearing life saving sounds around you such as car horns or emergency sirens.
• This product generates strong permanent magnetic fields that could cause in-
Page 3

terference with cardiac pacemakers and implanted defibrillators (ICDs). Maintain
a distance of at least 4-inches (10cm) between the headphones and the medical
device. • Do not expose product to heat (hair dryer, radiators, etc.) and do not
store in direct sunlight for extended periods of time. • Protect product from
moisture. • Avoid dropping and strong impact. • Do not pull the cord to
remove the headphones from the ear or from the audio device. • Clean or
replace ear pads prior to use by other persons.
Page 4

CONTENTS
(1) Headphones
(1) Cable with remote and microphone
(1) 1/4-inch to 3.5mm adaptor
(1) Travel case
(1) Manual
PROPER PLACEMENT
The side with an ‘R’ is for the right ear. The side with an ‘L’ is for the left ear. You
can also use the cable to distinguish between the right and left side. The cable
attaches on the left side.
ADJUSTING THE HEADPHONE SIZE
To adjust the size of the headphones, gently slide each ear cup down and away
from the headband.
Page 5
Page 6

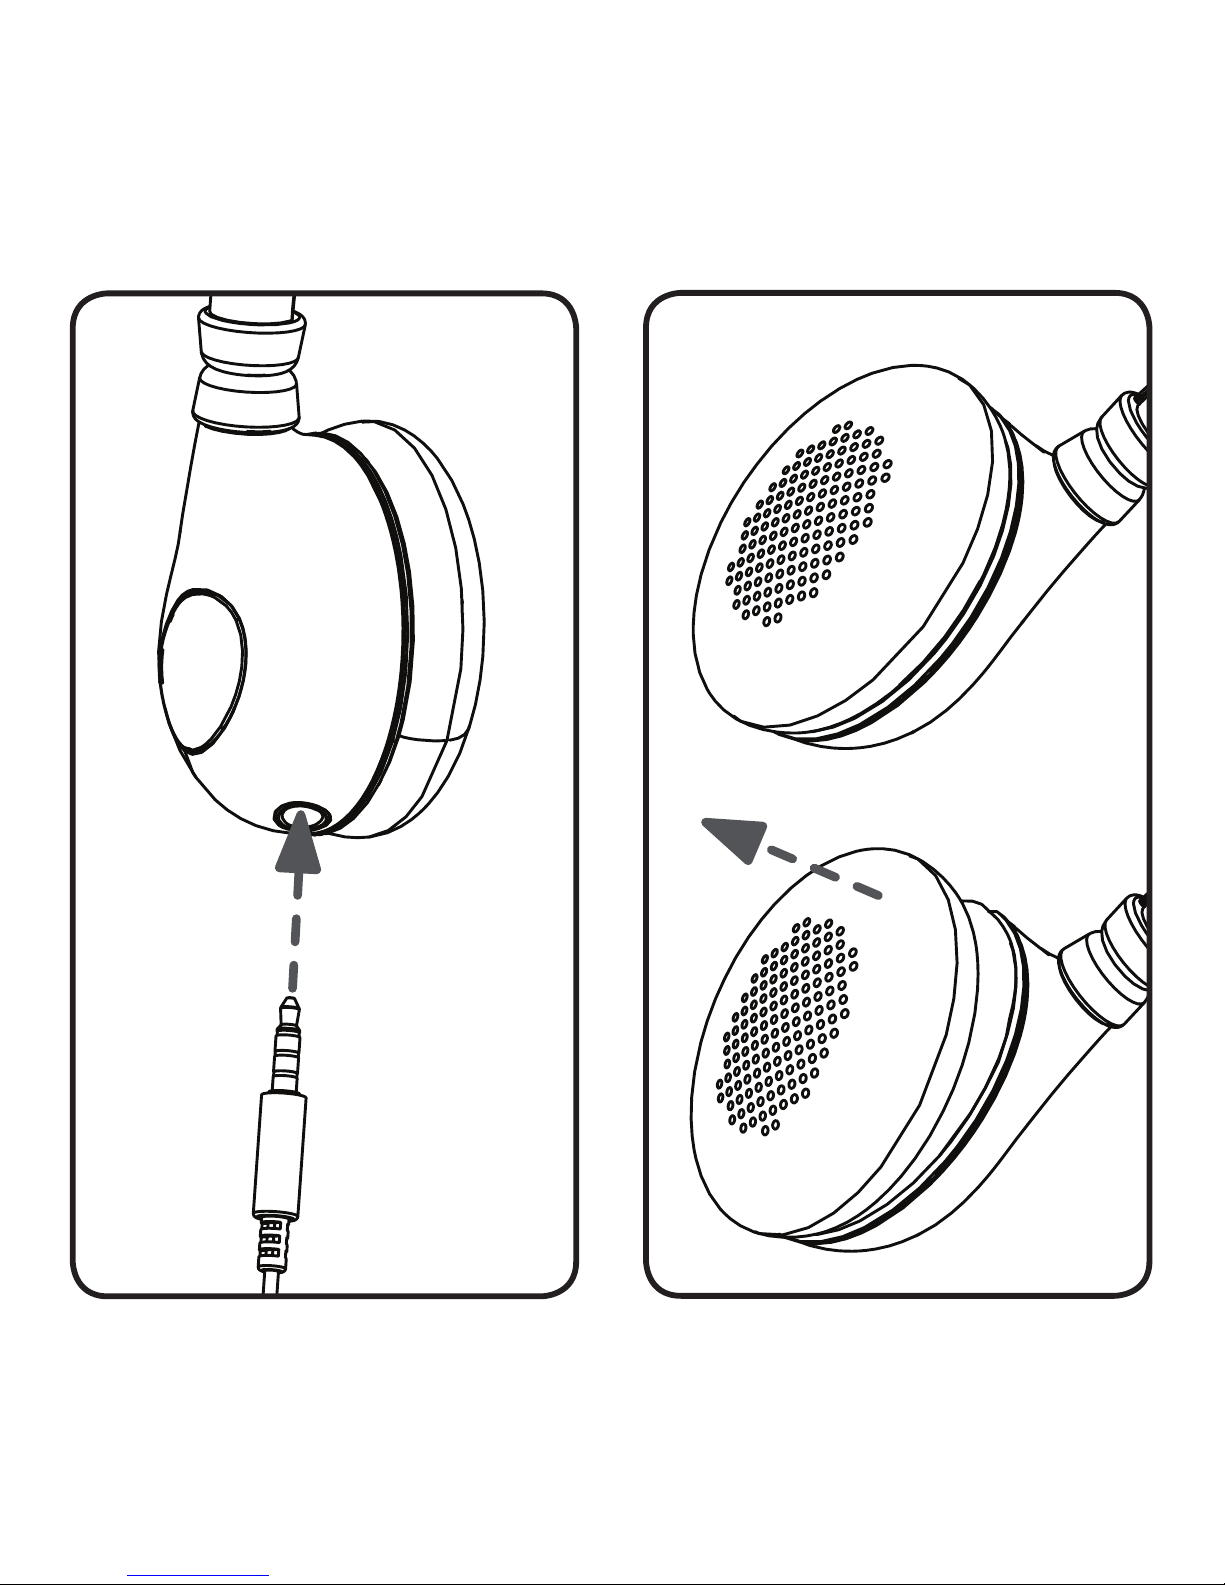
CONNECTING AND REMOVING THE CABLE
Attach the cable to the left side of the headphones. When properly attached, the
remote and microphone should be on the side closest to the headphones. To remove
the cable, grip the connector between your fingers and gently pull it away from the
headphones.
COLLAPSING THE HEADPHONES FOR TRAVEL
Gently slide both ear cups up until they are next to the headband. Swivel each ear
cup 90 degrees so the headphones are flat. Place the headphones in the travel case.
REPLACING THE EAR PADS
Gently pinch and pull the old ear pad away from the ear cup. Work the leather edge
on back of the new ear pad into the channel around the perimeter of the ear cup.
It is sized to fit snugly.
Page 7

REMOTE: AUDIO FUNCTIONS (SELECT APPLE PRODUCTS)*
Volume up/down press top button/press bottom button
Play/pause press middle button
Next track press middle button two times (rapidly)
Previous track** press middle button three times (rapidly)**
Voice control press and hold middle button for two seconds when
the iPhone, iPod, or iPad home screen is displayed
REMOTE: PHONE FUNCTIONS (SELECT APPLE PRODUCTS)*
Answer/end call press middle button
Reject call press and hold middle button for two seconds
*The remote and mic are supported only by iPod nano (4th, 5th, and 6th generation), iPod classic, iPod touch
(2nd, 3rd, and 4th generation), iPhone 4S, iPhone 4, iPhone 3GS, iPad (3rd generation), iPad 2, and iPad.
The remote is supported by iPod shuffle (3rd and 4th generation). Audio is supported by all iPod models.
Page 8

**Pressing the middle button three times will go to beginning of the current track. Pressing the
middle button three times during the first few seconds of a track will go to the previous track.
MICROPHONE AND REMOTE (NON-APPLE PRODUCTS)
The headphones will play audio from any source with a standard 3.5mm 3-conductor (stereo headphone) socket. The microphone will function with most smart phones
and similar devices with a standard 3.5mm 4-conductor socket (stereo headphone
+ microphone). The remote control will function with some non-Apple smart
phones, digital media players, and similar devices. Exact functions of the remote
will vary by make and model and MartinLogan cannot guarantee compatibility with
specific brands or models.
BREAK IN
Allow approximately 15–30 hours of break in at moderate listening levels before
any critical listening. Like most high-performance audio reproduction devices, a
Page 9

break-in period should result in improved performance. For rapid break-in you may
choose to leave the headphones connected to an audio source playing music during
the night or when otherwise not in use.
CLEANING
To clean the headphones lightly wipe the ear piece and cord with a slightly
damp cloth. Never use solvents and other harsh cleaning products as they will
permanently damage the headphones.
Page 10

SPECIFICATIONS (subject to change without notice)
Frequency response . . .6–22,000 Hz
Impedance . . . . . . . . . . .26 Ohms with cable
Maximum output. . . . . .112.83dB SPL
Sensitivity. . . . . . . . . . . .98dB (at 1kHz with 1mW input)
Max input power. . . . . .300mW
Transducer . . . . . . . . . . .35mm dynamic driver
Noise isolation . . . . . . .
92.05% (-22dB SPL, at 1kHz with 1mW input, 30cm)
Weight. . . . . . . . . . . . . . .163g (5.75oz.)
Connector . . . . . . . . . . . .
Right angle gold-plated 3.5mm (1/8”) 4-conductor plug
Cord. . . . . . . . . . . . . . . . .4 foot (1.2m) cable
SPECIFICATIONS: MICROPHONE (subject to change without notice)
Frequency response . . .180Hz–10kHz (-5dB; 3dB)
Pickup pattern. . . . . . . .Omnidirectional
Sensitivity. . . . . . . . . . . .-42dB (as per 121 R 9-5)
Page 11

PROBLEMS WITH YOUR HEADPHONES?
Please do not return headphones to the retailer. Contact MartinLogan customer service directly at (785) 749-0133 or email info@martinlogan.com.
WARRANTY
MartinLogan warrants this product against defects in materials and workmanship
under normal use and operation for a period of one (1) year from the date of retail
purchase by the original end-user purchaser. Maintain your original sales receipt
for proof of purchase. For complete warranty information visit our website at www.
martinlogan.com/warranty.
DECLARATION OF CONFORMITY
This product is in compliance with the essential requirements and
other relevant provisions of directives: EMC 2004/108/EC, RoHS 202/95/EC,
WEEE 202/96/EC.
Page 12

EUROPEAN RECYCLING AND REUSE GUIDELINES
In accordance with the European Union WEEE (Waste Electrical and
Electronic Equipment) directive effective August 13, 2005, we would like to
notify you that this product may contain regulated materials which upon disposal,
according to the WEEE directive, require special reuse and recycling processing.
For this reason Martin Logan has arranged with our distributors in European Union
member nations to collect and recycle this product at no cost to you. To find your
local distributor please contact the dealer from whom you purchased this product,
email info@martinlogan.com or visit the distributor locator at www.martinlogan.com.
Please note, only this product itself falls under the WEEE directive. When disposing
of packaging and other related shipping materials we encourage you to recycle
these items through the normal channels.
Page 13

iPad, iPhone, iPod, iPod classic, iPod nano, iPod shuffle, and iPod touch are trademarks of Apple
Inc., registered in the U.S. and other countries.
The remote and mic are supported only by iPod nano (4th, 5th, and 6th generation), iPod classic, iPod touch
(2nd, 3rd, and 4th generation), iPhone 4S, iPhone 4, iPhone 3GS, iPad (3rd generation), iPad 2, and iPad.
The remote is supported by iPod shuffle (3rd and 4th generation). Audio is supported by all iPod models.
“Made for iPod”, “Made for iPhone”, and “Made for iPad” mean that an electronic accessory
has been designed to connect specifically to iPod, iPhone, or iPad, respectively, and has been
certified by the developer to meet Apple performance standards. Apple is not responsible for the
operation of this device or its compliance with safety and regulatory standards. Please note that
the use of this accessory with iPod, iPhone, or iPad may affect wireless performance.
Page 14

Designed by MartinLogan. Made in China.
©2012 MartinLogan Ltd. Lawrence, Kansas. All rights reserved.
www.martinlogan.com
rev. 082812
®
Inspired by the clarity and detail
of MartinLogan’s legendary
high-end electrostatic loudspeakers.
Page 15

®
Page 16

DIRECTIVES IMPORTANTES EN MATIÈRE DE SÉCURITÉ
ET D’UTILISATION. VEUILLEZ LIRE CE QUI SUIT AVANT
D’UTILISER VOS ÉCOUTEURS.
Avant de placer les
écouteurs
sur les oreilles, réglez le volume au plus bas, puis augmentez-le
graduellement jusqu’à l’obtention du volume souhaité. • Évitez l’écoute à des volumes élevés
pendant de longues périodes. Les niveaux sonores sont mesurés en décibels (dB). L’exposition régulière à un bruit de 85dB ou plus peut causer une perte de l’audition. Surveillez le niveau sonore,
car la perte de l’audition survient au fil du temps. Consultez les lignes directrices du site Web de
la Consumer Electronics Association concernant les niveaux sonores sécuritaires : http://www.
ce.org/PDF/ListenLifetime_spread.pdf • N’utilisez pas les écouteurs lorsque votre attention est requise, comme lorsque vous conduisez, lorsque vous opérez de la machinerie lourde,
ou lorsque vous faites de la bicyclette ou du jogging. Cela est dangereux et dans certains territoires,
il est illégal de conduire en portant des écouteurs à isolation sonore, car ceux-ci diminuent de
façon importante la possibilité d’entendre des sons ambiants pouvant vous sauver la vie, comme
Page 17

des klaxons ou des sirènes. • Ce produit génère des champs magnétiques permanents puissants
qui pourraient causer une interférence avec les stimulateurs cardiaques et les défibrillateurs (ICD).
Gardez une distance d’au moins 4 po (10cm cm) entre l’écouteur et le dispositif médical. •
N’exposez pas le produit à la chaleur (séchoir à cheveux, radiateur, etc.) et ne l’entreposez pas
directement dans les rayons du soleil pendant de longues périodes. • Protégez le produit de
l’humidité.
• Évitez de laisser tomber les écouteurs et les impacts forts. • Ne tirez pas sur le
cordon pour enlever les écouteurs ou d’un appareil audio. • Nettoyez ou remplacez les embouts
avant l’utilisation par d’autres personnes.
Page 18

CONTENU
(1) Écouteurs
(1) Câble avec télécommande et micro
(1) 1/4-inch à 3.5mm adaptateur
(1) Étui de voyage
(1) Manuel
LES POSITIONNEMENT CORRECT
Le côté avec un «R» est pour l’oreille droite. Le côté avec un «L» est pour l’oreille gauche. Vous
pouvez également utiliser le câble de distinguer entre la droite et à gauche. Le câble se connecte
sur le côté gauche.
RÉGLAGE DE LA TAILLE ÉCOUTEUR
Pour régler la taille des écouteurs, glissez délicatement chaque embout d’oreille vers le bas, en
direction opposée du serre-tête.
Page 19

Page 20

CONNEXION ET RETRAIT DU CABLE
Branchez le câble sur le côté gauche les écouteurs. Lorsqu’il est correctement attaché, la télécommande et microphone doit fermer à la prise écouteurs. Pour retirer le câble, le connecteur
adhérence entre vos doigts et retirez-le doucement à l’écart des écouteurs.
PLIER LES ÉCOUTEURS POUR LE TRANSPORT
Glissez délicatement les deux embouts d’oreille jusqu’à ce qu’ils se trouvent à côté du serre-tête.
Faites pivoter chaque embout d’oreille de 90 degrés de façon à ce que les écouteurs reposent à
plat. Placez les écouteurs dans l’étui de voyage.
REMPLACEMENT DES COUSSINETS D’OREILLE
Pincez délicatement le coussinet et retirez-le de l’embout d’oreille. Passez le rebord en cuir du
nouveau coussinet dans le canal autour du périmètre de l’embout d’oreille. Le coussinet est
conçu pour un ajustement bien serré.
Page 21

TÉLÉCOMMANDE : FONCTIONS AUDIO (CERTAINS PRODUITS APPLE)*
Volume haut/bas appuyez sur le bouton du haut/du bas
Lecture/Pause appuyez sur le bouton du milieu
Piste suivante
appuyez sur le bouton du milieu deux fois (rapidement)
Piste précédente**
appuyez sur le bouton du milieu trois fois (rapidement)**
Commande de la voix
appuyez et maintenez enfoncé le bouton du milieu pendant deux
secondes lorsque l’écran d’accueil du iPhone, iPod ou iPad est affiché
TÉLÉCOMMANDE : FONCTIONS TÉLÉPHONE (CERTAINS PRODUITS APPLE)*
Répondre/terminer un appel
presse bouton du milieu
Refuser un appel
appuyez et maintenez enfoncé le bouton pendant deux secondes
*La télécommande et le microphone sont uniquement pris en charge par les iPod nano (4e ,
5e, et 6e génération), iPod classic, iPod touch (2e, 3e, et 4e génération), iPhone 4S, iPhone 4,
iPhone 3GS, iPad (3e génération), iPad 2, et iPad. La télécommande est prise en charge par
Page 22

le iPod shuffle (3e et 4e génération). L’audio est pris en charge par tous les modèles de iPod.
**En appuyant trois fois sur le bouton du milieu, on revient au début de la piste en cours. En
appuyant trois fois sur le bouton du milieu pendant les premières secondes d’une piste renvoie
à la piste précédente.
MICROPHONE ET TÉLÉCOMMANDE (PRODUITS AUTRES QUE APPLE)
Les écouteurs joueront l’audio de toute source dotée d’une prise standard de 3,5 mm à 3
conducteurs (écouteur stéréo). Le microphone fonctionnera avec la plupart des téléphones intelligents et des appareils semblables dotés d’une prise standard de 3,5 mm à 4 conducteurs
(écouteur stéréo + microphone). La télécommande fonctionnera avec certains téléphones
intelligents, lecteurs médias numériques et appareils semblables autres que ceux d’Apple. Les
fonctions exactes de la télécommande varieront selon le fabricant et le modèle et MartinLogan
ne peut pas garantir la compatibilité avec des marques ou des modèles particuliers.
Page 23

RODAGE
Allouez de 15 à 30 heures de rodage à un volume d’écoute modéré avant toute écoute critique.
Comme la plupart des appareils de reproduction audio de haute performance, la période de rodage
améliorera le rendement. Pour obtenir un rodage rapide, vous pouvez laisser les écouteurs branchés à une source audio jouant de la musique pendant la nuit ou lorsque vous ne les utilisez pas.
NETTOYAGE
Pour nettoyer les écouteurs, essuyez délicatement l’oreillette et le cordon à l’aide d’un linge un peu
humide. N’utilisez jamais de solvants ou d’autres produits nettoyants puissants, car ils endommageront les écouteurs de façon permanente.
Page 24

SPÉCIFICATIONS (peuvent changer sans préavis)
Réponse de fréquence . . . .6–22 000 Hz
Impédance . . . . . . . . . . . . . .26 Ohms avec câble
Sortie maximale . . . . . . . . .112,83 dB SPL
Sensibilité. . . . . . . . . . . . . . .98 dB (à 1 kHz avec entrée 1 mW)
Puissance d’entrée max. . .300 mW
Transducteur. . . . . . . . . . . . .Haut-parleur dynamique de 35 mm
Isolation sonore . . . . . . . . . 92,05 % (-22 dB SPL, à 1 kHz avec entrée de 1 mW, 30 cm)
Poids . . . . . . . . . . . . . . . . . . .163 g (5,75 oz)
Connecteur. . . . . . . . . . . . . .
Prise à 4 conducteurs à angle droit plaquée or de 3,5 mm (1/8 po)
Cordon. . . . . . . . . . . . . . . . . .Cordon de 1,2 m (4 pi)
SPÉCIFICATIONS : MICROPHONE (peuvent changer sans préavis)
Frequency response . . . . . .180 Hz–10 kHz (-5 dB; 3 dB)
Schéma de détection . . . . . Omnidirectionnel
Sensibilité. . . . . . . . . . . . . . .-42 dB (selon 121 R 9-5)
Page 25

PROBLÈMES AVEC VOS ÉCOUTEURS?
Veuillez ne pas retourner les écouteurs chez le détaillant. Communiquez directement avec le
service à la clientèle de MartinLogan en composant le (785) 749-0133 ou en envoyant un
courriel à info@martinlogan.com.
GARANTIE
MartinLogan garantit ce produit contre les défauts de matériaux et de fabrication dans des
conditions normales d’utilisation pendant une période d’un (1) an à compter de la date d’achat
par l’acheteur original. Conservez le présent manuel et le reçu comme preuves d’achat et de
garantie. Pour obtenir des renseignements complets sur la garantie, consultez notre site Web
www.martinlogan.com/warranty.
DÉCLARATION DE CONFORMITÉ
Ce produit est conforme aux exigences essentielles et aux autres dispositions
pertinentes des directives : EMC 2004/108/EC, RoHS 202/95/EC, WEEE 202/96/EC.
Page 26

DIRECTIVES SUR LE RECYCLAGE ET LA RÉUTILISATION
En vertu de la directive WEEE de l’Union européenne (directive sur les déchets électriques et électroniques) entrée en vigueur le 13 août 2005, nous vous avisons que ce produit
pourrait renfermer des matériaux réglementés dont l’élimination doit faire l’objet de procédures
de réutilisation et de recyclage particulières. À cette fin, MartinLogan a demandé à ses distributeurs dans les pays membres de l’Union européenne de reprendre et recycler ce produit
gratuitement. Pour trouver le distributeur le plus près, veuillez communiquer avec le revendeur
auprès de qui vous avez acheté ce produit, envoyer un courriel à info@martinlogan.com ou
consulter le localisateur de distributeur sur le site Web www.martinlogan.com.
Veuillez noter que seul le produit est régi par la directive WEEE. Nous vous encourageons à recycler les matériaux d’emballage et autres matériaux d’expédition selon les procédures normales.
Page 27
•
iPad, iPhone, iPod, iPod classic, iPod nano, iPod shuffle et iPod touch sont des marques de
commerce de Apple Inc., enregistrées aux États-Unis et dans les autres pays.
•
La télécommande et le microphone sont uniquement pris en charge par les iPod nano (4e , 5e,
et 6e génération), iPod classic, iPod touch (2e, 3e, et 4e génération), iPhone 4S, iPhone 4, iPhone
3GS, iPad (3e génération), iPad 2, et iPad. La télécommande est prise en charge par le iPod shuffle
(3e et 4e génération). L’audio est pris en charge par tous les modèles de iPod.
• Les termes « Conçu pour iPod », « Conçu pour iPhone », et « Conçu pour iPad » signifient qu’un
accessoire électronique a été conçu pour se brancher spécifiquement aux appareils iPod, iPhone ou
iPad, respectivement, et qu’il a été certifié par le développeur pour répondre aux normes de rendement d’Apple. Apple n’est pas responsable du fonctionnement de cet appareil ou de sa conformité
aux normes de sécurité ou réglementaires. Veuillez noter que l’utilisation de cet accessoire avec un
iPod, iPhone ou iPad peut avoir des répercussions sur le rendement de la fonction sans fil.
Page 28

Conçu par MartinLogan. Fabriqué en Chine.
©2012 MartinLogan, Ltd. Lawrence, Kansas. Tous droits réservés.
www.martinlogan.com
rev. 082812
®
Inspiré par la clarté et le détail
des haut-parleurs électroacoustiques légendaires
de première qualité de MartinLogan.
 Loading...