

Page 1
crescendo'
user’s manual
·
.,.._,..
i\iPod QiPhone
QiPad
®
1[5\
Am
~
U
Page 2
Do Not Open! Risk of Electrical Shock. Voltages in this equip-
ment are hazardous to life. No user-serviceable parts inside.
Refer all servicing to qualified service personnel. To prevent
fire or shock hazard, do not expose this module to moisture.
The lightning bolt flash with arrowhead
symbol, within an equilateral triangle, is
intended to alert the user to the presence of
potentially “dangerous voltage” within the product’s enclo
sure that may be of sufficient magnitude to constitute a risk
of electric shock to persons.
The exclamation point within an equi-
lateral triangle is intended to alert the
user to the presence of important oper-
ating and maintenance (servicing) instructions in the
literature accompanying the appliance.
-
CRESCENDO
Tested to comply with FCC standards.
FOR HOME OR OFFICE USE
In accordance with the European
Union WEEE (Waste Electrical
and Electronic Equipment) direc-
tive effective August 13, 2005,
we would like to notify you that this product
may contain regulated materials which upon
disposal, according to the WEEE directive,
require special reuse and recycling processing.
For this reason MartinLogan has arranged with
our distributors in European Union member
nations to collect and recycle this product at no
cost to you. To find your local distributor please
contact the dealer from whom you purchased
this product, email info@martinlogan.com or visit
the distributor locator at www.martinlogan.com.
Please note, only this product itself falls under
the WEEE directive. When disposing of packaging and other related shipping materials we
encourage you to recycle these items through
the normal channels.
IMPORTANT SAFETY INSTRUCTIONS!
1 Read these instructions.
2 Keep these instructions.
3 Heed all warnings.
4 Follow all instructions.
5 Do not use this apparatus near water.
6 Clean only with dry cloth.
7 Do not block any ventilation openings. Install in
accordance with the manufacturer's instructions.
8 Do not install near any heat sources such as
radiators, heat registers, stoves, or other apparatus (including amplifiers) that produce heat.
9 Do not defeat the safety purpose of the polar-
ized or grounding-type plug. A polarized
plug has two blades with one wider than
the other. A grounding type plug has two
blades and a third grounding prong. The
2
wide blade or the third prong are provided
for your safety. If the provided plug does not
fit into your outlet, consult an electrician for
replacement of the obsolete outlet.
10 Protect the power cord from being walked
on or pinched, particularly at plugs, convenience receptacles, and the point where they
exit from the apparatus.
11 Only use attachments/accessories specified
by the manufacturer.
12 Use only with the cart, stand, tripod, bracket,
or table specified by the manufacturer, or
sold with the apparatus.
When a cart is used, use
caution when moving the
cart/apparatus combination
to avoid injury from tip-over.
Page 3

13. Unplug this apparatus during lightning storms
or when unused for long periods of time.
14. Refer all servicing to qualified service personnel. Servicing is required when the apparatus
has been damaged in any way, such as power-supply cord or plug is damaged, liquid has
been spilled or objects have fallen into the
apparatus, the apparatus has been exposed
to rain or moisture, does not operate normally,
or has been dropped.
15. To completely disconnect this equipment from
the AC mains, disconnect the power supply
cord plug from the AC receptacle.
16. The mains plug of the power supply cord shall
remain readily operable.
17 CAUTION: Danger of explosion if battery is
incorrectly replaced. Replace only with the same
or equivalent type (AAA). Dispose of dead batteries in accordance with local regulation.
18. To prevent overheating, do not cover the
apparatus. Install in accordance with the
manufacturer’s instructions.
19. No naked flame sources, such as candles,
should be placed on the product.
20.
Do not expose this apparatus to dripping or
splashing and ensure that no objects filled with liquids, such as vases, are placed on the apparatus.
21. Batteries (battery pack or batteries installed)
shall not be exposed to excessive heat such
as sunshine, fire, or the like.
22. For apparatus mounted to wall, the apparatus shall be installed on solid wood, bricks,
concrete or solid wood columns and battens.
a detachable power cord, use only the type provided with your product or by your local distributor
and/or retailer. If you are unsure of the correct operational voltage, please contact your local distributor
and/or retailer.
This device complies with Part 15 of the FCC
Rules. Operation is subject to the following two
conditions: (1) this device may not cause harmful interference, and (2) this device must accept
any interference received, including interference
that may cause undesired operation. Changes or
modifications not expressly approved by the party
responsible for compliance could void the user’s
authority to operate the equipment.
Note: This equipment has been tested and found
to comply with the limits for a Class B digital
device, pursuant to part 15 of the FCC Rules. The
limits are designed to provide reasonable protection against harmful interference in a residential
installation. This equipment generates, uses and
can radiate radio frequency energy and, if not
installed and used in accordance with the instructions, may cause harmful interference to radio
communications. However, there is no guarantee that interference will not occur in a particular
installation. if this equipment does cause harmful
interference to radio or television reception, which
can be determined by turning the equipment off
and on, the user is encouraged to try to correct
the interference by one or more of the following
measures:
WARNING: This product is intended to be operated
ONLY from the AC Voltages listed on the back panel
or included power supply of the product. Operation
from other voltages other than those indicated may
cause irreversible damage to the product and void
the products warranty. The use of AC Plug Adapters
is cautioned because it can allow the product to be
plugged into voltages in which the product was not
designed to operate. If the product is equipped with
• Reorient or relocate the receiving antenna.
• Increase the separation between the equipment
and receiver.
• Connect the equipment into an outlet on a circuit different from that to which the receiver is
connected.
• Consult the dealer or an experienced radio/TV
technician for help.
3
Page 4

Approved under the verification provision of FCC
Part 15 as a Class B Digital Device.
Caution: Changes or modifications not expressly
approved by the manufacturer could void the
user’s authority to operate this device.
This device complies with Industry Canada licenceexempt RSS standard(s). Operation is subject to the
following two conditions: (1) this device may not
cause interference, and (2) this device must accept
any interference, including interference that may
cause undesired operation of the device.
AirPlay, iPad, iPhone, iPod, iPod classic, iPod
nano, and iPod touch are trademarks of Apple
Inc., registered in the U.S. and other countries.
AirPlay works with iPhone, iPad, and iPod touch
with iOS 4.3.3 or later, Mac with OS X Mountain
Lion, and Mac and PC with iTunes 10.2.2 or later.
USB works with iPhone 5S, iPhone 5C, iPhone 5,
iPhone 4S, iPhone 4, iPad (3rd and 4th generation),
iPad mini, iPod touch (3rd through 5th generation),
and iPod nano (5th through 7th generation).
“Made for iPod,” “Made for iPhone,” and “Made
for iPad” mean that an electronic accessory has
been designed to connect specifically to iPod,
iPhone, or iPad, respectively, and has been certified by the developer to meet Apple performance
standards. Apple is not responsible for the operation of this device or its compliance with safety and
regulatory standards. Please note that the use of this
accessory with iPod, iPhone, or iPad may affect
wireless performance.
Made for:
• iPhone 5S
• iPhone 5C
• iPhone 5
• iPhone 4S
• iPhone 4
• iPad (4th generation)
• iPad mini
• iPad (3rd generation)
• iPod touch (5th generation)
• iPod touch (4th generation)
• iPod touch (3rd generation)
• iPod nano (7th generation)
• iPod nano (6th generation)
• iPod nano (5th generation)
4
Page 5

Introduction and Overview ...............7
Placement ............................. 7
Connection ............................ 7
Power Connection ...................7
Signal Connection ...................7
Wi-Fi Setup and Status ................8
Subwoofer Connection ................8
An Overview of Connections .............. 9
Volume Behavior by Input ............... 11
Controls .............................. 11
Front Panel Controls .................11
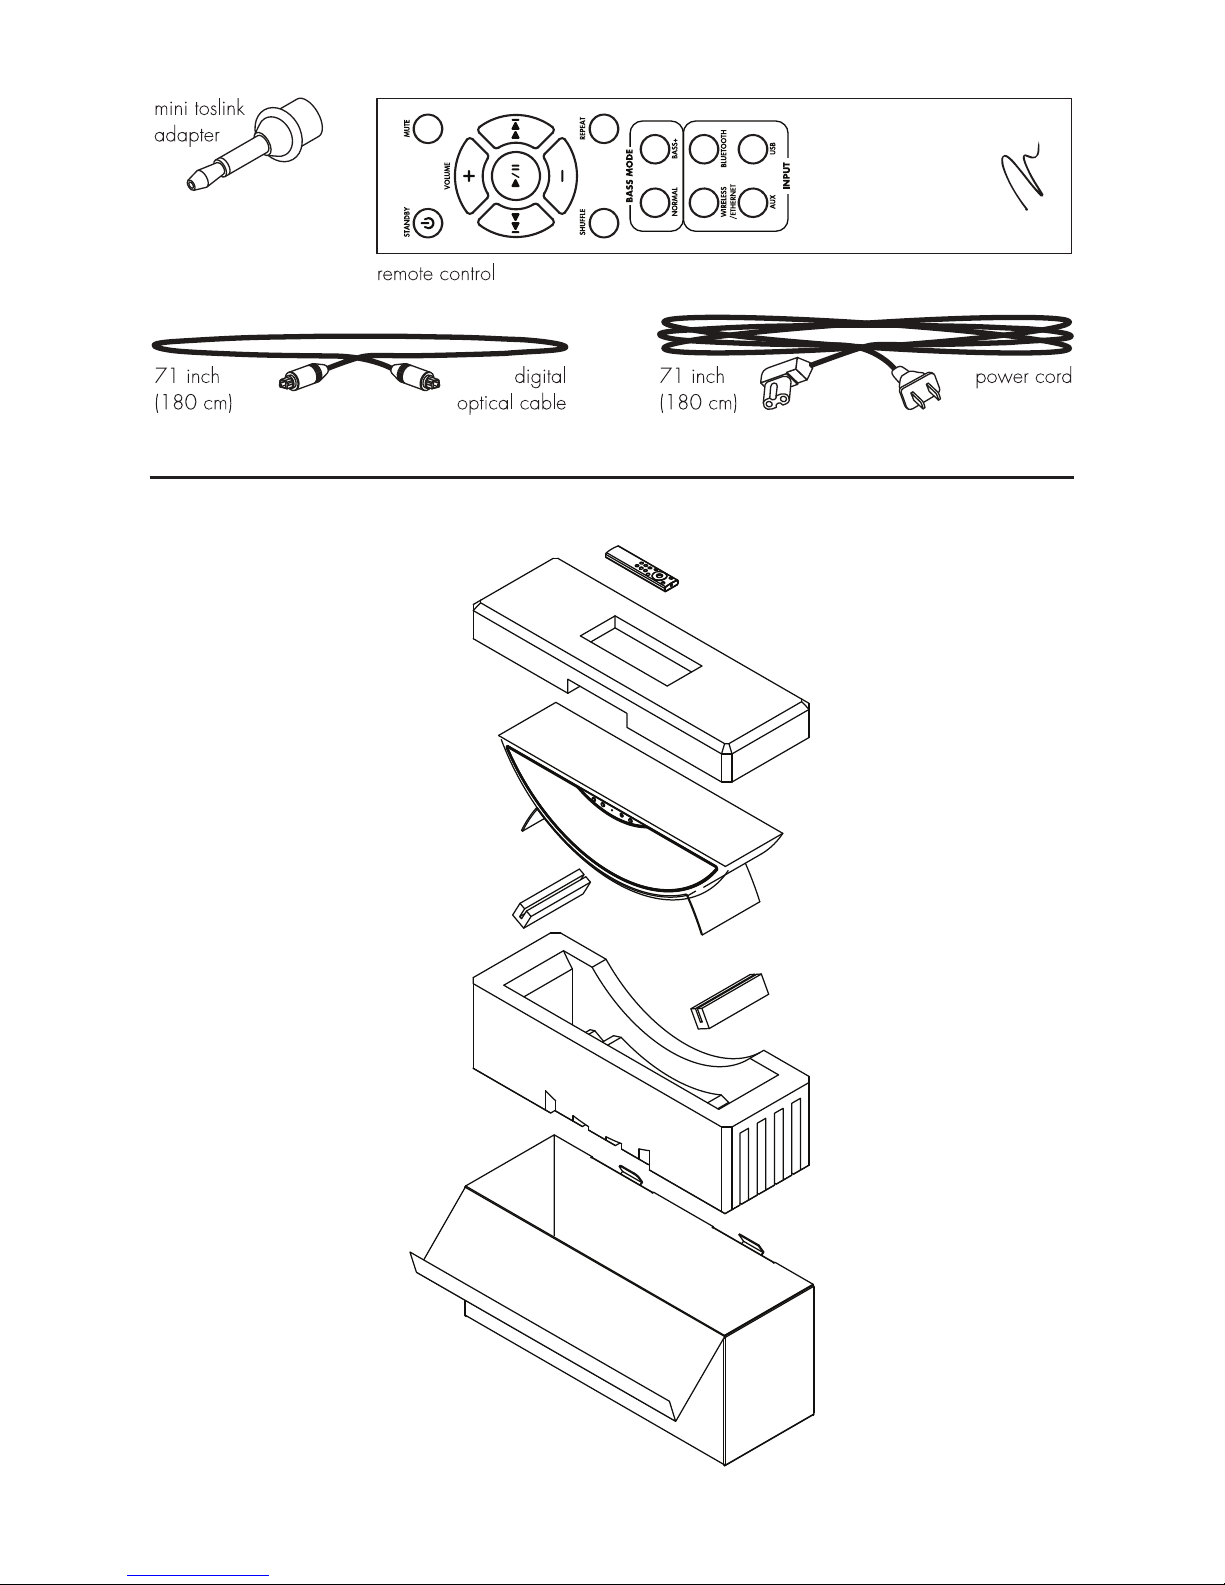
Remote Control ....................12
Changing the Remote’s Battery ..........13
Control Functions by Input ............... 13
Playing Music Using Wireless/Ethernet ..... 14
Automatic Airplay Input Selection ........14
Playback – From an Apple iOS Device ....14
Playback – From iTunes on a Mac or PC . . .14
Controlling Playback Using iTunes ........14
Playback – Using DLNA ..............14
Connecting to a Local Area Network ....... 14
Problems Connecting to Your LAN? .......14
Downloading Connection Settings
From an Apple Device ..............15
Using Wi-Fi to Set Up Your Speaker ......15
Using Ethernet to Set Up Your
Speaker’s Wi-Fi Connection ..........15
Setting Up A Permanent Ethernet Connection
. .16
Setting Up A Wi-Fi Connection ..........16
USB Connection (Compatible Apple Device) .. 16
Bluetooth Connection ................... 17
Updating the Firmware .................. 17
Removing the Front Grille ................ 17
Contacting Customer Service ............. 18
General Information .................... 18
Warranty Information ................18
Serial Number .....................18
Service .........................18
Frequently Asked Questions .............. 19
Troubleshooting ....................... 19
Specifications ......................... 21
Dimensional Drawings .................. 22
Serial Number:_____________________________
Record your serial number here for easy reference.
You will need this information when filling out your
warranty registration. The serial number is located on
the back of the speaker and on the product carton.
5
Page 6
c
71
(180
inch
cml
(ij?'
remote
'fi
control
digital
optical cable
•
71 inch
n
80
cml
-
-
power cord
=-
6
Page 7
INTRODUCTION AND OVERVIEW
Thank you—the MartinLogan owner, for loving what we
do, and making it possible for us to do what we love.
MartinLogan’s dedicated in-house engineering and
design team developed the Crescendo speaker to deliver exceptional audio performance from a single system,
easily integrated and installed in a diverse variety of
environments. The Crescendo produces an enveloping
field of richly detailed audio incorporating two tweeters
(featuring MartinLogan’s award-winning Folded Motion
technology), a high-performance woofer, and three
channels of dedicated class-D amplification representing
100 watts of total system power.
An advanced 24-bit 48kHz DSP (digital signal pro-
PLACEMENT
cessing) based pre-amplifier allows MartinLogan to
replace dedicated stereo speakers with a one piece
solution, capable of reproducing sound with unflinching accuracy, resolution, and detail—the inspiration
behind every MartinLogan design. Additionally, for
a fully authentic audio experience, the Crescendo
makes connecting a dedicated subwoofer as simple
as the push of a button.
The Crescendo’s remote control quickly adjusts volume, selects inputs, and controls your media. The
remote also allows you to easily switch between
two discrete acoustic modes—‘Bass +’ mode (for
those moments requiring a little extra thunder) and a
‘Normal’ mode that restores normal levels.
We recommend locating the speaker on a surface
that provides a wide, level, and stable platform
such as a table or audio/video rack. Please note,
this speaker is not magnetically shielded and there-
CONNECTION
WARNING! Turn your speaker off
before making or breaking any signal connections! WARNING! The
power cord should not be installed,
removed, or left detached from the speaker while
the other end is connected to an AC power source.
POWER CONNECTION
The power cord should be firmly inserted into the
AC power receptacle on the rear of the speaker,
and then to any convenient AC wall outlet.
fore should not be placed directly beneath or on
top of a CRT (cathode ray tube) television. The
magnetic field of the speaker will not affect plasma
and LCD style televisions.
plied in any subsequent location is suitable
before connecting and operating the speaker.
Substantially impaired performance or severe
damage may occur to the speaker if operation is
attempted from an incorrect AC power source.
SIGNAL CONNECTION
Connections are made at the signal input section
on the rear electronics panel of the speaker. Your
speaker features the following audio inputs:
If you remove your speaker from the country of
original sale, be certain that the AC power sup-
• USB: used for streaming from connected Apple
devices and charging compatible devices.
7
Page 8
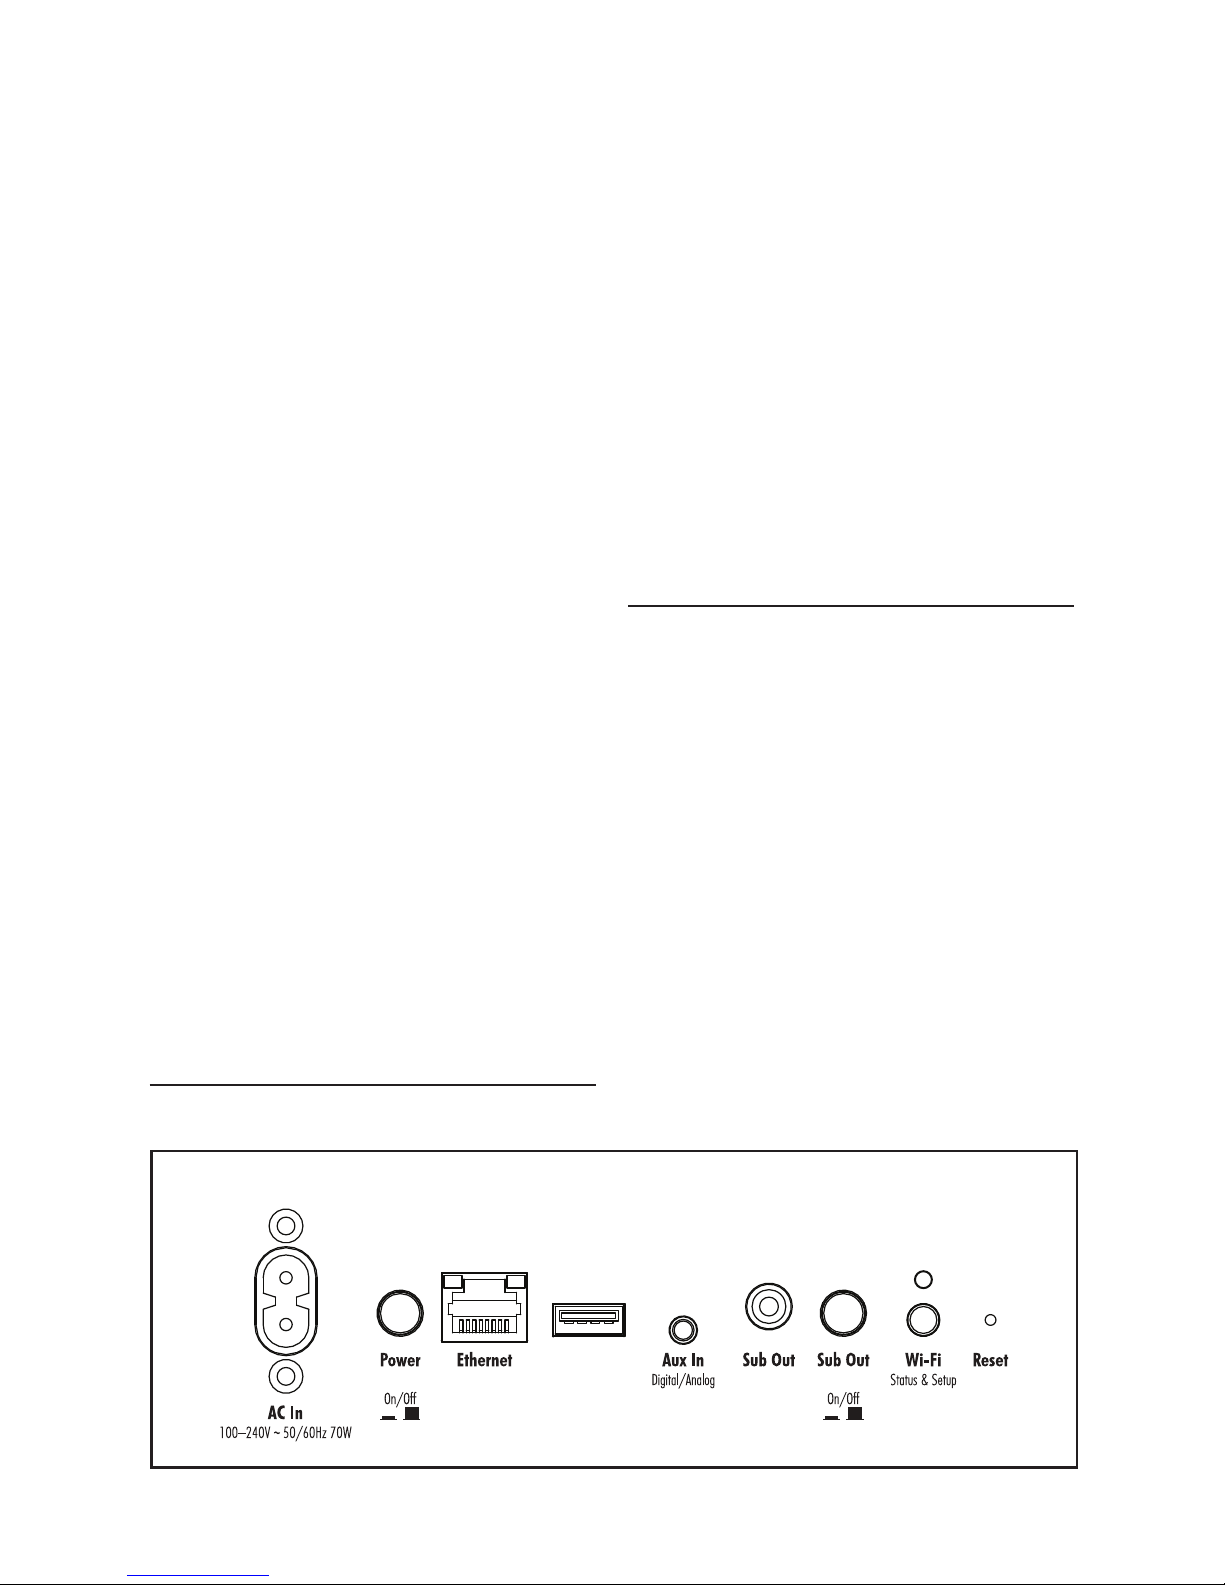
• Ethernet: used for streaming audio from
Apple® AirPlay® or DLNA.
• Aux [Auxiliary]: used for either digital optical
(Toslink) or analog input. This input will accept
either a standard 3.5mm stereo headphone
style or mini-Toslink plug. A special mini-Toslink to Toslink cable or mini-Toslink adaptor is
required for digital optical connection.
In addition, the speaker features two inputs that do
not require a physical connection:
• Wireless: used for streaming audio from
Apple® AirPlay® or DLNA devices.
• Bluetooth: used for streaming from compatible
Bluetooth equipped devices, including apt-X®
Bluetooth devices.
Please note, when utilizing this speaker to reproduce audio from a television via the speaker’s
Auxiliary (digital or analog) connection, the television’s audio output should be defeated. Some
televisions will allow you to turn off the internal
speaker via the television’s menu system. Other
televisions may require you to turn the television’s
volume to “zero” or “mute.” Additionally, your television may require you to turn on the digital optical
output or and/or configure the output for 2-channel (stereo) sound. Please refer to your television’s
manual.
WI-FI SETUP AND STATUS
The Wi-Fi Setup button is used to connect to a Wi-Fi
Network. Step-by-step instructions for network connection setup are included in this manual. The status
LED indicates the following information:
• Green: Connected to a Wi-Fi network.
• Flashing Green: Not connected to a Wi-Fi network.
• Flashing Red/Green: Wi-Fi setup mode.
• Solid Red: Wireless direct mode (the speaker
and your device establish a direct wireless connection).
• Flashing Red/Red/Green/Green: Firmware
upgrade mode.
SUBWOOFER CONNECTION
You may choose to employ a separate subwoofer
to enhance bass performance. Subwoofers can
be connected via the speaker’s “Sub Out” RCA
connection. We recommend using a superb
MartinLogan subwoofer.
Using a high-quality RCA style cable designed for
subwoofer connection, connect “Sub Out” from the
speaker to the “LFE In/Sub In” on the subwoofer.
On the back panel of the speaker, set the Sub
Out button to “On” (in its “on” state the button will
be depressed—in its “off” state the button will be
extended). When the Sub Out is turned on, the
deep bass output of the speaker will be reduced
Fig. 1 Connection Panel
8
Page 9

(to optimize performance) and bass information will
be sent directly to your external subwoofer for a
deeper, extended, overall bass response.
Reference your subwoofer’s manual to learn how
to properly adjust the sub’s level and phase controls to achieve proper blending with the speaker.
When Sub Out is set to “On,” the speaker will
handle the crossover setting to the subwoofer,
achieving ideal blending with the speaker.
Because of this, the subwoofer’s crossover should
be set to “bypass” or “LFE.” For subwoofers that
do not have a “bypass” or “LFE” crossover setting,
we recommend adjusting the crossover to its high-
est setting—remember, the speaker will handle the
crossover before sending out the sub signal.
Using a MartinLogan Dynamo Subwoofer:
If using a MartinLogan Dynamo family subwoofer,
we recommend beginning with the following subwoofer settings:
• Low-pass: Bypass
• Phase: 0
• Volume: Knob set to vertical (12-o’clock to
1-o’clock position)
AN OVERVIEW OF CONNECTIONS
Digital Optical: Also referred to as Toslink, this cable utilizes one cable to pass digital
audio information (no video). A digital optical cable offers a high-quality digital
connection and passes multi-channel encoded audio between a source compo-
nent and an audio output device. The Auxiliary input on this speaker accepts
digital optical connection with the use of a mini-Toslink adaptor (included with
this speaker). Toslink to mini-Toslink cables may also be available from your dealer.
Left/Right Analog RCA: These cables are used to pass audio information (no
video). An analog RCA cable can only pass a single channel of audio infor-
mation between a source component and audio output device. To achieve
two-channels of audio (left/right), you will find that analog RCA cables come
bundled as a stereo pair (two connectors on each end). The Auxiliary input
on this speaker can accept an analog stereo signal through a cable using a
3.5mm stereo “headphone style” jack. If you are connecting this speaker to a device (such as a dock
or CD player) with left/right RCA analog outputs, you will need a special cable with a 3.5mm ‘headphone style’ jack on one end and left/right RCA jacks on the other end.
Left/Right Analog 3.5mm Stereo “Headphone Style” Jack: This cable is used to pass
audio information (no video). Users may find source components such as digital
media players and docks utilize a 3.5mm ‘headphone style’ connector. The
Auxiliary input on this speaker can accept an analog stereo signal through a
cable using a 3.5mm “headphone style” connector. These devices also have a
“volume control” that increases or decreases the level of the output signal. [CONTINUED ON PAGE 10]
9
Page 10

AN OVERVIEW OF CONNECTIONS
[CONTINUED] If you are connecting a device which allows volume adjustment (like a digital media player
or cell phone), we recommend the volume on the device not be set to maximum. When the volume is set to
its maximum setting, the amplifier in the external device is likely to introduce elevated distortion into the audio
signal which, in turn, will be passed on to this speaker and further amplified, creating even more distortion.
Ethernet: This cable allows you to physically connect a device to a LAN (local area
network). When connected to a LAN, audio information can be sent to this
speaker using various protocols (such as AirPlay® or DLNA). If a wireless
(Wi-Fi) connection is used to connect to a LAN, there is no need to use an
Ethernet connection. However, in some installations, a ‘hard-wired’ Ethernet
connection may prove more desirable than a wireless connection.
USB: This cable allows you to connect compatible Apple devices and to use the
speaker as a dock and charger. This connection will also charge any non-Apple
devices capable of being charged via a USB connection. This speaker’s USB
connection was designed to rapidly charge a variety of devices.
Wi-Fi: This connection technology wirelessly connects a device to a LAN (local area
network). When connected to a LAN, audio information can be sent to this speaker using
various protocols (such as AirPlay® or DLNA). If an Ethernet connection is used to connect
to a LAN, there is no need to use a Wi-Fi connection. In some installations a ‘hard-wired’ Ethernet
connection may prove more desirable than a wireless connection.
Bluetooth: This wireless connection technology allows a wide variety of devices to connect
to an audio output device and stream audio. Bluetooth establishes a connection directly
with an audio output device and does not require either device to be connected to a LAN.
Fig. 2 Front Panel Controls
STANDBY/MUTE INPUT VOL– VOL+FRONT LED
10
Page 11

VOLUME BEHAVIOR BY INPUT
Depending on the input selected on your speaker, the volume will exhibit different behaviors.
SPEAKER INPUT FRONT LED COLOR VOLUME BEHAVIOR
Wireless or Ethernet
(using AirPlay)
Wireless or Ethernet
(using DLNA or other control source)
Aux [Auxiliary]
Bluetooth
USB
(iOS device connected)
* Devices connected via auxiliary and Bluetooth will often have
their own volume control which functions separately from the
speaker’s volume. If you are connecting a device which allows
you to adjust its volume separately, we recommend that the
volume on the device not be set to maximum. When set to its
Purple (flashing purple indicates
no network is available)
Purple flashing purple indicates
no network is available)
CONTROLS
Volume on device/remote and speaker
are synced and control each other.
Volume on device/remote and speaker are
sometimes synced and control each other.
Green
Blue
White
maximum setting, the amplifier in the external device is likely to in
troduce elevated levels of distortion into the audio signal which,
in turn, will be further amplified by the speaker. Find a volume be
tween 50–75% of the device’s maximum volume and use your
speaker’s volume control to adjust the final playback volume.
Volume on device/remote and volume
on speaker are controlled separately.*
Volume on device/remote and volume
on speaker are controlled separately.*
Volume on device/remote and speaker
are synced and control each other.
-
-
FRONT PANEL CONTROLS
STANDBY/MUTE: This button mutes the
speaker and toggles between on and standby. To mute press the button once (front LED will
flash red). To enter standby press the button for two
seconds (front LED will turn red). If no audio signal is
detected for ten minutes, the speaker will automatically go into standby mode. When the speaker is in
standby mode, press the button once to exit. A new
audio signal will also automatically wake the speaker. Please note, if the Auxiliary Input has a cable
plugged into the connection (with or without active
audio content), the speaker will not go into standby
mode automatically and will not stay in standby
mode, even if manually activated (fig. 2).
INPUT: Cycles through the four audio
inputs. The order of the inputs is:
Wireless/Ethernet (purple) > Auxiliary (green) >
Bluetooth (blue) > USB (white) (fig. 2).
FRONT LED: The LED on front of the speaker indicates the following (fig. 2):
• No Color: Speaker does not have power (or
updating firmware).
• Red: Speaker is in standby.
• Flashing Red: Speaker is muted.
• Purple: Wireless/Ethernet input active.
• Flashing Purple: Wireless/Ethernet input active
(no network connected).
• Green: Auxiliary input active.
• Blue: Bluetooth input active.
• White: USB input active.
VOL –/VOL +: Adjusts the volume
level (fig. 2). For more details see
the section titled “VOLUME BEHAVIOR BY INPUT.”
11
Page 12

REMOTE CONTROL
STANDBY: This button toggles between on and
standby. To enter standby, press the button for two
seconds (front LED will turn red). If no audio signal is
detected for ten minutes, the speaker will automatically go into standby mode. When the speaker is in
standby mode, press the button once to exit. A new
audio signal will also automatically wake the speaker. Please note, if the Auxiliary Input has a cable
plugged into the connection (with or without active
audio content), the speaker will not go into standby
mode automatically and will not stay in standby
mode, even if manually activated.
MUTE: Mutes the volume. A second press will restore
the previous volume setting. Additionally, you can
turn mute off by pressing either of the volume buttons.
When mute is active, the front LED will blink red.
VOL+/VOL–: Adjusts volume level. See the section
titled “VOLUME CONTROL (BY INPUT).”
PREVIOUS TRACK†: Skips to the beginning of the
current track. Pressing the button twice skips to the
beginning of the previous track.
NEXT TRACK†: Skips to the beginning of the next
track.
PLAY/PAUSE†: Toggles between play or pause.
†
SHUFFLE
REPEAT
: Set the current playlist to shuffle randomly.
†
: Sets the current track to repeat.
BASS MODE – NORMAL: Normal bass levels.
BASS MODE – BASS+: Increases bass output.
Fig. 3 Remote Control
INPUT – WIRELESS/ETHERNET: Sets the current
input to receive an audio signal from the local
area network via the Wi-Fi or Ethernet connection
(using AirPlay or DLNA).
INPUT – AUXILIARY: Sets the current input to
receive an audio signal from the auxiliary input via
a digital optical mini Toslink or analog 3.5mm stereo “headphone” style jack connection.
INPUT – BLUETOOTH: Sets the current input to
receive an audio signal from a Bluetooth capable
device that is connected wirelessly to the speaker.
INPUT – USB: Sets the current input to receive an
audio signal from USB input. This input allows
the speaker to work as a dock when compatible
Apple devices are attached.
12
†
This button works when a source is connected
via AirPlay.
Page 13

CHANGING THE REMOTE’S BATTERY
The remote control for your speaker uses two AAA
type batteries. Access the battery compartment by
using a Phillips screwdriver to remove the screw
located on the bottom of the remote.
Caution! Danger of explosion
if battery is incorrectly replaced.
Replace only with the same or
equivalent type.
CONTROL FUNCTIONS BY INPUT
Depending on the input selected on your speaker, the remote will control functions differently.
Digital or
Speaker Input
Front LED Color
Standby
Mute
Volume –/+
AirPlay iTunes DLNA
Wireless/
Ethernet
Purple Purple Purple Green Blue White
¥¥¥¥¥¥
¥¥¥¥¥¥
¥ ¥ ¥ ¥ ¥ ¥
Wireless/
Ethernet
Wireless/
Ethernet
Analog Bluetooth
Auxiliary Bluetooth USB
(Apple Only)
USB
Previous Track/
Next Track
Play/Pause
Shuffle
Repeat
Bass Mode:
Normal
Bass Mode:
Bass +
Input: Wireless/
Ethernet
Input: Auxiliary
Input: Bluetooth
Input: USB
*Devices connected via auxiliary and Bluetooth will
often have their own volume control which is separate
from the speaker’s volume. If you are connecting a
device which allows you to adjust its volume separately,
we recommend that the volume on the device not be
set to maximum. When set to its maximum setting, the
amplifier in the external device is likely to introduce
¥ ¥ ¥ ¥
¥ ¥ ¥ ¥
¥ ¥ ¥ ¥
¥ ¥ ¥ ¥
¥¥¥¥¥¥
¥¥¥¥¥¥
¥¥¥¥¥¥
¥¥¥¥¥¥
¥¥¥¥¥¥
¥¥¥¥¥¥
elevated levels of distortion into the audio signal which,
in turn, will be further amplified by the speaker. Find
a volume between 50-–75% of the device’s maximum
volume and use your speaker’s volume control to adjust
the final playback volume.
** This feature is not be compatible with all DLNA devices.
13
Page 14

PLAYING MUSIC USING WIRELESS/ETHERNET
AUTOMATIC AIRPLAY INPUT SELECTION
Your speaker may automatically switch to the
AirPlay input if it detects that a new AirPlay connection has been established with the speaker.
PLAYBACK – FROM AN APPLE iOS DEVICE
1 Set the speaker’s input to “Wireless/Ethernet.”
The front LED will be purple. Please note: If
the front LED flashes purple, this indicates the
speaker is not connected to a network and is
currently unable to stream music via this input.
2 Open your music application.
3 Press the AirPlay Icon and choose your
speaker form the list.
4 Play music.
PLAYBACK – FROM ITUNES ON A MAC
OR PC (PERSONAL COMPUTER)
1 Set the speaker’s input to “Wireless/Ethernet.”
The front LED will be purple. Please note: If
the front LED flashes purple, this indicates the
speaker is not connected to a network and is
currently unable to stream music via this input.
2 Launch iTunes (version 10 or later).
3 Click the AirPlay icon (usually located in the
upper left of the iTunes window) and choose
your speaker from the list. You can choose
multiple speakers if you have more than one
speaker on your network.
4 Play music.
CONTROLLING PLAYBACK USING ITUNES
To control playback (play/pause/song skip/shuffle/repeat/volume) from your speaker or remote
control, follow these steps:
1 Set the speaker’s input to “Wireless/
Ethernet.” The front LED will be purple.
2 On your computer, launch iTunes (version 10
or later).
3 Open “Preferences” and choose “Devices.”
4 Check the box for “Allow iTunes audio con-
trol from remote speakers” and click okay.
PLAYBACK – USING DLNA
DLNA (Digital Living Network Alliance) streaming is available through a variety of compatible
devices, such as Blu-ray players, game consoles,
and software/operating systems, including recent
versions of Windows Media Player. Please refer to
www.dlna.org for more information.
1 Set the speaker’s input to “Wireless/Ethernet.”
The front LED will be purple. Please note: If
the front LED flashes purple, this indicates the
speaker is not connected to a network and is
currently unable to stream music via this input.
2 Refer to the instructions that came with your
device/software to learn how to choose the
speaker as the play device.
3 Play music.
CONNECTING TO A LOCAL AREA NETWORK
PROBLEMS CONNECTING TO YOUR
LOCAL AREA NETWORK?
If you are experiencing problems connecting your
speaker to your LAN, try the following:
14
1 Power your speaker off and back on using the
power button located on back of the speaker.
2 Perform a factory reset by inserting a pin or
other small object into the small hole above
the “Reset” label on back of the speaker.
Page 15

Using the pin, press the recessed button for
approximately five seconds. The “Wi-Fi Setup
and Status” LED will briefly turn green and
then rapidly blink green for approximately
fifteen seconds. Then, the speaker will restart
itself and the “Wi-Fi Setup and Status” LED
will begin blinking slowly green.
DOWNLOADING CONNECTION
SETTINGS FROM AN APPLE DEVICE
1
If not already connected, wirelessly connect
your Apple device (iPad/iPod/iPhone) to your
desired Wi-Fi network (2.4GHz network only).
2 Turn your speaker on and wait approximately
thirty seconds.
3 Using a USB cable, attach your Apple iOS
device to the speaker.
4 For two seconds press and hold the “Wi-Fi
Setup and Status” button (located on back of
the speaker. The LED above the button will
begin blinking red/green. If the connected
Apple device is capable of sharing Wi-Fi settings, a dialog box will appear on the Apple
device. Press “Allow.” Your speaker will automatically be programmed to connect to your
wireless network.
5 Upon successfully completing Wi-Fi setup, the
“Wi-Fi Setup and Status” LED will turn green.
6 Remove the Apple device from the USB cord.
7 You are ready to stream music to your speaker.
USING WI-FI TO SET UP YOUR SPEAKER
1 Turn your speaker on and wait approximately
thirty seconds.
2 For six seconds, press and hold the “Wi-Fi
Setup and Status” button (located on back of
the speaker. The LED above the button will
begin blinking red.
3
On your iOS device, access “Settings >
Wi-Fi.” If using a non-iOS device, access the
device’s Wi-Fi control panel. You can also use
a laptop with Wi-Fi capability to complete this
setup.
4 Select the speaker from the list of available
Wi-Fi networks. You may need to refresh the
network list several times before the speaker
will appear.
5 Open a web browser and enter the address
“192.168.1.1” in the field where you would
normally enter a web-site addresses.
6
If you would like to assign a unique AirPlay
name to the speaker, enter a name in the
“AirPlay Device Name” field and hit “Apply.”
Before proceeding, you may need to reload the
speaker’s setup screen as described in step 5.
7
Under “Wireless LAN Settings,” select your
desired Wi-Fi network from the drop down list
(2.4GHz network only). If your wireless network
requires a pass phrase, enter it into the “WPA
Pass phrase” field. If you require custom settings,
such as a different encryption method, please
select “Configure Manually” from the drop
down list and fill out the appropriate fields.
8 Click “Apply.”
9 Upon successfully completing Wi-Fi setup, the
“Wi-Fi Setup and Status” LED will turn green.
10 Reconnect the device you used to set up your
speaker to its normal Wi-Fi network connec-
tion settings.
11 You are ready to stream music to your speaker.
USING ETHERNET TO SET UP YOUR
SPEAKER’S WI-FI CONNECTION
1 Turn your speaker on and wait approximately
thirty seconds.
2 Turn off the Wi-Fi on the computer.
3 Connect an Ethernet cable directly from the
computer to the speaker.
4 Open a web browser and enter the address
“192.168.1.1” in the field where you would
normally enter a web-site addresses.
5 If you would like to assign a unique name
to the speaker, enter a name in the “AirPlay
15
Page 16

Device Name” field and hit “Apply.” Before
proceeding, you may need to reload the
setup screen as described in step 4.
Under “Wireless LAN Settings,” select your
6
desired Wi-Fi network from the drop down list
(2.4GHz network only). If your wireless network
requires a pass phrase, enter it into the “WPA
Pass phrase” field. If you require custom settings,
such as a different encryption method, please
select “Configure Manually” from the drop
down list and fill out the appropriate fields.
7 Click “Apply.”
8 Upon successfully completing Wi-Fi setup, the
“Wi-Fi Setup and Status” LED will turn green.
9 Disconnect the Ethernet cords from your
computer and the speaker. Reconnect your
computer to your Wi-Fi network.
10 You are ready to stream music to your speaker.
SETTING UP A PERMANENT ETHERNET
CONNECTION
1 Turn your speaker on and wait approximately
thirty seconds.
2 Use an Ethernet cable to connect your speaker
to your router.
3 Your speaker should now appear as an avail-
able device on your network.
4 If you would like to customize the name of
your speaker, follow steps 1–5 of “USING
ETHERNET TO SET UP YOUR SPEAKER’S
WI-FI CONNECTION.”
5 You are ready to stream music to your speaker.
SETTING UP A DIRECT WI-FI CONNECTION
In some situations, you may not have access to a
Wi-Fi network. It is still possible to wirelessly connect to the speaker and play music.
1 Turn your speaker on and wait approximately
thirty seconds.
2 For six seconds press and hold the “Wi-Fi
Setup and Status” button (located on back of
the speaker. The LED above the button will
blink red.
3 On your Apple iOS device, access “Settings
> Wi-Fi.” If using a non-Apple device, access
the device’s Wi-Fi network control panel. You
can also use a laptop with Wi-Fi capability
to complete this setup.
4 Select the speaker from the list of available
Wi-Fi networks. You may need to refresh the
network list several times before the speaker
will appear.
5 You are ready to stream music to your speaker.
USB CONNECTION (COMPATIBLE APPLE DEVICES)
Compatible Apple devices, when connected via
a USB cable, can send music to your speaker
using the USB input. In addition, these devices will
charge when attached to the speaker’s USB input.
Non-Apple devices, when connected to the USB
input, will charge but cannot play audio over this
connection, although you may still stream audio
from these devices via the speakers Auxiliary and
Bluetooth inputs. Many devices, when connected
to this speaker, will receive a rapid charge.
16
1 Set your speaker to USB mode. Use the remote
to select USB, or repeatedly press the input button on front of the speaker until the front LED
turns white.
2 Open your iOS device music application and
start playing a song. Within your music application, you may need to select the speaker as
the playback device.
Page 17

BLUETOOTH CONNECTION
1 Set your speaker to Bluetooth mode. Use the
speaker’s remote control to select Bluetooth,
or repeatedly press the input button on front
of the speaker until the front LED turns blue.
2 Sync the speaker with your digital media
device or computer. Follow the directions that
came with your device/computer.
UPDATING THE FIRMWARE
It may be necessary to occasionally update your
speaker’s firmware. For instructions on performing
a firmware update visit www.martinlogan.com.
REMOVING THE FRONT GRILLE
Fig. 4
3 Within your music application, you may need
to select the speaker as the output device for
playback.
4 You are now ready to stream music to your
speaker
To remove the front grille from the speaker use a
finger to firmly apply pressure to either corner of
the grille.
17
Page 18

CONTACTING CUSTOMER SERVICE
MartinLogan customer service is available
Monday–Friday between the hours of 8am–5pm
(central time) by calling (785) 749-0133 or by
GENERAL INFORMATION
WARRANTY INFORMATION
Your speaker is provided with an automatic Limited
90 Day Warranty coverage. You have the option,
at no additional charge, to receive Limited 2 Year
Warranty coverage. To obtain the Limited 2 Year
Warranty coverage, please complete and return
the Certificate of Registration to MartinLogan within 30 days of purchase. For your convenience,
MartinLogan also offers online warranty registration at www.martinlogan.com.
MartinLogan may not honor warranty service
claims unless we have a completed Warranty
Registration card on file! If you did not receive a
Certificate of Registration with your new speaker,
you cannot be assured of having received new
units. If this is the case, please contact your authorized MartinLogan dealer.
emailing service@martinlogan.com.
SERVICE
Should you use your MartinLogan product in a
country other than the one in which it was originally
purchased, we ask that you note the following:
1 The appointed MartinLogan distributor for any
given country is responsible for warranty servicing
only on units distributed by or through it in that country in accordance with its applicable warranty.
2 Should a MartinLogan product require servicing in a country other than the one in which
it was originally purchased, the end user may
seek to have repairs performed by the nearest
MartinLogan distributor, subject to that distributor’s local servicing policies, but all cost of repairs
(parts, labor, and transportation) must be borne by
the owner of the MartinLogan product.
SERIAL NUMBER
The serial number is located on back of the speaker, near the connection panel. The serial number
may also be found on the product carton.
18
If, after owning your speaker for six months, you
relocate to a country other than the one in which
you purchased your speaker, your warranty may
be transferable. Contact MartinLogan for details.
Page 19

FREQUENTLY ASKED QUESTIONS
How do I clean my speaker?
Use a dust free cloth (such as a micro fiber cloth)
or a soft brush to remove dust from your speakers.
Do not spray any kind of cleaning agent on or in
close proximity to the drivers.
Can I use other cables other than those
provided with the speaker?
The cables included with the speaker are intended
to get you started. You may find it necessary to
augment your system with additional cables or
replace the included cables with cables of different length.
Could you suggest a list of suitable electronics and cables ideal for this speakers?
We have no favorites and use electronics and
cables quite interchangeably. We would suggest
listening to a number of brands—and above all
else—trust your ears. Dealers are always the best
source for information when purchasing additional
audio equipment.
Is there likely to be interaction between
my speaker and the TV in my A/V system?
Yes, but only with CRT televisions. This speaker is
not magnetically shielded and should be kept at
least two feet away from a CRT television. LCD
and plasma televisions will not be affected.
How can I remove the grille cloth from
the speaker?
Use a finger to firmly apply pressure to either corner
of the grille.
TROUBLESHOOTING
My speaker is not behaving as expected
•
Turn the speaker off using the Power button on
back of the speaker next to the AC input. Wait
thirty seconds and turn the speaker back on.
• Unplug the speaker, wait
plug it back in.
• Turn the speaker on and perform a factory
reset by inserting a pin or other small object
into the small hole above the “Reset” label on
back of the speaker. Using the pin, press the
recessed button for approximately five sec-
onds. When the factory default settings have
successfully been restored, the “Wi-Fi Setup
and Status” LED will briefly turn off, rapidly
blink green for approximately fifteen seconds,
and then begin blinking slowly green.
Front LED is flashing purple
• The speaker is set to Wireless/Ethernet input,
but no network is detected.
thirty
seconds, and
• If connected via an Ethernet cable, check to
make sure the cable is attached to a router
and that the router is functioning properly.
•
If connected via Wi-Fi, make sure your router is
on and functioning properly. Unplug your router’s
power, wait thirty seconds, and plug it back in.
•
Check to make sure your speaker is properly
configured to connect to your LAN and not
using a 5GHz network connection. Review the
section of the manual titled, “CONNECTING
TO A LOCAL AREA NETWORK (LAN).”
Speaker volume is not changing when
using a compatible Apple device or a computer with iTunes (version 10 or later).
• You may need to enable iTunes control
from remote speakers. Review the section of
the manual titled “CONTROLLING MUSIC
PLAYBACK USING ITUNES.”
• Refer to the software’s documentation.
19
Page 20

When using Windows Media Player for
DLNA, the speaker is not playing music.
• You may need to turn on media sharing
within Windows Media Player to enable
streaming to the speaker. Refer to the software documentation.
• Within Windows Media Player you may
need to select the speaker as the output
device. Refer to the software documentation.
Sound is coming from both my speaker
and my television
• When utilizing the speaker with a television,
the television’s audio output should be defeated. Some televisions will allow you to turn off
the internal speaker via the television’s menu
system. Other televisions may require you to
turn the television’s volume to “zero” or to
“mute” the television.
When using a device with DLNA, the
speaker is not playing music.
• You may need to turn on media sharing within
your device to enable streaming to the speaker.
Refer to the software documentation.
• Within your DLNA compatible device, you
may need to select the speaker as the output
device. Refer to the software documentation.
Speaker does not turn on
• Check that the speaker’s AC power cord is
firmly attached to the speaker’s AC In jack
and plugged into a working AC outlet.
No output from the speaker
• Check that the speaker is turned on.
• Check that the speaker is not muted.
• Check that the speaker’s volume is not turned
all the way down.
• Check the speaker is set to the proper input.
• Check that your source component is turned
on and source material is playing.
• Turn the speaker off and on using the remote
control or the front panel standby button.
• Unplug the speaker, wait thirty seconds, and
plug it back in.
• Check that all interconnecting cables are
connected at both ends. If necessary, try connecting an alternate source component to
make sure the original source component isn’t
the problem.
The speaker is too quiet even when it is
turned up
• Check that the output on your audio source
is not connected via a variable level output.
Sometimes this option may be configured in
the source component’s menu. Please refer
to the manual for the source component in
question. If the connected device has a variable level output (such as a headphone jack
on a digital media player), you may need to
adjust the volume level on the device itself.
No sound coming from external sub
• Check that the external sub is turned on.
• Check that the speaker Sub Out button is set
to On.
• Unplug the speaker, wait thirty seconds, and
plug it back in.
External sub is too quiet
• Turn up the volume on the subwoofer.
• Try moving the subwoofer to a different location in the listening room.
The speaker will not enter standby
mode or stay in standby mode
• If the Auxiliary Input has a cable plugged into
the connection (with or without active audio
content), the speaker will not go into standby
mode or stay in standby mode, even if standby is manually activated.
20
Page 21

SPECIFICATIONS*
Frequency Response .....................
Crossover Frequency.....................
Amplifier Power ........................
High Frequency Drivers...................
Low Frequency Drivers ...................
Cabinet ..............................
Components ...........................
50–23,000 Hz ± 3 dB
3,600 Hz
1 x 50 Watts (woofer). 2 x 25 Watts (tweeters)
100 Watts (140 Watts peak) combined total output.
Two 0.94” x 1” (2.4cm x 2.5cm) Folded Motion
Transducers with 2.8” x 1.25” (7.1cm x 3.2cm)
diaphragm.
5” x 7” (12.7cm x 17.8cm) fiber cone with
extended throw drive assembly. Non-resonant
asymmetrical chamber format.
Ported
24-bit 48kHz
DSP based preamplifier
Class-D amplifier
Inputs................................
Wireless Inputs.........................
USB Charging Power ....................
Output ...............................
Power Draw...........................
Remote Battery.........................
Weight...............................
Dimensions (H x W x D) ..................
USB (iPhone, iPad, iPod digital connection)
Auxiliary analog/optical digital (3.5mm mini jack)
RJ45 Ethernet
802.11b/g (2.4GHz)
Bluetooth v4.0 (supports AAC, aptX
®
, MP3, SBC)
2.4 Amp (capable of rapidly charging some devices)
Subwoofer Out via analog RCA
Max: 70 Watts, Idle: 6.5 Watts, Standby: < 4 Watts
2x AAA
15 lbs. (6.8 kg)
8.1” x 25.7” x 6.9” (20.5cm x 65.3cm x 17.5cm)
* Specifications are subject to change without notice.
21
Page 22

DIMENSIONAL DRAWING
MARTINLOGAN CRESCENDO
25.7” (65.3cm) / 25,7 po (65,3cm)
8.1” (20.5cm)
8,1 po (20,5cm)
6.5” (16.5cm)
6,5 po (16,5cm)
6.9” (17.5cm)
6,9 po (17,5cm)
Lawrence, Kansas, USA tel 785.749.0133 fax 785.749.5320 www.martinlogan.com
P/N: 9900201
®
Rev. #122613©2014 MartinLogan Ltd. All rights reserved.
Page 23

CONNECTING TO CRESCENDO
•••
This
GUIDE
will help connect
for
AirPlay playback.
Wireless/Ethernet
(AirPlay)
wireless
or
ethernet connection
!through your
local area network)
Auxiliary
stereo (analog
or
digital) connection to
Crescendo through an audio cable
[]
'------.J~
Bluetooth
direct wireless connection between
Crescendo
and
your mobile device/laptop
USB
wired !digital)
audio
through o
USB
cable
connected
to
a compatible Apple device
0
~-----.J~
CONNECTING VIA A
COMPATIBLE
APPLE
DEVICE
••••
Follow
these
simple
steps
to wirelessly
connect
your
Crescendo
to your local area network. If
the
steps
below do not work for you or
if
you would like to
connect
to
Crescendo
in
a different way
please
see
the
instructions
in
the
OWNER'S
MANUAL.
0
Power
your
Crescendo
Insert the
power
cord into
the
"AC
In" jock on bock
of
the Crescendo and plug it into o
wall
outlet.
0
Turn
Crescendo
on
Press
the power button on bock
of
Crescendo.
Wait
30
seconds while the speaker initializes.
The
Wi-Fi status light
will
begin blinking
red/
green
if
the network isn't
set
up.
9
Connect
via
USB
Make
sure
your
Apple
device
is
connected to your Wi-Fi
network
(2.4GHz
network only).
Use o USB
cable to
connect your
Apple
iOS device.
~D
@
0
Share
seHings
with
Crescendo
For 2 seconds press
and
hold
the
button on
the
bock
of
Crescendo labeled "Wi-Fi Status & Setup." Your
Apple
device will ask
if
you would like to shore Wi-Fi settings.
Top
"ALLOW."
Disconnect
the
USB
cable.
Page 24

MARTIN
LOGAN®
BUSINESS
REPLY
MAIL
FIRST-CLASS
MAIL
PERMIT
NO.
66
LAWRENCE,
KS
POSTAGE
WILL
BE
PAID
BY
ADDRESSEE
MARTIN
LOGAN
2101
DELAWARE
ST
LAWRENCE,
KS
66046-9702
USA
1.11
•••
11
••
11
•••• 1
••
1.11
••
1.1
••
1 •••
111
•••••
1.111
••• 1
NO
POSTAGE
NECESSARY
IF
MAILED IN
THE
UNITED
STATES
Page 25

Important!
To receive a Limited Five Year Warranty (Three Year
Warranty for subwoofers), free
of
charge, you must
return this registration card
within
30 days from
date
of
delivery. For your convenience
Martinlogan
offers full warranty details and online warranty
registration at www.martinlogan.com.
Important:
Please
retain
your
receipt. A copy
of
your
receipt
will be required should your speaker require servicing in the future.
Contact
Information
Name
-------------------------------------
Address
------------------------------------
City
____________________________________
_
State
-----------------
Zip
_______
_
Phone
-------------------------------------
E-mail
-------------------------------------
0 Check here
if
you
would
like
to
receive occasional email
updates about news and opportunities regarding Martin logan.
Register online at www.Martinlogan.com!
Speaker
Information
Model(s)
-----------------------------------
Serial #(s)
----------------------------------
Date
of
Purchase
------------------------------
Date
of
Delivery
____________________________
__
Retail Store
Name
-----------------------------
Salesperson's
Name
__________________________
_
How
did
you initially
learn
about
Martin
logan
'
f1(
)(
)-..c
1 n w:?
0 Internet 0
Sales
associate 0 Friend
or
family
member
0
Audio
magazine (please specify):
______________
_
0
Other
magazine (please specify):
______________
_
0
Other
(please specify):
______________________
_
Rev.
060909
 Loading...