


USER MANUAL
MI 415
Turbidity Meter
Dear Customer,
Thank you for choosing a Martini product.
This manual will provide you with the necessary information for the correct use of the
instrument. Please read it carefully before
using the meter.
This instrument is in compliance with
directives.
Range 0.00 to 50.00 FNU
50 to 1000 FNU
Resolution 0.01 FNU and 1 FNU
Precision ±0.5FNU or ±5% of read-
ing, whichever is greater
Light Source High emission infrared LED
Light Detector Silicon Photocell
Method Detection of scattered light
Environment 0 to 50°C (32 to 122°F);
100% RH max.
Battery Type 1 x 9 volt
Auto-Shut off After 5' of non-use
Dimensions 192 x 104 x 52 mm
(7.5 x 4.1 x 2”)
Weight 380 g
SPECIFICATIONS:
ISTMI415 07/05
MEASUREMENT PROCEDURE:
1• Turn the meter on by pressing
ON/OFF.
2• When the LCD displays “- - -”, the
meter is ready.
3• Fill a clean, dry cuvet with sample
up to the mark.
4• Replace the cap.
5• Clean the cuvet with a lint-
free cloth to remove any fin-
gerprints, dirt or waterspots.
6• Place the cuvet into the
holder and ensure that the
notch on the cap is posi-
tioned securely into the
groove.
7• Press READ/
and “SIP” will blink during
measurement.
8• The instrument directly displays turbidity in
FNU units.
CALIBRATION PROCEDURE:
1• Turn the meter on by pressing ON/OFF.
When the LCD displays “- - -”, the meter is
ready.
2• Press CAL key and “CAL” will blink on the
display.
3• Press CAL key again. The date of calibra-
tion in MM.DD format appears on the LCD.
4• To toggle between month and day
press DATE/
key.
5• To change the date press READ/
key.
6• To confirm the date values press
CAL key.
A blinking ZERO message will appear on
the LCD. Insert the 0 FNU standard and
press CAL key. “SIP” will blink during measurement.
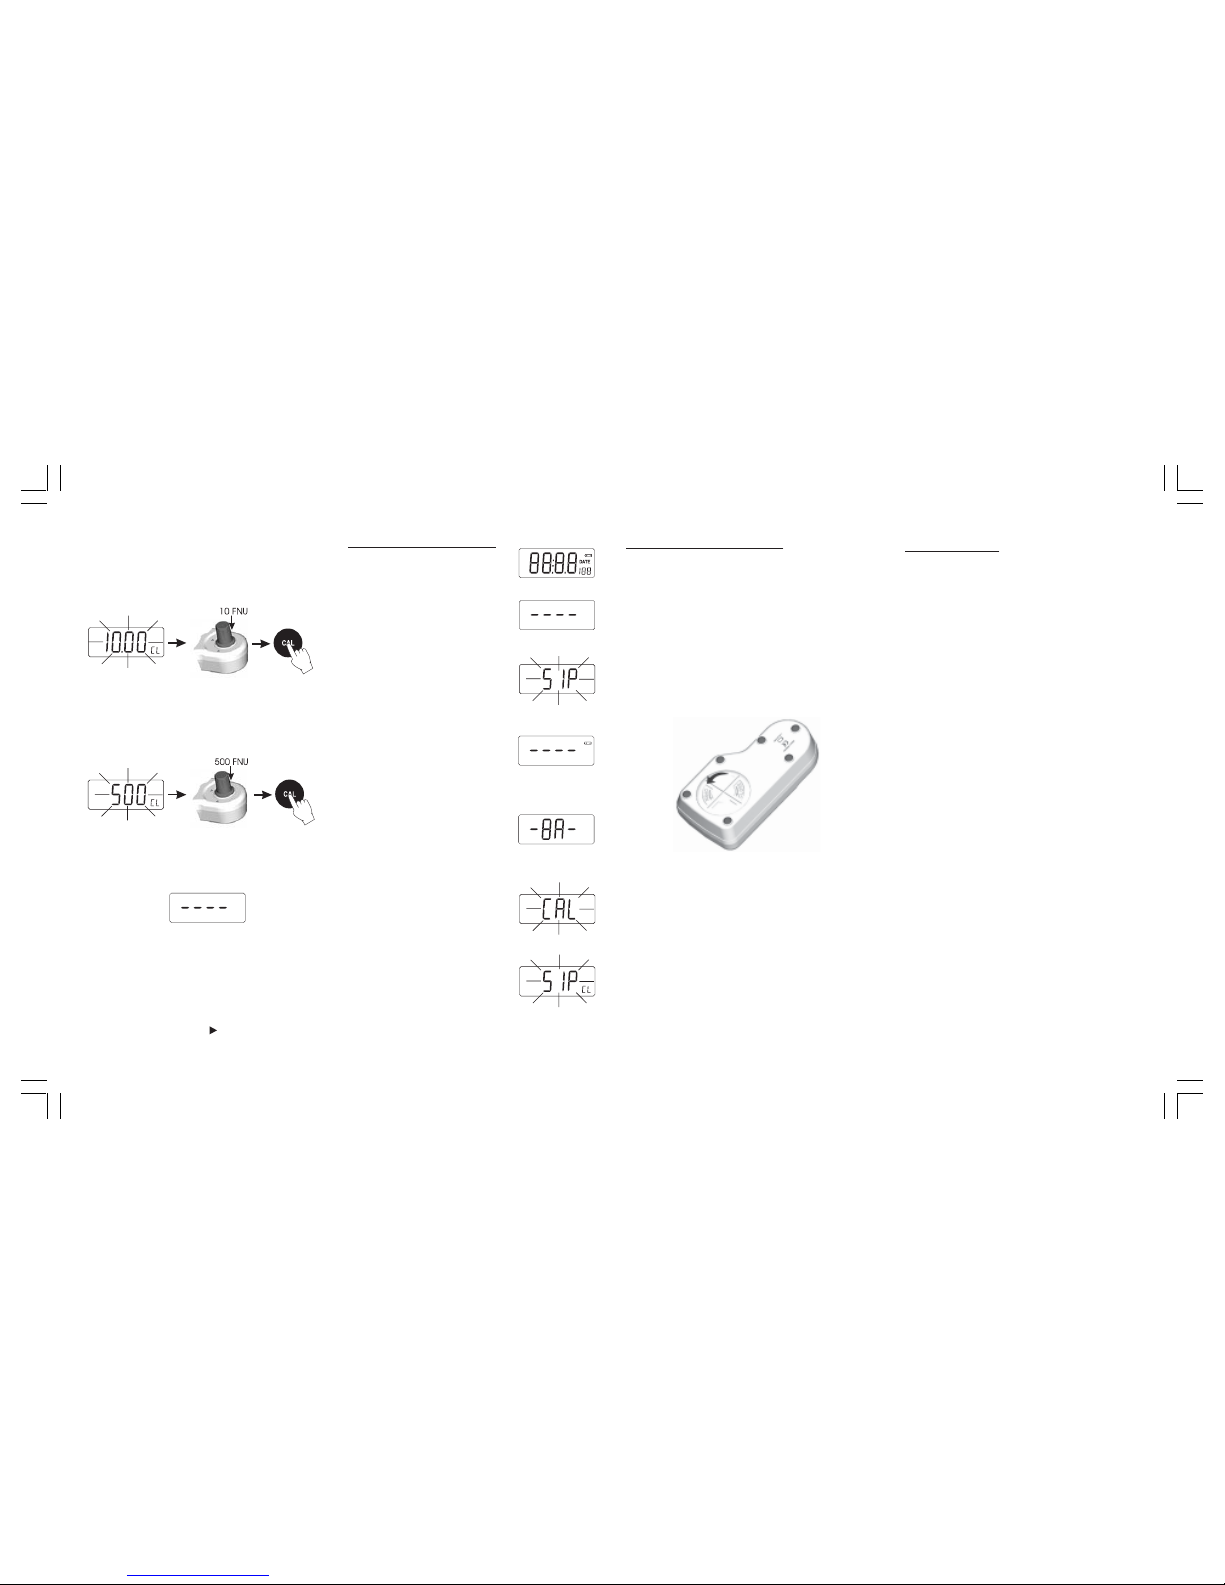
GUIDE TO DISPLAY CODES:
This prompt appears for 1
second each time the instrument is turned on.
The dashes “- - -” indicates
that the meter is in a ready
state and measurement can
be performed.
Sampling In Progress. Flashing “SIP” prompt appears each
time the meter is performing a
measurement.
The presence of battery icon
on the display indicates that
the battery voltage is getting
low and the battery needs to
be replaced.
“-BA-”, the battery is dead and
must be replaced. Once this
indication is displayed, the
meter will lock up. Change the
battery and restart the meter.
“CAL”, the meter is in calibration mode. If the CAL key is
not pressed within 6 seconds,
the meter will automatically
switch to idle mode.
“CL” appears on the lower part
of the display when the meter
is in calibration mode.
BATTERY REPLACEMENT
Battery replacement must only take place in a
non-hazardous environment.
Simply rotate the battery cover on the back of
the meter.
Detach the battery from the terminals and
attach a fresh 9V battery while paying attention to the correct polarity. Insert the battery
and replace the cover.
ACCESSORIES:
MI0004 Tissue for wiping cuvets
(4 pcs.)
MI0005 9V battery (1 pc.)
MI0011 10 mL glass cuvete (2pcs.)
MI0012 cap for 10 mL glass cuvet
(2 pcs.)
MI0013 Stopper for 10 mL glass
cuvet (2 pcs.)
MI515-000 Calibration standards: 0,
10, 500FNU (3 x 30 mL
dropper bottles)
WARRANTY
This instrument is warranted against defects in materials and manufacturing for a period of two years
from the date of purchase.
If during this period the repair or replacement of parts
is required, where the damage is not due to negligence or erroneous operation by the user, please
return the meter to either distributor or our office in
the original packing and the repair will be free of
charge.
Damages due to accidents, misuse, tampering or
lack of prescribed maintenance are not covered.
ISTMI415 07/05
7• At the end the blinking “10.00” message
will appear on the LCD.
Insert the 10 FNU standard and press CAL
key. “SIP” will blink during measurement.
8• The blinking “500” message will appear on
the LCD.
Insert the 500 FNU standard and press CAL
key. “SIP” will blink during measurement.
9• At the end of the reading the instrument
goes directly to measurement mode. Now
the instrument is calibrated and ready to
use.
Note: A monthly calibration is recommended.
The instrument can be checked with the
supplied standard solutions each day.
To check the date of the last calibration
simply press DATE/
key.
 Loading...