

Page 1

Tiger Strings Paths
Visit http://www.martinarchery.com/tiger/ for more detailed pictures of the strings paths.
Instruction Manual
Manufacture warrants to the original retail purchaser, this product to be free
LIMITED 90 DAY WARRANTY
from defects in material and workmanship for a period of ninety days (90)
days from the date of purchase. Should this product become defective due to
material or workmanship within the warranty period, contact our Customer Service
Department for repair or replacement at our option. This warranty is not
transferable and does not cover normal wear and tear, or damage caused by
improper handling, installation or use or this product. This warranty is also void
if product is in anyway abused, damaged or modied from its original state, or if
used for other then residential use. This warranty gives you specic legal rights,
and you may have other rights which vary from state to state.
An arrow shaft can become damaged from
WARNING
impact with hard objects or other arrows. A
damaged arrow could break upon release
and injure you or a bystander. You must
carefully inspect each arrow shaft, nock and
other components before each shot to see
that they have not been damaged. Before
shooting, look closely for nicks, cracks, splits,
dents or other marks that could indicate
damage to the arrow. If an arrow has been
damaged, or if you believe it has been
damaged, do not shoot it again. As it could
break on release and sharp arrow pieces could
hit and injure you or someone nearby.
WARNING: NOT A TOY!
May cause serious or fatal injury!
Read these instructions carefully!
Keep out of reach of children! Use
only with adult supervision! Bow
and arrows shipped in this set are
matched. Do not use arrows in any
other bow.
WARNING
Do not expose to excessive heat.
Leaving in a car on a hot day may
cause warping of the riser.
Page 2
THE ARROW: The arrow nock always has the
groove positioned so that the index vane clears the
bow in the best fashion. (Figure 3)
NOCKING THE ARROW: Place the arrow nock
groove on the string. Make sure the arrow nock
groove is completely sealed on the string. The arrow
should be 90 degrees (right angle) to the string.
(Figure 4)
ARMGUARD: Put arm guard on the arm with which you
hold the bow. It should cover the inside of the lower arm to
protect it from being slapped by the string when string is
released. (Figure 5)
FINGER TAB: The nger tab protects your ngers from
rubbing by the bow string when string is release. (Figure 6)
To place nger tab on hand:
1. Slip the nger tab over your second nger so that the tab is
on the palm side of your hand with the small lobe up.
2. Bend the tab so that the small lobe covers your index
nger, and the large lobe covers your middle two ngers.
HOLDING THE STRING AND ARROW: Hook the three ngers
on the string at the rst joint. Place the thumb and little
nger together in the modied Boy Scout Salute. (Figure 7)
SHOOTING STANCE AND AIMING:
1. Stand with your body at a right angle to the target.
Right-handers will have their left shoulder toward the target.
Left-handers will have their right shoulder toward the target.
These instructions are written for right-handers.
Left-handers simply reverse instructions.) (Figure 8)
2. Stand with target slightly to the front of a line running from
your left shoulder. (Figure 8)
3. Hold the bow in your left hand. Extend left arm toward the
target with your head in a natural “looking at the target”
position.
4. Place the arrow on the left hand side of the bow with the
odd color feather (index vane) facing the left.
5. Nock the arrow on the string.
6. Pull the string using your rst three ngers of your right
hand, with the arrow between your rst and second ngers.
Keep your left arm (holding the bow) slightly bent. Keep
bow straight up and down. (Figure 7)
7. Pull the string to your face. Aim arrow at the target and
release string. Time should be taken to aim before releasing
arrow. (Figure 9)
THE TARGET: The target face shipped with this set should be mounted close to the
ground and on something that will accept the arrow and hold it, will not cause the
arrow to glance o, and will not damaged the arrow. For example, use a large
cardboard box stued with straw.
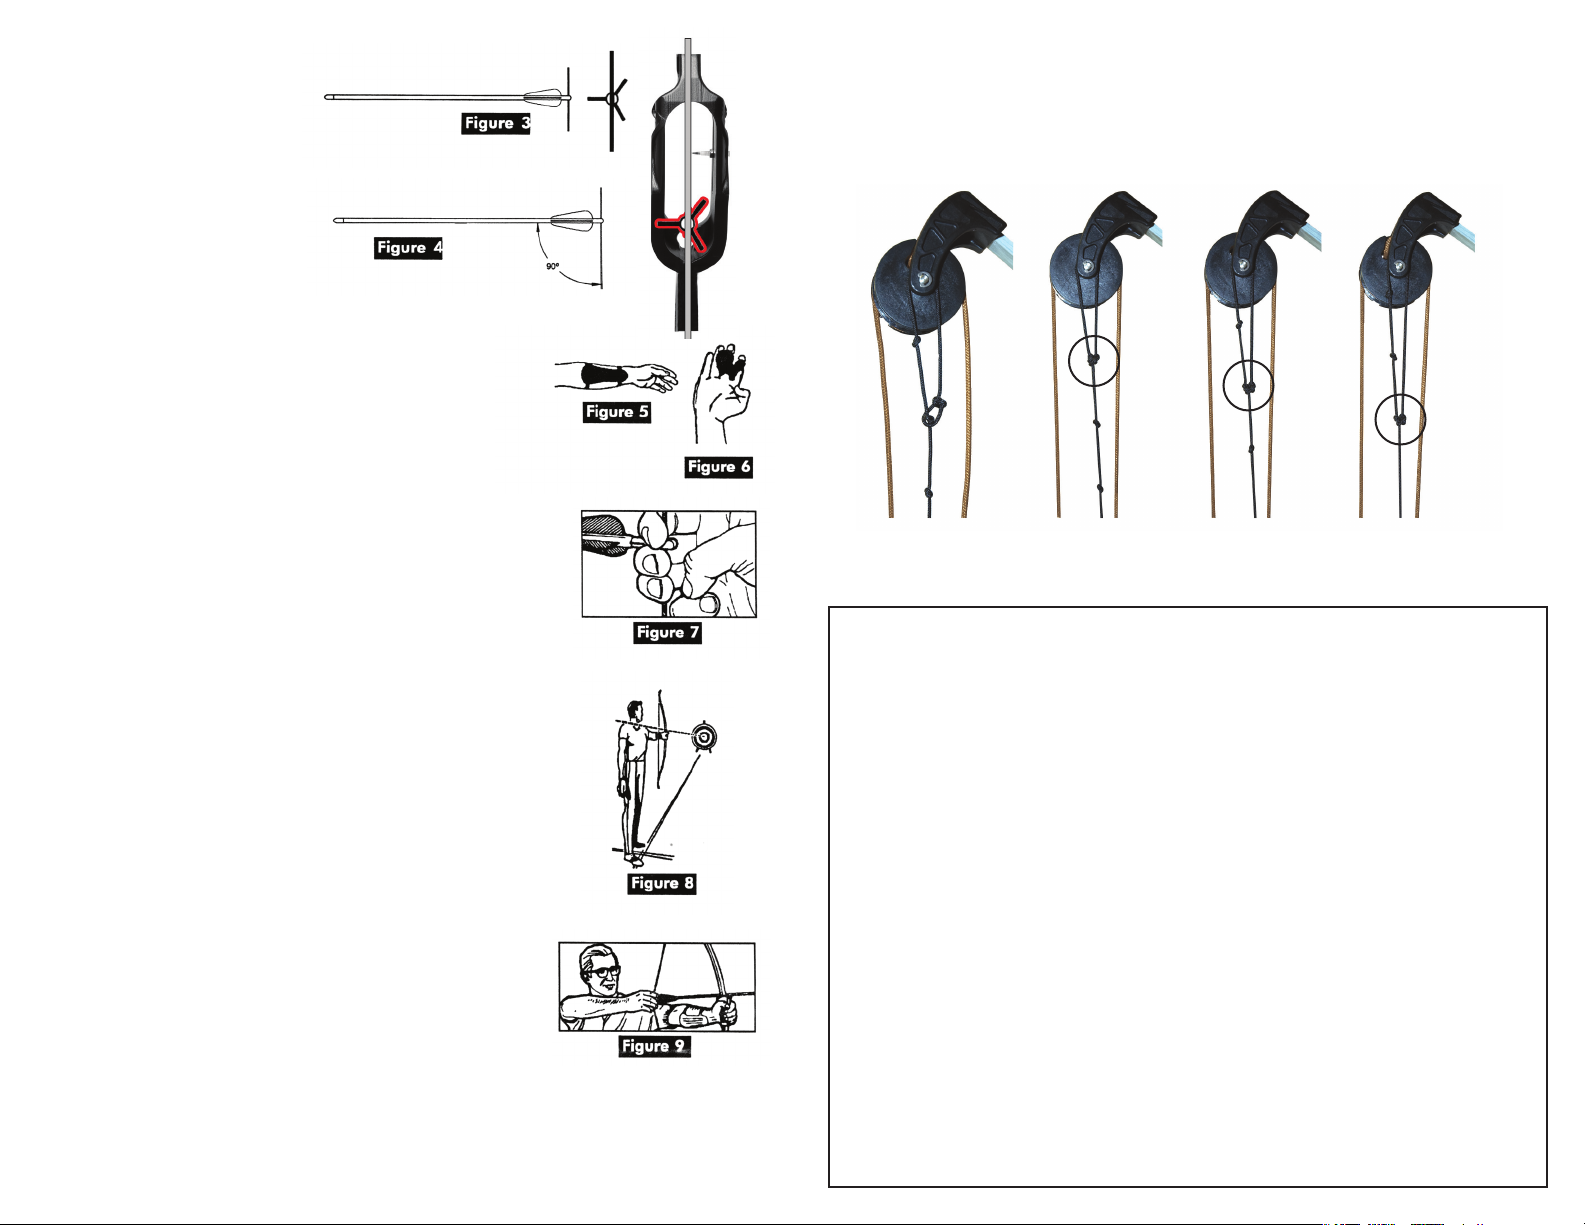
CHANGING DRAW WEIGHT: The Martin Tiger ships at 15# and can be
adjusted to, 10#, 15#, or 20#.
The best way to adjust the Tigers draw weight is to put it in a bow press to compress
the limbs. Loosen the slip not on the black string and move it to the appropriate
knot. The knot closest to the upper wheel is #10, the center knot is #15, and the knot
the furthest away from the upper wheel is the 20# setting.
Loosen
10# Knot
15# Knot
20# Knot
Slip knot
Safety
Bows and arrows are not toys! Safety precautions should be taken just as with
air rie or darts. The user should read, understand and follow the guidelines.
• Always remember that a loaded bow is a deadly weapon!
• Never Show your skill by using a human target or permit someone to hold a
target for you!
• Be sure no one is standing in front of to the sides of the archer while the bow is
being drawn or shot! Be sure everyone is standing behind the archer.
• Never use arrows that are too short!
• Replace your bowstring when it becomes worn or frayed.
• Always string your bow properly!
• Always use nger and arm protectors!
• Never use a target that cannot stop an arrow!
• Always have an adequate backstop in the area behind the target. Make sure the
area behind the target is clear and free of objects that may cause the arrows to
bounce o or be deected. The target in this set is designed to have its base
on the ground or close to the ground so that the arrow will not have to be shot
upward.
• Do not allow anyone to retrieve arrows until ALL arrows have been shot!
• Remember, look before you shoot!
• Never use a damaged bow or damaged arrows! Inspect bow and arrows
periodically for imperfections such as cracks, splits, or splinters. If any damage is
detected, bow or arrow must be destroyed!
 Loading...