

Page 1
T-Rex
www.audiovias.com
user manual
Page 2
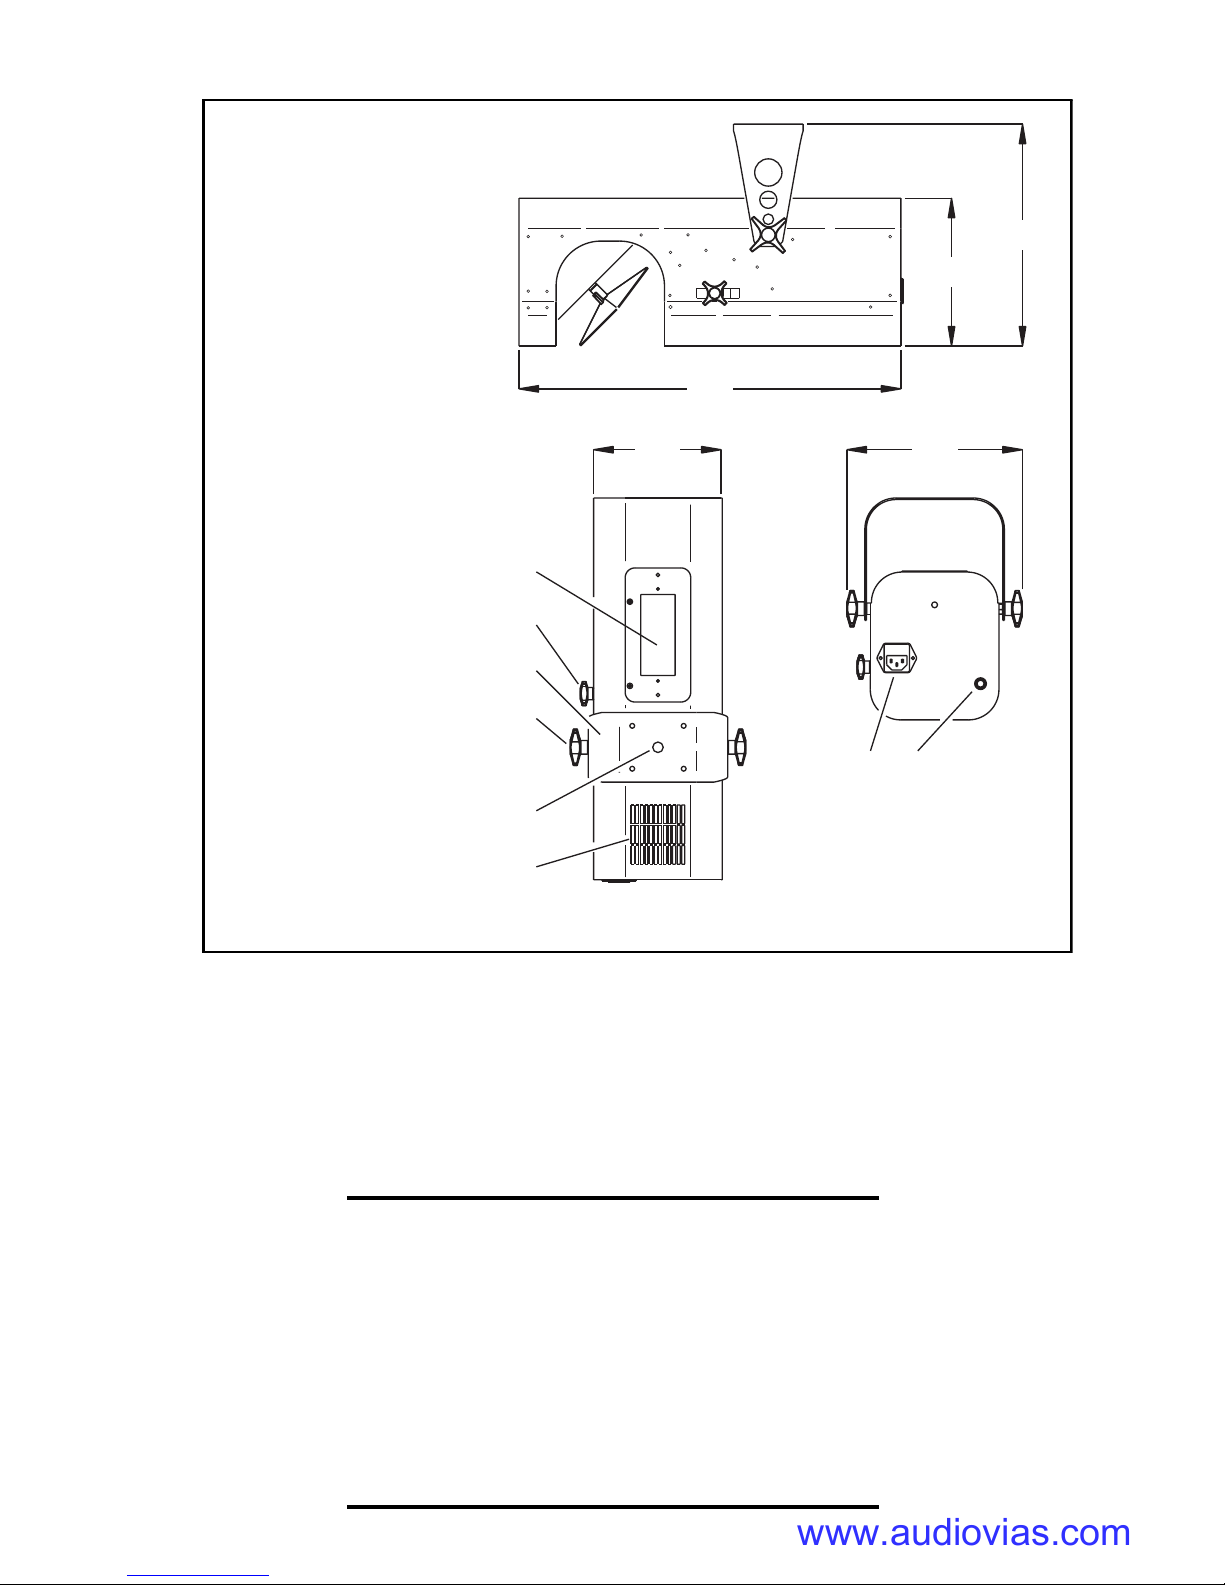
Measurements are expressed in millimeters.
www.audiovias.com
1 Lamp access
2 Focus adjustment
3 Mounting bracket
4 Swivel locks
5 Clamp hole
6 Air vent
285
190
7 AC input & main fuse
8 Microphone
490
164 225
1
2
3
4
7 8
5
6
© 2001 Martin Professional A/S, Denmark.
All rights reserved. No part of this manual may be
reproduced, in any form or by any means, without
permission in writing from Martin Professional A/S,
Denmark.
Printed in China.
P/N 35000101, Rev. B
Page 3

Introduction . . . . . . . . . . . . . . . . . . . . . . . . . . . . . . . . . . . . . . . .4
www.audiovias.com
T-Rex safety information . . . . . . . . . . . . . . . . . . . . . . . . . . . . . . . . . . . . . . . . . 4
Unpacking . . . . . . . . . . . . . . . . . . . . . . . . . . . . . . . . . . . . . . . . . . . . . . . . . . . . 5
AC power . . . . . . . . . . . . . . . . . . . . . . . . . . . . . . . . . . . . . . . . . .6
Installing a plug on the mains lead . . . . . . . . . . . . . . . . . . . . . . . . . . . . . . . . . 6
Installation . . . . . . . . . . . . . . . . . . . . . . . . . . . . . . . . . . . . . . . . .7
Installing or hanging the T-Rex . . . . . . . . . . . . . . . . . . . . . . . . . . . . . . . . . . . . 7
Using the bracket as a floor stand . . . . . . . . . . . . . . . . . . . . . . . . . . . . . . . . . . 8
Operation . . . . . . . . . . . . . . . . . . . . . . . . . . . . . . . . . . . . . . . . . .9
Service . . . . . . . . . . . . . . . . . . . . . . . . . . . . . . . . . . . . . . . . . . .10
replacing the main fuse . . . . . . . . . . . . . . . . . . . . . . . . . . . . . . . . . . . . . . . . . 10
Lamp installation . . . . . . . . . . . . . . . . . . . . . . . . . . . . . . . . . . . . . . . . . . . . . . 10
Troubleshooting . . . . . . . . . . . . . . . . . . . . . . . . . . . . . . . . . . .12
Specifications . . . . . . . . . . . . . . . . . . . . . . . . . . . . . . . . . . . . .13
3
Page 4

I
www.audiovias.com
NTRODUCTION
Thank you for selecting the Martin T-Rex. This lighting fixture uses a 250 watt
halogen lamp, a moving 4-facet mirror, a multi-effect color/gobo wheel, and a
built-in microphone to project exciting effects automatically in time with the
music.
1
T-REX SAFETY INFORMATION
Warning! This product is not for household use. It presents risks of
lethal or severe injury due to fire and heat, electric shock, and
falls.
Read this manual before powering or installing the fixture, follow the safety
precautions listed below and observe all warnings in this manual and printed on
the fixture. If you have questions about how to operate the fixture safely, please
contact a Martin distributor for assistance. Refer any service operation not
described in this manual to a qualified technician. Do not modify the fixture or
install other than genuine Martin accessories and upgrade kits.
Avoiding electric shocks
• Disconnect the fixture from AC power before removing or installing the lamp,
fuses, or any part, and when not in use.
• Always ground (earth) the fixture electrically.
• Use only a source of AC power that comp lies with local building and electrical
codes and has both overload and ground-fault protection.
• Do not expose the fixture to rain or moisture.
• Refer all service to a qualified technician.
• Never operate the fixture with missi ng or damaged lenses and/or covers.
Protecting yourself and others from burns and fire
• Never attempt to bypass the thermostatic switch or fuses. Al ways replace
defective fuses with ones of the specified type and rating.
• Ensure that the air flow through fans and vents is free and unobstructed.
4 T-Rex user manual
Page 5

• Keep all combustible materials (for example fabric, wood, paper) at least 0.3
www.audiovias.com
meters (12 inches) away from the fixture. Keep flammable material s well away
from the fixture.
• Do not illuminate surfaces within 0.1 meters (4 inches) of the fixture.
• Provide a minimum clearance of 1 meter (39 inches) around fans and air vents.
• Replace the lamp i f it becomes de fecti ve or w orn out, or before usage e xceeds the
maximum service life. When replacing the lamp, all ow the fixture to cool for at
least 5 minutes before opening the fixture or remo ving the lamp. It can tak e up to
15 minutes for the fixture to cool completely.
• Never place filters or other materials over the lens or mirrors.
• The exterior of the f ixture can reach temperatures up to 60° C (140° F). Allo w the
fixture to cool for at least 5 minutes before handling.
• Do not operate the fixture if the ambient temperature (Ta) exceeds 40° C (104°
F).
• Do not stare directly into the light.
Preventing injuries due to falls
• When suspending the fixture above ground level, verify that the structure can
hold at least 10 times the weight of all installed devices.
• Verify that all e xternal c o ve rs and rig ging hardw are a re secur ely f astened and use
an approved means of secondary attachment such as a safety cable.
• Block access below the work area whenever installing or removing the fixture.
UNPACKING
The packing material is carefully designed to protect the fixture during shipment
- always use it to transport the fixture.
The T-Rex comes with:
• Mounting bracket
• 1.5-meter, 3-wire IEC power cable
•User manual
Introduction 5
Page 6

AC
www.audiovias.com
POWER
2
The T-Rex’s operating voltage is printed on the serial number label near the AC
input. Verify that the operating voltage closely matches the AC supply voltage
before applying power. Contact your Martin dealer if the voltage on the label
differs from the AC mains voltage by more than five percent.
INSTALLING A PLUG ON THE MAINS
LEAD
The fixture’s mains lead may require a grounding-type cord cap that fits your
power distribution cable or outlet. Consult a qualified electrician if you have any
doubts about proper installation.
Warning! For protection from dangerous electric shock, the fixture must
be grounded (earthed). The AC mains supply shall have
overload and ground-fault protection.
Important! Verify that the feed cables are undamaged and rated for the
current requirements of all connected devices before use.
Following the cord cap manufacturer’s instructions, connect the yellow and green
wire to ground (earth), the brown wire to live, and the blue wire to neutral. The
table below shows some pin identification schemes.
Wire Pin Marking Screw color
brown live “L” yellow or brass
blue neutral “N” silver
yellow/green ground green
6 T-Rex user manual
Page 7

I
www.audiovias.com
NSTALLATION
The T-Rex can be permanently installed or hung with a clamp (not included), or it
can be placed on the floor. For maximum lamp life, do not place the fixture
directly on or beside a speaker cabinet or other source of strong vibrations.
Warning! Block access below the work area before proceeding. Always
use a secure means of secondary attachment.
3
INSTALLING OR HANGING THE T-REX
1 Install the mounting bracket on
the chassis as shown. Place
the washers on the stud before
the bracket.
2 Verify that the structure can
support at least 10 times the
weight of all installed fixtures,
clamps, cables, auxiliary
equipment, etc.
3 If hanging the fixture with a
rigging clamp, verify that the
clamp is undamaged and can
bear at least 10 times the
fixture’s weight. Bolt the clamp securely to the bracket with a grade 8.8 (minimum)
M12 bolt and lock nut, or as recommended by the clamp manufacturer, through the
clamp hole in the mounting bracket.
4 If permanently installing the fixture, verify that the hardware (not included) and
mounting surface can bear at least 10 times the fixture’s weight. The four 6 mm
holes and the clamp hole in the mounting bracket may be used for attachment.
Installation 7
Page 8

5 Working from a stable platform, clamp
www.audiovias.com
or fasten the fixture to the structure.
6 Install a safety cable that can hold at
least 10 times the weight of the fixture
through/over the support and mounting
bracket as shown.
7 Loosen the swivel locks, tilt the fixture
to the desired angle, and retighten.
8 V erify that the fixture is at least 1.0 meters (39 in.) from the surface to be illuminated
and at least 0.3 meters (12 in.) from any combustible materials. Verify that the
clearance around the air vent and lamp access plate is at least 0.1 meters (4 in.).
USING THE BRACKET AS A FLOOR
STAND
1 The T-Rex may be placed on the floor by
standing it squarely on the mirror end or
with the support of the mounting bracket.
Never lay the fixture flat on its back!
2 (Optional) Install the mounting bracket as
described above.
3 Set the fixture flat on its mirror end or in
one of the positions shown below. Adjust
the mounting bracket and tighten both swivel locks.
4 Verify (1) that the fixture is stable, (2) that the fixture is at least 1 meters (39 in.)
from the surface to be illuminated and at least 0.3 meters (12 in.) from any
combustible materials, and (3) that the clearance around the air vent and lamp
access plate is at least 0.1 meters (4 in.).
8 T-Rex user manual
Page 9

O
www.audiovias.com
PERATION
Warning! Verify that the power cables are undamaged and rated for the
current requirements of all connected devices before use.
Important! Electric dimmers may damage the electronic components.
The lamp turns on as soon as power is applied. The effects start moving as soon
as sound is picked up by the built-in microphone. An Automatic Gain Control
(AGC) adjusts sensitivity when the average sound pressure alters.
Once the T-Rex is installed and connected, the focus may be adjusted by
loosening and sliding the focus adjustment knob.
Although the T-Rex cannot be dimmed, it may be switched on and off remotely
using switch packs or the full-on and full-off levels on dimmer packs.
4
Operation 9
Page 10

S
www.audiovias.com
ERVICE
1 Unplug the mains cable from the input socket. Pry open the fuse holder and remove
2 Replace the fuse with one of the same type. The fuse rating is listed on serial
5
With the exception of the mains fuse and the lamp, there are no user-serviceable
parts inside the T-Rex. Please refer all service to a Martin distributor, dealer, or
service center.
REPLACING THE MAIN FUSE
the fuse.
number label.
LAMP INSTALLATION
The T-Rex uses a 24V, 250W ELC halogen lamp. Two models are available: an
economical 500 hour lamp and a high-output 50 hour lamp. Installing any other
lamp may damage the fixture!
Allow the lamp to cool for at least 5 minutes before moving the fixture. To avoid
possible damage, remove the lamp when shipping the fixture.
Warning! Disconnect the fixture from AC power and allow the fixture to
cool for 5 minutes before installing a new lamp.
10 T-Rex user manual
Page 11

Installing a lamp in the T-Rex
www.audiovias.com
1 Disconnect the fixture from AC power. If replacing a lamp, allow it to cool for 5
minutes before removing the lamp access cover. The lamp cools faster with the
cover in place.
2 Remove both screws from the lamp access cover and lift the cover off.
3 If replacing a lamp, grasp the old lamp by the reflector and pull it out of the holder.
Then pull the socket off the lamp. Do not pull the wires.
4 Push the socket fully onto the pins of the new lamp.
5 Gently push the lamp into the holder until it snaps into place.
6 Replace the lamp access cover and screws.
Service 11
Page 12

T
www.audiovias.com
ROUBLESHOOTING
Problem Probable cause(s) Remedy
No power to fixture. Check that power is
Fixture is completely dead.
Primary fuse blown. Replace fuse.
6
switched on and cables are
plugged in.
Effect fails to reset correctly.
No light.
Lamp cuts out intermittently
or burns out too quickly.
The effect requires
mechanical adjustment.
Lamp missing or blown Disconnect fixture and
The operating voltage does
not match AC supply.
Blocked air vent. Increase clearance around
Dust buildup inside fixture. Contact Martin technician
The fan may not be w orking.
This will result in the
thermostatic switch cutting
power to the lamp when the
fixture overheats. When the
fixtures cools the lamp will
come on again, causing the
fixture to heat, which will
again trip the thermostatic
switch, and so forth.
Contact Martin technician
for serv ice.
replace lamp.
Contact Martin technician
for serv ice.
fixture.
for professional cleaning.
Contact Martin technician
for serv ice.
12 T-Rex user manual
Page 13

S
www.audiovias.com
PECIFICATIONS
PHYSICAL
• Size (L x W x H)................................... 490 x 164 x 190 mm (19.3 x 6.5 x 7.5 in)
• Weight.......................................................................................... 7.5 kg (16.5 lbs)
CONSTRUCTION
• Housing.................................................................................... aluminum and steel
• Finish . .. ........................... .......................... .. ................el ectrostatic powder coating
THERMAL
• Maximum ambient temperature (Ta) ...............................................40° C (104° F)
• Maximum surface temperature........................................................60° C (140° F)
INSTALLATION
• Minimum distance to combustible materials..................................... 0.3 m (12 in)
• Minimum distance to illuminated surfaces........................................ 1.0 m (39 in)
• Minimum clearance around fan and air vents.......................................0.1 m (4 in)
A
CONTROL
• Control method.............................................................................. sound-activated
ELECTRICAL, EU MODEL
• Input.................................................................................3-prong IEC male socket
• AC Power........................................................................................... 230 V, 50 Hz
• Primary fuse............................................................2.5 AT / 250 V, P/N 05020010
• Maximum power and current...................................270 W, 1.2 A @ 230 V, 50 Hz
ELECTRICAL, UK MODEL
• Input.................................................................................3-prong IEC male socket
• AC Power........................................................................................... 245 V, 50 Hz
• Primary fuse............................................................2.5 AT / 250 V, P/N 05020010
• Maximum power and current...................................270 W, 1.1 A @ 245 V, 50 Hz
ELECTRICAL, US MODEL
• Input.................................................................................3-prong IEC male socket
• AC power............................................................................................125 V , 60 Hz
Specifications 13
Page 14

• Primary fuse............................................................5.0 AT / 250 V, P/N 05020018
www.audiovias.com
• Maximum power and current.................................. 270 W, 2.4 A @ 110 V, 60 Hz
• Maximum power and current.................................. 270 W, 2.2 A @ 120 V, 60 Hz
ACCESSORIES
• Martin DMX Switch Pack, 210-245 V ................................................... 90758200
• Martin DMX Switch Pack, 100-130 V ................................................... 90758300
• Osram 24V/250W ELC 50 h halogen lamp............................................ 97000104
• Philips 24V/250W ELC 500 h halogen lamp.......................................... 97000107
• G-clamp .................................................................................................. 91602003
• Half-coupler clamp ................................................................................ 91602005
14 T-Rex user manual
Page 15

www.audiovias.com
Page 16

www.martin.dk • Olof Palmes Allé 18 • 8200 Aarhus N • Denmark
www.audiovias.com
Tel: +45 8740 0000 •
Fax +45 8740 0010
 Loading...