

Martin RUSH MH 7 Hybrid User Manual

RUSH MH 7 Hybrid
User Manual

© 2016 Martin Professional™ ApS. Information subject to change without notice. Martin
Professional™ and all affiliated companies disclaim liability for any injury, damage, direct or
indirect loss, consequential or economic loss or any other loss occasioned by the use of,
inability to use or reliance on the information contained in this manual. RUSH™, Martin™,
Harman™ and all other trademarks in this document pertaining to services or products by
Martin Professional™ or its affiliates and subsidiaries are registered as the property of Harman
International Industries.
Martin Professional • Olof Palmes Allé 18 • 8200 Aarhus N • Denmark • www.martin.com
Manual: Revision B

Table of contents
Safety information ................................................................................. 4
Introduction ......................................................................................... 10
Before using the product for the first time ................................ 10
Maximizing lamp life ................................................................ 10
Physical installation ............................................................................ 11
Fastening the fixture to a flat surface ...................................... 11
Mounting the fixture on a truss ................................................ 11
AC power ............................................................................................ 13
Linking fixtures to power in a chain ......................................... 14
Fixture overview ................................................................................. 15
Control data link .................................................................................. 16
Tips for reliable data transmission ........................................... 16
Connecting the data link .......................................................... 16
Fixture setup ....................................................................................... 17
Using the control menus .......................................................... 17
DMX address .......................................................................... 17
Lamp settings .......................................................................... 17
Fixture settings ........................................................................ 18
Fixture readouts ...................................................................... 21
Offset menu ............................................................................. 21
Effects ................................................................................................ 22
Hybrid modes .......................................................................... 22
Dimming .................................................................................. 22
Strobe effects .......................................................................... 22
Gobos ...................................................................................... 23
Colors ................................................................................................. 25
Prisms ..................................................................................... 25
Frost ........................................................................................ 25
Focus ...................................................................................... 25
Zoom ....................................................................................... 25
Pan and tilt .............................................................................. 26
Maintenance ....................................................................................... 27
Cleaning .................................................................................. 27
Replacing gobos ...................................................................... 28
Lamp replacement ................................................................... 30
Replacing the primary fuse ...................................................... 32
Service and repairs ................................................................. 32
DMX protocol ...................................................................................... 33
Control menus .................................................................................... 38
Troubleshooting .................................................................................. 40
Specifications ..................................................................................... 41
4 RUSH™ MH 7 Hybrid User Manual
Safety information
WARNING!
Read the safety precautions in this manual before
installing, operating or servicing this product.
The following symbols are used to identify important safety information on the
product and in this manual:
Warning!
Safety
hazard. Risk
of severe
injury or
death.
Warning!
Powerful
light
emission.
Risk of eye
injury.
Warning!
See user
manual for
important
safety
information.
Warning!
Hazardous
voltage.
Risk of
lethal or
severe
electric
shock.
Warning!
Hot
surfaces.
Warning!
Fire hazard.
Warning! Risk Group 3 (high risk) product according to EN
62471. Possibly hazardous radiation emitted from this product.
May be harmful to the eyes. Do not stare at operating lamp
and do not view the light output with optical instruments or any
device that may concentrate the beam.
This lighting fixture is for professional use only and must be
installed by a qualified technician. It is not for household use. It
presents risks of severe injury or death due to fire hazards,
electric shock and falls. It produces a powerful, concentrated
beam of light that can create a fire hazard or a risk of eye
injury if the safety precautions below are not followed.
Install, operate and service Martin™ products only as directed
in their user manuals, or you may create a safety hazard or
cause damage that is not covered by product warranties.
Follow the safety precautions listed below and observe all
warnings in this manual and printed on the product. Keep this
user manual for future use.
RUSH™ MH 7 Hybrid User Manual 5
For the latest user documentation and other information for
this and all Martin™ products, please visit the Martin website
at http://www.martin.com
If you have any questions about how to install, operate or
service the fixture safely, please contact your Martin™
distributor (see www.martin.com/distributors for details) or call
the Martin™ 24-hour service hotline on +45 8740 0000, or in
the USA on 1-888-tech-180.
Respect all locally applicable laws, codes and regulations
when installing, operating or servicing the fixture.
Protection from electric shock
Do not expose the fixture to rain or moisture.
Disconnect the fixture from AC power before carrying out any
installation or maintenance work and when the fixture is not in
use.
Ensure that the fixture is electrically connected to ground
(earth).
Use only a source of AC power that complies with local
building and electrical codes and has both overload and
ground-fault (earth-fault) protection.
Socket outlets or external power switches used to supply the
fixture with power must be located near the fixture and easily
accessible so that the fixture can easily be disconnected from
power.
Replace defective fuses with ones of the specified type and
rating only.
Isolate the fixture from power immediately if the power plug or
any seal, cover, cable, or other component is damaged,
defective, deformed, wet or showing signs of overheating. Do
not reapply power until repairs have been completed.
Before using the fixture, check that all power distribution
equipment and cables are in perfect condition and rated for the
electrical requirements of all connected devices.
Use only Neutrik PowerCon cable connectors to connect to
power sockets.
Do not connect devices to power in a chain that will exceed the
electrical ratings of any cable or connector used in the chain.
6 RUSH™ MH 7 Hybrid User Manual
The supplied power input cable is rated 9 A and can safely
supply only one fixture with mains power. Do not connect any
device to the fixture’s MAINS OUT connector when using this
cable. If you replace this cable and also use the replacement
cable to supply only one fixture with mains power, the
replacement cable must also be rated 9 A minimum, have
three conductors 18 AWG or 0.75 mm² minimum conductor
size, have an outer cable diameter of 6 - 15 mm (0.2 - 0.6 in.)
and be temperature-rated to suit the application. In the USA
and Canada the cable must be UL listed, type SJT or
equivalent. In the EU the cable must be type H05VV-F or
equivalent.
To connect fixtures to mains power in a chain, you must first
obtain 14 AWG or 1.5 mm
2
power input and throughput cables
that are 16 A rated and temperature-rated to suit the
application. In the USA and Canada the cables must be ULlisted, type SJT or equivalent. In the EU the cables must be
type H05VV-F or equivalent. Suitable cables with Neutrik
PowerCon connectors are available from Martin™ (see
‘Accessories’ on page 43). If you use these cables, you can
connect fixtures to power in a linked chain, MAINS OUT
throughput socket to MAINS IN input socket, but do not link
more than:
• two (2) RUSH MH 7 Hybrid fixtures in total at 100-120 V,
or
• four (4) RUSH MH 7 Hybrid fixtures in total at 200-240 V.
The voltage and frequency at the MAINS OUT socket are the
same as the voltage and frequency applied to the MAINS IN
socket. Only connect devices to the MAINS OUT socket that
accept this voltage and frequency.
Protection from burns and fire
Do not operate the fixture if the ambient temperature (T
a
)
exceeds 40° C (104° F).
The surface of the product casing can reach up to 100° C
(212° F) during operation. Avoid contact by persons and
materials. Allow the fixture to cool for at least 10 minutes
before handling.
Keep flammable materials well away from the fixture. Keep all
combustible materials (e.g. fabric, wood, paper) at least 0.2 m
(8 in.) away from the fixture head.
RUSH™ MH 7 Hybrid User Manual 7
Ensure that there is free and unobstructed airflow around the
fixture. Provide a minimum clearance of 0.5 m (20 in.) around
fans and air vents.
Do not illuminate surfaces within 10 m (33 ft.) of the fixture.
Do not attempt to bypass thermostatic switches or fuses.
Do not stick filters, masks or other materials onto any optical
component.
The fixture’s lenses can focus the sun’s rays inside the fixture,
creating a risk of fire and damage. Do not expose the front of
the fixture to sunlight or any other bright light source.
Protection from injury
Fasten the fixture securely to a fixed surface or structure when
in use. The fixture is not portable when installed.
Ensure that any supporting structure and/or hardware used
can hold at least 10 times the weight of all the devices they
support.
If suspending from a rigging structure, fasten two (2) suitable
rigging clamps to the fixture as described in this manual. Do
not use safety cables as the primary means of support.
If the fixture is installed in a location where it may cause injury
or damage if it falls, install as directed in this manual a
secondary attachment such as a safety cable that will hold the
fixture if a primary attachment fails. The secondary attachment
must be approved by an official body such as TÜV as a safety
attachment for the weight that it secures, must comply with EN
60598-2-17 Section 17.6.6 and must be capable of bearing a
static suspended load that is ten times the weight of the fixture
and all installed accessories.
Allow enough clearance around the head to ensure that it
cannot collide with an object or another fixture when it moves.
Check that all external covers and rigging hardware are
securely fastened.
Block access below the work area and work from a stable
platform whenever installing, servicing or moving the fixture.
Do not operate the fixture with missing or damaged covers,
shields or any optical component.
8 RUSH™ MH 7 Hybrid User Manual
Do not lift or carry the fixture by its head. Support the fixture by
its base only.
In the event of an operating problem, stop using the fixture
immediately and disconnect it from power. Do not attempt to
use a fixture that is obviously damaged.
Do not modify the fixture in any way not described in this
manual or install other than genuine Martin™ parts.
Refer any service operation not described in this manual to a
qualified technician.
Lamp safety
Install only a lamp that is approved by Martin™ for use in the
product.
Prolonged exposure to an unshielded discharge lamp can
cause eye and skin burns. Do not look at an exposed lamp
while it is lit. Do not operate the fixture with missing or
damaged covers, shields, lenses, ultraviolet screens or any
optical component.
A hot discharge lamp is under pressure and can explode
without warning. Allow the fixture to cool for at least 1 hour
before handling a lamp and protect yourself with safety
glasses and gloves.
Replace the lamp immediately if it becomes visually deformed,
damaged or in any way defective.
Monitor hours of lamp use. Replace the lamp before or when it
reaches its average lifetime as specified in this manual or by
the lamp manufacturer or if you notice a fall in light output. If
you exceed the average lamp lifetime, the lamp may explode
and damage the fixture.
If the quartz envelope of a discharge lamp is broken, the lamp
releases a small quantity of mercury and other toxic gases. If a
discharge lamp explodes in a confined area, evacuate the area
and ventilate it thoroughly for 30 minutes. Wear nitrile gloves
when handling a broken discharge lamp. Do not use a vacuum
cleaner to remove pieces of a broken lamp. Treat broken or
used discharge lamps as hazardous waste: put them in a
plastic bag and send to a specialist for disposal.

RUSH™ MH 7 Hybrid User Manual 9
Protection from eye injury
Warning! Risk Group 3 (high risk) product according to
EN 62471. Possibly hazardous optical radiation emitted from
this product.
Do not look directly into the product’s light output.
Do not look at operating lamp. Eye injury may result.
Do not expose persons to the product’s light output from a
distance of less than 1.5 m (5 ft.).
Avoid eye or skin exposure to unshielded product. UV emitted
from this product.
Do not look at the light output with magnifiers, telescopes,
binoculars or similar optical instruments that may concentrate
the light output.
Ensure that persons are not looking directly into the front of the
fixture when the product lights up suddenly. This can happen
when power is applied, when the product receives a DMX
signal, or when certain control menu items are selected.
To minimize the risk of eye irritation or injury, disconnect the
fixture from power at all times when the fixture is not in use
and provide well-lit conditions to reduce the pupil diameter of
anyone working on or near the fixture.

10 RUSH™ MH 7 Hybrid User Manual
Introduction
The RUSH™ MH 7 Hybrid is a powerful fixture with a high-intensity beam from
a Philips MSD Platinum 11R 250W short-arc discharge lamp. Designed to be
versatile, the RUSH™ MH 7 Hybrid gives you the flexibility of Beam, Spot and
Wash Modes. Its moving head is packed with motorized focus and 1:6 zoom,
smooth full-range dimming, a strobing shutter and pulse effects, 12 static
gobos, 8 user-replaceable rotating gobos, 13 color filters, 2 rotating prisms and
a frost filter. It provides 540° of pan and 250° of tilt. The short-arc source and
multiple effects make it ideal for live shows, TV events, stage, concerts, and
nightclubs.
The RUSH MH 7 Hybrid can be controlled using any DMX-compliant
controller. It is supplied with a 1.5 m (5 ft.) power cable ready for a local power
plug (not included) and two mounting brackets for attachment of suitable, usersupplied rigging clamps.
Before using the product for the first time
1. Read ‘Safety information’ on page 4 before installing, operating or
servicing the fixture.
2. Unpack and ensure that there is no transportation damage before using
the fixture. Do not attempt to operate a damaged fixture.
3. If the fixture is not going to be hard-wired to a mains supply, install a local
power plug (not supplied) on the end of the supplied power cable.
4. Ensure that the voltage and frequency of the power supply match the
power requirements of the fixture.
5. Check the support pages on the Martin Professional website at
www.martin.com for the most recent user documentation and technical
information about the fixture. Martin™ user manual revisions are identified
by the revision letter at the bottom of the inside cover.
Note that whenever AC power is applied to the fixture, it will reset all effects
and functions to their home positions. Be prepared for the fixture head to
move. A reset usually takes around 50 seconds.
Maximizing lamp life
To obtain maximum output over the lifetime of the fixture’s lamp:
• Each time you power the lamp on, allow it to warm up for at least 5
minutes before you power it off.
• Before shutting down power completely, power the lamp off but leave
power applied to the fixture for a few minutes so that cooling fans can
prevent any momentary lamp temperature increase caused by heat from
surrounding components.
RUSH™ MH 7 Hybrid User Manual 11
Physical installation
Warning! Read ‘Safety information’ on page 4 before
installing the fixture.
The fixture is designed for indoor use only and must be used in
a dry location with adequate ventilation. Ensure that none of the
fixture’s ventilation slots are blocked.
Fasten the fixture to a secure structure or surface. Do not stand
it on a surface or leave it where it can be moved or fall over. If
you install the fixture in a location where it may cause injury or
damage if it falls, secure it as directed in this user manual using
a securely anchored safety cable that will hold the fixture if the
primary fastening method fails.
Do not use the fixture to illuminate surfaces within 10 m (33 ft.)
of the fixture.
Martin™ can supply safety cables and rigging clamps that are suitable for use
with the fixture (see ‘Accessories’ on page 43).
Fastening the fixture to a flat surface
The fixture can be fastened to a hard, fixed, flat surface. Ensure that the
surface and all fasteners used can support at least 10 times the weight of all
fixtures and equipment they will support.
Fasten the fixture securely. Do not stand it on a surface or leave it where it can
be moved or fall over. If you install the fixture in a location where it may cause
injury or damage if it falls, secure it as directed below with a securely anchored
safety cable that will hold the fixture if the primary fastening method fails.
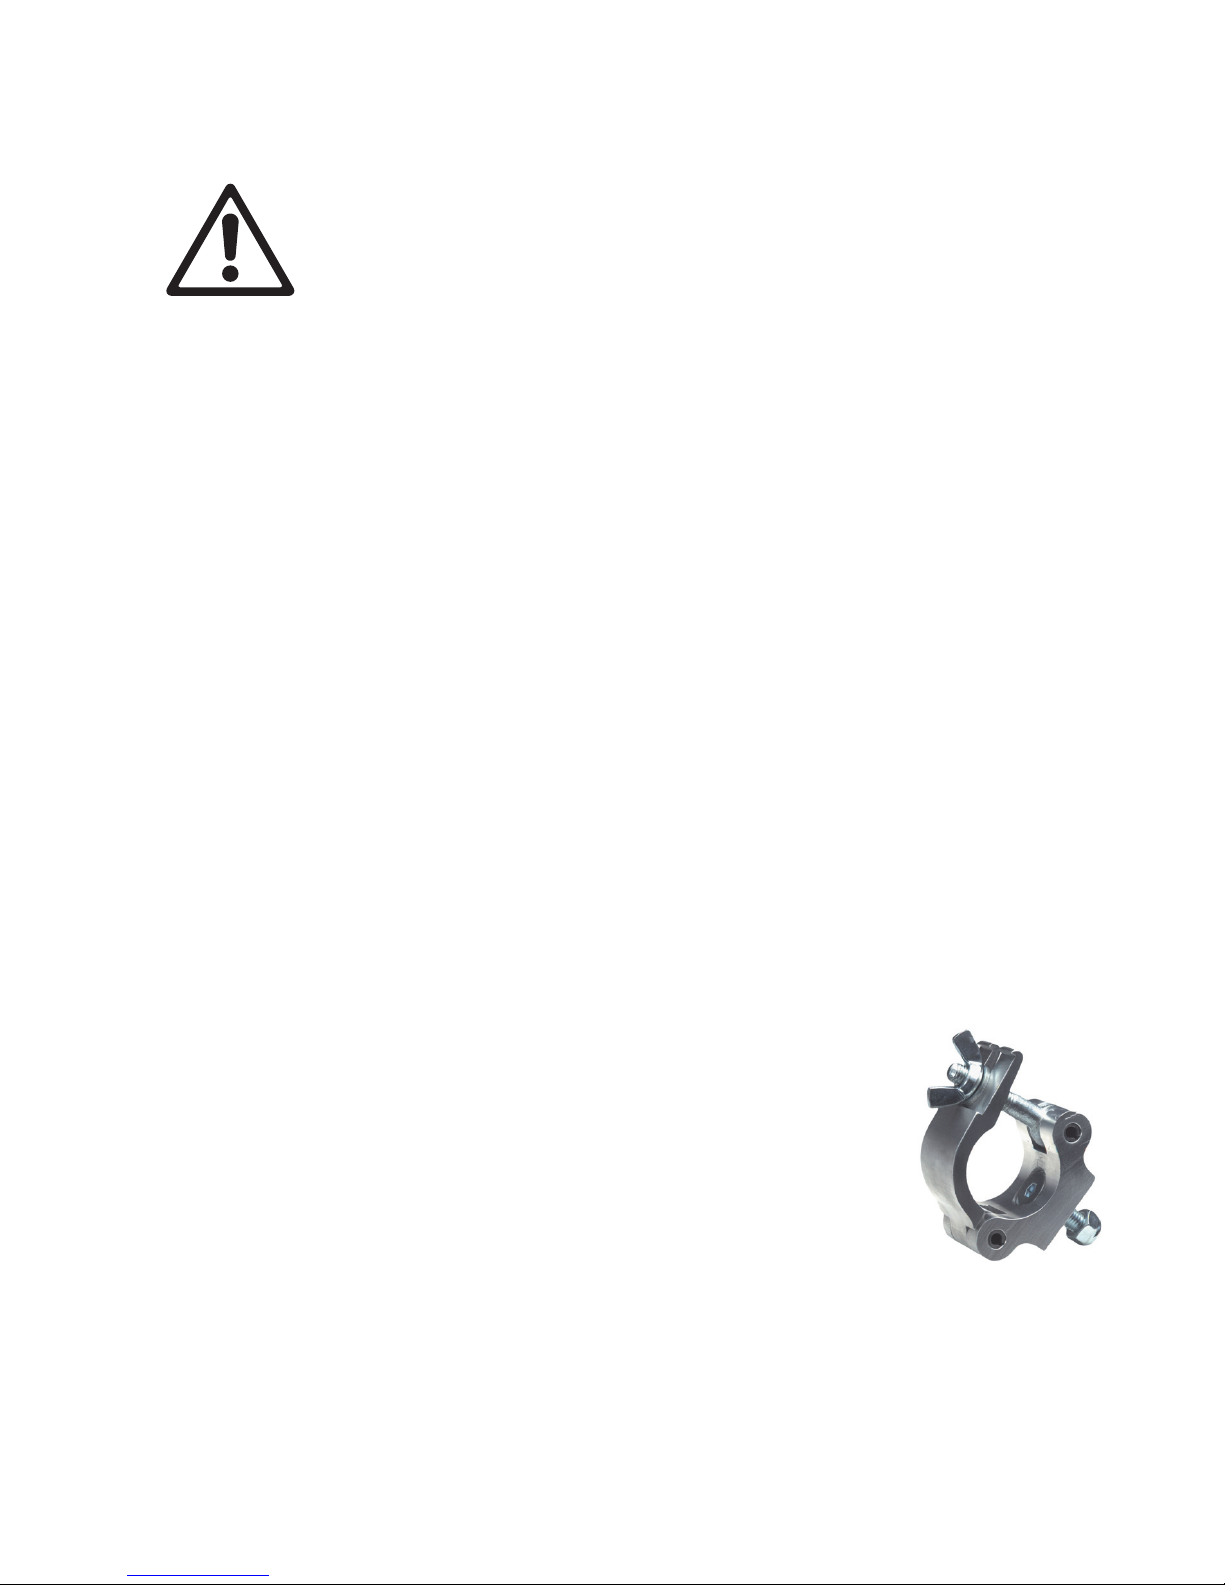
Mounting the fixture on a truss
The fixture can be clamped to a truss or similar rigging
structure in any orientation. When installing the fixture
hanging vertically down, you can use an open-type clamp
such as a G-clamp. When installing in any other orientation,
you must use a closed-type rigging clamp such as halfcoupler clamp (see illustration on right) that completely
encircles the truss chord.
To clamp the fixture to a truss:
1. Check that the rigging structure can support at least 10 times the weight of
all fixtures and equipment to be installed on it.
2. Block access under the work area.
12 RUSH™ MH 7 Hybrid User Manual
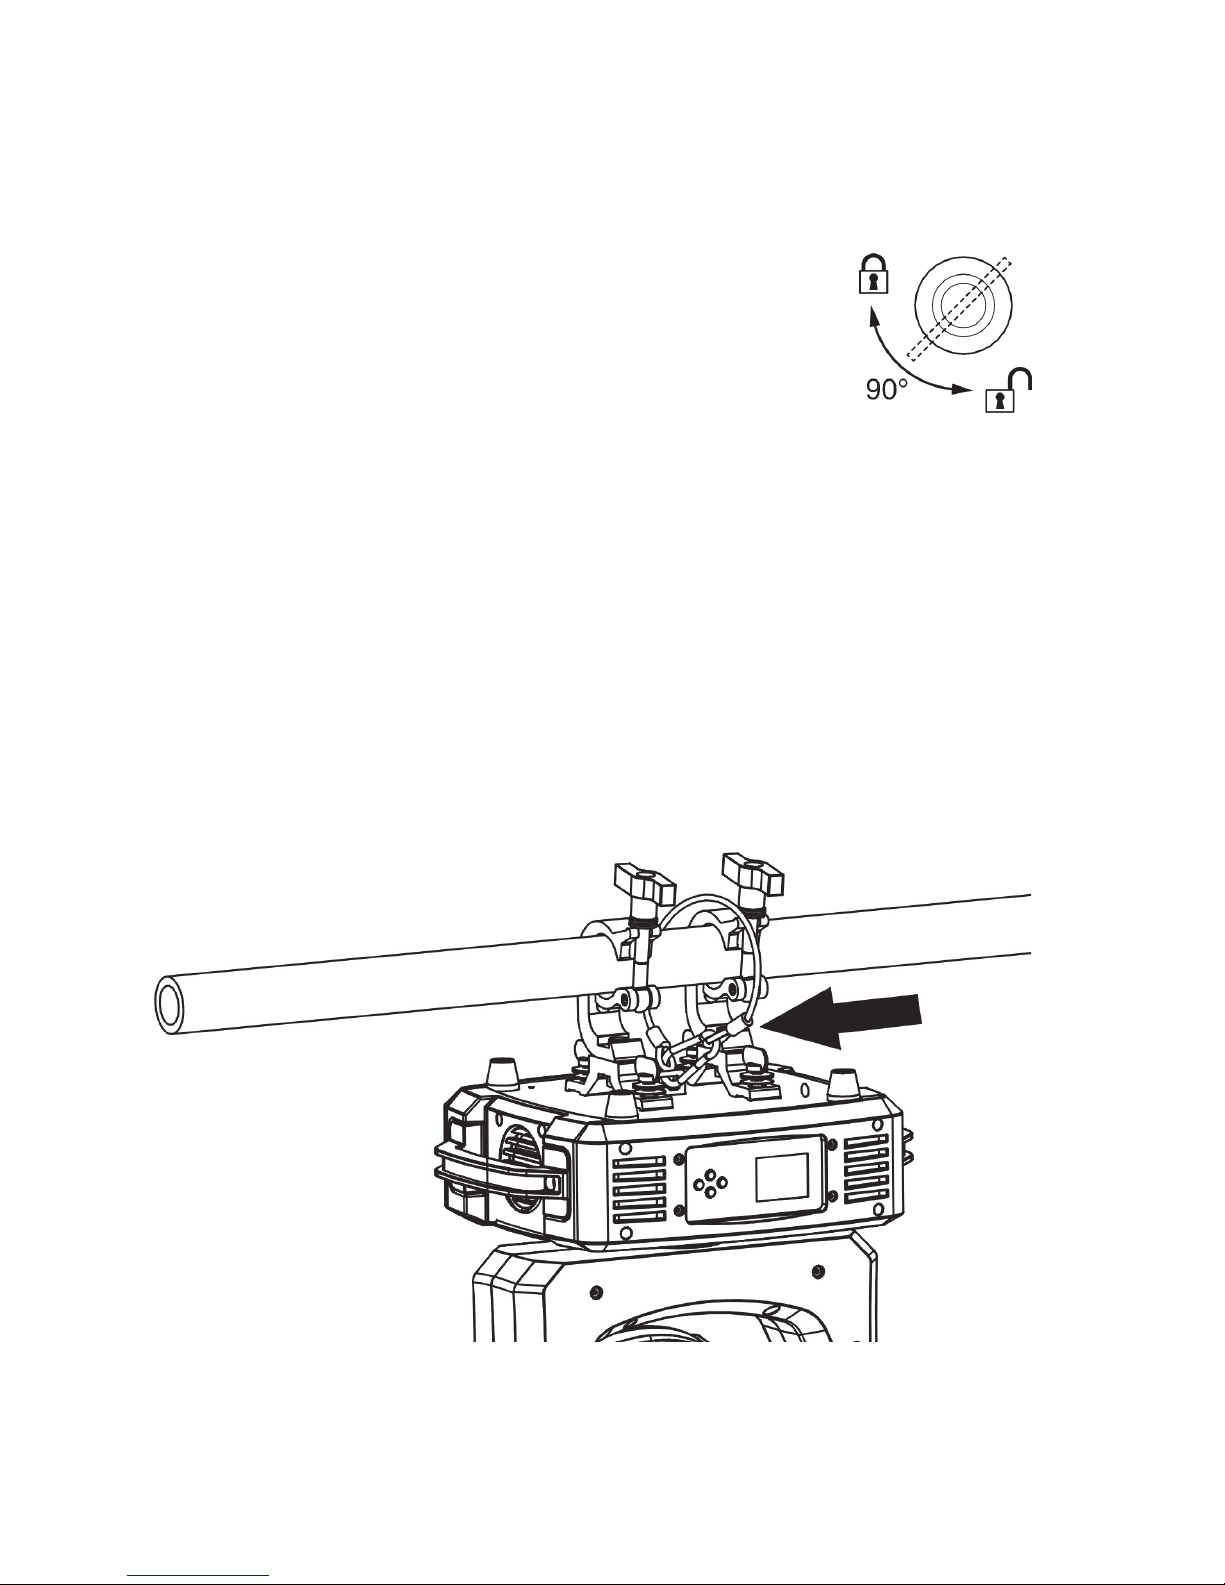
3. The fixture is supplied with two omega-type brackets to which rigging
clamps can be attached. Check that the rigging clamps are undamaged
and approved for the fixture’s weight. Bolt a rigging clamp securely to each
bracket. The bolts used must be M12, grade 8.8 steel minimum, and
fastened with self-locking nuts.
4. Fasten the omega brackets to the base of the fixture
using the brackets’ quarter-turn fasteners. Turn quarterturn fasteners a full 90° to lock them (see illustration on
right).
5. Working from a stable platform, hang the fixture on the truss and fasten
the rigging clamps onto the truss.
6. Secure the fixture with a safety cable as directed below.
7. Check that the head will not collide with other fixtures or objects.
Securing with a safety cable
Secure the fixture with a safety cable (or other secondary attachment) that is
approved for the weight of the fixture so that the safety cable will hold the
fixture if a primary attachment fails.
Loop the safety cable through the eye bracket in the fixture’s baseplate
(arrowed in illustration below) and around a secure anchoring point.
RUSH™ MH 7 Hybrid User Manual 13
AC power
Read ‘Safety information’ on page 4 before connecting the
fixture to AC mains power.
Warning! The mains power input cable supplied with the
fixture is rated 9 A and can supply only one fixture with
mains power. Do not connect any device to the fixture’s
MAINS OUT power throughput socket when using this input
cable. If you want to connect other fixtures to the MAINS
OUT socket, see ‘Linking fixtures to power in a chain’ on
page 14.
For protection from electric shock, the fixture must be grounded
(earthed). The power distribution circuit must be equipped with a
fuse or circuit breaker and ground-fault (earth-fault) protection.
Do not insert or remove live Neutrik PowerCon connectors to apply or cut
power, as this may cause arcing at the terminals that will damage the
connectors.
Socket outlets or external power switches used to supply the fixture with power
must be located near the fixture and easily accessible so that the fixtures can
easily be disconnected from power.
Do not use an external dimming system to supply power to the fixture, as this
may cause damage to the fixture that is not covered by the product warranty.
The fixture can be hard-wired to a building electrical installation if you want to
install it permanently, or a power plug (not supplied) that is suitable for the
local power outlets can be installed on the power cable.
If you install a power plug on the power cable, install a grounding type
(earthed) plug with integral cable grip that is rated minimum 250 V, 9 A. Follow
the plug manufacturer’s instructions and connect the wires in the power cable
as shown in this table:
The fixture has an auto-ranging power supply that accepts AC mains power at
100-240 V at 50/60 Hz. Do not apply AC mains power at any other voltage or
frequency to the fixture.
Live or L Neutral or N
Earth, Ground or
US system
Black White Green
EU system
Brown Blue Yellow/green

14 RUSH™ MH 7 Hybrid User Manual
Linking fixtures to power in a chain
If you obtain a 14 AWG or 1.5mm2power input cable and 14 AWG or 1.5mm2
throughput cables from Martin™ (see ‘Accessories’ on page 43), you can relay
mains power from one fixture to another by connecting fixtures to power in a
linked daisy-chain, MAINS OUT throughput socket to MAINS IN input socket.
Using 14 AWG or 1.5 mm
2
cables from Martin™, you can link:
• Maximum two (2) RUSH™ MH 7 Hybrid fixtures in total at 100-120 V, or
• Maximum four (4) RUSH™ MH 7 Hybrid fixtures in total at 200-240 V.
If you install a power plug on the 14 AWG / 1.5 mm
2
power input cable, install
a grounding type (earthed) plug with integral cable grip that is rated minimum
20 A, 250 V.
RUSH™ MH 7 Hybrid User Manual 15
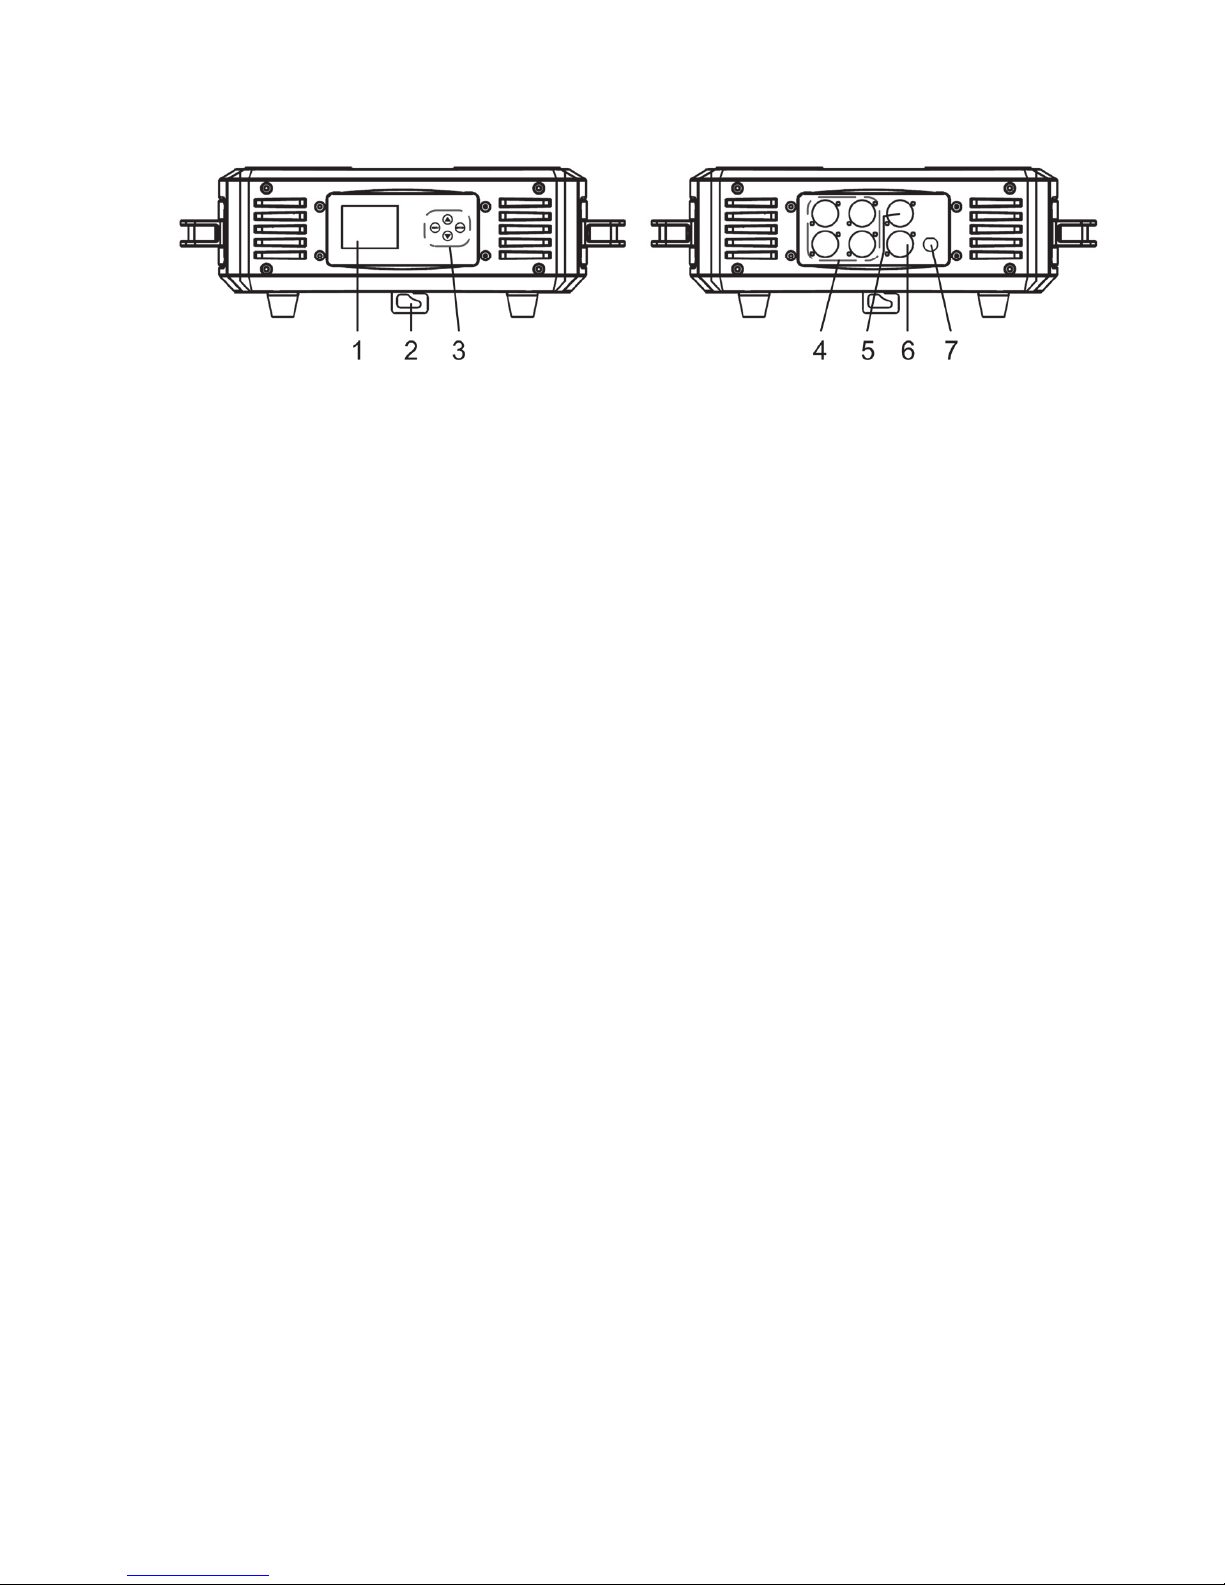
Fixture overview
1 – LCD Display
While operating, the screen displays the fixture’s DMX address. The address
flashes if the DMX signal is lost. The display automatically turns off after a
user-settable delay.
2 – Secondary attachment point
A dedicated eye bracket is provided for securing a safety cable to the base. Do
not use the handles for secondary attachment.
3 – Control buttons
• MENU: Press to activate the menu. Within the menu, press to escape and
return to the previous level. Press and hold to exit the menu.
• DOWN: Press to scroll down through menu options.
• UP: Press to scroll up through menu options.
• ENTER: Press to confirm and save the menu selection. Press and hold to
exit the menu.
4 –XLR DMX input/output sockets
3 and 5-pin XLR sockets are provided for DMX input and output (throughput).
5 – Mains power input
Connect mains power to the blue Neutrik PowerCon input socket.
6 – Mains power throughput
The white Neutrik PowerCon socket can be used to supply power to other
fixtures only if you respect the safety precautions given in this manual (see
‘Safety information’ on page 4).
7 – Main Fuse
The fixture’s 5T 250V 8A fuse is located in a fuse holder next to the power
input/output connectors.
 Loading...