

Page 1
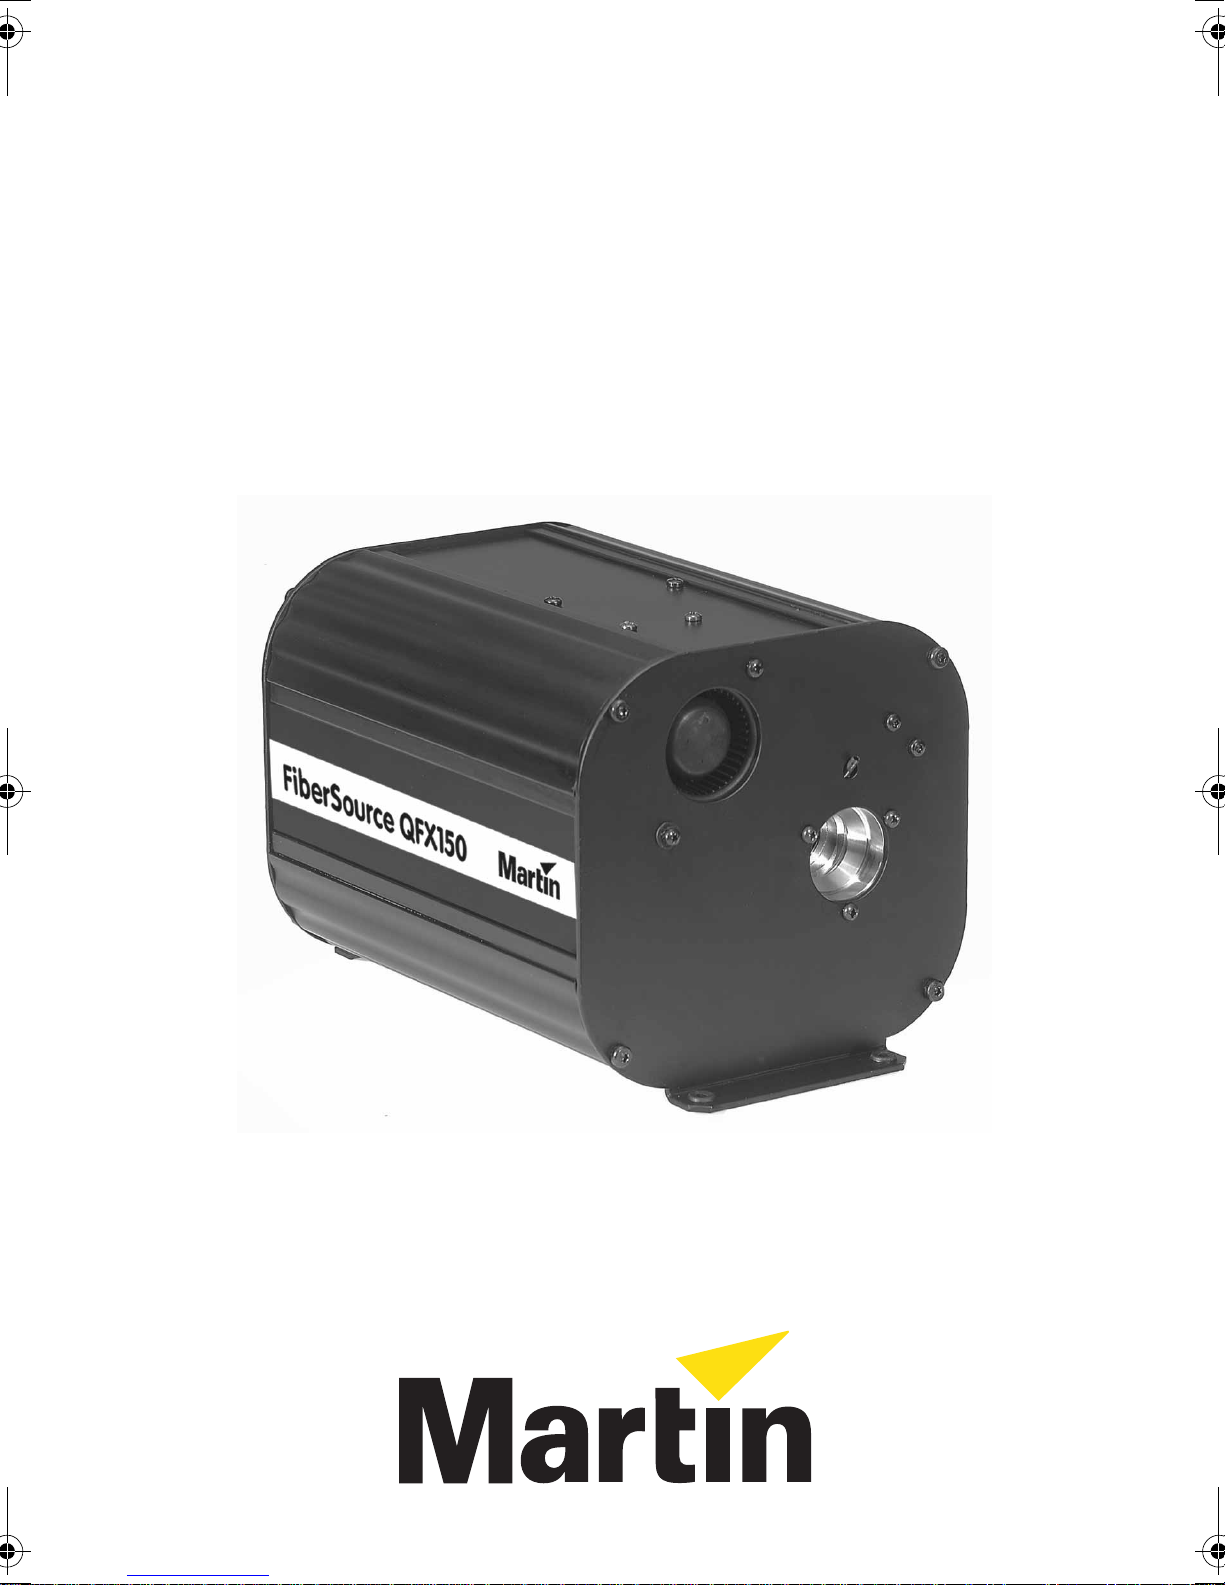
FiberSource QFX 150
user manual
Page 2
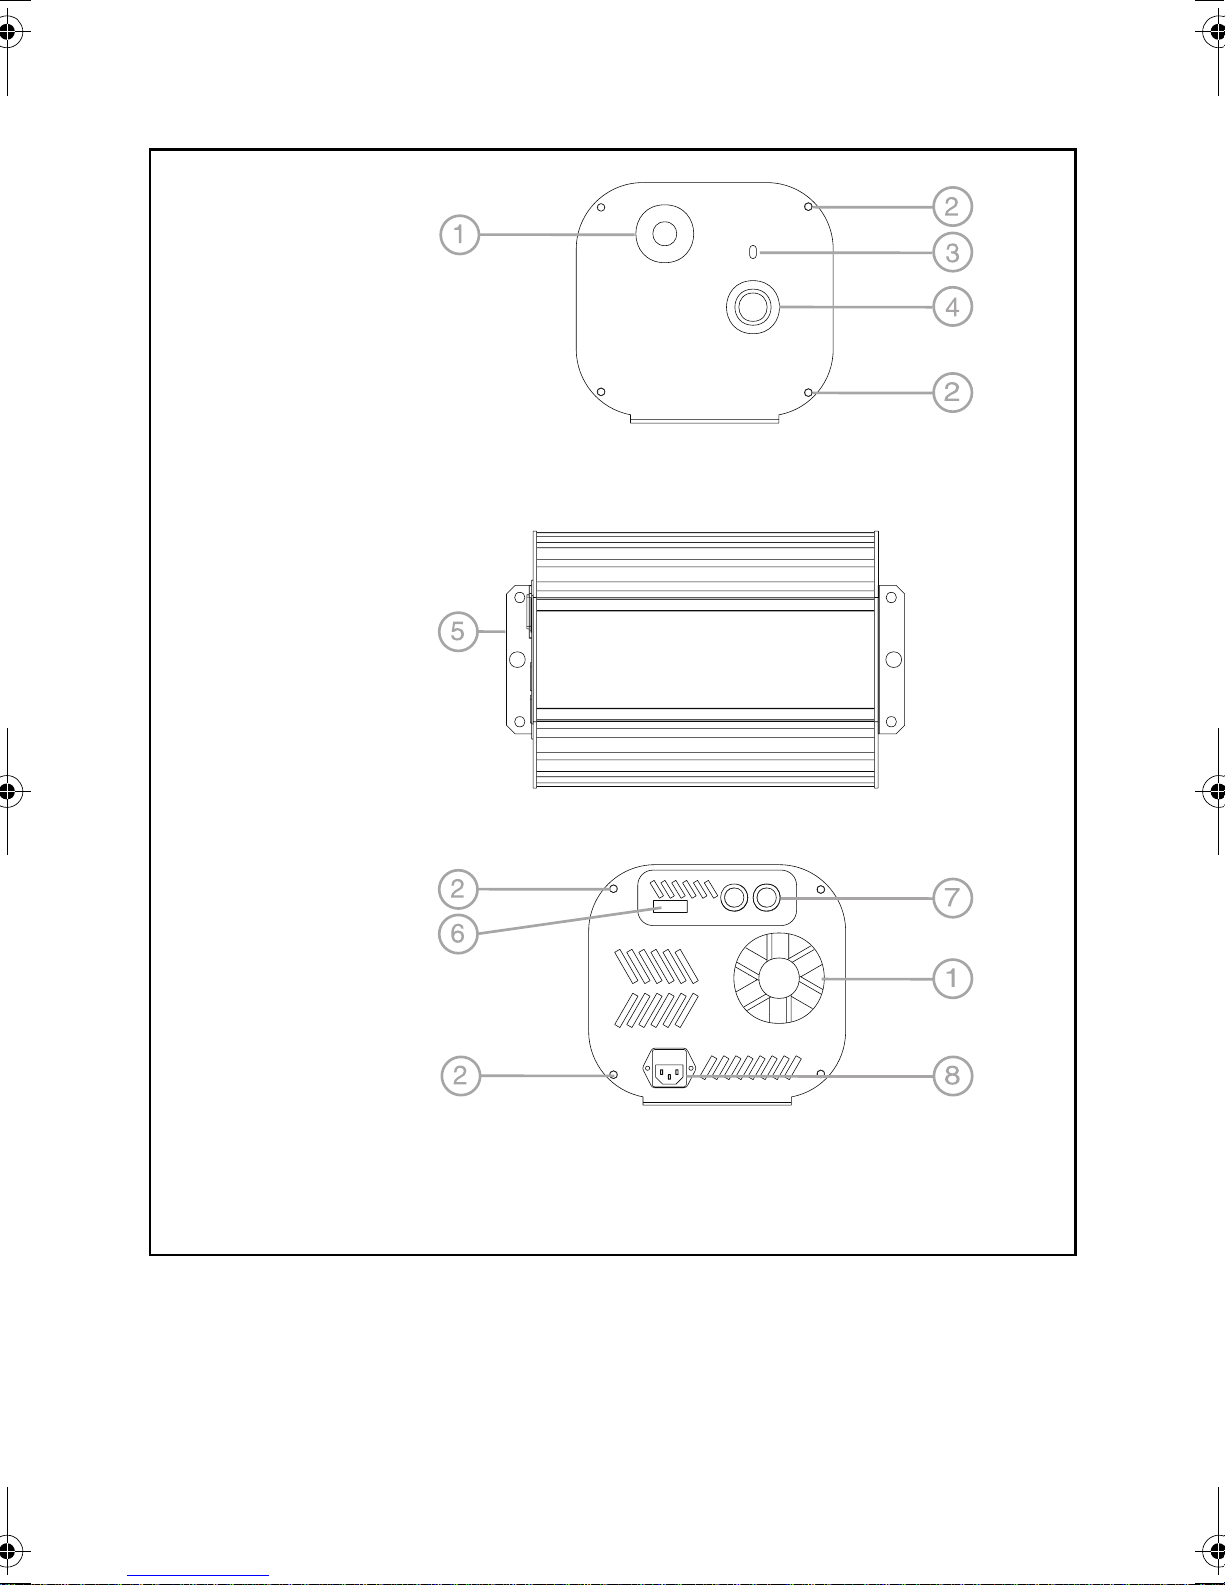
1 cooling fan
2 lamp access
cover screw
3 adaptor set screw
4 cable socket
5 mounting flang e
6 DIP-switch
7 data sockets
8 AC input & main
fuse
©1999 Martin Professional A/S, Denmark.
All rights reserved. No part of this manual may be
reproduced, in any form or by any means, without
permission in writing from Martin Professional A/S,
Denmark.
Printed in Denmark.
P/N 35000079, Rev. B
Page 3

I
NTRODUCTION
. . . . . . . . . . . . . . . . . . . . . . . . . . . . . . . . . . . . . . . . . 4
L
AC
I
NSTALLATION
F
C
S
M
B
T
DMX
. . . . . . . . . . . . . . . . . . . . . . . . . . . . . . . . . . . . . . . . . . . . . . . . 6
AMP
POWER
. . . . . . . . . . . . . . . . . . . . . . . . . . . . . . . . . . . . . . . . . . . 7
. . . . . . . . . . . . . . . . . . . . . . . . . . . . . . . . . . . . . . . . . 9
IBER OPTIC CABLE
ONTROLLER OPERATION
TAND-ALONE OPERATION
ASTER/SLAVE OPERATION
ASIC SERVICE
ROUBLESHOOTING
PROTOCOL
. . . . . . . . . . . . . . . . . . . . . . . . . . . . . . . . . . . . 11
. . . . . . . . . . . . . . . . . . . . . . . . . . . . . . . . . . . . . . . 19
. . . . . . . . . . . . . . . . . . . . . . . . . . . . . . . . . . . . 22
. . . . . . . . . . . . . . . . . . . . . . . . . . . . . . . . . . . . . . 23
. . . . . . . . . . . . . . . . . . . . . . . . . . . . . . . . 12
. . . . . . . . . . . . . . . . . . . . . . . . . . . . . . . 16
. . . . . . . . . . . . . . . . . . . . . . . . . . . . . . 18
S
PECIFICATIONS
A
CCESSORIES
. . . . . . . . . . . . . . . . . . . . . . . . . . . . . . . . . . . . . . 25
. . . . . . . . . . . . . . . . . . . . . . . . . . . . . . . . . . . . . . . . 28
3
Page 4

NTRODUCTION
I
Thank you for selecting the Martin FiberSource QFX 150. This fiber optic lighting
fixture uses a long-life 150 watt discharge la mp and provides 4 colors plus white,
full-range dimming, and a variable-speed twinkle effect. It operates with DMX-512
controllers, in stand-alone mode, and in master/slave configuration.
1
SAFETY INFORMATION
Warning! This product is for professional use only. It is not for household use.
This produ ct prese nt s ris ks of le t hal or severe injur y due.
powering or installing the fixture, follow the safety precautions listed below and
observe all warnings in this manual and on the fixture. If you have questions about
how to operate the fixture safely, pl ease contact your Ma rtin dealer or call the
Martin 24-hour service hotline.
Read this manual
before
To protect yourself and others from electric shock
• Disconnect the fixture from power be for e re moving or installing the lamp, f uses, or
any part, and when not in use.
• Always ground (earth) the fixtu r e electrically.
• Use only a source of power that complies with local building and electrical codes
and has both overload and ground-fault protection.
• Do not expose the fixture to rain or moisture.
• Refer all service to a qualified technician.
To protect yourself and others from UV radiation and lamp
explosion
• Do not operate th e fixture without a fiber optic cable inserted.
• When replacing the lamp, allow the fixture to cool for at least 5 minutes before
opening. Protect your hands and eyes with gloves and safety glasses.
• Never look at a lamp while it is lit.
• Replace the lamp when it becomes defective or worn out, or before usage exceeds
110 percent of the rated average life.
4 Introduction
Page 5

To protect yourself and others from burns and fire
• Never attempt to bypass the thermostatic switch or fuses. Always replace defective
fuses with ones of the speci fied type and rating.
• Keep all combustible materials (for example fabric, wood, paper) at least 0.1 meters
(4 inches) away from the fixture. Keep flammable materials well away from the
fixture.
• Provide a minimum clearan ce of 0.1 meters (4 inches) around fans and air vents.
• Allow the fixture to cool before handling.
• Do not modify the fixture or install other than genuine Martin parts.
• Do not operate the fixture if the ambient t emperature (Ta) exceeds 40° C (104° F).
To protect yourself and others from injury due to falls
• When suspending the fixture above ground level, verify that the structure can hold
at least 10 times the weight of all installed devices.
• Verify that all external covers and rigging hardware are securely fastened and use an
approved means of secondary attachment such as a safety cable.
• Block access below the work area whenever installing or removing the fixture.
UNPACKING
The packing material is carefully designed to protect the fixture during shipment always use it to transport the fixture.
The FiberSource QFX 150 comes with:
• Osram HQI-R 150 W lamp
• 3 m power cable w/ 3-pin IEC female cord cap
• 4 dichroic color filters
•user manual
Introduction 5
Page 6
AMP
L
The FiberSource QFX 150 is designed for use with the Osram HQI-R 150 lamp. Do
not install any other type of lamp.
Warning! Disconne ct the fixt ure from p ower and allow i t to co ol before
opening.
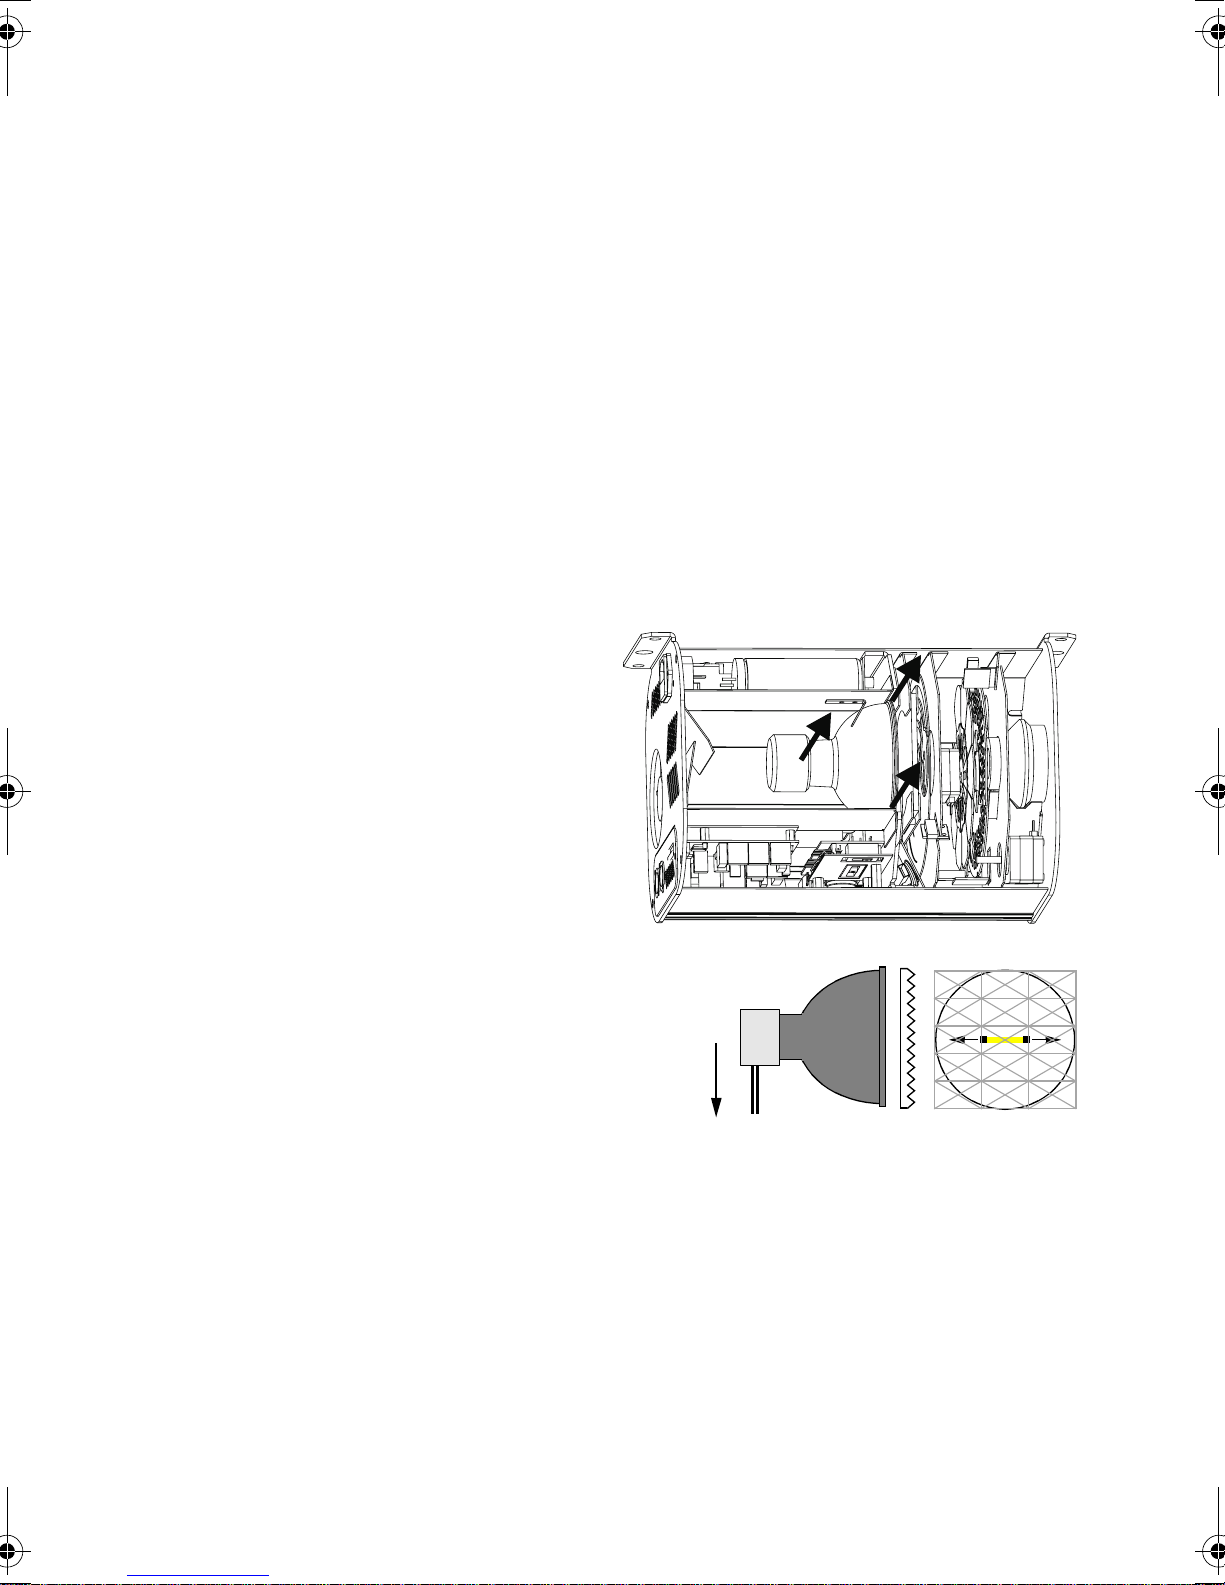
Impor tant! Turn the lamp so that the arc is horizo ntal.
2
To install or position the lamp
1 Remove the 4 lamp access
cover screws and pull off the
access cover, which is
indicated by the arrow on the
rear panel.
2 To remove the lamp, place a
hand under it and pull it out. Do
not lift by the ceramic base
alone. Squeeze the sides of the
lamp plug and pull it out.
3 To position the lamp, turn it so the wires,
where they exit the lamp base, point
towards the ground when the fixture is
installed
burning posi tion.
4 To install a lamp, plug in the connector
and then place the reflector rim in the
slot. Gently press the lamp between the
springs until it snaps into place.
5 Remove and turn the diffusion filter 90°, if necessary, so the long sides of the
prisms align with the arc.
6 Check the power setting as described in the next section before replacing the
lamp access cover.
.
This puts the arc in its ideal
Turn lamp so wires
point towards
ground and arc is
horizontal.
Align long edge of
diffuser prisms
with arc.
6 Lamp
Page 7

AC
Warning! For pro te ct io n from electric shock, the fixture must be ground e d
Import ant! Install fuse and ve rify th at power supply set tings match l ocal
POWER
The FiberSource QFX 150 has 10 switch-selectable power supply settings. Always
use the setting that is closest to the local AC supply.
(eart hed). T he power supply sh all have overload an d groundfault protection.
AC supply before use.
3
To check or change the voltage
setting
1 Disconnect the fixture from power.
Remove the lamp access cover.
2 Set the 5-position switch to the
setting closest to the A C v o ltage. Use
the higher setting if the voltage is
halfway between 2 settings. For
example, use the 230 V setting
instead of the 210 V setting for
operation with 220 V power.
3 Set the 2-position switch to the AC
frequency (50 / 60 Hz).
4 Replace the cover and apply a new
power setting label to the serial
number label.
250 V
230 V
210 V
100 V
120 V
50Hz
60Hz
AC po wer 7
Page 8
To install the main fuse
Fuses are provided for 1 00 - 130 V and 200 - 250 V o peratio n.
specified for the operating voltage.
1 Locate the bag containing the fuse for your AC voltage. Insert the fuse in the
fuse holder. The holder may be packed with the other fuse.
2 Remove the label covering the mains input socket.
3 Insert the fuse holder in t he empty slot in the mains input socket. See a lso “To
replace the main fuse” on page 20.
Use only the fuse
To install a plug on the power cable
The power cable must be fitted with a grounding-type cord cap that fits your power
distribution system. Consult an electrician if you have any doubts about proper
installation.
Important! Verify that the feed cables are undamaged and rated for the
current r equir ements of all conne cted d evices before use .
• Following the cord cap manufacturer’s instructions, connect the yellow and
green wire to ground (earth), the br own wire to live, and the blue wire to neut ral.
The table below shows some pin identification schemes.
Wire Pin Marking Screw color
brown live “L” yellow or brass
blue neutral “N” silver
yellow/green ground green
8 AC power
Page 9

NSTALLATION
I
The FiberSour ce QFX 150 can b e fastened directly through the 4 rubber washers in
the mounting flanges, or hun g with 2 rigging clamps (not in cluded) fastened
through the 13 mm holes.
INSTALLATION REQUIREMENTS
For optimum performance an d ease of service, install the fixture such that
• The long axis is horizontal as
shown in A to right. This
positions the lamp electrodes
for maximum lamp life. Do not
install as shown in B.
4
• The minimum clearance around
the fans and air vents at both
ends is 10 cm (4 in.) and
circulation is adequate keep the
air around the fixture at 40° C
(104° F) or below.
• The DIP-switch is acc essible and there is room to insert cables.
• The lamp access panel can be removed.
• All safety requirements are met.
To install the FiberSource QFX 150
Wa rning! Always u se a secu re mea ns of se condar y atta chment when
hanging t he fixt ure with clamps.
1 Verify that the fasteners or clamps can bear 10 times the fixture’s weight. Verify
that the structure can support 10 times the weight of all installed fixtures,
clamps, cables, auxiliary equipment, etc.
2 Block access belo w th e work area.
3 If fastening directly, place a metal washer over each rubber washer. The metal
washer must be as wide as the rubber washer, or wider , to insure a secure hold.
Fasten with 4 suitable fasteners 4 - 5 mm (5/32 - 3/16 in.) in diameter.
Installation 9
Page 10

4 If clamping, bolt the clamps securely to the flang es with grade 8.8 (minimum)
M12 bolts and lock nuts, or as recommended by the clamp manufacturer,
through the 13 mm holes. Install a safety cable that can hold at lea st 10 times
the weight of the fixture through one of the small holes and around the truss or
pipe. Remove a rubber washer if necessary to thread the safety cable.
5 Verify t hat the fixture is located at least 0.1 meters (4 in.) from any combustible
materials. Verify that the clearance around the fan and air vents is at least 0.1
meters (4 in.). Verify that there are no flammable materials nea rby.
10 Installation
Page 11

IBER OPTIC CABLE
F
The FiberSource male adaptor for 50 - 300 strand cables, P/N 91611016 (not
included), is tapered to fit fiber optic cables 8.3 - 19.3 mm (5/16 - 3/4 in.) in
diameter. With cables over 8.3 mm in diameter, the adaptor must be shortened for
proper fit and maximum light output. Please follow the instructions included with
the fiber adaptor.
CABLE CONNECTION
The following guidelines provi de a starting point for estimating your needs. Light
transmission through fiber-optic cable depends on its quality and results will vary
depending on the type of cable used.
5
SIDE-EMITTING CABLE
With 1 fixture, best results are had when the fiber optic cable is 10 m (33 ft.) or
shorter. The length may be increased to 15 m (50 ft.) by looping the cable and
illuminating both ends. With 2 fixtures, one at each end of the cable, lengths up to
30 m (100 ft.) can be achieved.
END-EMITTING CABLE
Light output de creases with length: keep the ca ble as short as possible. Th e
maximum recommende d length is 25 meters. Cut the ligh t emitting end of the f i bers
with a sharp knife for maximum output.
To install fiber optic cable
1 Install the cable in the fiber adaptor according to the instructions packaged
with the adaptor.
2 Insert the adaptor fully into the fiber optic cable socket.
3 Tighten the set screw with a 2 mm (5/64 in.) Allen wrench.
Fi b er optic cable 11
Page 12

ONTROLLER OPERATION
C
This Fibe rSource QFX 150 ma y be operated wi th any DMX-512 protoc ol
controller.
DATA CONNECTION
A reliable data connection begins with the right cable. Standard microphone cable
cannot transmit DMX data reliably over long runs. For best results, use cable
specifically designed for RS-485 applications. Your Martin dealer can supply high
quality cable in various lengths.
The FiberSource QFX 150’s data sockets are wired pin 1 to ground, pin 2 to signal (cold), an d pin 3 to signal + (ho t). Thi s is the stan dard pi n assignme nt for DMX
devices.
6
One or more adapt or cables m ay b e req uired to conn ect t he fixture to the c ontro ller
and other devices because many devices have 5-pin connectors and others may have
reversed signal polarity, that is, pin 2 hot and pin 3 cold.
5-pin to 3-pin
Adaptor
Male Female
1
2
3
4
5
P/N 11820005
1
2
3
To connect the data link
3-pin to 5-pin
Adaptor
Male Female
1
2
3
P/N 11820004
1
2
3
4
5
3-pin to 3-pin
Phase-Reversing
Adaptor
Male Female
1
2
3
P/N 11820006
1
2
3
1 Connect a data cable to the controller’s data output. If controller has a 5-pin
output, use a 5-pin male to 3-pin female adaptor cable (P/N 11820005).
2 Lead the data cable from the controller to the first fixture and plug the cable
into the data input.
12 Controller operation
Page 13

3 Connect the output of the fixture closest to the
Male XLR
1
2
3
Male
P/N 91613017
120
T ermination Plug
controller to the input of the next fixture. If
connecting to a fixture with reversed-polarity (pin 3
cold), insert a phase-reversing cable between the two
fixtures.
4 Continue connecting fixtures output to input. Up to
32 devices may be connected on a serial link.
5 Terminate the link by inserting a male termination
plug (P/N 91613017) into the data output of the last
fixture. A termination plug is simply an XLR
connector with a 120 ohm, 0.25 W resistor soldered
across pins 2 and 3.
ADDRESS SELECTION
A control address must be set using the DIP-switch on the rear panel. The control
address, also known as the start cha nnel, is the first channel used to rec eive
instructions from the controller. The FiberSource QFX 150 uses 5 DMX channels.
Import ant! Disconnec t the fixtu re from power before changing the D IP-
To set the address
Each fixture must be assigned its own address and non-overlapping control
channels for individual control . Two FiberSource QFX 150s may share the same
address, but they will respond identically and individual control will not be
possible.
switch setting. C hanges take effect after the fixtur e has been
turned o ff and back on.
1 Select an address for the fixture between 1 and 508 on your controller.
2 Look up the DIP-switch setting for the address on page 14.
3 Disconnect the fixture from power.
4 Set pins 1 through 9 to the ON (1) or OFF (0) position as listed in the table.
5 Set pin 10 to the OFF positio n.
Controller operation 13
Page 14

DIP-SWITCH ADDRESS TABLE
Find the address in the table below. Read the settings for pins 1 - 5 to the left and
read the settings for pins 6 - 9 ab ove the address. “0” means OF F and “1” means
ON.
Impor tant! Pin 10 must be OFF for controller operat ion.
DIP-Switch Setting
0 = OFF
1 = ON
#1 #2 #3 #4 #5
00000 326496128160192224256288320352384416448480
10000 1336597129161193225257289321353385417449481
0 1 0 0 0 2 34 66 98 130 162 194 226 258 290 322 354 386 418 450 482
11000 3356799131163195227259291323355387419451483
00100 43668100132164196228260292324356388420452484
1 0 1 0 0 5 37 69 101 133 165 197 229 261 293 325 357 389 421 453 485
01100 63870102134166198230262294326358390422454486
11100 73971103135167199231263295327359391423455487
0 0 0 1 0 8 40 72 104 136 168 200 232 264 296 328 360 392 424 456 488
10010 94173105137169201233265297329361393425457489
01010 104274106138170202234266298330362394426458490
1 1 0 1 0 11 43 75 107 139 171 203 235 267 299 331 363 395 427 459 491
00110 124476108140172204236268300332364396428460492
10110 134577109141173205237269301333365397429461493
0 1 1 1 0 14 46 78 110 142 174 206 238 270 302 334 366 398 430 462 494
11110 154779111143175207239271303335367399431463495
00001 164880112144176208240272304336368400432464496
1 0 0 0 1 17 49 81 113 145 177 209 241 273 305 337 369 401 433 465 497
01001 185082114146178210242274306338370402434466498
11001 195183115147179211243275307339371403435467499
0 0 1 0 1 20 52 84 116 148 180 212 244 276 308 340 372 404 436 468 500
10101 215385117149181213245277309341373405437469501
01101 225486118150182214246278310342374406438470502
1 1 1 0 1 23 55 87 119 151 183 215 247 279 311 343 375 407 439 471 503
00011 245688120152184216248280312344376408440472504
10011 255789121153185217249281313345377409441473505
0 1 0 1 1 26 58 90 122 154 186 218 250 282 314 346 378 410 442 474 506
11011 275991123155187219251283315347379411443475507
00111 286092124156188220252284316348380412444476508
1 0 1 1 1 29 61 93 125 157 189 221 253 285 317 349 381 413 445 477 509
01111 306294126158190222254286318350382414446478510
11111 316395127159191223255287319351383415447479511
#90000000011111111
#80000111100001111
#70011001100110011
#60101010101010101
14 Controller operation
Page 15

CONTROLLABLE EFFECTS
LAMP POWER AND RESET
The lamp on command is on channel 1, the address channel.
controller operation, the lamp remains off until a lamp-on command is sent.
A peak of electric current many times the operating current is drawn briefl y when
striking a lamp. Striking many discharge lamps at once may cause a voltage drop
that prevents lamps from striking or trips circuit breakers. When striking multiple
fixtures, space lamp on comman ds at 5 second intervals.
The lamp can be turned off as well, but then it must be allowed to cool for several
minutes before it can be turned back on. To prevent acc idental lamp off commands,
this command only works when the dimmer is closed (ch. 2 < 3) and the twinkle
effect is rotating s lowly CCW (ch. 4 > 252). If a hot lamp does not strike, send the
lamp off command and wait several minutes before trying again.
All effects reset to their home position s when the fixture i s powered up. There is
also a reset command on channel 1. To prevent accidental resets, the command must
be sent for 5 seconds.
When set up for
DIMMER
The intensity of the light is controlled from full-off to full-on on channel 2.
COLOR
The color wheel is control led o n channel 3 . You can program split-color effects with
continuous scroll, stick to full color posi tions usi ng stepped scroll, and rotate the
wheel continuously. The speed at which colors fade from one position to another
can be controlled on channel 5, the speed channel.
TWINKLE
The speed and direction of the twinkle effect is controlled on channel 4. When
stopped, the effect wheel returns to its hom e position where t here is a removable
section. The light output can be made more uniform if the twinkle effect is not used
by removing this section.
FADE SPEED
Channel 5 controls the speed of the color wheel, allowing you to achieve variable
fades on controller s without cross-faders. If your control ler has cross-faders, an d
you use them, then set channel 5 to 0 (tracking), for best results.
Controller operation 15
Page 16

TAND-ALONE OPERATION
S
CONTROL OPTIONS
The FiberSource QFX 150 can be opera ted without a controller in stand-alone
mode. This mode provides various combinations of color and twinkle effect that are
selected usin g DIP-switch pins 1 - 7.
The twinkle effect may by set to off, slow, medium , or fast usi n g DIP-s w itc h pins 1
and 2. If the twinkle effect is not required, a section o f the effect wheel can be
removed to increase the uniformity of the output: refer t o “To remove or replace the
twinkle wheel section” on page 19.
The speed at which the color wheel moves from one color to the next may be set to
snap, slow, medium, or fast using DIP-switch pins 3 and 4. This setting has no effect
if white or color 1 is selected.
7
The color or colors are selected using DIP-switch pins 5, 6, and 7. You can select
white, color 1 (position 1), a range of colors, and continuous rotation. If continuous
color wheel rotation is selected, then the color change speed must be slow, medium,
or fast.
If a range of colors is selected, the color wheel holds at pos ition 1 for 1 second,
moves to position 2 at the selected change speed, holds for 1 second, and so on.
When the last p ositi on is reached, th e colo r wheel reverses direction. Col ors can be
arranged in any order as described under “To change color filters” on page 19.
To set stand-alone behavior
1 Disconnect the fixture from power.
2 Set DIP-switch pins 1 - 7 on or off as shown in the table below to achieve the
desired combination of effects.
3 Set pins 8 and 9 to off. Set pin 10 to on.
4 Apply power to the fixture.
The option setting wi ll take effect and the lamp will automatically strike. Note,
howeve r, that a hot lamp must cool for several minutes before it can be restruck. If
the lamp does not strike, disconnect the fixture from power for several minutes to
reduce strain on the starter while the lamp cools.
16 Stand-alone operation
Page 17

Import ant! D IP-switch pi n 10 must be ON for stand- alone op eration .
0 = OFF
1 = ON
Effect Setting
no twinkle 0 0 0 0 1
slow twinkle 1 0 0 0 1
medium twinkle 0 1 0 0 1
fast twinkle 1 1 0 0 1
snap color change 0 0 0 0 1
slow color change 1 0 0 0 1
medium color change 0 1 0 0 1
fast color change 1 1 0 0 1
white 000001
color 1 100001
color 1 - 2 010001
pin 1
pin 2
pin 3
pin 4
pin 5
pin 6
pin 7
pin 8
pin 9
pin 10
color 1 - 4 110001
color 1 - 6 001001
color 1 - 8 101001
color 1 - 9 0 11001
continuous rotation* 111001
* Continuous rotation is not available when snap co lor ch an ge is sel ect ed.
Stand-alone operation 17
Page 18

ASTER/SLAVE OPERATION
M
Several FiberSource QFX 150s may be connected together for synchronous
operation without a controller. They are connected together and one, the maste r, is
set up in stand-alone mode and sends cont rol instructio ns to the others. Up t o 32
fixtures can be can be connected and operated this way.
Impor tant Verify that al l slave fixture s are set as des cribed. Damag e can
be caus ed if t here is more than 1 device (ma ster f ixture or
controller) sendin g cont rol signal s on the seri al data link.
8
To connect and set fixtures for master/slave operation
1 Disconnect all fixtures from power.
2 Plug a 3-pin XLR data cable into the OUT socket of the first fixture and the IN
socket of the next fixture.
3 Continue connecting fixtures output to input. Up to 32 FiberSource QFX 150s
may be connected.
4 Terminate the data link on
both ends. Insert a female
termination plug (P/N
91613018) into the IN socket
of the first fixture . Insert a
male termination plug (P/N
91613017) into the OUT
socket of the last fixture. A
termination plug is an XLR
connector with a 120 ohm,
0.25 W resistor soldered
across pins 2 and 3.
5 Select any one fixture to be the master. Set the desired stand-alone options
using the master’s DIP-switch as described on page 16.
6 On all other fixtures (slaves), set DIP-switch pin 1 to the ON position; set all
other DIP-switch pins to the OFF position.
Male
Male XLR
1
2
120
3
P/N 91613017
Female
Termination PlugTermination Plug
Female XLR
1
2
120
3
P/N 91613018
7 Apply power to the fixtures.
18 Master/slave operation
Page 19

ASIC SERVICE
B
The FiberSource QFX 150 requires simple routine maintenance. The maintenance
schedule de pends he avily on the op erating environm ent; pleas e consul t a Marti n
service technician for recommendations.
Any service procedure not described here should be referred to a qualified
technician.
Warning! Disconnect the f ixture from power before re moving any cover.
Import ant! Excessive du st, gre ase, and sm oke fl uid buildup degr ades
performance and causes overheati ng and damage t o the fixture
that is not covered by the war ranty.
9
To change color filters
1 Disconnect the fixture from power. Remove the lamp access cover.
2 Turn the color wheel by hand until the desired filter is accessible.
3 Using a soft cloth or gloves, gently tilt the outside edge of the filter back
towards the lam p to unlock. Remove filter.
4 To place a filter in the wheel, insert the plastic holder between the spring clip
with the protruding tab facing forwards until it snaps into place.
5 Replace the lamp access cover before applying power.
To remove or replace the twinkle wheel section
The twinkle wheel has a removable section for uniform light ou tp ut when the effect
is not used.
1 Disconnect the fixture from power. Remove the lamp access cover.
2 Turn the twinkle wheel by hand until the removable section is aligned with the
cable socket. Turn the color wheel so that the open position is aligned with the
cable socket.
3 Support the twinkle wheel with one hand and unlock the removable section by
pulling the outside e dge ba ck towards the lamp. Grasp the section and pull it
up and out.
4 To replace the section, turn the wheel to the open position and slide the section
between the wheel and the spring clip, with the heads of the screws towards
Basic service 19
Page 20

the cable socket. Center the section and then supp ort the wheel wi th a fing er
from the front as you press the 2 screw hea ds through the wheel.
5 Replace the lamp access cover before applying power.
To clean optical components
Use care when cleaning optical components. The surface of the color filters is
fragile and small scratches may be visible.
1 Disconnect the fixture from power and allow it to cool com pletely. Remove the
lamp access cover.
2 Blow or vacuum away loose dust. Remove residues from filters with a soft cloth
or cotton swabs wetted with isopropyl alcohol. Regular glass cleaner may also
be used, but no residues may remain.
3 Rinse with distilled water. Mixing the water with a small amount of wetting
agent such as Kodak Photoflo will help prevent streaking and spotting.
4 Dry with a clean, soft and lint-free cloth or blow dry with co mp ressed ai r.
To clean the fan and air vents
To maintain adequate cool ing, dust must be cleaned from the fan and ai r vents
periodically.
1 Disconnect the fixture from power.
2 Remove dust and dirt from the fan blades and vent grills using a soft brush,
cotton swab, vacuum, or compressed air.
To replace the main fuse
1 Unplug the mains cable from the input socket. Pry open the fuse holder as
shown.
2 Remove the defective fuse and replace it with one of the same type and rating.
3 Replace the fuse holder in the mains input socket.
20 Basic service
Page 21

To replace the secondary fuse
1 Disconnect the fixture from power.
2 Remove one screw by the DIP-switch and one screw by the data IN socket.
3 Pull the circuit board assembly out until you can access the fuse, which is
located behind the data IN socket.
4 Remove the defective fuse and replace it with one of the same type and rating.
5 Replace the circ uit board assembly before applying power.
Basic service 21
Page 22

ROUBLESHOOTING
T
Problem Probable cause(s) Remedy
10
Fixture is completely dead.
Fixture resets correctly but does
not respond to the co ntroller.
Fixture fails to reset correctl y.
No power to fixture.
Primary fuse blown. Replace fuse.
Secondary fuse blown. Replace fuse.
The controller is not connected. Connect controller.
Reversed data signal polarity.
Bad data link c onnection
Data link no t terminated.
Incorrect address setti ng. Check DIP-switch settings.
One of the fixtures is
transmitting as a master or is
defective.
An effect requires mechanical
adjustment.
Check tha t po wer is swi tche d on
and cables ar e pl ugged in.
Install a phas e-reversing cable
between the cont roller and the
fixture.
Inspect connections and cables.
Repair or replac e damaged
cables.
Insert termination plug in output
of the last fixture on the l ink.
Bypass one fixture at a time
until normal ope ra tion is
regained: unplug both cables
from fixture and connect them
directly together. Contact
Martin technician for service.
Contact Ma rtin technician for
service.
No light.
Lamp cuts out intermittently or
burns out too quickly.
22 Troubleshooting
Lamp too hot to strike . All ow lamp to cool.
Power settings do not match AC
supply.
Defective lamp. Replace lamp.
Fixture is too hot. Allow fixture to c ool .
Power settings do not match AC
supply.
Defective fan.
Check AC setting.
Check set tings.
Contact Ma rtin technician for
service.
Page 23

DMX
Channel Value Percent Function
PROTOCOL
0 - 89
90 - 119
1
120 - 149
150 - 199
200 - 249
250 - 255
0 - 35
35 - 46
47 - 58
59 - 78
78 - 98
98 - 100
Reset and lamp power
No function
Reset (time > 5 sec.)
No function
Lamp on
No function
Lamp off (w/ Ch. 2 < 3 & Ch. 4 > 252)
A
2
3
0 - 255 0 - 100
0 - 144
0
16
32
48
64
80
96
112
128
144
145 - 185
145 - 148
149 - 152
153 - 156
157 - 160
161 - 164
165 - 168
169 - 172
173 - 176
177 - 180
181 - 185
0 - 56
0
6
12
18
25
31
37
44
50
56
57 - 72
57 - 58
58 - 59
60 - 61
61 - 63
63 - 64
65 - 66
66 - 67
68 - 69
69 - 70
71 - 72
Dimmer
Closed to Open
Color Wheel
Continuous scroll
Open
Color 1 (blue 108)
Color 2 (green 206)
Color 3 (yellow 603)
Color 4 (red 308)
Color 5 (-)
Color 6 (-)
Color 7 (-)
Color 8 (-)
Color 9 (-)
Stepped scroll
Color 9 (-)
Color 8 (-)
Color 7 (-)
Color 6 (-)
Color 5 (-)
Color 4 (red 308)
Color 3 (yellow 603)
Color 2 (green 206)
Color 1 (blue 108)
Open
186 - 220
221 - 255
4
5
0 - 1
2 - 125
126 - 131
132 - 255
0 - 2
3 - 5
6 - 255
73 - 86
87 - 100
0
0 - 49
49 - 51
52 - 100
0
1
2 - 100
Continuous rotation
CW, fast to slow
CCW, slow to fast
Twinkle Wheel
Stop/Open
CW, slow to fast
Stop
CCW, fast to slow
Color Speed
Tracking (speed function off)
Fast speed with shortcut enabled
Fast to slow, shortcut disabled
DMX protocol 23
Page 24

NO F
UNCTION
hold 5 seconds
L
A
M
P
C
OLOR SPEED
S
TEPPED COLOR SCROLL
C
ONTINUOUS ROTATION
fast CW slow
T
WINKLE
slow
9876 432105
R
ESET
L
AMP ON
D
IMMER
slow CCW fast
stop
fast CCW slow
Implemented from software version 1.0
NO F
UNCTION
O
F
F
Page 25

PECIFICATIONS
S
PHYSICAL
Length: . . . . . . . . . . . . . . . . . . . . . . . . . . . . . . . . . . . . . . . . . . . . . . . . . . . . 330 mm (13.0 in)
Width: . . . . . . . . . . . . . . . . . . . . . . . . . . . . . . . . . . . . . . . . . . . . . . . . . . . . . . 213 mm (8.4 in)
Height: . . . . . . . . . . . . . . . . . . . . . . . . . . . . . . . . . . . . . . . . . . . . . . . . . . . . . 199 mm (7.8 in)
Weight: . . . . . . . . . . . . . . . . . . . . . . . . . . . . . . . . . . . . . . . . . . . . . . . . . . . . . . . . 10.4kg (lbs)
SOURCE
Osram HQI-R 150 (include d): . . . . . . . . . . . . . . . . . . . . . . . . . . . . . 150 W, 6000 hr. , 420 0K
CONTROL
Control options: . . . . . . . . . . . . . . . . . . . . . . . . . . . . . .DMX-512, stand-alone, master/slave
DMX channels: . . . . . . . . . . . . . . . . . . . . . . . . . . . . . . . . . . . . . . . . . . . . . . . . . . . . . . . . . . 5
Data I/O: . . . . . . . . . . . . . . . . . locking 3-pin XLR, pin 1 shi el d, pin 2 col d (-), pin 3 hot (+)
Recommended cable: . . . 24 AWG (min.), low capacitance, 85-150 Ω shielded twisted pair
INSTALLATION
Orientation: . . . . . . . . . . . . . . . . . . . . . . . . . . . . . . . . . . . . . . . . . . . . . . . . . . . . . .horizontal
Minimum distance to combustible materials: . . . . . . . . . . . . . . . . . . . . . . . . . . .0.1 m (4 in)
Minimum clearance around fan and air vents: . . . . . . . . . . . . . . . . . . . . . . . . . . .0.1 m (4 in)
B
AC SUPPLY
Power supply options: . . . . . . . . . . . 100/120/210/230/250 V, 50/60 Hz (switch-selecta ble)
Maximum power and curren t: . . . . . . . . . . . . . 205W, 1.9A @ 120V; 195W, 1.0A @ 230V
FUSES
2
Primary fuse: . . . . . . . . . . . . . . . . . . . . . . . . . . . . T 3.15 A, high I
Secondary fuse: . . . . . . . . . . . . . . . . . . . . . . . . . . . . . . . . . . T 2.0 A, 250 V, P/N 05020009
CONSTRUCTION
Housing: . . . . . . . . . . . . . . . . . . . . . . . . . . . . . . . . . . . . . . . . . . . . . sheet steel and aluminum
Finish: . . . . . . . . . . . . . . . . . . . . . . . . . . . . . . . . . . . . . . black, electrostatic powder coating
Protection factor: . . . . . . . . . . . . . . . . . . . . . . . . . . . . . . . . . . . . . . . . . . . . . . . . . . . . . .IP 20
t, 250 V, P/N 05020013
Specifications 25
Page 26

CCESSORIES
A
Male adapto r for 50 - 300 strand cables with installation materi al s: . . . . . . .P/N 91611016
G-clamp: . . . . . . . . . . . . . . . . . . . . . . . . . . . . . . . . . . . . . . . . . . . . . . . . . . . . .P/N 91602003
Half-coupler clamp: . . . . . . . . . . . . . . . . . . . . . . . . . . . . . . . . . . . . . . . . . . . . .P/N 91602005
Accessory color filter, blue 111: . . . . . . . . . . . . . . . . . . . . . . . . . . . . . . . . . . .P/N 62327015
Accessory color filter, blue 101: . . . . . . . . . . . . . . . . . . . . . . . . . . . . . . . . . . .P/N 62327016
Accessory color filter, cyan 401: . . . . . . . . . . . . . . . . . . . . . . . . . . . . . . . . . . .P/N 62327017
Accessory color filter, green 202: . . . . . . . . . . . . . . . . . . . . . . . . . . . . . . . . . .P/N 62327018
Accessory color filter, yellow 604: . . . . . . . . . . . . . . . . . . . . . . . . . . . . . . . . .P/N 62327019
Accessory color filter, red 301: . . . . . . . . . . . . . . . . . . . . . . . . . . . . . . . . . . . .P/N 62327021
Accessory color filter, pink 312: . . . . . . . . . . . . . . . . . . . . . . . . . . . . . . . . . . .P/N 62327022
Accessory color filter, magenta 507: . . . . . . . . . . . . . . . . . . . . . . . . . . . . . . . .P/N 62327023
Accessory color filter, purple 502: . . . . . . . . . . . . . . . . . . . . . . . . . . . . . . . . .P/N 62327025
Accessory color filter, green 204: . . . . . . . . . . . . . . . . . . . . . . . . . . . . . . . . . .P/N 62327034
Accessory color filter, orange 306: . . . . . . . . . . . . . . . . . . . . . . . . . . . . . . . . .P/N 62327035
C
26 Accessories
 Loading...