

Page 1

Maxedia 4
User Manual
! DRAFT VERSION !
© 2010 Martin Professional A/S
Page 2
Disposing of this product
Martin products are supplied in compliance
w ith Directive 2002/96/EC of the European
Parliament and of the Council of the European
Union on WEEE (Waste Electrical and
Electronic Equipment), as amended by
Directive 2003/108/EC, w here applicable.
Help preserve the environment! Ensure that
this product is recycled at the end of its life.
Your supplier can give details of local
arrangements for the disposal of Martin
products.
© 2009 Martin Professional A/S, Denmark. All rights reserved. No part of this manual may be reproduced, in any form or by any
means, without permission in writing from Martin Professional A/S, Denmark. Printed in Denmark.
Information subject to change without notice. Martin Professional A/S and all affiliated companies disclaim liability for any injury,
damage, direct or indirect loss, consequential or economic loss or any other loss occasioned by the use of, inability to use or
reliance on the information contained in this manual.
Rev. A. October 2009
Page 3

Table of Contents
Set-up
......................................................................................1
................................................................................................................................... 1Maxedia Hardware
.......................................................................................................................................................... 1Unpacking
.......................................................................................................................................................... 2Packing
.......................................................................................................................................................... 2Modifications
.......................................................................................................................................................... 3Maxedia Safety Information
.......................................................................................................................................................... 4AC Power
......................................................................................................................................................... 4Pow er Supply
......................................................................................................................................................... 4Pow er Connection
......................................................................................................................................................... 4Pow er Cables
.......................................................................................................................................................... 6IO Box
......................................................................................................................................................... 8IO Box Menu
.......................................................................................................................................................... 9Maxedia Broadcast
.......................................................................................................................................................... 11Maxedia Pro
.......................................................................................................................................................... 13Maxedia Compact
.......................................................................................................................................................... 15Connecting DMX Devices
................................................................................................................................... 16Monitors
................................................................................................................................... 20Installing Software
................................................................................................................................... 22Start Maxedia
................................................................................................................................... 25Select Output Display
................................................................................................................................... 27Media Content DVDs
.......................................................................................................................................................... 27Permitted Use
.......................................................................................................................................................... 27Copyright
.......................................................................................................................................................... 28Installing Media From Maxedia DVD
Planning a Show
......................................................................................30
................................................................................................................................... 30Screens
................................................................................................................................... 31Pixelmapping
................................................................................................................................... 31Programming
................................................................................................................................... 31Media
................................................................................................................................... 31Control
Programming
......................................................................................32
................................................................................................................................... 33Layer Parameters
.......................................................................................................................................................... 33Global
......................................................................................................................................................... 33Output
......................................................................................................................................................... 33Output FX
......................................................................................................................................................... 33Media
......................................................................................................................................................... 33Speed
......................................................................................................................................................... 33Blending
......................................................................................................................................................... 34Contrast Brightness
.......................................................................................................................................................... 353D
......................................................................................................................................................... 353D Position
......................................................................................................................................................... 353D Position FX
......................................................................................................................................................... 353D Rotation
......................................................................................................................................................... 36Size
......................................................................................................................................................... 36Size FX
.......................................................................................................................................................... 37Color
......................................................................................................................................................... 37RGB
Maxedia 4
I © 2010 Martin Professional A/S
Page 4

................................................................................................................................... 77Plugins
......................................................................................................................................................... 37RGB FX
.......................................................................................................................................................... 38Effects
......................................................................................................................................................... 38Shader Media
......................................................................................................................................................... 38Shader
......................................................................................................................................... 38Reverse
......................................................................................................................................... 40Grayscale
......................................................................................................................................... 41Edge
......................................................................................................................................... 42Reverse Edge
......................................................................................................................................... 43Postarization
......................................................................................................................................... 44Separate (Shift)
......................................................................................................................................... 45Separate (Rotation)
......................................................................................................................................... 46Gaussian Blur
......................................................................................................................................... 47Zoom
......................................................................................................................................... 48Replace
......................................................................................................................................... 49Glare
......................................................................................................................................... 49Reverse Glare
......................................................................................................................................... 50Brightness - Contrast
......................................................................................................................................... 51Color Shift
......................................................................................................................................... 52Mask
......................................................................................................................................... 53RGB -> RBG
......................................................................................................................................... 54RGB -> GRB
......................................................................................................................................... 55RGB -> GBR
......................................................................................................................................... 56RGB -> BGR
......................................................................................................................................... 57RGB -> BRG
......................................................................................................................................... 58Halftone
......................................................................................................................................... 58Halftone Noise
......................................................................................................................................... 59Bloom
......................................................................................................................................... 60Glow
......................................................................................................................................... 61Radial Blur
......................................................................................................................................... 62Glare
......................................................................................................................................... 63Raster
......................................................................................................................................... 63Blur
......................................................................................................................................... 64Add
......................................................................................................................................... 65Mul
......................................................................................................................................... 66Subtract
......................................................................................................................................... 67Reverse Subtract
......................................................................................................................................... 68Max
......................................................................................................................................... 69Min
......................................................................................................................................... 70Luminance Key
......................................................................................................................................................... 71Image Effects
......................................................................................................................................... 71Tile
......................................................................................................................................... 72Dot
......................................................................................................................................... 72Mosaic
......................................................................................................................................... 73Mirror-XY
......................................................................................................................................... 73Mirror-X
......................................................................................................................................... 74Mirror-Y
......................................................................................................................................... 74Oil Paint
......................................................................................................................................... 75Ring
......................................................................................................................................... 75Cube
......................................................................................................................................... 76Cube Vision
......................................................................................................................................... 76Cut-Out
.......................................................................................................................................................... 77Video Effects
......................................................................................................................................................... 77Media Player
......................................................................................................................................................... 77Random Zoom
......................................................................................................................................................... 78Video Grid
......................................................................................................................................................... 782D Fluid
......................................................................................................................................................... 793D Flat Tunnel
Maxedia 4
II © 2010 Martin Professional A/S
Page 5

......................................................................................................................................................... 803D Dome
......................................................................................................................................................... 802D Particles
......................................................................................................................................................... 81Sound
.......................................................................................................................................................... 812D Effects
......................................................................................................................................................... 812D Smoke
......................................................................................................................................................... 822D Plasma
......................................................................................................................................................... 832D Text
......................................................................................................................................................... 83ASCII Text
......................................................................................................................................................... 85Text Animation
......................................................................................................................................................... 85Output Delay
......................................................................................................................................................... 863D Wire Cube
......................................................................................................................................................... 87Rain
......................................................................................................................................................... 88Multi-Shape
.......................................................................................................................................................... 893D Effects
......................................................................................................................................................... 893D Ocean
......................................................................................................................................................... 903D Tunnel
......................................................................................................................................................... 913D Landscape
......................................................................................................................................................... 923D Ribbons
......................................................................................................................................................... 933D Spikes
......................................................................................................................................................... 943D Object
......................................................................................................................................................... 953D Blob
......................................................................................................................................................... 963D Knot
......................................................................................................................................................... 963D Grid
......................................................................................................................................................... 973D Layer
.......................................................................................................................................................... 98Sound Effects
......................................................................................................................................................... 98Sound Bars
......................................................................................................................................................... 99Sound Balls
......................................................................................................................................................... 100Sound Lines 1
......................................................................................................................................................... 101Sound Lines 2
......................................................................................................................................................... 102Sound Circle
.......................................................................................................................................................... 103Matrix
......................................................................................................................................................... 103Matrix Fire
......................................................................................................................................................... 104Matrix Radar
......................................................................................................................................................... 104Matrix Circle
......................................................................................................................................................... 104Matrix Ellips
......................................................................................................................................................... 105Matrix Lines
......................................................................................................................................................... 105Matrix Square
......................................................................................................................................................... 105Matrix Weave
......................................................................................................................................................... 105Matrix Wheel
......................................................................................................................................................... 105Matrix Shape
......................................................................................................................................................... 105Matrix Sw irl
......................................................................................................................................................... 105Matrix Arrow
......................................................................................................................................................... 105Matrix Fill 1
......................................................................................................................................................... 106Matrix Fill 2
................................................................................................................................... 106Blending
................................................................................................................................... 106Recording Cues
................................................................................................................................... 107Media Formats
.......................................................................................................................................................... 107Video Form ats
......................................................................................................................................................... 107Overview
......................................................................................................................................................... 109General Codec Settings
......................................................................................................................................................... 111H.264/AVC Encoding settings (Recommended Codec)
......................................................................................................................................................... 111MPEG2 Encoding Settings
......................................................................................................................................................... 112DV Encoding Settings
......................................................................................................................................................... 112BlackMagic Encoding Settings
......................................................................................................................................................... 113Cineform Encoding Settings
.......................................................................................................................................................... 113Third Party Encoder Packages
......................................................................................................................................................... 113Encoding Packages for PC
Maxedia 4
III © 2010 Martin Professional A/S
Page 6

......................................................................................................................................................... 114Encoding Packages for MAC
.......................................................................................................................................................... 114Image Formats
.......................................................................................................................................................... 1143D Object Format
.......................................................................................................................................................... 114Text File Format
Layout
................................................................................................................................... 116Menu
................................................................................................................................... 154Media Library
................................................................................................................................... 158Main Screens
......................................................................................116
.......................................................................................................................................................... 116File
......................................................................................................................................................... 116Show
......................................................................................................................................................... 118Screen Layout
......................................................................................................................................... 119Custom Screen Layout
.......................................................................................................................................................... 124DMX
......................................................................................................................................................... 124DMX Addresses
......................................................................................................................................................... 126DMX Devices
......................................................................................................................................................... 127Pixelmapping
......................................................................................................................................................... 131Pixelmapping Settings
.......................................................................................................................................................... 132Video
......................................................................................................................................................... 132Output Displays
......................................................................................................................................................... 133Performance and Quality
......................................................................................................................................................... 134Video-In Devices
......................................................................................................................................... 135Configuration
......................................................................................................................................... 135BlackMagic Decklink Control
......................................................................................................................................................... 139Edge Blending
.......................................................................................................................................................... 146Sound
.......................................................................................................................................................... 148System
......................................................................................................................................................... 148Netw ork
......................................................................................................................................................... 149General
......................................................................................................................................................... 150Tools
......................................................................................................................................................... 152Plugins
.......................................................................................................................................................... 153About
.......................................................................................................................................................... 158CueByCue Mixer
......................................................................................................................................................... 159Output Mixer
......................................................................................................................................................... 160Transitions
.......................................................................................................................................................... 161A-B Mixer
.......................................................................................................................................................... 162Cue Programmer
......................................................................................................................................................... 162Plugins
......................................................................................................................................................... 163Media Groups
......................................................................................................................................................... 163Media Selection
......................................................................................................................................................... 164Layers
......................................................................................................................................................... 164Direct Access
......................................................................................................................................................... 165Layer Parameters
.......................................................................................................................................................... 166Output Adjust
......................................................................................................................................................... 166Color Adjustment
......................................................................................................................................................... 167KeyStoning
......................................................................................................................................................... 168Mask Adjustment
......................................................................................................................................................... 169Mask Selection
.......................................................................................................................................................... 170Pixelmapping Layout
......................................................................................................................................................... 171Layout
......................................................................................................................................................... 172Fixtures
......................................................................................................................................................... 172Settings
......................................................................................................................................................... 176Saved Layouts
.......................................................................................................................................................... 177Pixelmapping Dim Groups
......................................................................................................................................................... 178DMX-Out Settings
......................................................................................................................................................... 178DMX Master
......................................................................................................................................................... 179DMX Dim Group Manager
Maxedia 4
IV © 2010 Martin Professional A/S
Page 7

......................................................................................................................................................... 179Fixture Groups
......................................................................................................................................................... 180Dim Groups
.......................................................................................................................................................... 180DMX Viewer
.......................................................................................................................................................... 181Netw orking
......................................................................................................................................................... 182Netw ork Synchronization
......................................................................................................................................................... 183Netw ork Settings
.......................................................................................................................................................... 184Cue Directory
.......................................................................................................................................................... 185Single Monitor View
.......................................................................................................................................................... 186Engine 1 Engine 2
Play Back Cues
......................................................................................187
................................................................................................................................... 187Manual Play Back
................................................................................................................................... 187Console Control
.......................................................................................................................................................... 188Maxedia Base
.......................................................................................................................................................... 189Maxedia Output Adjustment
.......................................................................................................................................................... 190Maxeda Layer Adjustment
.......................................................................................................................................................... 192Maxedia Top Layer
.......................................................................................................................................................... 193Maxedia Pixelmap Group
.......................................................................................................................................................... 193Maxedia Pixelmap Master
105
......................................................................................194
................................................................................................................................... 194Shift in Layer
................................................................................................................................... 194Framing Options
................................................................................................................................... 194Framing Shift
................................................................................................................................... 194Framing Rotation
................................................................................................................................... 194Saturation
................................................................................................................................... 194Low RGB
................................................................................................................................... 195Mid RGB
................................................................................................................................... 195High RGB
Maxedia 4
V © 2010 Martin Professional A/S
Page 8
Set-up
Product
Maxedia Broadcast
Maxedia Professional
Maxedia Compact
Outputs322DMX In
Yes
Yes
Yes
ArtNet In
Yes
Yes
No
DMX Out
Yes
Yes
Yes
ArtNet Out
Yes
Yes
Yes
A/B Layers
20206
Top Layers
441
HD Playback
Yes
Yes
No
Video Capture
SD-SDI
Composite
Composite
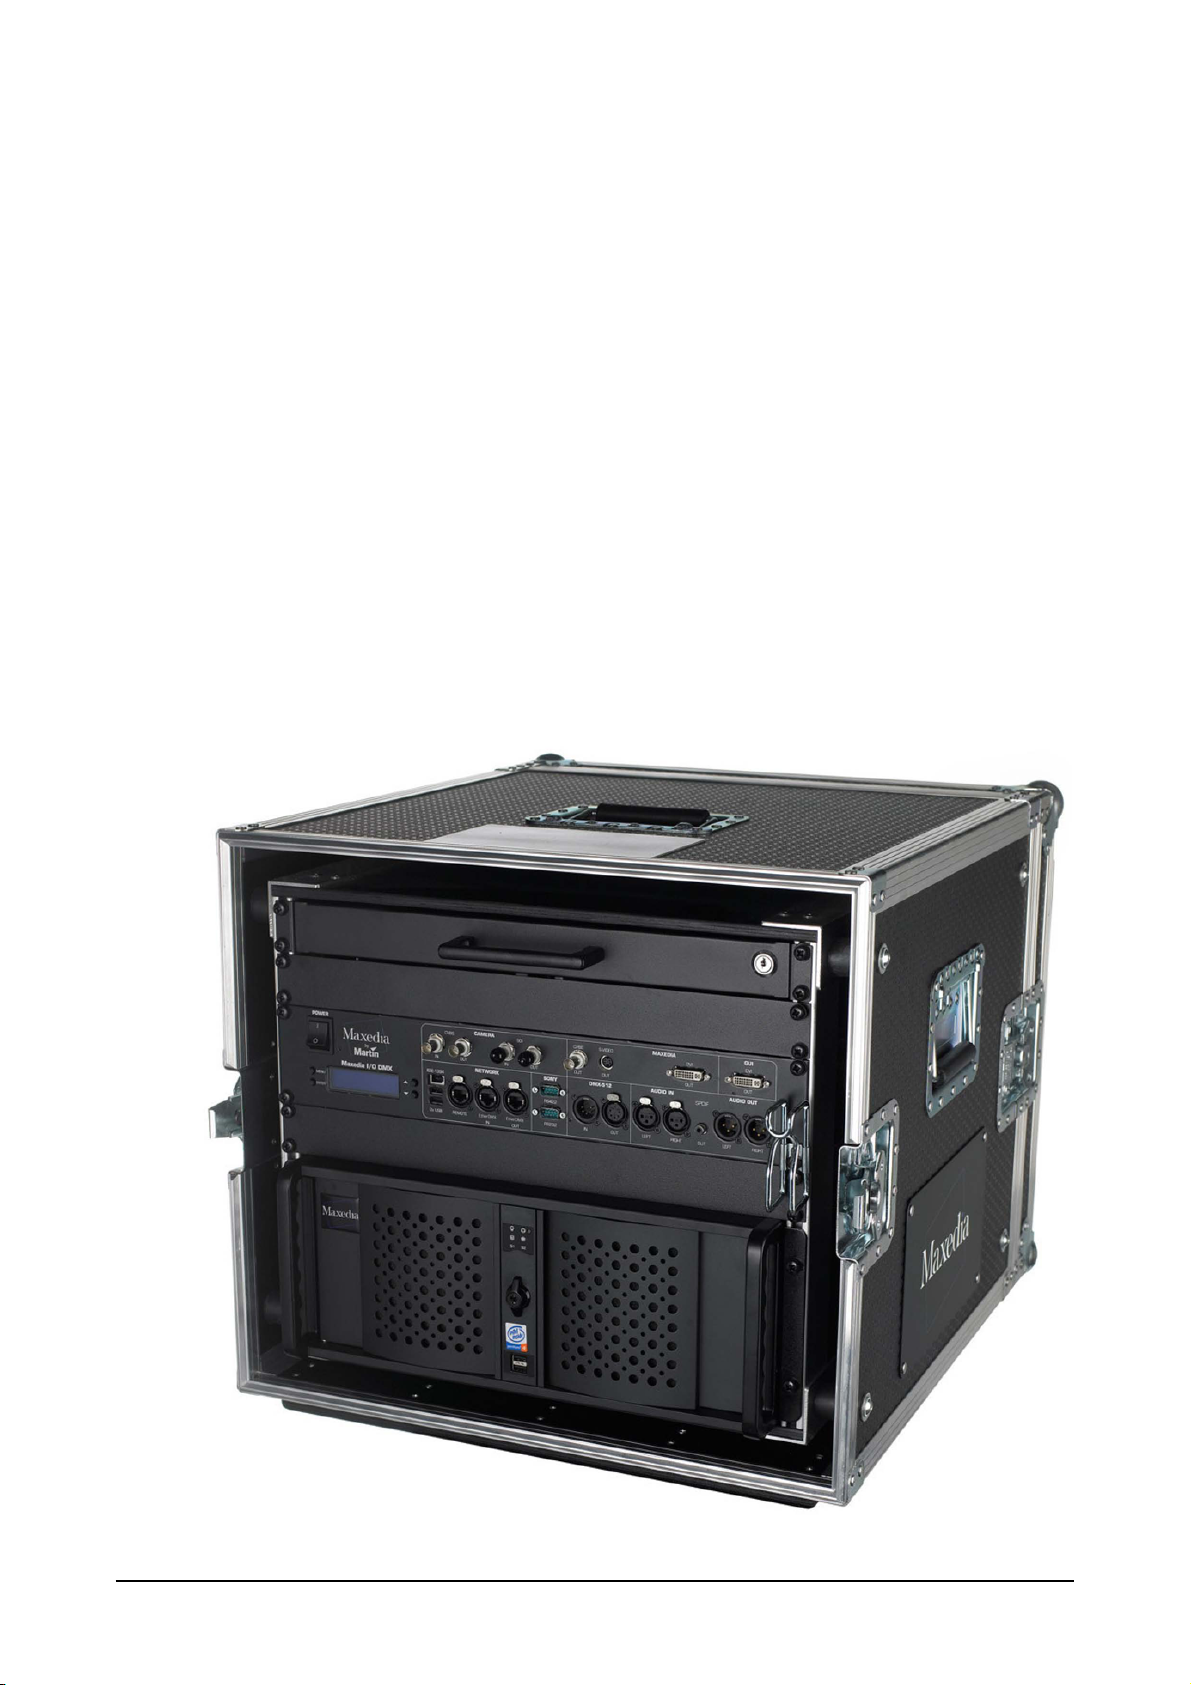
Maxedia Hardware
There are three versions of Maxedia available: Maxedia Broadcast, Maxedia Professional, and
Maxedia Compact. Each version has different hardware and some different software restrictions.
Below is a table summarizing the hardware differences and restrictions.
Unpacking
Maxedia 4
1 © 2010 Martin Professional A/S
Page 9
The Maxedia Broadcast and Maxedia Pro Flightcase versions must be unpacked for operation. The
flight case should rest on it's wooden skids. Remove both front and rear lids.
Both front and rear lids must be removed for operation to ensure proper air circulation for
computer cooling to avoid hardware damage due to over-heating.
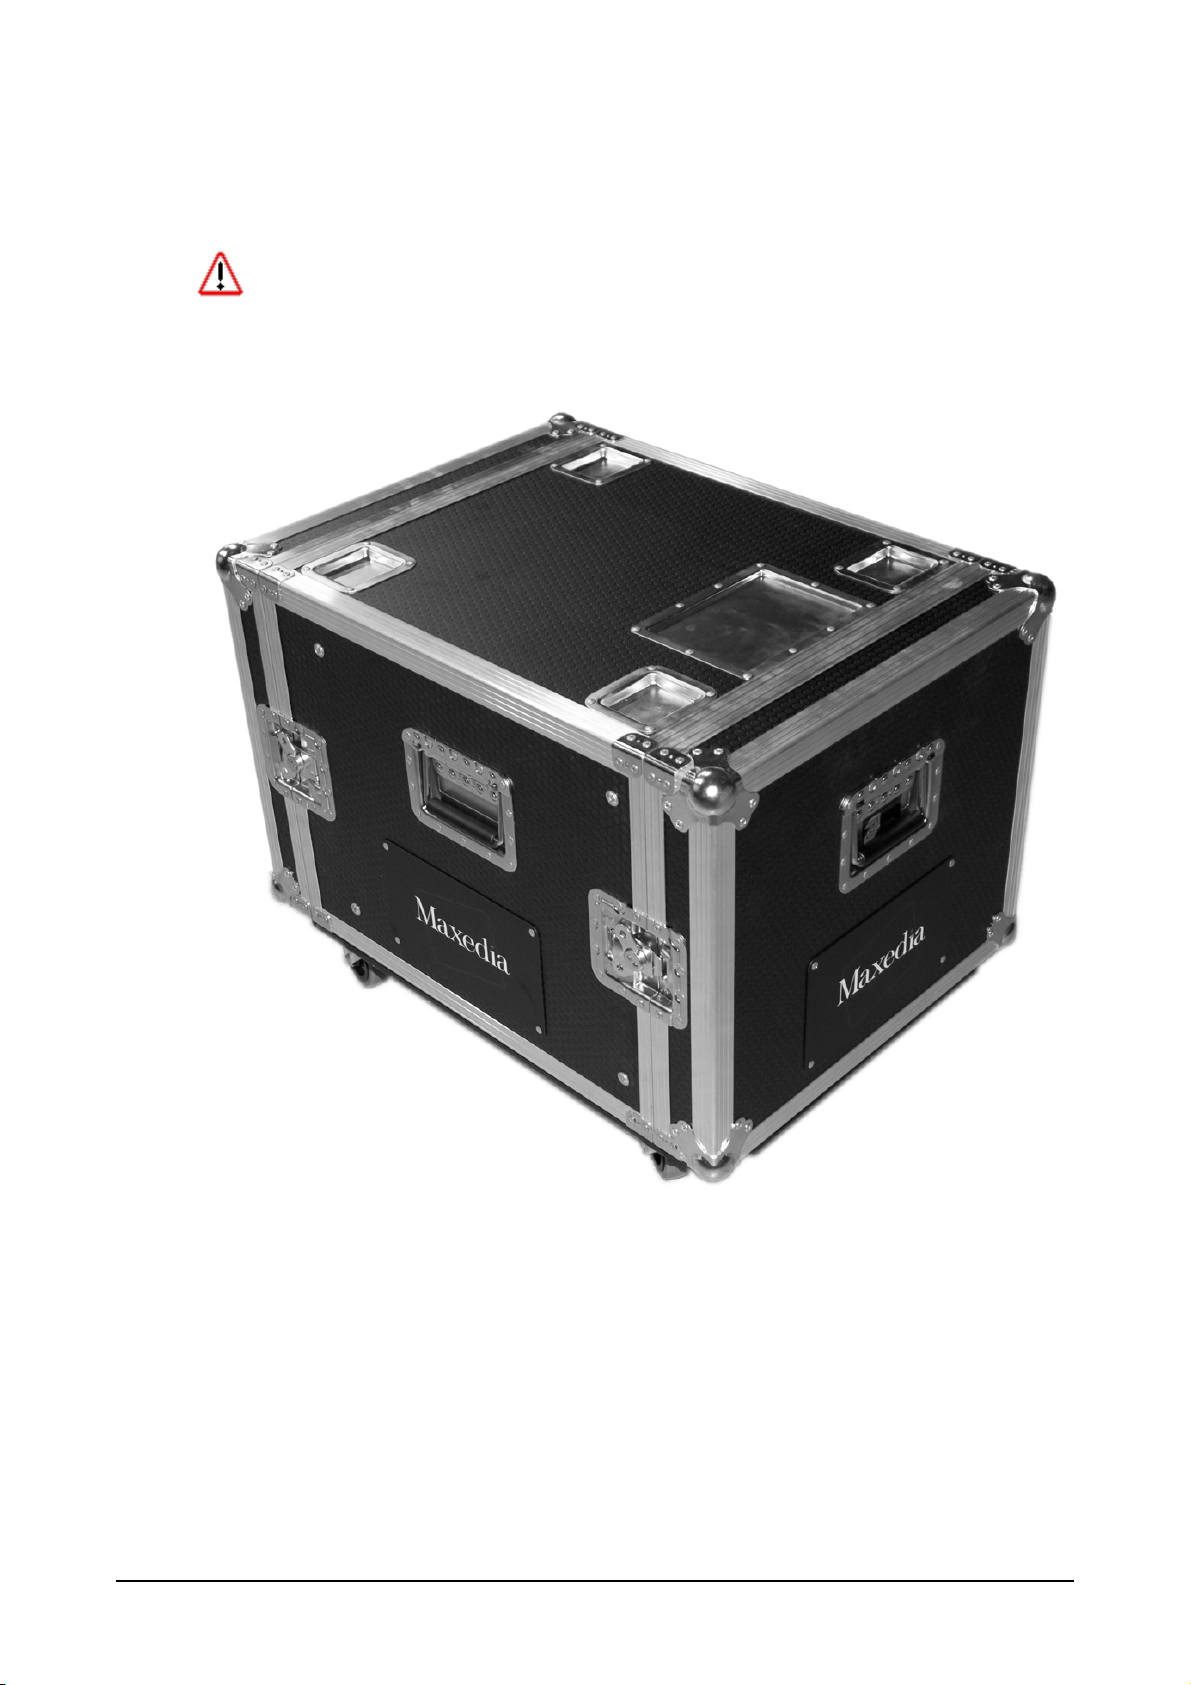
Packing
To pack the Flightcase for transport:
rest on it's wooden skids.
Modifications
The Maxedia software is carefully designed to match the operating system. Do not install any
other software. Doing so could seriously affect performance and make it impossible for the
Maxedia 4
Disconnect power to IO Box.
Disconnect all cables from the front of the IO Box.
Disconnect any cables from computer other than connections to IO Box and keyboard.
Replace front and rear lids.
Old style Flightcases with wheels on the rear lid can be rolled on wheels but should always
New style Flightcases can ride on their wheels.
2 © 2010 Martin Professional A/S
Page 10

Maxedia to operate.
Do not modify the system in any way, as this may make it impossible to provide service on the
Maxedia!
Maxedia Safety Information
This product presents risks of lethal or severe injury due to electric shock. Read this manual before
powering or installing the Maxedia, follow safety precautions listed below and observe all warnings in
this manual and printed on the Maxedia.
Always ground (earth) the Maxedia electrically.
Use only a source of AC power that complies with local building and electrical codes and has both
overload and ground-fault protection.
Do not expose the Maxedia to rain or moisture.
Refer any service operation not described in this manual to a qualified technician.
Do not modify the Maxedia or install other than genuine Martin parts.
Do not lift or carry the Maxedia Flightcase alone.
Maxedia 4
3 © 2010 Martin Professional A/S
Page 11
AC Power
For protection from electric shock , the Maxedia must be grounded (earthed). The AC mains
supply must be fitted with a current overload circuit breaker or fuse and ground-fault (earth-fault)
device.
The Maxedia accepts 100 - 240 VAC nominal, 50/60 Hz. Do not operate the Maxedia on supply
voltages outside this range. The Maxedia IO Box has a primary fuse that is rated 6.3 A, 250 V slowblow, high capacity. Disconnect the device from power before changing the fuse. Replace only with a
T 6.3 AH 250 V fuse.
No user-serviceable parts inside.
To apply power, set the power switch to the I position.
Power Supply
The Maxedia comes with an auto-sensing, auto-ranging switch-mode power supply. Manual
adjustments to the main voltage and frequency are not necessary as the Maxedia automatically
adapts.
Power Connection
For protection from electric shock , the Maxedia must be grounded (earthed). The AC mains
supply must be fitted with a current overload circuit breaker or fuse and ground-fault (earth-fault)
device.
Connect the Maxedia directly to AC power. Do not connect it to a dimmer system. Doing so may
damage the system.
The Maxedia IO Box's 3 AC power output connectors provide a total of 6.3 A maximum. The voltage
at these connectors is the same as the voltage applied to the AC power input connector. Use the
power output connectors only to connect low-power devices such as the 19" Maxedia computer,
external monitors and ethernet switches.
Power Cables
A power cable without a power connector is suppled. Only replace this cable with one of the following
types:
SVT, 18 AWG x 3 - 16 AWG x 3
SJT, 18 AWG x 3 - 14 AWG x 3
H05VV-F, 3G 0.75 - 1.5
4V-75, 250/440 V, 3G 0.75 - 1.0
227 IEC53 (RVV), 300/500 V, 3G 0.75 - 1.5
A 3-prong power plug with live, neutral and ground (earth) pins rated 250 VAC, 10 A minimum must be
installed on the power cable following the plug manufacturer's instructions. Use a power plug of the
approved type for your region. For example:
USA: NEMA 5-15 A
Europe: CEE or Schuko
United Kingdom: UK BSI 13 A
Denmark: SEV
Maxedia 4
4 © 2010 Martin Professional A/S
Page 12

The table below shows some possible pin identification schemes. If pins are not clearly identified, or
Wire color
Pin
Symbol
Screw (USA)
Brown
LiveLYellow or brass
Blue
Neutral
N
Silver
Yellow/green
Ground
Green
if you have any doubts about proper installation, consult a qualified electrician.
Maxedia 4
5 © 2010 Martin Professional A/S
Page 13
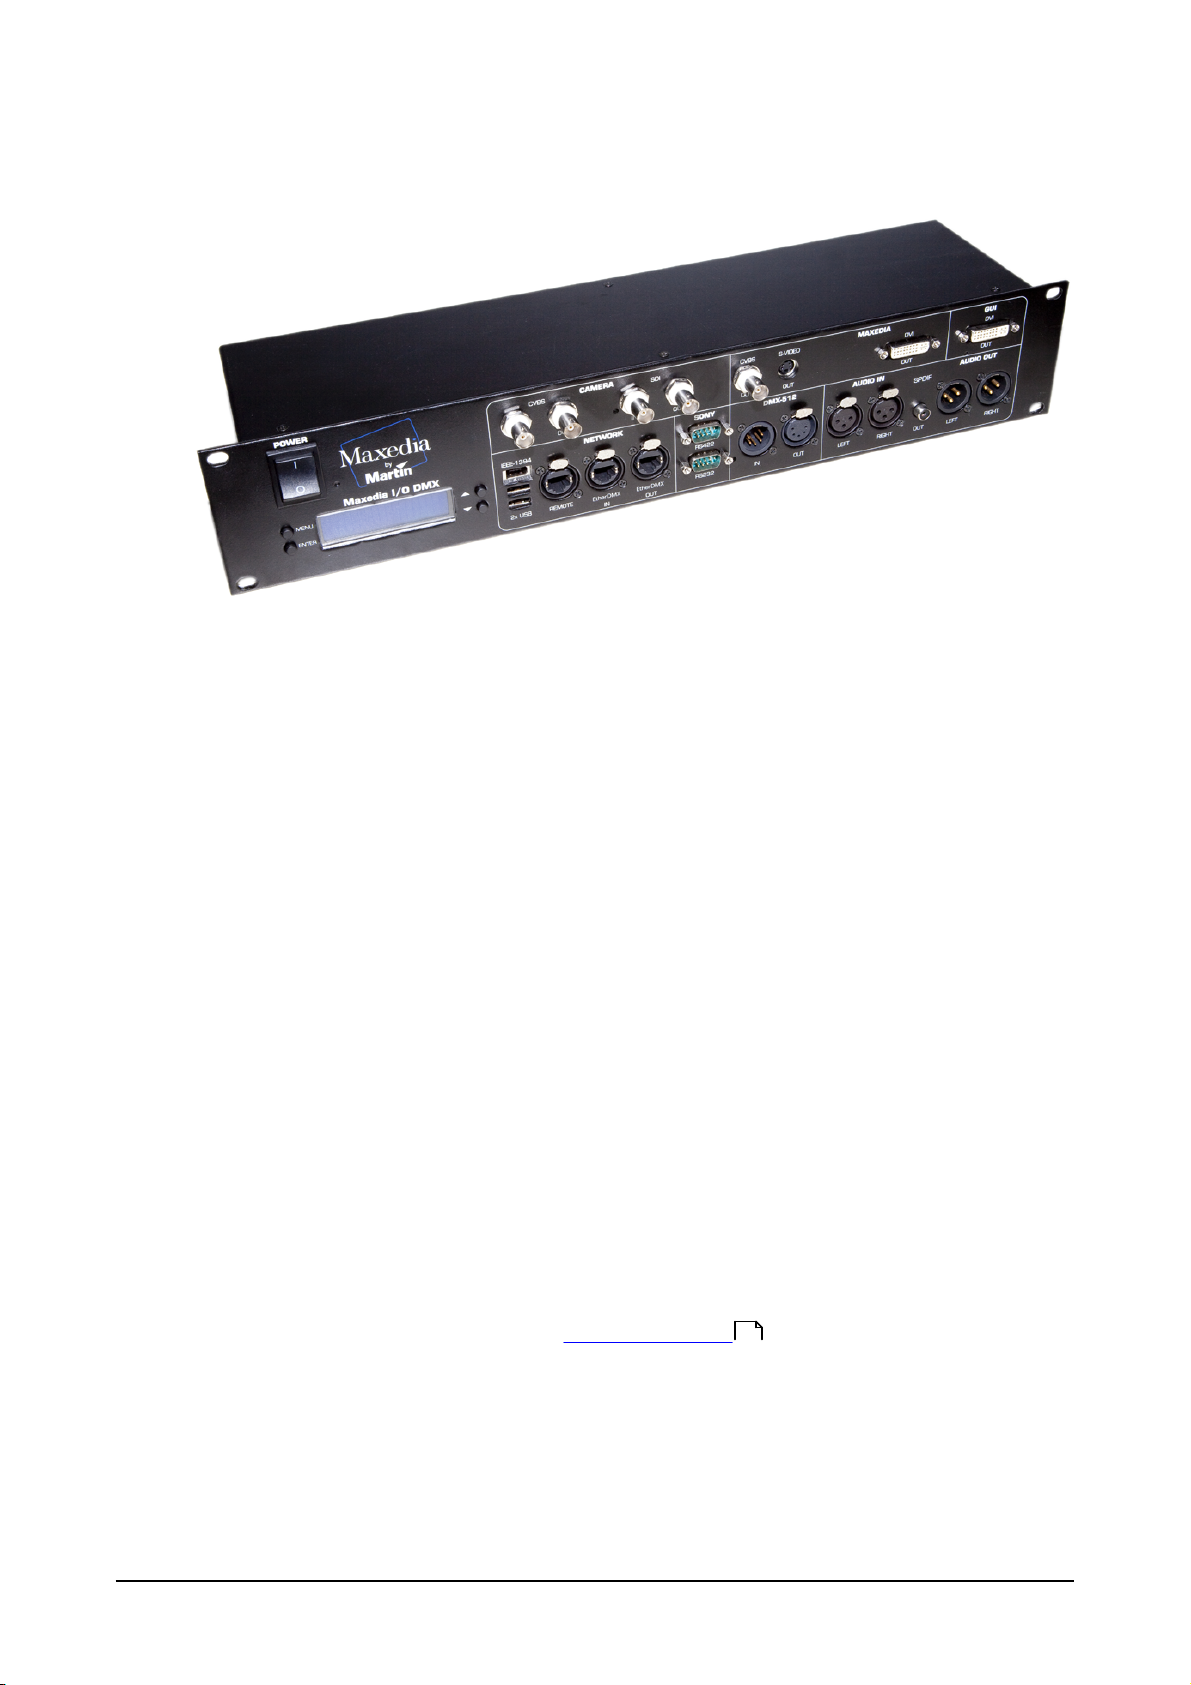
IO Box
Most connections to your Maxedia Broadcast or Maxedia Pro are made through the IO Box. Two
monitors must be connected before powering on the Maxedia. If you are using a VGA monitor use
the included DVI to VGA adaptor to connect the VGA monitor through the DVI port on the front of the
IO Box. The USB cable for the User Interface touch screen should be connected to the USB port at
the left side of the IO Box.
The Power switch on the IO Box controls the IO Box it's self, the Maxedia and any other components
receiving power from the back of the IO Box.
The Camera section of the IO Box has inputs to capture Composite Video (CVBS IN) and Digital
Video (SDI IN). Each of these has a corresponding output that sends a loop of the incoming signal
(CVBS OUT and SDI OUT). The Digital Video input (SDI IN) is only active on Broadcast machines
with a Black Magic Decklink SDI capture card.
The Maxedia section contains connections for the output of the Maxedia engine. A DVI or VGA
monitor should be connected to the DVI Out port. The composite video (CVBS) and S-Video out will
both be active if TV is selected in the windows display driver as an active display.
The touch screen monitor being used for the Graphic User Interface should be connected to the GUI
DVI OUT port.
The Network section has a Firewire connection (IEEE-1394), 2 USB 1.0 ports, and 3 ethernet
connectors. The Remote port is used to network multiple Maxedia to sync media, cues, and
synchronize output timing. The EtherDMX IN port is used to receive DMX control from an Artnet
lighting console. the EtherDMX OUT port is used to send Pixelmapping information to lighting fixtures
in the rig.
There are 2 Serial interface connections RS422 and RS232.
The DMX-512 section has connectors to receive and send a single universe of DMX via 5-pin. You
can specify which universe to output in the DMX Devices Menu .
126
The Audio section has XLR connectors for stereo audio capture and output, as well as digital surround
sound output (SPDIF)
Maxedia 4
The IO Box should be connected to the Maxedia with the included cable bundle.
6 © 2010 Martin Professional A/S
Page 14
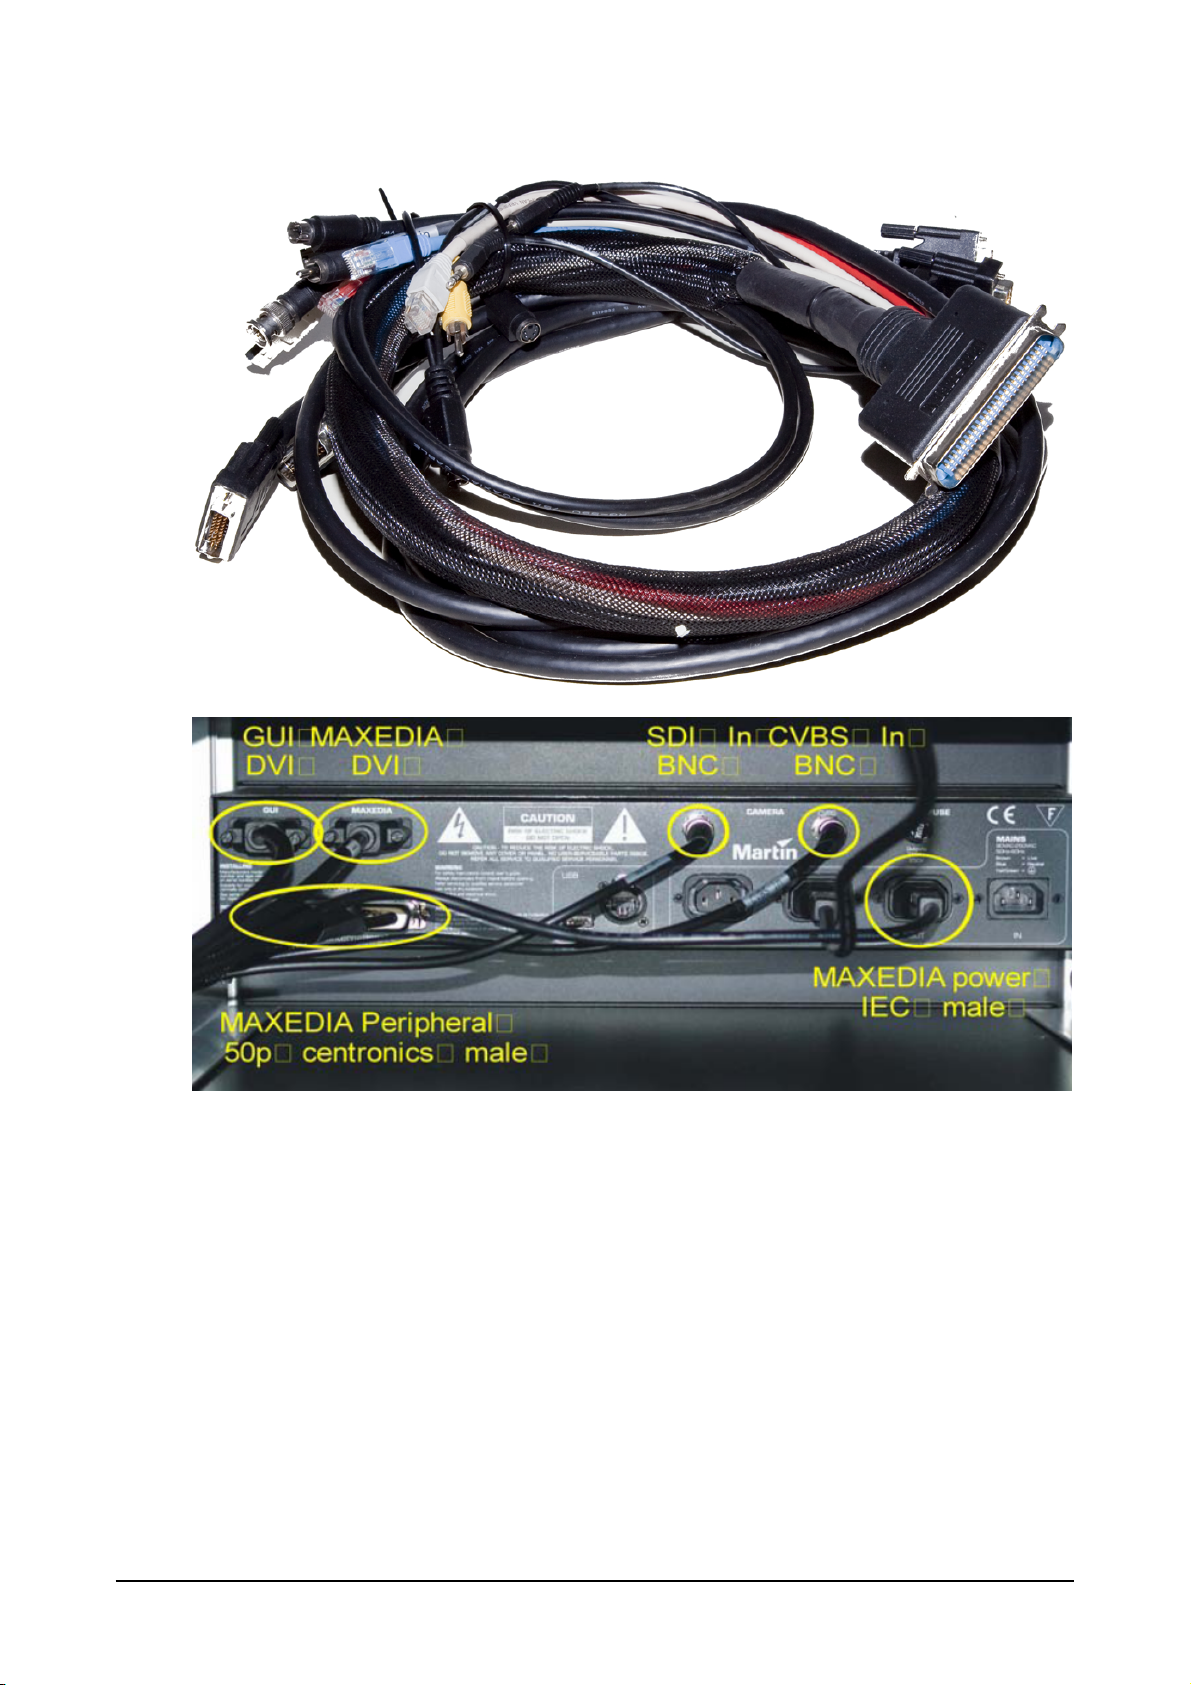
Connections to the Maxedia are different for each hardware revision.
Maxedia 4
7 © 2010 Martin Professional A/S
Page 15

IO Box Menu
The Menu on the IO Box allows you access to few functions of the Maxedia without accessing the
User Interface. This is most helpful when you are using Duel Output from a Maxedia Pro.
- The Menu button can be used for opening new menus and for returning to a previous menu.
- The two Arrow buttons can be used for moving through a menu.
- The Enter button can be used for opening menus and executing commands.
1. Test Images (allows you to select the test images available through the Color Adjustment
window on the Output Adjust screen)
166
166
1.1 Normal
1.2 Color Bar
1.3 Luminance Bar
1.4 Alignment
1.5 Video 1 in
1.6 Video 2 in
2. DMX-In (allows you to view and adjust the DMX addresses that some functions in the Maxedia will
respond to)
2.1 Set DMX-Base Address
2.2 Set DMX Output Adjustment Address
2.3 Set DMX Layer Address
2.4 Set Number of Layers
2.5 Select DMX Protocol (DMX In/Artnet)
2.6 DMX Base Universe
2.7 DMX Output Adjustment Universe
2.8 DMX Layer Universe
2.9 DMX Base Active (On/Off)
2.10 DMX Output Adjustment Active (On/Off)
2.11 DMX Layer Active (On/Off)
3. Global Settings
3.1 Set Boxname
3.2 Set Auto Scroll (On/Off) (if set to On the display will scroll thru the current settings when
the menu is not active)
Maxedia 4
4. Defaults
4.1 Save Userdefault
4.2 Load Userdefault
4.3 Load MFGDefaults
5. Diagnostics
5.1 DMX Viewer
5.2 Connection Test
8 © 2010 Martin Professional A/S
Page 16
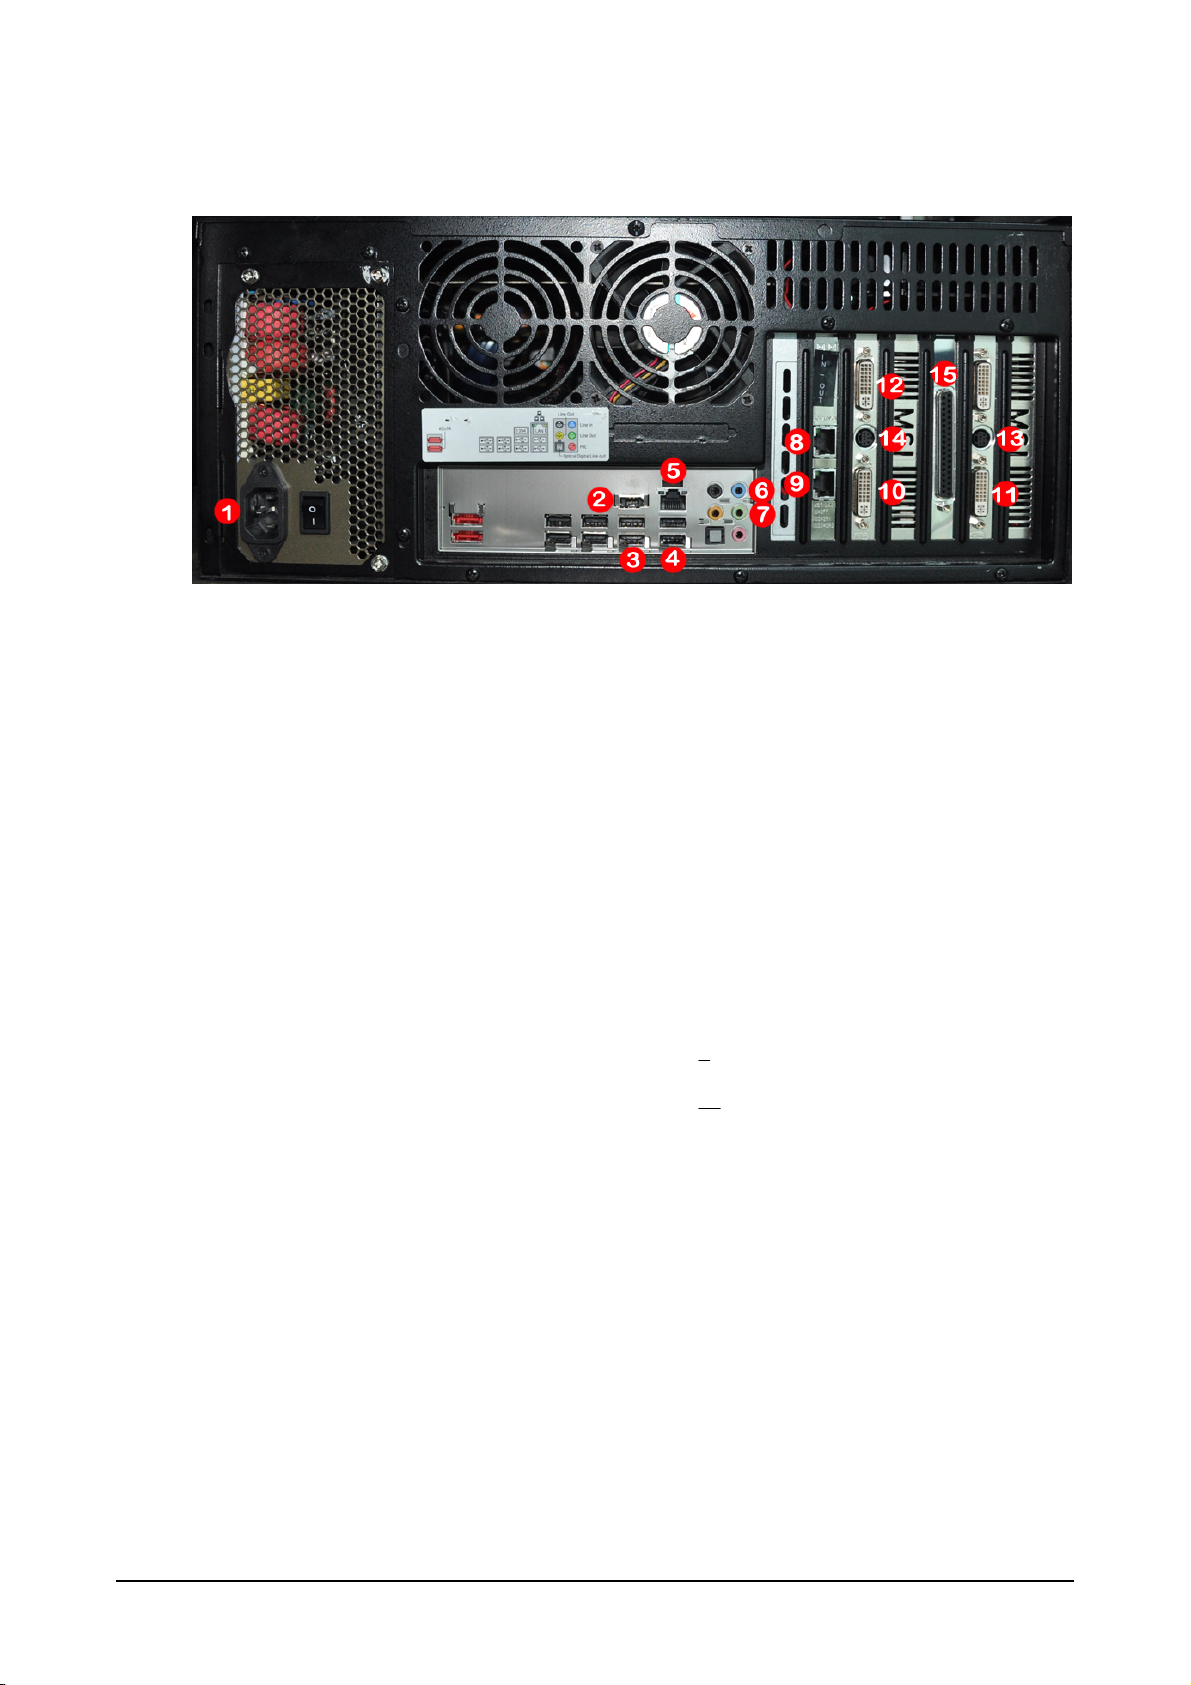
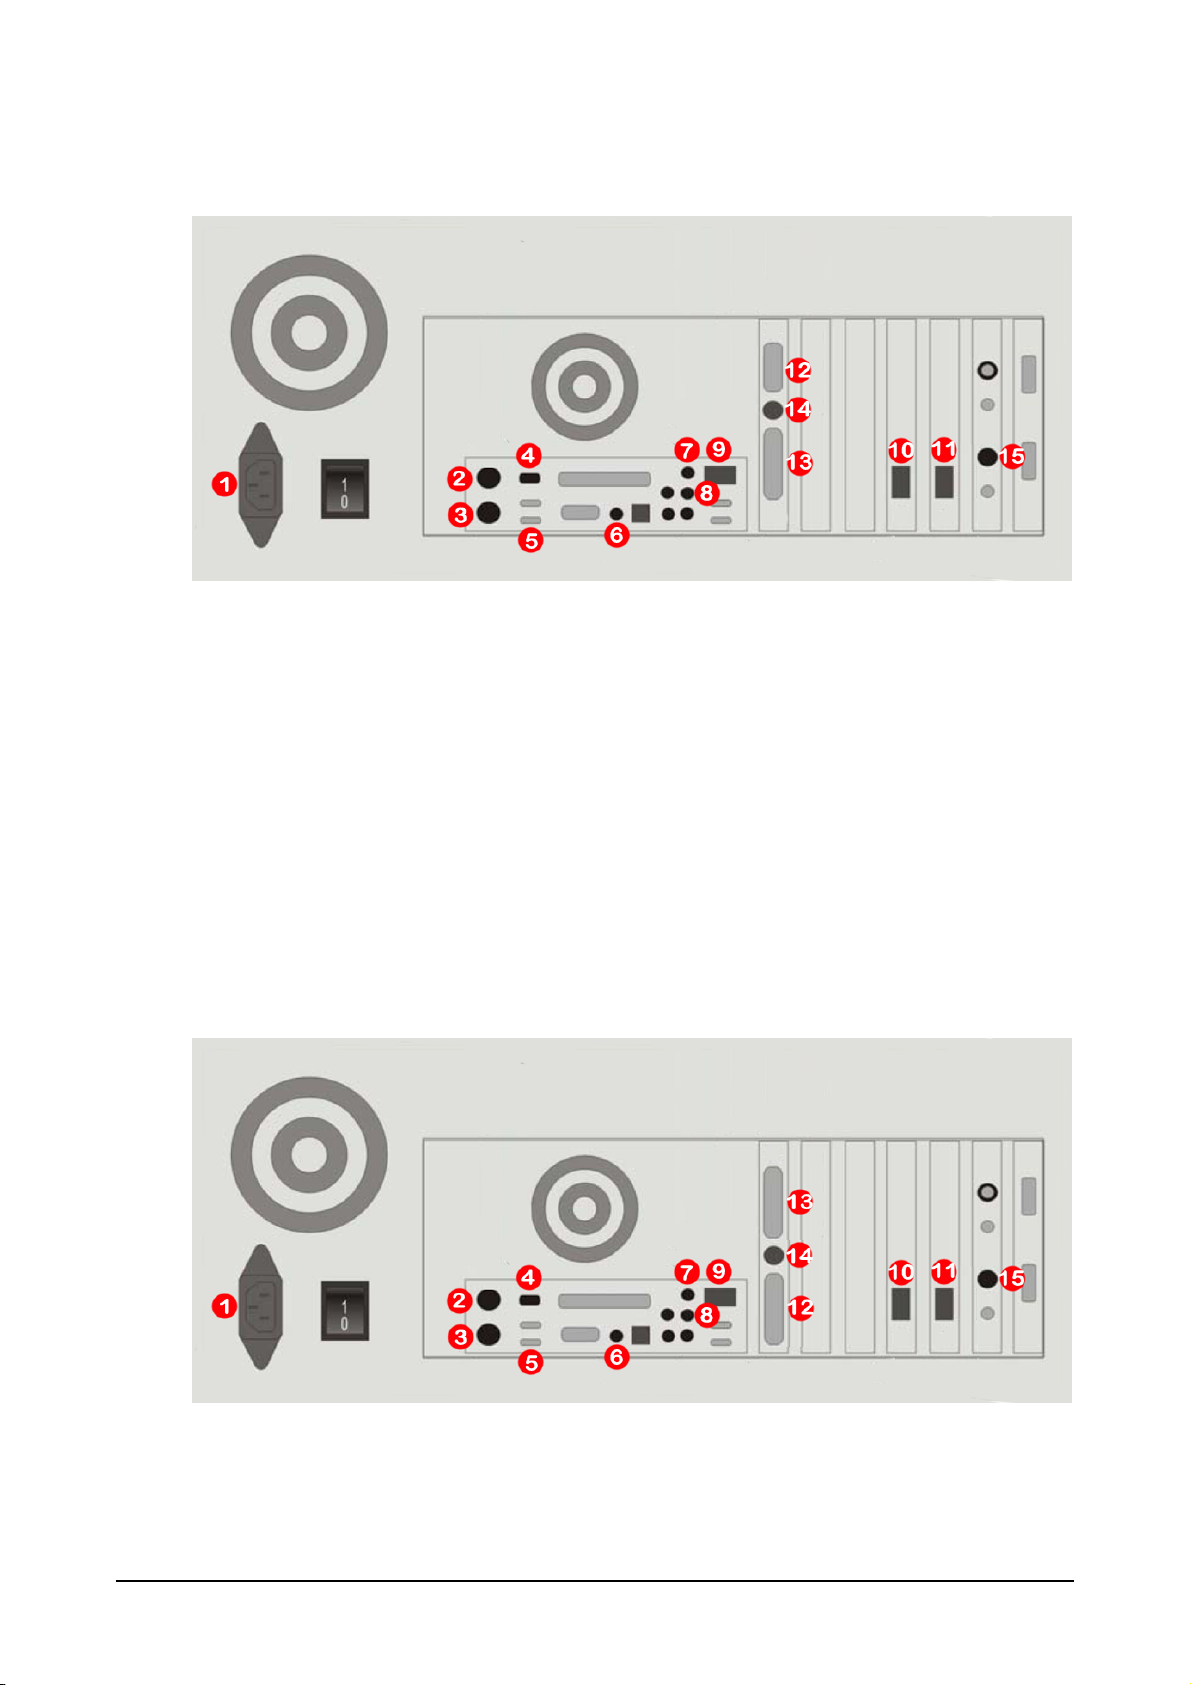
Maxedia Broadcast
Using the included cable bundle, connect the Maxedia Broadcast to the IO Box as follows:
1. Power Cable
2. Firewire IEEE1394
3. Keyboard USB
4. USB (to IO Box)
5. Remote Network
6. Audio In
7. Audio Out
8. Ether DMX1 (In)
9. Ether DMX2 (Out)
10. GUI (DVI)
11. Maxedia (DVI) - This is the Maxedia Out 1 - connected thru the IO Box.
12. Maxedia (DVI) - This is the Maxedia Out 2 - If you are using duel output, connect the
second output monitor directly to the Maxedia here.
13. S-Video Out - If you are using S-Video an S-Video monitor for Maxedia Out 1
14. S-Video Out - If you are using duel output and using an S-Video monitor for the Maxedia
Out 2
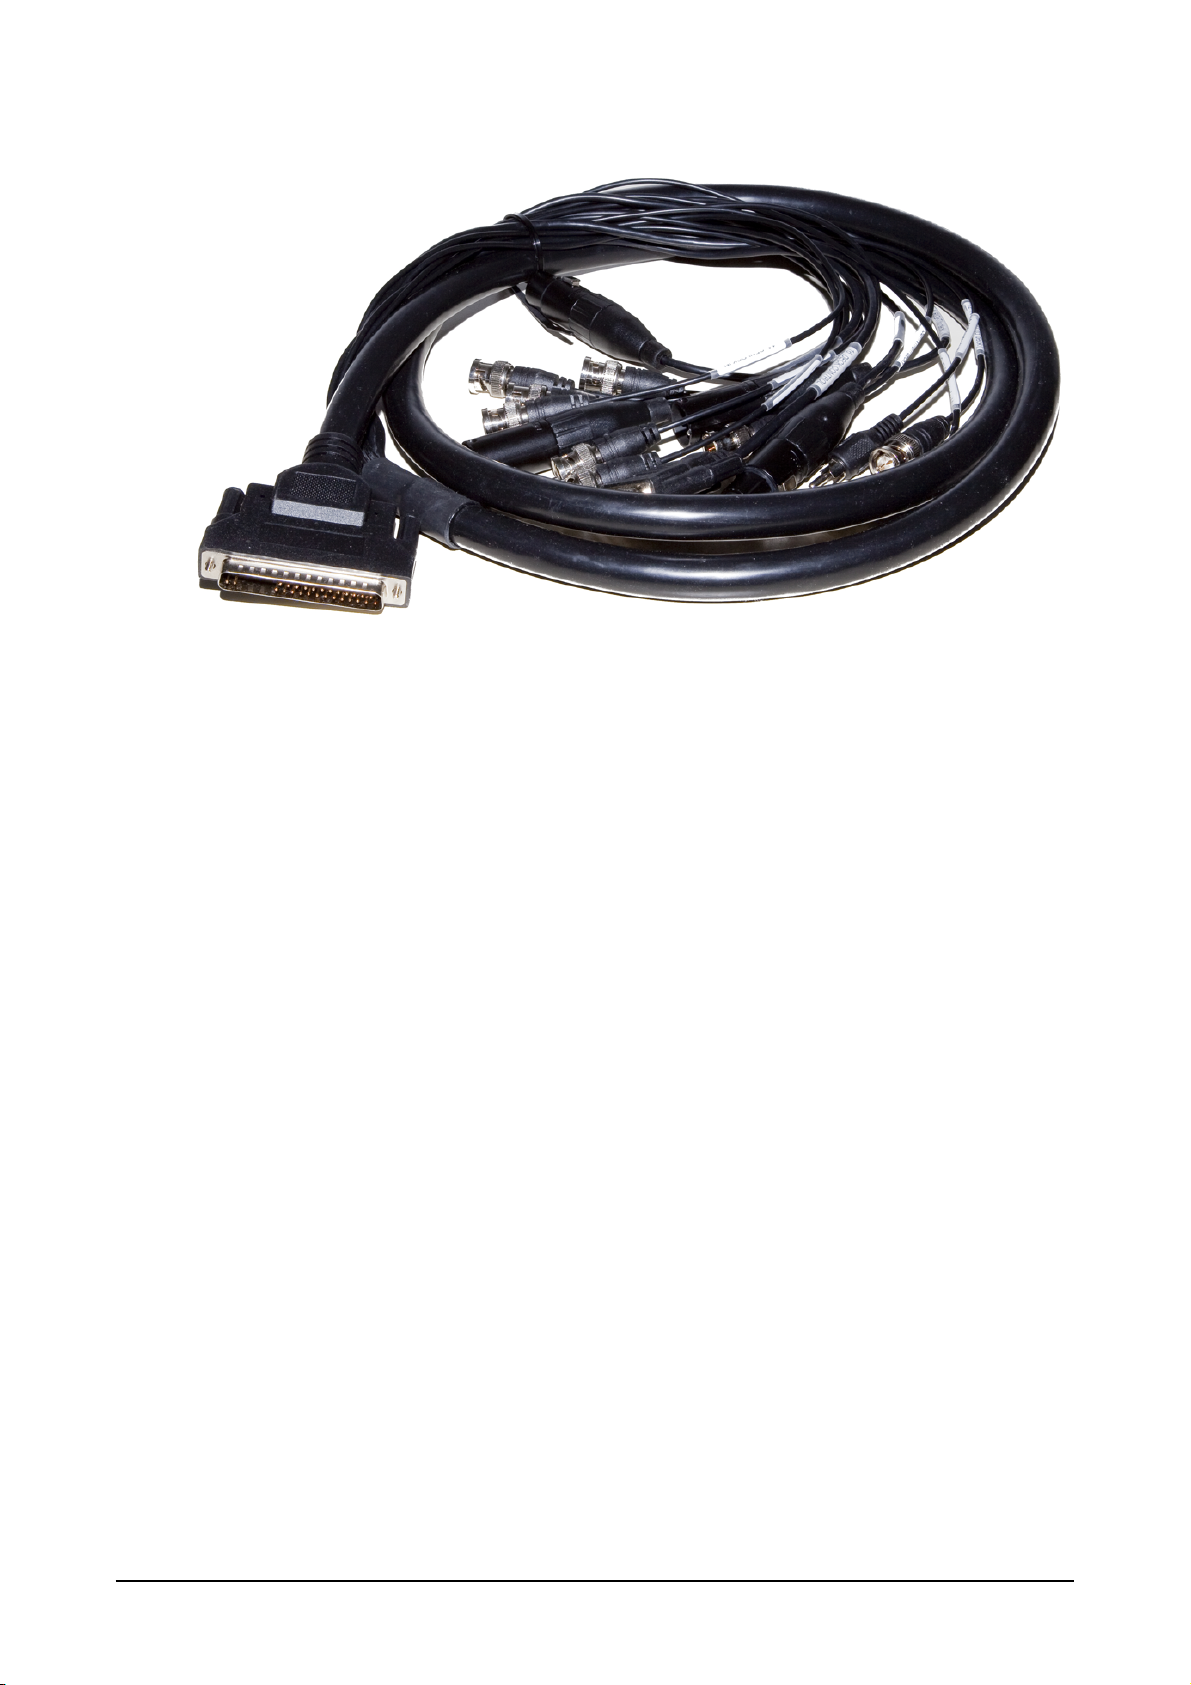
15. Black Magic Deck link connector - The Black Magic cable Bundle connects here
Connect the BNC Male connector labeled 7 Y IN (from deck) to the Camera CVBS
connector on the back of IO Box
Connect the BNC male connector labeled 15 SDI IN (from deck) to the Camera SDI
connector on the back of the IO Box
Maxedia 4
9 © 2010 Martin Professional A/S
Page 17
Maxedia 4
10 © 2010 Martin Professional A/S
Page 18
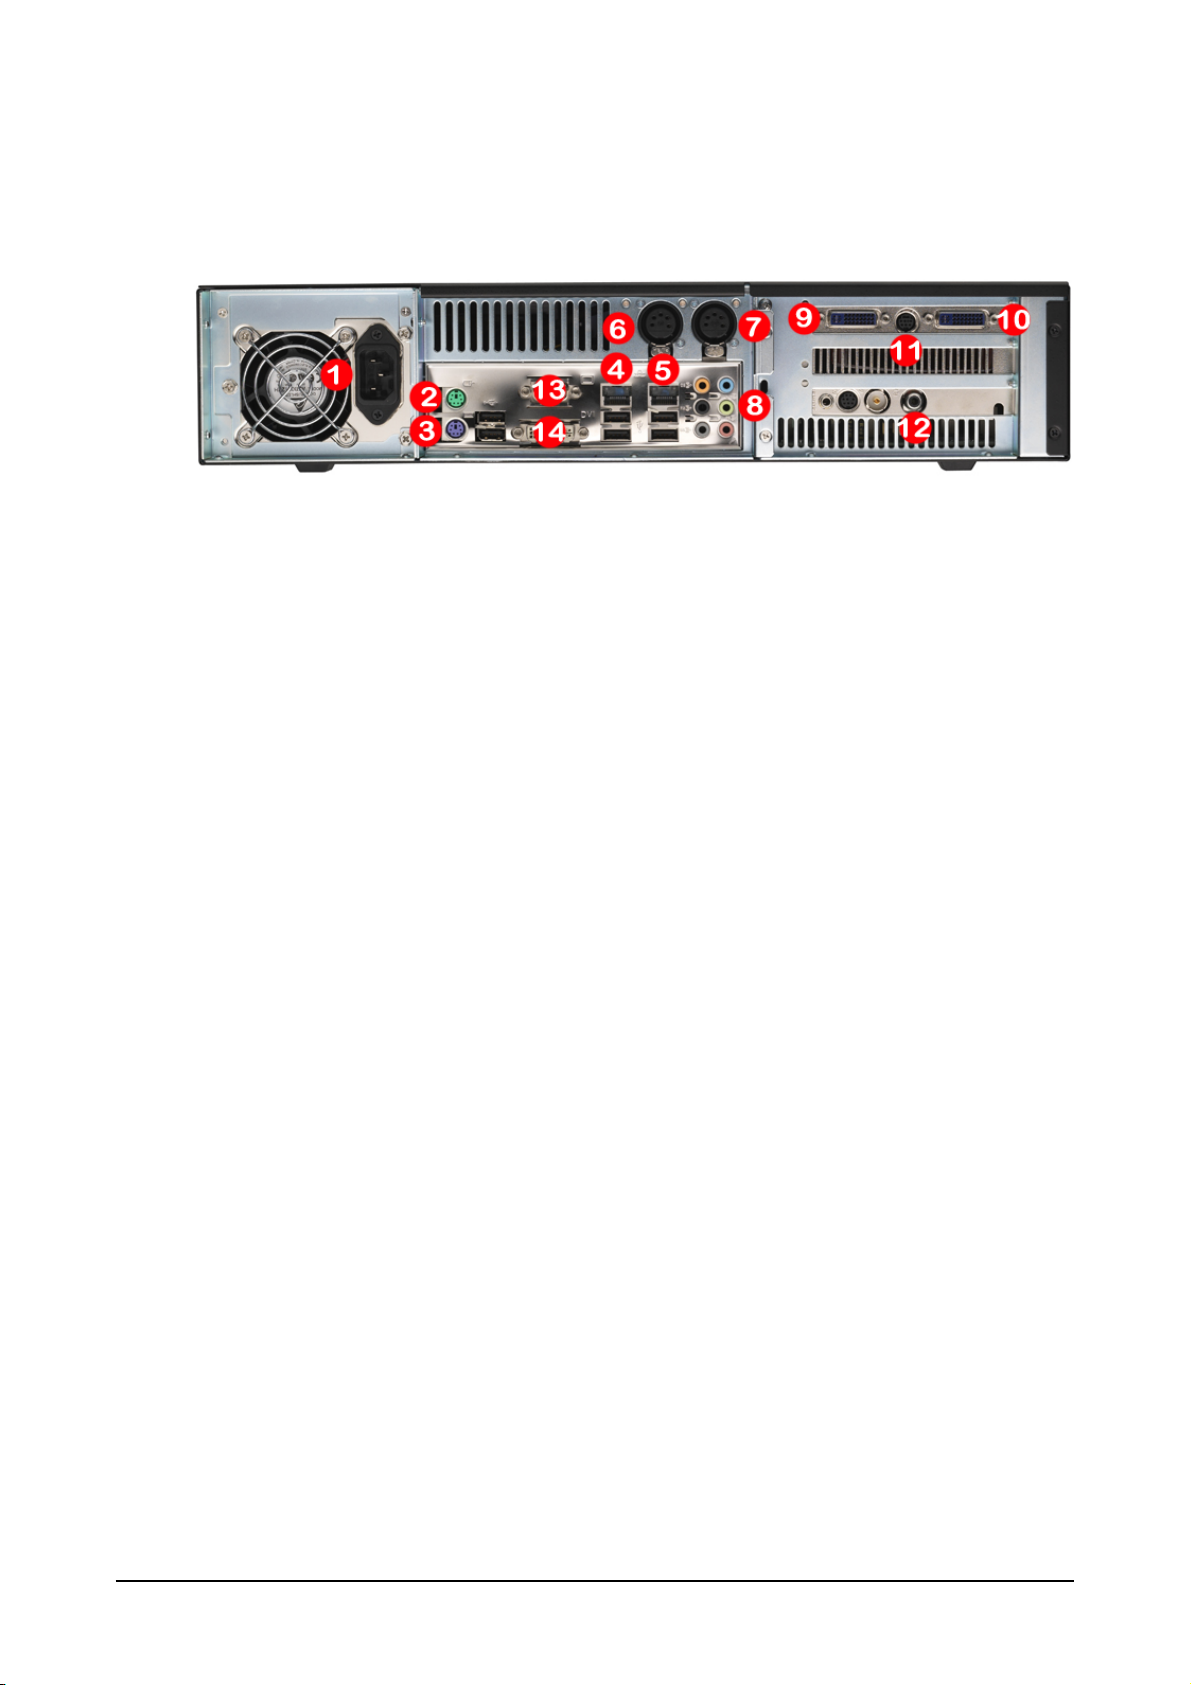
Maxedia Pro
Using the included cable bundle, connect the Maxedia Pro with a 1 VGA and 1 DVI video card to the
IO Box as follows:
1. Power Cable
2. PS2 Touchpad - Green connector
3. PS2 Keyboard - Purple connector
4. Firewire IEEE1394
5. USB (to IO Box)
6. SPDIF Out
7. Audio In
8. Audio Out
9. Remote Network
10. Ether DMX1 (In)
11. Ether DMX2 (Out)
12. GUI (VGA)
13. Maxedia (DVI)
14. S-Video Out
15. CVBS In
Maxedia 4
Using the included cable bundle, connect the Maxedia Pro with a duel DVI video card to the IO Box
as follows:
1. Power Cable
2. PS2 Touchpad - Green connector
3. PS2 Keyboard - Purple connector
11 © 2010 Martin Professional A/S
Page 19

4. Firewire IEEE1394
5. USB (to IO Box)
6. SPDIF Out
7. Audio In
8. Audio Out
9. Remote Network
10. Ether DMX1 (In)
11. Ether DMX2 (Out)
12. GUI (DVI)
13. Maxedia (DVI)
14. S-Video Out
15. CVBS In
Maxedia 4
12 © 2010 Martin Professional A/S
Page 20
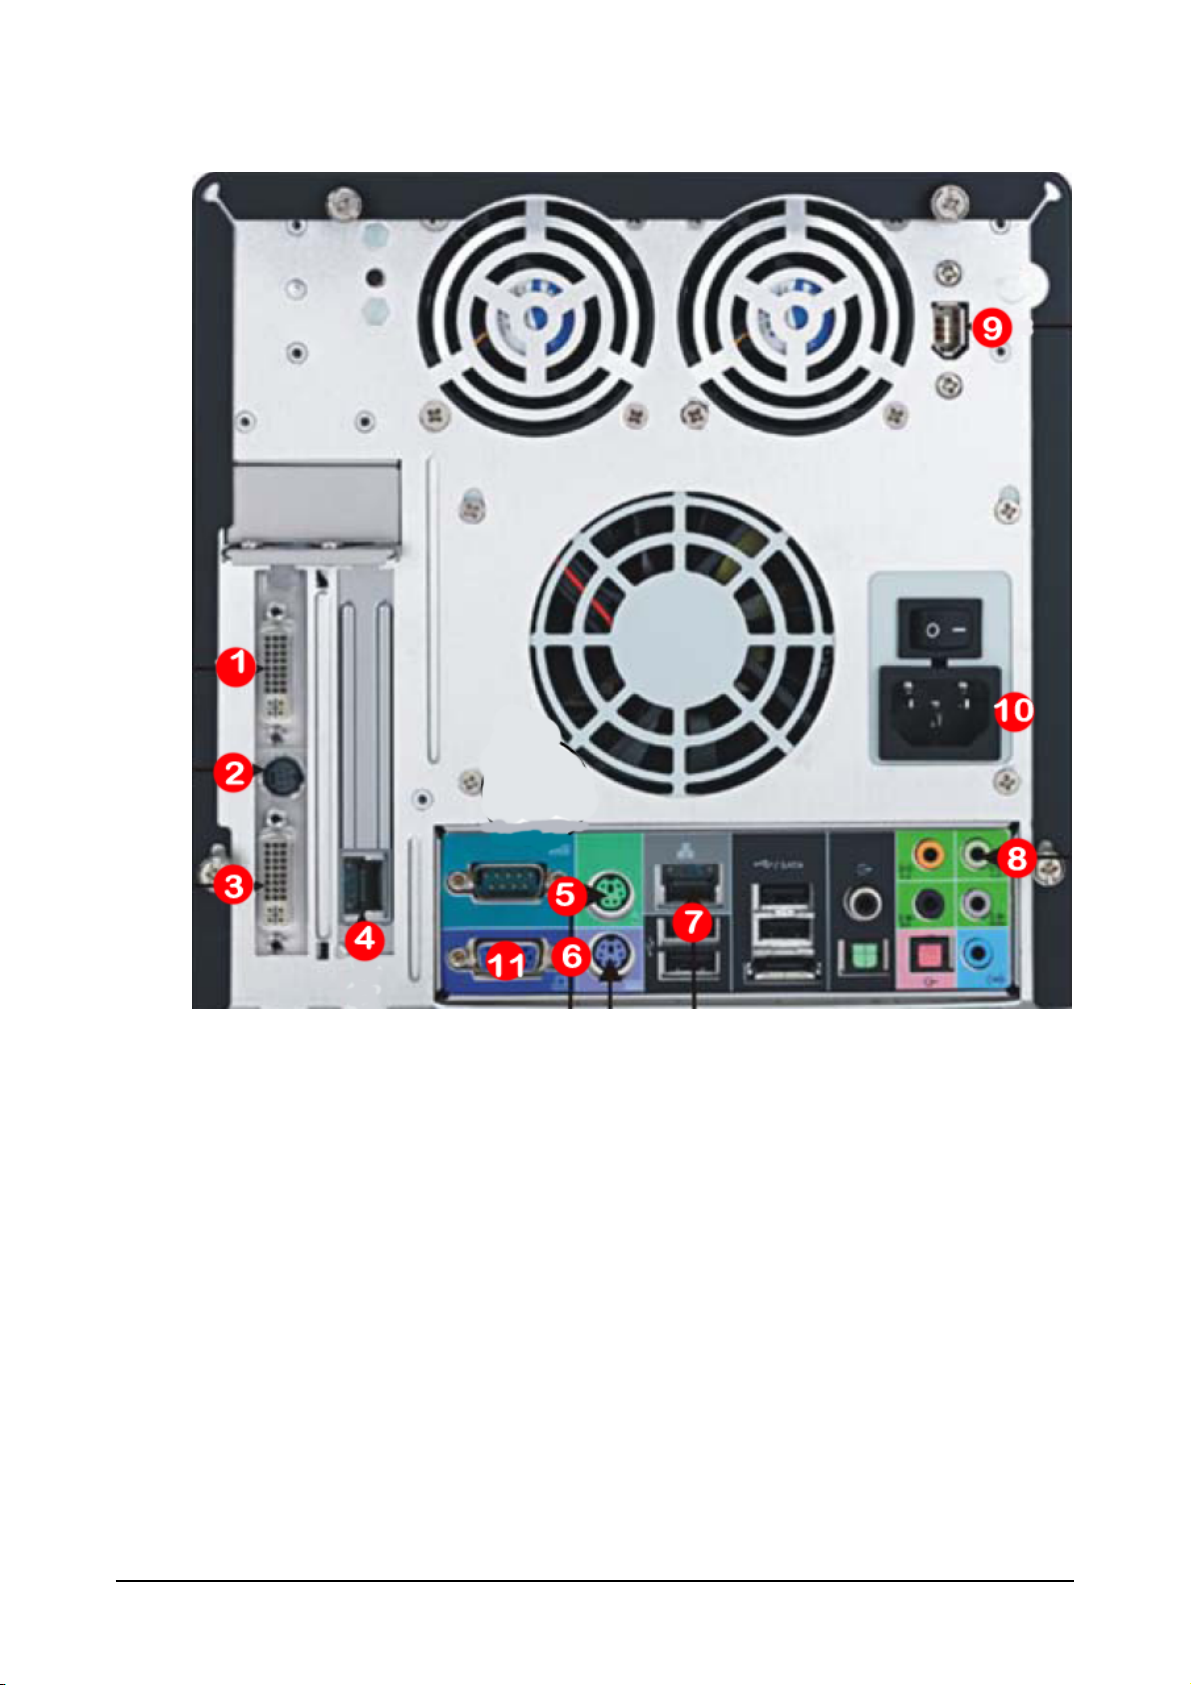
Maxedia Compact
Maxedia Compact Rackmount systems connections:
1. Power Cable
2. PS2 Mouse
3. PS2 Keyboard
4. Artnet - EtherDMX control from lighting console
5. Remote network - Syncing cues and content with other Maxedia
6. DMX A
7. DMX B
8. Audio Line Out
9. GUI (DVI) - User Interface monitor
10. Maxedia Output (DVI) - Output monitor
11. CVBS / S-Video Output - S-Video TV for Maxedia Output
12. CVBS Input - Composite video capture
13. Motherboard VGA - DO NOT USE
14. Motherboard DVI - DO NOT USE
Maxedia 4
13 © 2010 Martin Professional A/S
Page 21
Maxedia Compact Non-Rackmount system connections:
1. Maxedia Output (DVI) - Output monitor
2. CVBS / S-Video Output - S-Video TV for Maxedia Output
3. GUI (DVI) - User Interface monitor
4. Artnet - EtherDMX control from lighting console
5. PS2 Mouse
6. PS2 Keyboard
7. Remote network - Syncing cues and content with other Maxedia
8. Audio Line Out
9. Fire wire IEEE-1394
10. Power Cable
11. Motherboard VGA - DO NOT USE
Maxedia 4
14 © 2010 Martin Professional A/S
Page 22

Connecting DMX Devices
The Maxedia has 5-pin XLR sockets for DMX input and output. The pin-put on all sockets is pin 1 to
shield, pin 2 data cold/compliment (-), and pin 3 to data hot/true (+).
Use shielded twisted-pair cable designed specially for DMX devices: standard microphone cable
cannot transmit control data reliably. 24 AWG cable is suitable for runs up to 300 meters (1000 ft.)
Heavier gauge cable and/or an amplifier are recommended for longer runs.
To split the DMX link into multiple branches, use a splitter such as the Martin 4-Channel OptoIsolated RS-485 Splitter/Amplifier. Never use a Y-cable.
Do not overload the link. Up to 31 additional devices may be connected on any given DMX link.
Terminate the link by installing a termination plug in the output socket of the last fixture. The
termination plug, which is a male XLR plug with a 120 ohm, 0.25 watt resistor soldered between
pins 2 and 3, "soaks up" the control signal so it does not reflect and cause interference. If a splitter
is used, terminate each branch of the link. Please note that some fixtures and dimmers provide
onboard termination and do not require an external terminator. Consult the users manual of the
DMX device for details.
Martin fixtures introduced before 1997 have reversed polarity data sockets (pin 2 + and pin 3 -). The
socket polarity is labeled. Use a phase-reversing cable between the Maxedia and any device with
reversed polarity.
Maxedia 4
15 © 2010 Martin Professional A/S
Page 23
Monitors
The Maxedia must always have two monitors connected prior to boot up. Starting the Maxedia with
only one monitor connected will reset all of the display settings, and not allow the Maxedia engine to
start. To program cues without integrating the system into a lighting and/or video rig, or using the
Maxedia only for Pixelmapping, connect both monitors directly to the Maxedia IO Box, or Maxedia
Compact. The Windows display driver must be able to recognize the monitors attached to the
Maxedia. therefore to broadcast the Maxedia output to a screen system, you may have to attach a
standard monitor and split the signal to send it to your screens.
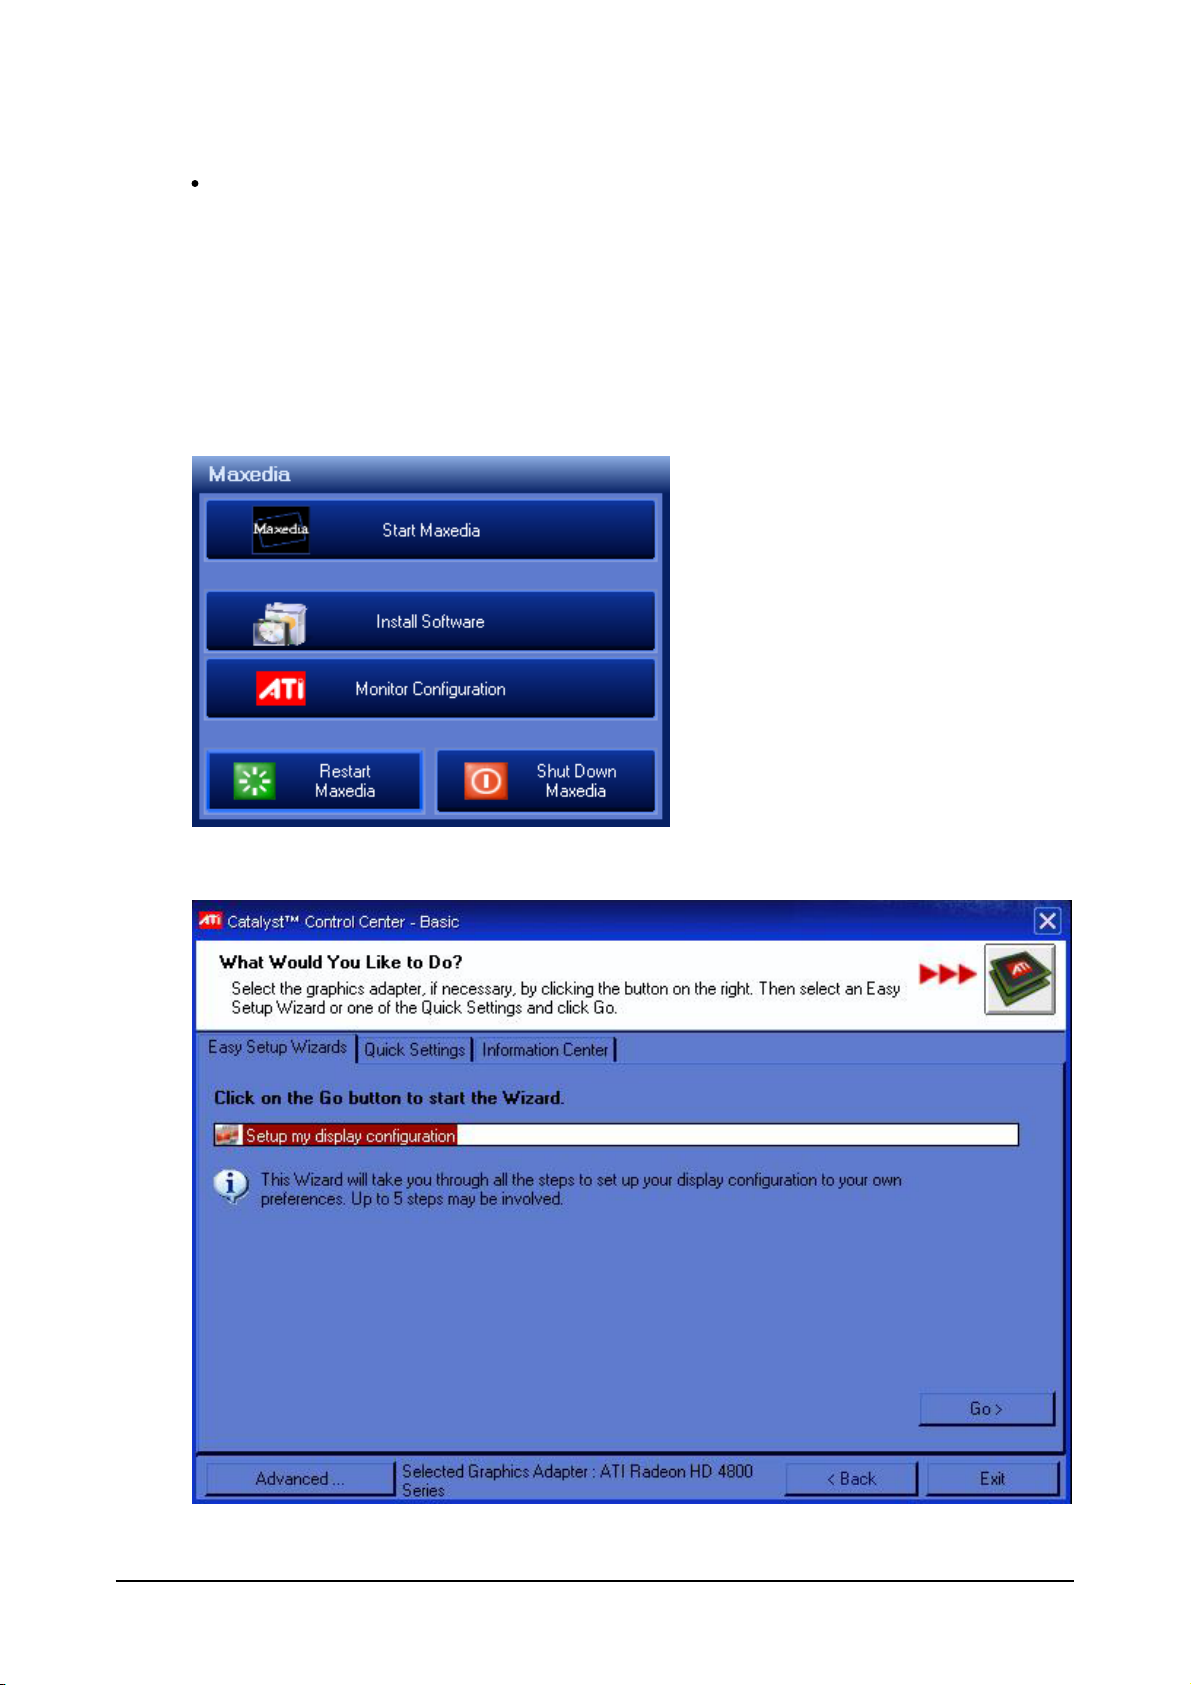
From the Main Start Menu click Monitor Configuration to open the ATI Catalyst Control Center.
Maxedia 4
Click Go > to begin Easy Setup Wizard
16 © 2010 Martin Professional A/S
Page 24
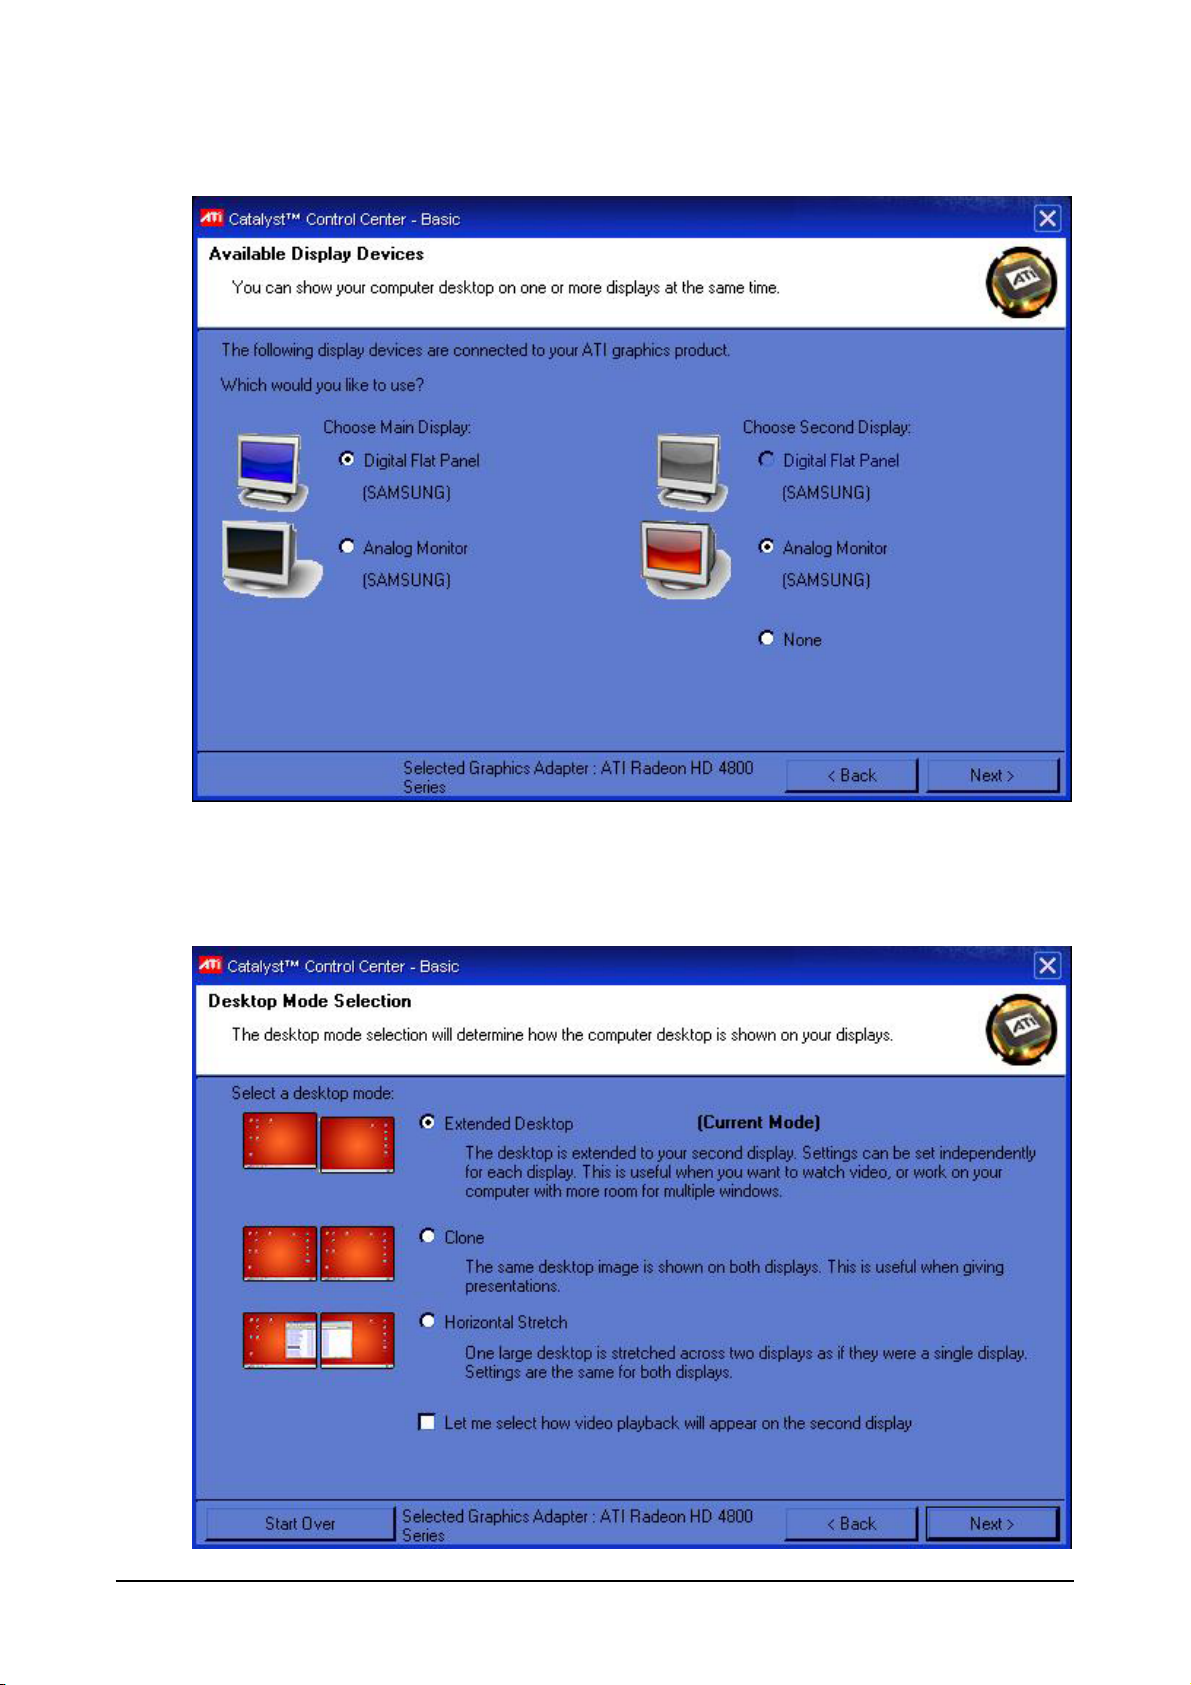
Select the monitor to be used as your user interface (typically this will be an Elo Touch monitor) from
the Choose Main Display column.
Select the monitor to be used as you Maxedia output from the Choose Second Display column.
Click Next >.
Maxedia 4
17 © 2010 Martin Professional A/S
Page 25
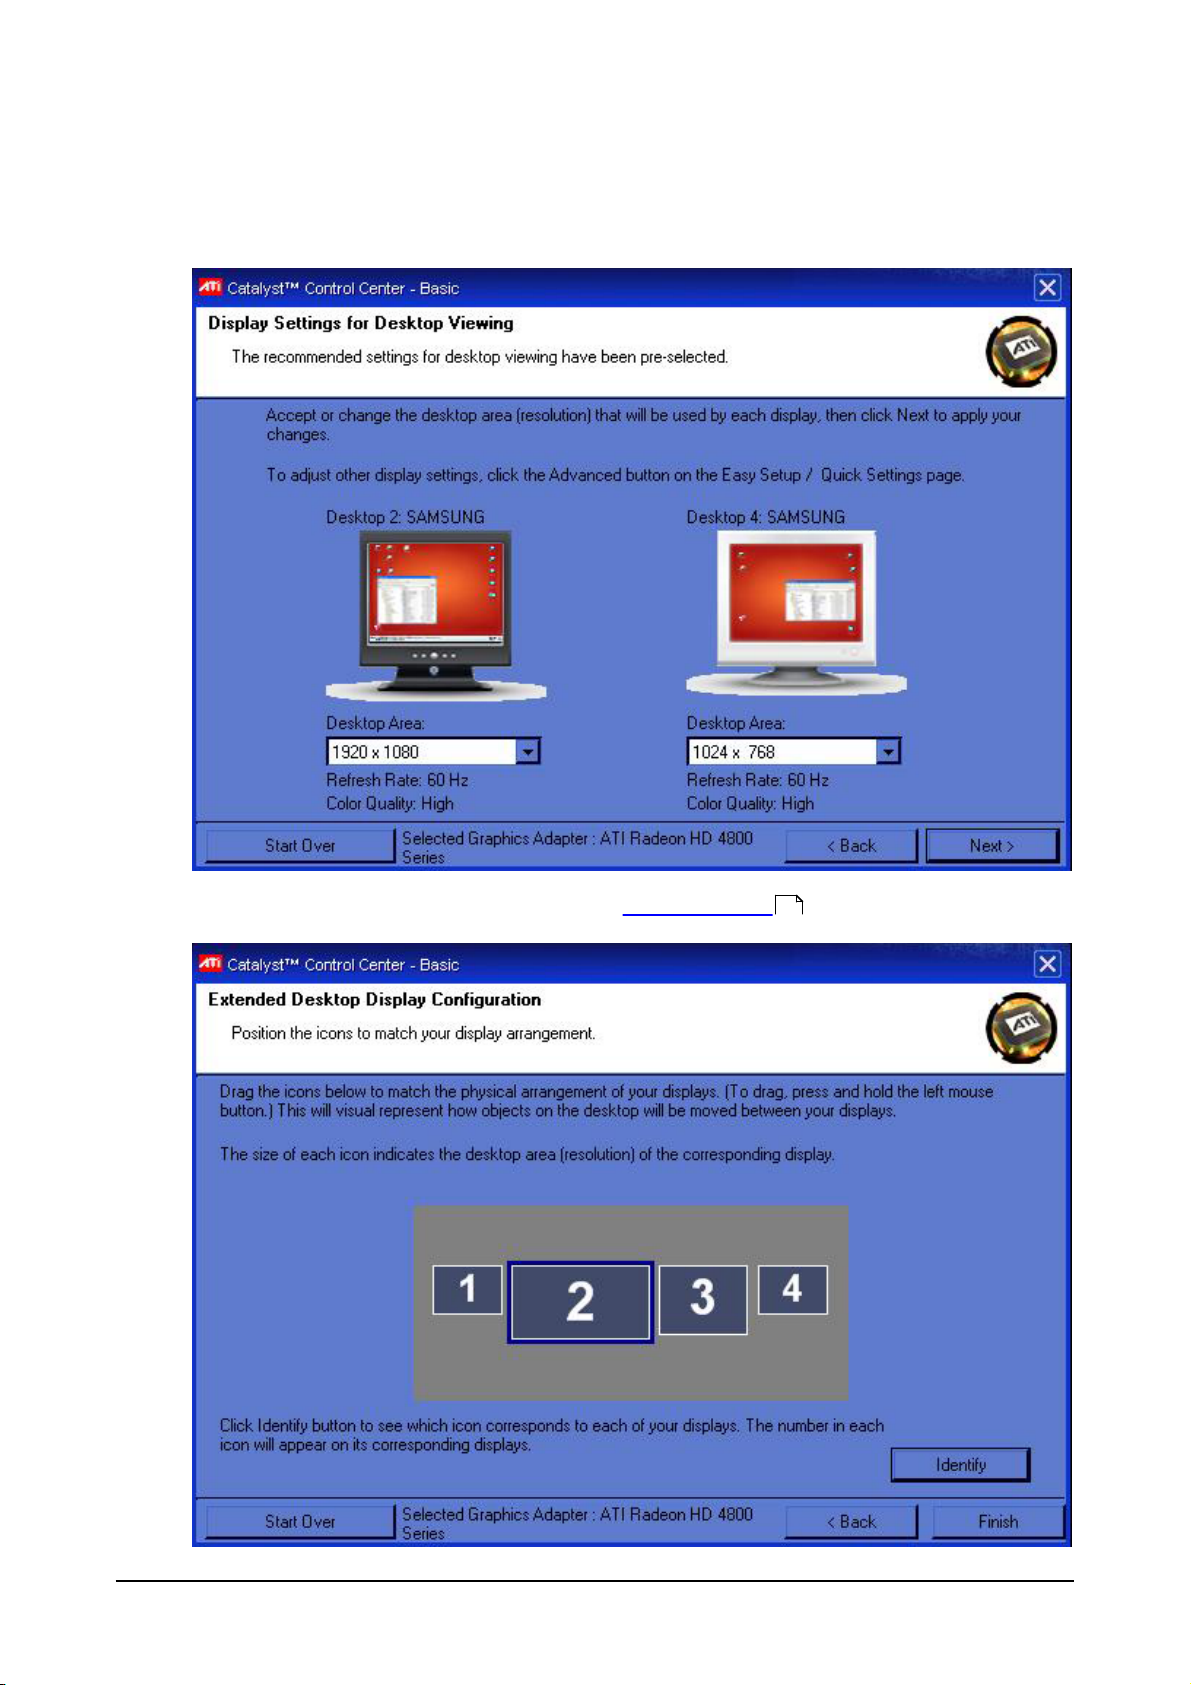
Select Extended Desktop mode.
Click Next >.
Click Next > (desktop resolution will be set in the Maxedia program )
132
Maxedia 4
18 © 2010 Martin Professional A/S
Page 26

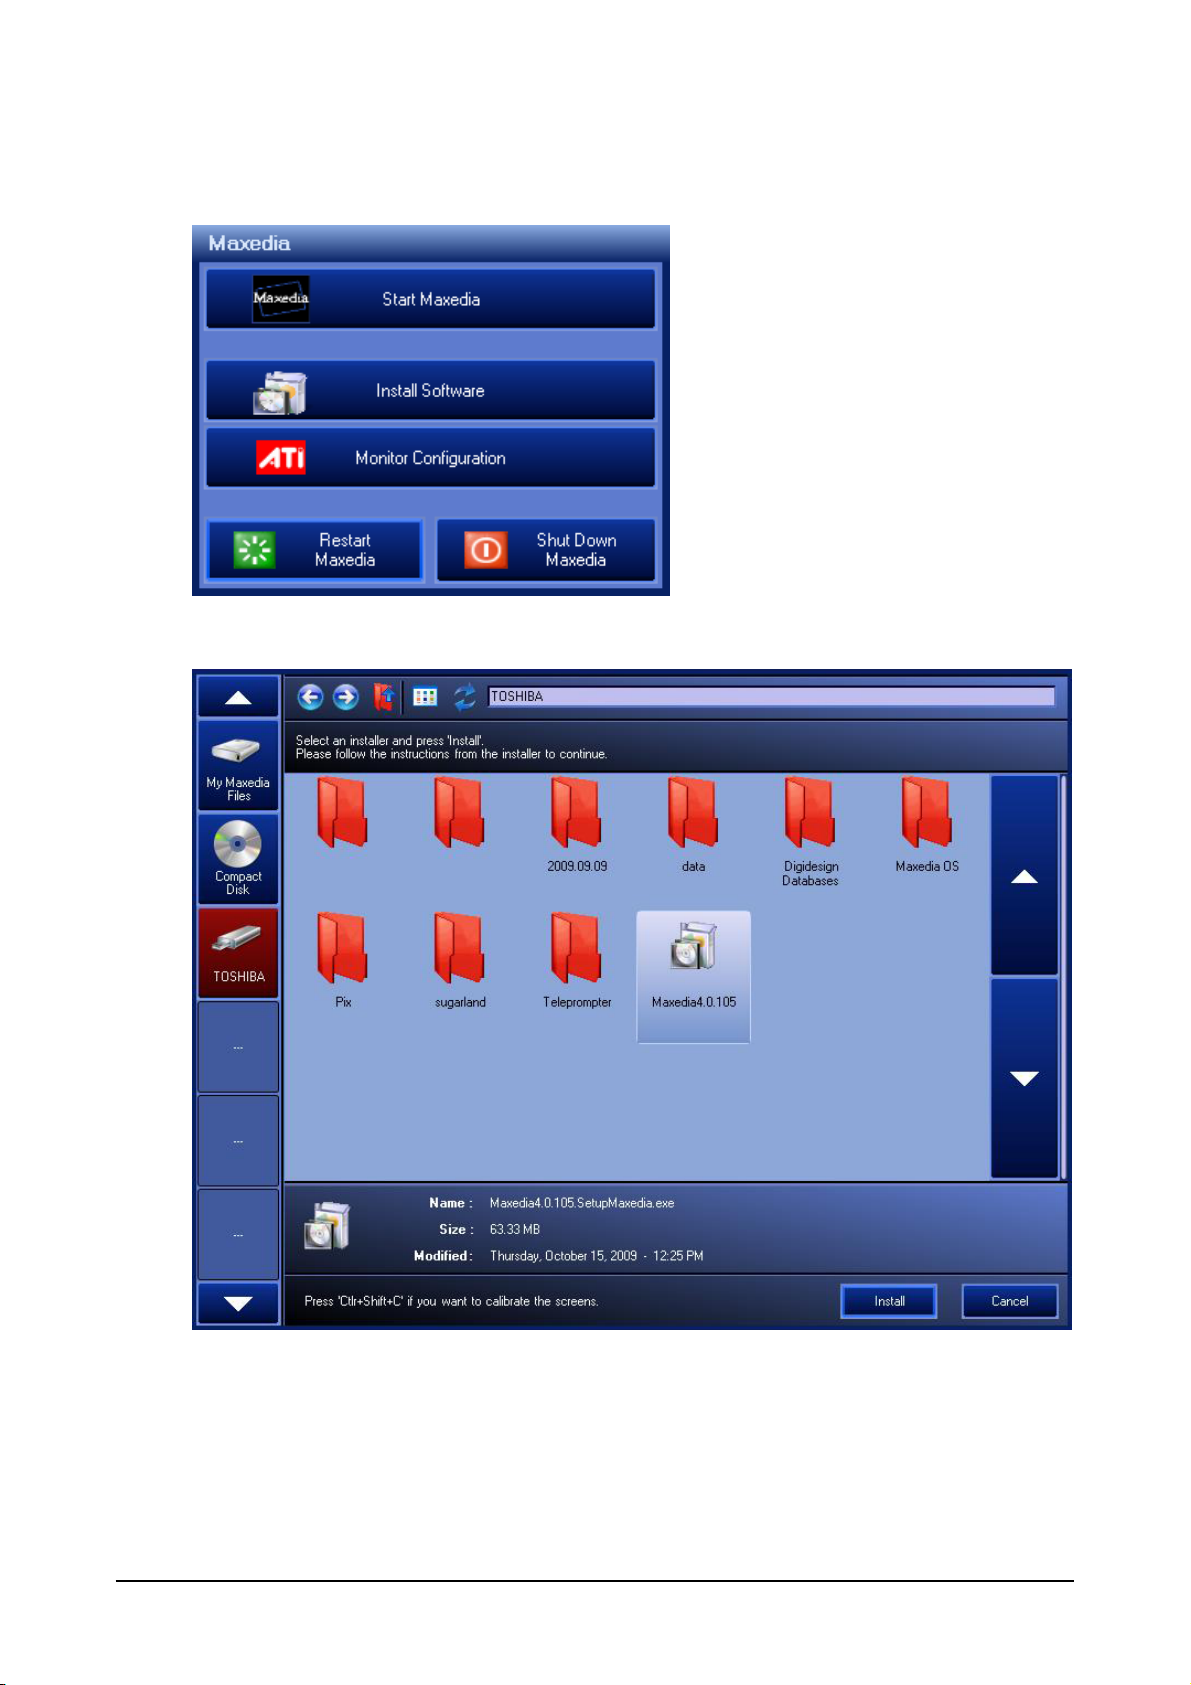
Click Identify and verify that your touch screen is display 1 and your output monitor is display 2.
Click Finish to exit.
Maxedia 4
19 © 2010 Martin Professional A/S
Page 27
Installing Software
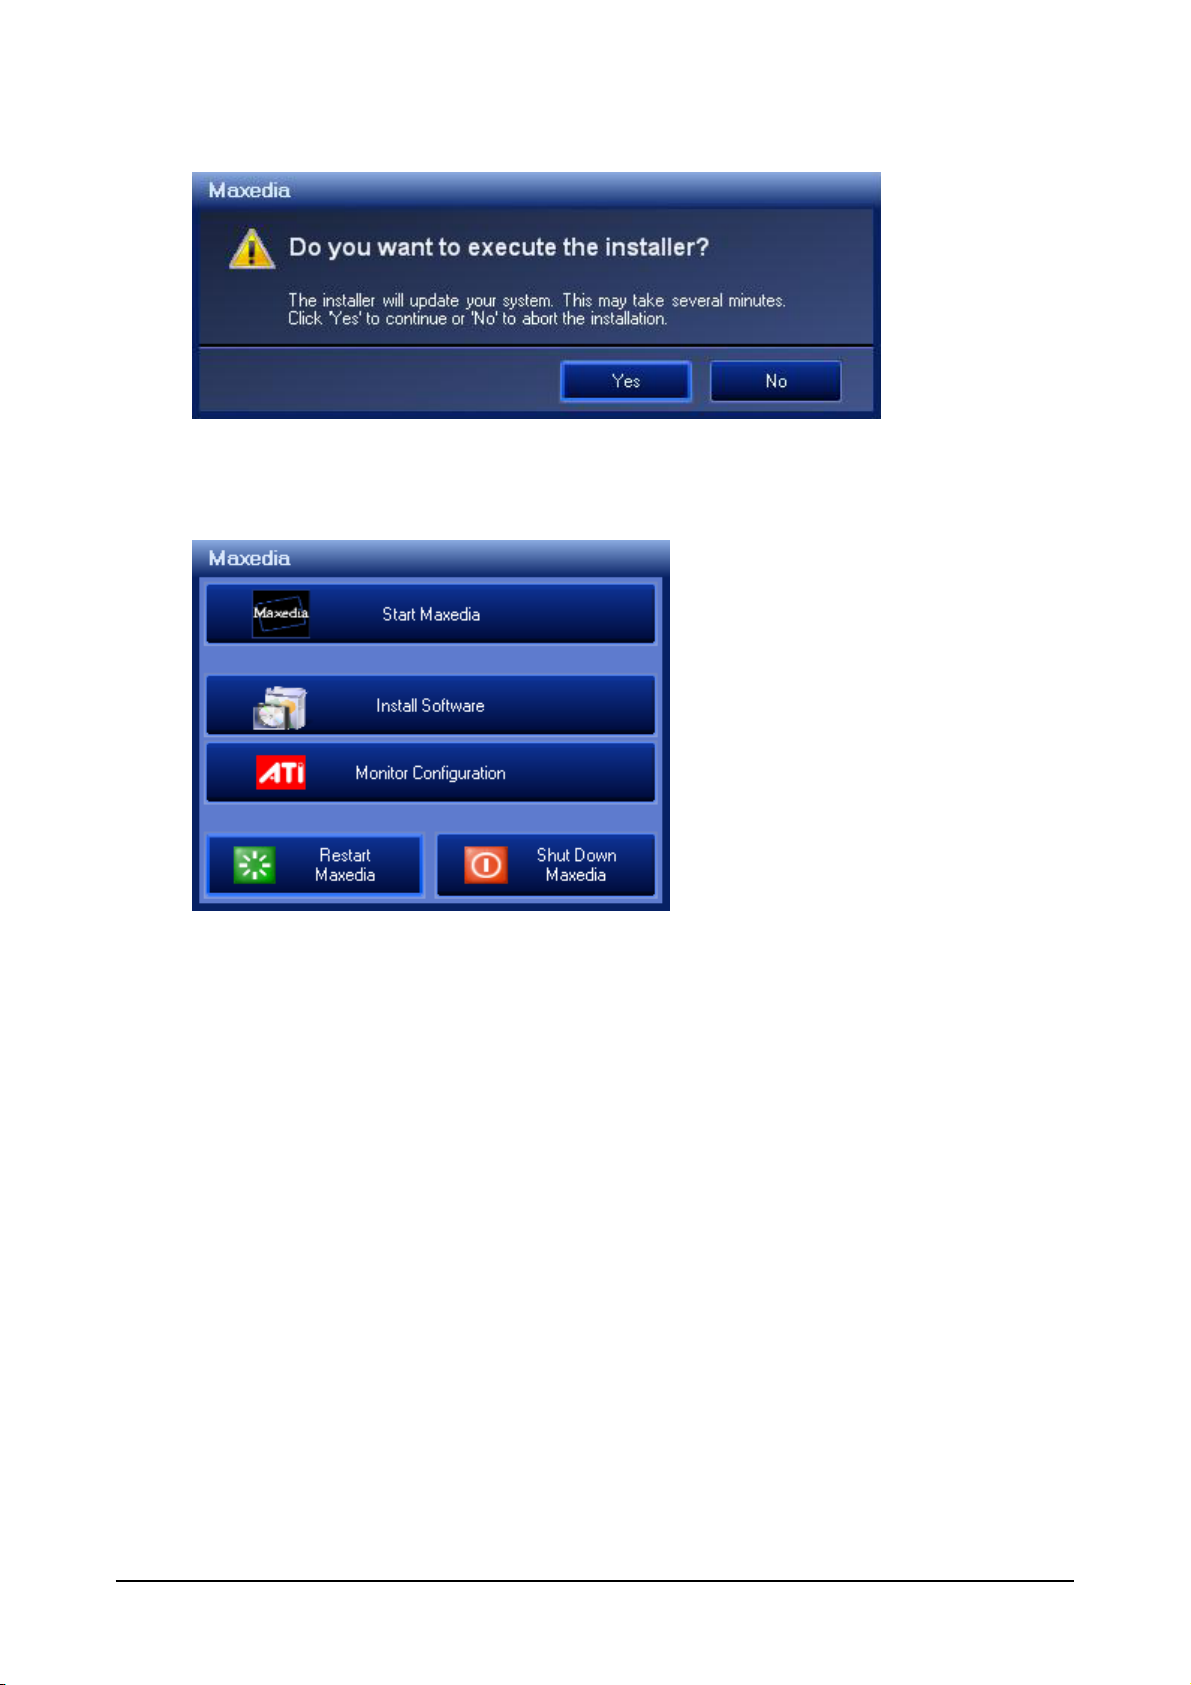
From the Maxedia Main Start window click Install Software
Maxedia 4
Select the drive where the .SetupMaxedia.exe file is stored from the left. Click on the file Icon and
click Install.
20 © 2010 Martin Professional A/S
Page 28
Confirm the installation by clicking Yes. The Maxedia will flash thru several installation screens that
require no user input. When Installation has completed successfully you will be returned to the Main
Start window.
Maxedia 4
21 © 2010 Martin Professional A/S
Page 29
Start Maxedia
After Boot-up the Maxedia Loader Screen will appear
From this screen you can:
Create a new show by typing the name of your show in the "Show Name" box and clicking
"New Show"
Continue the last show run on this machine by clicking "Continue" which will display the
name of the show to be opened
(If "Auto Continue " is selected in the Menu you will have a 30 second countdown
in which to select a different option than continue, other wise it will boot the last show automatically
after 30 seconds.)
Clicking "Load Show" will open the Load Show Screen
149
Maxedia 4
On the left you can select any of the Shows that have been loaded on this Maxedia in the state that
they were last played.
To load a saved show click "load a show from a MXSHOW".
22 © 2010 Martin Professional A/S
Page 30
Navigate to the location of your MXSHOW file, select the file name and then click "Open"
If the MXSHOW file was created from a show that exists on this machine there will be a pop-up
asking if you want to overwrite the show. Overwriting the show will loose any changes made to that
show since the MXSHOW file you are loading was created.
To load a show that has been saved on the Backup D:\ drive click "Show Management " from the
116
Select Show Menu.
Click on the Show name on the left under the Backup Drive: D:\ drive then click the "==>" button to
copy the show back to the External Drive E:\.
Once the show has finished copying click "Close"
Maxedia 4
23 © 2010 Martin Professional A/S
Page 31

The Select Show menu will reappear.
Click on the show name.
The Splash Screen will appear as Maxedia loads the show you have selected.
Maxedia 4
24 © 2010 Martin Professional A/S
Page 32

Select Output Display
To Set up Output Display Click "Menu"
Maxedia 4
Click the "Video" tab on the left.
25 © 2010 Martin Professional A/S
Page 33

From the drop down boxes under User Interface, Engine 1, and Engine 2 Select the displays you
would like to use.
The "User Interface Display" option lets you see Engine 1 output in a small window on your
control monitor.
Click Apply
Confirm the settings change by clicking Ok.
When the Engine Status registers as Running, you are ready to continue.
Maxedia 4
26 © 2010 Martin Professional A/S
Page 34

Media Content DVDs
Permitted Use
The media files provided on the Media Content DVDs may be used on Maxedia Media Servers only.
Owners of Maxedia systems may rent these files to another person, company, organization or other
entity only as part of a Maxedia system.
The media files on the Media Content DVDs may be incorporated into artistic works such as live
performances, films, videos, broadcasts, multimedia presentations, advertisements, World Wide Web
page, presentations or print project.
The media files on the Media Content DVDs may not be used in a defamatory, scandalous, illegal,
misleading, or otherwise unlawful manner and may not be used in or in conjunction with pornographic
material.
For further information, please view the readme.htm file on each Media Content DVD.
Copyright
The files included on the Media Content DVDs are trademark, property and copyright of their owners.
The media files on the Media Content DVDs may not be used, sold, licensed, reproduced, distributed
as stock or effects imagery elements, made available as downloadable files or included in any other
clip media/stock product, library, collection, or set of clips for distribution or resale.
We wish to thank the following media content providers for contributing their work for use by Maxedia
users:
DigiGobos http://www.digigobos.com
Dean Price http://www.maxedia.de
A Luna Blue http://www.alunablue.com
Main Concept http://www.mainconcept.com/
Mode Studios http://www.modestudios.com
Blue Pony Digital http://www.blueponydigital.com
Sean Bridwell Productions http://www.seanbridwellproductions.com
Idyll Hands Imagery http://www.idyllhandsimagery.com
Showfootage.com http://www.showfootage.com
Maxedia 4
27 © 2010 Martin Professional A/S
Page 35

Installing Media From Maxedia DVD
Importing media from a Maxedia DVD:
1.
Insert the DVD.
2.
Go to the Media Library .
3.
Click the Import Media DVD button in the lower right corner and the screen pictured above will
154
open.
4.
Double click a group button at the top to add that group. To only add part of a group, single
click the group. the directories in that group will be displayed below the groups. Double click a
directory to add it. (Groups and directories in red have been imported or have been added to
the que to be imported.)
5.
When you have added all of the groups and directories that you would like to import, click
Apply changes.
6.
Click Back to Media Library.
Removing media from a Media DVD:
1.
Insert the DVD.
2.
Go to Media Library .
3.
Click the Import Media DVD button in the lower right corner.
4.
Double click a group or directory to remove it. (Groups and directories in red have been
154
imported, groups and directories in blue have not been imported or are in que to be removed.)
5.
Click Apply changes to remove selected files.
Maxedia 4
28 © 2010 Martin Professional A/S
Page 36

Maxedia 4
29 © 2010 Martin Professional A/S
Page 37

Planning a Show
Every minuet you spend planning your show will save you hours of headaches down the road.
Because the Maxedia is so versatile and the shows it will be used on are so varied, there is no one
way to set it up to run a show. There are a few questions to ask yourself (and/or your video and
lighting crews) before starting. In this section we will look at some of these questions, that may seem
very basic, and how the answers to them will effect how you set-up your Maxedia. Some of these
questions include:
Am I broadcasting to screens, pixelmapping lighting/LED fixtures, or both?
Is the Maxedia running the screens directly or is it being routed thru a video switcher?
What type of video signal is required by the video system?
Are the screens LED walls, televisions, soft LED, projectors.....?
How many screens are there?
Do any screens receive the same content?
What is the resolution and size of the screens?
Which fixtures are being pixelmapped?
Will the entire lighting rig be pixelmapped?
How will the pixelmapping DMX get to the rig?
Where will I program my cues?
Is there any pre-produced media specific to this show?
Will there be a live camera feed to capture and run thru the Maxedia engine?
How will the Maxedia be controlled?
Screens
Am I broadcasting to screens, pixelmapping lighting/LED fixtures, or both?
How many screens are there?
Do any screens receive the same content?
These three questions help you determine how many Maxedia servers you will require. One
Maxedia can output two Engines at once. If you only have one or two screens or if the same cue
will ALWAYS be running on all screens and some pixelmapping to do you can run the show on
one machine. If you want to be able to feed a discreet feed to multiple screens you will need
multiple machines.
Is the Maxedia running the screens directly or is it being routed thru a video switcher?
What type of video signal is required by the video system?
Where the Maxedia going to be located during the show can in large part be determined by the
destination of your output, type of input required and how far that signal can travel without signal
loss. If the Maxedia is sending a VGA signal directly to a projector, you will need to have the
Maxedia close to the projector because of the limited range of a VGA signal. If you are sending
the signal to a switcher, you may need to use a scan converter to change the Maxedia's VGA or
DVI output to SDI. Coordinate with the video techs to be sure you/they have everything you/they
will need to integrate the systems.
Are the screens LED walls, televisions, soft LED, projectors.....?
What is the resolution and size of the screens?
Cues will read differently on different screens. What may be stunning content on your
programming monitor may be fairly average on a given screen type (the converse is also true,
particularly with low resolution screens). Time to program and tweak cues on the real screens is
invaluable.
Maxedia 4
30 © 2010 Martin Professional A/S
Page 38

Pixelmapping
Which fixtures are being pixelmapped?
Will the entire lighting rig be pixelmapped?
How will the pixelmapping DMX get to the rig?
Programming
Where will I program my cues?
Media
Is there any pre-produced media specific to this show?
Will there be a live camera feed to capture and run thru the Maxedia engine?
Control
How will the Maxedia be controlled?
Maxedia 4
31 © 2010 Martin Professional A/S
Page 39

Programming
To begin writing a new cue click Cue Programmer at the top of your screen.
162
A cue in Maxedia is made of at least one layer. A layer must contain a plugin to become active.
Add a plugin to your first layer by doing one of the following:
Double clicking the icon of the plugin in the Plugins window
Dragging the plugin from the Plugins window onto an empty layer slot in the Layers window.
Double clicking the icon of a media clip in the Media Selection window (this adds the Media
Player plugin with that media selected).
Dragging the media icon from the Media Selection window onto an empty layer slot in the Layers
window.
Maxedia 4
32 © 2010 Martin Professional A/S
Page 40

Layer Parameters
Belt
Type
Function
Dimmer
fader
Sets the overall output of the layer.
Layer Enable
toggle
This is most useful in programming to quickly identify the effect the layer you
are working on has on the overall cue. By setting Layer Enable to OFF, you
can see how the cue would look if you were to delete that layer.
Layer Buffer
toggle
Setting Layer Buffer to ON sets the output of this layer as the source for the
Layer Buffer input found in Video In - General. If you are using several layers
that will be playing the same media clip, you should build one layer that is
playing that clip, set the Dimmer to 0 and the Layer Buffer to ON. Now build
all your other layers using the Layer Buffer as your source media. This way
the Maxedia is only reading and playing the media file once, saving a lot of
processing power.
Sound Level
fader
Sets the audio level of the media clip playing in this layer.
Belt
Type
Function
Effect
multi position switch
Selects the type of scrip being run; Scroll, Bounce, Random or
None.
Amplitude
fader
Sets the amount that the dimmer is adjusted between it's highest
and lowest point in the script.
Speed
fader
Sets the speed at which the dimmer value is changed.
Sound
fader
Sets the volume threshold at which sound will begin to effect the
dimmer.
Belt
Type
Function
Speed
fader
Adjusts the speed at which the media file in this layer is played.
Once a plugin has been added to a layer there are many parameters that can be adjusted to create a
unique cue. Many of these parameters are available for all plugins, some are unique to a particular
plugin. Manual control of these parameters is available thru the buttons and fader belts in the Layer
Parameters window. Adjustment presets are available thru the buttons in the Direct Access window.
Adjustments made will only effect the active layer (the active layer is outlined in red in the Layers
window.
Global
Output
Output FX
The Output FX let you set up a script that will adjust the dimmer on the layer over time as the cue
runs. It also allows you to set the dimmer to respond to the audio level.
Media
This button displays the file name and icon of the media being played in this layer.
Speed
Blending
The Blending parameters allow you to set the way that the active layer is blended with the layers
below it. (The blending in layer 3 sets the way it is blended with layer 2. The blending in layer 4 sets
Maxedia 4
the way it is blended with the RESULT of the blending of layers 2 and 3.)
33 © 2010 Martin Professional A/S
Page 41

Belt
Type
Function
Blending Mode
multi position
switch
Selects which blending script to use to blend the current layer with
the layers lower than it. Scripts include; Add, Subtract, Multiplex,
Maximize, Minimize, Black Transparent, Black Opaque, Black
Opaque White, White Transparent, White Opaque, White Opaque
White, Luminance Key Black, Luminance Key White, Chroma Key,
Chroma Key Reverse, Luminance Key, and Picture In Picture.
Use Alpha
toggle
When Use Alpha is set to On the alpha channel information in the
media will be used to select which parts of the layer are blended with
the lower layer.
Hue
fader
When Chroma Keying is used this sets the hue which will become
transparent allowing the lower layers to show through.
Hue Delta
fader
When Chroma Keying is used this sets the size of the range of hues
which will become transparent.
Intensity
fader
When Chroma Keying is used this sets the brightness value of the
selected hue which will become transparent.
Intensity Delta
fader
When Chroma Keying is used this sets the size of the range of
brightness values which will become transparent.
Level
fader
When Luminance Key is used this sets the brightness level which
will become transparent allowing the lower layer to show through.
Delta
fader
When Luminance Key is used this sets the size of the range of
brightness levels which will become transparent.
Contrast Brightness
Belt
Type
Function
Contrast
fader
Adjusts the contrast of the Media playing in this layer.
Brightness
fader
Adjusts the brightness of the Media playing in this layer.
Maxedia 4
34 © 2010 Martin Professional A/S
Page 42

3D
Belt
Type
Function
X
fader
Adjusts the horizontal position of the layer relative to the screen.
Y
fader
Adjusts the vertical position of the layer relative to the screen.
Z
fader
Adjusts the depth (how near or far from the camera) of the layer.
Belt
Type
Function
Script
multi position
switch
Selects the type of scrip being run; Shake Vertical, Shake Horizontal, Shake
Depth, Scroll Vertical Linear, Scroll Horizontal Linear, Scroll Depth Linear,
Scroll Vertical, Scroll Horizontal, Scroll Depth, Jitter, Diagonal, Circle, Circle
Zoom or None.
Radius
fader
Sets the amount that the position is adjusted between it's highest and
lowest point in the script.
Speed
2 way fader
Sets the speed at which the position is changed. A 50% value is equivalent
to no speed. As values increase from 50% speed will increase with
movement one direction. As values decrease from 50% speed will increase
with movement in the opposite direction.
Sound
fader
Sets the volume threshold at which sound will begin to effect the position.
X Shift
fader
When the Jitter script is selected, this fader sets the limit of the horizontal
movement in the script.
Y Shift
fader
When the Jitter script is selected, this fader sets the limit of the vertical
movement in the script.
Script
Description
Shake
layer will move from one side of the screen to the other and then reverse direction and
return.
Scroll Linear
layer will move at a constant speed from one side of the screen to the other, then
begin again at the first side.
Scroll
layer will move from one side of the frame to the other, slowing as it moves thru the
middle of the screen, then speeding back up as it moves off the screen, and then
begin again at the first side.
Jitter
layer will move randomly vertically and horizontally between the limits set in X Shift
and Y Shift.
Diagonal
layer will move diagonally across the screen. The Speed fader will set both speed
and direction.
Circle
layer will move in a circle around the center point of the screen.
Circle Zoom
layer will move in a circle around the center point of the screen, at the same time, it
will move away/towards the camera, until it disappears and then returns to the other
extreme Z value to continue.
Belt
Type
Function
X
4 way fader
0-25% - Sets speed at which layer will rotate continuously counterclockwise thru
the x-axis.
25-50% - Sets indexed angle to which the layer is rotated counterclockwise thru
the x-axis.
3D Position
3D Position FX
The 3D Position FX let you set up a script that will adjust the X, Y, and/or Z position of the layer over
time as the cue runs. It also allows you to set the position to respond to the audio level.
3D Rotation
Maxedia 4
35 © 2010 Martin Professional A/S
Page 43

Belt
Type
Function
50-75% - Sets indexed angle to which the layer is rotated clockwise thru the xaxis.
75-100% - Sets speed at which layer will rotate continuously clockwise thru the
x-axis.
Y
4 way fader
0-25% - Sets speed at which layer will rotate continuously counterclockwise thru
the y-axis.
25-50% - Sets indexed angle to which the layer is rotated counterclockwise thru
the y-axis.
50-75% - Sets indexed angle to which the layer is rotated clockwise thru the yaxis.
75-100% - Sets speed at which layer will rotate continuously clockwise thru the
y-axis.
Z
4 way fader
0-25% - Sets speed at which layer will rotate continuously counterclockwise thru
the z-axis.
25-50% - Sets indexed angle to which the layer is rotated counterclockwise thru
the z-axis.
50-75% - Sets indexed angle to which the layer is rotated clockwise thru the zaxis.
75-100% - Sets speed at which layer will rotate continuously clockwise thru the
z-axis.
Size
Belt
Type
Function
X
fader
Sets the length of the media player window.
Y
fader
Sets the hight of the media player window.
Aspect Ratio
toggle
When set to On this will force the aspect ratio of the media player
window to remain fixed at the original aspect ratio of the media being
played.
Original Resolution
toggle
When set to On the size of the media player window will be fixed at
the resolution of the media being played.
Belt
Type
Function
Script
multi position
switch
Selects the type of scrip being run; Horizontal, Vertical, Global, Random
or None.
Amplitude
fader
Sets the amount that the size is adjusted between it's highest and
lowest point in the script.
Speed
fader
Sets the speed at which the size is changed.
Sound
fader
Sets the volume threshold at which sound will begin to effect the size.
X
fader
When the Random script is selected, this fader sets the limit of the
amount of length change in the script.
Y
fader
When the Random script is selected, this fader sets the limit of the
amount of height change in the script.
Script
Description
Horizontal
The length of the media player window will expand and contract over time.
Vertical
The Height of the media player window will expand and contract overtime.
Global
The height and length of the media player will expand and contract simultaneously over
time.
Random
The height and length of the media player will expand and contract independently over
time.
Size FX
The Size FX let you set up a script that will adjust the height and length of the media player window
over time as the cue runs. It also allows you to set the size to respond to the audio level.
Maxedia 4
36 © 2010 Martin Professional A/S
Page 44

Color
Belt
Type
Function
Red
2 way fader
As the fader is pulled down from 50% an incremental amount of red is
subtracted from all pixels in the layer. As the fader is pushed above 50% an
incremental amount of red is added to all pixels in the layer.
Green
2 way fader
As the fader is pulled down from 50% an incremental amount of green is
subtracted from all pixels in the layer. As the fader is pushed above 50% an
incremental amount of green is added to all pixels in the layer.
Blue
2 way fader
As the fader is pulled down from 50% an incremental amount of blue is
subtracted from all pixels in the layer. As the fader is pushed above 50% an
incremental amount of blue is added to all pixels in the layer.
Belt
Type
Function
Script
multi position
switch
Selects the color that will be added or subtracted from the layer as the
script runs; White-Black, Red, Green, Blue, Cyan, Magenta, Yellow,
Rainbow or None.
Amplitude
2 way fader
Values above 50% set the amount of the selected color that is added to
each pixel in the layer with each pulse of the script. Values below 50%
set the amount of the selected color that is subtracted from each pixel in
the layer with each pulse of the script.
Speed
fader
Sets the speed at which the color is pulsed.
Sound
fader
Sets the volume threshold at which sound will begin to effect the color.
Color setting allow you to adjust the color of the media in the layer. The addition of the Low, Mid and
High RGB settings give you a great deal of creative freedom to create color effects.
RGB
RGB FX
The RGB FX let you set up a script that will pulse the color levels of all pixels in the layer from the
default color to the selected limits and back to the defaults over time as the cue runs. It also allows
you to set the color change to respond to the audio level.
Maxedia 4
37 © 2010 Martin Professional A/S
Page 45

Effects
Player Media
Shader Media
Result
White
There are many effects that can be placed on each layer. An explanation of each effect follows.
Shader Media
The Shader Media button in the Layer Parameters window displays the shader media that has been
selected. The shader media is a media file that is used by the shader to create the effect. The default
selection is a white canvas. The effect of the shader media depends on which shader is being used.
Shader media is selected in the Media Selection window. First, click the Shader Media button (in the
Media Selection window). Once that button is highlighted (Red), select the media file you would like
to use for your shader media. To change the player media, click the Player Media button (in the
Media Selection window) and then select your new player media.
Shader
The first Belt under the Shader parameters lets you select the Shader Mode. Some modes have more
than 3 parameters, when these modes are selected the Shader 2 button will become active allowing
you to access the additional parameters.
Reverse
The Reverse Shader creates a photographic negative of the player media. The shader media will
receive a grayscale filter and then be used to determine the extent to which the effect replaces the
original media (ranging from white areas where the effect will be at full to black areas where there will
be no effect.)
Maxedia 4
38 © 2010 Martin Professional A/S
Page 46

Maxedia 4
Belt
Type
Function
Intensity
fader
Acts as a dimmer for the Shader Media.
39 © 2010 Martin Professional A/S
Page 47

Grayscale
Player Media
Shader Media
Result
White
Belt
Type
Function
Intensity
fader
Acts as a dimmer for the Shader Media.
The Grayscale shader converts the player media from color to grayscale. The shader media will
receive a full grayscale filter and then be used to determine the extent to which the effect replaces the
original media (ranging from white areas where the effect will be at full to black areas where there will
be no effect.)
Maxedia 4
40 © 2010 Martin Professional A/S
Page 48

Edge
Player Media
Shader Media
Result
White
Belt
Type
Function
Intensity
fader
sets the threshold at which two colors are sufficiently different to become sperate
areas.
The Edge shader replaces the player media with a white-on-black line drawing representing the
boundary of areas of similar color. The Intensity fader sets the threshold at which two colors are
sufficiently different to become sperate areas, and therefore how many lines will make up the drawing.
The less similar two colors in bordering regions are, the thicker the line marking the boarder will be.
The shader media will receive a grayscale filter and then be used to determine the extent to which the
effect replaces the original media (ranging from white areas where the effect will be at full to black
areas where there will be no effect.)
Maxedia 4
41 © 2010 Martin Professional A/S
Page 49

Reverse Edge
Player Media
Shader Media
Result
White
Belt
Type
Function
Intensity
fader
sets the threshold at which two colors are sufficiently different to become sperate
areas.
The Reverse Edge shader replaces the player media with a black-on-white line drawing representing
the boundary of areas of similar color. The Intensity fader sets the threshold at which two colors are
sufficiently different to become sperate areas, and therefore how many lines will make up the drawing.
The less similar two colors in bordering regions are, the thicker the line marking the boarder will be.
The shader media will receive a grayscale filter and then be used to determine the extent to which the
effect replaces the original media (ranging from white areas where the effect will be at full to black
areas where there will be no effect.)
Maxedia 4
42 © 2010 Martin Professional A/S
Page 50

Postarization
Player Media
Shader Media
Result
White
Belt
Type
Function
Intensity
fader
Acts as a dimmer for the output of the effect.
The Postarization shader converts the player media from 32-bit color down to 256 colors, creating a
cartoon like look. The shader media will receive a grayscale filter and then be used to determine the
extent to which the effect replaces the original media (ranging from white areas where the effect will
be at full to black areas where there will be no effect.)
Maxedia 4
43 © 2010 Martin Professional A/S
Page 51

Separate (Shift)
Player Media
Shader Media
Result
White
Belt
Type
Function
Shift
fader
Sets the amount each color component is offset from the next.
The Separate (Shift) shader separates the player media into it's magenta, cyan, and yellow
components and then shifts each along the x axis. The shader media will receive a grayscale filter
and then be used to determine the extent to which the effect replaces the original media (ranging from
white areas where the effect will be at full to black areas where there will be no effect.)
Maxedia 4
44 © 2010 Martin Professional A/S
Page 52

Separate (Rotation)
Player Media
Shader Media
Result
White
Belt
Type
Function
Rotate
fader
Sets the amount each color component is rotated from the next.
The Separate (Rotation) shader separates the player media into it's magenta, cyan, and yellow
components and then rotates each thru the z axis. The shader media will receive a grayscale filter
and then be used to determine the extent to which the effect replaces the original media (ranging from
white areas where the effect will be at full to black areas where there will be no effect.)
Maxedia 4
45 © 2010 Martin Professional A/S
Page 53

Gaussian Blur
Player Media
Shader Media
Result
White
Belt
Type
Function
Blur
fader
Sets the amount of diffusion placed on the player media.
The Gaussian Blur shader places a diffusion on the player media. The shader media will receive a
grayscale filter and then be used to determine the extent to which the effect replaces the original
media (ranging from white areas where the effect will be at full to black areas where there will be no
effect.)
Maxedia 4
46 © 2010 Martin Professional A/S
Page 54

Zoom
Player Media
Shader Media
Result
White
In this example the 3D Z position
has been increased to fully show
the effect.
Belt
Type
Function
Scale
fader
Sets the amount of scale change from one instance to the next.
Intensity
fader
Sets the intensity of the of the repetitions.
Alpha
fader
Sets the number of times that the player media is repeated.
Center X
fader
Sets the horizontal position used as the center of the effect.
Center Y
fader
Sets the vertical position used as the center of the effect.
The Zoom shader reproduces the player media multiple times at increasing scales and decreasing
intensity and then adds these instances together to create the layer. The shader media has no effect
on this shader.
Maxedia 4
47 © 2010 Martin Professional A/S
Page 55

Replace
Player Media
Shader Media
Result
Belt
Type
Function
Intensity
fader
Sets the extent to which the effect will replace the player media.
The Replace shader converts the player media from 32-bit color to 256 colors and then replaces the
color values with colors found in the shader media.
Maxedia 4
48 © 2010 Martin Professional A/S
Page 56

Glare
Player Media
Shader Media
Result
White
Belt
Type
Function
Intensity
fader
Sets the brightness threshold at which the shader will take effect.
Blur
fader
Sets the amount of diffusion placed on the Glare areas.
Player Media
Shader Media
Result
White
Belt
Type
Function
Intensity
fader
Sets the brightness threshold at which the shader will take effect.
Blur
fader
Sets the amount of diffusion placed on the Glare areas.
The Glare shader selects areas in the player media with high brightness and replaces those areas
with full white, which has a diffusion on it so it can bleed into neighboring areas. The shader media
has no effect on this shader.
Reverse Glare
The Reverse Glare shader selects areas in the player media with low brightness and replaces those
areas with full white, which has a diffusion on it so it can bleed into neighboring areas. The shader
media has no effect on this shader.
Maxedia 4
49 © 2010 Martin Professional A/S
Page 57

Brightness - Contrast
Player Media
Shader Media
Result
White
Belt
Type
Function
Intensity
fader
Sets the limit of the amount that the effect can replace the player media.
Contrast
fader
Sets the contrast value for the effect.
Brightness
fader
Sets the brightness value for the effect.
The Brightness - Contrast shader allows you to adjust the brightness and contrast of select areas of
the player media. The shader media will receive a grayscale filter and then be used to determine the
extent to which the effect replaces the original media (ranging from white areas where the effect will
be at full to black areas where there will be no effect.)
Maxedia 4
50 © 2010 Martin Professional A/S
Page 58

Color Shift
Player Media
Shader Media
Result
White
Belt
Type
Function
Hue
fader
Selects the amount that wavelengths are shifted.
Saturation
fader
Selects the saturation of the shifted colors that is added to the grayscale.
The Color Shift shader shifts the wave length of each color in the player media by the selected
amount. These new colors are added to a grayscale version of the original player media. The shader
media has no effect on this shader.
Maxedia 4
51 © 2010 Martin Professional A/S
Page 59

Mask
Player Media
Shader Media
Result
Belt
Type
Function
Threshol
d
fader
Sets the threshold of brightness in the shader media at which the player media will
be masked.
Delta
fader
Sets the range from the brightness threshold at which the player media will be
partially masked.
The Mask shader uses a grayscale version of the shader media to create a mask to block out the
player media. You can select what brightness value will be the cut off between masking and not
masking the image, as well as the range in which the image will be partially masked.
Maxedia 4
52 © 2010 Martin Professional A/S
Page 60

RGB -> RBG
Player Media
Shader Media
Result
White
Belt
Type
Function
Intensity
fader
Sets the ratio of the original color value to new color value used.
The RGB -> RBG shader swaps the color values of the player media (Green for Blue and Blue for
Green). The shader media will receive a grayscale filter and then be used to determine the extent to
which the effect replaces the original media (ranging from white areas where the effect will be at full to
black areas where there will be no effect.)
Maxedia 4
53 © 2010 Martin Professional A/S
Page 61

RGB -> GRB
Player Media
Shader Media
Result
White
Belt
Type
Function
Intensity
fader
Sets the ratio of the original color value to new color value used.
The RGB -> GRB shader swaps the color values of the player media (Green for Red and Red for
Green). The shader media will receive a grayscale filter and then be used to determine the extent to
which the effect replaces the original media (ranging from white areas where the effect will be at full to
black areas where there will be no effect.)
Maxedia 4
54 © 2010 Martin Professional A/S
Page 62

RGB -> GBR
Player Media
Shader Media
Result
White
Belt
Type
Function
Intensity
fader
Sets the ratio of the original color value to new color value used.
The RGB -> GBR shader swaps the color values of the player media (Green for Red, Red for Blue and
Blue for Green). The shader media will receive a grayscale filter and then be used to determine the
extent to which the effect replaces the original media (ranging from white areas where the effect will
be at full to black areas where there will be no effect.)
Maxedia 4
55 © 2010 Martin Professional A/S
Page 63

RGB -> BGR
Player Media
Shader Media
Result
White
Belt
Type
Function
Intensity
fader
Sets the ratio of the original color value to new color value used.
The RGB -> BGR shader swaps the color values of the player media (Blue for Red and Red for Blue).
The shader media will receive a grayscale filter and then be used to determine the extent to which the
effect replaces the original media (ranging from white areas where the effect will be at full to black
areas where there will be no effect.)
Maxedia 4
56 © 2010 Martin Professional A/S
Page 64

RGB -> BRG
Player Media
Shader Media
Result
White
Belt
Type
Function
Intensity
fader
Sets the ratio of the original color value to new color value used.
The RGB -> BRG shader swaps the color values of the player media (Blue for Red, Green for Blue
and Red for Green). The shader media will receive a grayscale filter and then be used to determine the
extent to which the effect replaces the original media (ranging from white areas where the effect will
be at full to black areas where there will be no effect.)
Maxedia 4
57 © 2010 Martin Professional A/S
Page 65

Halftone
Player Media
Shader Media
Result
White
Player Media
Shader Media
Result
White
The Halftone shader replaces the player media with a grid of white dots. Each dot's diameter
corresponds to the average brightness of the area it is replacing. The shader media has no effect on
this shader.
Halftone Noise
The Halftone Noise shader replaces the player media with a black and white geometric pattern that
corresponds to the average brightness of the area it is replacing. The shader media has no effect on
this shader.
Maxedia 4
58 © 2010 Martin Professional A/S
Page 66

Bloom
Player Media
Shader Media
Result
White
Belt
Type
Function
Threshold
fader
Sets the brightness value above which the effect will be applied.
Blur
fader
Sets the level of blur applied to the effected areas.
Scene
fader
Sets the level of blur applied to the entire media.
Glow
fader
Sets the level of glow applied to the entire media.
Highlight
fader
Sets the level of glow applied to the effected areas.
The Bloom shader takes areas of the player media above the selected brightness threshold and
allows them to grow and begin to bleed into the areas surrounding them. The shader media has no
effect on this shader.
Maxedia 4
59 © 2010 Martin Professional A/S
Page 67

Glow
Player Media
Shader Media
Result
White
Belt
Type
Function
Blur
fader
Sets the amount of blur that is applied to the areas receiving the effect.
Intensity
fader
Selects the amount that the brightness is increased.
The Glow shader selects bright areas of the player media and increases their brightness. The shader
media has no effect on this shader.
Maxedia 4
60 © 2010 Martin Professional A/S
Page 68

Radial Blur
Player Media
Shader Media
Result
White
In this example the 3D Z position
has been increased to fully show
the effect.
Belt
Type
Function
Center X
fader
Sets the horizontal position used as the center of the effect.
Center Y
fader
Sets the vertical position used as the center of the effect.
Start
fader
Sets Z position of the first ghost image.
Delta
fader
Sets the amount X, Y, and Z coordinates are changed from one ghost image to the
next.
Intensity
fader
Sets the intensity of the ghost images.
The Radial Blur shader creates a series of ghost images of the player media and repeats them in front
of and/or behind the media with X, Y, and Z coordinates of each ghost image being slightly different
than the previous one. The shader media has no effect on this shader.
Maxedia 4
61 © 2010 Martin Professional A/S
Page 69

Glare
Player Media
Shader Media
Result
White
Belt
Type
Function
Exponent
fader
Sets the color depth of the player media creating a postarizing effect.
Level
fader
Sets the brightness of the postarized image.
Star Type
multi position
switch
Selects which flare pattern will be applied to the image.
Bloom Intensity
fader
Sets the amount that already bright areas of the image are further
brightened.
Star Intensity
fader
Sets the intensity of the flare effect.
The Star Glare shader applies a lens flare to bright areas of the player media. The shader media has
no effect on this shader.
Maxedia 4
62 © 2010 Martin Professional A/S
Page 70

Raster
Player Media
Shader Media
Result
White
Belt
Type
Function
Noise
fader
Sets the speed at which the band script runs.
Shift
fader
Sets the horizontal distance each row of pixels shifts to the left and right as the
effect runs.
Band
fader
Selects the hight and number of horizontal cut-out bands that dance across the
media.
Player Media
Shader Media
Result
White
Belt
Type
Function
Blur
fader
Sets the strength of the diffusion placed on the player media.
Offset
fader
Sets the amount that the colors are offset toward red, green or blue.
Intensity
fader
Sets the brightness of the offset colors.
The Raster shader applies a poor signal quality look to the player media. The shader media has no
effect on this shader.
Blur
The Blur shader places a diffusion over the player media as well as selecting colors and shifting them
towards red, green or blue depending on which color is predominant in the RGB value of the original
color. The shader media has no effect on this shader.
Maxedia 4
63 © 2010 Martin Professional A/S
Page 71

Add
Player Media
Shader Media
Result
White (Intensity at 25%)
Belt
Type
Function
Intensity
fader
Acts as a dimmer for the shader media.
The Add shader adds the color values of the player media and shader media together. Using media
that is too bright can get blown out easily with this shader.
Maxedia 4
64 © 2010 Martin Professional A/S
Page 72

Mul
Player Media
Shader Media
Result
Belt
Type
Function
Intensity
fader
Acts as a dimmer for the shader media.
The Mul shader uses the brightness of the shader media as an opacity map for the shader media
(from bright areas becoming transparent to dark areas becoming opaque). The shader media is placed
on top of the player media and they are added together.
Maxedia 4
65 © 2010 Martin Professional A/S
Page 73

Subtract
Player Media
Shader Media
Result
White
Belt
Type
Function
Intensity
fader
Acts as a dimmer for the shader media.
The Subtract shader subtracts the color values of the player media from the shader media.
Maxedia 4
66 © 2010 Martin Professional A/S
Page 74

Reverse Subtract
Player Media
Shader Media
Result
Belt
Type
Function
Intensity
fader
Acts as a dimmer for the shader media.
The Reverse Subtract shader subtracts the color values of the shader media from the player media.
Maxedia 4
67 © 2010 Martin Professional A/S
Page 75

Max
Player Media
Shader Media
Result
White (Intensity at 25%)
Belt
Type
Function
Intensity
fader
Acts as a dimmer for the shader media.
The Max shader adds the player media and shader media together, giving priority to bright areas in
each media. When the brightness of overlapping areas is similar, those areas will be added. The
greater the difference in brightness between overlapping areas, the more the brighter media will be
used and the darker discarded.
Maxedia 4
68 © 2010 Martin Professional A/S
Page 76

Min
Player Media
Shader Media
Result
White
Belt
Type
Function
Intensity
fader
Acts as a dimmer for the shader media.
The Min shader adds the player media and shader media together, giving priority to dark areas in
each media. When the brightness of overlapping areas is similar, those areas will be added. The
greater the difference in brightness between overlapping areas, the more the darker media will be used
and the brighter discarded.
Maxedia 4
69 © 2010 Martin Professional A/S
Page 77

Luminance Key
Player Media
Shader Media
Result
Belt
Type
Function
Intensity
fader
Acts as a dimmer on the shader media.
Level
fader
Selects the brightness level in the shader media that will become transparent.
Delta
fader
Sets the size of the range of brightness levels that will be transparent.
The Luminance Key shader uses the shader media to mask the player media. Only areas in the
shader media that have the selected brightness range will become transparent and allow the player
media to show through.
Maxedia 4
70 © 2010 Martin Professional A/S
Page 78

Image Effects
Belt
Type
Function
Amount
fader
Sets the number of tiles high/wide the output will be.
The following illustrations of the Image Effects available in the Maxedia were created by applying the
effects to this stock Maxedia texture.
Tile
Tile creates a grid of the original media.
Maxedia 4
71 © 2010 Martin Professional A/S
Page 79

Dot
Belt
Type
Function
Amount
fader
Sets the thickness of the grid lines that divide the image.
Belt
Type
Function
Amount
fader
Sets the number of tiles high/wide the output will be.
Dot creates a grid of negative space the breaks the image into a series of dots.
Mosaic
Mosaic reproduces a low resolution version of the media using large square pixels to create the look
of a tile mosaic.
Maxedia 4
72 © 2010 Martin Professional A/S
Page 80

Mirror-XY
Belt
Type
Function
Amount
fader
Sets the diagonal distance from the upper left corner to the point which will be
used for the reflection.
Belt
Type
Function
Amount
fader
Sets the distance from the left side of the media to the point thru which it will be
reflected.
Mirror-XY reflects the upper left corner of the media thru the X and Y axis at the center of the layer.
Mirror-X
Mirror-X reflects the left side of the media thru the Y axis of the layer.
Maxedia 4
73 © 2010 Martin Professional A/S
Page 81

Mirror-Y
Belt
Type
Function
Amount
fader
Sets the distance from the top of the media to the point thru which it will be
reflected.
Belt
Type
Function
Amount
fader
Sets the distance that each pixel is allowed to wabble.
Mirror-Y reflects the top of the media thru the X axis of the layer.
Oil Paint
Oil Paint causes each pixel in the media to wabble creating a distorted, brush stoke look.
Maxedia 4
74 © 2010 Martin Professional A/S
Page 82

Ring
Belt
Type
Function
Amount
fader
Sets the number of instances of the media that make up the ring and therefore the
diameter of the ring.
Belt
Type
Function
Amount
fader
Sets the size of the cube.
Ring creates a 3D round screen around which the media is repeated.
Cube
Cube creates a 3D cube with the media playing on each of it's six faces.
Maxedia 4
75 © 2010 Martin Professional A/S
Page 83

Cube Vision
Belt
Type
Function
Amount
fader
Sets the number of tiles high/wide that will be played on each wall of the box.
Belt
Type
Function
Amount
fader
Sets the number of strips.
Width
fader
Sets how wide the strips are stretched and therefore how much of the original
media is not displayed
Orientation
toggle
Selects whether the strips are vertical or horizontal.
Cube Vision creates a 3D hallow box with the media tiled on it's four walls.
Cut-Out
Cut-Out divides the media into strips, removes every other strip, and then stretches the remaining
strips to fill the gaps.
Maxedia 4
76 © 2010 Martin Professional A/S
Page 84

Plugins
Belt
Type
Function
In
fader
Sets the point in the video file where playback will begin every time it
loops.
Out
fader
Sets the point in the video file where playback will stop (and restart if
looping is selected.)
Loop Mode
toggle
Selects whether the video will play once and freeze at the end or
restart and keep playing on a continual loop.
Start Offset
2 way fader
0-50% sets how long after the cue is started the video will wait to
start playing the first time. 50-100% sets how far into the video it will
start playing when the cue is first started. Unlike changing the In
point, this will only effect the first time the video plays when the cue
starts, and not subsequent loops.
Belt
Type
Function
Frame Blending
toggle
With Frame Blending set to On the video will run more smoothly
at speeds other than 30fps.
Override Frame Rate
toggle
When set to On this will force the video to play at 30fps.
Start Synced
toggle
Belt
Type
Function
Interval
multi position
switch
Selects the frequency with which the zoom view is changed.
Belt
Type
Function
Scale X
fader
Sets the horizontal size of the zoom window.
Plugins are the most basic component of a layer. Most plugins can be adjusted with the layer
parameters listed above. In addition most plugins have some parameters that are specific to them.
Below is a description of each plugin as well as a list of parameters specific to each.
Video Effects
Media Player
The Media Player creates a screen which displays video or texture files.
Video
Options
Random Zoom
The Random Zoom plugin snaps between different views of the player media, zooming in on a different
random point in the media at each view change.
Interval
Scaling
Maxedia 4
77 © 2010 Martin Professional A/S
Page 85

Belt
Type
Function
Scale Y
fader
Sets the vertical size of the zoom window.
Scale Z
fader
Sets the distance of the layer from the camera.
Keep Aspect
toggle
With Keep Aspect set to On, the media will always retain it's original
aspect ratio.
Video Grid
Belt
Type
Function
Amount
fader
Sets the number of instances to be playing at full intensity at a given
time.
Grid Speed
fader
Sets the frequency with which a given instance fade out and return.
Line Speed
fader
Sets the rate at which the instances will fade out.
Player Media
Plugin output
Belt
Type
Function
Effect Script
multi position
switch
Selects which script will be used to disturb the surface of the
liquid.
Stiffness
fader
Sets the viscosity of the liquid (and therefore how long it will
remain deformed after it has been disturbed).
Amplitude
fader
Sets the strength of the waves created on the surface.
The Video Grid plugin creates an 11 by 11 grid of instances of the player media. Each instance will
play at full intensity for a while, then randomly fade out leaving a black space until it pops back to full
intensity.
Grid
2D Fluid
The 2D Fluid plugin projects the player media onto the surface of a viscus liquid and then disturbs the
surface of the liquid to create image stretching and ripples.
Fluid
Maxedia 4
78 © 2010 Martin Professional A/S
Page 86

Player Media
Plugin output
3D Flat Tunnel
Belt
Type
Function
Speed
2 way fader
Sets the speed at which the camera appears to move into/out of
the tunnel.
Rotation Speed
2 way fader
Sets the speed at which the image rotates. 0-50% Clockwise. 50100% Counterclockwise.
Phase
2 way fader
Sets the amount of swirl in the seam between the left and right
sides of the original media.
Depth
fader
Sets the hight of each instance of the original media as it sinks or
grows.
Player Media
Plugin output
The 3D Flat Tunnel plugin folds the player media around on itself to create the appearance of a tunnel.
The media sinks into (or grows out of) the center of the screen.
Options
Maxedia 4
79 © 2010 Martin Professional A/S
Page 87

3D Dome
Belt
Type
Function
Heading
fader
Sets the vertical tilt of the camera.
Distance
fader
Sets the distance from the camera to the side of the solid that you are
viewing.
Height
fader
Sets the vertical amount of tiles that make up the solid.
Rotation
2 way fader
Sets the speed at which the camera rotates. 0-50% Counterclockwise.
50-100% Clockwise.
Player Media
Plugin output
Player Media
Plugin output
The 3D Dome plugin reproduces the player media as tiles making up the inside of an elliptical solid.
The camera will rotate horizontally showing all of the interior surfaces.
Options
2D Particles
The 3D Particles plugin creates multiple instances of the player media of varying sizes that originate
in the center of the screen. The instances then travel away from the center in straight lines, shrinking
as they get farther from the center.
Options
None
Maxedia 4
80 © 2010 Martin Professional A/S
Page 88

Sound
Belt
Type
Function
In
fader
Sets the point in the audio file where playback will begin every time it
loops.
Out
fader
Sets the point in the audio file where playback will stop (and restart if
looping is selected.)
Loop Mode
toggle
Selects whether the audio will play once or restart and keep playing
on a continual loop.
Start Offset
2 way fader
0-50% sets how long after the cue is started the audio will wait to
start playing the first time. 50-100% sets how far into the audio it will
start playing when the cue is first started. Unlike changing the In
point, this will only effect the first time the audio plays when the cue
starts, and not subsequent loops.
Belt
Type
Function
Volume
fader
Sets the volume of the audio file.
Balance
fader
Sets the left right balance of a stereo audio file.
Start
Synced
multi position
switch
The Sound plugin allows you to add an audio file, separate from any video files, to your cue.
Sound
Options
2D Effects
Enter topic text here.
2D Smoke
The 2D Smoke plugin creates a billowing smoke layer.
Smoke
Maxedia 4
81 © 2010 Martin Professional A/S
Page 89

Belt
Type
Function
Smoke
fader
Sets the amount of smoke.
2D Plasma
Belt
Type
Function
Dimension
fader
Sets the zoom level of the view port.
Scale Bias
fader
Sets the brightness of the bright areas of the plasma.
The 2D Plasma plugin creates amorphous areas of bright yellow bordered by shifting dark regions.
Options
Maxedia 4
82 © 2010 Martin Professional A/S
Page 90

2D Text
Belt
Type
Function
Video
multi position
switch
Selects the font for the text.
The 2D Text plugin creates a layer containing the text entered in the Text box with the keyboard.
Text Effect
ASCII Text
The ASCII Text plugin creates a layer containing the text entered in the Text box with the keyboard or
imported as an ASCII formatted .txt file. This plugin allows you to scroll the text and greater control
over the font than in the 2D Text plugin.
Maxedia 4
83 © 2010 Martin Professional A/S
Page 91

Text Input
Belt
Type
Function
Mode
toggle
Selects between the Live Input text box and an imported .txt file as the source of
the text.
Belt
Type
Function
Font
multi position
switch
Selects the font for the text.
Font Size
fader
Sets the font size.
Edge Width
fader
Sets the thickness of the border around the text.
No Wrap
toggle
When set to On this forces all of the text to be displayed as a single
line.
Belt
Type
Function
Vertical
multi position
switch
Selects alignment of the text to the Top, Center or Bottom of the
screen.
Horizontal
multi position
switch
Selects alignment of the text to the Left, Center or Right of the screen.
Belt
Type
Function
Animation
multi position
switch
Selects the animation script that will be run on the text.
Loop
fader
Delay
fader
Sets the amount of time that the animation script will hold each step
in the script.
Fade
fader
Sets the amount of time that will be used to fade each card in an out.
Belt
Type
Function
Speed
fader
Sets the overall speed at which the animation script will run.
Font
Alignment
Animation
Speed
Maxedia 4
84 © 2010 Martin Professional A/S
Page 92

Text Animation
Belt
Type
Function
Mode
toggle
Selects between the Live Input text box and an imported .txt file as the source of
the text.
Belt
Type
Function
Font
multi position
switch
Selects the font for the text.
Belt
Type
Function
Type
multi position
switch
Selects the script that will be used to animate the text.
Size
fader
Sets the size of the area that will have text in it.
Depth
fader
Sets the average distance from the camera to the text.
The Text Animation plugin creates a layer containing multiple copies of the text entered in the Text
box with the keyboard or imported as an ASCII formatted .txt file. The copies of the text are moved
around the screen.
Text Input
Font
Mode
Output Delay
The Output Delay plugin creates a series of copies of the output of any layer lower than the layer that
the Output Delay plugin is stored in. Each of these copies will be one video frame behind the one in
front of it. The more delayed a copy is the dimmer it will be.
Options
Maxedia 4
85 © 2010 Martin Professional A/S
Page 93

Belt
Type
Function
Exponent
fader
Blend
fader
Sets the brightness of the delayed images.
Scale
2 way fader
0-50% incrementally increases the size of each delayed copy. 50-100%
incrementally decreases the size of each delayed copy.
Rotation
2 way fader
0-50% rotates each successive copy of the output clockwise. 50-100%
rotates each successive copy of the output counterclockwise.
3D Wire Cube
Belt
Type
Function
Shapes
fader
Sets the size of the cubes that make up the wall.
Width
fader
Sets the distance between the centers of adjacent cubes.
Wave Speed
fader
Sets the speed at which the wall undulates.
The 3D Wire Cube plugin creates an undulating wall of wire frame cubes.
Shape
Maxedia 4
86 © 2010 Martin Professional A/S
Page 94

Rain
Belt
Type
Function
Bundle Width
fader
Sets the horizontal distance between streaks.
Bundle Height
fader
Sets the vertical distance between streaks.
Streak Width
fader
Sets the thickness of the streaks.
The Rain plugin creates an pattern of falling streaks.
Shape
Maxedia 4
87 © 2010 Martin Professional A/S
Page 95

Multi-Shape
Belt
Type
Function
Type
multi position
switch
Selects the shape of the objects.
Size
fader
Sets the size of the objects.
Loop
fader
Sets the length of the of the loop that creates the shape around the
center.
Resolution
fader
Sets the number of objects.
Belt
Type
Function
Invert
fader
Selects between white objects on a black background or black objects on a
white background.
Delay
fader
Sets the duration of the ghost image trail left behind as the object moves.
Anti-Aliasing
fader
Sets the smoothness of the edges of the objects.
Belt
Type
Function
Base
fader
Sets the radius of the empty space in the center from which the objects
emanate.
Stretch 1
fader
Adjusts the amount of displacement of objects at certain points in the loop.
Stretch 2
fader
Adjusts the amount of displacement of objects at other points in the loop.
Rotation
fader
Sets the amount the shape is rotated around the center.
Belt
Type
Function
Base Anim
fader
Sets the speed at which the Base value is changed as the cue runs.
Stretch 1 Anim
fader
Sets the speed at which the Stretch 1 value is changed as the cue runs.
Stretch 2 Anim
fader
Sets the speed at which the Stretch 2 value is changed as the cue runs.
Rotation Anim
fader
Sets the speed at which the Rotation value is changed as the cue runs.
The Multi-Shape plugin creates a field of objects that emanate from a point at the center of the screen
then move out and back into the center creating spiraling patterns.
General
Appearance
Shape
Shape Animation
Maxedia 4
88 © 2010 Martin Professional A/S
Page 96

3D Effects
Belt
Type
Function
Height
fader
Sets the average height of the waves.
Wind
fader
Sets the how much the crests of the waves are "blown over" by the
"wind".
Suppression
fader
Sets the amount of smaller interference waves that will interact with the
main waves.
Belt
Type
Function
Texture
fader
Sets the amount of reflective texture on the surface of the ocean.
Fresnel
fader
Adjusts the focus of the light shining on the surface of the ocean.
Resolution
fader
Sets the resolution of the reflective texture pattern.
3D Ocean
The 3D Ocean plugin creates an view of the open ocean at the bottom of the screen.
Wave
Texture
Maxedia 4
89 © 2010 Martin Professional A/S
Page 97

3D Tunnel
Belt
Type
Function
Direction
2 way fader
0-50% sets the speed at which the camera moves backwards out of the
tunnel. 50-100% sets the speed at which the camera moves forward into
the tunnel.
Depth
fader
Sets the zoom of the camera lens.
Belt
Type
Function
U
fader
Sets the amount that the player media is stretched horizontally in each tile.
V
fader
Sets the amount that the player media is stretched vertically in each tile.
Belt
Type
Function
Camera
multi position
switch
Selects the direction the camera is pointed relative to the center of the
tunnel.
The 3D Tunnel plugin creates an looping, twisting tunnel with the player media tiled and projected on
the sides of the tunnel. The camera is then flown thru the tunnel to create the output video.
Options
UV
Tunnel Camera
Maxedia 4
90 © 2010 Martin Professional A/S
Page 98

3D Landscape
Belt
Type
Function
Distance
fader
Sets how far the horizon appears to be from the camera.
Height
fader
Sets how far the ground and sky appear to be from each other.
Fog
fader
Sets the distance towards the horizon that the camera can see before being
obscured.
Belt
Type
Function
Heading
fader
Sets the speed at which the camera pans from left to right and back as it moves
toward the horizon.
Bank
fader
Sets the speed at which the horizon banks clockwise then counterclockwise.
The 3D Landscape plugin creates planes representing the ground and sky on which tiled repetitions of
the player media are projected. The camera is then flown thru the landscape toward the horizon.
Options
Twist
Maxedia 4
91 © 2010 Martin Professional A/S
Page 99

3D Ribbons
Belt
Type
Function
Amount
fader
Selects the number of ribbons used.
Shift
fader
Sets the amount by which the center of the sphere on which each ribbon is
wrapped is displaced from the others.
Radius
fader
Sets the amount by which the radius of the sphere on which each ribbon is
wrapped is different from the others.
Belt
Type
Function
Width
fader
Sets the width of the ribbons.
Length
fader
Sets the length of the ribbons.
Radius
fader
Sets the radius of the sphere on which the ribbons are wrapped.
The 3D Ribbons plugin creates a sphere on which instances of the player media are stretched to give
the appearance of pieces of ribbon wrapped around a ball. These ribbons each rotate around the
sphere.
Options
Shape
Maxedia 4
92 © 2010 Martin Professional A/S
Page 100

3D Spikes
Belt
Type
Function
Amount
fader
Selects the number of spheres.
Shape 1
fader
Sets the size of the squares that define the ends of the spikes.
Shape 2
fader
Sets the amount by which the center of the sphere is displaced from the others.
Shape 3
fader
Sets the average length of the spikes.
Belt
Type
Function
Speed
fader
Sets the time between growth and retraction of individual spikes.
Power
fader
Sets the force available to grow new spikes.
The 3D Spikes plugin creates spheres on which instances of the player media are projected. The
surface of the sphere is divided into squares which grow into spikes and retract at random as the cue
progresses.
Shape
Velocity
Maxedia 4
93 © 2010 Martin Professional A/S
 Loading...