

Page 1
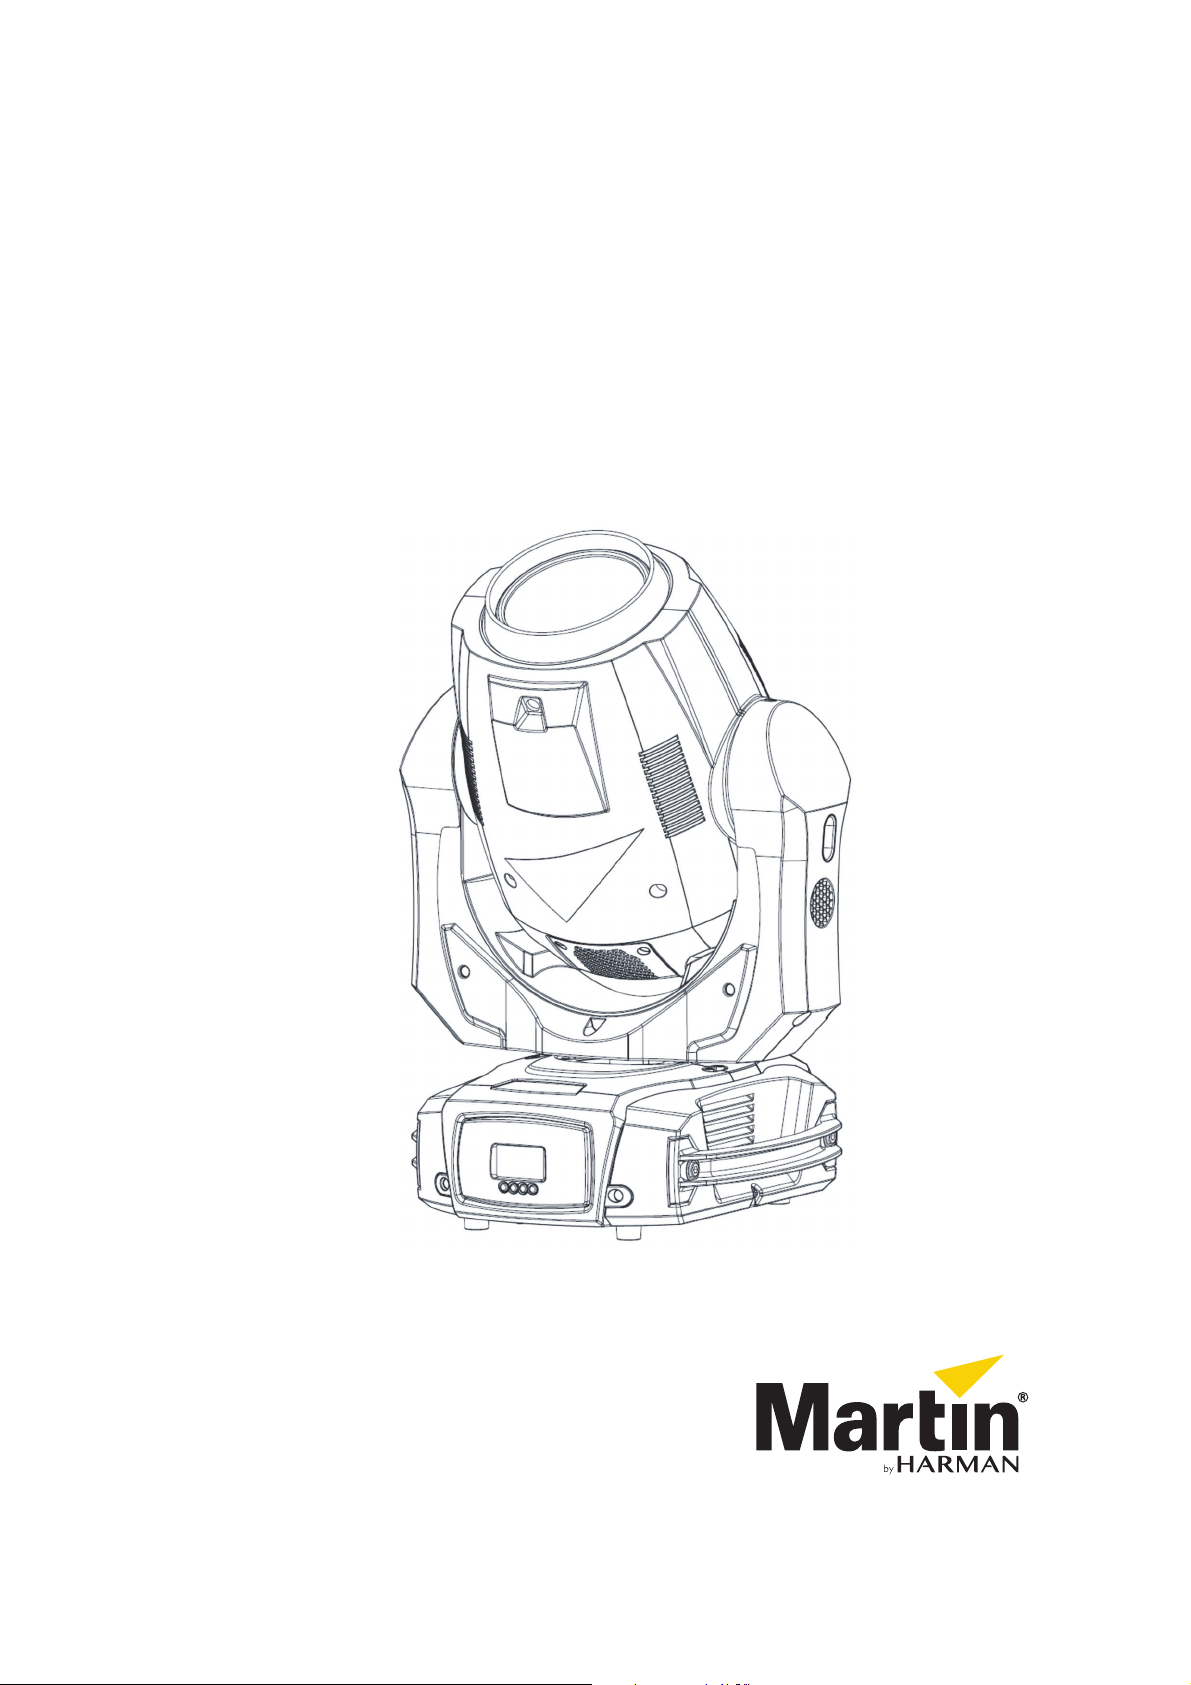
MAC Axiom™ Hybrid
User manual
Page 2

© 2013-2016 Martin Professional™ ApS. Information subject to change without notice. Martin Professional™ and all affiliated
companies disclaim liability for any injury, damage, direct or indirect loss, consequential or economic loss or any other loss
occasioned by the use of, inability to use or reliance on the information contained in this manual. Martin™, Harman™ and all other
trademarks in this document pertaining to services or products by Martin Professional™ or its affiliates and subsidiaries are
registered as the property of Harman International Industries.
Martin Professional • Olof Palmes Allé 18 • 8200 Aarhus N • Denmark • www.martin.com
Manual: Revision D
Page 3

Table of contents
Safety information ................................................................................................ 4
Protection from electric shock ...................................................................... 5
Protection from burns and fire ...................................................................... 5
Lamp safety .................................................................................................. 6
Protection from eye injury ............................................................................. 6
Protection from injury ................................................................................... 6
Introduction .......................................................................................................... 8
Before using the product for the first time .................................................... 8
Tilt lock ......................................................................................................... 8
Physical installation .............................................................................................. 9
Fastening the fixture to a flat surface ........................................................... 9
Mounting the fixture on a truss ..................................................................... 9
Securing with a safety cable....................................................................... 10
AC power ........................................................................................................... 11
Fixture overview ................................................................................................. 12
DMX data link ............................................................................................. 12
Connecting the data link ............................................................................. 13
Fixture setup ....................................................................................................... 14
Using the control panel ............................................................................... 14
DMX address .............................................................................................. 14
Personality .................................................................................................. 14
Factory default ............................................................................................ 15
Information ................................................................................................. 15
DMX Live .................................................................................................... 16
Test ............................................................................................................. 16
Manual control ............................................................................................ 16
Effects ................................................................................................................ 17
Dimming ..................................................................................................... 17
Strobe effects ............................................................................................. 17
Cyan, Magenta, Yellow and CTO ............................................................... 17
Rotating gobos ........................................................................................... 17
Fixed gobos ................................................................................................ 18
Color wheel ................................................................................................ 19
Prisms and prism lineator ........................................................................... 20
Frost ........................................................................................................... 20
Focus/Zoom linking .................................................................................... 20
Pan and tilt ................................................................................................. 20
Service and maintenance .................................................................................. 21
Cleaning ..................................................................................................... 21
Access inside the head .............................................................................. 22
Lamp replacement ...................................................................................... 23
Replacing the prism .................................................................................... 25
Replacing a rotating gobo .......................................................................... 27
Handling gobos .......................................................................................... 29
Replacing the primary fuse ......................................................................... 29
DMX protocol ..................................................................................................... 30
Control menus .................................................................................................... 35
Error messages .................................................................................................. 38
Troubleshooting ................................................................................................. 39
Specifications ..................................................................................................... 40
Page 4
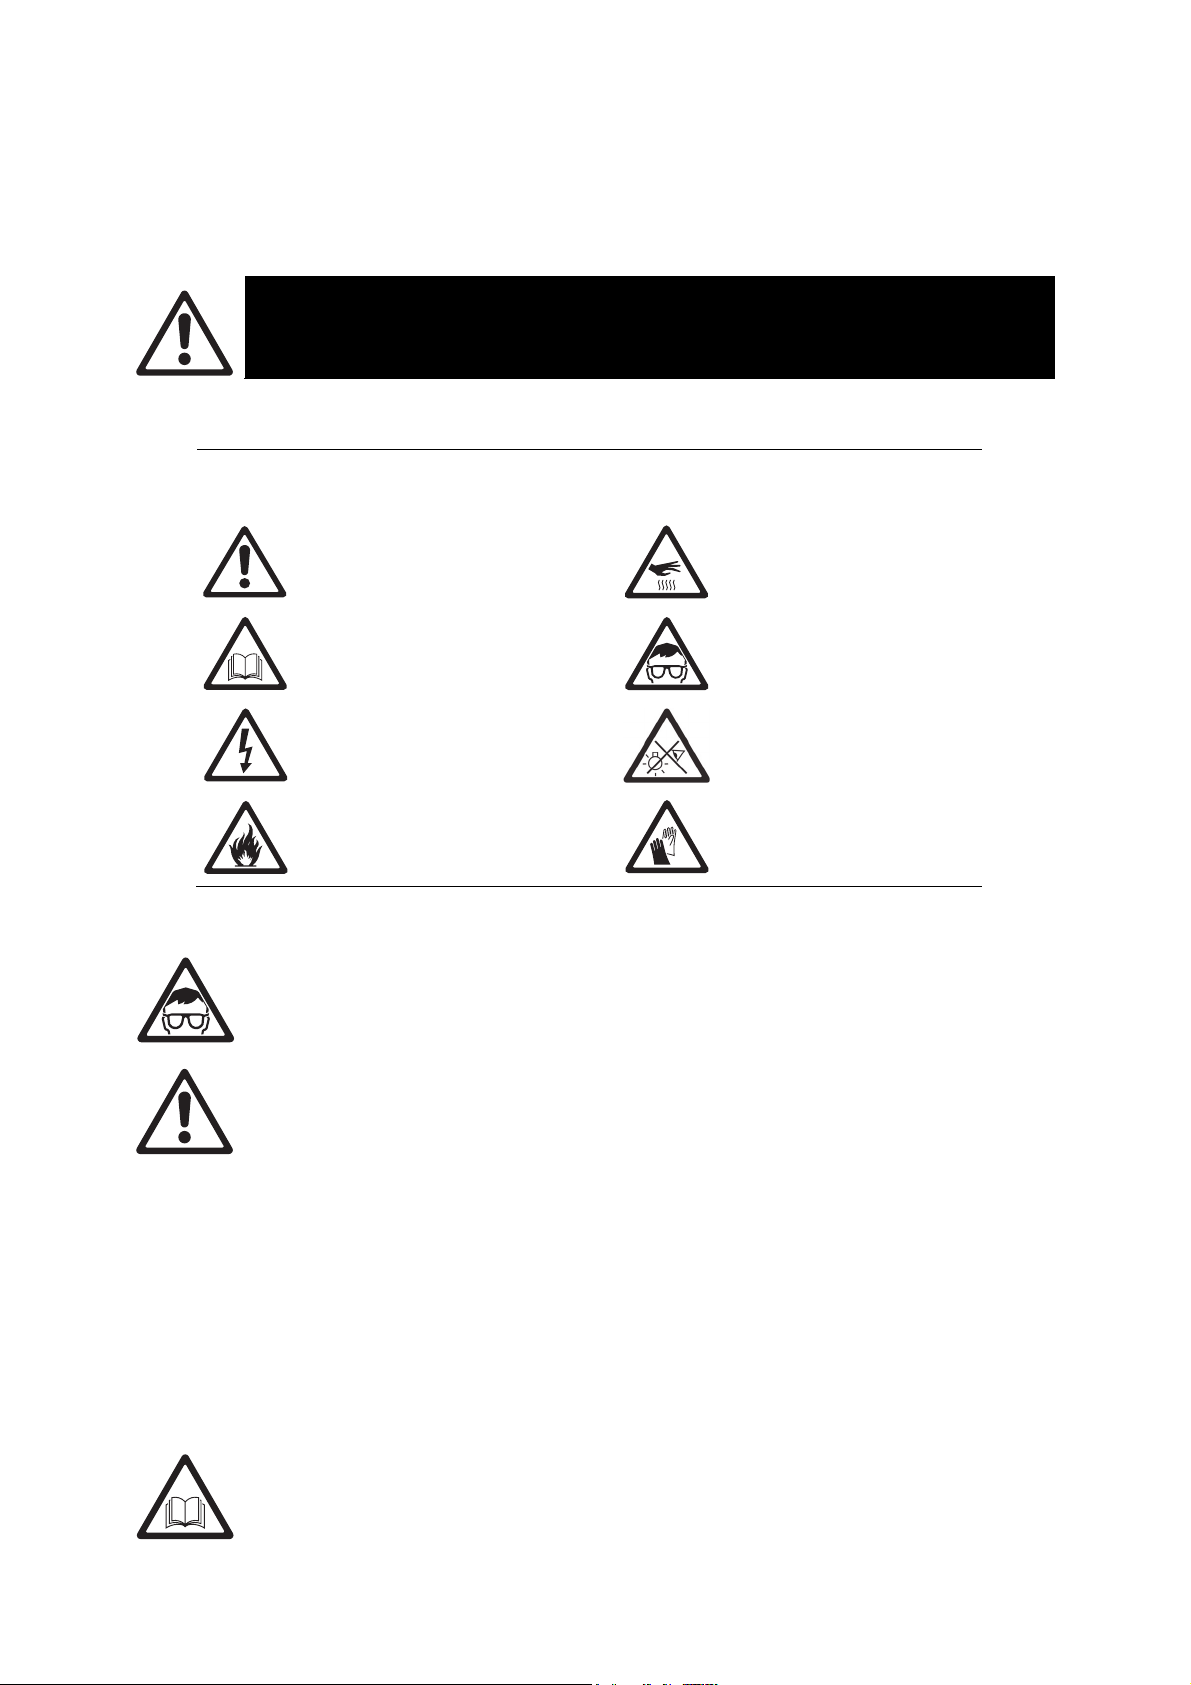
Safety information
Read the safety precautions in this manual before installing, operating or
The following symbols are used to identify important safety information on the product
and in this manual:
WARNING!
servicing this product.
Warning! Safety hazard.
Risk of severe injury or
death.
Warning! See user manual
for important safety
information.
Warning! Hazardous
voltage. Risk of lethal or
severe electric shock.
Warning! Fire hazard.
Warning! Hot surface. Risk
of burns.
Warning! Risk of eye
injury. Wear protective
eyewear.
Warning! Do not look into
light output.
Warning! Wear protective
gloves.
Warning! Risk Group 2 product according to EN 62471. Avoid looking directly into the
beam and do not view the light output with optical instruments or any device that may
concentrate the beam.
This lighting fixture is for professional use only – it is not for household use. The fixture
must be installed by a qualified technician. The safety of the installation is the
responsibility of the installer. The fixture presents risks of severe injury or death due to
fire hazards, electric shock and falls. It produces a powerful, concentrated beam of light
that can create a fire hazard or a risk of eye injury if the safety precautions below are not
followed.
If you have any questions about how to install, operate or service the fixture safely,
please contact your Martin™ distributor (see www.martin.com/distributors for details) or
call the Martin™ 24-hour service hotline on +45 8740 0000, or in the USA on 1-888tech-180.
Respect all locally applicable laws, codes and regulations when installing, operating or
servicing the fixture.
Refer any service operation not described in this manual to an authorized Martin™
service technician. Do not try to carry out any such operation yourself, as doing so may
present a health or safety risk. It may also cause damage or malfunction and it may void
your product warranty.
Before you use this product, please visit the Martin™ website at http://www.martin.com
and make sure that you have all the latest user documentation for this product and for
any other Martin™ products that you intend to use.
4 MAC Axiom Hybrid User Manual
Page 5
Install, operate and service Martin™ products only as directed in their user manuals, or
you may create a safety hazard or cause damage that is not covered by product
warranties.
Follow the safety precautions listed below and observe all warnings in this manual and
printed on the product. Keep this manual for future use.
Protection from electric shock
Do not expose the fixture to rain or moisture.
Disconnect the fixture from AC power before carrying out any installation or
maintenance work, such as changing the lamp, and when the fixture is not in use.
Ensure that the fixture is electrically connected to ground (earth).
Use only a source of AC power that complies with local building and electrical codes and
has both overload and ground-fault (earth-fault) protection.
Socket outlets or external power switches used to supply the fixture with power must be
located near the fixture and easily accessible so that the fixture can easily be
disconnected from power.
The power input cable must be rated 10 A, hard usage type, heat-resistant to 90° C
(194° F) minimum and temperature-rated to suit the application. It must have three
conductors and an outer cable diameter of 5 - 15 mm (0.2 - 0.6 in.). In the USA and
Canada the cable must be UL listed, type SJT or equivalent. In the EU the cable must
be type H05VV-F or equivalent.
Use only a Neutrik PowerCon TRUE1 cable connector to connect to the fixture’s power
socket.
Before using the fixture, check that all power distribution equipment and cables are in
perfect condition and rated for the current requirements of all connected devices.
Isolate the fixture from power immediately if the power plug or any seal, cover, cable, or
other component is damaged, defective, deformed, wet or showing signs of overheating.
Do not reapply power until repairs have been completed.
Replace defective fuses with ones of the specified type and rating only.
Protection from burns and fire
Do not use the fixture to illuminate surfaces within 15 m (49.2 ft.) of the fixture.
Do not operate the fixture if the ambient temperature (T
The surface of the product casing can reach up to 90° C (194° F) during operation.
Avoid contact by persons and materials. Allow the fixture to cool for at least 20 minutes
before handling.
Keep flammable materials well away from the fixture. Keep all combustible materials
(e.g. fabric, wood, paper) at least 100 mm (4 in.) away from the fixture head.
Ensure that there is free and unobstructed airflow around the fixture. Provide a minimum
clearance of 100 mm (4 in.) around fans and air vents.
Do not attempt to bypass thermostatic switches or fuses.
Do not stick filters, masks or other materials onto any optical component.
) exceeds 40° C (104° F).
a
MAC Axiom Hybrid User Manual 5
Page 6
Lamp safety
Install only a lamp that is approved for use in the product.
Prolonged exposure to an unshielded discharge lamp can cause eye and skin burns. Do
not look directly into the light output.
Never look at an exposed lamp while it is lit.
Do not operate the fixture with missing or damaged covers, shields, lenses, ultraviolet
screens or any optical component.
A hot discharge lamp is under pressure and can explode without warning. Allow the
fixture to cool for at least 60 minutes and protect yourself with safety glasses and gloves
before handling a lamp.
Replace the lamp immediately if it becomes visually deformed, damaged or in any way
defective. Replace the lamp if light output intensity falls noticeably.
Monitor hours of lamp use and replace the lamp before it reaches the limit of its service
life as specified in this manual or by the lamp manufacturer.
If the quartz envelope of a discharge lamp is broken, the lamp releases a small quantity
of mercury and other toxic gases. If a discharge lamp explodes in a confined area,
evacuate the area and ventilate it thoroughly. Wear nitrite gloves when handling a
broken discharge lamp. Treat broken or used discharge lamps as hazardous waste and
send to a specialist for disposal.
Protection from eye injury
The fixture emits infrared and ultraviolet rays that are not normally visible but that may
be harmful to the eyes and skin. Do not stare at an operating lamp. Minimize exposure
to eyes or skin. Use appropriate shielding or eye protection.
Do not look directly into the light beam. Do not point the beam in a direction where a
person can look directly into it.
Ensure that persons are not looking at the light beam when the product lights up
suddenly. This can happen when power is applied, when the product receives a DMX
signal, or when certain control menu items are selected.
Do not look at the light output with magnifiers, telescopes, binoculars or similar optical
instruments that may concentrate the light output.
To minimize the risk of eye irritation or injury, disconnect the fixture from power at all
times when the fixture is not in use, and provide well-lit conditions to reduce the pupil
diameter of anyone working on or near the fixture.
Do not operate the fixture with missing or damaged covers, shields or any optical
component. If shields, lenses or ultraviolet screens have become visibly damaged to
such an extent that their effectiveness is impaired, for example by cracks or deep
scratches, return the fixture to an authorized Martin™ service agent for replacement.
Protection from injury
Fasten the fixture securely to a fixed surface or structure when in use. The fixture is not
portable when installed.
Ensure that any supporting structure and/or hardware used can hold at least 10 times
the weight of all the devices they support.
If suspending from a rigging structure, fasten the fixture to a rigging clamp. Do not use
safety cables as the primary means of support.
Always install as directed in this manual a secondary attachment such as a safety cable
that will hold the fixture if a primary attachment fails. The secondary attachment must be
approved by an official body such as TÜV as a safety attachment for the weight that it
6 MAC Axiom Hybrid User Manual
Page 7

secures, must comply with EN 60598-2-17 Section 17.6.6 and must be capable of
bearing a static suspended load that is ten times the weight of the fixture and all
installed accessories.
Allow enough clearance around the head to ensure that it cannot collide with an object
or another fixture when it moves.
Check that all external covers and rigging hardware are securely fastened.
Block access below the work area and work from a stable platform whenever installing,
servicing or moving the fixture.
Do not lift or carry the fixture by its head. Always ensure that the fixture is supported by
its base.
In the event of an operating problem, stop using the fixture immediately and disconnect
it from power. Never attempt to use a fixture that is obviously damaged.
Do not modify the fixture or install other than genuine Martin™ parts.
MAC Axiom Hybrid User Manual 7
Page 8
Introduction
The MAC Axiom™ Hybrid is a true all-in-one product, combining beam and spot into one compact unit
that also offers diffused wash functionality.
The high-precision optical system offers exceptional contrast, both in mid-air and projection, as well as
a surprisingly flat field, usually not seen with this short-arc lamp technology.
The implementation of the CMY color palette from the MAC Viper gives designers the advantage of
unlimited choice from subtle pastel shades to deep and saturated colors.
All this comes in a small footprint and lightweight product that delivers superior performance in the
best feature vs. size and weight ratio available in the market.
Before using the product for the first time
Read ’Safety information’ on page 4 before installing, powering, operating or servicing the fixture.
Unpack and ensure that there is no transportation damage before using the fixture. Never attempt to
operate a damaged fixture.
Prepare a power cable as described under ‘AC power’ on page 11.
Ensure that the voltage and frequency of the local power source match the mains power requirements
of the fixture.
Release the tilt lock before operating the fixture.
Check the MAC Axiom™ support pages on the Martin Professional™ website at www.martin.com for
the most recent user documentation and technical information for the fixture. Martin™ user manual
revisions are identified by the revision letter at the bottom of the inside cover.
Note that whenever AC mains power is applied to the fixture, it will reset all effects and functions to
their home positions and the fixture head will move. This process usually takes around 53 seconds.
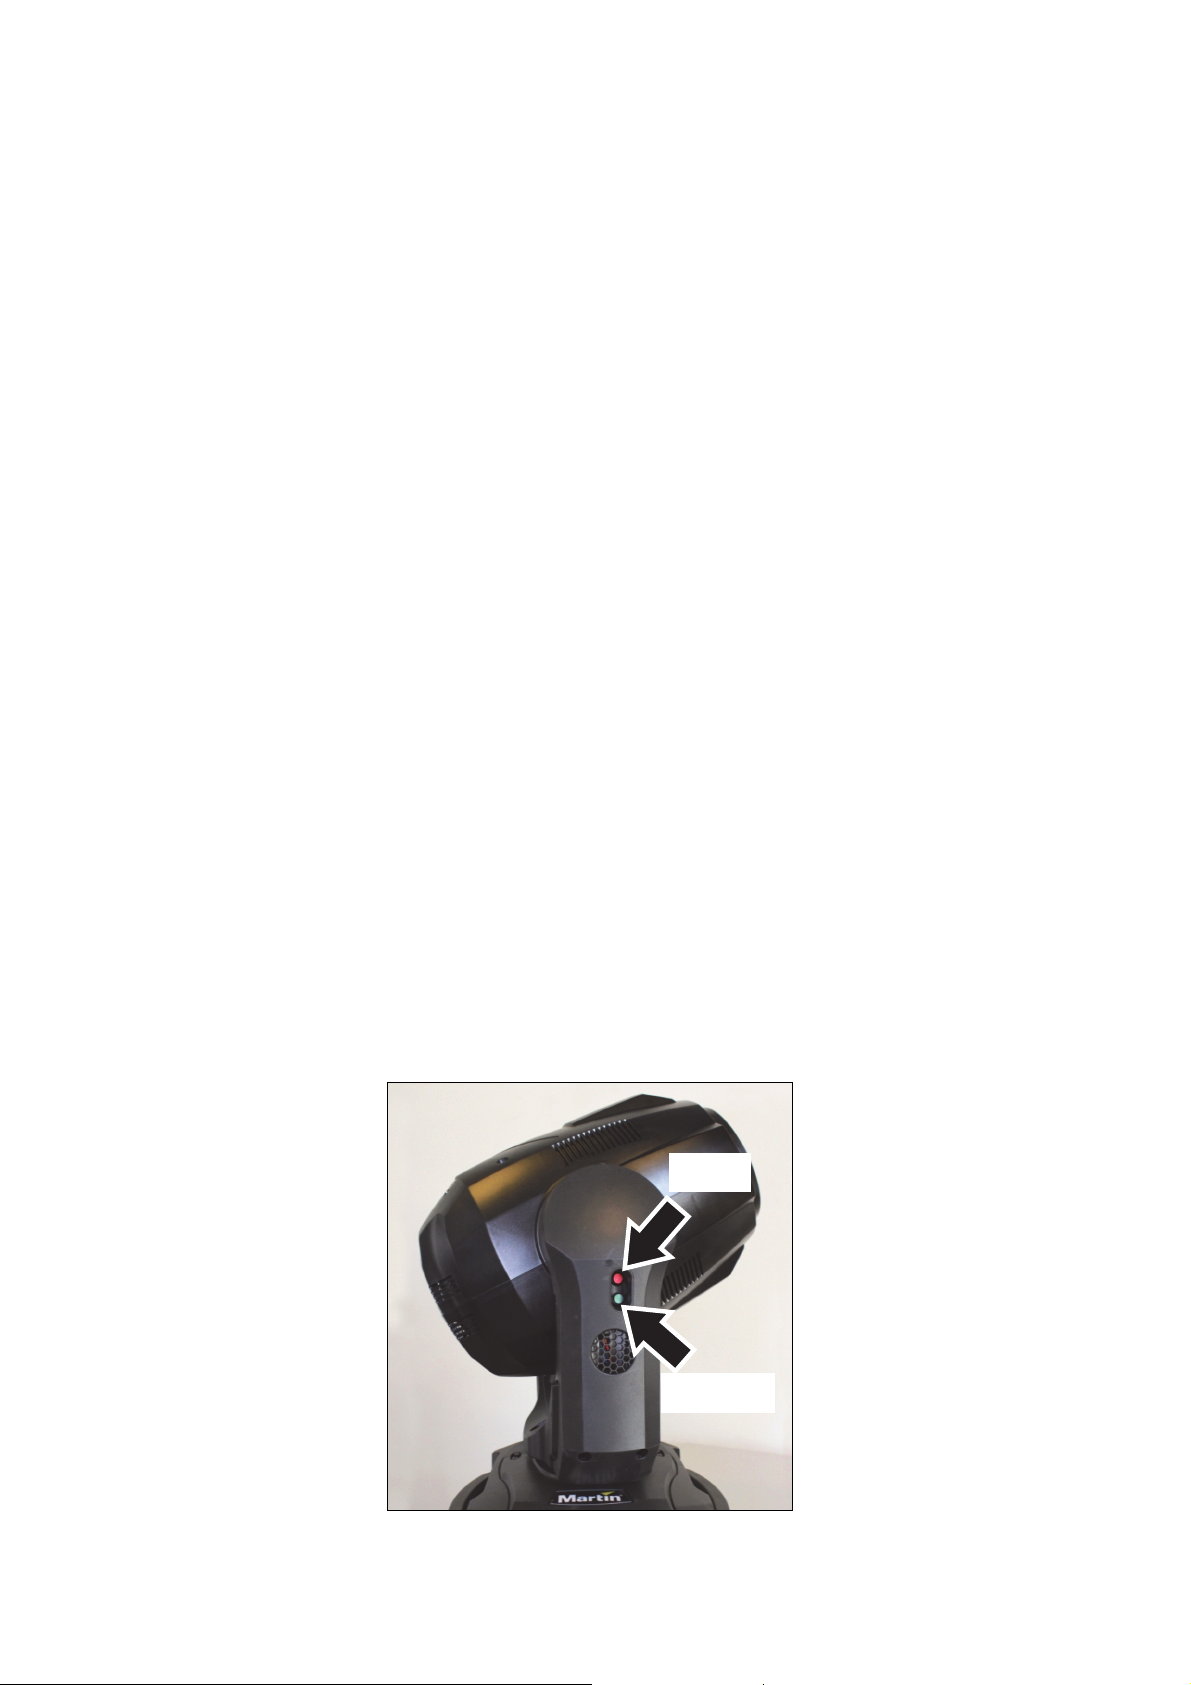
Tilt lock
See illustration below.
• Release the tilt lock before putting the fixture into its flightcase and before operating the fixture.
• Apply the tilt lock if convenient while moving or servicing the fixture.
Lock
Release
8 MAC Axiom Hybrid User Manual
Page 9

Physical installation
Warning! Read ‘Safety information’ on page 4 before installing the fixture.
The fixture is designed for indoor use only and must be used in a dry location
with adequate ventilation. Ensure that none of the fixture’s ventilation slots are
blocked.
Fasten the fixture to a secure structure or surface. Do not stand it on a surface or
leave it where it can be moved or fall over. Always secure the fixture as directed in
this user manual using a securely anchored safety cable that will hold the fixture
if the primary fastening method fails.
Do not use the fixture to illuminate surfaces within 15 m (50 ft.) of the fixture.
Martin™ can supply rigging hardware that is suitable for use with the fixture (see ‘Accessories’ on
page 47).
Fastening the fixture to a flat surface
The fixture can be fastened to a hard, fixed, flat surface that is oriented at any angle. Ensure that the
surface and all fasteners used can support at least 10 times the weight of all fixtures and equipment
they will support.
Fasten the fixture securely. Always install a safety cable as directed in ‘Securing with a safety cable’
below.
Mounting the fixture on a truss
The fixture can be clamped to a truss or similar rigging structure in any
orientation. When installing the fixture hanging vertically down, you can use an
open-type clamp such as a G-clamp. When installing in any other orientation,
you must use a closed-type rigging clamp such as half-coupler clamp (see
illustration on right) that completely encircles the truss chord.
To clamp the fixture to a truss:
1. Check that the rigging structure can support at least 10 times the weight of
all fixtures and equipment to be installed on it.
2. Block access under the work area.
3. The fixture is supplied with two omega-type brackets to which rigging clamps can be attached.
Check that the rigging clamps are undamaged and approved for the fixture’s weight. Bolt a rigging
clamp securely to each bracket. The bolts used must be M12, grade 8.8 steel minimum, and
fastened with self-locking nuts.
4. Fasten the omega brackets to the base of the fixture using the brackets’
quarter-turn fasteners. Turn quarter-turn fasteners a full 90° to lock them (see
illustration on right).
5. Working from a stable platform, hang the fixture on the truss and fasten the
rigging clamps onto the truss.
6. Secure the fixture with a safety cable as directed below.
7. Check that the head will not collide with other fixtures or objects.
MAC Axiom Hybrid User Manual 9
Page 10

Securing with a safety cable
Secure the fixture with a safety cable
(or other secondary attachment) that
is approved for the weight of the
fixture so that the safety cable will
hold the fixture if a primary
attachment fails.
Attach the safety cable to the
attachment point in the fixture’s
baseplate (arrowed in illustration on
right) and loop it around a secure
anchoring point.
10 MAC Axiom Hybrid User Manual
Page 11

AC power
Warning! Read ‘Safety information’ on page 4 before connecting the fixture to AC mains
power.
For protection from electric shock, the fixture must be electrically connected to ground
(earth). The AC mains power distribution circuit must be equipped with a fuse or circuit
breaker and ground-fault (earth-fault) protection.
Socket outlets or external power switches used to supply the fixture with power must be
located near the fixture and easily accessible so that the fixtures can easily be
disconnected from power.
Do not use an external dimming system to supply power to the fixture, as this may cause damage to
the fixture that is not covered by the product warranty.
The MAC Axiom Hybrid requires a power input cable with a Neutrik PowerCon TRUE1 NAC3FX-W
female cable connector for AC mains power input. The cable must meet the requirements listed under
“Protection from electric shock” on page 5.
Martin™ can supply either a suitable 3 m (9.8 ft.) power cable with PowerCon TRUE1 input connector
installed or the PowerCon TRUE1 input connector without a cable (see “Accessories” on page 42).
The fixture can be hard-wired to a building electrical installation if you want to install it permanently, or
a power plug (not supplied) that is suitable for the local power outlets can be installed on the power
cable.
If you install a power plug on the power cable, follow the plug manufacturer’s instructions and connect
the wires in the power cable as shown in this table:
US system
EU system
The fixture has an auto-ranging power supply that accepts AC mains power at 100-240 V at 50/60 Hz.
Do not apply AC mains power at any other voltage or frequency to the fixture.
Earth, Ground or
Green White Black
Yellow/green Blue Brown
Neutral or N Live or L
MAC Axiom Hybrid User Manual 11
Page 12
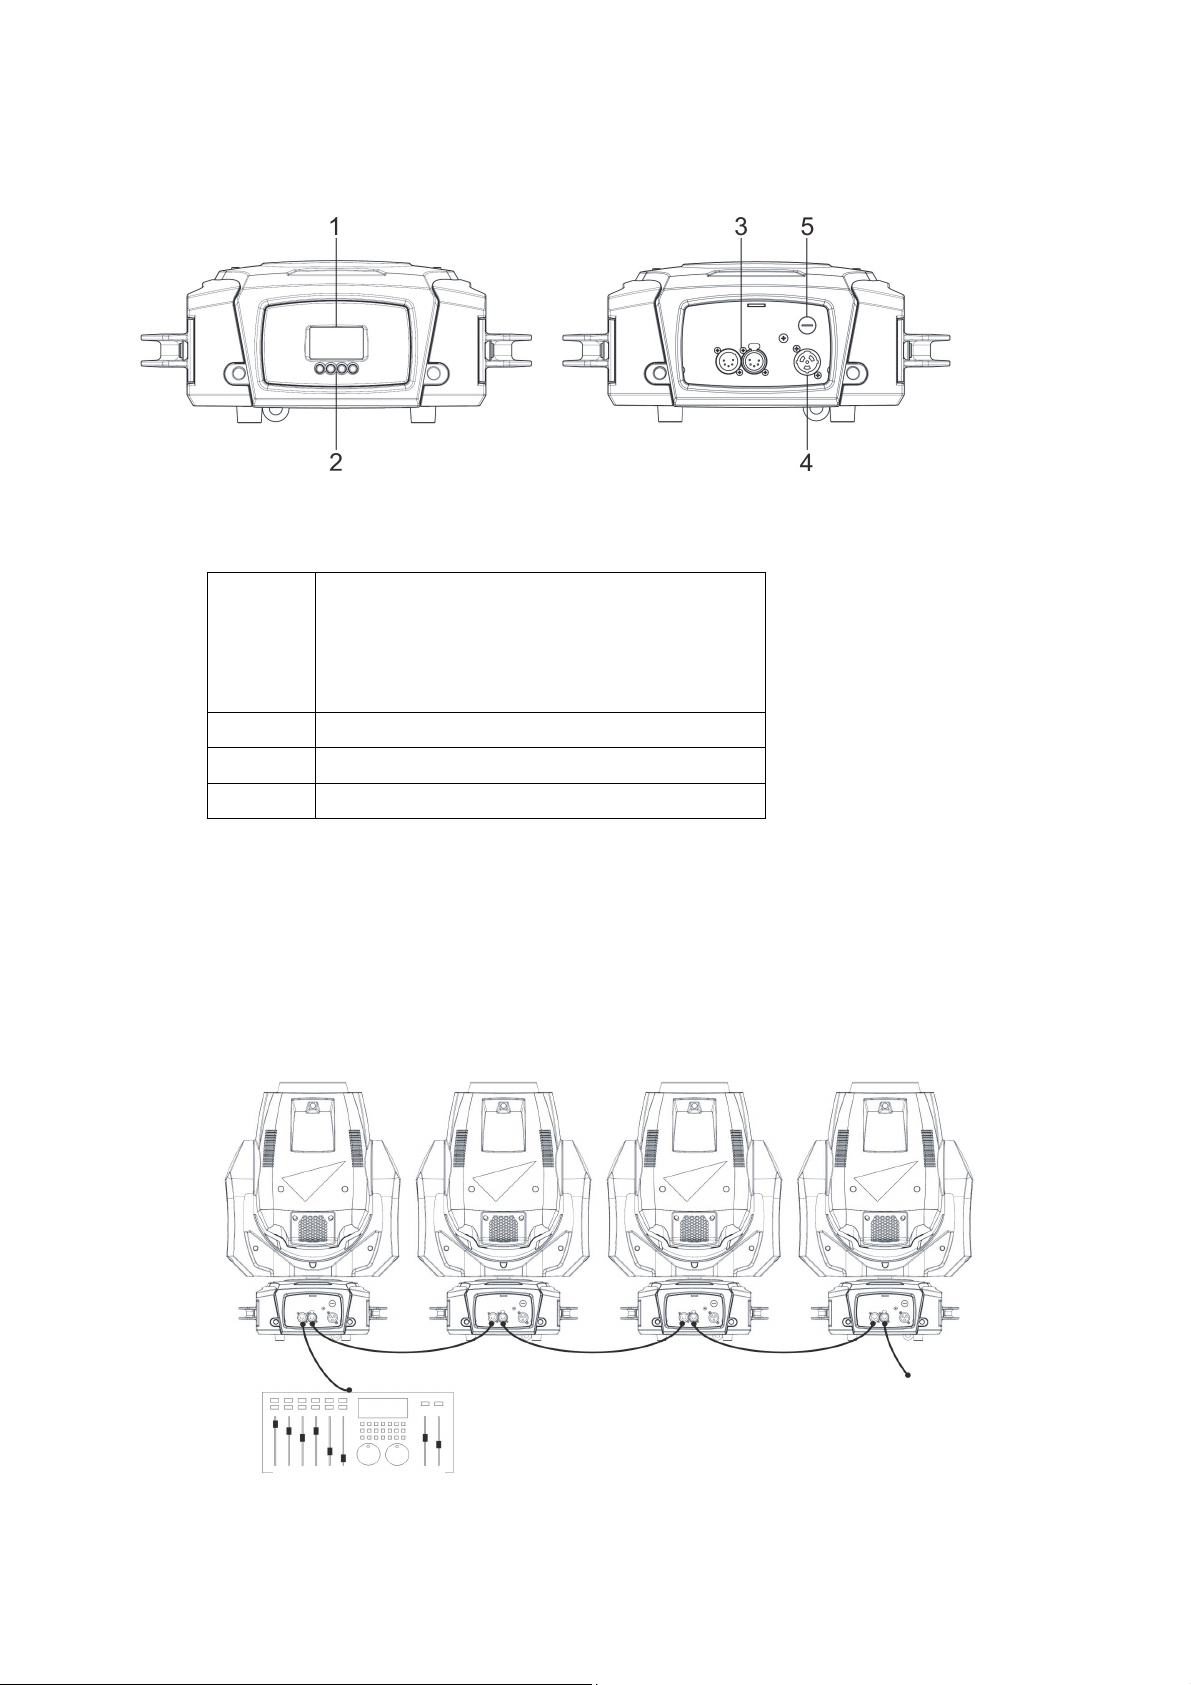
Fixture overview
1 – Display
2 – Control buttons:
Activate the menu mode functions, or
MENU
ENTER Confirm the selected menu item
DOWN Go down a menu branch
UP Go down a menu branch
3 - DMX XLR input/output sockets (5-pin locking XLR)
4 – AC mains power IN socket (Neutrik PowerCON TRUE1)
5 – Primary (mains power) fuse
Return to the previous level of the menu
structure, or
Press and hold to exit the menus
DMX data link
A DMX 512 control data link is required in order to control the fixture via DMX. The fixture has 5-pin
XLR connectors for DMX data input and output (throughput).
12 MAC Axiom Hybrid User Manual
DMX512 Controller
DMX OUT
Page 13

The number of daisy-chained fixtures is limited by the number of DMX channels required by the
fixtures in relation to the maximum 512 channels available in one DMX universe. Note that if
independent control of a fixture is required, it must have its own DMX channels. Fixtures that are
required to behave identically can share the same DMX address and channels. To add more fixtures or
groups of fixtures when the above limit is reached, add a DMX universe and another daisy-chained
link.
Note that if a fixture loses its DMX signal it will maintain its current effect until powered off or reset.
Tips for reliable data transmission
Use shielded twisted-pair cable designed for RS-485 devices: standard microphone cable cannot
transmit control data reliably over long runs. 24 AWG cable is suitable for runs up to 300 meters (1000
ft.). Heavier gauge cable and/or an amplifier is recommended for longer runs. The pin-out on 5-pin
XLR connectors is:
• pin 1 = shield
• pin 2 = cold (-)
• pin 3 = hot (+)
Pins 4 and 5 are not used in the fixture but are available for possible additional data signals as
required by the DMX512-A standard. Standard pin-out for these terminals is:
• pin 4 = data 2 cold (-)
• pin 5 = data 2 hot (+)
Creating branches
To split the link into branches, use a splitter such as the Martin DMX 5.3 Splitter™ or Martin RDM 5.5
Splitter™.
Terminating the link
Terminate the link by installing a termination plug in the output socket of the last fixture. The
termination plug, which is a male XLR plug with a 120 Ohm, 0.25-Watt resistor soldered between pins
2 and 3, “soaks up” the control signal so it does not reflect and cause interference. If a splitter is used,
terminate each branch of the link.
Connecting the data link
To connect the fixture to data:
1. Connect the DMX data output from the controller to the first fixture’s male XLR DMX input
connector.
2. Connect the first fixture’s DMX output to the DMX input of the next fixture and continue connecting
fixtures output to input.
3. Terminate the last fixture on the link with a DMX termination plug.
MAC Axiom Hybrid User Manual 13
Page 14

Fixture setup
This section explains the options available to change the fixture’s settings. Settings are made using
the menus available in the control panel and are retained when the fixture is powered off.
A complete map of the control menu structure and brief explanations of their purposes can be found in
‘Control menus’ on page 35.
Using the control panel
• To access the control menus, press the MENU button.
• Navigate the menu structure using the ENTER, DOWN and UP buttons.
• Scroll between menu items using the DOWN and UP buttons.
• Select any required menu option using the ENTER button.
• To return to the previous level in the menu structure without making a change, press the MENU
button.
• To exit the menus, press the MENU button.
DMX address
The fixture can be controlled using signals sent by a DMX controller over 23 DMX channels. The DMX
address, also known as the start channel, is the first channel used to receive instructions from the
DMX controller. Each DMX-controlled fixture must have a DMX address set. If a fixture has its DMX
address set to 1 and you want to use all 23 channels, then the next fixture can have a DMX address of
24, the next 47, then 70, and so on until the 512 channels in one DMX universe have all been
allocated.
For independent control, each fixture must be assigned its own DMX channels. Two fixtures of the
same type may share the same address, if identical behavior is desired. Address sharing can be useful
for diagnostic purposes and symmetric control, particularly when combined with the inverse pan and
tilt options.
To set the fixture’s DMX address:
1. Select DMX ADDRESS in the control panel and press ENTER. The fixture’s current DMX address
will blink in the display.
2. Use the UP and DOWN buttons to select a new address (1 to 512).
3. Once the address has been selected, press ENTER to set it (or to return to the previous menu
level without making a change, press MENU).
Personality
The MAC Axiom Hybrid provides several options that let you optimize the fixture for different
applications in the PERSONALITY menu:
• The PAN/TILT menu lets you swap and/or invert pan and tilt.
• The PAN TIL T SPEED menu lets you set PAN/TILT to FAST (optimized for speed) or SMOOTH
(optimized for smooth movement – useful for slow movements in long-throw applications).
• FOCUS TRACKING sets focus to automatically adapt to changes in zoom angle.
• AUTO LAMP ON gives three lamp strike options:
- When set to OFF, the lamp remains off until a “lamp on” command is received via DMX.
- When set to ON, the lamp strikes automatically after the fixture is powered on.
- When set to DMX, the lamp strikes automatically when the fixture begins to receive DMX data.
14 MAC Axiom Hybrid User Manual
Page 15

Automatic lamp strikes are staggered to prevent all lamps from striking at once. A delay is
determined by the fixture’s DMX address.
No matter what the AUTOMATIC LAMP ON setting is, the lamp can be struck by sending a Lamp
on command via DMX on the Fixture control/settings channel.
• DMX LAMP OFF and DMX RESET define whether the lamp can be powered off, or whether fixture
or individual effects can be reset by sending a DMX command on the Fixture control/settings
channels. If either of these settings are set to OFF, you can override this setting and cut lamp
power or reset effects by applying a special combination of DMX values (see “DMX protocol” on
page 20).
• EFFECT SHORTCUT determinates whether the gobo wheel and color wheel take the shortest path
between two positions (shortcuts enabled), crossing the open position if necessary, or always avoid
the open position (shortcuts disabled).
• CMY MODE gives two option for using the CMY color mixing system:
- CMY SNAP bypasses the first 10% of the color mixing range in order to avoid uneven color
mixing at very low saturation levels. From 10% – 100% each color fades gradually.
- CMY FADE gives control over the full color mixing range from 0% – 100%, giving gradual
fading and freedom of color choice at all levels of saturation.
• DISPLAY offers the following options for the LCD display:
- DISPLAY SLEEP determinates whether the display remains on permanently, or goes into
sleep mode 2, 5 or 10 minutes after the last press of the MENU button.
- DISPLAY ROTATION lets you rotate the display through 180° so that it can be read easily if
the fixture is installed with the head hanging below the base.
- DISPLAY CONTRAST lest you define the contrast of the backlit graphic display. Set the
contrast to a level from 1% to 100%.
• ERROR MODE enables or disables error warnings. If set to NORMAL, the display is activated and
lights up if the fixture needs to report an error. If set to SILENT, the fixture does not light the display
with error warnings but error messages can still be read when the display is activated manually.
Factory default
• FACTORY DEFAULT lets you reload the fixture’s factory default settings.
Effect calibration is not affected, so any effects that have been re-calibrated will not be returned to
factory calibration settings.
Information
The following fixture information can be called up in the display:
• POWER ON TIME provides two counters:
- The TOTAL counter is not user-resettable and displays total hours powered on since
manufacture.
- The RESETTABLE counter is user-resettable and displays the number of hours the fixture has
been powered on since the counter was last reset.
• LAMP ON TIME provides two counters:
- The TOTAL counter is not user-resettable and displays total hours the lamp has been
powered on since manufacture.
- The RESETTABLE counter is user-resettable and displays the number of hours the lamp has
been powered on since the counter was last reset. This counter is intended to allow you to
monitor lamp life.
MAC Axiom Hybrid User Manual 15
Page 16

• LAMP STRIKES provides two counters:
- The TOTAL counter is not user-resettable and displays the total number of lamp strikes since
manufacture.
- The RESETTABLE counter is user-resettable and displays the number of lamp strikes since
the counter was last reset.
• SW VERSION displays the currently installed firmware (fixture software) version.
• RDM UID displays the fixture’s factory-set unique ID for identification using an RDM-compatible
controller.
• FANS provides separate status readouts from the fixture’s cooling fans.
• TEMPERATURES displays a temperature readout from the ballast PCB.
DMX Live
The MAC Axiom Hybrid provides data on the DMX signal it is receiving in the DMX LIVE menu. This
information can be useful for troubleshooting control problems.
• RATE displays the DMX refresh rate in packets per second. Values lower than 10 or higher than 45
may result in erratic performance, especially when using tracking control.
• QUALITY displays the quality of the received DMX data as a percentage of packets received.
Values much below 100 indicate interference, poor connections, or other problems with the serial
data link that are the most common cause of control problems.
• START CODE displays the DMX start code. Packets with a start code other than 0 may cause
irregular performance.
The remaining options under DMX LIVE display the DMX values in a range from 0 – 255 that are
being received on each channel.
Test
TEST activates effects in sequence, allowing you to test all functions, pan and tilt movement only, or
effects only (i.e. without pan and tilt movement) without a DMX controller. To run a test:
1. Select a test type and press ENTER to start the test.
2. Press MENU button to stop the test.
Manual control
The MANUAL CONTROL menu lets you reset the MAC Axiom Hybrid, strike or douse the lamp, and
operate the fixture without a DMX controller.
To execute commands in the MANUAL CONTROL menu
1. Select a menu item for the effect that you want to control.
2. Enter a value from 0 to 255 to apply a command. The menu items and values correspond to the
commands listed in the DMX protocol on page 30.
16 MAC Axiom Hybrid User Manual
Page 17

Effects
This section gives an overview of the DMX-controllable effects that require particular explanation. See
‘DMX protocol’ on page 30 for a full list of the DMX channels and values used to control the different
effects.
Dimming
The MAC Axiom Hybrid has full-range mechanical dimming.
Strobe effects
A range of strobe and pulse effects are available, with variable speed and random effects.
Cyan, Magenta, Yellow and CTO
The amount of cyan, magenta, yellow and CTO (Color Temperature Control Orange) applied to the
MAC Axiom Hybrid’s light output can be varied from zero to 100%.
Rotating gobos
The rotating gobo wheel in the MAC Axiom Hybrid provides nine rotating gobos plus an open position.
Gobo 1: Damped Wave Gobo 2: 4 Luck Stakes Gobo 3: Bite Me
Gobo 4: Laser Squares Gobo 5: Kite Surf Gobo 6: Dots in Space
Gobo 7: Organic Delight Gobo 8: Slice It Gobo 9: Circles
Rotating gobo wheel seen from front lens side
All gobos can be selected, indexed (positioned at an angle), rotated continuously and shaken
(bounced). The entire gobo wheel can also be scrolled continuously or shaken.
MAC Axiom Hybrid User Manual 17
Page 18

The type of effect (gobo indexing, continuous gobo rotation, gobo shake or continuous wheel
movement) is selected on one channel. Depending on what is selected on this first channel, the gobo
indexed angle or gobo rotation speed/direction are set on the next channel. If gobo indexing is
selected on the first channel, fine control of gobo indexed angle is available on the third control
channel.
All gobos are interchangeable, but replacement gobos must match the dimensions, construction and
quality of the gobos supplied as standard. The gobos are made of glass with special high temperature
treatment and have 13,9 mm (+ 0 / - 0,1 mm) external diameter, 9 mm image area diameter.
Fixed gobos
The MAC Axiom Hybrid contains a gobo wheel with an open position, three iris positions, a pinspot
effect, 12 fixed gobos, a frost glass and an animation effect that can be used in conjunction with
rotating gobos:
Fixed gobo wheel seen from front lens side
18 MAC Axiom Hybrid User Manual
Page 19

You can project any gobo or rotate the wheel clockwise or counter-clockwise at variable speeds.
Use the focus DMX channel to adjust the sharpness of gobo projections.
The frost glass and the gobo animation let you create animated effects by combining them with rotating
gobos. When using frost glass or gobo animation, we recommend that you adjust focus to obtain the best
results.
Color wheel
The fixture incorporates a color wheel with 16 dichroic color filters plus open. The colors can be
applied as split colors or in full-color steps. The wheel can be rotated at varying speeds clockwise and
counter-clockwise or at random at fast, medium or slow speed.
Open
1
16
4
2
3
15
14
13
5
6
7
10
12
11
89
Open
Slot 1
Slot 2
Slot 3
Slot 4
Slot 5
Slot 6
Slot 7
Slot 8
MAC Axiom Hybrid User Manual 19
Blue
Light green
Half CTB
Orange
Magenta
Full CTB
Yellow 2
Light blue
MAC Axiom Hybrid color filters
Slot 9
Slot 10
Slot 11
Slot 12
Slot 13
Slot 14
Slot 15
Slot 16
Light red
Lavender
Dark green
Purple
Pink
Yellow 1
Blue 101
Red
Page 20

Prisms and prism lineator
Either a 3-facet 15° prism or an 8-facet 15° rotating prism can be applied to the projection. Direction
and speed of prism rotation are variable.
An innovative dynamic “prism lineator” zoom effect is available for whichever prism is active. This
effect combines zoom with prism projections to alter the spread or overlap of the multiple projections
from the prism.
Frost
A frost filter can be applied to the beam to provide a wash effect.
Focus/Zoom linking
Focus can be linked to zoom so that it automatically adjusts to match changes in zoom angle.
To link focus and zoom:
1. Adjust focus to obtain the required degree of sharpness.
2. Enable linking on the Fixture Control/Settings DMX channel or in FOCUS TRACKING in the
control panel PERSONALITY menu.
Pan and tilt
The fixture’s moving head can be panned through 540° and tilted through 260° using coarse and fine
control channels.
20 MAC Axiom Hybrid User Manual
Page 21

Service and maintenance
Warning! Read ‘Safety information’ on page 4 before servicing the fixture.
Refer any service or repair operation not described in this manual to an authorized
Martin™ service technician.
Disconnect mains power before cleaning or servicing the fixture.
Service the fixtures in an area where there is no risk of injury from falling parts, tools or
other materials.
Installation, on-site service and maintenance can be provided worldwide by the Martin Professional
Global Service organization and its approved agents, giving owners access to Martin’s expertise and
product knowledge in a partnership that will ensure the highest level of performance throughout the
product’s lifetime. Please contact your Martin™ supplier for details.
We recommend that you magnetize screwdrivers to help you avoid dropping screws into the fixture.
Cleaning
Excessive dust, smoke fluid, and particle buildup degrades performance, causes overheating and will
damage the fixture. Damage caused by inadequate cleaning or maintenance is not covered by the
product warranty.
The cleaning of external optical lenses must be carried out periodically to optimize light output.
Cleaning schedules for lighting fixtures vary greatly depending on the operating environment. It is
therefore impossible to specify precise cleaning intervals for the fixture. Environmental factors that
may result in a need for frequent cleaning include:
• Use of smoke or fog machines.
• High airflow rates (near air conditioning vents, for example).
• Presence of cigarette smoke.
• Airborne dust (from stage effects, building structures and fittings or the natural environment at
outdoor events, for example).
If one or more of these factors is present, inspect fixtures within their first 100 hours of operation to
see whether cleaning is necessary. Check again at frequent intervals. This procedure will allow you to
assess cleaning requirements in your particular situation. If in doubt, consult your Martin™ supplier
about a suitable maintenance schedule.
Use gentle pressure only when cleaning, and work in a clean, well-lit area. Do not use any product that
contains solvents or abrasives, as these can cause surface damage.
To clean the fixture:
1. Disconnect the fixture from power and allow it to cool for at least 20 minutes.
2. Vacuum or gently blow away dust and loose particles from the outside of the fixture and the air
vents at the back and sides of the head and in the base with low-pressure compressed air.
3. Clean optical components by wiping gently with a soft, clean lint-free cloth moistened with a weak
detergent solution. Do not rub the surface hard: lift particles off with a soft repeated press. Dry with
a soft, clean, lint-free cloth or low-pressure compressed air. Remove stuck particles with an
unscented tissue or cotton swab moistened with glass cleaner or distilled water.
4. Check that the fixture is dry before reapplying power.
MAC Axiom Hybrid User Manual 21
Page 22

Access inside the head
For access to the components inside the head to allow lamp replacement or service of optical
components:
1. If the fixture has been in use, power the lamp off but leave the fixture powered on for at least 10
minutes so that the cooling fans cool the lamp. Disconnect the fixture from power and allow it to
cool for 20 minutes.
2. Apply the tilt lock (see “Tilt lock” on page 8).
3. Use a flat-bladed screwdriver to release the three quarter-turn fasteners (arrowed) on each head
cover and lift the cover up from the head:
5. For each head cover, slide the silicone sleeve (arrowed) down the cover’s safety wire and unhook
the safety wire from the head, and then lift the cover away from the fixture:
6. After completing service, reinstall the safety wires and head covers using the instructions above
as a guide and check that the fixture is secure before reapplying power.
22 MAC Axiom Hybrid User Manual
Page 23

Lamp replacement
Warning! Read ‘Lamp safety’ on page 6 before servicing the lamp.
Important! Replace the lamp before it reaches the end of the specified
Replacing the lamp
The lamp must be perfectly clean. Do not touch the lamp’s glass bulb with bare hands. If this happens,
clean the lamp with an alcohol wipe and dry it with a clean, lint-free cloth.
To replace the lamp:
1. Obtain an Osram SIRIUS HRI 440W lamp.
2. Remove the head covers (see ‘Access inside the head’ on page 22).
3. Put on protective glasses and gloves.
4. Unscrew the four Torx 10 screws (arrowed) from the lamp compartment cover and then remove
the cover:
lifetime given under ‘Lamp’ on page 41, or the lamp may explode in the
fixture and cause damage that is not covered by the product warranty.
5. Disconnect the lamp wires from the lamp terminals (arrowed):
MAC Axiom Hybrid User Manual 23
Page 24

6. Loosen the four Torx 10 screws (arrowed) on the metal lampholder plate. Lift the plate and the
lamp out of the fixture:
7. To install the new lamp, follow the above procedure in reverse, noting the following points:
Install the lampholder plate with the convex side facing the lamp:
Convex side must
face towards lamp
Install the new lamp with the lamp terminals facing the same way as for the old lamp, towards the
lamp wire cutout (arrowed) in the side of the lamp compartment. Route the lamp wires through the
cutout as shown when you fasten the lamp and lampholder plate into position:
8. When the fixture is reassembled and secure, check that the tilt lock is released, power the fixture
on and reset the Lamp On Time counter in the control menu.
24 MAC Axiom Hybrid User Manual
Page 25

Replacing the prism
To replace the prism:
1. Stand the fixture on its base on a stable work surface.
2. Remove the head covers (see ‘Access inside the head’ on page 22).
3. Point the head upwards and apply the tilt lock.
4. Note the positions of the four locating keys for the front glass assembly. You will need to install the
front glass so that the slots in the front glass assembly fit onto these keys when you reinstall the
front glass. The photo on the right below shows one of the keys with the front glass removed:
5. Remove the four Torx 20 screws from the front glass assembly and lift the front glass assembly off
the fixture:
6. Lift the prism car up towards the top of the head so that you can reach the prism with a
screwdriver:
MAC Axiom Hybrid User Manual 25
Page 26

7. Prepare to hold the circlip and washer that hold the prism in place so that you do not lose these
two items when you release the circlip. Use a flat-bladed screwdriver in the cutout (arrowed) in the
prism holder to lever the circlip out of its groove. Lift the circlip and its washer away and keep
these two components for reuse:
8. Wearing a clean, dry, lint-free glove, lift the prism out of its holder:
9. Reassembly is the reverse of the above procedure. Install the prism with the facetted side
(arrowed) facing downwards towards the lamp and the flat side of the prism facing up towards the
front glass:
26 MAC Axiom Hybrid User Manual
Facetted side must
face towards lamp
Page 27

10. Place the prism in the holder first, then the washer, and then install the circlip on top of the
washer:
Circlip (on top) Washer (under circlip) Prism (under washer)
11. Check that the head cover safety wires are correctly installed during reassembly. Check that the
fixture is secure before reapplying power.
Replacing a rotating gobo
Gobo removal
To remove a rotating gobo:
1. Stand the fixture on its base on a stable work surface.
2. Remove the head covers (see ‘Access inside the head’ on page 22).
3. Tilt the head so that you can access the rotating gobo wheel as shown below. Rotate the wheel by
hand until you have access to the gobo that you want to replace (arrowed):
4. Wearing a clean, dry, lint-free glove, press the goboholder away from the wheel against the arms
(arrowed) of its retaining clip, then slide the goboholder out of the wheel:
MAC Axiom Hybrid User Manual 27
Page 28

5. Using your thumb, press the gobo firmly through from the back of the goboholder to release the
circlip and gobo from the holder. Keep the gobo as flat as possible while pressing.
Gobo installation
To install a new gobo:
1. Place the goboholder on a clean work surface with the gear teeth facing upwards. Wearing a
clean, lint-free glove, push the gobo fully into the the goboholder with the dark side of the gobo
facing upwards, towards the teeth. Press the circlip (arrowed) down into the goboholder.
Ensure that the gobo remains flat at the bottom of the goboholder while you install the circlip, or
the gobo may become wedged in a crooked position and you may damage it.
2. Use a flat-bladed screwdriver to press the circlip down until all of the circlip is sitting flat
against the gobo. Be careful not to damage the gobo with the screwdriver. Then turn the gobo
28 MAC Axiom Hybrid User Manual
Page 29

over and check that the shiny side of the gobo is sitting flat against the rim of the goboholder
(arrowed):
3. Reinstall the goboholder in the rotating gobo wheel by sliding it under the arms of its clip. Check
that the goboholder is correctly seated in its cutout in the rotating gobo wheel. Check that the teeth
of the goboholder engage in the teeth of the rotating gobo activation wheel.
4. The rest of the reassembly procedure is the reverse of disassembly. Check that the head cover
safety wires are installed securely during reassembly. Check that the fixture is secure before
reapplying power.
Handling gobos
Handling and storing gobos requires special care:
• Store all gobos in a dust-free environment with approx. 50% humidity.
• Always use clean gloves when handling gobos.
• Avoid scratching coated and uncoated sides.
• Avoid touching the other gobos when taking out a gobo from a rack: the sharp edge of one gobo
can scratch the others.
• Clean the coated side of gobos with dust and oil-free compressed air only.
• Clean the uncoated side of gobos with photographic quality lens-cleaner and optics cleaning
tissues. Use a repeated dabbing action rather than a rubbing action.
• Never place a gobo with the coated side face-down on any surface.
• Mount the gobo with the matted coating towards the lens.
Replacing the primary fuse
If the fixture is completely dead, the fixture’s primary fuse may have blown and it may be necessary to
install a new fuse. This fuse is located in a fuseholder next to the AC mains power IN socket on the
connections panel. See ‘Fixture overview’ on page 12.
To change the fuse:
1. Disconnect the fixture from power and allow it to cool for at least 60 minutes.
2. Use a large flat-bladed screwdriver to unscrew the cap of the fuseholder.
3. Replace the fuse with one of the same type and rating only (250 V, T 8 A, slow blow).
4. Reinstall the fuseholder cap before reapplying power.
MAC Axiom Hybrid User Manual 29
Page 30

DMX protocol
Channel Value Function
Strobe
0-19 Shutter closed
20-49 Shutter open
1
2
3
4
5
6
7
50-180 Strobe (slow → fast)
181-190 Opening pulse (slow → fast)
191-200 Closing pulse (slow → fast)
201-210 Shutter open
211-255 Random strobe (slow → fast)
Dimmer
0-255 Closed → open
Cyan
0-255 0 → 100%
Magenta
0-255 0 → 100%
Yellow
0-255 0 → 100%
CTO
0-255 Open → warm
Color wheel
0
1-8 Open → Slot 1
9 Slot 1
10-17 Slot 1→ Slot 2
18 Slot 2
19-26 Slot 2 → Slot 3
27 Slot 3
28-35 Slot 3 → Slot 4
36 Slot 4
37-44 Slot 4 → Slot 5
45 Slot 5
46-53 Slot 5 → Slot 6
54 Slot 6
55-62 Slot 6 → Slot 7
63 Slot 7
64-71 Slot 7 → Slot 8
72 Slot 8
73-80 Slot 8 → Slot 9
81 Slot 9
82-89 Slot 9 → Slot 10
90 Slot 10
91-98 Slot 10 → Slot 11
99 Slot 11
100-107 Slot 11 → Slot 12
108 Slot 12
109-116 Slot 12 → Slot 13
117 Slot 13
Continuous scrolling (split colors)
Open
Fade
type
Snap 30
Fade 0
Fade 0
Fade 0
Fade 0
Fade 0
Snap 0
Default
Value
30 MAC Axiom Hybrid User Manual
Page 31

7
(cont.)
118-125 Slot 13 → Slot 14
126 Slot 14
127-134 Slot 14 → Slot 15
135 Slot 15
136-143 Slot 15 → Slot 16
144 Slot 16
145-152 Slot 16 → Open
153-162 Open
163 Slot 1
164 Slot 2
165 Slot 3
166 Slot 4
167 Slot 5
168 Slot 6
169 Slot 7
170 Slot 8
171 Slot 9
172 Slot 10
173 Slot 11
174 Slot 12
175 Slot 13
176 Slot 14
177 Slot 15
178 Slot 16
179-192 Open
193-214 CW, fast → slow
215-221 Stop (wheel stops at its current position)
222-243 CCW, slow → fast
244-247 Fast
248-251 Medium
252-255 Slow
Stepped scrolling (full colors)
Continuous wheel rotation
Random slots
Snap 0
MAC Axiom Hybrid User Manual 31
Page 32

8
9-10
0-2 Open
3-6 Gobo 1
7-10 Gobo 2
11-14 Gobo 3
15-19 Gobo 4
20-23 Gobo 5
24-27 Gobo 6
28-31 Gobo 7
32-35 Gobo 8
36-40 Gobo 9
41-44 Gobo 1
45-48 Gobo 2
49-52 Gobo 3
53-56 Gobo 4
57-60 Gobo 5
61-64 Gobo 6
65-68 Gobo 7
69-71 Gobo 8
72-80 Gobo 9
81-90 Gobo 1 shake, 25° slow → 10° fast
91-100 Gobo 2 shake, 25° slow → 10° fast
101-110 Gobo 3 shake, 25° slow → 10° fast
111-120 Gobo 4 shake, 25° slow → 10° fast
121-130 Gobo 5 shake, 25° slow → 10° fast
131-140 Gobo 6 shake, 25° slow → 10° fast
141-150 Gobo 7 shake, 25° slow → 10° fast
151-160 Gobo 8 shake, 25° slow → 10° fast
161-170 Gobo 9 shake, 25° slow → 10° fast
171-200
201-228 CW fast → slow
229-255 CCW slow → fast
0-65535 Indexed angle (0° index at 32768)
0-600 No rotation (gobo indexed at 0°)
601-32130 Rotation CW fast → CW slow
32131-32895 No rotation (gobo stops at its current position)
32896-64515 Rotation CCW slow → CCW fast
64516-65535 No rotation (gobo indexed at 90°)
Rotating gobo wheel
Gobo indexing (set angle on channels 9 and 10)
Gobo rotation (set rotation speed and direction on
channels 9 and 10)
Gobo shake (set indexed angle on channels 9-10)
Open
Continuous gobo wheel rotation
Gobo indexing angle / gobo rotation direction and
speed, 16-bit (MSB and LSB)
Gobo indexing
Gobo rotation
Snap 0
Fade 32768
32 MAC Axiom Hybrid User Manual
Page 33

11
12
13
14
15
0-20 Open
21-30 Iris 1
31-40 Iris 2
41-50 Iris 3
51-60 Pinspot
61-70 Gobo 1
71-80 Gobo 2
81-90 Gobo 3
91-100 Gobo 4
101-110 Gobo 5
111-120 Gobo 6
121-130 Gobo 7
131-140 Gobo 8
141-150 Gobo 9
151-160 Gobo 10
161-170 Gobo 11
171-180 Gobo 12
181-190 Frost
191-200 Indexed
201 Slow
202 Medium
203 Fast
204-220 CW, fast → slow
221-226 Stop (wheel stops at its current position)
227-243 CCW, slow → fast
244-247 Fast
248-251 Medium
252-255 Slow
0-127
128-255
0-10 Open
11-20 3-facet
21-30 8- facet
31-40 3-facet
41-255 8- facet
0-2 No rotation (prism stops at its current position)
3-126 Rotating CW fast → CW slow
127-129 No rotation (prism stops at its current position)
130-253 Rotating CCW slow → CCW fast
254-255 No rotation (prism stops at its current position)
0-255 Wide → narrow
Fixed gobo wheel
Gobo selection (stepped gobo wheel scroll)
Animation
Continuous rotation
Random slots
Frost
Disabled
Enabled
Prism deployment
Position 1 ( between zoom and focus)
Position 2 (in front of zoom)
Prism rotation
Prism lineator
Snap 0
Snap 0
Snap 0
Fade 0
Fade 128
MAC Axiom Hybrid User Manual 33
Page 34

16
17-18
19-20
21-22
23
0-255 Wide → narrow
0-65535 Infinity → near
0-65535 Left → right
0-65535 Forward → backward
0-9
10-14 Reset fixture
15
16-17 Reset head motors only
18 Reset pan and tilt
19-27
28 Pan and tilt speed = FAST (default)
29 Pan and tilt speed = SMOOTH
30 Parameter shortcuts = ON (default)
31 Parameter shortcuts = OFF
32 Disable focus tracking
33 Enable focus tracking
34
35
36-39
40-44 Lamp = ON
45-51 Lamp = OFF
52 Turn on onboard display
53 Turn off onboard display
54-255
Zoom
Focus, 16-bit (MSB and LSB)
Pan, 16-bit (MSB and LSB)
Tilt, 16-bit (MSB and LSB)
Fixture control settings
No function
No function
No function
CMY Snap mode (default)
CMY Fade mode
No function
No function
Fade 128
Fade 32768
Fade 32768
Fade 32768
Snap 0
34 MAC Axiom Hybrid User Manual
Page 35

Control menus
To access the control menus, press the MENU button. Use the UP and DOWN buttons to navigate the
menus. Select any required menu option using the ENTER button. For more information, see ‘Using
the control panel’ on page 14.
Default fixture settings are shown in bold.
Menu level 1 Menu level 2 Menu level 3 Menu level 4 Notes (Default settings in bold print)
DMX
ADDRESS
PERSONALITY
FACTORY
DEFAULT
1-490 Set fixture's DMX address
PAN/TILT
PAN TILT SPEED FAST Optimize pan/tilt movement for speed
FOCUS TRACKING
AUTO LAMP ON
DMX LAMP OFF
DMX RESET
EFFECT
SHORTCUT
CMY MODE
DISPLAY
ERROR MODE
LOAD ARE YOU SURE? YES/NO
PAN INVERT ON/OFF Reverse DMX pan control: from right to left
TILT INVERT ON/OFF Reverse DMX tilt control: from down to up
SMOOTH Optimize pan/tilt movement for smoothness
ENABLED Enables zoom focus linking
DISABLED Disables zoom focus linking
OFF Automatic lamp striking disabled
ON
DMX
ON Lamp can be powered off via DMX
OFF Lamp cannot be powered off via DMX
ON Fixture can be reset via DMX
OFF Fixture cannot be reset via DMX
ON
OFF
SNAP
FADE CMY colors fade gradually from 0-100%
ON Onboard display panel permanently on
2 MINUTES
DISPLAY SLEEP
DISPLAY ROTATION
DISPLAY
CONTRAST
NORMAL
SILENT
5 MINUTES
10 MINUTES
AUTOMATIC
NORMAL Display orientation normal
ROTATE 180 Display orientation inverted
15-40 Adjust contrast of display (default = 25)
Lamp strikes automatically within 60
seconds of fixture being powered on
Lamp strikes automatically when the fixture
receives a DMX signal
Effects take shortest route during
changes, crossing open positions if
necessary.
Effects avoid open positions during effects
changes
CMY colors jump directly from 0 to 10%
and then fade gradually to 100%
Display goes into sleep mode 2 minutes
after last key press
Display goes into sleep mode 5 minutes
after last key press
Display goes into sleep mode 10 minutes
after last key press
Display flips vertically automatically
depending on fixture orientation.
Enable error messages and warnings in
display
Disable error messages and warnings in
display
Return all settings (except calibrations) to
factory default
MAC Axiom Hybrid User Manual 35
Page 36

INFORMATION
DMX LIVE
TEST
MANUAL
CONTROL
TOTAL 0 - xxx HR
POWER ON TIME
RESETTABLE
TOTAL 0 - xxx HR
LAMP ON TIME
RESETTABLE
TOTAL 0 - xxx
LAMP STRIKES
RESETTABLE
SW VERSION x.x.x
RDM UID 4D50:xxxxxx Fixture's unique RDM ID
BASE xx.x V
LAMP 60 xx.x V
LAMP 40 xx.x V
FANS
TEMPERATURES BALLAST x C Temperature in °C of ballast PCB
RATE 0-45 HZ
QUALITY 0-100 % Percent of packets received
1 STROBE
...
...
23 FIXTURE
CONTROL
ALL
PAN
TILT
STROBE
DIMMER
CMY
CTO
COLOR
GOBO WHEEL
GOBO ROTATION
FIXED GOBO
FROST
PRISM 3F
PRISM 8F
PRISM LIN
ZOOM
FOCUS
RESET
LAMP ON/OFF ON/OFF Manually strike/douse lamp
STROBE 0-255 Set shutter/strobe effect (default = 30)
DIMMER 0-255 Set dimmer opening (default = 255)
CYAN 0-255 Add cyan
MAGENTA 0-255 Add magenta
YELLOW 0-255 Add yellow
CTO 0-255
COLOR WHEEL 0-255 Select color filter
GOBO W SEL 0-255 Select rotating gobo
GOBO W I/R MSB 0-255 Adjust rotating gobo indexing/rotation
GOBO W I/R LSB 0-255 Adjust rotating gobo indexing/rotation, fine
LAMP F xx.x V
LAMP B xx.x V
GOBO xx.x V
SHUTTER xx.x V
0-255
HEAD MOTORS Reset head motors only
PAN TILT Reset pan and tilt only
ALL MOTORS Reset all motors
CLEAR COUNTER ?
YES/NO
CLEAR COUNTER ?
YES/NO
CLEAR COUNTER ?
YES/NO
Hours fixture has been powered on since
manufacture (not user-resettable)
Hours fixture has been powered on since
last counter reset
Hours of lamp use since manufacture (not
user-resettable)
Hours of lamp use since last counter reset
(user-resettable)
Number of times lamp has been struck
since manufacture (not user-resettable)
Number of times lamp has been struck
since last counter reset (user-resettable)
Currently active software version
Current voltages of cooling fans for lamp
(four fans), gobo wheels and shutter blades
DMX transmission speed in packets per
second
DMX value currently being received on
DMX channels 1 – 23 in sequence
Run test sequence of all effects, of pan, tilt
or of single effects. Press Menu button to
stop test.
Adjust color temperature control (add
warmth)
36 MAC Axiom Hybrid User Manual
Page 37

MANUAL
CONTROL
(contd.)
SERVICE
FIXED GOBO 0-255 Select fixed gobo
FROST 0-255 Frost insertion
PRISM 0-255 Prism insertion
PRISM ROTATION 0-255 Set prism rotation
PRISM LINEATOR 0-255 Set prism lineator position
ZOOM 0-255 Set zoom (default = 128)
FOCUS MSB 0-255 Set focus (default = 128)
FOCUS LSB 0-255 Set focus fine (default = 128)
PAN MSB 0-255 Set pan angle (default = 128)
PAN LSB 0-255 Set pan angle, fine (default = 128)
TILT MSB 0-255 Set tilt angle (default = 128)
TILT LSB 0-255 Set tilt angle, fine (default = 128)
CONTROL 0-255
ERROR LIST Empty or up to 20 errors Display any errors in memory
PT FEEDBACK
ON
OFF Disable pan/tilt position feedback
Apply commands on control / settings
channel
Enable pan/tilt position feedback
systems
MAC Axiom Hybrid User Manual 37
Page 38

Error messages
Error: Appears when:
PAN LOCKED
TILT LOCKED
Pan motor or tilt motor locked.
DATA ERROR
BUS 10 MOTORS MASTER
BUS 10 MOTORS SLAVE
BUS AUX FANS
3 F. PRISM ERROR
8 F. PRISM ERROR
COLOUR WHEEL ERROR
CTO ERROR
CYAN ERROR
FIXED GOBO ERROR
FOCUS ERROR
GOBO ERROR
GOBO INDEX ERROR
MAGENTA ERROR
PAN ERROR
PRISM LINEATOR ERROR
SHUTTER ERROR
TILT ERROR
YELLOW ERROR
ZOOM ERROR
Parameter storage problem.
Pan/tilt board memory damaged.
Communication problem between 10 motors board master
or slave and pan & tilt board.
Wiring fault or 10 motors board damage possible.
Communication problem between fans control board and
pan & tilt board.
Wiring fault or fans control board damage possible.
Effect position error (may appear when powering on or
resetting fixture.
Sensor or component damage possible.
LAMP STARTUP FAIL No lamp detected or lamp wiring fault.
The lamp has exceeded 1500 hours of use. Change the
LAMP ON OVER 1500 HOURS
38 MAC Axiom Hybrid User Manual
lamp as directed in this manual. Continuing to use the lamp
increases the risk of a lamp explosion.
Page 39

Troubleshooting
This section describes a few common problems that may occur during operation and provides some
suggestions for easy troubleshooting:
Symptom Potential cause Remedies
No light from fixture, or
fans not working.
One of the control
channels is
unresponsive or only
responds intermittently.
Lamp cuts out
intermittently
Fixture does not respond
or does not respond
correctly to DMX control.
Power supply issue, such as
blown fuse, faulty connector or
damaged cable.
Damaged step motor or cable
connection between the head and
body.
Incorrect mains voltage or
internal temperature is too high.
Incorrect DMX addressing.
Fault on DMX link.
Check all power connections and
cables.
Replace fixture’s primary fuse.
Contact your Martin™ supplier for
assistance.
Check mains voltage.
Check that there is free airflow around
the fixture and that the ambient
temperature does not exceed the
permitted maximum.
Clean fixture, especially cooling fans
and vents.
If problem persists, contact your
Martin™ supplier for assistance.
Ensure that fixture’s DMX address
matches address set on DMX control
device.
Check that DMX link is terminated.
Check that all devices on DMX link
use standard DMX polarity.
Check for faulty devices on DMX link
(bypass devices one by one).
Check for faulty DMX control device
(try to control the fixture with another
DMX control device).
Move or shield DMX link if it is very
close to an unshielded high-voltage
installation.
MAC Axiom Hybrid User Manual 39
Page 40

Specifications
Physical
Weight ........................................................................................................................ 24.8 kg (54.7 lbs.)
Width ......................................................................................................................... 414 mm (16.3 ins.)
Length ....................................................................................................................... 399 mm (15.8 ins.)
Height ........................................................................................................................ 616 mm (24.3 ins.)
Dynamic Effects
Color mixing ........................................................................... CMYC, independently variable 0 – 100%
Color wheel .................................................................................................. 16 dichroic filters, stepped,
continuous rotation, random color
Rotating gobo wheel .......................................................... 9 interchangeable rotating gobos, indexing,
shake, continuous scrolling and rotation
Fixed gobo wheel ........................................ 3 irises, pinspot, 12 fixed gobos, frost and gobo animation
effects with continuous scrolling, random gobo
Prisms .................................................................................. 3-facet 15° and 8-facet 15° rotating prisms
with dynamic “prism lineator” zoom effect
Frost ................................................................................................................ Frost filter for wash effect
Mechanical dimmer/shutter ........................................ 0 - 100% dimming, strobe effect 2 - 10 Hz, pulse
effects, instant open and blackout
Focus ..................................................................................................................... 2 m (6.6 ft.) to infinity
Zoom ................................................................................ 2°-44° continuous (no Beam or Spot modes)
Pan ................................................................................................................................................... 540°
Tilt .................................................................................................................................................... 260°
Control and Programming
Control platform ............................................................................................................... DMX and RDM
DMX channels ..................................................................................................................................... 23
Setting and addressing ..................................................................... Onboard control panel or via DMX
16-bit control .............................................................................................................. Focus, pan and tilt
Onboard display panel .................................................................................... Backlit LCD with auto-flip
40 MAC Axiom Hybrid User Manual
Page 41

DMX compliance ........................................................................................................ USITT DMX512-A
RDM compliance ........................................................................................................ ANSI/ESTA E1.20
Receiver ......................................................................................................................... Isolated RS-485
Firmware update ......................................................... Windows PC and USB-DMX hardware interface
Lamp
Approved lamp .............................................................................................. Osram SIRIUS HRI 440 W
Type .............................................................................................................. 440 W short-arc discharge
Color temperature ........................................................................................................................ 7000 K
CRI (Color rendering index .................................................................................................................. 80
Average lifetime (manufacturer’s figure, to min. 70% output ................................................ 1500 hours
Construction
Color ................................................................................................................................................ Black
Housing ................................................................. Alloy, steel, UV-resistant fiber-reinforced composite
Protection rating .............................................................................................................................. IP 20
Installation
Mounting points ..................................................................................... Four quarter-turn locking points
Minimum distance to illuminated surfaces ........................................................................ 15 m (49.3 ft.)
Minimum distance to combustible materials ...................................................................... 0.2 m (0.7 ft.)
Orientation ......................................................................................................................................... Any
Connections
AC power input ..................................................................................................... Neutrik PowerCon TRUE1
DMX and RDM data in/out .......................................................................................... 5-pin locking XLR
Electrical
AC power .................................................................................................. 100-240 V nominal, 50/60 Hz
Fuse ................................................................................................................. 250 V, T 8 A (slow blow)
Power supply unit .......................................................................... Auto-ranging electronic switch-mode
Typical Power and Current
110 V, 60 Hz ........................................................................................... 5.5 A, 600 W, PF > 0.9 typical
230 V, 50 Hz ........................................................................................... 2.7 A, 600 W, PF > 0.9 typical
Measurements made at nominal voltage. Figures are typical, not maximum. Allow for a deviation of
+/- 10%.
Thermal
Cooling .................................................................................................................................... Forced air
Maximum ambient temperature (Ta max) ........................................................................ 40° C (104° F)
Maximum surface temperature, steady state, at Ta max ................................................ 90° C (194° F)
Total heat dissipation (calculated, +/- 10% at 230 V, 50 Hz) ............................................. 2050 BTU/hr.
Approvals
EU safety .............................................................. EN 60598-2-17 (EN 60598-1), EN 62471, EN 62493
EU EMC .......................................................... EN 55015; EN 55032; EN 55103-1,-2; EN61000-3-2,-3;
EN 61000-4-2,-4; EN 61547
US safety .................................................................................................................................... UL 1573
US EMC ................................................................................................................. FCC Part 15 Class A
Canadian safety ....................................................................................................... CSA C22.2 No. 166
Canadian EMC ........................................................................................................... ICES-003 Class A
Australia/New Zealand (pending) ................................................................................................... RCM
Included Items
Two mounting brackets with quarter-turn fasteners
MAC Axiom Hybrid User Manual 41
Page 42

Accessories
Flightcase for 2 x MAC Axiom Hybrid .............................................................................. P/N 91515037
Frost filter (can be interchanged with either prism) ................................................................... P/N TBA
Power cables
Power input cable, 14 AWG, SJT, 1.5 mm², H05VV-F,
with female PowerCon TRUE1 NAC3FX-W power input connector, 3 m (9,8 ft.) ........ P/N 11541513
Power connectors
Neutrik PowerCon TRUE1 NAC3FX-W cable connector, power input, female ............... P/N 05323416
Installation hardware
Half-coupler clamp ........................................................................................................... P/N 91602005
G-clamp (suspension with yoke vertically downwards only) ........................................... P/N 91602003
Quick-trigger clamp (suspension with yoke vertically downwards only) .......................... P/N 91602007
Related Items
Martin™ M-DMX USB-to-DMX Interface Box .................................................................. P/N 90737060
Ordering Information
MAC Axiom™ Hybrid in cardboard box ........................................................................... P/N 90490000
Specifications are subject to change without notice. For latest product specifications, see
www.martin.com
Disposing of this product
Martin™ products are supplied in compliance with Directive 2012/19/EC of the European
Parliament and of the Council of the European Union on WEEE (Waste Electrical and
Electronic Equipment), where applicable. Help preserve the environment! Ensure that this
product is recycled at the end of its life. Your supplier can give details of local
arrangements for the disposal of Martin products
Photobiological Safety Warning
The warning shown above is printed on this product. If it becomes difficult or impossible to read, it
must be replaced using the above illustration to reproduce a label in black with a yellow background.
42 MAC Axiom Hybrid User Manual
Page 43

Page 44

Tel: +45 8740 0000 · Fax +45 8740 0010
www.martin.com · Olof Palmes Allé 18 · 8200 Aarhus N · Denmark
 Loading...