

Page 1
MAC 250™ Beam Kit Installation Guide
Introduction
This Installation Guide explains how to install the MAC 250 Beam™ Upgrade Kit to convert a standard
Martin Professional™ MAC 250 Wash™ to a MAC 250 Beam model. Installation only takes a few
minutes. A fixture software update is required if the installed software version is earlier than v. 1.4.0.
If you keep the standard components you remove, the MAC 250 Beam components can be uninstalled
and the fixture returned to sta nd a rd MAC 250 Wash configuration at any time.
The MAC 250 Beam Kit has part number P/N 91610101.
For the latest documentation and information about this and all Martin Professional products, please
visit the Martin website at www.martin.co m.
Warning! The MAC 250 Beam has a much more intense light beam than the standard MAC 250
Wash. Do not u se it to il luminat e an y surf ace c loser t han 3.5 m ( 11 ft. 6 in s.) fr om t he fr ont of the
head, or you may create a fire risk.
Make sure that the fron t lens does not face the sun direc tl y f or lon ger than a f e w seconds at an y
time during daylight hours. The Beam lens can focus the sun's rays inside the fixture, causing
internal damage and creating a possible fire risk.
Apart from the new minimum distance to illuminated surfaces specified above, follow all the
other safety precautions in the MAC 250 Wash user manual when installing the MAC 250 Beam
Kit and using the modified product. The user manual is supplied with MAC 250 Wash fixtures ,
and the latest revision of the us er manual is also available for download from the Product
Support page for the MAC 250 Wash at www.martin.com
Disconnect the fixture from power and allow to cool for at least 20 minutes bef ore s tarting w ork .
The MAC 250 Beam Kit must be installed by q ualified profession al technicians only. Read all of
this Installation Guide carefully before starting to install the Kit.
If you have any questions about ho w to install the MAC 250 Beam Kit or use the MAC 250 Beam
safely, ple ase contact y our local Martin distrib utor (see www .martin.com/distributors f or details)
or call the Martin 24-hour service hotline on +45 8740 0000, or in the USA on 1-888-tech-180.
Important! Do not get oil or grease onto optical components. If necessary, clean components
with 99.9% isopropyl alcohol.
© 2009-2010 Martin Professional A/S. Olof Palmes Allé 18, DK-8200 Aarhus N, Denmark. Information subject to change without notice.
Martin Professional A/S and all affiliated companies disclaim liability for any injury, damage, direct or indirect loss, consequential or
economic loss or any other loss occasioned by the use of, inability to use or reliance on the information contained in this installation note.
The Martin logo, the Martin name and all other trademarks in this document pertaining to services or products by Martin Professional A/S
or its affiliates and subsidiaries are trademarks owned or licensed by Martin Professional A/S or its affiliates or subsidiaries.
P/N 35000607 Rev. G
MAC 250 Beam Installation Note 1
Page 2
Overview
The MAC 250 Beam Upgrade Kit contains the following items:
• MAC 250 Beam front lens assembly, P/N 62409076
• MAC 250 Beam lens bracket assembly, P/N 62420240
• Four M4 x 12 Torx 20 button-head screw s, P/N 08070710
• Set of six beam effect gobo s for MAC 250 Beam, P/N 62420250
• Aperture plate with sunlight shield, MAC 250 Beam, P/N 23819530
• Warning label (min. distance to illuminated surfaces), P/N 33150092
Keep the protective packaging from the front lens assembly for re-use when packing the fixture in a
MAC 250 flightcase or storing the assembly.
Tools required
Screw sizes given in this Installation Guide are indicative only.
The following tools a re normally required to inst all the st andar d MAC 250 Beam Kit. However, if screws
have been replaced during service, for example, you may find that other tools are required.
• Pozidriv PZ1 and PZ2 screwdrivers
• Torx TX20 screwdriver
Installation procedure
To install the MAC 250 Beam components in a standard MAC 250
Beam fixture:
1. Disconnect the fixture from power and allow it to cool.
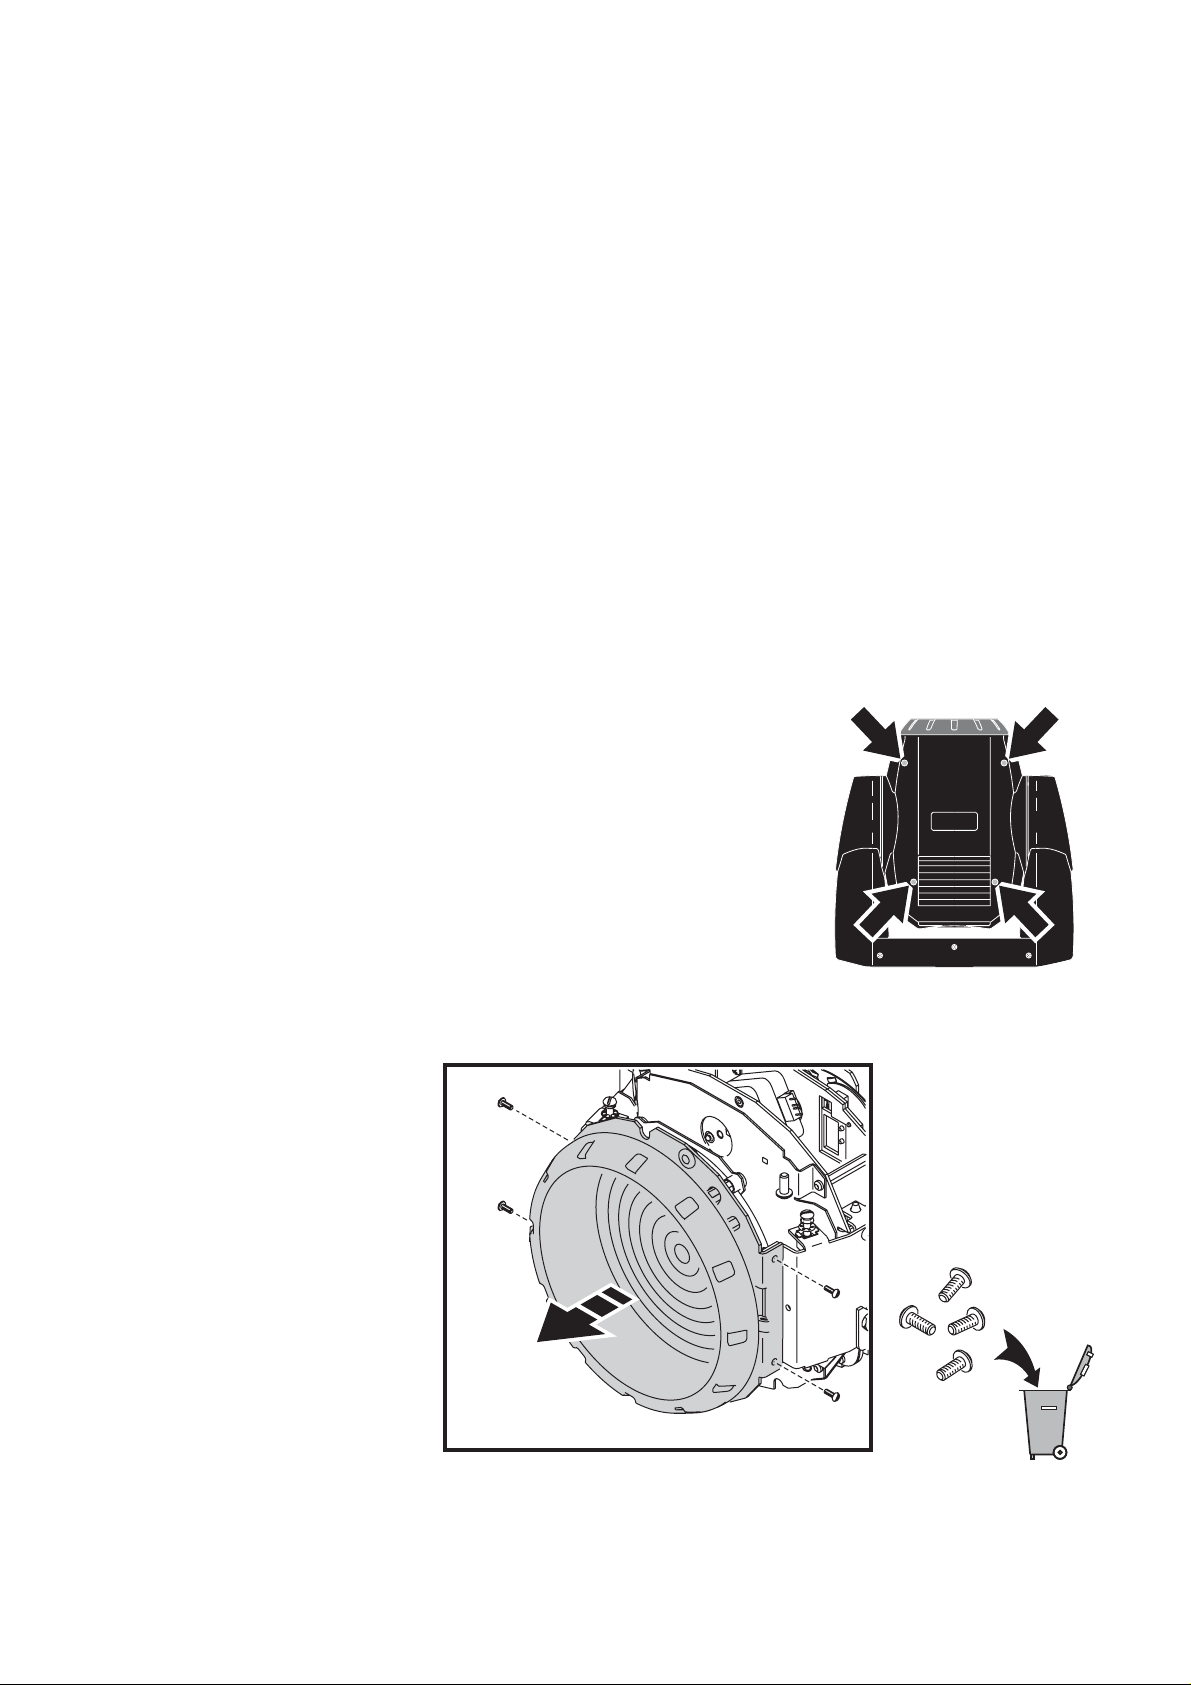
2. See Figure 1. Release the head cover retaining screws
(arrowed) and remove both head covers. You can either let the
head covers hang on their safety cables or unclip their safety
cables and remove them completely, whichever is more
convenient.
3. Apply the tilt lock with the head topside up (in this position the
text on the back of the head is the right way up).
4. See Figure 2. Remov e
the four crosshead
retaining screws from
the front lens
assembly and remove
the front lens. The
screws have Loctite
applied at the factory,
so take care when
removing them. Store
the front lens for
possible re-use if the
fixture is to be
returned to standard
MAC 250 Wash
configuration at a later
time. You can send the
screws for scrap metal
recycling, because
new Torx screws are
supplied in the Kit.
Figure 2
Figure 1
MAC 250 Beam Installation Note 2
Page 3
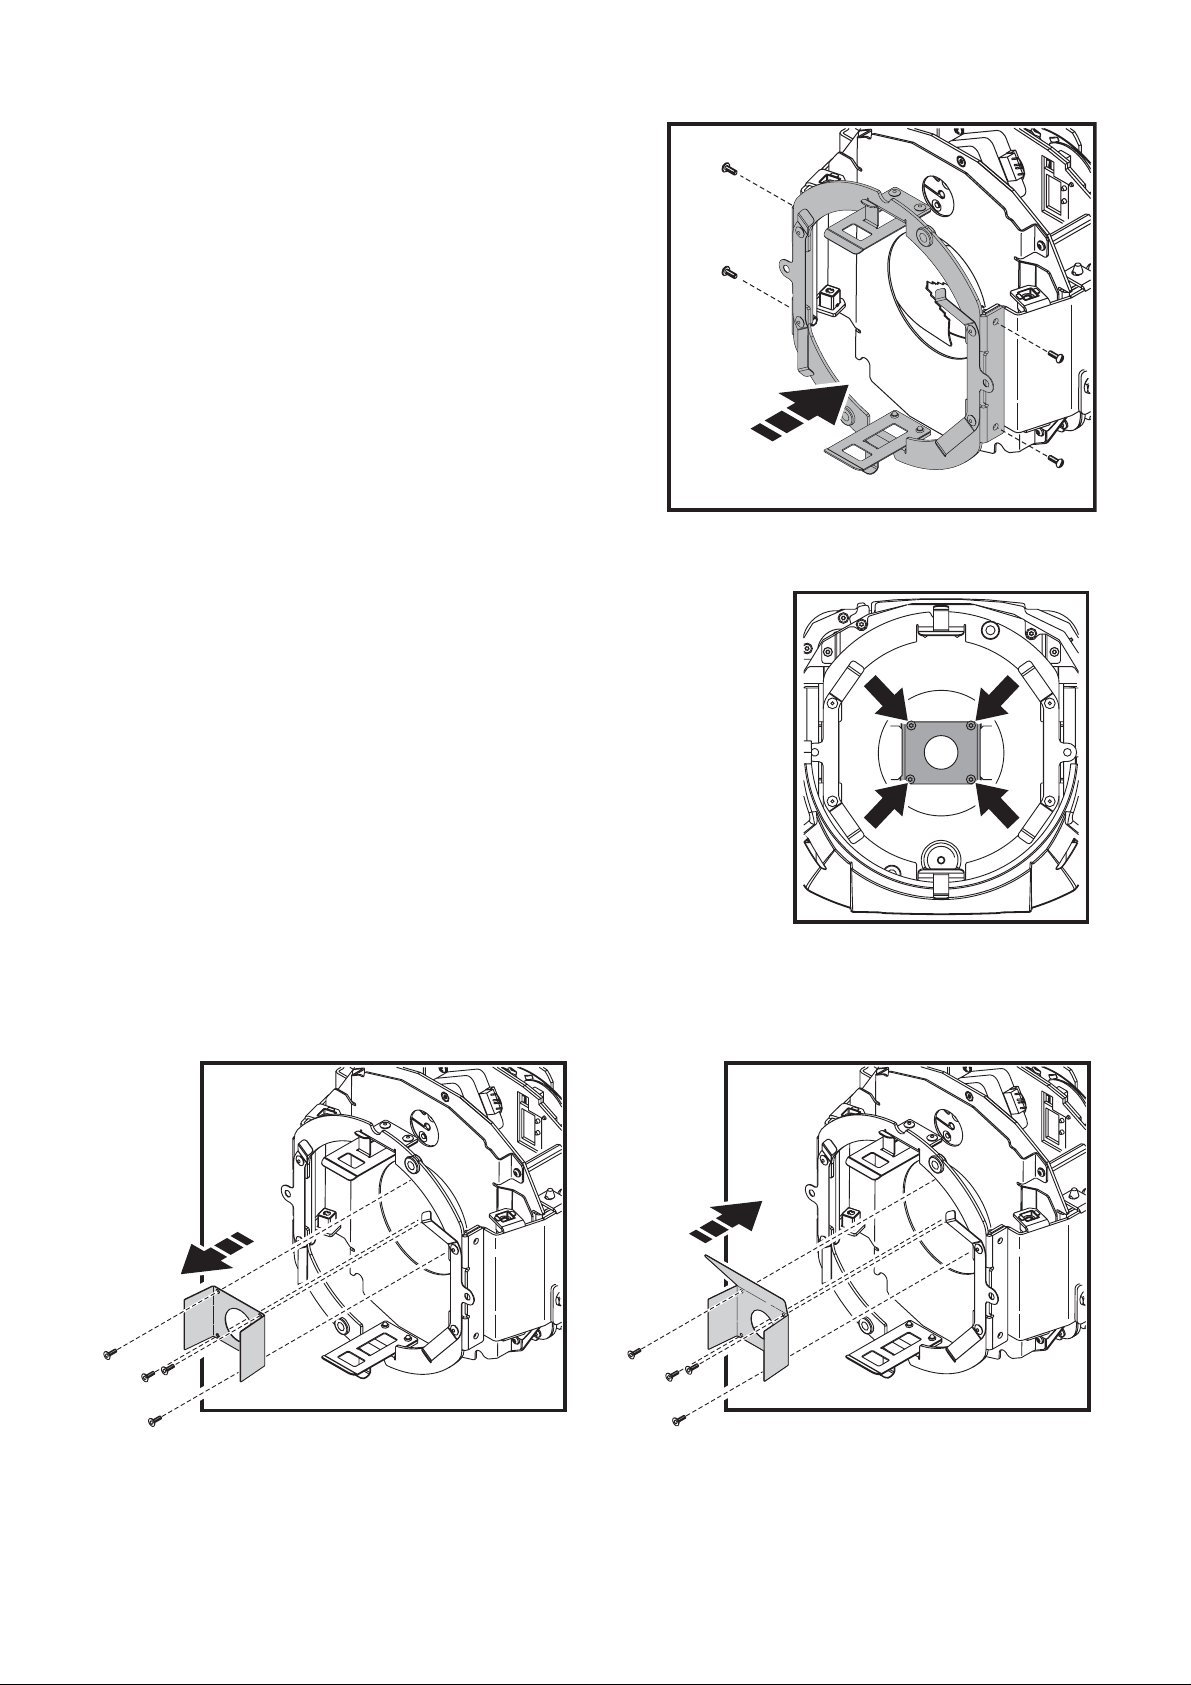
5. See Figure 3. Fasten the new front lens
mounting bracket (P/N 62420240) supplied in
the Kit to the front of the head using the four
M4 X 12 Torx 20 screws (P/N 08070710) also
supplied in the Kit. Apply a v ery small quantity
of Loctite to the threads before tightening the
screws.
If you reinstall the original front lens at a later
date to return the fixture to standard MAC 250
Wash configur ation, r e-use t hes e Torx screws.
6. See Figure 4. Remove t he four screws
(arrowed) that hold the ap erture plate in place inside the front
of the head. See Figure 5. Remove the aperture plate and
install the new aperture plate with shield plate (P/N
23819530) supplied in the Kit in its place, re-using the
original four screws. The shield plate in the aperture plate
must face upwards as illustrated to protect the wiring in the
head from sunlight that might be focussed into the head by
the new front lens assembly.
Figure 3
If you reinstall the original front lens at a later date to return
the fixture to standard MAC 250 Wash configuration, you
must remove the new aperture plate together with the new
front lens assembly.
Figure 4
Figure 5
MAC 250 Beam Installation Note 3
Page 4

7. A set of six beam eff ect gobos (P/N 624 20250) is supplied in the Kit. See Figure 6. To install a beam
effect gobo, remove a color filter from the color wheel by pressing it gently away from its retaining
tabs (A) and lifting it carefully out of the color wheel (B).
8. Filters and gobos have small beads of silicone applied to them to act as cushions. If a bead of
silicone from a color filter has become stuck to the color wheel, remove it and replace it on the color
filter.
9. Insert gobos with the silicone beads facing the color wheel with reference to Figure 7 and to the
illustration on the last page of this guide. Store the original color filters safely for possible future
re-use.
Figure 6
10. We recommend that you install beam effect gobos in the
color/gobo wheel in the positions seen from the front lens
side* shown in Figure 7 in all the fixtures you modify, so that
all MAC 250 Beam fixtures will have identical behavior under
DMX control. A larger copy of this illustration is included on
page 6 of this guide.
*The previous revision of this installation note showed the
color/gobo wheel seen from the lamp side. Figure 7 shows
the wheel seen from the front lens side instead to g iv e a true
picture of the wheel in reality, because the front lens side is
where the color filters/gobos are actually installed. Note that
when viewed from the front lens side, the gobo slots are
numbered counterclockwise.
11. See Figure 8. The new
front lens assembly (P/N
62409076) has a safety
cable with a carabiner
clip. Attach the clip to the
head using either of the
two holes (A) provided in
the new front lens
mounting bracket, then
push the clip flat (B) to
give space for the front
lens assembly.
A
Figure 7
B
Figure 8
MAC 250 Beam Installation Note 4
Page 5

12. See Figure 9. Clip the new
front lens assembly securely
onto its mounting bracket in
the front of the head.
13. Stick the warning
label supplied in
the Kit onto the
back of the head as
shown in Figure 10.
With the Beam Kit
installed, this label
replaces the
warning printed on
the standard MAC
250 Wash. Do not
illuminate any
surface within
3.5m (11ft. 6ins.)
of the MAC 250
Beam. Do not
allow the front
lens to point at
the sun.
Figure 9
Figure 10
14. Finally, before using the fixture, update the fixture software to version 1.4.0 or later, following the
software update instructions in the MAC 250 W ash user manual. From software v.1.4.0, the frost
filter is moved very slightly forward in orde r to reduce reflections from the CMY flags. Th ere is no
need to roll back the software t o an earlier version th an v.1.4.0 if the fixture is returned to a standard
MAC 250 Wash configuration at a future time.
The front lens assembly must be unclipped and removed from the head when the fixture is packed in a
MAC 250 flightcase. We recommend that you re-use the assembly’s protective packaging supplied in
the MAC 250 Beam Kit and store the assembly in the tray in t he flightcase.
MAC 250 Beam Installation Note 5
Page 6

Appendix A: MAC 250 Beam recommended gobo positions
Magnet
1. Beam aperture 15
2. Beam aperture 10
3. Beam 2 dots
4. Beam 3 dots
5. Beam 2 bars
6. Beam cone
To give a realistic picture of the color/gobo wheel, this illustration shows the wheel as seen from the front lens
side – the side where color filters and gobos are actually installed. The previous revision of this installation note
showed the color/gobo wheel as seen from the lamp side.
Note that when the wheel is viewed from the front lens side, the gobo slots are numbered counterclockwise.
MAC 250 Beam Installation Note 6
Page 7

Appendix B: Changes in control
Control menu
When the MAC 250 Beam Kit is installed iun a MAC 250 Wash, the control menu commands → →
- now manually select the beam effect gobos shown on the previous page rather than color filters.
DMX
DMX Channel 6 (in 16-bit mode) or 10 (in 16-bit extended mode) now controls beam effect gobos as shown below:
Beam gobo wheel scrolling and rotation,
random CMY
0
1 - 26
27 - 51
52 - 77
78 - 102
103 - 128
129 - 152
153 - 179
0
0 - 10
11 - 20
21 - 30
31 - 40
41 - 50
51-60
61 - 70
Continuous scrolling (split gobos)
Open
Open → Beam aperture 15
Beam aperture 15 → Beam aperture 10
Beam aperture 10 → Beam two dots
Beam two dots → Beam three dots
Beam three dots → Beam two bars
Beam two bars → Beam cone
Beam cone → Open
180 - 183
610
184 - 187
188 - 191
192 - 195
196 - 199
200 - 203
204 - 207
208 - 226
227 - 245
246 - 248
249 - 251
252 - 255
71 - 72
72 - 73
74 - 75
75 - 76
77 - 78
78 - 79
80 - 81
82 - 88
89 - 96
97
98
99 - 100
Stepped scrolling (full gobos)
Beam cone
Beam two bars
Beam three dots
Beam two dots
Beam aperture 10
Beam aperture 15
Open
Continuous rotation
Clockwise, fast → slow
Counterclockwise, slow → fast
Random CMY color (set min. & max. CMY levels
on channels 3, 4 & 5 in 16-bit and channels 4, 6 & 8
in 16-bit ex. modes)
Fast
Medium
Slow
MAC 250 Beam Installation Note 7
Page 8

Martin Professional A/S • Olof Palmes Allé 18 • 8200 Aarhus N • Denmark
Tel: +45 8740 0000 • Fax +45 8740 0010 • www.martin.com
MAC 250 Beam Installation Note 8
 Loading...