

Page 1
Ether2DMX
Router
user manual
Page 2

© 2003 Martin Professional A/S, Denmark.
All rights reserved. No part of this manual may be reproduced, in any form or by any means,
without permission in writing from Martin Professional A/S, Denmark.
Printed in Denmark.
P/N 35000134, Rev. C
Page 3

Introduction..........................................................................4
Features ................................................................................................................4
Safety information ................................................................................................. 4
AC power ..............................................................................5
Voltage selection ...................................................................................................5
Plug Installation ..................................................................................................... 5
Data connections................................................................. 6
Ethernet connection ..............................................................................................6
DMX connections ..................................................................................................6
Other data connections .........................................................................................6
Setup..................................................................................... 7
Default settings ...................................................................................................... 7
DMX Port Configuration .........................................................................................8
IP address ............................................................................................................. 9
Subnet Mask .......................................................................................................10
Optional settings .................................................................................................. 10
Operation............................................................................13
Status display ......................................................................................................13
Ethernet/DMX conversion ....................................................................................14
Ethernet bridge ....................................................................................................14
DMX routing ........................................................................................................ 15
Utilities .................................................................................................................16
Advanced functions .......................................................... 17
General purpose I/O ............................................................................................17
MIDI / RS-232 ......................................................................................................18
1-based decimal to 0-based hex table ............................. 20
Specifications ....................................................................21
3
Page 4

I
NTRODUCTION
FEATURES
Thank you for purchasing the Martin Ether2DMX Router. This device
provides bidirectional conversion of 4 universes of DMX data to and from
ArtNet Ethernet.
The Ether2DMX Router allows you to
• route DMX data via ArtNet Ethernet,
• add DMX outputs to the Maxxyz controller,
• build a DMX to Ethernet to DMX bridge,
• channel DMX input to the Martin ShowDesigner,
• patch DMX input to multiple DMX outputs.
1
SAFETY INFORMATION
The Ether2DMX Router is not for household use. For safe operation, read
this manual before use and follow the safety precautions listed below. If
you have questions about how to operate the device safely, please contact
your Martin distributor or dealer.
• Disconnect the device from AC power before removing fuses or any part,
and when not in use.
• Always ground (earth) the device electrically.
• Use only a source of AC power that complies with local building and
electrical codes and has both overload and ground-fault protection.
• Do not expose the device to rain or moisture.
• Never attempt to bypass fuses. Always replace defective fuses with ones
of the specified type and rating.
• Refer all service to a qualified technician.
• Do not modify the device or install other than genuine Martin parts.
4 Ether2DMX Router user manual
Page 5

AC
POWER
VOLTAGE SELECTION
2
Before using the Ether2DMX Router for the first time, set the voltage
selection switch on the rear panel to the setting closest to the local mains
AC voltage. The switch allows you to select between 115 and 230 volts.
PLUG INSTALLATION
The fixture’s mains lead requires a grounding-type cord cap that fits your
power distribution cable or outlet. Consult a qualified electrician if you
have any doubts about proper installation.
Warning! For protection from danger ous electric shoc k, the fixture m u st
be grounded (earthed). The AC mains supply shall have
overload and ground-fault protection.
Following the cord cap manufacturer’s instructions, connect the yellow
and green wire to ground (earth), the brown wire to live, and the blue wire
to neutral. The table below shows some pin identification schemes.
Wire Pin Marking Screw color
brown live “L” yellow or brass
blue neutral “N” silver
yellow/green ground green
AC power 5
Page 6

D
ATA CONNECTIONS
ETHERNET CONNECTION
DIRECT CONNECTION TO CONTROLLER
To connect a single Ether2DMX Router to a controller, use a category 5
(CAT5) unshielded twisted pair (UTP) crossover cable between the RJ-45
jack labelled “10BaseT” on the rear panel of the Ether2DMX Router and
the Artnet Ethernet jack on the controller. On the Maxxyz, this jack is
labelled “EtherDMX”. Note: the maximum Ethernet cable run is 100
meters.
CONNECTION OF MULTIPLE ROUTERS
A suitable network is required to connect multiple Ether2DMX Routers to a
controller. Though network configuration is beyond the scope of this
manual, at minimum the network will consist of a multiport hub and CAT5
UTP network cables.
3
You can use as many Ether2DMX Routers as required to provide the
maximum number of DMX universes supported by the controller.
DMX CONNECTIONS
The Ether2DMX Router provides 4 DMX-512 outputs on 5-pin female XLR
connectors and 4 DMX-512 inputs on 5-pin male XLR connectors. There
is no contact on pins 4 and 5. The DMX ports are completely isolated to
protect the device and other ports from faults on the DMX line.
Terminate the DMX data links properly to avoid signal transmission
problems.
OTHER DATA CONNECTIONS
Please refer to “Advanced functions” on page 17.
6 Ether2DMX Router user manual
Page 7

S
ETUP
4
The Ether2DMX Router’s DMX ports, IP address, and subnet mask must
be configured for your application. Section 5 describes some sample
applications and their setup requirements. Section 6 describes additional
setup options for advanced applications.
DEFAULT SETTINGS
The default settings are suitable for outputting DMX universes 9 - 12
when connected directly to a Maxxyz controller. These settings are shown
below.
Setting Default
IP address 192.168.2.2
Subnet mask 255.255.255.0
ID 000
Output A Enable, 9 (08)
Output B Enable, 10 (09)
Output C Enable, 11 (0A)
Output D Enable, 12 (0B)
Input A Disable
Input B Disable
Input C Disable
Input D Disable
MIDI / RS232 Disable
Display Auto On
Universe numbering Decimal
Name Maxxyz EtherDMX
Setup 7
Page 8

To restore factory settings
Important! This procedure deletes all user settings.
1 Press MENU to enter setup mode.
2 Navigate to menu 17, “Clear All”, with the arrow keys or scroll wheel.
Press ENTER.
3 Press both arrow keys at the same time to restore the factory default
settings, or press MENU to escape.
4 Press MENU to exit setup mode.
DMX PORT CONFIGURATION
The DMX ports can be enabled or disabled. When disabled, there is no
DMX signal. Enabled ports must be assigned to a DMX universe. While
each input must be patched to a unique universe, two or more outputs can
be patched to the same universe.
ABOUT PORT NUMBERING
Ports are labelled 1, 2, 3, 4 on the back panel and A, B, C, D on screen.
“IN 1” corresponds to “Input A” and so on.
ABOUT UNIVERSE NUMBERING
In normal operating mode, the Ether2DMX Router displays universe
numbers in 0-based hexadecimal. The universe numbers run from 00 to
FF. On controllers, though, universe numbers are typically displayed in 1based decimal format, and run from 1 to up to 256.
The default universe numbering setting displays universe numbers in 1based decimal in setup mode to make patching more intuitive.
There is a 0-based hex to 1-based decimal conversion table for your
convenience on page 20.
8 Ether2DMX Router user manual
Page 9

To configure a DMX port
1 Press MENU to enter setup mode.
2 Navigate to the menu for the desired DMX input or output port, for
example menu 4, “Set Output A Routing”, with the scroll wheel or arrow
keys. Press ENTER.
3 To activate the output, select “enable”, otherwise, select “disable”. Press
ENTER.
4 Scroll to the desired universe number. Note that the number is displayed
in 0-based hexadecimal.
5 Press ENTER to save the setting and return to the setup menu.
IP ADDRESS
When used with the Maxxyz, the Ether2DMX Router must be given a
unique IP address - 2.0.0.5. Ensure that your Maxxyz controller is running
software version 1.04, or later.
For use with other Ethernet DMX controllers, consult the controller’s user
manual.
To set the IP address
1 Press MENU to enter setup mode.
2 Navigate to menu 1, “Set IP Address”. Press ENTER.
3 Press the arrow keys as required to move the cursor to the first (left-most)
IP address field. Scroll to the desired value. (2 for Maxxyz)
4 Move the cursor to the second field. Scroll to the desired value. (0 for
Maxxyz)
5 Move the cursor to the third field. Scroll to the desired value. (0 for
Maxxyz)
6 Move the cursor to the fourth field. Scroll to the desired value. (5 for the
Maxxyz)
7 Press ENTER to save the setting. Press MENU to exit setup mode.
Setup 9
Page 10

SUBNET MASK
There are three possible subnet mask settings. For use with a Maxxyz
console, use subnet mask 255.0.0.0.
To set the subnet mask
1 Press MENU to enter setup mode.
2 Navigate to menu 2, “Set Subnet Mask” using the scroll wheel or arrow
keys. Press ENTER.
3 Select the desired subnet mask. (255.0.0.0 for Maxxyz)
4 Press ENTER to save the setting. Press MENU to exit setup mode.
OPTIONAL SETTINGS
USER ID
You can define an ID number to keep track of multiple routers.
DISPLAY MODE
With “Display Auto” > “On”, the Ether2DMX Router displays three status
screens at fixed intervals. With “Display Auto” > “Off”, the display does not
scroll but you can change views manually with the scroll wheel or arrow
keys.
DEVICE NAME
You can edit the text displayed to the right of the software version number
in the port status display. The displayed text may be 15 characters long.
UNIVERSE NUMBERING
With “Display Universe Mode” > “Decimal”, universes are displayed in 1based decimal format when patching universes in setup mode.
“Hexadecimal” displays universe numbers in 0-based hexadecimal format.
Note that the status display always uses hexadecimal format.
10 Ether2DMX Router user manual
Page 11

To set ID
1 Press MENU to enter setup mode.
2 Navigate to menu 3, “Set ID”. Press ENTER.
3 Select a position with the arrow keys. Select characters with the scroll
wheel.
4 Press ENTER to save the setting. Press MENU to exit setup mode.
To set display option
1 Press MENU to enter setup mode.
2 Navigate to menu 14, “Set Display Mode”. Press ENTER.
3 Select “On” or “Off” with the arrow keys or wheel.
4 Press ENTER to save the setting. Press MENU to exit setup mode.
To edit name text
1 Press MENU to enter setup mode.
2 Navigate to menu 16, “Edit Name”. Press ENTER.
3 Move the cursor with the arrow keys. Select characters with the scroll
wheel.
4 Press ENTER to save the setting. Press MENU to exit setup mode.
Setup 11
Page 12

To set universe numbering format
1 Press MENU to enter setup mode.
2 Navigate to menu 15, “Display Universe Mode”, with the arrow keys or
scroll wheel. Press ENTER.
3 Select “Decimal” or “Hexadecimal” with the arrow keys or wheel.
4 Press ENTER to save the setting. Press MENU to exit setup mode.
12 Ether2DMX Router user manual
Page 13

O
PERATION
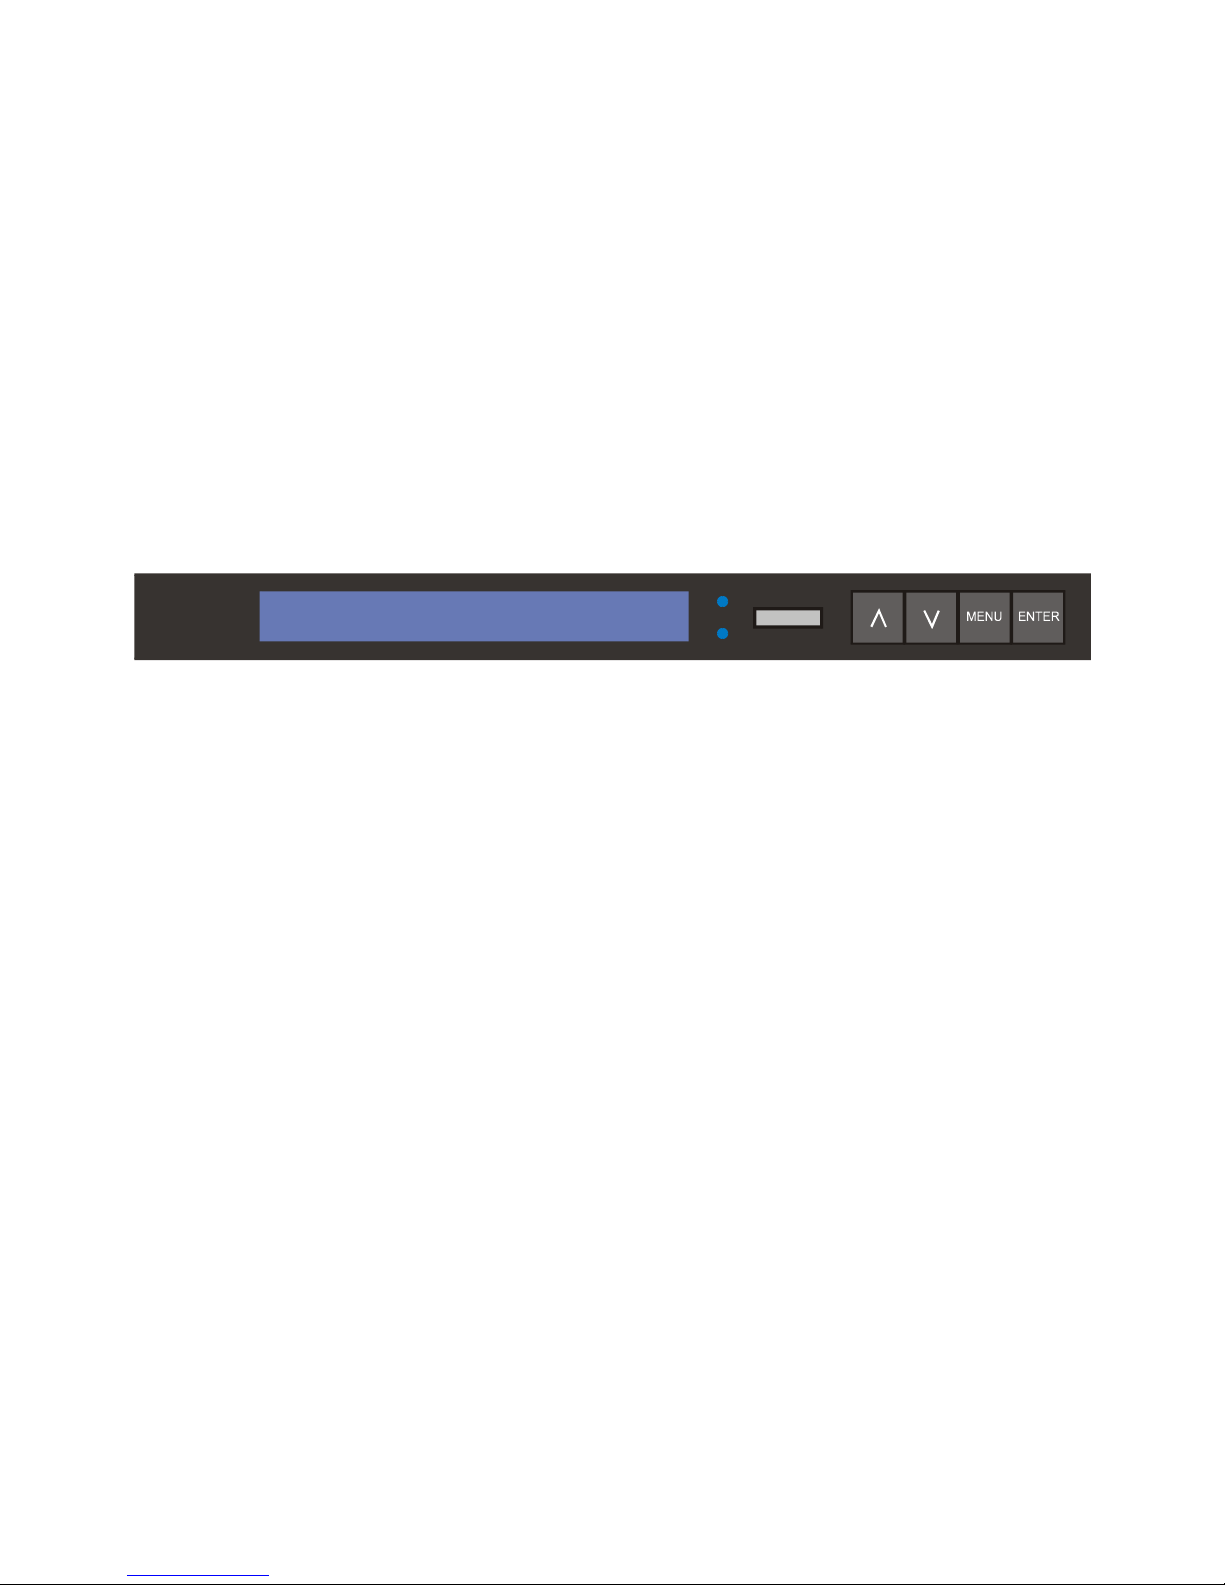
STATUS DISPLAY
5
Status information and option menus are displayed on a 20 x 2 character
LCD screen. When you turn on the Ether2DMX Router, it enters operation
mode and displays status information.
The LED labeled “LAN” indicates, when lit, that there is a working
Ethernet link. If this LED does not light, there may be a problem with the
Ethernet cable or a hardware defect in the unit.
The “RX” LED blinks to indicate that the unit is receiving data. If it fails to
blink, it is likely due to an incorrect address or port setting.
PORT STATUS
The port status display shows a fixed name text, the firmware version,
and a user-defined text on the top line. The second line displays DMX port
Operation 13
Page 14

status: a check mark to the right of the port letter indicates data
transmission through the port.
DMX ROUTING
The second status screen displays the DMX universe patched to each
DMX port.
ETHERNET ADDRESS
The third screen displays the unit’s IP address, subnet mask, and a userdefinable ID number.
ETHERNET/DMX CONVERSION
In this application, the devices converts DMX to the ArtNet Ethernet
protocol and vice versa.
To convert Ethernet to DMX
1 Connect the Ether2DMX Router to the ArtNet Ethernet jack on the lighting
controller.
2 Connect the DMX data links to the DMX output jacks on the rear panel of
the Ether2DMX Router.
3 Configure the router’s IP address and subnet mask.
4 Enable the DMX outputs and patch them to DMX universes as desired.
To convert DMX to Ethernet
1 Connect the Ether2DMX Router to the ArtNet Ethernet jack on the lighting
controller.
2 Connect up to four DMX universes to the DMX inputs on the rear panel of
the Ether2DMX Router.
3 Configure the router’s IP address and subnet mask.
4 Enable the DMX inputs and patch each one to a unique DMX universe.
ETHERNET BRIDGE
Two Ether2DMX Routers can be connected to provide an Ethernet bridge
for 4 DMX universes. DMX input to the first unit is converted to Ethernet,
travels to second unit, and is converted back to DMX.
14 Ether2DMX Router user manual
Page 15

To build an Ethernet bridge
1 Connect two Ether2DMX Routers directly with a CAT 5 crossover cable,
or through an ArtNet Ethernet network.
2 Give both routers a different IP address and the same subnet mask.
3 Connect up to four DMX universes to the DMX inputs on the first
Ether2DMX Router. Enable the inputs and patch each one to a unique
universe.
4 Connect up to four DMX data links to the outputs of the second
Ether2DMX Router. Enable and patch the DMX outputs as desired.
DMX ROUTING
Both DMX and Ethernet input can be patched to the Ether2DMX Router’s
DMX outputs. This allows the router to function alone, without an Ethernet
connection, as a 4-port DMX splitter. A more likely application is to
combine the routing and bridge functions to provide DMX output at both
ends of the bridge.
Note: the Ether2DMX Router does not support DMX merge: each input
must be assigned to a unique DMX universe.
To route DMX input/output
1 Connect up to 4 sources of DMX data to the DMX inputs. Enable and
assign each input port to a unique universe.
2 Connect up to 4 DMX data links to the DMX outputs. Patch the outputs as
desired.
Operation 15
Page 16

UTILITIES
DMX VIEWER
The Ether2DMX Router provides a low resolution DMX viewer to help
troubleshoot addressing and configuration problems. The viewer is in the
form of a bar graph. Each bar represents a DMX channel and has 8 steps.
Each step represents 32 DMX values. The viewer shows 40 channels at a
time.
To view DMX values
1 Press MENU to enter setup mode.
2 Navigate to menu 13, “View DMX Values”. Press ENTER.
3 Select the DMX port to view with the arrow keys or scroll wheel. Press
ENTER.
4 Scroll to the channel area to view. The scroll wheel increments the display
1 channel at a time and the arrow keys move the display 40 channels up
or down.
5 Press MENU 3 times to exit setup mode.
16 Ether2DMX Router user manual
Page 17

A
DVANCED FUNCTIONS
6
GENERAL PURPOSE I/O
The General Purpose I/O port may be used for sensor input or similar
purposes.
Warning! Improper connection to the General Purpose I/O port can
damage the device. Use this port only if you have experience
in the field of electronics. Do not use the port to switch heavy
loads or devices connected to the main supply.
GP I/O DB9 PINOUT
Pin Function
1 Ground
2 Output 1 LOAD
3 Output 2 LOAD
4 Input 1
5 Input 2
6 Output 1 supply ground
7 Output 2 supply ground
8 Ground
9 Ground
OUTPUTS
Optocouplers on the main PCB isolate the outputs from internal circuits.
• Maximum voltage: 30 VDC
• Maximum delivered current: 6 mA
DB9: ouput x LOAD
DB9: ouput x supply ground
LOAD
supply +
max 24VDC
supply -
Basic Output Circuit
Advanced functions 17
Page 18

INPUTS
A clamping circuit on the main PCB offers limited input protection. The
inputs are pulled high internally. A switch, relay, or an open collector circuit
may be used to pull down the input.
• Maximum voltage: 75 VDC
• Minimum voltage: 0 VDC
DB9: Input
Switch
DB9: Ground
Basic Input Circuit
MIDI / RS-232
The Ether2DMX Router can send MIDI or RS-232 data over the Ethernet.
You can not use both protocols at the same time, however, because the
MIDI and RS-232 ports are electrically connected.
The Ether2DMX Router has 1 MIDI output on a female DIN-5 connector
and 1 MIDI input on a female DIN-5 connector.
RS-232 is brought out on a DB9 connector.
To configure MIDI/RS232 port
1 Use the scroll wheel to select one of the following port types:
• RS 232
• MIDI InOut
• MIDI Out
• MIDI InThru
2 Use the arrow keys to navigate through the port settings. Use the scroll
wheel to adjust the settings of the selected port type.
• Speed (RS232 only): Data rate of the port in bps.
18 Ether2DMX Router user manual
Page 19

• Input: This is a unique number that the controller software uses to identify
the source of received data.
• Output: This is a unique number that the controller software uses to
specify the destination of the data.
3 Press ENTER to save settings and return to the setup menu.
Advanced functions 19
Page 20

1-
BASED DECIMAL TO
0-
BASED HEX TABLE
Dec Hex Dec Hex Dec Hex Dec Hex Dec Hex Dec Hex Dec Hex Dec Hex
10 33 20 65 40 97 60 129 80 161 a0 193 c0 225 e0
21
32
43
54
65
76
87
98
10 9
11 a
12 b
13 c
14 d
15 e
16 f
17 10
18 11
19 12
20 13
21 14
22 15
23 16
24 17
25 18
26 19
27 1a
28 1b
29 1c
30 1d
31 1e
32 1f
34 21 66 41 98 61 130 81 162 a1 194 c1 226 e1
35 22 67 42 99 62 131 82 163 a2 195 c2 227 e2
36 23 68 43 100 63 132 83 164 a3 196 c3 228 e3
37 24 69 44 101 64 133 84 165 a4 197 c4 229 e4
38 25 70 45 102 65 134 85 166 a5 198 c5 230 e5
39 26 71 46 103 66 135 86 167 a6 199 c6 231 e6
40 27 72 47 104 67 136 87 168 a7 200 c7 232 e7
41 28 73 48 105 68 137 88 169 a8 201 c8 233 e8
42 29 74 49 106 69 138 89 170 a9 202 c9 234 e9
43 2a 75 4a 107 6a 139 8a 171 aa 203 ca 235 ea
44 2b 76 4b 108 6b 140 8b 172 ab 204 cb 236 eb
45 2c 77 4c 109 6c 141 8c 173 ac 205 cc 237 ec
46 2d 78 4d 11 0 6d 142 8d 174 ad 206 cd 238 ed
47 2e 79 4e 111 6e 143 8e 175 ae 207 ce 239 ee
48 2f 80 4f 11 2 6f 144 8f 176 af 208 cf 240 ef
49 30 81 50 11 3 70 145 90 177 b0 209 d0 241 f0
50 31 82 51 11 4 71 146 91 178 b1 210 d1 242 f1
51 32 83 52 11 5 72 147 92 179 b2 211 d2 243 f2
52 33 84 53 11 6 73 148 93 180 b3 212 d3 244 f3
53 34 85 54 11 7 74 149 94 181 b4 213 d4 245 f4
54 35 86 55 11 8 75 150 95 182 b5 214 d5 246 f5
55 36 87 56 11 9 76 151 96 183 b6 215 d6 247 f6
56 37 88 57 120 77 152 97 184 b7 216 d7 248 f7
57 38 89 58 121 78 153 98 185 b8 217 d8 249 f8
58 39 90 59 122 79 154 99 186 b9 218 d9 250 f9
59 3a 91 5a 123 7a 155 9a 187 ba 219 da 251 fa
60 3b 92 5b 124 7b 156 9b 188 bb 220 db 252 fb
61 3c 93 5c 125 7c 157 9c 189 bc 221 dc 253 fc
62 3d 94 5d 126 7d 158 9d 190 bd 222 dd 254 fd
63 3e 95 5e 127 7e 159 9e 191 be 223 de 255 fe
64 3f 96 5f 128 7f 160 9f 192 bf 224 df 256 ff
7
Page 21

S
PECIFICATIONS
PHYSICAL
Size (L x W x H) . . . . . . . . . . . . . . . . . . . . . . . . . . 482 x 160 x 43 mm (19” 2U rack)
Weight. . . . . . . . . . . . . . . . . . . . . . . . . . . . . . . . . . . . . . . . . . . . . . . . 2.8 kg (6.1 lb)
CONSTRUCTION
Housing. . . . . . . . . . . . . . . . . . . . . . . . . . . . . . . . . . . . . . .sheet steel and aluminum
Finish . . . . . . . . . . . . . . . . . . . . . . . . . . . . . . . . . . . . . . electrostatic powder coating
ELECTRICAL
AC Power . . . . . . . . . . . . . . . . . . . . . . . . . . . . . . . 90-130 V / 200-260 V, 50-60 Hz
Power and current consumption (@ 230 V, 50 Hz). . . . . . . . . . . . . . . . . 8 W, 45 mA
Power and current consumption (@ 120 V, 60 Hz). . . . . . . . . . . . . . . . . 8 W, 90 mA
Main fuse . . . . . . . . . . . . . . . . . . . . . . . . . . . 0.125 A T (time delay), P/N 05020002
8
Specifications 21
 Loading...