

Page 1
IMPORTANT NOTICE
Please read operating instructions before using this product.
Please keep original box and packing materials in the
event that service is required.
For questions or concerns please contact customer service at:
Toll-Free: (855) 881-7977
Email: info@versatilehousewares.com
8-Quart
EVERYTHING
PRESSURE COOKER
7-IN-1 PRESSURE COOKER,
SLOW COOKER, RICE COOKER, STEAMER,
SAUTÉ, YOGURT MAKER, AND WARMER
Use and care plus recipes
Martha Stewart™ and the Martha Stewart Emblem are trademarks of
Martha Stewart Living Omnimedia, Inc. Used under license.
© 2018 MSLO, Inc. All rights reserved.
Distributed by Versatile Housewares, LLC • Hollywood, FL
MODEL MSEPC0010
Page 2

IMPORTANT SAFEGUARDS
Your Martha Stewart Everything Pressure Cooker cooks under pressure. When using
this Everything Pressure Cooker basic safety precautions should be followed.
1.
Read all instructions.
2.
Do not touch hot surfaces. Use handles or knobs and a potholder.
3.
Do not close or clog the Vent Pipe or place anything on top of the Everything
Pressure Cooker under any circumstance.
4.
To protect against risk of electrical shock, do not put power cord, plug or body of the
appliance in water or other liquid.
5.
This Everything Pressure Cooker should not be used by children or by individuals
with disabilities or limited knowledge in using pressure cookers. Close supervision is
necessary when any appliance is used by or near children.
6.
This appliance cooks under pressure and requires liquid to pressurize. Always
ensure there is a minimum of 1 measuring cup (8 ounces) of liquid when operating.
Improper use may result in scalding injuries. Make certain the Lid is properly closed
before operating. Please see "Operating Your Everything Pressure Cooker".
7.
Do not place hands or face directly over the Pressure Valve. Hot steam escaping the
Pressure Valve could cause a scalding injury. Use the Pressure Valve Handle on your
Pressure Valve to move it from SEAL to VENT, or vice-versa. You can also use a wooden
spoon to move the Pressure Valve so your hands do not get too close to the steam.
8.
Unplug from outlet when not in use and before cleaning. Allow the Everything
Pressure Cooker to cool before putting on or taking off parts. To disconnect, turn
the Everything Pressure Cooker off by pressing the Keep Warm/Cancel button until
four zeros [0000] appear in the LED and the Keep Warm indicator light is off, then
unplug from the wall outlet.
9.
Do not operate any appliance with a damaged cord or plug or after the appliance
malfunctions or is dropped or damaged in any manner. Return the appliance to
Versatile Housewares for examination, repair, or electrical or mechanical adjustment.
10.
Do not fill the unit over 2/3 full as per the marking on the inside of the Pot when
using the Everything Pressure Cooker. When cooking foods that expand during
cooking such as rice or dried vegetables, do not fill the unit over 1/2 full. Over filling
may cause a risk of clogging the Vent Pipe and developing excess pressure. See
"Using Your Everything Pressure Cooker" section of this manual.
11.
Be aware that certain foods, such as applesauce, cranberries, pearl barley, oatmeal or
other cereals, split peas, noodles, macaroni, rhubarb, or spaghetti can foam, froth,
and sputter, and clog the Pressure Valve and Vent Pipe. These foods should not be
cooked in a pressure cooker.
12.
The use of parts or accessories not recommended or sold by Versatile Housewares
may cause fire, electric shock, or injury.
13.
To reduce the risk or electric shock, cook only in the stainless-steel cooking Pot
provided with your Everything Pressure Cooker.
14.
Do not use outdoors.
15.
Do not place the appliance on or near hot gas or electric burners, in a heated oven,
or any other hot surfaces.
16.
Do not let cord hang over edge of table or counter or touch hot surfaces, including
the stove.
17.
Extreme caution must be used when moving the Everything Pressure Cooker
containing hot contents or liquids.
18.
This appliance cooks under pressure. Improper use may result in scalding injury.
Make certain the Lid is properly closed and the Pressure Valve is in the SEAL
position before cooking under pressure. See "Operating Your Everything Pressure
Cooker" section of this manual.
19.
Do not use this Everything Pressure Cooker for other than intended use.
20.
Always attach power cord to appliance first, then plug cord into wall outlet. To
disconnect, press the Keep Warm/Cancel button until four zeros [0000] appear in
the LED and the Keep Warm indicator light is off, then unplug from the wall outlet.
Grasp plug and pull from the wall. Never yank on cord.
21.
Always check the Pressure Valve, Red Pressure Indicator, and Vent Pipe for
clogging, food residue or particles, clean prior to using your Everything Pressure
Cooker according to the Care & Cleaning Section of this manual.
22.
Do not open the Everything Pressure Cooker until unit has cooled and internal
pressure has been released. If the Lid is difficult to open, this indicates that the cooker
is still pressurized – DO NOT FORCE IT OPEN. Any pressure in the cooker can be
hazardous. See "Using Your Everything Pressure Cooker" section of this manual.
23.
Do not operate this appliance in the presence of explosives and/or flammable fumes.
24.
Do not use Everything Pressure Cooker for pressure frying with oil, or as a deep fryer.
25.
Move your Everything Pressure Cooker away from overhead cabinets when releasing
pressure. The fast-moving jet of steam released upward may cause damage.
SAVE THESE INSTRUCTIONS
HOUSEHOLD USE ONLY
ADDITIONAL SAFETY INFORMATION
GROUNDING INSTRUCTIONS: This Everything Pressure Cooker must be grounded.
It is equipped with a 3-prong cord having a grounded plug. The plug must be plugged
into an outlet which is properly installed and grounded.
WARNING: Improper use of the grounded cord can result in the risk of electric shock.
Consult a qualified electrician if necessary. Do not attempt to defeat this safety feature
by modifying plug.
A short power-supply cord is provided to reduce the hazards resulting from
entanglement or tripping over a long cord. If it is necessary to use an extension cord, it
should be positioned such that it does not drape over the counter or tabletop where it
can be pulled on by children or tripped over and:
A.
Use only 3-prong extension cord with 3-blade grounding plug.
B.
The marked rating of the extension cord must be equal to or greater than the
rating of this appliance. The electrical rating of this Everything Pressure Cooker
is 1,200 watts.
2 3
Page 3
"Whether you’re pressed for time, cooking on a budget, or making
nutritious and flavorful meals for yourself and your family, my
Everything Pressure Cooker is a wonderful way to cook safely,
practically, and fast. It's such a versatile machine that can be used as
a Pressure Cooker, Sauté Pan, Yogurt Maker, Rice Cooker, Steamer,
Food Warmer, and even Slow Cooker. My book Martha Stewart’s
Pressure Cooker is a great introduction to cooking with your new
TABLE OF CONTENTS
gadget. It features a range of recipes—even desserts!— so each dish
you make is unique and mouthwatering. You can also get started
right away with a few recipes from the book, included in this guide."
Important Safeguards ������������������������������������������������������������������������������������������ 2
Additional Safety Information ����������������������������������������������������������������������� 3
About Martha Stewart ����������������������������������������������������������������������������������������� 4
Know Your Everything Pressure Cooker ����������������������������������������������� 6
Before Your First Use �������������������������������������������������������������������������������������������� 8
Safety First ��������������������������������������������������������������������������������������������������������������������� 9
Operating Your Everything Pressure Cooker �����������������������������������10
Cooking Functions ������������������������������������������������������������������������������������������������14
Care & Cleaning ������������������������������������������������������������������������������������������������������ 17
Recipes���������������������������������������������������������������������������������������������������������������������������� 18
Limited Warranty �������������������������������������������������������������������������������������������������� 51
Contact Information ������������������������������������������������������������������������������������� Back
4 5
Page 4
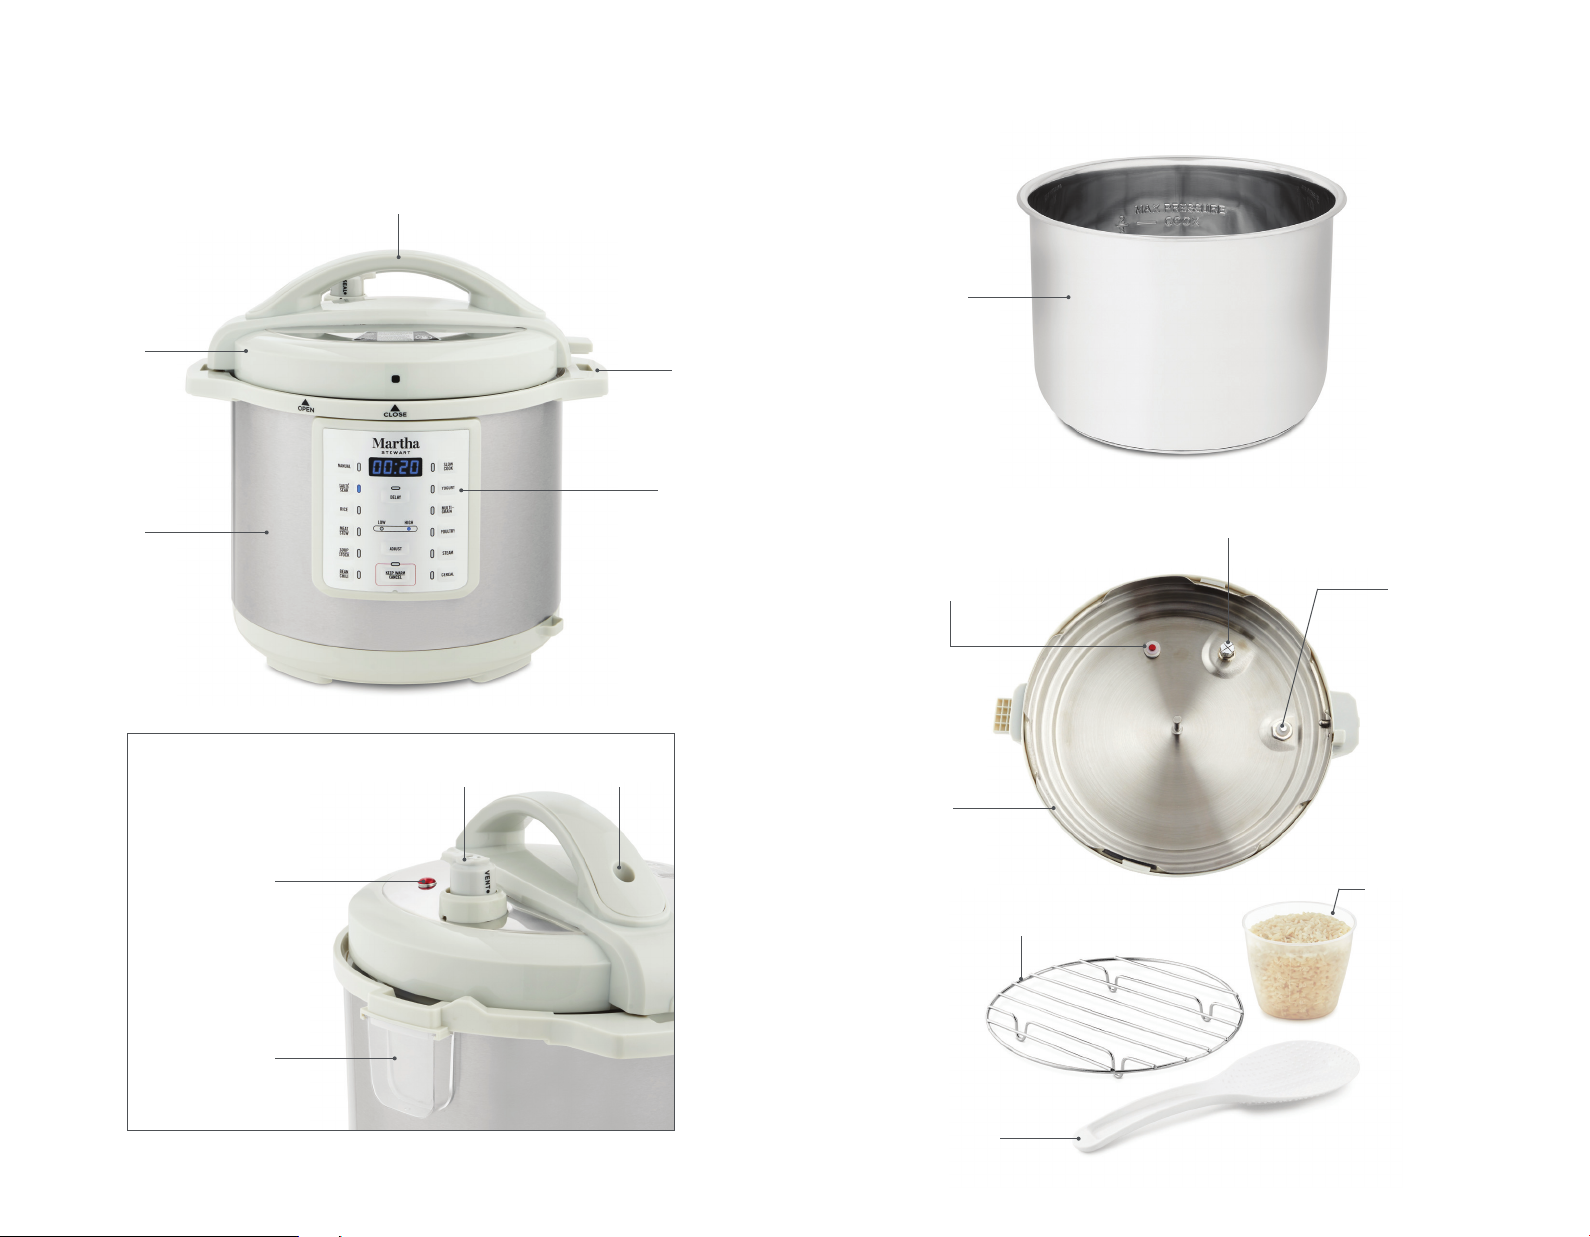
KNOW YOUR
EVERYTHING PRESSURE COOKER
Lid Handle
Pot
Lid
Housing
Red Pressure
Indicator
(Top)
Pressure
Valve
Float Valve
(Top)
Side
Handle
Control
Panel
Red Pressure Indicator
(Underside)
Includes Silicone
Sealer Gasket
Sealing
Ring Rack
Wire Rack
Vent Pipe
(Underside of Float Valve)
Float Valve
(Underside)
Includes Silicone
Sealer Gasket
Rice Measuring
Cup
Condensation
Collector
Actual product may differ slightly from illustrations on this page
6 7
Spoon
Page 5

BEFORE YOUR FIRST USE
SAFETY FIRST
Carefully unpack the Everything Pressure Cooker and parts and remove all packaging
materials. Read this instruction manual thoroughly paying close attention to the
Important Safeguards and other warnings located in this manual.
Clean the Everything Pressure Cooker according to the Care and Cleaning section of
this manual.
1.
Place the Everything Pressure Cooker on a stable, level, clean surface.
2.
Slide the Condensation Collector into the slot at the back of the Everything
Pressure Cooker (Figure 1).
3.
Place the Pressure Valve over the Vent Pipe on the top of the Lid and press down
until it stops. The Pressure Valve will feel loose over the Vent Pipe. This is by design
as it allows you to switch between SEAL & VENT and is weighted to limit the
amount of pressure in the Pot.
4.
Never place hands or face directly over the Pressure Valve. Hot steam escaping the
Pressure Valve could cause a scalding injury. Use the Pressure Valve to move it from
SEAL to VENT, or vice-versa. You can also use a wooden spoon to move the Pressure
Valve so your hands do not get too close to the steam.
5.
The sealing ring is removable for cleaning and inspection. To remove, grasp the
Sealing Ring and gently pull it upward in sections from the Sealing Ring Rack.
To place the Sealing Ring back into the Sealing Ring Rack press it down behind
the outer edge of the Sealing Ring Rack section by section. The Sealing Ring is
universal, meaning there is no up or down position. Ensure that the Sealing Ring
Rack is positioned in the center of the Sealing Ring. The Sealing Ring will not fit
tight around the Sealing Ring Rack, there will be some play to allow you to adjust to
correct position (Figure 2).
Figure 1 Figure 2
Figure 5
Figure 3
Figure 6Figure 4
HOW TO SAFELY OPEN THE LID
1.
Always ensure that your Everything Pressure Cooker is in Keep Warm mode or
turned off prior to opening the Lid. The Keep Warm mode will automatically come
on after the programmed cooking time expires, or you can start it manually by
pressing the Keep Warm/Cancel Button until the Keep Warm indicator illuminates.
2.
To turn off, press the Keep Warm/Cancel button until four zeros [0000] appear in
the LED and the Keep Warm indicator light is off, then unplug from the wall outlet.
Grasp plug and pull from the wall. Never yank on cord.
3.
There are two ways to release pressure from your Everything Pressure Cooker:
QUICK RELEASE
•
Do not use the Quick Release method with recipes containing lots of liquid, such
as soups and stews, or recipes that contain high starch content such as porridge
and congee to avoid food content from sputtering from the Pressure Valve. Use
the Natural Release method instead.
•
Never place hands or face directly over the Pressure Valve. Hot steam escaping
the Pressure Valve could cause a scalding injury. Use the Pressure Valve Handle
to move it from SEAL to VENT, or vice-versa. You can also use a wooden spoon to
move the Pressure Valve so your hands do not get too close to the steam.
NATURAL RELEASE
•
Keep the Pressure Valve in the SEAL position (Figure 6). It can take anywhere
from 10 minutes up to an hour for all pressure to naturally release from the
Everything Pressure Cooker depending on the volume of food in the Everything
Pressure Cooker.
•
If you have waited at least 30 minutes after the Everything Pressure Cooker has
been in Keep Warm mode or turned off and the Red Pressure Indicator is still
in the raised position you can release any remaining pressure by moving the
Pressure Valve from SEAL to VENT.
•
Never place hands or face directly over the Pressure Valve. Hot steam escaping
the Pressure Valve could cause a scalding injury. Use the Pressure Valve to move it
from SEAL to VENT, or vice-versa. You can also use a wooden spoon to move the
Pressure Valve so your hands do not get too close to the steam.
4.
OPEN THE LID
•
Ensure the Pressure Valve is in the VENT position (Figure 7) and the Red
Pressure Indicator is completely down and flush with the Lid (Figure 7) before
attempting to open.
•
Remove the Lid by grasping the Lid Handle and turning it clockwise until the
symbol on the Lid is directly over the OPEN marking on the Housing (Figure 4).
Lift straight up.
•
WARNING: If the Lid is difficult to open or has any resistance in opening this
indicates that the Pot is still pressurized – DO NOT FORCE IT OPEN. Any
pressure in the Pot can be hazardous and cause a scalding injury. Never attempt
to press down on the Red Pressure Indicator or the Float Valve located in the Lid
Handle to avoid a serious scalding injury. If you have difficulty opening the Lid
contact Versatile Housewares customer service at (855) 881-7977.
8 9
Page 6

OPERATING YOUR EVERYTHING
OPERATING YOUR EVERYTHING
PRESSURE COOKER
PRESSURE COOKING (PRESSURE VALVE POSITION: SEAL)
Manual • Rice • Multigrain • Meat/Stew • Poultry • Soup/Stock • Steam •
Bean/Chili • Cereal
The cooking times in pressure recipes refer to the time cooked under full operating
pressure, not the preheating time it takes to reach pressure. Your Everything Pressure
Cooker has a microchip that automatically detects when the Everything Pressure Cooker
has reached operating pressure and will start the countdown timer automatically. This
eliminates guesswork in determining how long to preheat your cooker since this preheat
time is determined by volume and food type being cooked.
1.
Follow instructions in the Preparing Your Everything Pressure Cooker section of
this manual.
2.
When the Everything Pressure Cooker is first plugged in you will see four zeros
[0000] on the Digital Display indicating you are in standby mode.
3.
Press the desired function button (see Cooking Functions section of this manual for
default settings for each function).
4.
The blue indicator lights for the selected function and the pressure settings of Low
or High will begin flashing and the Display will show the default cooking time. Press
the Adjust button to change the pressure setting between Low or High while the
lights are still blinking.
5.
To change the Default time, press the selected function button successively and the
time will scroll up. Hold the function button in to scroll at a faster rate. Once your
cooking settings are complete the Everything Pressure Cooker will begin the Preheat
cycle within 10 seconds of the last button press. The Everything Pressure Cooker will
let you know it is in Preheat mode by flashing the first two digits of the Time Display.
Once full pressure has been reached the first two digits of the Timer Display will stop
flashing and the countdown timer will start.
NOTE: Once the preheat cycle has started you cannot change the Pressure Level or the
Cooking Function. If you need to change either of these settings press the Keep Warm/
Cancel button and enter your new settings. The timer can be changed at any time.
6.
When the set time has elapsed the Everything Pressure Cooker will automatically
switch to Keep Warm. Refer to the recipe to determine which release method you
should use at the end of the cooking cycle and the section Safety First – How to Open
Your Lid.
SLOW COOK (PRESSURE VALVE POSITION: VENT)
1.
Follow instructions in the Preparing Your Everything Pressure Cooker section of
this manual.
2.
When the Everything Pressure Cooker is first plugged in you will see four zeros
[0000] on the Digital Display indicating you are in standby mode.
PRESSURE COOKER (CONT.)
4.
The blue indicator lights for the selected function and the temperature settings of
Low or High will begin flashing and the Display will show the default cooking time.
Press the Adjust button to change the temperature settings between Low or High
while the lights are still blinking.
5.
To change the Default time, press the selected function button successively and
the time will scroll up. Hold the function button in to scroll at a faster rate. Once
cooking settings are complete the Everything Pressure Cooker will begin the Slow
Cook cycle within 10 seconds of the last button press. The Timer Display will start
the countdown timer.
NOTE: Once countdown timer has started you cannot change the Cooking Function
or the temperature setting. If you need to change either of these settings press the
Keep Warm/Cancel button and enter your new settings.
6.
When the set time has elapsed the Everything Pressure Cooker will automatically
switch to Keep Warm. Refer to the section Safety First – How to Safely Open
Your Lid.
SAUTÉ/SEAR (PRESSURE VALVE POSITION: N/A - DO NOT USE LID)
1.
Only use the Sauté/Sear Function with the Lid off. Never place the Lid on the cooker,
even partially, to avoid building pressure up in the cooker.
2.
Follow instructions in the Preparing Your Everything Pressure Cooker section of
this manual.
3.
When the Everything Pressure Cooker is first plugged in you will see four zeros
[0000] on the Digital Display indicating you are in standby mode.
4.
Press the Sauté/Sear function (see Cooking Functions section of this manual for
default settings).
5.
The blue indicator lights for the selected function and the temperature settings of
Low or High will begin flashing and the Display will show the default cooking time.
Press the Adjust button to change the temperature settings between Low or High
while the lights are still blinking.
6.
To change the Default time, press the selected function button successively and the
time will scroll up. Hold the function button in to scroll at a faster rate. Once your
cooking settings are complete the Everything Pressure Cooker will begin the Sauté/
Sear cycle within 10 seconds of the last button press. The Timer Display will start the
countdown timer. Wait 5 minutes to allow the Pot to preheat. You can change the
time during the cooking function but do not exceed 30 minutes of continuous use of
this function to avoid damaging the cooker.
7.
NOTE: Once countdown timer has started you cannot change the Cooking Function
or the temperature setting. If you need to change either of these settings press the
Keep Warm/Cancel button and enter your new settings.
3.
Press the Slow Cook function, (see Cooking Functions section of this manual for
default settings).
10 11
8.
When the set time has elapsed the Everything Pressure Cooker will go back to
standby mode.
Page 7

OPERATING YOUR EVERYTHING
OPERATING YOUR EVERYTHING
PRESSURE COOKER (CONT.)
YOGURT (PRESSURE VALVE POSITION: VENT)
Making Yogurt in your Everything Pressure Cooker is a simple process. The below
recommendation is one way of making yogurt. There are many different recipes
available, but the method is similar.
1.
Follow instructions in the Preparing Your Everything Pressure Cooker section of
this manual.
2.
Add 1 gallon of milk (low fat or whole) to the Pot and place the Lid on the Everything
Pressure Cooker (ensure Pressure Valve is in Vent position).
3.
When the Everything Pressure Cooker is first plugged in you will see four zeros
[0000] on the Digital Display indicating you are in standby mode. Press the Steam
function set the Time to 1 minute. You want to bring the milk to 180°F, it will take
about 1 hour. Check the temperature after 45 minutes as you do not want to bring
the milk to a full rolling boil.
4.
Once the milk temperature reaches 180°F press the Keep Warm/Cancel Button to
turn the Everything Pressure Cooker off and unplug from the wall outlet.
5.
Allow the milk to cool to 110°F. To speed up the process you can remove the pot
from the Everything Pressure Cooker and set it on a wire rack. This will also take
about 1 hour.
6.
Once the milk has cooled down to 110°F you can add your yogurt starter. A starter
can be any pain yogurt with live and active cultures, add 3 tablespoons to the
warmed milk and whisk well
7.
Place the pot back into the Everything Pressure Cooker and press the Yogurt
function. The Timer will show 8 hours, you can increase to 10 hours if you like your
yogurt to have more of a tart taste.
PRESSURE COOKER (CONT.)
KEEP WARM
Your Everything Pressure Cooker can be used as a buffet server to keep foods warm.
1.
Follow instructions in the Preparing Your Everything Pressure Cooker section of
this manual.
2.
When the Everything Pressure Cooker is first plugged in you will see four zeros
[0000] on the Digital Display indicating you are in standby mode.
3.
Press the Keep Warm/Cancel button. The blue indicator light for the selected
function will illuminate.
4.
The Timer Display will begin counting in one-minute increments.
DELAY TIMER
You can delay the start of the cooking process up to 24 hours. The Delay function works
on all functions except Sauté/Sear, and Yogurt.
WARNING: Do not use the Delay function for foods that are perishable. Perishable
foods are those likely to spoil, decay or become unsafe to consume if not kept
refrigerated at 40°F (4.4°C) or below or frozen at 0°F (-17.8°C) or below. Examples
of foods that must be kept refrigerated for safety include meat, poultry, fish, dairy
products, and all cooked leftovers.
NOTE: We do not recommend using the Delay function when cooking rice as the
extended time of soaking rice will give it an overly soft texture and the excess leeched
starch will cause sticking and burning to the bottom of the Pot.
8.
When the Timer has elapsed place in bowls, cover, and refrigerate. You can add
some sweetener or vanilla extract to the yogurt if desired.
If you would like Greek Yogurt simply strain the yogurt with a cheese cloth. Place a
double layer of cheese cloth inside a colander or strainer and set in sink. Allow it to
strain for about two hours.
12 13
Page 8

COOKING FUNCTIONS
Below are the available settings and defaults for each function of your
Everything Pressure Cooker.
COOKING FUNCTIONS (CONT.)
Pressure Valve
Default Time
Default Pressure
Adjust Button
Keep Warm
Pressure Valve
Default Time
Default Pressure
Adjust Button
Keep Warm
Pressure Valve
Default Time
Default Pressure
Adjust Button
Keep Warm
Pressure Valve
Default Time
Default Pressure
Adjust Button
Keep Warm
MANUAL
SEAL
1 minute. Can be set up to 2 hours in 1-minute increments
High
High or Low Pressure
Automatic at end of cooking cycle
SLOW COOK
VENT
3 hours. Can be set up to 20 hours in 30-minute increments
N/A - Slow cook feature is not to be used under pressure
High or Low Temperature
Automatic at end of cooking cycle
SAUTÉ/SEAR
Only use Sauté/Sear with Lid Off
20 minutes. Can be set up to 20 minutes in 1-minute increments
Only use Sauté/Sear with Lid Off
Low Sear or High Sear
Not available in this function
YOGURT
VENT - Yogurt function should not be cooked under pressure
8 hours. Can be set up to 99:30 hours in 30-minute increments
N/A – Yogurt function should not be cooked under pressure
Not available in this function
Not available in this function
Pressure Valve
Default Time
Default Pressure
Adjust Button
Keep Warm
Pressure Valve
Default Time
Default Pressure
Adjust Button
Keep Warm
Pressure Valve
Default Time
Default Pressure
Adjust Button
Keep Warm
Pressure Valve
Default Time
Default Pressure
Adjust Button
Keep Warm
MULTIGRAIN
SEAL
15 minutes. Can be set up to 2 hours in 1-minute increments
High
High or Low Pressure
Automatic at end of cooking cycle
MEAT/STEW
SEAL
30 minutes. Can be set up to 2 hours in 1-minute increments
High
High or Low Pressure
Automatic at end of cooking cycle
POULTRY
SEAL
14 minutes. Can be set up to 2 hours in 1-minute increments
High
High or Low Pressure
Automatic at end of cooking cycle
SOUP/STOCK
SEAL
15 minutes. Can be set up to 2 hours in 1-minute increments
High
High or Low Pressure
Automatic at end of cooking cycle
Pressure Valve
Default Time
Default Pressure
Adjust Button
Keep Warm
RICE
SEAL
3 minutes. Can be set up to 25 minutes in 1-minute increments
Low
High or Low Pressure
Automatic at end of cooking cycle
14 15
Pressure Valve
Default Time
Default Pressure
Adjust Button
Keep Warm
STEAM
SEAL
1 minute. Can be set up to 2 hours in 1-minute increments
High
High or Low Pressure
Automatic at end of cooking cycle
Page 9

COOKING FUNCTIONS (CONT.)
BEAN CHILI
Pressure Valve
Default Time
Default Pressure
Adjust Button
Keep Warm
Pressure Valve
Default Time
Default Pressure
Adjust Button
Keep Warm
NOTE: When cooking oatmeal or other cereals in your pressure cooker, never exceed
the halfway mark after all combined ingredients have been added to the pot. As with all
cooking functions of your Everything Pressure Cooker, follow the Care & Cleaning section
of this manual after each use. Always use the natural release method for this function.
The Delay function works on all program modes except Sauté/Sear, Yogurt, Rice,
Multigrain, Meat/Stew, and Poultry. The Delay time defaults to 6 hours and can be
changed in 10-minute increments up to 24 hours.
The Keep Warm function operates automatically in all modes except Sauté/Sear and
Yogurt. You can manually turn Keep Warm off by pressing the Keep Warm/Cancel
button until the indicator light turns off. To manually turn Keep Warm on press the Keep
Warm/Cancel button until the indicator light turns on.
SEAL
30 minutes. Can be set up to 4 hours in 1-minute increments
High
High or Low Pressure
Automatic at end of cooking cycle
CEREAL
SEAL
15 minutes. Can be set up to 2 hours in 1-minute increments
High
High or Low Pressure
Automatic at end of cooking cycle
DELAY
KEEP WARM
CARE & CLEANING
•
Unplug the Detachable Power Cord from the outlet and then from the pressure
cooker. Allow your Everything Pressure Cooker to cool completely before cleaning.
•
The outside of the Housing can be washed with a warm damp cloth, do not use
abrasive cleaners or cleaning pads, or immerse the Pressure Cooker Housing or
Detachable Power Cord in water or any other liquid. The inside of the Housing can be
wiped with a soft damp cloth and dried thoroughly.
•
The removable stainless-steel Pot can be washed with warm soapy water or placed
in the dishwasher. To remove any stubborn stains on the bottom of the pot we
recommend any food grade stainless steel cleaner.
•
Remove the Sealing Ring Gasket and wash in warm soapy water, rinse, and dry. Do
not put in the Dishwasher.
•
Remove the Pressure Valve from the Lid by grasping and pulling straight up. Rinse
with warm water, and dry. Inspect the Pressure Valve to ensure that there are no food
particles inside the valve. Do not use any abrasive cleaners on the Pressure Valve to
avoid removing text from this part.
•
Rinse the top and underside of the Lid with warm water, including the Vent Pipe,
Red Pressure Indicator, and Float Valve. Check the Red Pressure Indicator and Float
Valve to ensure there are no food particles or sticky substances on them that prevent
them from moving up and down freely.
•
To inspect the Vent Pipe, hold the Lid up to a light to ensure it is clear and free of any
particles. You must ensure that this is inspected after each use. If there are any food
particles within the Vent Pipe use a narrow utensil, if necessary, to poke through the
valve to remove them.
•
Remove the Condensation Collector and wash in warm soapy water, rinse, dry, and
replace onto the Housing.
•
The Wire Rack, Rice Measuring Cup, and spoon can be washed in warm soapy water,
rinsed, and dried. You can also place these parts in the top rack of the dishwasher.
•
Do not store pressure cooker with Lid locked in place. If you store the Lid locked onto
the pressure cooker it will reduce the life of the Sealing Gasket.
•
There is no other servicing that should be done to your Everything Pressure Cooker.
Do not attempt to remove any nuts or screws to avoid damaging your Everything
Pressure Cooker or possibly causing personal injury.
16 17
Page 10

POT ROAST WITH DATES, OLIVES,
AND ORANGE / Serves 6 to 8
INGREDIENTS
1 tablespoon extra-virgin olive oil
1 boneless beef chuck roast (about 3 pounds)
Coarse salt and freshly ground pepper
2 garlic cloves, smashed
2 tablespoons all-purpose flour
3 cups chicken stock, homemade (see page 40) or store-bought
1 pound carrots, cut into thick rounds
1
cup pitted oil-cured olives
3
10 dates, pitted and chopped
1 teaspoon fresh thyme leaves
1 dried bay leaf
½ teaspoon cumin seeds
Finely grated zest and juice of 1 large navel orange
1. In an 8-quart Everything Pressure Cooker set to SAUTE/SEAR setting, heat oil. Pat
beef dry and season with 1 teaspoon salt and ½ teaspoon pepper. Add beef and cook
until browned on all sides, 8 to 10 minutes; transfer to a plate. Pour out all but 2
tablespoons fat (or add enough oil to equal 2 tablespoons). Add garlic and flour, and
cook, stirring, until fragrant, 1 to 2 minutes. Whisk in stock, carrots, olives, dates,
thyme, bay leaf, cumin seeds, orange zest and juice, and 1 teaspoon salt. Return beef
along with any accumulated juices to cooker. Secure lid. Set to MEAT/STEW setting
on HIGH for 90 minutes. Once time is complete, turn off, quickly release pressure,
then remove lid.
2. Let beef stand in liquid for 10 minutes. Skim any fat from surface. Transfer beef to a
serving platter. (Discard bay leaf.) Spoon sauce over and around beef and serve.
Reprinted from Martha Stewart’s Pressure Cooker. Copyright © 2018
by Martha Stewart Living Omnimedia, Inc. Photographs copyright © 2018
by Marcus Nilsson. Published by Clarkson Potter/Publishers, an imprint of
Penguin Random House LLC.
18
MEAT/
STEW
setting
Page 11

BEEF SHORT RIBS WITH
MEAT/
STEW
setting
POTATO-CARROT MASH / Serves 6
INGREDIENTS
½ cup all-purpose flour
6 beef short ribs (about 3 ¼ pounds), about 4 inches long
Coarse salt and freshly ground pepper
3 tablespoons unsalted butter
1 small yellow onion, finely chopped
2 garlic cloves, minced
1 tablespoon fresh thyme leaves
¾ cup dry red wine, such as Cabernet Sauvignon or Merlot
¼ cup water
2 russet potatoes, peeled and cut into 2-inch pieces
4 medium carrots, cut into 2-inch pieces
1. Place flour in a shallow dish. Season beef with salt and pepper, then coat in flour,
shaking off excess. In an 8-quart Everything Pressure Cooker set to SAUTE/SEAR
setting, melt 1 tablespoon butter. Working in batches, add beef and cook until
browned on all sides, about 8 minutes; transfer to a plate.
2. Add onion, garlic, and thyme to cooker; sauté until soft, 4 minutes. Add wine and the
water; cook, stirring and scraping up browned bits with a wooden spoon, 1 minute.
Return beef to cooker. Fill steamer basket with potatoes and carrots, and place
over meat.
3. Secure lid. Set to MEAT/STEW setting on HIGH for 50 minutes. Once time is
complete, turn off, quickly release pressure, then remove lid. Transfer vegetables to
a bowl with remaining 2 tablespoons butter and mash; season with salt and pepper.
Serve short ribs with potato-carrot mash, and drizzle with cooking liquid.
Reprinted from One Pot. Copyright © 2014 by Martha Stewart Living
Omnimedia, Inc. Published by Clarkson Potter/Publishers, an imprint of
Penguin Random House LLC.
21
Page 12

BEEF, FARRO, AND
POTATO STEW / Serves 4
INGREDIENTS
1 pound trimmed beef chuck, cut into 4-inch pieces
Coarse salt and freshly ground pepper
2 tablespoons olive oil
3 garlic cloves, minced
6 thyme sprigs
1 pound new potatoes, scrubbed and halved
½ cup farro
4 cups chicken or beef broth
1 can (14.5 ounces) diced tomatoes
Cilantro sprigs, for serving
1. Season beef with salt and pepper. In an 8-quart Everything Pressure Cooker set to
SAUTE/SEAR setting, heat oil. Add beef and cook until browned on all sides, about
6 minutes. Add garlic and thyme; cook until fragrant, 1 minute. Add potatoes, farro,
broth, and tomatoes.
2. Secure lid. Set to MEAT/STEW setting on HIGH for 45 minutes. Once time is
complete, turn off, quickly release pressure, then remove lid. Using two forks, shred
beef. Skim fat. Season with salt and pepper. Garnish with cilantro.
MEAT/
STEW
setting
22
Page 13

MEAT/
STEW
setting
PORK AND HOMINY STEW / Serves 6
INGREDIENTS
1 ¼ pounds boneless pork shoulder, trimmed and cut into 4-inch pieces
Coarse salt and freshly ground pepper
2 tablespoons vegetable oil
1 medium white onion, chopped
4 garlic cloves, minced
2 tablespoons chili powder
4 cups low-sodium chicken broth
2 cups water
2 cans (15 ounces) hominy, drained and rinsed
Chopped avocado and lime wedges, for serving
1. Season pork with salt. In an 8-quart Everything Pressure Cooker set to SAUTE/
SEAR setting, heat oil. Add pork and cook until browned on all sides, about 8
minutes; transfer to a plate.
2. Add onion, garlic, and chili powder; sauté until soft, 4 minutes. Add broth and the
water; cook, stirring and scraping up browned bits with a wooden spoon. Return
pork to cooker.
3. Secure lid. Set to MEAT/STEW setting on HIGH for 45 minutes and let it come to
pressure. Once time is complete, turn off, quickly release pressure, then remove lid.
Skim fat. Using two forks, shred pork; then stir in hominy and heat through. Season
with salt and pepper. Serve with avocado and lime.
Reprinted from One Pot. Copyright © 2014 by Martha Stewart Living
Omnimedia, Inc. Published by Clarkson Potter/Publishers, an imprint of
Penguin Random House LLC.
25
Page 14

CILANTRO CHICKEN
AND RICE / Serves 4 to 6
INGREDIENTS
1 medium bunch fresh cilantro, plus more for garnish
½ cup finely chopped white onion
3 garlic cloves
1 cubanelle or poblano chile, stemmed and seeded
1 serrano chile, seeds and ribs removed, if desired
1 teaspoon dried oregano
1 teaspoon cumin seeds
5 allspice berries or ¼ teaspoon ground allspice
Coarse salt and freshly ground pepper
1 ½ to 2 cups water
3 pounds bone-in, skinless chicken thighs
1 ½ cups long-grain rice
Lime wedges, for serving
1. In a blender, purée cilantro, onion, garlic, both chiles, oregano, cumin seeds, allspice,
1 teaspoon salt, 1 teaspoon pepper, and ½ cup water. Add enough water (remaining
1 to 1 ½ cups) to measure a total of 3 cups liquid. Transfer cilantro mixture to an
8-quart Everything Pressure Cooker set to SAUTE/SEAR setting on HIGH.
2. Add chicken and bring to a boil. Add rice and stir to combine. Secure lid. Set to
POULTRY setting on HIGH for 15 minutes. Once time is complete, turn off, quickly
release pressure, then remove lid.
3. Top with cilantro or other fresh herbs and serve with lime wedges.
POULTRY
setting
Reprinted from Martha Stewart’s Pressure Cooker. Copyright © 2018
by Martha Stewart Living Omnimedia, Inc. Photographs copyright © 2018
by Marcus Nilsson. Published by Clarkson Potter/Publishers, an imprint of
Penguin Random House LLC.
27
Page 15

CHICKEN WITH PEPPERS,
OLIVES, AND CAPERS / Serves 4
INGREDIENTS
8 bone-in chicken thighs (about 2 ½ pounds)
Coarse salt and freshly ground black pepper
3 tablespoons olive oil
3 garlic cloves, minced
2 teaspoons chopped thyme
½ teaspoon red-pepper flakes
2 small red bell peppers, sliced into strips
1 medium yellow onion, thinly sliced
¼ cup dry white wine, such as Sauvignon Blanc or Pinot Grigio
1 can (14 ½ ounces) diced tomatoes
½ cup pitted Castelvatrano olives
2 tablespoons brined capers, drained
Polenta, for serving
Parsley sprigs, for serving
1. Season chicken with salt and pepper. In an 8-quart Everything Pressure Cooker set
to SAUTE/SEAR setting heat 1 tablespoon oil. Working in batches, add chicken,
skin-side down, and cook until browned, about 5 minutes; transfer to a plate. Repeat
with remaining chicken, adding an additional tablespoon of olive oil if needed.
2. Heat remaining tablespoon oil. Add garlic, thyme, and red-pepper flakes; cook until
fragrant, about 1 minute. Add bell pepper and onion; stir to combine. Stir in wine,
and cook until reduced by half, about 2 minutes. Stir in tomatoes and chicken, along
with any accumulated juices.
3. Secure lid. Set to POULTRY setting on HIGH for 10 minutes. Once time is complete,
turn off, quickly release pressure, then remove lid.
4. Add olives and capers. Season with salt and pepper.
5. Serve over polenta and garnish with parsley.
POULTRY
setting
28
Page 16

SLOW
COOK
setting
SICILIAN-STYLE BEEF STEW / Serves 4 to 6
INGREDIENTS
3 pounds beef chuck, fat trimmed, meat cut into 1 ½-inch pieces
Coarse salt and freshly ground pepper
2 tablespoons extra-virgin olive oil
6 shallots, thinly sliced
½ cup dry red wine
1 can (28 ounces) whole peeled tomatoes with their juices
1 fennel bulb, cut into ½-inch wedges
1 rosemary sprig
2 (1-inch) strips orange zest, plus wedges for serving
1 cup pitted green olives, such as Castelvetrano
1. Season beef with salt and pepper. In an 8-quart Everything Pressure Cooker set to
SAUTE/SEAR setting, heat 1 tablespoon oil. Add half the beef in a single layer; cook,
turning a few times, until browned, 5 to 7 minutes. Transfer to a plate. Repeat with
remaining oil and beef.
2. Add shallots and wine to cooker; cook, scraping up any browned bits with a wooden
spoon, until wine has almost evaporated, about 3 minutes. Crush tomatoes and
stir in with their juices, fennel, rosemary, and zest. Return beef along with any
accumulated juices to cooker. Secure lid. Turn the steam release handle to “venting”
position. Set to SLOW COOK setting on HIGH for 4 ½ hours. Once time is
complete, turn off, then remove lid.
3. Stir in olives, and season with salt and pepper. Remove rosemary, and serve stew
with orange wedges.
Reprinted from Martha Stewart’s Slow Cooker. Copyright © 2017 by
Martha Stewart Living Omnimedia, Inc. Photographs copyright © 2017
by Stephen Kent Johnson. Published by Clarkson Potter/Publishers,
an imprint of Penguin Random House LLC.
31
Page 17

SPICY BUFFALO CHICKEN
SANDWICHES / Serves 8
INGREDIENTS
1 tablespoon extra-virgin olive oil
2 pounds boneless, skinless chicken thighs, cut into 1 ½-inch pieces
Coarse salt and freshly ground pepper
1 onion, finely chopped
3 garlic cloves, chopped
1 red bell pepper (ribs and seeds removed), finely chopped
¼ cup water
1 can (14 ½ ounces) crushed tomatoes
¼ cup hot-pepper sauce
3 tablespoons Worcestershire sauce
2 tablespoons yellow mustard
1 tablespoon unsulfured molasses
8 hamburger buns, for serving
Pickled vegetables, for serving
1. In an 8-quart Everything Pressure Cooker set to SAUTE/SEAR setting, heat oil. Add
half the chicken, and season with salt and pepper. Cook, stirring once, until meat is
golden brown, about 5 minutes. Transfer to a plate. Repeat with remaining chicken.
Pour out all but 1 teaspoon fat.
2. Add onion, garlic, bell pepper, and the water to cooker. Cook, stirring and scraping
up any browned bits from bottom with a spoon, until onion is translucent, about 5
minutes. Season with salt and pepper. Return chicken to cooker.
3. Add crushed tomatoes, hot-pepper sauce, Worcestershire, mustard, and molasses
to cooker; stir to combine. Secure lid. Turn the steam release handle to “venting”
position. Set to SLOW COOK setting on HIGH for 4 hours. Once time is complete,
turn off, then remove lid.
4. Transfer chicken to a large plate. Using two forks, shred chicken; return to sauce.
Season with salt and pepper. Serve on buns, with pickled vegetables on the side.
SLOW
COOK
setting
Reprinted from Martha Stewart’s Slow Cooker. Copyright © 2017 by
Martha Stewart Living Omnimedia, Inc. Photographs copyright © 2017
by Stephen Kent Johnson. Published by Clarkson Potter/Publishers,
an imprint of Penguin Random House LLC.
32
Page 18

CRÈME BRÛLÉE / Serves 8
INGREDIENTS
Boiling water, for Everything Pressure Cooker
4 cups heavy cream
¾ cup granulated sugar
1 vanilla bean, split lengthwise and seeds scraped
7 large egg yolks
¼ teaspoon coarse salt
¼ cup superfine sugar, for topping
1. Set a 1 ½-quart soufflé dish into an 8-quart Everything Pressure Cooker. Pour
enough boiling water into cooker to reach halfway up the sides of soufflé dish.
2. Combine cream, 6 tablespoons granulated sugar, and vanilla bean and seeds into a
saucepan and heat over medium just until bubbles start to form around edges, 7 to 8
minutes (do not boil).
3. Whisk yolks with remaining 6 tablespoons granulated sugar and the salt, in a large
bowl. Gently whisk a small amount of cream mixture into egg mixture to combine.
Add 2 more ladles of cream mixture, one at a time, whisking to combine after each.
Gradually whisk in remaining cream mixture. Strain custard through a fine sieve
into a large measuring cup (discard solids). Pour custard into dish. Cover with
parchment-lined foil, crimping to secure.
4. Secure lid. Set to SLOW COOK on HIGH for 2 ½ hours. Once time is complete, turn
off, then remove lid.
5. Let custard stand until water is cool enough to remove dish. Let cool completely,
cover with plastic wrap, and refrigerate, at least 2 hours and up to 3 days.
6. Sprinkle superfine sugar over custard. Pass the flame of a kitchen torch in a circular
motion 1 to 2 inches above custard until sugar bubbles and turns amber.
Serve immediately.
SLOW
COOK
setting
Reprinted from Martha Stewart’s Slow Cooker. Copyright © 2017 by
Martha Stewart Living Omnimedia, Inc. Photographs copyright © 2017
by Stephen Kent Johnson. Published by Clarkson Potter/Publishers,
an imprint of Penguin Random House LLC.
35
Page 19

BASIC BEANS / Makes 7 cups
INGREDIENTS
1 pound (2 ½ cups) cranberry or any other type of dried bean
2 sprigs fresh sage
2 sprigs fresh rosemary
1 head garlic, halved horizontally
1 carrot, peeled and cut into 1-inch pieces
1 stalk celery, cut into 1-inch pieces
1 onion, peeled and quartered
Extra-virgin olive oil, for cooking and for serving
1 tablespoon coarse salt
1. Pick over the beans to remove any stones or bad or broken beans. Rinse thoroughly.
Place the beans in a large bowl and cover with plenty of cold water. Soak overnight at
room temperature or in the refrigerator if your kitchen is warm.
2. Alternatively, set cooker to SAUTE/SEAR setting, cover beans by 2 inches water,
bring to a boil, and turn off cooker. Let soak 30 minutes.
3. Drain and rinse beans and place in an 8-quart Everything Pressure Cooker, making
sure not to fill more than halfway but adding enough cold water to cover by 3 inches.
4. Wrap the herbs and garlic in a 6-inch square of cheesecloth and tie to enclose. Add
the carrot, celery, onion, a drizzle of olive oil, and salt. Secure lid. Set to BEAN/
CHILI setting on HIGH for 7 minutes. Once time is complete, turn off, let pressure
decrease naturally, then remove lid. If the pressure has not come down in 10
minutes, release the rest of the pressure using the release valve.
5. Remove and discard the cheesecloth bundle and vegetables and drain beans. Serve
beans warm, drizzled with olive oil.
6. Save the bean liquid for storing any leftover beans for up to 4 days, or use it in
risottos and soups.
BEAN /
CHILI
setting
36
Page 20

VEGETARIAN CHILI / Serves 6
INGREDIENTS
2 tablespoons extra-virgin olive oil
1 medium yellow onion, diced
4 garlic cloves, roughly chopped
1 ½ teaspoons ground cumin
1 teaspoon chipotle chili powder
Coarse salt and freshly ground pepper
1 medium zucchini, cut into ½-inch dice
¾ cup (6 ounces) tomato paste
3 cups cooked beans such as pinto or black beans (see page 36)
1 can (10 ounces) diced tomatoes with green chiles
1 can (14 ½ ounces) diced tomatoes
Limes wedges, sour cream, cilantro sprigs, diced avocado, crushed tortilla chips for serving
1. In an 8-quart Everything Pressure Cooker set to SAUTE/SEAR setting, heat oil.
Add onion and garlic; cook, stirring frequently, until onion is translucent and garlic
is soft, about 4 minutes. Add cumin and chili powder, season with salt and pepper,
and cook until spices are fragrant, 1 minute. Add zucchini and tomato paste; cook,
stirring frequently, until tomato paste is deep brick red, 3 minutes.
2. Stir in beans and tomatoes. Add 2 cups water. Secure lid. Set to BEAN/CHILI
setting on HIGH for 5 minutes. Once time is complete, turn off, quickly release
pressure, then remove lid. Season with salt and pepper.
3. Serve with limes wedges and garnish with sour cream, cilantro sprigs, diced avocado,
and crushed tortilla chips.
BEAN /
CHILI
setting
38
Page 21

CHICKEN STOCK / Makes about 3 quarts
1
2
INGREDIENTS
4 ½ pounds chicken parts (wings, backs, and necks), rinsed
8 cups water
2 large carrots, scrubbed or peeled, cut into 1-inch pieces
2 large ribs celery, cut into 1-inch pieces
1 large onion, peeled and cut into 1-inch pieces
1 dried bay leaf
1 teaspoon whole black peppercorns
1. In an 8-quart Everything Pressure Cooker combine chicken, water, vegetables, bay
leaf, and peppercorns.
2. Secure lid. Set to SOUP/STOCK setting on HIGH for 30 minutes. Once time is
complete, turn off, quickly release pressure (loosely cover vent with a clean
kitchen towel), then remove lid. If time permits, let the pressure decrease naturally,
about 20 minutes.
3. Allow stock to cool slightly. Strain through cheesecloth set over a fine-mesh sieve.
Skim off fat if using immediately, or let cool completely (in an ice-water bath, if
desired) before transferring to airtight containers. Refrigerate at least 8 hours to
allow the fat to accumulate at the top; lift off and discard fat before using or storing
stock. Stock can be refrigerated up to 3 days or frozen up to 3 months.
Image reprinted from Martha Stewart’s Cooking School. Copyright © 2008 by Martha Stewart Living
Omnimedia, Inc. Photographs by Marcus Nilsson. Published by Clarkson Potter/Publishers, an imprint of
Penguin Random House LLC.
40
SOUP /
STOCK
setting
Page 22

WHITE-BEAN SOUP WITH
SOUP /
STOCK
setting
GRILLED SAUSAGES / Serves 8
INGREDIENTS
1 pound dried cannellini beans
4 cups chicken broth
3 cloves garlic, minced
2 teaspoons fresh thyme
½ teaspoon red-pepper flakes
Coarse salt and freshly ground pepper
1 large bunch escarole, roughly chopped
Extra virgin olive oil, for grill, plus more serving
8 chicken or turkey sausages, fully cooked (about 1 pound)
Grated Parmesan, for serving
Lemon wedges, for serving
1. In an 8-quart Everything Pressure Cooker set to SAUTE/SEAR setting, cover beans
by 2 inches water, bring to a boil, and turn off cooker. Let soak 30 minutes. Drain
beans and return to cooker. Add broth, garlic, and red-pepper flakes; season with
salt and pepper. Secure lid. Set to SOUP/STOCK setting on HIGH for 18 minutes.
Once time is complete, turn off, quickly release pressure, then remove lid. Stir in
escarole. Season with salt and pepper.
2. Meanwhile, heat a grill or grill pan to high. Clean and lightly oil hot grill. Grill
sausages until browned, about 12 minutes; let rest 5 minutes, then slice. Serve soup
topped with sausages and Parmesan. Drizzle with olive oil and serve with lemon.
43
Page 23

RISOTTO WITH SHRIMP
AND HERBS / Serves 4
INGREDIENTS
4 tablespoons unsalted butter
1 small yellow onion, finely chopped
1 ½ cups Arborio or Carnaroli rice
2 tablespoons white wine, such as Sauvignon Blanc or Pinot Grigio
4 ½ cups low-sodium chicken broth
Coarse salt and freshly ground pepper
1 pound peeled, deveined large shrimp
¾ cup grated Parmigiano-Reggiano cheese (3 ounces), plus more for serving
¼ cup fresh herbs, chopped such as tarragon and flat-leaf parsley
1. In an 8-quart Everything Pressure Cooker set to SAUTE/SEAR setting melt 2
tablespoons butter. Add onion and sauté until soft, about 4 minutes. Add rice and
cook, stirring, 1 minute. Add wine and cook until just evaporated, 30 seconds. Add 3
cups broth; season with salt and pepper.
2. Secure lid. Set to MULTI GRAIN setting on HIGH for 6 minutes. Once time is
complete, turn off, quickly release pressure (loosely cover vent with a clean kitchen
towel), then remove lid.
3. Set cooker to SAUTE/SEAR setting on HIGH. Stir in remaining 1 ½ cups broth
and shrimp; cook until opaque, about 5 minutes. Stir in Parmigiano-Reggiano,
remaining butter and fresh herbs. Season with salt and pepper. Serve immediately,
topped with additional cheese.
MULTI
GRAIN
setting
Reprinted from One Pot. Copyright © 2014 by Martha Stewart Living
Omnimedia, Inc. Published by Clarkson Potter/Publishers, an imprint of
Penguin Random House LLC.
45
Page 24

RICH &
STEAMED CAULIFLOWER
CREAMY POLENTA / Makes about 5 cups
INGREDIENTS
4 cups chicken or vegetable stock
1
1 cups coarsely ground yellow cornmeal
3
4 sprigs thyme
1 ¼ teaspoons coarse salt
½ teaspoon freshly ground pepper, plus more for serving
2 tablespoons unsalted butter
½ cup heavy cream
½ cup finely grated Parmigiana-Reggiano cheese (2 ounces)
1. In an 8-quart Everything Pressure Cooker, whisk together the water, cornmeal,
thyme, salt and pepper.
2. Secure lid. Set to MULTI GRAIN setting on HIGH for 10 minutes. Once time is
complete, turn off, quickly release pressure (loosely cover vent with a clean kitchen
towel), then remove lid.
3. Remove thyme. Add butter, heavy cream and cheese, and stir until butter is
incorporated and mixture has thickened slightly, about 2 minutes. Serve with more
freshly ground pepper.
WITH SALSA VERDE / Serves 2 to 4
INGREDIENTS
3 cups water
Coarse salt
1 large head cauliflower, cut in 3 inch florets
1. Place a steamer basket in an 8-quart Everything Pressure Cooker with water and 1
teaspoon salt. Add cauliflower to basket. Secure lid. Set to STEAM setting on LOW
for 1 minute. Once time is complete, turn off, quickly release pressure, then remove
lid. Serve with salsa verde.
Salsa Verde
Combine 1 cup chopped herbs such as cilantro and parsley, ¼ cup capers, 2 tablespoons sherry vinegar, and ½ cup extra virgin olive oil. Season with coarse salt and
freshly ground pepper.
MULTI
GRAIN
setting
46 47
STEAM
setting
Page 25

STEAMED CORN WITH
LONG GRAIN WHITE RICE / makes 3 cups
CHILI LIME BUTTER / Serves 6
INGREDIENTS
3 cups water
Coarse salt
6 ears corn, shucked
1. Place a steamer basket in an 8-quart Everything Pressure Cooker with water and 1
teaspoon salt. Add corn to basket. Secure lid. Set to STEAM setting on LOW for 4
minutes. Once time is complete, turn off, quickly release pressure, then remove lid.
Serve with chili lime butter.
Chili Lime Butter
Combine 8 ounces of softened butter, zest from 2 limes, 2 teaspoons coarse salt, a
pinch of cayenne. Brush on steamed corn.
STEAM
setting
INGREDIENTS
1 cup white rice (Jasmine or Basmati), rinsed and drained
1 cup chicken stock or water
1 tablespoon extra-virgin olive oil or unsalted butter
½ teaspoon salt
1. In an 8-quart Everything Pressure Cooker, add stock (or water), rice, oil (or butter).
Secure lid. Set to RICE setting on HIGH FOR 3 minutes. Once time is complete,
turn off, let pressure decrease naturally, then remove lid. If the pressure has not
come down in 10 minutes, release the rest of the pressure using the release valve.
Flavor Variations
Stir in ¼-½ cup chopped fresh herbs like parsley or cilantro
Stir in ¼-½ cup toasted nuts like sliced almonds or cashews
Stir in ¼-½ cup chopped dried fruits like apricots or dates
RICE
setting
48 49
Page 26

BROWN RICE / makes 3 cups
LIMITED WARRANTY
INGREDIENTS
1 cup brown rice, rinsed and drained
1 ½ cup chicken stock or water
1 tablespoon extra-virgin olive oil or unsalted butter
½ teaspoon salt
1. In an 8-quart Everything Pressure Cooker, add stock (or water), rice, oil (or butter).
Secure lid. Set to RICE setting on HIGH FOR 18 minutes.
2. Once time is complete, turn off, let pressure decrease naturally, then remove lid. If
the pressure has not come down in 10 minutes, release the rest of the pressure using
the release valve.
Flavor Variations
Stir in ¼-½ cup chopped fresh herbs like parsley or cilantro
Stir in ¼-½ cup toasted nuts like sliced almonds or cashews
Stir in ¼-½ cup chopped dried fruits like apricots or dates
RICE
setting
This warranty covers all defects in workmanship or materials in the mechanical and
electrical parts, arising under normal usage and care, in this product for a period of
12 months from the date of purchase provided you are able to present a valid proof-ofpurchase. A valid proof-of-purchase is a receipt specifying item, date purchased, and
cost of item. A gift receipt with date of purchase and item is also an acceptable proofof-purchase. Product is intended for household use only. Any commercial use voids
the warranty.
This warranty covers the original retail purchaser or gift recipient. During the applicable
warranty period within normal household use, we will repair or replace, at our
discretion, any mechanical or electrical part which proves defective, or replace unit with a
comparable model.
To obtain service under the terms of this warranty, call Toll-Free (855) 881-7977.
THIS LIMITED WARRANTY COVERS UNITS PURCHASED AND USED WITHIN
THE UNITED STATES AND CANADA AND DOES NOT COVER:
Damages from improper installation.
•
Defects other than manufacturing defects.
•
Damages from misuse, abuse, accident, alteration, lack of proper care and maintenance,
•
or incorrect current or voltage.
Damage from service by other than an authorized dealer or service center.
•
This warranty gives you special legal rights and you may also have other rights to which
you are entitled which may vary from state (province) to state (province).
Proof of purchase required to validate the warranty.
Shipping and handling charges may apply.
50 51
 Loading...