

Page 1

RS-232
306
Datalogger
Page 2

CONTENTS
TITLE PAGE
I. Introduction
.............................................................................................................. 1
II. Specifications
......................................................................................................... 1
III. Symbol Definition and Button Location
............................................. 2
IV. Operating Instructions
4.1 Power-Up ............................................................................................................. 3
4.2 Connecting the Thermocouples........................................................................ 3
4.3 Selecting the Temperature Scale....................................................................... 3
4.4 Data-Hold Operation........................................................................................... 3
4.5 DataLogger.......................................................................................................... 3
4.6 Clock Setup ......................................................................................................... 3
4.7 Recording Interval Setup ................................................................................... 4
4.8 Time Operation.................................................................................................... 4
4.9 MAX/MIN Operation ............................................................................................ 4
4.10 Auto Power Off.................................................................................................. 4
4.11 Low Battery Condition......................................................................................
4.12 Calibration Point ...............................................................................................
4.13 Digital Output .................................................................................................... 5
.................................................................................... 3
V. Setup ThermoLog (Thermo DataLogger)
4
4
RS232 Interface Software
.......................................................................... 7
Page 3

MARTEL 306
I. Introduction:
This instrument is a digital thermometer for use with any K-type thermocouple as temperature
sensor. Temperature indication follows National Bureau of Standards and IEC584
temperature/voltage table for K-type thermocouples. Its internal memory can store up to 16,312
records.(See Note 1 below.) An RS232 interface provides bi-directional communication with a PC.
II. Specifications:
Numerical Display: 4 digital Liquid Crystal Display
Measurement Range: -200°C ~ 1370°C -328°F ~ 2498°F
Resolution: -200°C~ 200°C: 0.1°C; 200°C ~1370°C: 1°C
Input Protection at Thermocouple Input: 60V DC, or 24Vrms AC
Environmental:
R Operating Temperature and Humidity: 0°C ~50°C (32°F ~ 122°F) ; 0 ~ 80% RH
R Storage Temperature and Humidity: -10°C to 60°C (14°F ~ 140°F); 0 ~ 80% RH
R Altitude up to 2000 meters.
Accuracy: at ( 23 ± 5°C )
-200°C ~ 200°C ±(0.2% reading + 1°C)
200°C ~ 400°C ±(0.5% reading + 1°C)
400°C~1370°C ±(0.2% reading + 1°C)
-328°F ~ -200°F ±(0.5% reading + 2°F)
-200°F ~ 200°F ±(0.2% reading + 2°F)
200°F ~ 2498°F ±(0.3% reading + 2°F)
The basic accuracy specification does not include the error of the probe. Please refer to the
probe accuracy specification for additional details.
Sample Rate: 1.25 times per second
Dimensions (LxWxH): 7.2”x2.5”x1.1” (184x64x30 mm)
Weight: 7.4 oz. (210g); approximate
Accessories: K-Type Bead Probe, Battery, Carrying Case, Instruction Manual, Software Package
Power Requirement: 9 Volt Battery
Battery Life: Approx. 100hrs with alkaline battery
AC Adapter: 9VDC ±15% 100mA
Plug Diameter: 3.5mm×1.35mm
Option : AC Adapter
-200°F~ 200°F: 0.1°F; else 1°F
Range Accuracy
Temperature Coefficient:
For ambient temperatures from 0°C ~ 18°C and 28°C
~ 50°C, for each °C ambient below 18°C or above
28°C add the following tolerance into the accuracy
spec.
Note:
(Program and RS232 Connection Cable)
0.01% of reading + 0.03°C
(0.01% of reading + 0.06°F )
Note1:
Each time you press the "RECORD" button to start recording data and press it again to stop recording, a
new data set is stored in memory. As many additional data sets as you want may be added into memory
until it is full.
1
Page 4
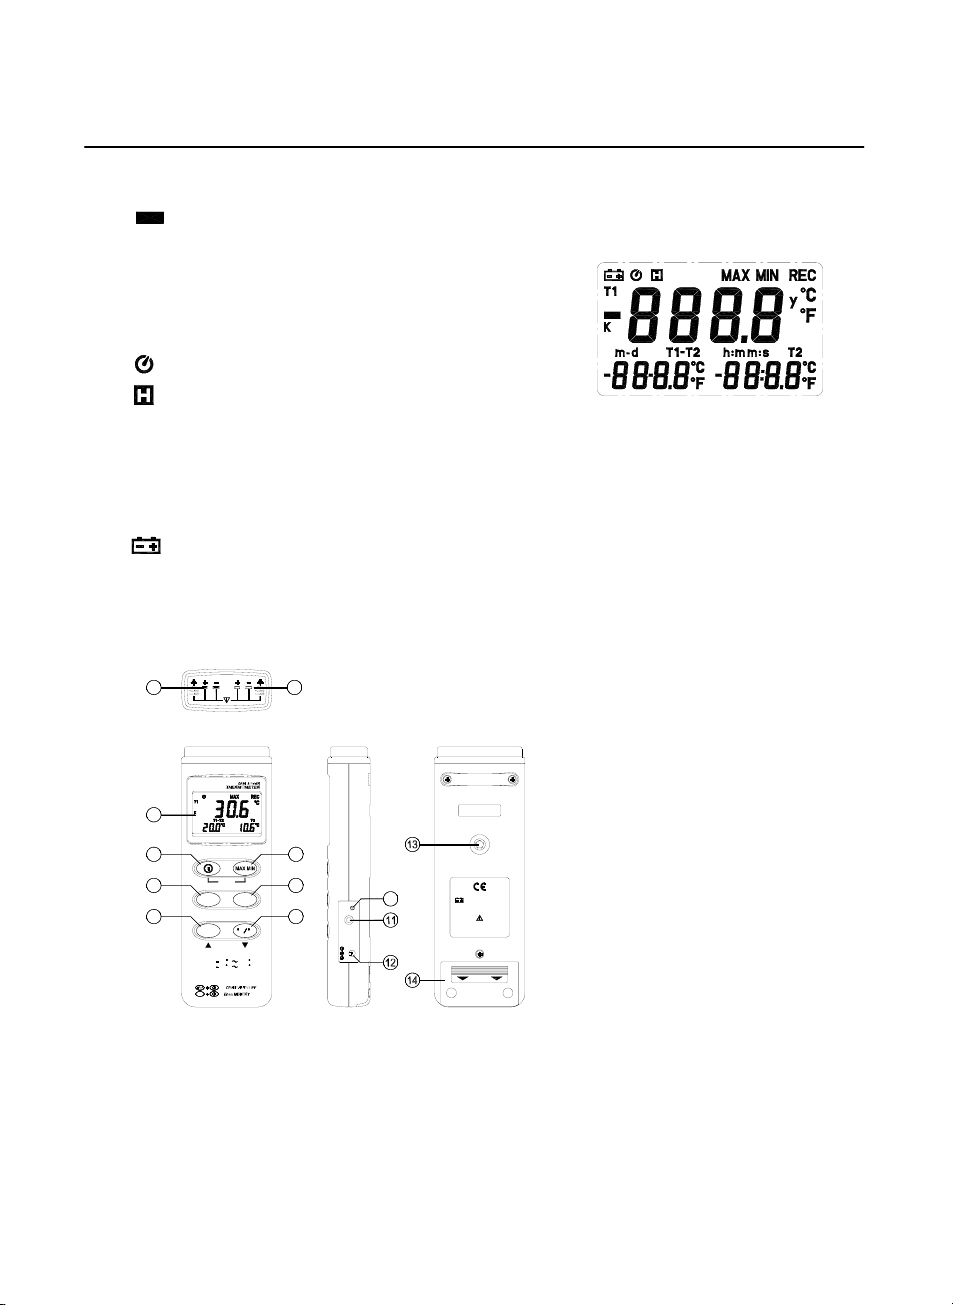
III. Symbol Definition and Button Location:
: This indicates that a negative temperature is sensed.
ƨƩ
: Centigrade and Fahrenheit indication.
K
: Thermocouple Type Indication
MAX
: The Maximum value is being displayed
MIN
: The Minimum value is being displayed
: This indicates auto power off is enabled.
: This indicates that the display data is being held.
m-d
: Indicates the value below is month and day
h:m
: Indicates the value below is hour and minute
m:s
: Indicates the value below is minute and second
y
: Indicates year is displayed in the main window.
: The battery voltage is low. The battery should be replaced.
REC
: This indicates that the tester is recording. If it blinks, it indicates the memory is full.
2
3
4
5
6
T2
SETUP
TIME
CLOCK
REC
311
RANGE:
439
POWER-UP OPTIONS
REC
D 2481GD
G 35:9
1
T1
T1T2
7
8
HOLD
INTV
9
F
C
10
CAL
OUTPUT
DC9V
9V BATTERY
NEDA 1604 6F22 006P
PLEASE READ
MANUAL FOR SAFETY
OPEN
2
Button Location:
1
○
K type temperature sensor T1 input
connector
2
○
K type temperature sensor T2 input
3
○
LCD display
4
○
ON/OFF button
5
○
Time display button
6
○
Record button
7
○
MAX MIN function control button
8
○
HOLD button
9
○
°C, °F control button
10
○
Offset calibration screw
11
○
Digital output connector
12
○
AC power adapter connector
13
○
Tripod connector
14
○
Battery cabinet cover
MARTEL 306
Page 5

MARTEL 306
IV. Operating Instructions:
4.1 Power-Up
Press the
When powered on, the LCD will show how much memory space is
available to use.
For example: It indicates that there are 16,000 records available in memory.
4.2 Connecting the Thermocouples
Plug the thermocouple into the input connectors.
4.3 Selecting the Temperature Scale
When the meter is first powered on, the default scale setting is set at Celsius (°C) scale. The scale
may be changed to Fahrenheit (°F) by pressing the “°C/°F” button. Press it again to revert to Celsius.
When you power on, the scale setting will be the same as that when you last powered off.
4.4 Data-Hold Operation
The present reading may be held and kept on the display by pressing the “HOLD” button. When the
held data is no longer needed, release the data-hold operation by pressing the “HOLD” button
again.
When the meter is in the Data Hold mode, the “TIME”, "MAX/MIN" and “°C/°F” buttons are
disabled, and will respond with two beeps when pressed.
4.5 DataLogger:
Pressing the "REC" button will start recording. Pressing it again
will stop recording. To clear the memory, power off the meter, then
press and hold the “REC” button while you press and hold the
power button for at least 2 seconds. Release all buttons and the
LCD will show "CLR" indicating that the memory has been cleared.
4.6 Clock Setup:
power button
to turn the thermometer ON or OFF.
1. Press and hold the “MAX MIN” button and then power on the
meter:
2. Press “TIME”(clock):
3. Press "REC" or "°C/°F" to increase or decrease the number. Press
the “TIME”(clock) button to adjust the next item. The adjustment
order is year→month→day→hour→minute. When finished, press
the “TIME” (clock) button to save your adjustments. If you want to
abort the setup process, press the power button to cancel.
3
Page 6

MARTEL 306
4.7 Recording Interval Setup :
1. Press and hold “MAX MIN” button and then power on the meter:
2. Press “HOLD" (INTV)
3. Press "REC" or "°C/°F" to increase or decrease the number. Press
the “HOLD" (INTV) button to adjust next item, then press the
“HOLD” (INTV) to save your changes. If you want to abort the setup
process, press the power button to cancel.
4.8 Time Operation:
Pressing the “TIME” button will display time. The year is displayed at the top of the LCD, month and
day are displayed on the bottom left of the display, and the hour and minute on the bottom right.
Pressing the "TIME" button or any other button will exit this mode. This operation will not interrupt
the recording and MAX/MIN operation.
4.9 MAX/MIN Operation:
Pressing the "MAX/MIN" button enters the MAX/MIN mode. Under this mode the maximum and
minimum values are kept in memory simultaneously and updated with every new data sample.
When the MAX symbol is displayed, the Maximum value is displayed.
Pressing the "MAX/MIN" button again displays both MIN symbol and the minimum reading.
Pressing the "MAX/MIN" button again causes both MAX and MIN to blink together, which indicates
that all these data is updated in the memory and the reading is the present temperature.
Repeatedly pressing the "MAX/MIN" button cycles the display mode among these options.
In the MAX/MIN mode the “°C/°F” button is disabled, and will respond with two beeps.
To exit the MAX/MIN mode, press and hold "MAX/MIN" for two seconds.
4.10 Auto Power Off:
By default, when the meter is powered on, it is in the auto power off mode. The meter will power
itself off after 30 minutes if no key operation, no RS232 communications, and no recording occurs.
To disable the auto power off feature, press and hold the “HOLD” button while powering on the
meter. Two successive beeps indicate that auto power off is disabled and the will not show up.
4.11 Low Battery Condition
When the battery voltage below that for proper operation, the symbol will be displayed.
Replace the battery.
4.12 Calibration Point:
input Adjust VR tolerance
0 °C VR1 ± 0.1 °C
190 °C VR2 ± 0.1 °C
1000 °C VR3 ± 1 °C
1900 °F VR4 ± 1 °F
P. S
Normally, performing offset Calibration with thermal
stabled ice water through VR1 will give a very good
calibration result.
4
Page 7

MARTEL 306
4.13 Digital Output:
The Digital Output is a 9600bps N 81 serial interface.
The RX is a 5V normal high input port.
The TX is a 5V normal high output port.
The command of Digital Output is list below:
RS232 command Function Remarks
K(ASC 4BH) Ask for model No. Return 4 bytes
A(ASC 41H) Inquire all encoded data Return encoded 10 byte
H(ASC 48H) Hold button
M(ASC 4DH) MAX/MIN button
N(ASC 4EH) Exit MAX/MIN mode
T(ASC 52H) TIME button
C(ASC 43H) C/F button
U(ASC 55H) Dump all memory of thermometer return 32768 bytes
P(ASC 50H) Load recorded data
•Command K:
Return 4 bytes. For example, when sending command "K" to the meter, it will return "3","0","6",
ASCII(13) .
•Command U:
Return 32,768 bytes .
•Command P:
Instead of returning all 32,768 bytes, only recorded data is returned .
•Command H:
Equivalent to pushing the HOLD button and no message is returned.
•Command M:
Equivalent to pushing the MAX/MIN button and no message is returned.
•Command N:
Equivalent to pushing and holding the MAX/MIN button for two seconds to exit MAX/MIN mode.
•Command T:
Equivalent to pushing the TIME button and no message is returned.
•Command C:
Equivalent to pushing the °C/°F button and no message is returned.
•Command A:
nd
1
BYTE:
The first byte is the start byte , its value is 2.
nd
BYTE:
2
bit7 bit6 bit5 bit4 bit3 bit2 bit1 bit0
C/F Low Bat Hold TIME MAX/MIN REC
bit 0: 1→recording mode, 0→not recording
bit 2 bit 1
0 0 →normal mode
0 1 →MAXIMUM mode
1 0 →MINIMUM mode
1 1 →calculate MAX/MIN in background mode .
TX
RX
GND
5
Page 8

bit3: 1→Indicates the LCD is displaying time.
bit4: not used
bit5: 1→ HOLD, 0→not HOLD
bit6: 1→LOW BATTERY , 0→BATTERY NORMAL
bit7: 1→°C 0→°F
th
BYTE:
3
Auto Power Off memory full resolution sign OL resolution sign OL
bit0: 1→T1 is OL, 0→not OL
bit1: 1→T1 value is minus, 0→T1 value is plus.
bit2: 1→4
bit3: 1→T2 is OL, 0→not OL
bit4: 1→T2 value is minus, 0→T2 value is plus.
bit5: 1→8
bit6: 1→Memory is full. 0→Memory is not full.
bit7: 1→Auto power off enabled. 0→Auto power off disabled.
th
4
BYTE: first two BCD code of T1 value.
th
5
BYTE:last two BCD code of T1 value
th
6
BYTE:
If bit3 of 2
If bit3 of 2
th
BYTE:
7
If bit3 of 2
If bit3 of 2
th
BYTE:
8
If bit3 of 2
If bit3 of 2
th
BYTE:
9
If bit3 of 2
If bit3 of 2
th
BYTE: end byte, it value is 3, 1
10
bit7 bit6 bit5 bit4 bit3 bit2 bit1 bit0
th
byte and 5th byte represent #### , 0→4th byte and 5th byte represent ###.#
th
byte and 9th byte represent #### , 0→8th byte and 9th byte represent ###.#
nd
BYTE =0 : first two BCD code of T1-T2 value.
nd
BYTE =1 : two BCD code of month.
nd
BYTE =0 : last two BCD code of T1-T2 value.
nd
BYTE =1 : two BCD code of day.
nd
BYTE =0 : first two BCD code of T2 value.
nd
BYTE =1 : two BCD code of hour.
nd
BYTE =0 : last two BCD code of T2 value.
nd
BYTE =1 : two BCD code of minute.
nd
and 10th are used to check frame error.
MARTEL 306
Appendix: Thermocouple probe specification
Model Range Tolerances Description
TP-K01
Bead probe
TP-K01:
-50℃ to 200℃
-58℉ to 392℉
±2.2℃ or ±0.75%
(±3.6℉ or ±0.75%)
with Teflon tape insulation Maximum
insulating temperature : 260℃
probe for general purpose measurements, especially for
complex and hard to reach places.
6
Page 9

MARTEL 306
V. Setup ThermoLog (Thermo DataLogger)ȋRS232 interface software:
The ThermoLog package contains:
1. Two 3.5” diskettes
2. Custom designed RS232 cable for THERMOLOG.
System Required:
Windows 95, Windows 98, Windows NT 4.0, or above.
Minimum Hardware Required:
- 486-100 MHz PC-compatible, 16 MB RAM
- At least 5 MB of hard disk space available to install THERMOLOG program
- Display resolution of 800X600 recommended
Install ThermoLog:
1. We strongly recommend closing all other applications before installing ThermoLog software.
2. Insert setup diskette 1 into floppy disk drive.
3. Choose the Start button on the Taskbar and select Run.
4. Type A:\SETUP and choose OK. The ThermoLogg.exe ( executable file ) and help
files will be copied to your hard disk (default location is c:\program files\ThermoLog ).
For other operating instructions, please refer to the on-line help available under ThermoLog.
Main Menu
GRAPH - Click to plot
data in graph form.
Click to show graph ,
panel, and tabular
windows.
CONTROL PANEL –
Provides real-time,
on-screen control of
the thermometer.
LINK TEST - Click to test
communications between the
thermometer and PC.
Link Test :
Open the Link Test window to search for a thermometer connected to the PC. When you start
the THERMOLINK program, this window displays first and will automatically search for a
thermometer. The result will be shown in the a box.
Control Panel:
Open the Control Panel Window to control the thermometer via the buttons in this window.
7
Click to exit ThermoLog.
HELP - Click to show on-line help.
DATA LOGGER - Click to load the
recorded data from thermometer.
TABULAR - Click to show the
present data in list form.
STATUS - Indicates if
thermometer is connected or not.
Page 10

MARTEL 306
DataLogger:
Open the DataLogger Window to load the recorded data from thermometer to the PC.
Tabular:
Open the Tabular window to list the data from the thermometer in a scrolling table. The data can
be stored as a file, or the table can be copied to other programs such as Microsoft EXCEL for
further analysis.
Graph:
Open the Real-Time Graph window to plot the data in graph form.
Exit:
Terminates THERMOLOG program.
Tray Icon:
When THERMOLOG is running , there will be an icon displayed on the Windows Tray area
(see figure below). Click this icon to open a pop-up menu.
Tray Icon
8
Page 11

MARTEL ELECTRONICS
PO Box 770, Londonderry, NH 03053 USA
Tel: 800-821-0023
E-Mail: sales@martelcorp.com
Web: http : / / www.martelcorp.com
306-0107
 Loading...