

Page 1
OIL HEATER
Instruction manual
МАСЛЯНЫЙ РАДИАТОР ОТОПЛЕНИЯ
Руководство по эксплуатации
MT-2426
Page 2
2
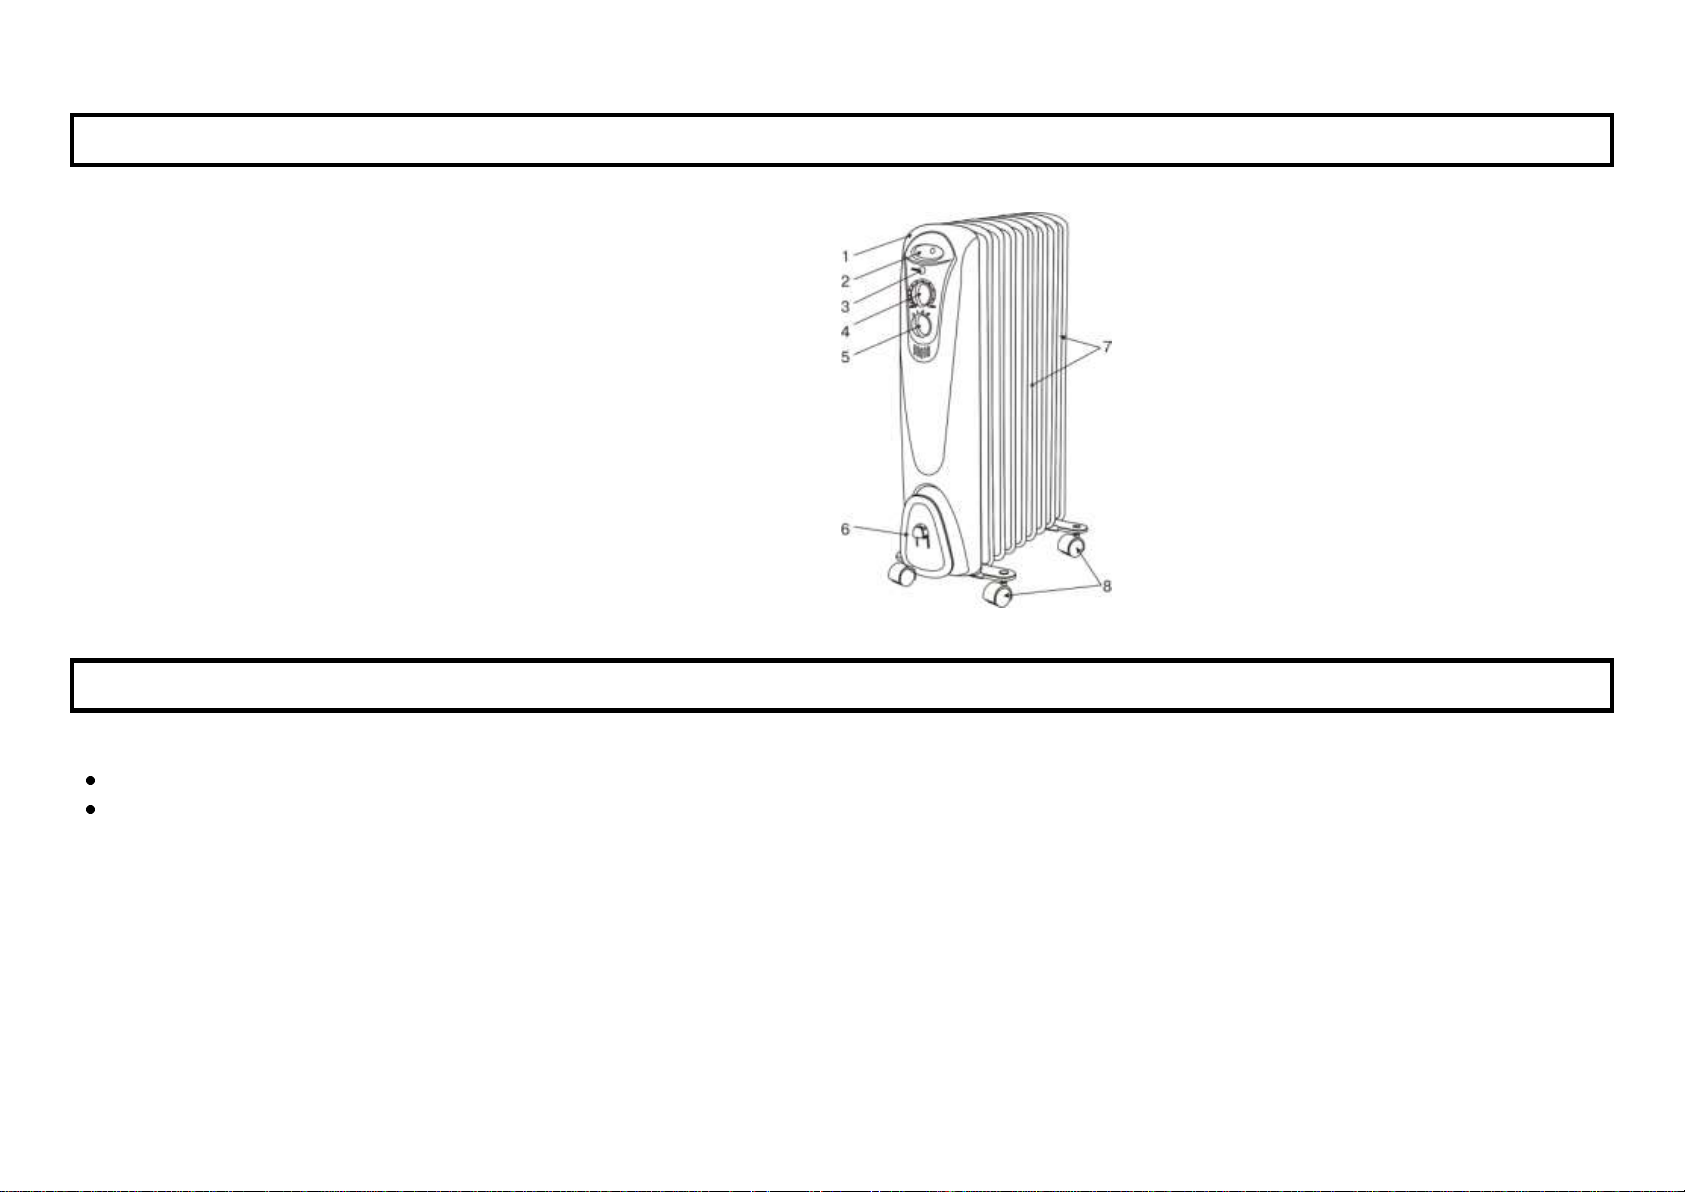
1. Front cover
2. Integrated handle
3. Pilot lamp
4. Thermostat knob
5. Power switch knob
6. Cord wrap
7. Heater units
8. Wheels
DESCRIPTION
IMPORTANT SAFEGUARDS
When using any electrical appliance, basic safety precautions should always be followed, including the following:
To ensure familiarity with the controls, safety features, and operation of your heater, read all instructions before use.
To reduce hazard of injury due to electric shock:
- Danger of electric shock exists even when the appliance is switched off. ALWAYS unplug the unit when not in use.
- Heater should never be used under conditions where it may be immersed, or come in contact with water. Similarly do not plug in your heater if its surfaces
are damp.
- Do not operate the heater with a damaged cord set, or if it has been dropped, or damaged in any manner. Return it to an Autho rized Service center for
inspection, repairing and testing.
- Close supervision is required when any appliance is used by or near children.
- Disconnect the cord from the outlet before cleaning.
- Unplug heater by grasping plug and pulling it from the outlet. NEVER YANK ON CORD.
- When store your heater, keep it in a cool, dry place.
Page 3
3
WARNING:
The surface temperature of the flanges is higher, during use, thus closely supervise any children in the area of this appliance.
Do not use on a wet place to prevent electrical shock.
Do not leave the cable on hot surfaces.
Do not use outdoors.
If malfunctions happen during operation, please put it to nearby appointed service center with the maintenance card. Never disassemble it by yourself.
Be sure to pull out the plug from an outlet when not in use and before cleaning.
DO NOT OPERATE WITHOUT CASTORS ATTACHED!
CAUTION! Do not cover the oil heater while it is on. This can cause dangerous temperature increase.
ASSEMBLING
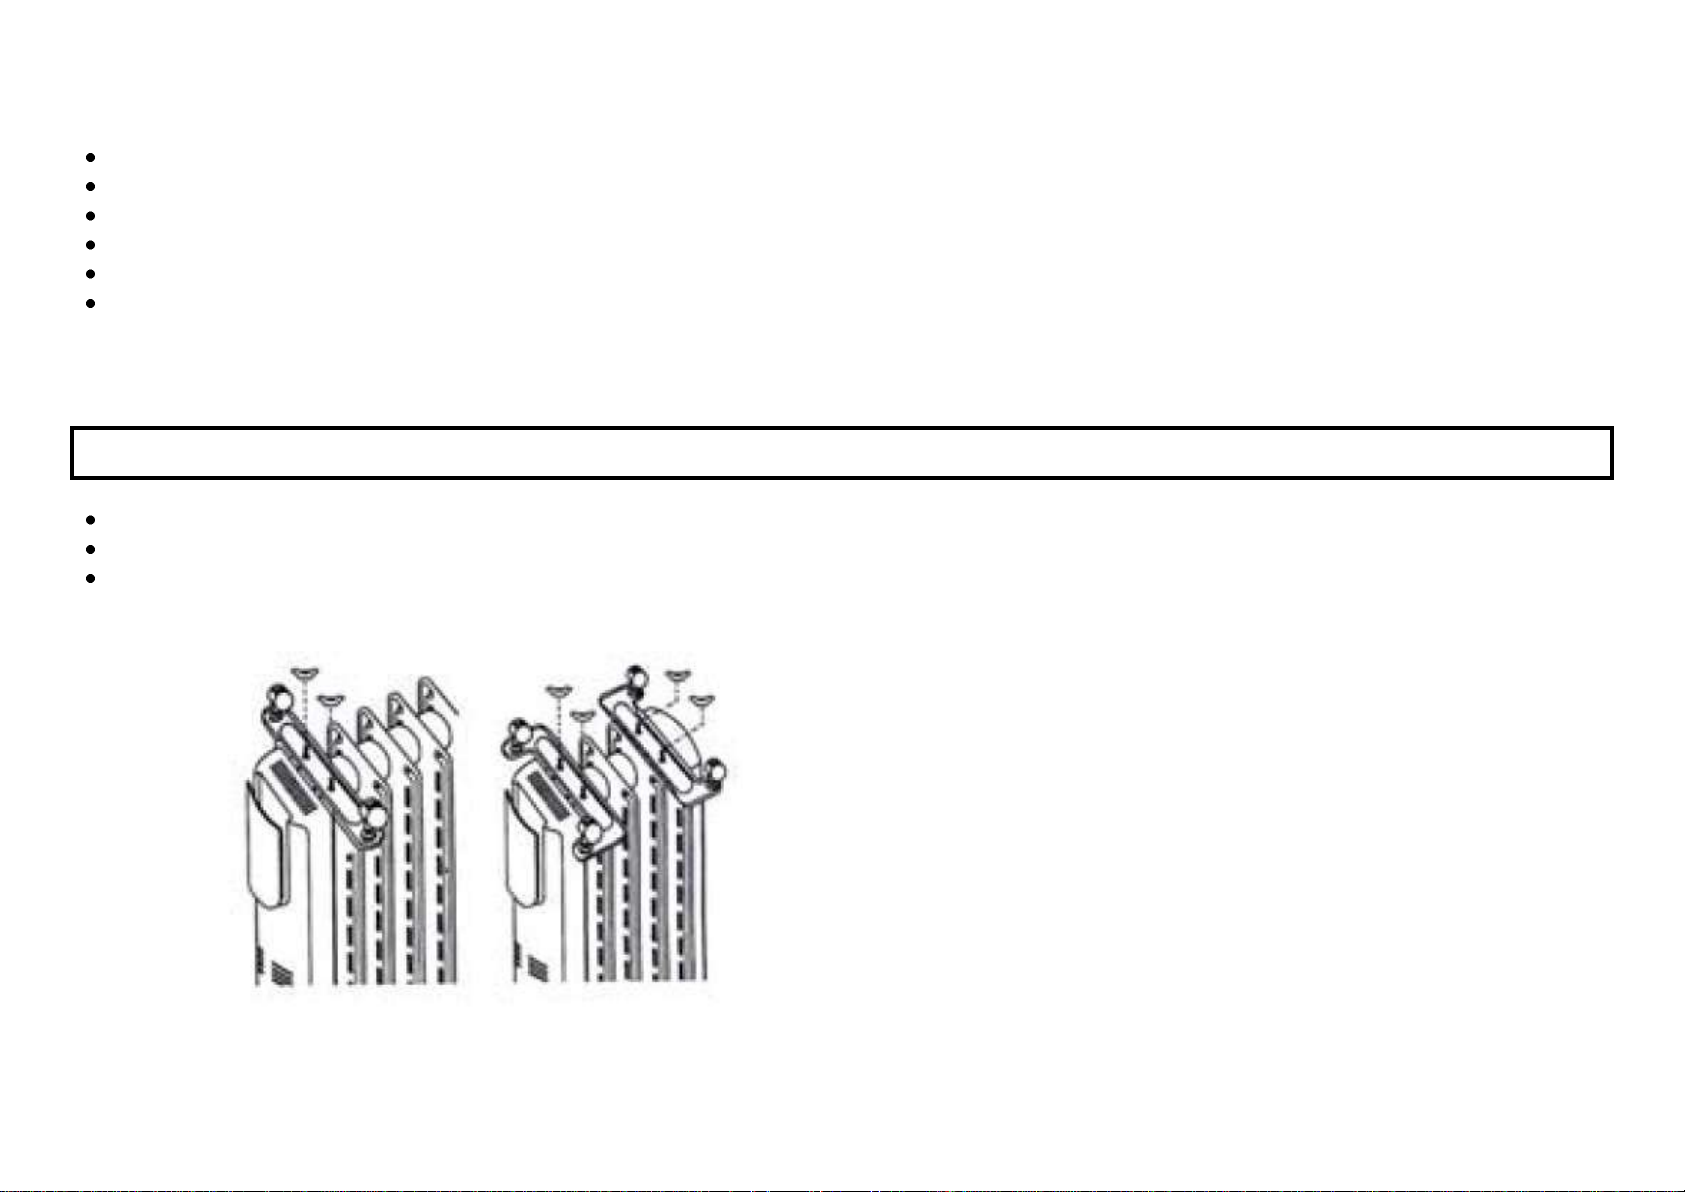
Carefully turn the oil heater upside down on a carpet or any other soft surface, in order to avoid damaging the protective layer.
Put two wheels and supporting plate assemblies on the unit and insert the “U” shape screw into two holes of the supporting plate.
Insert the butterfly nuts and screw them tightly counter clockwise.
Page 4

4
CAUTIONS FOR OPERATION
Never use the unit in places which are not flat and unstable.
Do not insert and pull out the plug by wet hands, as this may cause electrical shock.
Power supply capacity should be enough.
The oil heater must always operate in vertical position.
The unit should be far away from the flammable or easily deformed objects while in operation.
Do not scrap the surface with rod or sharp hard tools, as this may cause deformation and rust because of damage of paint coat.
During use surface temperature of the flanges is perhaps higher, thus do not touch it except handle, knob and the keys.
USING APPLIANCE
Never use the unit in place which is not flat, make sure there are no flammable or easy deformed objects within 1m.
The heater is suitable for operation on an A. C. electricity supply having the same voltage as that shown on its rating label.
The unit should be earthed. Do not cover the appliance.
Insert the plug to the wall outlet after setting the thermostat to the “MIN” position and setting the power switch to the “OFF” position.
Turn the power switch to the “HIGH” position, then turn the thermostat to the “HIGH” position, at this moment the unit begins working, when the temperature rises to what
you are satisfied with, slowly turn the thermostat counter clockwise until the indicator light is out, and the room temperature thus can be kept constant. If you want to raise
or lower the room temperature, you can make another regulation: Turn the thermostat clockwise to raise the temperature, or counter-clockwise to lower it and you can
also set the power switch to position I, II or III for different power selecting.
Position I – Minimum power (600 W)
Position II – Medium power (900 W)
Position III – Maximum power (1500 W)
NOTE:
The pilot lamp will be on only if the temperature is below the setting value of the thermostat.
The room must be sealed in good condition, if not, it will not make good result because of heat escape.
The outlets of the control chamber must be kept ventilative, if not, undue move of the thermostat may occur.
After use, switch off the keys for power setting first, then turn the thermostat to the “OFF” position, and pull out the power supply plug.
Page 5

5
CLEANING AND MAINTENANCE
Power supply
220 - 240 V, 50 Hz
Max. power
1500 W
Net / Gross weight
7.5 kg / 8.3 kg
Radiating fins quantity
7
Gift box dimensions (L x W x H)
385 mm x 145 mm x 662 mm
Recommended room space
15 m²
The oil heater should be cleaned regularly to wipe out the dust in the surface of flanges.
Disconnect electricity supply and allow radiator to cool, wipe over with a soft damp cloth. Do not use detergent or abrasives.
Do not scarp the surfaces of flanges with sharp hard tools, to avoid surfaces getting rusty, because of damage of the paint coat.
SPECIFICATION
Page 6

6
1. Передняя панель
2. Встроенная ручка
3. Индикатор нагрева
4. Термостат
5. Переключатель мощности
6. Устройство для хранения электрошнура
7. Нагревательные элементы
8. Колеса
ОПИСАНИЕ
МЕРЫ БЕЗОПАСНОСТИ
Внимательно прочитайте данную инструкцию перед эксплуатацией прибора во избежание повреждений в процессе использования и
сохраните ее для справок в дальнейшем.
Во избежание поражения электротоком всегда отключайте прибор от сети питания, если Вы им не пользуетесь.
Не используйте прибор вблизи легковоспламеняющихся и горючих предметов и избегайте контактов прибора с водой. Не используйте прибор
в помещениях с повышенной влажностью.
Не включайте прибор в сеть при попадании воды на контрольную панель прибора.
Не используйте прибор с поврежденным сетевым шнуром. При повреждении сетевого шнура он должен быть немедленно заменен. Ремонт
прибора должен выполняться квалифицированными специалистами.
Особенная осторожность необходима при использовании прибора в непосредственной близости от детей.
Всегда отключайте прибор от сети питания перед чисткой.
При отключении прибора от сети питания не тяните за сетевой шнур.
Прибор должен храниться в сухом, прохладном месте.
Page 7

7
ВНИМАНИЕ:
Во время использования поверхность прибора сильно нагревается, поэтому будьте осторожны при нахождении работающего прибора в непосредственной
близости от детей.
Во избежание поражения электротоком не устанавливайте прибор на влажную поверхность.
Следите за тем, чтобы шнур не касался горячей поверхности.
Не используйте прибор вне помещения.
При обнаружении неполадок в работе прибора во время его использования немедленно отнесите его в ближайший сервисный центр. Никогда не
ремонтируйте и не разбирайте прибор самостоятельно.
Убедитесь, что прибор отключен от сети питания, если Вы его не используете, а также перед чисткой.
В ПРОЦЕССЕ ЭКСПЛУАТАЦИИ СЛЕДИТЕ ЗА ТЕМ, ЧТОБЫ ПРИБОР НАХОДИЛСЯ СТРОГО В ВЕРТИКАЛЬНОМ ПОЛОЖЕНИИ!
БЕЗ УСТАНОВКИ КОЛЕС ПРИБОР ИСПОЛЬЗОВАТЬ НЕЛЬЗЯ!
НЕ НАКРЫВАЙТЕ НИЧЕМ ПРИБОР, КОГДА ОН РАБОТАЕТ.
СБОРКА
Аккуратно переверните радиатор отопления и поставьте на ковер или на другое мягкое покрытие, чтобы избежать повреждения защитного покрытия.
Установите ножки с колесиками на прибор с помощью дугообразного крепления.
Зафиксируйте ножки, плотно закрутив крыльчатые гайки против часовой стрелки
Переверните радиатор отопления в рабочее положение.
УБЕДИТЕСЬ В ТОМ, ЧТО ПРИБОР ЗАНЯЛ УСТОЙЧИВОЕ ВЕРТИКАЛЬНОЕ ПОЛОЖЕНИЕ!
Page 8

8
МЕРЫ БЕЗОПАСНОСТИ ПРИ ИСПОЛЬЗОВАНИИ ПРИБОРА
Никогда не устанавливайте прибор на неустойчивую, неровную поверхность.
Во избежание поражения электротоком не дотрагивайтесь до сетевого шнура влажными руками при включении и выключении прибора.
Во время эксплуатации следите за тем, чтобы прибор находился в строго вертикальном положении.
Никогда не располагайте прибор вблизи легковоспламеняющихся и деформирующихся от температуры предметов.
Чтобы избежать повреждения покрытия прибора, появления ржавчины и различных его деформаций, никогда не кладите на прибор тяжелые вещи и не
дотрагивайтесь до него острыми предметами.
Никогда не касайтесь самого радиатора во время его работы во избежание ожогов. Используйте ручки, кнопки и переключатели.
Данный нагреватель предназначен только для обогрева помещений. Во избежание опасности возгорания не используйте его для других целей, не
предусмотренных данной инструкцией.
ИСПОЛЬЗОВАНИЕ ПРИБОРА
Никогда не устанавливайте прибор на неустойчивую, неровную поверхность. Не используйте прибор вблизи легковоспламеняющихся и деформирующихся во
время работы прибора предметов. Во избежание опасности возгорания, расстояние от нагревателя до ближайшего предмета должно быть не менее 1м.
Напряжение питания прибора указано в таблице с техническими характеристиками. Перед подключением к сети убедитесь, что напряжение питания прибора
совпадает с напряжением Вашей локальной сети.
Прибор должен быть заземлен. Не накрывайте прибор.
Перед тем как подключить прибор к сети питания установите термостат в положение “MIN” и переключатель мощности в положение “OFF” (Выкл.).
Подключите прибор к электросети.
Установите переключатель мощности и термостат в максимальное положение. Прибор начнет работать. Если Вы почувствовали, что в комнате достаточно
высокая температура и в дальнейшем нагреве нет необходимости, поверните термостат против часовой стрелки, до тех пор, пока не погаснет индикатор
нагрева. Теперь прибор автоматически будет поддерживать нужную Вам температуру в комнате.
Для изменения температуры в комнате существует два возможных варианта:
- вращение термостата в нужном направлении: против часовой стрелки – для уменьшения температуры, по часовой стрелке - для увеличения температуры.
- установка различных уровней мощности
Положение I – Минимальная мощность (600 Ватт)
Положение II – Средняя мощность (900 Ватт)
Положение III – Максимальная мощность (1500 Ватт)
Когда температура воздуха в комнате упадет ниже заданного уровня, радиатор автоматически начнет нагреваться до установленной температуры. Таким
образом, температура воздуха в комнате постоянно поддерживается на заданном уровне с минимальными затратами электроэнергии.
Page 9

9
ПРИМЕЧАНИЕ:
Электропитание
220 - 240 Вольт, 50 Герц
Максимальная мощность
1500 Ватт
Вес нетто / брутто
7,5 кг / 8,3 кг
Количество секций
7
Размеры коробки (Д х Ш х В)
385 мм х 145 мм х 662 мм
Рекомендуемая площадь помещения
15 м²
Индикатор нагрева горит только тогда, когда включается нагревательный элемент для поддержания установленной температуры.
Комната должна быть закрыта, в противном случае Вы не достигнете желаемого результата.
Во избежание поломок термостата, должна работать система вентиляции воздуховыводящих отверстий.
После окончания использования прибора сначала переведите в положение “OFF” (Выкл.) переключатель мощности, затем термостат и только после этого
отключите прибор от сети питания.
ЧИСТКА И УХОД
Регулярно очищайте внешнюю поверхность прибора, т. к. скопление грязи между пластинами радиатора уменьшает эффективность его работы.
Перед чисткой радиатора отключите его от сети питания и дайте остыть.
Чистка производится при помощи мягкой влажной тряпочки. Не используйте для чистки агрессивные химические или абразивные вещества.
Не производите чистку воздушных зазоров между секциями радиатора при помощи острых предметов, т. к. это может привести к нарушению покрытия и
образованию ржавчины.
ТЕХНИЧЕСКИЕ ХАРАКТЕРИСТИКИ
Завод-изготовитель: GD Мидея Инвайронмент Эплайнс Мфг Ко., Лтд
№28 Ист Эрия, Хесуэй Индастриал Парк, Донгфу Роуд, Донфенг Таун, Джонгшань, Гуандонг, Китай
 Loading...