

Page 1
INSTALLATION & TECHNICAL MANUAL
GENERAL
1. TEV LTD recommend that personnel working on this equipment be skilled and fully conversant
with the appropriate Refrigeration and Electrical practices and have sound knowledge of current
Industrial Safe Working practices.
2. These units are supplied with a holding charge of oxygen free nitrogen and polyolester oil.
Do not mix oils or refrigerants.
3. These units when installed contain live electrical components, moving parts and refrigerant under
pressure. Always site out of reach of children and protect from vandalism.
4. The data plate only gives information for the outdoor unit.
5. FUSES - for recommended fuse size see page 9.
6. The refrigerant used should be identified by locating the R404A label (if appropriate) on the unit
case
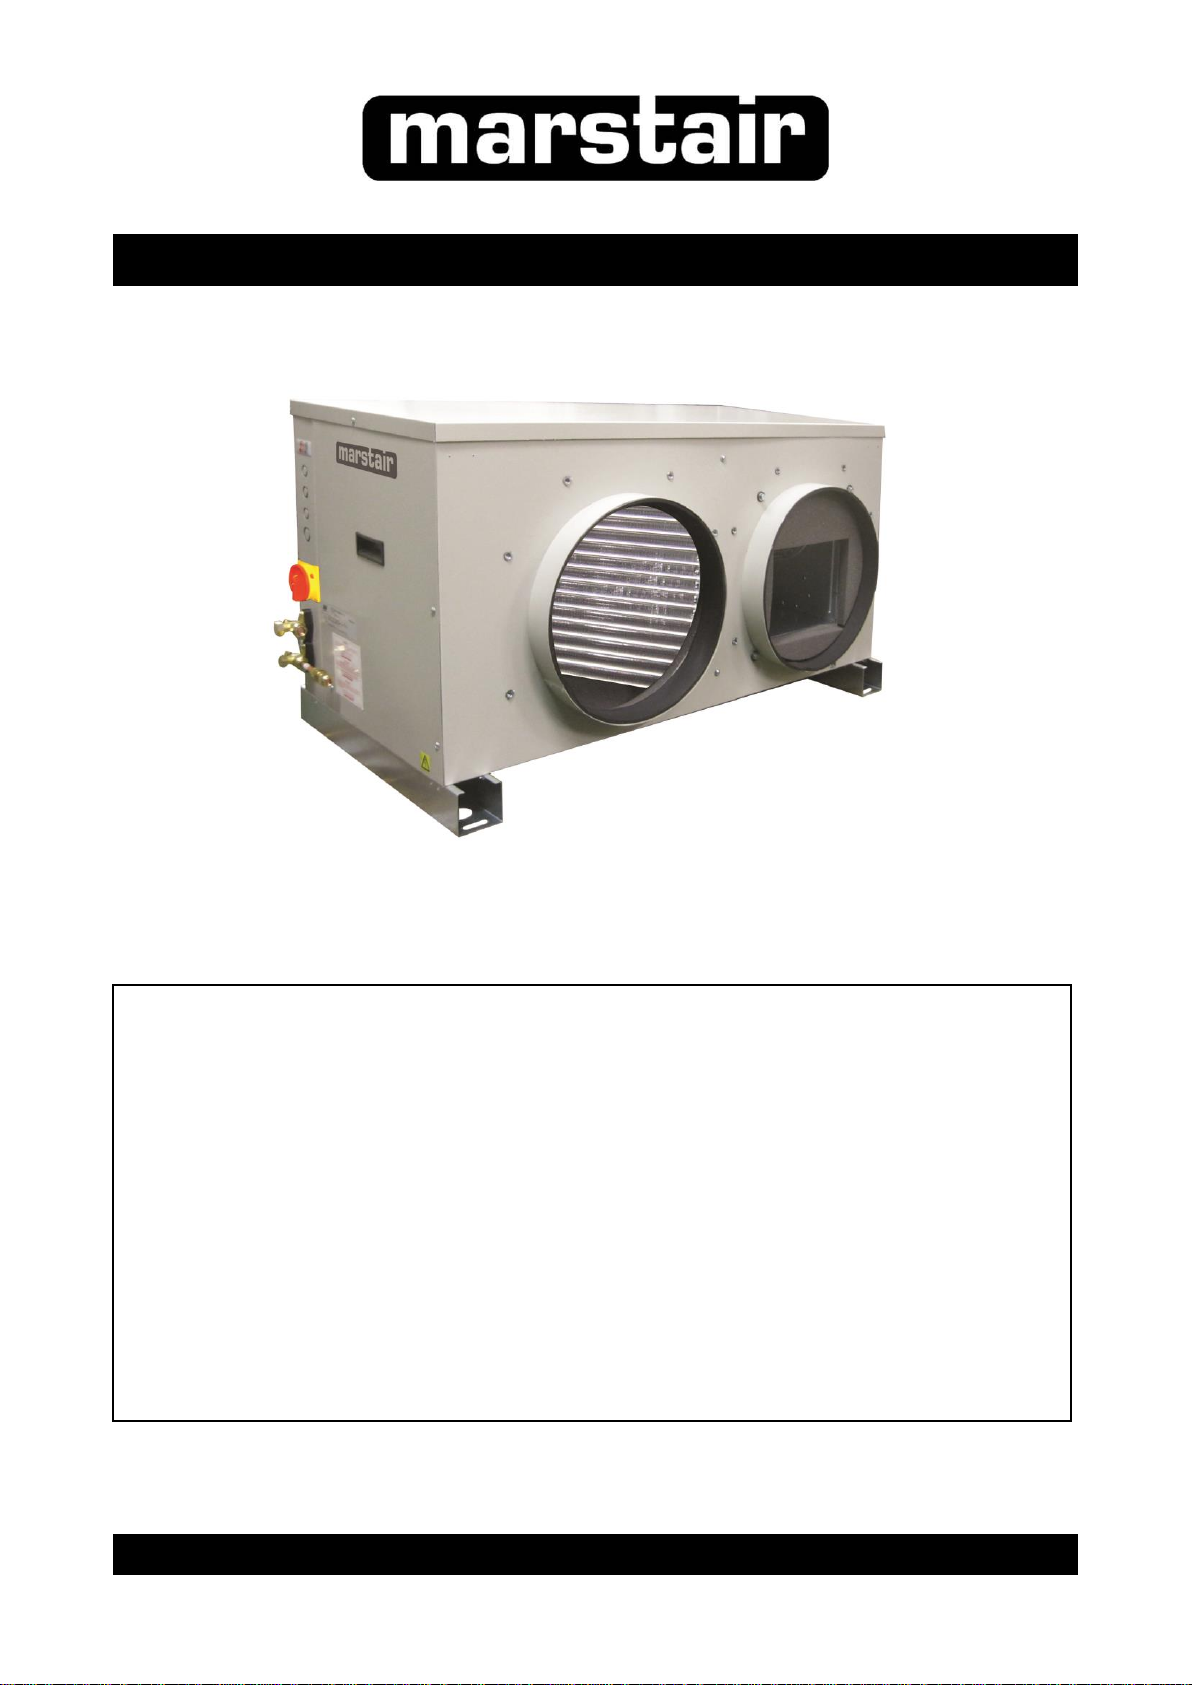
MARSTAIR DUCTED REFRIGERATION CONDENSING UNITS (DRC+)
54208007-06
Page 2

CONTENTS
PAGE
SPECIFICATION DETAILS.
3
DIMENSIONS & WEIGHTS.
4
MOUNTING.
5
PIPEWORK.
6-8
ELECTRICAL & FUSES.
8
REFRIGERANT.
9-10
RECEIVER.
11
INDEX
NOTE
IF MECHANICAL PUMP DOWN OPERATION IS REQUIRED CONNECT A LINK WIRE
BETWEEN TERMINALS L1 & 3.
IF THIS LINK IS USED THEN TERMINAL 5 CAN NOT BE USED AS AN ALARM FACILITY
2/11
54208007-06
Page 3
DRC+ 20
30
40
50
60
80
Nominal cooling capacity
(-5°C evaporating temp &
32°C ambient temp)
kW
1Ph
3Ph
1.80
1.80
2.48
2.48
3.52
3.52
4.05
4.05
4.86
4.86
5.87
5.87
Operating weight kg
70
70
72
81
81
84
1Ph (230V 50Hz) compresser load only (at nominal cooling capacity)
Power (nominal)
kW
1.16
1.46
1.87
2.20
2.56
2.95
Starting current LRA
A
28
36
50
51
60
71
Nominal current FLA
A
5.9
7.2
9.3
10.0
12.0
14.1
3Ph (400V 50Hz) compresser load only (at nominal cooling capacity)
Power (nominal)
kW - 1.45
1.90
2.12
2.52
2.80
Starting current LRA
A - 18
22
24
24
27
Nominal current FLA
A - 2.7
3.9
4.0
4.2
4.8
Sound Pressure Levels (SPL) at 3m distance free field conditions (Reference 2x10⁻⁵N/M²)
Fan Speed Min
dBA
35
35
35
44
44
44
NR
29
29
29
32
32
32
Fan Speed Max
dBA
52
52
52
54
54
54 NR
46
46
46
48
48
48
Condenser fan (1Ph 230V 50Hz)
Airflow (max speed)
m³/s
0.44
0.42
0.38
0.53
0.53
0.48
Fan Motor rating
kW
0.34
0.34
0.34
0.34
0.34
0.34
Nominal current FLA
A
2.6
2.6
2.6
2.6
2.6
2.6
Starting Current
A
6.0
6.0
6.0
6.0
6.0
6.0
MODEL
Ambient
Temp
°C
EVAPORATING TEMPERATURE °C
-15
-10
-5
COOLING CAPACITY AND POWER INPUT kW
CAP.
POWER
CAP.
POWER
CAP.
POWER
DRC+ 20
27
1.23
0.85
1.59
0.93
2.00
1.01
32
1.09
0.85
1.43
0.94
1.80
1.03
40
0.90
0.85
1.27
0.96
1.49
1.07
DRC+ 30
27
1.84
1.09
2.27
1.19
2.75
1.29
32
1.64
1.09
2.04
1.20
2.48
1.31
40
1.35
1.09
1.82
1.23
2.06
1.37
DRC+ 40
27
2.66
1.64
3.24
1.74
3.89
1.85
32
2.40
1.66
2.94
1.77
3.52
1.91
40
1.98
1.68
2.44
1.84
2.92
2.01
DRC+ 50
27
2.86
1.84
3.60
1.95
4.47
2.08
32
2.58
1.86
3.27
1.99
4.05
2.15
40
2.13
1.88
2.71
2.06
3.36
2.26
DRC+ 60
27
3.43
2.07
4.33
2.18
5.37
2.31
32
3.10
2.09
3.92
2.22
4.86
2.38
40
2.56
2.11
3.25
2.29
4.03
2.49
DRC+ 80
27
4.15
2.44
5.23
2.55
6.48
2.68
32
3.75
2.46
4.74
2.59
5.87
2.75
40
3.09
2.48
3.93
2.66
4.87
2.86
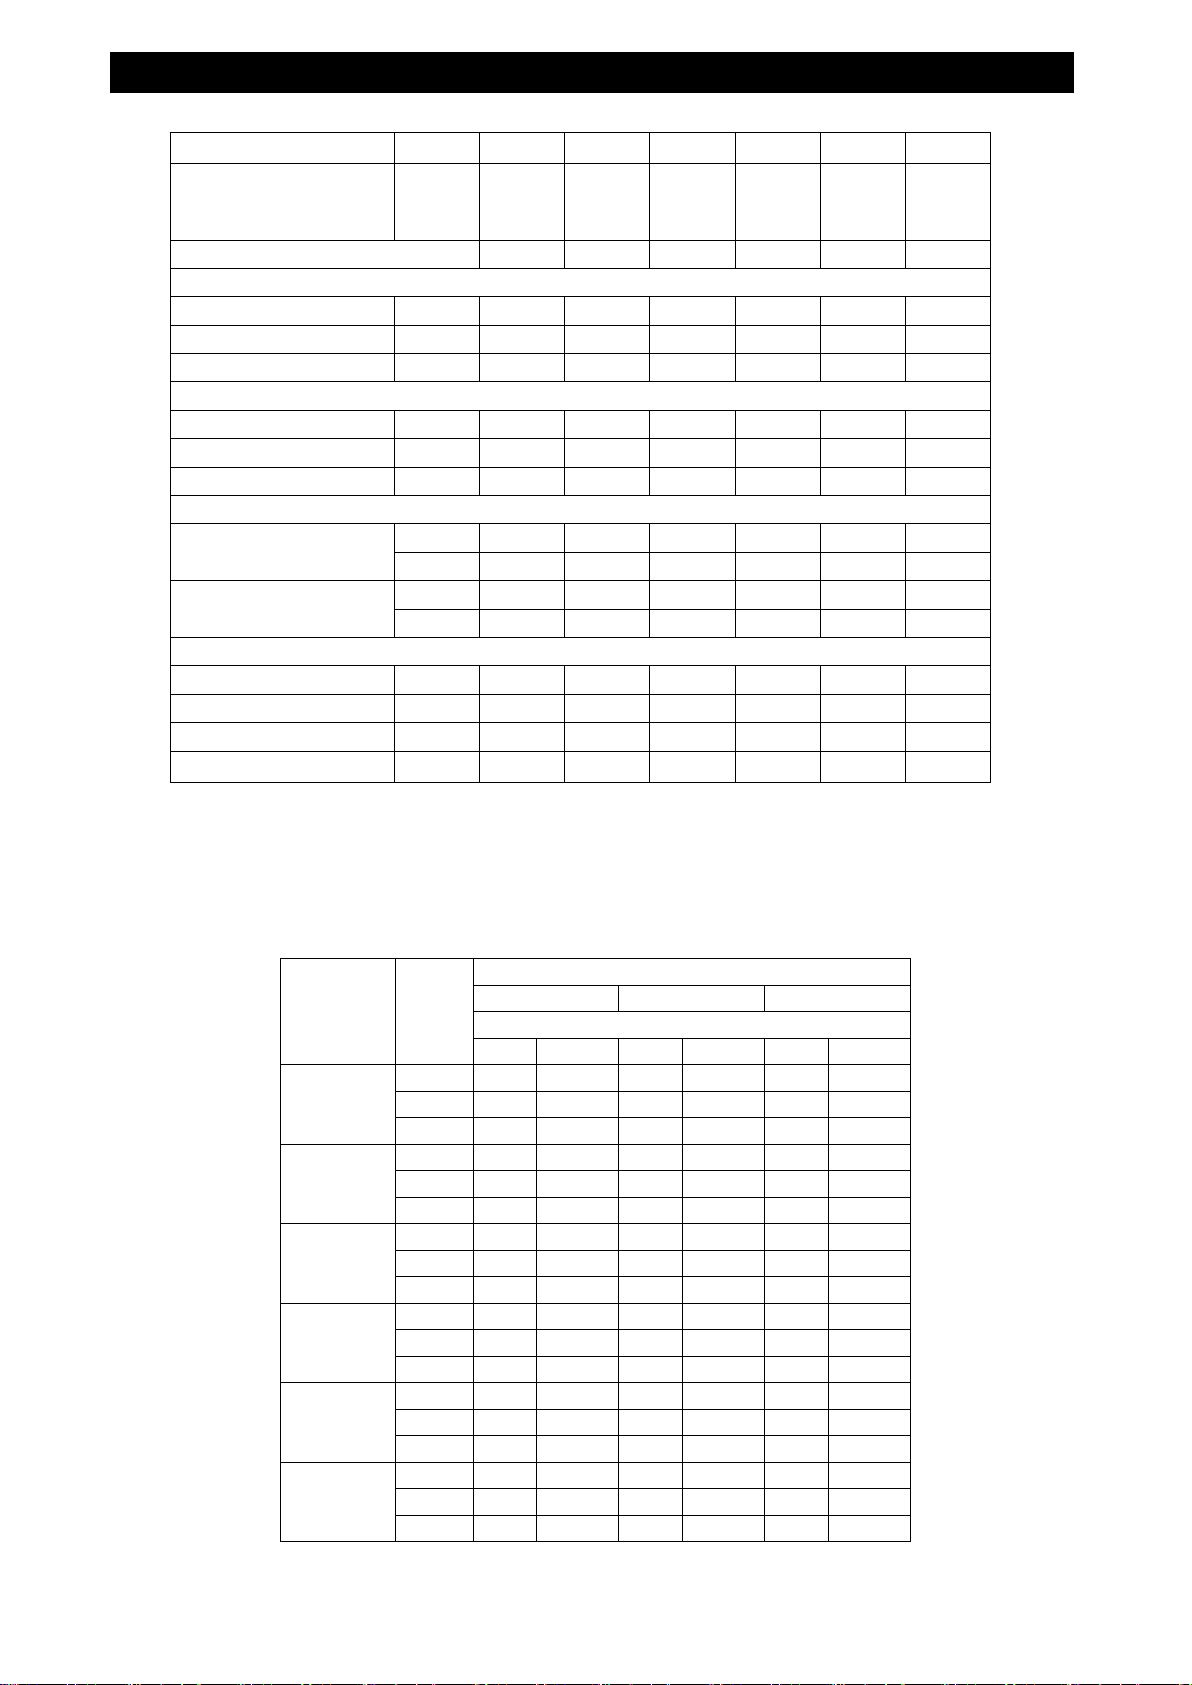
SPECIFICATION DETAILS
Maximum external resistance 100Pa
DRC+ 20 - 80 CAPACITIES
3/11
54208007-06
Page 4
ITEM
DESCRIPTION
QUANTITY
1
Stabilizing brackets
4 2 No10 Screws
8
3
Cable glands
2
Model A B C D E F G H J K
Spigot Ø
Weight (kg)
DRC+ 20
930
510
495
1004
490
65
65
210
317
757
354
70
DRC+ 30
930
510
495
1004
490
65
65
210
317
757
354
70
DRC+ 40
930
510
495
1004
490
65
65
210
317
757
354
72
DRC+ 50
1100
510
560
1174
490
65
65
240
392
865
404
81
DRC+ 60
1100
510
560
1174
490
65
65
240
392
865
404
81
DRC+ 80
1100
510
560
1174
490
65
65
240
392
865
404
84
SPIGOT
CONTENTS
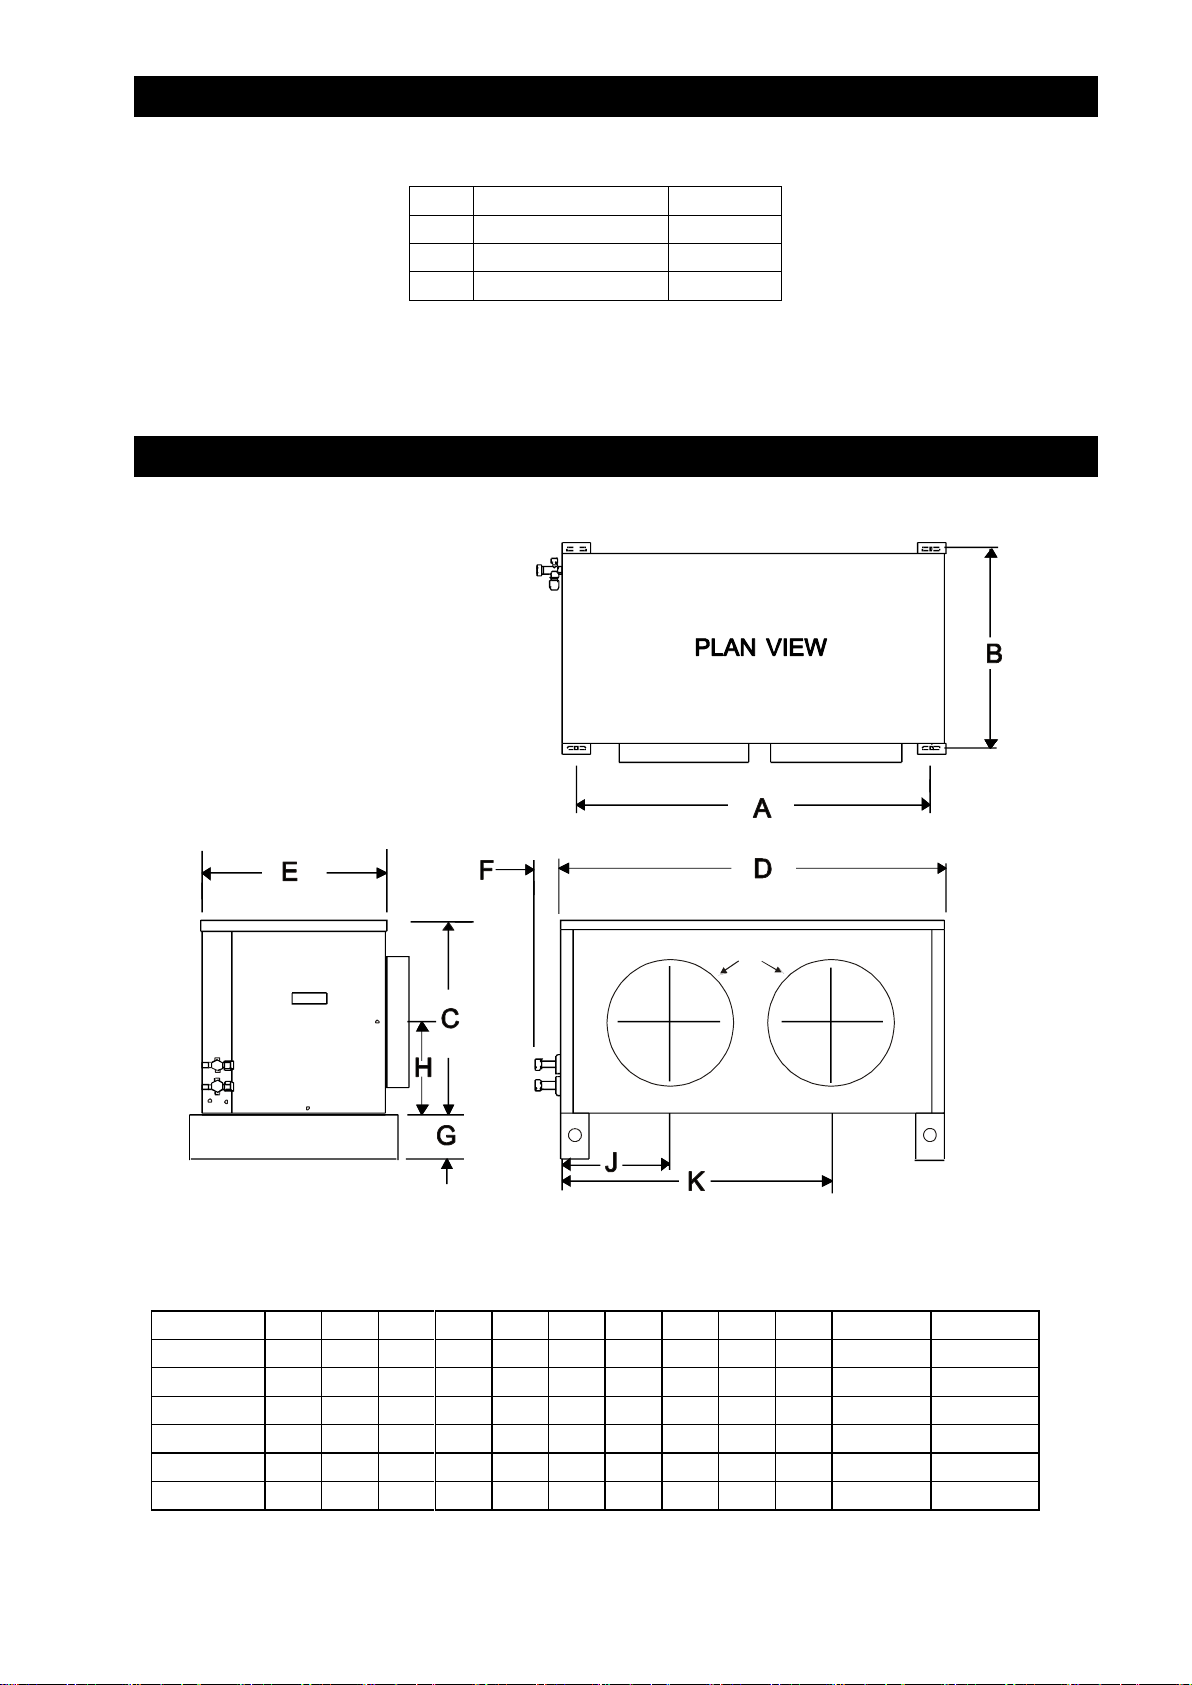
DIMENSION & WEIGHTS
NOTE: Units are supplied with a packing piece supporting the blower assembly, this MUST be removed prior
to commissioning.
4/11
54208007-06
Page 5
DRC+
A (mm)
B (mm)
15 to 40
930
510
50 to 80
1100
510
MOUNTING
OR
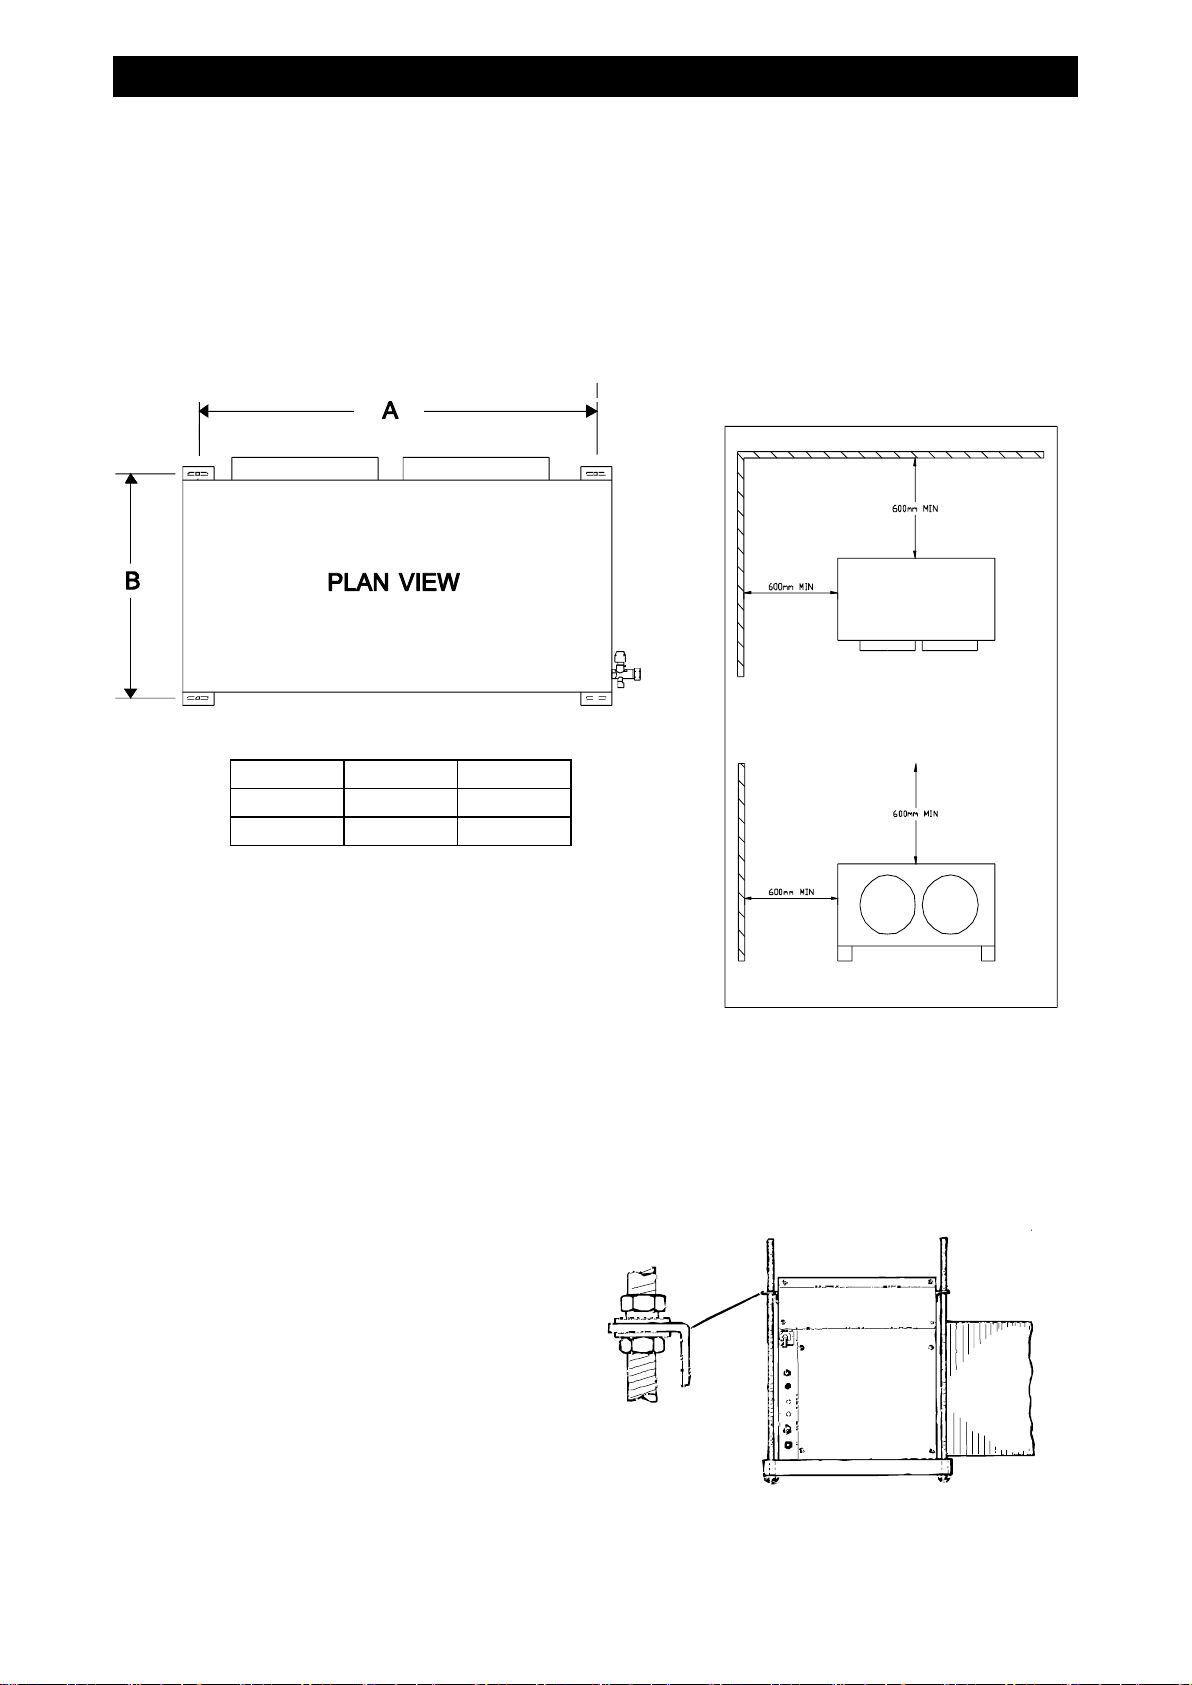
Ducted units are designed to be hung on a wall (brackets available as a kit), suspended from a ceiling
(installer supplied fittings), or to stand on a flat surface. Whichever method is used it is essential that the
mounting surface is capable of supporting the unit's weight. Leave space around the unit for air circulation
and access for installation and maintenance.
FLOOR MOUNTING
Using the appropriate side of the packing carton as a template, (centres marked A), mark out and drill 4
holes to suit maximum M8 bolts (also see Fig. 1). Secure the unit to the floor. Discard the 4 stabilizing
brackets and 8 screws.
FIG.1.
SUSPENSION MOUNTING
The installer must supply 4 x M8 threaded rods with 16 nuts and
washers to suit.
IMPORTANT: The stabilizing brackets provided MUST be used
when suspending a unit.
Fit the stabilizing brackets to the top corners of the backpanel and front face using the No.
10 screws provided, (2 per bracket).
If these brackets are omitted the unit will be subject to unacceptable movement on
compressor start (Fig. 2).
Where long drops of M8 rod are used, it is advisable to incorporate flexible pipes in the suction and
expansion lines.
Using the template printed on the side of the packing
carton, (centres marked A), mark out the ceiling and
drill 4 holes to suit M8 screwed rod, (see Fig. 1). Raise
the unit to the required height and pass the screwed
rods through the mounting holes in the units feet and
stabilizing brackets. Secure the unit with a nut and
washer on either side of each stabilizing bracket and
two nuts and washers underneath each foot mounting
hole, (Fig. 2).
FIG.2.
WALL MOUNTING
Wall mounting brackets are available as an optional Kit (53200407)
5/11
54208007-06
Page 6
Size
20
30
40
50
60
80
Liquid
3/8
3/8
3/8
3/8
3/8
1/2
Suction
3/8
1/2
1/2
1/2
5/8
5/8
PIPEWORK
DUCTWORK
Each unit is supplied with air inlet and discharge spigots.(see page 2 for sizes)
These may be used for connecting installers ducting or used with the optional duct, plenum and grille kits
(refer to kit instructions for installation)
NOTE: It is essential that ducting is adequately insulated to prevent sweating. An insulation thickness of at
least 45mm is recommended.
MAXIMUM PIPE RUNS
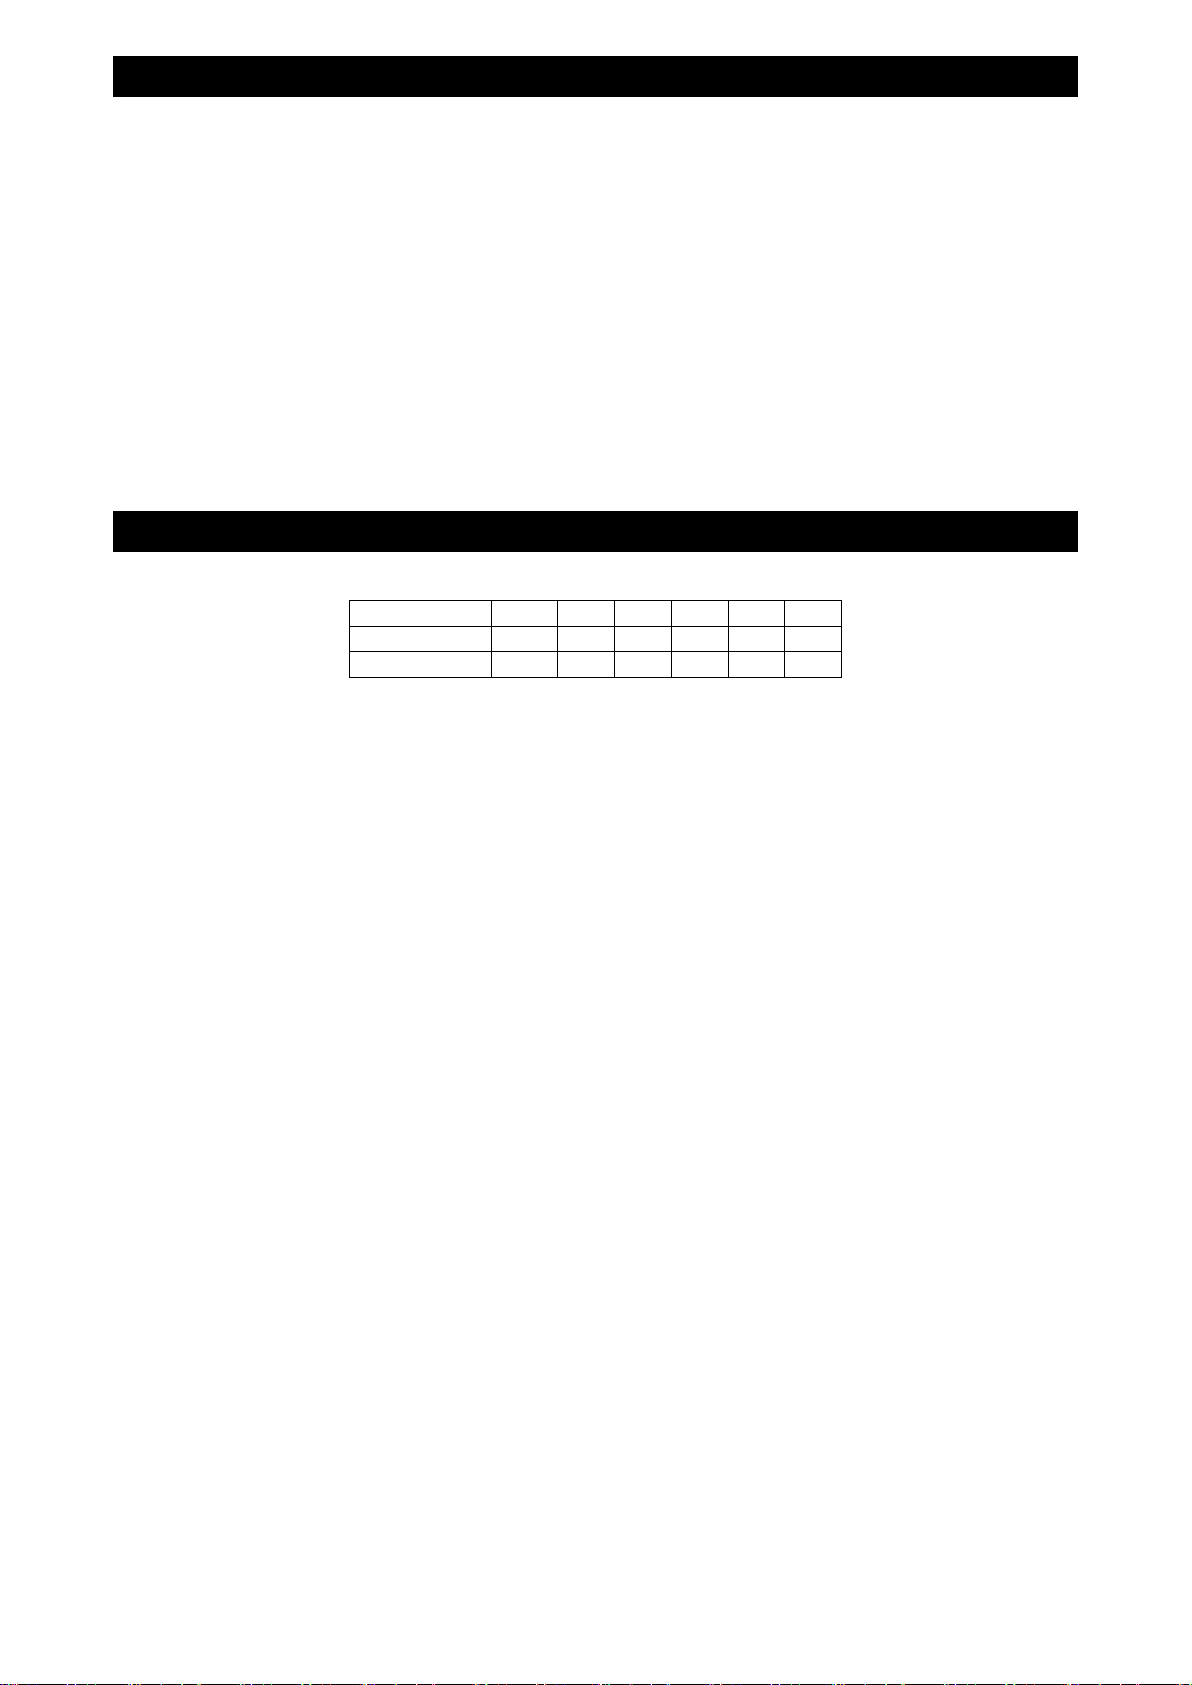
45m maximum including 6m lift. There will be no significant loss of capacity for extended pipe runs provided
pipes are correctly sized.
CALCULATING EQUIVALENT LENGTHS
The effects of bends and fittings must be taken into account.
Pipe sizes are based on:
Minimum of 2.5 m/s (500 fpm) suction gas velocity for horizontal or downflow.
Minimum of 5.0 m/s (1000 fpm) suction gas velocity for upflow.
Maximum of 20.0 m/s (4000 fpm) suction gas.
Where vertical risers exceed 3m, oil traps must be formed in the pipe. This will help ensure that oil returns to
the compressor. Typically fit an oil trap every 3m with a trap at the bottom of the riser.
GOOD PRACTICE
Keep pipe runs as short as possible.
Avoid sharp bends
Fully insulate both suction and liquid including mechanical connections
Try to avoid running pipes through hot areas.
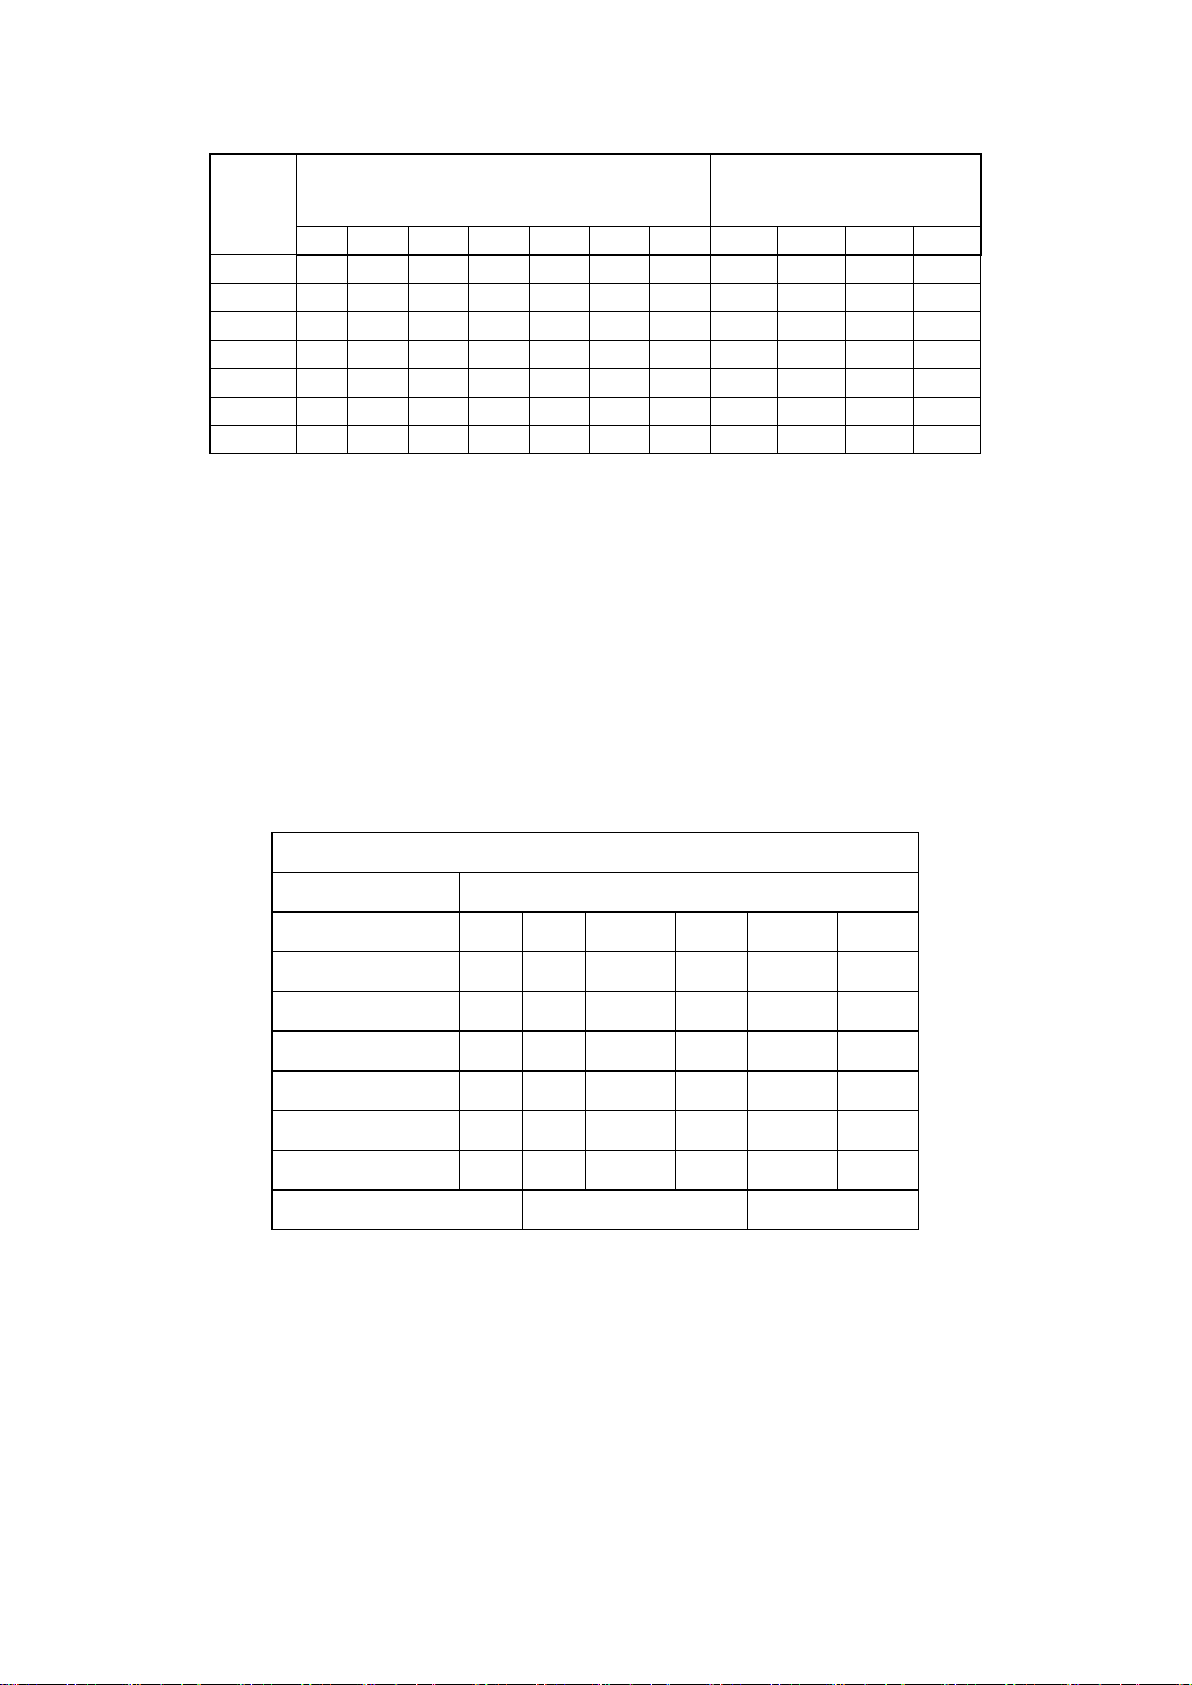
The maximum pipe lengths to be used for each pipe size and outdoor unit are shown in the table below.
Use of these sizes and lengths is recommended in order to achieve optimum system performance. Smaller
suction line sizes may be used but will impose a loss in performance of approximately 2% per 1K additional
suction line pressure drop on total cooling and approximately 1% on sensible cooling.
6/11
54208007-06
Page 7
FITTING LOSSES, in equivalent straight lengths of pipe (m)
Pipe Size (outside diameter in inches)
Fitting
⅜ ½ ⅝ ¾ ⅞
1⅛
45° Bend
0.12
0.15
0.18
0.21
0.24
0.3
90° Bend R/d = 1
0.37
0.43
0.49
0.55
0.61
0.79
90° Bend R/d = 1.5
0.24
0.27
0.30
0.37
0.43
0.52
180° Bend C/d = 1.5
0.73
0.91
1.10
1.28
1.46
1.83
180° Bend C/d = 2.5
0.46
0.55
0.64
0.76
0.85
1.07
90° Elbow
0.67
0.85
1.04
1.25
1.46
1.89
R = Radius of bend
d = Diameter of tube
C = Centres of bend
UNIT
SIZE
MAXIMUM LENGTH OF EQUIVALENT
SUCTION LINE PIPE SIZES (m)
LIQUID LINE
⅜ ½ ⅝ ¾ ⅞
1⅛
1⅜ ⅜ ½ ⅝ ¾
20
7.5
23
45
45
30
15
45
45
40
10
36
45 7.5
45
45
10
36
45 7.5
45
50
7.5
18
45 7.5
45
60
14
36
45
7.5
45
80
11
30
45 45
PIPE SIZE
In calculating equivalent lengths of pipe runs, the effect of bends and fittings must be taken into account. The
table below covers fittings most likely to be encountered in this type of installation. The equivalent lengths of
all fittings in a particular pipe run must be added together and the total added to the actual length of pipe in
the run, in order to calculate its total equivalent length.
Use the shortest possible route, avoiding sharp bends.
Fully insulate both the suction and expansion lines, including the expansion device, since both lines may
sweat.
7/11
54208007-06
Page 8

CONNECTING THE UNITS
1PH FUSE SIZE
DRC+
20
30
40
50
60
80
FUSE
16
16
20
25
25
32
3PH FUSE SIZE
DRC+
30
40
50
60
80
FUSE
10
10
10
10
16
1. Connecting the pipework:
a. Remove the flare nuts from the service valves and release the nitrogen holding charge by slowly
opening the valves using a 5mm or 8mm allen key.
b. Ensure the suction line is fully insulated.
c. Place the flare nuts over the incoming pipework and flare the pipe ends.
d. Connect the pipework between the units. Do not leave pipes ends, valves etc open to the
atmosphere. Always use 2 spanners when tightening the flare nuts to avoid twisting the pipes.
Use a small amount of refrigerant oil on the mating surfaces.
EVACUATING
With the valves open, connect a vacuum pump to the service ports on the outdoor unit valves. Evacuate the
interconnecting pipework and indoor unit to 1000 microns (1 Torr) or better. Allow this to be held for a
minimum of 15 minutes.
ELECTRICAL
The installer supplies mains, control and interconnecting cables: equipment must be earthed.
Wiring must be carried out in accordance with local and national codes.
Mains supply cables must be size compatible with the recommended fuse.
Cable clamps for use with stranded cables are supplied in units 30 - 90 and should be used to secure
incoming/outgoing cables. Installers must supply a method of securing solid sheathed cables.
FUSES: The system and its supply/interconnecting wiring must be protected by fuses, preferably High
Rupture Current (HRC) motor rated types (to BS EN60269) or miniature circuit breakers to (BS EN60898) or
local codes having similar time lag characteristics, that allow starting of the compressor yet still afford close
overcurrent protection under running conditions. The ratings below are for HRC motor rated fuses.
8/11
54208007-06
Page 9
R404A REFRIGERANT
Electricsbox
Headpressure
adjustmentscrew
Fancapacitor
Charging the System:
1. Evacuate the system and interconnecting pipework as page 8 ensuring the service valves are fully
open.
2. Allow the evacuated system to draw in the majority of the refrigerant charge.
3. The final charge should be adjusted with the system running.
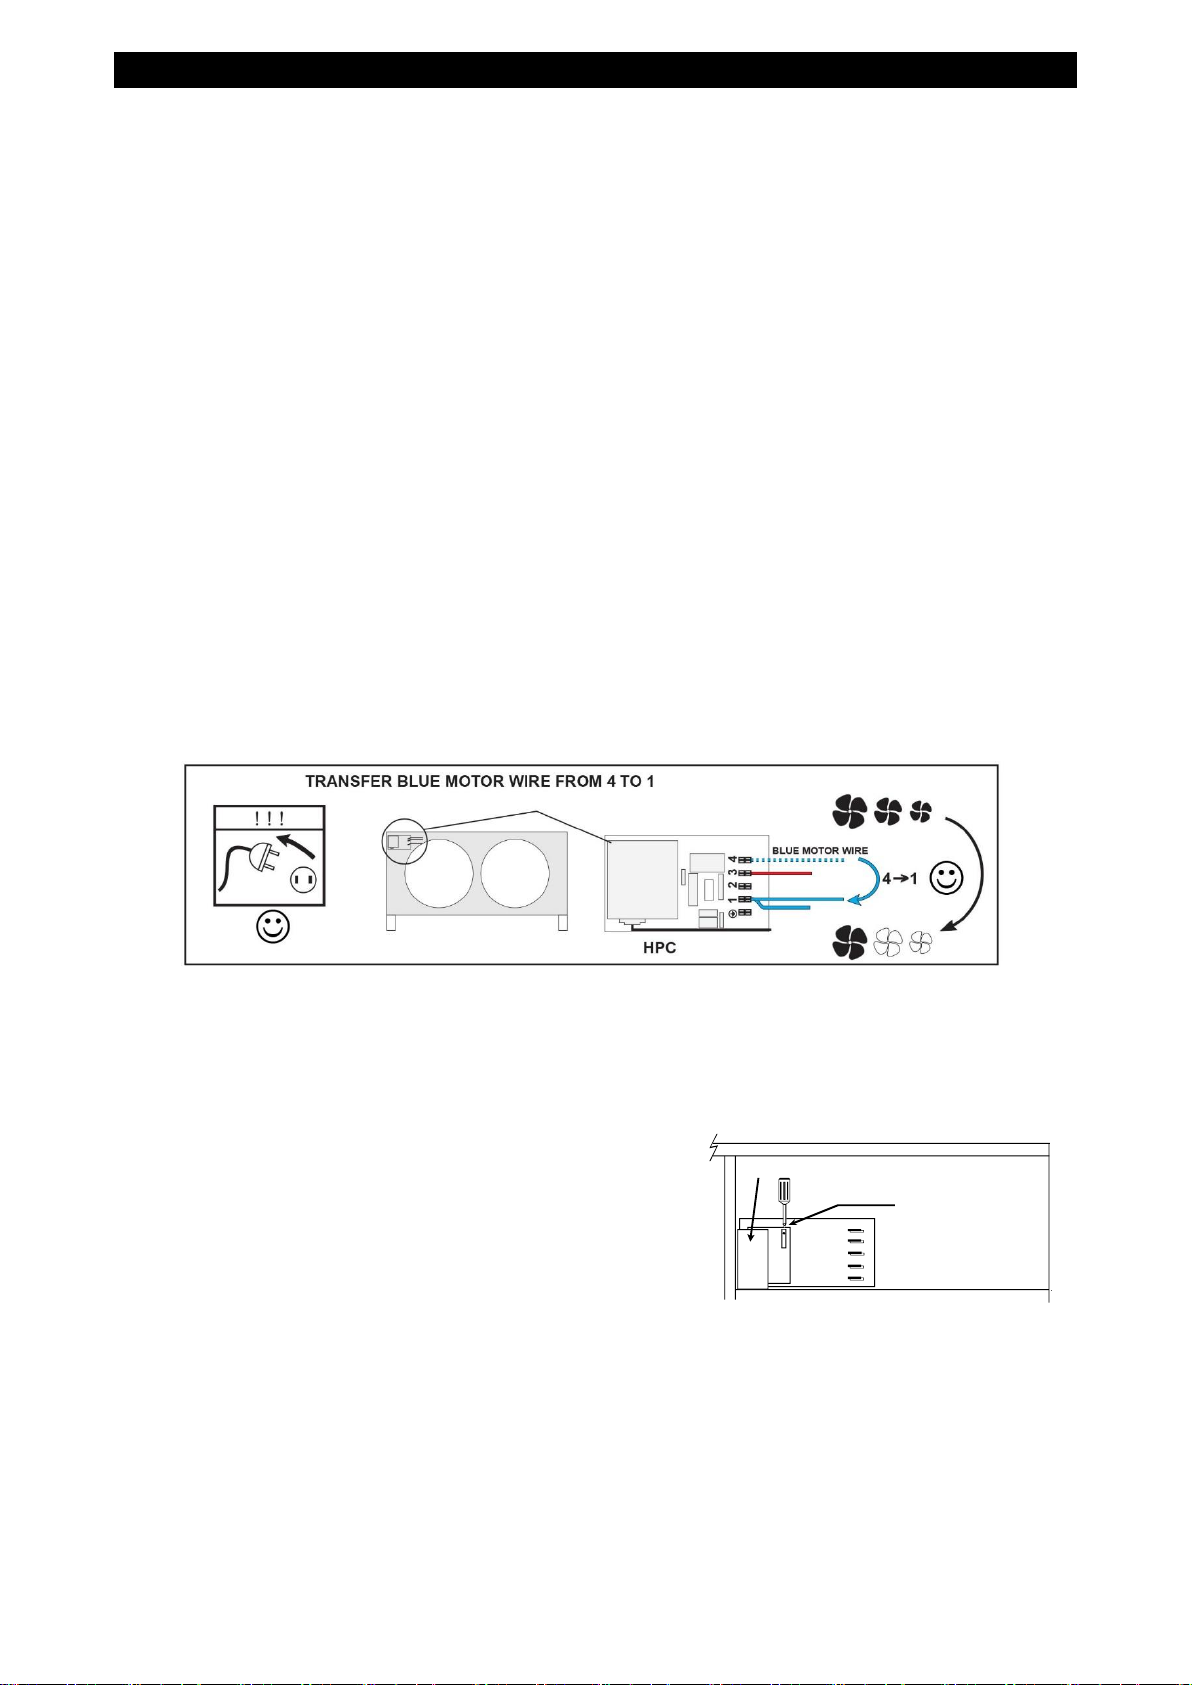
4. All units are fitted with head pressure control. The link wire across the orange terminals allows the fan
to operate at full speed. THIS SHOULD BE REMOVED AFTER CHARGING
5. A random start delay of up to 1 minute occurs when mains is first applied. A 3 minute delay occurs
between successive compressor operations on all systems.
6. Refrigerant and polyolester oil should be introduced through the Schrader valve the service port on the
suction service valve on the outdoor unit. Ensure the refrigerant is the correct type, as shown on
the rating plate. R404A must always be added in the liquid state.
7. Run the system for a few minutes to allow it to stabilize. Where possible, charge to a sweat line on the
evaporator. Typical suction pressures on short lines at UK conditions, with high speed evaporator fan,
high speed condenser fan, should be; low temperature system approx 4.4 bar (65 psig).
8. Systems should not be overcharged, to avoid liquid return to the compressor.
9. HEAD PRESSURE CONTROL SAGINOMIYA (RGE – ZIN4 – SH)
The head pressure controller is factory set to suit the refrigerant. It may be necessary to adjust this to
suit site conditions, to raise or lower the nominal head pressure.
a. With the system switched off, connect a high pressure gauge to the liquid line service valve.
b. Switch on the system, and run for a few minutes to stabilise.
c. The head pressure should be approximately:
R404A: 210-220 psig (14.5-15.2barg) to achieve this
adjust the screw clockwise to increase pressure or
anticlockwise to decrease. Each ½ turn will alter the
pressure by approx 5 psig (0.5 barg)
Min fan speed (0 rpm) and fan cut in pressure 200 psig
(13.8 barg) are factory set and not adjustable.
NOTE: The condenser fan may stop if the operating pressure drops below 200 psig (13.8 barg)
9/11
54208007-06
Page 10
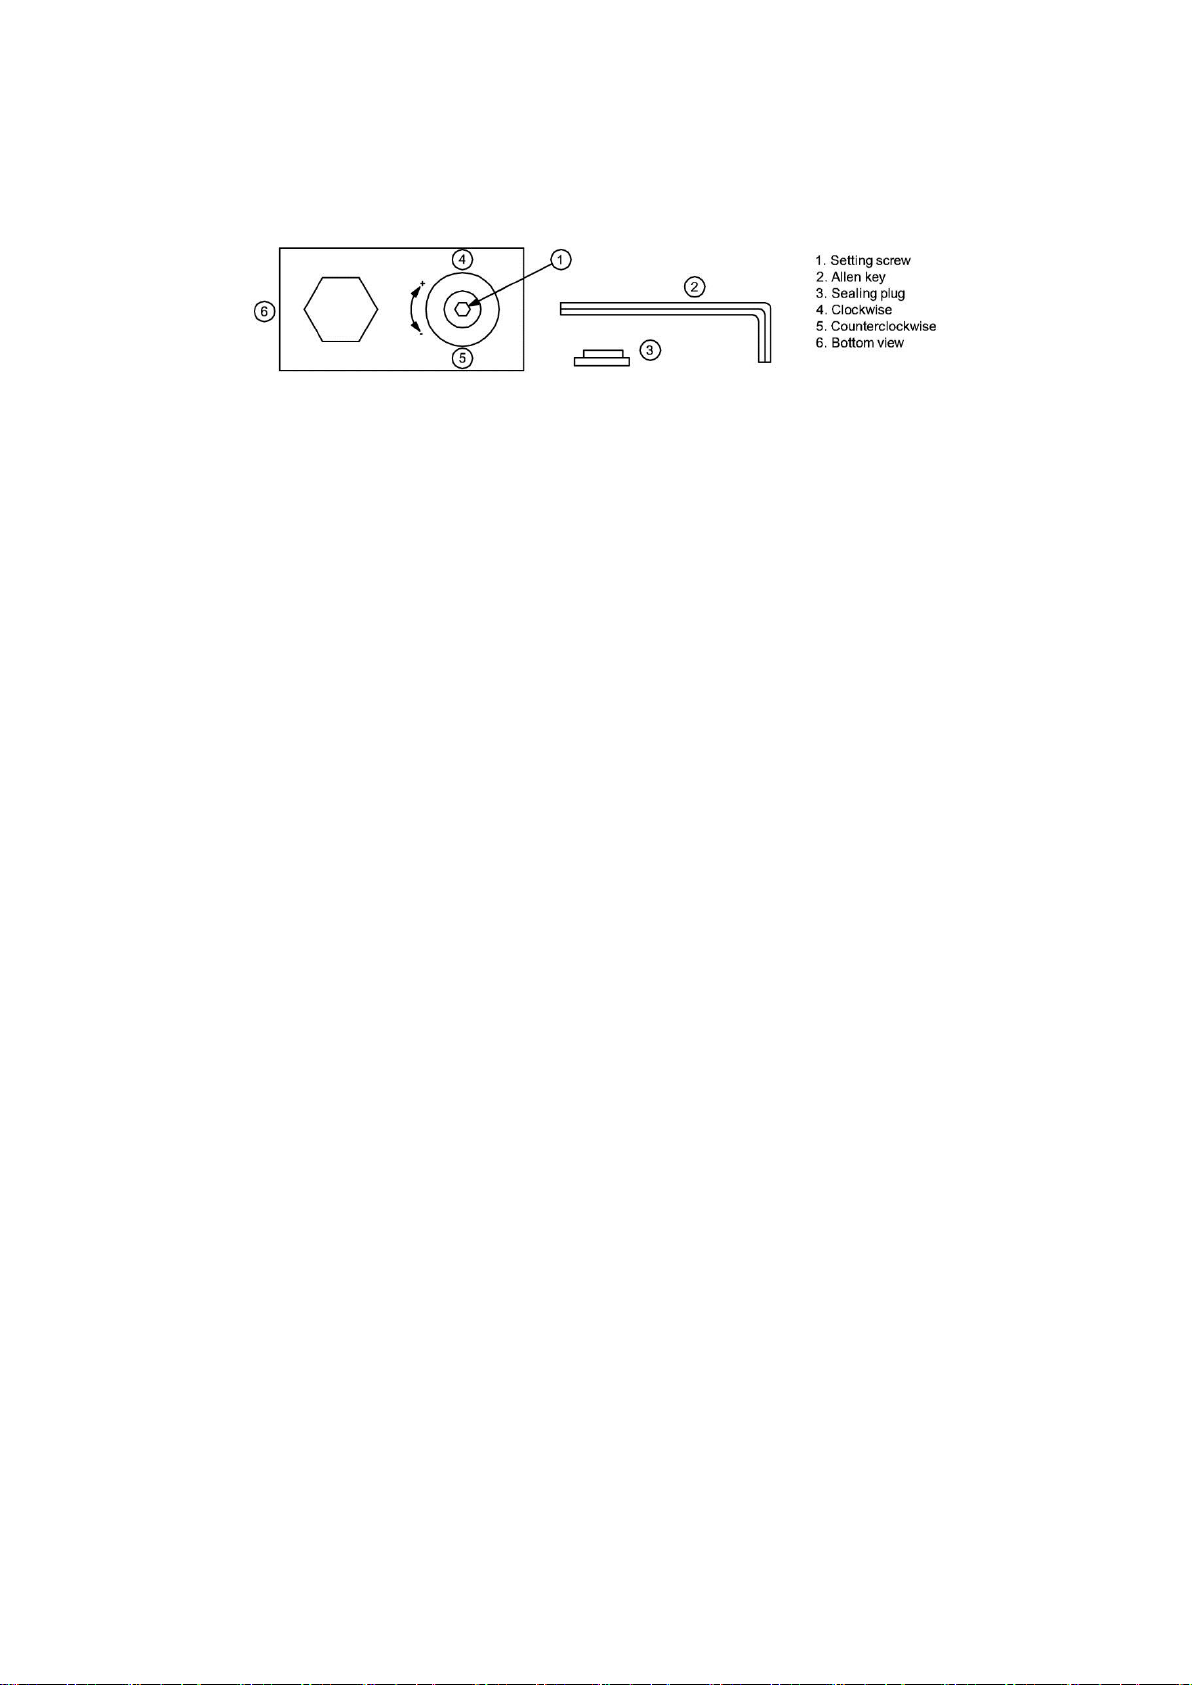
10. HEAD PRESSURE CONTROL ALCO (FSY-42S)
The head pressure controller is factory set to suit the refrigerant. It may be necessary to adjust this to
suit site conditions, to raise or lower the nominal head pressure.
a. With the system switched off, connect a high pressure gauge to the liquid line service valve.
b. Switch on the system, and run for a few minutes to stabilise.
c. The head pressure should be approximately:
R404A: 210-220 psig (14.5-15.2barg) to achieve this remove sealing plug and insert 2mm or 5/64”
allen key into setting screw. Turn allen key clockwise (+) or counter clockwise (-) to readjust the
setting. Do not turn setting screw more than 3 turns clockwise (+3). Use following table as a quick
guideline for setting:
Pressure changes per turn of adjusting screw:
Pressure change 1: 4.0 … 12.5 bar:
Clockwise ~ +1,2 bar, counter clockwise ~ -1,2 bar
Pressure change 2: 9.2 … 21.2 bar:
Clockwise ~ +2,5 bar, counter clockwise ~ -2,5 bar
Pressure change 3: 12.4 … 28.4 bar:
Clockwise ~ +3,3 bar, counter clockwise ~ -3,3 bar
After adjustment, re-insert sealing plug and make sure that it is properly fitted. IP65 protection requires
firmly sealed plug
NOTES:
Tolerances for condensing temperatures setpoint: ±2K
Min fan speed (0 rpm) and fan cut in pressure 200 psig (13.8 barg) are factory set and not adjustable.
NOTE: The condenser fan may stop if the operating pressure drops below 200 psig (13.8 barg)
10/11
54208007-06
Page 11
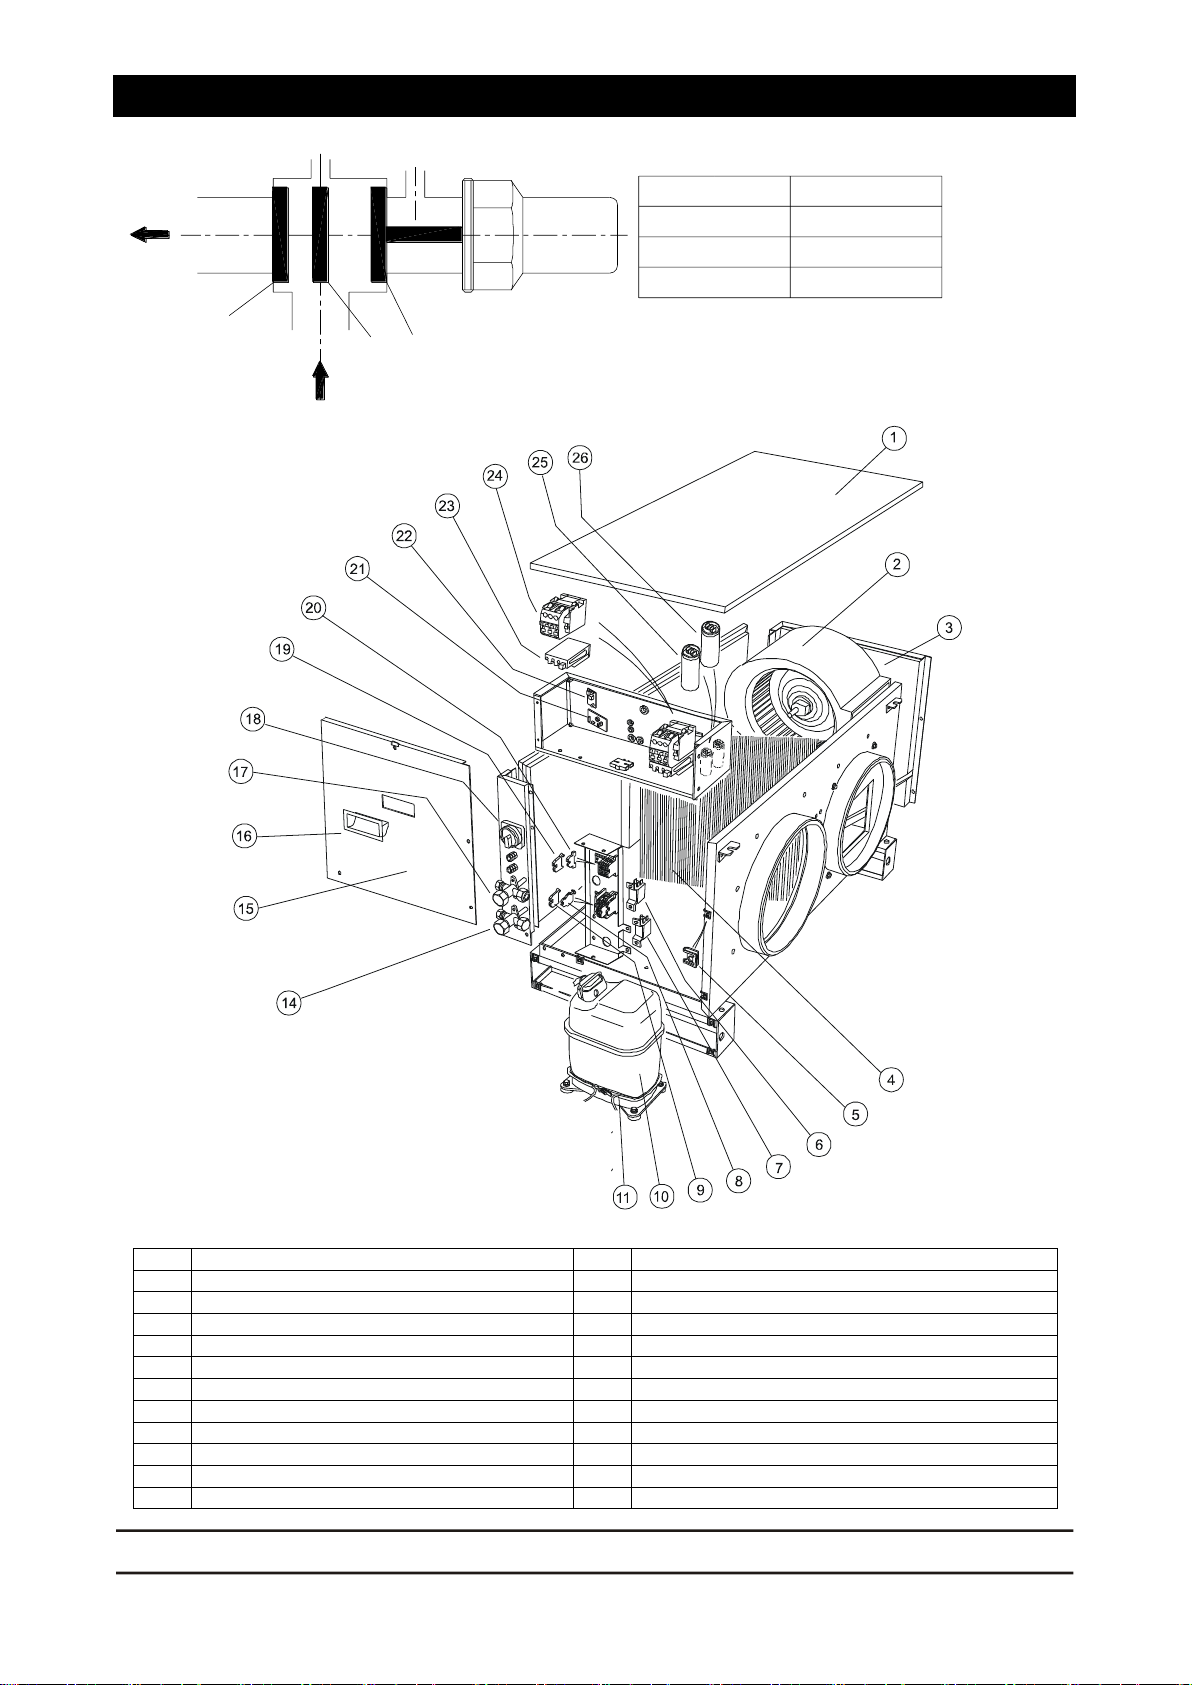
ROTA-LOCKED VALVES FITTED TO RECIEVER
1
LID
15
PANEL ELECTRICS ACCESS
2
FAN ASSEMBLY
16
HANDLE
3
PANEL RIGHT HAND ACCESS
17
SERVICE VALVE
4
HEAT EXCHANGER COIL
18
ISOLATOR
5
SPIRE CLIP
19
END CLAMP
6
SWITCH LP AUTO
20
TERMINAL
7
SWITCH HP AUTO
21
HEAD PRESSURE CONTROL pcb
8
TERMINAL (4 WAY)
22
3 MIN TIMER
9
TERMINAL FUSED
23
OVER LOAD (3ph)
10
COMPRESSOR
24
CONTACTOR
11
CRANK CASE HEATER
25
FAN CAPACITOR
14
SERVICE VALVE
26
COMPRESSOR CAPACITOR (1ph)
TEV LTD, ARMYTAGE ROAD, BRIGHOUSE, WEST YORKSHIRE, HD6 1QF. + 44 (0) 1484 405600 +44 (0) 1484 405620
[email protected] www.marstair.com
TEL: FAX:
EMAIL: WEB:
OUT
IN
A
B
C
P2
P1
POSITION SPINDLE
A
B
C
FUNCTION
OUT CLOSED
ALL OPEN
P1 CLOSED
Pay attention
- P1, P2: optional gages ports.
- The positions IN - OUT could be inverted according to the
employment of client.
- The spindle must be positioned in the position B when the
valve will be connected to the unit.
Sight Glass, Dryer and Receiver
not shown
11/11
54208007-06
 Loading...