

Page 1

™
Instruction Manual
Instructivo • Fiche D’instructions
E400
EDI-10400
by
Page 2

CAUTION: DO NOT USE THE ENFORCER™ UNTIL YOU
CAUTION
CAUTI ON: DO NOT US E THE E NFORCE R
™
UNTIL YOU HA VE FULL Y READ AND
UNDER STOOD T HE INST RUCTION MANUA L
AND A LL WARN ING LAB ELS.
DO NO T USE T HIS PRO DUCT UN LESS Y OU
ARE W ILLING TO OBSE RVE THE SE
INSTR UCTIONS AND WA RNING L ABELS.
PRIOR TO EAC H USE O F THE E NFORCE R
™
CHECK ALL CO NNECTIO NS AND CHECK
FOR W ORN PAR TS. RE PLACE I F
NECES SARY WI TH SPEC IFIED E NFORCE R
™
PARTS ONLY.
DO NO T MODIF Y THIS PRODUCT IN AN Y
MANNE R. DOI NG SO C OULD RE SULT I N
SERIO US INJU RY.
U.S. & Foreign Patents Pending
WARNING!
DO NOT EXCEED AN INLET AIR
PRESSURE OF 120 PSI . DOING SO
COULD RESULT IN COMPONENT
FAILURE AND POSSI BLE INJ URY.
HAVE FULLY READ AND UNDERSTOOD THE INSTRUCTION
MANUAL AND ALL THE WARNING LABELS.
DO NOT USE THIS PRODUCT UNLESS YOU ARE WILLING TO
OBSERVE ALL THE INSTRUCTIONS AND WARNING LABELS.
PRIOR TO EACH USE OF THE ENFORCER CHECK ALL
CONNECTIONS AND CHECK FOR WORN PARTS. REPLACE IF
NECESSARY WITH SPECIFIED ENFORCER™ PARTS. DO NOT
MODIFY THIS PRODUCT IN ANY MANNER. DOING SO COULD
RESULT IN SERIOUS INJURY.
U.S. and Foreign Patents Pending
CUIDADO: NO UTILICE LA ENFORCER™ HASTA QUE
HAYA LEÍDO Y COMPRENDIDO EN SU TOTALIDAD EL
MANUAL DE INSTRUCCIONES Y TODAS LAS ETIQUETAS DE
ADVERTENCIA.
NO UTILICE ESTE PRODUCTO A MENOS QUE ESTÉ DISPUESTO
A RESPETAR TODAS LAS INSTRUCCIONES Y ETIQUETAS DE
ADVERTENCIA.
ANTES DE CADA USO DE LA ENFORCER™ REVISE TODAS
LAS CONEXIONES Y VERIFIQUE QUE NO TENGA PIEZAS
DESGASTADAS. SI ES NECESARIO, REEMPLÁCELAS CON
LAS PIEZAS ENFORCER™ ESPECIFICADAS. NO MODIFIQUE
DE NINGUNA MANERA ESTE PRODUCTO. HACERLO PODRÍA
CAUSAR LESIONES GRAVES.
Patentes de los E.U.A y en el extranjero pendientes
ATTENTION : NE PAS UTILISER LE PULVÉRISATEUR
ENFORCER™ AVANT D’AVOIR ENTIÈREMENT LU ET COMPRIS
LE MODE D’EMPLOI ET TOUTES LES ÉTIQUETTES DE MISE
EN GARDE.
Phone 800-888-0127 / 641-753-0127 • Fax 800-477-6341 / 641-753-6341 • www.MARSHALLTOWN.com
NE PAS UTILISER CE PRODUIT À MOINS D’ÊTRE PRÊT À
RESPECTER TOUTES LES INSTRUCTIONS ET ÉTIQUETTES
DE MISE EN GARDE.
AVANT CHAQUE UTILISATION DE L’ENFORCER™, VÉRIFIER
TOUS LES RACCORDS ET CONTRÔLER L’ÉTAT D’USURE
DES PIÈCES. LE CAS ÉCHÉANT, REMPLACER PAR DES
PIÈCES ENFORCER™ PRÉCONISÉES. NE MODIFIER CE
PRODUIT D’AUCUNE FAÇON. CECI POURRAIT RÉSULTER EN
DES BLESSURES GRAVES.
For more information visit www.marshalltown.com
Brevets en instance aux États-Unis et dans d’autres pays
Page 3

Assembly
1
3
5
7
9
2
3
4
5
6
7
8
9
3
5
7
9
4
5
6
7
8
9
5
7
9
1
3
5
7
9
2
3
4
5
6
7
8
9
3
5
7
9
4
5
6
7
8
9
5
7
9
6
7
8
9
Attach mud hose
assembly to tank outlet. Thread mud hose
fitting into bottom cap
until tight.
Priming the Unit
Flip toggle switch to
FILL/OFF. To remove
the top cap, begin by
loosening the top bolts
1-2 turns.
Insert the coiled blue
air hose into the pushlock fitting in the bottom of the pneumatic
assembly cover until it
locks in place.
Attach mud hose
assembly to the bottom
inlet of gun. Tighten by
hand. DO NOT OVER
TIGHTEN.
Connect the quickdisconnect coupler into
the back of the gun.
Place bottom of tank
over backpack support
bar and lock straps.
Ensure the pneumatic
assembly faces the
right side. Tighten
straps until there is a
secure fit.
Next, while pulling and
holding the top cap
release pin up (red),
turn the top cap counter clockwise until it
stops. Lift up on the
cap to remove.
NOTE: YOU MAY FEEL SUBSTANTIAL
RESISTENCE THE FIRST TIME YOU
TRY TO TWIST THE TOP CAP. THIS
IS CAUSED BY THE SEAL LUBRICANT
THAT WAS APPLIED PRIOR TO SHIPPING.
THIS IS NORMAL.
Remove piston by
squeezing the gun trigger and pulling upward
on the piston handle.
Next, fill the tank ¾ full
of drywall compound
by pouring mixed mud
into the top of the tank.
Insert piston into tank
and push down until
it is situated on top
of the mud. A slight
twisting or rocking motion may be necessary
to release the air trapped between the piston
and the mud.
Cut one end of the fill
hose ½” deep lengthwise and connect this
end of the fill hose to
the outlet of your mud
pump. Tighten clamp
with screw driver.
3
Place top cap back
onto the tank. Once
the top cap is securely
in place, push down
the lock release to
ensure a tight fit.
Page 4

5
Spraying
1
3
5
7
9
2
3
4
5
6
7
8
9
3
5
7
9
4
5
6
7
8
9
5
7
9
Ensure the fill/spray
toggle switch is in the
FILL/OFF position
and that the mud flow
control is turned all
the way in the counterclockwise direction.
Finally, make sure the
air flow control on the gun is turned to the off
position.
Once the desired mud
flow is achieved, lock
the mud flow control by pushing the
outer portion of the
dial back down. DO
NOT ATTEMPT TO
OVERTIGHTEN THE
KNOB. DOING SO COULD RESULT IN
COMPONENT FAILURE AND SERIOUS
INJURY.
You are now ready to use the ENFORCER™
Connect the air compressor hose to the
male air inlet on the
pneumatic assembly.
Set the air compressor
to 40 psi and adjust
as desired. DO NOT
EXCEED 120 PSI.
DOING SO COULD RESULT IN SERIOUS
INJURY.
Once the air compres-
sor hose is connected,
put the backpack on.
There are several
adjustments that can
be made to the straps
to ensure a comfort-
able, snug fit. Once the
backpack is in a secure and comfortable position, flip the fill/spray toggle switch to SPRAY
and adjust the gun airflow by opening the ball
valve at the base of the gun.
While holding down the
trigger of the gun, begin
adjusting the mud flow.
Simply lift and turn the
mud flow control in a
clockwise direction to
increase flow and turn
counterclockwise to
decrease flow. This may require spraying
some material onto a scrap sheet of material.
NOTE: There are several adjustments that
can be made to the Sharpshooter 2.0, the
ENFORCER, and the compressor to get the
texture of spray you desire.
• The more open the trigger; the more
material will be applied with a resulting
coarser pattern.
• Thehighertheairpressure,thefinerthe
pattern; the lower the air pressure, the
coarser the pattern.
•Thehighertheairflow,thefinerthe
pattern; the lower the air flow, the coarser
the pattern.
•Largerorificeopeningswillproducea
coarser pattern than will a smaller opening.
• Ofthethreemostpopularpatterns,orange
peel, knockdown, and popcorn – orange
peel and knockdown are generally applied
to walls while popcorn aggregate is a
ceiling finish.
•Themoreopenthemudflowcontrolonthe
ENFORCER™, the more mud that will be
applied.
To apply orange peel: select the second
smallest opening (#6) in the orifice plate, set
the trigger so that the end of the air nozzle
is approximately 1/8" (3.18 mm) from the orifice plate. Air pressure should be 22–30 psi.
Again, before spraying the finished product,
check for the desired texture on a scrap piece
of sheetrock.
To apply knockdown: also referred to as
splatter, change the orifice plate to the middle
opening (.315"/8.0 mm dia.) (#4), set the trigger fully open. The air pressure should be
reduced to 18–25 psi. Again, before spraying
finished product, check for the desired texture
on a scrap piece of sheetrock.
Phone 800-888-0127 / 641-753-0127 • Fax 800-477-6341 / 641-753-6341 • www.MARSHALLTOWN.com
Page 5

To apply popcorn: ceiling texture, use one
1
3
5
7
9
1
3
5
7
9
2
3
4
5
6
7
8
9
2
3
4
5
6
7
8
9
3
5
7
9
4
5
6
7
8
9
5
7
9
6
7
8
9
7
9
of the largest openings (#1, 2, or 3) - Which
one will depend on the size of the acoustic
aggregate. The trigger setting should be fully
open. The air pressure should be 30–40 psi.
NOTE: The textures described above are
made using either a 3/8" or 1/2" I.D. hose. If
you are using a 1/4" I.D. hose, use greater
air pressures than specified.
Refilling WITHOUT Mud Pump
Remove the tank from
your back and place on
a secure, level surface.
Flip the fill/spray toggle
switch to the FILL position.
Remove piston by
squeezing the gun trigger and pulling upward
on the handle.
Next, fill the tank ¾ full
of drywall compound.
Insert piston into tank
and push down until
it is situated on top of
the mud. A slight twisting or rocking motion
may be necessary to
release the air trapped between the piston
and the mud.
Place top cap back
onto the tank by positioning over the top
bolts and twisting
clockwise. Once the
top cap is securely in
place, push down the
lock release to ensure a
tight fit. Tighten top bolts as necessary.
Refilling WITH Mud Pump
Pull upward on the
red lock release to
relieve the built up air
pressure. Ensure all
air pressure has been
released before moving
to the next step.
To remove the top cap,
begin by loosening
the top bolts 1-2 turns.
Next, while holding
the red lock release
up, turn the top cap
counter clockwise until
it stops. Lift up on the
cap to remove.
5
from the pneumatic assembly.
air into the tank which will result in inconsistent textures.
Flip the fill/spray toggle
switch to the FILL position. Ensure all air
pressure is released
from the tank before filling is started. You will
know this is done when
the air stops exhausting
Next, remove the cap
on the top of the gun
port plug by turning
counter clockwise.
Prime the pump until
the fill hose has filled
with mud. Failure to
do this step will force
Page 6
7
Place the end of the fill
3
5
7
9
4
5
6
7
8
9
5
7
9
6
7
8
9
1
3
5
7
9
2
3
4
5
6
7
8
9
3
5
7
9
4
5
6
7
8
9
hose over the fill fitting
on the gun.
Performing regular maintenance and cleaning
will extend the life of your ENFORCER™ and
its components.
DO NOT HOOK THE ENFORCER™ UP TO
ANY WATER LINE. DOING SO COULD
RESULT IN COMPONENT FAILURE AND
SERIOUS INJURY.
Pump mud from
the bucket into the
ENFORCER™. The
number of pumps
required to fill the tank
will vary depending on
the material viscos-
ity and pump stroke,
but 20-25 pumps is typical. When the
ENFORCER™ is full it will become significantly harder to pump. Stop pumping at this
point. DO NOT OVER-PUMP. DOING SO
COULD RESULT IN COMPONENT FAILURE
AND SERIOUS INJURY.
Once the system is full,
remove the hose from
the fill fitting on the gun.
Replace the cap on
the top port plug in the
gun ensuring a secure
fit. Place the end of the
mud fill hose back into
the bucket to avoid overflow of material.
Now flip the toggle
switch back to spray
and you’re ready to go.
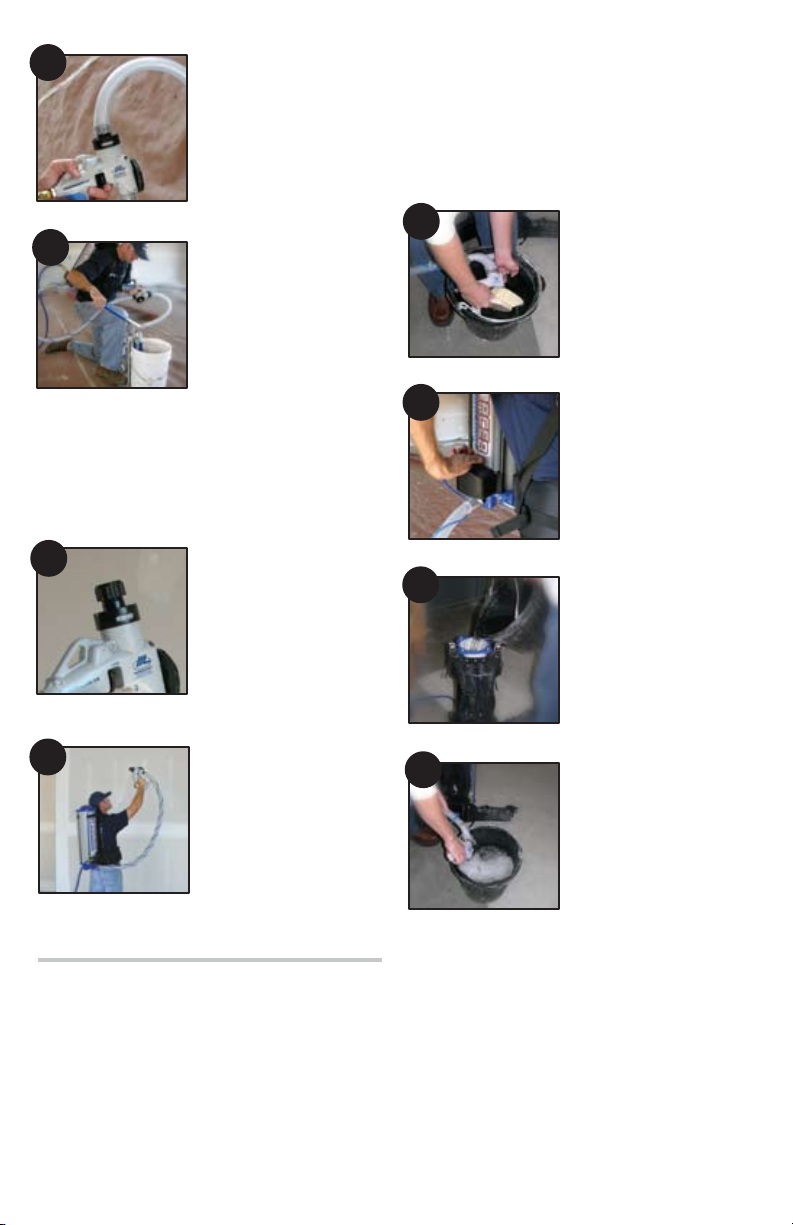
After every use the orifice of the gun should
be cleaned. For best
results, separate the
gun and orifice plate
and flush each with
clean water.
For a more thorough
cleaning, empty all left
over mud by opening
the mud flow control to
the highest setting and
spraying the material
into a bucket.
Next, open the tank by
removing the top cap
assembly and piston
and fill with clean water
while washing of the
bottom of the tank.
Replace the piston and
lid and spray the clean
water through.
Repeat steps 3 and 4
until the sprayed water
is clear.
Cleaning
The frequency of required cleaning will vary
by material, frequency of use, and environment. ALL MATERIALS OTHER THAN
DRYWALL COMPOUND SHOULD BE
CLEANED AFTER USE. As a general rule
of thumb, if drywall compound will be, or
has been, in the tank for more than 2 weeks
without use the unit should be cleaned out.
Phone 800-888-0127 / 641-753-0127 • Fax 800-477-6341 / 641-753-6341 • www.MARSHALLTOWN.com
Remove the gun and scrub as necessary.
Leave the lid and gun off the wet unit to
reduce mold build-up.
Re-lubricate the piston seals and cap o-rings
after cleaning. Now the ENFORCER™ is
ready for the next job
Page 7

Maintenance
DET.
TANK AIRMANIFO LD2
5
TANK AIRMANIFO LDO-RIN G16
AIR TUBEFITTING18
BOTTOM CAP B OLT
4
9
TOP CLAMPING CAP110
TOP CAPCLA MPINGSTUD
413
AIR TUBECOVER116
11
13
10
12
5
8
16
4
14
3
7
1
2
15
6
9
17
OTHER RE-ORDER ITEMS
RE-ORDER #
DESCRIPTION
10410
TOTAL HOSE KIT
MUD HOSE ASSEMBLY & FILL HOSE ASSEMBLY
10413 SEAL KIT
(2) CAP O-RINGS & (2) PISTON SEALS
Regularly inspect your ENFORCER™ to
ensure all major components are free of
damage and are in good working condition.
Replace all worn or damaged components
with the appropriate repair part as indicated
on page 19.
Re-lubricate the piston seals and cap o-rings
after cleaning. Failure to do this will result in
poor product performance and possibly component failure.
After cleaning and re-lubrication, cycle the
piston up and down while twisting the piston
by hand within the tank to ensure a good
seal between the piston seals and tank walls.
Cycling this piston will also ensure the best
piston function by lubricating the inside walls
of the tank. If the piston does not move easily and freely within the tank, the gun trigger
may be closed or the piston seals are sandwiched between the piston body and tank
wall
Replacement Parts
Replacement parts found on p.19
7
Page 8

9
Ensamblado
1
3
5
7
9
2
3
4
5
6
7
8
9
3
5
7
9
4
5
6
7
8
9
5
7
9
6
7
8
9
1
3
5
7
9
2
3
4
5
6
7
8
9
3
5
7
9
Fije el ensamble de la
manguera de pasta en
la salida del tanque.
Enrosque el adaptador
de la manguera de
pasta en la tapa inferior
hasta que quede apretada.
Haga un corte de
1/2 pulg. (13 mm) de
profundidad a lo largo
de un extremo de la
manguera de llenado y
conecte este extremo
de la manguera de
llenado a la salida de la
bomba de pasta. Apriete la abrazadera con
un destornillador.
Inserte la manguera
azul de aire tipo bobina
en el adaptador de
empuje-bloqueo en la
parte inferior de la
cubierta del ensamble
neumático hasta que se
inmovilice en su lugar.
Fije el ensamble de la
manguera de pasta en
la entrada inferior de la
pistola. Apriételo solamente con la mano.
NO LO APRIETE EN
EXCESO.
Conecte el acoplador
de desconexión rápida
en la parte trasera de la
pistola.
Coloque la parte inferior del tanque sobre
la barra de soporte de
la mochila y ajuste las
correas. Apriete las
correas hasta que estén
ajustadas con firmeza.
Cebado De La Unidad
Para quitar la tapa
superior, empiece aflo-
jando 1 a 2 giros los
tornillos superiores.
Luego, mientras tira y
sostiene hacia arriba
el pasador de liber-
ación (rojo) de la tapa
superior haga girar
la tapa superior en el
sentido contrario de
las manecillas del reloj
hasta que se detenga. Levante la tapa para
extraerla.
NOTA: ES POSIBLE QUE SIENTA
UNA RESISTENCIA CONSIDERABLE
LA PRIMERA VEZ QUE INTENTE
DESENROSCAR LA TAPA SUPERIOR.
ESTO SE DEBE AL LUBRICANTE DEL
SELLO QUE FUE APLICADO ANTES DEL
ENVÍO. ESTO ES NORMAL.
Extraiga el pistón
apretando el gatillo de
la pistola y tirando de la
empuñadura del pistón
hacia arriba.
Phone 800-888-0127 / 641-753-0127 • Fax 800-477-6341 / 641-753-6341 • www.MARSHALLTOWN.com
Page 9

Luego, llene el tanque
4
5
6
7
8
9
5
7
9
1
3
5
7
9
2
3
4
5
6
7
8
9
3
5
7
9
4
5
6
7
8
9
5
7
9
hasta un ¾ de su
capacidad con compuesto de yeso vertiendo la pasta mezclada
en la parte superior
de la tapa. Inserte el
pistón en el tanque y
apriete hasta que esté situado sobre la pasta.
Es posible que necesite torcerlo o sacudirlo
un poco para hacer salir el aire atrapado
entre la pistola y la pasta.
Vuelva a colocar la
tapa superior sobre el
tanque colocándola
sobre los tornillos supe-
riores y enroscándola
en el sentido de las
manecillas del reloj.
Cuando la tapa superior esté fijada en su sitio con firmeza, apriete
hacia abajo el dispositivo de desbloqueo para
lograr un ajuste firme. Apriete los tornillos
superiores si fuera necesario.
firme.
tola abriendo la válvula de globo en la base
de la pistola.
Rociado
Asegúrese de que el
interruptor de palanca
de llenado/rociado
esté en la posición de
FILL/OFF (LLENADO/
APAGADO) y de que
el control de flujo de la
pasta se haya girado
completamente en la dirección contraria a las
manecillas del reloj. Finalmente, asegúrese
de que el control de flujo de aire de la pistola
se haya girado hasta la posición de apagado.
Conecte la manguera
del compresor de aire
en la entrada de aire
macho en el ensamble
neumático. Establezca
el compresor de aire
en 40 psi y ajústelo si
fuera necesario. NO
EXCEDA LOS 120 PSI. HACERLO PODRÍA
CAUSAR LESIONES GRAVES.
9
manecillas del reloj para incrementar el flujo
y en la dirección contraria de las manecillas
del reloj para disminuir el flujo. Es posible
que esto requiera rociar algo de material en
una cubeta o en una hoja de material de
desecho. Cuando se haya alcanzado el flujo
de pasta deseado, bloquee el control de flujo
de la pasta volviendo a apretar la parte exterior del cuadrante hacia abajo. NO INTENTE
APRETAR EN EXCESO LA PERILLA.
HACERLO PODRÍA HACER QUE FALLE
EL COMPONENTE Y CAUSAR LESIONES
GRAVES.
Ahora ya está listo para usar la
ENFORCER™.
NOTA: Se puede hacer varios ajustes al
Sharpshooter 2.0, la ENFORCER y el compresor para obtener la textura de rociado
deseada.
• Cuantomásabiertoestéelgatillo,se
aplicará más material lo que resultará en
un patrón más áspero.
Cuando la manguera
del compresor de
aire esté conectada,
colóquese la mochila.
Hay varios ajustes que
se pueden realizar en
las correas para asegurar un ajuste cómodo y
Cuando la mochila esté
en una posición segura
y cómoda, invierta el
interruptor de palanca
de llenado/rociado a
la posición de SPRAY
(ROCIADO) y ajuste el
flujo de aire de la pis-
Mientras mantiene
presionado el gatillo
de la pistola, empiece
a ajustar el flujo de
pasta. Sólo tiene que
levantar y girar el control de flujo de la pasta
en la dirección de las
Page 10

11
• Cuantomásaltasealapresióndelaire,
1
3
5
7
9
2
3
4
5
6
7
8
9
3
5
7
9
4
5
6
7
8
9
5
7
9
más fino será el patrón del texturizado;
cuanto más baja sea la presión del aire,
más áspero será dicho patrón.
• Cuantomásaltoseaelflujodelaire,más
fino será el patrón del texturizado, cuanto
más bajo sea el flujo del aire, más áspero
será dicho patrón.
• Lasaberturasconmayoresdimensiones
en los orificios producirán un patrón más
áspero que las aberturas con menores
dimensiones.
• Delostrespatronesmáscomunes–
cáscara de naranja, tirol y acústico – gen
eralmente se utiliza el acabado cáscara
de naranja y tirol en los muros, mientras
que se utiliza el acústico en los acabados
para techos.
• Cuantomásabiertoestéelcontroldeflujo
de la pasta en la ENFORCER™, mayor
será la cantidad de pasta que se aplique.
Para aplicar el acabado cáscara de naranja:
seleccione la segunda abertura más pequeña
(No. 6) en la placa selectora de orificios,
coloque el gatillo de manera que el extremo
de la boquilla de aire esté a una distancia
aproximada de 1/8 pulg (3.2 mm) de la placa
selectora de orificios. La presión del aire
deberá ser de 22 a 30 psi Una vez más,
antes de aplicarle el acabado al producto,
revise la textura deseada sobre un panel de
yeso desperdiciado.
Para aplicar el acabado tirol: también conocido como salpicado, cambie la placa selectora a la abertura media (0.315 pulg./8 mm
de diámetro). (No. 4) y coloque el gatillo en
la posición de totalmente abierto. La presión
del aire deberá reducirse a 18 o 25 psi. Una
vez más, antes de aplicarle el acabado al
producto, revise la textura deseada sobre un
panel de yeso desperdiciado.
Para a un techo la textura acústica: use una
de las aberturas más grandes (No. 1, 2 ó
3) – Optar por cuál de ellas dependerá de las
dimensiones del agregado acústico. El gatillo
deberá estar en su abertura máxima. La
presión del aire deberá ser de 30 a 40 psi.
NOTA: Las texturas descritas anteriormente
se hacen usando una manguera con un
diámetro interno de 3/8 ó 1/2 pulg. Si está
usando una manguera con un diámetro
interno de 1/4 pulg., use presiones de aire
mayores que las especificadas.
Rellenado Sin Una
Bomba De Pasta
Desmonte el tanque de
su espalda y colóquelo
sobre una superficie
segura y nivelada.
Invierta el interruptor
de palanca de llenado/
rociado a la posición de
FILL (LLENADO).
Tire hacia arriba del
dispositivo de desbloqueo rojo para dejar
salir la presión de aire
acumulada. Asegúrese
de que haya escapado
toda la presión de aire
antes de continuar con
el paso siguiente.
Para quitar la tapa
superior, empiece aflojando 1 a 2 giros los
tornillos superiores. A
continuación, mientras
sujeta el dispositivo
de desbloqueo rojo
hacia arriba, gire la
tapa superior en el sentido contrario de las
manecillas del reloj hasta que se detenga.
Levante la tapa para extraerla.
Extraiga el pistón
apretando el gatillo de
la pistola y tirando de
la empuñadura hacia
arriba.
Phone 800-888-0127 / 641-753-0127 • Fax 800-477-6341 / 641-753-6341 • www.MARSHALLTOWN.com
Page 11

A continuación, llene el
6
7
8
9
7
9
1
3
5
7
9
2
3
4
5
6
7
8
9
3
5
7
9
4
5
6
7
8
9
5
7
9
6
7
8
9
tanque hasta un ¾ de
su capacidad con compuesto de yeso. Inserte
el pistón en el tanque
y empuje hacia abajo
hasta que esté situado
sobre la pasta. Es
posible que necesite torcerlo o sacudirlo un
poco para hacer salir el aire atrapado entre el
pistón y la pasta.
Vuelva a colocar la
tapa superior sobre el
tanque colocándola
sobre los tornillos supe-
riores y enroscándola
en el sentido de las
manecillas del reloj.
Cuando la tapa superior
esté fijada en su sitio con firmeza, apriete
hacia abajo el dispositivo de desbloqueo para
asegurar un ajuste apretado. Apriete los tornillos superiores si fuera necesario.
Coloque el extremo de
la manguera de llenado
sobre el adaptador de
llenado de la pistola.
Bombee pasta desde
la cubeta hasta la
ENFORCER. El número de bombeos requerido para llenar el tanque
variará en función de
la viscosidad del mate-
rial y de las carreras
de la bomba, pero se suelen necesitar entre
20 y 25 bombeos. Cuando la ENFORCER™
esté llena, se hará bastante más difícil bombear. Deje de bombear en este punto. NO
BOMBEE EN EXCESO. HACERLO PODRÍA
HACER QUE FALLE EL COMPONENTE Y
CAUSAR LESIONES GRAVES.
Rellenado Con
Bomba De Pasta
Invierta el interruptor
de palanca de llenado/
rociado a la posición
de FILL (LLENADO).
Asegúrese de que se
libere toda la presión
del aire del tanque
antes de que se inicie el
llenado. Usted sabrá que lo ha logrado cuando deje de salir aire del ensamble neumático.
Luego, quite la tapa de
la parte superior del
tapón de la lumbrera de
la pistola girando en el
sentido contrario de las
manecillas del reloj.
Cebe la bomba hasta
que se haya llenado
con pasta la manguera de llenado. No
completar este paso forzará aire adentro
del tanque lo que resultará en texturas
desiguales.
Cuando el sistema
esté lleno, extraiga la
manguera del adaptador de llenado de
la pistola. Vuelva a
instalar la tapa en el
tapón de la lumbrera
superior de la pistola
asegurándose que quede ajustada con firmeza. Coloque el extremo de la manguera de
llenado de pasta en la cubeta para evitar que
se derrame el material.
Ahora mueva el interruptor de palanca nuevamente a la posición
de ROCÍO y estará listo
para seguir.
11
Page 12

13
Limpieza
1
3
5
7
9
2
3
4
5
6
7
8
9
3
5
7
9
4
5
6
7
8
9
La frecuencia de la limpieza necesaria variará con el material, la frecuencia del uso y
el ambiente. SE DEBEN LIMPIAR TODOS
LOS MATERIALES DESPUÉS DE USARLOS
EXCEPTO LA PASTA PARA PANELES DE
YESO Como regla general, si la pasta para
paneles de yeso estará o estuvo en el tanque
durante más de 2 semanas sin que se use
la unidad, se debe limpiar. Efectuar el mantenimiento y la limpieza de rutina extenderá
la vida útil de su ENFORCER™ y de sus
componentes.
Vuelva a instalar el
pistón y la tapa y rocíe
agua limpia a través
de ellos. Repita los
pasos 3 y 4 hasta que
el agua rociada salga
transparente.Extraiga
la pistola y friegue la
misma si fuera necesario.No instale la tapa y
la pistola en una unidad mojada para reducir
la acumulación de moho. Vuelva a lubricar
los sellos del pistón y las juntas tóricas de
la tapa después de la limpieza. Ahora la
ENFORCER™ está lista para el próximo
trabajo.
NO CONECTE LA ENFORCER™ A UNA
TUBERÍA DE AGUA. HACERLO PODRÍA
HACER QUE FALLE EL COMPONENTE Y
CAUSAR LESIONES GRAVES.
Se debe limpiar el
orificio de la pistola
después de cada uso.
Para obtener los
mejores resultados,
separe la pistola y la
placa selectora de orificios y enjuague cada
una de ellas con agua limpia.
Para hacer una limpieza más a fondo, vacíe
toda la pasta sobrante
abriendo el control
de flujo de la pasta al
ajuste más alto y rocíe
el material en una
cubeta.
Luego, abra el tanque
quitando el ensamble
de la tapa superior y
el pistón, y llene con
agua limpia mientras
lava la parte inferior del
tanque.
Mantenimiento
Inspeccione la ENFORCER con
regularidad para asegurarse de que los componentes principales no tengan daños y que
estén en buen estado de funcionamiento.
Reemplace todos los componentes dañados
usando los repuestos correspondientes como
se indica en la página 16.
Vuelva a lubricar los sellos del pistón y tape
las juntas tóricas después de la limpieza. No
hacerlo resultará en un rendimiento pobre
del producto y posiblemente en la falla del
componente.
Después de limpiar y volver a lubricar,
accione el pistón hacia arriba y abajo mientras que da vuelta a mano al pistón adentro
del tanque para asegurarse de que haya un
buen sello entre el pistón y las paredes del
tanque. Accionar el pistón también asegurará el mejor funcionamiento del mismo al lubricar las paredes interiores del tanque. Si el
pistón no se mueve fácilmente y con libertad
adentro del tanque, es posible que el gatillo
de la pistola esté cerrado o que los sellos del
pistón estén apretados entre el cuerpo del
pistón y la pared del tanque.
Partes de repuesto p 19.
Phone 800-888-0127 / 641-753-0127 • Fax 800-477-6341 / 641-753-6341 • www.MARSHALLTOWN.com
Page 13

Assemblage
1
3
5
7
9
2
3
4
5
6
7
8
9
3
5
7
9
4
5
6
7
8
9
5
7
9
6
7
8
9
1
3
5
7
9
2
3
4
5
6
7
8
9
3
5
7
9
4
5
6
7
8
9
Amorçage De L’appareil
Attacher le tuyau à
enduit à la sortie du
réservoir. Visser à
fond le raccord du
tuyau d’enduit dans le
capuchon inférieur.
Enfoncer le tuyau d’air
spiralé bleu pour l’enclencher dans le raccord poussoir au bas
du capot du système
pneumatique.
Attacher le tuyau à
enduit au raccord d’admission inférieur du pistolet. Serrer à la main.
NE PAS FORCER.
Brancher le raccord
rapide dans l’arrière du
pistolet.
Pour déposer le capuchon supérieur, commencer par desserrer
les boulons supérieurs
de 1 à 2 tours.
Ensuite, tout en tenant
la broche de verrouilla-
ge (rouge) du capuchon
en position tirée, tourner
le capuchon vers la
gauche jusqu’à la butée.
Soulever le capuchon
pour l’enlever.
REMARQUE : IL EST POSSIBLE QUE
LE CAPUCHON PRÉSENTE UNE FORTE
RÉSISTANCE LORS DU PREMIER
DÉVISSAGE. CETTE RÉSISTANCE
EST CAUSÉE PAR LE LUBRIFIANT
D’ÉTANCHÉITÉ APPLIQUÉ AVANT
L’EXPÉDITION. CECI EST NORMAL.
Appuyer sur la gâchette
du pistolet et tirer vers
le haut sur la poignée
de piston pour enlever
le piston.
Poser le dessous du
réservoir sur la barre de
support du sac à dos
et attacher les sangles.
Serrer les sangles de
manière à obtenir un
maintien ferme.
sur le dessus de l’enduit. Un léger mouve-
Couper un bout du
tuyau de remplissage
sur 13 mm dans le sens
de la longueur et raccorder ce bout du tuyau
à la sortie de la pompe
à enduit. Serrer le collier au tournevis.
13
ment de rotation ou d’oscillation peut être
nécessaire pour libérer l’air piégé entre le
piston et l’enduit.
Ensuite, remplir le
réservoir aux ¾ d’enduit pour cloison sèche
en le versant dans
l’orifice du capuchon.
Placer le piston dans le
réservoir et l’enfoncer
jusqu’à ce qu’il repose
Page 14

15
Remettre le capuchon
5
7
9
1
3
5
7
9
2
3
4
5
6
7
8
9
3
5
7
9
4
5
6
7
8
9
5
7
9
en place sur le réservoir en le plaçant sur
les boulons et le tourner vers la droite. Une
fois le capuchon bien
en place, rabaisser le
loquet pour assurer une
fermeture étanche. Serrer les boulons supérieurs comme il se doit.
Pulvérisation
Vérifier que le com-
mutateur de remplis-
sage/pulvérisation est
en position FILL/OFF
et que la commande
de débit d’enduit est
tournée à fond vers la
gauche. Enfin, vérifier
que la commande de débit d’air sur le pistolet
est en position fermée.
Raccorder le tuyau du
compresseur d’air à
l’entrée pneumatique
mâle du système.
Régler le compresseur
sur 40 psi et ajuster
le cas échéant. NE
PAS DÉPASSER 120
PSI. CECI POURRAIT RÉSULTER EN DES
BLESSURES GRAVES.
Une fois le tuyau du
compresseur d’air rac-
cordé, mettre le sac sur
le dos. Les bretelles
offrent plusieurs
réglages pour assurer
un ajustement ferme et
confortable.
Une fois le sac à dos en
position sûre et confort-
able, placer le commu-
tateur de remplissage/
pulvérisation en position
SPRAY (pulvérisation)
et ouvrir le robinet au
bas du pistolet pour
ajuster le débit d’air.
Phone 800-888-0127 / 641-753-0127 • Fax 800-477-6341 / 641-753-6341 • www.MARSHALLTOWN.com
menter le débit, vers la gauche pour le réduire. Pulvériser éventuellement l’enduit initial
dans un seau ou sur un morceau de rebut
de matériau. Une fois que le débit souhaité
est obtenu, renfoncer la bague extérieure
du bouton de réglage pour le verrouiller.
NE PAS FORCER LE SERRAGE DU
BOUTON. CECI POURRAIT PROVOQUER
UNE DÉFAILLANCE MATÉRIELLE ET DES
BLESSURES GRAVES.
L’ENFORCER™ est à présent prêt à l’emploi
REMARQUE : Divers réglages du
Sharpshooter 2.0, de l’ENFORCER et du
compresseur permettent d’obtenir la texture de pulvérisation souhaitée.
• Pluslagâchetteestenfoncéeetplusla
quantité de matériau projeté est impor tante, produisant une texture grossière.
• Pluslapressiond’airestélevéeetplusla
texture est fine ; plus la pression est faible
et plus la texture est grossière.
• Plusledébitd’airestélevéetpluslatex-
ture est fine ; plus le débit est faible et plus
la texture est grossière.
• Lesorificesdegranddiamètreproduisent
des textures plus grossières que les orifi ces plus petits.
• Destroistextureslespluspopulaires–
peau d’orange, choc et pop-corn – peau
d’orange et choc s’utilisent habituellement
sur les murs alors que l’agrégat pop-corn
est plutôt une finition de plafond.
• Pluslacommandededébitd’enduitest
ouverte sur l’ENFORCER™, plus la
quantité d’enduit appliquée est importante.
Pour appliquer une finition peau d’orange :
choisir le second plus petit orifice du disque
Tout en tenant la
gâchette du pistolet
enfoncée, régler le
débit d’enduit. Il suffit de soulever et de
tourner la commande
de débit d’enduit, vers
la droite pour aug-
Page 15

(n°6) et régler la gâchette de façon à ce que
1
3
5
7
9
2
3
4
5
6
7
8
9
3
5
7
9
4
5
6
7
8
9
5
7
9
6
7
8
9
7
9
le bout de la buse d’air soit à 1/8 po (3,2 mm)
du disque de sortie. La pression d’air doit être
de 22 à 30 psi. Avant de pulvériser sur la surface à finir, vérifier la texture sur une chute
de panneau de plâtre.
Pour appliquer la texture choc, ou éclaboussure : régler le disque de sortie sur l’orifice
du milieu (diam. 0,315 po/8,0 mm) (n°4) et
la gâchette sur son ouverture maximale. La
pression d’air doit être ramenée entre 18 et
25 psi. Avant de pulvériser sur la surface à
finir, vérifier la texture sur une chute de panneau de plâtre.
Pour appliquer la texture de plafond pop-
corn : utiliser les orifices de plus grand diamètre (n°1, 2 ou 3) - le choix exact dépend
de la taille de l’agrégat acoustique. Régler
la gâchette sur son ouverture maximale. La
pression d’air doit être de 30 à 40 psi.
REMARQUE: Les textures ci-dessus s’obtiennent en utilisant un tuyau de 3/8 ou 1/2 po
de diam. intérieur. Avec un tuyau de 1/4 po,
utiliser des pressions d’air plus élevées.
Tirer le loquet rouge
vers le haut pour libérer la pression d’air.
Vérifier que tout l’air
a été libéré avant de
passer à l’étape suivante.
Pour déposer le capuchon, commencer par
desserrer les boulons
supérieurs de 1 à 2
tours. Ensuite, tout en
tenant le loquet rouge
en position haute, tour-
ner le capuchon vers la
gauche jusqu’à la butée. Soulever le capuchon pour l’enlever.
Appuyer sur la gâchette
du pistolet et tirer vers
le haut sur la poignée
pour enlever le piston.
Remplissage Sans Pompe
À Enduit
Enlever le réservoir du
sac à dos et le poser
sur une surface solide
et horizontale.
mouvement de rotation ou d’oscillation peut
être nécessaire pour libérer l’air piégé entre
le piston et l’enduit.
Placer le commutateur
de remplissage/pulvérisation en position FILL.
fermeture étanche. Serrer les boulons supérieurs comme il se doit.
15
Ensuite, remplir le
réservoir aux ¾ d’enduit pour cloison sèche.
Placer le piston dans
le réservoir et l’enfoncer jusqu’à ce qu’il
repose sur le dessus
de l’enduit. Un léger
Remettre le capuchon
en place sur le réservoir
en le plaçant sur les
boulons et le tourner
vers la droite. Une
fois le capuchon bien
en place, rabaisser le
loquet pour assurer une
Page 16

17
Remplissage Avec Pompe
1
3
5
7
9
2
3
4
5
6
7
8
9
3
5
7
9
4
5
6
7
8
9
5
7
9
6
7
8
9
1
3
5
7
9
À Enduit
Placer le commutateur
de remplissage/pulvérisation en position FILL.
Veiller à libérer toute la
pression d’air du réservoir avant de débuter le
remplissage. Cela est
accompli lorsque l’air
cesse de s’échapper du système pneumatique.
Ensuite, enlever le
capuchon sur le bouchon d’orifice supérieur
du pistolet en le tournant vers la gauche.
Amorcer la pompe
jusqu’à ce que le tuyau
de remplissage soit
rempli d’enduit.
pour éviter l’injection d’air dans le réservoir,
ce qui produirait des textures irrégulières.
la pompe, mais se situe typiquement aux
environs de 20 à 25 coups.Lorsque l’ENFORCER™ est plein, le pompage devient
nettement plus difficile. Arrêter alors de
pomper. NE PAS FORCER LE POMPAGE.
CECI POURRAIT PROVOQUER UNE
DÉFAILLANCE MATÉRIELLE ET DES
BLESSURES GRAVES.
Cette étape est essentielle
Attacher le bout du
tuyau de remplissage
au raccord de remplissage du pistolet.
Pomper l’enduit depuis
un seau dans l’ENFORCER. Le nombre
de coups de pompe
nécessaire pour remplir
le réservoir dépend de
la viscosité de l’enduit
et de la course de
Une fois que le système est plein, détacher
le tuyau du raccord
de remplissage du
tuyau. Bien remettre
le capuchon en place
sur le bouchon d’orifice
supérieur du pistolet
Remettre le bout du tuyau de remplissage
dans le seau d’enduit pour éviter les débordements.
Ahora mueva el interruptor de palanca nuevamente a la posición
de ROCÍO y estará listo
para seguir.
Nettoyage
La fréquence de nettoyage requise dépend
du matériau, de la fréquence d’utilisation
et du milieu environnant. TOUS LES
MATÉRIAUX AUTRES QUE L’ENDUIT
POUR CLOISON SÈCHE DOIT ÊTRE
NETTOYÉ APRÈS EMPLOI. En règle générale, si l’enduit pour cloison sèche doit
rester, ou est resté, dans le réservoir pendant plus de 2 semaines sans être utilisé,
l’appareil doit être nettoyé. Un entretien et
un nettoyage réguliers permettront d’étendre la durée de service de l’ENFORCER™
et de ses accessoires.
NE JAMAIS RACCORDER L’ENFORCER™
À UNE QUELCONQUE CONDUITE D’EAU.
CECI POURRAIT PROVOQUER UNE
DÉFAILLANCE MATÉRIELLE ET DES
BLESSURES GRAVES.
La sortie du pistolet
doit être nettoyée après
chaque utilisation.
Pour bien les nettoyer,
séparer le pistolet et le
disque de sortie et les
rincer à l’eau claire.
Phone 800-888-0127 / 641-753-0127 • Fax 800-477-6341 / 641-753-6341 • www.MARSHALLTOWN.com
Page 17

Pour effectuer un net-
2
3
4
5
6
7
8
9
3
5
7
9
4
5
6
7
8
9
toyage plus complet,
ouvrir la commande
de débit d’enduit à son
maximum et pulvériser
tout le reste d’enduit
dans un seau.
Ensuite, enlever le
couvercle supérieur et
le piston pour ouvrir
le réservoir et remplir
d’eau propre tout en
nettoyant le fond du
réservoir.
Remettre le piston et le
couvercle en place et
pulvériser l’eau pour la
vider.
Répéter les étapes 3 et
4 jusqu’à ce que l’eau
pulvérisée soit propre.
Déposer le pistolet et
récurer selon les besoins.
à la main à l’intérieur du réservoir pour
assurer une bonne étanchéité entre les segments de piston et les parois du réservoir.
L’actionnement du piston a aussi pour effet
de lubrifier les parois internes du réservoir,
ce qui assure un meilleur fonctionnement. Si
le piston ne se déplacement pas aisément
et librement à l’intérieur du réservoir, il est
possible que la gâchette du pistolet soit fermée ou que les segments de piston soient
coincés entre le corps de piston et la paroi du
réservoir.
Pièces de rechange p. 19
Garder le couvercle et le pistolet séparés de
l’appareil mouillé pour éviter la formation de
moisissures.
Relubrifier les segments de piston et les
joints toriques du capuchon après le nettoyage. L’ENFORCER™ est maintenant prêt
pour le projet suivant.
Entretien
Vérifier régulièrement l’absence de dommages et le bon état de fonctionnement de tous
les éléments principaux de l’ENFORCER.
Changer toutes les éléments usés ou endommagés en utilisant les pièces de rechange qui
conviennent, indiquées à la page 16.
Pour éviter les problèmes de fonctionnement,
voire la défaillance d’une pièce, relubrifier les
segments de piston et les joints toriques du
capuchon après le nettoyage.
Après le nettoyage et le graissage, actionner
le piston de haut en bas tout en le pivotant
17
Page 18

19
Replacement Parts / Partes de repuesto / Pièces de rechange
11
13
10
12
5
8
16
4
14
3
7
1
2
15
6
9
17
10401
Backpack
Assembly,
Ensamble de
la mochila,
Sac à dos
10404
Pneumatic
Assembly,
Ensamble
neumático,
Système
pneumatique
10408
Top Cap
Bolt Set,
Tornillos para la
tapa superior,
Boulonnerie de
capuchon supérieur
10402
Piston
Assembly,
Ensamble
del pistón,
Piston
10406
Mud Hose Kit,
Juego de
manguera de
pasta,
Trousse tuyau
à enduit
10409
Mud Hose
Barbed Fitting,
Adaptador
dentado
para manguera
de pasta,
Raccord cannelé
tuyau à enduit
10403
Top Cap
Assembly,
Ensamble de
la tapa superior,
Capuchon
supérieur
10407
Filling Hose Kit,
Juego de
manguera
de llenado,
Trousse tuyau de
remplissage
10410
Total Hose Kit,
Juego de
manguera completo,
Trousse tuyaux
complète
10411
Backpack Tank
Straps,
Correas del tanque
para mochila,
Sangles de réservoir
pour sac à dos
10412
Fill Plug,
Tapón de
llenado,
Bouchon de
remplissage
10413
Seal Kit,
Juego de
sellos,
Trousse
d’étanchéité
10415
Replacement Caps,
Tapas de repuesto,
Capuchons de
rechange
Phone 800-888-0127 / 641-753-0127 • Fax 800-477-6341 / 641-753-6341 • www.MARSHALLTOWN.com
Page 19

Replacement Parts / Partes de repuesto / Pièces de rechange
RE-ORDER # (EDI)
DESCRIPTION
QTY.
DET.
BOTTOM CAP11
CAP O-RING12
-
TANK13
-
TIE ROD44
-
TANK AIR MANIFOLD2
5
-
TANK AIR MANIFOLD O-RING16
-
AIR TUBE FITTING18
-
BOTTOM CAP BOLT
4
9
-
TOP CLAMPING CAP110
1040310403TOP CAP ASSEMBLY111
1040210402PISTON ASSEMBLY112
TOP CAP CLAMPING STUD
413
-
AIR TUBE COVER116
1040710407FILL HOSE ASSEMBLY117
-
1040110401BACKPACK ASSEMBLY118
11
13
10
12
5
8
16
4
14
3
7
1
2
15
6
9
17
OTHER RE-ORDER ITEMS
RE-ORDER #
DESCRIPTION
PARTS INCLUDED
10410
TOTAL HOSE KIT
MUD HOSE ASSEMBLY & FILL HOS E ASSEMBLY
10413 SEAL KIT
(2) CAP O-RINGS & (2) PISTON S EALS
DET. QTY. DESCRIPTION
RE-ORDER
NO.
1 1 BOTTOM CAP 2 2 CAP O-RING 3 1 TANK 4 4 TIE ROD 5 1 TANK AIR MANIFOLD 6 1 TANK AIR MANIFOLD O-RING 7 1 PNEUMATIC ASSEMBLY 10404
8 1 AIR TUBE FITTING -
9 4 BOTTOM CAP BOLT 10 1 TOP CLAMPING CAP 11 1 TOP CAP ASSEMBLY 10403
12 1 PISTON ASSEMBLY 10402
13 4 TOP CAP CLAMPING STUD 10408
14 2 BACKPACK TANK STRAP 10411
15 1 MUD HOSE ASSEMBLY 10406
16 1 AIR TUBE COVER 17 1 FILL HOSE ASSEMBLY 10407
18 1 BACKPACK ASSEMBLY 10401
RE-ORDER NO. DESCRIPTION PARTS INCLUDED
10409 MUD HOSE BARBED FITTING 10410 TOTAL HOSE KIT MUD & FILL HOSE ASSEMBLIES
10412 SHARPSHOOTER 2.0 FILL PLUG KIT PLUG, CAP, O-RING, & RETAINING RING
10413 SEAL KIT (2) CAP O-RINGS & (2) PISTON SEALS
10415 REPLACEMENT CAPS (2) CAPS
OTHER RE-ORDER ITEMS
19
Page 20

104 South 8th Ave
Marshalltown, IA 50158
WS137
 Loading...