

Page 1
SCAN TO WATCH
ASSEMBLY VIDEO
OPERATIONS MANUAL
MODEL: MIX59000D
3 1/2 CU. FT.
104 S. 8th Ave.
Marshalltown, IA
Phone 800-888-0127 / 641-753-0127
Fax 800-477-6341 / 641-753-6341
www.marshalltown.com
WS521
04/2012R1
Page 2

INTRODUCTION
The Gilson Wheelbarrow mixer is great for the do-it-yourself home project. It allows you to work almost anywhere. The
mixer will clear a 30” door and easily fits into an elevator. A quiet 115-volt motor allows you to work indoors without
emissions.
The exclusive in-mold helix drum gives a better homogenous mix. The lifting action picks material up from the base of
the drum.
Used in the mixing of concrete, plaster, adhesives, overlays, chemicals, seed, and grain – the
options are endless.
• Mixes 3 ½ Cu. Ft. of cement, mortar mix, or 2 bags of pre-mix concrete.
• High torque ½ HP single phase 115 volt electric motor and “On/Off” Switch
• Strong polyurethane drum will not crack or rust
• Ring gear is enclosed for safe operation
• Lightweight – 125 lbs. – Can ship UPS
• Handles adjust for easy storage
• Clears a 30 inch door opening
• Fast mixing and easy clean up
• Simple drive system
• Quiet Operation
• Easy Assembly
IMPORTANT—READ THIS MANUAL BEFORE ASSEMBLING OR OPERATING
After referring to the operation manual, if you still require assistance, please contact our customer service department
This operator’s manual has been prepared to provide the information you need to correctly operate and maintain your
unit. Read it carefully and keep it for future reference.
The replacement of any part on this product by other than the manufacturer’s authorized replacement part may
adversely affect the performance, durability or safety of this product. Should you ever require repair parts or service,
contact your authorized parts and service dealer.
The manufacturer reserves the right to make changes or add improvements to its product at any time without prior
notice. The manufacturer also reserves the right to decide, upon its discretion at any time, to discontinue a product.
Read and follow all safety precautions and operating instructions in this manual.
Page 3

1. SAFETY PRECAUTIONS
The following precautions are suggested to help prevent accidents. Before operating this equipment read all precautions.
Equipment should be operated by trained individuals. If the safety instructions and warnings are not read and carefully
followed, personal injury could occur.
• Keep hands and clothing away from any moving parts while the mixer is running.
•
• Clear the work area around the machine to prevent tripping or falling onto the mixer.
•
• Operate on level ground to prevent the mixer from tipping over.
•
• Keep all unauthorized and untrained people away from the mixer at all times.
•
• DO NOT OPERATE this mixer under the influence of alcohol or while taking medication that impairs your reactions.
•
• NEVER run the mixer unattended, turn off the motor when you leave the machine.
•
• Do not pull the cord to disconnect it. Keep the cord away from heat, oil, and sharp edges.
•
• Use factory authorized parts for replacement.
•
• Wear safety glasses when mixer is in use.
•
• Never attempt to move the mixer while the motor is on.
•
• Do not operate this mixer until all the warnings and safety instructions have been read and understood by the operator.
•
• NEVER operate this mixer without all the guards in place and firmly attached.
•
• Make sure that the mixing drum is clear of obstructions and stand clear of the mixer while making power cord
connections.
•
• Keep all people excluding the operator at least 5 feet away from the mixer during peration.
•
• Properly grounded electric circuit is required to protect the operator from possible electric shock.
•
• NEVER plug or unplug the motor while standing in or around damp or wet ground.
•
• Do not start the motor if the drum is fully loaded.
3 of 16
Page 4
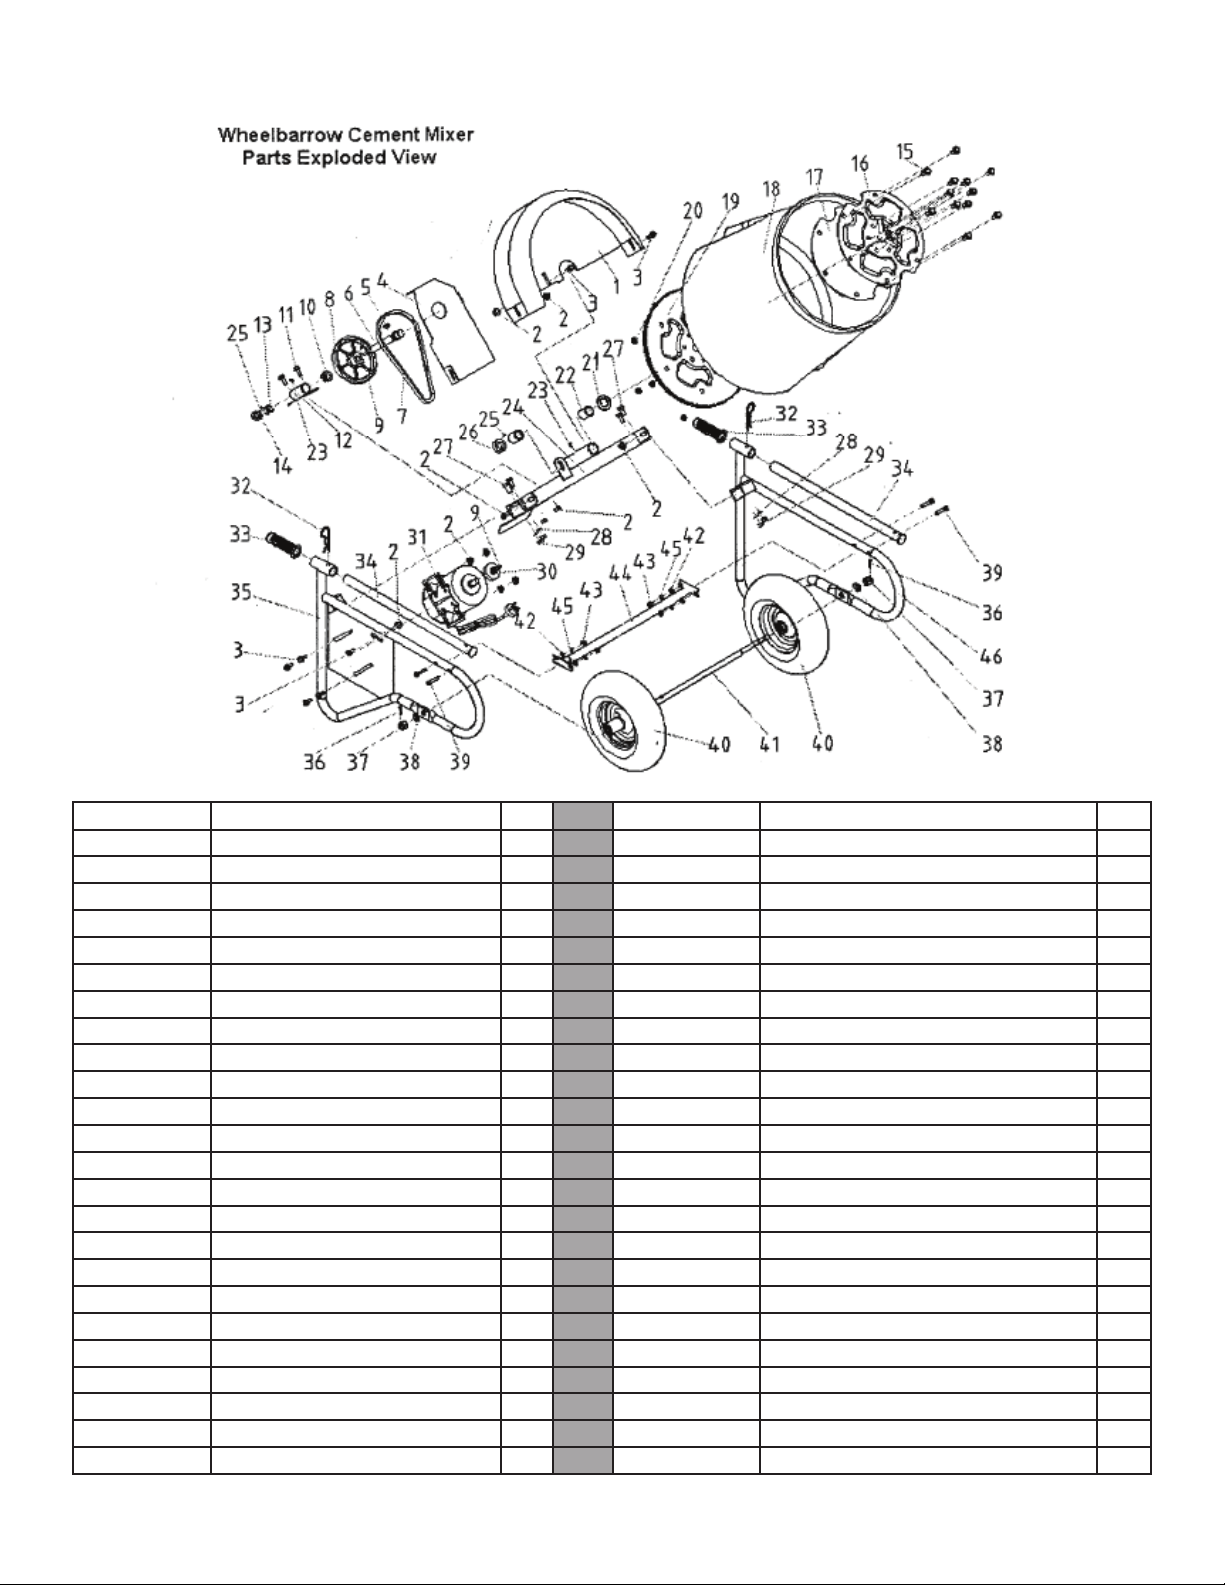
Part # Description Qty
MIX59000D-01 GEAR PLASTIC GUARD-ABS 1 MIX59000D-25 HEX SOCKET SCREW-#M8x8 1
MIX59000D-02 HEX FLANG NUT-#M8 10 MIX59000D-26 GEAR SHAFT FASTEN SLEEVE-#45 C 1
MIX59000D-03 HEX FLANG BOLT-#M8 8 MIX59000D-27 HEX BOLT-#M10x25 4
MIX59000D-04 BELT PLASTIC GUARD-ABS 1 MIX59000D-28 LOCK WASHER-#D10 4
MIX59000D-05 PLAIN HEAD PIN-#6x20 1 MIX59000D-29 HEX NUT-#M10 4
MIX59000D-06 GEAR SHAFT-#45-C.STEEL 1 MIX59000D-30 PULLEY, 1
MIX59000D-07 V-BELT #A27 1 MIX59000D-31 MOTOR,REPLACEMENT FOR PORTABLE 1
MIX59000D-08 DRIVEN BELT PULLEY-#YX041 1 MIX59000D-32 HANDLE FIXING CLIP-#65MN 2
MIX59000D-09 HEX SOCKET SCREW-#M6x8 2 MIX59000D-33 HANDLE SLEEVE-66 NYLON 2
MIX59000D-10 GEAR SHAFT SLIDE BEARING #1- N 1 MIX59000D-34 HANDLE 2
MIX59000D-11 HEX FLANGE BOLT-#M8x25 2 MIX59000D-35 RIGHT WHEELBARROW FRAME 1
MIX59000D-12 GEAR POSITIONING SLEEVE ASSY 1 MIX59000D-36 OPEN-END PIN-3.2x25 2
MIX59000D-13 GEAR SHAFT SLIDE BEARING #2 NY 1 MIX59000D-37 HEX NUT WITH OPEN SLOTS-#M14 2
MIX59000D-14 GEAR SHAFT FSTEN SLEEVE-#45C. 1 MIX59000D-38 WASHER-#D14 2
MIX59000D-15 CARRIAGE BOLT-#M10x30 12 MIX59000D-39 HEX BOLT-#M8x40 4
MIX59000D-17 DRUM LEAK PROOF RUBBER PAD - F 1 MIX59000D-40 TIRE-14",RUBBER 2
MIX59000C-16 DRUM FIXING PLATE ASSY. 1 MIX59000D-41 WHEEL AXLE-#45-C.STEEL 1
MIX59000D-18 DRUM,POLYETHYLENE - NEW STYLE 1 MIX59000D-42 WASHER-#D8 4
MIX59000D-19 GEAR 1 MIX59000D-43 HEX NUT-#M8 4
MIX59000D-20 HEX FLANGE NUT-#M10 12 MIX59000D-44 WHEELBARROW SUPPORT PIPE 1
MIX59000D-21 WASHER-#45 C.STEEL 1 MIX59000D-45 LOCK WASHER-#D8 4
MIX59000D-22 DRIVEN SHAFT SLIDE BEARING-66 2 MIX59000D-46 LEFT WHEELBARROW FRAME 1
MIX59000D-23 GREASE ZERK-#M6 2 MIX59000D-47 ON/OFF SWITCH 1
MIX59000D-24 DRUM FIXING STEEL BOARD 1 MIX59000D-48 PLASTIC ELECTRICAL BOX FOR ON 1
Part # Description Qty
Page 5
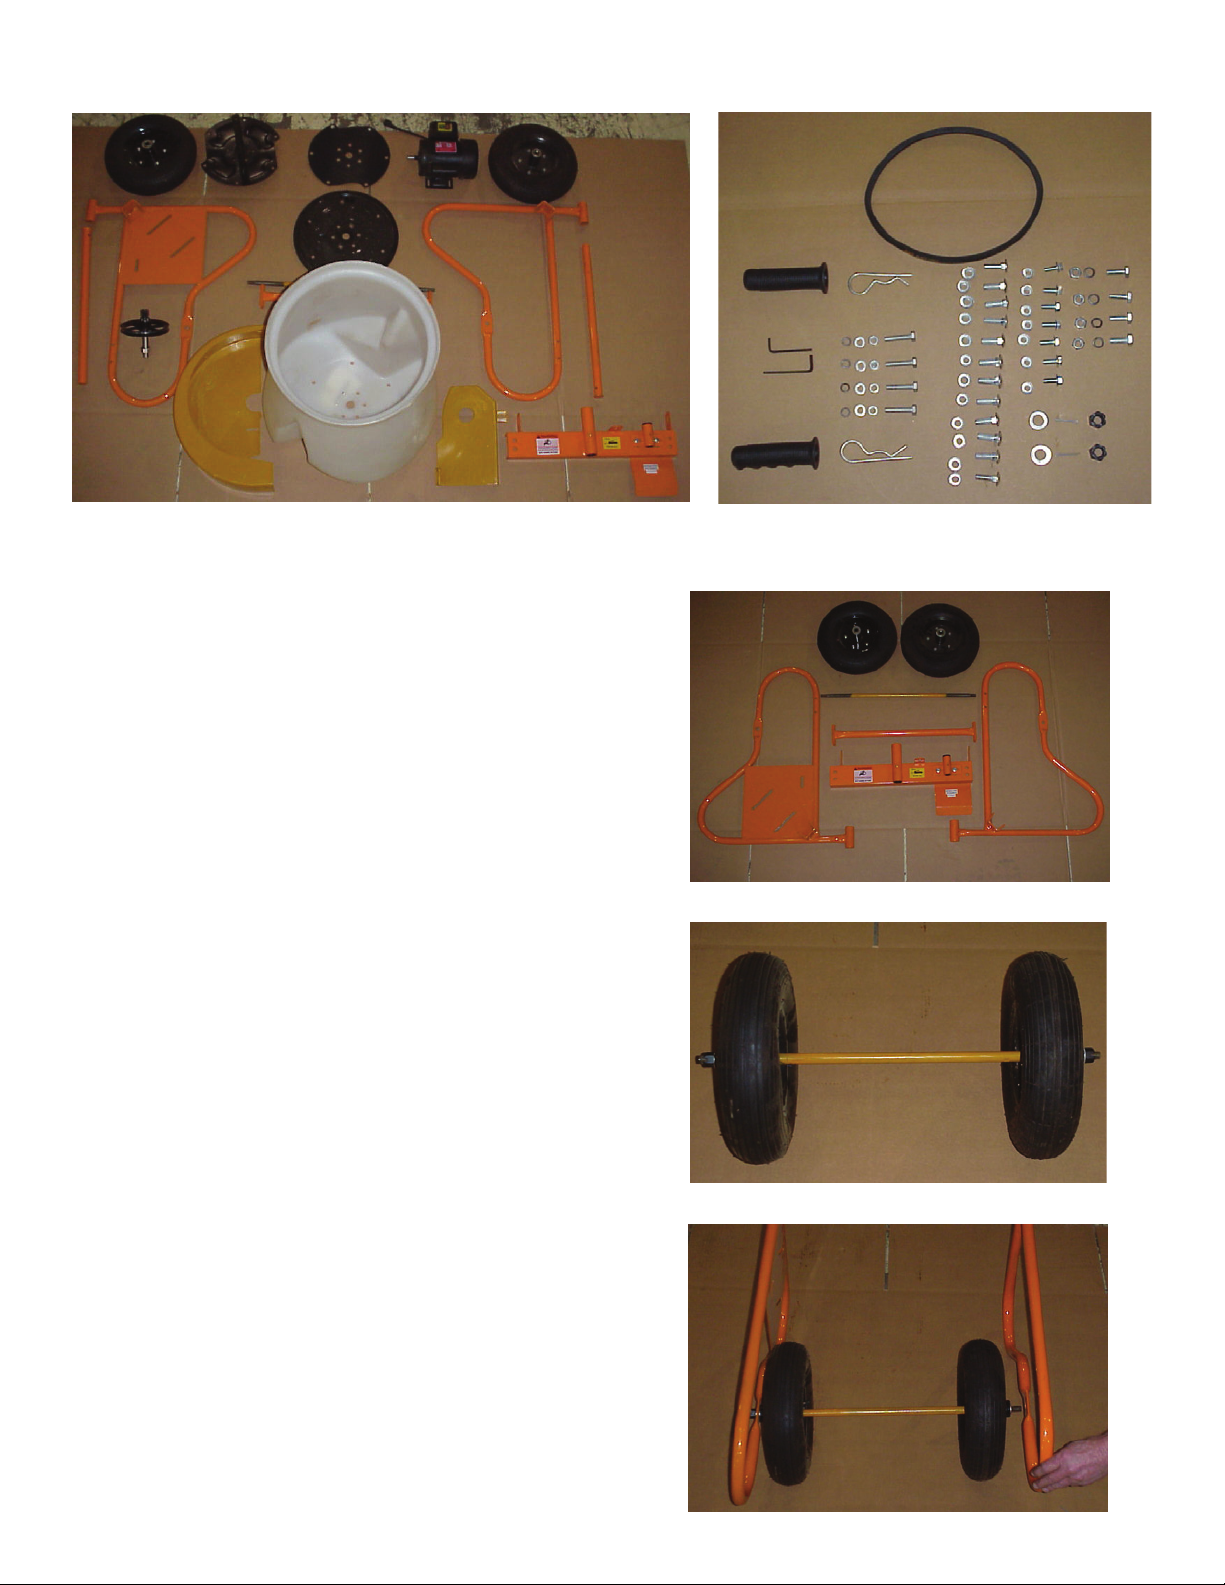
ASSEMBLY GUIDE
FRAME ASSEMBLY
1. Lay out the frame parts.
2. Assemble the tires on the axle. (# 40 & # 41)
3. Assemble tires and axle to the frame.
5 of 16
Page 6

FRAME ASSEMBLY CONTINUED
4. Attach the axle to the frame.
5. Assemble the supporting pipe.
(Using # 39, # 42, # 43 and # 45)
6. Assemble the drum support frame.
(Using # 27, # 28, and # 29)
Page 7

FRAME ASSEMBLY CONTINUED
7. Fasten all the bolts and nuts.
MOTOR ASSEMBLY
1. Assemble the motor onto the frame.
(Using # 2 and # 3)
NOTE: Assemble the drive pulley (# 30)
on the motor shaft -
(If Not Preassembled)
2. Assemble the pinion gear shaft driven pulley
to gear sleeve assembly and attach shaft
sleeve (# 14).
7 of 16
Page 8

MOTOR ASSEMBLY CONTINUED
3. Assemble the V-Belt on the pulleys
NOTE: Adjust belt tension and keep pulleys parallel. Tension
can be adjusted by sliding motor and/or pinion gear sleeve.
Tighten bolts when you have enough tension.
4. Attach the belt guard on the frame.
(Using # 2 and # 3)
5. Attach the gear guard on the frame.
(Using # 2 and # 3)
Page 9

DRUM ASSEMBLY
1. Lay out the drum components.
2. Assemble the central paddle (#16) and its
Pad (#17) in the drum.
3. Assemble the gear wheel (#19) to bottom of the drum.
NOTE: Make sure raised side of gear is facing away from drum.
4. Bolt the drum plate assembly, pad and
gear to drum (Using # 15 and # 20).
NOTE: We recommend applying siliconoe to #15 bolt head to ensure
a proper seal.
9 of 16
Page 10

DRUM ASSEMBLY CONTINUED
5. Put the washer (#21) on the gear shaft.
6. Assemble the drum onto the frame.
7. Check that gears are aligned and interlocked.
INCORRECT
Adjust by loosening pulley gear.
CORRECT
Page 11

DRUM ASSEMBLY CONTINUED
8. Assemble the shaft positioning sleeve (#26) on the gear shaft.
9. Assemble the handle (#34) on the frame.
10. Insert the handle fixing spring clip on the handle.
11. Attach the plastic handle cover.
11 of 16
Page 12

HOW TO MIX CONCRETE
Wheelbarrow Mixer - Model MIX59000D
You’ll need approximately 1 ¼ gallons of water.
1 – 80 lb. Bag of pre-mix concrete
1. Start Mixer
2. Put in 1 gallon of water
3. Add ½ of 80 lb. Bag of pre-mix concrete – mixture will be very sloppy
4. Slowly add 2nd half bag of concrete
5. Add ¼ gallon of water slowly to obtain desired thickness.
How to mix Sand & Gravel
Wheelbarrow Mixer - Model 59000D
You’ll need a square point shovel
Portland cement, gravel or round stone and masonry sand.
1. Start Mixer
2. Put in 1 gallon of water *
3. Add 3 shovels full of gravel or round stone
4. Add 1 shovel full of Portland cement
5. Add 2 shovels full of masonry sand – slowly
6. Add water to obtain desired thickness
* Amount of water will vary according to moisture content of sand and gravel.
Remember to grease fittings before every use!
Page 13

MIXERS ONE-YEAR WARRANTY
This product is warranted to the original purchaser only, to be free of defects in material and workmanship under normal
use, for one year from purchase date. MARSHALLTOWN Company shall without charge for parts and labor, repair or
replace such parts which are found to be defective. All transportation charges for replacement parts must be borne by the
purchaser.
For warranty service, the product must be delivered, with proof of purchase date, to the dealer of original purchase, or any
factory authorized service dealer. The delivery of the unit must be made no later than 30 days after the expiration of the
warranty period.
If difficulty is encountered in having warranty work performed, contact the factory Service Department:
All implied warranties, including those of merchantability and fitness for a particular purpose, are limited to one year from
date of purchase by the original retail customer and to the extent permitted by law any and all implied warranties are
excluded and disclaimed after the expiration of such period.
Some states do not allow limitations on how long an implied warranty lasts, or the Exclusion or limitations of incidental or
consequential damages, so the above Limitations or exclusions may not apply to you. This warranty gives you specific legal
rights, and you may also have other rights, which vary from state to state.
Exclusion from this warranty:
1. The following items are not covered under the MARSHALLTOWN Company one
year Warranty and are warranted by their respective manufacturer.
a) Engines, including starters, generators, alternators and gear reducers.
b) Enclosed gear transmissions.
NOTE: A copy of the warranty and service contact information for the above items is furnished
with the individual product.
2. All consequential damages, including pickup and delivery of the unit, communication, mileage charges and/or
rental of a replacement unit during repairs are not covered under this warranty, nor are any loss of income and/or
other loss resulting from the failure of the product to function due to a warranty defect.
3. This warranty will not apply when the product becomes inoperative due to misuse, normal wear, neglect,
improper maintenance, accident or freight damage; has not been operated and maintained in accordance
with the instructions furnished in the Operator’s Manual; or has been altered or modified without approval
from the factory Service Department.
4.No parts or products are to be returned to the factory without prior written approval from the factory.
13 of 16
Page 14

HOW TO OBTAIN PARTS AND SERVICE INFORMATION
For parts and service information, contact either your local dealer or the MARSHALLTOWN Company:
104 S 8 Ave
Marshalltown, IA 50158
Phone: (641) 753-0127
Fax: (641) 753-9227
HOW TO ORDER PARTS
When ordering parts, be sure to indicate the following information:
• Nameofeachpart
• Completepartnumber
• Quantityofeachpart
• ModelName(Includealllettersandnumbers)
• SerialNumber(Includealllettersandnumbers)
Page 15

15 of 16
Page 16

04/2012R1
 Loading...