

Page 1

Marshall
M-CT7 Camera-Top Monitor Owner’s Manual
M-CT7
Camera-Top Monitor
Owner’s Manual
|1
Page 2

Marshall
Thank you for purchasing a Marshall M-CT7 camera-top monitor. The
M-CT7 is a great tool for focusing, composing, and viewing images/video
clips directly from your digital camera/video camera. It is conveniently sized
for easy transportation, and it is perfect for difficult shooting situations.
To obtain the best results with your new M-CT7, please take the time to
read this manual.
M-CT7 Camera-Top Monitor Owner’s Manual
CAUTION
• Please use the supplied power sources.
• Do not expose this product to excessive heat or humidity.
• Avoid subjecting the unit to physical shock wherever possible.
• Do not use chemical solutions to clean this unit. Simply wipe with a
clean soft cloth to remove fingerprints or smudges.
2|
Page 3
Marshall
M-CT7 Camera-Top Monitor Owner’s Manual
CONTENTS
PRODUCT OVERVIEW .....................3-4
MONITOR .............................3
REMOTE CONTROL ......................4
CABLES ..............................4
MENU OPERATION ...................... 5-8
SPECIFICATIONS ..........................9
INCLUDED ACCESSORIES .................. 10
TROUBLESHOOTING ...................... 10
BATTERY COMPATIBILITY .................. 11
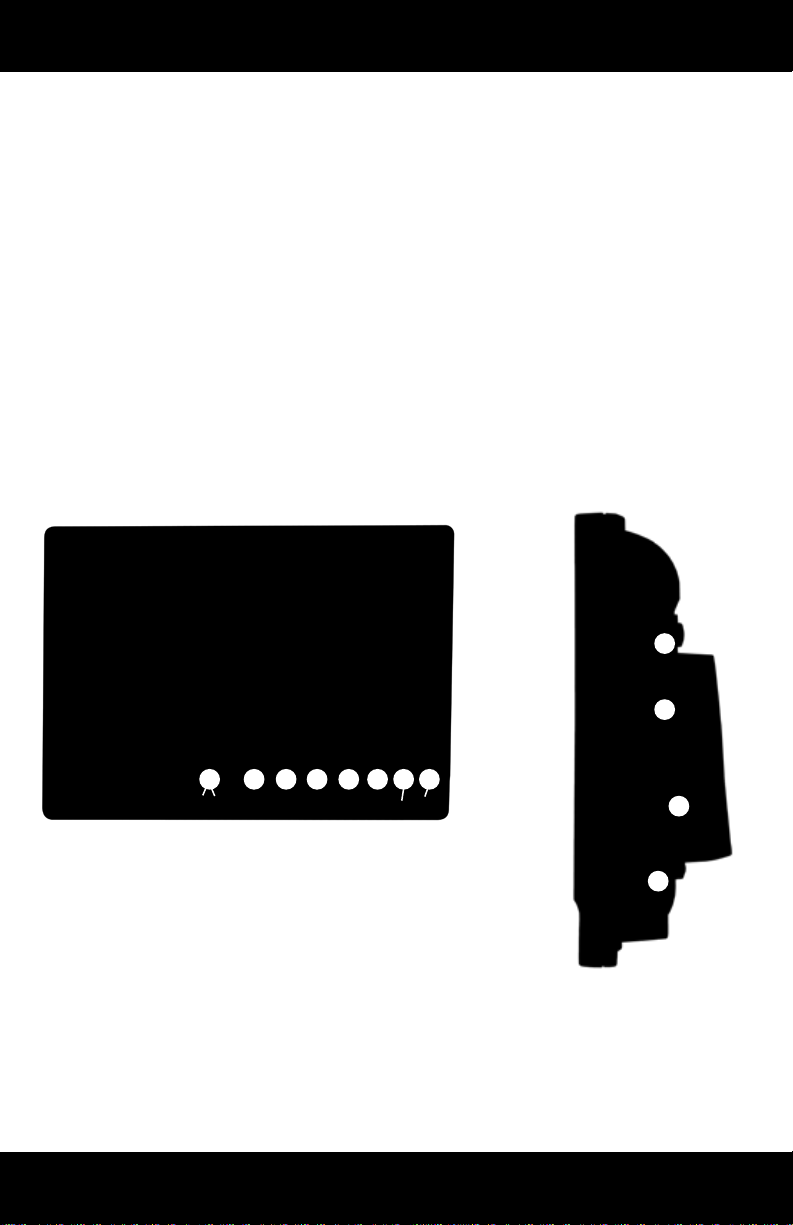
MONITOR
1 2 5 6 7 83 4
1. Volume UP/DOWN / Adjust value of setting function
2. Activate OSD menu
3. Selection key / adjust phase directly
4. Selection key / adjust the brightness directly
5. Input selection switch
6. Power ON/OFF
7. Indicator light
8. Infrared receiving window
9. 3.5mm AV input jack
10. VGA input jack
11. HDMI input jack
12. Power input jack
12
11
10
9
|3
Page 4
Marshall
M-CT7 Camera-Top Monitor Owner’s Manual
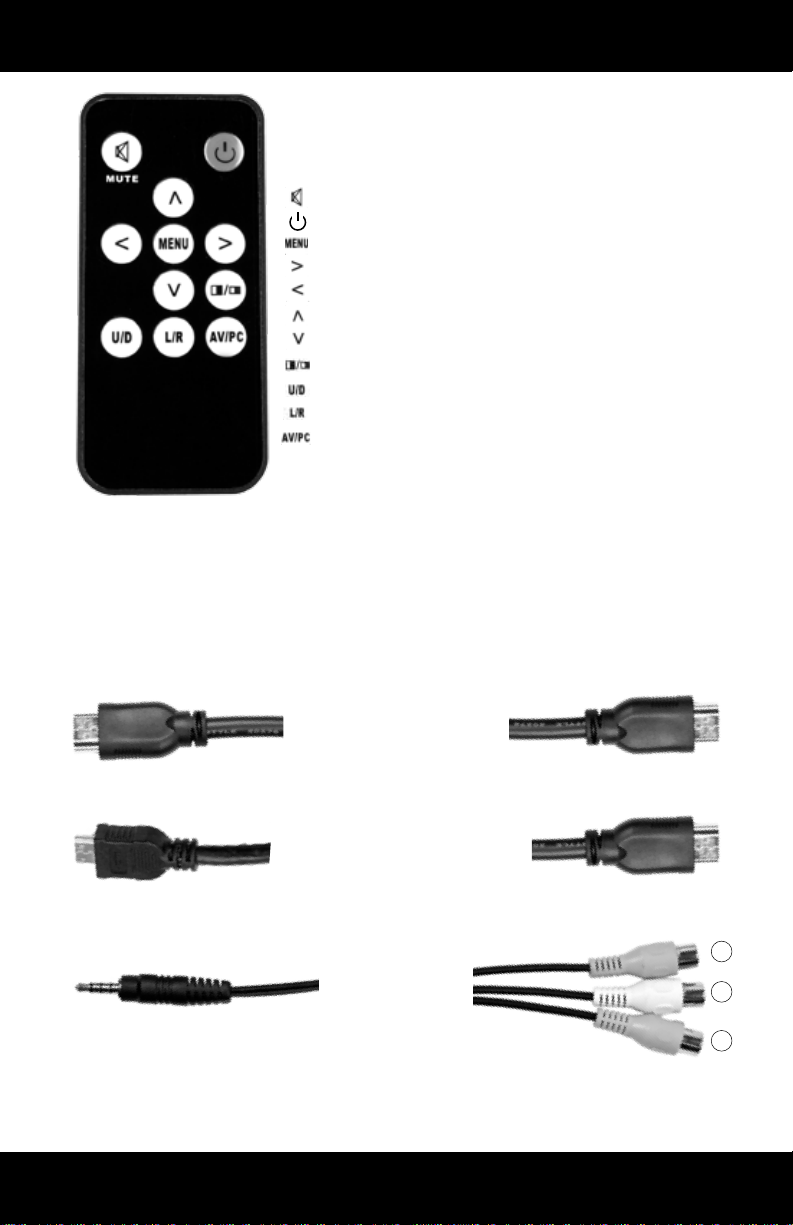
REMOTE CONTROL
MUTE
Power ON / OFF
Activate OSD menu
Volume UP / adjust value of setting function
Volume DOWN / adjust value of setting function
Selection key / adjust brightness directly
Selection key / adjust phase directly
Aspect ratio switch (4:3/16:9)
UP / DOWN
LEFT / RIGHT
Input Selection
mini HDMI-to-HDMI
1. Yellow RCA jack for VIDEO 1 input
2. White RCA jack for AUDIO input
3. Yellow RCA jack for VIDEO 2 input
4|
CABLES
HDMI cable
AV Cable
1
2
3
Page 5

Marshall
M-CT7 Camera-Top Monitor Owner’s Manual
MENU OPERATION
After connecting power, the unit will be in standby mode, which is indicated
by a red light. Press "POWER" on the unit or on the remote control, and
the buttons on the unit will illuminate in blue when the unit is operational.
Pressing the same button again will return the unit to STANDBY mode.
Push "PC/AV" on the unit or the remote control to select the signal input.
OSD in HDMI / PC Mode
OSD in AV Mode
You can press or on the unit or on the remote control to select the
items: COLOR ADJUST MENU FUNCTION SOUND
and confirm by pressing on the unit or on the remote control, then
push again to adjust the items. Push to exit the OSD after your
adjustments are complete.
or
or
|5
Page 6

Marshall
M-CT7 Camera-Top Monitor Owner’s Manual
COLOR (HDMI / PC MODE)
After selecting "Color" mode on the OSD, use to select and then
push to adjust.
1. Brightness: adjusts the brightness of the image
2. Contrast: adjusts the contrast of image
3. Color Temp: adjusts the color temperature of the image
4. Custom Color Adjustment mode
Color temperature within the OSD is adjustable also. Press on the
unit or on the remote controller to select "Color Temp," then choose to set
color temperature to: 9300 K, 6500 K, or USER or by pressing .
RED, GREEN and BLUE may then be adjusted with to obtain any
custom settings you may require.
Note: when you select “USER,” a mini box will appear in the right bottom corner of
the OSD (
or
as pictured above
).
or
or
or
or
6|
Page 7

Marshall
M-CT7 Camera-Top Monitor Owner’s Manual
ADJUST (PC MODE)
1. Auto Config: adjusts settings automatically
2. H Position: adjusts the picture horizontally
3. V Position: adjusts the picture vertically
4. Phase: adjusts the phase
5. Clock: adjusts the clock, make field, and line synchronization
OSD (ALL MODES)
Language window
1. Language: sets the displayed language
2. H Position: adjusts the OSD window horizontally
3. V Position: adjusts the OSD window vertically
4. OSD Timeout: adjusts the timeout for the OSD shut-off
5. Transparent: switches between a translucent and opaque OSD
|7
Page 8

Marshall
M-CT7 Camera-Top Monitor Owner’s Manual
FUNCTION (ALL MODES)
1. Reset: resets the monitor to the original factory settings
2. Zoom: changes the aspect ration from 4:3 to 16:9 (4:3 is default)
3. LR: flip image horizontally (Mirror image)
4. UD: flip image vertically (up / down)
SOUND (ALL MODES)
1. Volume: adjusts the monitor volume
8|
Page 9

Marshall
M-CT7 Camera-Top Monitor Owner’s Manual
SPECIFICATIONS
Display Panel 7-inch TFT LCD (1,152,000 pixels)
Resolution 800x480 (VGA)
Upscaled Resolution 1920x1440 (VGA)
Brightness 400 cd/m
Contrast 50 0:1
Viewing Angles 75°/75° (Left/Right) 50°/70° (Up/Down)
Video Signal Input 0.7 ~ 1.4Vp-p / 75Ω
VGA Signal Input Horizontal: 30~60KHz Vertical: 60~75Hz
Speaker ≥2.5W/8Ω
Color System NTSC: 3.58 / PAL: 4.43
Voltage DC: 12V ± 10﹪
Signal Inputs PC (VGA), AV1, AV2
Power Consumption ≤8w
Working Temperature -10 -75°C
Store Temperature -3 0-75° C
2
Size 182mm (L) x 127mm (W) x 32mm (H)
Weight 14 oz. (without battery)
|9
Page 10

Marshall
M-CT7 Camera-Top Monitor Owner’s Manual
INCLUDED ACCESSORIES
• Power AC adapter
• Car power adapter
• AV cable
• HDMI-to-HDMI cable
• Mini HDMI-to-HDMI cable
• Remote control
• Camera mount
• Battery
• Battery charger
• Operation manual
• Soft pouch
TROUBLESHOOTING
Image is only showing black and white:
Make sure the level of color saturation and brightness is correct.
The power is on but there is no picture:
Make sure the AV or VGA cable is tightly connected from the video out
connector or VGA signal output connector. Make sure you are using the
standard power adapter supplied with the monitor.
The colors are incorrect or abnormal:
If any color is missing, check the cables to make sure they are securely
connected. Broken or loose pins in the cable connector can cause a
bad connection.
The remote control does not work:
Check the battery to make sure the battery is installed properly.
If you are still experiencing problems, contact Marshall Electronics
technical support at:
(800 ) 800-6608 or +1 (310) 333-0606
10|
Page 11

Marshall
M-CT7 Camera-Top Monitor Owner’s Manual
BATTERY COMPATIBILITY
This camera-top monitor is compatible with a variety of different DSLR and
camcorder batteries, depending upon which option is purchased:
DSLR Batteries
Canon BP511
Canon E6
Nikon EL3
Camcorder Batteries
Canon BP-970G
JVC BN-V438U
Panasonic CGA-D54
Panasonic VW-VBG6
Sony NP-QM91
Sony NP-F970
|11
Page 12

Marshall
M-CT7 Camera-Top Monitor Owner’s Manual
12|
Marshall Electronics
1910 E. Maple Avenue
El Segundo, CA 90245 USA
Phone: 310-333-0606 • 800-800-6608 • Fax: 310-333-0688
www.marshall-usa.com
 Loading...