

Marshall electronic M-LCD7-HDMI-B-C511, M-LCD7-HDMI-B-CE6, M-LCD7-HDMI-B-NEL3, M-LCD7-HDMI User Manual
Page 1
Marshall Electronics
M-LCD7-HDMI
M-LCD7-HDMI-B-C511
M-LCD7-HDMI-B-CE6
M-LCD7-HDMI-B-NEL3
Portable 7’’ HDMI TFT LCD Monitor
User Manual
Page 2

Product Overview
The M-LCD7-HDMI is a 7” high-denition widescreen LCD monitor featuring our completely digital
TFT-MegaPixel active matrix LCD platform. This monitor is ideal as a light-weight high resolution
viewnder or focus-assist monitor. Our proprietary digital signal processing features, along with multiformat compatibility, accommodate multiple video formats including NTSC and PAL. The HDMI input
also accepts VESA (VGA) standards allowing the display to be used as a computer monitor.
Features
■ High-Resolution 7” Widescreen Monitor
The M-LCD7-HDMI features an all-digital TFT-MegaPixel active matrix LCD system with
1,152,000 pixels. The LCD panel features a brightness of 300 cd/m2 and a contrast ratio of
500:1, making the display ideal in a variety of environments and lighting conditions.
■ Multi-Format Compatibility
The M-LCD7-HDMI accommodates multiple video standards with Composite Video, VGA,
NTS/PAL, and HDMI inputs.
■ User-Interchangeable Battery Adapters
Several battery adapters are available to accommodate a wide variety of professional
camcorder and DSLR batteries.
Caution
1. Please use the attached adapter accessory.
2. Do not expose this product to direct sunlight, heat, or humidity.
3. For optimal image quality, avoid bright lights while using this product.
4. Avoid heavy impact or dropping product on the ground.
5. Do not use chemical solutions to clean this product. Simply wipe with a soft clean
cloth.
2 M-LCD7-HDMI Manual
Page 3

Unpacking
Carefully unpack the M-LCD7-HDMI monitor and verify that the following items are included:
■ AC model (M-LCD7-HDMI) includes:
M-LCD7-HDMI Monitor
AC Power Supply
HDMI Cable
HDNI – MINI HDMI Cable
Car Cigarette Adapter
Table Stand
PC Cable [9-pin VGA Cable]
Multi-function input cable [SKS Cable]
Camera mount
Remote control
Operating Instructions
■ DC model (M-LCD7-HDMI-B-XXX) includes the following additional items:
Battery (Canon B511, or Nikon EN-EL3E, or Canon LP-E6)
Battery mount
Mounting plate
Power DC cable
Hood
Battery charger
When storing the monitor for extended lengths of time, please remove the battery or unplug the
battery from the monitor.
Inspect the unit for any physical damage that may have occurred during shipping. If there is any
damage, immediately call Marshall Electronics Customer Service at (800) 800-6608. If you are not
located within the continental United States, call +1 (310) 333-0606.
3M-LCD7-HDMI Manual
Page 4
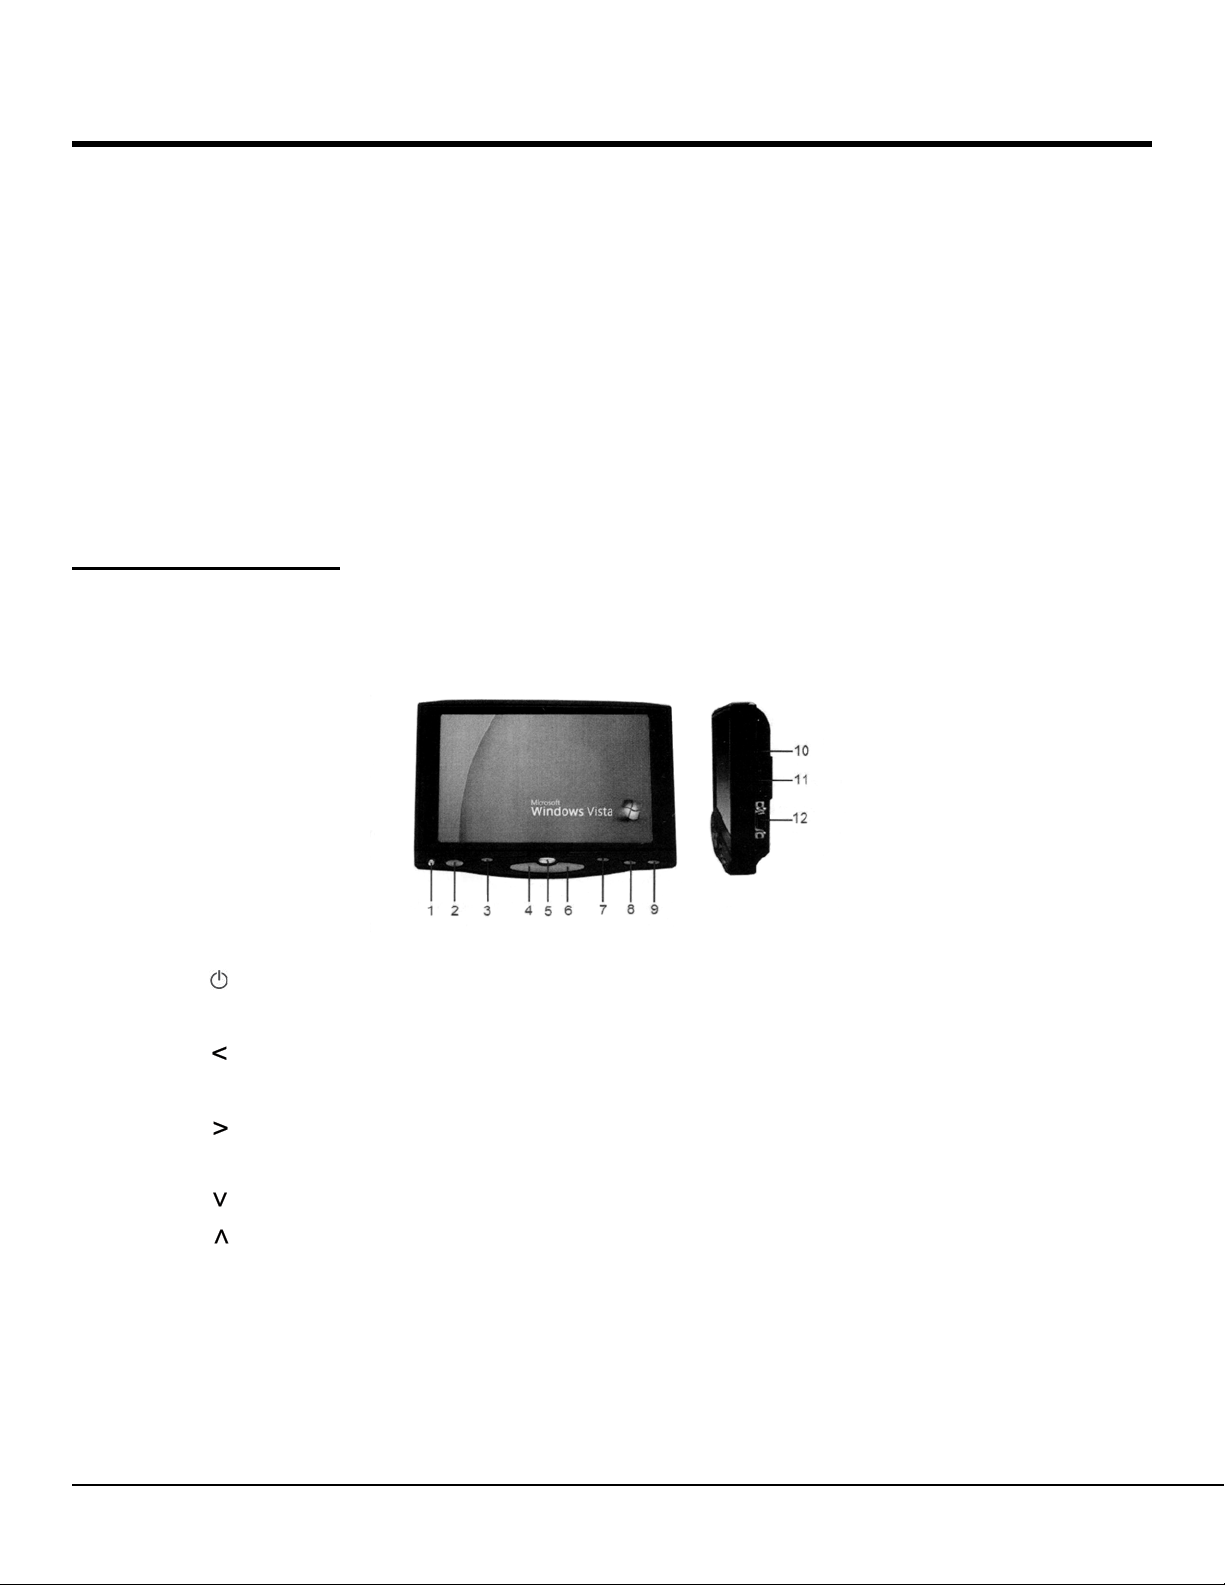
Table of Contents
■ Product Description ........................................................................................................... 4
Remote Control .......................................................................................................... 5
Matched Cable ............................................................................................................ 5
Connection ................................................................................................................. 6
■ Operating Instructions ....................................................................................................... 7
■ Specications ..................................................................................................................... 13
■ Accessories ......................................................................................................................... 13
■ Troubleshooting .................................................................................................................. 14
■ Warranty .............................................................................................................................. 15
Product Description
■ Description of Monitor
1. Indicator light
2. : Power on/off
3. AV/PC: AV/PC switch
4. : Volume down or to adjust the value setting function
5. Infrared receiver
6. : Volume up or to adjust the value of setting function
7. MENU: To activate OSD menu
8. : Selection key, to adjust phase directly
9. : Selection key, to adjust brightness directly
10. DC12V: DC12V input jack
11. HDMI: HDMI input jack
12. SKS: SKS input jack
4 M-LCD7-HDMI Manual
Page 5
Product Description
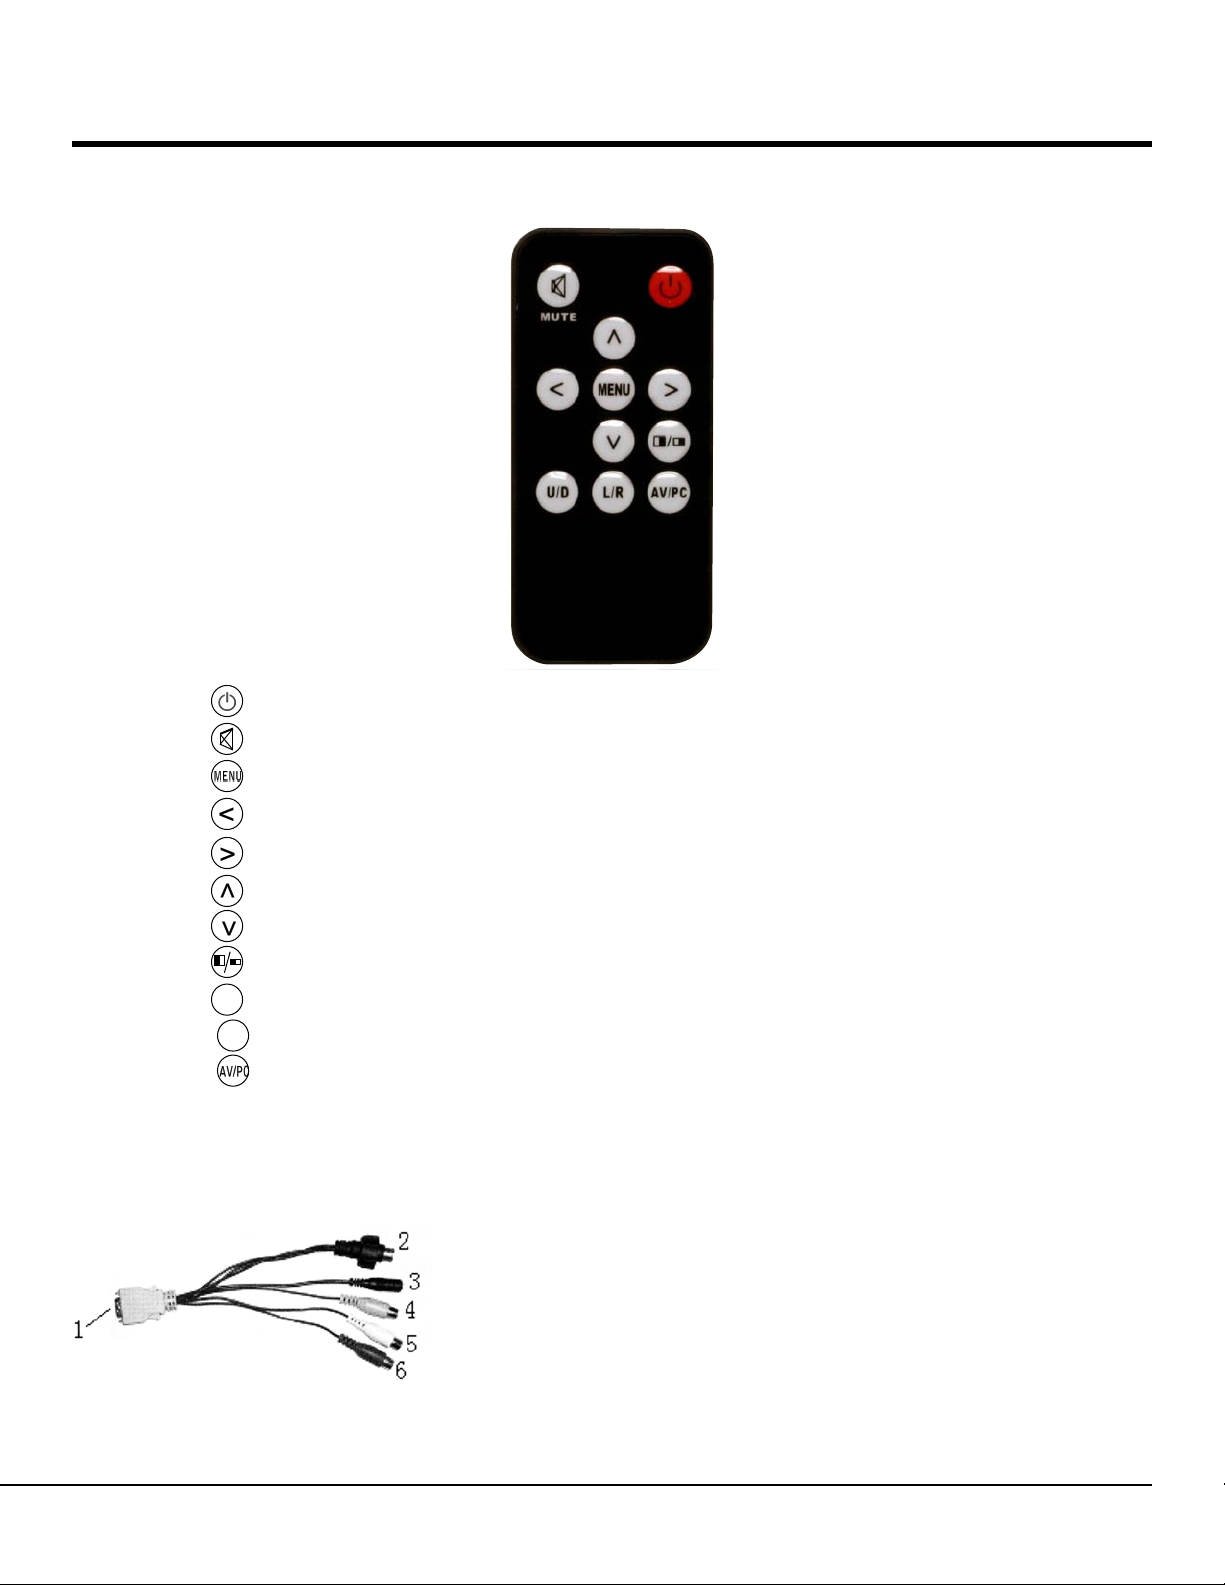
■ Remote Control
1. : Power on/off
2. : MUTE
3. : To activate OSD Menu
4. : Volume down, or to adjust the value of setting function
5. : Volume up, or to adjust the value of setting function
6. : Selection key, the brightness adjustment
7. : Selection key, the phase adjustment
8. : Aspect ratio switch, 4:3 or 16:9
U/D
9. : Up/Down Switch
L/R
10. : Right/Left Switch
11. : AV1/AV2/PC Switch
■ Matched Cable
1. SKS input connector to be connected to SKS input
jack on monitor
2. Male 9-pin plug for VGA signal
Picture 3 (AV cable)
3. DC12V power
4. Yellow RCA jack for video 1
5. White RCA jack for audio
6. Red RCA jack for video 2
5M-LCD7-HDMI Manual
Page 6

Product Description
Picture 4 (VGA cable)
1. Female 9-pin jack connects to male 9-pin plug on picture 3
2. 15-pin VGA signal input end connects to computer VGA port
■ Connection
1. Connect SKS input end of the AV cable (picture 3) into the AV input jack of the monitor.
The other jack of the AV cable should be connected as follows:
2. Male 9-pin plug of picture 3 is connected to female 9-pin jack of picture 4; the VGA
signal input end of picture 4 will be connected to the VGA port at the back of the
computer. Tighten the screws.
3. Black jack connects to DC12V power
4. Yellow RCA jack connects to video signal 1
5. White RCA jack connects to audio signal
6. Red RCA jack connects to video signal 2
Please use the included DC adapter. (Note that the power consumption should be less or equal to
10W.)
6 M-LCD7-HDMI Manual
Page 7

Operating Instructions
Operation
After connecting to power, the unit will be in standby mode (red light). Press the power button on the
unit or on the remote control and the buttons of the unit will light up blue. Press the same button again
and the unit will return to standby mode. (Note the blue button will shut off 5 or 6 seconds after you
turn the unit off.) Push “PC/AV” on the unit or AC/PC on the remote control to switch between AV and
PC.
■ OSD in PC Mode:
■ OSD in AV Mode:
You can press “ ” or “ ” on the unit or on the remote control to select the items: (Color), (Adjust),
(Menu), (Edit), (Volume), and conrm by pressing “ ” or ” ” on the unit or on the remote control.
Then push “ ” or ” ” again to adjust the values. Push “ ” to exit the OSD after your adjustment.
7M-LCD7-HDMI Manual
Page 8

Operating Instructions
■ Description of OSD:
In PC mode:
(Color)
■ In Color mode of OSD, use “ ” or ” ” to select and then push “ ” or ” ” to adjust.
Brightness: To adjust the brightness
Contrast: To adjust the contrast
Color Temp: To adjust the color temperature
The color temperature of OSD is adjustable. Press “</>” on the unit or on the remote control to select
“Color Temp,” then choose a color temperature such as 6500 Ks, 7500 Ks or 9300 Ks by pressing “ ”
or ” ”. You can also adjust color temperature by selecting “USER” and adjusting the RED, GREEN,
and BLUE by pushing “ ” or “ ” until desired color value is achieved.
8 M-LCD7-HDMI Manual
Page 9

Operating Instructions
Note: when you select “USER,” a mini box will appear on the bottom right corner of the OSD, as pictured below:
■ (Adjust):
Auto Cong: To automatically adjust to factory default setting
If the auto adjust is not satisfactory, use manual adjust.
H Position: To adjust the picture horizontally
V Position: To adjust the picture vertically
Phase: To adjust the phase
Clock: To adjust the clock for eld and line synchronization
■ (OSD):
9M-LCD7-HDMI Manual
Page 10

Operating Instructions
■ Language: language selection:
H Position: To adjust the picture in horizontal
V Position: To adjust the picture in vertical
OSD Time out: To adjust the clock
Transparent: To adjust the level of transparency
■ (Function):
Reset: Back to the original factory setting
Display Ratio: To change the display ratio: 16:9, 4:3
LR Rotation: To change the picture left/right
UD Rotation: To change the picture up/down
■ Sound
Volume: To adjust the volume.
10 M-LCD7-HDMI Manual
Page 11

Operating Instructions
■ In AV mode:
■ Color:
Brightness: To adjust the brightness
Contrast: To adjust the contrast
Hue: To adjust the hue in NTSC mode
Saturation: To adjust the saturation
■ OSD:
■ Language: 8 languages for OSD as shown above:
H Position: To adjust the picture in horizontal
V Position: To adjust the picture in vertical
OSD Time out: To adjust the clock
Transparent: To adjust the level of transparency
11M-LCD7-HDMI Manual
Page 12

Operating Instructions
■ Function:
Reset: Manufacturer default setting
Display Ratio: To change the display ratio: 16:9, 4:3
LR Rotation: To change the picture (mirror image ip)
UD Rotation: To change the picture up/down
■ Sound:
Volume: To adjust the volume
12 M-LCD7-HDMI Manual
Page 13

Specications
Specications
M-LCD7-HDMI
Display Panel
Resolution 800x480 (VGA)
Up Resolution 1920x1440 (VGA)
Brightness 300 cd/m
Contrast 500:1
Viewing Angle 70
Video Signal Input 0.7 ~ 1.4Vp-p/75 Ohms
VGA Signal Input H:30 ~ 60kHz
Speaker > 250mW/8 Ohms
Color System PAL -4.43; NTSC -3.58
Voltage DC12V + 10%
Signal Input PC (VGA) AV1, AV2 (HDNI 619 optional)
Power Consumption < 6w
Work Temperature -20 ~ 55
Store Temperature -30 ~ 65
Size (mm) 188(L) x 129(W) x 40(H)
Weight (w/o battery) 12 oz.
TFT LCD 7’’
1152000 Pixels
2
o
/70o, 50o /60o (L/R, U/D)
V:60 ~ 75Hz
o
C
o
C
Battery Compatibility
7-BP970G-CM Canon BP-970G Battery assembly
7-BN-V438U-JM JVC BN-V438U Battery assembly
7-CGS-D54-PM Panasonic CGA-D54 Battery assembly
7-VW-VBG6-PV Panasonic VW-VBG6 Battery assembly
7-NP-QM91-SM Sony NP-QM91 Battery assembly
7-NP-F970-SL Sony NP-F970 Battery assembly
13M-LCD7-HDMI Manual
Page 14

Troubleshooting
Troubleshooting
■ Only black and white image
Adjust the levels of color saturation and brightness
■ Power on but no picture
Make sure the AV and VGA cable are secure from the video out connector & VGA signal
output connector. Make sure you are using the standard power adapter included with the
monitor.
■ Wrong or abnormal colors
If any color is missing, check the cables to make sure they are securely connected. Broken
or loose pins in the cable connector can cause a bad connection.
■ Remote control doesn’t work
Check that the battery is installed properly. Also make sure the battery is not low. Make sure
the signal is not being blocked by obstructions.
■ Battery drain while the monitor is off
Unplug the battery cable
Remove the battery
■ Other problems
If intermittent image occurs, it may be that the VGA signal frequency isn’t matched with
normal standard.
It is a normal for some bright lines to appear on screen when you turn the unit.
14 M-LCD7-HDMI Manual
Page 15

Warranty
Marshall Electronics warranties to the rst consumer that this M-LCD7-HDMI LCD monitor will, under
normal use, be free from defects in workmanship and materials, when received in its original container,
for a period of one year from the purchase date. This warranty is extended to the rst consumer only,
and proof of purchase is necessary to honor the warranty. If there is no proof of purchase provided
with a warranty claim, Marshall Electronics reserves the right not to honor the warranty set forth above.
Therefore, labor and parts may be charged to the consumer. This warranty does not apply to the product exterior or cosmetics. Misuse, abnormal handling, alterations or modications in design or construction void this warranty. It is considered normal for a minimal amount of pixels, not to exceed three, to fail
on the periphery of the display active viewing area. Marshall Electronics reserves the option to refuse
service for display pixel failure if deemed unobtrusive to effective use of the monitor by our technicians.
No sales personnel of the seller or any other person is authorized to make any warranties other than
those described above, or to extend the duration of any warranties on behalf of Marshall Electronics,
beyond the time period described above. Due to constant effort to improve products and product features, specications may change without notice.
15M-LCD7-HDMI Manual
Page 16

Marshall Electronics, Inc.
1910 East Maple Ave.
El Segundo, CA 90245
Tel: (800) 800-6608 / (310) 333-0606 • Fax: 310-333-0688
www.marshall-usa.com
MLCD7HDMI-BManV1
 Loading...