

Page 1
RG-1
MODULATION
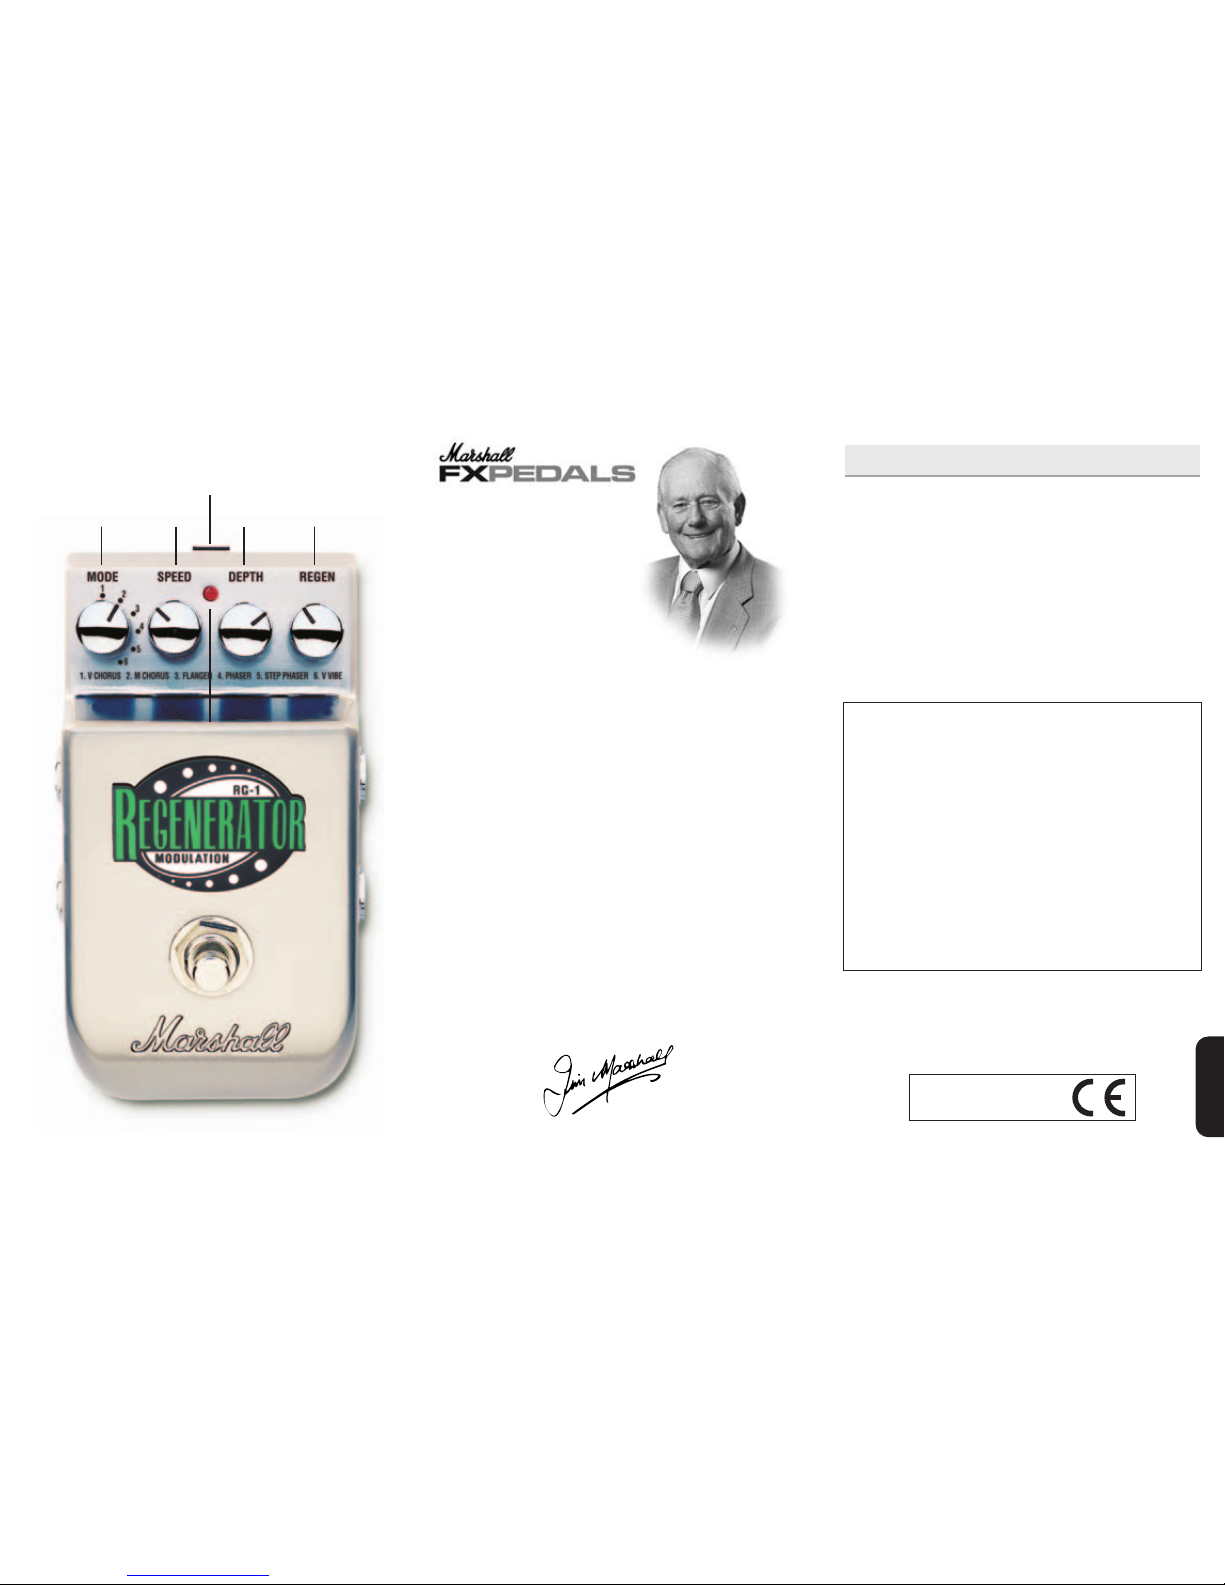
RG-1 Regenerator
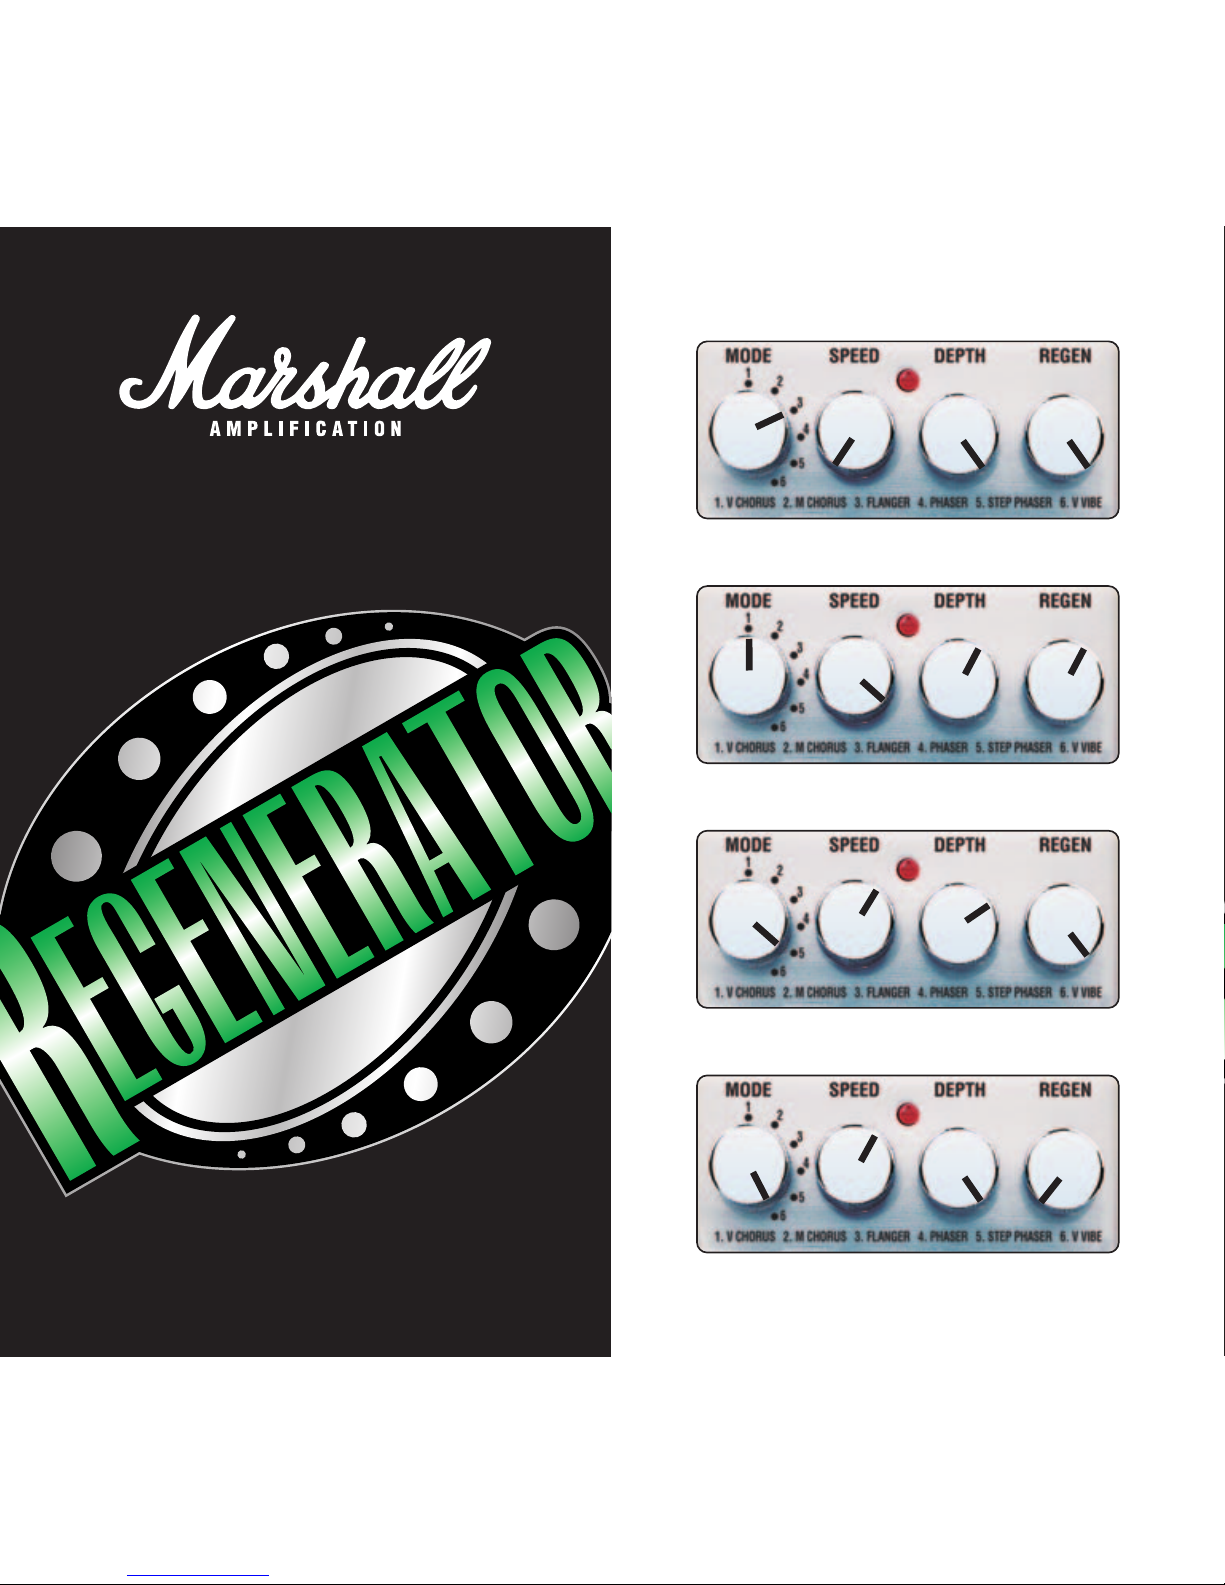
Regenerator Suggested Settings
Owners Manual
FLY BY (Amp: Clean)
SHIMMER (Amp: Clean)
LOOK AROUND YOU (Amp: Clean)
SWIRLIVERSE (Amp: Clean)
Page 2
3
5678
11
10
9
1
24
WARNING!
IMPORTANT Precautions
Refer all servicing to qualified service personnel. Servicing is
required when the apparatus has been damaged in any way, such
as liquid has been spilled or objects have fallen into the apparatus,
the apparatus has been exposed to rain or moisture, does not
operate normally, or has been dropped.
WARNING
Do not expose the apparatus to rain or moisture. Do not expose
the apparatus to dripping or splashing. No objects filled with
liquids should be placed on or near the apparatus. Do not use this
apparatus near water.
Clean only with dry cloth.
Note: This equipment has been tested and found to comply with
the limits for a Class B digital device, pursuant to part 15 of the
FCC Rules. These limits are designed to provide reasonable
protection against harmful interference in a residential
installation. This equipment generates, uses, and can radiate
radio frequency energy and, if not installed and used in
accordance with the instructions, may cause harmful interference
to radio communications. However, there is no guarantee that
interference will not occur in a particular installation. If this
equipment does cause harmful interference to radio or television
reception, which can be determined by turning the equipment off
and on, the user is encouraged to try to correct the interference
by one or more of the following measures:
• Reorient or relocate the receiving antenna.
• Increase the separation between the equipment and receiver.
• Connect the equipment into an outlet on a circuit different
from that to which the receiver is connected.
• Consult the dealer or an experienced radio/TV technician for
help.
Changes or modifications not expressly approved by Marshall
Amplification plc could void the user’s authority to operate the
equipment.
Heed all warnings.
Follow all instructions.
Keep these instructions.
European Product Only
From The Chairman
I would like to personally thank you
for selecting one of our effects pedals.
For over 40 years the Marshall name has been synonymous
with the greatest guitar tones in music. We have worked hand
in hand with guitarists from all levels throughout the world to
maintain and improve that special ingredient, ‘The Marshall
Sound.’
Our range of effects pedals gives the opportunity to augment
the classic Marshall tone to add Marshall character to a guitar
set-up.
All our pedals are made with the same utmost attention to
quality, in both materials and manufacture as our world
renowned amplifiers, cabinets and combos, in order to provide
you with optimum reliability and tone.
I would like to wish you every success with all of your musical
endeavours and also your new Marshall effects pedal, which I
am sure you will find a pleasure to play for many years to
come.
Yours Sincerely,
1
ENGLISH
Page 3

23
Introduction
The Regenerator RG-1 is every modulation pedal you'll need in
one package. It is a stereo modulation pedal recreating six
different modulation modes for you to explore giving you full
control over the modulation time, modulation depth and
regeneration of every mode creating a truly awesome stereo
sound field.
Below is a complete run down of the Regenerator's features
for your information. We have also enclosed a number of
suggested settings to help guide you. It should be
remembered that these are only suggested settings and you
should really experiment as much as possible.
Features
1. 'In' Jack Socket
This is the input jack for connection to your guitar or to the
output of another effects pedal when linking pedals together.
2. 'Expression' Socket
An expression pedal can be connected to this socket to
control the modulation speed. Moving the pedal overrides the
speed control on the pedal allowing you to
increase/decrease the control as you perform.
Always use good quality shielded leads.
Always use 9V regulated DC supply with centre negative rated
at 80mA or above.
Although it may seem obvious the first action in achieving a
good effected sound (be it duration / compression etc.) is to
find the perfect bypassed sound. This will then allow the
correct level to be set with the effect unit to allow a cut or
boost in volume and a realistic tone.
On clean channels it is advisable to set the gain (or volume)
to a setting of no less than one quarter maximum so as not to
get unrealistic results due to any volume dependent tonal
shaping on the amplifier preamp.
Setting Up
ENGLISH
Page 4

3. 'Out 1 / Left' Jack Socket - Passive Bypass
Out 1 is connected to a passive bypass circuit. The passive
bypass ensures complete tonal integrity by disconnecting the
output of the effects circuit when not in operation. When a
jack is connected to Out 1 the pedal operates in mono mode.
4. 'Out 2 /Right' Jack Socket - Spill-Over
Out 2 is connected to a spill-over circuit. When the pedal is
switched off and the regen it has produced is allowed to 'spill'
and rapidly decay over your playing while the input feeding the
effects circuit is switched off. When a jack is connected to Out
2 the pedal operates in mono mode.
When jacks are connected to Out 1 & Out 2 the pedal operates
in Stereo mode, the 2nd output's phase is inversed creating an
even more spacious modulation.
5. Mode
The Regenerator offers six different modulation modes.
Selected by switching the mode knob in to one of the six
positions.
Vintage Chorus A classic chorus, adding mellow sweeps to
high speed vibrato and everything in between
to your sound.
Multi Chorus Based upon Marshall's classic Supervibe
pedal, its unique sweeping pattern allows you
to create simple sweeps through to complex
ensemble sounds.
Vintage Flanger The versatile vintage flanger let's you go
deep and detune your sound to extremes,
turn up the regen for it to soar across your
sound, or hold back to create natural flange
effects.
Phaser A rich phasing effect making your sound
swell with energy, creating fluid waves which
wash around your tone.
54
Step Phaser Adding a crystal staircase effect to the phaser
mode allows you to trip around its sweeping
textures.
Vintage Vibe Get those good vibrations with this swirling
vintage vibe mode.
6. Speed
Controls the speed of the modulation tail from fully anticlockwise, providing slowly sweeping sounds, to fully
clockwise, generating fast vibrato.
7. Depth
Controls the amount of modulation applied to the signal. For
the vintage chorus, multi chorus and vintage flanger this
controls the amount of delay between the direct sound and
processed, greater depths causing a greater amount of
detuning. For the phaser, step phaser and vintage vibe this
controls the range of frequencies that are swept by the filters.
8. Regen
Controls the level of the regeneration, the amount of effect
sent back to the input. Fully anti-clockwise means no signal is
sent back, while fully clockwise sends gives the most signal
back accentuating the sound of the modulation sweeps.
9. Foot Switch
For switching the Regenerator on and off.
10. LED
Indicates when the Regenerator is in operation.
11. DC Input
For input of a 9V DC centre negative regulated adaptor should
you not wish to use batteries.
ENGLISH
Page 5

Technical Specification
Power: 9V DC Centre Negative Regulated
Minimum Current Draw: 80mA
Controls: Mode, Speed, Depth, Regen
Switches: On/Off Switch
Indicators: On/Off LED
Jacks: 2 Input, 2 Output 'Jack sockets'
Input Impedance: 1MΩ
Output Load Impedance: < 1kΩ
Dimensions: 120mm x 65mm x 55mm
Weight: 510 grammes
76
ENGLISH
Battery Replacement
1. To replace the battery, open the easily accessed coin screw
battery cover plate by loosening screw as shown, then
disconnect the battery connector lead.
2. Use PP3 or equivalent battery
(for improved battery life use
alkaline type).
3. Always ensure that the battery
is removed when the pedal is
not in use for long periods.
4. Dispose of old battery in a
safe place.
WHAT IF
NO
OUTPUT
SOUND TOO
TREBLY OR
FIZZY
UNUSUAL
HUM
BASS
FEEDBACK
SOUND TOO
MUSHY OR
BASSY
UNUSUAL
FEEDBACK
INDICATOR
LED NOT
ON
NOISE IN
BYPASS
CHECK
BATTERY
CHECK
LEADS
CHECK PEDAL
CONTROLS
DC INLET
CHECK AMP
CONTROLS
CHECK GUITAR
REDUCE
TREBLE
REDUCE
TREBLE
INPUT
LEAD
Trouble Shooting
33
3
3
3
3
3
3333
3
333
3
3
33
333
MOVE A
W
AY
FROM AMP
PICKUPS
MAY BE
VIBRATING
 Loading...