

Page 1

Remote Control Manual
Portable Room Air Conditioner
Remote Control for:
PS-81B
PS-101B
517.787.2100 • www.marsdelivers.com • www.heatcontroller.com
Page 2

Remote Control Manual - PS-81B / PS-101B
Page 3
Remote Control Manual - PS-81B / PS-101B
CONTENTS
Features of remote control............................................................
Indicators on remote controller......................................................
Handling the remote controller.....................................................
Setting the clock...........................................................................
Automatic operation......................................................................
Cooling/Heating/Fan only operation..............................................
Drying operation ..........................................................................
Timer operation............................................................................
Example of timer setting...............................................................
Cautions.......................................................................................
1
3
4
5
6
7
7
8
9
11
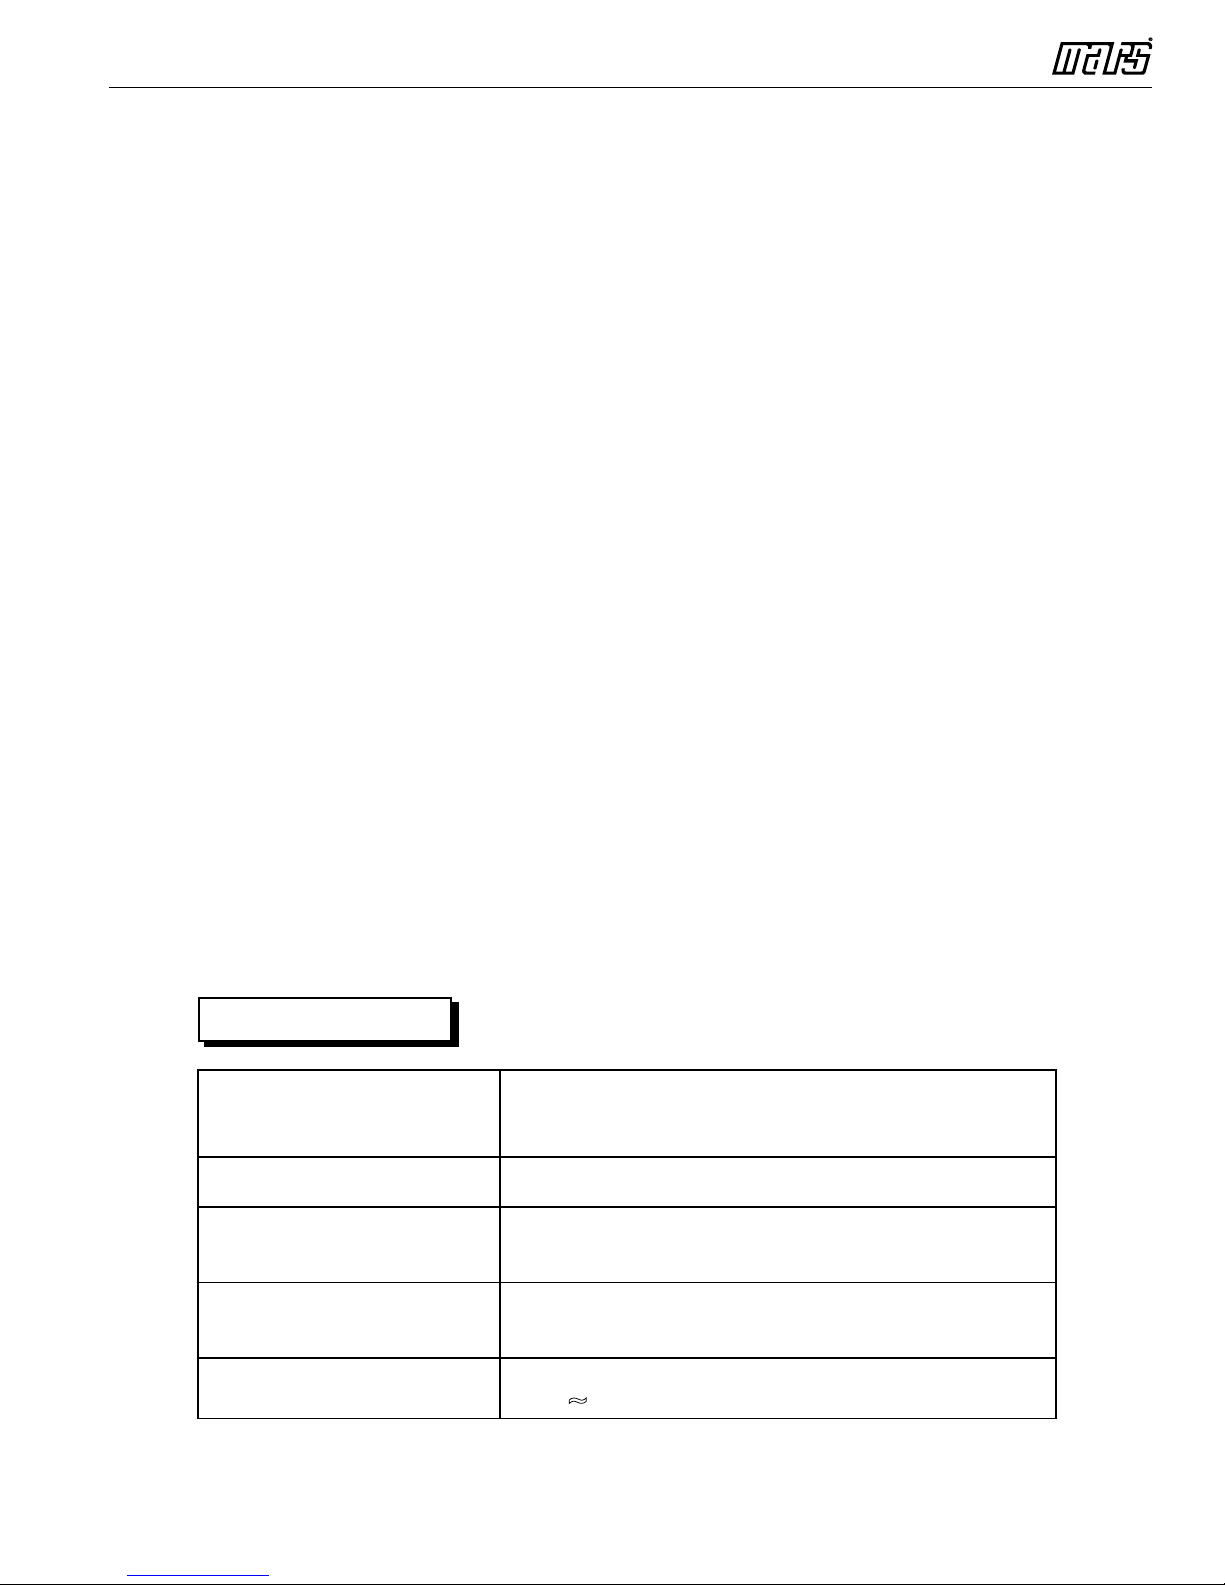
Specification
Model
Rated Voltage
Lowest Voltage of
CPU Emitting Signal
Transmission Distance
Environment
R09D/BG(C)E,
R09E/BG(C)E, RG09E/BG(C)EU1,
R09F/BG(C)E, RG09D/BG(C)EU
3.0V(Dry batteries R03/LR03×2)
2.0V
8m
。 。
-5 C 60 C(-41 F~140 F)
~
O O
Page 4
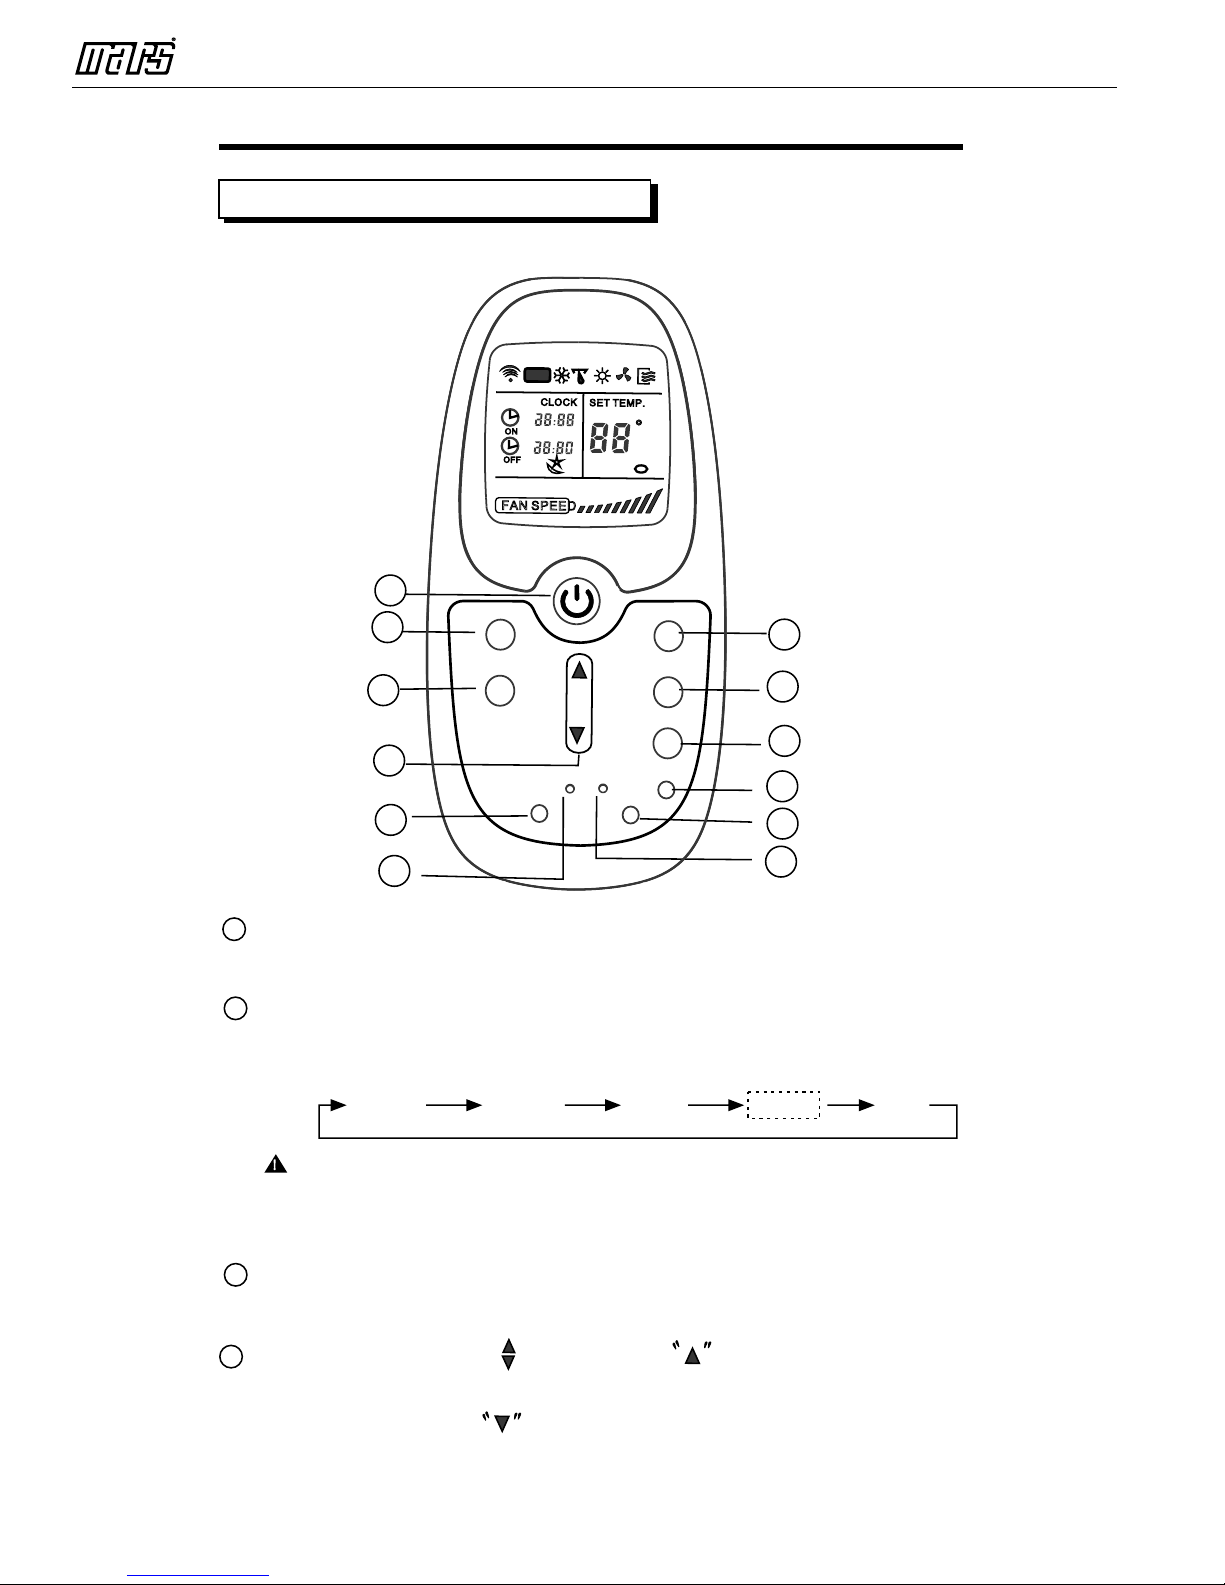
Features of remote control
ON
O
FF
ON
O
FF
On
Stop
2 hours later
after setting
Set
Start
10 hours later
after setting
Off
Stop
Start
5 hours later
after setting
8 hours later
after setting
Set
AUTO
C
L
O
C
K
SE
T
T
E
O
N
O
F
F
F
A
N
S
P
E
E
D
Remote Control Manual - PS-81B / PS-101B
M
P
.
C
F
1
2
MODE
SWING
3
FAN
7
TIMER
8
CANCEL
9
4
5
RES ET
SLEEP
6
1
ON/OFF Button: Push this button to start operation, push
LOC K
LED
CLOCK
10
11
12
the button again to stop operation.
2
MODE Select Button: Each time you push the button, a mode
is selected in a sequence that goes from AUTO、COOL、
DRY、HEAT and FAN, as the following figure indicates:
AUTO
COOL
DRY
HEAT
FAN
!
NOTE:
Do not select HEAT mode if the machine you
purchased is cooling only type. Heat mode is not supported
by the cooling only appliance.
3
SWING Button(on some models): Push this button, the louver
will swing up and down automatically. Push it again to stop.
4
TEMP/TIME Button : Push the button to increase the
indoor temperature setting or to adjust the TIMER in a clockwise
direction. Push the button to decrease the indoor
1
Page 5
Remote Control Manual - PS-81B / PS-101B
button
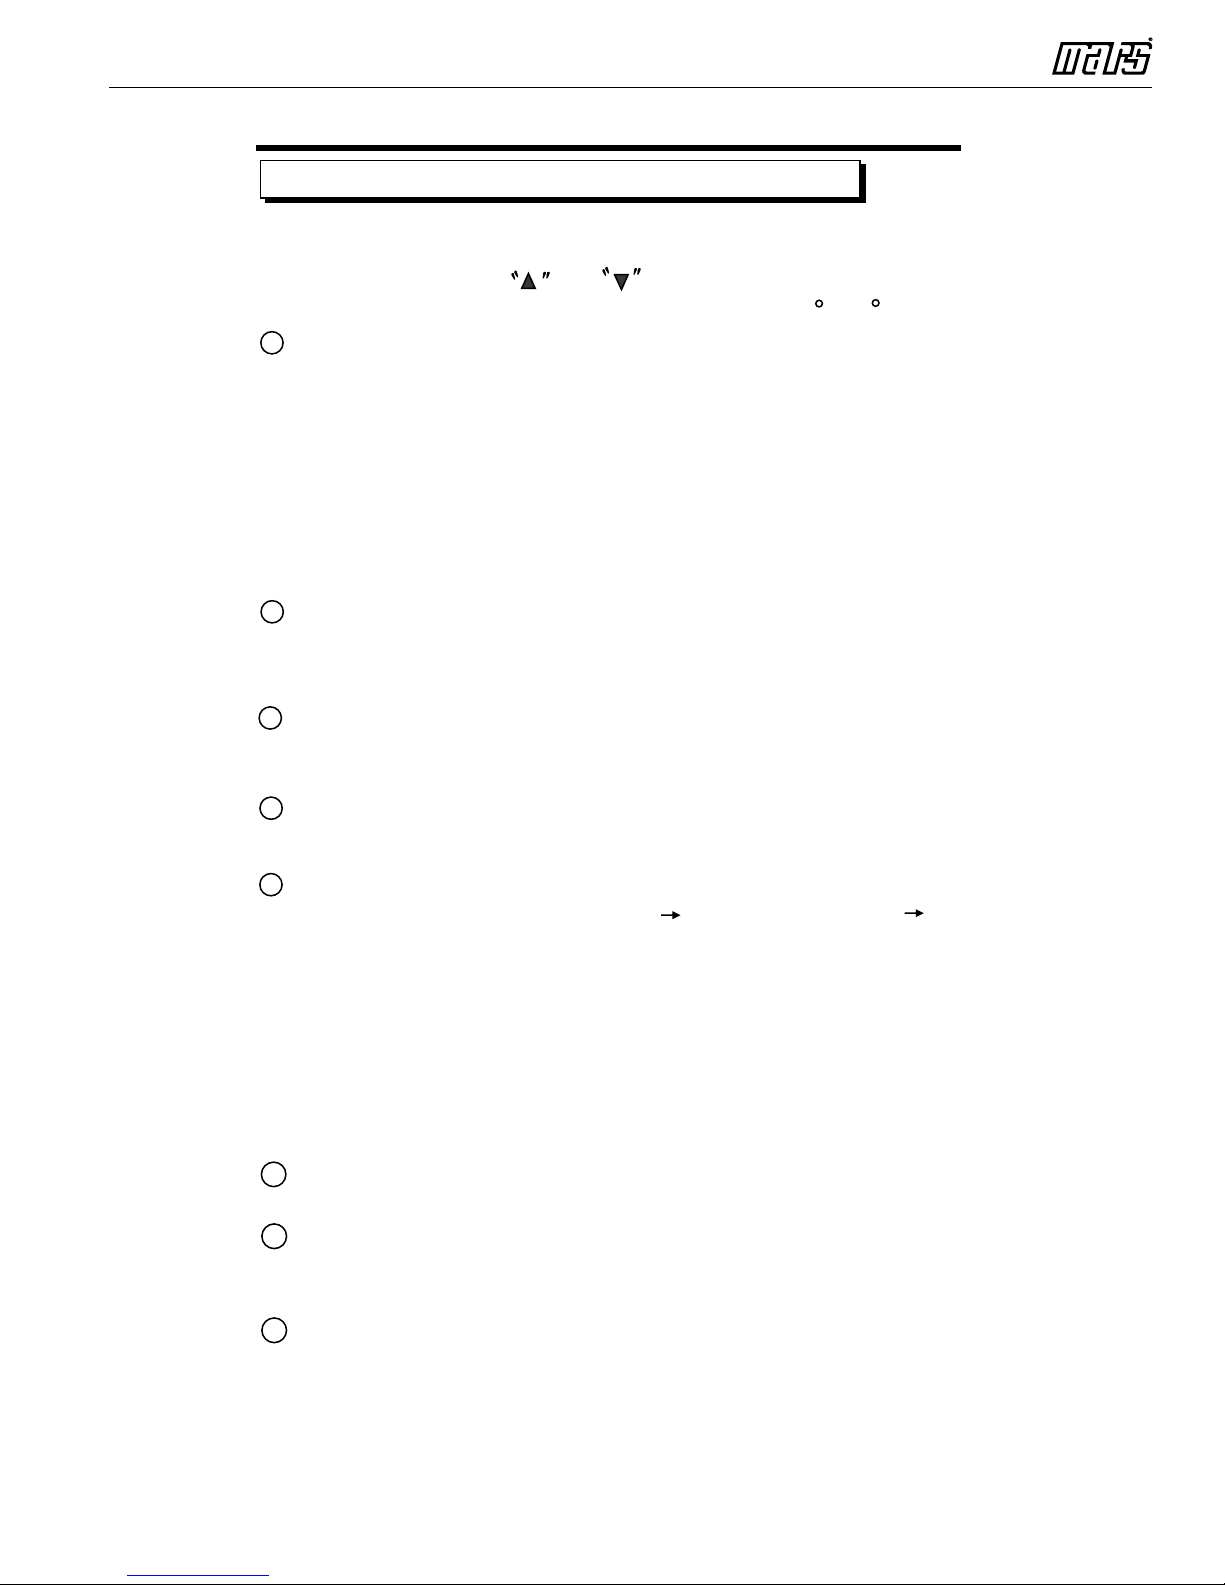
Features of remote control(continued)
temperature setting or to adjust the TIMER in a counter-clockwise
direction.
NOTE: Press and hold and buttons together for 3 seconds
will alternate the temperature display between the C & F scale.
5
SLEEP Button: In SLEEP mode,
Active/Disable sleep function. This will maintain the most
comfortable temperature and save energy. This function is
available on COOL, HEAT or AUTO mode only. For detail,
,,,,
see Sleep operation in USER S MANUAL.
,,
,
,,
NOTE:
While the unit is running under SLEEP mode, it would
be cancelled if MODE, FAN SPEED or ON/OFF button is
pressed.
6
RESET Button: When you press the recessed RESET button,
all current settings are cancelled and the control will return to
the initial settings.
FAN Button: Used to select the Fan Speed in four steps-
7
AUTO、LOW 、MED(some models without) or HIGH. Each
time the button is pressed, the fan speed mode is shifted.
8
TIMER Button: This button is used to preset the time ON
(start to operate) and the time OFF (turn off the operation).
CANCEL Button:
9
(a). If the TIMER ON, TIMER ON OFF or TIMER OFF ON
feature has been set, pressing the CANCEL button will override
the TIMER program and turn off the unit as well.
(b). If only setting TIMER OFF feature, pressing the CANCEL
will cancel the timer off setting and turn on the unit (when
the unit is off).
(c). If no TIMER feature has been set, press the CANCEL button,
and nothing will happen.
10
CLOCK Button: Use to set the time.
11
LED Button: Press this button to clear the digit display in the
air conditioner, press it again to activate it .
12
LOCK Button: When you press the LOCK button, all current
settings are locked in and the remote controller does not accept
any operation except that of the LOCK. Press again to cancel
the LOCK mode.
2
Page 6

Indicators on remote controller
Timer operation
When you select the timer operation, the remote controller automatically
transmits the timer signal to the indoor unit at the specified time.
Therefore, keep the remote controller in a location from which it can
transmit the signal to the indoor unit properly.
The effective operation time set by remote controller is limited in 24 hours.
CAUTIONS
.
.
2
ON
O
FF
SET TE MP.
FAN S PEED
MODE
SLE EP
LED
CLOCK
CANCE L
TIM ER
FAN
RESE T
LOCK
SWING
C
Transmission Indicator
This transmission indicator lights when
remote controller transmits signals to the
indoor unit.
Mode display
Displays the current operation mode. Including
AUTO( ), COOL( ), DRY( ), HEAT( )
(Not applicable to cooling only models), FAN
ONLY ( )and back to AUTO( ).
ON/OFF display
Displayed by pressing the ON/OFF button.
Press the ON/OFF button again to remove.
Temp. display
Displays the temperature setting (17 C/62 F
AUTO
CL OC K
ON
OF F
FA N SPEE D
SE T TE MP.
F
to 30 C/86 F)when you set the operating
mode to FAN ONLY, no temperature setting is
displayed.
Time display
C
Indicate Timer on/off time(0 24 hours)
or clock time.
The clock time is indicated only when no
AUTO-ON/OFF timer is set. When AUTOTIMER feature is operating, it displays the
AUTO-ON/OFF time. To check the current
time, press the CLOCK button, and the time
will display.
Fan speed display
Displays the selected fan speed, AUTO
and three fan speed levels " " (LOW)
" " (MED) " " (HIGH)
will be indicated. Displays AUTO when the
operating mode is either AUTO or DRY.
Note: Some models have no MED Fan
speed selection.
Lock Display
Displayed by pressing the LOCK button.
Press the LOCK button again to remove.
Sleep Display
Displayed by pressing the SLEEP button.
Press the SLEEP button again to remove.
Note:
All displays on the remote controller are
shown for illustration purposes only.
Remote Control Manual - PS-81B / PS-101B
AUT O
AUT O
。
~
3
Page 7

Remote Control Manual - PS-81B / PS-101B
Handling the remote controller
8m
CAUTIONS
.
The air conditioner will not operate if curtains, doors or other materials
block the signals from the remote controller to the indoor unit.
.
Prevent any liquid from spilling into the remote controller. Do not expose
the remote controller to direct sunlight or heat.
.
If the infrared signal receiver on the indoor unit is used in direct
sunlight, the air conditioner may not function properly. Use curtains to
prevent the sunlight from falling on the receiver.
.
If other electrical appliances react to the remote controller. either move
these appliances or consult your local dealer.
Location of the remote controller.
.
Keep the remote controller where its
signals can reach the receiver of the
unit (a distance of 8m is allowed).
.
When you select the timer operation, the
remote controller automatically transmits
a signal to the indoor unit at the specified
time.
If you keep the remote controller in a
position that hinders proper signal
transmission, a time lag of up to 15
minutes may occur.
Replacing batteries
The remote controller uses two
dry batteries (R03/LR03X2)
(1) Slide the cover of the battery
compartment off according to the
arrow direction, then replace the
old batteries with new ones.
(2) Insert the new batteries making
sure that the(+) and (-) of battery
are installed correctly.
(3) Reattach the cover by sliding it
.
back into position.
After replacing batteries, set the
remote controller clock.
4
Page 8

Automatic operation
Setting the clock
1
2
CLOC K
SET TE MP.
FAN S PEED
AUTO
3
MOD E
SLE EP
LED
CLO CK
CAN CEL
TIM ER
FAN
RESE T
LOCK
SWI NG
C
AUTO
CLOC K
SET TE MP.
C
FAN SP EED
MOD E
SWI NG
1
SLEE P
RESET
LOCK
CL OC K
FAN
TIM ER
CAN CEL
CLO CK
LED
Remote Control Manual - PS-81B / PS-101B
Before you start operating the air conditioner,
set the clock of the remote controller using
the procedures given in this section. The
clock panel on the remote controller will
display the time regardless of whether the
air conditioner is in use or not.
Initial Setting of the Clock
After batteries are inserted in the remote
controller, the clock panel will display "12:00".
Press and hold the CLOCK button for 3nds,
the time begin to flash.
1. TEMP/TIME adjust button
.
Press this button to set time.
Forward.
Backward.
2
.
Each time you press the button, the time
moves forward or backward by one minute
depending on which side you press.
The time alters as quickly as you push the
button.
.
Keep pressing the button without releasing,
the time moves forward or backward by 10
minutes depending on which side you press.
2.
CLOCK button
When the right time is achieved, press the
CLOCK button or release the or and
wait for 5 seconds, the clock time stops
flashing and the clock starts operating.
3.Readjusting the Clock
Press the CLOCK button on the remote
controller for about 3 seconds, the clock
display time will start to flash.
To set the new time, follow 1 and 2 of "Initial
Setting of the Clock".
CAUTIONS
Static electricity or other factors (in case of extremely high voltage) can
cause remote controller clock initialize. If your remote controller is
initialized (flashing "12:00"), readjust the clock before you start operation.
Note: The time of the CLOCK must be set
before the AUTO-TIMER feature will operate.
If you readjust the time of the CLOCK after
setting the AUTO-ON/OFF timer, the remote
controller will send the readjusted timer
information to the unit.
* Clock accuracy is within 15 seconds per day.
5
Page 9

Remote Control Manual - PS-81B / PS-101B
Automatic operation
AUTO
CLOC K
SET TE MP.
C
FAN S PEED
1
MODE
SWING
2
RESE T
SLE EP
LOCK
FAN
TIMER
CANCE L
CLOCK
LED
When you set the air conditioner in AUTO
mode, it will automatically select cooling,
heating (cooling only type without), or
fan only operation depending on what
temperature you have selected and the
room temperature.
Once you select the operating mode, the
operating conditions are saved in the
unit's microcomputer memory.
Thereafter, the air conditioner will start
operating under the same conditions
when you simply push the ON/OFF
3
button of the remote controller.
Start
Ensure the unit is plugged in and power
is available. The OPERATION indicator
on the display panel of the indoor unit
starts flashing.
1. Mode select button (MODE)
Press to select AUTO.
2. TEMP/TIME button
Set the desired temperature. Normally,
O
。 。
set it between 21 C/ to 2 8 C/83 F.
70 F
3. ON/OFF button
When the remote controller is off,
push this button to start the air
conditioner.
Stop
ON/OFF button
Push this button again to stop the air
conditioner.
If the AUTO mode is uncomfortable, you
can select the desired conditions manually.
When you select the AUTO mode, you do
not have to set the fan speed. The fan
speed will be automatically controlled.
6
Page 10

8m
CAUTIONS
The air conditioner will not operate if curtains, doors or other materials
block the signals from the remote controller to the indoor unit.
Prevent any liquid from spilling into the remote controller. Do not expose
the remote controller to direct sunlight or heat.
If the infrared signal receiver on the indoor unit is used in direct
sunlight, the air conditioner may not function properly. Use curtains to
prevent the sunlight from falling on the receiver.
If other electrical appliances react to the remote controller. either move
these appliances or consult your local dealer.
.
.
.
.
Cooling/Heating/Fan only operation
Handling the remote controller
Start
Ensure unit is plugged and power is available.
The OPERATION lamp on the display panel of
the indoor unit starts flashing.
CLOCK
SET TEM P.
C
FAN SP EED
MOD E
1
SWI NG
2
SLEE P
RESET
LOCK
FAN
TIM ER
CAN CEL
CLO CK
LED
1. Mode select button (MODE)
Press to select COOL, HEAT (Not applicable to
cooling only models), or FAN ONLY
2. TEMP/TIME button
Set the desired temperature, the most comfortable
4
temperature is between 21 C/70 F to 2 8 C/83 F.
3
3. Fan speed button (FAN SPEED)
Press to select "AUTO" "LOW", "MED" and "HIGH"
4. ON/OFF button
When the remote controller is off, push this
button to start the air conditioner.
Stop
Remote Control Manual - PS-81B / PS-101B
。
O
。
DRYING OPERATION
CLOCK
SET TEM P.
C
FAN SP EED
3
MOD E
1
SWI NG
2
SLEE P
RESET
LOCK
FAN
TIM ER
CAN CEL
CLO CK
LED
ON/OFF button
Push this button again to stop the air conditioner.
The FAN ONLY mode does not control temperature.
Therefore, perform only steps 1,3, and 4 to select
this mode.
Start
Ensure unit is plugged in and power is available.
The OPERATION indicator on the display panel
of the indoor unit starts flashing.
1. Mode select button (MODE)
Press to select DRY.
2. TEMP/TIME button
Push the "TEMP/TIME" button to set the desired
temperature from 21 C/70 F to 28 C/83 F.
。
O o O
3. ON/OFF button
When the remote controller is off, push this
button to start the air conditioner.
Stop
ON/OFF button
Push this button again to stop the air conditioner.
Note: The fan speed cannot be adjusted when
the unit is in AUTO and DRY mode.
7
Page 11

Remote Control Manual - PS-81B / PS-101B
Timer operation
SET TE MP.
ON
OFF
FAN S PEED
MOD E
SWI NG
2
RESE T
SLE EP
LOCK
C
FAN
TIM ER
CAN CEL
CLO CK
LED
1. TIMER button
.
Press the TIMER button, the remote
displays 0.0 alongside either the TIMER
ON or TIMER OFF indicator, and will
flash.
2. TEMP/TIME button
Press to set the desired time.
Forward
Backward
.
Press or hold the forward or backward
button to change the Auto time by 0.5
hour increments, up to 10 hours, then
1
at 1 hour increments up to 24 hours.
.
3
The selected time will register in seconds
after setting.
3. After setting the timer for TIMER ON and
TIMER OFF, check the TIMER indicator
on the display panel of the unit is
illuminated.
Canceling
4. Cancel button(CANCEL)
Press the CANCEL button to cancel
the timer setting.
Changing
Preform steps 1, 2 and 3 to change the
settings.
CAUTIONS
.
When you select the timer operation, the remote controller automatically
transmits the timer signal to the indoor unit at the specified time.
Therefore, keep the remote controller in a location from which it can
transmit the signal to the indoor unit properly.
.
The effective operation time set by remote controller is limited in 24 hours.
8
Page 12

Example of timer setting
Features of remote control(continued)
RESET Button: When you press the recessed RESET button,
all current settings are cancelled and the control will return to
the initial settings.
7
FAN Button: Used to select the Fan Speed in four steps-
AUTO、LOW 、MED(some models without) or HIGH. Each
time the button is pressed, the fan speed mode is shifted.
6
8
temperature setting or to adjust the TIMER in a counter-clockwise
direction.
NOTE: Press and hold and buttons together for 3 seconds
will alternate the temperature display between the C & F scale.
TIMER Button: This button is used to preset the time ON
(start to operate) and the time OFF (turn off the operation).
10
LOCK Button: When you press the LOCK button, all current
settings are locked in and the remote controller does not accept
any operation except that of the LOCK. Press again to cancel
the LOCK mode.
9
11
CANCEL Button:
(a). If the TIMER ON, TIMER ON OFF or TIMER OFF ON
feature has been set, pressing the CANCEL button will override
the TIMER program and turn off the unit as well.
(b). If only setting TIMER OFF feature, pressing the CANCEL button
will cancel the timer off setting and turn on the unit (when
the unit is off).
(c). If no TIMER feature has been set, press the CANCEL button,
and nothing will happen.
CLOCK Button: Use to set the time.
LED Button: Press this button to clear the digit display in the
air conditioner, press it again to activate it .
12
SLEEP Button: In SLEEP mode,
5
Active/Disable sleep function. This will maintain the most
comfortable temperature and save energy. This function is
available on COOL, HEAT or AUTO mode only. For detail,
see Sleep operation in USER S MANUAL.
,,
NOTE:
be cancelled if MODE, FAN SPEED or ON/OFF button is
pressed.
While the unit is running under SLEEP mode, it would
,,,,
ON
Start
Off
Set
OF F
On
Set 6 hours later
8 hours later
Stop
Remote Control Manual - PS-81B / PS-101B
TIMER ON
(Timer Start Operation)
The TIMER ON feature is useful when
you want the unit to turn on automatically.
The air conditioner will automatically
start operating at the set time.
IMPORTANT: The time will be registered
within a 3 second period(after pressing
the TEMP/TIME button), so you should
continue pressing the button until the
desired time is established. Otherwise
you must repeat the steps again.
Example:
To start the air conditioner in 8 hours.
1. Press the TIMER button, the TIMER
ON indicator is displayed and the
setting time beside is flashing.
2. Use the TEMP/TIME button to display
"8.0" beside the TIMER ON display
of the remote control.
3. Wait for 3 seconds and the setting time
stops flashing and this function is
activated.
TIMER OFF
(Timer Stop Operation)
The TIMER OFF feature is useful
when you want the unit to turn off
automatically. The air conditioner
will stop automatically at the set time.
Example:
To stop the air conditioner in 6 hours.
1. Press the TIMER button until the
TIMER OFF indicator is displayed
and the setting time beside is flashing.
2. Use the TEMP/TIME button to display
"6.0" beside the TIMER OFF display.
3. This function will be activated after 3
seconds you release the TEMP/TIME
button.
9
Page 13

Remote Control Manual - PS-81B / PS-101B
ON
OF F
Start
On
Set
2 hours later
after setting
Stop
10 hours later
after setting
COMBINED TIMER
(S both ON and OFF
etting timers
simultaneously)
TIMER OFF → TIMER ON
(On → Stop → Start operation)
This feature is useful when you want to
stop the air conditioner after you go to
bed, and start it again in the morning
when you wake up or when you return
home.
Example:
To stop the air conditioner 2 hours after
setting and start it again 10 hours after
setting.
1. Press the TIMER button until the TIMER
OFF indicator is displayed and time setting
is flashing.
2. Use the TEMP/TIME button to display
"2.0" beside the TIMER OFF display.
3. Press the TIMER button again to display
the TIMER ON .
4. Use the TEMP/TIME button to display
"10" beside the TIMER ON display.
5. Wait for 3 seconds until the TIMER ON
time stops flashing and this function
is activated.
Set
OF F
Off
ON
5 hours later
after setting
Start
Stop
8 hours later
after setting
TIMER ON → TIMER OFF
(Off → Start → Stop operation)
This feature is useful when you want to start
the air conditioner before you wake up and
stop it after you leave the house.
Example:
To start the air conditioner 5 hours after
setting, and stop it 8 hours after setting.
1. Press the TIMER button, the TIMER ON
displays and the setting time flashes.
2. Use the TEMP/TIME button to display
"5.0" beside the TIMER ON display of the
remote controller.
3. Press the TIMER button again to display
the TIMER OFF and the setting time.
4. Use the TEMP/TIME button to display
"8.0" beside the TIMER OFF display.
5. Wait for 3 seconds until the TIMER OFF
time stops flashing and this function
is activated.
10
Page 14

Remote Control Manual - PS-81B / PS-101B
Features of remote control............................................................
Indicators on remote controller......................................................
Handling the remote controller.....................................................
Setting the clock...........................................................................
Automatic operation......................................................................
Cooling/Heating/Fan only operation..............................................
Drying operation ..........................................................................
Timer operation............................................................................
Example of timer setting...............................................................
Cautions.......................................................................................
Model
Transmission Distance
Lowest Voltage of
CPU Emitting Signal
Rated Voltage
R09D/BG(C)E,
8m
2.0V
Environment
Specification
-5 C 60 C(-41 F~140 F)
R09F/BG(C)E, RG09D/BG(C)EU
3.0V(Dry batteries R03/LR03×2)
Cautions
1. When replacing batteries, do not use old batteries or different type
batteries. Otherwise it may cause the remote controller to malfunction.
2. If you do not use the remote controller for a few weeks or more, remove
the batteries. Otherwise, battery leakage may damage the remote
controller.
3. The average battery life during normal use is approximately half a year.
Replace the batteries when there is no receiving beep from the indoor
unit or if the transmission indicator on the remote controller fails to light.
4. Be sure there are no barriers between the remote controller and
the receiver of indoor unit otherwise the air conditioner will not
work.
5. Keep the Remote Controller away from all liquids.
6. Protect the Remote Controller from high temperatures and exposure
to radiation.
7. Keep the indoor receiver out of direct sunlight or the Air Conditioner
may malfunction.
8. Keep controller away from EMI (Electro-Magnetic Interference)
supplied by other household appliances.
OTE:
Buttons design is based on typical model an d might be slightly different
rom the actual one you purchased, the actua l shape shall pre vail.
All the functions described are accompl ished by the unit . If your remo te is
issing a refer enced button, the corresp onding functi on is not available.
When there are wide differences b etween Remote controller Illustratio n
nd USERS MANUAL on function description, the descr iption on USERS
ANUAL sh all prevail.
This device co mplies with all national regulations. In C anada,
t complies with CAN ICES-3 (B)/NMB-3(B ). In USA, thi s device
omplies with part 15 of the FC C Rules. Operat ion is subject to the
ollowing two c onditions: (1) Th is device may not cause harmful interfe-
ence, and (2) this device must accept any int erference rec eived,
ncluding int erference that may cause un desired opera tion.
This equipme nt has been tested and found to c omply with the limits for
lass B digital device, pursuant to part 15 of t he FCC Rules. These
imits are desi gned to provide reasonable protection ag ainst harmful
nterference in a residential installa tion. This equipment generates , uses
nd can radiate r adio frequency energy and, if not installe d and used in
ccordance wi th the instructions, may ca use harmful interferenc e to radio
ommunications. However, there is no guar antee that interference w ill
ot occur in a particular installation. If t his equipment does cause harmful
nterference to radio or television rece ption, which ca n be determined by
urning the equ ipment off and on, th e user is encoura ged to try to correct
he interference by one or more of the followi ng measures:
eorient or relocate the receiving anten na.
ncrease the se paration between the equi pment and recei ver.
onnect the equ ipment into an outlet on a circ uit different fro m that to
hich the recei ver is connected.
onsult the dea ler or an experienced radio/TV technicia n for help.
hanges or modi fications not approved by t he party respon sible for
ompliance co uld void suers authority to o perate the equi pment.
11
Page 15

Remote Control Manual - PS-81B / PS-101B
12
Page 16

'XHWRRQJRLQJSURGXFWLPSURYHPHQWVVSHFLILFDWLRQVDQGGLPHQVLRQVDUH
VXEMHFWWRFKDQJHDQGFRUUHFWLRQZLWKRXWQRWLFHRULQFXUULQJREOLJDWLRQV'HWHUPLQLQJWKH
DSSOLFDWLRQDQGVXLWDELOLW\IRUXVHRIDQ\SURGXFWLVWKHUHVSRQVLELOLW\RIWKHLQVWDOOHU
$GGLWLRQDOO\WKHLQVWDOOHULVUHVSRQVLEOHIRUYHULI\LQJGLPHQVLRQDOGDWDRQWKHDFWXDOSURGXFW
SULRUWREHJLQQLQJDQ\LQVWDOODWLRQSUHSDUDWLRQV
,QFHQWLYHDQGUHEDWHSURJUDPVKDYHSUHFLVHUHTXLUHPHQWVDVWRSURGXFWSHUIRUPDQFH
DQGFHUWLILFDWLRQ$OOSURGXFWVPHHWDSSOLFDEOHUHJXODWLRQVLQHIIHFWRQGDWHRIPDQXIDFWXUH
KRZHYHUFHUWLILFDWLRQVDUHQRWQHFHVVDULO\JUDQWHGIRUWKHOLIHRIDSURGXFW
7KHUHIRUHLWLVWKHUHVSRQVLELOLW\RIWKHDSSOLFDQWWRGHWHUPLQHZKHWKHUDVSHFLILF
PRGHOTXDOLILHVIRUWKHVHLQFHQWLYHUHEDWHSURJUDPV
1900 Wellworth Ave. • Jackson, MI 49203
517.787.2100 • www.marsdelivers.com • www.heatcontroller.com
11/2015
 Loading...