

User Guide
English (3–8)
Guía del usuario
Español (9–14)
Guide d’utilisation
Français (15–20)
Guida per l’uso
Italiano (21–26)
Benutzerhandbuch
Deutsch (27–32)
Appendix
English (33)

2

3
User Guide (English)
Introduction
Box Contents
Onset 120WW Gobo Holder User Guide
Power Cable Gel Holder Safety & Warranty Manual
DMX Cable
Support
For the latest information about this product (documentation, technical specifications, system
requirements, compatibility information, etc.) and product registration, visit marqlighting.com.
For additional product support, visit marqlighting.com/support.
Safety Notes
Important: In addition to the notes below, please refer to the included safety & warranty manual for
additional safety information.
• Carry this product by the hanging/mounting bracket or the handles only.
• Use this product indoors only (IP20). To prevent risk of fire or shock, do not expose this product
to rain or moisture.
• Do not use this product for permanent installations.
• Connect this product to grounded and protected circuits only.
• Always disconnect it from its power source before cleaning or replacing this product’s fuse.
Replace the fuse with another of the same type and rating.
• Before connecting the product to a power source, make sure the power cable is not crimped or
damaged.
• Make sure the power outlet’s voltage is within the range stated on this product (on its housing or
decal).
• Never connect this product to a dimmer or rheostat.
• Never disconnect this product from the power cable by pulling or tugging on the cable itself.
• If you mount this product overhead, use a safety cable.
• Always make sure this product is used in a location with adequate ventilation with at least 20”
(50cm) from adjacent surfaces. Make sure none of this product’s ventilation slots are obstructed.
• Do not use this product at ambient temperatures higher than 104 °F / 40 °C.
• Do not allow flammable materials near this product during use.
• Do not look at the light source when the product is on.
• Do not touch this product while it is powered on or immediately after powering it off. The product
and its housing can reach high temperatures.
• If you encounter a serious problem while using this product, stop using it immediately.
• Do not open this product’s housing. It contains no user-serviceable parts and will void your warranty.
4
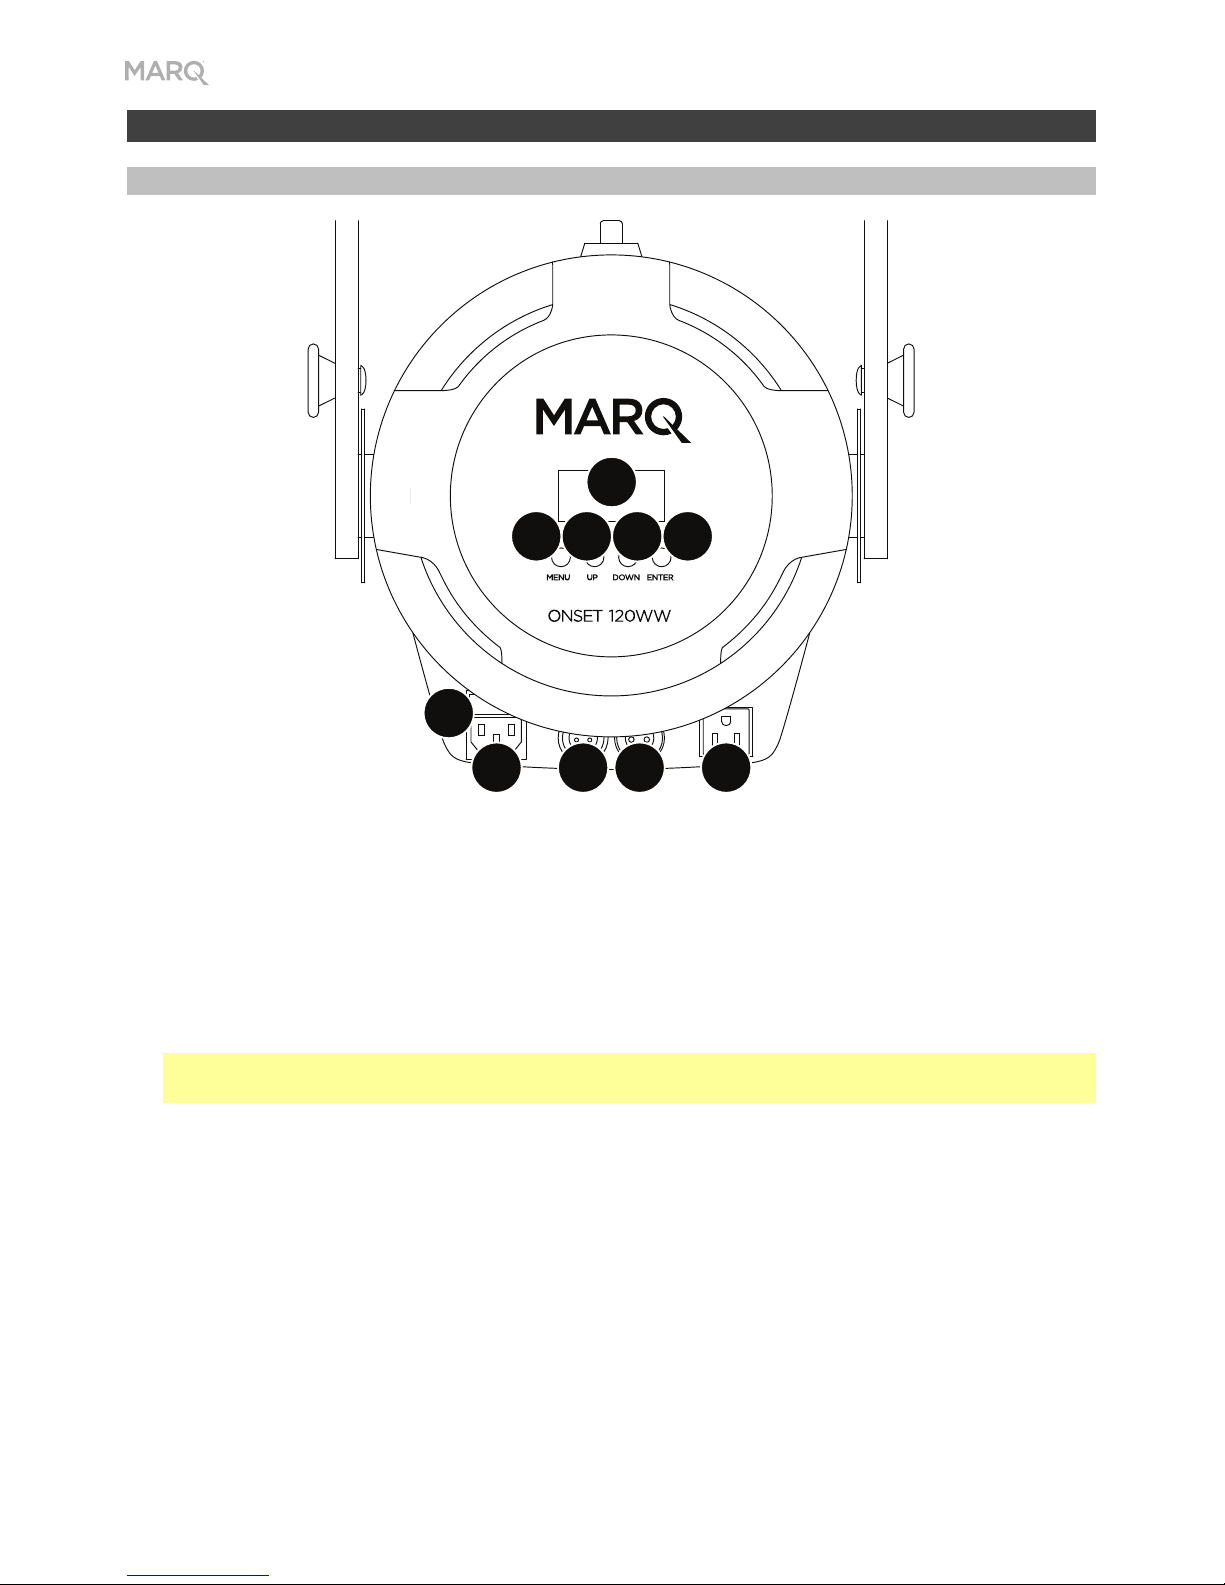
Features
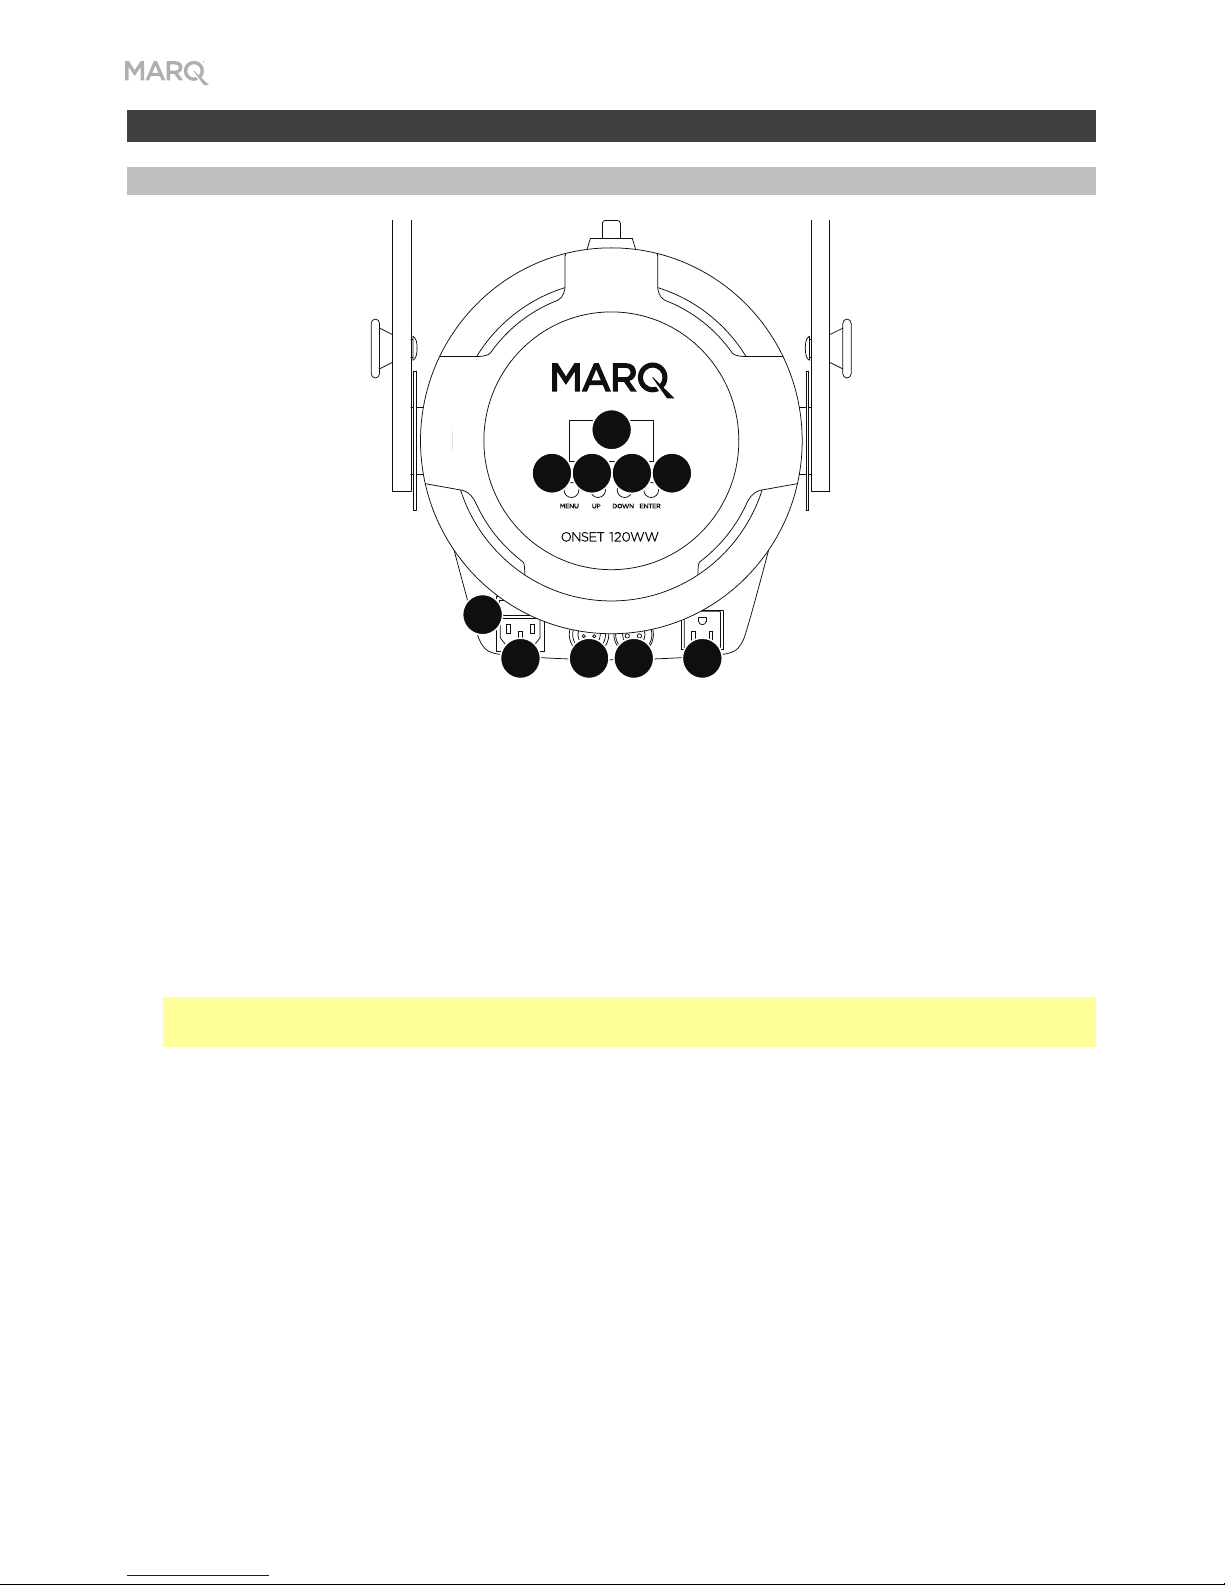
Rear Panel
1
2
34
5
6
7
89
10
1. Power In: Use a standard power cable (included) to connect this input to a power outlet.
2. Fuse: This compartment holds the fuse. Before cleaning or replacing the fuse, disconnect
Onset 120WW from its power source. Use a screwdriver or other tool to remove the
compartment (do not pull it out by the tab only). Replace the fuse only with a new fuse with the
same rating (250 V, 3 A).
3. Power Out: Use a standard power cable to connect this output to an additional fixture. This
connection will supply power to the additional fixture when this one is connected a power outlet.
Please see Setup > Linking > Power for information about linking multiple fixtures.
Note: On models sold in the USA, this will be a standard “Edison” (NEMA) connection. On other
models, this will be a standard IEC connection.
4. DMX In: Use a standard 3-pin XLR cable to connect this input (A) to your DMX controller or (B) to
another fixture that will pass DMX data through it to this one. Onset 120WW receives DMX data over
this connection. Please see Setup > Linking > DMX for information about linking multiple fixtures.
5. DMX Out: Use a standard 3-pin XLR cable to connect this output to an additional fixture. Onset
120WW sends its data to an additional fixture over this connection. Please see Setup > Linking
> DMX for information about linking multiple fixtures.
6. Display: This display shows messages and values indicating the fixture’s current status.
7. Menu: Press this button to access Onset 120WW’s menu.
8. Up: Press this button to select the next-highest menu option or to increase the value by 1.
9. Down: Press this button to select the next-lowest menu option or to decrease the value by 1.
10. Enter: Press this to confirm your current selection or value.
5
Setup
Note: Items not listed under the Introduction > Box Contents are sold separately.
Power Information
Before connecting the fixture to a power outlet, make sure the power cable is not crimped or
damaged. Also, make sure the power outlet’s voltage is within the range stated on this product (on
its housing or decal).
Before cleaning or replacing the fuse, disconnect Onset 120WW from its power source. Use a
screwdriver or other tool to remove the compartment (do not pull it out by the tab only). Replace the
fuse only with a new fuse with the same rating (250 V, 3 A).
Mounting/Rigging
Standing
Place the fixture on a flat, stable surface. Make sure all cables are secured and placed so that no one
will trip over them.
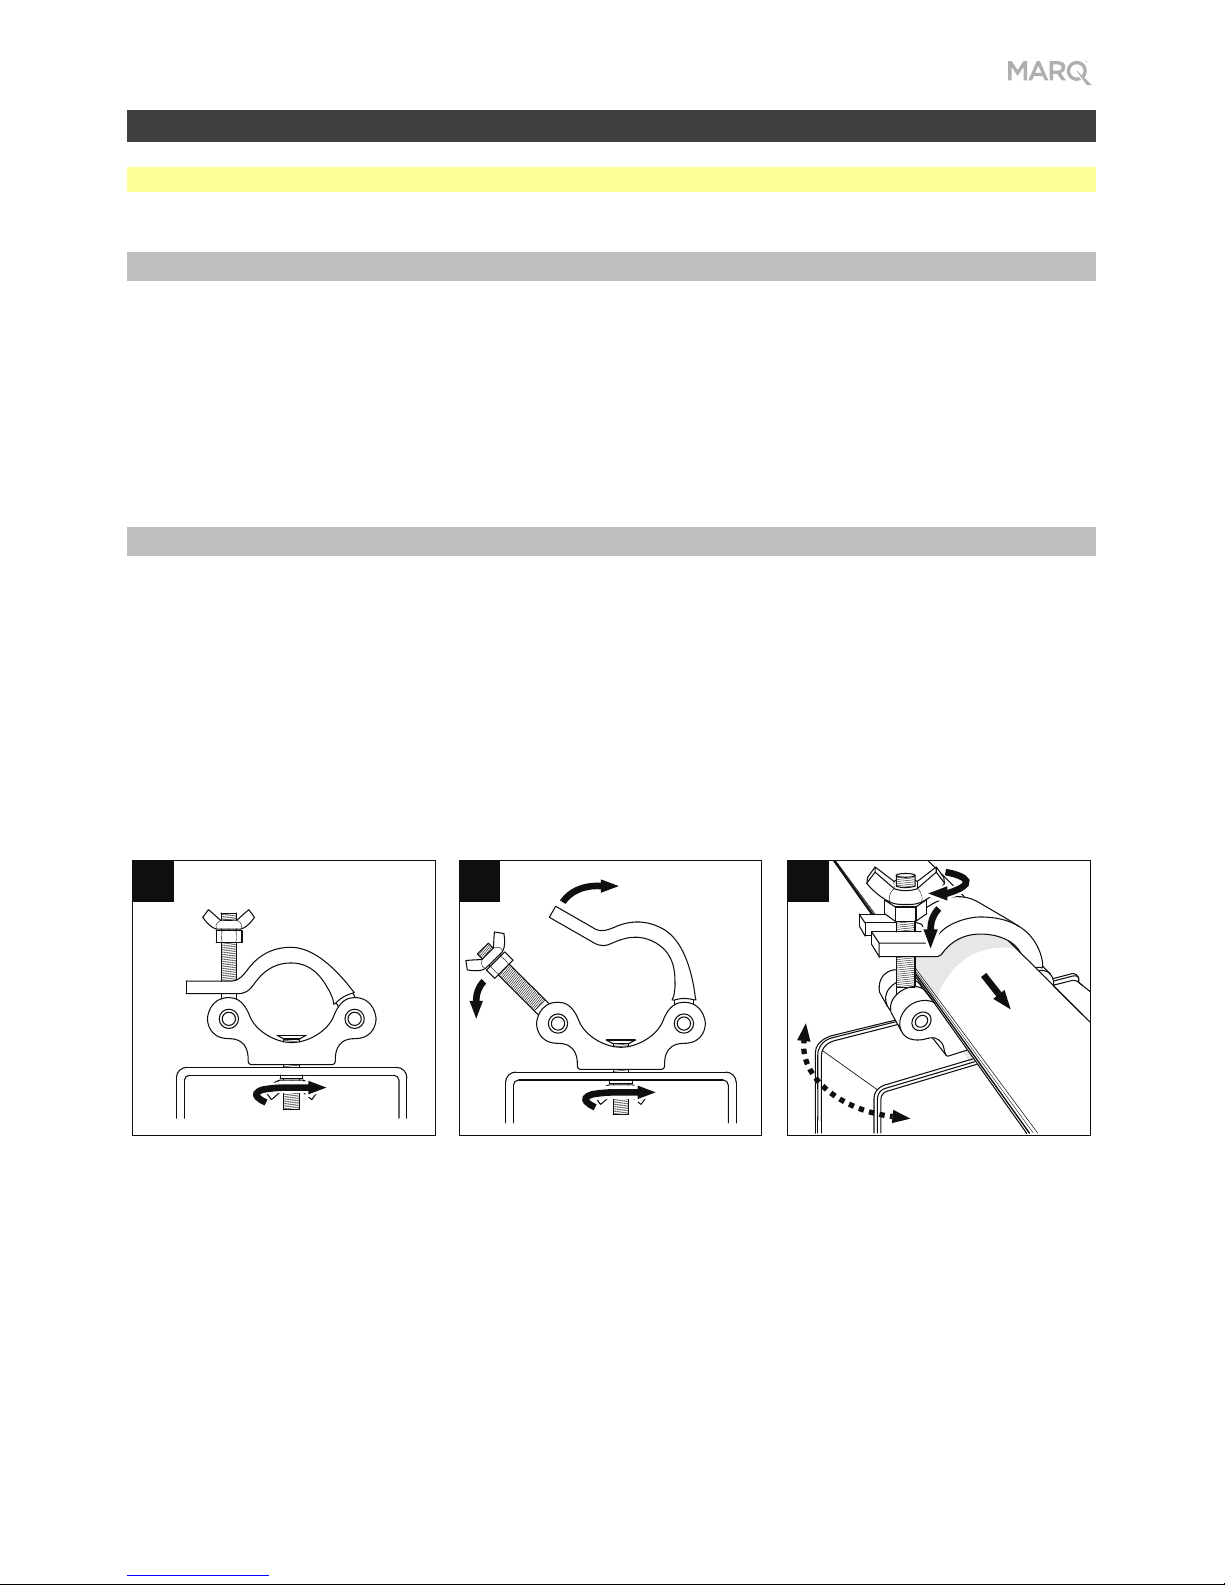
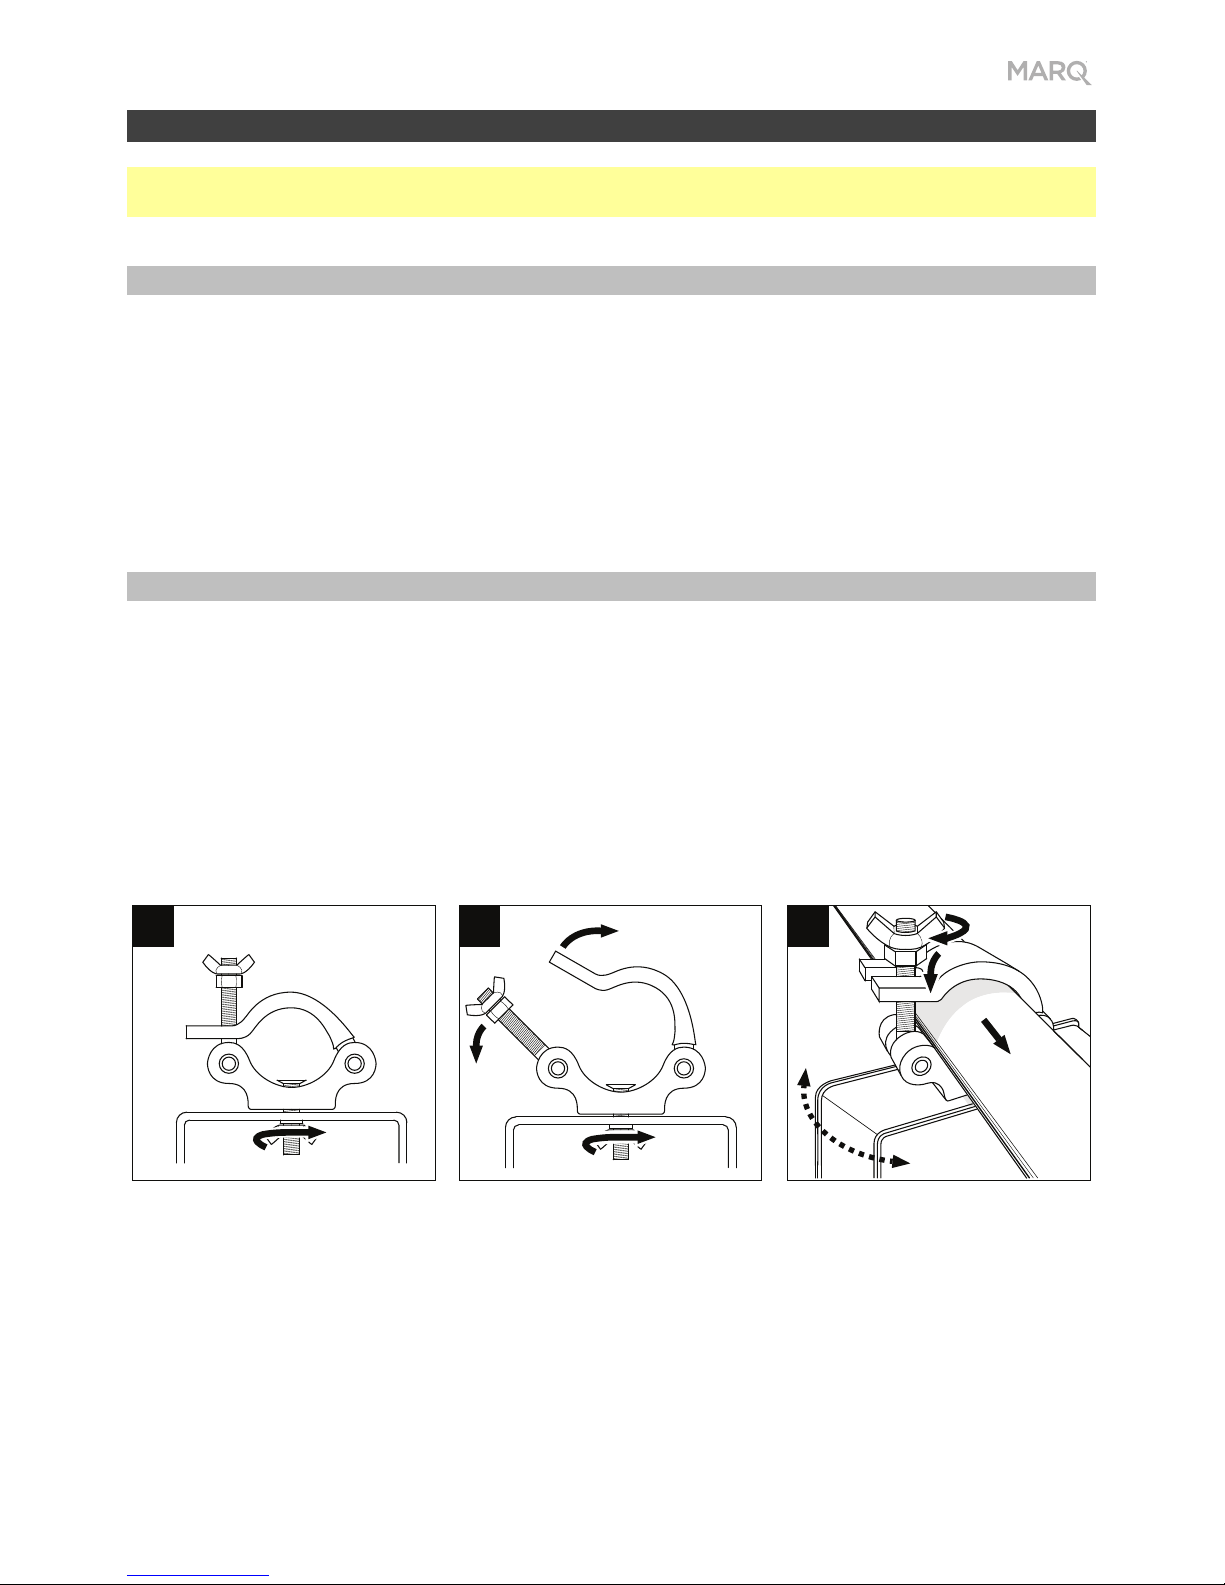
Suspended
Follow these steps to use the hanging yoke for mounting the fixture to a truss.
13
2
Clamp (not included)
Tighten until
secure.
Rotate.
6
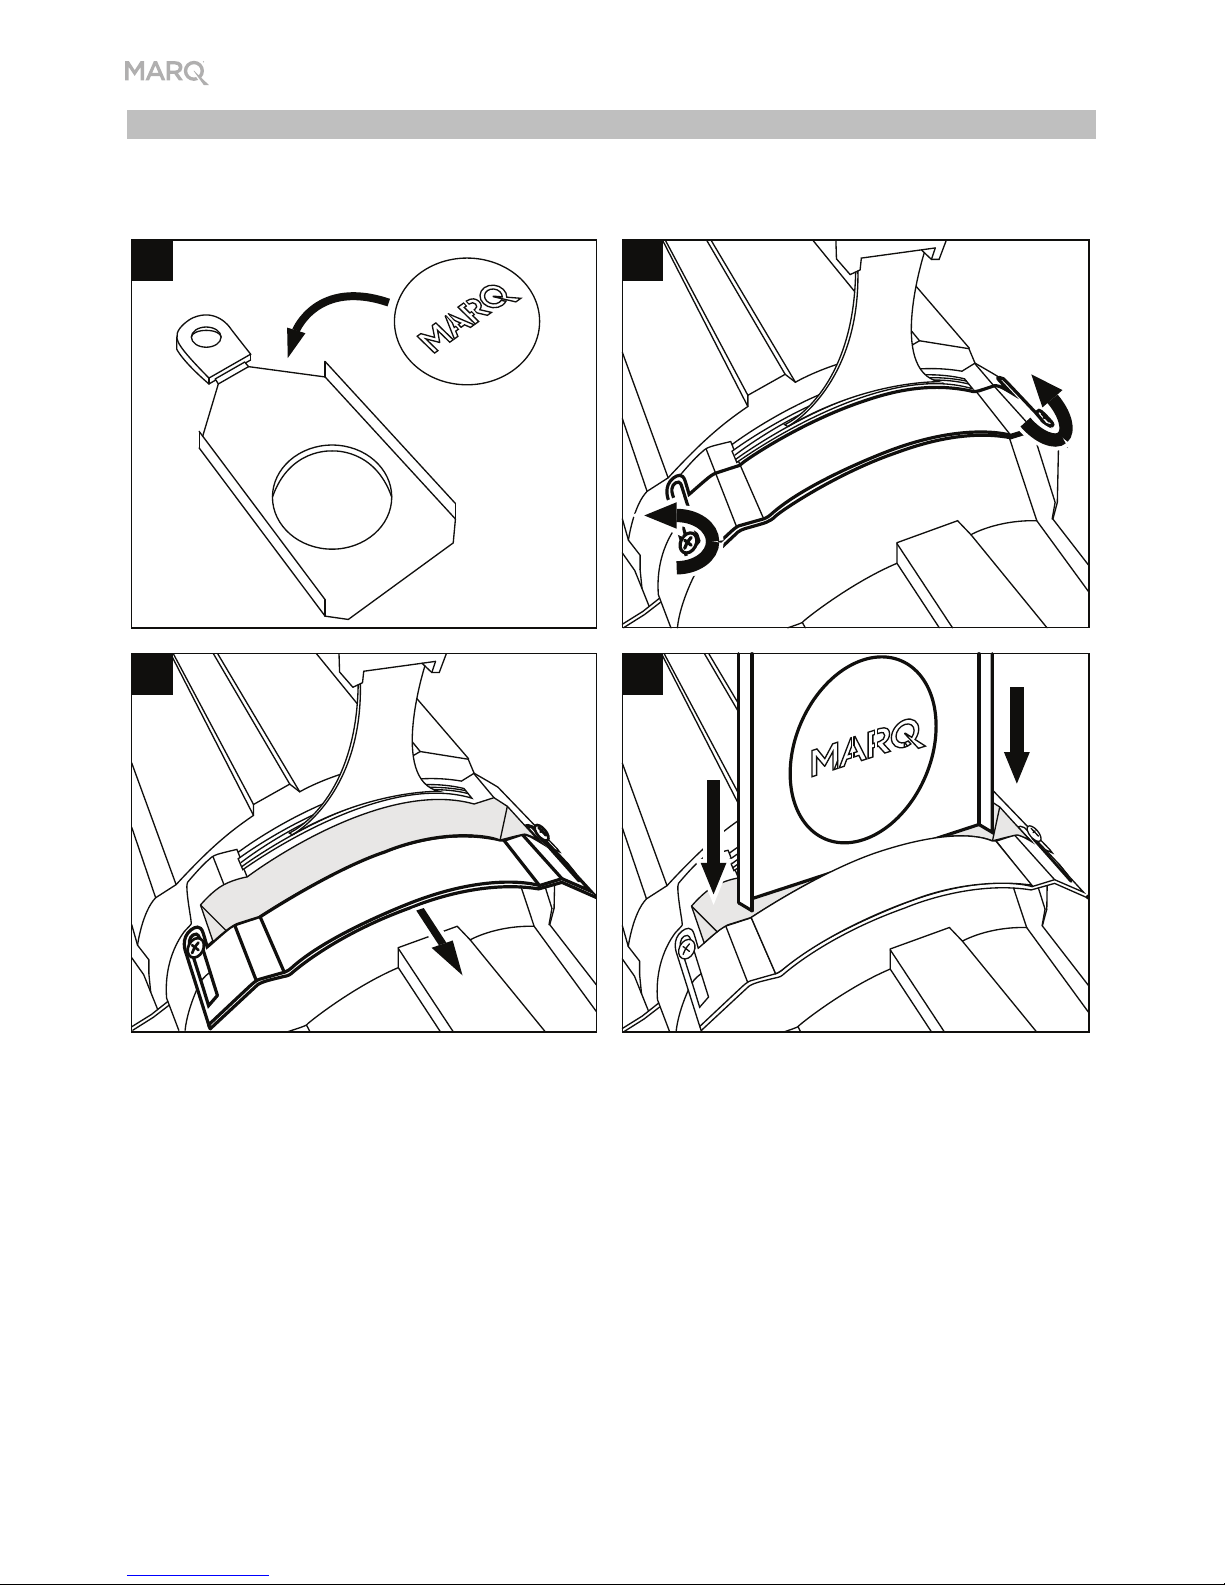
Gobo Replacement
Follow these steps to insert a gobo into the fixture.
1
34
2
Gobo holder
Unscrew.
7
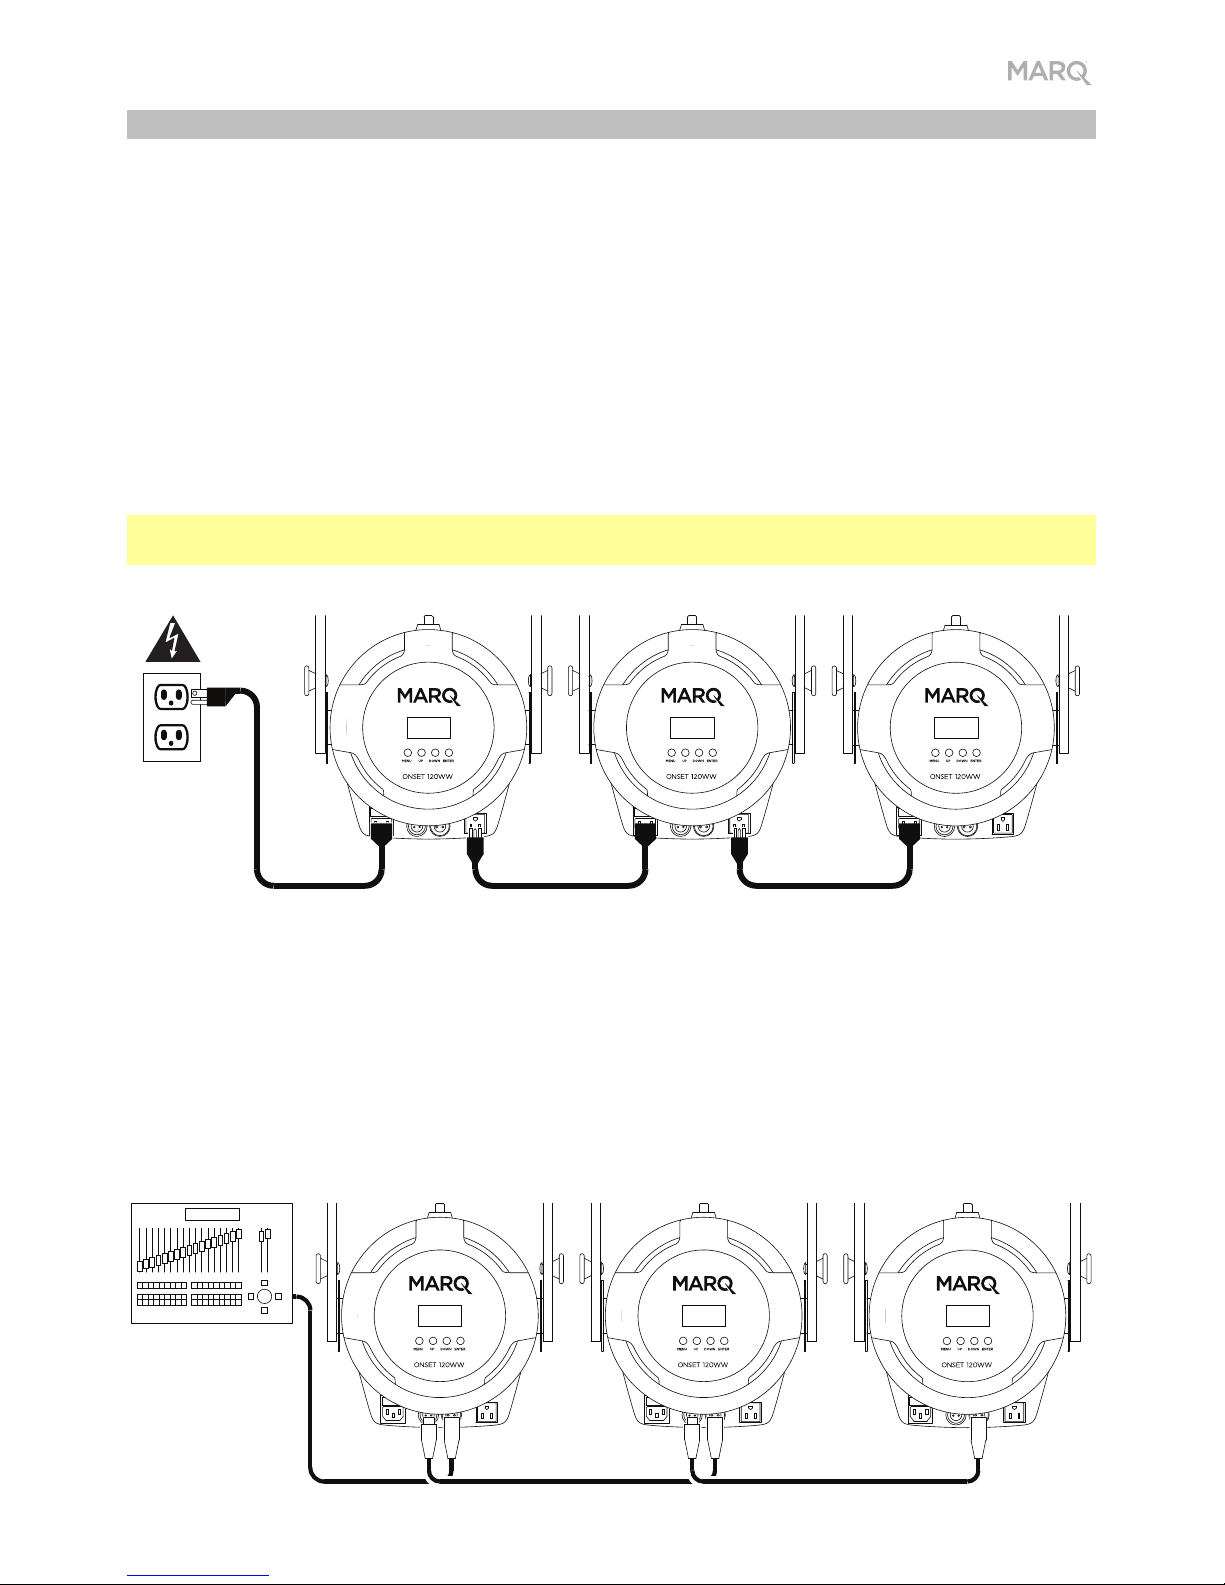
Linking
When using multiple Onset 120WW fixtures, you can link (“daisy-chain”) them so that each each
fixture supplies power and/or sends DMX data to the next one. This helps reduce clutter in your
cabling and save you setup time.
You do not have to link fixtures for both power and DMX control; you can link them for either
purpose independently. For instance, you could link 20 fixtures together for DMX control while linking
only 10 of those same fixtures together for power (powering the other 3 fixtures separately).
Power
Use a standard IEC power cable to connect the Power Out of one fixture to the Power In of another.
As long as the first fixture is connected to a power outlet, any of the linked fixtures can remain off
and still supply power to the next one.
Important: To prevent undue damage to your fuses, we recommend linking no more than 10 fixtures
in the same chain.
DMX
Use a standard 3-pin XLR cable to connect the DMX Out of one fixture to the DMX In of another.
Your connected DMX controller will send its data to the fixtures in sequence. All fixtures in this chain
will receive all DMX data.
According to the DMX standard, you can link up to 32 fixtures with up to 300 feet (91 meters)
between each fixture, without amplification. Keep in mind the number of channels you are using as
well as the starting address.
Onset 120WW Onset 120WW Onset 120WW Power
Onset 120WW
Onset 120WW
Onset 120WW
DMX Controller
8
Operation
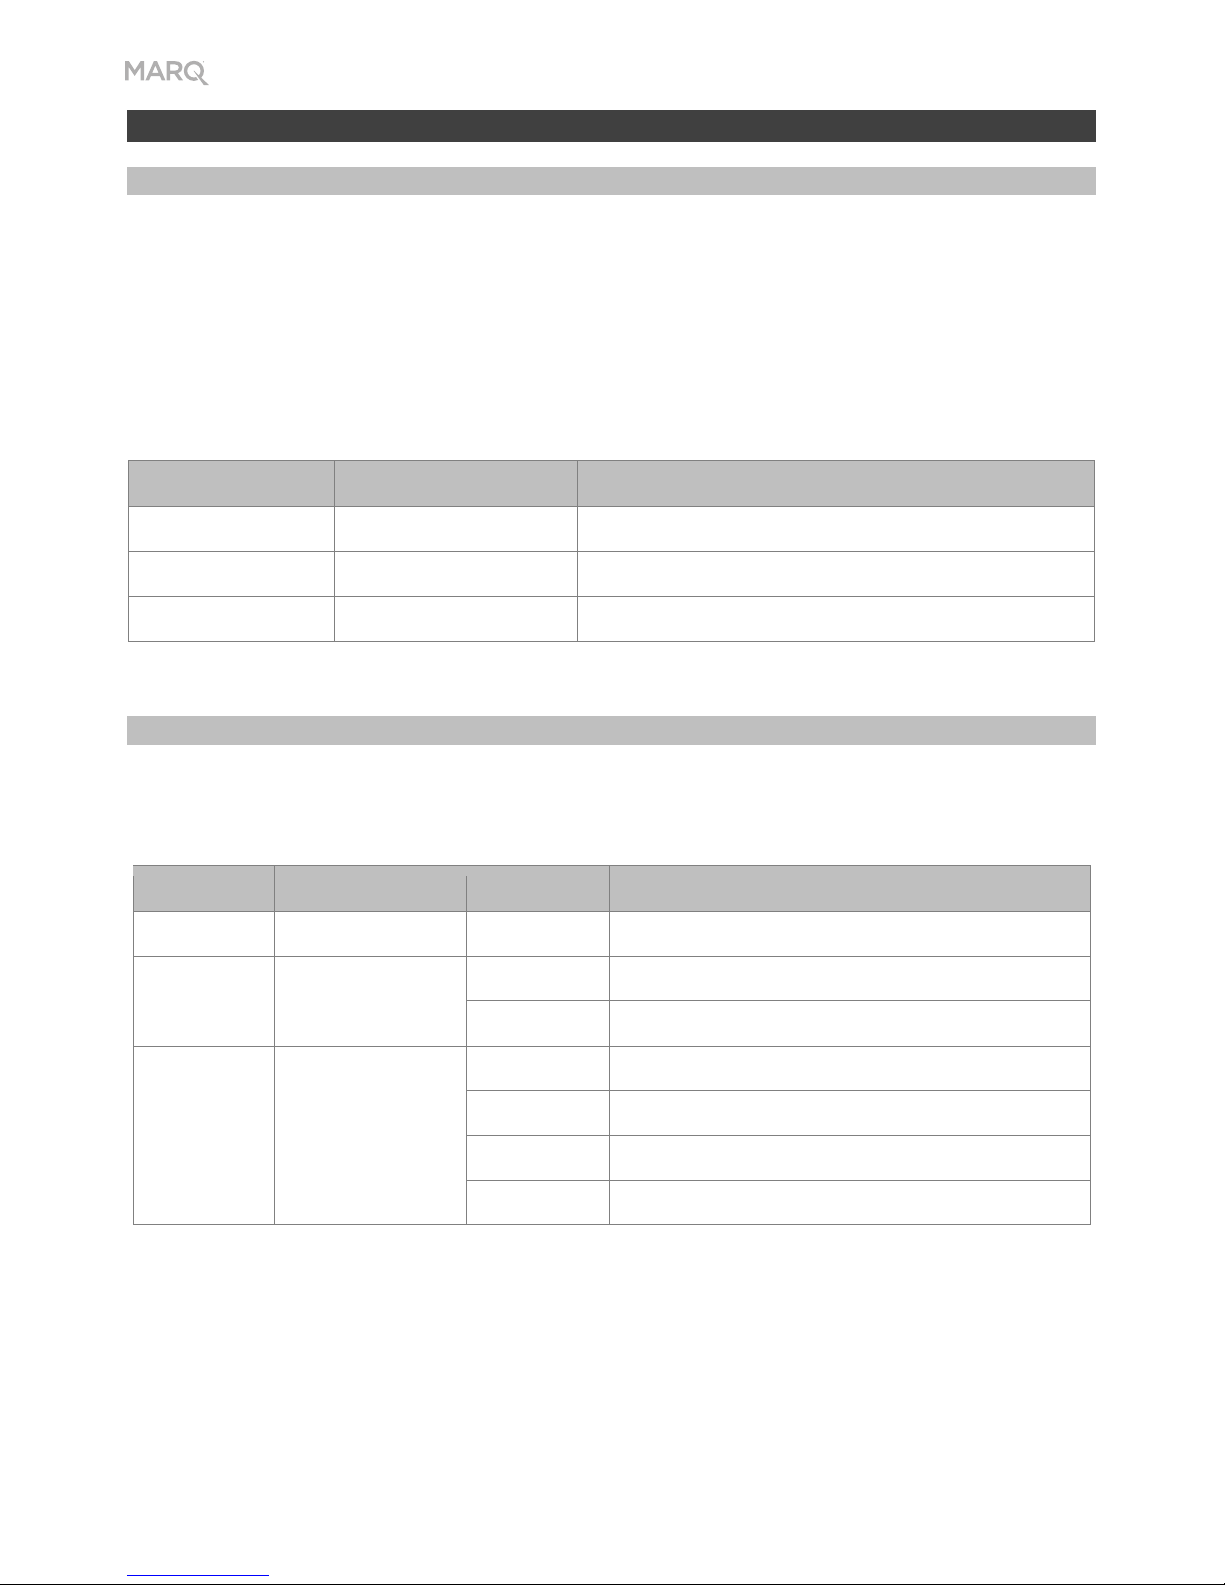
Menu Options
To use the menu:
1. Press Menu to cycle through the available menus: DMX Mode, Dimmer, and Strobe.
2. Press Enter to select a menu.
3. Use the Up and Down buttons to change the currently shown setting.
4. Press Menu to confirm your choice.
To adjust other settings, repeat Steps 1–4.
Menu Settings/Values Description
DMX Mode
001–512 DMX address setting
Dimmer
000–255
Dimmer, dark (000) to bright (255)
Strobe
000–255
Strobe rate, slow (000) to fast (255)
DMX Functions
You can control Onset 120WW by linking it to a DMX controller. See below for a chart of the
available functions.
Channel Function Value Description
1
Dimming 000–255
Dimmer, dark (000) to bright (255)
2
Strobe 000–009 No function
010–255
Strobe rate, slow (010) to fast (255)
3
Dimming Curve 000–063 Dimming Curve 1
064–127 Dimming Curve 2
128–191 Dimming Curve 3
192–255 Dimming Curve 4

9
Guía del usuario (Español)
Introducción
Contenido de la caja
Onset 120WW Soporte para gobo Guía del usuario
Cable de corriente Soporte de gel Manual de seguridad y garantía
Cable de DMX
Soporte
Para obtener la información más reciente acerca de este producto (documentación, especificaciones
técnicas, requisitos de sistema, información de compatibilidad, etc.) y registrarlo, visite marqlighting.com.
Para obtener soporte adicional del producto, visite marqlighting.com/support.
Notas sobre la seguridad
Importante: Además de las notas a continuación, consulte el manual de seguridad y garantía
incluido para obtener información de seguridad adicional.
• Traslade este producto tomándolo solo de un soporte para colgar/montar o su manija/las manijas.
• Use este producto solo en interiores (IP20). Para evitar el riesgo de incendio o choque eléctrico,
no exponga este producto a la lluvia o a la humedad.
• No use este producto para instalaciones permanentes.
• Conecte este producto solo a circuitos protegidos y con descarga a tierra.
• Siempre desconecte el producto de su fuente de corriente antes de limpiarlo o reemplazar su
fusible. Remplace el fusible con otro del mismo tipo y capacidad.
• Antes de conectar el producto a una fuente de corriente, asegúrese de que el cable de corriente
no esté pinzado ni dañado.
• Asegúrese de que el voltaje de la toma de corriente se encuentre dentro del rango indicado en
este producto (en su carcasa o etiqueta).
• Nunca conecte este producto a un atenuador o reóstato.
• Nunca desconecte este producto tirando de su cable de corriente.
• Si monta este producto de forma suspendida, utilice un cable de seguridad.
• Asegúrese de que este producto se use siempre en una ubicación con ventilación adecuada y al
menos 50 cm (20 pulg.) de distancia de superficies adyacentes. Asegúrese de que ninguna de
las ranuras de ventilación de este producto queden obstruidas.
• No use este producto a temperaturas ambientes superiores a 40°C/104°F.
• No acerque materiales inflamables a este producto durante su uso.
• No mire directamente a la fuente de luz del producto cuando se encuentre encendido.
• No toque este producto mientras esté encendido o inmediatamente después de apagarlo. Este
producto y su carcasa pueden alcanzar temperaturas elevadas.
• Si se encuentra con un problema grave al usar este producto, deje de usarlo inmediatamente.
• No abra la carcasa de este producto. No contiene piezas reparables por el usuario y hacerlo
invalidará la garantía.
10
Características
Panel trasero
1
2
34
5
6
7
89
10
1. Entrada de corriente: Utilice el cable de corriente estándar (incluido) para conectar esta entrada
a una toma de corriente.
2. Fusible: Este compartimiento sostiene al fusible. Antes de limpiar o reemplazar el fusible,
desconecte el Onset 120WW de su fuente de corriente. Utilice un destornillador u otra
herramienta para retirar el compartimiento (no lo retire tirando de la lengüeta solamente).
Reemplace el fusible sólo con un fusible nuevo de la misma capacidad (250 V, 5 A).
3. Salida de corriente: Utilice un cable de corriente estándar para conectar esta salida a un
artefacto de iluminación adicional. Esta conexión suministrará corriente al artefacto de
iluminación adicional cuando se encuentre conectado a una toma de corriente. Consulte
Instalación > Enlace > Suministro eléctrico para obtener información sobre el enlace de
múltiples artefactos de iluminación.
Nota: En los modelos vendidos en EE.UU., esta será una conexión “Edison” (NEMA®) estándar.
En los demás modelos, será una conexión IEC estándar.
4. Interruptor de encendido: Utilice este interruptor para encender y apagar el Onset 120WW.
5. Entrada DMX: Utilice un cable DMX de tres patillas estándar para conectar esta entrada (A) a su
controlador DMX o (B) a otro artefacto de iluminación a través del cual pasarán los datos de DMX
hacia este. Onset 120WW recibe datos de DMX a través de esta conexión. Consulte Instalación >
Enlace > DMX para obtener información sobre el enlace de múltiples artefactos de iluminación.
6. Salida DMX: Utilice un cable DMX de 3 patillas estándar para conectar esta salida a un artefacto
de iluminación adicional. Onset 120WW envía sus datos a un artefacto de iluminación adicional a
través de esta conexión. Consulte Instalación > Enlace > DMX para obtener información sobre
el enlace de múltiples artefactos de iluminación.
7. Pantalla: Esta pantalla muestra mensajes y valores que indican el estado actual del artefacto de
iluminación.
8. Menu : Cette touche permet d’accéder au menu du Onset 120WW.
9. /Prev: Pulse este botón para seleccionar la opción anterior del menú o para aumentar el valor en 1.
10. /Next: Pulse este botón para seleccionar la siguiente opción del menú o para disminuir el valor en 1.
11. Intro: Pulse este botón para confirmar su selección o valor actual.
11
Instalación
Nota: Los elementos que no se enumeran en Introducción > Contenidos de la caja se venden por
separado.
Información sobre la corriente
Antes de conectar el artefacto de iluminación a una toma de corriente, asegúrese de que el cable de
corriente no esté pinzado ni dañado. Además, asegúrese de que el voltaje de la toma de corriente se
encuentre dentro del rango indicado en este producto (en su carcasa o etiqueta).
Antes de limpiar o reemplazar el fusible, desconecte el Onset 120WW de su fuente de corriente.
Utilice un destornillador u otra herramienta para retirar el compartimiento (no lo retire tirando de la
lengüeta solamente). Reemplace el fusible sólo con un fusible nuevo de la misma capacidad (250 V,
3 A).
Montaje/Instalación
Sobre una superficie
Coloque el artefacto de iluminación sobre una superficie plana y estable. Asegúrese de que todos
los cables estén asegurados y colocados de forma que nadie se tropiece con ellos.
Suspendido
Siga estos pasos para colgar el artefacto de iluminación de una viga.
13
2
Mordaza (no se
incluye)
Ajustar hasta
que quede
firme
Girar.

12
Reemplazo del gobo
Siga estos pasos para insertar un gobo en el artefacto de iluminación.
1
34
2
Soporte del
gobo
Desatornillar.

13
Enlace
Si utiliza múltiples artefactos de iluminación Onset 120WW, puede enlazarlos (“conectarlos en
cadena”) de manera que cada accesorio suministre la corriente y/o envíe los datos de DMX al
siguiente. Esto ayuda a reducir el amontonamiento de cables y le ahorra tiempo de instalación.
No es obligatorio enlazar tanto la corriente como el control de DMX de los artefactos de iluminación;
puede enlazarlos para cualquier propósito individual de forma independiente del otro. Por ejemplo, podría
enlazar 8 artefactos de iluminación entre sí para control de DMX, pero solo enlazar 4 de ellos mediante el
cable de corriente (alimentando los 4 restantes mediante sus cables de corriente individuales).
Suministro eléctrico
Utilice un cable de corriente IEC estándar para conectar la salida Power Out de un artefacto de
iluminación a la entrada Power In de otro. Siempre que el primer artefacto de iluminación esté
conectado a una toma de corriente, cualquiera de los accesorios enlazados puede permanecer
apagados y aun así suministrar corriente al siguiente.
Importante: Para evitar daños excesivos a sus fusibles, recomendamos no enlazar más de 10
artefactos de iluminación en la misma cadena.
DMX
Utilice un cable DMS de 3 patillas estándar para conectar la salida DMX Out de un artefacto de
iluminación a la entrada DMX In de otro. Su controlador DMX conectado enviará sus datos a los
artefactos de iluminación en secuencia. Todos los artefactos de iluminación en esta cadena recibirán
todos los datos de DMX.
Onset 120WW Onset 120WW Onset 120WW
Suministro
eléctrico
Onset 120WW
Onset 120WW
Onset 120WW
Controlador DMX

14
Funcionamiento
Menú de opciones
Para utilizar el menú:
1. Pulse Menu para alternar los menús disponibles: Modo DMX, atenuador y estrobo.
2. Pulse Enter para seleccionar un menú.
3. Utilice los botones arriba y abajo para cambiar el ajuste o la opción que se muestra
actualmente.
4. Pulse el botón Menú para confirmar su selección.
Para cambiar otros ajustes, repita los pasos 1–4.
Menú Ajustes/Valores Descripción
Modo DMX
001-512 Ajuste de dirección de DMX
Atenuador
000-255
Atenuador, del más oscuro (000) al más claro (255)
Estrobo
000-255
Velocidad del estrobo, de la más lenta (000) a la más rápida (255)
Funciones de DMX
Usted puede controlar el Onset 120WW enlazándolo con un controlador de DMX. Consulte a
continuación la tabla con las funciones disponibles.
Canale Función Valor Descripción
1
Atenuación 000-255
Atenuador, del más oscuro (000) al más claro (255)
2
Estrobo 000-009 Sin función
010-255
Velocidad del estrobo, de la más lenta (010) a la más rápida (255)
3
Curva de
atenuación
000-063 Curva de atenuación 1
064-127 Curva de atenuación 2
128-191 Curva de atenuación 3
192-255 Curva de atenuación 4

15
Guide d’utilisation (Français)
Présentation
Contenu de la boîte
Onset 120WW Porte gobo Guide d'utilisation
Câble d'alimentation Porte gélatine Consignes de sécurité et informations concernant la garantie
Câble DMX
Assistance technique
Pour les toutes dernières informations concernant la documentation, les spécifications techniques, la
configuration requise, la compatibilité et l’enregistrement du produit, veuillez visiter marqlighting.com.
Pour de l’assistance supplémentaire, veuillez visiter le site marqlighting.com/support.
Consignes de sécurité
Important : En plus des consignes ci-dessous, veuillez consulter le guide des consignes de sécurité
et informations concernant la garantie inclus.
• Pour transporter ce produit, utiliser uniquement un support de montage ou la poignée/les poignées.
• Ce produit doit être utilisé à l’intérieur seulement (IP20). Afin de réduire le risque d’incendie ou
de décharge électrique, ne pas exposer le produit à la pluie ou à l’humidité.
• Ce produit ne doit pas être utilisé pour des installations permanentes.
• Ce produit doit être branché uniquement à un circuit mis à la terre.
• Toujours débrancher ce produit avant de procéder à son nettoyage ou au remplacement de son
fusible. Remplacer le fusible par un autre fusible de même type et de même calibre.
• Avant de relier le produit à une source d’alimentation, s’assurer que le câble d’alimentation n’est
ni tordu ni endommagé.
• La tension de la prise secteur doit être dans la plage de tensions indiquée sur cet appareil (sur le
boîtier ou l’étiquette).
• Ne jamais relier ce produit à un gradateur ou à un rhéostat.
• Ne jamais débrancher ce produit en tirant sur le câble d’alimentation.
• Pour une installation suspendue, veuillez utiliser un câble de sécurité.
• Toujours utiliser cet appareil dans un endroit bien aéré à au moins 50 cm des surfaces
adjacentes. S’assurer qu’aucune des fentes de ventilation de ce produit n’est obstruée.
• Ne pas utiliser ce produit à des températures ambiantes supérieures à 40 °C.
• S’assurer qu’aucune matière inflammable ne se trouve à proximité du projecteur lors de son
fonctionnement.
• Ne pas regarder directement la lumière lorsque le produit fonctionne.
• Ne pas toucher ce produit alors qu’il est sous tension ou immédiatement après la mise hors
tension. Le produit et son boîtier peuvent atteindre des températures élevées.
• En cas de sérieux problèmes de fonctionnement, cesser d’utiliser l’appareil immédiatement.
• Ne pas ouvrir le boîtier de ce produit. Il ne contient aucune pièce réparable par l’utilisateur et
annulera votre garantie.

16
Caractéristiques
Panneau arrière
1
2
34
5
6
7
89
10
1. Entrée d’alimentation : Utilisez le câble d’alimentation fourni pour brancher cette entrée à une
prise secteur.
2. Fusible : Ce compartiment contient le fusible. Avant de nettoyer ou de remplacer le fusible,
débranchez le Onset 120WW de la source d’alimentation. Utilisez un tournevis ou un autre
outil pour retirer le logement (ne tirez pas uniquement sur la languette). Remplacez le fusible par
un autre fusible de même type et de même calibre (250 V, 5 A).
3. Sortie d’alimentation : Utilisez un câble d’alimentation standard afin de relier cette sortie à un
deuxième projecteur. Cette sortie permet d’alimenter un deuxième projecteur lorsque celui-ci est
branché à une prise secteur. Veuillez consulter la section lnstallation > Raccordement en série
> Alimentation afin d’en savoir plus sur le raccordement en série de plusieurs projecteurs.
Remarque : Sur les modèles vendus aux États-Unis, ceci est une connexion NEMAMD standard.
Sur les autres modèles, ceci est une connexion CEI standard.
4. Interrupteur d’alimentation : Cet interrupteur permet de mettre le Onset 120WW sous et hors
tension.
5. Entrée DMX : Utilisez un câble DMX standard à 3 broches pour relier cette entrée (A) à votre
contrôleur DMX ou (B) à un autre projecteur qui transmettra des données DMX grâce à celui-ci. Le
Onset 120WW reçoit des données DMX par le biais de cette connexion. Veuillez consulter la
section lnstallation > Raccordement en série > DMX afin d’en savoir plus sur le raccordement
en série de plusieurs projecteurs.
6. Sortie DMX : Utilisez un câble DMX standard à 3 broches afin de brancher cette sortie à un
deuxième projecteur. Le Onset 120WW transmet ses données DMX à un autre projecteur par le
biais de cette connexion. Veuillez consulter la section lnstallation > Raccordement en série >
DMX afin d’en savoir plus sur le raccordement en série de plusieurs projecteurs.
7. Écran d’affichage : Cet écran affiche les messages et valeurs concernant l’état du projecteur.
8. Menú: Pulse este botón para acceder al menú del Onset 120WW.
9. /Prev: Cette touche permet de passer à l’option du menu précédent ou d’augmenter la valeur par 1.
10. /Next: Cette touche permet de passer à l’option du menu suivant ou de diminuer la valeur par 1.
11. Enter: Appuyez sur cette touche pour confirmer la sélection ou la valeur.

17
Installation
Remarque : Les articles qui ne figurent pas dans la section Présentation > Contenu de la boîte
sont vendus séparément.
Alimentation électrique
Avant de relier le projecteur à une source d’alimentation, veuillez vous assurer que le câble
d’alimentation n’est pas n’est ni tordu ni endommagé. La tension de la prise secteur doit être dans la
plage de tensions indiquée sur cet appareil (sur le boîtier ou l’étiquette).
Avant de nettoyer ou de remplacer le fusible, débranchez le Onset 120WW de la source
d’alimentation. Utilisez un tournevis ou un autre outil pour retirer le logement (ne tirez pas
uniquement sur la languette). Remplacez le fusible par un autre fusible de même type et de même
calibre (250 V, 3 A).
Montage
Support
Placez le projecteur sur une surface plane et stable. Veuillez vous assurer que tous les câbles sont
bien fixés et placés de sorte que personne ne trébuche.
Suspension
Veuillez suivre les étapes suivantes afin de suspendre le projecteur à un pont en utilisant la lyre.
13
2
Bague de fixation
(non incluse)
Serrez à
fond.
Pivoter.

18
Remplacement de gobo
Veuillez suivre les étapes suivantes pour insérer un gobo dans le projecteur.
1
34
2
Porte-gobo
Dévissez.

19
Raccordement en série
Lorsque vous utilisez plusieurs projecteurs Onset 120WW, vous pouvez les raccorder en série afin
que chaque projecteur alimente et/ou transmette des données DMX au projecteur suivant. Cela
permet de réduire le câblage et de gagner du temps d’installation.
Vous pouvez raccorder les projecteurs pour l’alimentation et la commande DMX, mais également
pour l’un ou l’autre indépendamment. Par exemple, vous pourriez raccorder 8 projecteurs pour la
commande DMX, en raccordant seulement 4 d’entre eux pour fournir une alimentation électrique
(alimentant les 4 autres projecteurs séparément).
Alimentation
Utilisez un câble d’alimentation CEI standard afin de relier la sortie d’alimentation d’un des
projecteurs à l’entrée d’alimentation d’un autre. Tant que le premier projecteur est branché à une
prise secteur, les autres projecteurs peuvent demeurer hors tension et fournir une alimentation au
projecteur suivant.
Important : Afin d’éviter d’endommager inutilement les fusibles, nous vous recommandons de ne
pas raccorder en série plus de 10 projecteurs.
DMX
Utilisez un câble DMX standard à 3-pin broches afin de relier la sortie DMX d’un projecteur à
l’entrée DMX d’un autre projecteur. Le contrôleur DMX relié transmettra ses données aux
projecteurs dans l’ordre. Tous les projecteurs de cette série recevront toutes les données DMX.
Onset 120WW Onset 120WW Onset 120WW
Alimentation
Onset 120WW
Onset 120WW
Onset 120WW
Contrôleur DMX

20
Fonctionnement
Options menu
Pour utiliser le menu :
1. Appuyez sur la touche Menu afin de parcourir les différents menus : DMX Mode (mode DMX),
Dimmer (gradateur) et Strobe (stroboscope).
2. Appuyez sur la touche Enter pour sélectionner un menu.
3. Utilisez les touches Up et Down pour modifier le paramètre sélectionné à l’écran.
4. Appuyez sur la touche Menu pour confirmer votre sélection.
Pour modifier les autres paramètres, répétez les étapes 1 à 4.
Menu Paramètres/Valeurs Description
DMX Mode (mode DMX)
001–512 Configuration de l’adresse DMX
Dimmer (gradateur)
000–255
Gradateur, sombre (000) à lumineuse (255).
Strobe (stroboscope)
000–255
Effet stroboscopique, lent (000) à rapide (255)
Fonctions DMX
Vous pouvez commander l’Onset 120WW en le raccordant à un contrôleur DMX. Reportez-vous au
tableau pour connaître les fonctions disponibles.
Canal Fonction Valeur Description
1
Gradateur 000–255
Gradateur, sombre (000) à lumineuse (255)
2
Stroboscope 000–009 Aucune fonction
010–255
Effet stroboscopique, lent (010) à rapide (255)
3
Courbe de gradation 000–063 Courbe de gradation 1
064–127 Courbe de gradation 2
128–191 Courbe de gradation 3
192–255 Courbe de gradation 4

21
Guida per l’uso (Italiano)
Introduzione
Contenuti della confezione
Onset 120WW Supporto per gobo Guida per l'uso
Cavo di alimentazione Supporto lente colorata Manuale di sicurezza e garanzia
Cavo DMX
Assistenza
Per le ultime informazioni in merito a questo prodotto (documentazione, specifiche tecniche, requisiti
di sistema, informazioni sulla compatibilità, ecc.) e per effettuarne la registrazione, recarsi alla pagina
marqlighting.com.
Per ulteriore assistenza sul prodotto, recarsi alla pagina marqlighting.com/support.
Indicazioni di sicurezza
Importante: oltre alle note qui di seguito, fare riferimento al manuale di sicurezza e garanzia per
ulteriori informazioni di sicurezza.
• Trasportare il prodotto unicamente servendosi da una staffa di montaggio o della apposita
maniglia / delle apposite maniglie.
• Utilizzare il prodotto unicamente da interni (IP20). Per evitare il rischio di incendio o scossa
elettrica, non esporre il prodotto alla pioggia o all’umidità.
• Non utilizzare il prodotto per impianti permanenti.
• Collegare il prodotto unicamente a circuiti messi a terra e protetti.
• Scollegarlo sempre dall’alimentazione elettrica prima di pulirlo o di sostituire il fusibile. Sostituire
il fusibile con un altro dello stesso tipo e della stessa tensione nominale.
• Prima di collegare il prodotto a una fonte di alimentazione, assicurarsi che il cavo di
alimentazione non sia schiacciato o danneggiato.
• Assicurarsi che la tensione della presa elettrica rientri nell’intervallo indicato sul prodotto
(sull’alloggiamento o su un adesivo).
• Mai collegare questo prodotto a uno smorzatore o a un reostato.
• Mai scollegare l prodotto dal cavo di alimentazione tirando o strattonando il cavo stesso.
• Se si monta il prodotto sospeso, servirsi di un cavo di sicurezza.
• Assicurarsi sempre che il prodotto sia utilizzato in una sede con adeguata ventilazione con
almeno 50 cm di spazio dalle superfici adiacenti. Assicurarsi che nessuna delle aperture di
ventilazione del prodotto sia ostruita.
• Non utilizzare il prodotto a temperature ambiente superiori a 40°C/104°F.
• Non avvicinare materiali infiammabili al prodotto durante l’uso.
• Non guardare la fonte luminosa quando il prodotto è acceso.
• Non toccare il prodotto quando è acceso o subito dopo lo spegnimento. Il prodotto e il suo
alloggiamento possono raggiungere temperature elevate.
• Se si verificano gravi problemi durante l’uso del prodotto, interromperne l’uso immediatamente.
• Non aprire l’alloggiamento del prodotto. Contiene parti non riparabili dall’utente e tale apertura
annullerebbe la garanzia.

22
Caratteristiche
Pannello posteriore
1
2
34
5
6
7
89
10
1. Ingresso di alimentazione: servirsi di un cavo standard di alimentazione (in dotazione) per collegare
questo ingresso a una presa di alimentazione.
2. Fusibile: questo scomparto contiene il fusibile. Prima della pulizia o prima di sostituire il fusibile,
scollegare il Onset 120WW dalla fonte di alimentazione. Servirsi di un cacciavite o di un altro
attrezzo per rimuovere lo scomparto (non limitarsi a tirare la linguetta). Sostituire il fusibile unicamente
con un fusibile nuovo avente la stessa tensione nominale (250 V, 5 A).
3. Uscita di alimentazione: servirsi di un cavo di alimentazione standard per collegare questa uscita a un
ulteriore accessorio. Questo collegamento fornirà alimentazione all’accessorio aggiuntivo quando
questo è collegato a una presa di alimentazione. Si veda Configurazione > Collegamento >
Alimentazione per maggiori informazioni sul collegamento di più dispositivi.
Nota bene: nei modelli venduti negli Stati Uniti, questo sarà un collegamento standard “Edison”
(NEMA®). Su altri modelli, si tratterà di un collegamento IEC standard.
4. Interruttore di alimentazione: servirsi di questo interruttore per accendere e spegnere il Onset
120WW.
5. Ingresso DMX: servirsi di un cavo standard DMX a 3 poli per collegare questo ingresso (A) al controller
DMX o (B) a un altro dispositivo che farà passare dati DMX da quello a questo. Il Onset 120WW riceve
dati DMX tramite questo collegamento. Si veda Configurazione > Collegamento > DMX per maggiori
informazioni sul collegamento di più dispositivi.
6. Uscita DMX: servirsi di un cavo DMX standard a 3 poli per collegare questa uscita a un ulteriore
accessorio. Il Onset 120WW invia i suoi dati a un altro dispositivo tramite questo collegamento. Si veda
Configurazione > Collegamento > DMX per maggiori informazioni sul collegamento di più dispositivi.
7. Display: il display mostra messaggi e valori a indicare lo stato corrente della lampada.
8. Menu: premere questo tasto per accedere al menu del Onset 120WW.
9. /Prev: premere questo tasto per selezionare l’opzione del menu subito precedente o per aumentare il
valore di 1.
10. /Next: premere questo tasto per selezionare l’opzione del menu subito successiva o per diminuire il
valore di 1.
11. Enter (invio): premere questo tasto per confermare la scelta o il valore corrente.

23
Configurazione
Nota bene: elementi non elencati sotto Introduzione > Contenuti della confezione sono venduti
separatamente.
Informazioni sull’alimentazione
Prima di collegare la lampada a una fonte di alimentazione, assicurarsi che il cavo di alimentazione
non sia schiacciato o danneggiato. Assicurarsi inoltre che la tensione della presa elettrica rientri
nell’intervallo indicato sul prodotto (sull’alloggiamento o su un adesivo).
Prima della pulizia o prima di sostituire il fusibile, scollegare il Onset 120WW dalla fonte di
alimentazione. Servirsi di un cacciavite o di un altro attrezzo per rimuovere lo scomparto (non
limitarsi a tirare la linguetta). Sostituire il fusibile unicamente con un fusibile nuovo avente la stessa
tensione nominale (250 V, 3 A).
Installazione/ montaggio
A terra
Collocare la lampada su una superficie uniforme e stabile. Assicurarsi che tutti i cavi siano ben fissati
e collocati in modo che nessuno possa inciamparvi.
Sospesa
Procedere come segue per utilizzare la forcella di sospensione per il montaggio della lampada a una
trave.
13
2
Morsetto (non in
dotazione)
Serrare fino a
quando non è
ben fissata.
Ruotare.

24
Sostituzione del gobo
Procedere come segue per inserire un gobo nella lampada.
1
34
2
Supporto del gobo
Svitare.

25
Collegamento
Quando si utilizzano più lampade Onset 120WW, è possibile collegarle (“collegamento a margherita”)
in modo che ciascuna di esse fornisca alimentazione e/o invii dati DMX a quella successiva. Questo
aiuta a evitare disordine nel cablaggio e a risparmiare tempo nell’installazione.
Non è necessario collegare le lampade sia per l’alimentazione che per il controllo DMX: è possibile
collegarle indipendentemente per ciascuno scopo. Ad esempio, si possono collegare 8 lampade per il
controllo DMX collegando solo 4 di esse per l’alimentazione (alimentando le rimanenti 4 separatamente).
Alimentazione
Servirsi di un cavo di alimentazione IEC standard per collegare l’uscita di alimentazione di una
lampada all’ingresso di alimentazione di un’altra. Purché la prima lampada sia collegata a una
presa elettrica, le altre possono rimanere spente e comunque alimentare la successiva.
Importante: Per evitare danni ai fusibili si raccomanda di non collegare più di 10 lampade nella
stessa catena.
DMX
Servirsi di un cavo DMX standard per collegare l’uscita DMX di una lampada all’ingresso DMX di
un’altra. Il controller DMX collegato invierà i dati alle lampade in sequenza. Tutte le lampade presenti
nella catena riceveranno tutti i dati DMX.
Onset 120WW Onset 120WW Onset 120WW
Alimentazione
Onset 120WW
Onset 120WW
Onset 120WW
Controller DMX

26
Operation
Opzioni menu
Per utilizzare il menu:
1. premere Menu per commutare tra i menu disponibili: DMX Mode, Dimmer e Strobe (modalità
DMX, smorzatore e stroboscopio).
2. Premere Enter per selezionare un menu.
3. Servirsi dei tasti Up e Down per modificare le impostazioni illustrate.
4. Premere Menu per confermare la scelta.
Per regolare altre impostazioni, ripetere i passaggi 1-4.
Menu Impostazioni/valori Descrizione
Modalità DMX
001-512 Impostazione indirizzo DMX
Smorzatore
000-255
Smorzatore, da scuro (000) a luminoso (255)
Strobo
000-255
Frequenza di strobo, da lento (000) a rapido (255)
Funzioni DMX
Si può controllare l'Onset 120WW collegandolo a un controller DMX. Si veda qui di seguito lo
schema relativo alle funzioni disponibili.
Canale Funzione Valore Descrizione
1
Smorzamento 000-255
Smorzatore, da scuro (000) a luminoso (255)
2
Strobo 000-009 Nessuna funzione
010-255
Frequenza di strobo, da lento (010) a rapido (255)
3
Curva di smorzamento 000-063 Curva di smorzamento 1
064-127 Curva di smorzamento 2
128-191 Curva di smorzamento 3
192-255 Curva di smorzamento 4

27
Benutzerhandbuch (Deutsch)
Einführung
Lieferumfang
Onset 120WW Gobo-Halter Benutzerhandbuch
Netzkabel Linsenhalter Sicherheits- & Garantieinformationen
DMX-Kabel
Kundendienst
Für die neuesten Informationen zu diesem Produkt (Dokumentation, technische Daten, Systemanforderungen,
Informationen zur Kompatibilität etc.) und zur Produktregistrierung besuchen Sie bitte: marqlighting.com.
Für zusätzlichen Produkt-Support besuchen Sie marqlighting.com/support.
Sicherheitshinweise
Wichtig: Neben den unten stehenden Erläuterungen lesen Sie bitte zusätzlich das beiliegende Sicherheits-
und Garantiehandbuch für weitere Sicherheitsinformationen aufmerksam durch.
• Tragen Sie dieses Produkt ausschließlich an eine Aufhänge-/Montagehalterung oder an den Griff(en).
• Verwenden Sie dieses Produkt ausschließlich in Innenräumen (IP20). Um die Gefahr von elektrischen
Schlägen oder die Brandgefahr zu vermeiden, setzen Sie dieses Produkt niemals Regen oder
Feuchtigkeit aus.
• Nutzen Sie dieses Produkt nicht als permanente Montagen.
• Schließen Sie dieses Gerät ausschließlich an geerdete und geschützte Stromkreise an.
• Trennen Sie es immer von der Stromquelle bevor Sie es reinigen oder die Sicherung ersetzen. Ersetzen
Sie die Sicherung mit einer Sicherung vom gleichen Typ und Sicherungswert.
• Bevor Sie das Produkt an eine Stromquelle anschließen, stellen Sie sicher, dass das Stromkabel nicht
gequetscht oder beschädigt ist.
• Stellen Sie sicher, dass die Spannung der Steckdose innerhalb des Werts liegt, der am Produkt
angegeben ist (an seinem Gehäuse oder Aufkleber).
• Verbinden Sie dieses Produkt niemals mit einem Dimmer oder Rheostat.
• Trennen Sie dieses Produkt niemals vom Stromkabel, indem Sie am Kabel selbst ziehen oder zerren.
• Wenn Sie dieses Produkt überhängend montieren, verwenden Sie bitte ein Sicherheitskabel.
• Stellen Sie sicher, dass dieses Produkt an einem ausreichend belüfteten Ort verwendet wird und
mindestens 50cm (20”) Abstand von angrenzenden Flächen hat. Stellen Sie sicher, dass die
Lüftungsschlitze des Produkts nicht verdeckt werden.
• Verwenden Sie dieses Produkt nicht bei Umgebungstemperaturen von mehr als 40°C/104°F.
• Lassen Sie keine brennbaren Materialien in die Nähe dieses Produkt kommen, wenn es in Gebrauch ist.
• Blicken Sie nie in die Lichtquelle, wenn das Produkt eingeschaltet ist.
• Berühren Sie dieses Produkt nicht, während es eingeschaltet ist oder kurz nachdem es ausgeschaltet
wurde. Das Produkt und sein Gehäuse können hohe Temperaturen erreichen.
• Wenn ein ernsthaftes Problem bei der Verwendung des Produkts auftritt, stellen Sie den Gebrauch
sofort ein.
• Öffnen Sie niemals das Gehäuse. Es enthält keine Teile, die vom Benutzer gewartet werden können
und die Garantie erlischt.

28
Funktionen
Rückseite
1
2
34
5
6
7
89
10
1. Netzanschluss: Verwenden Sie ein handelsübliches Stromkabel (im Lieferumfang enthalten), um den
Eingang mit einer Steckdose zu verbinden.
2. Sicherung: Dieses Fach hält die Sicherung. Trennen Sie Ihr Onset 120WW von der Stromquelle,
bevor Sie die Sicherung reinigen oder ersetzen. Verwenden Sie einen Schraubenzieher oder ein
anderes Werkzeug, um das Fach abzunehmen (ziehen Sie nicht nur an der Lasche). Ersetzen Sie die
Sicherung nur durch eine neue Sicherung mit gleichem Sicherungswert (250 V, 5 A).
3. Netzausgang: Verwenden Sie ein standardmäßiges Netzkabel, um diesen Ausgang mit einer
zusätzlichen Vorrichtung zu verbinden. Diese Verbindung versorgt die zusätzliche Vorrichtung mit
Strom, wenn diese mit einer Steckdose verbunden ist. Siehe Setup > Linking > Stromversorgung für
nähere Informationen über das Verknüpfen von mehreren Geräten.
Hinweis: Bei Modellen, die in den USA verkauft werden, handelt es sich um eine standardmäßige „Edison“
(NEMA®) Verbindung. Bei anderen Modellen wird dies eine standardmäßige IEC-Verbindung sein.
4. Netzschalter: Mit diesem Schalter schalten Sie das Onset 120WW ein oder aus.
5. DMX In: Verwenden Sie ein standardmäßiges, 3-poliges DMX-Kabel, um diesen Eingang (A) mit Ihrem
DMX-Controller (B) oder einer anderen Vorrichtung zu verbinden. Onset 120WW empfängt DMX-Daten
über diese Verbindung. Siehe Setup > Linking > DMX für nähere Informationen über das Verknüpfen
von mehreren Vorrichtungen.
6. DMX Out: Verwenden Sie ein standardmäßiges, 3-poliges DMX-Kabel, um diesen Ausgang mit einer
zusätzlichen Vorrichtung zu verbinden. Onset 120WW sendet ihre Daten über diese Verbindung an eine
weitere Vorrichtung. Siehe Setup > Linking > DMX für nähere Informationen über das Verknüpfen von
mehreren Vorrichtungen.
7. Display: Diese Anzeige zeigt Meldungen und Werte, die den aktuellen Status der Vorrichtung angeben.
8. Menü: Drücken Sie diese Taste, um in das Onset 120WW-Menü zu gelangen.
9. /Prev: Drücken Sie diese Taste, um die vorherige Menüoption auszuwählen oder um den Wert um 1
zu erhöhen.
10. /Next: Drücken Sie diese Taste, um die nächste Menüoption auszuwählen oder um den Wert um 1 zu
reduzieren.
11. Enter: Drücken Sie diese Taste, um Ihre aktuelle Auswahl oder den Wert zu bestätigen.

29
Setup
Hinweis: Teile, die nicht unter Einführung > Lieferumfang angegeben sind, sind separat erhältlich.
Leistungsinformation
Bevor Sie das Produkt an eine Stromquelle anschließen, stellen Sie sicher, dass das Stromkabel nicht
gequetscht oder beschädigt ist. Stellen Sie außerdem sicher, dass die Spannung der Steckdose
innerhalb des Werts liegt, der am Produkt angegeben ist (an seinem Gehäuse oder Aufkleber).
Trennen Sie Ihr Onset 120WW von der Stromquelle, bevor Sie die Sicherung reinigen oder
ersetzen. Verwenden Sie einen Schraubenzieher oder ein anderes Werkzeug, um das Fach
abzunehmen (ziehen Sie nicht nur an der Lasche). Ersetzen Sie die Sicherung nur durch eine neue
Sicherung mit gleichem Sicherungswert (250 V, 3 A).
Montage/Rigging
Stehend
Legen Sie die Vorrichtung auf eine ebene, stabile Oberfläche. Sorgen Sie dafür, dass alle Kabel
festsitzen und so angeordnet sind, dass sie keine Stolpergefahr darstellen.
Hängend
Befolgen Sie diese Schritte, um den Hängebügel bei der Montage an einen Träger zu verwenden.
13
2
Klammer (nicht im
Lieferumfang
enthalten)
Ziehen Sie
die Klammer
fest.
Drehen.

30
Austauschen des Gobo
Befolgen Sie diese Schritte, um einen Gobo in die Vorrichtung zu bringen.
1
34
2
Gobo-Halter
Lösen Sie
die
Schrauben.

31
Linking
Wenn Sie mehrere Onset 120WW verwenden, können Sie diese verketten („daisy-chain“), sodass jede
Vorrichtung Strom und/oder DMX-Daten an das nächste Gerät sendet. Auf diese Weise kann eine
unordentliche Verkabelung verhindert und Zeit gespart werden.
Sie müssen die Vorrichtungen für den Strom und die DMX-Steuerung nicht verketten: Sie können Sie
für jeden Zweck unabhängig verbinden. Sie können zum Beispiel 8 Vorrichtungen für die DMXSteuerung verbinden, während nur 4 von diesen Vorrichtungen für den Strom miteinander verbunden
werden (die Stromversorgung der anderen 4 Vorrichtungen verläuft separat).
Stromversorgung
Verwenden Sie ein standardmäßiges IEC-Stromkabel, um den Netzausgang einer Vorrichtung mit
dem Netzeingang einer anderen zu verbinden. Solange die erste Vorrichtung mit einer Steckdose
verbunden ist, kann jede der verknüpften Vorrichtungen ausgeschaltet bleiben und die nächste
Vorrichtung immer noch mit Strom versorgen.
Wichtig: Um vermeidbare Schäden an den Sicherungen zu verhindern, empfehlen wir die Verknüpfung
von nicht mehr als 10 Vorrichtungen in der gleichen Kette.
DMX
Verwenden Sie ein 3-poliges DMX-Kabel, um das DMX Out einer Vorrichtung mit dem DMX In einer
anderen zu verbinden. Ihr angeschlossener DMX-Controller wird seine Daten hintereinander an die
Vorrichtungen senden. Alle Vorrichtungen in dieser Kette werden alle DMX-Daten erhalten.
Onset 120WW Onset 120WW Onset 120WW
Steckdose
Onset 120WW
Onset 120WW
Onset 120WW
DMX-Controller

32
Betrieb
Menüoptionen
So verwenden Sie das Menü:
1. Drücken Sie Menü, um durch die verfügbaren Menüs zu blättern. DMX-Modus, Dimmer und
Stroboskop.
2. Drücken Sie Eingabe, um ein Menü auszuwählen.
3. Verwenden Sie die Tasten Aufwärts und Abwärts, um die aktuell angezeigte Einstellung zu
ändern.
4. Drücken Sie Menü, um Ihre Auswahl zu bestätigen.
Um andere Einstellungen zu bearbeiten, wiederholen Sie die Schritte 1-4.
Menü Einstellungen/Werte Beschreibung
DMX-Modus
001–512 DMX-Adresseinstellung
Dimmer
000–255
Dimmer, dunkel (000) bis hell (255)
Stroboskop
000–255
Stroboskopgeschwindigkeit, langsam (000) bis schnell (255)
DMX-Funktionen
Sie können Onset 120WW steuern, indem Sie einen DMX-Controller verbinden. Siehe folgende
Tabelle für verfügbare Funktionen.
Kanal Funktion Wert Beschreibung
1
Dimming 000–255
Dimmer, dunkel (000) bis hell (255)
2
Stroboskop 000–009 Keine Funktion
010–255
Stroboskopgeschwindigkeit, langsam (010) bis schnell (255)
3
Dimmverlauf 000–063 Dimmverlauf 1
064–127 Dimmverlauf 2
128–191 Dimmverlauf 3
192–255 Dimmverlauf 4

33
Appendix (English)
Technical Specifications
Specifications are subject to change without notice.
Light Type
LED
Power
120 W
Colors
Warm white, 3200K
Color Rendering Index
85
Gobo
B-size with removable gobo holder
Illuminance
2,600 lux @ 4 m (13.1 ft.)
Beam Angle
26°
Strobe Rate
0–20 Hz
DMX Display
Monochromatic backlit LCD
Connections
(1) 3-pin input for DMX
(1) 3-pin output for DMX
Channel Profiles
3
Power Supply
Switching (internal)
Automatic voltage selection
Connection All Countries: Standard IEC input
USA: Standard female Edison/NEMA
®
output
for linking multiple fixtures
Non-USA: Standard female IEC output for
linking multiple fixtures
Linking
Up to 10 fixtures
Consumption
145 W
Input Voltage
110–240 VAC, 50/60 Hz
Fuse
250 V, 3 A
Physical / Mechanical Mounting
Hanging yoke with screw hole
Dimensions
(width x depth x height)
27.6” x 10.2” x 9.8”
700 x 260 x 250 mm
Weight
14.1 lbs.
6.4 kg

34
Lumen Output
Lumens:
4025 2600 1090 600 385
Distance (m):
0 3
4 6 8
10
(ft.):
0 9.84
13.12 19.69 26.25
32.81
Diameter (m):
0 1.26
1.65 2.46 3.23
4.13
(ft):
0 4.13
5.41 8.07 10.6
13.55
Trademarks & Licenses
Marq is a trademark of inMusic Brands, Inc., registered in the U.S. and other countries. NEMA® is the
registered trademark and service mark of the National Electrical Manufacturers Association. All other
product names, company names, trademarks, or trade names are those of their respective owners.
26°

35

marqlighting.com
Manual Version 1.4
 Loading...