


User Guide
Guía del usuario
Guide d’utilisation
Guida per l’uso
Benutzerhandbuch
Appendix
English (3–12)
Español (13–22)
Français (23–32)
Italiano (33–42)
Deutsch (43–52)
English (53–54)

2

User Guide (English)
Introduction
Box Contents
Gesture Beam 500 (2) Hanging Brackets
Power Cable User Guide
DMX Cable Safety & Warranty Manual
Support
For the latest information about this product (documentation, technical specifications, system
requirements, compatibility information, etc.) and product registration, visit marqlighting.com.
For additional product support, visit marqlighting.com/support.
Safety Notes
Important: In addition to the notes below, please refer to the included safety & warranty manual for
additional safety information.
• Carry this product by the hanging/mounting bracket or the handles only.
• Use this product indoors only (IP20). To prevent risk of fire or shock, do not expose this product
to rain or moisture.
• Do not use this product for permanent installations.
• Connect this product to grounded and protected circuits only.
• Always disconnect it from its power source before cleaning or replacing this product’s fuse.
Replace the fuse with another of the same type and rating.
• Before connecting the product to a power source, make sure the power cable is not crimped or
damaged.
• Make sure the power outlet’s voltage is within the range stated on this product (on its housing or
decal).
• Never connect this product to a dimmer or rheostat.
• Never disconnect this product from the power cable by pulling or tugging on the cable itself.
• If you mount this product overhead, use a safety cable.
• Always make sure this product is used in a location with adequate ventilation with at least 20”
(50cm) from adjacent surfaces. Make sure none of this product’s ventilation slots are obstructed.
• Do not use this product at ambient temperatures higher than 104 °F / 40 °C.
• Do not allow flammable materials near this product during use.
• Do not look at the light source when the product is on.
• Do not touch this product while it is powered on or immediately after powering it off. The product
and its housing can reach high temperatures.
• If you encounter a serious problem while using this product, stop using it immediately.
• Do not open this product’s housing. It contains no user-serviceable parts and will void your warranty.
• If the lens, shield lens, or ultraviolet screen becomes cracked, scratched, or otherwise damaged,
stop using it immediately. Contact Marq technical support for service and repair information.
3
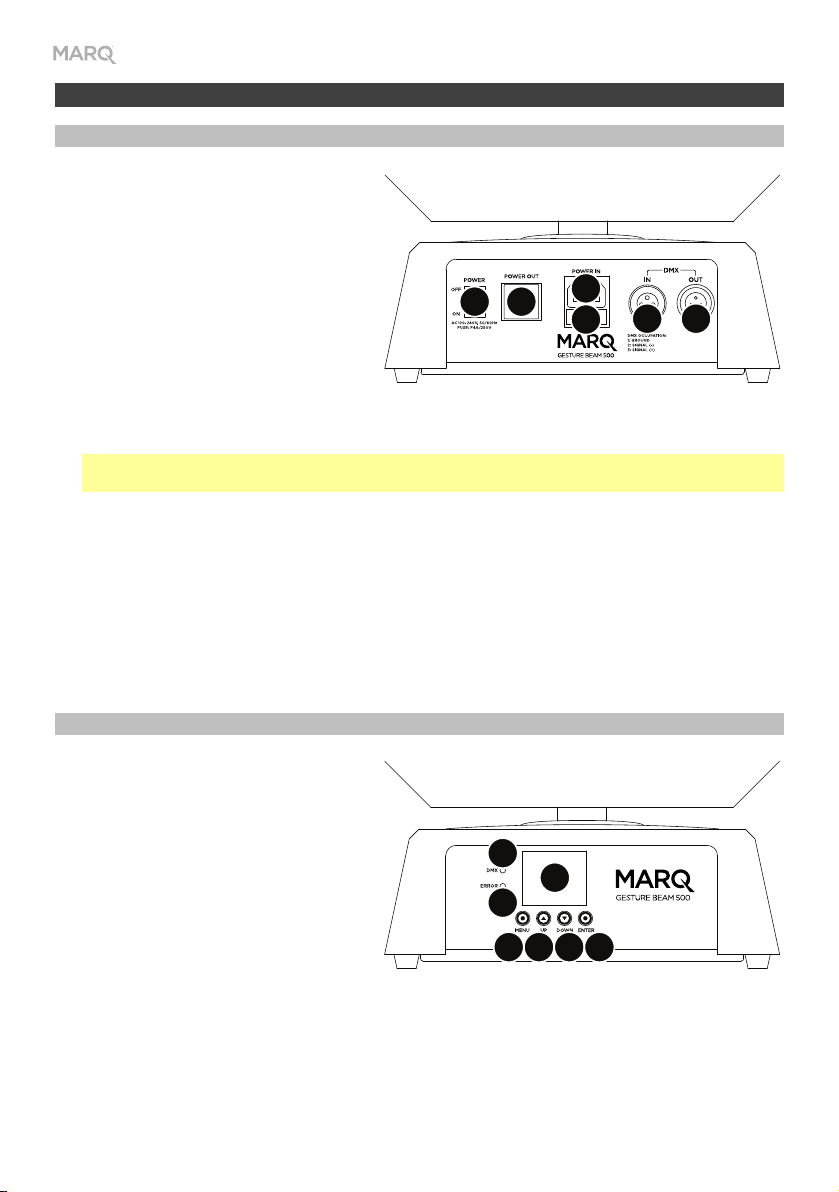
Features
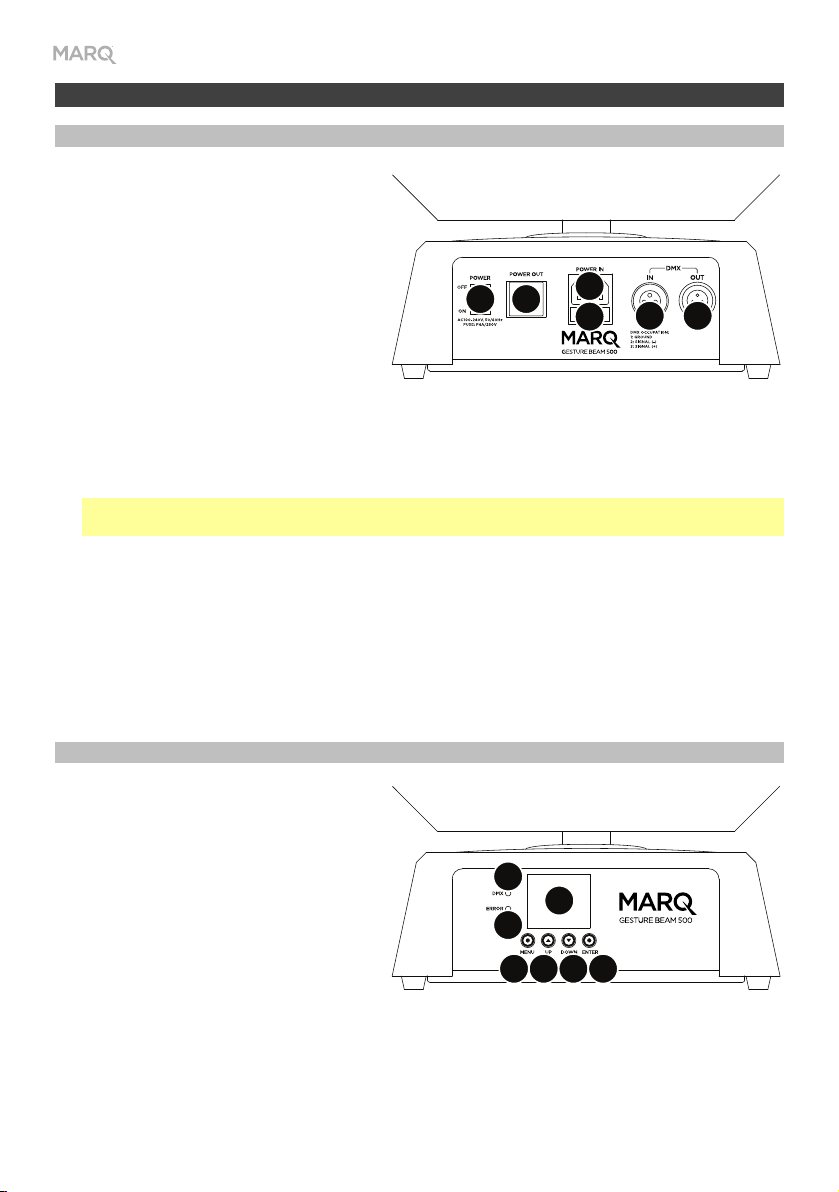
Rear Panel
1. Power In: Use a standard power cable
(included) to connect this input to a
power outlet.
2. Fuse: This compartment holds the fuse.
Before cleaning or replacing the fuse,
disconnect Gesture Beam 500 from its
power source. Use a screwdriver or
other tool to remove the compartment
(do not pull it out by the tab only).
Replace the fuse only with a new fuse
with the same rating (250 V, 4 A).
3. Power Out: Use a standard power cable to connect this output to an additional fixture. This
connection will supply power to the additional fixture when this one is connected a power outlet.
Please see Setup > Linking > Power for information about linking multiple fixtures.
Note: On models sold in the USA, this will be a standard “Edison” (NEMA®) connection. On other
models, this will be a standard IEC connection.
4. Power Switch: Use this switch to power Gesture Beam 500 on/off.
5. DMX In: Use a standard 3-pin DMX cable to connect this input (A) to your DMX controller or (B)
to another fixture that will pass DMX data through it to this one. Gesture Beam 500 receives DMX
data over this connection. Please see Setup > Linking > DMX for information about linking
multiple fixtures.
6. DMX Out: Use a standard 3-pin DMX cable to connect this output to an additional fixture.
Gesture Beam 500 sends its data to an additional fixture over this connection. Please see Setup
> Linking > DMX for information about linking multiple fixtures.
3
4
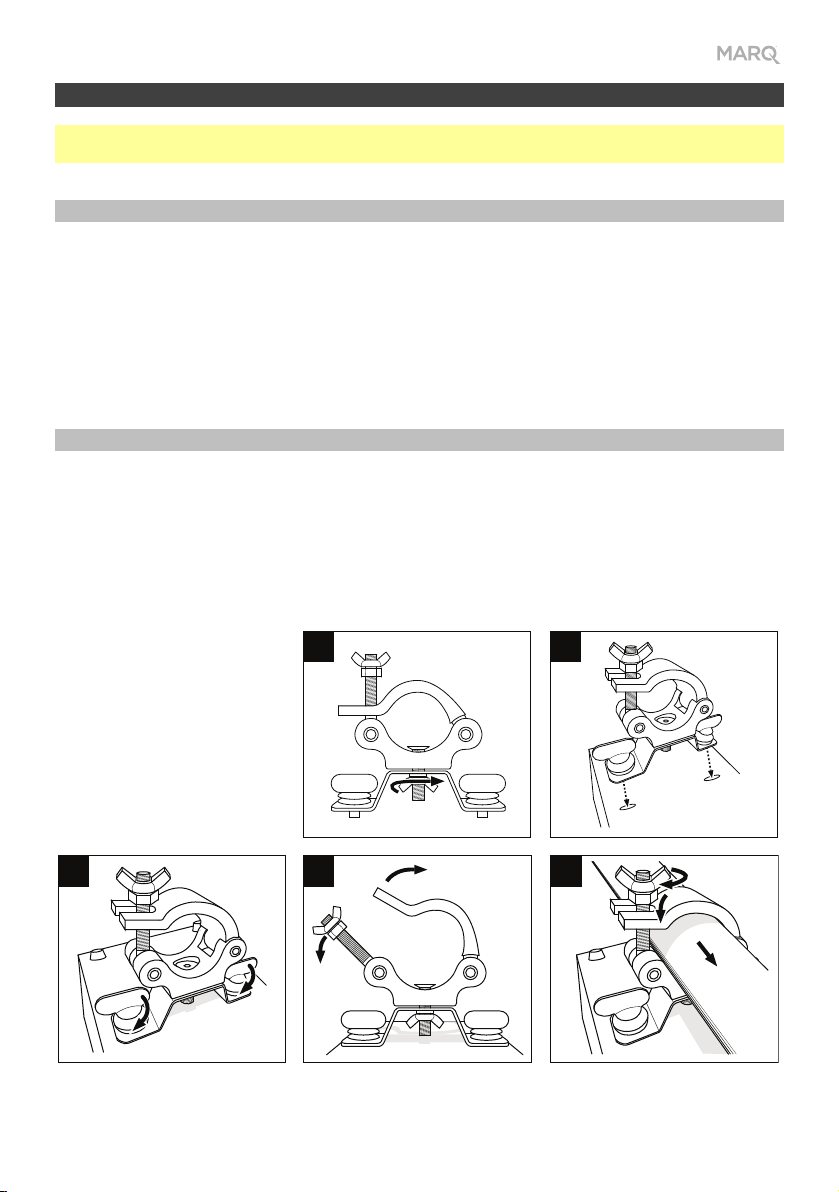
Front Panel
7. Display: This display shows messages
and values indicating the fixture’s
current status.
8. Menu: Press this button to access
Gesture Beam 500’s menu.
9. Up: Press this button to select the nexthighest menu option or to increase the
value by 1.
10. Down: Press this button to select the
next-lowest menu option or to decrease
the value by 1.
11. Enter: Press this to confirm your current selection or value.
12. DMX: This light will illuminate when Gesture Beam 500 is receiving DMX data properly through
its DMX In.
13. Error: This light will illuminate when Gesture Beam 500 receives an invalid DMX command.
12
13
89
1
2
6
5
7
11
10
4

Setup
Note: Items not listed under the Introduction > Box Contents are sold separately.
Power Information
Before connecting the fixture to a power outlet, make sure the power cable is not crimped or
damaged. Also, make sure the power outlet’s voltage is within the range stated on this product (on
its housing or decal).
Before cleaning or replacing the fuse, disconnect Gesture Beam 500 from its power source. Use
a screwdriver or other tool to remove the compartment (do not pull it out by the tab only). Replace
the fuse only with a new fuse with the same rating (250 V, 4 A).
Mounting/Rigging
Standing
Place the fixture on a flat, stable surface. Make sure all cables are secured and placed so that no one
will trip over them.
Suspended
Optional: Follow these steps
to use the hanging bracket(s)
(included) for mounting the
fixture to a truss.
1
Clamp (not included)
2
Hanging Bracket
345
1/4-turn
1/4-turn
(tighten until
secure)
5
Follow these steps to use a safety cable (not
included) to secure the fixture to a truss. We
recommend using a safety cable with a
diameter of at least 5 mm and a load
capacity of at least 272 lbs. (124 kg).
1
2
3
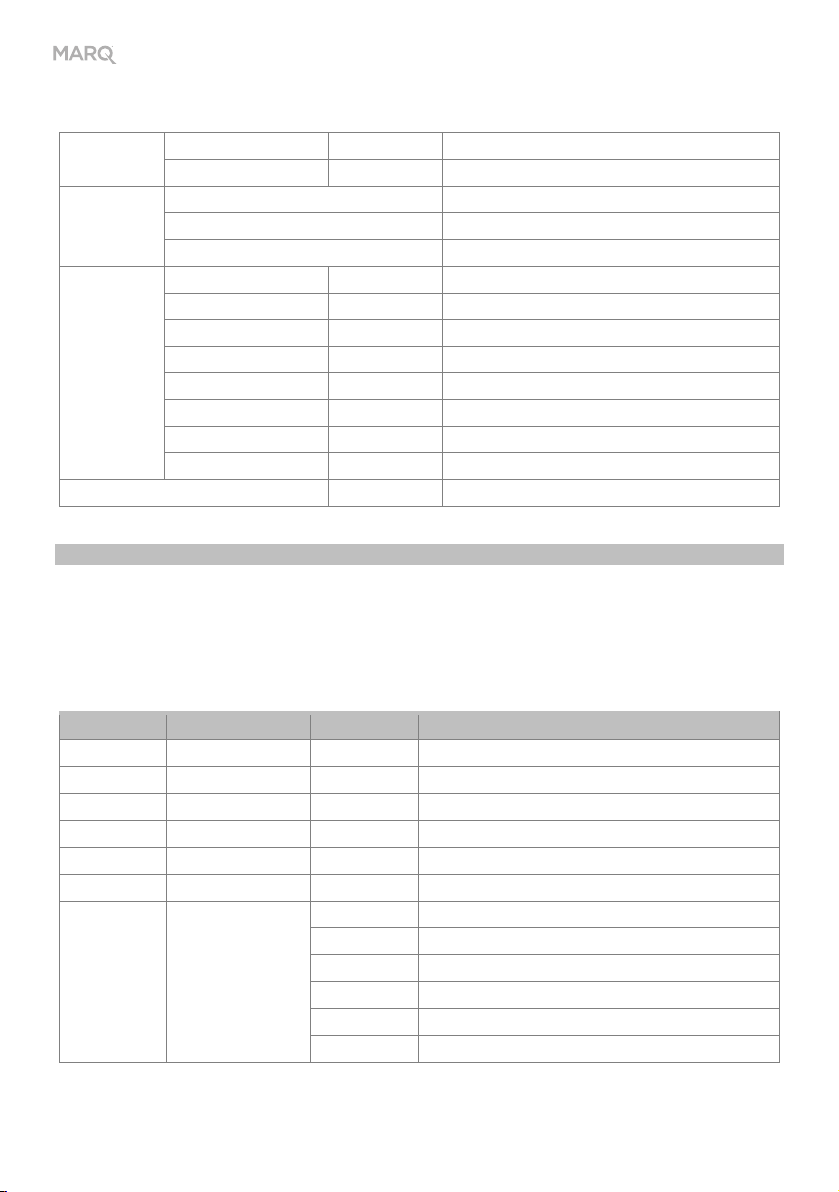
Linking
When using multiple Gesture Beam 500 fixtures, you can link (“daisy-chain”) them so that each each fixture
supplies power and/or sends DMX data to the next one. This helps reduce clutter in your cabling and save
you setup time.
You do not have to link fixtures for both power and DMX control; you can link them for either purpose
independently. For instance, you could link 8 fixtures together for DMX control while linking only 4 of those
same fixtures together for power (powering the other 4 fixtures separately).
Power
Use a standard IEC power cable to connect the Power Out of one fixture to the Power In of another. As
long as the first fixture is connected to a power outlet, any of the linked fixtures can remain off and still
supply power to the next one.
Important: To prevent undue damage to your fuses, we recommend linking no more than 6 fixtures in the
same chain.
Power
Gesture Beam 500 Gesture Beam 500 Gesture Beam 500
DMX
Use a standard 3-pin DMX cable to connect the DMX Out of one fixture to the DMX In of another. Your
connected DMX controller will send its data to the fixtures in sequence. All fixtures in this chain will receive
all DMX data.
DMX Controller
6
Gesture Beam 500
Gesture Beam 500
Gesture Beam 500

V
f
f
f
f
f
Operation
Menu Options
Menu Submenu Settings/Values Description
DMX
Function
Auto
Movement
Manual
Test
Fixture
Settings
DMX Address 001–512 DMX address setting
Channel Mode 15Ch 15-channel operation
8Ch 8-channel operation
No DMX Signal Keep When no DMX signal, do nothing (hold)
Auto When no DMX signal, enter Run Mode
Clear When no DMX signal, black out
DMX Monitor
Run Mode See Description DMX, Sound, Random, 8 auto movement programs
Sound Active On, Of
Sound Sense 000–100
Slave Mode Slav 1–4 4 slave modes
Pan 000–255
Pan Fine 000–255 Fine control of panning
Tilt 000–255
Tilt Fine 000–255 Fine control of tilting
Pan/Tilt Time 000–255
Dimmer 000–255
Stop/Strobe 000–255 Shutter(see 15-Channel Operation > Channel 7)
Color 000–255 Color options (see 15-Channel Operation > Channel 8)
Gobo Change 000–255 Gobo options (see 15-Channel Operation > Channel 9)
Frost 000–255 Frost effect
Focus 000–255
Prism Insertion 000–255 3-facet prism
Prism Rotation 000–255 Indexing and rotation of prism
Macro Function 000–255 Macro functions (see 15-Channel Operation >
Ctrl Functions 000–255 Blackout & reset functions (see 15-Channel Operation
Pan Limit 540˚, 360˚, 180˚Select range of pan angle: 540°, 360°, or 180°
Tilt Limit 270˚, 180˚, 90˚Select range of tilt angle: 270°, 180°, or 90°
Invert Pan On, Of
Invert Tilt On, Of
Swap Pan-Tilt On, Of
Pan-Tilt Correction On, Of
Load Default All OK, Cancel Restore default pan and tilt settings
iew values received on DMX channels
Sound activation
Sound-activation microphone sensitivity, low (000)
to high (255)
Pan angle, 0° (000) to 540° (255)
Tilt angle, 0° (000) to 270° (255)
Pan/tilt speed, fast (000) to slow (255)
Dimmer, dark (000) to bright (255)
Motorized focus, zoom out (000) to zoom in (255)
Channel 14
> Channel 15
Invert pan direction
Invert tilt direction
Switch pan and tilt
Correct pan and tilt
)
)
7
f
Menu Options
(continued)
Display
Settings
Fixture
Information
Offset
Calibration
Reset All
Inverse
Auto-Off On, Of
Firmware Currently installed firmware version
Total Use Hours
Current Use Hours
Pan Calibration -128 –+127 Offset for pan value
Tilt Calibration -128 –+127 Offset for tilt value
Color Calibration -128 –+127 Offset for color value
Gobo Calibration -128 –+127 Offset for gobo value
Focus Calibration -128 –+127 Offset for motorized focus value
Frost Calibration -128 –+127 Offset for frost effect value
Prism Insertion -128 –+127 Offset for prism value
Prism Rotation -128 –+127 Offset for prism indexing and rotation
OK, Cancel Restore all default settings
Invert control panel’s display
Automatically turn off display when not in use
Total running time (HHHHH:MM)
Current use running time (HHHHH:MM)
DMX Functions
You can control Gesture Beam 500 by linking it to a DMX controller. See below for charts of available
functions.
15-Channel Operation
Channel Function Value Description
1
2
3
4
5
6
7
Pan 000–255
Pan Fine 000–255 Fine control of panning
Tilt 000–255
Tilt Fine 000–255 Fine control of tilting
Pan/Tilt Speed 000–255
Dimmer 000–255
Shutter 000–003 Closed
004–007 Open
008–076
077–145
146–215
216–255 Open
Pan angle, 0° (000) to 540° (255)
Tilt angle, 0° (000) to 270° (255)
Pan/tilt speed, fast (000) to slow (255)
Dimmer, dark (000) to bright (255)
Strobe, slow (008) to fast (076)
Pulse, slow (077) to fast (145)
Random strobe, slow (146) to fast (215)
8

k
–
–
15-Channel Operation
(continued)
Channel Function Value Description
8
Color Wheel 000–006 White
007–013 Red
014–020 Orange
021–027 Green
028–034 Light Blue
035–041 Purple
042–048 Yellow
049–055 Blue
056–063 Pin
064–127 Color indexing
128–189
Clockwise, fast (128) to slow (189)
190–193 Stop
194–255
9
Gobo Wheel
See Appendix > Technical
Specifications > Gobos to
view gobo patterns.
000–007 Open/white
008–015 Gobo 1
016–023 Gobo 2
024–031 Gobo 3
Counterclockwise, slow (194) to fast (255)
032–039 Gobo 4
040–047 Gobo 5
048–055 Gobo 6
056–063 Gobo 7
064–071 Gobo 8
072–079
080–087
088–095
096–103
104–111
112–119
120–127
128–135
136–143
144–197
Open spot shaking, slow (072) to fast (079)
Gobo 1 shaking, slow (080) to fast (087)
Gobo 2 shaking, slow (088) to fast (095)
Gobo 3 shaking, slow (096) to fast (103)
Gobo 4 shaking, slow (104) to fast (111)
Gobo 5 shaking, slow (112) to fast (119)
Gobo 6 shaking, slow (120) to fast (127)
Gobo 7 shaking, slow (128) to fast (135)
Gobo 8 shaking, slow (136) to fast (143)
Counterclockwise gobo change, fast (144) to slow (197)
198–202 Stop at current position
10
203–255
Frost 000
Clockwise gobo change, slow (203) to fast (255)
127 No function
128–255 Frost effect
11
12
Focus 000–255
Prism 000
Motorized focus, zoom out (000) to zoom in (255)
127 No function
128–255 Prism effect
9
–
15-Channel Operation
Channel Function Value Description
13
14
15
10
(continued)
Prism Rotation
Macro Functions 000
Control Functions
All functions are executed
after 2 seconds.
000–127
128–189
Indexed position, 0° (000) to 360° (127)
Counterclockwise prism rotation, fast (128) to slow (189)
190–193 Stop at current position
194–255
Clockwise prism rotation, slow (194) to fast (255)
007 No function
008–023 Automatic movement 1
024–039 Automatic movement 2
040–055 Automatic movement 3
056–071 Automatic movement 4
072–087 Automatic movement 5
088–103 Automatic movement 6
104–119 Automatic movement 7
120–135 Automatic movement 8
136–151 Sound-active movement 1
152–167 Sound-active movement 2
168–183 Sound-active movement 3
184–199 Sound-active movement 4
200–215 Sound-active movement 5
216–231 Sound-active movement 6
232–247 Sound-active movement 7
248–255 Sound-active movement 8
000–049 No function
050–059 Blackout during pan/tilt or color/gobo change
060–069 Disable blackout during pan/tilt or color/gobo change
070–079 Blackout during pan/tilt
080–089 Disable blackout during pan/tilt
090–099 Blackout during color change
100–109 Disable blackout during color change
110–119 Blackout during gobo change
120–129 Disable blackout during gobo change
130–139 No function
140–149 Reset pan/tilt
150–169 Reset color/gobo/focus/prism
170–199 No function
200–209 Reset all
210–255 No function

8-Channel Operation
Channel Function Value Description
1
2
3
4
Pan 000–255
Tilt 000–255
Shutter
000–003 Closed
Pan angle, 0° (000) to 540° (255)
Tilt angle, 0° (000) to 270° (255)
004–007 Open
008–076
077–145
146–215
Strobe, slow (008) to fast (076)
Pulse, slow (077) to fast (145)
Random strobe, slow (146) to fast (215)
216–255 Open
Color Wheel
000–006 White
007–013 Red
014–020 Orange
021–027 Green
028–034 Light Blue
035–041 Purple
042–048 Yellow
049–055 Blue
056–063 Pink
064–127 Color indexing
128–189
Clockwise, fast (128) to slow (189)
190–193 Stop
194–255
Counterclockwise, slow (194) to fast (255)
11

8-Channel Operation
(continued)
Channel Function Value Description
5
Gobo Wheel
See Appendix > Technical
Specifications > Gobos to
view gobo patterns.
000–007 Open/white
008–015 Gobo 1
016–023 Gobo 2
024–031 Gobo 3
032–039 Gobo 4
040–047 Gobo 5
048–055 Gobo 6
056–063 Gobo 7
064–071 Gobo 8
072–079
080–087
088–095
096–103
104–111
112–119
120–127
128–135
136–143
144–197
Open spot shaking, slow (072) to fast (079)
Gobo 1 shaking, slow (080) to fast (087)
Gobo 2 shaking, slow (088) to fast (095)
Gobo 3 shaking, slow (096) to fast (103)
Gobo 4 shaking, slow (104) to fast (111)
Gobo 5 shaking, slow (112) to fast (119)
Gobo 6 shaking, slow (120) to fast (127)
Gobo 7 shaking, slow (128) to fast (135)
Gobo 8 shaking, slow (136) to fast (143)
Counterclockwise gobo change, fast (144) to slow (197)
198–202 Stop at current position
203–255
6
Frost 000–127 No function
Clockwise gobo change, slow (203) to fast (255)
128–255 Frost effect
7
8
Focus 000–255
Motor focus, zoom out (000) to zoom in (255)
Prism 000–127 No function
128–255 Prism effect
12

Guía del usuario (Español)
Introducción
Contenido de la caja
Gesture Beam 500 (2) Soportes de montaje
Cable de corriente Guía del usuario
Cable DMX Manual de seguridad y garantía
Soporte
Para obtener la información más reciente acerca de este producto (documentación, especificaciones
técnicas, requisitos de sistema, información de compatibilidad, etc.) y registrarlo, visite marqlighting.com.
Para obtener soporte adicional del producto, visite marqlighting.com/support.
Notas sobre la seguridad
Importante: Además de las notas a continuación, consulte el manual de seguridad y garantía
incluido para obtener información de seguridad adicional.
• Traslade este producto tomándolo solo de un soporte para colgar/montar o su manija/las manijas.
• Use este producto solo en interiores (IP20). Para evitar el riesgo de incendio o choque eléctrico,
no exponga este producto a la lluvia o a la humedad.
• No use este producto para instalaciones permanentes.
• Conecte este producto solo a circuitos protegidos y con descarga a tierra.
• Siempre desconecte el producto de su fuente de corriente antes de limpiarlo o reemplazar su
fusible. Remplace el fusible con otro del mismo tipo y capacidad.
• Antes de conectar el producto a una fuente de corriente, asegúrese de que el cable de corriente
no esté pinzado ni dañado.
• Asegúrese de que el voltaje de la toma de corriente se encuentre dentro del rango indicado en
este producto (en su carcasa o etiqueta).
• Nunca conecte este producto a un atenuador o reóstato.
• Nunca desconecte este producto tirando de su cable de corriente.
• Si monta este producto de forma suspendida, utilice un cable de seguridad.
• Asegúrese de que este producto se use siempre en una ubicación con ventilación adecuada y al
menos 50 cm (20 pulg.) de distancia de superficies adyacentes. Asegúrese de que ninguna de
las ranuras de ventilación de este producto queden obstruidas.
• No use este producto a temperaturas ambientes superiores a 40°C/104°F.
• No acerque materiales inflamables a este producto durante su uso.
• No mire directamente a la fuente de luz del producto cuando se encuentre encendido.
• No toque este producto mientras esté encendido o inmediatamente después de apagarlo. Este
producto y su carcasa pueden alcanzar temperaturas elevadas.
• Si se encuentra con un problema grave al usar este producto, deje de usarlo inmediatamente.
• No abra la carcasa de este producto. No contiene piezas reparables por el usuario y hacerlo
invalidará la garantía.
• Si la lente, el protector de la lente o la pantalla ultravioleta se resquebrajan, rayan o dañan de
cualquier manera, deje de usar el producto inmediatamente. Póngase en contacto con el soporte
técnico de Marq para obtener información sobre el servicio y reparación.
13
Características
Panel trasero
1. Entrada de corriente: Utilice el cable de
corriente estándar (incluido) para conectar
esta entrada a una toma de corriente.
2. Fusible: Este compartimiento sostiene al
fusible. Antes de limpiar o reemplazar el
fusible, desconecte el Gesture Beam 500
de su fuente de corriente. Utilice un
destornillador u otra herramienta para
retirar el compartimiento (no lo retire
tirando de la lengüeta solamente).
Reemplace el fusible sólo con un fusible
nuevo de la misma capacidad (250 V, 4 A).
3. Salida de corriente: Utilice un cable de corriente estándar para conectar esta salida a un
artefacto de iluminación adicional. Esta conexión suministrará corriente al artefacto de
iluminación adicional cuando se encuentre conectado a una toma de corriente. Consulte
Instalación > Enlace > Suministro eléctrico para obtener información sobre el enlace de
múltiples artefactos de iluminación.
Nota: En los modelos vendidos en EE.UU., esta será una conexión “Edison” (NEMA®) estándar.
En los demás modelos, será una conexión IEC estándar.
4. Interruptor de encendido: Utilice este interruptor para encender y apagar el Gesture Beam 500.
5. Entrada DMX: Utilice un cable DMX de tres patillas estándar para conectar esta entrada (A) a su
controlador DMX o (B) a otro artefacto de iluminación a través del cual pasarán los datos de DMX
hacia este. Gesture Beam 500 recibe datos de DMX a través de esta conexión. Consulte Instalación
> Enlace > DMX para obtener información sobre el enlace de múltiples artefactos de iluminación.
6. Salida DMX: Utilice un cable DMX de 3 patillas estándar para conectar esta salida a un artefacto de
iluminación adicional. Gesture Beam 500 envía sus datos a un artefacto de iluminación adicional a
través de esta conexión. Consulte Instalación > Enlace > DMX para obtener información sobre el
enlace de múltiples artefactos de iluminación.
3
4
Panel frontal
7. Pantalla: Esta pantalla muestra mensajes
y valores que indican el estado actual del
artefacto de iluminación.
8. Menú: Pulse este botón para acceder al
menú del Gesture Beam 500.
9. Subir: Pulse este botón para seleccionar
la siguiente opción superior del menú o
para aumentar el valor en 1.
10. Abajo: Pulse este botón para seleccionar
la siguiente opción inferior del menú o
para disminuir el valor en 1.
11. Intro: Pulse este botón para confirmar su selección o valor actual.
12. DMX: Esta luz se iluminará cuando el Gesture Beam 500 esté recibiendo datos de DMX
correctamente a través de su entrada de DMX.
13. Error: Esta luz se enciende cuando el Gesture Beam 500 recibe un comando de DMX inválido.
14
12
13
89
1
2
6
5
7
11
10
Instalación
Nota: Los elementos que no se enumeran en Introducción > Contenidos de la caja se venden por
separado.
Información sobre la corriente
Antes de conectar el artefacto de iluminación a una toma de corriente, asegúrese de que el cable de
corriente no esté pinzado ni dañado. Además, asegúrese de que el voltaje de la toma de corriente se
encuentre dentro del rango indicado en este producto (en su carcasa o etiqueta).
Antes de limpiar o reemplazar el fusible, desconecte el Gesture Beam 500 de su fuente de
corriente. Utilice un destornillador u otra herramienta para retirar el compartimiento (no lo retire
tirando de la lengüeta solamente). Reemplace el fusible sólo con un fusible nuevo de la misma
capacidad (250 V, 4 A).
Montaje/Instalación
Sobre una superficie
Coloque el artefacto de iluminación sobre una superficie plana y estable. Asegúrese de que todos
los cables estén asegurados y colocados de forma que nadie se tropiece con ellos.
Suspendido
Opcional: Siga estos pasos
a fin de utilizar los soportes
de montaje (incluidos) para
colgar el artefacto de
iluminación de una viga.
1
Abrazadera (no incluido)
2
Soporte de montaje
345
1/4 de
vuelta
1/4 de
vuelta
(Apriete hasta
seguro.)
15
Siga estos pasos a fin de utilizar un cable de
seguridad (no se incluye) para sujetar el artefacto
de iluminación a una viga. Recomendamos
utilizar un cable de seguridad con un diámetro
de al menos 5 mm y una capacidad de carga de
al menos 124 kg (272 lb).
1
2
3
Enlace
Si utiliza múltiples artefactos de iluminación Gesture Beam 500, puede enlazarlos (“conectarlos en cadena”)
de manera que cada accesorio suministre la corriente y/o envíe los datos de DMX al siguiente. Esto ayuda
a reducir el amontonamiento de cables y le ahorra tiempo de instalación.
No es obligatorio enlazar tanto la corriente como el control de DMX de los artefactos de iluminación; puede
enlazarlos para cualquier propósito individual de forma independiente del otro. Por ejemplo, podría enlazar
8 artefactos de iluminación entre sí para control de DMX, pero solo enlazar 4 de ellos mediante el cable de
corriente (alimentando los 4 restantes mediante sus cables de corriente individuales).
Suministro eléctrico
Utilice un cable de corriente IEC estándar para conectar la salida Power Out de un artefacto de iluminación
a la entrada Power In de otro. Siempre que el primer artefacto de iluminación esté conectado a una toma
de corriente, cualquiera de los accesorios enlazados puede permanecer apagados y aun así suministrar
corriente al siguiente.
Importante: Para evitar daños excesivos a sus fusibles, recomendamos no enlazar más de 4 artefactos de
iluminación en la misma cadena.
Suministro
eléctrico
Gesture Beam 500 Gesture Beam 500
Gesture Beam 500
DMX
Utilice un cable DMS de 3 patillas estándar para conectar la salida DMX Out de un artefacto de iluminación a
la entrada DMX In de otro. Su controlador DMX conectado enviará sus datos a los artefactos de iluminación
en secuencia. Todos los artefactos de iluminación en esta cadena recibirán todos los datos de DMX.
Controlador DMX
16
Gesture Beam 500
Gesture Beam 500
Gesture Beam 500

F
F
F
F
Funcionamiento
Opciones del menú
Menú Submenú Ajustes/Valores Descripción
Función de
DMX
Movimiento
automático
Prueba
manual
Ajustes del
artefacto
de
iluminación
DMX Address 001–512 Ajuste de dirección de DMX
Channel Mode 15Ch Funcionamiento de 15 canales
8Ch Funcionamiento de 8 canales
No DMX Signal Keep Cuando no se recibe señal de DMX, no hacer nada
Auto Cuando no se recibe señal de DMX, entrar al modo Run
Clear Cuando no se recibe señal de DMX, apagar todo
DMX Monitor Ver los valores recibidos en los canales DMX
Run Mode Consulte la
descripción
Sound Active On, Off Activación por sonido
Sound Sense 000–100 Sensibilidad de la activación por sonido del micrófono, de
Slave Mode Slav 1–4 4 modos esclavos
Pan 000–255
Pan Fine 000–255 Control fino del paneo
Tilt 000–255
Tilt Fine 000–255 Control fino de la inclinación
Pan/Tilt Time 000–255 Velocidad de paneo/inclinación, de rápida (000) a lenta (255)
Dimmer 000–255
Stop/Strobe 000–255
Color 000–255
Gobo Change 000–255
Frost 000–255 Efecto de escarcha
Focus 000–255
Prism Insertion 000–255 Prisma de 3 facetas
Prism Rotation 000–255 Indexación y rotación del prisma
Macro Function 000–255
Ctrl Functions 000–255 Funciones de apagado y reinicio (Consulte
Pan Limit 540˚, 360˚, 180˚ Seleccione el rango del ángulo de paneo: 540°, 360° o 180°
Tilt Limit 270˚, 180˚, 90˚ Seleccione el rango del ángulo de inclinación: 270°, 180° o 90°
Invert Pan On, Off Invertir dirección del desplazamiento horizontal (paneo)
Invert Tilt On, Off Invertir la dirección de la inclinación
Swap Pan-Tilt On, Off Conmutar paneo e inclinación
Pan-Tilt Correction On, Off Corregir paneo e inclinación
Load Default All OK, Cancel Restaurar los ajustes predeterminados de paneo e
(Ejecución)
DMX, Sonido, Aleatorio, 8 programas de movimiento
automático
la más baja (000) a la más alta (255)
Ángulo del desplazamiento horizontal (paneo), de 0° (000)
a 540° (255)
Ángulo de inclinación, de 0° (000) a 270° (255)
Atenuador, de lo más oscuro (000) a lo más claro(255)
Obturador (Consulte
Canal 7)
Opciones de color (Consulte
canales > Canal 8)
Opciones de gobo (Consulte
canales > Canal 9)
Foco motorizado, del más lejano (000) al más cercano (255)
Funciones macro (Consulte
canales > Canal 14)
Funcionamiento de 15 canales > Canal 15)
inclinación
uncionamiento de 15 canales >
uncionamiento de 15
uncionamiento de 15
uncionamiento de 15
17

f
V
–
r
V
r
r
Opciones del menú
(continuación)
Ajustes de la
pantalla
Información del
artefacto
Calibración del
desplazamiento
Reinicializar todo
Inverse
Auto-Off On, Of
Firmware
Total Use Hours
Current Use Hours
Pan Calibration -128
Tilt Calibration -128 –+127 Desplazamiento del valor de la inclinación
Color Calibration -128 –+127 Desplazamiento del valor del colo
Gobo Calibration -128 –+127 Desplazamiento del valor del gobo
Focus Calibration -128 –+127 Desplazamiento del valor del foco motorizado
Frost Calibration -128 –+127 Desplazamiento del valor del efecto de escarcha
Prism Insertion -128 –+127 Desplazamiento del valor del prisma
Prism Rotation -128 –+127 Desplazamiento de la indexación y rotación del prisma
OK, Cancel
Invertir la pantalla del panel de control
Apagar automáticamente la pantalla cuando no está
en uso
ersión del firmware instalada actualmente
Tiempo de funcionamiento total (HHHHH:MM)
Tiempo de funcionamiento del uso actual (HHHHH:MM)
+127 Desplazamiento del valor del paneo
Restaurar todos los ajustes predeterminados de fábrica
Funciones de DMX
Usted puede controlar el Gesture Beam 500 enlazándolo con un controlador de DMX. Consulte a
continuación las tablas con las funciones disponibles.
Funcionamiento de 15 canales
Canal Función Valor Descripción
1
2
3
4
5
6
7
18
Pan 000–255
Paneo fino 000–255 Control fino del paneo
Inclinación 000–255
Inclinación fina 000–255 Control fino de la inclinación
elocidad del
paneo/inclinación
Atenuador 000–255
Obturador 000–003 Cerrado
000–255
004–007 Abri
008–076
077–145
146–215
216–255 Abri
Ángulo del desplazamiento horizontal (paneo), de 0° (000) a
540° (255)
Ángulo de inclinación, de 0° (000) a 270° (255)
Velocidad de paneo/inclinación, de rápida (000) a lenta (255)
Atenuador, de lo más oscuro (000) a lo más claro (255)
Estrobo, del más lento (008) al más rápido (076)
Pulso, del más lento (077) al más rápido (145)
Estrobo aleatorio, del más lento (146) al más rápido (215)

r
–
–
Funcionamiento de 15 canales
(continuación)
Canal Función Valor Descripción
Rueda de color 000–006 Blanco
8
007–013 Rojo
014–020 Naranja
021–027Verde
028–034 Celeste
035–041 Púrpura
042–048 Amarillo
049–055 Azul
056–063 Rosa
064–127 Indexación del colo
128–189
En sentido horario, de la más rápida (128) a la más lenta (189)
190–193 Detener
Rueda de gobo
9
Consulte Apéndice >
Especificaciones
técnicas > Gobos para
ver los patrones de gobo.
194–255
000–007 Abierto/blanco
008–015 Gobo 1
016–023 Gobo 2
024–031 Gobo 3
032–039 Gobo 4
En sentido antihorario, de la más lenta (194) al más rápida (255)
040–047 Gobo 5
048–055 Gobo 6
056–063 Gobo 7
064–071 Gobo 8
072–079
080–087
088–095
096–103
104–111
112–119
120–127
128–135
136–143
144–197
Sacudida de luz sin gobo, de lenta (072) a rápida (079)
Sacudida del gobo 1, de lenta (080) a rápida (087)
Sacudida del gobo 2, de lenta (088) a rápida (095)
Sacudida del gobo 3, de lenta (096) a rápida (103)
Sacudida del gobo 4, de lenta (104) a rápida (111)
Sacudida del gobo 5, de lenta (112) a rápida (119)
Sacudida del gobo 6, de lenta (120) a rápida (127)
Sacudida del gobo 7, de lenta (128) a rápida (135)
Sacudida del gobo 8, de lenta (136) a rápida (143)
Cambio antihorario del gobo, de rápido (144) a lento (197)
198–202 Detención en el lugar actual
Escarcha 000
10
203–255
Cambio horario del gobo, de lento (203) a rápido (255)
127 Sin función
128–255 Efecto de escarcha
Foco 000–255
11
Prisma 000
12
Foco motorizado, del más lejano (000) al más cercano (255)
127 Sin función
128–255 Efecto de prisma
19

r
r
/
Funcionamiento de 15 canales
Canal Función Valor Descripción
Rotación del prisma
13
Funciones de macro 000–007 Sin función
14
Funciones de control
15
Todas las funciones se
ejecutan tras 2 segundos.
20
(continuación)
000–127
128–189
Posición indexada, de 0° (000) a 360° (127)
Rotación antihoraria del prisma, de rápida (128) a lenta (189)
190–193 Detención en el lugar actual
194–255
Rotación horaria del prisma, de lenta (194) a rápida (255)
008–023 Movimiento automático (lento) 1
024–039 Movimiento automático (lento) 2
040–055 Movimiento automático (lento) 3
056–071 Movimiento automático (lento) 4
072–087 Movimiento automático (rápido) 1
088–103 Movimiento automático (rápido) 2
104–119 Movimiento automático (rápido) 3
120–135 Movimiento automático (rápido) 4
136–151 Movimiento activado por sonido 1
152–167 Movimiento activado por sonido 2
168–183 Movimiento activado por sonido 3
184–199 Movimiento activado por sonido 4
200–215 Movimiento activado por sonido 5
216–231 Movimiento activado por sonido 6
232–247 Movimiento activado por sonido 7
248–255 Movimiento activado por sonido 8
000–049 Sin función
050–059 Apagar durante paneo/inclinación o cambio de color/gobo
060–069 Desactivar el apagado durante paneo/inclinación o cambio de
color/gobo
070–079 Apagar durante paneo/inclinación
080–089 Desactivar el apagado durante paneo/inclinación
090–099 Apagar durante cambio de colo
100–109 Desactivar el apagado durante cambio de color
110–119 Apagar durante cambio de gobo
120–129 Desactivar el apagado durante cambio de gobo
130–139 Sin función
140–149 Reinicializar paneo/inclinación
150–169 Reinicializar colo
gobo/foco/prisma
170–199 Sin función
200–209 Reinicializar todo
210–255 Sin función

Funcionamiento de 8 canales
Canal Función Valor Descripción
1
2
3
4
Pan 000–255
Inclinación 000–255
Ángulo del desplazamiento horizontal (paneo), de 0° (000) a 540° (255)
Ángulo de inclinación, de 0° (000) a 270° (255)
Obturador 000–003 Cerrado
004–007 Abrir
008–076
077–145
146–215
Estrobo, del más lento (008) al más rápido (076)
Pulso, del más lento (077) al más rápido (145)
Estrobo aleatorio, del más lento (146) al más rápido (215)
216–255 Abrir
Rueda de
color
000–006 Blanco
007–013 Rojo
014–020 Naranja
021–027 Verde
028–034 Celeste
035–041 Púrpura
042–048 Amarillo
049–055 Azul
056–063 Rosa
064–127 Indexación del color
128–189
En sentido horario, de la más rápida (128) a la más lenta (189)
190–193 Detener
194–255
En sentido antihorario, de la más lenta (194) al más rápida (255)
21

Funcionamiento de 8 canales
(continuación)
Canal Función Valor Descripción
Rueda de gobo
5
Consulte Apéndice >
Especificaciones técnicas
> Gobos para ver los
patrones de gobo.
000–007 Abierto/blanco
008–015 Gobo 1
016–023 Gobo 2
024–031 Gobo 3
032–039 Gobo 4
040–047 Gobo 5
048–055 Gobo 6
056–063 Gobo 7
064–071 Gobo 8
072–079
080–087
088–095
096–103
104–111
112–119
120–127
128–135
136–143
144–197
Sacudida de luz sin gobo, de lenta (072) a rápida (079)
Sacudida del gobo 1, de lenta (080) a rápida (087)
Sacudida del gobo 2, de lenta (088) a rápida (095)
Sacudida del gobo 3, de lenta (096) a rápida (103)
Sacudida del gobo 4, de lenta (104) a rápida (111)
Sacudida del gobo 5, de lenta (112) a rápida (119)
Sacudida del gobo 6, de lenta (120) a rápida (127)
Sacudida del gobo 7, de lenta (128) a rápida (135)
Sacudida del gobo 8, de lenta (136) a rápida (143)
Cambio antihorario del gobo, de rápido (144) a lento (197)
198–202 Detención en el lugar actual
203–255
Escarcha 000–127 Sin función
6
Cambio horario del gobo, de lento (203) a rápido (255)
128–255 Efecto de escarcha
Foco 000–255
7
Prisma 000–127 Sin función
8
Foco motorizado, del más lejano (000) al más cercano (255)
128–255 Efecto de prisma
22

Guide d’utilisation (Français)
Présentation
Contenu de la boîte
Gesture Beam 500 (2) Supports de montage
Câble d’alimentation Guide d’utilisation
Câble DMX Consignes de sécurité et informations concernant la garantie
Assistance technique
Pour les toutes dernières informations concernant la documentation, les spécifications techniques, la
configuration requise, la compatibilité et l’enregistrement du produit, veuillez visiter marqlighting.com.
Pour de l’assistance supplémentaire, veuillez visiter le site marqlighting.com/support.
Consignes de sécurité
Important : En plus des consignes ci-dessous, veuillez consulter le guide des consignes de sécurité
et informations concernant la garantie inclus.
• Pour transporter ce produit, utiliser uniquement un support de montage ou la poignée/les poignées.
• Ce produit doit être utilisé à l’intérieur seulement (IP20). Afin de réduire le risque d’incendie ou
de décharge électrique, ne pas exposer le produit à la pluie ou à l’humidité.
• Ce produit ne doit pas être utilisé pour des installations permanentes.
• Ce produit doit être branché uniquement à un circuit mis à la terre.
• Toujours débrancher ce produit avant de procéder à son nettoyage ou au remplacement de son
fusible. Remplacer le fusible par un autre fusible de même type et de même calibre.
• Avant de relier le produit à une source d’alimentation, s’assurer que le câble d’alimentation n’est
ni tordu ni endommagé.
• La tension de la prise secteur doit être dans la plage de tensions indiquée sur cet appareil (sur le
boîtier ou l’étiquette).
• Ne jamais relier ce produit à un gradateur ou à un rhéostat.
• Ne jamais débrancher ce produit en tirant sur le câble d’alimentation.
• Pour une installation suspendue, veuillez utiliser un câble de sécurité.
• Toujours utiliser cet appareil dans un endroit bien aéré à au moins 50 cm des surfaces
adjacentes. S’assurer qu’aucune des fentes de ventilation de ce produit n’est obstruée.
• Ne pas utiliser ce produit à des températures ambiantes supérieures à 40 °C.
• S’assurer qu’aucune matière inflammable ne se trouve à proximité du projecteur lors de son
fonctionnement.
• Ne pas regarder directement la lumière lorsque le produit fonctionne.
• Ne pas toucher ce produit alors qu’il est sous tension ou immédiatement après la mise hors
tension. Le produit et son boîtier peuvent atteindre des températures élevées.
• En cas de sérieux problèmes de fonctionnement, cesser d’utiliser l’appareil immédiatement.
• Ne pas ouvrir le boîtier de ce produit. Il ne contient aucune pièce réparable par l’utilisateur et
annulera votre garantie.
• Si la lentille, l’écran de protection ou le filtre à ultraviolet deviennent fissurés, rayés ou endommagés,
cessez immédiatement d’utiliser le projecteur. Veuillez communiquer avec le service d’assistance
technique de Marq afin d’obtenir des informations sur le service après-vente et la réparation.
23

Caractéristiques
Panneau arrière
1. Entrée d’alimentation : Utilisez le câble
d’alimentation fourni pour brancher cette
entrée à une prise secteur.
2. Fusible : Ce compartiment contient le fusible.
Avant de nettoyer ou de remplacer le fusible,
débranchez le Gesture Beam 500 de la
source d’alimentation. Utilisez un tournevis
ou un autre outil pour retirer le logement (ne
tirez pas uniquement sur la languette).
Remplacez le fusible par un autre fusible de
même type et de même calibre (250 V, 4 A).
3. Sortie d’alimentation : Utilisez un câble d’alimentation standard afin de relier cette sortie à un
deuxième projecteur. Cette sortie permet d’alimenter un deuxième projecteur lorsque celui-ci est
branché à une prise secteur. Veuillez consulter la section lnstallation > Raccordement en série
> Alimentation afin d’en savoir plus sur le raccordement en série de plusieurs projecteurs.
Remarque : Sur les modèles vendus aux États-Unis, ceci est une connexion NEMAMD standard.
Sur les autres modèles, ceci est une connexion CEI standard.
4. Interrupteur d’alimentation : Cet interrupteur permet de mettre le Gesture Beam 500 sous et
hors tension.
5. Entrée DMX : Utilisez un câble DMX standard à 3 broches pour relier cette entrée (A) à votre
contrôleur DMX ou (B) à un autre projecteur qui transmettra des données DMX grâce à celui-ci. Le
Gesture Beam 500 reçoit des données DMX par le biais de cette connexion. Veuillez consulter la
section lnstallation > Raccordement en série > DMX afin d’en savoir plus sur le raccordement
en série de plusieurs projecteurs.
6. Sortie DMX : Utilisez un câble DMX standard à 3 broches afin de brancher cette sortie à un
deuxième projecteur. Le Gesture Beam 500 transmet ses données DMX à un autre projecteur par
le biais de cette connexion. Veuillez consulter la section lnstallation > Raccordement en série
> DMX afin d’en savoir plus sur le raccordement en série de plusieurs projecteurs.
4
Panneau avant
7. Écran d’affichage : Cet écran affiche les
messages et valeurs concernant l’état du
projecteur.
8. Menu : Cette touche permet d’accéder au
menu du Gesture Beam 500.
9. Up : Cette touche permet de passer à l’option
du menu suivant ou d’augmenter la valeur par 1.
10. Down : Cette touche permet de passer à
l’option du menu précédent ou de diminuer la
valeur par 1.
11. Enter : Appuyez sur cette touche pour confirmer la sélection ou la valeur.
12. DMX : Ce voyant s’allume lorsque le Gesture Beam 500 reçoit correctement des données DMX
par le biais de l’entrée DMX.
13. Error : Ce voyant s’allume lorsque le Gesture Beam 500 reçoit une commande DMX invalide.
24
12
13
89
1
3
2
6
5
7
11
10

Installation
Remarque : Les articles qui ne figurent pas dans la section Présentation > Contenu de la boîte
sont vendus séparément.
Alimentation électrique
Avant de relier le projecteur à une source d’alimentation, veuillez vous assurer que le câble
d’alimentation n’est pas n’est ni tordu ni endommagé. La tension de la prise secteur doit être dans la
plage de tensions indiquée sur cet appareil (sur le boîtier ou l’étiquette).
Avant de nettoyer ou de remplacer le fusible, débranchez le Gesture Beam 500 de la source
d’alimentation. Utilisez un tournevis ou un autre outil pour retirer le logement (ne tirez pas
uniquement sur la languette). Remplacez le fusible par un autre fusible de même type et de même
calibre (250 V, 4 A).
Montage
Support
Placez le projecteur sur une surface plane et stable. Veuillez vous assurer que tous les câbles sont
bien fixés et placés de sorte que personne ne trébuche.
Suspension
Facultative : Veuillez suivre
les étapes suivantes afin de
suspendre le projecteur à un
pont en utilisant les supports
de montage (fournis).
1
Pince (non inclus)
2
Support de montage
345
quart de
quart de
tour
tour
(Serrez jusqu’à
ce que fixée.)
25

Veuillez suivre les étapes suivantes afin de
sécuriser le projecteur à un pont en
utilisant un câble de sécurité (non inclus).
Nous vous recommandons d’utiliser un
câble de sécurité avec un diamètre d’au
moins 5 mm et une capacité de charge
d’au moins 124 kg (272 lb).
1
2
3
Raccordement en série
Lorsque vous utilisez plusieurs projecteurs Gesture Beam 500, vous pouvez les raccorder en série afin que
chaque projecteur alimente et/ou transmette des données DMX au projecteur suivant. Cela permet de
réduire le câblage et de gagner du temps d’installation.
Vous pouvez raccorder les projecteurs pour l’alimentation et la commande DMX, mais également pour l’un
ou l’autre indépendamment. Par exemple, vous pourriez raccorder 8 projecteurs pour la commande DMX,
en raccordant seulement 4 d’entre eux pour fournir une alimentation électrique (alimentant les 4 autres
projecteurs séparément).
Alimentation
Utilisez un câble d’alimentation CEI standard afin de relier la sortie d’alimentation d’un des projecteurs à
l’entrée d’alimentation d’un autre. Tant que le premier projecteur est branché à une prise secteur, les
autres projecteurs peuvent demeurer hors tension et fournir une alimentation au projecteur suivant.
Important : Afin d’éviter d’endommager inutilement les fusibles, nous vous recommandons de ne pas
raccorder en série plus de 4 projecteurs.
Alimentation
Gesture Beam 500
Gesture Beam 500 Gesture Beam 500
DMX
Utilisez un câble DMX standard à 3 broches afin de relier la sortie DMX d’un projecteur à l’entrée DMX
d’un autre projecteur. Le contrôleur DMX relié transmettra ses données aux projecteurs dans l’ordre. Tous
les projecteurs de cette série recevront toutes les données DMX.
Contrôleur DMX
26
Gesture Beam 500
Gesture Beam 500 Gesture Beam 500

F
Fonctionnement
Options menu
Menu Sous-menu Paramètres/Valeurs Description
DMX Function
(Fonctions
DMX)
Auto
Movement
(Mouvement
automatique)
Manual Test
(Essai manuel)
Fixture
Settings
(configuration
du projecteur)
DMX Address 001–512 Configuration de l’adresse DMX
Channel Mode 15Ch Fonctionnement à 15 canaux
8Ch Fonctionnement à 8 canaux
No DMX Signal Keep Lorsqu’aucun signal DMX, ne rien faire
Auto Lorsqu’aucun signal DMX, passer en mode exécution
Clear Lorsqu’aucun signal DMX, obscurcissement total
DMX Monitor Afficher les valeurs reçues sur les canaux DMX
Run Mode Voir la description DMX, son, aléatoire, 8 programmes de mouvement
Sound Active On, Off Mode sonosensible
Sound Sense 000–100
Slave Mode Slav 1–4 4 modes esclave
Pan 000–255
Pan Fine 000–255 Contrôle précis du panoramique
Tilt 000–255
Tilt Fine 000–255 Contrôle précis de l’inclinaison
Pan/Tilt Time 000–255
Dimmer 000–255
Stop/Strobe 000–255
Color 000–255 Options couleur (veuillez consulter la section
Gobo Change 000–255 Options gobo (veuillez consulter la section
Frost 000–255 Effet de givre
Focus 000–255
Prism Insertion 000–255 Prisme à 3 facettes
Prism Rotation 000–255 Indexation et rotation du prisme
Macro Function 000–255 Fonctions macro (veuillez consulter la section
Ctrl Functions 000–255 Fonctions d’obscurcissement total et de réinitialisation
Pan Limit 540˚, 360˚, 180˚ Sélectionner une plage d’angle de panoramique : 540°,
Tilt Limit 270˚, 180˚, 90˚ Sélectionner une plage d’angle d’inclinaison : 270°, 180°
Invert Pan On, Off Mouvement de panoramique inversé
Invert Tilt On, Off Mouvement d’inclinaison inversé
Swap Pan-Tilt On, Off Inverse le panoramique et l’inclination
Pan-Tilt
Correction
Load Default All OK, Cancel Réinitialise tous les réglages de panoramique et
On, Off Corrige le panoramique et l’inclination
automatique
Sensibilité sonosensible du microphone, faible (000) à
élevée (255)
Angle panoramique, 0° (000) à 540° (255)
Angle d’inclinaison, 0° (000) à 270° (255)
Vitesse de panoramique/d’inclinaison, lent (000) à rapide
(255)
Gradateur, sombre (000) à lumineuse (255)
Obturateur (veuillez consulter la section
à 15 canaux > canal 7)
Fonctionnement à 15 canaux > canal 8)
Fonctionnement à 15 canaux > canal 9)
Mise au point motorisée, zoom arrière (000) et zoom
avant (255)
Fonctionnement à 15 canaux > canal 14)
(veuillez consulter la section Fonctionnement à 15
canaux > canal 15)
360° ou 180°
ou 90°
d’inclinaison à leurs valeurs par défaut
onctionnement
27

f
V
–
r
V
Options menu (suite)
Display
Settings
(réglages de
l’affichage)
Fixture
Information
(informations
sur l’appareil)
Offset
Calibration
(étalonnage du
décalage )
Reset All (réinitialisation de tous les
réglages)
Inverse
Auto-Off On, Of
Firmware
Total Use Hours Nombre d’heures d’utilisation depuis la sortie d’usine
Current Use Hours Nombre d’heures d’utilisation depuis la dernière mise
Pan Calibration -128
Tilt Calibration -128 –+127 Décalage pour la valeur d’inclinaison
Color Calibration -128 –+127 Décalage pour la valeur de couleu
Gobo Calibration -128 –+127 Décalage pour la valeur de gobo
Focus Calibration -128 –+127 Décalage pour la valeur de mise au point motorisée
Frost Calibration -128 –+127 Décalage pour la valeur d’effet de givre
Prism Insertion -128 –+127 Décalage pour la valeur du prisme
Prism Rotation -128 –+127 Décalage pour l’indexation et la rotation du prisme
OK, Cancel Réinitialise tous les réglages à leurs valeurs par
Inverse l’affichage du panneau de contrôle
Éteint automatiquement l’écran lorsque l’appareil
n’est pas utilisé
ersion du progiciel
(HHHH:MM)
à zéro du compteur (HHHH:MM)
+127 Décalage pour la valeur de panoramique
défaut
Fonctions DMX
Vous pouvez commander le Gesture Beam 500 en le raccordant à un contrôleur DMX. Reportezvous aux tableaux ci-dessous pour connaître les fonctions disponibles.
Fonctionnement à 15 canaux
Canal Fonction Valeur Description
1
2
3
4
5
6
7
28
Panoramique 000–255
Panoramique précis 000–255 Contrôle précis du panoramique
Inclinaison 000–255
Inclinaison précise 000–255 Contrôle précis de l’inclinaison
itesse de panoramique/de
l’inclinaison
Gradateur 000–255
Obturateur 000–003 Fermé
000–255
004–007 Ouvert
008–076
077–145
146–215
216–255 Ouvert
Angle de panoramique, 0° (000) à 540° (255)
Angle d’inclinaison, 0° (000) à 270° (255)
Vitesse de panoramique/d’inclinaison, lent (000) à rapide
(255)
Gradateur, sombre (000) à lumineuse (255)
Effet stroboscopique, lent (008) à rapide (076)
Pulsations, lent (077) à rapide (145)
Effet stroboscopique aléatoire, lent (146) à rapide (215)

r
r
–
–
Fonctionnement à 15 canaux (suite)
Canal Fonction Valeur Description
Roue de couleur 000–006 Blanc
8
007–013 Rouge
014–020 Orange
021–027Vert
028–034 Bleu clai
035–041Violet
042–048 Jaune
049–055 Bleu
056–063 Rose
064–127 Indexation de couleu
128–189
Sens horaire, rapide (128) à lent (189)
190–193 Arrêt
Roue de gobo
9
Veuillez consulter la section
Appendice >
Spécifications techniques
> Gobos
motifs des gobos
pour voir les
194–255
000–007 Ouvert/blanc
008–015 Gobo 1
016–023 Gobo 2
024–031 Gobo 3
032–039 Gobo 4
Sens antihoraire, rapide (194) à lent (255)
040–047 Gobo 5
048–055 Gobo 6
056–063 Gobo 7
064–071 Gobo 8
072–079
080–087
088–095
096–103
104–111
112–119
120–127
128–135
136–143
144–197
Faisceau ouvert avec vibration, lent (072) à rapide (079)
Gobo 1 avec vibration, lent (080) à rapide (087)
Gobo 2 avec vibration, lent (088) à rapide (095)
Gobo 3 avec vibration, lent (096) à rapide (103)
Gobo 4 avec vibration, lent (104) à rapide (111)
Gobo 5 avec vibration, lent (112) à rapide (119)
Gobo 6 avec vibration, lent (120) à rapide (127)
Gobo 7 avec vibration, lent (128) à rapide (135)
Gobo 8 avec vibration, lent (136) à rapide (143)
Changement de gobo, sens antihoraire, lent (144) à rapide (197)
198–202 Arrêtez à la position actuelle
Effet de givre 000
10
203–255
Changement de gobo, sens horaire, lent (203) à rapide (255)
127 Aucune fonction
128–255 Effet de givre
Mise au point
11
Prisme 000
12
000–255
Mise au point motorisée, zoom arrière (000) et zoom avant (255)
127 Aucune fonction
128–255 Effet de prisme
29

Fonctionnement à 15 canaux (suite)
Canal Fonction Valeur Description
Rotation du prisme
13
000–127
128–189
Position indexée, 0° (000) à 360° (127)
Rotation du prisme, sens antihoraire, rapide (128) à lent (189)
190–193 Arrêtez à la position actuelle
194–255
Fonctions macro 000–007 Aucune fonction
14
Rotation du prisme, sens horaire, lent (194) à rapide (255)
008–023 Mouvement automatique (lent) 1
024–039 Mouvement automatique (lent) 2
040–055 Mouvement automatique (lent) 3
056–071 Mouvement automatique (lent) 4
072–087 Mouvement automatique (rapide) 1
088–103 Mouvement automatique (rapide) 2
104–119 Mouvement automatique (rapide) 3
120–135 Mouvement automatique (rapide) 4
136–151 Mouvement sonosensible 1
152–167 Mouvement sonosensible 2
168–183 Mouvement sonosensible 3
184–199 Mouvement sonosensible 4
200–215 Mouvement sonosensible 5
216–231 Mouvement sonosensible 6
232–247 Mouvement sonosensible 7
248–255 Mouvement sonosensible 8
Fonctions de
15
commande
Toutes les fonctions
sont exécutées après
2 secondes.
000–049 Aucune fonction
050–059 Obscurcissement total durant le changement de
panoramique/l’inclinaison ou de couleur/gobo
060–069 Désactivation de l’obscurcissement total durant le changement de
panoramique/l’inclinaison ou de couleur/gobo
070–079 Obscurcissement total durant le panoramique/l’inclinaison
080–089 Désactivation de l’obscurcissement total durant le
panoramique/l’inclinaison
090–099 Obscurcissement total durant le changement de couleur
100–109 Désactivation de l’obscurcissement total durant le changement de
couleur
110–119 Obscurcissement total durant le changement de gobo
120–129 Désactivation de l’obscurcissement total durant le changement de
gobo
130–139 Aucune fonction
140–149 Réinitialisation du panoramique/l’inclinaison
150–169 Réinitialisation de la couleur/du gobo/de la mise au point/du prisme
170–199 Aucune fonction
200–209 Réinitialisation de tous les réglages
210–255 Aucune fonction
30

Fonctionnement à 8 canaux
Canal Fonction Valeur Description
1
2
3
4
Panoramique 000–255
Inclinaison 000–255
Angle de panoramique, 0° (000) à 540° (255)
Angle d’inclinaison, 0° (000) à 270° (255)
Obturateur 000–003 Fermé
004–007 Ouvert
008–076
077–145
146–215
Effet stroboscopique, lent (008) à rapide (076)
Pulsations, lent (077) à rapide (145)
Effet stroboscopique aléatoire, lent (146) à rapide (215)
216–255 Ouvert
Roue de couleur 000–006 Blanc
007–013 Rouge
014–020 Orange
021–027 Vert
028–034 Bleu clair
035–041 Violet
042–048 Jaune
049–055 Bleu
056–063 Rose
064–127 Indexation de couleur
128–189
Sens horaire, rapide (128) à lent (189)
190–193 Arrêt
194–255
Sens antihoraire, rapide (194) à lent (255)
31

Fonctionnement à 15 canaux (suite)
Canal Fonction Valeur Description
Roue de gobo
5
Veuillez consulter la section
Appendice >
Spécifications techniques
> Gobos
des gobos
pour voir les motifs
000–007 Ouvert/blanc
008–015 Gobo 1
016–023 Gobo 2
024–031 Gobo 3
032–039 Gobo 4
040–047 Gobo 5
048–055 Gobo 6
056–063 Gobo 7
064–071 Gobo 8
072–079
080–087
088–095
096–103
104–111
112–119
120–127
128–135
136–143
144–197
Faisceau ouvert avec vibration, lent (072) à rapide (079)
Gobo 1 avec vibration, lent (080) à rapide (087)
Gobo 2 avec vibration, lent (088) à rapide (095)
Gobo 3 avec vibration, lent (096) à rapide (103)
Gobo 4 avec vibration, lent (104) à rapide (111)
Gobo 5 avec vibration, lent (112) à rapide (119)
Gobo 6 avec vibration, lent (120) à rapide (127)
Gobo 7 avec vibration, lent (128) à rapide (135)
Gobo 8 avec vibration, lent (136) à rapide (143)
Changement de gobo, sens antihoraire, lent (144) à
rapide (197)
198–202 Arrêtez à la position actuelle
203–255
Effet de givre 000–127 Aucune fonction
6
Changement de gobo, sens horaire, lent (203) à rapide (255)
128–255 Effet de givre
Mise au point 000–255
7
Mise au point motorisée, zoom arrière (000) et zoom
avant (255)
Prisme 000–127 Aucune fonction
8
128–255 Effet de prisme
32

Guida per l’uso (Italiano)
Introduzione
Contenuti della confezione
Gesture Beam 500 (2) Staffe di sospensione
Cavo di alimentazione Guida per l’uso
Cavo di DMX Manuale di sicurezza e garanzia
Assistenza
Per le ultime informazioni in merito a questo prodotto (documentazione, specifiche tecniche, requisiti
di sistema, informazioni sulla compatibilità, ecc.) e per effettuarne la registrazione, recarsi alla pagina
marqlighting.com.
Per ulteriore assistenza sul prodotto, recarsi alla pagina marqlighting.com/support.
Indicazioni di sicurezza
Importante: oltre alle note qui di seguito, fare riferimento al manuale di sicurezza e garanzia per
ulteriori informazioni di sicurezza.
• Trasportare il prodotto unicamente servendosi da una staffa di montaggio o della apposita
maniglia / delle apposite maniglie.
• Utilizzare il prodotto unicamente da interni (IP20). Per evitare il rischio di incendio o scossa
elettrica, non esporre il prodotto alla pioggia o all’umidità.
• Non utilizzare il prodotto per impianti permanenti.
• Collegare il prodotto unicamente a circuiti messi a terra e protetti.
• Scollegarlo sempre dall’alimentazione elettrica prima di pulirlo o di sostituire il fusibile. Sostituire
il fusibile con un altro dello stesso tipo e della stessa tensione nominale.
• Prima di collegare il prodotto a una fonte di alimentazione, assicurarsi che il cavo di
alimentazione non sia schiacciato o danneggiato.
• Assicurarsi che la tensione della presa elettrica rientri nell’intervallo indicato sul prodotto
(sull’alloggiamento o su un adesivo).
• Mai collegare questo prodotto a uno smorzatore o a un reostato.
• Mai scollegare l prodotto dal cavo di alimentazione tirando o strattonando il cavo stesso.
• Se si monta il prodotto sospeso, servirsi di un cavo di sicurezza.
• Assicurarsi sempre che il prodotto sia utilizzato in una sede con adeguata ventilazione con
almeno 50 cm di spazio dalle superfici adiacenti. Assicurarsi che nessuna delle aperture di
ventilazione del prodotto sia ostruita.
• Non utilizzare il prodotto a temperature ambiente superiori a 40°C/104°F.
• Non avvicinare materiali infiammabili al prodotto durante l’uso.
• Non guardare la fonte luminosa quando il prodotto è acceso.
• Non toccare il prodotto quando è acceso o subito dopo lo spegnimento. Il prodotto e il suo
alloggiamento possono raggiungere temperature elevate.
• Se si verificano gravi problemi durante l’uso del prodotto, interromperne l’uso immediatamente.
• Non aprire l’alloggiamento del prodotto. Contiene parti non riparabili dall’utente e tale apertura
annullerebbe la garanzia.
• Se la lente, lo schermo della lente o lo schermo a ultravioletti si incrina, si graffia o subisce altri danni,
interromperne l’uso immediatamente. Contattare l’assistenza tecnica di Marq per informazioni in
materia di assistenza tecnica e riparazioni.
33

Caratteristiche
Pannello posteriore
1. Ingresso di alimentazione: servirsi di un
cavo standard di alimentazione (in dotazione)
per collegare questo ingresso a una presa di
alimentazione.
2. Fusibile: questo scomparto contiene il
fusibile. Prima della pulizia o prima di
sostituire il fusibile, scollegare il Gesture
Beam 500 dalla fonte di alimentazione.
Servirsi di un cacciavite o di un altro
attrezzo per rimuovere lo scomparto (non
limitarsi a tirare la linguetta). Sostituire il
fusibile unicamente con un fusibile nuovo avente la stessa tensione nominale (250 V, 4 A).
3. Uscita di alimentazione: servirsi di un cavo di alimentazione standard per collegare questa
uscita a un ulteriore accessorio. Questo collegamento fornirà alimentazione all’accessorio
aggiuntivo quando questo è collegato a una presa di alimentazione. Si veda Configurazione >
Collegamento > Alimentazione per maggiori informazioni sul collegamento di più dispositivi.
Nota bene: nei modelli venduti negli Stati Uniti, questo sarà un collegamento standard “Edison”
(NEMA®). Su altri modelli, si tratterà di un collegamento IEC standard.
4. Interruttore di alimentazione: servirsi di questo interruttore per accendere e spegnere il Gesture
Beam 500.
5. Ingresso DMX: servirsi di un cavo standard DMX a 3 poli per collegare questo ingresso (A) al
controller DMX o (B) a un altro dispositivo che farà passare dati DMX da quello a questo. Il
Gesture Beam 500 riceve dati DMX tramite questo collegamento. Si veda Configurazione >
Collegamento > DMX per maggiori informazioni sul collegamento di più dispositivi.
6. Uscita DMX: servirsi di un cavo DMX standard a 3 poli per collegare questa uscita a un ulteriore
accessorio. Il Gesture Beam 500 invia i suoi dati a un altro dispositivo tramite questo collegamento.
Si veda Configurazione > Collegamento > DMX per maggiori informazioni sul collegamento di più
dispositivi.
4
Pannello anteriore
7. Display: il display mostra messaggi e valori
a indicare lo stato corrente della lampada.
8. Menu: premere questo tasto per accedere
al menu del Gesture Beam 500.
9. Up (su): premere questo tasto per selezionare
l’opzione del menu subito superiore o per
aumentare il valore di 1.
10. Down (giù): premere questo tasto per
selezionare l’opzione del menu subito inferiore
o per diminuire il valore di 1.
11. Enter (invio): premere questo tasto per confermare la scelta o il valore corrente.
12. DMX: questa spia si illumina quando il Gesture Beam 500 riceve dati DMX correttamente tramite
il suo ingresso DMX.
13. Errore: questa spia si accende quando il Gesture Beam 500 riceve un comando DMX non valido.
34
12
13
89
1
3
2
6
5
7
11
10

Configurazione
Nota bene: elementi non elencati sotto Introduzione > Contenuti della confezione sono venduti
separatamente.
Informazioni sull’alimentazione
Prima di collegare la lampada a una fonte di alimentazione, assicurarsi che il cavo di alimentazione
non sia schiacciato o danneggiato. Assicurarsi inoltre che la tensione della presa elettrica rientri
nell’intervallo indicato sul prodotto (sull’alloggiamento o su un adesivo).
Prima della pulizia o prima di sostituire il fusibile, scollegare il Gesture Beam 500 dalla fonte di
alimentazione. Servirsi di un cacciavite o di un altro attrezzo per rimuovere lo scomparto (non
limitarsi a tirare la linguetta). Sostituire il fusibile unicamente con un fusibile nuovo avente la stessa
tensione nominale (250 V, 4 A).
Installazione/montaggio
A terra
Collocare la lampada su una superficie uniforme e stabile. Assicurarsi che tutti i cavi siano ben fissati
e collocati in modo che nessuno possa inciamparvi.
Sospesa
Facoltativo: Procedere come
segue per utilizzare le staffe di
sospensione (in dotazione) per
il montaggio della lampada a
una trave.
1
Morsetto
(non in dotazione)
2
Staffa di sospensione
345
1/4 di giro
1/4 di giro
(Serrare a
fondo.)
35

Procedere come segue per servirsi di un
cavo di sicurezza (non in dotazione) per
fissare in maniera sicura la luce a una trave.
Raccomandiamo di utilizzare un cavo di
sicurezza di minimo 5 mm di diametro e una
capacità di carico di almeno 124 kg (272 lb).
1
2
3
Collegamento
Quando si utilizzano più lampade Gesture Beam 500, è possibile collegarle (“collegamento a margherita”) in
modo che ciascuna di esse fornisca alimentazione e/o invii dati DMX a quella successiva. Questo aiuta a
evitare disordine nel cablaggio e a risparmiare tempo nell’installazione.
Non è necessario collegare le lampade sia per l’alimentazione che per il controllo DMX: è possibile
collegarle indipendentemente per ciascuno scopo. Ad esempio, si possono collegare 8 lampade per il
controllo DMX collegando solo 4 di esse per l’alimentazione (alimentando le rimanenti 4 separatamente).
Alimentazione
Servirsi di un cavo di alimentazione IEC standard per collegare l’uscita di alimentazione di una lampada
all’ingresso di alimentazione di un’altra. Purché la prima lampada sia collegata a una presa elettrica, le
altre possono rimanere spente e comunque alimentare la successiva.
Importante: Per evitare danni ai fusibili si raccomanda di non collegare più di 4 lampade nella stessa
catena.
Alimentazione
Gesture Beam 500
Gesture Beam 500
Gesture Beam 500
DMX
Servirsi di un cavo DMX standard per collegare l’uscita DMX di una lampada all’ingresso DMX di un’altra.
Il controller DMX collegato invierà i dati alle lampade in sequenza. Tutte le lampade presenti nella catena
riceveranno tutti i dati DMX.
Controller DMX
36
Gesture Beam 500
Gesture Beam 500 Gesture Beam 500

Operazione
Opzioni menu
Menu Sottomenu Impostazioni/valori Descrizione
DMX
Functions
(Funzione
DMX)
Auto
Movment
(Movimento
automatic)
Manual Test
(Test manual)
Fixture
Settings
(Impostazioni
della
lampada)
DMX Address 001–512 Impostazione indirizzo DMX
Channel Mode 15Ch Funzionamento a 15 canali
8Ch Funzionamento a 8 canali
No DMX Signal Keep In assenza di segnale DMX, non fare nulla (hold)
Auto In assenza di segnale DMX, entrare in modalità Run
Clear In assenza di segnale DMX, vai a nero
DMX Monitor Visualizza valori ricevuti sui canali DMX
Run Mode Si veda la descrizione DMX, Audio, Casuale, 8 programmi di movimento
Sound Active On, Off Attivazione sonora
Sound Sense 000–100 Sensibilità del microfono con attivazione sonora, da
Slave Mode Slav 1–4 4 modalità slave
Pan 000–255 Angolazione di panning, da 0° (000) a 540° (255)
Pan Fine 000–255 Controllo fine del panning
Tilt 000–255
Tilt Fine 000–255 Controllo fine dell’inclinazione
Pan/Tilt Time 000–255 Velocità di panning/inclinazione, da rapido (000) a lento (255)
Dimmer 000–255
Stop/Strobe 000–255 Otturatore (si veda Operazione a 15 canali > Canale 7)
Color 000–255 Opzioni colore (si veda Operazione a 15 canali > Canale 8)
Gobo Change 000–255
Frost 000–255 Effetto brina
Focus 000–255
Prism Insertion 000–255 Prisma a 3 facce
Prism Rotation 000–255 Indicizzazione e rotazione del prisma
Macro Function 000–255
Ctrl Functions 000–255
Pan Limit 540˚, 360˚, 180˚ Selezionare l’intervallo di angolazione di panning: 540°,
Tilt Limit 270˚, 180˚, 90˚ Selezionare l’intervallo di angolazione di inclinazione:
Invert Pan On, Off Inverti direzione pan
Invert Tilt On, Off Inverti direzione inclinazione
Swap Pan-Tilt On, Off Attiva panning e inclinazione
Pan-Tilt
Correction
Load Default All OK, Cancel Ripristina impostazioni predefinite di panning e inclinazione
On, Off Correggi panning e inclinazione
automatico
bassa (000) ad alta (255)
Angolo di inclinazione, da 0° (000) a 270° (255)
Smorzatore, da scuro (000) a luminoso (255)
Opzioni gobo (si veda Operazione a 15 canali > Canale 9)
Messa a fuoco motorizzata, da zoom out (000) a zoom in
(255)
Funzioni macro (si veda Operazione a 15 canali >
Canale 14)
Funzioni blackout e reset (si veda Operazione a 15 canali
> Canale 15)
360° o 180°
270°, 180° o 90°
37

f
V
V
Opzioni menu
(continua)
Display
Settings
(Impostazioni
del display)
Fixture
Information
(Informazioni
sulla lampada)
Calibration
Offset
(Calibrazione
offset
[sfasamento])
Reset All (azzera tutto)
Inverse
Auto-Off On, Of
Firmware
Total Use Hours
Current Use Hours
Pan Calibration -128 –+127 Offset valore di panning
Tilt Calibration -128 –+127 Offset valore di inclinazione
Color Calibration -128 –+127 Offset valore di colore
Gobo Calibration -128 –+127 Offset valore gobo
Focus Calibration -128 –+127 Offset valore messa a fuoco motorizzata
Frost Calibration -128 –+127 Offset valore effetto brina
Prism Insertion -128 –+127 Offset valore prisma
Prism Rotation -128 –+127 Offset indicizzazione e rotazione del prisma
OK, Cancel Ripristina tutti i valori predefiniti
Inverti display del pannello di controllo
Spegni automaticamente il display quando non è in
uso
ersione del firmware installata attualmente
Tempo totale di funzionamento (OOOOO:MM)
Tempo di funzionamento, utilizzo attuale (OOOOO:MM)
Funzioni DMX
Si può controllare il Gesture Beam 500 collegandolo a un controller DMX. Si vedano qui di seguito gli
schemi relativi alle funzioni disponibili.
Operazione a 15 canali
Canale Funzione Valore Descrizione
1
2
3
4
5
6
7
Pan 000–255
Panning fine 000–255 Controllo fine del panning
Inclinazione 000–255
Inclinazione fine 000–255 Controllo fine dell’inclinazione
elocità
panning/inclinazione
Smorzatore
Otturatore 000–003 Chiuso
000–255
000–255
004–007 Apri
008–076
077–145
146–215
216–255 Apri
Angolazione di panning, da 0° (000) a 540° (255)
Angolo di inclinazione, da 0° (000) a 270° (255)
Velocità di panning/inclinazione, da rapido (000) a lento (255)
Smorzatore, da scuro (000) a luminoso (255)
Strobo, da lento (008) a rapido (076)
Impulso, da lento (077) a rapido (145)
Strobo casuale, da lento (146) a rapido (215)
38

–
Operazione a 15 canali (continua)
Canale Funzione Valore Descrizione
8
9
10
11
12
Rotella colori 000–006 Bianco
Rotella gobo
Si veda Appendice >
Specifiche tecniche >
Gobo per visualizzare i
pattern dei gobo.
Brina 000
Messa a fuoco 000–255
Prisma 000–127 Nessuna funzione
007–013 Rosso
014–020 Arancione
021–027Verde
028–034 Azzurro
035–041Viola
042–048 Giallo
049–055 Blu
056–063 Rosa
064–127 Indicizzazione colori
128–189
190–193 Stop
194–255
000–007 Aperto/bianco
008–015 Gobo 1
016–023 Gobo 2
024–031 Gobo 3
032–039 Gobo 4
040–047 Gobo 5
048–055 Gobo 6
056–063 Gobo 7
064–071 Gobo 8
072–079
080–087
088–095
096–103
104–111
112–119
120–127
128–135
136–143
144–197
198–202 Arresto nella posizione corrente
203–255
128–255 Effetto brina
128–255 Effetto prisma
Senso orario, da rapido (128) a lento (189)
Senso antiorario, da lento (194) a rapido (255)
Vibrazione punto aperto, da lento (072) a rapido (079)
Vibrazione gobo 1, da lento (080) a rapido (087)
Vibrazione gobo 2, da lento (088) a rapido (095)
Vibrazione gobo 3, da lento (096) a rapido (103)
Vibrazione gobo 4, da lento (104) a rapido (111)
Vibrazione gobo 5, da lento (112) a rapido (119)
Vibrazione gobo 6, da lento (120) a rapido (127)
Vibrazione gobo 7, da lento (128) a rapido (135)
Vibrazione gobo 8, da lento (136) a rapido (143)
Modifica in senso antiorario del gobo, da rapido (144) a
lento (197)
Modifica in senso orario del gobo, da lento (203) a rapido (255)
127 Nessuna funzione
Messa a fuoco motorizzata, da zoom out (000) a zoom in (255)
39

–
Operazione a 15 canali (continua)
Canale Funzione Valore Descrizione
13
14
15
Rotazione del prisma
Funzioni macro 000
Funzioni di controllo
Tutte le funzioni vengono
eseguite dopo 2 secondi.
40
000–127
128–189
Posizione indicizzata, da 0° (000) a 360° (127)
Rotazione in senso antiorario del prisma, da rapido (128) a
lento (189)
190–193 Arresto nella posizione corrente
194–255
Rotazione in senso orario del gobo, da lento (194) a rapido (255)
007 Nessuna funzione
008–023 Movimento automatico (lento) 1
024–039 Movimento automatico (lento) 2
040–055 Movimento automatico (lento) 3
056–071 Movimento automatico (lento) 4
072–087 Movimento automatico (rapido) 1
088–103 Movimento automatico (rapido) 2
104–119 Movimento automatico (rapido) 3
120–135 Movimento automatico (rapido) 4
136–151 Movimento Sound-Active 1
152–167 Movimento Sound-Active 2
168–183 Movimento Sound-Active 3
184–199 Movimento Sound-Active 4
200–215 Movimento Sound-Active 5
216–231 Movimento Sound-Active 6
232–247 Movimento Sound-Active 7
248–255 Movimento Sound-Active 8
000–049 Nessuna funzione
050–059 Blackout durante il panning/l’inclinazione o durante il
060–069 Disattiva blackout durante il panning/l’inclinazione o durante il
cambiamento di colore/gobo
cambiamento di colore/gobo
070–079 Blackout durante il panning/l’inclinazione
080–089 Disattiva blackout durante il panning/l’inclinazione
090–099 Blackout durante il cambiamento di colore
100–109 Disattiva blackout durante il cambiamento di colore
110–119 Blackout durante il cambiamento di gobo
120–129 Disattiva blackout durante il cambiamento di gobo
130–139 Nessuna funzione
140–149 Reset panning/inclinazione
150–169 Reset colore/gobo/messa a fuoco/prisma
170–199 Nessuna funzione
200–209 Reset all (azzera tutto)
210–255 Nessuna funzione

Operazione a 8 canali
Canale Funzione Valore Descrizione
1
2
3
4
Pan 000–255
Inclinazione 000–255
Angolazione di panning, da 0° (000) a 540° (255)
Angolo di inclinazione, da 0° (000) a 270° (255)
Otturatore 000–003 Chiuso
004–007 Apri
008–076
077–145
146–215
Strobo, da lento (008) a rapido (076)
Impulso, da lento (077) a rapido (145)
Strobo casuale, da lento (146) a rapido (215)
216–255 Apri
Rotella colori 000–006 Bianco
007–013 Rosso
014–020 Arancione
021–027 Verde
028–034 Azzurro
035–041 Viola
042–048 Giallo
049–055 Blu
056–063 Rosa
064–127 Indicizzazione colori
128–189
Senso orario, da rapido (128) a lento (189)
190–193 Stop
194–255
Senso antiorario, da lento (194) a rapido (255)
41

Operazione a 8 canali (continua)
Canale Funzione Valore Descrizione
5
Rotella gobo
Si veda Appendice > Specifiche
tecniche > Gobo per visualizzare
i pattern dei gobo.
000–007 Aperto/bianco
008–015 Gobo 1
016–023 Gobo 2
024–031 Gobo 3
032–039 Gobo 4
040–047 Gobo 5
048–055 Gobo 6
056–063 Gobo 7
064–071 Gobo 8
072–079
080–087
088–095
096–103
104–111
112–119
120–127
128–135
136–143
144–197
Vibrazione punto aperto, da lento (072) a rapido (079)
Vibrazione gobo 1, da lento (080) a rapido (087)
Vibrazione gobo 2, da lento (088) a rapido (095)
Vibrazione gobo 3, da lento (096) a rapido (103)
Vibrazione gobo 4, da lento (104) a rapido (111)
Vibrazione gobo 5, da lento (112) a rapido (119)
Vibrazione gobo 6, da lento (120) a rapido (127)
Vibrazione gobo 7, da lento (128) a rapido (135)
Vibrazione gobo 8, da lento (136) a rapido (143)
Modifica in senso antiorario del gobo, da rapido (144)
a lento (197)
198–202 Arresto nella posizione corrente
203–255
Modifica in senso orario del gobo, da lento (203) a
rapido (255)
6
Brina 000–127 Nessuna funzione
128–255 Effetto brina
7
Messa a fuoco 000–255
Messa a fuoco motorizzata, da zoom out (000) a
zoom in (255)
8
Prisma 000–127 Nessuna funzione
128–255 Effetto prisma
42

Benutzerhandbuch (Deutsch)
Einführung
Lieferumfang
Gesture Beam 500 (2) Montagehalterungen
Netzkabel Benutzerhandbuch
DMX-Kabel Sicherheits- und Garantiehandbuch
Kundendienst
Für die neuesten Informationen zu diesem Produkt (Dokumentation, technische Daten, Systemanforderungen,
Informationen zur Kompatibilität etc.) und zur Produktregistrierung besuchen Sie bitte: marqlighting.com.
Für zusätzlichen Produkt-Support besuchen Sie marqlighting.com/support.
Sicherheitshinweise
Wichtig: Neben den unten stehenden Erläuterungen lesen Sie bitte zusätzlich das beiliegende Sicherheits-
und Garantiehandbuch für weitere Sicherheitsinformationen aufmerksam durch.
• Tragen Sie dieses Produkt ausschließlich an eine Aufhänge-/Montagehalterung oder an den Griff(en).
• Verwenden Sie dieses Produkt ausschließlich in Innenräumen (IP20). Um die Gefahr von elektrischen
Schlägen oder die Brandgefahr zu vermeiden, setzen Sie dieses Produkt niemals Regen oder
Feuchtigkeit aus.
• Nutzen Sie dieses Produkt nicht als permanente Montagen.
• Schließen Sie dieses Gerät ausschließlich an geerdete und geschützte Stromkreise an.
• Trennen Sie es immer von der Stromquelle bevor Sie es reinigen oder die Sicherung ersetzen. Ersetzen
Sie die Sicherung mit einer Sicherung vom gleichen Typ und Sicherungswert.
• Bevor Sie das Produkt an eine Stromquelle anschließen, stellen Sie sicher, dass das Stromkabel nicht
gequetscht oder beschädigt ist.
• Stellen Sie sicher, dass die Spannung der Steckdose innerhalb des Werts liegt, der am Produkt
angegeben ist (an seinem Gehäuse oder Aufkleber).
• Verbinden Sie dieses Produkt niemals mit einem Dimmer oder Rheostat.
• Trennen Sie dieses Produkt niemals vom Stromkabel, indem Sie am Kabel selbst ziehen oder zerren.
• Wenn Sie dieses Produkt überhängend montieren, verwenden Sie bitte ein Sicherheitskabel.
• Stellen Sie sicher, dass dieses Produkt an einem ausreichend belüfteten Ort verwendet wird und
mindestens 50cm (20”) Abstand von angrenzenden Flächen hat. Stellen Sie sicher, dass die
Lüftungsschlitze des Produkts nicht verdeckt werden.
• Verwenden Sie dieses Produkt nicht bei Umgebungstemperaturen von mehr als 40°C/104°F.
• Lassen Sie keine brennbaren Materialien in die Nähe dieses Produkt kommen, wenn es in Gebrauch ist.
• Blicken Sie nie in die Lichtquelle, wenn das Produkt eingeschaltet ist.
• Berühren Sie dieses Produkt nicht, während es eingeschaltet ist oder kurz nachdem es ausgeschaltet
wurde. Das Produkt und sein Gehäuse können hohe Temperaturen erreichen.
• Wenn ein ernsthaftes Problem bei der Verwendung des Produkts auftritt, stellen Sie den Gebrauch
sofort ein.
• Öffnen Sie niemals das Gehäuse. Es enthält keine Teile, die vom Benutzer gewartet werden können
und die Garantie erlischt.
• Wenn das Objektiv, die Streulichtblende oder der Ultraviolettschirm rissig, zerkratzt oder anderweitig
beschädigt sind, sollten Sie die Vorrichtung unverzüglich außer Betrieb nehmen. Wenden Sie sich an
den technischen Support von Marq für Service- und Reparaturinformationen.
43

Funktionen
Rückseite
1. Netzanschluss: Verwenden Sie ein
handelsübliches Stromkabel (im Lieferumfang
enthalten), um den Eingang mit einer Steckdose
zu verbinden.
2. Sicherung: Dieses Fach hält die Sicherung.
Trennen Sie Ihr Gesture Beam 500 von der
Stromquelle, bevor Sie die Sicherung
reinigen oder ersetzen. Verwenden Sie einen
Schraubenzieher oder ein anderes Werkzeug,
um das Fach abzunehmen (ziehen Sie nicht
nur an der Lasche). Ersetzen Sie die
Sicherung nur durch eine neue Sicherung mit gleichem Sicherungswert (250 V, 4 A).
3. Netzausgang: Verwenden Sie ein standardmäßiges Netzkabel, um diesen Ausgang mit einer
zusätzlichen Vorrichtung zu verbinden. Diese Verbindung versorgt die zusätzliche Vorrichtung mit
Strom, wenn diese mit einer Steckdose verbunden ist. Siehe Setup > Linking > Stromversorgung
für nähere Informationen über das Verknüpfen von mehreren Geräten.
Hinweis: Bei Modellen, die in den USA verkauft werden, handelt es sich um eine standardmäßige
„Edison“ (NEMA®) Verbindung. Bei anderen Modellen wird dies eine standardmäßige IECVerbindung sein.
4. Netzschalter: Mit diesem Schalter schalten Sie das Gesture Beam 500 ein oder aus.
5. DMX In: Verwenden Sie ein standardmäßiges, 3-poliges DMX-Kabel, um diesen Eingang (A) mit
Ihrem DMX-Controller (B) oder einer anderen Vorrichtung zu verbinden. Gesture Beam 500 empfängt
DMX-Daten über diese Verbindung. Siehe Setup > Linking > DMX für nähere Informationen über
das Verknüpfen von mehreren Vorrichtungen.
6. DMX Out: Verwenden Sie ein standardmäßiges, 3-poliges DMX-Kabel, um diesen Ausgang mit
einer zusätzlichen Vorrichtung zu verbinden. Gesture Beam 500 sendet ihre Daten über diese
Verbindung an eine weitere Vorrichtung. Siehe Setup > Linking > DMX für nähere Informationen
über das Verknüpfen von mehreren Vorrichtungen.
4
Vorderseite
7. Display: Diese Anzeige zeigt Meldungen und
Werte, die den aktuellen Status der Vorrichtung
angeben.
8. Menü: Drücken Sie diese Taste, um ins Menü
des Gesture Beam 500 zu gelangen.
9. Aufwärts: Drücken Sie diese Taste, um die
nächst höhere Menüoption auszuwählen oder
um den Wert um 1 zu erhöhen.
10. Abwärts: Drücken Sie diese Taste, um die
nächst niedrigere Menüoption auszuwählen
oder um den Wert um 1 zu reduzieren.
11. Enter: Drücken Sie diese Taste, um Ihre aktuelle Auswahl oder den Wert zu bestätigen.
12. DMX: Dieses Licht beginnt zu leuchten, wenn Gesture Beam 500 ordnungsgemäß DMX-Daten
über das DMX In empfängt.
13. Fehler: Dieses Licht beginnt zu leuchten, wenn Gesture Beam 500 einen ungültigen DMX-Befehl
erhält.
44
12
13
89
1
3
2
6
5
7
11
10

Setup
Hinweis: Teile, die nicht unter Einführung > Lieferumfang angegeben sind, sind separat erhältlich.
Leistungsinformation
Bevor Sie das Produkt an eine Stromquelle anschließen, stellen Sie sicher, dass das Stromkabel nicht
gequetscht oder beschädigt ist. Stellen Sie außerdem sicher, dass die Spannung der Steckdose
innerhalb des Werts liegt, der am Produkt angegeben ist (an seinem Gehäuse oder Aufkleber).
Trennen Sie Ihr Gesture Beam 500 von der Stromquelle, bevor Sie die Sicherung reinigen oder
ersetzen. Verwenden Sie einen Schraubenzieher oder ein anderes Werkzeug, um das Fach
abzunehmen (ziehen Sie nicht nur an der Lasche). Ersetzen Sie die Sicherung nur durch eine neue
Sicherung mit gleichem Sicherungswert (250 V, 4 A).
Montage/Rigging
Stehend
Legen Sie die Vorrichtung auf eine ebene, stabile Oberfläche. Sorgen Sie dafür, dass alle Kabel
festsitzen und so angeordnet sind, dass sie keine Stolpergefahr darstellen.
Hängend
Optional: Befolgen Sie diese
Schritte, um die (inkludierten)
Montagehalterungen bei der
Montage an einen Träger zu
verwenden.
1
Klemm
(nicht in Lieferumfang
enthalten)
2
Montagehalterung
345
Vierteldrehung
Vierteldrehung
(Ziehen Sie die
Klammer.)
45

r
Befolgen Sie diese Schritte, um die Halterung
mit einem Sicherheitskabel (nicht im
Lieferumfang enthalten) sicher an einem
Träger zu befestigen. Wir empfehlen, ein
Sicherheitskabel mit einem Durchmesser von
mindestens 5 mm und einer Tragfähigkeit von
mindestens 124 kg (272 lb.) zu verwenden.
1
2
3
Linking
Wenn Sie mehrere Gesture Beam 500 verwenden, können Sie diese verketten („daisy-chain“), sodass jede
Vorrichtung Strom und/oder DMX-Daten an das nächste Gerät sendet. Auf diese Weise kann eine
unordentliche Verkabelung verhindert und Zeit gespart werden.
Sie müssen die Vorrichtungen für den Strom und die DMX-Steuerung nicht verketten: Sie können Sie für
jeden Zweck unabhängig verbinden. Sie können zum Beispiel 8 Vorrichtungen für die DMX-Steuerung
verbinden, während nur 4 von diesen Vorrichtungen für den Strom miteinander verbunden werden (die
Stromversorgung der anderen 4 Vorrichtungen verläuft separat).
Stromversorgung
Verwenden Sie ein standardmäßiges IEC-Stromkabel, um den Netzausgang einer Vorrichtung mit dem
Netzeingang einer anderen zu verbinden. Solange die erste Vorrichtung mit einer Steckdose verbunden ist,
kann jede der verknüpften Vorrichtungen ausgeschaltet bleiben und die nächste Vorrichtung immer noch
mit Strom versorgen.
Wichtig: Um vermeidbare Schäden an den Sicherungen zu verhindern, empfehlen wir die Verknüpfung von
nicht mehr als 4 Vorrichtungen in der gleichen Kette.
Steckdose
Gesture Beam 500
Gesture Beam 500
Gesture Beam 500
DMX
Verwenden Sie ein 3-poliges DMX-Kabel, um das DMX Out einer Vorrichtung mit dem DMX In einer
anderen zu verbinden. Ihr angeschlossener DMX-Controller wird seine Daten hintereinander an die
Vorrichtungen senden. Alle Vorrichtungen in dieser Kette werden alle DMX-Daten erhalten.
DMX-Controlle
46
Gesture Beam 500
Gesture Beam 500 Gesture Beam 500

5-K
5-K
5-K
5-K
5
Betrieb
Menüoptionen
Menü Untermenü Einstellungen/Werte Beschreibung
DMX Functions
(DMX-Funktionen)
Auto Movement
(Auto-Bewegung)
Manual Test
(Manueller Test)
Fixture Settings
(Geräteeinstellungen)
DMX Address 001–512 DMX-Adresseinstellung
Channel Mode 15Ch 15-Kanalbetrieb
8Ch 8-Kanalbetrieb
No DMX Signal Keep Wenn kein DMX-Signal vorhanden ist, setzen Sie
Auto Wenn kein DMX-Signal vorhanden ist, wechseln
Clear Wenn kein DMX-Signal vorhanden ist,
DMX Monitor Auf den DMX-Kanälen empfangene Werte anzeigen
Run Mode Siehe Beschreibung DMX, Sound, Zufall, 8 Automatische
Sound Active On, Off Sound-Aktivierung
Sound Sense 000–100 Sound-Aktivierung für Mikrofonempfindlichkeit,
Slave Mode Slav 1–4 4 Slave-Modi
Pan 000–255
Pan Fine 000–255 Panning-Feinsteuerung
Tilt 000–255
Tilt Fine 000–255 Neigungs-Feinsteuerung
Pan/Tilt Time 000–255
Dimmer 000–255
Stop/Strobe 000–255
Color 000–255
Gobo Change 000–255
Frost 000–255 Frost-Effekt
Focus 000–255
Prism Insertion 000–255 3-faches Prisma
Prism Rotation 000–255 Indexierung und Rotation des Prismas
Macro
Function
Ctrl Functions 000–255
Pan Limit 540˚, 360˚, 180˚ Wählen Sie den Bereich des Schwenkwinkels:
Tilt Limit 270˚, 180˚, 90˚ Wählen Sie den Bereich des Neigungswinkels:
Invert Pan On, Off Invertierte Pan-Richtung
Invert Tilt On, Off Invertierte Neigungsrichtung
Swap Pan-Tilt On, Off Pan und Neigung umschalten
Pan-Tilt
Correction
Load Default
All
000–255
On, Off Pan und Neigung korrigieren
OK, Cancel Standardeinstellungen für Pan und Neigung
keine Aktion (halten)
Sie in den Run-Modus
verwenden Sie die Blackout-Funktion
Bewegungsprogramme
niedrig (000) bis hoch (255)
Pan-Winkel, 0° (000) bis 540° (255)
Neigungswinkel, 0° (000) bis 270° (255)
Geschwindigkeit Pan/Neigen, schnell (000) bis
langsam (255)
Dimmer, dunkel (000) bis hell (255)
Shutter (siehe 1
Farboptionen (siehe 1
Gobo-Optionen (siehe 1
Motorisierter Fokus , Herauszoomen (000) auf
Hineinzoomen (255)
Makro-Funktionen (siehe 1
Kanal 14)
Blackout & Funktion Zurücksetzen (siehe 1
Kanalbetrieb > Kanal 15)
540°, 360° oder 180°
270°, 180° oder 90°
wiederherstellen
analbetrieb > Kanal 7)
analbetrieb > Kanal 8)
analbetrieb > Kanal 9)
analbetrieb >
-
47

f
–
r
Menüoptionen
(Fortsetzung)
DisplayEinstellungen
Geräteinformation
OffsetKalibrierung
Alle zurücksetzen
Inverse
Auto-Off On, Of
Firmware Derzeit installierte Firmware-Version
Total Use Hours
Current Use Hours
Pan Calibration -128
Tilt Calibration -128 –+127 Offset für Neigungswert
Color Calibration -128 –+127 Offset für Farbwert
Gobo Calibration -128 –+127 Offset für Gobo-Wert
Focus Calibration -128 –+127 Offset für motorisierten Fokuswert
Frost Calibration -128 –+127 Offset für Frost-Effektwert
Prism Insertion -128 –+127 Offset für Prisma-Wert
Prism Rotation -128 –+127 Offset für Indexierung und Rotation des Prismas
OK, Cancel Wiederherstellen aller Standardeinstellungen
Invertiertes Bedienpanel-Display
Schaltet das Display automatisch bei
Nichtgebrauch aus
Gesamtlaufzeit (SSSSS:MM)
Aktuelle Laufzeit (SSSSS:MM)
+127 Offset für Pan-Wert
DMX-Funktionen
Sie können Gesture Beam 500 steuern, indem sie ihn mit einem DMX-Controller verbinden. Siehe
folgende Tabelle für verfügbare Funktionen.
15-Kanalbetrieb
Kanal Funktion Wert Beschreibung
1
2
3
4
5
6
7
Pan 000–255
Pan-Feineinstellung 000–255 Panning-Feinsteuerung
Neigung 000–255
Neigungsfeineinstellung 000–255 Neigungs-Feinsteuerung
Geschwindigkeit Pan/Neigen 000–255
Dimmer 000–255
Shutte
000–003 Geschlossen
004–007 Offen
008–076
077–145
146–215
216–255 Offen
Pan-Winkel, 0° (000) bis 540° (255)
Neigungswinkel, 0° (000) bis 270° (255)
Geschwindigkeit Pan/Neigen, schnell (000) bis
langsam (255)
Dimmer, dunkel (000) bis hell (255)
Stroboskop, langsam (008) bis schnell (076)
Puls, langsam (077) bis schnell (145)
Zufallsstroboskop, langsam (146) bis schnell (215)
48

k
15-Kanalbetrieb
(fortgesetzt)
Kanal Funktion Wert Beschreibung
Farbrad 000–006 Weiß
8
007–013 Rot
014–020 Orange
021–027 Grün
028–034 Hellblau
035–041 Lila
042–048 Gelb
049–055 Blau
056–063 Pin
064–127 Farbindizierung
128–189
Im Uhrzeigersinn, schnell (128) bis langsam (189)
190–193 Stop
9
Gobo-Rad
Siehe Anhang >
Technische Daten >
Gobos, um die Gobo-
Muster zu sehen.
194–255
000–007 Offen/weiß
008–015 Gobo 1
016–023 Gobo 2
024–031 Gobo 3
032–039 Gobo 4
Gegen den Uhrzeigersinn, langsam (194) bis schnell (255)
040–047 Gobo 5
048–055 Gobo 6
056–063 Gobo 7
064–071 Gobo 8
072–079
080–087
088–095
096–103
104–111
112–119
120–127
128–135
136–143
144–197
Offener Vibrationseffekt, langsam (072) bis schnell (079)
Gobo 1 vibrierend, langsam (080) bis schnell (087)
Gobo 2 vibrierend, langsam (088) bis schnell (088)
Gobo 3 vibrierend, langsam (096) bis schnell (096)
Gobo 4 vibrierend, langsam (104) bis schnell (111)
Gobo 5 vibrierend, langsam (112) bis schnell (119)
Gobo 6 vibrierend, langsam (120) bis schnell (127)
Gobo 7 vibrierend, langsam (128) bis schnell (135)
Gobo 8 vibrierend, langsam (136) bis schnell (143)
Gobo-Wechsel gegen den Uhrzeigersinn, schnell (144) bis
langsam (197)
198–202 Stoppt an der aktuellen Position
203–255
Frost 000–127 Keine Funktion
10
Gobo-Wechsel im Uhrzeigersinn, langsam (203) bis schnell (255)
128–255 Frost-Effekt
Fokus 000–255
11
Prisma 000–127 Keine Funktion
12
Motorisierter Fokus , Herauszoomen (000) auf Hineinzoomen (255)
128–255 Prisma-Effekt
49

15-Kanalbetrieb
(fortgesetzt)
Kanal Funktion Wert Beschreibung
13
Prisma-Rotation
000–127
128–189
Indizierte Position, 0° (000) bis 360° (127)
Prisma-Rotation gegen den Uhrzeigersinn, schnell (128) bis
langsam (189)
190–193 Stoppt an der aktuellen Position
194–255
Macro-Funktionen 000–007 Keine Funktion
14
Prisma-Rotation im Uhrzeigersinn, langsam (194) bis schnell (255)
008–023 Automatische Bewegung (Langsam) 1
024–039 Automatische Bewegung (Langsam) 2
040–055 Automatische Bewegung (Langsam) 3
056–071 Automatische Bewegung (Langsam) 4
072–087 Automatische Bewegung (Schnell) 1
088–103 Automatische Bewegung (Schnell) 2
104–119 Automatische Bewegung (Schnell) 3
120–135 Automatische Bewegung (Schnell) 4
136–151 Bewegung im Modus Sound in Betrieb 1
152–167 Bewegung im Modus Sound in Betrieb 2
168–183 Bewegung im Modus Sound in Betrieb 3
184–199 Bewegung im Modus Sound in Betrieb 4
200–215 Bewegung im Modus Sound in Betrieb 5
216–231 Bewegung im Modus Sound in Betrieb 6
232–247 Bewegung im Modus Sound in Betrieb 7
248–255 Bewegung im Modus Sound in Betrieb 8
15
Steuerfunktionen
Alle Funktionen
werden nach 2
Sekunden ausgeführt.
000–049 Keine Funktion
050–059 Blackout während Pan/Neigung oder Farb-/Gobowechsel
060–069 Blackout während Pan/Neigung oder Farb-/Gobowechsel
deaktivieren
070–079 Blackout während Pan/Neigung
080–089 Blackout während Pan/Neigung deaktivieren
090–099 Blackout während Farbwechsel
100–109 Blackout während Farbwechsel deaktivieren
110–119 Blackout während Gobowechsel
120–129 Blackout während Gobowechsel deaktivieren
130–139 Keine Funktion
140–149 Pan/Neigung zurücksetzen
150–169 Farbe/Gobo/Fokus/Prisma zurücksetzen
170–199 Keine Funktion
200–209 Alle zurücksetzen
210–255 Keine Funktion
50

8-Kanalbetrieb
Kanal Funktion Wert Beschreibung
1
2
3
4
Pan 000–255
Neigung 000–255
Pan-Winkel, 0° (000) bis 540° (255)
Neigungswinkel, 0° (000) bis 270° (255)
Shutter 000–003 Geschlossen
004–007 Offen
008–076
077–145
146–215
Stroboskop, langsam (008) bis schnell (076)
Puls, langsam (077) bis schnell (145)
Zufallsstroboskop, langsam (146) bis schnell (215)
216–255 Offen
Farbrad 000–006 Weiß
007–013 Rot
014–020 Orange
021–027 Grün
028–034 Hellblau
035–041 Lila
042–048 Gelb
049–055 Blau
056–063 Pink
064–127 Farbindizierung
128–189
Im Uhrzeigersinn, schnell (128) bis langsam (189)
190–193 Stop
194–255
Gegen den Uhrzeigersinn, langsam (194) bis schnell (255)
51

8-Kanalbetrieb
(fortgesetzt)
Kanal Funktion Wert Beschreibung
5
Gobo-Rad
Siehe Anhang >
Technische Daten >
Gobos, um die Gobo-
Muster zu sehen.
000–007 Offen/weiß
008–015 Gobo 1
016–023 Gobo 2
024–031 Gobo 3
032–039 Gobo 4
040–047 Gobo 5
048–055 Gobo 6
056–063 Gobo 7
064–071 Gobo 8
072–079
080–087
088–095
096–103
104–111
112–119
120–127
128–135
136–143
144–197
Offener Vibrationseffekt, langsam (072) bis schnell (079)
Gobo 1 vibrierend, langsam (080) bis schnell (087)
Gobo 2 vibrierend, langsam (088) bis schnell (088)
Gobo 3 vibrierend, langsam (096) bis schnell (096)
Gobo 4 vibrierend, langsam (104) bis schnell (111)
Gobo 5 vibrierend, langsam (112) bis schnell (119)
Gobo 6 vibrierend, langsam (120) bis schnell (127)
Gobo 7 vibrierend, langsam (128) bis schnell (135)
Gobo 8 vibrierend, langsam (136) bis schnell (143)
Gobo-Wechsel gegen den Uhrzeigersinn, schnell (144)
bis langsam (197)
198–202 Stoppt an der aktuellen Position
203–255
Gobo-Wechsel im Uhrzeigersinn, langsam (203) bis
schnell (255)
Frost 000–127 Keine Funktion
6
128–255 Frost-Effekt
Fokus 000–255
7
Motorisierter Fokus , Herauszoomen (000) auf
Hineinzoomen (255)
Prisma 000–127 Keine Funktion
8
128–255 Prisma-Effekt
52

Appendix (English)
Technical Specifications
Specifications are subject to change without notice.
Light Type
Power
Colors
Gobos
Illuminance
Beam Angle
Strobe Rate
Pan Ranges
Tilt Ranges
Focus
Prism
DMX Display
Connections
Channel Profiles
Power Supply
Connection All Countries: Standard IEC input
Linking
Consumption
Input Voltage
Fuse
Physical/Mechanical
Mounting
Dimensions
(width x depth x height)
Weight
LED
120 W
8 + white, split colors, scrolling
8 pattern + 1 open, gobo shake & scrolling
0.93” (23.5 mm) outside
0.75” (19 mm) image
0.04” (1.1 mm) max thickness
97,100 lux @ 3 m (9.8 ft.)
5°
0–20 Hz + pulse and random
540°, 360°, 180°
270°, 180°, 90°
Motorized + frost
8-facet with rotation and indexing
Full-color LCD
(1) 3-pin input for DMX
(1) 3-pin output for DMX
8, 15
Switching (internal)
Automatic voltage selection
USA: Standard female Edison/NEMA® output for linking
multiple fixtures
Non-USA: Standard female IEC output, for linking
multiple fixtures
Up to 4 fixtures
180 W, 36 V, 8 A @ 230 V, 50 Hz
110–240 VAC, 50/60 Hz
250 V, 4 A
1/4-turn bracket for “omega”-style clamp (not included)
21.8” x 17.5” x 12.4”
554 x 445 x 315 mm
22.7 lbs.
10.3 kg
53

Lumen Output
Lumens:
120000 97100 39200
5°
Distance (m):
Diameter (cm):
(in.):
Gobos
0
(ft.): 0 3.3 9.8 16.4
0
0
1 3 5
7.2 18 29.2
2.8 7.1 11.5
Gobo 1 Open Gobo 2
Gobo 4 Gobo 3 Gobo 5
Gobo 6 Gobo 8
Gobo 7
Trademarks & Licenses
Marq is a trademark of inMusic Brands, Inc., registered in the U.S. and other countries. NEMA® is the
registered trademark and service mark of the National Electrical Manufacturers Association. All other
product names, company names, trademarks, or trade names are those of their respective owners.
54

55

marqlighting.com
Manual Version 1.5
 Loading...