

Marmitek TV Anywhere 2.4GHz User Manual
with built-in tuner
20292/20090202 • TV ANYWHERE™ Wireless Audio/Video System
ALL RIGHTS RESERVED MARMITEK ©
USER MANUAL 3
GEBRAUCHSANLEITUNG 19
GUIDE UTILISATEUR 37
MODO DE EMPLEO 55
MANUALE D’ISTRUZIONE 71
GEBRUIKSAANWIJZING 87
TV ANYWHERE™ 2.4/5.8GHz
Wireless Audio/Video System
with built-in tuner
2 © MARMITEK
TV Anywhere 2.4GHz / TV Anywhere 5.8GHz

ENGLISH
3TV Anywhere™
SAFETY WARNINGS
• This product should only be used indoor and only in dry areas. Do not expose the components
to rain or moisture. Do not use the product close to a bath, swimming pool etc.
• Do not cover or expose the components of your systems to extremely high temperatures
• Do not open the product
• In case of improper usage or if you have opened, altered and repaired the product yourself,
all guarantees expire. Marmitek does not accept responsibility in the case of improper
usage of the product or when the product is used for purposes other than specified.
• Adapters: Only connect the adapter to the mains after checking your the mains voltage is
the same as the values on the identification tags. Never connect an adapter or power cord
when it is damaged.
• Batteries: keep batteries out of the reach of children. Dispose of batteries as chemical
waste. Never use old and new batteries or different types of batteries together. Remove
the batteries when you are not using the system for a longer period of time.
Check the polarity (+/-) of the batteries when inserting them in the product.
CONTENT
1. The TV Anywhere system _________________________________________________ 4
2. Installing the system ______________________________________________________ 4
2.1 Installing the transmitter without extra equipment ________________________ 4
2.2 Installing the transmitter with extra equipment ___________________________ 5
2.3 Installing the receiver _________________________________________________ 6
2.4 6in1 remote control _________________________________________________ 6
2.5 Button description Remote Control _____________________________________ 6
3. TV Anywhere channel setup _______________________________________________ 8
3.1 Re-arranging the TV channels _________________________________________ 9
3.2 Fine tuning ________________________________________________________ 10
3.3 Re-scan ___________________________________________________________ 10
3.4 Selecting a different TV system _______________________________________ 10
3.5 Master reset _______________________________________________________ 10
4 Moving the receiver to the final location ____________________________________ 10
5 Remote control - Universal use ____________________________________________ 11
5.1 Programming the remote control ______________________________________ 11
5.2 Manual code search ________________________________________________ 11
5.3 Automatic code search for some well-known brands ____________________ 11
5.4 Automatic code search for all brands _________________________________ 12
5.5 Manual code entry _________________________________________________ 12
5.6 Identifying codes found _____________________________________________ 13
5.7 Configure volume control for various devices ___________________________ 13
5.8 Switching between antenna signal and audio/video source _______________ 14
5.9 Changing the code of the 6in1 remote for use with the TV Anywhere ______ 14
5.10 Resetting the configuration of the remote control _______________________ 15
4 © MARMITEK
6. Frequently Asked Questions ______________________________________________ 16
7. Technical Specifications __________________________________________________ 18
1. THE TV ANYWHERE SYSTEM
The TV Anywhere system includes a transmitter with built-in tuner and a receiver for antenna
signals and A/V signals. With the TV Anywhere system, you can transmit audio and video
signals throughout your house to a remote (2nd) TV, without additional coaxial cables. The
built-in tuner converts the antenna signal into a standard audio/video signal. This A/V signal
is transmitted by the unit on a 2.4 GHz or 5,8 GHz frequency (model dependend). The TV
Anywhere transmitter can be connected directly to your antenna wall socket. The receiver is
connected to the A/V input of your remote (2nd) Television.
Multisource and remote control
Additional A/V equipment can be connected to the transmitter as well (e.g.Set-Top Box, DVD
player or satellite receiver). The source can be selected with the remote control supplied,
even from another room. The supplied remote is a 6in1 universal remote and can be used
locally (for your connected TV) as well as for various other equipment (e.g. DVD, Set-Top Box,
satellite receiver, etc.) connected to the transmitter in another room. This remote control
is also used to select channels on the TV Anywhere. The TV Anywhere has a built-in IR
(infrared) extender to use your original IR remotes as well.
2. INSTALLING THE SYSTEM
Attention: During set up, install the TV Anywhere transmitter and receiver in the
same room with a TV connected. After succesfull installation the receiver can be
placed to wherever you wish to connect your remote (2nd) TV.
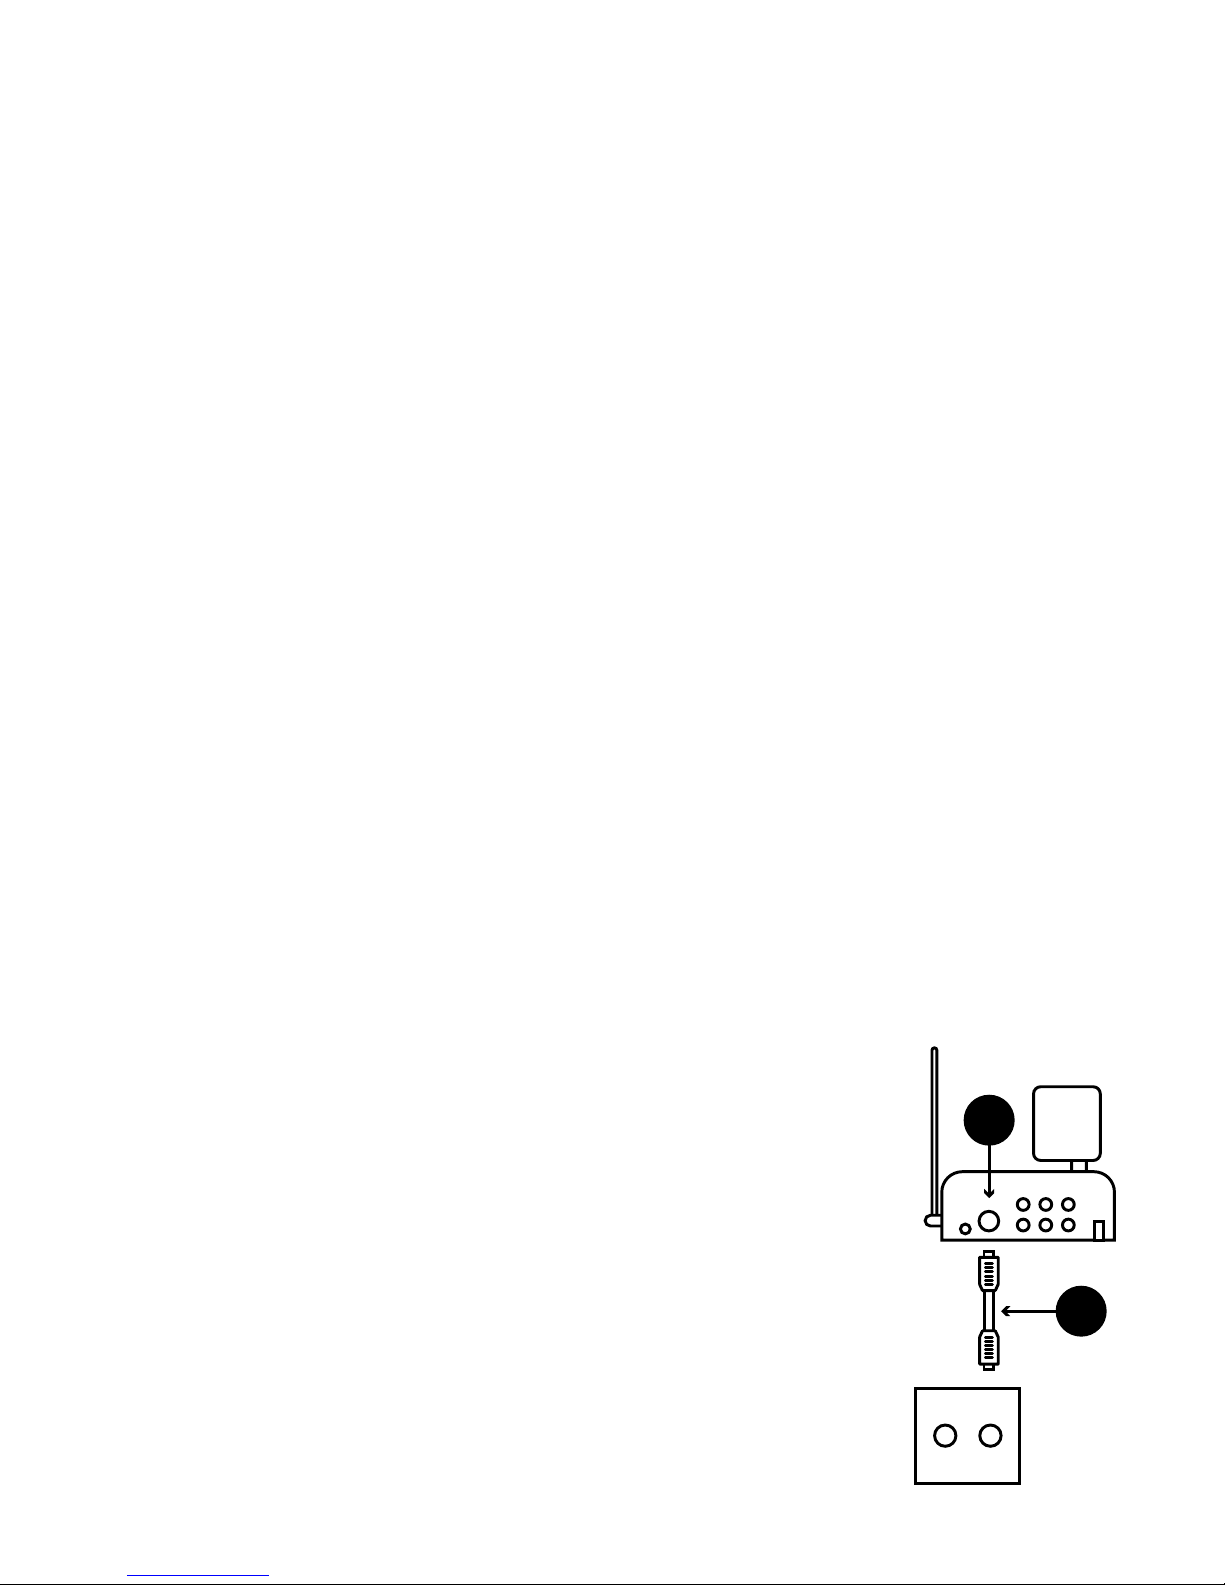
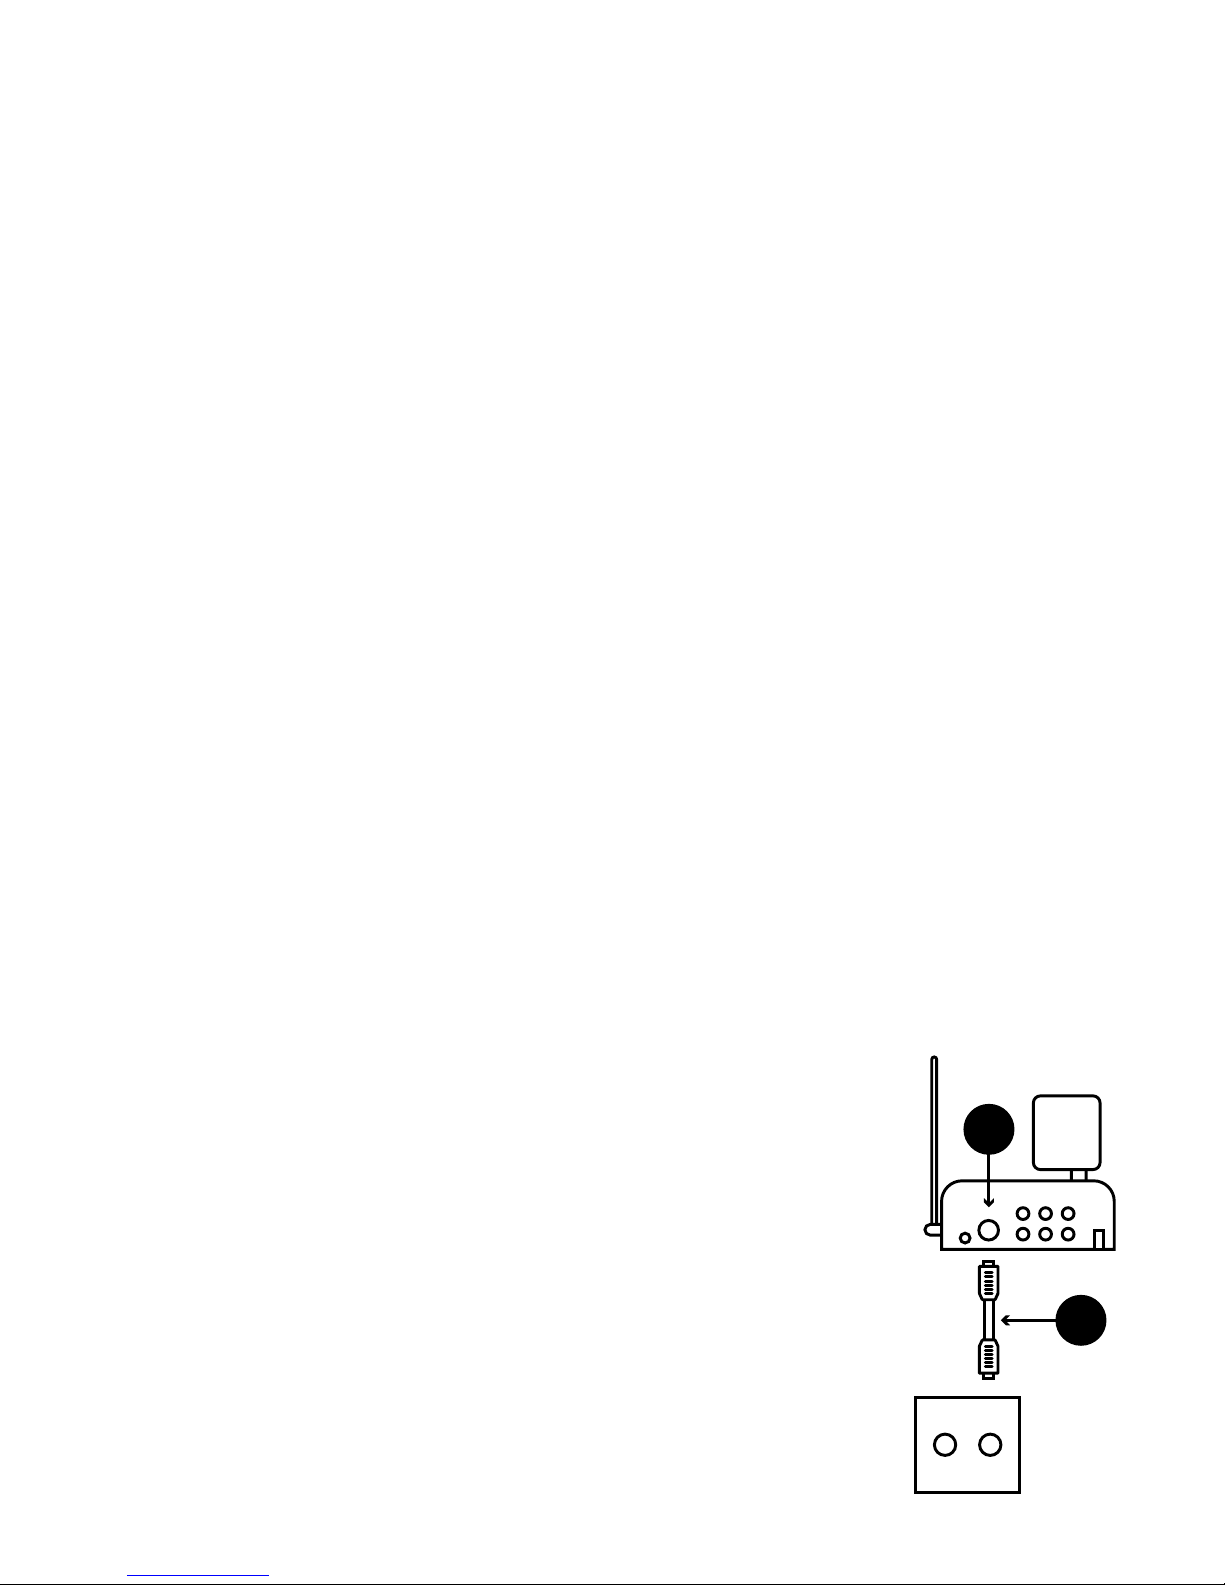
2.1 Installing the transmitter without extra a/v equipment
1. Connect a coaxial cable [A] to your antenna wall socket.
2. Connect a coaxial cable to the Antenna Input [3] of your TV
Anywhere transmitter.
3. Select a channel using the Channel Selector slide switch [9] (see
page 2), e.g. C.
4. Connect the large power adapter to the TV Anywhere transmitter [6].
5. Switch on the unit with the ON/OFF switch [7].
6. Make sure the TV Anywhere transmitter is placed some distance
away from other equipement which may interfere. Do not place
the transmitter on top of your audio and/or video equipment.
7. Direct the flat antenna [8] at the receiver.
RADIO TV
3
A
B
ENGLISH
5TV Anywhere™
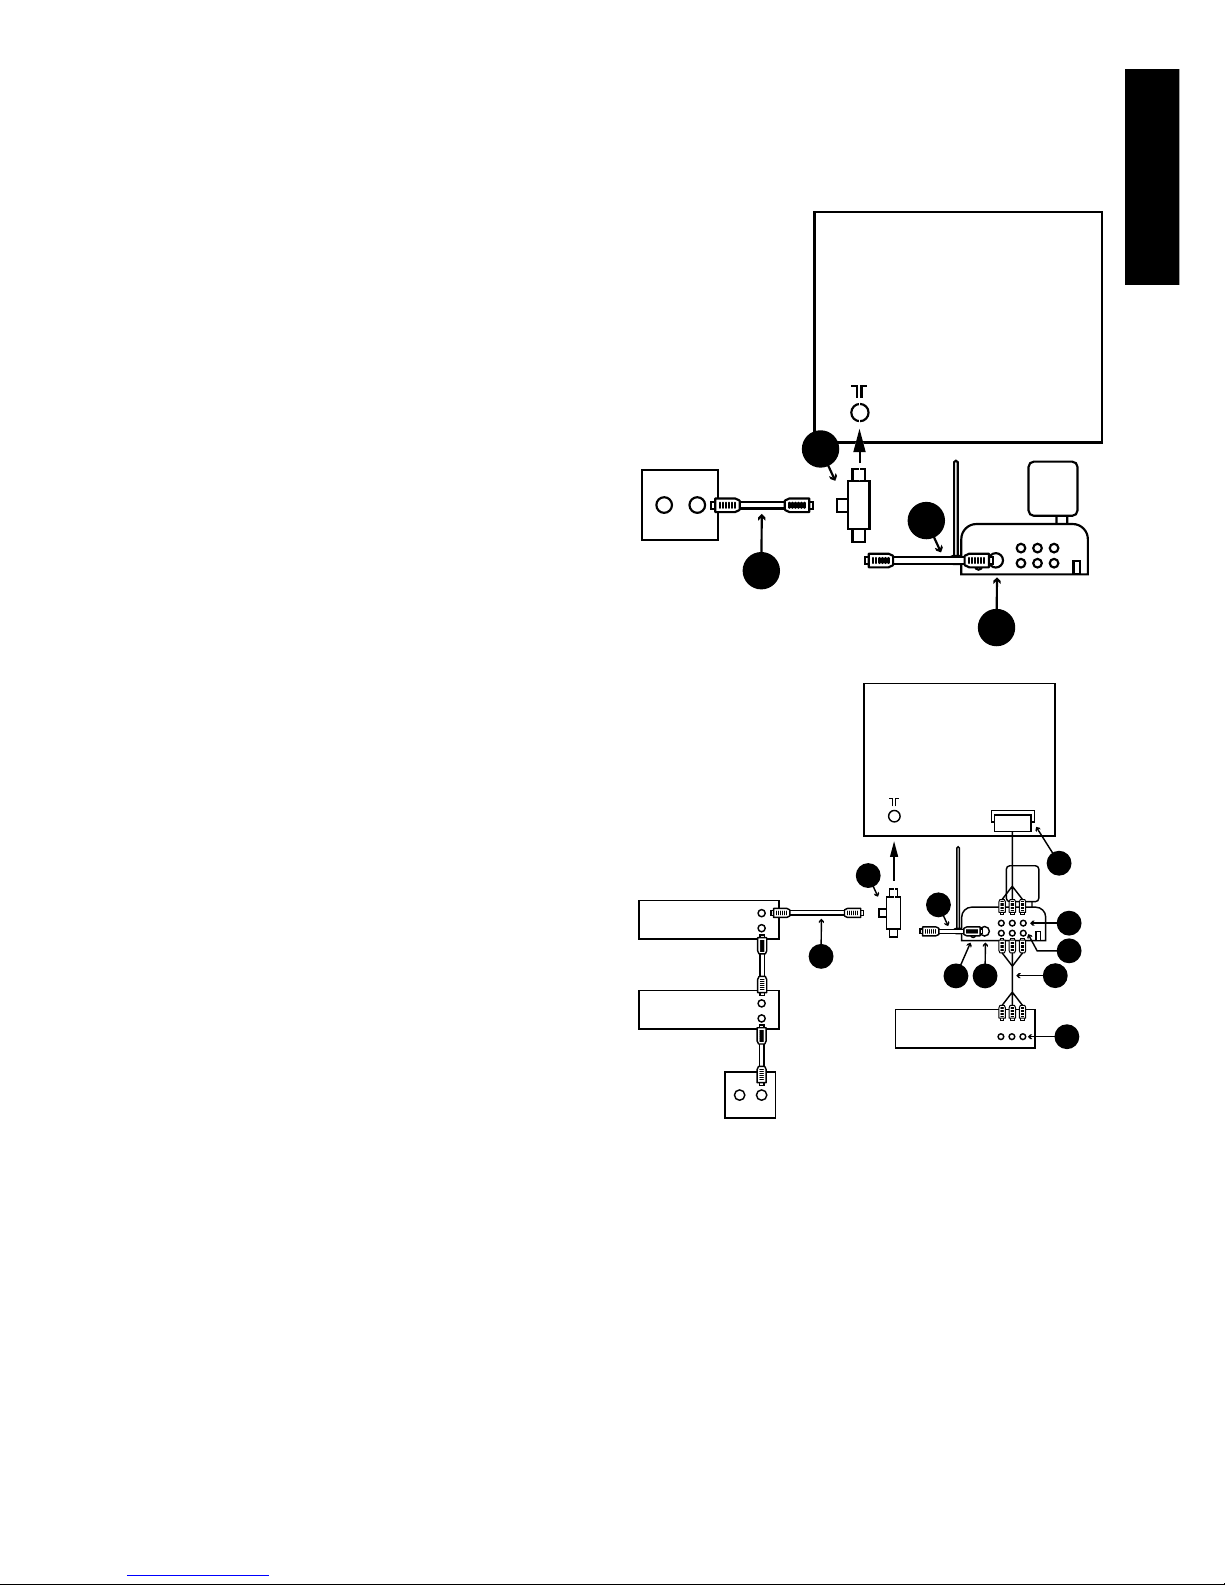
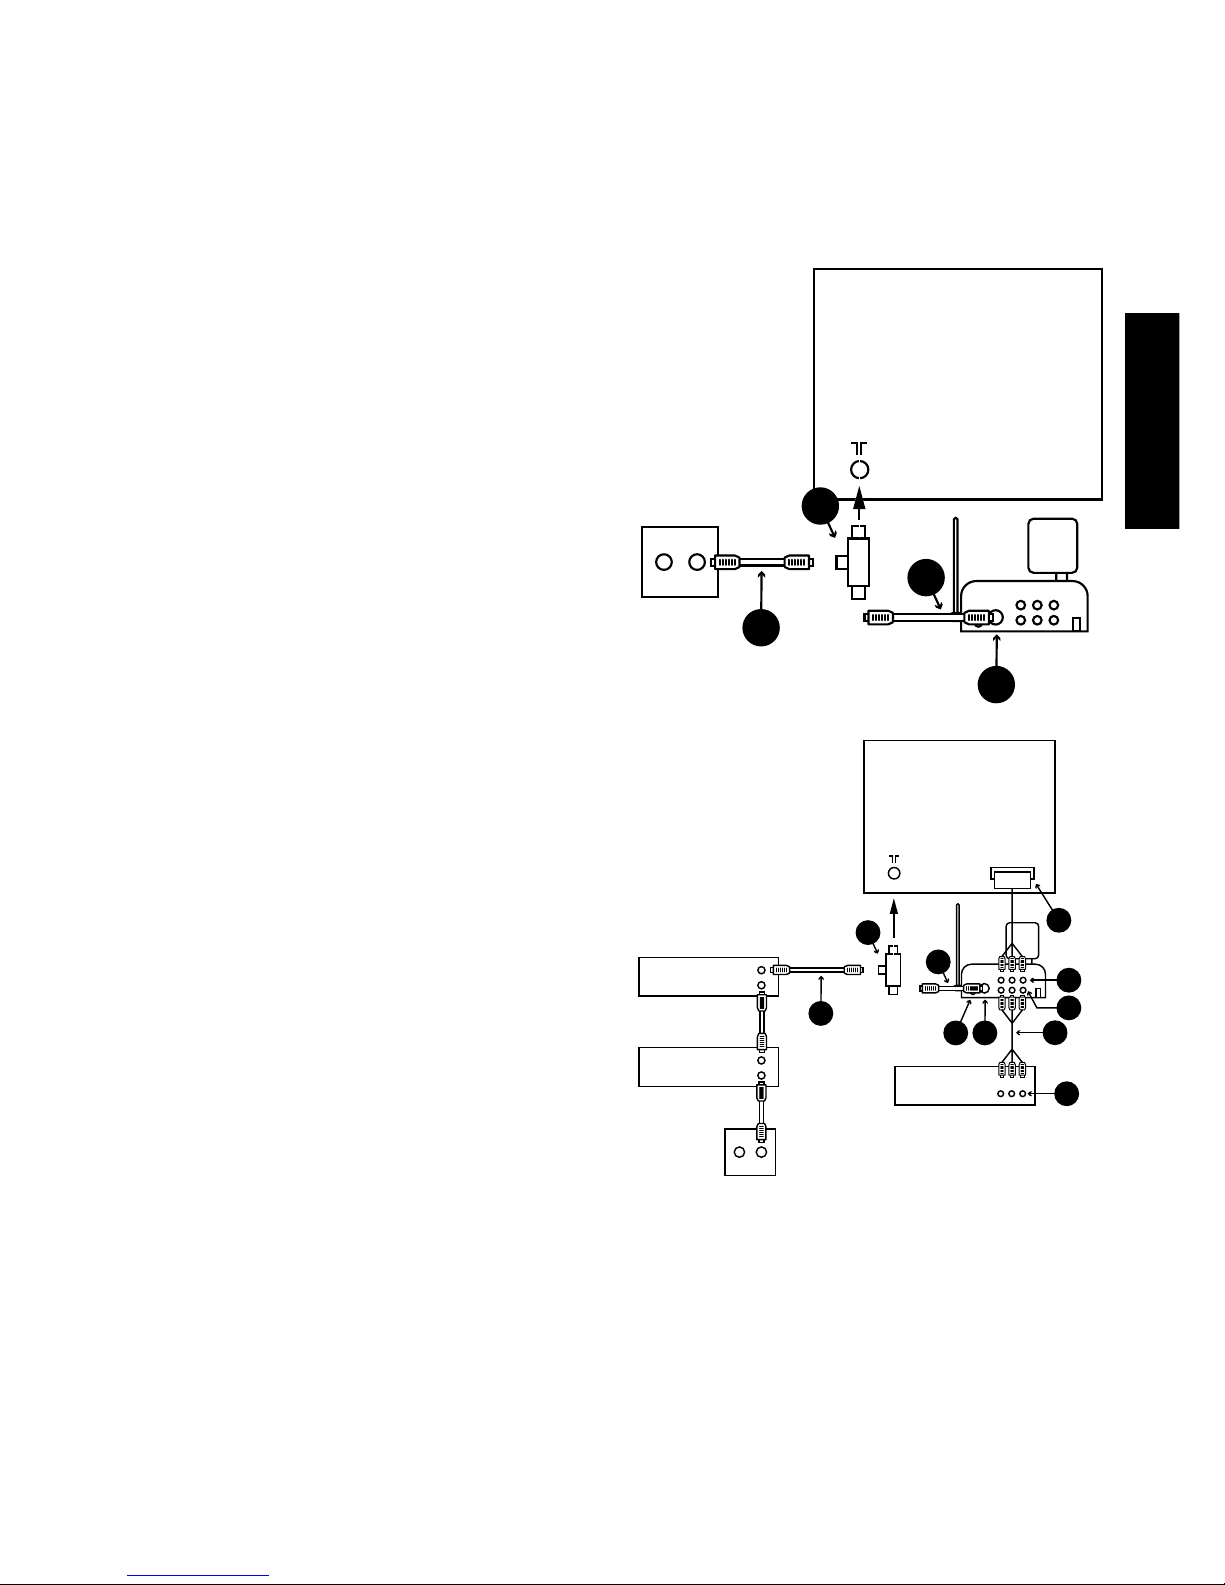
2.2 Installing the transmitter with extra equipment (satellite receiver, Set-Top Box,
DVD player, etc )
This setup allows you to watch all sources both in the main room TV and the second room TV.
1. Connect the antenna splitter [B] to the
aerial connection of your TV.
2. Connect a coaxial cable [A] to one side of
the antenna splitter [B].
3. Connect the other end of the coaxial cable
[A] to the antenna input [3] of the TV
Anywhere transmitter.
4. Connect the existing coaxial cable (C)(from
your satellite receiver or Set-Top) to the
other end of the splitter.
5. Connect the audio/video output [D]
from your DVD player to the audio/video
input [4] of the TV Anywhere transmitter
[MultiSource function]. An RCA/RCA cable
[E] is supplied.
6. Connect the audio/video output [5] of the
TV Anywhere transmitter to the audio/
video input (SCART) [F] of your TV. To make
this connection, you can use the cable you
originally used for connecting your DVD to
your TV.
7. Insert the plug of the infrared extender
cable to the output [2] on the TV Anywhere
transmitter.
8. Locate the small IR LED’s on the IR sensors of
the equipment connected. The IR emitters
have adhesive tape on the back. Remove
the protective label and press the emitter
lightly to the front of your equipment. You
may have to make some adjustments to
find the right location.
9. Select a channel using the Channel Selector slide switch [9], e.g. C.
10. Connect the large power adapter to the TV Anywhere transmitter [6].
Attention: The power adapters for the transmitter and receiver are different!
11. Switch on the unit with the ON/OFF switch [7].
12. Make sure the TV Anywhere transmitter is placed some distance away from other
equipement which may interfere. Do not place the transmitter on top of your audio and/
or video equipment.
13. Direct the flat antenna [8] at the receiver.
TV1
SCART
RADIO TV
E
IN
OUT
IN
OUT
D
VCR
DVD
3
C
F
2
A
5
4
SAT
B
TV1
RADIO TV
3
C
A
B
6 © MARMITEK
2.3 Installing the receiver
1. Connect the RCA cable to the A/V output on the TV Anywhere receiver [15] to a TV A/V
input. Match the color of the plugs with the color code on the jacks of the receiver.
2. If connected to the Scart input use the Scart adapter marked “Receiver”
3. Select the corresponding channel [16] with your transmitter (set both units to e.g. “C”).
4. Connect the small power adapter to the TV Anywhere receiver [17].
5. Switch on the unit with the ON/OFF switch [18]. The red indicator lights up.
6. Direct the flat antenna [8] at the transmitter.
! To receive the signals from your TV Anywhere, switch the TV connected to your TV Anywhere
receiver (remote TV) on to the A/V channel (on some TV’s use channel “0”). If connected and if
no channel is programmed on your TV Anywhere a blue screen will appear.
2.4 Universal Remote Control
1. Open the battery compartment on the back of the remote.
2. Insert 2 batteries (AAA size, not included). Note the correct polarity/position.
3. Close the battery compartment.
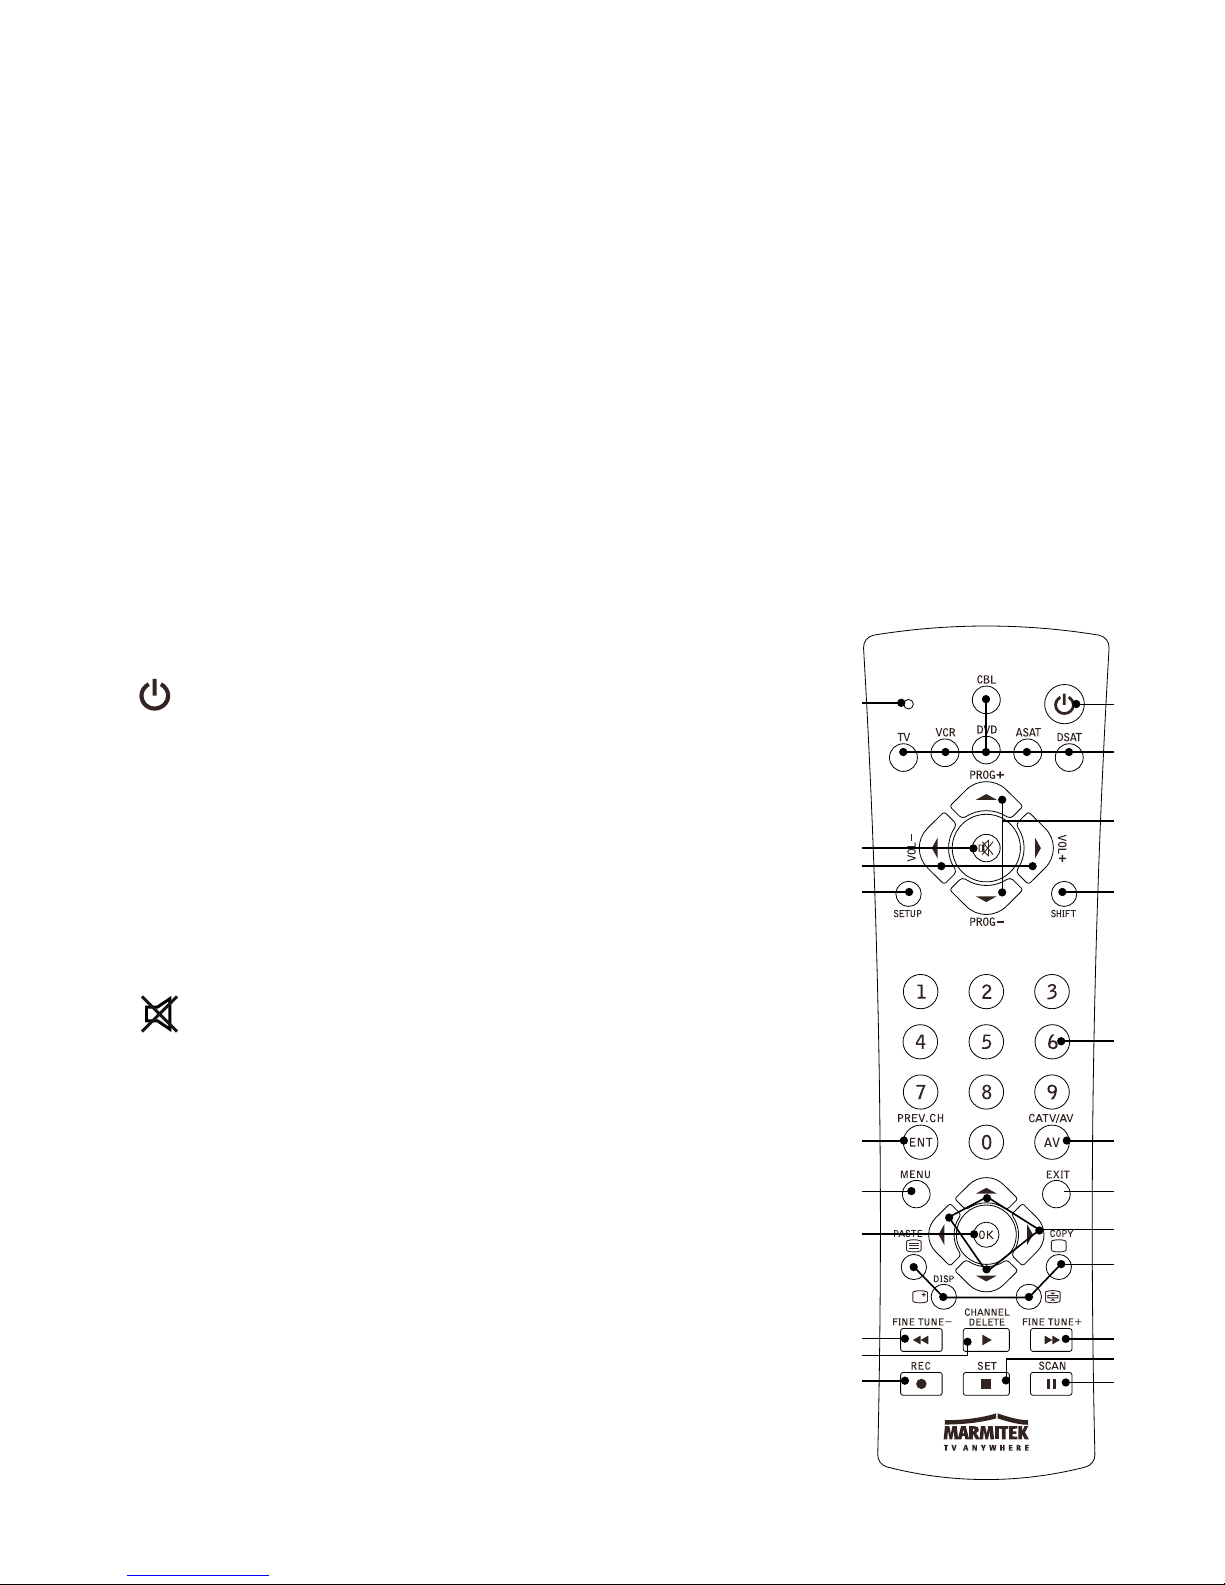
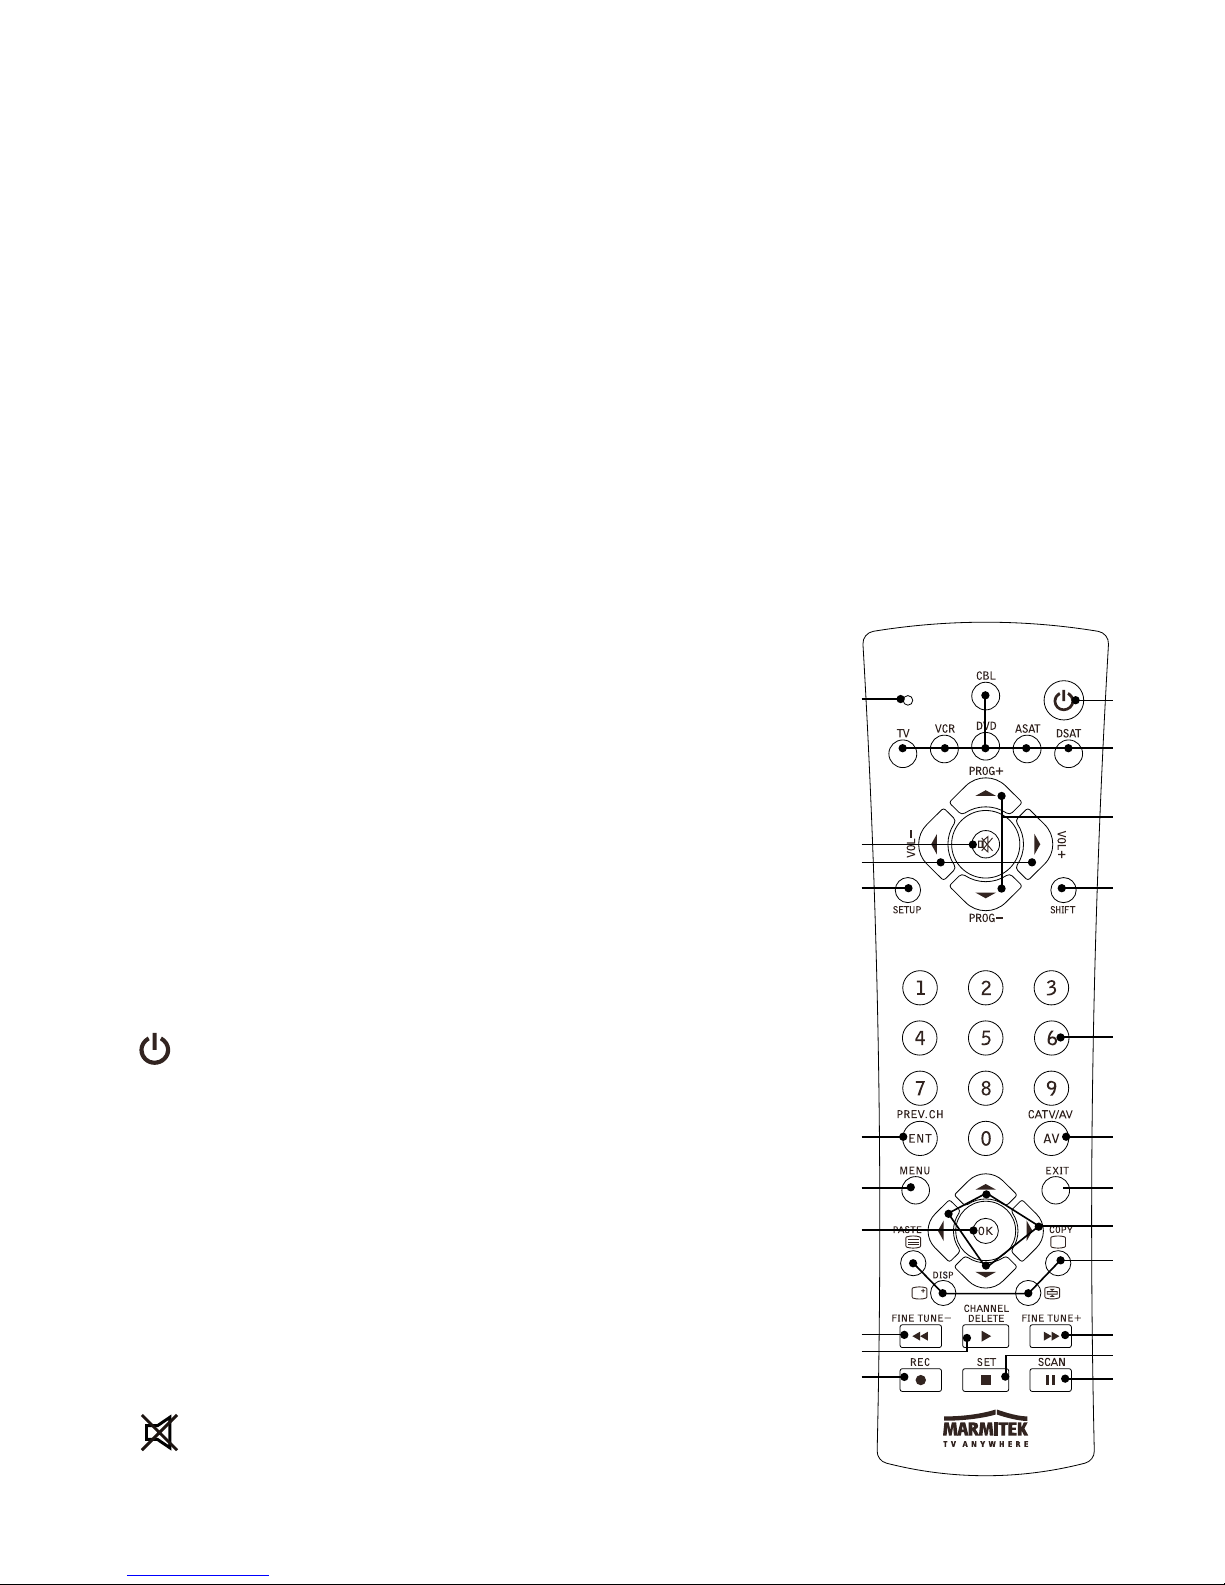
2.5. Button descriptions Remote Control
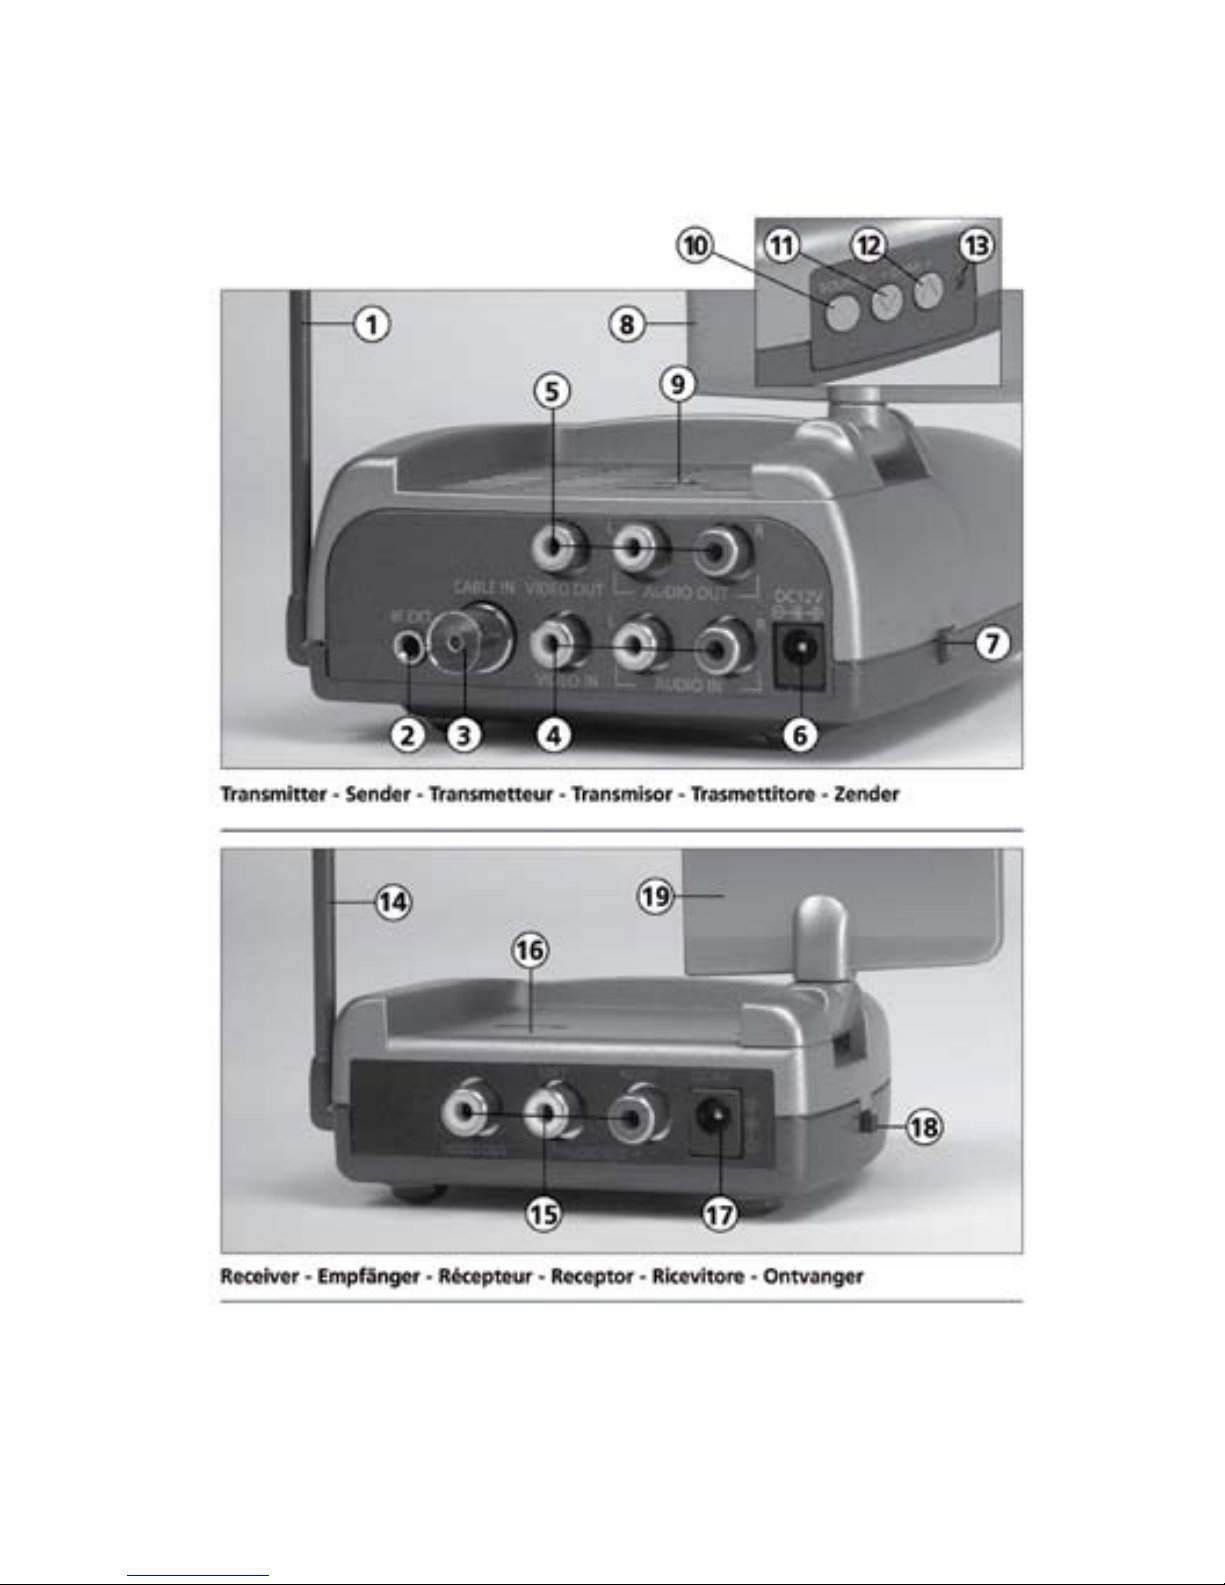
[1]
(On/Off)
Allows you to turn off the device last selected. Some devices can
also be turned on by pressing this button.
[2] RED LED indicator
The indicator light flashes when the remote control is operating
or is continuously lit when programming the remote.
[3] CBL (TV Anywhere), TV, VCR, DVD, ASAT (analogue
satellite receiver), DSAT (digital satellite receiver)
These buttons allow you to select the device you wish to
control.
[4]
MUTE (Volume off)
Turns the sound on or off
[5] PROG +/-
Select the next or the previous channel of your TV or SAT. In
DVD mode: next or previous chapter.
[6] VOL +/-
Adjusts the volume. You can turn the volume of your devices
up or down.
[7] SETUP
Allows you to program your remote control before the first use.
It also allows you to access to secondary functions of certain
A/V equipment (Shift). Press SETUP followed by the function
button you want to set.
1
3
5
8
9
10
13
15
16
18
20
22
2
7
4
6
11
12
14
17
21
19

ENGLISH
7TV Anywhere™
[8] SHIFT
To access secondary functions. Press SHIFT followed by any button of your choice. Press
SHIFT again to exit Shift-mode.
[9] Numeric keys 0-9
These work the same way as on your original remote control.
[10] AV
To select an external source.
[11] ENT
For some devices, this button in combination with the numeric keys allows you to directly
select channels higher than 9. If you are in programming mode - automatic code search - you
can use it to confirm the code.
[12] Menu
Menu ON
[13] Exit
Menu OFF
[14] OK
To confirm menu selection.
[15] Navigation keys
Up, Down, Right, Left. These allow you to navigate through the menu (TV, DVD, etc.).
[16]
Teletext ON: Start/stop Teletext/Fasttext.
Teletext OFF: Stop Teletext/Fasttext.
Teletext Hold: Stop page change in Teletext/Fasttext mode.
Teletext Mix: Allows you to mix the Teletext/Fasttext and the picture of the
selected channel.
[17]
REW (rewind)
In VCR or DVD mode: This button works the same way as the one on your original remote
control.
IN TV mode: Coloured key (Red), videotext control or special equipment functions.
[18]
FF (fast forward)
In VCR or DVD mode: This button works the same way as the one on your original remote
control.
IN TV mode: Coloured key (Red), videotext control or special equipment functions.
[19]
PLAY
In VCR or DVD mode: This button works the same way as the one on your original remote
control.
IN TV mode: Coloured key (Yellow), fasttext control or special equipment functions.
[20]
STOP
In VCR or DVD mode: This button works the same way as the one on your original remote
control.
IN TV mode: Coloured key (Green), fasttext control or special equipment functions.

8 © MARMITEK
[21]
REC (record)
This key works the same way as the one on your original remote control for your VCR.
In order to avoid mistakes, you have to press this key twice to activate this feature.
[22]
PAUSE
In VCR or DVD mode: This button works the same way as the one on your original remote
control.
IN TV mode: Coloured key (purple), fasttext control or special equipment functions.
3. TV ANYWHERE CHANNEL SETUP
1. When you power up the TV Anywhere for the first time, the memory does not contain any
TV channels. In this case the unit will display the screen below:
2. Press the CBL button on the TV Anywhere remote control.
3. Press button 1-5, depending on the TV system used in your country. Don’t forget to aim
at the receiver when using the remote. If you don’t know which TV system is used, choose
option 1 (PAL-BG).
4. You will be asked to confirm your choice. Press the Enter key (ENT) on the remote control.
If you made the wrong choice, re-enter 1, 2, 3, 4 or 5 followed by ENT.
5. The following screen is displayed:
NO TV CHANNELS
Press [SCAN] to search
CHOOSE YOUR TV SYSTEM
[1] PAL-BG (western EU)
[2] PAL-I (uk, irl)
[3] PAL-DK (eastern EU)
[4] SECAM-L (france)
[5] SECAM-DK (russia)

ENGLISH
9TV Anywhere™
6. Press SCAN to have your TV Anywhere search for channels. This procedure may take up
to 7 minutes, depending on the number of channels available. The TV Anywhere will
automatically recognize and store all TV channels available on your antenna system. A status
bar will indicate the progress. At 100% the search will be completed within 1 minute.
7. When the SCAN procedure is finished, the TV Anywhere will show how many TV channels
were found. The screen below will be displayed for 4 seconds.
8. After the “Scan complete” screen has disappeared, you can select TV channels by pressing
the PROG+ and PROG- buttons or by using the numeric keys on the remote control.
! Because the tuner will also cover weak channels, there is a chance that the list will contain
some “empty” channels. If you see any of these channels, you can delete them by pressing
the CHANNEL DELETE button on your remote control. If you press this button, the word
“DELETED” will be displayed on the screen. 4 seconds later the TV channel will be deleted
from the list.
3.1. Re-arranging the TV channels
The TV Anywhere lets you re-arrange the order of the TV channels, to create your favorite list.
1. Move up or down the TV channels using PROG+ and PROG- and look for the TV channel
you want to move to position 1 on the list.
2. When you have found the TV channel of your choice, press COPY. The screen now reads
“COPIED. READY TO MOVE”.
3. Now move to position 1. You can do this by using PROG+ and PROG- or by pressing 1 on
your remote control.
4. When you have arrived at position 1, press PASTE. The channel has now been moved from its
original position to position 1 on the list. The screens show “ADDED TO PROGRAM LIST”.
SCAN COMPLETE
FOUND xx CHANNELS
SCANNING
Please wait
vhf uhf

10 © MARMITEK
! The original TV channel on position 1 is automatically moved to position 2, the channel on
position 2 is moved to 3, etc. This means that the complete list is automatically being moved
down and that no channels are lost.
5. Repeat steps 1 to 4 to move TV channels to positions 2, 3, .... etc.
3.2 Fine tuning
It may be that you feel you can improve the picture quality by manually fine tuning the
image.
1. Press FINE TUNE+ and FINE TUNE-. The text FINE TUNE + 1..12 or FINE TUNE - 1..12 will
appear on screen. You will gradually see the picture quality change.
2. Store the new settings by pressing COPY followed by PASTE.
3. When you don’t want to store the new settings, just move to a new channel by PROG+ or
PROG-.
3.3 Re-scan
If you have accidentally removed TV channels from the list, you can execute a new SCAN.
Press the SCAN button twice to restart scanning the frequency band. Be aware that you will
have to re-order the TV channels again to create your favorite list (3.1).
3.4 Selecting a different TV system
When no channels have been found, you may have chosen the wrong TV system (PAL-BG
/PAL-I /PAL-DK or SECAM-DK/ SECAM). To select a different TV system, you will have to
clear the memory of the TV Anywhere by doing a Master reset (3.5). After you executed the
Master Reset, you can choose a different TV system.
3.5. Master reset
1. Switch the TV Anywhere transmitter off and on again (by using the ON/OFF switch [7]).
2. Press the SOURCE and CHAN DOWN buttons (middle button) at the front of the transmitter
at the same time.
3. Keep the buttons pressed unit the text “DELETED” appears on your screen.
4. MOVING THE RECEIVER TO THE FINAL LOCATION
You are now ready to move your receiver to the final location. The maximum distance between
transmitter and receiver depends on local circumstances, but on average the distance is up
to 30m, through walls and floors.
When you feel that the image quality is poor or your TV Anywhere doesn’t react to the
remote, try to re-position the receiver or transmitter. Moving the receiver or transmitter a few
centimeters can make a difference in operating range.

ENGLISH
11TV Anywhere™
5. PROGRAMMING THE 6IN1 AS A UNIVERSAL REMOTE
The 6in1 remote control provided does not only control your TV Anywhere system you can
also control your TV, VCR, DVD player and satellite receiver with this remote. The remote
control is pre-programmed at the factory for most brands and models.
5.1 Programming the remote control for your TV, Set-Top Box, DVD player and
satellitereceiver
To make your remote control suitable for your own equipment, you have to program it once.
You can do this by entering a code, related to the brand and type of equipment you want to
control. You can program any device under any MODE button. For example, if you have two
Set-Top Boxs, you can program Set-Top Box 1 under VCR and Set-Top Box 2 under DVD.
5.2 Manual code entry
Take your code book and search for the list matching the device you are looking for, e.g. TV
or Cable. Next, find the relevant brand (e.g. Sony). Now you will see one or more codes. If
there is more than one code, it depends on your equipment which code is correct. Generally,
the codes are displayed in order of age of the device. Older devices first, newer devices last.
Sometimes you will have to try several codes before you find the right code for your device.
1. Make sure your device is switched on (for example the TV).
2. Press and hold SETUP [7] until the LED indicator stays lit. Release SETUP .
3. Press and release the mode button [3] of the device you want to control (for example
TV).
4. Enter the code from the code book by using the key pad [9]. The LED [2] will extinguish
after the last digit is entered. If you have entered a wrong code, the LED will flash for 3
seconds and then extinguish. You have to repeat steps 2-4.
5. Point the remote at your TV and press the POWER button [1]. Your device should now turn
off. Check other functions (for example for a VCR FF or REW, etc.). If certain functions
are not responding, the entered code is not the correct one. In that case repeat the steps
above with the next corresponding code of your brand.
6. Repeat this procedure from step 1 for the other devices you want to control (VCR, DVD,
SAT,...).
5.3 Automatic code search for some well-known brands
If your brand is listed below, you can use the brand search method (faster than the “manual”
and the “automatic code search”).
1. Turn on the device you want to control.
2. Press and hold SETUP [7] until the LED indicator [2] stays lit. Release SETUP.
3. Press the mode button (3) that matches the device you wish to control. The LED [2] will
flash once.
4. Enter the code for your brand, point the TV Anywhere Remote at your device and press
Prog+ [5] once. Continue to point the TV Anywhere remote control at your equipment
until the equipment changes Channel. (The remote control transmits an IR signal every
second. Please wait until your device reacts) When your device does react, press ENT [11]

12 © MARMITEK
to confirm. If you accidentally go past the code, you can stop the autosearch by pressing
Prog- [5] and by repeatedly pressing this button return to the right code. Press ENT [11] to
confirm.
! If some functions of your device do not work, you need to try another code for your brand.
The search function starts after the last confirmed code.
BRAND CODE
1 = Philips/Radiola/Aristona/Erres
2 = Sony/Panasonic/JVC/Sharp/Akai/Toshiba/Daewoo
3 = Thomson/Brandt
4 = Telefunken/Saba/Nordmende
5 = Grundig/Blaupunkt
6 = Nokia/ITT
5.4 Automatic code search for all brands
When searching an unknown code, you can step through the library automatically
(AutoSearch). When your device responds, you can stop the searching process and store the
code you found.
! You can dedicate any device (TV, DVD, SAT...) to the VCR, DVD, ASAT or DSAT buttons. You
first need to enter a code for the type of device you wish to control (from the code book),
i.e. if you want to program a SAT under the VCR button, enter ANY SAT code from the code
book and then follow the steps below:
1. Turn on the device you want to control.
2. Press and hold SETUP [7] until the LED indicator [2] stays lit. Release SETUP.
3. Press the mode button [3] that matches the device you wish to control. The LED [2] will
flash once.
4. Press Prog+ [5] once. After a few seconds the remote control will start stepping through
the code library (fast search, 1 code per second). When the device responds, you can press
Prog+ [5] to switch to slow search (1 code per 3 seconds). You can step back by pressing
Prog- [5] (you can step forward by pressing Prog+ [5] in case you went back too far). As
soon as the device responds again, press ENT [11] to store the code you found.
! if some functions of your device do not work, you need to try another code for your brand.
The search function starts after the last confirmed code.
5.5 Manual code search
Note: You can dedicate any device (TV, DVD, SAT...) to the VCR, CBL, DVD, CD, ASAT, DSAT or
AUX buttons. You first need to enter a code for the type of device you wish to control (from
the code book), i.e. if you want to program a SAT under the AUX button, enter ANY SAT code
from the code book and then follow the steps below:

ENGLISH
13TV Anywhere™
1. Make sure your device is switched on.
2. Press and hold SETUP [7] until the LED indicator stays lit. Release SETUP.
3. Press the mode button [3] that matches the device you want to control (for example TV).
4. Press Prog+ [5] repeatedly until the channel changes. If you step past the correct code, use
Prog- [5] to go back to the right code.
5. When the device you want to control reacts, press ENT [11] to confirm the code.
! If your equipment does not have Prog+, you can use PLAY (VCR or DVD) [19] or
POWER [1]. The search starts after the last registered code. Note: if certain functions
of your equipment cannot be controlled, you will have to find a different code for
your brand.
5.6 Identifying codes found
If the batteries have been outside the remote control for a longer period, the programmed
codes may be erased from the memory. It is a good idea to write down the codes, so you can
reprogram the remote control quickly. If you don’t know the code (for example because you
found the code by autosearch), you can identify it as follows:
1. Press and hold SETUP [7] until the LED indicator [2] stays lit. Release SETUP.
2. Press the mode button [3] for the device you want to identify (VCR, DVD, ASAT or DSAT).
The LED will flash once.
3. Press SETUP again. The LED will flash once. To identify the first digit, press each number
button from 0-9 [9] until the LED flashes. The number you pressed, is the first digit of the
code.
5. Press each number key from 0-9 as above to find the second digit.
6. Press each number key from 0-9 as above to find the third digit.
7. Press all digit keys again to locate the fourth digit. As soon as the fourth digit is located,
the LED goes off.
5.7 Configure volume control for various devices
The remote control is preset so that the Volume and Mute keys operate the device which is
programmed by the device keys [3]. If the programmed device does not have a volume/ mute
function then the TV volume will be controlled without having to switch to the TV function.
You can also adjust this set up manually and assign the volume control of the device in
question to the TV, for example, so you adjust the TV volume but not that of, for example,
the set top box, and all this without having to switch to the TV function.
Note, if you perform the procedure below for devices that do not have a volume/ mute
function then the Volume and Mute keys will not work. It is then necessary to switch to the
TV function in order to adjust the volume.
Configuration of one general volume control for all devices operated by the remote
control, e.g. TV:
1. Press SETUP (7) and hold this key down until the LED stays on (takes about 2-3 seconds).
2. Press MUTE (4) and hold this key down until the LED goes off.
3. Briefly press the desired key (3) e.g. TV, the LED flashes and stays on.

14 © MARMITEK
4. Briefly press MUTE (4), the LED goes off. The LED will flash quickly for approximately 3
seconds if the selected code does not have a volume/mute function.
5. In this instance, the TV volume will be controlled by all selection keys (3).
Configuration of the volume/mute function for each device individually:
1. Press SETUP (7) and hold this key down until the LED stays on (takes about 2-3 seconds).
2. Press MUTE (4) and hold this key down until the LED goes off.
3. Briefly press the desired key (3) e.g. TV, DVD etc., the LED flashes and stays on.
4. Briefly press the VOLUME key (6, lower volume), the LED flashes and stays on.
5. Briefly press MUTE (4), the LED goes off.
6. The selected device will now operate with its own volume function.
Restoring the volume/mute function to the standard (factory) settings:
1. Press SETUP (7) and hold this key down until the LED stays on (takes about 2-3 seconds).
2. Press MUTE (4) and hold this key down until the LED goes off (the LED now flashes).
3. Press MUTE (4) one more time and the LED goes off.
4. The volume/mute function is restored to the factory settings.
5.8 Switching between antenna signal and audio/video source
You can connect not only an antenna signal to the TV Anywhere transmitter, but also an
external audio/video source (for example a DVD player, a video recorder or a satellite receiver).
You can then use the TV Anywhere remote control to switch between the antenna signal and
the external source. You do this by pressing the [CATV/ AV] button on the remote control.
Make sure the remote is in CBL mode (press CBL first).
5.9 Changing the code of the 6in1 remote for use with the TV Anywhere
! You only have to change the code of the 6in1 remote if another TV Anywhere system is
used in your immediate neighbourhood (within 100 meters).
! You can only access the screen below / change the handset code AFTER you programmed
the TV Anywhere .
The default setting of the remote is “0636”. To change the code of both the 6in1 remote and
your TV Anywhere system:
1. Press and hold SETUP until the LED stays lit.
2. Press CBL.
3. Enter one of the following codes:
0639
0638
0637
0636 (default)
4. Switch the TV Anywhere transmitter off and then on again (by using the ON/OFF switch
[7])

ENGLISH
15TV Anywhere™
5. Press the SOURCE and CHAN UP buttons (right button) at the front of the transmitter at
the same time.
6. The following text will appear on your screen:
7. Press “SET”. The following text will appear on your screen:
8. Press “SET” again.
9. The following text will appear on your screen (where WXYZ is the new code):
10. Test the connection by pressing PROG+ or PROG-.
5.10 Resetting the configuration of the remote control
You can reset the remote control to its original configuration, as follows:
1. Press the SETUP button until the LED stays lit.
2. Press the STOP button twice and then press the MUTE button once.
3. The LED will extinguish.
CODE WXYZ ACCEPTED
PRESS [SET] AGAIN TO
CONFIRM
HANDSET CODE 0636
PRESS [SET] TO CHANGE
OR
ANY OTHER KEY TO CONTINUE

16 © MARMITEK
6. FREQUENTLY ASKED QUESTIONS
The system does not work properly
Attention: The power adapters for the transmitter and receiver are different. You need
to connect the small power adapter to the receiver. The large power adapter needs to be
connected to the transmitter.
Poor picture quality on all TV channels
1. Disturbances in the signal can sometimes affect the transmission quality. Move the TV
Anywhere transmitter or receiver a few centimeters to solve the problem.
2. Change the channel settings (A .. D) for both the transmitter and the receiver. The channel
setting on the transmitter must match the setting on the receiver (e.g. both set to B).
Poor picture quality on some of the TV channels
1. Check the antenna connection of the TV Anywhere transmitter. You can check the
signal on the transmitter side by directly connecting a TV to the antenna connection. It is
especially important to check your antenna system, as high frequency channels contain
more noise that lower frequency channels.
2. If the TV channel found is not tuned properly, use the FINE TUNE+ and FINE TUNE- buttons
to fine tune the TV channel. Press COPY followed by PASTE to store the new settings.
The infrared extender does not work
1. Is the infrared extension cable connected to the TV Anywhere transmitter? Are the
infrared eyes attached to your equipment at the right position? Try to experiment with
their location if you are not convinced of the right position on your device.
2. If you are using wireless headphones, wireless speakers or other equipment using
433.92MHz transmission, this could affect the range of the infrared extender function
dramatically. Switch these devices off to improve the range.
The remote won’t control your A/V equipment or doesn’t work at all
1. Use manual controls or the original remote control to confirm the equipment is working
properly.
2. Make sure you press the device button for the device you want to control.
3. Re-enter the code for your A/V device form the code list.
4. Try searching for codes by using the Manual or Automatic code search.
5 Check the polarity of the batteries.
6. Replace the batteries.
The remote won’t work with the TV Anywhere
1. The code for the remote control does not match the code set up for the TV Anywhere
system.
2. To operate the TV Anywhere with the remote provided, you need to point it at the TV
Anywhere receiver.

ENGLISH
17TV Anywhere™
3. To operate the TV Anywhere with the remote provided, it has to be set to TV Anywhere
mode. To set it to the TV Anywhere mode, press the [CBL] button.
4. Using a wireless baby monitor, wireless headphones or wireless speakers that use the
same frequency as the infrared extender of your TV Anywhere (433 MHz), will significantly
decrease the range.
5. Read paragraph 5.9 on how to set the handset code
My TV Anywhere cannot find any channels
1. You have chosen the wrong TV system. Read paragraph 3.
2. Check your antenna connection.
I do not get a blue screen on my TV
The TV Anywhere receiver is attached to the Scart input on your TV. This means that the TV
always has to be set to “external channel” or “audio/video” channel. The instruction manual
for your TV will tell you how to do this.
I’ve programmed the channels on the TV Anywhere but I can’t switch channels
1. Read “The remote won’t work with the TV Anywhere “.
2. The TV Anywhere has stored the channels on the transmitter. You therefore cannot switch
channels on the TV; you have to do this on the TV Anywhere transmitter itself. The TV
always has to be set to the “external” or “audio/video” channel. By setting the remote
to TV Anywhere mode (using the [CBL] button), you can change the channels on the TV
Anywhere transmitter. When doing so, it is important to point it at the TV Anywhere
receiver.
I can hear the sound of the first TV on the second TV via the TV Anywhere.
You have probably connected the cable with the Scart adapter TRANSMITTER to the audio/
video OUT of the TV Anywhere transmitter. You need to use OUTPUT with the Scart adapter
RECEIVER and INPUT with the Scart adapter TRANSMITTER.
Do you still have questions?
Please check out www.marmitek.com for more information.

18 © MARMITEK
7. TECHNICAL SPECIFICATIONS.
Operating range: Up to 100m free field, up to 30m through walls and ceilings
Power 2,4GHz.: 230VAC/50Hz, 6V/300mA (receiver) and 12V/500mA (transmitter) DC
mains adapter
Power 5,8 GHz.: 230VAC/50Hz, 7,2V/250mA (receiver) and 7,2V/450mA (transmitter)
DC mains adapter
Built in cable tuner: Philips, VHF low, VHF high, UHF
Standard: Multi Europe: PAL BG/PAL I/PAL DK/ SECAM DK /SECAM L.
Compatibility: +/- channel compatible for use in all countries using PAL
Memory: 120 channel
Transmitter: 2,4 GHz, (2,4GHz version) or 5,8 GHz (5,8 GHz version) 4 channels
(A,B,C,D)
Infrared extender: built in 433,92 MHz transmitter and receiver
Universal remote: Controls up to six devices (TV Anywhere, TV, VCR, SAT, DVD)
Specifications may be modified without prior notice.
Environmental Information for Customers in the European Union
European Directive 2002/96/EC requires that the equipment bearing this symbol on the product and/or ist
packaging must not be disposed of with unsorted municipal waste. The symbol indicates that this product should
be disposed of separately from regular household waste streams. It is your responsibility to dispose of this and other
electric and electronic equipment via designated collection facilities appointed by the government or local authorities.
Correct disposal and recycling will help prevent potential negative consequences to the environment and human health.
For more detailed information about the disposal of your old equipment, please contact your local authorities, waste
disposal service, or the shop where you purchased the product.

DEUTSCH
19TV Anywhere™
SICHERHEITSHINWEISE
• Dieses Produkt ausschließlich im Hause und nur in trockenen Räumen verwenden. Setzen
Sie die Komponenten nicht Regen oder Feuchtigkeit aus. Nicht neben oder nahe eines
Bades, Schwimmbades usw. verwenden.
• Setzen Sie die Komponenten Ihres Systems nicht extrem hohen Temperaturen aus. Decken
Sie die komponenten nicht ab.
• Das Produkt niemals öffnen.
• Bei einer zweckwidrigen Verwendung, selbst angebrachten Veränderungen oder selbst
durchgeführten Reparaturen erlöschen sämtliche Garantieansprüche. Marmitek übernimmt
bei einer falschen Verwendung des Produkts oder einer anderen Verwendung des Produkts
als für den vorhergesehenen Zweck keinerlei Produkthaftung. Marmitek übernimmt für
Folgeschäden keine andere Haftung als die gesetzliche Produkthaftung.
• Batterien: Halten Sie die Batterien außer Reichweite von Kindern. Geben Sie die Batterien
als chemischen Kleinabfall ab. Verwenden Sie niemals alte und neue Batterien oder
unterschiedliche Batteriesorten durcheinander. Entfernen Sie die Batterien, wenn Sie
das System längere Zeit nicht benutzen. Achten Sie beim Einlegen der Batterien auf die
Polarität (+ / -).
INHALTSVERZEICHNIS
1. Das TV Anywhere System _________________________________________________ 20
2. Das System installieren ____________________________________________________20
2.1 Sender ohne zusätzliche Geräte installieren _____________________________20
2.2 Sender mit zusätzlichen Geräten installieren ____________________________ 21
2.3 Empfänger installieren _______________________________________________22
2.4 Fernbedienung _____________________________________________________ 22
2.5 Funktionsbeschreibung der Tasten _____________________________________22
3. TV Anywhere Sender einstellen ____________________________________________ 24
3.1. Gewünschte Reihenfolge der TV Sender bestimmen _____________________ 26
3.2. Feinabstimmung ____________________________________________________ 26
3.3. Nochmals scannen __________________________________________________ 26
3.4. Anderes TV System wählen ___________________________________________ 26
3.5. Master Reset _______________________________________________________ 26
4. Empfänger an seinem definitiven Platz aufstellen _____________________________ 27
5. Fernbedienung - universelle Nutzung _______________________________________ 27
5.1 Einstellung der Fernbedienung _______________________________________ 27
5.2 Manuelle Eingabe der Codes _________________________________________ 27
5.3 Automatisches Suchen von geläufigen Marken __________________________ 28
5.4 Automatisch Codes suchen alle Marken _______________________________ 29
5.5 Manuell Codes suchen 5.6. Gefundene Codes identifizieren ______________29
5.6 Gefundene Codes identifizieren _______________________________________ 30
5.7 Volumensteuerung für verschiedene Quellen einstellen. __________________30
20 © MARMITEK
5.8 Schalten zwischen Antennensignal und Audio/Video Quelle _______________ 31
5.9 Den Code der 6in1 Fernbedienung ändern
für Verwendung mit dem TV Anywhere ________________________________ 31
5.10 Die Fernbedienung in die ursprüngliche Einstellung ab Werk zurückversetzen ___ 32
6. Häufig gestellte Fragen ___________________________________________________ 33
7. Technichen Daten ________________________________________________________ 35
1. DAS TV ANYWHERE SYSTEM
Mit dem Marmitek TV Anywhere System können Sie Ihren TV mit einem Antennensignal
versehen ohne irgendwelche Kabel verlegen zu müssen. Der TV Anywhere Sender kann
unmittelbar an den Antennenanschluss Ihrer Wohnung angeschlossen werden.
Der TV Anywhere Sender besitzt einen eingebauten TV Tuner, der die Sender Ihrer Wahl
selektiert und zum an Ihren Fernseher angeschlossenen Empfänger versendet. Das Signal
wird auf einer Frequenz von 2,4GHz oder 5,8GHz (Modelabhängig) übersendet.
Multisource und Fernbedienung
Der TV Anywhere Sender besitzt zudem Anschlüsse für zusätzliche Geräte wie einen
Videorekorder, DVD-Player oder Satellitenempfänger. Auch diese Signale können Sie
mithilfe dieses Senders drahtlos zu Ihrem TV versenden. Mit der mitgelieferten 6in1
Universalfernbedienung können Sie nunmehr zwischen dem TV Tuner und Ihrem DVD-Player,
Satellitenempfänger und/oder Videorekorder schalten. Darüber hinaus können Sie all diese
Geräte mit der mitgelieferten 6in1 Universalfernbedienung fernbedienen.
2. DAS SYSTEM INSTALLIEREN
Achtung: Während installation müssen Sie den TV Anywhere Sender und den TV
Anywhere Empfänger während der Installierung nebeneinander aufstellen. Erst
nach Installationsbeendung können Sie den Empfänger an
die Stelle, wo Sie Ihren TV permanent aufstellen möchten,
aufstellen. Während der Installation muss Ihr Empfänger an
einen beliebigen Fernseher angeschlossen sein.
2.1 Sender ohne zusätzliche Geräte installieren
1. Schließen Sie das mitgelieferte Koaxkabel [A] an die Antennen/
Kabel Wandsteckdose an.
2. Schließen Sie das andere Ende des Koaxkabels an den
Antenneneingang [3] des TV Anywhere Senders an
3. Stellen Sie den Kanalschalter (Schiebeschalter) [9] (Siehe Seite 2) auf
einen Kanal nach Ihrer Wahl ein. Z.B. Kanal C
4. Schließen Sie den großen Speisungsadapter an den TV Anywhere
Sender [6] an.
RADIO TV
3
A
B
DEUTSCH
21TV Anywhere™
5. Schalten Sie den Sender mit der ON/OFF Taste [7] ein.
6. Stellen Sie den TV Anywhere Sender, wenn möglich rundherum frei, auf. Stellen Sie Ihren
Sender vorzugsweise nicht auf Ihre Audio- und Videogeräte. Richten Sie die Parabolantenne
[8] mit der flachen Seite in Richtung des Empfängers.
2.2 Sender mit zusätzlichen Geräten installieren (wie Satellitenempfänger,
Videorekorder oder DVD-Player)
Mit dieser Konfiguration können Sie sich
sowohl im Wohnzimmer wie in einem zweiten
Raum Bilder aller angeschlossenen Quellen
ansehen.
1. Stecken Sie den Antennensplitter [B] in den
Anschluss an der TV-Rückseite.
2. Schließen Sie das mitgelieferte Koaxkabel
[A] an den Antennensplitter [B] an.
3. Schließen Sie das andere Ende des
Koaxkabels [A} an den Antenneneingang
[3] des TV Anywhere Senders an
4. Verbinden Sie das zu Ihren Geräten
gehörende Koaxkabel (Ihres Videorekorders
oder Satellitenempfängers [C]) mit dem
Antennensplitter.
5. Verbinden Sie den Audio/Video Ausgang
[D] des DVD-Players mit dem Audio/Videoeingang [4] des TV Anywhere
Senders [für die MULTISOURCE Funktion].
Ein Chinch/Chinchkabel [E] ist mitgeliefert.
6. Verbinden Sie den Audio-/Videoausgang
[5] des TV Anywhere Senders mit dem
Audio-/Videoeingang (Scart-Eingang) [F]
des Fernsehers. Verwenden Sie hierzu das
Kabel, mit dem Sie ursprünglich Ihren DVDPlayer an den TV angeschlossen hatten.
7. Stecken Sie den Stecker des InfrarotExtenderkabels in Ausgang [2] des Senders.
8. Bringen Sie die Infrarot-LED’s des Extenderkabels auf den Infrarotsensoren Ihres
Videorekorders, Satellitenempfängers und/oder DVD-Players an. Es ist wichtig, dass die
LEDs genau vor den Infrarotsensoren angebracht werden.
9. Stellen Sie den Kanalschalter (Schiebeschalter) [9] auf einen Kanal Ihrer Wahl, z.B. Kanal
10. Schließen Sie den großen Speisungsadapter an den TV Anywhere Sender [6] an.
11. Schalten Sie den Sender mit der ON/OFF Taste [7] ein.
12. Stellen Sie den TV Anywhere Sender, wenn möglich rundherum frei auf. Stellen Sie den
Sender vorzugsweise nicht auf Ihre Audio- und Videogeräte.
TV1
SCART
RADIO TV
E
IN
OUT
IN
OUT
D
VCR
DVD
3
C
F
2
A
5
4
SAT
B
TV1
RADIO TV
3
C
A
B
22 © MARMITEK
13. Richten Sie die Parabolantenne [8] mit der flache Seite in Richtung des Empfängers.
2.3 Empfänger installieren
1. Schließen Sie ein Chinch/Chinch Kabel-Set an den Audio-/Videoausgang [15] des TV Anywhere
Empfängers (Receiver) an. Achten Sie dabei auf die Farbkodierung. Der gelbe Stecker ist für
das Videosignal, der rote und weiße sind für das Audiosignal (rechts bzw. links).
2. Schließen Sie das andere Ende des Chinch/Chinchkabels an Ihren Fernseher an. Wenn Ihr
Fernseher mit einem Scarteingang ausgestattet ist, dann können Sie den mitgelieferten
Scartadapter verwenden. (mit dem Label ‘Receiver’).
3. Schalten Sie den Kanalschalter [16] auf denselben Kanal, auf den Sie den TV Anywhere
Sender eingestellt haben (z.B. Kanal C).
4. Schließen Sie den kleinen Speisungsadapter an den TV Anywhere Empfänger [17] an.
5. Schalten Sie den Empfänger mit der ON/OFF Taste [18] ein.
6. Richten Sie die Parabolantenne [8] mit der flachen Seite in Richtung des Senders.
! NB. Um Bild des TV Anywhere auf Ihrem TV empfangen zu können, schalten Sie den TV,
worauf der Receiver angeschlossen ist, auf den A/V Eingang um
(bei manchen TV ist dies Kanal “0”). Der TV Anywhere zeigt
einen blauen Schirm, wenn noch keine Sender in den Speicher
programmiert wurden.
2.4 Fernbedienung
1. Öffnen Sie die Abdeckung auf der Rückseite Ihrer
Fernbedienung.
2. Legen Sie 2 AAA Batterien (Alkaline) ein. Beachten Sie die
Polarität (+ und -) die auf der Innenseite des Batteriefachs
angegeben ist.
3. Schließen Sie das Batteriefach wieder sorgfältig.
2.5 Funktionsbeschreibung der Tasten
[1]
(Ein/aus)
Schaltet das zuletzt eingeschaltete Gerät aus. Manche Geräte
können mit dieser Taste auch eingeschaltet werden.
[2] Rote LED-Anzeige
Diese Anzeige blinkt, wenn die Fernbedienung aktiviert
wird und leuchtet anhaltend, wenn Sie die Fernbedienung
programmieren.
[3] CBL (TV Anywhere), TV, VCR, DVD, ASAT
(analoger Satellitenempfänger), DSAT (digitaler
Satellitenempfänger)
Mit diesen Tasten wählen Sie das Gerät an, das Sie bedienen
möchten.
[4]
(Ton aus)
Schaltet den Ton ein oder aus. (Sehen Sie Kap. 7.5).
1
3
5
8
9
10
13
15
16
18
20
22
2
7
4
6
11
12
14
17
21
19

DEUTSCH
23TV Anywhere™
[5] PROG +/-
Schaltet zum vorigen oder nächsten Sender Ihres Fernsehers oder Satellitenempfängers. Im
DVD-Modus den nächsten oder vorigen Track.
[6] VOL +/-
Hiermit regeln Sie die Lautstärke. Sie können den Ton Ihrer Geräte leiser oder lauter stellen.
[7] SETUP
Hiermit können Sie die Fernbedienung für Inbetriebnahme programmieren. Zudem haben
Sie mit dieser Taste Zugang zu einigen Nebenfunktion von bestimmten A/V Geräten (Shift).
Drücken Sie die SETUP-Taste und nachfolgende die gewünschte Funktionstaste.
[8] SHIFT
Verschafft Zugang zu Nebenfunktionen. Drücken Sie die SHIFT Taste und nachfolgend die
Taste Ihrer Wahl.
Drücken Sie nachmals die SHIFT Taste um den SHIFT Modus zu verlassen.
[9] Numeric keys 0-9 [Zahlentasten]
Wirken ebenso wie die Ihrer normalen Fernbedienung.
[10] AV
Selektiert eine externe AV Quelle (über den A/V oder Scart Eingang).
[11] ENT
M
it dieser Taste können bei manchen Geräten Sender mit einer höheren Nummer als 9 (2ziffrig) angewählt werden. Wenn Sie sich im Set-Up Modus befinden und automatisch Codes
suchen, können Sie mit dieser Taste den Code des zu bedienenden Gerätes speichern.
[12] Menu
Menü EIN
[13] Exit
Menü AUS
[14] OK
Bestätigung der Menüwahl.
[15] Navigation keys
Nach oben, nach unten, nach links, nach rechts. Navigieren im Menü (TV, DVD usw.).
[16]
Teletext ON: Start/Stop Teletext/Fasttext.
Teletext OFF: Stop Teletext/Fasttext.
Teletext Hold: Stoppt Seitenwechsel im Teletext/Fasttext Modus
Teletext Mix: Ermöglicht um den Teletext/Fasttext und das Bild des angewählten
Senders zu mixen.
[17]
REW (Schnelllauf zurück)
Im VCR- oder DVD Modus: diese Taste funktioniert auf dieselbe Weise wie die Ihrer OriginalFernbedienung. Im TV-Modus: Farbtaste (rot), Steuerung des Teletextes - oder anderer
Gerätefunktionen.
[18]
FF (Schnelllauf vorwärts)
Im VCR- oder DVD Modus: diese Taste funktioniert auf dieselbe Weise wie die Ihrer OriginalFernbedienung. Im TV-Modus: Farbtaste (blau), Steuerung des Teletextes - oder anderer
Gerätefunktionen.

24 © MARMITEK
[19]
PLAY
Im VCR oder DVD Modus: diese Taste funktioniert auf dieselbe Weise wie die Ihrer OriginalFernbedienung. Im TV-Modus: Farbtaste (gelb), Steuerung des Teletextes - oder anderer
Gerätefunktionen
[20]
STOP
Im VCR- oder DVD Modus: diese Taste funktioniert auf dieselbe Weise wie die Ihrer OriginalFernbedienung. Im TV-Modus: Farbtaste (grün), Steuerung des Teletextes - oder anderer
Gerätefunktionen.
[21]
REC (Aufnahme)
Diese Taste funktioniert auf dieselbe Weise wie die Ihrer Originalfernbedienung für den
Videorekorder. Zur Vermeidung unabsichtlichen Aufnehmens müssen Sie, um diese Funktion
zu aktivieren, die Taste zweimal drücken.
[22]
PAUSE
Im VCR oder DVD Modus: diese Taste funktioniert auf dieselbe Weise wie die Ihrer OriginalFernbedienung. Im TV-Modus: Farbtaste (Violet), Steuerung des Teletextes - oder anderer
Gerätefunktionen.
3. TV ANYWHERE SENDER EINSTELLEN
Der TV Anywhere erkennt automatisch alle Fernsehsender Ihres Antennensystems und
speichert diese. Befolgen Sie nachstehende Schritte:
1. Wenn Sie das TV Anywhere System zum ersten Mal einschalten, befinden sich noch keine
Fernsehsender im Speicher. Daraufhin erscheint dann untenstehender Schirm:
2. Drücken Sie die CBL Taste Ihrer TV Anywhere Fernbedienung.
3. Drücken Sie Taste 1-5, abhängig vom TV System, das in Ihrem Land verwendet wird.
Vergessen Sie nicht während des Gebrauchs der Fernbedienung, um auf den Empfänger
zu richten. Wenn Sie nicht wissen welches TV System in Ihrem Land verwendet wird,
wählen Sie dann Option 1 (PAL-BG).
4. Sie werden ersucht, Ihre Wahl zu bestätigen. Drücken Sie die ENTER Taste (ENT) der
Fernbedienung. Wenn Sie einen Fehler gemacht haben, drücken Sie dann erneut die
Tasten 1, 2, 3, 4 oder 5, und anschließend die ENT Taste.
CHOOSE YOUR TV SYSTEM
[1] PAL-BG (western EU)
[2] PAL-I (uk, irl)
[3] PAL-DK (eastern EU)
[4] SECAM-L (france)
[5] SECAM-DK (russia)

DEUTSCH
25TV Anywhere™
5. Nachstehender Mitteilung erscheint:
6. Drücken Sie die SCAN Taste, um Ihr TV Anywhere System nach Fernsehsendern suchen zu
lassen. Das kann bis zu 7 Minuten dauern und ist abhängig von der Anzahl verfügbarer
Fernsehsender. Auf dem Schirm erscheint eine Statusangabe, woraus Sie den Status des
Prozesses entnehmen können. Wenn der Balken 100% schwarzgefüllt ist, wird das TV
Anywhere System innerhalb der nächsten Minute mit der Suche fertig sein.
7. Hat das TV Anywhere System die Suche beendet, dann sehen Sie auf dem Schirm wie viele
Sender gefunden wurden. Dieser Schirm erlischt nach 4 Sekunden wieder automatisch.
8. Nachdem die “Scan complete” Mitteilung erloschen ist, können Sie mit den PROG+ und
PROG- Tasten Ihrer Fernbedienung durch die Fernsehsender “zappen”. Hierzu können Sie
auch die Zahlentasten Ihrer fernbedienung verwenden.
! Da der Tuner auch sehr schwache Sender erkennen kann, kann es sein, dass “leere” Sender in der
Tabelle vorkommen. Wenn Sie einem solchen leeren Sender begegnen, so können Sie diesen aus
der Tabelle entfernen indem Sie die CHANNEL DELETE Taste drücken. Wenn Sie diese Taste drücken,
erscheint der Text DETELED im Schirm. Der Sender wird nach 4 Sekunden aus der Tabelle entfernt.
SCAN COMPLETE
FOUND xx CHANNELS
SCANNING
Please wait
vhf uhf
NO TV CHANNELS
Press [SCAN] to search

26 © MARMITEK
3.1. Gewünschte Reihenfolge der TV Sender bestimmen
Sie können die gefundenen TV Sender nun in die gewünschte Reihenfolge bringen:
1. Verwenden Sie die PROG+ und PROG- Tasten um die gefundenen TV Sender zu
durchlaufen. Suchen Sie den TV Sender, der an Tabellenspitze stehen soll. Wenn Sie den
gewünschten Sender gefunden haben, drücken Sie auf Copy. Auf dem Schirm erscheint
der Text “COPIED. READY TO MOVE”
2. Fahren Sie mit den PROG+ und/oder PROG- Tasten, oder durch Drücken der Taste 1 Ihrer
Fernbedienung zur Tabellenspitze.
3. Wenn Sie in der Tabellenspitze angekommen sind, drücken Sie die Taste PASTE. Der TV
Sender wird nun von seiner ursprünglichen Position zur Tabellenspitze transponiert. Auf
dem Schirm erscheint nun der Text “ADDED TO PROGRAM LIST”.
! Der ursprüngliche TV Sender der an der Tabellenspitze stand, wird automatisch auf Position
2 eingestellt, der Sender von Position rückt auf Position 3 vor usw. Dies bedeutet, dass die
komplette Tabelle um eine Position vorrückt, sodass keine Sender verloren gehen.
4. Wiederholen Sie die Schritte 1 bis einschl. 4, um TV Sender in eine andere Position wie
2,3, ..... usw. zu bringen.
3.2 Feinabstimmung
Manchmal können Sie die Bildqualität der gefundenen Sender mit Hilfe der manuellen
Feinabstimmung verbessern.
1. Drücken Sie auf FINE TUNE+ and FINE TUNE-. Der Text FINE TUNE + 1..12 oder FINE TUNE-
1..12 erscheint auf dem Bildschirm. Sie sehen, dass sich die Bildqualität schrittweise ändert.
2. Speichern Sie nun die neuen Einstellungen indem Sie die COPY Taste, und danach die
PASTE Taste drücken.
3. Möchten Sie die neue Einstellung nicht speichern, so schalten Sie mit den PROG+ und
PROG- Tasten einfach einen anderen Sender ein.
3.3 Nochmals scannen
Wenn Sie aus Versehen einen TV Sender aus der Tabelle entfernt haben, so können Sie einen
neuen SCAN durchführen. Drücken Sie 2x die SCAN Taste um mit dem Scannen zu beginnen.
Denken Sie daran, dass Sie Ihre Sender hiernach erneut in die gewünschte Reihenfolge
bringen werden müssen.
3.4 Ein anderes TV-System wählen
Wenn Sie keine TV Sender gefunden haben, so kann es sein, dass Sie das falsche TV System
gewählt haben (PAL-BG / PAL-I oder SECAM). Um ein anderes TV System anzuwählen,
müssen Sie zunächst ein Master Reset durchführen. (3.5). Nach Durchführung des Master
Resets können Sie erneut ein TV System wählen.
3.5. Master Reset
1. Schalten Sie den TV Anywhere Sender aus und ein (mit der ON/OFF Schalter [7]).
2. Drücken Sie gleichzeitig die Taste SOURCE und CHAN DOWN (mittlere Taste) an der
Sendervorderseite.

DEUTSCH
27TV Anywhere™
3. Halten Sie die Tasten gedrückt, bis der Text “DELETED” auf dem Schirm erscheint.
4. DEN EMPFÄNGER AN SEINEM DEFINITIVEN PLATZ AUFSTELLEN
Sie können den Empfänger nun an seinem definitiven Platz aufstellen. Der Höchstabstand
zwischen Sender und Empfänger hängt von den örtlichen Gegebenheiten ab, beträgt jedoch
durchschnittlich bis zu 30 Meter, durch Wände und Decken hindurch. Verrücken Sie den
Sender oder den Empfänger, wenn die Bildqualität zu wünschen übrig lässt oder wenn Ihr
TV Anywhere nicht mehr auf die Fernbedienung reagiert. Das Verrücken von nur wenigen
Zentimetern kann schon einen großen Unterschied hinsichtlich der Reichweite machen.
5. FERNBEDIENUNG FÜR UNIVERSELLE NUTZUNG
Die mitgelieferte 6in1 Fernbedienung besitzt nicht nur Funktionen für Ihr TV Anywhere
System, Sie können auch Ihren TV, Videorekorder, DVD-Player und Satellitenempfänger
mit ihr bedienen! Die Fernbedienung ist fabriksmäßig für die meisten Gerätemarken und
Gerätetypen vorprogrammiert.
5.1 Einstellung der Fernbedienung für Ihren TV, Videorekorder, DVD-Player und
Satellitenempfänger
Um die Fernbedienung mit Ihren eigenen Geräten nutzen zu können, muss diese einmalig
programmiert werden. Hierzu geben Sie einen Code ein, der mit der Marke und dem
Gerätetyp, die/den Sie mit dieser Fernbedienung steuern möchten, übereinstimmt. Sie können
übrigens jedes gewünschte Gerät unter jeder Taste speichern. Haben Sie zum Beispiel zwei
Videorekorder, dann können Sie Videorekorder 1 unter VCR speichern, und Videorekorder
2 unter DVD.
5.2 Manuelles Festlegen der Codes
Suchen Sie im Codebuch die Liste für die entsprechende Geräteart (TV, Videorekorder,
usw). Suchen Sie daraufhin in der Liste die entsprechende Marke (z.B. Sony). Sie finden nun
eine oder mehrere Codes. Sind mehrere Codes verzeichnet, so hängt es vom Gerätetyp ab,
welcher Code geeignet ist.
Im Allgemeinen stehen die Codes in Reihenfolge des Alters des Gerätes. Ältere Geräte zuerst,
jüngere Geräte am Schluss. Es kann vorkommen, dass Sie verschiedene Codes ausprobieren
müssen, um den richtigen Code für Ihr Gerät zu finden:
1. Schalten Sie das Gerät zunächst ein (z.B. TV)
2. Halten Sie die Setup Taste (7) gedrückt bis die LED Anzeige anbleibt. Lassen Sie die Setup
Taste los.
3. Drücken Sie die Modustaste (3) des Gerätes, das Sie steuern möchten (z.B. TV) und lassen
Sie diese wieder los.

28 © MARMITEK
4. Geben Sie den Code aus dem Codebuch mit den Nummerntasten ein (9). Die LED Anzeige
erlöscht, nachdem die letzte Nummer eingegeben wurde. Wenn Sie den falschen Code
eingegeben haben, blinkt die Modus LED Anzeige 3 Sekunden. Danach erlöscht die LEDAnzeige. Wiederholen Sie dann die Einstellung ab Schritt 2.
5 Richten Sie die Fernbedienung auf den TV und drücken die EIN/AUS Taste (1). Das
Gerät wird nun ausgeschaltet. Überprüfen Sie die anderen Funktionen (für z.B. einen
Videorekorder: vorspulen, zurückspulen usw.). Falls einige Funktionen nicht verwendet
werden können, zeigt dies an, dass der eingegebene Code nicht korrekt ist. In diesem Fall
wiederholen Sie den oben genannten Vorgang mit den nächsten entsprechenden Code
Ihrer Marke.
6. Wiederholen Sie den Prozess für andere Geräte die Sie bedienen möchten (Video,
DVDPlayer, Satellit usw.) ab Schritt 1.
5.3 Automatisches Suchen einzelner, viel vorkommender Marken
Wenn Ihre Marke in der nachstehenden Liste aufgeführt ist, so können Sie nach Marke
suchen (das geht schneller als manuell oder automatisch suchen)
1. Schalten Sie das Gerät, das Sie bedienen möchten, ein.
2. Halten Sie die SETUP Taste (7) gedrückt bis die LED Anzeige (2) anbleibt. Lassen Sie die
SETUP Taste los.
3. Drücken Sie die Modustaste (3) die zu dem Gerät, das Sie bedienen möchten, gehört. Die
LED Anzeige (2) blinkt einmal.
4. Geben Sie den Code Ihrer Gerätemarke ein, richten Sie die TV Anywhere Fernbedienung
auf das Gerät und drücken Sie einmal auf Prog+ (5). Richten Sie die Fernbedienung so
lange auf das Gerät, bis der Kanal umschaltet (die Fernbedienung sendet ein Infrarotsignal
pro Sekunde. Warten Sie also kurz, bis Ihr Gerät reagiert). Reagiert Ihr Gerät, drücken Sie
auf ENT (11) um den Code zu bestätigen. Haben Sie den Code aus Versehen verfehlt, dann
können Sie die Suche beenden indem Sie auf Prog- (5) drücken und kehren Sie dann nach
wiederholtem Tastendrücken wieder zu dem richtigen Code zurück. Drücken Sie auf ENT
(11) um den Code zu bestätigen.
! Reagieren einige Funktionen Ihres Gerätes nicht, so müssen Sie einen nächsten Code Ihrer
Marke ausprobieren. Die Suchfunktion beginnt nach dem zuletzt bestätigten Code.
BRAND CODE
1 = Philips/Radiola/Aristona/Erres
2 = Sony/Panasonic/JVC/Sharp/Akai/Toshiba/Daewoo
3 = Thomson/Brandt
4 = Telefunken/Saba/Nordmende
5 = Grundig/Blaupunkt
6 = Nokia/ITT

DEUTSCH
29TV Anywhere™
5.4 Automatisch Codes suchen alle Marken:
Wenn Sie einen unbekannten Code suchen, können Sie auch automatisch alle Codes
durchlaufen. (AutoSearch).
! Da Sie jedes Gerät (TV, DVD, Satellit) den VCR-, CBL-, DVD-, AUDIO-, ASAT-, DSAT- und AUXTasten zuweisen können, müssen Sie zunächst einen Code des Gerätetyps, das Sie bedienen
möchten, eingeben (siehe Codebuch), zum Beispiel: Wenn Sie einen Satelliten unter der AUXTaste programmieren möchten, so geben Sie erst einen WILLKÜRLICHEN Satellitencode aus
dem Codebuch ein und befolgen daraufhin unten stehende Schritte:
1. Vergewissern Sie sich, dass das Gerät, das Sie bedienen möchten, eingeschaltet ist.
2. Halten Sie die SETUP Taste (7) gedrückt, bis die LED Anzeige (2) anbleibt. Lassen Sie die
SETUP Taste los.
3. Drücken Sie die Modustaste (3) die zu dem Gerät, dass Sie bedienen möchten, passt. Die
LED Anzeige (2) blinkt einmal.
4. Drücken Sie einmal auf Prog+ (5). Nach einigen Sekunden startet die Fernbedienung die
Suche nach dem Code (Schnellsuche, 1 Code pro Sekunde). Wenn das Gerät reagiert,
können Sie Prog+ (5) drücken um die Suche zu verlangsamen (1 Code pro 3 Sekunden).
Sie können mit Prog- (5) Schritte zurückgehen (oder vorausgehen mit Prog+ (5) wenn Sie
zu weit zurückgegangen sind). So wie das Gerät wieder reagiert, drücken Sie auf -/-- (11)
um den gefundenen Code zu speichern.
! Reagieren einige Funktionen Ihres Gerätes nicht, so müssen Sie einen nächsten Code Ihrer
Marke ausprobieren. Die Suchfunktion beginnt nach dem zuletzt bestätigten Code.
5.5 Manuell Codes suchen:
! Da Sie jedes Gerät (TV, DVD, Satellit) den VCR-, CBL-, DVD-, AUDIO-, ASAT- und DSAT
Tasten zuweisen können, müssen Sie zunächst einen Code des Gerätetyps, das Sie bedienen
möchten, eingeben (siehe Codebuch), zum Beispiel: Wenn Sie einen Satelliten unter der DVDTaste programmieren möchten, so geben Sie erst einen WILLKÜRLICHEN Satellitencode aus
dem Codebuch ein und befolgen daraufhin nachstehende Schritte:
1. Schalten Sie das Gerät ein.
2. Halten Sie die SETUP Taste (7) gedrückt bis die LED Anzeige anbleibt. Lassen Sie die SETUP
Taste wieder los.
3. Drücken Sie die Modustaste (3) des Geräts, das Sie bedienen möchten (z.B. den TV) und
lassen diese wieder los.
4. Drücken Sie so lange auf Prog+ (5) bis der Kanal umspringt. Wenn Sie den richtigen Code
verpasst haben, dann drücken Sie die Prog- (5) um zum richtigen Code zurückzukehren.
5. Wenn Ihr Gerät reagiert, drücken Sie auf ENT (11), um den Code zu bestätigen.
! Wenn Ihr Gerät keine Prog+ Taste hat, so können Sie die PLAY- (Video oder DVD) (19) oder
die POWER Taste (1) verwenden. Reagieren einige Funktionen Ihres Gerätes nicht, so müssen
Sie einen nächsten Code Ihrer Marke ausprobieren. Die Suchfunktion beginnt nach dem
zuletzt bestätigten Code.

30 © MARMITEK
5.6 Gefundene Codes identifizieren
Wenn die Batterien über einen längeren Zeitraum aus dem Gerät entfernt werden so kann
es sein, dass der eingestellte Code aus Ihrem Speicher gelöscht wird. Es empfiehlt sich
deshalb, die Codes irgendwo aufzuzeichnen, sodass sie diese später eventuell wieder schnell
programmieren können. Wissen Sie den eingestellten Code nicht (z.B. weil Sie den Code
mithilfe der Autosearch Funktion gefunden haben) dann können Sie diesen wie folgt lesen:
1. Halten Sie die SETUP Taste [7] gedrückt bis die LED-Anzeige (2) anbleibt. Lassen Sie die
SETUP Taste wieder los.
2. Drücken Sie die Modustaste [3] des Geräts, das Sie identifizieren möchten (TV, VCR, DVD,
ASAT oder DSAT). Die LED-Anzeige (2) blinkt einmal.
3. Drücken Sie nochmals die SETUP Taste [7]. Die LED-Anzeige [2] blinkt einmal.
4. Zur Identifizierung der ersten Zahl drücken Sie auf die Zahlen von 0 bis einschl. 9 [9] bis
die LED-Anzeige blinkt. Die gedrückte Nummer ist die erste Zahl des Codes.
5. Drücken Sie wieder auf alle Zahlentasten um die zweite Zahl zu finden.
6. Drücken Sie wiederum auf alle Zahlentasten um die dritte Zahl zu finden.
7. Drücken Sie wieder auf alle Ziffertasten um die vierte Ziffer zu finden. So wie die vierte
Ziffer gefunden ist, erlischt die LED Anzeige.
5.7 Volumensteuerung für verschiedene Quellen einstellen.
Die Fernbedienung ist serienmäßig so eingestellt, dass die Tasten Volumen und Mute das
Gerät bedienen, das unter den Gerätetasten programmiert ist. Wenn das programmierte
Gerät keine Volumen/Mute Funktionen hat, dann wird das Volumen vom Fernseher geregelt
werden, ohne dass Sie zur TV-Funktion umschalten müssen.
Sie können diese Einstellung auch selber ändern und die Volumenfunktion des betreffenden
Geräts z.B. dem Fernseher zuweisen, sodass Sie nicht das Volumen von beispielsweise
der Settop Box regeln, sondern das des Fernsehers, und dies ohne zur Fernseh-Funktion
umschalten zu müssen.
Achtung: Wenn Sie unten stehende Prozedur bei Geräten ohne Volumen/Mute Funktion
durchführen, dann werden die Volumen- und Mute-Tasten nicht funktionieren. Sie müssen in
diesem Fall zur Fernsehfunktion umschalten, um das Volumen regeln zu können.
Einstellung einer allgemeinen Volumenreglung für alle Geräte auf der
Fernsehbedienung, z.B. Fernseher:
1. Drücken Sie auf SETUP (7) und halten Sie die Taste fest, bis die LED Anzeige kontinuierlich
leuchtet (dauert ca. 2-3 Sekunden).
2. Drücken Sie auf MUTE (4) und halten Sie die Taste fest, bis die LED Anzeige erlischt.
3. Drücken Sie die gewünschte Auswahltaste (3) z.B. Fernseher und lassen Sie diese los, bis
die LED Anzeige blinkt und kontinuierlich leuchtet.
4. Drücken Sie auf MUTE (4) und lassen Sie diese los. Die LED Anzeige erlischt. Die LED wird
ca. 3 Sekunden lang schnell blinken, wenn der gewählte Kode keine Volumen-/Mute
Funktion besitzt.
5. In diesem Fall wird bei allen Auswahltasten (3) das Volumen des Fernsehers geregelt
werden.
 Loading...