

Page 1
MARMITEK
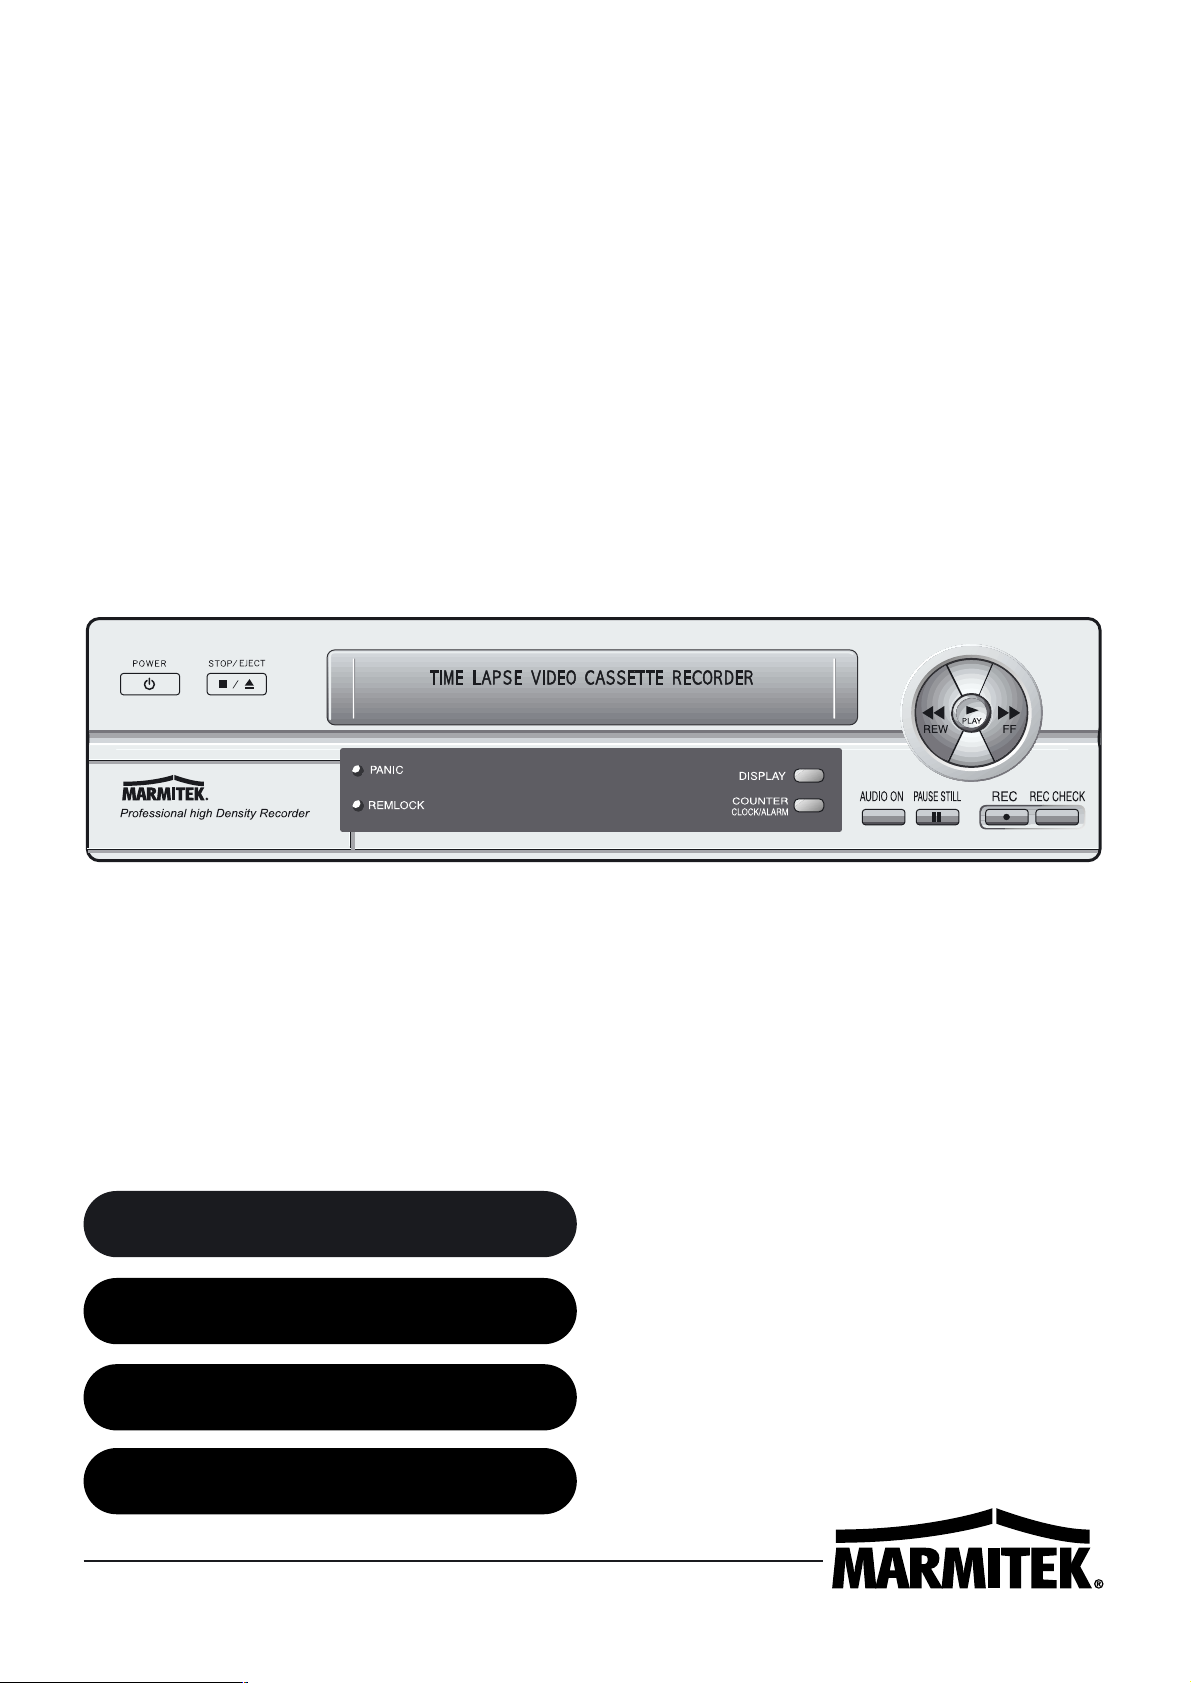
TIME LAPSE RECORDER
TLV 9600
091202-UK • TLV9600 COPYRIGHT ALL RIGHTS RESERVED MARMITEK 2002
OWNERS MANUAL
BEDIENUNGSANLEITUNG
NOTICE D’UTILISATION
GEBRUIKSAANWIJZING
Page 2

Page 3
PRECAUTIONS
ENGLISH
• Read carefully through this manual to familiarize yourself with
this high-quality Time Lapse VCR.
• Make sure the rating of your household electricity supply
matches that shown on the back of the Time Lapse VCR.
• During the power off, the unit is always connected to the mains.
Unplug the unit from the wall outlet if it is not to be used for
several days or more.
Do not ...
... expose the Time Lapse VCR to high levels of humidity and heat,
to avoid the risk of fire and electric shock.
... open the Time Lapse VCR. Have a qualified technician carry out
repairs.
... connect the Time Lapse VCR to the power supply if you have just
moved it from a cold to warm environment. This can result in
condensation inside the recorder and cause serious damage to
the machine and cassettes. Wait around two hours to allow it to
reach room temperature.
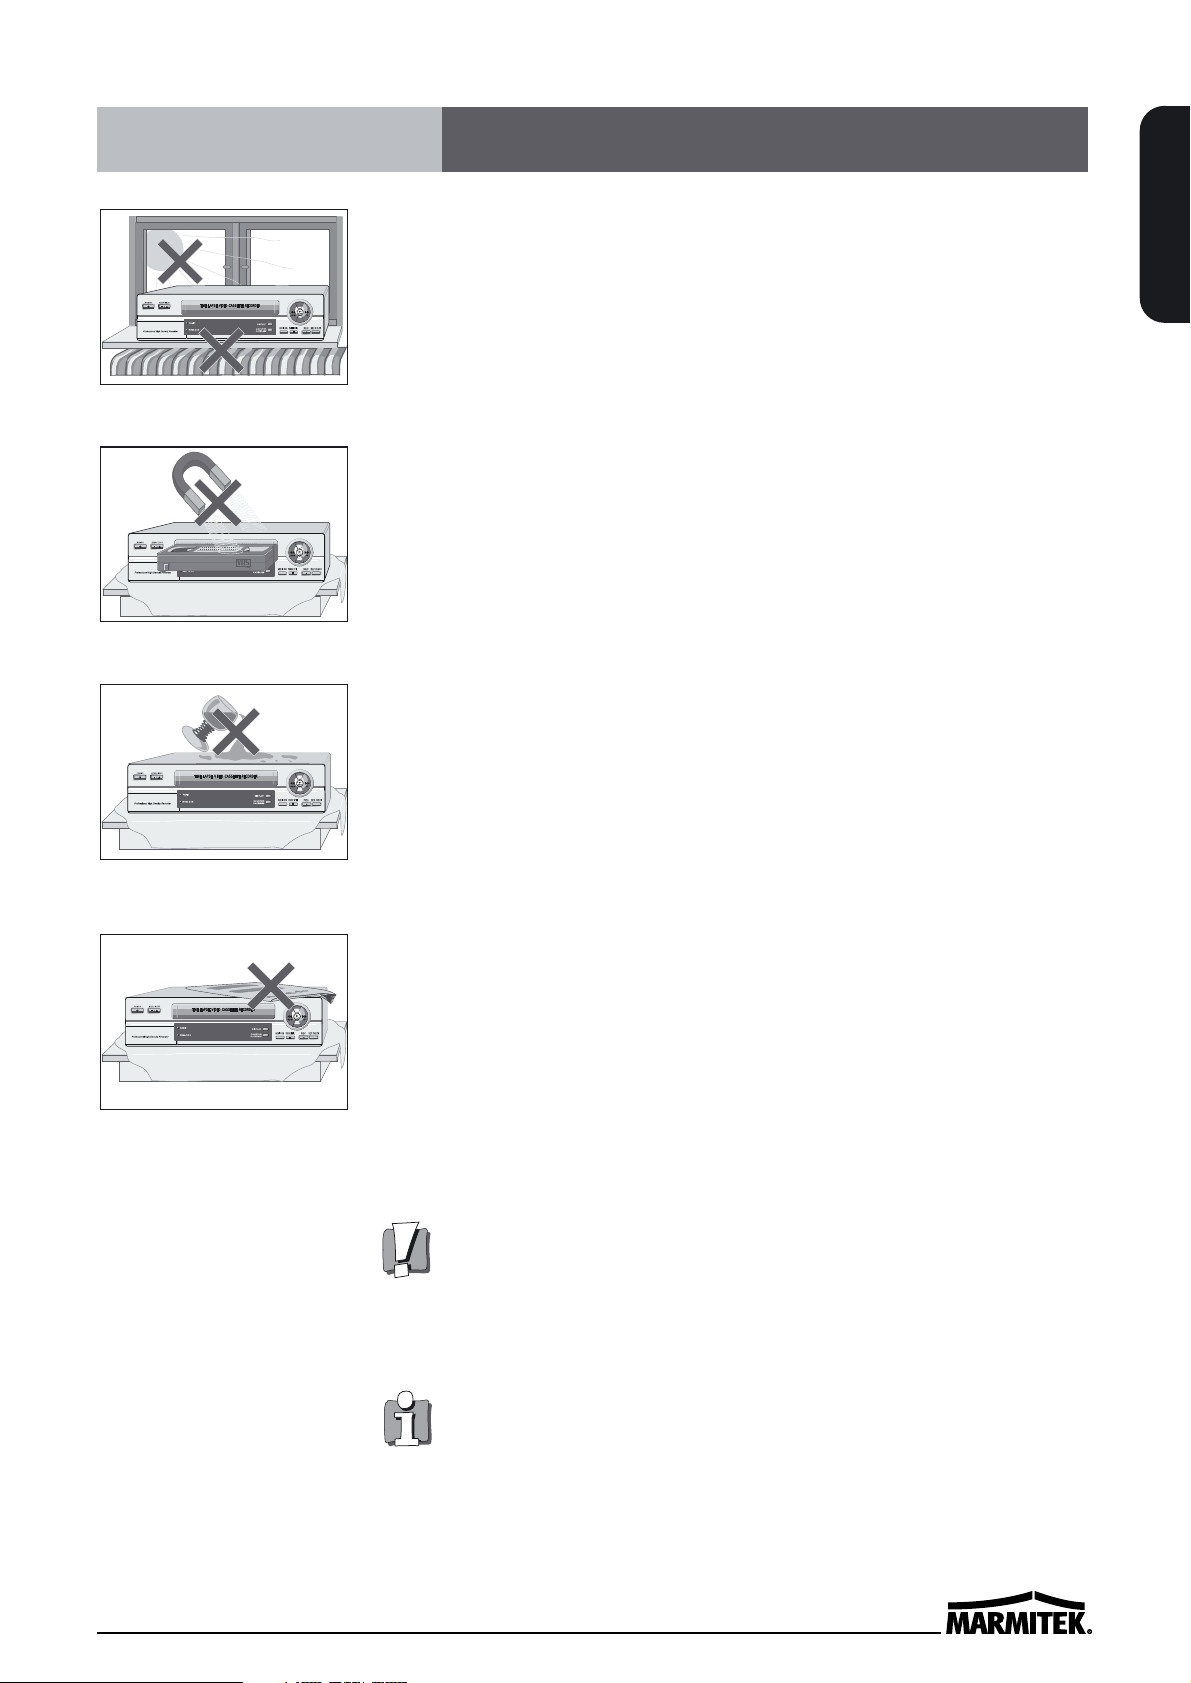
Make sure ...
... the Time Lapse VCR is placed on a steady, flat surface.
... you place the Time Lapse VCR where there is good ventilation all
around.
... you clean the Time Lapse VCR only with a soft, lint-free cloth; do
not use aggressive or alcohol-based cleaning agents.
... you disconnect the power supply if the Time Lapse VCR appears
to be working incorrectly, is making an unusual sound, has a
strange smell, has smoke emitting from it or liquids have got
inside it. Have a qualified technician check the recorder.
... you disconnect the power supply and aerial if you will not be
using the Time Lapse VCR for a long period or during a
thunderstorm.
For your own safety!
• There are no components in this Time Lapse VCR you
can service or repair yourself.
• Do not open the case of the Time Lapse VCR. Only
allow qualified personnel to repair or service your set.
• This Time Lapse VCR is designed for continuous
operation. Switching it off does not disconnect it from
the mains (stand-by). To disconnect it from the mains,
you have to unplug it.
• Recording any copyright protected material may infringe
a copyright.
Precautions
Page 4
IMPORTANT SAFEGUARDS
1. READ INSTRUCTIONS - All the safety and operating instructions should be read before the unit is operated.
2. RETAIN INSTRUCTIONS - The safety and operating instructions should be retained for future reference.
3. HEED WARNINGS - All warnings on the unit and in the operating instructions should be adhered to.
4. FOLLOW INSTRUCTIONS - All operating and use instructions should be followed.
5. CLEANING - Unplug this unit from the wall outlet before cleaning. Do not use liquid cleaners or aerosol cleaners.
Use a damp cloth for cleaning.
6. ATTACHMENTS - Do not use attachments not recommended by the unit’s manufacturer as they may cause
hazards.
7. WATER AND MOISTURE - Do not use this unit near water - for example, near a bathtub, washbowl, kitchen sink
or laundry tub; in a wet basement; nor near a swimming pool in an unprotected outdoor installation, or any area
which is classified as a wet location.
8. ACCESSORIES - Do not place this unit on an unstable stand, tripod, bracket or mount. The unit may fall, causing
serious injury to a person and serious damage to the unit. Use only with a stand, tripod,
bracket nor mount recommended by the manufacturer or sold with the unit. Any mounting of
the unit should follow the manufacturer’s instructions and should use a mounting accessory
recommended by the manufacturer. An appliance and cart combination should be moved with
care. Quick stops, excessive force, and uneven surfaces may cause the appliance and cart
combination to overturn.
9. VENTILATION - Openings in the enclosure, if any, are provided for ventilation and to ensure reliable operation
of the unit and to protect it from overheating. These openings must not be blocked or covered. This unit should
never be placed in a built-in installation unless proper ventilation is provided or the manufacturer's instructions
have been adhered to.
10. POWER SOURCES - This unit should be operated only from the type of power source indicated on the marking
label. If you are not sure of the type of power supply you plan to use, consult your appliance dealer or local
power company. For units intended to operate from battery or other sources, refer to the operating instructions.
CAUTION
RISK OF ELECTRIC SHOCK
DO NOT OPEN
CAUTION: TO REDUCE THE RISK OF ELECTRIC SHOCK, DO NOT REMOVE
COVER (OR BACK). NO USER-SERVICEABLE PARTS INSIDE.
REFER SERVICING TO QUALIFIED SERVICE PERSONNEL.
The lightning flash with arrowhead symbol, within an equilateral triangle, is intended to
alert the user to the presence of uninsulated “dangerous voltage” within the product’s
enclosure that may be of sufficient magnitude to constitute a risk of electric shock.
The exclamation point within an equilateral triangle is intended to alert the user to the
presence of important operating and servicing instructions in the literature accompanying
the appliance.
WARNING : TO REDUCE THE RISK OF FIRE OR ELECTRIC SHOCK, DO NOT EXPOSE THIS
APPLIANCE TO RAIN OR MOISTURE.
CAUTION : TO PREVENT ELECTRIC SHOCK, MATCH WIDE BLADE OF PLUG TO WIDE SLOT,
FULLY INSERT.
Important Safeguards
Page 5

IMPORTANT SAFEGUARDS
ENGLISH
11. GROUNDING OR POLARIZATION - This unit may be equipped with a polarized alternating-current line plug (a
plug having one blade wider than the other). This plug will fit into the power outlet only one way. This is a safety
feature. If you are unable to insert the plug fully into the outlet, try reversing the plug. If the plug should still fail to
fit, contact your electrician to replace your obsolete outlet. Do not defeat the safety purpose of the polarized
plug. Alternately, this unit may be equipped with a 3-wire grounding-type plug, having a third (grounding) pin.
This plug will only fit into a grounding-type power outlet. This is a safety feature. If you are unable to insert the
plug into the outlet, contact your electrician to replace your obsolete outlet. Do not defeat the safety purpose of
the grounding-type plug.
12. POWER-CORD PROTECTION - Power-supply cords should be routed so that they are not likely to be walked
on or pinched by items placed upon or against them, paying particular attention to cords and plugs, convenience
receptacles, and the point where they exit from the appliance.
13. POWER LINES - An outdoor system should not be located in the vicinity of overhead power lines or other
electric light or power circuits, or where it can fall into such power lines or circuits. When installing an outdoor
system, extreme care should be taken to keep from touching such power lines or circuits as contact with them
might be fatal. U.S.A models only - refer to the National Electrical Code Article 820 regarding installation of
CATV systems.
14. OVERLOADING - Do not overload outlets and extension cords as this can result in a risk of fire or electric
shock.
15. OBJECT AND LIQUID ENTRY - Do not push objects of any kind into this unit through openings as they may
touch dangerous voltage points or short-out parts that could result in a fire or electric shock. Never spill liquid of
any kind on the unit.
16. SERVICING - Do not attempt to service this unit yourself as opening or removing covers may expose you to
dangerous voltage or other hazards. Refer all servicing to qualified service personnel.
17. DAMAGE REQUIRING SERVICE - Unplug the unit from the wall outlet and refer servicing to qualified service
personnel under the following conditions:
a. When the power-supply cord or plug is damaged.
b. If liquid has been spilled, or objects have fallen into the unit.
c. If the unit has been exposed to rain or water.
d. If the unit does not operate normally by following the operating instructions. Adjust only those controls that are
covered by the operating instructions, as an adjustment of other controls may result in damage and will often
require extensive work by a qualified technician to restore the unit to its normal operation.
e. If the unit has been dropped or the cabinet has been damaged.
f. When the unit exhibits a distinct change in performance - this indicates a need for service.
18. REPLACEMENT PARTS - When replacement parts are required, be sure the service technician uses replacement
parts specified by the manufacturer or have the same characteristics as the original part. Unauthorized substitutions
may result in fire, electric shock or other hazards.
19. SAFETY CHECK - Upon completion of any service or repairs to this unit, ask the service technician to perform safety
checks to determine that the unit is in proper operating condition.
20. COAX GROUNDING - If an outside cable system is connected to the unit, be sure the cable system is
grounded. U.S.A models only - Section 810 of the National Electric Code, ANSI/NFPA No.70-1981, provides
information with respect to proper grounding of the mount and supporting structure, grounding of the coax to a
discharge unit, size of grounding conductors, location of discharge unit, connection to grounding electrodes and
requirements for the grounding electrode.
21. LIGHTNING - For added protection of this unit during a lightning storm or when it is left unattended and unused
for long period of time, unplug power cord from the wall.
Polarized Attachment Plug Marking - for CNL use only.
CAUTION - TO PREVENT ELECTRIC SHOCK, MATCH WIDE BLADE OF PLUG TO WIDE SLOT,
FULLY INSERT
Page 6

CONTENTS
Locations of controls and indicators...................................................................................................... 1
Front panel.......................................................................................................................... 1
Digital display..................................................................................................................... 2
Display of operating conditions ........................................................................................ 3
Back panel........................................................................................................................... 4
Remote control.................................................................................................................... 5
Connections ......................................................................................................................................... 6
Video Cassettes Tapes ........................................................................................................................... 7
Types of on-screen displays and Display Sequence ................................................................................ 8
Setting the Clock ............................................................................................................................... 10
Changing the on-screen display .......................................................................................................... 12
Normal Recording .............................................................................................................................. 14
Program Timer Recording ................................................................................................................... 15
Alarm Recording ................................................................................................................................ 19
Panic Recording ................................................................................................................................. 20
Series(Link) Recording ....................................................................................................................... 20
Autorepeat Recording ........................................................................................................................ 22
Normal Playback ................................................................................................................................ 23
Normal Playback .............................................................................................................. 23
Tracking Control ...............................................................................................................23
Audio Playback .................................................................................................................23
Special Playback ................................................................................................................................ 24
Picture Search .................................................................................................................. 24
Still Image ........................................................................................................................ 24
Vertical Lock Control ........................................................................................................ 24
Slow ................................................................................................................................. 24
Recording Check .............................................................................................................. 24
Time/Date Search ............................................................................................................ 25
Alarm Search ...................................................................................................................25
Alarm Scan ....................................................................................................................... 26
Zero Search....................................................................................................................... 26
Other functions ................................................................................................................................. 27
Tape Counter (Zero Search) .............................................................................................. 27
Setting the Security Lock (Set Lock) ................................................................................ 28
Setting the SW Out Terminal Output ............................................................................... 28
Setting the Buzzer ............................................................................................................ 29
Changing the Alarm Recording Times ............................................................................. 30
Checking the Power Loss Times ...................................................................................... 30
Checking Usage Duration ................................................................................................ 31
Setting In/Out Terminals .................................................................................................. 31
Maintenance ...................................................................................................................................... 34
Troubleshooting Guide ....................................................................................................................... 35
Specifications ..................................................................................................................................... 37
Contents
Page 7
1
ENGLISH
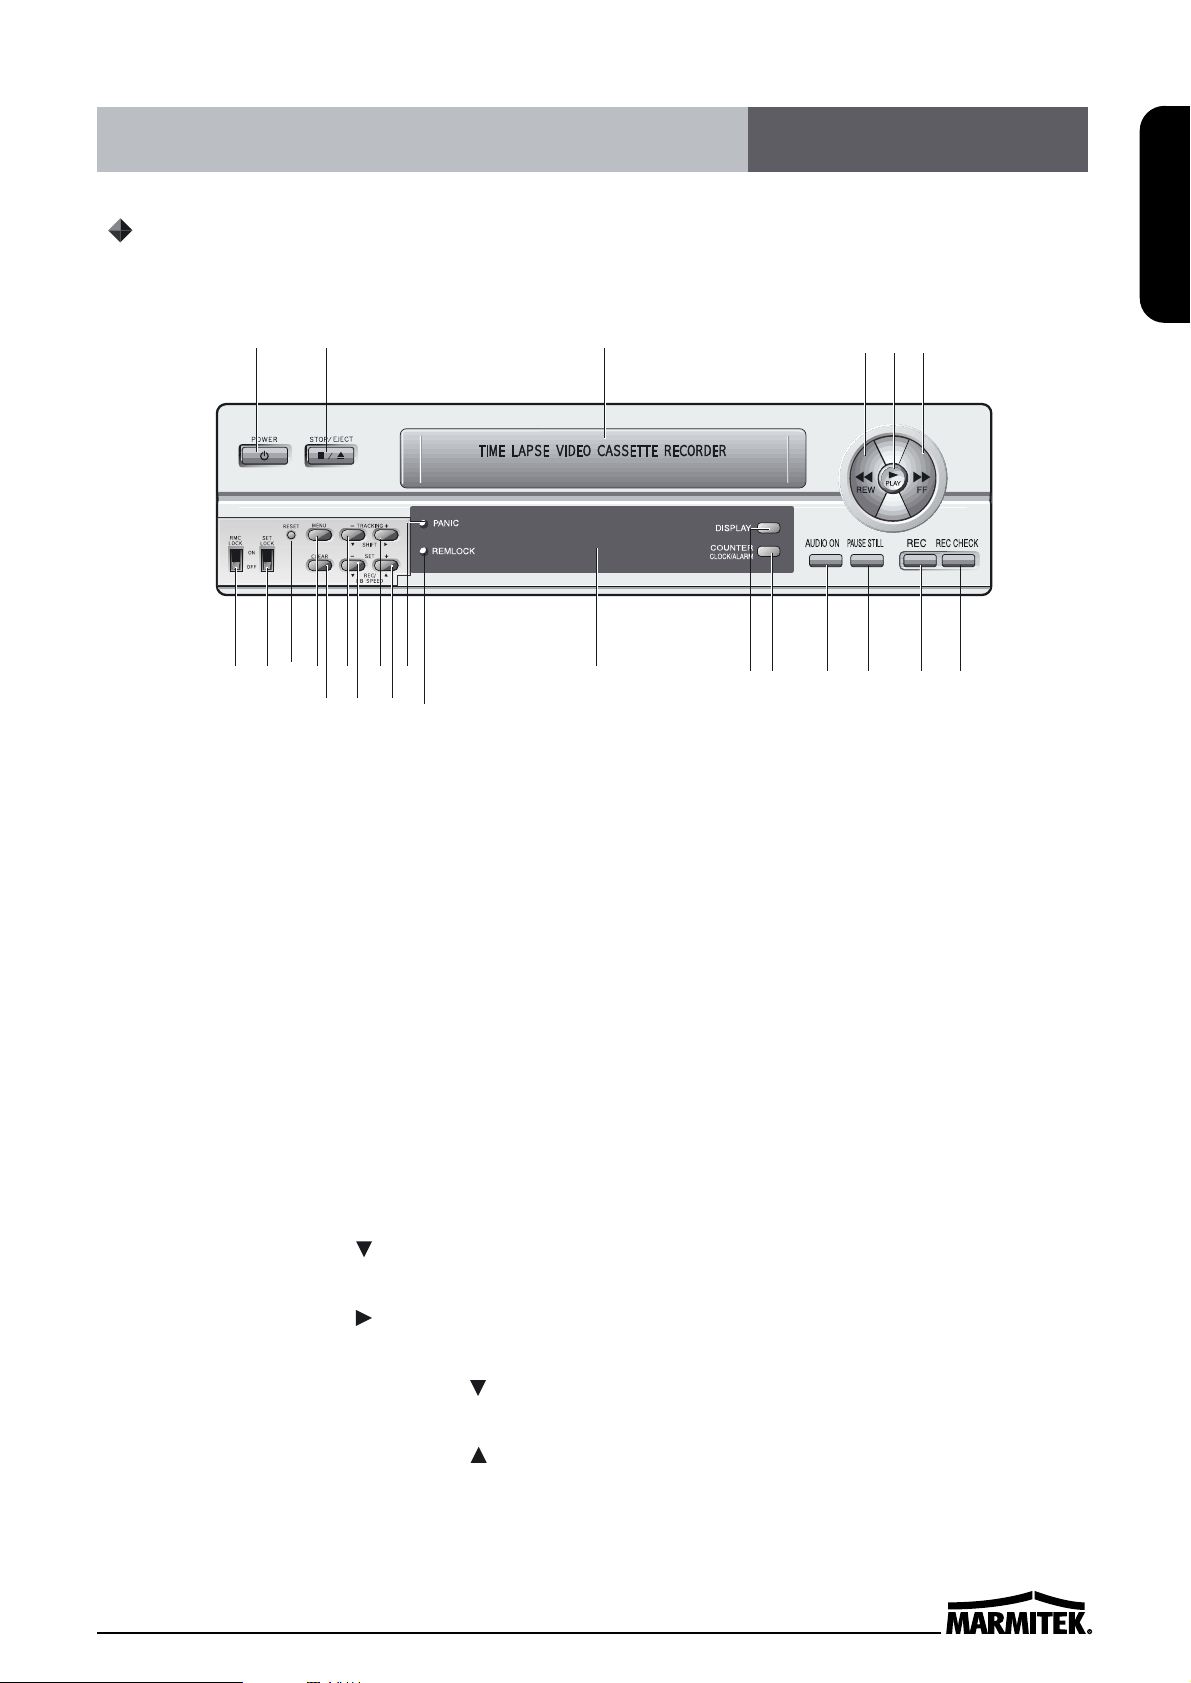
Locations of controls and indicators
1 POWER/TIMER button
2 STOP/EJECT button
3 CASSETTE Compartment
4 REW button
5 PLAY button
6 FF button
7 Remote Control LOCK switch
8 SET LOCK switch
9 RESET button
10 MENU button
11 CLEAR button
12 SHIFT( ) / TRACKING (-)
button
13 SHIFT( ) / TRACKING (+)
button
14 REC/PLAY SPEED( ) button
(SET - button)
15 REC/PLAY SPEED( ) button
(SET + button)
1 POWER/TIMER button
2 STOP/EJECT button
3 CASSETTE Compartment
4 REW button
5 PLAY button
6 FF button
7 Remote Control LOCK switch
8 SET LOCK switch
9 RESET button
10 MENU button
11 CLEAR button
12 SHIFT( ) / TRACKING (-)
button
14
12 3 6
7
45
89
11 15 16
12 13 18
19
201021 22 23 24
17
Front panel
16 Remote Control LOCK indicator
It comes on when the Remote Control Lock
switch is set to the "ON" position.
17 PANIC IN indicator
18 DISPLAY window
19 DISPLAY button
20 COUNTER/CLOCK/ALARM button
21 AUDIO ON button
22 PAUSE/STILL button
23 RECORD button
24 RECORD CHECK button
Page 8
2
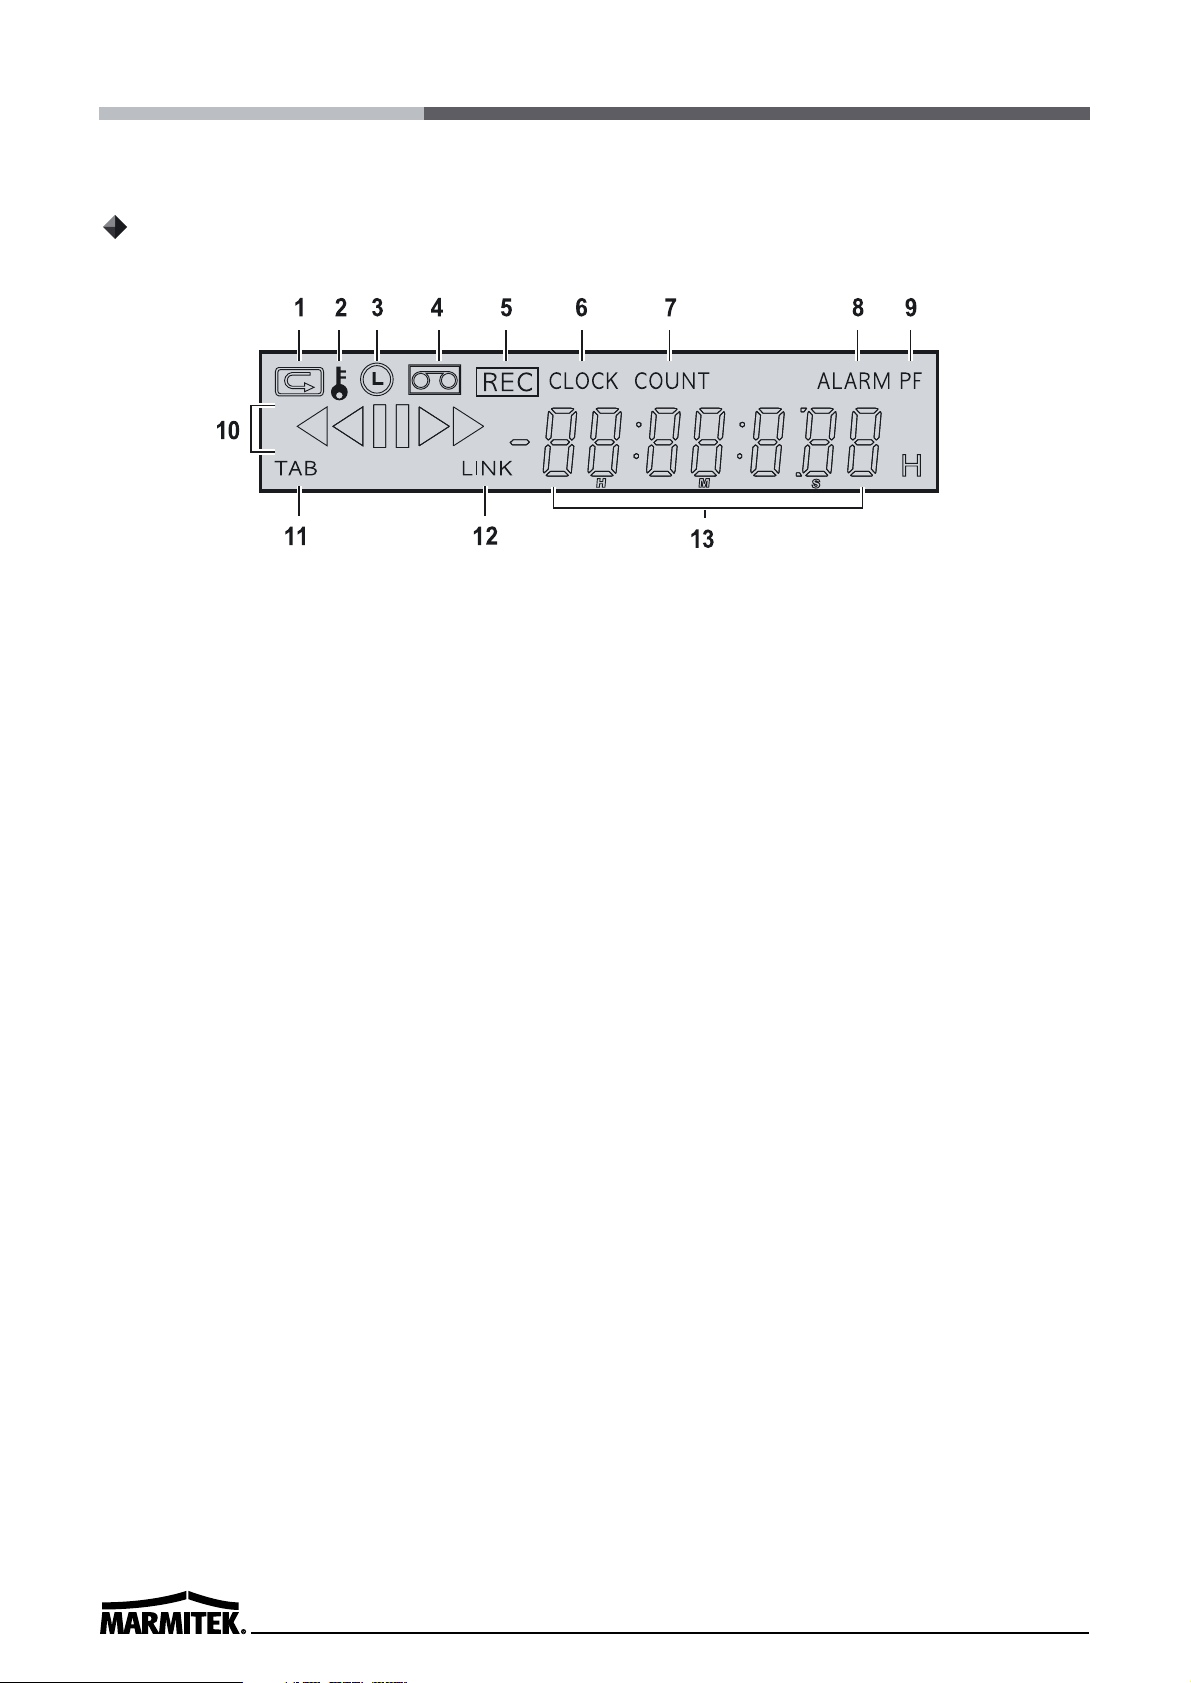
1 Repeat recording
It indicates that repeat recording is activated. When the tape reaches
its end, the unit will rewind and record over previously taped footage.
2 SET LOCK
It comes on when the SET LOCK sw is set to the “ON” position.
3 Timer recording
It appears when the timer is programmed.
4 Cassette status indicator
It illuminates when a tape is inserted.
5 REC indicator
It illuminates during recording and when TIMER REC is set to on.
6 CLOCK indicator
It indicates the current time.
7 COUNT indicator
It indicates the relative position on the tape.
8 ALARM indicator
It appears after the alarm mode is activated.
9 PF indicator
It indicates the existence of power failure.
10 Play / cue / review / still / slow
It indicates the tape operation.
11 TAB indicator
It appears when the tape does not have a security tab.
Digital Display
Page 9
3
ENGLISH
12 LINK indicator
It appears when LINK (Series) REC is turned on.
13 Digit indicator
It indicates clock, tape counter, and tape speed during
playback/recording.
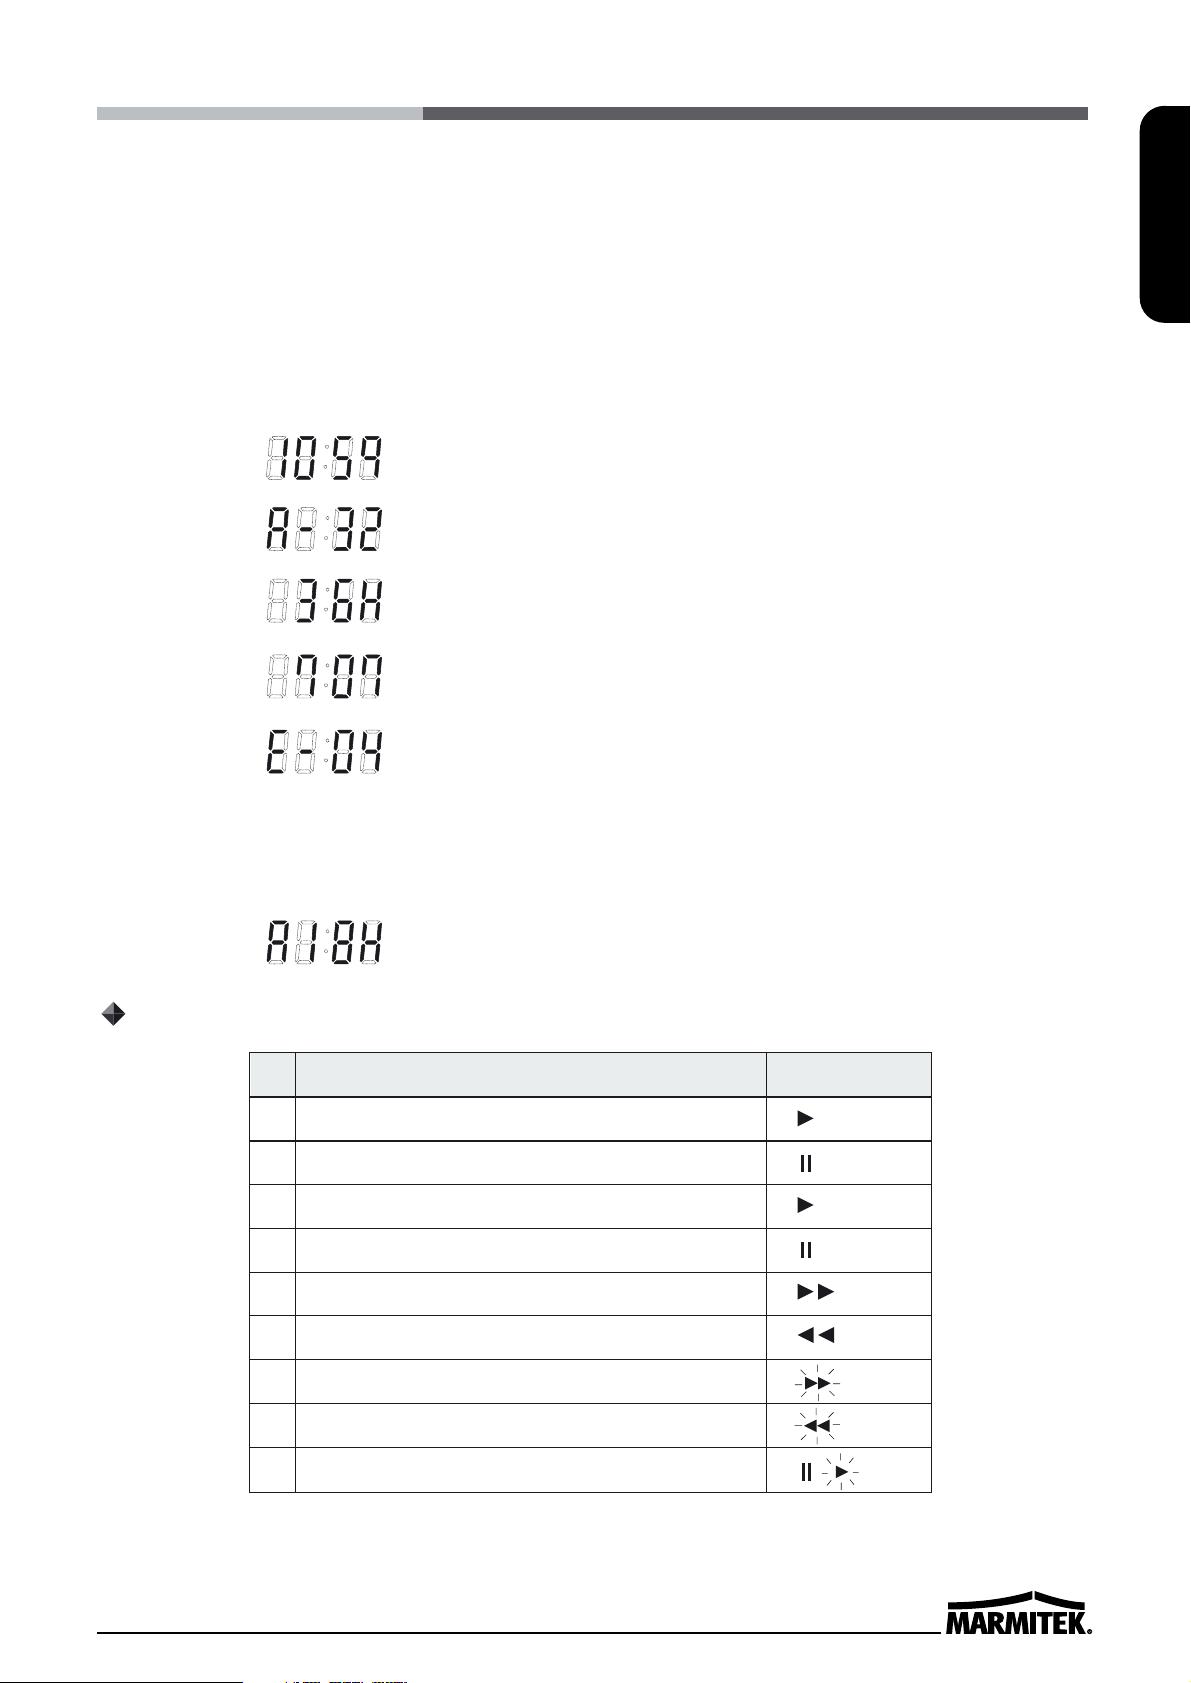
14 Mode display
• TAPE COUNTER display (ex:10:HOUR,59:MINUTE)
- Maximum Hour : 19 - Maximum Minute : 59
• ALARM COUNTER display (ex: A:Alarm , 32:Alarm No.)
• PLAY/REC SPEED display (ex: 36H:Play/Recording Speed)
• TIME display (ex: 7:HOUR , 07:MINUTE)
• ERROR display (ex: E:Error , 04:Error No.)
- E-01 : The cassette cannot be loaded or unloaded.
- E-02 : The tape stops.
- E-03 : The drum can not rotate properly.
- E-04 : The tape is cut/broken.
• AUDIO ON display (ex: A:Audio , 18H:Play Speed)
Operation Mode Indicator
1 Record(REC) REC
2 Record pause (REC PAUSE) REC
3 Playback (PLAY)
4 Still image (STILL)
5 Fast forward (FF)
6 Rewind (REW)
7 CUE (CUE)
8 Review (REVIEW)
9 Slow (Pause Still + FF, Pause Still + REW)
Display of operating conditions
Page 10
4
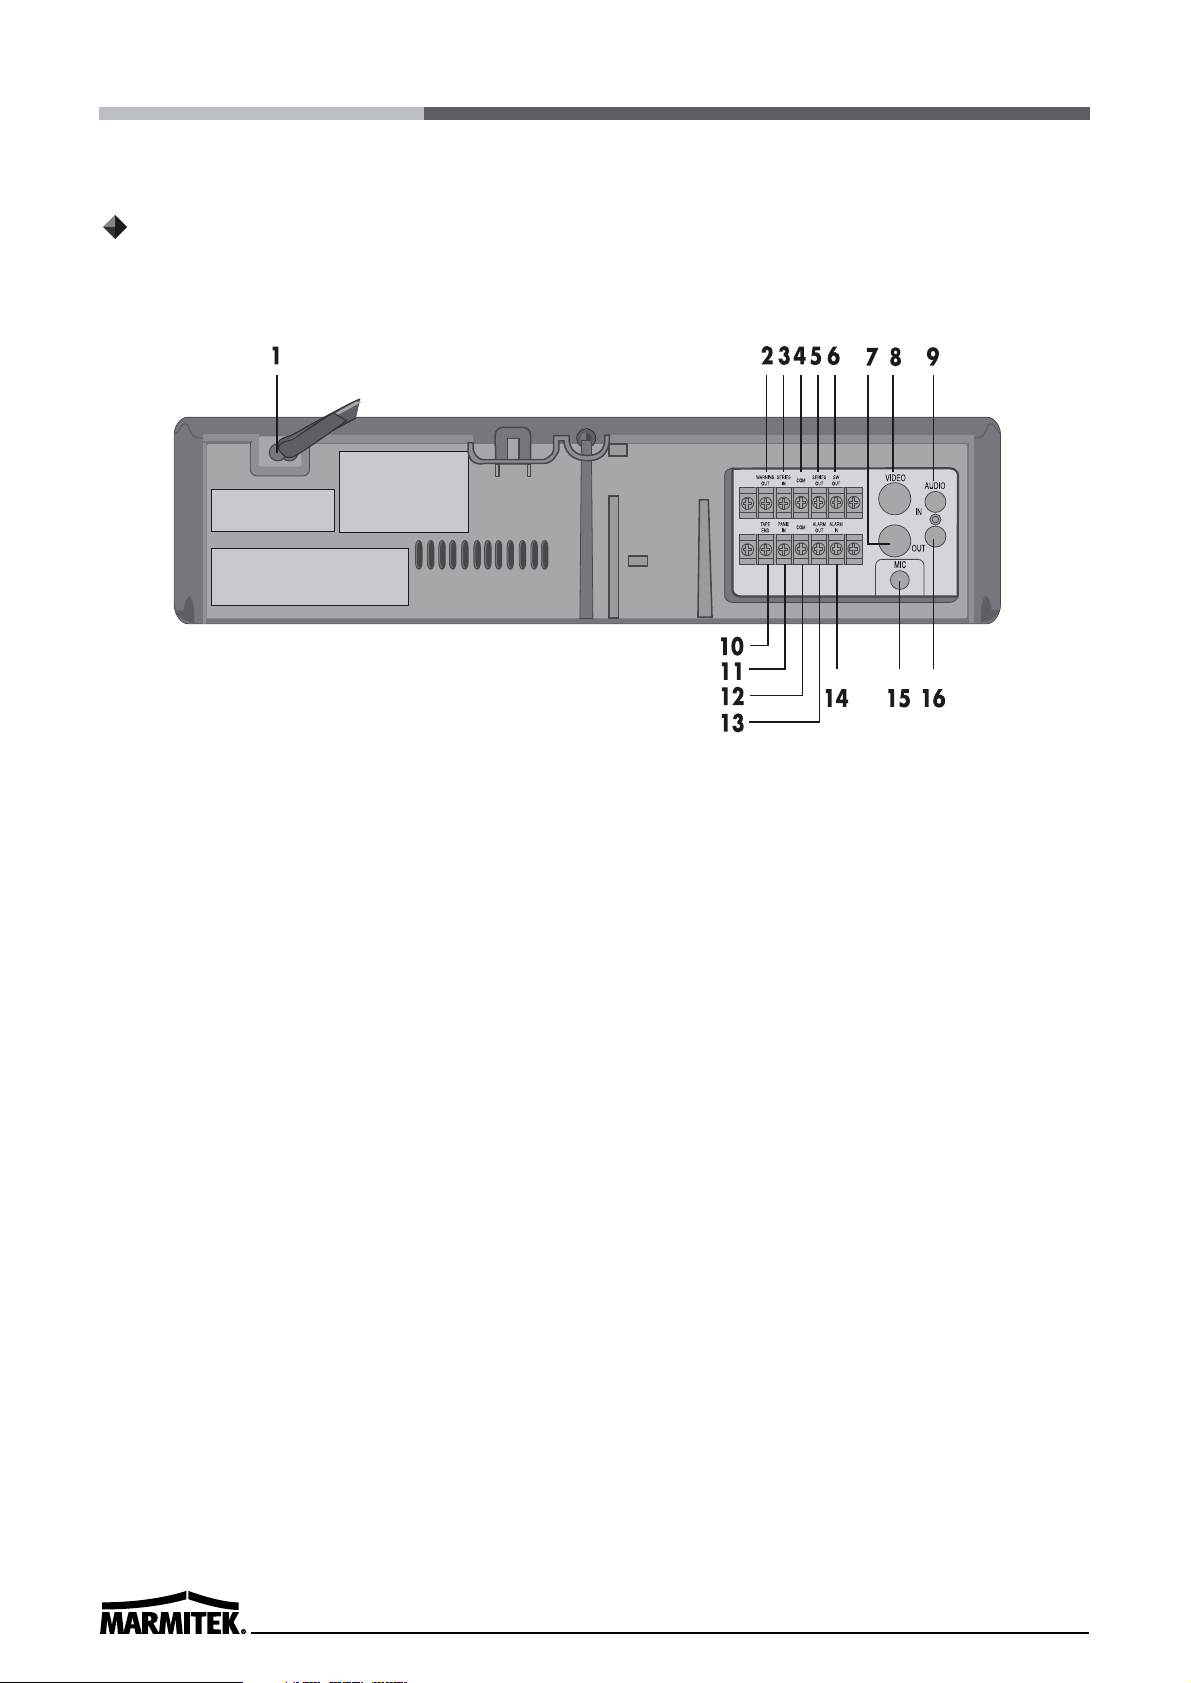
Back Panel
1 AC POWER CORD
2 WARNING OUT terminal
3 SERIES IN terminal
4 COM terminal
5 SERIES OUT terminal
6 SW OUT terminal
7 VIDEO OUT jack (BNC Type)
8 VIDEO IN jack (BNC Type)
9 AUDIO IN jack (RCA Type)
10 TAPE END terminal
11 PANIC IN terminal
12 COM terminal
13 ALARM OUT terminal
14 ALARM IN terminal
15 MIC(microphone input) jack
16 AUDIO OUT jack (RCA Type)
Page 11
5
ENGLISH
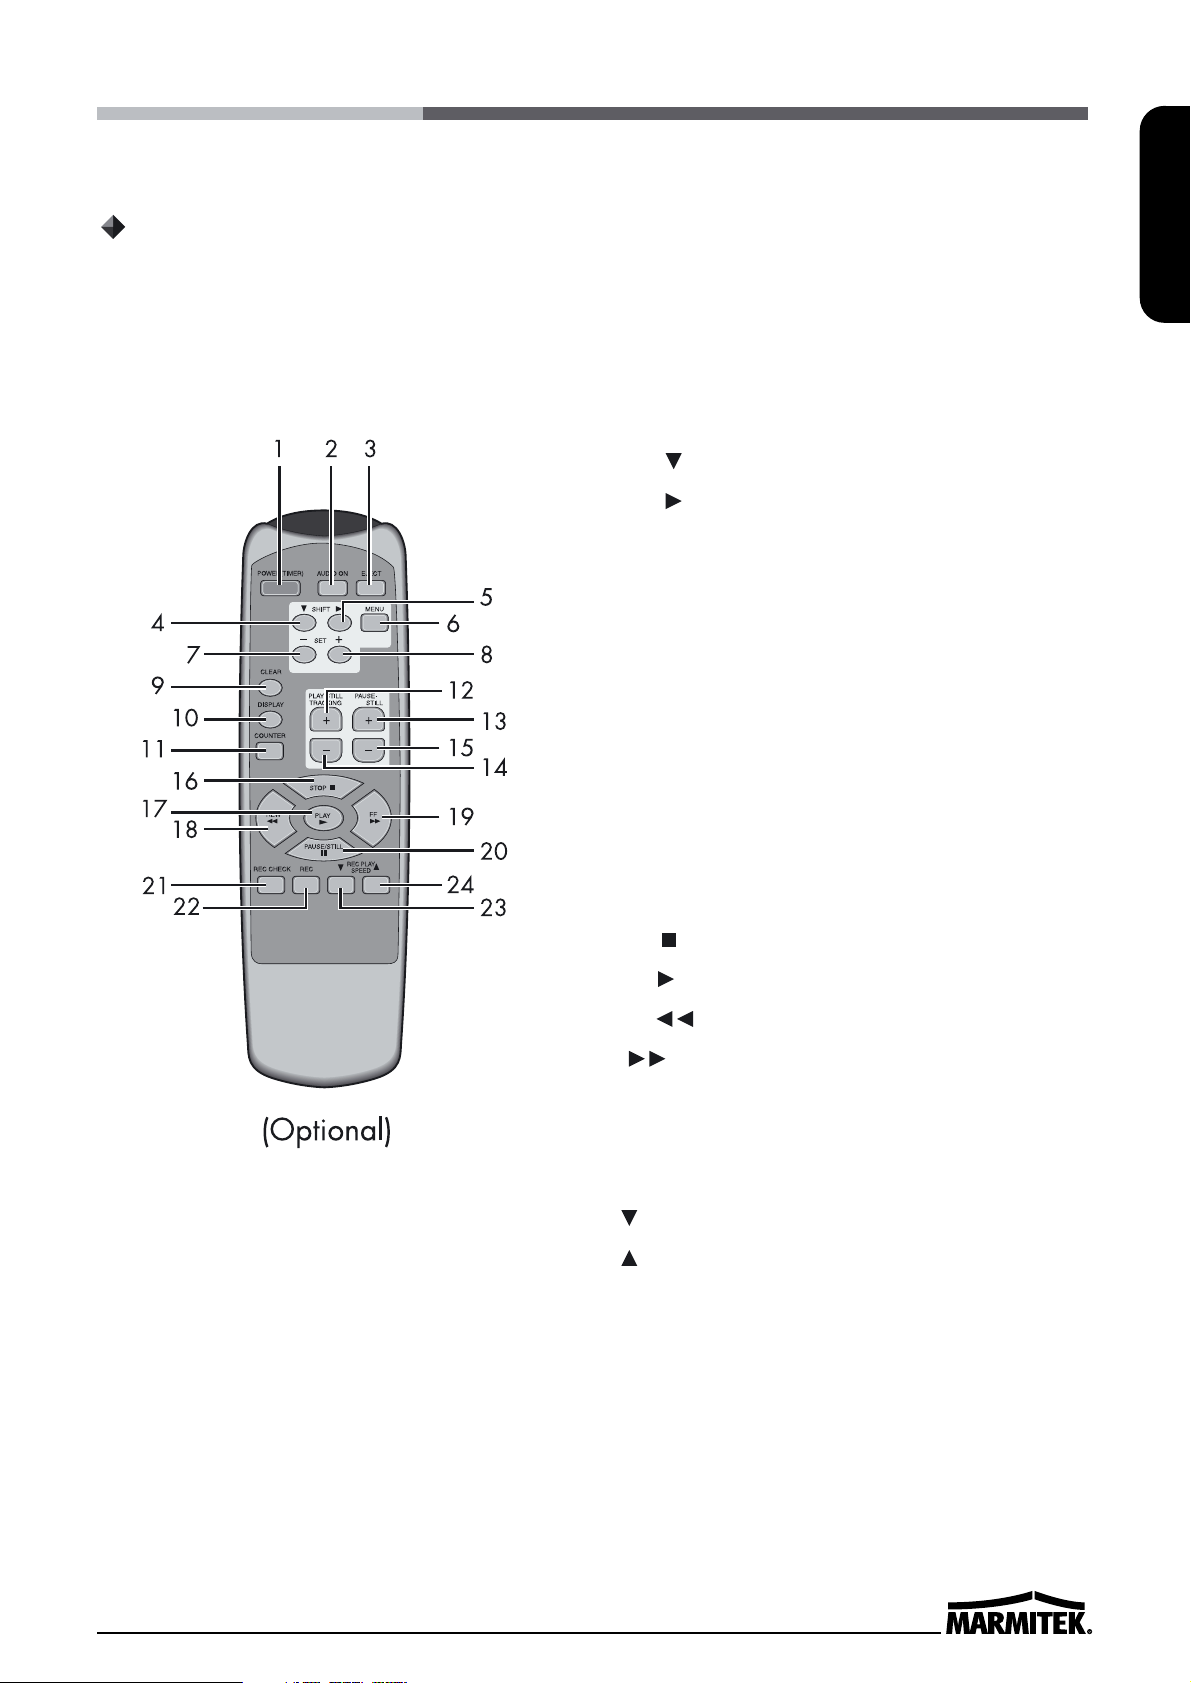
1 POWER (TIMER) button
2 AUDIO ON button
3 EJECT button
4 SHIFT button
5 SHIFT button
6 MENU button
7 SET - button
8 SET + button
9 CLEAR button
10 DISPLAY button
11 COUNTER button
12 PLAY/STILL TRACKING + button
13 PAUSE / STILL + button
14 PLAY/STILL TRACKING - button
15 PAUSE/STILL - button
16 STOP button
17 PLAY button
18 REW button
19 FF button
20 PAUSE / STILL button
21 REC CHECK button
22 REC button
23 REC/PLAY SPEED button
24 REC/PLAY SPEED button
Remote Control
Page 12
6
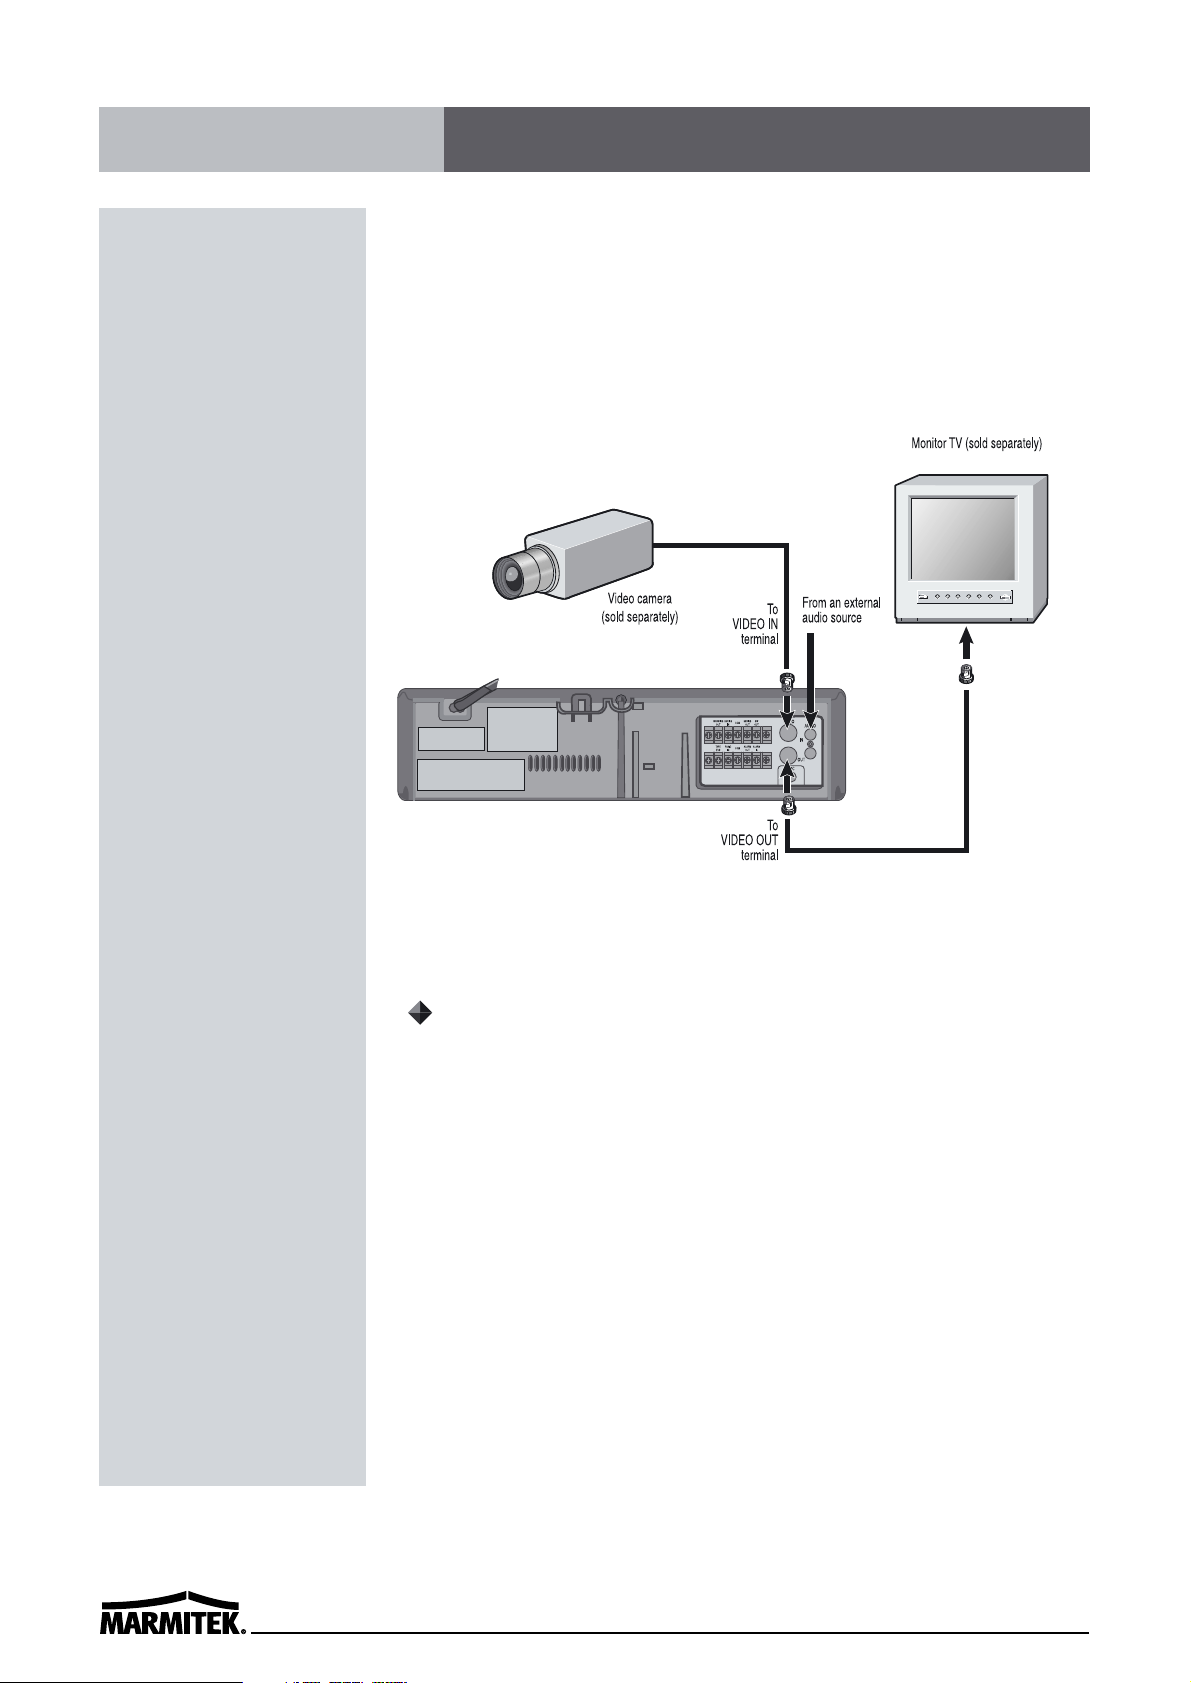
Connect the video camera and monitor TV as shown in the figure
below.
NOTE : Make sure to turn the power off on all devices before making
the connections.
✔
• For more details, please refer to
the manuals accompanying all
other devices. If the
connections are not made
properly, it may cause a fire or
damage the equipment.
Connections
Power Cord Installation
Insert the plug of the power cord into an outlet.
Page 13
7
ENGLISH
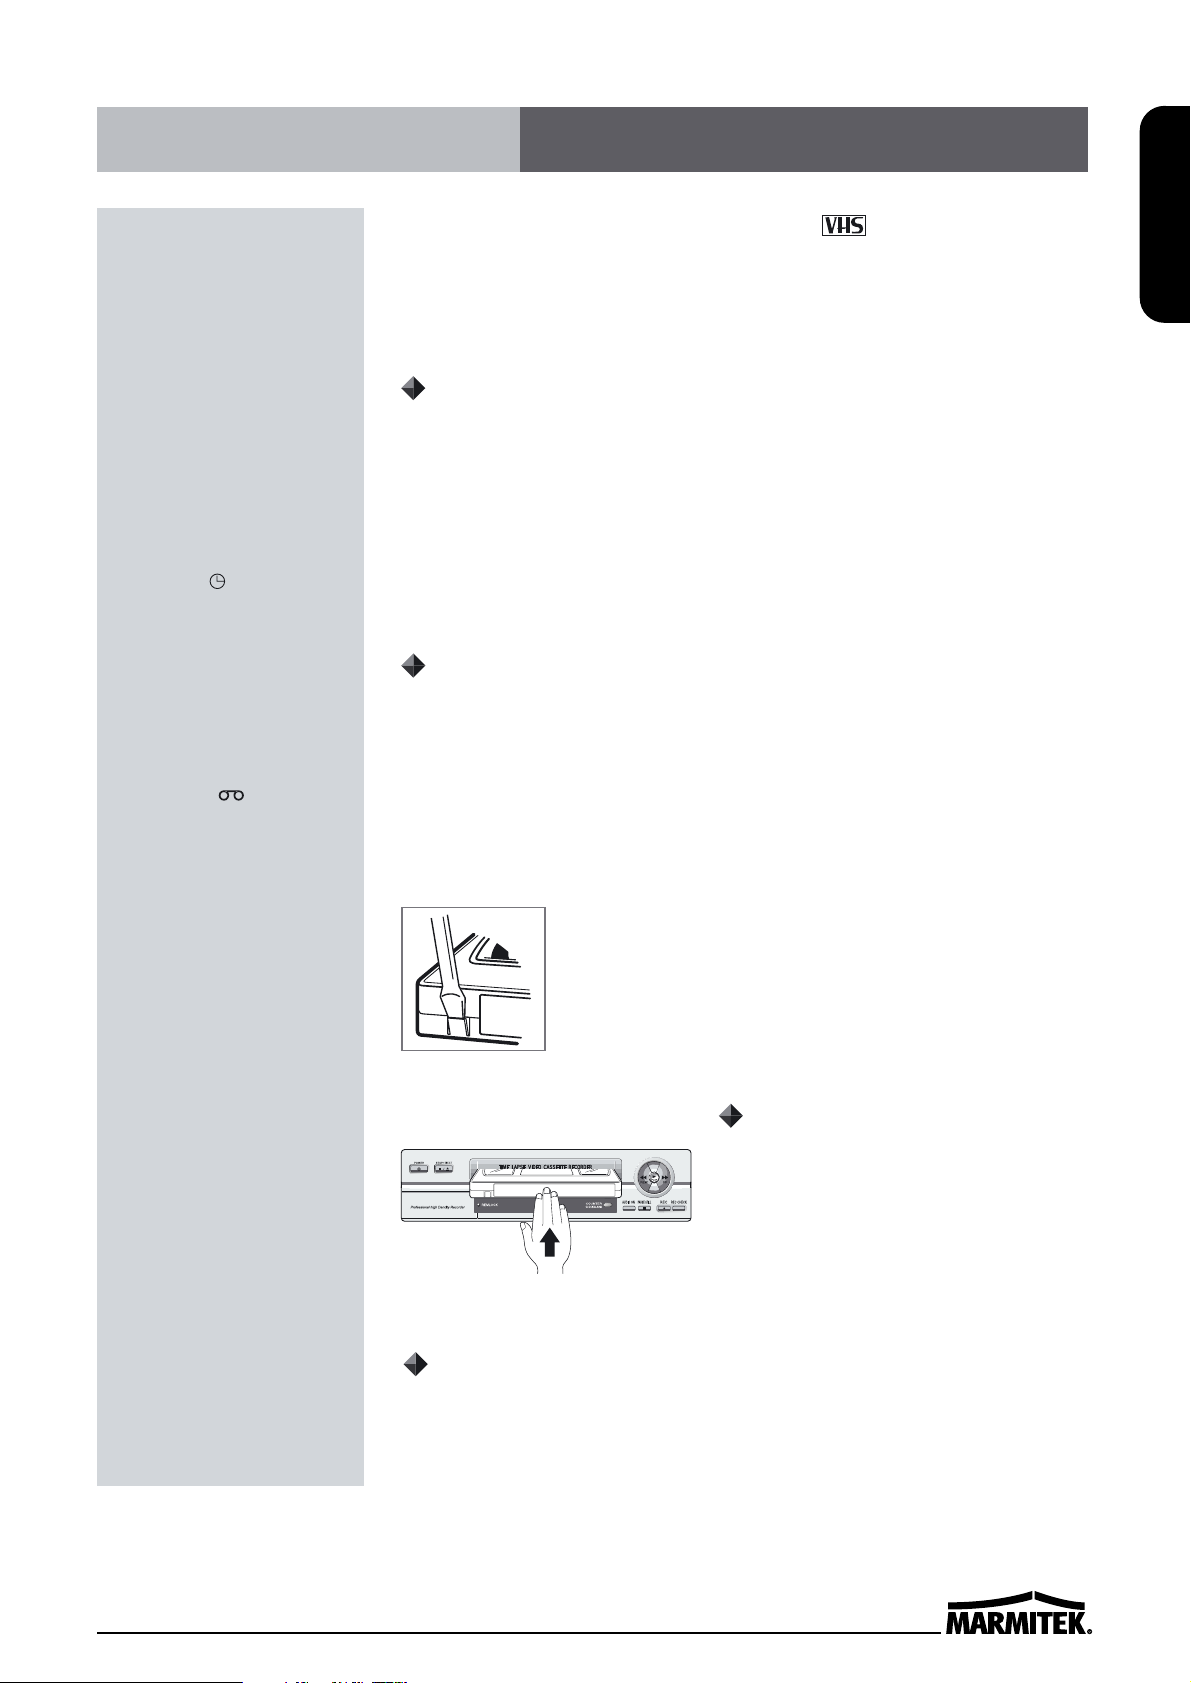
Use only video cassette tapes bearing the logo.
This VCR was primarily designed for use with T-120 cassette tapes.
It is recommended to use T-120 VHS video cassette tapes for
optimal performance.
Handling Cassette Tapes
Cassette tapes should always be stored vertically in their cases,
away from high temperatures, magnetic fields, direct sunlight, dirt,
dust and locations subject to mold formation.
Do not tamper with the cassette mechanism.
Never touch the tape with your fingers.
Protect cassette tapes from shocks or strong vibrations.
To Protect your recordings
After having recorded a tape, if you wish to keep the recording, use
a flathead screwdriver to break off the erasure-prevention tab on the
cassette.
To record again on a tape without erasure-prevention tab, cover the
hole with adhesive tape.
Erasure-prevention tab
To prevent accidental erasure, remove the tab after
recording.
To record again, cover the hole with vinyl tape.
Loading
Place the cassette, label side up, in
the loading slot. Gently push the
center of the cassette until it is
loaded automatically.
Unloading
In STOP mode, press the EJECT button. The cassette is automatically
ejected.
✔
• If you try to record on a
cassette without the erasureprevention tab, the VCR will
eject the cassette.
• If the TIMER button is
pressed when a cassette
without the erasureprevention tab is loaded,
the VCR will eject the
cassette, the timer recording
indicator ( ) will start
flashing and a buzzer will
sound if “YES” is set in the
menu for buzzer.
✔
• When the cassette is
loaded, the cassette
indicator “ “ will light on
the display panel.
• The counter display will
switch to the reset counter
“0H 00M 00S” display on
the monitor screen. (“0H
00M 00S” on the display
panel.)
✔
• Do not insert any object in
the cassette loading slot, as
that may cause injury and
damage to the VCR.
• If your hand gets stuck in the
cassette loading slot, unplug
the power cord and consult
the dealer where the unit
was bought. Do not forcibly
pull the hand out as that
may cause severe injuries.
Video Cassettes Tapes
Page 14
8
( NTSC )
( PAL )
Types of on-screen displays and Display Sequence
Page 15
9
ENGLISH
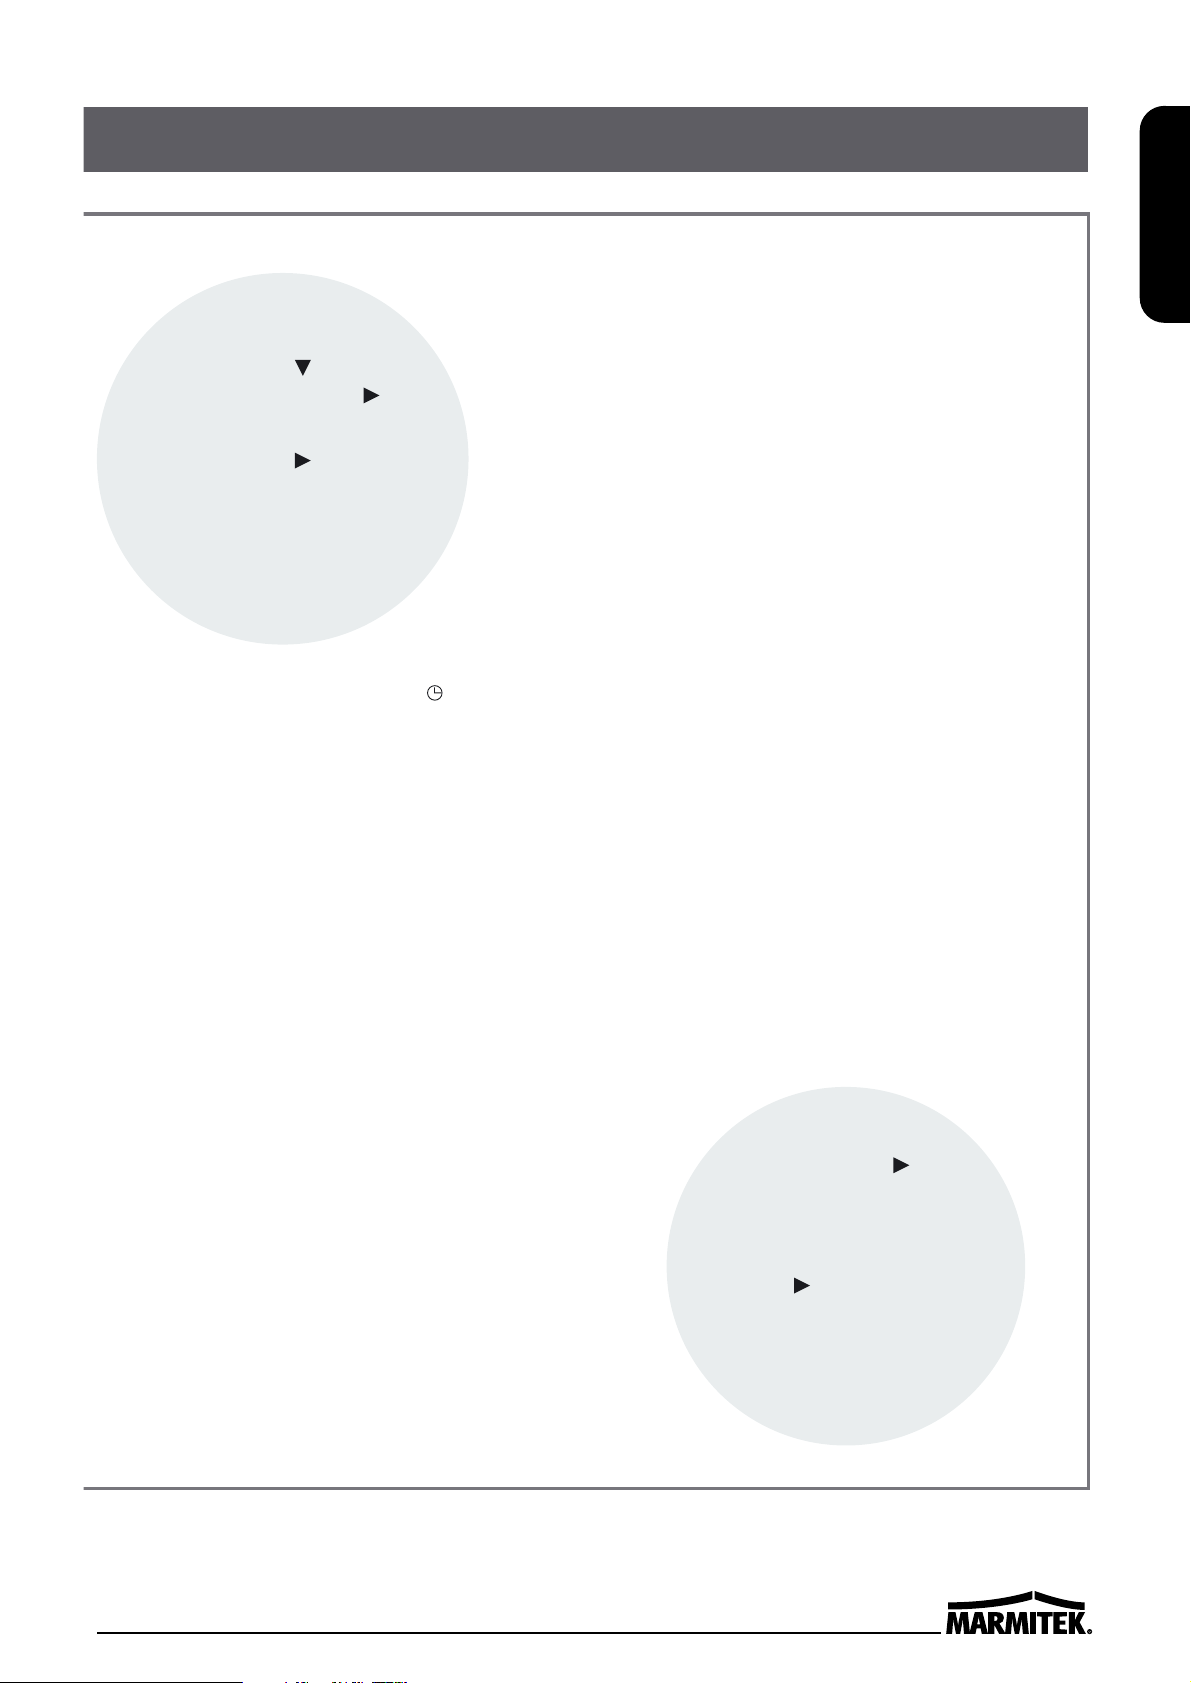
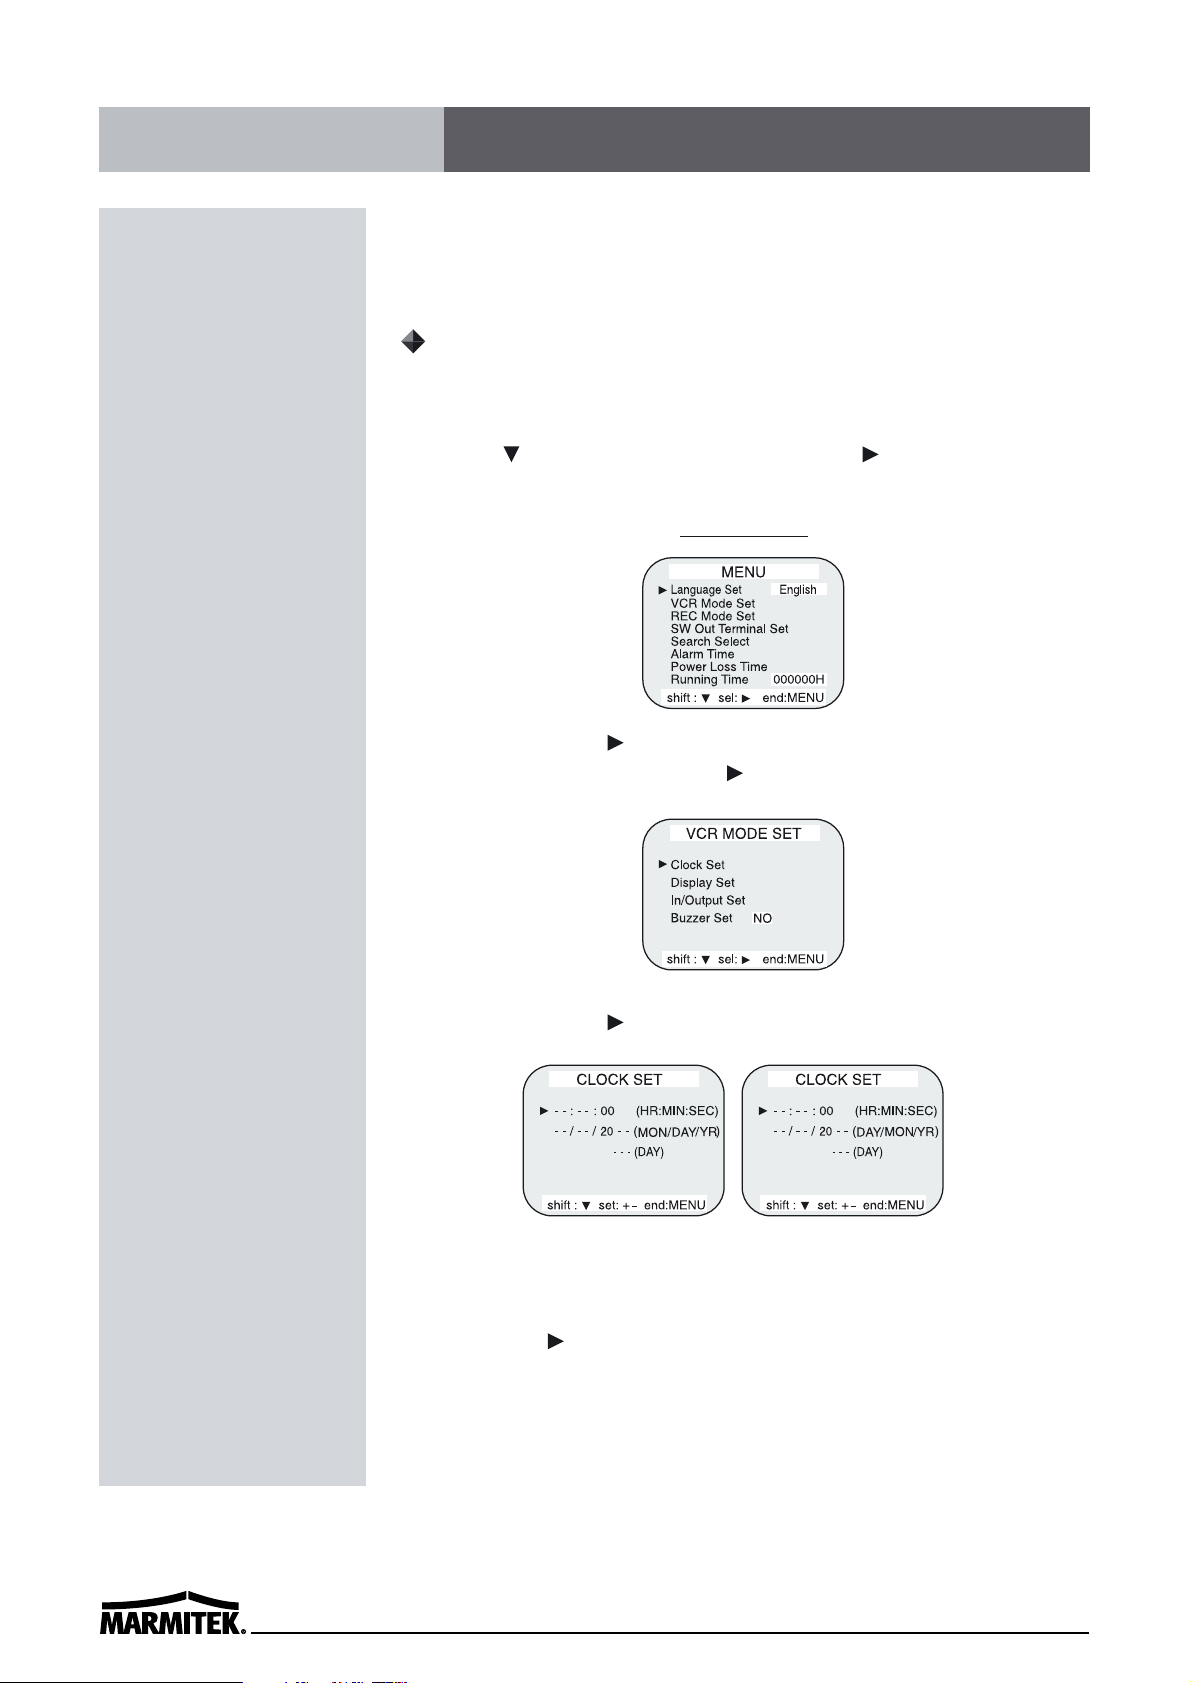
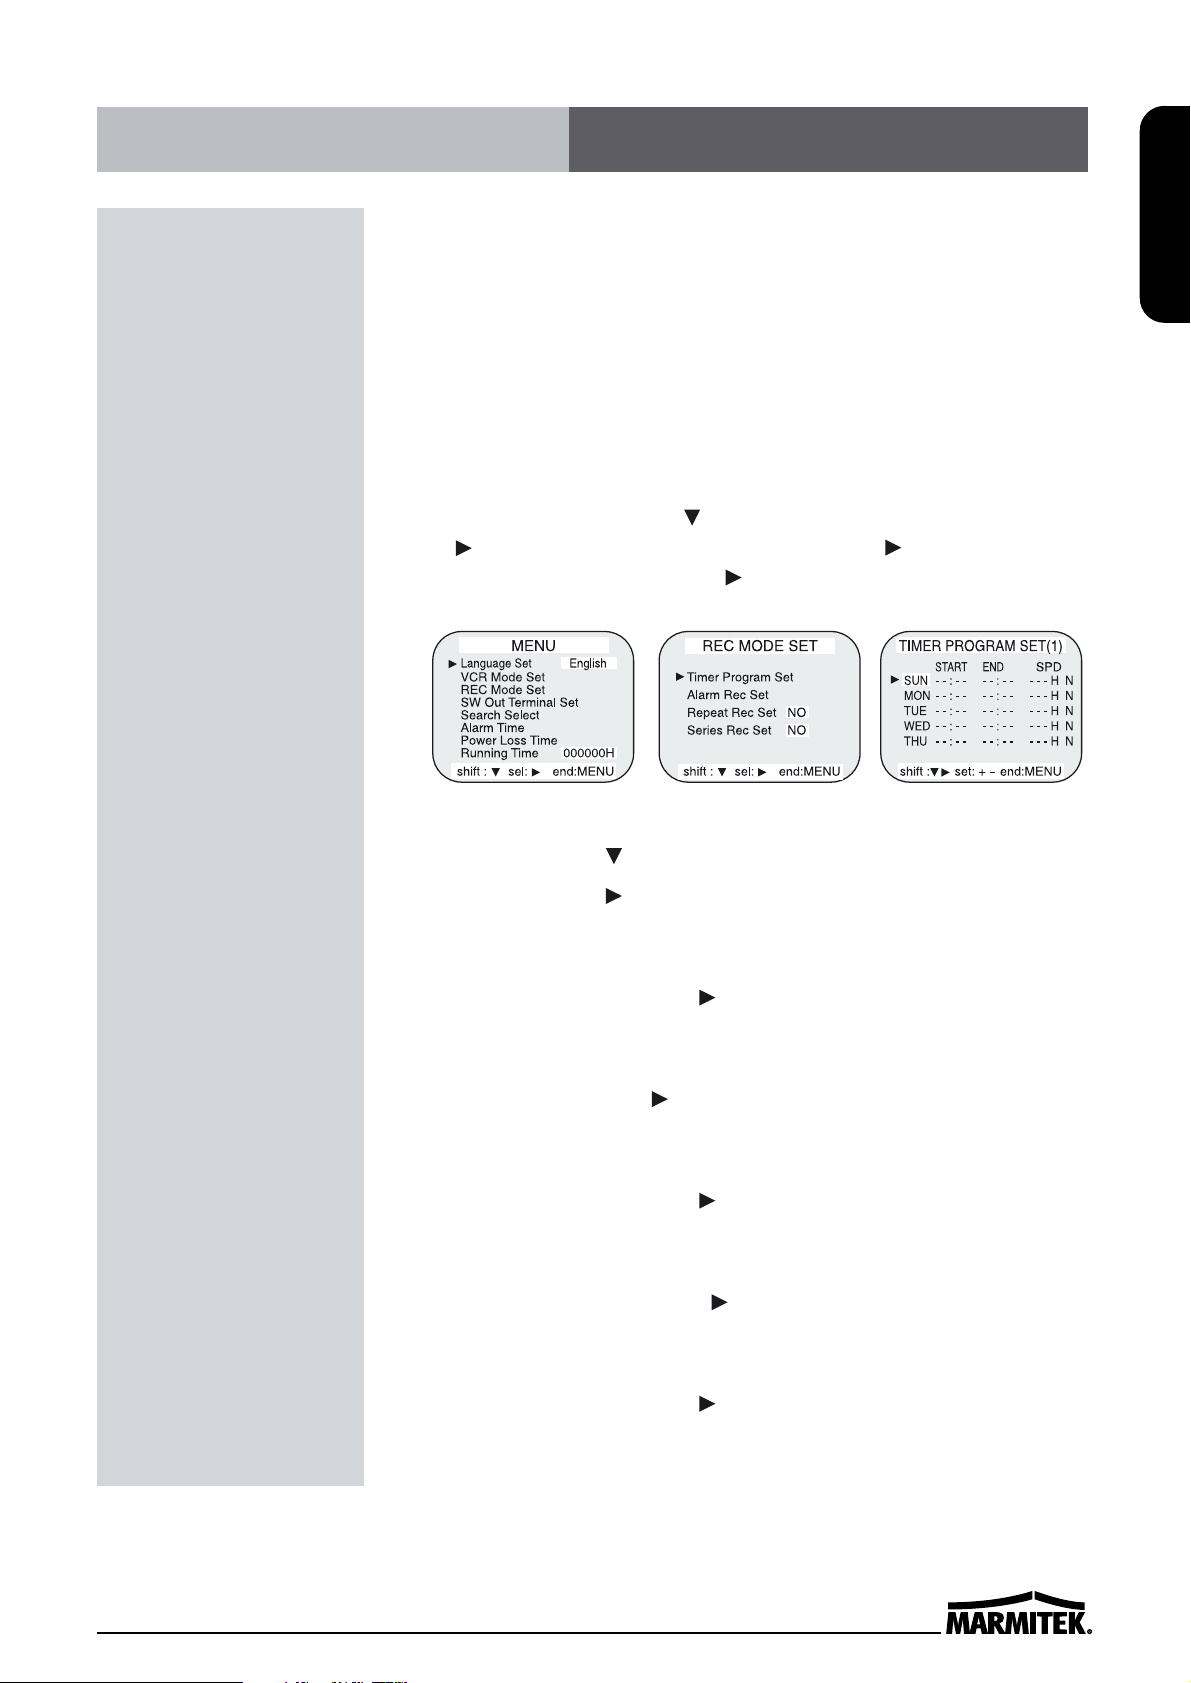
• Press the MENU button. (First
time)
• Press the SHIFT button to
move the arrow mark ( )
downward for the desired item.
• Press the SHIFT button to
select the desired item, then
the desired menu is displayed.
• Press the MENU button to
return to the normal screen
from the initial menu.
• If the VCR is in timer recording stand-by mode
(the ““ indicator is displayed on the display
panel), the on-screen displays will not be
available. First press the Power/Timer button,
to cancel the recording stand-by mode, then
proceed with the VCR programming. When
finished, press the Power/Timer button again
to return the VCR to timer recording stand-by
mode.
• When a menu is displayed, recording will not
be possible.
• Press the MENU button three times, the
setting procedure is now completed then the
normal screen is displayed.
• During recording or playback the menus
cannot be displayed.
• Press the SHIFT button
to select the desired item.
• Press the SET - (or +)
button to set or Press the
SHIFT button to select
“YES” or “NO”.
• Press the MENU button to
return to the initial menu.
Page 16
10
Example: To set the clock to April 12, 2000 at 9:30
Clock Setting
1 Turn the power on to all devices used.
2 Press the MENU button, the initial menu is displayed. Press the
SHIFT button to move the arrow mark ( ) located on “VCR
Mode Set”.
Initial MENU
3 Press the SHIFT button, the VCR MODE SET menu is
displayed. The arrow mark ( ) is located in “Clock Set”.
4 Press the SHIFT button, the CLOCK SET menu is displayed.
5 Press the SET - (or +) button to set the hours (ex : 09), then press
the SHIFT button.
(NTSC
)
(PAL)
Setting the Clock
Page 17

11
ENGLISH
6 Press the SET - (or +) button to set the minutes (ex : 30), then
press the SHIFT button.
7 The seconds are already set to “00”.
8 Press the SHIFT button.
9 Press the SET - (or +) button to set the month (ex : 04), then
press the SHIFT button.
(NTSC)
Press the SET - (or +) button to set the day (ex : 12), then press
the SHIFT button.
(PAL)
10 Press the SET - (or +) button to set the day (ex : 12), then press
the SHIFT button.
(NTSC)
Press the SET - (or +) button to set the day month (ex : 04), then
press the SHIFT button.
(PAL)
11 Press the SET - (or +) button to set the year.
• The day of the week is set automatically.
12 Press the MENU button three times, the normal screen is
displayed.
• The setting procedure is now complete.
Page 18
12
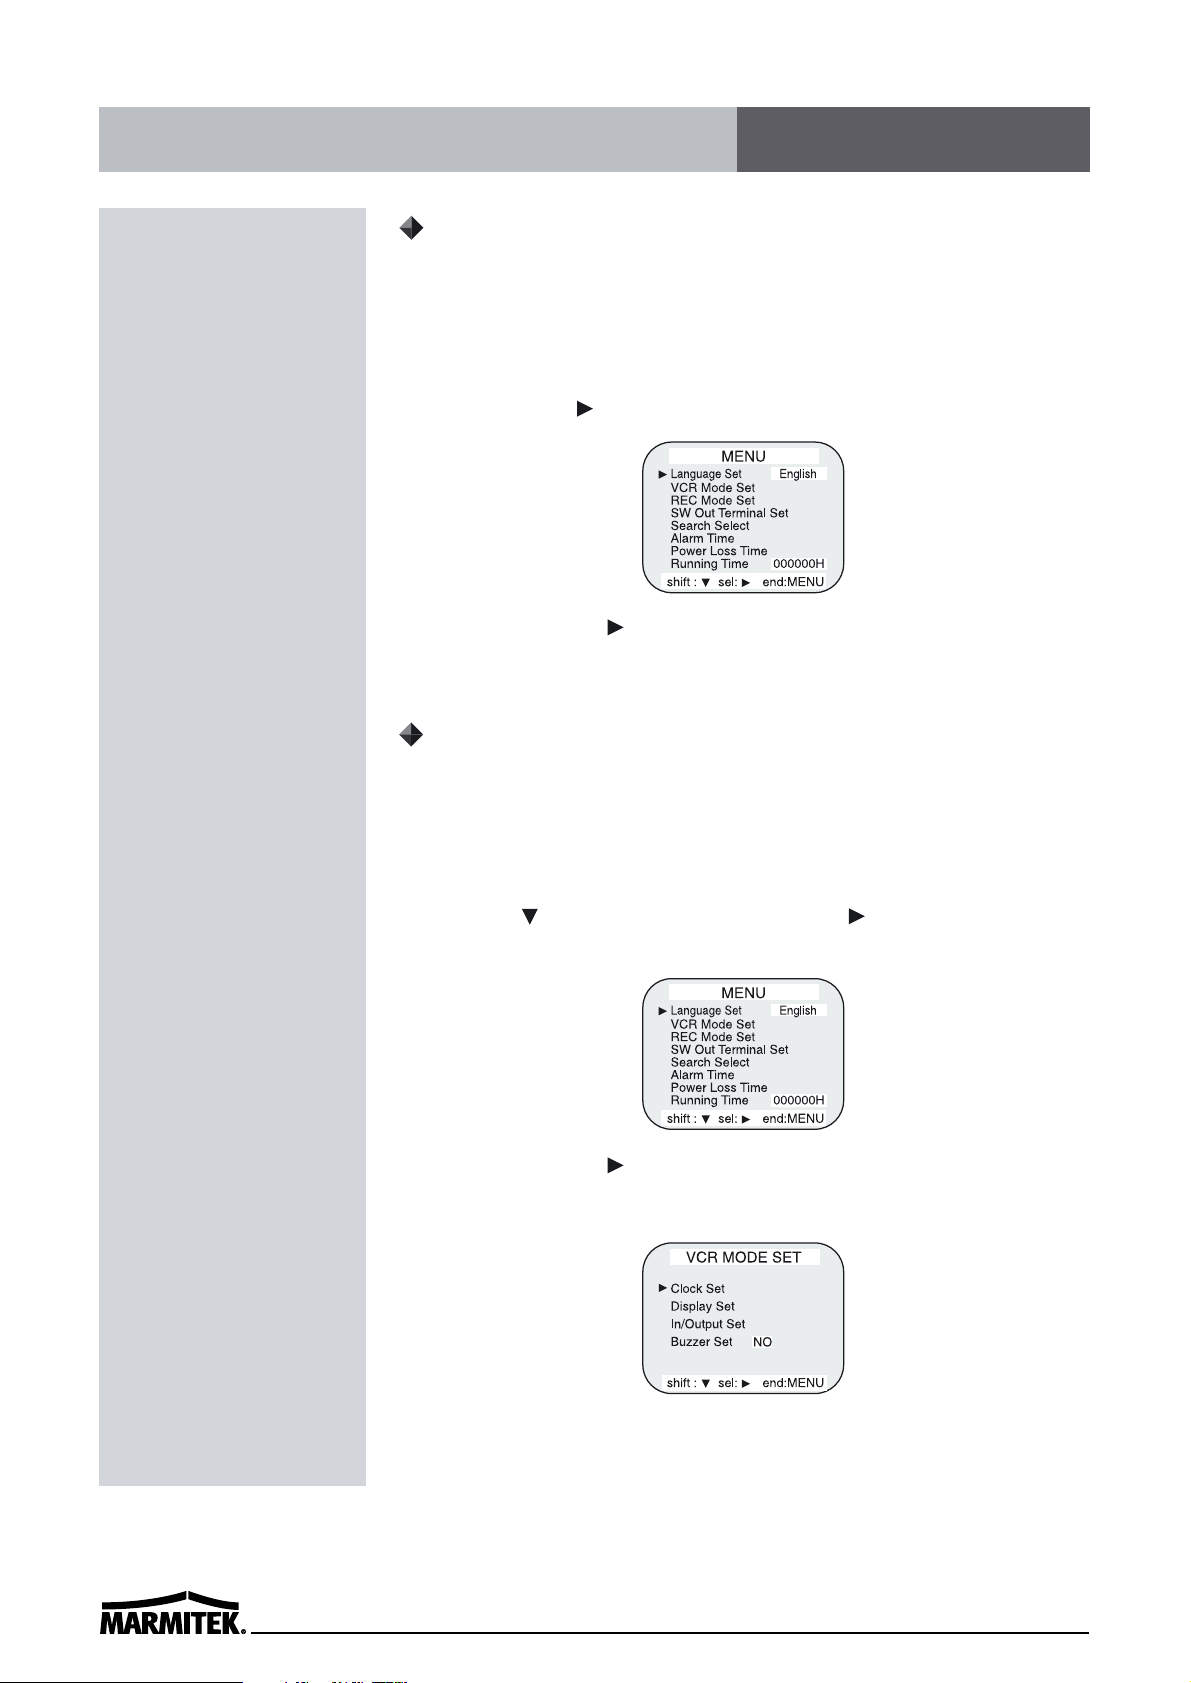
Selecting the Language
You can select the language -English, French, Spanish or Germanwhich is more convenient for you.
1 Turn the power on to all devices used.
2 Press the MENU button. The initial menu is displayed. The
arrow mark ( ) is located in “Language Set”.
3 Press the SHIFT button to select the desired language. OSD
(On-Screen Display) will display with the selected language.
Selecting the On-screen Display
You can select to display the time, date, frame counter, alarm
counter, counter title.
1 Turn the power on to all devices used.
2 Press the MENU button. The initial menu is displayed. Press the
SHIFT ( ) button to move arrow mark ( ) to “VCR Mode
Set”.
3 Press the SHIFT button to select the VCR Mode Set, then the
VCR Mode Set menu is displayed.
Changing the On-Screen Display
Page 19
13
ENGLISH
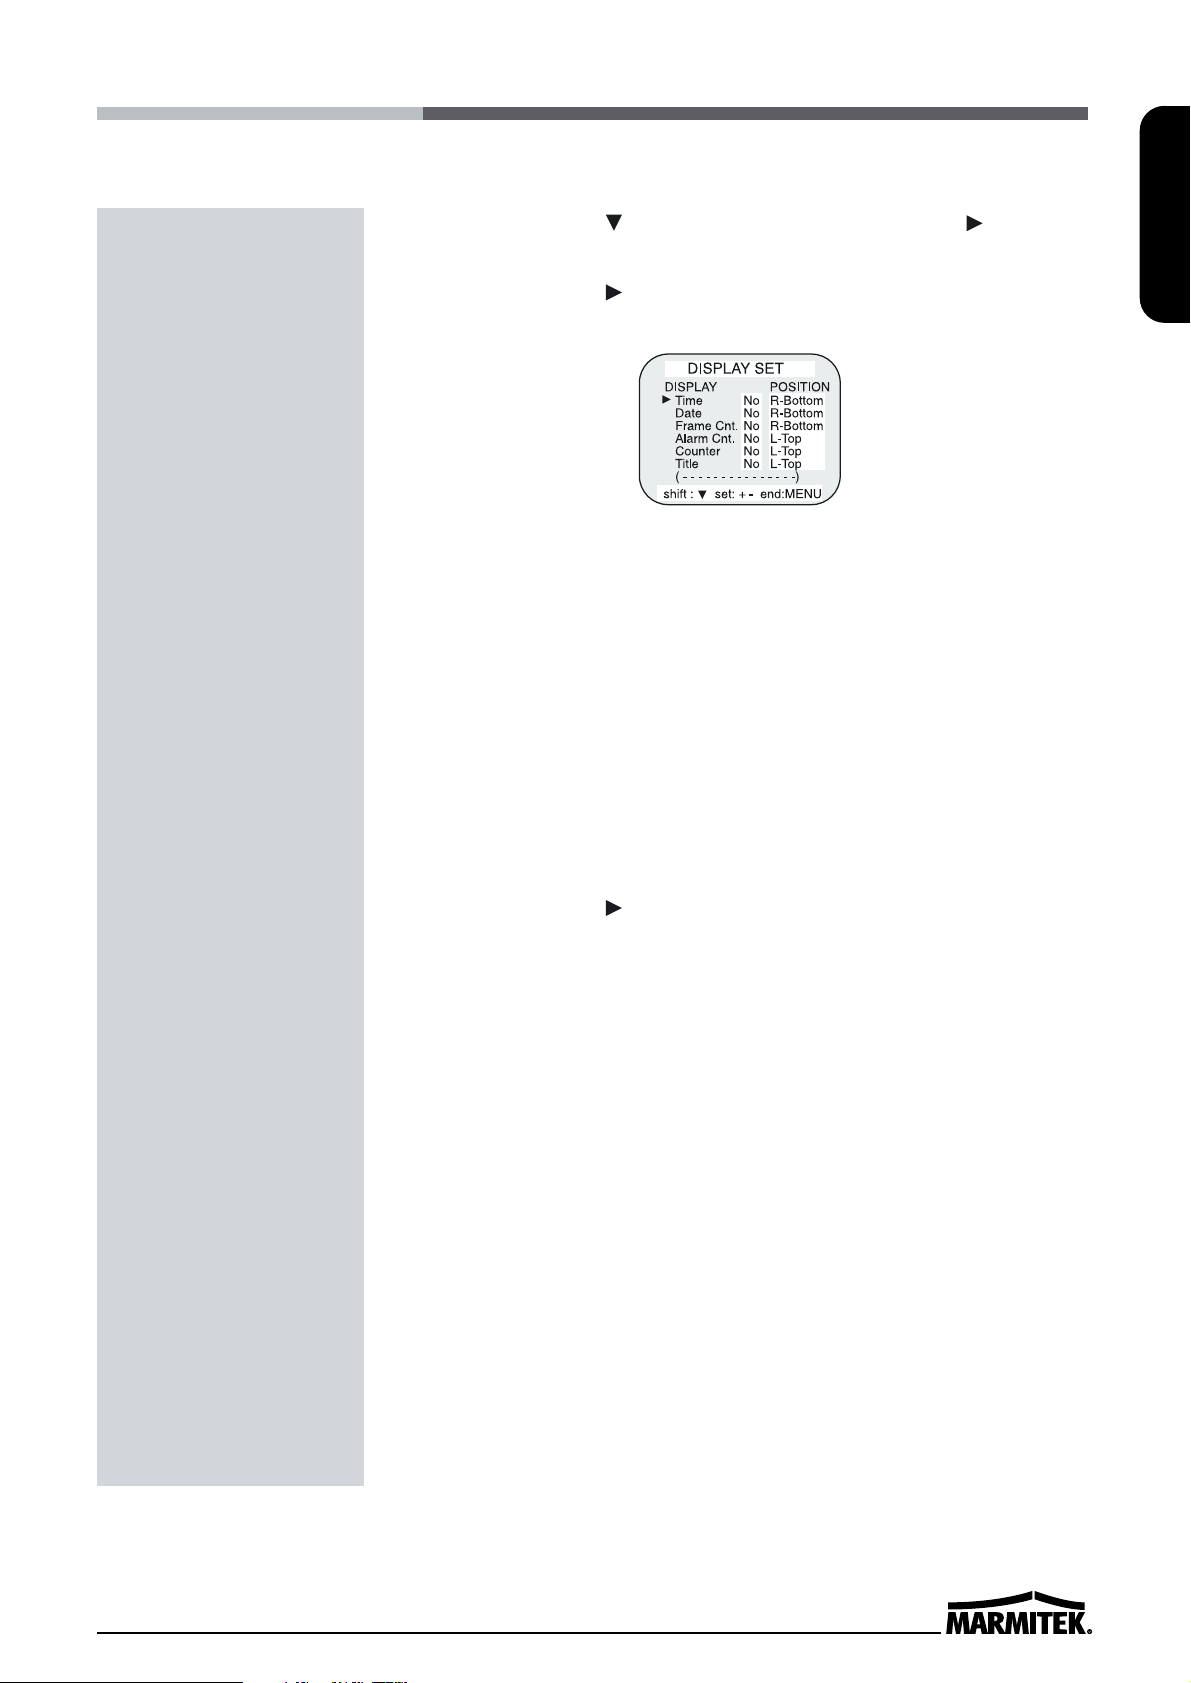
4 Press the SHIFT button, until the arrow mark ( ) points
“Display set”.
5 Press the SHIFT button to select Display Set. Then the
DISPLAY SET menu is displayed.
6 Press the SET - (or +) button to set “YES” for the functions
described below.
Time ..............The time is displayed.
Date ..............The Month-Day-Year is displayed.
Frame Cnt......The number of frames is displayed.
Alarm Cnt......The number of alarms is displayed.
Counter .........The counter is displayed.
Title ...............The title is displayed.
• A maximum of 20 characters can be used. (alphabet, numbers,
space)
7 Press the SHIFT button to set the display position.
8 Press the SET - (or +) button to set the position of the time, date,
frame cnt. alarm cnt. to “L-Bottom (or R-Bottom).
• If one of 4 items is set, the position of 4 items is changed
identically.
9 Press the SET - (or +) button to set the position of counter, title
to “C-Top” (or “R-Top” or “L-Top”)
If one of 2 items is set, the position of 2 items is changed
identically.
L-Top / C-Top / R-Top
: Left Top / Center Top / Right Top
L-Bottom / R-Bottom
: Left Bottom / Right Bottom
10 Press the MENU button three times, the normal screen is
displayed.
The setting procedure is now complete.
✔
• The items for which “YES” is
set are recorded. The items for
which “NO” is set at step 6
above are not recorded.
Page 20
14
Normal Recording
1 Turn the power on to all devices used.
2 Load a cassette tape with erasure prevention tab in place.
3 Press the REC/PLAY SPEED (or ) button to set the recording
speed.
• The recording speed is displayed on-screen and on the display
panel.
• If you don’t want to record the recording speed, counter, title, time,
date etc, press the DISPLAY button, then start recording.
4 Press the REC button.
• The “REC” indicator is displayed on the display panel and recording
starts.
5 To stop recording, press the STOP button.
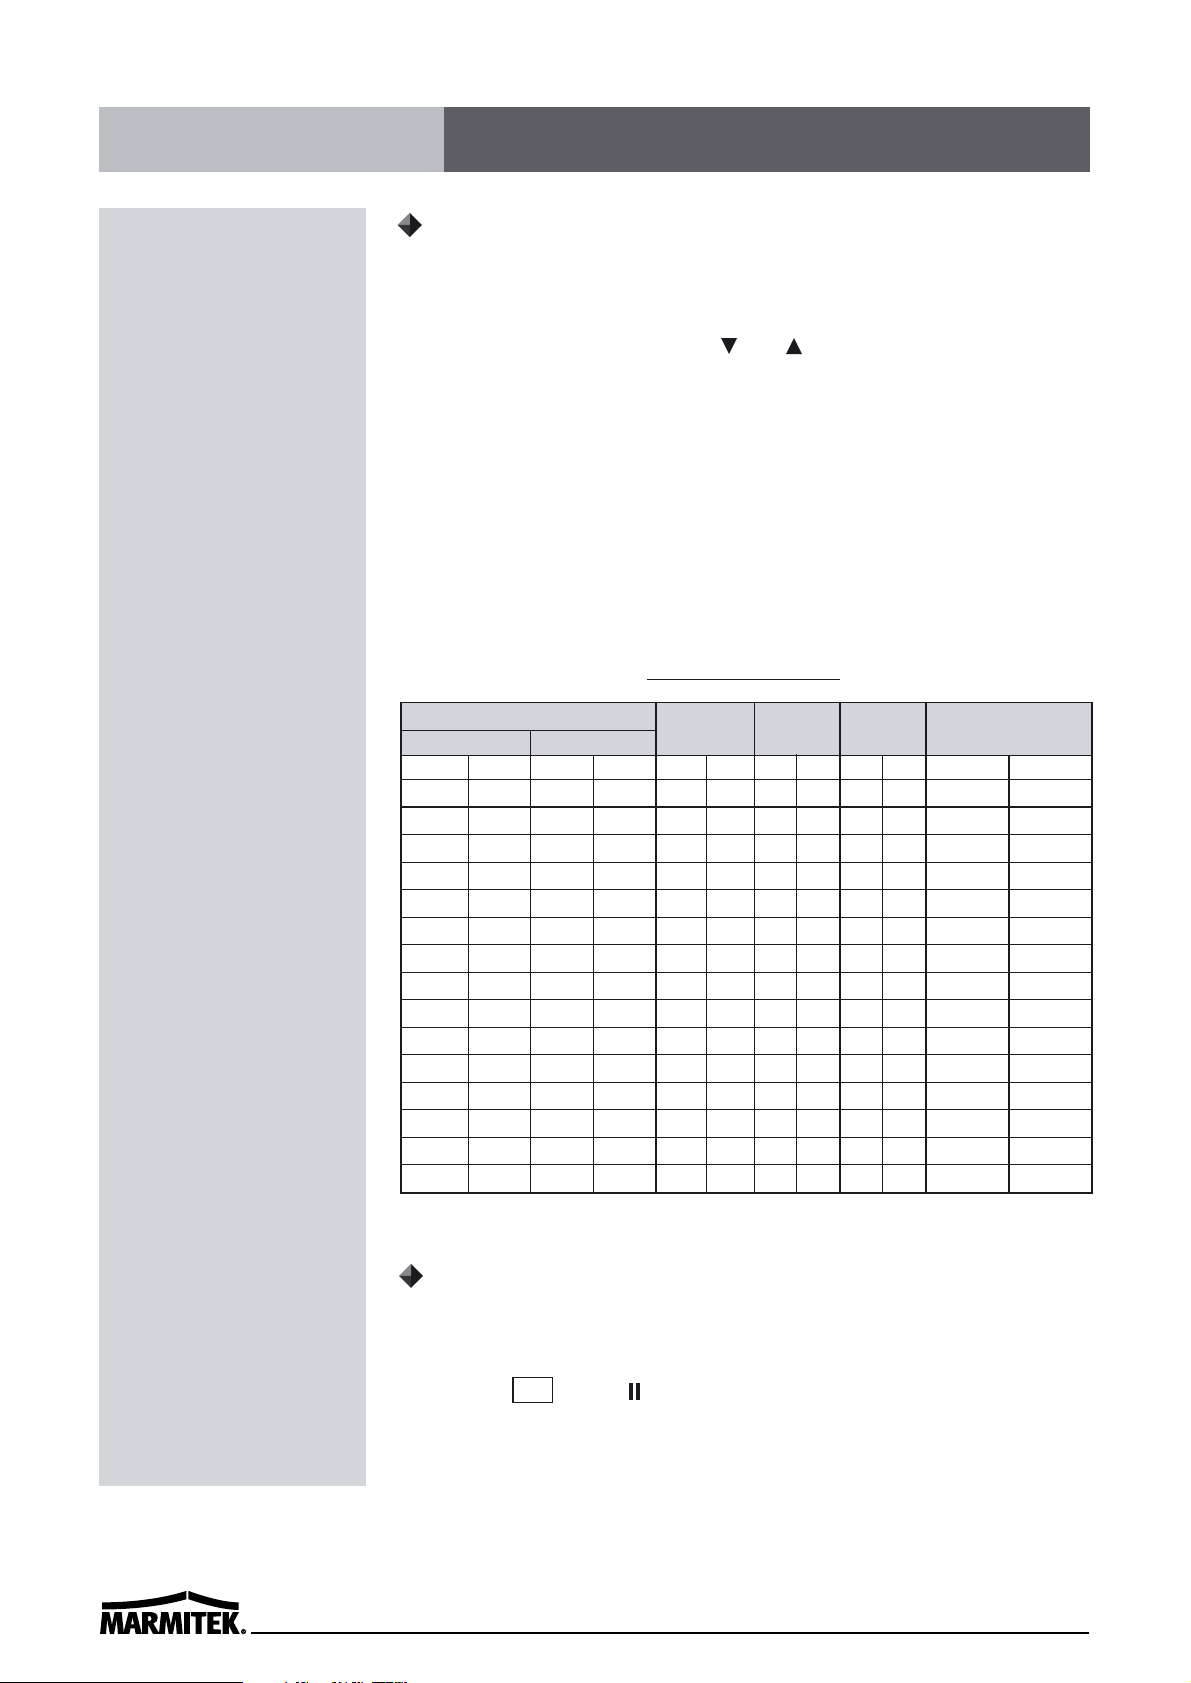
<Recording Speed>
✔
• If the Repeat Rec Set is set to
“NO” in the REC MODE SET
menu , recording will continue
to the end of the tape, then stop
and the tape will be ejected.
✔
• A tape recorded on this VCR
cannot be played back on
another make of time lapse
VCR.
• If you press on the REC button
and the loaded cassette has no
erasure-prevention tab, the VCR
will eject the cassette.
• During recording, the Menu
button will not function (the
menu cannot be accessed).
Record Pause
Recording can be interrupted temporarily.
1 Press the PAUSE/STILL button during recording.
• The “
REC
” and “” indicators are displayed on the display panel.
2 To resume recording, press the REC button, or press the
PAUSE/STILL button again.
✔
• During pause,the image
appears on-screen but it is not
recorded.
• If a recording pause continues
for 5 minutes or more, the VCR
will go into stop mode to avoid
damage to the tape.
✔
• If you playback the recorded
part where recording check was
performed, noise may appear.
• If you change the recording
speed during recording, noise or
missing signal may result.
2(SP) 2.67 1/60 60 YES Continuous
6(EP) 8 1/60 60 YES Continuous
18(EP) 24 3/60 20 YES Continuous
24(SP) 32 12/60 5 NO Intermittent
36(SP) 48 18/60 3.3 NO Intermittent
48(SP) 64 24/60 2.5 NO Intermittent
72(SP) 96 36/60 1.6 NO Intermittent
96(SP) 128 48/60 1.2 NO Intermittent
120(SP) 160 1 1 NO Intermittent
168(SP) 224 1.4 0.7 NO Intermittent
240(SP) 320 2 0.5 NO Intermittent
360(SP) 480 3 0.3 NO Intermittent
480(SP) 640 4 0.25 NO Intermittent
720(SP) 960 6 0.16 NO Intermittent
960(SP) 1280 8 0.12 NO Intermittent
Recording Speeds & Duration
Recording
Intervals Sec.
Rec.
Fields/Sec.
Audio
Recording
Tape
Motion
3 HR 4 HR 1/50 50 YES Continuous
12 HR 16 HR 5/50 10 YES Continuous
18 HR 24 HR 7/50 7.1 YES Continuous
24 HR 32 HR 9/50 5.6 YES Continuous
36 HR 48 HR 12/50 4.2 NO Step
48 HR 64 HR 16/50 3.1 NO Step
72 HR 96 HR 24/50 2.1 NO Step
96 HR 128 HR 32/50 1.6 NO Step
120 HR 160 HR 40/50 1.3 NO Step
168 HR 224 HR 1.1 0.9 NO Step
240 HR 320 HR 1.6 0.6 NO Step
360 HR 480 HR 2.4 0.4 NO Step
480 HR 640 HR 3.2 0.3 NO Step
720 HR 960 HR 4.8 0.2 NO Step
960 HR 1280 HR 6.4 0.1 NO
Step
PAL
NTSC
PAL
NTSC
PAL
NTSC
PAL
NTSC
✎ (SP) means to be recorded by SP heads. (EP) means to be recorded by EP heads.
(NTSC)
T-120 E-180
T-160
E-240
NTSC PAL
Normal Recording
Page 21
15
ENGLISH
There are two program timer recording methods, daily recording
or recording on certain days of multiple weeks (weekly recording).
Example 1 : To record on every Thursday from
10 : 00 to 18 : 00 , in 18-hour mode (recording
speed)
1 Make sure that the set date and time are correct.
2 Load a cassette tape with erasure prevention tab in place.
3 Press the MENU, SHIFT button twice to move the arrow mark
( ) located on the “REC Mode Set”, SHIFT button to select
“Timer Program Set”, SHIFT button to display the “TIMER
PROGRAM SET(1)“ menu.
• The white block cursor is on “SUN”(Sunday).
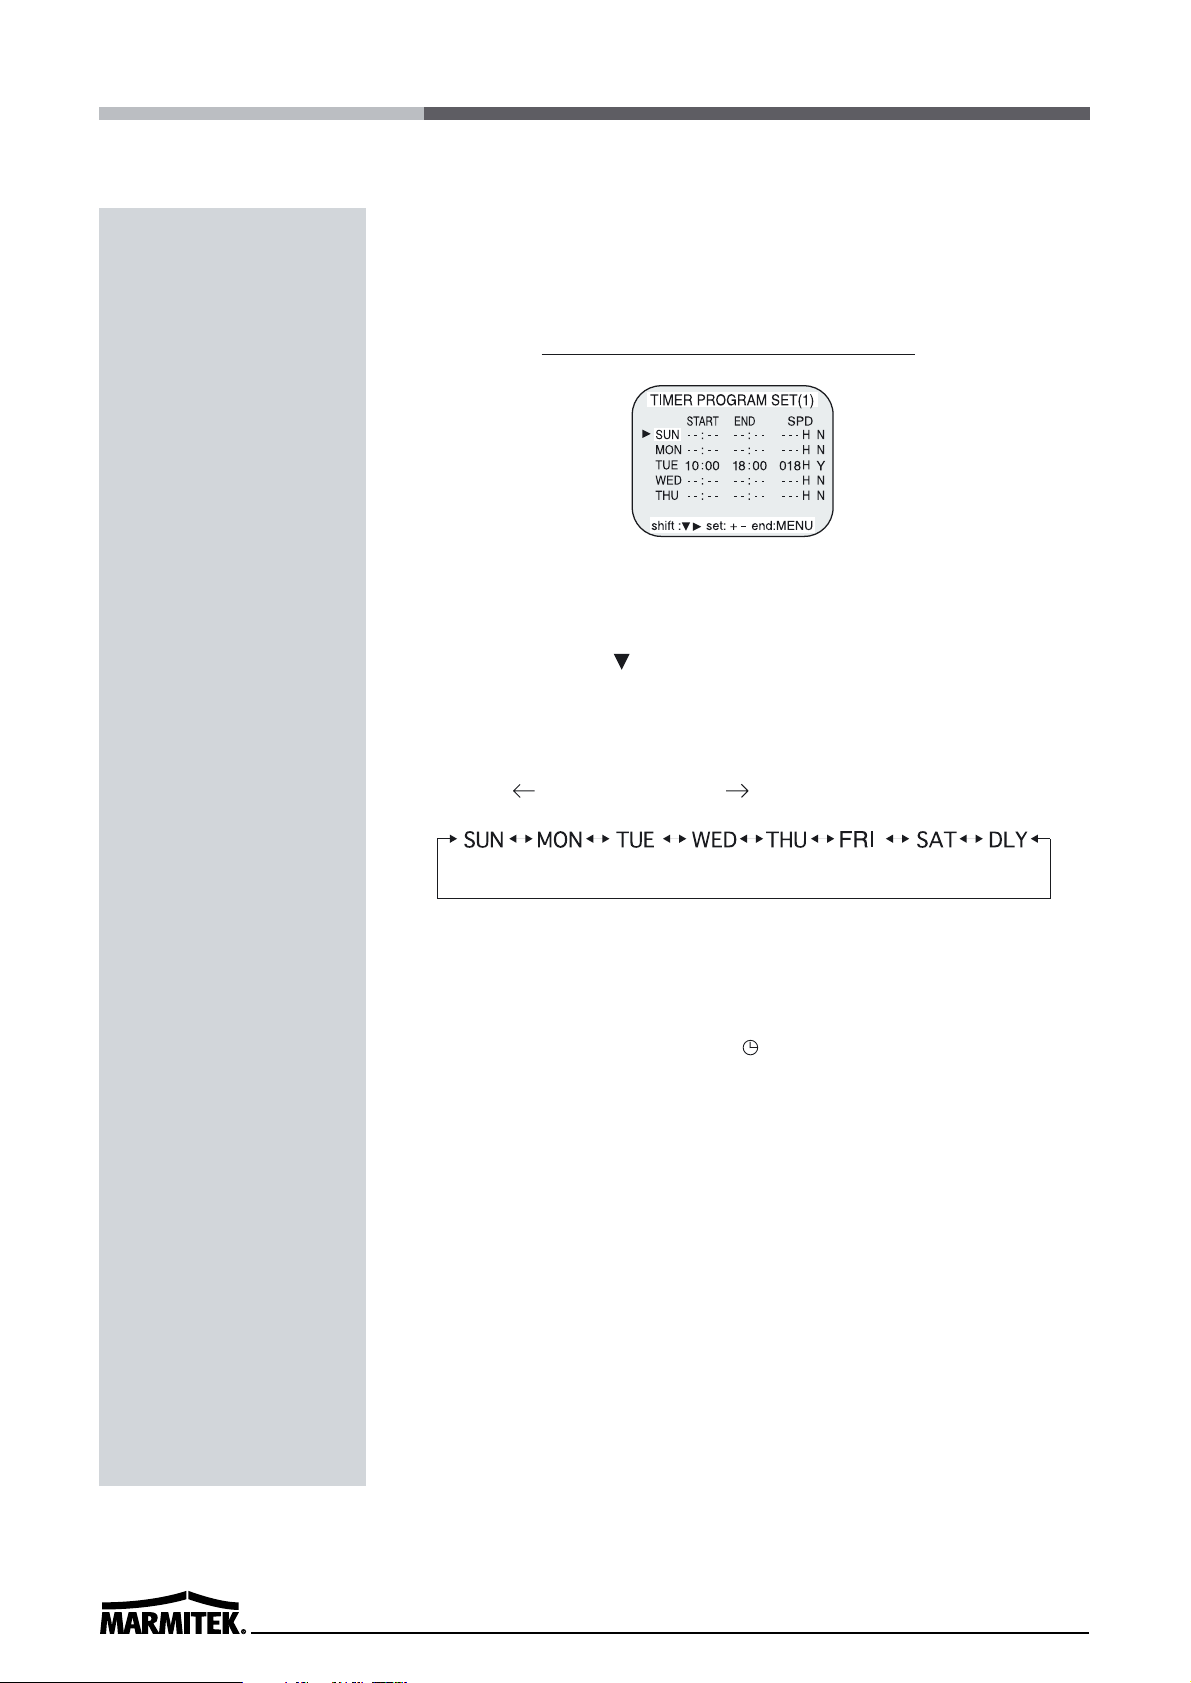
4 Press the SHIFT button, until the cursor is on “THU”.
5 Press the SHIFT button.
• The cursor is moved to the recording start hour position.
6 Press the SET - (or +) button to set the recording start hour(ex :
10), then press the SHIFT button.
• The cursor is moved to the recording start minutes position.
7 Press the SET - (or +) button to set the recording start minute (ex
: 00), then the SHIFT button.
• The cursor is moved to the recording stop hour position.
8 Press the SET - (or +) button to set the recording stop hour(ex :
18), then press the SHIFT button.
• The cursor is moved to the recording stop minutes position.
9 Press the SET - (or +) button to set the recording stop minutes(ex
: 00), then press the SHIFT button.
• The cursor is moved to the recording speed position.
10 Press the SET - (or +) button to select the recording speed(ex :
18), then press the SHIFT button.
• The cursor is moved to the N/Y position.
Program Timer Recording
Page 22
16
11 Press the SET - (or +) button to select “Y”.
Y . . . . . recording will take place
N . . . . . recording will not take place
Pr
ogrammed timer recording Example
• Repeat steps 4 to 11 to program timer recordings for other days of
the week.
• To set two or more timer recordings the same day of the week,
press the SHIFT button, until the cursor is located in the day of
the week for the second recording, then press the SET - (or +)
button, to set the desired day of the week. With each press of the
SET - ( or +) button, the day will change as indicated below.
SET - : direction , SET + : direction
12 Press the MENU button three times, the normal screen is
displayed.
13 Press the POWER/TIMER button.
• The timer recording indicator ““ will light on the display panel.
The VCR is now in timer recording stand-by mode.
✔
• If the set stop time is earlier
than or the same time as the
set start time, the VCR will
consider the stop time to be
the following day.
Page 23
17
ENGLISH
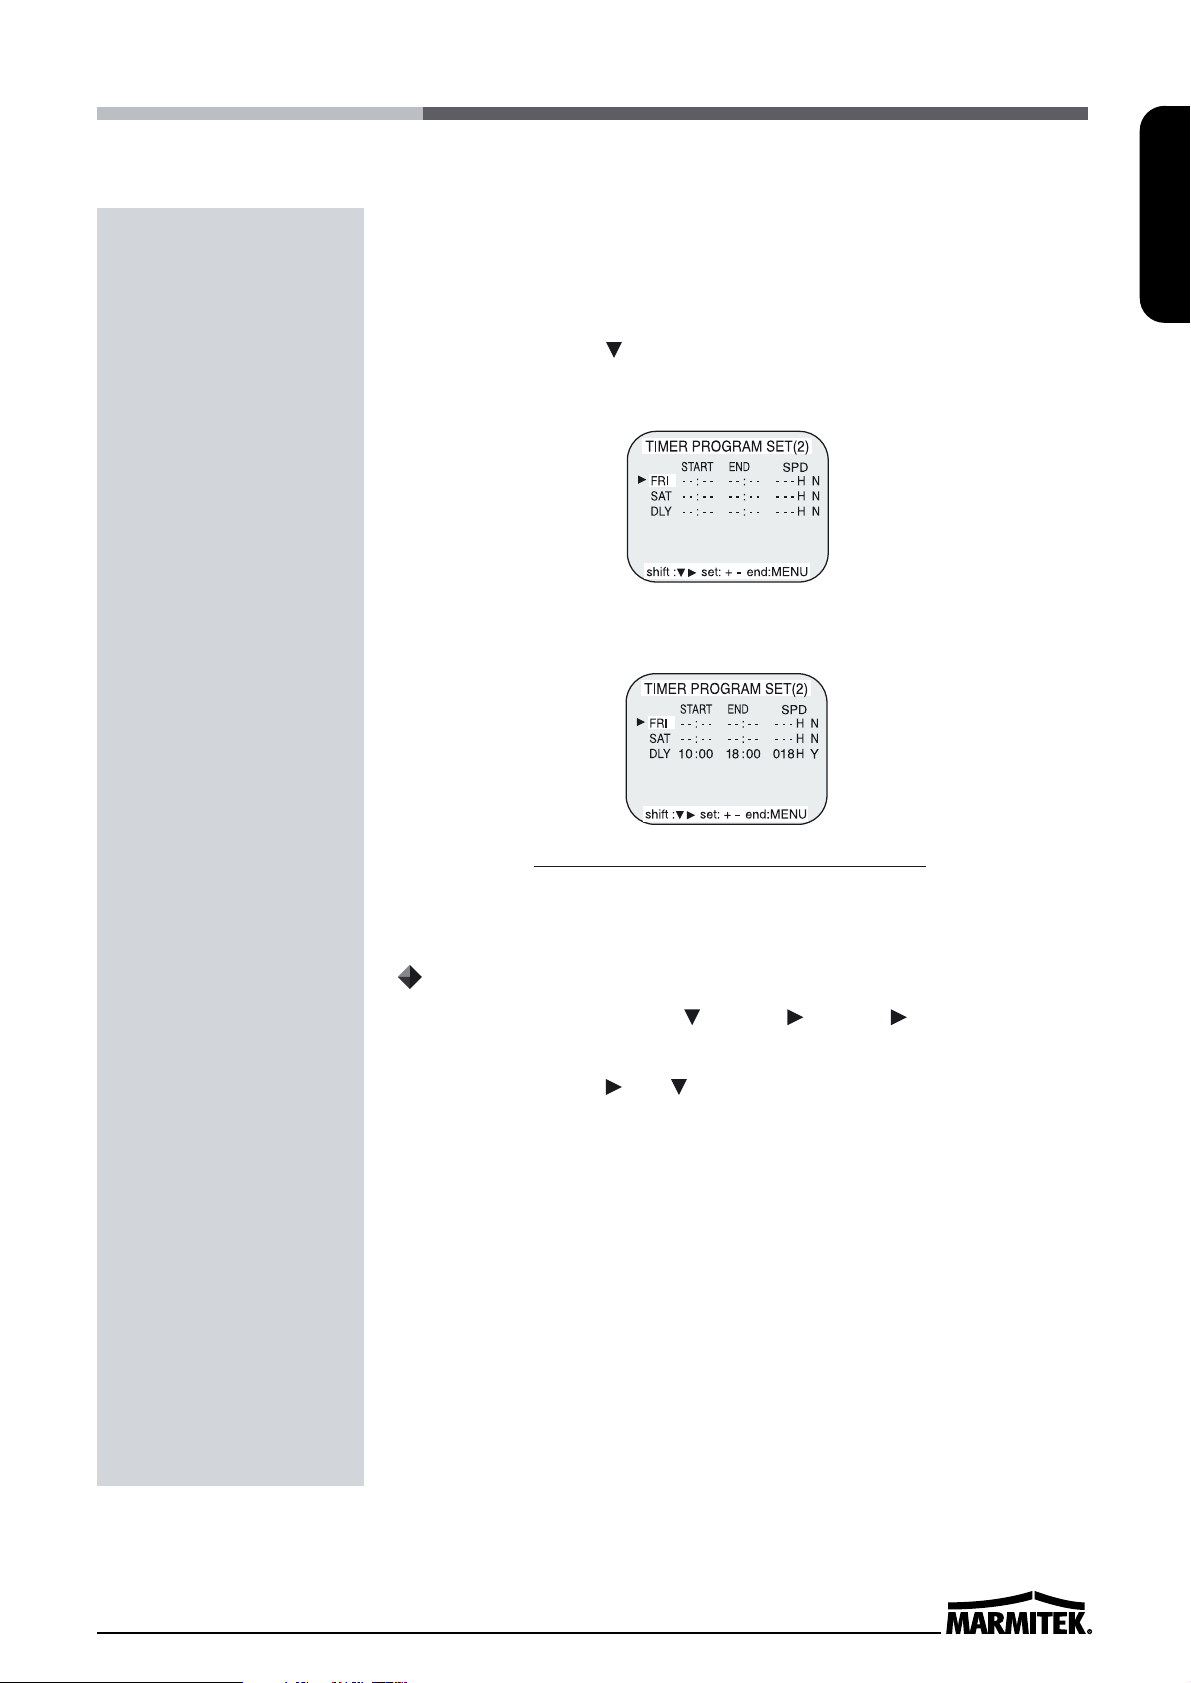
Example 2 : To record on everyday from 10 : 00
to 18 : 00, in 18-hour mode (recording speed)
1 Repeat steps 1 to 3 of example 1.
2 Press the SHIFT button, until the cursor is on “DLY”. The
MENU below is displayed.
3 Repeat steps 5 to 13 of example 1.
Changing a Program Timer Recording
1 Press the MENU, SHIFT , SHIFT , SHIFT buttons in
sequence to display the TIMER PROGRAM SET(1) menu.
2 Press the SHIFT (or ) button, until the cursor is located in
the setting to correct.
3 Press the SET - (or +) button, to correct the setting.
• Press the MENU button three times until the normal screen is
displayed.
4 Press the POWER/TIMER button.
✔
• To modify, cancel timer
recording, press the
POWER/TIMER button to cancel
the timer recording mode.
Programmed timer recording Example 2
Page 24
18
To Cancel a Program Timer Recording
1 Repeat step 1 of changing a program timer recording.
2 Press the SHIFT (or ) button until the cursor is located in
the “Y” corresponding to the timer recording to cancel.
3 Press the SET - (or +) button, to select “N”.
4 Press the MENU button three times until the normal screen is
displayed.
5 Press the POWER/TIMER button.
• The clear button can erase the programmed timer recording in the
line that the cursor is located.
Notes...
• During timer recording all the buttons on the VCR, except the STOP
button, are disabled. If the STOP button is pressed for three seconds
during timer recording, the recording will stop. During timer
recording stand-by, press the POWER/TIMER button if the buttons
do not respond.
• If there is a power loss, the recording will be interrupted. When the
power is restored, the recording will resume if the stop time has not
yet been reached, and “ PF “ will be flashing on the display panel.
The VCR internal battery is completely charged after the VCR has
been connected to an AC power outlet for 48 hours, and it will
maintain all the VCR settings memory for up to 30 days.
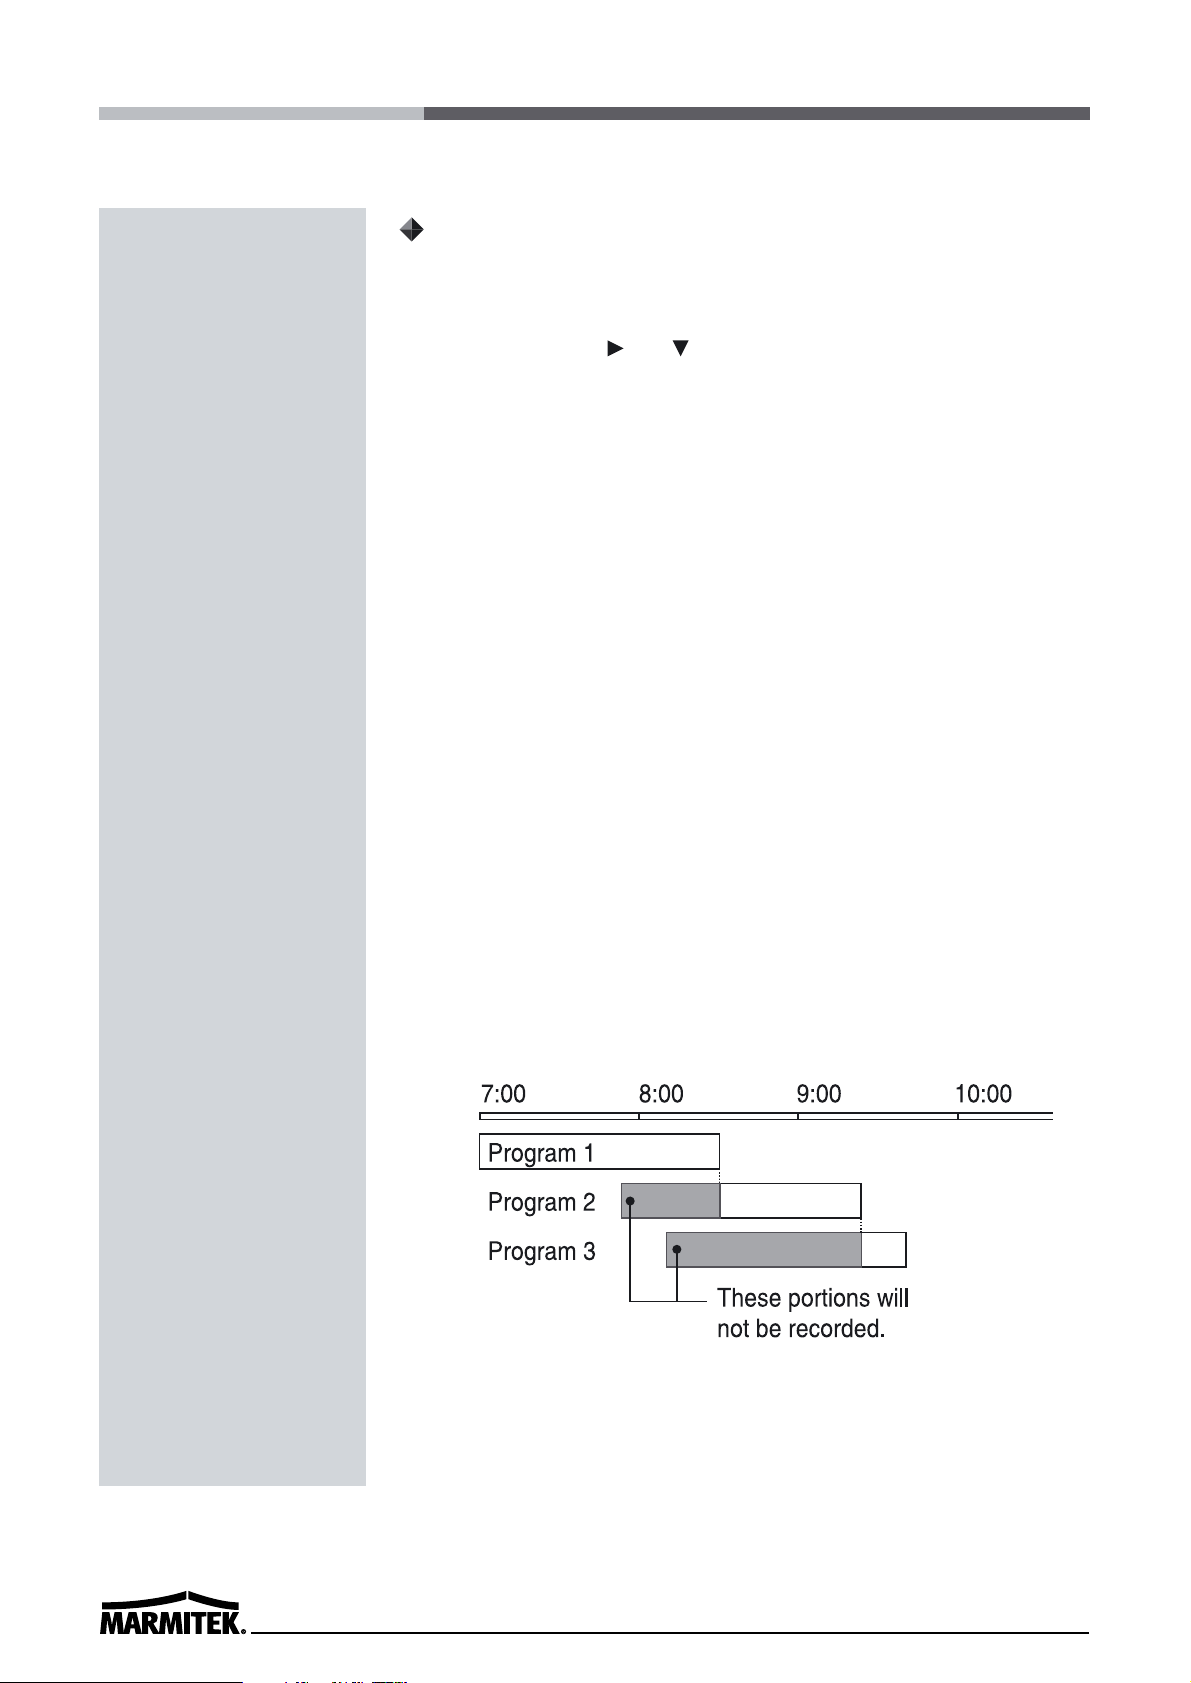
• Set the timer recordings so that the recording times do not overlap.
If they do, the one with the earliest recording start time will have
priority.
(See chart below)
• If the cassette tape is ejected while timer recording is set, the
buzzer will be heard 5 times (when the buzzer function is set to
“YES”.).
Page 25
19
ENGLISH
Alarm Recording Setting
Alarm recording is performed when there is an input (trigger) at the
ALARM IN terminal, “ ALARM “ is displayed on the display panel.
1 Make all necessary connections.
2 Press the MENU, SHIFT , SHIFT buttons in sequence to
display the REC MODE SET menu .
3 Press the SHIFT button until the arrow mark( ) points to Alarm
Rec Set.
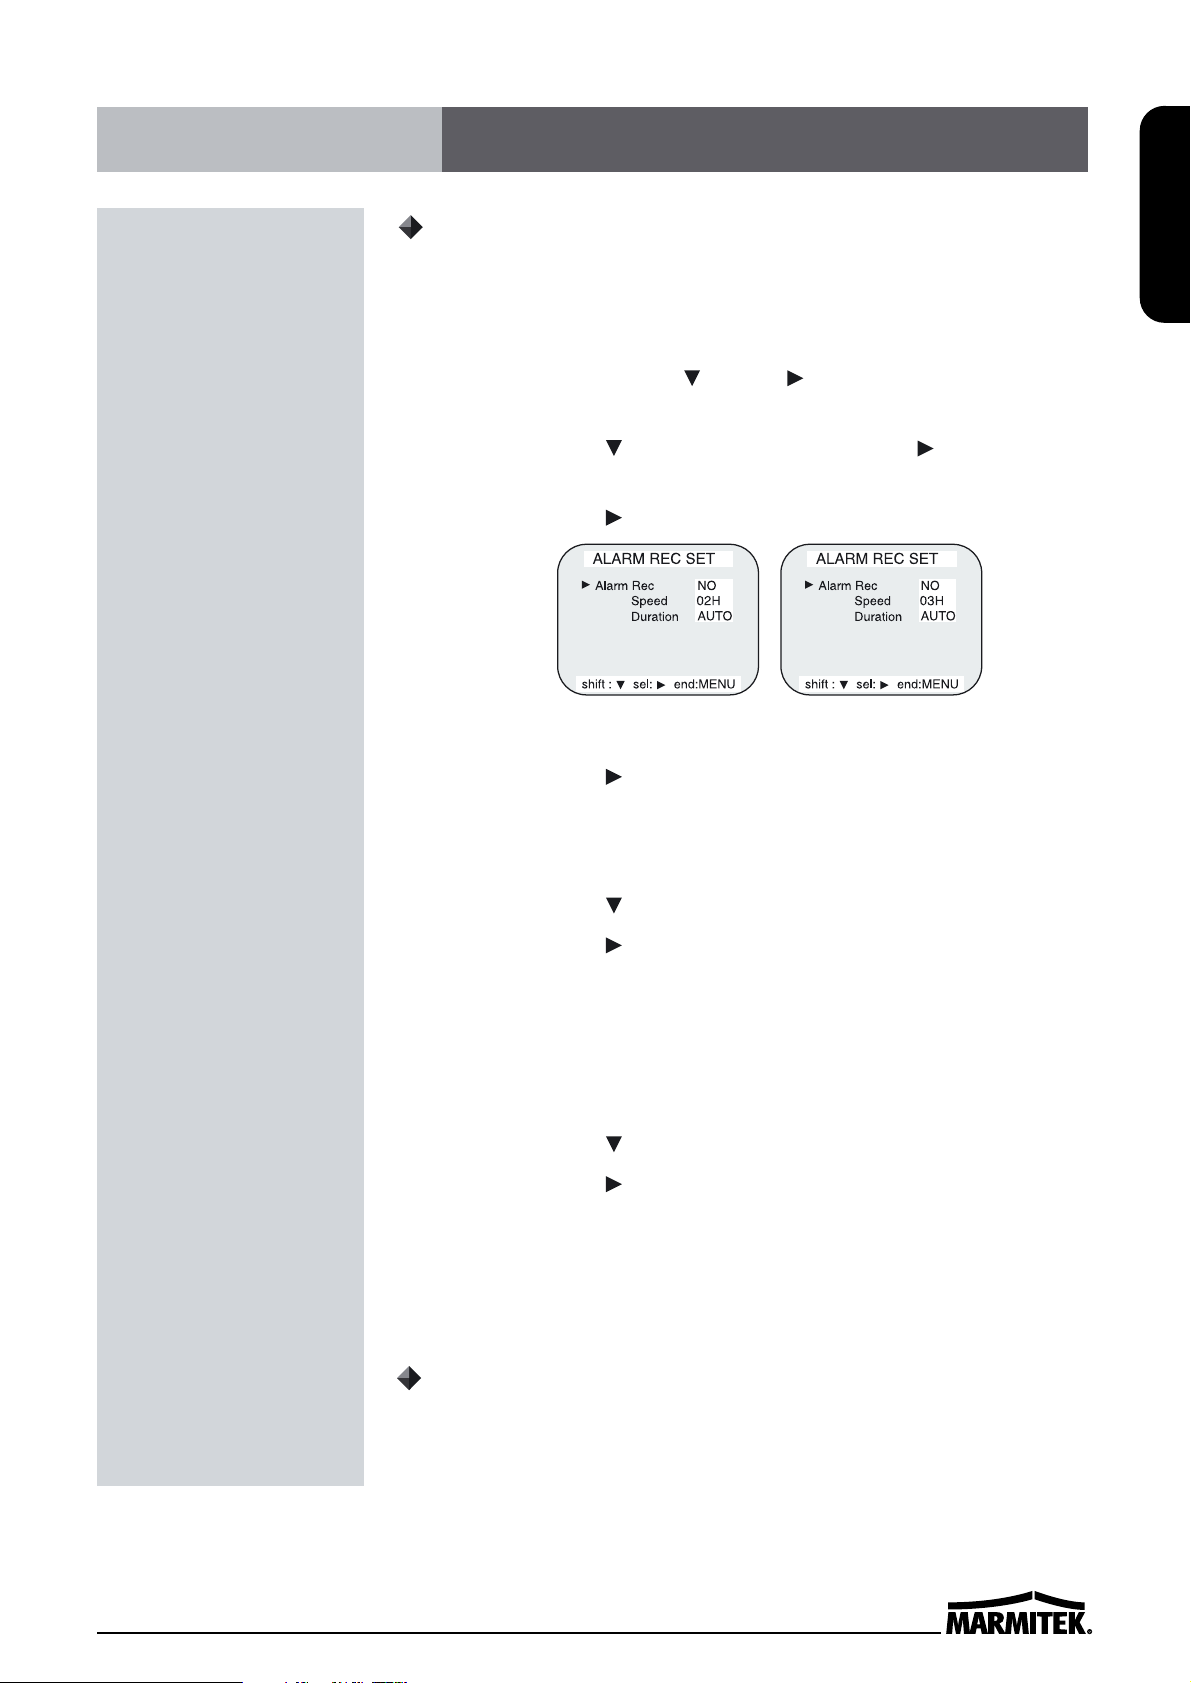
4 Press the SHIFT button to display the ALARM REC SET menu.
5 Press the SHIFT button to select “YES” or “NO”.
• YES . . . . . The alarm recording takes place when there is alarm trigger
input
• NO . . . . . . The alarm recording does not take place
6 Press the SHIFT button to set the Alarm speed.
7 Press the SHIFT button to select the desired recording speed.
• 2H . . .2-hour mode recording • 3H . . .3-hour mode recording
• 6H . . .6-hour mode recording •12H . . .12-hour mode recording
•18H . . .18-hour mode recording •18H . . .18-hour mode recording
•24H . . .24-hour mode recording
8 Press the SHIFT button to set the alarm duration
9 Press the SHIFT button to select the desired recording duration.
• Auto : Records as long as the alarm signal is being input.
(Minimum 2 minutes is recorded.)
• 3/5/10/15/20/25/30 MIN : Recording for the set duration.(MIN : minute)
• T.END : Records until the tape end is reached when there is alarm
trigger input.
Alarm Recording Counter Display
During alarm recording, “ ALARM “ will be flashing on the display panel.
The maximum display number of alarm triggers is “35”, at the next
alarm recording the counter will indicate “00”.
✔
• During alarm recording all
buttons are disabled except the
STOP button. If the STOP button
is pressed, the alarm recording
will stop.
• If an alarm trigger is received
while alarm recording is in
progress, the recording duration
for the second alarm will be
calculated from that point.
• When there is a power loss
during alarm recording, if the
power is restored within the
recording set duration, alarm
recording will continue.
✔
• Alarm Counter Reset can be
performed by pressing the
CLEAR key in “Alarm Time” of
Initial Menu screen.
( NTSC ) ( PAL )
( NTSC ) ( PAL )
Alarm Recording
Page 26
20
When there is a panic input at the PANIC IN Terminal, panic
recording starts and continues to the end of tape in 2-hour recording
mode.
Also, PANIC IN indicator will be on.
To release the panic recording, press the STOP key.
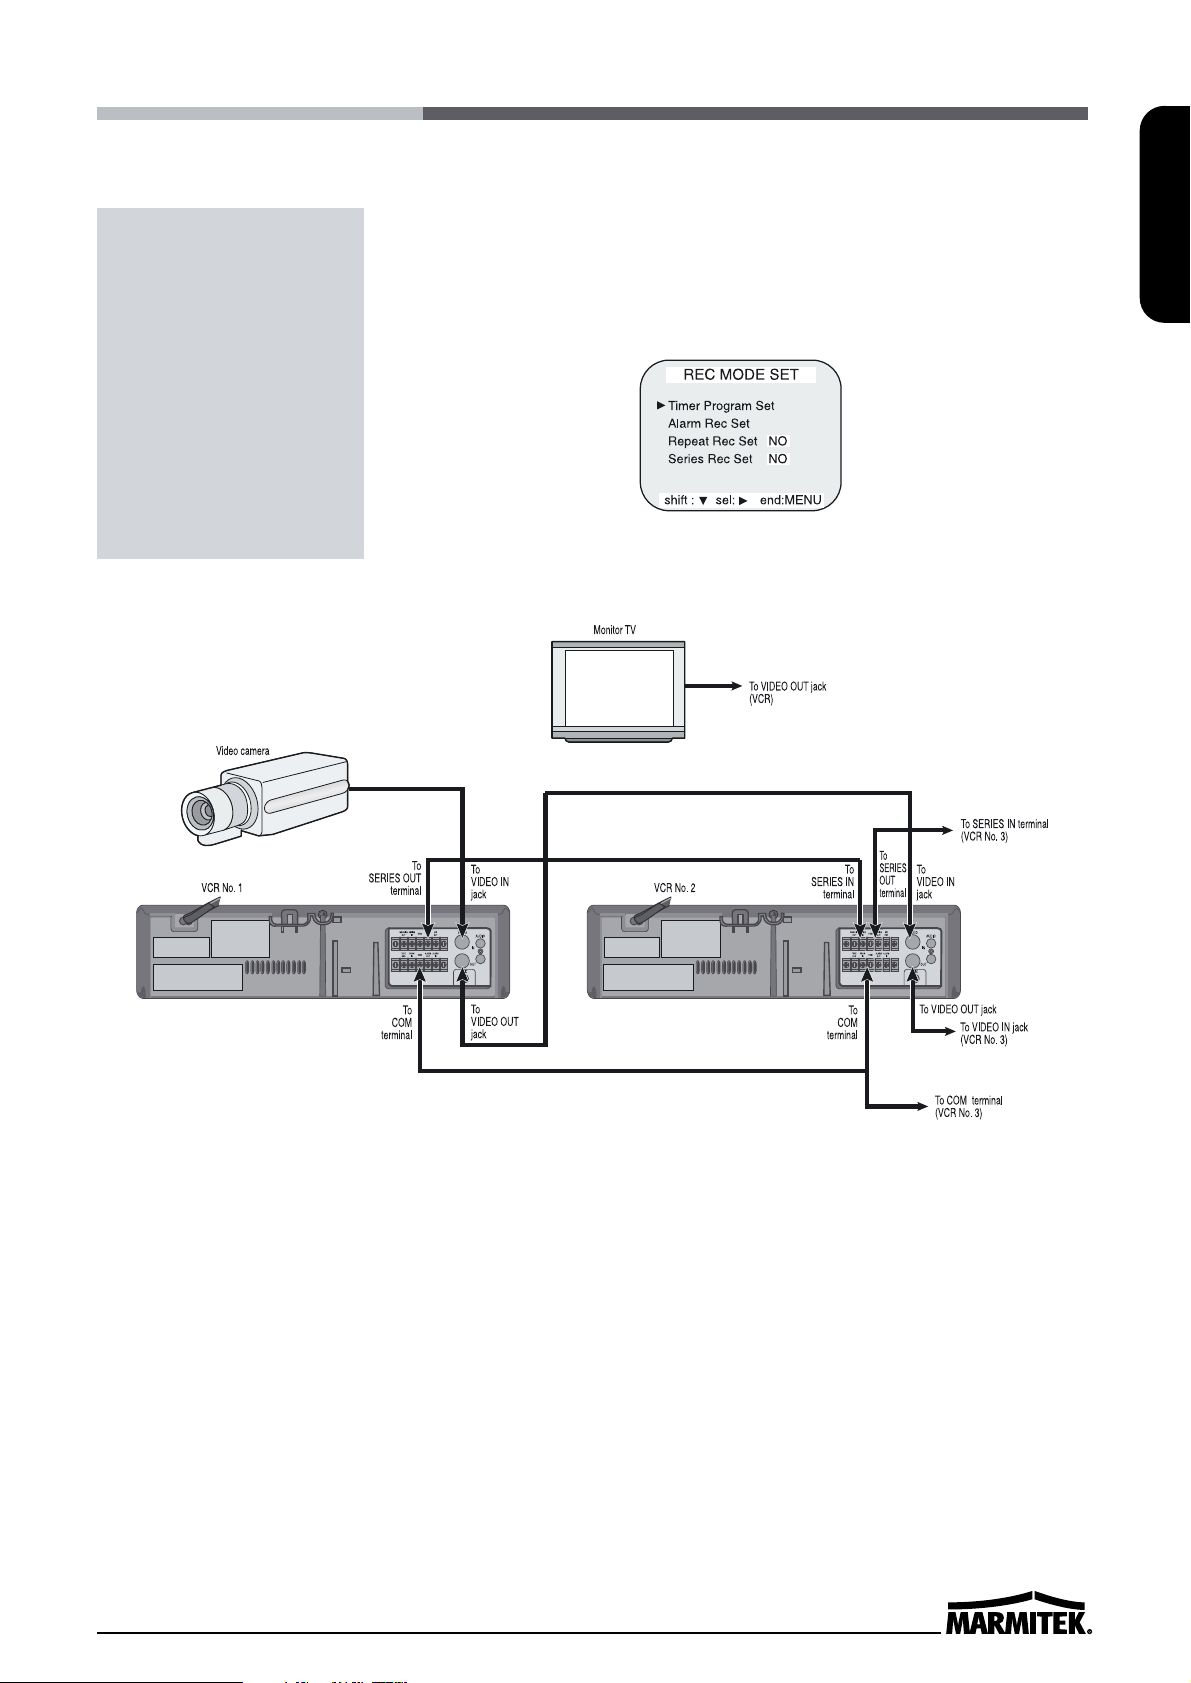
Using 2 VCRs or more, the series recording function lets you switch
recording from one unit to the next (only with VCRs of the same
model as this one).
Series(Link) Recording Setup
1 Connect 2 VCRs or more as illustrated on next page.
2 Set the following items as indicated.
3 Press the REC button on VCR No.1.
• Recording will start in series recording mode.
Item VCR No.1 VCR No.2
and on
Cassette tape Loaded Loaded
Operation mode Stop Stop
Repeat Rec Set “NO”“NO”
Series Rec Set “YES” “YES”
Timer recording OFF (not set) OFF (not set)
Security lock switch (SET LOCK switch) “OFF”
“ON”
Panic Recording
Series(Link) Recording
Page 27
21
ENGLISH
4 Set the security lock on VCR No.1.
• When the end of the tape on VCR No.1 is reached, the output at the
SERIES OUT terminal will switch signal. This will start recording on
VCR No.2, the tape will stop and be ejected on VCR No.1.
✔
• During series recording,
autorepeat recording or timer
recording are not possible.
• If in the REC MODE SET menu,
“Series Rec Set” is set to “NO”,
series recording will not be
possible.
Page 28
22
Autorepeat Recording
The same tape can be recorded over many times.
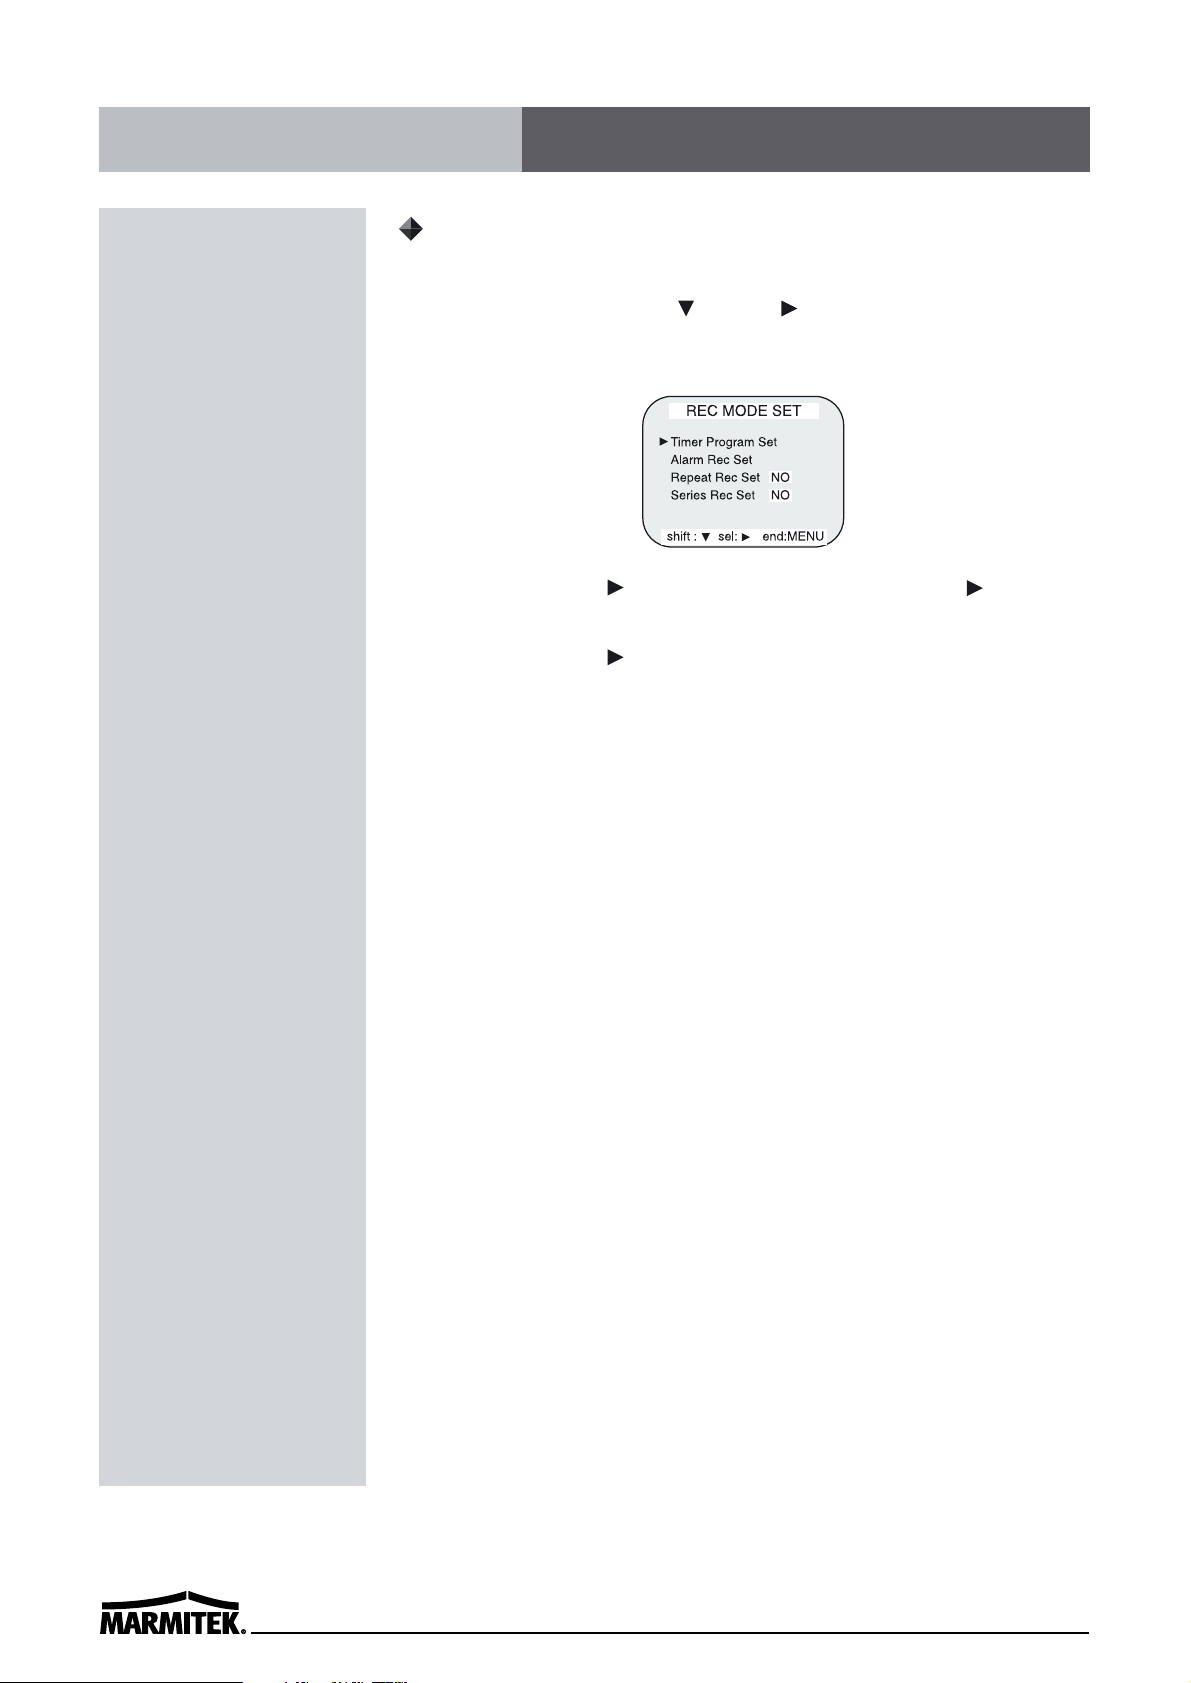
1 Press the Menu, SHIFT , SHIFT button in sequence to
display the REC MODE SET menu.
2 Press the SHIFT button to make the arrow mark ( ) point to
Repeat Rec Set.
3 Press the SHIFT button to set the desired autorepeat
recording mode.
NO . . . . . . Autorepeat recording doesn’t take place.
YES . . . . . Autorepeat recording takes place.
“R.REC” will light on the display panel.
4 Press the Menu button two times, the normal screen is
displayed.
• The setting procedure is now complete.
5 Press the REC button.
• Recording will start. When the tape’s end is reached, the VCR will
rewind it to the beginning regardless of the counter memory, and
recording will resume.
✔
• If during autorepeat recording
there is an alarm trigger,
“ ALARM “ is displayed on the
display panel and alarm
recording will take place.
Autorepeat recording will
continue after alarm recording
has completed its programmed
duration.
Autorepeat Recording
Page 29

23
ENGLISH
Normal Playback
1 Turn on the power to the TV monitor.
2 Load the video cassette tape.
3 Press the REC/PLAY SPEED (or ) button to select the
playback speed.
• The selected playback speed is displayed on the display panel
• A tape recorded with EP heads can be played in 6-hour, 18-hour
modes
(NTSC ONLY)
.
• A tape recorded with SP heads can be played in 2-, 24-, 36-, 48-,
72-, 96-, 120-, 168-, 240-, 360-, 480-, 720-, 960-hour modes
(NTSC
ONLY)
.
• The picture quality recorded by EP heads can be lower than SP
heads
(NTSC ONLY)
.
• A tape recorded can be played in 3-, 12-, 18-, 24-, 36-, 48-, 72-, 96-,
120-, 168-, 240-, 360-, 480-, 720-, 960-hour modes
(PAL ONLY)
.
4 Press the PLAY button.
• Playback starts.
• If necessary, adjust the tracking to eliminate the noise from the
picture.
5 To stop playback, press the STOP button.
• To advanced or rewind the tape, press the FF/CUE or REW/REVIEW
button.
Tracking Control
If there is noise in the image during playback,
1 While looking at the playback picture, press and hold the
TRACKING + button to minimize the noise.
2 If it cannot be minimized, press the TRACKING - button.
Audio Playback
Audio playback is only possible in 2, 6 and 18-hour modes
(NTSC)
or
3,12,18 and 24-hour modes
(PAL)
.
The playback speed has to be the same as the recording speed, for
normal playback of the audio.
For a tape recorded in 2, 6 and 18-hour modes
(NTSC)
or 3,12,18 and
24-hour modes
(PAL)
, to playback the audio, press the AUDIO ON
button after pressing the PLAY button. “A” will be displayed to the
left of the playback speed on the display panel. Press the AUDIO ON
button again to remove “A”.
✔
• A slow motion effect or
accelerated playback effect can
be achieved by using a slower
or faster playback speed than
the speed used for recording.
✔
• Noise will appear in the image
when audio playback is used in
18-hour mode (NTSC) or 6,12,
18 and 24-hour modes (PAL).
Normal Playback
Page 30

24
Picture Search
1 Press the FF/CUE (or REW/REVIEW) button, during normal
playback.
• The image can be seen while the tape is advanced (or rewound) at
high speed.
2 To return to normal playback, press the PLAY button.
Still Image
1 Press the PAUSE/STILL button, during normal playback.
• A still image can be viewed.
2 To return to normal playback, press the PLAY button.
• With each press of the PAUSE/STILL button, the still image is
advanced one image (frame).
Vertical Lock Control
During still image mode,
1 Press the TRACKING + button to reduce the vertical rolling of the
image.
2 If it cannot be corrected, press the TRACKING - button.
Slow
1 With each press of the FF button, during still image mode, the
slow speed will change as indicated below. 1/15times
1/20times 1/30times (forward direction)
2 With each press of the REW button, during still image mode,
the slow speed will change as indicated below. 1/15times
1/10times 1/5times (forward direction)
3 To return to normal playback, press the PLAY button.
Recording Check
During recording, press the REC CHECK button.
• The tape will be rewound for about 5 seconds and slow play mode
will be performed. The VCR will then return to the previous
recording mode.
✔
• During picture search, noise
(horizontal bars) will appear in
the picture.
• The sound is muted.
✔
• If still mode continues for 5
minutes or more, the VCR will
go into stop mode to avoid
damaging the tape.
• If the image is unstable (rolling
vertically), adjust the tracking
control to correct.
✔
• During recording check
operations, recording is
suspended momentarily.
Special Playback
Page 31

25
ENGLISH
Time/Date Search
1 Press the Menu button to display the initial menu.
2 Press the SHIFT button to select Search Select, then press
the SHIFT button to display the SEARCH SELECT menu.
3 Move the arrow mark( ) to “Time” in the Time/Date Search
mode as you want to search.
4 Press the SET - (or +) button to enter the time as you want to
search.
5 Press the SHIFT button to move the cursor to “Date”, then
press the SET - (or +) button to enter the date as you want to
search.
6 Press - (or +) button to proceed in reverse (or forward) direction.
• The display returns to the normal screen.
• The VCR will advance (or rewind) the tape at high speed.
• To cancel the Time/Date Search mode, press the STOP button.
7 While the desired recording is reached, press the PLAY button.
• Playback will start, and Time/Date Search is cancelled.
Alarm Search
1 Repeat steps 1 to 2 of Time/Date Search.
2 Move the arrow mark( ) to search number.
3 Press the SET -(or +) button to enter the number of alarm marks
you want to search.
4 Press the SHIFT button to select FF or REW, then press - (or +)
to proceed in reverse (or forward) direction.
✔
• The start time in Time/Date
Search can be different
according to its recording mode.
• Only the date/hour except
minute/second can be searched
in SEARCH SELECT screen.
Page 32

26
• The display returns to the normal screen.
• The VCR will locate the desired alarm recording and begin
playback.
Alarm Scan
1 Repeat steps 1 to 2 of Time/Date Search.
2 Move the arrow mark ( ) to FF or REW in Alarm Search Mode.
3 Press the SHIFT button to search forward or in reverse
without entering a specific alarm number.
• The display returns to the normal screen.
• The VCR will advance (or rewind) the tape at high speed, and
playback the first 5 seconds of every alarm recording.
• To cancel the alarm scan mode, press the STOP button.
4 While the desired recording is being played back, press the PLAY
button.
• Playback will start, and alarm scan is cancelled.
Zero Search
1 Repeat steps 1 to 2 of Time/Date Search.
2 Press the SHIFT ( ) to move the arrow mark ( ) to Zero
Search.
3 Press the SHIFT button to rewind the tape to the zero
position.
Page 33

27
ENGLISH
Tape Counter (Zero Search)
Using the counter, it is easy to find a desired recording.
1 Press the CLEAR button, at the beginning of the desired
recording.
• The counter will be reset to “0H 00M 00S” (on screen).
• The counter will be reset to “0H 00M 00S”(on the display panel).
2 After recording or playback, press the Menu button to display
the initial menu.
3 Press the SHIFT button to move the arrow mark ( ) to
Search Select.
4 Press the SHIFT button to display the SEARCH SELECT menu.
The SEARCH SELECT menu is displayed.
5 Press the SHIFT button to move the arrow mark ( ) to Zero
Search.
6 Press the SHIFT button to search the counter “0H 00M
00S”(“0H 00M 00S” on the display panel).
• The display returns to the normal screen.
• The tape is rewound or advanced to the counter “0H 00M 00S”
reading(“0H 00M 00S” on the display panel).
✔
• When you insert a cassette, the
counter always resets to zero.
• There is no tape counter
indication for the blank portions
of tape.
• In the 2-hour(NTSC), 3-hour
(PAL) recording speed mode
only, the tape counter indicates
real hours, minutes and
seconds.
• In the other SP recording speed
modes(24H, 36.....960H), the
tape counter indication is a
ratio of the 2-hour mode base
indication.(In 24-hour recording
mode, each “second” of the
tape counter actually represents
approximately 24/2 = 12 real
seconds.) (NTSC ONLY)
• In the other EP recording speed
modes(18H), the tape counter
indication is a ratio of the 6hour mode base indication.(In
18-hour recording mode, each
“second” of the tape counter
actually represents
approximately 18/6 = 3 real
seconds.) (NTSC ONLY)
• In the other recording speed
modes(12H, 18, 24.....960H), the
tape counter indication is a
ratio of the 3-hour mode base
indication.(In 24-hour recording
mode, each “second” of the
tape counter actually represents
approximately 24/3 = 8 real
seconds.) (PAL ONLY)
• There may be a slight
discrepancy between the
position shown on the tape
counter and the actual tape
position.
• When rewinding the tape past
the “0H 00M 00S” position(“0H
00M 00S” on the display panel),
a minus(-) displayed.
Other Functions
Page 34

28
Setting the Security Lock (Set Lock)
The security lock function is designed to prevent accidental stopping
of recording if the STOP button is pressed inadvertently.
1 Set the SET LOCK switch to “ON” position.
• “ “ is displayed on the display panel.
2 To cancel the security lock, set the SET LOCK switch to “OFF”
position.
• “ “ will be erased from the display panel.
Setting the SW Out Terminal Output
Synchronization pulses for multiplexers can be obtained from the
SW OUT terminal.
1 Press the MENU button, to display the initial menu.
2 Press the SHIFT button to move the arrow mark( ) to SW
OUT Terminal Set.
3 Press the SHIFT button to display the SW OUT TERMINAL
SET menu.
4 Press the SHIFT button to set “FIELD” (or “FRAME”).
• With each press of the SHIFT button, the setting will changes as
indicated below.
5 Press the SHIFT button, to select Timing.
6 Press the SHIFT button to set the “TIMING”.
• FIELD . . . 1 pulse is output after each set number of fields.
• FRAME . . 1 pulse is output after each set number frames.
7 Press the MENU button, the normal screen is displayed.
• The setting procedure is now complete.
✔
• While the security lock is
engaged, all commands are
disabled.
• The security lock should not be
engaged while a menu is
displayed.
✔
• If “TIMING” is set to FRAME
(see step 6), “FRAME” will be
indicated instead of “FIELD”.
Page 35

29
ENGLISH
Setting the Buzzer
1 Press the MENU button to display the initial menu.
2 Press the SHIFT button to select VCR Mode Set. The VCR
Mode Set menu is displayed.
3 Press the SHIFT button to move the arrow mark( ) to Buzzer
Set.
4 Press the SHIFT button to set “YES” for the functions
described below.
• The buzzer will be heard whenever a button is pressed.
✔
In the following cases, the buzzer
will be heard approximately 5
times.
- If the REC button is pressed
while a cassette without
erasure-prevention tab is
loaded.
- If the TIMER button is pressed
while a cassette without
erasure-prevention tab is
loaded.
- If there is a series recording
input while a cassette without
erasure-prevention tab is
loaded.
- If the TIMER button is pressed
without inserting a cassette.
✔
• If “NO” is set, the buzzer will
not operate.
Page 36

30
Checking the Alarm Recording Times
1 Press the MENU button to display the initial menu.
2 Press the SHIFT button to move the arrow mark( ) to Alarm
Time.
3 Press the SHIFT button to display the ALARM TIME menu.
• The number of alarm triggers and the 35 most recent alarm
recording times are displayed.
4 Press the MENU button twice, the normal screen is displayed.
Checking Power Loss Times
1 Press the MENU button to display the initial menu .
2 Press the SHIFT button to move the arrow mark( ) to Power
Loss Time.
3 Press the SHIFT button to display the Power Loss Time menu.
• The number of power losses, and the 35 most recent power loss
times are displayed.
4 Press the MENU button twice, the normal screen is displayed.
✔
• The data for the previous
alarm recordings, past 35, is
erased.
✔
• POWER LOSS ....
the number of power losses and
the date and time of the 35
most recent power loss and
recovery are displayed.
Page 37

31
ENGLISH
Checking Usage Duration
1 Press the MENU button to display the initial menu.
Running Time : The video heads usage duration.
2 Press the MENU button, the normal screen is displayed.
Setting In/Out terminals
1 Press the MENU button to display the initial menu.
2 Press the SHIFT button to display the VCR Mode Set menu.
3 Press the SHIFT button to move the arrow mark( ) to
In/Output Set.
4 Press the SHIFT button to display the IN/OUTPUT SET menu.
5 Press the SHIFT button to move the arrow mark( ) for the
desired item.
6 Press the SHIFT button to set “Open” or “Closed”, “High” or
“Low”.
7 Press the MENU button three times, the normal screen is
displayed.
✔
• The Running Time data cannot
be reset even though the reset
button is pressed. If the RESET
button is pressed, all data can
be reset except the running
time data.
Page 38

32
ALARM INPUT Terminal
1) “N/C” (Normally Closed Switch Circuit)
If the input becomes DC 5V for 500 msec or more, the VCR starts
alarm recording.
2) “N/O” (Normally OPEN Switch Circuit)
If the input becomes 0V for 500 msec or more, the VCR starts
alarm recording.
ALARM OUTPUT Terminal
1) “High”
When an alarm input is received and the unit is recording, the
output becomes DC 5V. Once the alarm recording is over, the
output returns to 0V.
2) “Low”
When an alarm input is received and the unit is recording, the
output becomes 0V. Once the alarm recording is over, the output
returns to DC 5V.
PANIC INPUT Terminal
1) “N/C” (Normally Closed Switch Circuit)
If the input becomes DC 5V for 500 msec or more, the VCR starts
panic recording.
2) “N/O” (Normally OPEN Switch Circuit)
If the input becomes 0V for 500 msec or more, the VCR starts
panic recording.
TAPE END(OUT) Terminal
1) “High”
During recording, when the end of the tape is reached, the
output becomes DC 5V.
2) “Low”
During recording, when the end of the tape is reached, the
output becomes DC 0V.
Page 39

33
ENGLISH
SW OUTPUT Terminal
While recording, a pulse signal(DC 5V) is output at the SW OUT
terminal after each recording period. This terminal is usually
connected to the switch input of devices like a camera switching
unit, or a quad compressor.
1) Low
2) High
SERIES OUTPUT Terminal
During recording, when the end of the tape is reached, the output
becomes DC 5V .
SERIES INPUT Terminal
If the input becomes DC 5V for 200 msec or more,the VCR starts
series recording.
WARNING OUTPUT Terminal
1) “High”
If the error display on the display panel continues to flash, the
output becomes DC 5V. If the POWER button is pressed, the
emergency mode is released. then the output becomes 0V.
2) “Low”
If the error display on the display panel continues to flash, the
output becomes 0V. If the POWER button is pressed, the
emergency mode is released. then the output becomes DC 5V.
(NTSC) (PAL)
Page 40

34
Daily Inspection
The following daily inspections are recommended in order to assure
long-term and trouble-free operation of the unit.
The daily inspections are particularly important if using autorepeat
recording
.
Inspection Procedure
1 Turn on the power to the camera, TV monitor and other connected
devices.
2 Check that the image received on the TV monitor is correct.
3 Check that the on-screen display of the date and time is correct.
4 Press the REW button to rewind the recorded tape a few seconds.
5 Press the PLAY button and check that the playback image is correct.
• Check in particular playback of time lapse recording (24 hour mode)
6 Check that the recorded date and time are correct.
Servicing Periodically
✔
• If the security lock is engaged,
it has to be released before
proceeding with the inspection.
• If any problem is discovered
during the inspection,unplug the
power cord and consult your
dealer.
Maintenance period(Hrs)
1,000 2,000 3,000 4,000 5,000
DRUM TOTAL ASS’Y ❉
▲
❉
▲
❉
CAPSTAN MOTOR ❉
▲
❉
▲
❉
L/C BRKT TOTAL ASS’Y ❉
▲
❉
▲
❉
REEL BELT ❉
▲
❉
▲
❉
IDLER PLT ASS’Y ❉
▲
S/T REEL TABLE ASS’Y ❉
▲
T-SUB BRAKE ASS’Y
▲▲
BAND BRAKE ASS’Y
▲▲
MAIN PLATE
▲▲
L-LOADING ASS’Y
▲▲
PINCH LEVER T/T ASS’Y ❉
▲
❉
AC HEAD TOTAL ASS’Y
▲
FE HEAD
▲
REEL GEAR TOTAL ASS’Y ❉
▲
❉
❉ : Check and replace parts if necessary
▲
: Replacement
The requirement for professional servicing on the VCR varies
depending on the usage and environment of the deck. The following
table provides a recommended guide on when to contact a service
representative for maintenance.
WARNING
Do cleaning and lubricating
from time to time even if the
deck is not used
.
Items
Maintenance
Page 41

35
ENGLISH
If the unit does not operate normally when you follow the instructions indicated in the manual,
please refer to the table below.
Troubleshooting Guide
SYMPTOM POSSIBLE CAUSE CORRECTIVE ACTION
No power.
No image
displayed on
the monitor TV.
The buttons do
not respond.
Unit will not go
into record
mode.
Autorepeat.
Timer
recording.
The power cord is not correctly
connected to the wall outlet.
The unit is in timer recording
stand-by mode.
The connections are not correct.
The power to the camera and/or
monitor TV is not turned on.
The unit is in timer recording
stand-by mode.
Alarm recording.
Panic recording.
The security lock(SET LOCK) is
engaged.
The loaded cassette has no
erasure prevention tab.
“NO” is selected for autorepeat
recording in the REC MODE SET
menu.
During autorepeat recording
when there is an alarm input,
autorepeat recording is canceled.
The date and time are not
correct.
The unit is not set to timer
recording stand-by mode.
“N” is selected for the TIMER
PROGRAM SET.
- Connect the power cord firmly into
the walloutlet.
- This is normal, not a malfunction.
- Check that all connections are correct.
- Turn all connected devices power
on.
- Press the POWER/Timer button.
- Wait for the alarm recording to end.
- Press the STOP button for 3
seconds to stop.
- Wait for the panic recording to end.
- Press the STOP button for 3
seconds to stop.
- Cancel the security lock.
- Load a cassette tape with
erasure prevention tab or cover
the tab hole with adhesive tape.
- Be sure to select “YES” for
autorepeat recording.
- Set “YES” again for autorepeat
recording.
- Set the date and time correctly.
- Press the POWER/TIMER button to
display “”on the display panel.
- Be sure to select “Y” for the
TIMER PROGRAM SET.
Page 42

36
Periodic Inspection and Maintenance
Periodic inspection and maintenance should be referred to your
dealer. If there is noise in the playback picture, and it cannot be
corrected using the tracking control, it may indicated that the
video heads need cleaning. The video heads should be cleaned and
inspected every 1,000 hours. The video heads usage can be checked
using initial menu, running time.
System Down
If the unit does not function at all, try the following.
1 Unplug the power cord then plug it back in.
2 Reset the memory. (Press the RESET button. Under normal
conditions, do not touch the RESET button)
3 If the problem is not corrected after performing steps 1 and 2,
consult your dealer.
✔
• Press the RESET button for
more than 5 seconds to perform
the reset. Running Time will not
be reset.
SYMPTOM POSSIBLE CAUSE CORRECTIVE ACTION
Alarm
recording.
Noise in the
playback picture.
The date and
time are not
recorded.
The cassette tape
cannot be ejected
“NO” is selected for alarm
recording in the ALARM REC SET
menu.
The tracking must be adjusted.
The video heads need cleaning.
“NO” is selected for the date and
time in the DISPLAY SET menu.
The date and time go off the ONSCREEN by pressing the DISPLAY
button.
Problem with the system or tape.
- Be sure to select “YES” for alarm
recording.
- Adjust it by using the manual
tracking.
- Press the PLAY button in the
playback mode.
- Clean the video heads.
- Be sure to select “YES” for the
display.
- Press the DISPLAY button to
show the date and time.
- Unplug the power cord then plug
it back in.
Page 43

37
ENGLISH
GENERAL SPECIFICATIONS
Recording method Dual-azimuth 4-head rotating helical scanning system
Audio recording
In 2, 6, and 18 hour modes
Tape speed 33.35 m/sec (2 hour mode)
Specified video cassette tape
VHS 1/2 inch video cassette tape
Recording/playback time
24H Model : L2, L6, L18, 24, 36 hours
(when using T-120 tape)
960H Model : L2, L6, L18, 24, 36, 48, 72, 96, 120,
168, 240, 360, 480, 720, 960 hours
(when using T-120 tape)
Fast forward/rewind time
Within 3 minutes (when using T-120 tape)
Television system
NTSC color TV system
VIDEO
Recording method
Luminance signal : FM recording
Color signal : Down-converted subcarrier direct
recording
Video input
1 Vp-p, BNC, 75, unbalanced
Video output
1 Vp-p, BNC, 75, unbalanced
Horizontal resolution
Black & white mode 350 lines
Color mode 300 lines
AUDIO
Input
RCA pin jack more than 47k -8.8dBm,unbalanced
Output
RCA pin jack less than 1.5k -7.8dBm, unbalanced
Microphone input
-60 dBs, 3.5mm mini jack, 10k, unbalanced
CONNECTORS
Alarm input
DC 4~5V(Open), DC 0~0.8V(Closed)/5.7k
Alarm output
DC 4~5V(H), DC 0~0.8V(L)/5.7k
Panic input
DC 4~5V(Open), DC 0~0.8V(Closed)/5.7k
End output
DC 4~5V(H), DC 0~0.8V(L)/5.7k
Warning output
DC 4~5V(H), DC 0~0.8V(L)/5.7k
Series input
DC 4~5V(H), DC 0~0.8V(L)/5.7k
Series output
DC 4~5V(H), DC 0~0.8V(L)/5.7k
Switch output
DC 4~5V(H), DC 0~0.8V(L)/5.7k
Common
0V( GND)
OTHER SPECIFICATIONS
Operating temperature range
41ºF ~ 104ºF
Operating humidity range
80% or less
Power requirements
AC90 ~ 240V, 50/60 Hz
Power consumption
17W
Dimensions
360(W) x 90(H) x 289(D)
Weight
approximately 4kg
In 3, 12,18, and 24 hour modes
23.39 m/s (3 hour mode)
24H Model : L3, L12, L18, L24, 36 hours
(when using E-180 tape)
960H Model : L3, L12, L18, L24, 36, 48, 72, 96, 120,
168, 240, 360, 480, 720, 960 hours
(when using E-180 tape)
Within 3 minutes (when using E-180 tape)
PAL color TV system
Luminance signal : FM recording
Color signal : Down-converted subcarrier phase
shift recording
11W
NTSC
PAL
NOTE : The specifications and external appearance of this unit are subject to change without notice.
Specifications
Page 44

Page 45

MARMITEK
LANGZEITVIDEOREKORDER
TLV 9600
051202-DE • TLV9600 COPYRIGHT ALL RIGHTS RESERVED MARMITEK 2002
BEDIENUNGSANLEITUNG
Page 46

Einführung
Sehr geehrter Kunde,
wir bedanken uns für den Kauf des Langzeitvideorekorders.
Mit diesem Gerät haben Sie ein Produkt erworben, welches nach dem heutigen Stand
der Technik gebaut wurde.
Der Aufbau entspricht der Schutzklasse II. Darüber hinaus ist das Gerät funkentstört. Dieses Produkt erfüllt somit die Anforderungen der geltenden europäi-
schen und nationalen Richtlinien. Die Konformität wurde nachgewiesen, die entsprechenden Erklärungen und Unterlagen sind beim Hersteller hinterlegt.
Um diesen Zustand zu erhalten und einen gefahrlosen Betrieb sicherzustellen müssen
Sie als Anwender diese Bedienungsanleitung beachten!
Bestimmungsgemäße Verwendung
Der Langzeitvideorekorder dient zur Aufnahme von Bild- und Tonsignalen in der Über-
wachungstechnik und wird dabei zwischen eine Überwachungskamera und einen
Überwachungsmonitor geschaltet.
Als Aufnahmemedien dürfen nur handelsübliche VHS-Videocassetten verwendet werden.
Dieses Produkt ist nur für den Anschluß an 230 Volt / 50 Hz (10/16 A) Wechselspan-
nung zugelassen.
Eine Verwendung ist nur in geschlossenen Räumen, also nicht im Freien erlaubt. Der
Kontakt mit Feuchtigkeit, z.B. im Badezimmer u.ä. ist unbedingt zu vermeiden.
Eine andere Verwendung als zuvor beschrieben führt zur Beschädigung dieses Pro-
duktes, darüber hinaus ist dies mit Gefahren, wie z.B. Kurzschluß, Brand, elektrischer
Schlag etc. verbunden. Das gesamte Produkt darf nicht geändert bzw. umgebaut und
das Gehäuse nicht geöffnet werden!
Die Sicherheitshinweise sind unbedingt zu befolgen!
2
Page 47

DEUTSCH
3
Inhaltsverzeichnis
Einführung . . . . . . . . . . . . . . . . . . . . . . . . . . . . . . . . . . . . . . . . . . . . . . . . . . . . . . . . . . 2
Bestimmungsgemäße Verwendung . . . . . . . . . . . . . . . . . . . . . . . . . . . . . . . . . . . . . . 2
Inhaltsverzeichnis . . . . . . . . . . . . . . . . . . . . . . . . . . . . . . . . . . . . . . . . . . . . . . . . . . . . 3
Einzelteilbezeichnungen . . . . . . . . . . . . . . . . . . . . . . . . . . . . . . . . . . . . . . . . . . . . . . . . . . . . 4
Sicherheitshinweise . . . . . . . . . . . . . . . . . . . . . . . . . . . . . . . . . . . . . . . . . . . . . . . . . . . 6
Funktionsbeschreibung . . . . . . . . . . . . . . . . . . . . . . . . . . . . . . . . . . . . . . . . . . . . . . . . 7
Inbetriebnahme . . . . . . . . . . . . . . . . . . . . . . . . . . . . . . . . . . . . . . . . . . . . . . . . . . . . . . 8
Aufstellung . . . . . . . . . . . . . . . . . . . . . . . . . . . . . . . . . . . . . . . . . . . . . . . . . . . . . . . . 8
Einlegen der Batterien in die Fernbedienung . . . . . . . . . . . . . . . . . . . . . . . . . . . . . . 8
Anschluß . . . . . . . . . . . . . . . . . . . . . . . . . . . . . . . . . . . . . . . . . . . . . . . . . . . . . . . . . 9
Anschluß der Ein- und Ausgänge . . . . . . . . . . . . . . . . . . . . . . . . . . . . . . . . . . . . . 9
Netzanschluß . . . . . . . . . . . . . . . . . . . . . . . . . . . . . . . . . . . . . . . . . . . . . . . . . . . 11
Bedienung . . . . . . . . . . . . . . . . . . . . . . . . . . . . . . . . . . . . . . . . . . . . . . . . . . . . . . . 11
On-Screen-Display Übersicht . . . . . . . . . . . . . . . . . . . . . . . . . . . . . . . . . . . . . . . 11
Einstellung der Uhrzeit . . . . . . . . . . . . . . . . . . . . . . . . . . . . . . . . . . . . . . . . . . . . 13
Änderung der Bildschirmanzeige . . . . . . . . . . . . . . . . . . . . . . . . . . . . . . . . . . . . 14
Manuelle Aufnahme . . . . . . . . . . . . . . . . . . . . . . . . . . . . . . . . . . . . . . . . . . . . . . 16
Programmierung von Zeitaufnahmen . . . . . . . . . . . . . . . . . . . . . . . . . . . . . . . . . 17
Aufnahme im Alarmbetrieb . . . . . . . . . . . . . . . . . . . . . . . . . . . . . . . . . . . . . . . . . 20
Panikaufnahme . . . . . . . . . . . . . . . . . . . . . . . . . . . . . . . . . . . . . . . . . . . . . . . . . . 22
Serienaufnahme . . . . . . . . . . . . . . . . . . . . . . . . . . . . . . . . . . . . . . . . . . . . . . . . . 23
Automatische Bandüberspielung . . . . . . . . . . . . . . . . . . . . . . . . . . . . . . . . . . . . 25
Wiedergabe im Normalbetrieb . . . . . . . . . . . . . . . . . . . . . . . . . . . . . . . . . . . . . . 26
Sonderfunktionen bei der Wiedergabe . . . . . . . . . . . . . . . . . . . . . . . . . . . . . . . . 27
Weitere Funktionen . . . . . . . . . . . . . . . . . . . . . . . . . . . . . . . . . . . . . . . . . . . . . . . 31
Handhabung . . . . . . . . . . . . . . . . . . . . . . . . . . . . . . . . . . . . . . . . . . . . . . . . . . . . . . . 35
Gerät . . . . . . . . . . . . . . . . . . . . . . . . . . . . . . . . . . . . . . . . . . . . . . . . . . . . . . . . . . 35
Videocassetten . . . . . . . . . . . . . . . . . . . . . . . . . . . . . . . . . . . . . . . . . . . . . . . . . . 36
Wartung und Entsorgung . . . . . . . . . . . . . . . . . . . . . . . . . . . . . . . . . . . . . . . . . . . . . 37
Wartung . . . . . . . . . . . . . . . . . . . . . . . . . . . . . . . . . . . . . . . . . . . . . . . . . . . . . . . . . 37
Allgemeines . . . . . . . . . . . . . . . . . . . . . . . . . . . . . . . . . . . . . . . . . . . . . . . . . . . . . 37
Tägliche Überprüfung . . . . . . . . . . . . . . . . . . . . . . . . . . . . . . . . . . . . . . . . . . . . . 37
Entsorgung . . . . . . . . . . . . . . . . . . . . . . . . . . . . . . . . . . . . . . . . . . . . . . . . . . . . . . . 38
Behebung von Störungen . . . . . . . . . . . . . . . . . . . . . . . . . . . . . . . . . . . . . . . . . . . . . 38
Technische Daten . . . . . . . . . . . . . . . . . . . . . . . . . . . . . . . . . . . . . . . . . . . . . . . . . . . 40
Umgebungsbedingungen . . . . . . . . . . . . . . . . . . . . . . . . . . . . . . . . . . . . . . . . . . . . . 41
Page 48

4
Einzelteilbezeichnungen
(1) Taste POWER
(2) Taste STOP/EJECT
(3) Cassettenschacht
(4) Taste REW
(5) Taste PLAY
(6) Taste FF
(7) Schalter RMC LOCK
(8) Schalter SET LOCK
(9) Taste RESET
(10) Taste MENU
(11) Taste CLEAR
(12) Taste TRACKING – / SHIFT
(13) Taste SET –
(14) Taste SET +
(15) Taste TRACKING + / SHIFT
(16) Anzeige PANIC
(17) Anzeige REM LOCK
(18) Display
(19) Taste COUNTER/CLOCK/ALARM
(20) Taste DISPLAY
(21) Taste AUDIO ON
(22) Taste PAUSE/STILL
(23) Taste REC
(24) Taste REC CHECK
(25) Symbol Endlosaufzeichnung
(26) Symbol Sperre eingeschaltet
(27) Symbol Timerbetrieb
(28) Symbol Kassettenstatus
(29) Symbol REC (Aufzeichnung)
(30) Symbol CLOCK (Uhrzeit)
(31) Symbol COUNT (Bandposition)
(32) Symbol ALARM
(Betriebsart Alarm eingeschaltet)
(33) Symbol PF
(Fehler in der Stromversorgung)
(34) Symbol Betriebsart (Laufwerk)
(35) Symbol TAB
(36) Symbol LINK (Serienaufzeichnung)
(37) Ziffernanzeige
(Uhrzeit, Zähler, Bandgeschwindigkeit)
(38) Netzleitung
(39) Anschluß WARNING OUT
(40) Anschluß SERIES IN
(41) Anschluß COM
(42) Anschluß SERIES OUT
(43) Anschluß SW OUT
(44) Anschluß VIDEO IN
(45) Anschluß AUDIO IN
(46) Anschluß TAPE END
(47) Anschluß PANIC IN
(48) Anschluß COM
(49) Anschluß ALARM OUT
(50) Anschluß ALARM IN
(51) Anschluß VIDEO OUT
(52) Anschluß MIC
(53) Anschluß AUDIO OUT
(54) Taste POWER/TIMER
(55) Taste AUDIO ON
(56) Taste EJECT
(57) Taste SHIFT
(58) Taste SET –
(59) Taste CLEAR
(60) Taste DISPLAY
(61) Taste COUNTER
(62) Taste STOP
(63) Taste REW
(64) Taste REC CHECK
(65) Taste REC
(66) Taste REC/PLAY SPEED
(67) Taste REC/PLAY SPEED
(68) Taste PAUSE/STILL
(69) Taste FF
(70) Taste PLAY/STILL TRACKING –
(71) Taste PAUSE-STILL –
(72) Taste PAUSE-STILL +
(73) Taste PLAY/STILL TRACKING +
(74) Taste SET +
(75) Taste MENU
(76) Taste SHIFT
(77) Taste PLAY
Page 49

DEUTSCH
5
Page 50

6
Sicherheitshinweise
Ein in einem Dreieck befindliches Ausrufezeichen weist auf wichtige
Hinweise in der Bedienungsanleitung hin. Lesen Sie bitte vor Inbetriebnahme die komplette Anleitung durch, sie enthält wichtige Hinweise zum korrekten Betrieb.
Das Blitzsymbol in einem Dreieck warnt vor ungeschützten, spannungsführenden Bauteilen, bzw. -elementen im Gehäuseinneren. Die
Berührung dieser Bauteile, bzw. -elemente kann lebensgefährlich
sein.
Bei Schäden, die durch Nichtbeachten dieser Bedienungsanleitung
verursacht werden, erlischt der Garantieanspruch! Für Folgeschä-
den übernehmen wir keine Haftung!
Bei Sach- oder Personenschäden, die durch unsachgemäße Handhabung oder Nichtbeachten der Sicherheitshinweise verursacht
werden, übernehmen wir keine Haftung! In solchen Fällen erlischt
jeder Garantieanspruch.
Aus Sicherheits- und Zulassungsgründen (CE) ist das eigenmächtige
Umbauen und/oder Verändern des Produktes nicht gestattet.
Als Spannungsquelle darf nur eine ordnungsgemäße Netzsteckdose (230
V / 50 Hz) des öffentlichen Versorgungsnetzes verwendet werden.
Achten Sie auf eine sachgerechte Inbetriebnahme des Gerätes. Beachten
Sie hierbei diese Bedienungsanleitung.
Stellen Sie sicher, daß beim Aufstellen des Produktes das Netzkabel
nicht gequetscht oder durch scharfe Kanten beschädigt wird.
Geräte, die an Netzspannung betrieben werden gehören nicht in Kinderhände. Lassen Sie deshalb beim Betrieb des Gerätes in Anwesenheit von
Kindern besondere Vorsicht walten, insbesondere, wenn diese versuchen
Gegenstände durch Gehäuseöffnungen in ein Gerät zu stecken. Es
besteht die Gefahr eines lebensgefährlichen elektrischen Schlags.
Gießen Sie nie Flüssigkeiten über elektrischen Geräten aus. Es besteht
höchste Gefahr eines Brandes oder lebensgefährlichen elektrischen
Schlags. Sollte es dennoch zu einem solchen Fall kommen, trennen Sie
sie sofort vom Netz und ziehen Sie eine Fachkraft zu Rate.
Page 51

DEUTSCH
7
Setzen Sie das Gerät keinen hohen Temperaturen, Feuchtigkeit oder
starken Vibrationen, sowie starken mechanischen Beanspruchungen
aus.
Wenden Sie sich an eine Fachkraft, wenn Sie Zweifel über die Arbeitsweise, die Sicherheit oder den Anschluß des Produktes haben.
Lassen Sie Verpackungsmaterial nicht achtlos liegen. Plastikfolien/-tüten,
Styroporteile, etc. könnten für Kinder zu einem gefährlichen Spielzeug
werden.
Beachten Sie auch die Sicherheitshinweise und Bedienungsanleitungen
der übrigen Geräte, die an das Gerät angeschlossen werden.
In gewerblichen Einrichtungen sind die Unfallverhütungsvorschriften des
Verbandes der gewerblichen Berufsgenossenschaften für elektrische
Anlagen und Betriebsmittel zu beachten.
Funktionsbeschreibung
Der Langzeitvideorekorder nimmt Bild- und Audiosignale von Überwachungskameras
auf handelsübliche VHS-Videocassetten auf.
Zur Kontrolle kann ein Überwachungsmonitor angeschlossen werden.
Die Carbon-Kopftrommel, 4-Videoköpfe, eine automatische Kopfreinigungsfunktion
und die Doppelazimuth-Schrägspuraufzeichnung ermöglichen eine hohe Qualität der
Aufnahmen.
Die Aufzeichnungsdauer ist variabel. Mit einer E-180-Cassette beträgt sie max. 36
Stunden (Modell TLV-2400) bzw. 960 Stunden (Modell TLV-9600). Zur Erhöhung dieser Aufzeichnungsdauer können mehrere baugleiche Geräte in Serie geschaltet wer-
den. Wenn das Aufzeichnungsende einer Cassette erreicht ist, schaltet sich automatisch der nachfolgende Rekorder ein und führt die Aufzeichnung fort.
Die Aufzeichnung kann manuell, zeitgesteuert, alarmgesteuert oder über einen Paniktaster ausgelöst werden.
Endlosaufzeichungen sind möglich.
Das Gerät besitzt ein On-Screen-Display, welches eine einfache Programmierung
ermöglicht, und verfügt außerdem über eine Fernbedienung.
Page 52

8
Inbetriebnahme
Um eine sachgemäße Inbetriebnahme zu gewährleisten, lesen Sie
vor Gebrauch unbedingt diese Bedienungsanleitung mit den Sicherheitshinweisen vollständig und aufmerksam durch!
Aufstellung
Achten Sie bei der Auswahl des Aufstellortes Ihres Gerätes darauf,
daß direktes Sonnenlicht, Vibrationen, Staub, Hitze, Kälte und
Feuchtigkeit vermieden werden müssen. Es dürfen sich keine starken Transformatoren oder Motoren in der Nähe des Gerätes befinden.
Betreiben Sie den Langzeitvideorekorder nur auf einem stabilen
Untergrund, der nicht wärmeempfindlich ist und in waagerechter
Lage, da ansonsten keine korrekte Luftzirkulation gegeben ist.
Stellen Sie ihn auf keinen Fall auf eine weiche Oberfläche oder einen
Teppich, da ansonsten die Luftzirkulation und damit die erforderliche Kühlung des Gerätes verhindert wird.
Bauen Sie das Gerät nicht in Gehäuse ein, die keine ausreichende
Belüftung gewährleisten. Decken Sie Ventilationsöffnungen nicht ab.
Stellen Sie das Gerät sicher auf. Durch ein Herabfallen könnten Personen verletzt werden.
Ein Nichtbeachten dieser Hinweise könnte eine Beschädigung des
Gerätes nach sich ziehen.
Der Langzeitvideorekorder sollte auf einer stabilen, ebenen Fläche aufgestellt werden.
Angesichts der Vielfalt der verwendeten Lacke und Polituren bei Möbeln, ist nicht aus-
zuschließen, daß die Gerätefüße hervorgerufen durch eine chemische Reaktion, sichtbare Rückstände auf den Möbeln hinterlassen könnten. Das Gerät sollte deshalb nicht
ohne geeigneten Schutz auf wertvolle Möbeloberflächen gestellt werden.
Einlegen der Batterien in die Fernbedienung
Batterien gehören nicht in Kinderhände.
Achten Sie beim Einlegen der Batterien auf die richtige Polung.
Lassen Sie Batterien nicht offen herumliegen, es besteht die Gefahr,
daß diese von Kindern oder Haustieren verschluckt werden. Suchen
Sie im Falle eines Verschluckens sofort einen Arzt auf!
Page 53

DEUTSCH
9
Klappen Sie den Batteriefachdeckel auf
der Rückseite der Fernbedienung auf.
Legen Sie 2 neue 1,5V-Microbatterien
(AAA) polungsrichtig ein.
Setzen Sie den Batteriefachdeckel wieder
auf das Gehäuse der Fernbedienung und
klappen Sie ihn zu, bis er hörbar einra-
stet.
Bei längerer Nichtbenutzung entnehmen
Sie bitte die Batterien um ein Auslaufen
zu verhindern.
Wenn die Batterien schwächer werden,
verringert sich die Reichweite der Fernbedienung. Sie sollten dann neue Batterien
einlegen.
Anschluß
Anschluß der Ein- und Ausgänge
Benutzen Sie zum Anschluß der Ein- und Ausgänge nur hierfür
geeignete abgeschirmte BNC-Leitungen. Bei Verwendung anderer
Kabel können Störungen auftreten.
Um Verzerrungen oder Fehlanpassungen zu vermeiden, die zur
Beschädigung des Gerätes führen können, dürfen an die Anschlüsse
nur Geräte mit geeigneten Ein- und Ausgängen angeschlossen wer-
den.
Beachten Sie hierzu auch die Anschlußwerte in den "Technischen
Daten".
Schalten Sie vor dem Anschluß des Langzeitvideorekorders den
Rekorder selbst und alle anderen Geräte, die mit ihm verbunden
werden sollen aus und trennen Sie sie vom Stromversorgungsnetz
(Netzstecker ziehen).
Gehen Sie bei Änderungen der Beschaltung ebenso vor.
Verbinden Sie den Ausgang Ihrer Über-
wachungskamera mit dem Anschluß
VIDEO IN (44).
Drücken Sie die Verriegelung hierzu mit
dem Fingernagel nach innen.
Die richtige Polung ist in den Boden des
Batteriefachs eingeprägt.
Mischen Sie niemals alte und neue oder
verschiedene Typen von Batterien.
Im Interesse einer langen Batterielebensdauer sollten nur Alkaline-Typen verwendet werden.
Falls zusätzlich eine Audioüberwachung
gewünscht wird schließen Sie den Audioausgang der Überwachungskamera an
Page 54

Verbinden Sie den Anschluß VIDEO OUT
(51) mit dem Videoeingang des Überwa-
chungsmonitors.
den Anschluß AUDIO IN (45) an oder Sie
verwenden zur Audioaufzeichnung ein
externes, dynamisches Mikrofon, welches an den Anschluß MIC (52) ange-
schlossen wird.
Verwenden Sie jedoch nie den
Anschluß AUDIO IN (45) und den
Anschluß MIC (52) gleichzeitig.
Bei zusätzlicher Audioüberwachung
schließen Sie den Anschluß AUDIO OUT
(53) an den Audioeingang des Überwa-
chungsmonitors an.
10
Page 55

DEUTSCH
11
Netzanschluß
Beachten Sie bitte, daß das Gerät auch in ausgeschaltetem Zustand
noch mit dem Netz verbunden ist.
Um es vom Netz zu trennen muß der Netzstecker gezogen werden.
Stecken Sie den Netzstecker der Netzleitung (38) in eine Netzsteckdose.
Mit der Taste POWER (1) bzw. POWER/
TIMER (54) an der Fernbedienung wird
das Gerät ein- bzw. ausgeschaltet.
Bedienung
☞
Zur besseren Übersichtlichkeit der Anleitung werden die folgenden Bedienschritte anhand der Tasten auf der Fernbedienung erklärt. Die gleichnamigen
Tasten am Gerät können hierzu jedoch genauso verwendet werden.
On-Screen-Display Übersicht
Folgendes ist beim Programmieren des Gerätes mit Hilfe des ON-Screen-Displays (im folgenden kurz OSD genannt) zu beachten:
• Das OSD kann bei eingeschaltetem Timer nicht abgerufen werden. Hierzu muß
zuerst die Timer-Funktion mit der Taste POWER/TIMER (54) abgeschaltet werden.
• Wenn das OSD aktiviert ist kann keine Aufnahme gestartet werden.
• Während der Aufnahme oder Wiedergabe kann das OSD nicht abgerufen werden.
Grundsätzliche Bedienung des OSD:
Taste Funktion
MENU (75) • aktiviert das OSD (im Normalbetrieb)
• springt jeweils eine Menüebene zurück
(in den Untermenüs)
• beendet das OSD (im Hauptmenü)
SHIFT (57) • bewegt die Positionsmarke nach unten
SHIFT (76) • wählt das gewünschte Untermenü aus
(im Hauptmenü)
• ruft die gewünschte Funktion auf oder
wählt JA oder NEIN aus (in den Untermenüs)
SET - oder SET + (58 bzw. 74) • nimmt Einstellungen in den Menüs vor
☞
In der unteren Zeile des OSD werden die jeweiligen Tastenfunktionen angezeigt.
Bei eingeschaltetem Gerät leuchtet die
Beleuchtung des Displays (18) heller als
bei ausgeschaltetem Gerät.
Page 56

12
Übersicht über die vorhandenen OSD-Menüs:
Page 57

DEUTSCH
13
Einstellung der Uhrzeit
Nach der ersten Inbetriebnahme muß zuerst die Uhr eingestellt werden. Dazu gehen
Sie folgendermaßen vor:
Schalten Sie alle Geräte Ihres Systems
ein.
Drücken Sie die Taste MENU (75).
Bewegen Sie die Positionsmarke mit der
Taste SHIFT (57) auf das Untermenü
"Grundeinstellungen".
Rufen Sie das Untermenü "Grundeinstel-
lungen" mit der Taste SHIFT (76) ab.
Rufen Sie das Untermenü "Uhrzeit" mit
der Taste SHIFT (76) ab.
Das Hauptmenü erscheint auf dem Moni-
tor.
Die Positionsmarke zeigt auf das Untermenü "Sprache".
Bei der ersten Inbetriebnahme erscheint
der Menüpunkt "Uhreinstellung" sofort
nach dem Einschalten (hier allerdings in
englischer Sprache). Bevor andere Einstellungen (z.B. Sprachauswahl) durchgeführt werden können, muß zuerst die Uhr
gestellt werden.
Die Positionsmarke zeigt auf das Untermenü "Uhrzeit".
Page 58

14
Stellen Sie mit den Tasten SET - oder
SET + (58 bzw. 74) die Stunden ein.
Stellen Sie mit den Tasten SET - oder
SET + (58 bzw. 74) die Minuten ein.
Stellen Sie mit den Tasten SET - oder
SET + (58 bzw. 74) den Tag ein.
Stellen Sie mit den Tasten SET - oder
SET + (58 bzw. 74) den Monat ein.
Stellen Sie mit den Tasten SET - oder
SET + (58 bzw. 74) die letzten 2 Ziffern
des Jahres ein.
Drücken Sie die Taste MENU (75) dreimal.
Änderung der Bildschirmanzeige
Auswahl der Sprache:
Schalten Sie alle Geräte Ihres Systems
ein.
Drücken Sie die Taste MENU (75).
Bestätigen Sie die Eingabe mit der Taste
SHIFT (76).
Bestätigen Sie die Eingabe mit der Taste
SHIFT (76).
Bestätigen Sie die Eingabe mit der Taste
SHIFT (76).
Bestätigen Sie die Eingabe mit der Taste
SHIFT (76).
Der Wochentag wird automatisch eingestellt.
Das Gerät schaltet wieder in den Normalbetrieb zurück.
Die Uhreinstellung ist beendet.
Das Hauptmenü erscheint auf dem Moni-
tor.
Die Positionsmarke zeigt auf das Untermenü "Sprache".
Page 59

DEUTSCH
15
Wählen Sie die gewünschte Sprache mit
der Taste SHIFT (76) aus.
Einblendung von Informationen auf dem Bildschirm:
Die Informationen Datum, Uhrzeit, Bildzähler, Alarmzähler und Titel können auf dem
Bildschirm eingeblendet werden.
Schalten Sie alle Geräte Ihres Systems
ein.
Drücken Sie die Taste MENU (75).
Bewegen Sie die Positionsmarke mit der
Taste SHIFT (57) auf das Untermenü
"Grundeinstellungen".
Rufen Sie das Untermenü "Grundeinstel-
lungen" mit der Taste SHIFT (76) ab.
Bewegen Sie die Positionsmarke mit der
Taste SHIFT (57) auf das Untermenü
"Display Einblendungen".
Rufen Sie das Untermenü "Display Ein-
blendungen" mit der Taste SHIFT (76)
ab.
Es stehen Deutsch, Französisch, Spanisch und Englisch zur Verfügung.
Das Hauptmenü erscheint auf dem Moni-
tor.
Die Positionsmarke zeigt auf das Untermenü "Sprache".
Die Positionsmarke zeigt auf das Untermenü "Uhrzeit".
Die Positionsmarke zeigt auf den Punkt
"Zeit".
Page 60

16
Nur die mit "Ja" ausgewählten Einblendungen werden auch bei der Aufnahme
mit aufgezeichnet.
Wird die Position einer Anzeige geändert,
ändern sich die Positionen der anderen
Anzeigen automatisch.
Die Zeichen werden mit den Tasten SET oder SET + (58 bzw. 74) ausgewählt, mit
der Taste SHIFT (76) wird das Zeichen
bestätigt und eine Stelle weiter gesprungen.
Das Gerät schaltet wieder in den Normal-
betrieb zurück.
Stellen Sie mit den Tasten SET - oder
SET + (58 bzw. 74) die gewünschten Einblendungen auf "Ja".
Jeweils neben der gewählten Funktion
wird mit der Taste SHIFT (76) die
gewünschte Position der Einblendung auf
dem Bildschirm ausgewählt.
Für die Titelbezeichnung können bis zu
20 Zeichen eingegeben werden.
Drücken Sie die Taste MENU (75) dreimal.
Manuelle Aufnahme
Schalten Sie alle Geräte Ihres Systems ein.
Legen Sie eine Cassette in den Cassettenschacht (3) ein.
Wählen Sie mit der Taste REC/PLAY
SPEED (66) oder REC/PLAY SPEED
(67) die Aufnahmegeschwindigkeit aus.
Drücken Sie die Taste REC (65).
Drücken Sie die Taste STOP (62) um die
Aufnahme zu beenden.
Achten Sie darauf eine Cassette mit
intakter Löschschutznase zu verwenden,
da ansonsten keine Aufnahme möglich ist
(Cassette wird bei Betätigung der Taste
REC (65) ausgeworfen).
Die Geschwindigkeit wird in der Ziffernanzeige (37) und auf dem Monitor angezeigt.
Wenn Sie die Einblendungen auf dem
Monitor nicht mit aufnehmen wollen
drücken Sie die Taste DISPLAY (60).
Im Display erscheint das Symbol REC
(29) und die Aufnahme beginnt.
Page 61

DEUTSCH
17
Um die Aufnahme zeitweise zu unterbrechen drücken Sie die Taste PAUSE/STILL
(68).
☞
Wird im Menü "Aufnahmeeinstellungen" die Funktion "A-Wiederholung" auf
"Nein" gestellt, bricht die Aufnahme am Bandende ab und die Cassette wird
ausgeworfen.
Während einer Aufnahme kann das OSD nicht aktiviert werden.
Wird bei einer Aufnahme die Bandposition erreicht, an der zuvor ein Aufnahmetest
durchgeführt wurde kann es zu Bildstörungen kommen.
Wird während der Aufnahme die Aufnahmegeschwindigkeit geändert, kann es zu Bildstörungen kommen.
Während einer Aufzeichnungspause wird zwar am Monitor ein Bild dargestellt, jedoch
nicht aufgenommen.
Dauert die Aufzeichnungspause länger als 5 Minuten wird die Aufnahme beendet um
Bandschäden zu vermeiden.
Bei sehr niedrigen Aufnahmegeschwindigkeiten (lange Aufnahmedauer) kann es zur
leichten Verschlechterung der Bild- und Tonqualität kommen.
Programmierung von Zeitaufnahmen
Programmierung:
Überprüfen Sie die Uhrzeiteinstellung.
Legen Sie eine Cassette mit intakter
Löschschutznase ein.
Rufen Sie das Menü "Timer Programm"
auf.
Um die Aufnahme fortzusetzen drücken
Sie entweder die Taste PAUSE/STILL (68)
erneut oder die Taste REC (65).
Betätigen Sie hierzu nacheinander die fol-
genden Tasten:
MENU (75)
2 x SHIFT (57)
2 x SHIFT (76)
Page 62

18
Wählen Sie mit der Taste SHIFT (57)
den gewünschten Wochentag aus.
Bestätigen Sie die Eingabe mit der Taste
SHIFT (76).
Stellen Sie mit den Tasten SET - oder
SET + (58 bzw. 74) die Stunden ein.
Bestätigen Sie die Eingabe mit der Taste
SHIFT (76).
Stellen Sie mit den Tasten SET - oder
SET + (58 bzw. 74) die Minuten ein.
Bestätigen Sie die Eingabe mit der Taste
SHIFT (76).
Stellen Sie mit den Tasten SET - oder
SET + (58 bzw. 74) die Stunden ein.
Bestätigen Sie die Eingabe mit der Taste
SHIFT (76).
Stellen Sie mit den Tasten SET - oder
SET + (58 bzw. 74) die Minuten ein.
Bestätigen Sie die Eingabe mit der Taste
SHIFT (76).
Stellen Sie mit den Tasten SET - oder
SET + (58 bzw. 74) die Aufnahmegeschwindigkeit ein.
Bestätigen Sie die Eingabe mit der Taste
SHIFT (76).
Die weiteren Wochentage erscheinen,
wenn die Positionsmarke über "DO" hinaus weiter bewegt wird.
Die Position "TGL" wählt die tägliche Aufnahmefunktion aus. Das Gerät nimmt
dann täglich zur einprogrammierten Zeit
auf.
Die Positionsmarke springt auf das Stundeneingabefeld für die Startzeit.
Die Positionsmarke springt auf das Minuteneingabefeld für die Startzeit.
Die Positionsmarke springt auf das Stundeneingabefeld für die Schlußzeit.
Die Positionsmarke springt auf das Minuteneingabefeld für die Schlußzeit.
☞
Wenn die Eingabe der Schlußzeit
gleich der Starzeit ist oder früher
liegt, wird davon ausgegangen,
daß der folgende Tag damit
gemeint ist.
Die Positionsmarke springt auf das Eingabefeld für die Aufnahmegeschwindigkeit.
Die Positionsmarke springt auf das Eingabefeld für die Aufnahmeausführung.
Page 63

DEUTSCH
19
Stellen Sie mit den Tasten SET - oder
SET + (58 bzw. 74) die Aufnahmeausführung ein.
Wiederholen Sie die zuvor beschriebenen
Schritte um weitere Wochentage zu programmieren.
Drücken Sie die Taste MENU (75) dreimal.
Drücken Sie die Taste POWER/TIMER (54).
☞
Vor jeder Änderung oder Löschung einer Timerprogrammierung muß der
Bereitschaftszustand für die Timeraufnahme aufgehoben werden (Gerät mit
Taste POWER/TIMER (54) einschalten).
Programmierung einer Timeraufnahme ändern:
• Verfahren Sie wie oben beschrieben und markieren Sie mit den Tasten SHIFT (57)
bzw. SHIFT (76) die zu ändernde Position im Menü "Timer Programm (1)".
•Ändern Sie die Position mit den Tasten SET - oder SET + (58 bzw. 74) entsprechend.
• Drücken Sie die Taste MENU (75) dreimal.
• Drücken Sie die Taste POWER/TIMER (54).
Löschen einer Timereinstellung:
• Verfahren Sie wie oben beschrieben ("Programmierung einer Timeraufnahme
ändern").
• Stellen Sie mit den Tasten SET - oder SET + (58 bzw. 74) die Aufnahmeausführung
der entsprechenden Position auf "N" (=NEIN).
• Drücken Sie die Taste MENU (75) dreimal.
• Drücken Sie die Taste POWER/TIMER (54).
☞
Mit der Taste CLEAR (11 bzw. 59) kann eine Timereinstellung ebenfalls gelöscht
werden. Alle Eingaben in einer markierten Zeile im Menü "Timer Programm (1)"
werden mit dieser Taste gelöscht.
"J" = JA: die Aufnahme wird ausge-
führt.
"N" = NEIN: die Aufnahme wird nicht
ausgeführt (wird nur gespeichert).
☞
Wird an einem Wochentag eine
zweite programmierte Aufnahme
gewünscht, positionieren Sie die
Positionsmarke mit der Taste
SHIFT (57) auf den folgenden
Wochentag und ändern ihn dann
mit den Tasten SET - oder SET +
(58 bzw. 74) entsprechend ab.
Programmieren Sie nie sich über-
lappende Aufnahmezeiten. Sollte
dies dennoch geschehen hat
immer die frühere Startzeit Vor-
rang.
Das Gerät schaltet wieder in den Normalbetrieb zurück.
Das Gerät schaltet ab und im Display (18)
erscheint das Symbol Timerbetrieb (27).
Page 64

Wenn sich das Gerät im Bereitschaftszustand für Timeraufnahmen befindet
(Symbol Timerbetrieb (27) leuchtet) sind alle Tasten außer der Taste STOP (62)
gesperrt. Wollen Sie eine Aufnahme abbrechen drücken Sie die Taste STOP
(62) für ca. 3s.
Bei Stromausfall unterbricht das Gerät die Timeraufnahme und setzt nach
erneuter Stromversorgung die Aufnahme fort, sofern die eingestellte Stopzeit
noch nicht überschritten ist. Im Display (18) wird durch das Symbol PF (33) auf
den Stromausfall hingewiesen. Die Programmierungen bleiben durch einen eingebauten Notstromakku bis zu 30 Tage erhalten.
Wird während einer Timeraufnahme das Bandende erreicht, ertönt der Summer
5-mal (sofern er aktiviert wurde).
Aufnahme im Alarmbetrieb
Es besteht die Möglichkeit den Langzeitvideorekorder durch einen Alarmimpuls auf-
nehmen zu lassen. Für diese Alarmaufnahme ist ein externer Alarmsensor an den
Anschluß ALARM IN (50) anzuschließen. Die Einrichtung dieses Anschlusses ist weiter
hinten unter "Weitere Funktionen" beschrieben.
Anschluß des Alarmsensors:
Programmierung für den Alarmbetrieb:
Schalten Sie alle Geräte Ihres Systems ein.
Rufen Sie das Menü "Aufnahmeeinstel-
lungen" auf.
Betätigen Sie hierzu nacheinander die fol-
genden Tasten:
MENU (75)
2 x SHIFT (57)
1 x SHIFT (76)
20
Page 65

DEUTSCH
21
Rufen Sie das Menü "Alarm-Aufnahme"
auf.
Stellen Sie mit der Taste SHIFT (76) die
Alarm-Aufnahme auf "JA".
Betätigen Sie die Taste SHIFT (57) und
stellen Sie mit der Taste SHIFT (76) die
Aufnahmegeschwindigkeit ein.
Betätigen Sie die Taste SHIFT (57) und
stellen Sie mit der Taste SHIFT (76) die
Aufnahmedauer ein.
Drücken Sie die Taste MENU (75) dreimal.
☞
Während der Alarmaufnahme sind alle Tasten mit Ausnahme der Taste STOP
(62) gesperrt. Bei Betätigung dieser Taste wird die Alarmaufnahme beendet.
Wenn während der Alarmaufnahme ein erneuter Alarm ausgelöst wird, berech-
net sich die Aufnahmedauer ab dem Zeitpunkt des letzten Alarms.
Betätigen Sie hierzu nacheinander die folgenden Tasten:
1 x SHIFT (57)
1 x SHIFT (76)
03H: Aufnahmegeschwindigkeit 3 Stunden
12H: Aufnahmegeschwindigkeit 12 Stunden
18H: Aufnahmegeschwindigkeit 18 Stunden
24H: Aufnahmegeschwindigkeit 24 Stunden
AUTO: Aufzeichnungsdauer = Alarmdauer (mind. 2 Minuten).
03/05/10/15/20/25/30 MIN: Aufzeichnungsdauer wie eingestellt.
B-ENDE: Aufzeichnungsdauer bis zum
Ende der Cassette.
Das Gerät schaltet wieder in den Normalbetrieb zurück.
Page 66

22
Bei Stromausfall während einer Alarmaufnahme wird die Aufnahme zum Zeitpunkt der
erneuten Stromversorgung für die verbleibende Zeit fortgesetzt.
Alarmzähler:
Während einer Alarmaufnahme blinkt im
Display (18) das Symbol ALARM (32).
Die Ziffernanzeige (37) zeigt die Anzahl
der Alarmauslösungen.
Zum Rücksetzen des Zählers stellen Sie
die Positionsmarke im Hauptmenü auf
"Alarmzeit" und drücken die Taste
CLEAR (59).
Panikaufnahme
Es besteht die Möglichkeit den Langzeitvideorekorder durch einen Panikimpuls auf-
nehmen zu lassen. Für diese Panikaufnahme ist ein externer Paniktaster an den
Anschluß PANIC IN (47) anzuschließen. Die Einrichtung dieses Anschlusses ist weiter
hinten unter "Weitere Funktionen" beschrieben.
Anschluß des Paniktasters:
Der Zähler zählt höchstens 35 Alarmaus-
lösungen und wird dann wieder auf "00"
zurückgesetzt.
Page 67

DEUTSCH
23
Wenn am Anschluß PANIC IN (47) ein
Impuls anliegt nimmt der Rekorder für
eine Dauer von 2 Stunden auf.
Die Panikaufnahme kann durch Betäti-
gung der Taste STOP (62) vorzeitig beendet werden.
Serienaufnahme
Es besteht die Möglichkeit die maximale Aufzeichnungsdauer des Langzeitvideorekorders durch einen zweiten oder noch mehrere in Serie geschaltete Langzeitvideorekorder zu verlängern.
Es muß sich jedoch hierbei um Geräte desselben Typs handeln.
Anschluß:
Verbinden Sie den Anschluß SERIES OUT
(42) des ersten Rekorders mit dem
Anschluß SERIES IN (40) des zweiten
Rekorders.
Verbinden Sie den Anschluß COM (48)
des ersten Rekorders mit dem Anschluß
COM (48) des zweiten Rekorders.
Verbinden Sie den Anschluß VIDEO OUT
(51) mit dem Anschluß VIDEO IN (44) des
zweiten Rekorders.
Der Anschluß VIDEO OUT des zweiten
Rekorders wird mit dem Videoeingang
des Überwachungsmonitors verbunden.
Verbinden Sie den Anschluß AUDIO OUT
(53) mit dem Anschluß AUDIO IN (45) des
zweiten Rekorders.
Der Anschluß AUDIO OUT (53) des zweiten Rekorders wird mit dem Audioeingang des Überwachungsmonitors verbunden.
Während einer Panikaufnahme leuchtet
die Anzeige PANIC (16).
Werden mehrere Rekorder angeschlossen, so wird der Anschluß SERIES OUT
(42) des zweiten Rekorders mit dem
Anschluß SERIES IN (40) des dritten
Rekorders verbunden usw.
Werden mehrere Rekorder angeschlossen, so werden alle Anschlüsse COM (48)
miteinander verbunden.
Werden mehrere Rekorder angeschlossen, so wird der Anschluß VIDEO OUT
(51) des zweiten Rekorders mit dem
Anschluß VIDEO IN (44) des dritten
Rekorders verbunden usw.
Der Anschluß VIDEO OUT (51) des letzten
Rekorders wird dann mit dem Videoeingang des Überwachungsmonitors verbunden.
Werden mehrere Rekorder angeschlossen, so wird der Anschluß AUDIO OUT
(53) des zweiten Rekorders mit dem
Anschluß AUDIO IN (45) des dritten
Rekorders verbunden usw.
Der Anschluß AUDIO OUT (53) des letzten Rekorders wird dann mit dem
Audioeingang des Überwachungsmoni-
tors verbunden.
Page 68

24
Programmierung:
Legen Sie in alle Rekorder eine Cassette
mit intakter Löschschutznase ein.
Schalten Sie alle Geräte Ihres Systems
ein.
Betriebszustand der Rekorder: STOP
Page 69

DEUTSCH
25
Rufen Sie das Menü "Aufnahmeeinstellungen" auf.
Markieren Sie mit der Taste SHIFT (57)
die Position A-Wiederholung.
Markieren Sie mit der Taste SHIFT (57)
die Position "Serienaufnahme".
Drücken Sie die Taste MENU (75) zweimal.
Die obigen Einstellungen müssen bei allen in Serie geschalteten Rekordern durchgeführt werden.
Die Zeitaufnahme darf bei keinem Gerät programmiert sein.
Der Schalter SET LOCK (8) muß beim ersten Rekorder auf OFF, bei den anderen
Rekordern auf ON stehen.
Starten der Serienaufnahme:
Drücken Sie am ersten Rekorder die
Taste REC (23).
Stellen Sie am ersten Rekorder den
Schalter SET LOCK (8) auf ON.
☞
Während einer Serienaufnahme kann die automatische Bandüberspielung nicht
eingeschaltet werden.
Automatische Bandüberspielung
Dies ist Möglichkeit das Band am Bandende zurückzuspulen und erneut darauf aufzu-
nehmen.
Betätigen Sie hierzu nacheinander die fol-
genden Tasten:
MENU (75)
2 x SHIFT (57)
1 x SHIFT (76)
Stellen Sie mit der Taste SHIFT (76) die
Position "A-Wiederholung" auf "NEIN".
Stellen Sie mit der Taste SHIFT (76) die
Position "Serienaufnahme" auf "JA".
Im Display (18) erscheint das Symbol
LINK (36).
Das Gerät schaltet wieder in den Normalbetrieb zurück.
Die Serienaufnahme startet.
Bei Erreichen des Bandendes im ersten
Rekorder erhält nun der zweite Rekorder
ein Signal, das dort die Aufnahme startet.
Die Cassette im ersten Rekorder wird
ausgeworfen.
Page 70

26
Schalten Sie alle Geräte Ihres Systems
ein.
Rufen Sie das Menü "Aufnahmeeinstel-
lungen" auf.
Markieren Sie mit der Taste SHIFT (57)
die Position A-Wiederholung.
Drücken Sie die Taste MENU (75) zweimal.
☞
Wenn während einer Aufzeichnung mit automatischer Bandüberspielung ein
Alarm ausgelöst wird, schaltet der Rekorder auf Alarmaufnahme um und kehrt
nach Beendigung der Alarmaufnahme wieder zur vorherigen Betriebsart zurück.
Wiedergabe im Normalbetrieb
Normale Wiedergabe
Schalten Sie alle Geräte Ihres Systems
ein.
Legen Sie eine Cassette ein.
Wählen Sie mit der Taste REC/PLAY
SPEED (66) oder REC/PLAY SPEED
(67) die gewünschte Wiedergabegeschwindigkeit aus.
Drücken Sie die Taste PLAY (77).
Mit den Tasten STOP (62), REW (63) und
FF (69) kann die Wiedergabe gestoppt,
zurückgespult oder vorgespult werden.
Betätigen Sie hierzu nacheinander die fol-
genden Tasten:
MENU (75)
2 x SHIFT (57)
1 x SHIFT (76)
Stellen Sie mit der Taste SHIFT (76) die
Position "A-Wiederholung" auf "JA".
Das Gerät schaltet wieder in den Normalbetrieb zurück.
Durch Einstellung einer höheren oder
niedrigeren Bandgeschwindigkeit wie bei
der Aufnahme kann ein Zeitlupen- oder
Zeitraffereffekt erzielt werden.
Die Wiedergabe startet.
Page 71

DEUTSCH
27
Bandfeineinstellung:
Um die Wiedergabequalität zu verbessern können Sie mit den Tasten PLAY/STILL
TRACKING – (70) bzw. PLAY/STILL TRACKING + (73) das Bild feineinstellen
Audiowiedergabe:
Mit der Taste AUDIO ON (55) wird die
Tonwiedergabe eingeschaltet.
Zum Abschalten der Tonwiedergabe
drücken Sie die Taste AUDIO ON (55)
erneut.
☞
Eine Tonwiedergabe ist nur in den Aufnahmegeschwindigkeiten 3, 12, 18 oder
24 Stunden möglich.
Die Abspielgeschwindigkeit muß mit der Aufnahmegeschwindigkeit identisch
sein.
Sonderfunktionen bei der Wiedergabe
Bildsuchlauf:
Drücken Sie während der Wiedergabe die
Taste REW (63) für Bildsuchlauf rück-
wärts oder die Taste FF (69) für Bildsuchlauf vorwärts.
Durch nochmaliges Drücken der entsprechenden Taste kann die Suchlaufgeschwindigkeit verändert werden.
Betätigen Sie die Taste PLAY (77) um zur
normalen Wiedergabe zurückzuschalten.
Standbild:
Drücken Sie die Taste PAUSE/STILL (68)
während der Wiedergabe.
Betätigen Sie die Taste PLAY (77) um zur
normalen Wiedergabe zurückzuschalten.
☞
Sollte das Standbild vertikal durchlaufen kann es mit der Bandnachführung eingestellt werden. Betätigen Sie hierzu die Taste PLAY/STILL TRACKING – (70)
bzw. PLAY/STILL TRACKING + (73) bis das Bild sich stabilisiert.
Um Schäden zu vermeiden wird die Wiedergabe im Standbildbetrieb nach 5
Minuten ohne Tastenbetätigung abgeschaltet.
Drücken Sie die Taste während der Wiedergabe.
Im Display (18) erscheint in der Ziffernanzeige (37) ein "A".
Die Bildwiedergabe erfolgt schneller in
die gewählte Richtung.
Der Ton ist während des Bildsuchlaufs
stummgeschaltet und es kann zu Bildstörungen kommen.
Es wird ein Standbild wiedergegeben.
Durch erneute Betätigung der Taste PAUSE/STILL (68) wird um ein Bild weitergeschaltet.
Page 72

28
Zeitlupe:
Drücken Sie die Taste FF (69) während
der Standbildwiedergabe.
Drücken Sie die Taste REW (63) während
der Standbildwiedergabe.
Betätigen Sie die Taste PLAY (77) um zur
normalen Wiedergabe zurückzuschalten.
Aufnahmetest:
Drücken Sie die Taste REC CHECK (64)
während der Aufnahme
Suchfunktion Datum und Uhrzeit:
Rufen Sie das Menü "Suchmodus" auf.
Es erfolgt eine Vorwärts-Zeitlupenwieder-
gabe mit 1/15 der normalen Bandgeschwindigkeit.
Erneutes Betätigen erzeugt eine Zeitlupe
mit 1/20 und nochmaliges Betätigen eine
Zeitlupe mit 1/30 der normalen Bandgeschwindigkeit.
Es erfolgt eine Vorwärts-Zeitlupenwieder-
gabe mit 1/15 der normalen Bandgeschwindigkeit.
Erneutes Betätigen erzeugt eine Zeitlupe
mit 1/10 und nochmaliges Betätigen eine
Zeitlupe mit 1/5 der normalen Bandgeschwindigkeit.
Die Aufnahme wird um 5 Sekunden
zurückgespult und dann in Zeitlupe wiedergegeben.
Danach wird der Aufnahmebetrieb fortgesetzt.
Hierzu muß natürlich erst eine Aufnahme
von 5 Sekunden Länge erfolgt sein. Dies
ist von der Einstellung der Aufnahmegeschwindigkeit abhängig (bis zu 27 Minuten nach Aufnahmebeginn bei 960 Stunden).
Betätigen Sie hierzu nacheinander die fol-
genden Tasten:
MENU (75)
4x SHIFT (57)
1 x SHIFT (76)
Page 73

DEUTSCH
29
Stellen Sie mit den Tasten SET - oder
SET + (58 bzw. 74) die gewünschte Uhrzeit (Stunde) ein.
Bestätigen Sie die Eingabe mit der Taste
SHIFT (76).
Stellen Sie mit den Tasten SET - oder
SET + (58 bzw. 74) das gewünschte
Datum ein.
Betätigen Sie die Taste SHIFT (57).
Stellen Sie mit den Tasten SET - oder
SET + (58 bzw. 74) die gewünschte Suchrichtung ein.
Die Bildsuche erfolgt ohne Bildwiedergabe.
Sobald die gewählte Position erreicht ist
kann mit der Taste PLAY (77) die Wiedergabe gestartet werden.
Suchfunktion Alarmbild:
Rufen Sie das Menü "Suchmodus" auf.
Bewegen Sie die Positionsmarke mit der
Taste SHIFT (57) auf die Position
Such-Nummer.
Stellen Sie mit den Tasten SET - oder
SET + (58 bzw. 74) die gewünschte
Alarmnummer ein.
Betätigen Sie die Taste SHIFT (57).
Stellen Sie mit den Tasten SET - oder
SET + (58 bzw. 74) die gewünschte Suchrichtung ein.
Die Bildsuche erfolgt ohne Bildwiedergabe.
Die Positionsmarke springt auf das Eingabefeld für das Datum.
SET -: Bildsuche rückwärts
SET +: Bildsuche vorwärts
Während des Suchlaufs kann dieser mit
der Taste STOP (62) jederzeit angehalten
werden. Dabei werden die Einstellungen
für Datum und Zeit gelöscht.
Betätigen Sie hierzu nacheinander die folgenden Tasten:
MENU (75)
4x SHIFT (57)
1 x SHIFT (76)
SET -: Bildsuche rückwärts
SET +: Bildsuche vorwärts
Während des Suchlaufs kann dieser mit
der Taste STOP (62) jederzeit angehalten
Page 74

30
Sobald die gewählte Position erreicht ist
kann mit der Taste PLAY (77) die Wiedergabe gestartet werden.
Suchfunktion Alarmbilder suchen:
Rufen Sie das Menü "Suchmodus" auf.
Bewegen Sie die Positionsmarke mit der
Taste SHIFT (57) auf die Position FF: +
REW: -.
Stellen Sie mit den Tasten SET - oder
SET + (58 bzw. 74) die gewünschte Suchrichtung ein.
Wenn das gewünschte Alarmbild gefun-
den wurde betätigen Sie die Taste PLAY
(77) um die Aufzeichnung wiederzugeben.
Suchfunktion Nullposition:
Rufen Sie das Menü "Suchmodus" auf.
Bewegen Sie die Positionsmarke mit der
Taste SHIFT (57) auf die Position :
Position 00:00-Suche.
Betätigen Sie die Taste SHIFT (76).
☞
Das Zählwerk wird bei Einlegen einer Cassette immer auf 00:00 zurückgesetzt.
Mit der Taste CLEAR (59) kann das Zählwerk jederzeit auf 00:00 zurückgesetzt
werden.
In Bandbereichen, auf denen nichts aufgezeichnet ist funktioniert die Zähl-
werkanzeige nicht.
Die angezeigte Zeit bezieht sich immer auf eine Geschwindigkeit von 3 Stunden. Bei anderen Geschwindigkeiten stimmt die Anzeige nicht mit der wirklichen Uhrzeit überein.
werden. Dabei wird die Einstellung für die
Alarmnummer gelöscht.
Betätigen Sie hierzu nacheinander die fol-
genden Tasten:
MENU (75)
4x SHIFT (57)
1 x SHIFT (76)
SET -: Alarmbildsuche rückwärts
SET +: Alarmbildsuche vorwärts
Der Rekorder schaltet bei jedem gefundenen Alarmbild für 5 Sekunden auf Wie-
dergabe.
Durch Betätigung der Taste STOP (62)
wird die Funktion wieder abgeschaltet.
Betätigen Sie hierzu nacheinander die fol-
genden Tasten:
MENU (75)
4x SHIFT (57)
1 x SHIFT (76)
Die Cassette wird bis zum Zählerstand
00:00 gespult.
Page 75

DEUTSCH
31
Weitere Funktionen
Sicherheitsverriegelung:
Mit der Sicherheitsverriegelung kann ein versehentliches Stoppen der Aufnahme verhindert werden.
Stellen Sie den Schalter SET LOCK (8) in
die Position ON.
Um die Sperre aufzuheben stellen Sie
den Schalter SET LOCK (8) wieder in die
Position OFF.
Anschluß SW OUT (43) aktivieren:
Über den Anschluß SW OUT (43) können einem Multiplexer Synchronisationssignale
zugeführt werden.
Rufen Sie das Menü "Synchronbetrieb"
auf.
Bewegen Sie die Positionsmarke mit der
Taste SHIFT (57) auf die Position : Synchr.
Bewegen Sie die Positionsmarke mit der
Taste SHIFT (57) auf die Position : Feld
bzw. Vollbild, je nach vorheriger Auswahl.
Die Verriegelung ist eingeschaltet.
Im Display (18) erscheint das Symbol
"Sperre eingeschaltet" (26).
Alle Steuerbefehle werden nun ignoriert.
☞
Aktivieren Sie die Verriegelung
nicht im Menübetrieb.
Betätigen Sie hierzu nacheinander die folgenden Tasten:
MENU (75)
3x SHIFT (57)
1 x SHIFT (76)
Wählen Sie mit der Taste SHIFT (76) die
Funktion aus:
FELD: nach jedem Feld wird ein Synchronisationsimpuls ausgegeben.
VOLLBILD: nach jedem Vollbild wird ein
Synchronisationsimpuls ausgegeben.
Wählen Sie mit der Taste SHIFT (76) die
Anzahl der Felder bzw. Vollbilder aus,
nach denen ein Synchronisationsimpuls
ausgegeben werden soll.
Page 76

32
Drücken Sie die Taste MENU (75) zweimal.
Summereinstellung:
Rufen Sie das Menü "Grundeinstellungen" auf.
Bewegen Sie die Positionsmarke mit der
Taste SHIFT (57) auf die Position :
Summer.
☞
Der Quittungston ertönt fünfmal, wenn:
• Die Taste REC (65) oder POWER/TIMER (54) betätigt wurde, ohne vorher eine
Cassette mit Löschschutznase einzulegen.
• Eine Serienaufzeichnung gestartet wird, ohne vorher eine Cassette mit
Löschschutznase einzulegen.
• Die Taste POWER/TIMER (54) betätigt wurde, ohne vorher eine Cassette ein-
zulegen.
Alarmzeitanzeige:
Rufen Sie das Menü "Alarmzeit" auf.
Das Gerät schaltet wieder in den Normal-
betrieb zurück.
Betätigen Sie hierzu nacheinander die folgenden Tasten:
MENU (75)
1x SHIFT (57)
1 x SHIFT (76)
Wählen Sie mit der Taste SHIFT (76) die
Funktion aus:
JA: nach jeder Tastenbetätigung ertönt
ein Quittungston
NEIN: der Quittungston ist abgeschaltet
Betätigen Sie hierzu nacheinander die folgenden Tasten:
MENU (75)
5x SHIFT (57)
1 x SHIFT (76)
Page 77

DEUTSCH
33
Die Daten der detektierten Alarme werden angezeigt (max. 35).
Drücken Sie die Taste MENU (75) zwei-
mal.
Netzausfallanzeige:
Rufen Sie das Menü "Stromausfallzeit"
auf.
Die Daten der Stromausfälle werden
angezeigt (max. 35).
Drücken Sie die Taste MENU (75) zwei-
mal.
Betriebsstundenanzeige:
Drücken Sie die Taste MENU (75).
Drücken Sie die Taste MENU (75) erneut.
Anschlüsse programmieren:
Rufen Sie das Menü "Grundeinstellungen" auf.
Das Gerät schaltet wieder in den Normalbetrieb zurück.
Betätigen Sie hierzu nacheinander die folgenden Tasten:
MENU (75)
6x SHIFT (57)
1 x SHIFT (76)
Das Gerät schaltet wieder in den Normalbetrieb zurück.
Die Betriebsstunden werden rechts unten
angezeigt.
Die Anzeige kann nicht mit der Taste
CLEAR (59) zurückgesetzt werden.
Das Gerät schaltet wieder in den Normalbetrieb zurück.
Betätigen Sie hierzu nacheinander die folgenden Tasten:
MENU (75)
1x SHIFT (57)
1 x SHIFT (76)
Page 78

34
Rufen Sie das Menü "Ein/Ausgänge setzen" auf.
Stellen Sie die Positionsmarke mit der
Taste SHIFT (57) auf die gewünschte
Zeile.
Drücken Sie die Taste SHIFT (76) um
die gewünschte Einstellung vorzunehmen.
Drücken Sie die Taste MENU (75) dreimal.
Anschluß ALARM IN (50)
Einstellung N/O: Potentialfreier Kontakt, Start der Alarmaufzeichnung, wenn Kontakt
länger als 500 ms geschlossen
Einstellung N/S: Potentialfreier Kontakt, Start der Alarmaufzeichnung, wenn Kontakt
länger als 500 ms geöffnet
Anschluß ALARM OUT (49)
NIEDRIG: Bei Alarm und aktiver Aufnahme liegt hier eine Spannung von 0V
an
H-PEGEL: Bei Alarm und aktiver Aufnahme liegt hier eine Spannung von 5V
an
Anschluß PANIC IN (47)
Einstellung N/O: Potentialfreier Kontakt, Start der Panikaufzeichnung, wenn Kontakt
länger als 500 ms geschlossen
Betätigen Sie hierzu nacheinander die fol-
genden Tasten:
2x SHIFT (57)
1 x SHIFT (76)
Das Gerät schaltet wieder in den Normalbetrieb zurück.
Page 79

DEUTSCH
35
Einstellung N/S: Potentialfreier Kontakt, Start der Panikaufzeichnung, wenn Kontakt
länger als 500 ms geöffnet
Anschluß TAPE END
NIEDRIG: Am Bandende liegt am Ausgang eine Spannung von 0V an
H-PEGEL: Am Bandende liegt am Ausgang eine Spannung von 5V an
Hier kann z.B. ein Warnsummer o.ä. angeschlossen werden, der auf das Bandende
aufmerksam macht.
Anschluß SW OUT (43)
NIEDRIG: Synchronisationsimpuls: Spannung fällt nach jeder Aufzeichnungs-
periode für 4ms von 5V auf 0V ab
H-PEGEL: Synchronisationsimpuls: Spannung steigt nach jeder Aufzeich-
nungsperiode für 4ms von 0V auf 5V an
Anschluß SERIES OUT (42)
Bei Erreichen des Bandendes liegen am Anschluß 5V an
Anschluß SERIES IN (40)
Liegt länger als 200ms eine Spannung von 5V an, wird die Serienaufzeichnung akti-
viert
Anschluß WARNING OUT (39)
NIEDRIG: Bei Fehleranzeige auf dem Display (18) liegt eine Spannung von 0V
an
H-PEGEL: Bei Fehleranzeige auf dem Display (18) liegt eine Spannung von 5V
an
Nach Betätigung der Taste POWER/TIMER (54) wird der Schaltzustand dieses
Anschlusses wieder gelöscht.
Hier kann z.B. ein Warnsummer o.ä. angeschlossen werden, der auf eine Fehlfunktion
aufmerksam macht.
Handhabung
Gerät
Stecken Sie den Netzstecker niemals gleich dann in eine Netzsteckdose, wenn das
Gerät von einem kalten Raum in einen warmen Raum gebracht wurde. Das dabei entstehende Kondenswasser kann unter Umständen das Gerät zerstören.
Lassen Sie das Gerät uneingesteckt auf Zimmertemperatur kommen. Warten Sie
bis das Kondenswasser verdunstet ist.
Netzstecker dürfen nie mit nassen Händen ein- oder ausgesteckt werden.
Page 80

36
Ziehen Sie Netzstecker nie an der Leitung aus der Steckdose, ziehen Sie sie immer
nur an den dafür vorgesehenen Griffflächen aus der Netzsteckdose.
Ziehen Sie bei längerer Nichtbenutzung den Netzstecker aus der Netzsteckdose.
Achten Sie während des Betriebs auf eine ausreichende Belüftung des Gerätes.
Ziehen Sie aus Sicherheitsgründen bei einem Gewitter immer den Netzstecker aus der
Netzsteckdose.
Ersetzen Sie nie schadhafte Anschlußleitungen selbst. Trennen Sie das Gerät in einem
solchen Fall vom Netz und bringen Sie es in eine Fachwerkstatt.
Videocassetten
Verwenden Sie nur Marken-Videocassetten mit dem VHS-Logo. Verwenden Sie keine
Billig-Cassetten.
Verwenden Sie nur Bänder mit maximal 240 Minuten Spieldauer (E-240). Die Bildqua-
lität könnte sich bei Verwendung von Bändern mit längerer Spieldauer verschlechtern.
Bewahren Sie Ihre Videocassetten nach dem Abspielen in den mitgelieferten Cassetten-Hüllen auf.
Öffnen Sie die Gehäuse der Cassetten nie und berühren Sie das Bandmaterial nicht.
Vermeiden Sie bei der Lagerung von Videocassetten direkte Sonneneinstrahlung, Hitze, Feuchtigkeit und starke Magnetfelder.
Um Aufnahmen zu sichern und Cassetten mit einem Löschschutz zu versehen, kön-
nen Sie die Löschschutznase an der Cassettenoberseite vorsichtig ausbrechen. Ein
unbeabsichtigtes Überspielen Ihrer Aufnahme ist dann nicht mehr möglich.
Wollen Sie diesen Löschschutz wieder rückgängig machen überkleben Sie die ent-
standene Öffnung mit einem Stück Klebeband.
Page 81

DEUTSCH
37
Wartung und Entsorgung
Wartung
Allgemeines
Überprüfen Sie regelmäßig die technische Sicherheit des Langzeitvideorekorders z.B.
auf Beschädigung der Netzleitung (38) und des Gehäuses.
Wenn anzunehmen ist, daß ein gefahrloser Betrieb nicht mehr möglich ist, so ist das
Gerät außer Betrieb zu setzen und gegen unbeabsichtigten Betrieb zu sichern. Netz-
stecker aus der Steckdose ziehen!
Es ist anzunehmen, daß ein gefahrloser Betrieb nicht mehr möglich ist, wenn:
• das Gerät sichtbare Beschädigungen aufweist
• das Gerät nicht mehr arbeitet
• nach längerer Lagerung unter ungünstigen Verhältnissen, oder
• nach schweren Transportbeanspruchungen
Reinigen Sie die Videoköpfe ca. alle 1000 Betriebsstunden mit einem handelsüblichen
Reiniger für Videorekorder (z.B. Reinigungscassette). Die Betriebsstundenanzeige
rechts unten im Hauptmenü gibt Ihnen Auskunft über die Betriebsdauer.
Bevor Sie den Langzeitvideorekorder reinigen oder warten beachten Sie unbedingt folgende Sicherheitshinweise:
Beim Öffnen von Abdeckungen oder Entfernen von Teilen können
spannungsführende Teile freigelegt werden.
Vor einer Wartung oder Instandsetzung muß deshalb das Gerät von
allen Spannungsquellen getrennt werden.
Kondensatoren im Gerät können noch geladen sein, selbst wenn es
von allen Spannungsquellen getrennt wurde.
Ersetzen Sie nie schadhafte Netzleitungen selbst. Trennen Sie das
Gerät einem solchen Fall vom Netz und bringen Sie es in eine Fachwerkstatt.
Eine Reparatur darf nur durch eine Fachkraft erfolgen, die mit den
damit verbundenen Gefahren bzw. einschlägigen Vorschriften vertraut ist.
Tägliche Überprüfung
Folgende Wartungsschritte sollten täglich vorgenommen werden, damit das Gerät
insbesondere beim Betrieb mit der Funktion automatische Bandüberspielung fehler-
frei und verläßlich arbeitet:
Page 82

38
• Schalten Sie alle Geräte Ihres Systems ein.
•Überprüfen Sie die Funktion des Monitors und die Bildqualität.
• Stellen Sie sicher, daß Datum und Uhrzeit fehlerfrei angezeigt werden.
• Spulen Sie die Cassette ein Stück zurück und starten Sie die Wiedergabe.
•Überprüfen Sie die Bildqualität insbesondere bei Zeitrafferaufnahmen.
•Überprüfen Sie die Datums- und Uhrzeitaufnahme.
☞
Vor diesen Wartungsschritten muß die Sicherheitsverriegelung deaktiviert werden (Schalter SET LOCK (8) in Stellung OFF bringen).
Entsorgung
Entsorgen Sie das unbrauchbare Gerät gemäß den geltenden gesetzlichen Vorschriften.
Umwelt-Hinweis!
Der Endverbraucher ist gesetzlich (Altbatterieverordnung) zur Rück-
gabe aller gebrauchten Batterien und Akkus (Knopfzelle bis Bleiakku) verpflichtet; eine Entsorgung über den Hausmüll ist untersagt.
Ihre verbrauchten Batterien und Akkus können Sie sowohl in unseren Niederlassungen bzw. an die Zentrale in Hirschau unentgeltlich
zurückgeben, als wie bisher auch zu kommunalen Entsorgern (Wert-
stoffhöfe), die zur Rücknahme verpflichtet sind.
Leisten auch Sie Ihren Beitrag zum Umweltschutz!
Behebung von Störungen
Mit dem Langzeitvideorekorder haben Sie ein Produkt erworben, welches nach dem
Stand der Technik gebaut wurde und betriebssicher ist.
Dennoch kann es zu Problemen oder Störungen kommen.
Deshalb möchten wir Ihnen hier beschreiben, wie Sie mögliche Störungen beheben
können:
Beachten Sie unbedingt die Sicherheitshinweise!
Page 83

DEUTSCH
39
Problem Lösung
Keine Funktion, Display (18) • Ist der Netzstecker in der Netzsteckdose ein-
leuchtet nicht gesteckt?
•Überprüfen Sie die Netzsteckdose. Wird sie ord-
nungsgemäß mit Strom versorgt?
Das Display (18) leuchtet, • Sind alle Geräte des Systems eingeschaltet?
es ist jedoch kein Bild zu sehen • Sind alle Anschlüsse richtig miteinander verbun-
den?
Das Gerät reagiert nicht auf • Ist der Timer ausgeschaltet? Drücken Sie die
Tastenbefehle. Taste POWER/TIMER (54).
• Wird gerade eine Alarm- oder Panikaufnahme
gemacht?
• Ist die Sicherheitsverriegelung eingeschaltet
(Schalter SET LOCK (8) in Stellung ON)?
Die Aufnahme kann nicht • Ist die Löschschutznase der Videocassette
gestartet werden. vorhanden?
Die automatische Bandüber- • Ist die automatische Bandüberspielung im
spielung funktioniert nicht. entsprechenden Menü aktiviert worden?
• Ist eine Alarmaufnahme ausgelöst worden?
Die Zeitaufnahme funktioniert • Sind Datum und Uhrzeit richtig eingestellt?
nicht. • Ist die Taste POWER/TIMER nach der Program-
mierung der Zeitaufnahme betätigt worden?
Leuchtet im Display (18) das Symbol Timerbetrieb (27)?
• Ist die Zeitaufnahme richtig programmiert worden?
Die Alarmaufnahme funktioniert • Ist diese Funktion richtig programmiert worden?
nicht. • Ist der Alarmsensor richtig angeschlossen?
Die Bildqualität der Aufnahme • Ist die Bandnachführung richtig eingestellt?
ist schlecht. • Sind die Videoköpfe verschmutzt?
• Wird eine abgenutzte oder minderwertige Cassette verwendet?
• Eine etwas schlechtere Bildqualität bei Aufnahmen mit sehr geringer Aufnahmegeschwindigkeit
ist normal.
Datum und Uhrzeit werden • Wurde die Aufzeichnung richtig
nicht aufgezeichnet. programmiert?
• Wurde die Anzeige auf dem Bildschirm durch
Betätigung der Taste DISPLAY (60) deaktiviert?
Page 84

40
Problem Lösung
Die Cassette kann nicht • Probleme bei der Bandführung. Schalten Sie das
ausgeworfen werden. Gerät aus und wieder ein.
Unerklärlicher Fehler, • Ziehen Sie den Netzstecker und stecken Sie ihn
das Gerät reagiert nicht mehr. wieder ein. Drücken Sie danach die Taste RESET
(9) mit einem spitzen Gegenstand und halten Sie
diese mindestens 5 Sekunden gedrückt. Hier-
durch werden die Systemeinstellungen auf die
Werkseinstellung zurückgesetzt.
Das Gerät verfügt außerdem über eine Fehleranzeige im Display (18). Folgende Fehler
sind möglich und können Ihnen und dem Servicetechniker bei der Lokalisierung von
Fehlern helfen:
Anzeige Fehler
E 01 Cassette ist blockiert und kann nicht eingelegt bzw. entfernt werden
E 02 Cassette klemmt
E 03 Kopftrommel rotiert nicht richtig
E 04 Cassette ist gerissen
Andere Reparaturen als zuvor beschrieben sind ausschließlich durch
einen autorisierten Fachmann durchzuführen.
Technische Daten
Stromversorgung
Betriebsspannung 90 – 250 VAC / 50 Hz
Leistungsaufnahme 11 W
Allgemeines
Aufnahmesystem Doppel-Azimuth 4-Kopf-System mit
Schrägspuraufzeichnung
TV-System PAL
Cassettentyp VHS
Kopfreinigung Automatisch
Audio/Video
Videoeingang 1 Vss / 75 Ohm Anschluß BNC
Videoausgang 1 Vss / 75 Ohm Anschluß BNC
Horizontalauflösung S/W 350 Zeilen
Farbe 300 Zeilen
Page 85

DEUTSCH
41
Audioeingang -8,8 dBm / 47 kOhm
Audioausgang -8,8 dBm / 1,5 kOhm
Mikrofoneingang -60 dB / 10 kOhm
Aufnahmegeschwindigkeiten Modell TLV 2400: 3/12/18/24/36 h
Modell TLV-9600: 3/12/18/24/36/48/72/96/120/
168/240/360/480/720/960 h
Bandgeschwindigkeit 23,39 mm/s (bei Aufnahmegeschwindigkeit 3h)
Tonaufzeichnung Nur bei Aufnahmegeschwindigkeit 3/12/18/24 h
Anschlüsse
ALARM IN 4 – 5 VDC (N/O) / 0 – 0,8 VDC (N/S) / 5,7 kOhm
ALARM OUT 4 – 5 VDC (H-Pegel) / 0 – 0,8 VDC (Niedrig) / 5,7 kOhm
PANIC IN 4 – 5 VDC (N/O) / 0 – 0,8 VDC (N/S) / 5,7 kOhm
TAPE END 4 – 5 VDC (H-Pegel) / 0 – 0,8 VDC (Niedrig) / 5,7 kOhm
WARNING OUT 4 – 5 VDC (H-Pegel) / 0 – 0,8 VDC (Niedrig) / 5,7 kOhm
SERIES IN 4 – 5 VDC (H-Pegel) / 0 – 0,8 VDC (Niedrig) / 5,7 kOhm
SERIES OUT 4 – 5 VDC (H-Pegel) / 0 – 0,8 VDC (Niedrig) / 5,7 kOhm
SW OUT 4 – 5 VDC (H-Pegel) / 0 – 0,8 VDC (Niedrig) / 5,7 kOhm
COM 0 VDC / Masse
Abmessungen (B x H x T) 360 x 94 x 288 mm
Masse ca. 4kg
Umgebungsbedingungen
Betriebstemperatur 5 – 40 °C
Rel. Luftfeuchte < 80 % nicht kondensierend
Page 86

Page 87

MARMITEK
MAGNÉTOSCOPE
IMAGE PAR IMAGE
TLV 9600
011002-FR • TLV9600 COPYRIGHT ALL RIGHTS RESERVED MARMITEK 2002
NOTICE D’UTILISATION
Page 88

Avant la mise en service de l’appareil, veuillez lire attentivement ce mode d’emploi et les consignes de sécurité.
POUR VOTRE SÉCURITÉ
1. Lisez ces instructions avant de mettre l’appareil en service.
2. Conservez soigneusement ces instructions pour vous y reporter ultérieurement.
3. Tenez compte de tous les avertissements figurant sur l’appareil ou dans cette notice d’utilisation.
4. Évitez d’utiliser l’appareil dans un environnement humide.
5. Nettoyez l’appareil exclusivement avec un chiffon doux propre.
6. Veillez à ce que les orifices de ventilation de votre magnétoscope ne soient pas obstrués. L’appareil doit être
installé de sorte que l’air circule librement autour.
7. Ne placez pas l’appareil au-dessus d’une source de chaleur (par ex., sur un radiateur ou sur un autre appareil).
8. Raccordez l’appareil au secteur exclusivement au moyen du cordon fourni. Vérifiez d’abord que la tension du
réseau correspond à celle de votre appareil.
9. Vérifiez que le cordon d’alimentation ne risque pas de s’abîmer et insérez la prise dans le connecteur approprié.
10. Si l’appareil doit être réparé, confiez cette tâche exclusivement à un réparateur agréé ou au service technique de Marmitek. L’ouverture de l’appareil peut être extrêmement dangereuse. Si le cordon d’alimentation
est abîmé, ou si du liquide a pénétré dans l’appareil, débranchez-le immédiatement du secteur avant de le
confier à un réparateur agréé.
2
Page 89

CONTENU DE L’EMBALLAGE :
Commandes :
Façade 4
Affichage numérique 5
Dos de L’appareil 6
Télécommande 7
Raccordement 8
Bandes vidéo 8
Arborescence des menus 9
Réglage de l’heure 10
Réglage de l’affichage 11
Enregistrement normal 12
Enregistrement programmé 13
Enregistrement des alarmes 15
Raccordement en série d’un second magnétoscope 16
Lecture normale 17
Résolution des problèmes 23
3
FRANÇAIS
Page 90

COMMANDES
COMMANDES EN FAÇADE
1. Commutateur marche-arrêt et horloge
2. Touche Stop/Eject
3. Touche d’enregistrement
4. Rembobinage
5. Lecture
6. Avance rapide
7. Verrouillage RMC
8. Réglage du verrouillage
9. Touche de remise à zéro
10. Touche d’accès au menu
11. Touche d’effacement
12. Touche Shift / suivi (-)
13. Touche Shift / suivi (+)
14. Touche enregistrement / lecture / vitesse / validation -
15. Touche enregistrement/lecture / vitesse / Validation +
16. Indicateur de verrouillage de la télécommande
17. Indicateur d’entrée d’urgence
18. Affichage
19. Touche Display
20. Touche compteur/horloge/alarme
21. Touche Audio On
22. Pause/arrêt sur image
23. Enregistrement
24. Touche de test d’enregistrement
4
14
12 3 6
7
45
89
11 15 16
12 13 18
19
201021 22 23 24
17
Page 91

AFFICHAGE NUMÉRIQUE
1. Enregistrement en boucle
(indique que l’enregistrement en boucle est activé. Lorsque la bande vidéo est pleine, elle est rembobinée
automatiquement et l’enregistrement se poursuit par-dessus l’enregistrement existant.)
2. Activation du verrouillage
(indique que le verrouillage est activé).
3. Enregistrement programmé
(indique que l’enregistrement est programmé).
4. Indicateur d’état de la cassette
(indique qu’une cassette a été insérée dans l’appareil).
5. Indicateur d’enregistrement
(indique que l’enregistrement est en cours ou programmé).
6. Horloge
(indique l’heure du moment).
7. Compteur
(indique la position relative sur la bande).
8. Indicateur d’alarme
(indique que la fonction d’alarme est activée).
9. Indicateur PF
(signale qu’une panne de courant a eu lieu).
10. Lecture/signal/revoir/arrêt sur image/ralenti
(indique le réglage de lecture).
11. Indicateur TAB
(indique que la bande vidéo est dépourvue de languette de protection).
12. Indicateur de liaison
(indique que deux magnétoscopes sont branchés en série).
13. Compteur
(indique l'heure, la position du compteur et la vitesse de défilement de la bande pendant l’enregistrement et
la lecture).
14. Affichage des fonctions
a. Compteur de bande (par ex. : 10 (heures): 59 (minutes)
Valeur maximale : 19 heures 59 minutes
b. Compteur d’alarmes (Ex. : A : alarme, 32 : n° d’alarme)
c. Affichage de la vitesse de lecture/enregistrement
d. Heure (par ex. : 7 (heures), 07 (minutes))
e. ERROR (message d’erreur) E (erreur) 04 (n° d’erreur)
E01: il est impossible de charger ou de retirer la cassette.
E02: la bande est arrêtée.
E03: la tête ne tourne pas correctement.
E04: la bande est coupée.
f. Affichage Audio On : A (audio), 18 h (vitesse)
5
FRANÇAIS
Page 92

AFFICHAGE DES FONCTIONS :
Fonction Indicateur :
1. REC (enregistrement) REC
2. REC PAUSE (pause enregistrement)
||
REC
3. PLAY (lecture)
4. STILL (arrêt sur image)
||
5. FF (avance rapide)
6. REW (rembobinage)
7. CUE (signal)
8. REVIEW (revoir)
9. Pause Still + FF ou Pause Still + REW (ralenti)
||
DOS DE L’APPAREIL
1. Cordon d’alimentation
2. Signal d’avertissement de sortie
3. Connecteur d'entrée pour le raccordement en série de plusieurs magnétoscopes
4. Conducteur nul commun
5. Connecteur de sortie pour le raccordement en série de plusieurs magnétoscopes
6. Sortie SW
7. Sortie vidéo (BNC)
8. Entrée vidéo (BNC)
9. Entrée audio (RCA)
10. Sortie de fin de bande
11. Entrée d'urgence
12. Conducteur nul commun
13. Sortie d’alarme
14. Entrée d’alarme
15. Entrée microphone
16. Sortie audio (RCA)
6
Page 93

TÉLÉCOMMANDE
1. Temporisation marche-arrêt
2. Fonction audio activée
3. Eject (éjection de la bande)
4. Shift
5. Shift
6. Menu
7. Set – (validation)
8. Set + (validation)
9. Clear (remise à zéro)
10. Affichage
11. Compteur
12. Lecture/arrêt sur image/suivi +
13. Pause/arrêt sur image +
14. Lecture/arrêt sur image/suivi -
15. Pause/arrêt sur image -
16. Arrêt
17. Lecture
18. Rembobinage
19. Avance rapide
20.Pause/arrêt sur image
21. Test d’enregistrement
22.Enregistrement
23.Enregistrement/vitesse de lecture
24.Enregistrement/vitesse de lecture
7
FRANÇAIS
Page 94

RACCORDEMENT
Vous pouvez raccorder une caméra vidéo directement au magnétoscope comme le montre le schéma ci-dessous.
Le plus souvent, la caméra est raccordée au moniteur. Dans ce cas, la sortie du moniteur est raccordée à la prise
Video In (entrée vidéo).
BANDES VIDÉO
Utilisez exclusivement des bandes vidéo portant le logo VHS. Ce magnétoscope Marmitek est conçu pour une
utilisation avec des bandes de 120 minutes.
RANGEMENT DES BANDES VIDÉO :
Rangez les bandes vidéo verticalement dans leur boîtier, à l’abri des températures élevées, de la lumière directe
du soleil, des champs magnétiques (par ex., haut-parleurs) et de la poussière.
Ne touchez jamais la bande directement avec les doigts.
Évitez les chocs ou les vibrations.
VERROUILLAGE D’ENREGISTREMENT :
Si vous souhaitez conserver un enregistrement et empêcher son effacement, brisez la languette de
protection qui se trouve au dos de la cassette.
Si vous introduisez une bande dont la languette est brisée, elle est rejetée automatiquement.
Si un enregistrement est programmé et que vous insérez une bande protégée dans le magnétoscope, l’indicateur Timer (temporisation) clignote et le magnétoscope émet un signal sonore (si la
fonction sonnerie a été activée dans le menu – état YES).
INSERTION DE LA BANDE :
Insérez la cassette avec l’étiquette vers le haut dans l'ouverture prévue à cet effet.
Appuyez légèrement sur le milieu de la cassette pour l’insérer complètement.
Le compteur est remis à zéro et indique 0H 00M 00S.
8
Page 95

RETRAIT DE LA BANDE :
Appuyez sur STOP puis sur EJECT.
N’introduisez jamais la main dans l’ouverture, vous risqueriez de vous blesser. Toutefois, si cela vient à se produire,
débranchez immédiatement la prise secteur.
ARBORESCENCE DES MENUS
9
FRANÇAIS
( NTSC )
MENU PRINCIPAL DEUXIÈME SOUS-MENU TROISIÈME SOUS-MENU
Page 96

UTILISATION DES MENUS
1. Appuyez sur la touche d’accès au menu.
2. Vous pouvez parcourir le menu à l’aide des touches SHIFT
pour accéder à l’option qui vous intéresse .
3. Appuyez sur SHIFT
pour activer l’option souhaitée.
4. Appuyez sur SET
ou + pour sélectionner des valeurs ou sur SHIFT pour choisir entre Oui et Non.
5. Appuyez une nouvelle fois sur la touche d'accès au menu pour revenir au menu principal.
6. Appuyez trois fois brièvement sur la touche des menus pour mémoriser le réglage.
ATTENTION :
lorsqu’un enregistrement est programmé (indiqué par le signe ), il n’est pas possible d’accéder au menu.
Vous devez d’abord appuyer sur la touche Power/Timer (marche/temporisation) pour rappeler les réglages avant
d'accéder au menu de programmation.
Lorsqu’un menu est affiché, il n’est pas possible d’enregistrer en même temps.
RÉGLAGE DE L’HEURE :
ex. : réglage de l’horloge pour le 12 avril 2001 à 9 h 30 :
1. Mettez l’appareil sous tension.
2. Appuyez sur la touche Menu (vous accédez alors au menu principal). Appuyez sur SHIFT
et accédez au
sous-menu VCR MODE SET.
3. Appuyez sur SHIFT
pour faire apparaître le menu de réglage de l'horloge.
4. Appuyez sur SHIFT
pour accéder au menu de l’horloge.
5. Appuyez sur SET – ou SET + pour régler les heures, puis appuyez sur SHIFT
6. Appuyez sur SET – ou SET + pour régler les minutes, puis appuyez sur SHIFT
7. Les secondes sont réglées automatiquement sur 00.
8. Appuyez sur la touche SHIFT
.
9. Appuyez sur SET – ou SET + pour régler le mois (ici : 04 = avril), puis sur SHIFT
.
10. Répétez l’opération pour le jour et l’année.
11. Le jour est indiqué automatiquement.
12. Appuyez trois fois brièvement sur la touche MENU pour mémoriser le réglage.
10
Page 97

RÉGLAGE DE L’AFFICHAGE
CHOIX DE LA LANGUE :
Vous avez le choix entre l'anglais, le français, l'allemand et l'espagnol.
1. Mettez l’appareil sous tension.
2. Appuyez sur la touche Menu pour accéder au menu principal.
3. Choisissez l’option langue (language set).
4. Appuyez sur SHIFT puis sélectionnez la langue de votre choix.
CHOIX DU MODE D’AFFICHAGE :
Il vous est possible de choisir les éléments à afficher : heure, date, compteur, compteur d’alarme et compteur de
titres.
1. Mettez l’appareil sous tension.
2. Accédez au menu principal.
3. Accédez à l’option VCR MODE SET en appuyant sur SHIFT
.
4. Appuyez sur SHIFT
pour accéder au menu DISPLAY SET.
5. Appuyez sur SHIFT
pour afficher le menu.
6. Appuyez sur SET – ou SET + pour sélectionner l’une des fonctions ci-dessous :
Time : affichage de l’heure.
Date : affichage de la date.
Frame Cnt : affichage du nombre d’images.
Alamr Cnt : affichage du nombre de messages d’alarme.
Counter : affichage du compteur.
Title : affichage du titre de la bande (20 caractères maxi.).
7. Appuyez sur SHIFT
pour sélectionner l’ordre des différents éléments.
8. Appuyez sur SET – ou SET + pour les classer par ordre décroissant ou croissant.
9. Appuyez sur SET – ou SET + pour spécifier où les éléments doivent être affichés
(en haut à gauche, en haut à droite, etc.).
10. Appuyez trois fois sur MENU pour effectuer les réglages.
11
FRANÇAIS
Page 98

ENREGISTREMENT NORMAL
ENREGISTREMENT NORMAL
1. Mettez l’équipement sous tension.
2. Introduisez une cassette non verrouillée.
3. Appuyez sur REC/PLAY SPEED
ou pour régler la vitesse d’enregistrement. La vitesse d’enregistrement
s’affiche.
Si vous ne souhaitez pas enregistrer ces éléments sur la bande, appuyez sur la touche DISPLAY avant de
démarrer l’enregistrement.
Pour connaître le nombre d’images et la durée d’enregistrement, reportez-vous au schéma ci-dessous (variable selon la bande utilisée).
4. Appuyez sur la touche REC (l’indicateur REC s'affiche alors).
5. Pour arrêter l’enregistrement, appuyez sur STOP.
ATTENTION :
- Lorsque la fonction Repeat (enregistrement en boucle) est désactivée (menu REC SET), l’enregistrement se
poursuit jusqu’à la fin de la bande. La bande est ensuite éjectée.
- Une bande déjà enregistrée ne peut être lue que sur un magnétoscope image par image Marmitek identique.
- Si vous appuyez sur la touche REC mais que la bande est verrouillée, celle-ci est éjectée.
- Pendant l’enregistrement, il n’est pas possible d’accéder au menu.
- Si vous lisez une partie de la bande où est effectué ce qu’il est convenu d’appeler un contrôle d’enregistrement, cela risque de provoquer des parasites.
- Si vous modifiez la vitesse pendant l’enregistrement, cela risque d'entraîner des parasites, voire l’absence de
signal.
PAUSE PENDANT L’ENREGISTREMENT
Il est possible de suspendre temporairement l’enregistrement.
1. Pour ce faire, appuyez sur PAUSE/STILL pendant l’enregistrement. (Le symbole REC
||
s’affiche alors.)
2. Pour reprendre l’enregistrement : appuyez une nouvelle fois sur la touche REC ou sur la touche PAUSE/STILL.
ATTENTION :
- Pendant que l’appareil est en PAUSE, l’image est bien affichée, mais elle n’est pas enregistrée.
- Lorsque l’appareil est en pause plus de 5 minutes, la fonction STOP (arrêt) s’enclenche automatiquement
pour éviter d’abîmer la bande.
12
Recording Speeds & Duration E-180 Recording Speeds & Duration E-180 Recording Intervals Rec. Fields/Sec. Audio Rec. Tape Motion
3HR 4HR 1/50 sec 50 YES Continous
12HR 16HR 5/50 sec 10 YES Continous
18HR 24HR 7/50 sec 7,1 YES Continous
24HR 32HR 9/50 sec 5,6 YES Continous
36HR 48HR 12/50 sec 4,2 NO STEP
48HR 64HR 16/50 sec 3,1 NO STEP
72HR 96HR 24/50 sec 2,1 NO STEP
96HR 128HR 32/50 sec 1,6 NO STEP
120HR 160HR 40/50 sec 1,3 NO STEP
168HR 224HR 1,1 sec 0,9 NO STEP
240HR 320HR 1,6 sec 0,6 NO STEP
360HR 480HR 2,4 sec 0,4 NO STEP
480HR 640HR 3,2 sec 0,3 NO STEP
720HR 960HR 4,8 sec 0,2 NO STEP
960HR 1280HR 6,4 sec 0,1 NO STEP
Page 99

ENREGISTREMENT PROGRAMMÉ
Il existe deux modes d’enregistrement image par image :
a. enregistrement quotidien aux heures fixées,
b. enregistrement hebdomadaires aux jours et aux heures fixés.
EXEMPLE : POUR ENREGISTRER TOUS LES JEUDIS DE 10 HEURES À 6 HEURES DANS UNE
PLAGE DE 18 HEURES :
1. Vérifiez que la date et l’heure du magnétoscope sont correctes.
2. Introduisez une cassette non verrouillée.
3. Accédez au menu principal puis successivement aux menus REC SET, TIMER PROGRAM SET (programmation)
et TIME PROGRAM SET (1). (Le curseur, de couleur blanche, est placé sur le dimanche.)
4. Au moyen de la touche SHIFT
, allez jusqu’à THU (jeudi).
5. Appuyez sur la touche SHIFT
. (Le menu passe alors au réglage de l’heure.)
6. Appuyez sur SET – ou SET + pour définir l’heure de début (10) (le curseur passe alors sur les minutes).
7. Spécifiez le nombre de minutes dans la zone (00) (le curseur passe alors au réglage de l’heure de fin).
8. Spécifiez l’heure de fin dans (06).
9. Spécifiez les minutes de l’heure de fin dans (00).
10. Réglez la vitesse d’enregistrement (18) puis appuyez sur SHIFT
.
Le curseur passe alors sur la position N/Y (Non/Oui).
11. Appuyez sur SET – ou + pour sélectionner "Y" (oui).
Y : enregistrer
N : ne pas enregistrer
Répétez cette procédure pour les autres jours le cas échéant.
Il vous est également possible de sélectionner deux heures différentes un même jour.
12. Appuyez trois fois sur la touche MENU pour effectuer les réglages.
13. Appuyez sur sw Power/Timer (une petite horloge apparaît alors à l’écran pour indiquer que vous avez déjà
programmé une heure).
ATTENTION :
si vous spécifiez une heure de fin antérieure à l’heure de départ, l’appareil considère que l’heure de fin tombe le lendemain.
EXEMPLE 2 : VOUS SOUHAITEZ ENREGISTRER CHAQUE JOUR DE 10 HEURES À 6
HEURES AVEC UNE VITESSE RÉGLÉE SUR 18 HEURES :
1. Répétez les trois premières étapes de l’exemple précédent.
2. Appuyez sur la touche SHIFT
jusqu’à ce que le curseur soit sur DLY.
3. Répétez les étapes 5 à 13.
13
FRANÇAIS
Page 100

MODIFICATION DES HEURES D’ENREGISTREMENT SPÉCIFIÉES :
1. Appuyez sur Menu, puis successivement sur SHIFT , SHIFT et SHIFT pour accéder au menu TIME PRO-
GRAM SET (1).
2. Appuyez sur SHIFT
ou pour accéder au champ voulu.
3. Appuyez sur SET – ou + pour modifier le réglage.
Appuyez trois fois sur la touche Menu pour valider le réglage.
4. Appuyez sur la touche POWER/Timer.
ANNULATION D’UN PROGRAMME D’ENREGISTREMENT :
1. Appuyez sur Menu, puis successivement sur SHIFT , SHIFT et SHIFT pour accéder au menu TIME PRO-
GRAM SET (1).
2. Appuyez sur SHIFT
ou pour amener le curseur sur l’option "Y" du réglage souhaité.
3. Appuyez sur SET + ou – pour choisir "N".
4. Appuyez trois fois sur la touche MENU pour valider le réglage.
5. Appuyez sur la touche Power/Timer.
ATTENTION :
- Pendant l’enregistrement, toutes les touches sont bloquées, à l’exception de la touche STOP. Si vous maintenez la touche STOP enfoncée plus de trois secondes, l’enregistrement est arrêté. Si le magnétoscope est en
attente et que des heures d’enregistrement sont programmées, vous pouvez appuyer sur la touche
Power/Timer pour activer les touches.
- En cas de coupure d’électricité, l’enregistrement s’arrête. Lorsque l’alimentation est restaurée, l’enregistrement reprend, sauf si l’heure de mise hors tension est atteinte. Les coupures de courant sont indiquées
sur l’écran par les lettres PF.
- Pendant une coupure d’électricité, tous les réglages sont conservés. La batterie de sauvegarde interne est à
pleine charge au bout de 48 heures et elle peut conserver les réglages pendant 30 jours.
- Programmez le magnétoscope de sorte que les heures d’enregistrement ne se chevauchent pas. Si cela vient
à se produire, c’est le premier réglage horaire qui est prioritaire.
- Si vous retirez la bande pendant une plage d’enregistrement programmée, la sonnerie émet un signal d’avertissement (si cette option est réglée sur YES).
14
 Loading...