

Page 1
CLASSIC
C11, C12, C21, C31
DE
Betriebs-/Montageanleitung
GB
Operating/assembly instructions
SE
Bruks-/monteringsanvisning
IT
Istruzioni per l’uso e il montaggio
RU
Инструкция по эксплуатации и
монтажу
HU
Üzemeltetési-/szerelési útmutató
BG
Ръководство за работа/монтаж
HR
Uputa za uporabu/montažu
SI
Navodila za uporabo/montažo
Page 2
DE
DEUTSCH
4
GB
ENGLISH
SE
SVENSKA
IT
ITALIANO
RU
РУССКИЙ ЯЗЫК
HU
MAGYAR
BG
БЪЛГАРСКИ
HR
HRVATSKI
SI
SLOVENSKI
7
9
11
13
16
19
21
23
Page 3
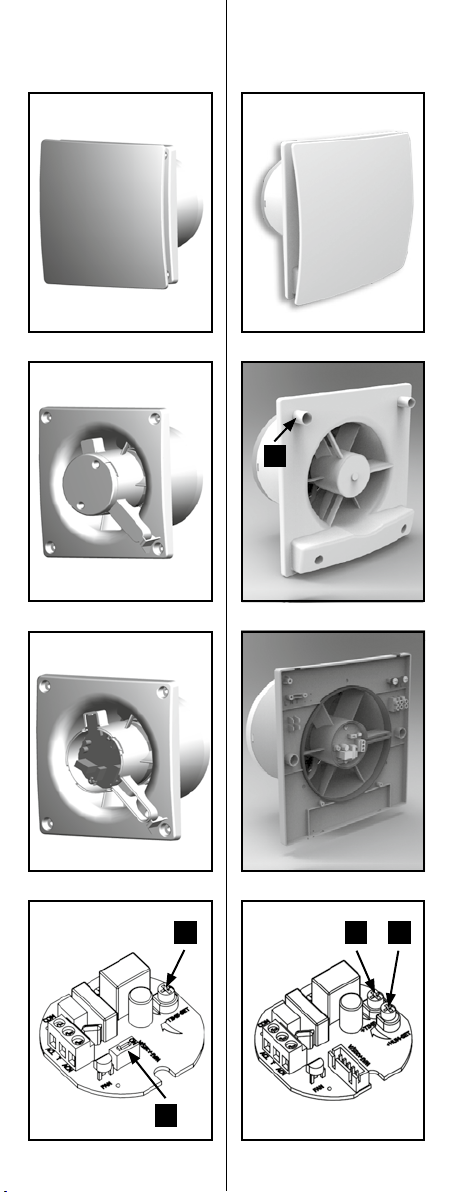
Ø 100, 125: Ø 150:
A
B B C
D
Page 4

DE
DEUTSCH
Bitte diese Montageanleitung vor Beginn der
Installation durchlesen.
Achtung
Alle Arbeiten im spannungslosen Zustand durchführen. Die elektrischen
Anschlüsse dürfen nur durch autorisiertes Fachpersonal und entsprechend den jeweils gültigen Vorschriften erfolgen. Spannung
und Frequenz der Stromversorgung müssen mit den Angaben des
Ventilators übereinstimmen. Installationsseitig ist eine allpolige
Trennvorrichtung mit einer Kontaktöffnungsweite von mind. 3 mm
vorzusehen. Die Ventilatoren sind doppelt schutzisoliert und benötigen keinen Schutzleiter.
Bei Betrieb schornsteinabhängiger Feuerstellen im zu entlüftenden
Raum muss für ausreichend Zuluft gesorgt werden. Die Installation
in Feuchträumen muss gemäß DIN/VDE 0100 T701 erfolgen. Zur
Reinigung Pinsel oder feuchtes Tuch verwenden, keine Lösungsmittel
einsetzen.
Dieses Gerät kann von Kindern ab 8 Jahren und darüber sowie von
Personen mit verringerten physischen, sensorischen oder mentalen
Fähigkeiten oder Mangel an Erfahrung und Wissen benutzt werden,
wenn sie beaufsichtigt oder bezüglich des sicheren Gebrauchs des
Gerätes unterwiesen wurden und die daraus resultierenden Gefahren
verstehen. Kinder dürfen nicht mit dem Gerät spielen. Reinigung und
Benutzer-Wartung dürfen nicht von Kindern ohne Beaufsichtigung
durchgeführt werden.
Ventilator für Wand- und Deckenmontage zum Entlüften
von Räumen. Achtung! Die Rückstaufolie darf nicht
entfernt werden.
Montage
1. Lüftungsrohr in der Wand bzw. in der Decke montieren. Bei
Wandmontage auf leichtes Gefälle (~2°) nach außen achten.
Bei Deckenmontage das Lüftungsrohr isolieren, wenn es durch
ungeheizte Bereiche führt.
2. Ø 100, 125: Die Blende gegen den Uhrzeigersinn drehen und
vom Gehäuse trennen.
Ø 150: Blende nach vorn ziehen und vom Gehäuse trennen.
3. Ø 100, 125: Mittelabdeckung durch Lösen der beiden Schrauben
vom Gehäuse trennen.
Ø 150: Abdeckung durch Lösen der Schraube (A) von der
Grundplatte lösen.
4. Stromversorgung des Hausstromkabels unterbrechen
und Hausstromkabel von hinten durch das Gehäuse führen. Bei
Überputzverkabelung das Stromkabel durch die Zugsicherung
sichern. Ventilator an Wand/Decke verschrauben.
5. Stromkabel gemäß Schaltbild anschließen.
Modelle VN: Um die Nachlauffunktion zu aktivieren, ist eine 2.
dauerhaft stromführende Phase erforderlich, den Nachlaufschalter
(D) auf ON stellen.
Modell VFN: Automatikbetrieb = dauerhafte Phase auf ACL
Automatik plus manueller Betrieb = dauerhafte Phase auf ACL plus
geschaltete Phase auf T
6. Einstellung der Nachlaufzeit*
Zum Verlängern der Nachlaufzeit das Potentiometer (B) „timer“ mit
einem kleinen Schraubendreher im Uhrzeigersinn drehen.
4
Page 5
7. Einstellen des Feuchtesensors*
VN
ACL
T
ACN
VFN
L
N
ACL
T
ACN
ON
VN
L
N
ACL
T
ACN
VFN
L
N
ACL
T
ACN
N
L
VFN
ACL
T
ACN
VFN
L
N
VN VFN
– Ventilator schaltet sich zu spät ein bzw. zu früh aus: Potentiometer
(C) gegen den Uhrzeigersinn verdrehen, Ventilator schaltet nun
bei geringeren Luftfeuchtigkeiten.
– Ventilator schaltet sich nicht ab bzw. zu früh an: Potentiometer (C)
im Uhrzeigersinn verdrehen. Bei Spannung auf der geschaltete
Phase läuft der Ventilator so lange er eingeschaltet ist plus
Nachlauf.
8. Nach Montage der Mittelabdeckung/Abdeckung und der Blende
die Stromversorgung wieder herstellen.
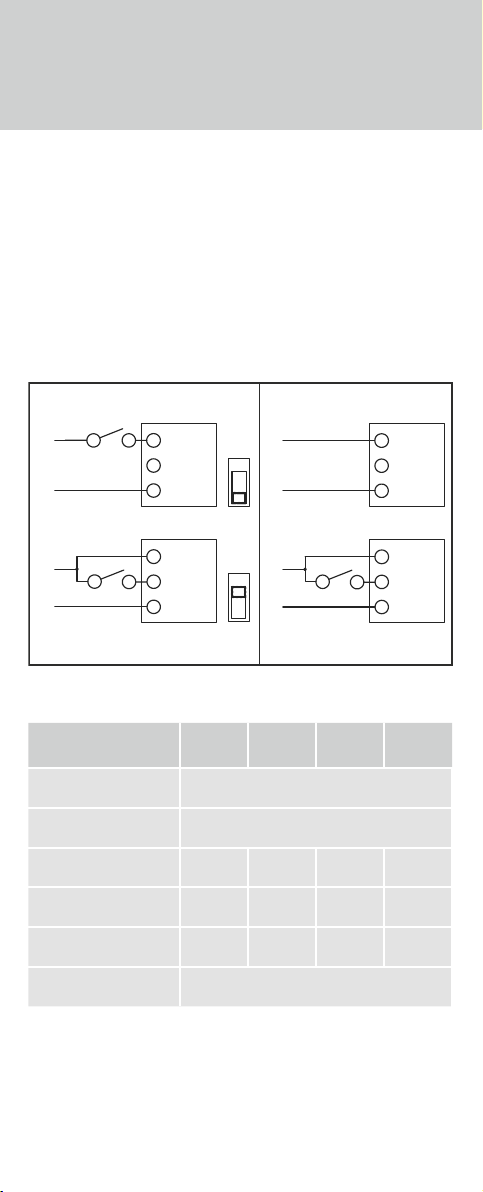
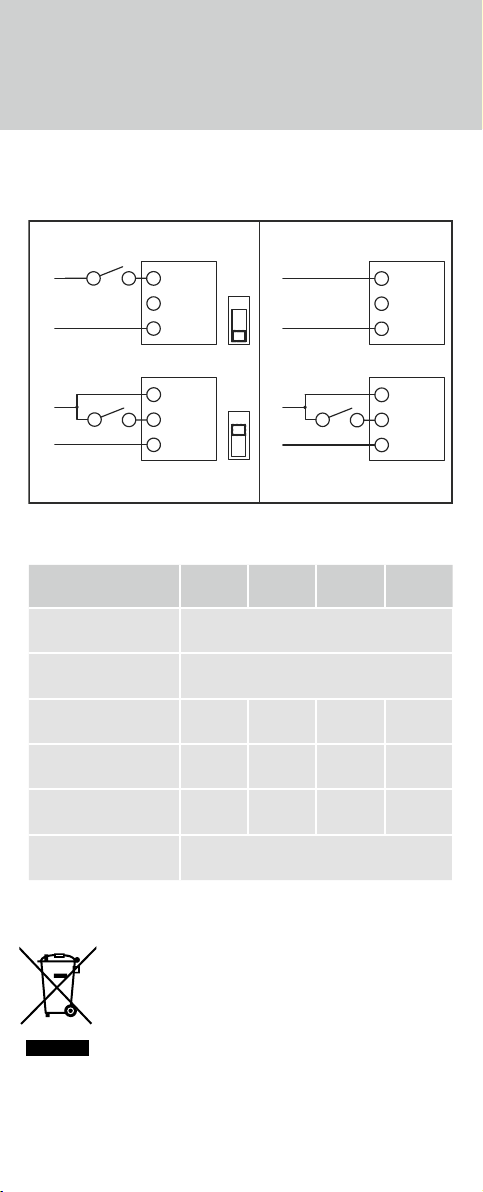
Schaltbild
L
N
L
N
ACL
T
ACN
kein Nachlauf
ACL
T
ACN
Nachlauf
ON
ON
L
N
Automatikbetrieb
L
N
Automatik plus
manueller Betrieb
Technische Daten**
VN
C12
MC-100
Ventilator:
Schutzklasse/-art: IP 24
Netzspannung: 230 V ~50 Hz
Leistungsaufnahme: 12 W 12 W 17 W 26 W
Schalldruck (3 m): 35 dB (A) 35 dB (A) 37 dB (A) 41 dB (A)
Förderleistung: 90 m³/h 90 m³/h 168 m³/h 230 m³/h
Max. Fördertemperatur: 40 °C
* (Werkseinstellung ~10 min, ~75 % rel. Feuchte)
** Technische Änderungen vorbehalten.
C11
MC-100
VFN
C21
MC -125
VN
ACL
T
ACN
ACL
T
ACN
C31
MC -150
VN
5
Page 6
Entsorgung
Innerhalb der EU weist dieses Symbol darauf hin, dass
dieses Produkt nicht über den Hausmüll entsorgt werden
darf. Altgeräte enthalten wertvolle recyclingfähige
Materialien, die einer Verwertung zugeführt werden
Gesundheit nicht durch unkontrollierte Müllbeseitigung zu schaden.
Bitte entsorgen Sie Altgeräte deshalb über geeignete Sammelsysteme
oder senden Sie das Gerät zur Entsorgung an die Stelle, bei der Sie es
gekauft haben. Diese wird dann das Gerät der stofflichen Verwertung
zuführen.
sollten und um der Umwelt bzw. der menschlichen
6
Page 7

GB
ENGLISH
Please read these assembly instructions carefully
before starting the installation.
Caution
Ensure that all electric power is turned off before carrying out any work.
The electrical connections must be carried out by a qualified electrician
and must comply with the relevant local regulations. The voltage and fre quency of the power supply must comply with the fan's specifications. The
installation site must have an all-pole disconnecting device with a contact
opening width of at least 3 mm. The fans are double-insulated and do not
require a protective earth conductor.
If operated near a fireplace with chimney, care must be taken to ensure
that sufficient air can enter the room being ventilated. In rooms with high
humidity, installation must be done in accordance with DIN/VDE 0100
T701. Use a soft brush or damp cloth to clean, do not use any solvents.
This appliance can be used by children aged from 8 years and above
and persons with reduced physical, sensory or mental capabilities or
lack of experience and knowledge if they have been given supervision
or instruction concerning use of the appliance in a safe way and understand the hazards involved. Children shall not play with the appliance.
Cleaning and user maintenance may not be carried out by children
unsupervised.
Ventilator fan for wall/ceiling installation for ventilating
rooms. Caution! The backflow foil may notbe removed.
Installation
1. Install the duct in the wall or ceiling. For wall installation ensure there
is a slight gradient (~2°) towards the outside. For ceiling installation
you must insulate the air duct if it passes through unheated areas.
2. Ø 100, 125: Remove the cover from the casing by unscrewing in
an anti-clockwise direction.
Ø 150: Pull the cover forward and remove from the casing.
3. Ø 100, 125: Unscrew both screws and remove the middle cover
from the casing.
Ø 150: Unscrew screw (A) to remove the cover from the base plate.
4. Interrupt the building's power supply. Feed the power cable through
the casing from the back. Protect power cable using the cable strain
relief when cabling on top of plaster. Screw the fan into place on the
wall or ceiling.
5. Connect power cable in accordance with the connection diagram.
Model VN: To activate the overrun function, a second permanently
active phase is required, turn the overrun switch (D) to ON.
Model VFN: Automatic mode = permanent phase ACL
Automatic plus manual mode = permanent phase ACL plus switched
phase to T
6. Setting the overrun time*
Use a small screwdriver to extend overrun time by turning the potentiometer (B) "timer" in a clockwise direction.
7. Adjusting humidity sensor:
– fan turns on too late or off too soon: Turn the potentiometer (C)
anti-clockwise, fan now turns on at a lower humidity level.
– fan does not turn off or turns on too soon: Turn the potentiometer
(C) clockwise. With voltage on the switched phase, the fan runs as
long as it is turned on plus overrun
7
Page 8
8.
VN
ACL
T
ACN
VFN
L
N
ACL
T
ACN
ON
VN
L
N
ACL
T
ACN
VFN
L
N
ACL
T
ACN
N
L
VFN
ACL
T
ACN
VFN
L
N
VN VFN
Replace middle cover/cover and front cover and restore power supply.
Connection diagram
L
N
L
N
ACL
T
ACN
no overrun
ACL
T
ACN
overrun
ON
ON
L
N
L
N
ACL
T
ACN
automatic mode
ACL
T
ACN
automatic plus
manual mode
Technical Data**
VN
C12
MC-100
Fan:
Protection class/type: IP 24
Mains voltage: 230 V ~50 Hz
Power consumption: 12 W 12 W 17 W 26 W
Noise level (3 m): 35 dB (A) 35 dB (A) 37 dB (A) 41 dB (A)
Output: 90 m³/h 90 m³/h 168 m³/h 230 m³/h
C11
MC-100
VFN
C21
MC -125
VN
C31
MC -150
VN
Max. air temperature: 40 °C
* (Factory setting ~10 min, ~75 % rel. humidity)
** Subject to technical modifications.
Disposal
This marking indicates that this product should not be dis-
systems or contact the retailer where the product was purchased. They
can take this product for environmental safe recycling.
8
posed with other household wastes throughout the EU. To
prevent possible harm to the environment or human health
from uncontrolled waste disposal, recycle it responsibly to
promote the sustainable reuse of material resources. To return your used device, please use the return and collection
Page 9

SE
SVENSKA
Läs igenom denna monteringsanvisning innan
installationen påbörjas.
OBS
Alla arbeten får endast utföras i spänningsfritt tillstånd. Elektriska
anslutningar får endast utföras av auktoriserad fackpersonal i
överensstämmelse med gällande föreskrifter. Elförsörjningens
och frekvens måste stämma överens med fläktens uppgifter. För
instal
lationen krävs en allpolig brytare med ett kontaktavstånd på minst
3 mm.
Fläktarna är utrustade med dubbel skyddsisolering och behöver
ingen skyddsledare.
Vid drift av eldstäder med skorsten i de utrymmen som ska ventileras
måste tillräckligt med tilluft stå till förfogande. Installation i våtutrymmen
måste utföras i överensstämmelse med DIN/VDE 0100 T701. Använd
pensel eller fuktig duk för rengöring. Lösningsmedel får ej komma till
användning.
Denna utrustning kan användas av barn från och med 8 år samt av personer med nedsatt fysisk, motorisk eller mental förmåga eller med bristande
erfarenhet och kunskap, om de hålls under uppsikt eller instruerats om en
säker användning av utrustningen och om de förstått de risker som användningen kan medföra. Barn får inte leka med utrustningen. Rengöring och
användarunderhåll får inte utföras av barn utan uppsikt.
Ventilator för vägg- och takmontering för ventilation av
rum. OBS! Folie-slutaren får inte tas bort.
spänning
Montering
1. Montera ett ventilationsrör i väggen resp. i innertaket. Se till att det
finns en lätt lutning (~2°) utåt vid väggmontering. Vid montering i
innertak måste ventilationsröret isoleras, när det leds igenom ouppvärmda utrymmen.
2. Ø 100, 125: Skyddet vrids motsols och tas loss från höljet.
Ø 150: Dra skyddet framåt och ta loss det från höljet.
3. Ø 100, 125: Ta loss skyddet i mitten från höljet genom att lossa de
båda skruvarna.
Ø 150: Ta loss skyddet genom att lossa skruven (A) från bottnen.
4. Stäng av strömmen och dra husets elkabel bakifrån genom höljet.
Dras ledningarna utanpå väggen måste elkabeln säkras med en
dragsäkring. Skruva fast fläkten på vägg/tak.
5. Anslut elkabeln enligt kopplingsschemat.
Modeller VN: För att aktivera eftereffekten krävs en andra perma-
nent strömförande fas. Ställ in brytaren (D) på ON för eftereffekt.
Modell VFN: Automatisk drift = permanent fas på ACL
Automatik plus manuell drift = permanent fas på ACL plus kopplad
fas på T
6. Inställning av eftereffekten*
För att förlänga tiden för eftereffekt skruvas potentiometer (B) "timer"
medsols med en liten skruvmejsel.
7. Inställning av fuktsensorn*
– Fläkten startar för sent resp. stängs för tidigt: Vrid potentiometern (C)
motsols, fläkten kopplas nu till vid ringa luftfuktighet.
– Fläkten stängs inte av resp. startar för tidigt: Vrid potentiometer (C)
medsols. Vid spänning på kopplad fas går fläkten så länge den är
påslagen plus eftereffekt.
8.
Efter montering av skyddet i mitten/skyddet och locket, kan strömmen åter
slås på.
9
Page 10

Kretsschema
VN
ACL
T
ACN
VFN
L
N
ACL
T
ACN
ON
VN
L
N
ACL
T
ACN
VFN
L
N
ACL
T
ACN
N
L
VFN
ACL
T
ACN
VFN
L
N
VN VFN
L
N
ACL
T
ACN
L
ON
N
Ingen eftereffekt
L
N
ACL
T
ACN
Eftergång
ON
L
N
Automatisk drift plus
ACL
T
ACN
Automatisk drift
ACL
T
ACN
manuell drift
Tekniska data**
VN
C12
MC-100
Fläkt:
Skyddsklass/-typ: IP 24
Nätspänning: 230 V ~50 Hz
Effektförbrukning: 12 W 12 W 17 W 26 W
Ljudtryck (3 m): 35 dB (A) 35 dB (A) 37 dB (A) 41 dB (A)
Kapacitet: 90 m³/h 90 m³/h 168 m³/h 230 m³/h
Max. arbetstemperatur: 40 °C
C11
MC-100
VFN
C21
MC -125
VN
C31
MC -150
VN
* (Fabriksinställning ~10 min, ~75 % relativ fuktighet)
** Tekniska ändringar förbehålls.
Avfallshantering
I EU-länderna innebär denna symbol att produkten inte får
kastas tillsammans med hushållsavfallet. Uttjänta apparater
innehåller värdefulla material som kan och bör återvinnas
för att inte skada miljön resp. människors hälsa genom
skickas tillbaka till det ställe där de köpts. Därifrån kommer apparaten att
skickas till återvinning.
10
okontrollerad avfallshantering. Uttjänta apparater får därför endast lämnas på lämpliga återvinningsstationer eller
Page 11

IT
ITALIANO
Prima di iniziare le operazioni di installazione, leggere
attentamente le presenti istruzioni di montaggio.
Attenzione
Eseguire tutte le operazioni in assenza di tensione. Far eseguire i collegamenti elettrici esclusivamente da personale specializzato autorizzato
e nel rispetto delle relative norme in vigore. La tensione e la frequenza
dell'alimentazione elettrica devono corrispondere ai dati riportati sul
ventilatore. In fase di installazione occorre prevedere un sezionatore
onnipolare con una distanza di apertura dei contatti di almeno 3 mm. I
ventilatori sono muniti di un doppio isolamento e non hanno bisogno di
alcun conduttore di protezione.
Se, nell'ambiente da ventilare, sono presenti focolai funzionanti con cimi
niera, è necessario prevedere una quantità sufficiente di aria in ingresso.
L'installazione in ambienti umidi deve essere eseguita secondo quanto
prescritto dalla norma DIN/VDE 0100 T701. Per la pulizia utilizzare un
pennello o un panno umido, non utilizzare solventi.
Questo apparecchio può essere utilizzato da bambini a partire dagli 8
anni di età e da persone con limitate capacità fisiche, sensoriali o cogni
tive o prive di esperienza e conoscenza, premesso che ricevano precise
istruzioni sull’utilizzo dell’apparecchio e comprendano i rischi che ne
derivano. L’apparecchio non è un giocattolo. Gli interventi di pulizia e
manutenzione da parte dell’utente possono essere eseguiti dai bambini
soltanto sotto adeguata sorveglianza.
Ventilatore per montaggio a parete e a soffitto per la ventilazione di locali. Attenzione! Non rimuovere la pellicola
antiristagno.
Montaggio
1. Montare il tubo di ventilazione nella parete o sul soffitto. In caso di
installazione a parete, prestare attenzione alla leggera pendenza
(~2°) verso l’esterno. Per il montaggio a soffitto invece, isolare il tubo
di ventilazione se conduce attraverso zone non riscaldate.
2. Ø 100, 125: Ruotare la mascherina in senso antiorario e staccarla
dalla scatola.
dalla scatola.
3. Ø 100, 125: Rimuovere la copertura centrale dalla scatola allen-
tando le due viti. Ø 150: Staccare la copertura dalla piastra di base,
allentando la vite (A).
4.
Staccare l'alimentazione elettrica del cavo di rete domestica. Far
passare il cavo elettrico attraverso la scatola dalla parte posteriore. In
caso di cablaggio a parete, mettere in sicurezza il cavo elettrico con
lo scarico della trazione. Avvitare il ventilatore alla parete o al soffitto.
5. Collegare il cavo seguendo lo schema elettrico.
Modelli VN: Per attivare la funzione di disinserimento ritardato
occorre una seconda fase continuamente sotto corrente. Posizionare il
commutatore (D) di disinserimento ritardato su ON.
Modello VFN: Funzionamento automatico = fase continua su ACL.
Funzionamento automatico più manuale = fase continua su ACL più
fase attiva su T
6. Impostazione del ritardo di disinserimento*
Per prolungare il ritardo di disinserimento ruotare in senso orario il
potenziometro (B) "timer" con un piccolo cacciavite.
7. Impostazione del sensore di umidità*
–
Il ventilatore si avvia troppo tardi o si disinserisce troppo presto:
tare il potenziometro (C) in senso antiorario, il ventilatore si avvierà
anche in presenza di una quantità minima di umidità dell’aria.
– Il ventilatore non si disinserisce o si inserisce troppo presto: Ruotare
il potenziometro (C) in senso orario. Se è presente tensione sulla
fase attiva, il ventilatore continua a funzionare finché è acceso più il
tempo di ritardo.
Ø 150: Tirare in avanti la mascherina e rimuoverla
Ruo-
-
-
11
Page 12

8. Dopo aver montato la copertura centrale/copertura e la mascherina,
VN
ACL
T
ACN
VFN
L
N
ACL
T
ACN
ON
VN
L
N
ACL
T
ACN
VFN
L
N
ACL
T
ACN
N
L
VFN
ACL
T
ACN
VFN
L
N
VN VFN
ripristinare l’alimentazione elettrica.
Schema elettrico
L
N
Nessun ritardo di disinserimento
L
N
Ritardo di disinserimento
ACL
T
ACN
ACL
T
ACN
L
ON
N
Funzionamento automatico
L
ON
N
automatico più manuale
Funzionamento
Dati tecnici**
VN
C12
MC-100
Ventilatore:
Classe e grado di
protezione:
Tensione di rete: 230 V ~50 Hz
Assorbimento di
potenza
Pressione sonora (3 m): 35 dB (A) 35 dB (A) 37 dB (A) 41 dB (A)
Portata: 90 m³/h 90 m³/h 168 m³/h 230 m³/h
Temperatura di
mandata max.:
* (Impostazioni di fabbrica ~10 min, ~75 % umidità relativa)
** Con riserva di modifiche tecniche.
Smaltimento
All’interno della UE questo simbolo indica che il prodotto
di smaltire gli apparecchi vecchi mediante appositi sistemi di raccolta o di
non può essere smaltito come rifiuto domestico. Gli apparecchi vecchi contengono materiali riciclabili preziosi, che
dovrebbero essere recuperati per non provocare danni
all’ambiente o alla salute dell’uomo conseguenti ad uno
smaltimento incontrollato dei rifiuti. Siete pregati pertanto
C11
MC-100
12 W 12 W 17 W 26 W
riportare l’apparecchio nel luogo dove l’avete acquistato. Il negozio provvederà allo smaltimento dell’apparecchio nel centro di recupero materiali.
12
VFN
40 °C
IP 24
C21
MC -125
VN
ACL
T
ACN
ACL
T
ACN
C31
MC -150
VN
Page 13

RU
РУССКИЙ ЯЗЫК
Пожалуйста, прочтите эту инструкцию по монтажу
перед началом работ по установке.
Внимание
Все работы осуществляются в обесточенном состоянии. Электромонтажные подключения разрешается выполнять только авторизованным
специалистам-электрикам в соответствии с действующими предписаниями. Напряжение и частота подаваемого тока должны соответствовать данным вентилятора. Со стороны монтажа необходимо предусмотреть многополюсный разъединитель с зазором между контактами
мин. 3 мм. Вентиляторы имеют двойную защитную изоляцию и не
нуждаются в защитном проводе.
При эксплуатации очагов с дымоходами в вентилируемом помещении необходимо позаботиться о достаточной приточной
вентиляции. Электромонтажные работы во влажных помещениях
необходимо осуществлять согласно стандарту DIN/VDE 0100 T701.
Для чистки применять кисть или влажную тряпку, не использовать
растворителеи.
Данный прибор может использоваться детьми от 8 лет и старше,
а также людьми с ограниченными физическими, сенсорными или
ментальными способностями или с недостатком опыта и знаний,
если они находятся под присмотром, или если их научили безопасному обращению с прибором, и они понимают исходящие от него
опасности. Детям нельзя играть с прибором. Очистка и пользовательское техобслуживание не должны проводиться детьми
без присмотра.
Вентилятор для установки на стене и на потолке для проветривания помещений. Внимание! Защиту от обратной
тяги удалять нельзя.
Монтаж
1. Монтировать воздуховод в стену или потолок. При настенном
монтаже обеспечить легкий уклон (~2°) наружу. При потолочном монтаже выполнить теплоизоляцию вентиляционной трубы,
если она проходит по неотапливаемым зонам.
2. Ø 100, 125: Повернуть заслонку против часовой стрелки и
отсоединить от корпуса.
Ø 150: Потянуть заслонку вперед и отсоединить от корпуса.
3.
Ø 100, 125: Отсоединить средний кожух, вывинтив оба винта.
Ø 150: Снять кожух с плиты основания, вывинтив винт (A).
4. Отключить электропитание имеющегося на месте монтажа
силового кабеля и провести силовой кабель сзади через корпус.
В случае прокладки силового кабеля поверх штукатурки обеспечить его фиксацию с натяжением. Присоединить вентилятор
винтами к стене/потолку.
5. Подключить кабель питания согласно схеме подключений.
Модели VN: Для активации функции инерционного выбега
необходима 2-я долгая токопроводящая фаза, выключатель
ционного выбега переключить (D) в положение ВКЛ. ("ON").
Модели VFN: Автоматический режим = долгая фаза на ACL.
Автоматика плюс ручной режим = долгая фаза на ACL плюс
подключенная фаза на T
6. Настройка времени инерционного выбега*
Для увеличения времени инерционного выбега повернуть малой
отверткой потенциометр (B) "timer" по часовой стрелке.
инер-
13
Page 14

7. Настройка датчика влажности*
VN
ACL
T
ACN
VFN
L
N
ACL
T
ACN
ON
VN
L
N
ACL
T
ACN
VFN
L
N
ACL
T
ACN
N
L
VFN
ACL
T
ACN
VFN
L
N
VN VFN
– Вентилятор включается слишком поздно или выключается
слишком рано: Повернуть потенциометр (C) против часовой
стрелки, теперь вентилятор включается при малых значениях
влажности воздуха.
– Вентилятор не выключается или включается слишком рано:
Повернуть потенциометр (C) по часовой стрелке. При напряжении включенной фазы вентилятор работает, пока он
включен, плюс инерционный выбег.
8. После монтажа среднего кожуха/кожуха и заслонки восстано-
вить электропитание.
Электрическая схема
L
N
Нет задержки выключения
L
N
Инерционный выбег
ACL
T
ACN
ACL
T
ACN
ON
ON
L
N
Автоматический режим
L
N
Автоматика плюс
ручной режим
Технические характеристики**
Вентилятор:
Класс/род защиты: IP 24
Напряжение сети: 230 В ~50 Гц
Потребляемая
мощность:
Звуковое давление (3 м):
Производительность: 90 м³/ч 90 м³/ч 168 м³/ч 230 м³/ч
Макс. температура
подачи:
* (заводская настройка ~10 мин, ~75 % отн. влажности)
** Мы оставляем за собой право на технические изменения.
14
C11
MC-100
12 Вт 12 Вт 17 Вт 26 Вт
35 дБ (A) 35 дБ (A) 37 дБ (A) 41 дБ (A)
VN
C12
MC-100
VFN
40 °C
C21
MC -125
VN
ACL
T
ACN
ACL
T
ACN
C31
MC -150
VN
Page 15

Утилизация
На территории ЕС данный символ указывает на то,
что данное изделие нельзя утилизировать как бытовые
отходы. Использованные приборы содержат ценные
материалы, пригодные для вторичной переработки, их
вреда окружающей среде или здоровью людей в результате бесконтрольного удаления мусора. Поэтому утилизируйте, пожалуйста,
использованные приборы через подходящие системы сбора или
отправьте прибор на утилизацию в место, где вы его приобрели. Продавец сам утилизирует прибор надлежащим образом.
необходимо отправить на утилизацию без нанесения
15
Page 16

HU
MAGYAR
Kérjük, hogy a beszerelés elkezdése előtt olvassa el ezt
a szerelési útmutatót elejétől a végéig.
Figyelem
Minden munkát csak feszültségmentes állapotban szabad végezni.
Az elektromos csatlakoztatások kivitelezésével csak ilyen munkák
végzésére jogosult szakembereket szabad megbízni, akik betartják a
mindenkor érvényes előírásokat. Olyan áramellátást kell választani,
amelynek feszültsége és frekvenciája egyezik a ventilátorra megadott
értékekkel. A beszerelés helyén olyan hálózatleválasztó készülékről kell
gondoskodnia, amely minden pólust megszakít, és ahol az érintkezők
min. 3 mm-re nyitnak. A ventilátorok kétszeres védőszigeteléssel vannak
ellátva, így nincs szükségük védővezetőre.
Ha a szellőztetendő helyiségben kéményre kötött tüzelőhelyet üzemeltetnek, gondoskodni kell a frisslevegő kellő utánpótlásáról. Párás
helyiségekben a beszerelést a DIN/VDE 0100 T701 szerint kell végezni. A ventilátort ecsettel vagy nedves kendővel lehet tisztítani, oldószer
azonban nem használható erre a célra.
A készüléket 8 évnél idősebb gyermekek, valamint korlátozott testi-,
szellemi- illetve érzékelési képességgel rendelkező vagy az ilyen
készülék használatához szükséges gyakorlatnak vagy tudásnak híján
lévő személyek csak felügyelet mellett használhatják, illetve ha megtanították nekik a készülék biztonságos használatának módját, és tudják,
hogy használat közben milyen veszélyek fenyegetik őket. Gyermekek
ne játsszanak a készülékkel. Gyermekek csak felügyelet mellett tisztíthatják és tarthatják karban a készüléket.
Falra és mennyezetre szerelhető ventilátor helyiségek
szellőztetéséhez. Figyelem! A feltorlódott fóliát nem szabad eltávolítani.
Szerelés
1. Szerelje fel a szellőzőcsövet a falon, ill. a mennyezeten. Falra
szereléskor ügyeljen rá, hogy a cső kifelé enyhén (~2°-al) lejtsen.
Mennyezetre szereléskor szigetelje el a szellőzőcsövet, ha az fűtetlen területeken halad keresztül.
2. 100 -as, 125-ös átm.: Forgassa el a takarólapot az óramutató
járásával ellentétesen, és vegye le a házról.
150-es átm.: Húzza előre a takarólapot és vegye le a házról.
3.
100-as, 125-ös átm.: A két csavar meglazítása után vegye le
középső fedelet a házról.
150-es átm.: Az (A) csavar meglazítása után vegye le a fedelet
az alaplemezről.
4. Szakítsa meg a lakás elektromos kábelének áramellátását. Hátulról
dugja keresztül az elektromos kábelt a házon. Falsík feletti vezetés
esetén biztosítsa az elektromos kábelt húzásmentesítővel. Csavarozza fel a ventilátort a falra/mennyezetre.
5. Kösse be az elektromos kábelt a kapcsolási rajz szerint.
VN jelű modelleknél: A ventilátor utánjárása céljából egy
2-ik, állandóan áramtól átjárt fázisra is szükség lesz. Az utánjárás
kapcsolóját (D) állítsa ON állásba.
VFN jelű modellnél: Automatikus üzemmód = állandó fázis
ACL-en. Automatikus és kézi üzemmód = állandó fázis ACL-en és
kapcsolt fázis T-n
16
a
Page 17

6. Az utánjárási idő* beállítása
VN
ACL
T
ACN
VFN
L
N
ACL
T
ACN
ON
VN
L
N
ACL
T
ACN
VFN
L
N
ACL
T
ACN
N
L
VFN
ACL
T
ACN
VFN
L
N
VN VFN
Az utánjárási időt úgy tudja elnyújtani, hogy kis csavarhúzóval elforgatja a
"timer" (B) potenciométert az óramutató járásának irányában.
7. A légnedvesség érzékelő* beállítása
– Ventilátor túl későn kapcsol be, ill. túl korán kapcsol ki: Csavarja el
a (C) potenciométert az óramutató járásával ellentétesen. Ekkor a
ventilátor már kisebb légnedvesség esetén is bekapcsol.
– Ventilátor nem kapcsol ki, ill. túl korán kapcsol be: Csavarja el
a (C) potenciométert az óramutató járásának irányában. Ha a
kapcsolt fázison feszültség van, a ventilátor mindaddig jár, amíg
be van kapcsolva és kikapcsolás után le nem áll.
8. A középső fedél/fedél és a takarólap felszerelése után állítsa helyre
ismét az áramellátást.
Kapcsolási rajz
L
N
L
N
ACL
T
ACN
utánjárás nélkül
ACL
T
ACN
utánjárással
ON
ON
L
N
automatikus üzemmód
L
N
automatikus és kézi
üzemmód
Műszaki adatok**
VN
C12
MC-100
Ventilátor:
Védettségi osztály/-mód:
Hálózati feszültség: 230 V ~50 Hz
Teljesítményfelvétel: 12 W 12 W 17 W 26 W
Hangnyomás (3 m): 35 dB (A) 35 dB (A) 37 dB (A) 41 dB (A)
Szállítóteljesítmény: 90 m³/h 90 m³/h 168 m³/h 230 m³/h
Max.
szállítóhőmérséklet:
* (gyári beállítás ~10 perc, ~75 % rel. légnedvesség)
** A műszaki változtatás jogát fenntartjuk.
C11
MC-100
VFN
40 °C
IP 24
C21
MC -125
VN
ACL
T
ACN
ACL
T
ACN
C31
MC -150
VN
17
Page 18

Ártalmatlanítás
Az Európai Unión belül ez a jelkép utal arra, hogy a
terméket nem lehet a háztartási szeméttel együtt ártalmatlanítani. A régi készülékek értékes újrahasznosítható anyagokat tartalmaznak, amelyeket célszerű újrafeldolgozás
károsítsa az egészséget, ill. a környezetet. Ezért a régi készülékeket arra
alkalmas gyűjtőrendszerek bevonásával ártalmatlanítsa, vagy küldje
el a készüléket arra a helyre, ahol azt vásárolta. Ők majd eljuttatják a
készüléket az újrafeldolgozó üzembe.
végett leadni, nehogy az ellenőrizetlen szemételtávolítás
18
Page 19

BG
БЪЛГАРСКИ
Преди да започнете инсталирането, моля прочетете
това ръководство за монтаж.
Внимание
Всички работи се извършват при изключено напрежение. Електрическите връзки трябва да се изпълняват само от оторизиран
персонал и съобразно действащите предписания. Напрежението
и честотата на мрежата трябва да съответстват на данните на вентилатора. При инсталиране трябва да се предвиди прекъсвач на
всички полюси с ширина на отворите на контакта най-малко 3 мм.
Вентилаторите са двойно изолирани и не се нуждаят от заземителен проводник.
При наличие на отоплителни уреди, свързани с комин, в съответното помещение трябва да се осигури достатъчен приток на чист
въздух. Инсталирането във влажни помещения трябва да е съобразено с DIN/VDE 0100 T 701. За почистване използвайте четка или
влажна кърпа, не използвайте разтворители.
Този уред може да се употребява от деца над 8 годишна възраст,
както и от лица с намалени физически, сетивни или умствени способности и от такива, на които им липсва опит или познание,
ако са под наблюдение или са получили указание за безопасната
употреба на уреда, както и разбират произтичащите от това опасности. Децата не трябва да си играят с уреда. Почистването и
потребителската поддръжка не трябва да се извършват от деца без
наблюдение.
Вентилатор за таванен или стенен монтаж, за вентилация на помещения. Внимание! Фолиото за обратния
клапан не трябва да се отстранява.
Монтаж
1. Монтирайте вентилационната тръба в стената или в тавана.
При монтаж в стената, внимавайте тръбата да има лек
наклон (~2°) навън. А при монтаж на таван изолирайте
вентилационната тръба, ако минава през не отоплявани зони.
2. Ø 100, 125: Завъртете блендата обратно на часовниковата
стрелка и я отделете от корпуса.
Ø 150: Издърпайте блендата напред и я отделете от корпуса.
3. Ø 100, 125: Отделете средното покритие от корпуса, като
развинтите двата винта.
Ø 150: Освободете покритието от основната плоча, като
развинтите винта (А).
4. Прекъснете захранването на местния силов кабел и вкарайте
кабела отзад в корпуса на вентилатора. При открито окабеляване силовият кабел трябва да се обезопаси срещу издърпване.
Завинтете вентилатора към стената/тавана.
5. Свържете силовия кабел според схемата за електрическо свърз-
ване.
Модели VN: За да се активира функцията за ход по инерция,
е необходима втора постоянна фаза, а шалтерът (D) за ход по
инерция трябва да се постави на положение ON.
Модел VFN: Автоматичен режим = постоянната фаза се
свързва с ACL Автоматичен и ръчен режим = постоянната фаза
се свързва с ACL, а прекъснатата фаза се свързва с Т.
6. Настройка на времето за ход по инерция*
За да удължите времето за ход по инерция, с малка отвертка
19
Page 20

завъртете потенциометъра (В) „таймер” по посока на часовни -
VN
ACL
T
ACN
VFN
L
N
ACL
T
ACN
ON
VN
L
N
ACL
T
ACN
VFN
L
N
ACL
T
ACN
N
L
VFN
ACL
T
ACN
VFN
L
N
VN VFN
ковата стрелка.
7. Настройка на сензора за влага*
– Вентилаторът се включва късно или се изключва рано: Завър-
тете потенциометъра (С) обратно на часовниковата стрелка,
сега вентилаторът ще се включва при по-малка влажност на
въздуха.
– Вентилаторът не се изключва или се включва много рано:
Завъртете потенциометъра (С) по посока на часовниковата
стрелка. Ако в прекъсната фаза има напрежение, вентилаторът ще работи непрекъснато, докато е включен и ще се върти
по инерция след изключването.
8. След монтажа на средното покритие/покритието и на бленда-
та, възстановете електрозахранването.
Схема на свързване
L
N
L
N
ACL
T
ACN
няма ход по инерция
ACL
T
ACN
с ход по инерция
ON
ON
L
N
автоматичен режим
L
N
автоматичен и ръчен
режим
Технически данни**
VN
C12
MC-100
230 V ~50 Hz
Вентилатор:
Клас/вид защита: IP 24
Мрежово
напрежение:
Разход на ток: 12 W 12 W 17 W 26 W
Степен на шума (3 m): 35 dB (A) 35 dB (A) 37 dB (A) 41 dB (A)
Капацитет на
изтласкване:
Макс. температура
при изтласкване:
* (Фабрична настройка ~10 минути, ~75 % относителна влажност)
** Запазваме си правото на технически изменения.
20
C11
MC-100
90 m³/h 90 m³/h 168 m³/h 230 m³/h
VFN
40 °C
C21
MC -125
VN
ACL
T
ACN
ACL
T
ACN
C31
MC -150
VN
Page 21

HR
HRVATSKI
Molimo prije početka instalacije pročitajte ovu uputu za
montažu.
Pozor
Sve radove provedite kada uređaj ne stoji pod naponom. Električne
priključke isključivo smije izvršiti ovlašteno stručno osoblje i prema dotično važećim propisima. Napon i frekvencija napajanja strujom moraju
odgovarati podacima ventilatora. Onaj tko instalira treba predvidjeti
sveopolnu razdjelnu napravu sa širinom kontaktnog otvora od najm. 3
mm. Ventilatori su dvostruko zaštitno izolirani i nije im potreban zaštitni
vodič.
Kod korištenja ognjišta neovisno o dimnjaku, u prostoriji koja se treba
odzračiti treba se pobrinuti za dovoljno svježeg zraka. Instalacija u
vlažnim prostorijama se mora izvršiti prema DIN/VDE 0100 T701. Za
čišćenje koristite kist ili vlažnu krpu, nemojte koristiti otapala.
Ovim se uređajem mogu koristiti djeca starija od 8 godina te osobe
smanjenih tjelesnih, senzoričkih ili umnih sposobnosti ili nedovoljna
iskustva i znanja, ako su pod nadzorom ili su upućene u sigurnu uporabu
uređaja i razumiju opasnosti koje iz toga proizlaze. Djeca se ne smiju
igrati uređajem. Čišćenje i održavanje ne smiju provoditi djeca koju
nitko ne nadzire.
Ventilator za zidnu i stropnu montažu za odzračivanje
prostorija. Pozor! Samoljepljiva folija ne smije se uklanjati.
Montaža
1. Ventilacijske cijevi montirajte u zid ili u strop. Kod montaže na zid
pazite na lagani pad (~2°) prema vani. Kod stropne montaže
cijev izolirajte ukoliko cijev prolazi preko prostorija bez grijanja.
V prípade montáže na strop potrubie zaizolujte, ak vedie cez
nevyhrievané oblasti.
2. Ø 100, 125: Zaslon okrenite suprotno smjeru kazaljke na satu i
odvojite ga od kućišta.
Ø 150: Zaslon povući naprijed i skinuti sa kućišta.
3. Ø 100, 125: Srednji poklopac skinuti sa kućišta popuštanjem
obadva vijka.
Ø 150: Poklopac popuštanjem vijka (A) popustiti sa osnovne ploče.
4. Prekinuti napajanje kućnog strujnog kabela i strujni kabel straga
uvesti u kučište. Kod nadžbuknog postavljanja kabela strujni kabel
osigurajte tlačnim rasterećenjem kabela. Ventilator zavrnite na zid/
strop.
5. Strujni kabel priključite prema slici uklapanja.
Modeli VN: Za aktiviranje funkcije noćnog rada potrebna je 2.
faza koja trajno dovodi struju, sklopku (D) za noćni rad pritisnite na
ON.
Model VFN: Automatski pogon = trajna faza na ACL
Automatika plus manualni pogon = trajna faza na ACL plus uključena faza na T
6. Podešavanje vremena naknadnog hoda*
Za produžetak vremena naknadnog hoda potenciometar (B) „timer“
sa malim odvijačem okrenite u smjeru kazaljke na satu.
7. Podešavanje senzora vlage*
– Ventilator se prekasno uključuje tj. prerano isključuje: Potencio-
metar (C) okrenite suprotno smjeru kazaljke na satu, Ventilator se
sada uključuje kod male vlažnosti zraka.
– Ventilator se ne isključuje tj. prerano se uključuje: Potenciometar
21
Page 22

(C) okrenite u smjeru kazaljke na satu. Kod napona na uključenim
VN
ACL
T
ACN
VFN
L
N
ACL
T
ACN
ON
VN
L
N
ACL
T
ACN
VFN
L
N
ACL
T
ACN
N
L
VFN
ACL
T
ACN
VFN
L
N
VN VFN
fazama ventilator radi skroz dok je uključen plus dodatni hod.
8. Nakon montaže srednjeg poklopca/poklopca i zaslona ponovno
uspostavite dovod struje.
Slika uklapanja
L
N
L
N
ACL
T
ACN
Bez naknadnog hoda
ACL
T
ACN
Naknadni hod
ON
ON
L
N
Automatski pogon
L
N
Automatika plus
manualni pogon
VN
C12
MC-100
Ventilator:
Klasa/vrsta zaštite IP 24
Mrežni napon: 230 V ~50 Hz
Prihvat snage: 12 W 12 W 17 W 26 W
Tehnički podaci**
Zvučni tlak (3 m): 35 dB (A) 35 dB (A) 37 dB (A) 41 dB (A)
Učinak prijenosa: 90 m³/h 90 m³/h 168 m³/h 230 m³/h
Maks. temperatura
prijenosa:
* (Tvornička postavka~10 min, ~75 % rel. vlaga)
** Tehničke izmjene ostaju pridržane.
C11
MC-100
VFN
40 °C
C21
MC -125
VN
ACL
T
ACN
ACL
T
ACN
C31
MC -150
VN
22
Page 23

SI
SLOVENSKI
Pred pričetkom postavitve preberite navodila za
montažo.
Opozorilo
Vsa dela izvajajte pri izklopljeni napetosti. Električno povezavo izvede
le usposobljeno osebje ob upoštevanju veljavnih predpisov. Napetost in
frekvenca omrežja morata ustrezati lastnostim ventilatorja. Pri postavitvi
se mora na vsakem polu predvideti vtičnica s širino odprtin najmanj
3 mm. Ventilatorji so dvojno izolirani ter ne potrebujejo zaščitnega
vodnika.
V primeru, ko v prostoru, kjer se ventilator uporablja, gori peč z
dimnikom ali kamin, se mora zagotoviti zadosten pritok svežega zraka.
Pri namestitvi v vlažne prostore se mora upoštevati standard DIN/
VDE 0100 T701. Za čiščenje uporabite le krtačo oz. mokro krpo, ne
uporabljajte razredčil.
Napravo lahko uporabljajo otroci, starejši od 8 let in osebe z zmanjšanimi fizičnimi, senzornimi ali mentalnimi sposobnostmi ali pomanjkanjem
izkušenj in znanja samo, če so pod nadzorom ali pa so bile podučene o
varni uporabi naprave in razumejo tveganja, ki lahko nastanejo. Otroci
se ne smejo igrati z napravo. Čiščenje in vzdrževanje, ki ga izvaja
uporabnik, je prepovedano otrokom brez nadzora.
Ventilator za stensko in stropno montažo za prezračevanje
prostorov. Pozor! Protipovratne lopute se ne sme odstraniti.
Montaža
1.
Ventilacijsko cev montirajte v steno oziroma v strop. Pri stenski
montaži poskrbite za rahel naklon (~2°) navzven. Pri stropni montaži
ventilacijsko cev izolirajte, če je speljana skozi neogrevana območja.
2. Ø 100, 125: Ploščo zavrtite v nasprotno smer urnega kazalca ter
jo odstranite z ohišja.
Ø 150: Ploščo potegnite naprej ter jo odstranite z ohišja.
3.
Ø 100, 125: Z odvijanjem dveh vijakov odstranite srednjo prevleko.
Ø 150: Z razvijanjem vijaka (A) sprostite prevleko od osnovne
plošče.
4. Prekinite napajanje v omrežni kabel ter ga vstavite v ohišje
ventilatorja. Pri odprti električni napeljavi se mora napajalni kabel
zavarovati pred potegom. Ventilator pritrdite na steno/strop.
5. Napajalni kabel povežite v skladu s shemo za povezovanje.
Modeli VN: Da bi zagnali funkcijo hod po inerciji, potrebujete
drugo stalno fazo ter morate stikalo (D) za hod po inerciji postaviti
v ON položaj.
Model VFN: Samodejni režim = stalna faza se poveže na
ACL Samodejni in ročni režim = stalna faza se poveže na
ACL ter prekinjena faza na T.
6. Nastavitev časa za hod po inerciji*
Da bi podaljšali čas delovanja po inerciji, morate z majhnim izvijačem zavrteti potenciometer (B) "timer" v smeri urnega kazalca.
7. Nastavitev senzorja za vlago*
– Ventilator se vklopi prepozno oz. se vklopi prezgodaj: Potencio-
meter (C) zavrtite v nasprotni smeri urnega kazalca, tako se bo
ventilator vklopil pri nižji vlažnosti zraka.
– Ventilator se ne izklopi oz. se zelo redko vklopi: Potenciometer (C)
zavrtite v smeri urnega kazalca. V primeru, ko je v prekinjeni fazi
prisotna napetost, bo ventilator deloval neprekinjeno dokler je
vklopljen ter se bo po izklopu vrtel po inerciji.
23
Page 24

8. Po montaži srednje prevleke/prevleke plošče, ponovno vzpostavite
VN
ACL
T
ACN
VFN
L
N
ACL
T
ACN
ON
VN
L
N
ACL
T
ACN
VFN
L
N
ACL
T
ACN
N
L
VFN
ACL
T
ACN
VFN
L
N
VN VFN
napajanje.
Shema električne povezave
L
N
Brez zagona po inerciji
L
N
ACL
T
ACN
ACL
T
ACN
ON
ON
L
N
Samodejni režim
L
N
Z zagonom po inerciji
Tehnični podatki**
VN
C12
MC-100
Ventilator:
Zaščitni razred/tip IP 24
Omrežna napetost: 230 V ~50 Hz
Poraba energije: 12 W 12 W 17 W 26 W
Emisije hrupa (3 m): 35 dB (A) 35 dB (A) 37 dB (A) 41 dB (A)
Zmogljivost vsesavanja
zraka
Maksimalna temperatura vsesanega zraka
* (Tovarniške nastavitve ~10 minut ~75 % relativna vlažnost zraka)
** Pridržimo si pravico do tehničnih sprememb.
C11
MC-100
90 m³/h 90 m³/h 168 m³/h 230 m³/h
VFN
40 °C
C21
MC -125
VN
ACL
T
ACN
ACL
T
ACN
Samodejni in
ročni režim
C31
MC -150
VN
24
Page 25

Hinweise für Reklamationen und Garantiefälle
Information Regarding Complaints and
Warranty Claims
Sehr geehrte Kundin, sehr geehrter Kunde,
vielen Dank, dass Sie sich für ein Marley-Produkt entschieden
haben. Bitte beachten Sie die Montagehinweise und unsere
jeweiligen Garantiebedingungen.
Marley Produkte werden mit größter Sorgfalt gefertigt
und verpackt. Sollte ein gekauftes Produkt dennoch einen
Mangel aufweisen, nutzen Sie bitte das Kontaktformular
unter www.marley.de/kontakt.
Um das Produkt eindeutig zu identifizieren, sollten Sie vorher
die Artikelbezeichnung oder die EAN-Nummer (unter dem
Strichcode) notieren.
4002644
Artikelnummer
Artikelbezeichnung
Ihre Marley Deutschland GmbH
Dear Customers,
thank you for choosing a Marley product. Please observe
the installation instructions and the respective terms of our
warranty.
Marley products are manufactured and packaged with
the utmost care. However, should a purchased product
prove to be defective, please use the contact form under the
following link: www.marley.de/contact.
Please first make a note of the item description or EAN number
(underneath the bar code) which uniquely identifies the
product.
4002644
Item number
Item description
Your Marley Deutschland GmbH
Page 26

Marley Deutschland GmbH
Adolf-Oesterheld-Str. 28
D-31515 Wunstorf
Phone +49.(0)5031.53-0
Fax +49.(0)5031.53-371
www.marley.de
Stand 09/18
 Loading...