

Page 1
A
42E724A In-Wall Programmable Astronomic Time Switch INSTRUCTIONS
♦ GENERAL INFORMATION
Ratings: 15A - 120VAC General Purpose
15A - 120VAC Resistive
960W - 120VAC Tungsten
1/2HP - 120VAC Motor
500VA - 120VAC Electronic Ballast
Switching: SPST
Operating temperature: -10°C to 55°C (14°F to 131°F )
: - Keep these instructions available for future reference.
NOTES
- Indoor use only.
- This product is intended for use in the continental US, Alaska,
and Hawaii.
DESCRIPTION:
This 24-hour, programmable time switch is designed to automatically
energize a light, fan, or small appliance load on a daily basis (or other
combination of days). It is equipped with a special "Astronomic" feature
that can adjust the start or stop time of the load as sunrise and sunset
change throughout the year. In addition to 20 available ON/OFF program
slots, the 42E724A also has an array of other features to further customize
the programmed time of the load and provide enhanced convenience
during use. Can replace standard toggle or decorator style switches in
single or 3-way applications.
FEATURES:
- Astronomic programming available to adjust with sunrise and sunset.
- 20 available ON/OFF program slots.
- 3-Way capable.
- Automatically adjusts for DST (Daylight Savings Time) with two other
manual modes available if desired.
- Random timing mode available for added security while away for
extended periods. Gives a house more of a realistic, lived-in look.
- Manual pushbutton for temporary or continuous override of automatic
programming.
- Time delay available for auto-shut-off after manual override is activated.
- Countdown timer mode available.
♦ INSTALLATION
CAUTION
: INSTALLATION BY A LICENSED ELECTRICIAN IS RECOMMENDED.
INSTALLATION AND USE OF THIS EQUIPMENT SHOULD BE IN ACCORDANCE WITH
PROVISIONS OF THE U.S. NATIONAL ELECTRICAL CODE, APPLICABLE LOCAL
CODES, AND PERTINENT INDUSTRY STANDARDS.
CAUTION
: USE THIS DEVICE WITH COPPER WIRE ONLY.
: THESE TIMERS ARE NOT TO BE USED IN PRECISION TIMING
CAUTION
APPLICATIONS WHEN INACCURATE TIMING COULD HAVE DANGEROUS
CONSEQUENCES SUCH AS WITH SUN LAMPS OR TANNING EQUIPMENT.
WARNING
AT CIRCUIT BREAKER OR FUSE AND TEST THAT POWER IS OFF
BEFORE WIRING!
1) Remove existing wall plate and switch if applicable.
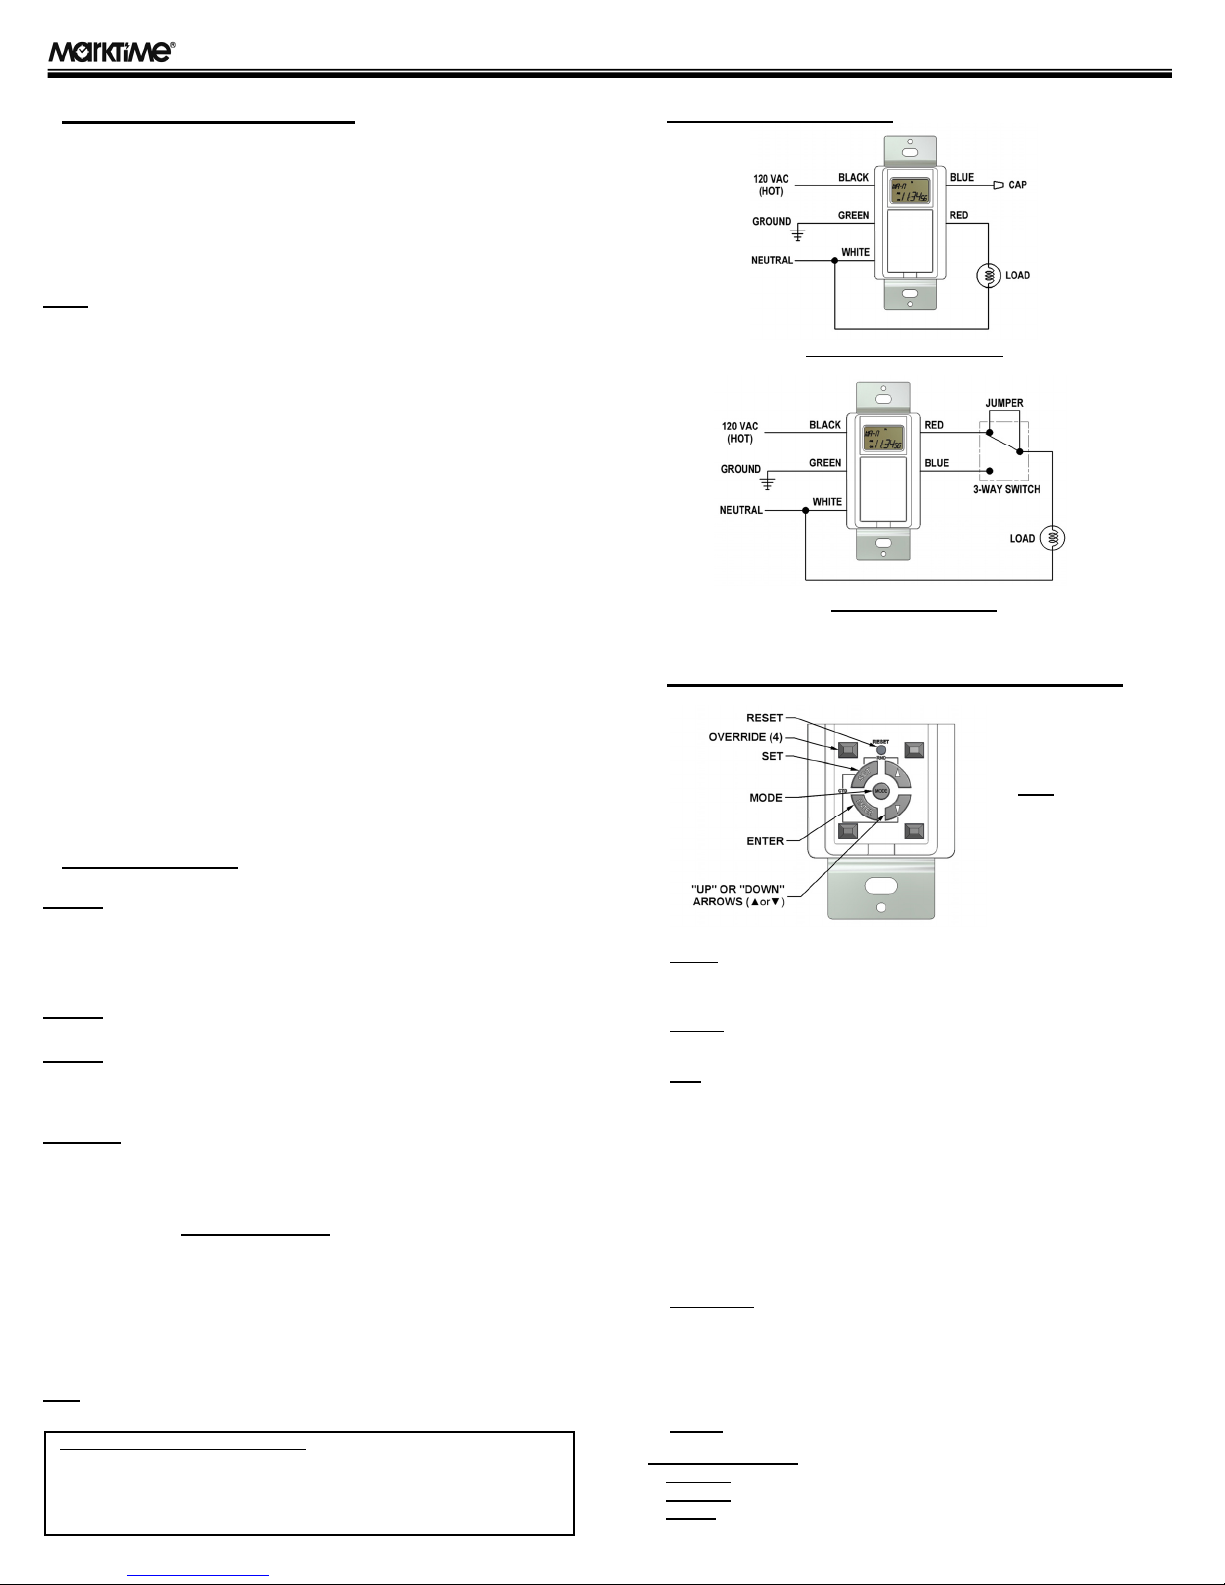
2) Referring to the WIRING DIAGRAMS
to the wires in the wall box using the supplied wire nuts. Be sure all wire
nuts are secure.
3) Gently position wires in wall box to allow room for switch.
4) Carefully place wires and switch into wall box, and secure with two
mounting screws.
5) Install the wall plate.
6) Restore power to the circuit breaker or fuse panel.
NOTE
SWITCH BETWEEN RED LEAD WIRE OF THE TIMER AND THE LOAD LEAD WIRE.
ONE YEAR LIMITED WARRANTY
If this product fails because of a m anufacturing defect within one year after purc hase, we will replace it at no
charge. Our warranty does not cover dam age caused by accident, abuse, or misuse. We assume no further
liability with respect to the sale or us e of this product.
This warranty is in lieu of all other warranties, expressed or implied, inc luding the warranty of merchantabil ity.
We make no warranty with respect to the f itness of any goods for the user's part icular application. This warra nty
gives you specific legal rights, and you may also have other rights which vary from state to state.
: TO AVOID FIRE, SHOCK, OR DEATH, TURN OFF POWER
, connect the wires from the switch
: FOR 3-WAY INSTALLATIONS, BE SURE TO INSTALL JUMPER ON 3-WAY
♦ WIRING DIAGRAMS
Single Pole (Typical) Wiring
(NOTE: JUMPER REQUIRED ON 3-WAY SWITCH.)
2-Switch, 3-Way Wiring
♦ KEYPAD LAYOUT / BUTTON FUNCTION
NOTE: TO ACCESS
THE KEYPAD, LIFT
BOTTOM OF DOOR IN
FRONT OF TIMER WITH
SMALL SLOTTED
SCREWDRIVER.
1. MODE
A) Mode selection (Normal Display, PROG, CALD, ZONE, SUN±, DST).
B) Current and Countdown rest time display switched in countdown mode.
2. ENTER - In and out of setting modes (PROG, CALD, ZONE, SUN±,
DST.)
3. SET - Locks in chosen parameters and provides access to sub-settings.
4. (▲) - "Up arrow"
A) Switches Normal Display between current date and time.
B) Increments up for available selections in setting mode.
C) Increments up for reviewing Program Slots in Program Mode.
5. (▼) - "Down arrow"
A) Provides review of DST (Daylight Savings Time) dates in Normal
Display.
B) Increments down for available selections in setting mode.
C) Increments down for reviewing Program Slots in Program Mode.
6. OVERRIDE - Four buttons in corners of the keypad.
A) Press one time for Manual ON/OFF switching of load. Press and hold
for 3-seconds to switch between automatic operation and fully manual
operation.
B) Hide/Unhide setting data in program mode.
C) Pause/Continue in countdown period.
7. RESET - Clears all programming and reloads default settings.
Dual-Key Functions
1. SET + ▲
2. SET + ▼
3. ▲ + ▼
- Random function start/stop.
- Countdown function start/stop.
- Manual DST function start/cancel. (NOTE: this feature only
works when DST is set in "MANU" (Manual) mode.
BX1214
Page 2
A
42E724A In-Wall Programmable Astronomic Time Switch INSTRUCTIONS
♦ PROGRAMMING / OPERATION
█ POWER-UP SEQUENCE
1) Lift door on front of timer with a small, slotted screwdriver.
2) Press RESET using an insulated tool such as a toothpick.
3) Press ENTER to start the timer.
█ SETTING THE CURRENT DATE & TIME
1) Press MODE two times so "CALD" flashes in the Normal Display.
2) Press ENTER
3) Press the UP or Down Arrows (▲ or ▼) to select the desired year. Then
press SET
4) Repeat (▲ or ▼), and SET for Month, Day, Hour, Minute, and Seconds
settings.
5) Press ENTER to lock in settings and return to the Normal Display.
█ SETTING THE LOCATION ZONE
1) Press MODE
2) Press ENTER
3) Press the UP or Down Arrows (▲ or ▼) to select the zone where the timer is
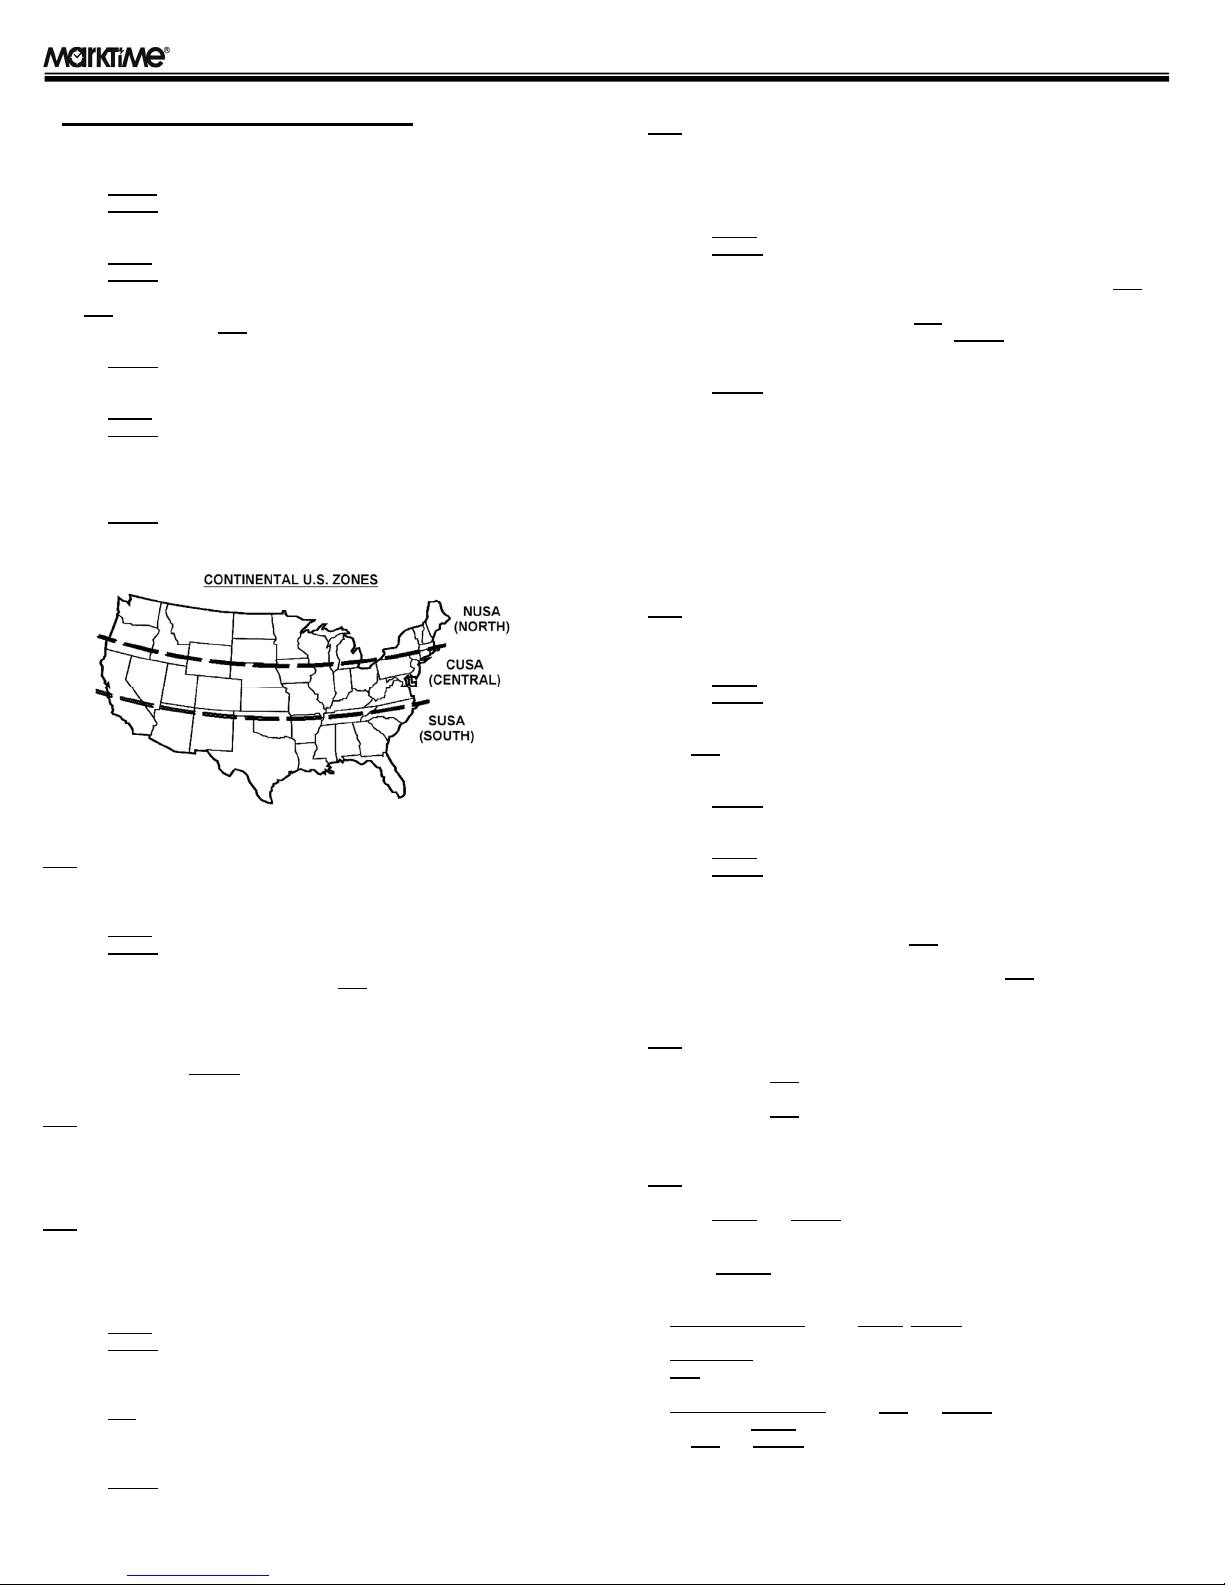
located (see image below):
NUSA (Default) = North USA, CUSA = Center USA, SUSA = South USA, ALAS
= Alaska, HAWI = Hawaii.
4) Press ENTER to lock in the zone selection and return to the Normal Display.
5) The Normal Display will indicate the selected zone as a "-N", "-C", "-S", "-A",
or "-H" following "AU" (Auto Mode) or "MA" (Manual Mode).
█ PROGRAMMING ON/OFF EVENTS
NOTE: The 42E724A will allow the setting times to be entered as a specific time
(TIME), as Sunrise (SNUP), or as Sunset (SNST). The Sunrise and Sunset
settings will automatically adjust throughout the year as daylight changes.
1) Press MODE once so "PROG" flashes in the Normal Display.
2) Press ENTER to access the Programming mode. "1
Normal Display. This would be the first event ON time.
3) Press (▲ or ▼) if necessary followed by SET to enter the desired ON time
parameters for the first event; Program slot number, Day, Timing type (TIME,
SNUP, SNST), Hours, Minutes.
4) Repeat Step 3 to set the OFF time for first event.
5) Repeat Steps 2 & 3 for up to 20 ON and OFF programmed events.
6) At any time, press ENTER
Normal Display.
NOTE: By default, all days of the week are selected for the event. Pressing (▲
or ▼) will cycle through the available daily combinations; Individual Day (Mon,
Tue, etc), Mon~Fri, Sat~Sun, Mon~Sat, Mon/Wed/Fri, Tue/Thu/Sat, Mon~Wed,
Thu~Sat, Mon~Sun.
█ SUNRISE AND SUNSET TIME ADJUSTMENT
NOTE: The actual sunrise and sunset schedule across the U.S. may differ
slightly from the timer program. This function will allow the consumer to adjust
this schedule. Any adjustment to the current sunrise/sunset time will be
remembered by the timer from that point on. Actual sunrise and sunset times
for your location can be obtained on the internet or based on your observation.
1) Press MODE
2) Press ENTER
today's sunrise time will show in the display.
3) Press (▲ or ▼) to increase or decrease the set time for sunrise. Maximum
time adjustment is +/- 2 hours.
4) Press SET to lock in the sunrise time adjustment and move to the sunset
adjustment. "SNST" and today's sunset time will show in the display.
5) Press (▲ or ▼) to increase or decrease the set time for sunset. Maximum
time adjustment is +/- 2 hours.
6) Press ENTER to complete the sunrise/sunset time adjustment and return to
the Normal Display.
to access the Calendar mode.
to move to the next value.
three times so "ZONE" flashes in the Normal Display.
to access the Zone setting mode.
ON"
flashes in the
to finish programming and return back to the
four times so "SUN±" flashes in the Normal Display.
to access the Sunrise/Sunset adjustment mode. "SNUP" and
█ DST (DAYLIGHT SAVINGS TIME)
NOTE: The 42E724A has 3 available settings for DST, automatic, manual-date-
entry, and fully manual operation. The "INIT" or automatic setting follows the
U.S. standard for DST. Within the manual-date-entry, or "NEW" setting, the
consumer can specify the dates for DST. With "MANU" or fully manual
operation, the consumer can override the automatic DST settings.
1) Press MODE five times so "DST" flashes in the Normal Display.
2) Press ENTER to access the DST setting mode. "INIT" will flash in the
display.
3) Press (▲ or ▼) to select DST type "INIT", "NEW", or "MANU" and SET to
lock in selection.
4) If using "NEW", press (▲ or ▼) and SET to set new date & time for DST to
start "DON", and DST to end "DOFF". Press ENTER to lock.
5) If using "MANU", press (▲and▼) at the same time while in the Normal
Display to manually start and stop DST.
6) Press ENTER anytime if needed to exit the DST setting mode and return to
the Normal Display.
█ MANUAL ON/OFF OVERRIDE
1) Press the front panel pushbutton (or 3-way switch) at any point during
operation to override the automatic programming and turn the load ON or OFF
as needed. This is a temporary override and programming will resume at the
next timing event.
2) Press and hold the front panel pushbutton (or 3-way switch) for 3 seconds to
permanently override the automatic programming. Press and hold the
pushbutton (or 3-way switch) again for 3 seconds to revert back to automatic
programming.
NOTE: The 42E724A offers a time delay for automatically switching OFF a load
that has been manually turned ON & OFF with the front pushbutton. Delay
sequence starts when the timer is manually turned off.
3) Press MODE once so "PROG" is flashing in the display.
4) Press ENTER to access the Programming mode. "1
display.
5) Press (▼) to access the OFF Delay setting. "dL
Press SET to move to time selection.
6) Press (▲ or ▼) to select OFF time delay value (15 sec, 30 sec, 1 min, 5
min, 10 min, 30 min, 1 hour, and NONE).
7) Press ENTER to complete the setting and return to the Normal Display.
█ COUNTDOWN TIMER PROGRAM SETTING
1) Press MODE once so "PROG" is flashing in the display.
2) Press ENTER to access the Programming mode. "1
display.
3) Press (▼) twice to access the OFF Delay setting. "Cd
display.
4) Repeat using (▲ or ▼) followed by SET for the ON or OFF countdown time
setting.
5) To operate as a Countdown Timer, press (▼) and SET at the same time to
start countdown timed operation of the load.
█ RANDOM ON/OFF PROGRAM TIMES
NOTE: Randomly vary the programmed ON and OFF times by up to 30 minutes.
1) Press (▲) and SET
shows in the display.
2) Press (▲) and SET again at the same time to stop Random function. "RND"
disappears in the display.
█ HIDING PROGRAMMED TIME ENTRIES
NOTE: Hide the time value for each programmed ON/OFF event.
1) Press MODE and ENTER as you would to program the timer.
2) Press (▲ or ▼) to cycle through the programmed events.
3) Press any of the 4 override buttons to hide or unhide the time value.
4) Press ENTER
at the same time to start Random function. "RND"
to return to the Normal Display.
█ REVIEWING THE SETTINGS
1) Programmed events
the program slots.
2) Current date: press (▲) to view, press again for the Normal Display.
3) DST
: press (▼) to view date & time when DST starts. Press again to vew
when it stops. Press a third time to return to the Normal Display.
4) Sunrise & Sunset times: press SET and ENTER to view current time for
sunrise. Press MODE
Press SET
and ENTER again to return back to the Normal Display.
: press MODE, ENTER and (▲ or ▼) to cycle through
to cycle between viewing sunrise and sunset times.
ON"
flashes in the
" flashes in the display.
OFF
ON"
flashes in the
ON"
flashes in the
BX1214
 Loading...