

Page 1
LCD digital colour TV
MS3770DVB
USER GUIDE
Page 2

Introduction
Thank you for purchasing this LCD TV which has been designed and manufactured
to give you many years of trouble free service.
You may already be familiar with using a similar product but please take time to read
these instructions which have been written to ensure you get the very best from your
purchase.
HDMI
HDMI (High Definition Multimedia Interface) is the next generation of digital interface.
Unlike conventional connections, it transmits uncompressed digital and audio signals
using a single cable. This TV supports high-definition video input via the HDMI
socket on the back of the TV.
Safety is important
To ensure your safety and the safety of others, please read the safety information
BEFORE you operate this product.
Contents
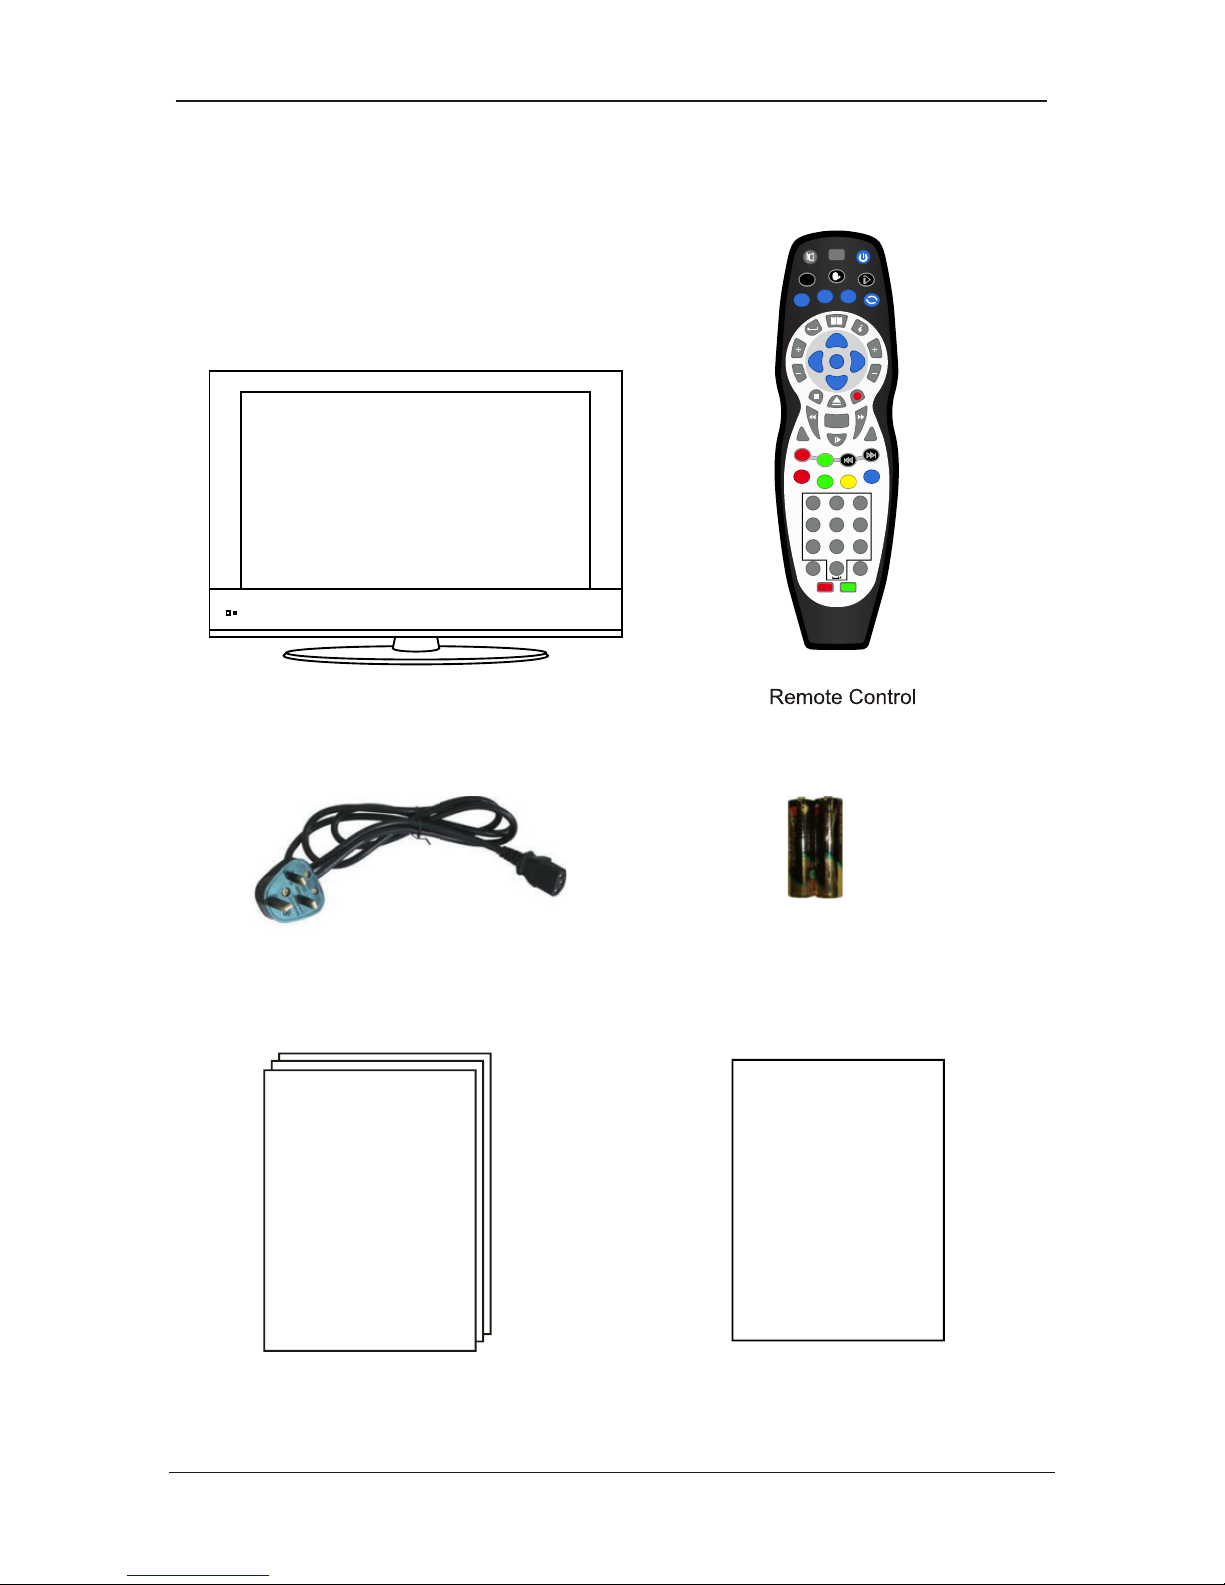
You will find the following
• TV
• User Guide
• Quick Start Guide
• Remote Control
• 2 x AA Batteries
NOTE: If any of the items listed are damaged or missing please contact our
technical helpline on 0845 6710665
Page 3

Connecting the TV
Getting Started
Front View
Rear View
REMOTE CONTROL
Menu Operation
Basic TV operation
PICTURE menu options
SOUND menu options
TIMER menu options
FUNCTION menu options
SETUP menu options
4
Unit and Accessories3
5-7
5
6
7-10
11-17
USING YOUR COMMON INTERFACE SLOT18
11-12
13
14
14
15
16-17
1-2 SAFETY INFORMATION
TROUBLE SHOOTING GUIDE
TECHNICAL SPECIFICATIONS
19
20
Contents
USER GUIDE
Page 4
SAFETY INFORMATION
CAUTION TO PREVENT ELECTRICAL SHOCK, DO NOT REMOVE ANY COVER
SCREWS, NO USER SERVICEABLE PARTS INSIDE, REFER SERVICING TO
QUALIFIED SERVICE PERSONNEL.
This symbol indicates that there are important operating maintenance instructions in
the literature accompanying the this unit.
present within this unit.
IMPORTANT SAFETY INSTRUCTIONS - READ CAREFULLY BEFORE USE.
Take note of the following safety information which appears on the back of the TV.
This symbol indicates that dangerous voltage constituting a risk of electric shock is
Keep these instructions
• Do not use this TV near water.
• Clean only with a slightly damp cloth.
• Do not block any ventilation openings
• Install in accordance with the supplied Quick Start Guide and this User Guide.
• Protect the power chord from being walked on or pinched, particularly at plugs, and the
point where it exits from the TV.
• Do not allow the power chord to overhang the edge of a table.
• Unplug this TV during lightening storms or when unused for long periods of time.
• To avoid interference, switch this TV off while operating other radio devices in the
immediate vicinity. Refer all servicing to qualified service personnel. Servicing is required
when the TV has been damaged in any way, such as the power chord or plug being
damaged, liquid being spilled on or objects have fallen onto the TV, the TV has been exposed
to rain or moisture, does not operate normally, or has been dropped.
WARNING! TO REDUCE THE RISK OF FIRE OR ELECTRICAL SHOCK, DO NOT
EXPOSE THIS TV TO RAIN OR MOISTURE. THE TV MUST NOT BE EXPOSED
TO DRIPPING AND SPLASHING AND NO OBJECTS FILLED WITH LIQUIDS
SHOULD BE PLACED ON THE TV.
NOTE: No naked flames such as candles should be placed on the TV.
USER GUIDE
1
Page 5
CAUTION! CHANGES OR MODIFICATIONS NOT EXPRESSLY APPROVED BY
THE MANUFACTURER COULD VOID THE USER’S AUTHORITY TO OPERATE
THIS DEVICE.
CAUTION! USAGE OF CONTROLLER ADJUSTMENTS OR PERFORMANCE OF
PROCEDURES OTHER THAN THOSE SPECIFIED HEREIN MAY RESULT IN
HAZARDOUS EXPOSURE.
Important
This TV generates, uses and can radiate frequency energy and, if not installed and
used in accordance with these instructions, may cause harmful interference to radio
communication. However, this is no guarantee that interference will not occur in a
particular installation. If the TV does cause harmful interference to electrical devices,
which can be determined by turning the TV off and on, the user is encouraged to try
and correct the interference by one of the following measures.
Re-Orient or relocate the receiving antenna.
Increase the separation between the external device and the TV.
Connect the external device into an outlet on a circuit different from that which
the TV is connected.
Consult the dealer or an experienced radio/TV technician for help.
ELECTRICAL INFORMATION
Mains Supply
The mains operating voltage is detailed on the rating plate on the rear of the TV.
The mains lead on this equipment may be supplied with a molded plug incorporating
a fuse. Should the fuse need to be replaced, an ASTA or BSI approved BS1362 fuse
must be used of the same rating. If the fuse is detachable never use the plug with
the cover removed. If a replacement fuse cover is required, ensure it is of the same
colour as that visible on the pin face of the plug. If there is no alternative to cutting off
the mains plug, dispose of it immediately, having first removed the fuse, to avoid a
possible shock hazard by inadvertent connection to the mains supply.
•
•
•
•
USER GUIDE
2
Page 6
Power cable
USER GUIDE
EASY START GUIDE
EASY START GUIDE
USER GUIDE
Unit and Accessories
TV set
Batteries
Source
Menu
Help
Quick
Start
Guide
OK
Search
InfoExit
VOL
Picture
IP Setup
Sound
-Day
abc def
ghi jkl mno
pqrs tuv wxyz
+Day
CH
DVD
Menu
1 2 3
4 5 6
7 8 9
0
SUB TXT
SD1
IP
P S
TV
Delete User
RCC005
Shuffle Text
R
TV/Radio
I-Player
@
USER GUIDE
3
Page 7
Connecting the TV
WARNING! ENSURE THE TV AND ALL ANCILLARY EQUIPMENT IS
UNPLUGGED FROM THE MAINS BEFORE MAKING ANY CONNECTIONS!
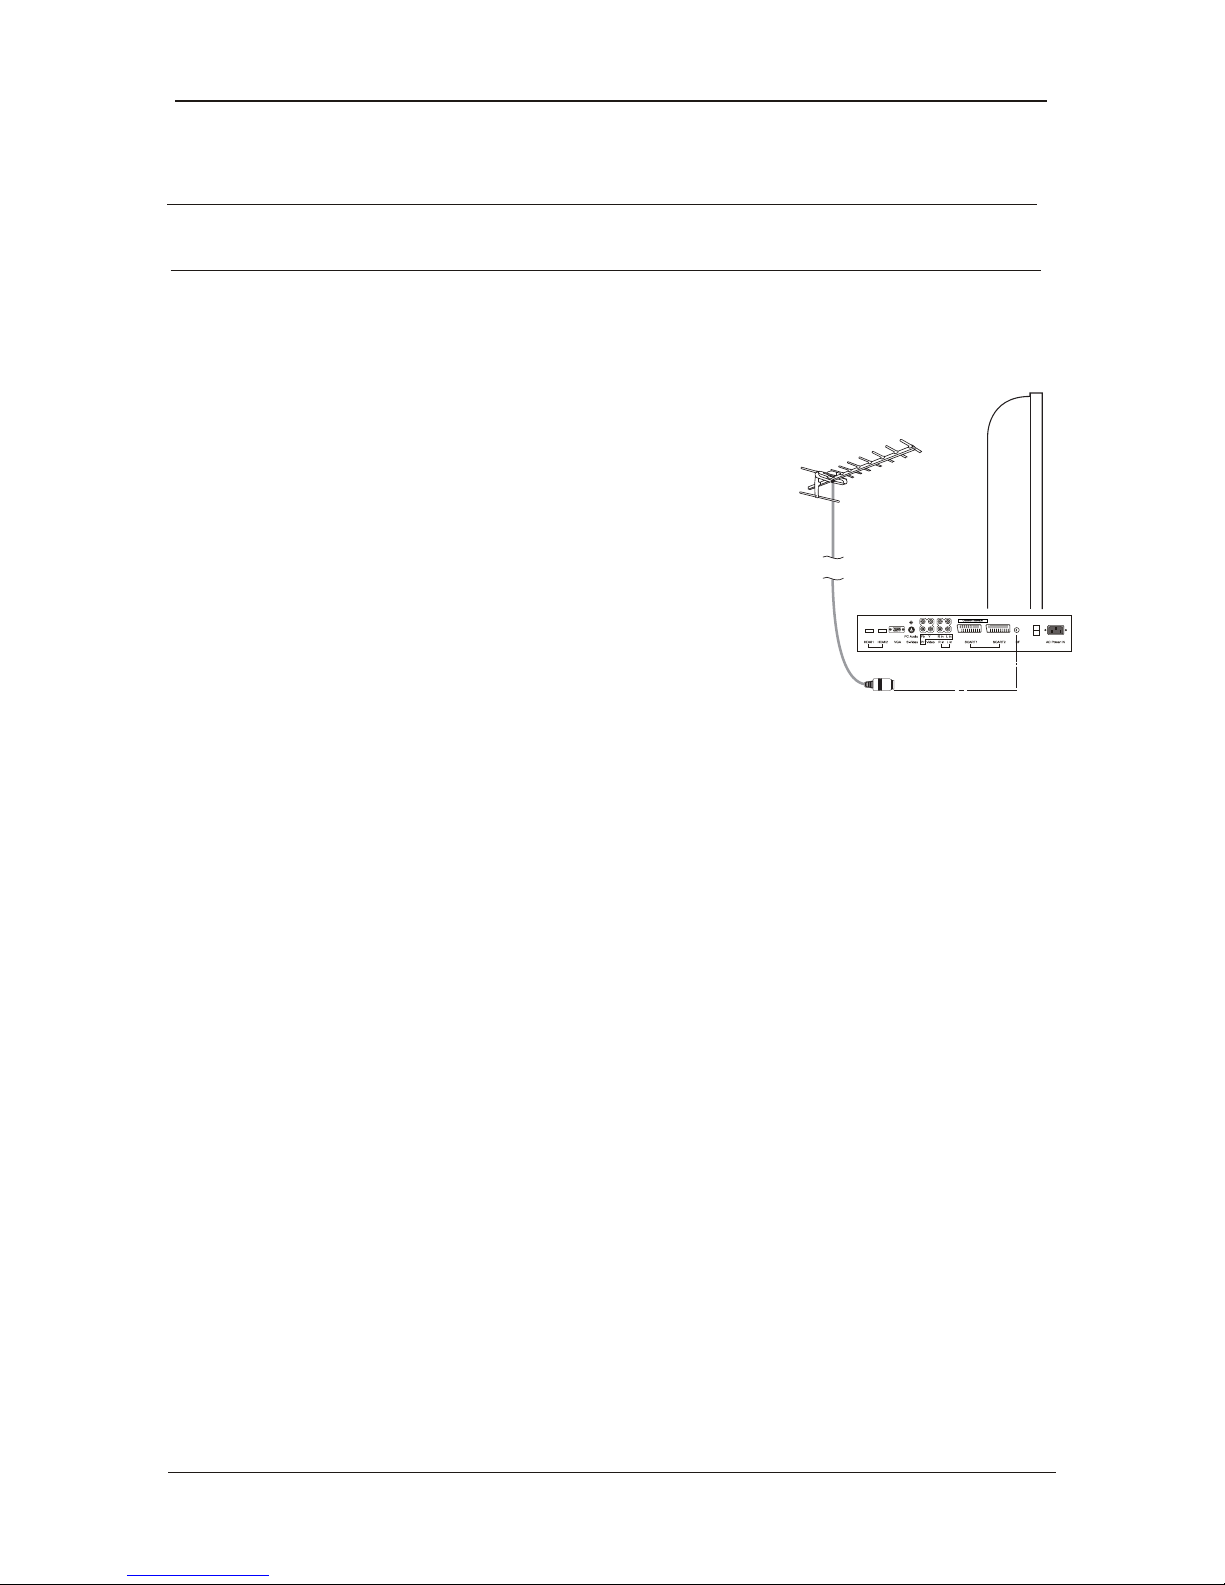
Connecting the TV Antenna
Connect the TV antenna to the aerial socket with a 75 ohm co-axial plug. For best
results use a high gain TV aerial, preferably roof or loft mounted.
• To improve picture quality in a poor signal area, purchase
and install a signal amplifier.
• If the antenna needs to be split for two TVs, use a 2-Way
Signal Splitter (not supplied).
Connecting External Devices
This instruction manual shows the simplest and most effective way of
connecting your TV to ancillary equipment. Alternate methods are listed below.
HDMI Lead
You can connect this TV to a compatible device using a HDMI lead. This method will
give the best picture.
Connect the cable from the HDMI equipment to the TV HDMI socket.
SCART Lead
You can connect this TV to a compatible device using a SCART lead. The
connection uses component video signals,
i.e. the red, green and blue (RGB)
content of the video are sent on separate signals.
VGA Cable
You can use your TV as a monitor for your personal computer by using a VGA cable.
Sound from your personal computer may also be played through the TV.
S-VIDEO Lead
You can connect this TV to a compatible device using an S-VIDEO lead.
USER GUIDE
4
Page 8
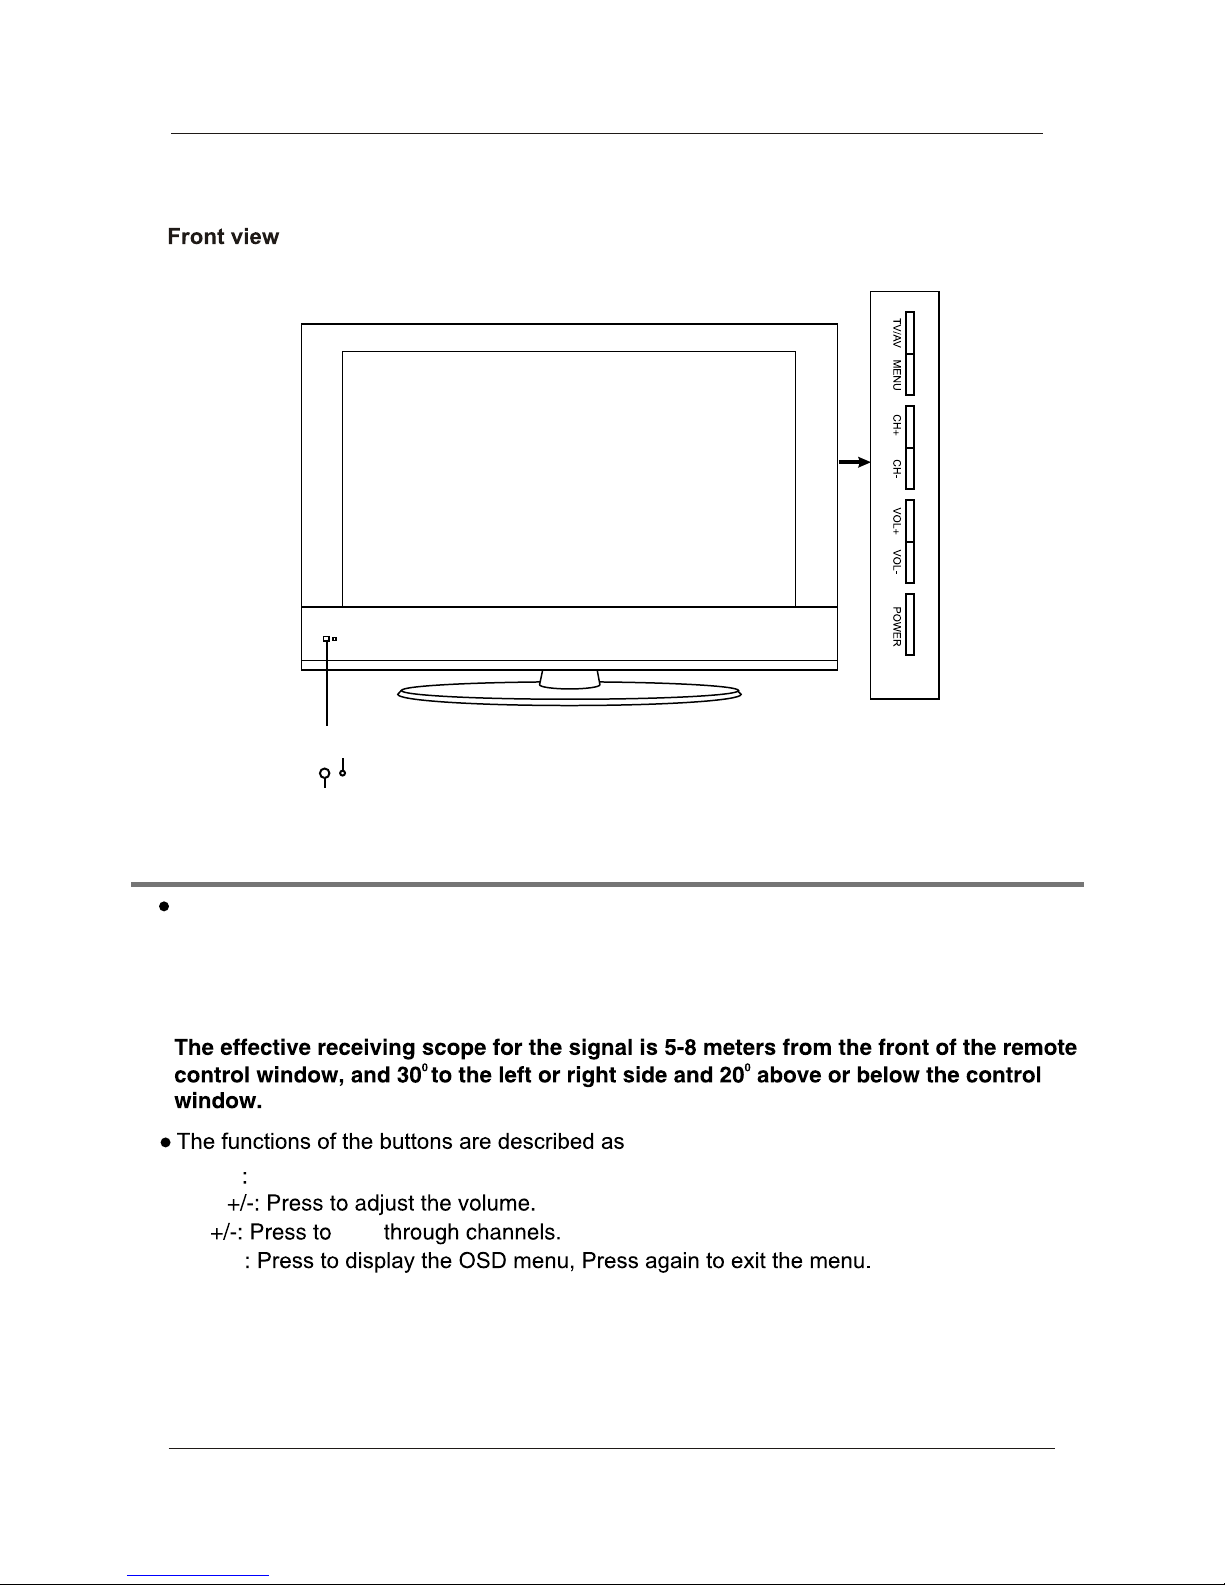
Getting Started
CH
VOL
Power
MENU
TV/AV
(IR) Infrared Receiver: Receives IR signals from the remote control.
(Power on/Standby) LED Indicator: Press POWER to turn on and off,
Press to display the input source menu.
Indicator on(RED) Standby mode
Indicator on(GREEN) Power on mode
skip
USER GUIDE
5
below.
: Turn ON/OFF the TV set.
Remote Control Window
(keep clear)
LED Indicator
Page 9
400mm
200mm
4 Mounting holes
Screw size MB5 x15
USER GUIDE
6
SWITCH
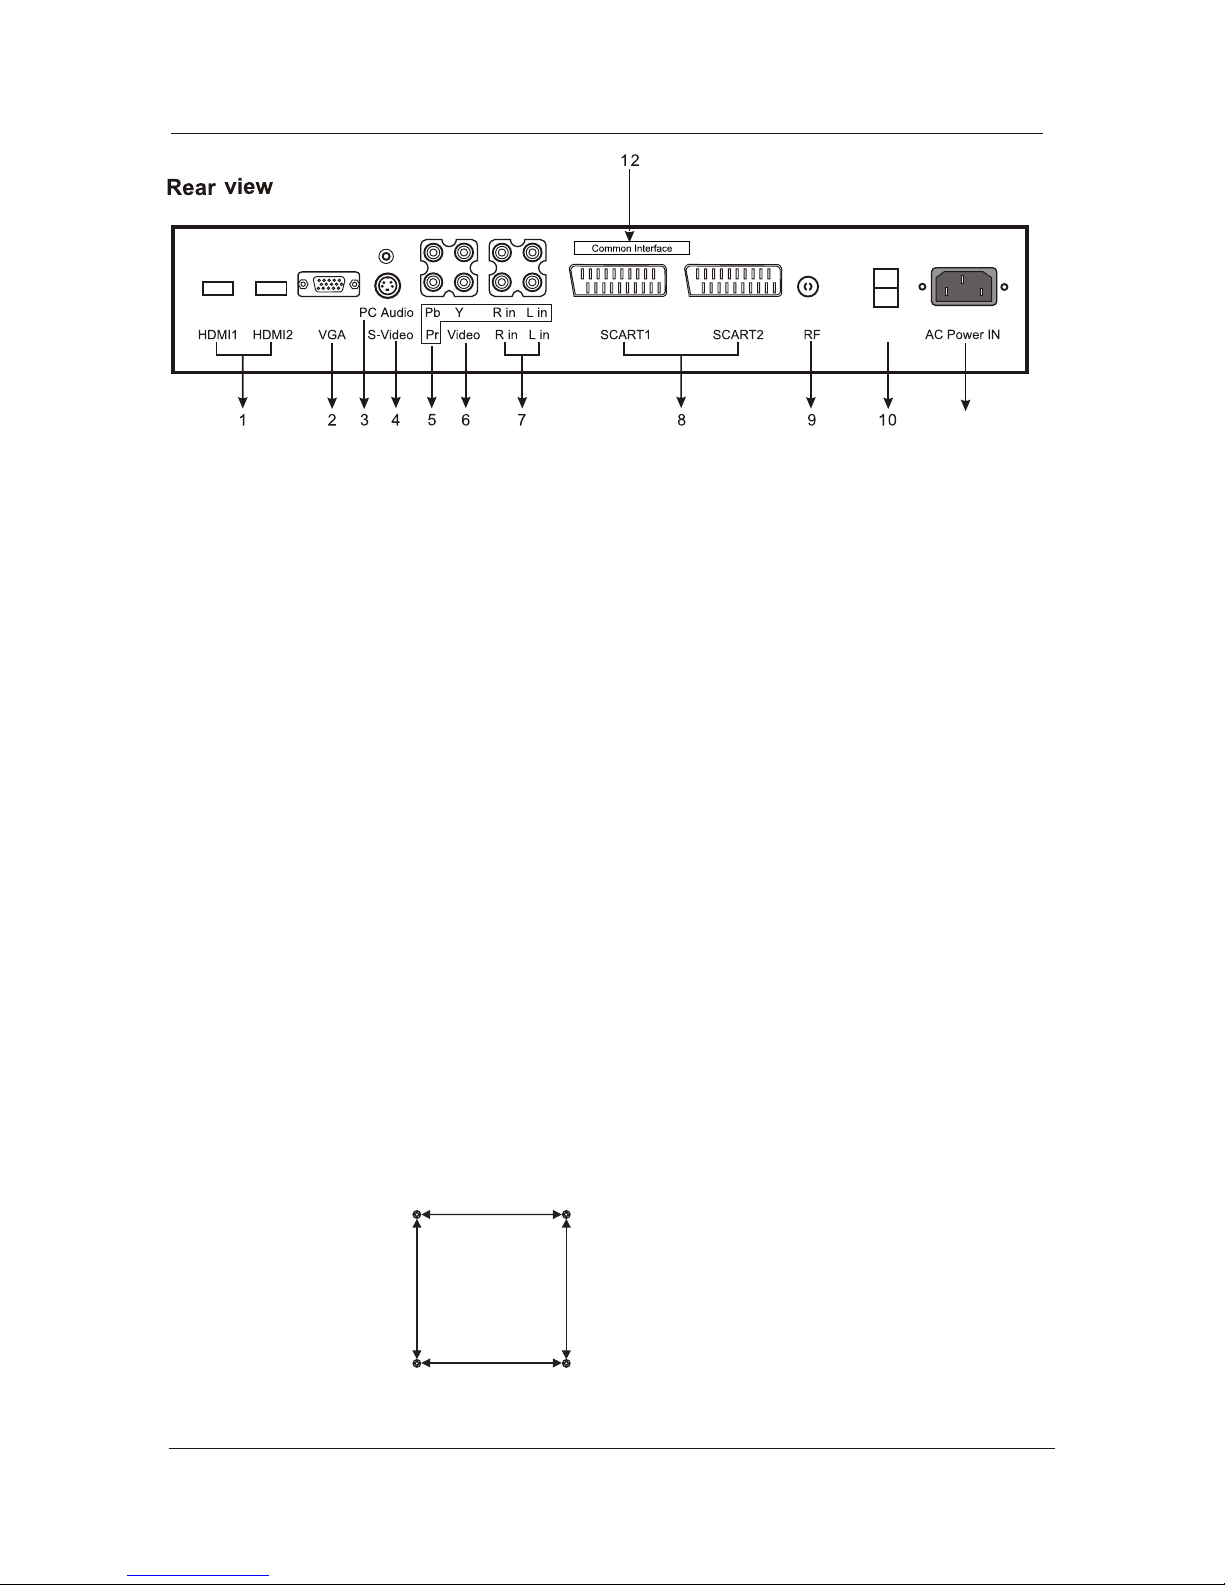
11
10. SWITCH: Turn on/off the power supply.
11. AC POWER INPUT: 100-240V AC 50/60Hz. (Warning: This appliance must be earthed).
1. HDMI 1 / 2: Connect to the HDMI sockets of DVD player or other equipment.
2. VGA: PC Display. Connect to the D-Sub 15 pin connector of PC.
3. PC AUDIO : Connect to Audio output of PC sound card.
4. S-VIDEO: Connect to S-Video socket of DVD player or similar equipment (video only).
5. YPbPr :
L/R in: Connect them to the audio output terminal of DVD.
Connect all to video output connectors of DVD or similar equipment.
6. VIDEO(CVBS): Connect to AV connector of DVD or similar equipment (Video only).
7. L/R in: Connect to audio output connectors of DVD or similar equipment when using S-Video connectors.
8. SCART 1 / 2: Connect to Scart connector of DVD or similar equipment.
SCART 1: supports CVBS (AV) and RGB signal inputs.
SCART 2: supports CVBS (AV) only.
9. RF: TV tuner input. 75 Ohm coaxial socket.
12.Common Interface: CI-Slot for Pay per View cards
Wall Mounting
1. The stand must first be removed. Place the TV face down.
2. Remove the six screws holding the stand in place.
3. Remove and store the stand and screws.
4. Use four machine screws to mount the TV on the bracket.
This unit is VESA-Compliant and designed to be wall mounted with a VESACompliant 400mm x 200mm mounting kit. Mount this unit according to the
instructions of the wall bracket (not supplied)
Page 10
REMOTE CONTROL
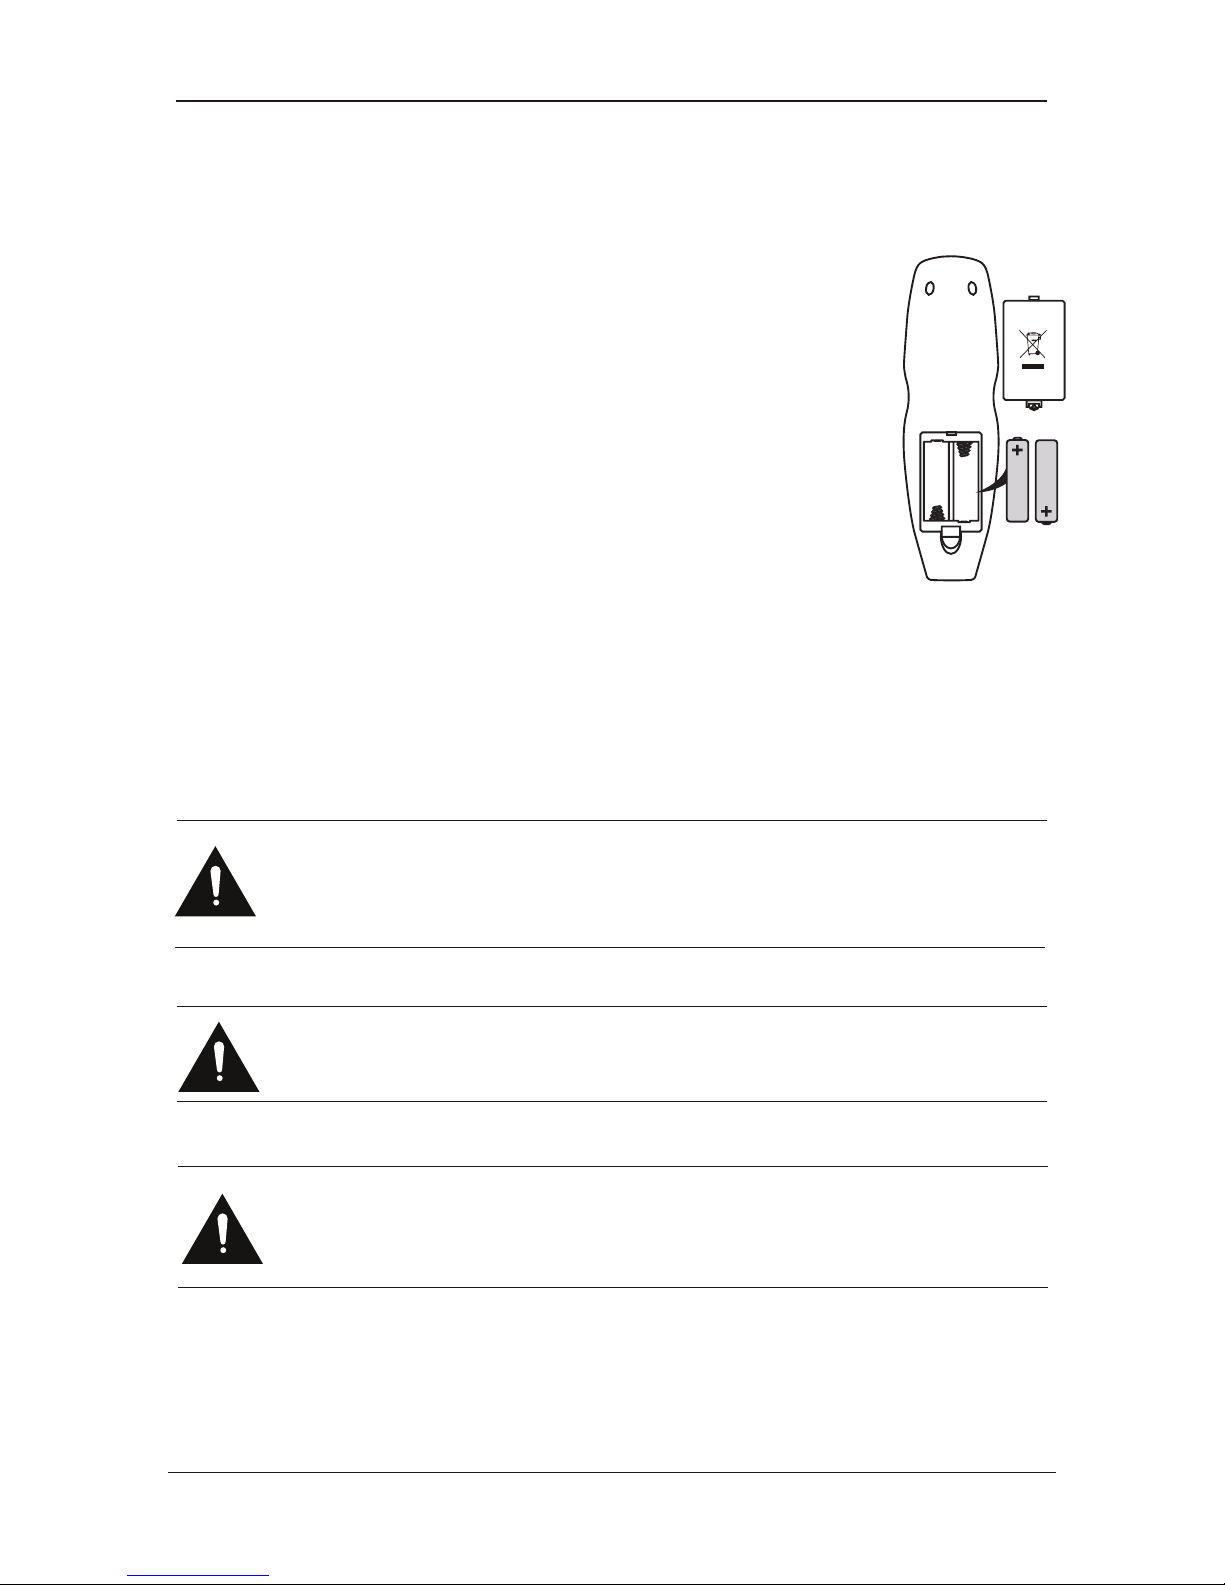
Installing Batteries in the Remote Control
1. Remove the battery compartment cover at the rear of the remote
control by pushing the retaining clip forward and pulling up.
2. Install the supplied batteries, ensuring the polarity matches what
is shown in the battery compartment.
3. Replace the battery compartment cover.
Using the Remote Control
To use the remote control point it at the TV and press the required buttons. You must
be within 6 meters and at an angle of less than 30 degrees from the center of the TV.
NOTE: Sunshine or other strong light sources may interfere with the signal from the
remote control. In this situation turn the TV away from the light source.
WARNING! DO NOT LEAVE BATTERIES IN THE REMOTE CONTROL FOR
EXTENDED PERIODS AS THEY CAN LEAK OR CORRODE CAUSING DAMAGE
TO THE REMOTE CONTROL. CHECK THEM PERIODICALLY AND REPLACE
THEM AS REQUIRED.
WARNING! DO NOT MIX BATTERY TYPES. WHEN INSERTING BATTERIES,
REPLACE ALL BATTERIES AT THE SAME TIME. DO NOT MIX OLD AND NEW
BATTERIES.
WARNING! EXHAUSTED BATTERIES MUST BE TREATED WITH CARE AND
DISPOSED OF ACCORDING TO ANY SAFETY OR RECYCLING REGULATIONS
IN FORCE IN YOUR LOCAL AREA, NEVER DISPOSE OF BATTERIES INTO
GENERAL WASTE, OR FIRE.
USER GUIDE
7
Page 11
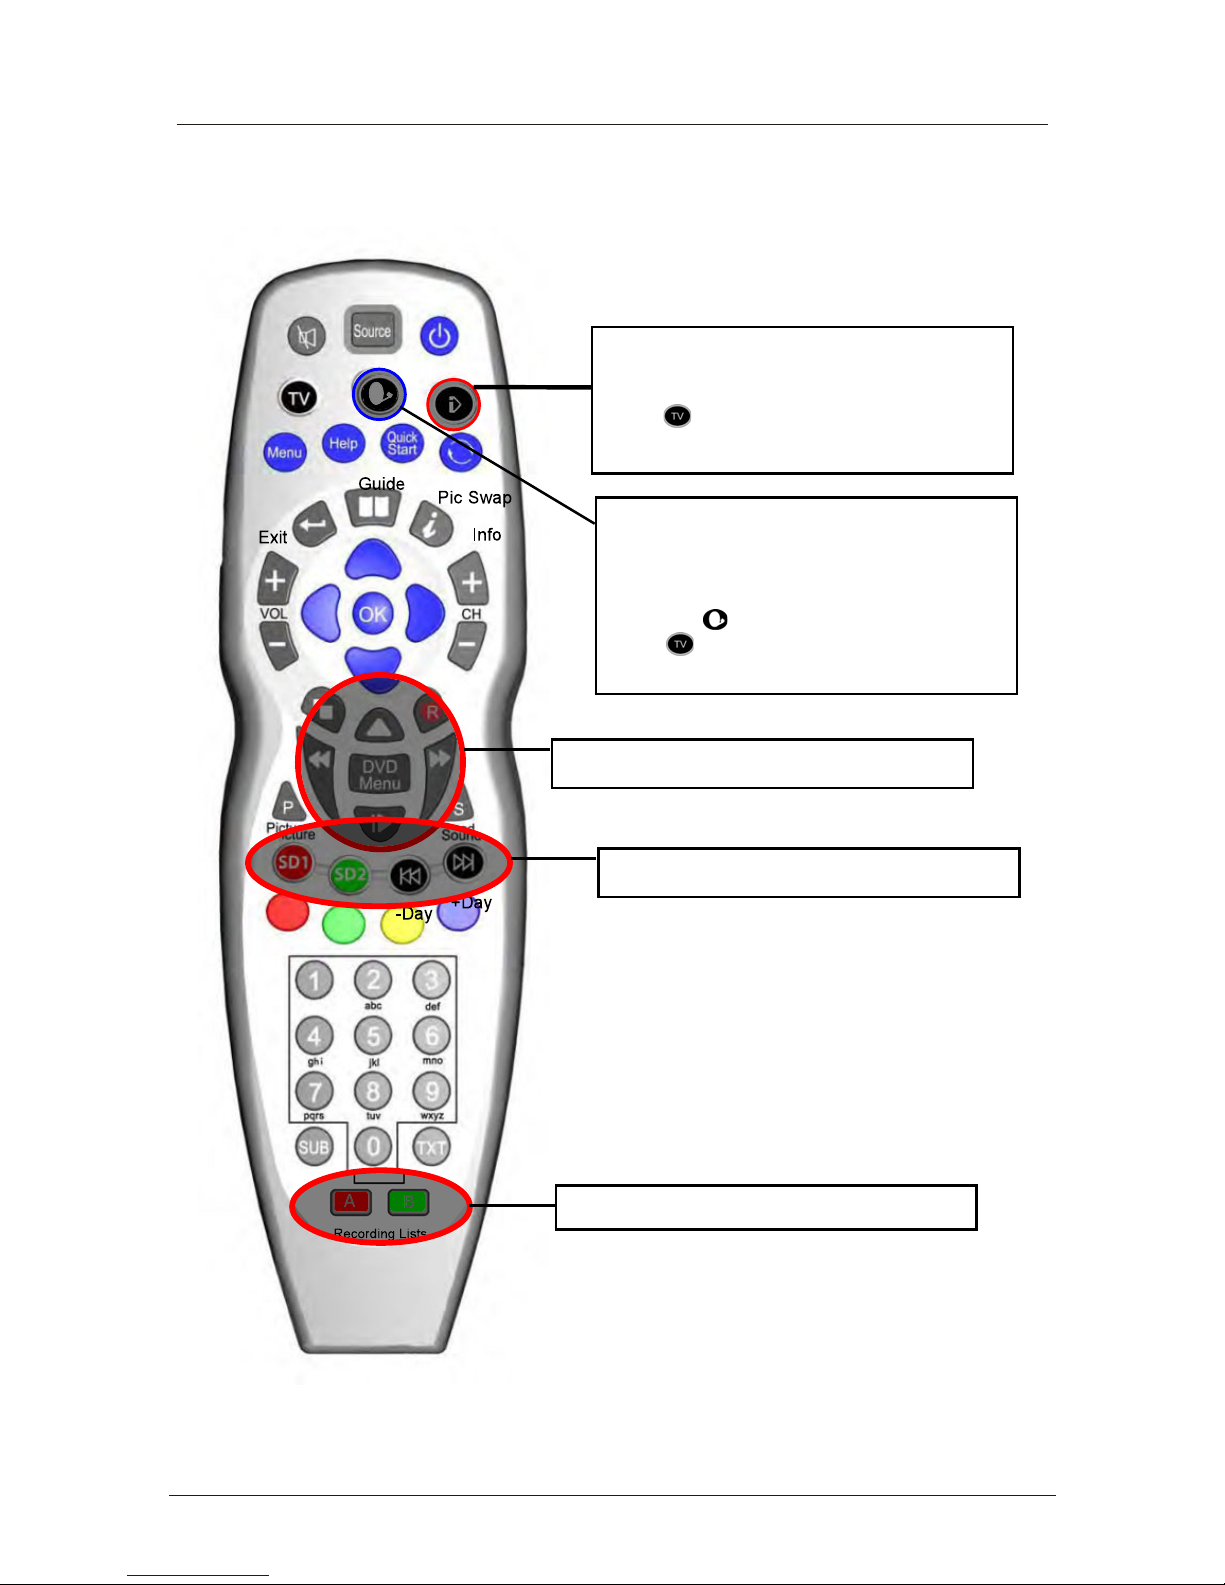
*Dependant on Model
Only used on TVs with Internet Player*.
In this mode the remote does not control
the TV.
Press
to control the TV again.
steuern.
If you have set the remote to work a
Satellite receiver, the remote controls only
the Satellite receiver and not the TV when
you press
Press to control the TV again.
Used on TVs with DVD* or PVR*
Used on TVs with PVR* or Internet Player*
Used on TVs with PVR* or Internet Player*
Dependant on the model of theTV some keys will have no function
USER GUIDE
8
5HPRWH&RQWURO.H\)XQctionV
Page 12
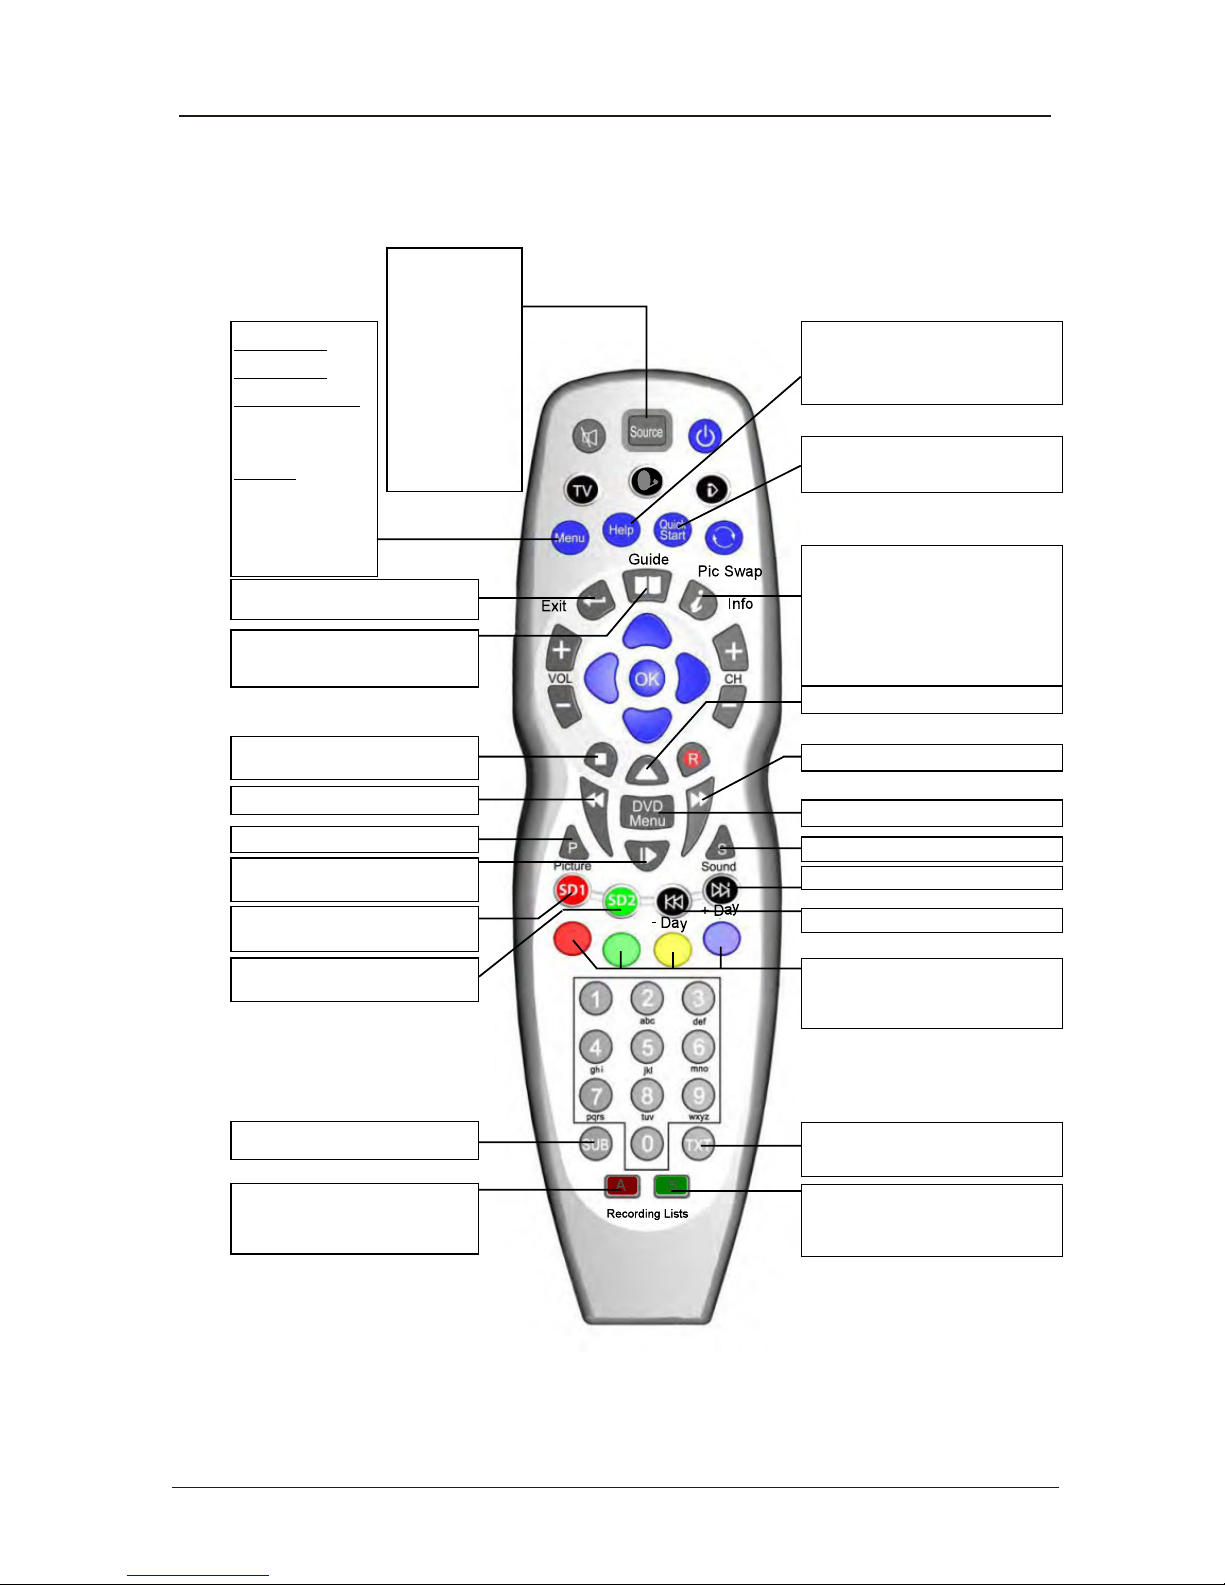
Source Menu
TV (Analogue)
DTV ( Freeview )
SD1 (red card)*
SD2 (green card)*
AV
Scart 1
Scart 2
S-Video
HDMI 1
HDMI 2
YprPb
DVD*
Iplayer *
PC
Menu
Picture settings
TSound setttings
Function settings
PVR*
Tuning
Language
Setup
DVD setup*
General setup
Reset
Help
Back
Exit from any Menu
Guide(DTV)
Press to enter, press again to exit.
Stop
For DVD*, iPlayer*, SD1*and SD2*.
Reverse - DVD*&SD1*, SD2*
Picture Mode
Pause/Play
DVD*, iPlayer*, SD1* und SD2*
Display the Playback list on SD1*
(red card)
Subtitles
DVD*and DTV mode only.
A*
Displays the red recording list.
(The programmes you have booked to be
recorded).
Help
This displays a page that gives telephone
numbers for service.
Press to enter, press again to exit.
Quick Start
Searches all ATV and DTV channels by a
single key (can take up to 10 Mins).
Info-Taste
In DTV mode shows Now / Next.
2nd Press
Extended programme Info.
Whilst Recording*
Shows details of the recording and space
available on the card.
DVD Eject *
Fast forward - DVD*&SD1*, SD2*
DVD Disc Menu *
Sound - changes the sound *
Next - DVD*, iPlayer*, PVR*
Previous- DVD*, iPlayer*, PVR*
Soft Keys
The action they perform is shown on the
menu and changes for each menu .
Teletext / MHEG5
(You can not record this)
Display the Playback list on SD2*
(green card)
B*
Displays the green recording list.
(The programmes you have booked to be
recorded).
*Dependant on Model
USER GUIDE
9
Page 13
USER GUIDE
10
Page 14
Menu Operation
1. Press VOL+/- to adjust the volume.
2. If you want to switch the sound OFF, press the MUTE
3. You can cancel this function by pressing MUTE or VOL+ button.
Basic TV operation
First time installation
Using the CH+/- on the front panel or on the remote control.
Press CH+ to increase channel number.
Press CH- to decrease channel number.
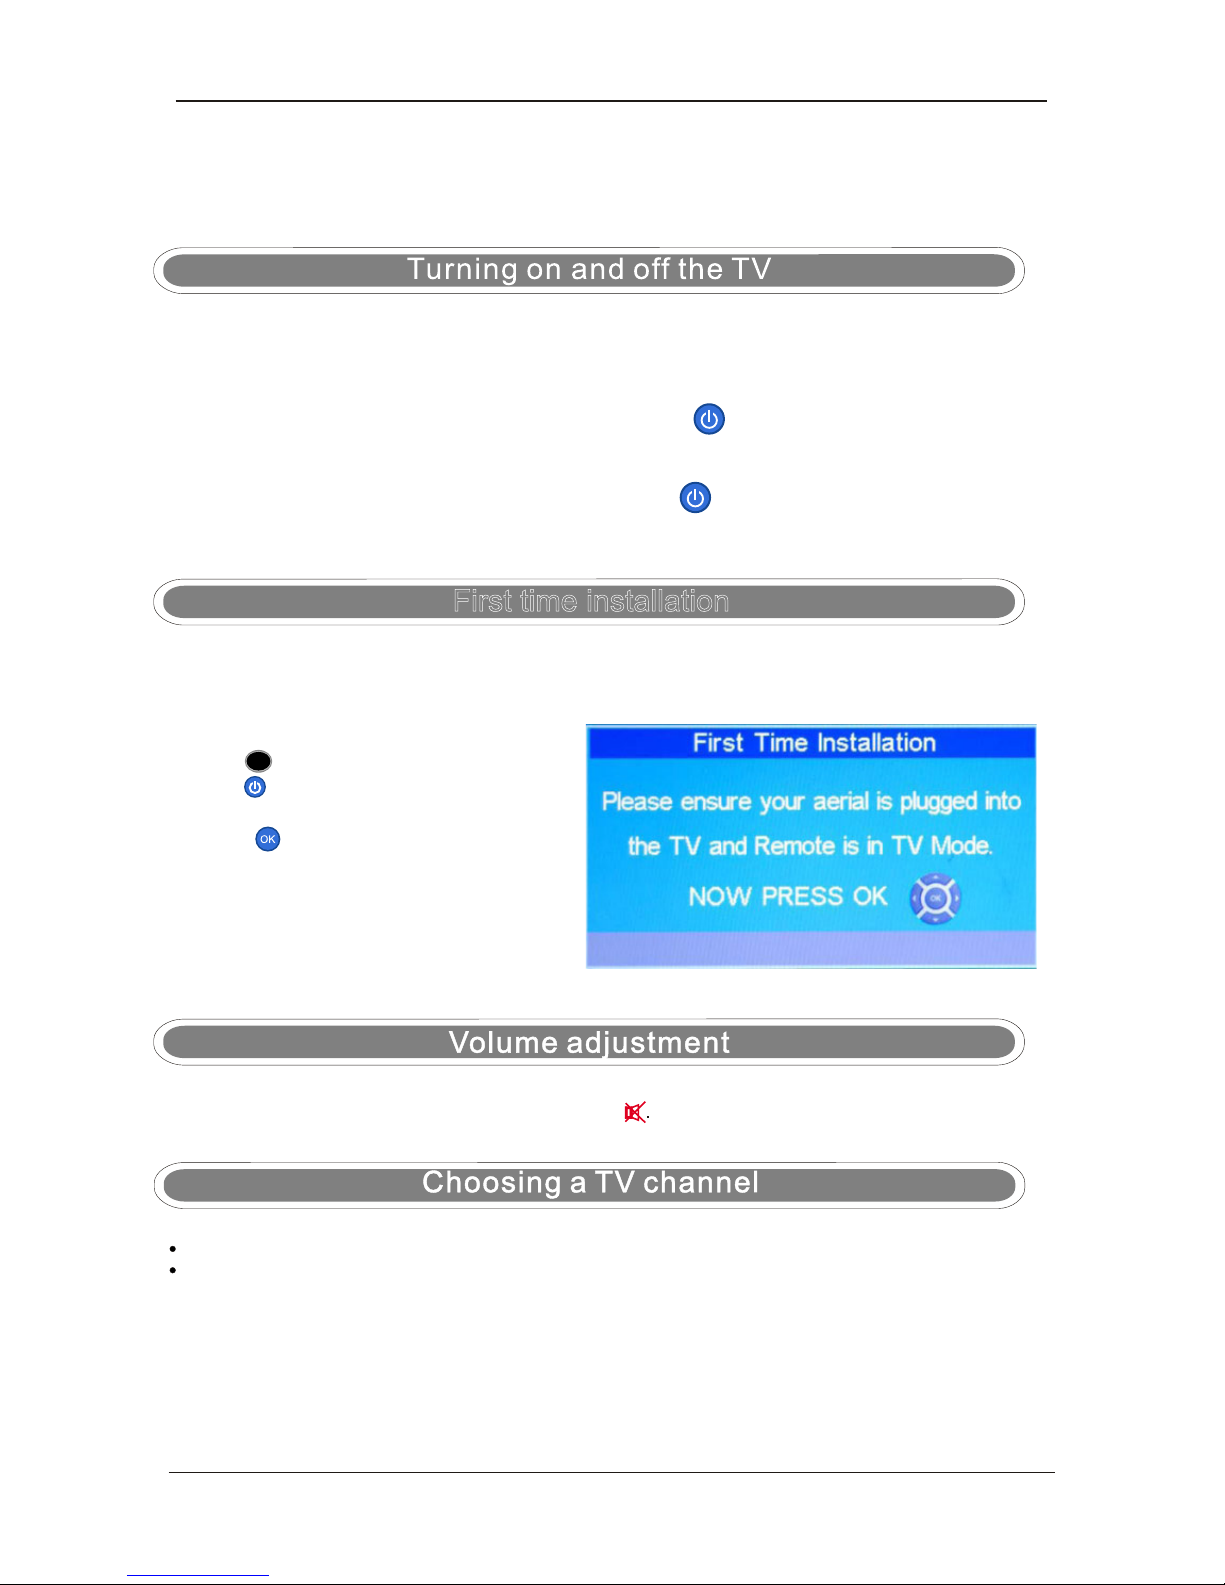
NOTE: When you initially use the TV, you will see the “First Time Installation” menu as below:
Ensure that the aerial is plugged into the TV,
Make sure your Remote is in TV mode (by
pressing button), switch on the TV by
pressing . You will see the first time
installation menu.
Press the button on the remote control to
start the tuning procedure. This process will
find all available ATV and DTV channels and
store them.
By pressing the Quick Start button the first
time installation can be recalled at any time.
TV
USER GUIDE
11
TURN ON LCD TV
TURN OFF LCD TV
1.Connect power cable to mains supply and turn on the power by using the “ Switch” at the back
of
the TV next to the AC Power in socket. The standby indicator on the front of the TV will light up red.
2. Press the
POWER button on the side of the TV or the button on the remote control to
turn on the TV, the indicator will light green.
Press the
POWER button on the side of the TV or the button on the remote control to turn
the TV off into standby mode, the indicator will light red.
Page 15
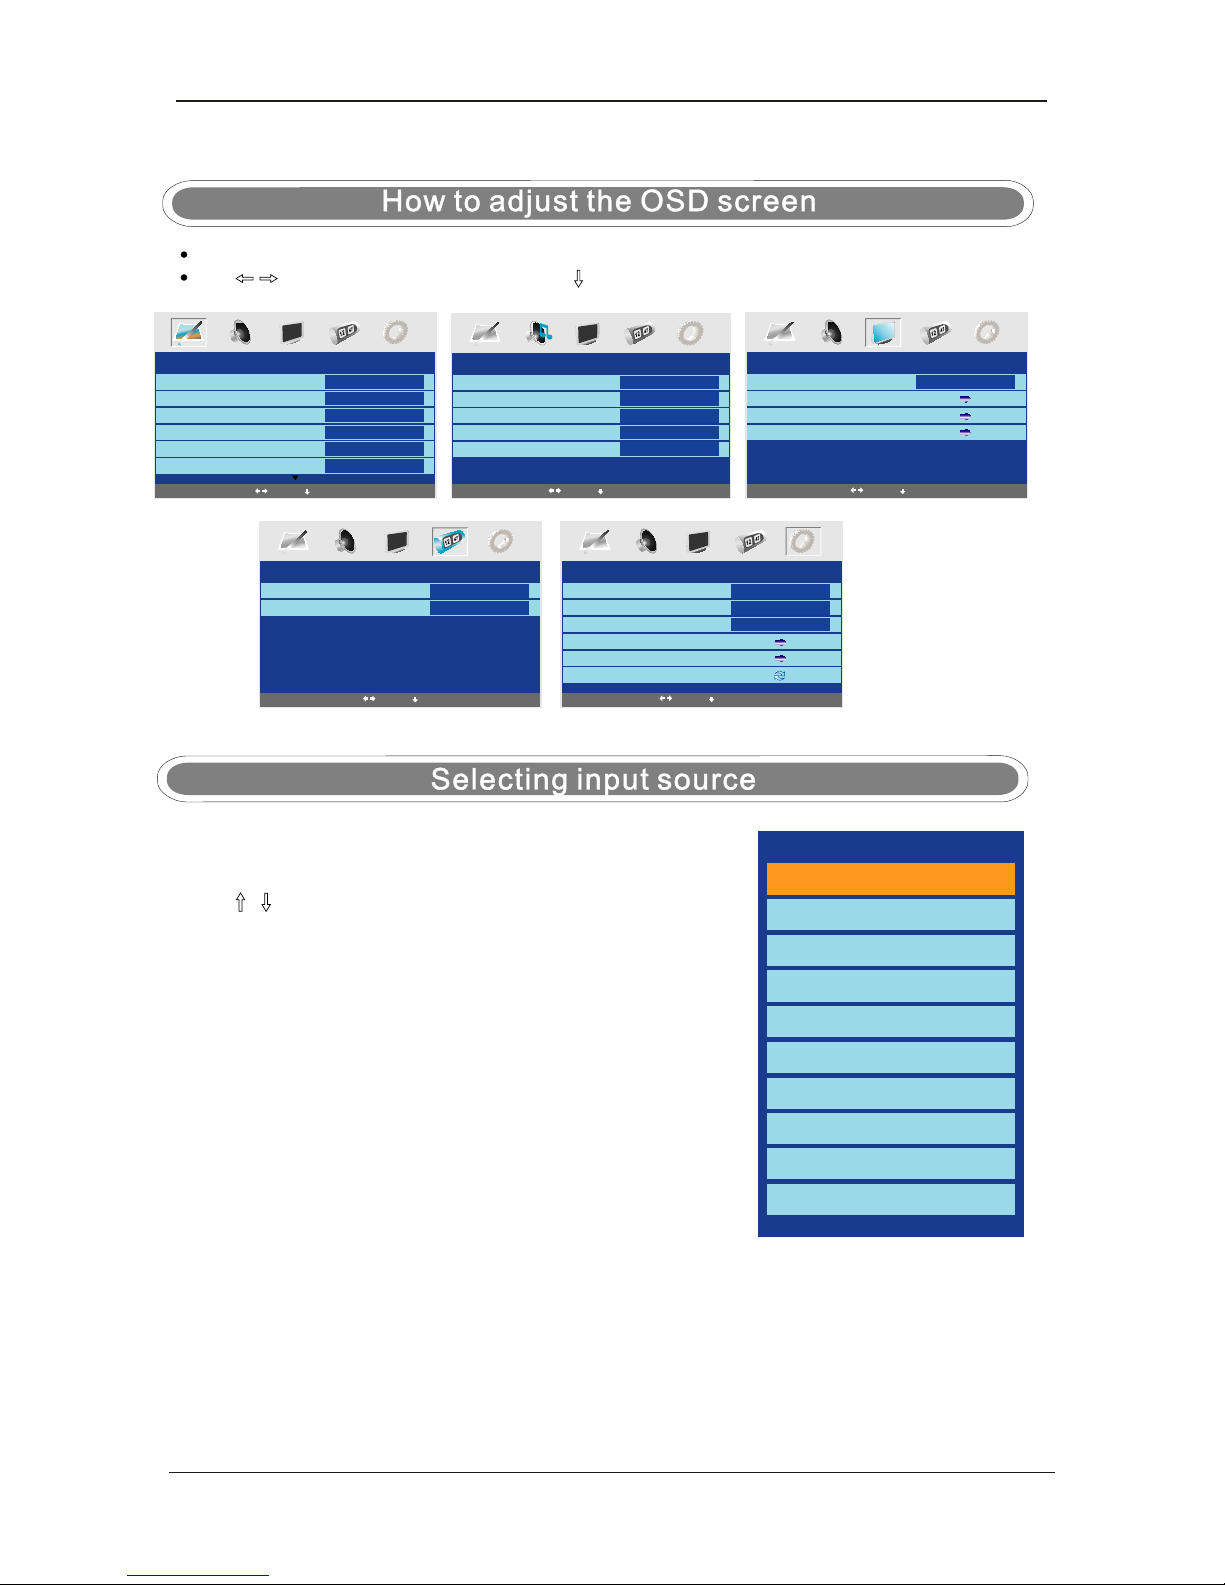
Press the MENU button to display the main menu.
Use
/ buttons to select menu, and press button to enter the menu.
PICTURE
Picture Mode
Contrast
Brightness
Color
Personal
50
50
50
Select
Enter
TIMER
Sleep Timer
OSD Timer
0 Min
30Sec
SOUND
Volume
Sound Mode
Bass
Treble
Balance
20
Music
60
52
50
SETUP
Country
Auto tuning
Manual tuning
Program Edit
UK
FUNCTION
Language
Video Size
Blue Screen
Child Lock
First Time Installation
Reset
English
Auto
On
Select
Enter
Select
Enter
Select
Enter
Select
Enter
You can display the input source menu by pressing the Source
button on the remote control or the TV/AV button on the TV,
press
/ button
to select, and press OK button to confirm.
Sharpness
Normal
Normal
Colour temperature
USER GUIDE
12
TV
SCART1
SCART2
CVBS
S-VIDEO
YPbPr
VGA
HDMI1
HDMI2
DTV
Page 16
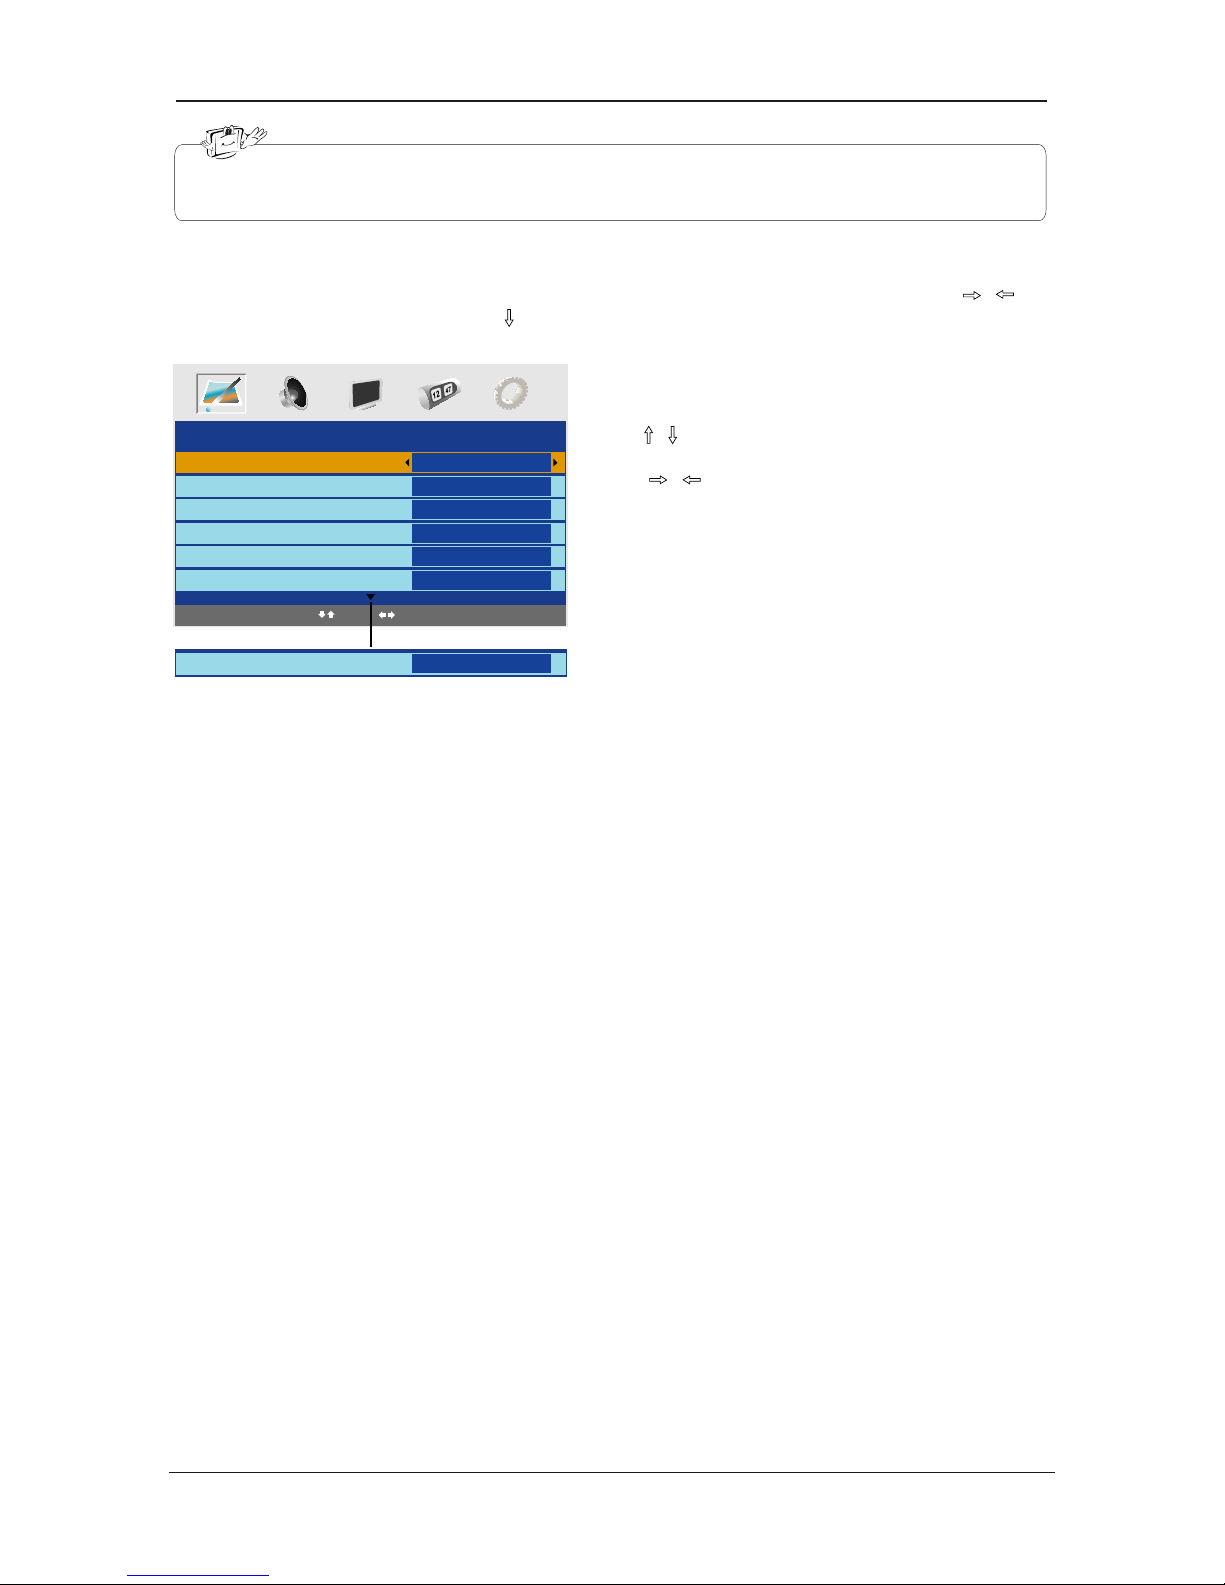
In this manual, the settings shown on the OSD (On Screen Display) may be different from those on
your TV. Those printed here are only an example to help demonstrate TV operation.
PICTURE menu options
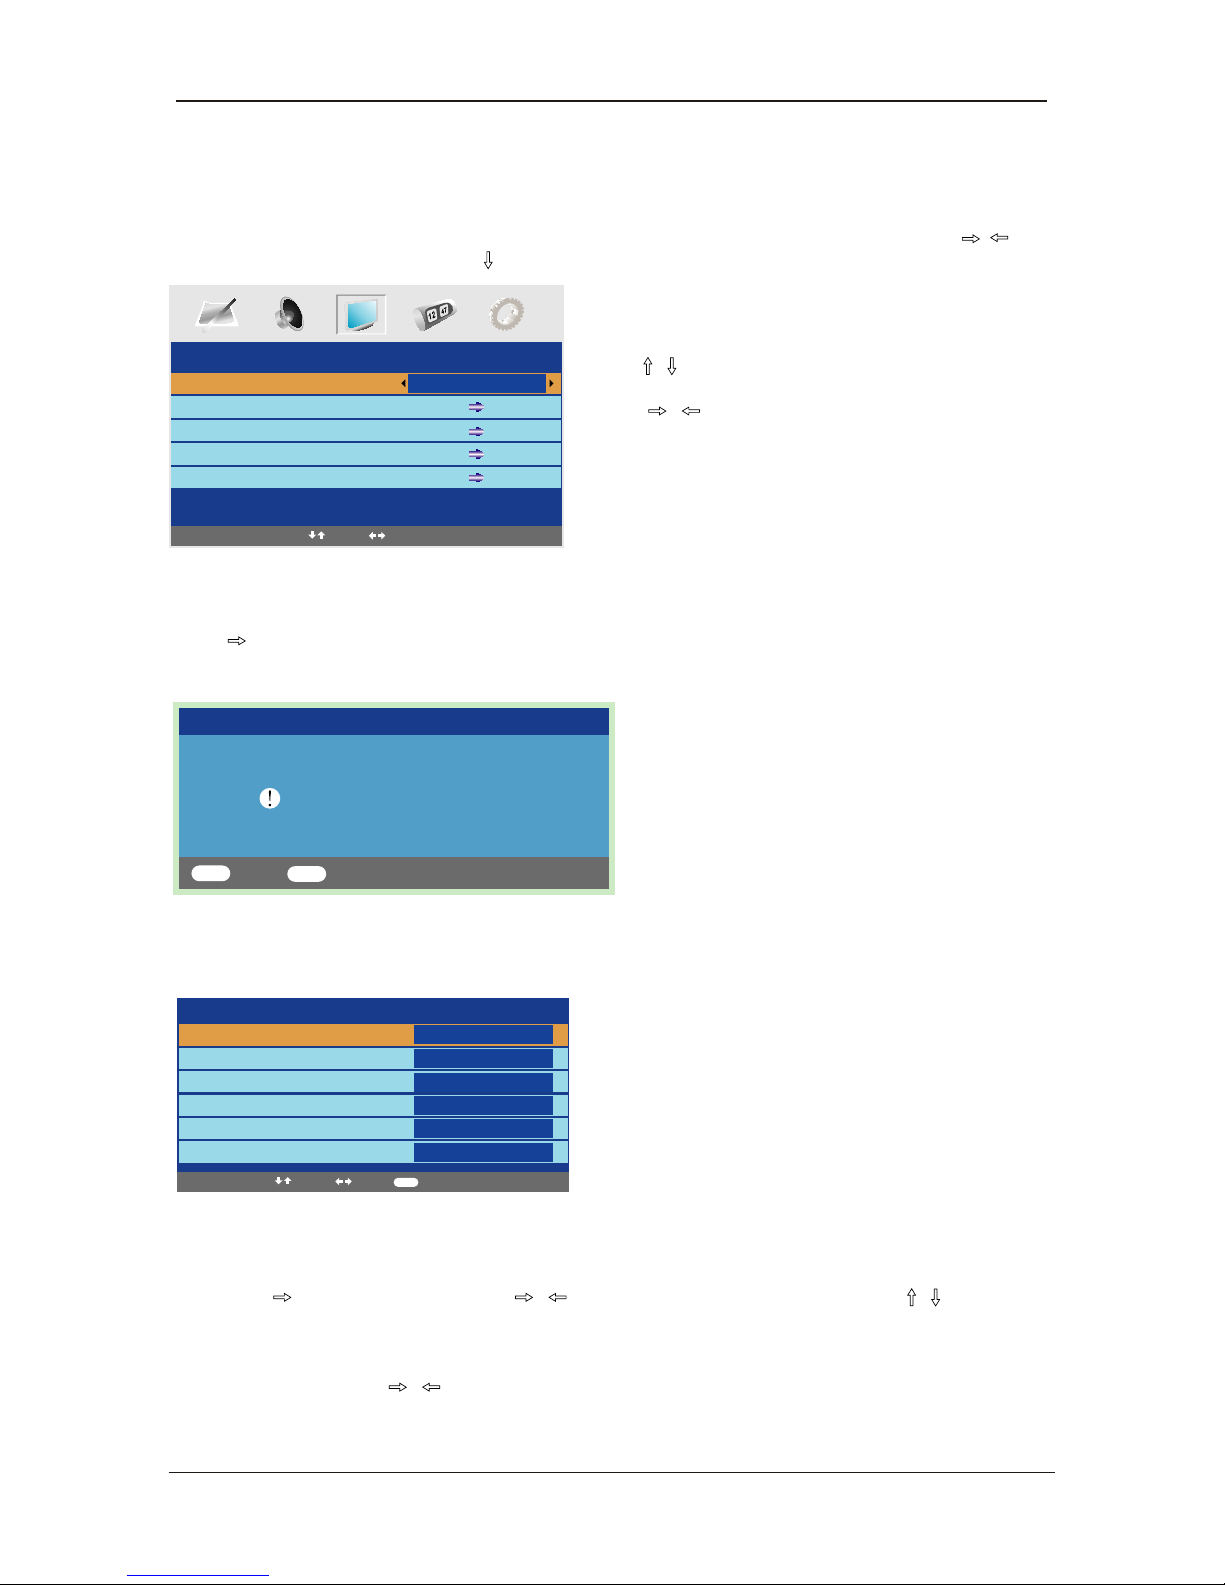
Press the MENU button on the side of your TV or the MENU button on the remote control then use /
button to select the picture menu, press to enter the menu. (see picture below).
1. Use / button to select what you want to
2. Press
/ button to adjust.
3. When you are satisfied with your adjustment, press
MENU button.
Picture Mode
Select the type of picture which best corresponds to your viewing requirements by selecting Picture Mode in
Picture menu. You may select the picture mode directly by pressing the PICTURE button on the remote
control.
Contrast
Adjust the contrast of the picture.
Brightness
Adjust the brightness of the picture.
Colour
Adjust the colour of the picture.
NOTE: This option is invalid in PC mode, and it will be shown in gray.
Sharpness
Select sharpness mode of the picture.
Colour Temperature(in VGA mode)
Select an optimum color temperature mode to suit your eyes for viewing. Options: Normal, Warm and Cold.
DNR
If the broadcast signal received is weak, you can select the DNR option to reduce the video noise level
between Off, Low, Mid and High.
PICTURE
Picture Mode
Contrast
Brightness
Colour
Sharpness
Personal
50
50
50
Normal
Normal
Off
Select
Adjust
Colour temperature
DNR
adjust in the Picture menu.
USER GUIDE
13
Page 17
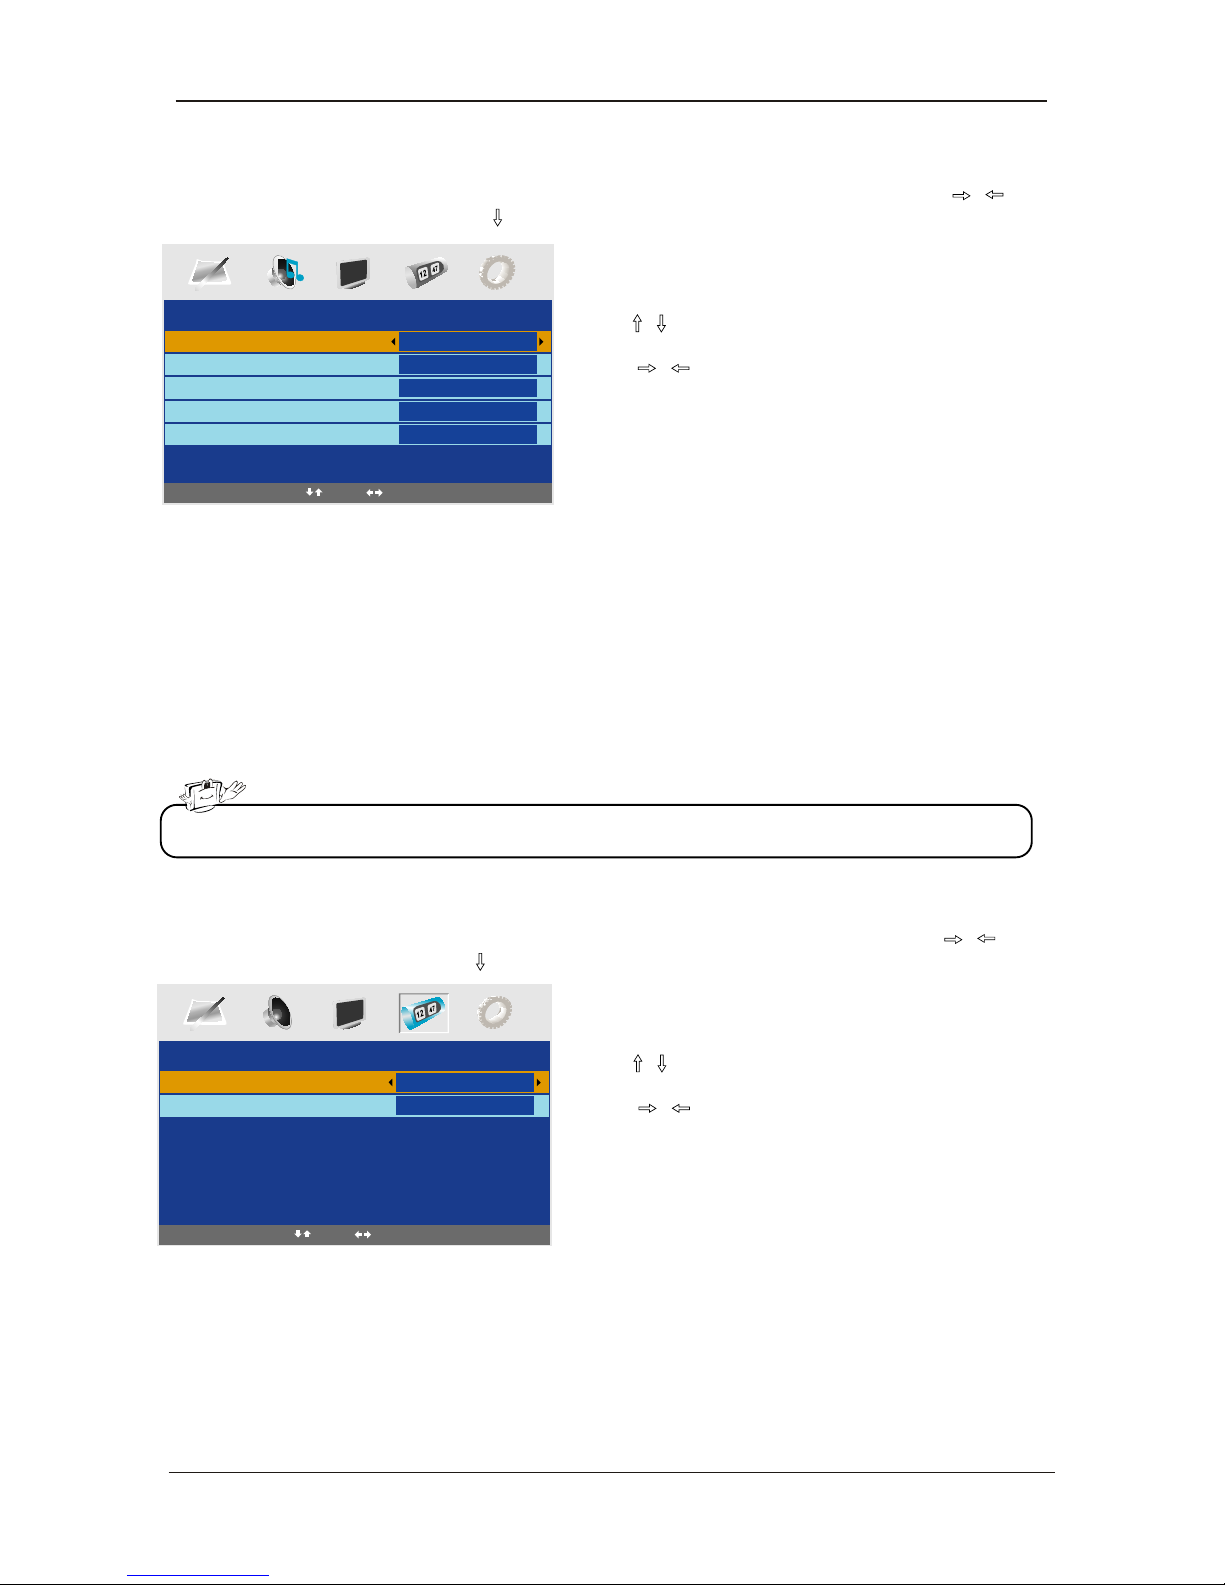
1. Use / button to select what you want to
adjust in the Sound menu.
2. Press
/ button to Adjust.
3. When you are satisfied with your adjustment, press
MENU button.
1. Use
/ button to select what you want to
adjust in the Timer menu.
2. Press
/ button to Adjust.
3. When you are satisfied with your adjustment, press
MENU button.
Volume
Adjust the volume.
Sound Mode
Select the type of sound which best corresponds to your listening requirements by selecting Sound
Mode in Sound menu. You may select the picture mode directly by pressing the SOUND button on
the remote control.
Bass
Adjust the level of the lower-pitched sounds.
Treble
Adjust the level of the higher-pitched sounds.
Balance
Adjust the audio output between left and right speakers.
Sleep Timer
Select the sleep time to put the TV automatically into standby mode after a specified period of time.
The period of time for automatic switch off can be selected in steps 15, 30, 45, 60,
75, 90, 105, 120 and 0 Min(Off). You can also select the automatic sleep time by pressing the TIMER
button on the remote control repeatedly.
OSD Timer
You can select the time period for OSD display to remain on the screen such as: 5Sec, 10Sec, 15Sec,
20Sec, 25Sec and 30Sec
SOUND menu options
TIMER menu options
NOTE: The treble and Bass levels can only be adjusted when the sound setting personal is selected.
SOUND
Volume
Sound Mode
Bass
Treble
Balance
20
Music
60
52
50
Select
Adjust
TIMER
Sleep Timer
OSD Timer
0 Min
30Sec
Select
Adjust
Press the MENU button on the side of
button to select the sound menu, press
to enter the menu. (see picture below).
Press the MENU button on the side of
button to select the Timer menu, press
to enter the menu. (see picture below).
USER GUIDE
14
your TV or the MENU button on the remote control then use /
your TV or the MENU button on the remote control then use /
Page 18
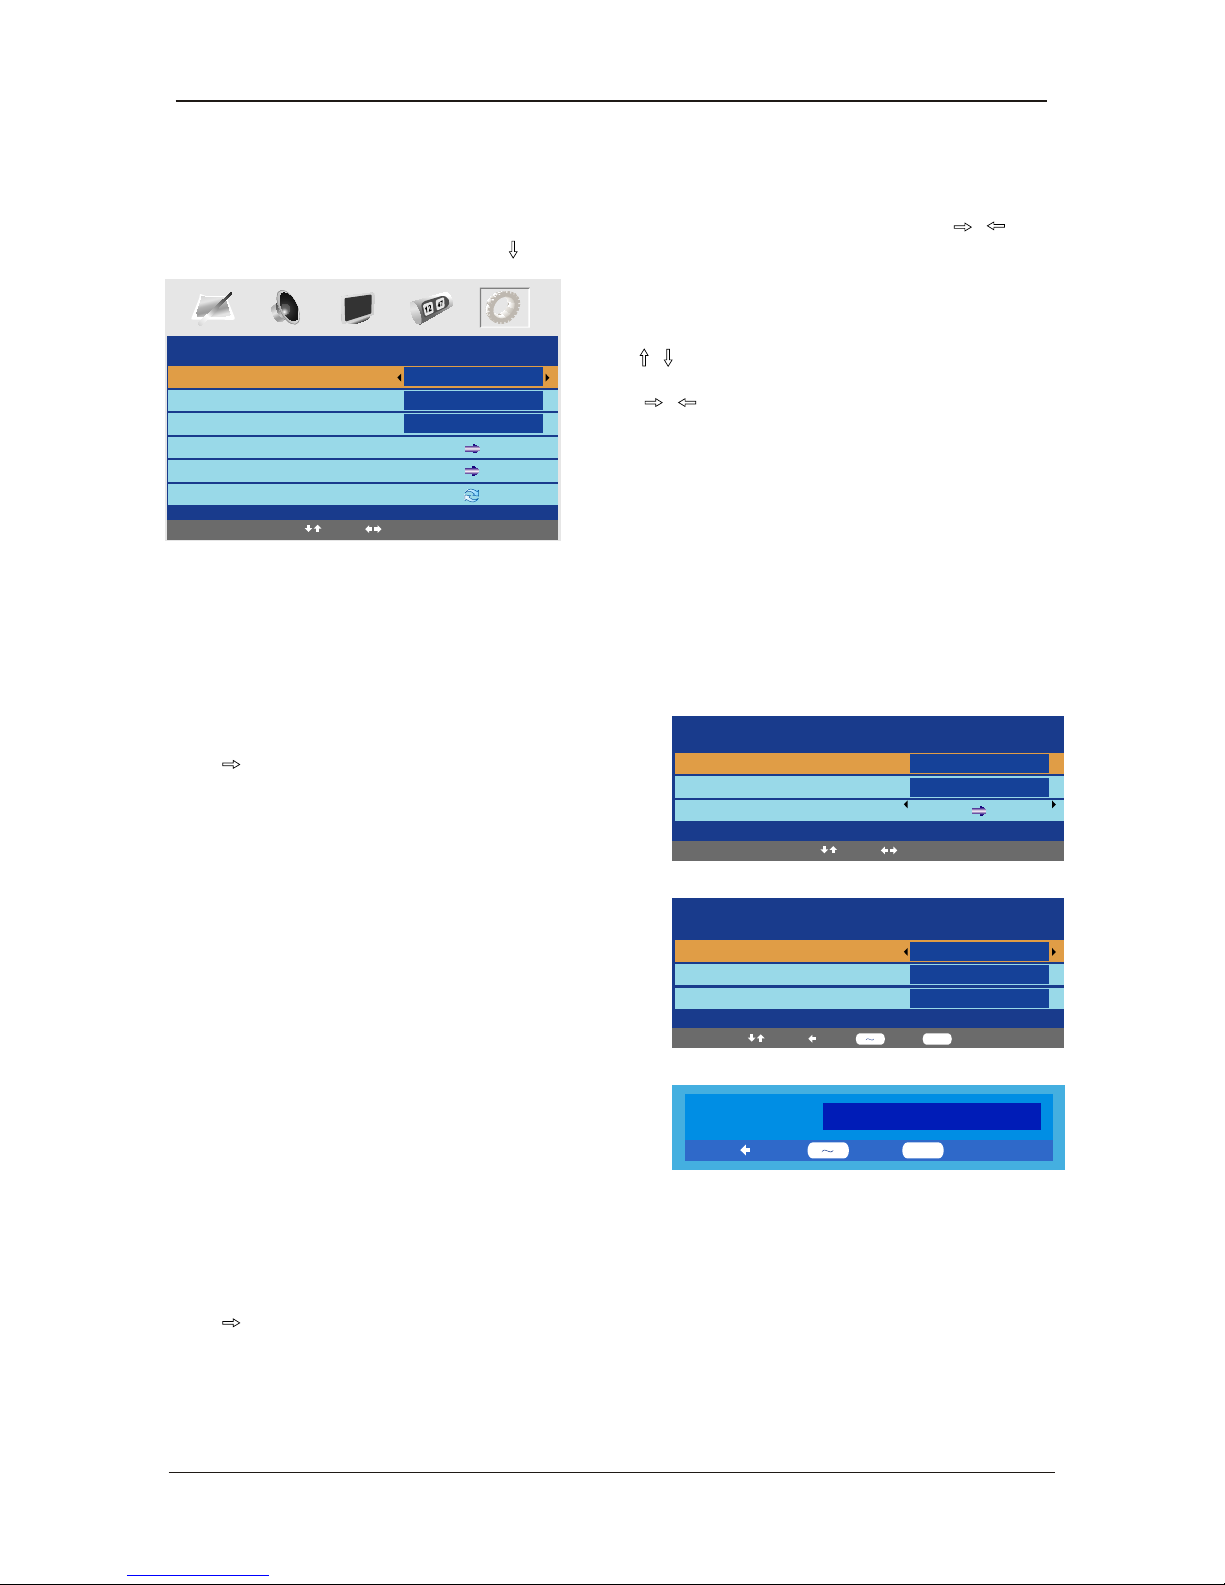
FUNCTION
Language
Video Size
Blue Screen
Child Lock
First Time Installation
Reset
English
Full Screen
On
1. Use / button to select what you want to
adjust in the Function menu.
2. Press
/ button to adjust.
3. When you are satisfied with your adjustment, press
MENU button.
Language
Select the language of the OSD menu.
Video Size
Select the screen display mode.
Note: The available aspect modes may differ from one input source to another.
Blue Screen
To turn ON/OFF the function. When the function is turned on, the screen background will turn blue at very weak
or no signal condition.
Child Lock
Press
button to enter the Child Lock menu as below:
Child Lock: Turn on/off the child lock function.
Key Lock: This option allows you to lock the buttons on
the TV set, so that a child may not accidentally
change your viewing preferences.
Change PIN Code: Set pin code.
Old PIN Code: The default is no password, press
OK to confirm. If the pin code is changed, it must enter the
old code to change.
New PIN Code: Enter the new password.
Enter Again: Enter the same password twice, the
password will be changed successfully.
FUNCTION menu options
Select
Adjust
Child Lock
Child Lock
Key Lock
Change PIN Code
Off
Off
Select
Adjust
Change PIN Code
Old PIN Code
New PIN Code
Enter Again
Select
Delete Input Confirm
0 9 OK
If you turn on the Child Lock function, and set the PIN
Code, you have to enter the program edit option in Menu Setup(page 13) to lock one or more channels.
If the Quick Start button is pressed you will also be prompted for the child lock password.
Note: If the pin code is changed and the number forgotten or lost, please call the helpline.
Reset
Press
button to reset the setup.
Delete Input Enter
0 9 OK
PIN Code:
Press the MENU button on the side of
button to select the Function menu, press
to enter the menu. (see picture below) .
USER GUIDE
15
your TV or the MENU button on the remote control then use /
Page 19
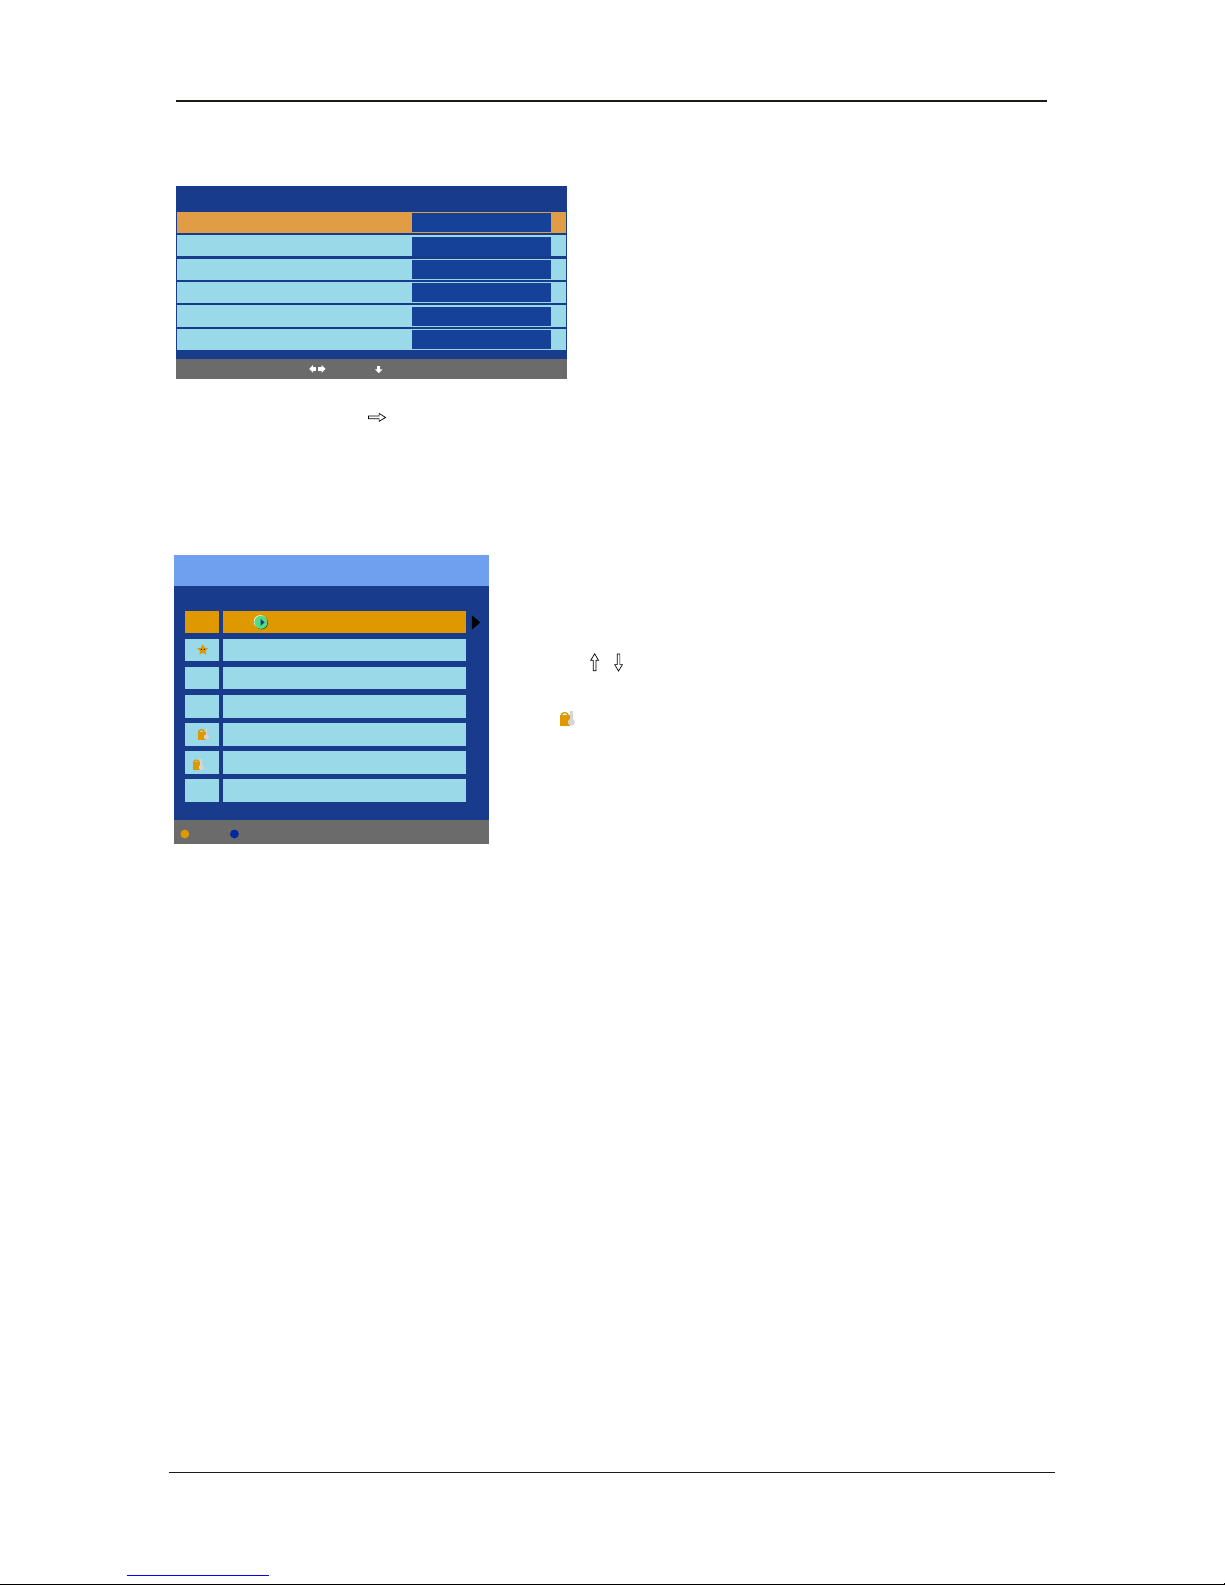
1. Use / button to select what you want to
adjust in the setup menu.
2. Press
/ button to adjust.
3. When you are satisfied with your adjustment, press
MENU button.
Country
This option allows you to select the country.
Auto Tuning
Press
button to start auto tuning.
Note: Before you perform Auto Tuning, you must choose the country where you are by selecting
COUNTRY option. (In TV mode)
Manual Tuning
Note: Before you perform Manual Tuning, you must choose the country where you are by selecting
Country option. (In TV mode)
SETUP menu options
(used in TV/DTV source)
Manual Tuning
Program
Sound System
Colour System
Program Label
AFT
Manual Search
1
I
PAL
Off
471.43MHz
Select
Adjust
Input
SETUP
Country
Auto Tuning
Manual Tuning
Program Edit
Common Interface
UK
Select
Adjust
Auto tuning
Press OK key to start
Enter
Return
OK
MENU
Program: Select the current channel.
Sound System: Select a corresponding sound system.
Colour System: Select a corresponding colour system.
Program Label: Name the current channel, you can also rename the program which you have named.
Press
button to enter, and press / button to select the position, then press /
button or 0-9 button to enter the character, press OK button to confirm.
AFT: Due to a weak signal some channels may not be tuned optimally.
The AFT function allows you to fine tune selected channels.
Manual Search: Press / button to search.
0-9
Manual Tuning in TV mode
Press the MENU button on the side of your TV or the MENU button on the remote control then use /
button to select the setup menu, press
to enter the menu. (see picture below).
USER GUIDE
16
Page 20
Manual Tuning
Channel
Start Search
Service Found
Signal Quality
Signal Strength
Frequency
32
Begin
0
0%
0%
474.00MHz
Select
Enter
Channel: Select the current channel.
Start Search: press
button to begin searching, and it will display “Search”, after a few second,
it will display “Finish”.
Manual Tuning in DTV mode
Common interface(For DTV mode)
Please contact your "Pay per View" provider who can supply a viewing card, cam unit and instructions for
their use.
Program Edit
Channel list
Flags
X
X
X
X
1. BBC1
2. BBC2
3. ITV1
4. CHANNEL 4
5. FIVE
6. ITV2
7. BBC3
Delete Lock
DTV
In DTV mode
Delete: Delete the channel, the channel will be deleted.
Lock: Lock the channel, you have to enter the code(PIN code in
Child Lock menu--Function menu) to view the channel.
Use
/ button to select the channel, and press the
blue button on the remote control to set, and there will be a
“ ” on the channel, press the blue button again to cancel.
Such as channel 5 and 6.
USER GUIDE
17
Page 21
USING YOUR COMMON INTERFACE SLOT
Common Interface
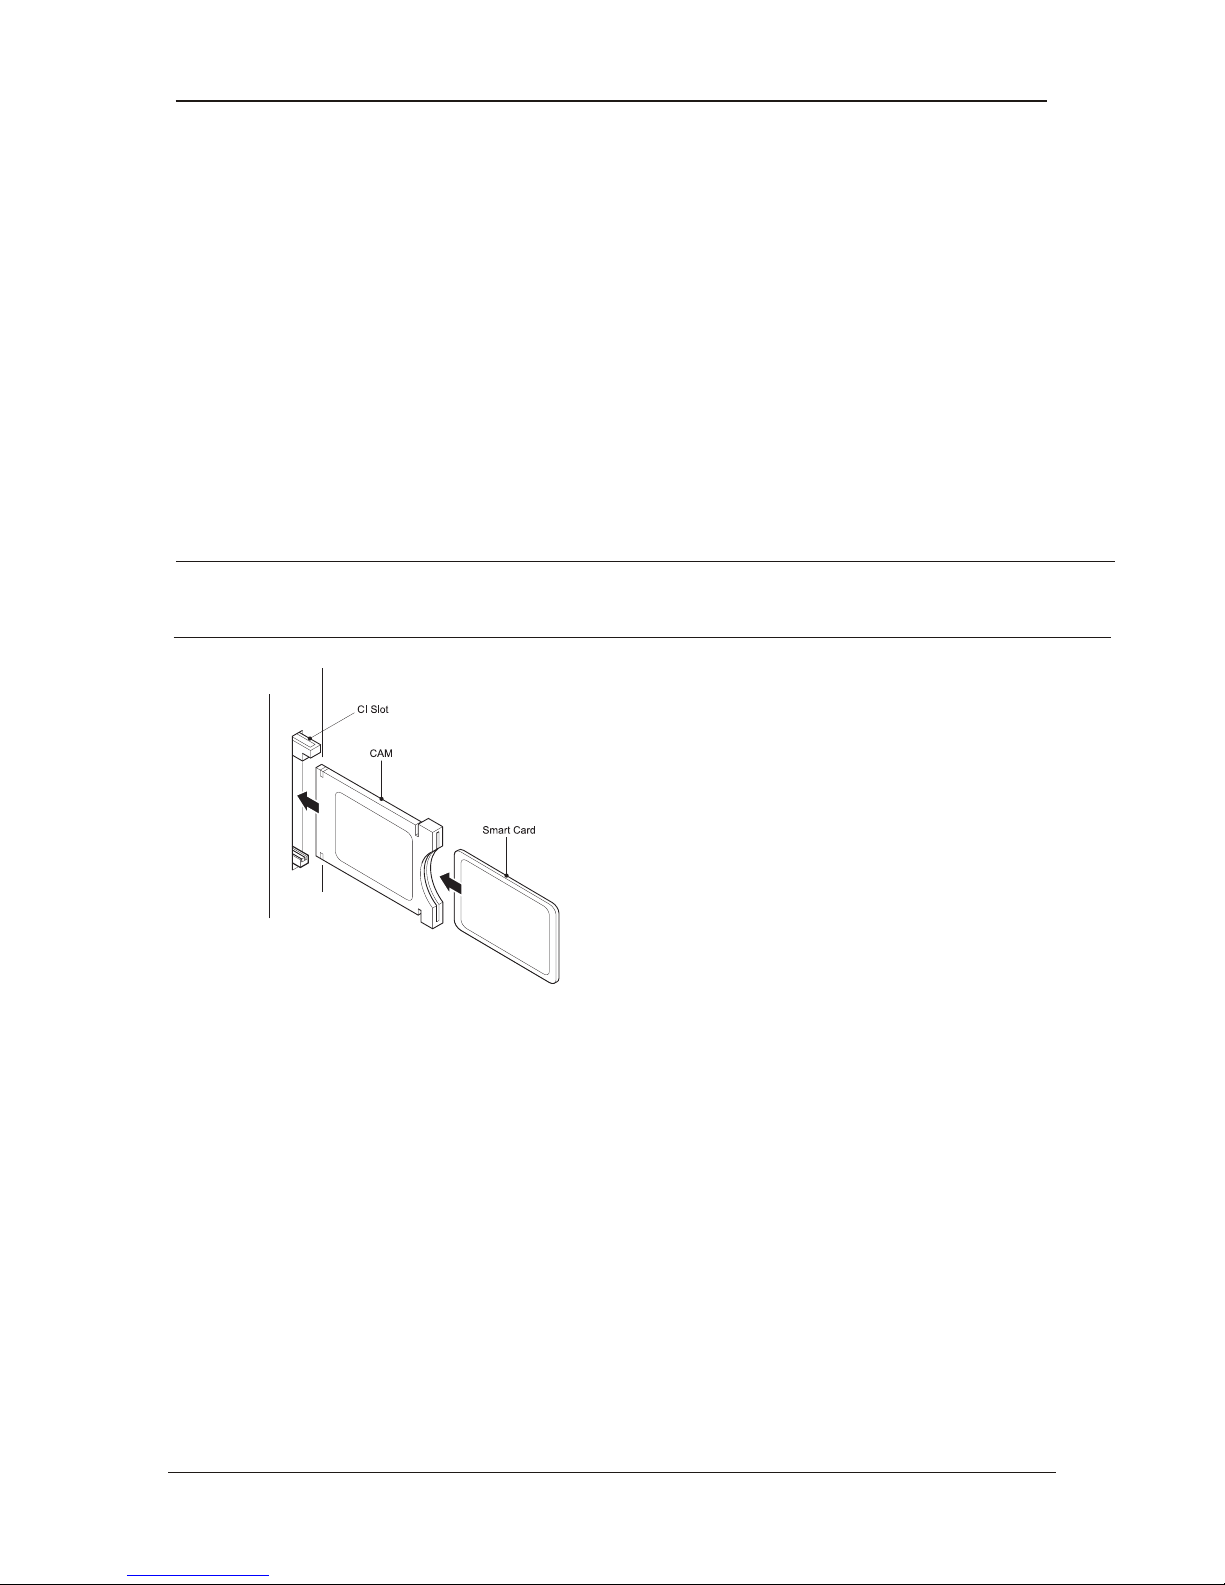
The Common Interface (CI) slot is designed to accept the Conditional Access
Module (CAM) and Smart Card in order to view the pay TV programmes and
additional services. Contact your Pay Per View TV service provider to get more
information about the modules and subscriptions.
NOTE: Conditional Access Module and Smart Cards are sold separately
.
WARNING! SWITCH OFF YOUR TV BEFORE ANY MODULE IS INSERTED INTO THE COMMON
INTERFACE SLOT, THEN ADD THE SMART CARD TO THE CAM.
1. Turn on the TV and ensure ‘DTV’ Source is selected.
2. If the CAM is detected the TV will display the following message on the
screen. "Common Interface Module inserted" wait for a few moments
until the card is activated.
3. Select the relevant digital Pay Per View channel.
4. Detailed information on the Smart Card in use is displayed
5. Press the Ok button to access the card menu. Refer to the Module
Instruction Manual for setting details.
6. When the module is removed, the following message will appear on the
screen. "Common Interface module removed".
USER GUIDE
18
Page 22
TROUBLE SHOOTING GUIDE
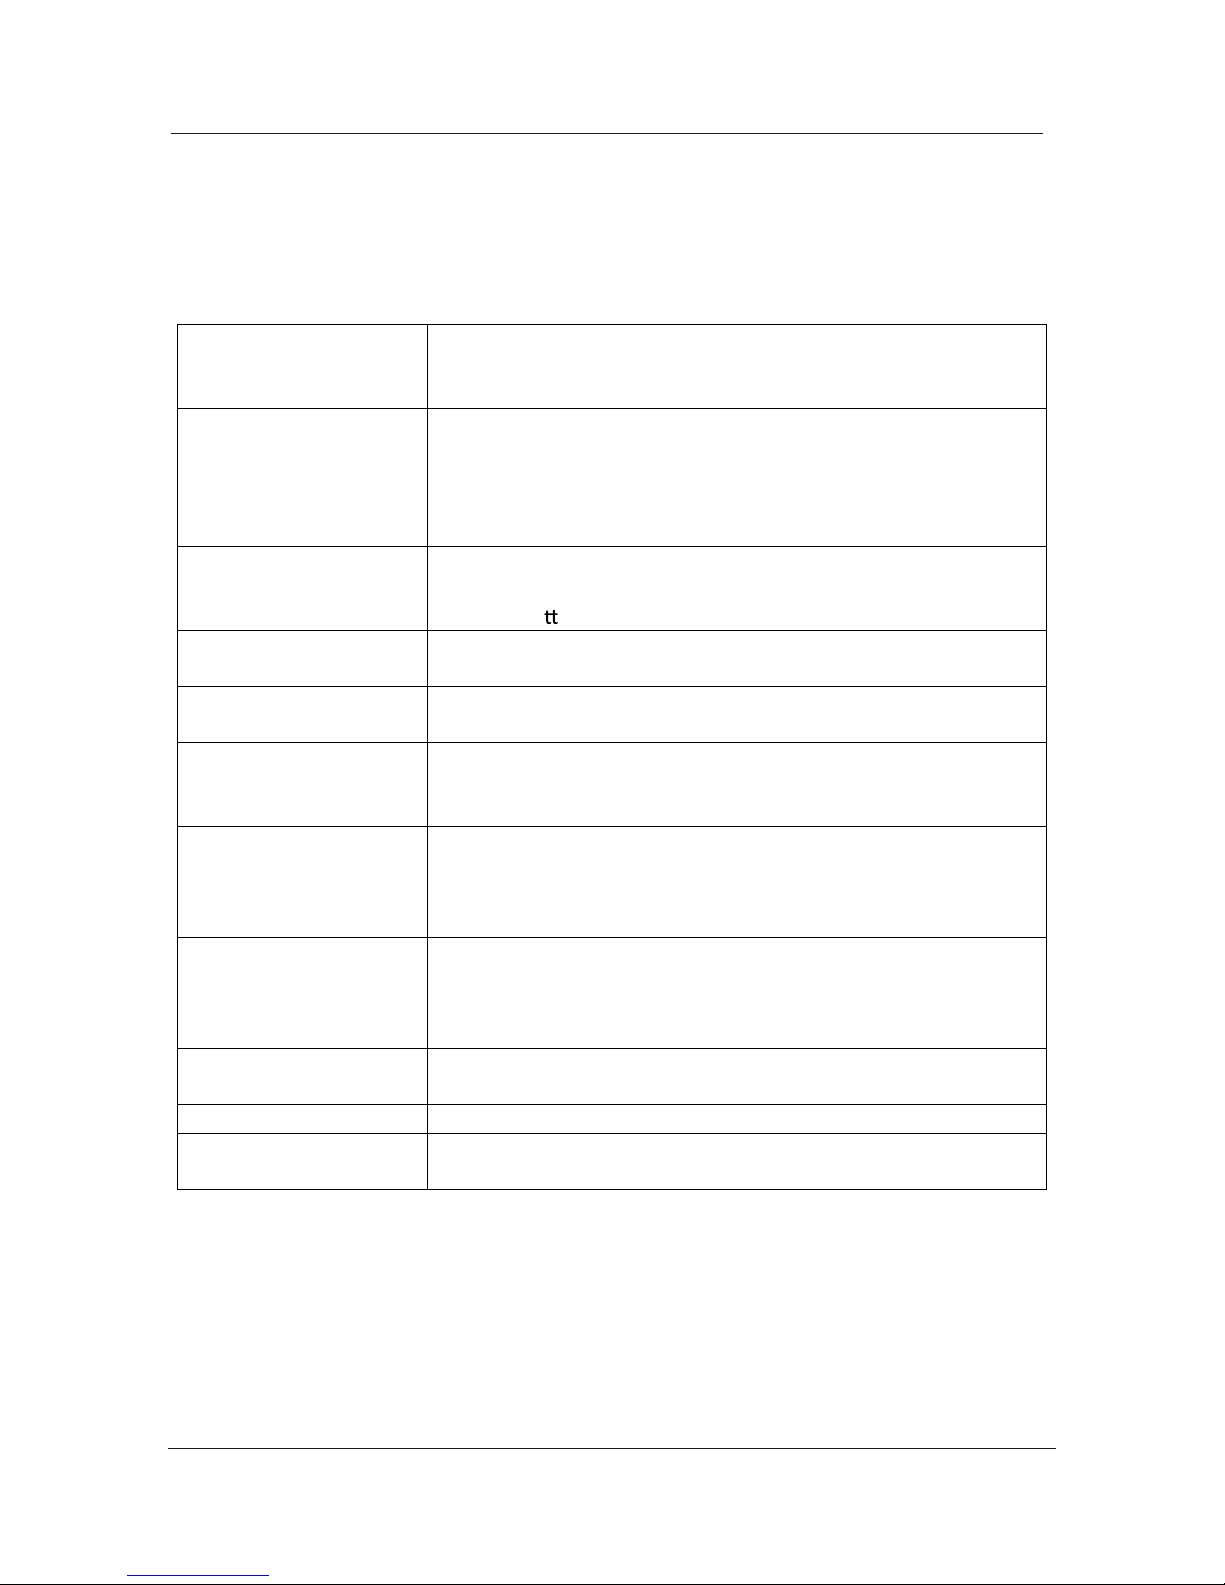
To assist in locating possible faults use the help guide below.
SYMPTOM TROUBLESHOOTING
No Picture, no sound Check that the TV is correctly plugged in.
Check that the TV is connected to a suitable power source.
Check the electrical supply is turned on.
No Picture Ensure that the TV is powered on.
Check that the cables are fitted securely.
Ensure the aerial and/or external sources are connected.
Press the SOURCE button to change the source.
Turn the TV on or off.
No Sound Press the MUTE button and check if Mute mode is set.
Switch to another channel and see if the same problem occurs.
Press V+ bu on to see if the problem can be solved.
No picture on some
channels
Check that correct channel is selected
Adjust the antenna.
No colour on some
channels (black & white)
Check if the same problem exists on other channels.
Ensure the correct picture settngs are selected.
Noisy, Snowy, Ghosting
picture.
Check the antenna is connected correctly.
Check that the antenna Is in good condition.
Try moving the antenna.
Controls not working Disconnect the TV from the power supply, wait 10 seconds,
reconnect the TV to the power supply.
If the problem still exists, contact authorized after sales service
for technical assistance.
No response to remote
control.
Remote control not aimed correctly.
Front panel remote control sensor obstructed.
Remote control batteries inserted incorrectly.
Remote control batteries exhausted.
Blue Screen Press Source button on the remote control or the TV/AV button
on the TV to select the correct source.
No Power to the TV Check all connections to the TV.
No picture but the
standby light is red.
Press the power button on the TV or the on off button on the
remote control.
If none of the suggestions seem to work, try switching your TV off and then on again. If this
does not work contact our technical helpline 0845 6710665.
NOTE: The TV must only be repaired by a qualified registered service person. Never
attempt to remove the back cover as the TV has dangerous voltages inside that may cause
fatality or fire.
USER GUIDE
19
Page 23
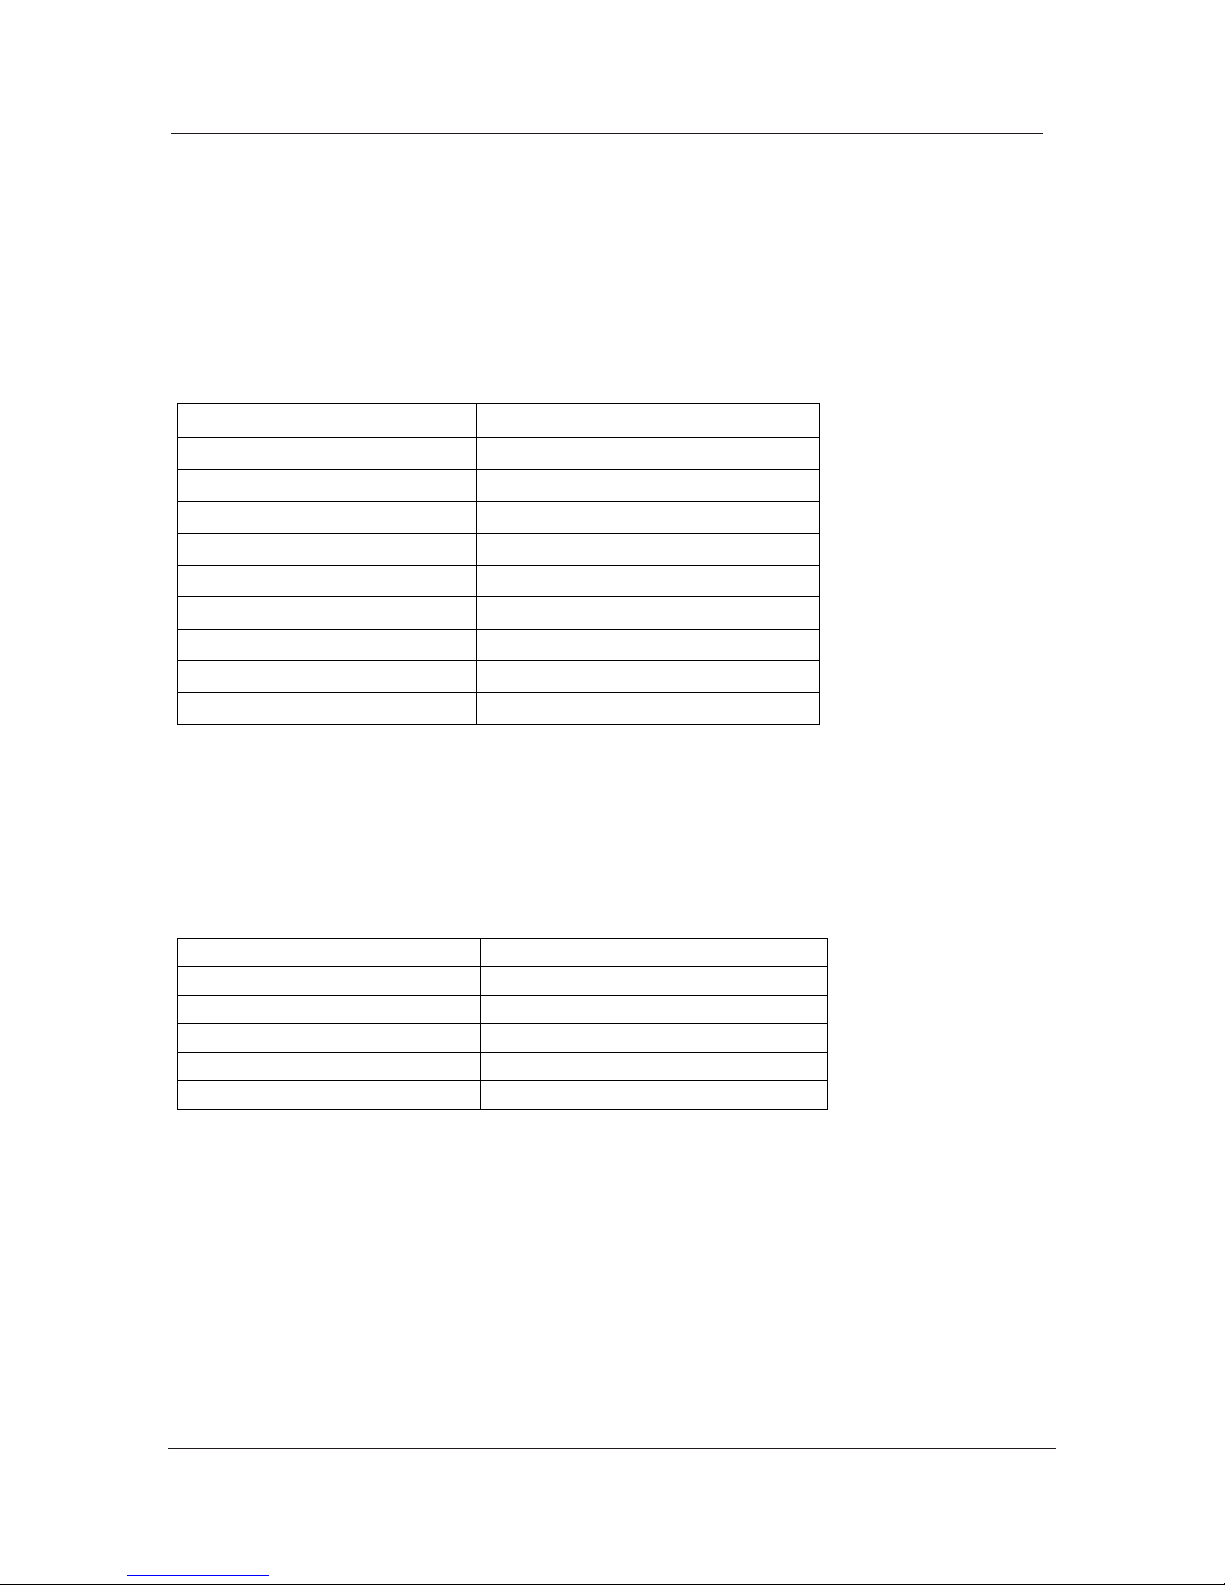
TECHNICAL SPECIFICATIONS
Specifications of the TV that you have just purchased may vary from the information in this
table due to technical innovaons.
TV Specifications
TV System PAL / BG / DK / I
Audio System BG / DK / I / L’L
Screen size 37 ” (Diagonal)
Resolution 1920 x 1080 Pixels (RGB)
Aerial input 75 Ω (unbalanced)
Audio output power 2 x 6 W
Power requirements AC 100-240V 50/60Hz
Power consumption < 240W
Standby power consumption < 1W
Weight 20.4 kg
Remote control specifications
Type Infrared
Control distance 5m
Control angle 30 degrees (Horizontal)
Batteries 2 x 1.5V, Size AA
Dimensions 60 x 204 x 32mm
Weight 140g (without batteries)
USER GUIDE
20
Page 24
WASTE ELECTRICAL RECYCLING
On 1st July 2007, The Waste Electrical and Electronic Equipment (WEEE)
Regulations were implemented in the UK in order to reduce the quantity of
electronic waste being sent to landfill and thereby protect our environment.
Marks & Spencer plc has joined a new body - the Distributor Take-Back
Scheme (DTS) - which will allow you to deposit your old electrical and
electronic items at UK recycling sites, free of charge. To find your nearest
recycling site for waste electrical and electronic items, visit www.recyclemore.co.uk and simply type your postcode into the recycling bank locator.
You'll find advice and tips on other aspects of recycling.
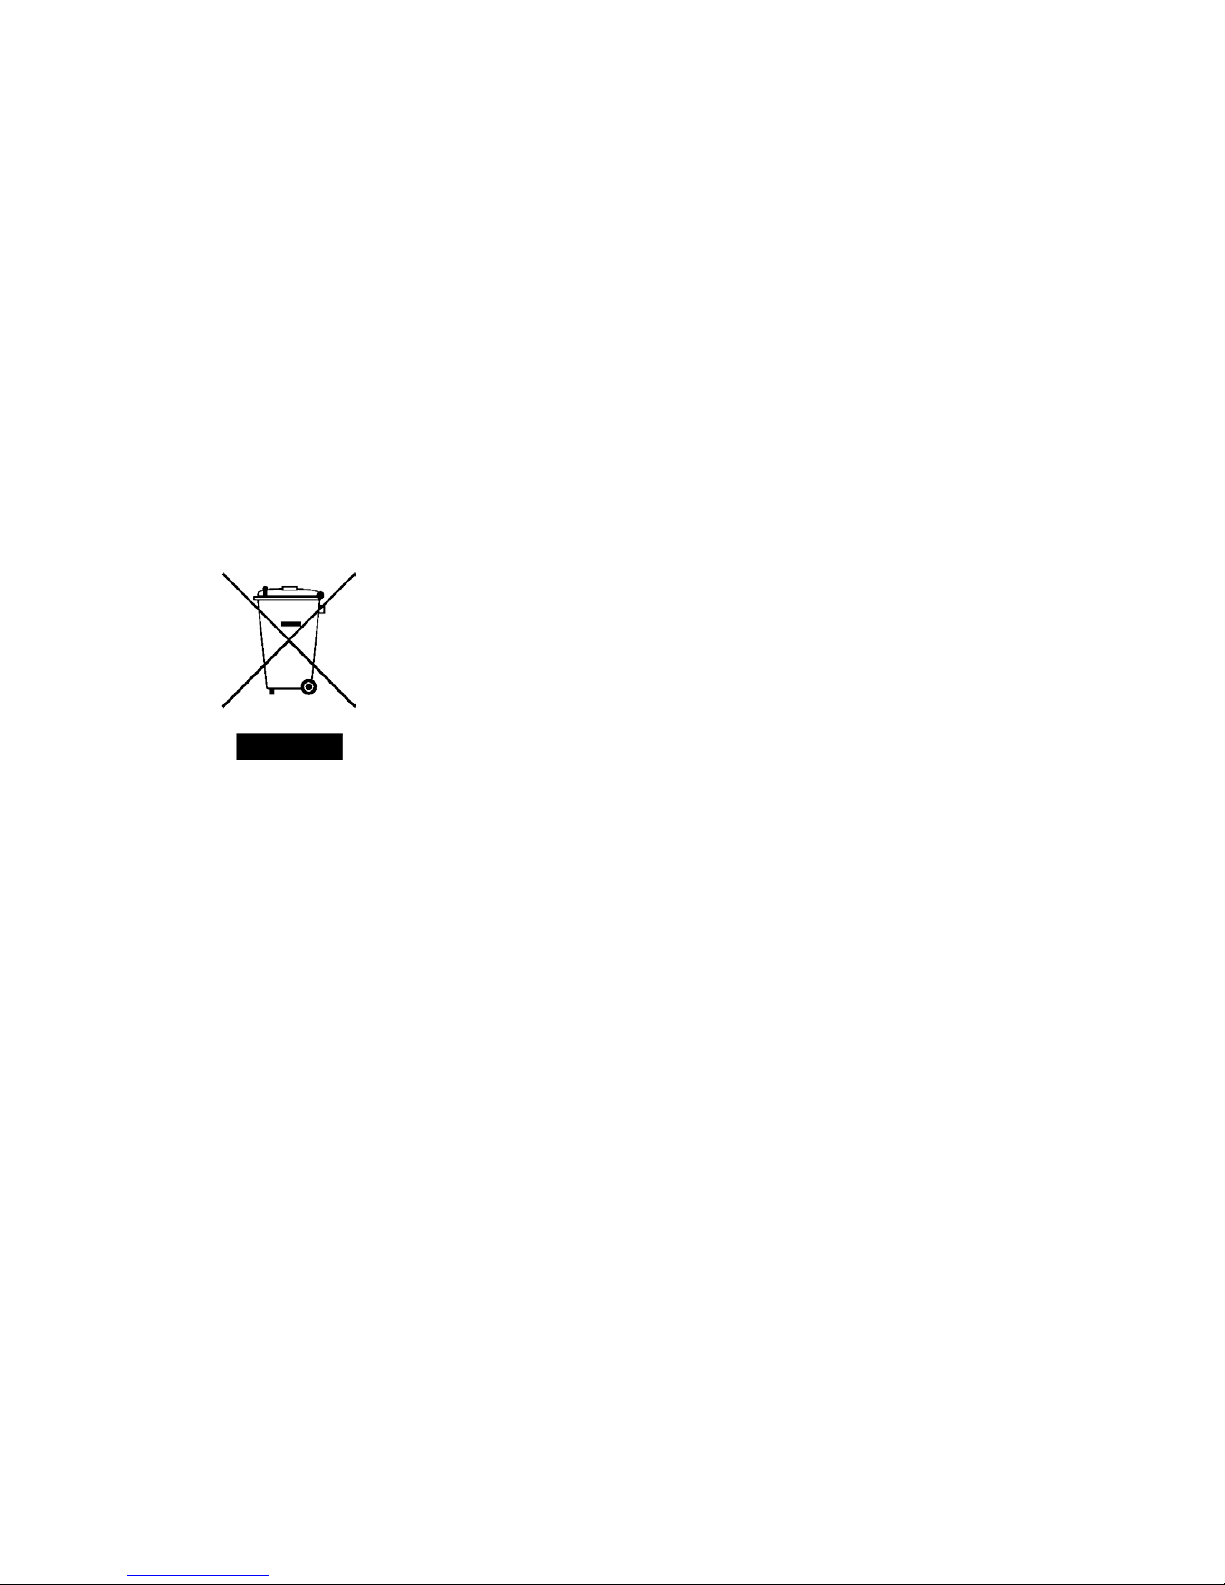
Please note all electrical and electronic products and/or packaging now
carries a "crossed out wheelie bin" logo to help you identify products
that are recyclable.
Marks & Spencer stores will not accept electrical items in store for
recycling. Instead, M&S has contributed to the funding of an alternative
network of UK recycling facilities as stated above. Store colleagues will
however be able to advise you as to the location of recycling facilities in
your area.
Page 25
T04/9350/1806
W2 1NW
Registered No:
214436
(England
andWales)
www
.marksandspencer.com
M&Stechnologycustomerservice
s:
Tel 0845 671 0665
This may be to return it with original packaging to any M&S store (except Outlets and
Simply Food stores) along with your receipt. If it’s within 35 days of purchase we will
offer an exchange for a new product or a full refund. After 35 days and for the remainder
of the guarantee period, we will arrange for the product to be repaired.
Once the tamperproof seal on your technology product is broken, refunds can only be
given in accordance with your legal rights. Remember you are not entitled to a refund if
you simply change your mind, or if you damage the goods after you buy them.
Should a repair not be possible, we will exchange the product for a new or nearest
equivalent product. In the unlikely event of being unable to exchange, we will offer a full
refund.
This warranty is only valid within the United Kingdom, Republic of Ireland and/or
Channel Islands. This warranty excludes faults caused by accident, neglect, misuse,
not following the instructions or normal wear and tear.
This warranty is in addition to your legal rights and supersedes any guarantee or
warranty that is with the product.
(copyright) Marks & Spencer plc
Marks and Spencer plc
PO Box 3339 Chester CH99 9QS
Please retain proof of purchase in case of return. In the unlikely event of a fault
please contatct our customer service helpline on 0845 671 0665, who will advise
you of the best course of action.
 Loading...