

Page 1
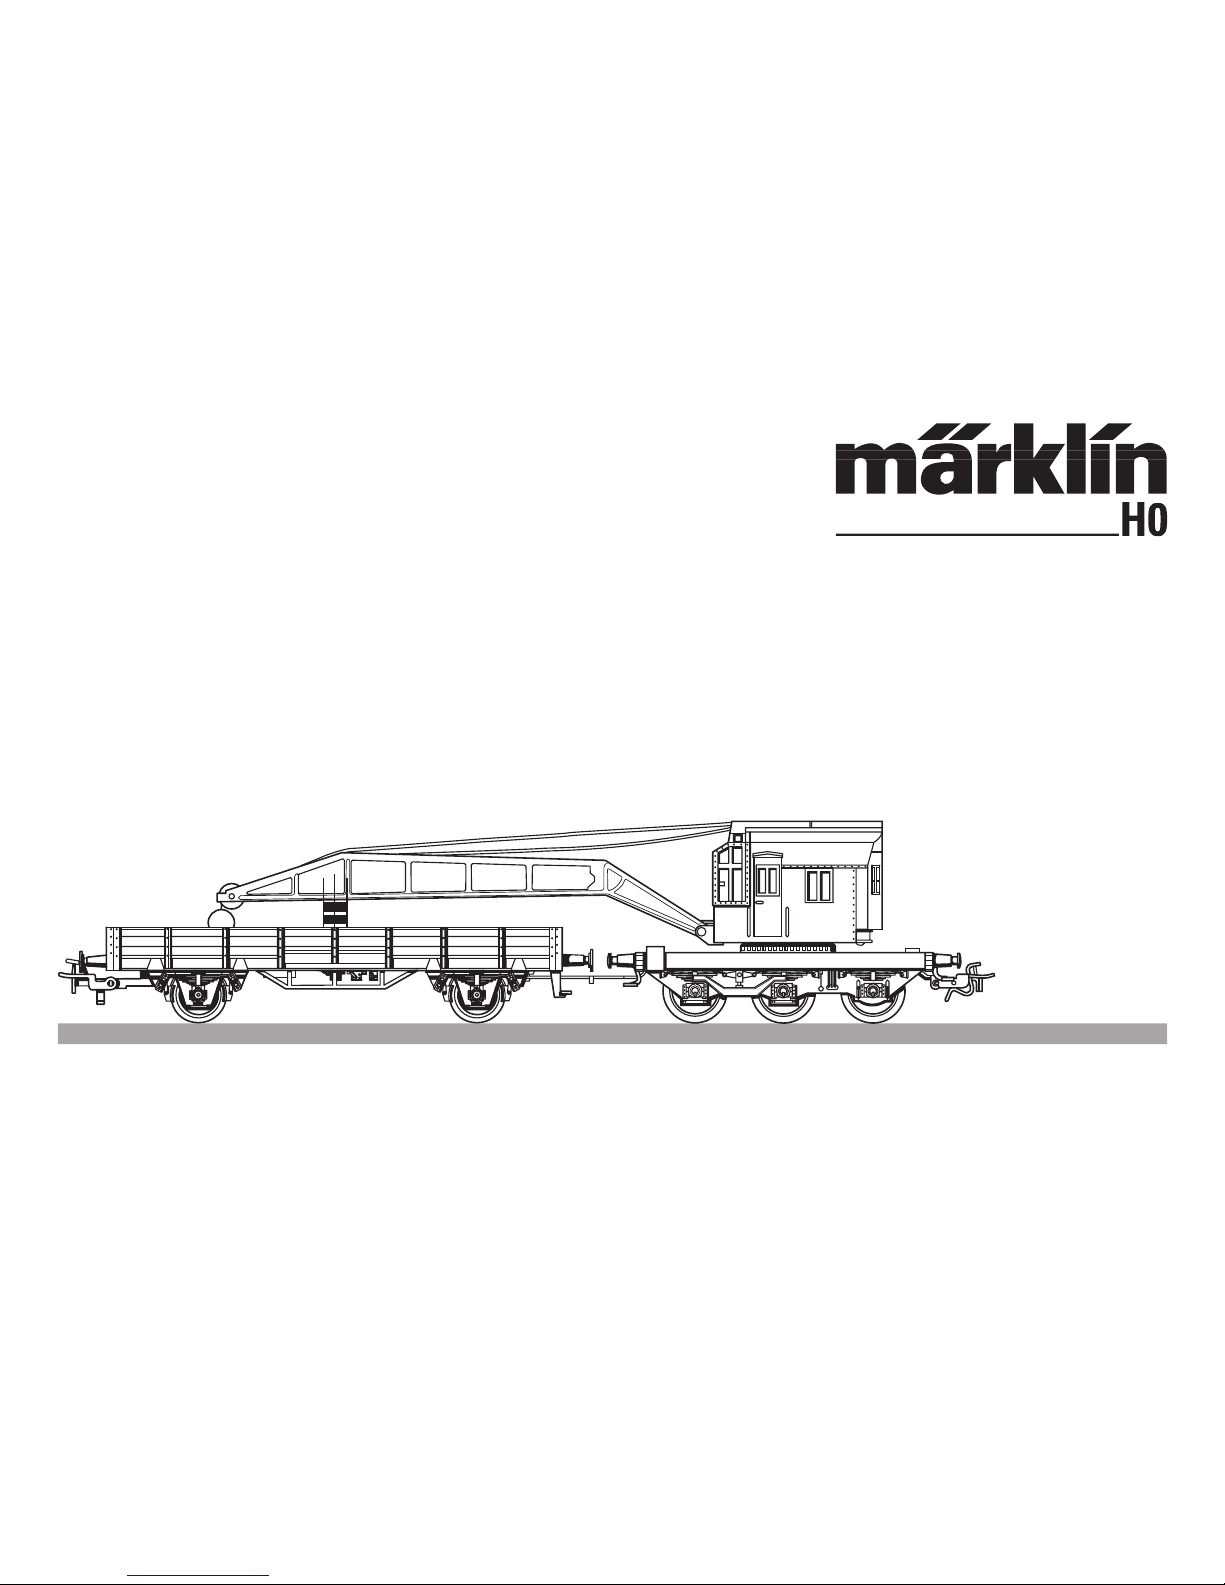
Modell eines Eisenbahndrehkrans Epoche III
46717
Page 2
2
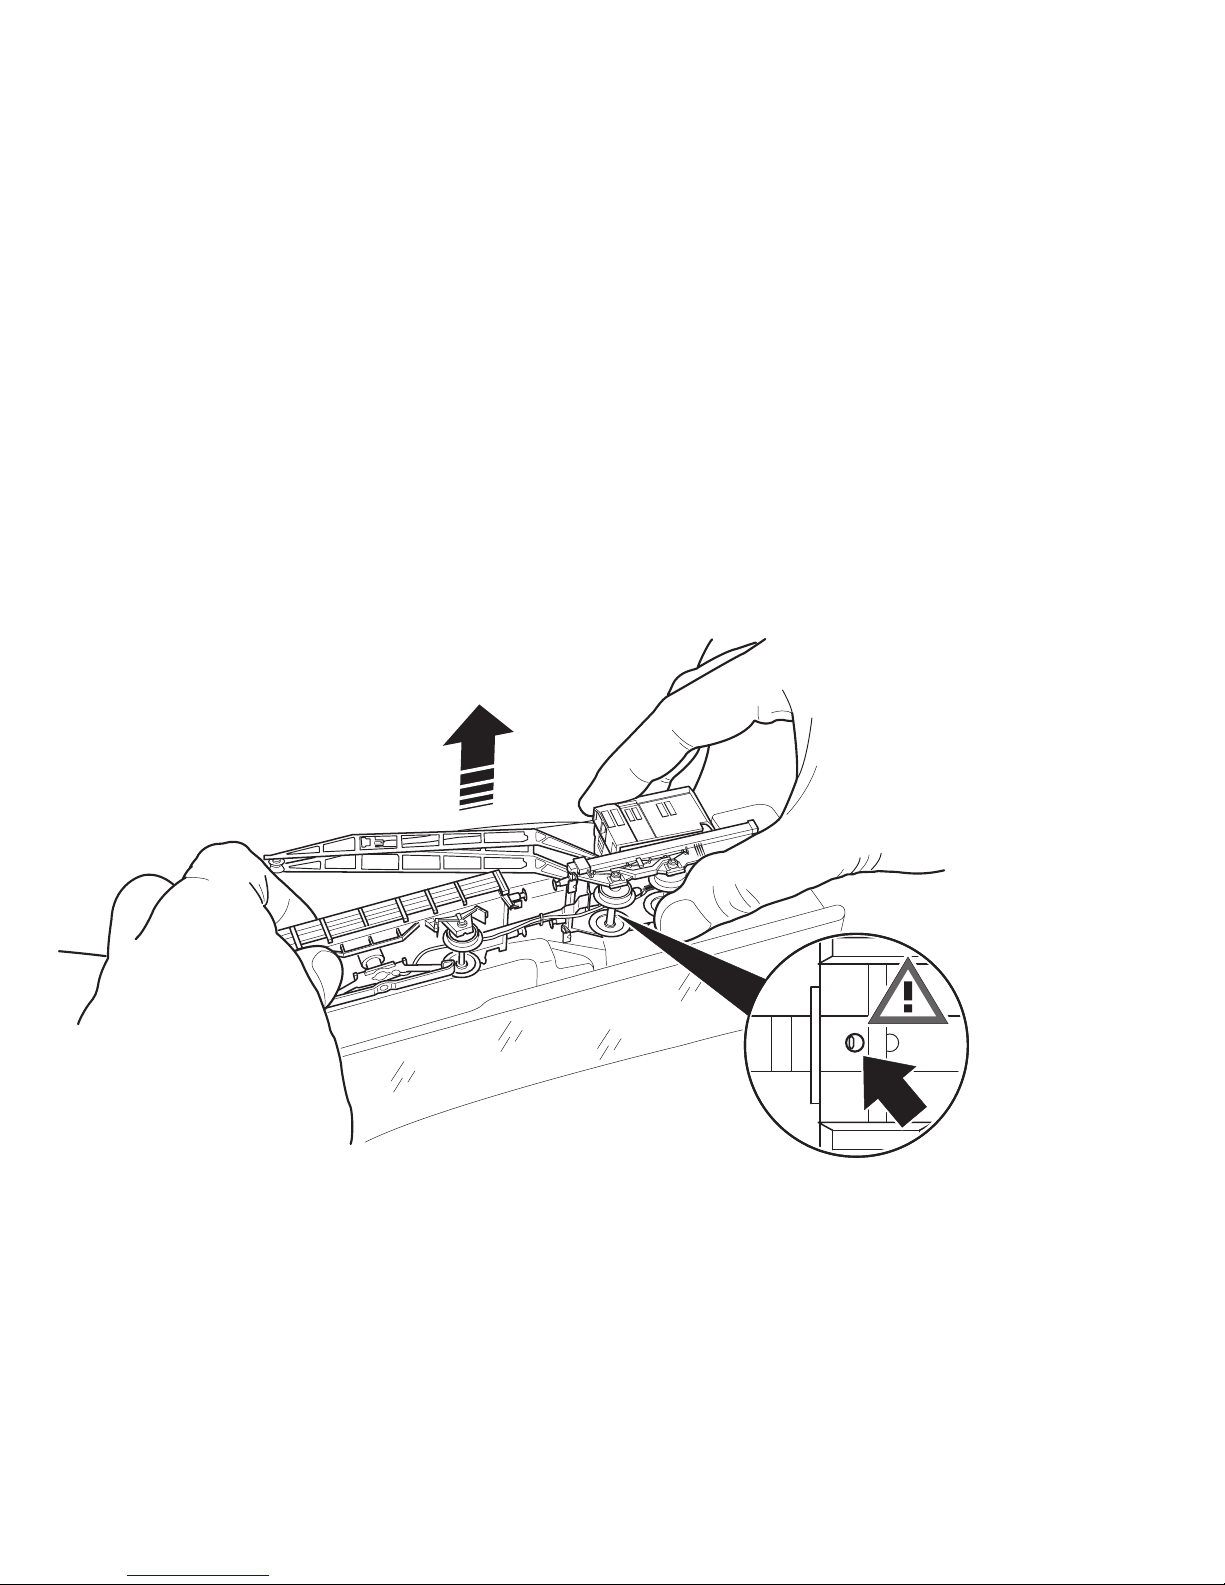
Vorsicht beim Herausnehmen. Auf richtige Position der Deichsel achten
Use caution when removing this model from its packaging. Make sure the position of the drawbar between the
two cars is correct.
Attention en retirant l’article. Veiller à la position correcte du timon.
Voorzichtig met het uitpakken. Let op de juiste positie van de dissel.
Precaución durante la extracción. Asegurarse de que el pivote esté en la posición correcta.
Attenzione durante l’estrazione. Si presti attenzione alla corretta posizione del timone
Lakttag försiktighet när vagnen packas upp ur och ned i sin förpackning. Kranen måste därvid stå i rätt läge
Vær forsigtig ved udtagning Pas på, at vognstangen er i den rigtige position
Page 3
3
1.
2.
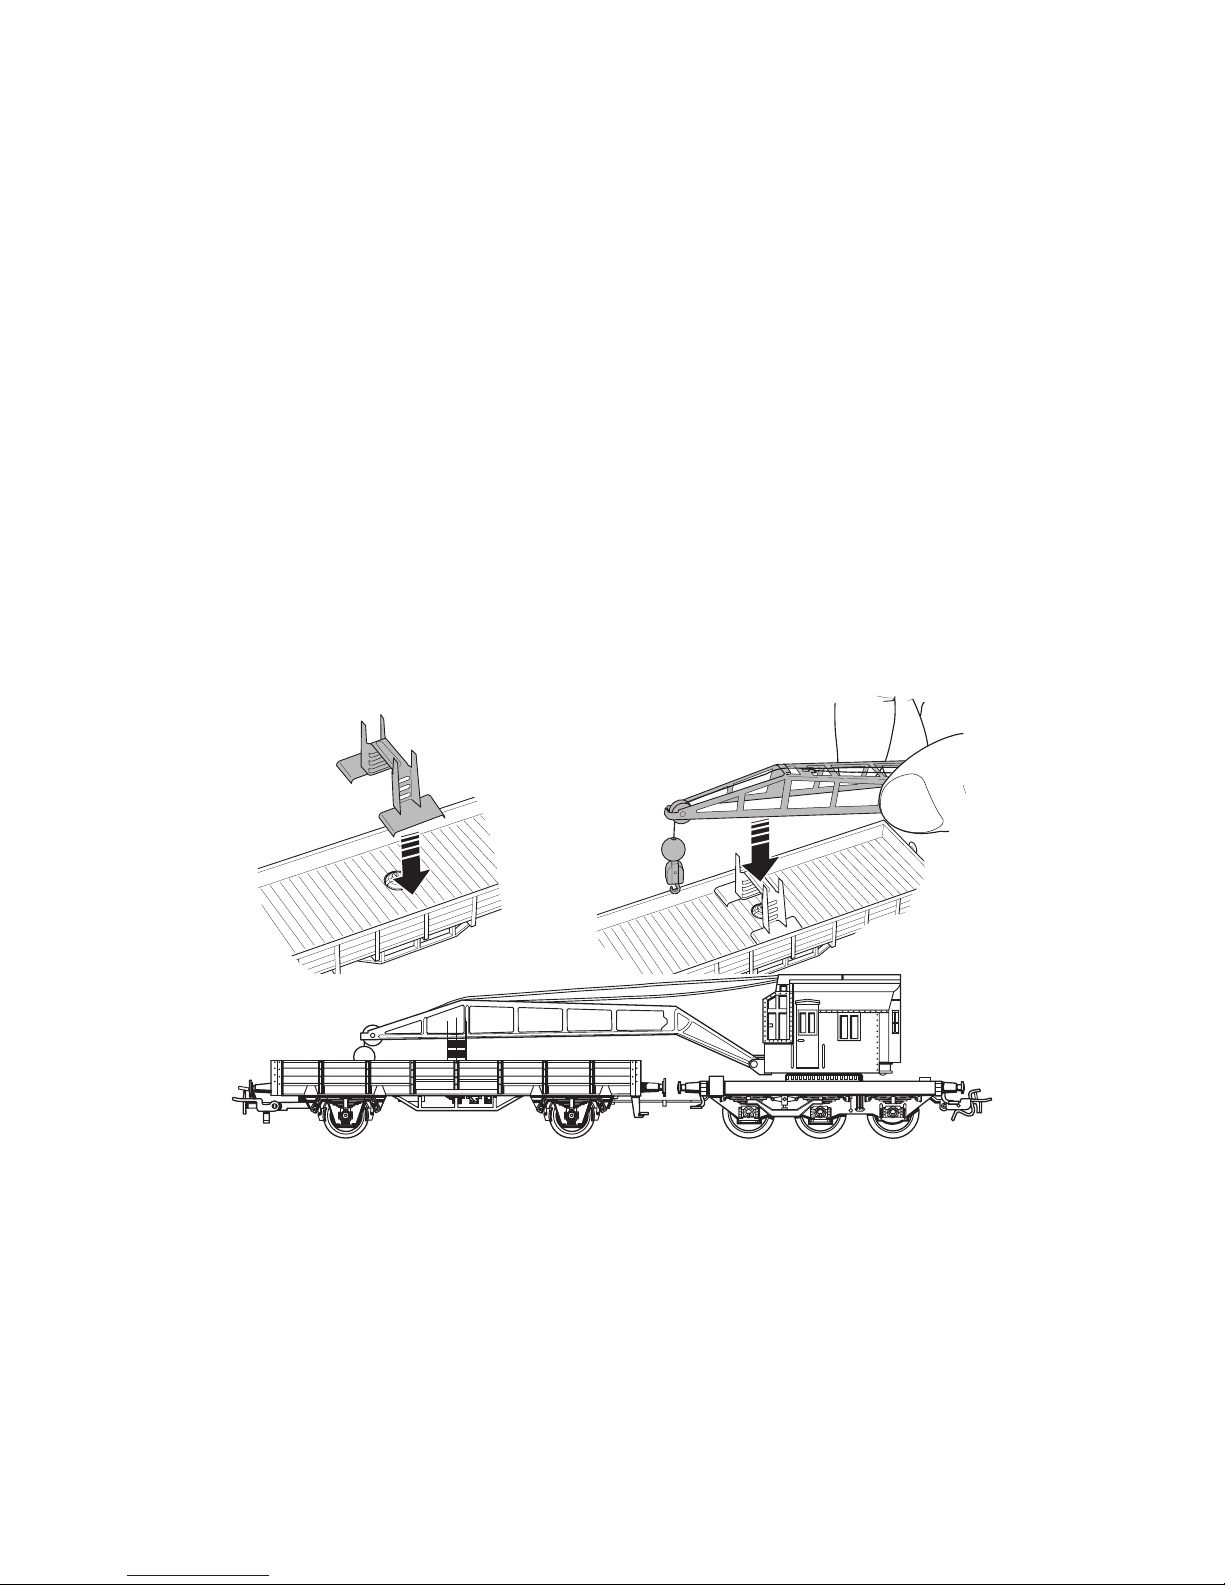
Fahren des Krans in einem Zug nur mit auf Schutzwagen abgelegtem Ausleger
The crane can be run in a train only with the boom resting on the crane tender car.
Transport de la grue dans un train uniquement avec flèche reposant sur le wagon de protection.
Het rijden met de kraanwagen mag alleen als de kraanarm op de steun in de bijbehorende wagen rust.
Transportar la grúa en un tren siempre con el pescante apoyado sobre el vagón de protección.
Viaggio della gru in un treno solamente con il braccio supportato sul carro scudo
Körning med kranvagnen på modelljärnvägen får endast ske med kranarmen vilande på skyddsvagnens stödbock
Kør kun kranen i et tog med udliggeren lagt af på hjælpevognen
Page 4

4
Funktionen
• Mögliche Betriebssysteme:
Märklin Digital, Märklin Systems.
• Einstellbare Adresse (Control Unit): 01 – 80.
Adresse ab Werk:
77.
• Eine Funktion kann bei Stellung 0 des Drehreglers ange
wählt werden. Es ist immer nur eine der drei Funktionen
aktiv steuerbar.
• Durch Rückstellung des Reglers auf 0 wird die Funktion
automatisch beendet
• Die Bewegungen werden automatisch nach 10 Sekun
den beendet, sofern keine andere Fahrstufeninformation
am Steuergerät ausgeführt wird.
Die Bewegung wird wieder ausgeführt, wenn der Regler
auf 0 gestellt und dann wieder hoch gedreht wird.
• Die Stellung des Drehreglers bestimmt die Geschwin
-
digkeit, mit der eine Funktion ausgeführt wird.
• Im Falle von Stromunterbrechung wird die Funktion
ausgeschaltet. Sie wird wieder ausgeführt, wenn der
Regler auf 0 und dann wieder hoch gedreht wird.
• Die Hubkraft des Hakens ist abhängig von der Stellung
des Auslegers:
Hohe Stellung des Auslegers = hohe Hubkraft
Niedere Stellung des Auslegers = geringe Hubkraft
Eine manuelle Betätigung der Funktionen ist nicht möglich!
Die bei normalem Betrieb anfallenden Wartungsarbeiten
sind nachfolgend beschrieben. Für Reparaturen oder
Ersatzteile wenden Sie sich bitte an Ihren Märklin-Fach
-
händler.
Jegliche Garantie-, Gewährleistungs- und Schadensersatzansprüche sind ausgeschlossen, wenn in Märklin-Produkten nicht
von Märklin freigegebene Fremdteile eingebaut werden und /
oder Märklin-Produkte umgebaut werden und die eingebauten
Fremdteile bzw. der Umbau für sodann aufgetretene Mängel und
/ oder Schäden ursächlich war. Die Darlegungs- und Beweislast
dafür, dass der Einbau von Fremdteilen oder der Umbau in bzw.
von Märklin-Produkten für aufgetretene Mängel und / oder Schäden
nicht ursächlich war, trägt die für den Ein- und / oder Umbau verantwortliche Person und / oder Firma bzw. der Kunde.
Sicherheitshinweise
• Die Lok darf nur mit einem dafür bestimmten Betriebs
system (Märklin Digital oder Märklin Systems) eingesetzt werden.
Nur Transformatoren verwenden, die Ihrer örtlichen
Netzspannung entsprechen.
Keinesfalls Transformatoren für eine Netzspannung
von 220 V bzw. 110 V einsetzen.
• Die Lok darf nur aus einer Leistungsquelle gleichzeitig
versorgt werden.
• Beachten Sie unbedingt die Sicherheitshinweise in der
Gebrauchsanleitung zu Ihrem Betriebssystem.
!
WARNUNG! Dieses Produkt enthält Magnete. Das
Verschlucken von mehr als einem Magneten kann unter
Umständen tödlich wirken. Gegebenenfalls ist sofort ein
Arzt aufzusuchen.
Page 5

5
Function
• Possible operating systems:
Märklin Digital, Märklin Systems.
•
Addresses that can be set (Control Unit): 01 – 80.
Address set at the factory: 77.
• One function can be selected with the 0 setting on a
digital controller‘s speed control knob. Only one of the
three functions can be actively controlled at any one
time.
• The function is automatically ended by setting the
control knob back to 0.
• The movements of the functions are automatically
ended after 10 seconds, as long as no other speed level
data is carried out at the controller.
The movement is carried out again, when the control
knob is set to 0 and is then turned up high again.
• The setting for the control knob determines the speed
at which the function is carried out.
• In the event the current to the crane car is interrupted,
the function is turned off. It is reactivated, when the
control knob is set to 0 and then turned up high again.
• The ability of the hook on the line to raise loads de
pends on the position of the boom:
High position for the boom = high level of lifting power
Low position for the boom = low level of lifting power
Do not try to activate the functions manually!
The maintenance work necessary with normal operation
of this locomotive is described below.Please see your
authorized Märklin dealer for repairs or spare parts.
No warranty or damage claims shall be accepted in those cases
where parts neither manufactured nor approved by Märklin have
been installed in Märklin products or where Märklin products have
been converted in such a way that the non-Märklin parts or the
conversion were causal to the defects and / or damage arising. The
burden of presenting evidence and the burden of proof thereof,
that the installation of non-Märklin parts or the conversion in or of
Märklin products was not causal to the defects and / or damage
arising, is borne by the person and / or company responsible for
the installation and / or conversion, or by the customer.
Safety Warnings
• This locomotive is to be used only with an operating
system designed for it
(Märklin Digital or Märklin Systems).
Use only transformers rated for your local hosehold
power.
Do not under any circumstances use transformers
rated for 220 volts or 110 volts
• This locomotive must never be supplied with power
from more than one transformer.
• Pay close attention to the safety warnings in the
instructions for your operating system.
!
WARNING! This product contains magnets. Swallowing
more than one magnet may cause death in certain
circumstances. If necessary, see a doctor immediately.
Page 6

6
Fonction
• Systèmes d’exploitation possibles:
Märklin Digital, Märklin Systems.
• Adresses réglables (Control Unit): 01 – 80. Adresse
encodée en usine: 77.
• Une fonction peut être sélectionnée en positionnant le
régulateur sur 0. Seule une des trois fonctions peut être
activée à la fois.
• En repositionnant le régulateur sur 0, la fonction est
automatiquement désactivée
• Les mouvements s‘arrêtent automatiquement après 10
secondes dans la mesure où aucune autre information
relative au cran de marche n‘est transmise via l‘appareil
de commande.
Le mouvement reprend lorsque le régulateur est positi
-
onné sur 0 puis tourné vers la droite.
• La position du régulateur détermine la vitesse à laquelle
la fonction concernée est exécutée.
• Dans le cas d’une coupure de courant, la fonction est
désactivée. Elle est de nouveau activée lorsque le régulateur est positionné sur 0 puis tourné vers la droite.
• La puissance de levage du crochet dépend de la positi
on de la flèche.
Position haute de la flèche = puissance de levage
importante Position basse de la flèche = puissance de
levage limitée
Les fonctions ne peuvent pas être activées manuellement !
Les travaux d‘entretien occasionnels à effectueren
exploitation normale sont décrits plus loin. Pour toute
réparation ou remplacement de pièces, adressez-vous à
votre détaillant-spécialiste Märklin.
Tout recours à une garantie commerciale ou contractuelle ou à
une demande de dommages-intérêt est exclu si des pièces non
autorisées par Märklin sont intégrées dans les produits Märklin
et / ou si les produits Märklin sont transformés et que les pièces
d’autres fabricants montées ou la transformation constituent la
cause des défauts et / ou dommages apparus. C’est à la personne
et / ou la société responsable du montage / de la transformation
ou au client qu’incombe la charge de prouver que le montage des
pièces d’autres fabricants sur des produits Märklin ou la transformation des produits Märklin n’est pas à l’origine des défauts et ou
dommages apparus.
Remarques importantes sur la sécurité
• La locomotive ne peut être mise en service qu’avec
un système d’exploitation adéquat (Märklin Digital ou
Märklin Systems).
Utilisez uniquement des transformateurs correspon
dant à la tension secteur locale.
Bon courage en aucun cas des transformateurs
pour une tension secteur de 220 V, respectivement
110 V.
• La locomotive ne peut être alimentée en courant que
par une seule source de courant.
• Veuillez impérativement respecter les remarques sur
la sécurité décrites dans le mode d’emploi en ce qui
concerne le système d’exploitation.
!
ATTENTION ! Ce produit contient des aimants.
L’ingestion de plusieurs aimants peut être mortelle. Le
cas échéant, consulter immédiatement un médecin.
Page 7

7
Werking
• Mogelijke bedrijfssystemen:
Märklin Digital, Märklin Systems.
• Instelbaar adres (Control Unit): 01 – 80.
Vanaf de fabriek: 77.
• Een functie kan bij de stand 0 van de draairegelaar ge
kozen worden. Er kan telkens één van de drie mogelijke
functies geactiveerd worden.
• Door het terugdraaien van de regelaar in de 0 stand
stopt de functie automatisch.
• De bewegingen worden automatisch na 10 seconden
beëindigd, voor zover er geen nieuwe rijstap door het
besturingsapparaat uitgegeven wordt.
De beweging wordt opnieuw uitgevoerd als de regelaar
terug op 0 gedraaid en daarna weer omhoog wordt
geregeld.
• De stand van de regelaar bepaalt de snelheid waarmee
de functie uitgevoerd word.
• Bij een stroomonderbreking wordt de functie uitgescha
keld. Deze wordt opnieuw uitgevoerd als de regelaar
terug op 0 gedraaid en daarna weer omhoog wordt
geregeld.
• de hefkracht van de haak is afhankelijk van de stand
van de kraanarm:
kraanarm in de hoogste stand = grote hefkracht
kraanarm in de laagste stand = kleine hefkracht
Handmatige bediening van de functies is niet mogelijk!
De in het normale bedrijf voorkomende onderhoudswerkzaamheden zijn verderop beschreven. Voor reparatie of
onderdelen kunt u zich tot uw Märklin winkelier wenden
Elke aanspraak op garantie en schadevergoeding is uitgesloten,
wanneer in Märklin-producten niet door Märklin vrijgegeven vreemde onderdelen ingebouwd en / of Märklin-producten omgebouwd
worden en de ingebouwde vreemde onderdelen resp. de ombouw
oorzaak van nadien opgetreden defecten en / of schade was. De
aantoonplicht en de bewijslijst daaromtrent, dat de inbouw van
vreemde onderdelen in Märklin-producten of de ombouw van
Märklin-producten niet de oorzaak van opgetreden defecten en /
of schade is geweest, berust bij de voor de inbouw en/of ombouw
verantwoordelijke persoon en / of firma danwel bij de klant.
Veiligheidsvoorschriften
• De loc mag alleen met een daarvoor bestemd bedrjfssysteem (Märklin digitaal of Märklin Systems) gebruikt
worden.
Alleen transformatoren gebruiken die geschikt zijn
voor de bij u geldende netspanning.
In geen geval transformatoren voor een netspanning
van 220 V dan wel 110 V gebruiken.
• De loc mag niet vanuit meer dan één stroomvoorziening
gelijktijdig gevoed worden.
• Lees ook aandachtig de veiligheidsvoorschriften in de
gebruiksaanwijzing van uw bedrijfssysteem.
!
LET OP!
Dit product bevat magneten. Het inslikken van
meer dan één magneet kan onder bepaalde omstandigheden de dood tot gevolg hebben. Waarschuw direct een arts.
Page 8

8
Aviso de seguridad
• La locomotora solamente debe funcionar en un sistema
de corriente propio (Märklin Digital o Märklin Systems).
Utilizar únicamente transformadores que correspon
dan a la tensión de red local.En ningún caso utilizar
transformadores para una tensión de red de 220 V
o bien 110 V.
• La locomotora no deberá recibir corriente eléctrica mas
que de un solo punto de abasto.
• Observe bajo todos los conceptos, las medidas de
seguridad indicadas en las instrucciones de su sistema
de funcionamiento.
Función
• Sistemas operativos posibles:
Märklin Digital, Märklin Systems.
• Dirección ajustable (Control Unit): 01 – 80.
Código de fábrica: 77.
• Es posible activar una función con el mando giratorio
en la posición 0. Puede controlarse activamente siemp
-
re sólo una de las tres funciones.
• La función se termina automáticamente restableciendo
a 0 el mando giratorio.
• Los movimientos se terminan automáticamente al cabo
de 10 segundos, siempre que no se ejecute ninguna otra
información de nivel de marcha en la unidad de control.
El movimiento se ejecuta de nuevo al colocar el mando
a 0 y girarlo de nuevo hacia arriba.
• La posición del mando giratorio determina la velocidad
con que se ejecuta la función.
• En el caso de la interrupción de la corriente, se
desconecta esta función. La función se ejecuta de nuevo al poner el mando a 0 y luego girarlo de nuevo hacia
arriba.
• La fuerza de elevación del gancho depende de la posi
ción del pescante:
Posición alta del pescante = fuerza de elevación alta
Posición baja del pescante = fuerza de elevación baja
¡No es posible activar manualmente las funciones!
Se puede colocar posteriormente el kit de humo.Los
trabajos de mantenimiento normales están descritos a
continuación. Para reparaciones o recambios contacte
con su proveedor Märklin especializado.
Se excluye todo derecho de garantía, prestación de garantía e
indemnización sobre aquellos productos Märklin en los que se hubieran montado piezas ajenas no autorizadas por Märklin y/o sobre
aquellos productos Märklin que hayan sido modificados cuando la
piezas ajenas montadas o la modificación sean las causas de los
desperfectos y/o daños posteriormente surgidos. La persona y/o
empresa o el cliente responsable del montaje o modificación será
el responsable de probar y alegar que el montaje de piezas ajenas
o la modificación en/de productos Märklin no son las causas de los
desperfectos y/o daños surgidos.
!
¡ ADVERTENCIA ! Este producto contiene imanes. Ingerir
más de un imán puede ser mortal según las circunstan
-
cias. En este caso, acudir inmediatamente a un médico.
Page 9

9
Funzionamento
• Possibili sistemi di funzionamento:
Märklin Digital, Märklin Systems.
• Indirizzi impostabili (Control Unit): 01 – 80.
Indirizzo di fabbrica: 77.
• Una determinata funzione può venire selezionata in
corrispondenza alla posizione 0 del regolatore rotativo.
Si può sempre comandare in modo attivo soltanto una
delle tre funzioni.
• Mediante arretramento del regolatore su 0 la funzione
viene automaticamente terminata
• I movimenti vengono automaticamente terminati dopo 10
secondi, nel caso in cui sul regolatore di marcia non venga
eseguita alcun’altra informazione di graduazione di marcia.
Il movimento viene eseguito di nuovo, qualora il regolatore
venga disposto su 0 e poi nuovamente ruotato in aumento.
• La posizione del regolatore rotativo determina la velocità
con la quale una data funzione viene eseguita.
• Nel caso di un’interruzione di corrente, la funzione viene disattivata. Essa viene eseguita di nuovo, qualora il regolatore
venga ruotato su 0 e poi nuovamente verso un valore alto.
• La forza di sollevamento del gancio è dipendente dalla
disposizione del braccio:
Disposizione elevata del braccio = elevata forza di
sollevamento
Disposizione abbassata del braccio = ridotta forza di
sollevamento
Un azionamento manuale delle funzioni non è possibile!
Le operazioni di manutenzione che si verificano nel
normale funzionamento sono descritte nel seguito. Per
riparazioni o parti di ricambio Vi preghiamo di rivolgerVi al
Vostro rivenditore specialista Märklin.
Märklin non fornisce alcuna garanzia, assicurazione e risarcimento
danni in caso di montaggio sui prodotti Märklin di componenti non
espressamente approvati dalla ditta. Märklin altresì non risponde in
caso di modifiche al prodotto, qualora i difetti e i danni riscontrati
sullo stesso siano stati causati da modifiche non autorizzate o dal
montaggio di componente esterni da lei non approvati. L‘onere
della prova che i componenti montati e le modifiche apportate
non sono state la causa del danno o del difetto, resta a carico del
cliente o della persona / ditta che ha effettuato il montaggio di
componenti estranei o che ha apportato modifiche non autorizzate.
Avvertenze per la sicurezza
• Tale locomotiva deve essere impiegata soltanto con un
sistema di funzionamento adeguato per questa
(Märklin Digital oppure Märklin Systems).
Impiegare solamente dei trasformatori che corris
pondono alle loro tensioni di rete locali.
Non si impieghino in nessun caso dei trasformatori per
una tensione di rete di 220 V o rispettivamente 110 V.
• La locomotiva non deve venire alimentata nello stesso
tempo con più di una sorgente di potenza.
• Vogliate prestare assolutamente attenzione alle avver
tenze di sicurezza nelle istruzioni di impiego per il Vostro
sistema di funzionamento.
!
AVVERTIMENTO! Questo prodotto contiene magneti.
L‘ingestione di più di un magnete può causare la morte. In
caso di ingestione informare immediatamente un medico.
Page 10

10
Funktion
• Möjliga driftsystem:
Märklin Digital, Märklin Systems.
• Inställbar adress (Conrol Unit): 01 – 80.
Adress från tillverkaren:
77.
• En funktion kan väljas när körkontrollens vridknapp är
ställd på 0. Man kan endast nå en av kranvagnens tre
olika funktioner i taget.
• Återställer man körkontrollens vridknapp till läge 0, så
stängs funktionen av automatiskt.
• Beordrad rörelse avslutas automatiskt efter 10 sekunder,
om ej annan körorder givits via körkontrollen.
Beordrad rörelse kommer åter att utföras, om vridknap
-
pen åter först ställs i läge 0, för att därefter vridas medurs.
• Vridknappens läge bestämmer hastigheten för funktionens rörelser.
• Vid strömavbrott kopplas funktionen bort. Den kopplas
automatiskt på igen om man ställer vridknappen först
på 0 och därefter vrider vridknappen medurs.
• Lyftkrokens kraft är beroende av kranarmens läge.
Kranarmen i brant vinkel uppåt = större lyftkraft
Kranarmen i låg vinkel nedåt = mindre lyftkraft.
OBS! Kranvagnens funktioner kan inte manövreras
manuellt!
Underhållsarbeten som uppstår vid normal användning
beskrivs som följer. Kontakta din Märklinfackhandlare för
reparationer och reservdelar.
Varje form av anspråk på garanti och skadestånd är utesluten
om delar används i Märklin-produkter som inte har godkänts av
Märklin och / eller om Märklin-produkter har modifierats och de
inbyggda främmande delarna resp. modifieringen var upphov till
de därefter uppträdande felen och / eller skadorna. Bevisbördan
för att inbyggnaden av främmande delar i eller ombyggnaden av
Märklin-produkter inte är upphovet till de uppträdande felen och /
eller skadorna, bär den person och / eller företag resp. kund som är
ansvarig för in- och / eller ombyggnaden.
Säkerhetsanvisningar
• Loket får endast köras med ett därtill avsett driftsystem
( Märklin Digital eller Märklin Systems).
Använd endast transformatorer som är avsedda för
den nätspänning som tillhandahålls av er elleverantör.
Anslut aldrig en transformator för 220 V nätspänning
till 110 V - eller tvärt om.
• Loket får inte samtidigt försörjas av mer än en kraftkälla.
• Beakta alltid säkerhetsanvisningarna i bruksanvisningen
som hör till respektive driftsystemet.
!
VARNING! Denna produkt innehåller magneter. Sväljandet
av mer än en magnet kan under vissa omständigheter
leda till döden. Om en magnet svalts: Sök omedelbart
läkarhjälp.
Page 11

11
Funktion
• Mulige driftssystemer:
Märklin Digital, Märklin Systems.
• Indstillelig adresse (Control Unit): 01 – 80.
Adresse ab fabrik:
77.
• En funktion kan vælges, når drejekontakten står på stil
-
lingen 0. Der kan altid kun styres én af de tre funktioner.
• Ved tilbagestilling af drejekontakten til 0 afsluttes funkti
-
onen automatisk
• Bevægelserne standser automatisk efter 10 sekunder,
hvis der ikke udføres andre køretrinsinformationer på
styreenheden.
Bevægelsen genoptages, når drejekontakten sættes på
0 og derefter drejes op igen.
• Drejekontaktens stilling bestemmer hastigheden, som
en funktion udføres med.
• I tilfælde af strømafbrydelse kobles funktionen fra.
Funktionen genoptages, når drejekontakten sættes på 0
og derefter drejes op igen.
• Krogens løftekraft er afhængig af udliggerens stilling:
Høj stilling af udliggeren = høj løftekraft
Lav stilling af udliggeren = lav løftekraft
Det er ikke muligt at betjene funktionerne manuelt!
Vedligeholdelsesarbejder ved normal drift er beskrevet i
det efterfølgende. For reparation eller reservedele bedes
De henvende Dem til Deres Märklinforhandler.
Ethvert garanti-, mangelsansvars- og skadeserstatningskrav er
udelukket, hvis der indbygges fremmeddele i Märklinprodukter,
der ikke er frigivet dertil af Märklin og / eller hvis Märklinprodukter
bygges om og de indbyggede fremmeddele hhv. ombygningen var
årsag til sådanne opståede mangler og / eller skader. Det påhviler
kunden hhv. den person og / eller det firma, der er ansvarlig for
ind- og / eller ombygningen, at påvise hhv. bevise, at indbygningen
af fremmeddele i, eller ombygningen af Märklinprodukter ikke var
årsag til opståede mangler og / eller skader.
Vink om sikkerhed
• Lokomotivet må kun bruges med et driftssystem
(Märklin Digital eller Märklin Systems), der er beregnet
dertil.
Anvend kun transformatorer, der passer til den lokale
netspænding.
Anvend aldrig transformatorer der er beregnet til en
netspænding på 220 V eller 110 V.
• Lokomotivet må ikke forsynes fra mere end én strømkil
-
de ad gangen.
• Vær under alle omstændigheder opmærksom på de
vink om sikkerhed, som findes i brugsanvisningen for
Deres driftssystem.
!
ADVARSEL! Dette produkt indeholder magneter. Det kan
i visse tilfælde have dødelige følger at sluge mere end en
magnet. I givet fald skal der straks søges læge.
Page 12
12
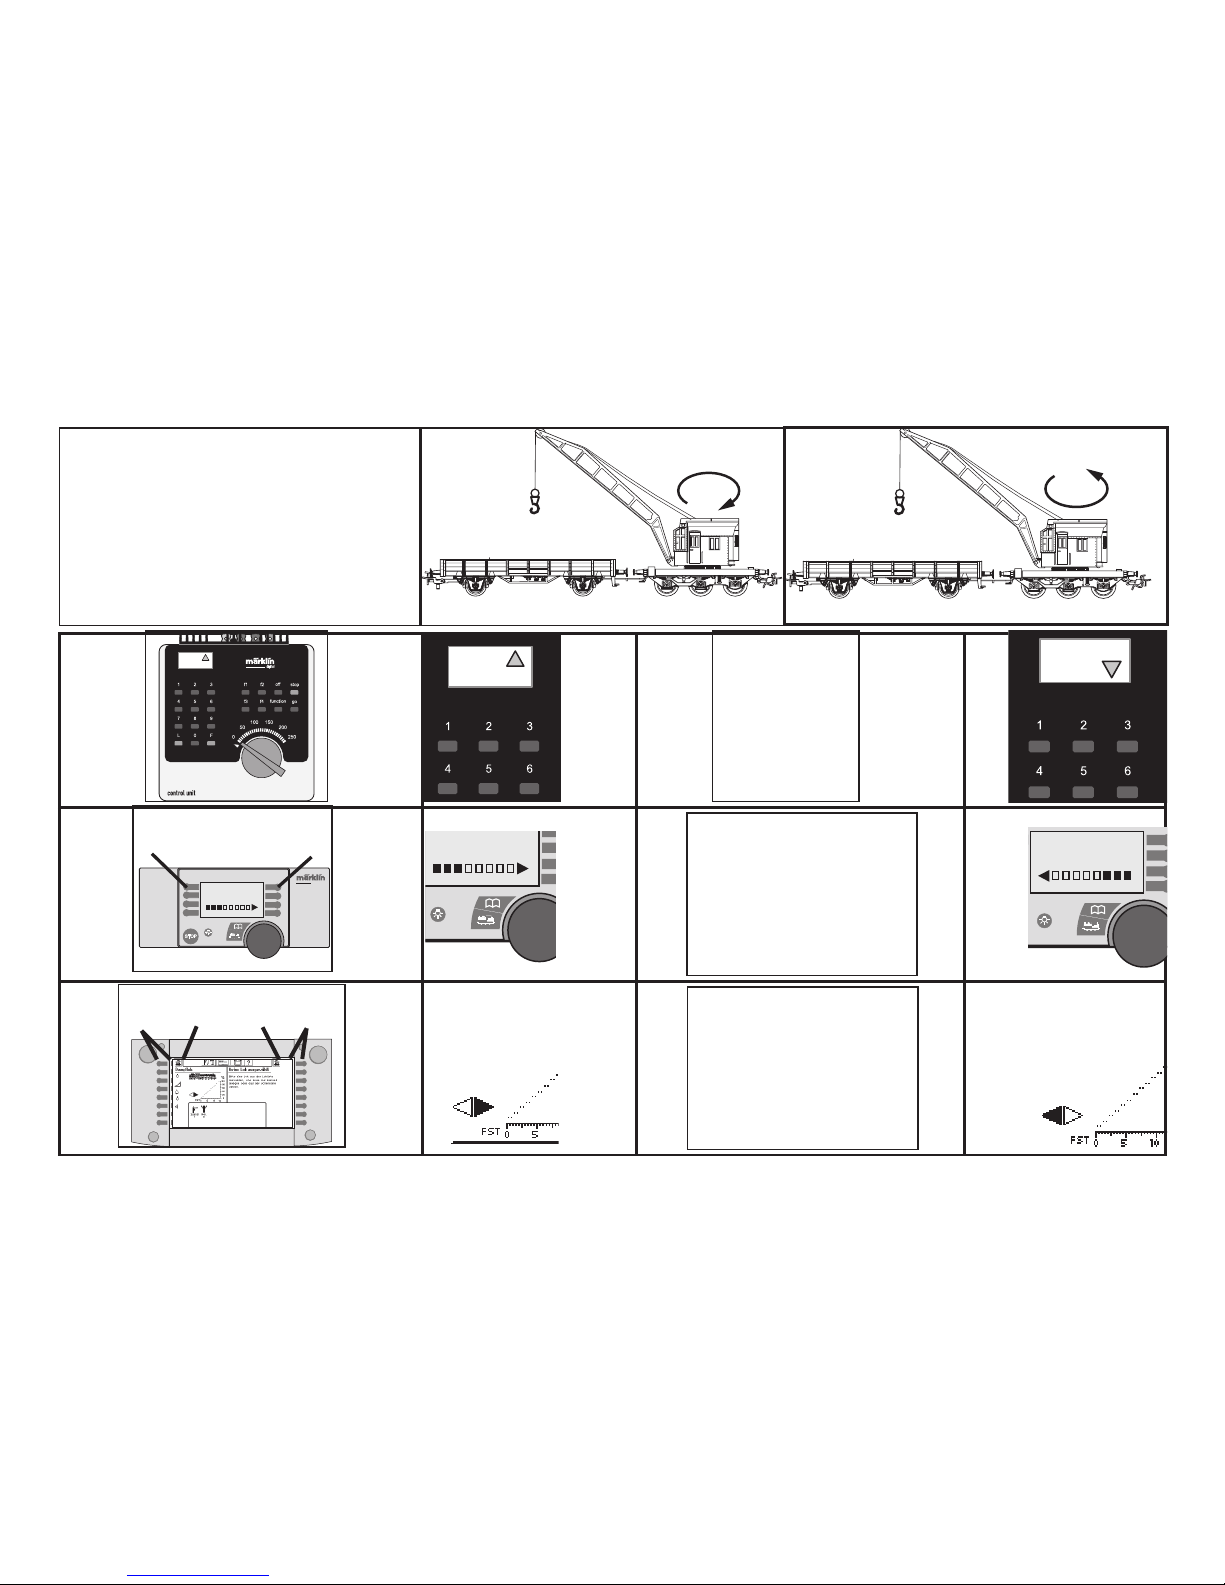
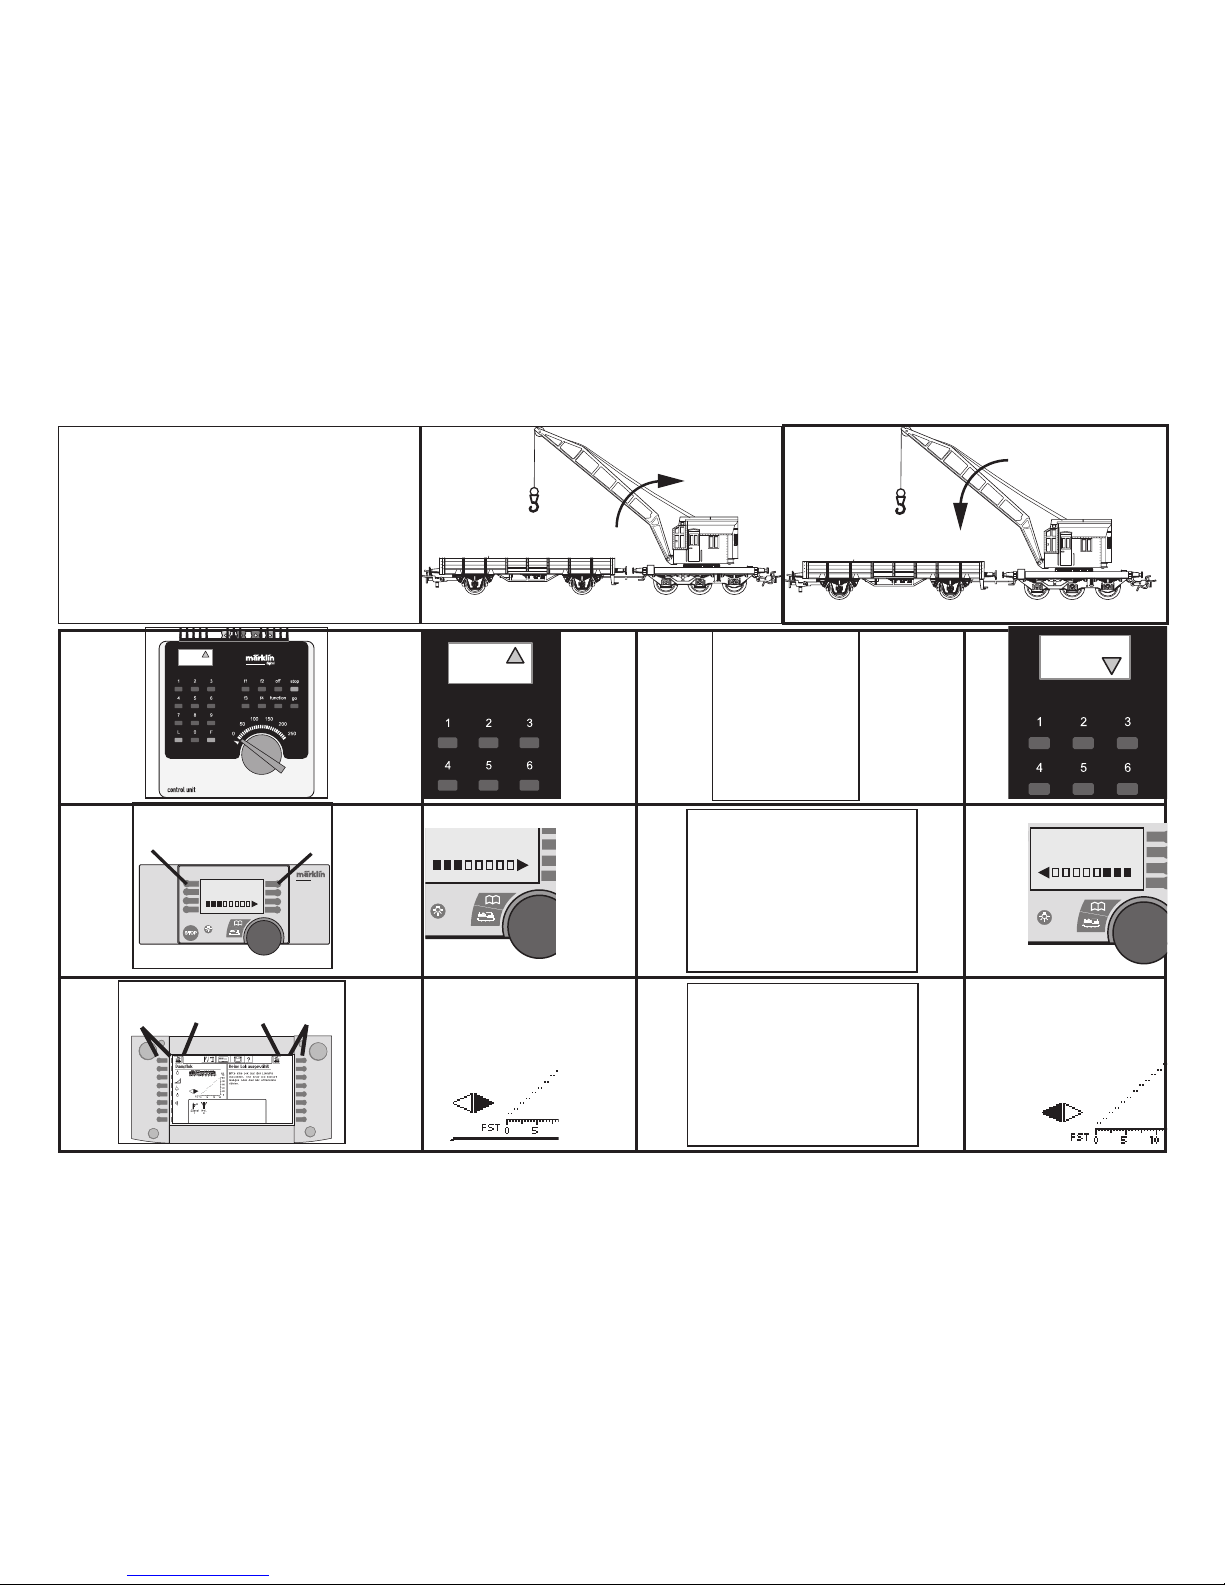
Schaltbare Funktionen • Controllable
Functions • Fonctions commutables•
Schakelbare functies • Funciones
posibles • Funzioni commutabili •
Kopplingsbara funktioner / Styrbare
funktioner
77
STOP
mobile station
systems
1
5
f0
f0f8
f8
Taste 1 ohne Symbol
Button 1 without symbol
Touche 1 sans symbole
Toets 1 zonder symbool
Tecla 1 sin símbolo
Tasto 1 senza simbolo
Knapp 1 utan symbol
Knap 1 uden symbol
f1
77
mobile station
systems
5
77
mobile station
systems
5
Taste f1 ohne Symbol
Button f1 without symbol
Touche f1 sans symbole
Toets f1 zonder symbool
Tecla f1 sin símbolo
Tasto f1 senza simbolo
Knapp f1 utan symbol
Knap f1 uden symbol
Page 13
13
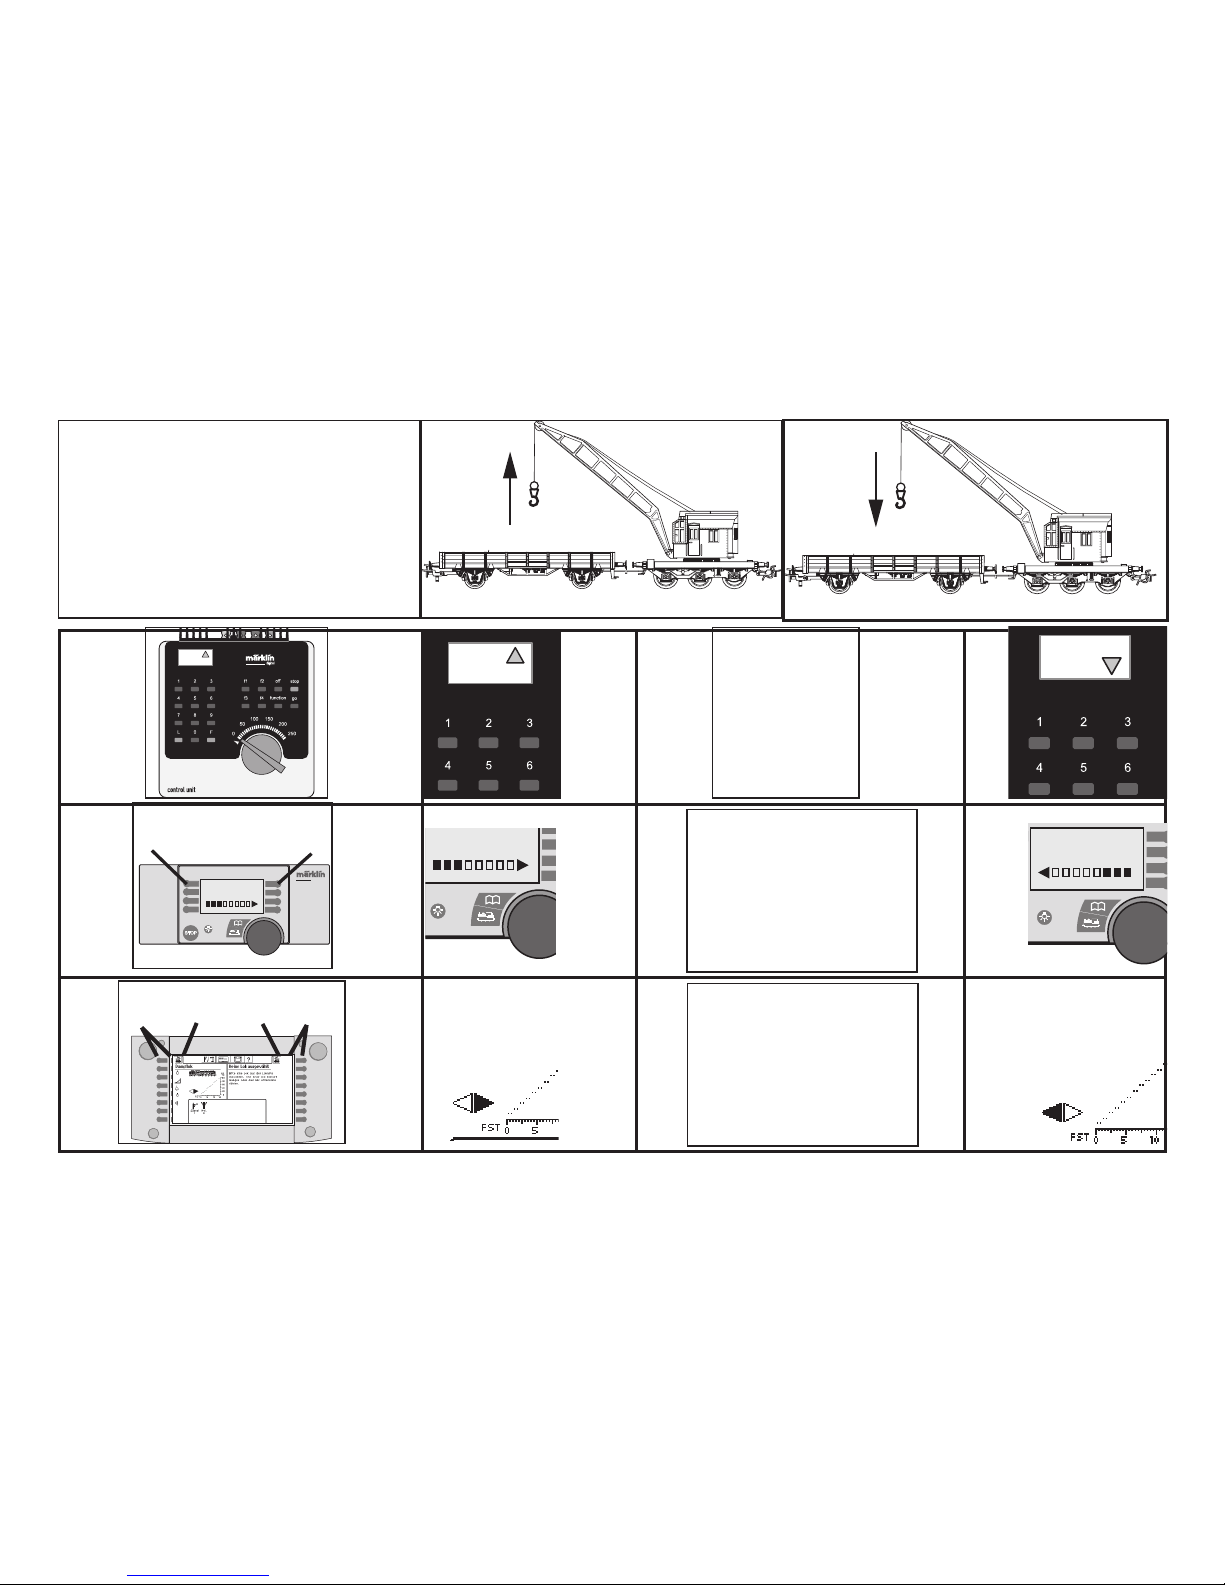
Schaltbare Funktionen • Controllable
Functions • Fonctions commutables•
Schakelbare functies • Funciones
posibles • Funzioni commutabili •
Kopplingsbara funktioner / Styrbare
funktioner
77
STOP
mobile station
systems
1
5
f0
f0f8
f8
Taste 2 ohne Symbol
Button 2 without symbol
Touche 2 sans symbole
Toets 2 zonder symbool
Tecla 2 sin símbolo
Tasto 2 senza simbolo
Knapp 2 utan symbol
Knap 2 uden symbol
f2
77
mobile station
systems
5
77
mobile station
systems
5
Taste f2 ohne Symbol
Button f2 without symbol
Touche f2 sans symbole
Toets f2 zonder symbool
Tecla f2 sin símbolo
Tasto f2 senza simbolo
Knapp f2 utan symbol
Knap f2 uden symbol
Page 14
14
Schaltbare Funktionen • Controllable
Functions • Fonctions commutables•
Schakelbare functies • Funciones
posibles • Funzioni commutabili •
Kopplingsbara funktioner / Styrbare
funktioner
77
STOP
mobile station
systems
1
5
f0
f0f8
f8
Taste 3 ohne Symbol
Button 3 without symbol
Touche 3 sans symbole
Toets 3 zonder symbool
Tecla 3 sin símbolo
Tasto 3 senza simbolo
Knapp 3 utan symbol
Knap 3 uden symbol
f3
77
mobile station
systems
5
77
mobile station
systems
5
Taste f3 ohne Symbol
Button f3 without symbol
Touche f3 sans symbole
Toets f3 zonder symbool
Tecla f3 sin símbolo
Tasto f3 senza simbolo
Knapp f3 utan symbol
Knap f3 uden symbol
Page 15

15
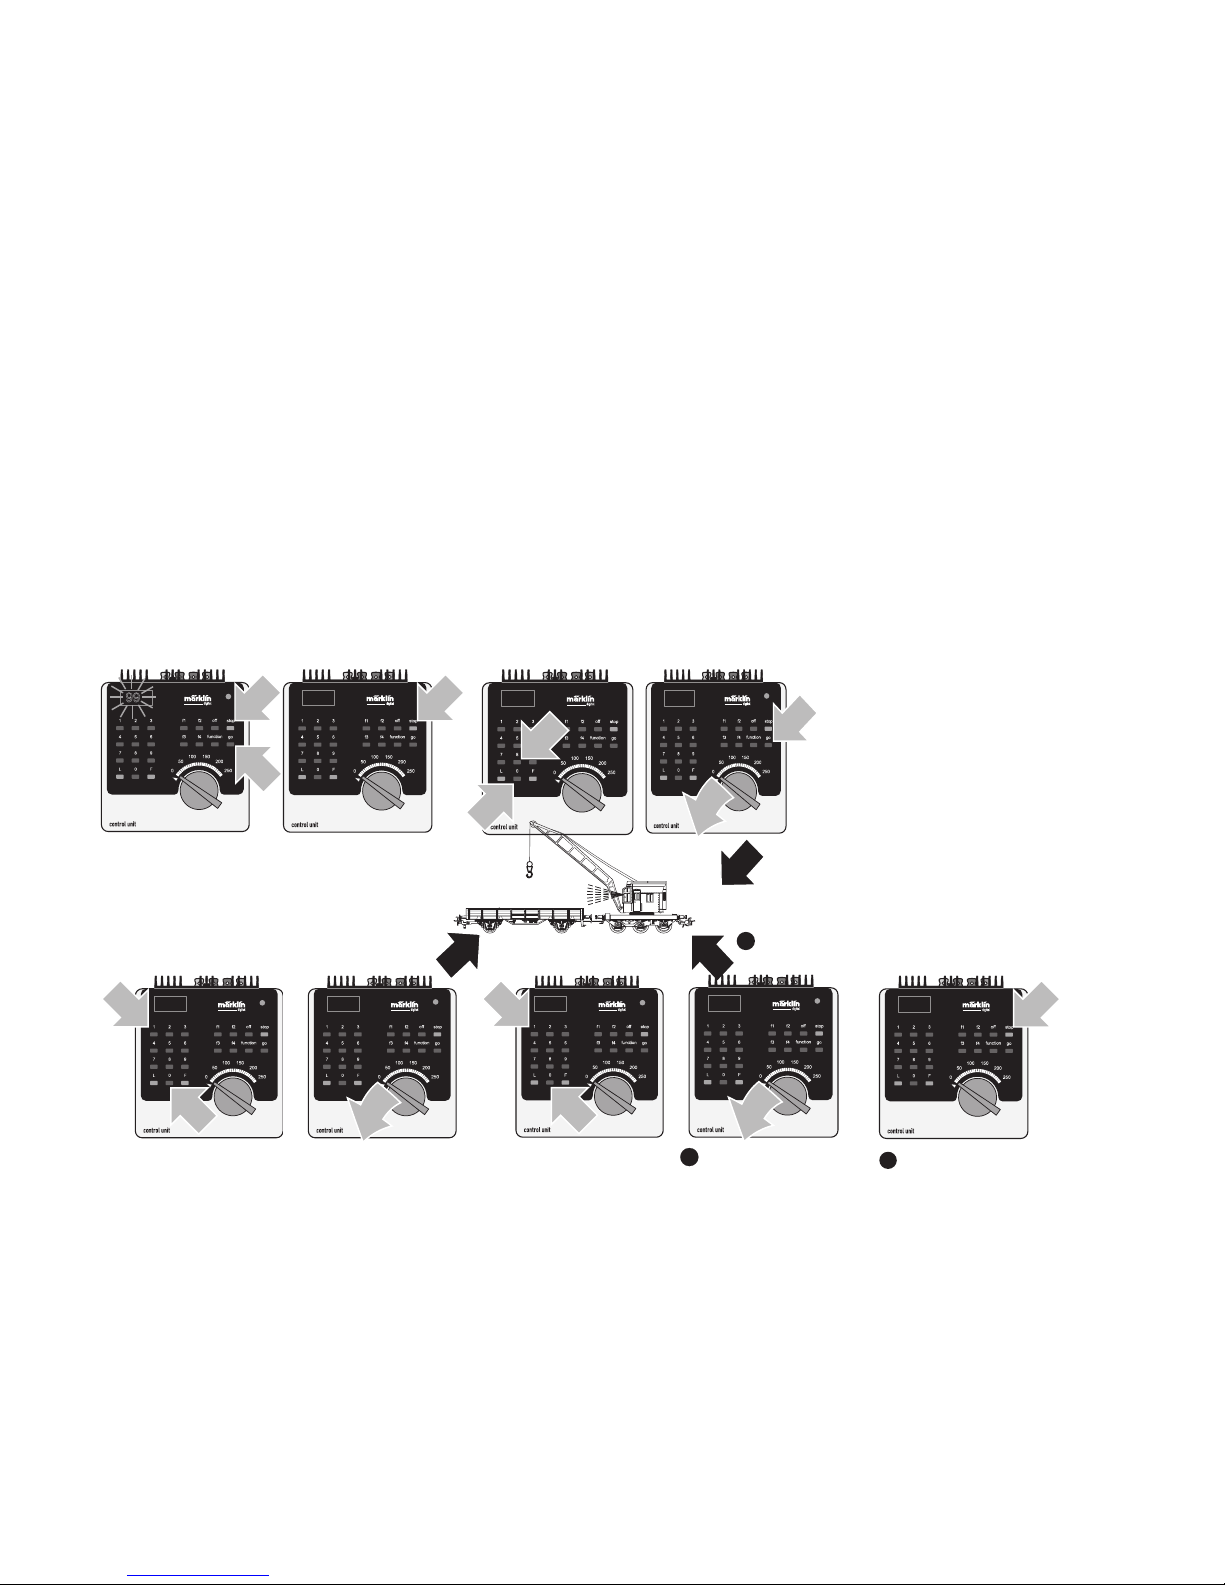
Adresse einstellen mit der Control Unit
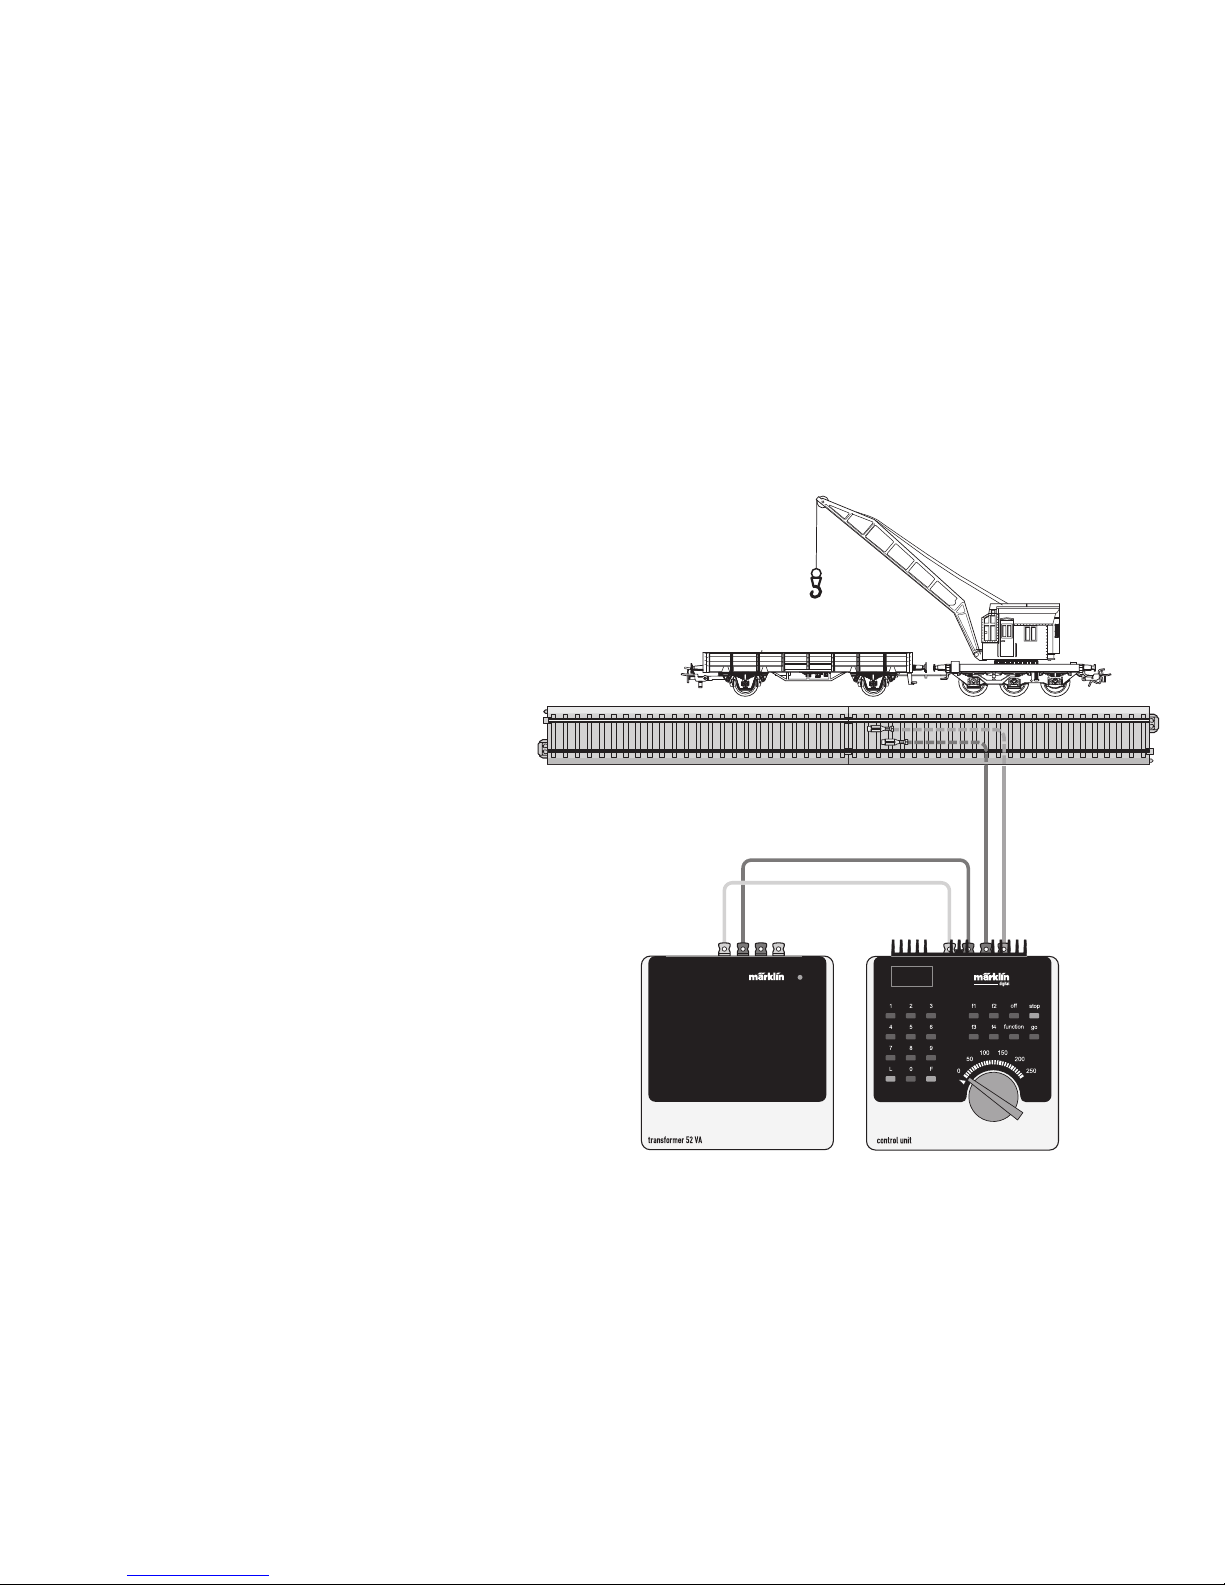
1. Voraussetzung: Aufbau wie Grafik S. 19.
Nur der Kran ist auf dem Gleis.
2. „Stop“- und „Go“-Taste gleichzeitig drücken, bis
„99“ in der Anzeige aufblinkt.
3. „Stop“-Taste drücken.
4. Adresse „80“ eingeben.
5.
Umschaltbefehl am Fahrregler halten.
Während
des Haltens die „Go“-Taste drücken.
6. Licht des Krans, von vorne durch das offene
Fenster im Führerhaus sichtbar, blinkt langsam.
Wenn nicht, ab Schritt 2 wiederholen.
7. Registernummer 01 eingeben
8. Fahrtrichtungswechsel betätigen.
9. Licht blinkt schnell
10. Neuen Wert zwischen 01 und 80 eingeben.
11. Fahrtrichtungswechsel betätigen.
12. Licht blinkt 3 x schnell
13. Vorgang beenden mit Drücken der „Stop“Taste. Anschließend Drücken der „Go“-Taste.
Setting adress with the Control Unit
1. Requirement: Setup as in diagram on page 19.
Only the crane to be changed can be on the track.
2. Press the “Stop” and “Go” at the same time until
“99” blinks in the display.
3. Press the “Stop” button.
4. Enter the locomotive address „80“.
5. Hold the control knob in the reverse direction area.
While holding the control knob here, press the
„Go“ button.
6.
The light in the crane cab can be seen through the
open window on the front of the crane cab. It will
blink slowly. If it does not do this, then repeat Step 2.
7. Enter the register number 01
8. Active the change of direction.
9. The headlights will blink rapidly.
10. Entering a new value between 01 and 80.
11. Active the change of direction.
12. The light blinks rapidly 3 times.
13. End the process by pressing the „Stop“ button.
Then press the „Go“ button.
Page 16

16
Réglage des paramètres de la loco avec la
Control Unit
1. Condition: Montage comme sur illustration en
page 19. Seule la loco à modifier peut se trouver
sur la voie.
2. Pressez simultanément les touches „Stop“ et „Go“
jusqu’à ce que le nombre „99“ clignote sur l’écran.
3. Pressez la touche „Stop“.
4. Introduisez l’adresse de loco „80“.
5. Maintenir l’ordre de commutation sur le régulateur
de marche. Durant le maintien, appuyer sur la
touche „Go“.
6. Eclairage de la grue, visible de l’avant par la fenêt
-
re ouverte de la cabine de conduite, clignote lente
ment. Dans le cas contraire, renouveler l’opération
à partir de l’étape 2.
7. Indiquer le numéro d’enregistrement 01.
8. Activer l’inversion du sens de marche.
9. Les feux clignotent rapidement.
10. Entrer une nouvelle valeur entre 01 et 80.
11. Activer l’inversion du sens de marche.
12. La lumière clignote 3x rapidement.
13. Terminez le processus en pressant la touche
„Stop“. Ensuite, pressez la touche „Go“.
Locparameters instellen met de Control Unit
1.
Voorwaarde: opbouw zoals tekening op pagina 19.
Alleen de loc die gewijzigd moet worden op de rails.
2. ”Stop”- en ”Go”-toets gelijktijdig indrukken tot
”99” in het display oplicht.
3. ”Stop”-toets indrukken.
4. Het adres „80“ invoeren.
5. Omschakelcommando met de rijregelaar vast
houden. Tijdens het vasthouden de toets “Go”
indrukken.
6. De verlichting van de kraan, aan de voorzijde door
het open raam van de cabine zichtbaar, knippert
langzaam. Zo niet, dan stap 2 herhalen.
7 Het registernummer 01 invoeren .
8. Omschakelcommando geven.
9. Verlichting gaat snel knipperen.
10. Nieuwe waarde tussen 01 en 80 invoeren.
11. Omschakelcommando geven.
12. Licht knippert 3 keer snel.
13 Sessie beëindigen door het indrukken van de toets
“Stop”. Aansluitend de toets “Go” indrukken.
Page 17

17
Parámetros de la locomotora configurables con el
Control Unit
1. Condición previa: montaje como el gráfico
pág. 19. En la vía debe encontrarse solamente la
locomotora a configurar.
2. Apretar simultáneamente la tecla “Stop” y “Go”
hasta que aparece “99” en pantalla.
3. Apretar la tecla “Stop”.
4. Marcar el código de la locomotora „80“.
5. Mantener la orden de conmutación en el regulador
de marcha. Durante la parada, pulsar la tecla „Go“.
6. .La luz de la grúa, visible por delante a través de la
ventana de la cabina del gruista, destella lentamen
-
te. De no ser así, repetir desde el paso 2.
7. Introducir el número de registro 0.1
8. Activar el cambio de sentido de la marcha.
9. La luz se enciende con intermitencia rápida
10.
Introducir un valor nuevo comprendido entre 01 y 80.
11. Activar el cambio de sentido de la marcha.
12. La luz destella 3 veces.
13. Repetir la operación pulsando la tecla „Stop“. A
continuación, pulsar la tecla „Go“.
Impostazione dei parametri della locomotiva con la
Control Unit
1. Predisposizione: assetto come da schema a
pag. 19. Soltanto la locomotiva da modificare si
trova sul binario.
2. Premere contemporaneamente i tasti „Stop“ e
„Go“, fino a che sul visore lampeggia „99“.
3. Premere il tasto „Stop“.
4. Introdurre l’indirizzo della locomotiva „80“.
5. Tenere premuto il comando di commutazione
sul regolatore di marcia. Durante tale pressione,
premere il tasto „Go„.
6. L’illuminazione della gru, visibile anteriormente
attraverso il finestrino aperto nella cabina di co
mando, lampeggia lentamente. In caso negativo,
si riprenda dal punto 2.
7. Introdurre il numero di registro 01.
8. Azionare la commutazione della direzione di marcia.
9. I fanali lampeggiano velocemente
10. Impostazione di un nuovo valore tra 01 e 80.
11. Azionare la commutazione della direzione di marcia.
12. La luce lampeggia con velocità 3 x.
13. Terminare il procedimento con la pressione del tas
-
to „Stop„.Successivamente premere il tasto „Go„.
Page 18

18
Lokparametrar ställs in med Control Unit
1. Förutsättning: Montering som visas enligt grafik på
s. 19. Endast det lok som ska ändras ska finnas på
spåret.
2. Både „Stop“- och „Go“-tangenten hålls nedtryckt
tills „99“ blinkar på displayen.
3. „Stop“-tangenten hålls ner.
4. Lokadress „80“ matas in.
5. Tryck ned körkontrollen, som vid ändring av kör
riktningen. Håll ned knappen och tryck samtidigt
på „Go“- knappen.
6. Kranens lykta, synlig framifrån genom förarhyttens
öppna fönster, blinkar långsamt. Om så ej är fallet:
Upprepa manövern från punkt 2.
7. Ange registernummren 01.
8. Gör en körriktningsändring.
9. Strålkastarna blinkar snabbt.
10. Mata in ett nytt värde mellan 01 och 80.
11. Gör en körriktningsändring.
12. ljuset blinkar 3x snabbt.
13. Avsluta med att trycka på “Stop“- knappen. Tryck
därefter på “Go“-knappen.
Indstilling af lokomotivparametre med Control Unit
1. Forudsætning: Opbygning som på grafikken
s. 19. Kun det lokomotiv, der skal ændres, er
på sporet.
2. Tryk samtidig på „Stop“- og „Go“-tasten, indtil
„99“ blinker i displayet.
3. Tryk på „Stop“-tasten.
4. Indtast den lokomotivadresse „80“.
5. Hold omskiftningskommando på køreregulator Tryk
på „Go“-knappen mens der holdes.
6. Kranens lys, som kan ses forfra igennem den
åbne rude i førerhuset, blinker langsomt. Hvis ikke
gentages proceduren fra trin 2.
7. Indtast registernummeret 01.
8. Betjen køreretningsskiftet.
9. Lyset blinker hurtigt.
10. Indtast en ny værdi mellem 01 og 80.
11. Betjen køreretningsskiftet.
12. Lyset blinker 3 x hurtigt).
13. Afslut proceduren ved at trykke på „Stop“- knap
-
pen Tryk derefter på „Go“-knappen.
Page 19
19
Kranadresse mit Control Unit ändern.
Changing crane adress with the Control Unit.
Modification des adresse avec la Control Unit.
Kraan adresse met de Control Unit.
Modificar los codigo de la grua con el Control Unit.
Modifica dei indirizzi della gru con la Control Unit.
Kranvagn adress ändras med Control Unit.
Ændring af kranvognen adresse med Control Unit.
Page 20
20
1
80
1
1
1
99
1
2
80
2
1
01
01
1
1
2
10
10
1
11
14
12
Kranadresse mit Control Unit ändern.
Changing crane adress with the Control Unit.
Modification des adresse avec la Control Unit.
Kraan adresse met de Control Unit.
Modificar los codigo de la grua con el Control Unit.
Modifica dei indirizzi della gru con la Control Unit.
Kranvagn adress ändras med Control Unit.
Ændring af kranvognen adresse med Control Unit.
Page 21

21
Kranadresse mit der Mobile Station /
Central Station verändern
1. Adresse des Krans eingeben.
2. Zum Untermenü „LOKÄNDERN“ wechseln.
3. Zum Untermenü „ADRESSE“
wechseln.
4. Neuen Wert eingeben und übernehmen.
Beachten Sie die Hinweise in der Anleitung zur Mobile
Station / Central Station.
Changing Crane adress with the
Mobile Station / Central Station
1. Select the crane from the locomotive list
2. Change to the submenu “EDIT LOC”.
3. Go to the submenu „ADRESSE“
4. Enter the new value and accept it into the system.
Please note the information in the instructions for the
Mobile Station / Central Station.
Modification des adresse de la grue avec la
Mobile Station / Central Station
1. Sélectionnez la grue dans la liste
2. Allez au sous-menu „MODIF LOC“.
3. Ouvrir le sous-menu « ADRESSE »
4. Entrez la nouvelle valeur et acceptez.
Respectez les remarques mentionnées dans l’instruction
accompagnant la Mobile Station / Central Station.
Kraanwagen adress wijzigen met het Mobile Station /
Central Station
1.Kraanwagen uit de loclijst kiezen.
2. Ga naar het nevenmenu ”WIJZIG LOC”.
3. Naar het nevenmenu “ADRESSE” .
4. Nieuwe waarde invoeren en overnemen.
Lees ook de opmerkingen in de gebruiksaanwijzing van
het Mobile Station / Central Station.
Modificar los dirección de la locomotora con la
Mobile Station / Central Station
1. Selecciona la grúa de la lista de locomotora.
2. Pasar al menú subsidiario “EDIT LOC”.
3. Cambiar al submenú „ADRESSE“
4. Introducir el nuevo código y memorizar.
Observe las indicaciones en las instrucciones de la
Mobile Station / Central Station.
Modifica dei indirizzii della gru con la Mobile Station
/ Central Station
1. Selezionare la gru dalll‘elenco locomotive
2. Commutare al sottomenù „EDIT LOC“.
3. Sul menù sottostante commutare „ADRESSE„
4. Introdurre il nuovo valore e accettarlo.
Prestate attenzione alle avvertenze nelle istruzioni della
Mobile Station / Central Station.
Page 22
22
Kranvagn adress ändras med Mobile Station /
Central Station
1. Välj kranvagnen från loklistan.
2. Växla till undermenyn „EDIT LOC“.
3.
Byt till resp. Undermeny: “ADRESSE“.
4. Mata in nytt värde och acceptera.
Glöm ej: Se även i anvisningarna i bruksanvisningen för
Mobile Station / Central Station.
Ændring af Kranvognen adresse med
Mobile Station / Central Station
1. Vælg kranen fra listen.
2. Skift til undermenuen „EDIT LOC“.
3. Til undermenu „ADRESSE“
4. Indtast den nye værdi og overtag den.
Lagttag henvisningerne i vejledningen til Mobile Station
/ Central Station.
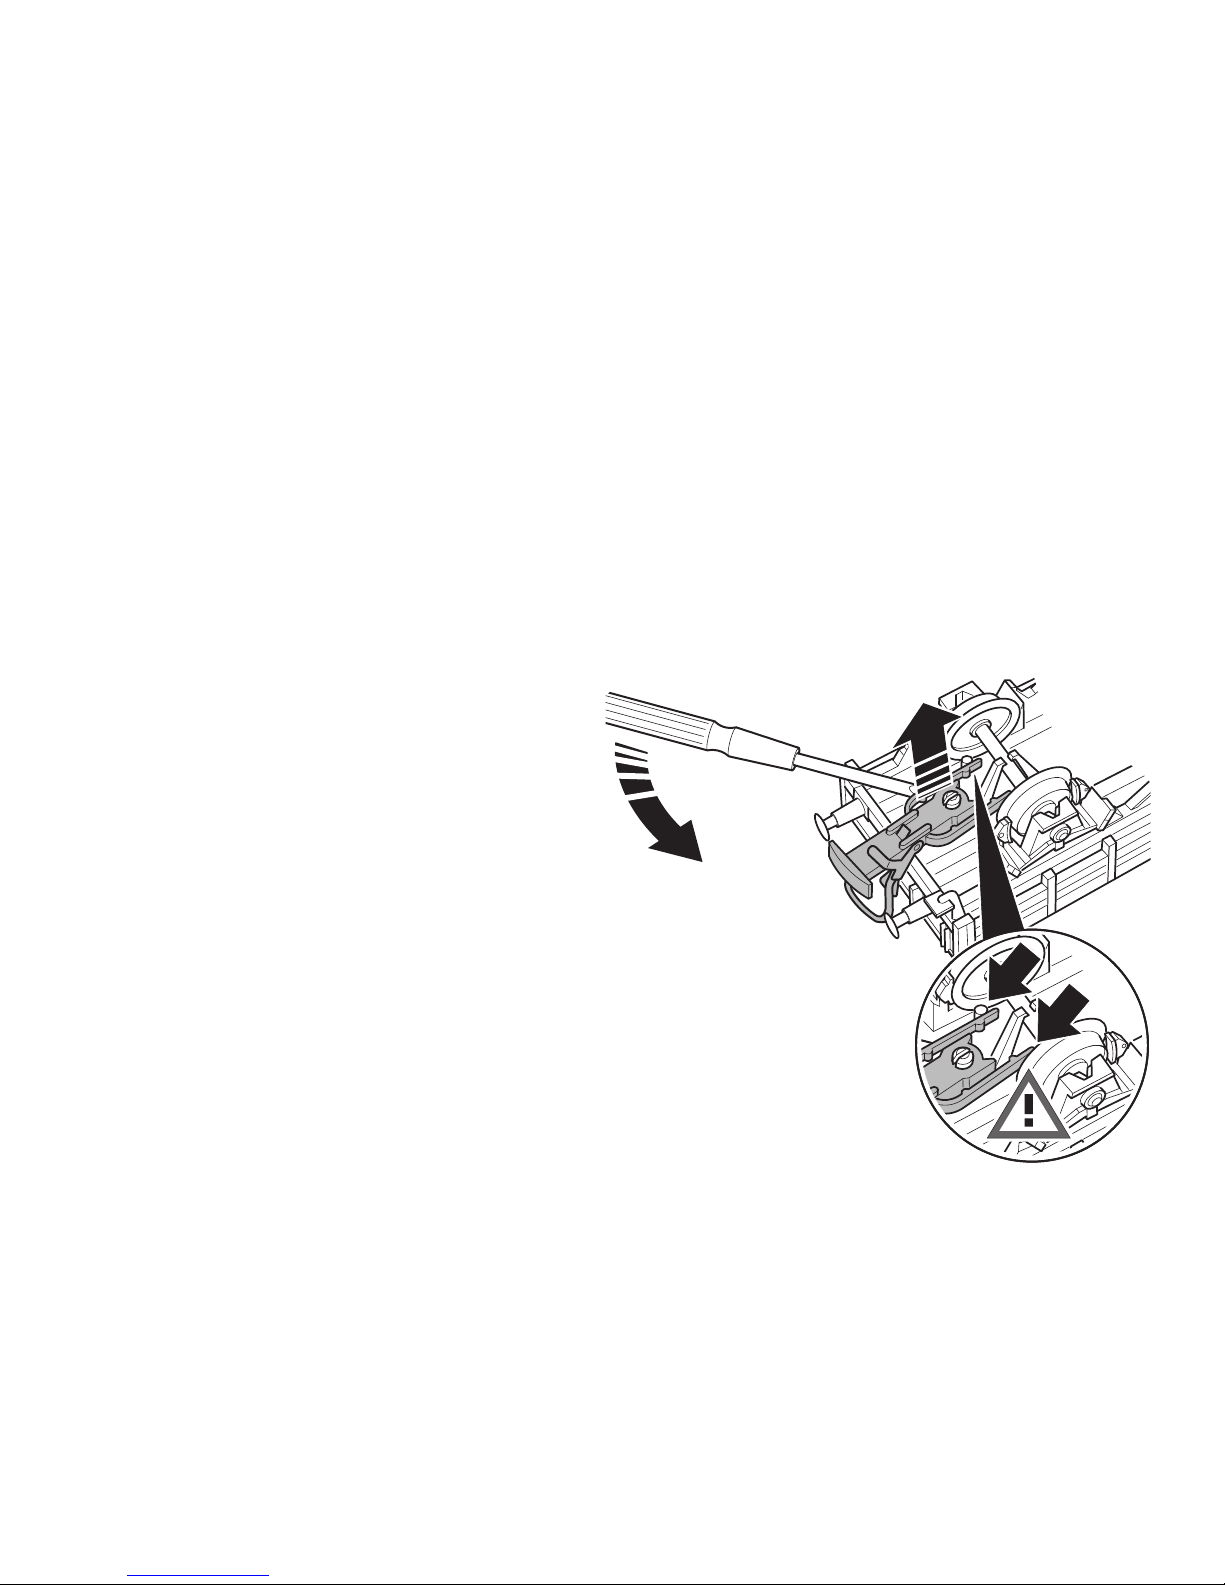
2.
1.
Kupplung am Schutzwagenende austauschen
Replacing the coupler on the end of the crane tender car
Echanger l’attelage à l’extrémité du wagon de protection
Koppeling aan de hulpwagen vervangen
Sustituir el enganche del extremo del vagón de protección
Sostituzione del gancio all’estremità del carro scudo
Byte av skyddsvagnens koppel
Udskift koblingen på hjælpevognens ende
Page 23
23
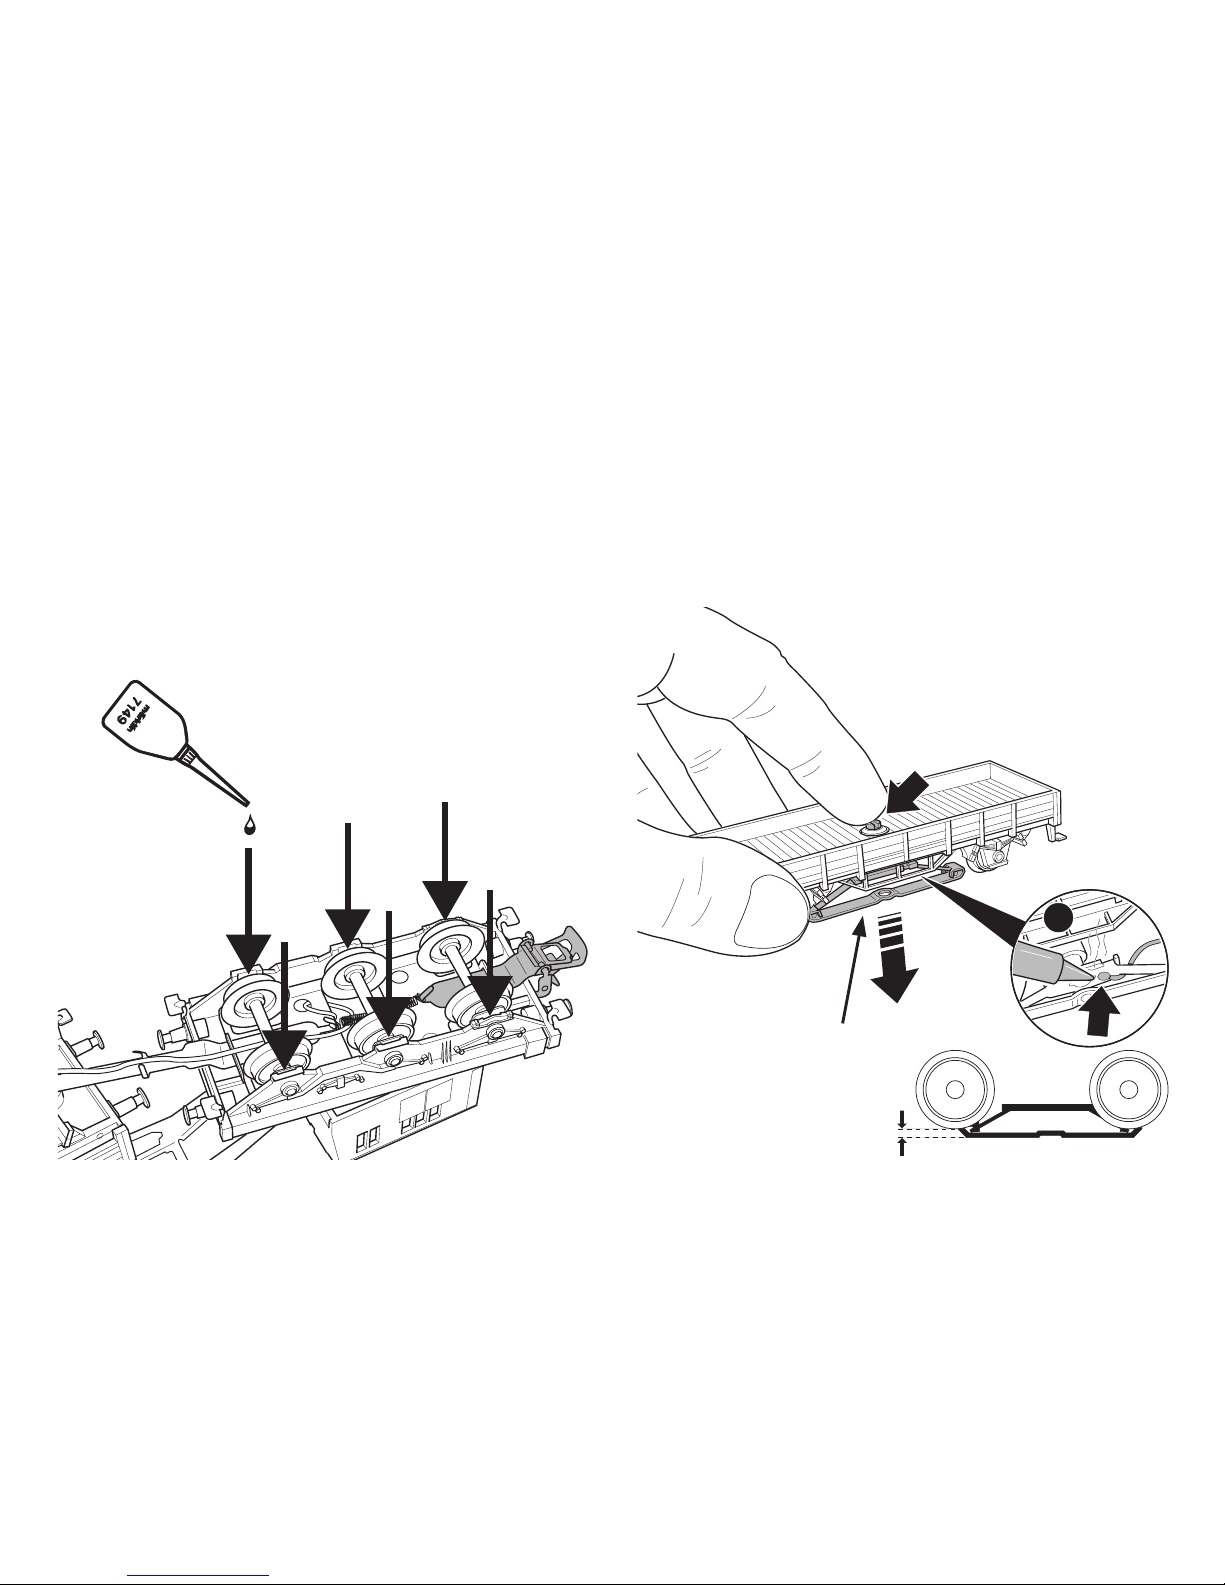
Schmierung nach etwa 40 Betriebsstunden
Lubrication after approximately 40 hours of operation
Graissage après environ 40 heures de marche
Smering na ca. 40 bedrijfsuren
Engrase a las 40 horas de funcionamiento
Lubrificazione dopo circa 40 ore di funzionamento
Smörjning efter ca. 40 driftstimmar
Smøring efter ca. 40 driftstimer
Schleifer auswechseln
Changing pickup shoes
Changer les frotteurs
Slepers vervangen
Cambio del patín
Sostituzione del pattino
Släpsko byts
Slæbesko udskiftes
2.
1.
112706
2 mm
Page 24

Gebr. Märklin & Cie. GmbH
Postfach 8 60
D-73008 Göppingen
www.maerklin.com
Änderungen vorbehalten
© by Gebr. Märklin & Cie. GmbH
This device complies with Part 15 of the FCC Rules.
Operation is subject to the following two conditions:
(1) This device may not cause harmful interference, and
(2) this device must accept any interference received, including
interference that may cause undesired operation.
113 605/1108/HaEf
 Loading...