

Page 1
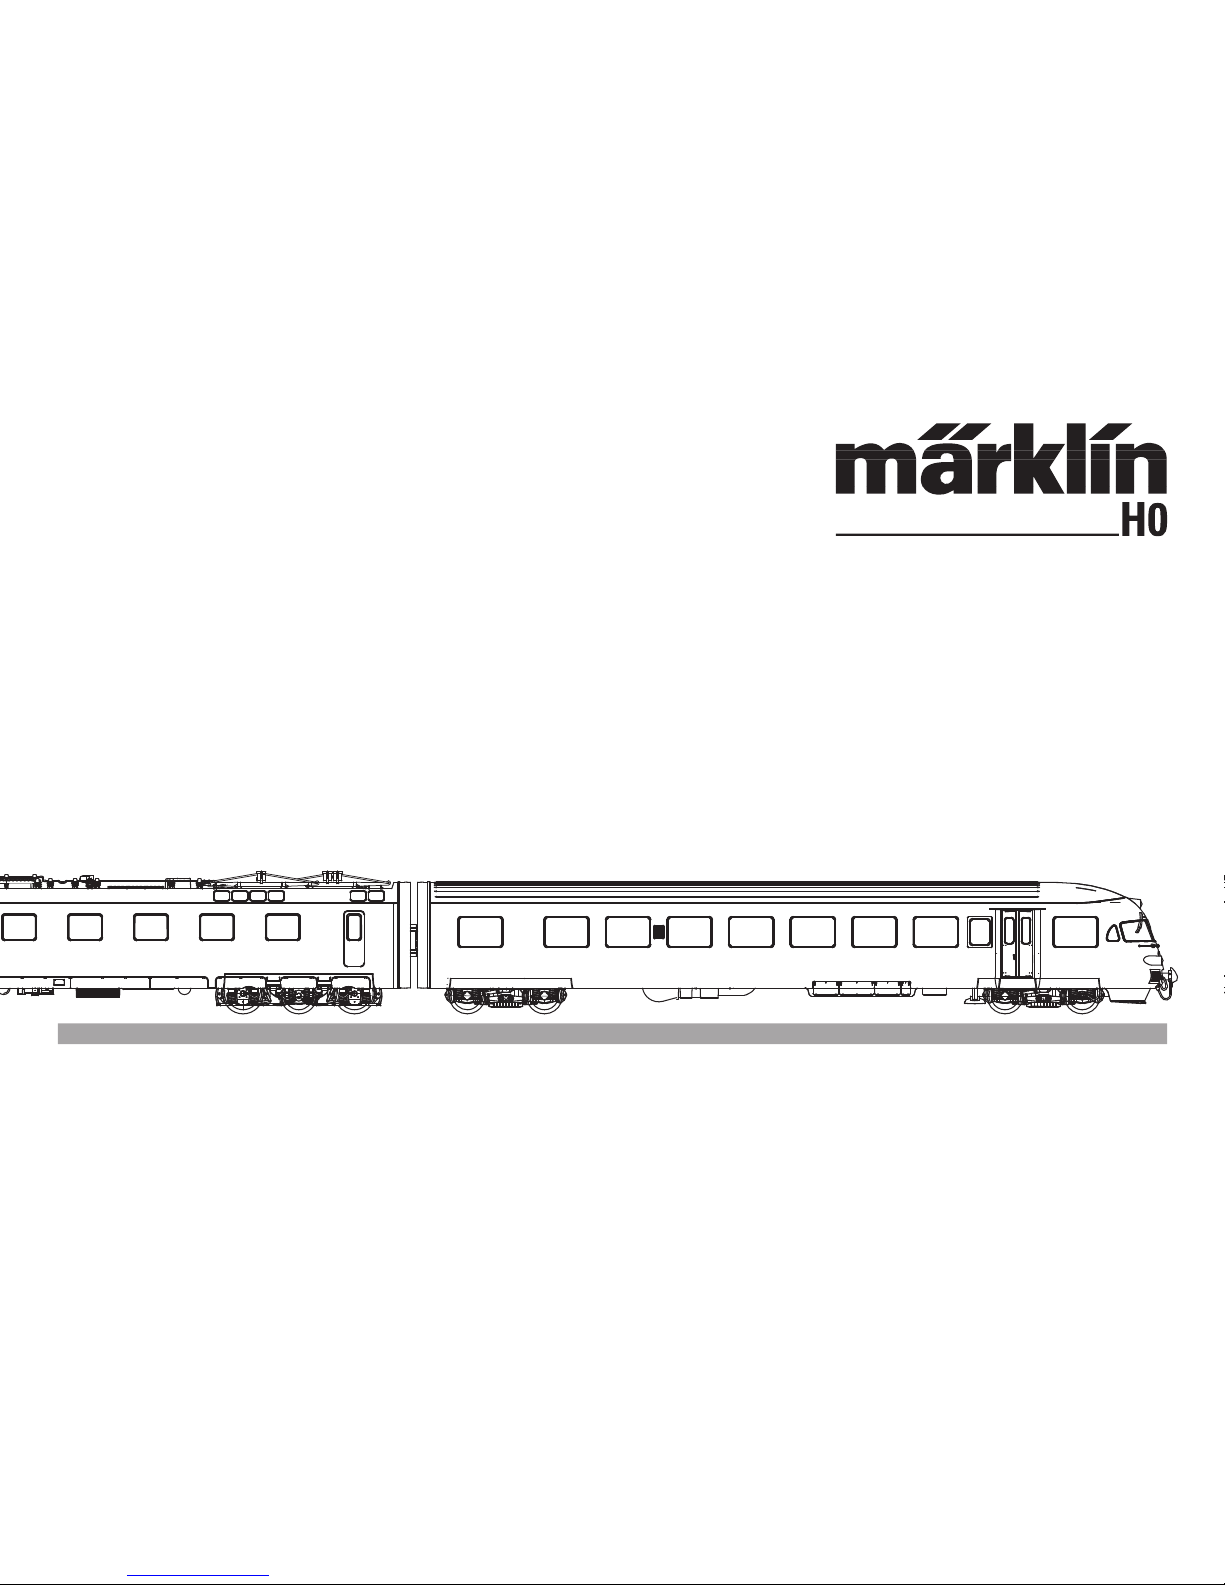
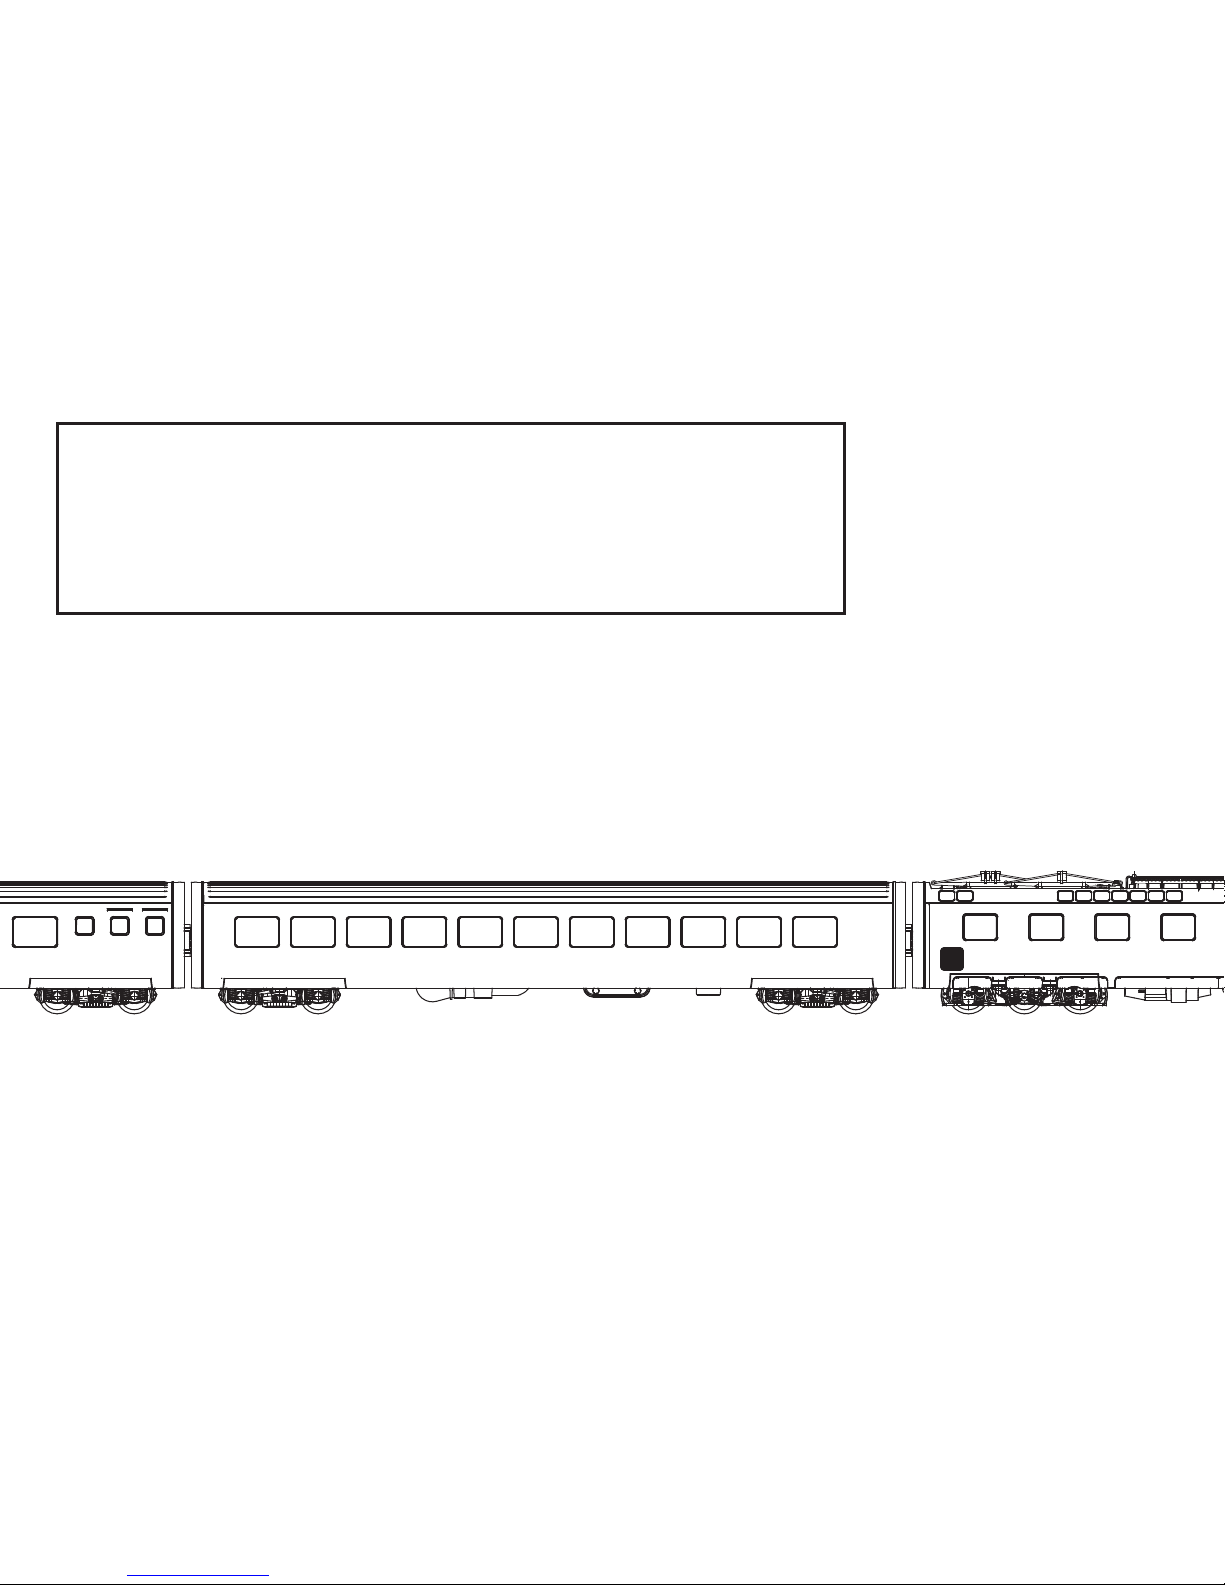
Modell des RAe TEE II
39540
Page 2

2
Informationen zum Vorbild:
Der Triebzug RAe TEE II wurde als Viersystem Triebzug
1961 für die SBB gebaut. Dies hatte den Vorteil, dass der
Zug ohne große Aufenthaltszeiten an den Systemgrenzen
eingesetzt wurde. Neben dem besonderen Komfort, be
saß der Zug nur Wagen der 1. Klasse. Die Antriebseinheit
ist im Original, wie im Modell im Mittelwagen untergebracht. Nur der Mittelwagen ist mit einem Seitengang, die
restlichen Wagen sind als Großraumwagen eingerichtet.
Seine Einsätze waren unter anderem:
- TEE „Gottardo“ Zürich – Milano – Zürich
- TEE „Cisalpin“ Milano – Paris – Milano
- TEE „Edelweiss“ Zürich – Amsterdam – Zürich
Nach 30 Jahren Einsatz wurden die Züge umgebaut und
als Euro City eingestuft. Seit dieser Zeit gab es auch
Wagen der 2.Klasse im Zugverband.
Information about the Prototype:
The RAe TEE II powered rail car train was built for the SBB
in 1961 as a four-system powered rail car train. The advantage of this was that the train could be used across power
system limits without long stops. The train has a special
level of comfort and only cars with 1st class seating. The
propulsion system for the original and for the model is in
the middle car. Only the middle car was set up with a side
corridor; the other cars were arranged as open seating
cars. The train was used on these routes among others:
- TEE „Gottardo“ Zürich – Milan – Zürich
- TEE „Cisalpin“ Milan – Paris – Milan
- TEE „Edelweiss“ Zürich – Amsterdam – Zürich
After 30 years of use, the trains were rebuilt and used in
Euro City service. Since this time there were also cars with
2nd class seating in the trains.
Informations relatives au modèle réel :
Le train automoteur RAe TEE II fut construit en 1961 pour
les CFF comme train automoteur quadricourant. Cette
conception présentait l’avantage de pouvoir utiliser ce
train sans arrêt prolongé aux frontières des systèmes.
Outre son confort particulier, le train possédait unique
ment des voitures de 1re classe. L’unité motrice est logée
dans la voiture centrale, dans le train réel comme sur
le modèle réduit. Seule la voiture centrale présente un
couloir latéral, les autres sont à couloir central. Ce train
fut utilisé entre autres sur les lignes suivantes :
- TEE „Gottardo“ Zurich – Milan – Zurich
- TEE „Cisalpin“ Milan – Paris – Milan
- TEE „Edelweiss“ Zurich – Amsterdam – Zurich
Après 30 années de service, ces trains furent transfor-
més et classés Euro City. Depuis, les rames comportent
également des voitures de 2nde classe.
Informatie over het voorbeeld:
Het treinstel RAe TEE II werd in 1961 als vier-systemen
treinstel voor de SBB gebouwd. Dit had als voordeel dat
de trein zonder veel oponthoud op de systeemgrenzen gebruikt kon worden. Naast het bijzondere comfort beschikte
de trein uitsluitend over rijtuigen van de eerste klasse.
De aandrijving bij dit model is, net als bij het origineel, in
het middelste rijtuig ondergebracht. Alleen het middelste
rijtuig heeft een zijpad, de andere rijtuigen hebben een
middenpad. Het treinstel werd onder andere ingezet als:
- TEE “Gorttardo” Zürich - Milaan - Zürich
- TEE “Cisalpin” Milaan - Parijs - Milaan
- TEE “Edelweiss” Zürich - Amsterdam - Zürich
Na dertig jaar ingebruik te zijn geweest werden de treinen
omgebouwd en ingezet als Euro City. Sindsdien zaten er
ook rijtuigen van de tweede klasse in de trein.
Page 3

3
Safety Warnings
• This locomotive is to be used only with an operating
system designed for it (Märklin 6646/6647 AC transformer, Märklin Delta, Märklin Digital or Märklin Systems).
Use only transformers rated for your local hosehold
power.
Do not under any circumstances use transformers
rated for 220 volts or 110 volts
• This locomotive must never be supplied with power
from more than one transformer.
• Pay close attention to the safety warnings in the
instructions for your operating system.
The maintenance work necessary with normal operation
of this locomotive is described below. Please see your
authorized Märklin dealer for repairs or spare parts.
No warranty or damage claims shall be accepted in those cases
where parts neither manufactured nor approved by Märklin have
been installed in Märklin products or where Märklin products have
been converted in such a way that the non-Märklin parts or the
conversion were causal to the defects and / or damage arising. The
burden of presenting evidence and the burden of proof thereof,
that the installation of non-Märklin parts or the conversion in or of
Märklin products was not causal to the defects and / or damage
arising, is borne by the person and / or company responsible for
the installation and / or conversion, or by the customer.
!
Sicherheitshinweise
• Die Lok darf nur mit einem dafür bestimmten Betriebs
system (Märklin Wechselstrom-Transformator 6647,
Märklin Delta, Märklin Digital oder Märklin Systems)
eingesetzt werden.
Nur Transformatoren verwenden, die Ihrer örtlichen
Netzspannun entsprechen.
Keinesfalls Transformatoren für eine Netzspannung
von 220 V bzw. 110 V einsetzen.
• Die Lok darf nur aus einer Leistungsquelle gleichzeitig
versorgt werden.
• Beachten Sie unbedingt die Sicherheitshinweise in der
Gebrauchsanleitung zu Ihrem Betriebssystem.
Die bei normalem Betrieb anfallenden Wartungsarbeiten
sind nachfolgend beschrieben. Für Reparaturen oder
Ersatzteile wenden Sie sich bitte an Ihren Märklin-Fach
-
händler.
Jegliche Garantie-, Gewährleistungs- und Schadensersatzansprüche sind ausgeschlossen, wenn in Märklin-Produkten nicht
von Märklin freigegebene Fremdteile eingebaut werden und /
oder Märklin-Produkte umgebaut werden und die eingebauten
Fremdteile bzw. der Umbau für sodann aufgetretene Mängel und
/ oder Schäden ursächlich war. Die Darlegungs- und Beweislast
dafür, dass der Einbau von Fremdteilen oder der Umbau in bzw.
von Märklin-Produkten für aufgetretene Mängel und / oder Schäden
nicht ursächlich war, trägt die für den Ein- und / oder Umbau verantwortliche Person und / oder Firma bzw. der Kunde.
!
Page 4

4
Remarques importantes sur la sécurité
• La locomotive ne peut être mise en service qu’avec
un système d’exploitation adéquat (Märklin courant
alternatif - transformateur 6647, Märklin Delta, Märklin
Digital ou Märklin Systems).
Utilisez uniquement des transformateurs correspon
dant à la tension secteur locale.
Bon courage en aucun cas des transformateurs
pour une tension secteur de 220 V, respectivement
110 V.
• La locomotive ne peut être alimentée en courant que
par une seule source de courant.
• Veuillez impérativement respecter les remarques sur
la sécurité décrites dans le mode d’emploi en ce qui
concerne le système d’exploitation.
Les travaux d‘entretien occasionnels à effectuer en
exploitation normale sont décrits plus loin. Pour toute
réparation ou remplacement de pièces, adressez vous à
votre détaillant-spécialiste Märklin.
Tout recours à une garantie commerciale ou contractuelle ou à
une demande de dommages-intérêt est exclu si des pièces non
autorisées par Märklin sont intégrées dans les produits Märklin
et / ou si les produits Märklin sont transformés et que les pièces
d’autres fabricants montées ou la transformation constituent la
cause des défauts et / ou dommages apparus. C’est à la personne
et / ou la société responsable du montage / de la transformation
ou au client qu’incombe la charge de prouver que le montage des
pièces d’autres fabricants sur des produits Märklin ou la transformation des produits Märklin n’est pas à l’origine des défauts et ou
dommages apparus.
!
Veiligheidsvoorschriften
• De loc mag alleen met een daarvoor bestemd bedrjfssysteem (Märklin wisselstroom transformator 6647,
Märklin Delta, Märklin digitaal of Märklin Systems)
gebruikt worden.
Alleen transformatoren gebruiken die geschikt zijn
voor de bij u geldende netspanning.
In geen geval transformatoren voor een netspanning
van 220 V dan wel 110 V gebruiken.
• De loc mag niet vanuit meer dan één stroomvoorzie
-
ning gelijktijdig gevoed worden.
• Lees ook aandachtig de veiligheidsvoorschriften in de
gebruiksaanwijzing van uw bedrijfssysteem.
De in het normale bedrijf voorkomende onderhoudswerkzaamheden zijn verderop beschreven. Voor reparatie of
onderdelen kunt u zich tot uw Märklin winkelier wenden.
Elke aanspraak op garantie en schadevergoeding is uitgesloten,
wanneer in Märklin-producten niet door Märklin vrijgegeven vreemde onderdelen ingebouwd en / of Märklin-producten omgebouwd
worden en de ingebouwde vreemde onderdelen resp. de ombouw
oorzaak van nadien opgetreden defecten en / of schade was. De
aantoonplicht en de bewijslijst daaromtrent, dat de inbouw van
vreemde onderdelen in Märklin-producten of de ombouw van
Märklin-producten niet de oorzaak van opgetreden defecten en /
of schade is geweest, berust bij de voor de inbouw en/of ombouw
verantwoordelijke persoon en / of firma danwel bij de klant.
!
Page 5

5
Aviso de seguridad
• La locomotora solamente debe funcionar en un
sistema de corriente propio (Märklin corriente alterna
– transformador 6647 – Märklin Delta – Märklin Digital
o Märklin Systems).
Utilizar únicamente transformadores que correspon
-
dan a la tensión de red local.
En ningún caso utilizar transformadores para una
tensión de red de 220 V o bien 110 V.
• La locomotora no deberá recibir corriente eléctrica mas
que de un solo punto de abasto.
• Observe bajo todos los conceptos, las medidas de
seguridad indicadas en las instrucciones de su sistema
de funcionamiento.
Los trabajos de mantenimiento normales están descritos
a continuación. Para reparaciones o recambios contacte
con su proveedor Märklin especializado.
Se excluye todo derecho de garantía, prestación de garantía e
indemnización sobre aquellos productos Märklin en los que se hubieran montado piezas ajenas no autorizadas por Märklin y/o sobre
aquellos productos Märklin que hayan sido modificados cuando la
piezas ajenas montadas o la modificación sean las causas de los
desperfectos y/o daños posteriormente surgidos. La persona y/o
empresa o el cliente responsable del montaje o modificación será
el responsable de probar y alegar que el montaje de piezas ajenas
o la modificación en/de productos Märklin no son las causas de los
desperfectos y/o daños surgidos.
!
Avvertenze per la sicurezza
• Tale locomotiva deve essere impiegata soltanto con un
sistema di funzionamento adeguato per questa (trasformatore per corrente alternata Märklin 6647, Märklin
Delta, Märklin Digital oppure Märklin Systems).
Impiegare solamente dei trasformatori che corris
pondono alle loro tensioni di rete locali.
Non si impieghino in nessun caso dei trasformatori
per una tensione di rete di 220 V o rispettivamente
110 V.
• La locomotiva non deve venire alimentata nello stesso
tempo con più di una sorgente di potenza.
• Vogliate prestare assolutamente attenzione alle av
vertenze di sicurezza nelle istruzioni di impiego per il
Vostro sistema di funzionamento.
Le operazioni di manutenzione che si verificano nel
normale funzionamento sono descritte nel seguito. Per
riparazioni o parti di ricambio Vi preghiamo di rivolgerVi al
Vostro rivenditore specialista Märklin.
Märklin non fornisce alcuna garanzia, assicurazione e risarcimentodanni in caso di montaggio sui prodotti Märklin di componenti non
espressamente approvati dalla ditta. Märklin altresì non risponde in
caso di modifiche al prodotto, qualora i difetti e i danni riscontrati
sullo stesso siano stati causati da modifiche non autorizzate o dal
montaggio di componente esterni da lei non approvati. L‘onere
della prova che i componenti montati e le modifiche apportate
non sono state la causa del danno o del difetto, resta a carico del
cliente o della persona / ditta che ha effettuato il montaggio di
componenti estranei o che ha apportato modifiche non autorizzate.
!
Page 6

6
Säkerhetsanvisningar
• Loket får endast köras med ett därtill avsett driftsystem
(Märklin Växelström-transformator 6647, Märklin Delta,
Märklin Digital eller Märklin Systems).
Använd endast transformatorer som är avsedda för
den nätspänning som tillhandahålls av er elleverantör.
Anslut aldrig en transformator för 220 V nätspänning
till 110 V - eller tvärt om.
• Loket får inte samtidigt försörjas av mer än en kraftkäl
-
la.
• Beakta alltid säkerhetsanvisningarna i bruksanvisnin
-
gen som hör till respektive driftsystemet.
Underhållsarbeten som uppstår vid normal användning
beskrivs som följer. Kontakta din Märklinfackhandlare för
reparationer och reservdelar.
Varje form av anspråk på garanti och skadestånd är utesluten
omdelar används i Märklin-produkter som inte har godkänts av
Märklin och / eller om Märklin-produkter har modifierats och de
inbyggda främmande delarna resp. modifieringen var upphov till
de därefter uppträdande felen och / eller skadorna. Bevisbördan
för att inbyggnaden av främmande delar i eller ombyggnaden av
Märklin-produkter inte är upphovet till de uppträdande felen och /
eller skadorna, bär den person och / eller företag resp. kund som är
ansvarig för in- och / eller ombyggnaden.
!
Vink om sikkerhed
• Lokomotivet må kun bruges med et driftssystem (Mär
klin vekselstrøm-transformator 6647, Märklin Delta,
Märklin Digital eller Märklin Systems), der er beregnet
dertil.
Anvend kun transformatorer, der passer til den
lokale netspænding.
Anvend aldrig transformatorer der er beregnet til en
netspænding på 220 V eller 110
• Lokomotivet må ikke forsynes fra mere end én strøm
-
kilde ad gangen.
• Vær under alle omstændigheder opmærksom på de
vink om sikkerhed, som findes i brugsanvisningen for
Deres driftssystem.
Vedligeholdelsesarbejder ved normal drift er beskrevet i
det efterfølgende. For reparation eller reservedele bedes
De henvende Dem til Deres Märklinforhandler.
Ethvert garanti-, mangelsansvars- og skadeserstatningskrav er
udelukket, hvis der indbygges fremmeddele i Märklinprodukter,
der ikke er frigivet dertil af Märklin og / eller hvis Märklinprodukter
bygges om og de indbyggede fremmeddele hhv. ombygningen var
årsag til sådanne opståede mangler og / eller skader. Det påhviler
kunden hhv. den person og / eller det firma, der er ansvarlig for
ind- og / eller ombygningen, at påvise hhv. bevise, at indbygningen
af fremmeddele i, eller ombygningen af Märklinprodukter ikke var
årsag til opståede mangler og / eller skader.
!
Page 7
7
2.
2.
2.
2.
.
1
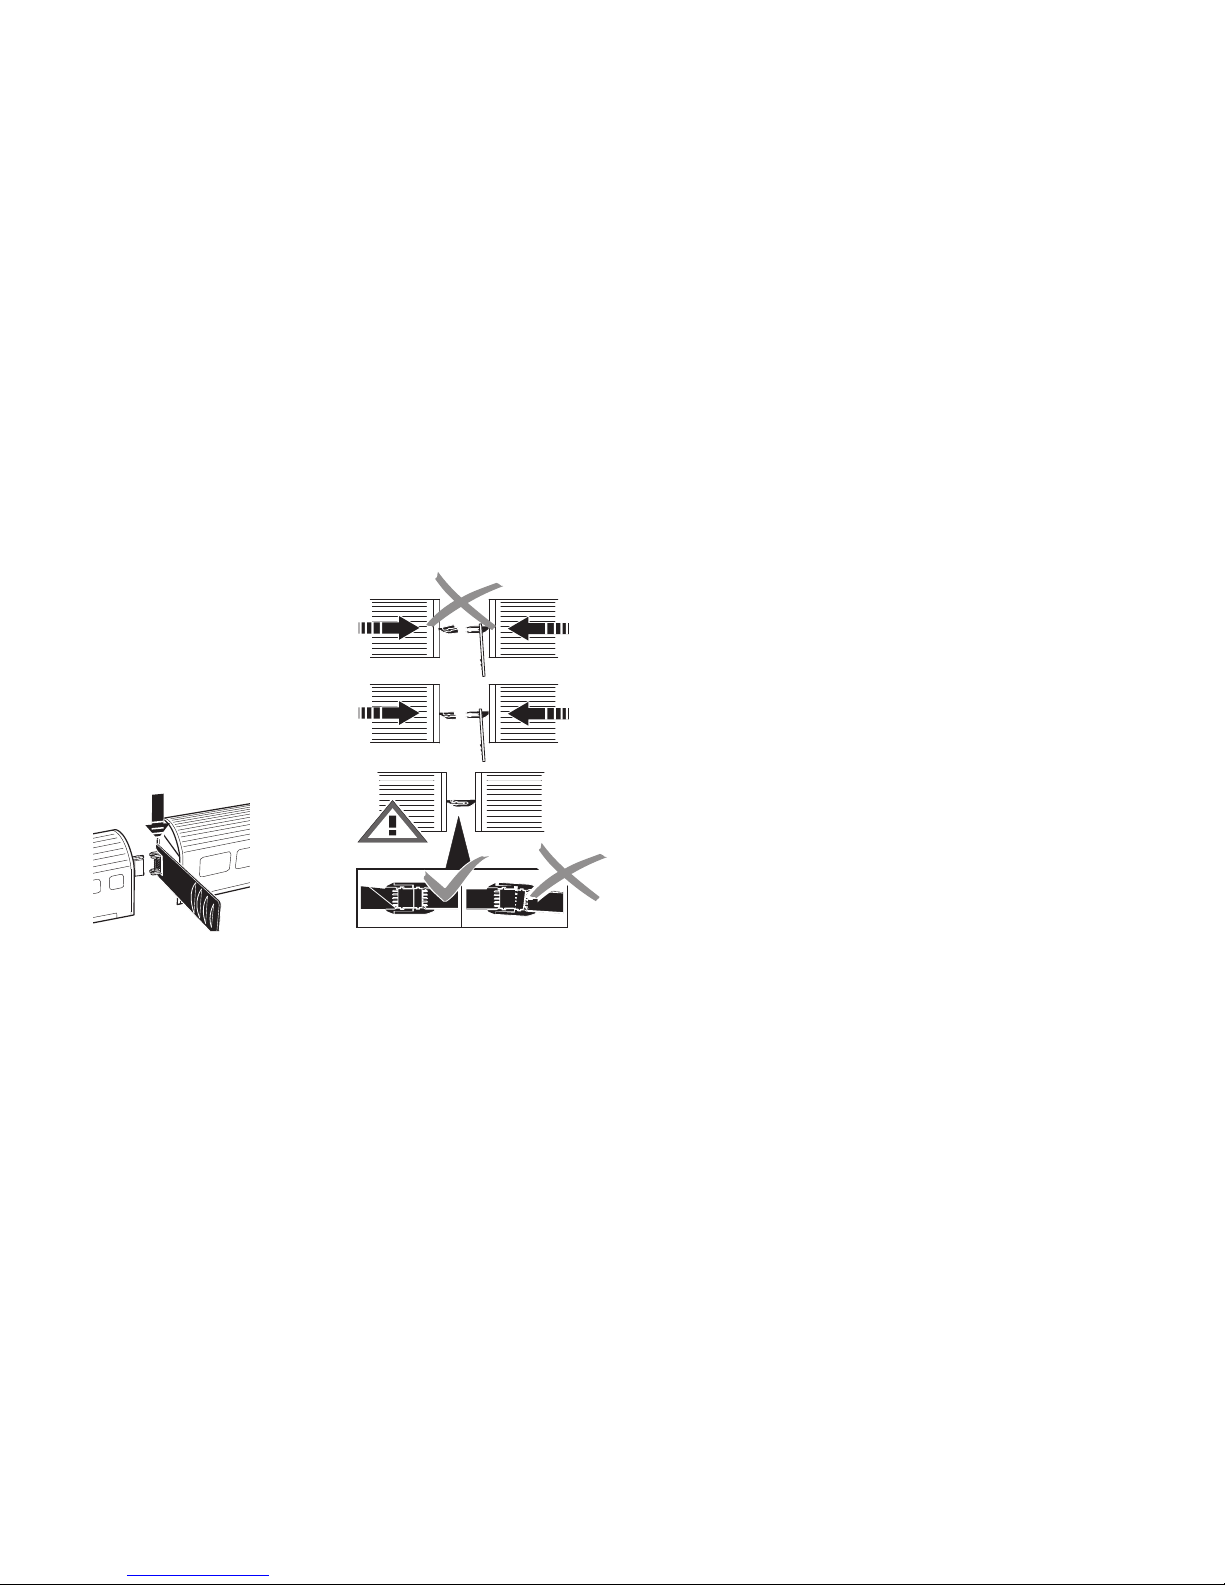
• Einheit gemäß nebenstehender Zeichnung kuppeln
• Couple the cars in the train as shown in the diagram
nearb
y.
• Atteler l’unité conformément à la l’illustration ci-contre.
• De rijtuigen volgens de afbeelding hiernaast aan elkaar
koppelen.
• Acoplar la unidad de tren conforme al dibujo mostrado
al lado.
• Agganciare le unità conformemente allo schema situato qui accanto.
• Enheterna måste kopplas samman så som framgår av
nedanstående teckning.
•
Sammenkobl enheden ifølge tegningen her ved siden af.
Page 8
8
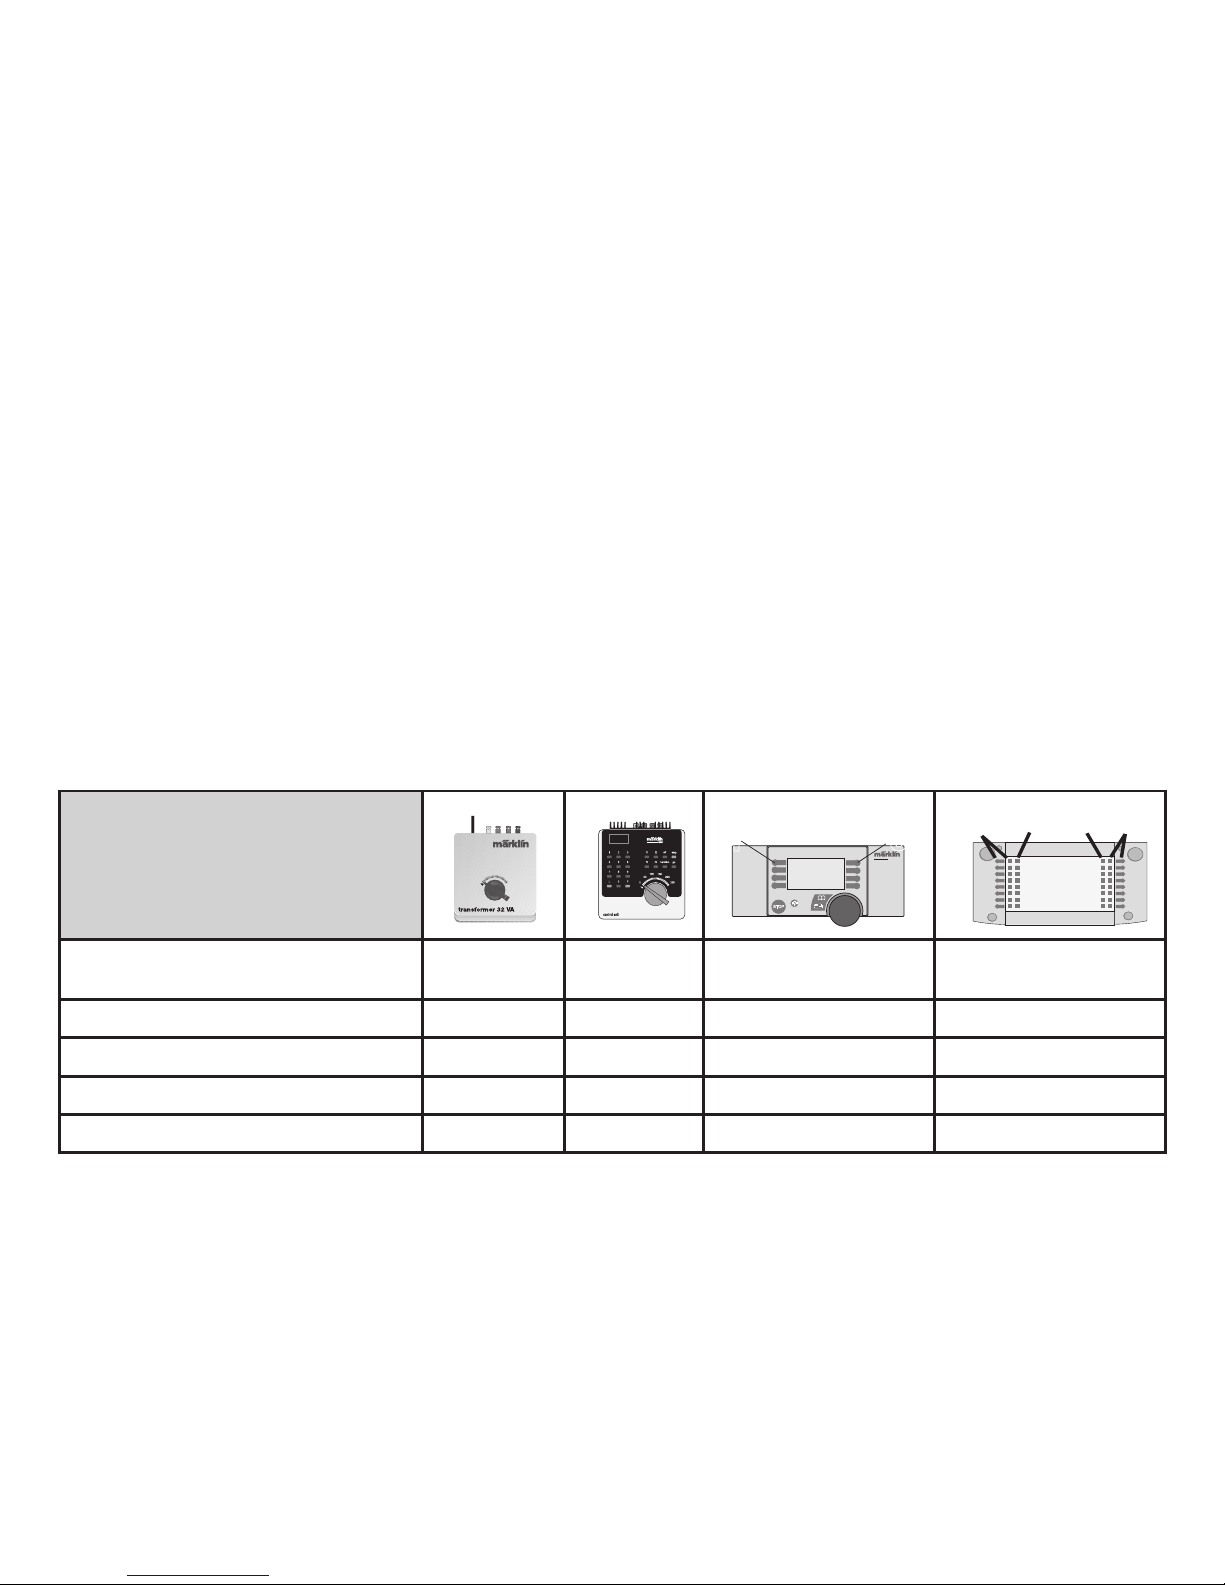
Schaltbare Funktionen
Spitzensignal /Schlußlicht/Innenbeleuchtung
Dauernd ein function + off Licht-Taste Taste f0 mit Symbol
— — f1 Taste 1 Taste f1
Geräusch: Bahnhofsansage — f2 Taste 8 mit Symbol Taste f2 mit Symbol
Geräusch: Lokpfeife ein/aus — f3 Taste 4 mit Symbol Taste f3 mit Symbol
ABV aus/an — f4 Taste 2 mit Symbol Taste f4 mit Symbol
STOP
mobile station
systems
1
5
central
station
60212
f0
f0f8
f8
Funktionen
• Mögliche Betriebssysteme:
Märklin Transformer 6647, Märklin Delta,
Märklin Digital, Märklin Systems.
• Erkennung der Betriebsart: automatisch.
• Einstellbare Adresse (Control Unit): 01 – 80.
Adresse ab Werk:
51.
• Mfx-Softdrive für Mobile Station / Central Station.
Name ab Werk: RAE 1051 SBB
• Fahrtrichtungsabhängiger Wechsel des Spitzensignals
• Veränderbare Anfahr/Bremsverzögerung (ABV).
• Veränderbare Höchstgeschwindigkeit.
• Einstellen der Lokparameter elektronisch über
Control Unit, Mobile Station oder Central Station.
Hinweise zur Inbetriebnahme:
• für den Fahrbetrieb werden mindestens die beiden Steuerwagen
und der Mittelwagen benötigt
• befahrbarer Mindestradius 360mm.
• Lichtraumprofil beachten
Page 9
9
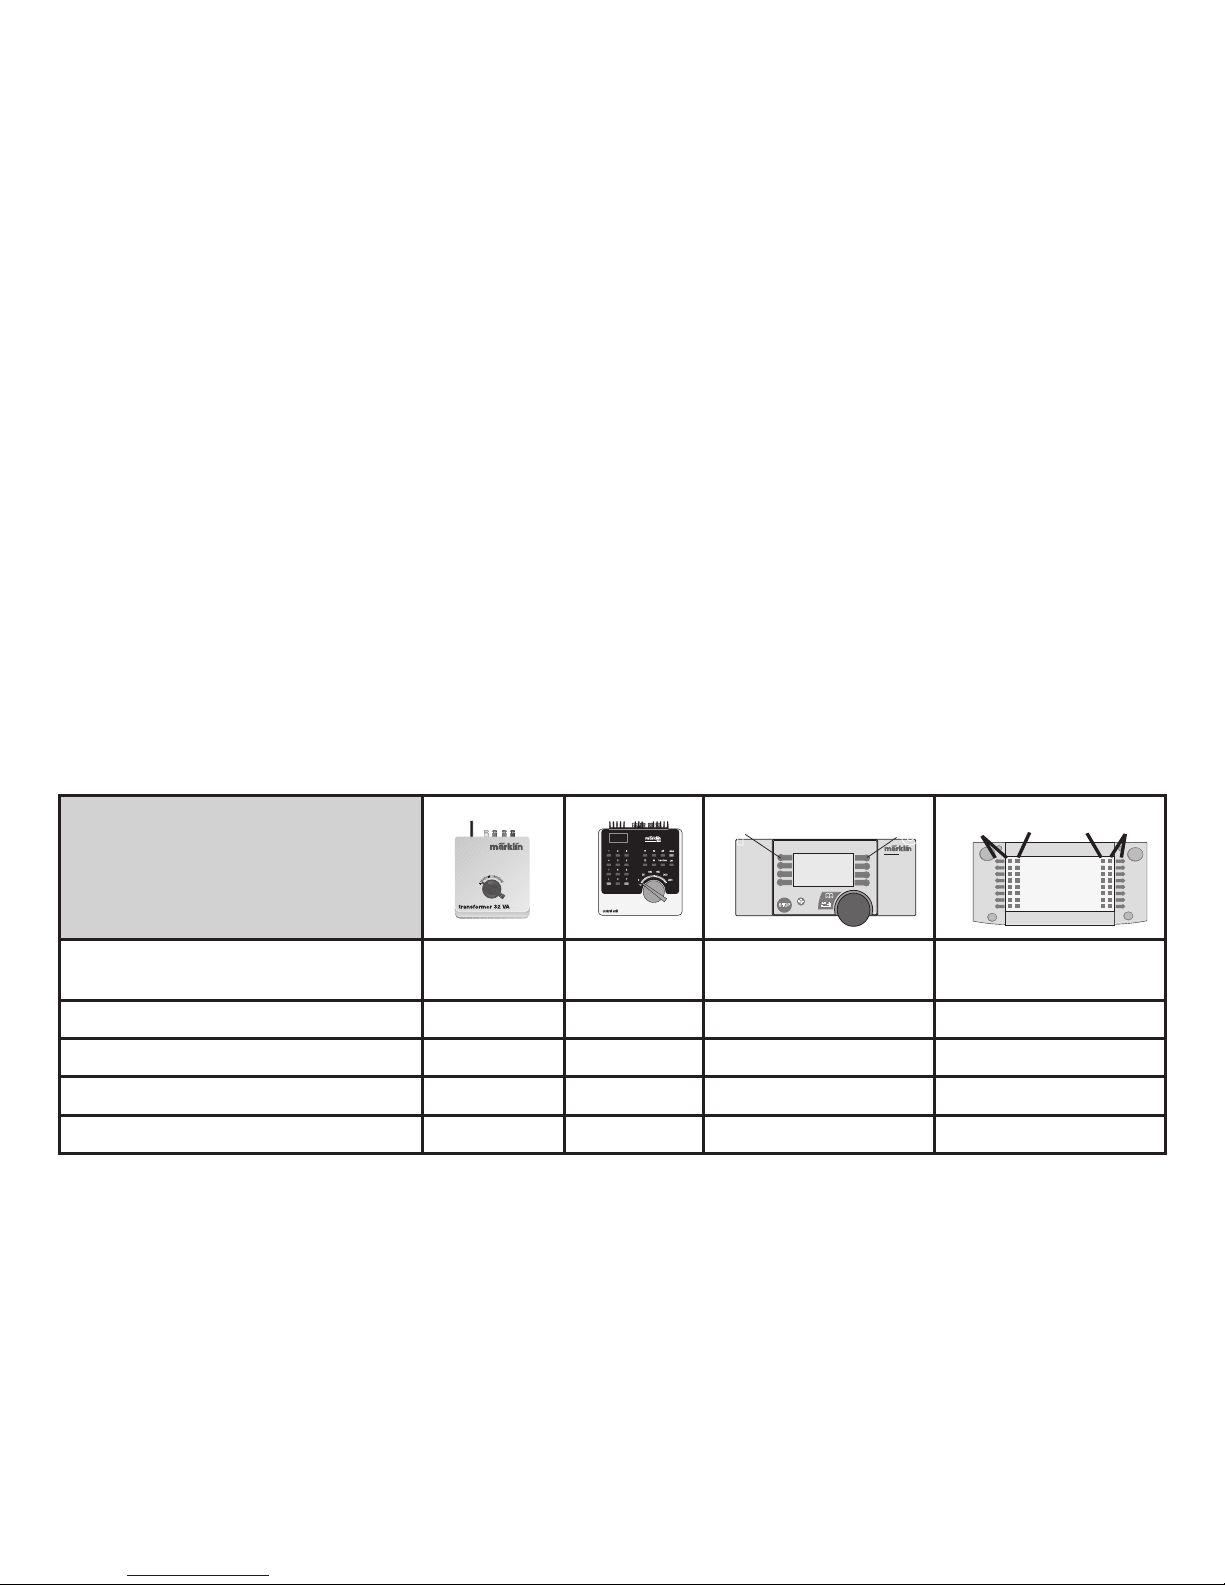
Controllable Functions
Headlights/ Red marker light/Interior
lights
Always on function + off Headlight Button Button f2 with symboll
— — f1 Button 1 Button f1
Sound effect: Station announcements
— f2 Button 8 with symbol Button f2 with symbol
Sound effects: Locomotive whistle on/off
— f3 Button 4 with symbol Button f3 with symbol
ABV off/on
— f4 Button 2 with symbol Button f4 with symboll
STOP
mobile station
systems
1
5
central
station
60212
f0
f0f8
f8
Function
• Possible operating systems:
6646/6647 Märklin Transformer, Märklin Delta, Märklin
Digital, Märklin Systems.
• Recognition of the mode of operation: automatic.
• Addresses that can be set (Control Unit): 01 – 80.
Address set at the factory:
51
• Mfx Softdrive for the Mobile Station / Central Station.
Name set at the factory: RAE 1051 SBB
• Headlights change over with the direction of travel.
• Adjustable acceleration (ABV).
• Adjustable Braking delay (ABV).
• Adjustable maximum speed.
• Setting the locomotive parameters electronically with
the Control Unit, Mobile Station or Central Station.
Notes about using this model for the first time:
• At least both control cars and the center motor car
must be used for operation.
• Minimum radius for operation is 360 mm / 14-3/16“
• Make sure you have enough clearance!
Page 10
10
Fonction
• Systèmes d’exploitation possibles:
Märklin Transformer 6647, Märklin Delta,
Märklin Digital, Märklin Systems.
• Détection du mode d’exploitation: automatique.
• Adresses réglables (Control Unit): 01 – 80.
Adresse encodée en usine:
51
• Mfx-Softdrive pour Mobile Station / Central Station.
Nom en codee en usine: RAE 1051 SBB
• Inversion du fanal en fonction du sens de marche
• Temporisation d’accélération réglable (ABV).
• Temporisation de freinage réglable (ABV).
• Vitesse maximale réglable.
• Réglage des paramètres de la loco électroniquement
à l’aide de la Control Unit, de la Mobile Station ou de la
Central Station.
Indications relatives à la mise en service :
• Le mode conduite nécessite au moins les deux voitu
-
res-pilotes ainsi que la voiture centrale.
• Rayon minimal d’inscription en courbe 360 mm
• Tenir compte du gabarit d’espace libre !
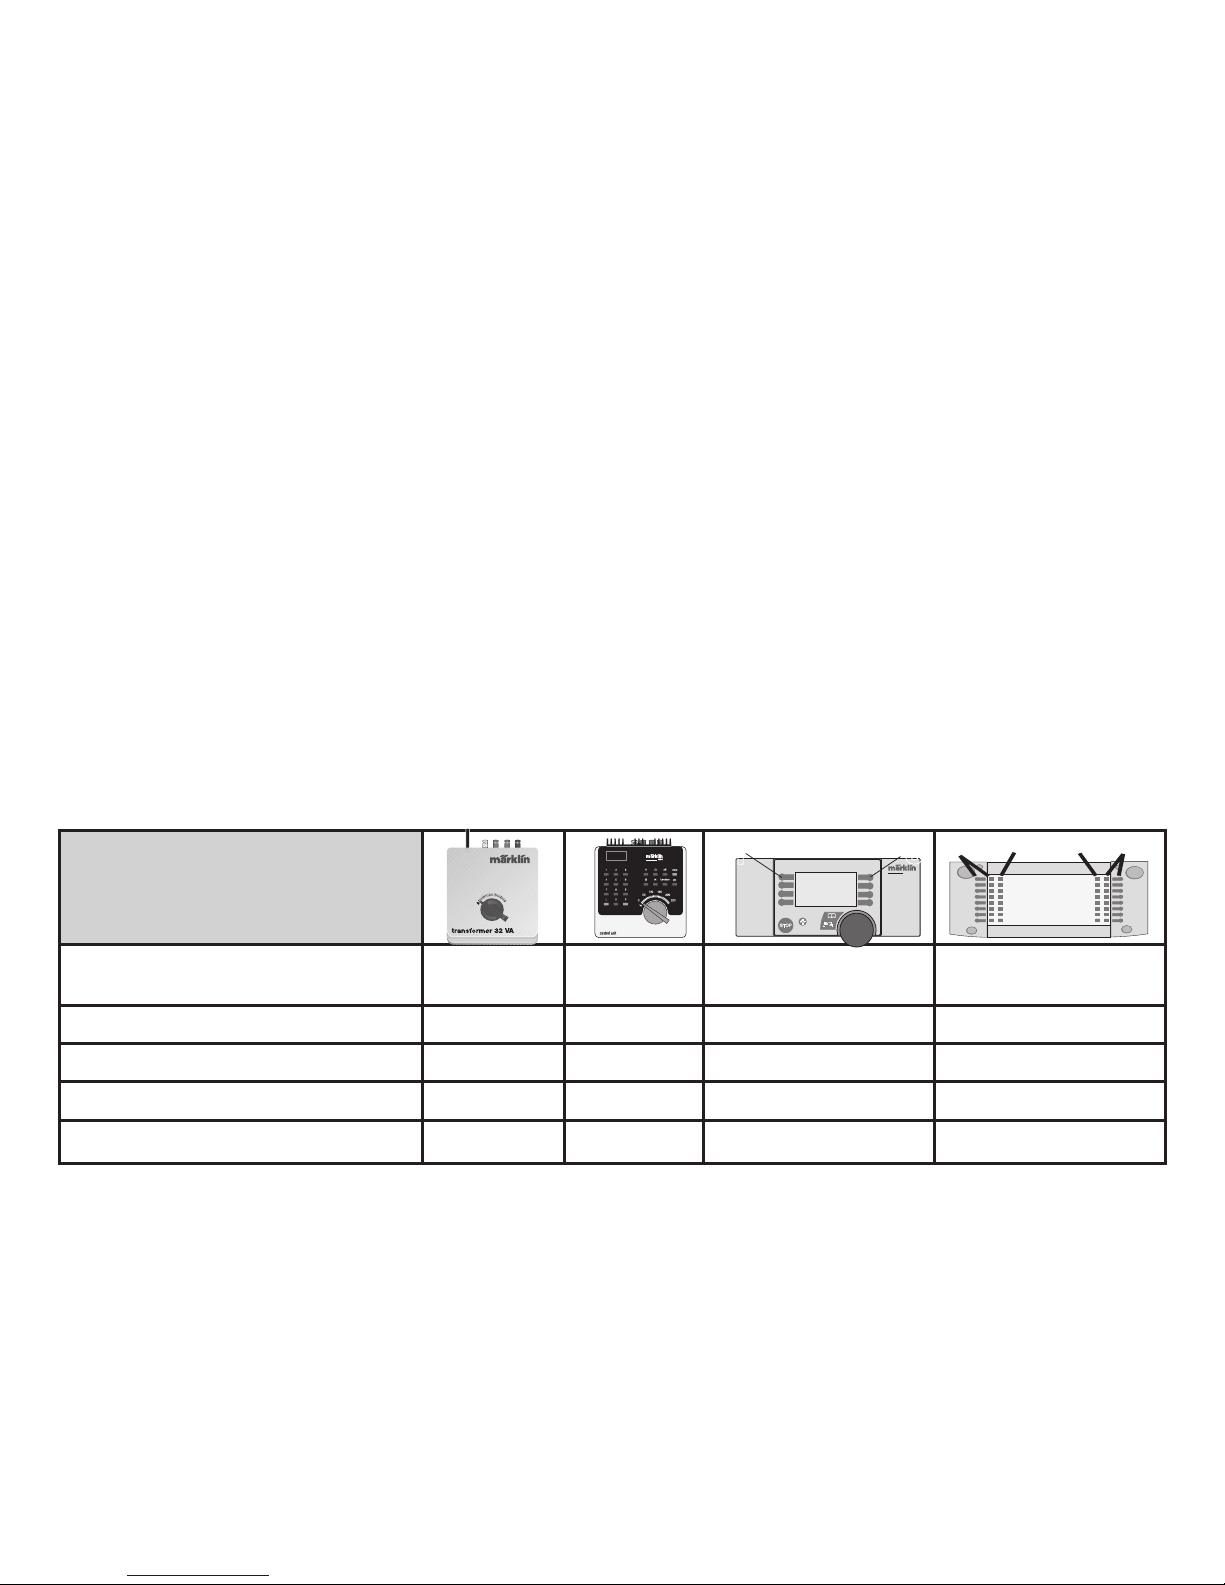
Fonctions commutables
Fanal /Feu de fin de convoi rouge/Eclairage intérieur
Activé en per-
manence
function + off Touche éclairage Touche f0 avec symbole
— — f1 Touche 1
Touche f1
Bruitage : Annonce en gare — f2
Touche 8 avec symbolel
Touche f2 avec symbole
Bruitage : Sifflet locomotive marche/arrêt
— f3 Touche 4 avec symbole Touche f3 avec symbole
ABV
arrêt/marche
— f4 Touche 2 avec symbole
Touche f4 avec symbole
STOP
mobile station
systems
1
5
central
station
60212
f0
f0f8
f8
Page 11
11
Opmerking voor de ingebruikname:
• Om er mee te kunnen rijden zijn tenminste de beide
stuurstandrijtuigen en het middelste rijtuig nodig.
• Minimale te berijden radius: 360 mm.
• Let op het profiel van vrije ruimte!
Werking
• Mogelijke bedrijfssystemen:
Märklin Transformer 6647, Märklin Delta,
Märklin Digital, Märklin Systems.
• Herkenning van het bedrijfssysteem: automatisch.
• Instelbaar adres (Control Unit): 01 – 80.
Van af de fabriek:
51
• Mfx-Softdrive voor het Mobile Station / Central Station.
Naam af de fabriek: RAE 1051 SBB
• Rijrichtingafhankelijke frontseinverlichting.
• Instelbare optrekvertraging (ABV).
• Instelbare afremvertraging (ABV).
• Instelbare maximumsnelheid.
• Elektronische instelling van de locomotiefparameters
via de Control Unit, Mobile Station of Central Station.
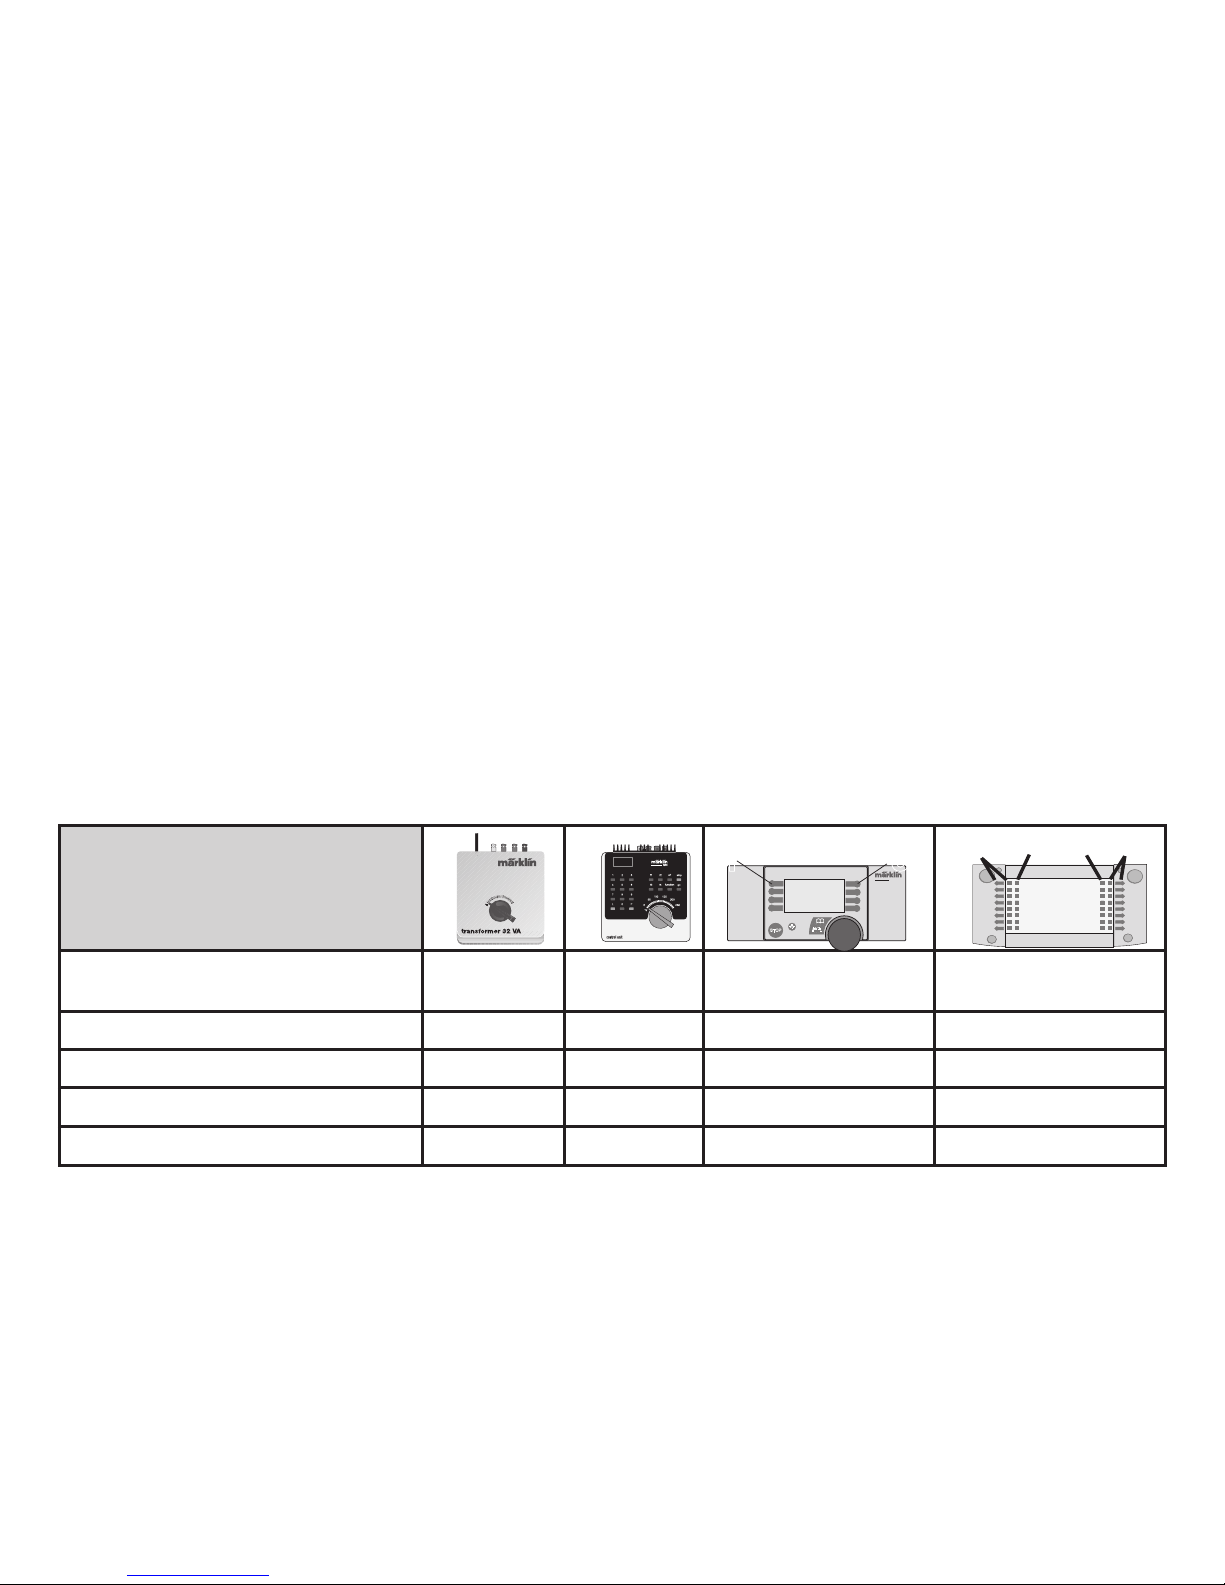
Schakelbare functies
Frontverlichting/Sluitlicht rood/Binnenverlichting
continu aan function + off Verlichtingstoets Toets 0 met symbooll
— — f1 Toets 1 Toets f1
Geluid: stationsomroep
— f2 Toets 8 met symbool Toets f2 met symbool
Geluid: locfluit aan/uit
— f3 Toets 4 met symbool Toets f3 met symbool
ABV uit/aan — f4 Toets 2 met symbool Toets f4 met symbool
STOP
mobile station
systems
1
5
central
station
60212
f0
f0f8
f8
Page 12
12
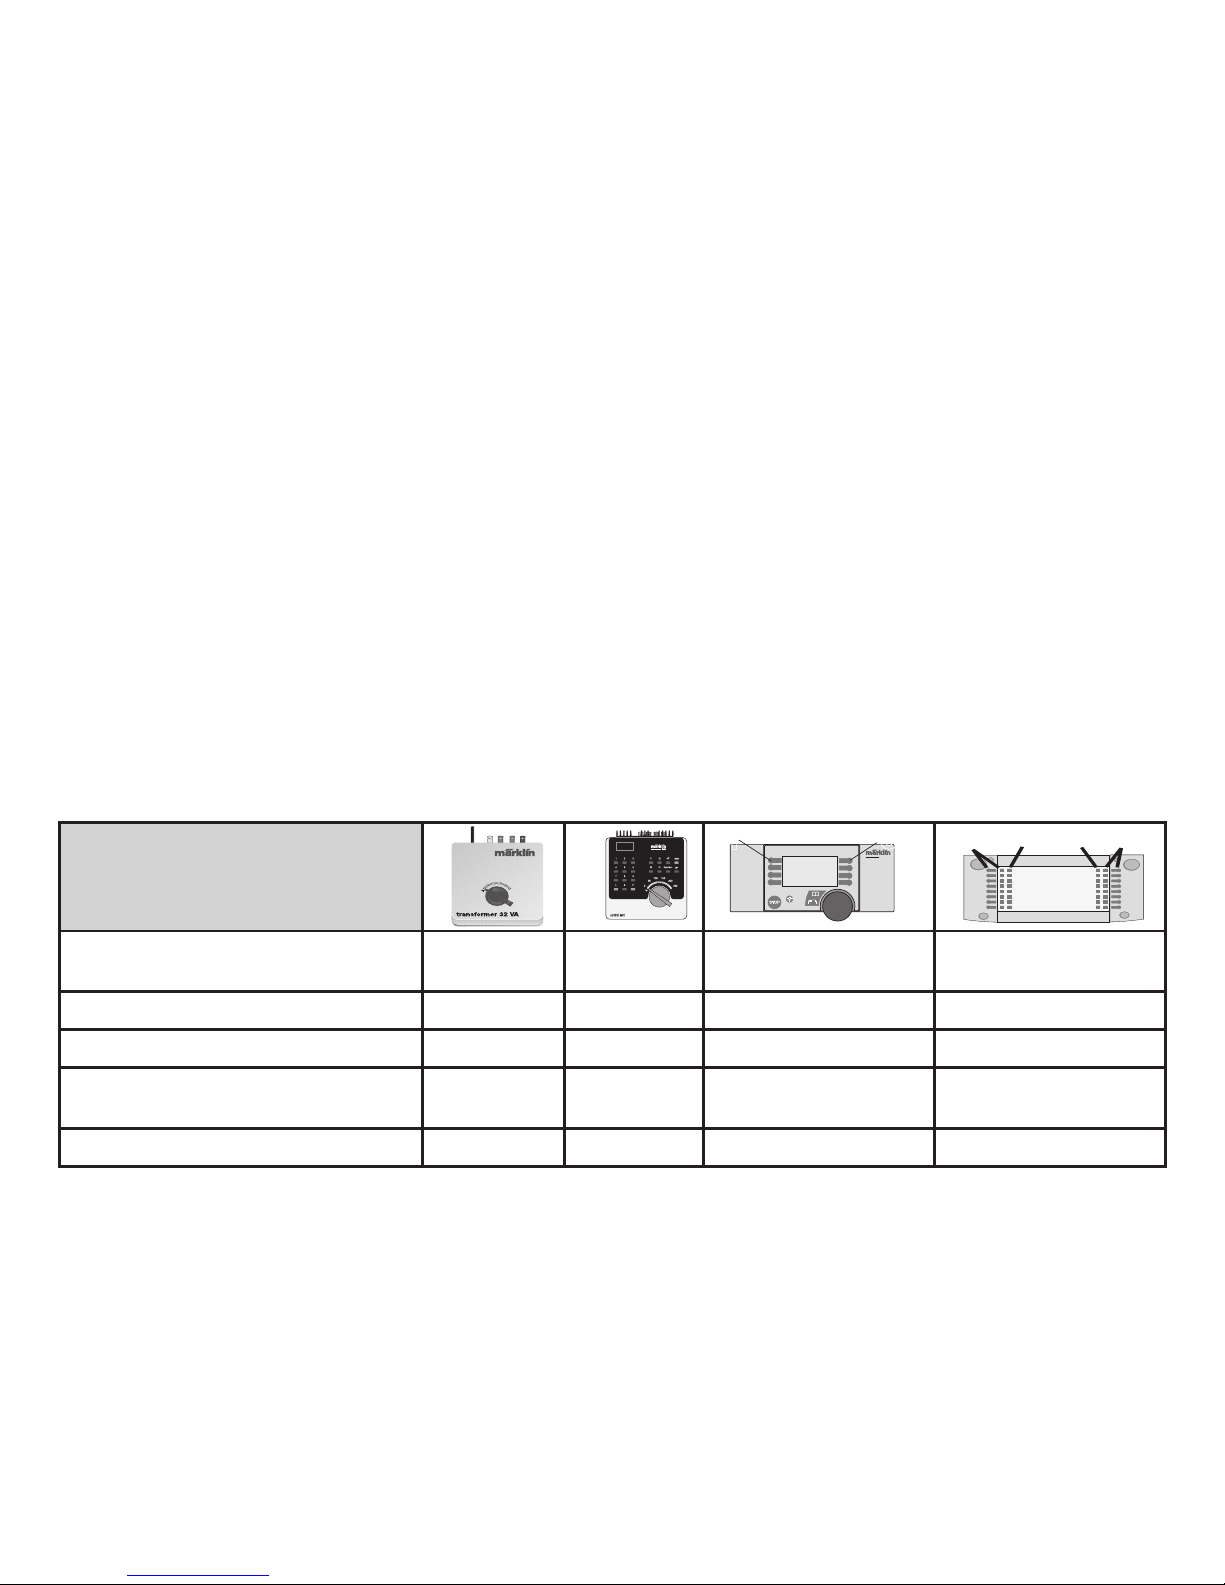
Funciones posibles
Faros frontales/Luces de cola rojas/Iluminación interior
Simpre
encendido
function + off Tecla de luz Tecla f0 con símbolo
— — f1 Tecla 1 Tecla f1
Ruido: Locución hablada en estaciones — f2 Tecla 8 con símbolo Tecla f2 con símbolo
Ruido del silbido de la locomotor
encendido/apagado
— f3 Tecla 4 con símbolo Tecla f3 con símbolo
ABV apagado/encendido — f4 Tecla 2 con símbolo Tecla f4 con símbolo
STOP
mobile station
systems
1
5
central
station
60212
f0
f0f8
f8
Función
• Sistemas operativos posibles:
Märklin transformador 6647, Märklin Delta,
Märklin Digital, Märklin Systems.
• Reconocimiento del sistema: automático.
• Dirección ajustable (Control Unit): 01 – 80.
Código de fábrica: 51
• Mfx-Softdrive para la Mobile Station / Central Station.
Nombre de fabrica:
RAE 1051 SBB
• Alternancia de la señal de cabeza (faros frontales) en
unción del sentido de la marcha
• Arranque lento variable (ABV).
• Frenado lento variable (ABV).
• Velocidad máxima variable.
• Fijar parámetros de la locomotora electrónicamente
por el Control Unit, Mobile Station o Central Station.
Notas para la puesta en servicio:
• Para el servicio de circulación se necesitan al menos
ambos coches piloto y el coche intermedio.
• Radio mínimo describible 360 mm.
• ¡Tener presente el gálibo!
Page 13
13
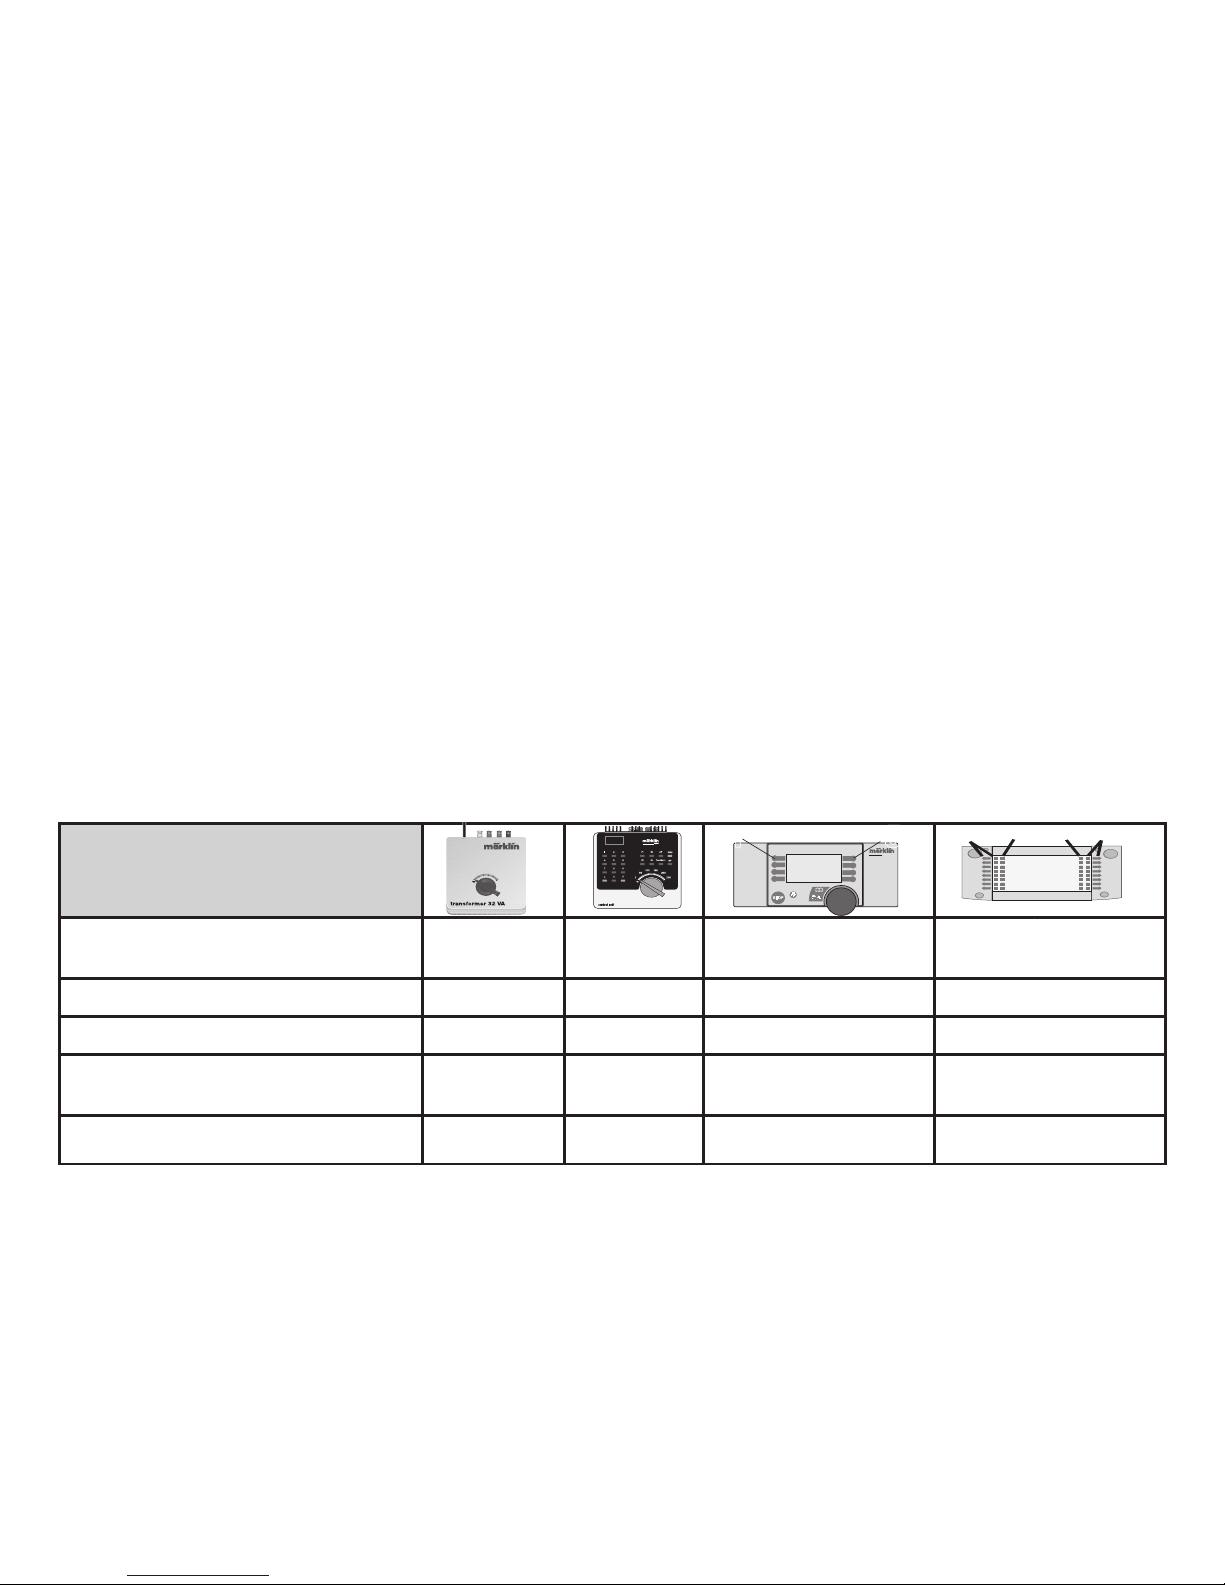
Funzioni commutabili
Illuminazione di testa/Fanale di coda
rosso/Illuminazione interna
sempre
accesa
function + off Tasto illuminazione Tasto X con simbolo
— — f1 Tasto 1 Tasto f1
Rumore: annuncio di stazione
— f2 Tasto 8 con simbolo Tasto f2 con simbolo
Rumore: Fischio da locomotiva acce
-
sa/spenta
— f3 Tasto 4 con simbolo Tasto f3 con simbolo
ABV spenta/accesa — f4 Tasto 2 con simbolo Tasto f4 con simbolo
STOP
mobile station
systems
1
5
central
station
60212
f0
f0f8
f8
Funzionamento
• Possibili sistemi di funzionamento:
Märklin Transformer 6647, Märklin Delta,
Märklin Digital, Märklin Systems.
• Riconoscimento del tipo di funzionamento:automatico.
• Indirizzi impostabili (Control Unit): 01 – 80.
Indirizzo di fabbrica: 51
• Mfx-Softdrive per Mobile Station / Central Station.Nome
di fabrica: RAE 1051 SBB
• Commutazione del segnale di testa dipendente dalla
direzione di marcia
• Ritardo di avviamento modificabile (ABV).
• Ritardo di frenatura modificabile (ABV).
• Velocità massima modificabile.
• Regolazione dei parametri della locomotiva elettroni
camente tramite Control Unit, Mobile Station oppure
Central Station.
Avvertenza per la messa in esercizio:
• Per l’esercizio di marcia risultano necessarie come mi
-
nimo entrambe le carrozze pilota e la carrozza centrale.
• Raggio minimo percorribile 360 mm.
• Si presti attenzione alla sagoma limite!
Page 14
14
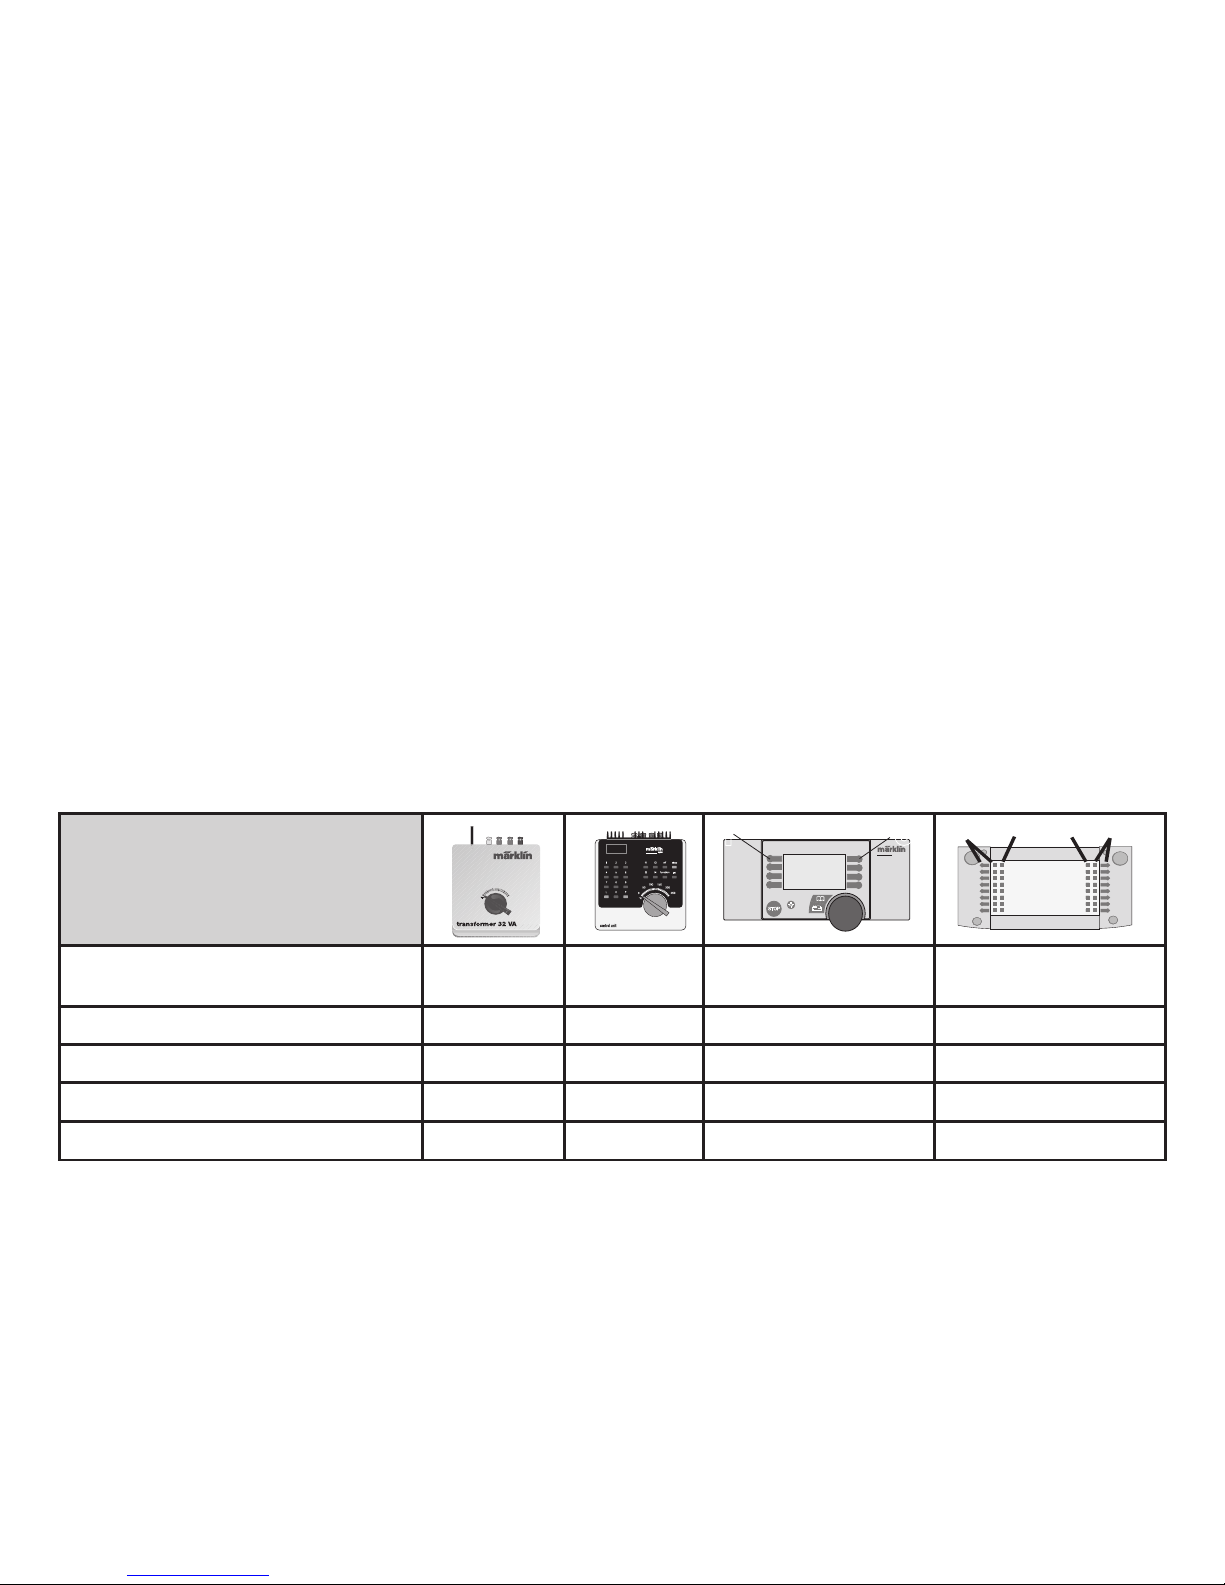
Kopplingsbara funktioner
Frontstrålkastare/Slutljus rött/Belysning,
förarhytt
Permanent till function + off Belysningsknapp Knapp f0 med symbol
— — f1 Knapp 1 Knapp f1
Ljud: Stationsutrop
— f2 Knapp 8 med symbol Knapp f2 med symbol
Ljud: Lokvissla till/från — f3 Knapp 4 med symbol Knapp f3 med symbol
ABV från/till — f4 Knapp 2 med symbol Knapp f4 med symbol
STOP
mobile station
systems
1
5
central
station
60212
f0
f0f8
f8
Funktion
• Möjliga driftsystem:
Märklin Transformer 6647, Märklin Delta,
Märklin Digital, Märklin Systems.
• Driftsättet igenkänns automatiskt.
• Inställbar adress (Conrol Unit): 01 – 80.
Adress från tillverkaren:
51
• Mfx-Softdrive för Mobile Station / Central Station.
Namn fran tillverkaren:
RAE 1051 SBB
• Körriktningsberoende ljusväxling av frontstrålkastarna.
• Accelerationsfördröjning kan ändras (ABV).
• Bromsfördröjning kan ändras (ABV).
• Toppfart kan ändras.
• Elektronisk inställning av lokparametrar via
Control Unit, Mobile Station eller Central Station.
Anvisningar för körning med modellen
• För att kunna köra modellen måste man koppla sam
-
man bägge manövervagnarna och mellanvagnen.
• Kan köras på en minsta radie av 360 mm
• Tänk på lastprofilen!
Page 15
15
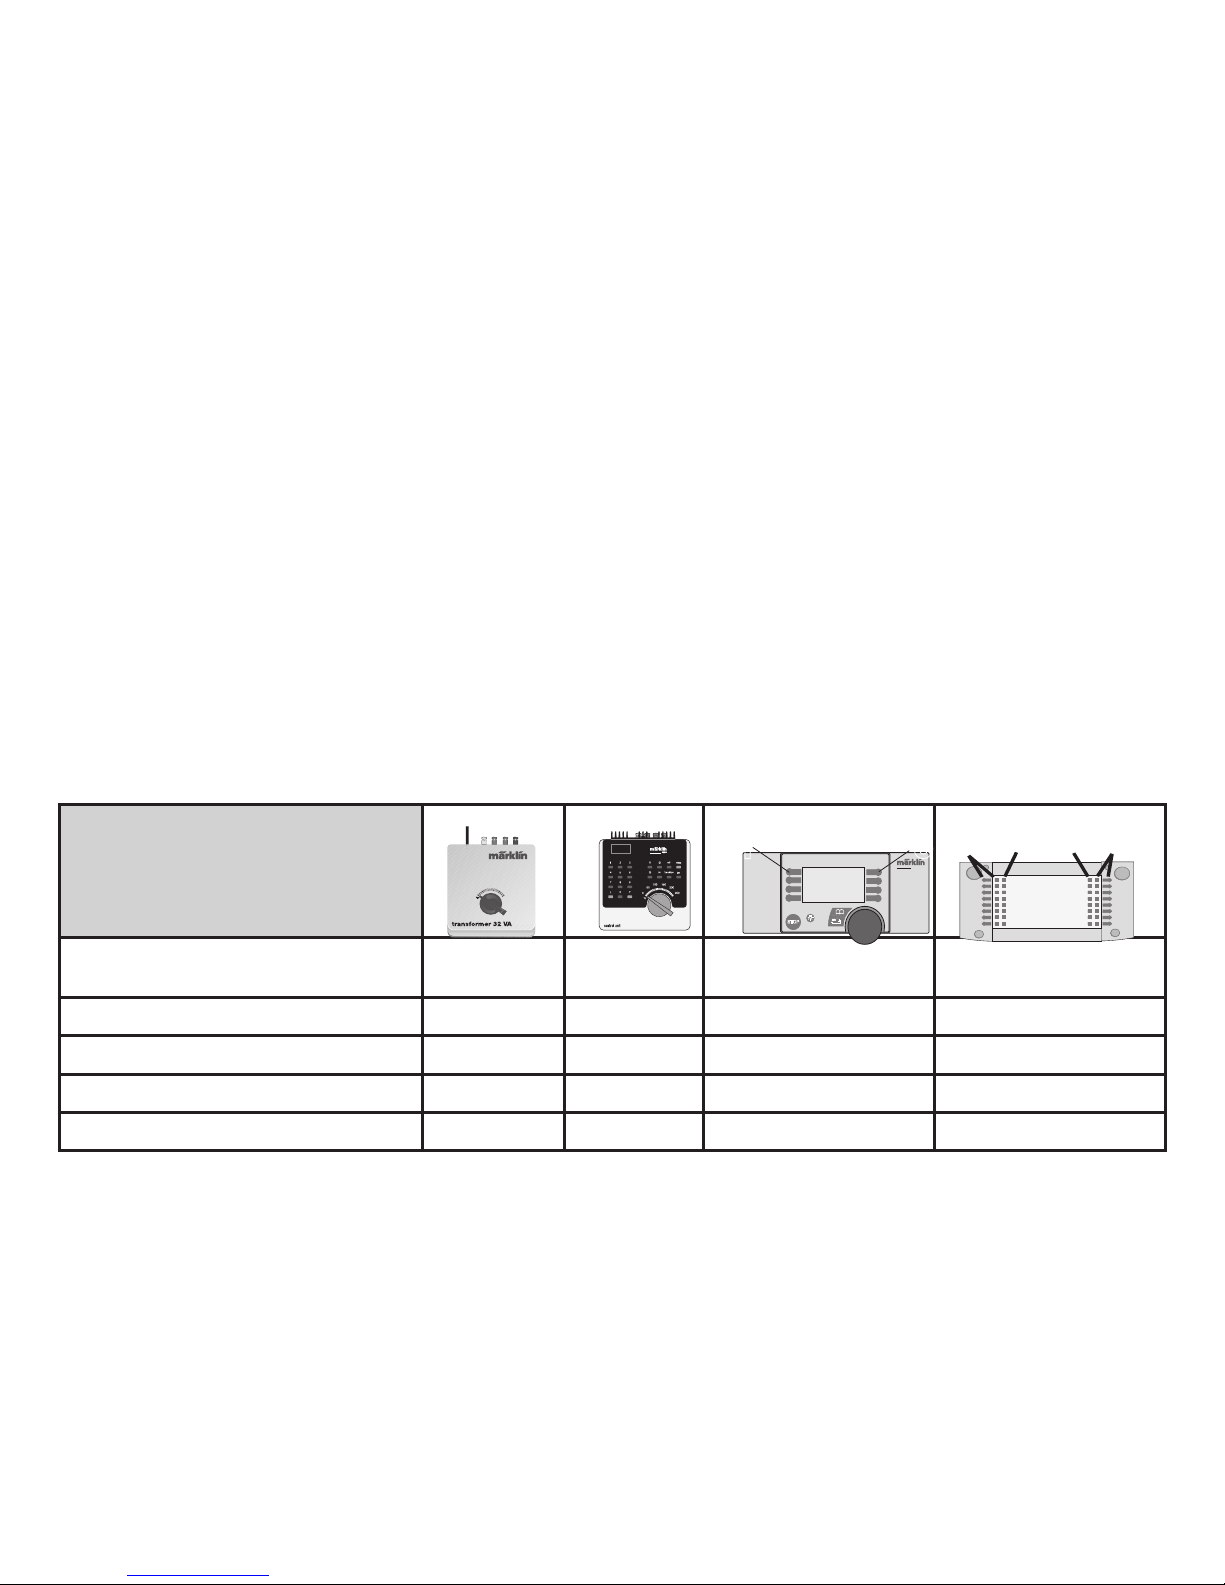
Styrbare funktioner
Frontbelysning/Slutlys rødt/Indvendig
belysning
konstant
tændt
function + off
Belysningsknap Knap f0 med symbol
— — f1 Knap 1 Knap f1
Lyd: Banegårdsmeddelelse
— f2 Knap 8 med symbol Knap f2 med symbol
Lyd: Lokomotivfløjte til/fra
— f3 Knap 4 med symbol Knap f3 med symbol
ABV fra/til — f4 Knap 2 med symbol Knap f4 med symbol
Funktion
• Mulige driftssystemer:
Märklin Transformer 6647, Märklin Delta,
Märklin Digital, Märklin Systems.
• Registrering af driftsarten: automatisk.
• Indstillelig adresse (Control Unit): 01 – 80.
Adresse ab fabrik:
51
• Mfx-Softdrive til Mobile Station / Central Station.
Navn ab fabrik: RAE 1051 SBB
• Køreretningsafhængigt skift af frontsignalet
• Indstillelig opstartforsinkelse (ABV).
• Indstillelig bremseforsinkelse (ABV).
• Indstillelig maksimalhastighed.
• Elektronisk indstilling af lokomotivparametrene via
Control Unit, Mobile Station eller Central Station.
Henvisninger til ibrugtagning:
• Der skal bruges mindst de to styrevogne og mellem
-
vognen for at der kan køres med toget.
• Farbar mindsteradius 360 mm.
• Tag hensyn til fritrumsprofilen!
central
station
60212
f0
f0f8
f8
STOP
mobile station
systems
1
5
Page 16

16
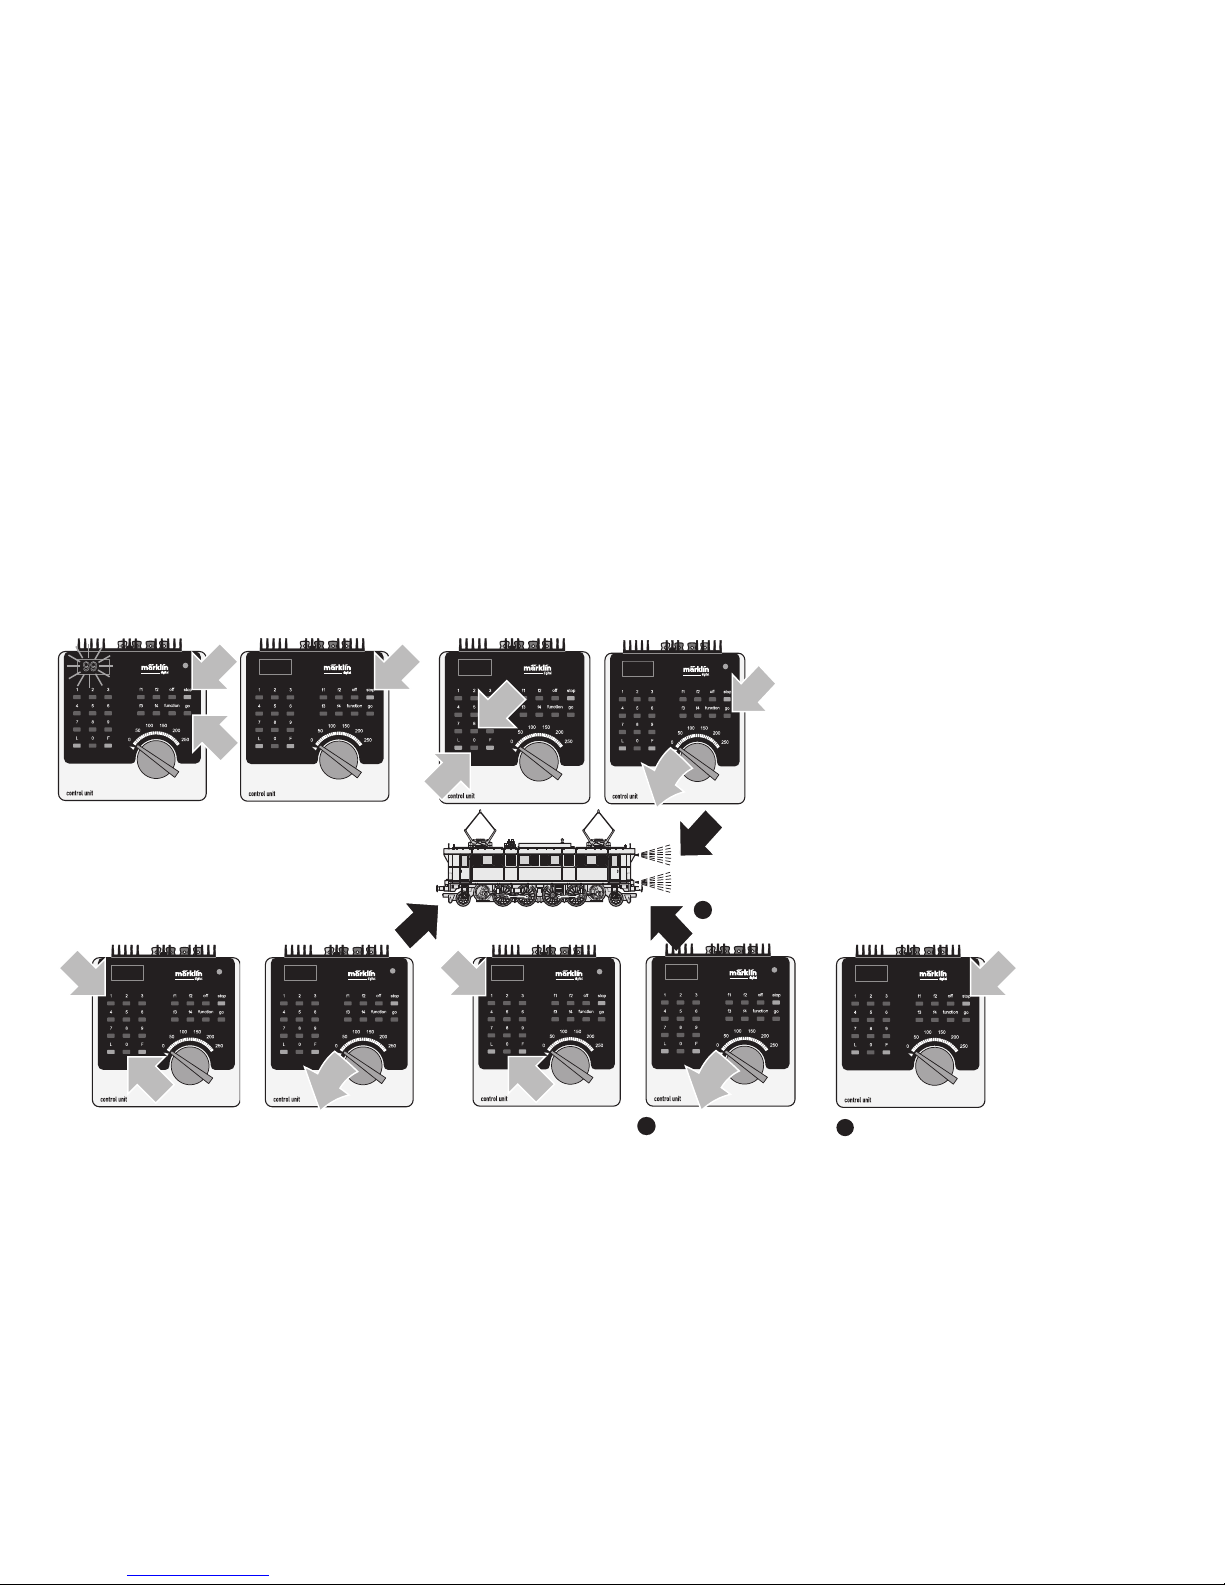
Lokparameter einstellen mit der Control Unit
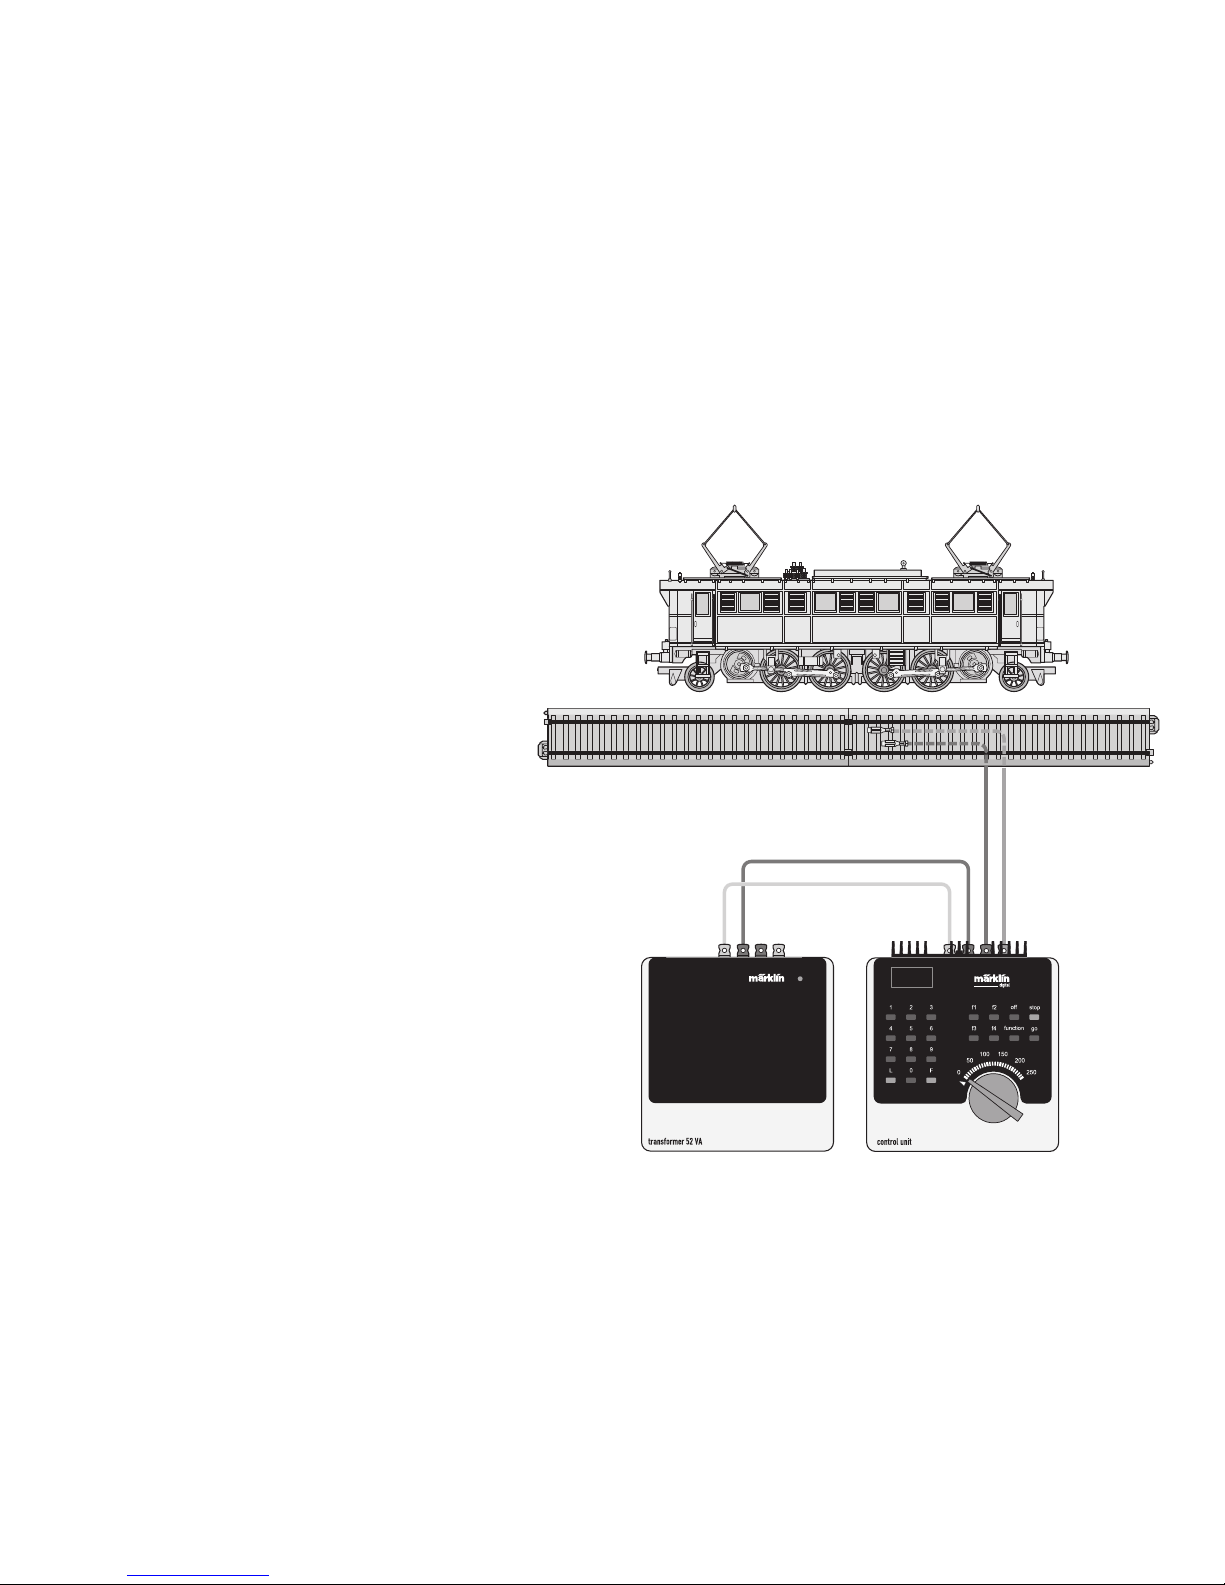
1. Voraussetzung: Aufbau wie Grafik S. 20.
Nur die zu verändernde Lok ist auf dem Gleis.
2. „Stop“- und „Go“-Taste gleichzeitig drücken, bis „99“ in
der Anzeige aufblinkt.
3. „Stop“-Taste drücken.
4. Lokadresse „80“ eingeben.
5.
Umschaltbefehl am Fahrregler halten.
Während des
Haltens die „Go“-Taste drücken.
6. Licht der Lok blinkt langsam. Wenn nicht, ab Schritt 2
wiederholen.
7. Registernummer für den zu ändernden Para-meter
eingeben (=> Liste auf Seite 22).
8. Fahrtrichtungswechsel betätigen.
9. Licht blinkt schnell
10.Neuen Wert eingeben (=> Liste auf Seite 22).
11.Fahrtrichtungswechsel betätigen.
12.Licht blinkt langsam (Ausnahme Werkreset)
13.Nächste Parametereinstellung ab 6. oder
beenden mit 14.
14.Vorgang beenden mit Drücken der „Stop“-
Taste. Anschließend Drücken der „Go“-Taste.
Setting Locomotive Parameters with the Control Unit
1.
Requirement: Setup as in diagram on page 20. Only the
locomotive to be changed can be on the track.
2. Press the “Stop” and “Go” at the same time until “99”
blinks in the display.
3. Press the “Stop” button.
4. Enter the locomotive address „80“.
5. Hold the control knob in the reverse direction area.
While holding the control knob here, press the „Go“
button.
6. The headlights on the rail bus will blink slowly. If they
don‘t, repeat Step 2.
7. Enter the register number for the parameter to be
changed (=> List on page 22).
8. Active the change of direction.
9. The headlights will blink rapidly.
10.Enter the new value (=>List on page 22).
11.Active the change of direction.
12.
The headlights will blink slowly (exception: factory reset)
13.Enter the next parameter setting from 6 or end with 14.
14.End the process by pressing the „Stop“ button. Then
press the „Go“ button.
„Änderungen der Lokparameter im Decoder dürfen
nur wie beschrieben ausgeführt werden. Für darüber
hinaus gehende Änderungen, die zu Fehlverhalten oder
Beschädigung des Decoders führen, haftet Märklin nicht;
eventuelle nötige Reparaturen werden kostenpflichtig
ausgeführt.“
„Changes to the locomotive parameters in the decoder
may only be carried out as described. Märklin is not liable
for changes beyond this that cause malfunctions or damages to the decoder; the cost for any necessary repairs
must be borne by the consumer.“
Page 17

17
Réglage des paramètres de la loco avec la
Control Unit
1. Condition: Montage comme sur illustration en page 20.
Seule la loco à modifier peut se trouver sur la voie.
2. Pressez simultanément les touches „Stop“ et „Go“
jusqu’à ce que le nombre „99“ clignote sur l’écran.
3. Pressez la touche „Stop“.
4. Introduisez l’adresse de loco „80“.
5. Maintenir l’ordre de commutation sur le régulateur de
marche. Durant le maintien, appuyer sur la touche
„Go“.
6. Les feux de la locomotive clignotent lentement.
Dans le cas contraire, renouveler l’opération à partir
de l’étape 2.
7. Indiquer le numéro d’enregistrement pour le paramètre
à modifier (=> liste page 22).
8. Activer l’inversion du sens de marche.
9. Les feux clignotent rapidement.
10. Entrer la nouvelle valeur (=> liste page 22).
11. Activer l’inversion du sens de marche.
12. Les feux clignotent lentement (exception : réinitialisation aux valeurs d’usine)
13. Définition de paramètres suivante à partir du point 6
ou terminer par le point 14.
14. Terminez le processus en pressant la touche „Stop“.
Ensuite, pressez la touche „Go“.
Locparameters instellen met de Control Unit
1. Voorwaarde:
opbouw zoals tekening op pagina 20.
Alleen de loc die gewijzigd moet worden op de rails.
2. ”Stop”- en ”Go”-toets gelijktijdig indrukken tot ”99” in
het display oplicht.
3. ”Stop”-toets indrukken.
4. Het adres „80“ invoeren.
5. Omschakelcommando met de rijregelaar vasthouden.
Tijdens het vasthouden de toets “Go” indrukken.
6. De verlichting van de loc knippert langzaam. Indien dit
niet het geval is, vanaf stap 2 opnieuw beginnen.
7. Het registernummer van de te wijzigen parameter
invoeren (=> lijst op pagina 22).
8. Omschakelcommando geven.
9. Verlichting gaat snel knipperen.
10. Nieuwe waarde invoeren (=> lijst op pagina 22).
11. Omschakelcommando geven.
12. Verlichting knippert langzaam (uitgezonderd bij
decoder reset)
13. Volgende parameterinstelling of beëindigen met 14
14. Sessie beëindigen door het indrukken van de toets
“Stop”. Aansluitend de toets “Go” indrukken.
« Pour modifier les paramètres de la locomotive dans le
décodeur, procédez impérativement de la manière décri
te. La garantie Märklin ne couvre pas les modifications
ne respectant pas scrupuleusement les instructions et
pouvant être à l’origine d’un dysfonctionnement ou d’une
détérioration du décodeur ; d’éventuelles réparations
seront facturées. »
„Het wijzigingen van de loc-parameters in de decoder
mag enkel en alleen op de beschreven wijze worden
uitgevoerd. Elke op andere wijze uitgevoerde wijziging,
die tot storing of beschadiging van de decoder leidt,
valt buiten de garantie van Märklin; eventuele noodzakelijke reparaties worden met berekening van de kosten
uitgevoerd.“
Page 18

18
Parámetros de la locomotora configurables con el
Control Unit
1. Condición previa: montaje como el gráfico
pág. 20. En la vía debe encontrarse solamente la locomotora a configurar.
2. Apretar simultáneamente la tecla “Stop” y “Go” hasta
que aparece “99” en pantalla.
3. Apretar la tecla “Stop”.
4. Marcar el código de la locomotora „80“.
5. Mantener la orden de conmutación en el regulador de
marcha. Durante la parada, pulsar la tecla „Go“.
6. La luz de la locomotora se enciende con intermitencia
lenta. En caso negativo, repetir desde el paso 2.
7. Introducir el número de registro del parámetro que se
desee modificar (=> Lista en página 22).
8. Activar el cambio de sentido de la marcha.
9. La luz se enciende con intermitencia rápida
10. Introducir un valor nuevo (=> Lista en página 22).
11. Activar el cambio de sentido de la marcha.
12. La luz se enciende con intermitencia lenta (excepción:
se ha realizado un reset en fábrica)
13. Configuración de siguiente parámetro repitiendo a
partir de 6. o terminar con 14.
14. Repetir la operación pulsando la tecla „Stop“. A
continuación, pulsar la tecla „Go“.
Impostazione dei parametri della locomotiva con la
Control Unit
1. Predisposizione: assetto come da schema a pag.
20. Soltanto la locomotiva da modificare si trova sul
binario.
2. Premere contemporaneamente i tasti „Stop“ e „Go“,
fino a che sul visore lampeggia „99“.
3. Premere il tasto „Stop“.
4. Introdurre l’indirizzo della locomotiva „80“.
5. Tenere premuto il comando di commutazione sul
regolatore di marcia. Durante tale pressione, premere
il tasto „Go„.
6. I fanali della locomotiva lampeggiano lentamente. In
caso negativo, si riprenda dal passo 2.
7. Introdurre il numero di registro per il parametro da
modificare (=> elenco a pagina 22).
8. Azionare la commutazione della direzione di marcia.
9. I fanali lampeggiano velocemente
10. Introdurre il nuovo valore (=> elenco a pagina 22).
11. Azionare la commutazione della direzione di marcia.
12. I fanali lampeggiano lentamente (ad eccezione del
ripristino di fabbrica).
13. Impostazione del prossimo parametro ripartendo da
6. oppure terminare con 14.
14. Terminare il procedimento con la pressione del tasto
„Stop„.Successivamente premere il tasto „Go„.
„Las modificaciones de los parámetros de la locomotora
en el decoder deben ejecutarse sólo como se ha descrito.
Märklin no se hará responsable de los cambios que
vayan más allá de estos y que provoquen una respuesta
anómala o daños al decoder; las posibles reparaciones
necesarias se facturarán.“
„Variazioni dei parametri della locomotiva nel Decoder devono essere eseguite soltanto come descritto. Per variazioni
che si discostano da queste, le quali conducano a un comportamento difettoso oppure a danneggiamenti del Decoder,
Märklin non assume la responsabilità; eventuali riparazioni
necessarie vengono eseguite addebitandone il costo.“
Page 19

19
Lokparametrar ställs in med Control Unit
1. Förutsättning: Montering som visas enligt grafik på
s. 20. Endast det lok som ska ändras ska finnas på
spåret.
2. Både „Stop“- och „Go“-tangenten hålls nedtryckt tills
„99“ blinkar på displayen.
3. „Stop“-tangenten hålls ner.
4. Lokadress „80“ matas in.
5. Tryck ned körkontrollen, som vid ändring av körrikt
ningen. Håll ned knappen och tryck samtidigt på
„Go“-knappen.
6. Lokets strålkastare blinkar långsamt. Om inte – uppre
-
pa steg 2.
7. Ange registernummren för de ändrade parametrarna
(=> Se lista på sidan 22).
8. Gör en körriktningsändring.
9. Strålkastarna blinkar snabbt.
10. Ange önskade nya värden (=> Se lista på sidan 22).
11. Gör en körriktningsändring.
12. Strålkastarna blinkar långsamt (Gäller inte vid genom
-
förd reset)
13.Nästa parameterinställning från steg 6. eller sluta med
steg 14.
14. Avsluta med att trycka på “Stop“-knappen. Tryck
därefter på “Go“-knappen.
Indstilling af lokomotivparametre med Control Unit
1. Forudsætning: Opbygning som på grafikken
s. 20. Kun det lokomotiv, der skal ændres, er på sporet.
2. Tryk samtidig på „Stop“- og „Go“-tasten, indtil „99“
blinker i displayet.
3. Tryk på „Stop“-tasten.
4. Indtast den lokomotivadresse „80“.
5. Hold omskiftningskommando på køreregulator Tryk på
„Go“-knappen mens der holdes.
6. Lyset på lokomotivet blinker langsomt. Hvis ikke genta
-
ges proceduren fra trin 2.
7. Indtast registernummeret for den parameter, der skal
ændres (=> liste på side 22).
8. Betjen køreretningsskiftet.
9. Lyset blinker hurtigt
10.Indtast den nye værdi (=> liste på side 22).
11.Betjen køreretningsskiftet.
12.Lyset blinker langsomt (undtaget fabriksnulstilling)
13.Udfør næste parameterindstilling fra 6. eller afslut
med 14.
14.Afslut proceduren ved at trykke på „Stop“-knappen
Tryk derefter på „Go“-knappen.
„Ändringar av dekoderns lokparametrar får endast göras
på det sätt som instruktionerna anger. Märklin ansvarar
inte för andra - eller på annorlunda sätt utförda - parame
terändringar som leder till fel på - eller skadar - dekodern.
Eventuella reparationer som i sådana fall erfordras debite
-
ras enligt gängse taxa.“
Ændring af lokomotivets parametre i dekoderen må kun
udføres som beskrevet. Märklin hæfter ikke for ændringer,
der ligger uden for dette, og som kan medføre fejlfunktion
eller beskadigelse af dekoderen. Eventuelle nødvendige
reparationer udføres mod beregning.
Page 20
20
Lokparameter mit Control Unit ändern.
Changing Locomotive Parameters with the Control Unit.
Modification des paramètres avec la Control Unit.
Locparameter met de Control Unit.
Modificar los parámetros de la locomotora con el Control Unit.
Modifica dei parametri della locomotiva con la Control Unit.
Lokparametrar ändras med Control Unit.
Ændring af lokomotivparametre med Control Unit.
Page 21
21
1
80
1
Lokparameter verändern mit der Control Unit 6021.
Changing Locomotive Parameters with the 6021 Control Unit.
Modification des paramètres de la locomotive avec la Control Unit 6021.
Locparameter wijzigen met de Control Unit.
Modificar los parámetros de la locomotora con el Control Unit 6021.
Modifica dei parametri della locomotiva con la Control Unit 6021.
Lokparametrar ändras med Control Unit 6021.
Ændring af lokomotivparametre med Control Unit 6021.
1
1
99
1
2
80
2
1
01
01
1
1
2
10
10
1
11
14
12
Page 22
22
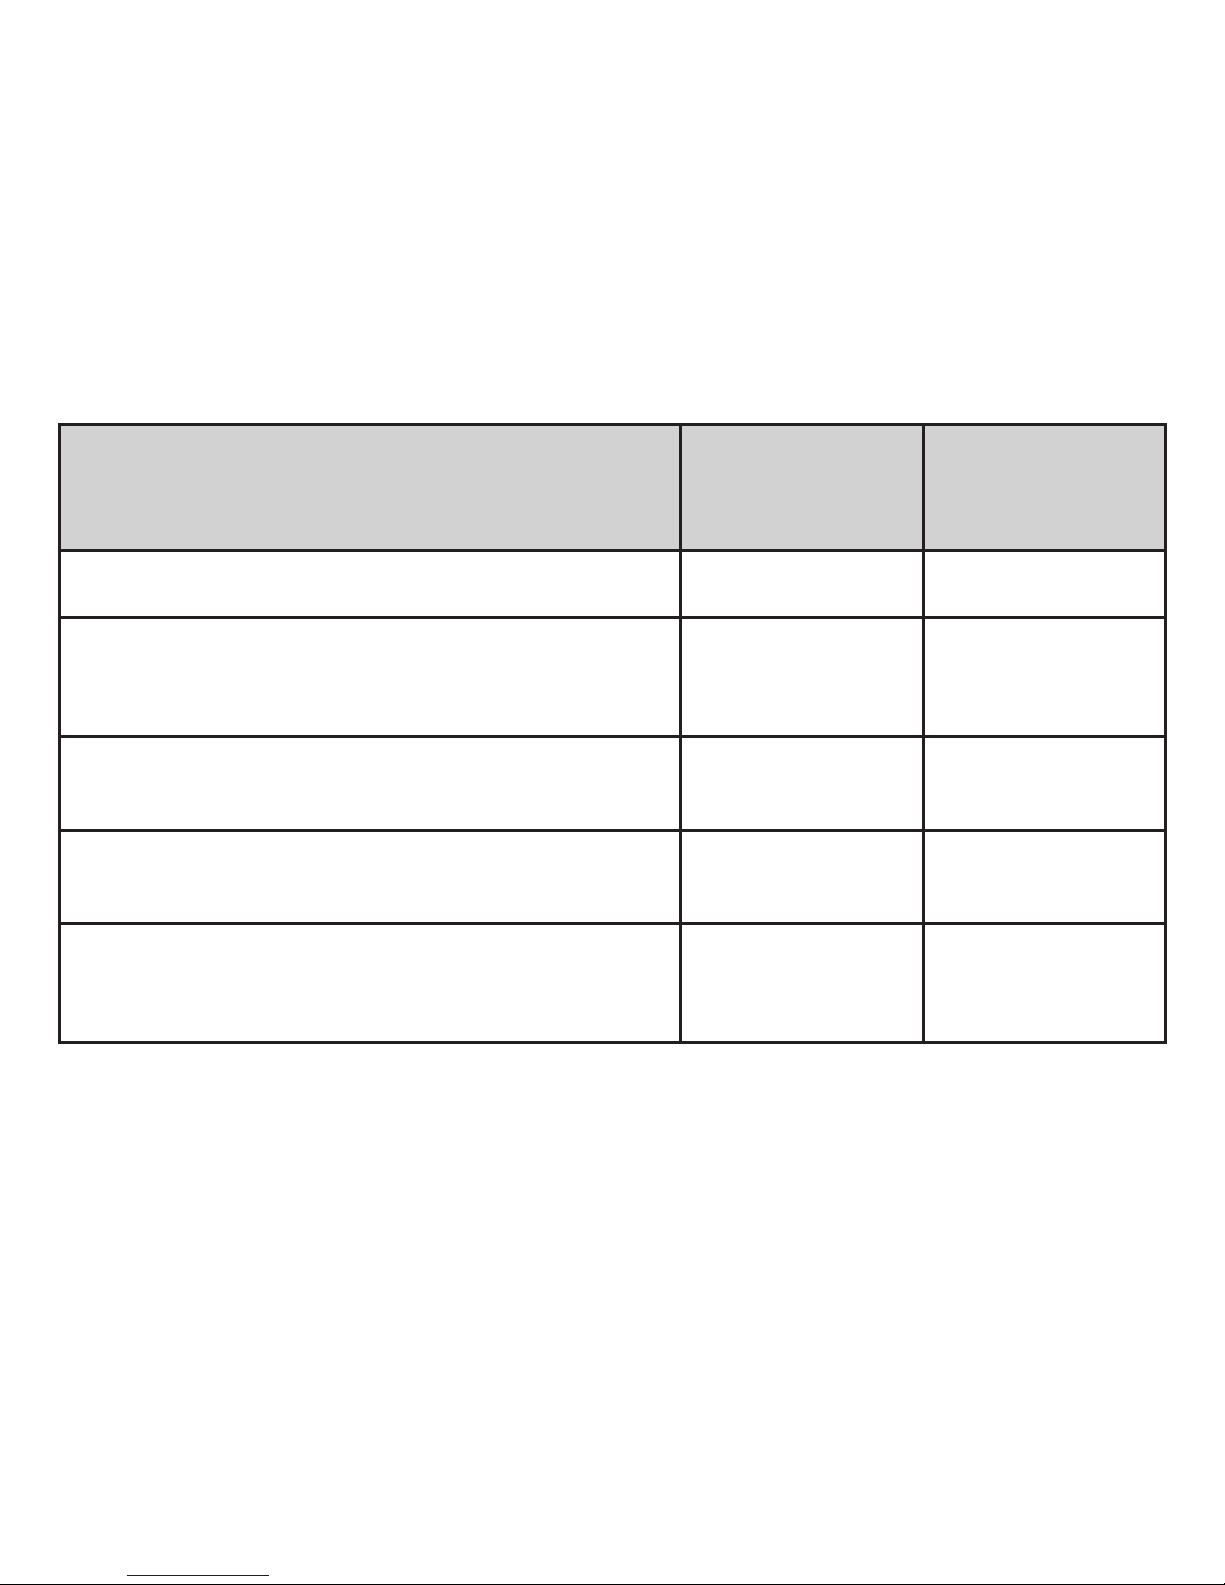
Parameter • Parameter • Paramètre • Parameter •
Parámetro • Parametro • Parameter • Parameter
Register • Register •
Registre • Register •
Registro • Registro •
Register • Register
Wert • Value •
Valeur • Waarde
• Valor • Valore •
Värde • Værdi
Adresse • Address • Adresse • Adres • Código • Indrizzo •
Adress • Adresse
01 01 - 80
Anfahrverzögerung • Acceleration delay • Temoprisation
accélération • Optrekvertraging • Regulación arranque •
Ritardo di avviamento • Igångsättningsreglering • Opstartregulierung
03 01 - 63
Bremsverzögerung • Braking delay • Temporisation de freinage • Afremvertraging • Frenado lento • Ritardo di frentura
• Bromsfördröjning • Bremseforsinkelse
04 01 - 63
Höchstgeschwindigkeit • Maximum speed •
Vitesse maximale • Maximumsneilheid • Velocidad máxima •
Velocità massima • Toppfart • Maksimalhastighed
05 01 - 63
Rückstellen auf Serienwerte • Reset to series value • Remettre aux valeurs de série • Terugzetten naar serie-instellingen •
Restablecer los valores de serie • Pipristinare sui valori di serie
• Återställa till standardvärden • Tibagestil til serieværdien
08 08
Page 23

23
Betrieb mit Mobile Station / Central Station
• Lok aufgleisen. Die Lok meldet sich selbsttätig in der
Lokliste an.
• Keine Rückmeldung der Lok, wenn:
bei Mobile Station der Geschwindigkeitsbalken blinkt
bei Central Station das mfx-Symbol unterstrichen ist
• Lok abmelden:
1. Lok vom Gleis entfernen.
2. Lokeintrag löschen.
Eine Adressänderung ist nicht notwendig.
Lokparameter mit der Mobile Station / Central Station
verändern
1. Lok aus der Lokliste auswählen.
2. Zum Untermenü „LOKÄNDERN“ wechseln.
3. Zum Untermenü „VMAX“ (Höchstgeschwindigkeit),
„ACC“ (Beschleunigung), „DEC“ (Bremsen),
„VOL“ (Lautstärke) oder
„RESET“ (Decoder auf Werkeinstellung zurück)
wechseln.
4. Neuen Wert eingeben und übernehmen.
Beachten Sie die Hinweise in der Anleitung zur
Mobile Station / Central Station.
Zugunsten der guten Fahreigenschaften ist an dem Mo
dell die VMAX auf 86% (Mobile Station) bzw. 220 (Central
Station) voreingestellt. Ein weiteres Anheben dieses
Wertes hat keine Geschwindigkeitserhöhung zur Folge,
sondern beeinflusst nur die Fahreigenschaften negativ.
Operation with the Mobile Station / Central Station
• Set the locomotive on the track. The locomotive auto
-
matically registers itself in the locomotive list.
• The locomotive will not communicate back to the
controller when:
the speed bar on the Mobile Station blinks.
the mfx symbol has a line beneath it on the Central
Station.
• Taking the locomotive out of the locomotive list:
1. Remove the locomotive from the track.
2. Delete the locomotive entry.
It is not necessary to change the address.www
Changing Locomotive Parameters with the
Mobile Station / Central Station
1. Select the locomotive from the locomotive list.
2. Change to the submenu “EDIT LOC”.
3. Go to the submenu „VMAX“ (maximum speed),
„ACC“ (acceleration), „DEC“ (brakes),
„VOL“ (volume) or
„RESET“ (resetting the decoder to factory default
settings).
4. Enter the new value and accept it into the system.
Please note the information in the instructions for the
Mobile Station / Central Station.
The VMAX has been preset at 86% (Mobile Station) and
at 220 (Central Station) on the model in order to give
good running characteristics. Raising this value further
will not increase the speed; it will only have a negative
effect on the running characteristics.
Page 24

24
Exploitation avec Mobile Station / Central Station
• Enrailler la locomotive. La locomotive signale automatiquement sa présence dans la liste des locos.
• Pas de rétrosignalisation de la locomotive lorsque :
- la barre de vitesse clignote pour Mobile Station
- le symbole mfx est souligné pour Central Station
• Appeler loco:
1. Enlever loco de la voie.
2. Effacer entrée loco.
Une modification de l’adresse n’est pas nécessaire.
Modification des paramètres de la loco avec la
Mobile Station / Central Station
1. Sélectionnez la loco dans la liste.
2. Allez au sous-menu „MODIF LOC“.
3. Ouvrir le sous-menu « VMAX » (vitesse maximale),
« ACC » (accélération), « DEC » (freinage),
« VOL » (volume) ou « RESET » (réinitialisation du
décodeur aux valeurs d’usine).
4. Entrez la nouvelle valeur et acceptez.
Respectez les remarques mentionnées dans l’instruction
accompagnant la Mobile Station / Central Station.
En faveur de l’une des bonnes caractéristiques de roule
ment, la VMAX du modèle est préréglée sur 86% (Mobile
Station) ou 220 (Central Station). L’augmentation de cette
valeur n’augmentera pas la vitesse, mais risque uniquement d’altérer les caractéristiques de roulement.
Bedrijf met Mobile Station / Central Station
• Loc op de rails plaatsen. De loc meldt zichzelf aan in
de loclijst.
• Geen terugmelding van de loc als:
bij het Mobile Station de snelheidsbalk knippert
bij het Central Station het mfx-symbool onderstreept is
• Loc afmelden:
1. loc van de rails nemen
2. loc invoer wissen.
Het wijzigen van het adres is niet nodig.
Locparameter wijzigen met het Mobile Station
1. Loc uit de loclijst kiezen.
2. Ga naar het nevenmenu ”WIJZIG LOC”.
3. Naar het nevenmenu “VMAX” (maximumsnelheid)
“ACC” (optrekken), “DEC” (afremmen),
“VOL” (volume) of
“RESET” (decoder terugzetten naar fabrieksinstelling)
omschakelen.
4. Nieuwe waarde invoeren en overnemen.
Lees ook de opmerkingen in de gebruiksaanwijzing van
het Mobile Station / Central Station.
Voor het verbeteren van de rijeigenschappen is bij het
model de maximumsnelheid op 86% (Mobile Station)
dan wel 220 (Central Station) ingesteld. Het verhogen
van deze vooringestelde waarde heeft geen invloed op
de maximumsnelheid, maar beïnvloed alleen de rijeigenschappen negatief.
Page 25

25
Funcionamiento con Mobile Station / Central Station
• Encarrilar la loc. La loc se introduce por si
misma en la lista de locomotoras.
• No se recibe señalización de respuesta de la locomo
tora si: En la Mobile Station luce intermitentemente la
barra de velocidad En la Central Station está subrayado el símbolo mfx
• Dar de baja a la loc.:
1º retirar la loc. de la vía
2º borrar los datos de la loc.
No hace falta cambiar el código.
Modificar los parámetros de la locomotora con la
Mobile Station
1. Seleccionar la locomotora de la lista de locomotora.
2. Pasar al menú subsidiario “EDIT LOC”.
3. Cambiar al submenú „VMAX“ (Velocidad máxima),
„ACC“ (Aceleración), „DEC“ (Frenado), „VOL“
(Volumen) o
„
RESET“ (Devolver decoder a configuración de fábrica).
4. Introducir el nuevo código y memorizar.
Observe las indicaciones en las instrucciones de la
Mobile Station / Central Station.
Para favorecer una de las buenas características de
marcha, en el modelo en miniatura se ha preconfigurado
la VMAX a 86% (Mobile Station) o bien 220 (Central Station). Un aumento adicional de este valor no tendrá como
resultado un aumento de velocidad, sino que tan solo
afectará negativamente a las características de marcha.
Funzionamento con Mobile Station / Central Station
• Disporre la locomotiva sul binario. La locomotiva si
annuncia automaticamente nell’elenco locomotive.
• Nessun segnale di ritorno della locomotiva, qualora:
nel caso di Mobile Station lampeggia la barra della
velocità nel caso di Central Station il simbolo mfx è
sottolineato
• Dare congedo alla locomotiva:
1. Rimuovere la locomotiva dal binario.
2. Cancellare l’impostazione della locomotiva.
Non è necessaria una modifica dell’indirizzo.
Modifica dei parametri della locomotiva con la
Mobile Station
1. Selezionare la locomotiva dall’elenco locomotive.
2. Commutare al sottomenù „EDIT LOC“.
3. Sul menù sottostante commutare „VMAX„ (velocità
massima),
„ACC„ (accelerazione), „DEC„ (frenatura),
„VOL„ (volume sonoro) oppure
„RESET„ (riporta il Decoder alle impostazioni di fabbrica).
4. Introdurre il nuovo valore e accettarlo.
Prestate attenzione alle avvertenze nelle istruzioni della
Mobile Station / Central Station.
A vantaggio di una delle buone caratteristiche di marcia,
in tale modello la VMAX è già impostata su 86% (Mobile
Station) o rispettivamente 220 (Central Station). Un
ulteriore incremento di questo valore non ha come effetto
alcun incremento di velocità, bensì influenza le caratteris
-
tiche di marcia solo in modo negativo.
Page 26

26
Drift med Mobile Station / Central Station
• Sätt loket på spåret. Loket anmäler sig själv på loklistan.
• Loket anmäler sig inte när:
Mobile Station hastighetsbalk blinkar
Central Station mfx-symbol är understruken
• Att avregistrera loket:
1. Ta loket från spåret
2. Ta bort loket från loklistan.
En adressändring behövs inte
Lokparametrar ändras med Mobile Station
1. Välj lok från loklistan.
2. Växla till undermenyn „EDIT LOC“.
3. Byt till resp. Undermeny: “VMAX“ (maxhastighet),
“ACC“ (acceleration), „DEC„ (bromsning),
„VOL„ (ljudstyrka) eller till
„RESET„ (för återställning av dekodern till ursprunglig
fabriksinställning).
4. Mata in nytt värde och acceptera.
Glöm ej: Se även i anvisningarna i bruksanvisningen för
Mobile Station / Central Station!
Till modellens goda köregenskaper bidrar att VMAX är
förinställd på 86% (Mobile Station) 220 Central Station.
Ytterligare höjning av detta värde ger ingen hastighetsök
ning, utan kommer endast att negativt påverka modellens
köregenskaper.
Drift med Mobile Station / Central Station
• Sæt lokomotivet på skinnerne. Lokomotivet registreres
automatisk i lokomotivlisten.
• Ingen tilbagemelding fra lokomotivet, når:
hastighedsbjælken blinker ved brug af Mobile Station
mfx-symbolet er understreget ved brug af Central Station
• Afmelding af lokomotivet:
1. Tag lokomotivet af skinnerne.
2. Slet lokomotivet fra listen.
Det er ikke nødvendigt med en adresseændring.
Ændring af lokomotivparametre med Mobile Station
1. Vælg lokomotivet fra listen.
2. Skift til undermenuen „EDIT LOC“.
3. Til undermenu „VMAX“ (maksimalhastighed),
„ACC“ (acceleration), „DEC“ (bremse),
„VOL“ (lydstyrke) eller
„RESET“ (nulstille dekoder til fabriksindstilling).
4. Indtast den nye værdi og overtag den.
Lagttag henvisningerne i vejledningen til Mobile Station /
Central Station.
Til fordel for en af de gode køreegenskaber er VMAX på
modellen forindstillet til 86% (Mobile Station) respektive
220 (Central Station) En yderligere forhøjelse af denne
værdi medfører ingen hastighedsforøgelse, men har kun
negativ indflydelse på køreegenskaberne.
Page 27
27
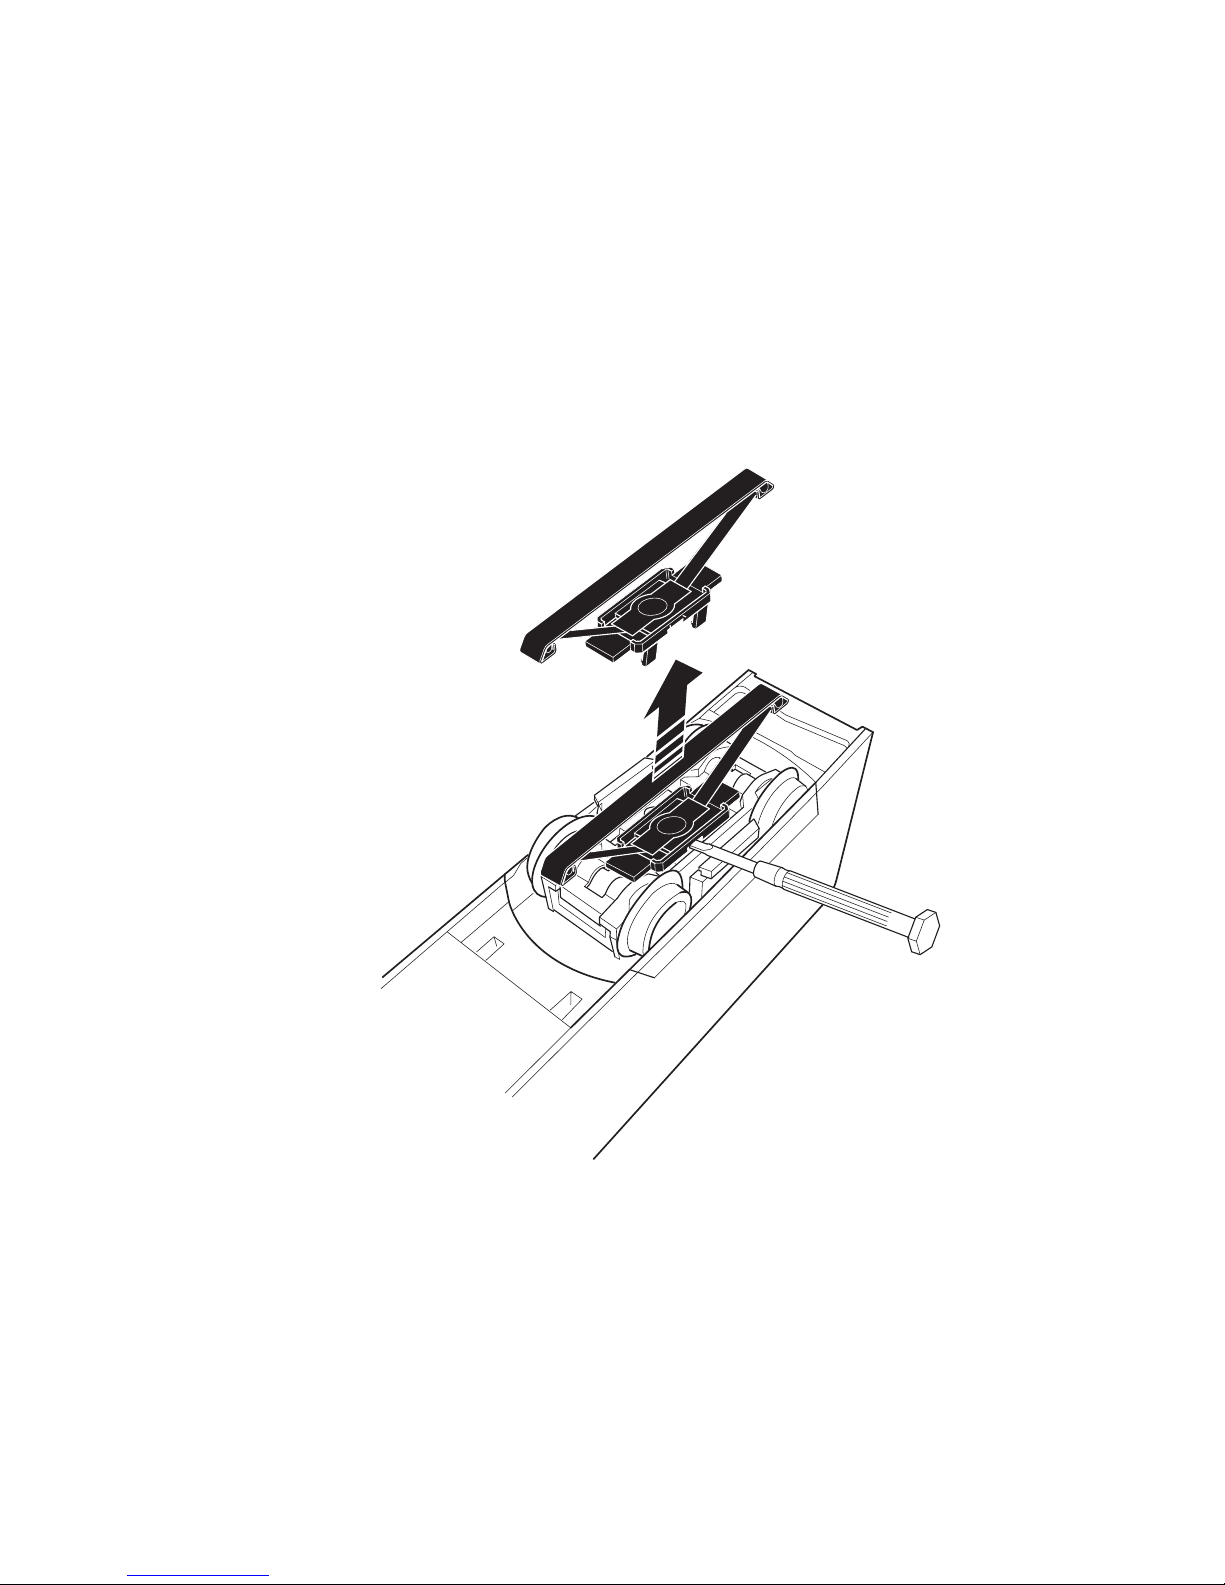
Schleifer auswechseln
Changing pickup shoes
Changer les frotteurs
Slepers vervangen
Cambio del patín
Sostituzione del pattino
Släpsko byts
Slæbesko udskiftes
Page 28
28
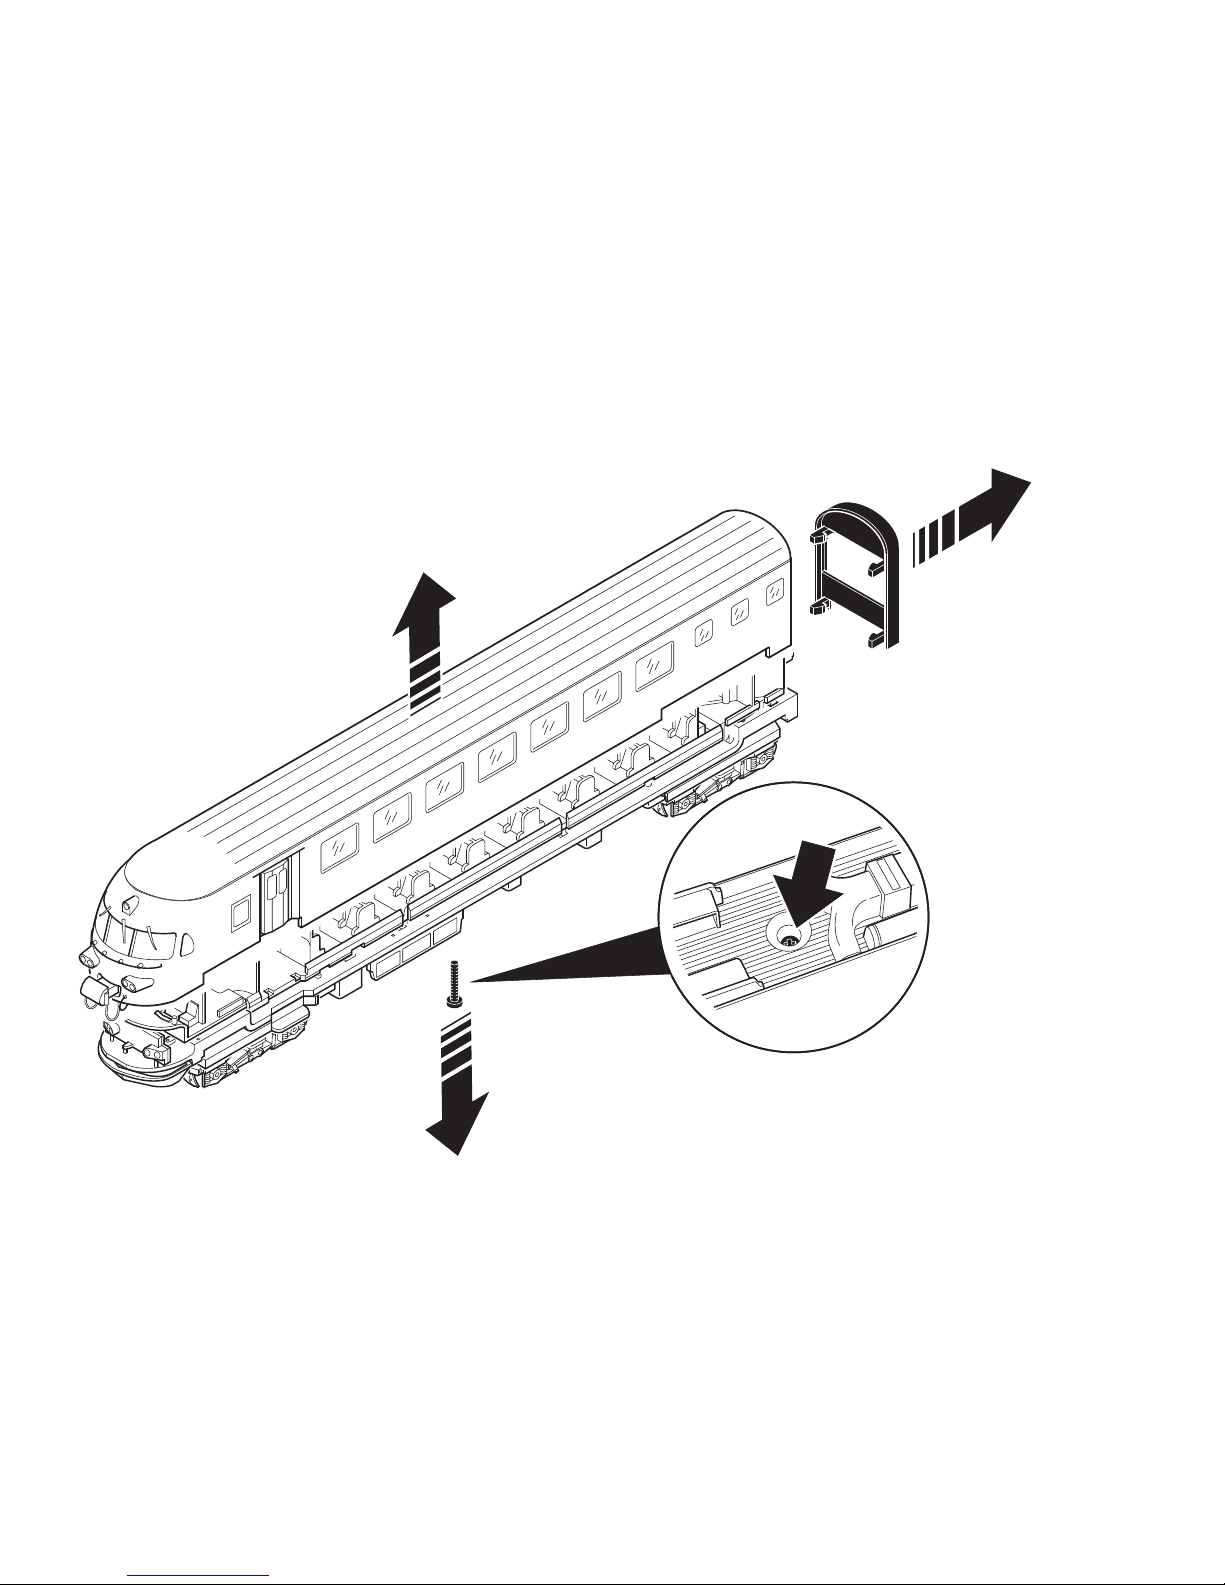
Gehäuse abnehmen
Removing the body
Enlever le boîtier
Kap afnemen
Retirar la carcasa
Smontare il mantello
Kåpan tas av
Overdel tages af
1.
3.
2.
Page 29
29
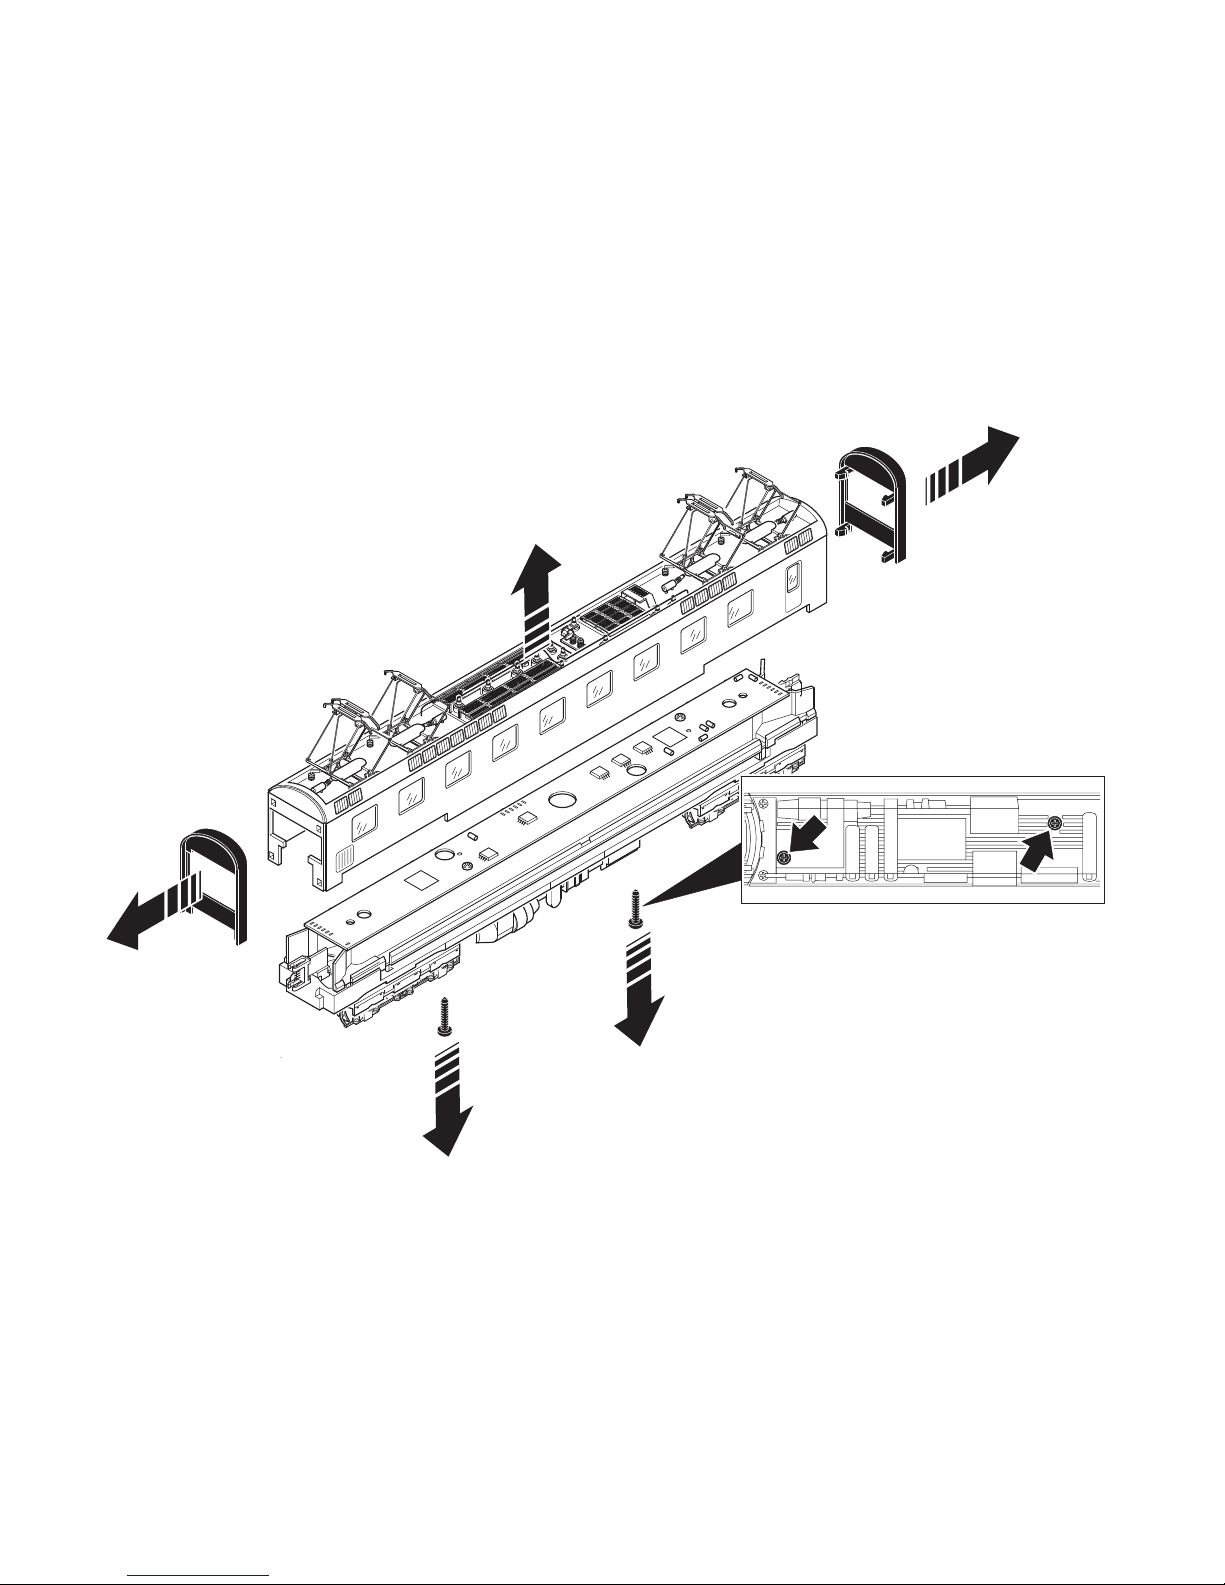
Gehäuse abnehmen
Removing the body
Enlever le boîtier
Kap afnemen
Retirar la carcasa
Smontare il mantello
Kåpan tas av
Overdel tages af
1.
2.
2.
1.
3.
Page 30
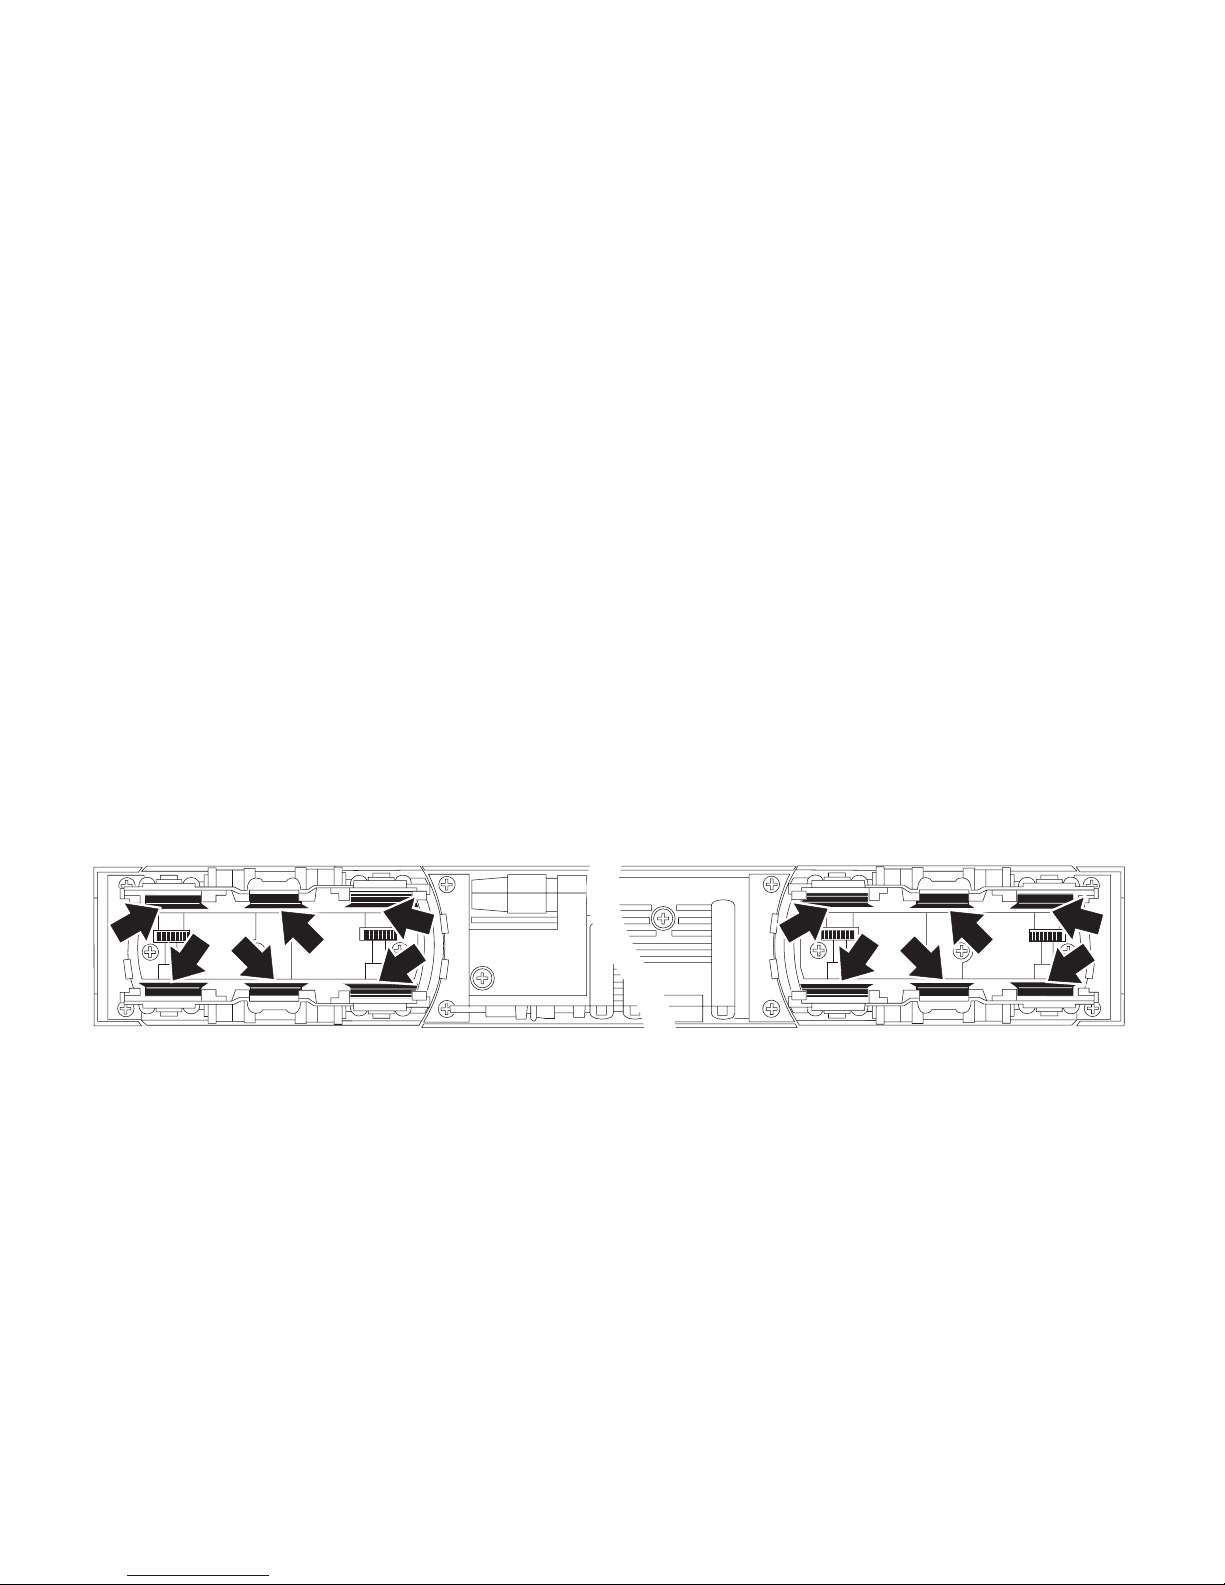
30
Schmierung nach etwa 40 Betriebsstunden
Lubrication after approximately 40 hours of operation
Graissage après environ 40 heures de marche
Smering na ca. 40 bedrijfsuren
Engrase a las 40 horas de funcionamiento
Lubrificazione dopo circa 40 ore di funzionamento
Smörjning efter ca. 40 driftstimmar
Smøring efter ca. 40 driftstimer
Page 31
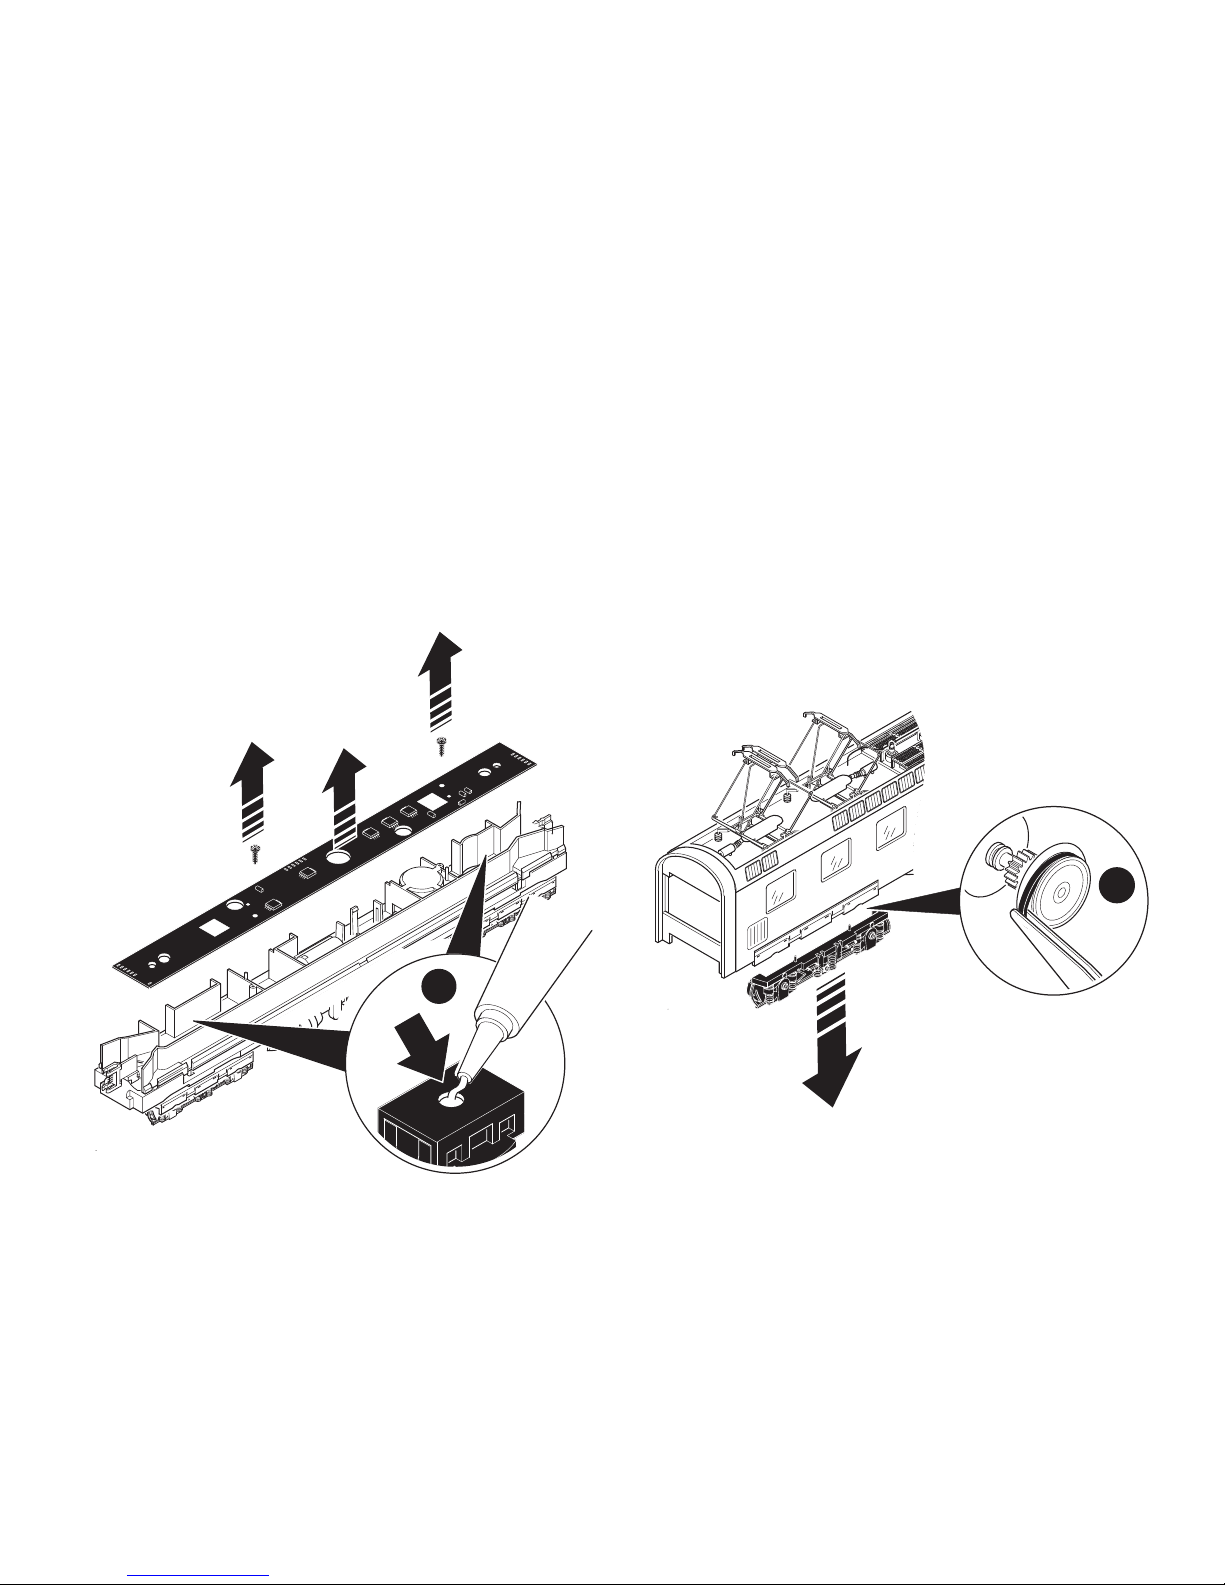
31
2.
1.
1.
3.
Schnecke fetten, 1 Tropfen je Bohrung • Grease the
worm gear, 1 drop per opening.
Graissage de la vis sans fin, une goutte par trou.
Wormwiel smeren, 1 druppel per boring.
Engrasar el sin fin, 1 gota por cada agujero
Si lubrifichi la vite senza fine, 1 goccia in ciascun foro
Snäckorna smörjes mycket, 1 droppe olja i varje
smörjhål.
Smør snekken, 1 dråbe i hver boring
1.
2.
Haftreifen auswechseln
Changing traction tires
Changer les bandages d’adhérence
Antislipbanden vervangen
Cambio de los aros de adherencia
Sostituzione delle cerchiature di aderenza
Slirskydd byts
Friktionsringe udskiftes
Page 32
32
1.
2.
2.
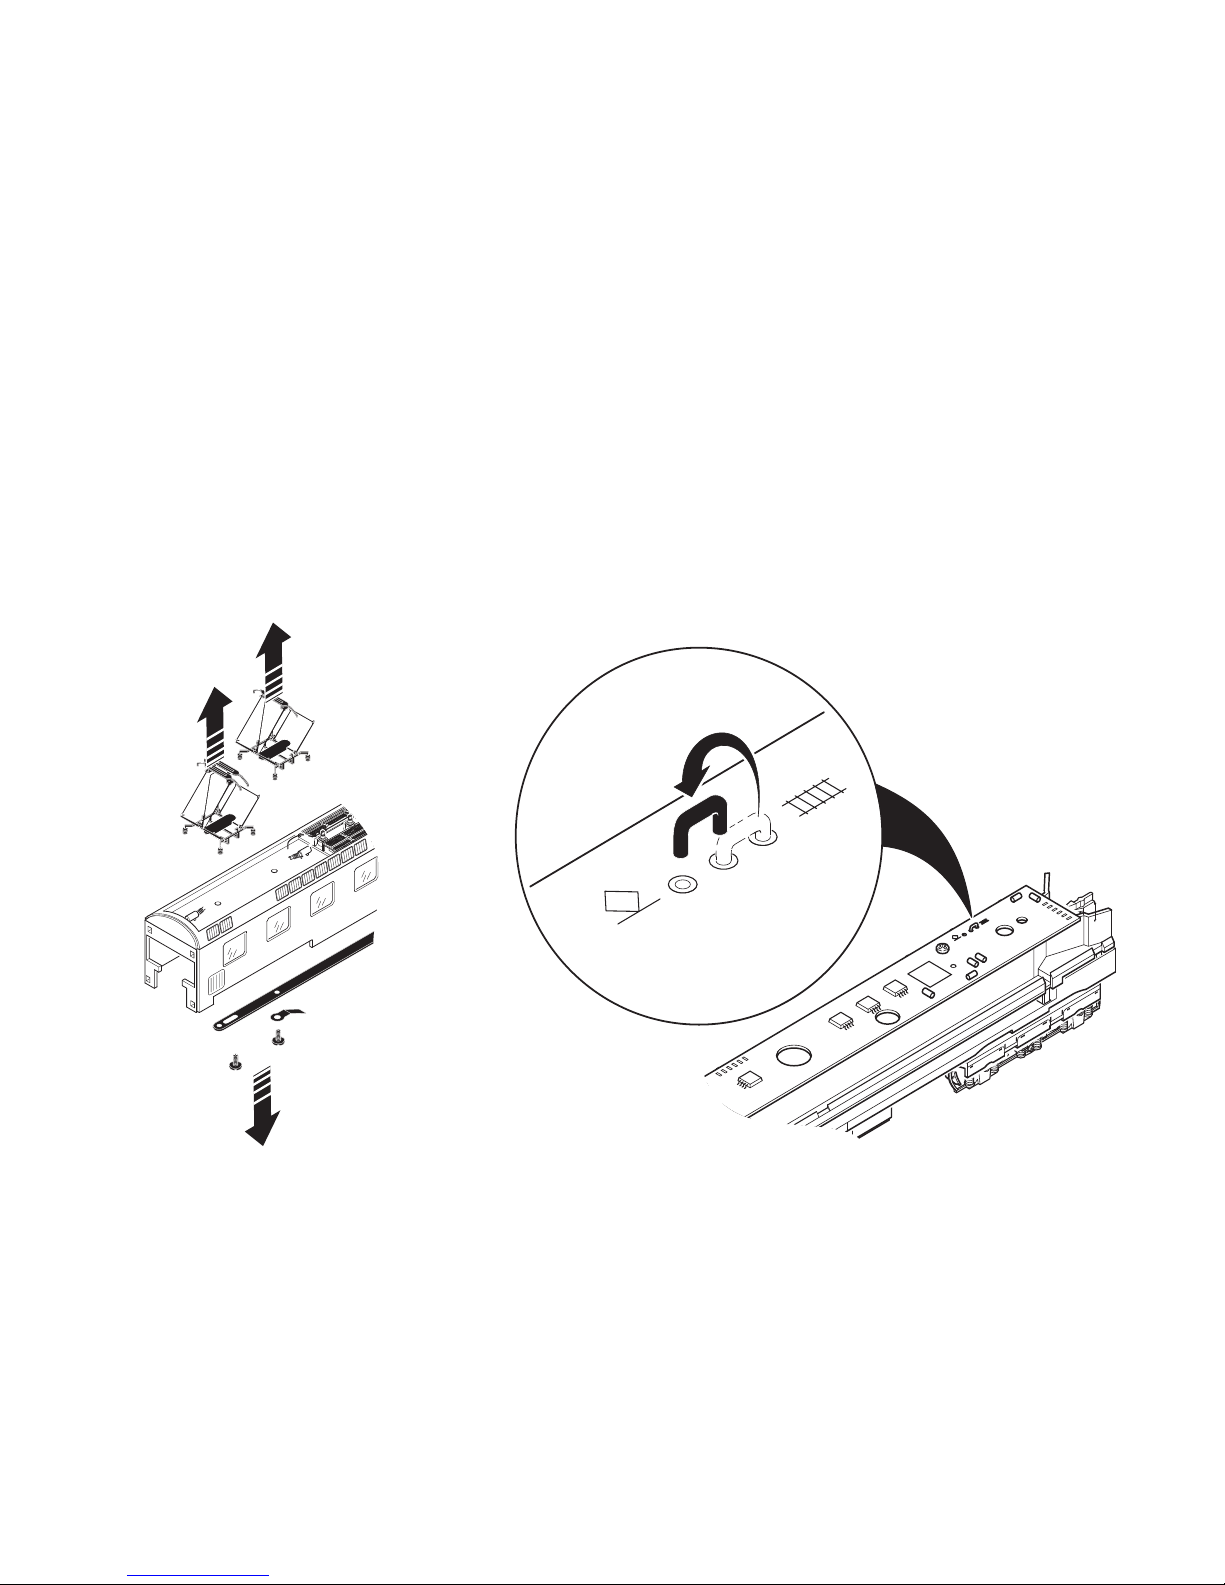
Dachstromabnehmer auswechseln
Changing pantographs
Remplacement du pantographe
Vervanging van de stroombeugel
Cambiar el pantógrafo
Sostituzione dei pantografi
Byte av strömavtagare
Udskiftning af pantograf
Umschaltung für Oberleitungsbetrieb
Switch for selecting catenary or track operation
Commutation pour alimentation par ligne aérienne
Omschakeling op bovenleiding
Conmutación a toma-corriente por catenaria
Commutazione per esercizio con linea aerea
Omkoppling till kontaktledning
Omskiftning til luftledningsdrift
Page 33

33
Wichtiger Hinweis !
Dem Vorbild entsprechend sind die inneren Dachstrom
abnehmer mit einem schmalen Schleifstück ausgerüstet.
Um Funktionsstörungen auszuschließen, empfehlen wir,
für Oberleitungsbetrieb nur die äusseren Dachstromab
-
nehmer (mit breitem Schleifstück) einzusetzen.
Important information !
The inner pantographs are equipped with a narrow
contact strip like the prototype. We recommend using
only the outer pantographs (with a wider contact strip) for
catenary operation in order to prevent malfunctions.
Conseil important !
Conformément au modèle réel, les pantographes intérieurs sont équipés d’une mince semelle d’archet. Afin
d’éviter les dysfonctionnements lors d’une exploitation
sous caténaire, nous conseillons d’utiliser uniquement
les pantographes extérieurs (munis d’une large semelle
d’archet).
Conseil important !
Conformément au modèle réel, les pantographes intérieurs sont équipés d’une mince semelle d’archet. Afin
d’éviter les dysfonctionnements lors d’une exploitation
sous caténaire, nous conseillons d’utiliser uniquement
les pantographes extérieurs (munis d’une large semelle
d’archet).
Avvertenza importante !
In modo corrispondente al prototipo, sul tetto i pantografi
interni sono equipaggiati con un elemento strisciante piccolo. Per escludere difetti di funzionamento, noi consigli
amo di impiegare per l’esercizio con linea aerea soltanto i
pantografi esterni (con elemento strisciante largo).
Overeenkomstig het voorbeeld zijn de binnenste panto
grafen voorzien van een smal sleepstuk. Om problemen
te voorkomen is het aan te bevelen voor het bovenleidingsbedrijf alleen de buitenste pantografen (met het
brede sleepstuk) te gebruiken.
OBS! VIKTIGT!
Liksom på modellens verkliga förebild är de inre/mittre
takströmavatagarna utrustade med smalare/kortare
byglar för kontaktledningen. För att undvika problem så
rekommenderar vi att man vid körning med strömmatning
via kontaktledning endast använder de yttre takströmav
-
tagarna (dvs. de med bredare/längre byglar).
Vigtig henvisning:
Ligesom på forbilledet er de indvendige pantografer
udstyret med et smalt slæbestykke. For at udelukke funk
tionsfejl anbefales det, at du kun anvender den udvendige
pantograf (med bredt slæbestykke) ved overledningsdrift.
Page 34
34
5/95
4
3
6
9
1
7
13
12/96
14/97
11
17/98
8
15
16
24/103
27
29
26/102
29
28
24/103
10
18/99
19/100
28
4
2
4/94
6
25
24/103
27
29
20
24/103
29
21
22
24/103
23/101
13
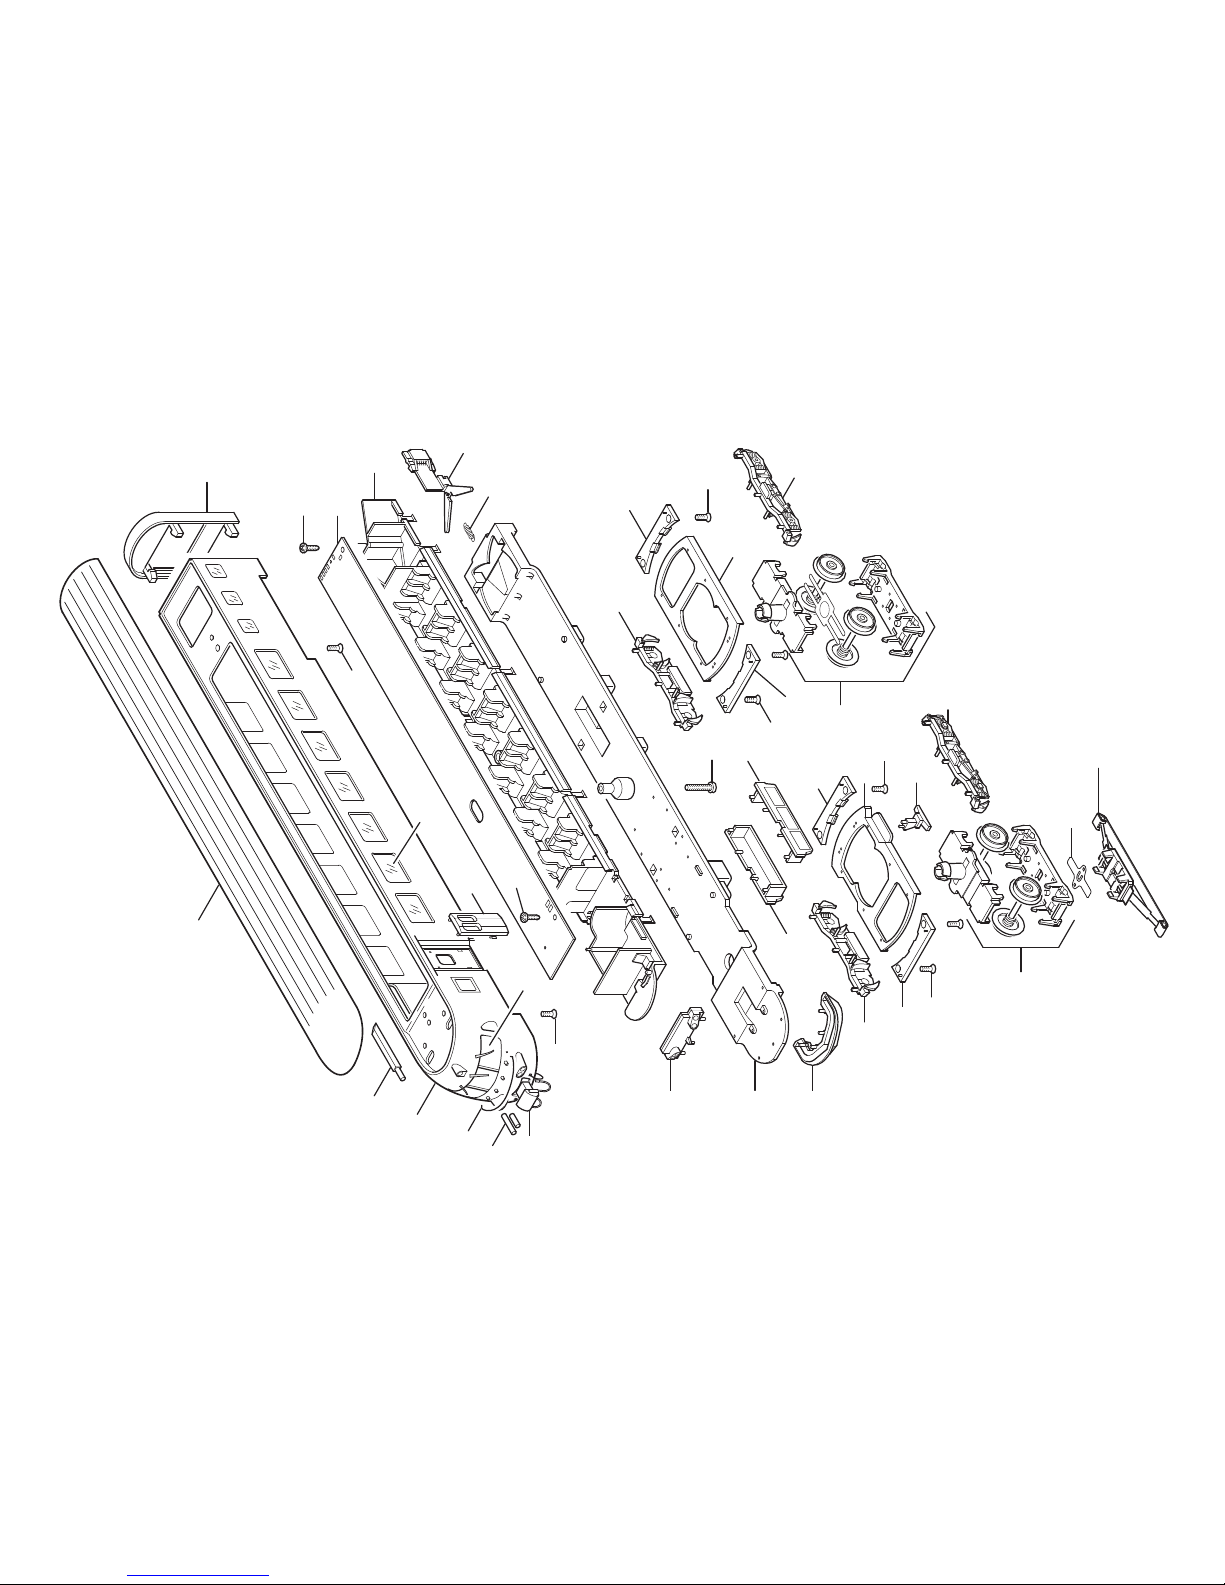
Details der Darstellung
können von dem Modell
abweichen
Page 35
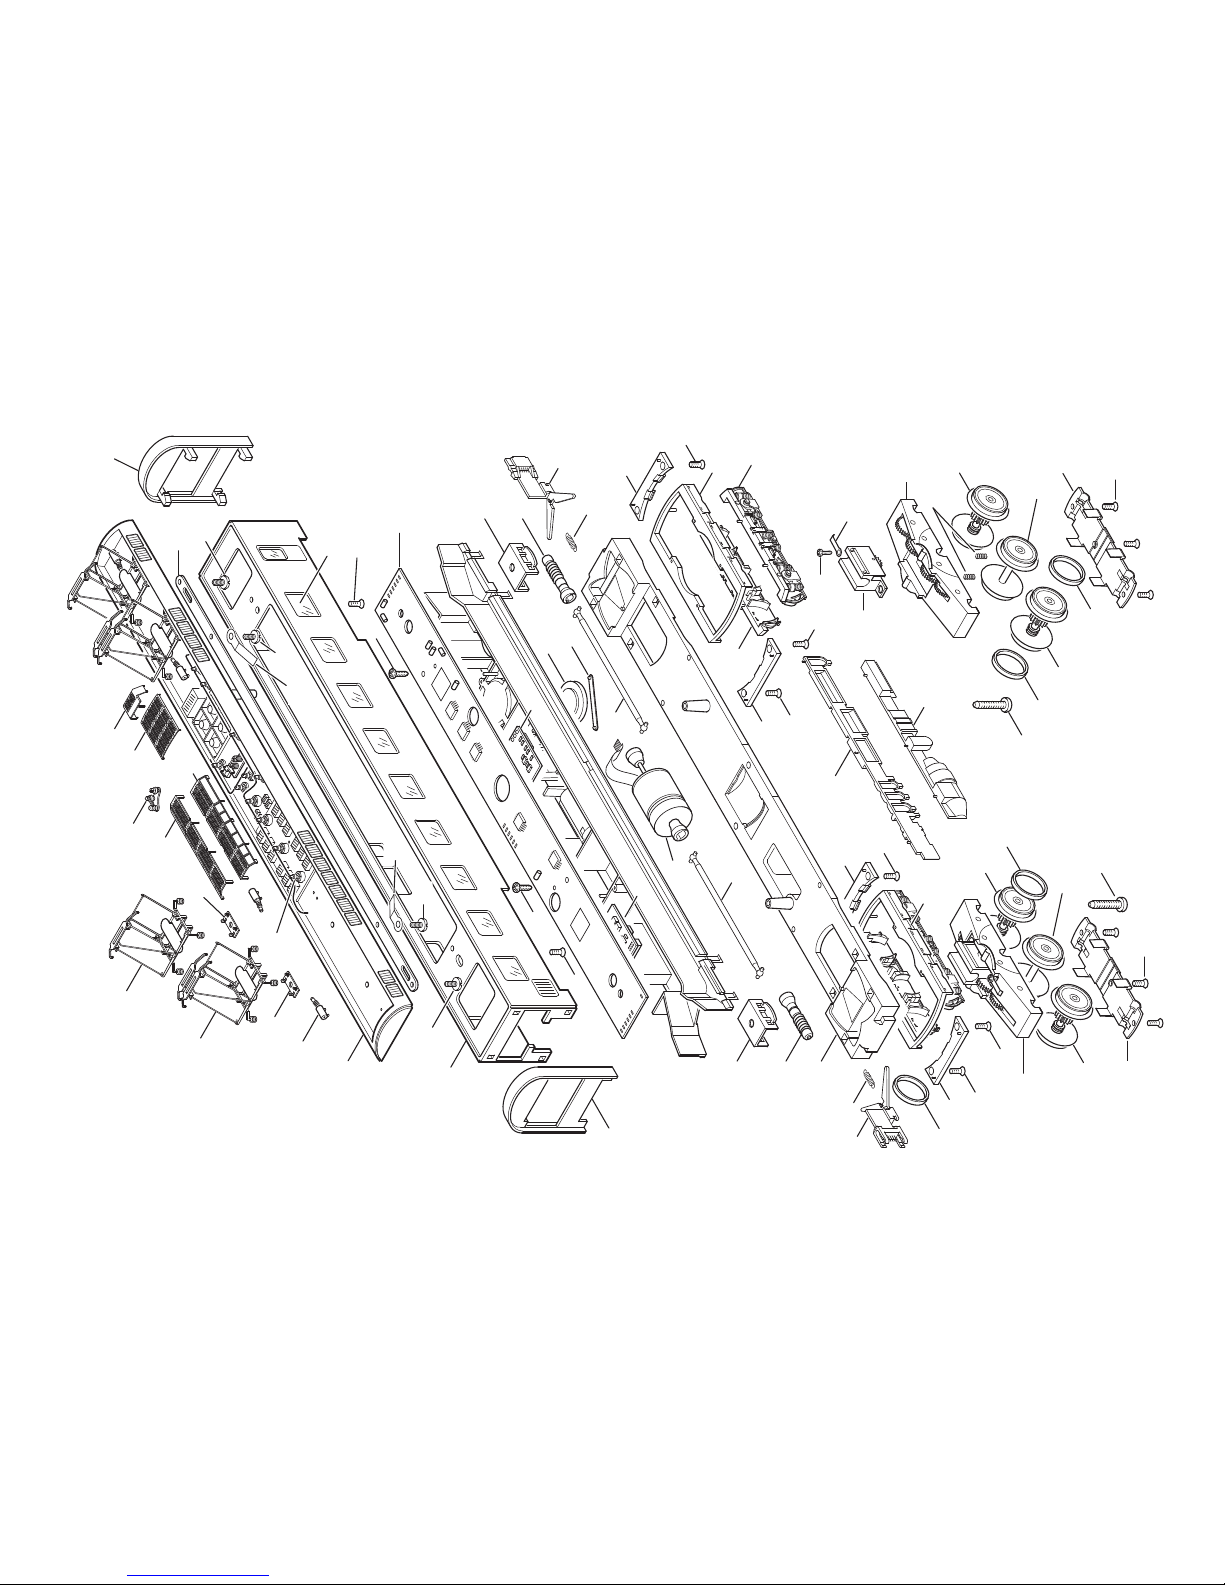
35
47
45
46
49
44
48
31
6
15
42
16
16
49
50
50
51
51
52
53
54
67
70
29
29
29
70
68
69
56
57
55
29
70
30
32
37
33
33
40
7
13
6
39
40
39
40
13
35
36
34
34
34
34
37
33
38
40
7
61
63
63
63
29
29
70
66
63
61
60
65
64
62
41
41
58
58
60
62
64
65
59
Details der Darstellung
können von dem Modell
abweichen
Page 36
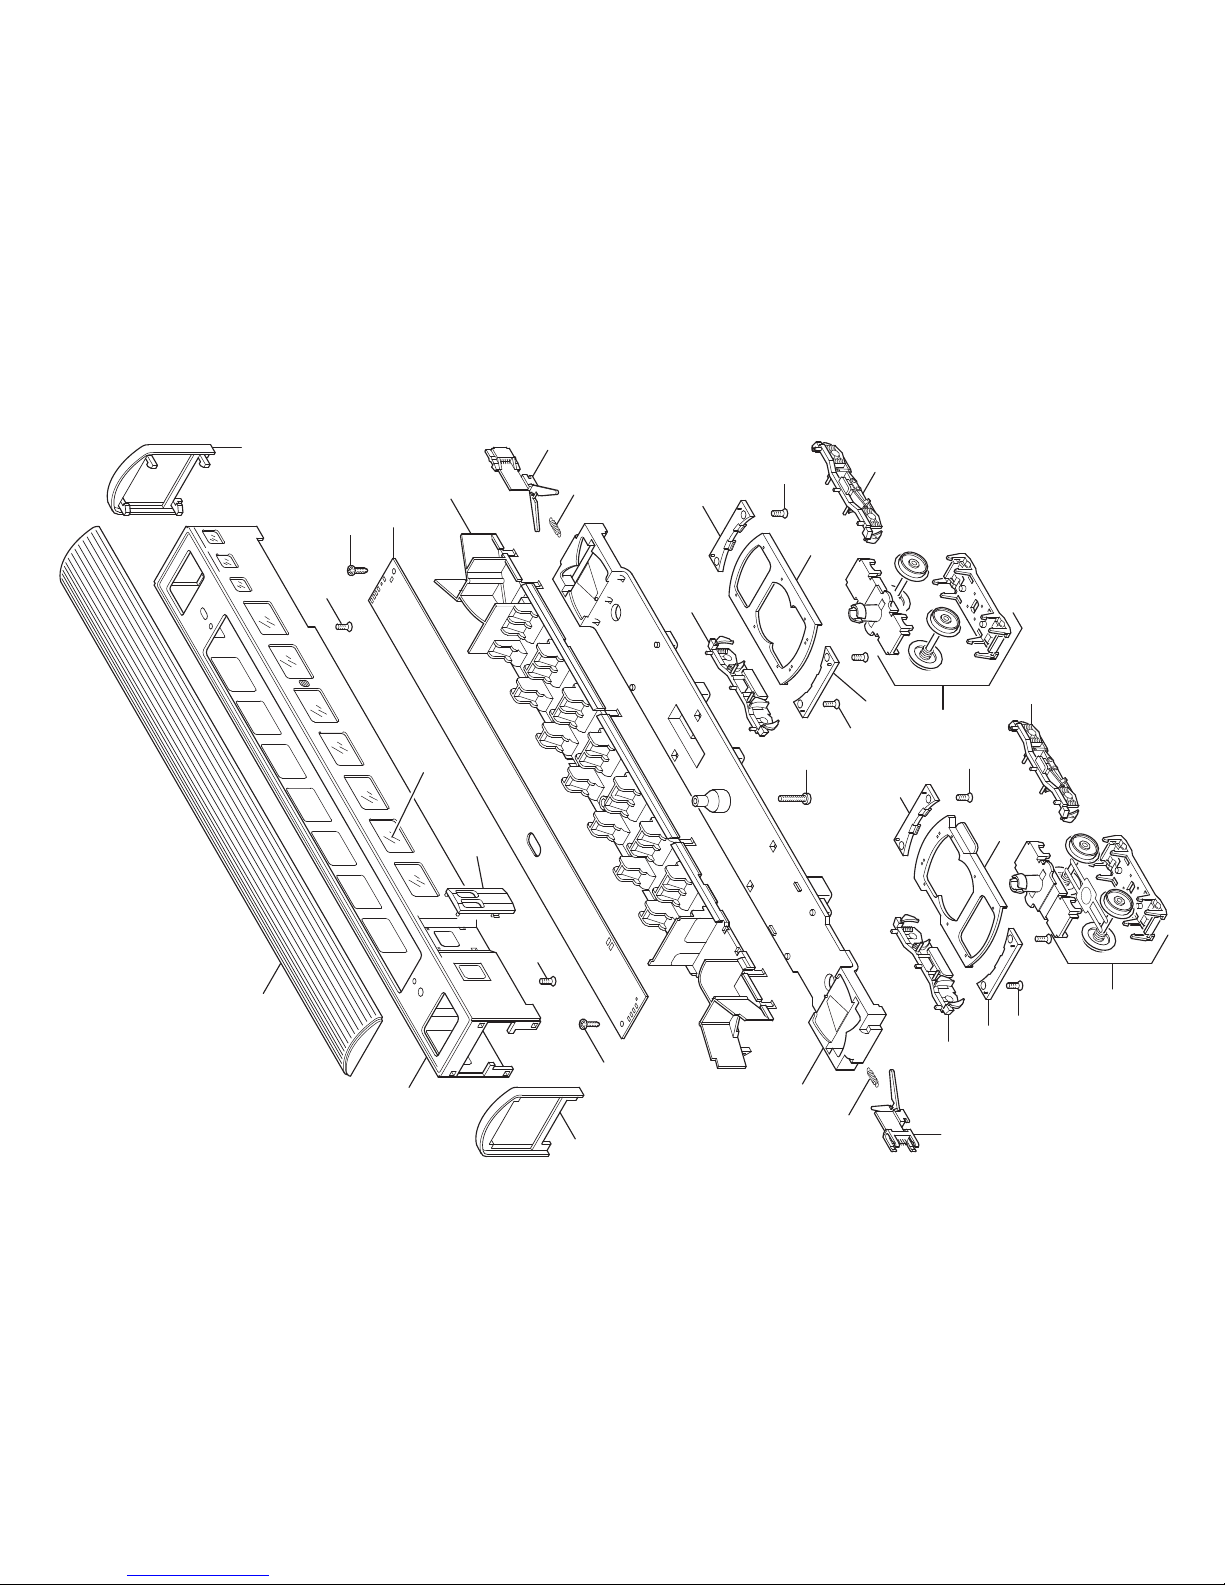
36
29
28
10
83/93
27
29
79
29
28
83/93
79/91
43
83/93
27
29
80/92
83/93
80
74/87
71/84
72/85
73/86
7
7
6
13
6
13
75/88
76/89
15
16
77/90
16
Details der Darstellung
können von dem Modell
abweichen
Page 37

37
Steuerwagen 1
1 Gehäuse 124 423
2 Türe 114 642
3 Griffstange 114 539
4 Glasteile 124 424
5 Dach 119 632
6 Senkschraube 786 790
7 Faltenbalg 113 662
8 Schienenräumer 116 866
9 Kupplungsimitation 117 854
10 Linsenschraube 786 870
Unterteil
11 Stirnbeleuchtung 114 629
12 Leiterplatte Innenbeleuchtung 110 759
13 Linsenschraube 786 330
14 Inneneinrichtung 114 628
15 Kupplung M 119 490
16 Schaltschieberfeder 7 194
17 Boden 113 656
18 Kastenimitation 116 832
19 Kastenimitation 114 626
20 Drehgestell vorne 114 635
21 Schleifer 206 370
22 Kontaktfeder 205 784
23 Blende vorne 117 295
24 Drehgestellblenden 124 436
25 Drehgestell hinten 114 640
26 Blende hinten 117 294
27 Führung außen 114 446
28 Führung innen 114 447
29 Senkschraube 786 790
Page 38
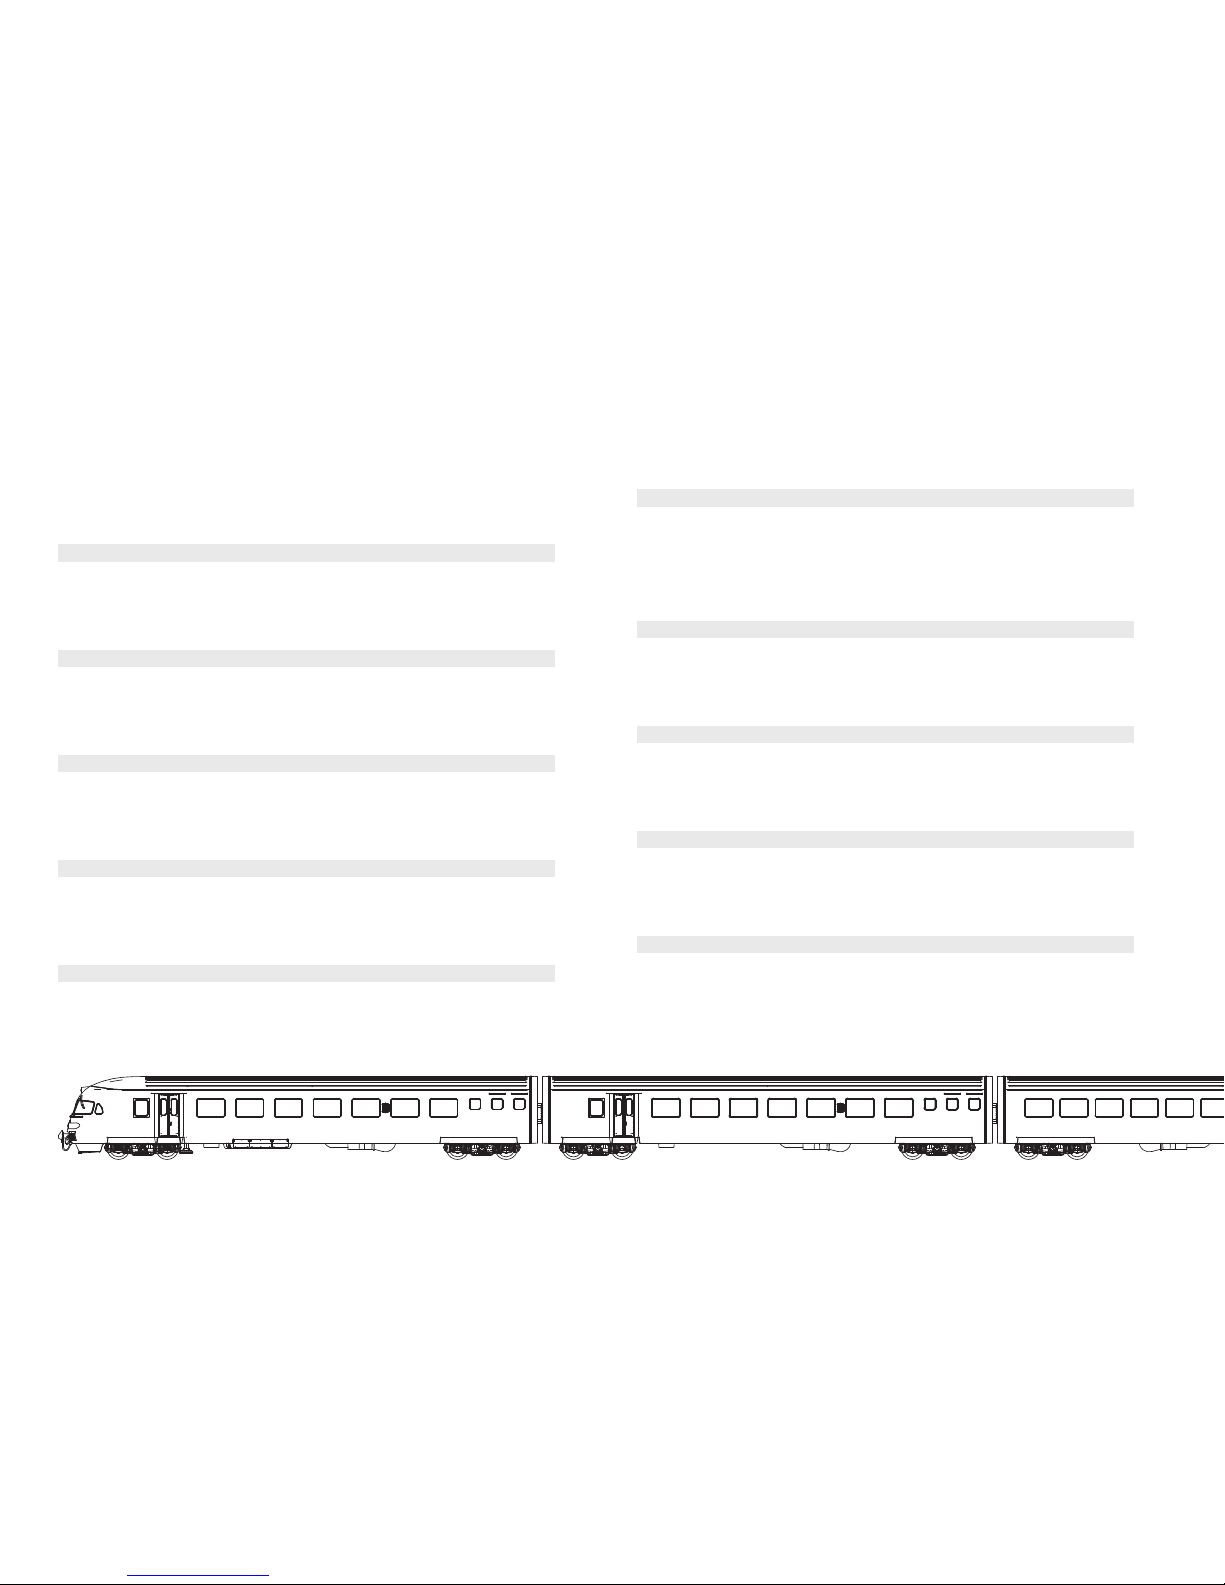
38
Motorwagen
30 Gehäuse 119 345
31 Glasteile 124 425
32 Dach 113 446
33 Dachleitungen u. Isolatoren 124 426
34 Abdeckungen 124 427
35 Dachstromabnehmer 114 583
36 Dachstromabnehmer 114 582
37 Isolierplatte 255 050
38 Verbindungsstreifen 110 967
39 Kontaktfeder 494 260
40 Zylinderschraube 784 800
41 Linsenschraube 308 468
42 Leiterplatte 110 968
43 Kupplung W 119 491
44 Decoder 110 969
45 Lautsprecher 100 619
46 Haltebügel 207 649
47 Leiterplatte Sound 108 015
48 Motor 230 592
49 Kardanwelle 115 646
50 Schneckenwelle 127 262
51 Halteklammer 230 561
52 Boden 113 425
53 Attrappe 115 811
54 Attrappe 113 430
55 Getriebeblock 102 238
56 Linsenschraube 786 750
57 Lötfahne 201 540
58 Traggestell 115 537
59 Druckfeder 765 690
60 Treibradsatz ohne Haftreifen 115 542
61 Treibradsatz mit Haftreifen 115 541
62 Laufradsatz 115 671
63 Haftreifen 222 793
64 Getriebedeckel 115 539
65 Senkschraube 786 790
66 Blende vorne 113 427
67 Blende hinten 113 429
68 Drehgestellblende li 115 602
69 Drehgestellblende re 116 795
70 Führung 113 635
Page 39
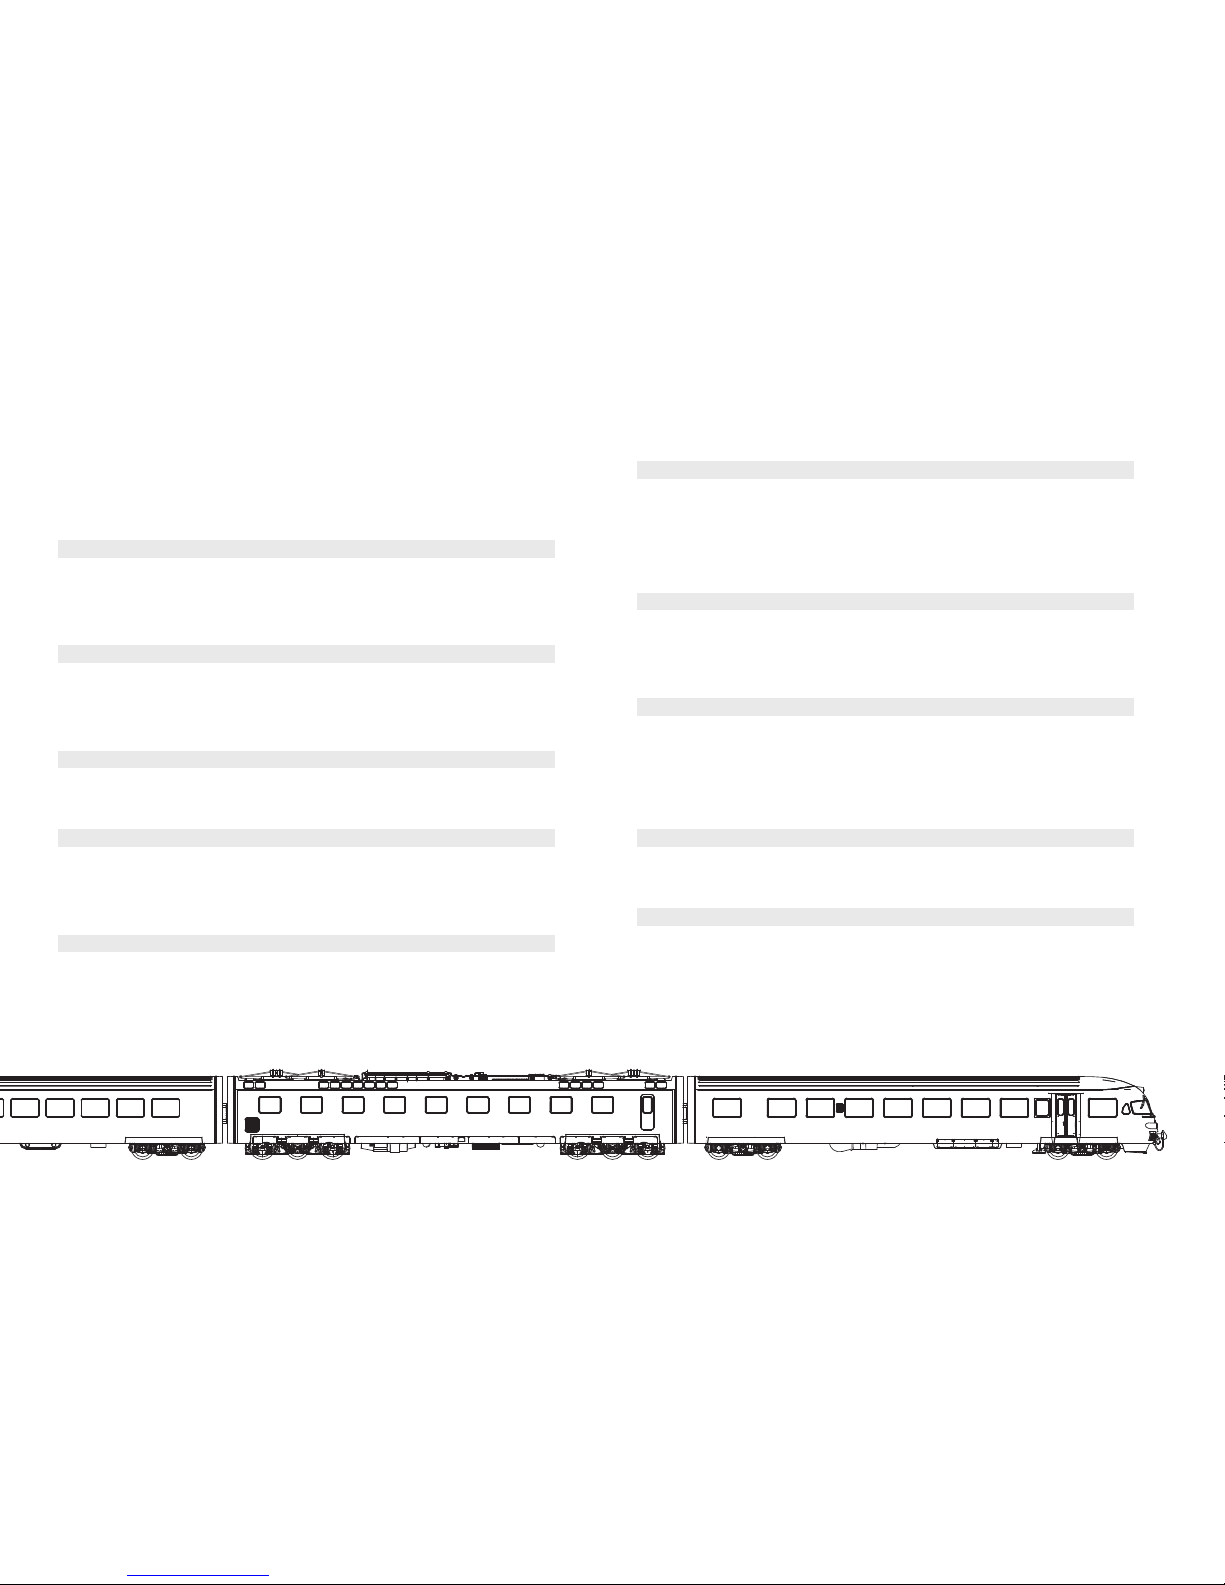
39
Barwagen
71 Gehäuse 110 789
72 Türe
73 Glasteile 124 428
74 Dach 113 448
75 Leiterplatte Innenbeleuchtung 119 503
76 Inneneinrichtung 110 989
77 Boden 113 658
78 Kastenimitation 117 059
79 Drehgestell mit Massefeder 114 640
80 Drehgestell 125 161
81 Blende vorne 110 773
82 Blende hinten 110 775
83 Drehgestellblende 114 637
Sitzwagen
84 Gehäuse 124 264
85 Türe 114 642
86 Glasteile 124 429
87 Dach 110 779
88 Leiterplatte Innenbeleuchtung 119 503
89 Inneneinrichtung 114 453
90 Boden 113 657
91 Blende vorne 110 783
92 Blende hinten 110 785
93 Drehgestellblende 114 637
Steuerwagen 2
94 Gehäuse 124 430
95 Dach 111 775
96 Leiterplatte Innenbeleuchtung 124 265
97 Inneneinrichtung 118 861
98 Boden 113 656
99 Kastenimitation 116 832
100 Kastenimitation 114 626
101 Blende vorne 117 303
102 Blende hinten 117 301
103 Drehgestellblenden 124 436
Page 40
This device complies with Part 15 of the FCC Rules.
Operation is subject to the following two conditions:
(1) This device may not cause harmful interference, and
(2) this device must accept any interference received, including
interference that may cause undesired operation.
Gebr. Märklin & Cie. GmbH
Postfach 8 60
D-73008 Göppingen
www.maerklin.com
115845/0907/Ha Ef
Änderungen vorbehalten
© by Gebr. Märklin & Cie. GmbH
 Loading...