

Page 1

Operating Manual
Balanced Bridging Kit
Single-Ended Bridging Kit
Balanced Y -Adapter
Single-Ended Y -Adapter
Madrigal Audio Laboratories, Inc.
Bridged Operation ....................................... 2
Bridging Explained ........................................ 2
Balanced Bridging........................................ 2
Balanced Bridging Kit...................................2
Balanced Bridged Input Connection ........ 3
Single-Ended Bridging .................................. 4
Single-Ended Bridging Kit ............................. 5
Single-Ended Bridged Input Connection... 6
Biamplification ............................................. 7
Biamplification Explained ............................ 7
Balanced Y -adapter.....................................7
Passive “vertical” biamping diagram ......... 8
U.S. and Canadian Warranty....................... 9
Obtaining Service ...................................... 10
Page 2
Bridged Operation
Bridging Explained Bridging refers to the act of reconfiguring the circuitry in both the left and
right channels of an amplifier to act as though it were a single, much larger
amplifier. (Of course, you will need a second bridged amplifier for stereo;
more for multichannel sound, as in home theater applications.)
Bridging is accomplished by sending a normal signal to one channel and an
inverted signal to the other. In this configuration, one channel will always be
“pushing” when the other is “pulling.” By connecting the loudspeaker leads
across the left and right red output terminals, the amplifier can now deliver
twice the normal voltage to the loudspeaker. Working together this way, the
two amplifier channels can deliver almost four times the power to a speaker
that a single channel could deliver on its own.
Bridged operation is particularly beneficial with low sensitivity, high-impedance loudspeakers (8Ω or higher) that have a greater need for voltage than for
current. It is not recommended for loudspeakers that have an impedance significantly below 4Ω, as the speaker’s impedance is “split” by the two halves of
the amplifier. Thus the bridged amplifier “sees” a 2Ω load when connected to
a 4Ω loudspeaker. Prolonged delivery of high power levels into such a low
impedance creates a great deal of heat that needs to be dissipated. (Of course,
Madrigal amplifiers are protected against overheating, but having an amplifier
shut itself down even temporarily can put a damper on the evening’s entertainment.)
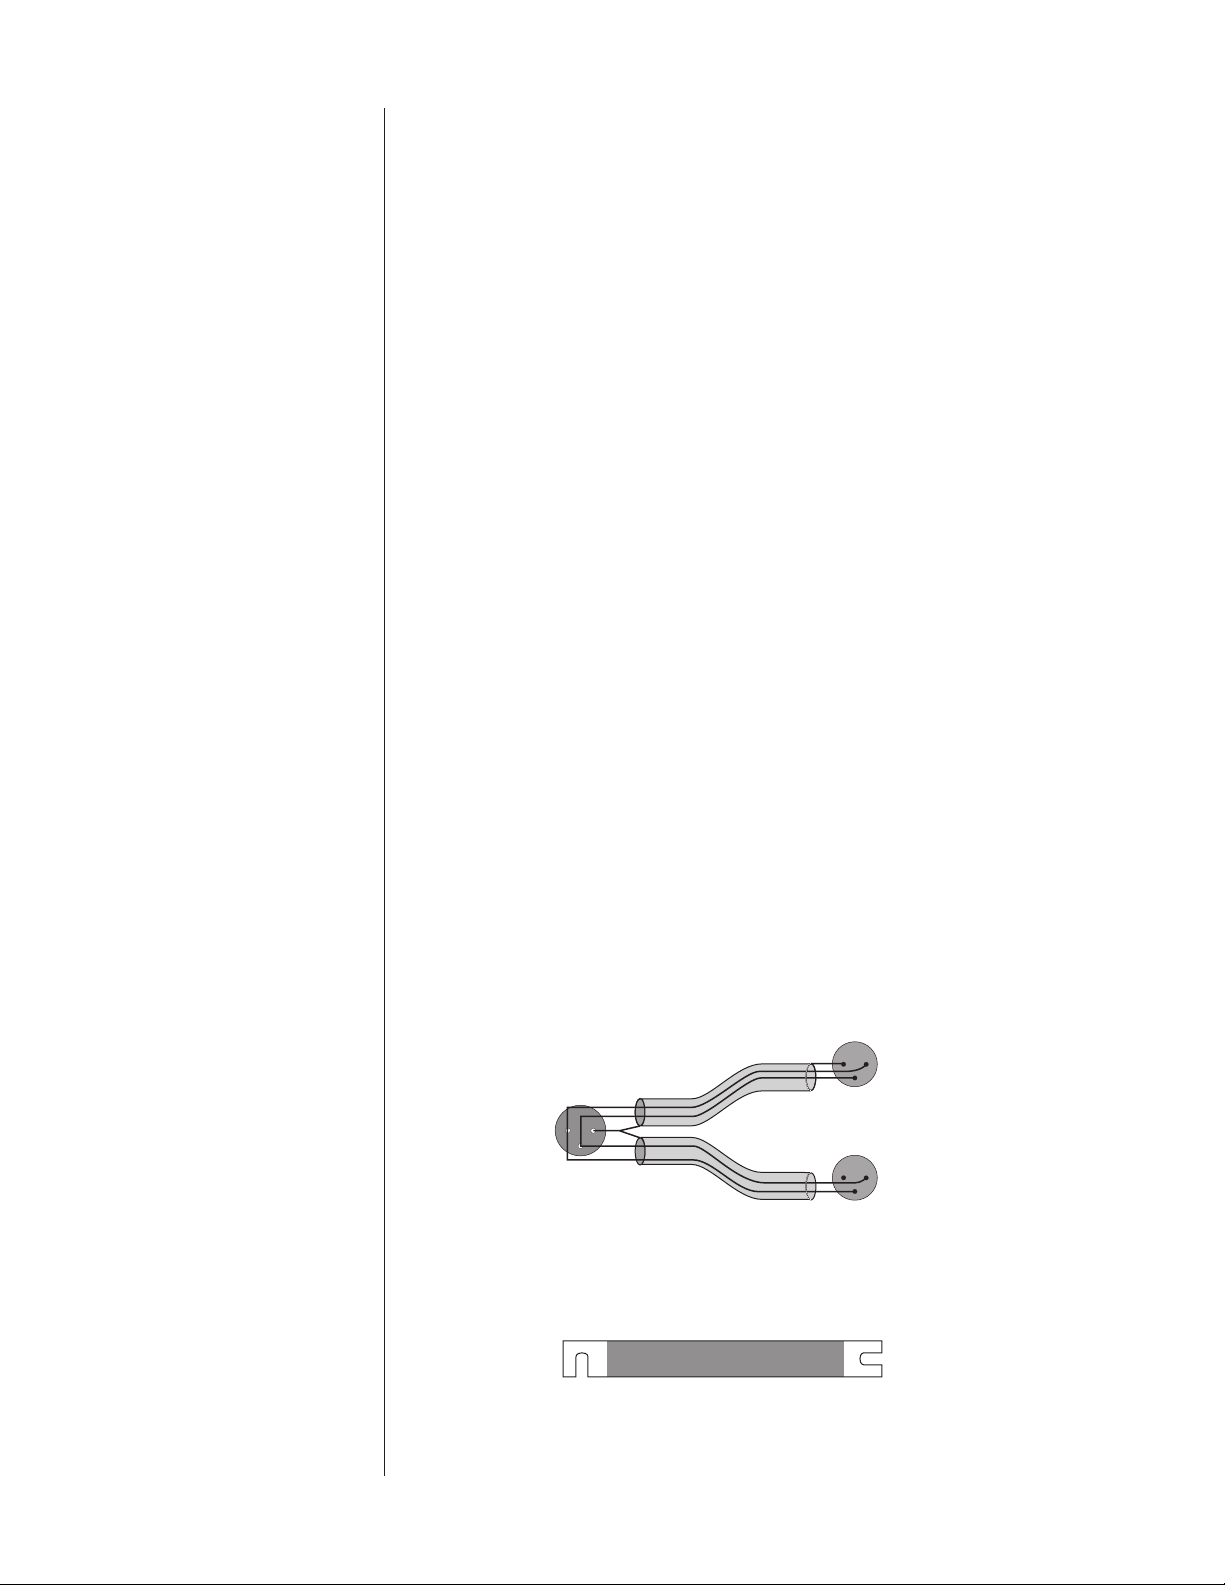
Balanced Bridging If your preamplifier has balanced outputs, use a Madrigal Balanced Bridging
Kit for each channel to be bridged. This kit is comprised of two pieces: and
input cable that splits the incoming signal (inverting one side only), and a
ground bus bar that ties the output ground terminals together and allows
ground currents to flow through an extremely low impedance.
These cables are wired internally as indicated below:
Male XLR Output (normal)
Balanced Bridging Kit
Balanced Bridging
Input Adapter
(pin configuration)
21
3
Female XLR Input
Pin 1: signal ground
Pin 2: signal + (non-inverting)
Pin 3: signal – (inverting)
Bridging Output Adapter
(not drawn to scale)
Pin 1: signal ground
Pin 2: signal + (non-inverting)
Pin 3: signal – (inverting)
12
3
(shield not connected)
12
3
Male XLR Output (inverted)
Pin 1: not used (floated)
Pin 2: signal – (inverting)
Pin 3: signal + (non-inverting)
The “normal” leg of the Madrigal Balanced Bridging Kit will be marked with a
red stripe on the XLR to indicate positive polarity, while the XLR on the inverted leg will be solid black to indicate inverted polarity.
2
Page 3
The Bridging Output Adapter is simply a bus bar of solid copper (with gold
over silver plating) used to strap two of the output ground terminals together.
This establishes a common ground reference for the amplifier and completes
the circuit that includes the loudspeakers. (There are two such bus bars in-
cluded in each kit: one appropriate for Mark Levinson 300-series amplifiers,
and one appropriate for Proceed amplifiers. Use whichever is appropriate, or
heavy guage speaker wire if for some reason the bus bars cannot be used.)
Important! Do not attempt to operate your amplifier in a bridged mode
without first strapping the black output terminals together.
Failure to establish a common ground reference between
the two channels can damage your amplifier by forcing
significant currents to flow where they do not belong!
To bridge your Madrigal amplifier using a balanced input signal, follow these
steps:
1 DISCONNECT YOUR AMPLIFIER FROM EVERYTHING
Start with your amplifier totally disconnected from inputs, outputs, and
AC power. It is always best to power down an amplifier before changing
connections; here you are also changing its basic configuration.
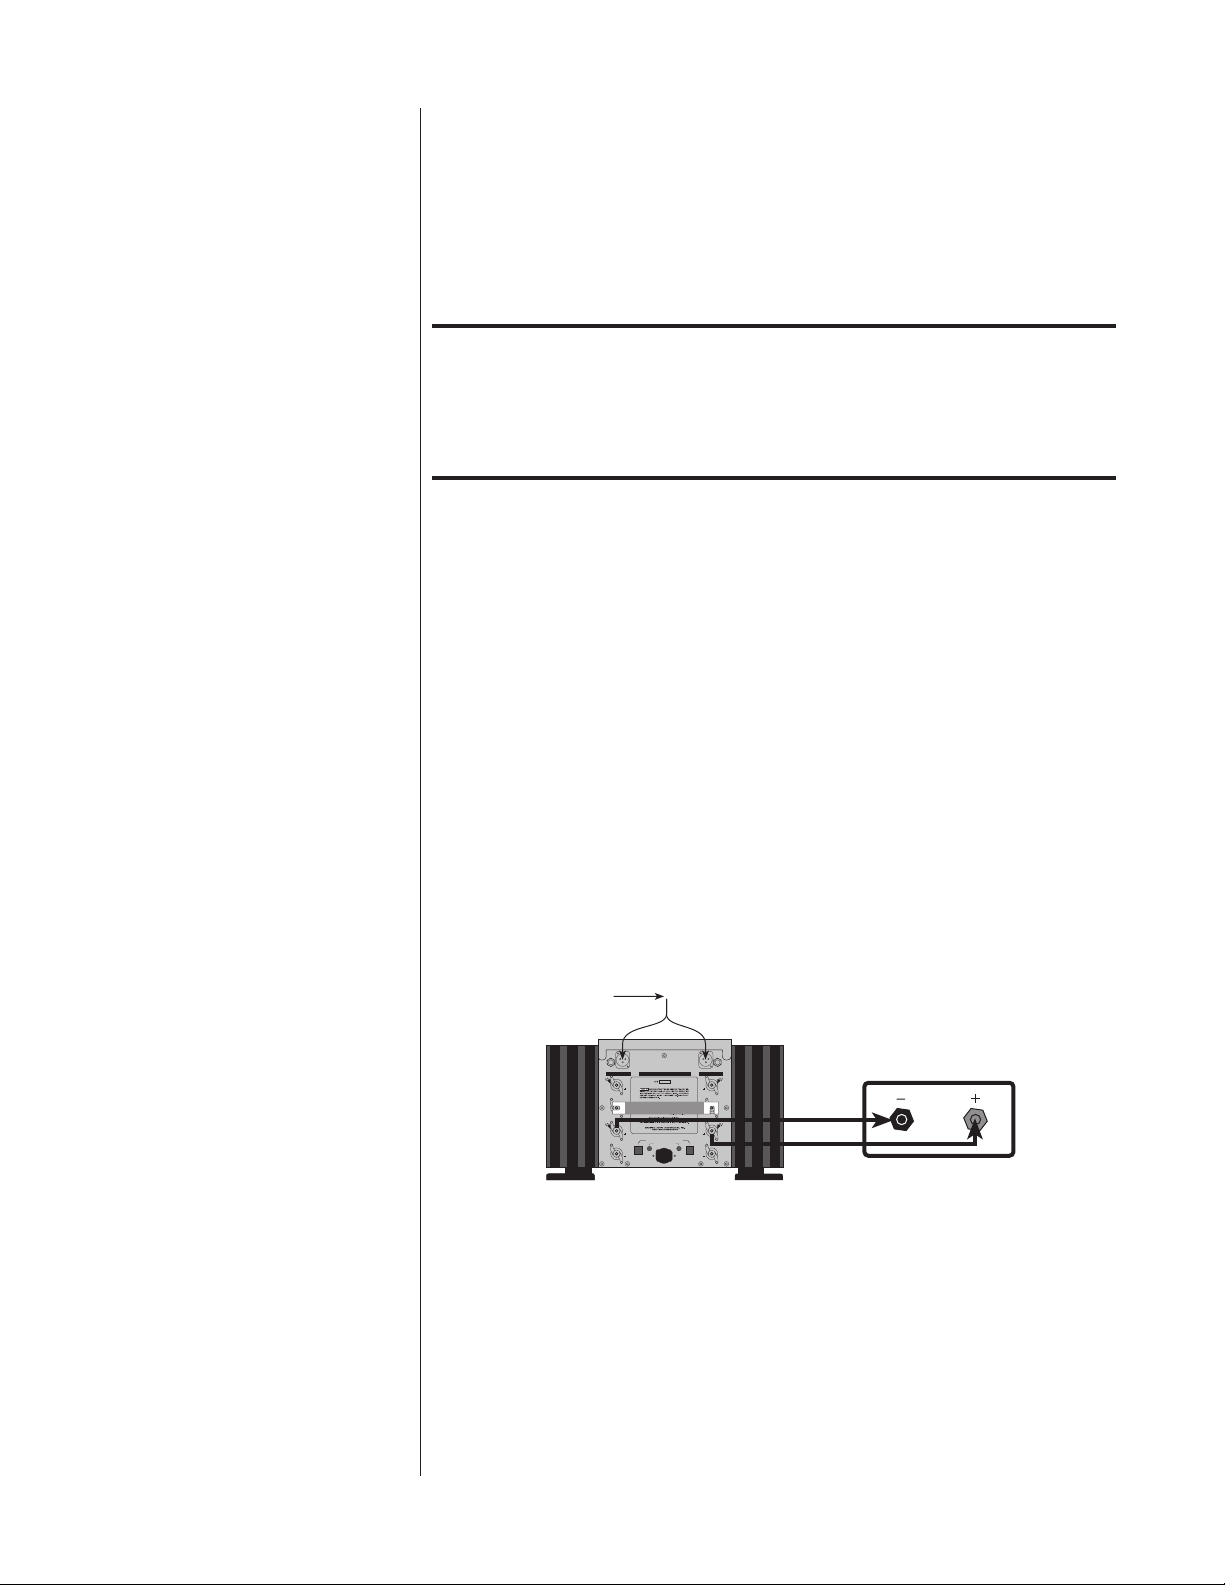
Balanced Bridged
Input Connection
2 CONNECT THE BALANCED BRIDGING INPUT ADAPTER TO THE AMP’S
INPUTS
Connect the two male XLRs to the inputs of your amplifier, noting which
XLR is marked red and which is black. You may want to standardize on
“Red is Right” to avoid confusion, although it makes no difference to the
amplifier. The channel with the red, normal input will later be connected
to the red, positive terminal of your loudspeaker.
from preamplifier
inverting non inverting
nputs inpus
Madrigal Bridging Output Adapter
Madrigal Balanced Bridging Input Adapter
DU L MONAURL POWER AMP I I R Nº 33
communcat on pors
j k
loudspeaker terminals
3 CONNECT ONE END OF THE BALANCED BRIDGING OUTPUT
ADAPTER TO TWO SIDE-BY-SIDE BLACK OUTPUT TERMINALS
Connect one end of the Balanced Bridging Output Adapter to an upper
black output terminal on one side of the amplifier, and then connect the
other end to a black output terminal on the other side of the amplifier.
(The two connections should be side-by-side rather than one above the
other.) Make sure these connection are snug and secure. (The upper
black connectors are used on Mark Levinson 300-series amplifiers since
strapping the lower black terminals would inhibit access to the communication ports and AC cord. Electrically, it would make no difference.)
3
Page 4

4 CONNECT YOUR LOUDSPEAKER WIRE ACROSS TWO SIDE-BY-SIDE,
RED OUTPUT TERMINALS
In this case, you may use either the upper or the lower red output terminals. Connect the positive/+/red binding post of your loudspeaker to the
red output terminal associated with the red (normal) side of the In-
put Adapter. Connect the negative/–/black binding post of your loudspeaker to the red output terminal on the other side of the amplifier, the
one associated with the black (inverted) side of the Input
Adapter.
Following this connection convention preserves the polarity of the signal
sent to the loudspeaker. In practice, the most important thing is to be
consistent throughout the system, as inconsistency will result in out-ofphase loudspeakers. In turn, this results in unstable imaging and poor
bass reproduction. (The effect is not dangerous, but neither is it subtle.)
5 CONNECT ONE OUTPUT CHANNEL OF YOUR PREAMPLIFIER TO THE
INPUT OF YOUR BRIDGED AMPLIFIER
The female XLR at the junction of the Balanced Bridging Input Adapter is
now the single input to this bridged amplifier.
6 POWER UP YOUR AMPLIFIER
Remember that a Mark Levinson power amplifier incorporates inrush
protection circuitry that allows its power supply to charge up gently, enhancing its longevity. Plug the amplifier back into the AC mains; press
the standby button once to bring the amp from off to standby; wait at
least ten seconds; and press the standby button again to bring it from
standby to operate.
7 REPEAT THIS PROCESS WITH YOUR OTHER AMPLIFIER(S)
Single-Ended Bridging If your preamplifier has only single-ended (RCA) outputs, a few details of
bridged operation will differ from the discussion above, all pertaining to the
connection of the preamp to the bridged amplifiers—resulting in your use of a
Madrigal Single-Ended Bridging Kit for each channel to be bridged.
4
Page 5

Single-Ended Bridging Kit
Single-Ended Bridging
Input Adapter
(pin configuration)
Male XLR Output (normal)
Pin 1: signal ground
Pin 2: signal + (non inverting)
Pin 3: signal ground
12
3
Female RCA Input
Skirt: signal ground
Center: signal + (non-inverting)
Bridging Output Adapter
(not drawn to scale)
12
3
Male XLR Output (inverted)
Pin 1: signal ground
Pin 2: signal ground
Pin 3: signal + (non inverting)
The “normal” leg of the Madrigal Single-Ended Bridging Input Adapter will be
marked with a red stripe to indicate positive polarity, and the inverted leg will
be marked with a black stripe to indicate inverted polarity (corresponding to
the red and black terminals of your loudspeaker).
The Bridging Output Adapter is simply a bus bar of solid copper (with gold
over silver plating) used to strap two of the output ground terminals together.
This establishes a common ground reference for the amplifier and completes
the circuit that includes the loudspeakers. (There are two such bus bars in-
cluded in each kit: one appropriate for Mark Levinson 300-series amplifiers,
and one appropriate for Proceed amplifiers. Use whichever is appropriate, or
heavy guage speaker wire if for some reason the bus bars cannot be used.)
Important! Do not attempt to operate your amplifier in a bridged mode
without first strapping the black output terminals together.
Failure to establish a common ground reference between
the two channels can damage your amplifier by forcing
significant currents to flow where they do not belong!
To bridge your Mark Levinson amplifier using a single-ended (RCA) input signal, follow these steps:
1 DISCONNECT YOUR AMPLIFIER FROM EVERYTHING
Start with your amplifier totally disconnected from inputs, outputs, and
AC power. It is always best to power down an amplifier before changing
connections; here you are also changing its basic configuration.
2 CONNECT THE SINGLE-ENDED BRIDGING INPUT ADAPTER TO THE
AMP’S INPUTS
Connect the two male XLRs to the inputs of your amplifier, noting which
XLR is marked red and which is black. You may want to standardize on
“Red is Right” to avoid confusion, although it makes no difference to the
amplifier. The channel with the red, normal input will later be connected
to the red, positive terminal of your loudspeaker.
5
Page 6

Single-Ended Bridged
Input Connection
from preamplifier
inverting non inverting
nputs inpus
Madrigal Bridging Output Adapter
Madrigal Single Ended Bridging Input Adapter
DU L MONAURL POWER AMP I I R Nº 33
communcat on pors
j k
loudspeaker terminals
3 CONNECT ONE END OF THE SINGLE-ENDED BRIDGING OUTPUT
ADAPTER TO TWO SIDE-BY-SIDE BLACK OUTPUT TERMINALS
Connect one end of the Balanced Bridging Output Adapter to an upper
black output terminal on one side of the amplifier, and then connect the
other end to a black output terminal on the other side of the amplifier.
(The two connections should be side-by-side rather than one above the
other.) Make sure these connection are snug and secure. (The upper
black connectors are used on Mark Levinson 300-series amplifiers since
strapping the lower black terminals would inhibit access to the communication ports and AC cord. Electrically, it would make no difference.)
4 CONNECT YOUR LOUDSPEAKER WIRE ACROSS TWO SIDE-BY-SIDE,
RED OUTPUT TERMINALS
In this case, you may use either the upper or the lower red output terminals. Connect the positive/+/red binding post of your loudspeaker to the
red output terminal associated with the red (normal) side of the Input
Adapter. Connect the negative/–/black binding post of your loudspeaker
to the red output terminal on the other side of the amplifier, the one as-
sociated with the black (inverted) side of the Input Adapter.
Following this connection convention preserves the polarity of the signal
sent to the loudspeaker. In practice, the most important thing is to be
consistent throughout the system, as inconsistency will result in out-ofphase loudspeakers. In turn, this results in unstable imaging and poor
bass reproduction. (The effect is not dangerous, but neither is it subtle.)
5 CONNECT ONE OUTPUT CHANNEL OF YOUR PREAMPLIFIER TO THE
INPUT OF YOUR BRIDGED AMPLIFIER
The female RCA at the junction of the Single-Ended Bridging Input
Adapter is now the single input to this bridged amplifier.
6 POWER UP YOUR AMPLIFIER
Remember that a Mark Levinson power amplifier incorporates inrush
protection circuitry that allows its power supply to charge up gently, enhancing its longevity. Plug the amplifier back into the AC mains; press
the standby button once to bring the amp from off to standby; wait at
least ten seconds; and press the standby button again to bring it from
standby to operate.
7 REPEAT THIS PROCESS WITH YOUR OTHER AMPLIFIER(S)
6
Page 7

Biamplification
Biamplification Explained In contrast to bridged operation (wherein a two channel amplifier is “fooled”
into behaving as a single, larger amplifier), biamplification makes use of a
two-channel amplifier to drive different portions of a single loudspeaker. As
with bridging, it offers a modular way of increasing the overall performance of
your system (if your loudspeakers support biamplification).
Since each channel of the amplifier is delivering current into its load only over
a limited range of frequencies (typically bass vs. midrange/treble), several
forms of distortion are reduced as compared to each channel handling the full
range of musical information. For this reason, many loudspeaker companies
design their products to include multiple speaker inputs (since using multiple
amplifiers improves the performance of their products as well). Another common use of biamplification involves adding a subwoofer (along with an appropriate electronic crossover) to supplement and/or improve the deep bass performance of your system.
Always refer to the specific directions provided by your loudspeaker manufacturer prior to setting up a biamplified speaker system. Any instructions contained herein cannot be substituted for those that are specific to the loudspeaker in question. In general, however, biamping is done in one of two
ways: active biamplification, or passive biamplification.
Balanced Y -adapter
Active biamping refers to the presence of an “active” electronic crossover that
divides the music into two (or sometimes more) bands of frequencies. These
are then forwarded to separate power amplifiers, and sent on directly to the
appropriate drivers in the speakers. The most common application of this approach is the use of a subwoofer crossover to separate the deep bass (below,
say, 80 Hz) from the rest of the program material. It is then amplified separately and sent to a dedicated subwoofer designed to handle those extremely
low frequencies.
Apart from adding a subwoofer, the next most common form of biamping
(called passive biamplification) involves merely using a conventional “Yadapter” (either balanced or single-ended) to provide a full range signal to two
channels.
Male XLR Output
Pin 1: signal ground
Pin 2: signal + (non-inverting)
Pin 3: signal – (inverting)
12
3
21
3
Female XLR Input
Pin 1: signal ground
Pin 2: signal + (non-inverting)
Pin 3: signal – (inverting)
12
3
Male XLR Output
Pin 1: signal ground
Pin 2: signal + (non-inverting)
Pin 3: signal – (inverting)
The outputs of these two channels are then connected to two sets of binding
posts on each loudspeaker. (See below.) The loudspeaker’s internal crossover
continues to divide the frequencies appropriately among the various drivers.
7
Page 8

Passive “vertical” biamping
wiring diagram
from preamplifier
Balanced Y adapter
loudspeaker terminals
inpus npus
UAL MON URAL PW R AMPL FER Nº 33
communicaton po ts
j k
treble
bass
“Horizontal” biamping refers to the practice of using one amplifier for left and
right low frequencies, and another for the high frequencies. For example, one
might use a Mark Levinson Nº333 for the bass and a Mark Levinson Nº331 for
the mids and highs (since the low frequencies typically require the greatest
portion of the available power).
“Vertical” biamping (illustrated above) refers to the practice of using a single
stereo amplifier for each loudspeaker (say, a Nº332 driving each loudspeaker).
Vertical biamping allows the amplifier to be placed extremely close to each
speaker, keeping speaker leads as short as possible.
To facilitate biamping, all Mark Levinson power amplifiers have the same voltage gain (26.7 dB) and input sensitivity (for 2.83V out into 8Ω). All Proceed
amplifiers have a gain of 29 dB (single-ended) and 23 dB (balanced), allowing
you to mix single-ended and balanced connections in the same system without difficulties. Because of this fact, you should not have to concern yourself
with adjusting the relative volumes of the bass and treble sections of your
loudspeakers—if they sounded good with a single amplifier, they should
sound better when biamplified.
8
Page 9

U.S. and Canadian Warranty
Limited five year warranty Madrigal provides an owner-transferable, five year limited warranty on all its
products within the U.S. and Canada ONLY. Warranty and service policies outside the U.S. and Canada are set by the local, authorized distributor and are
applicable in the country of purchase ONLY. Madrigal products are designed to
operate at set voltages appropriate for the country of sale and may be damaged if operated at the wrong voltage.
Madrigal® components purchased in the United States or in Canada are warranted to be free from defects in material and workmanship under normal use
for a period of five (5) years from the date of purchase. During the warranty
period, and upon proof of purchase, any Madrigal component exhibiting defects in materials and/or workmanship will be repaired or replaced, at our op-
tion, without charge for either parts or labor, at our factory. The warranty will
not apply to any Madrigal component that has been misused, abused or altered.
Any Madrigal component not performing properly may be returned (freight
prepaid) to the factory for evaluation. Return authorization must first be
obtained by either calling or writing the factory prior to shipping the component. (Please see Obtaining Service, next page). The factory will pay for return
shipping charges (within the United States and Canada) to return the unit only
in the event that the component is found to be defective as above mentioned.
There are other stipulations that may apply to shipping charges.
There is no other express warranty on this component. Neither this warranty
nor any other warranty, express or implied, including any implied warranties
of merchantability or fitness, shall extend beyond the warranty period. No responsibility is assumed for any incidental or consequential damages. Some
states do not allow limitations on how long an implied warranty lasts and
other states do not allow the exclusion or limitation of incidental or consequential damages, so that the above limitation or exclusion may not apply to
you.
This warranty gives you specific legal rights, and you may also have other
rights which vary from state to state. This warranty is applicable in the
United States and Canada only.
9
Page 10

Obtaining Service
We take great pride in our dealers. Experience, dedication, and integrity make
these professionals ideally suited to assist with our customers’ service needs.
If your Madrigal component must be serviced, please contact your dealer.
Your dealer will then decide whether the problem can be remedied locally, or
whether to contact Madrigal for further service information or parts, or to obtain a Return Authorization. The Madrigal Technical Services Department
works closely with your dealer to solve your service needs expediently.
Important! Return authorization must be obtained from Madrigal’s
Technical Services Department BEFORE a unit is shipped for
service.
It is extremely important that information about a problem be explicit and
complete. A specific, comprehensive description of the problem helps your
dealer and the Madrigal Technical Services Department locate and repair the
difficulty as quickly as possible.
A copy of the original bill of sale will serve to verify warranty status. Please
include it with the unit when it is brought in for warranty service.
Warning! All returned units must be properly packaged (preferably in
their original packing material), and the proper return
authorization numbers must be marked on the outer carton
for identification. If the packaging to protect the unit is, in our
opinion or that of our dealer, inadequate to protect the unit,
we reserve the right to repackage it for return shipment at
the owner’s expense. Neither Madrigal nor your dealer can
be responsible for shipping damage due to improper (that is,
non-original) packaging.
Your dealer can order a new set of shipping materials for you if you need to
ship your component and no longer have the original materials. There will be
a charge for this service. We strongly recommend saving all packing materials
in case you need to ship your unit some day.
10
Page 11

11
Page 12

MADRIGAL AUDIO LABORATORIES INC.
2081 South Main Street, P.O. Box 781
Middletown, Connecticut 06457 USA
Telephone: (860) 346-0896
Fax: (860) 346-1540
http://www.madrigal.com
Madrigal™ is a registered trademark of Madrigal Audio Laboratories, Inc.
a Harman International company
630232 © 4/1997 Madrigal Audio Laboratories, Inc. All rights reserved. Printed in U.S.A.
 Loading...