

Page 1

About Compact Disc
Direction the disc rotates
T
r
a
c
k
3
T
r
a
c
k
2
T
r
a
c
k
1
Direction the laser
pickup travels
Digital Audio…
To most people, a Compact Disc (CD) looks like a small, silver
phonograph record. In fact, there are some important differences
between records and CDs.
Phonograph records
vs. compact discs
The information on a phonograph record is contained within its
grooves. This
analog
information is
read by a stylus riding along in
the grooves and transmitted
via a cartridge. The
digital
information on a CD,
though arranged in
similar grooves, is read
by a laser mechanism
(called a
pickup
). A
phonograph’s stylus
must be in contact
with the record, but a
CD player’s pickup
never touches the CD.
The information on the
CD is transmitted via
complex decoder circuitry.
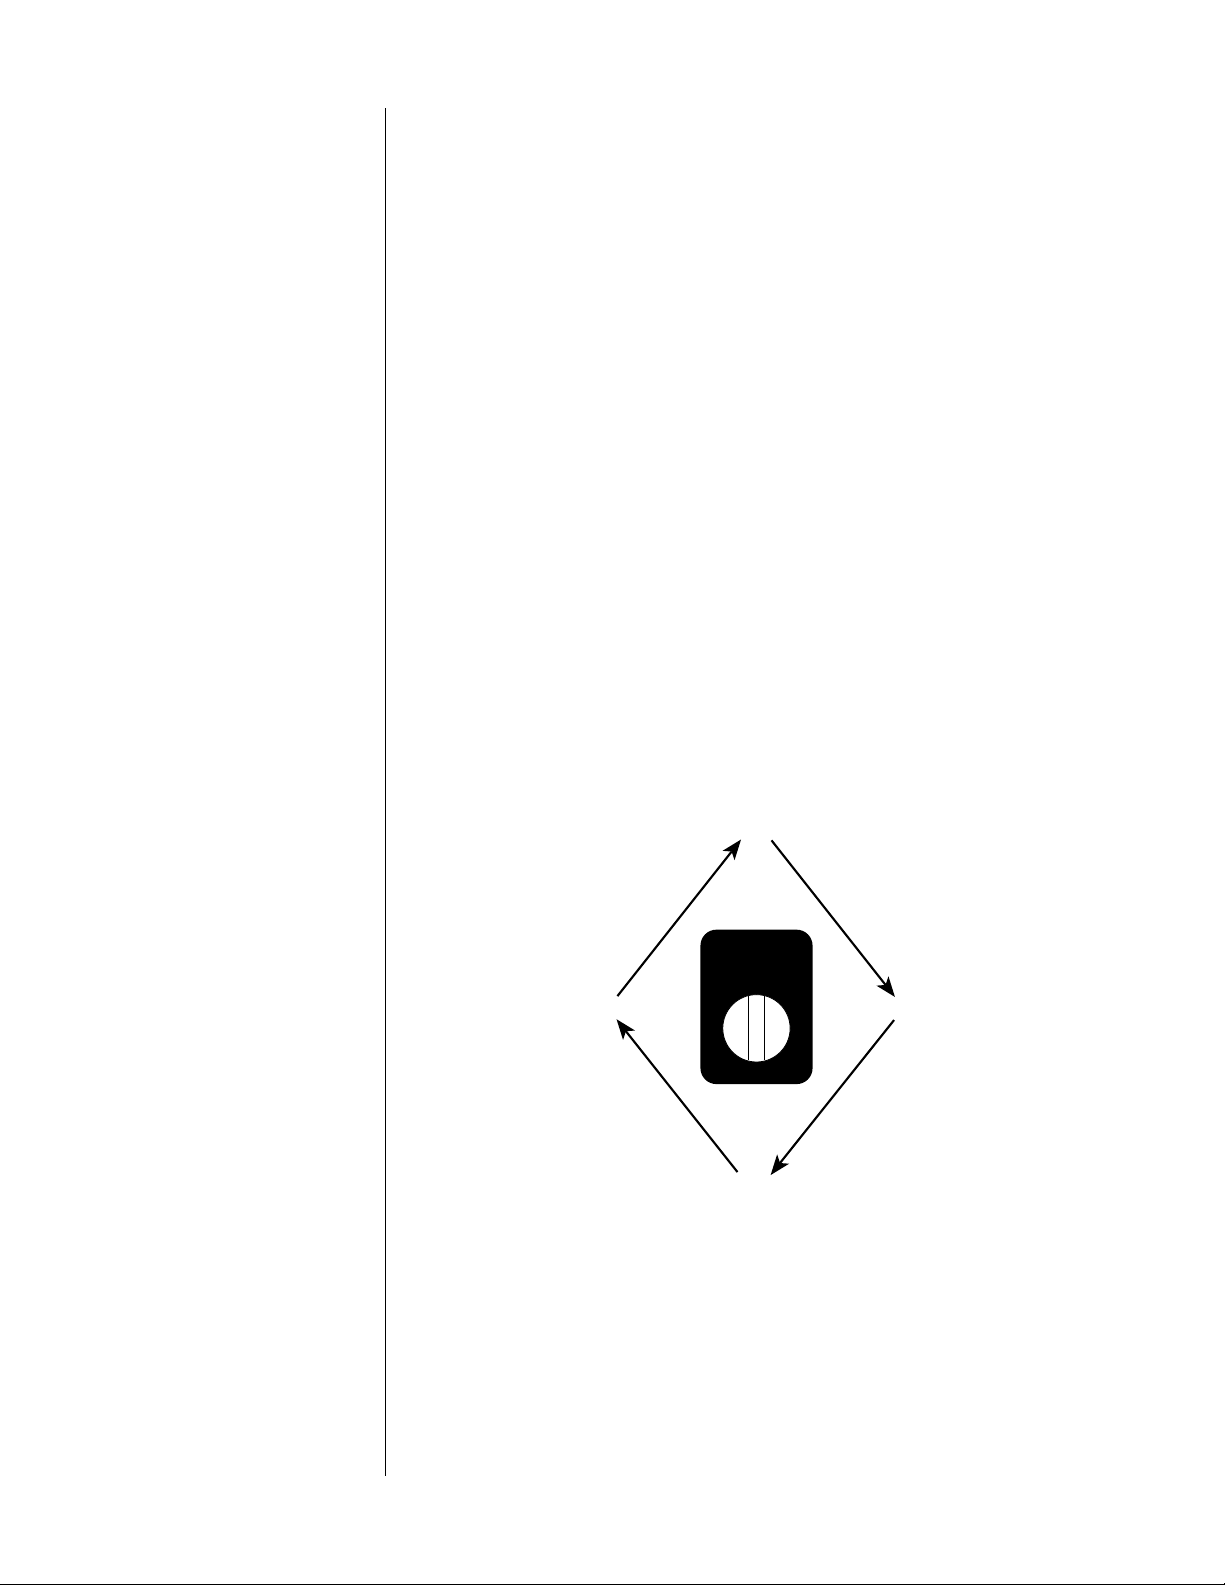
The CD rotates
counterclockwise, and the laser
pickup reads the underside of the CD
(the side opposite the label) beginning at the center and travelling
toward the outer edge. As the pickup moves away from the center,
the speed of rotation gradually decreases from 500 to 200 revolutions
per minute.
Tracks and indexes
Programs on CDs are organized into
tracks
, usually corresponding to
songs or movements. This allows you to select a part of a program
easily and precisely,
Lindsay's First Symphony
First Movement Second Movement Third Movement
(Track 1) (Track 2) (Track 3)
with virtually no wear
and tear on the CD.
There may be as many
as 99 tracks on a CD.
Index Numbers from Track 2
01 02 03 04 05 06 94 95 96 97 98 99
On some CDs, tracks
are further broken down
into
indexes
. These
"tracks within tracks"
allow even more precise selection and programming. A single track
may have up to 99 indexes.
1
Page 2

2
Page 3
2 43
5
display
intensity
repeat A
repeat disc repeat track program clear program review program save index mode
7 9
track index time
>
B preview program + program –
13 14
display
mode
elapsed time
time remaining
1086
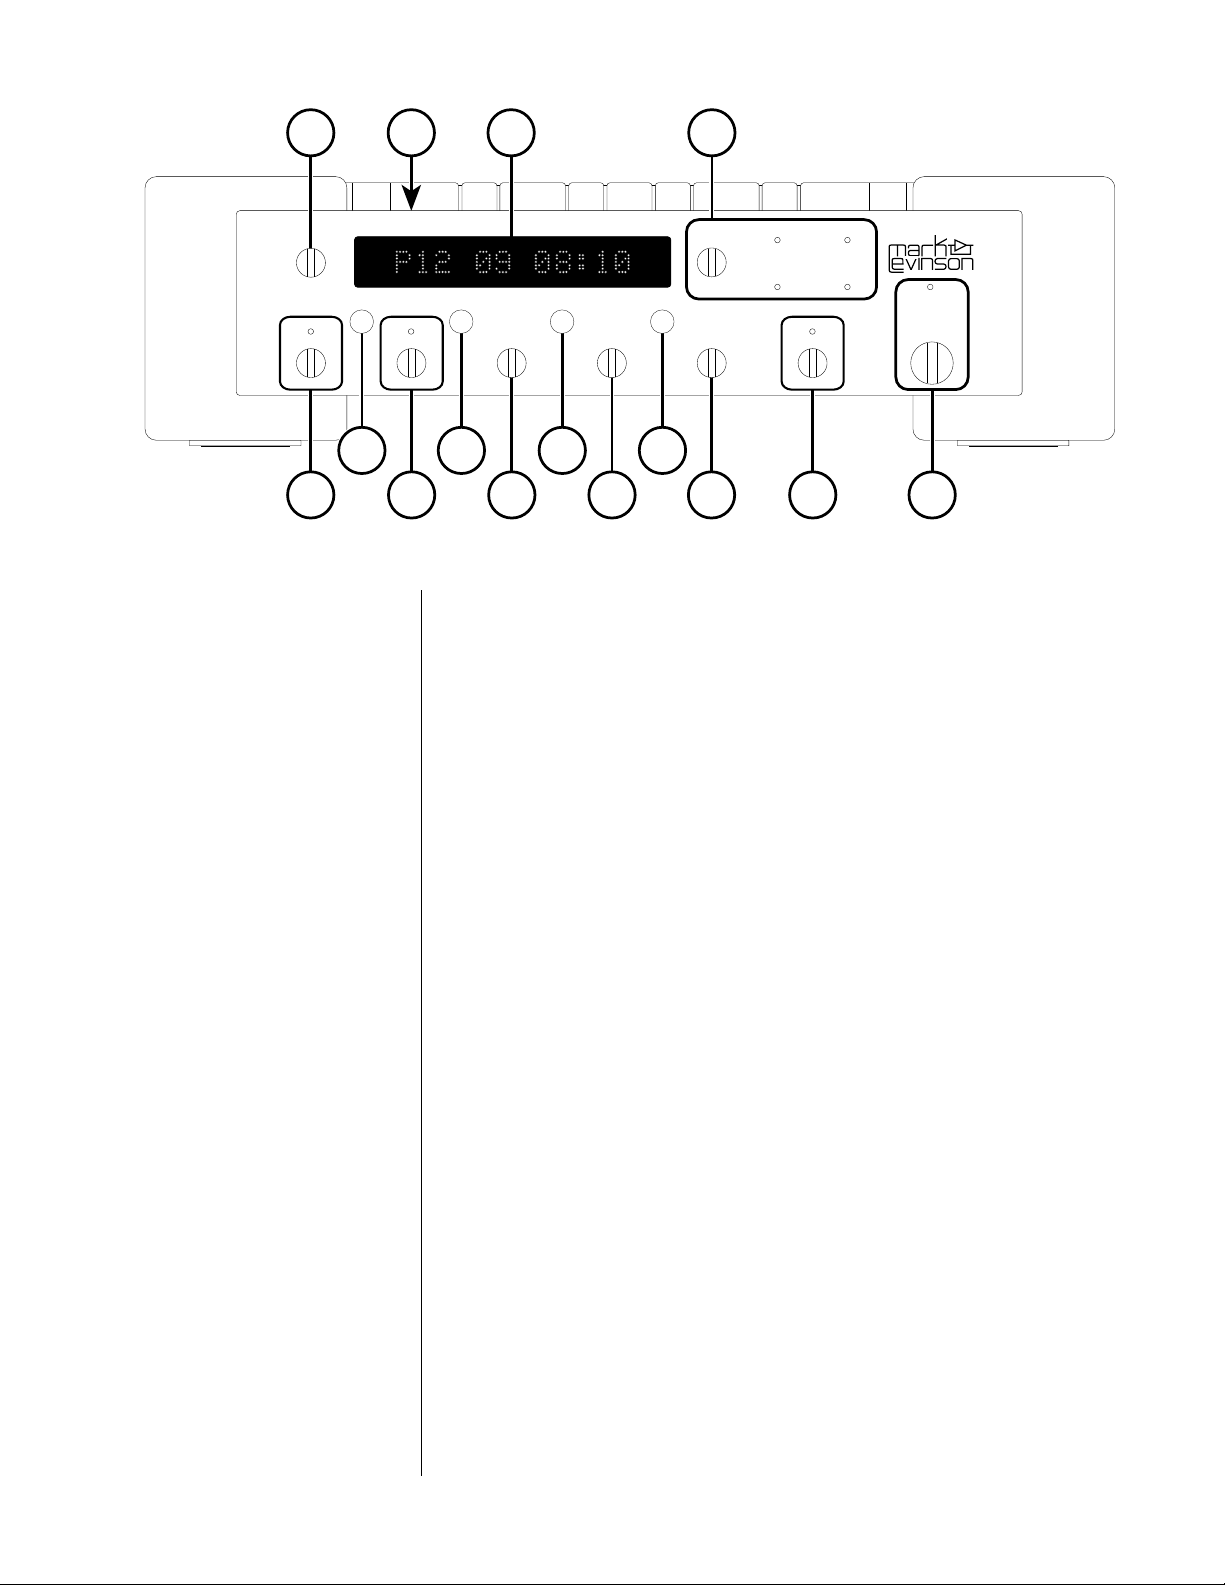
Front panel
1 standby
When the Nº31 is connected to AC power and the main power
switch on the rear panel is in the "|" position (see "Rear panel"),
pressing this button takes the Nº31 out of "standby" mode and
enables the front-panel controls.
on track
on disc
MADRIGAL AUDIO LABORATORIES
REFERENCE
CD TRANSPORT
Nº 31
standby
111 12 15
When the Nº31's main power switch is first turned on (or when
power is restored after an interruption), the Nº31 will be ready to
operate (that is, it won't be in standby mode).
Pressing standby again places the Nº31 into standby mode and
disables the front-panel controls.
While the Nº31 is in standby mode, the Display is dark and the
standby LED flashes slowly. When the Nº31 is ready to operate (not
in standby mode), the standby LED remains lighted.
Note: When going into standby, the Nº31 deactivates its
digital outputs. With some digital processors, this may result in
a low-level "pop" on the audio outputs (
linked
Mark Levinson
digital processors aren't subject to this effect).
To prevent this low-level "pop" from coming through your
system's speakers or headphones, adjust the volume to its
lowest level before placing the Nº31 into standby.
3
Page 4
2 display intensity
time remaining on track
display
mode
time remaining on disc
elapsed time on track
elapsed time on disc
Pressing this button varies the brightness of the Display. Four
brightness levels are available.
When the Nº31's main power switch is first turned on (or when
power is restored after an interruption), the Display is automatically
set to its second-brightest level.
Pressing display intensity once dims the Display one level; pressing
it again dims it further; pressing it again turns the Display off.
Pressing display intensity once more returns the Display to its
brightest level.
display intensity also affects the Nº31's front-panel LEDs. When the
Display is turned off, however, the LEDs still glow dimly.
3 Top-panel controls
See "Top panel."
4 Display
See "Display."
5 display mode
This button allows you to change the type of information shown in
the time part of the Display. (See "Display.")
When a CD is loaded and ready for play, the time part of the
Display shows the time remaining on the CD; the time remaining
and on disc LEDs are lighted.
Press display mode to change the time part of the Display:
The information in the time part of the Display corresponds to the
lighted LEDs to the right of the display mode button. After play
begins, the Display will reflect the last display mode you selected.
Along with program + (13) and program – (14), the display mode
button is also used to change the link settings. (See "Linked
functions.")
4
Page 5

6 repeat disc
To repeat (continuously) all tracks on a CD (or all tracks in a
program), press this button.
While repeat disc is active, the LED above the button is lighted.
To return to normal play, press repeat disc again or press Stop..
7 repeat A>B
This function allows you to repeat (continuously) a particular
phrase or passage on a CD.
While a CD is playing, press repeat A>B at the beginning of the
passage you'd like to repeat. At the end of the passage, press
repeat A>B again. The passage you selected will repeat
continuously.
While repeat A>B is active, A then B will alternate appearing in the
space preceding the track number on the Display. (See "Display.")
To return to normal play, press repeat A>B again.
8 repeat track
To repeat (continuously) the track in play, press this button.
While repeat track is active, the LED above the button is lighted.
To return to normal play, press repeat track again.
9 preview
This function allows you to play only the introduction of each track
on a CD or in a program.
Once a CD is loaded and ready for play, press preview. Beginning
with the first track on the CD (or the first track in the program), the
Nº31 will play the first ten seconds of the track, skip to the second
track and play the first ten seconds of that track, and so on.
While preview is active, the track part of the Display flashes. (See
"Display.")
To return to normal play, press preview again, or press Play. (See
"Top panel.")
10 program clear
Pressing this button erases any temporary program, and also
temporarily overrides a previously saved program. (See
"Programming.")
Pressing program clear, followed by pressing program save (12),
permanently erases a program from the Nº31's memory.
After pressing program clear, the Display will show PROG CLEARED.
If you press program clear when there is no program in the Nº31's
memory, the Display will show NO PROGRAM.
5
Page 6

11 program review
This function allows you to review the selections in the current
program. (See "Programming.")
Press this button once to view the first selection in your program. To
view the next selection, press program review again, and so on.
After you view the last selection in the program, the Display will
show PROGRAM END.
If you press program review when there is no program in the Nº31's
memory, the Display will show NO PROGRAM.
12 program save
Pressing this button records a program in the Nº31's memory. (See
"Programming.")
After pressing program save, the Display will show NEW PROGRAM,
PROG CHANGED, or PROG DELETED.
13 program
Pressing this button adds a selection to a program. (See
"Programming.")
Along with display mode (5), the program + button is used to
change the link settings. (See "Linked functions.")
14 program –
Used along with program review (11), pressing this button erases a
selection from a previously saved program without erasing the
entire program. (See "Programming.")
Along with display mode (5), the program – button is used to
change the link settings. (See "Linked functions.")
15 index mode
When you're playing a CD recorded with indexes, the Nº31's index
mode allows you to use those indexes to select more precisely the
music you want to play. (See "About Compact Disc Digital Audio"
and "Basic operation.")
After pressing index mode before playing the CD, the Display will
show INDEX SEARCH.
While the index mode function is active, the LED above the button
flashes.
+
6
While the Nº31 is in index mode, pressing Next or Previous skips the
laser pickup to the next or previous index on the CD (see "Top
panel"), and you may use the Remote Control's numbered buttons
to select indexes (see "Remote Control").
To cancel this function, press index mode again, press Play, or
press Stop.
Page 7
2
3
4
5
6
7
8
9
1
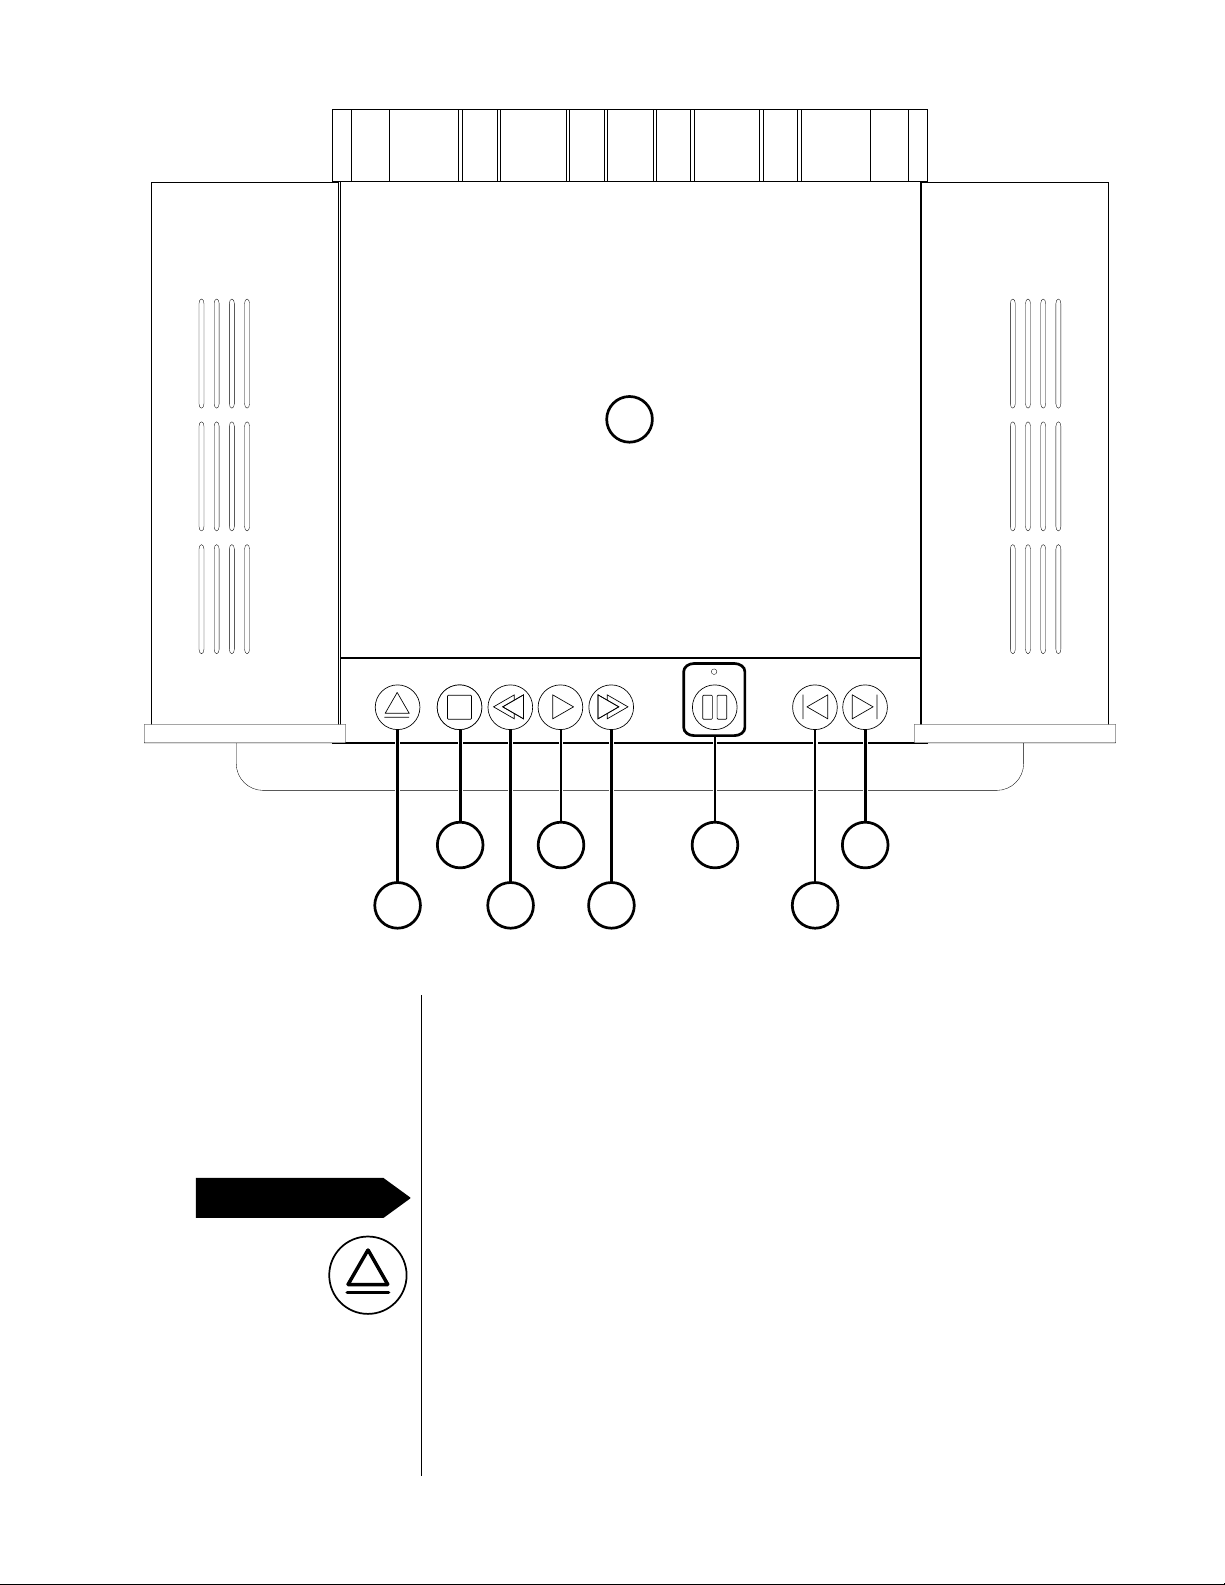
Top panel
1 Laser Isolation Device (LID)
The LID covers the CD transport assembly, the mechanism that
holds the CD during play. Its operation is controlled by the
LID Open/Close button (2).
PRECAUTION
Never hold onto the LID while it’s opening or closing.
2 LID Open/Close
Pressing this button opens the LID (1); pressing it again closes the
LID.
Pressing LID Open/Close while a CD is playing stops play and
opens the LID.
7
Page 8

3 Stop
Pressing this button while a CD is playing stops play. Pressing Stop
also cancels repeat disc and repeat track, if they're active.
Pressing Play (5) after pressing Stop begins play again with the first
track on the CD (or the first track in a program).
4 Search Reverse
Holding this button down during play moves the laser pickup
rapidly toward the beginning of the CD.
During search, the pickup moves at two different speeds,
increasing the longer you hold down Search Reverse, and the
volume is reduced.
Note: If your Nº31 is connected to a compatible Mark
Levinson digital processor (via the communication ports), you
may mute the volume completely during search. (See
"Linked functions.")
When you release Search Reverse, play normally resumes. If you
have reached the beginning of the disc, the Nº31 will Stop and
wait for your next command.
5 Play
After a CD is loaded and the Disc Damper is in place, pressing this
button begins play with the first track on the CD (or the first track in
a program).
If you press Play while the LID is open, the LID closes and play starts
beginning with the first track on the CD (or the first track in a
previously saved program).
Pressing Play while a CD is playing suspends play, returns to the
beginning of the current track, and replays that track.
6 Search Forward
This button works in the same way as Search Reverse (4), except
that it moves the laser pickup rapidly toward the end of the CD.
7 Pause
While a CD is playing, pressing this button suspends play; pressing it
again resumes play at the point where Pause was first pressed.
While Pause is active, the LED above the button is lighted and ❙❙
appears preceding the track number on the Display. (See
"Display.")
If left in Pause for several minutes, the transport will stop spinning
and the laser will turn off (thereby enhancing the longevity of
both). This will be indicated by the Pause indicator in the display
("❙❙") flashing on and off. Alternatively, this Long Term Pause feature
may be engaged by pressing and holding the Pause button until
the indicator begins to flash in the display. Pressing Pause again will
resume play at the point where Pause was first pressed, (after a
short delay to allow the disc to get up to speed).
8
Page 9

To "cue up" the beginning of a CD or track, press Pause
pressing Play (5). To begin play, press Pause again. (You may also
select another track or index while play is suspended.)
8 Previous
This button's function depends on whether or not the Nº31 is in
index mode. (See "Front panel.")
While the Nº31 is in index mode, pressing Previous "skips" the laser
pickup to the previous
Previous skips the laser pickup to the previous
Pressing Previous while a CD is playing suspends play, skips the
laser pickup to the previous track or index on the CD (or in a
program), and begins play there.
Note: If you press Previous while the first track on the CD (or in
a program) is playing, the Display will show FIRST TRACK, and
play will resume with that track.
Pressing Previous before play begins skips the laser pickup to the
beginning of the last track or index on the CD; pressing Play (5)
begins play there (temporarily overriding any existing program).
9 Next
This button works in the same way as Previous (8), except that it
skips to the
next
track or index.
index
. If index mode is inactive, pressing
track
before
.
While the Nº31 is in index mode, pressing Next skips the laser pickup
to the next
laser pickup to the next
Pressing Next while a CD is playing suspends play, skips the laser
pickup to the next track or index on the CD (or in a program), and
begins play there.
Note: If you press Next while the last track on the CD (or in a
program) is playing, the Display will show LAST TRACK, and
play will resume with that track.
Pressing Next before play begins skips the laser pickup to the
beginning of the next track or index on the CD; pressing Play (5)
begins play there (temporarily overriding any existing program).
index
. If index mode is inactive, pressing Next skips the
track
.
9
Page 10
1 1432
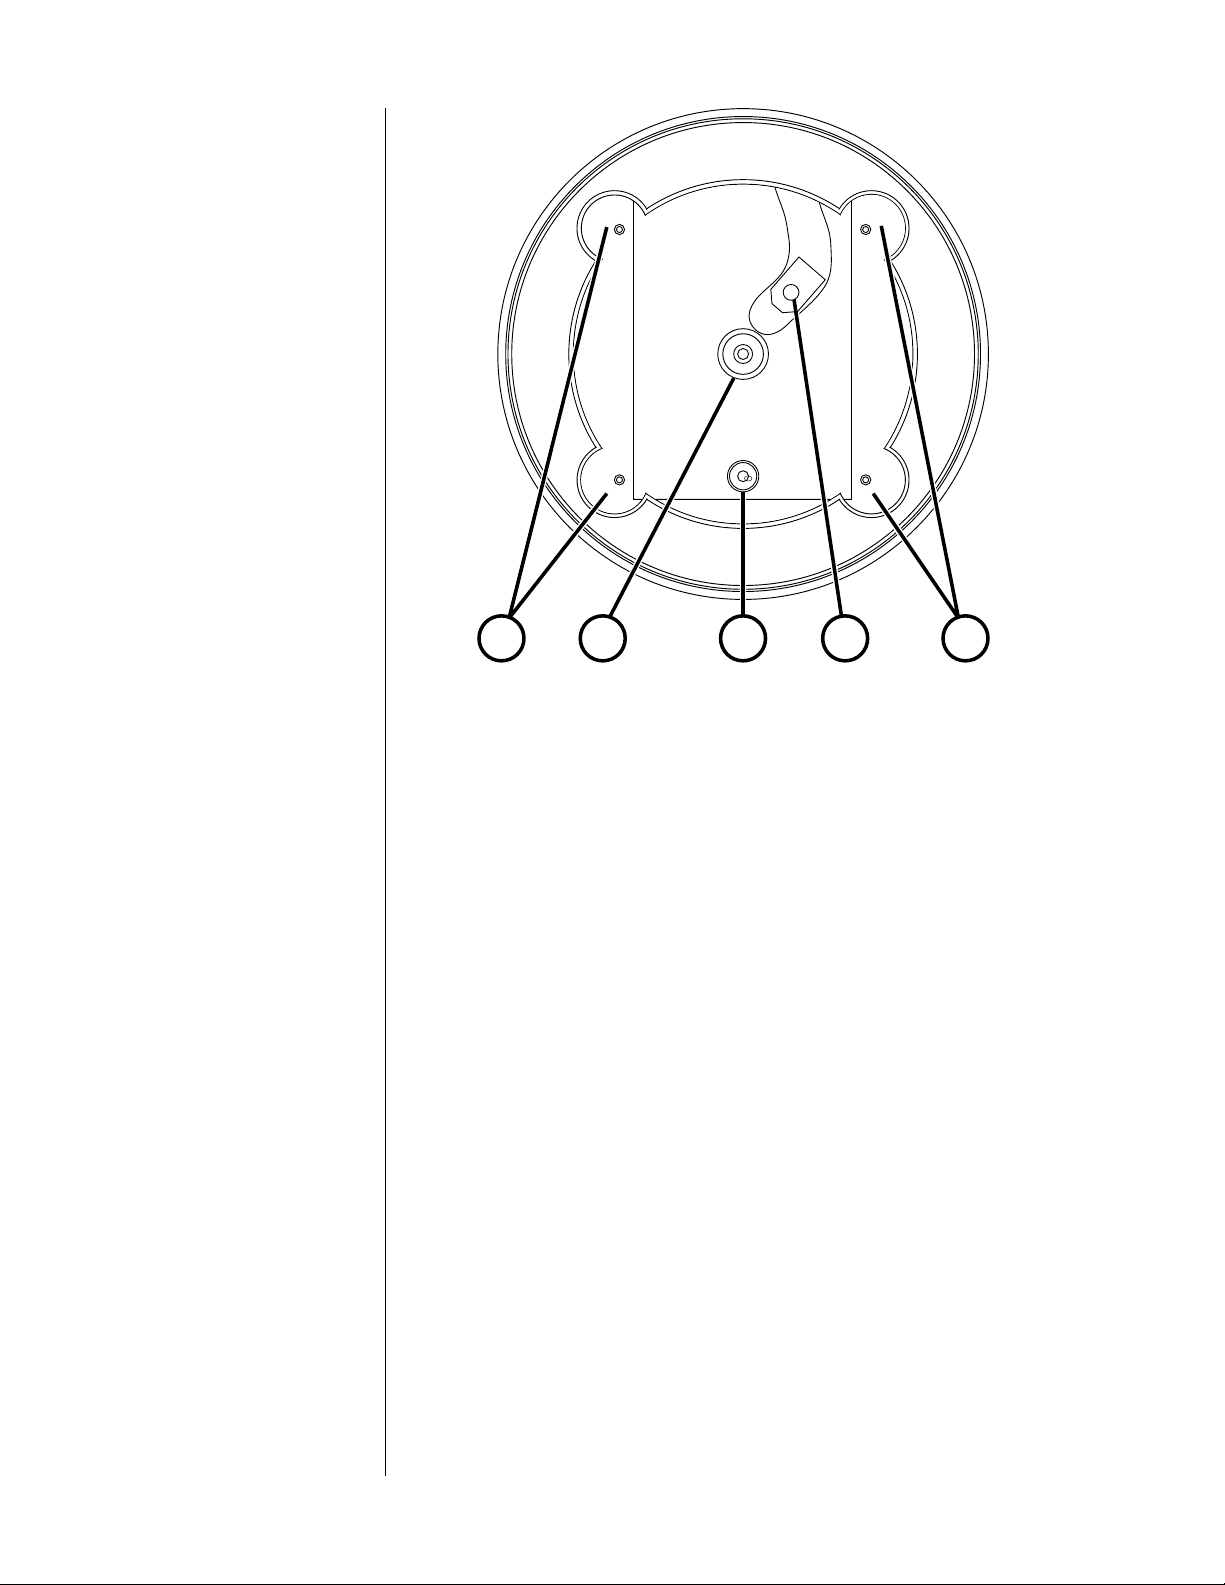
CD transport assembly
1 Finger wells
These cutouts make it easy to grasp a CD by its edges when
placing it on or removing it from the spindle.
Levelling screws
For the best performance, the Nº31's transport assembly should be
level. Four levelling screws (one inside each finger well) allow you
to adjust the transport assembly.
With the supplied 3/32" hex driver, and using the Nº31's bubble
level (3) as a gauge, adjust one or more of these screws to bring
the transport assembly to level. To lower a corner, turn the
corresponding screw clockwise; to raise a corner, turn the screw
counterclockwise.
2 Spindle
This is the device that spins the CD, and on which the CD rests
during play. The CD must be centered on the spindle, and it must
be clamped to the spindle by the Disc Damper.
10
3 Bubble level
Use this bubble level, along with the four levelling screws (1), to
make sure that the Nº31's transport assembly is level.
Page 11
4 Laser assembly
This assembly contains the Nº31's laser pickup, the device that
reads the underside of the CD.
PRECAUTION
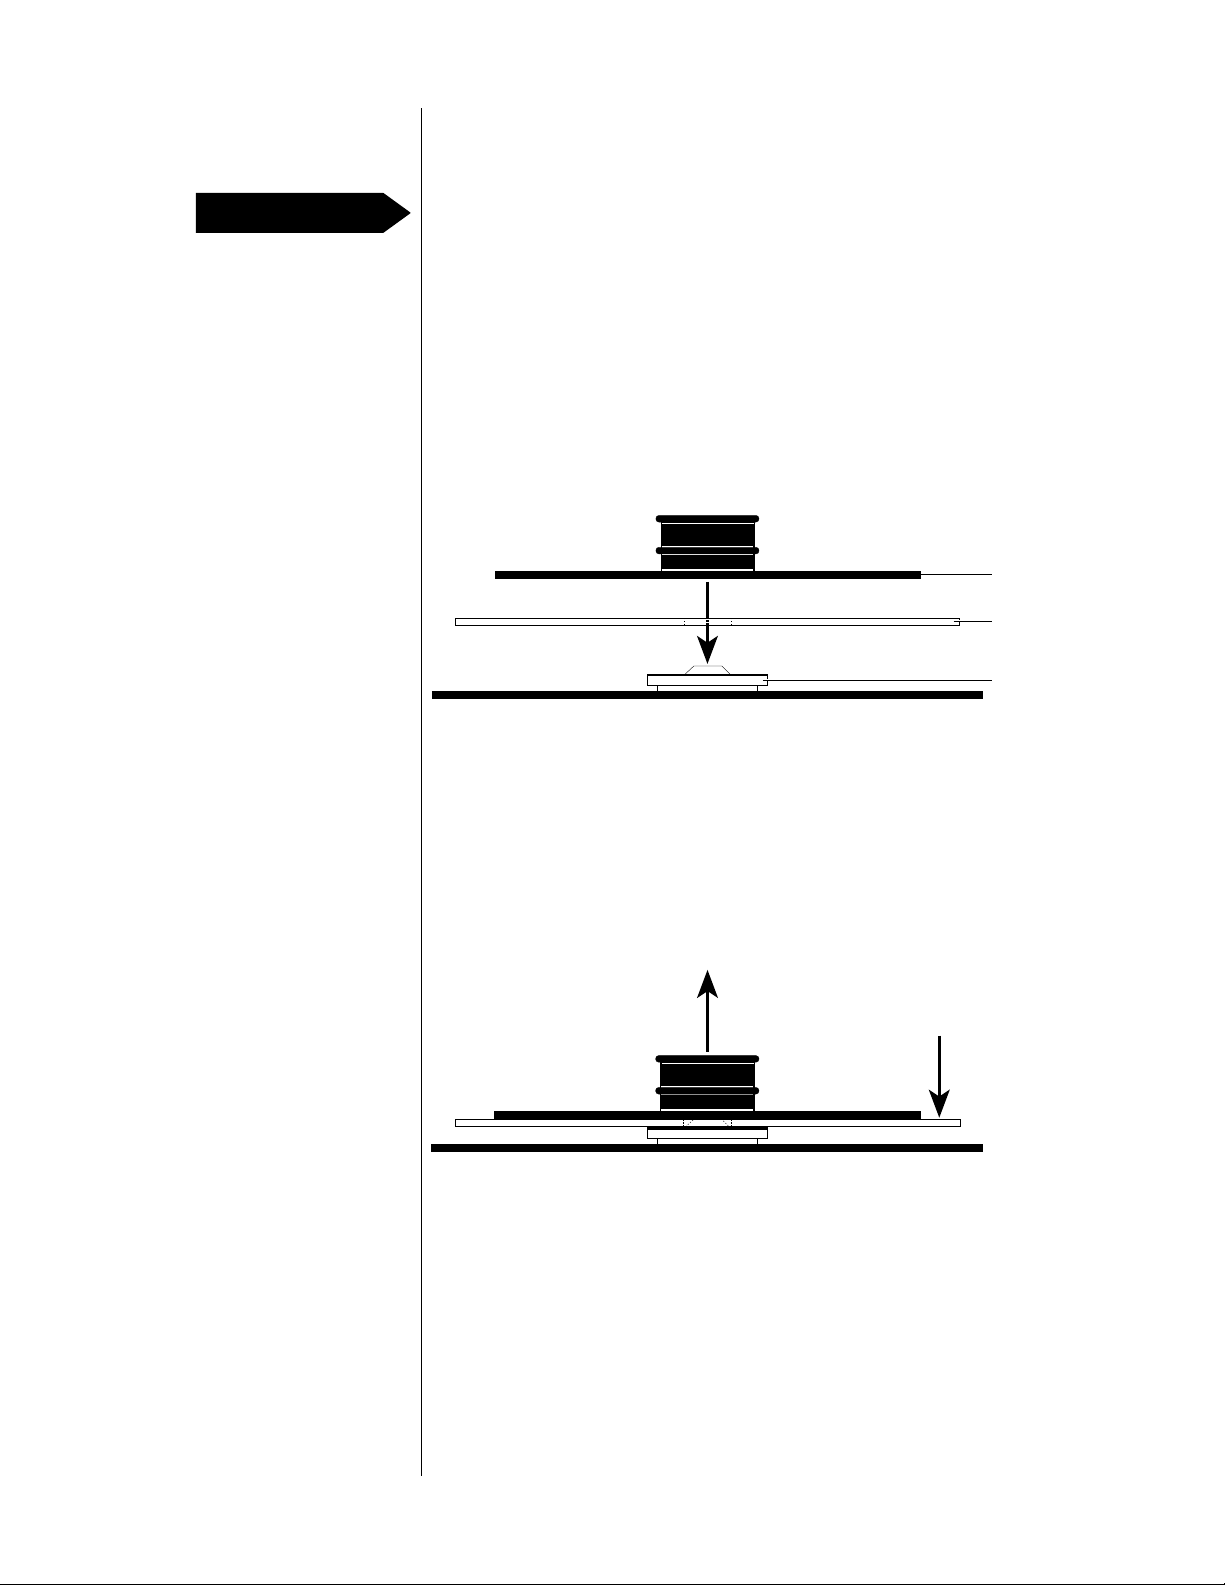
Disc Damper
Installing the Disc Damper
Never touch or attempt to clean the laser assembly.
To clamp a CD onto its spindle, the Nº31 uses a Disc Damper held in
place by a strong magnet.
Always make sure that the Disc Damper is in place before closing the
LID. If you close the LID without the Damper in place, the display will
show NO DAMPER and you'll be unable to play the CD.
When loading a CD for play, install the CD on the spindle, then place
the Disc Damper on top of the CD.
Disc damper
Compact disc
Spindle
The CD and the Damper must be centered on the spindle. You'll feel
the Damper's magnet "catch" when they're centered.
Removing the
Disc Damper
When removing a CD from the spindle, first remove the Disc Damper.
To prevent damage to the CD, gently hold it down by the edge while
pulling
straight up
on the Damper's knob.
Pull
straight up
on the
damper's knob…
…while gently
holding down
the edge of
the CD
To overcome the magnet, you'll need to give it a firm pull.
Note: When the Disc Damper clamps the CD onto the spindle,
its strong magnet forces the air from between the Damper and
the CD. If you don't follow the removal procedure outlined
above, the CD may stick briefly to the Damper's energyabsorbing surface after the magnet is released.
If the CD is stuck to the Damper when you remove them from
the spindle, take care not to let it fall.
11
Page 12

timetrack index
1 2 3 4
Display
1 track
Before play begins, this part of the Display shows the total number
of tracks on the CD.
During play, this part of the Display shows the number of the track
in play.
While a program is in the Nº31's memory, the letter P will appear
preceding the track number. A small P indicates a saved polarity
setting (possible only when the Nº31 is linked to a compatible Mark
Levinson digital processor).
While random play is active, the letter R will appear preceding the
track number.
While repeat A>B is active, the letters A then B will alternate
appearing in the space preceding the track number.
While Pause is active, " will appear preceding the track number
(as pictured above).
While preview is active, the track part of the Display will flash.
2 index
If a CD includes indices, this part of the Display shows the index in
play, beginning with 01 and increasing as the CD plays. If the CD in
play doesn't include indexes, this part of the Display shows 01
throughout play. For information on how to use indexes, see "Basic
operation."
Tracks may also be played from Index 00. (See "Linked functions.")
3 time
Before play, this part of the Display shows the total playing time for
all tracks on the CD. When play begins, this part of the Display
shows time-related information about the CD or the track.
You may vary the information in this part of the Display using the
display mode button. (See "Front panel.")
12
4 Remote sensor
This part of the Display accepts commands from the Nº31's Remote
Control. (See "Remote Control.") Always keep this window clean
and unobstructed.
Page 13

Display messages
The Display also shows messages about the Nº31's status and
operation. Here are some of the messages you'll see, and what they
mean.
■ CLOSING: The LID is in motion (closing); appears after the
LID Open/Close button is pressed.
■ FIRST TRACK: The Previous button was pressed while the first track
on the CD (or in a program or a random sequence) was playing.
■ INDEX SEARCH: The Nº31 is scanning the CD for indexes; appears
after index mode is pressed.
■ INSERT DISC: The LID is open; appears after the LID has stopped
opening.
■ LAST TRACK: The Next button was pressed while the last track on
the CD (or in a program) was playing.
■ NEW PROGRAM: A new program was recorded in the Nº31's
memory; appears after program save is pressed.
■ NO DAMPER: The LID is closed and the Disc Damper isn't installed
on the spindle; appears after the LID has closed.
■ NO PROGRAM: There's no program in the Nº31's memory;
appears after program review or program clear is pressed.
■ OPENING: The LID is in motion (opening); appears after the
LID Open/Close button is pressed.
■ P01 IS 1st: Indicates a track's place in a program; appears after
program review is pressed.
■ P02 02 IS 2: Indicates an index's place in a program; appears
after program review is pressed.
■ PROG CHANGED: Changes to a program were recorded in the
Nº31's memory; appears after program save is pressed.
■ POLARITY PRG: A program including only the polarity invert
function was saved; appears after program save is pressed.
■ PROG DELETED: A previously saved program was erased from the
Nº31's memory; appears after program clear is pressed, followed
by pressing program save.
■ PROG CLEARED: The temporary program was erased, or the
previously saved program was temporarily overridden; appears
after program clear is pressed.
■ PROGRAM END: There are no more selections in the program
being reviewed; appears after program review is pressed.
■ READING: The Nº31 is reading track and time information from
the CD; appears after the LID has closed.
13
Page 14

7
MADRIGAL AUDIO LABORATORIES
stop pause track
index
123
456
789
0
prg / time
A–B
d/a
polarity
display
mode
rpt trackrpt disc
display
intensity
5
1
2
3
1
4
6
Remote Control
1 Each of these buttons performs the same function as its
counterpart on the Nº31. (See "Top panel" and "Front panel").
Note: Used alone, the + and – buttons perform the Next and
Previous functions, respectively. When pressed after prg/time
(3), the + and – buttons perform the program + and
program – functions, respectively.
The index button performs the index mode function.
When no CD is playing, pressing stop opens the LID.
2 Numbered buttons
These buttons may be used to select tracks or indexes (instead of
using Next or Previous) or, along with prg/time (3), to begin play at
a specific time in a track.
Note: If the Nº31 is in index mode, the numbered buttons
select indexes. If the index mode is inactive, the numbered
buttons select tracks.
14
Page 15

To select a one-digit track or index number, you may press either
one or two buttons. For example, for track 1, you may enter either
1 or 01. To select a two-digit track number, enter both digits. Track
numbers you select will appear in the track part of the Display;
index numbers you select will appear in the index part of the
Display.
Entering a number before play begins play with that track or index
and plays the remaining tracks as ordered on the CD.
Entering a number during play skips to that track or index and
begins play, then plays the remaining tracks as ordered on the CD.
The numbered buttons may also be used to begin play at a
specific time; see prg/time (3). In this case, the numbers you select
will appear in the time part of the Display.
3 prg/time
This function, used with the numbered buttons (2), allows you to
begin play at a specific
index. Used with the + and – buttons, prg/time allows you to add
or erase selections from a program via the Remote Control.
To begin play at a specific time, use Next or Previous (or the
numbered buttons) to select a track. Press prg/time, then press the
numbered buttons corresponding to when you'd like play to begin.
(The numbers you select will appear in the time part of the
Display.) To begin play at that point, press Play.
time
— whether or not it corresponds to an
Note: The time you select depends on the selection you've
made with the display mode button: elapsed or remaining,
CD or track.
For example, if you want to begin play one minute and thirty
seconds into track 2, first press display mode until the
elapsed time and on track LEDs light. Then select track 2 by
pressing Next or Previous (or by entering 02). Press prg/time,
enter 130, then press Play.
To add or erase selections from a program, first select a track. Press
prg/time, then press + to add a selection or – to erase a selection.
(See "Programming.")
4 d/a polarity
Some recordings simply "sound better" when polarity is inverted.
When the Nº31 is linked to a compatible Mark Levinson digital
processor (via their communication ports), pressing this button
inverts polarity on the digital processor. (See "Rear panel" and
"Linked functions.")
15
Page 16
5 Transmit LED
This LED indicates when a command is transmitted by the Remote
Control. It lights when you press any button on the Remote Control.
Note: This LED indicates when the Remote Control sends a
command, not necessarily that the Nº31 received it.
If this LED fails to light when a button is pressed, replace the
Remote Control's batteries. (See "Set-up and installation.")
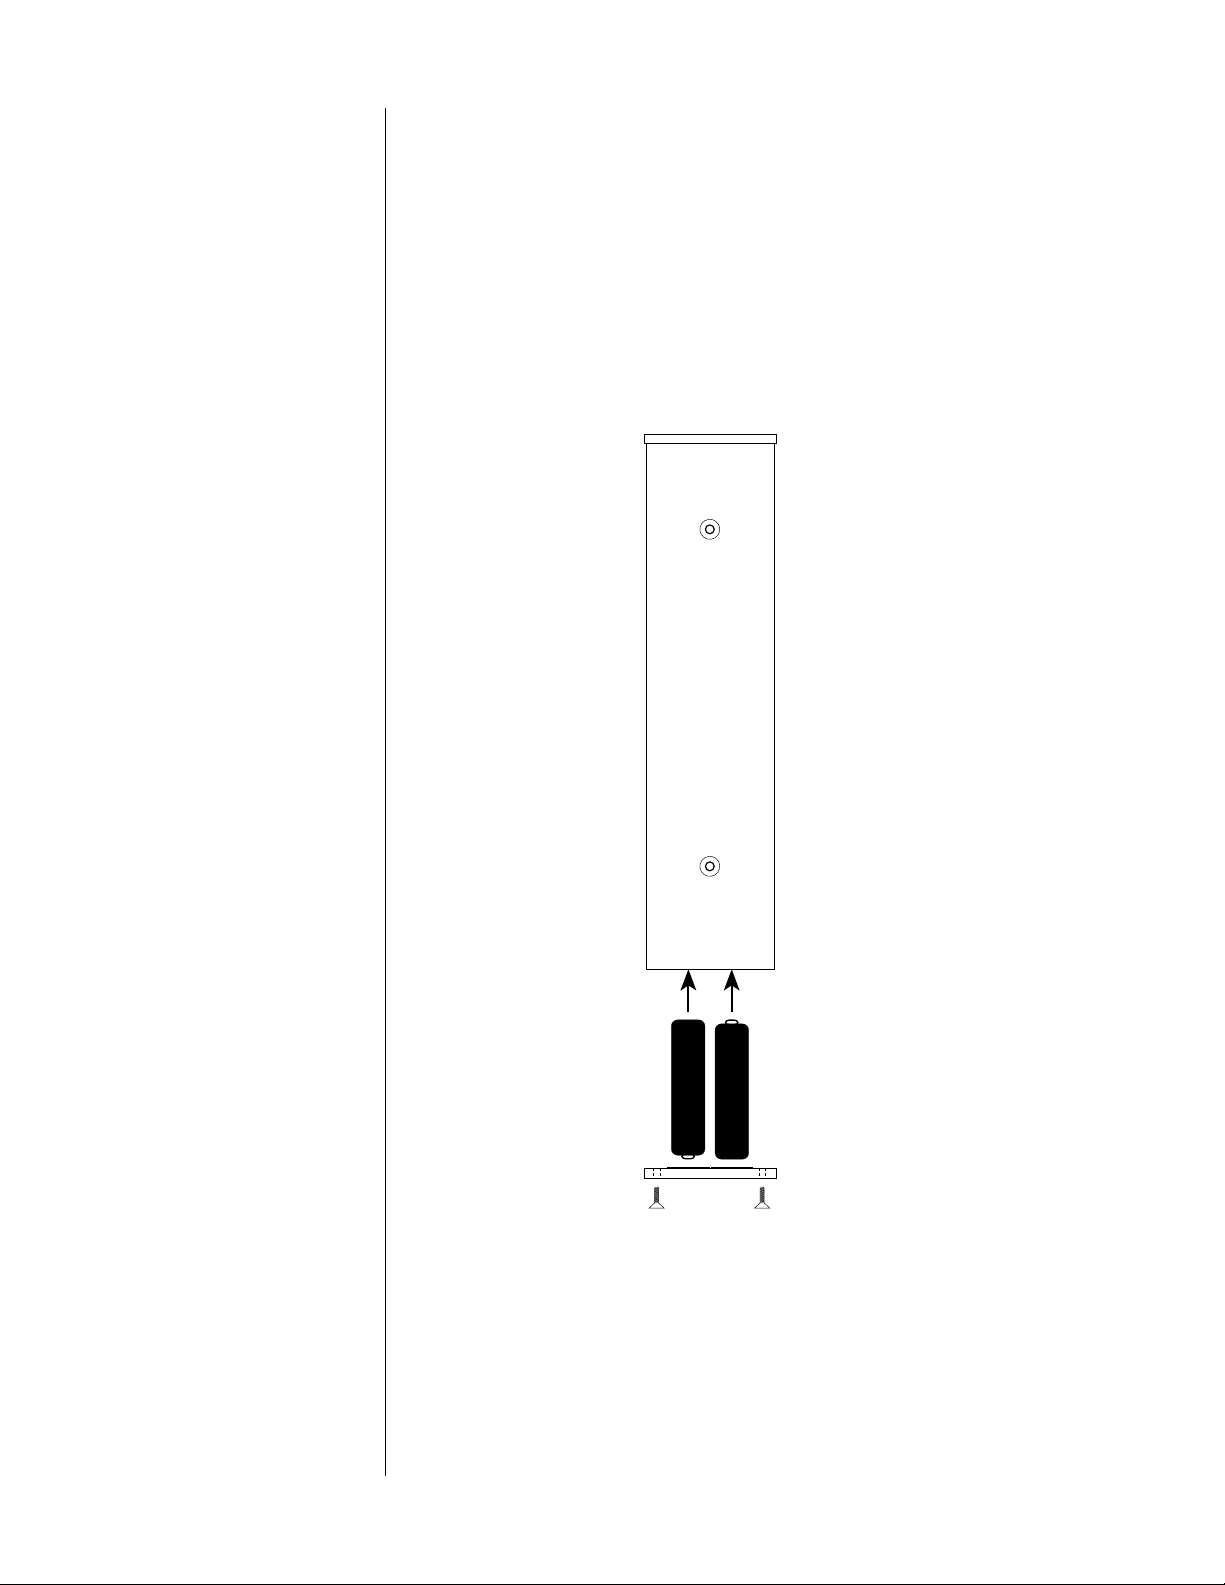
6 Battery compartment cover
This cap covers the compartment that holds the Remote Control's
batteries.
(Rear of
Remote Control)
+
–
+
–
Using the supplied 1/16" hex key, remove the two screws securing
the cover. Insert two AA batteries according to the symbols on the
inside of the battery compartment cover. Replace the battery
compartment cover.
16
Page 17

7 Projection lens
Infrared (IR) commands from the Remote Control to the Nº31 are
transmitted through this lens. (See "Set-up and installation.")
30 feet
or less
30˚ 30˚
Always keep the projection lens clean.
17
Page 18

main power
REFERENCE CD TRANSPORT Nº 31
designed and manufactured in U.S.A.
by MADRIGAL
communication ports digital outputs
slave
slave
out
in
S/N
eiaj st spdif
8
aes/ebu
operating voltage, 50-60Hz:
90 - 110VAC~
105 - 125VAC~
180 - 220VAC~
210 - 240VAC~
230 - 250VAC~
WARNING: BEFORE ATTEMPTING TO
OPERATE THIS DEVICE, REFER TO OWNER'S
MANUAL FOR PROPER OPERATING
INSTRUCTIONS AND SAFETY PRECAUTIONS.
HAZARDOUS VOLTAGE AVAILABLE INSIDE;
DISCONNECT AC ~ MAINS CABLE BEFORE
OPENING UNIT.
PRECAUTION
PRECAUTION
65 7
9 10 132 4
Rear panel
Disconnect all associated equipment from the AC mains BEFORE
making any signal connections and applying power to the Nº31.
1 Operating voltage indication
The Nº31 is set internally for 100, 120, 200, 220, or 240VAC mains
operation @ 50 or 60Hz. Make sure that this label indicates the
correct AC operating voltage for your location. (See "Set-up and
installation").
2 main power
This switch turns the Nº31 on and off. The switch must be in the "|"
(on) position for the Nº31 to function. (See "Set-up and
installation.")
Never operate the main power switch without first making
sure that power is turned off to your receiver, integrated
amplifier, or preamplifier/power amplifier.
18
PRECAUTION
3 AC power cord socket
This socket accepts AC mains power via the supplied AC power
cord.
4 Fuse compartment
The panel surrounding the main power switch is also a hinged
cover for the Nº31's fuse compartment. The Nº31 uses two 1.0ampere slow-blow fuses.
Never open the fuse compartment without first disconnecting
the Nº31 from AC power. If you need to replace the fuses,
always use the same type of fuse.
To open the fuse compartment, insert the tip of a small, flat-bladed
screwdriver into the slot at the top edge of this panel. Gently pry
open the top edge of the compartment cover.
Page 19

5 slave out
6 slave in
These communication ports allow the Nº31 to "link" to certain
compatible Mark Levinson components. (See "Linked functions.")
Using the Link cable, connect the Nº31's slave in port to the master
port on the Mark Levinson digital processor.
Make sure that the Link cable's locking tabs engage securely in the
components' communication ports.
If linking a second Nº31, connect the second Nº31's slave in port to
the first Nº31's slave out port.
PRECAUTION
Connecting the communication ports other than as
described in this manual will damage the Nº31 and the
digital processor, and will void the products' warranties.
7 digital output, EIAJ optical
This output provides digital audio (DAS, via a cable equipped with
TOSLINK-type optical connectors) to a digital processor, digital
audio tape recorder, preamplifier, integrated amplifier, or receiver
equipped with EIAJ optical digital inputs.
8 digital output, ST optical
This output provides digital audio (DAS, via a cable equipped with
ST-type optical connectors) to a digital processor, digital audio
tape recorder, preamplifier, integrated amplifier, or receiver
equipped with ST optical digital inputs.
9 digital output, SPDIF electrical
This output provides digital audio (DAS, via a cable equipped with
RCA-type connectors) to a digital processor, digital audio tape
recorder, preamplifier, integrated amplifier, or receiver.
10 digital output, AES/EBU electrical
This output provides digital audio (DAS, via a cable equipped with
XLR-type connectors) to a digital processor, digital audio tape
recorder, preamplifier, integrated amplifier, or receiver equipped
with XLR-type digital inputs.
Pin 1: System Ground
12
3
Note: The quality of the cables and connectors that you use
with your Nº31 can noticeably affect sound quality. For
electrical interconnection, we recommend Madrigal MDC
cable.
MDC-1 Pro is designed for AES/EBU interconnection; MDC-2
FatBoy is designed for SPDIF interconnection. MDC is
available in various lengths, pre-terminated with RCA and
XLR connectors. See your Mark Levinson dealer for more
information.
Pin 2: DAS + (Non-inverting)
Pin 3: DAS – (Inverting)
Connector Ground Lug: Chassis Ground
19
Page 20

20
Page 21

Set-up and installation
PRECAUTION
Unpacking
For your protection, review "Important Safety Instructions" before you
install your Nº31.
Carefully open the shipping carton and remove the contents. You
should have:
■ Mark Levinson Nº31 Reference Digital Transport
■ Remote control
■ Two AA batteries
■ Disc damper
■ Four spikes
■ AC power cord
■ Link cable (2m)
■ Two spare 1.0-ampere slow-blow fuses
■ One 1/16" hex key
■ One 1/8" hex key
■ One 3/32" hex driver
■ Owner’s manual
Save the shipping carton and all packing material. Though it may be
inconvenient to store, it’ll come in handy for shipping if you move, or if
the Nº31 needs to be shipped for service.
PRECAUTION
To set up your Nº31, you’ll need:
■ A soft cloth or towel (step 2)
■ A digital-audio cable (step 9)
1. Make sure that the Nº31 is unplugged from the AC power supply
and disconnected from your digital processor.
2. Place the Nº31 upright on a flat, stable surface. Carefully tip it so it
rests
on its side
Never turn the Nº31 upside-down (onto its top). Doing so will
damage the transport mechanism and will void the warranty.
; protect its finish with a soft cloth.
21
Page 22

Installing the spikes
(optional)
3. The Nº31 is shipped so that it rests solidly on its four feet, one under
each corner of the unit.
You may want to explore the potential sonic advantages of
installing the specially designed "spikes" supplied with the Nº31.
Removing the
transport screws
Install the spikes one at a time.
remove the screw securing the foot to the Nº31's chassis. Insert the
threaded end of the spike through the hole in the foot into the
threaded hole in the chassis, then turn the spike clockwise until it’s
hand-tight. (Be careful not to over-tighten it.)
Repeat this procedure for the other three spikes.
4. Locate the two transport screws on the bottom of the Nº31.
Using the supplied 1/8" hex key,
Nº31 chassis
Foot
Spike
Remove these
screws and washers
Warning tag
(protects finish)
5. Remove both transport screws by turning them counterclockwise
(no tools are necessary).
6.
Save the transport screws, washers, and warning tag with the
packing material. If you ever need to ship the Nº31, you must
replace them.
with its feet supported on raised blocks and the transport screws
inserted from underneath.
This is easiest when the Nº31 is level and upright,
22
Page 23

Placement
7. Turn the Nº31 upright.
To keep interconnect cabling as short as possible, place the Nº31
as close as possible to your digital processor. You may place it on
a shelf or in a cabinet where it's convenient to operate.
The Nº31 should rest on a level, stable surface. Avoid placing it
where it'll be exposed to shocks or vibration (such as on an
unstable table or near large loudspeakers). In general, place it as
you would a turntable.
You should also place other associated equipment so that it
doesn't induce hum in the Nº31 and other sensitive components.
PRECAUTION
About IR communication
Interfering with the Nº31’s ventilation or that of another
component could cause either to overheat, resulting in
damage to your system. To allow heat dissipation through air
circulation, allow 3 to 4 inches of clearance above the vents
on the top of the Nº31. Never block the vents on the bottom of
the Nº31.
To help with special installations and custom cabinetry, drawings
are included in this manual. (See "Dimensions").
The Remote Control sends infrared (IR) commands through its
projection lens, and the Nº31 receives IR commands through its
Remote sensor window. (See "Display").
30 feet or less
30˚ 30˚
IR communication between the Remote Control and the Nº31 will
be affected by:
■ Direct sunlight
■ Interior lighting
■ Wall, window, ceiling, and floor treatments
■ The angle of the Remote Control relative to the Nº31
23
Page 24

If the Nº31 will be subject to direct sunlight, place it no more than
10 feet from where you’ll normally operate the Remote Control.
Where bright sunlight virtually floods the room, IR communication
may not be possible.
In a room lighted primarily with incandescent fixtures, place the
Nº31 no more than 25 feet from where you’ll normally operate the
Remote Control. In a room with fluorescent fixtures, this range will
be reduced. Where bright fluorescent lighting virtually floods the
room, IR communication may not be possible.
IR, like visible light, reacts differently when it meets different
surfaces. Carpeting and draperies, for example, tend to diffuse
(scatter) IR and interfere with its transmission. Glossy or reflective
surfaces, such as mirrors and smooth walls, "bounce" (reflect) IR
and won’t interfere with its transmission. When placing the Nº31,
it’s important to account for potential IR bounce and diffusion.
Bare wall
(bounce)
(For example, in a room with thick carpeting, heavy
draperies, and many pieces of furniture, you'd place the Nº31
closer to where you’ll normally operate the Remote Control
than you would in a sparsely furnished room with bare walls
and hardwood flooring.)
If possible, install the Nº31 directly opposite where you’ll normally
operate the Remote Control. In practice, the Remote Control will
operate the Nº31 at up to 30 degrees to either side of this direct
line. To either side of this line, successful IR communication will
depend on bounce and ambient lighting.
Draperies
(diffusion)
24
Page 25

8.
Before making any audio connections, make sure that power is
turned off to both the Nº31 and your receiver, integrated amplifier,
or preamplifier/power amplifier.
Connectors and cable
Audio connection
Connecting the
communication ports
(optional)
The Nº31 incorporates RCA-type and XLR-type electrical
connectors, and EIAJ-type and ST-type optical connectors for
digital-audio signal output.
The quality of the cables and connectors that you use with your
Nº31 can noticeably affect the quality of the sound that you hear
from your speakers or headphones. For electrical interconnection,
we recommend Madrigal Audio Laboratories MDC cable.
MDC-1 Pro is designed for AES/EBU interconnection (via XLR-type
connectors); MDC-2 FatBoy is designed for SPDIF interconnection
(via RCA-type connectors). MDC is available in various lengths,
pre-terminated with RCA and XLR connectors. See your Mark
Levinson dealer for more information.
9. Using a high-quality digital-audio cable, connect the
digital output of the Nº31 to the digital input of your digital
processor.
10. If connecting your Nº31 to a compatible Mark Levinson digital
processor, you'll want to take advantage of certain "linked"
functions. (See "Linked functions.")
Using the Link cable, connect the Nº31's slave in port to the
master port on the Mark Levinson digital processor.
PRECAUTION
To Nº31
Make sure that the Link cable's locking tabs engage securely in
the components' communication ports.
If linking a second Nº31, connect the second Nº31's slave in port
to the first Nº31's slave out port.
To Mark Levinson
digital processor
Locking tabLocking tab
®
Connecting the communication ports other than as
described in this manual will damage the Nº31 and the digital
processor, and will void the products' warranties.
25
Page 26

Quick-reference:
Connecting the Nº31 to a
Mark Levinson
digital processor
In summary, then, this diagram shows the connections you need
to make to link your Nº31 to a Mark Levinson digital processor.
Nº30
OR
Nº35
digital input
Audio
connections
digital output
master
Link
cable
slave in
slave out
Link
cable
digital output slave in
Nº31
Nº31
26
Voltage setting
11. The Nº31 is set internally for 100V, 120V, 200V, 220V, or 240V AC
mains operation @ 50 or 60Hz. Make sure that the label on the
rear panel of your Nº31 indicates the correct AC operating
voltage for your location. (See "Rear panel.")
If the voltage indicated is incorrect, or if you wish to change the
AC operating voltage of the Nº31, see your Mark Levinson dealer.
The Nº31 can be powered by a normal 15-ampere AC mains line.
If other devices are also powered from the same AC line, their
additional power consumption must be taken into account.
Page 27

Connecting the
AC power cord
Connect the AC cord to the AC power cord socket on the rear
panel of the Nº31 (see "Rear panel"), then connect the AC cord
to the AC mains.
To Nº31 To AC mains
1 = Line (hot)
1
132
2
2 = Neutral
3 = Earth ground
3
Main power switch
PRECAUTION
12. Set the main power switch to the "|" (on) position; the standby LED
on the Nº31 will light. Allow the Nº31’s circuitry to stabilize for
several minutes, then connect all associated equipment to the
AC mains and activate it.
Never operate the main power switch without first making
sure that power is turned off to your receiver, integrated
amplifier, or preamplifier/power amplifier.
Note: The Nº31 won’t achieve its sonic potential right away —
sonic performance is close to the optimum after 350 hours (or
about two weeks of normal use). For the best performance,
you may leave the main power switch on at all times, except
when you won’t be using your Nº31 for a long period. (See
"Important Safety Instructions").
The Nº31 may be turned on and off without significantly
affecting its longevity. When it is turned on after being left
turned off, allow about one hour before expecting optimal
sonic performance.
27
Page 28

Levelling the
transport assembly
13. Press the LID Open/Close button on the top panel.
For the best performance, the Nº31's transport assembly should be
level. Four levelling screws (one inside each finger well) allow you
to adjust this.
With the supplied 3/32" hex driver, and using the Nº31's bubble
level as a gauge, adjust one or more of these screws to bring the
transport assembly to level. To lower a corner, turn the
corresponding screw clockwise; to raise a corner, turn the screw
counterclockwise.
Levelling
screws
Bubble level Levelling
screws
14. Place the Disc Damper on the spindle, then press LID Open/Close
again to close the LID.
28
Page 29

Installing batteries in the
Remote Control
15. Using the supplied 1/16" hex key, remove the two screws securing
the cover of the Remote Control’s battery compartment (the end
opposite the projection lens).
Projection
lens
(Rear of
Remote Control)
+
–
+
–
16. Insert two AA batteries according to the symbols on the inside of
the battery compartment cover. Replace the battery
compartment cover and screws.
29
Page 30

30
Page 31

Basic operation
Before operating your Nº31, become familiar with its controls and their
locations. (See "Front panel," "Top panel," "CD transport assembly," and
"Remote Control.")
Loading a CD
Temporarily overriding a
previously saved program
To load a CD for play:
1. Make sure that the main power switch is set to the "|" position.
2. Enable the Nº31's controls by pressing standby.
3. Press LID Open/Close to open the LID.
4. Remove the Disc Damper from the spindle.
5. Place a CD onto the spindle, label side up. Handle the CD by the
outer edges only.
6. Place the Damper on top of the CD. Make sure that it's centered
and seated securely.
7. Close the LID by pressing LID Open/Close again.
In a few seconds, the Display will show the total number of tracks
and their total playing time. The CD is now ready for play.
Note: If you'd previously saved a program for the CD, the
letter P will appear preceding the track number on the
Display. (See "Programming.")
To override a previously saved program, press program clear;
or on the Remote Control, press the 0 (zero) numbered key,
then press prg/time. All of the CD's tracks will be accessible
for basic operation, but the program will still be retained in
the Nº31's memory.
Playing all tracks in order
Beginning play with other
than the first track
To play all tracks on the CD, press the Play button. All tracks will play in
order. Play will stop automatically at the end of the CD.
To begin play with a track other than the first track:
1. Before pressing Play, press Next until the number of the desired
track shows on the Display. If you pass the track you want to play,
you can "back up" by pressing Previous. (You may also select the
track using the numbered buttons on the Remote Control.)
2. Press Play to begin playing that track. The remaining tracks will
play in order. Play will stop automatically at the end of the CD.
31
Page 32

Replaying a track To return to the beginning of a track while it's playing, press Play. Play
will be suspended briefly, then that track will replay followed by the
remaining tracks on the CD.
Playing tracks at random
Skipping to another track
Searching for a
specific passage
Using the Remote Control, you may have the Nº31 play tracks totally
at random. To do this, press the 0 (zero) numbered key, then press
Play.
While random play is active, the letter R will appear preceding the
track number on the Display.
To cancel random play, press Stop.
You may skip to another track any time while a CD is playing. To move
to another track, press Next (to go forward) or Previous (to go
backward) until the number of the track you want to play shows on
the Display. (You may also select the track using the numbered
buttons on the Remote Control.) Play will resume as soon as the pickup
reaches that track.
You may search for a particular passage on the CD using
Search Forward and Search Reverse. Scan the CD until the laser
pickup reaches the passage you want to hear. The search speed
increases when you hold down Search Forward or Search Reverse,
and the volume is reduced.
Note: If your Nº31 is linked to a compatible Mark Levinson digital
processor (via the communication ports), you have the option
of muting the volume completely during search. (See "Linked
functions.")
Previewing a CD
As soon as you release the button, play resumes.
If you search past the beginning or end of a track, the laser pickup will
move on to the previous (or next) track.
If you try to search forward past the end of a CD or program, the laser
pickup will stop at the end of the last track.
If you try to search backward past the beginning of a CD or program,
the laser pickup will stop at the beginning of the first track. When you
release Search Reverse, play will resume beginning with the first track.
Using the Nº31's preview function, you may play only the introduction
of each track on a CD, then resume normal play when you hear the
track you like.
Once a CD is loaded and ready for play, press preview. Beginning
with the first track, the Nº31 will play the first ten seconds of the track,
skip to the second track and play the first ten seconds of that track,
and so on. While the preview function is active, the track part of the
Display will flash.
To resume normal play, press preview again or press Play.
32
Page 33

Using indexes If a CD has indexes, you may use them to begin play in the middle of
a track.
1. Press index mode. (If there was no CD in play, the Display will
show INDEX SEARCH.) In a few seconds, the LED above the button
will flash.
2. Using Next and Previous (or the numbered buttons on the Remote
Control), select an index.
3. Press Play to begin play at the index you selected.
Beginning play in the
middle of a track
The Pause function
You may use prg/time on the Remote Control to begin play at a
specific
1. Using Next and Previous (or the numbered buttons on the Remote
2. Press prg/time, then press the numbered buttons corresponding to
3. To begin play at that point, press Play.
To suspend play while a CD is playing, press Pause. To resume play at
the same point, press Pause again.
If left in Pause for several minutes, the transport will stop spinning and
the laser will turn off (thereby enhancing the longevity of both). This will
be indicated by the Pause indicator in the display ("yy") flashing on
and off. Alternatively, this Long Term Pause feature may be engaged
by pressing and holding the Pause button until the indicator begins to
flash in the display. Pressing Pause again will resume play at the point
where Pause was first pressed, (after a short delay to allow the disc to
get up to speed).
time
— whether or not it corresponds to an index.
Control), select a track.
when you'd like play to begin. (The numbers you select will
appear in the time part of the Display.)
Note: The time you select depends on the selection you've
made with the display mode button: elapsed or remaining,
CD or track.
For example, if you want to begin play one minute and thirty
seconds into track 2, first press display mode until the elapsed
time and on track LEDs light. Then select track 2 by pressing
Next or Previous (or by entering 02). Press prg/time, enter 130,
then press Play.
Repeating the entire CD
Repeating the
current track
To "cue up" the beginning of a CD or track, press Pause
pressing Play (5). To begin play, press Pause again. (You may also
select another track or index while play is suspended.)
To repeat (continuously) all tracks on a CD, press repeat disc. While
the repeat disc function is active, the LED above the button is lighted.
To return to normal play, press repeat disc again.
To repeat (continuously) the track in play, press repeat track. While the
repeat track function is active, the LED above the button is lighted. To
return to normal play, press repeat track again.
before
33
Page 34

Repeating a
specific passage
To repeat (continuously) a specific phrase or passage on a CD, press
repeat A>B at the beginning of the passage you'd like to repeat. At
the end of the passage, press repeat A>B again. The passage you
selected will repeat continuously.
While the repeat A>B function is active, A then B will appear
preceding the track number on the Display. To return to normal play,
press the repeat A>B button again, or press Play.
Inverting playback polarity
Stopping play
If your Nº31 is linked to a compatible Mark Levinson digital processor
via the communication ports, you may change the playback polarity.
(See "Linked functions.")
After loading a CD, press the polarity invert button on the digital
processor's front panel, or press d/a polarity on the Nº31's Remote
Control, then press Play. The CD will play with inverted polarity.
If you want this CD to always play with inverted polarity, press
program save before pressing Play. The Display will show
POLARITY PRG, a small
the Display, and inverted polarity will be saved as a "program" for that
CD. (See "Programming.")
To stop play before the end of the CD, press Stop. The Display will show
the total number of tracks and their total playing time.
You may also stop play by pressing LID Open/Close. In this case, play
will stop and the LID will open.
P will appear preceding the track number on
34
Page 35

35
Page 36

Programming
Rather than playing an entire CD, you may choose to play only
certain selections. To do this, you create a "program" and store it in the
Nº31’s memory.
Before using your Nº31's programming features, become familiar with
its controls and their locations (see "Front panel," "Top panel," "CD
transport assembly," and "Remote Control"), as well as their basic
functions (see "Basic operation").
Note: The Nº31's basic functions operate as described in "Basic
operation," except that they affect only the program, not the
entire CD.
For instance, pressing Next during play skips to the next track or
index in the sequence, whether or not it's the next track or index
on the CD.
In the same way, pressing repeat disc will repeat the entire
program, not the entire CD.
The Nº31 allows up to 99 selections (tracks and indexes) per program.
A program may include both tracks and indexes.
How the Nº31
"remembers" programs
Assembling a program is possible only before play begins.
Note: The only programming functions that operate while a CD
is playing are program clear and program save.
When you load a CD, the Nº31 assigns it a unique identification code.
If you assemble a program for a particular CD
Nº31's memory, the Nº31 "remembers" that CD's program.
The next time you load that CD, the Nº31 will recognize the CD's
identification code and automatically loads the previously saved
program. (The letter P will appear preceding the track number on the
Display.)
Note: Even if you'd previously saved a program for a CD, the
Nº31 allows you to override it (and have access to all tracks on
the CD) without erasing it from the memory.
To override a previously saved program, press program clear; or
on the Remote Control, press the 0 (zero) numbered key, then
press prg/time. All of the CD's tracks will be accessible for basic
operation, but the program will still be retained in the Nº31's
memory. (See "Basic operation.")
The Nº31's memory can store programs for up to 1,300 different CDs.
Saved programs remain in memory when you place the Nº31 into
standby, when you turn off the main power switch — even if AC power
is interrupted.
and
save it into the
36
Page 37

Assembling a
new program
To assemble a new program:
1. Load a CD, close the LID, and wait for the Display to show the
number of tracks and their total playing time.
2. Using the Next and Previous (or the numbered buttons on the
Remote Control), select the first track in your program.
You may also include indexes in your program. Press index mode,
then use Next and Previous (or the numbered buttons on the
Remote Control) to select an index.
Note: If your Nº31 is linked to a compatible Mark Levinson
digital processor via the communication ports, you may set
the playback polarity independently for each track. (See
"Linked functions.")
polarity invert button on the digital processor's front panel, or
press d/a polarity on the Nº31's Remote Control.
3. Add the first selection to your program by pressing program + (on
the Remote Control, press prg/time, then press +). The letter P will
appear preceding the track number on the Display, along with
PRG +.
Note: You must press program + within five seconds after
making a selection, or the selection won’t be recorded.
Before continuing to step 3, press the
Shortcut: Ignoring tracks
4. Assemble the rest of your program (up to 99 selections) by
repeating steps 2 and 3. Make sure to press program + (or
prg/time and +) after each selection.
5. When you've finished adding selections:
a. If you want to play your program without recording it in the
Nº31's memory, go on to step 6.
b. If you want to record your program in the Nº31's memory, press
program save; the Display will show NEW PROGRAM.
6. To play the program, press Play.
If you want to play
may want to use this shortcut:
1. Load a CD, close the LID, and wait for the Display to show the
number of tracks and their total playing time. (See "Basic
operation.")
2. Using the Next and Previous (or the numbered buttons on the
Remote Control), select the first track you want to
your program.
most
of a CD, and just "ignore" a few tracks, you
eliminate
from
3. "Ignore" the track by pressing program – (on the Remote Control,
press prg/time, then press –). The letter P will appear preceding
the track number on the Display, along with PRG –.
4. Repeat steps 2 and 3 for each track you want to ignore, making
sure to press program – (or prg/time and –) each time.
37
Page 38

5. When you've finished eliminating tracks:
a. If you want to play your program without recording it in the
Nº31's memory, go on to step 6.
b. If you want to record your program in the Nº31's memory, press
program save; the Display will show NEW PROGRAM.
6. To play the program, press Play.
Reviewing a program
Erasing a selection
from a program
To review your program before playing it:
1. Load a CD for which you've already saved a program (the letter P
will appear preceding the track number on the Display); or load
an unprogrammed CD, then assemble and save a program.
2. Press program review. The Display will show the first selection in
your program.
For example, if track 3 is the first selection in your program, the
Display would show P03 IS 1st. If index 2 on track 5 is the first
selection, the Display would show P05 02 IS 1.
Note: If you press program review when there is no program
in the Nº31's memory, the Display will show NO PROGRAM.
3. To view the next selection, press program review again, and so
on.
Press program review for each selection in your program. After
you view the last selection, the Display will show PROGRAM END.
You may erase any selection from a previously saved program. To
erase a selection:
38
1. Load a CD for which you've already saved a program (the letter P
will appear preceding the track number on the Display); or load
an unprogrammed CD, then assemble and save a program.
2. Press program review. The Display will show the first selection in
your program.
3. Press program review until the selection you want to erase
appears on the Display.
4. Press program
press –); the Display will show the track you erased, along with
PRG –.
5. Repeat steps 3 and 4 for each selection you want to erase from
your program.
When you finish erasing selections from your program, press
program save; the Display will show PROG CHANGED.
– (on the Remote Control, press prg/time, then
Page 39

Adding a selection
to a program
You also may add a selection to the end of a previously saved
program. To add a selection:
1. Load a CD for which you've already saved a program (the letter P
will appear preceding the track number on the Display); or load
an unprogrammed CD, then assemble and save a program.
2. Using the Next and Previous (or the numbered buttons on the
Remote Control), select the track you want to add to your
program.
You may also include indexes in your program. Press index mode,
then use Next and Previous (or the numbered buttons on the
Remote Control) to select an index.
Note: If your Nº31 is linked to a compatible Mark Levinson
digital processor via the communication ports, you may set
the playback polarity independently for each track. (See
"Linked functions.")
Before continuing to step 3, press the polarity invert button on
the digital processor's front panel, or press d/a polarity on the
Nº31's Remote Control.
Temporarily overriding a
previously saved program
3. Add the selection to your program by pressing program
Remote Control, press prg/time, then press +).
Note: You must press program + (or prg/time and +) within
five seconds after making a selection, or the selection won’t
be recorded.
4. Repeat steps 2 and 3 for each selection you want to add to your
program. Make sure to press program + (or prg/time and +) after
each selection.
5. When you've finished adding selections, press program save; the
Display will show PROG CHANGED.
To override a previously saved program (temporarily), press
program clear (on the Remote Control, press the 0 numbered key,
then press prg/time); the Display will show PROG CLEARED.
All of the CD's tracks will be accessible for basic operation, but the
program will still be retained in the Nº31's memory. (See "Basic
operation.")
Note: If you press program save after pressing program clear,
the Display will show PROG DELETED and the program will be
erased from the Nº31's memory.
+ (on the
Erasing a program
To erase a previously saved program
memory:
1. Press program clear; the Display will show PROG CLEARED.
2. Press program save; the Display will show PROG DELETED.
permanently
from the Nº31's
39
Page 40

40
Page 41

Linked functions
The Nº31 has the ability to "link" seven of its functions to certain
compatible Mark Levinson digital processors (like the Nº30 Reference
Digital Processor and the Nº35 Digital Processor).
Note: To take advantage of linked functions, you must connect
the Nº31 to the digital processor via their communication ports.
(See "Rear panel" and "Set-up and installation.")
There are seven linked functions.
Record link
Mute link
■ Record link (Nº30 only): While the Nº31 is selected as the Nº30's
recording source (a CD must be in play), this link helps prevent
you from inadvertently disrupting the recording process.
If you attempt to use any of the Nº31's functions that might
disrupt the recording process (Stop, LID Open/Close, etc.), the
Nº31 will block that function and its Display will show RECORDING.
Likewise, if you attempt to place the Nº30 into standby, the Nº31
will block that function and Nº30's Display will show RECORDING.
To override the record link, press the function button
example, if you
though it's being recorded, press the Stop button twice in
succession.)
When the Nº31 is first turned on, the record link setting is
■ Mute link: This link automatically mutes the volume during search
(that is, whenever you press Search Forward or Search Reverse).
When the Nº31 is first turned on, the mute link setting is
do
want to stop the CD that's playing, even
twice
off
off
. (For
.
.
Standby link
■ Standby link: This feature links the standby modes of the Nº31
and the digital processor.
If both the Nº31 and the digital processor are in standby mode,
pressing the Nº31's standby button will take both components
out of standby mode (making them ready to operate).
If both the Nº31 and the digital processor are "on" (not in standby
mode), pressing the digital processor's standby button will place
both components into standby mode.
When the Nº31 is first turned on, the standby link setting is on.
41
Page 42

Alias link
■ Alias link (Nº30 only): The Nº30 allows you to set an "input alias"
for each of its sources; this alias appears on the Nº30's Display.
The Nº31's alias link automatically overrides the alias setting for its
input. When you select the Nº31's input, the Nº30 will show No31
on its Display.
Play link
Display link
When the Nº31 is first turned on, the alias link setting is
■ Play link: When you press the Nº31's Play button, this link
automatically selects the Nº31's input on the digital processor.
Note: If you've connected the Nº31 to two or more of the
digital processor's inputs, the play link will look first for
AES/EBU interconnection, then SPDIF, then ST, and finally
EIAJ.
When the Nº31 is first turned on, the play link setting is on.
■ Display link: This links the display intensity functions of the Nº31
and the digital processor.
When the components are linked, both Displays will be set to the
same brightness. Pressing display intensity on either component
will affect both Displays.
Note: Though the Nº35 has no display intensity button or
alphanumeric Display, its LEDs will be linked to the Nº31's
LEDs.
on
.
Polarity link
Index 0
When the Nº31 is first turned on, the display link setting is on.
■ Polarity link: This links the d/a polarity button on the Nº31's
Remote Control to the polarity invert function of the digital
processor.
The polarity link also allows inverted polarity to be saved with a
program. When inverted polarity is part of a saved program, this
link turns on the digital processor's polarity invert function. (See
"Programming.")
The polarity link setting is always on, and can't be changed.
In addition to the Linked Functions, the Nº31 has the ability to play
"Index 0," the CD equivalent of the "lead-in grooves" on an LP.
■ Index 0: When this option has been selected, pressing Play will
begin each track at Index 0 rather than at the usual Index 1,
resulting in a brief "count-down" to the beginning of the music.
If you prefer all track and index operations to use Index 0 as the
effective beginning of a given track (to hear the applause
before a song on a live recording, for example), you may select
Index 0 in the Set Options menu, described on the next page.
42
Page 43

Changing link settings
The Nº31 allows you to change the Index 0 option and six of its link
settings to suit your own preferences.
Note: The polarity link setting is always on, and can't be
changed.
1. Make sure that the main power switch is set to the "on" ("|")
position.
2. Enable the Nº31's controls by pressing standby.
Note: To change your Nº31's link settings, your Mark Levinson
digital processor also must be connected (linked) and turned
on.
3. Press the front-panel display mode button and hold it until SET
OPTIONS appears on the Display.
If you continue holding the display mode button, the Display will
show each of your Nº31's options, in this order:
INDEX 0 –
RECORD LINK –
MUTE LINK –
STANDBYLINK +
ALIAS LINK + – indicates that the option is turned
PLAY LINK +
DISPLAYLINK +
+ indicates that the option is turned
on
off
If you continue holding display mode after the Display shows
DISPLAYLINK+, the links are shown again beginning with INDEX 0 –,
then RECORD LINK–, then MUTE LINK–, and so on.
4. When the Display shows the link setting you want to change,
release the display mode button.
If you release display mode too soon, simply press display mode
once to move to the next link.
Note: In several seconds, if you make no changes to the link
settings, the Display will go back into its standard mode. To
return to SET OPTIONS, repeat step 3.
5. To turn the link
press the program – button.
6. Repeat steps 4 and 5 for each link setting you want to change.
When you've finished, wait several seconds for the Display to
return to its standard mode.
Your link settings remain in memory when you place the Nº31 into
standby, when you turn off the main power switch — even if AC
power is interrupted.
on
, press the program + button; to turn the link
off
,
43
Page 44

44
Page 45

PRECAUTION
Troubleshooting
In general, refer any service problems to your Mark Levinson dealer.
Before contacting your dealer, however, check to see if the problem is
listed here. If it is, try the suggested solutions. If none of these solves the
problem, contact your Mark Levinson dealer.
1. The Nº31 won’t function, and the Display is dark.
■ The main power switch on the rear panel isn't turned on.
Never operate the main power switch without first making
sure that power is turned off to your receiver, integrated
amplifier, or preamplifier/power amplifier.
■ The standby button on the front panel isn't turned on.
■ The Nº31 isn’t plugged into the AC mains.
■ The wall socket, adapter, or extension cord is faulty.
■ There’s a tripped circuit breaker or blown fuse in the wall
outlet’s circuit.
■ The Nº31's fuse is blown (contact your Mark Levinson dealer).
2. The Nº31's LID won’t close.
■ The Disc Damper is misaligned.
■ The Disc Damper or another object is blocking the LID.
3. The Nº31 won’t play a CD inserted in the player.
■ The CD is inserted upside down.
■ The Disc Damper is missing or misaligned.
■ The transport screws weren’t removed during set-up.
■ There may be condensation (moisture) on the laser pickup. This
can happen if the Nº31 is moved from a cold environment to a
warm one. Set the main power switch to its "|" position, and
leave it on for an hour before playing a CD.
4. No sound comes out of the speakers or headphones.
■ The proper source isn’t selected on your digital processor.
■ The audio cables are connected incorrectly.
5. When a CD is playing, the sound "skips."
■ The CD is scratched or dirty.
■ The Nº31 is on an unstable surface or is too close to your
speakers.
■ The transport screws weren’t removed during set-up.
45
Page 46

6. The sound from the speakers or headphones is distorted.
■ The Nº31 is connected to the wrong inputs of your digital
processor. Check all connections.
7. The Remote Control doesn’t operate the Nº31.
■ The Remote Control is at the wrong angle relative to the Nº31,
and the Nº31 can’t receive the signal.
■ The sensor window on the front panel of the Nº31 is dirty or
blocked.
■ The Remote Control’s projection lens is dirty.
■ Fluorescent lighting or sunlight is interfering with the operation
of the Remote Control.
■ The Remote Control’s batteries are weak and need to be
replaced.
■ The Remote Control’s batteries are installed incorrectly.
8. The linked functions don't work.
■ The Nº31 isn't connected to a compatible Mark Levinson digital
processor.
■ The Link cable is disconnected, or is connected incorrectly.
■ The digital audio cable is disconnected, or is connected
incorrectly.
■ Try turning off/disconnecting AC power from both the Nº31
and the Mark Levinson digital processor. After several seconds,
restore AC power to the digital processor,
Nº31's main power switch.
then
turn on the
PRECAUTION
Never operate the main power switch without first making
sure that power is turned off to your receiver, integrated
amplifier, or preamplifier/power amplifier.
9. The Display shows BAD PROGRAMS.
■ Contact your Mark Levinson dealer immediately.
46
Page 47

Care and maintenance
Nº31
Remote Control
Compact discs
To remove dust from the cabinet of the Nº31, use a feather duster. To
remove dirt and fingerprints, we recommend isopropyl alcohol
applied to a soft cloth. Don’t apply water, dusting sprays, solvents,
abrasives, or cleaning fluids directly to the cabinet.
Make sure that the Remote sensor window on the front panel and the
Remote Control’s projection lens are kept clean and dust-free.
Fluorescent lighting and sunlight may interfere with the operation of
the Remote Control. Avoid placing the Nº31 near fluorescent lamps or
in direct sunlight.
When the Remote Control’s batteries need to be replaced, use only
AA batteries; always replace both batteries at the same time. If you
don’t plan to use the Remote Control often, remove the batteries.
When not used for an extended period, even "leak-proof" batteries
can leak corrosive acids that will damage the Remote Control (and
will void the warranty).
A CD, handled carefully, will last indefinitely. A warped, dusty, or
scratched CD can cause playback problems or may sound noisy.
Handle a CD by the outer edges only; if necessary, support it with your
index finger at the center hole. Don’t touch the bottom (unprinted)
side of the CD, and never apply stickers, labels, or adhesive-backed
rings to either side of the CD.
If a CD becomes dirty, use a silicone-treated cloth (like those made for
cleaning camera lenses) or a special CD cleaning kit. Don’t use
solvents, anti-static fluids, or cleaners made for cleaning phonograph
records.
When you’re finished playing a CD, always return it to its plastic case.
Store your CDs where they won’t be exposed to direct sunlight, high
humidity, or extremely high or low temperatures.
47
Page 48

Specifications
The correlation between published specifications and sonic quality is
unreliable. A list of numbers reveals virtually nothing. All technical
measurements must be subject to qualitative as well as quantitative
interpretation.
Measurements of the Nº31 yield excellent results by any standards.
However, only those specifications that apply to its actual operation
are included here.
■ Direct digital output, RCA: SPDIF 75Ω
■ Direct digital output, XLR: AES/EBU 110Ω
■ Direct digital output, ST: AT&T optical standard
■ Direct digital output, EIAJ: TOSLINK™ optical standard
■ Mains voltage: 100V, 120V, 200V, 220V, 240V
■ Mains frequency: 50/60 Hz
■ Overall dimensions: See "Dimensions"
■ Shipping weight: 62 lbs. (28.2kg)
■ Connector complement: 1 female RCA-type connector
1 male XLR-type connector
1 EIAJ-type optical connector
1 ST-type optical connector
2 RJ45 connectors
1 IEC mains connector
48
If purchased in North America, this Mark Levinson product’s warranty is owner-transferable.
Warranty conditions are valid only in the country where the product was originally purchased.
For warranty information and conditions on products purchased outside of North America,
contact your local dealer or regional distributor.
Page 49

Dimensions
19.375"
5.560"
1.100"
11.861"
12.261"
13.726"
49
Page 50

14.426"
5.432"
.308"
50
Page 51

51
Page 52

MADRIGAL AUDIO LABORATORIES
2081 South Main Street, P.O. Box 781
Middletown, Connecticut 06457 USA
Telephone: (203) 346-0896
Fax: (203) 346-1540
®
is a registered trademark of Madrigal Audio Laboratories, Inc.
630110-1 Printed in U.S.A.
©1992 Madrigal Audio Laboratories, Inc. All rights reserved.
 Loading...