

Page 1
Page 2
Product Specification:
Transmitter size: 3.59”(length) x 3.55”(wide) x 1.68”(high)
Glove size ea: 8.47”(length) x 5.91”(wide) x .591” (high)
Cable length of Gloves & Transmitter: 37.4”
Power supply: 4 “AAA” batteries (not included)
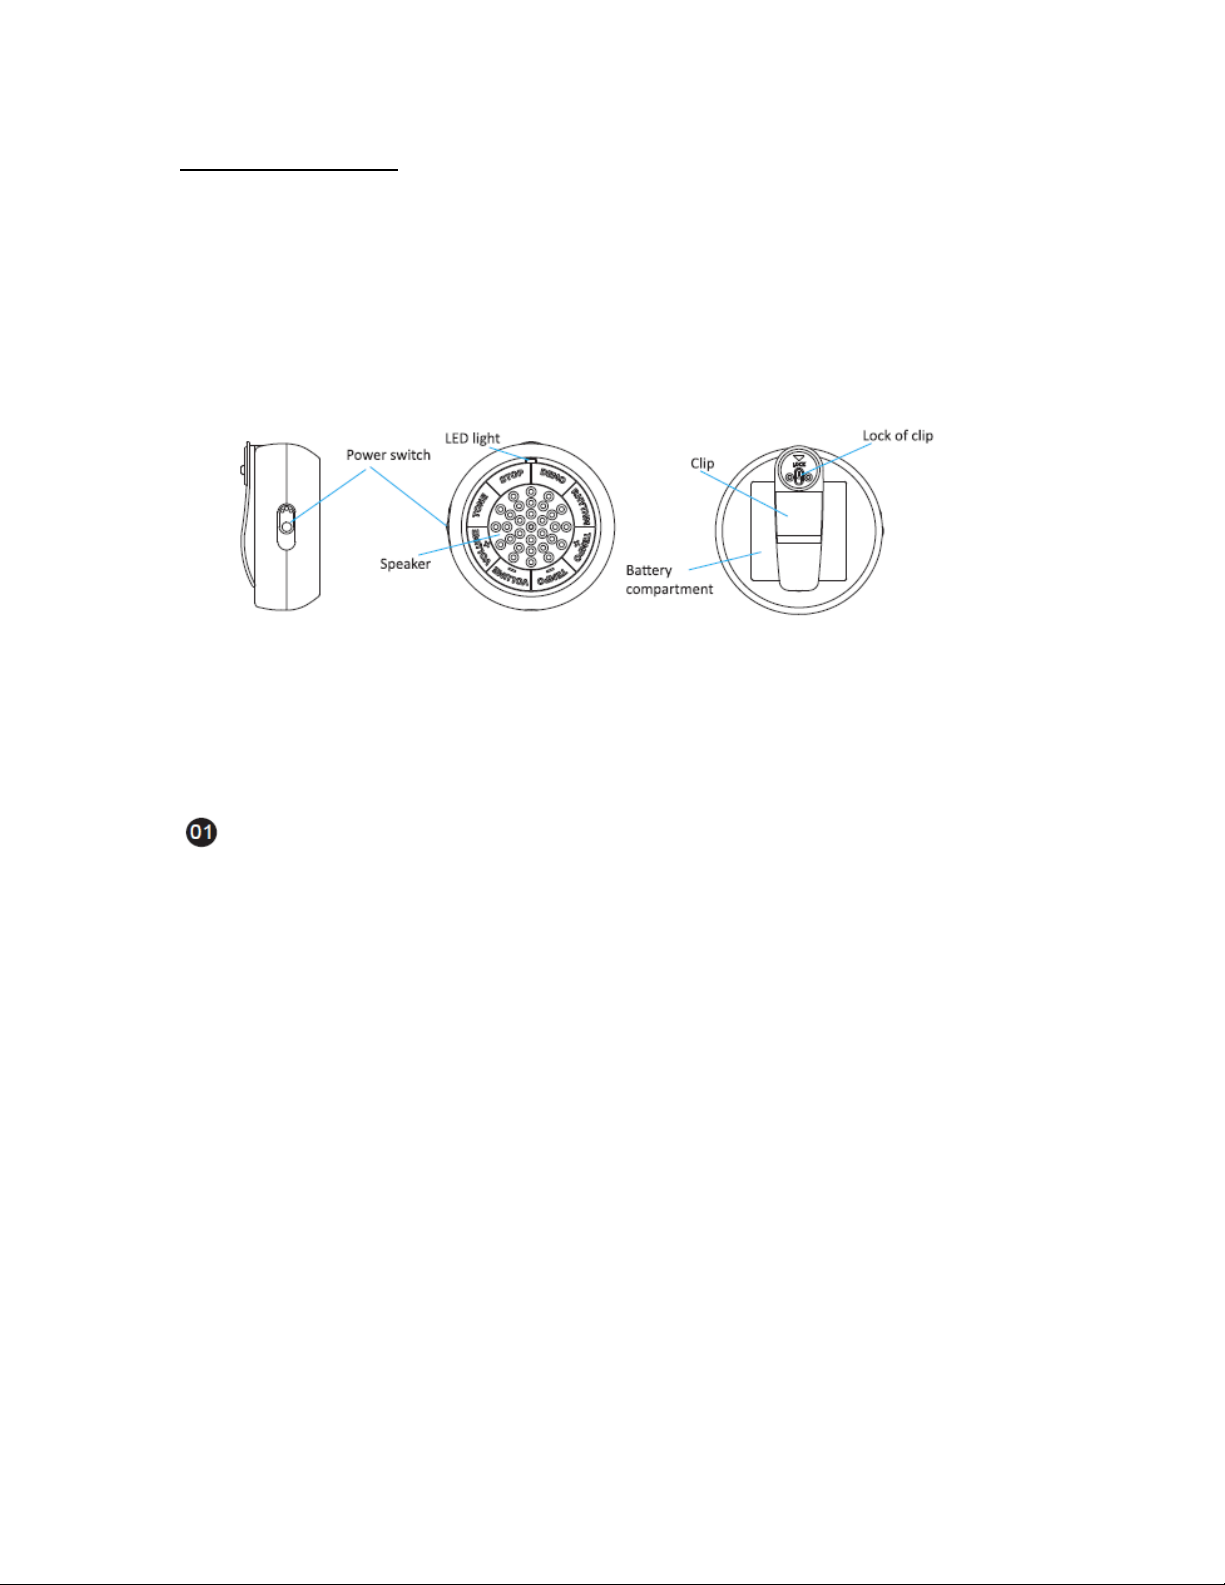
Controller
There is a Clip on the back side of Controller, which could be hung on a belt when
playing.
Page 3

OPERATION
Battery Installation
1. Unlock the Clip on the backside of Controller and rotate it. You will not be able to
open battery compartment without first unlocking Clip.
2. Remove screws from battery compartment and insert 4 “AAA” batteries (not
included). Make sure battery polarity is as indicated (+/-).
Power Switch
The ON/OFF switch is on the left side of the Controller. To turn on, switch it to ON
position and the LED light on top of Controller will illuminate. Switch it to OFF
position to turn off.
Page 4

Play Demonstration Songs
There are 6 built-in Demonstration songs in total.
Once the power is on, press the “DEMO” button on Controller. It will automatically
begin playing 1st demo song. Press the “DEMO” button again; it will play next
song….and repeat.
To stop the demo songs, just press the “STOP” button.
Demo song list
Happy Birthday
O Susanna
Row Row Row Your Boat
You are my Sunshine
Kumbaya
Michael row your boat ashore
Page 5

Volume Control
Press the “VOLUME+” button on the Controller to increase volume. Continue
to press button until you reach the highest level. Press the “VOLUME-“ button
to decrease volume. Continue to press button until you reach the lowest level.
There are 4 levels of volume.
Tempo Control
Press the “TEMPO+” button on the Controller to increase tempo. Continue
to press button until you reach the highest level. Press the “TEMPO-“ button to
decrease tempo. Continue to press button until you reach the lowest level.
There are 4 levels of tempo.
Page 6

Musical Instruments Tone Control
There are 8 built-in Musical Instruments for choice:
Piano Xylophone
Bass Music Box
Violin Guitar
Trumpet Drum
Press the “TONE” button on the Controller to select a musical instrument.
Rhythm Control
There are 20 built-in Rhythms for choice:
Dance Hard Rock 1 Hard Rock 2 Shuffle 16 Beat
8 Beat House Country Jazz 1 Rock 3
Latin Rock 1 Funk 1 Rock 2 Soul
Slow Rock Heavy Metal Funk 2 Disco Jazz 2
Press the “RHYTHM” button on the Controller to select a rhythm.
Page 7

Play Notes for each Finger
The tip of each finger represents a different note. Each glove has 8 notes; total 16
notes via 2 hands. When the palm of the hand is pressed down, 3 additional notes
are available. (See Illustrations below) Press down on any solid surface to play a
note.
Page 8

CARE AND HANDLING
1. Do not submerge in water or other liquids.
2. Do not disassemble the product for any reason.
3. Do not expose to extreme temperatures.
4. Do not drop or throw causing physical shock.
5. Clean using only a dry towel or cloth.
6. Do not use cleaners with chemical agents.
BATTERY NOTICE
1. Please change the batteries if LED ON/OFF light located on top of the controller is
flashing as it is an indication that batteries are becoming worn.
2. Do not mix old and new batteries. Do not mix alkaline, standard (Carbon-Zinc), or
rechargeable (Nickel Cadmium) batteries.
Page 9

3. To avoid leakage or explosion, do not put batteries in fire.
4. Remove the batteries if unit is not to be used for long periods of time.
5. Clean the battery contacts prior to battery installation.
Note: This device complies with Part 15 of the FCC Rules. Operation is subject to the
following two conditions: (1) This device may not cause harmful interference, and (2)
this device must accept any interference received, including interference that may cause
undesired operation.
Caution: Changes or modifications not expressly approved by the party responsible for
compliance could void the user’s authority to operate the equipment.
Page 10

NOTE: This equipment has been tested and found to comply with the limits for Class B
digital devices, pursuant to part 15 of the FCC rules. These limits are designed to provide
reasonable protection against harmful interference in a residential installation. This
equipment generates, uses and can radiate radio frequency energy and, if not installed
and used in accordance with the instructions, may cause harmful interference to radio or
television reception, which can be determined by turning the equipment off and on, the
user is encouraged to try to correct the interference by one or more of the following
measures:
Page 11

-Reorient or relocate the receiving antenna.
-Increase the separation between the equipment and the receiver.
-Connect the equipment into an outlet on a circuit different from that to which the
receiver is connected.
-Consult the dealer or an experienced radio/TV technician for help.
Mark Feldstein & Associates, inc.
www.markfeldstein.com
 Loading...