

Market Forge Industries ST-10, ST-10 Power-Plus Owner's Manual
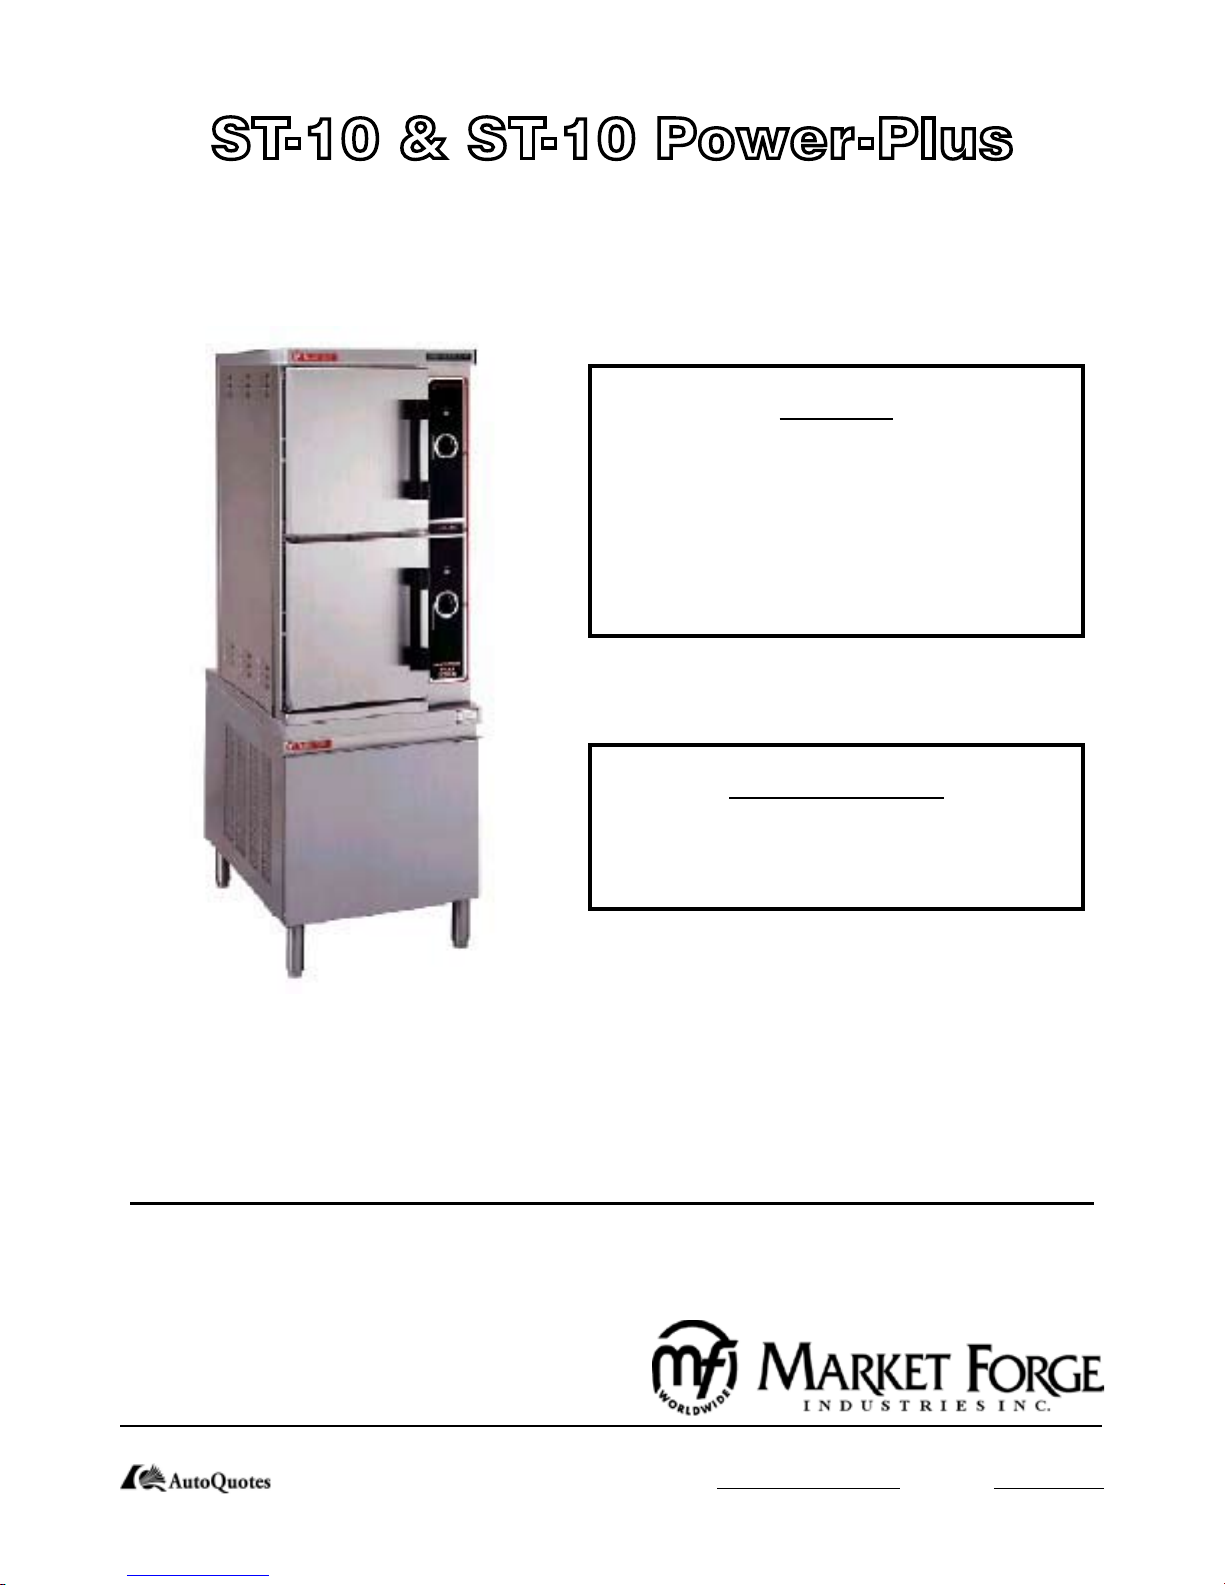
ST-10 & ST-10 Power-Plus
OWNER’S MANUAL
WARNING:
Improper Installation, adjustment,
alteration, service, or maintenance can
cause property damage, injury, or death.
Read the installation, operating, and
maintenance instructions thoroughly
before installing or servicing this
equipment.
FOR YOUR SAFETY:
Do not store or use gasoline or other
ammable vapors or liquids in the
vicinity of this or any other appliance.
MODELS: □ ST-10
□ ST-10 Power-Plus
INSTALLATION, OPERATION, MAINTENANCE, SERVICE AND PARTS MANUAL
Form Number: S-2486 REV: F 04/14
Printed in U.S.A. 35 Garvey Street l Everett l MA l 02149
Tel: (617) 387-4100 l Fax: (617) 387-4456 l Outside MA Fax: (800) 227-2659
E-Mail: CUSTSERV@mi.com l Website: www.mi.com

TABLE OF CONTENTS
SECTION 1 INTRODUCTION
1.1 Description ...........................................1
1.2 Basic Functioning ................................. 1
1.3 Service..................................................1
SECTION 2 INSTALLATION
2.1 Assembly .............................................2
2.2 Setting in Place ....................................2
2.3 Mechanical Connections ......................2
2.4 Water Connections ...............................2
2.5 Installation Check-Out .......................... 2
2.5.1 Initial Control Settings........................2
2.5.2 Cooker Check-Out .............................3
2.5.3 Shut-Down Procedure ....................... 3
2.6 Reversing the Doors .............................3
2-1 Typical door layout ...............................4
SECTION 3 OPERATION
3.1 Operating Controls and Indicators ........5
3.2 Operating Procedures ..........................5
3.2.1 Steam Source Operation ...................5
3.2.2 Preheating ........................................ 5
3.2.3 Cooking .............................................5
3.2.4 Shut-Down Procedure ...................... 5
3.3 Cleaning ..............................................5
3.4 Drainage ..............................................6
3.4.1 Cooking Compartment Drainage. ......6
3.4.2 Drip/Spill Trough Drainage ............... 6
3-1 Controls and Indicators .......................6
3-1 Controls and Indicators Digital .............6A
3.5 Test Kitchen Bulletin ............................7
SECTION 4 PRINCIPLES OF OPERATION
4.1 General ................................................11
4.2 Plumbing Circuits .................................11
4.2.1 Steam Inlet Line.................................11
4.2.2 Steam Exhaust and Drain Lines ........11
4.2.3 Steam Exhaust Condensing System .11
4.3 Electrical Circuits ..................................11
4.3.1 Control Circuit Components .............11
4-1 Pictorial Diagram-Steam and
Water Circuits .....................................12
4.3.1.1 60 Minute Timer ............................. 12
4.3.1.2 Indicator Lights .............................. 12
4.3.1.3 Buzzer ...........................................12
4.3.1.4 Door Interlock Switch......................12
4.3.1.5 Thermostatic Switch ...................... 12
SECTION 5 TROUBLE-SHOOTING
5.1 General ................................................13
5.2 Trouble-Shooting Guides ...................... 13
5.3 Electrical Fault Isolation........................13
5.4 Electrical Trouble-Shooting
Procedures ........................................... 13
5-1 General Trouble-Shooting Guide..........13
5.4.1 Incoming Power ................................14
5.4.2 Electrical Inspection...........................14
5-2 Electrical Fault Isolation Guide .............15
5.4.4 60-Minute Timer ................................15
5.4.4.1 Timer Contacts .............................. 15
5.4.4.2 Timer Motor .................................... 15
5-1 ST-10 Wiring Diagram ..........................16
5-1.2 Wiring Diagram, Digital Controls ....... 16A
5.4.5 Door Interlock Switch.........................17
5.4.6 Steam Solenoid Valves ......................17
5.4.7 Indicator Lights ................................. 17
5.4.8 Cooking Compartment Thermostatic
Switch ................................................17
5.4.9 Buzzer ..............................................17
5.4.10 Cold Water Condenser Circuit ........ 18
5.4.11 Wiring ..............................................18
5-2 ST-10 Schematic ................................. 18
5-3 ST-10 Power-Plus Wiring Diagram ......19
5-4 ST-10 Power-Plus Schematic ..............20
SECTION 6 MAINTENANCE
6.1 General ................................................. 21
6.2 Preventive Maintenance .......................21
6.2.1 Cooking Compartment Cleaning ......21
6.3 Repair and Replacement ..................... 21
6.3.1 Door Latch Tension Adjustment ........ 21
6.3.2 Door Handle Tension Adjustment ..... 21
6.3.3 Door Gasket Replacement ............... 22
6.3.4 Exterior Panel Removal .................... 22
6.3.5 Steam and Water Solenoid Valve
Replacement .....................................22
SECTION 7 ILLUSTRATED PARTS LIST
7.1 General ................................................ 23
7.2 Ordering Information ............................23
7.3 Index of Illustrated Parts List ............... 23
7-1 Cabinet Assembly ................................24
7-2 Door Assembly ....................................26
7-3 Control Panel Assembly .......................27
7-4 Condenser Assembly ........................... 28
7-5 Complete Condenser Assembly .......... 29
7-6 ST-10 Power-Plus ................................ 30

SECTION 1. INTRODUCTION
This service and parts manual contains general information, installation operation, principles
of operation, trouble-shooting, and maintenance information for the Market Forge ST-10 Pressureless Steam Cookers. Also included is a parts list in which each replaceable part is identied and shown in an accompanying exploded view.
1.1 DESCRIPTION
The ST-10 is a pressureless steam cooker consisting of two independently controlled compartments
enclosed in a single cabinet. Each compartment
is equipped with a separate three-piece door with
inner gasket plate isolated from the exterior surface. Door latches operate by action for positive
sealing of inner door. Steam and steam-condensing circuits are electrically controlled. Operating
controls are displayed on a single front-mounted
panel and include separate timers with indicator
lights for selection of constant steam or 60-minute-long duration cooking.
A separate steam source required for operation
of the Pressureless Cooker is normally purchased
with it, please refer to the respective manual for
guidance.
1.2 BASIC FUNCTIONING
The Model ST-10 may be operated with only one
compartment in use; or both may be used simultaneously. Each compartment is equipped with
identical controls, allowing selection of constant
steam or 60-minute timer operation. The cooker
becomes operational when it is set to constant
steam, or the timer is set at the desired cooking
time and the compartment door is closed. The
indicator light comes on and the steam solenoid
valve opens, allowing steam to ow into the compartment.
Steam emitted from the compartment along with
liquid cooking drainage is directed through a drain
screen inside the compartment into the cooker
drain line. A cold water solenoid valve connected
into the cooker drain line is automatically actuated
by a thermostatic switch in the boiler drain to condense the steam to water prior to discharge into
the boiler drain.
1.3 SERVICE
Required service, both preventive and corrective,
is explained in Section 6. Should repairs be required, a network of authorized agencies is available to assist with prompt service. A current Directory of Authorized
Service Agencies may be obtained by contacting:
Product Service Department
Market Forge
35 Garvey Street
Everett, Massachusetts 02149
Telephone (617) 387-4100
The model and serial numbers must be referenced
when corresponding with Market Forge. The data
plate containing the serial number pertaining to
the equipment is located on the lower front trim of
the cabinet.
When steam owing inside the compartment has
raised the interior temperature to 195°F, the contacts of a thermostatic switch automatically close,
completing the circuit to the timer motor and starting the cooking time period. At the end of the
set interval, timer contacts switch to shut off the
cooking operation and sound a signal buzzer. The
buzzer is silenced by returning the timer dial to the
OFF position. In the constant steam mode, operation will be continuous.
1

SECTION 2. INSTALLATION
2.1 ASSEMBLY
The Pressureless Cooker is factory-mounted on
a cabinet base containing either a steam boiler or
direct steam connection controls for the cooker.
The assembled unit is shipped bolted to a skid,
with cabinet feet in a separate container. Steps
required for assembly are as follows:
Remove the four bolts that fasten the equip-
1.
ment frame to the skid.
Install feet in threaded mounting locations of
2.
the cabinet frame.
Mount the two bafes on studs located on the
3.
rightinside of the cooking compartments.
Mount the four pan support racks in brack-
4.
ets inside control compartments.
Attach panels to lower cabinet. Detailed in-
5.
structions are enclosed with the panels.
Attach the drip trough on studs located on
6.
the face of the unit.
2.2 SETTING IN PLACE
The location of installation must be under an exhaust hood, which will remove small amounts of
water vapor emitted when the cooker doors are
opened, and exhaust fumes from the air. Level the
unit in nal location by turning the adjustable feet.
Using the cabinet top as a reference, obtain level
adjustment left-to-right and front-to-back.
2.3 MECHANICAL CONNECTIONS
Since the Pressureless Cooker is interconnected
at the factory to the steam boiler or direct steam
plumbing, no eld connections to the cooker are
required. All electrical and plumbing connections
are routed to the steam boiler cabinet through the
6-inch-high space between the oor and the bottom edge of the cabinet frame. Connection locations for the cooker mounted on steam boilers of
electric, gas, and steam coil utility and direct-connected steam are shown in separate installation
instructions for each.
2.4 WATER CONNECTIONS
Before connecting water to this unit, have water
supply analyzed to make sure that hardness is
no grater than 2.0 grains per gallon and pH level
is within the range of 7.0–8.5. Water that fails to
meet these standards should be treated by the installation of a water conditioner.
EQUIPMENT FAILURE CAUSED BY
INADEQUATE WATER QUALITY IS NOT
COVERED UNDER WARRANTY.
CAUTION
PVC or CPVC are not acceptable materials
for drains.
2.5 INSTALLATION CHECK-OUT
Check-out procedures for the cooker mounted on
steam boilers of electric, gas, and steam coil utility
or direct-connected steam are given in separate
installation instructions for each. Procedures for
the cooker only are included in Subsection 2.4.2.
If the cooker fails to perform as described, consult Table 5-1 of the Trouble-Shooting Guide for
corrective action. If difculty arises with the boiler,
reference the separate service and parts manual
for that equipment.
Before making this check-out, the operator must
be thoroughly familiar with the operating procedures in Section 3 and with the function of each
control described in Table 3-1. Reference Figure
3-1 for identication of controls required in the following procedures.
2.5.1 INITIAL CONTROL SETTINGS
Before beginning the start-up procedures for the
cooker, the instruction plate and service manual
for the steam boiler must be consulted and all
start-up procedures completed to supply 15 PSI
steam to the steam inlet line for the cooker.
All steam boiler controls are in the operat-
1.
ing mode and 15 PSI steam is applied to the
cooker inlet plumbing.
Cooker timers for both compartments (Fig-
2.
ure 3-1) are in the OFF position.
Cooker compartments are empty of all infor-
3.
mation materials, pan supports are mounted
in place, and doors are open.
2

SECTION 2. INSTALLATION
2.5.2 COOKER CHECK-OUT
The cooker check-out procedures are as follows:
With the doors open set timers to about the
1.
“4-minute” position. Observe that indicator
lights are off and steam does not enter compartments.
Close cooker compartment doors. Observe
2.
that indicator lights turn on, and steam can
be heard rushing into the compartment simultaneously with the door closing.
Observe the boiler drain line for passage
3.
of steam into the open oor drain. Correct
steam condenser operation is evidenced
by presence of water owing from the drain
line.
Observe cooker operation for several min-
4.
utes. Operation is correct if timer dials begin
to rotate after a short delay period required
for preheating. After the delay period plus
the “4-minute” initial setting, the timer dials
will return to the “0-Minute” position, at which
a buzzer sounds. The buzzer is silenced by
turning the dial to the OFF position.
2.5.3 SHUT-DOWN PROCEDURE
No shut-down procedure is required for the Pressureless Cooker except to check that all timer dials (2) are in the OFF position and the compartment doors are open. Consult the steam boiler
instruction plate and complete the shut-down procedures for the boiler.
sliding the panel down.
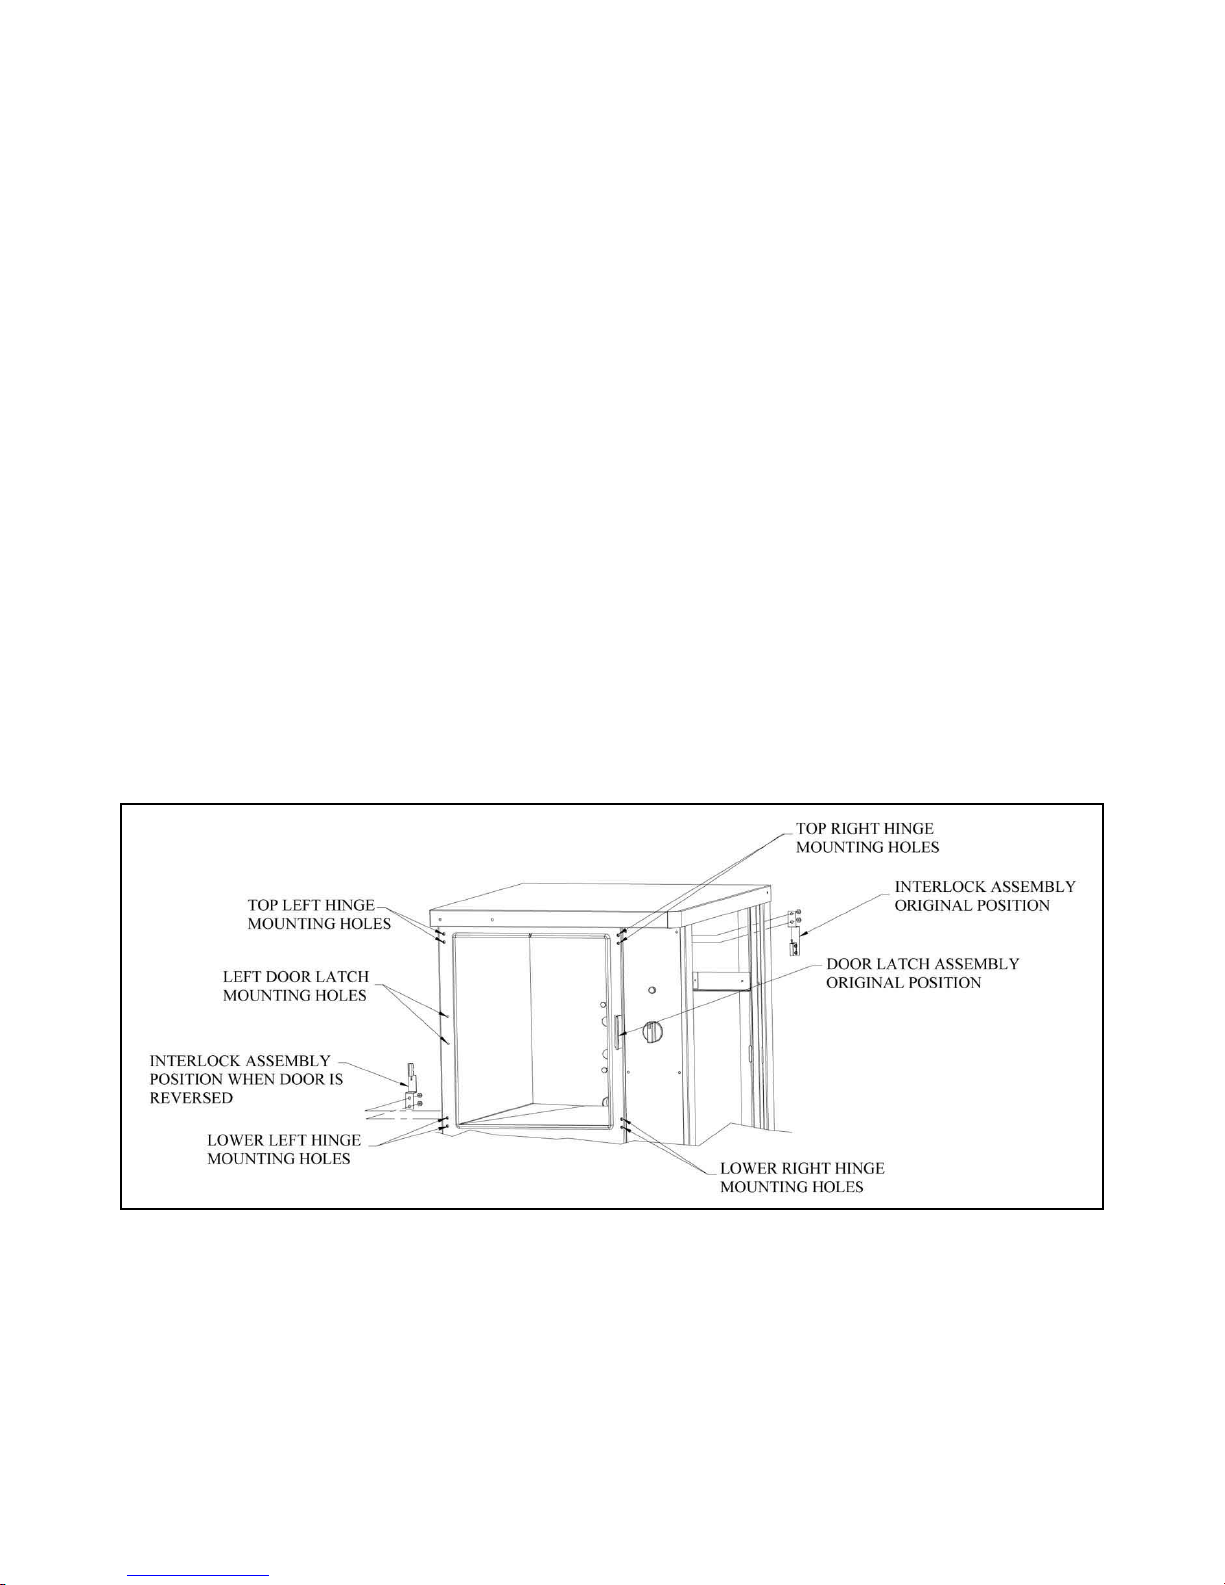
Remove the door interlock assembly by un-
7.
screwing the two nuts that hold it in place
(assembly is attached to the screws in the top
right hinge mounting holes, see g. 2-1).
Remove the four screws in the right side
8.
hinge mounting holes and install them in the
left side hinge mounting holes (where the
hinges were originally mounted).
Using the nuts removed in step #6, rein-
9.
stall the door interlock assembly onto the
2 screws in the lower left hinge mounting
holes (see g. 2-1) with by moving the assembly over the cooking cavity to the other
side of the unit. Rotate the door interlock
assembly 180° for installation, so that the
switch is now facing up.
Reinstall the top hinge and screws into the
10.
right lower hinge mounting holes. Rotate
the hinge 180° for installation, so that the
pin which the door rides on is now facing
up. The hinge must be rotated because it
will now function as the bottom hinge. DO
NOT COMPLETELY TIGHTEN THE HINGE
MOUNTING SCREWS YET. These will be
used later for adjusting the door.
Remove the door latch assembly from the
11.
face of the unit. The 2 nuts mounting the
door latch are located behind the face of the
unit and must be accessed where the right
side panel was removed.
2.6 REVERSING THE DOORS
The Pressureless Steam Cooker has a reversible
cooking compartment door. This section contains
instructions
for reversing this door.
Turn off power to the unit.
1.
Open the cooking compartment door
2.
Remove the two screws that attach the top
3.
hinge to the front of the unit.
Slide the door upwards, off the bottom
4.
hinge.
Remove the two screws that attach the bot-
5.
tom hinge to the front of the units.
Remove the right and left side panels by
6.
unscrewing the 1 screw on each panel and
Remove the two white hole plugs from the
12.
left door latch mounting holes, and insert
them into the right door latch mounting holes
(where the door latch assembly was originally mounted).
Rotate the door latch assembly 180°, and in-
13.
stall into the left door latch mounting holes.
NOTE: Each stud on the latch assembly
should have a plastic washer, a spring, a
plastic washer and a Nyloc type nut.
To adjust the tension of the door latch, tighten
14.
both nuts down until the springs are fully compressed, then back each nut off -1/2 turn.
Rotate the door 180° for mounting.
15.
Slide the remaining hinge into the top door
16.
bearing.
3
SECTION 2. INSTALLATION
Slide the door and hinge assembly down onto the hinge which you have already mounted to the
17.
front of the unit. Use the two screws to mount the top hinge into the right upper hinge mounting
holes. DO NOT COMPLETELY TIGHTEN THE HINGE MOUNTING SCREWS YET.
Slowly push the cooking compartment door closed until it is latched.
18.
The cooking compartment door can now be raised, lowered, and/or rotated into position by bump-
19.
ing it with the palm of your hand or by using a small rubber mallet.
First, check the alignment at the front of the door by making sure that the striker in the door is
20.
centered with the latch mechanism on the front of the unit.
Square the door to the unit by raising or lowering the hinge side of the door, keeping the latch
21.
centered with the striker.
Visually inspect the door. Be sure that the door is square to the unit, the striker is centered with
22.
the latch, and the gasket is in contact with the entire lip of the cooking compartment.
Gently open the cooking compartment door, taking care not to move it out of position.
23.
Tighten all 4 door hinge bracket mounting screws.
24.
Close and visually inspect the door again, as described in step 22.
25.
Reinstall the left and right side panels, using the screws for each panel.
26.
Figure 2-1 Typical Door Layout
4

SECTION 3. OPERATION
3.1 OPERATING CONTROLS & INDICATORS
The controls and indicators required to operate
the Pressureless Steam Cooker are listed in Table
3-1, together with a short functional description of
each. Figure 3-1 shows the physical location of
each control and indicator.
3.2 OPERATING PROCEDURES
The ST-10 Pressureless Steam Cooker defrosts
frozen foods and cooks fresh and defrosted foods.
Each cooking compartment permits selection of
continuous (constant steam) cooking or timed
(0–60 minutes) cooking. Instructions for operation
are included in this section. Consult Test Kitchen
Bulletin for detailed cooking information.
3.2.1 STEAM SOURCE OPERATION
The Pressureless Cooker is supplied mounted on
a cabinet containing either a steam boiler or controls for direct-connected steam. Manual controls
are accessed by opening the cabinet door. The
start-up procedure for the steam source is completed once before each daily operating period
of the cooker. (For steam boilers, see instruction
plate.)
3.2.2 PREHEATING
Before each initial operation of the cooker, and at
any other time when the cooking compartment is
cold, a 1-minute preheating period is required. To
preheat the cooker, put steam source into operation and proceed as follows:
Close cooking compartment door.
1.
Set 60-Minute Timer Dial (1) to “1-minute”
2.
setting. NOTE Total elapsed preheating
time equals the timer setting plus a short delay period needed to active a thermostatic
switch included in the controls.
Turn off buzzer, which sounds to indicate
3.
cooking is complete, by setting the Timer
Dial (1) to OFF position.
Close cooking compartment door.
2.
Set timer cooking time:
3.
CONSTANT STEAM—for continuous
a.
cooking.
60-MINUTE TIMER—for timed cooking.
b.
Set appropriate timer to the required cook-
4.
ing time (see Test Kitchen Bulletin #59).
Turn off buzzer, which sounds to indicate
5.
cooking is complete, by setting timer dial (1)
to the OFF position.
Open door sightly at rst letting most of the
6.
steam out of the compartment and then fully
open the door.
Unload by sliding pans of food from pan
7.
supports, taking care to avoid hitting compartment opening.
3.2.4 SHUT-DOWN PROCEDURE
No shut-down procedure is required for the cooker
except to check that both timer dials (1) are in the
OFF position and that both compartment doors
are open. When all cooking has been completed
for the day, the steam source must be shut off.
(For steam boilers, see instruction plate.)
CAUTION:
When the unit is not in use, leave the
cooking compartment door slightly ajar
to prolong the life of the door gasket.
3.3 CLEANING
After each period of daily operation (more frequently as required to maintain cleanliness), the
cooker should be thoroughly cleaned by completing the following steps:
Remove left- and right-side pan supports,
1.
bafes, and drain screens by lifting up and
off mounting studs. Wash with a mild detergent. Rinse and set aside for reassembly.
3.2.3 COOKING
Before loading the cooker, be sure compartment
is hot. See Subsection 3.2.2 for preheating instructions.
Slide pans of food into cooking compartment
1.
pan supports.
Wash cooking compartment interior using
2.
a mild detergent and water. Rinse and dry
thoroughly.
Replace pan supports, bafes, and drain
3.
screens in compartment and leave door
open.
5
SECTION 3. OPERATION
0
S
T
E
A
M
5
10
15
20
25
30
35
40
45
50
55
60
C
O
N
S
T
A
N
T
O
F
F
0
S
T
E
A
M
5
10
15
20
25
30
35
40
45
50
55
60
C
O
N
S
T
A
N
T
O
F
F
1
1
2
2
ST-10
CONVECTION
STEAM
COOKER
READY
READY
3.4 DRAINAGE
3.4.1 COOKING COMPARTMENT DRAINAGE
The bottom of the cooking compartment is angled
slightly toward the rear of the unit. This assures
that any condensate build-up or spills will be directed toward the drain hole, which is located at
the rear bottom center of the cooking compartment. Any liquid exiting the cooking compartment
runs down the cooking compartment drain tube
and into the drain line.
3.4.2 DRIP/SPILL TROUGH DRAINAGE
The ST-10 Pressureless Steam Cooker has a
drip/ spill trough below the cooking compartment
door. It will catch any condensate gathering on the
front of the unit when the door is opened.
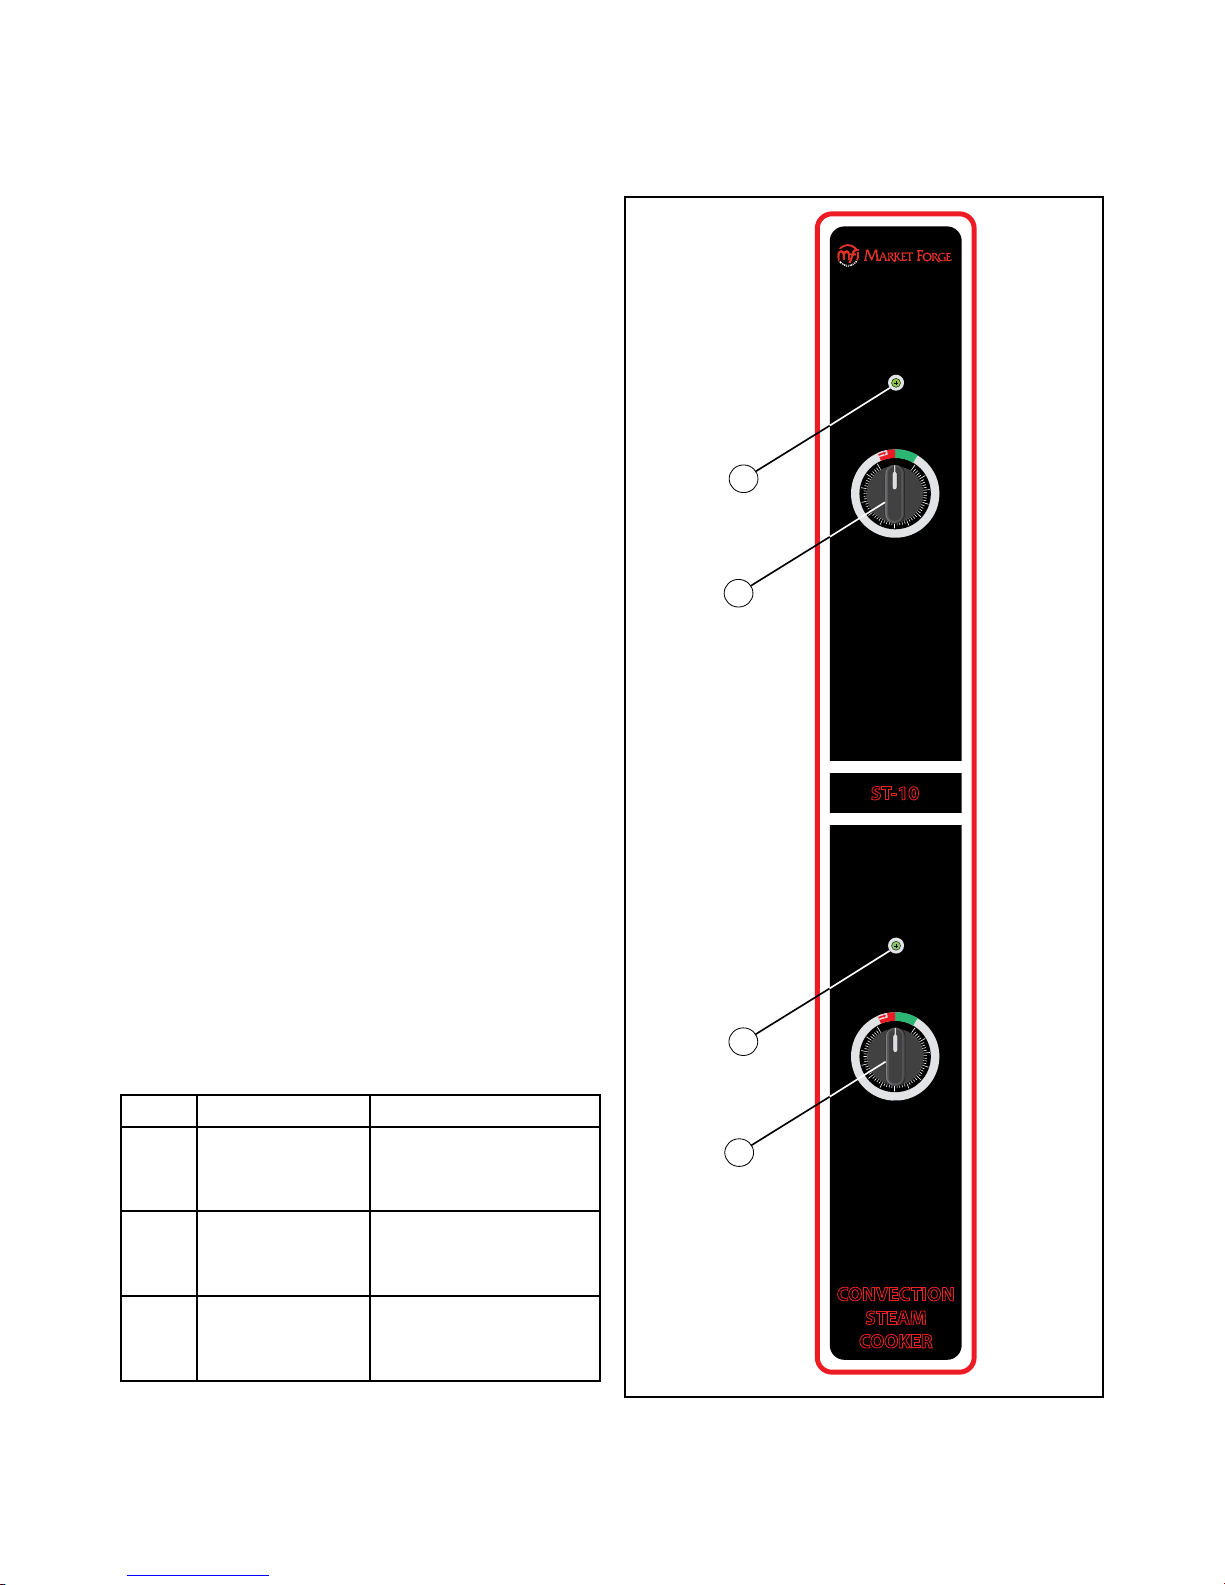
TABLE 3-1
CONTROLS AND INDICATORS
(See Figure 3-1)
REF. DESCRIPTION FUNCTION
1 Timer/Constant
Steam
2 Indicator Light
(Red)
Controls cooking up
to 60 minutes or uses
constant operation.
Indicates when lit
that cooker is in
operation.
3 Buzzer Signals end of
cooking period
(not shown).
Figure 3-1 Controls and Indicators
6
SECTION 3. OPERATION
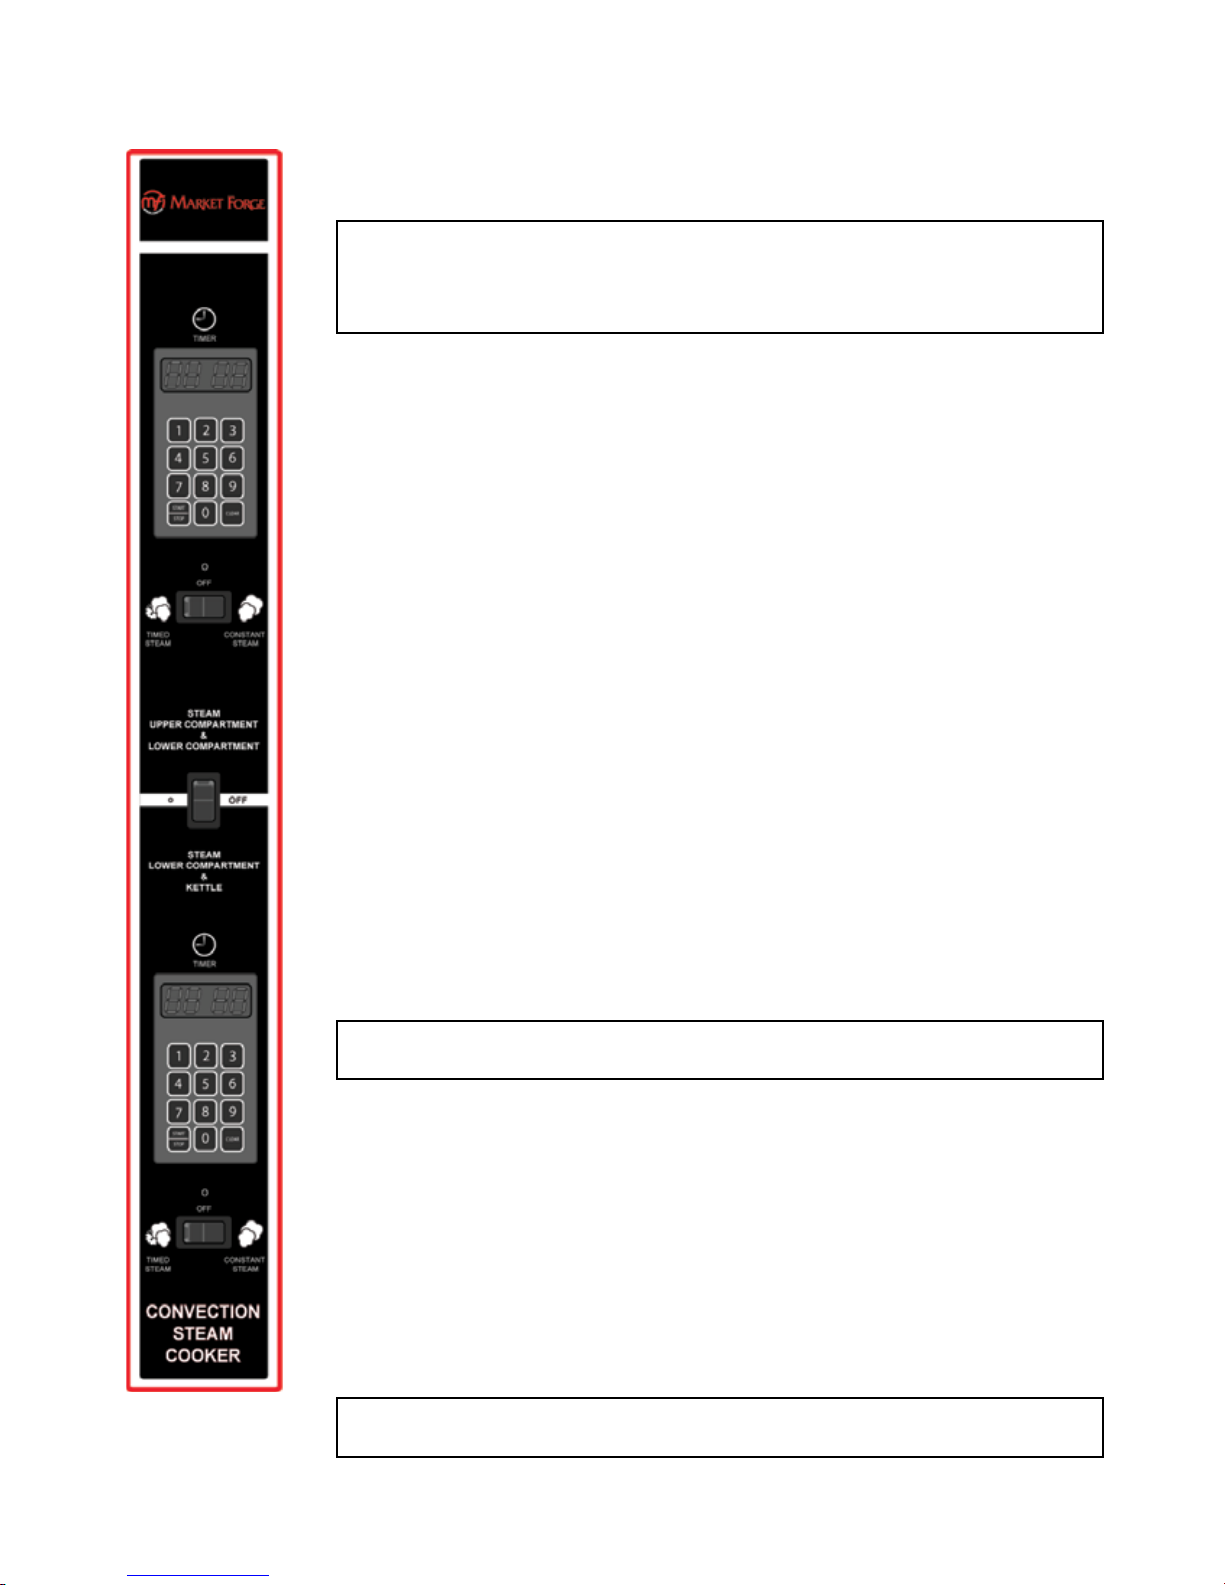
DIGITAL CONTROL PANEL
NOTE:
USER PROGRAMING OF THE TIMER CYCLE IS EASILY ACCOMPLISHED
VIA A (12) BUTTON NUMERIC KEYPAD AND A (4) DIGIT NUMERIC LED
DISPLAY. CONTROL
START PROGRAMING:
FIRST: Make sure doors are shut on both compartments.
SECOND: Flip on POWER SWITCH, located in the middle of control panel
to the ON position.
THIRD: Press the CLEAR button and HOLD for two (2) seconds. This
should clear the timer display to 00:00.
THE TIMER IS NOW READY FOR PROGRAMING. The timers are programmable from one second to 99 minutes and 99 seconds.
PLEASE NOTE: TIMER WILL NOT START COUNTING DOWN UNLESS:
1) DOOR IS SHUT.
2) THE THERMOSTAT REACHES 193oF INSIDE THE
COMPARTMENT.
When the timer reaches “0” the word “END” will ash on the display. The
AUTO-ALARM will sound and continue until the START/STOP button is
pressed.
When you press STOP, the existing program remains in the system. It is necessary to press CLEAR, then RE-PROGRAM the new time as needed.
NOTE: To STOP the TIMER in MID-COUNT DOWN, PRESS and HOLD the
STOP button for a few seconds.
The word “PAUSE” will appear on the screen every time the door is opened.
When the door is closed, the timer will resume the count down.
FEATURES:
1) FOUR DIGIT DISPLAY – Example 00:00
2) AUTO ALERT = End of cycle sound.
3) “END” = Displayed at the end of cycle.
4) “PAUSE” = Displayed when doors are opened.
5) START/STOP = Control Button for start and stopping.
6) POWER SWITCH = Turn power ON and OFF.
Fig. 2 Digital
Control Panel
NOTE: Unit is equipped with MANUAL OVERRIDE in the event of a TIMER
FAILURE (CONSTANT STEAM).
6A

SECTION 3. OPERATION
3.5 TEST KITCHEN BULLETIN
Model ST-10 Pressureless Cooker
Facts On Parade
Frozen vegetables should always be cooked in perforated 12” x 20” x 2-1/2” pans 7-1/2 lbs (34kg)
1.
maximum per pan.
Frozen entrees should be underlined with a perforated pan for best results. If they are defrosted
2.
rst, the heating time will be decreased.
Fresh foods may also be cooked in this unit. Vegetables and other foods where the stock is not
3.
to be retained should be cooked in perforated 12” x 20” x 2-1/2” pans for the most nutritious results.
There is a thermostatic time delay built into this unit which adapts the unit to the proper cooking
4.
time. This means that the total time will usually be longer than the time setting.
There is a safety microswitch on the door which shuts off the steam each time the door is opened
5.
if the unit is in the cooking cycle.
Both compartments may be lled and timers set simultaneously.
6.
Total cooking time will vary depending on the load, even though the timer setting is the same.
7.
All foods, except cakes and pastry, can be cooked in a steam cooking unit.
8.
Steam cooked meals have greater nutritional value since they retain most of their vitamins and
9.
minerals.
Because foods are cooked faster by the higher temperatures of steam cooking, they can be pre-
10.
pared closer to serving time, insuring maximum freshness.
Steam cooked foods have a higher percent yield more portions per dollar spent.
11.
Food may be served from the same pan in which it is steam cooked, thus reducing food breakage
12.
since there is no extra handling or transferring of food from cooking pans to serving pans. It also
reduces pot washing tasks.
Some important advantages of steam cooking are labor saving, reduced operating costs, space
13.
saving, and the lifting of heavy stock pots is eliminated.
Rice and spaghetti products, if thoroughly wet at the start of the cooking process, are very easily
14.
prepared.
Food such as potatoes, poultry, seafood, and some meats may be blanched in the steam cooker,
15.
thus reducing the total cooking time and grease absorption.
Fuel is used only when the steam cooking unit is in operation.
16.
The steam cooker will loosen foods burned on pans making washing easier.
17.
Solid pans are recommended when liquid is to be retained and perforated pans when the liquid
18.
is not to be retained.
Eggs may be cooked out of the shell if they are to be chopped which eliminates peeling after
19.
steaming.
The steam cooker can be opened during the cooking period to add or remove items. If any time
20.
is lost, and adjustment may be make on the timer.
Steam cooking information, including recommended pan size and type, weight per pan, cooking
21.
times and pan yields are given on the following pages of this bulletin.
7

SECTION 3. OPERATION
The ST-10 Pressureless Cooker is a two compartment unit. Each compartment holds ve 12” x 20” x 2-1/2” or three 12” x 20”
x 4” pans. This unit enables the cook to prepare foods close to the time of service. The cooking ntimes given are timer settings
and should be set on a preheated compartment. There is a thermostatic time delay in each compartment that adjusts the total
time depending on the temperature and amount of the food. Therefore the total time will be greater than the timer setting. At
the end of the timer cooking cycle the bell will ring, steam will stop owing and the food can be removed.
FROZEN VEGETABLES
APPROX.
FROZEN
WEIGHT PER
ITEM
Asparagus,
Spears
Beans, Green
Regular
Beans, Green
French Cut
Beans,
Lima
Broccoli 6 2.7 2.5 65 1-3 4-6 25 3 85
Brussel Sprouts 7.5 3.4 2.5 65 1-3 10-15 30 3 85
PAN
lbs. kg Inches mm Servings oz. g
7.5 3.4 2.5 65 1-3 12-15 30 3 85
6 2.7 2.5 65 1-3 10-15 25 3 85
6 2.7 2.5 65 1-3 5-7 25 3 85
7.5 3.4 2.5 65 1-3 12-15 30 3 85
RECOMMENDED
12” x 20” (1/1)
PERFORATED
PAN
NO. OF
PANS
TIMER
SETTINGS IN
MINUTES
APPROX. NO.
COOKED
SERVINGS
PER PAN
Carrots 6 2.7 2.5 65 1-3 10-15 25 3 85
Cauliower 6 2.7 2.5 65 1-3 7-12 25 3 85
Corn,
Cut
Mixed,
Vegetables
Peas,
Loose
Spinach 9 4 2.5 65 1-3 Must be Defrosted 30 4 115
Squash 12 5.4 2.5 65 1-3 Must be Defrosted 50 3 85
FROZEN PREPARED ENTREES
ITEM
Lobster Tails,
6-8oz. (170-255g)
Shrimp,
C.D.P.
Shrimp,
Green
Bulk Pack,
Frozen
Bulk Pack,
Defrosted
7.5 3.4 2.5 65 1-3 8-12 30 3 85
7.5 3.4 2.5 65 1-3 8-12 30 3 85
7.5 3.4 2.5 65 1-3 3-5 30 3 85
RECOMMENDED
12” x 20” (1/1)
WEIGHT
PER PAN
lbs. kg Inches mm Servings oz. g
7-8 3.2-3.6 2.5 65 1-3 15-25 15 6 170
16-20 7-9 2.5 65 1-3 8-11 75 3 85
16-20 7-9 2.5 65 1-3 11-15 50 3 85
3.5-4 1.6-1.8 2.5 65 1-3 35-45 10 6 170
3.5-4 1.6-1.8 2.5 65 1-3 25-35 10 6 170
PERFORATED
PAN
NO. OF
PANS
TIMER
SETTINGS IN
MINUTES
APPROX. NO.
COOKED
SERVINGS
PER PAN
8
 Loading...