

Page 1

1
TM
UNITY 2
Air Server Series 2 Operators
Manual
Version 1.0
February 2008
1. Introduction to the Air Server Accessory for UNITY 2 ............................................................2
1.1. Summary of Operation ...............................................................................................2
2. Developing a UNITY 2-Air Server method for whole air / gas analysis .....................................3
2.1. UNITY 2-Air Server method ........................................................................................3
2.2. Setting the carrier gas type ........................................................................................3
2.3. Parameters for on-line mode methods .........................................................................4
2.4. On-line methods .......................................................................................................6
3. Automatic sequencing of whole-air / gas analyses ................................................................7
3.1. Performing analyses ..................................................................................................7
3.2. Using the sequence builder and creating sequences of runs ............................................7
3.3. Setting up your first sequence ....................................................................................8
3.3.1. Editing individual lines in a sequence ....................................................................9
3.3.2. Recycling sequences ......................................................................................... 10
3.4. Running the sequence..............................................................................................10
3.5. Starting at a predefined date and time .......................................................................11
3.6. Stopping a sequence................................................................................................ 12
Air Server Series 2 Operators Manual
Page 2

2
1. Introduction to the Air Server Accessory for UNITY 2
The UNITY 2 Thermal Desorber normally requires sample introduction by means of a standard
sample tube. This could be a sorbent tube (used for diffusive or pumped sampling) or an empty tube
into which solid or liquid samples are weighed for direct desorption. The Air Server accessory
connects to UNITY 2 and extends the compatible sample range to include whole air / gas samples
e.g. continuous monitoring of air / gas streams or samples collected in whole-air containers such as
canisters or Tedlar bags. Tubes can still be desorbed using a UNITY 2 configured with the Air Server
accessory.
The Air Server contains appropriate inert switching valves and link tubing to interface the accessory
to UNITY 2. The Air Server is controlled via the UNITY 2 software. It features selection between three
(or eight) inlet ports as standard, using inert, PTFE-body solenoids, and is compatible with gas-phase
samples ranging in pressure from sub-atmospheric to 50 psig. Three ports are commonly used for
sample, calibrant and zero gas streams, but could just as easily be used for three (eight) different
samples.
1.1. Summary of Operation
The gas stream selected is directed out of the Air Server accessory (via the dryer - if one is fitted)
and into the UNITY 2 cold trap via the Link tube. During this ‘sampling phase’, UNITY 2’s cold trap is
electrically cooled and volatiles from acetylene to n-C14 can be quantitatively sampled and retained.
The sample / standard gas, once stripped of its target VOCs, exits through the desorb flow vent and
is directed to the ‘flow in’ port of the electronic mass flow controller on UNITY 2. It is not possible to
split during sampling. Set and actual sampling flows are displayed via the UNITY 2 software.
If the sample / standard gas is pressurised (>10 psi), the flow through the entire UNITY 2-Air Server
system is driven by this pressure. However if the sample is at low (<10 psi), atmospheric or just
below atmospheric pressure, a pump (
through the system.
Note: the flow controller and the optional pump are located downstream of the cold trap and thus
do not come into contact with the sample prior to trapping.
At the end of sampling and after a purge of carrier gas to eliminate air from the trap, the UNITY 2
focusing trap heats in the normal way, transferring compounds of interest to the analytical system
and triggering the measurement cycle. The outlet split at this point may be entered in the software
and is controlled by the mass flow controller. Collection of the next sample can begin, if required, as
soon as the cold trap has re-equilibrated at its trapping temperature.
The UNITY 2-Air Server sequence of operation is as follows:
1. Standby
2. Leak test (optional)
3. Pressure release
4. Pre-purge
5. Sampling
6. Line purge
7. Trap purge
8. Trap fire
U-ASPM1 / U-ASPM2
) is required to ‘pull’ the gas-phase sample
Air Server Series 2 Operators Manual
Page 3
3
Key Air Server applications include: -
Continuous on-line measurement of C2 to C10 hydrocarbons in ambient air using UNITY 2-Air
Server with GC-FID
Process monitoring of trace level volatiles in CO2 using UNITY 2-Air Server with process MS
Process monitoring of aroma during food and beverage production using UNITY 2 Air Server
combined with electronic nose technology
2. Developing a UNITY 2-Air Server method for whole air /
gas analysis
2.1. UNITY 2-Air Server method
Once the software has been downloaded to the Air Server, the only operating mode available will be
On Line Air and an on-line sampling method is displayed. The system is now ready for use with
whole-air samples or for continuous on-line monitoring of air or gas streams.
2.2. Setting the carrier gas type
Under the ‘View’ menu select ‘Options’ and then ‘Gas’.
Access the carrier gas selection by clicking on the box with the small arrow to the right of the
gas type.
The three carrier gas options - He, H2 and N2 - will then be displayed.
Air Server Series 2 Operators Manual
Page 4

4
Click on the desired gas and then click on the ‘OK’ button to select and set the carrier gas
type.
2.3. Parameters for on-line mode methods
All on-line method parameters (except Sample Gas and Sample Channel) are accessed and
changed in the same way as tube desorption method parameters in other method modes - see the
UNITY 2 operators manual.
This section of the manual only covers those parameters which differ from those used in standard
tube desorption methods. For common parameters, such as the flow path temperature, reference is
made to the relevant sections of the main UNITY 2 operators manual.
Split on in standby: This is the same parameter used in tube desorption methods (see the UNITY 2
operators manual) except that, in on-line mode the flow through the split in standby is controlled by
the electronic mass flow controller. The flow range is from 5-100 ml/min and may be set as required.
Leak test: Given that UNITY 2-Air Server systems are commonly used in a continuous or semicontinuous sequence by recycling or linking methods and given that there is no need to break into
the sample flow path by using the lever mechanism to change a tube between samples, the leak test
is optional in on-line mode.
However, if a sequence of air analyses is to be run in on-line mode and with the leak test deselected, it is recommended that an initial leak test be carried out to check system integrity before
initiating the series of runs.
To do this, first set up the run with ‘leak test’ selected - i.e. check the appropriate box.
Ensure that the UNITY 2 to Air Server Link tube is properly located in the desorption oven
with the lever mechanism fully down.
Initiate the run using the ‘Start run’ command. Watch as the instrument performs the
complete leak test. If the leak test is successful, stop the run immediately as described in the
main UNITY 2 operators manual.
The on-line mode method can then be modified to de-select the leak test before running the
sequence of samples. Save the method at this stage.
If the leak test is not successful, re-check the seal of the UASL link tube and all the
connections between UNITY 2 and the Air Server.
Pressure release: The Air Server can be used to sample using a pump or directly from a
pressurised container. In standby, the UNITY 2 trap and internal flow path is at the pressure of the
column. In the case of a pressurised source, if the carrier gas pressure is greater then the pressure
of the sample, then carrier gas will flow into the container when the sequence enters pre -purge. In
order to avoid dilution of the sample with carrier gas the pressure of the UNITY 2 flow path is first
reduced by venting carrier gas through the split line prior to opening any sampling valves. The
duration of this vent is set in the View >Options>Sequence section of the UNITY 2 software
Air Server Series 2 Operators Manual
Page 5

5
Note: The default value is 0.3, values greater than this may be required particularly if sampling from
very low-pressure source such as tedlar bags.
Prepurge time: Range 0.0 to 99.9 minutes selectable in 0.1 minute increments.
This ensures that the UNITY-Air Server flow path and individual sample lines leading up to the Air
Server are swept with the current sample before sample collection. This allows accurate metering of
a volume of sample during the sample collection phase without either contamination from previous
samples or dilution by carrier gas. The mass flow controller controls the pre-sample purge flow to
that set for sampling. The pre-sample purge flow is all directed down the split line. None of the gas is
allowed to pass into the cold trap.
Trap purge time: Range 0.2 to 99.9 minutes selectable in 0.1 minute increments.
This relates to the post sampling purge of the sampling lines and cold trap with carrier gas before the
trap is desorbed. It is analogous to the ambient temperature purge of the tube before desorption
(see the UNITY 2 operators manual). The Air Server and UNITY 2 sweep the internal sample flow
path (including the dryer, if fitted) out of the split, for the first 80% of the trap purge time, thus
ensuring that the metered volume of sample collected on the cold trap is not added to. During the
remaining 20%, the carrier gas is switched to flow entirely through the cold trap and eliminate air
before the trap is heated.
Note: By careful adjustment of the cold trap sorbents, purge volume and cold trap temperature it is
also often possible to use the trap purge to selectively eliminate water and / or solvents without
losing compounds of interest.
Air Server Series 2 Operators Manual
Page 6

6
Trap purge flow: Range 5-100 ml/min.
This determines the flow rate of carrier gas during the trap purge procedure above.
Check boxes for dryer: If a dryer is installed on the back of the Air Server, ‘Dryer On’ must be
selected in the method by checking the appropriate box.
Note: Failure to do this will lead to sample passing into the membrane dryer without the counter
flow of dry air / nitrogen being actuated. This can cause contamination of the dryer.
The dryer will not function without the appropriate hardware being installed.
Sample time: Range 0.0 to 999.9 minutes selectable in 0.1 increments. After the leak test (if
selected) and after the pre-sample purge, the flow of sample air / gas is directed to the electricallycooled trap of UNITY 2 for the time set as ‘sample time’.
Flow rate: Range 5-100 ml/min. This determines the flow of sample air / gas into the cold trap for
the sampling time. It is controlled by the mass flow controller on UNITY 2 and is independent of the
pressure of the sample. During sampling the actual flow will be displayed in the System Status box
of UNITY 2 software.
GC Cycle time: Entry of GC cycle time allows collection of the next sample to overlap the analysis of
the previous sample. The cycle time should equal the sum of times of all the different phases of
analyser operation – for example GC run time, cool down and equilibration. In the case of on-line
mode operation, UNITY 2 software uses the cycle time parameter to calculate when collection of the
next sample can begin such that the cold trap will be ready to desorb just after the analyser is ready
for the next injection.
Note: If sampling delays and intervals are set in the “Automation Window” then the GC cycle
time should be set to 0.1 minutes to avoid any interference with automated sampling times.
Further Notes:
• Splitting is not available during the on-line sampling phase.
• As with tube desorption methods, the status of the flow path in on-line mode can be displayed
schematically on the PC screen at all times. This facility is accessed as described in the UNITY 2
users manual.
Split flow during trap heat: Range 5-100 ml/min. It is possible to split the sample as it desorbs
during trap heat. In this case, the carrier gas head pressure drives the flow of carrier gas through
the hot trap and determines the flow to the analyser(s). The flow to the split vent and, consequently
the split ratio, is determined by the split flow setting and is controlled by the mass flow controller.
Note: Other cold trap parameters are as described for tube desorption methods - see the UNITY 2
operators manual.
2.4. On-line methods
Once an on-line mode method has been generated it is treated in the same way as one of the tube
desorption methods with respect to ‘controlling’ system operation, storage, recall and method linking
- see the UNITY 2 operators manual.
Air Server Series 2 Operators Manual
Page 7

7
3. Automatic sequencing of whole-air / gas analyses
3.1. Performing analyses
The UNITY 2-Air Server system runs in a fashion analogous to that of the automated UNITY 2-U
system, in that the Automation Window provides the top level control for running the instrument.
The Automation Window allows the user the freedom to run a single method or a complex sequence
of timed analyses with minimal effort.
3.2. Using the sequence builder and creating sequences of runs
Sequences are made up of sets with each set being a series of analyses. When a set is first created it
is a rapid and convenient tool for associating a defined number of analyses with a specific method
and sample channel. However, once created, sets may be modified to contain any combination of
methods and / or sample channels. Sequences containing complex sets may be saved for use at a
later date.
Sequences and sets are created and / or amended via the Automation Window which appears by
default in Air Server mode. When the software is set up to run in Air Server mode for the first time, a
default sequence with one set of ten runs is created. Right clicking with the mouse anywhere within
the "Sequence Builder" section of the Automation Window will bring up the contextual menu for
the sequence builder.
LTR
A
Note: These options can also be accessed by selecting the ‘Automation’ menu.
The contextual menu contains six items:
New Sequence Creates a new blank sequence in a new Automation
Window.
Open Sequence Opens the File Open dialogue to allow a previously saved
sequence to be opened in a new Automation Window.
Add Sequence Opens the File Open dialogue to allow a previously saved
sequence to be appended to the end of the current
sequence.
Add New Set Opens the Add New Set dialogue (see Section 3.3) and once
the new set has been defined it is appended to the next
available row in the sequence.
Add Sample Adds a single sample to a set within a sequence (only
available once a Set has been expanded by clicking on the
plus (+) sign located to the left of the Set name).
Delete Item Deletes the selected row - this may also be performed by
pressing the Delete button on your keyboard.
Air Server Series 2 Operators Manual
Page 8

8
3.3. Setting up your first sequence
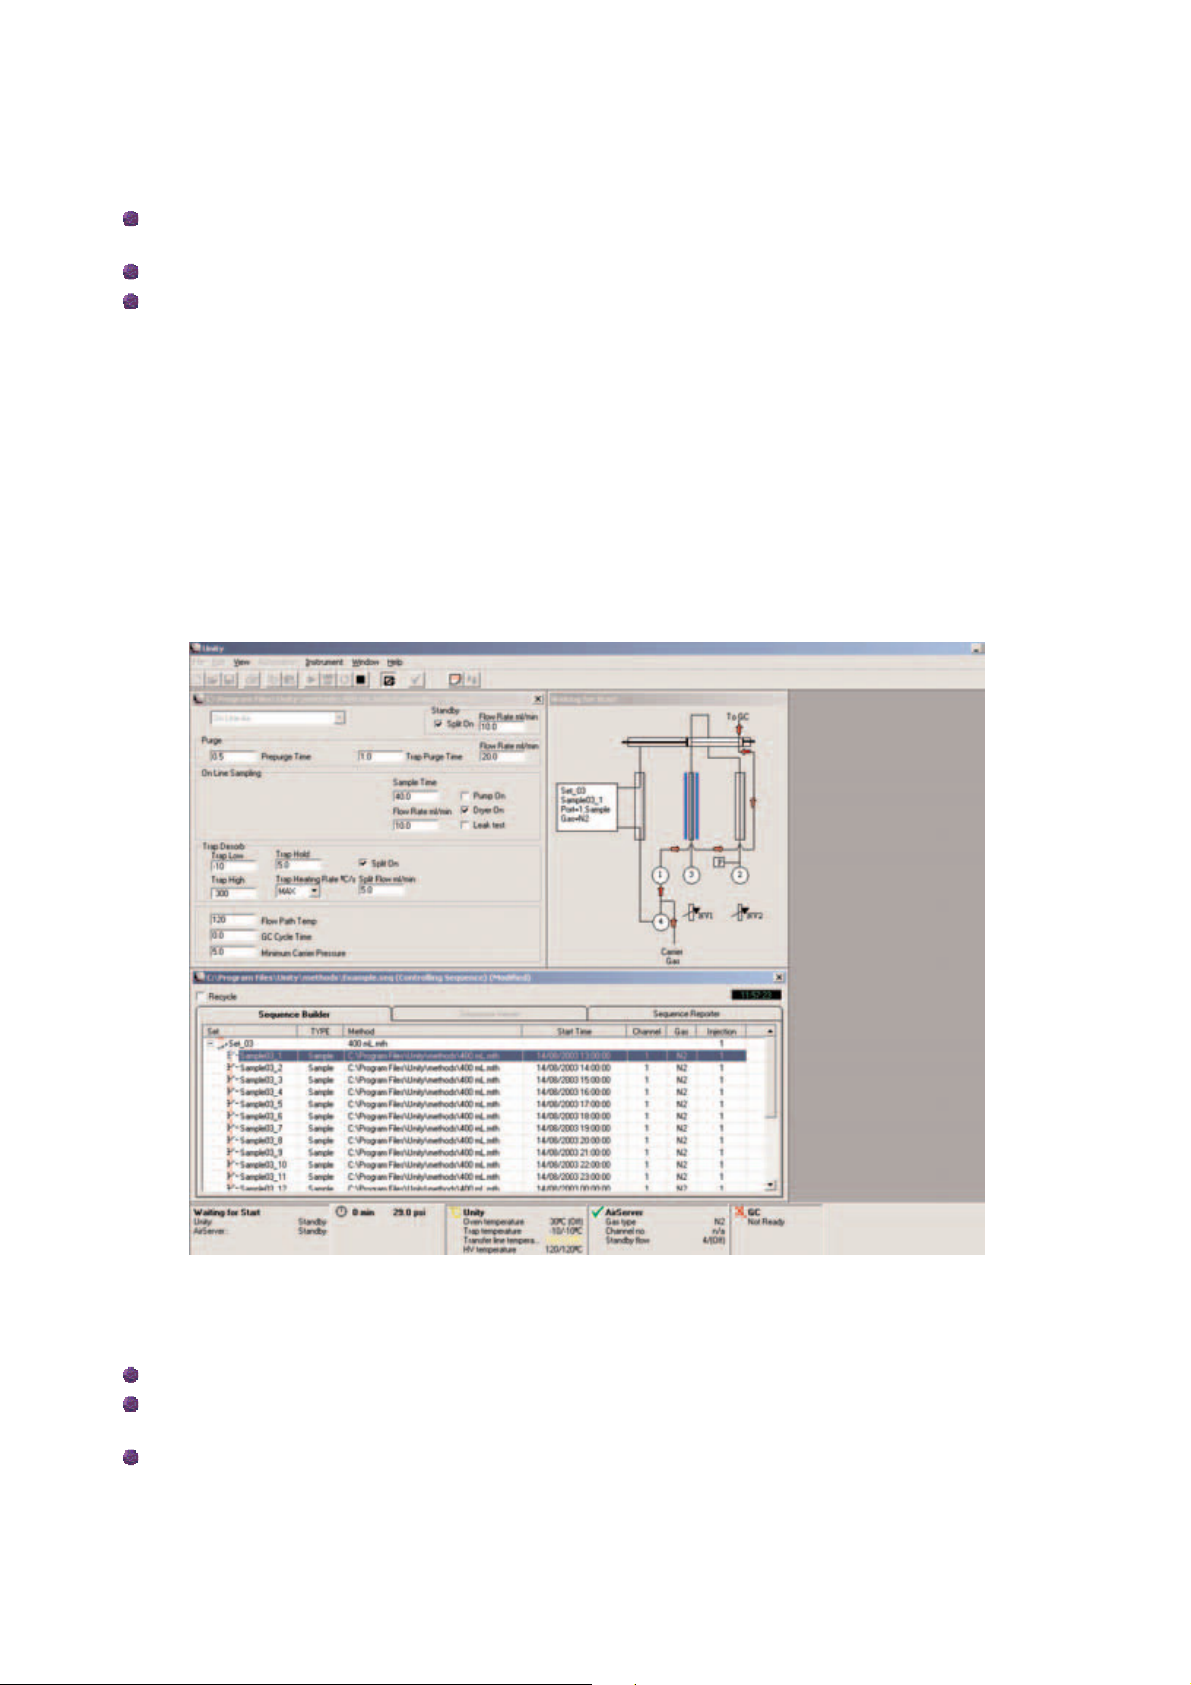
The first stage to setting up a single analysis or series of analyses is to edit and save an Air Server
method with convenient parameters. In the example shown below a method has been set up to take
400 ml of sample in 10 minutes and saved under the name "400 ml.mth".
Once you have created your new Air Server method and saved it you are ready to create your first
sequence.
Right click in the sequence builder and select ‘New Sequence’ and a new empty Automation
Window will appear.
It is good practice at this point to save this new sequence under a suitable file name (in the
example below the name chosen was "Example.seq") - to do this, use the "File - Save As"
function in the main software window.
Having saved your new sequence the next step is to create your first set. As before right click to
bring up the contextual menu and select "Add OLA Set". This will bring up the “Select Method to
be used with Sample or Set” dialogue which allows you to select the saved method you wish to
use.
Once the method has been selected the "Add New Set" dialogue box will appear with the selected
method entered in the Method box.
Air Server Series 2 Operators Manual
Page 9

9
The parameters within the "Add New Set" dialogue are the following:
Set Name Alphanumeric name given to a set to describe its contents – it is the only
name that will be visible when a set is collapsed
Method The UNITY 2-(Air Server) method that will initially be attributed to all the
members of this set. By default the software automatically inserts here the
most recently modified method. Alternatively, double-clicking in this box with
the left-hand mouse button opens the ‘File Open’ dialogue allowing
selection of an existing UNITY 2 method.
Channel The channel that will initially be attributed to all the members of this set (1 =
Sample channel, 2 = Blank channel, 3 = Reference channel). The channel
number set here corresponds to the numbers shown on Air Server.
Samples The number of separate sample rows to be included within a set.
Injections The number of times each sample row will be repeated.
Recollect When an optional re-collection ULTRA is installed it is possible to re-collect
up to 99 on-line air samples automatically onto tubes for sample archiving
and method validation purposes.
1st When re-collect is available, see above, this defines the first tube onto which
sample will be recollected.
Gas Sets the sample gas type so that the correct calibration factor is applied to
the mass flow controller. Available options are: N2, CO2, Air, He or H2.
Sample
base name
Sample
Interval
Set delay Allows an inter-set delay to be set between the last sample of a
The base name given to all the samples within a set to which an
automatically incremented number is appended.
Allows a timed interval to be specified between consecutive samples (0-9
days : 00-23 hours : 00-59 minutes).
Note: If the sum of the times set within a given method (leak test, pressure
release, prepurge, sample, trap purge and trap fire time) exceeds the
interval specified here, then the interval will not be taken into account. In
this case consecutive runs will take place one after another at a frequency
determined by the overall method duration.
given set and the first sample of the next set. The total delay will be equal to
the delay time plus the sample interval time, therefore if the sample interval
is set to 20 minutes and the set delay is set to 40 minutes then the total
delay will be 60 minutes between the last sample of a given set and the first
sample of the subsequent set.
3.3.1. Editing individual lines in a sequence
In a true air monitoring scenario, it would be convenient to include in this set a run of zero gas to
check the instrument blank and a run of calibration gas to check retention times and response
factors.
This can be done quite simply by double clicking on any of the parameters to change them – such as
changing the gas type for the blank and calibration from Air to Nitrogen.
Air Server Series 2 Operators Manual
Page 10

10
3.3.2. Recycling sequences
It will also be common in an Air monitoring scenario to want to run the same set of runs again and
again. This may be achieved simply by clicking the recycle check box (top left in the automation
window) where you will be prompted to define a number of re-cycles. e.g. If Stop after 1 re-cycle is
selected, then the sequence is run through twice. If nothing is entered then this set of runs will run
indefinitely.
3.4. Running the sequence
Before starting the run you will need to make the sequence you have created into the controlling
sequence. This is easily achieved by clicking the icon on the menu bar. The next step is to set
the sequence going by clicking on the "Run" button in the UNITY 2 Toolbar
Once "Run" is clicked then you will be prompted to start immediately:
• "Yes" triggers the UNITY 2 Air Server system to start straight away
• "No" opens the "Start Time Dialogue" box (see below)
• "Cancel" takes the system back into standby to allow further editing of the newly created sequence
If the sequence is set to run immediately then the start time column in the sequence builder will be
filled with the relevant start times for each of the samples.
Note: if recycle is chosen then only the start times for the first run through the set are shown these start times are updated each time a full cycle is completed.
Once running, progress through the sequence may be monitored via the sequence reporter tab in the
Automation Window.
The parameters reported in the sequence reporter may be changed by going to “View” then
selecting “Options” and then selecting the “Reporting” Tab.
Air Server Series 2 Operators Manual
Page 11

11
Click on the parameters that you wish to view in the Sequence Report.
Note: a spreadsheet view of this Sequence Report (.csv file) can be created from this Reporting Tab
by clicking “Create Report File” and saving the file.
3.5. Starting at a predefined date and time
If the start of the sequence needs to be delayed until a very specific date and time then clicking
"No", when prompted to start immediately, will bring up the "Start Time" dialogue box. Here it is
possible to define the start date and time down to the nearest minute and as far in advance as
wished.
Air Server Series 2 Operators Manual
Page 12

12
3.6. Stopping a sequence
A Sequence may be stopped at any time using the ‘Stop’ icon on the main toolbar. Clicking the icon
brings up the ‘Stop Link’ dialogue box.
This instructs UNITY 2 and Air Server to stop the Sequence and return to Standby. A number of
options are available according to whether you wish to stop immediately or at the end of a
designated cycle, injection, tube etc.
Continue Running - this will allow you to continue uninterrupted if you have clicked stop by
accident.
Stop after next injection of this sample - this will stop the sequence after it has finished
sampling and injected the sample (row) that is currently running.
Stop after all injections of this sample - this will stop the sequence after it has finished all of
the sampling steps and injections defined in the current sample (row).
Stop at the end of this set - will stop when the current set has completed.
Stop at the end of this cycle - will complete all the sets in a sequence and then stop (this is
useful for interrupting a sequence when cycle indefinitely has been chosen)
Stop immediate - this will stop the UNITY 2-Air Server immediately even if it is half way
through a sampling step - using stop immediate could mean that the cold trap is loaded with
sample when you come to start the next sequence
Air Server Series 2 Operators Manual
 Loading...