

Markbass Bass MultiAmp S, Bass MultiAmp User manual

v. 15.july.2015
owner’s manual
IMPORTANT SAFETY INSTRUCTIONS
“The Lightning Flash with arrowhead symbol
within an equilateral triangle, is intended
that may be of suf�icient magnitude to constitute
a risk of shock to persons.”
“The exclamation point within an equilateral
maintenance (servicing) instructions in the
literature accompanying the product.”
not exceeding 2000 m”
1) Read these instructions;
2) Keep these instructions;
3) Heed all warnings;
4) Follow all instructions;
5) Do not use this apparatus near water;
6) Clean only with dry cloth;
7) Do not block any ventilation openings. Install in accordance with the manufacturer’s instructions;
8) Do not install near any heat sources such as radiators, heat registers, stoves, or other apparatus (including ampliers) that produce heat;
9) Do not defeat the safety purpose of the polarized or ground-type plug. A polarized plug has two blades with one wider than the other. A grounding type plug has two blades and a third grounding prong.
The wide blade or the third prong are provided for your safety. If the provided plug does not t into your outlet, consult an electrician for replacement of the obsolete outlet;
10) Protect the power cord from being walked on or pinched, particularly at plugs, convenience receptacles, and the point where they exit from the apparatus;
11) Only use attachments/accessories specied by the manufacturer;
12) Use only with the cart, stand, tripod, bracket, or table specied by the manufacturer, or sold with the apparatus.
When a cart is used, use caution when moving the cart/apparatus combination to avoid injury from the tip-over (and Fig 21 DU Tipping Cart Symbol).
13) Unplug this apparatus during lightning storms or when unused for long periods of time;
14) Refer all servicing to qualied service personnel. Servicing is required when the apparatus has been damaged in any way, such as power-supply cord or plug is damaged, liquid has been spilled or objects have fallen into the apparatus, the apparatus has
been exposed to rain or moisture, does not operate normally, or has been dropped;
15) “Warning: to reduce the risk of re or electric shock, do not expose this apparatus to rain or moisture; and objects lled with liquids, such as vases, should not be placed on this apparatus”;
16) To completely disconnect this apparatus from the AC mains, disconnect the power supply cord plug fron the AC receptacle;
17) The mains plug of the power supply cord shall reamin readily accessible.
18) In case of voltage selector make sure the switch on the rear panel is on the correct voltage before connecting it to the AC power, and the fuse is the right value for that voltage (This selector is not available on the 100V version).
Please change the voltage/fuse values label located near the voltage selector matching the voltage/fuse values when you need to change the voltage of the apparatus.
19) “WARNING: this apparatus must be securely attached to the oor or wall in accordance with installation istruction. Tipping, shaking, or rocking the machine may cause injury or death.”
PRÉCAUTIONS D’EMPLOI
1) Lire ces instructions;
2) Conserver ces instructions;
3) Suivre tous les conseils d’utilisations;
4) Suivre toutes les instructions;
5) Ne pas utiliser cet appareil au bord de l’eau;
6) Nettoyer uniquement avec un chion humide;
7) Ne pas bloquer le système de ventilation. Installer conformément aux instructions du fabricant;
8) Ne pas installer l’appareil près d’une source de chaleur tel qu’un radiateur, un fourneau, ou bien un autre appareil qui produit de la chaleur;
9) Ne pas modier le système de sécurité de la che polarisée ou de de la che pour les prises de terre. Une che polarisée a deux broches, l’une étant plus distante de l’autre. Une che pour prise de terre a deux broches et une pointe pour la masse.
La broche plus distante et la pointe pour la masse ont été installées pour votre sécurité. Si la che fournie de rentre pas dans votre prise de courant consulter un électricien pour la substitution;
10) Protéger le cordon d’alimentation an qu’il ne soit pas piétiné ou écrasé tout particulièrement au niveau des ches, des prises de courant femelles, et des parties qui sortent de l’appareil;
11) Utiliser uniquement les accessoires recommendés par le fabricant;
12) Utilisez uniquement avec le chariot, le socle, le trépied, le support ou la table spéciés par le fabricant ou vendu avec l’appareil.
Lorsque vous utilisez un chariot, soyez prudent lorsque vous déplacez l’ensemble chariot / appareil pour éviter toute blessure du renversement (et la gure 21 DU Tipping panier Symbol).
13) Ne pas branché l’appareil en cas d’orage accompagné d’éclairs. Le débrancher en cas de non utilisation prolongée;
14) S’adresser à un service assistance agréé si l’appareil a subi des dommages, si le cordon d’alimentation ou la che a été endommagé, si un liquide a été renversé sur l’appareil ou bien si un object est tombé dans l’appareil, si ce dernier a été exposé à la
pluie ou à l’humidité, s’il ne fonctionne pas correctement ou s’il est tombé;
15) “Avertissant: pour réduire le risque du feu ou de décharge électrique, n’exposez pas cet appareil à la pluie ou l’humidité et les objets remplis de liquides; tels que des vases, ne devraient pas être placés sur cet appareil”;
16) Pour déconnecter totalement cet appareil du secteur, débranchez la cordon d’alimentation che de la prise secteur;
17) La prise de courant doit être facilement accessible.
18) En cas de sélecteur de tension s’assurer que l’interrupteur sur le panneau arrière est sur la bonne tension avant de le raccorder à l’alimentation secteur et le fusible est la bonne valeur pour que la tension (Ce sélecteur n’est pas disponible sur la version
100V). S’il vous plaît changer la tension / valeurs de fusibles étiquette située près du sélecteur de tension correspondant aux valeurs /fusibles de tension lorsque vous avez besoin de changer la tension de l’appareil.
19) “AVERTISSEMENT: cet appareil doit être assujetti au plancher ou au mur conformément aux instructions d’installation. Le fait de l’incliner, de le balancer ou de l’agiter peut causer des blessures ou la mort.”
MORE INFORMATION
For warrantee and service information, please contact your local Markbass distributor
(contact information available at www.markbass.it). For more technical information,
please visit us at www.markbass.it and ll out the form on the
Contact Us page. We hope you enjoy your amp and use it to make great music!
to alert the user to the presence of uninsulated
“dangerous voltage” within the product enclosure
triangle is intended to alert the user to the
presence of important operating and
“To be used only
with altitude
“To be used only
where the climate
is not tropical”
02
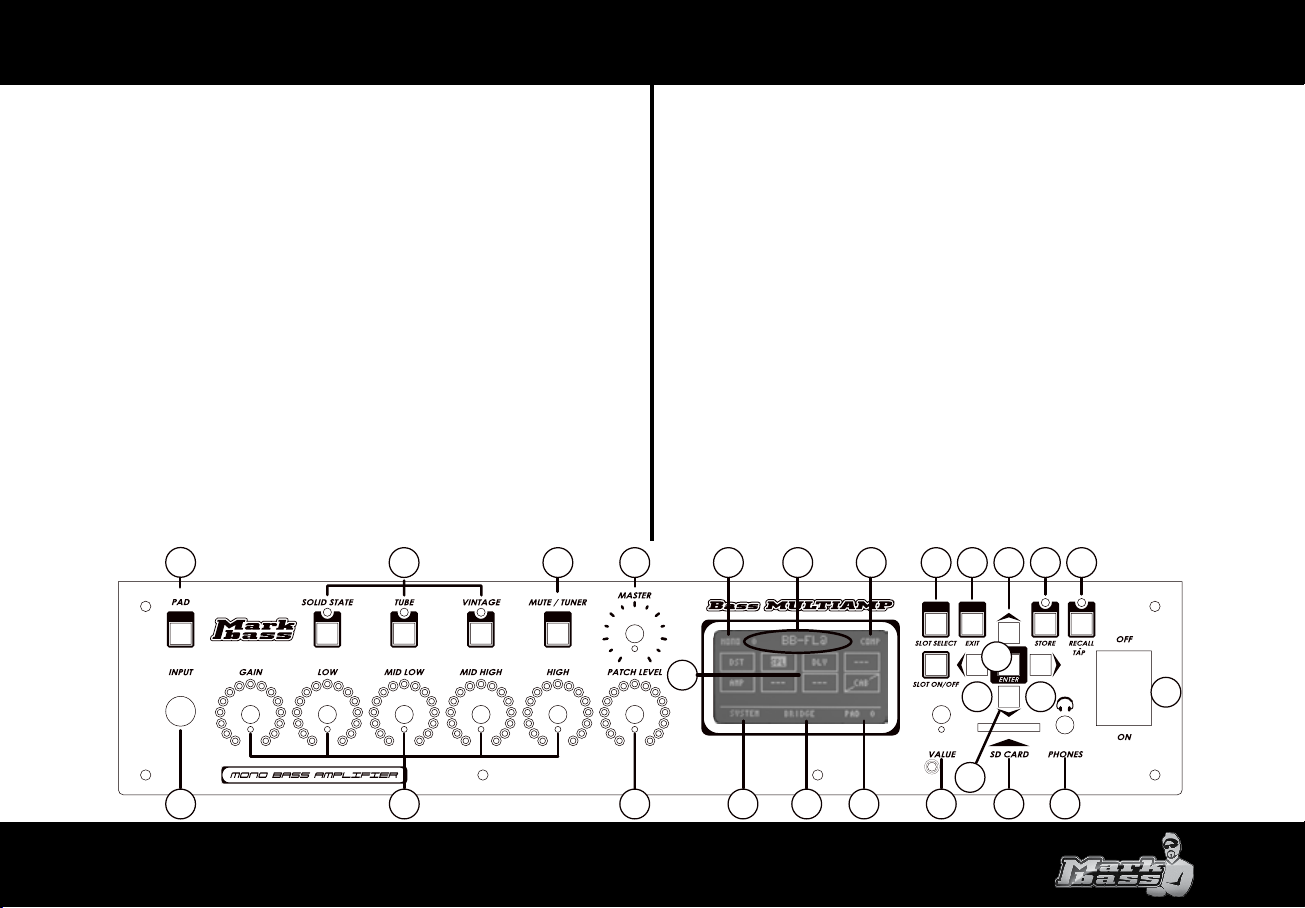
FRONT PANEL
1) INPUT Connect your bass guitar to this input using a standard ¼” shielded instrument cable.
2) PAD This switch pads the input (1) at -6dB, 0dB, +6dB, or +12dB to compensate for higher output
sources, such as basses with high-output pickups or active electronics.
3) SOLID STATE – TUBE - VINTAGE Push these buttons to select the AMP models for each AMP slot.
4) MUTE / TUNER This button allows you to access the chromatic tuner and the mute feature.
5) MASTER This control is the master feed of the power stage, it controls the volume to the speaker.
Headphone Level control is now available at System menu).
6) GAIN, LOW, MID LOW, MID HIGH, HIGH Preamp section controls. They reproduce the same
functions of the control pots of the selected AMP model.
7) PATCH LEVEL Controls the level of the patch in use.
8) SLOT The Bass Multiamp features 7 SLOTs where you can assign the AMP models and the eects, and
one additional SLOT for the CAB models.
9) BANK The display shows the selected BANK PRESET.
10) PRESET The display shows the name and number of the selected PRESET.
11) COMPRESSOR/LIMITER INDICATION The word COMP blinks on the right of the preset name to
show that the compressor/limiter is in action.
12) SYSTEM Use this function to recall the Memory Bank from an SD Card or to transfer the Memory
Bank onto an SD Card, to have access to the AMP MODE, to the MIDI functions, to the Firmware update.
or to select the BALANCED DI mode.
13) (Only BASS MULTIAMP S) Shows the output mode: STEREO (500W + 500W @ 4ohm, 300W + 300W
@ 8ohm), mono BRIDGE (1000W@8ohm) or BI-AMP (LEFT OUT --> LOW OUT; RIGHT OUT --> HIGH OUT).
14) PAD Shows the selected input pad (-6dB/O/+6dB/+12dB).
15) VALUE This control will increase/decrease the selected value.
PANNELLO FRONTALE
1) INPUT Ingresso strumento.
2) PAD Regolazione livello del segnale in ingresso.
3) SOLID STATE – TUBE - VINTAGE Tasti per la selezione dei modelli per lo slot AMP.
4) MUTE / TUNER Tasto di selezione accordatore cromatico e funzione mute.
5) MASTER Regola il volume di uscita speaker.
6) GAIN, LOW, MID LOW, MID HIGH, HIGH Controlli dello stadio di preamplicazione dell’AMP
simulator. Questi controlli assumono le stesse funzioni delle manopole di controllo del modello di Ampli
selezionato.
7) PATCH LEVEL Controlla il livello della patch in uso.
8) SLOT Il BASS MULTIAMP ha 7 SLOT dove poter inserire gli amp modelling e gli eetti e 1 SLOT per i
CAB, con possibilità di scegliere vari tipi di speaker.
9) BANK ll display visualizza il BANCO del PRESET selezionato.
10) PRESET Il display visualizza il nome e il numero del preset selezionato.
11) INDICAZIONE COMPRESSORE/LIMITER La parola COMP sulla destra del nome del preset
lampeggia per indicare quando il compressore/limiter è attivo.
12) SYSTEM Questo comando serve per il richiamo dei banchi di memoria da una SD card e per il
trasferimento dei banchi di memoria ad una SD card, per l’accesso all’AMP MODE, alle funzioni MIDI, al
FIrmware update e alla modalità BALANCED DI.
13) (Solo Versione BASS MULTIAMP S) Visualizza le modalita’ di uscita: STEREO (500W + 500W @ 4ohm,
300W + 300W @ 8ohm), mono BRIDGE (1000W@8ohm) o BI-AMP (USCITA LEFT --> USCITA LOW; USCITA
RIGHT --> USCITA HIGH).
14) PAD Visualizza il guadagno di ingresso selezionato (-6dB/O/+6dB/+12dB).
15) VALUE Manopola di incremento/decremento dei valori selezionati.
2
3
4
5
9
10
11
16 17 18
22
23
27
8
20
21
24
19
1
6
7
12 13
14
15
25 26
03

16) SLOT SELECT Enable/Disable the selected SLOT.
17) EXIT Push to exit from the function in use.
18) UP scroll button.
19) DOWN scroll button.
20) LEFT scroll button. When PRESET function is selected this button allows you to scroll UP 8 presets
at time (quick search).
21) RIGHT scroll button. When BANK function is selected this button allows you to scroll DOWN 8
presets at time (quick search).
22) STORE Push this button to memorize a preset to the internal memory.
23) RECALL /TAP Push this button to recall a preset from the internal memory. Hold it for few seconds
to access the TAP TEMPO function, push the ENTER button as many times as needed to set the desired
tempo: the led will show you the tempo speed. The TAP TEMPO is estimated as the average of the last
two time intervals marked by the last two presses of the ENTER button.
The display of the TAP TEMPO through the RECALL led is only possible if it is allocated and active a
DELAY eect within the SLOT.
24) ON/OFF This switch delivers AC power to the unit. Make sure the unit is grounded; all three terminals
of the AC power plug must be connected to avoid any injury to the user or damage to the unit.
Bass Multiamp is manufactured to be used in the country where it has been sold and is factory preset
to that country’s voltage. So make sure you’re sending the correct voltage to your Bass Multiamp before
you connect it to AC power.
25) SD CARD Insert an SD Card (FAT32 formatted, UP to 8Gbd) in this slot to memorize/recall preset/s
and for rmware update function (to format the SD CARD use the SD FORMAT function in the SYSTEM/
FILE menu).
26) PHONES Headphones mini plug (1/8”) input. When headphones are plugged in, the power section
is turned o; to turn the power section back on (for simultaneous use of headphones and cabinet) hold
the MUTE/TUNER button for 3 seconds.
27) ENTER Send/conrm button for selected function. In TAP mode, by pushing several times this
button, you can select the time speed of the Delay eect (if it is active in one of the slots).
16) SLOT SELECT Attiva o disattiva lo SLOT selezionato.
17) EXIT Pulsante di uscita funzione.
18) Pulsante scorrimento cursore verso l’alto.
19) Pulsante scorrimento cursore verso il basso.
20) Pulsante scorrimento cursore verso sinistra. Nella schermata di selezione PRESET questo tasto
consente di saltare verso l’alto i preset di 8 per volta (ricerca veloce).
21) Pulsante scorrimento cursore verso destra. Nella schermata di selezione BANK questo tasto consente
di saltare verso il basso i preset di 8 per volta (ricerca veloce).
22) STORE Tasto per la memorizzazione di un preset sulla memoria interna.
23) RECALL /TAP Tasto per il richiamo di un preset dalla memoria interna, tenendo premuto il tasto per
qualche secondo si accede alla funzione TAP TEMPO regolabile premendo più volte il tasto enter, il led
segnalerà la velocità del tempo selezionato. TAP TEMPO è valutato come intervallo di tempo scandito
dalle ultime due pressioni del tasto ENTER.
La visualizzazione del TAP TEMPO attraverso il led RECALL è possibile solo se è allocato e attivo un
eetto DELAY all’interno degli SLOT .
24) ON/OFF Questo switch eroga corrente AC all’unità. Assicurarsi che l’unità sia messa a terra; tutti e
tre i terminali della spina di alimentazione AC devono essere collegati per evitare lesione all’utente o
danni all’unità. Il BASS MULTIAMP è realizzato per essere utilizzato nel paese in cui è stato venduto, ed è
settato per la tensione di quel paese. Assicurarsi che si stia usando la giusta tensione per il vostro BASS
MULTIAMP prima di collegarlo alla rete elettrica.
25) SD CARD Inserire una scheda SD (formato FAT32, non superiore a 8Gb) in questo slot per
memorizzare / richiamare i preset e per eseguire l’aggiornamento del rmware (per formattare la SD
CARD utilizzare la funzione SD FORMAT al menu SYSTEM/FILE).
26) PHONES Ingresso mini jack per cua. Inserendo la cua la sezione nale viene disabilitata, tenendo
premuto per 3 sec il tasto MUTE/TUNER viene riattivata (per l’utilizzo simultaneo cua/cabinet).
27) ENTER Pulsante di invio o di conferma di una funzione selezionata, in modalita TAP premendo più
volte questo pulsante si selezionerà il tempo desiderato dell’eetto delay eventualmente attivato in
uno degli slot.
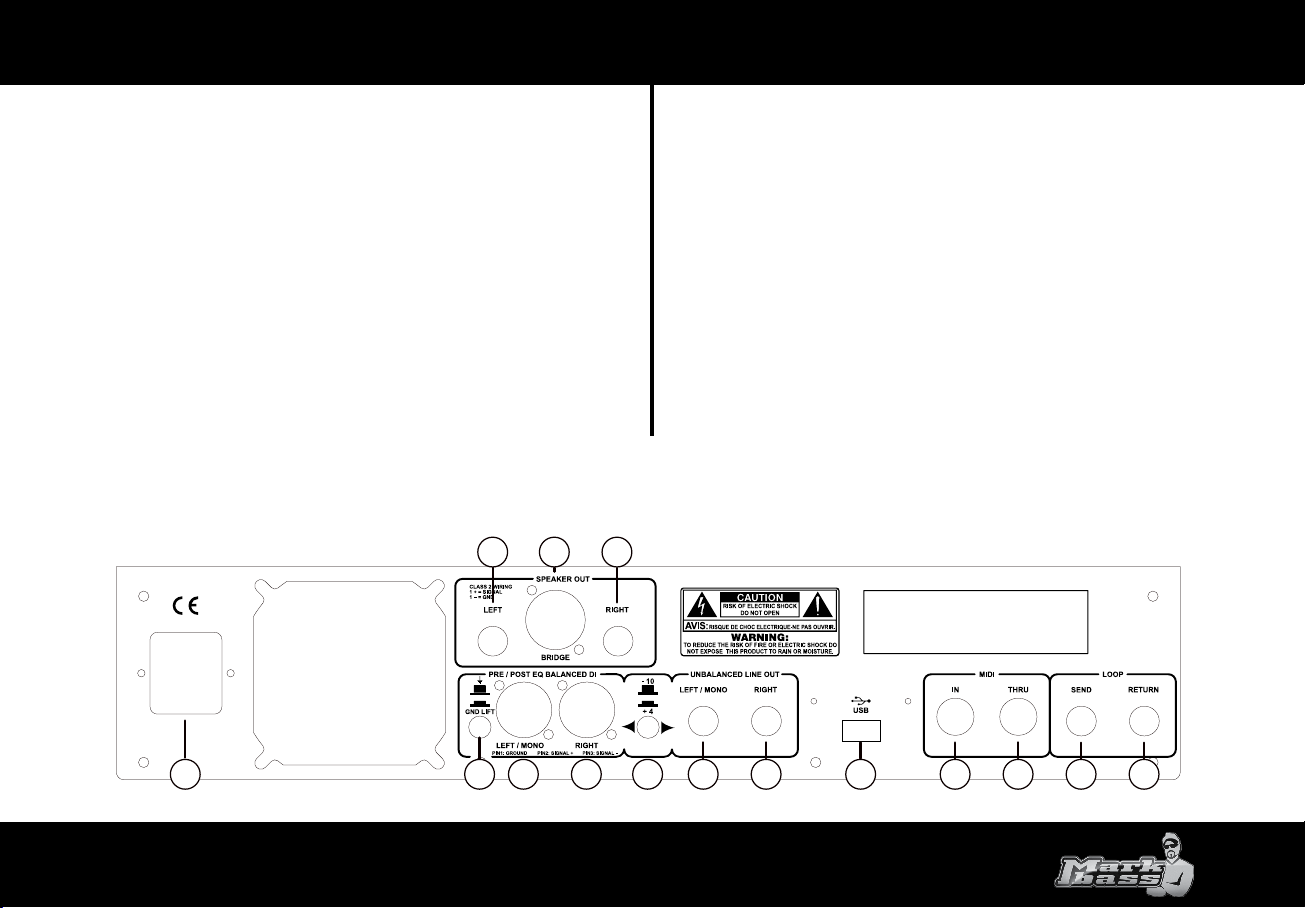
REAR PANEL
28) AC SOCKET Connection for the power cord. This location also houses the main fuse of the unit.
29/30/31) BASS MULTIAMP (mono version) These speaker outs provide power outputs to speaker
cabinets. Do not connect these outputs to a load of less than 4 ohms (the outputs are parallel wired)!
29/30) BASS MULTIAMP S (stereo version) These speaker outs provide power outputs for Left and
Right channels (stereo mode) to speaker cabinets. Do not connect these outputs to a load of less than
4 ohms!
31) BASS MULTIAMP S (stereo version) BRIDGE This speakon out is used when using the Multiamp
power amp in mono-bridge mode. Do not connect this output to a load of less than 8 ohms!
32) GROUND LIFT Occasionally you may detect a constant hum when using the Multiamp’s Balanced
DI. This is almost often due to a grounding problem related to your power source; you will likely
eliminate/reduce this hum simply by ipping the Ground Lift (GND) switch.
04
PANNELLO POSTERIORE
28) PRESA ALIMENTAZIONE + FUSIBILE.
29/30/31) BASS MULTIAMP (versione mono) Uscite speakers. Non collegare queste uscite ad un
carico con impedenza inferiore a 4 ohm.
29/28) BASS MULTIAMP S (versione stereo) Uscite speaker sinistra e destra per collegamento in
modalità stereo. Non collegare queste uscite ad un carico con impedenza inferiore a 4 ohm.
31) BASS MULTIAMP S (versione stereo) BRIDGE Uscita speakon combo per collegamento in modalità
mono. Non collegare questa uscita ad un carico con impedenza inferiore a 8 ohm.
32) GROUND LIFT Occasionalmente si può rilevare un costante ronzio quando si utilizza l’uscita di linea
bilanciata del BASS MULTIAMP. Questo è quasi sempre causato da un problema di messa a terra legato
dall’impianto che eroga la corrente elettrica; semplicemente cambiando posizione allo switch Ground
Lift (GND) è possibile eliminare / ridurre questo ronzio.
BALANCED DI
1
2
3
4
5
6
11
12 13
14
15
16 17 18
19
20
21
22
23
24
9
10
25 26
27
7
8
33) Balanced XLR LEFT Output to send the left channel signal to a mixer/PA (for mono connection use
this output).
34) Balanced XLR RIGHT Output to send the right channel signal to a mixer/PA.
35) Output Level select button (+4/-10dB) related to the output level selected in the proper BALANCED
DI menù.
UNBALANCED LINE OUT Unbalanced stereo output to connect to an external power amp (PRE OUT)
36) LEFT/MONO PRE out left channel (for mono connection use this output).
37) RIGHT PRE out right channel.
38) USB port (for service/maintenance).
MIDI
39) MIDI IN.
40) MIDI THRU.
LOOP If you use external eect processors or pedals you can route them through the LOOP section, it
can be selected in Serial or Parallel mode, and you can set it wherever you like in the signal chain (slot).
41) LOOP SEND Connect this output to your outboard eect processors or pedals input.
42) LOOP RETURN Connect this input to your outboard eect processors or pedals output
BALANCED DI
33) Uscita Bilanciata XLR Left. Questa uscita deve essere utilizzata per il collegamento in mono.
34) Uscita Bilanciata XRL Right.
35) Pulsante selezione del livello di uscita (+4/-10dB) rispetto al livello selezionato nel apposito menù
BALANCED DI.
UNBALANCED LINE OUT Uscite sbilanciate stereo per nale esterno (PRE OUT)
36) LEFT/MONO PRE out Left. Questa uscita deve essere usata nel caso di collegamento in mono.
37) RIGHT PRE out Right.
38) USB Uscita per collegamento USB (esclusivamente per service)
MIDI
39) IN Ingresso MIDI.
40) THRU Uscita THRU.
LOOP La sezione Loop può essere utilizzata sia in Serie che in Parallelo ,e può essere posizionata in
qualunque punto della catena audio (slot).
41) SEND Ingresso LOOP. Collega questo jack all’ingresso di un multieetto esterno.
42) RETURN Uscita LOOP. Collega questo jack all’uscita di un multieetto esterno.
29 3031
28
32 33 34
35 36
37 38
39 40
41 42
05

BASS MULTIAMP OVERVIEW
CONNECTIONS
The Bass Multiamp can be connected in many modes to t the needs of each musician.
BASS MULTIAMP (mono version)
Speaker outputs: Speakon and two Jack ¼ (in parallel). 300W@8ohm / 500W@4ohm (Do not connect
this output to a load of less than 4 ohms!)
BASS MULTIAMP S (stereo version)
For MONO connection use the BRIDGE output at rear panel. This output gives 1000W @ 8 Ohm (Do not
connect this output to a load of less than 8 ohms!)
For STEREO connections use LEFT RIGHT SPEAKER OUT at rear panel. Max Power: 500W + 500W @ 4ohm,
300W + 300W @ 8ohm (do not use impedance of less than 4 ohms!)
BI-AMP allows you to use the BASS MULTIAMP S in bi-amp mode, selecting the low and high frequencies
to send them to the two output channels/cabinets (LEFT OUT --> LOW OUT; RIGHT OUT --> HIGH OUT).
P.A./STUDIO CONNECTION BALANCED DI LEFT and RIGHT outputs on the rear panel (optimize the
output level thanks to the +4/-10dB button or the output level selected in the proper BALANCED DI
menù).
EXTERNAL POWER AMP CONNECTION UNBALANCED OUT on the rear panel.
Connect the BASS MULTIAMP and optimize the right input level signal with the PAD button. The PAD
SETTING section will appear on the display to pad the input (1) at -6dB, 0dB, +6dB, or +12dB. A level
meter will help to set the right value for your signal source.
The PAD value you choose is automatically related to the preset.
Select the SYSTEM menu with the buttons, press ENTER and go to the SYSTEM SETTING menu.
BASS MULTIAMP S (stereo version) Select AMP MODE, press ENTER and select STEREO mode, MONO
BRIDGE or BI-AMP mode.
The MONO/BRIDGE, STEREO or BIAMP mode is not related to the PRESET.
PRESET and MEMORY
The Bass Multiamp features 8 memory BANK (BASS MULTIAMP S) or 7 memory BANK (BASS MULTIAMP),
each one with 128 PRESETS subdivided in 3 FACTORY PRESETS Banks for BASS MULTIAMP S (2 FACTORY
PRESETS Banks for BASS MULTIAMP) and 5 USERS Banks.
The Factory Presets Banks are:
LIVE MONO for mono/bridge connection to a cabinet.
LIVE STEREO for stereo connection to two cabinets (Only BASS MULTIAMP S).
STUDIO P.A. for P.A. System or studio monitors connection.
IMPOSTAZIONE BASS MULTIAMP
COLLEGAMENTI
Il BASS MULTIAMP puo’ essere collegato in diverse modalita’ per poter essere sfruttato a seconda delle
esigenze di ciascun musicista.
BASS MULTIAMP (versione mono)
Speaker outputs: Speakon e due Jack ¼ (in parallelo). 300W@8ohm / 500W@4ohm (non collegare
queste uscite ad un carico con impedenza inferiore a 4 ohm).
BASS MULTIAMP S (versione stereo)
COLLEGAMENTO MONO uscita BRIDGE nel pannello posteriore.Questa uscita eroga una potenza di
1000W su 8 Ohm (non utilizzare impedenze inferiori a 8 ohm).
COLLEGAMENTO STEREO uscite LEFT RIGHT nel pannello posteriore SPEAKER OUT. Potenza max: 500W
+ 500W su 4ohm, 300W + 300W su 8ohm (non utilizzare impedenze inferiori a 4 ohm).
BI-AMP consente di utilizzare il BASS MULTIAMP S in bi-amplicazione, suddividendo le frequenze
basse/alte da inviare ai due canali/cabinets (USCITA LEFT --> USCITA LOW; USCITA RIGHT --> USCITA
HIGH).
COLLEGAMENTO P.A./STUDIO uscite LEFT RIGHT nella sezione BALANCED DI nel pannello posteriore
(ottimizzate il livello di uscita del segnale con il pulsante +4/-10 o tramite l’apposito BALANCED DI
menù.).
COLLEGAMENTO AD UN FINALE DI POTENZA: Uscite UNBALANCED OUT.
Dopo aver collegato il BASS MULTIAMP ,ottimizzate il livello del segnale in ingresso con il pulsante PAD.
Sul display apparira’ la sezione PAD SETTING e con i cursori e’ possibile selezionare il livello da -6dB, 0dB,
+6dB, +12dB. Un indicatore di livello aiutera’a trovare il giusto valore.
La funzione PAD una volta selezionata viene automaticamente associata al preset.
Selezionare il menu’ SYSTEM sul display con i tasti cursore,premere ENTER e accedere al menu’ SYSTEM
SETTING.
BASS MULTIAMP S (versione stereo) Selezionare AMP MODE premere ENTER e selezionare STEREO
mode, MONO BRIDGE, BI-AMP. Premere EXIT per uscire.
La modalità MONO/BRIDGE, STEREO o BIAMP non è associata al PRESET.
PRESET E MEMORIA
Il BASS MULTIAMP contiene 8 BANCHI di memoria, ciascuno con 128 PRESETS suddivisi in questa
modalita’: 3 Banchi Factory Presets per BASS MULTIAMP S (2 Banchi Factory Presets per BASS MULTIAMP)
e 5 USERS Bank.
I Banchi Factory Presets sono:
LIVE MONO per collegamento mono/bridge ad un cabinet).
LIVE STEREO per collegamento stereo a due cabinet (Solo BASS MULTIAMP S)
06
 Loading...