

Page 1
www.markaudio-sota.com
Unit 60 9-610, 6/F., Bio- Informa tics Centre, 2 S cience Pa rk West Avenue,
HK Science Park, S hatin, N T., Hong Kong
9. Specifications:
• Range 40 Hz to 25KHz anechoic (+/- 6d B)
• 88.5dB 1w@ 1m
• Dimensions : 230 x 280 x 90 0mm
• 1 x Sota 5 wide-range con e tweeter
• 2 x Sota 11 wide-range co ne bass -mid
• Weight (each) 20 KG
8. Aftercare
The cabi net surfaces w ill usually o nly require du sting. Avoid prod ucts that are abra sive, or contain s acid, alkal i or
antiba cterial agent s. Marks on the pa int surface ma y be removed with di luted soap solu tion. Remove any
remain ing marks by spra ying with a propr ietary glas s cleaner and l ightly wipin g dry with a micro -fiber clot h. Do
not use cl eaning agent s on the drivers a nd avoid touchi ng them.
Keep cabi nets away from hea t sources (radia tors and warm air ve nts) and direct s unlight sourc es. Avoid placin g
louds peakers in ver y moist or wet cond itions. Expe ct some gradual c olor changes a s the cabinet s age. This is
norma l for any wood furni ture.
7. Running In
Markau dio-Sota sp eaker drive comp onents are engi neered to tighte r tolerances tha n most other uni ts. Careful
thoug htful runni ng-in and ge neral operatio n will be rewarded by m any years of faithf ul service. Us e low volumes
for the fi rst 100 hours to a llow the driver s uspension s to adjust to the ir normal tole rance.
Over-dr iving louds peakers (hig h volumes) ris ks damaging t he drive units . It is also a majo r cause of human l oss of
heari ng.
6. Amplifier and Source Recommendations
Nearly a ll Loudspea kers are passi ve components . They can only per form at their be st if amplifi cation, sourc e and
cable co mponents are of h igh qualit y.
Careful a nd thoughtf ul choice of a sui table amplif ier should opt imise perfo rmance. Suita ble amplifi ers will range
from: Cl ass A/B 50 Wat ts to 100 Watts per c hannel at 8 Ohm s. Class A from 12 Watt s to 25 Watts per cha nnel at 8
Ohms an d Class D from 30 Wa tts to 60 Watts pe r channel at 8 Oh ms. Amplifi er design and p erformance va ries so
these recommendations can only be a guide.
Source co mponents suc h as CD players, DAC’s an d similar var y in performa nce quality. Take ti me to research
better quality components and recordings. Cables can also effect performance. Be prepared to experiment
with cab les to suit your li stening taste s
Page 2
3. Speaker Installation:
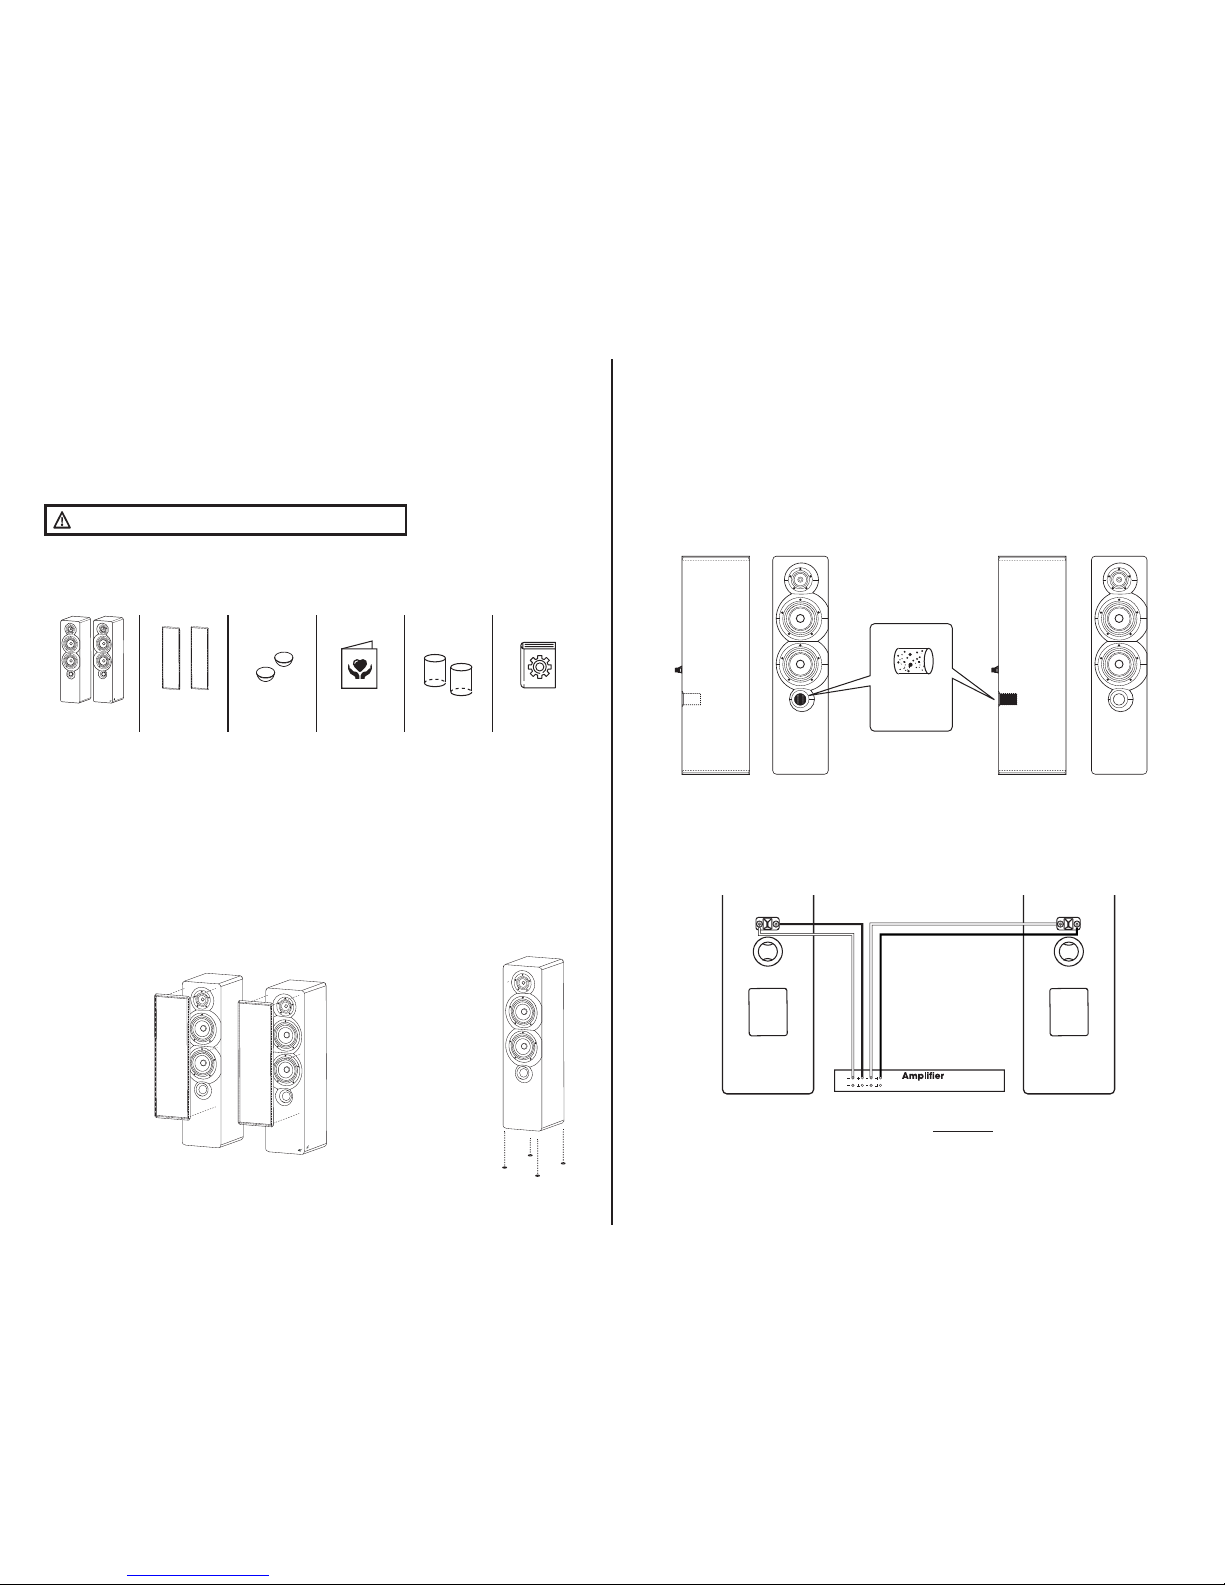
Instal l the speaker
grill to c abinet front
surfa ce.
Magnet o n speaker
grill and cabinet will
align the position.
Welcome and thank you for choosing MarkAudio Sota.
Markaudio-S ota’s engineering app roach usi ng full ra nge audi o driver technology w ith
minim al control net works and l amina te cabinet co nstruct ion are the keys t hat can un lock the
enjoyme nt of audio in the home. Th is is a hig h performance prod uct that reward s careful
ampli fier, source a nd cable s selecti on along w ith thou ghtful ro om posit ioning.
1. Unpacking
Carton c ontents: Plea se check in the 2 ca rtons for
Please t ake the tim e to read th is manua l before yo u begin.
2. Environmental Information:
This pro duct complie s with internat ional directi ves, includi ng but not limite d to:
i. The Restriction of Hazardous Substances (RoHS) in electrical and electronic equipment,
ii. The Registration, Evaluation, Authorisation and restriction of CHemicals (REACH)
iii. The disposa l of Waste Electri cal and Electron ic Equipment ( WEEE).
Pleas e consult your lo cal waste disp osal author ity for guidan ce on how properly to re cycle or dispo se of this
prod uct.
All bag s should be kept awa y from babies an d small chil dren.
Warranty card
x 1
Foam plu g
x 2
Speaker unit
x 2
Speaker grill
x 2
Supporting
rubber foot
x 8
User manual
x 1
Step 1 Step 2
The spe aker is design ed
to be mounte d on 4
supporting rubber feet
(supp lied), but ma y be
placed o n a Cesti T
stand (F S-CT) avai lable
separa tely if preferred to
optimi ze the
performance.
All connections should be made with the audio equipment switched of f.
Ensure te rminals to eac h loudspeake r are correctly con nected. Follow o ur wiring cabl e diagram. Con nect the
posit ive feed from the am plifier to the re d loudspeake r terminal. The n egative ampl ifier feed con nects to the
black terminal on the loudspeaker.
5. Connections
4.
Speaker positioning
Room acou stic perfor mance varies. A djusting th e speaker posi tions may fur ther improve the s ound qualit y.
Typical p lacement of loud speakers is e ither side of a T V. Start by p lacing the lou dspeakers a pproximately 2.5
metres to 3 met res apart with a m inimum clea rance from a back wa ll of 100mm with t he foam bung fit ted into the
rear por t. Enhanced bas s output can be do ne by moving the foa m bung from the rea r port and fit ting into the
front por t. Experiment by a ngling the lo udspeakers towa rd or away from your ce ntral listeni ng position to s uit your
tastes.
Big Listening room Small Listening room
Foam plug
correct
positioning
Frontback Frontback
 Loading...