

Page 1
LX 50G PRO
Rev 1.0
User Manual / Manual de Uso
Page 2

Unpacking
Thank you for purchasing this product. Please read user guide for safety and
operations information before using the product. Keep this manual for
reference. This product can
create perfect laser programs and effects since it
has passed a series of strictly tests before delivery. Please check the
attachments listed on the page after opening the carton. In the event of carton
damage or attachment missing in transit, please conta
ct your dealer or our after
sales service department.
Attachments:
1. Laser device LX 50 G PRO: 1PCS 2. Power Cable: 1PCS
3. User Guide: 1PCS
Notice:
1. Do not exposure the human eye directly to laser beam.
2. Do not turn on and off the laser frequently
3. Makes sure the power supply connects ground
wire before using.
4. This unit is intended for indoor use only and should be prevented f
rom
water,
moisture and shade. The working temperature of this unit is 18
-
30º C.
5 .Do not use this continuously over 4
hours, otherwise it shortens the lifetime
of the unit.
6. Use clean tissue to remove the dust absorbed on the external lenses
periodically to optimize light output.
7. Do not remove or break the warranty label, oth
erwise it void the warranty.
8. Replace
fuse with exact the same type
as ours. Any wrong fuse r
eplacement
which is not specified fuse might cause fire or electric shock and damage your
unit. That will overstep our manufacture’
s
warranty.
PAG. 1
User Manual/Manual de Instrucciones LX 50G PRO
EN
Page 3
Warning
High voltage and danger!
No dismantle
and staring
Warning:
1. Cut the power off for installment or repair.
2. The danger grade of laser is CLASS IIIB. Ensu
re the observing
time inside the laser beam less than 10 seconds and minimum
distance 13 cm for safety.
3. Keep laser away from combustible above 0.5meter.
Technical parameter:
1. Power supply:AC110V~240V/50
-60Hz
2. Wavelength: Green 532 nm
3. LASER power: 50 mW
Consumption: 50W
DMX Channels: 13 channels
4.
Scanning angle:
5.
7.
Scanner speed: > = 10K PPS
6.
8.
Control modes: auto/sound activate/master and slave/DMX 512
9. Dimensions: 275*195*130 mm
10. Weight: 1.5 Kg
Features:
0~+/-30°
This laser unit employs the latest scanner
technique and can project
out many cartoon, text and 3D effects like star, round, time
-tunnel,
letter, geometry graphics.
Pre-built 55 laser patterns of the latest performance effects and it
can discretional control the pattern by DMX
controller.
PAG. 2
User Manual/Manual de Instrucciones LX 50G PRO
EN
Page 4
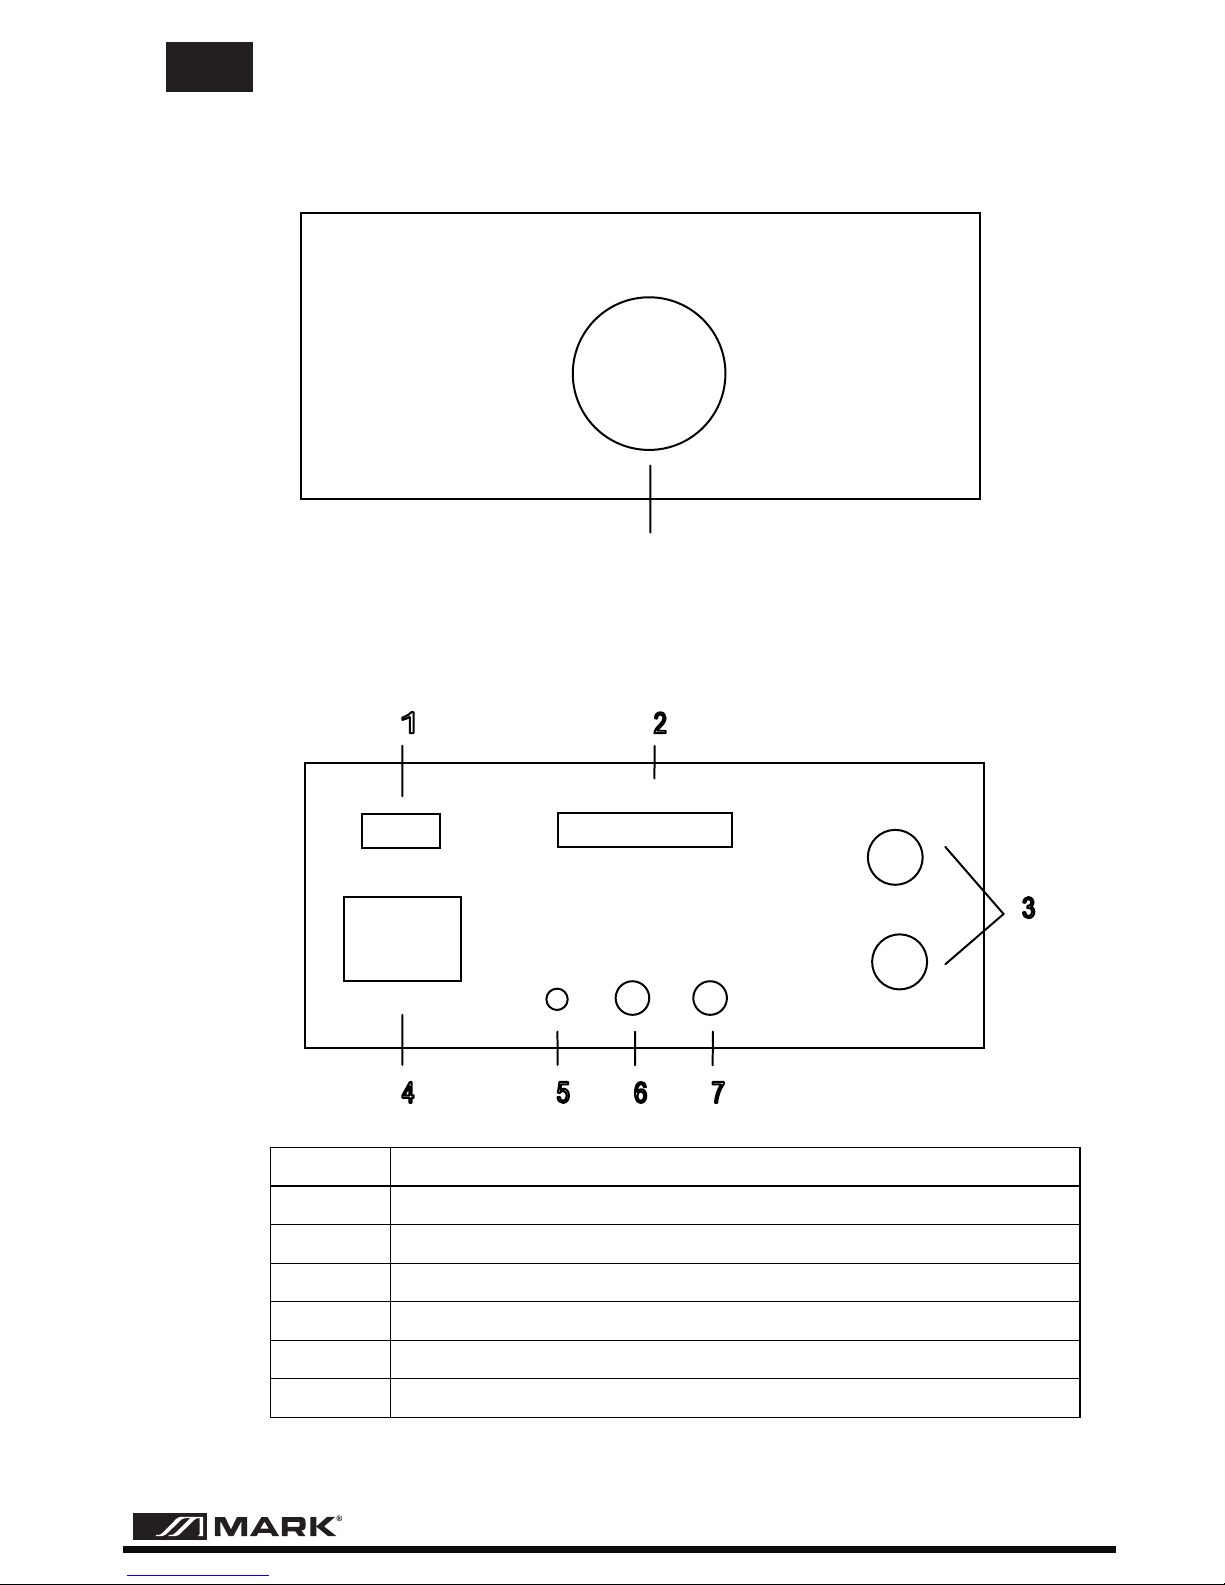
Front
panel
Back
panel description
1 Power switch
2
Address code
3
DMX IN/OUT
4
Power supply with fuse
5
Hang ring of safety rope
6
7
MIC
Sound sensitivity knob
PAG. 3
User Manual/Manual de Instrucciones LX 50G PRO
LASER OUTPUT
EN
Page 5

Operation
Stand-Alone Operation
1. Setting the work mode according to your
requirement to
set the mode
:
SOUND ACTIVE or AUTO MODE
see the
function setting chart.
2. Connecting the power
the unit start to work, beam come
out.
3. For SOUND ACTIVE mode
adjust the sound sensitivity knob
on the back
of the unit to
make the unit more or l
ess sensitive
to sound active
Mode is running
; Auto
automatically.
Master-Slave Mode
1. Setting the work Mode. Choose a unit to function as master mode,
set dipswitch to select Sound Active or Auto mode. T he other must
be set to Slave mode, set dipswitch to select Slave mode. Master
unit controls the slave unit.
2. Use standard XLR microphone cable to chain your units together
via the XLR connector on the rear of the units. Fo
r longer cable runs we
we suggest a terminator at the last fixture
3. Turn on the all units power, the units begins reset, then the unit
begins working. The slave units will react the same as the master
unit
4. In sound active mode, adjust audio sensitivity knob to make the unit
more or less sensitive in sound active; in Auto mode, the unit
is
running automatically
PAG. 4
User Manual/Manual de Instrucciones LX 50G PRO
EN
Page 6

DMX Mode
1. Setting work mode, the system only accepts the DMX512 signal
of international standard to control the system mode, and also
dispatched the address channel of DMX, please see the function
seeing chart.
2. Connect the
controller
line,usestandard XLR
-XLR microphone cable
from DMX512 ou tput connect to link jack of the first unit, and
from the link jack of first unit to the second’s input port, and do
as this chained all units.
3. Connect the power supply, use DMX512 control console.
Note: Do please connect one loop insert to output sign
al of the
terminal unit ,
this loop inserter must be placed
between to the
2 pin and 3 pin of the jack,pleaseconnect one
120Ω
resistance.
PAG. 5
User Manual/Manual de Instrucciones LX 50G PRO
EN
Page 7

0 0
0
0
0
0
0
0
0
0
SOUND ACTIVE
1 0
0
0
0
0
0
0
0
0
AUTO BEAM
0 0
0
0
0
0
0
0
1
0
AUTO ANIMATION
0 1
0
0
0
0
0
0
0
0
SLAVE MODE
SET DMX ADDRESS CODE
1
DMX
Dipswitch
Value
Dipswitch
Value
#2
1
#7
32
#3
2
#8
64
#4
4
#9
128
#5
8
#1
256
#6
16 #10 DMX set to“1”
0
#1 #2 #3 #4 #5 #6 #7 #8 #9 #1
0=OFF 1=ON
DISPWITCH CHART /Code Number Working mode
Address code setting
Please see the sheet attached.
Up means “ON” shown wi
th “1”
Down means “OFF”
shown with “0”
For DMX mode, the system only accept the DMX 512 signal of international
standard to control the system mode. Address from 1-9 dispswitch must be set.
The address is set from 1 to 511. Each dipswitch represents a binary value.
Example:
When setting, as long as you select the dipswitch account to value of the
binary is equal to the address you set, it is OK. The unit uses 13 channels
to DMX control. Please see the chart table.
PAG. 7
User Manual/Manual de Instrucciones LX 50G PRO
EN
Page 8

13 channel description
Channel
DMX512
Content
1. Control mode
0~51
Sound Active(3~13ch
invalid)
52-103
Auto Beam(3~13ch
invalid)
104-155
Auto-Animation
156-207
Manual, sound trigger
208-255
Manual, auto trigger
2. Open &Closed
0~85
closed
86-171
Open \Blanking
172-255
No blanking
3. Change of Patterns
0~225
55 patterns(0~255)
4. Speed
0~255/23=0~11
12 graded speed(0~11)
5. Rolling
0~63
Non-rolling
64~127
Horizontal Rolling
128~191
Vertical Rolling
192~255
Horizontal &Vertical Rolling
6.
0~63
64-127
128-191
192-255
PAG. 8
User Manual/Manual de Instrucciones LX 50G PRO
pattern
&
rotation
No function
Clockwise rotation
Dotted pattern
Dotted pattern and rotation
EN
Page 9

192~255
Horizontal & Vertical stretch
9. Zoom
0-85
NO ZOOM
86-169
one point to large
170-255
large to one point
10.
Slow - Draw Speed
0~5
No function
6~255
43
graded speed (
6~255)
11. Scanning speed
0-255
255 graded speed (Fast to
slow)
12. Color changing
speed
(6~255)/23 NULL
13. Size of pattern
0~2 NULL
(3~255)
42 grade zoom out
7.
0~63
64-127
128-191
192-255
8. Stretch
0~63
Non-stretch
64~127
Horizontal stretch
128~191 Vertical stretch
PAG. 9
User Manual/Manual de Instrucciones LX 50G PRO
Rotation
&Point-draw
Non-rotation & non point
draw
Rotation
Point draw
Rotation &Point-draw
EN
Page 10

In stand-Alone operation and in the
state of close if the power supply
red indicator is light up, and
the
sound active indicator light is light
up.
Its fault to set up as Slave mode
please set up as master mode.
In DMX mode, the laser is off and
the DMX signal indicator is
unlighted
Make sure to set up the DMX mode,
and make sure to have a good
connection.
In DMX mode, the unit can ’t be
controlled by the DMX console, but
the DMX signal indicator I flashing.
Please make sure the DMX console
and unit have the same channel.
In stand-Alone operation and in the
state of close if the power supply
red indicator is light up, and the
sound active indicator light isn’t light
up.
Because sound is too small make for
laser shut off in sound active, please
increase the music volume or
increase audio sensitivity with
sensitivity knob.
PAG. 10
User Manual/Manual de Instrucciones LX 50G PRO
Troubleshooting
Trouble
Solution
IF the power supply indicator
doesn’t light up and the laser
doesn’t work.
Please check the power supply and
the input voltage.
In stand-Alone mode, if the pattern
direction is offset, a part of pattern
was shading beam.
Maybe voltage of the power supply
is too low , causing the motor can ’t
work well. Please make sure the
range of the motor voltage within
±10V,and please use the low voltage
regulator.
EN
Page 11

1.Desembalaje
2.Acessorios incluidos:
1.
Dispositivo Láser LX 50G PRO
2. Cable de alimentación
3. Manual
Gracias por la adquisición de este producto. Por favor, lea este manual para
informarse de las normas de seguridad y manejo antes de utilizar el producto.
Conserve este manual para futuras referencias. Este dispositivo puede crear
programas Láser y efectos, habiendo pasado una serie de estrictos controles
antes de su empaquetado. Compruebe la lista de accesorios incluidos al
desembalar el producto. En el caso de que la caja esté dañada o falte algún
elemento, por favor, contacte con su proveedor.
Atención:
1. No exponga los ojos al haz directo de la unidad.
2. No encienda y apague el Láser frecuentemente.
3. Asegúrese que la toma de alimentación está conectada a tierra antes de
usarlo.
4. Esta unidad ha sido diseñada para su uso en interior y debe ser preservada
del agua o la humedad. La temperatura de trabajo de la unidad oscila entre
18-30ºC.
5. No use el dispositivo de manera continuada más de 4 horas, de esta manera
se acortará la vida útil de la unidad.
6. Use un paño seco para retirar el polvo que se acumula en las lentes externas
de manera periódica para optimizar la salida lumínica.
7. No abra las cubiertas o rompa el sello de garantía, si no la garantía será
revocada.
8. Sustituya el fusible con igual. Si se utiliza otro distinto en tamaño o valor, puede
causar fuego o descargas eléctricas y dañar la unidad. Está hará que se revoque
la garantía.
PAG. 11
User Manual/Manual de Instrucciones LX 50G PRO
ES
Page 12

Warning
High voltage and danger!
No dismantle
and staring
Aviso:
1. Desconecte la alimentación para su instalación operaración
2. Del láser es un dispositivo clase IIIB. Asegúrese de que el haz no se
proyecta sobre los ojos más de 10 segundos y la distancia mínima sea
superior a los 13 cm.
3. Mantenga el láser apartado al menos 0.5 m de elementos combustibles.
Parámetros Técnicos:
1. Alimentación: AC110V~240V/50
-60Hz
2. Longitud de onda: Verde 532 nm
3. Potencia del LASER : 50 mW
Consumo: 50W
Canales DMX: 13 canales
4.
Angulo de escaneo:
5.
7.
Velocidad de escaneo: > = 10K PPS
6.
8.
Modos de control: auto/activación por audio/master y esclavo/DMX 512
9. Dimensiones: 275*195*130 mm
10. Peso: 1.5 Kg
Características:
0~+/-30°
Este láser emplea la última técnica de escaneo y puede proyectar dibujos,
texto y efectos 3D como estrellas, círculos, efecto-tunel, letras o dibujos
geométricos.
Incorpora 55 patrones predefinidos con las últimas prestaciones y pueden ser
controlados mediante un controlador DMX.
PAG. 12
User Manual/Manual de Instrucciones LX 50G PRO
ES
Page 13

Panel frontal
Descripción del panel trasero
1 Interruptor de encendido
2
Dipswitch de direccionamiento
3
DMX IN/OUT
4
Toma de alimentación con fusible
5
Aro de fijación para el cable de seguridad
6
7
MIC
Mando de sensibilidad de audio
SALIDA DEL LASER
PAG. 13
User Manual/Manual de Instrucciones LX 50G PRO
ES
Page 14

Funcionamiento
Modo Stand-Alone-
Modo Master-Esclavo
1. Configure el modo de funcionamiento de acuerdo a sus requerimientos, los
modos a configurar son:
ACTIVACION POR AUDIO o MODO AUTO. Compruebe la tabla de configuración.
2. Conectando la alimentación, la unidad comenzará a funcionar y se proyectará
el haz.
3. Para el modo de ACTIVACION POR AUDIO, ajuste el mando de sensibilidad
situado en la parte trasera de la unidad, éste será más o menos sensible al
audio captado; el modo AUTO se pone en marcha automáticamente.
1. Configure el modo de funcionamiento. Elija una unidad para funcionar en modo
master, configure los dipswitch para seleccionar activación por Audio o modo
Auto. Las otras unidades deben configurarse en modo Esclavo, configure los
dipswitch para seleccionar este modo. La unidad master controla las unidades
Esclavo.
2. Use un cable de micrófono standwrd con conectores XLR para unir las unidades
entre ellas mediante el par de conectores situado en la parte trasera. Para
conexiones largas, le recomendamos la colocación de una resistencia para
finalizar el bucle. Consulte el punto 3 del funcionamiento en DMX para saber
como conectarlo.
3. Encienda todas las unidades, éstas tendrán un reset corto y comenzarán a
funcionar. Las unidades Esclavo funcionarán de la misma manera que la
unidad Master.
4. En modo de activación por Audio, ajuste el mando de sensibilidad de audio para
hacerla más o menos sensible. En modo Auto, la unidad operará automáticamente.
PAG. 14
User Manual/Manual de Instrucciones LX 50G PRO
ES
Page 15

Modo DMX
1. Configure el modo de funcionamiento, el sistema sólo acepta señal DMX512
standard para controlar con este modo. Configure la dirección de inicio DMX
de acuerdo al cuadro adjunto.
2. Conecte el controlador usando un cable standard de micrófono XLR-XLR,
uniendo la salida del controlador con la entrada de la primera unidad y su salida
con la entrada de la siguiente hasta unir todas las unidades.
3. Conecte la alimentación de las unidades, utilice los canales del controlador
DMX.
Nota: Le recomendamos que inserte un bucle de final de loop en la salida de la
última unidad de la cadena, para ello utilice una resistencia de 120Ω conectada
entre los pines 2 y 3 del conector XLR de salida.
PAG. 15
User Manual/Manual de Instrucciones LX 50G PRO
ES
Page 16

0 0
0
0
0
0
0
0
0
0
ACT. POR SONIDO
1 0
0
0
0
0
0
0
0
0
HAZ AUTOM.
0 0
0
0
0
0
0
0
1
0
AMINACION AUTOM.
0 1
0
0
0
0
0
0
0
0
MODO ESCLAVO
CODIGO CONFIGURACION DIRECCION DMX
1
DMX
Dipswitch
Valor
Dipswitch
Valor
#2
1
#7
32
#3
2
#8
64
#4
4
#9
128
#5
8
#1
256
#6
16 #10
DMX
config. a
“1”
0
#1 #2 #3 #4 #5 #6 #7 #8 #9 #1
0=OFF 1=ON
CUADRO DE LOS DISPWITCH /Código numérico
Modo
Configuración del código de direccionamiento
Por favor, consulte la tabla adjunta
Arriba significa “ON” marcado con
“1”
Abajo significa “OFF”
marcado con “0”
Para el modo DMX, el sistema sólo acepta señal standard DMX 512. La dirección
se configura con los dip 1-9. Este valor se establece entre 1 y 511. Cada dipswitch
representa un valor binario.
Al configurar la dirección compruebe que el valor binario obtenido es igual a la
dirección de inicio que se va a usar desde el controlador. La unidad precisa de
13 canales para el control DMX.
Como puede ver en la tabla siguiente.
PAG. 16
User Manual/Manual de Instrucciones LX 50G PRO
ES
Page 17

Descripción de los 13 canales DMX
Canal
DMX512
Contenido
1. Modo de Control
0~51
Sonido Activado (canales
Haz Autom. (canales
3~13 invalidados)
3~13 invalidados)
52-103
104-155
Animación Autom.
156-207
Disparo sonido, Manual
Disparo sonido, Auto
208-255
2. Abierto/Cerrado
0~85
Cerrado
86-171
Abierto
172-255
No blanking
3. Cambio de Patrones
0~225
55 patrones(0~255)
4. Velocidad
0~255/23=0~11
12 grados de velocidad
(
0~11)
5. Giro
0~63
Sin Giro
64~127
Giro Horizontal
128~191
Giro Vertical
192~255
Giro Horizontal y Vertical
6.
0~63
64-127
128-191
192-255
Patrón y Rotación
Sin función
Rotación en sentido horario
Patrón de puntos
Patrón de puntos y rotación
PAG. 17
User Manual/Manual de Instrucciones LX 50G PRO
ES
Page 18

192~255
Distorsión Horizontal y Vertical
9. Zoom
0-85
Sin ZOOM
86-169
de un punto al máximo
170-255
de máximo a un punto
10.
Velocidad
0~5
Sin función
6~255
43
grados de velocidad (
6~255)
11. Velocidad escaneo
0-255
255 grados de velocidad
(rápido a lento)
12. Velocidad de
cambio de color
(6~255)/23
ANULADO
13. Tamaño del patrón
0~2
Sin función
(3~255)
42 grados zoom out
7.
0~63
64-127
128-191
192-255
8. Distorsión
0~63
Sin distorsión
64~127
Distorsión Horizontal
128~191
Distorsión Vertical
Rotación y punto
de ancla
Sin Rotación ni Punto de
ancla
Rotación
Punto de ancla
Rotación y Punto de ancla
PAG. 18
User Manual/Manual de Instrucciones LX 50G PRO
ES
Page 19

Resolución de Problemas
Problema
Solución
±10V.
El indicador de encendido no se
ilumina y el laser no funciona.
Compruebe la alimentación, cable
y valor correcto del voltaje de entrada
En modo Stand-Alone, dirección del
patrón está descompensado y una
parte del patrón está sombreado.
El voltaje es bajo, causando que el
motor no funcione bien, compruebe
que el rango del motor está en un
rango de
En modo Stand-Alone y el estado
"cerrado", el indicador de encendido
se ilumina y el indicador de audio no.
En modo Stand-Alone y el estado
"cerrado", el indicador de encendido
se ilumina y el indicador de audio
también.
En modo DMX, el laser está apagado
y el indicador DMX también
En modo DMX, la unidad no puede
ser controlada con una consola DMX
pero el indicador de señal parpadea.
Asegúrese que la consola DMX y la
unidad tienen el mismo canal
Asegúrese de configurar el modo
DMX y que la conexión es buena.
Falla la configuración de modo
esclavo, configúrelo como unidad
master.
El sonido es demasiado débil para
activar el laser, incremente el
volumen y/o el mando de sensibilidad
de audio.
PAG. 19
User Manual/Manual de Instrucciones LX 50G PRO
ES
Page 20

http://www.equipson.es
This symbol on the product or on its packaging indicates that this product
shall not be treated as household waste. Instead it shall be handed over to
the applicable collection point for the recycling of electrical an electronic
equipment. By ensuring this product is disposed of correctly, you will help
prevent potential negative consequences for the environment and human
health, which could otherwise be caused by inappropriate waste handling
of this product. The recycling of materials will help to conserve natural
resources. For more detailed information about recycling of this product,
please contact your local city office, your household waste disposal service
or the shop where you purchased the product.
Manufactured by EQUIPSON, S.A.
 Loading...