

Page 1
StoryMill
User Guide
Copyright 2011. All rights reserved. Mariner Write, Mariner, WinJournal, Montage, Desktop Poet, Contour and Mariner Paperless are
registered trademarks of Mariner Software, Inc. All other trademarks are the property of their respective owners.
Page 2
Table of Contents
Section 1: First Encounters with StoryMill! 4
Chapter 1: StoryMill Basics! 5
The central metaphor! 6
The main project window and general terms! 8
Adding and removing items! 11
Editing items! 12
Annotations! 14
Adding and managing views! 15
Searching! 16
Chapter 2: Views, Chapters, Timelines, Tags! 17
Working with views! 18
Working with chapters! 22
Editing in the project window! 24
Timelines! 26
Storylines! 27
Editing scenes in the timeline! 28
Events! 30
Tags ! 31
Smart views! 32
Trial version and registration! 34
Section 2: Working with StoryMill! 35
Chapter 3: Advanced Text Editing! 36
The ruler! 37
Page 3

Styles! 38
Spellchecking, find and replace! 39
Splitting windows! 40
Conversion utilities! 41
Chapter 4: Exporting Your Work! 42
Exporting basics! 43
Export templates! 44
Using export template keywords! 45
Keywords reference! 46
Document templates! 51
Custom document templates! 52
Chapter 5: Tools! 53
Snapshots! 54
Using snapshots! 55
Word frequency! 56
Highlight Clichés! 57
Progress meter! 58
Window fading! 59
Chapter 6: Preferences! 60
General preferences! 61
Editor preferences! 62
Full Screen preferences! 63
Status preferences! 64
Snapshot preferences! 65
Troubleshooting! 66
3 of 66
Page 4
Section 1: First Encounters with StoryMill
Learn the basics that youʼll need to start writing.
4 of 66
Page 5

Chapter 1: StoryMill Basics
Welcome to StoryMill! Part word processor, part database,
StoryMill 4.0 provides every author with the tools essential to
writing a best seller: everything from project-wide annotations to
centuries-spanning timelines.
StoryMill introduces aspiring authors to multi-level writing
methods of tracking characters, scenes, and locations, while
professional writers will appreciate StoryMill's time-saving ability
to oversee and manage the full creative process with Smart
Views. Built from the ground up for Mac OS X, StoryMill offers an
innovative way to channel and fine tune the creative writing
process.
Although StoryMill provides an impressive array of features to
help you write and track the details of your story more effectively,
none of them are required! StoryMill is incredibly flexible: it can
simply be a no-nonsense place to write and revise using its
distraction-free full screen and powerful annotations, or a
complete database of every character, location, and scene that
makes up your novel.
In this chapter:
StoryMillʼs central metaphor
•
The main project window
•
Adding and removing items
•
Editing items
•
Annotations
•
Adding and managing views
•
Searching
•
In order to help you jump straight into writing, this chapter
introduces the basic interface and concepts behind StoryMill and
describes how to add, edit, and delete any item in your project.
5 of 66
Page 6
The central metaphor
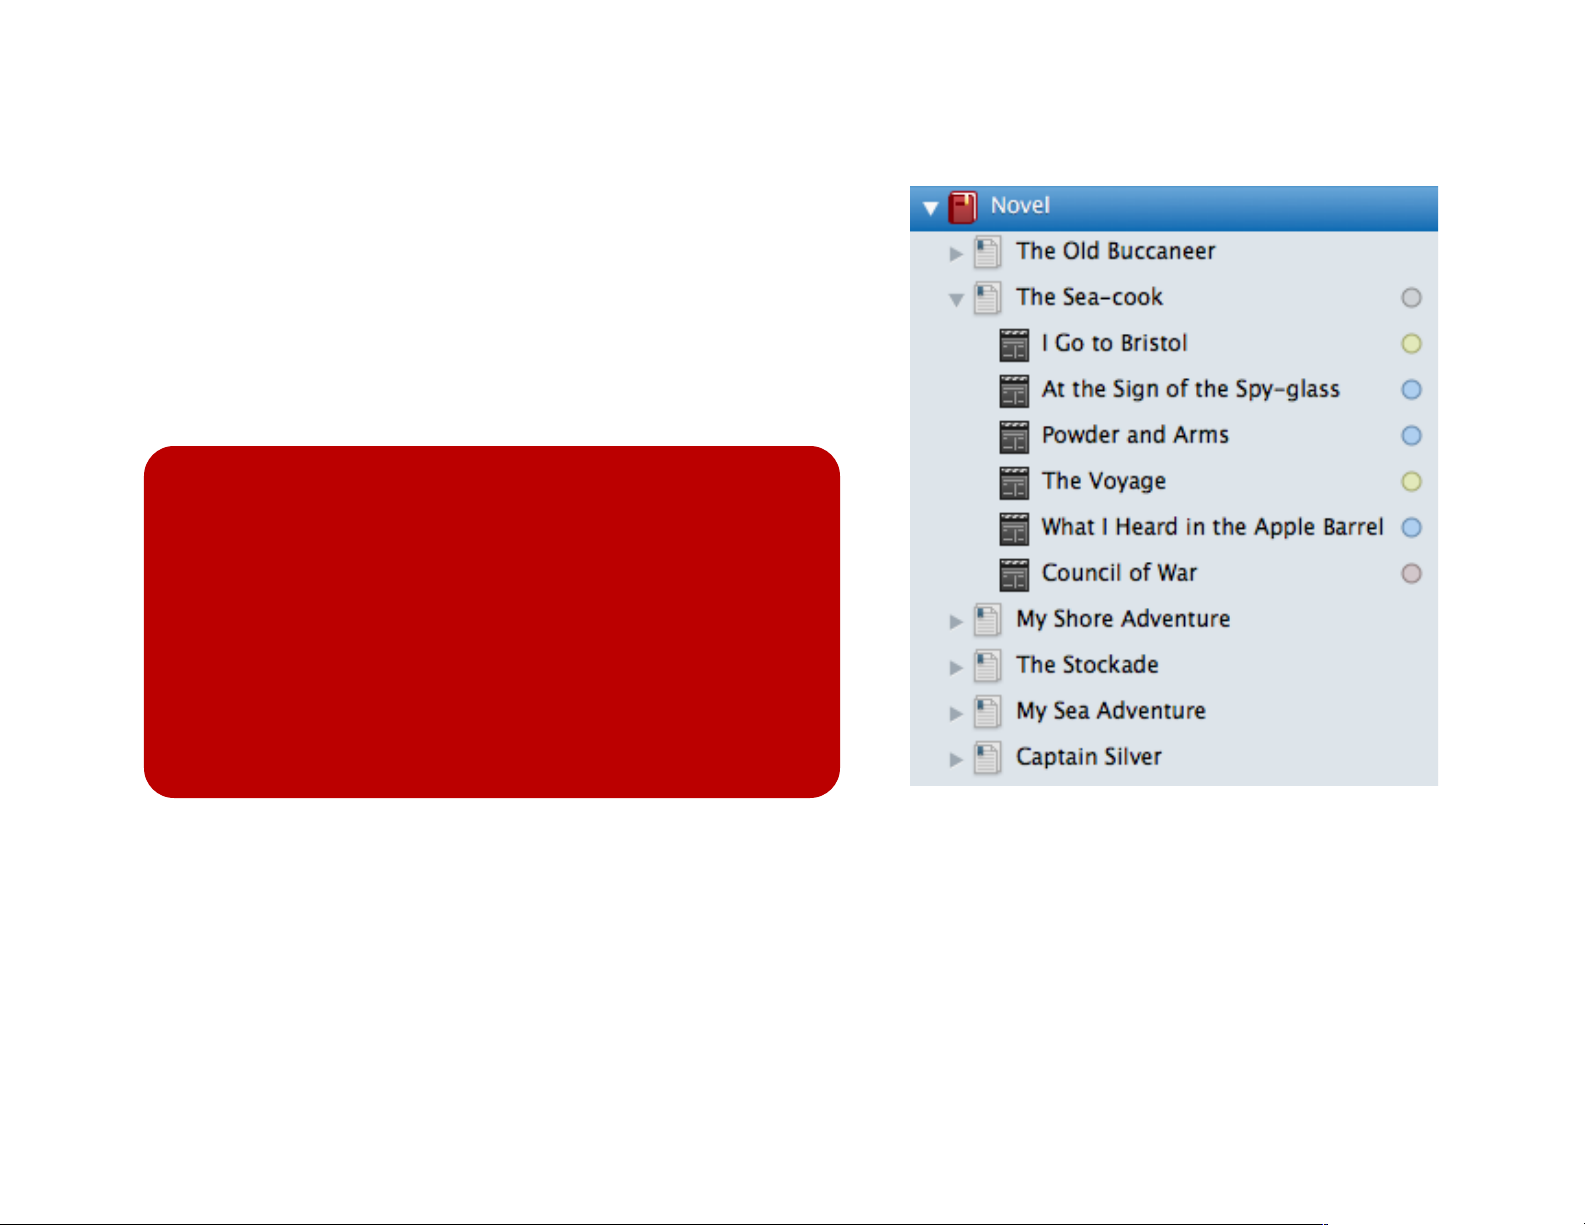
Before you can effectively make use of StoryMill, you need to
understand the concepts it is organized around. StoryMill takes
scenes as the basic building blocks of writing. A scene is a smaller
part of the overall story that may be demarcated by time, setting, or
content. There is the text that makes up the scene, but the
program also recognizes that there are characters (the actors in
the story), a location (the setting), and other information, such as
notes, that you as the author can manage.
Tip:
Think about scenes as discrete ideas that you can quickly
capture - and organize later. You canʼt control when your
creative juices will run - but you can control how you
organize them. So, first jot down the scene youʼre thinking
of - and then decide later how you want to integrate it into
your story. Approaching your story this way allows you to
develop it in a non-linear fashion. Once you capture your
ideas as scenes, then you can get creative again deciding
how you want to arrange them.
Scenes then make up chapters. While scenes are a key
organizational component of StoryMill, the chapters are how your
readers will eventually see your story organized.
Chapters then make up your story. StoryMillʼs novel view allows
you to see your entire story from start to finish as it will appear to
your reader, with alternating chapters displaying a light background
color. Scroll through, review your narrative flow, and admire your
work!
6 of 66
Page 7
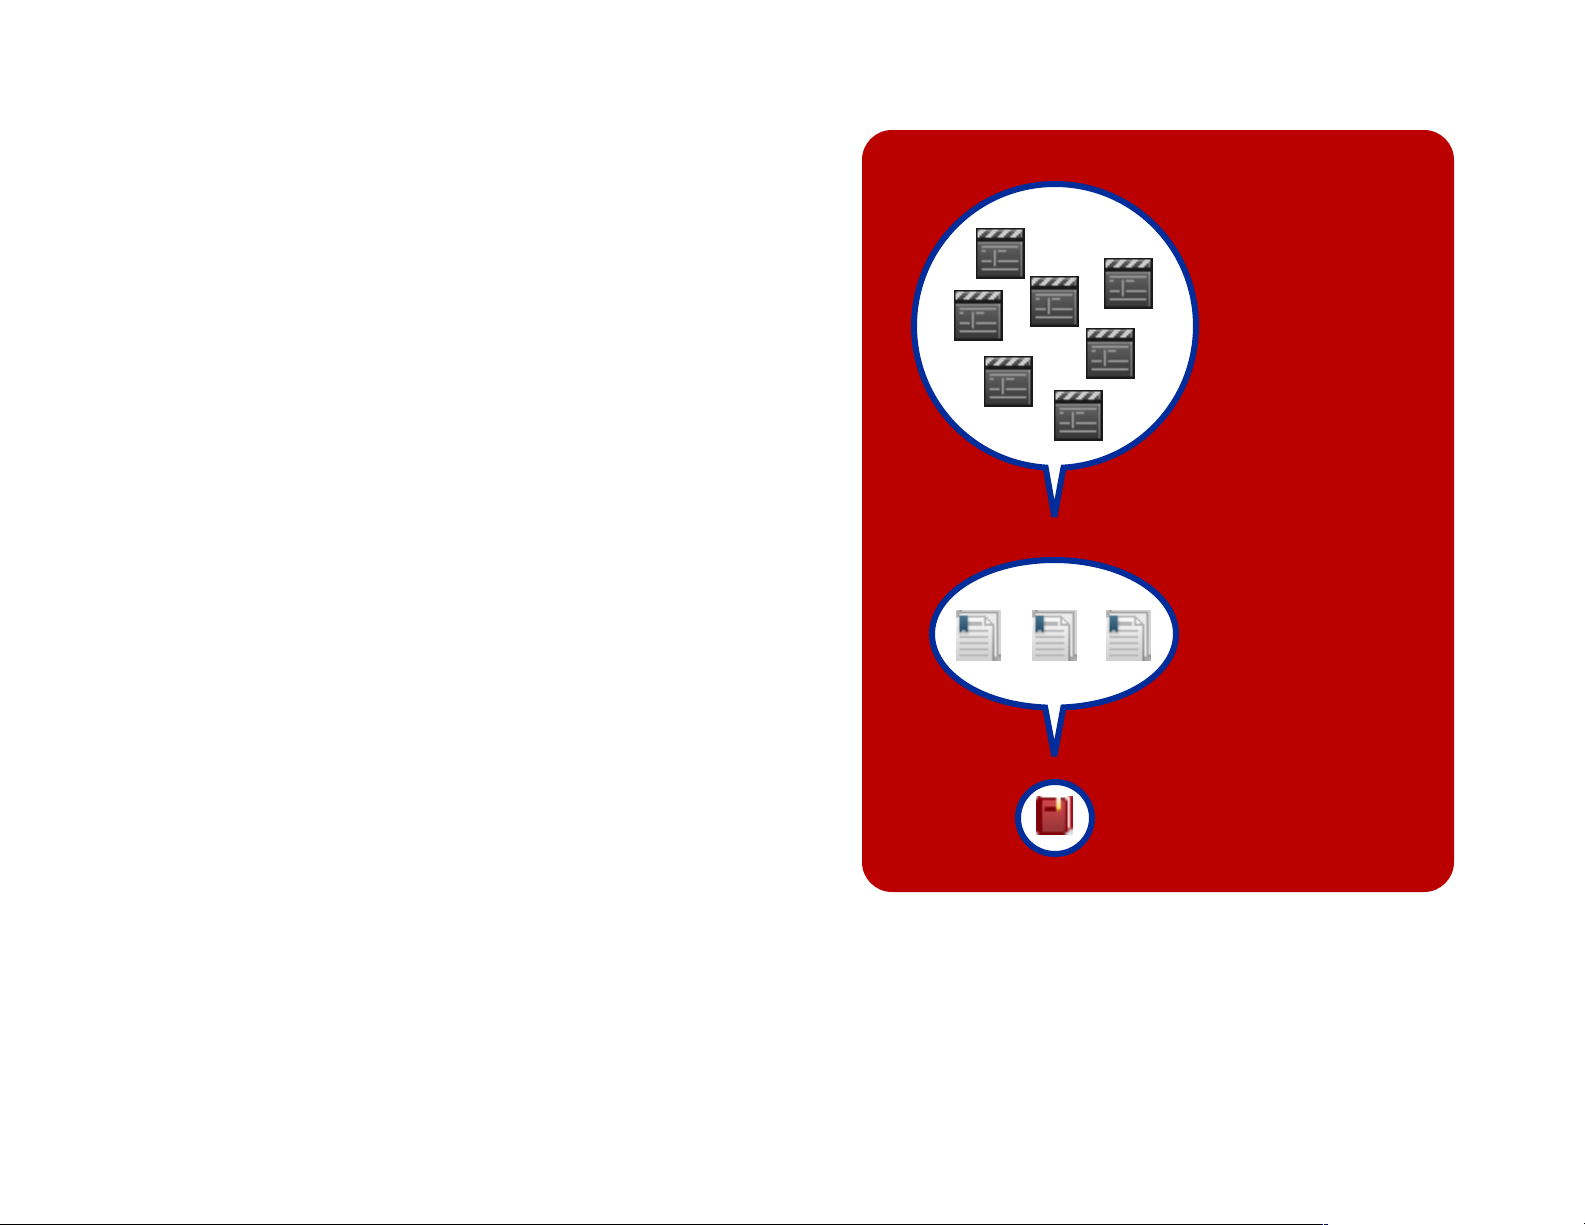
In addition to the narrative flow of scenes-within-chapters-within-
Scene ideas
novel, StoryMill allows you to examine the chronological flow of
your project using timelines. Because you can view scenes both
in the order they fall in the narrative as well as the order they fall
in time, scenes are a powerful way to organize your project.
For some people or writing projects, the concept of scenes as
building blocks for chapters may not make much sense.
Fortunately, you can use the novel or chapters views as generic
text containers (and disregard scenes entirely) while still making
use of StoryMillʼs annotations and other powerful writing and
organizational aids. For example, each “chapter” could instead
be a section of your research paper or novella.
Aside from the information that is directly influencing your story,
StoryMill can also track research and submissions to editors and
agents, allowing you to take your project all the way from
inception to publication in one program.
Chapters
Novel
7 of 66
Page 8
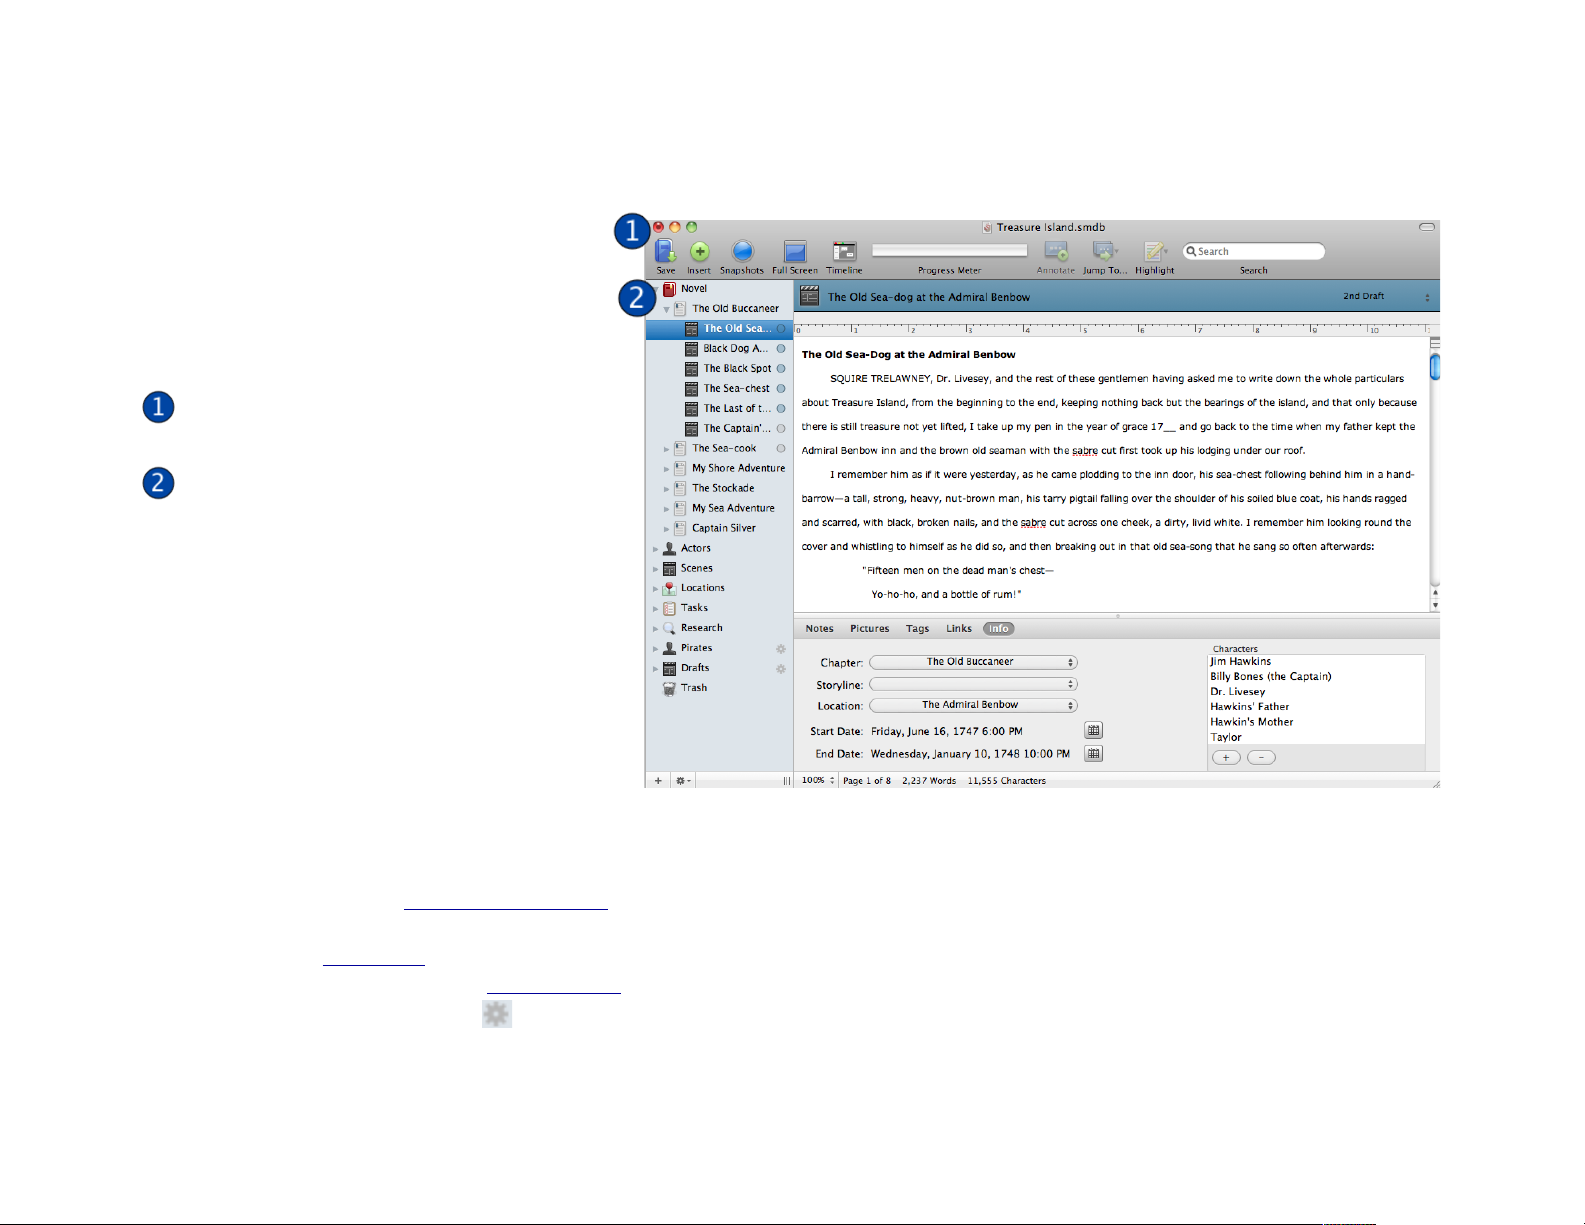
The main project window and general terms
The project window is where youʼll be
spending most of your time in StoryMill.
Each “project”, be it a short story, a paper
for your English class, or a novel, is saved
as an all-in-one document, and each has
its own project window.
Toolbar: The standard Mac OS X
toolbar.
Source List: The source list contains
all of the items that make up your
StoryMill project, organized in a
sensible hierarchy. "The source list
displays items that comprise the
content of your novel (like Chapters
and Scenes) and items you use to
develop and organize your writing (like
Locations, Tasks and Smart Views), all
organized into containers. "Clicking on
different items in the source list will
present you with different
corresponding views.
# An item containerʼs view will show a description of the container
and a tag cloud (see Working with views, p. 18). You can also
add a new item to the container from its view and even open a
timeline (see Timelines, p. 26) from the scenes view. You can
distinguish smart views (see Smart Views, p. 32) from the rest
based on the gray gear icon next to their name.
#
8 of 66
Page 9
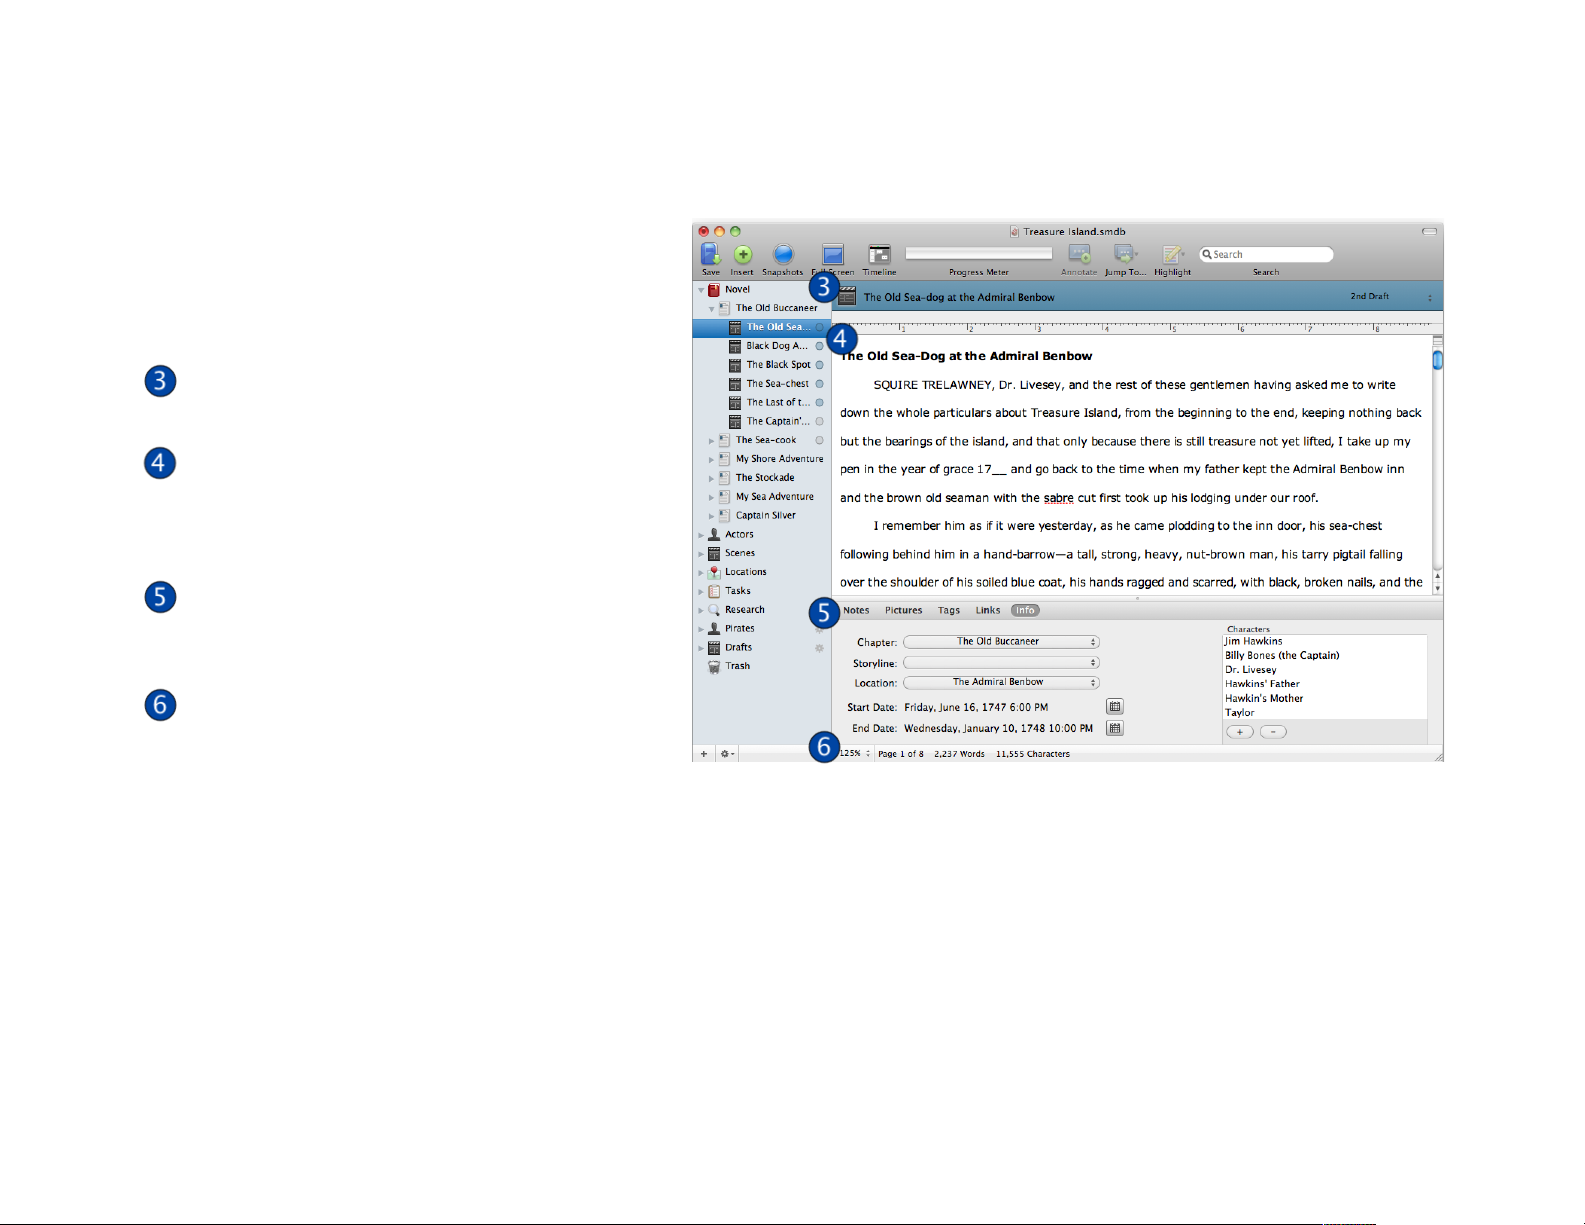
# The source list lets you sort individual items,
simply by dragging them around. An itemʼs
status is represented in the source list by a
colored circle to its right. You can also assign
it a status in its individual item view (shown at
right), comprised of a header bar, content
pane, metadata pane, and status bar.
Header Bar: This bar displays the icon of
your selected item, its title, and its status.
Content Pane: The content pane displays
all the text (and in some cases, pictures and
notes) that youʼve ascribed to the item
youʼve chosen.
Metadata Pane: The metadata pane
contains an array of information specific to
the item, including pictures, tags, and links.
Status Bar: This bar allows you to choose
the zoom level for your content pane, and
depending on the item selected, will monitor
its cursor location, page number, word
count, and character count.
continued from above
9 of 66
Page 10
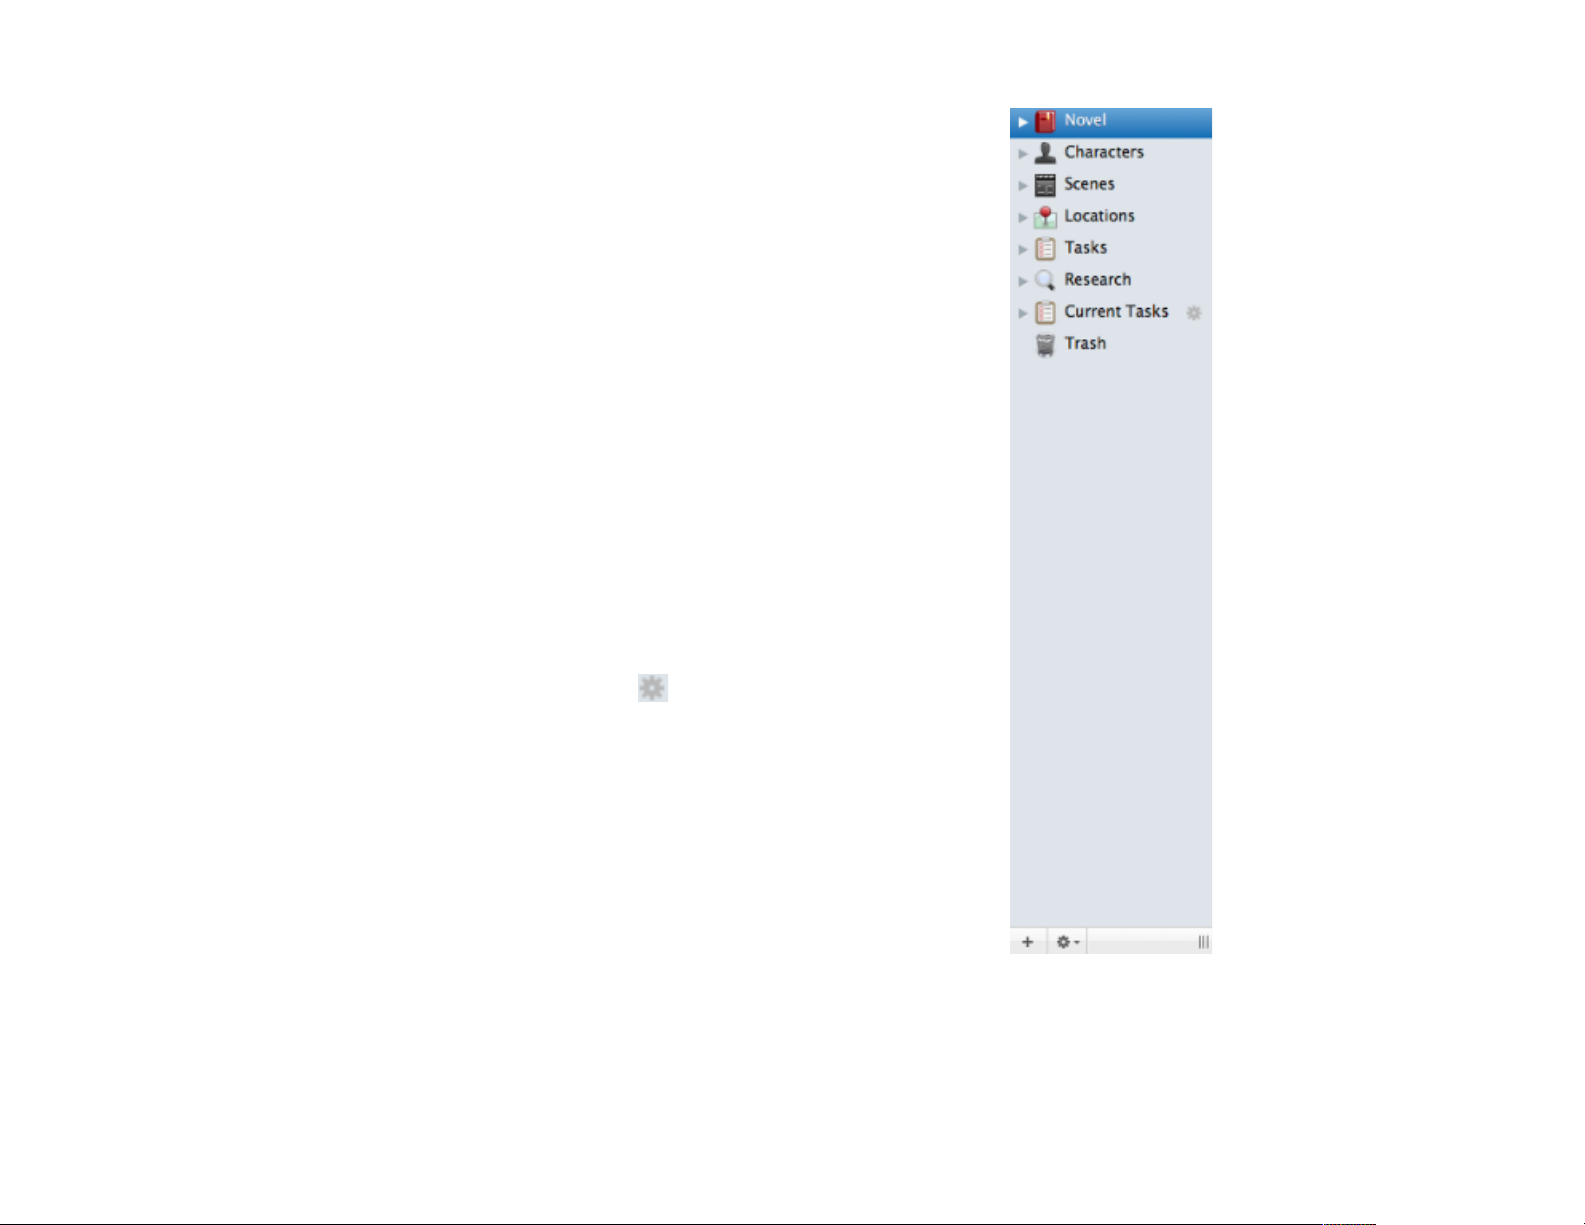
Since your project is made up of items organized into containers in
the source list, StoryMill provides you with the following views:
Novel, which contains the entire narrative text of your project and
•
is made up of chapters and scenes
Characters, which are the actors in your project
•
Scenes, which can have characters, locations and timelines
•
associated with them
Locations, which are the different settings in your project
•
Tasks , an example of a generic item view - a catch-all that can be
•
used for notes, tasks, or any number of other things
Research, which contains researched information pertinent to
•
your project
Current Tasks, which is a generic smart view.
•
Trash, which contains a list of all the items you have deleted,
•
including the ability to restore them.
Smart views are a special kind of view based off another view. A
smart view acts like a filter and only shows items that match its
search criteria. Smart views have a gray gear situated to their
right, and use the same icon as the view they are filtering (the
generic view in the example at right).
10 of 66
Page 11
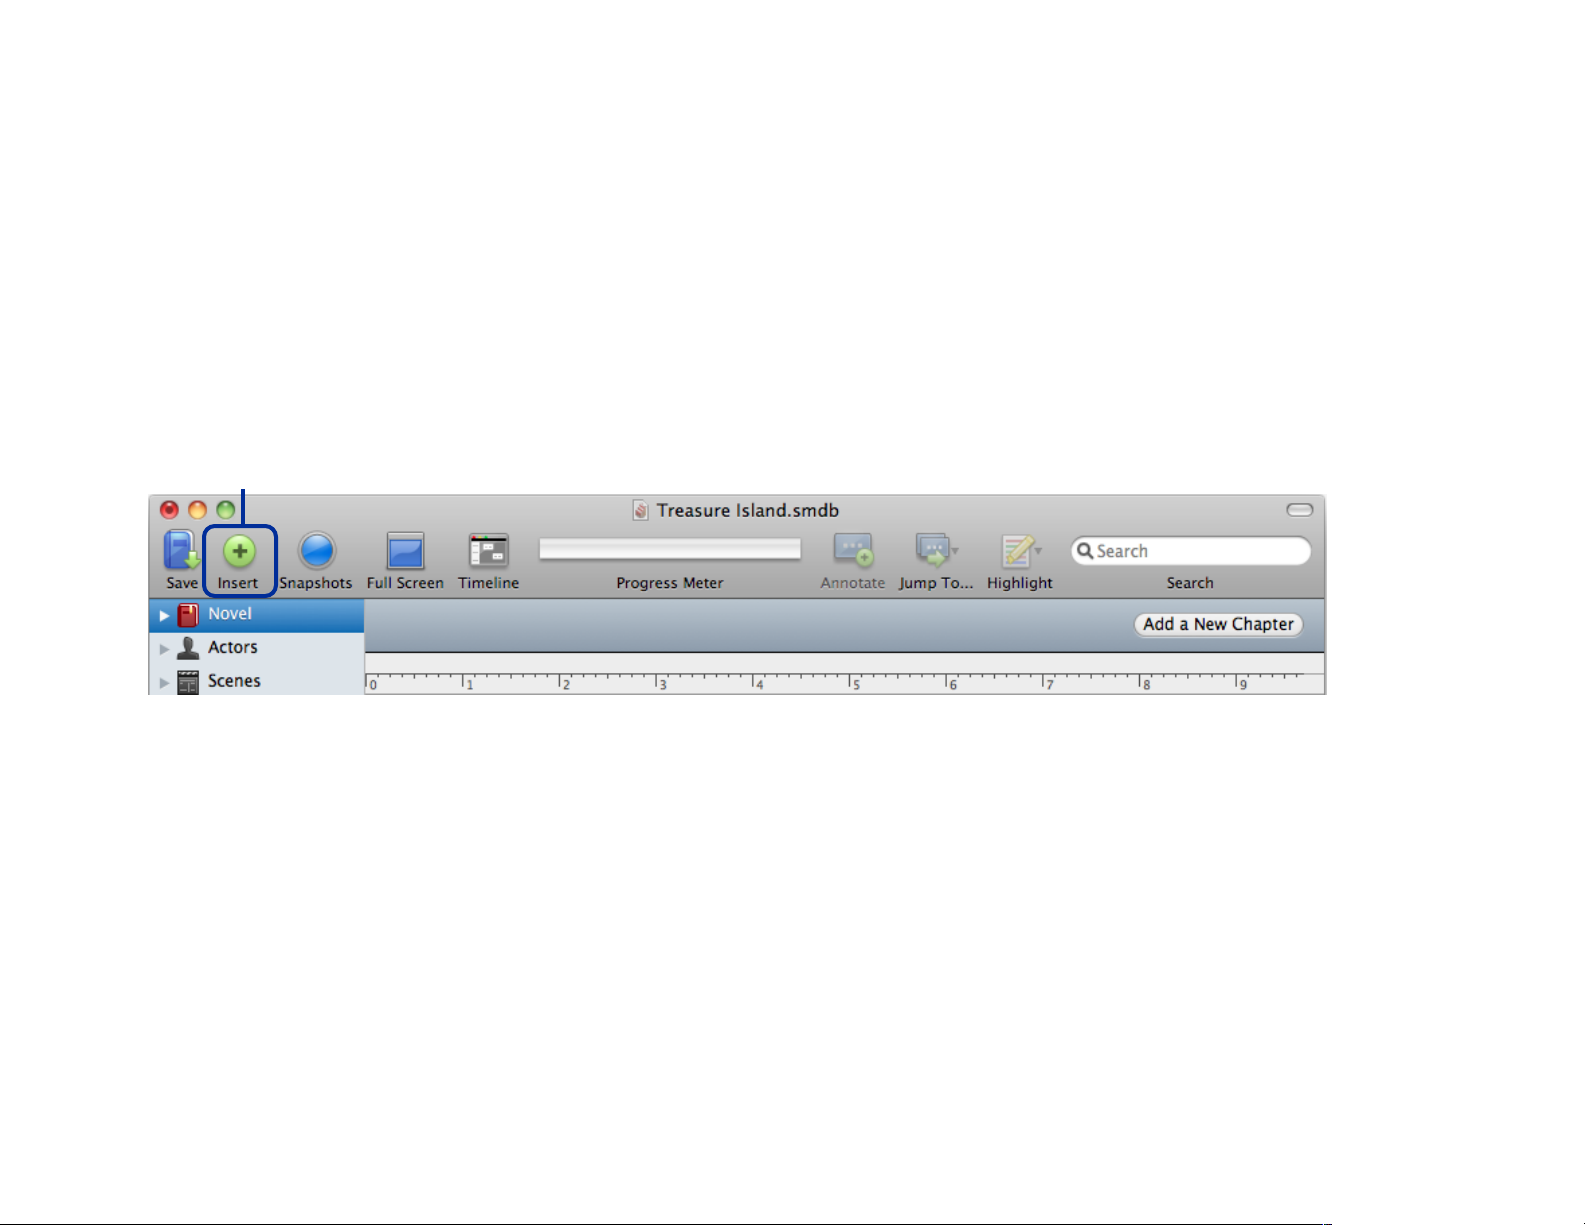
Adding and removing items
Insert button
StoryMillʼs items have a diverse amount of information attached to
them, but how you add and remove them is always the same.
To add an item, click the Insert button in the toolbar. You may also
choose Edit→Insert Item or use the hotkey ⇧⌘N. If you have a
container highlighted, the new item will be inserted at the bottom of
its items list. If you are already working in a item list, your new item
will be inserted immediately underneath the one currently highlighted.
When you insert an item, the name field will automatically gain
focus, allowing you to immediately name your new item. Your new
item will also have its own view with header bar, content and
metadata panes, and status bar (only for chapters and scenes).
To remove an item, either right click it (control-click for single button
mice) and choose Remove Items, select it in the item list and
choose Edit→Remove Item, or hit ⌘⌫.
11 of 66
Page 12
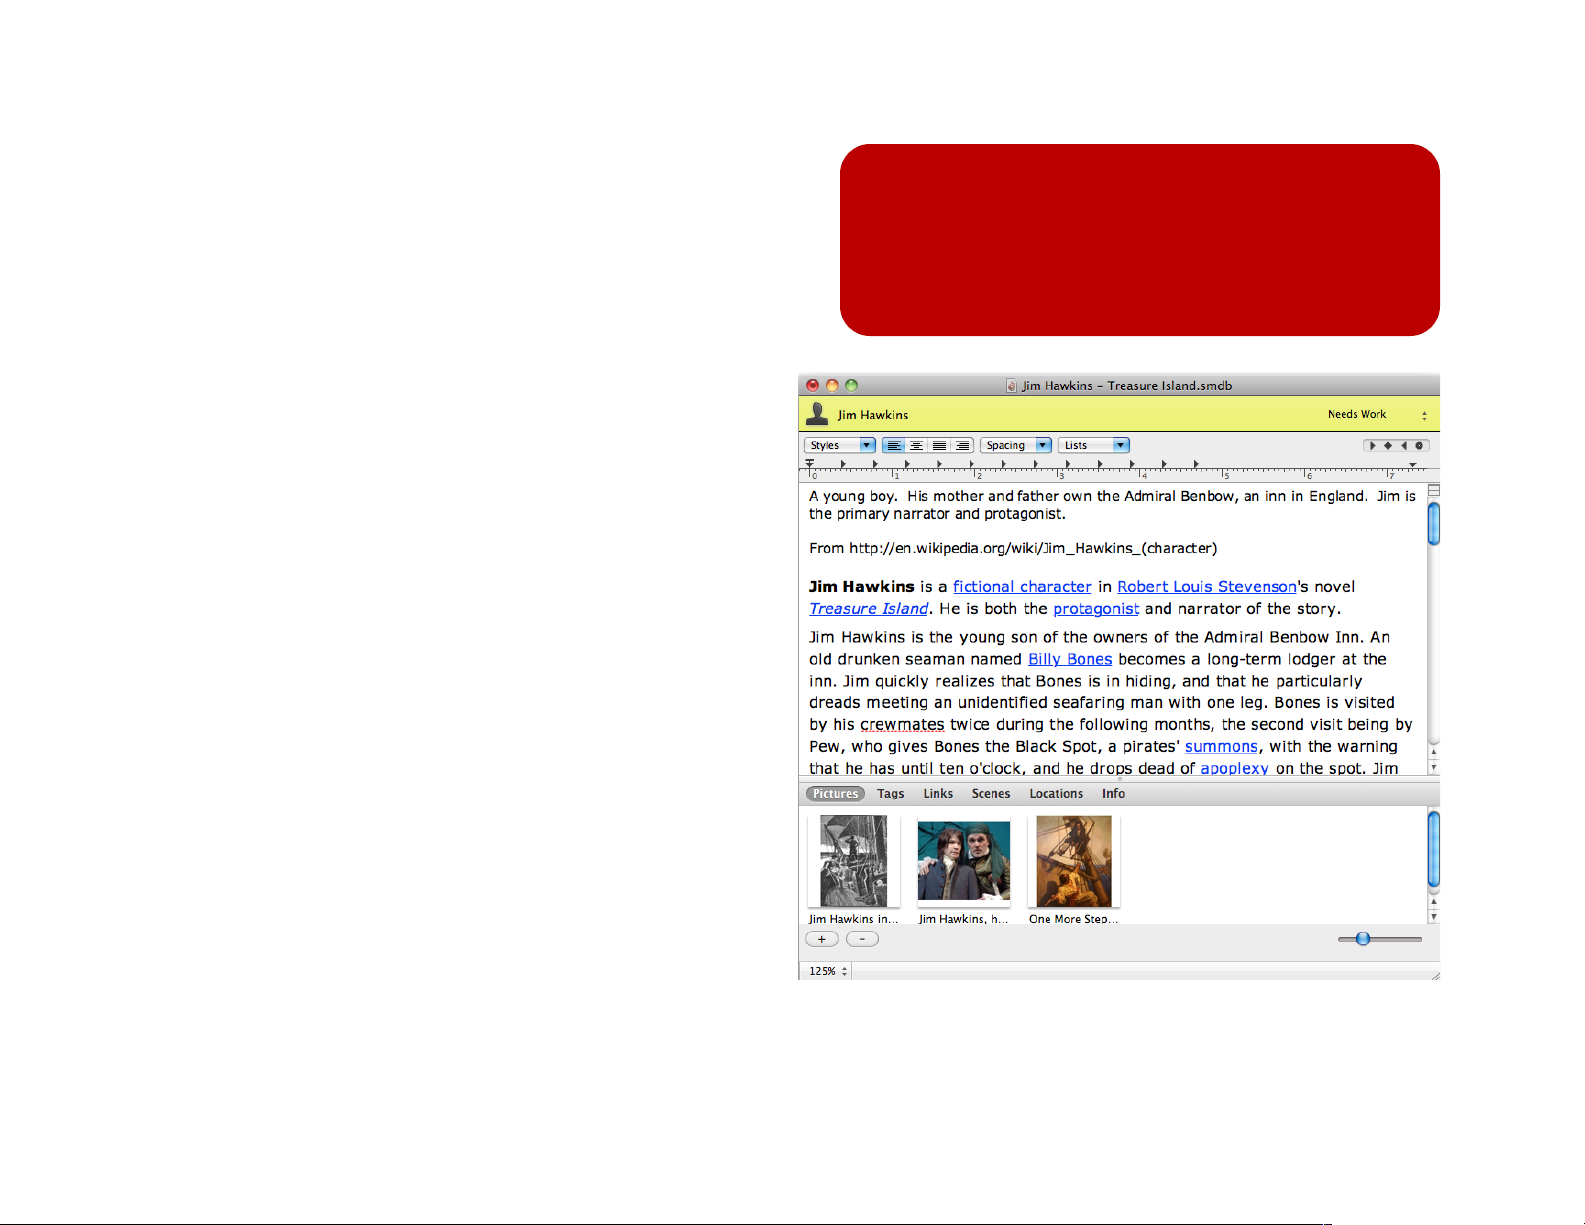
Editing items
Editing items should be fairly straight-forward, particularly if
youʼve used Cocoa applications in the past.
First, click the item you wish to edit in the item list. To change
its name, simply slow double click it. Edit its text or notes in
the content pane, and modify its metadata using the
metadata pane. You can also use the status drop-down in
the header bar to assign it a new status.
Right clicking (control-clicking for single button mice) your
selected item will also open a contextual menu that offers
you a number of options for managing it.
Like all text areas in StoryMill, an itemʼs notes can contain
richly formatted text, images, and more. Use Text→Show
Ruler or the hotkey ⌃⌘R (control-command-R) to show
and hide the default Cocoa ruler. Use the Text→Font
menu to control fonts and formatting.
All items can be edited in their own window in addition to
the project window. Double click any individual item in the
source list to open an item editing window (shown at
right) that is identical to the project window except that it
will not show the project windowʼs toolbar or source list.
The item editing windows are useful if you need a larger
space (for instance, if your notes field has images in it) and
also can be used to reference item notes while working in
another view.
Tip:
The item editing window is purely for content and
notes - so remember to edit your itemʼs name in
the source list!
An item editing window
12 of 66
Page 13
Like the project window, all item editing windows have a
content pane (for text, pictures and/or notes) and a metadata
pane - with pictures, tags, and links common to all items.
Pictures can be added independently of your notes, and the
links pane allows you to link a file on your computer or a web
URL to your item. Tags are single words or phrases that you
can use with smart views for very powerful filtering and
organizing (see Ta gs, p. 31).
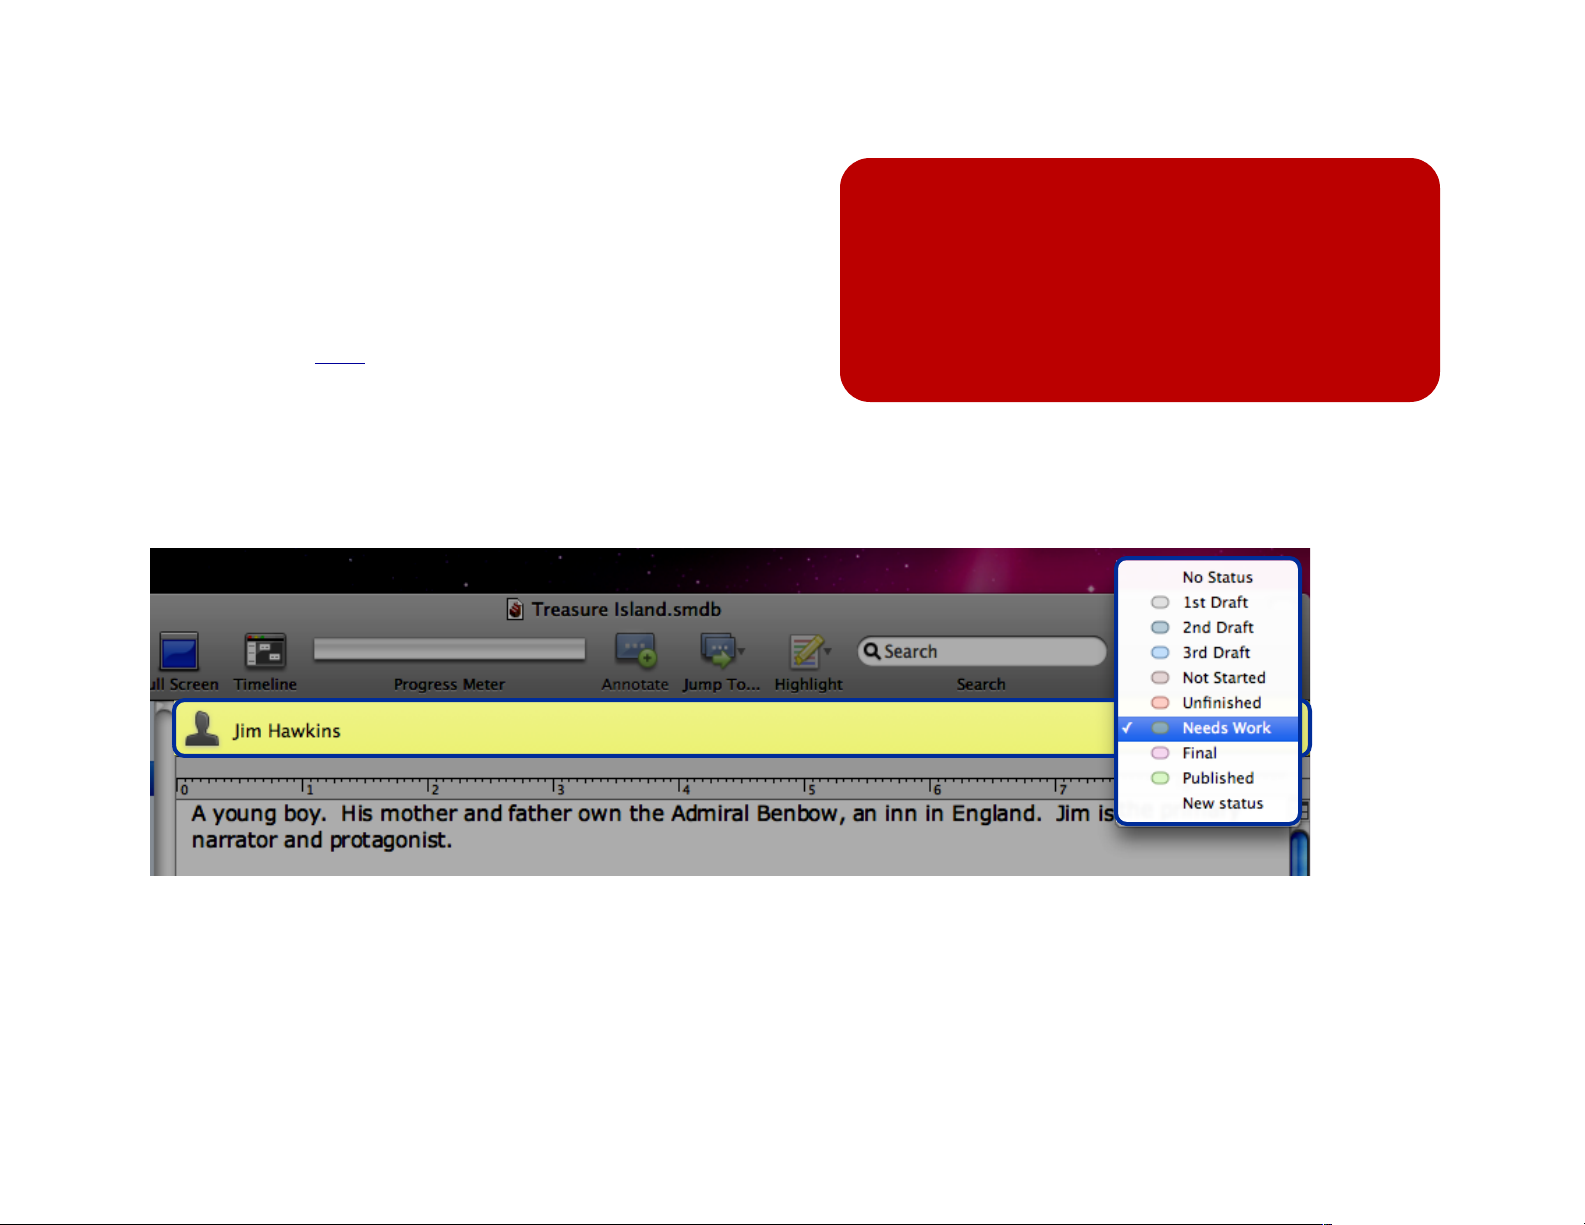
Each item also has a header bar (shown below) to track its
status. Select a different status from the drop-down menu, and
the barʼs background color will change accordingly. (The color of
the itemʼs status identifier circle in the source list will also change.)
Tip:
A chapter is both a container that holds scene
items and an item in the novel container.
Because of these dual functions, you can treat a
chapter like an item and double click it to open
its own item editing window.
13 of 66
Page 14
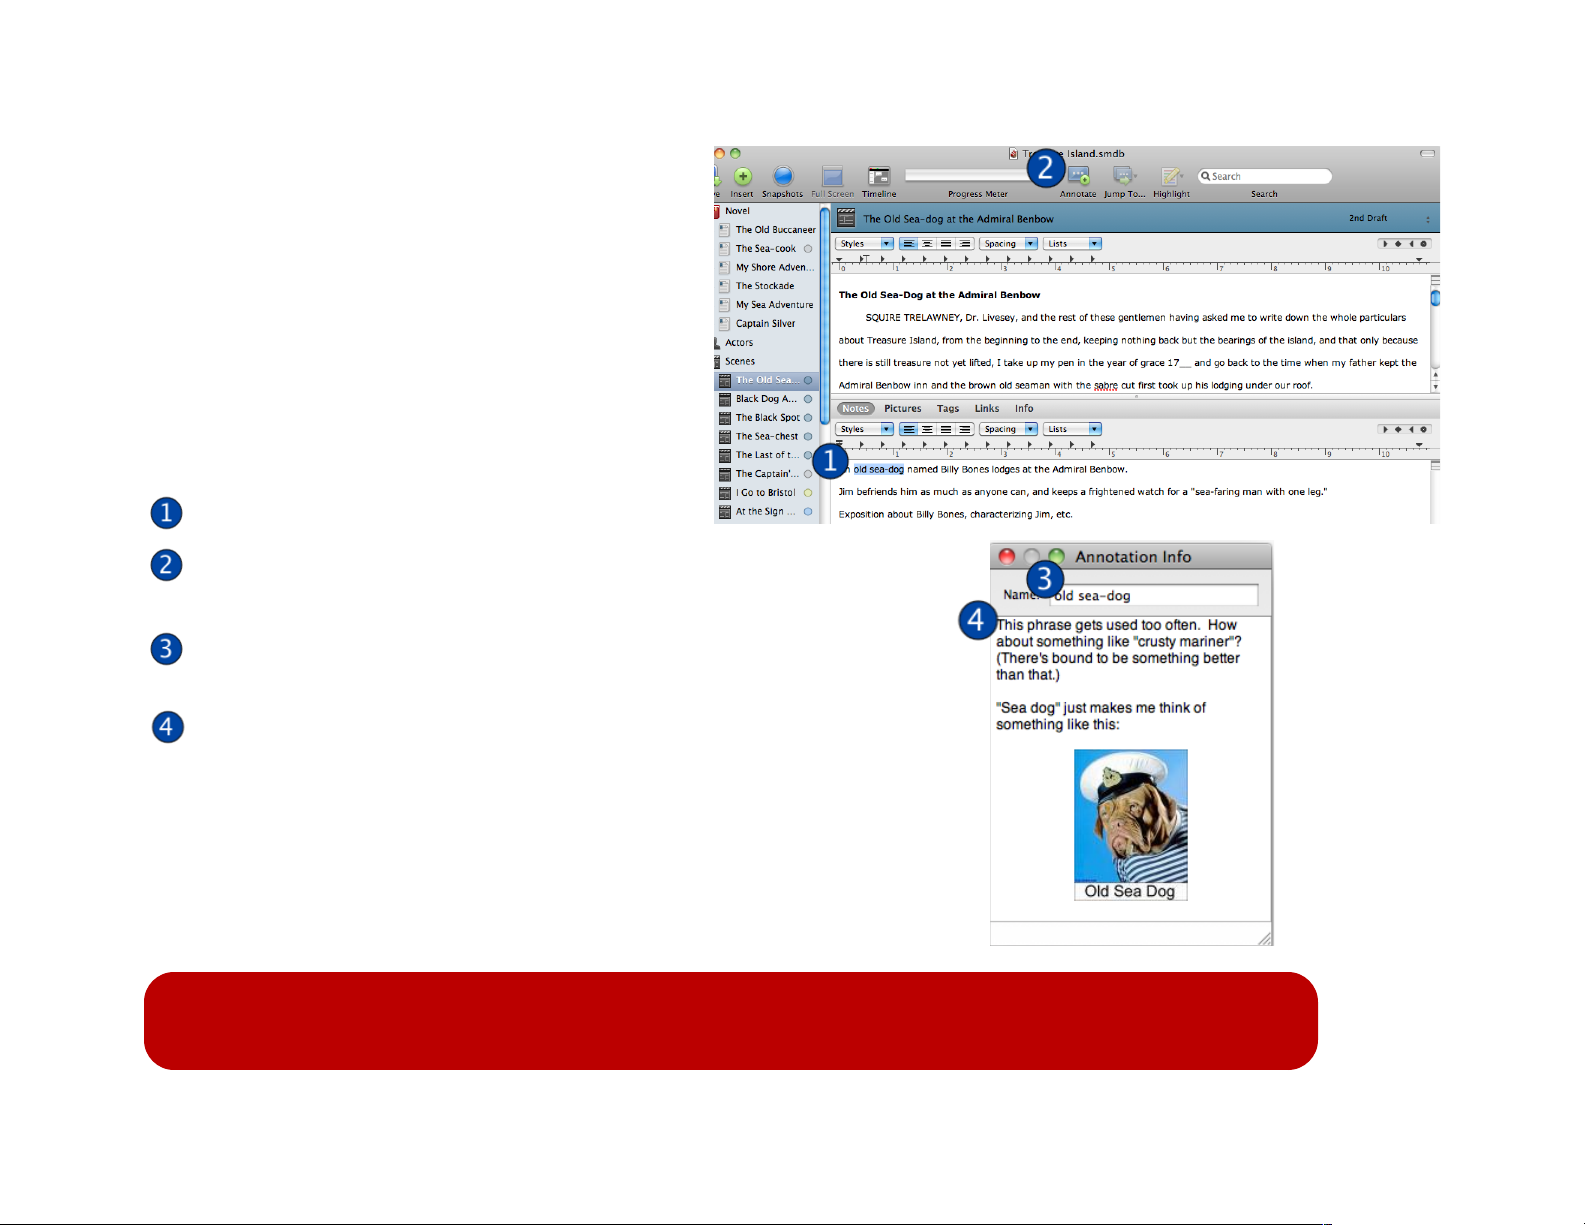
Annotations
An annotation is a comment attached to a specific
piece of text. In StoryMill, you can add annotations
to any rich text (such as notes areas and chapters,
but not plain text inputs like item names).
Like all other extended pieces of text in StoryMill,
annotations can contain richly formatted text,
images, and more.
To add an an not atio n:
Select some text.
Click the annotate button in the toolbar, choose
Text→Annotate, or hit ⌘D.
Enter a title for the annotation (optional; only useful in
chapters).
Hit tab or click in the text area of the annotation window and
enter your annotation.
To edit or view an annotation, click the linked text. You can hide all
annotation links using Text→Hide Annotation Marks or ⌃⌘D.
To remove an annotation, select the linked text or move your cursor
into it and click Remove Annotation in the toolbar, choose
Text→Remove Annotation, or hit ⇧⌘D.
Tip: Keep your hands on the keyboard! If your cursor is inside some linked text, just hit ⌘' (command-
apostrophe) or choose Text→View Annotation to see the annotation!
14 of 66
Page 15
Adding and managing views
By default, new projects in StoryMill do not have all views
(which views are included depends on which template you use
to create the new document; see Document templates, p. 51).
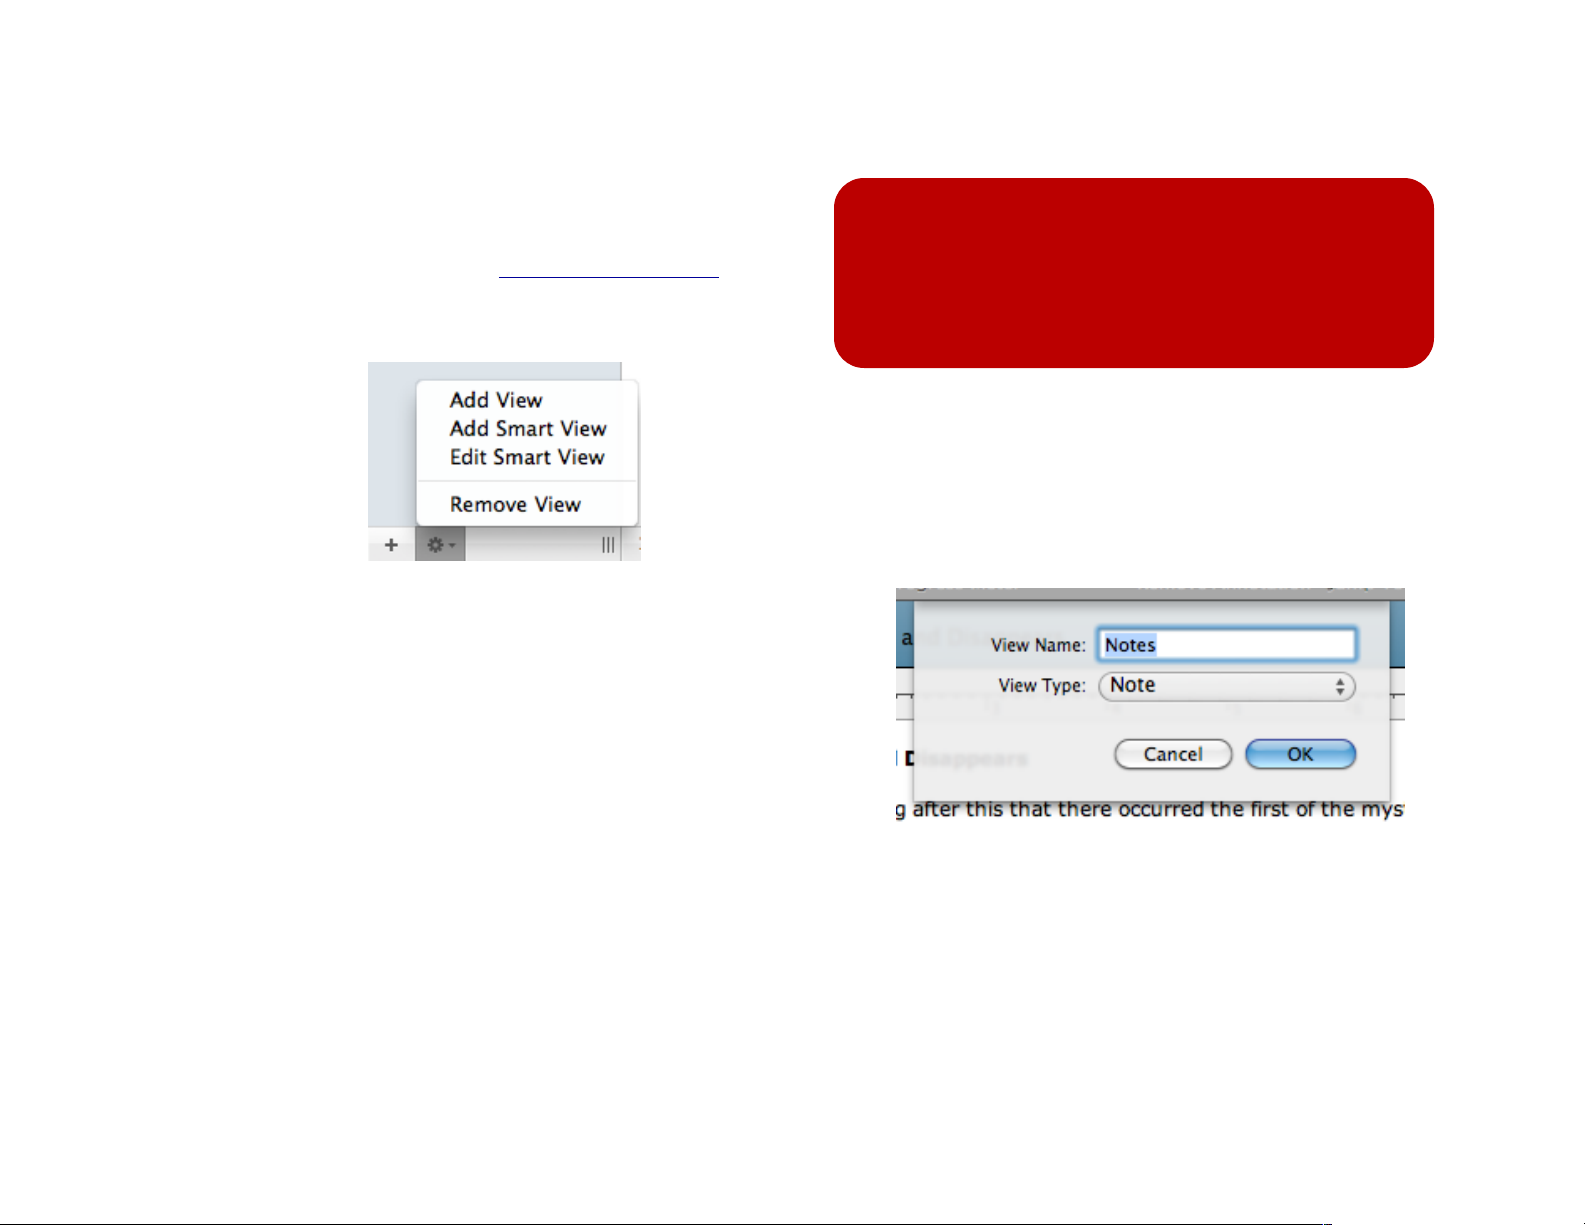
To manage your views use the buttons at the bottom of the
source list:
The + button adds a new smart view; the gear button also allows
you to add a new smart view, as well as edit an existing smart view,
add a non-smart view, or remove a view.
After you have added a view, use the pop up window to name it and
choose its type. Once you have named your new view, it will
appear in the source list and have the same display as your other
views of the same type.
Tip:
Remember that to remove a container view, you
need to use the gear button at the bottom of the
screen.
To rename a view, simply slow double click it in the source list and
type in its new name.
15 of 66
Page 16
Searching
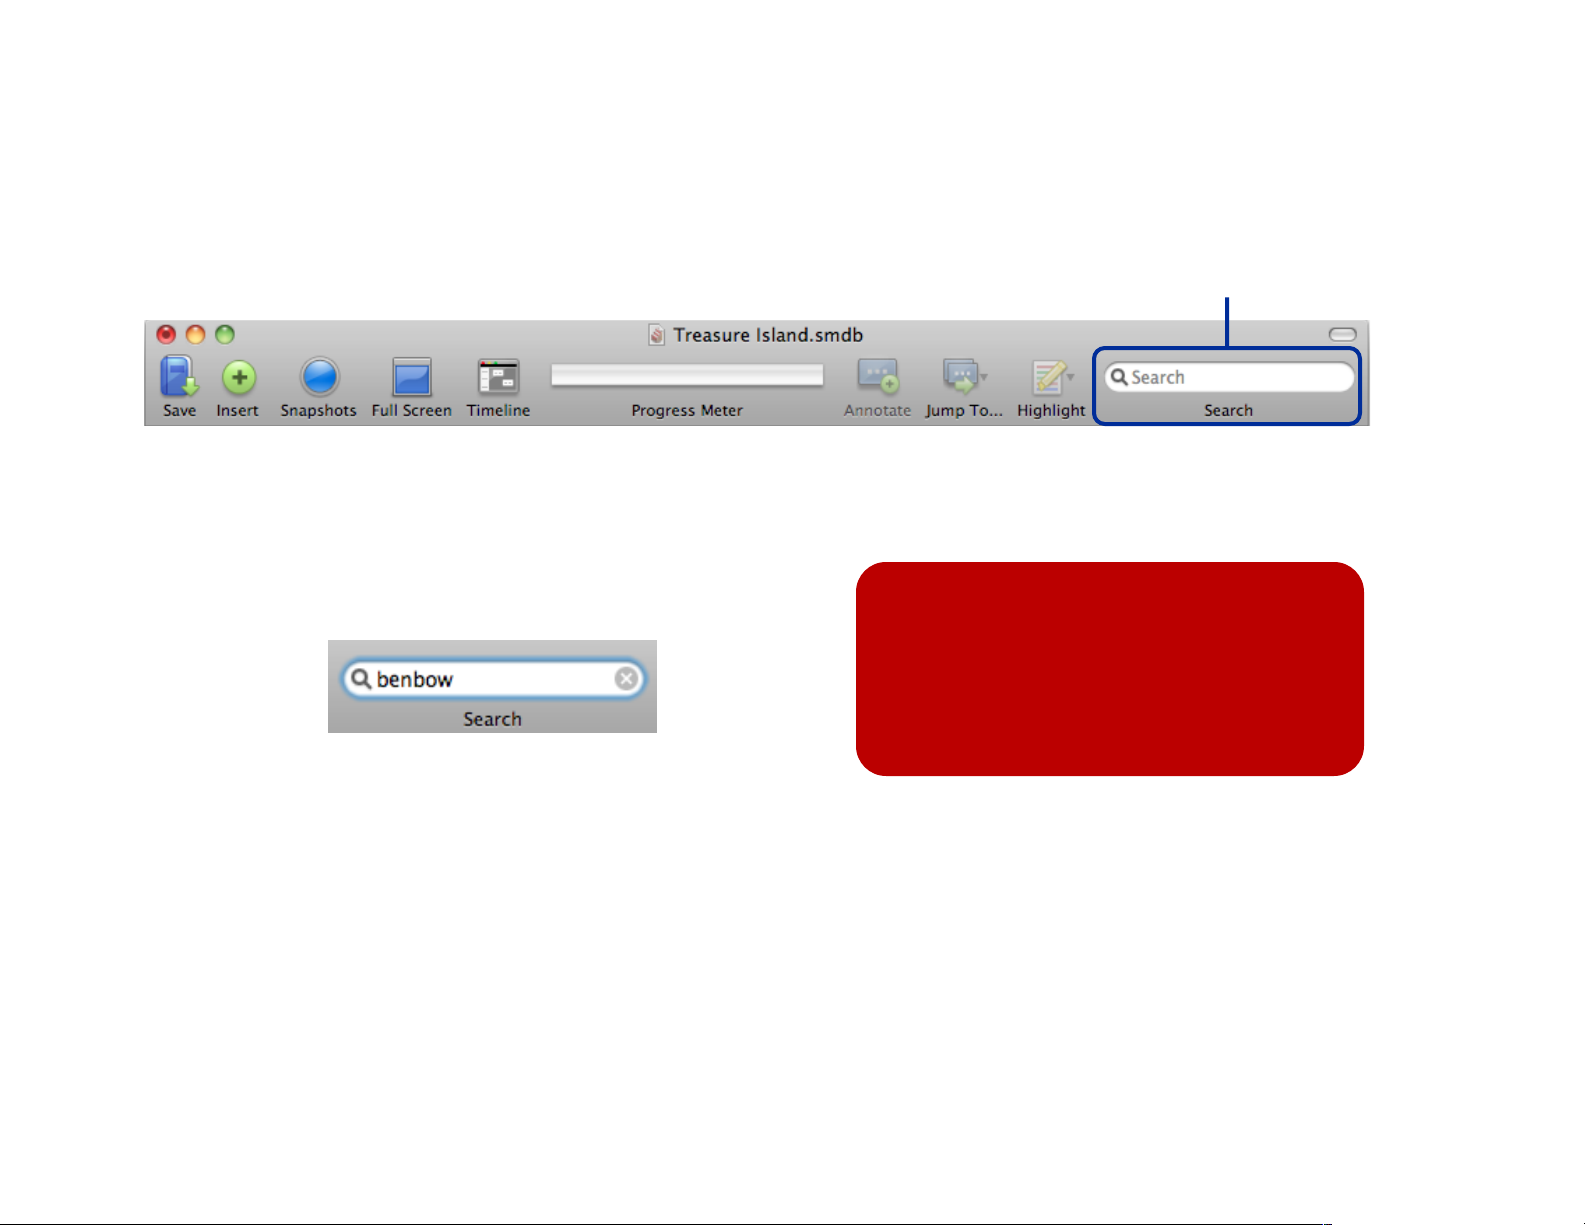
In addition to filtering views using smart views and temporary filters,
you can enable a project-wide search by using the search bar,
located by default at the far right of the project window toolbar:
Entering a search will launch a new window that displays a
collapsible list of results, sorted by view in the same order as your
source list.
To clear a search, click the x icon that appears at the right side
of the search bar:
Search bar
Tip:
Searches are project-wide! This means
that a search run while a particular view
is selected will still return results from
another view.
Keep in mind that StoryMill does not search anything except an
itemʼs name, notes, and text (in the case of chapters and scenes).
To search by tags or other information in the metadata pane, youʼll
need to use smart views or temporary filters.
16 of 66
Page 17

Chapter 2: Views, Chapters, Timelines, Tags
Using the information from Chapter 1, you should have a grasp on
the basics of using StoryMillʼs views and items. However, there
are four specific features that form StoryMillʼs core that deserve a
more in-depth look: views, editing, timelines, and tags.
All of these features were touched on in Chapter 1, but hereʼs a
quick run-down:
Scenes are the basic building blocks for everything written in
StoryMill. Within the scenes container view in the source list,
scenes are organized in the order they occur in the written work.
Scenes have a broad amount of information attached to them,
including characters, locations, start and end dates, and
storylines.
Chapters - the first item list in your novel view - provide an easy
way to gather scenes into groups. If you arenʼt organizing or
jotting down details and backstory, youʼll probably be working with
the chapters of your novel.
In this chapter:
Working with views
•
Working with chapters
•
Editing in the project window
•
Timelines
•
Storylines
•
Editing scenes in the timeline
•
Events
•
Tag s
•
Smart views
•
Trial version and registration
•
Timelines are a second way to look at your scenes. Whereas the
scenes view is ordered by when scenes occur in the narrative, the
timeline orders scenes based on when they fall in time. Timelines
put your scenes in context with one another, regardless of
narrative order.
Tags provide an easy way to organize and sort any item in
StoryMill in conjunction with smart views.
17 of 66
Page 18
Working with views
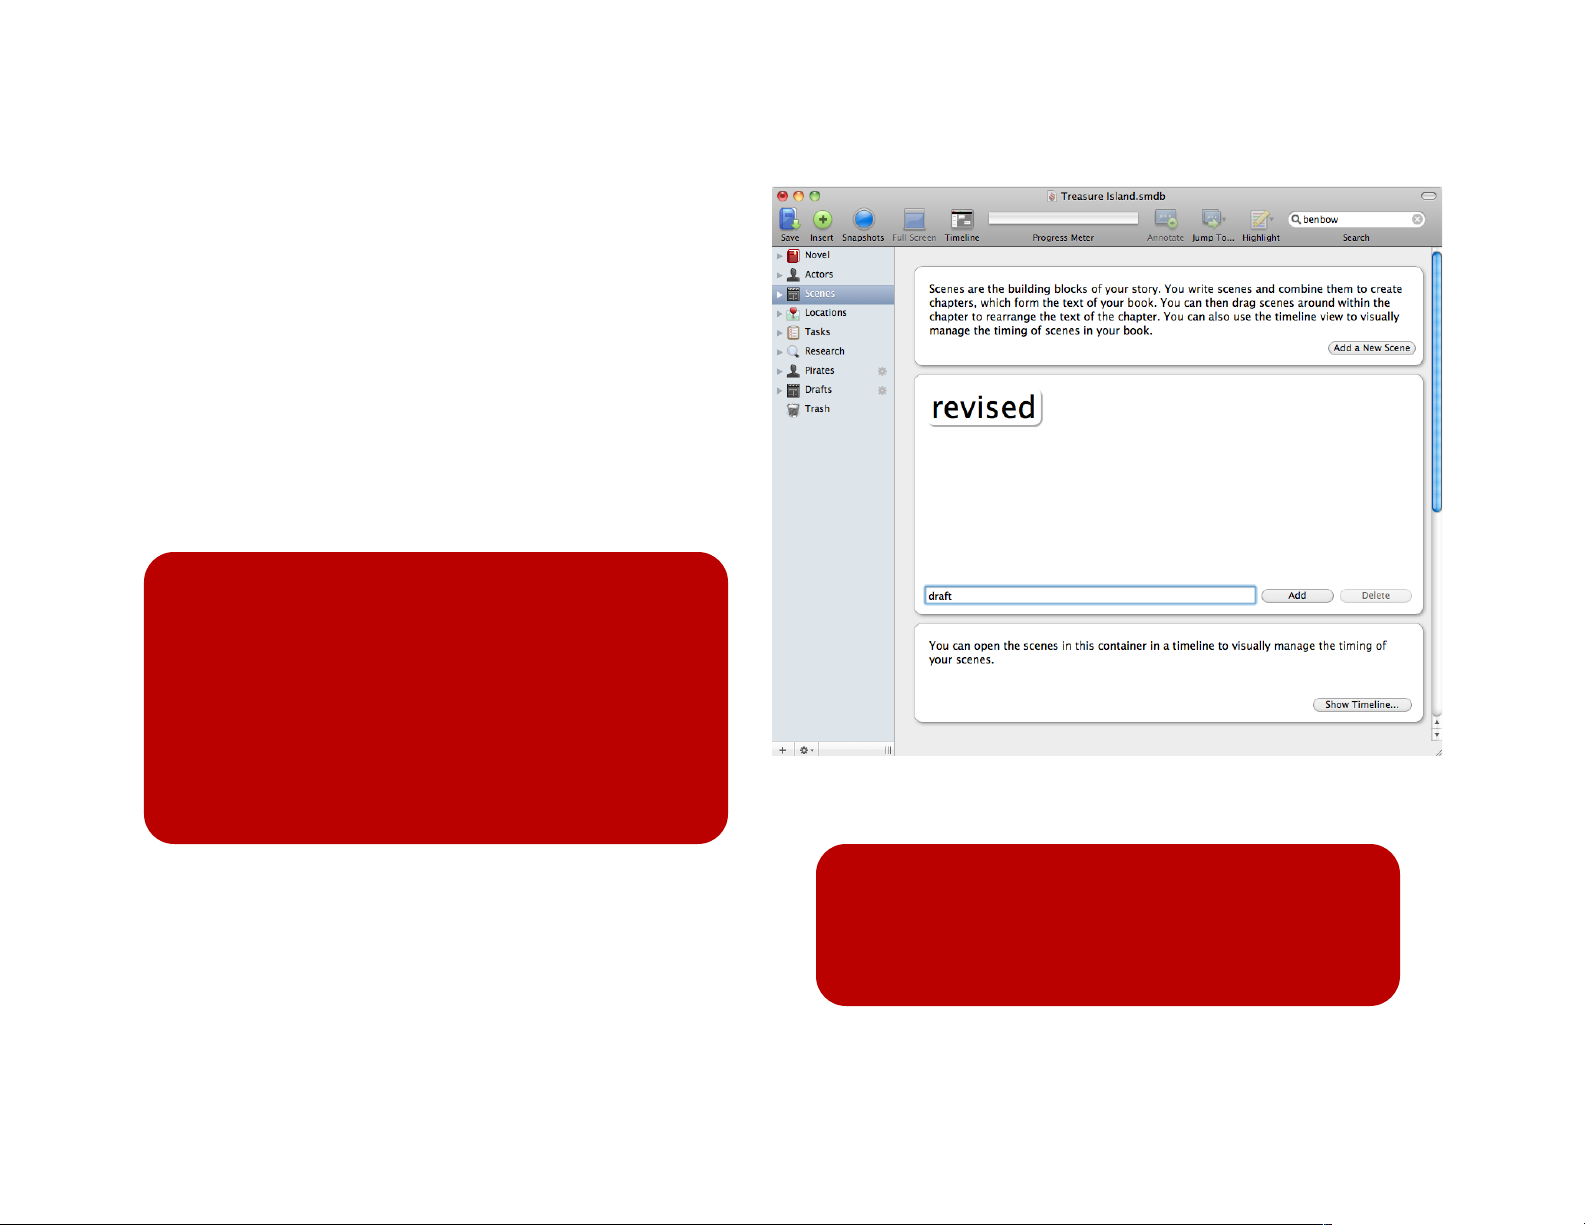
Each item container in the source list by default has a
container description view (scenes container view shown
at right) that allows you to add a new item, manage tags,
and in the case of scenes and scenes-based smart
views, see all the your viewsʼ items as part of a timeline.
The scenes container view provides a good example of
how to work with container views:
Clicking on “Add a New Scene” will add a new item at
the bottom of your scenes list, with the same single item
view enabled as for all your other scene items.
Tip:
Once youʼve added a new scene, assign it a
chapter in its metadata pane, and sort it within the
scenes list by dragging and dropping it. The order
of the scenes in the scenes list dictates their order
in the chapters. If you are placing chapter text in
scenes, reordering the scenes will automatically
move the text in the chapter.
Container description view (scenes view)
The tag cloud provides an easy way to manage your
scenesʼ tags. Adding a tag directly to the tag cloud adds it
to all the scenes in your container.
The bottom pane of the scenes container view is unique in
allowing you the option to open a timeline of your scenes.
Tip:
You cannot add new scenes in the novel view;
instead, youʼll need to add them in the scenes view.
18 of 66
Page 19
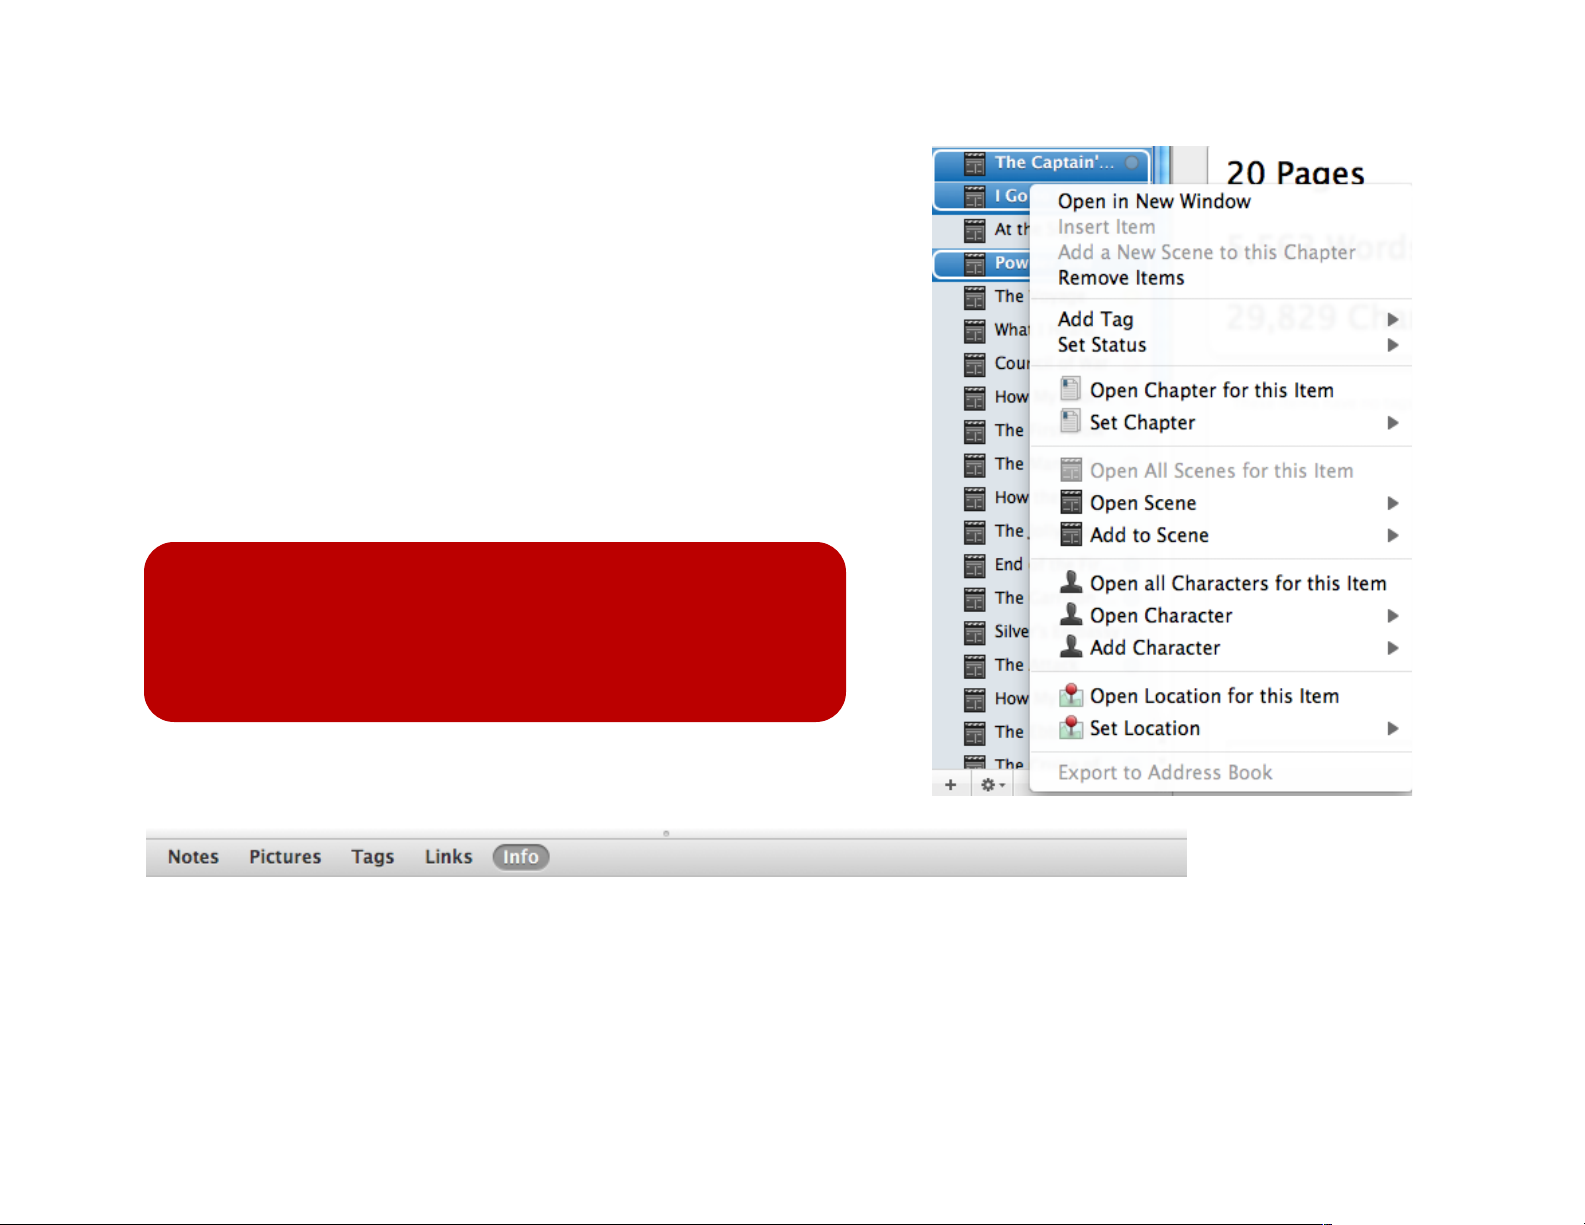
If you need to add information to multiple scenes at one time, you
can use the contextual menu (shown at right). Select from the
source list the scenes you want to modify with shift-click or
command-click and right click them (or control-click for single
button mice). From the contextual menu you can add tags, set
statuses, open an attached character or location in its item editing
window, open the chapter that contains the scenes, and more.
Individual item views provide a different set of options for managing
your work. As described in Chapter 1, each single item view
displays a header bar, content pane, metadata pane (described in
detail below), and status bar, enabling you to edit your story in a
variety of ways.
Tip:
Different individual items will display different views. For
example, the upper pane of a characterʼs view will allow
you to make notes on the character, while the upper pane
of a chapterʼs view will allow you to edit text.
Each individual item viewʼs metadata pane whose mode bar
(shown below) allows you to control a variety of metadata panes.
The available panes in the metadata pane vary by item, although
Pictures, Tags, and Links are common to all items.
Each will allow you to store different pieces of information, such as:
19 of 66
Page 20
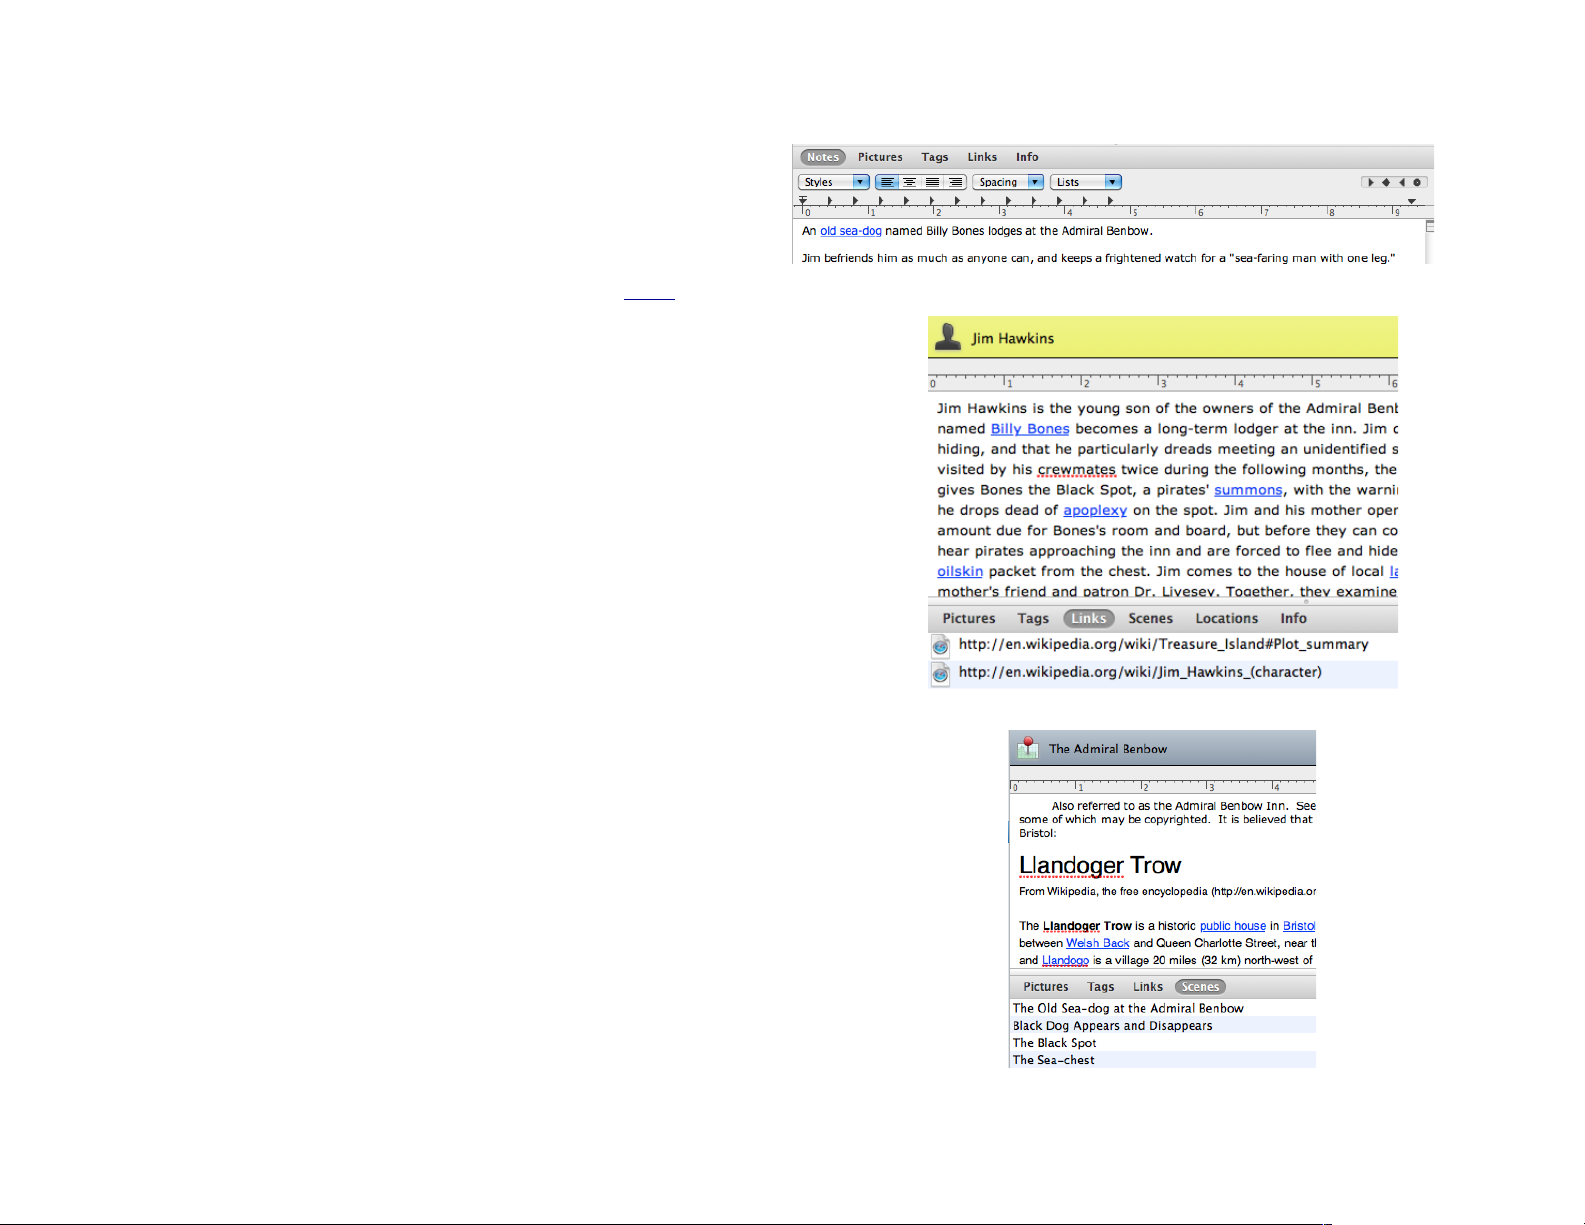
Notes: your ideas and thoughts on your item.
•
Pictures: any images you have associated with your
•
item.
Tags: any filters or organizing themes (see Ta gs , p.31).
•
Links: links to web URLs or desktop files for reference purposes.
•
Scenes: a list of scenes included in or associated with your item.
•
Locations: a list of locations defined for the scenes included in or
•
associated with your item.
Characters: a list of all characters in your item. This list is
•
populated by the characters view (if you have one).
Info: Unique metadata attached to scenes and characters,
•
detailed below:
# - Chapter: the chapter that contains the scene.
- Storyline: which storyline (in the timeline) the scene is in.
- Location: the setting for the scene. This drop down is #
populated by your locations view (if you have one).
# - Start Date: the date and time the scene starts.
# - End Date: the data and time the scene ends.
# - Characters: a list of the sceneʼs characters. This list
# is populated by the characters view (if you have one).
! - Traits: role and physical characteristics of your characters.
20 of 66
Page 21
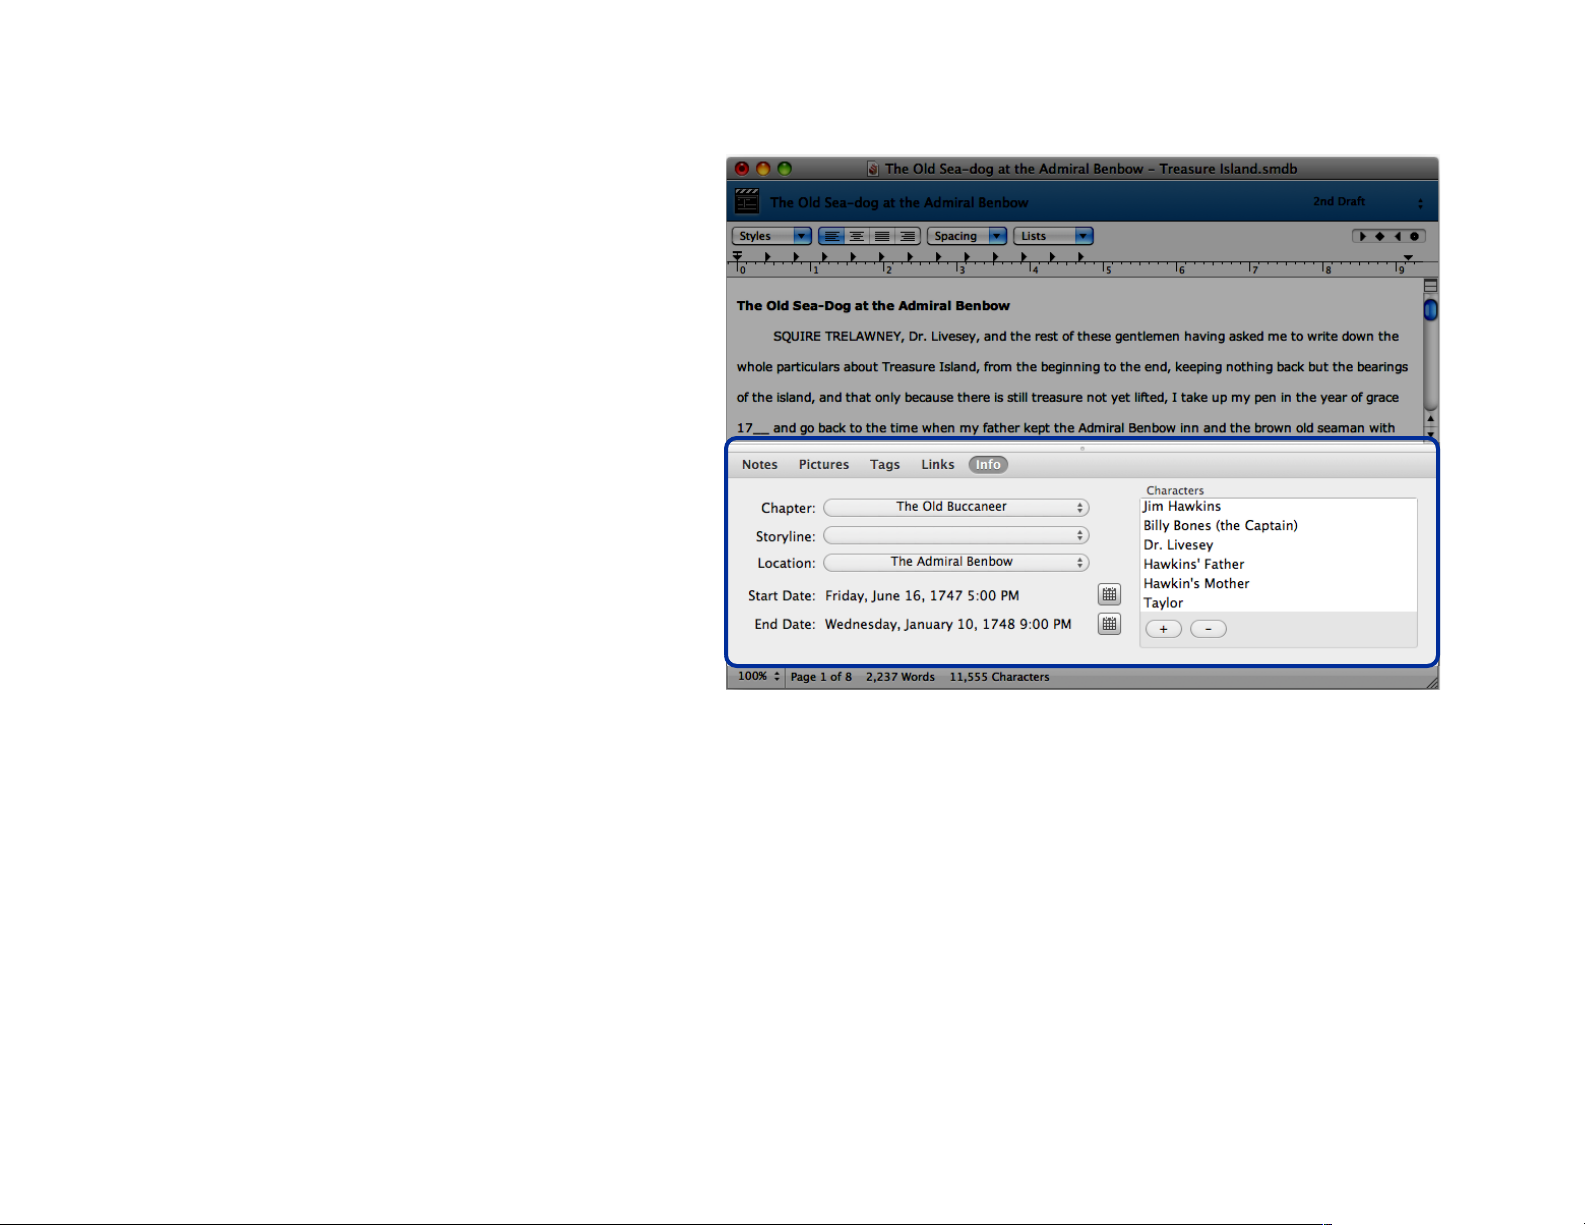
The individual scene viewʼs unique metadata pane
(shown at right) is worth a closer look:
Fields such as chapter, storyline, and location with
the small up and down arrows in their corner are
drop-downs; click anywhere in the field to open the
drop-down and select your desired value.
Choose a start and end date by clicking on the
calendar icon to choose a specific date from the
date picker (such as Aug 10, 1747).
Although the start and end date fields can be useful
in the scene view for quick reference, they are
primarily used for sorting scenes in the timeline.
Not every story takes place in the real world, of
course, but the timeline (and the start and end
dates) can still come in handy; just pick an arbitrary
date to start from, and arrange your scenes relative
to that date.
To add a character, click the + button. A list will open with all the
characters in your characters view (excepting any that are already
attached to the scene). Click and drag characters to reorder them.
21 of 66
Page 22
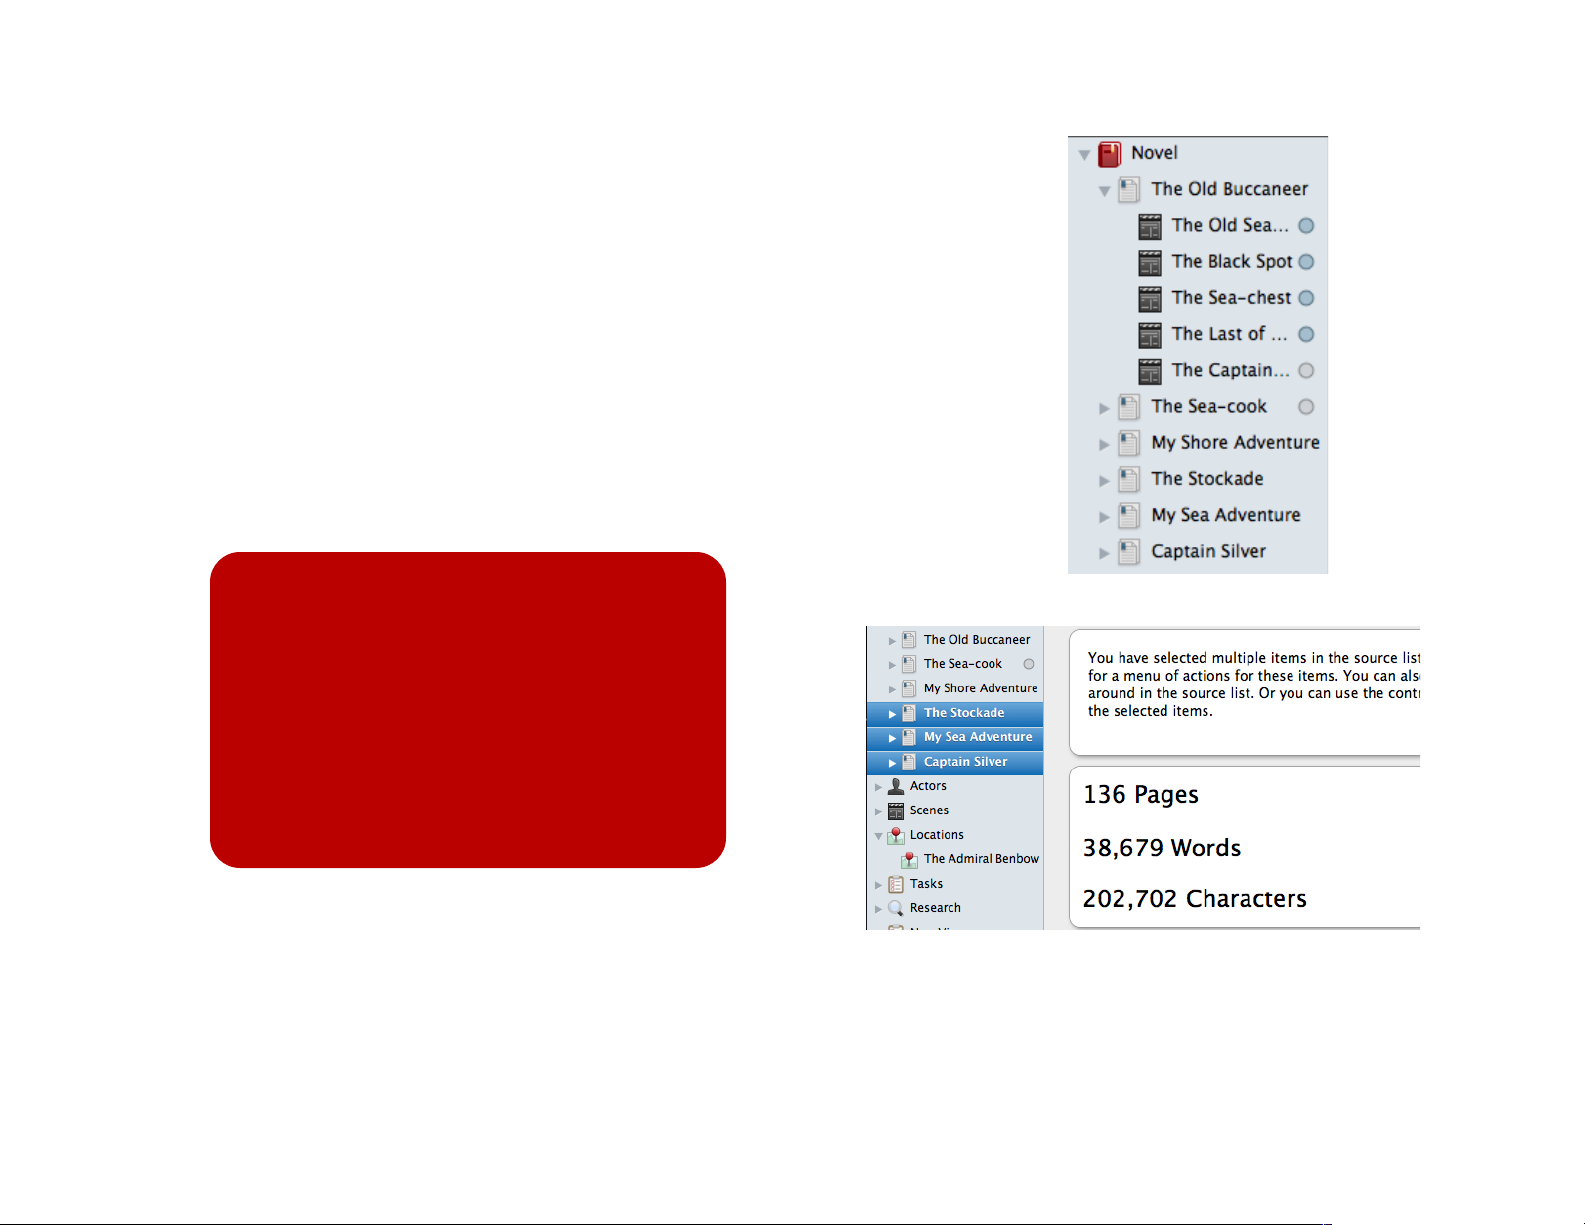
Working with chapters
There are two places to edit chapters: the project window
and the item editing window.
In the project window, you can toggle open the novel view
using the arrow to its left and click on individual chapters for
the single chapter view. You can then toggle open individual
chapters in the same way to see the single scene view.
The chapters list in the novel view is best for setting statuses or
sorting your chapters. The single chapter view is best for editing
a chapterʼs aggregate text in the project window, and the single
scene view is best for working on a single scene.
Tip:
The word count field in the single chapter
viewʼs status bar counts all of the words
in the currently selected chapter. If you
need to know how many words are in
chapters 1-3, just select the appropriate
chapters and the aggregate word count
(along with page and characters count)
will update accordingly!
In the single chapter view, the top pane in the screen
contains the chapter and scenes text. Youʼll also notice a
status bar along the bottom of the window whose content is
unique to the single chapter view (due to the inclusion of
the cursor location field):
22 of 66
Page 23
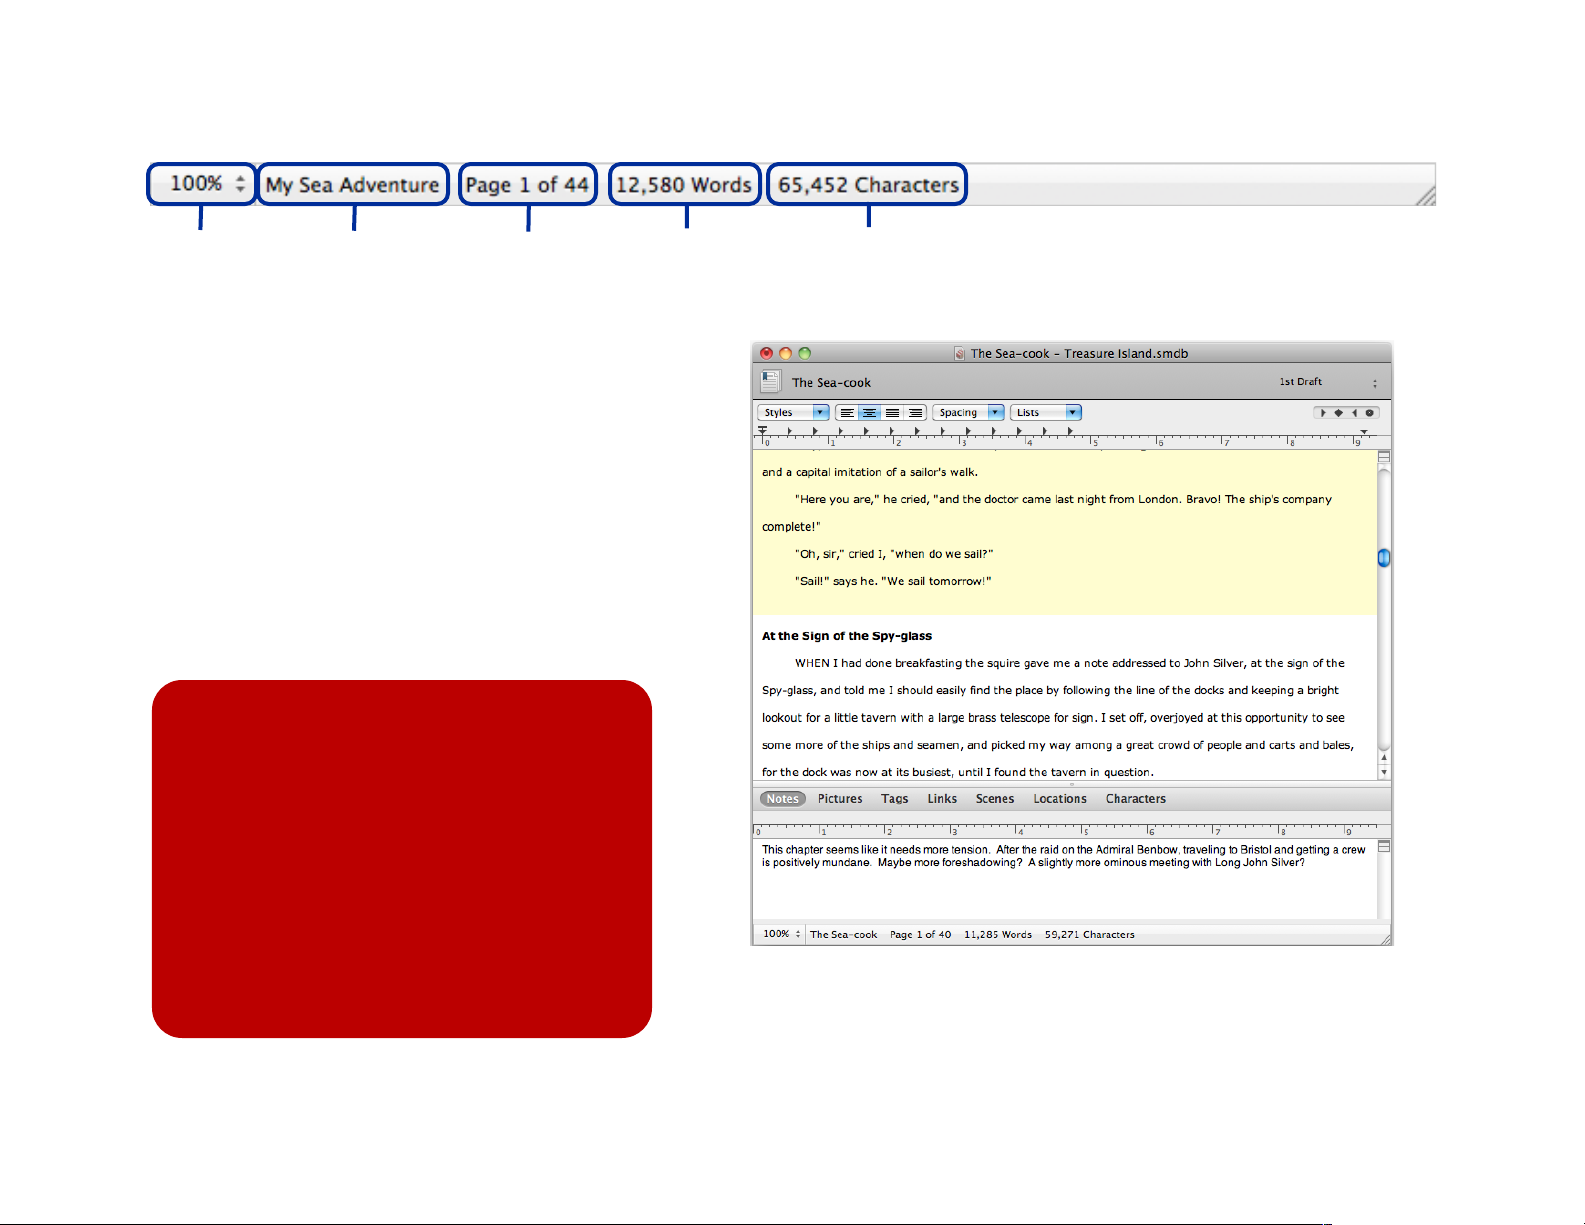
Zoom
level
Cursor
location
Approximate
page count
Word
count
The cursor location is the name of the scene (or
chapter) that the cursor is currently located in; the
others should be self-explanatory.
In order to help you distinguish between scenes,
alternating scenes have a light background color
(shown at right).
Although the top half of the split-screen window
contains the chapterʼs text, chapters still have notes.
The chapterʼs notes are available in the metadata
pane.
Tips:
They may not look it, but chapter notes
are rich text! You can use bold, italic,
different fonts, even images if you want.
Character
count
The approximate page count refers to a
formula used by publishers to estimate
the page counts of published books.
These are not intended to correspond to
page counts on 8.5 x 11 inch paper!
23 of 66
Page 24
Editing in the project window
The project windowʼs source list is a useful tool for navigating
between novel view, single chapter views, and single scene views
to see the text of your project in context. The project window also
offers a number of features that make text editing easy.
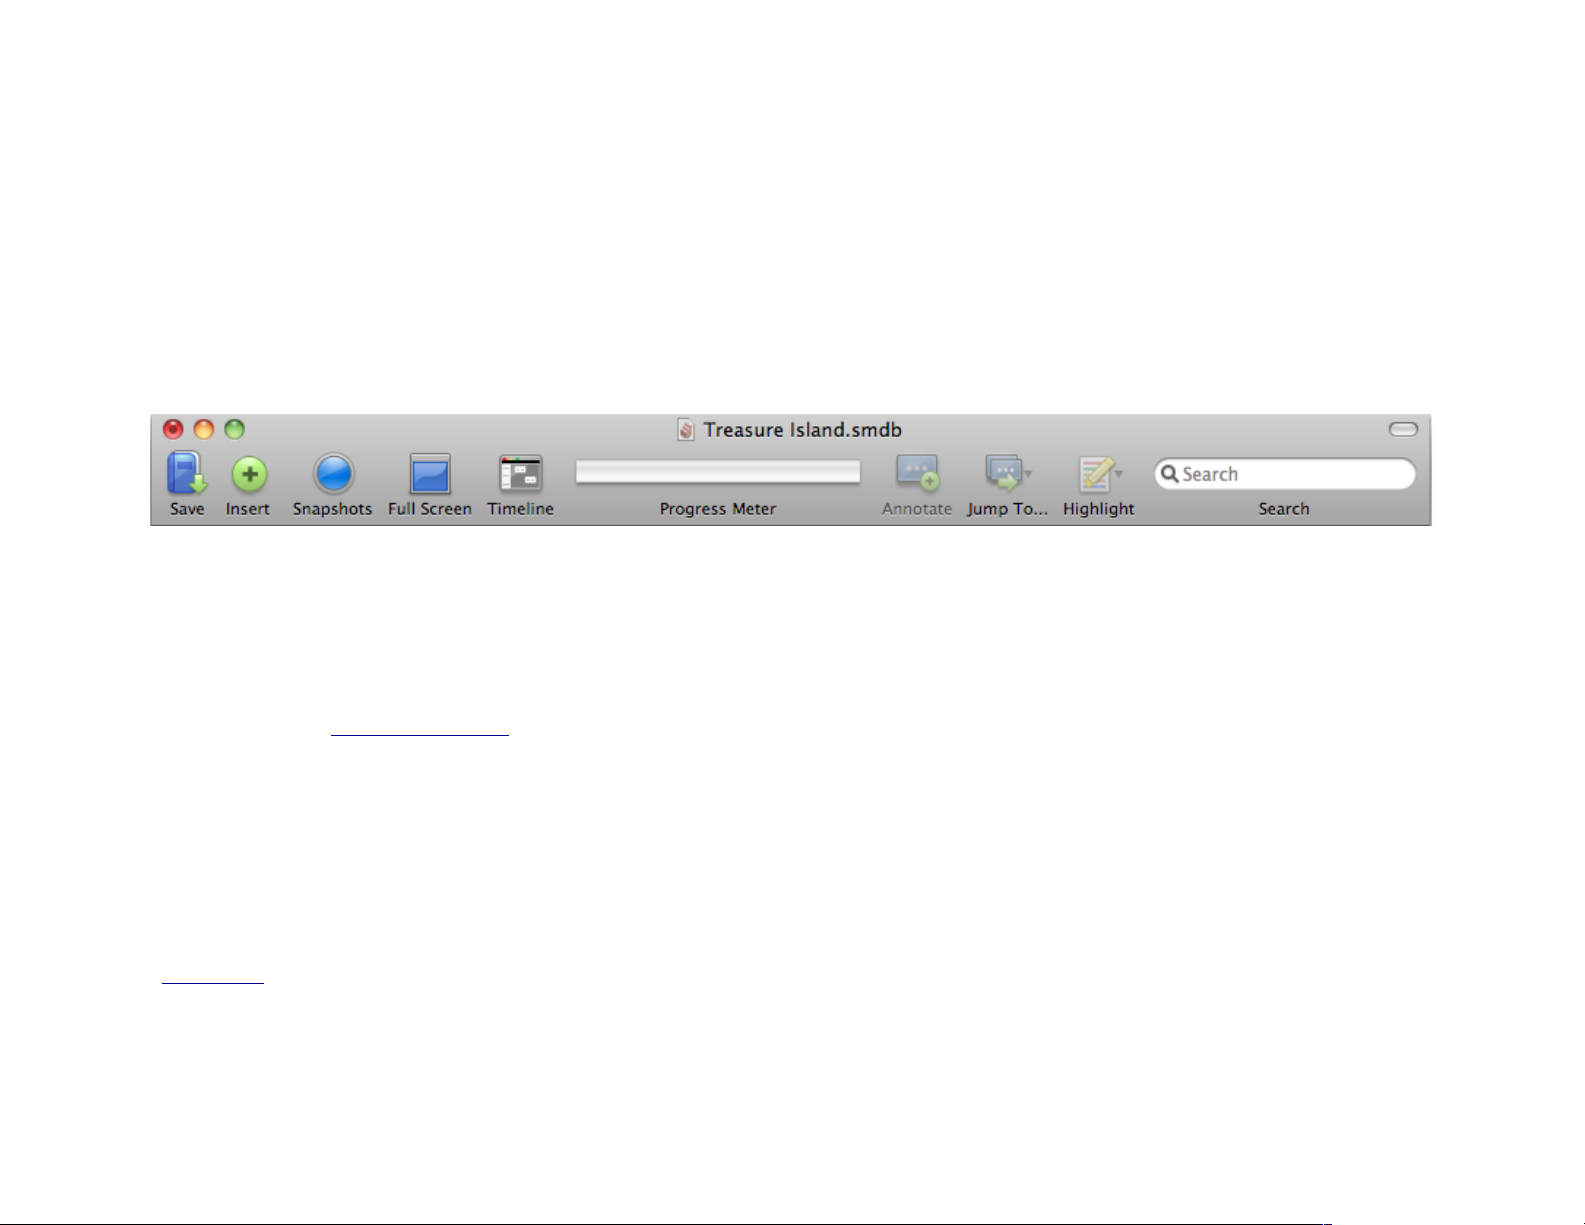
Most of the unique features of the project window (as opposed to
an individual item editing window) can be found in its toolbar.
Save: This opens a standard save dialog. Alternatively, choose
•
File→Save As or hit ⇧⌘S.
Insert: Click the Insert button to add a new item to your view.
•
Snapshots: Click this button to show and control all your
•
snapshots (see Using snapshots, p. 55).
Full Screen: Click this button to enter full screen mode. You can
•
also choose View→Full Screen or hit ⇧⌘F. While in full screen
mode, hit escape to return to normal. StoryMillʼs full screen mode
is an excellent way to reduce distractions and focus solely on your
text.
Timeline: The Timeline button launches the timeline window (see
•
Timelines, p. 26).
24 of 66
Page 25
(continued from previous page)
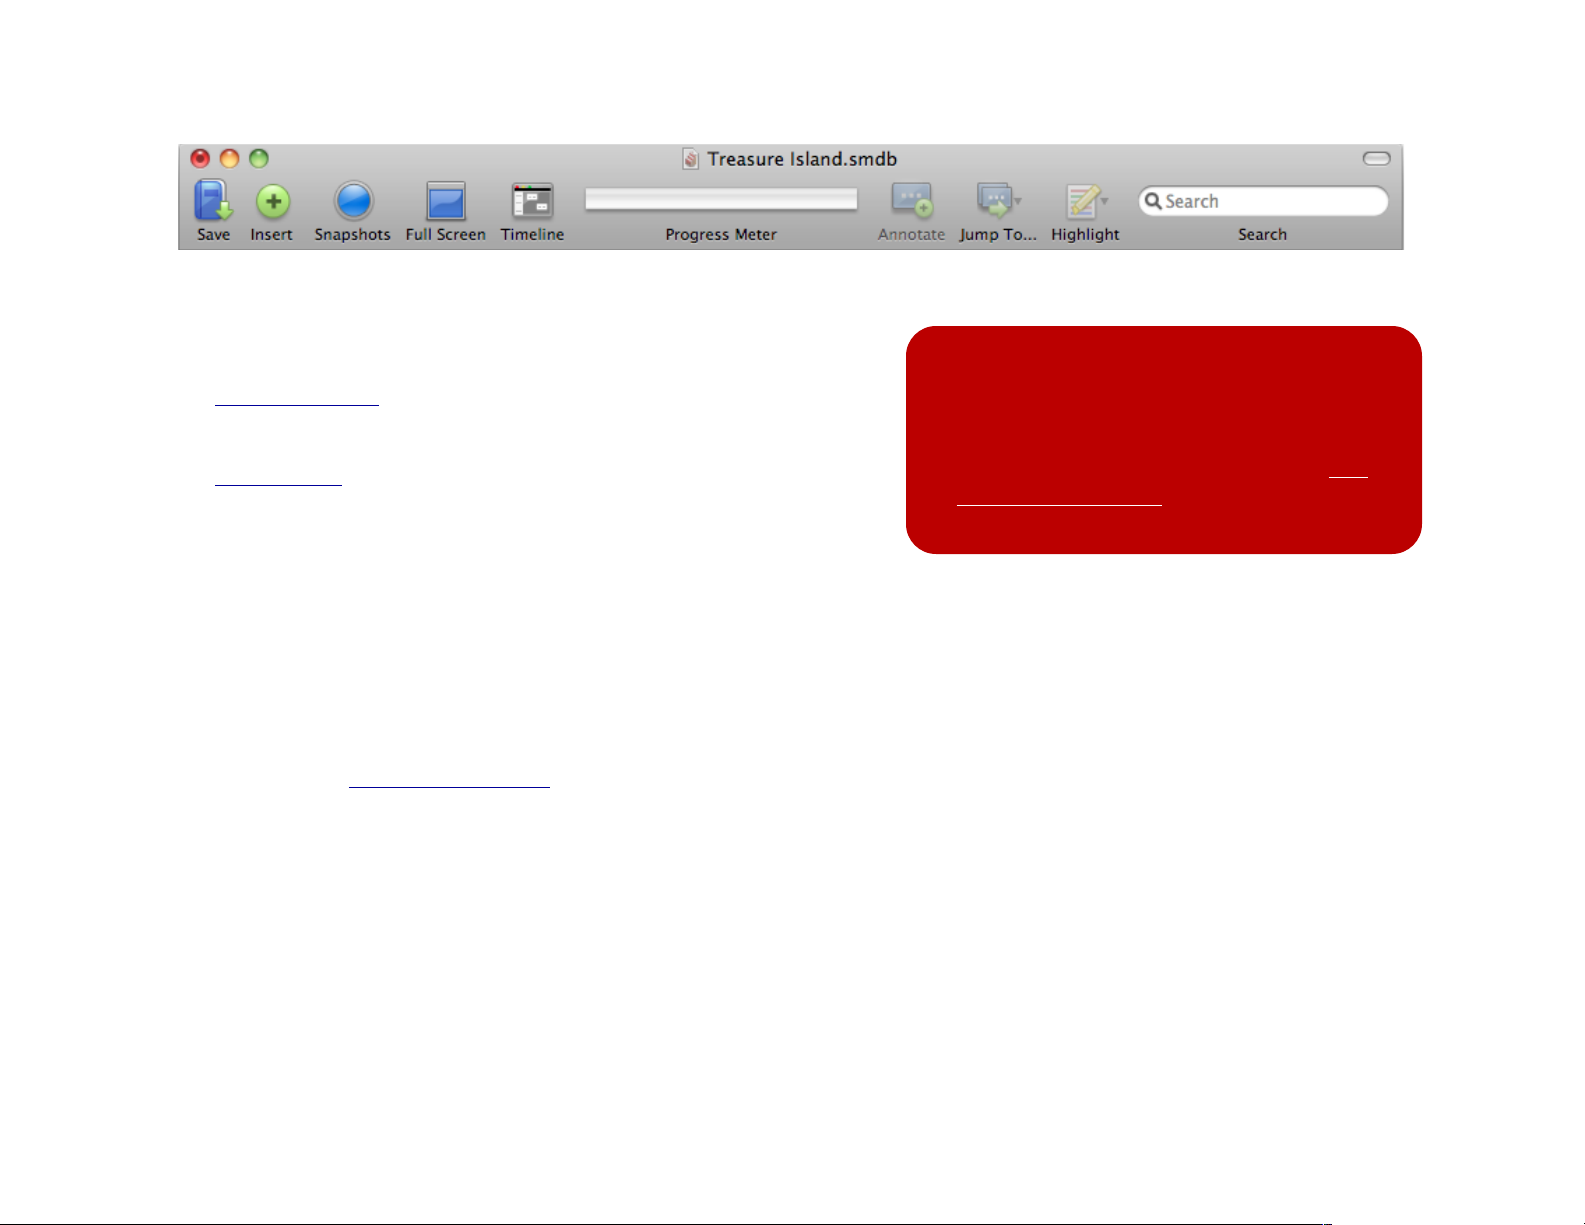
Progress Meter: The progress meter allows you to to track your
•
progress during a single writing session or on your entire project
(see Progress meter, p. 58).
Annotate: The Annotate button allows you to control annotations
•
(see Annotations, p. 14).
Jump To...: Use the Jump To.... button to jump to any annotations
•
in your current view, allowing those annotations to act as
bookmarks. This is particular useful if youʼre working with a large
amount of text (possibly in a chapter view or the novel view). You
can also choose Edit→Find→Jump to Selection or hit ⌘J.
Highlight: Select text you wish to highlight and choose a highlight
•
color from the drop-down. Each highlight color is associated with
a specific status and the available colors are based on your
preferences (see Status preferences, p. 64). You can also
choose Text→Highlight to highlight selected text. To remove
highlighting, select highlighted text and choose “None” in the
Highlighter or the menu.
Tips:
- You can use the full screen for any item!
- Color and margins in the full screen are
controlled in the preferences! See Full
screen preferences, p. 63.
Search: Use the search bar to run a project-wide search for
•
unique text, including item notes.
To edit the contents of the toolbar, right click it and choose
Customize Toolbar… or choose View→Customize Toolbar….
25 of 66
Page 26
Timelines
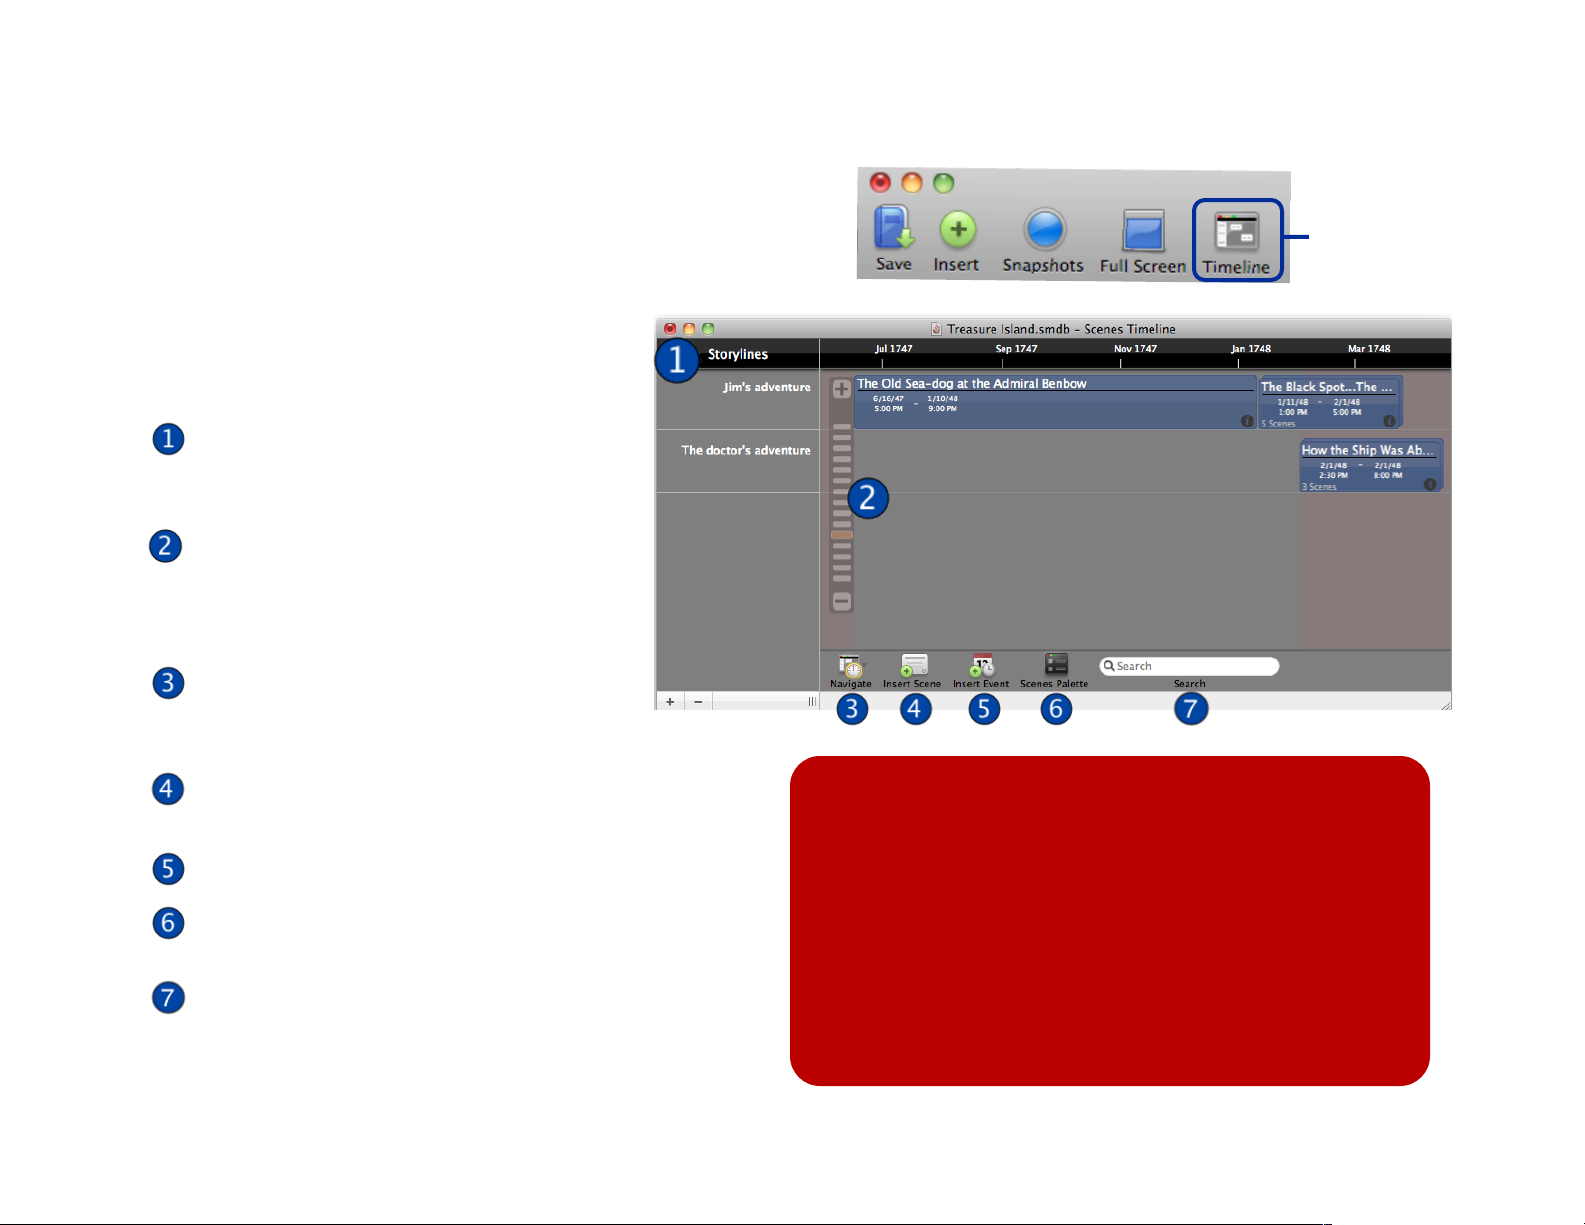
Your scenes view, and any smart view based off
your scenes view, can be viewed as a timeline.
To open a timeline of your active view, click the
Timeline toolbar button in the project window
(shown at right), or choose Tools→Timeline.
The timeline window has unique ways of
allowing you to manage its content:
Storylines: storylines group scenes
horizontally so you can see the
relationship between them.
Zoom controls: hover over the control
to change the base unit of
measurement all the way from minutes
to centuries.
Navigate: jump to the first or last
scene in the timeline, view all
scenes, or navigate by storyline.
Insert Scene: insert a scene into your timeline and
assign it dates and a storyline.
Insert Event: insert an event that spans storylines.
Scenes Palette: view the list of untimed scenes,
sorted by chapter.
Search bar: search for scene names and
automatically navigate to the first matching one
found.
Timeline
button
Tip:
The timeline window has an interface that works much
like your favorite online web mapping service. Simply
grab the screen or two-finger swipe your trackpad to pan
through the timeline. Similarly, pinch your trackpad to
zoom in or out of the timelineʼs scale. If you zoom out
enough, your scenes will be grouped together into a
single container much like smaller cities disappear into
larger ones on your mapping service.
26 of 66
Page 27
Storylines
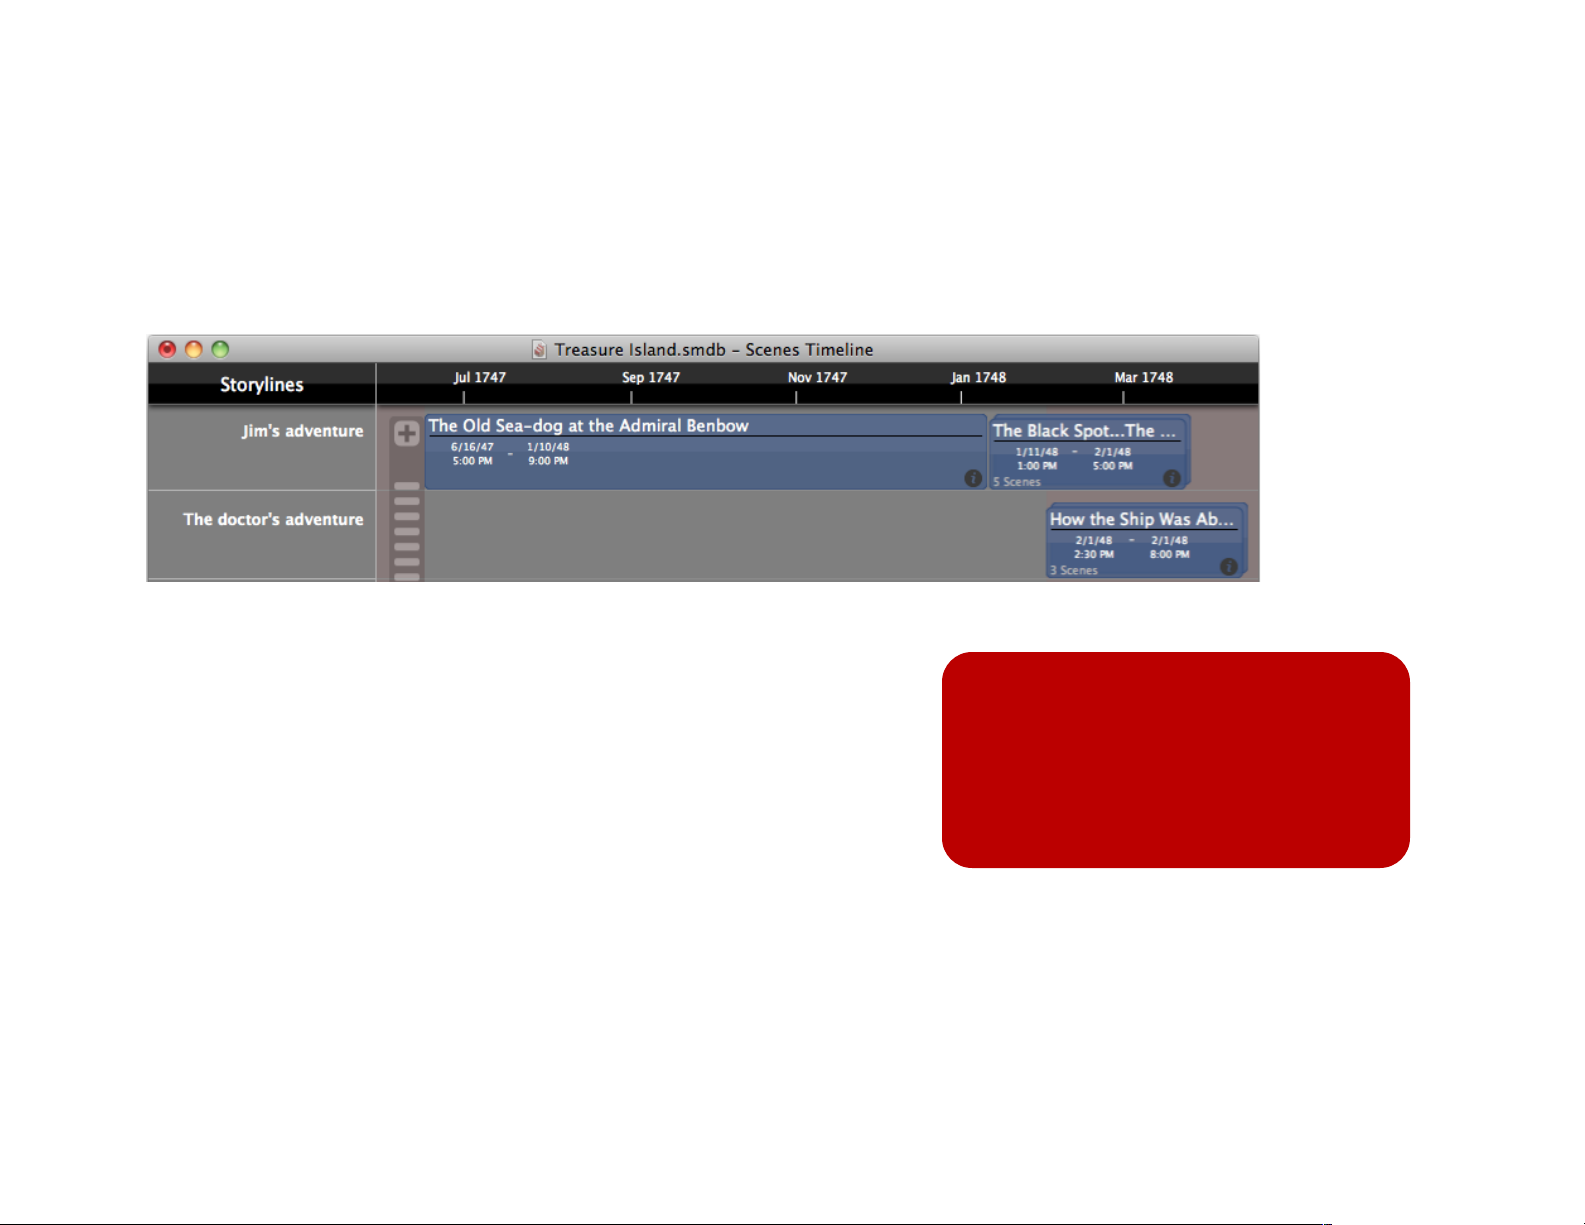
The timeline shows the chronological order of your scenes
(regardless of narrative order). Within the broader timeline, you
can then group scenes into storylines. This allows you to logically
group scenes which would otherwise overlap:
You can change or assign a sceneʼs storyline,by visiting the
metadata pane in the sceneʼs view window, or by editing the scene
in the timeline view.
To add and remove storylines, use the + and - buttons at the bottom
of the storyline pane. Double click a storyline to rename it.
Drag and drop storylines in the storyline pane to reorder them.
When you move a storyline, all scenes associated with it will be
moved vertically in the timeline as well.
Tip:
Changing the zoom level of the
timeline does not affect storylines
because it only affects how much
time is shown (which is horizontal).
Drag the bar between the storylines pane and the timeline to resize
the storylines pane.
27 of 66
Page 28
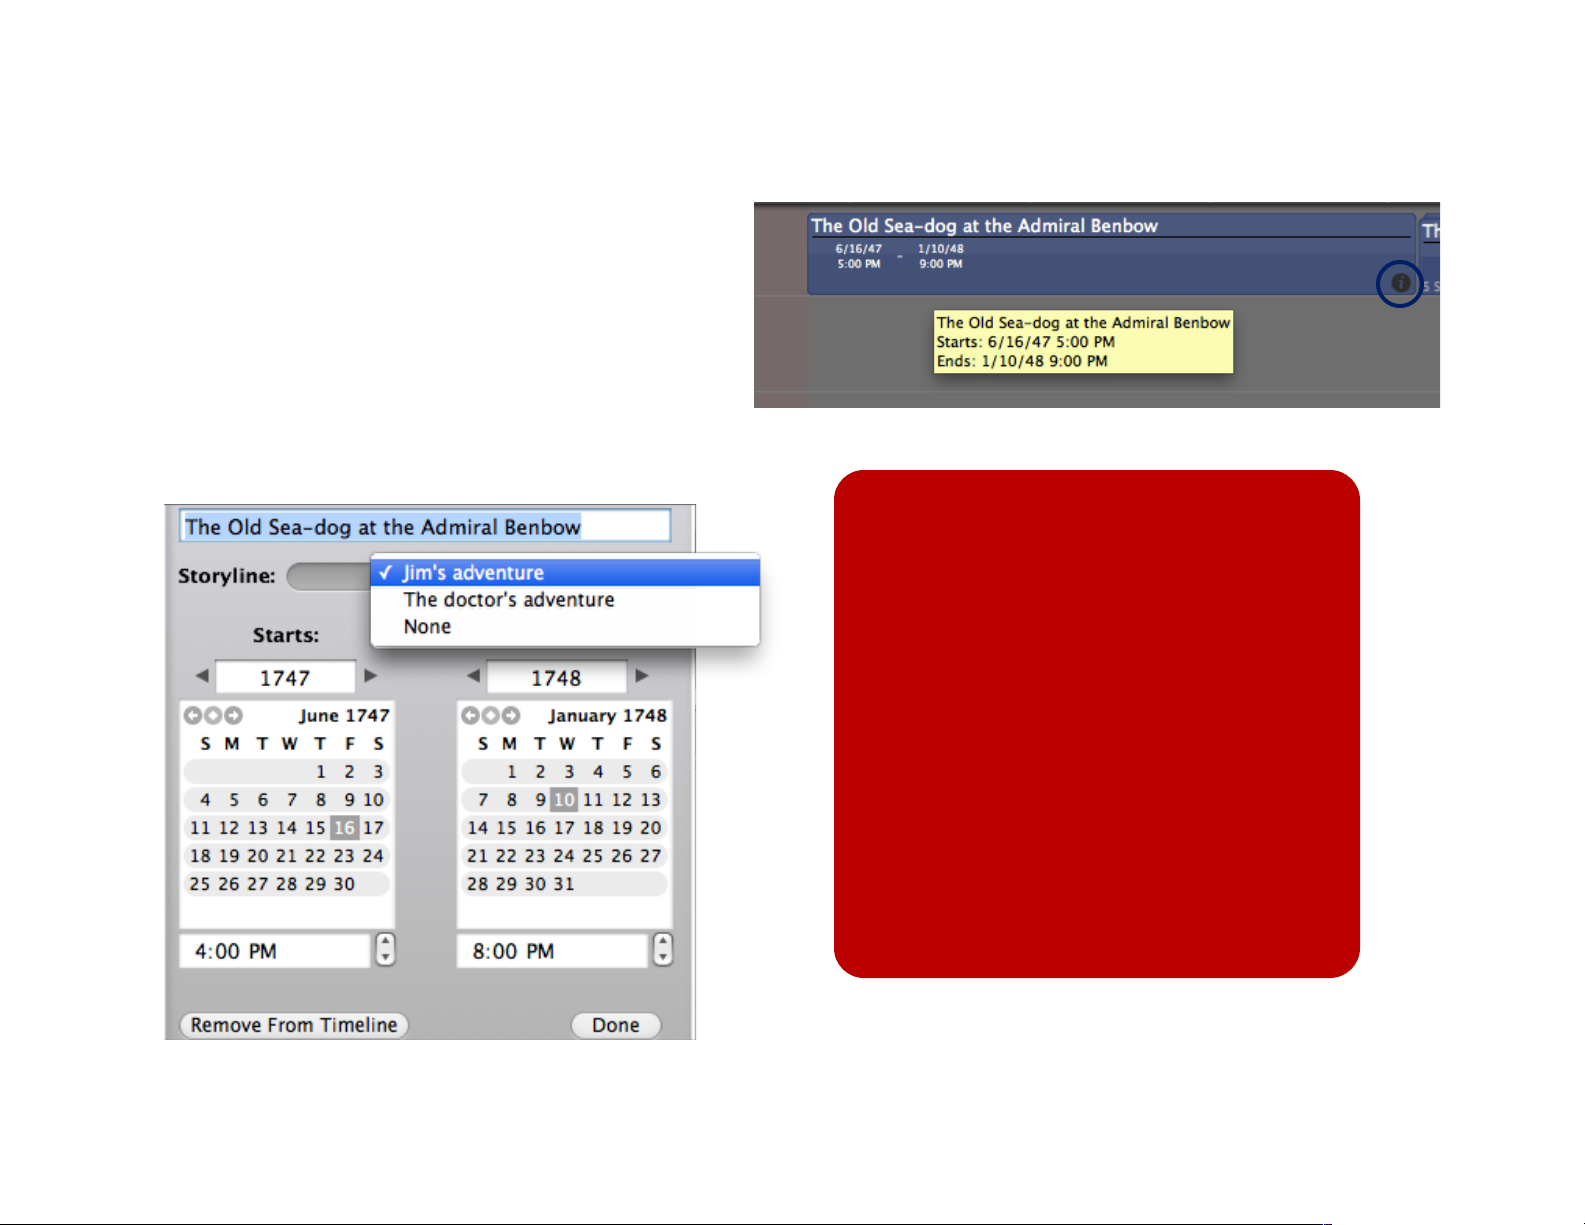
Editing scenes in the timeline
You can easily tell which timeline areas have scenes
assigned to them: those with scenes will show a gray
background, while those without any scenes will show
a red background.
Hover over a scene to see its start and end date and
full name in a tooltip (shown at right). To change
information about the scene, click on the info icon at its
bottom right to launch its timeline window, allowing you
to edit its time and date and assign it to a storyline.
Tips:
If no scenes have a start and end date,
then the timeline will by default start at the
date and time that you view it. So if you
create a new project and open a timeline
on January 7, 2007 at 10:07 AM, your
timeline will start at January 7, 2007 at
10:07 AM. For a more useful timeline,
define a start time in the scenes view for
at least one scene.
Timeline editing window
Individual scenes have a minimum bar
size! This means that in some cases your
scene bar will appear longer than your
sceneʼs time period.
28 of 66
Page 29
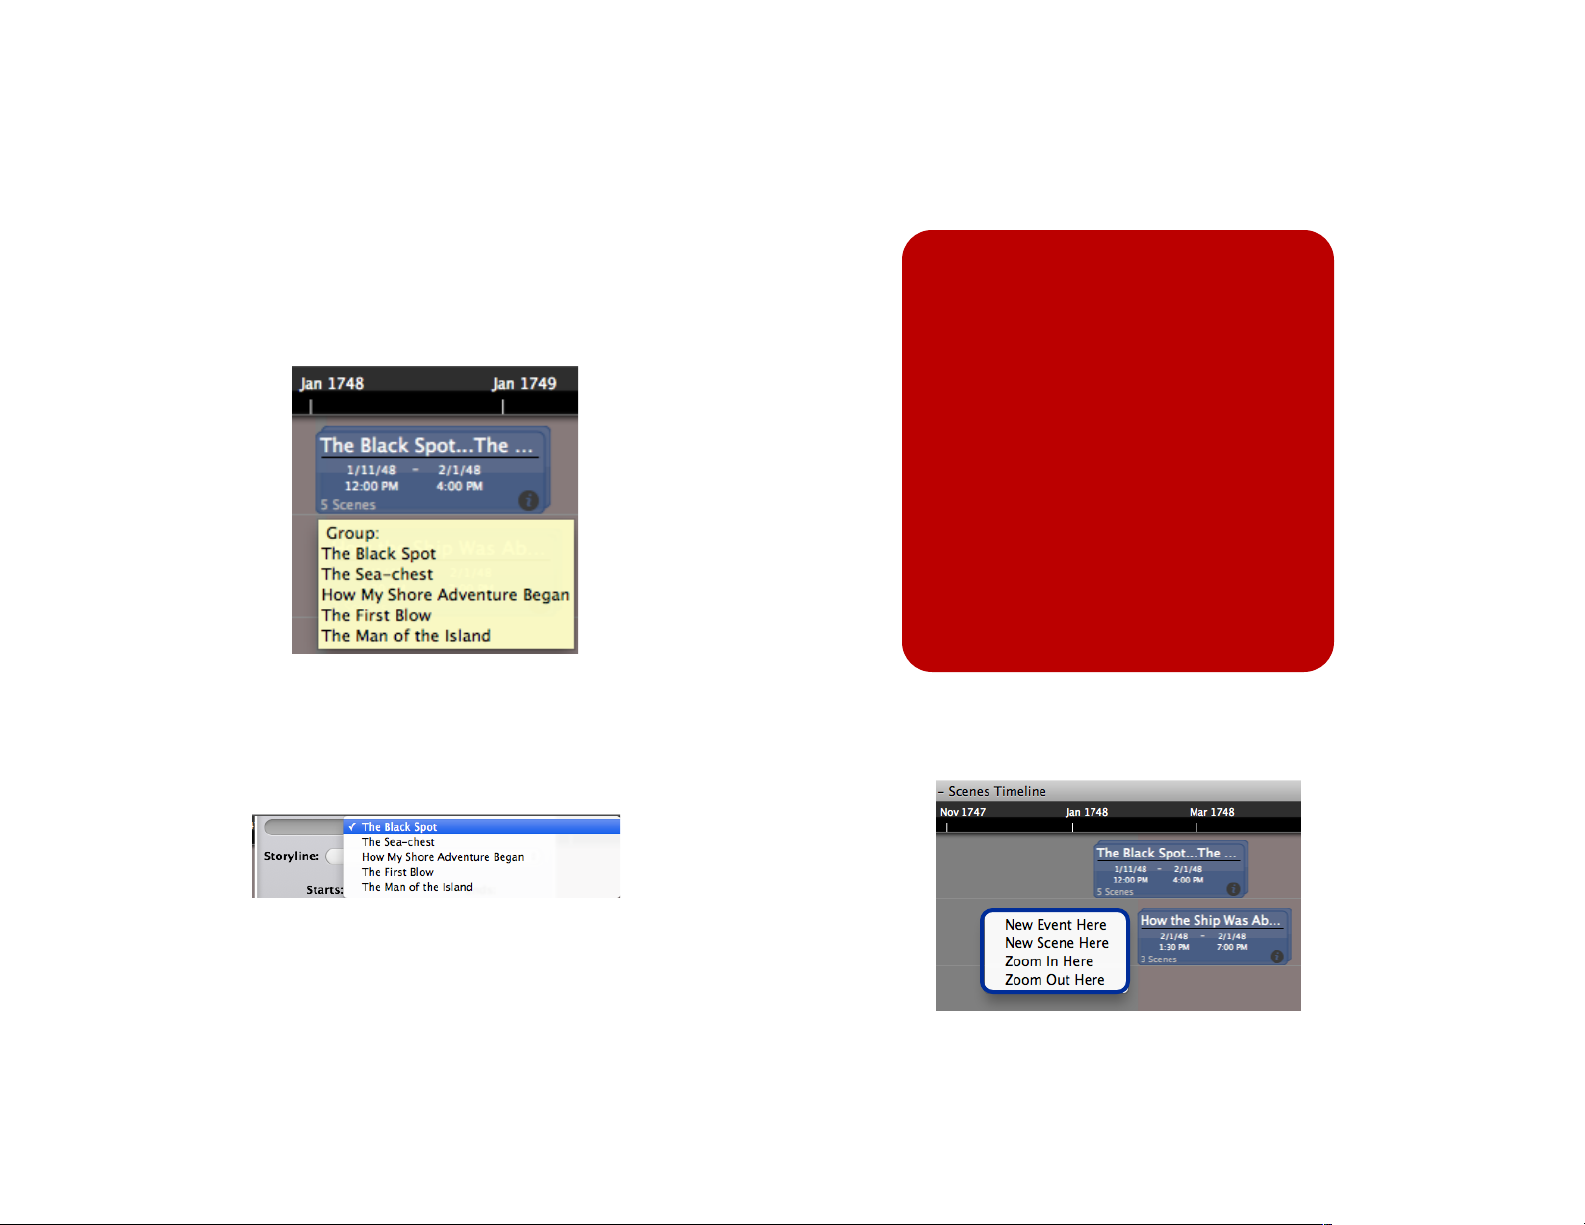
Often, scenes take place over a similar timespan, and will be
grouped together in your timeline view. In this case, each groupʼs
bar will display the number of scenes in the group, the name of the
groupʼs first and last scene chronologically, separated by an ellipsis,
and the time period the scenes take place in. Hover over a group to
see a tooltip displaying the list of scenes contained within the
group:
Clicking on the groupʼs small info icon will launch its first sceneʼs
timeline window. From there you can edit another scene from the
group by selecting it from the windowʼs drop-down list.
Tip:
If you need to arrange a large
number of scenes, first adjust
your zoom down (how much you
zoom will depend on how much
time passes in your project) and
select “Months,” “Years,” or even
“Centuries” as your unit of
measurement. You can then
insert the unplaced scenes into
the timeline by editing their start
and end dates in their metadata
panes.
Right click (or control-click a single button mouse) anywhere in the
timeline other than directly on an existing screen to open a menu
(shown at right) that allows you to insert a new scene or event at
that precise time. You can also zoom in or out of that exact time.
29 of 66
Page 30
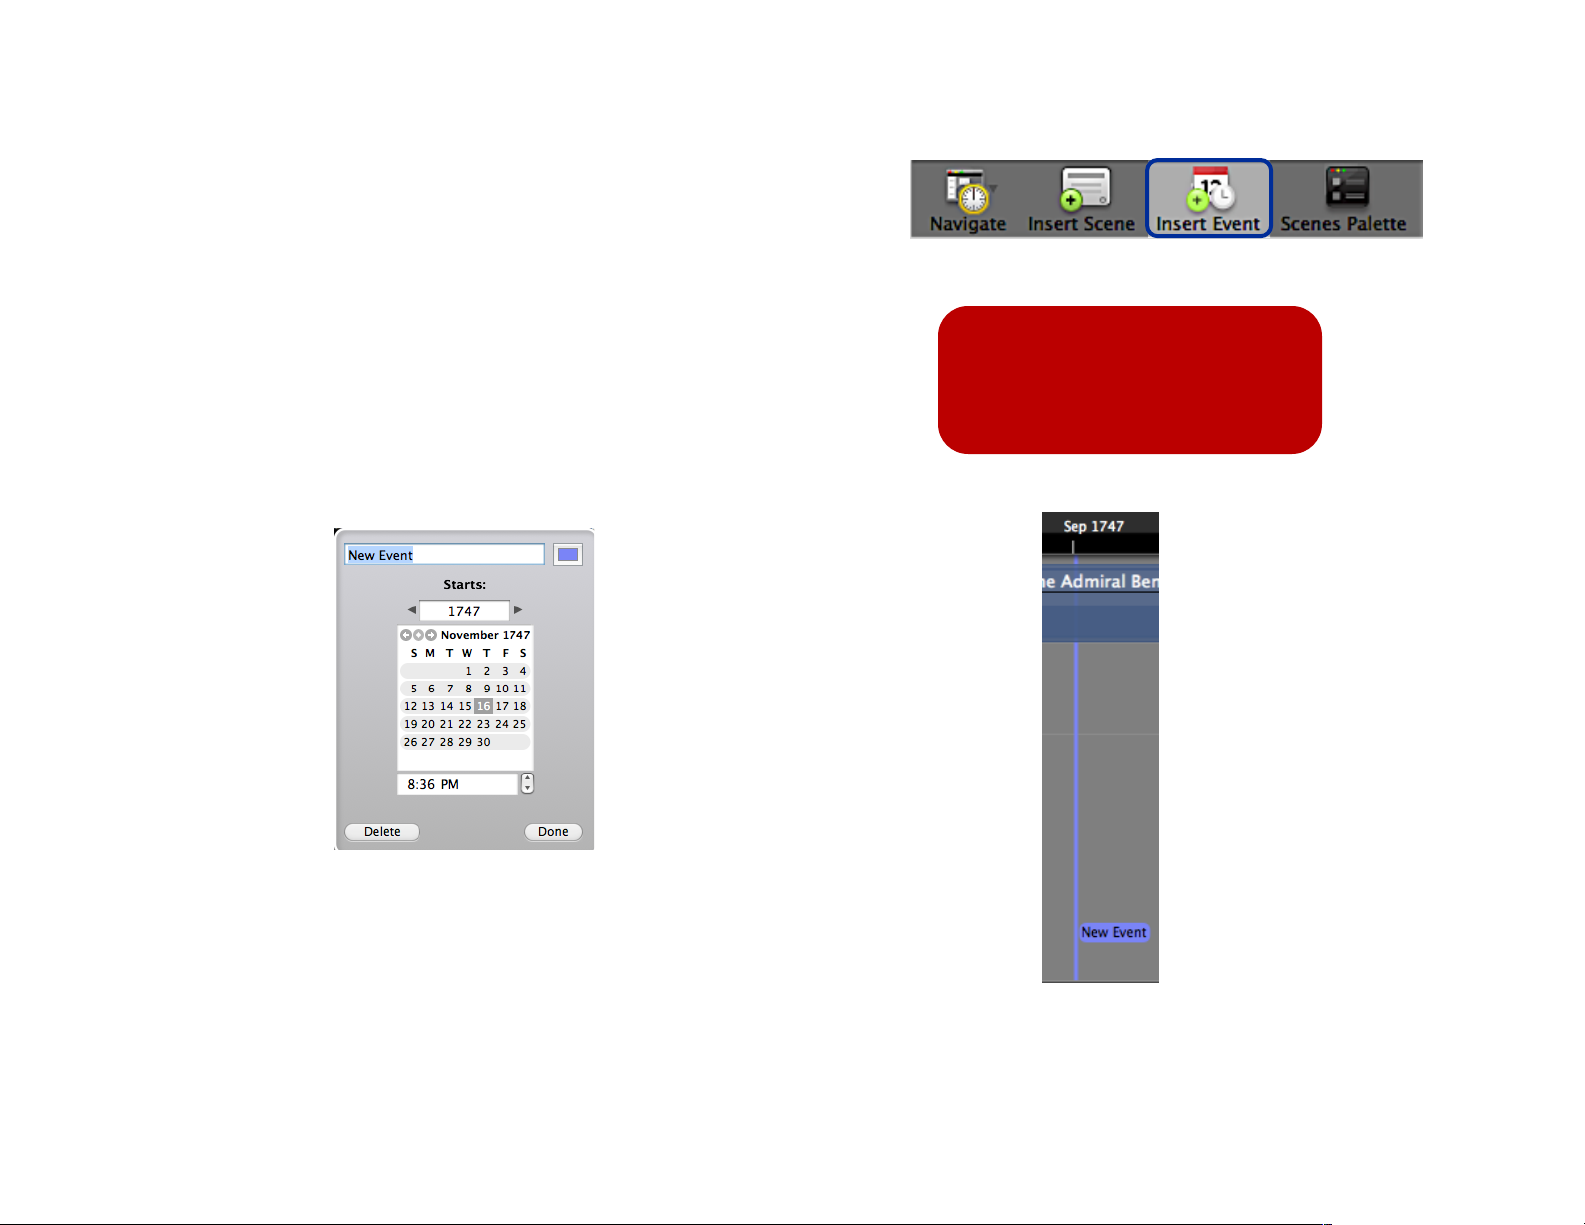
Events
An event in the timeline is something that happens at a single point
in time but that may affect scenes across storylines. For instance,
in Treasure Island by Robert Louis Stevenson, the first man killed
on Skeleton Island by the pirates affects Jim Hawkinsʼ storyline
(because he witnesses it) and also affects Dr. Liveseyʼs storyline
(because he and the people with him hear the man die).
Click the Insert Event button (shown at top right) or simply right
click (control-click on one button mice) anywhere on the timeline to
add an event to the timeline. You will see the Event Inspector
window:
Tip:
You can add events to the
timeline just by clicking
where you want them to fall!
To save your event, type a name for it, optionally type a different
date and time, and click Done. The event will show as a blue line
with the name near the ruler (shown at right).Double click the name
to edit the event in the Event Inspector.
30 of 66
Page 31
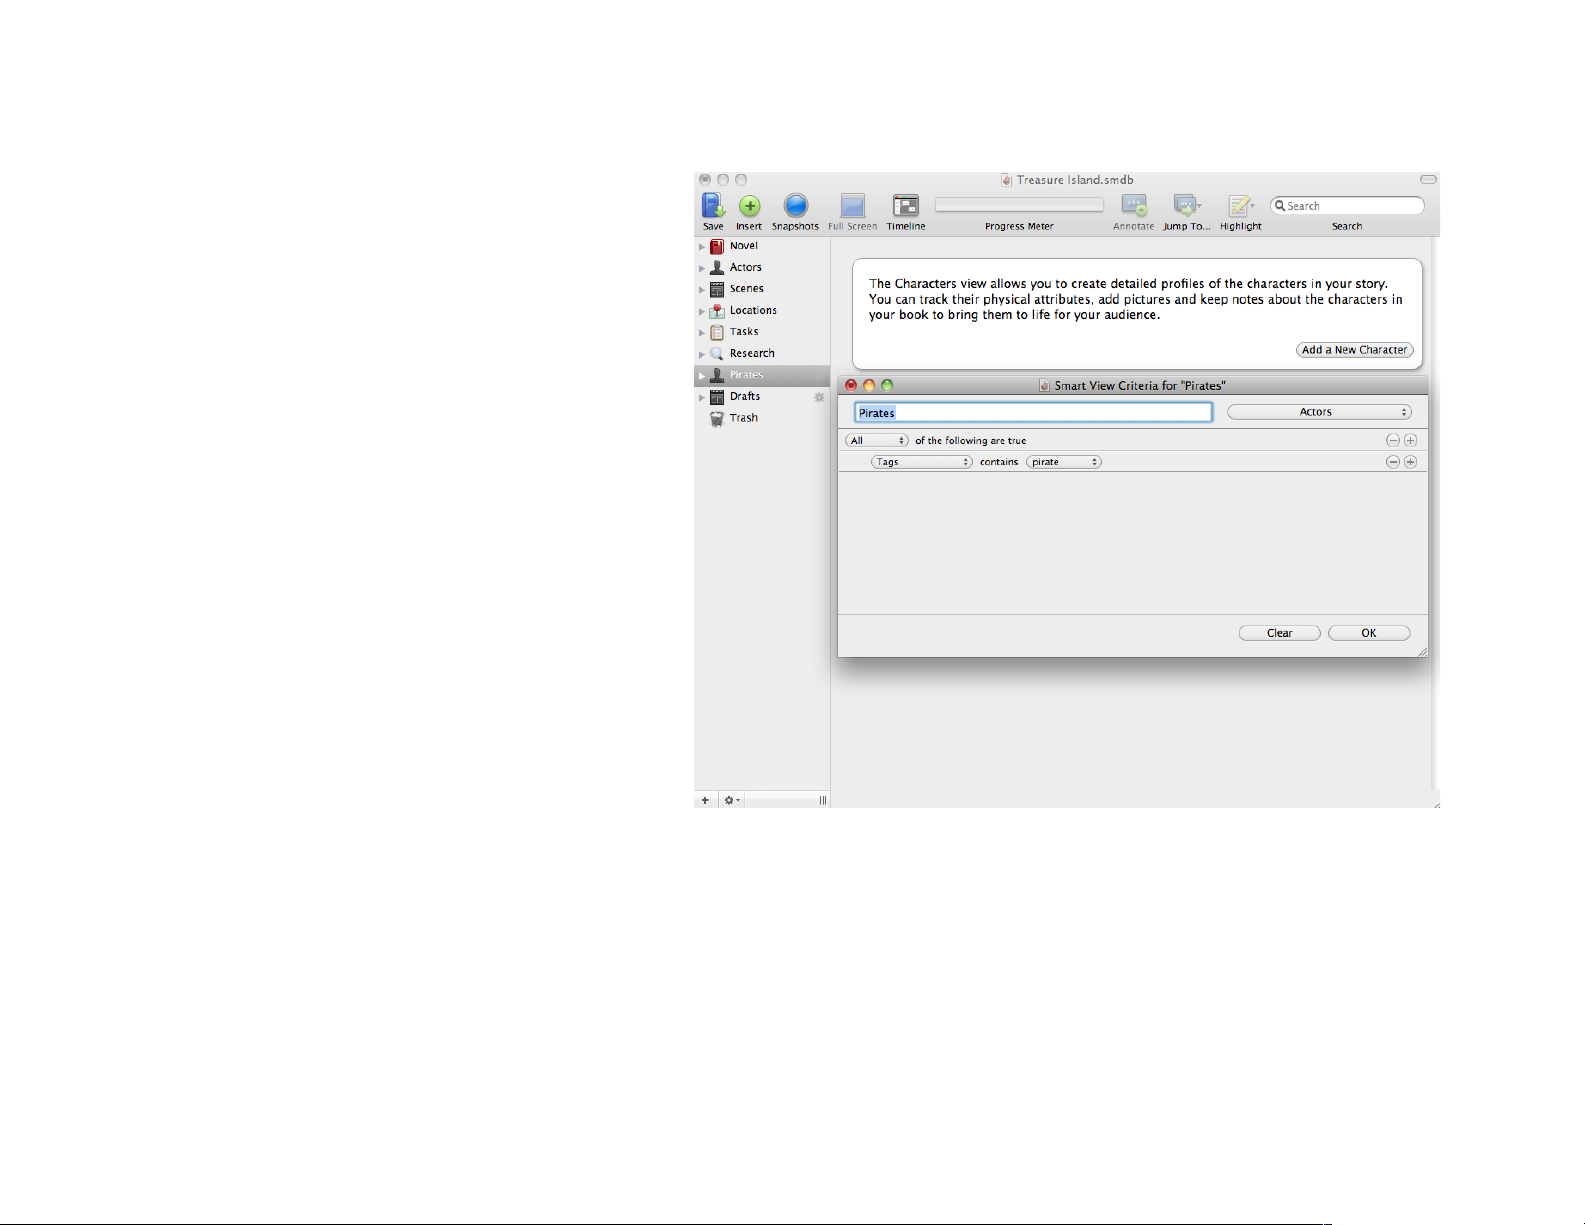
Tags
Tags are short words or phrases that provide a
flexible way to attach metadata to items in
StoryMill. If the metadata, such as name and
status, that StoryMill provides is enough for your
project, then you never have to use tags.
However, if you want to be able to filter views
based on custom metadata, youʼll need to use
tags.
For instance, if you wanted to keep track of all
the pirates in your novel, you could attach a
“pirate” tag to each pirate in the characters view,
and then create a smart view to show only
pirates (shown at right).
To add a tag, click the + button at the bottom of
the tags area in the itemʼs metadata pane,
choose Edit→Add Tag, or hit ⇧⌘T. A blank tag
will be added. As you type, it will autocomplete if
it finds a similar tag in the project. You may also
click the arrows at the right side of the tag to
open a drop down with all past tags. Select the
tag you are looking for.
Drag and drop tags to reorder them. To remove a tag, click the tag
to highlight it and then click the - button at the bottom of the tags
area or hit delete.
31 of 66
Page 32
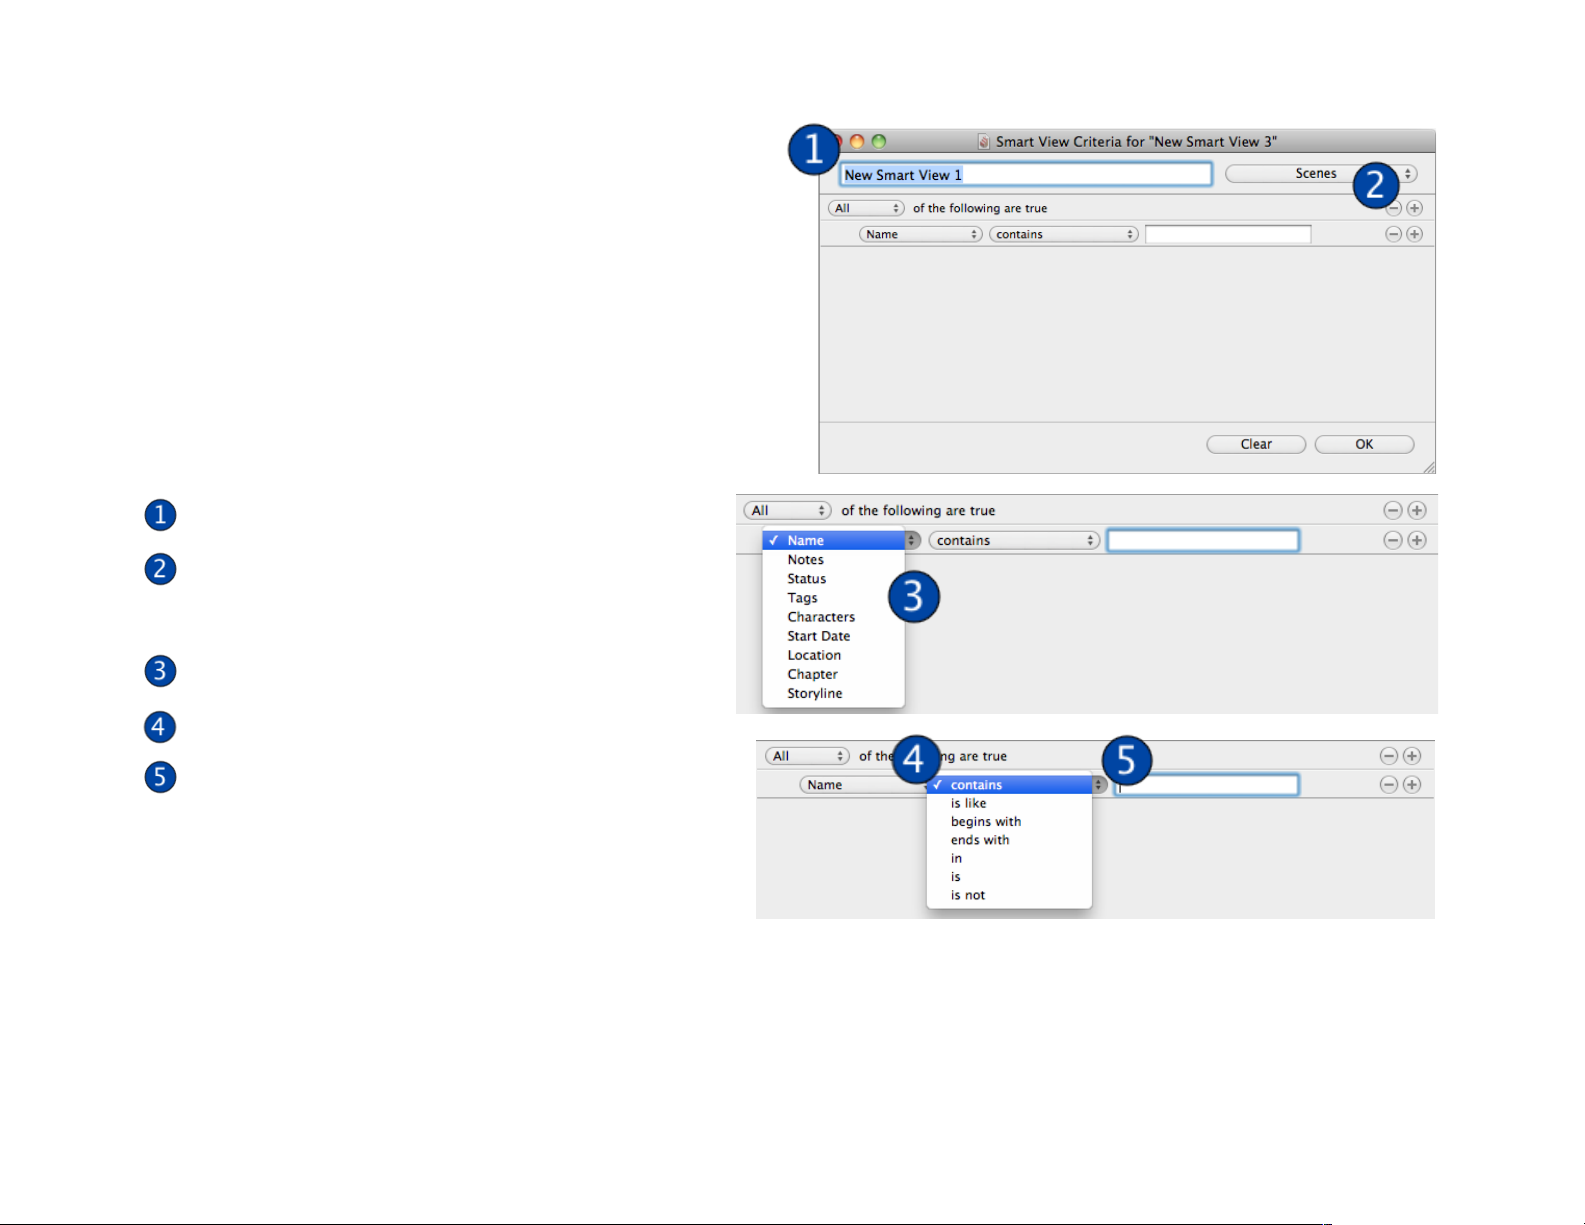
Smart views
Smart views are very similar to smart folders in the Finder
and smart playlists in iTunes. Although you can create smart
views based off a number of different pieces of metadata (the
specific metadata depends on the type of item), using smart
views together with tags is often the most efficient way to
filter your items.
Click the + button to add a new smart view or choose Add
Smart View… from the gear button at the bottom of the
source list. In the rules window, do the following:
Type a name for your smart view.
Optionally, choose a standard view to filter (by
default, the view that was selected when you
created the smart view will be filtered).
Select a metadata field.
Select a qualifier.
Enter a search term. Some metadata (such as
status or tags) will autocomplete as you type, or
you can click the arrows in the corner to choose
from a drop down.
32 of 66
Page 33
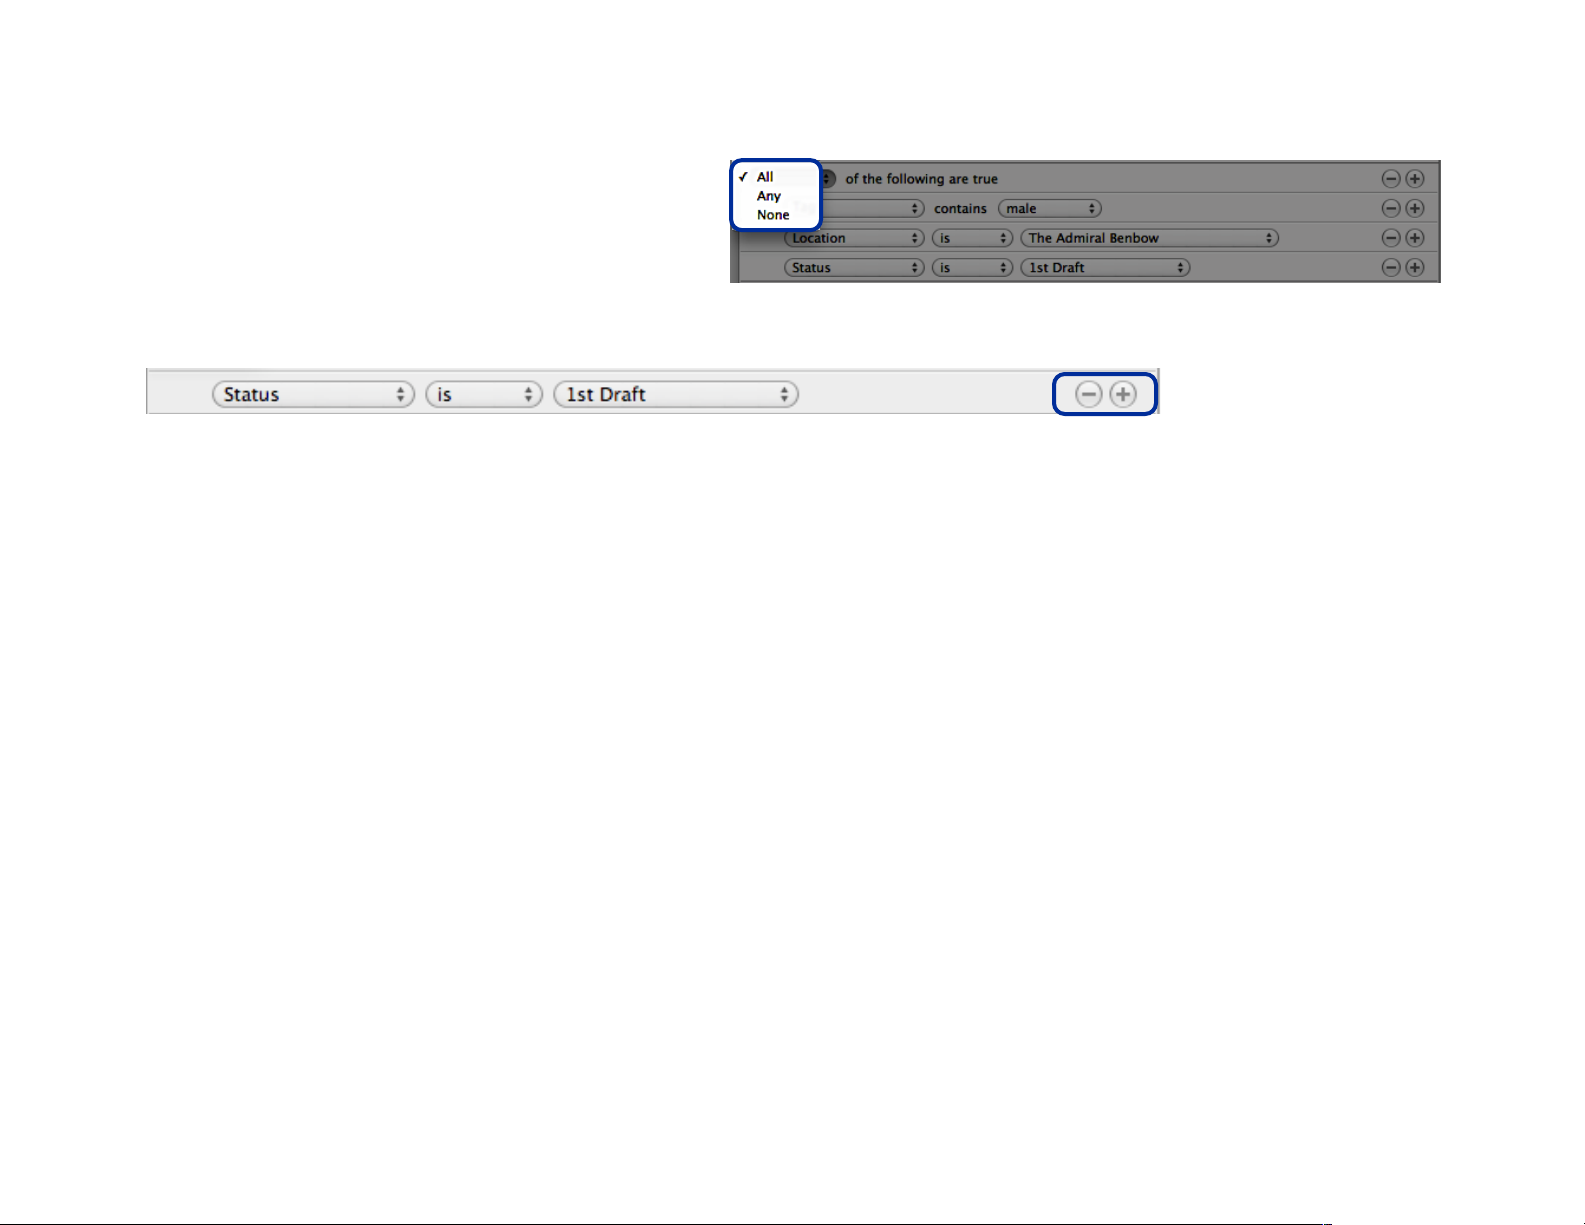
Add another rule with the + button. Repeat the steps
above to complete your rules. You can choose to
match either all of the rules or any of the rules using
the drop down at the top of the window.
To add or remove a rule from the list, simply click the
+ or - button at its right.
As you add and remove rules, the project windowʼs item list will
update. You can move the smart view rules window off to the side
to see in real time what items your smart view will contain. When
you are finished defining your smart view, click the OK button.
Aside from providing you with a filtered set of items, smart views
also function as templates for new items. For instance, if you have
a characters smart view with the rule “Tags - Contains - pirate” and
you add an item while using the smart view, the new item will have
the tag “pirate” attached to it automatically.
An itemʼs notes and name will not be populated in a smart view that
filters for name or notes, however. Using smart views as templates
only works for metadata that has a set number of possibilities (such
as tags, status, the actors in a scene, etc.); it will not work with
metadata that is entered as unique text.
33 of 66
Page 34
Trial version and registration
You should now be well prepared to jump into StoryMill and
start writing! Although there are many small details and
useful features within StoryMill left to explore, you
should hopefully have a good feeling for the basic
interface and how to use some of the most important
advanced features.
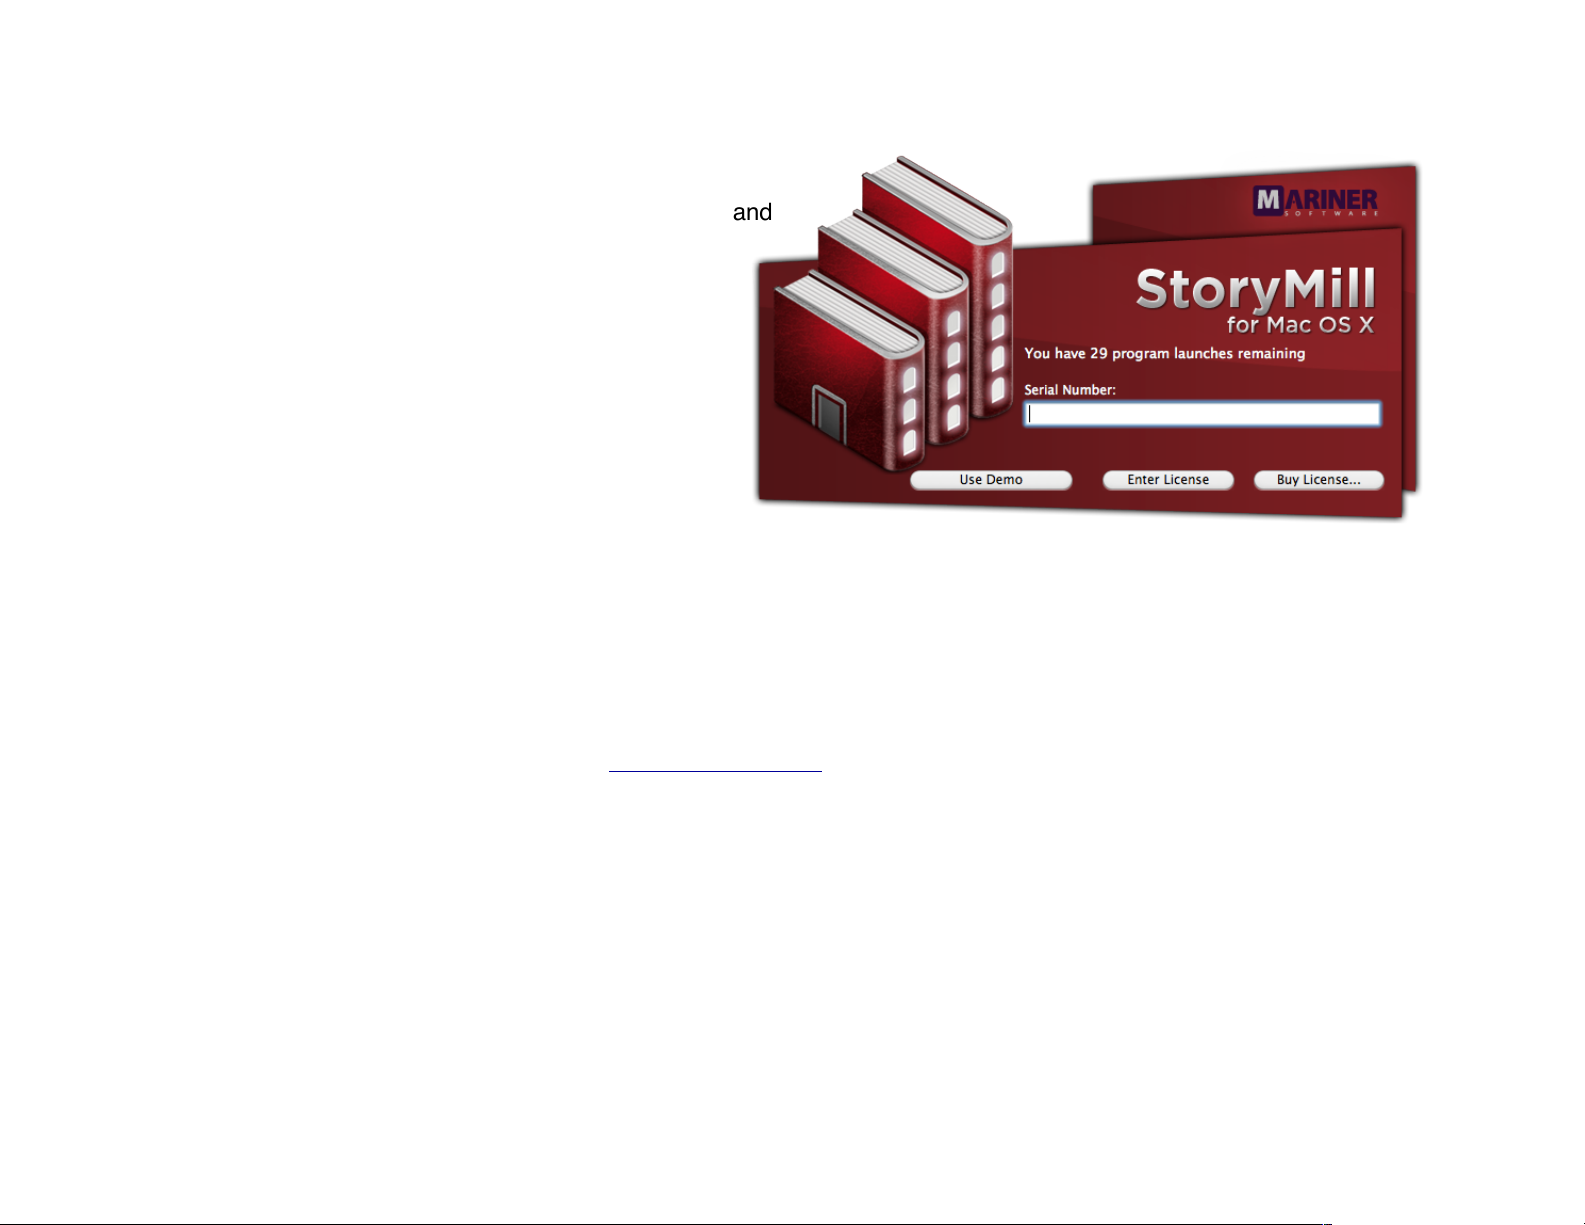
The StoryMill trial version is completely functional (no
features are crippled) and allows you to launch the
program 30 times before expiring. Before you register,
whenever you launch the program you will be greeted
by a splash screen that reminds you how many
launches you have left and provides a place to enter your
registration number (shown at right).
When your demo expires you will still be able to launch StoryMill in
order to export your work, but you wonʼt be able to save or print
your projects until you register.
To register, click the Buy License… button on the splash screen,
choose StoryMill→Buy Now…, or visit the Mariner online store.
You can also find a boxed version at select retailers; if you bought
the boxed version, your serial number will be inside the box.
Once you have bought StoryMill, you can enter your serial number
in the splash screen or in the general section of the preferences by
choosing StoryMill→Preferences… (or hitting ⌘,).
34 of 66
Page 35
Section 2: Working with StoryMill
Discover some of StoryMillʼs more advanced features
Page 36
Chapter 3: Advanced Text Editing
If you are familiar with other programs that use the default Cocoa
text editing features (such as the ruler, styles, etc.), then you should
feel right at home in StoryMill. Alongside the default Cocoa text
editing controls, StoryMill also provides a number of useful features
that make advanced text editing easier.
This chapter covers the tools that make StoryMill a powerful text
editing environment, including:
Styling and the ruler
•
Spellchecking
•
Find and replace
•
Window splitting
•
Text conversion utilities
•
In this chapter:
The ruler
•
Styles
•
Spellchecking, find and replace
•
Splitting windows
•
Conversion utilities
•
Although you can do a surprising amount of editing in StoryMill,
there are certain features that youʼll need a word processor for,
including headers, footers, advanced page layout, footnotes/
endnotes, and so forth. For information on how to export your work
for use in a word processor see the next chapter, Exporting Your
Work.
36 of 66
Page 37
The ruler
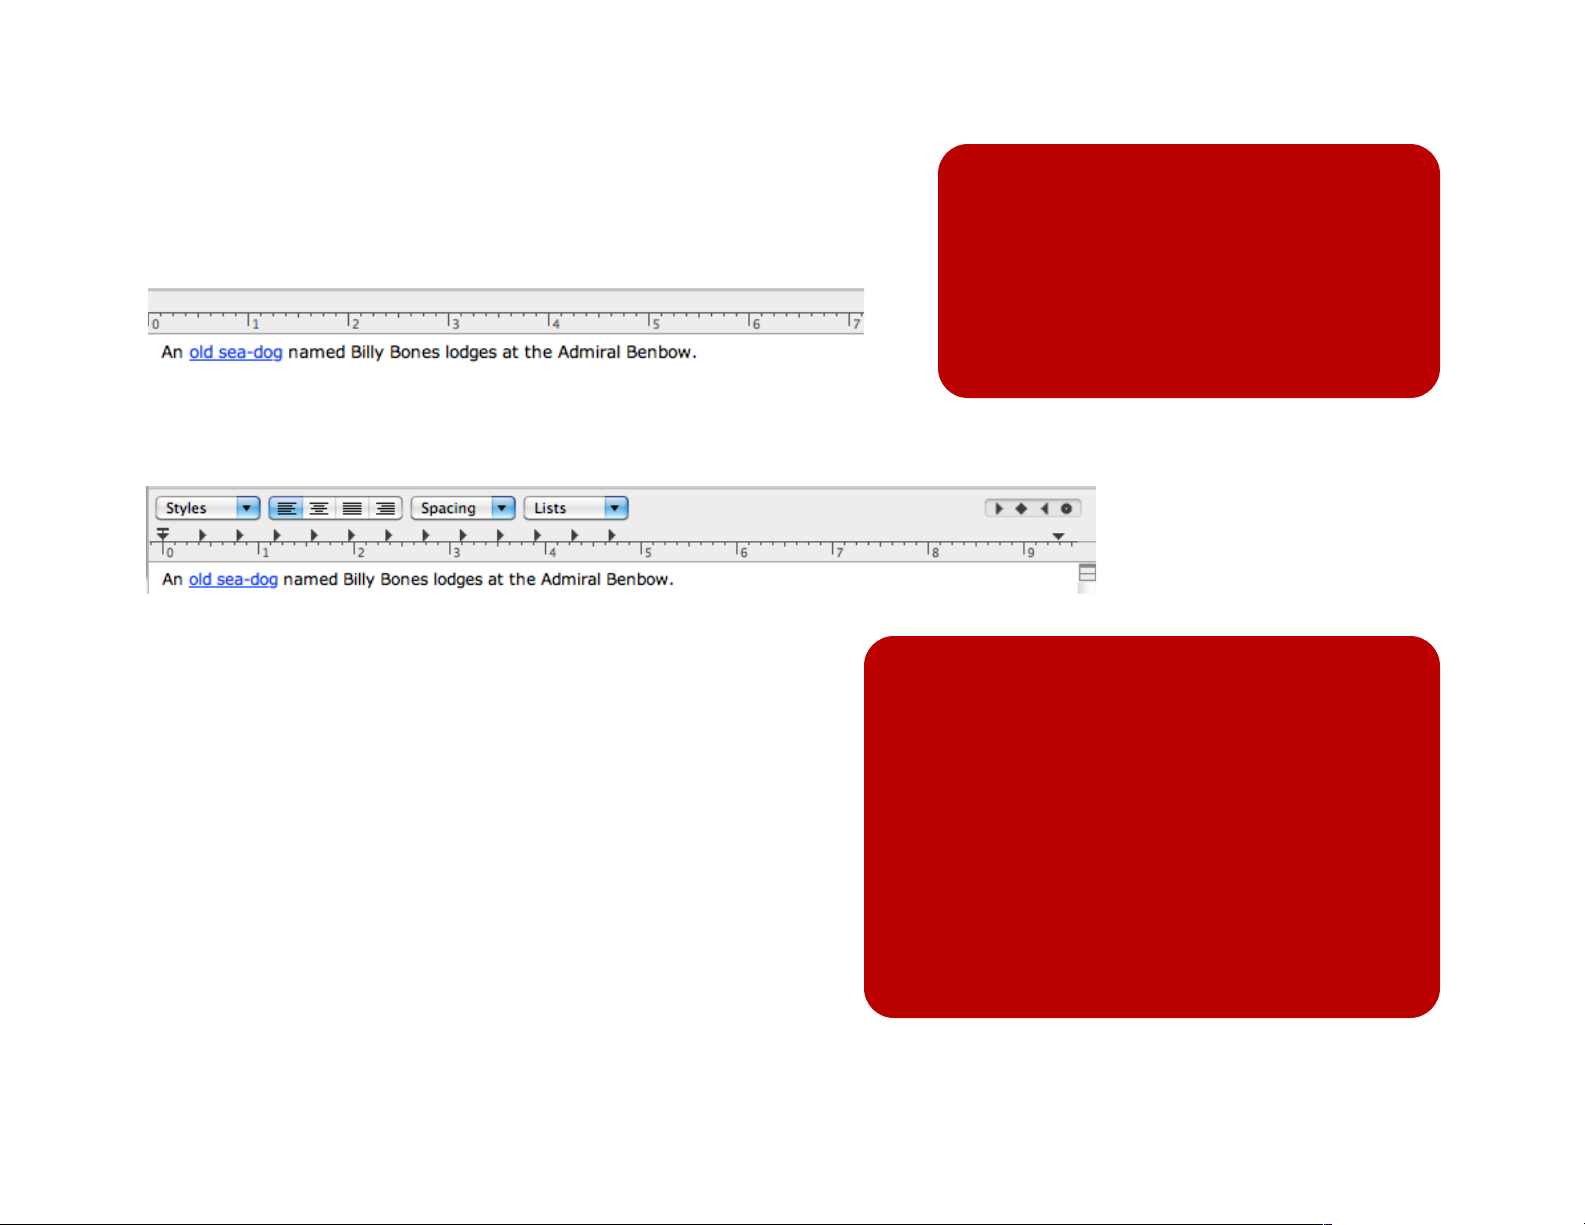
By default, the ruler is on in every text view. If the ruler is on but
your cursor is not inside the text view, youʼll see the mini ruler:
If the ruler is off, you can click inside the text view and choose
Text→Show Ruler or hit ⌃⌘R. The visible full ruler looks like this:
Use the buttons in the ruler for quick access to styles, text
justification, line spacing, and automatic lists.
Drag the “T” at the left of the ruler to set first line indent for the
selected text. Drag the downward arrow at the left of the ruler to
set the left margin of the selected text. Drag the downward
facing arrow at the right of the ruler to set the right margin of the
selected text.
To add a tab stop to the ruler, drag it from the tab stop well at the
far right (which contains, in order, a left tab stop, center tab stop,
right tab stop, and decimal tab stop). To remove a tab stop, drag
it outside the ruler and drop it.
Tip:
You can insert hyperlinks in your text!
Drag and drop links from your browser,
or highlight text and choose Text→Add
Link to assign the link manually (or
Text→Edit Link to edit linked text).
Tip:
A tab stop in the ruler sets where text will land
in a paragraph if you hit tab. Using tab stops
you can arrange text in columns.
Text at a left tab stop is left justified, text at a
center tab stop is centered, text at a right tab
stop is right justified, and text at a decimal tab
stop is aligned based on its decimal point
(useful for columns of dollar amounts, for
instance).
37 of 66
Page 38
Styles
Although Cocoaʼs styling support is limited, you can use the Styles
drop-down in the ruler to assign styles that you often use to your
text. Most people wonʼt need to worry about styles, however, since
you can set your default styling for text views in the preferences
(see Editor preferences, p. 62).
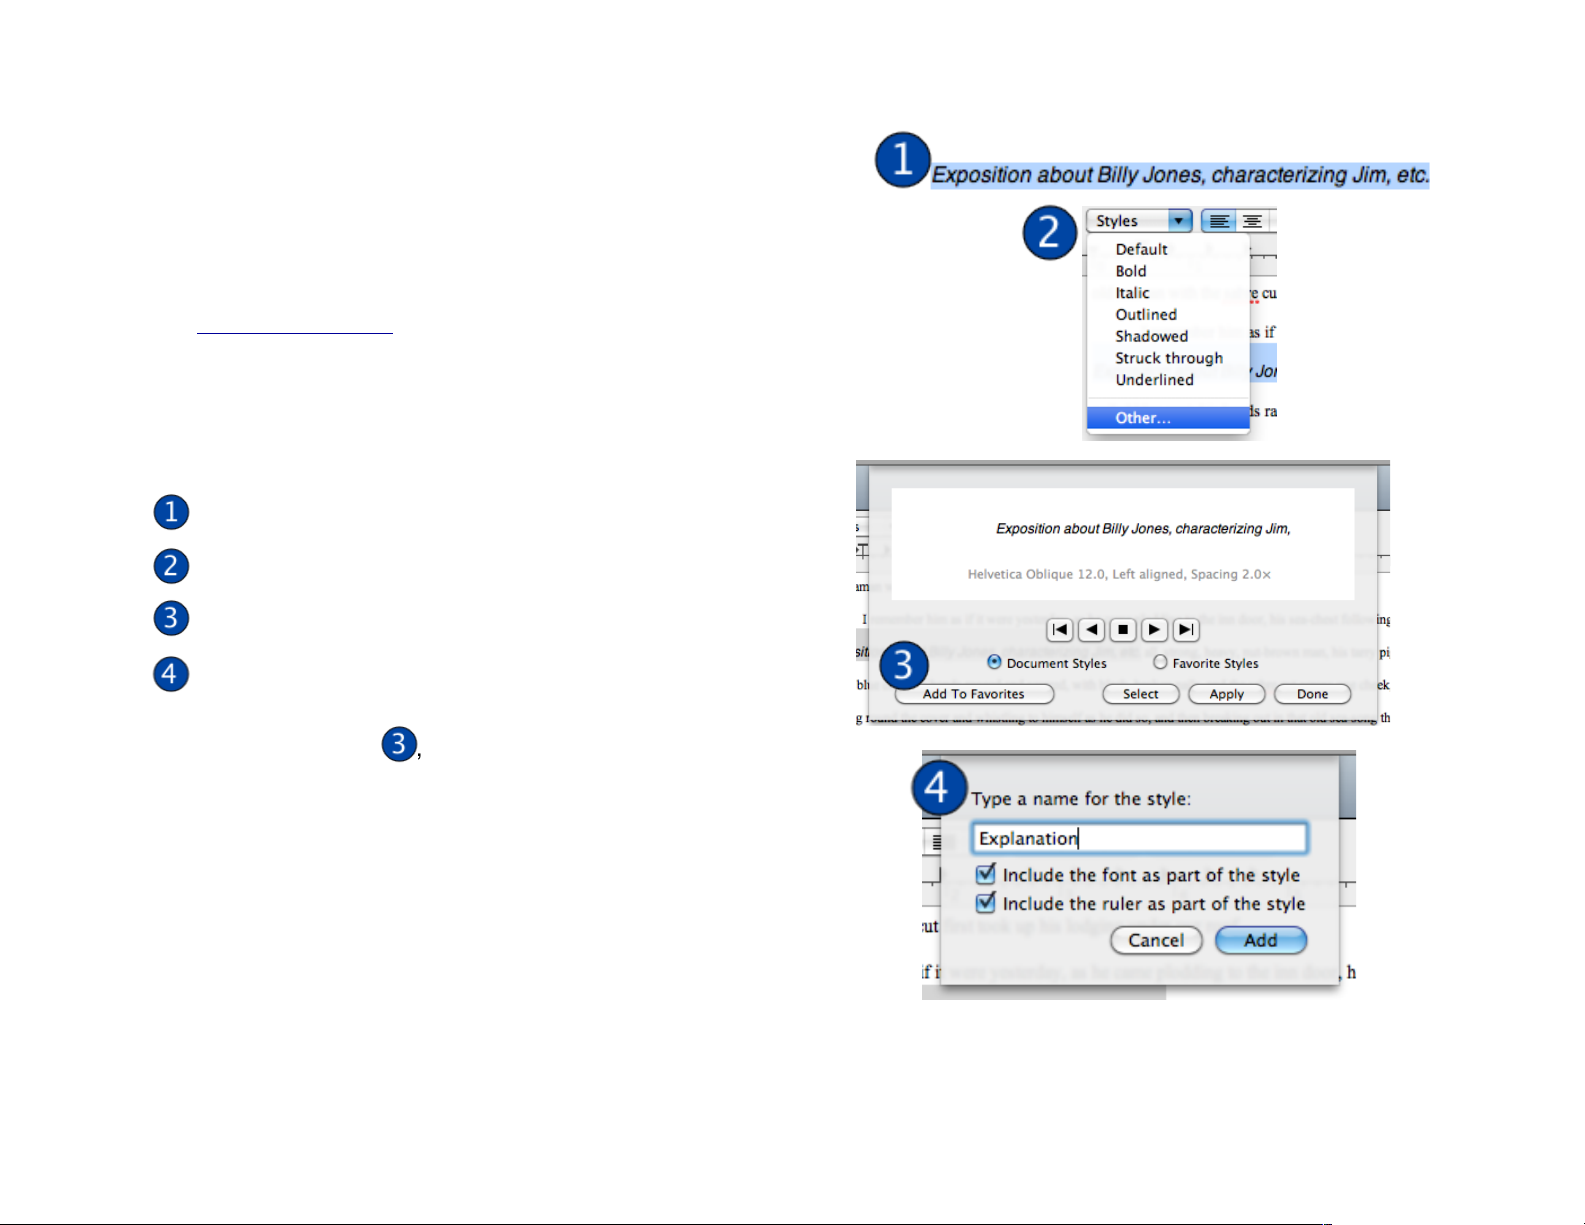
Select text and choose a style from the drop-down to set text to a
predefined style.
To define a new style:
Format some text. Select it.
Choose Styles→Other… in the ruler.
Choose Add To Favorites.
Type a name, and choose whether to include the font and
ruler in the style definition.
In the sheet from step , you can use the arrows to jump to the
first, previous, selected, next, and last styles in the text view. Click
the Favorite Styles radio button to remove or apply other
predefined styles.
Keep in mind that styles you define using the ruler will be available
in all applications that use the default Cocoa ruler.
38 of 66
Page 39
Spellchecking, find and replace
StoryMill uses the default Cocoa spellchecking for all of its text
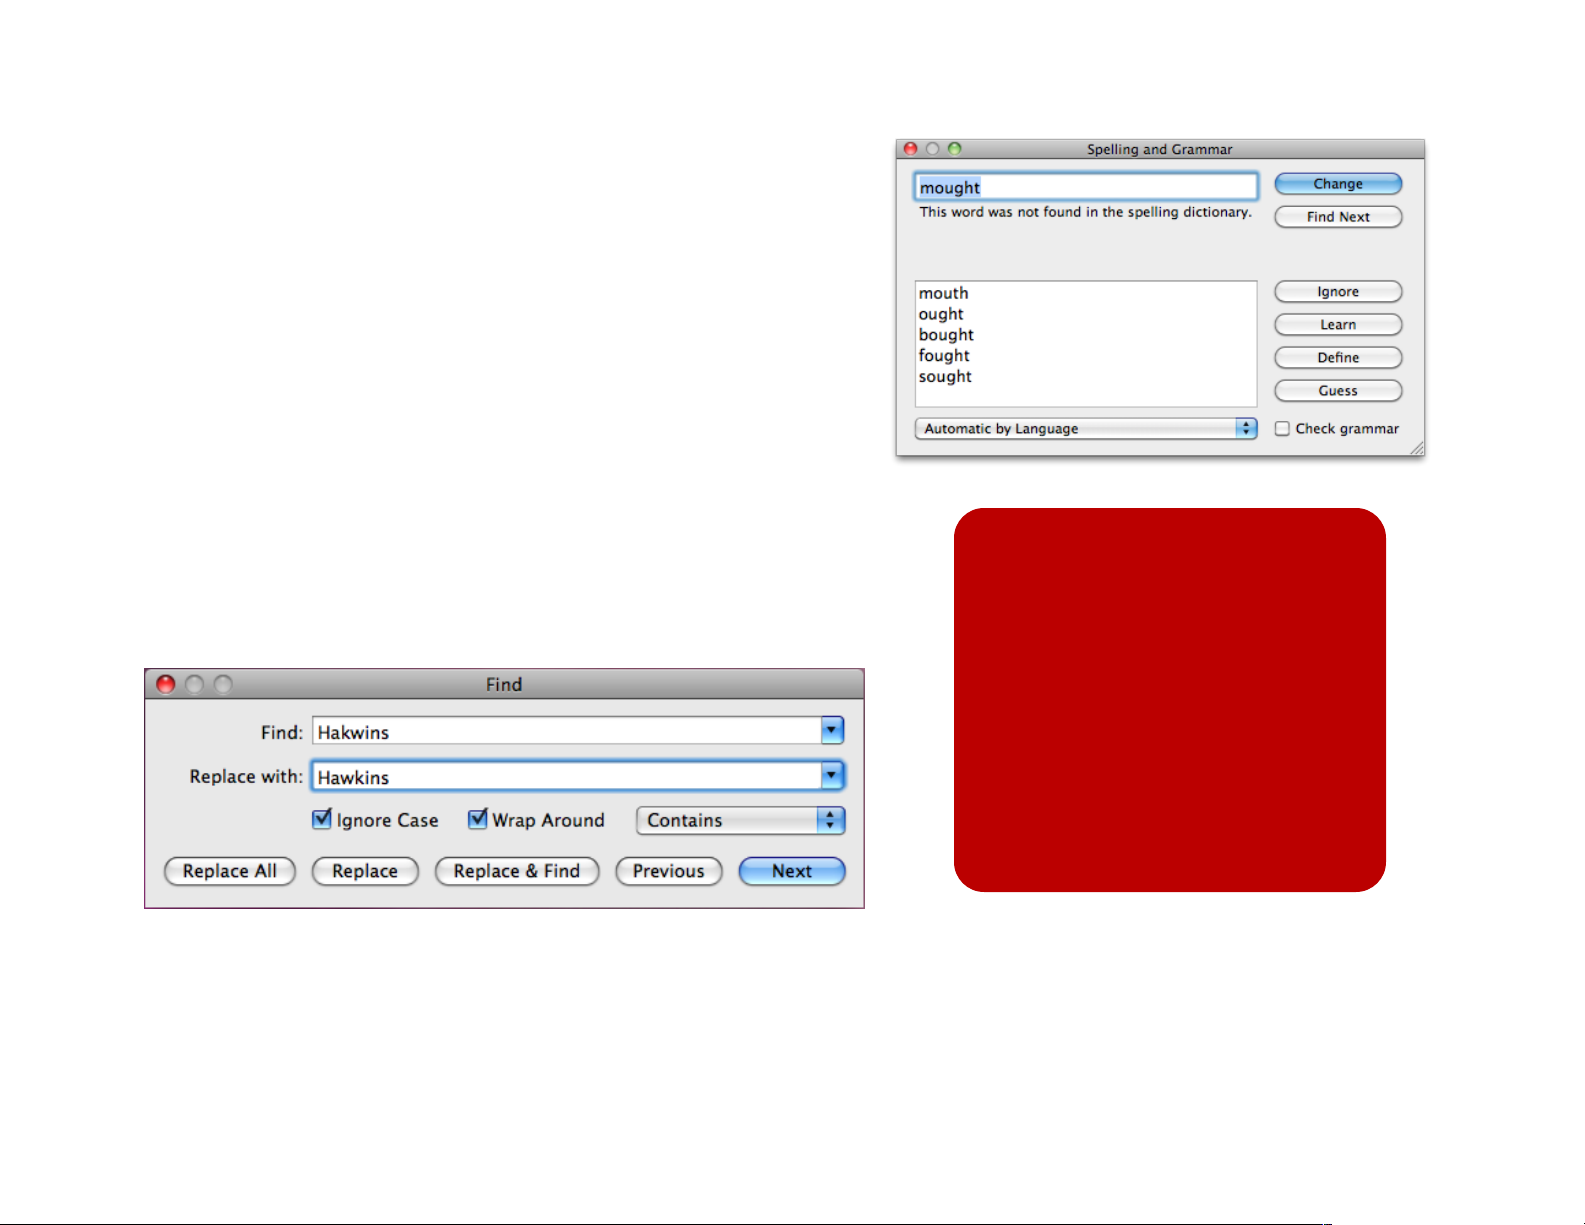
views. Choose Edit→Spelling→Check Spelling While Typing to
have misspelled words underlined in red as you type.
Additionally, you may opt to spellcheck manually. Choose
Edit→Spelling→Show Spelling and Grammar or hit ⌘: to open
the spellchecking window (shown at right). Use this window to find
suggestions for your misspelled words.
You can also choose Edit→Spelling→Check Spelling or hit ⌘; to
jump through the misspelled words in the text view without opening
the spellchecker window.
Choose Edit→Find→Find… or hit ⌘F to do a find and replace in
the active text view using the standard Cocoa find and replace
dialog:
Tip:
StoryMill supports project wide
search and replace - simply
choose Edit→Find→Project
Find and Replace or hit ⇧⌘F.
The search will work with
metadata that is entered as
unique text (such as item notes)
but not with metadata that has a
set number of possibilities (such
as tags or status.)
39 of 66
Page 40
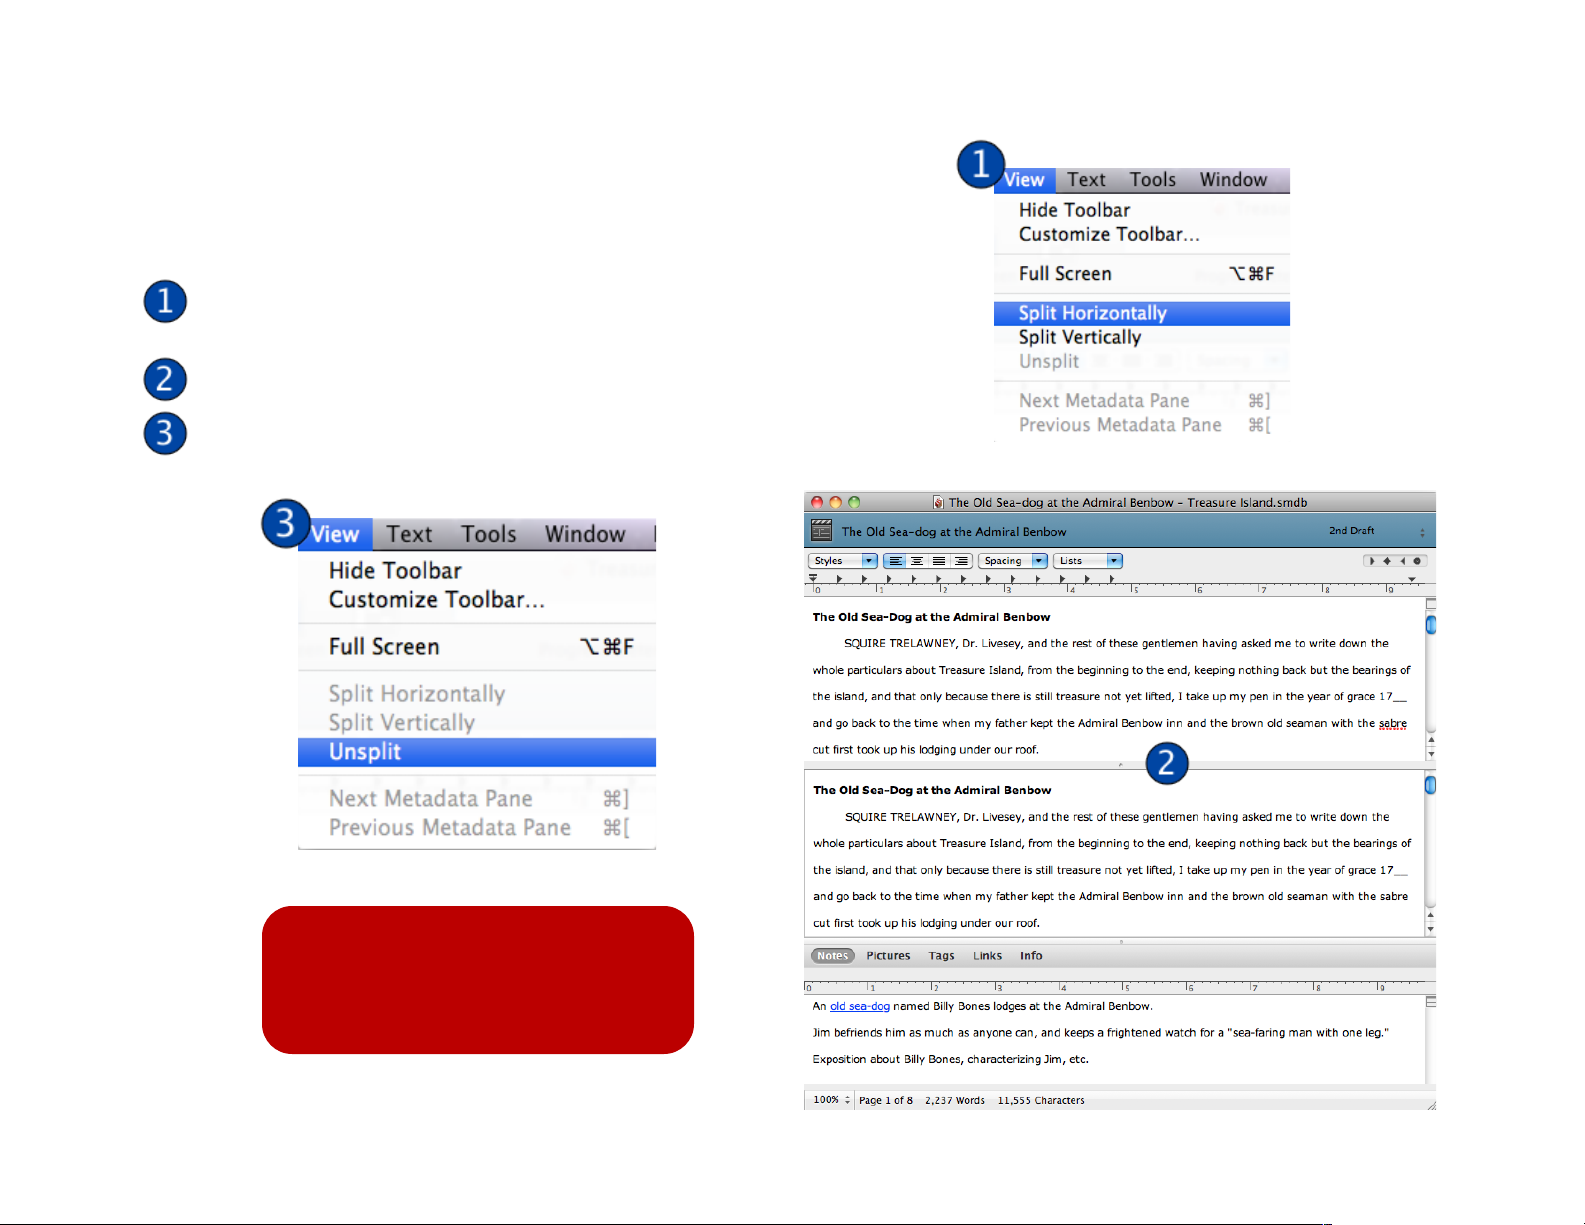
Splitting windows
If you are working in a content pane, you can split your text view to
both edit and reference the item at the same time.
With an editing window open, choose View→Split
Horizontally or View→Split Vertically.
Drag the bar between the splits to resize them to your liking.
Choose View→Unsplit to remove the split.
Tip:
You can also use the button that
sits on top of the scrollbar to split
your text view!
40 of 66
Page 41
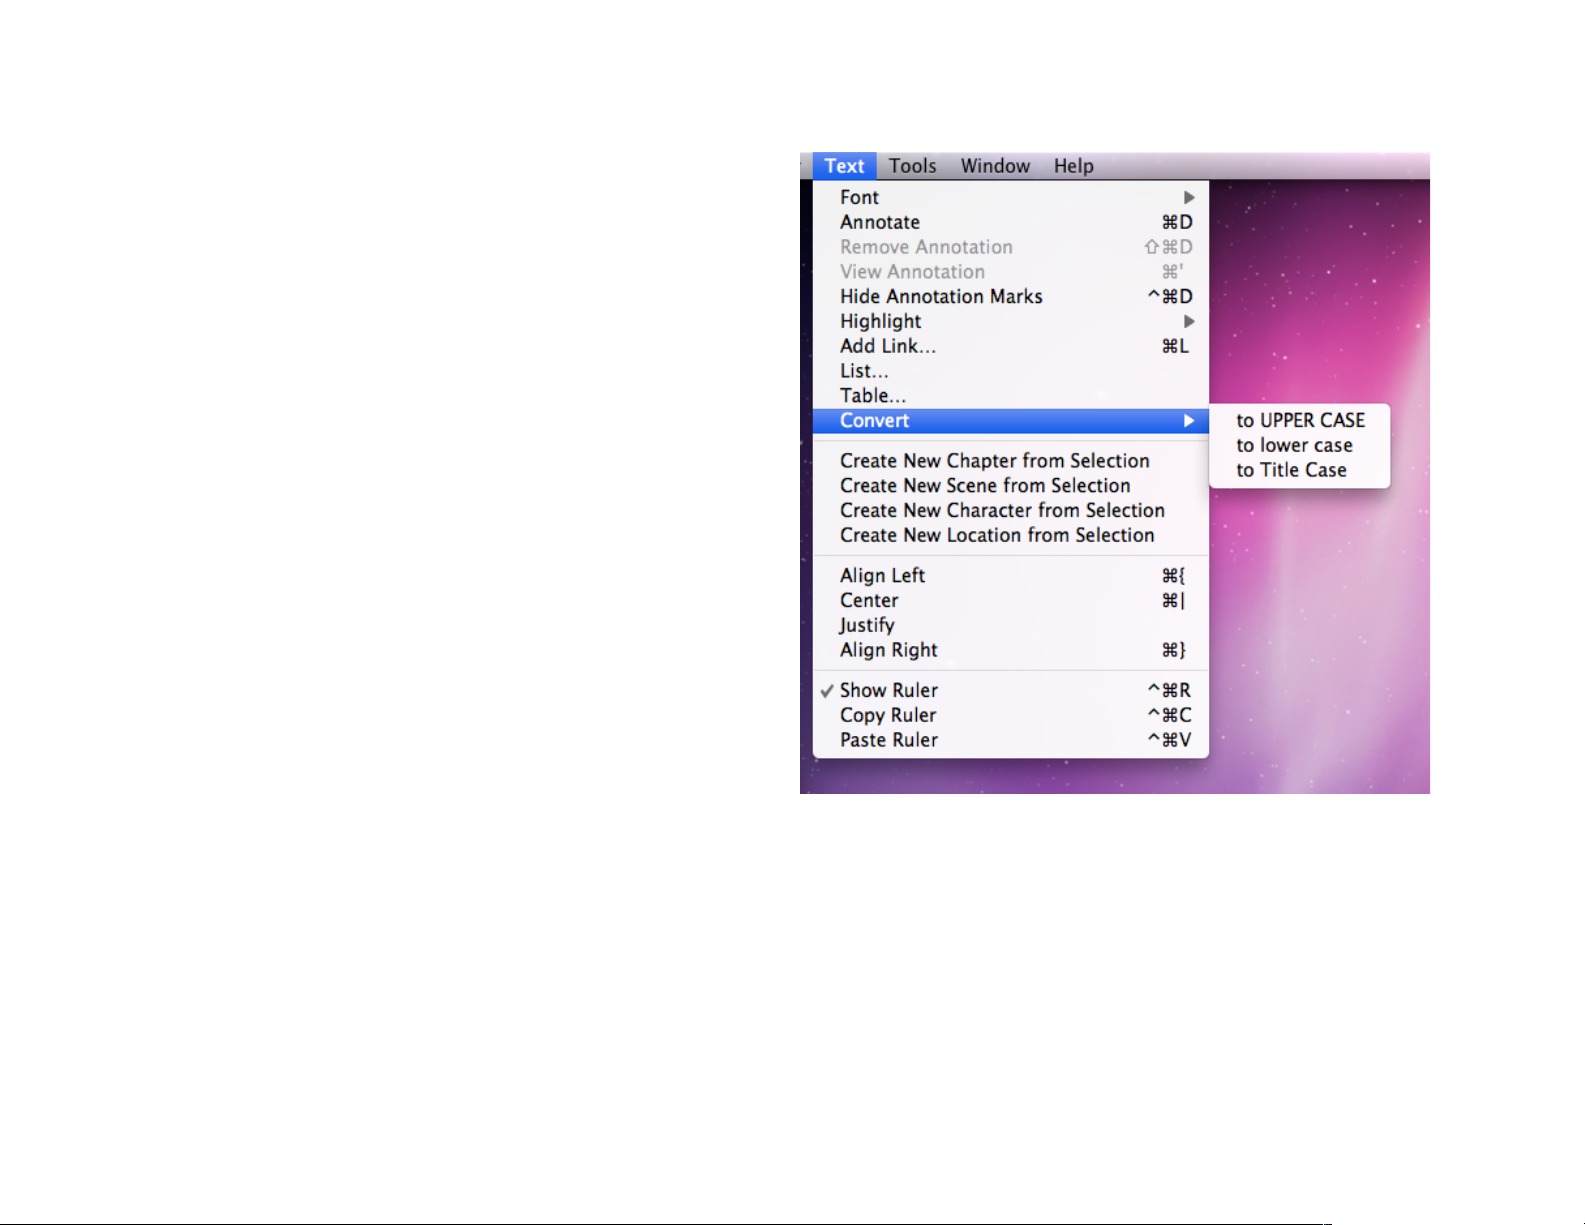
Conversion utilities
StoryMill provides a number of different text conversion
utilities to make what would otherwise be tedious tasks
quick and simple. You can find these utilities in
Text→Convert (shown at right).
To use one of the conversion utilities, first select the text
you wish to convert, and then choose the appropriate utility
from the Text menu.
To UPPER CASE: Selected text will be converted to all
•
uppercase characters.
To lower cas e: Selected text will be converted to all
•
lower case characters.
To Title Case: The first letter of each word in the selected
•
text will be capitalized.
41 of 66
Page 42

Chapter 4: Exporting Your Work
StoryMill provides most basic text formatting that youʼll need while
writing, but for advanced text editing features such as margins,
headers/footers, and footnotes, youʼll need to export your text and
work in another environment, such as a word processor. Before
youʼve finished your project you may want to print all of the
information youʼve entered so you can go over it by hand. Or else
you might want to share your research materials without needing
to go through your research view to copy and paste everything.
Fortunately, StoryMill doesnʼt just provide you with tools for writing
and revising your project; it also makes it extremely easy to export
your work to send to agents and publishers, or just to print a hard
copy of your scenes so you can mark them up in pen before you
do revisions.
StoryMillʼs powerful exporting system is capable of exporting any
text that youʼve entered in the program. You can also easily
create formatted export templates using rich text and special
keywords within the program. StoryMill exports to a number of
different formats, including Word, Word 2007, RTF, rich text with
attachments (RTFD), HTML, and plain text.
In this chapter:
Exporting basics
•
Export templates
•
Using export template keywords
•
Keywords reference
•
Document templates
•
Custom document templates
•
StoryMill ships with a number of basic export templates, but if you
find that they donʼt quite fit your needs you can easily modify or
duplicate them as a basis for designing your own custom
solutions.
42 of 66
Page 43
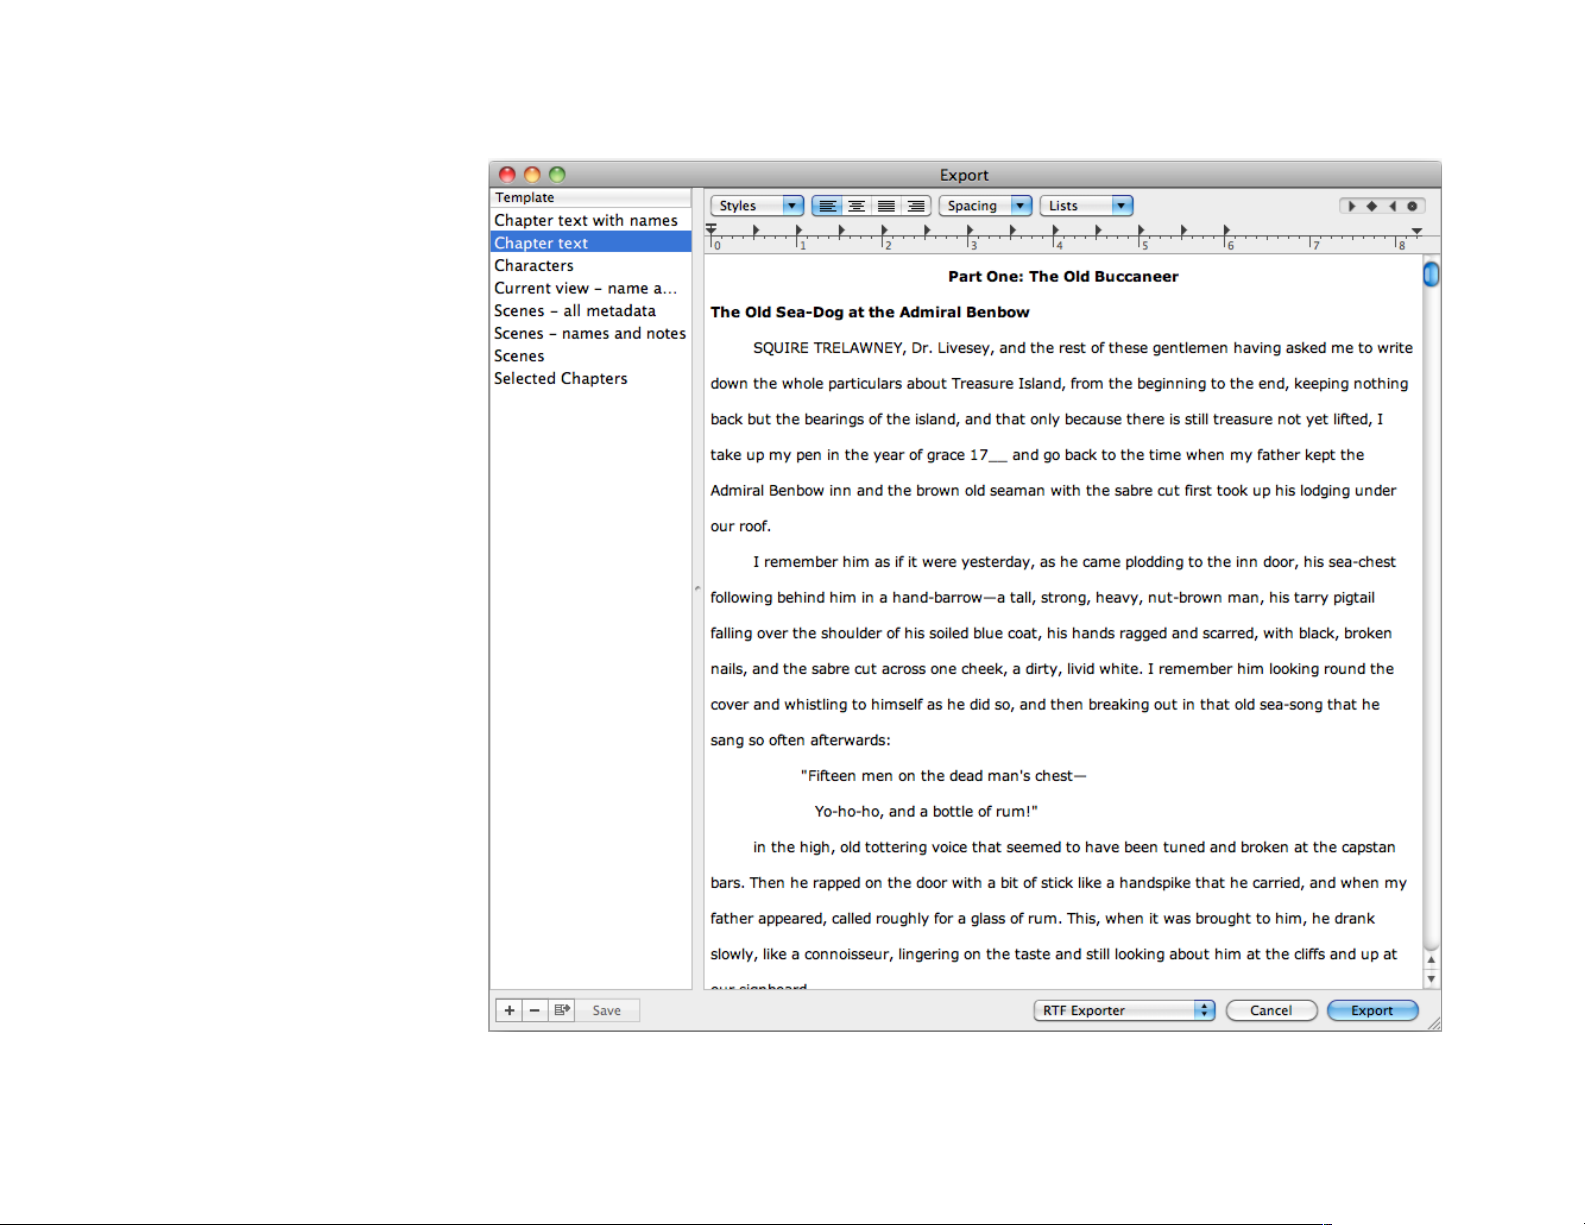
Exporting basics
To export anything out of your
project, first choose
File→Export…. The
exporting window will open
(shown at right).
The pane on the left contains
the available export
templates. When you select
an export template, the area
on the right will be filled with a
preview of what your
exported text will look like.
Once you have the template
that you want, select what
kind of document youʼd like to
export to using the drop-down
in the lower right of the
window and click the Export
button.
A standard save dialog will
open, allowing you to choose
a destination and a name for
your exported file.
43 of 66
Page 44
Export templates
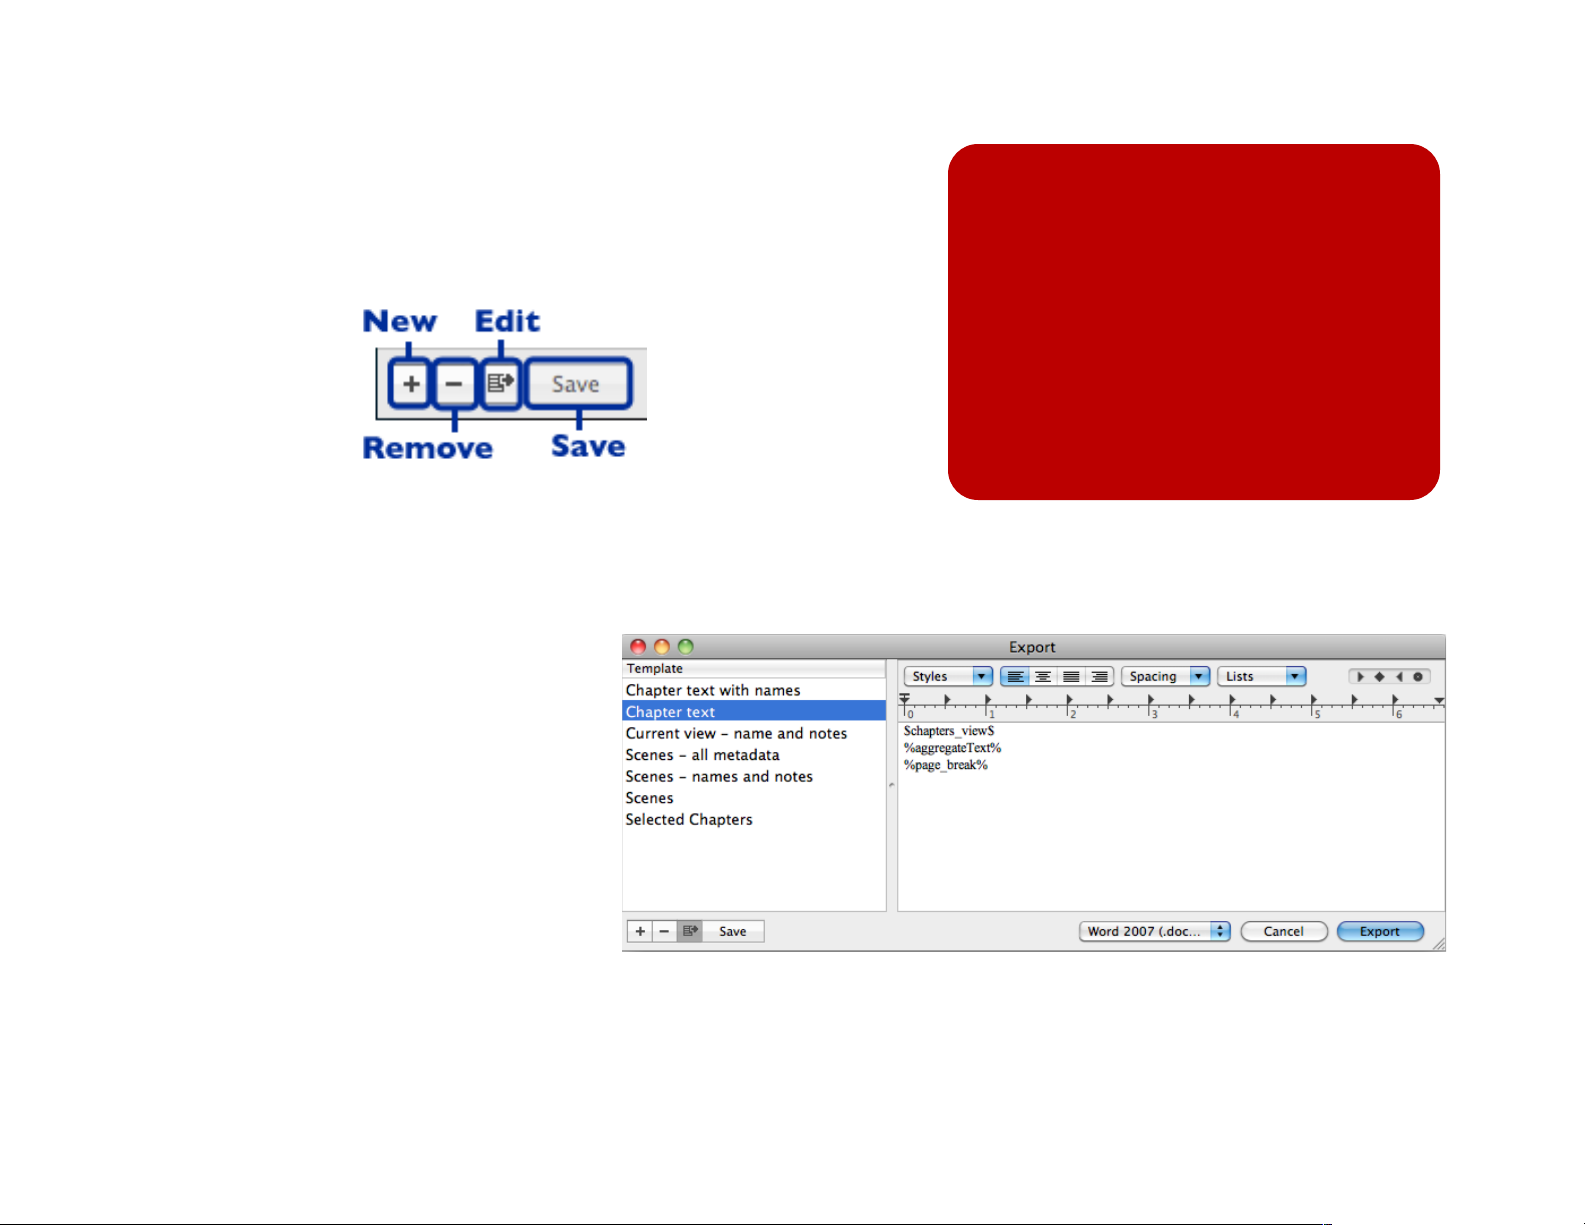
You can edit your export templates from the export window. Once
youʼve chosen File→Export… either select a current template or
click the + button at the bottom left to add a new template:
If you add a new template, its name will be highlighted in the
template list by default, ready to be edited. Otherwise you can
double click the templateʼs name to change it.
Once you have the template you wish to
edit selected, click the Edit button to
toggle between previewing and editing
mode (shown above). Youʼll see
something similar to the screenshot at
right.
Tip:
If you double click the name of a
template other than the highlighted
template, you may need to wait until the
preview has been generated before you
can edit it (the amount of time will vary
based on the size of the text to be
exported and the speed of your
computer). This slight lag is normal; the
program hasnʼt frozen!
Words such as $chapters_view$ and
%aggregateText% are special keywords
that are placeholders for the contents of
items in whichever view youʼre working in.
When exporting, the template will loop
through all the items in the designated
view and stick in their specific information
in place of the keywords. In the example shown, the chapter text
and scenes text (the aggregate text) for all items in the chapters
view will be displayed, with page breaks in between.
44 of 66
Page 45
Using export template keywords
Keywords in export templates may initially look very strange, but
theyʼre actually quite easy to use! There are two types of
keywords:
$keywords$ (dollar sign keywords): Keywords that start and
•
end with a dollar sign tell the template which view youʼre working
with
%keywords% (percentage sign keywords): Keywords that start
•
and end with a percentage sign tell the template what to stick into
the exported document for each item in the selected view.
Tip:
Remember that keywords are case-specific!
Where there are two words not separated
by an underline character, the second word
will always be capitalized. For example,
%creationdate% will not work, but
%creationDate% will.
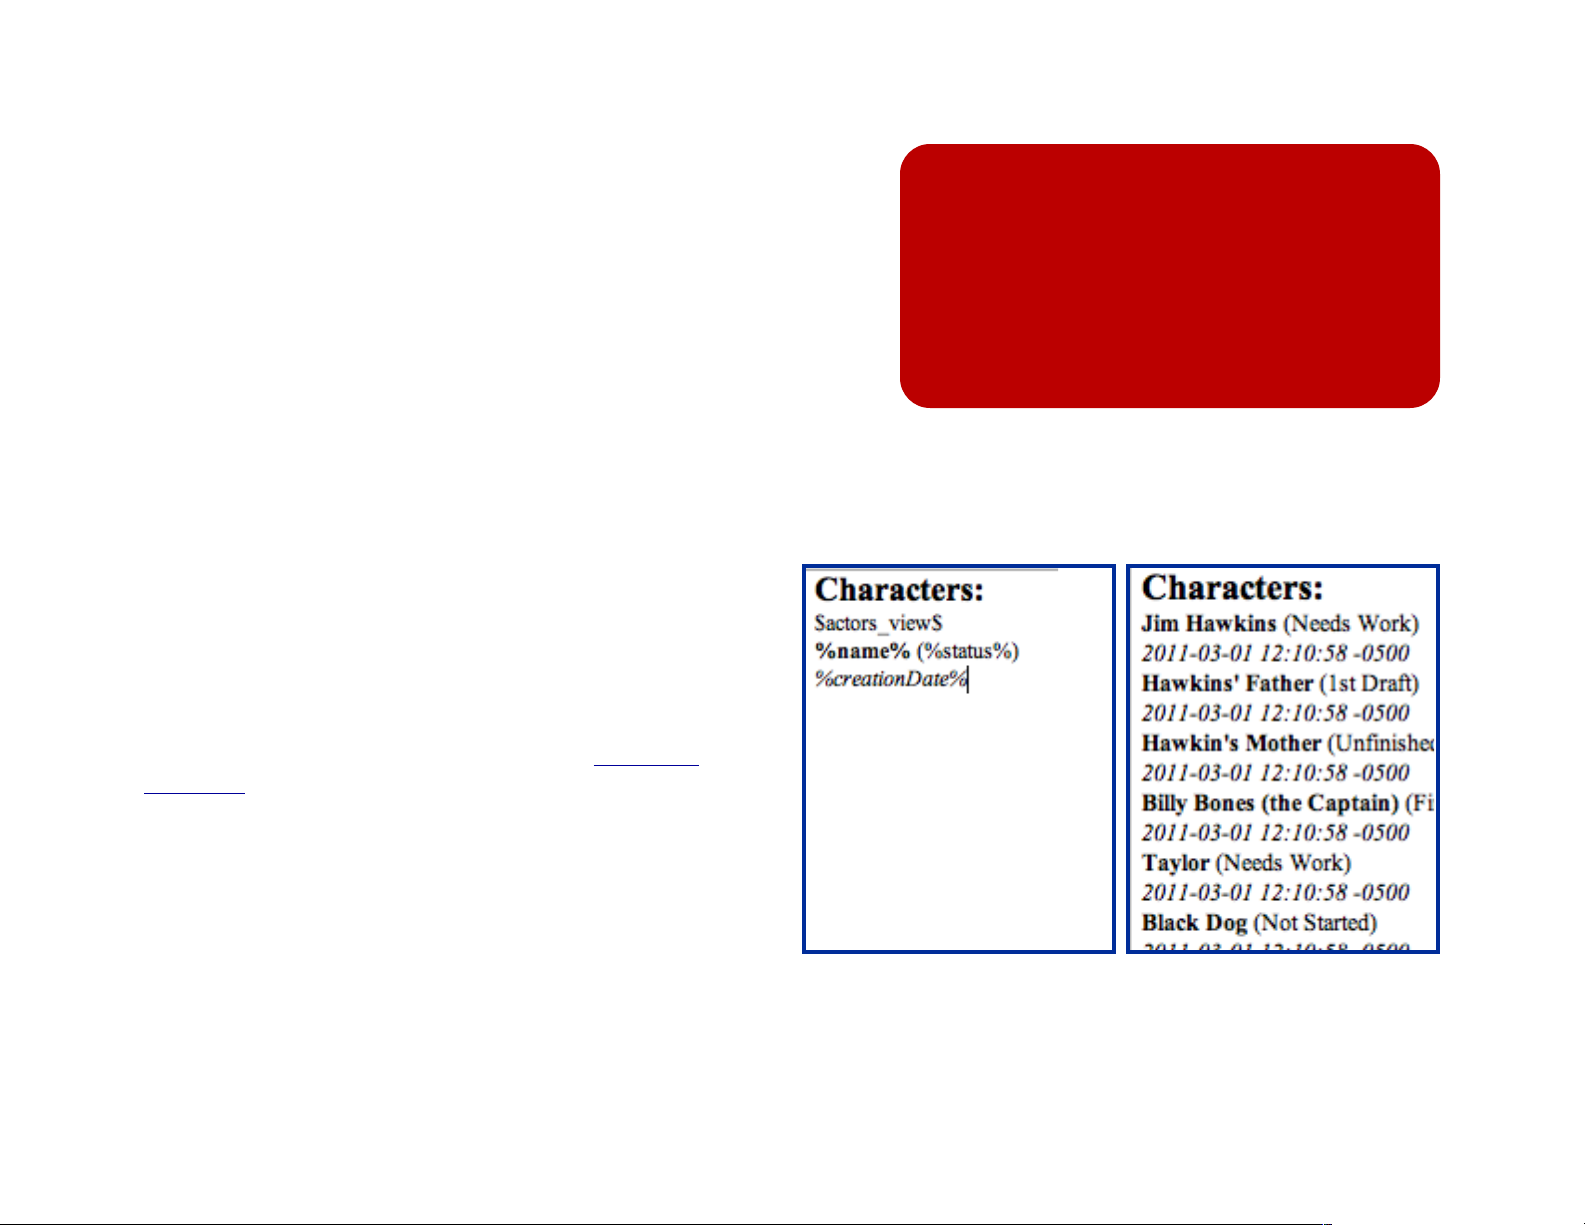
If you apply text formatting (such as font, size, bold,
alignment, etc.) to a keyword, that same formatting will be
applied to the text that it stands for (see the example to the
right).
There are certain keywords (such as %name% and
%status%) that apply to all items and can be used with any
view. Others (such as %scenesInChapter%) can only be
used with a specific type of view. See the Keywords
reference for a complete list of keywords.
You can place as many different views in a single export
template as you like. The exporter will process all items in
a view, and then proceed to the next view in the exporter
and process all of its items (and so forth until it hits the end
of the template).
Editing Output
45 of 66
Page 46
Keywords reference
Keyword
Output
Keyword
Output
$Your View Name$
The view named Your View
Name (capitalization
matters)
$locations_view$
The locations view
(regardless of its name)
$current_view$
The currently selected view
$research_view$
The first research view
(regardless of its name)
$chapters_view$
The novel view
$tasks_view$
The first generic view
(regardless of its name)
$scenes_view$
The scenes view (regardless
of its name)
$submissions_view$
The submissions view
(regardless of its name)
$actors_view$
The actors view (regardless
of its name)
$events$
The events in the timeline
$selection$
Your currently selected views
or items.
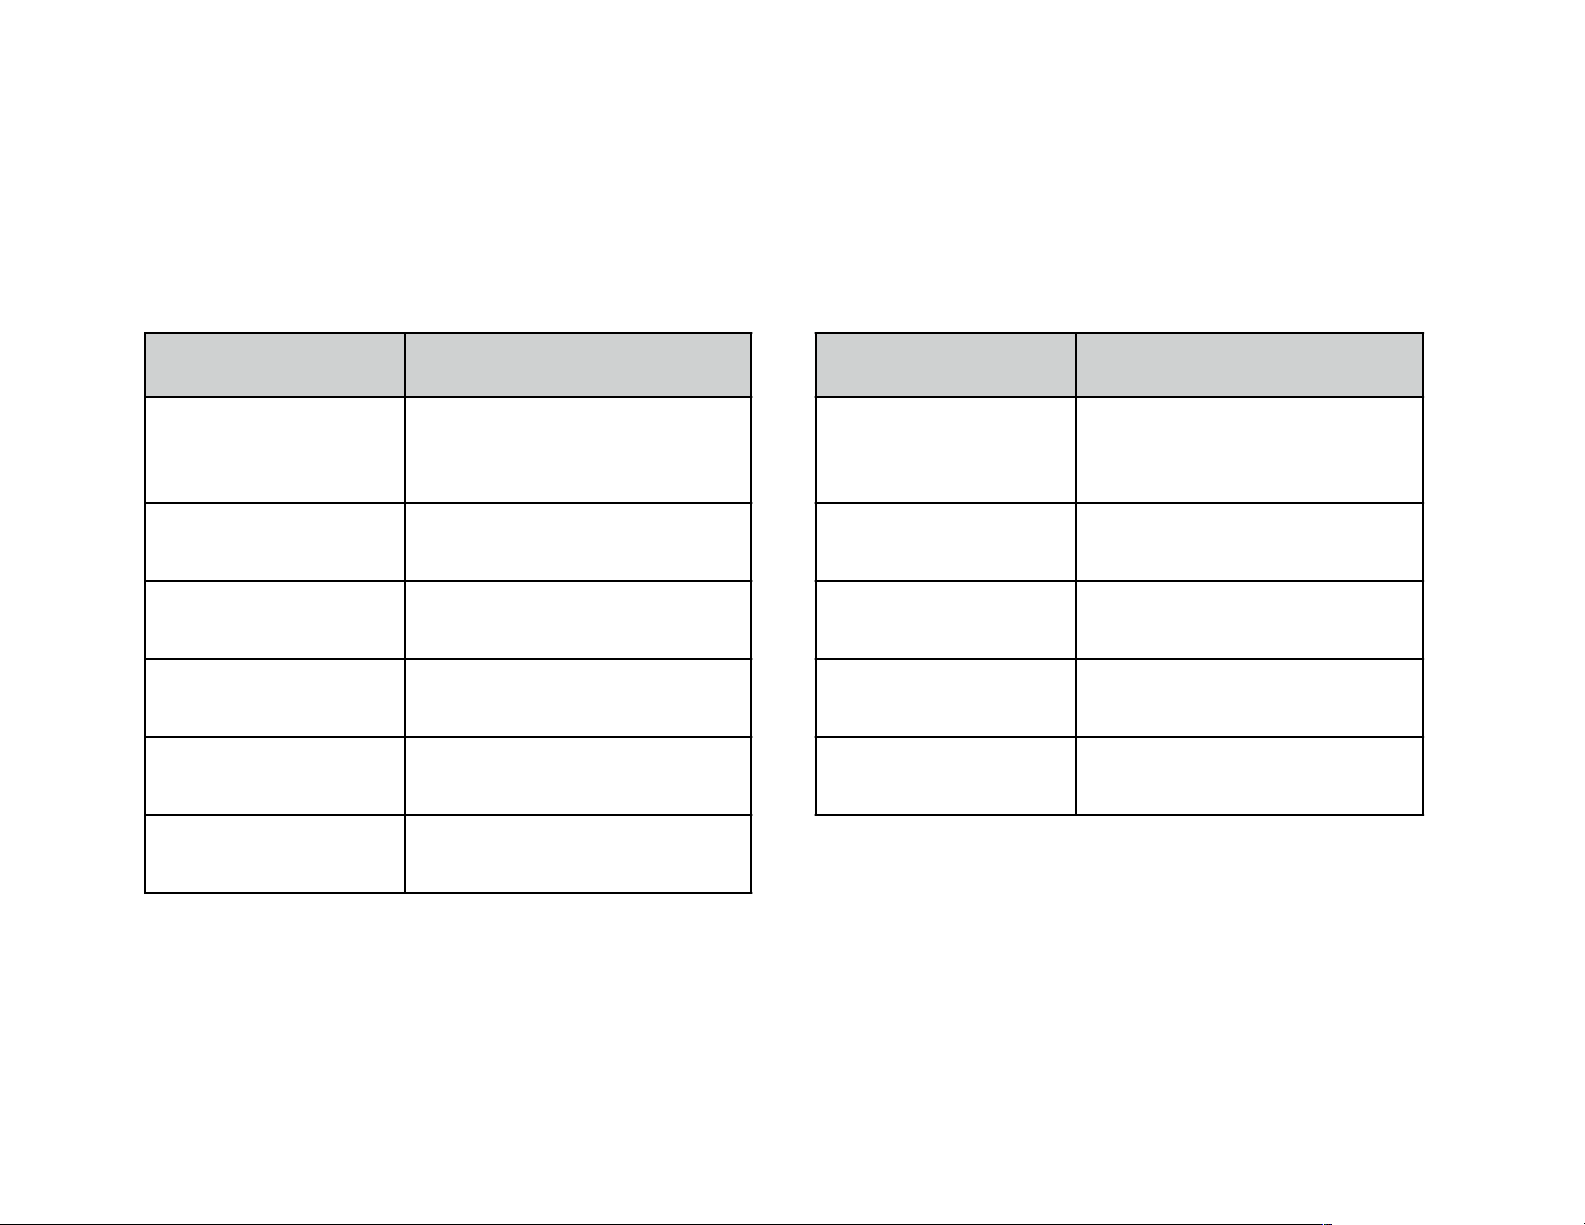
Here is a complete reference to all keywords available within
StoryMillʼs export templates.
View selectors
46 of 66
Page 47
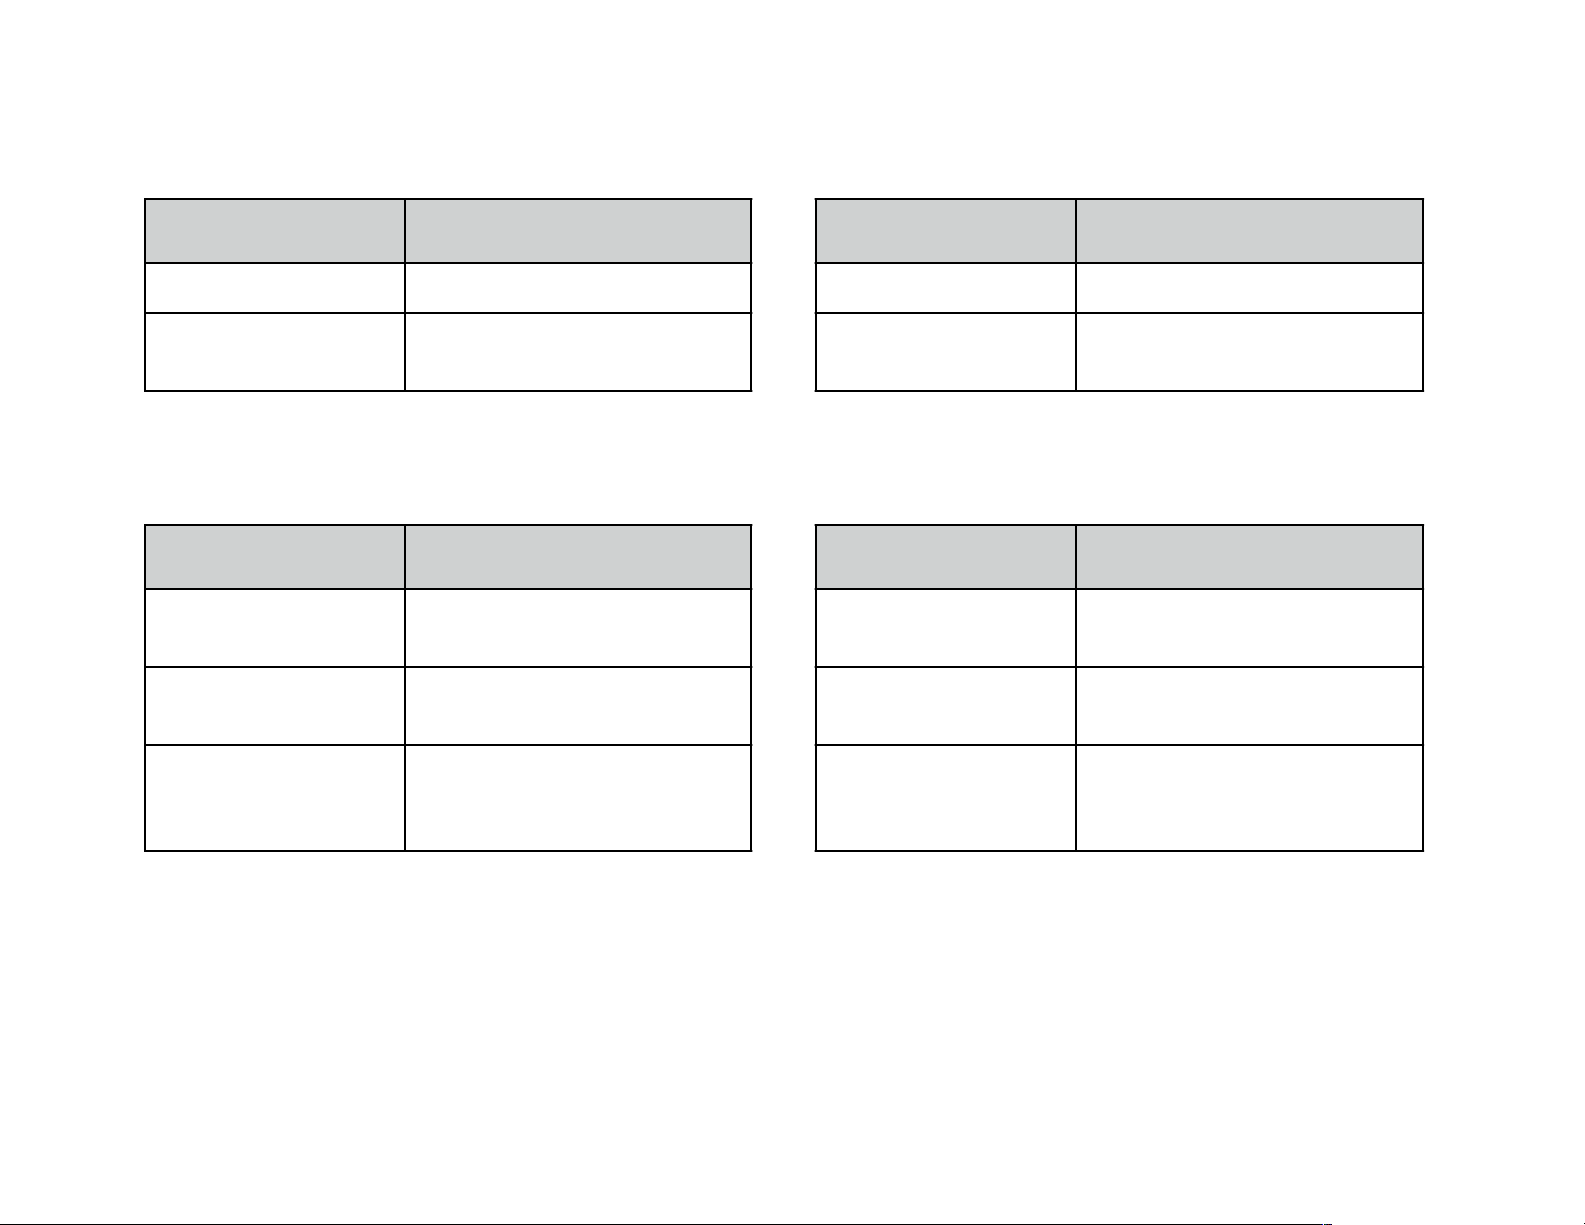
Document keywords (to be used outside of view selectors)
Keyword
Output
Keyword
Output
%title%
The projectʼs title
%views%
Names of all views
%storyLines%
All storylines in the projectʼs
timeline
%events%
All events in the projectʼs
timeline
Keyword
Output
Keyword
Output
%name%
The itemʼs name
%creationDate%
The date the item was
created
%notes%
The itemʼs notes
%lastModifiedDate%
The date the item was last
modified
%status%
The itemʼs status
%tags%
The itemʼs tags (listed with
carriage returns between
each tag)
Universal keywords
47 of 66
Page 48
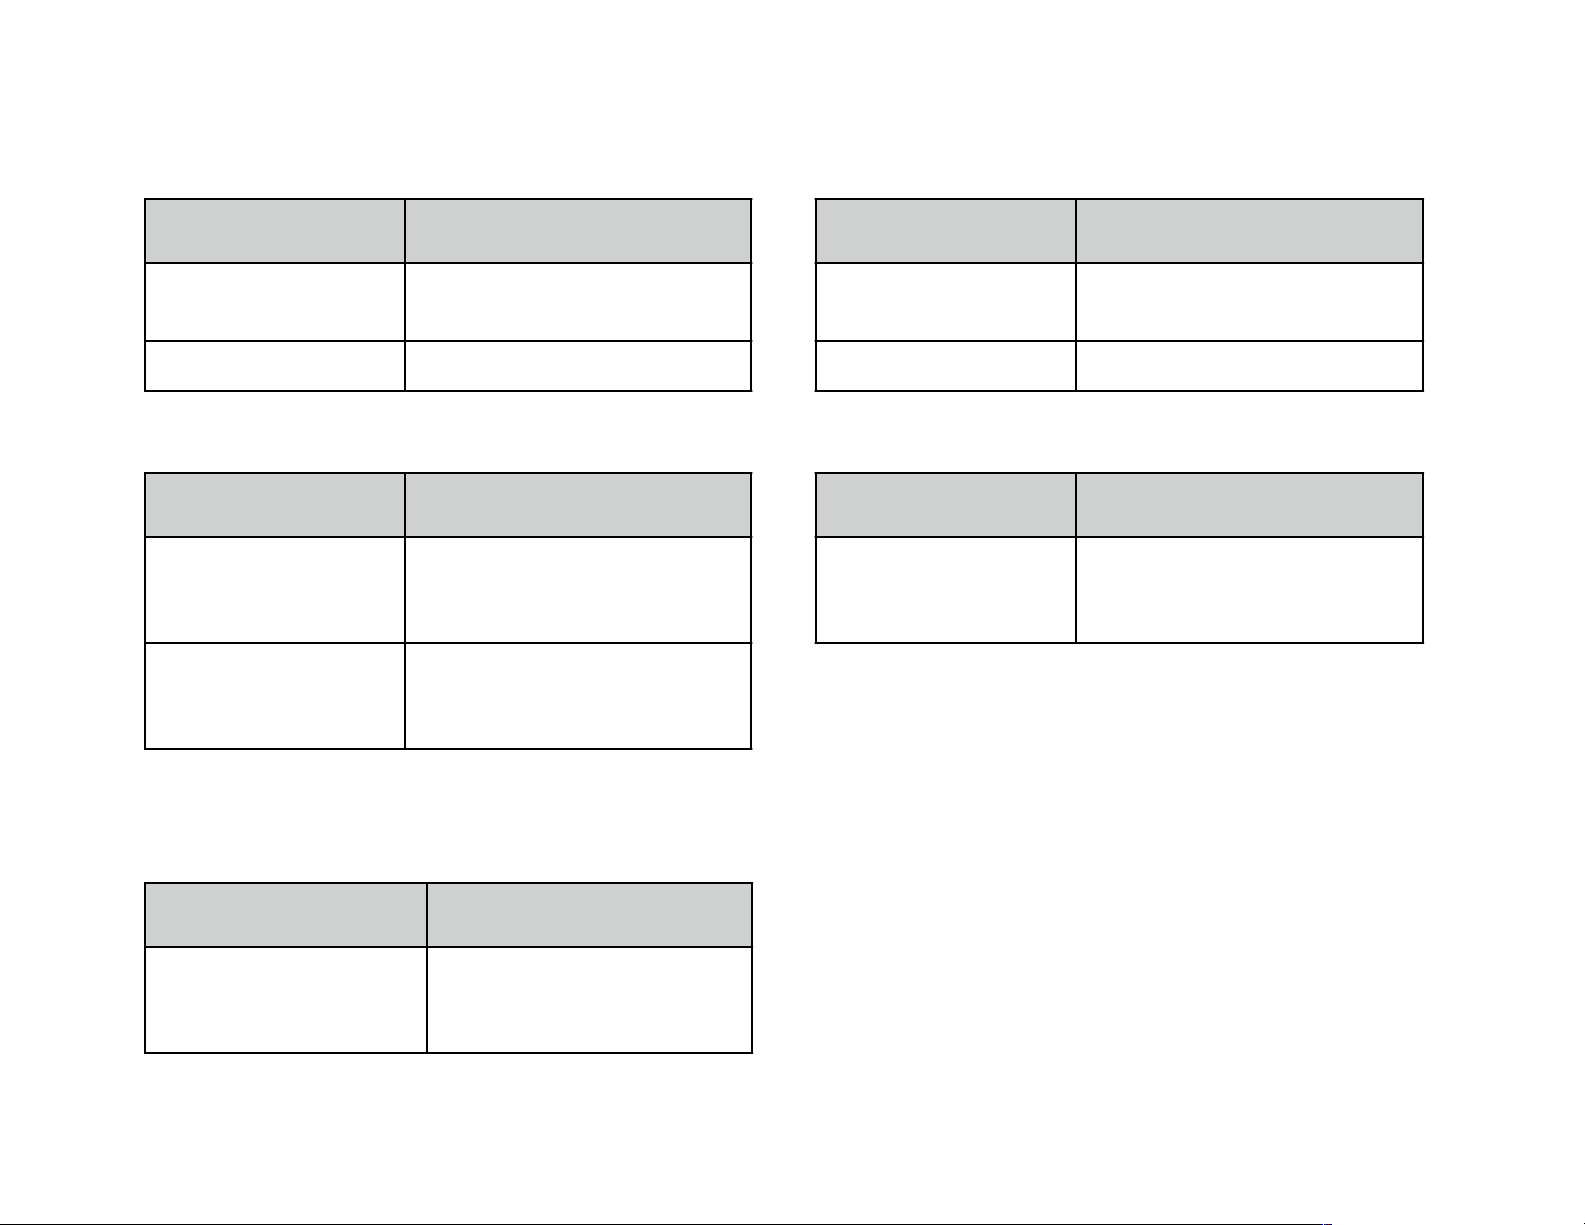
Scenes-specific keywords
Keyword
Output
Keyword
Output
%text%
The sceneʼs text (what
shows up in the chapter)
%startDate%
The sceneʼs start date
%storyLine%
The storyline for the scene
%endDate%
The sceneʼs end date
Keyword
Output
Keyword
Output
%text%
The chapter text
%scenesInChapter%
A list of all scenes in the
chapter (separated by
carriage returns)
%aggregateText%
The chapter and scene text
(what you see in the novel
view)
Keyword
Output
%scenesForActor%
A list of all scenes using
the actor (separated by
carriage returns)
Chapters-specific keywords
Actors-specific keywords
48 of 66
Page 49
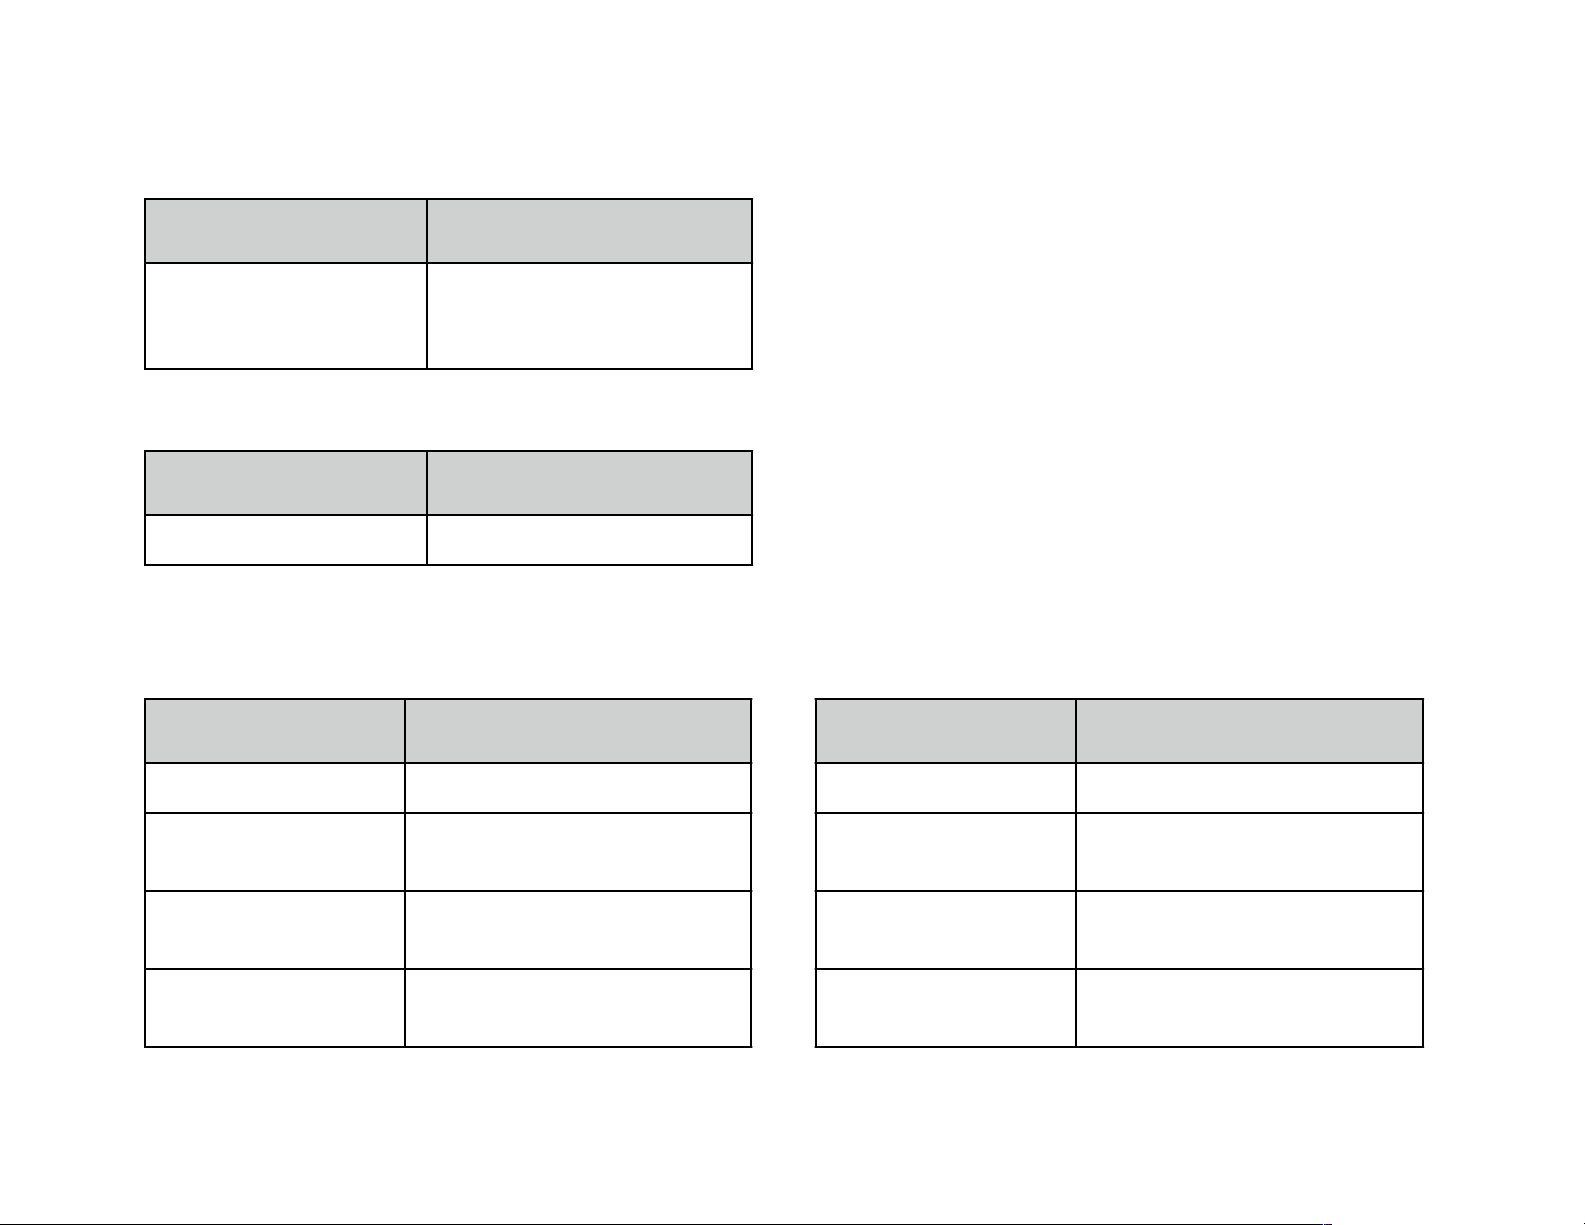
Locations-specific keywords
Keyword
Output
%scenesForLocation%
A list of all scenes using
the location (separated by
carriage returns)
Keyword
Output
%startDate%
The eventʼs date
Keyword
Output
Keyword
Output
%address%
The first address line
%homepage%
The submissionʼs homepage
%address2%
The second address line
%phone%
The submissionʼs phone
number
%city%
The addressʼs city
%fax%
The submissionʼs fax
number
%state%
The addressʼs state
%dateSubmitted%
The date the submission was
submitted
Events-specific keywords
Submissions-specific keywords
49 of 66
Page 50
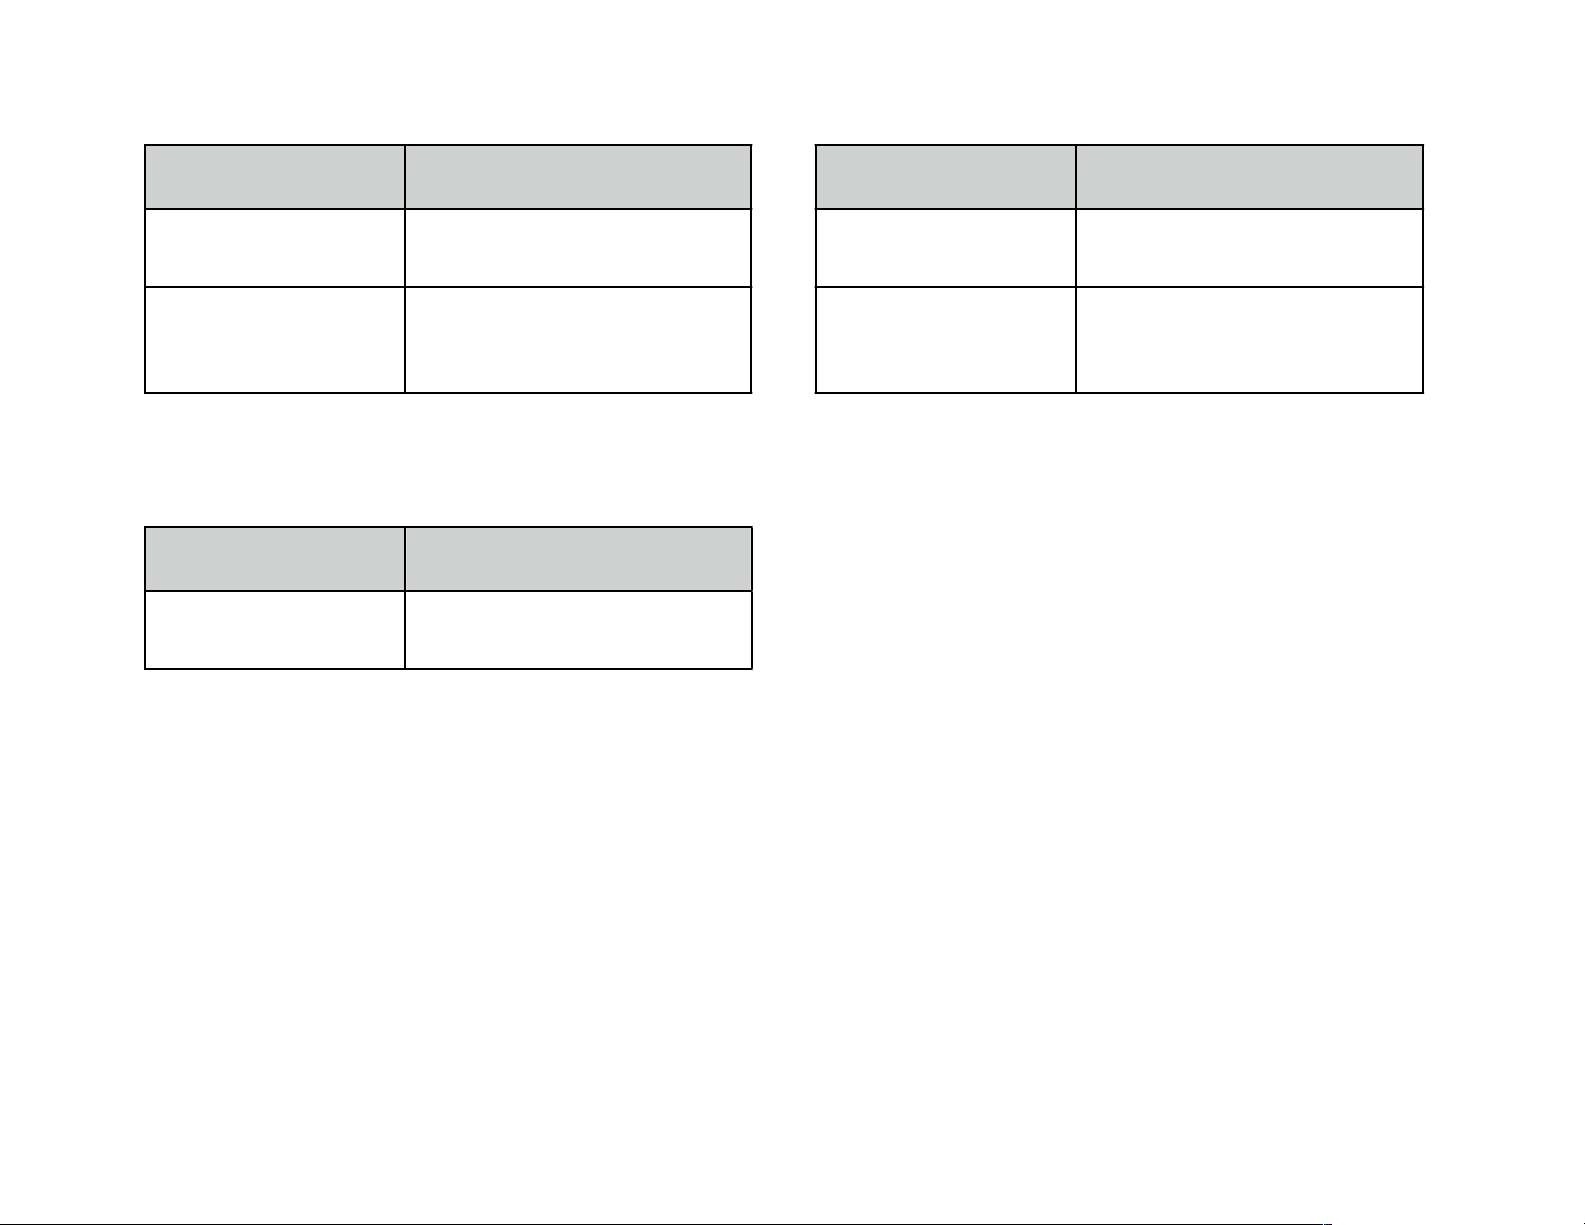
Keyword
Output
Keyword
Output
%zip%
The addressʼs zip code
%response%
The response you received
to the submission
%email%
The submissionʼs email
%agency%
The agency you submitted
your project to (the name of
the submission)
Special keywords
Keyword
Output
%page_break%
Inserts a page break (useful
to separate items)
50 of 66
Page 51
Document templates
Although exporting text from your project is important,
sometimes the structure of the project itself is what you want
to preserve. To create projects with different structures you
can use document templates.
By default all new projects use the Novel template. However,
StoryMill comes with two other templates or you can create
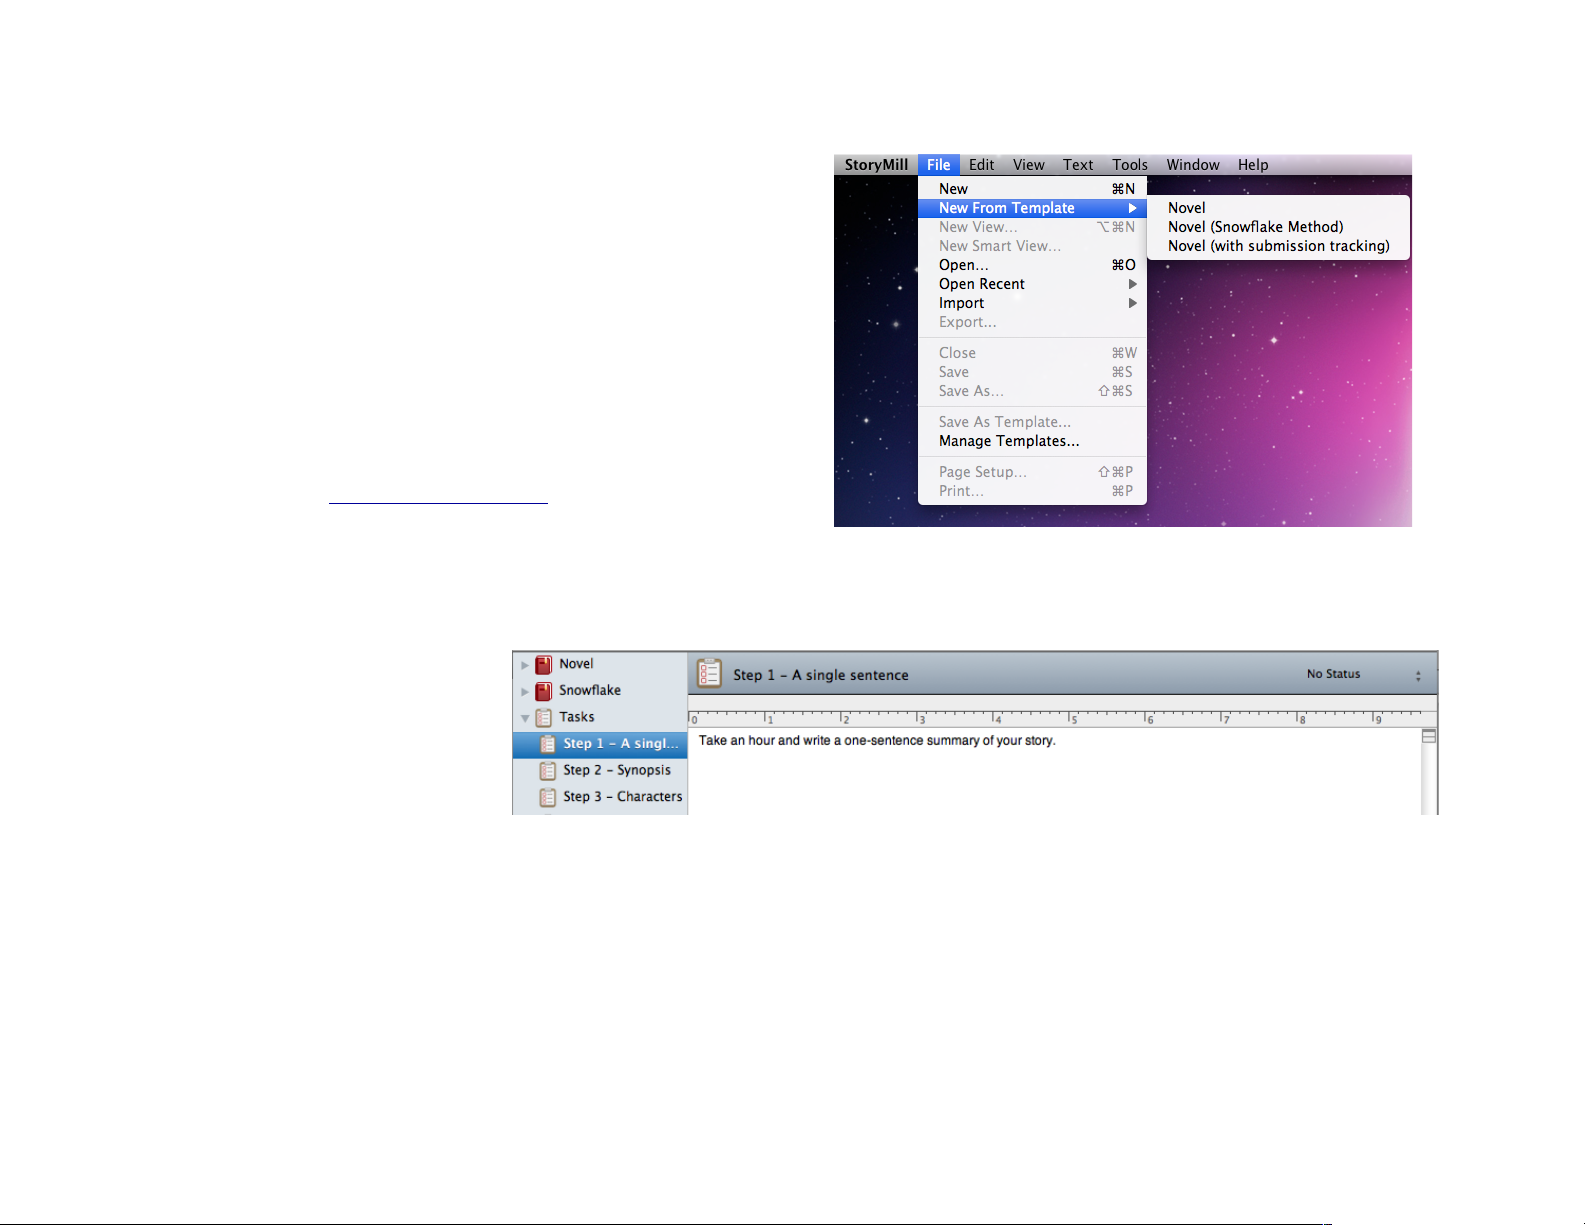
your own (more on that in a bit). Choose File→New From
Template→[Template Name] to create a new project with a
non-default template (you can set your default template in the
preferences; see General preferences, p. 61).
What template you use to create a project changes what
views and items are included in the new project. Take, for
instance, the three templates that come with StoryMill:
Novel creates a document
•
with the following views:
Novel, Characters, Scenes,
Locations, Tasks, Research,
and a smart view called
Current Tasks. The Novel
view has a single blank
chapter item inside.
A task view description in the Snowflake template
Novel (with submission tracking) is
•
identical to Novel with the addition of a Submissions view.
Novel (Snowflake Method) is identical to Novel except that it has
•
an additional novel view for storing your snowflake work, and a
number of the views have items with descriptions on how to use
the snowflake method.
51 of 66
Page 52
Custom document templates
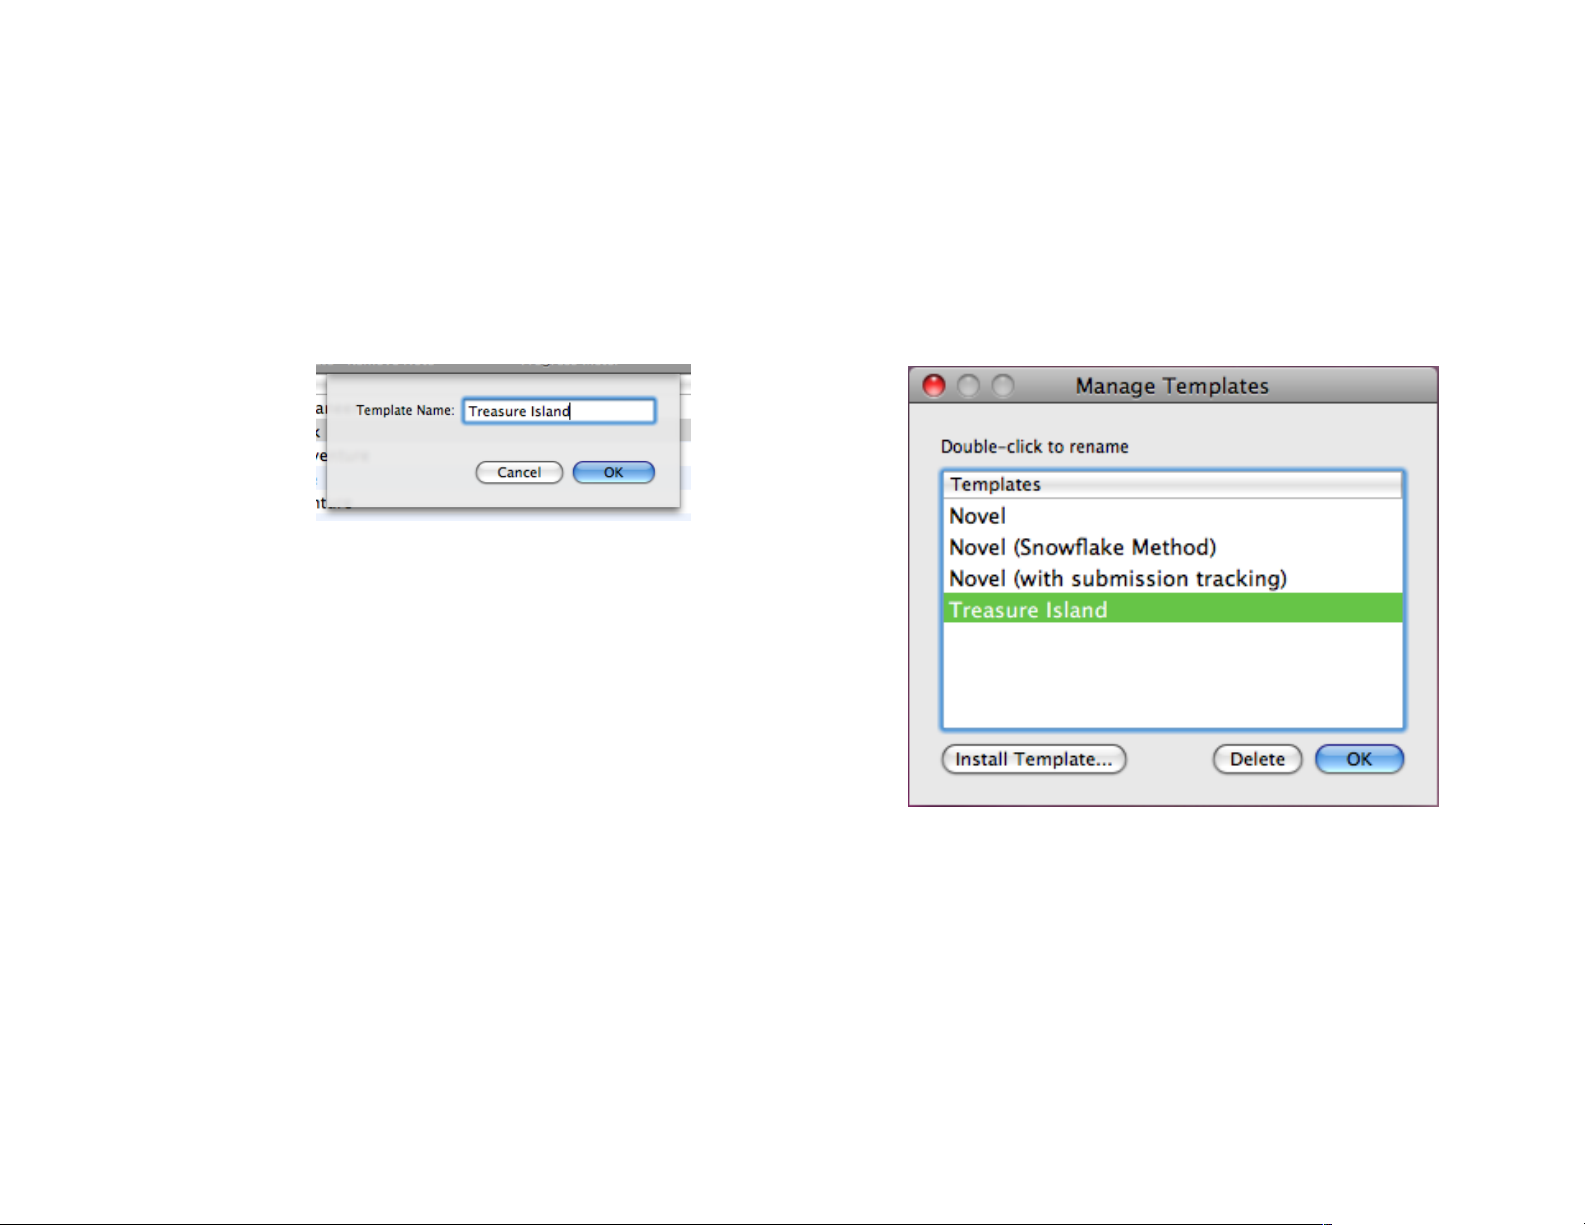
Saving a custom document template is easy. Simply open a
StoryMill project, set it up the way you want, and choose
File→Save as Template…. You will be prompted to enter your
templateʼs name. After you enter the name, the template will be
available in the template list.
To add, rename, or remove templates, choose File→Manage
Templates…. In the Manage Templates window (shown at right)
double click a template to rename it, select a template and click the
Delete button to remove it, or click the Install Template… button to
install a custom template (for example, one that you downloaded
from online).
When you are finished managing templates, click the OK button or
close the window using the standard close button in the upper left
corner.
The power of custom templates is that they create a new project
with a specific structure of views and also allow you to easily
include information via items in new projects. For example, if you
had a number of different books or stories that took place in the
same world, you could save a template with the basic characters or
details about the world already entered. Then whenever you
created a new project with that template, youʼd immediately have
access to the worldʼs basic information.
52 of 66
Page 53
Chapter 5: Tools
A big part of writing is revision and other mundane tasks.
Whether you need to set a daily word goal, analyze which words
you overuse, take a snapshot of your work, or find cliché phrases,
StoryMill has you covered.
This chapter will run through the ins and outs of using StoryMillʼs
tools to keep the creative juices flowing. Tools that havenʼt been
covered in previous chapters include:
Snapshots
•
The word frequency tool
•
Highlighting clichés
•
The progress meter and project goals
•
Window fading
•
In this chapter:
Snapshots
•
Word frequency
•
Highlight clichés
•
Progress meter
•
Window fading
•
53 of 66
Page 54
Snapshots
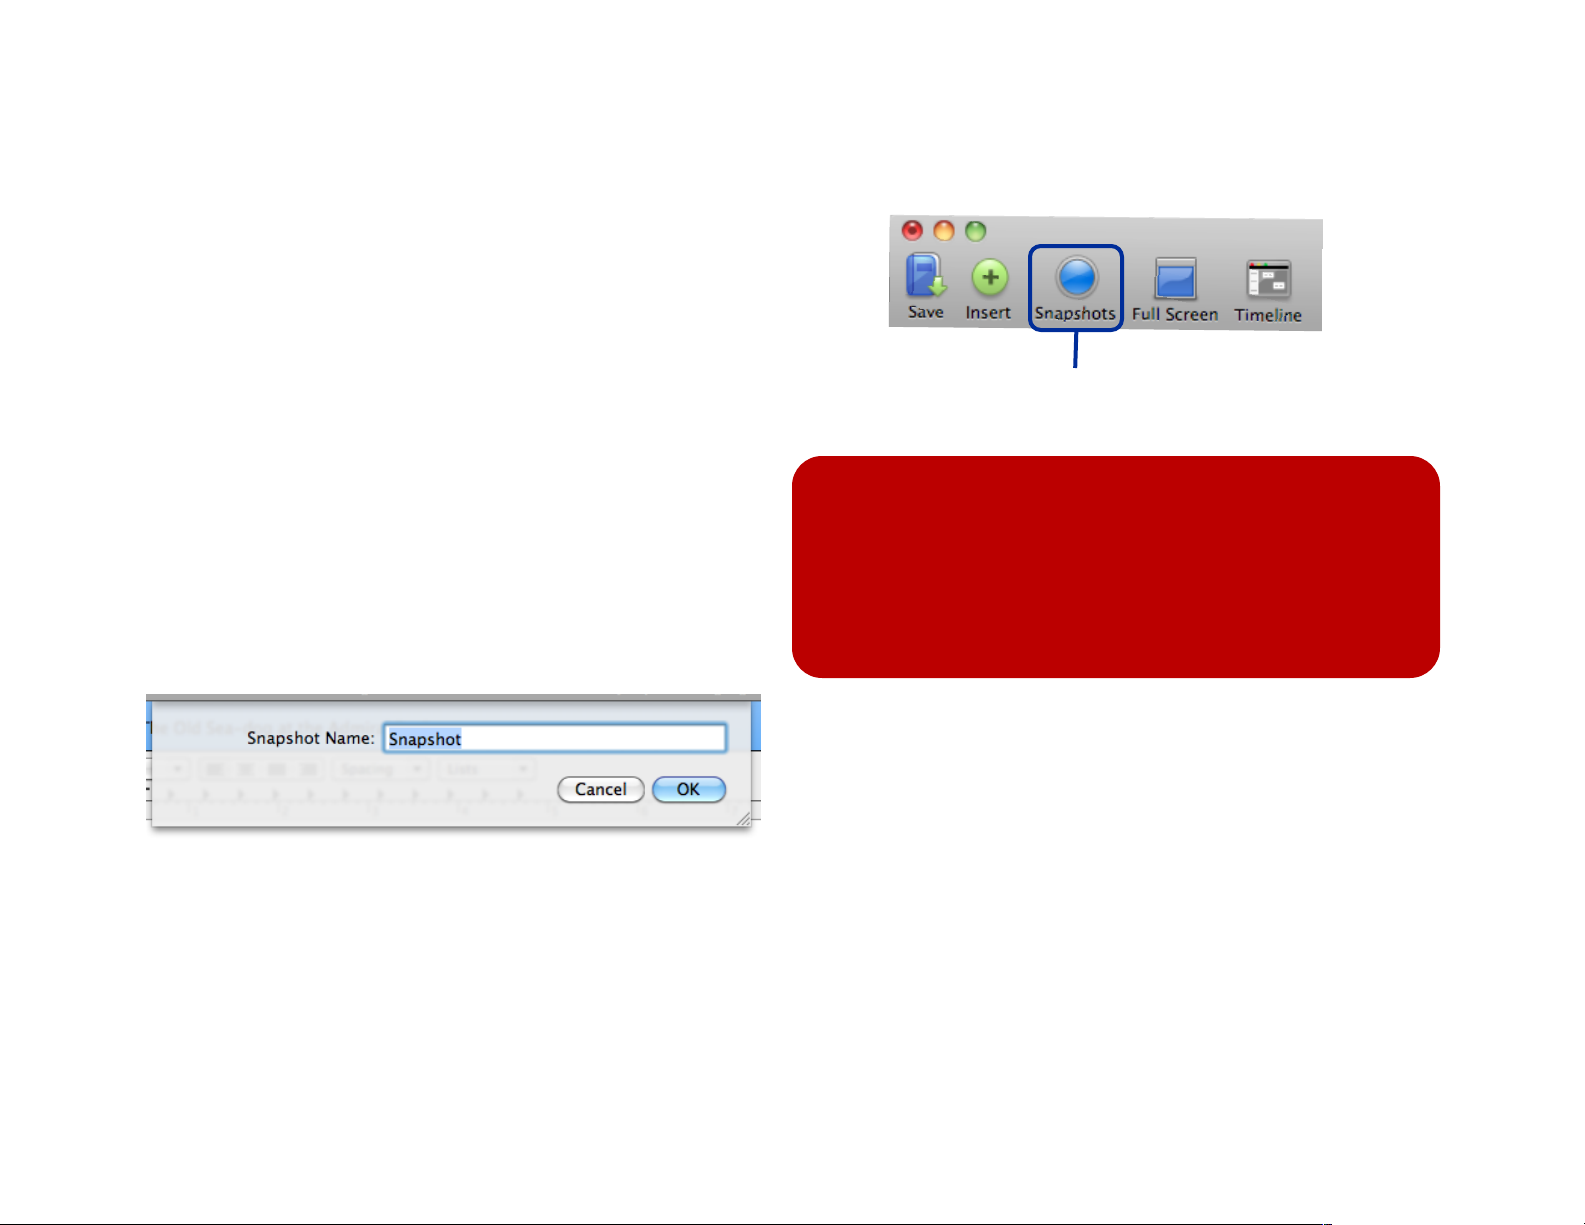
StoryMillʼs snapshot tool, available in the standard toolbar or via
Tools→Snapshots, allows you to make backup copies of your
work before forging ahead with changes to your story.
Taking a snapshot of your work is especially helpful if you are
about to make experimental additions and edits to your story. You
may find that youʼre unhappy with the changes youʼve made;
having a snapshot will enable you to compare the two versions of
your text and if necessary revert to the earlier one.
To take a snapshot of your novel, chapter, or scene text,
choose Tools→Snapshots→Take Snapshot or simply hit
⌥⌘S.
You will be prompted to enter your snapshotʼs name. After
you enter the name, your snapshot will be available in the
snapshot list.
Tip:
If you are working on a new story, remember to save it
before taking a snapshot. But donʼt worry - if you
forget, StoryMill will prompt you with a standard save
dialog before continuing.
Snapshots button
To see your snapshots, use the button in the standard
toolbar, choose Tools→Snapshots→Show All
Snapshots, or hit ⌥⇧⌘S.
A snapshots window will launch, allowing you to start using your
snapshots.
54 of 66
Page 55
Using snapshots
Snapshot menu
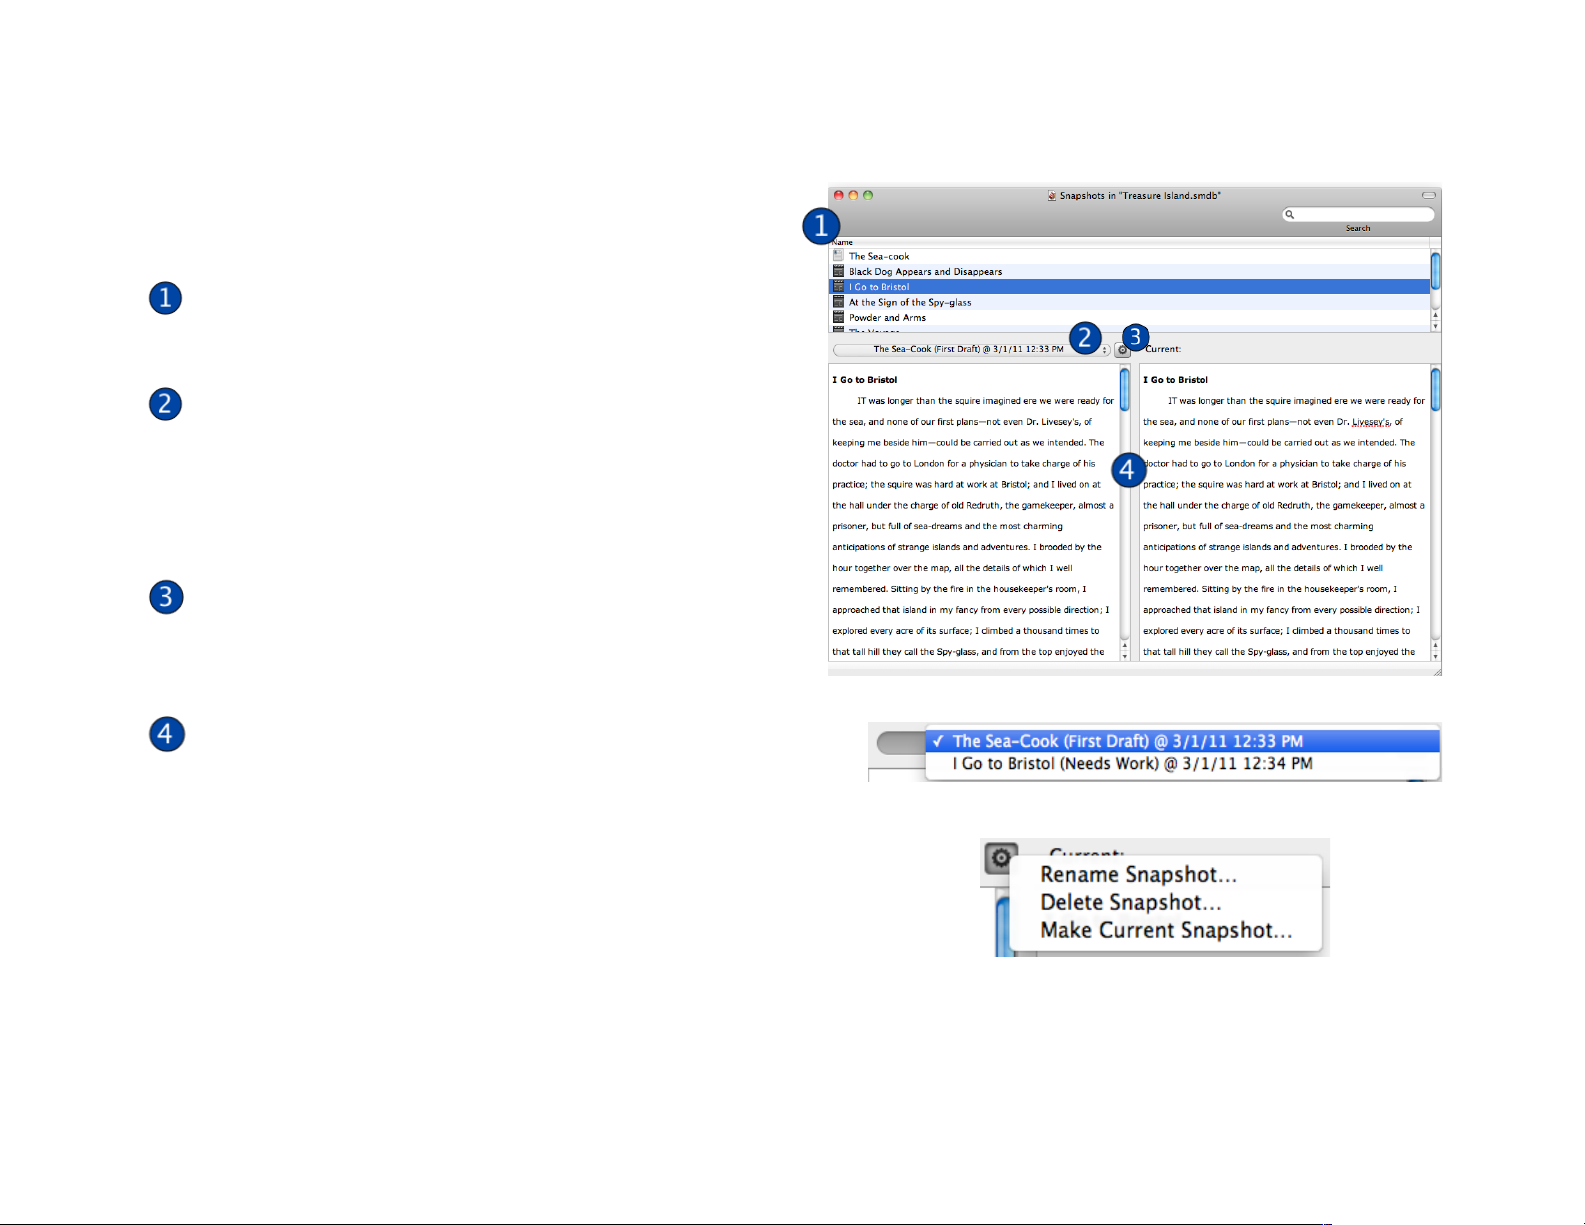
StoryMillʼs snapshots window (shown at right) is both easy
to use and extremely powerful.
When launched, your snapshots window will display a
list pane of all the items in your project which have
snapshots.
Select an item from that list, and use the drop-down
snapshot menu to choose a snapshot from the itemʼs
snapshot history. You can easily locate particular
snapshots in the menu, as they will be identified not
only by the names you gave them, but also the time
and date you created them.
Clicking on the gear button to the right of the dropdown will enable you to rename an itemʼs snapshot,
delete it, or make it your current text, essentially
reverting your edits back to the snapshotʼs version.
Choosing an item from the list pane and a snapshot from
its history will populate the comparison panes below.
These vertically split comparison panes allow you easy
navigation between your snapshot and your edited text.
The left pane will display the selected snapshot of your
text, while the right pane will provide the text in its current
form. As you edit your text in the right pane, it will update in
real time in the project window or the item editing window.
When you are finished editing your text or managing your
snapshots, close the window using the standard close button in the
upper left corner.
Gear menu
55 of 66
Page 56
Word frequency
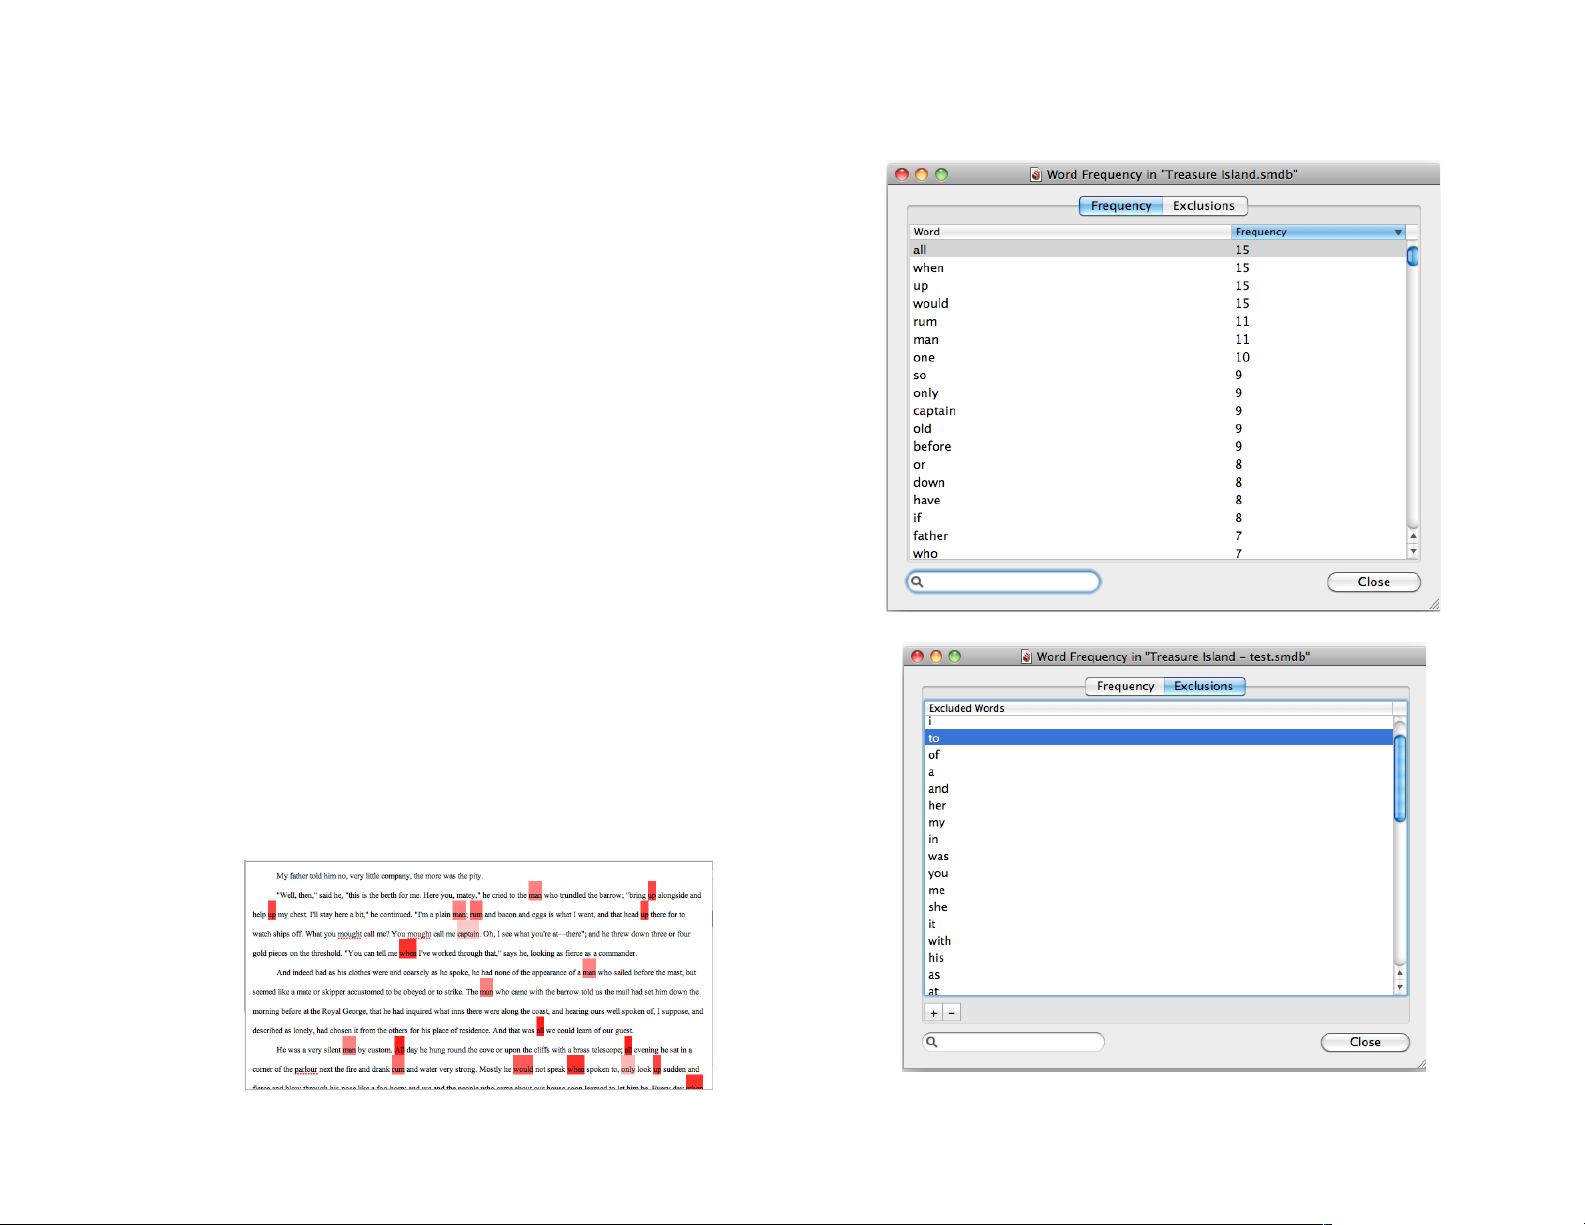
StoryMillʼs word frequency tool, available via Tools →Word
Frequency…, allows you to track your most frequently used words
in the currently selected item. Word frequency also works with the
novel and chapter containers in the source list.
To see your most frequently used words, select an item in the
source list and choose Tools →Word Frequency… to open the
word frequency window (shown at right).
The word frequency shows all of the words in the selected viewʼs
content pane, along with the number of times they occur. You can
search through the list by using the bar at the bottom left. By
default, StoryMill excludes a number of commonly used words from
the list (such as “the”, “I”, “to”, and so forth). To view or change
which words are excluded, click the Exclusions tab. Use the +
button to add words to the exclusions list, and the - button to
remove them (see screenshot to the lower right).
When you have the word frequency tool open, the view that it is
analyzing will have the top ten most frequent words highlighted in
varying shades of red. The most frequent word will be darkest, and
the tenth most frequent the lightest (shown below). Close the word
frequency window to remove the highlighting.
56 of 66
Page 57
Highlight Clichés
The highlight clichés tool does exactly what you would expect it to
do: it highlights potentially cliché phrases in the selected text view.
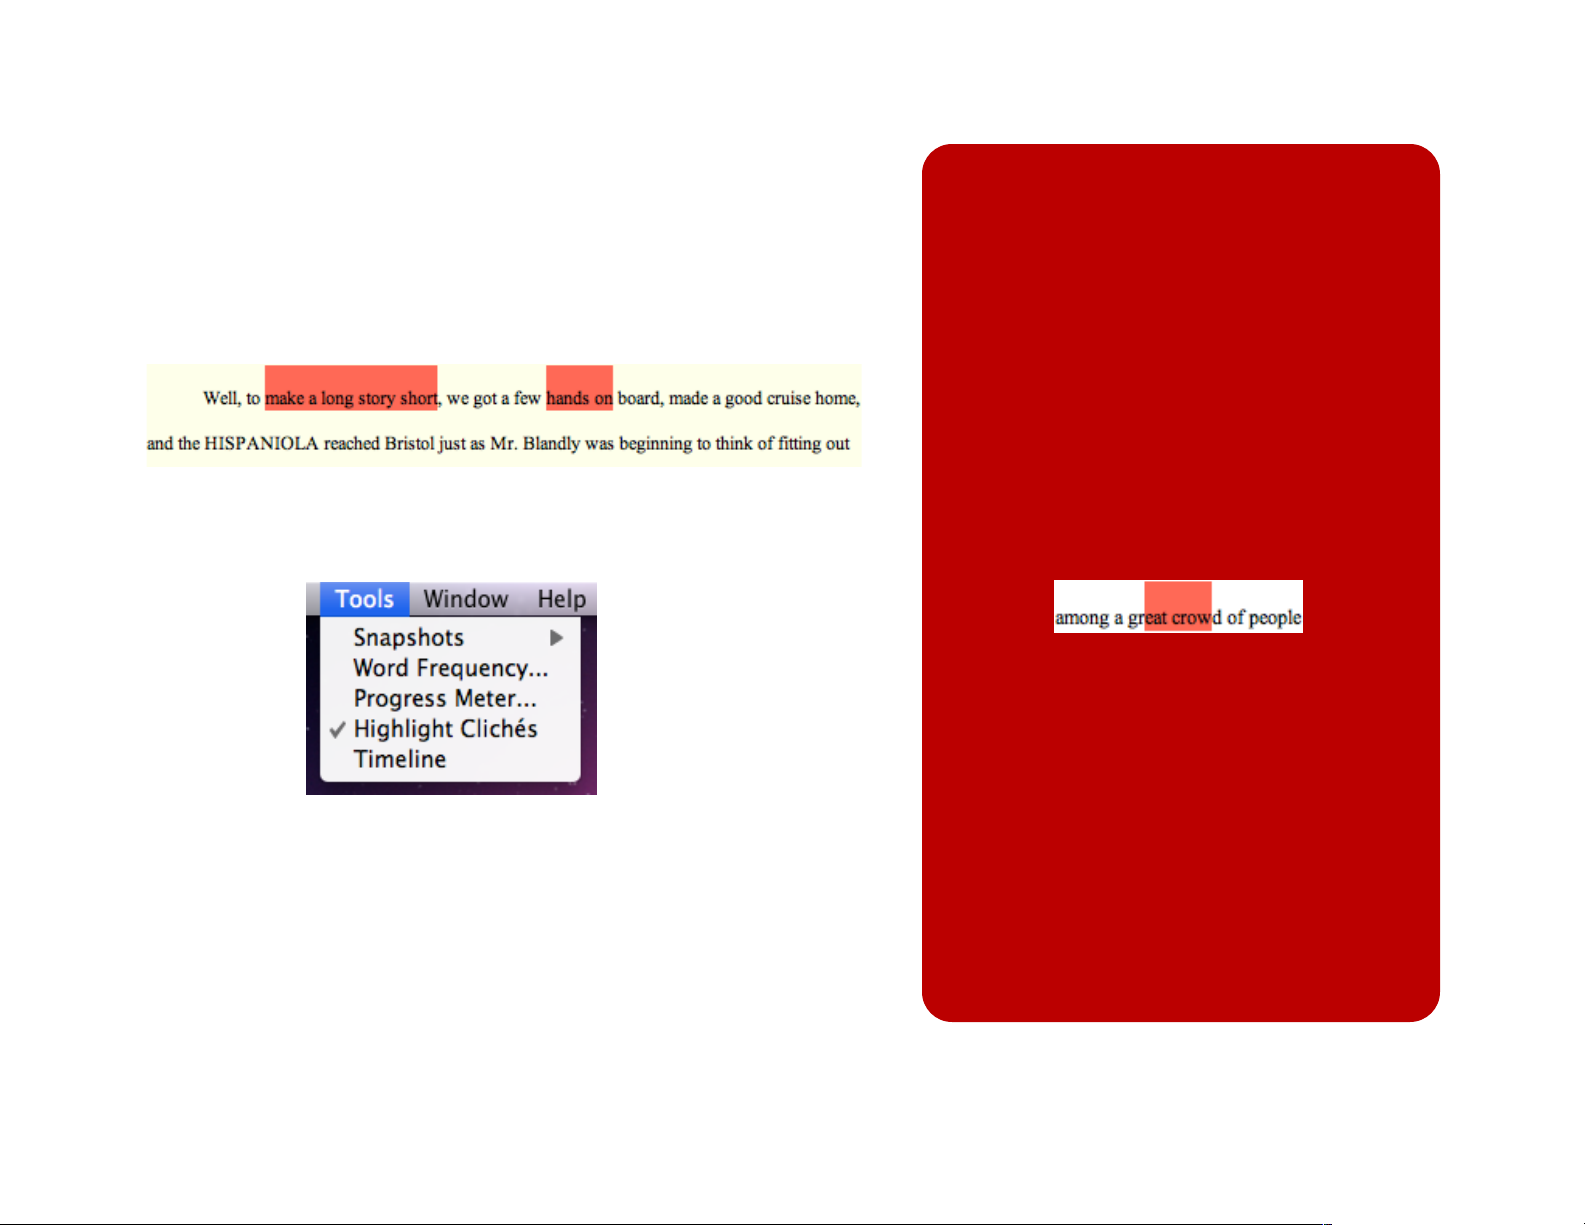
To use it, make sure that your cursor is in a text view, and choose
Tools→Highlight Clichés. After StoryMill has processed the text,
potential clichés and colloquialisms will be highlighted in red:
Tip:
Highlight Clichés ignores both context
and adjacent text when it looks for clichés
and colloquialisms. For instance, in the
screenshot at left “a few hands on board”
is being highlighted because StoryMill
thinks that “hands on” (as in “Iʼm a hands
on person”) is cliché. In this instance,
however, the phrase is not being used the
way StoryMill thinks.
When cliché highlighting is on, the menu item will have a
checkmark next to it:
To turn off cliché highlighting, choose Tools →Highlight Clichés a
second time or start typing in the text view. Cliché highlighting will
also turn off automatically if you switch to a new item or view.
Additionally, the phrase “great crowd” will
have “eat crow” highlighted like so:
StoryMill doesnʼt care that the phrase is
embedded within other words; it just
notices a text pattern thatʼs defined as
cliché.
Moral of the story: take StoryMillʼs
highlighted clichés with a grain of salt!
The tool is intended to help you find
clichés, but just because it highlights
something doesnʼt mean you necessarily
should revise or delete it.
57 of 66
Page 58
Progress meter
The StoryMill progress meter allows you to track your progress both
during a single writing session or on the project as a whole. The
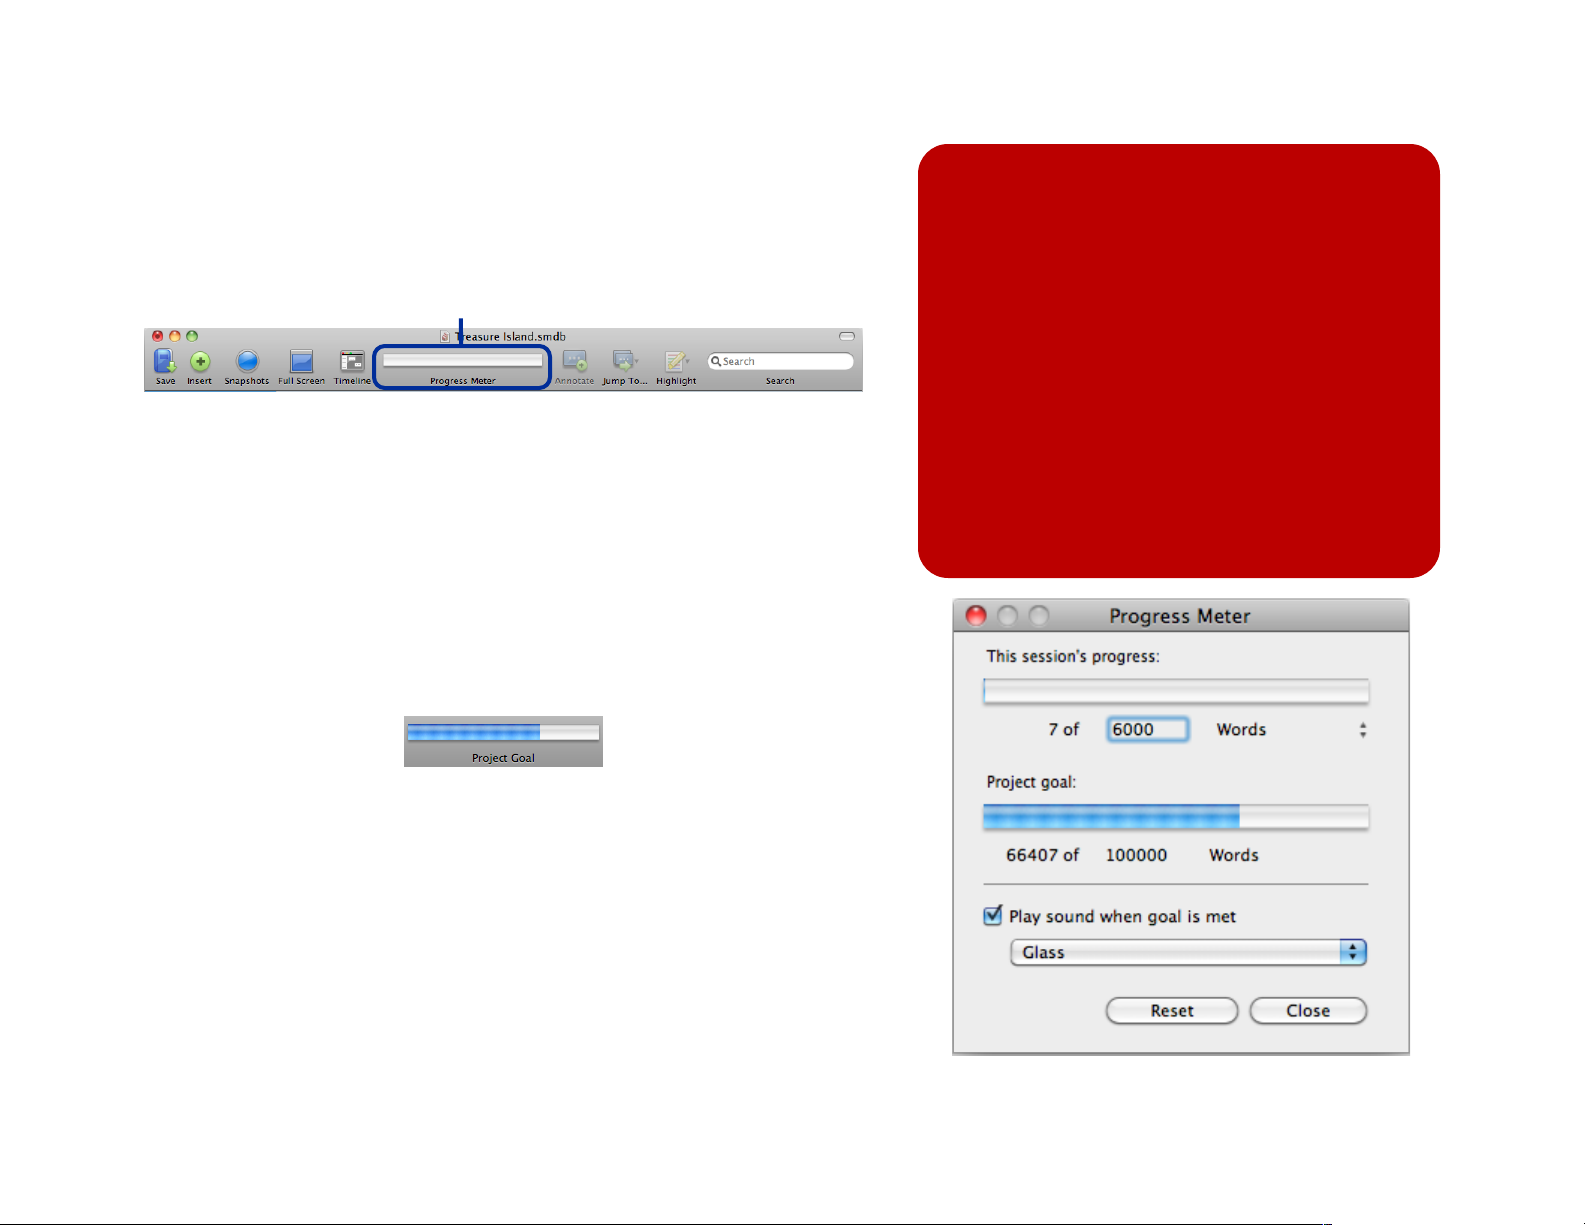
project meter by default is available in the standard toolbar:
Progress meter
Tips:
The goals you set in the project meter
window apply across projects. If you
choose 6,000 words per session as your
goal, each project will have a 6,000 word
session goal (even though how close you
are to that goal will differ per project).
The progress meter tracks all text typed in chapters (including
scene text). As you near your word goal, the progress meter will fill.
When you reach your goal, the progress meter will optionally notify
you with an alert sound.
By default, the progress meter in the toolbar will display your
session progress. Your session progress is the number of words
that youʼve typed in a chapter since you last launched StoryMill.
You can also display your progress towards an overall word goal by
clicking on the progress meter once:
Double click the progress meter or choose Tools →Progress
Meter… to open the progress meter window (shown at right). Click
the goal numbers to set them, and for session progress click
“Words” to choose from words, minutes, or approximate number of
pages.
To set your session progress back at 0, click the Reset button.
If you want to count text in your session
goal that you typed elsewhere, paste it
into a chapter using Edit→Paste and
Count in Progress or ⌥⌘V.
58 of 66
Page 59
Window fading
You may find yourself at times wishing to reference information
outside of StoryMill while you write. While you can always use
command-tab and so forth to switch to other applications to
reference them, StoryMill also provides the option to fade almost
any of its windows. Fading causes the window to become highly
transparent (just how transparent is configurable in the General
preferences; see p. 61). To use window fading, you can either add
the custom toolbar button or choose Window→Fade Window.
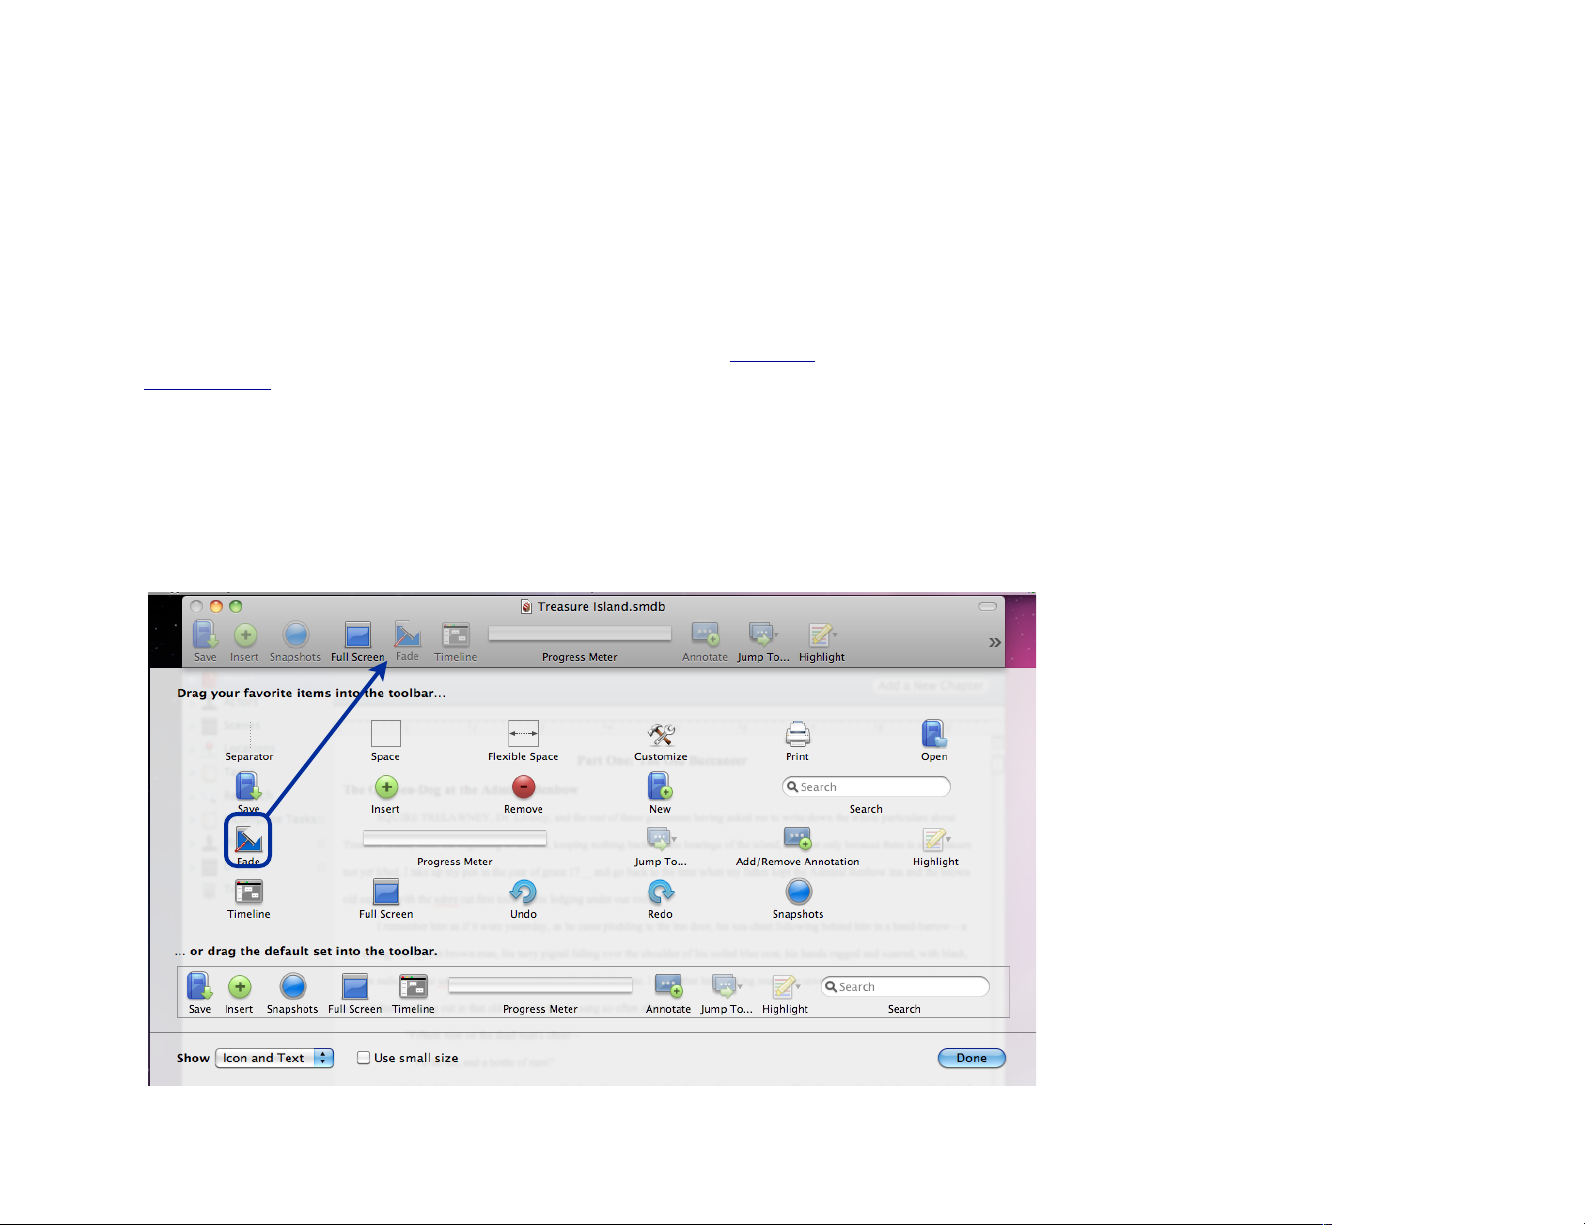
If you want to use the toolbar button, right click anywhere on the
toolbar (in either the chapter editing window or the project window)
or choose View→Customize Toolbar…. Drag the Fade button
from the sheet to the toolbar:
59 of 66
Page 60
Chapter 6: Preferences
For the most part, the StoryMill preferences should be selfexplanatory. However, if you need to find out specifically what
something in the preferences controls, this chapter provides a
comprehensive reference for each section of the preferences.
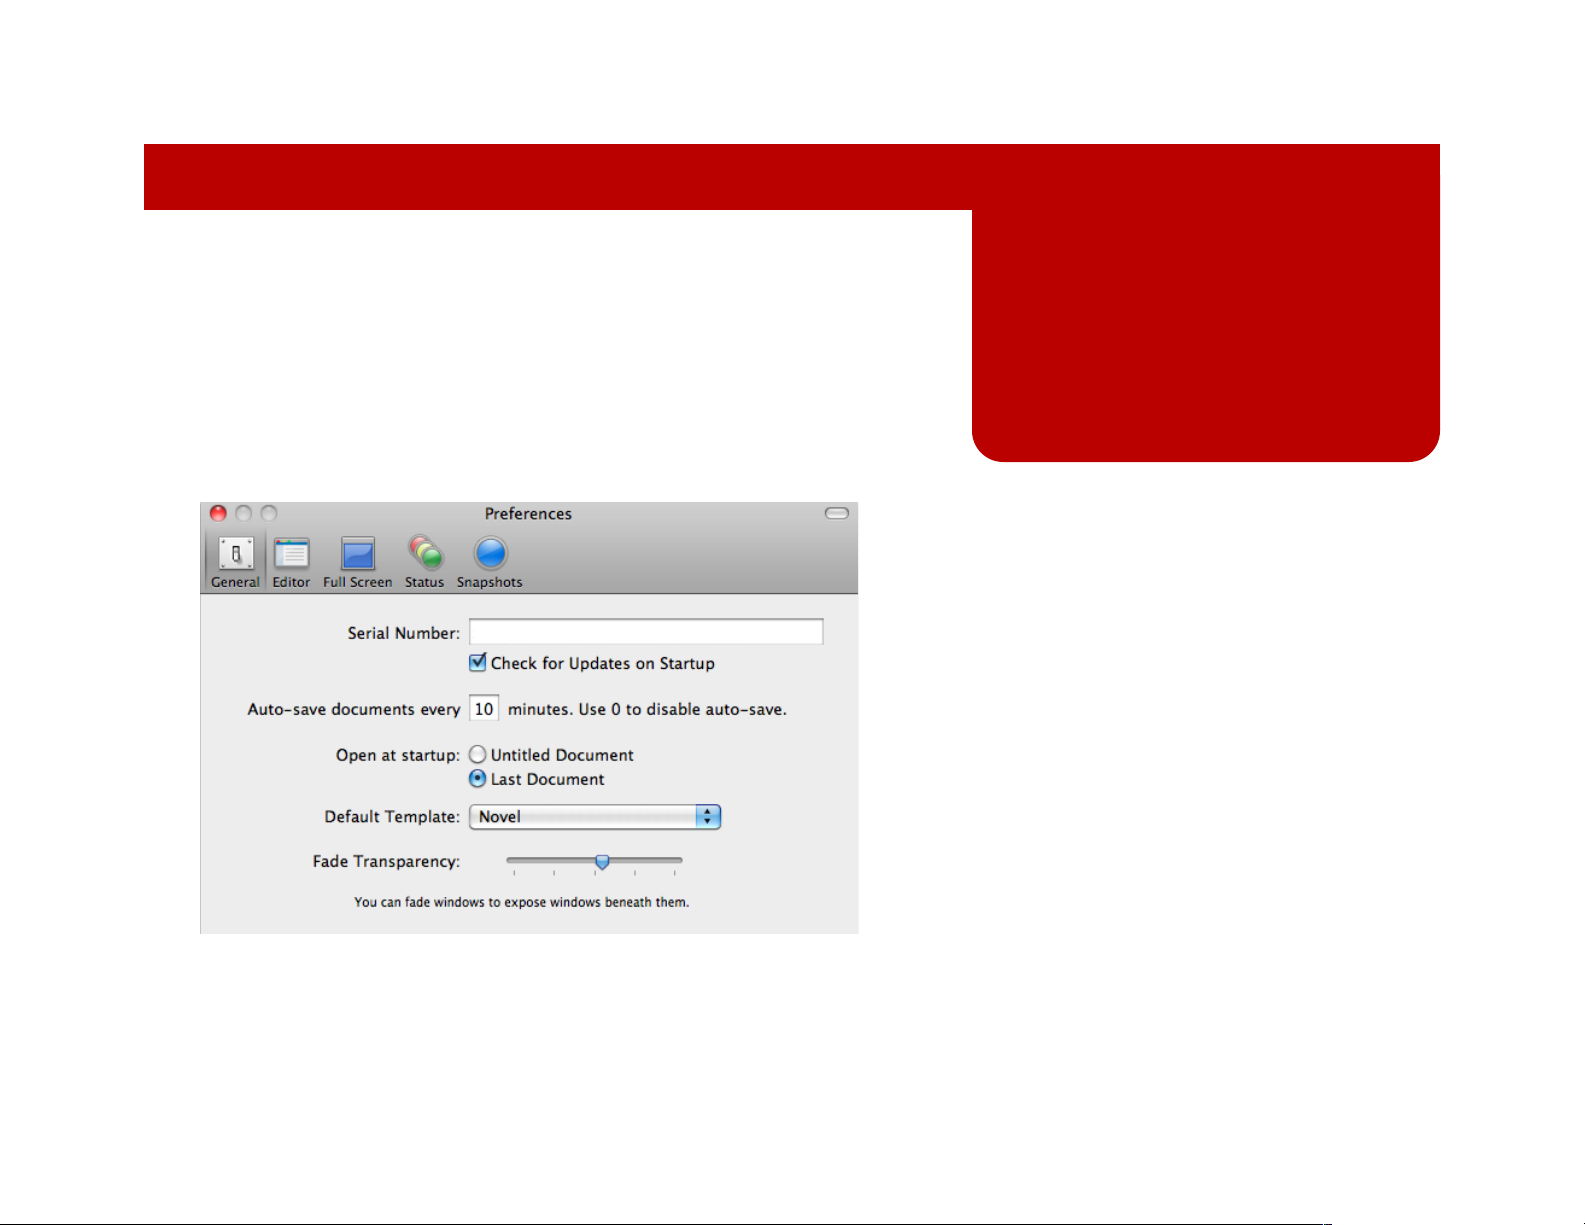
To access the preferences, choose StoryMill→Preferences… or
hit ⌘, (command-comma). By default, youʼll see the general
preferences:
In this chapter:
General preferences
•
Editor preferences
•
Full Screen preferences
•
Status preferences
•
Snapshots preferences
•
The toolbar area at the top has buttons for the five different
sections of the preferences: General, Editor, Full Screen, Status,
and Snapshots.
60 of 66
Page 61
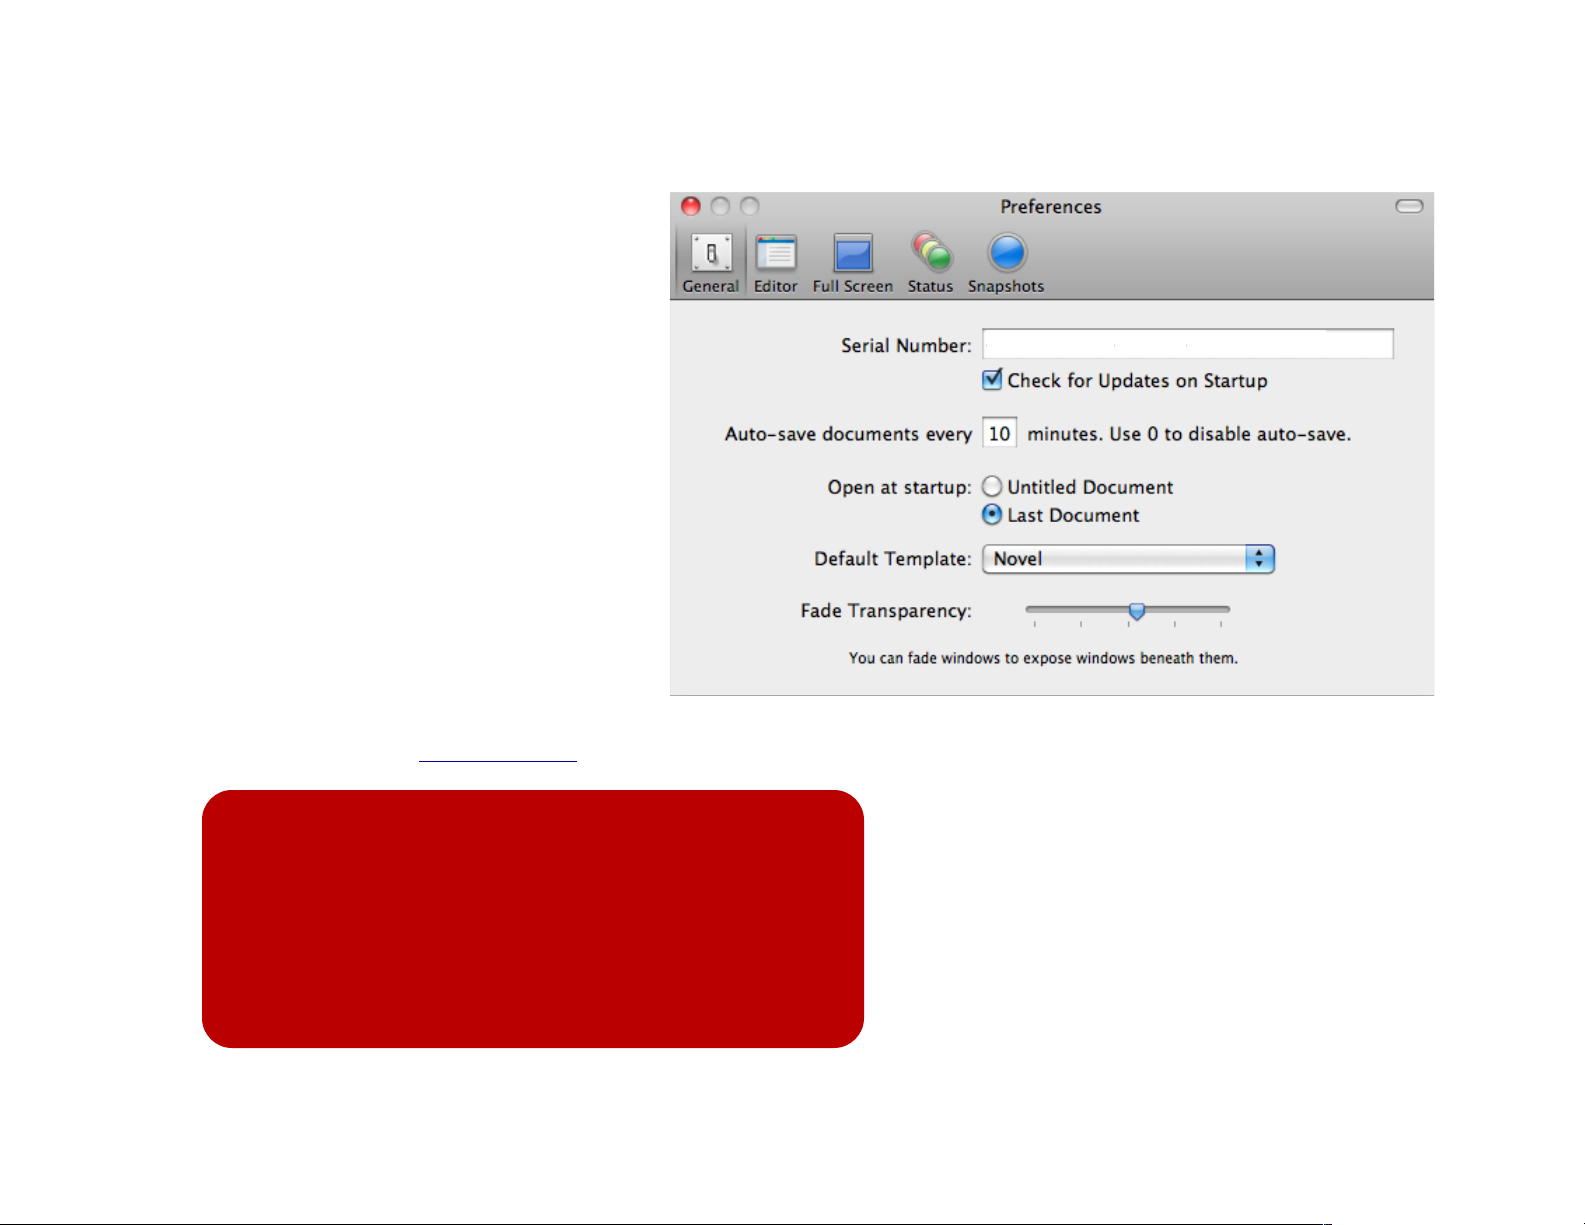
General preferences
Serial Number: when you buy StoryMill, you
•
can enter your serial number here.
Check for updates on startup: check if you
•
wish to have StoryMill automatically check for
updates when you launch the program.
Auto-save documents every [num]
•
minutes: set an auto-save interval, or 0
(zero) to disable auto-saving.
Open at startup: choose whether to open a
•
new document or the last document you had
open when you started up StoryMill.
Default template: choose the template used
•
for new documents.
Fade transparency: drag this slider to adjust
•
how transparent windows become when you
use window fading (see Window fading, p. 59).
Tip:
When you start dragging the fade transparency slider,
the preferences window will become transarent. Donʼt
panic! Keep dragging the slider until the preferences
are the transparency that youʼd like your windows to be
when you fade them. When you let go of the slider, the
window will return to its normal opaque self.
61 of 66
Page 62
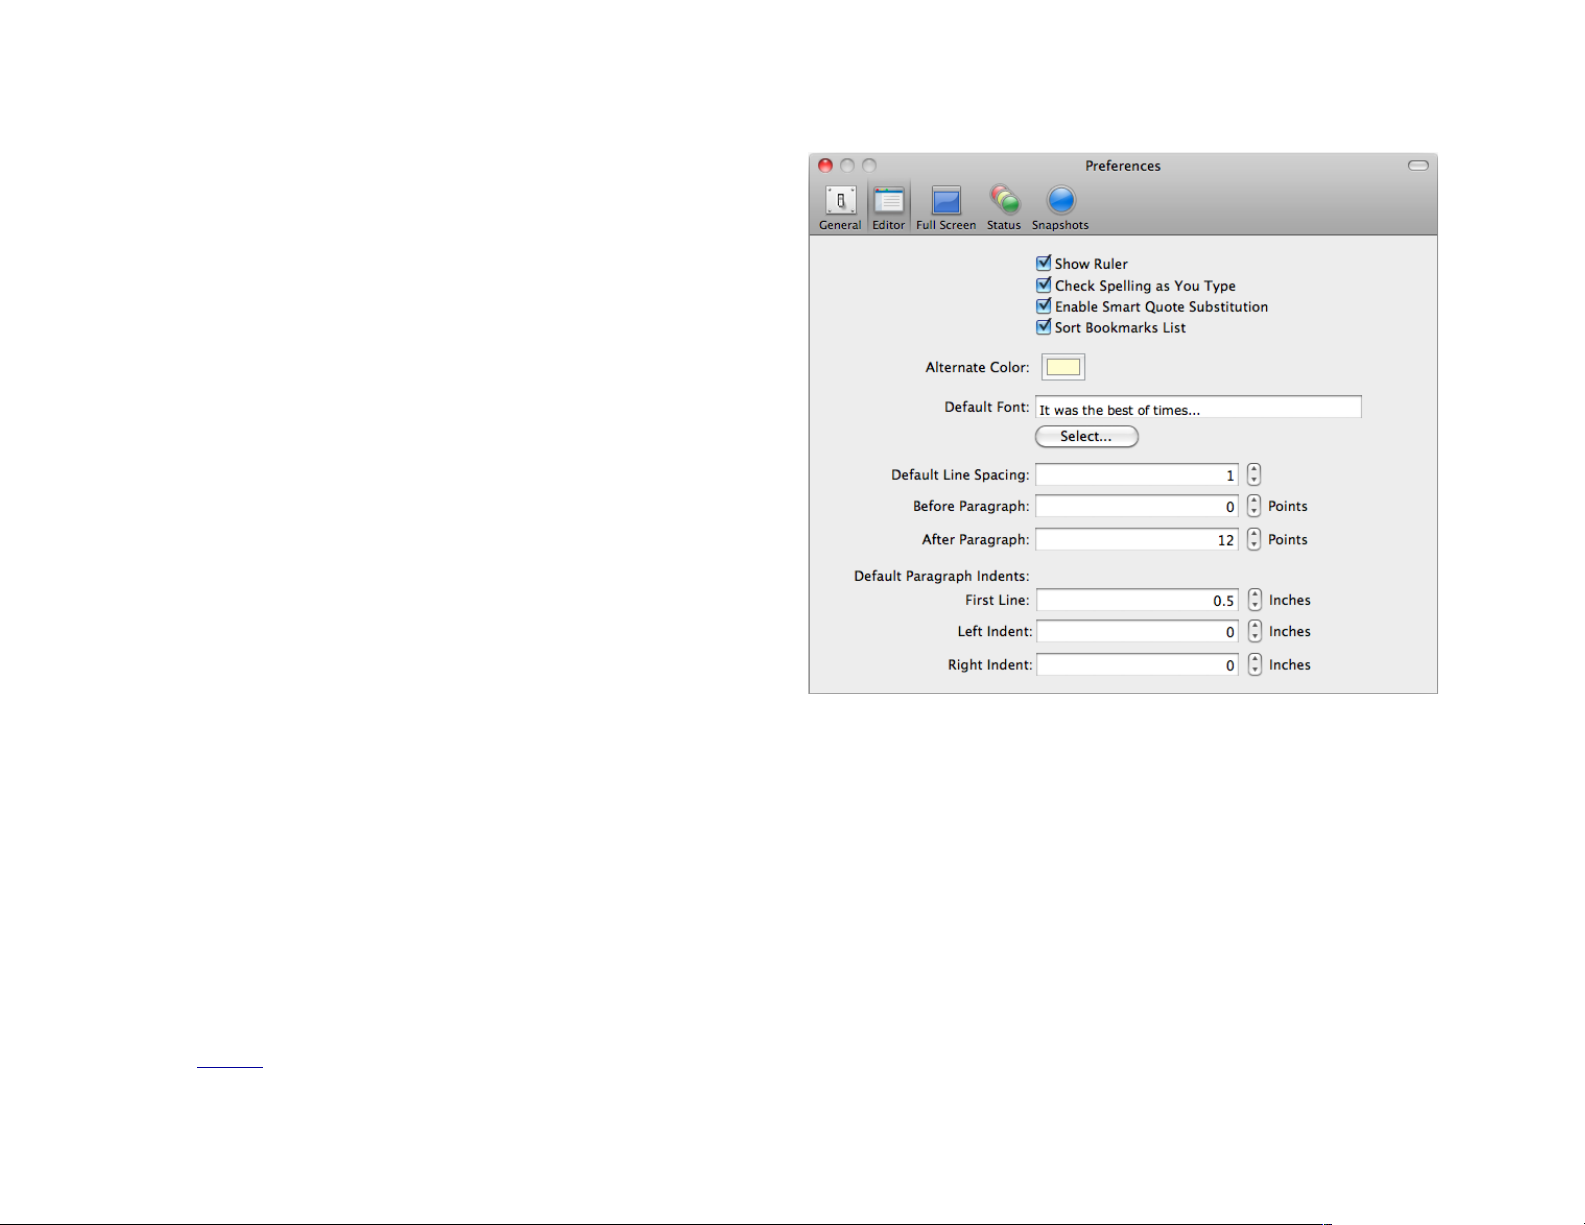
Editor preferences
Show Ruler: check if you want the ruler on by default.
•
Uncheck if you want to manually show the ruler.
Check Spelling as You Type: check this to have StoryMill
•
always check your spelling as you type.
Enable Smart Quote Substitution: check this to have
•
StoryMill convert straight quotes to smart (sometimes
called curly) quotes. Changing this preference will not
change text that has already been typed - to convert typed
text, open your content paneʼs contextual menu by right
clicking (or control-clicking for one button mice) within it,
and choose the Substitutions→Smart Quotes option.
Sort Bookmarks List: check this to have the bookmarks
•
drop-down in the chapter editing window sort annotations
alphabetically. Uncheck to have annotations displayed in
the order they fall in the text.
Use the Alternate Color button to set the background color of your
alternating items in the chapter and novel views.
The rest of the editor preferences set the defaults for text in your
text views. Click Select… to choose a default font and size using
the Mac OS X font picker. The text shown is example text in the
font you choose.
For the remaining controls, such as Default line spacing, either type
the number you want in the box, or use the arrow controls to
increment up and down. Changing the defaults will not change any
text that is already typed. To do that, you may want to use styles
(see Styles, p. 38).
62 of 66
Page 63
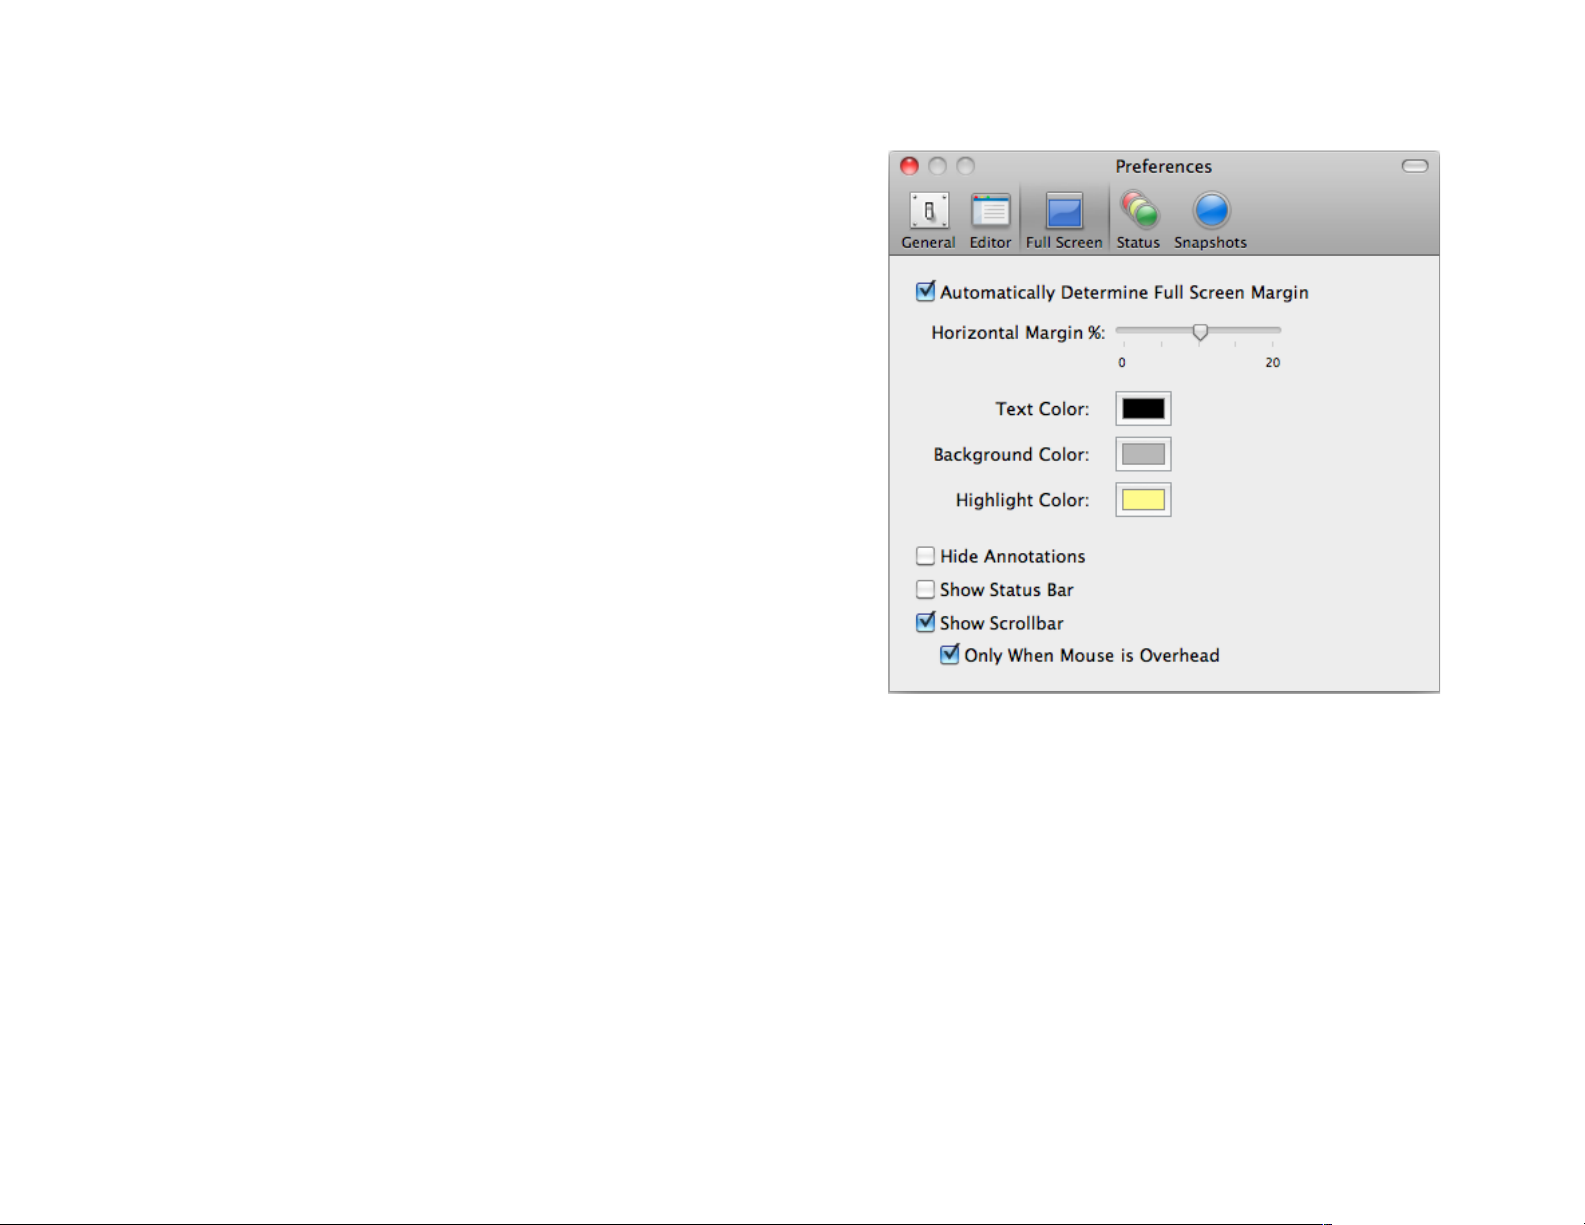
Full Screen preferences
Automatically determine full screen margin: check this to have
•
StoryMill automatically calculate the left and right margin around
your text in full screen. Uncheck this to set a horizontal margin
yourself using the slider. To have your text stretch from one side
of your screen all the way to the other, set the horizontal margin
percentage to 0. To have the outer 40% of your screen be margin
and the center 60% be text, slide the slider all the way to the right.
Text Color: set the color of the text in full screen mode.
•
Background Color: set the full screenʼs background color.
•
Highlight Color: set the color of the highlights in full screen
•
mode.
Hide Annotations: check this to have no visual indication of
•
annotations while in full screen mode to truly minimize your
distractions.
Show Status Bar: check this to show the status bar at the bottom
•
of the screen while in full screen mode. You can always close it by
clicking the x button at its left, or view it if unchecked by hovering
over the bottom of the screen.
Show Scrollbar: check this to show the scrollbar while in full
•
screen mode along the right side of the screen. You can always
scroll with your scroll wheel or by moving the cursor in the text,
regardless of whether the scrollbar is on or not.
Only When Mouse is Overhead: if you are showing the scrollbar
•
check this to only show it when your mouse is hovering over the
far right side of the screen.
63 of 66
Page 64
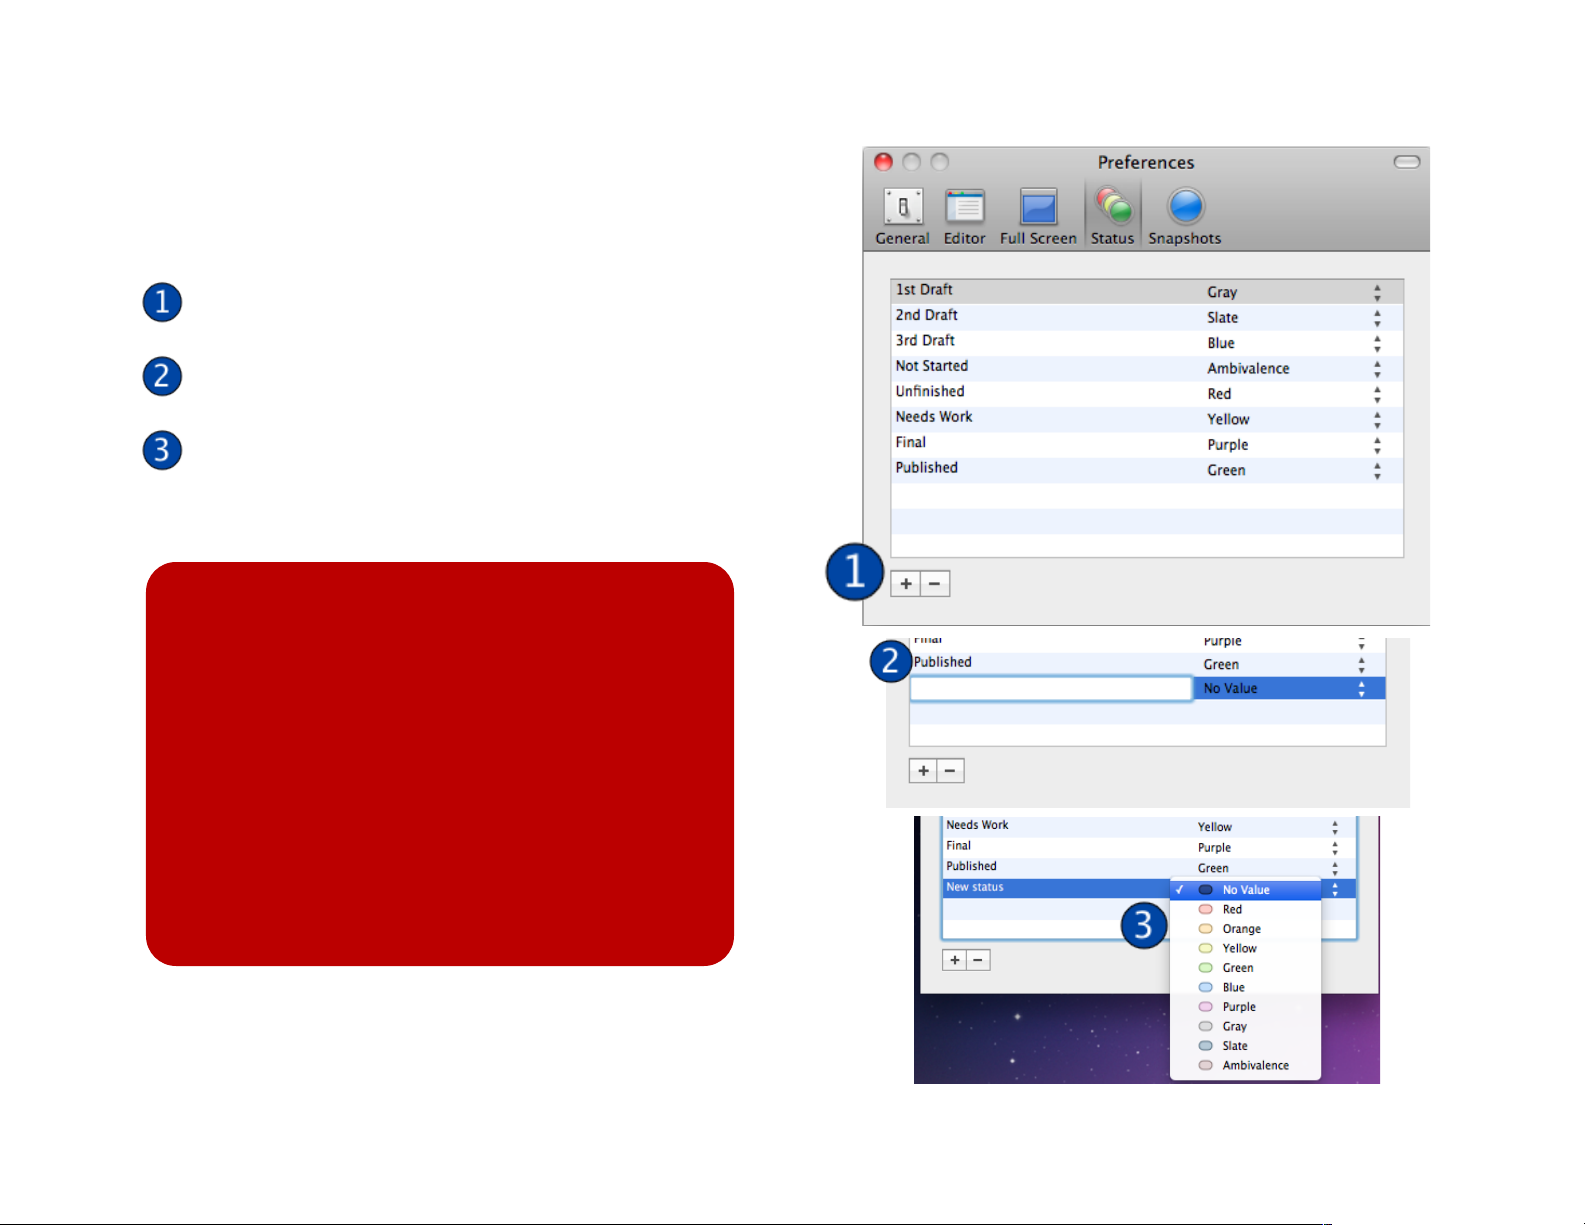
Status preferences
Statuses are used across projects to highlight text and keep track
of which scenes and items are in need of work.
Click the + button to add a new status (or the - button to
remove the selected status).
Name your new status. To rename a current status, double
click it.
Select a color for the status.
Drag and drop statuses to reorder them.
Tip:
Different users find different statuses useful. By
default StoryMill provides statuses for drafts and
various stages of completeness, but if you want
to handle drafts via tags, hereʼs another
potential set:
Incomplete (yellow)
Draft (orange)
Needs Work (red)
Final (blue)
Discarded (gray)
64 of 66
Page 65
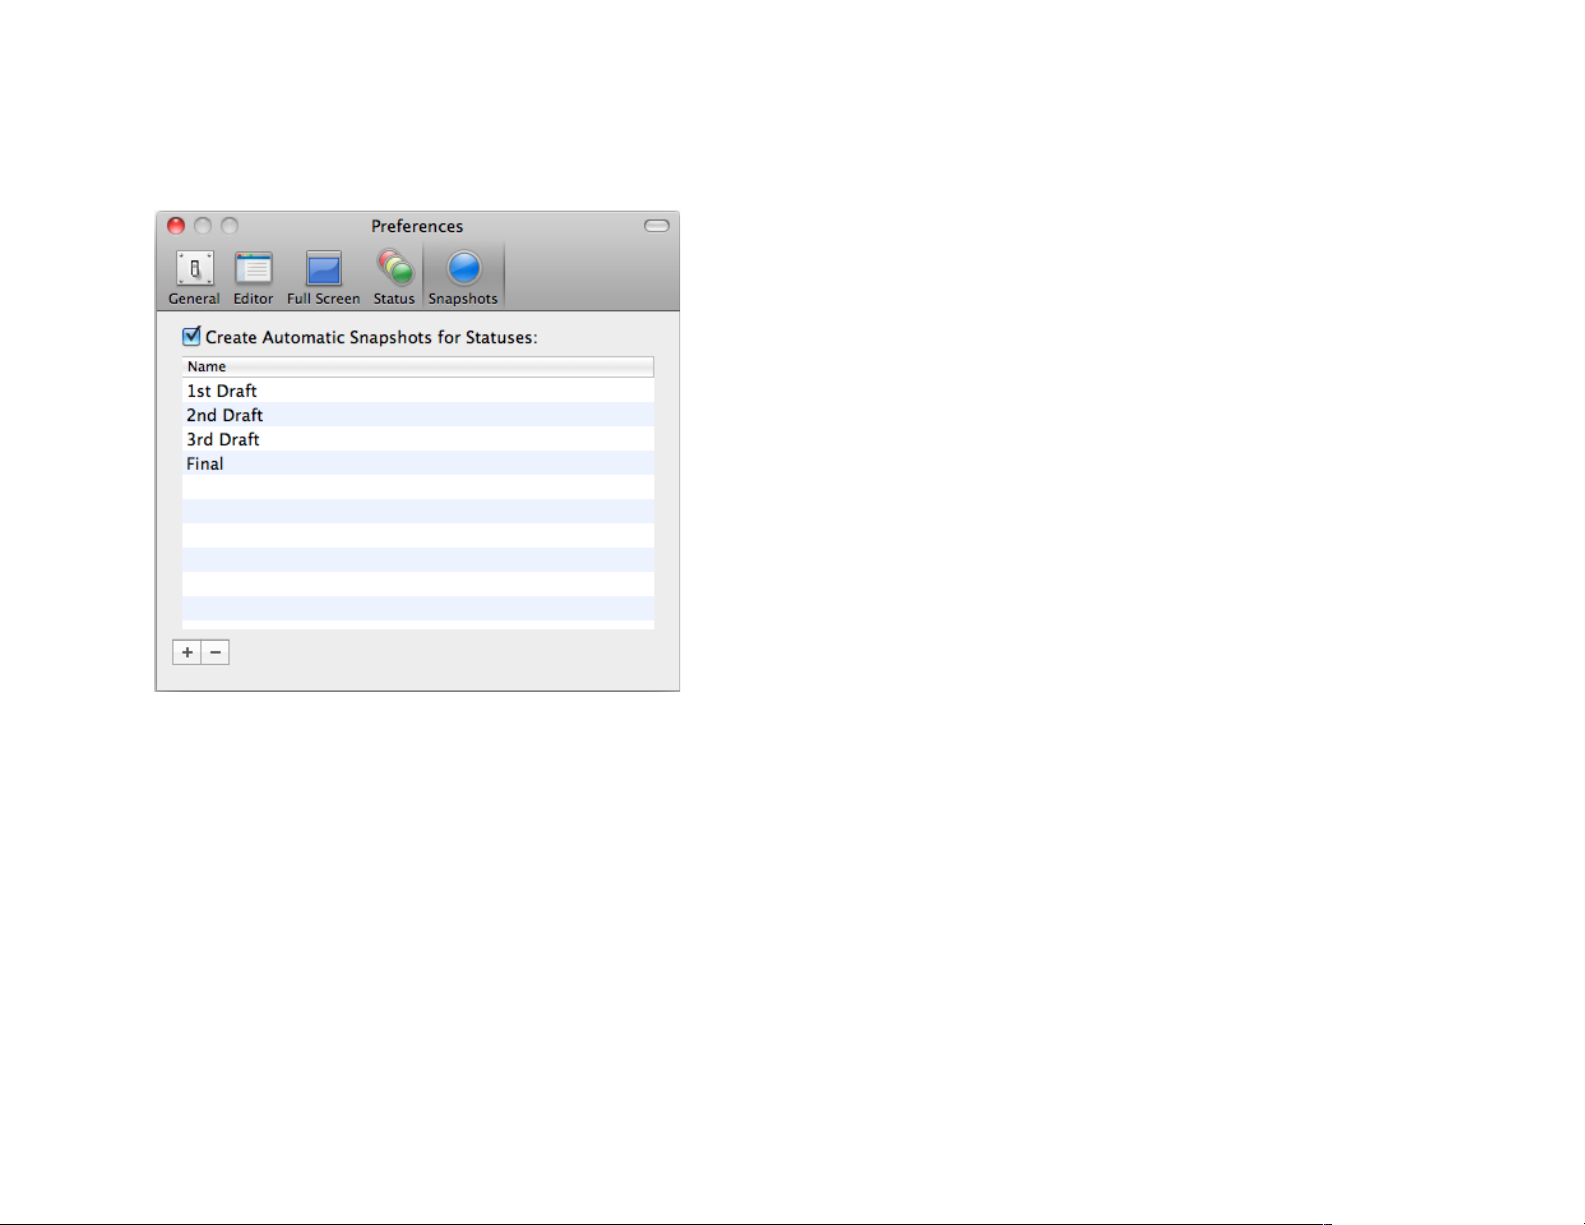
Snapshot preferences
Check Create Automatic Snapshots for Statuses to have
StoryMill automatically take a snapshot of your text when you
assign it a status. Choose which status to take automatic snapshots
of from the list below.
Changing this preference will not create snapshots of text that
already has been assigned the status you choose. You will have to
assign the text the selected status after you have enabled this
preference for it to work. To take a snapshot of your existing text,
choose Tools→Snapshots→Take Snapshot or simply hit ⌥⌘S.
Click the + button to add a new status (or the - button to remove a
selected status.)
65 of 66
Page 66
Troubleshooting
If youʼve gone through the documentation and are still having
problems with StoryMill, weʼre here to help!
For technical support, please visit http://www.marinersoftware.com/
support/. We make every effort to reply promptly, in most cases
within 24 hours.
We would also love to hear if you have an idea or feature request to
make StoryMill better! Email us at [email protected] to
help us improve our software.
You can also find a friendly community of StoryMill users in the
Mariner Software forums:
http://www.marinersoftware.com/forum/
Thank you for using StoryMill! We look forward to hearing from
you.
66 of 66
 Loading...