

Page 1
Create, Write and Submit Scripts for Film, TV, and Theater
User Guide v1.3
© Copyright 1998-2007 Mariner Software, Inc. All Rights Reserved. No part of this documentation may be copied, photocopied, reproduced, translated, microfilmed, or otherwise
duplicated on any medium without written consent of Mariner Software, Inc. Use of Montage software programs and documentation is subject to the Mariner Software license
agreement enclosed in the Montage package. All trade names referenced herein are either trademarks or registered trademarks of their respective companies.
Page 2

Table of Contents
Table of Contents..............................................................................................................................................................2
Chapter 1 Introduction..................................................................................................................................................8
Philosophy of Montage........................................................................................................................................9
Installing & Launching........................................................................................................................................11
Registration..........................................................................................................................................................12
Check for Updates ..............................................................................................................................................14
System Requirements.........................................................................................................................................16
Troubleshooting .................................................................................................................................................16
Help & Notes .......................................................................................................................................................17
Chapter 2 Starting a Script ..........................................................................................................................................18
Creating a Script..................................................................................................................................................19
Importing a Script ...............................................................................................................................................20
Importing a Final Draft® Script.........................................................................................................................21
Importing a Text or RTF Script .........................................................................................................................23
Chapter 3 Working With Scripts ...............................................................................................................................26
Views.....................................................................................................................................................................27
Removing a View................................................................................................................................................28
Using the Tab-Return System ...........................................................................................................................29
Using Keywords..................................................................................................................................................33
Searching a Script ................................................................................................................................................35
Saving a Find as a SmartView...........................................................................................................................36
Finding in a Script................................................................................................................................................37
MONTAGE
Table of Contents
Table of Contents..............................................................................................................................................................2
Chapter 1 Introduction..................................................................................................................................................8
Philosophy of Montage........................................................................................................................................9
Installing & Launching........................................................................................................................................11
Registration..........................................................................................................................................................12
Check for Updates ..............................................................................................................................................14
System Requirements.........................................................................................................................................16
Troubleshooting .................................................................................................................................................16
Help & Notes .......................................................................................................................................................17
Chapter 2 Starting a Script ..........................................................................................................................................18
Creating a Script..................................................................................................................................................19
Importing a Script ...............................................................................................................................................20
Importing a Final Draft® Script.........................................................................................................................21
Importing a Text or RTF Script .........................................................................................................................23
Chapter 3 Working With Scripts ...............................................................................................................................26
Views.....................................................................................................................................................................27
Removing a View................................................................................................................................................28
Using the Tab-Return System ...........................................................................................................................29
Using Keywords..................................................................................................................................................33
Searching a Script ................................................................................................................................................35
Saving a Find as a SmartView...........................................................................................................................36
Finding in a Script................................................................................................................................................37
2 of 124
MONTAGE
Page 3

Table of Contents
Chapter 4 Scene Navigation .......................................................................................................................................38
Using the Scene Navigation Palette..................................................................................................................39
Chapter 5 Exporting.....................................................................................................................................................40
Exporting a Script................................................................................................................................................41
Chapter 6 Script View..................................................................................................................................................42
Using the Script View .........................................................................................................................................43
Splitting Vertically...............................................................................................................................................44
Splitting Horizontally .........................................................................................................................................45
Chapter 7 Scene View ..................................................................................................................................................46
Adding a Scene ....................................................................................................................................................47
Naming a Scene...................................................................................................................................................48
Inserting an Annotation.....................................................................................................................................49
Chapter 8 Full Screen View.........................................................................................................................................50
Using Full Screen View.......................................................................................................................................51
Chapter 9 Outline View..............................................................................................................................................53
Adding a Scene ....................................................................................................................................................54
Adding a Character to a Scene..........................................................................................................................55
Reordering Scenes ..............................................................................................................................................56
Chapter 10 Character View ........................................................................................................................................57
Adding a Character.............................................................................................................................................58
Making Character Notes....................................................................................................................................59
MONTAGEMONTAGE
3 of 124
Page 4

Table of Contents
Chapter 11 Locations View .........................................................................................................................................61
Adding a Location...............................................................................................................................................62
Changing a Location Name...............................................................................................................................63
Chapter 12 Research View..........................................................................................................................................65
Adding a Location ..............................................................................................................................................66
Chapter 13 Tasks...........................................................................................................................................................67
Adding a Task......................................................................................................................................................68
Chapter 14 Contacts .....................................................................................................................................................69
Adding a Contact ................................................................................................................................................70
Downloading Contacts.......................................................................................................................................71
Viewing Contacts in Address Book..................................................................................................................72
Chapter 15 Queries.......................................................................................................................................................73
Creating a Query Letter.....................................................................................................................................74
Attaching a Query Letter to a Contact.............................................................................................................75
Chapter 16 Synopsis .....................................................................................................................................................77
Creating a Synopsis ............................................................................................................................................78
Chapter 17 Title Page...................................................................................................................................................79
Creating a Title Page...........................................................................................................................................80
Printing a Title Page............................................................................................................................................80
MONTAGE
Table of Contents
Chapter 11 Locations View .........................................................................................................................................61
Adding a Location...............................................................................................................................................62
Changing a Location Name...............................................................................................................................63
Chapter 12 Research View..........................................................................................................................................65
Adding a Location ..............................................................................................................................................66
Chapter 13 Tasks...........................................................................................................................................................67
Adding a Task......................................................................................................................................................68
Chapter 14 Contacts .....................................................................................................................................................69
Adding a Contact ................................................................................................................................................70
Downloading Contacts.......................................................................................................................................71
Viewing Contacts in Address Book..................................................................................................................72
Chapter 15 Queries.......................................................................................................................................................73
Creating a Query Letter.....................................................................................................................................74
Attaching a Query Letter to a Contact.............................................................................................................75
Chapter 16 Synopsis .....................................................................................................................................................77
Creating a Synopsis ............................................................................................................................................78
Chapter 17 Title Page...................................................................................................................................................79
Creating a Title Page...........................................................................................................................................80
Printing a Title Page............................................................................................................................................80
4 of 124
MONTAGE
Page 5

Table of Contents
Chapter 18 Smart Views..............................................................................................................................................81
Creating a Smart View.......................................................................................................................................82
Chapter 19 Printing......................................................................................................................................................85
Printing a Screenplay..........................................................................................................................................86
Widow & Orphan Control.................................................................................................................................87
More & Cont’d.....................................................................................................................................................88
Setting Print Headers..........................................................................................................................................89
Setting Margins....................................................................................................................................................90
Chapter 20 Templates..................................................................................................................................................91
Configuring Elements ........................................................................................................................................92
Creating a Template ...........................................................................................................................................93
Managing Templates ..........................................................................................................................................94
Default Templates ...............................................................................................................................................95
Template Specifications......................................................................................................................................96
Chapter 21 Production...............................................................................................................................................101
Adding Scene Numbers ...................................................................................................................................102
Removing Scene Numbers..............................................................................................................................106
MONTAGE
Table of Contents
Chapter 18 Smart Views..............................................................................................................................................81
Creating a Smart View.......................................................................................................................................82
Chapter 19 Printing......................................................................................................................................................85
Printing a Screenplay..........................................................................................................................................86
Widow & Orphan Control.................................................................................................................................87
More & Cont’d.....................................................................................................................................................88
Setting Print Headers..........................................................................................................................................89
Setting Margins....................................................................................................................................................90
Chapter 20 Templates..................................................................................................................................................91
Configuring Elements ........................................................................................................................................92
Creating a Template ...........................................................................................................................................93
Managing Templates ..........................................................................................................................................94
Default Templates ...............................................................................................................................................95
Template Specifications......................................................................................................................................96
Chapter 21 Production...............................................................................................................................................101
Adding Scene Numbers ...................................................................................................................................102
Removing Scene Numbers..............................................................................................................................106
MONTAGE
5 of 124
Page 6

Table of Contents
Chapter 22 Preferences..............................................................................................................................................107
General Preferences..........................................................................................................................................108
Editor Preferences .............................................................................................................................................109
Full Screen Preferences.....................................................................................................................................110
Status Preferences .............................................................................................................................................111
Keywords Preferences .....................................................................................................................................112
Chapter 23 Toolbars...................................................................................................................................................113
The Default Toolbar..........................................................................................................................................114
Customizing the Toolbar.................................................................................................................................115
Custom Toolbar Items .....................................................................................................................................116
Chapter 24 Help..........................................................................................................................................................117
Montage Help....................................................................................................................................................118
Montage User Guide.........................................................................................................................................118
How To Format Your Screenplay Like a Pro ...............................................................................................118
Copyright Your Script......................................................................................................................................119
Register Your Script..........................................................................................................................................119
Screenwriter’s Shop .........................................................................................................................................120
iScript™ Your Script .........................................................................................................................................121
Buy Montage......................................................................................................................................................122
Check For Updates ...........................................................................................................................................123
MONTAGE
Table of Contents
Chapter 22 Preferences..............................................................................................................................................107
General Preferences..........................................................................................................................................108
Editor Preferences .............................................................................................................................................109
Full Screen Preferences.....................................................................................................................................110
Status Preferences .............................................................................................................................................111
Keywords Preferences .....................................................................................................................................112
Chapter 23 Toolbars...................................................................................................................................................113
The Default Toolbar..........................................................................................................................................114
Customizing the Toolbar.................................................................................................................................115
Custom Toolbar Items .....................................................................................................................................116
Chapter 24 Help..........................................................................................................................................................117
Montage Help....................................................................................................................................................118
Montage User Guide.........................................................................................................................................118
How To Format Your Screenplay Like a Pro ...............................................................................................118
Copyright Your Script......................................................................................................................................119
Register Your Script..........................................................................................................................................119
Screenwriter’s Shop .........................................................................................................................................120
iScript™ Your Script .........................................................................................................................................121
Buy Montage......................................................................................................................................................122
Check For Updates ...........................................................................................................................................123
6 of 124
MONTAGE
Page 7

Table of Contents
MONTAGE
Table of Contents
MONTAGE
7 of 124
Page 8

Chapter 1
Welcome.
Writing screenplays - it’s about the writing, isn't it?
We built Montage so that the tool to manage your creativity
stays out of your way. Montage, with a simple user interface
and intuitive, yet powerful features, makes it simple to stay on
course to create, edit and manage screenplays.
Once your script is complete, Montage allows you to submit,
track, send your queries, synopsis, and scripts to hundreds of
included industry contacts through Montage's integration with
Apple's Address Book.
In this user guide you will find step-by-step visual instructions
to help you use Montage to easily create scripts. Writing the
script...that’s up to you.
Introduction to
Montage
In This Chapter:
Philosophy of Montage
Installing & Launching
System Requirements
Technical Support
Montage Help
Notes
MONTAGEMONTAGE
8 of 124
Page 9
Philosophy of Montage
Mac OS X Technologies
in Montage
Universal
Spotlight
Applescript
Address Book
The guiding philosophy behind Montage is composed of
several ideas:
• An attractive and intuitive user interface
• Text that looks great on-screen and on paper
• Managing the writing process from research to final draft
• Providing a multi-dimensional view of a script.
• Filtering the script with Smart Views
• Searching scripts from the Finder using Spotlight
• Helping the writer focus on the writing.
• Aiding script submission to included industry contacts
Chapter 1: Introduction to Montage
Philosophy of Montage
Mac OS X Technologies
in Montage
Universal
Spotlight
Applescript
Address Book
The guiding philosophy behind Montage is composed of
several ideas:
• An attractive and intuitive user interface
• Text that looks great on-screen and on paper
• Managing the writing process from research to final draft
• Providing a multi-dimensional view of a script.
• Filtering the script with Smart Views
• Searching scripts from the Finder using Spotlight
• Helping the writer focus on the writing.
• Aiding script submission to included industry contacts
9 of 124
Chapter 1: Introduction to Montage
Page 10
Philosophy of Montage
Scenes
The basic building blocks of a script. Each scene not only stores the writing for that scene
but it contains a title, status, notes, annotations, a list of characters, locations, and dates. All
the extra information helps you craft a better script and is the instrument by which you can
filter the script with a find or a smart view.
Outline
The live-updating outline is one of the main concepts behind Montage. It gives you the
ability to quickly make changes to the script. Changing a character or location will change it
throughout the script. The Re-ordering of scenes is as easy as drag and drop.
Smart Views
Smart Views show a view of your script based on search criteria you define instead of its
physical location in your script. Most screenwriting software is rigid: a script starts at FADE
IN: and progresses in a straight line to FADE OUT:. Smart Views fundamentally change the
way you view your script because now you can view parts of the script together regardless
of their location in the script.
Full Screen View
Distractions get in the way of writing, with so many things to look at on screen your eyes
can wander to an email or an icon bouncing in the dock. Full screen view encompasses the
whole screen and presents you with nothing but your script, allowing you to get more
writing done with less distractions.
Chapter 1: Introduction to Montage
Philosophy of Montage
Scenes
The basic building blocks of a script. Each scene not only stores the writing for that scene
but it contains a title, status, notes, annotations, a list of characters, locations, and dates. All
the extra information helps you craft a better script and is the instrument by which you can
filter the script with a find or a smart view.
Outline
The live-updating outline is one of the main concepts behind Montage. It gives you the
ability to quickly make changes to the script. Changing a character or location will change it
throughout the script. The Re-ordering of scenes is as easy as drag and drop.
Smart Views
Smart Views show a view of your script based on search criteria you define instead of its
physical location in your script. Most screenwriting software is rigid: a script starts at FADE
IN: and progresses in a straight line to FADE OUT:. Smart Views fundamentally change the
way you view your script because now you can view parts of the script together regardless
of their location in the script.
Full Screen View
Distractions get in the way of writing, with so many things to look at on screen your eyes
can wander to an email or an icon bouncing in the dock. Full screen view encompasses the
whole screen and presents you with nothing but your script, allowing you to get more
writing done with less distractions.
Chapter 1: Introduction to Montage
10 of 124
Page 11
Installing & Launching
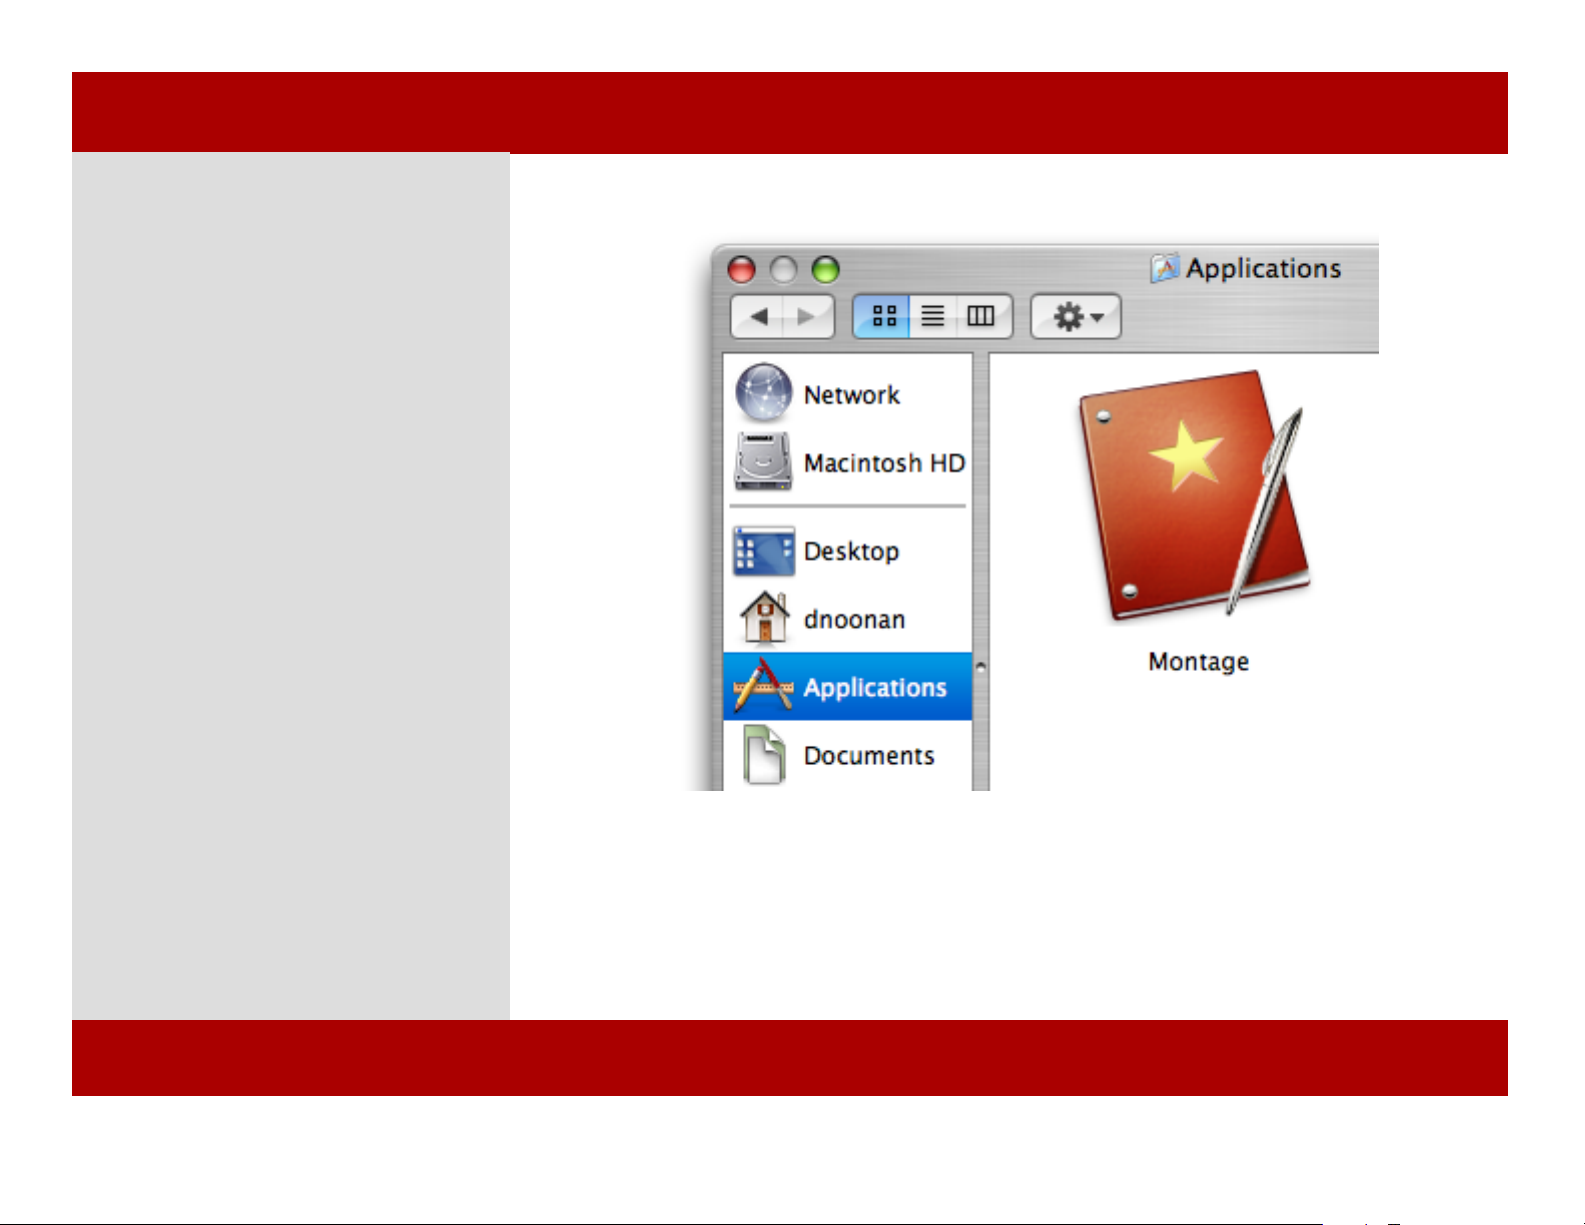
To install Montage:
1 Mount the disk image by double-
clicking on the Montage.dmg file in the
Finder.
2 Drag and drop the Montage icon
onto your Applications folder.
Montage is copied onto your hard
drive.
3 Once the copying finishes, you’re
ready to start using Montage.
4 Launch Montage by navigating to
your applications folder and doubleclicking the Montage icon.
2
Chapter 1: Introduction to Montage
11 of 124
Chapter 1: Introduction to Montage
Page 12
Registration
1
To register Montage:
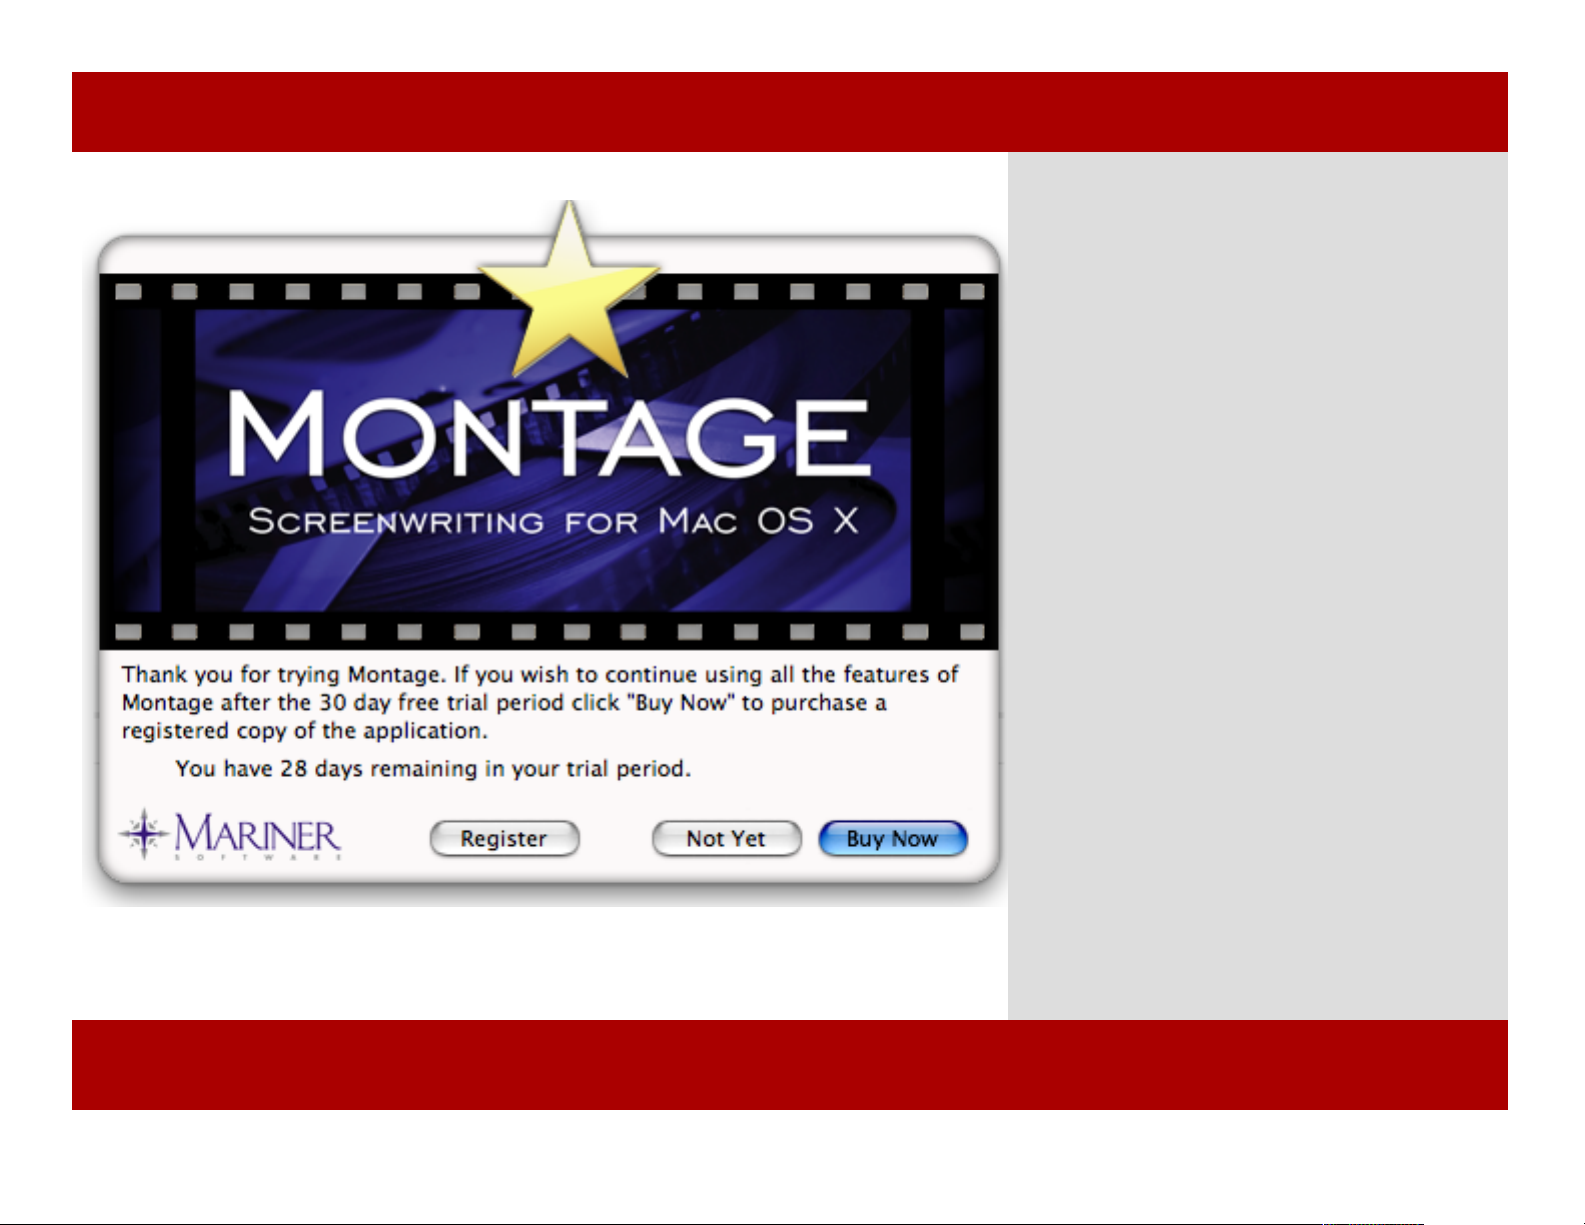
1 When you first launch Montage you are
prompted to register or buy the software.
Click Buy Now to go to the Mariner eStore
to purchase a license if you haven’t done so
already.
Click Register to enter your serial number.
Click Not Yet to continue to use the software
in trial mode.
Note: The trial period lasts 30 consecutive days
from the first time you enter into the trial period.
After this trial period you will either need to
purchase a license to continue using the software
or discard it from your computer.
Chapter 1: Introduction to Montage
Registration
1
To register Montage:
1 When you first launch Montage you are
prompted to register or buy the software.
Click Buy Now to go to the Mariner eStore
to purchase a license if you haven’t done so
already.
Click Register to enter your serial number.
Click Not Yet to continue to use the software
in trial mode.
Note: The trial period lasts 30 consecutive days
from the first time you enter into the trial period.
After this trial period you will either need to
purchase a license to continue using the software
or discard it from your computer.
Chapter 1: Introduction to Montage
12 of 124
Page 13
Registration
To register Montage:
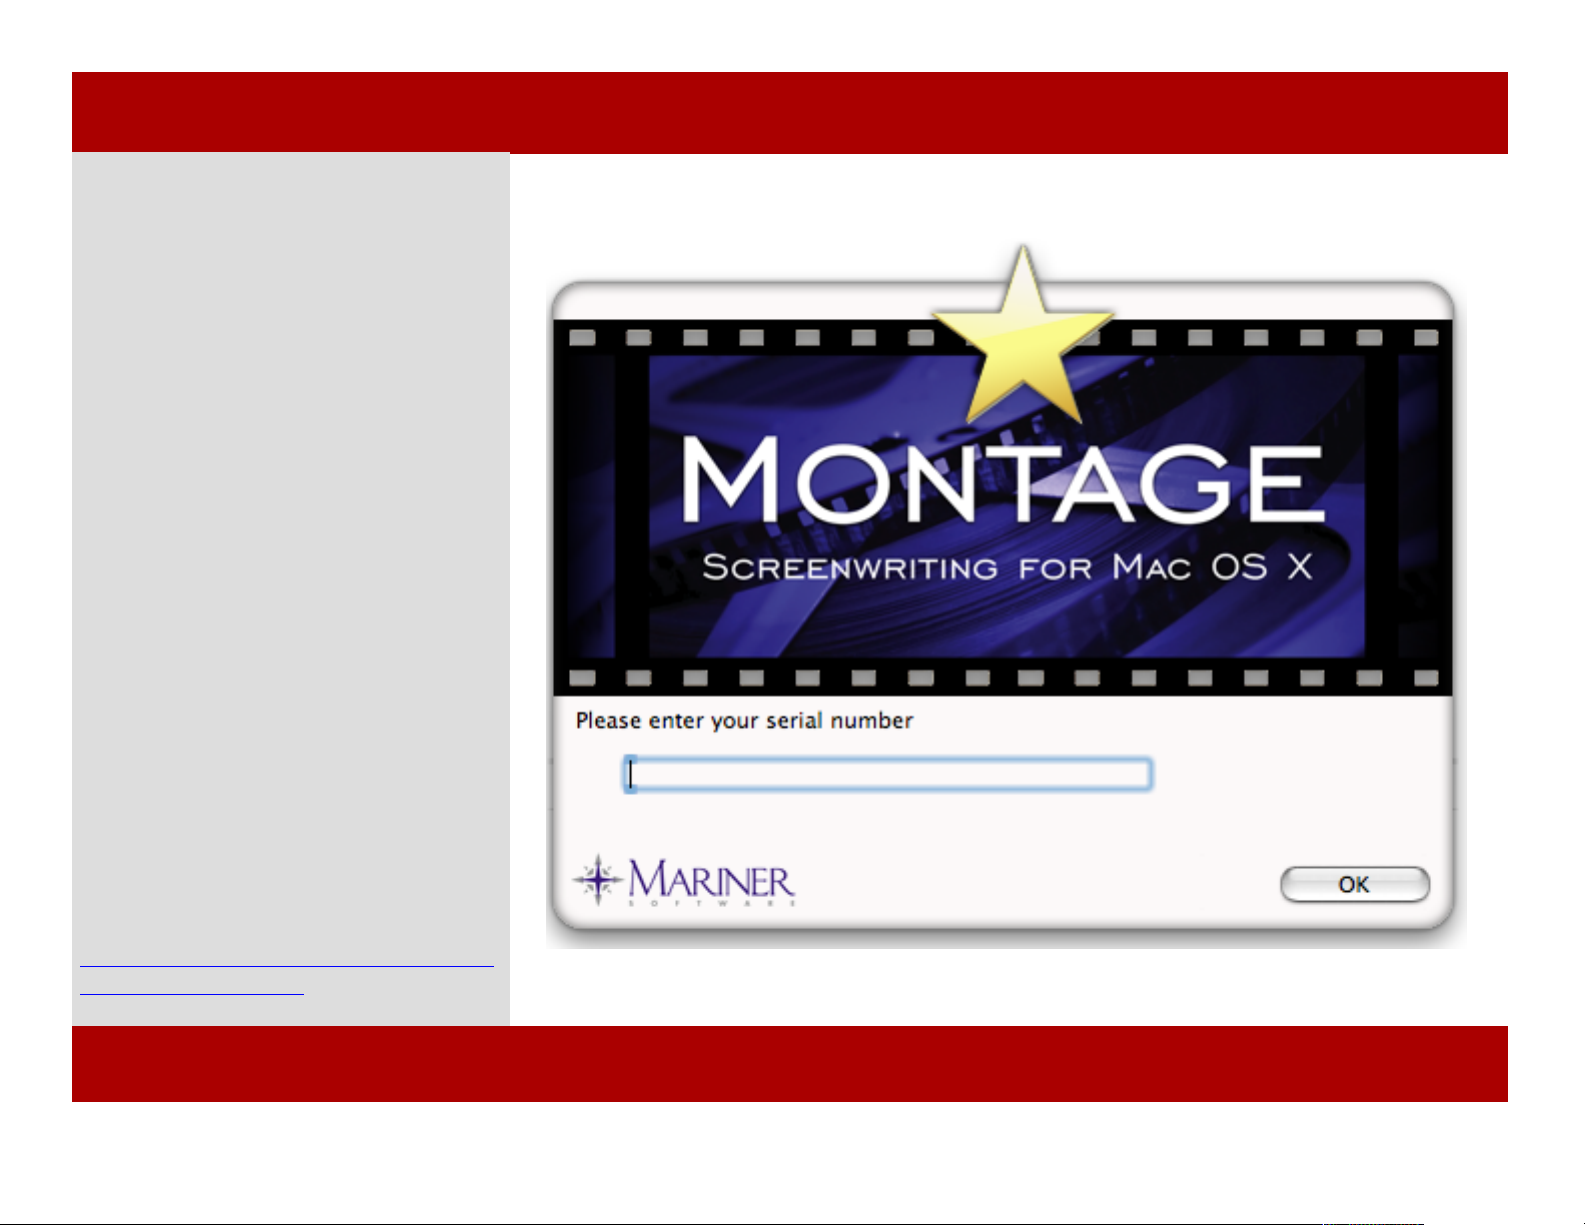
1 Clcik the Register button..
2 Enter your serial number.
Your serial number was either
provided on the back of the disk sleeve
on a sticker or in an email receipt.
3 Click OK when you are finished.
Note: The serial number will be in the
format of:
MGXXX-XX-XXX-XXXXXX-
XXXXXXXX
Hint: Your serial number can be found in
the General pane of Preferences.
Further help can be obtained on the
Mariner Software website at:
http://www.marinersoftware.com/sit
epage.php?page=104
1
Chapter 1: Introduction to Montage
Registration
To register Montage:
1 Clcik the Register button..
2 Enter your serial number.
Your serial number was either
provided on the back of the disk sleeve
on a sticker or in an email receipt.
3 Click OK when you are finished.
Note: The serial number will be in the
format of:
MGXXX-XX-XXX-XXXXXXXXXXXXXX
Hint: Your serial number can be found in
the General pane of Preferences.
Further help can be obtained on the
Mariner Software website at:
http://www.marinersoftware.com/sit
epage.php?page=104
1
13 of 124
Chapter 1: Introduction to Montage
Page 14
Check For Updates
1
When Montage starts up, or at any time
you’d like, you can check for updates. Here’s
how:
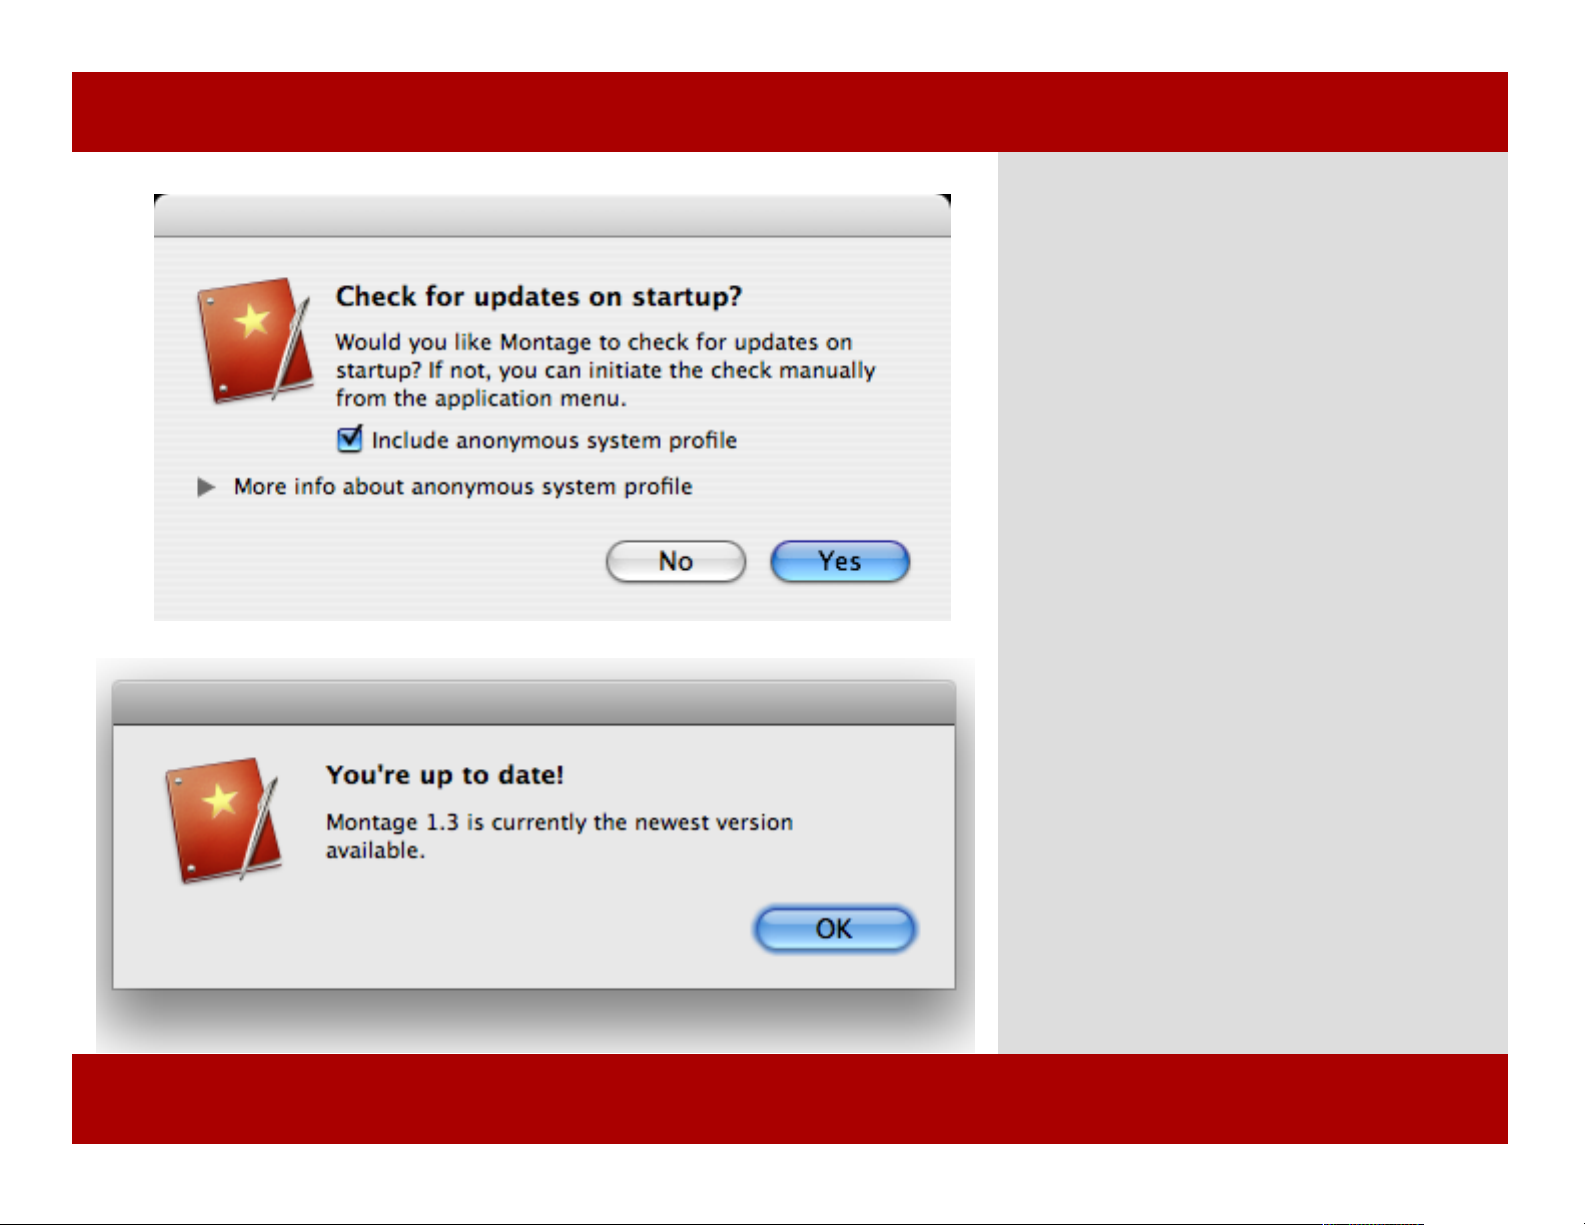
1 On first start up, a dialog appears.
2 Choose whether or not to include an
anonymous system profile. Click on the
“More info about anonymous system profile”
for more information about the information
collected see the following page in this
chapter.
3 Click the Yes button.
Montage will now check for updates on every
launch.
4 When you check for updates a dialog
appears letting you know you are either up-
to-date or there is a new version to
download.
Note: You can always check for updates manually
from either the Montage menu>Check for
Updates... or from the Help menu.
Chapter 1: Introduction to Montage
Check For Updates
1
When Montage starts up, or at any time
you’d like, you can check for updates. Here’s
how:
1 On first start up, a dialog appears.
2 Choose whether or not to include an
anonymous system profile. Click on the
“More info about anonymous system profile”
for more information about the information
collected see the following page in this
chapter.
3 Click the Yes button.
Montage will now check for updates on every
launch.
4 When you check for updates a dialog
appears letting you know you are either upto-date or there is a new version to
download.
Note: You can always check for updates manually
from either the Montage menu>Check for
Updates... or from the Help menu.
Chapter 1: Introduction to Montage
14 of 124
Page 15
Check for Updates
When Montage checks over the
internet for updates it can (optionally)
send us (Mariner Software) some
anonymous info about your system.
The info gathered is used to identify
what types of computers our
customers are using and help us better
tailor our software offerings to the
hardware and software combinations
our real-world customers are using.
We respect your right to privacy and in
no way use this information to identify
you or reveal anything more personal
than your hardware and operating
system preferences.
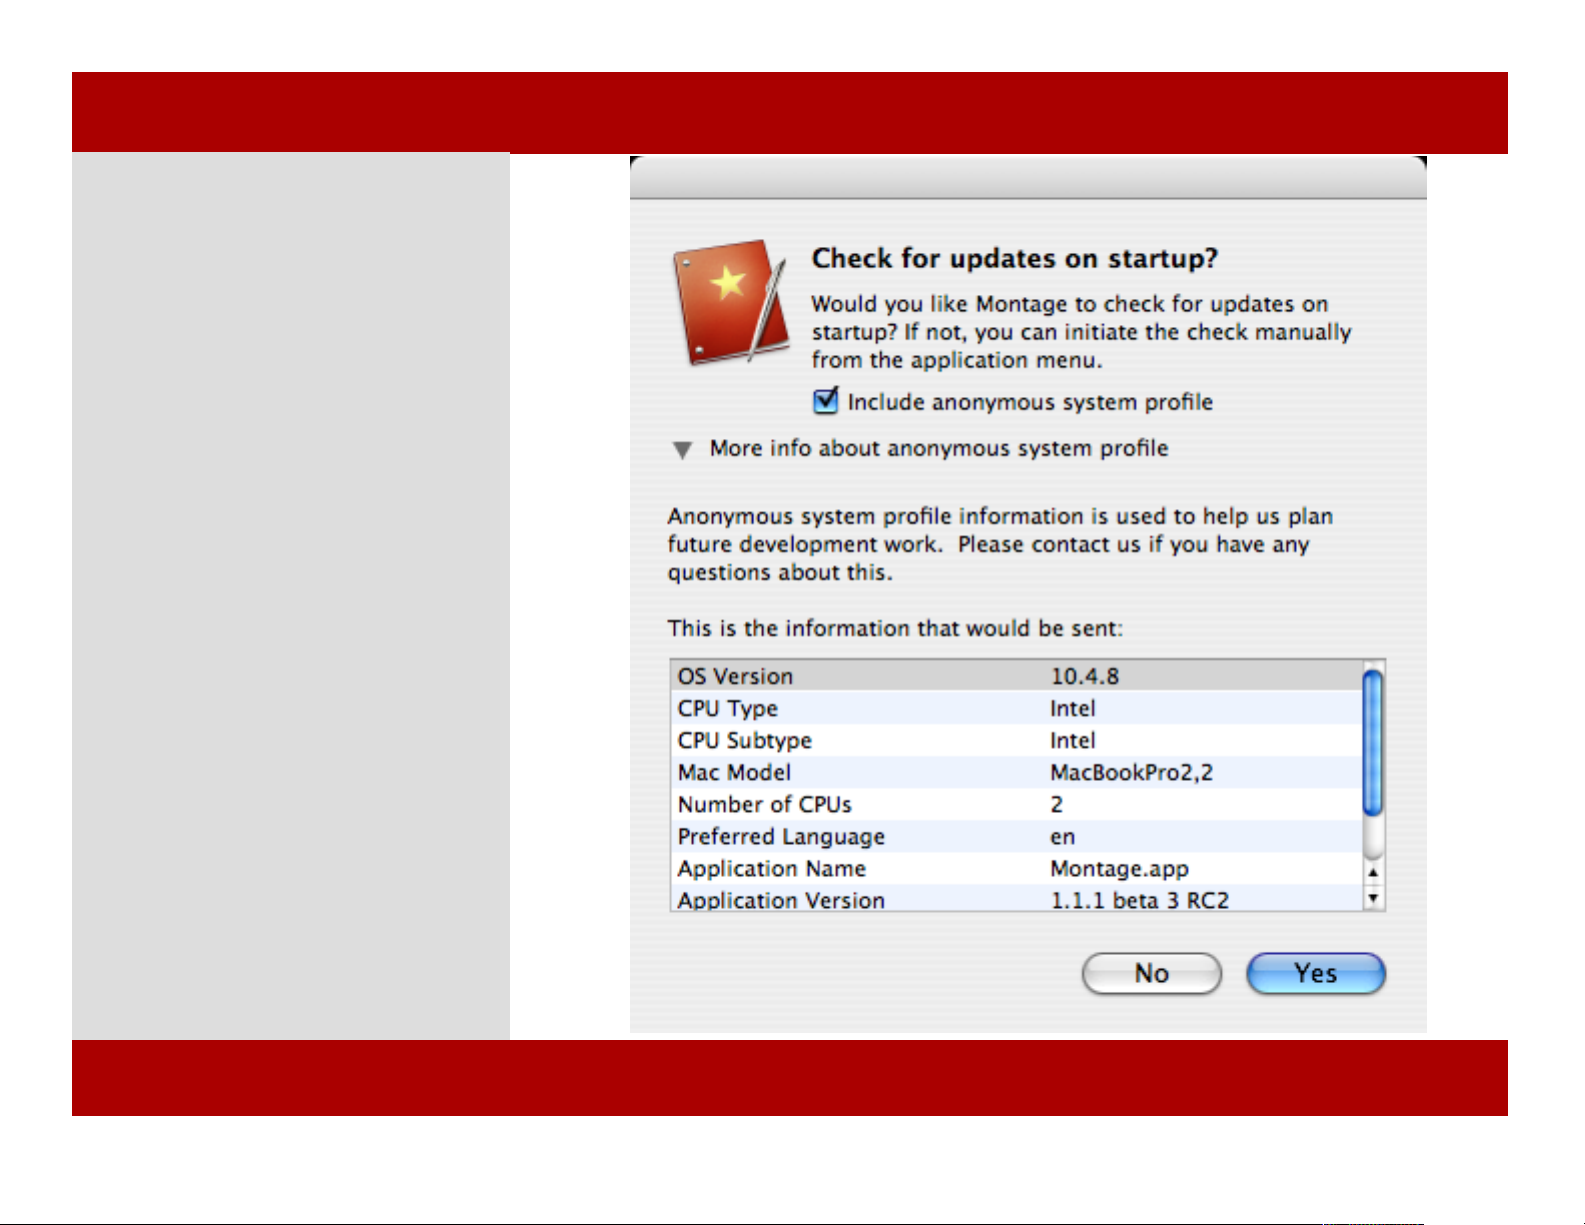
1 Launch Montage.
A dialog appears asking whether to
check for updates and whether or not
to send anonymous system
information.
1 Place a checkmark next to “Include
Anonymous system profile” and click
the Yes button.
1
Chapter 1: Introduction to Montage
Check for Updates
When Montage checks over the
internet for updates it can (optionally)
send us (Mariner Software) some
anonymous info about your system.
The info gathered is used to identify
what types of computers our
customers are using and help us better
tailor our software offerings to the
hardware and software combinations
our real-world customers are using.
We respect your right to privacy and in
no way use this information to identify
you or reveal anything more personal
than your hardware and operating
system preferences.
1 Launch Montage.
A dialog appears asking whether to
check for updates and whether or not
to send anonymous system
information.
1 Place a checkmark next to “Include
Anonymous system profile” and click
the Yes button.
1
15 of 124
Chapter 1: Introduction to Montage
Page 16

System Requirements & Troubleshooting
Hardware and Software Requirements
To use Montage you need:
• at least 128 MB (megabytes) of available memory (RAM), at least 100 MB free hard disk space
• Mac OS X 10.3.9 or above
Troubleshooting
If you have a question about using Montage, try finding the answers you need in this document or in
the Montage help. Alternatively, try the FAQ (Frequently Asked Questions) page on our web site.
View it at: http://marinersoftware.com/sitepage.php?page=24.
You may also visit our online forum at: http://marinersoftware.com/phpBB2/.
If you still can’t find the information you need, contact Mariner Software by phone, fax, or email.
Email: [email protected]
Phone: (612) 529-3770; Voice support, 9 a.m. – 6 p.m. Eastern Standard Time
Fax: (612) 529-3775
Mail: Mariner Software, Inc.
401 N. 3rd Street #665
Minneapolis, MN 55401
USA
For updates, tips and tricks, information about other Mariner products, user group discount information, and articles
for user group newsletter publication, visit our web site at: http://marinersoftware.com
Chapter 1: Introduction to MontageChapter 1: Introduction to Montage
16 of 124
Page 17

Montage Notes
Notes
Before using Montage, you should have a basic knowledge of Mac OS X. You should understand pointing, clicking, double-clicking,
dragging, and how to choose menu commands. You should also know how to operate dialog boxes, re-size windows, and use the
Clipboard. If you aren’t familiar with these or other basic Macintosh operations or terminology, refer to the Macintosh® Help
documentation included with your computer.
Errors
If you find any bugs or errors in the program, please send detailed information to [email protected].
For a crash of the Application, its usually helpful for us to know the version of Montage you are using, the version of OS X you are
running, and lastly, the kind of computer you have with which the problem occurs.
Thanks
Thank you to those who have helped improve this product with suggestions, information or bug reports.
Chapter 1: Introduction to Montage
Montage Notes
Notes
Before using Montage, you should have a basic knowledge of Mac OS X. You should understand pointing, clicking, double-clicking,
dragging, and how to choose menu commands. You should also know how to operate dialog boxes, re-size windows, and use the
Clipboard. If you aren’t familiar with these or other basic Macintosh operations or terminology, refer to the Macintosh® Help
documentation included with your computer.
Errors
If you find any bugs or errors in the program, please send detailed information to [email protected].
For a crash of the Application, its usually helpful for us to know the version of Montage you are using, the version of OS X you are
running, and lastly, the kind of computer you have with which the problem occurs.
Thanks
Thank you to those who have helped improve this product with suggestions, information or bug reports.
17 of 124
Chapter 1: Introduction to Montage
Page 18

Chapter 2
Starting a script
Scripts contain scenes, characters, locations, research items,
tasks, contacts, query letters, and a synopsis. Montage provides
several views to help you in the writing process.
The concept behind Montage is that you view your script by
any of the views listed above, as well as create your own
“smart” views.
Create your script using the live-outline, tag a scene with a
keyword and then create a Smart View to customize your view
of the script.
In this chapter, we’ll show you how to start your script and use
Montage’s views to aid you in the writing process.
Starting a Script
In This Chapter:
Creating a Script
Importing a Final
Draft® Script
Importing a Text or
RTF Script
MONTAGE
Chapter 2
Starting a script
Scripts contain scenes, characters, locations, research items,
tasks, contacts, query letters, and a synopsis. Montage provides
several views to help you in the writing process.
The concept behind Montage is that you view your script by
any of the views listed above, as well as create your own
“smart” views.
Create your script using the live-outline, tag a scene with a
keyword and then create a Smart View to customize your view
of the script.
In this chapter, we’ll show you how to start your script and use
Montage’s views to aid you in the writing process.
Starting a Script
In This Chapter:
Creating a Script
Importing a Final
Draft® Script
Importing a Text or
RTF Script
MONTAGE
18 of 124
Page 19
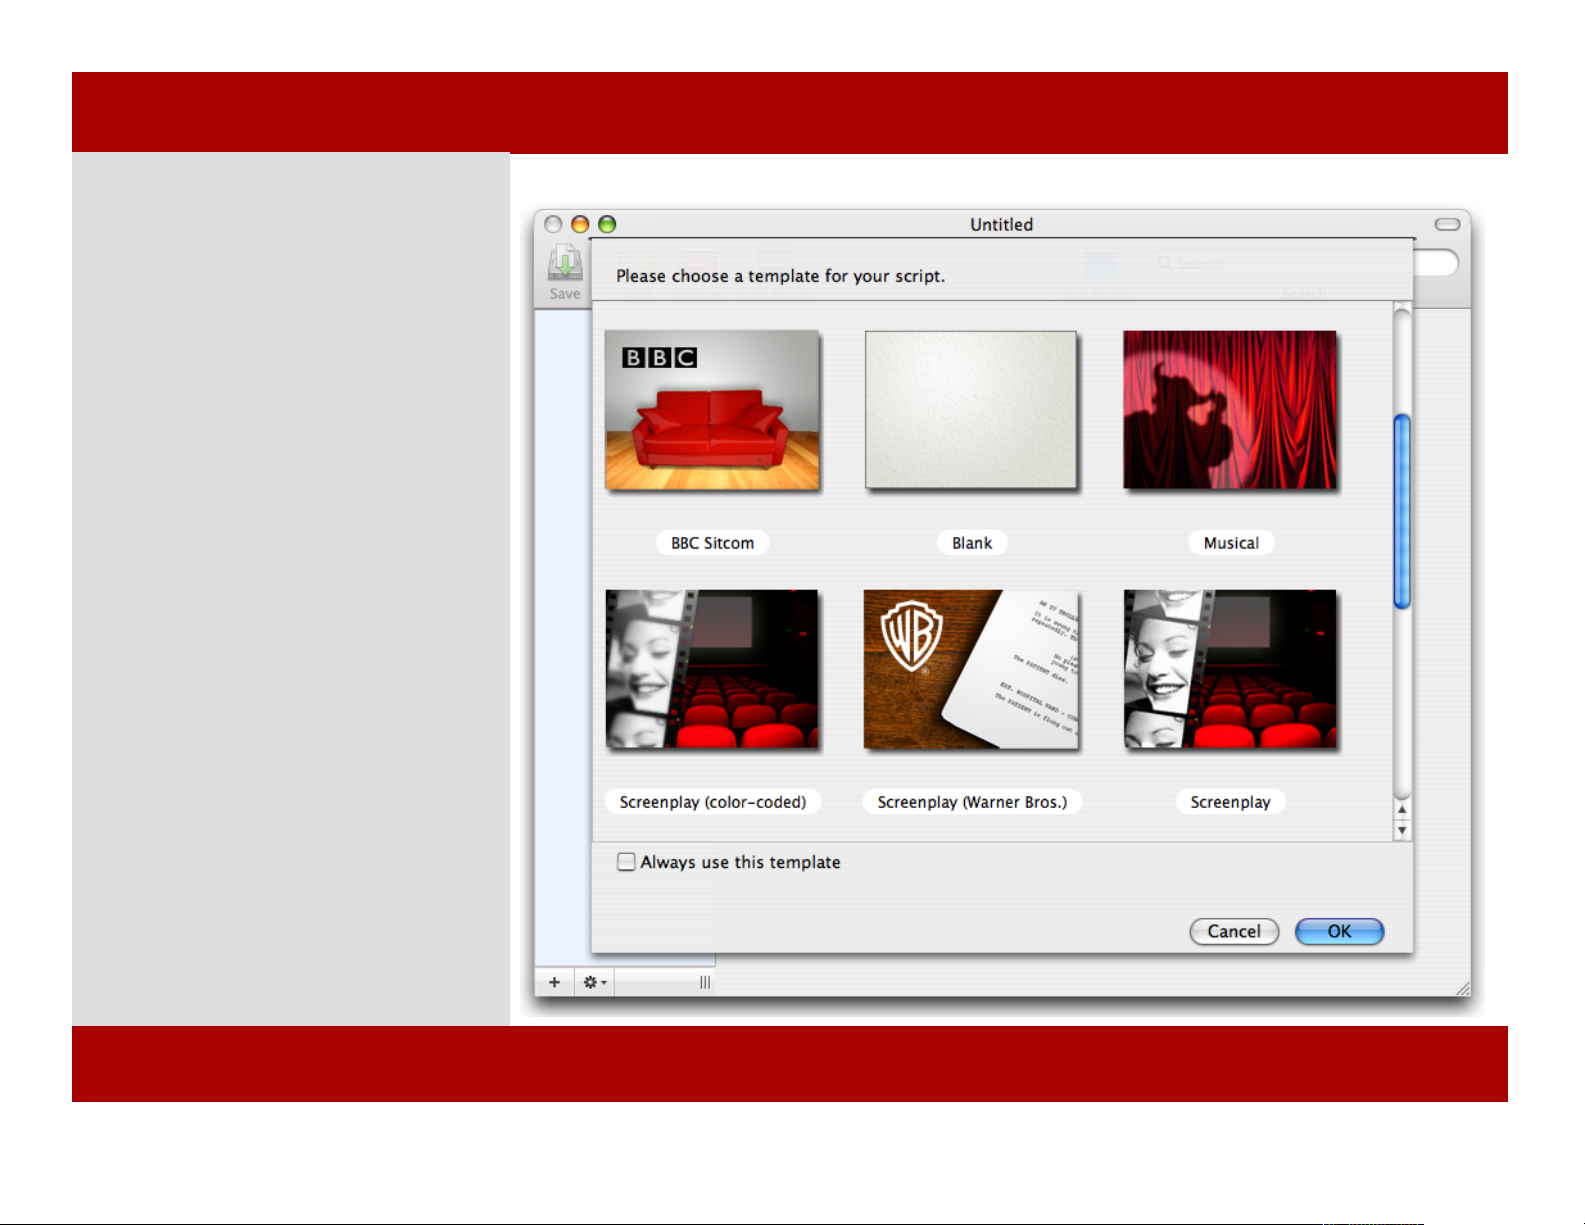
Creating a Script
To create a new script:
1 From the File menu, select New
(Command - N).
A sheet appears.
2 Choose a template and click OK or
press return.
Note: Your Screenplay is blank and isn’t
saved. The title reads Untitled until you
save the file to your hard drive.
Note: See Chapter 19 Templates &
Elements for more information about the
default templates included with Montage.
1
Chapter 2: Starting a Script
Creating a Script
To create a new script:
1 From the File menu, select New
(Command - N).
A sheet appears.
2 Choose a template and click OK or
press return.
Note: Your Screenplay is blank and isn’t
saved. The title reads Untitled until you
save the file to your hard drive.
Note: See Chapter 19 Templates &
Elements for more information about the
default templates included with Montage.
1
19 of 124
Chapter 2: Starting a Script
Page 20
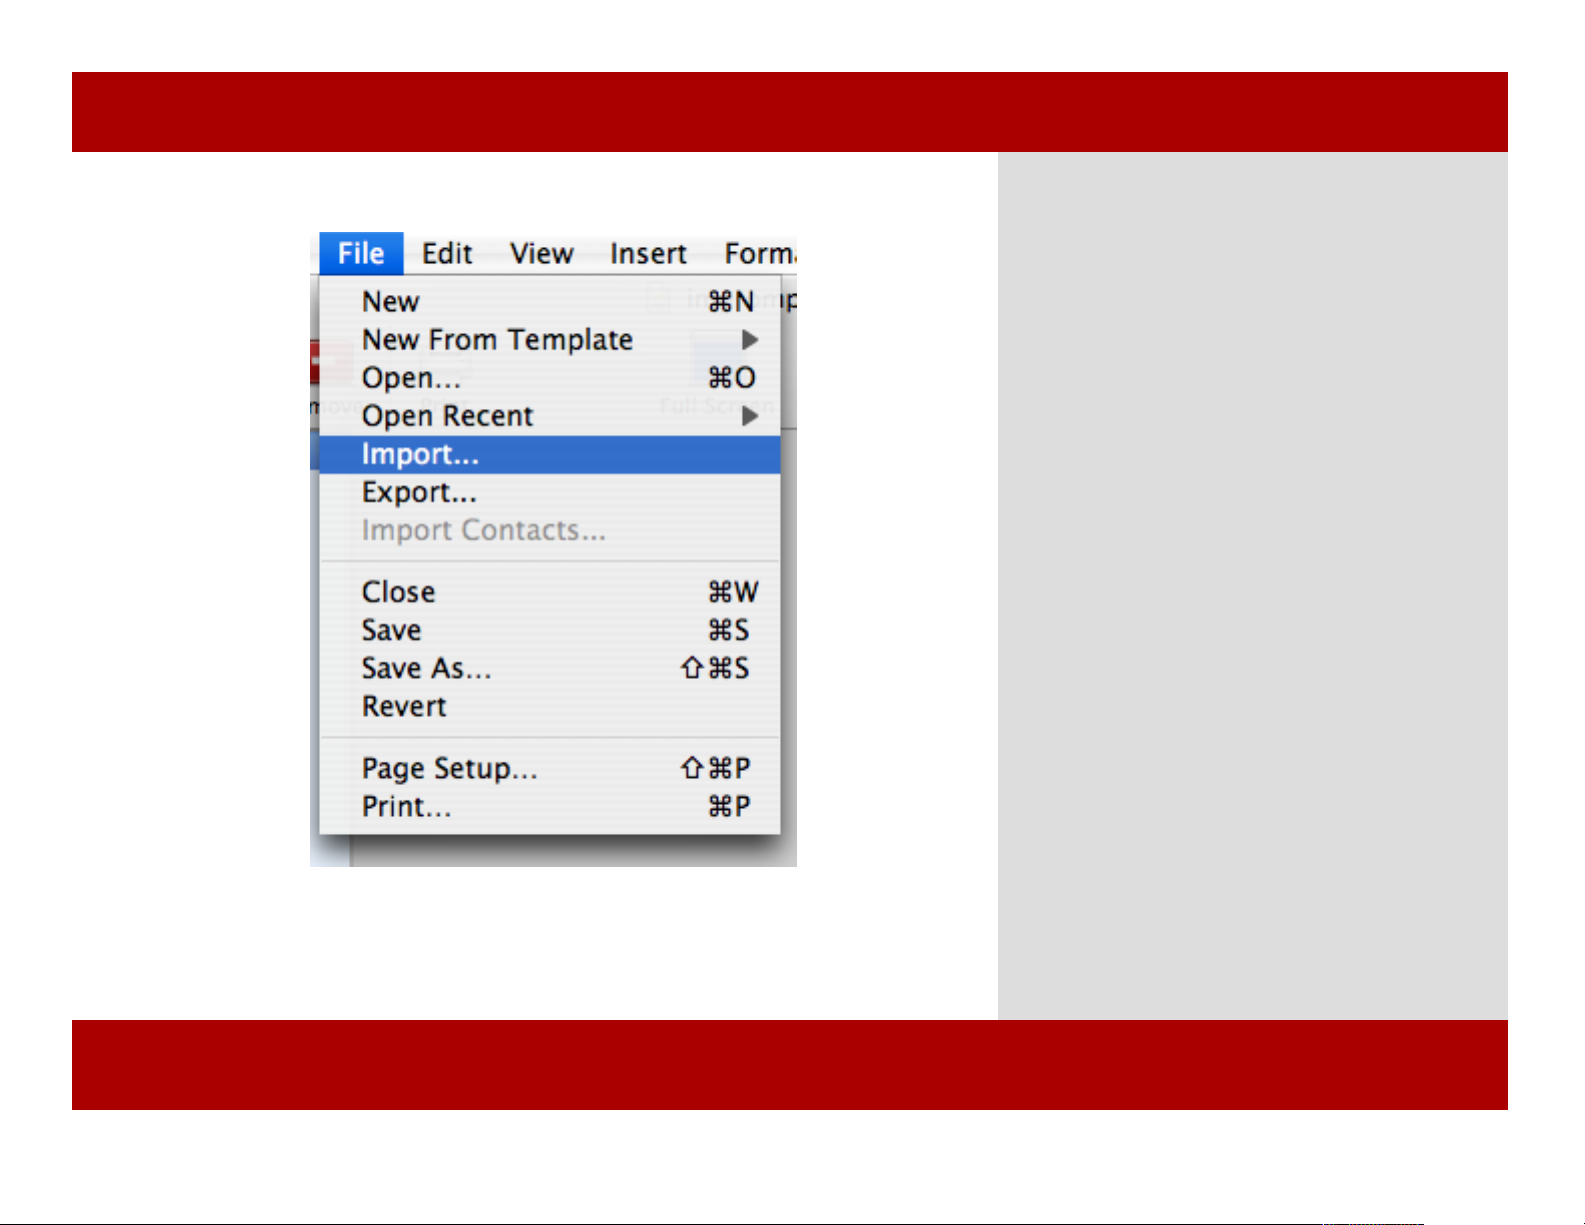
Importing a Script
1
To import a script:
1 From the File menu, select Import...
An Open dialog appears.
2 Navigate to the file you wish to import
and click Open.
2 A new document window opens with the
contents of you file translated into Montage.
Note: You can import your screenplays in Rich
Text Format (.RTF), Final Draft® Document
(.fdr) or Final Draft® template (.fdt).
Note: All the scenes, characters, locations, and
elements should be preserved from Final Draft®
documents. When importing from text or RTF,
Montage makes intelligent guesses to properly
format your script. Some proofing and editing may
be required.
Chapter 2: Starting a Script
Importing a Script
1
To import a script:
1 From the File menu, select Import...
An Open dialog appears.
2 Navigate to the file you wish to import
and click Open.
2 A new document window opens with the
contents of you file translated into Montage.
Note: You can import your screenplays in Rich
Text Format (.RTF), Final Draft® Document
(.fdr) or Final Draft® template (.fdt).
Note: All the scenes, characters, locations, and
elements should be preserved from Final Draft®
documents. When importing from text or RTF,
Montage makes intelligent guesses to properly
format your script. Some proofing and editing may
be required.
Chapter 2: Starting a Script
20 of 124
Page 21
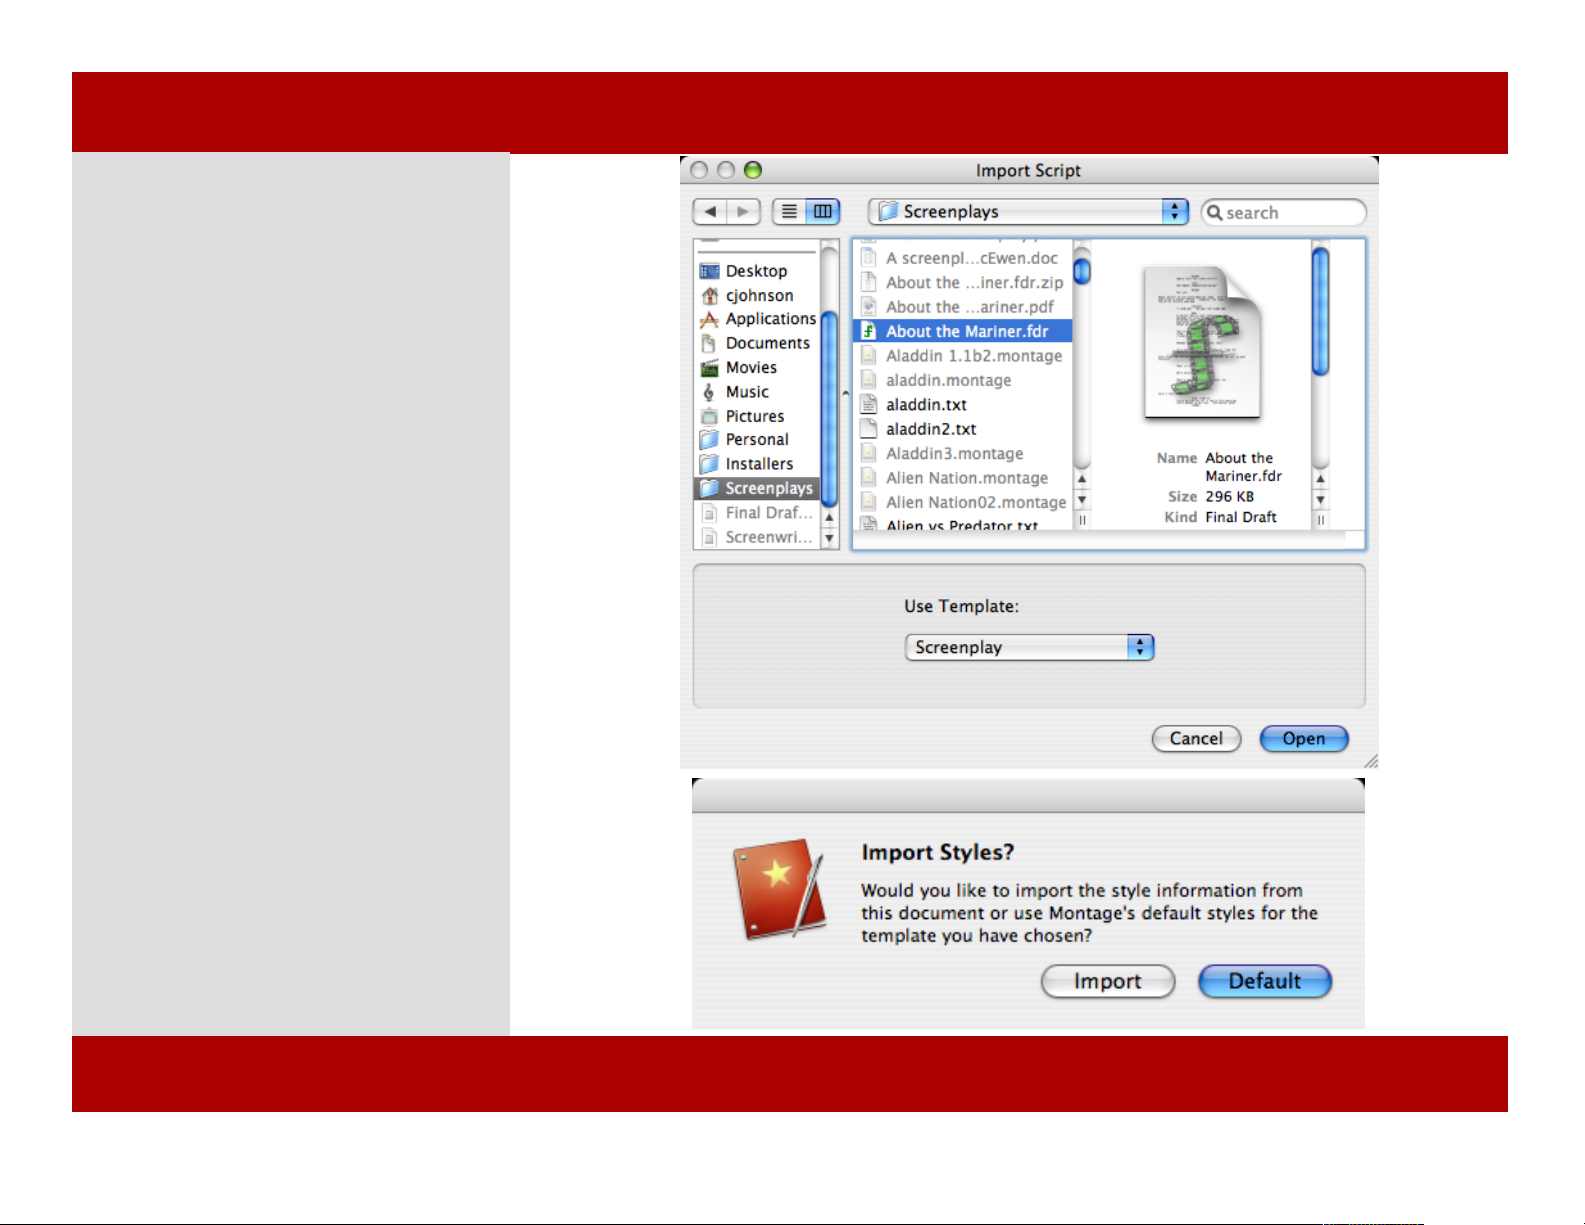
Importing a Final Draft® Script
There are two options when importing
a Final Draft® file. You can use an
existing template or import the style
information from the Final Draft® file.
Opening the file in an existing template
changes the formatting of the script to
match the template’s style info.
Here’s how to import the text and
formatting from a Final Draft® script:
1 Click File>Import...
A window appears.
2 Navigate to the file, select the file,
and click Open.
Note: Selecting a template isn’t necessary
since we’ll get that info from the file.
A dialog appears asking if you’d like to
import the style information.
3 Click Import.
The file opens in Montage and the
elements and formatting should be the
same as in Final Draft®.
1
2
Chapter 2: Starting a Script
21 of 124
Chapter 2: Starting a Script
Page 22
Importing a Final Draft® Script
Montage imports the text of the script
along with its formatting and
elements.. This function gets you up
and running quickly.
There are several things that currently
don’t import from Final Draft® files.
Below is a list of the main items:
Scene numbers
Voice assignments
Collaboration info
Line spacing settings
Locked page numbers
Locked scene numbers
Tagging
Revision info
Styled text
Colored text
Chapter 2: Starting a Script
Importing a Final Draft® Script
Montage imports the text of the script
along with its formatting and
elements.. This function gets you up
and running quickly.
There are several things that currently
don’t import from Final Draft® files.
Below is a list of the main items:
Scene numbers
Voice assignments
Collaboration info
Line spacing settings
Locked page numbers
Locked scene numbers
Tagging
Revision info
Styled text
Colored text
Chapter 2: Starting a Script
22 of 124
Page 23
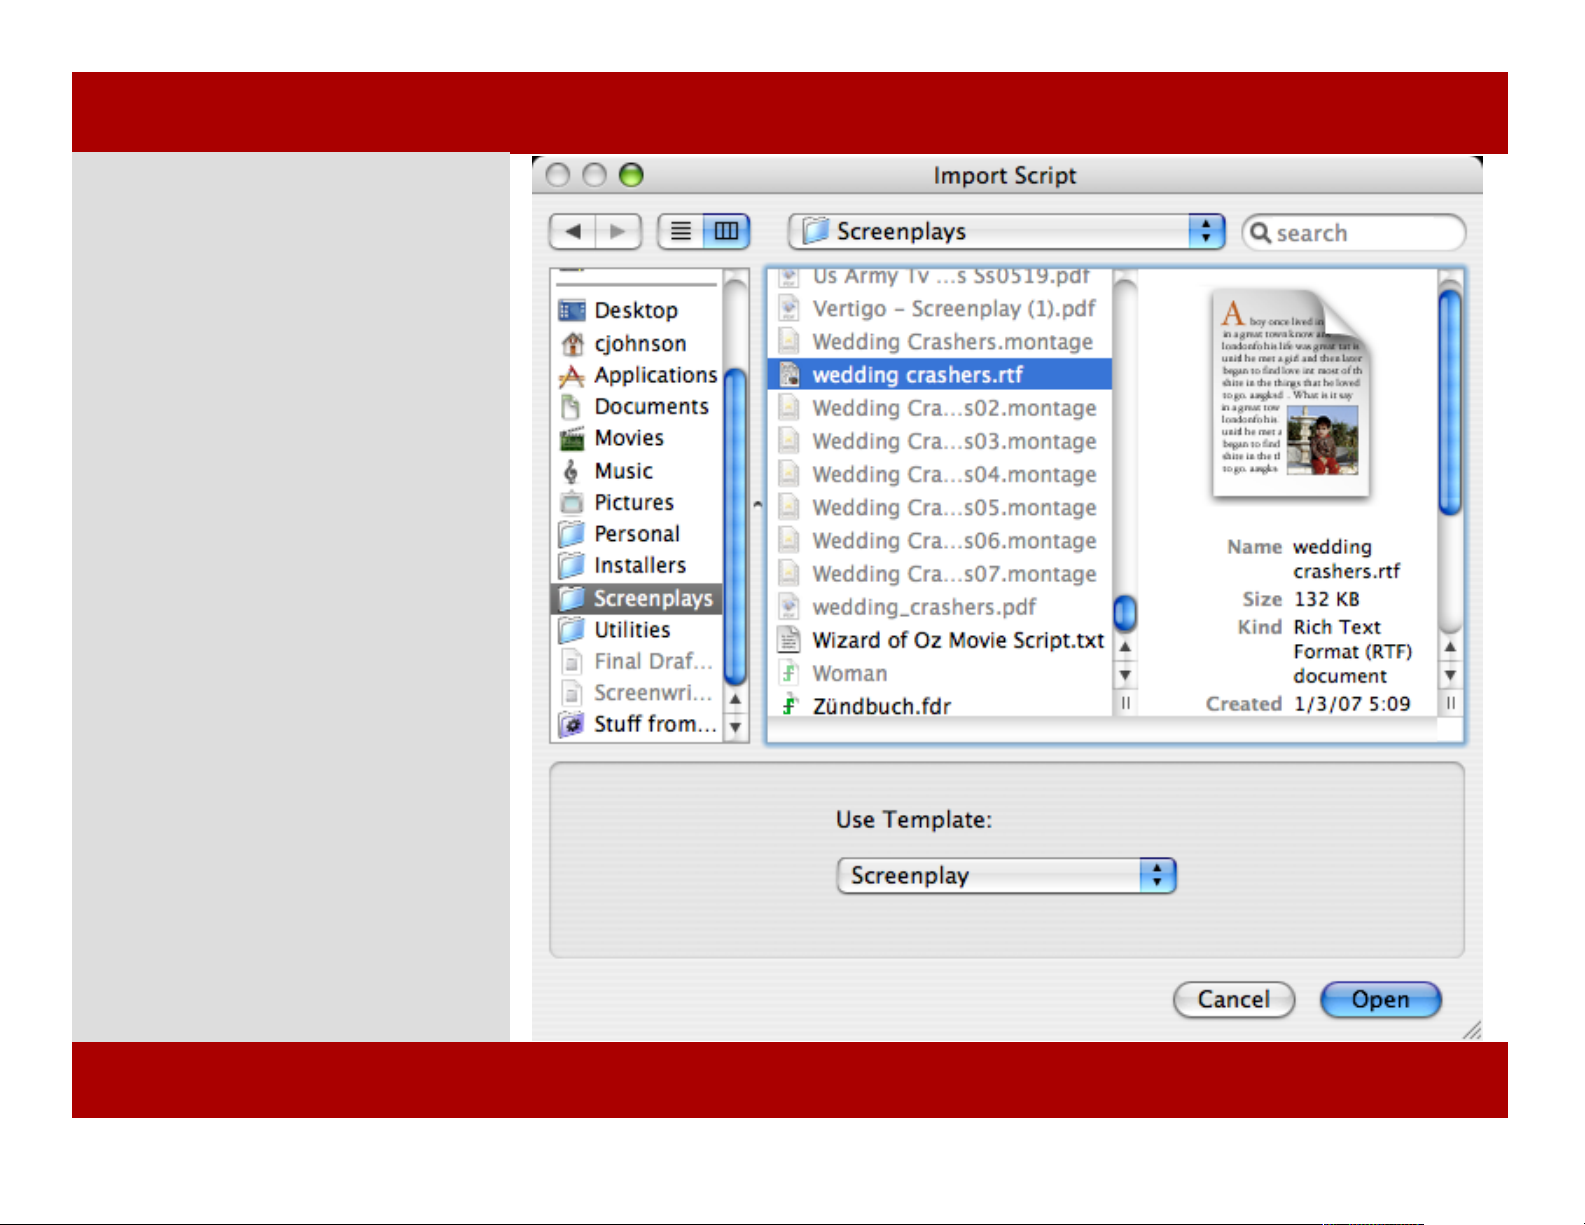
Importing a Text or RTF Script
Scripts in text form abound on the
internet. One text format example is
RTF, which stand for Rich Text Format.
RTF files can use stylesheets to define
their ruler settings rather than relying
on large tab or space runs to properly
indent. RTF is a standard interchange
format across the screenwriting world.
To import a text or RTF script:
1 Click File>Import...
A window appears.
2 Navigate to the file, select the file.
3 Select a template to use in
formatting the script.
3 Click Open.
Note: While importing Montage makes
many intelligent guesses based on the
stylesheets found in the RTF, as well as
based on spacing, tabs, and carriage
returns in text files.
Chapter 2: Starting a Script
Importing a Text or RTF Script
Scripts in text form abound on the
internet. One text format example is
RTF, which stand for Rich Text Format.
RTF files can use stylesheets to define
their ruler settings rather than relying
on large tab or space runs to properly
indent. RTF is a standard interchange
format across the screenwriting world.
To import a text or RTF script:
1 Click File>Import...
A window appears.
2 Navigate to the file, select the file.
3 Select a template to use in
formatting the script.
3 Click Open.
Note: While importing Montage makes
many intelligent guesses based on the
stylesheets found in the RTF, as well as
based on spacing, tabs, and carriage
returns in text files.
23 of 124
Chapter 2: Starting a Script
Page 24
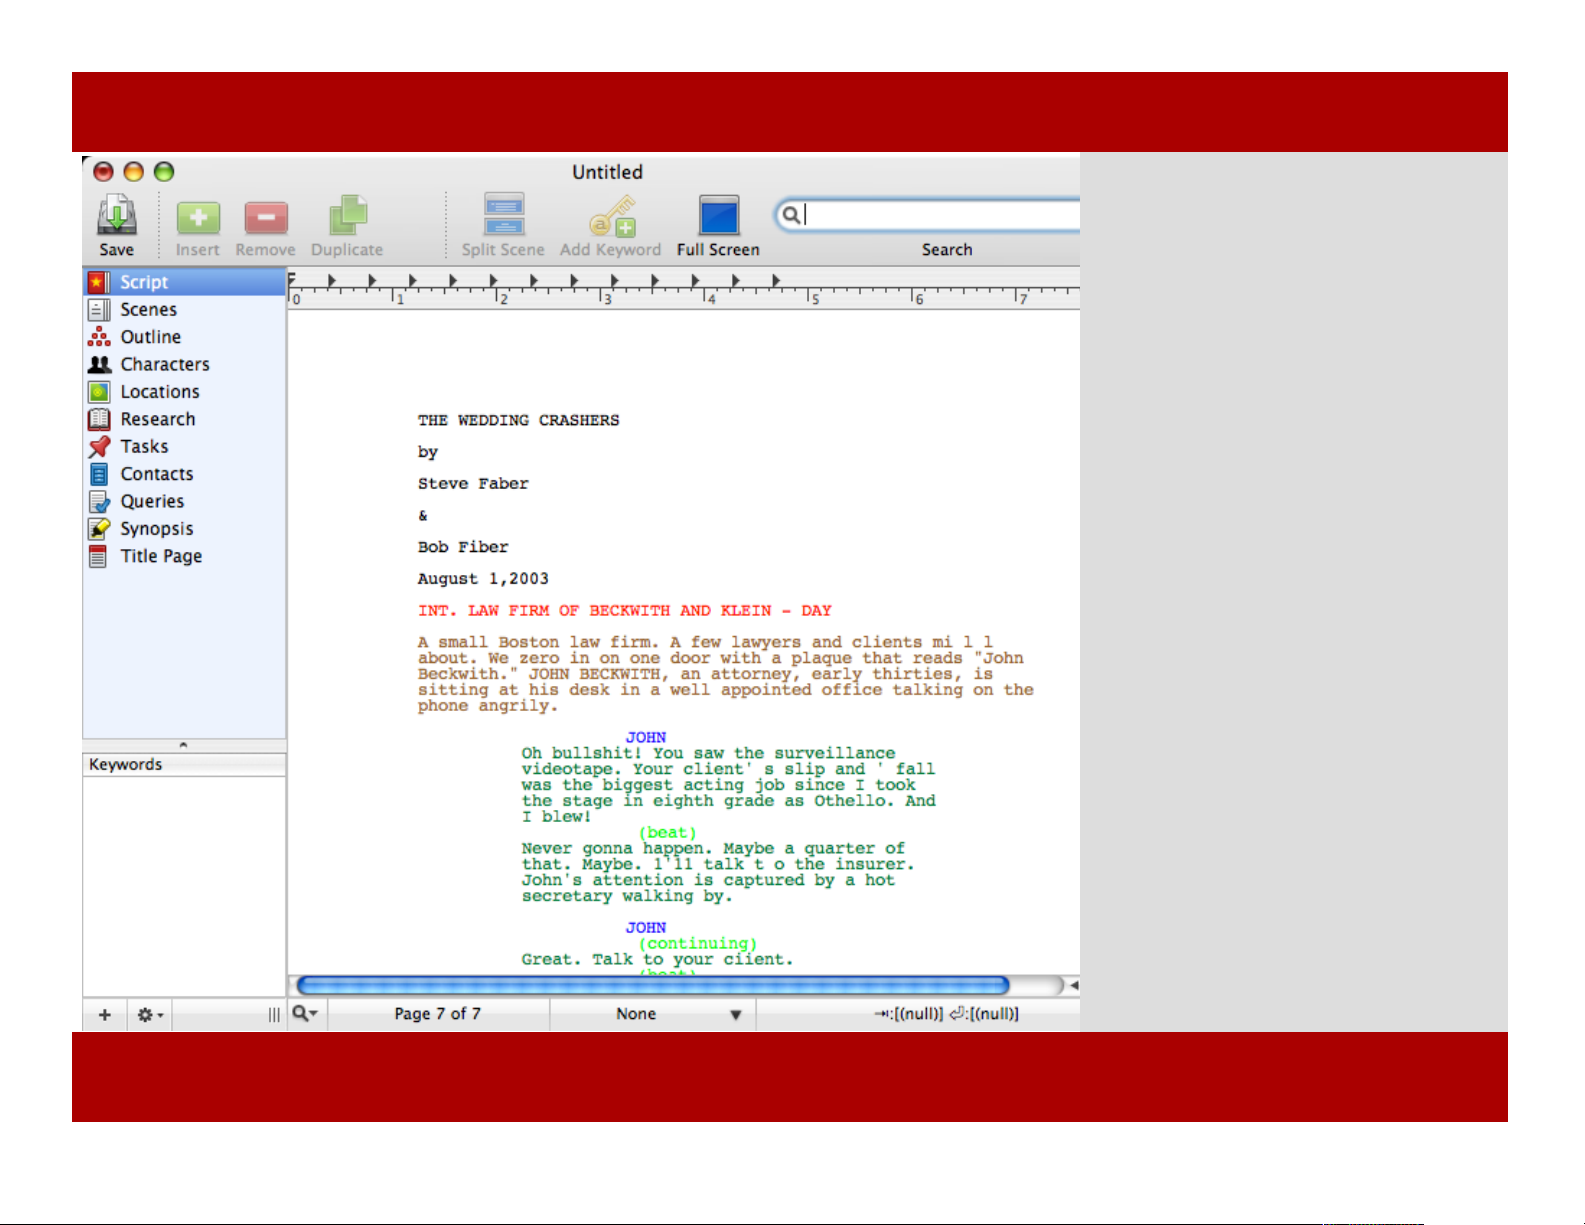
Importing a Text or RTF Script
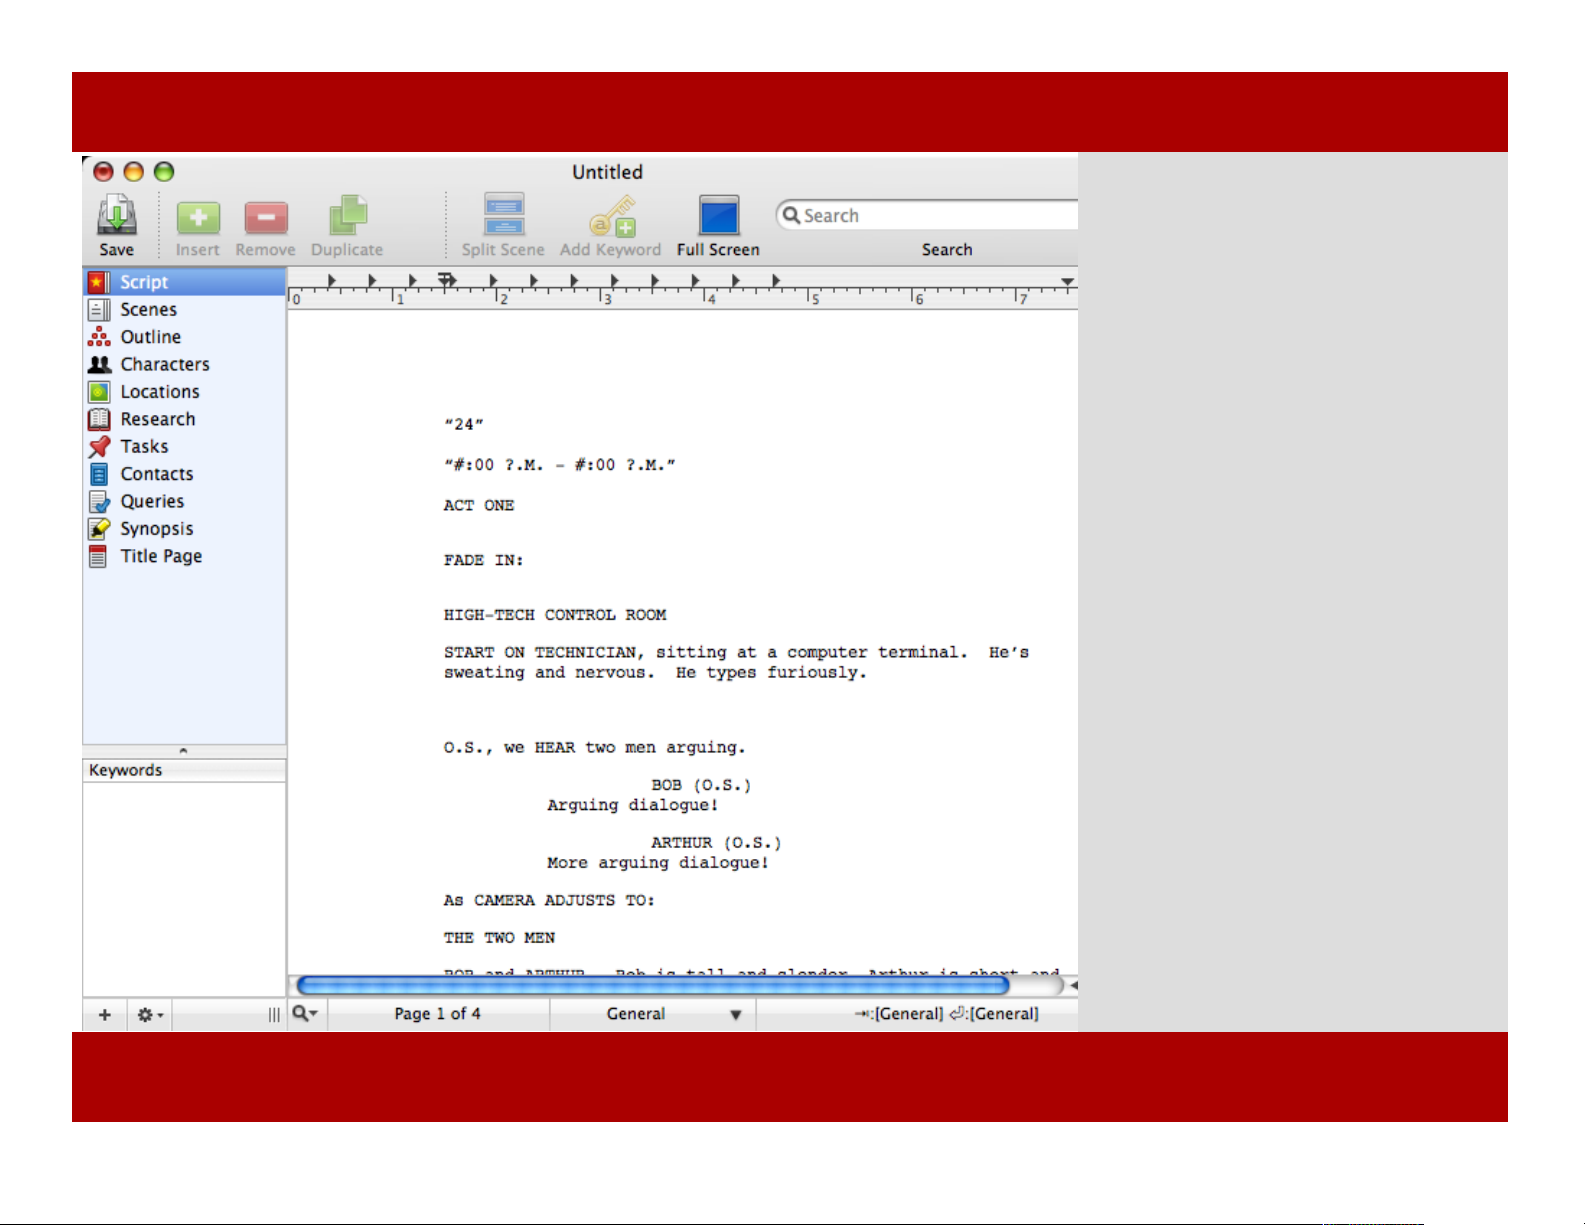
The script imports and a new script
window appears.
Hint: When importing a file from text, the
color-coded templates make visual
identification of formatting errors much
easier.
Chapter 2: Starting a ScriptChapter 2: Starting a Script
24 of 124
Page 25

This page left intentionally blank.
Chapter 2: Starting a Script
This page left intentionally blank.
25 of 124
Chapter 2: Starting a Script
Page 26

Chapter 3
Working With Scripts
As you work on your script, there are several things you should
master. The different views available to you, how to type and
use the tab-return system to auto-complete often typed text and
formatting.
There are also some non-writing functions in Montage that are
quite handy to learn such as, assigning keywords, customizing
your script using Smart Views, and finding and searching
through your script.
Working with Scripts
In This Chapter:
Views
Removing a View
Using the Tab-Return
System
Using Keywords
Searching a Script
Saving a Find as a
Smart View
Finding in a Script
MONTAGE
Chapter 3
Working With Scripts
As you work on your script, there are several things you should
master. The different views available to you, how to type and
use the tab-return system to auto-complete often typed text and
formatting.
There are also some non-writing functions in Montage that are
quite handy to learn such as, assigning keywords, customizing
your script using Smart Views, and finding and searching
through your script.
Working with Scripts
In This Chapter:
Views
Removing a View
Using the Tab-Return
System
Using Keywords
Searching a Script
Saving a Find as a
Smart View
Finding in a Script
MONTAGE
26 of 124
Page 27
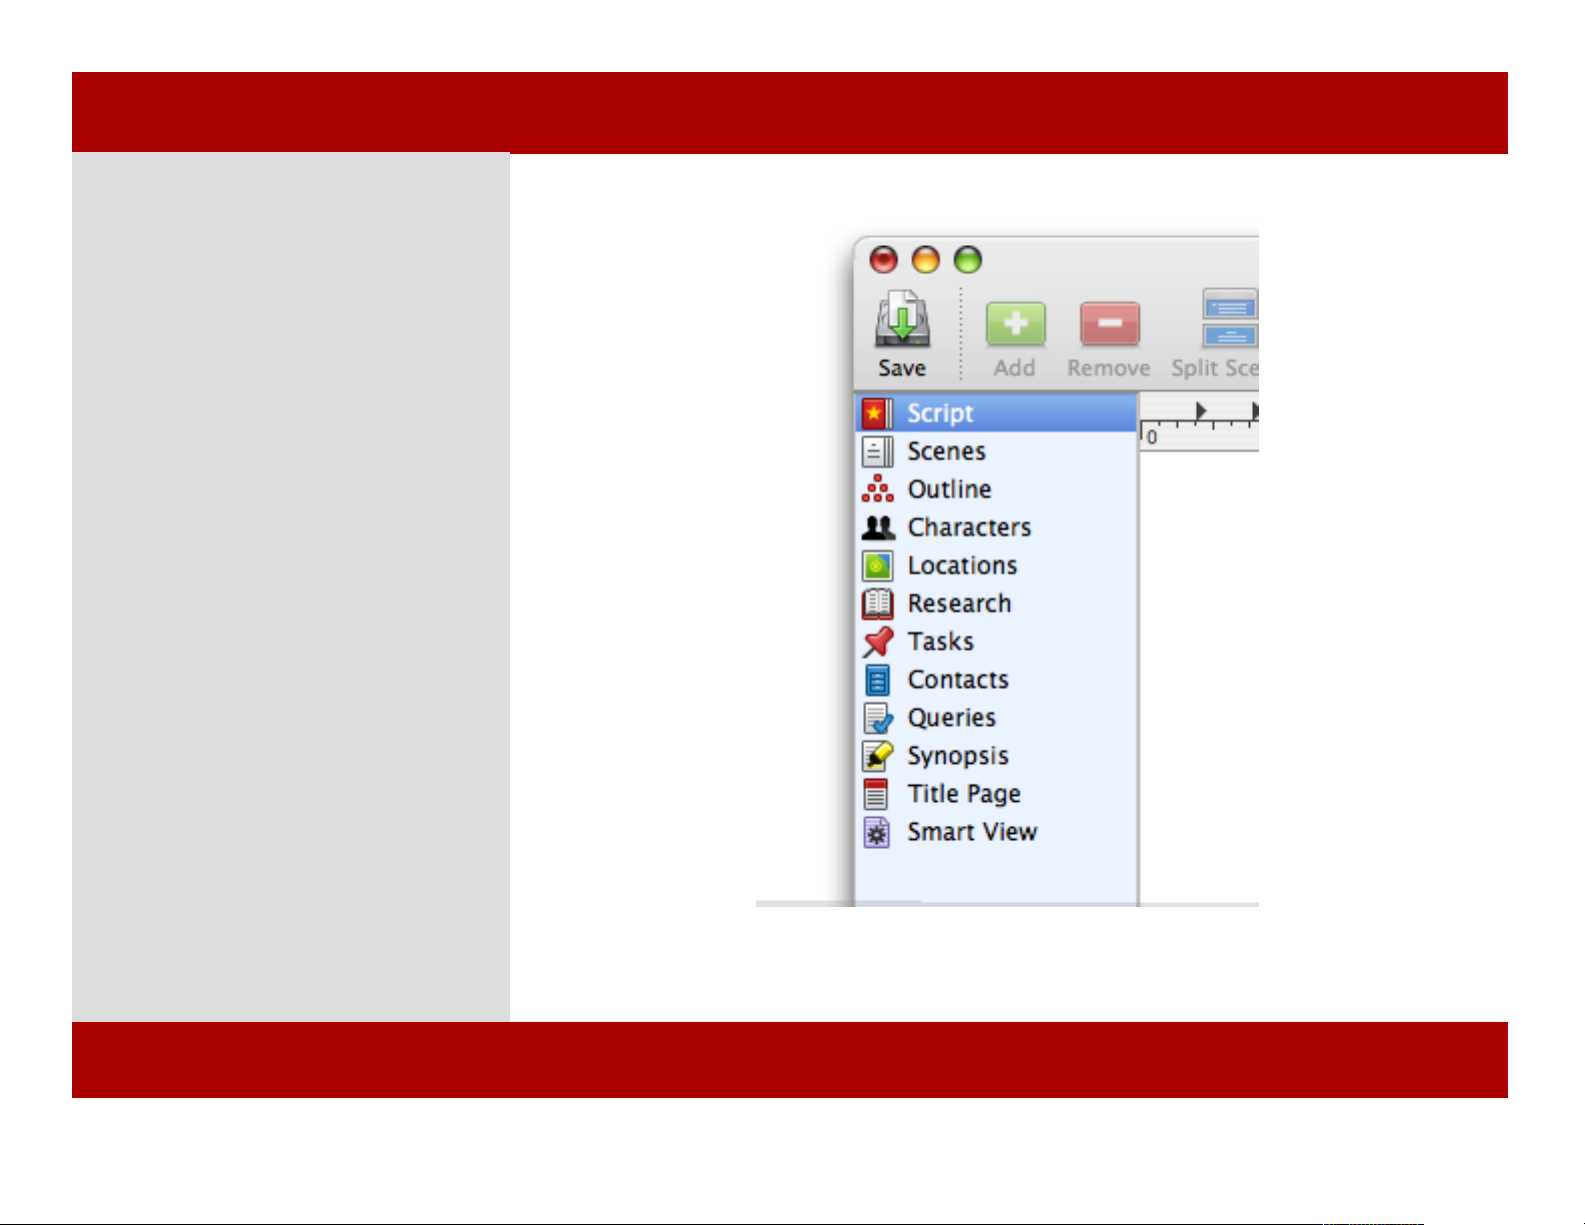
Views
The view pane shows a list of all the
views. items in this list can be selected,
reordered, added or removed.
Views are held within each document
and can be reordered in the view pane
by a simple drag and drop.
Here is a list of the default views:
Script View
Scenes View
Outline View
Characters View
Locations View
Research View
Tasks View
Contacts View
Queries View
Synopsis View
Title Page View
Smart Views
Note: New views are added to the bottom of
the list.
Hint: Reorder the views in the document
to match the frequency or sequence in
which you use them.
Chapter 3: Working with Scripts
Views
The view pane shows a list of all the
views. items in this list can be selected,
reordered, added or removed.
Views are held within each document
and can be reordered in the view pane
by a simple drag and drop.
Here is a list of the default views:
Script View
Scenes View
Outline View
Characters View
Locations View
Research View
Tasks View
Contacts View
Queries View
Synopsis View
Title Page View
Smart Views
Note: New views are added to the bottom of
the list.
Hint: Reorder the views in the document
to match the frequency or sequence in
which you use them.
27 of 124
Chapter 3: Working with Scripts
Page 28
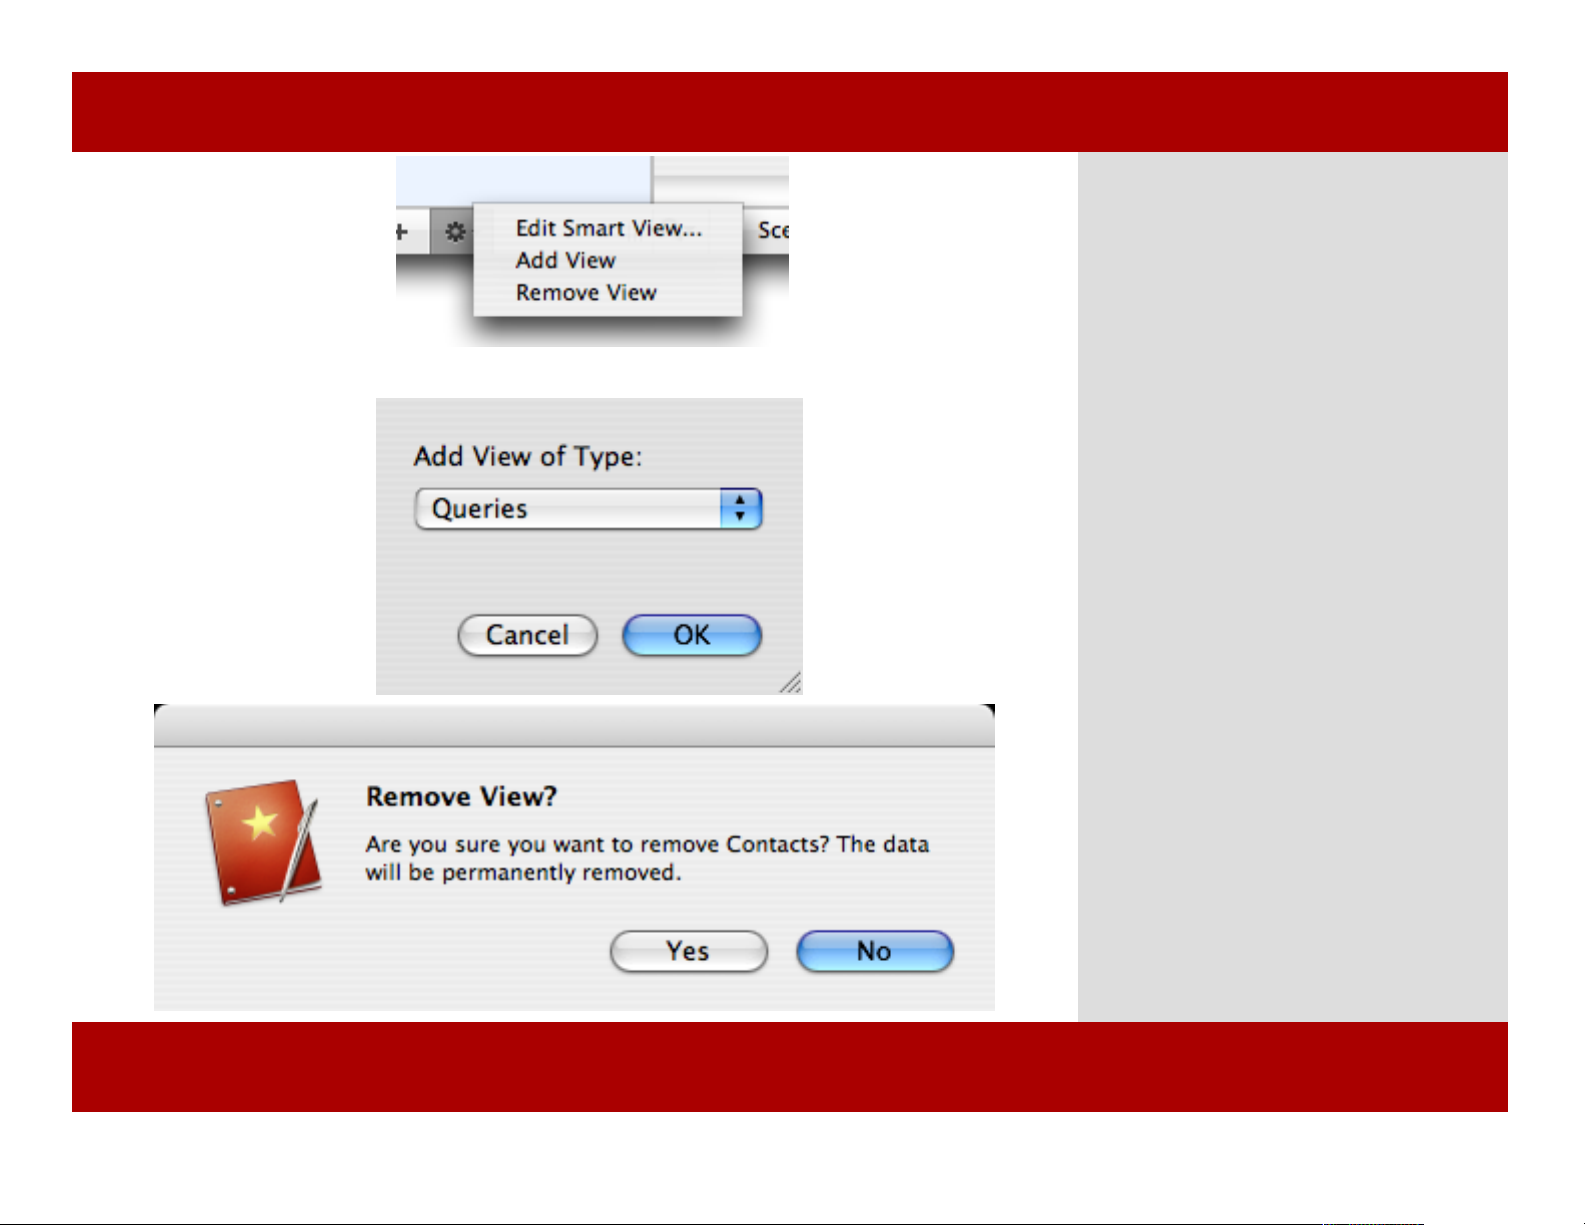
Removing a View
2
The action menu in the view pane.
3
The view pane shows a list of all the
views. items in this list can be selected,
reordered, added or removed.
Views are held within each document
and can be reordered in the view pane
by a simple drag and drop.
Here is a list of the default views:
• Script View
• Scenes View
• Outline View
• Characters View
• Locations View
• Research View
• Tasks View
• Contacts View
• Queries View
• Synopsis View
• Title Page View
• Smart Views
Note: New views are added to the bottom
of the list.
Hint: Reorder the views in the document
to match the frequency or sequence in
which you use them.
Chapter 3: Working with ScriptsChapter 3: Working with Scripts
28 of 124
Page 29
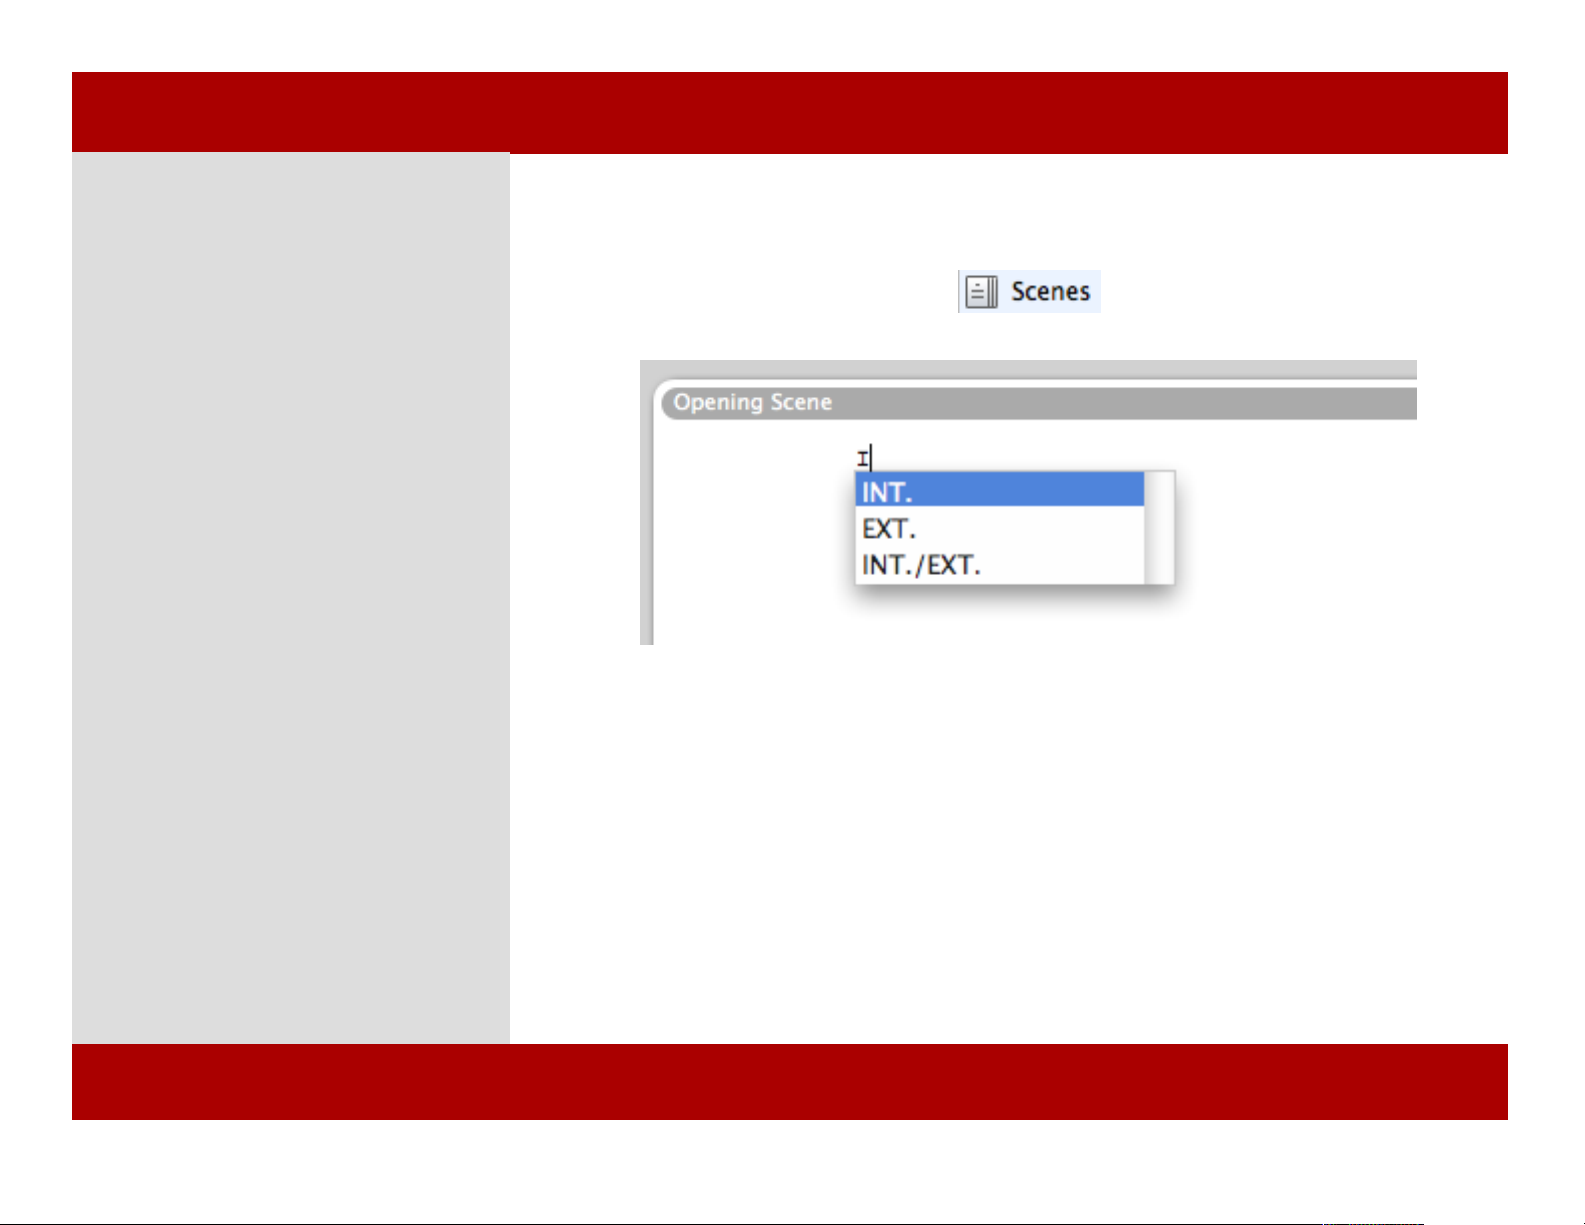
Using the Tab-Return System
The Tab-Return system helps you not
take your hands off the keyboard to
fiddle with formatting and elements
(styles). Each element has a setting that
determines which element is next
when you hit return. Tab changes to
another element.
1 Click the Scenes View button.
2 Click in the scene to place your
cursor where you can type.
Note: The first element in a Scene is the
Scene Header. See Preferences>Editor:
Create New Scene for New Scene
Headings to allow multiple scene
headings in one scene.
Auto-complete Selects Closest Match
3 Type “in” and pause a moment...
Montage presents a menu.
4 Press tab to accept the current
choice “INT.”
Hint: Use the arrow keys to select another
value then press tab to continue. Click
Escape to exit from the menu.
(MORE)
1
3
Chapter 3: Working with Scripts
Using the Tab-Return System
The Tab-Return system helps you not
take your hands off the keyboard to
fiddle with formatting and elements
(styles). Each element has a setting that
determines which element is next
when you hit return. Tab changes to
another element.
1 Click the Scenes View button.
2 Click in the scene to place your
cursor where you can type.
Note: The first element in a Scene is the
Scene Header. See Preferences>Editor:
Create New Scene for New Scene
Headings to allow multiple scene
headings in one scene.
Auto-complete Selects Closest Match
3 Type “in” and pause a moment...
Montage presents a menu.
4 Press tab to accept the current
choice “INT.”
Hint: Use the arrow keys to select another
value then press tab to continue. Click
Escape to exit from the menu.
(MORE)
1
3
29 of 124
Chapter 3: Working with Scripts
Page 30
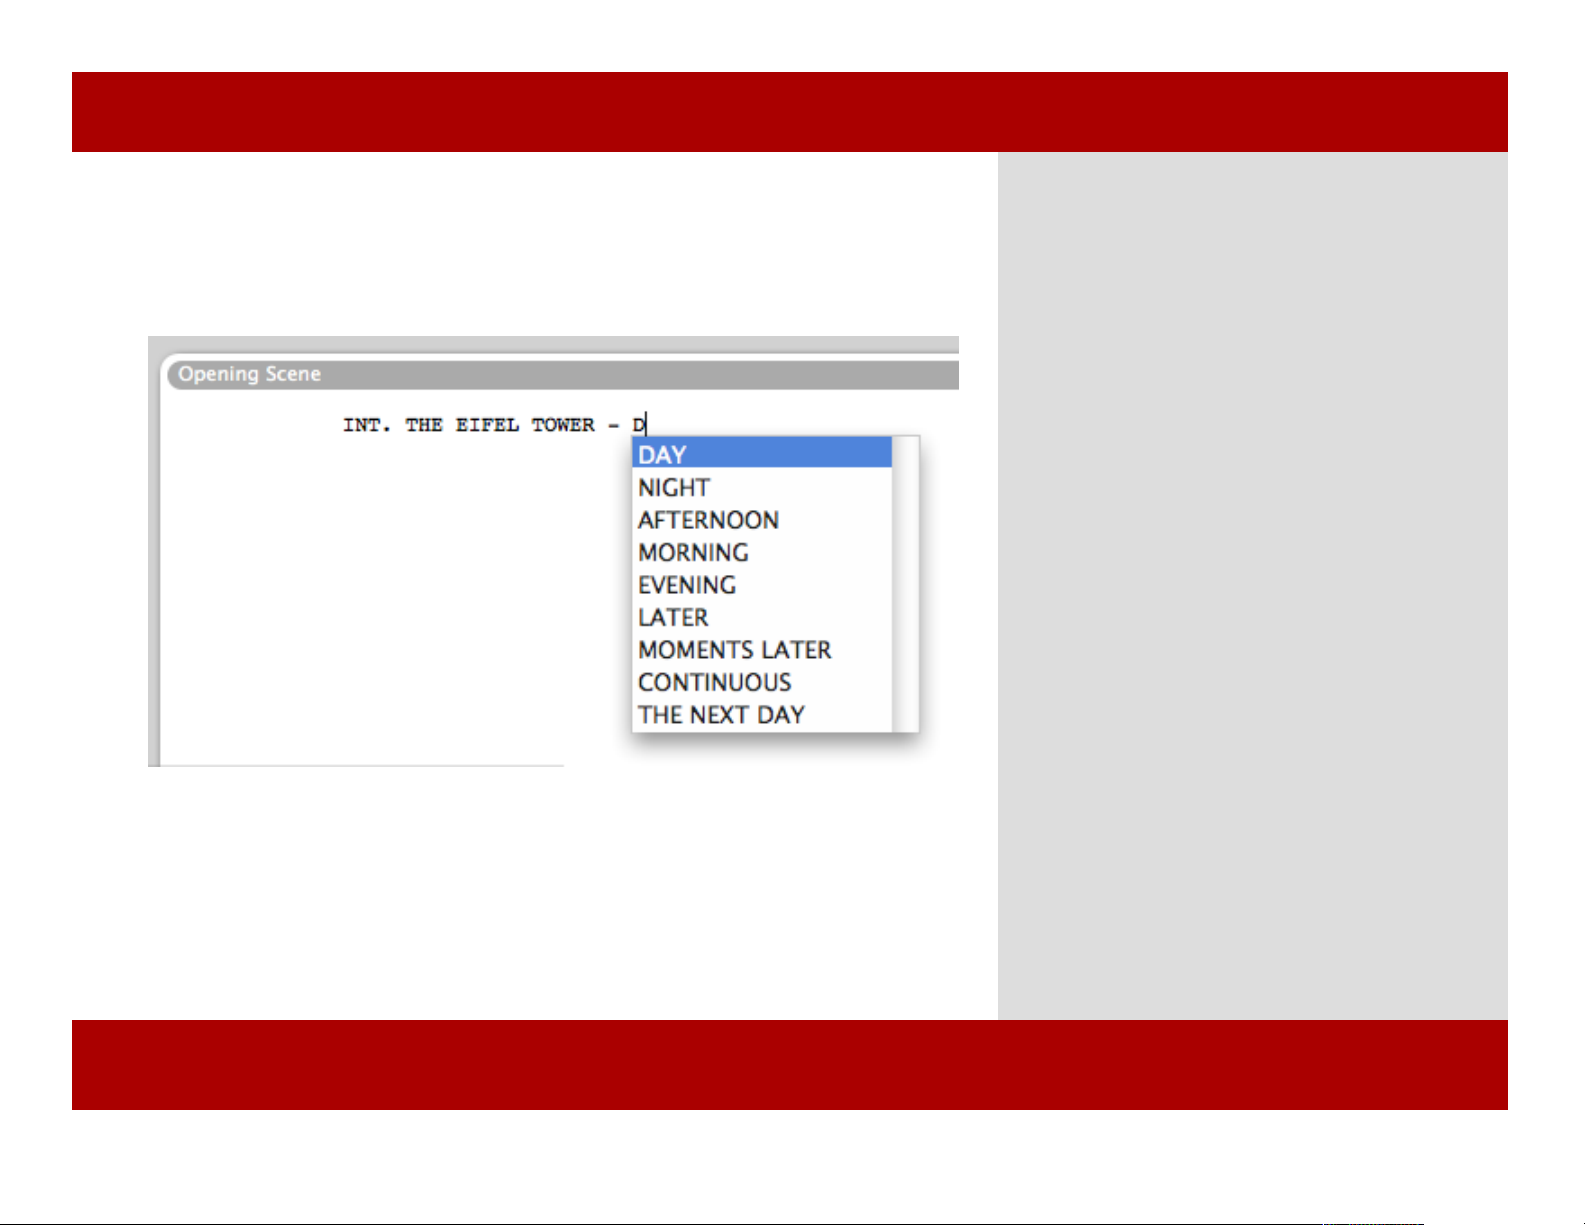
Using the Tab-Return System
6
5 Type the location of the Scene.
Note: The location is automatically added to the
location view and is created as an object.
6 After the location, type a space, “-” dash,
space to indicate that you want to specify a
time then type “da” for “day” and pause.
A menu appears with “DAY” automatically
selected.
7 Press return to accept the current choice
“DAY” and move to the next line. Or use the
arrow keys and return to select another
choice.
The cursor is placed on the next line and the
element is set to Action.
8 Continue writing an action or click tab to
switch to a different element.
Hint: Many of the elements have special behaviors
that help you format your script faster while
conforming to industry norms. Elements are
defined per templates and can be edited in
Format>Edit Elements.
Chapter 3: Working with Scripts
Using the Tab-Return System
6
5 Type the location of the Scene.
Note: The location is automatically added to the
location view and is created as an object.
6 After the location, type a space, “-” dash,
space to indicate that you want to specify a
time then type “da” for “day” and pause.
A menu appears with “DAY” automatically
selected.
7 Press return to accept the current choice
“DAY” and move to the next line. Or use the
arrow keys and return to select another
choice.
The cursor is placed on the next line and the
element is set to Action.
8 Continue writing an action or click tab to
switch to a different element.
Hint: Many of the elements have special behaviors
that help you format your script faster while
conforming to industry norms. Elements are
defined per templates and can be edited in
Format>Edit Elements.
Chapter 3: Working with Scripts
30 of 124
Page 31
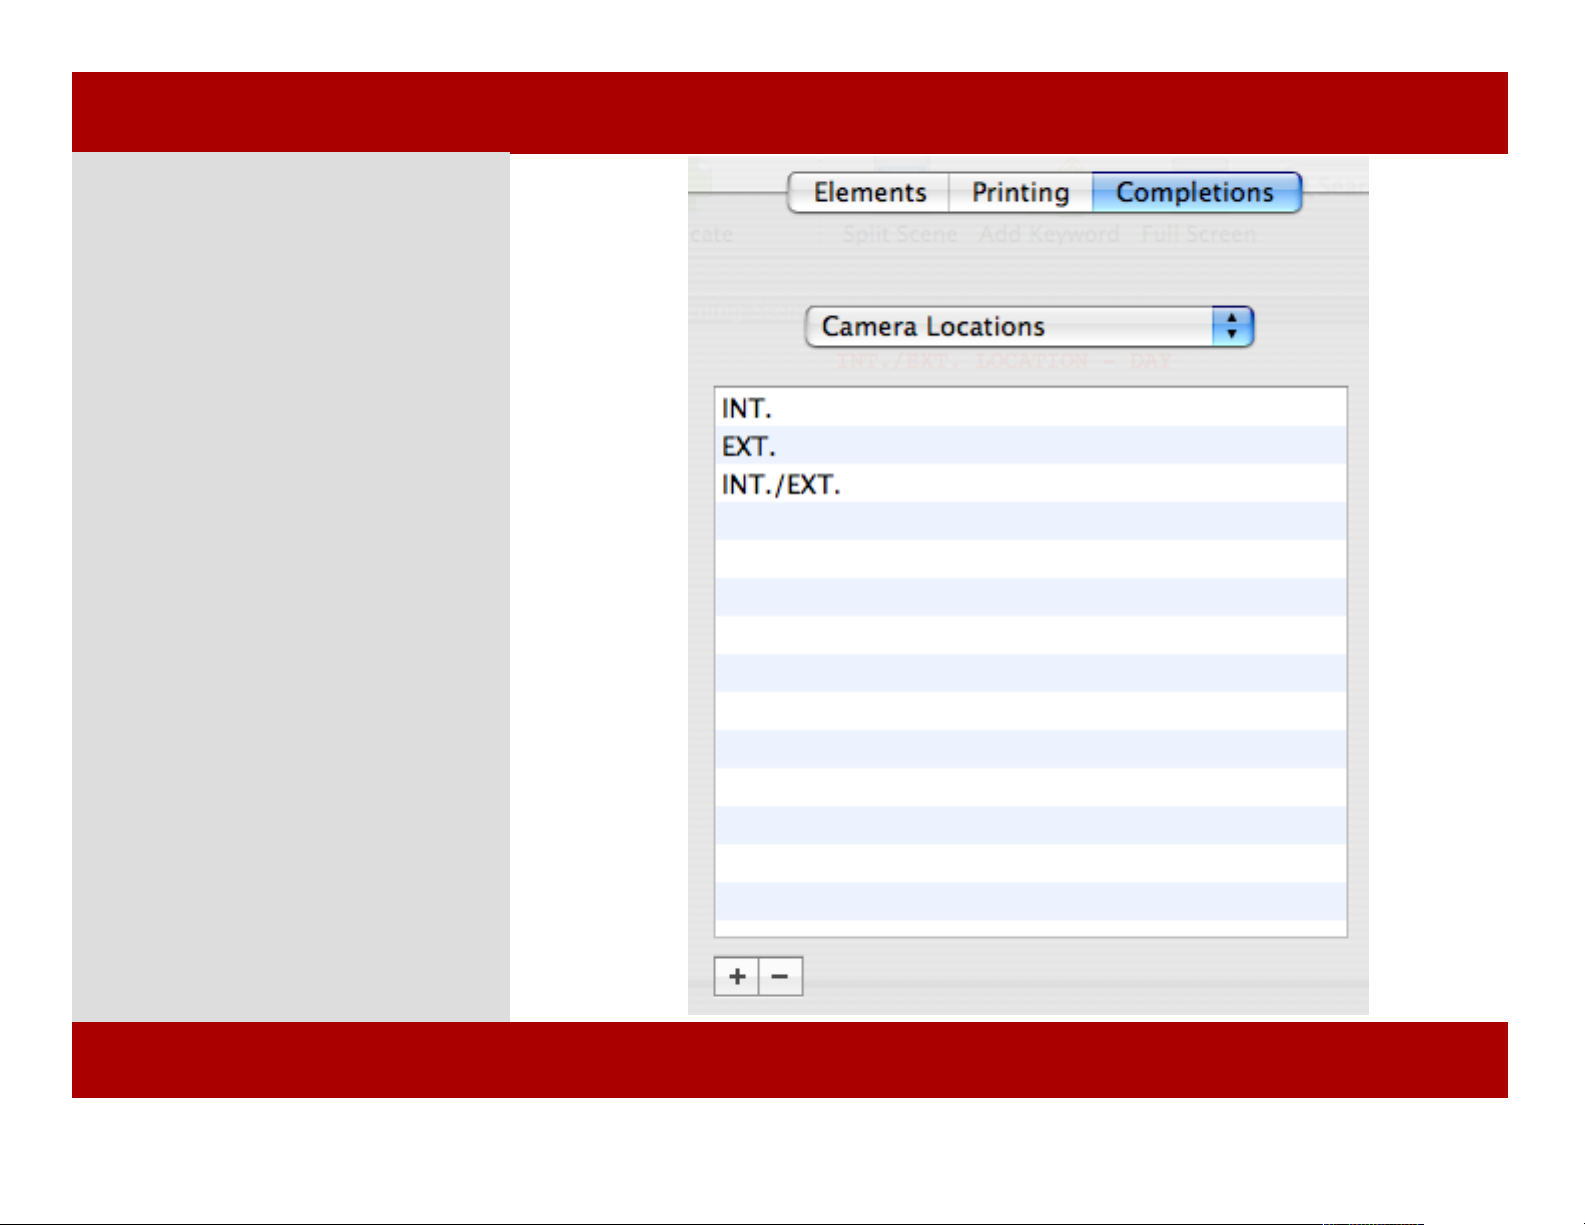
Using the Tab-Return System
The Completions tab of the Document
properties dictates the choices for the
auto-complete, tab-return typing
system in Montage. Here’s how to set
your own.
Completion item:
1 Choose the type of completion
from the drop down menu.
Camera Locations
Times
Transitions
8 Click the + (plus) button to add a
new item to the list.
A new item appears.
8 Enter the name of the new item.
8 Click the Close button when you
are finished.
Items in this list are used for autocompletion.
1
Chapter 3: Working with Scripts
31 of 124
Chapter 3: Working with Scripts
Page 32
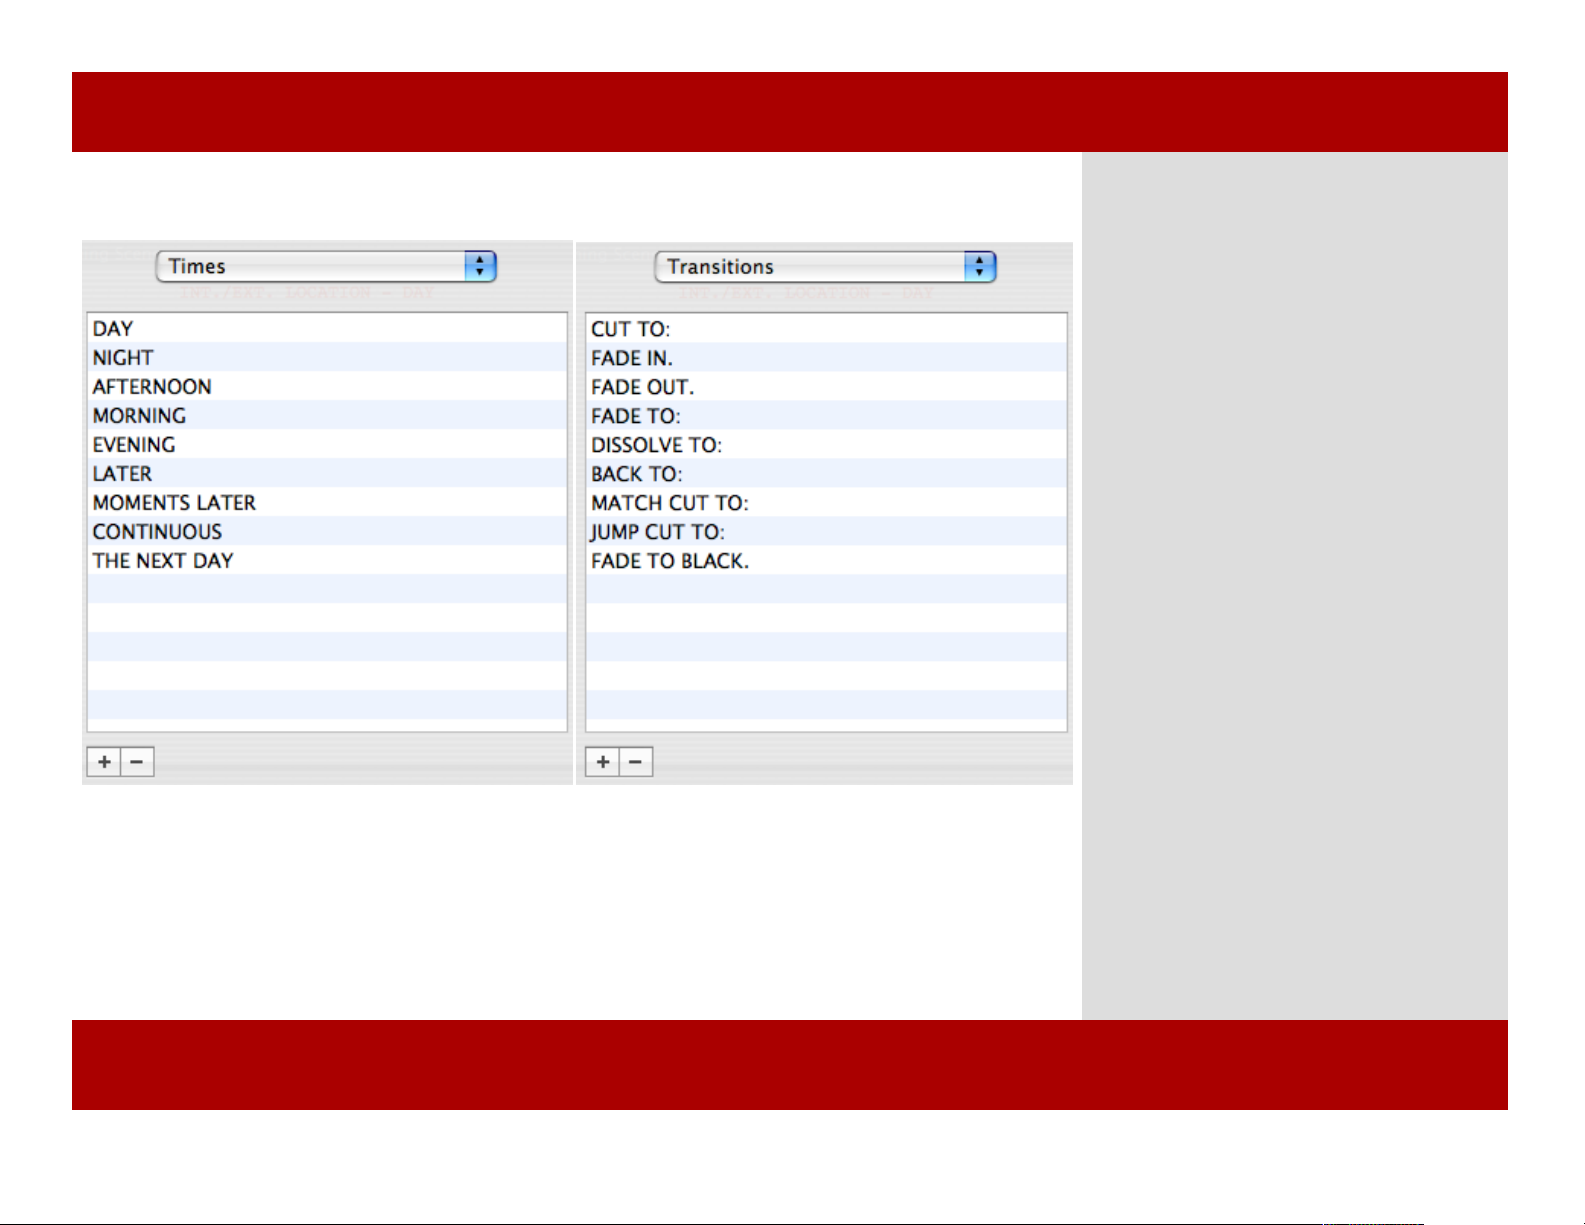
Using the Tab-Return System
Camera completions list:
INT.
EXT.
INT./EXT.
Times completion text:
DAY
NIGHT
AFTERNOON
MORNING
EVENING
LATER
MOMENTS LATER
CONTINUOUS
THE NEXT DAY
Transitions completion text:
CUT TO:
FADE IN:
FADE OUT.
DISSOLVE TO:
BACK TO:
MATCH CUT TO:
JUMP CUT TO:
FADE TO BLACK.
Chapter 3: Working with Scripts
Using the Tab-Return System
Camera completions list:
INT.
EXT.
INT./EXT.
Times completion text:
DAY
NIGHT
AFTERNOON
MORNING
EVENING
LATER
MOMENTS LATER
CONTINUOUS
THE NEXT DAY
Transitions completion text:
CUT TO:
FADE IN:
FADE OUT.
DISSOLVE TO:
BACK TO:
MATCH CUT TO:
JUMP CUT TO:
FADE TO BLACK.
Chapter 3: Working with Scripts
32 of 124
Page 33
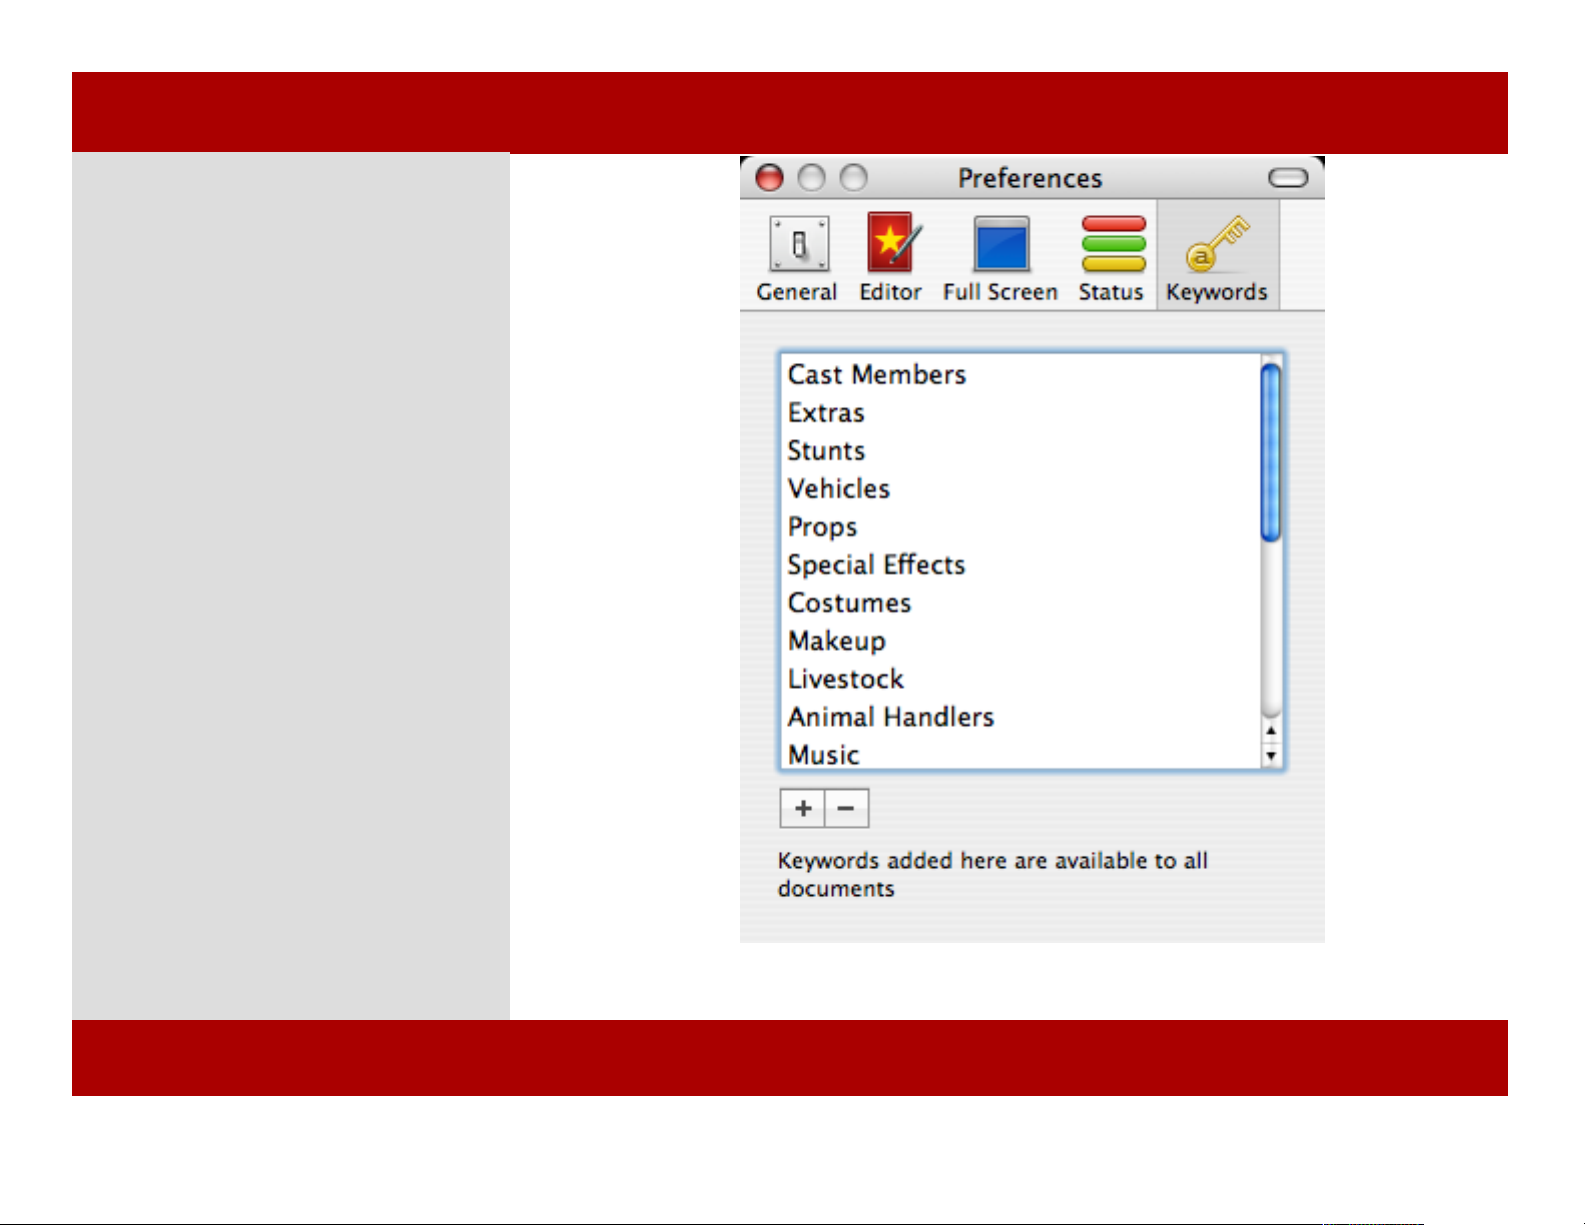
Adding Keywords
Keywords are a way to “tag” objects
so they can be included in Smart
Views. You can create your own
keywords and have them available to
all scripts or just the current script.
Here’s how to make a keyword
available for all your scripts:
1 From the Montage menu, select
Preferences (Command - , (comma)).
A window appears.
2 Choose keywords from the list
across the top of the window.
2 Click the + (Plus) button to create a
new keyword.
2
Chapter 3: Working with Scripts
Adding Keywords
Keywords are a way to “tag” objects
so they can be included in Smart
Views. You can create your own
keywords and have them available to
all scripts or just the current script.
Here’s how to make a keyword
available for all your scripts:
1 From the Montage menu, select
Preferences (Command - , (comma)).
A window appears.
2 Choose keywords from the list
across the top of the window.
2 Click the + (Plus) button to create a
new keyword.
2
33 of 124
Chapter 3: Working with Scripts
Page 34
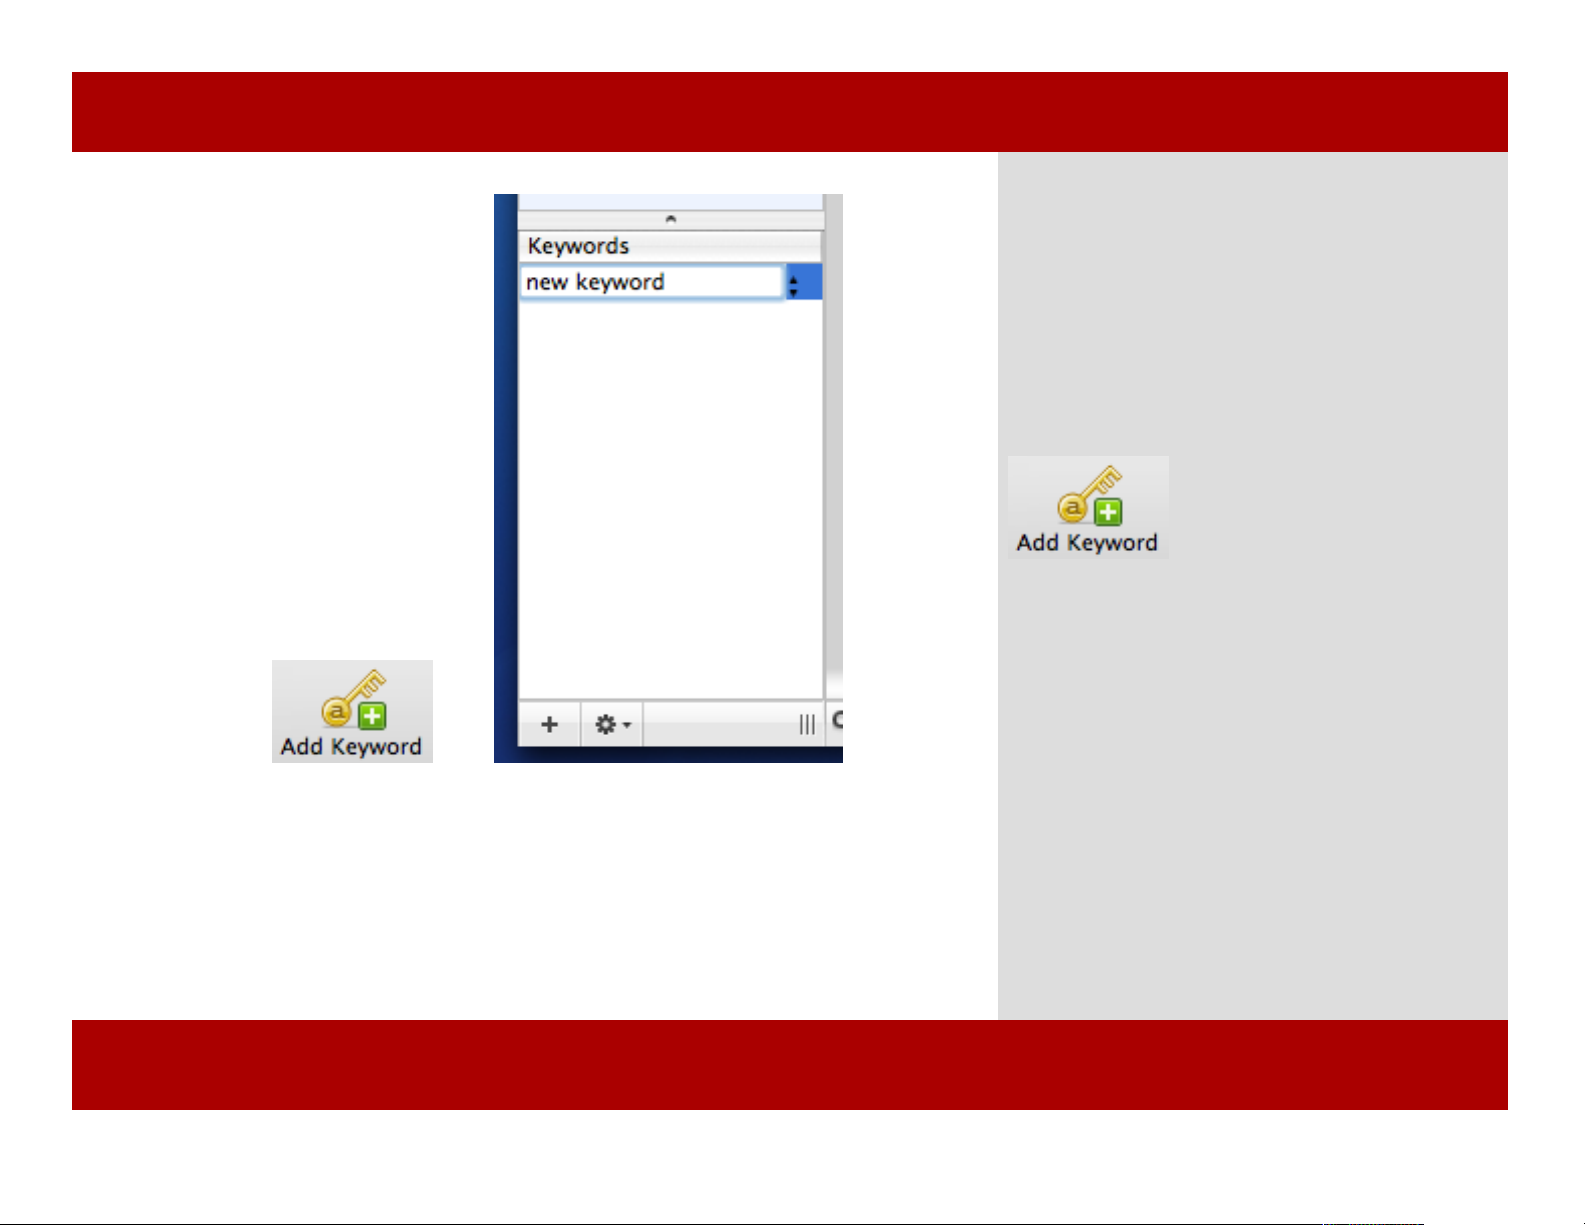
Using Keywords
2 3
Create keywords that are specific to the
current script. Here’s how to create a
keyword and assign it to an object in the
current script:
1 Select a scene, character, location, task, or
other object.
2 From the toolbar click the Add Keyword
button.
A new keyword appears in the keywords
section below.
2 Type a name for the keyword and click
elsewhere when you are finished.
The Keyword is created and assigned to the
selected object.
Note: Keywords assigned in the aforementioned
way are local to the script and not available to
other scripts. To create global keywords which are
accessible from any script, please see Using
Keywords earlier in this chapter. .
Chapter 3: Working with Scripts
Using Keywords
2 3
Create keywords that are specific to the
current script. Here’s how to create a
keyword and assign it to an object in the
current script:
1 Select a scene, character, location, task, or
other object.
2 From the toolbar click the Add Keyword
button.
A new keyword appears in the keywords
section below.
2 Type a name for the keyword and click
elsewhere when you are finished.
The Keyword is created and assigned to the
selected object.
Note: Keywords assigned in the aforementioned
way are local to the script and not available to
other scripts. To create global keywords which are
accessible from any script, please see Using
Keywords earlier in this chapter. .
Chapter 3: Working with Scripts
34 of 124
Page 35
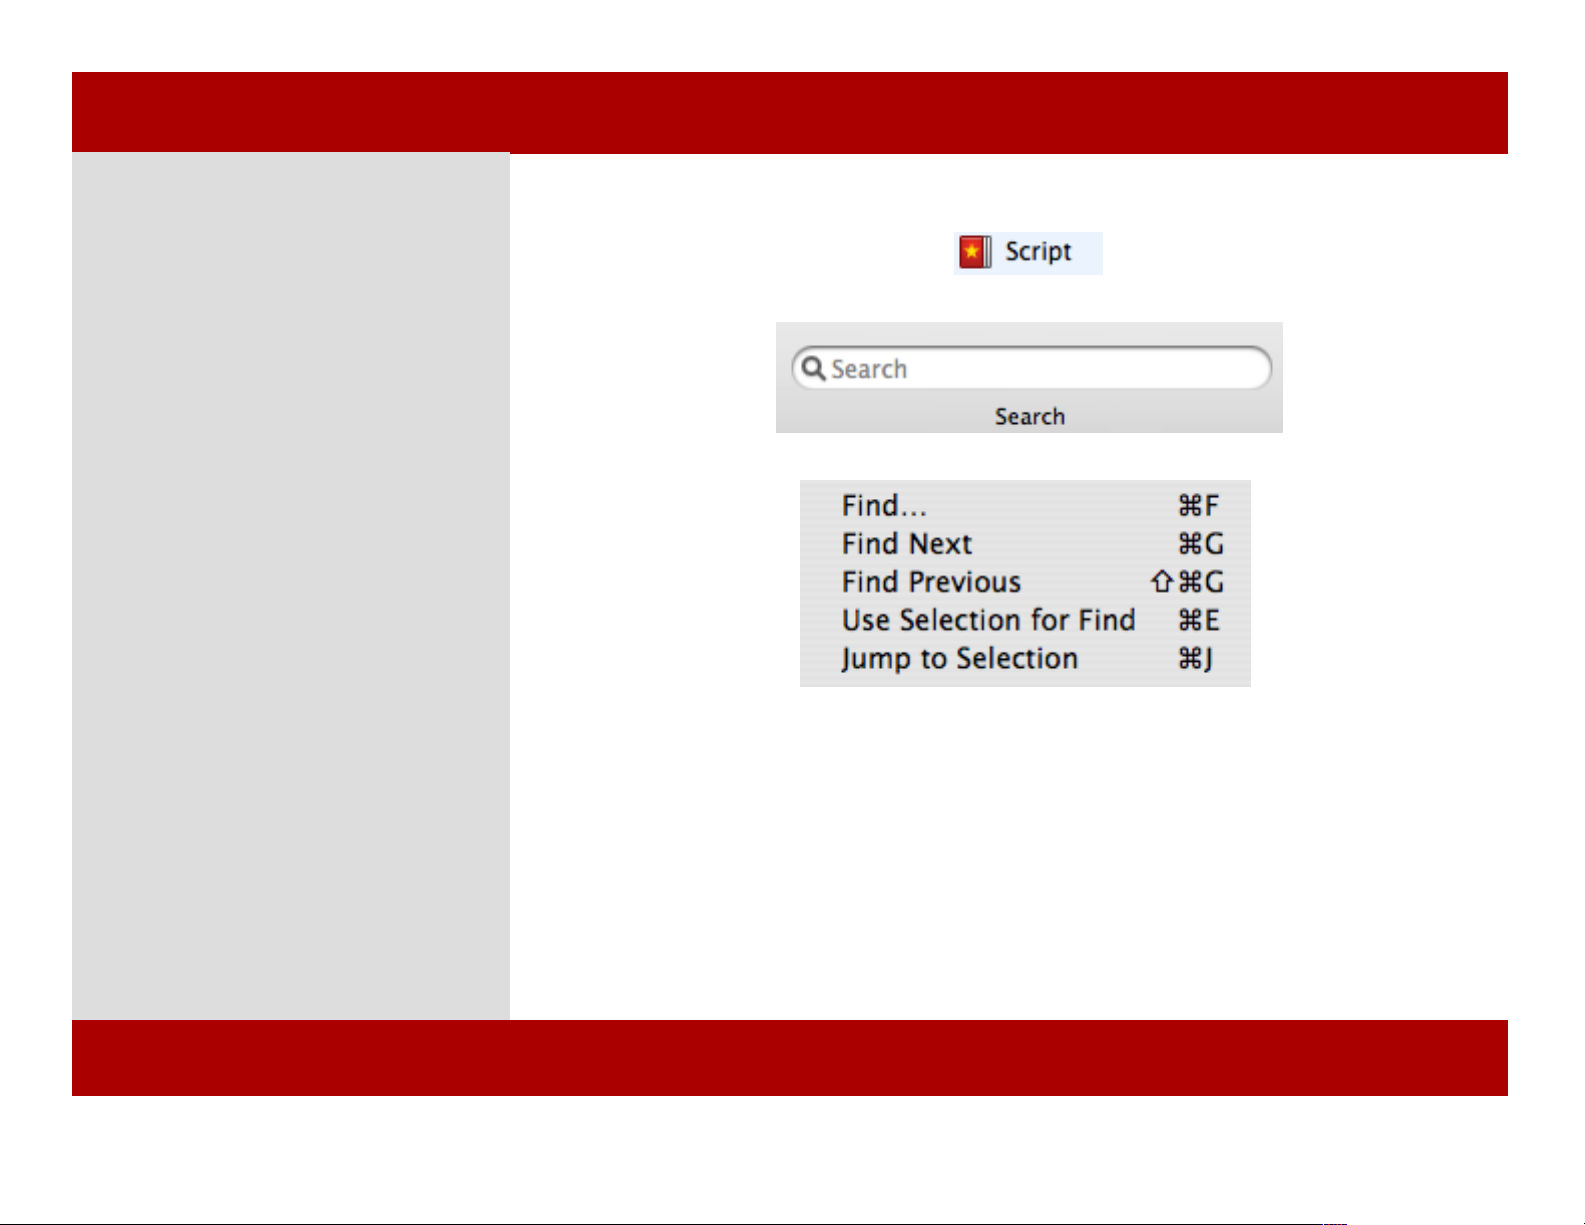
Searching a Script
To search in your script:
1 Click the Script View button.
2 Click in the Search field in the
toolbar and type the text you wish to
search for and press return to begin
the search.
The selection moves to the first
instance of the search criteria.
3 There are several find options
available from Edit>Find menu.
Find = Command - F
Find Next = Command - G
Find Previous = Shift - Command - G
Use Selection for Find = Command - E
Jump to Selection = Command - J
1
2
3
Chapter 3: Working with Scripts
35 of 124
Chapter 3: Working with Scripts
Page 36
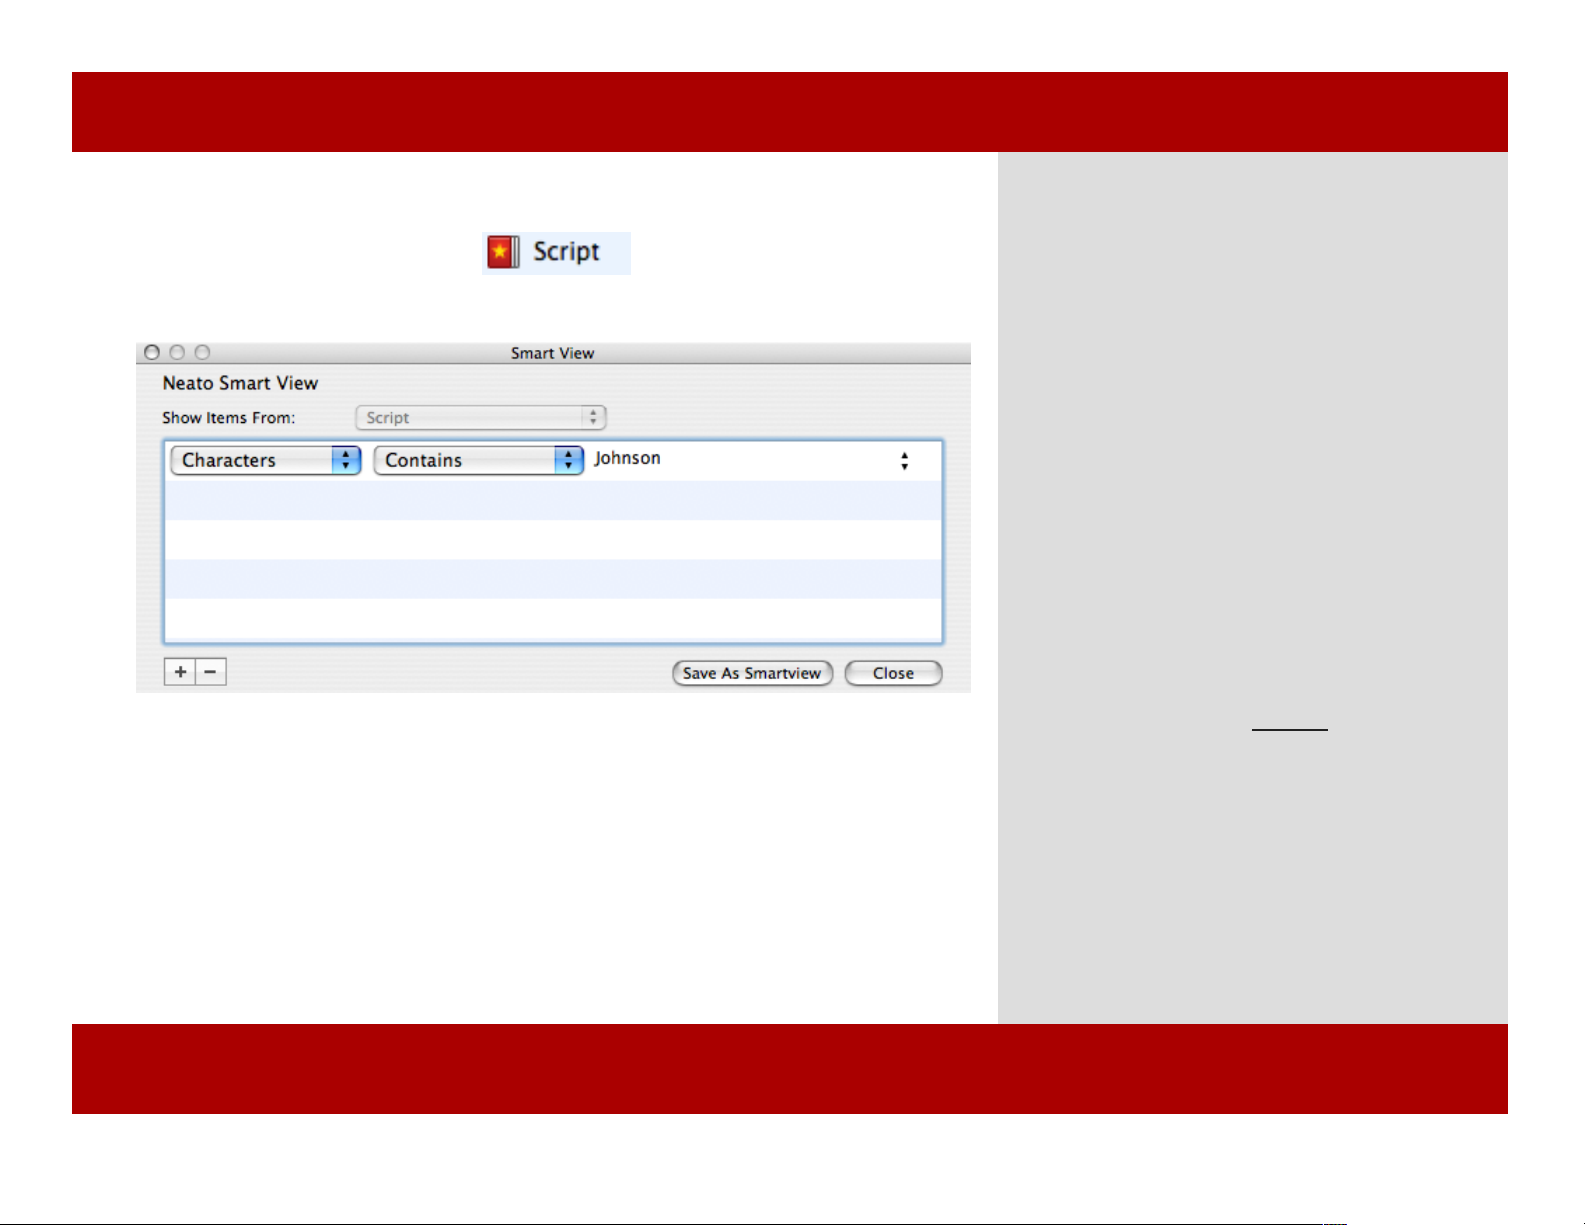
Saving a Find as a Smart View
1
2
Hint: A filtered view retains its filtering until you remove the rules that govern the filter. To
do so, click the minus (-) button in the Smart View dialog then click the close button to
dismiss the dialog.
To save a find as a Smart View:
1 Select a view icon (like script) from the list
of views on the left hand side.
2 Press Command - F or select Find from the
Edit Menu.
A Smart View dialog appears.
3 Click on the + button to add criteria to
your find.
Select criteria from the two drop-down items.
Enter the find criteria text.
4 The current view is filtered on the find
criteria.
5 Click the Save As Smartview button.
A new Smart View appears in the view pane.
Hint: When the view list has focus, Command - F
brings up the Smart View window. If a text view
has focus, Command - F shows the standard find
panel.
Chapter 3: Working with Scripts
Saving a Find as a Smart View
1
2
Hint: A filtered view retains its filtering until you remove the rules that govern the filter. To
do so, click the minus (-) button in the Smart View dialog then click the close button to
dismiss the dialog.
To save a find as a Smart View:
1 Select a view icon (like script) from the list
of views on the left hand side.
2 Press Command - F or select Find from the
Edit Menu.
A Smart View dialog appears.
3 Click on the + button to add criteria to
your find.
Select criteria from the two drop-down items.
Enter the find criteria text.
4 The current view is filtered on the find
criteria.
5 Click the Save As Smartview button.
A new Smart View appears in the view pane.
Hint: When the view list has focus, Command - F
brings up the Smart View window. If a text view
has focus, Command - F shows the standard find
panel.
Chapter 3: Working with Scripts
36 of 124
Page 37
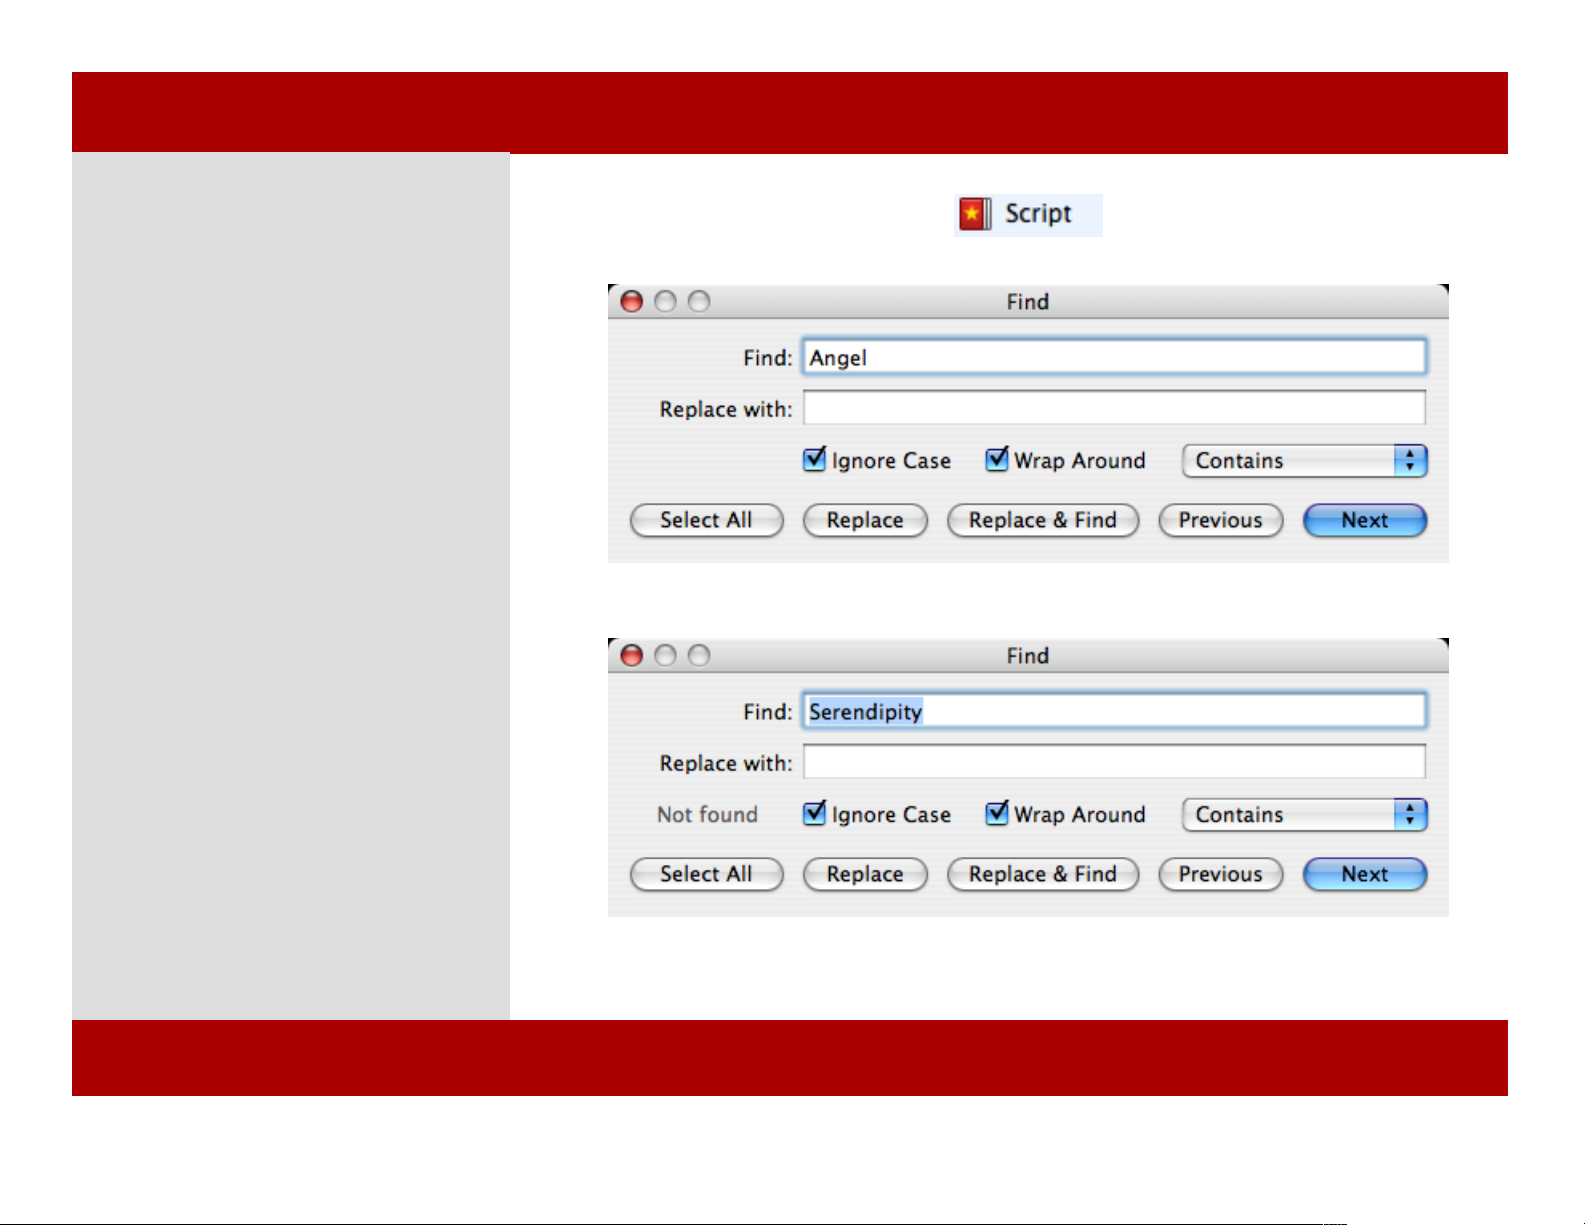
Finding in a Script
To find in your screenplay:
1 Select a view icon (like script) from
the view pane.
2 Place your cursor somewhere in a
scene.
3 Press Command - F or select Find
from the Edit Menu.
A dialog appears.
4 Choose the criteria you wish to find
and/or replace and press return.
5 If a match is found the text will be
highlighted in your script. Click next to
find again.
6 If a match is not found, you will
hear a beep and see the words “Not
Found” in the find window.
1
3
6
Chapter 3: Working with Scripts
Finding in a Script
To find in your screenplay:
1 Select a view icon (like script) from
the view pane.
2 Place your cursor somewhere in a
scene.
3 Press Command - F or select Find
from the Edit Menu.
A dialog appears.
4 Choose the criteria you wish to find
and/or replace and press return.
5 If a match is found the text will be
highlighted in your script. Click next to
find again.
6 If a match is not found, you will
hear a beep and see the words “Not
Found” in the find window.
1
3
6
37 of 124
Chapter 3: Working with Scripts
Page 38

Chapter 4
Scene Navigation
Moving around from scene to scene is made easy by the Scene
navigation palette. Click on a scene to go to that specific scene
or drag scenes to reorder them. The Scene navigation palette is
always accessible from the Script view.
Scene Navigation
In This Chapter:
Using the Scene
Navigation Palette
MONTAGEMONTAGE
38 of 124
Page 39
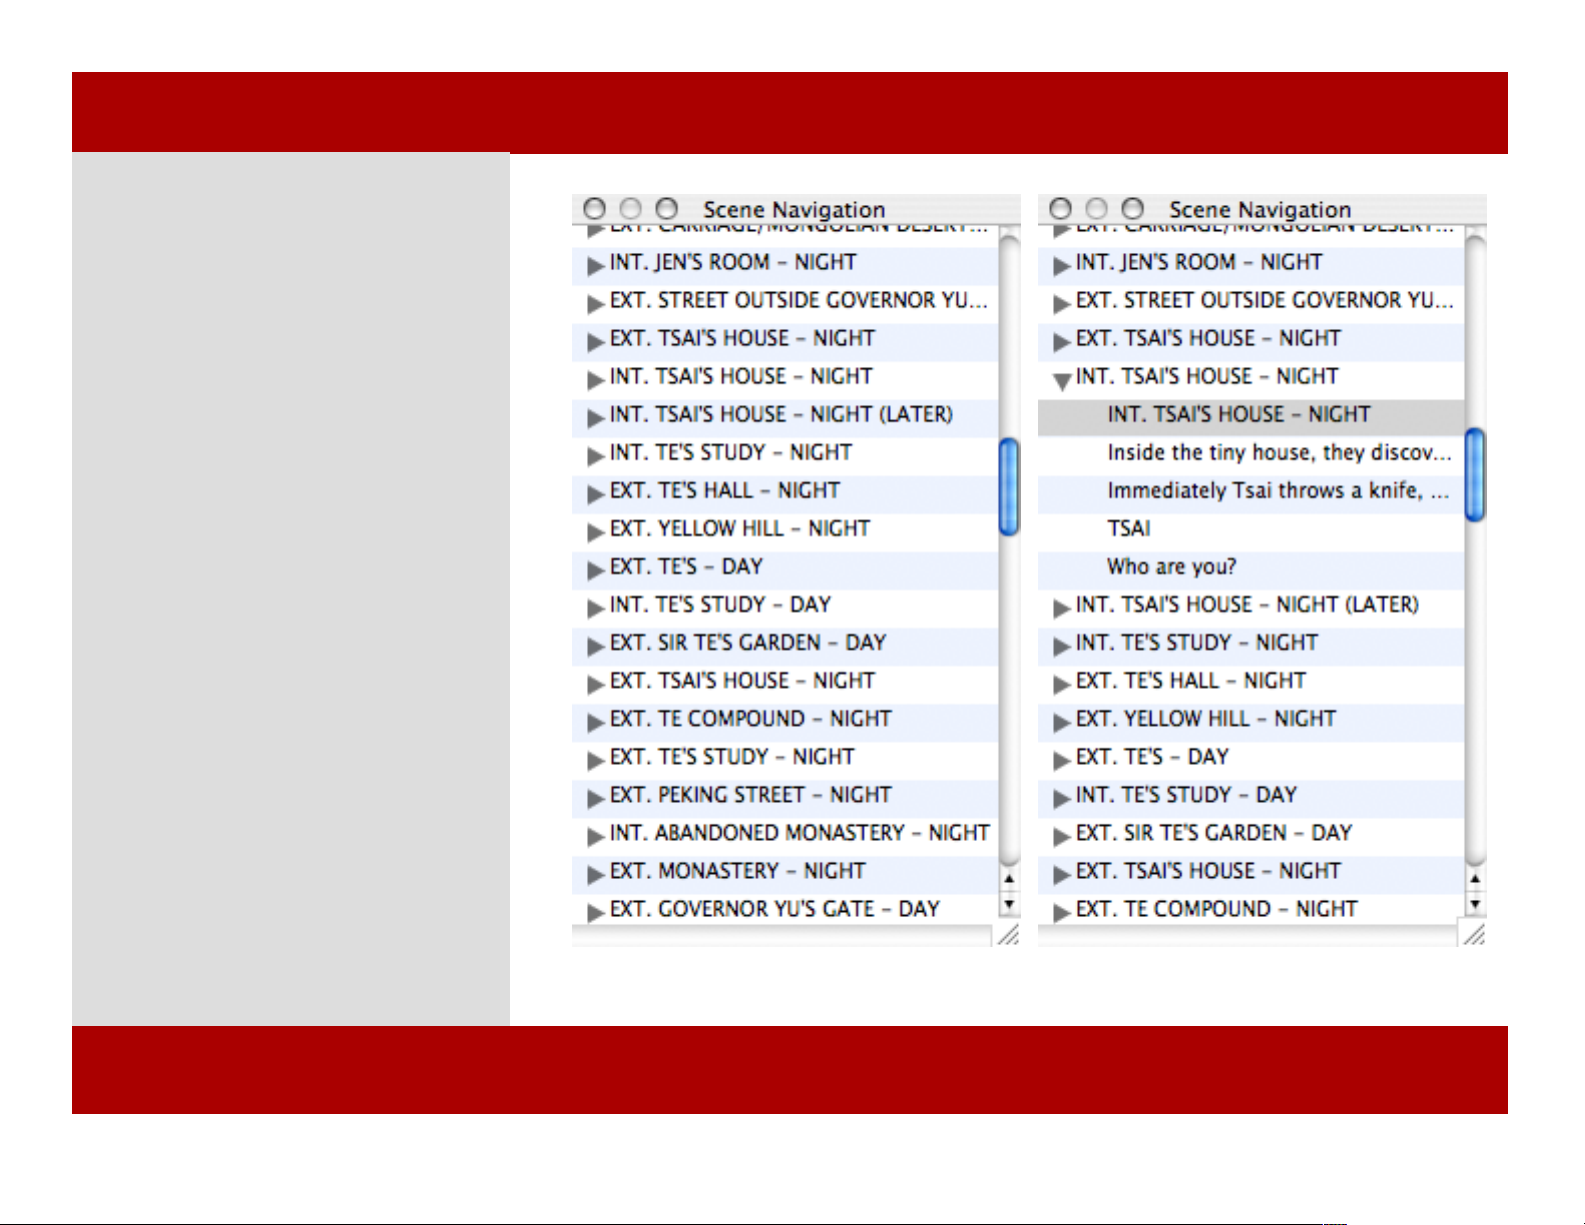
Using the Scene Navigation Palette
To navigate to a certain scene:
1 From the View Menu select Scene
Navigation Palette.
A window appears.
2 Click on a disclosure triangle on the
left of a scene header to display the
first five lines of text from that scene.
3 Click on a scene heading to
navigate to that scene for editing or
review.
4 Additionally, you may drag scenes
to reorder them by dragging and
dropping a scene into another scene
header in the list.
Note: Changes made by dragging and
dropping within the Scene Navigation
Palette are reflected in the script in scene,
script, and outline views.
Note: Status colors show up in the Scene
Navigation Palette.
2
Chapter 4: Scene Navigation
Using the Scene Navigation Palette
To navigate to a certain scene:
1 From the View Menu select Scene
Navigation Palette.
A window appears.
2 Click on a disclosure triangle on the
left of a scene header to display the
first five lines of text from that scene.
3 Click on a scene heading to
navigate to that scene for editing or
review.
4 Additionally, you may drag scenes
to reorder them by dragging and
dropping a scene into another scene
header in the list.
Note: Changes made by dragging and
dropping within the Scene Navigation
Palette are reflected in the script in scene,
script, and outline views.
Note: Status colors show up in the Scene
Navigation Palette.
2
39 of 124
Chapter 4: Scene Navigation
Page 40

Chapter 5
Exporting
Montage has the ability to export to several different file
formats. Scripts are usually submitted in pdf file format.
However, there are times when you might want to submit a
Montage file, an RTF, or Final Draft® file.
Sometimes when a script is going into production, the file is
taken to a Scheduling and/or budgeting software. Most
software titles accept the Scheduling Export file format (.sex).
Here is a list of the file formats supported for export:
Portable Document Format® .pdf
Rich Text Format .rtf
Microsoft Word® .doc
Final Draft® .fdr
Scheduling Export .sex
Exporting
In This Chapter:
Exporting a Script
MONTAGE
Chapter 5
Exporting
Montage has the ability to export to several different file
formats. Scripts are usually submitted in pdf file format.
However, there are times when you might want to submit a
Montage file, an RTF, or Final Draft® file.
Sometimes when a script is going into production, the file is
taken to a Scheduling and/or budgeting software. Most
software titles accept the Scheduling Export file format (.sex).
Here is a list of the file formats supported for export:
Portable Document Format® .pdf
Rich Text Format .rtf
Microsoft Word® .doc
Final Draft® .fdr
Scheduling Export .sex
Exporting
In This Chapter:
Exporting a Script
MONTAGE
40 of 124
Page 41
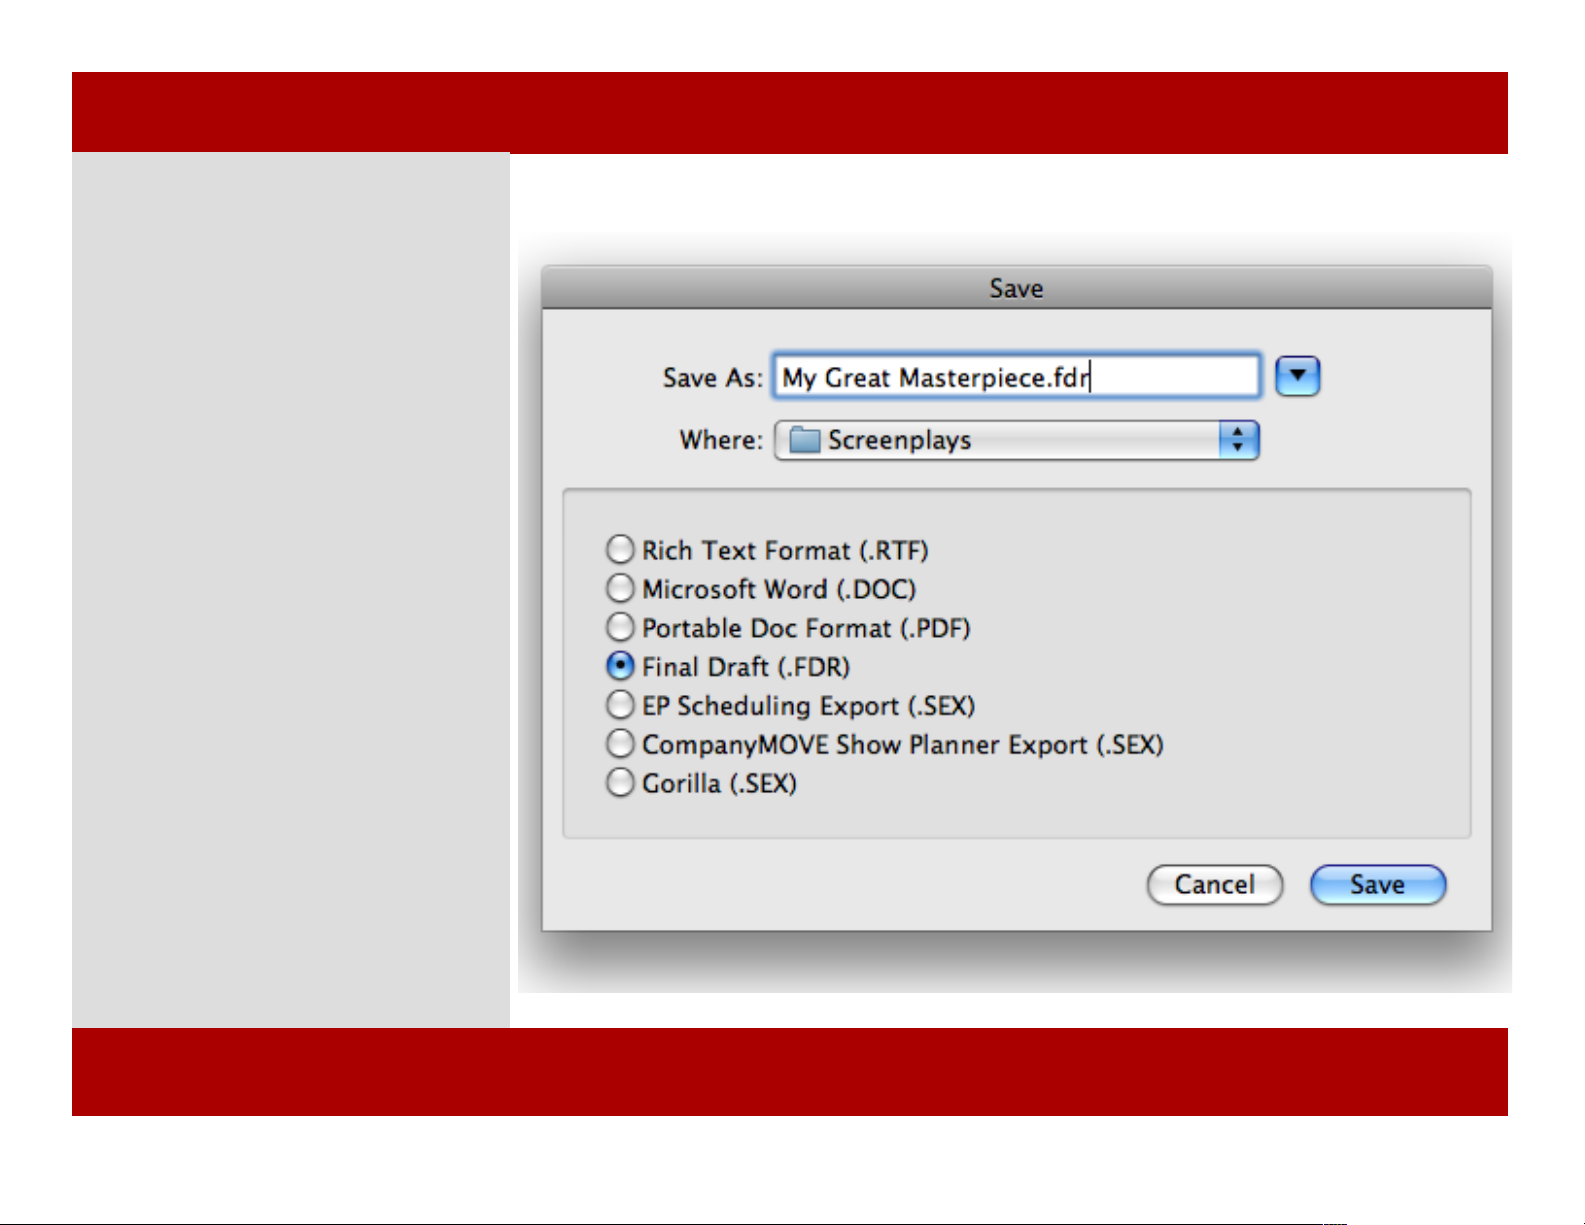
Exporting a Script
To export a script:
1 From the File Menu select Export...
A window appears.
2 Select a file format.
3 Click on a disclosure triangle on
the right to see your hard drive's
directories.
4 Choose a location to save your
exported script.
5 Click Save when you are ready.
Note: Be careful not to save over another
file with the same name.
Note: Not all features in Montage are
supported in the other file formats. Be sure
to check the exported file to make sure it is
acceptable.
2
Chapter 4: Exporting
Exporting a Script
To export a script:
1 From the File Menu select Export...
A window appears.
2 Select a file format.
3 Click on a disclosure triangle on
the right to see your hard drive's
directories.
4 Choose a location to save your
exported script.
5 Click Save when you are ready.
Note: Be careful not to save over another
file with the same name.
Note: Not all features in Montage are
supported in the other file formats. Be sure
to check the exported file to make sure it is
acceptable.
2
41 of 124
Chapter 4: Exporting
Page 42

Chapter 5
Script View
Here you can see white space and the general flow of your
script. Many screenwriting gurus stress the importance of
balance in your script. Too much action or too much dialogue
can bog down an otherwise good script.
The Montage Script View is an editable view that represents
your script on paper. This traditional view is best used as the
basis for a Smart View when printing your script.
Script View
In This Chapter:
Using the Script View
Splitting Vertically
Splitting Horizontally
MONTAGEMONTAGE
42 of 124
Page 43
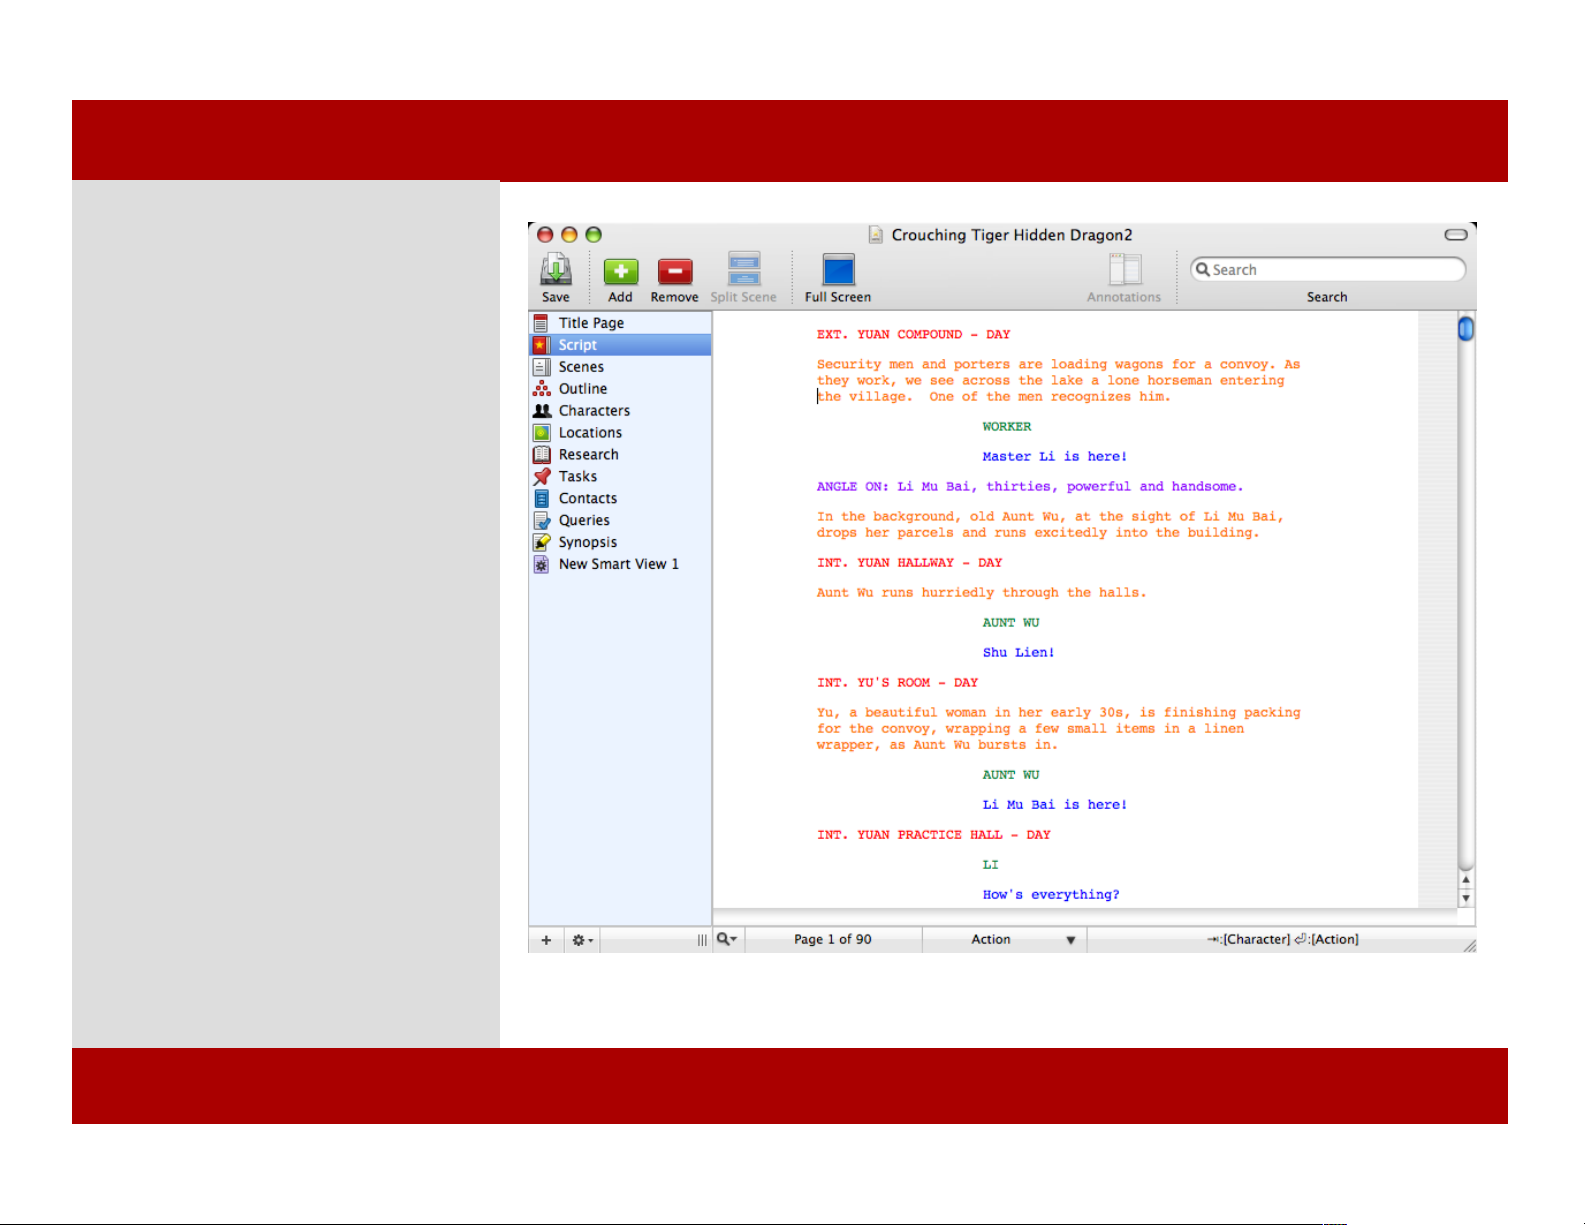
Using the Script View
To switch to Script View:
1 Click on the Script button in the
view pane on the left-hand side of the
document window.
1 the main window displays the
script view.
In Script View, scenes appear without
the demarcation provided in Scene
view. Typing a new scene header
automatically creates a new scene.
Script View is helpful for seeing the
white balance and flow of your script.
Hint: The real power of Script view is to
make a Smart View that is based on this
view but using criteria to filter the
contents. For example, you can revise
your scenes by keeping multiple instances
of each scene and tag each with a different
status, like first draft, second draft, and so
on. When it comes time to print a final
script make a Smart view that only shows
the scenes tagged final draft.1Color-coded Screenplay template pictured
Chapter 5: Script View
Using the Script View
To switch to Script View:
1 Click on the Script button in the
view pane on the left-hand side of the
document window.
1 the main window displays the
script view.
In Script View, scenes appear without
the demarcation provided in Scene
view. Typing a new scene header
automatically creates a new scene.
Script View is helpful for seeing the
white balance and flow of your script.
Hint: The real power of Script view is to
make a Smart View that is based on this
view but using criteria to filter the
contents. For example, you can revise
your scenes by keeping multiple instances
of each scene and tag each with a different
status, like first draft, second draft, and so
on. When it comes time to print a final
script make a Smart view that only shows
the scenes tagged final draft.1Color-coded Screenplay template pictured
43 of 124
Chapter 5: Script View
Page 44
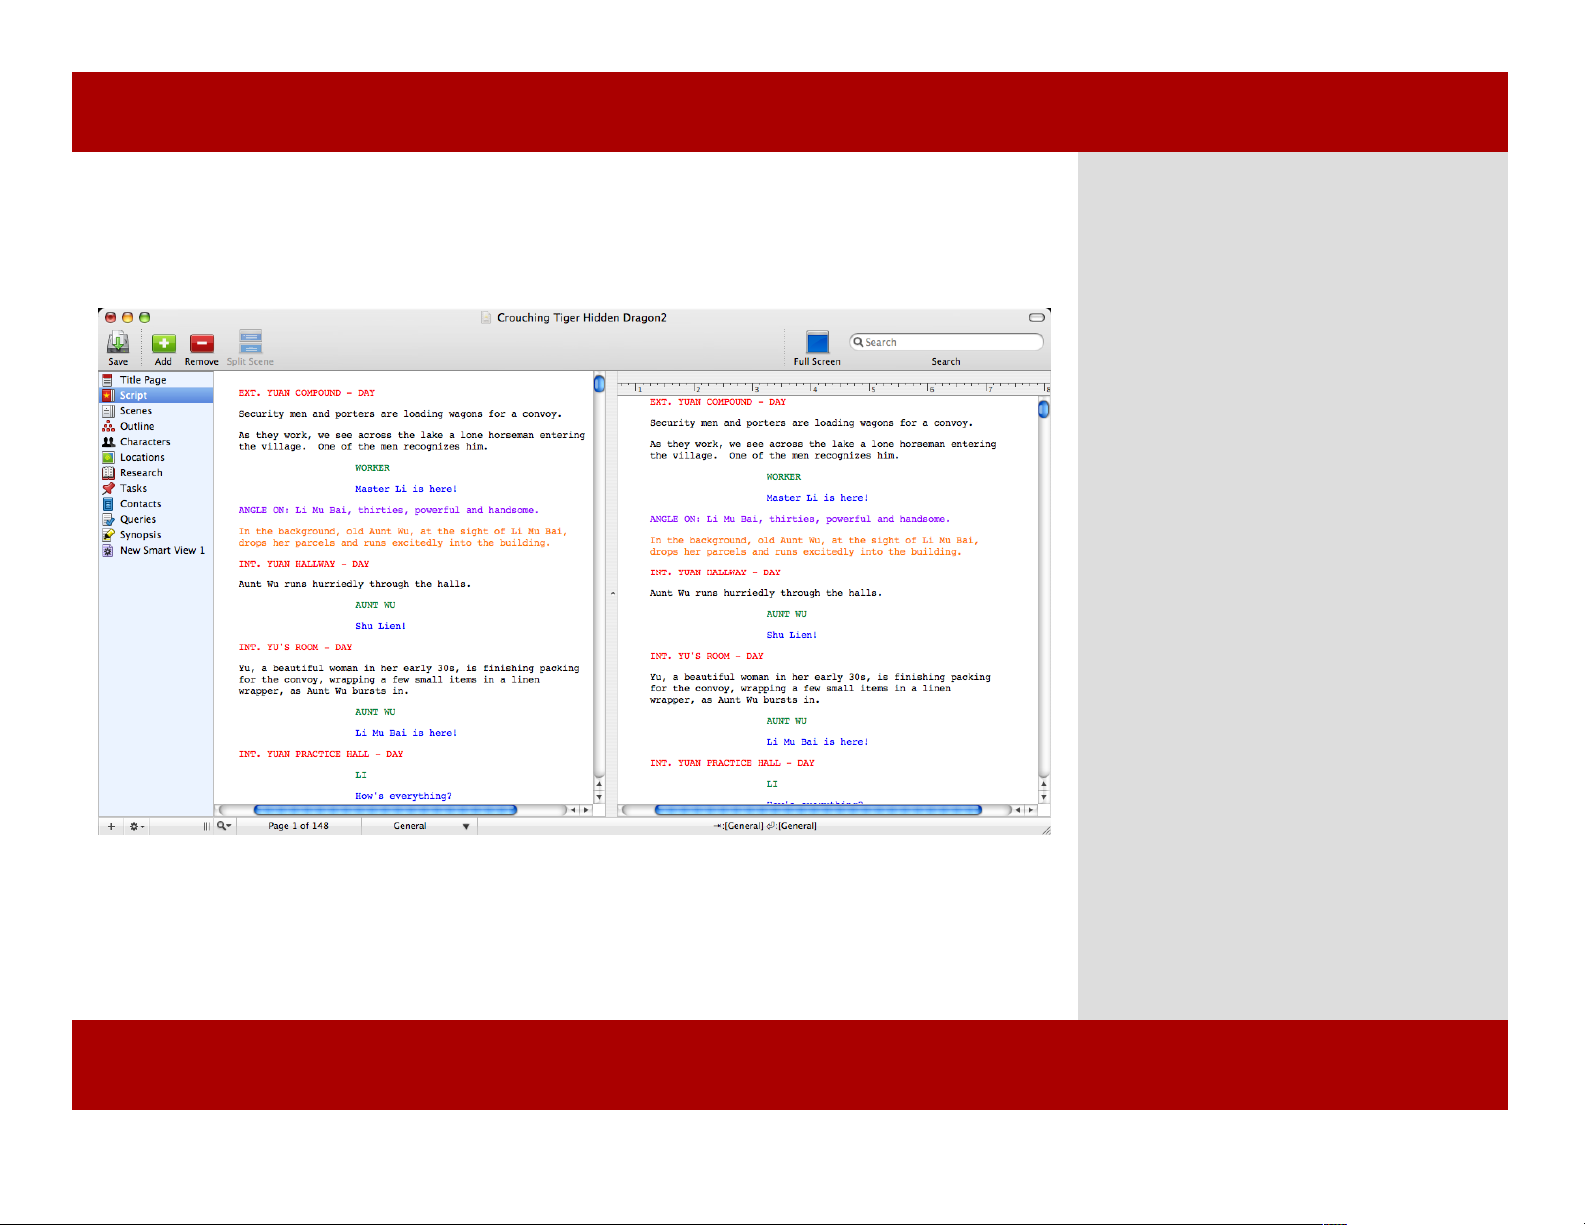
Splitting the View Vertically
2
Script view split vertically
Splitting the Script View allows you to
see two parts of the script at the same
time. This might be helpful when
comparing separate scenes in your
script.
To split the view vertically:
1 While in Script view, from the
View menu, select Split Vertically.
2 The script appears in two panes in
the same window allowing you to
scroll each pane independently of the
other.
Note: You can unsplit the window by
choosing View>Unsplit.
Chapter 5: Script View
Splitting the View Vertically
2
Script view split vertically
Splitting the Script View allows you to
see two parts of the script at the same
time. This might be helpful when
comparing separate scenes in your
script.
To split the view vertically:
1 While in Script view, from the
View menu, select Split Vertically.
2 The script appears in two panes in
the same window allowing you to
scroll each pane independently of the
other.
Note: You can unsplit the window by
choosing View>Unsplit.
Chapter 5: Script View
44 of 124
Page 45
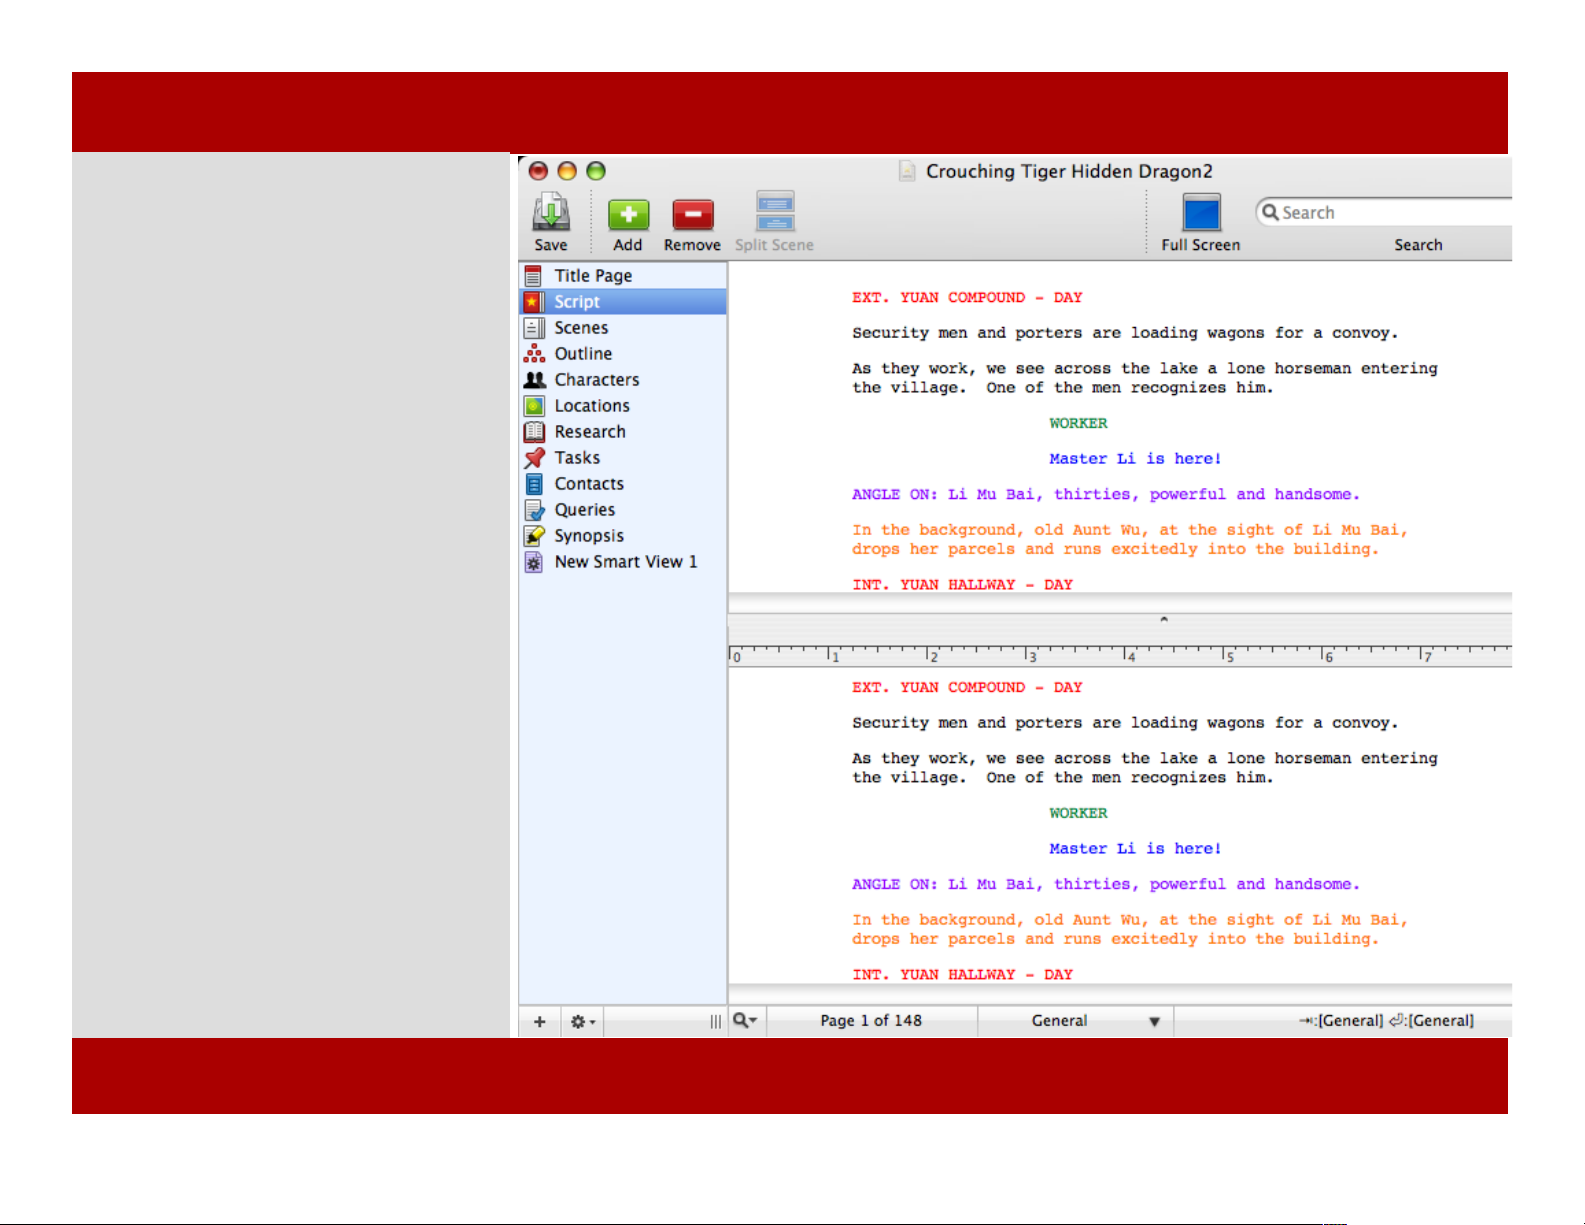
Splitting the View Horizontally
Splitting the Script view allows you to
see two parts of the script at the same
time. This might be helpful when
comparing separate scenes in your
script.
To split the view horizontally:
1 While in Script view, from the
View menu select Split Horizontally.
2 The Script appears in two panes in
the same window allowing you to
scroll each pane independently of the
other.
Note: You can unsplit the window by
choosing View > Unsplit.
Chapter 5: Script View
Splitting the View Horizontally
Splitting the Script view allows you to
see two parts of the script at the same
time. This might be helpful when
comparing separate scenes in your
script.
To split the view horizontally:
1 While in Script view, from the
View menu select Split Horizontally.
2 The Script appears in two panes in
the same window allowing you to
scroll each pane independently of the
other.
Note: You can unsplit the window by
choosing View > Unsplit.
45 of 124
Chapter 5: Script View
Page 46

Chapter 6
Scene View
Scenes are the main building blocks within scripts. A scene is
usually delimited by a scene heading element (aka: a slugline).
However sometimes a scene starts with a transition element.
Scenes in montage can even contain multiple sluglines.
When in Scene View, scenes are visually differentiated by being
displayed in their own “bubble” or “rounded note card.”
Scenes have a title and display the color corresponding to their
status. They have a status which can be used to create a Smart
View as well as an optional start and end date.
During production phases, scenes can be numbered, omitted,
or revised.
Montage keeps track of which characters and location are in
which scenes so you can focus on the writing.
Scene View
In This Chapter:
Adding a Scene
Naming a Scene
Inserting an
Annotation
MONTAGEMONTAGE
46 of 124
Page 47
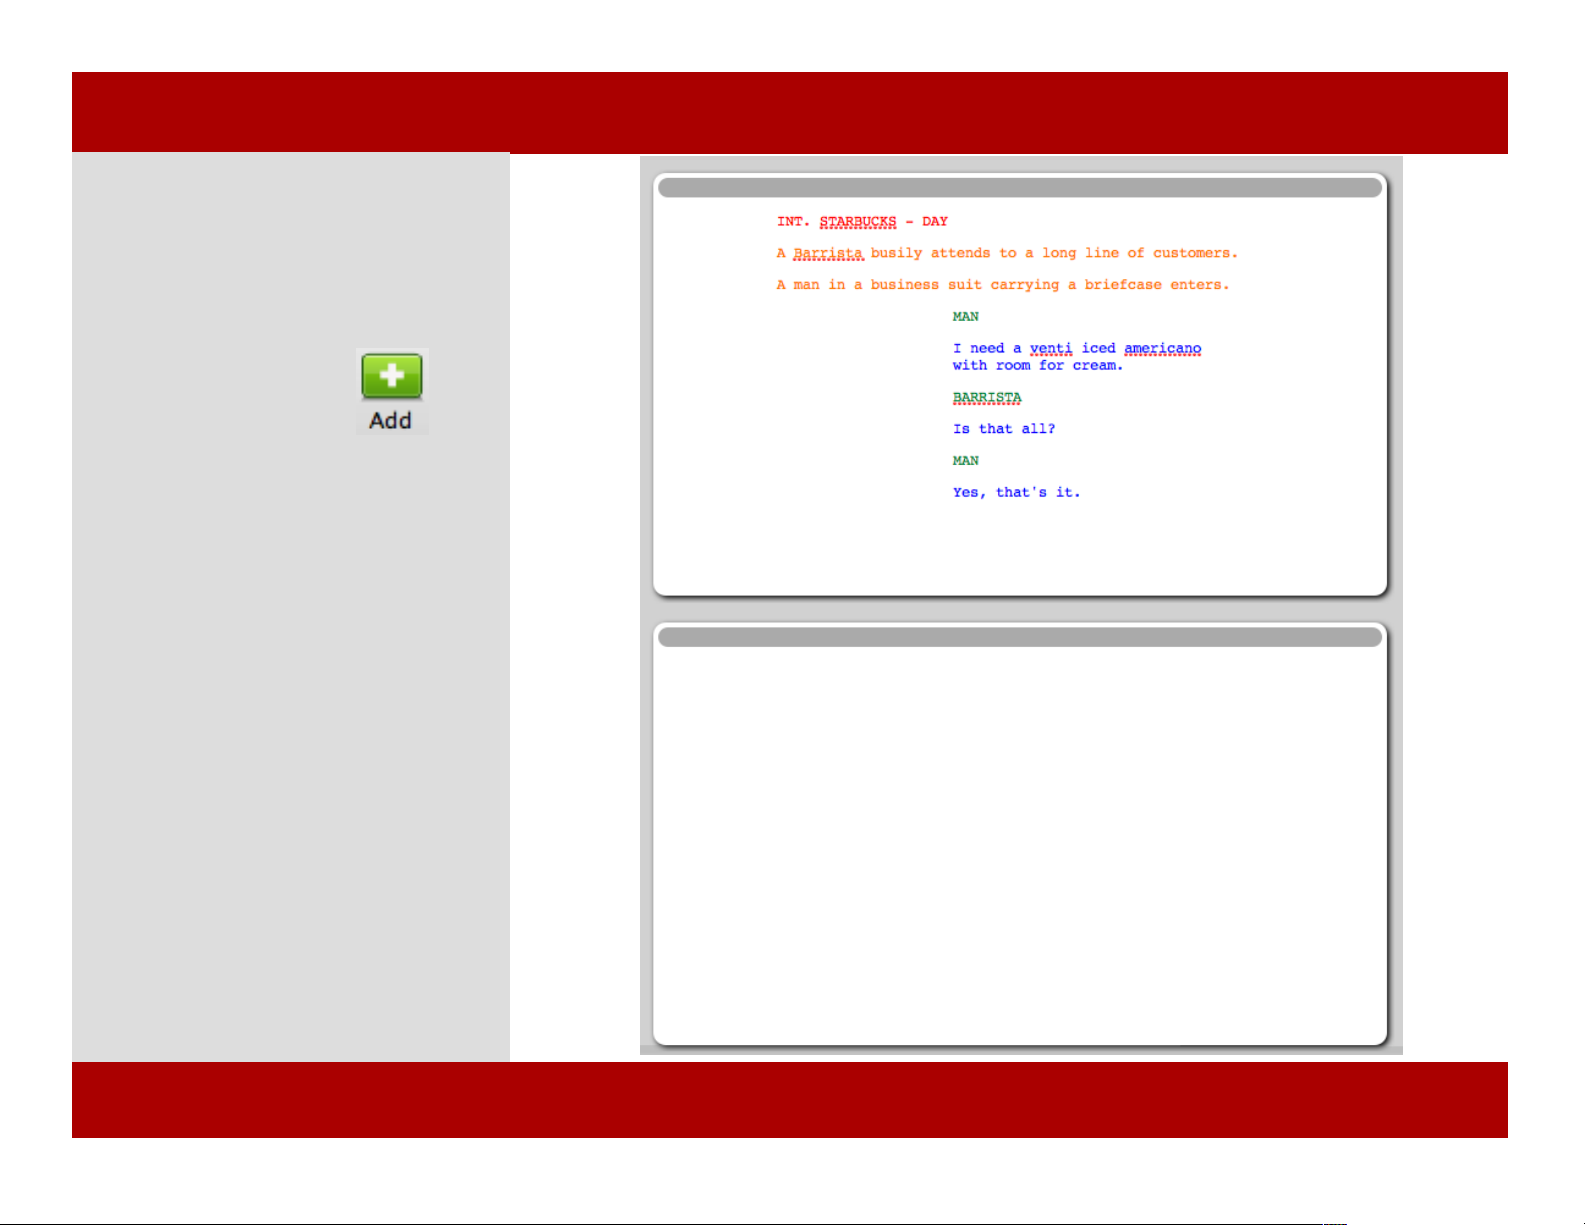
Adding a Scene
To add a scene:
1 Click the Add button in
the Toolbar or press Command - Shift -
N.
2 A new scene text box appears
below the currently selected scene.
Note: Scenes show the color of the status
assigned to them. This is an easy way to
visually identify each scene’s status.
2
Chapter 6: Scene View
Adding a Scene
To add a scene:
1 Click the Add button in
the Toolbar or press Command - Shift N.
2 A new scene text box appears
below the currently selected scene.
Note: Scenes show the color of the status
assigned to them. This is an easy way to
visually identify each scene’s status.
2
47 of 124
Chapter 6: Scene View
Page 48
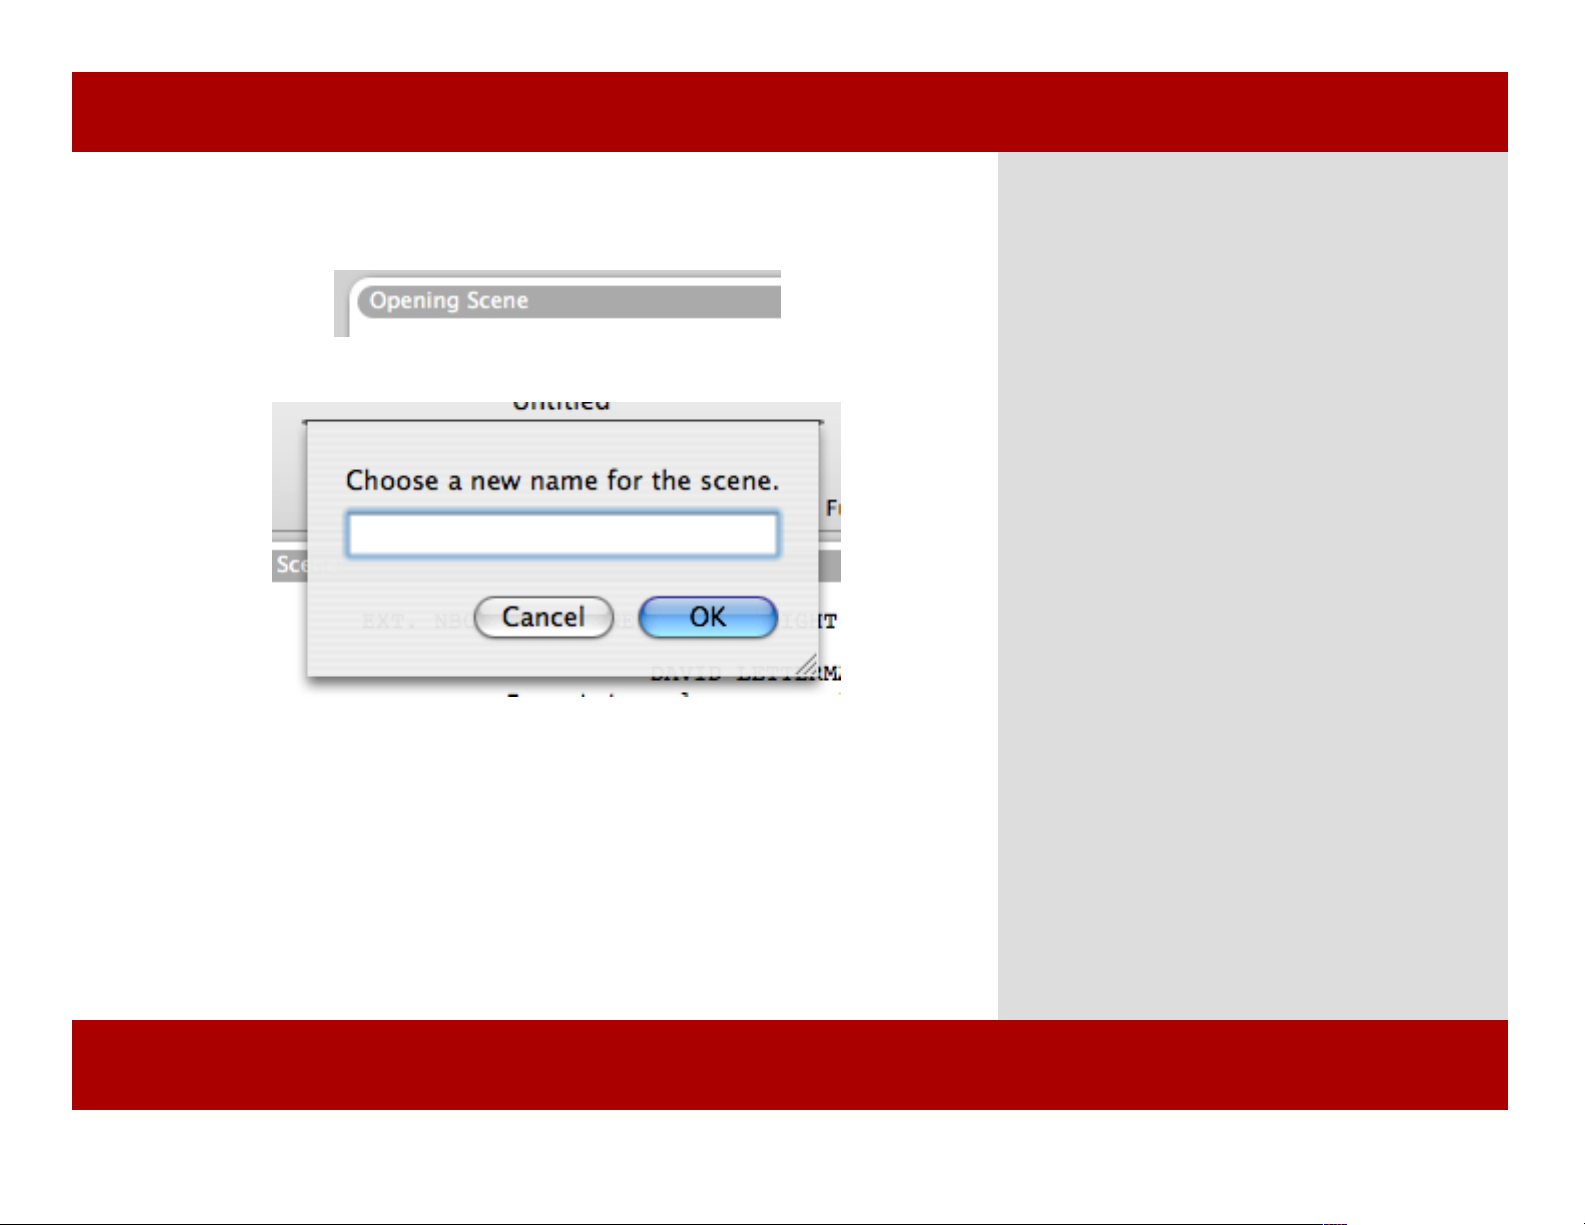
Naming a Scene
1
2
To name a scene:
1 Click on the scene header.
A sheet appears.
2 Enter a name for the scene.
3 Click OK.
The scene name changes to the new name.
Note: You can also change the scene names or
order in the Outline view. For more information
about Outline view see Chapter 6, pages 34 - 37
Note: The initial scene in a script is automatically
named “Opening Scene.”
Note: The prior value you entered when naming a
scene is automatically remembered and displayed
the next time you name a scene.
Chapter 6: Scene View
Naming a Scene
1
2
To name a scene:
1 Click on the scene header.
A sheet appears.
2 Enter a name for the scene.
3 Click OK.
The scene name changes to the new name.
Note: You can also change the scene names or
order in the Outline view. For more information
about Outline view see Chapter 6, pages 34 - 37
Note: The initial scene in a script is automatically
named “Opening Scene.”
Note: The prior value you entered when naming a
scene is automatically remembered and displayed
the next time you name a scene.
Chapter 6: Scene View
48 of 124
Page 49
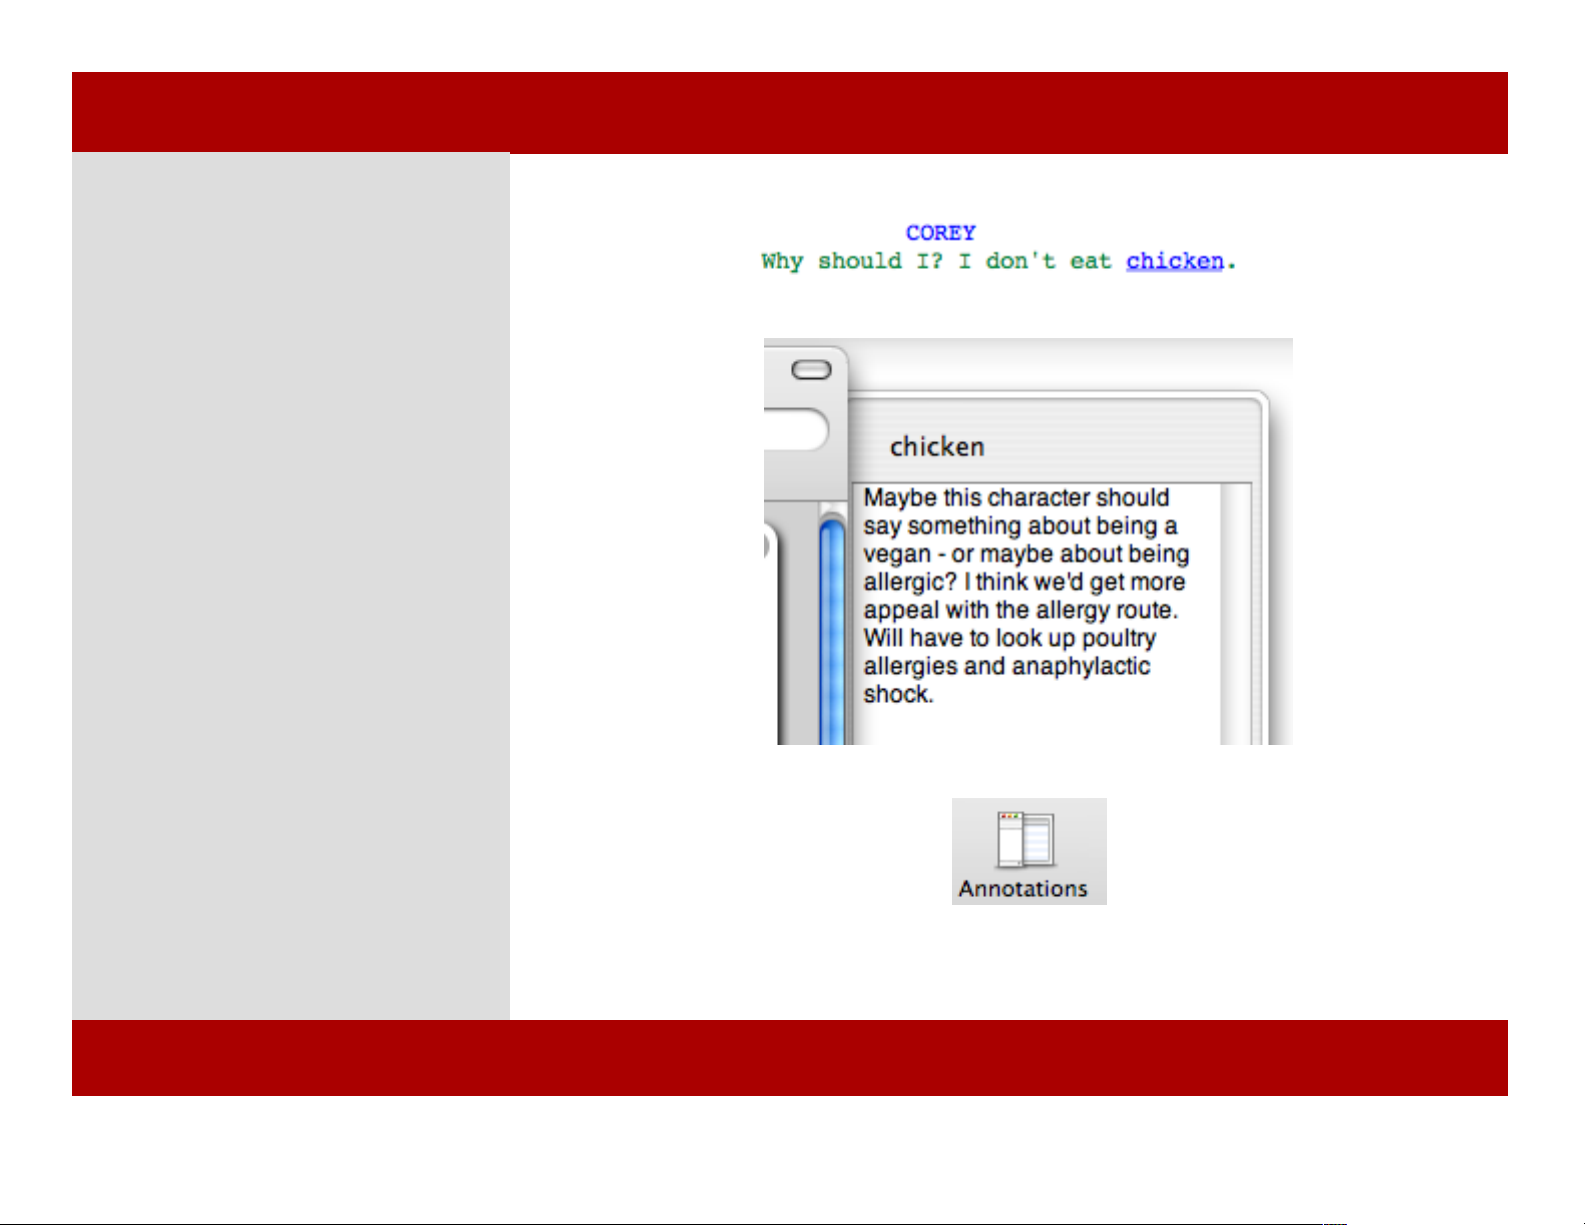
Inserting an Annotation
Annotations are a way to record your
thoughts, notes, and ideas within your
script without leaving the Scene view.
To add an annotation:
1 Select the text you wish to
annotate and select Insert > Annotation
from the menu or press
Command-Shift-A.
The selected text is blue and
underlined.
2 The Annotation drawer opens. .
2 Type some text in the annotations
drawer. You can leave the annotation
open, and continue working on your
script.
Note: The last annotation viewed stays in
the drawer until another annotation is
selected.
2 Hide the annotation drawer under
View > Hide Annotation Drawer or
through the toolbar button.
1
2
3
Chapter 6: Scene View
49 of 124
Chapter 6: Scene View
Page 50

Chapter 6
Full Screen Mode
This mode can help you avoid the distractions of bouncing dock
icons, incoming E-mail, or glancing at the time, and help you
focus on your writing.
There are several options to set regarding Full-screen mode.
You can set the background color and text color to match your
preference. Show or hide scrollbars as desired. Never fear, the
Tab-return system works as usual in full screen mode. Once
you start writing in Full Screen mode, you might not want to
change back.
Full Screen mode
In This Chapter:
Using Full-screen
Mode
MONTAGE
Chapter 6
Full Screen Mode
This mode can help you avoid the distractions of bouncing dock
icons, incoming E-mail, or glancing at the time, and help you
focus on your writing.
There are several options to set regarding Full-screen mode.
You can set the background color and text color to match your
preference. Show or hide scrollbars as desired. Never fear, the
Tab-return system works as usual in full screen mode. Once
you start writing in Full Screen mode, you might not want to
change back.
Full Screen mode
In This Chapter:
Using Full-screen
Mode
MONTAGE
50 of 124
Page 51
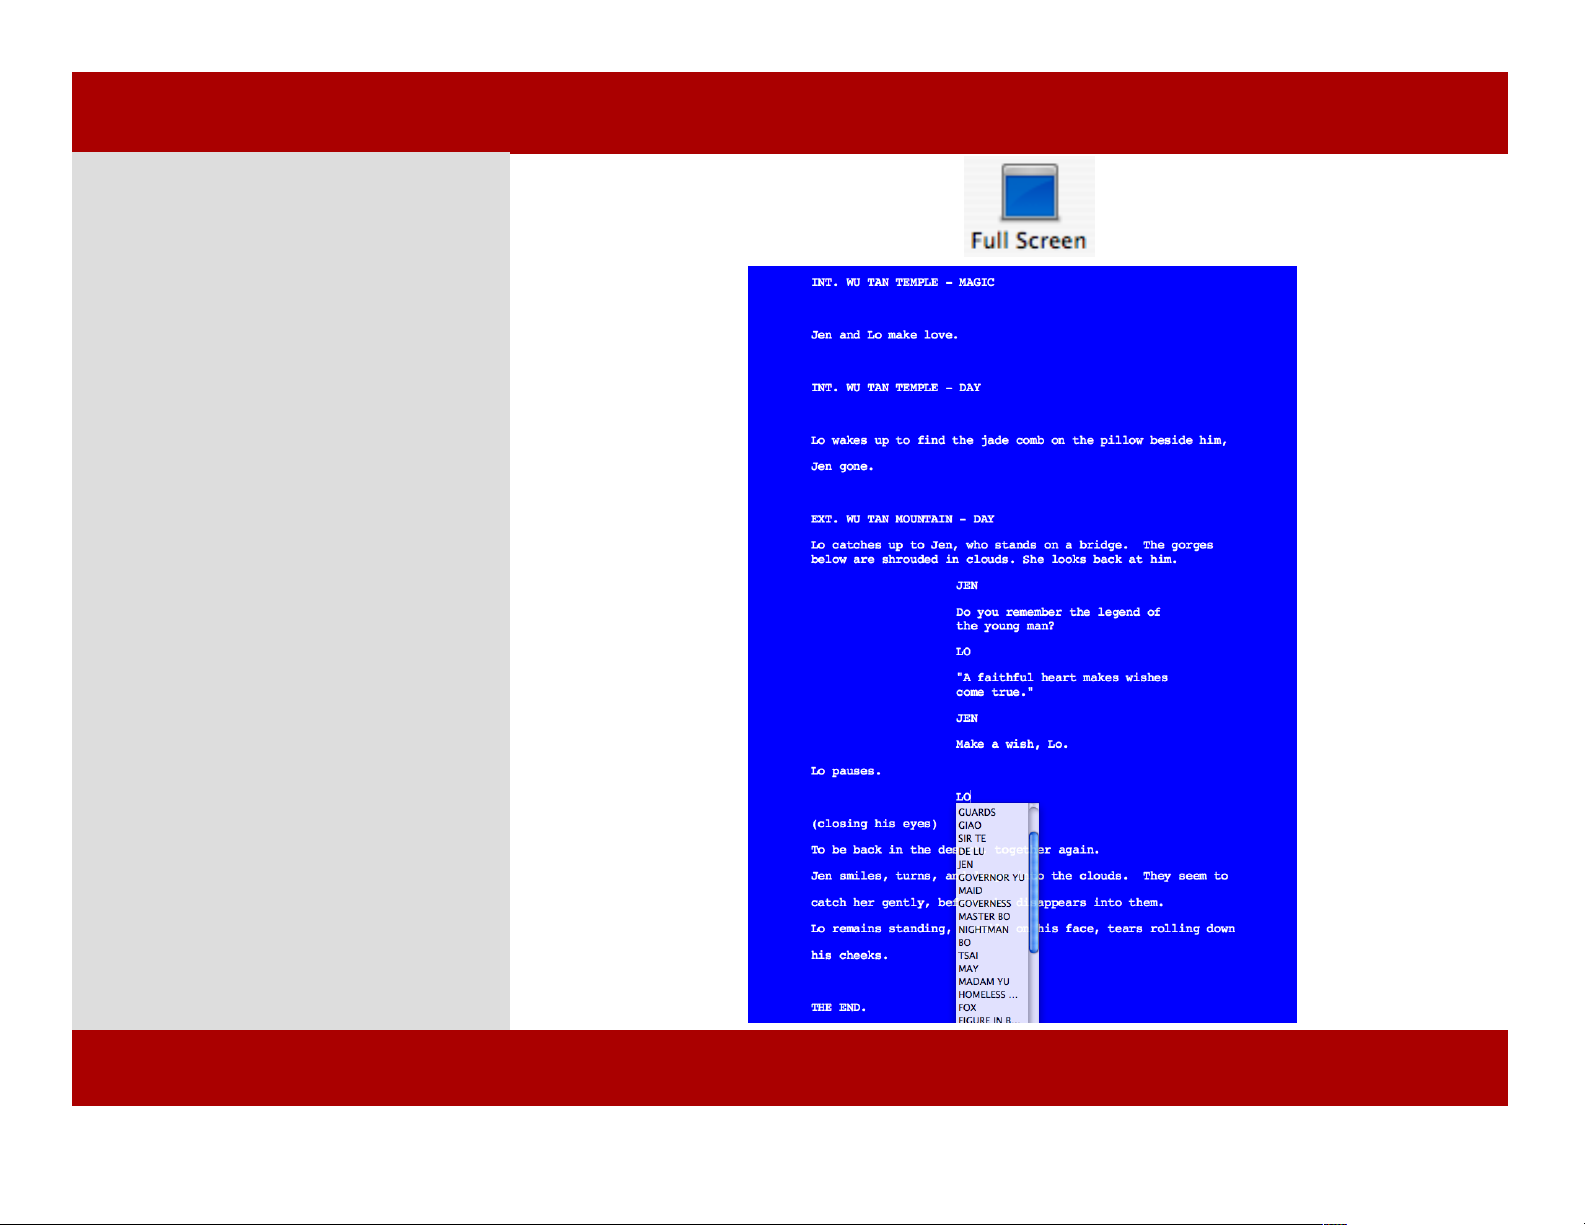
Using Full Screen Mode
To Enter Full Screen mode:
1 Click the Full Screen button on the
toolbar or press Command -Shift - F.
The screen changes to Full Screen
Mode, allowing you to focus
exclusively on writing.
2 To exit from Full Screen mode press
the esc (Escape) key.
Hint: You can set the style and colors used
in Full Screen mode by going to
Preferences and selecting Full Screen.
1
2
Chapter 6: Full Screen Mode
Using Full Screen Mode
To Enter Full Screen mode:
1 Click the Full Screen button on the
toolbar or press Command -Shift - F.
The screen changes to Full Screen
Mode, allowing you to focus
exclusively on writing.
2 To exit from Full Screen mode press
the esc (Escape) key.
Hint: You can set the style and colors used
in Full Screen mode by going to
Preferences and selecting Full Screen.
1
2
51 of 124
Chapter 6: Full Screen Mode
Page 52
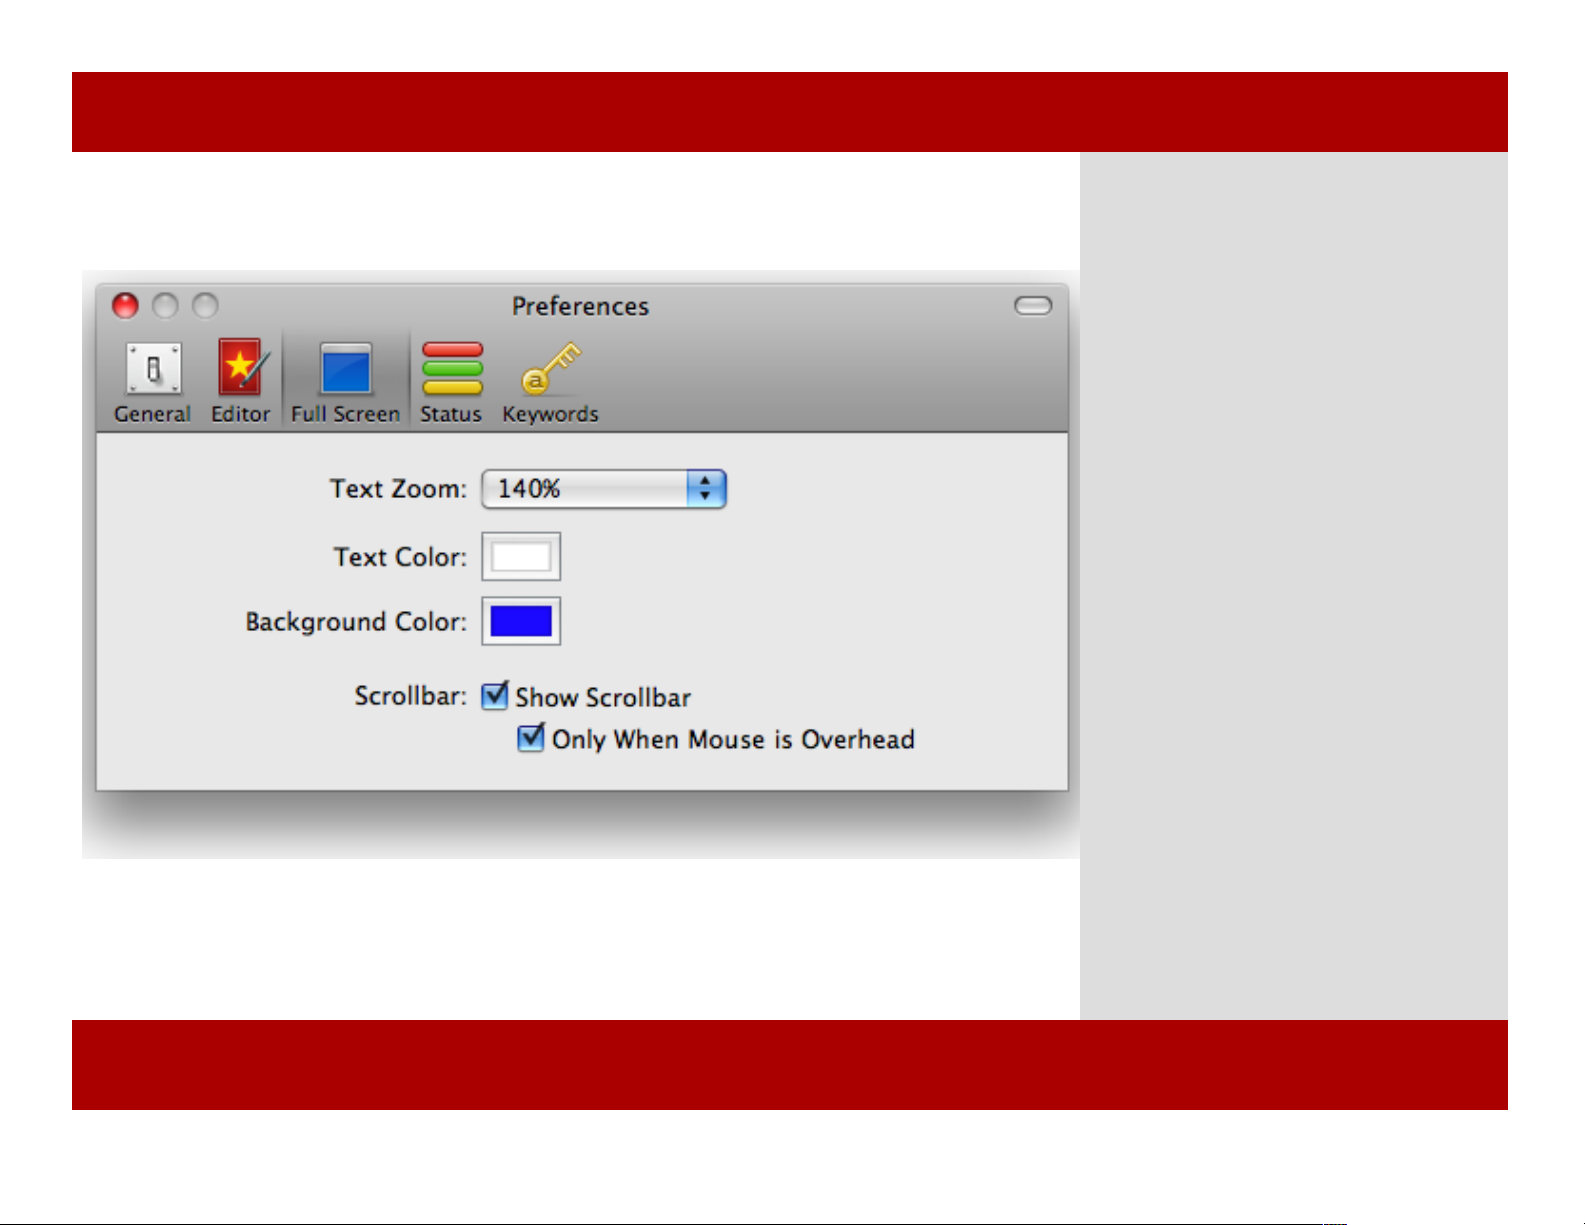
Using Full Screen Mode
2
The Full Screen preference pane
contains options for the Full Screen
mode.
1 Select Montage->Preferences.
The preferences appear.
2 Select Full Screen.
Instead of using the default
appearance, you can choose how you
want Full Screen mode to look.
Set the following options:
Text Zoom
Show Scroll bar
Only when Mouse is Overhead.
Foreground Color
Background Color
Chapter 6: Full Screen Mode
Using Full Screen Mode
2
The Full Screen preference pane
contains options for the Full Screen
mode.
1 Select Montage->Preferences.
The preferences appear.
2 Select Full Screen.
Instead of using the default
appearance, you can choose how you
want Full Screen mode to look.
Set the following options:
Text Zoom
Show Scroll bar
Only when Mouse is Overhead.
Foreground Color
Background Color
Chapter 6: Full Screen Mode
52 of 124
Page 53

Chapter 9
Outline View
Montage allows you to write your script unlike other
screenwriting software. By using the live outline view, you can
write your script without actually writing your script.
Say what?
As a writer, you know that there is a lot more to writing a script
than just hammering it out on the keyboard. Montage helps you
with the whole writing process. Outline view is instrumental in
the process, helping you make scenes, add characters to those
scenes, and take notes without actually writing the script.
In this chapter, you’ll learn how to make a scene, add a
character to that scene, and later re-order the scenes you’ve
made.
Outline View
In This Chapter:
Adding a Scene
Adding a Character to
a Scene
Re-ordering Scenes
MONTAGE
Chapter 9
Outline View
Montage allows you to write your script unlike other
screenwriting software. By using the live outline view, you can
write your script without actually writing your script.
Say what?
As a writer, you know that there is a lot more to writing a script
than just hammering it out on the keyboard. Montage helps you
with the whole writing process. Outline view is instrumental in
the process, helping you make scenes, add characters to those
scenes, and take notes without actually writing the script.
In this chapter, you’ll learn how to make a scene, add a
character to that scene, and later re-order the scenes you’ve
made.
Outline View
In This Chapter:
Adding a Scene
Adding a Character to
a Scene
Re-ordering Scenes
MONTAGE
53 of 124
Page 54
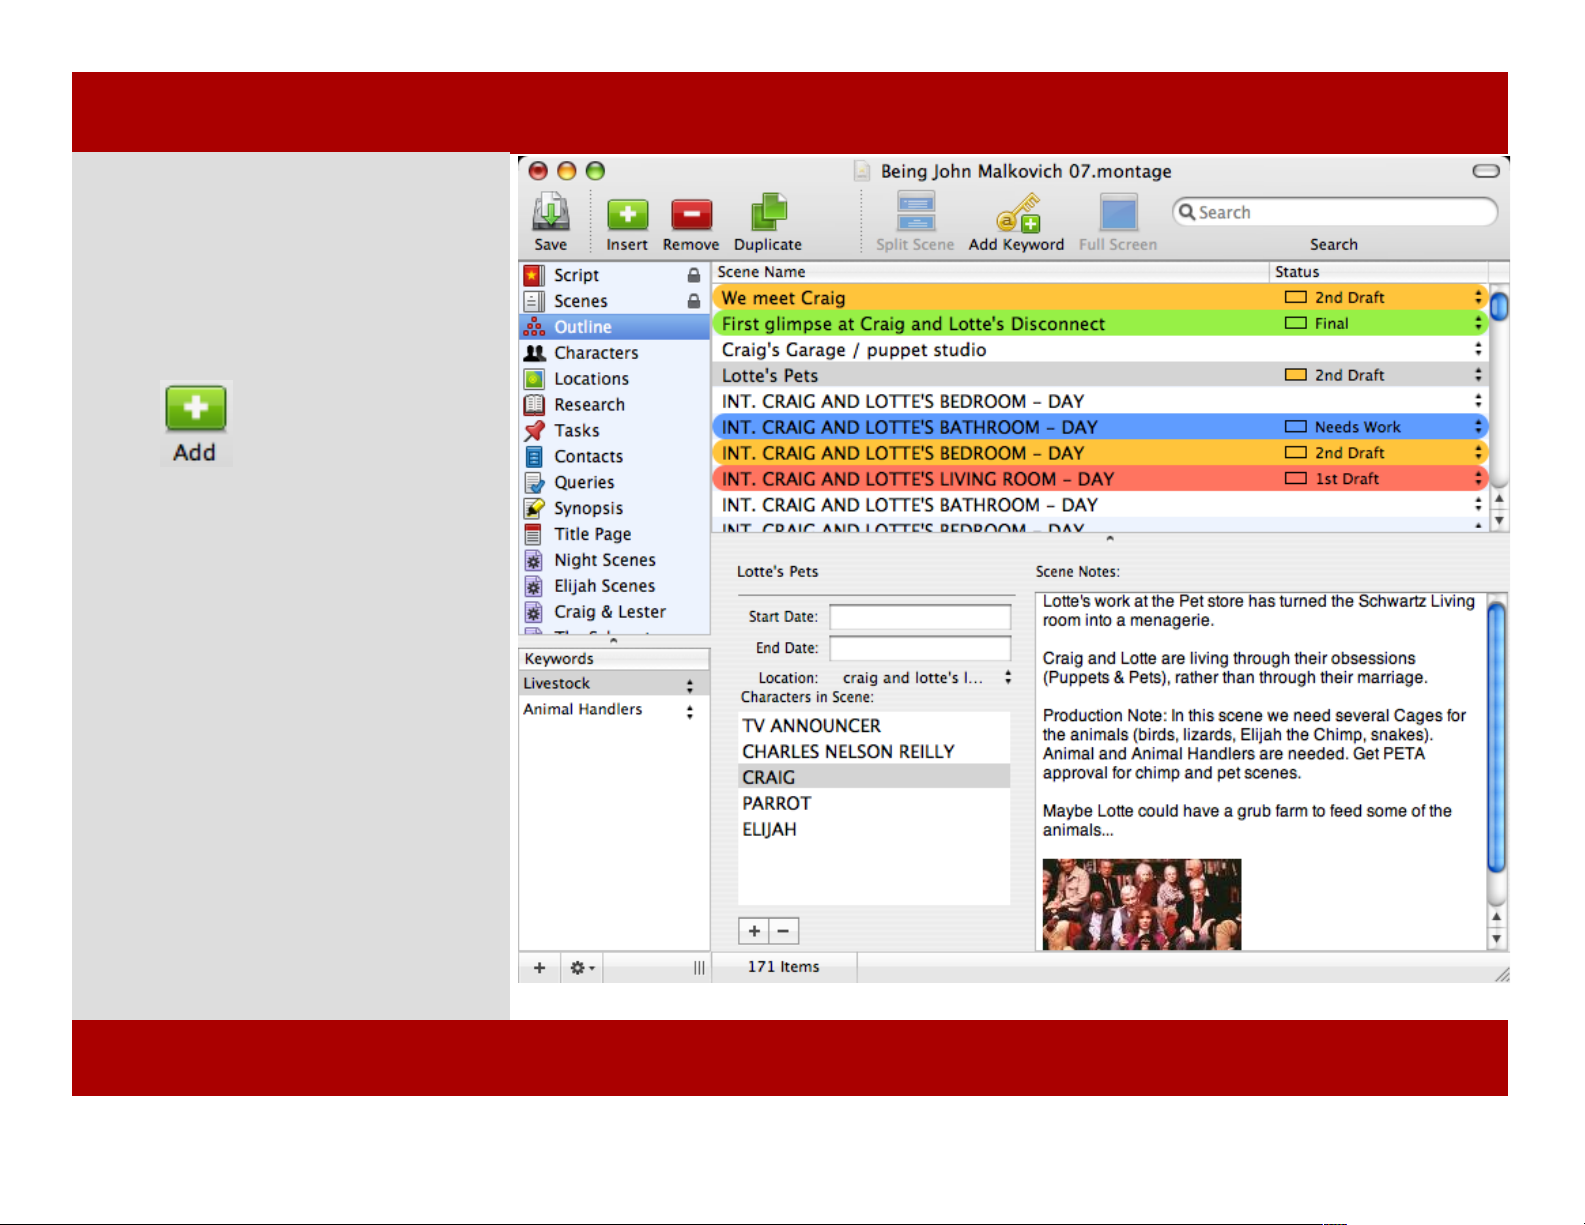
Adding a Scene
To add a Scene:
1 From Outline view, click the Add
button in the Toolbar or press
Command - Shift - N.
2 A new scene name text box appears
below the currently selected scene.
3 Type a name for the new scene,
enter dates, times, select a location, and
add notes.
Chapter 9: Outline View
54 of 124
Chapter 9: Outline View
Page 55
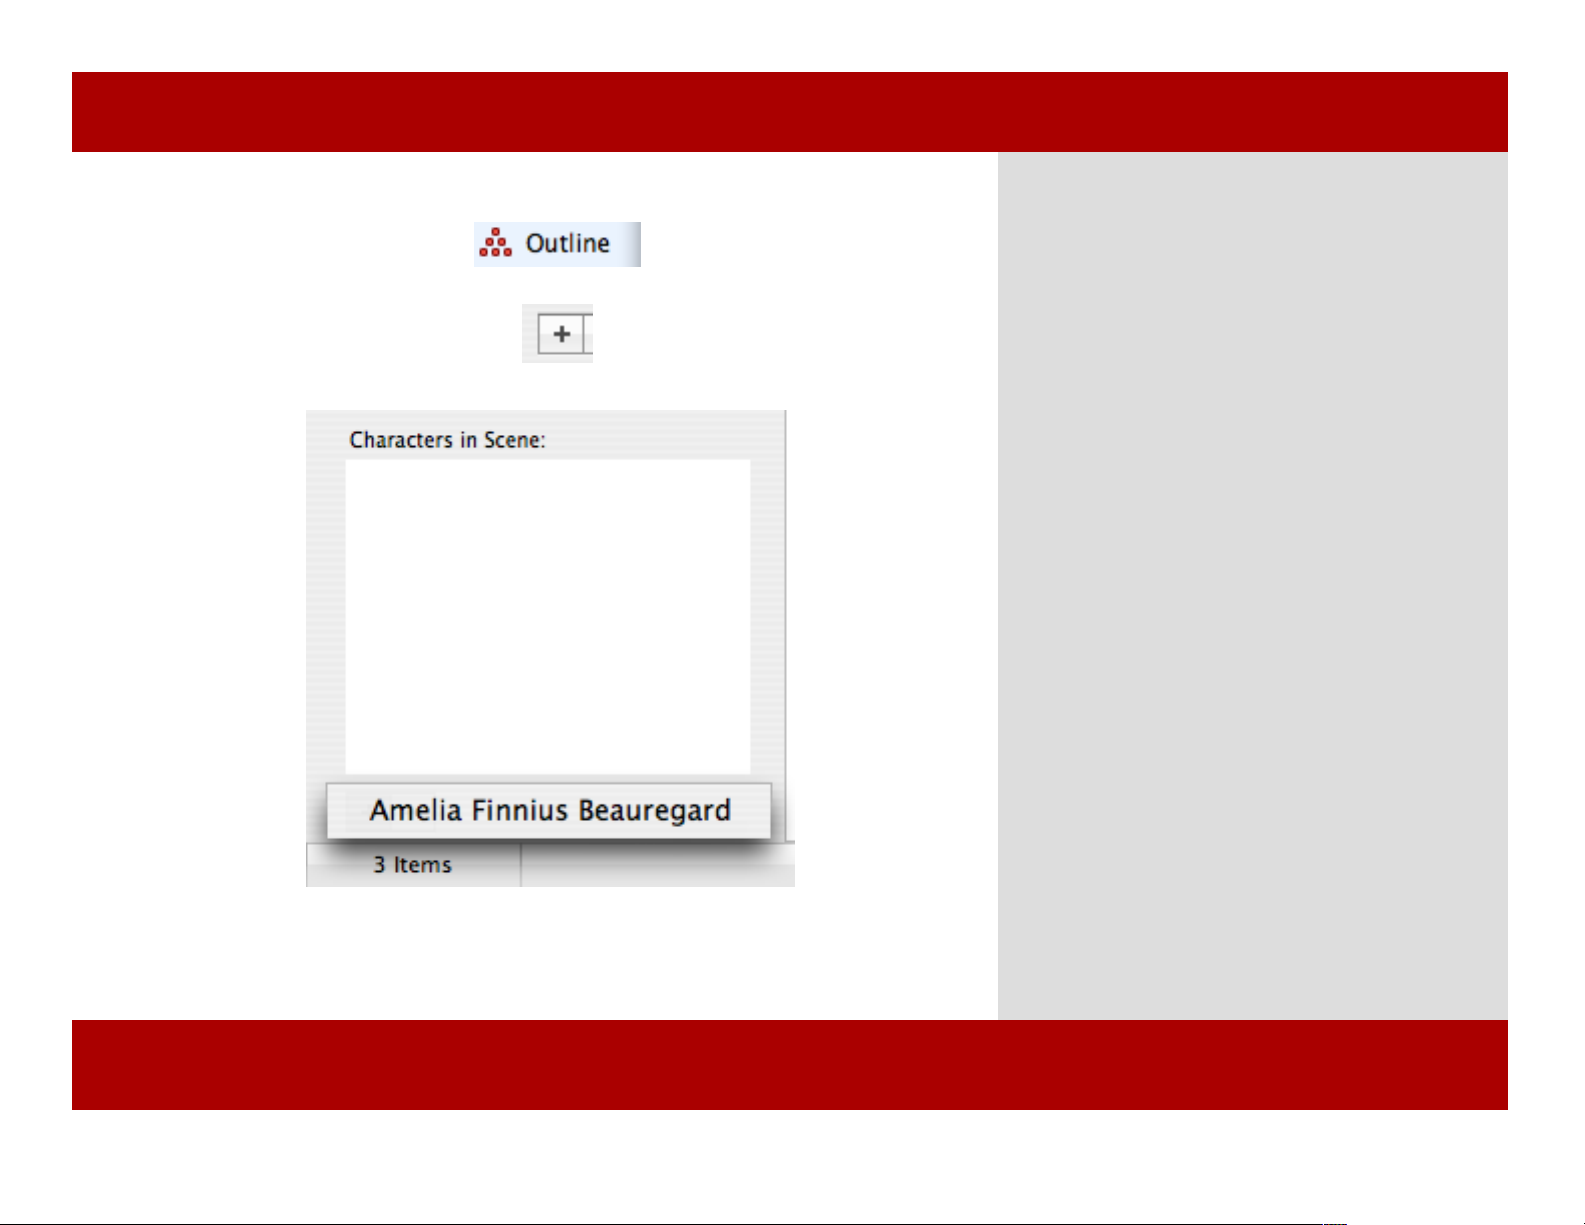
Adding a Character to a Scene
1
2
3
To add a character to a scene:
In Montage, you have the ability to flesh-out
your script in Outline view before even
writing the script. To help you do so, you can
add characters to scenes before the scenes are
written. Here is how:
1 Select Outline View from the view Pane.
2 Click the “+” button. to add a character to
a scene.
2 A pop-up menu appears. Select a
character from the list. to add them to the
scene.
Note: Characters are automatically added to scenes
as you type their dialogue. Adding characters
manually is useful in situations where a character
is present but never speaks
Note: Character aren't automatically removed from
scenes. If you delete a character and their dialogue
from a scene you'll need to remove them from the
scene's character list manually.
Chapter 9: Outline View
Adding a Character to a Scene
1
2
3
To add a character to a scene:
In Montage, you have the ability to flesh-out
your script in Outline view before even
writing the script. To help you do so, you can
add characters to scenes before the scenes are
written. Here is how:
1 Select Outline View from the view Pane.
2 Click the “+” button. to add a character to
a scene.
2 A pop-up menu appears. Select a
character from the list. to add them to the
scene.
Note: Characters are automatically added to scenes
as you type their dialogue. Adding characters
manually is useful in situations where a character
is present but never speaks
Note: Character aren't automatically removed from
scenes. If you delete a character and their dialogue
from a scene you'll need to remove them from the
scene's character list manually.
Chapter 9: Outline View
55 of 124
Page 56
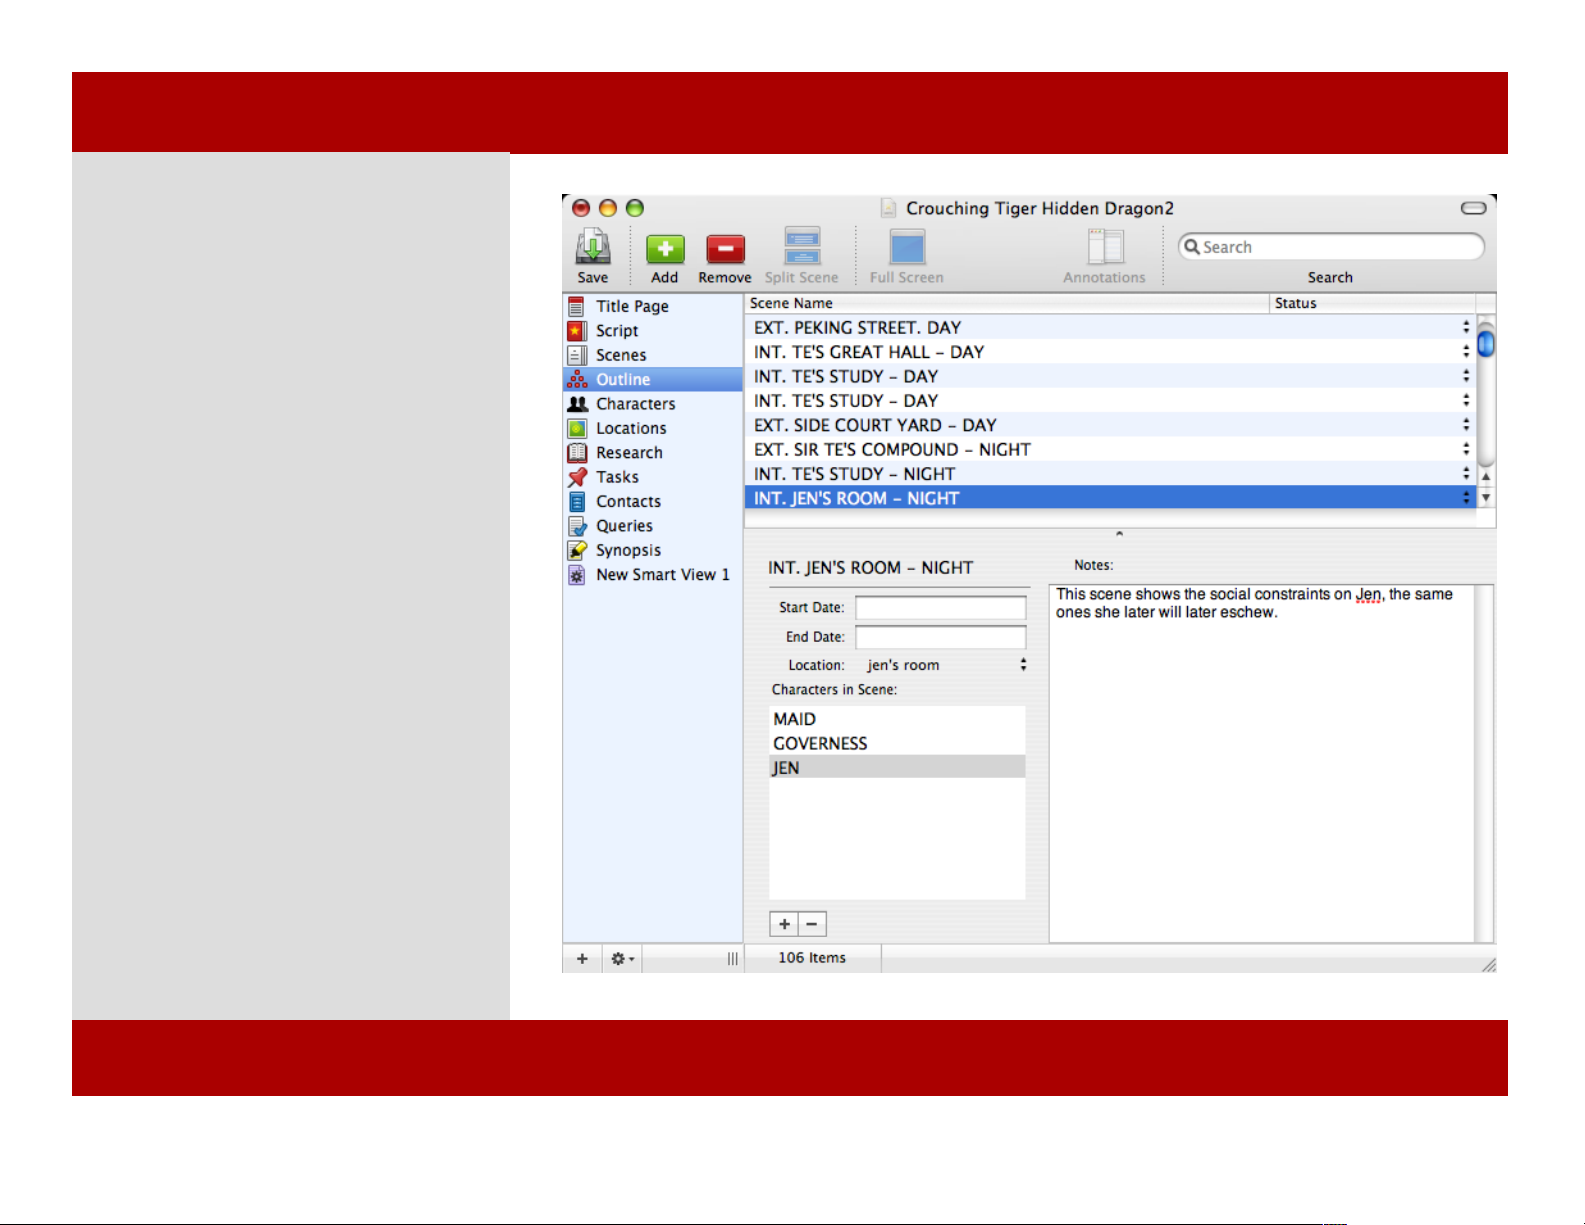
Re-ordering Scenes
To re-order scenes:
1 Select a scene from the list.
2 Click and drag that scene to the
location you wish.
The script view is automatically
updated to reflect the changes.
Note: If you move a scene and don't like it
you can always move it back.
1
Chapter 9: Outline View
Re-ordering Scenes
To re-order scenes:
1 Select a scene from the list.
2 Click and drag that scene to the
location you wish.
The script view is automatically
updated to reflect the changes.
Note: If you move a scene and don't like it
you can always move it back.
1
56 of 124
Chapter 9: Outline View
Page 57

Chapter 10
Character View
Characters are the players in your script and are used in
character elements. You can enter your characters prior to or
during the writing of your script. As you enter characters while
writing your script, the characters are dynamically added to the
Characters View. Likewise, any characters you enter in the
Characters View appear in the auto-type system while writing
your script. Characters can also contain notes and pictures.
Lastly, characters can be tagged with a status which can then be
used as criteria in a Smart View.
Character View
In This Chapter:
Adding a Character
Making Character
Notes
MONTAGE
Chapter 10
Character View
Characters are the players in your script and are used in
character elements. You can enter your characters prior to or
during the writing of your script. As you enter characters while
writing your script, the characters are dynamically added to the
Characters View. Likewise, any characters you enter in the
Characters View appear in the auto-type system while writing
your script. Characters can also contain notes and pictures.
Lastly, characters can be tagged with a status which can then be
used as criteria in a Smart View.
Character View
In This Chapter:
Adding a Character
Making Character
Notes
MONTAGE
57 of 124
Page 58
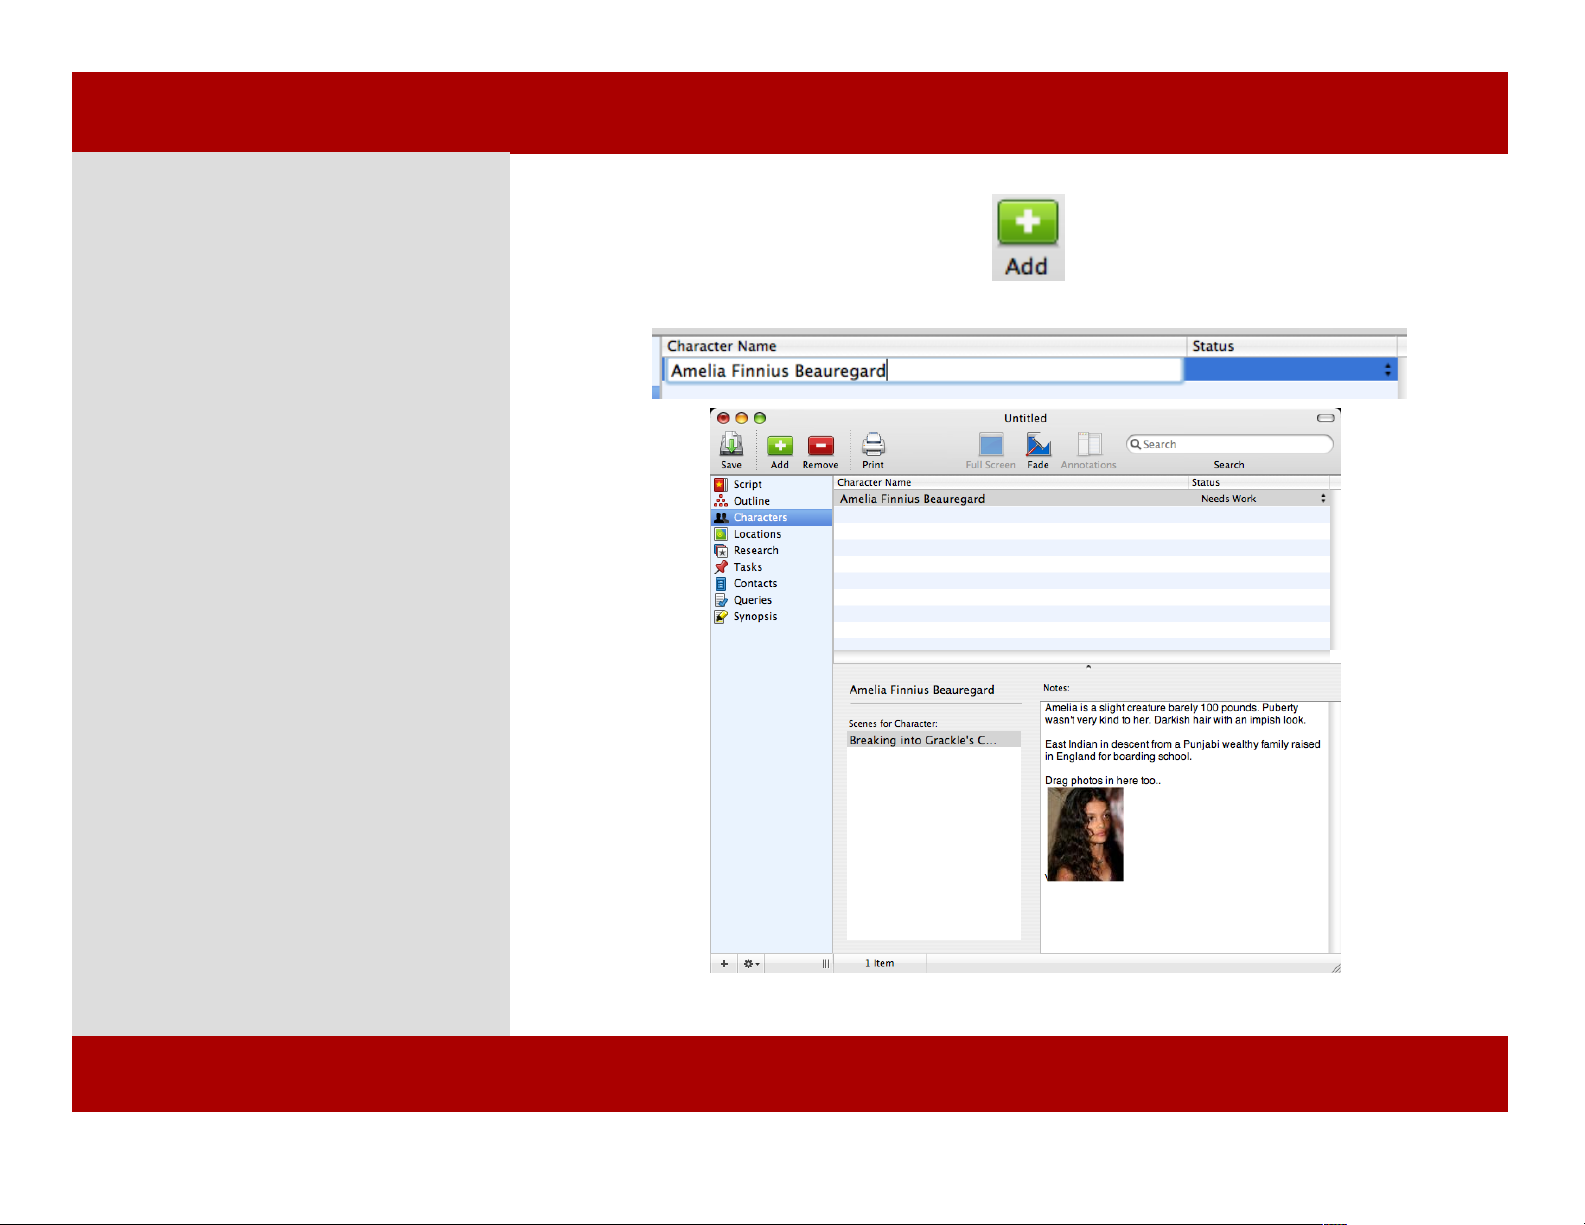
Adding a Character
Adding a Character:
1 Click the Add button in the
Toolbar or press Command - Shift - N.
2 A new character text box appears.
3 Type in a name for the character
and it is immediately available when
you are typing in a scene in Script
View.
4 Enter any details such as the status
of the character and notes, which can
also include photos.
Note: You can see the scenes a character is
in by looking at the Scenes For Character
pane.
Note: Many screenwriters come up with
characters before writing their script.
Character view can help you qualify a
character whether in concept, writing, or
for production.
1
3
4
Chapter 10: Character View
Adding a Character
Adding a Character:
1 Click the Add button in the
Toolbar or press Command - Shift - N.
2 A new character text box appears.
3 Type in a name for the character
and it is immediately available when
you are typing in a scene in Script
View.
4 Enter any details such as the status
of the character and notes, which can
also include photos.
Note: You can see the scenes a character is
in by looking at the Scenes For Character
pane.
Note: Many screenwriters come up with
characters before writing their script.
Character view can help you qualify a
character whether in concept, writing, or
for production.
1
3
4
58 of 124
Chapter 10: Character View
Page 59
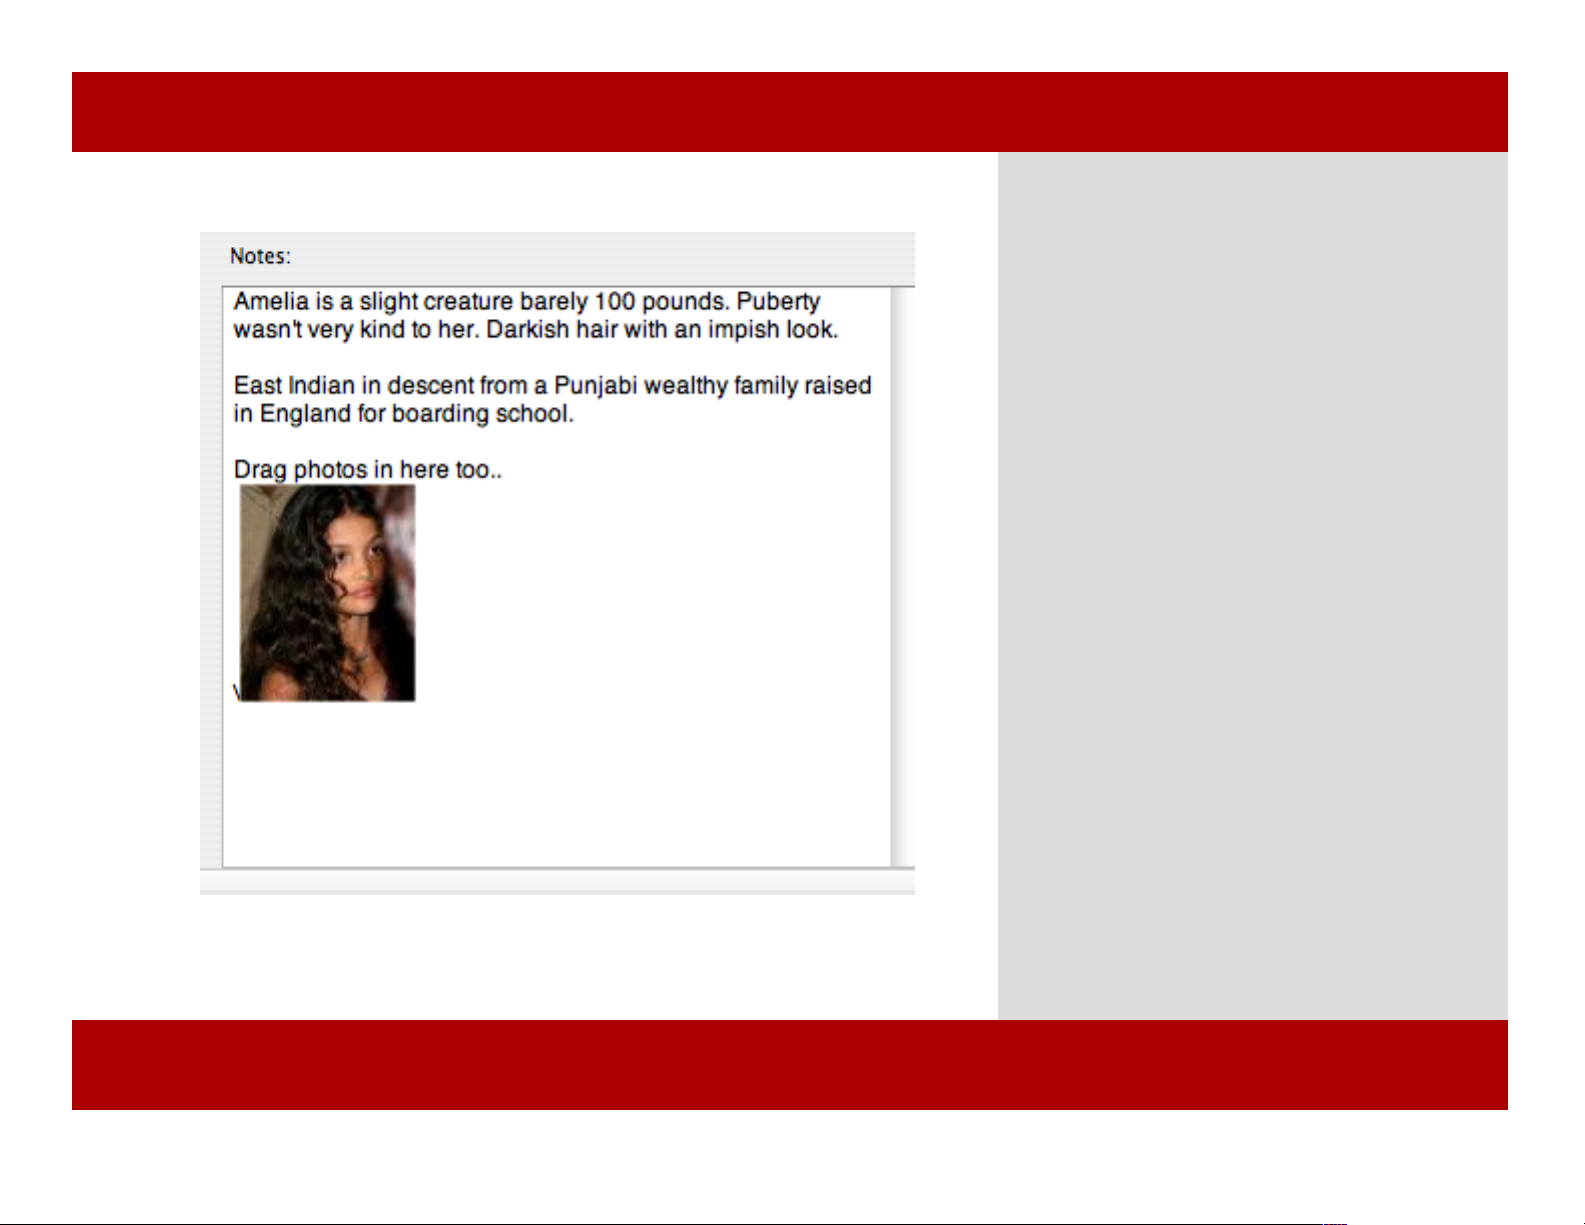
Making Character Notes
2
Making notes on a character:
1 Click into the notes area for a character.
2 Cut and paste, drag and drop, or type in
contents to the notes field.
Note: Notes can contain pictures and styled text.
For instance, you can do some research for a
character on the web and cut and paste info about
the character into the notes field. This should help
keep you more organized.
Chapter 10: Character View
2
Making notes on a character:
1 Click into the notes area for a character.
2 Cut and paste, drag and drop, or type in
contents to the notes field.
Note: Notes can contain pictures and styled text.
For instance, you can do some research for a
character on the web and cut and paste info about
the character into the notes field. This should help
keep you more organized.
Chapter 10: Character View
59 of 124
Page 60

Reserved for future content.
Chapter 10: Character View
Reserved for future content.
60 of 124
Chapter 10: Character View
Page 61

Chapter 11
Locations View
Locations are the places your story occurs and are used in scene
headings. Enter your locations prior to or during writing your
script. As you enter scene headings or “slug lines” the locations
are dynamically added to the Locations View. Likewise, any
locations in the Locations View appear in the auto-type system
when you enter a scene heading. Locations can contain notes
and pictures pertaining to the location. Locations can also be
tagged with a status which can then be used as criteria in a
Smart View.
Locations View
In This Chapter:
Adding a Location
Changing a Location
Name
MONTAGE
Chapter 11
Locations View
Locations are the places your story occurs and are used in scene
headings. Enter your locations prior to or during writing your
script. As you enter scene headings or “slug lines” the locations
are dynamically added to the Locations View. Likewise, any
locations in the Locations View appear in the auto-type system
when you enter a scene heading. Locations can contain notes
and pictures pertaining to the location. Locations can also be
tagged with a status which can then be used as criteria in a
Smart View.
Locations View
In This Chapter:
Adding a Location
Changing a Location
Name
MONTAGE
61 of 124
Page 62
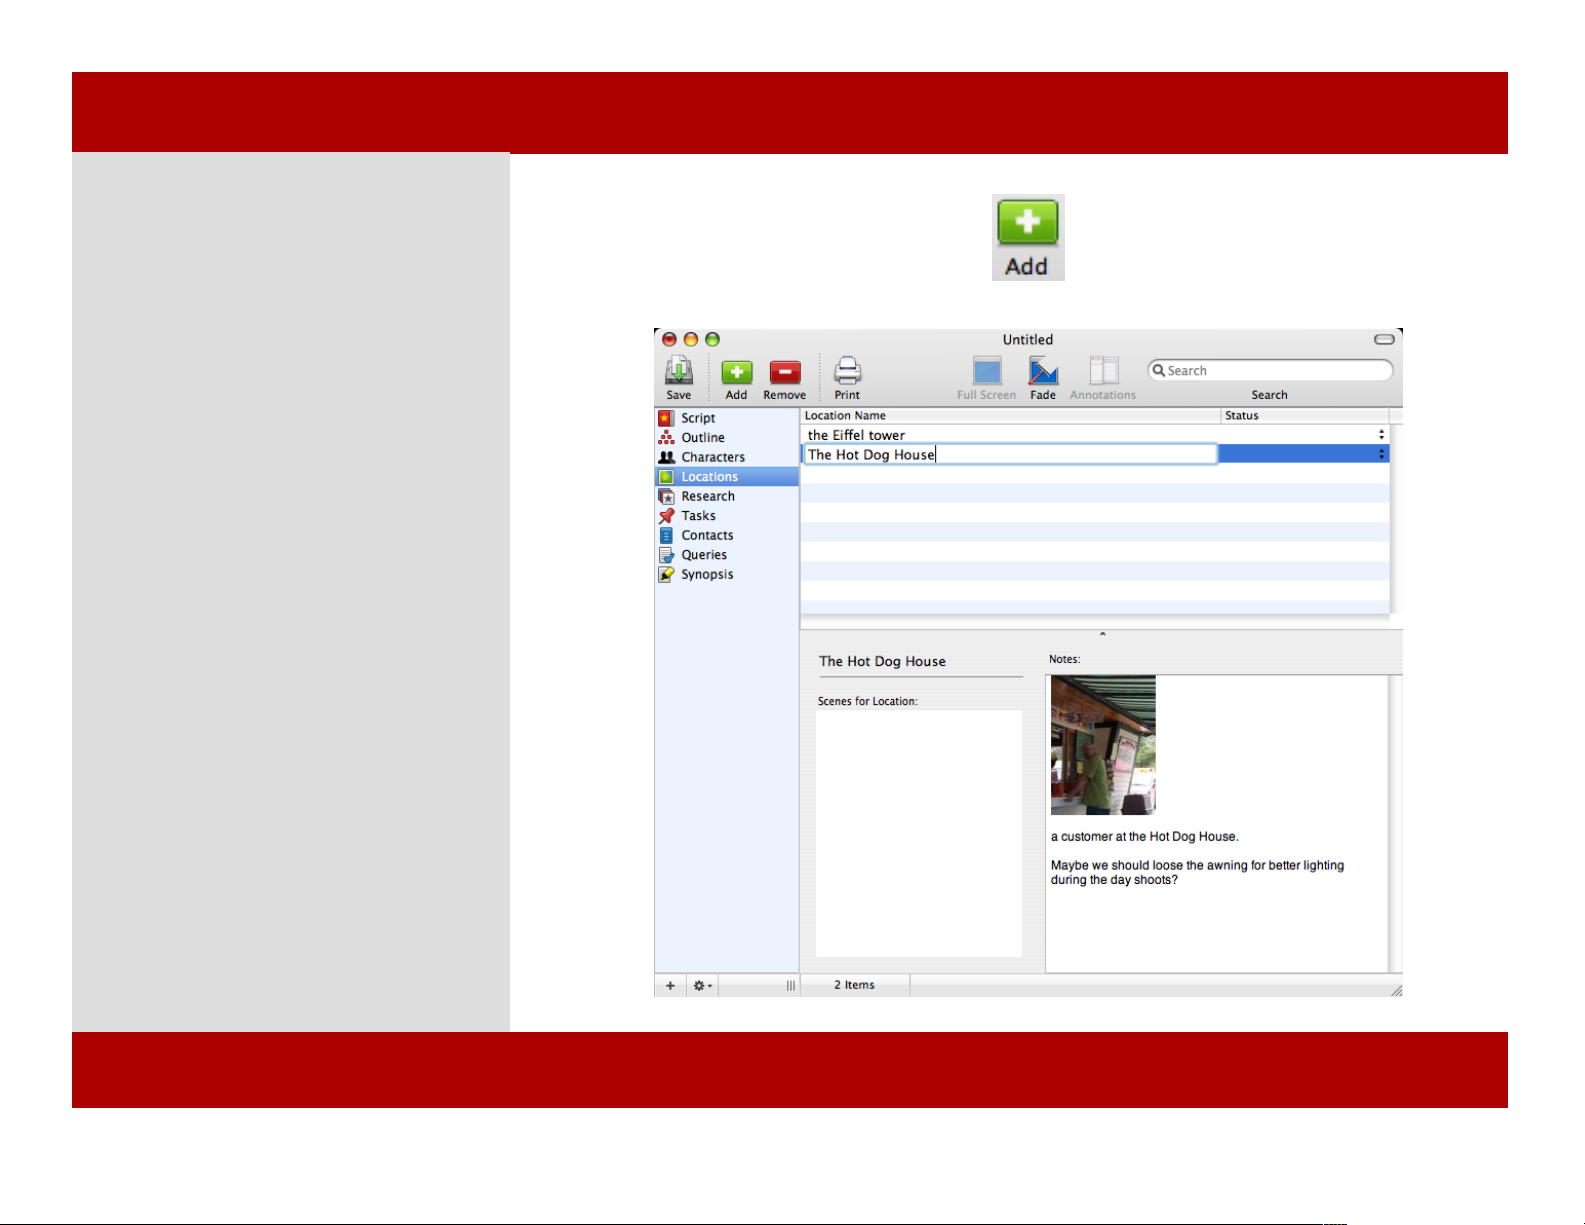
Adding a Location
Adding a location to your script:
1 Click the Add button in the
Toolbar or press Command - Shift - N.
2 A new location text box appears
below the currently selected scene.
3 Type in a name for the location and
it is immediately available when you
are typing in a scene heading in Script
View.
4 Enter any details such as the status
of the character and notes, which can
include photos.
Note: Many screenwriters come up with
locations, characters, and sequences before
actually writing their script. Location
View can help you flesh out a location
whether in concept, writing, or for
production.
1
2
Chapter 11: Locations View
Adding a Location
Adding a location to your script:
1 Click the Add button in the
Toolbar or press Command - Shift - N.
2 A new location text box appears
below the currently selected scene.
3 Type in a name for the location and
it is immediately available when you
are typing in a scene heading in Script
View.
4 Enter any details such as the status
of the character and notes, which can
include photos.
Note: Many screenwriters come up with
locations, characters, and sequences before
actually writing their script. Location
View can help you flesh out a location
whether in concept, writing, or for
production.
1
2
62 of 124
Chapter 11: Locations View
Page 63
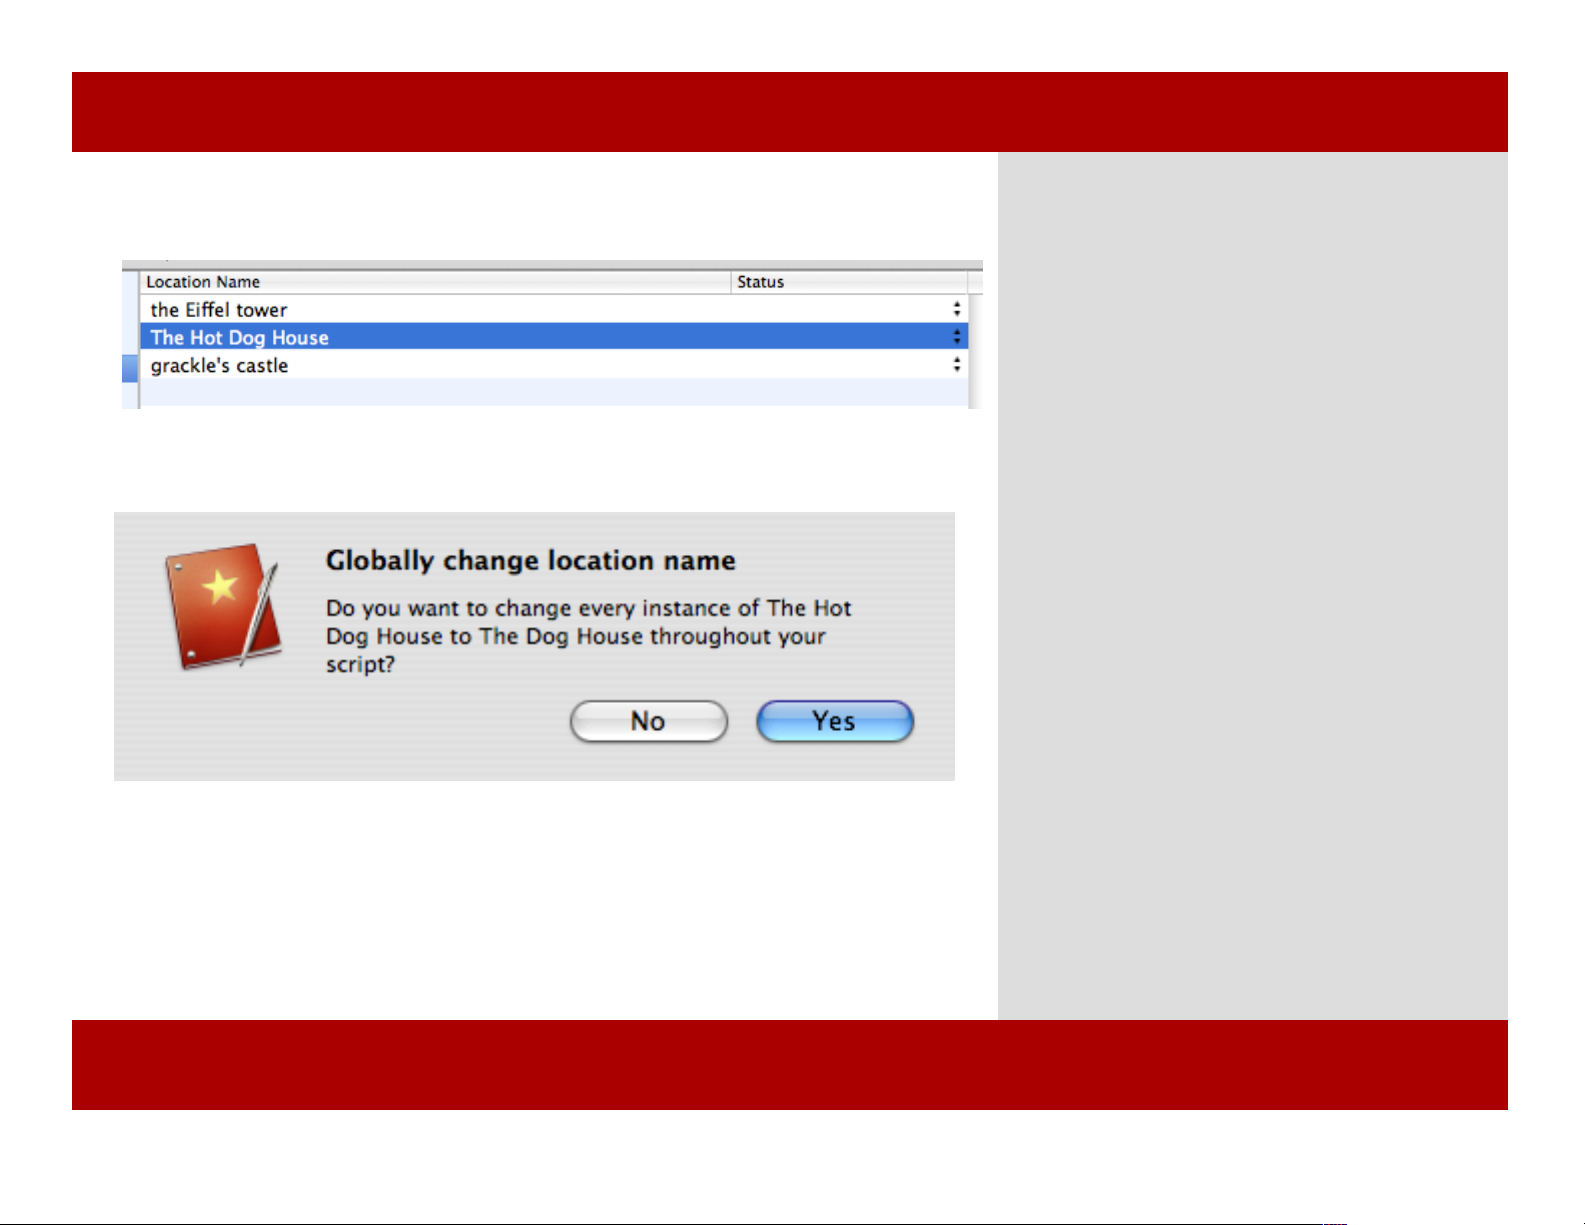
Changing a Location Name
1
2
To change a location’s name throughout your
script:
1 Click on the name field in the Location
view. Edit the name.
2 Upon leaving the field a prompt appears
asking if you wish to globally change the
name throughout the script.
3 Click Yes to make the changes.
Chapter 11: Locations View
Changing a Location Name
1
2
To change a location’s name throughout your
script:
1 Click on the name field in the Location
view. Edit the name.
2 Upon leaving the field a prompt appears
asking if you wish to globally change the
name throughout the script.
3 Click Yes to make the changes.
Chapter 11: Locations View
63 of 124
Page 64

Reserved for future content.
Chapter 11: Locations View
Reserved for future content.
64 of 124
Chapter 11: Locations View
Page 65

Chapter 12
Research View
Manage your script research from within Montage by using the
Research view. Research items allow you to store information,
as well as, pictures about items related to your script
development. Research items normally contain a name, notes,
and a status.
Research View
In This Chapter:
Adding a Research
Item
MONTAGE
Chapter 12
Research View
Manage your script research from within Montage by using the
Research view. Research items allow you to store information,
as well as, pictures about items related to your script
development. Research items normally contain a name, notes,
and a status.
Research View
In This Chapter:
Adding a Research
Item
MONTAGE
65 of 124
Page 66
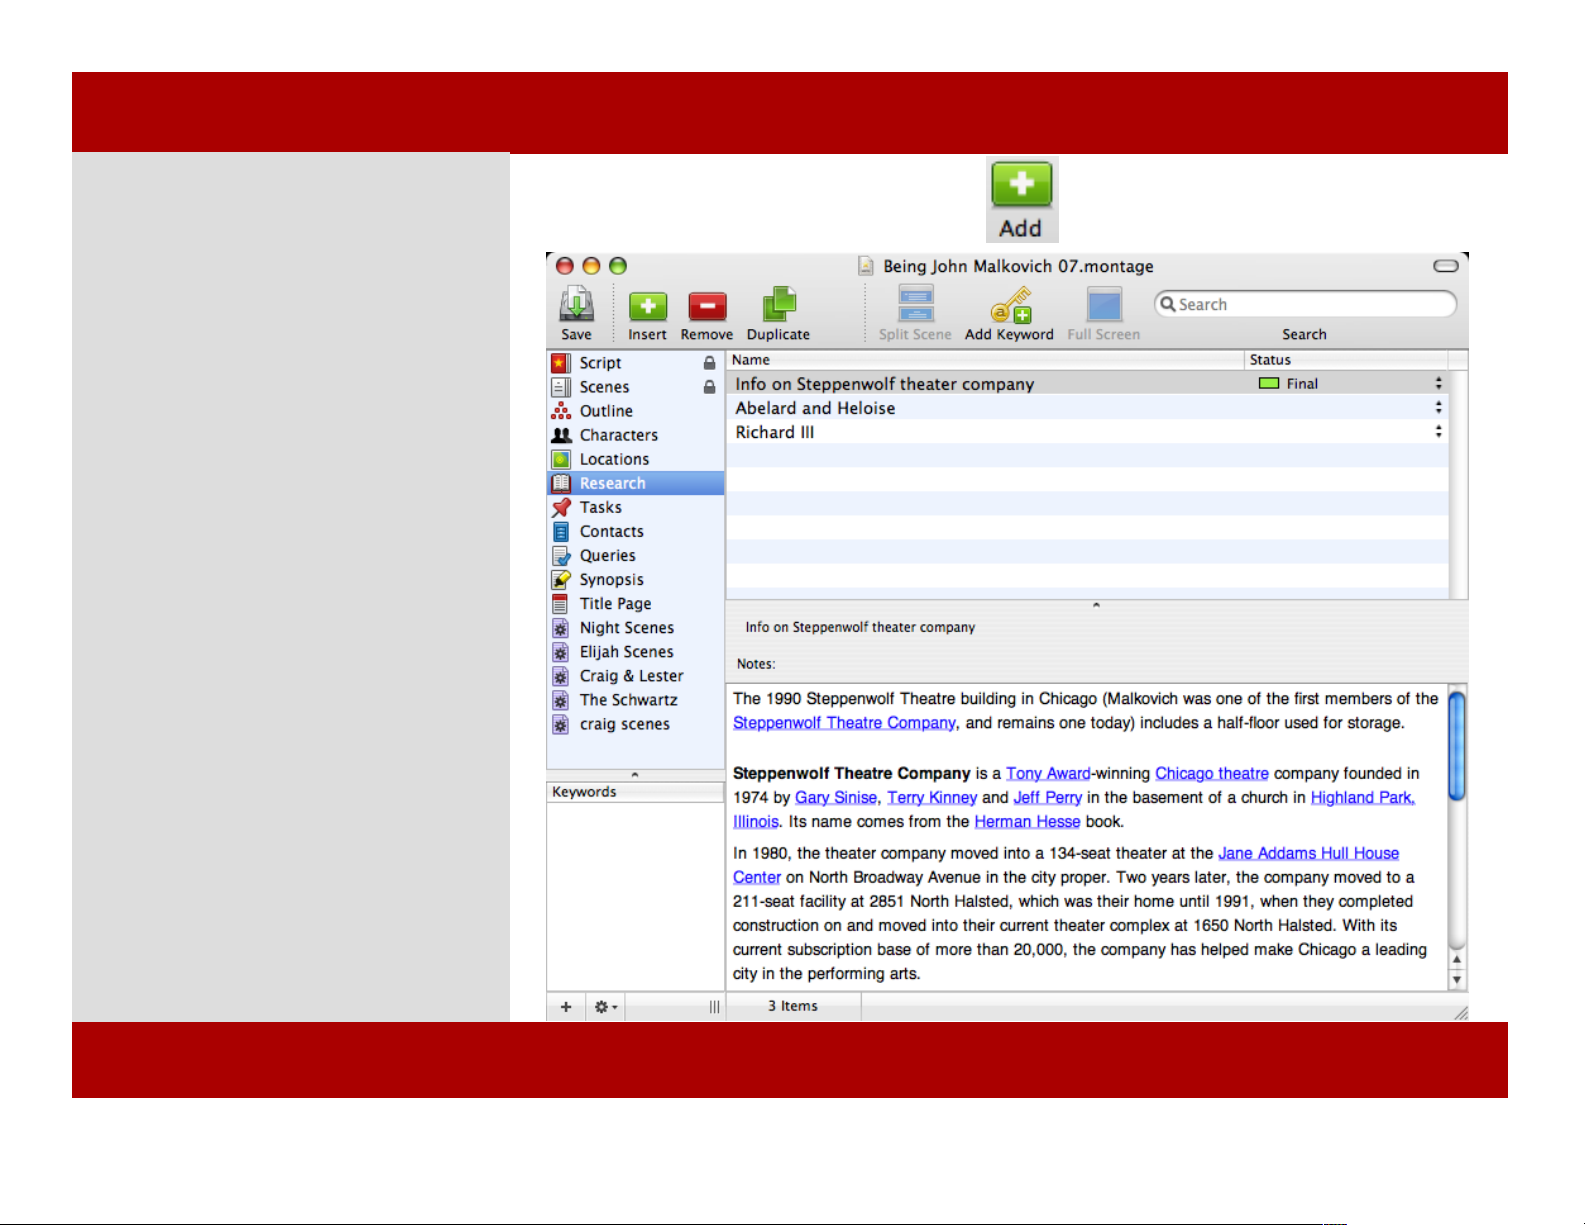
Adding a Research Item
To add a research item:
1 Click the Add button in the
Toolbar or press Command - Shift - N
2 A new research item appears in the
list.
3 Enter a name for the research item.
4 Enter any details such as the status
of the character and notes, which can
include photos.
Note: Research items are helpful to flesh-
out ideas you have that don’t belong in
your script yet or background information
that is pertinent to your script
development.
1
Chapter 12: Research View
Adding a Research Item
To add a research item:
1 Click the Add button in the
Toolbar or press Command - Shift - N
2 A new research item appears in the
list.
3 Enter a name for the research item.
4 Enter any details such as the status
of the character and notes, which can
include photos.
Note: Research items are helpful to fleshout ideas you have that don’t belong in
your script yet or background information
that is pertinent to your script
development.
1
66 of 124
Chapter 12: Research View
Page 67

Chapter 13
Tasks View
Manage the things you need to accomplish from within
Montage by using the Tasks view. Tasks contain a name, notes,
a start date, a status, and a completed date.
Tasks View
In This Chapter:
Adding a Task
MONTAGE
Chapter 13
Tasks View
Manage the things you need to accomplish from within
Montage by using the Tasks view. Tasks contain a name, notes,
a start date, a status, and a completed date.
Tasks View
In This Chapter:
Adding a Task
MONTAGE
67 of 124
Page 68
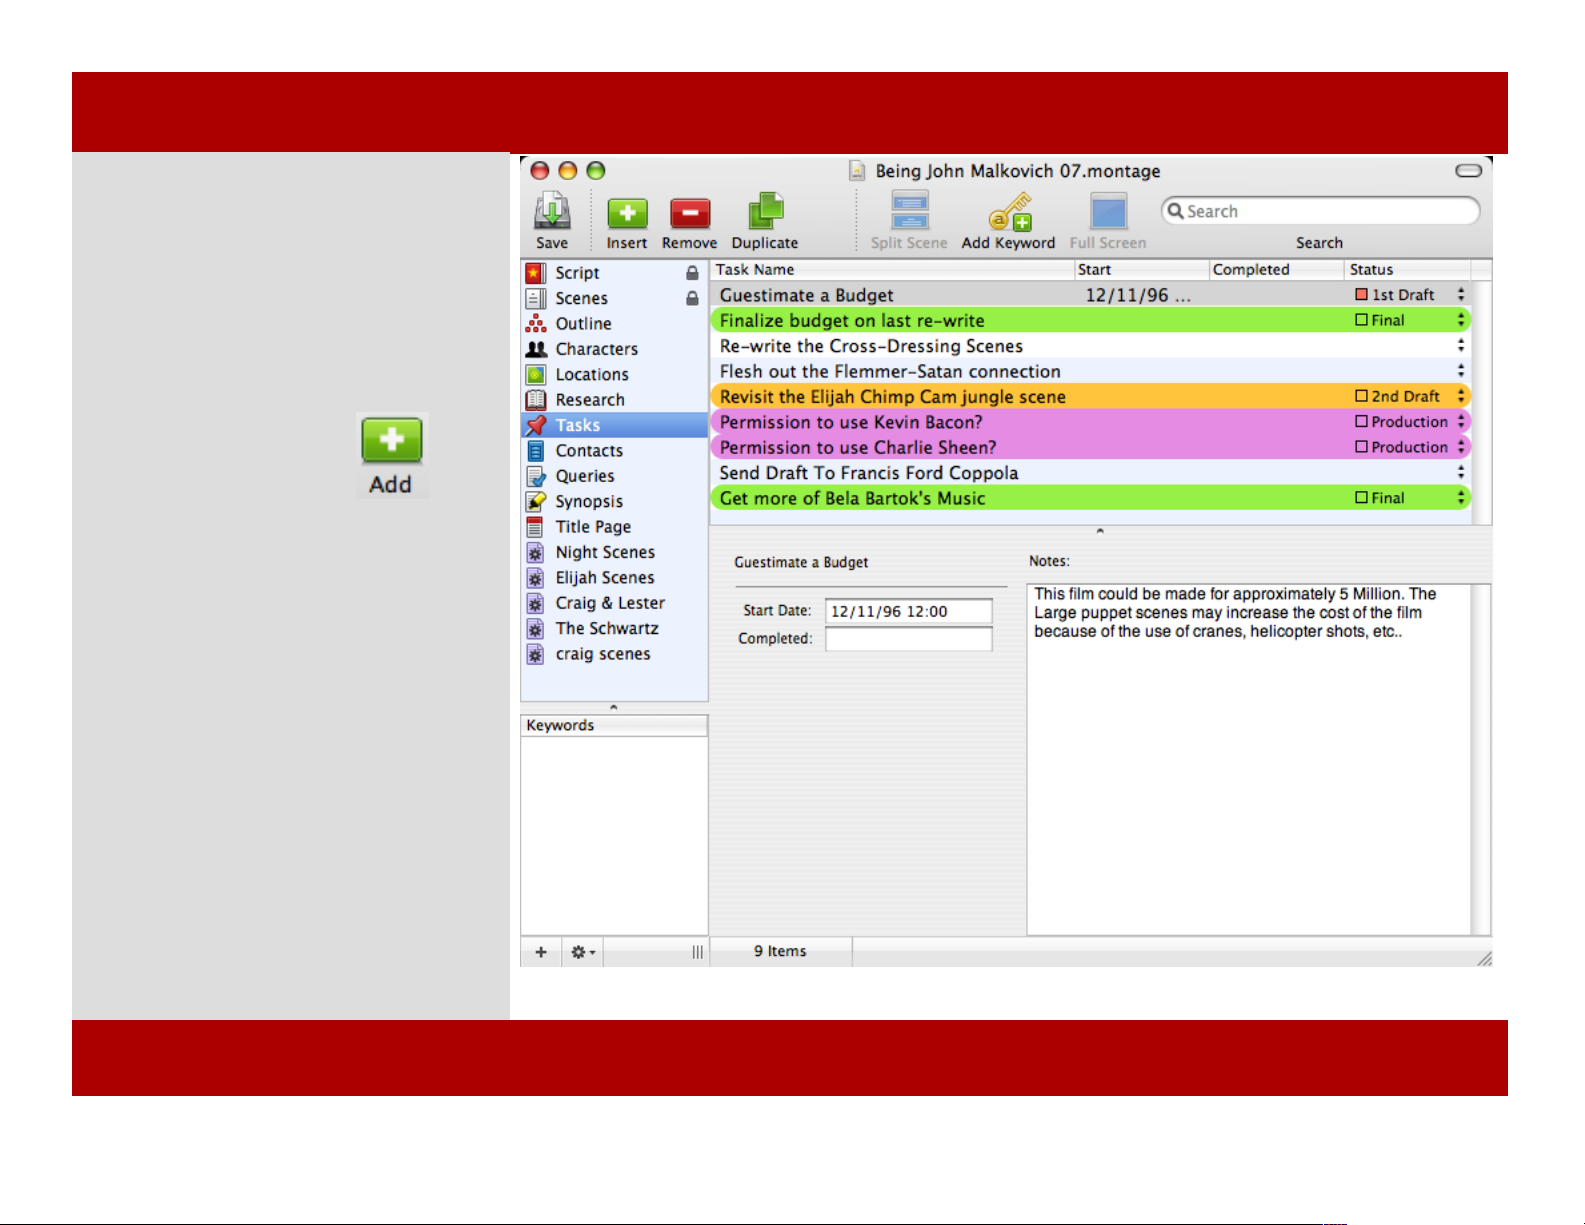
Adding a Task
To add a task:
1 Click the Add button in the
Toolbar or press Command - Shift - N.
2 A new task text box appears.
3 Enter a task name.
4 Enter any details such as the status
of the task, dates, and notes, which can
include photos.
Chapter 13: Tasks View
68 of 124
Chapter 13: Tasks View
Page 69

Chapter 14
Contacts View
Contacts are people or organizations to whom you can submit
your script. Contacts include thousands of managers, agents,
and production companies that might assist in your
representation and moving your script forward.
Contacts in Montage are integrated with your Apple Address
Book software. In this chapter you will learn how to download
a list of industry specific contacts that match up to the script(s)
you are writing. Later, you’ll learn how contacts and queries
can be associated with one another to aid you in the script
submission process.
Contacts View
In This Chapter:
Adding a Contact
Downloading Contacts
Viewing Contacts in
Address Book
MONTAGE
Chapter 14
Contacts View
Contacts are people or organizations to whom you can submit
your script. Contacts include thousands of managers, agents,
and production companies that might assist in your
representation and moving your script forward.
Contacts in Montage are integrated with your Apple Address
Book software. In this chapter you will learn how to download
a list of industry specific contacts that match up to the script(s)
you are writing. Later, you’ll learn how contacts and queries
can be associated with one another to aid you in the script
submission process.
Contacts View
In This Chapter:
Adding a Contact
Downloading Contacts
Viewing Contacts in
Address Book
MONTAGE
69 of 124
Page 70
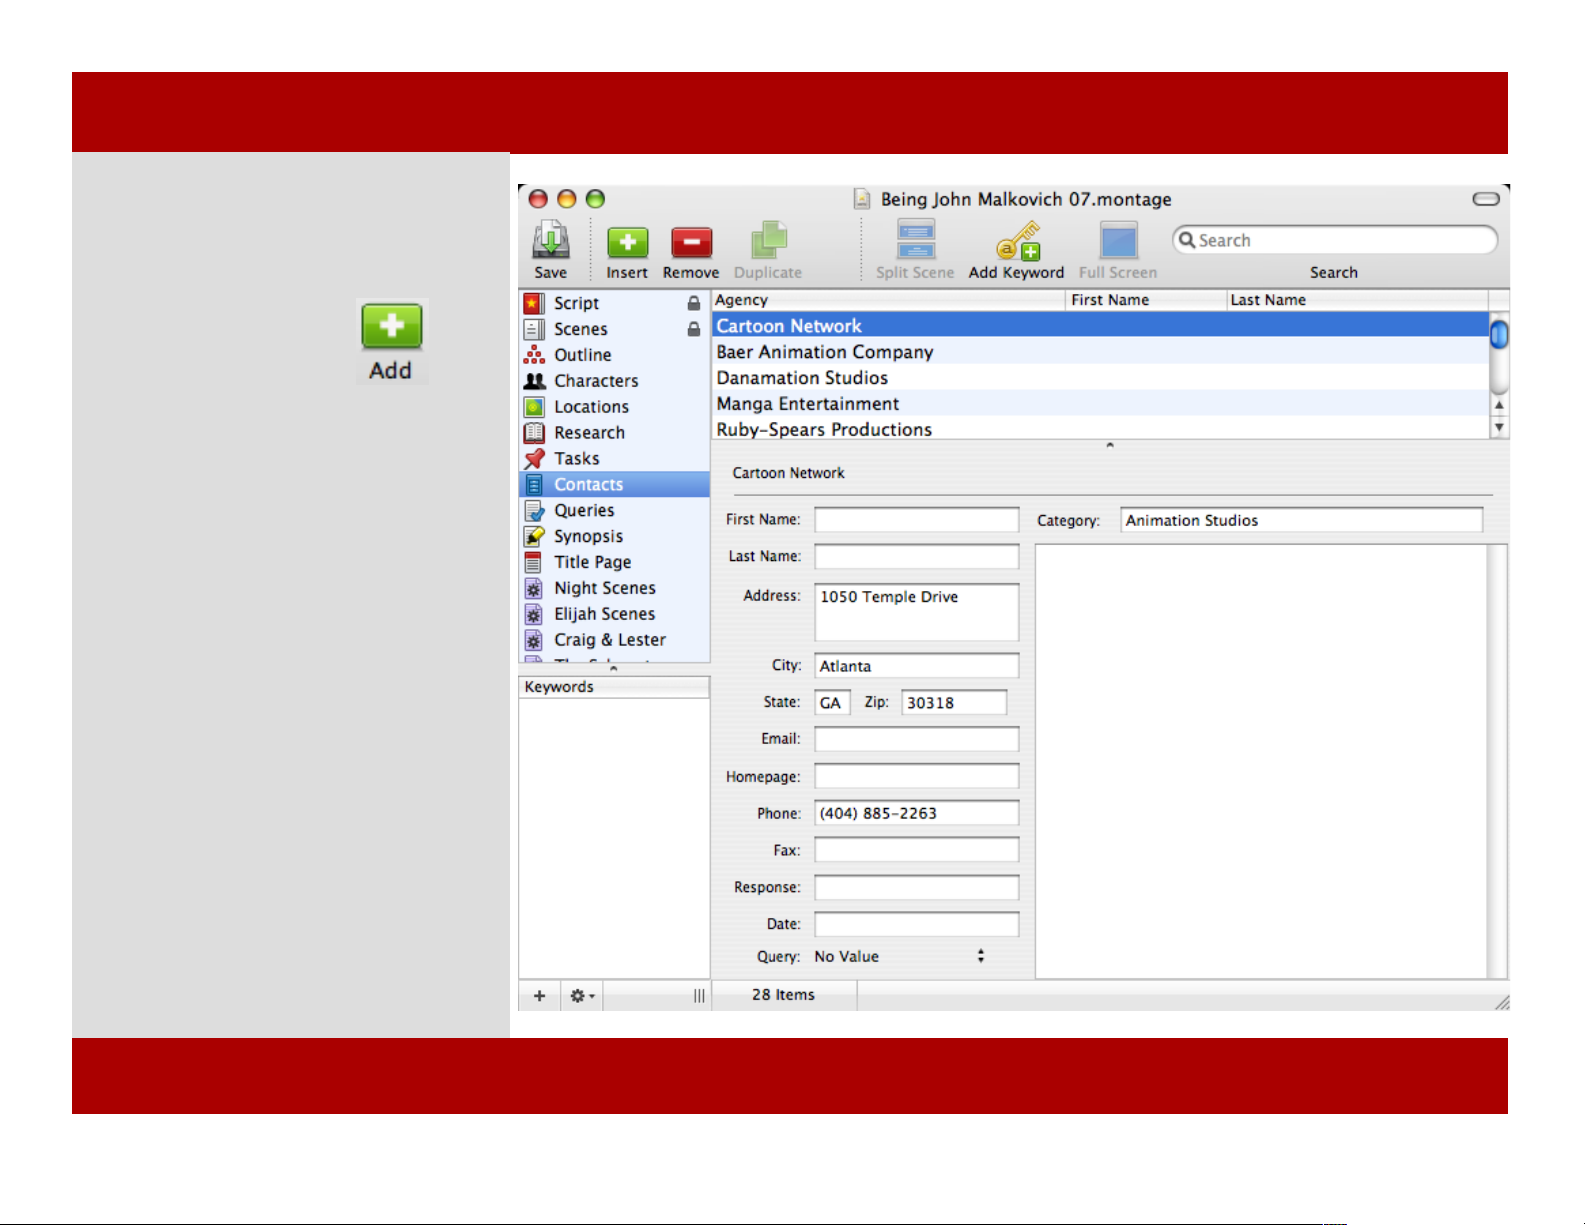
Adding a Contact
To add a contact:
1 Click the Add button in
the Toolbar or
press Command - Shift - N.
2 A new text box appears below the
currently selected scene.
3 Type in a name for the contact and
it is immediately available in Address
Book.
4 Add notes for the Contact which
can include pictures.
Note: Deleting a contact from Montage will
also delete it from Address Book.
Contacts have the following fields:
First Name, Last Name, Agency, Address,
City, State, Zip, Email, Homepage, Phone,
Fax, Response, Date, and Notes.
Chapter 14: Contacts View
Adding a Contact
To add a contact:
1 Click the Add button in
the Toolbar or
press Command - Shift - N.
2 A new text box appears below the
currently selected scene.
3 Type in a name for the contact and
it is immediately available in Address
Book.
4 Add notes for the Contact which
can include pictures.
Note: Deleting a contact from Montage will
also delete it from Address Book.
Contacts have the following fields:
First Name, Last Name, Agency, Address,
City, State, Zip, Email, Homepage, Phone,
Fax, Response, Date, and Notes.
70 of 124
Chapter 14: Contacts View
Page 71
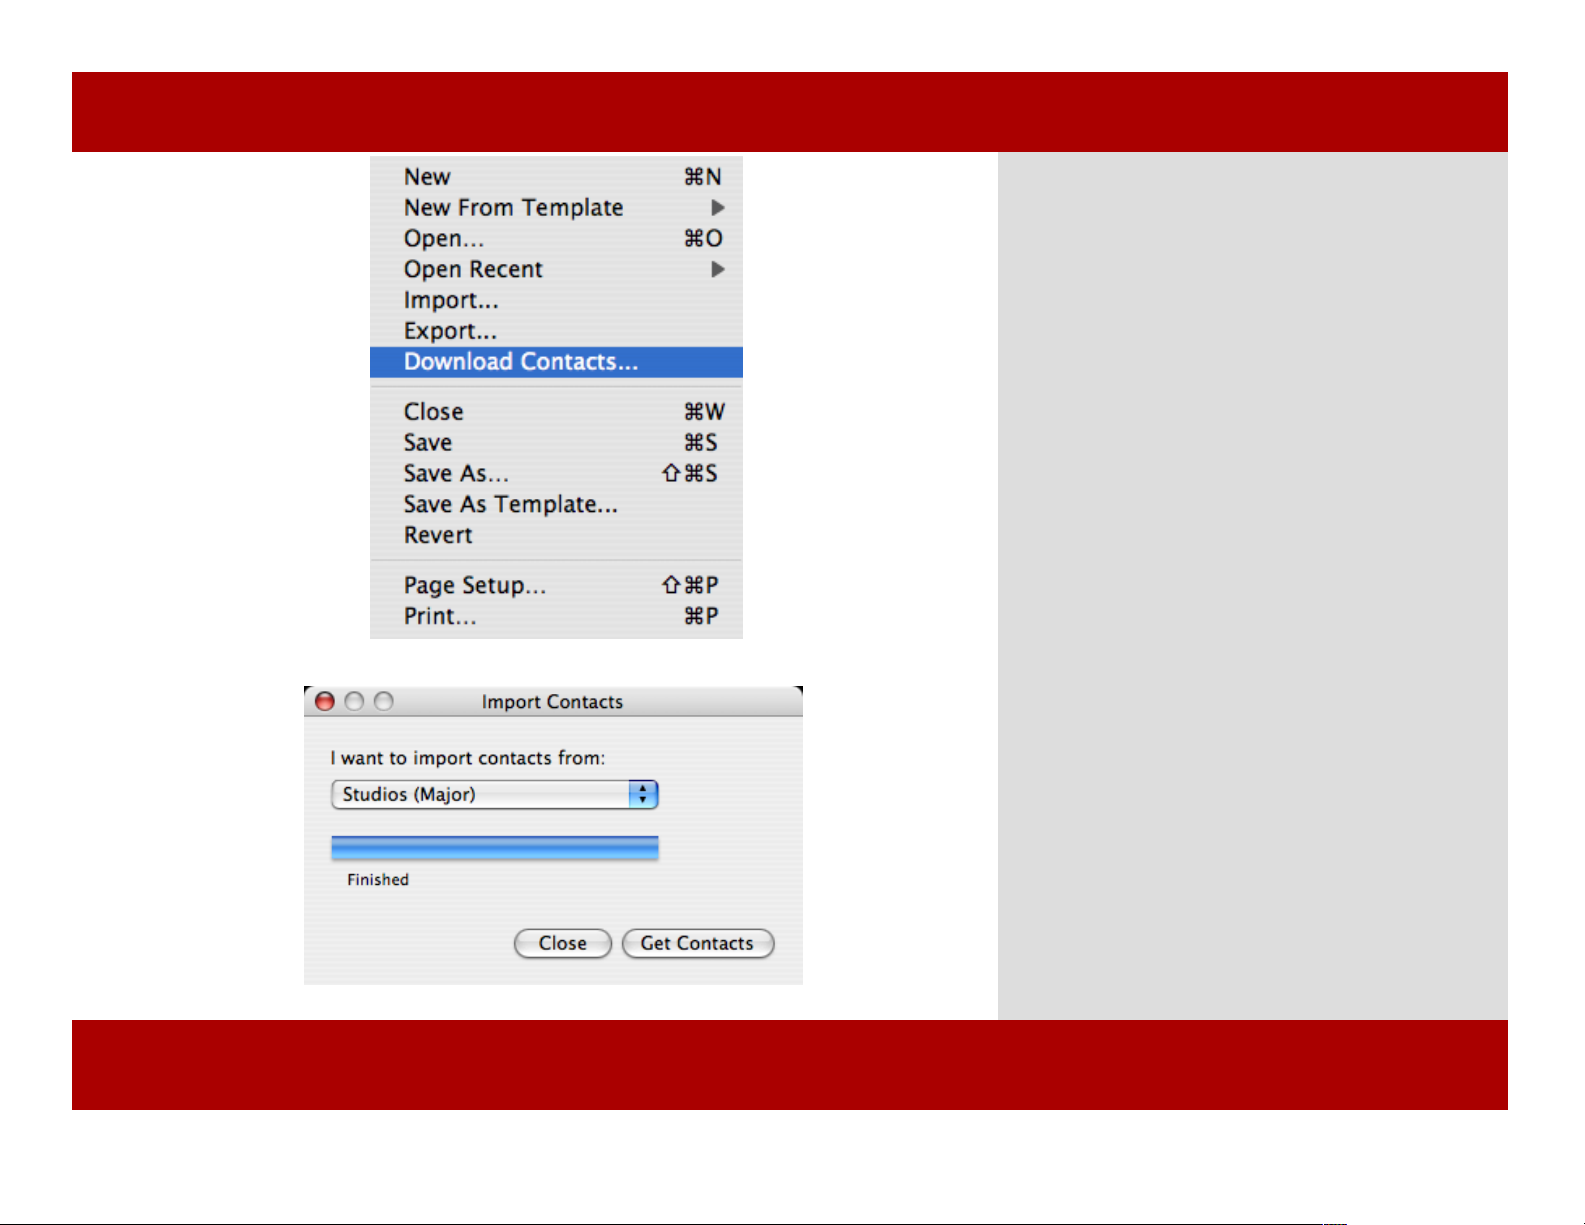
Downloading Contacts
1
2
To download a contact:
1 Select Download Contacts... from the File
Menu.
A dialog appears.
2 Choose the type of contacts you want to
download from the pop-up menu.
2 Click Get Contacts.
When the download finishes, click Close.
Note: The contacts are stored in the Mac OS X
Address Book. They are in a group called Montage
Contacts.
Chapter 14: Contacts View
Downloading Contacts
1
2
To download a contact:
1 Select Download Contacts... from the File
Menu.
A dialog appears.
2 Choose the type of contacts you want to
download from the pop-up menu.
2 Click Get Contacts.
When the download finishes, click Close.
Note: The contacts are stored in the Mac OS X
Address Book. They are in a group called Montage
Contacts.
Chapter 14: Contacts View
71 of 124
Page 72
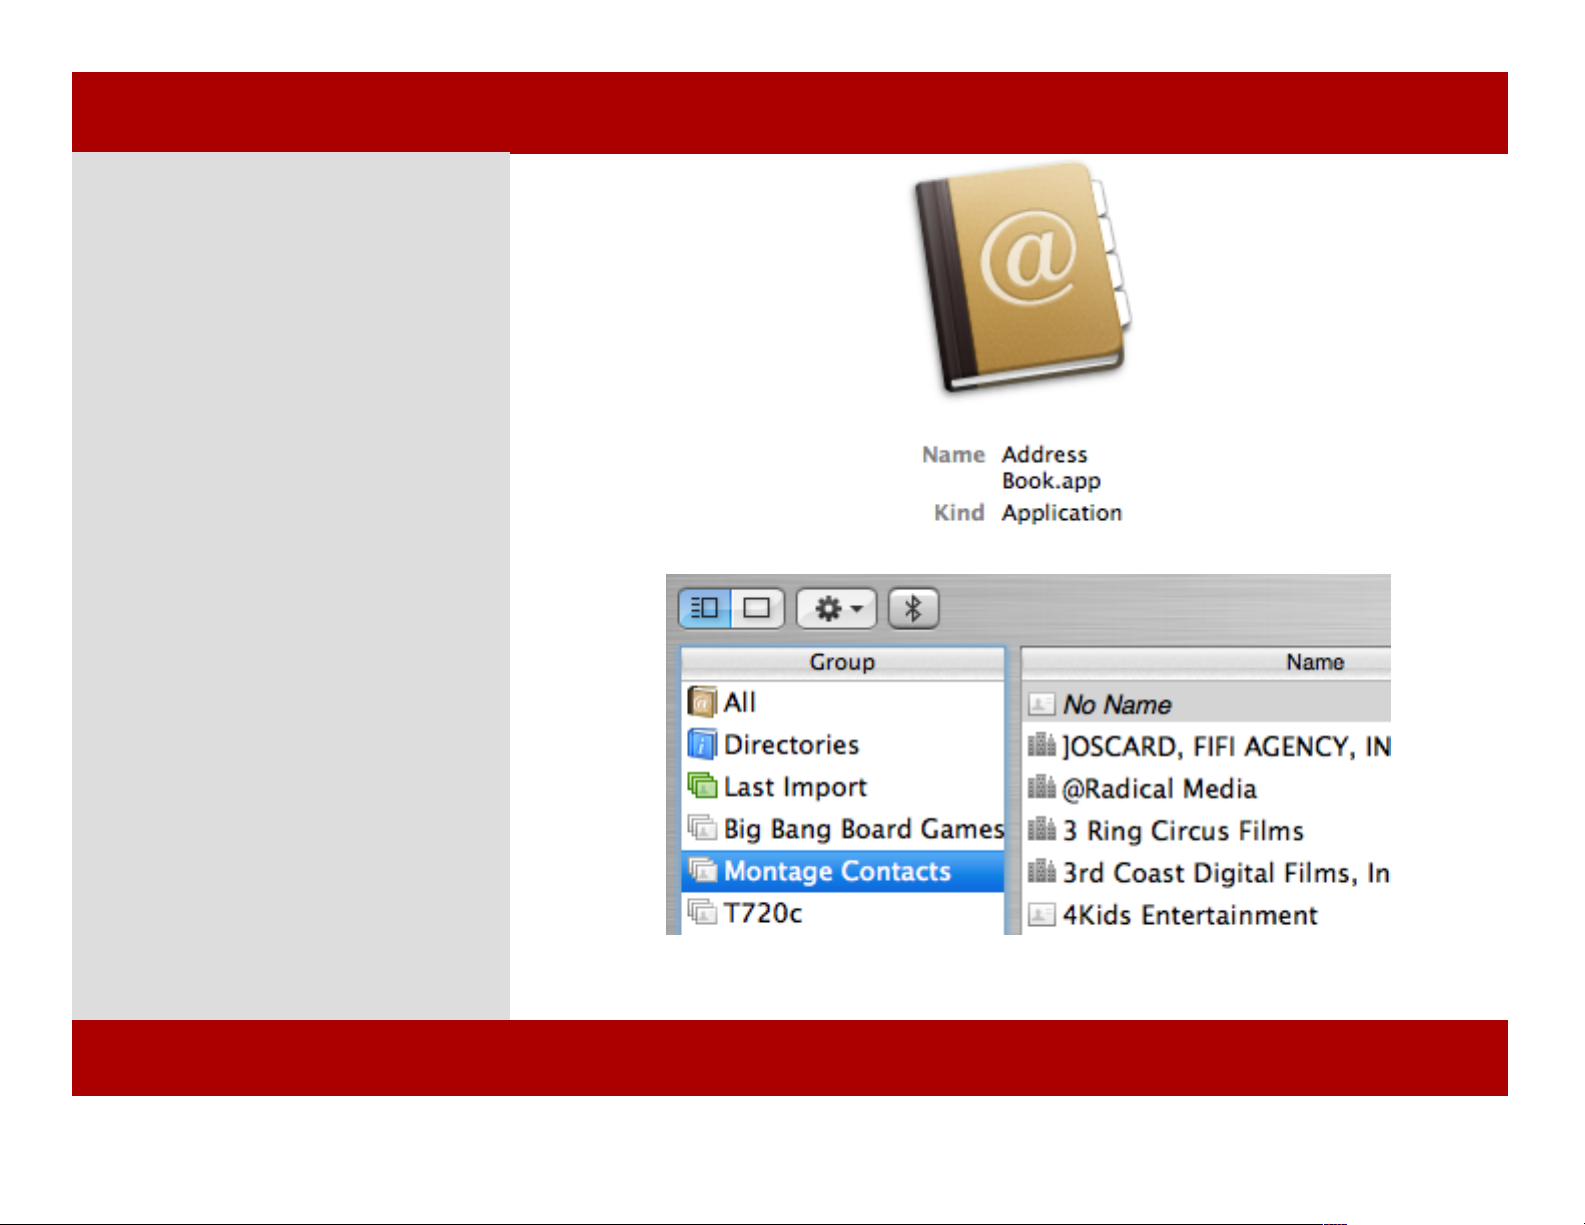
Viewing Contacts in Address Book
To view a contact in Address book:
1 Launch Address Book.
2 In Address Book you’ll see a group
called ‘Montage Contacts.’
Note: Contacts that you add in Montage
are stored in Address Book. They will be
globally available to all applications that tie
in to Address Book, similar to how Apple’s
Mail does this.
1
2
Chapter 14: Contacts View
Viewing Contacts in Address Book
To view a contact in Address book:
1 Launch Address Book.
2 In Address Book you’ll see a group
called ‘Montage Contacts.’
Note: Contacts that you add in Montage
are stored in Address Book. They will be
globally available to all applications that tie
in to Address Book, similar to how Apple’s
Mail does this.
1
2
72 of 124
Chapter 14: Contacts View
Page 73

Chapter 15
Queries View
Once you have completed your script, you need to write a
query letter. Everything begins with a query letter (or a query
phone call) and ultimately could be considered just as
important as the script itself.
One of the biggest misconceptions many novice writers have
when preparing to "get a foot in the door" with a decision
maker is they should blatantly ask permission to send their
script. While this approach is acceptable, some believe a query
letter should be sent with a subtle strategy in mind: to intrigue
those interested in responding to request a copy of your script.
Under no circumstances should you ever send an unsolicited
script. This is both rude and irresponsible and will most likely
turn off the decision maker. Consider your script intellectual
property and be willing to protect it.
Queries View
In This Chapter:
Creating a Query
Letter
Attaching a Query
Letter to a Contact
MONTAGE
Chapter 15
Queries View
Once you have completed your script, you need to write a
query letter. Everything begins with a query letter (or a query
phone call) and ultimately could be considered just as
important as the script itself.
One of the biggest misconceptions many novice writers have
when preparing to "get a foot in the door" with a decision
maker is they should blatantly ask permission to send their
script. While this approach is acceptable, some believe a query
letter should be sent with a subtle strategy in mind: to intrigue
those interested in responding to request a copy of your script.
Under no circumstances should you ever send an unsolicited
script. This is both rude and irresponsible and will most likely
turn off the decision maker. Consider your script intellectual
property and be willing to protect it.
Queries View
In This Chapter:
Creating a Query
Letter
Attaching a Query
Letter to a Contact
MONTAGE
73 of 124
Page 74
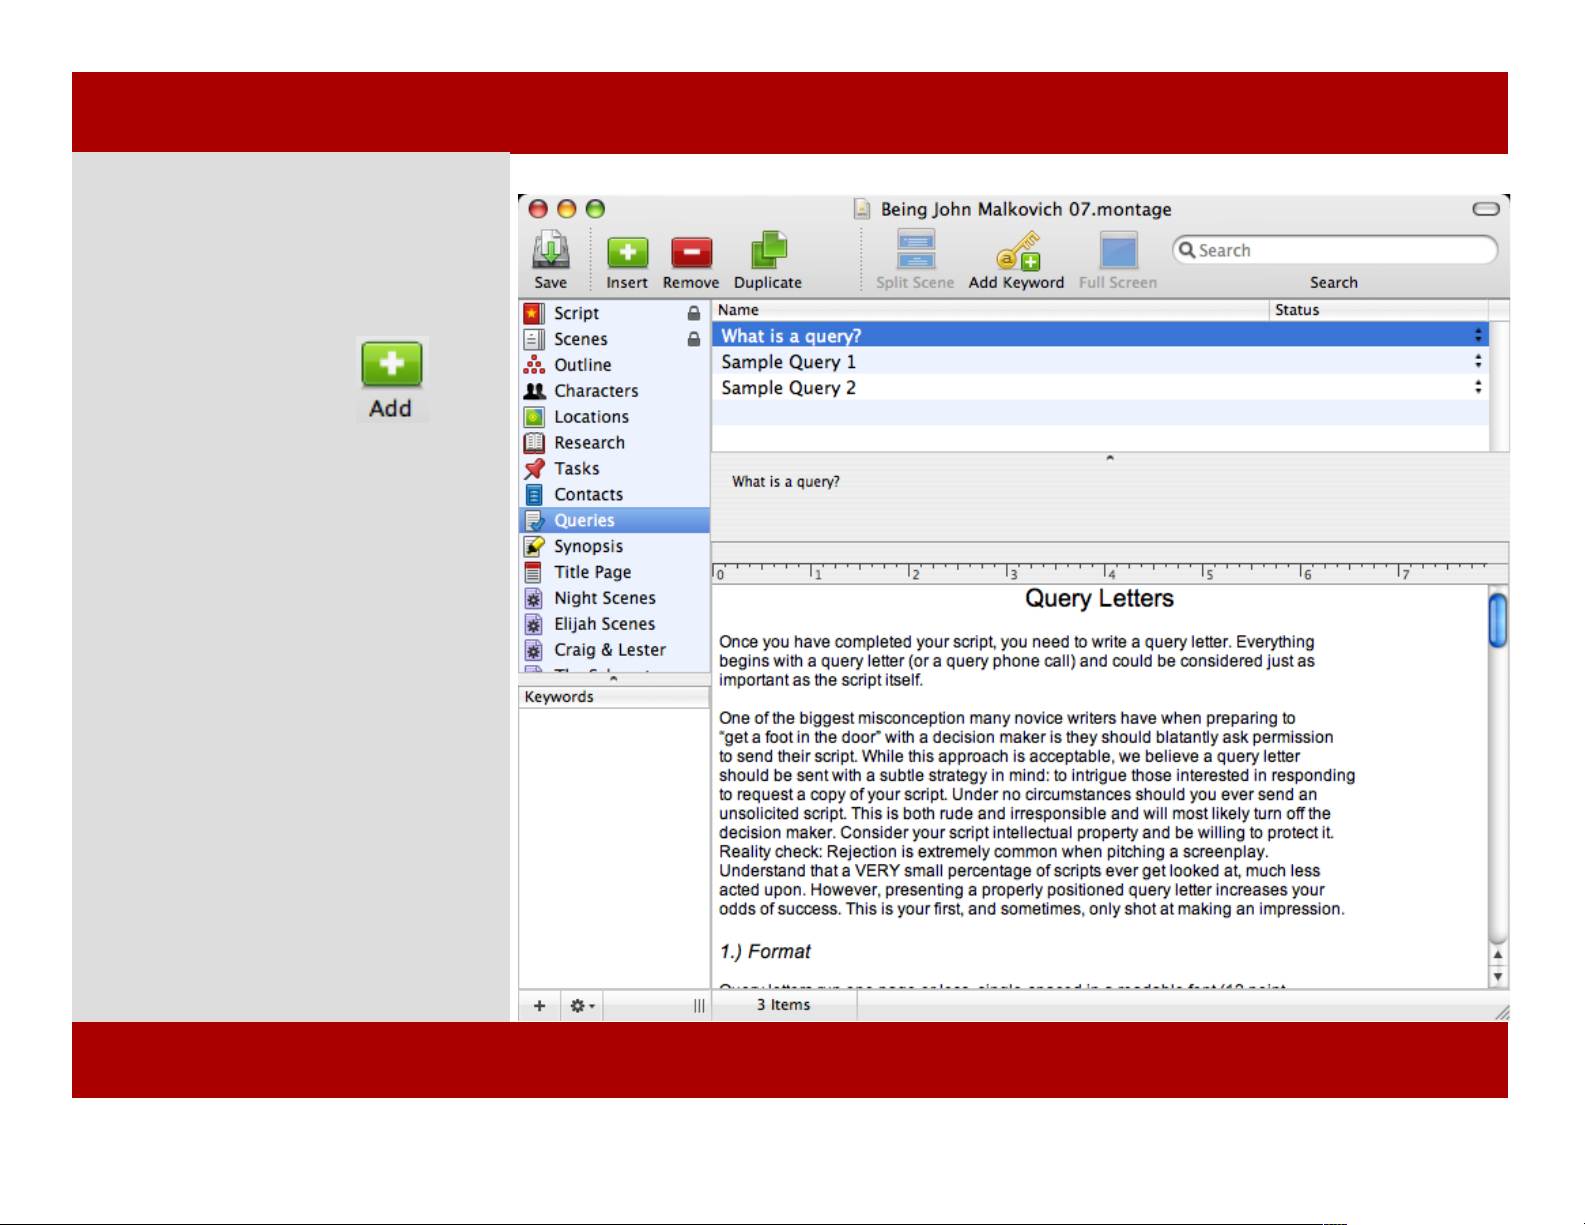
Creating a Query Letter
To Create a Query Letter:
1 Click the Add button in
the Toolbar or press Command - Shift -
N.
2 A new query text box appears.
3 Type your letter.
Chapter 15: Queries View
Creating a Query Letter
To Create a Query Letter:
1 Click the Add button in
the Toolbar or press Command - Shift N.
2 A new query text box appears.
3 Type your letter.
74 of 124
Chapter 15: Queries View
Page 75
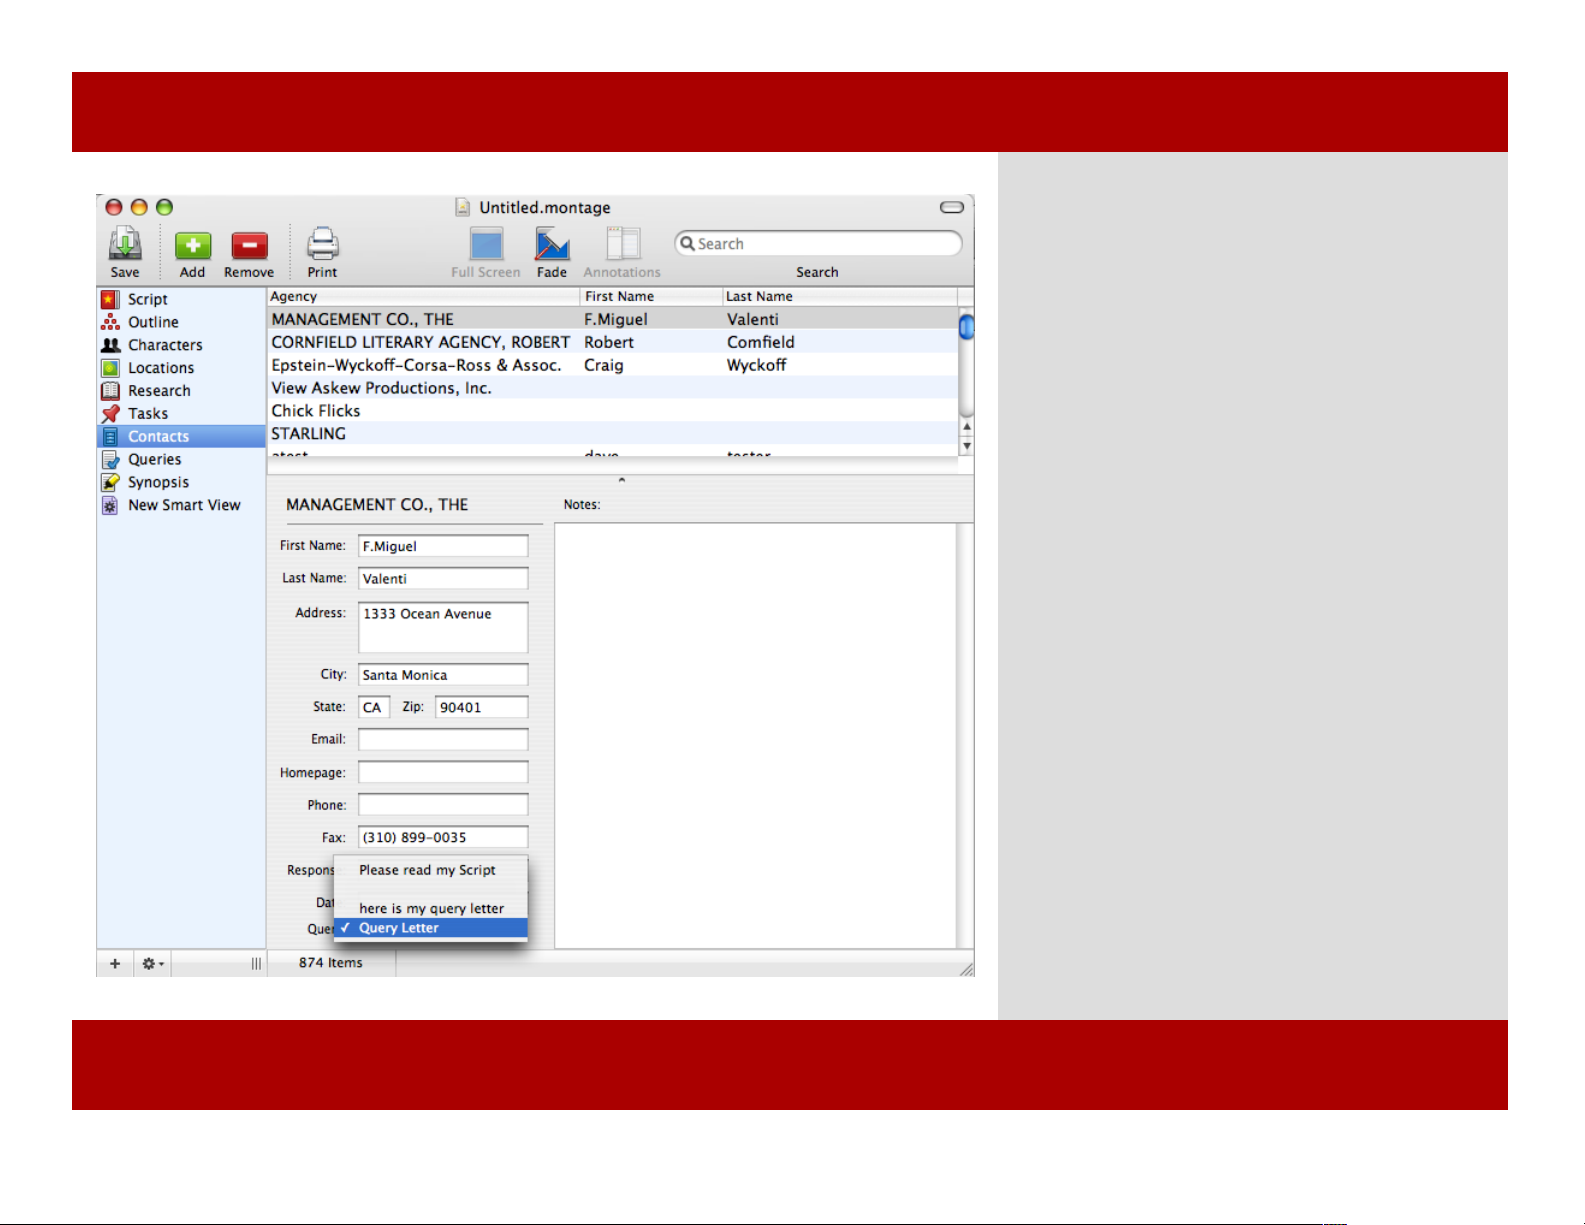
Attaching a Query Letter to a Contact
1
To attach a query letter to a contact:
1 In contact view, click on the pop-up for
the Query Letter.
If you haven’t made a query letter you will be
prompted to do so.
If you have query letters a pop-up menu will
appear.
Choose the query letter you wish to associate
with the contact.
Chapter 15: Queries View
Attaching a Query Letter to a Contact
1
To attach a query letter to a contact:
1 In contact view, click on the pop-up for
the Query Letter.
If you haven’t made a query letter you will be
prompted to do so.
If you have query letters a pop-up menu will
appear.
Choose the query letter you wish to associate
with the contact.
Chapter 15: Queries View
75 of 124
Page 76

Reserved for future content.
Chapter 15: Queries View
Reserved for future content.
76 of 124
Chapter 15: Queries View
Page 77

Chapter 16
Synopsis View
A synopsis is typically a one page summary, usually double
spaced and in a 12-point font for easy reading. It should tell a
story from beginning, to middle, to end and focus on the main
characters, their objectives, and conflicts. The goal, of course, is
to introduce the reader to major events that occur in each act;
subtly revealing major twists, turns and plot points.
Don't forget the key element, your dramatic conclusion.
Synopsis View
In This Chapter:
Creating a Script
Synopsis
MONTAGE
Synopsis View
A synopsis is typically a one page summary, usually double
spaced and in a 12-point font for easy reading. It should tell a
story from beginning, to middle, to end and focus on the main
characters, their objectives, and conflicts. The goal, of course, is
to introduce the reader to major events that occur in each act;
subtly revealing major twists, turns and plot points.
Don't forget the key element, your dramatic conclusion.
Synopsis View
In This Chapter:
Creating a Script
Synopsis
MONTAGE
77 of 124
Page 78
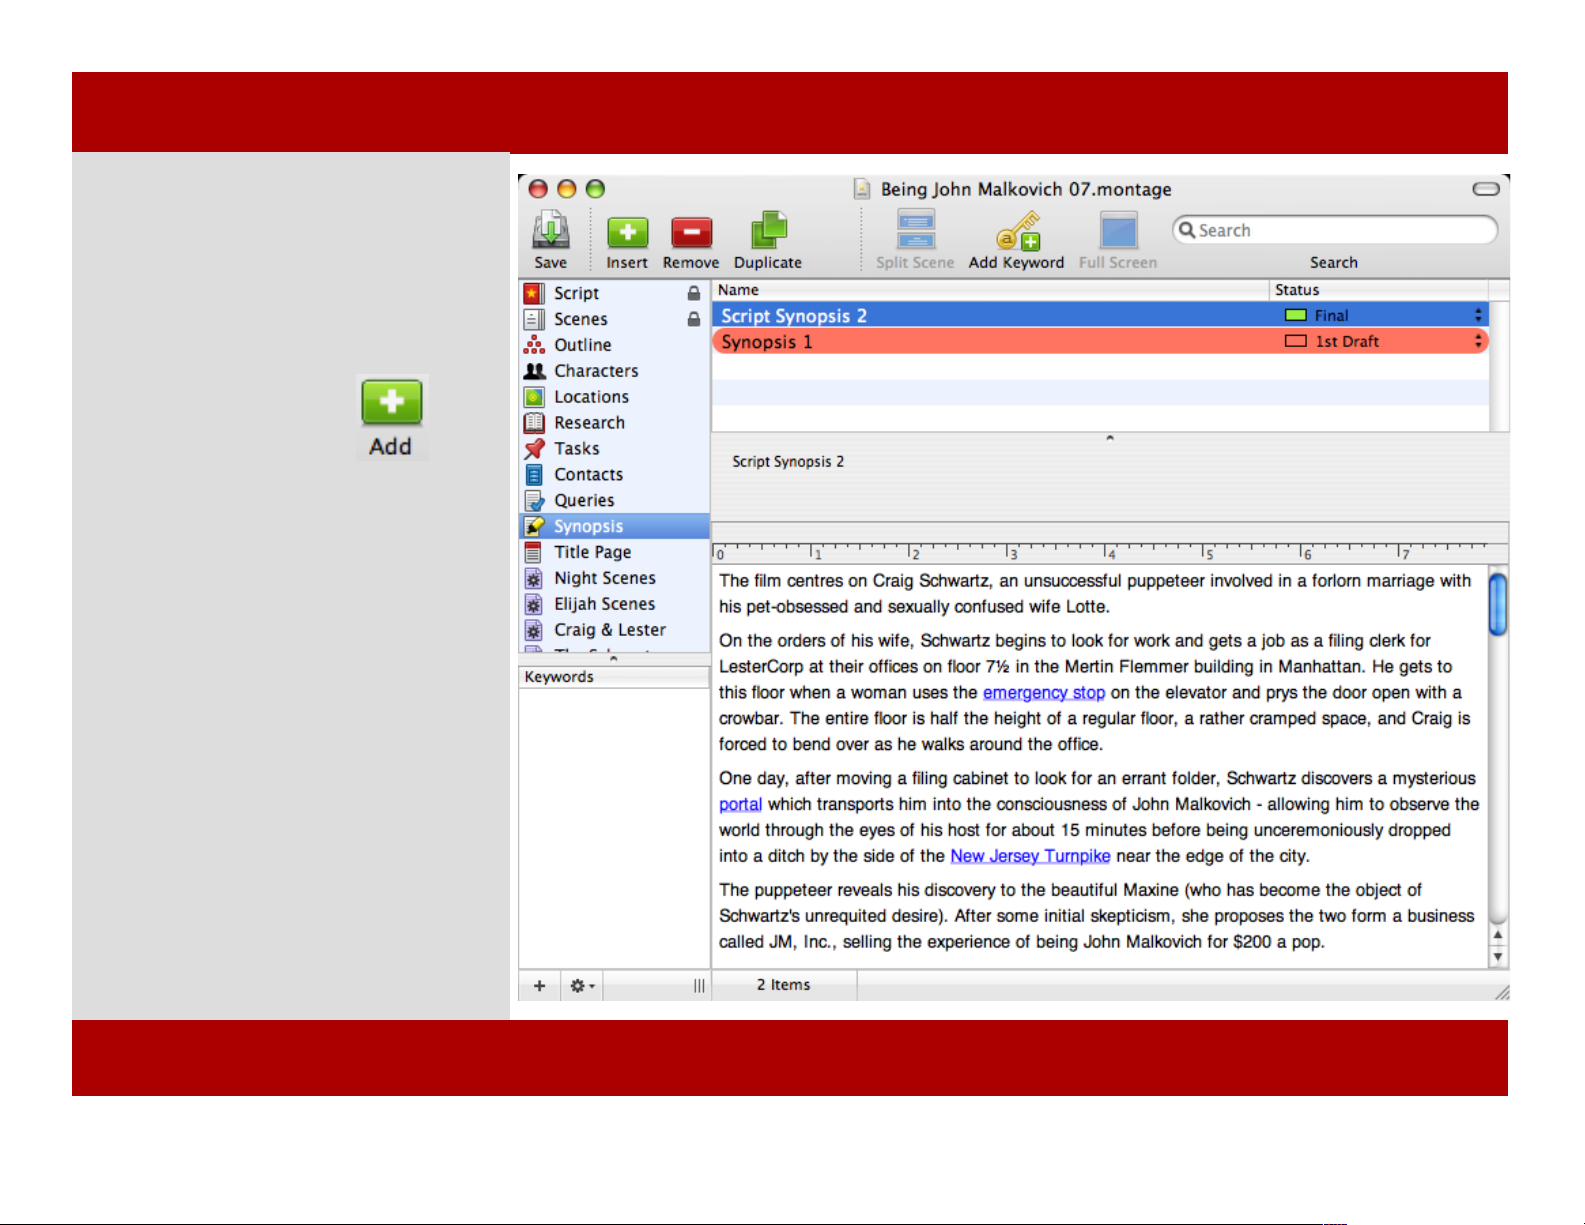
Creating a Script Synopsis
To create a script synopsis:
1 Click the Add button in
the Toolbar or press Command - Shift -
N
2 A new text box appears.
3 Enter a name for the synopsis, set
the status, and then click into the main
area to write your synopsis.
Note: You can have as many synopses as
you wish. You may want to try a couple
different flavors and see which one plays
best.
Chapter 16: Synopsis View
Creating a Script Synopsis
To create a script synopsis:
1 Click the Add button in
the Toolbar or press Command - Shift N
2 A new text box appears.
3 Enter a name for the synopsis, set
the status, and then click into the main
area to write your synopsis.
Note: You can have as many synopses as
you wish. You may want to try a couple
different flavors and see which one plays
best.
78 of 124
Chapter 16: Synopsis View
Page 79

Chapter 17
Title Page View
The first page of your script should contain: the title, your
name, and most importantly your contact info.
The title should be entirely capitalized and centered.
If you worked on the script with someone else, you should
include an ampersand “&” between your names. If you have an
agent, you probably already know all of this, and where to put
your agent’s name on the title page.
Your contact info can be located either bottom left or bottom
right. Make sure it is easy for someone to get a hold of you.
Whether or not to include the script registration number or
“by” in between the title and your name is debatable. Don’t
include revision numbers unless specifically directed to do so.
Title Page View
In This Chapter:
Creating a Title Page
Printing a Title Page
MONTAGE
Chapter 17
Title Page View
The first page of your script should contain: the title, your
name, and most importantly your contact info.
The title should be entirely capitalized and centered.
If you worked on the script with someone else, you should
include an ampersand “&” between your names. If you have an
agent, you probably already know all of this, and where to put
your agent’s name on the title page.
Your contact info can be located either bottom left or bottom
right. Make sure it is easy for someone to get a hold of you.
Whether or not to include the script registration number or
“by” in between the title and your name is debatable. Don’t
include revision numbers unless specifically directed to do so.
Title Page View
In This Chapter:
Creating a Title Page
Printing a Title Page
MONTAGE
79 of 124
Page 80
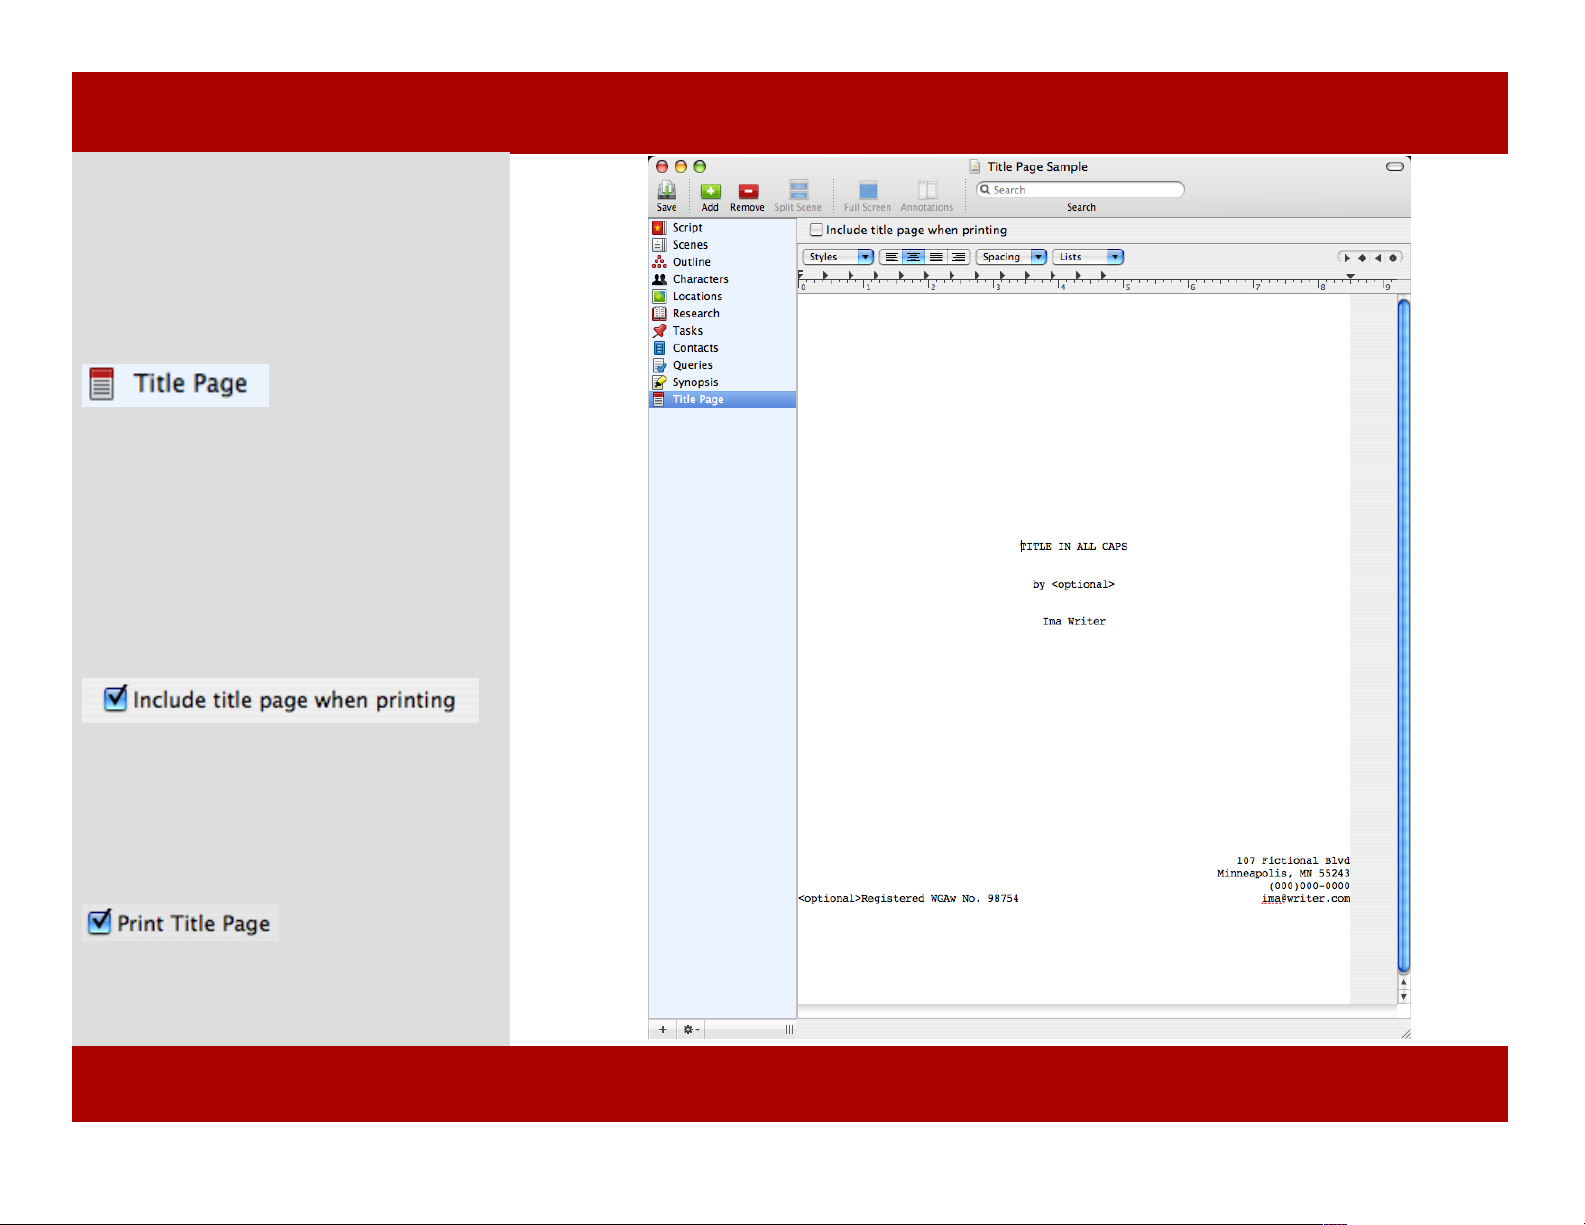
Creating a Title Page
To create a title page:
1 Click the Title Page icon (pictured
below)
from the view pane.
2 Format your Title page by entering
your title, name, and contact info.
To print your script with the title page
be sure to place a checkmark next to
“Include title page when printing.”
Note: You can ensure the Title page prints
in File> Document Properties... Switch to
the Printing tab and place a checkmark
next to Print Title Page.
2
Chapter 17: Title Page View
80 of 124
Chapter 17: Title Page View
Page 81

Chapter 18
Smart Views
Montage employs a whole new way of writing scripts. For
instance, you write three versions of the same scene in Scene
View, all slightly different, with statuses of "First Draft"
"Second Draft" and "Third Draft". Then, create a Smart View to
view the script using only the "Third Draft" version.
There is great flexibility of making a view that shows only
things you want to see based on criteria you set. Now make
that view auto-updating and you understand the essence of
Smart Views. A Smart View can be used for script revisions and
for script breakdowns. With Smart Views, you can do all this
and more.
Smart Views can be based on any view. In this chapter, we’ll
show you how to set up a Smart View as well as take
advantage of Smart Views’ functionality.
Smart Views
In This Chapter:
Creating a Smart View
MONTAGE
Chapter 18
Smart Views
Montage employs a whole new way of writing scripts. For
instance, you write three versions of the same scene in Scene
View, all slightly different, with statuses of "First Draft"
"Second Draft" and "Third Draft". Then, create a Smart View to
view the script using only the "Third Draft" version.
There is great flexibility of making a view that shows only
things you want to see based on criteria you set. Now make
that view auto-updating and you understand the essence of
Smart Views. A Smart View can be used for script revisions and
for script breakdowns. With Smart Views, you can do all this
and more.
Smart Views can be based on any view. In this chapter, we’ll
show you how to set up a Smart View as well as take
advantage of Smart Views’ functionality.
Smart Views
In This Chapter:
Creating a Smart View
MONTAGE
81 of 124
Page 82
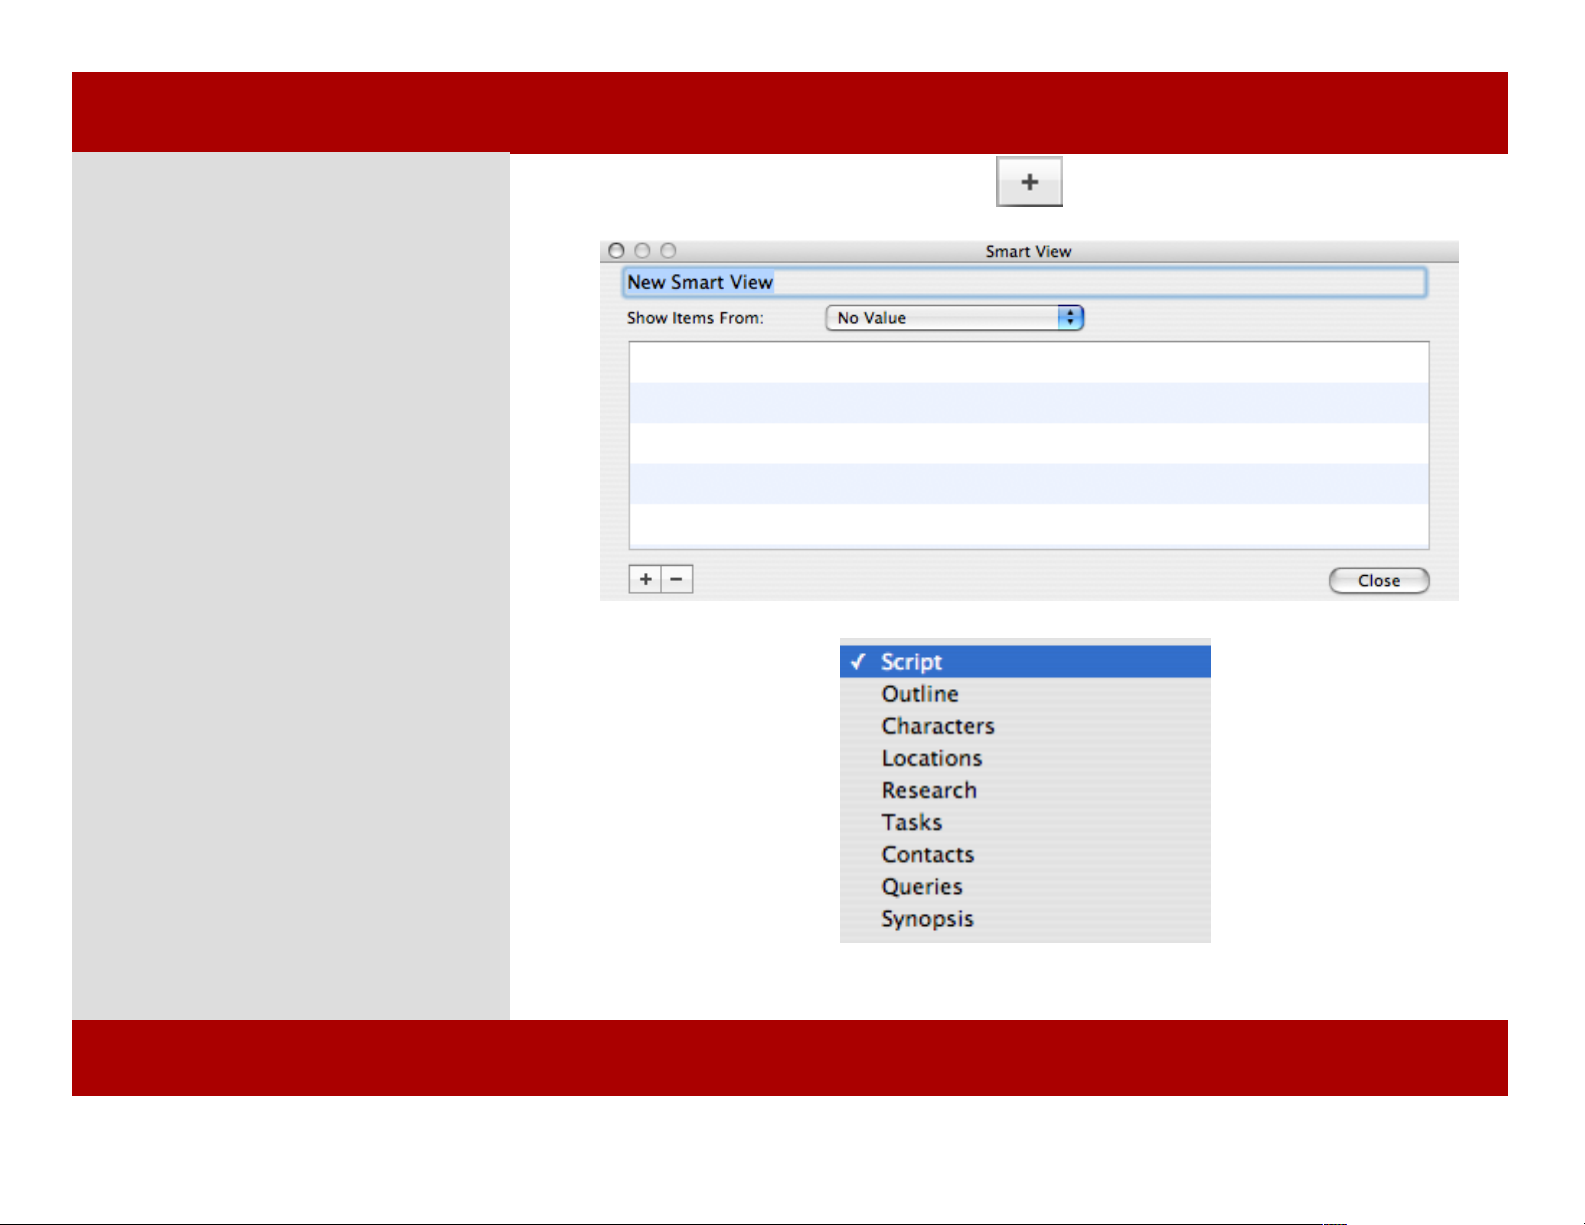
Creating a Smart View
To create a smart view:
1 Click the Add button in the view
area.
A Smart view window appears.
2 Select New Smart View... from the
contextual menu.
3 Type in a name for the Smart View.
4 Click on the pop-up menu labeled
Show Items From:
A pop-up menu appears.
Select a view on which to base the
Smart View.
(MORE)
1
2
4
Chapter 18: Smart Views
Creating a Smart View
To create a smart view:
1 Click the Add button in the view
area.
A Smart view window appears.
2 Select New Smart View... from the
contextual menu.
3 Type in a name for the Smart View.
4 Click on the pop-up menu labeled
Show Items From:
A pop-up menu appears.
Select a view on which to base the
Smart View.
(MORE)
1
2
4
82 of 124
Chapter 18: Smart Views
Page 83
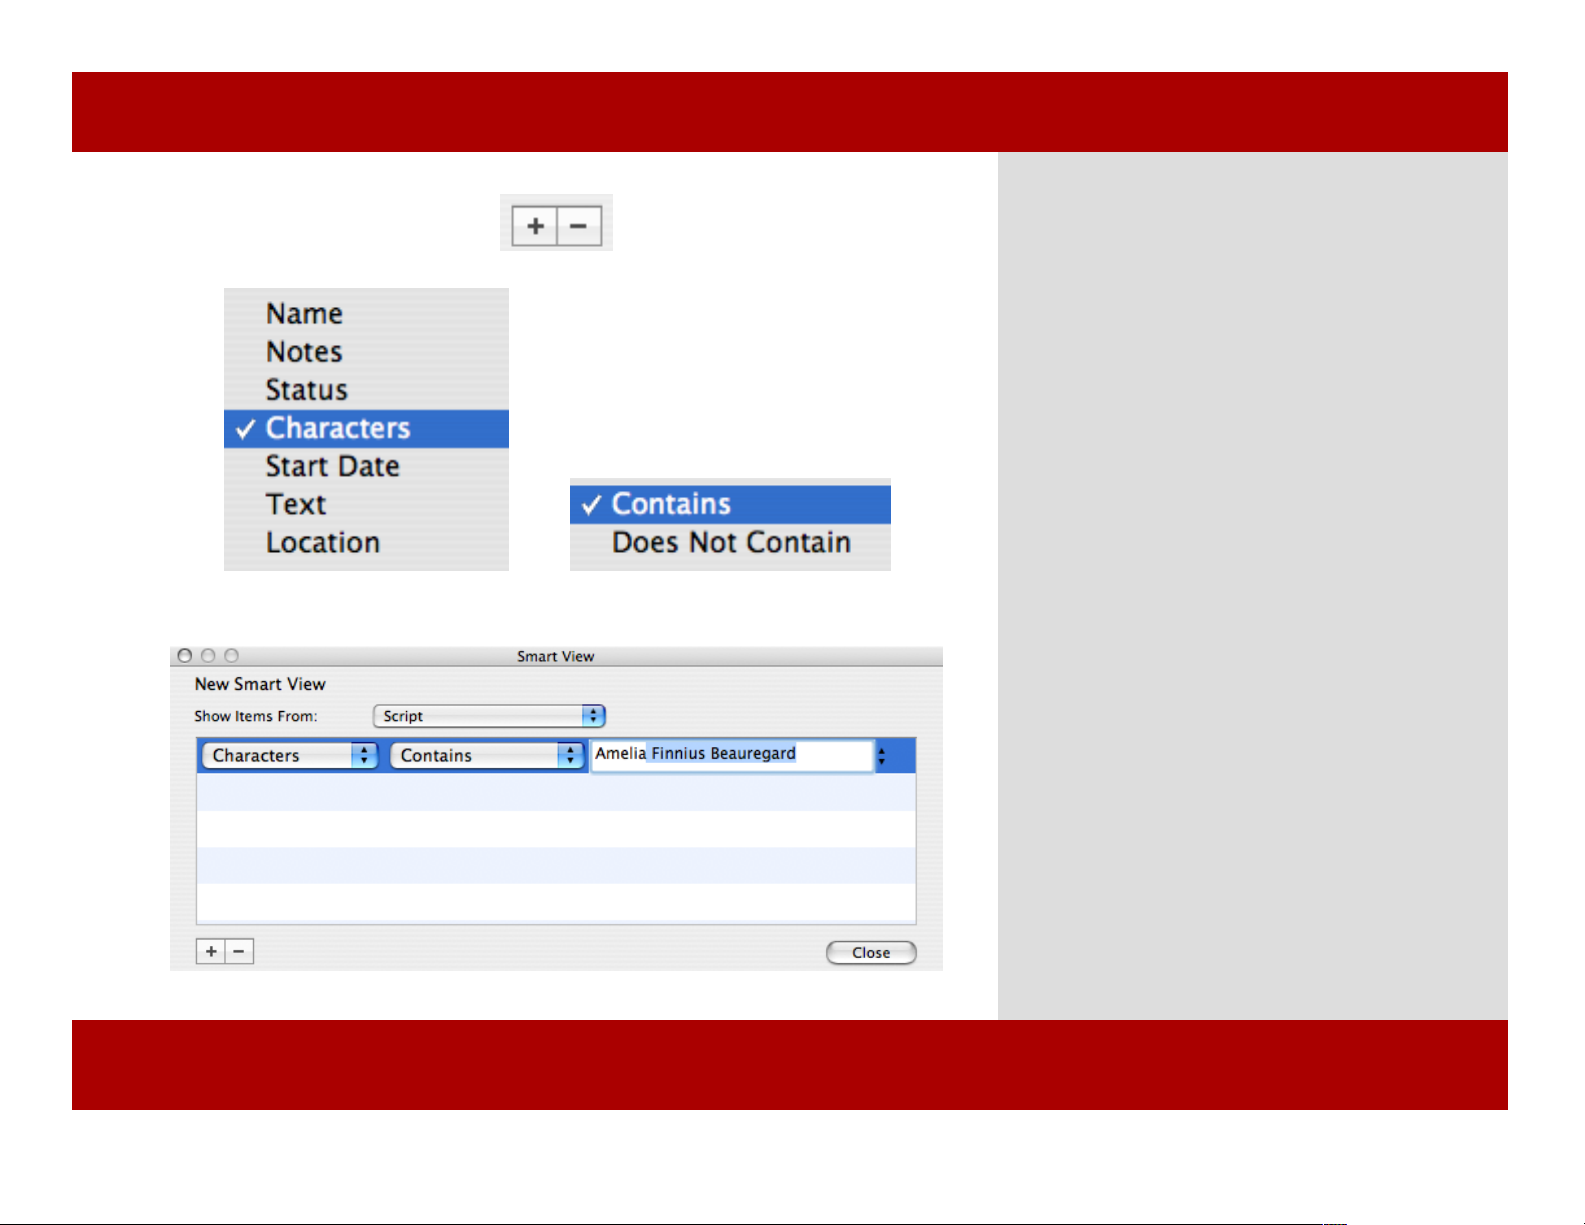
Creating a Smart View
5
6 7
8
(CONT’D)
5 Click the + button to add criteria.
two pop-up menus appear in the list.
3 Select the Subject of the criteria. In this
example choose, “Script.”
7 Select the Comparison of the criteria. In
this example choose, “Contains.”
8 Enter the Value of the criteria. In this
example start entering a Character name and
the name will be auto-filled.
9 Click the Close button or press the +
button to add more criteria.
Hint: You can use a Smart View to do a script
breakdown or to focus on one aspect or area of the
script.
Chapter 18: Smart Views
Creating a Smart View
5
6 7
8
(CONT’D)
5 Click the + button to add criteria.
two pop-up menus appear in the list.
3 Select the Subject of the criteria. In this
example choose, “Script.”
7 Select the Comparison of the criteria. In
this example choose, “Contains.”
8 Enter the Value of the criteria. In this
example start entering a Character name and
the name will be auto-filled.
9 Click the Close button or press the +
button to add more criteria.
Hint: You can use a Smart View to do a script
breakdown or to focus on one aspect or area of the
script.
Chapter 18: Smart Views
83 of 124
Page 84
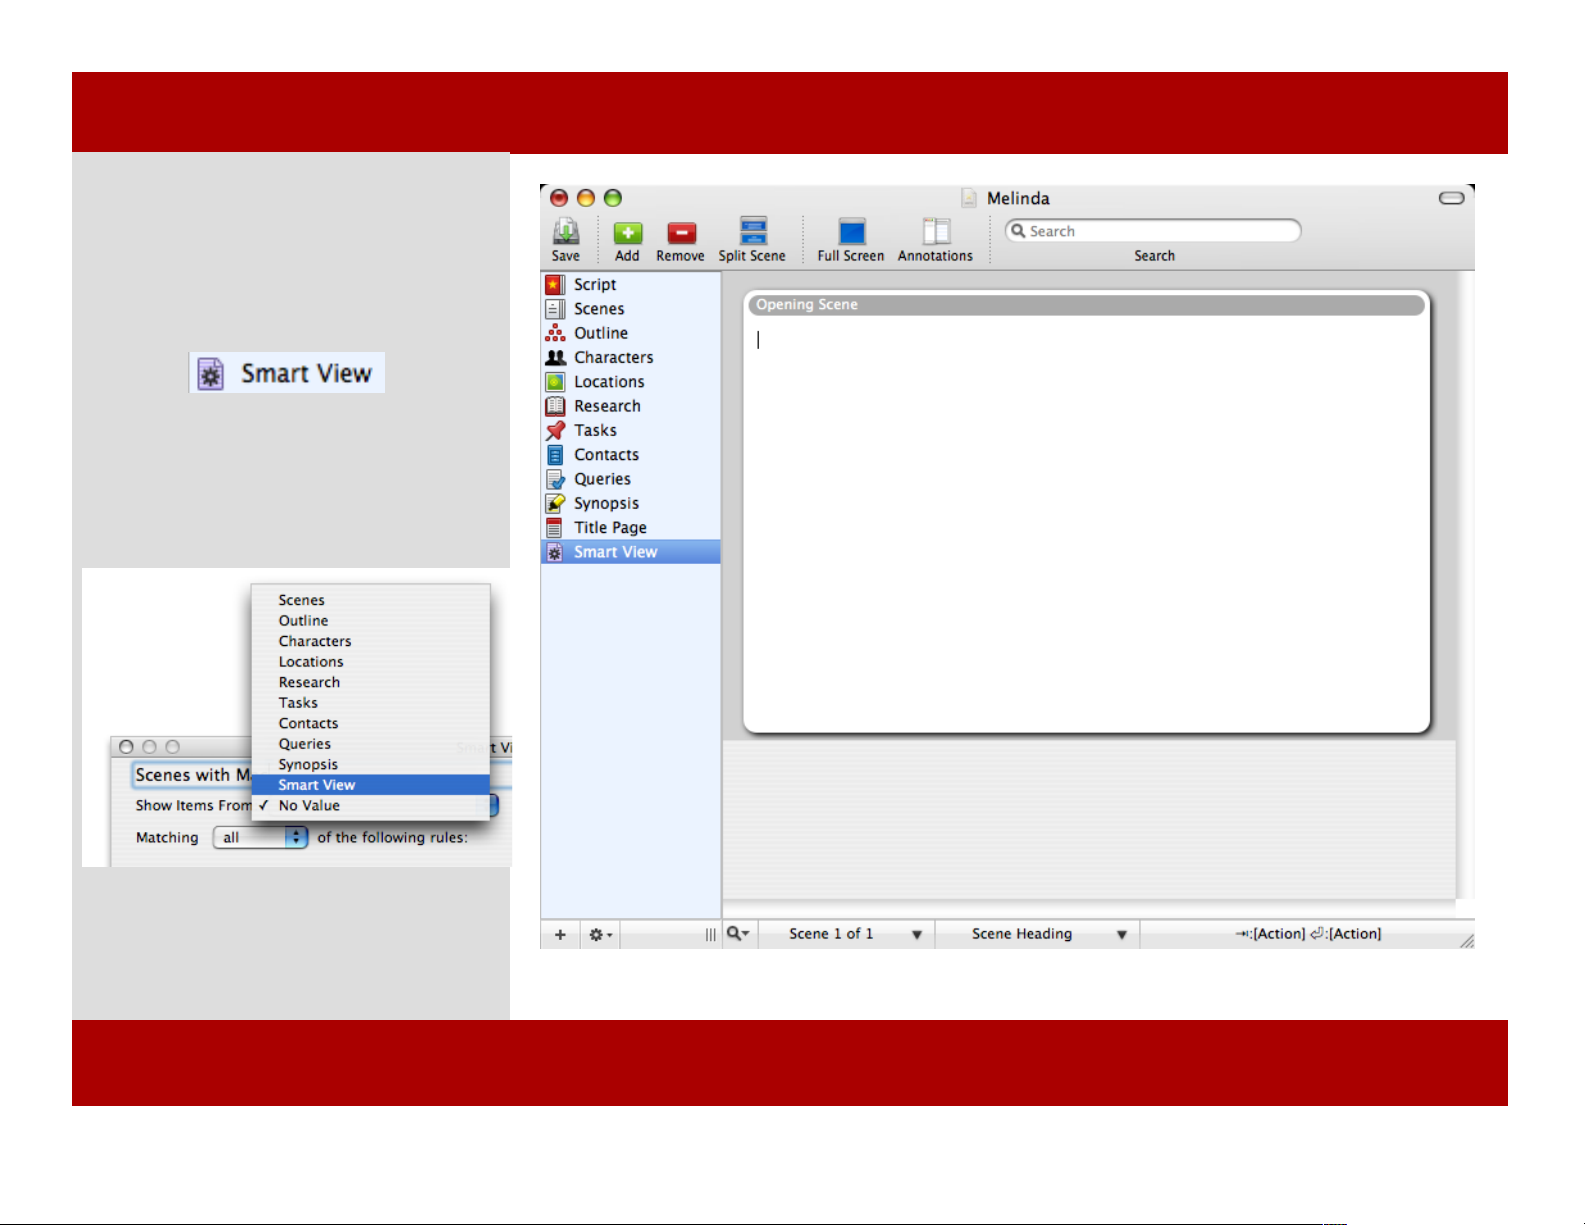
Creating a Smart View
Once you’ve created smart views, they
appear in the main view pane. The icon
for a smart view appears as a purple
document with a gear-like badge
(pictured below).
Smart views can be created based on
other smart views. Each time you add
a smart view it will be available in the
Show items from menu.
Using a Smart View as part of the
criteria for another smart view can be
extremely powerful.
Chapter 18: Smart Views
Creating a Smart View
Once you’ve created smart views, they
appear in the main view pane. The icon
for a smart view appears as a purple
document with a gear-like badge
(pictured below).
Smart views can be created based on
other smart views. Each time you add
a smart view it will be available in the
Show items from menu.
Using a Smart View as part of the
criteria for another smart view can be
extremely powerful.
84 of 124
Chapter 18: Smart Views
Page 85

Chapter 19
Printing
Even in this day of computers and e-mail, printed screenplays
are still the dominant form of script submission. Here you will
learn how to print your script, how widow and orphan control
works, where to find more and cont’d in your script, and how
to set up a print header.
The printed script has several features that do not appear on
screen. These items are script conventions for print.
Not stranding a line of text on the top or bottom of the page
away from the rest of the text. This practice is called widow and
orphan control.
A header is some common text that appears at the top of every
page in your script.
Printing a Screenplay
In This Chapter:
Printing a Screenplay
Widow & Orphan
Control
More & Cont’d
Setting Print Headers
Setting Margins
MONTAGEMONTAGE
85 of 124
Page 86
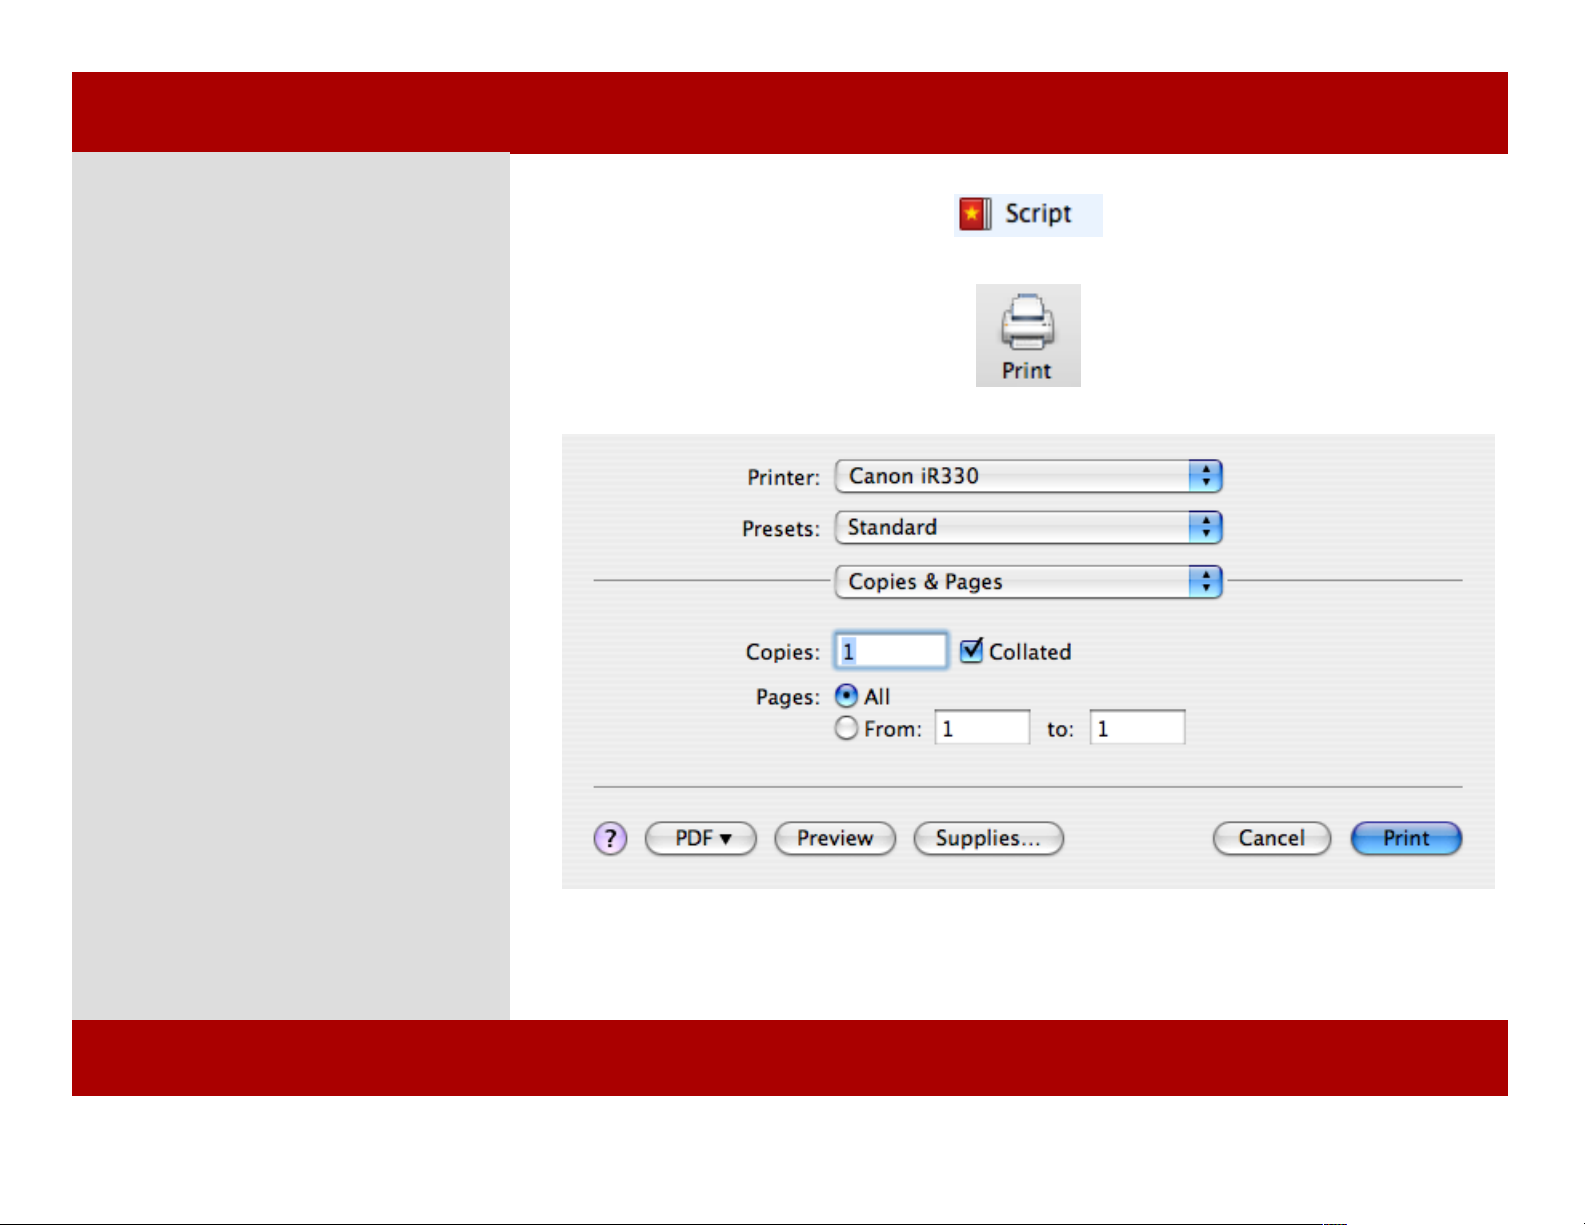
Printing a Script
To print a script:
1 Click the Script View button.
2 Click the Print button in the
Toolbar or press Command - P.
A dialog appears prompting you to set
printing options.
3 Click Print.
Hint: Your printer has many options,
many of which can be found from the
Copies & Pages pop-up menu.
Note: Your Printer dialog may look
different than in the screenshot depending
on which version of Mac OS X and/or your
model of printer. The sheet pictured is from
Mac OS X 10.4.6.
1
2
3
Chapter 19: Printing
Printing a Script
To print a script:
1 Click the Script View button.
2 Click the Print button in the
Toolbar or press Command - P.
A dialog appears prompting you to set
printing options.
3 Click Print.
Hint: Your printer has many options,
many of which can be found from the
Copies & Pages pop-up menu.
Note: Your Printer dialog may look
different than in the screenshot depending
on which version of Mac OS X and/or your
model of printer. The sheet pictured is from
Mac OS X 10.4.6.
1
2
3
86 of 124
Chapter 19: Printing
Page 87
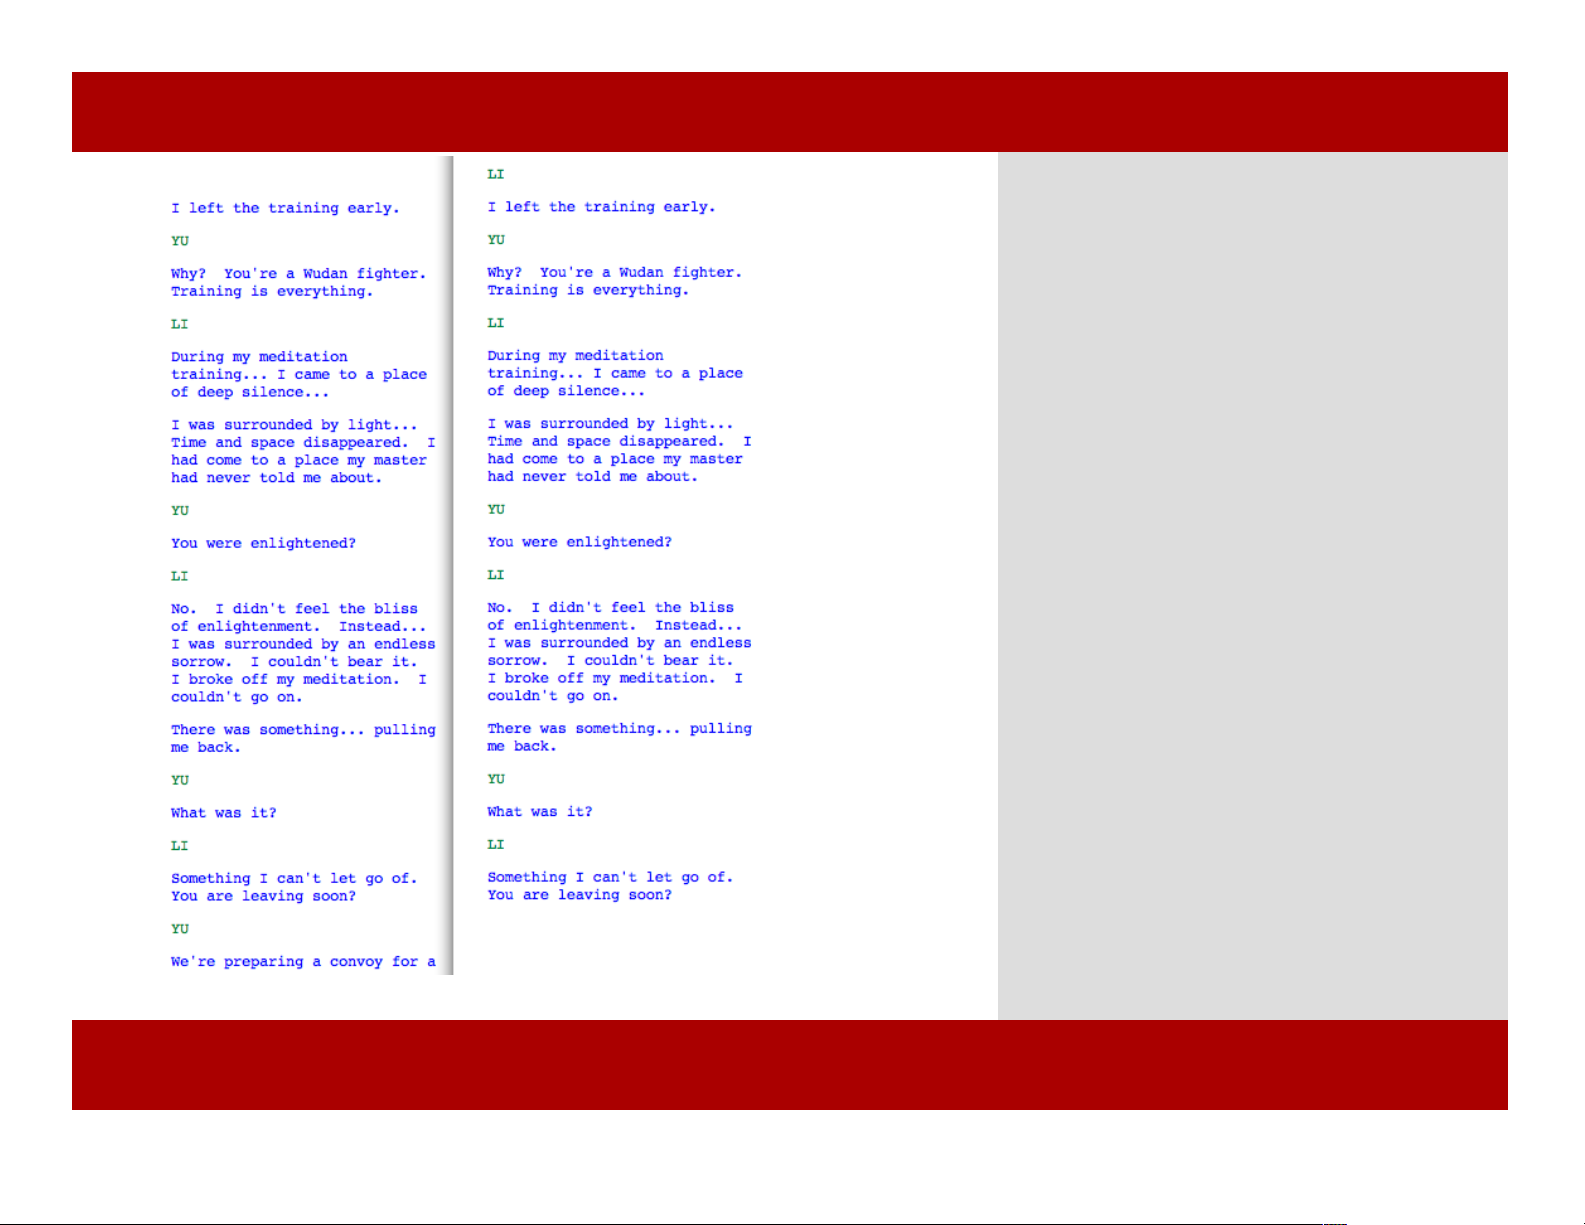
Widow & Orphan Control
1
A "widow" is the last line of a paragraph that
appears alone at the top of the next page.
An "orphan" is the first line of a paragraph
that appears alone at the bottom of a page.
1 Print a script.
The picture on the left is an example of
Widow and orphan control. The screen
version is on the left and the print version on
the right.
Widow Control: At the top of the printed
page (right) a widowed Character was pulled
down from previous page.
Orphan Control: At the bottom of the printed
page (right) two orphaned lines were pushed
down to the next page.
Chapter 19: Printing
Widow & Orphan Control
1
A "widow" is the last line of a paragraph that
appears alone at the top of the next page.
An "orphan" is the first line of a paragraph
that appears alone at the bottom of a page.
1 Print a script.
The picture on the left is an example of
Widow and orphan control. The screen
version is on the left and the print version on
the right.
Widow Control: At the top of the printed
page (right) a widowed Character was pulled
down from previous page.
Orphan Control: At the bottom of the printed
page (right) two orphaned lines were pushed
down to the next page.
Chapter 19: Printing
87 of 124
Page 88
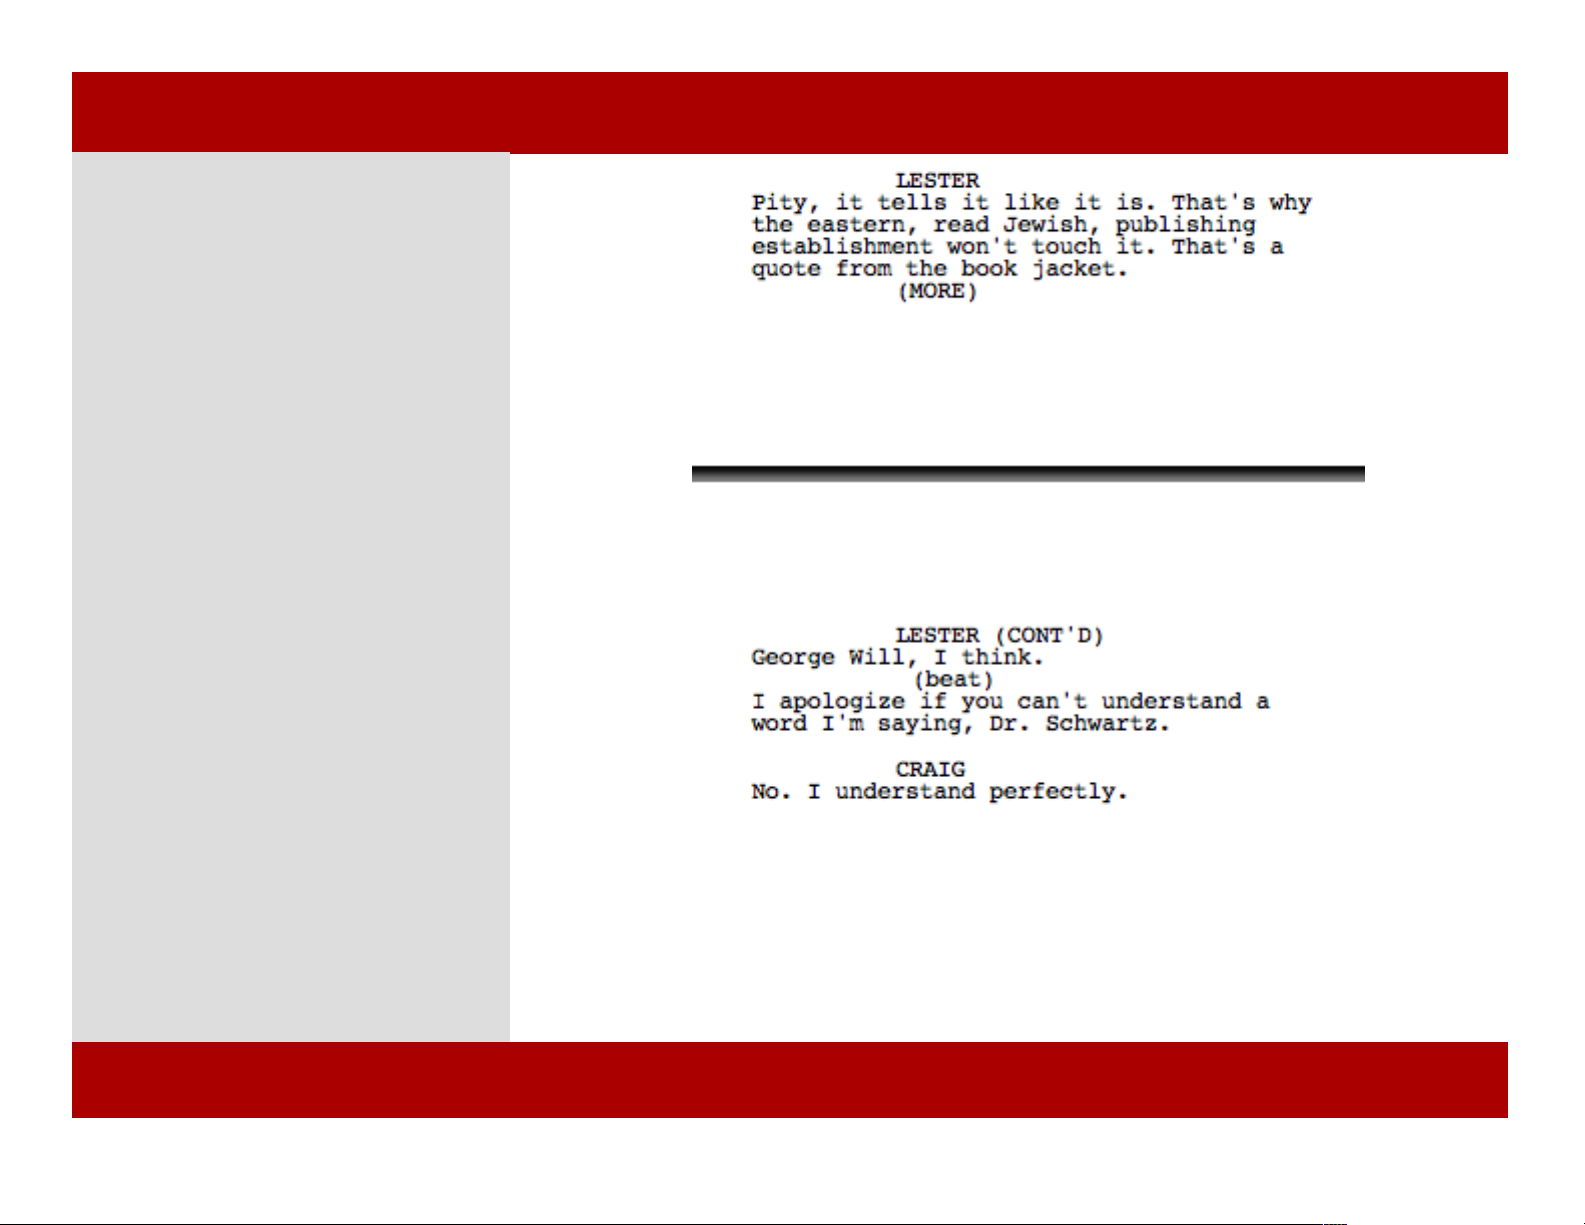
More & Cont’d
Using MORE & CONT’D to denote
when dialogue breaks across pages is a
screenwriting convention. “MORE”
appears at the bottom of the page and
“CONT’D” at the top of the next page.
The necessity of this convention is
debated by the screenwriting
community. Some believe the use of
MORE and CONT’D is no longer
needed because the reader of the script
can ascertain the character’s dialogue
continues on the next page. Others say
that MORE and CONT’D are still
necessary visual indicators for the
reader. Nevertheless, by default, when
printing, MORE and CONT’D is added
when dialogue breaks across the page.
1 (MORE) is added to the end of the
page. The Character’s name and
(CONT’D) is added to the top of the
next page.
Note: MORE and CONT’D only appear
when printing.
Note: MORE and CONT’D can be turned
off in the General Preferences. See Page
106 for more info
1
Examples of dialogue breaking across pages
Chapter 19: Printing
88 of 124
Chapter 19: Printing
Page 89
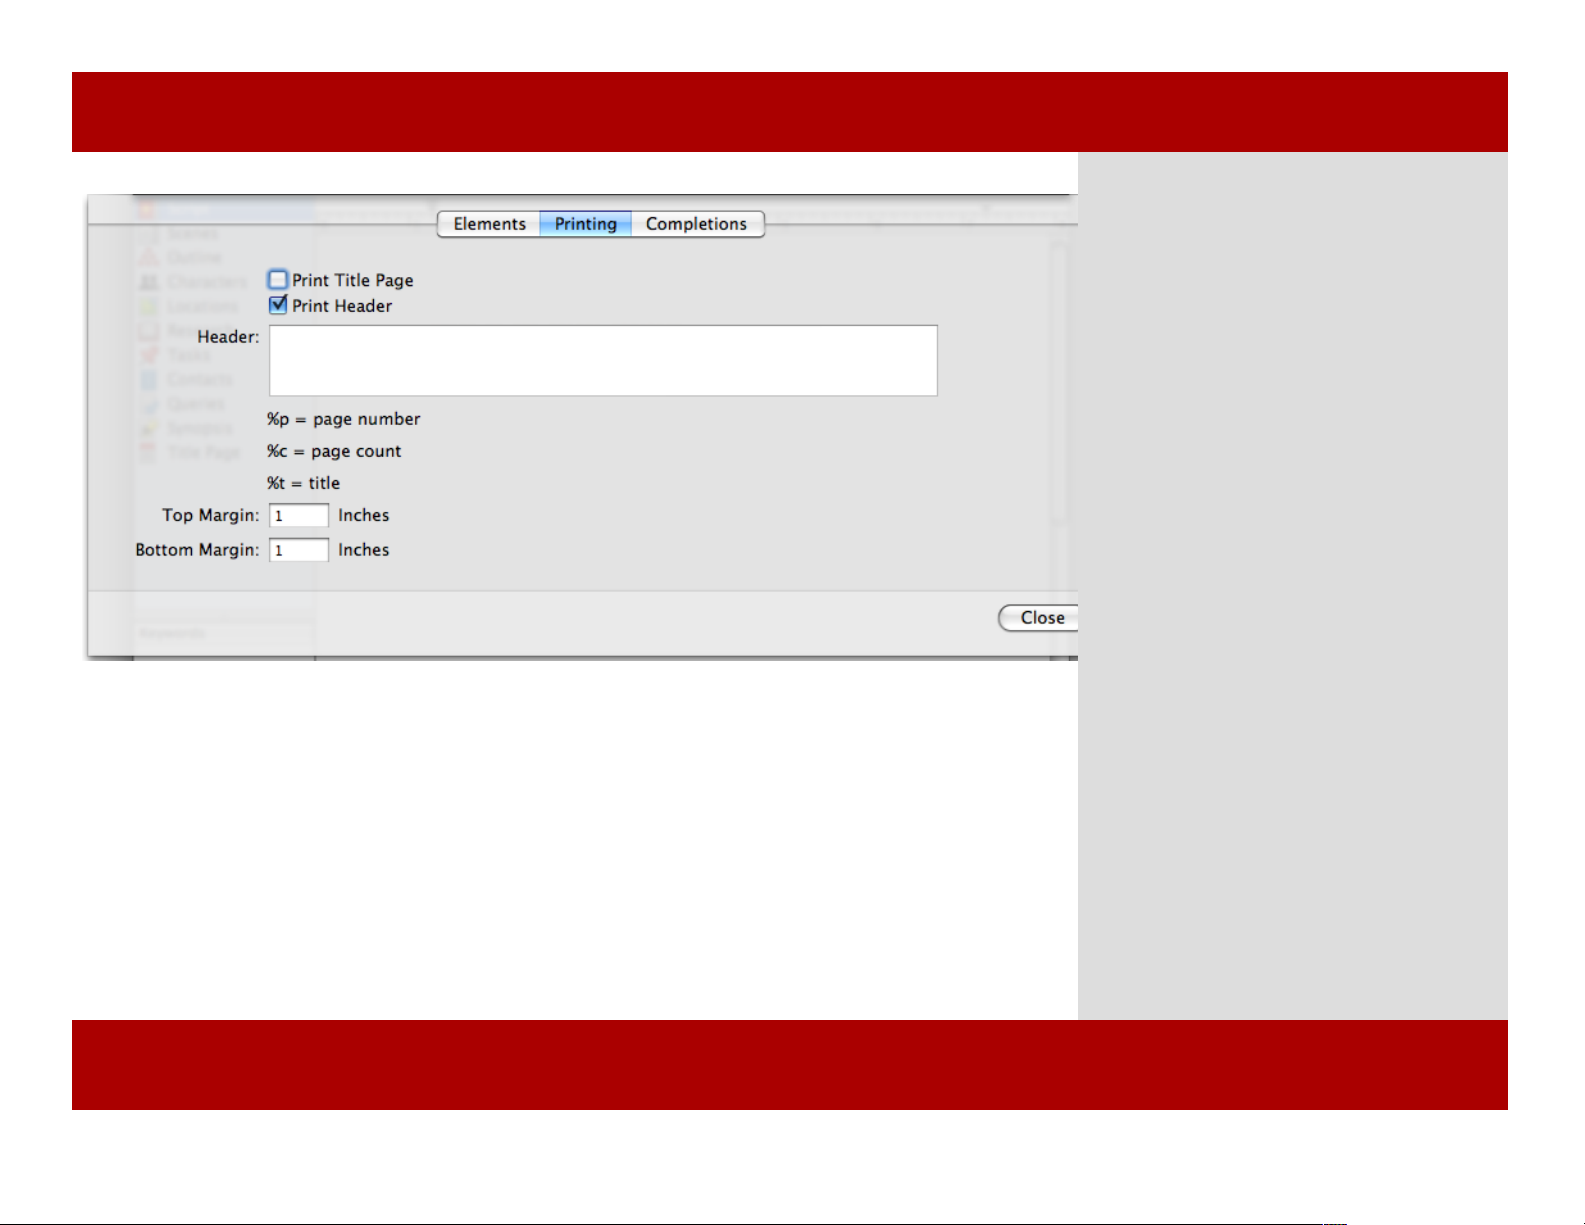
Setting Print Headers
2
Headers are text that appears on the
top of every printed page (Title page
excluded).
To set up print headers:
1 From the View menu, select
Document Properties...
A sheet appears.
2 Select the Printing tab.
3 Type in the text you wish to
appear in the header of your printed
script. Use the following guide for
page number, page count, and title:
%p = page number
%c = page count
%t = title
When you are finished click the Close
button.
Note: Headers appear on the printed page
but not in the on-screen views.
Note: If you want the Title page to print,
be sure to place a check mark next to Print
Title Page.
Chapter 19: Printing
Setting Print Headers
2
Headers are text that appears on the
top of every printed page (Title page
excluded).
To set up print headers:
1 From the View menu, select
Document Properties...
A sheet appears.
2 Select the Printing tab.
3 Type in the text you wish to
appear in the header of your printed
script. Use the following guide for
page number, page count, and title:
%p = page number
%c = page count
%t = title
When you are finished click the Close
button.
Note: Headers appear on the printed page
but not in the on-screen views.
Note: If you want the Title page to print,
be sure to place a check mark next to Print
Title Page.
Chapter 19: Printing
89 of 124
Page 90
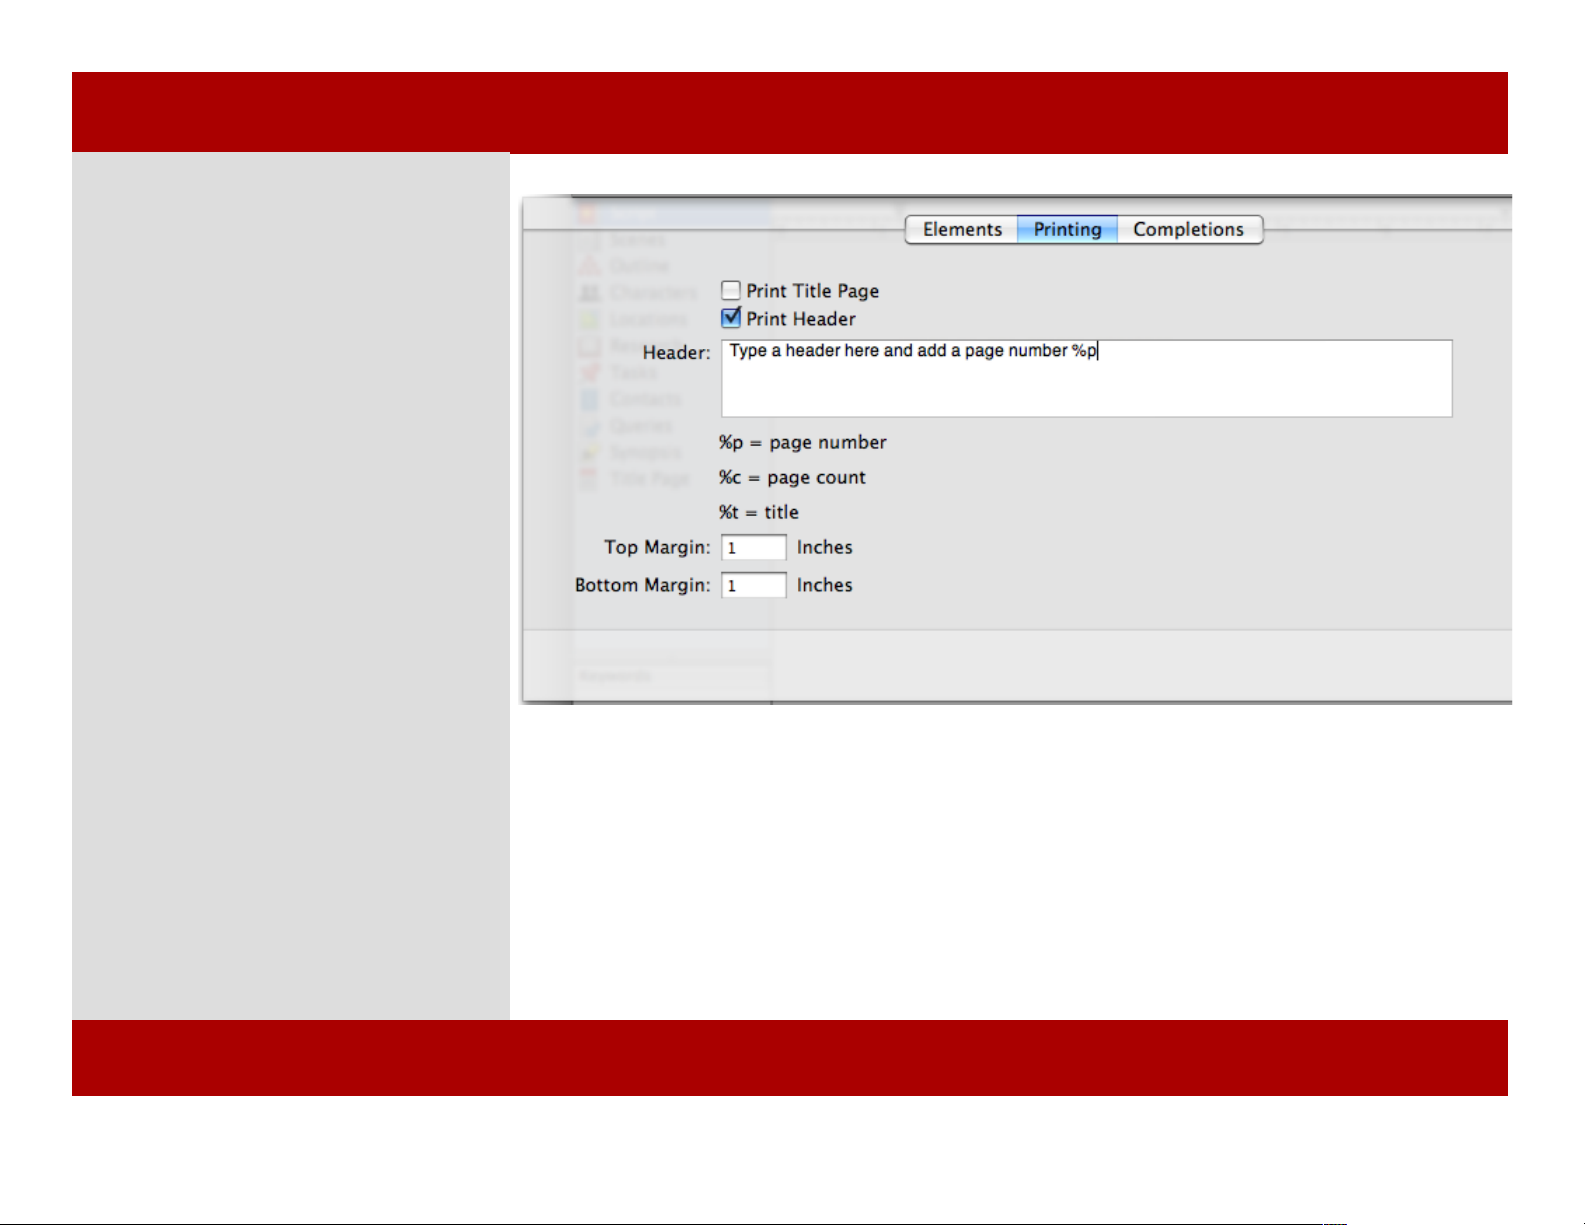
Setting Margins
Top and bottom margins are the white
space at the top and bottom of the
printed page.
To set up top and bottom print
margins:
1 From the View menu, select
Document Properties...
A sheet appears.
2 Select the Printing tab.
3 Type in the value (in inches) that
you wish to set for the top margin.
Repeat for the bottom margin.
4 Press the Close button when
finished.
2
Chapter 19: Printing
Setting Margins
Top and bottom margins are the white
space at the top and bottom of the
printed page.
To set up top and bottom print
margins:
1 From the View menu, select
Document Properties...
A sheet appears.
2 Select the Printing tab.
3 Type in the value (in inches) that
you wish to set for the top margin.
Repeat for the bottom margin.
4 Press the Close button when
finished.
2
90 of 124
Chapter 19: Printing
Page 91

Chapter 20
Templates & Elements
Templates are a preset group of views, elements, their settings
and any text.
When you start a new script you will be presented with a sheet
allowing you to choose a pre-defined or blank template. Using
a pre-defined template, you can create a pre-formatted title
page, and/or query letter so when you start your script you
merely need to fill in some details.
You can add or change the script elements if you are writing for
a production house or in a genre that has specific guidelines for
their scripts.
Templates & Elements
In This Chapter:
Configuring Elements
Creating a Template
Managing Templates
Default Templates
Template
Specifications
MONTAGEMONTAGE
91 of 124
Page 92
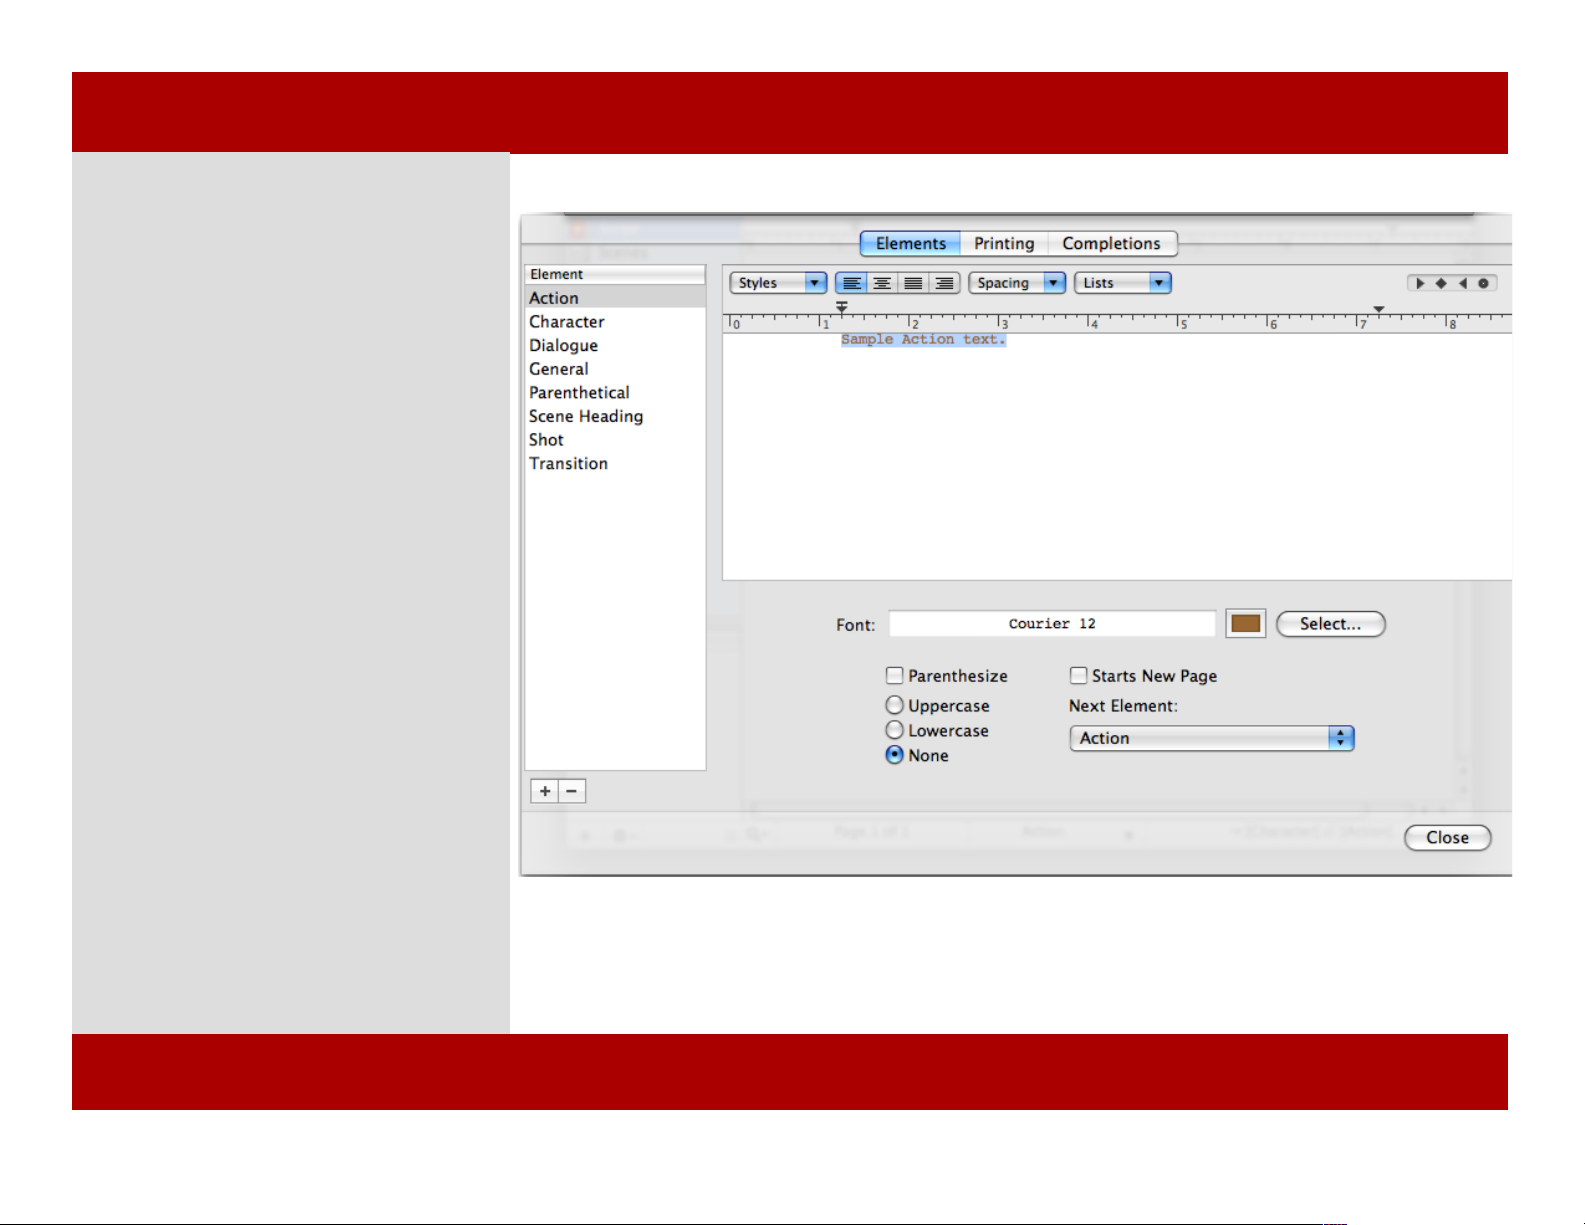
Configuring Elements
To configure an element:
1 Select View > Document
Properties...
A sheet appears.
2 In the Styles tab, choose an element
from the list of on the left hand side
and you see the Ruler settings, Sample
text area, and Style info for that
element. Configure each to your liking
and press the Close button when you
are finished.
Hint: Once you configure the document
the way you want it, you may wish to Save
it as a template. See Saving a Template.
Below are the attributes of an Element:
Text Alignment
Spacing (both before and after a line)
Ruler settings: indent, hanging indent
Font
Text Color
Parenthesize
Case: Uppercase or Lowercase
1
Chapter 20: Templates & Elements
Configuring Elements
To configure an element:
1 Select View > Document
Properties...
A sheet appears.
2 In the Styles tab, choose an element
from the list of on the left hand side
and you see the Ruler settings, Sample
text area, and Style info for that
element. Configure each to your liking
and press the Close button when you
are finished.
Hint: Once you configure the document
the way you want it, you may wish to Save
it as a template. See Saving a Template.
Below are the attributes of an Element:
Text Alignment
Spacing (both before and after a line)
Ruler settings: indent, hanging indent
Font
Text Color
Parenthesize
Case: Uppercase or Lowercase
1
92 of 124
Chapter 20: Templates & Elements
Page 93
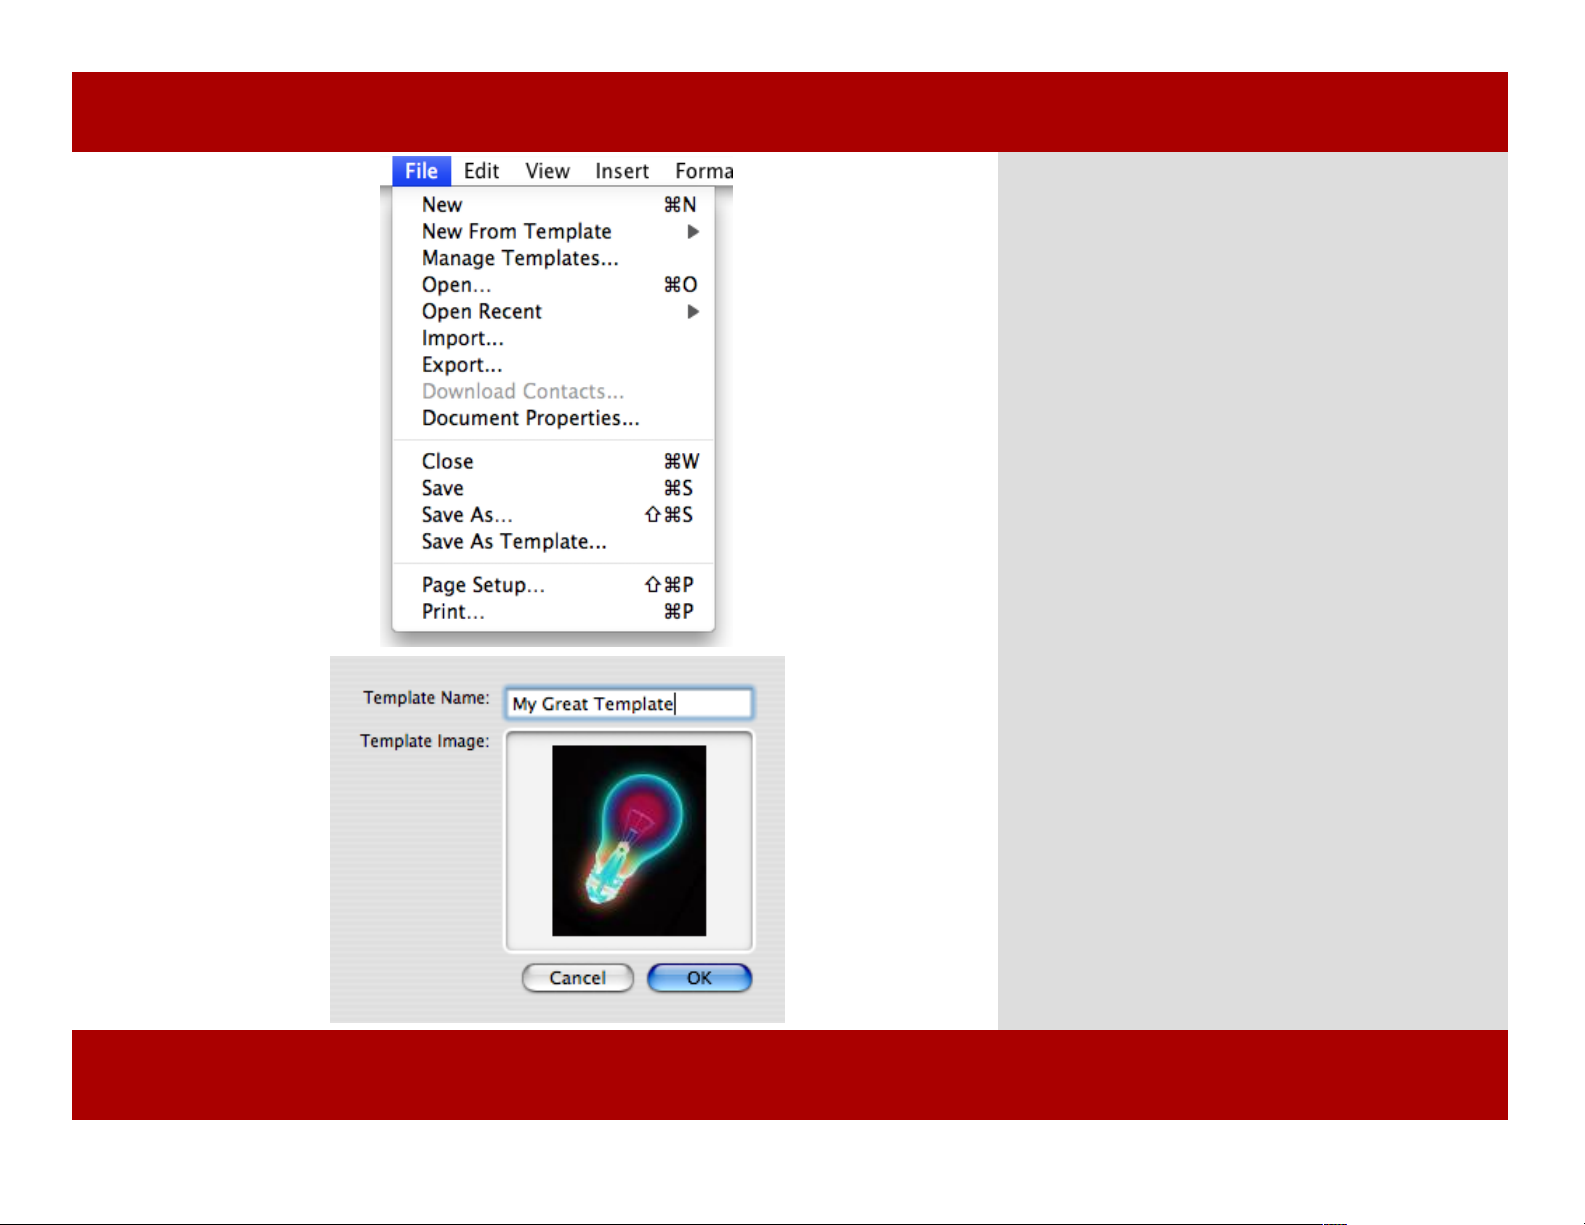
Creating a Template
2
3
Montage comes pre-equipped with several
industry-standard templates. You can use
them as-is or modify them if needed to match
the formatting requirements of the parties
you are working for/with.
Templates dictate the formatting of the script.
Not only does each genre of script writing
have different guidelines but individual
studios often have their own adaptations.
Templates contain elements and their styles,
views, and Smart Views.
Any document can be saved as a template.
To save a document as a template:
1 Set the document the way you want it.
Create Smart Views, edit the Elements and
Styles in the Document Properties>Styles tab.
2 From the File menu, Select Save As
Template...
3 A sheet appears. Enter a name, add an
image in the designated area (optional) and
click OK. The template will be available when
you create a new script.
Chapter 20: Templates & Elements
Creating a Template
2
3
Montage comes pre-equipped with several
industry-standard templates. You can use
them as-is or modify them if needed to match
the formatting requirements of the parties
you are working for/with.
Templates dictate the formatting of the script.
Not only does each genre of script writing
have different guidelines but individual
studios often have their own adaptations.
Templates contain elements and their styles,
views, and Smart Views.
Any document can be saved as a template.
To save a document as a template:
1 Set the document the way you want it.
Create Smart Views, edit the Elements and
Styles in the Document Properties>Styles tab.
2 From the File menu, Select Save As
Template...
3 A sheet appears. Enter a name, add an
image in the designated area (optional) and
click OK. The template will be available when
you create a new script.
Chapter 20: Templates & Elements
93 of 124
Page 94
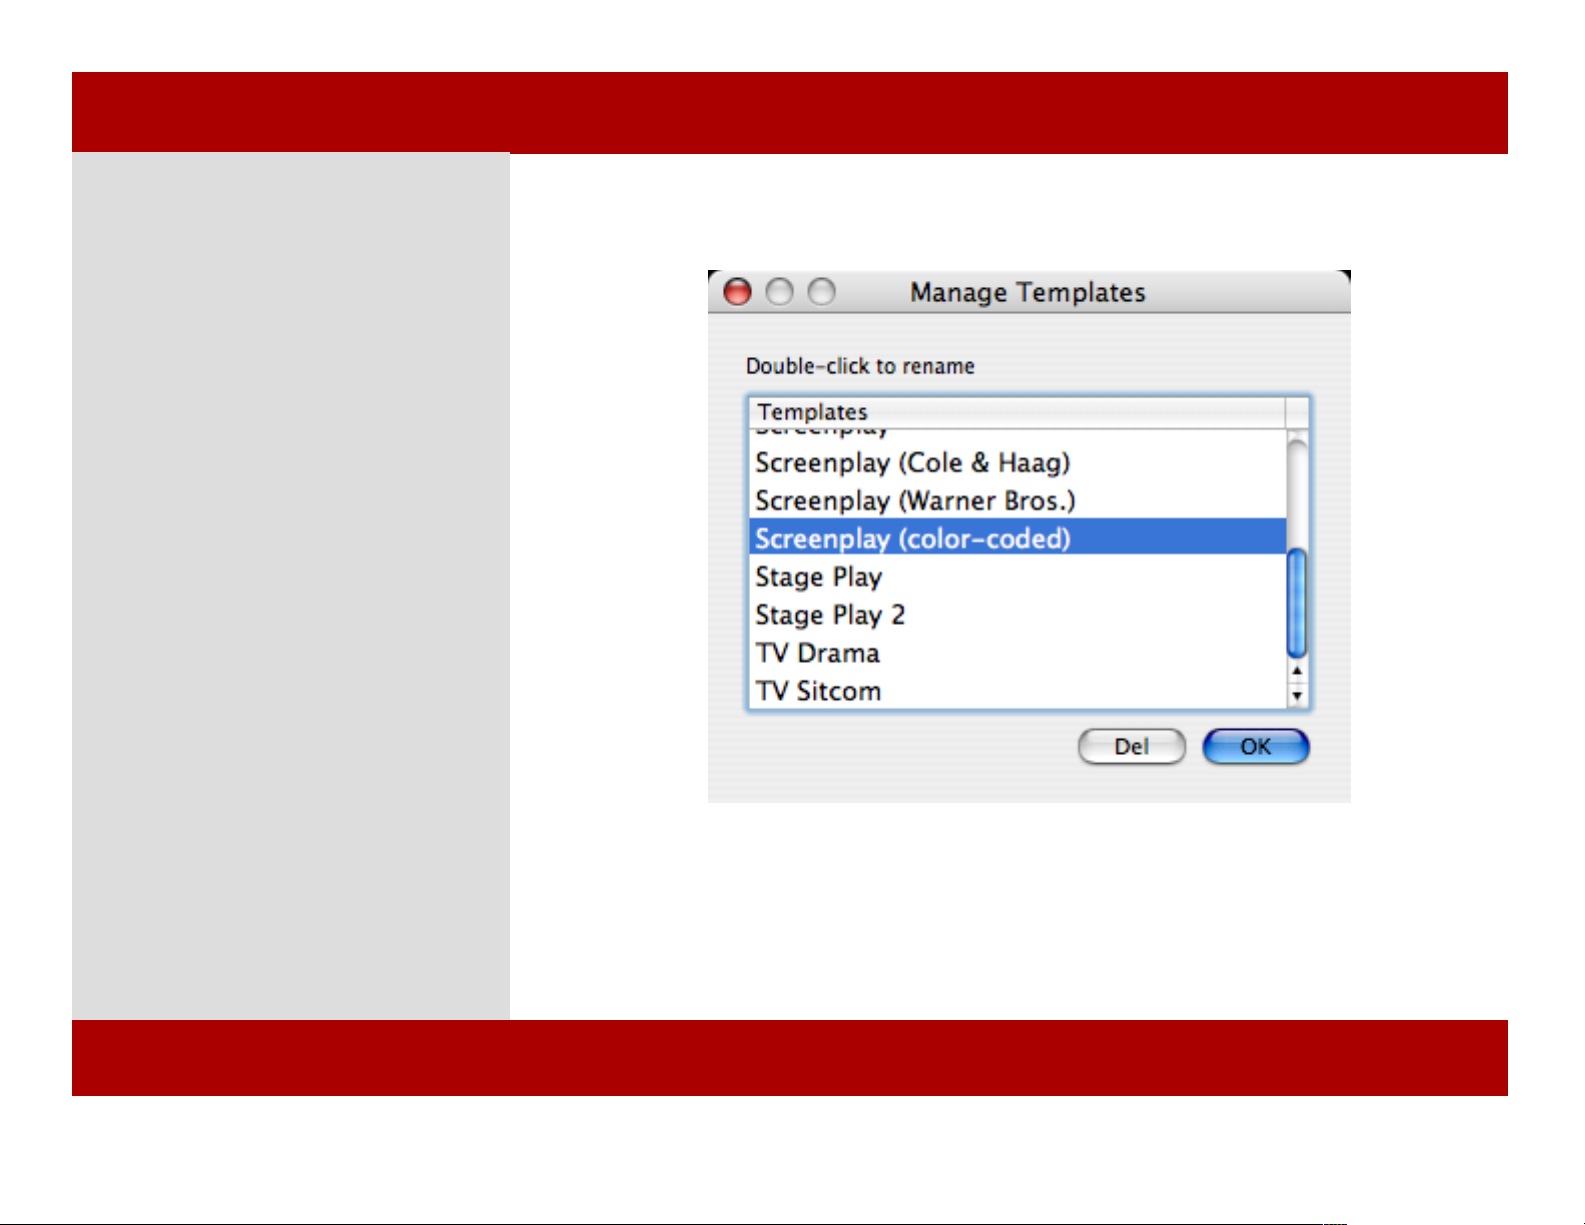
Managing Templates
To manage templates:
1 Select Manage Templates... from
the File menu.
2 Select a template and either
double-click it to rename the template,
press the OK button to dismiss the
dialog, or press the Del button to
delete the template.
Note: Templates are stored in:
~/Library/Application Support/Montage/
1
Chapter 20: Templates & Elements
94 of 124
Chapter 20: Templates & Elements
Page 95
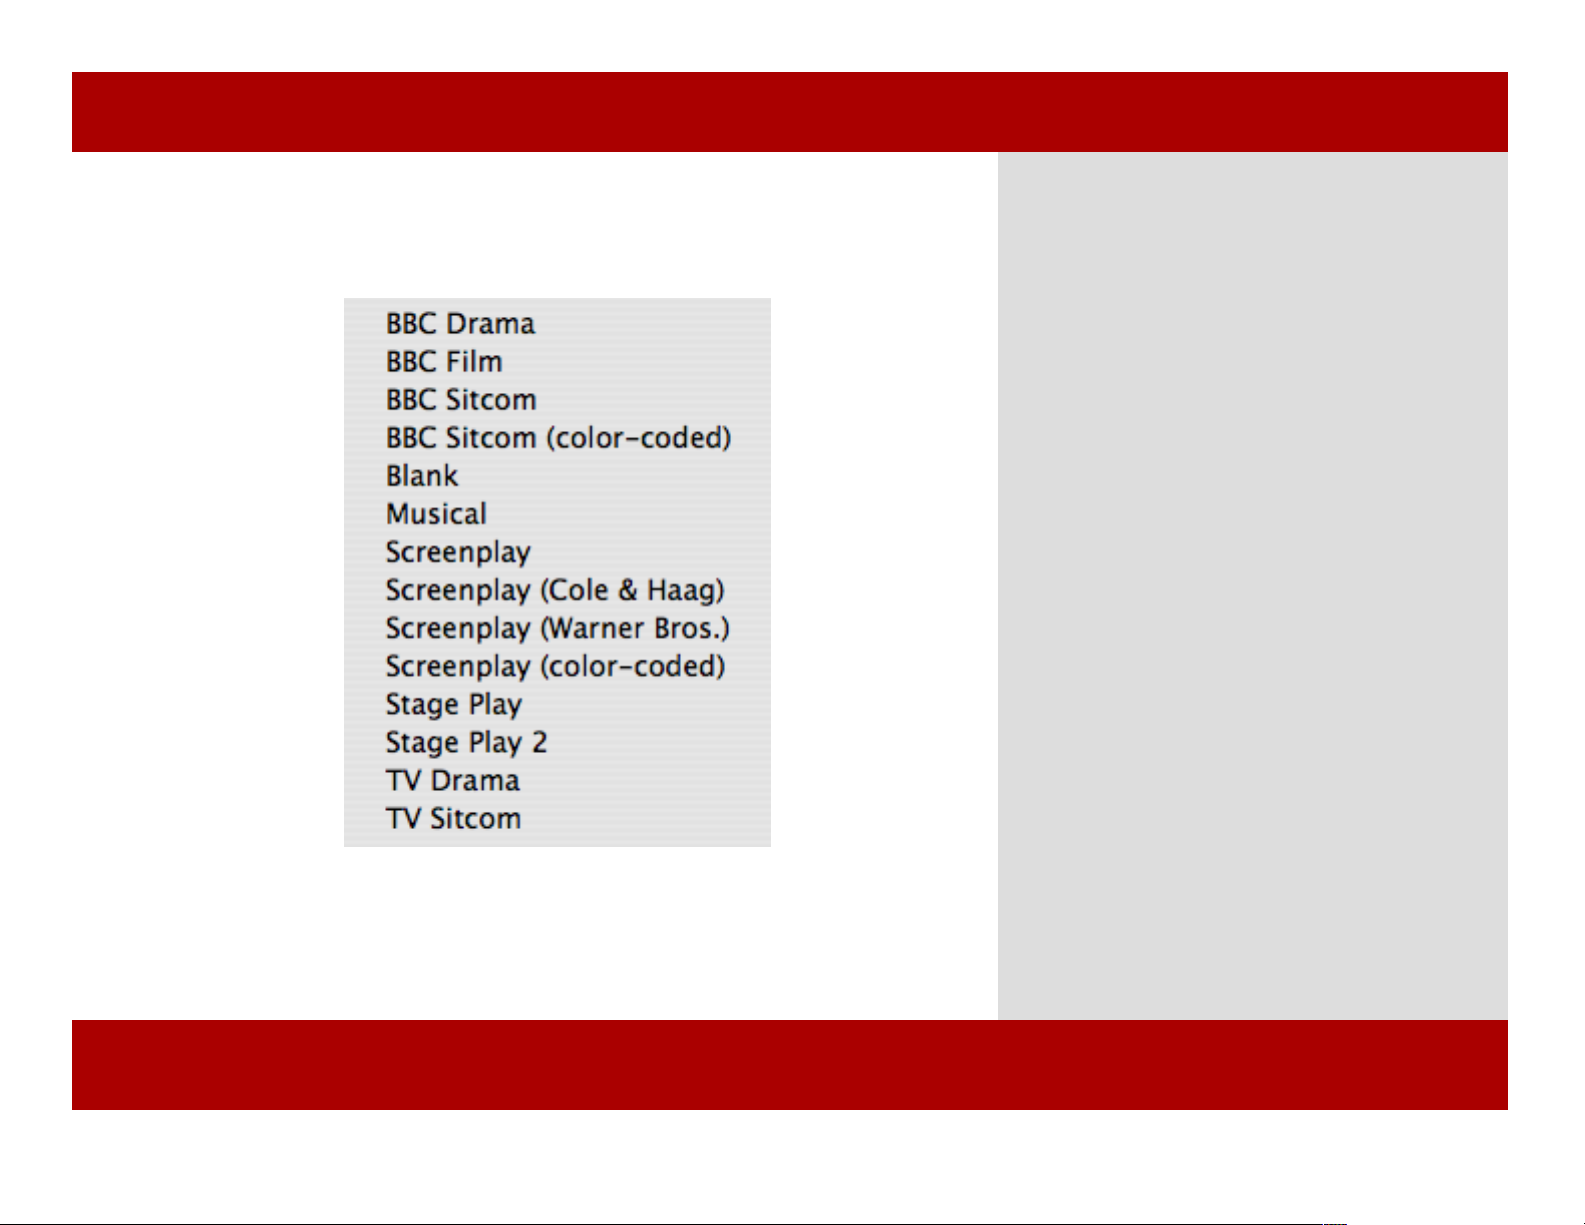
Default Templates
2
Current default templates
Montage has several default templates.
To create a new document using a template:
1 Select New From Template... from the
File menu.
2 Select a template from the list.
3 A new document window appears.
Chapter 20: Templates & Elements
Default Templates
2
Current default templates
Montage has several default templates.
To create a new document using a template:
1 Select New From Template... from the
File menu.
2 Select a template from the list.
3 A new document window appears.
Chapter 20: Templates & Elements
95 of 124
Page 96
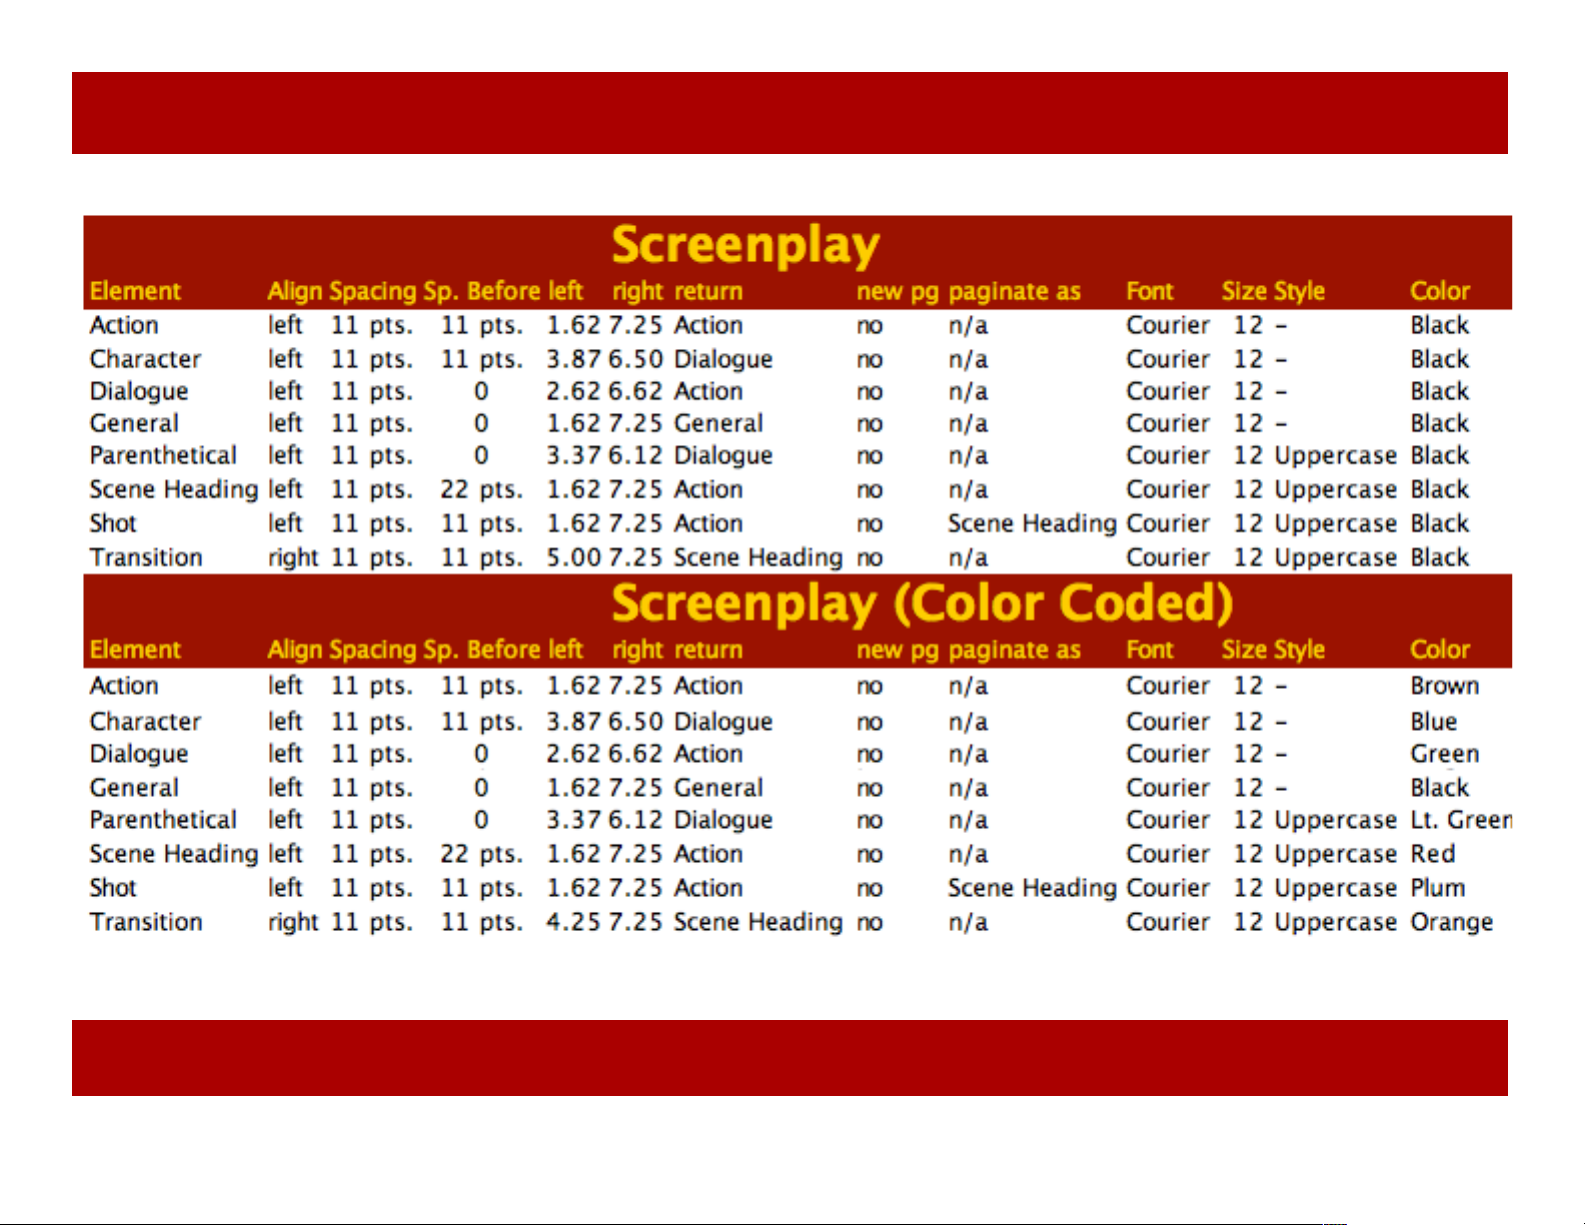
Template Specs
Chapter 20: Templates & Elements
Template Specs
96 of 124
Chapter 20: Templates & Elements
Page 97
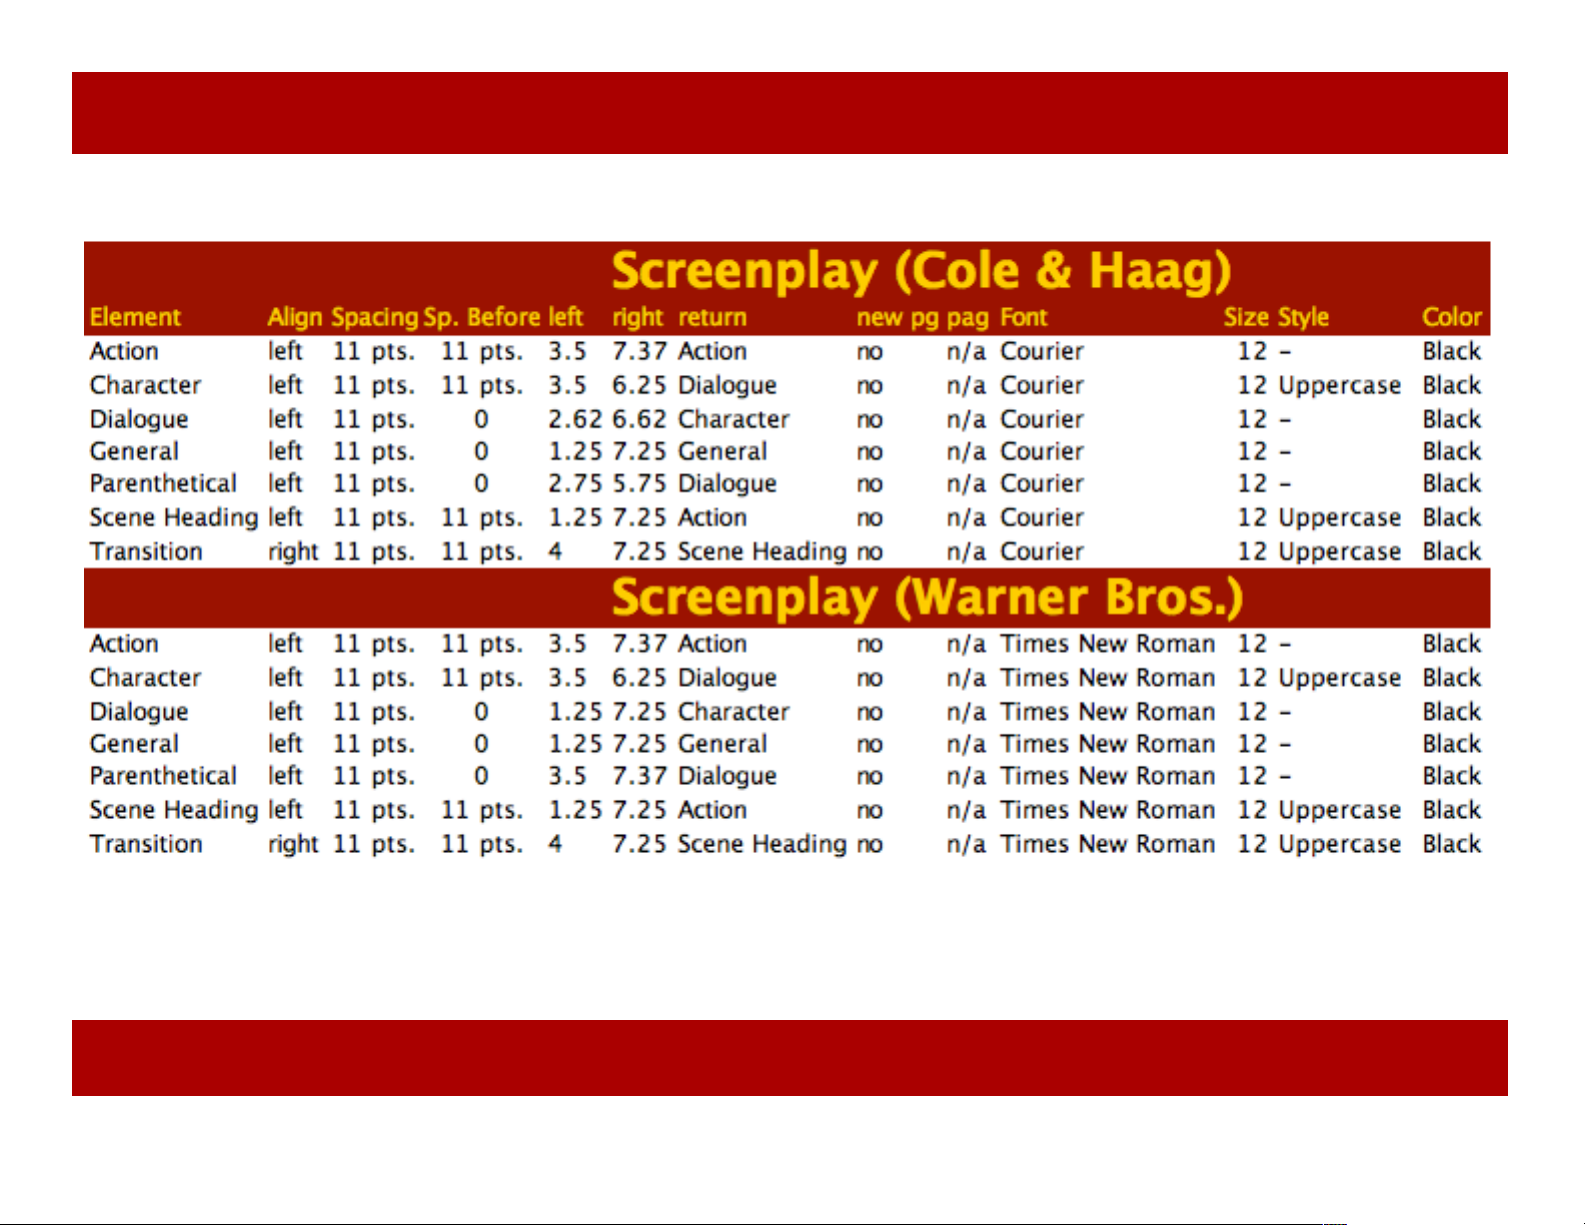
Template Specs
Chapter 20: Templates & Elements
Template Specs
Chapter 20: Templates & Elements
97 of 124
Page 98
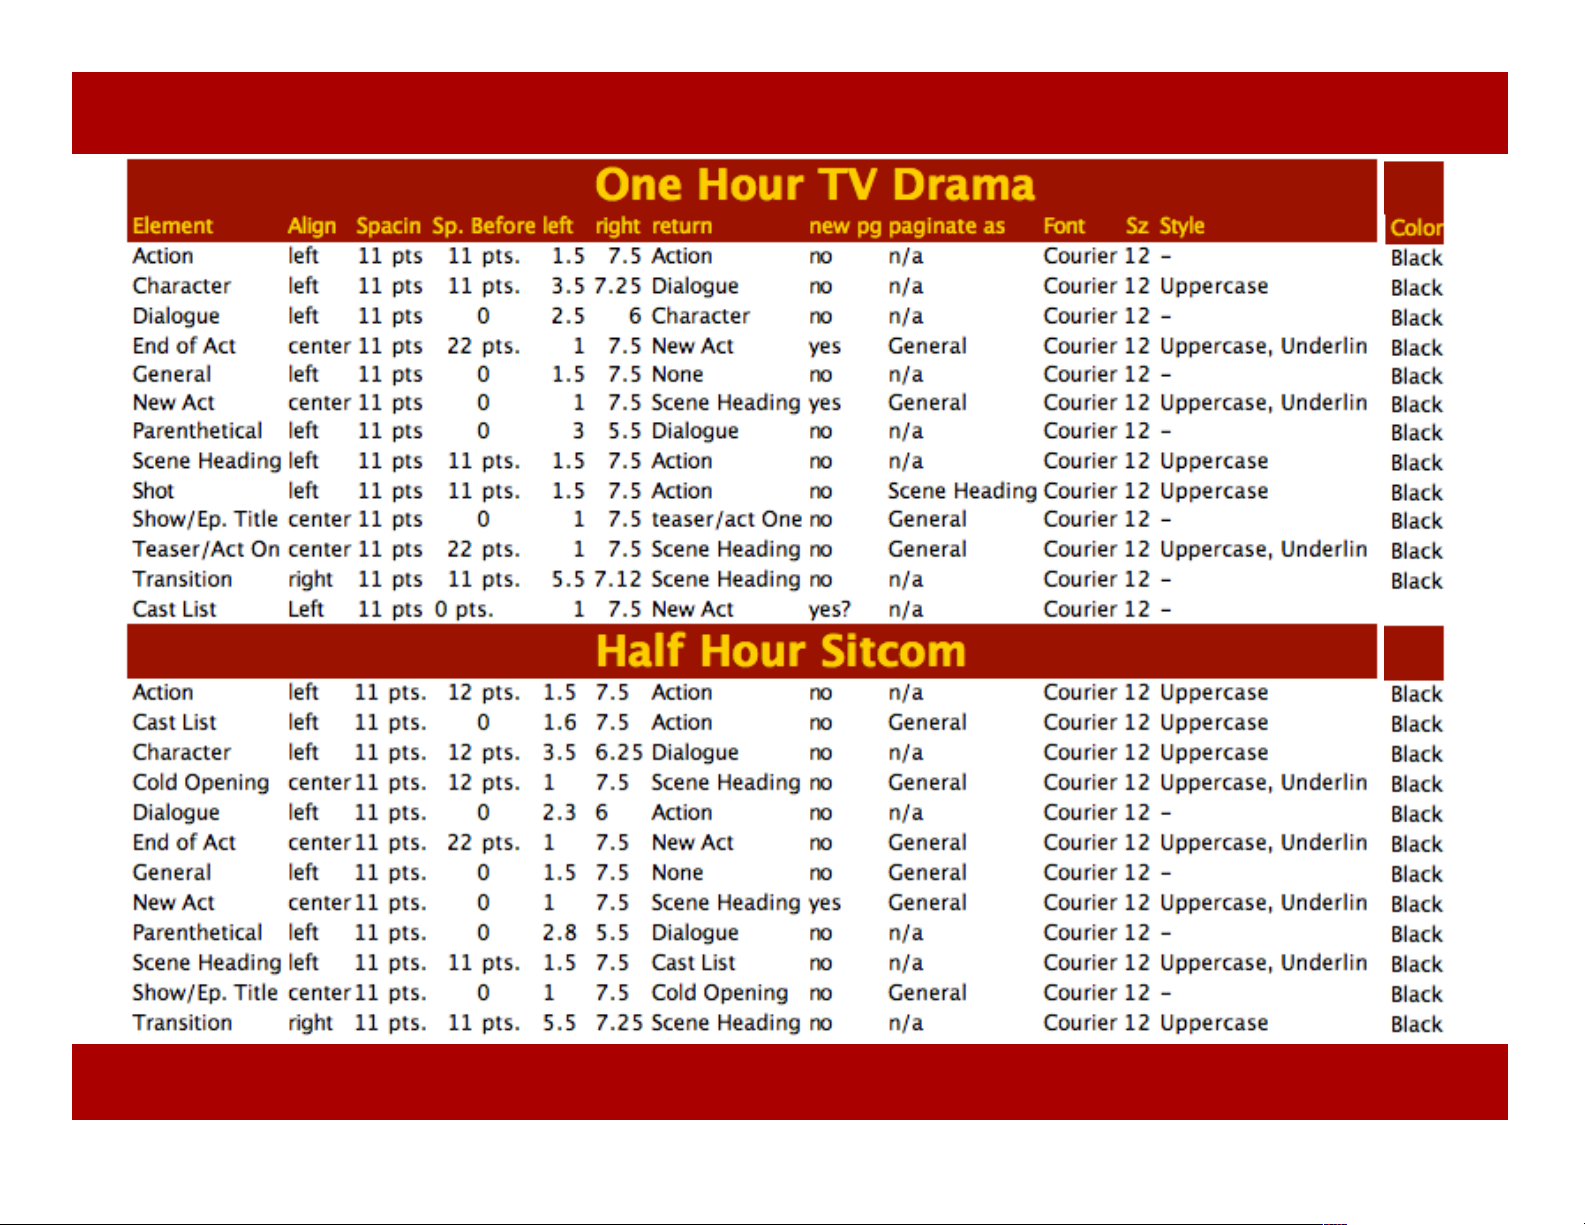
Template Specs
Chapter 20: Templates & Elements
Template Specs
98 of 124
Chapter 20: Templates & Elements
Page 99
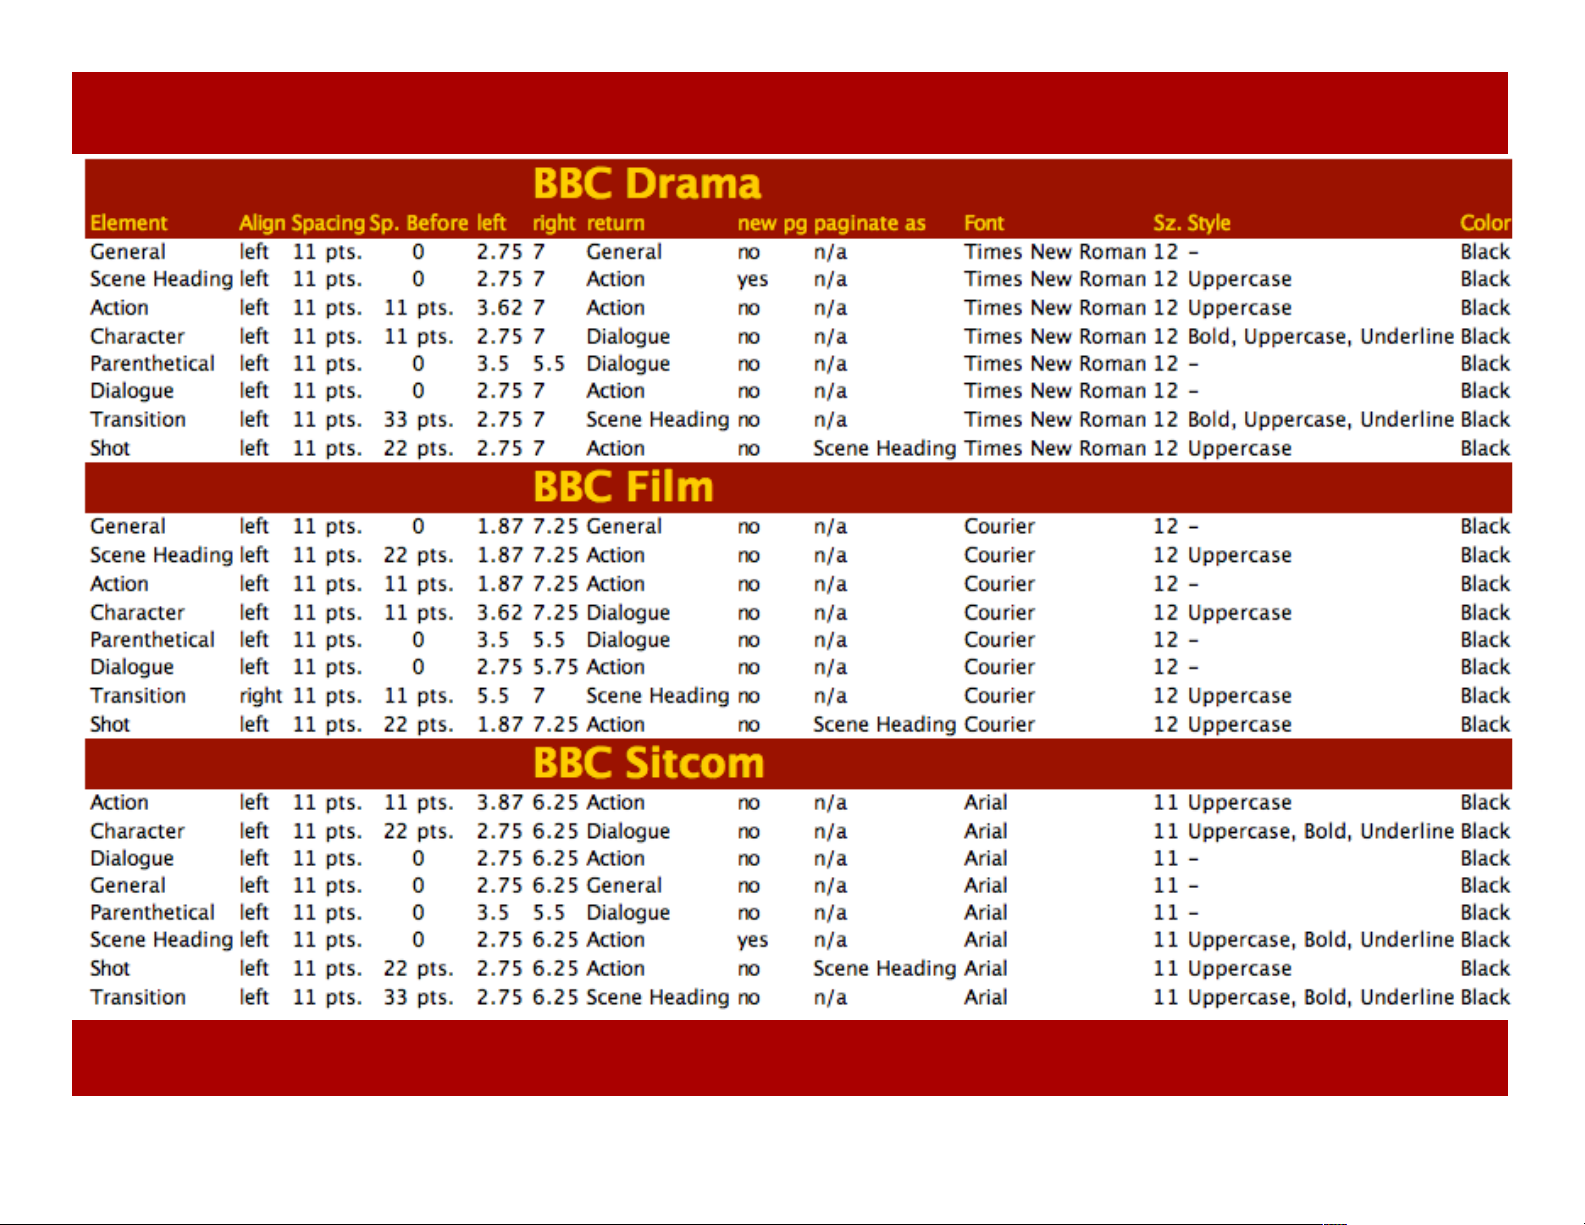
Template Specs
Chapter 20: Templates & Elements
Template Specs
Chapter 20: Templates & Elements
99 of 124
Page 100
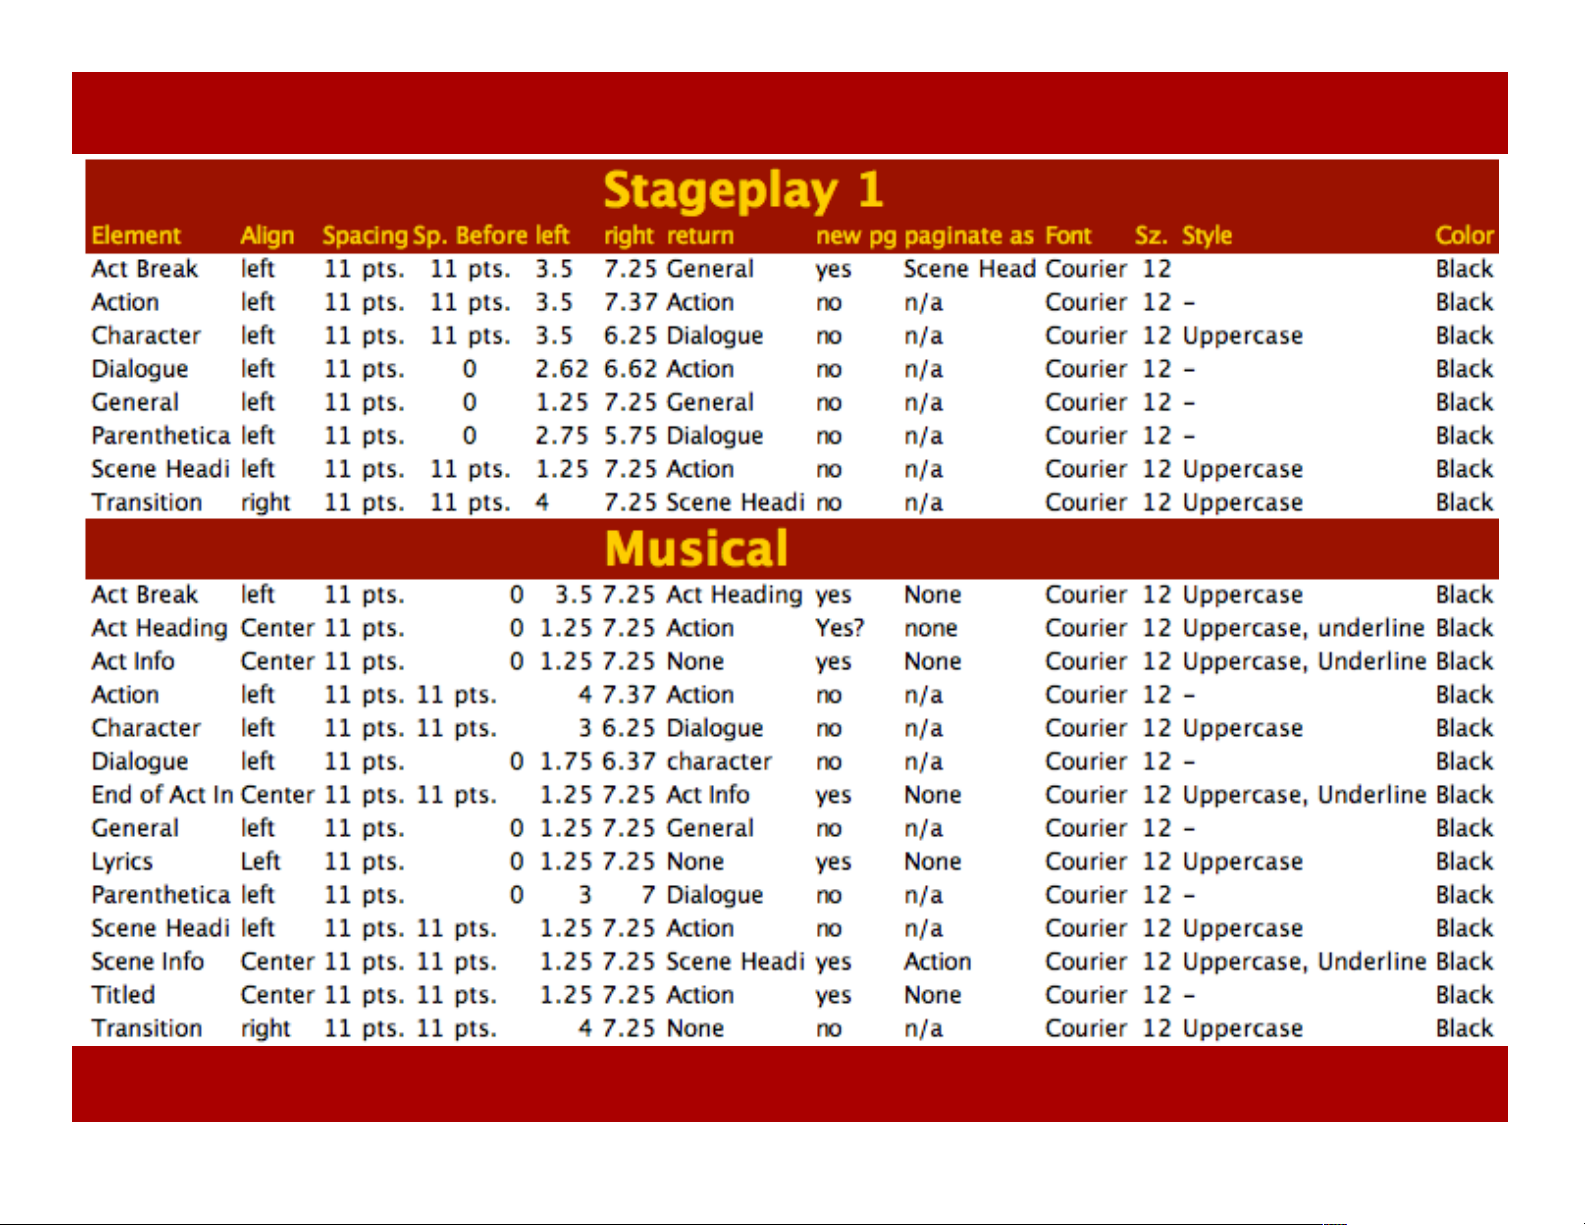
Template Specs
Chapter 20: Templates & Elements
Template Specs
100 of 124
Chapter 20: Templates & Elements
 Loading...