

Page 1
Mariner Write
™
!
For the Writer in Everyone.!
!
!
!
!
!
!
!
!
!
!
User Guide!
Version 3.9!
of 1 165
Page 2

Intro to Mariner Write! 10!
Welcome! 10!
Requirements! 10!
Technical Support! 11!
Help! 12!
About Tool Tips - Mac OS X! 12!
About Mariner Write Help! 12!
About This User Guide! 13!
Conventions! 13!
Working With Documents! 14!
Creating New Documents! 14!
Creating a Default Document! 15!
Opening Files! 16!
Opening Recent Documents! 17!
Opening Other File Types! 18!
Inserting Files (Importing)! 19!
Inserting Graphics! 20!
Closing Documents! 21!
Saving Documents! 22!
Saving As...! 23!
Save a Copy As...! 24!
Exporting! 25!
Reverting! 25!
Saving a Default Document! 25!
of 2 165
Page 3

Preferences! 26!
Display! 27!
Edit! 30!
Default! 35!
Ruler! 36!
Language! 37!
Files! 39!
Keyboard shortcuts! 41!
Open! 42!
Document Display Options! 43!
Line Numbers! 43!
Background Color! 45!
Working with Page Margins! 46!
Page Guides! 46!
Document View Modes! 47!
Split Pane View! 48!
Selecting Documents! 49!
Arranging Windows! 50!
Stack! 51!
Cascade! 51!
Tile Horizontal! 52!
Tile Vertical! 53!
Setting Document Scale! 54!
of 3 165
Page 4

Resizing Windows! 55!
Go To page...! 56!
Navigating by Keyboard! 56!
Showing the Selection! 57!
Invisible Characters! 58!
Showing Document Information! 59!
Printing Documents! 60!
Page Setup! 60!
Print Preview! 61!
Printing! 62!
Print Options! 63!
Print One Copy! 63!
Printing Envelopes! 64!
Envelope printing options! 65!
Entering Text and Editing! 66!
Entering Text! 66!
Word Wrap! 66!
Using Soft Returns! 67!
Soft Hyphens! 68!
Selecting Text! 68!
Selecting by Dragging! 69!
Selecting by Keyboard! 69!
Multiple Text Selections! 71!
Text Selection Shortcuts! 71!
of 4 165
Page 5

Editing Text! 72!
Cutting! 72!
Clearing! 72!
Copying! 73!
Pasting! 73!
Drag and Drop! 75!
Undo! 76!
Inserting Dates and Times! 77!
Inserting Page Numbers! 78!
Headers and Footers! 80!
Footnotes and Endnotes! 83!
Working with Graphics! 85!
Inline Graphics! 85!
Object Graphics! 86!
Scaling Graphics! 86!
Showing/Hiding Graphics! 86!
Modify! 87!
Change Case! 88!
Working with Hyperlinks! 89!
Formatting Text! 90!
The Ruler! 90!
The Style Ribbon! 91!
Working with Margins! 92!
Indenting Paragraphs! 93!
Space Before and After a Paragraph! 95!
Changing Margins for Paragraphs! 95!
of 5 165
Page 6

Tabs! 96!
Aligning Specific Characters! 97!
Creating Tabs! 97!
Creating Tabs by Dragging! 98!
Moving Tabs! 98!
Deleting Tabs! 98!
Tabs Dialog! 99!
Changing Tabs! 100!
Removing Tabs with the Tabs Dialog! 101!
Copying and Pasting Rulers! 102!
Paragraph Alignment! 103!
Changing Paragraph Alignment! 104!
Line Spacing! 105!
Bullets! 106!
Borders and Fill! 107!
Fonts! 108!
Text Size! 109!
Text Styles! 110!
Text Style Shortcuts! 111!
Other Text Styles! 111!
Changing Case! 112!
Kerning! 113!
Superscripts and Subscripts! 114!
Superior and Inferior Text! 115!
Columns! 116!
of 6 165
Page 7

Column Breaks! 117!
Page Breaks! 118!
Keep on Same Page! 118!
Style Sheets! 119!
Creating a Style Sheet! 120!
Document Options! 123!
Display:! 124!
Show Hidden Text! 124!
Vertical Text! 124!
Page Number! 124!
Starting Page Number! 124!
Fractional Character Widths! 124!
Text Smoothing! 124!
Lines:! 125!
Characters Per Line! 126!
Line Numbers! 127!
Page Frames! 128!
Notes! 129!
Footnote Marker! 129!
Endnote Marker! 129!
Tables! 130!
Create a Table! 130!
Convert Text into a Table:! 131!
of 7 165
Page 8

Merging Cells of a Table! 132!
Splitting Cells of a Table! 132!
Splitting a Table! 133!
Deleting a Table! 134!
Clearing Data from a Table! 135!
Inserting a Table! 136!
Table Format! 137!
Size! 137!
Borders! 138!
Shading Panel! 139!
Resizing a Table! 140!
Navigation Within a Table! 140!
Customizing Menus! 141!
Custom Key Commands! 141!
Adding a Keyboard Shortcut! 142!
Contextual menus! 143!
Contextual Menu Items! 143!
Proofing Your Documents! 144!
Finding and Replacing Text! 144!
Find Again! 146!
Find Selection! 146!
Find and Replace Formatting! 147!
Spell Checking! 149!
Spell Checking a Single Word! 150!
of 8 165
Page 9

Spell Checking Hidden Words! 150!
Learning New Words! 150!
Looking up Words in the dictionary! 151!
Thesaurus! 152!
Tool Bar! 153!
Toolbars! 153!
Customizing the Toolbar! 154!
Mail Merge! 155!
Data Documents! 156!
Merge Document! 158!
Merge Fields! 160!
Conditional Merge Fields! 161!
Merge Formulas! 161!
Merge Functions And Commands! 162!
Merging Documents! 165!
Send Merged Documents to options:! 165
of 9 165
Page 10

Intro to Mariner Write!
Welcome!
Mariner Write is a powerful yet streamlined word processor solution for the
masses. Boasting an elegant interface, as well as hundreds of intuitive
features such as the ability to read Microsoft Word documents and customizable headers, footers, endnotes, and footnotes, you will require little
need for the documentation. Just sit down and write.!
Requirements!
To use Mariner Write you need:!
•
Mac OS X 10.7 or newer (including Yosemite)!
!
of 10 165
!
!
In this chapter:!
!
•
Welcome!
•
Hardware & Software Requirements!
•
Technical Support!
•
Help!
•
About this Manual
Page 11

Technical Support!
If you have a question about using Mariner Write:!
1 Try to find the answers you need in this documentation.!
2 Find your answer in the FAQ (Frequently Asked Questions) / knowledge base page on our web site. It answers
many frequently asked questions.!
View it at http://marinersoftware.com/kb!
3 If you still can’t find the information you need, try looking through the online discussion forums here:!
http://www.marinersoftware.com/forum/!
!
4 If none of the other options allow you to find the answer to your question, E-mail: ! [email protected]!
For Mariner Write software updates, tips and tricks, information about other Mariner products, user group discount information, and
articles for user group newsletter publication, visit our Web site: "
http://www.marinersoftware.com"
of 11 165
Page 12
Help!
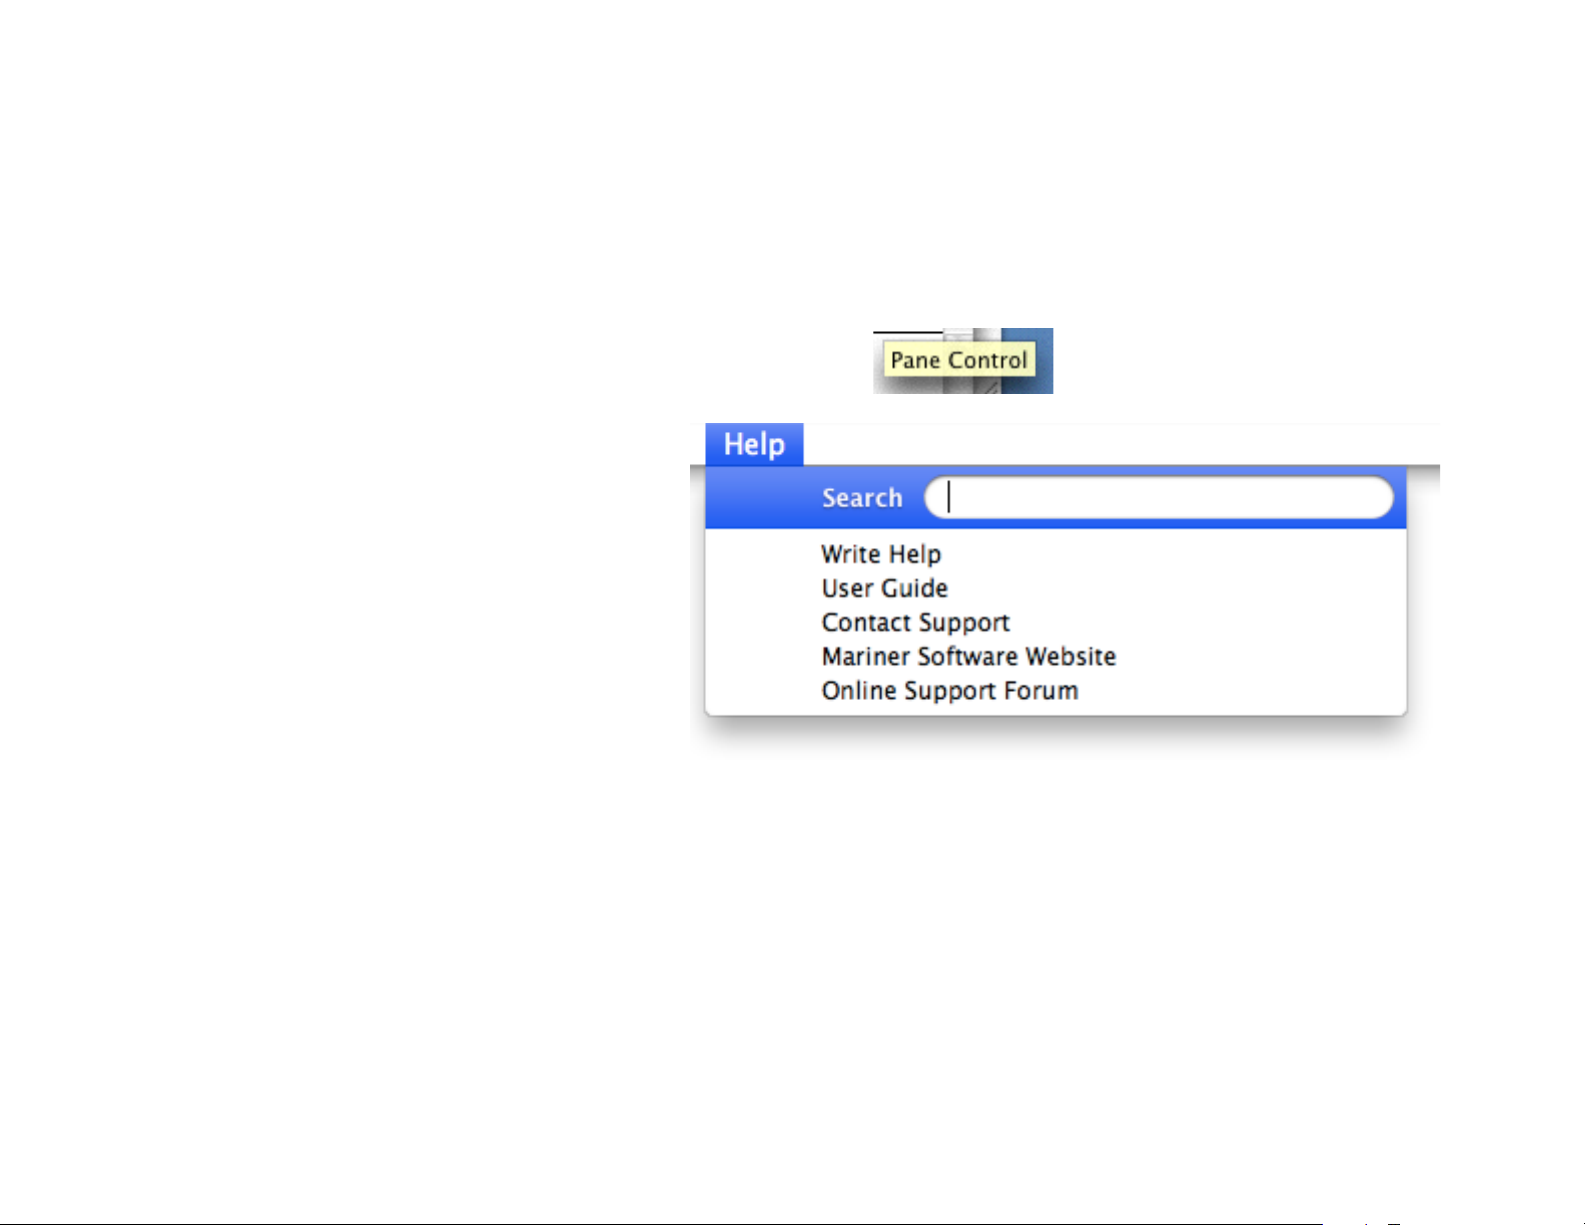
Mariner Write supports Tool Tips in Mac OS X. HTML-based Mac help is also available.!
About Tool Tips - Mac OS X!
Displays Tool Tips when you move the cursor over screen elements. !
About Mariner Write Help!
Both the Help files and this PDF User Guide are
listed in the Help menu. !
If these files are not listed in the Help menu, you
may need to reinstall the application.!
To use Mariner Write help files:!
1 From the Help menu choose Write Help.!
2 Click on a chapter topic to start, links to addi-
tional information appear as blue underlined text.!
3 Buttons - “Contents” - links to a list of chapter topics. Index - Displays a list of Mariner Write key words ,“Next” and
“Previous” buttons link to the previous / next chapter."
of 12 165
Page 13

About This User Guide!
Conventions!
Before using Mariner Write, you should have a basic knowledge of Mac operation.!
You should understand pointing, clicking, double-clicking, dragging, and how to choose menu commands. You should also
know how to operate dialog boxes, resize windows, and use the Clipboard for cut, copy, and paste.!
If you aren’t familiar with these or other basic operations or terminology, refer to the Mac® documentation included with
your computer.!
Mariner Write uses the following keyboard shortcuts when dialog boxes are displayed:!
•
Return or Enter to press the OK button.!
•
Command-period or Escape to press the Cancel button.!
•
Don’t Save can be enacted in the save dialog by pressing Command-D.!
of 13 165
Page 14
Working With Documents!
Creating New Documents!
To create a new Mariner Write document:!
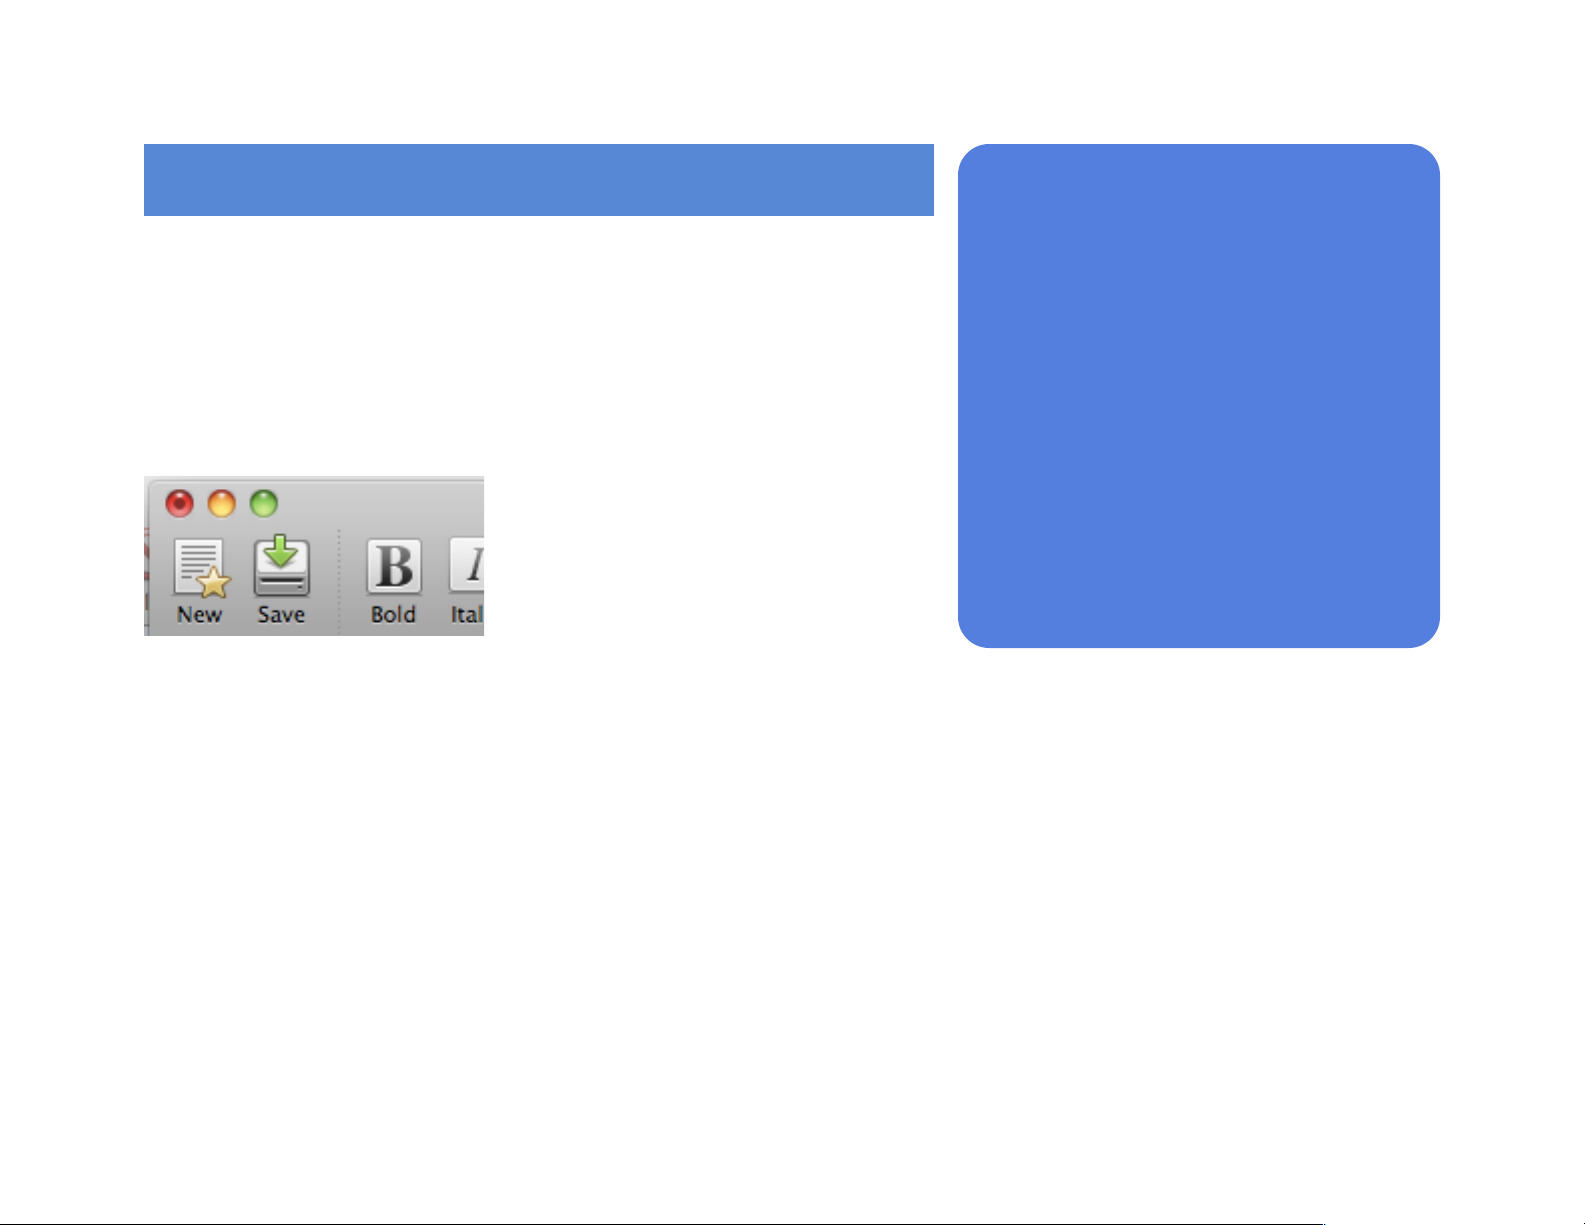
1 Launch Mariner Write, choose New (Command-N) from the File menu
or press the New Document button in the tool bar (if youʼve customized
your toolbar to add the New Document item).!
!
! To display the tool bar, choose Show Toolbar from the Show|Hide menu."
A new untitled document appears. !
Note: New documents are titled Untitled 1, Untitled 2, etc."
Each new document is a duplicate of a special Mariner Write document stored in the Mariner Preferences folder. This default document provides the default settings and content for new documents.!
To create a new document using factory defaults, choose New Empty Document from the Preferences sub-menu. The
Preferences sub-menu is located in the Edit menu.!
For detailed information about changing the default document, see the Preferences section later in this chapter."
of 14 165
!
!
In this chapter:!
!
•
Create new documents and open,
close, save, and manage existing
documents!
•
View your document as pages or
without page margins!
•
Set and save application preferences!
•
Change the magnification and control document and text appearance!
•
Set page margins and page setup!
•
Preview and print documents!
•
User other related document features
Page 15

Creating a Default Document!
A default document is a document which contains the settings for all new files.!
To create a default Mariner Write document:!
1 Choose New (Command-N) from the File menu.!
A new untitled document appears.!
2 Edit the document, set font, size, tables, even add a header or footer, etc.!
3 From the File menu choose Save as Default File!
The file is saved and anytime you create a “new” document in Mariner Write it will have the settings of the file you saved
as default!
Note: for more information about default document settings and overriding them, see the preferences chapter’s page 37!
of 15 165
Page 16
Opening Files!
To open a Mariner Write document:!
1 Choose Open (Command-O) from the File menu or press the Open button in the tool bar. !
To display the toolbar, choose Show Toolbar from the Show|Hide menu.!
2 Select and open the Mariner Write document in the open dialog.!
You can also double-click a Mariner Write document icon to open the file."
Note: you can open multiple files at the same time by command-clicking on more than one file from the open dialog.!
of 16 165
Page 17
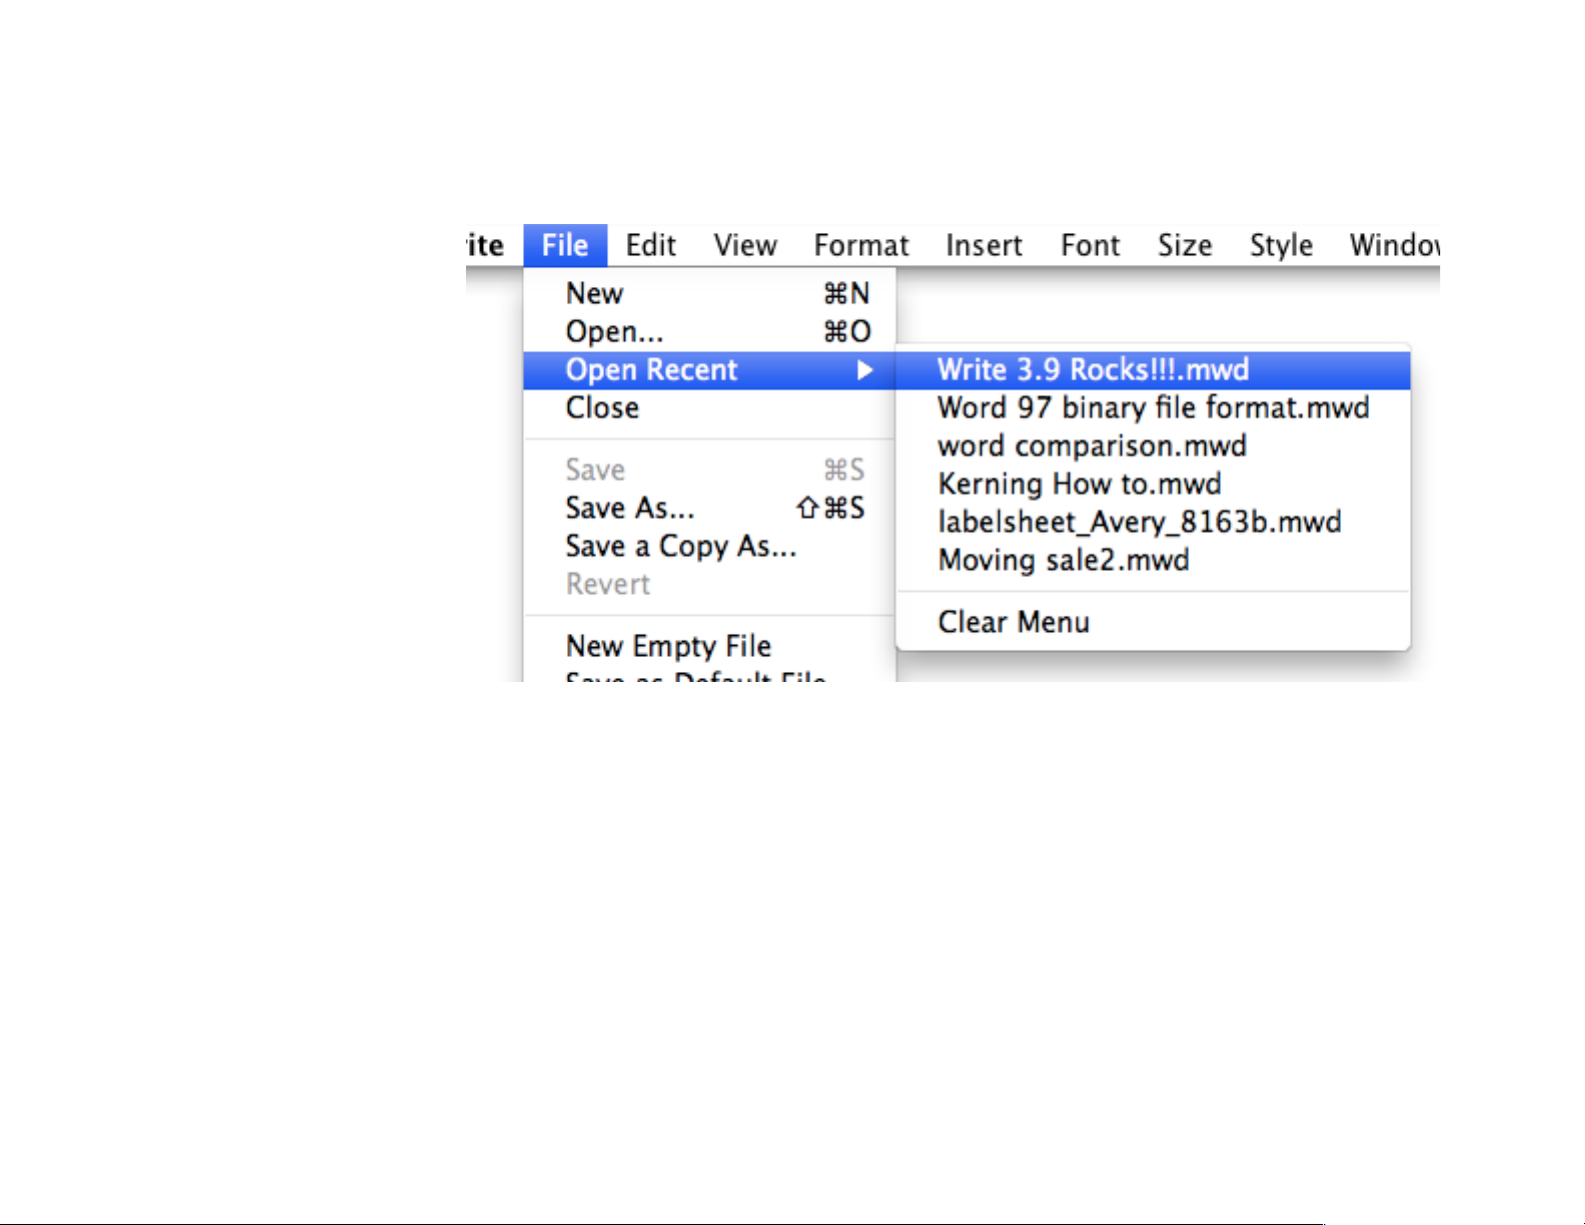
Opening Recent Documents!
The Open Recent submenu lists the last eight
files you opened.!
Simply click on a file to
open it again.!
Note: If the file has moved to
a different place on your hard
drive, the document may not
be found to be opened. In
such a case an error message
will appear."
!
of 17 165
Page 18
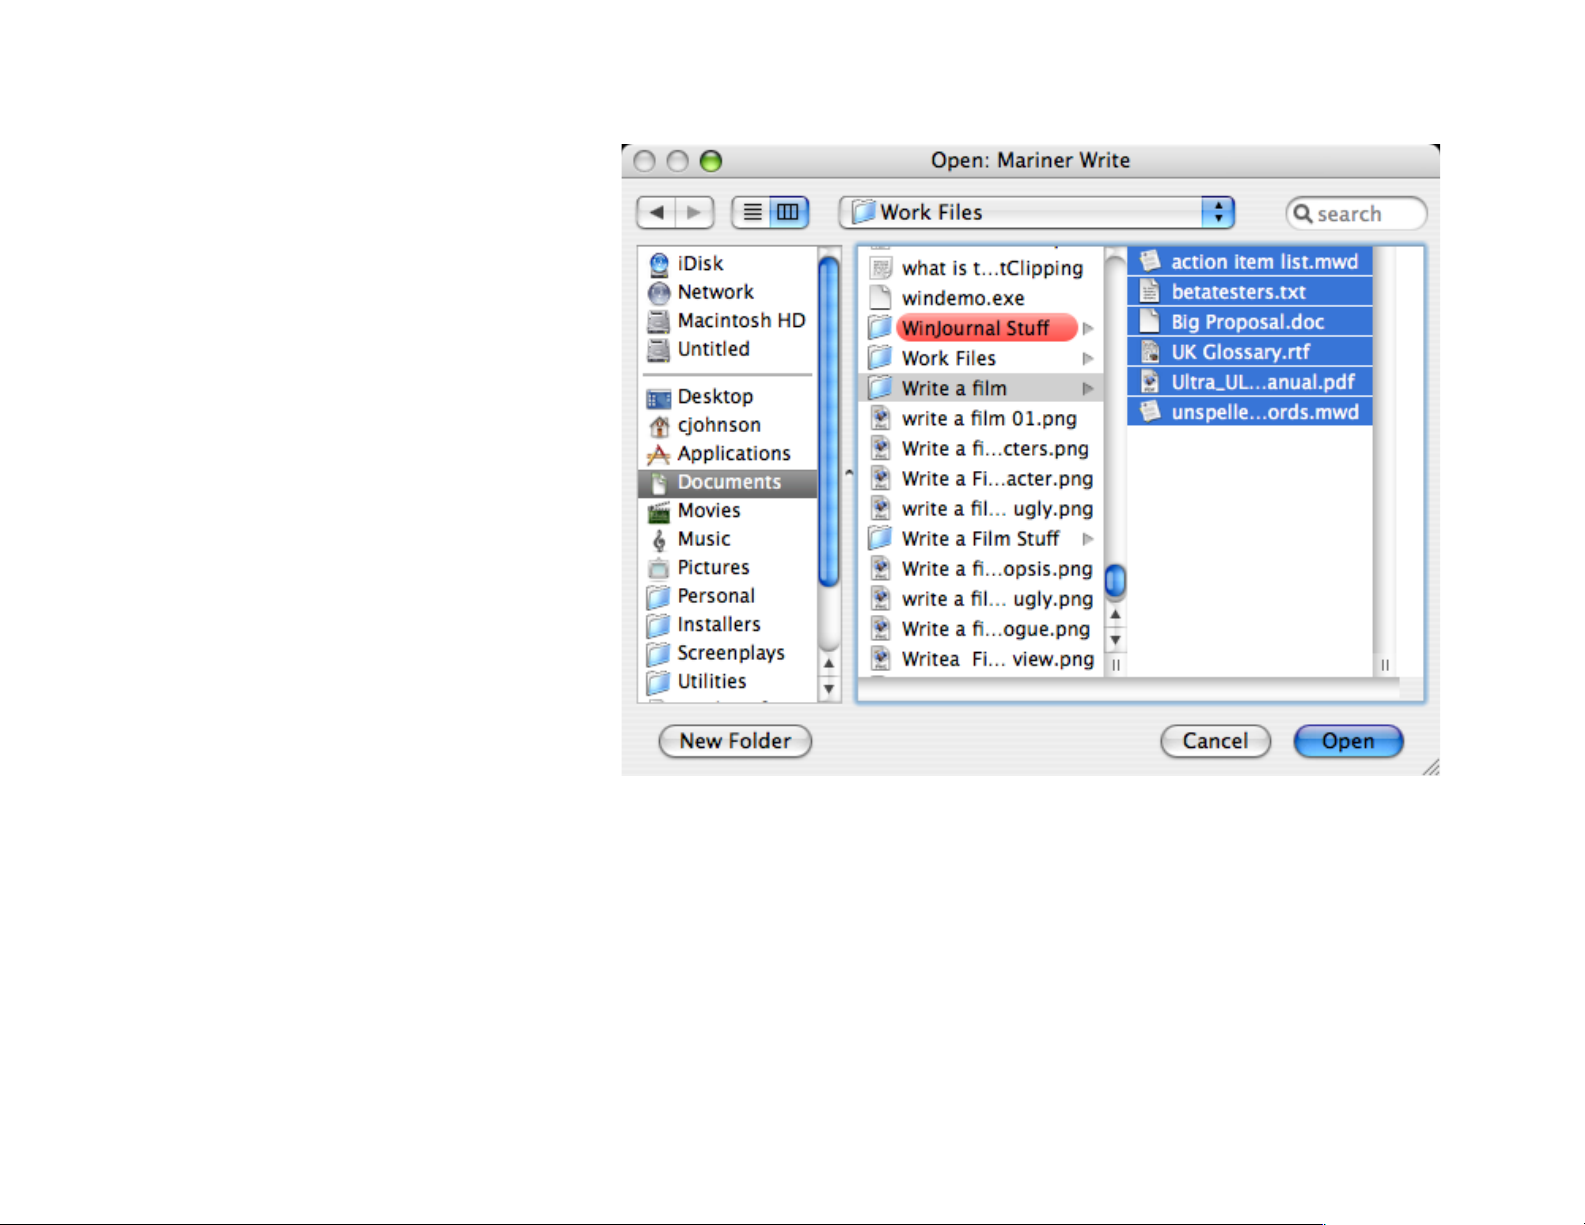
Opening Other File Types!
Choosing the Open command displays a
dialog to choose files to open. You can
open multiple files by holding the command key down and clicking on additional
selections.!
You can open and view the contents of
any file. Mariner Write allows you to open
any document it doesn’t recognize, as
text.!
Open documents saved in the following
formats:!
Text (.txt)!
! Files exported from word
processor programs in text (ASCII)
format. For example, XML, plists,
csv, .tab, .html, etc..!
Word (.doc)!
! Files exported from Microsoft® Word version 6 and later.!
Rich Text Format (.rtf)!
! Documents exported from word processor programs in RTF (Rich Text Format).!
PICT, EPS, GIF, JPEG, BMP, TIFF, PNG!
! Graphic format files.$
of 18 165
Page 19

Inserting Files (Importing)!
You can insert a graphic or the contents of another file into the current document.!
To insert a document into the current document:!
1 Position the insertion point where you want to insert the document.!
2 Choose File/Graphic from the Insert menu.!
Note: When inserting a Mariner Write file into the current document:"
• The contents of the header and footer are ignored when inserting a file.!
• Graphic-based objects are ignored.$
of 19 165
Page 20
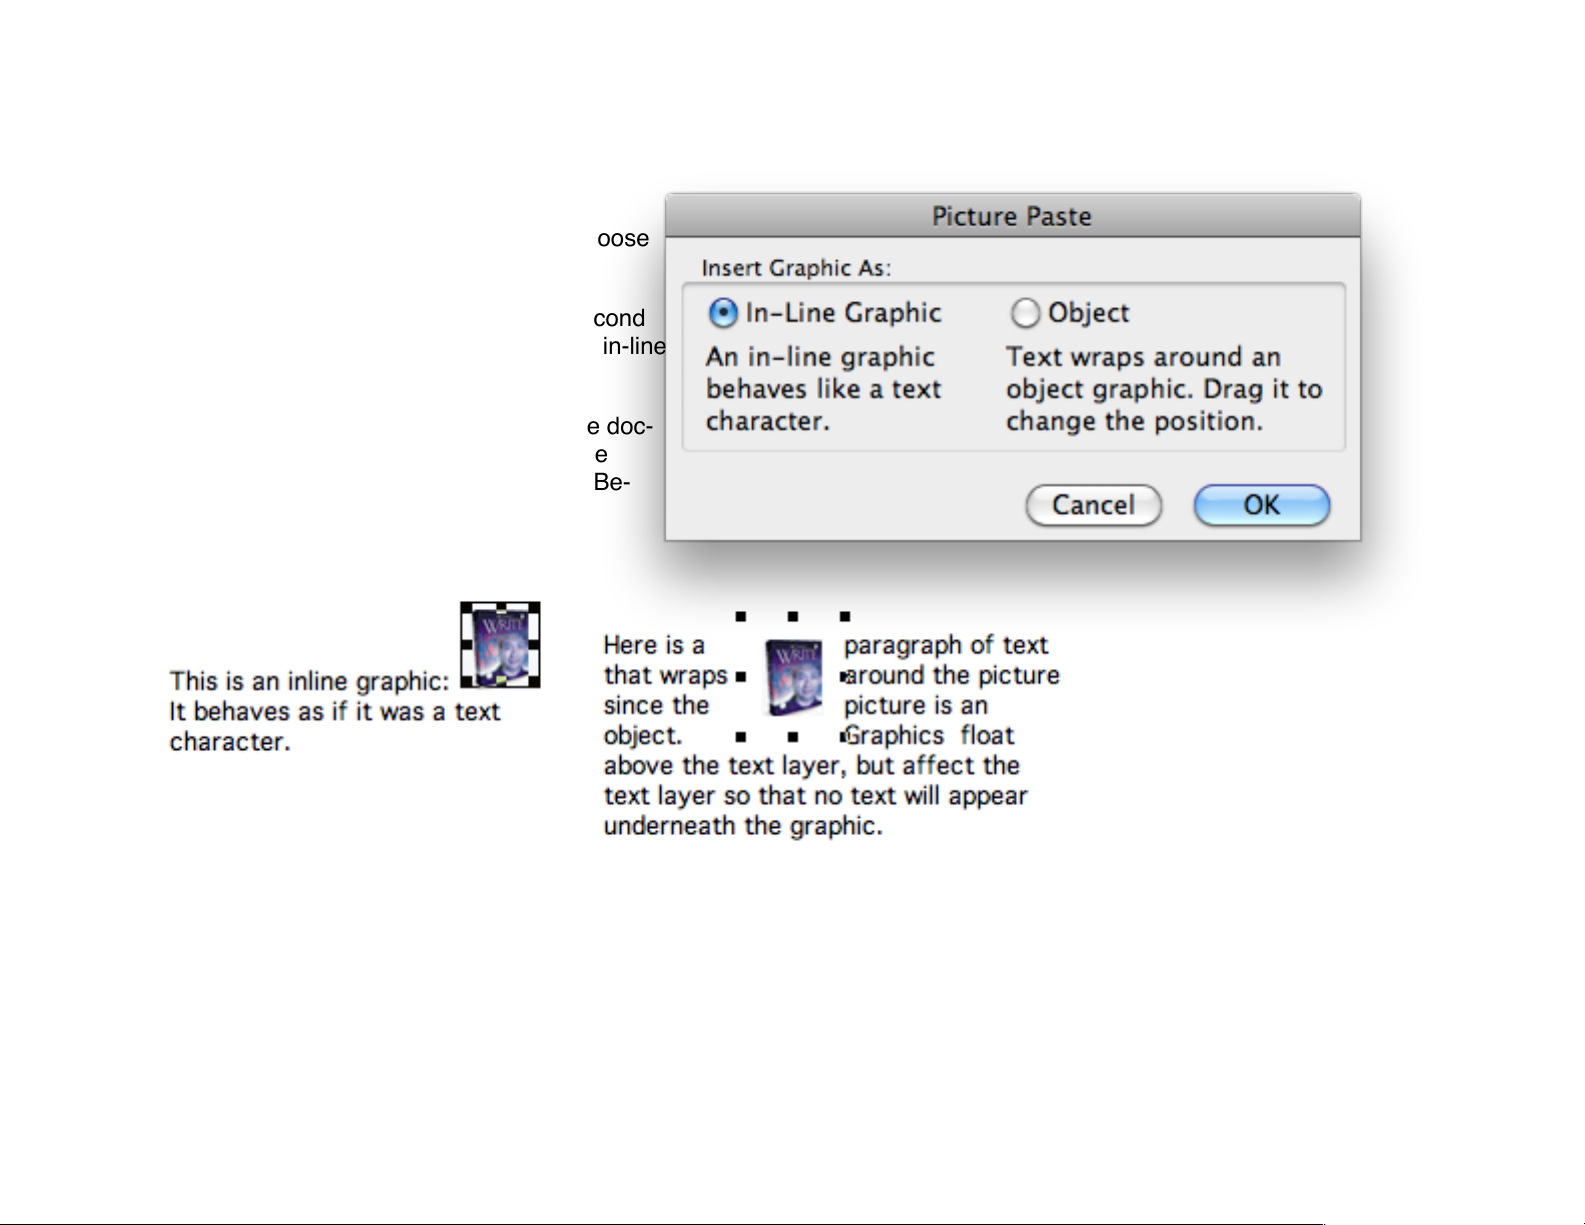
Inserting Graphics!
To import a graphic into your document, choose
File/graphic from the Insert Menu.!
Once the file is selected in the dialog, a second
dialog prompts you to insert the graphic as in-line
or as an object.!
In-line graphics are inserted in-line with the doc-
ument text and can be selected in the same
manner as a text character (See Example Be-
low)!
!
" !
In-line Graphic" Object Graphic"
Object-based graphics float above, but don’t obscure document text... Instead, the document text “wraps” around the
graphic (See example above). If you add text, making the document re-paginate, you will need to adjust the placement of
any object graphics For detailed information about editing graphics, see the Working with Graphics section in Chapter 3,
Entering and Editing."
of 20 165
Page 21

Closing Documents!
To close a Mariner Write document:!
•
Choose Close Window from the Window menu.!
-or-!
•
Click the close box in the upper left-hand corner of the document window.!
If you close your document but have made changes since it was last saved, an alert dialog asks if you want to save your
changes. !
Click the Save button to save your changes. Click the Don’t Save button to close the document without saving changes.
Click the Cancel button to return to your document without closing.!
Note: Closing the Header, Footer, Footnote does not close the document. To close the entire document, close the main document
window or use the Close command in the File menu.!
of 21 165
Page 22
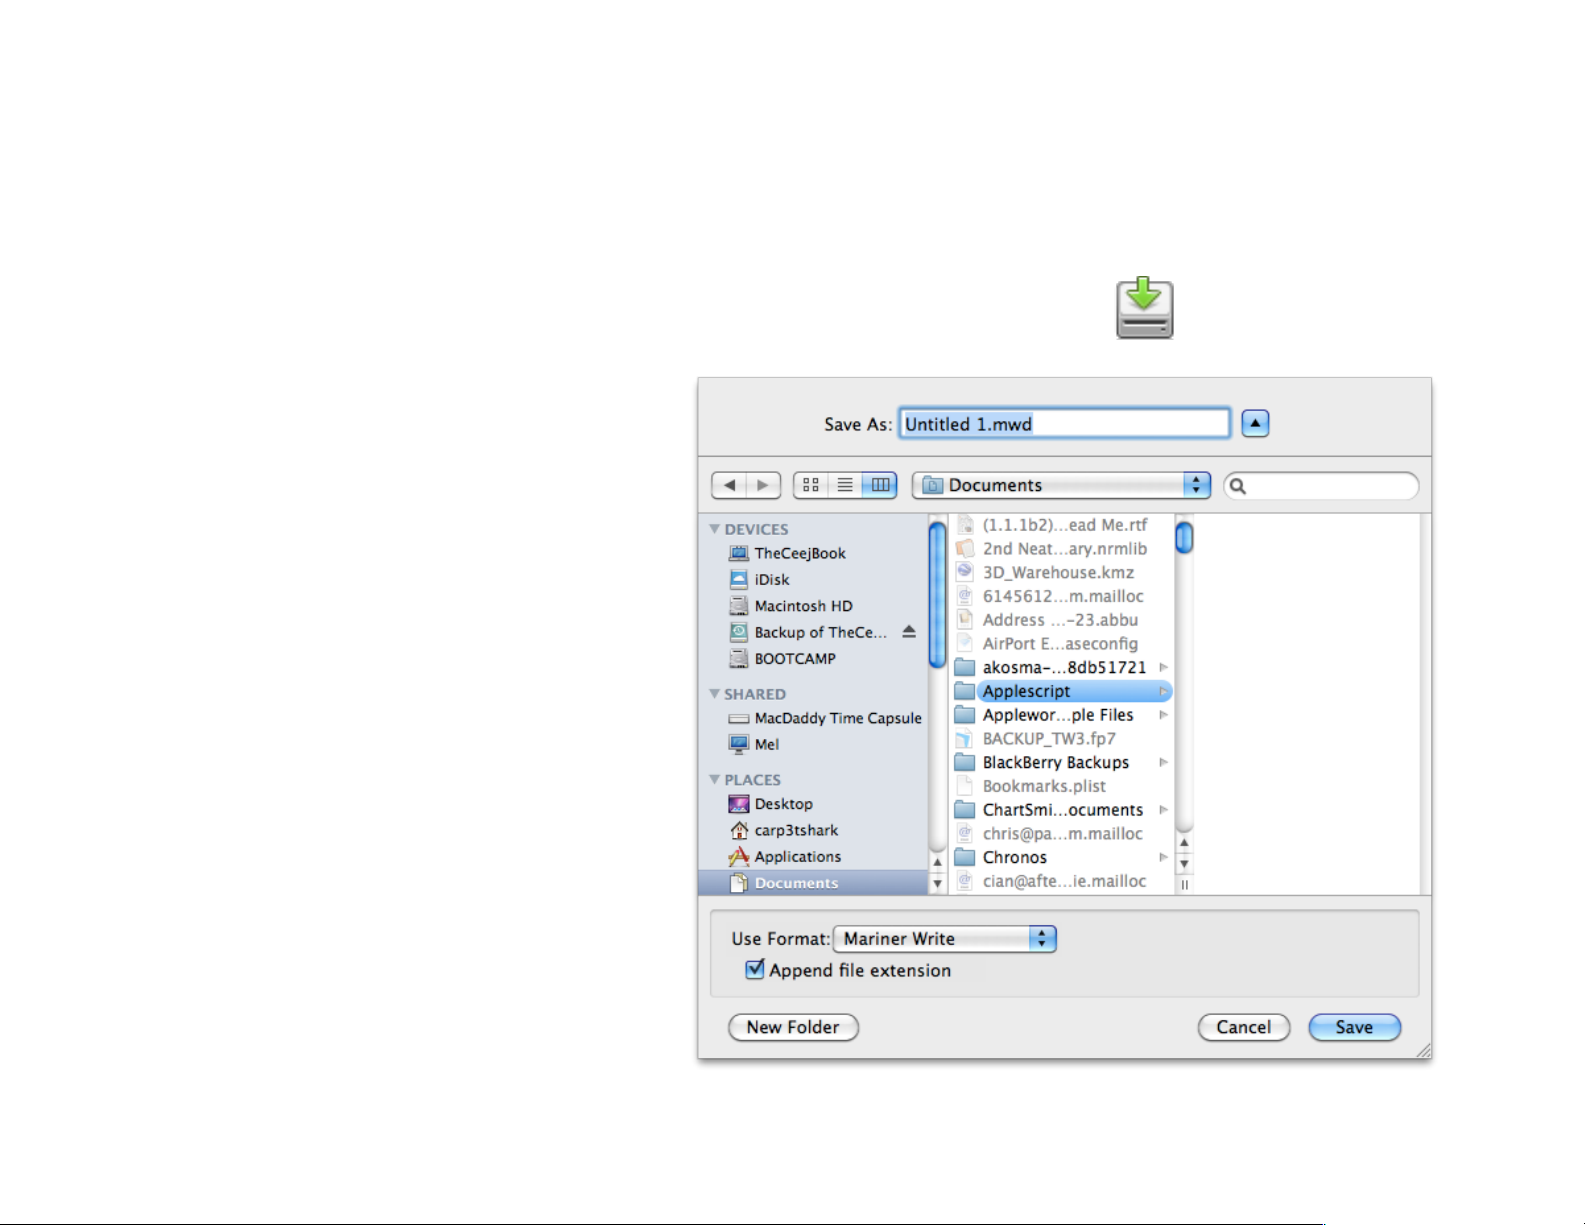
Saving Documents!
To save a Mariner Write document:!
1 Choose Save (Command-S) from the File menu or press the Save button in the tool bar. !
A dialog appears if the document hasn’t been
previously saved.!
2 Select the location where you want to save
your file and enter a name for it.!
3 Click the Save button when you are finished.!
Once you save a document, choosing Save from
the File menu saves your changes without displaying the Save dialog.!
See the following two sections, The Save As Command and The Save a Copy As Command for information on saving your document with a different name, to
a different location, or in a different format.!
of 22 165
Page 23
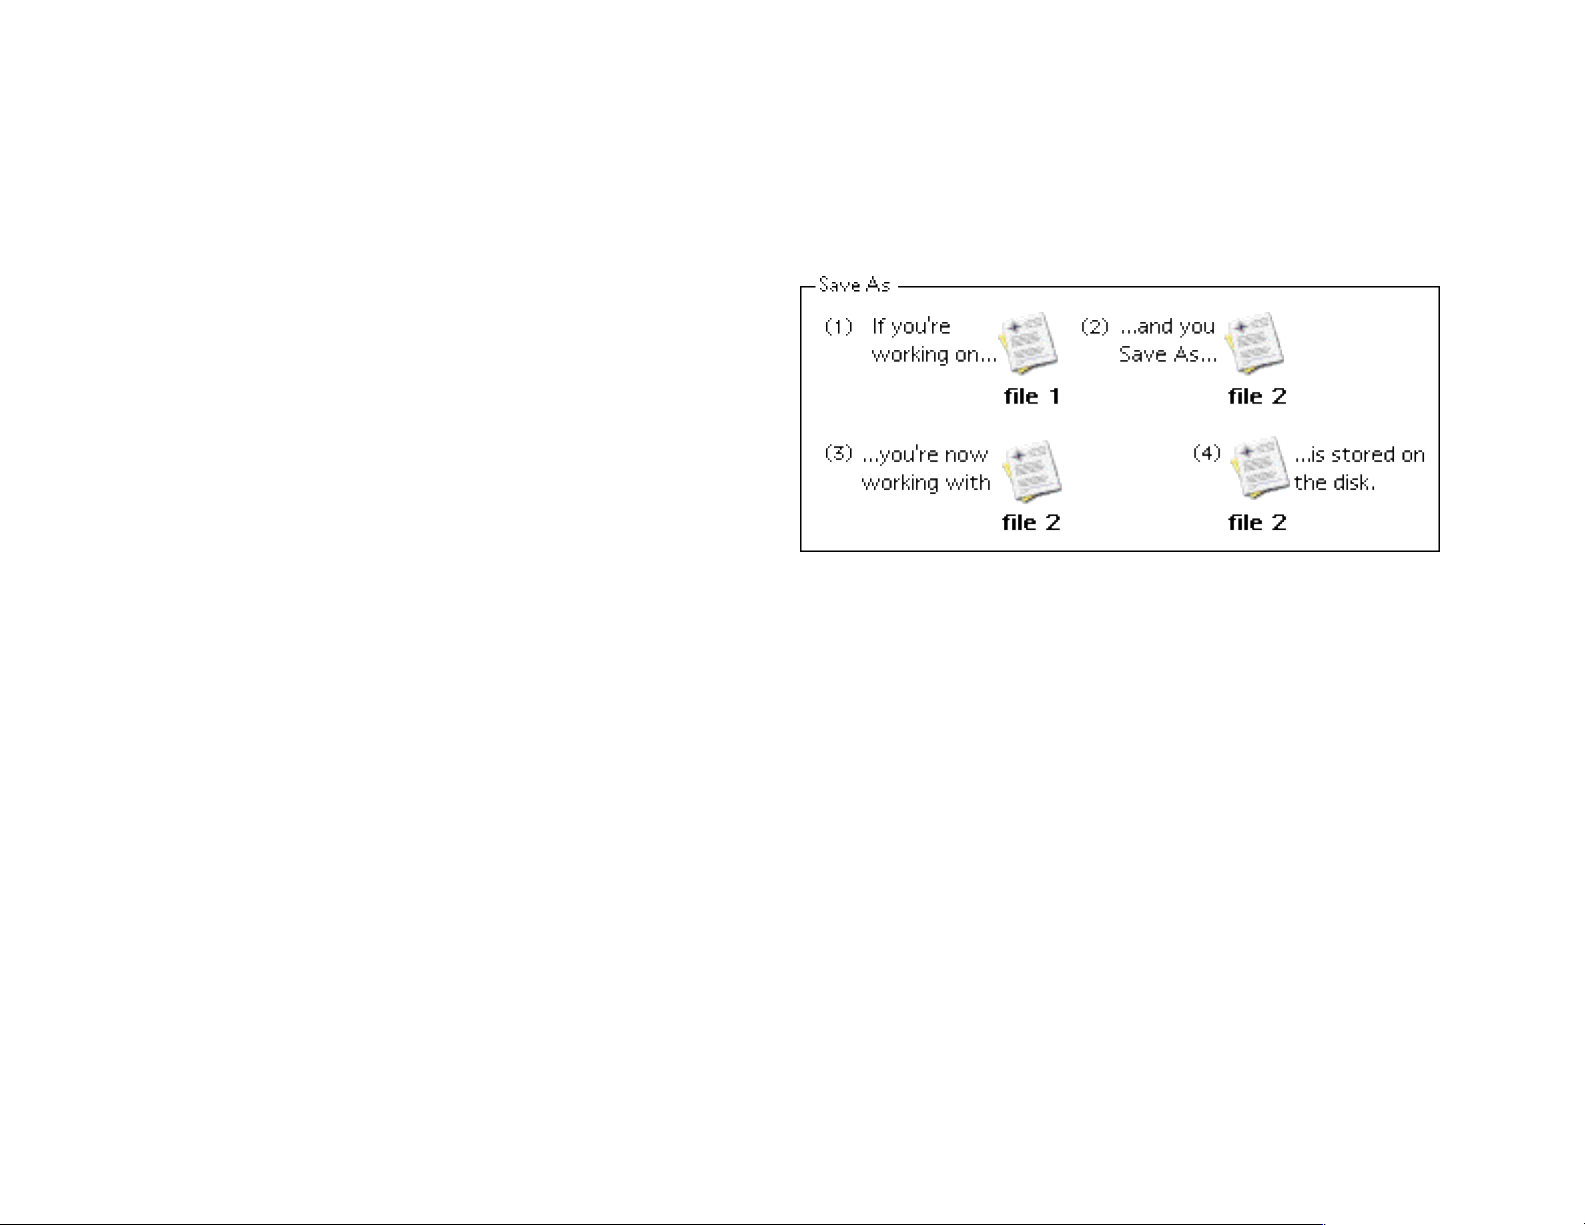
Saving As...!
The Save As command lets you save your document with a different name, to a different location, or in a different format.
The file created using the Save As command becomes the current document.!
To use the Save As command:!
1 Choose Save As from the File menu. !
2 Enter a different name for the file, and/or, choose a dif-
ferent location to save the file.!
3 To save the file in a different format, make the appropri-
ate selection from the file format pop-up menu.!
4 Click the Save button to save the file or the Cancel button to return to the document without saving.$
of 23 165
Page 24
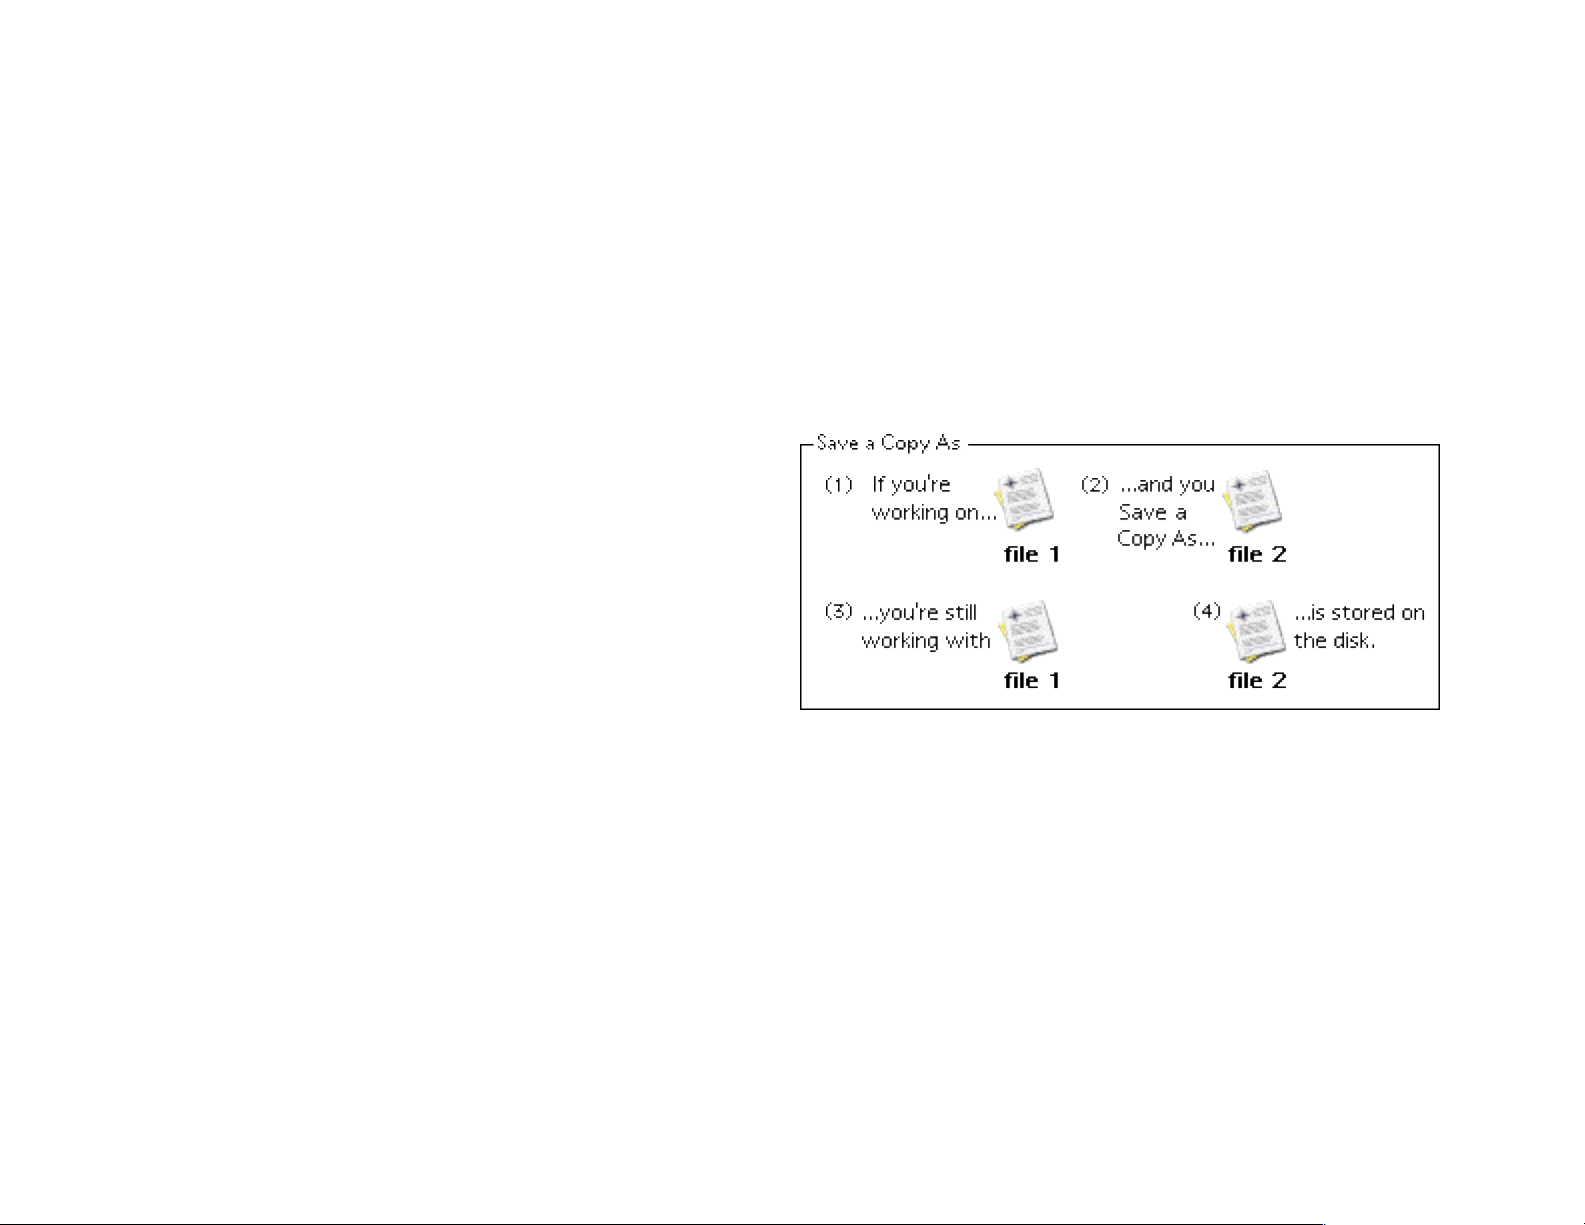
Save a Copy As...!
The Save a Copy As command also lets you save your current document with a different name, or to a different location,
or in a different format.!
Note: When you use the Save a Copy As command, you’re still working with the original document-the file name doesn’t change."
Use the Save a Copy As command when you’re finished working with the current document and want to save it under a
different name. Use the Save As command when you want to save the current document under a new name and continue
working with that document.!
To save a copy of the current file:!
1 Choose Save a Copy As from the File menu.!
2 Enter a different name for the file, and/or, choose a dif-
ferent location to save the file. Enter a new name for the
file in the space provided.!
3 If you want to save the file in a different format, make
the appropriate selection from the pop-up menu.!
4 Click the Save button to save the file or the Cancel button to return to the file without saving.$
of 24 165
Page 25

Exporting!
To save files in formats other applications can read, choose a file format other than Mariner Write in the Use Format popup in the Save, Save As, or Save a Copy As dialogs.!
See the previous sections for detailed information about using the Save, Save As, or Save a Copy As commands.!
Note: Graphics existing as objects in Mariner Write documents are not exported. The graphic must be re-inserted as a character. For
detailed information about importing graphics, see the Importing Graphics section earlier in this chapter."
Reverting!
Choose Revert from the File menu to open the last saved copy of the current document. %
Any changes since the document was last saved are lost.!
Saving a Default Document!
Each new Mariner Write document you create is actually a duplicate of a special Mariner Write document stored in the
Mariner folder in the System’s Preferences Folder. This default document provides the default settings and content for
new documents.!
Note: Other applications perform a similar function by use of a “stationery note” feature. You can bypass this feature by checking the
Apply To New Documents checkbox in the Preference dialog. In this case, new documents use the default setting."
To save the current document as the new default document, choose Save As Default File from the File menu. To create a
new document with default settings, choose New Empty File from the File menu.!
Quitting !
To quit the Mariner Write application, choose Quit from the Write menu. If there are any changes to your documents since
you last saved, you will be prompted to save your changes for each document.$
of 25 165
Page 26

Preferences!
!
Preferences control many aspects of the Mariner Write application. !
To open the preferences:!
1 Choose Preferences under the Write menu item.!
A dialog appears.!
2 Click on the tabs listed across the top of the dialog to change the cate-
gory. !
3 Press OK to accept the changes you’ve made or Cancel to nullify any
changes you’ve made.$
of 26 165
!
!
In this chapter:!
!
•
Display Preferences!
•
Edit Preferences!
•
Default Document preferences!
•
Ruler Preferences!
•
Language Preferences!
•
Files Preferences!
•
Keyboard Shortcut Preferences!
•
Open Options Preferences
Page 27
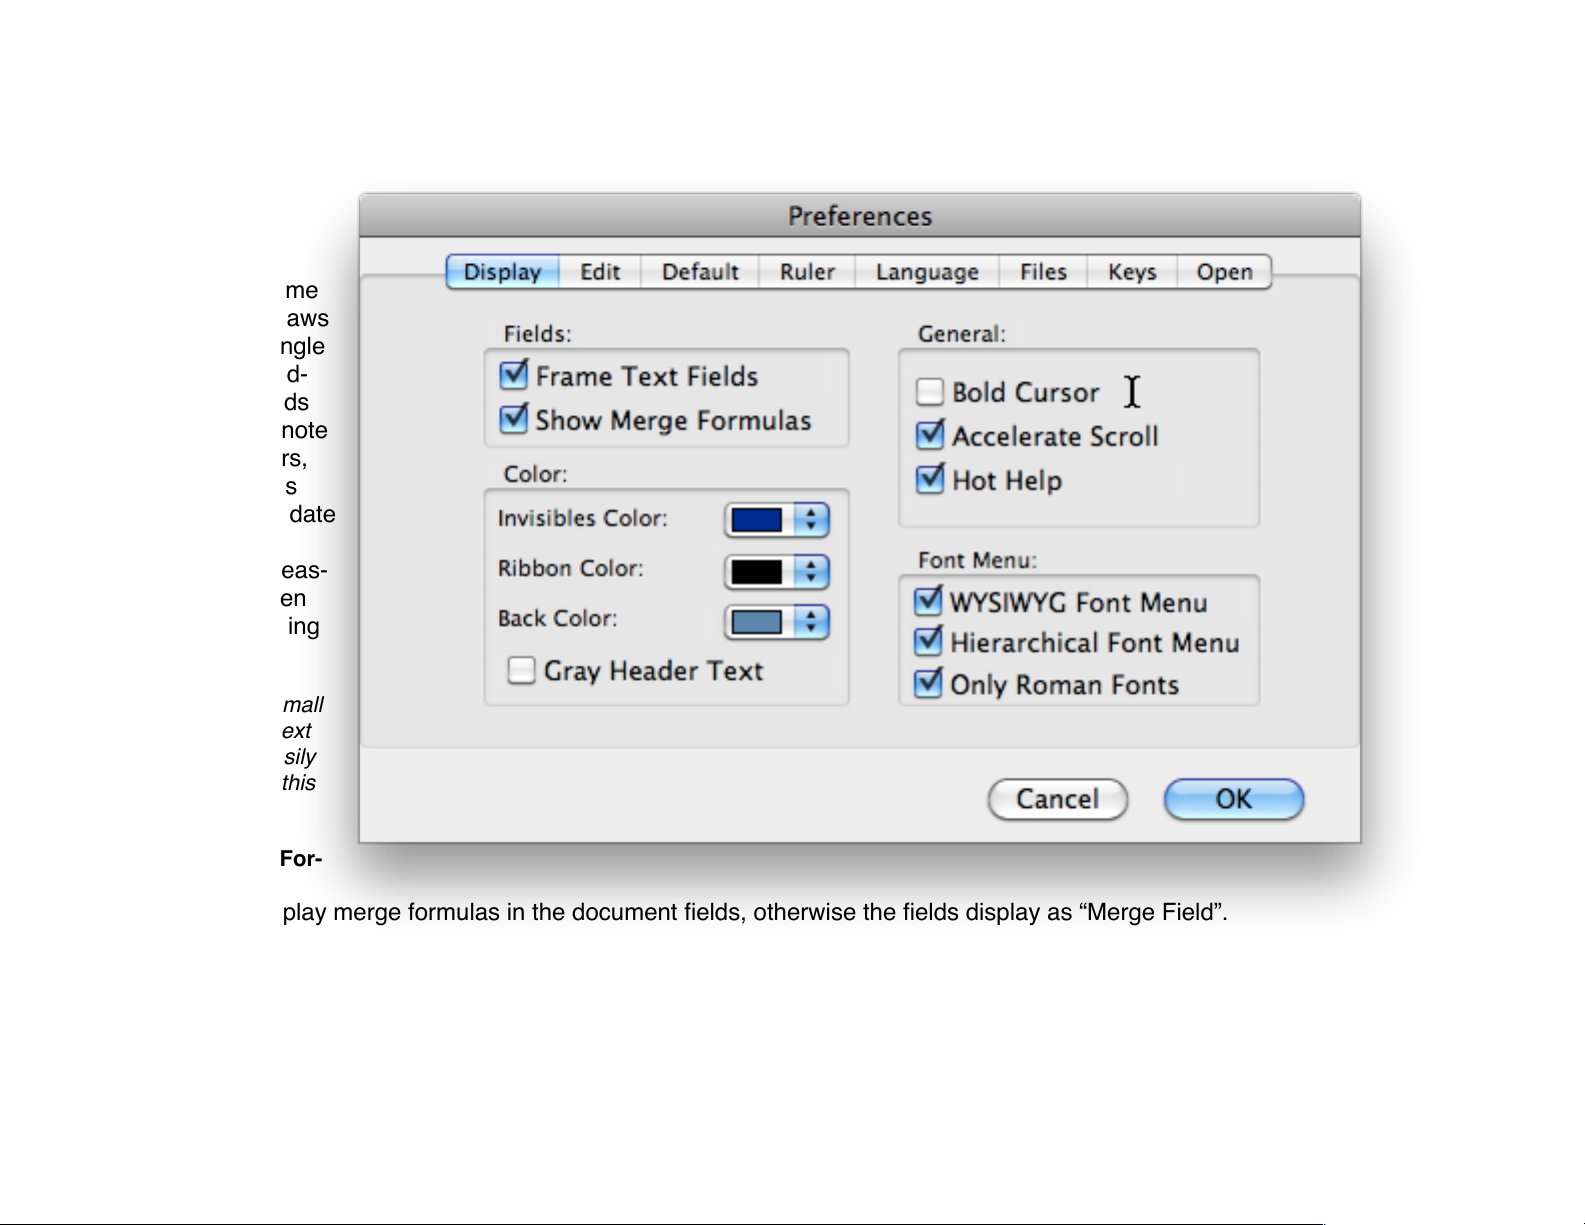
Display!
Framing Text
Fields!
Selecting Frame
Text Fields draws
a small rectangle
around non-ed-
itable text fields
(such as footnote
index numbers,
page numbers
and updating date
entries). This
makes them eas-
ier to see when
quickly scanning
a page. !
Note: With a small
font size, the text
may not be easily
readable with this
option on."
Show Merge For-
mulas!
Enable to display merge formulas in the document fields, otherwise the fields display as “Merge Field”.$
of 27 165
Page 28
Setting Colors:!
Setting Invisible Characters Color!
Selecting Show Invisible Characters in the Show|Hide menu to displays non-printing characters such as Tab, Return, Linefeed, page break, space, etc...!
To make invisible characters easier to see, change their color with the Invisibles pop-up menu. The default color is
dark blue.!
Setting Ribbon Color!
Changes the color of the text and icons displayed in the style ribbon.!
Setting the Background Color!
This sets the color of the background behind the page. The default color is a medium blue!
Setting the Header text to Gray!
Enable the Gray Header Text check box to display headers, footers, footnotes and endnotes using gray text.!
General:!
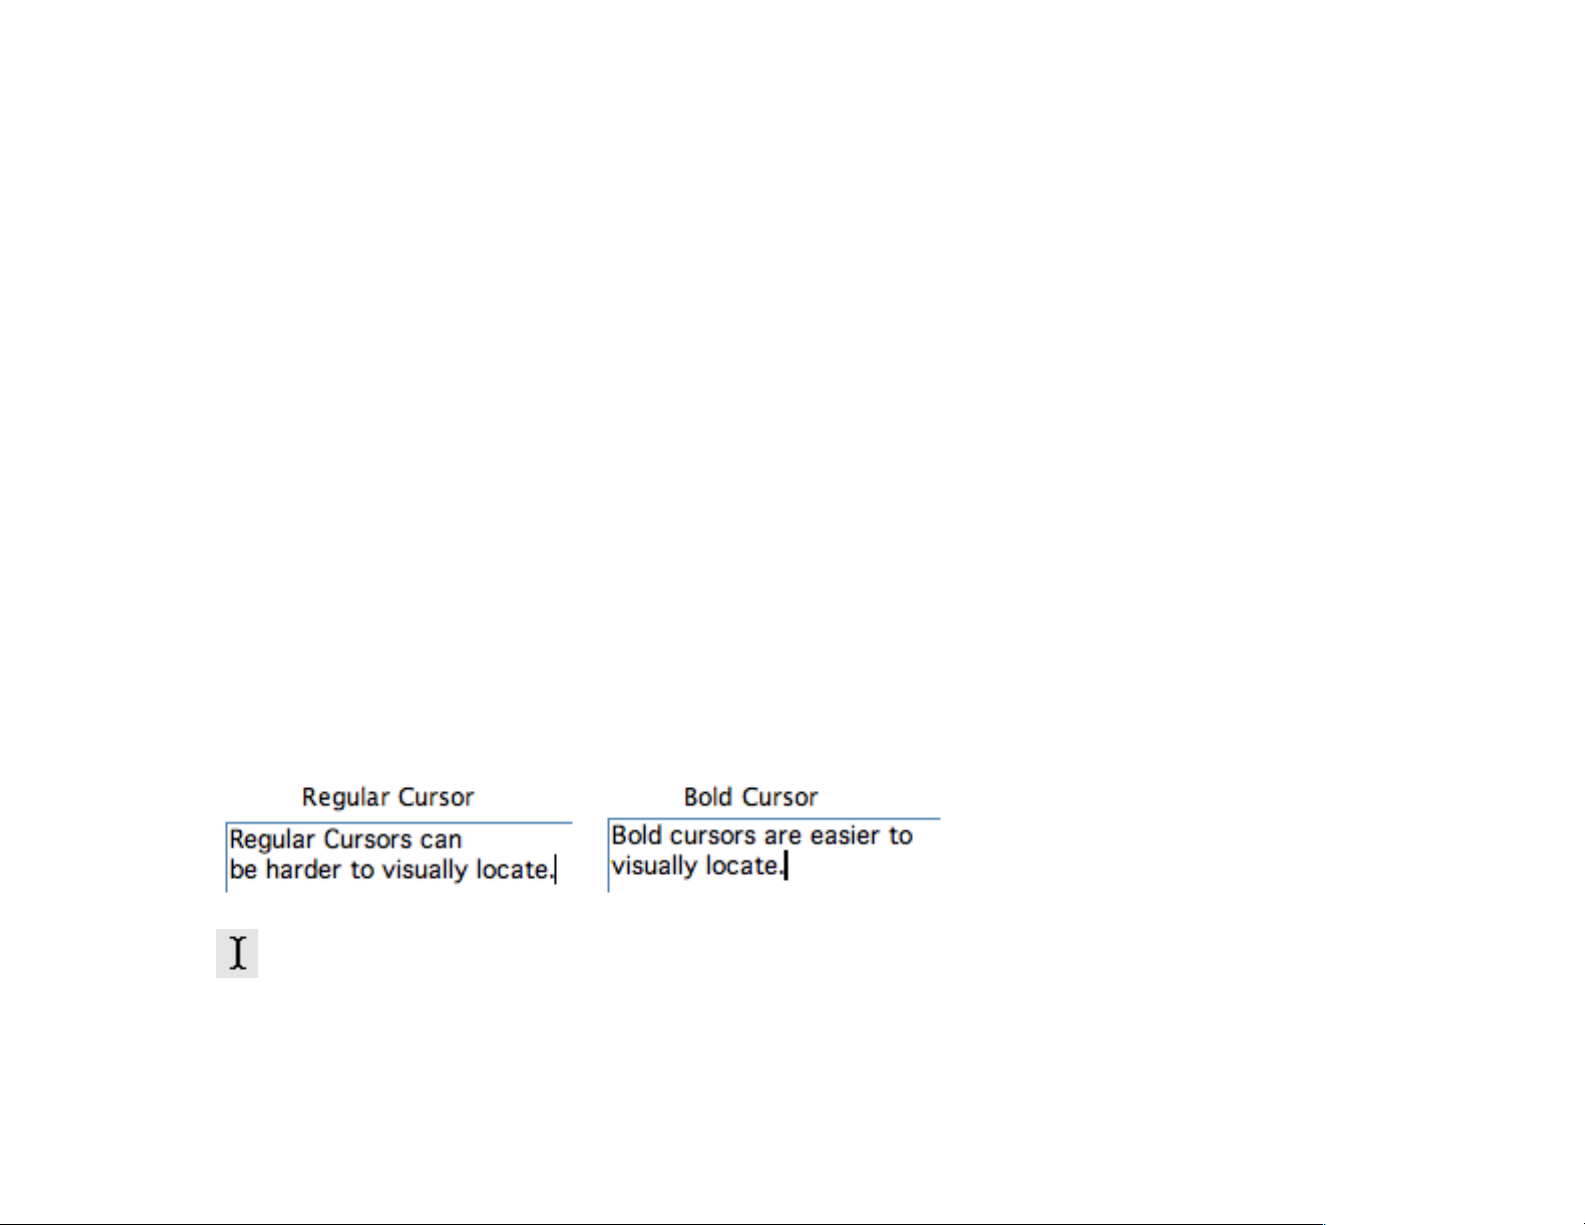
Bold Cursor!
Small graphics, such as the cursor and text insertion points, are sometimes difficult to see. Select the Bold Cursors
check box to display thicker versions of the Mariner Write cursor and insertion point.!
!
Bold Insertion Point!
of 28 165
Page 29
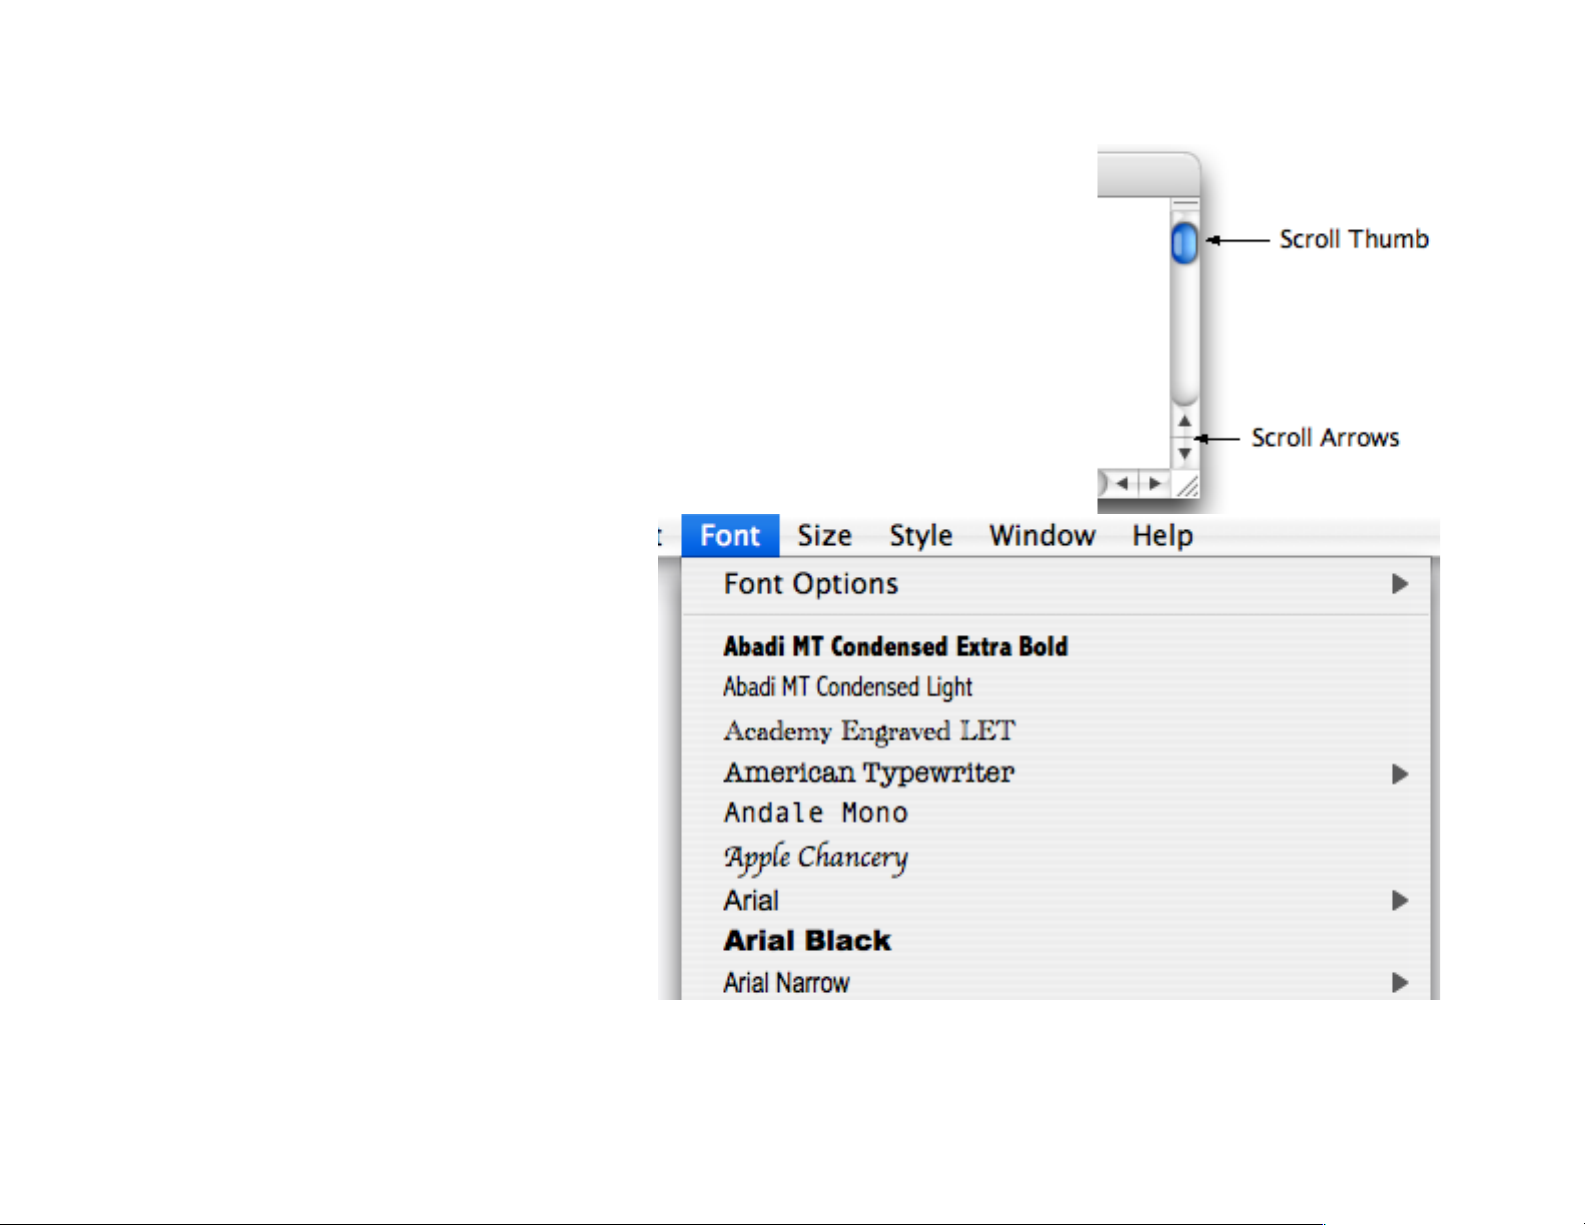
Accelerated Scrolling!
In many word processors, pressing one of the scroll arrows changes the document view at one steady speed.!
If you select the Accelerated Scrolling check box, your document scrolls faster
and faster as you hold down the scroll arrow.!
Hot Help!
To see help message tags, enable the Hot Help check box.!
!
!
Font Menu:!
WYSIWYG Font Menu!
When the WYSIWYG Font Menu
check box is selected, fonts are displayed using the actual typeface.!
Hierarchical Font Menu!
When the Hierarchical Font Menu
check box is selected, fonts are separated and displayed by font family.!
Only Roman Fonts!
When the Only Roman Fonts check
box is selected, non Roman fonts are
removed from the font menu.$
of 29 165
Page 30
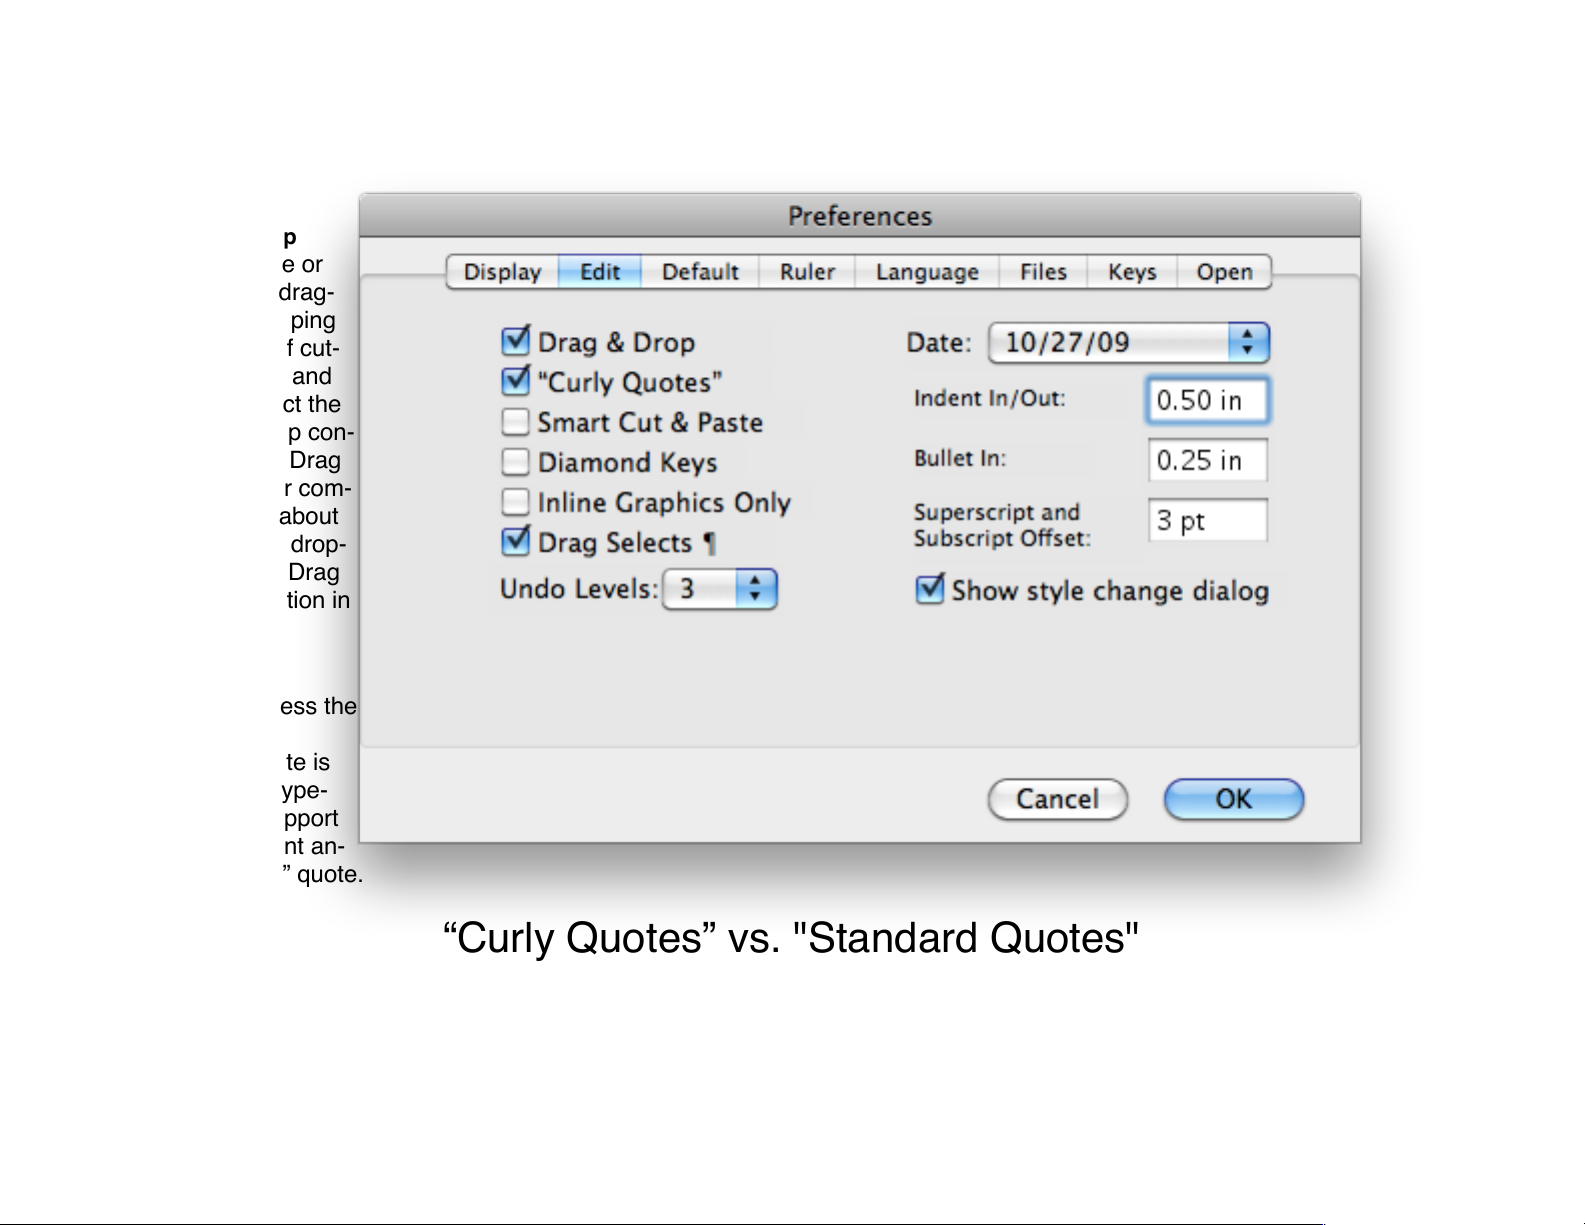
Edit!
Drag and Drop!
You can move or
copy text by drag-
ging and dropping
text instead of cut-
ting, copying, and
pasting. Select the
Drag and Drop con-
trol to enable Drag
and Drop. For com-
plete details about
dragging and drop-
ping, see the Drag
and Drop section in
Chapter 3.!
Curly Quotes!
When you press the
quote key, a
"straight" quote is
typed. Most type-
faces also support
a more elegant an-
gled or “curly” quote.!
“Curly Quotes” vs. "Standard Quotes"!
Note: Selecting Curly Quotes doesn’t change the style of existing quotes – only the quotes you type after enabling Curly Quotes. Use
the commands in the Modify menu to change existing quotes."
of 30 165
Page 31
Select the “Curly Quotes” check box to automatically type a curly quote instead of a regular quote. Mariner Write knows to
type a leading quote at the beginning of a word and a trailing curly quote at the end of a word. See Power User note in
Chapter 6 - Custom Menus.!
Tip! " You can create a left curly quote by typing Option + Left Bracket, and a right curly quote by typing Option - Shift - Left Bracket."
Example:"
Then Lou says, “What’s the name of the guy on third base?”!
!
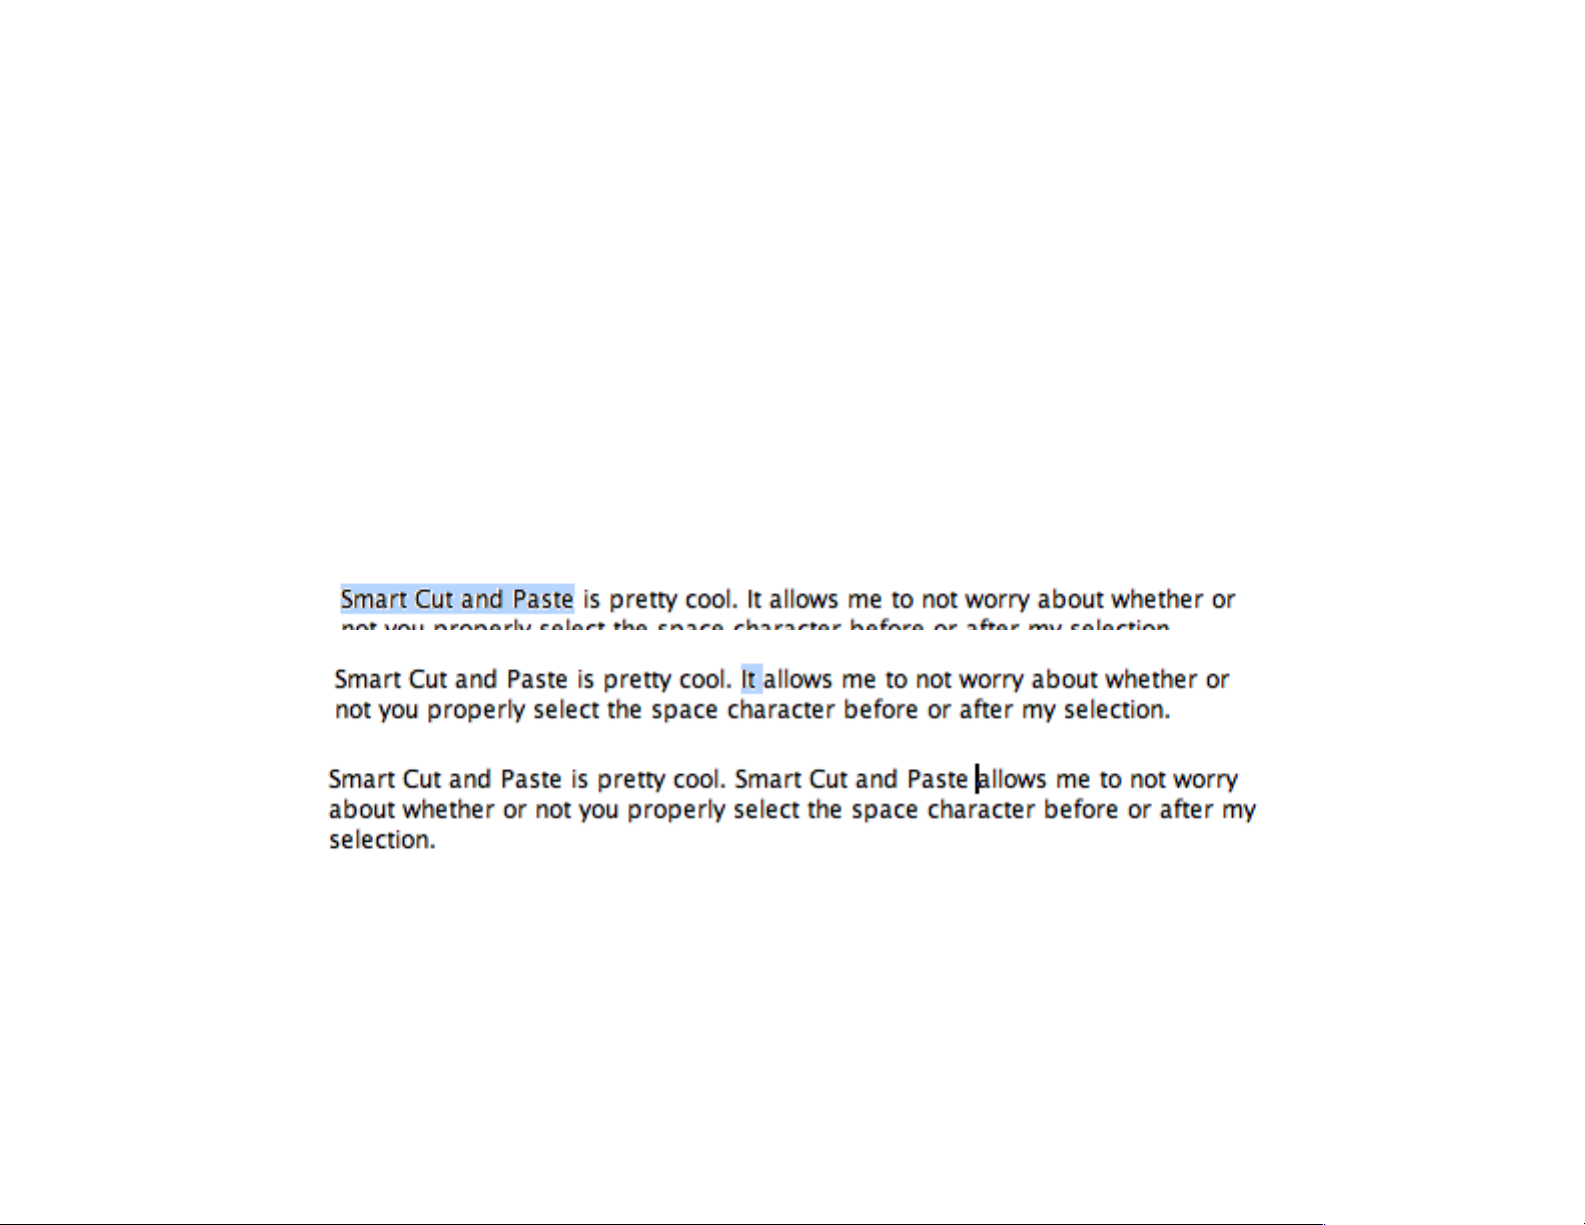
Smart Cut and Paste!
Smart Cut and Paste keeps track of the spaces between words so you don’t have to worry about inserting or deleting extra spaces when you cut/paste or Drag & Drop. See Power User note in Chapter 6 - Custom Menus.!
1 Copy!
2 Select!
!
3 Paste!
!
!
The extra space is automatically inserted afterwards and intelligently not added before “Smart Cut and Paste”.!
!
of 31 165
Page 32
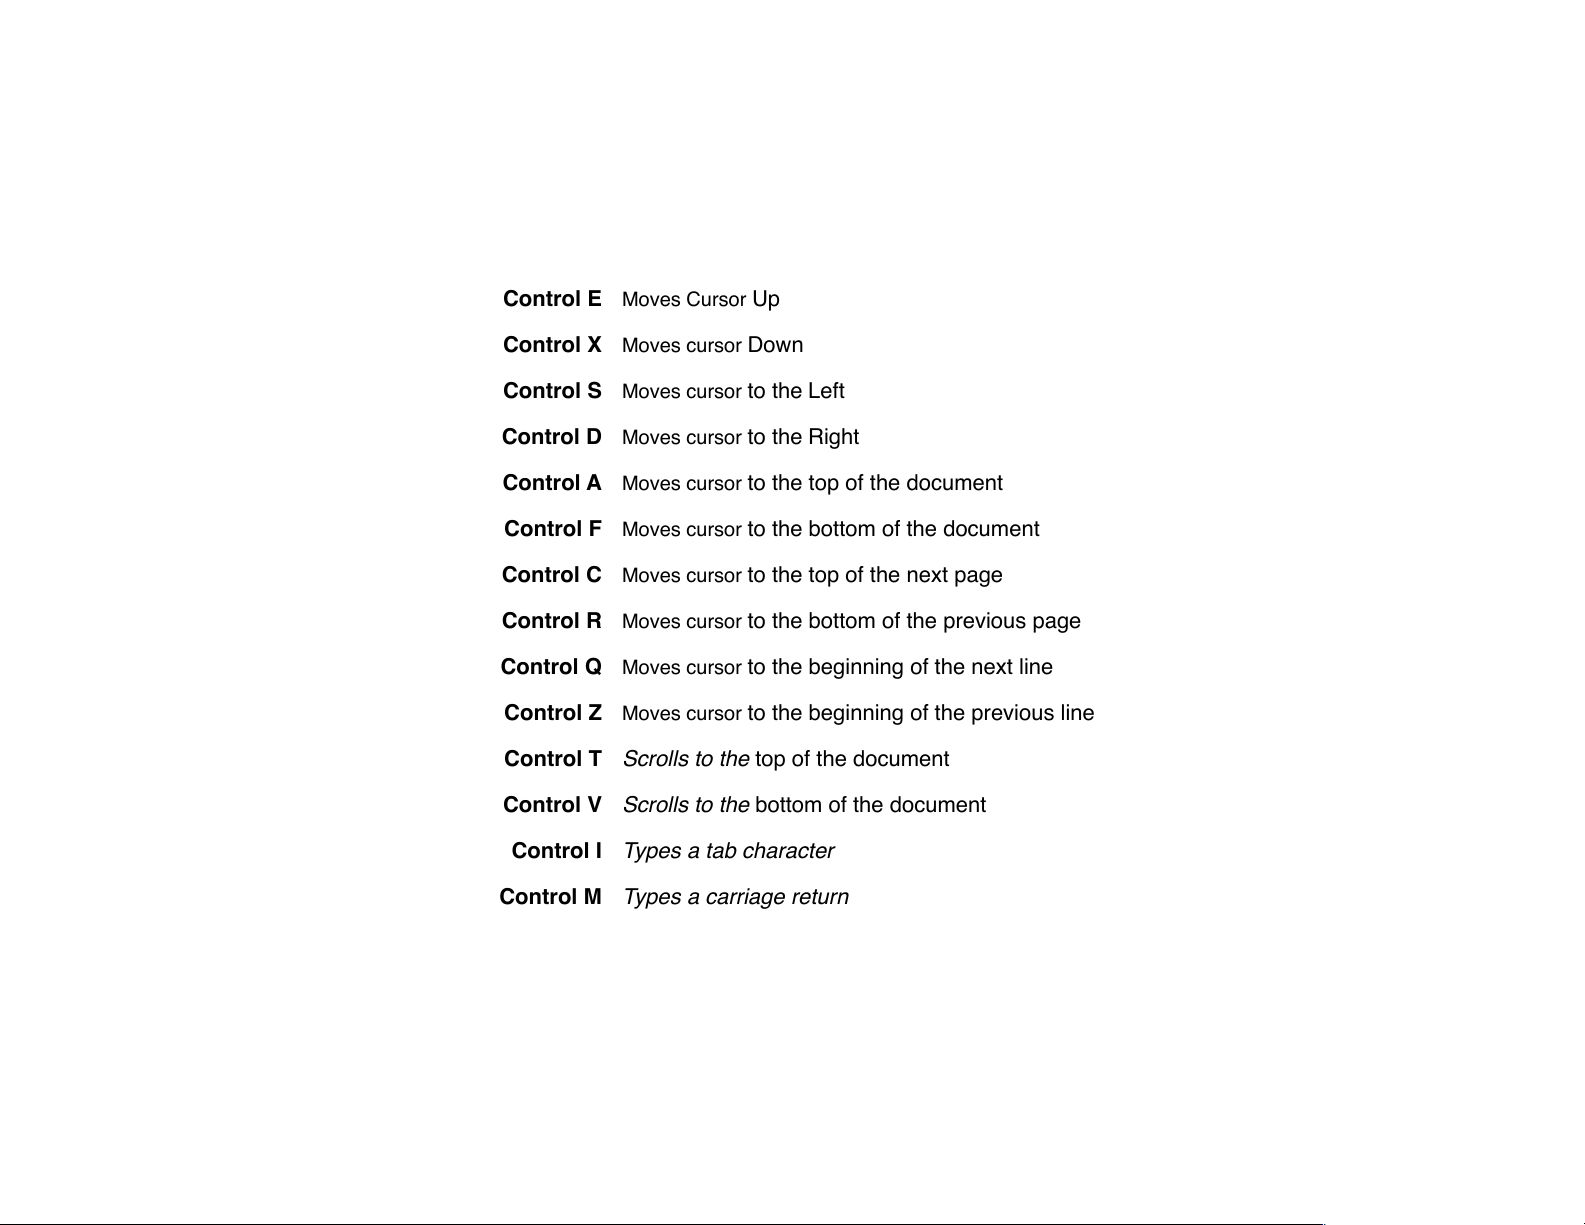
Diamond Keys!
Diamond keys let you use the Control Key for advanced navigating and editing keyboard shortcuts. !
Mariner Write supports the following diamond keys:!
Note: Turn off Diamond keys if you wish to type characters requiring the Control key.!
Control E
Moves Cursor Up
Control X
Moves cursor Down
Control S
Moves cursor to the Left
Control D
Moves cursor to the Right
Control A
Moves cursor to the top of the document
Control F
Moves cursor to the bottom of the document
Control C
Moves cursor to the top of the next page
Control R
Moves cursor to the bottom of the previous page
Control Q
Moves cursor to the beginning of the next line
Control Z
Moves cursor to the beginning of the previous line
Control T
Scrolls to the top of the document
Control V
Scrolls to the bottom of the document
Control I
Types a tab character
Control M
Types a carriage return
of 32 165
Page 33

Inline Graphics Only!
When importing or pasting a graphic, Mariner Write normally displays a dialog allowing you to choose between an object
or character element. Select this check box control to always enter graphics as inline characters (graphic flows with text).!
Note: This is helpful if you plan to export the file since many export file formats don't allow graphics to be stored as objects."
Drag Selects ¶!
Select this control to select control characters (CR, Soft Return, Page Break, etc) when you drag the mouse past them. !
Number of Undos!
The Undo Levels pop-up lets you select the number of undo levels–up to 10.!
For detailed information about using Undo and Redo, see the Undo section in Chapter 3, Entering and Editing."
Date!
Use the Date pop up menu to specify which format to use when using the “Date” menu command in the Insert menu.!
Indent In/Out!
Use the edit field to specify how much space to offset the paragraph left and first indent when using the Indent In and Indent Out commands. The Indent commands are located in the Justify menu (style ribbon), and also as buttons in the tool
bar.!
Bulleted List!
Use the edit field to specify how much space to move the paragraph left indent when using the Bullet command. The Bullet command is located in the Justify menu (style ribbon), the Format menu and also as a button in the tool bar.!
Superscript and Subscript Offset!
Use this field to specify how many points of offset to apply when using the script commands in the Style menu. Custom
offsets can be applied by using the Character command in the Format menu.$
of 33 165
Page 34
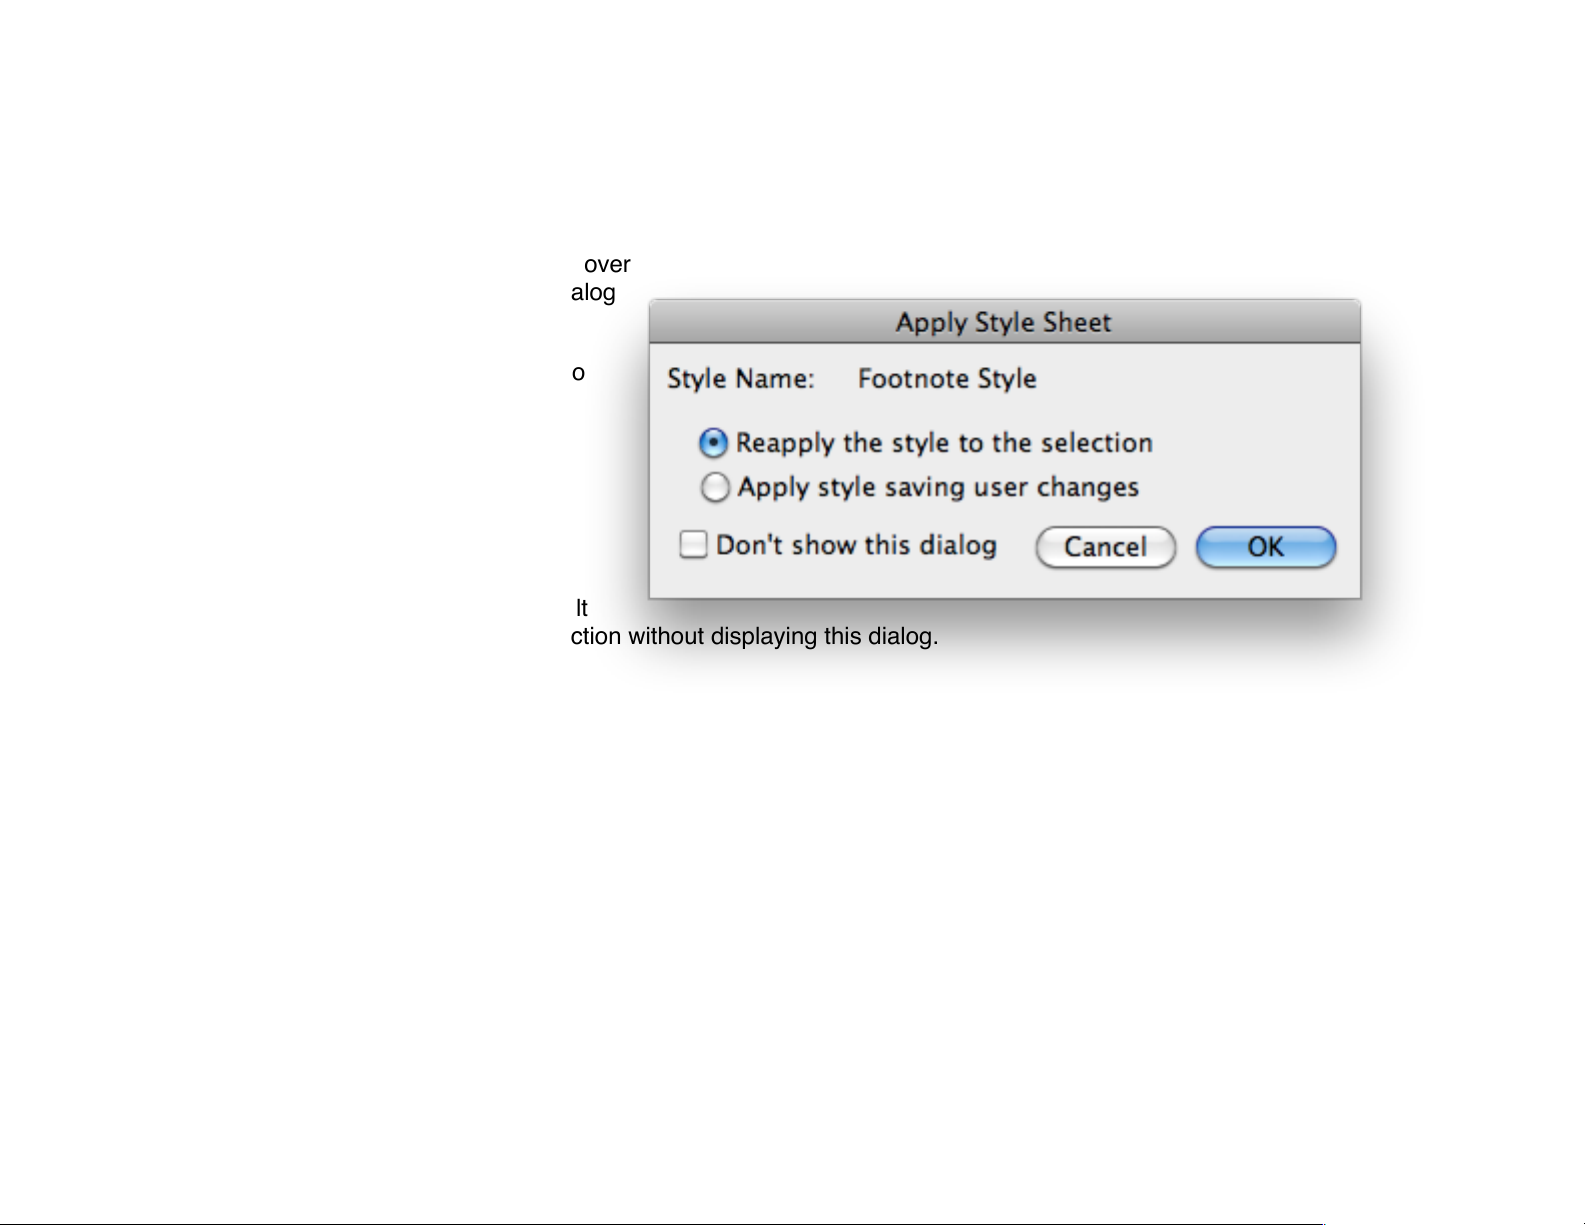
Show Style Change Dialog!
Enabling this checkbox presents a dialog when applying a style to a character range or paragraph that previously was assigned a style.!
When you attempt to Apply the new style over
an existing style the Apply Style sheet dialog
appears.!
The name of the style is displayed next to
Style Name:!
The options are:!
Reapply the style to the selection!
Apply style saving user changes!
Don’t show this dialog - Sets the default
behavior to Reapply the style to the selection without displaying this dialog.!
Click OK to apply the style.!
Note: If you apply a style over an existing style, or modify a text range with a style, the name of the style will appear with a “+” plus
symbol to denote that it is the assigned style ‘plus’ some other change(s).!
of 34 165
Page 35
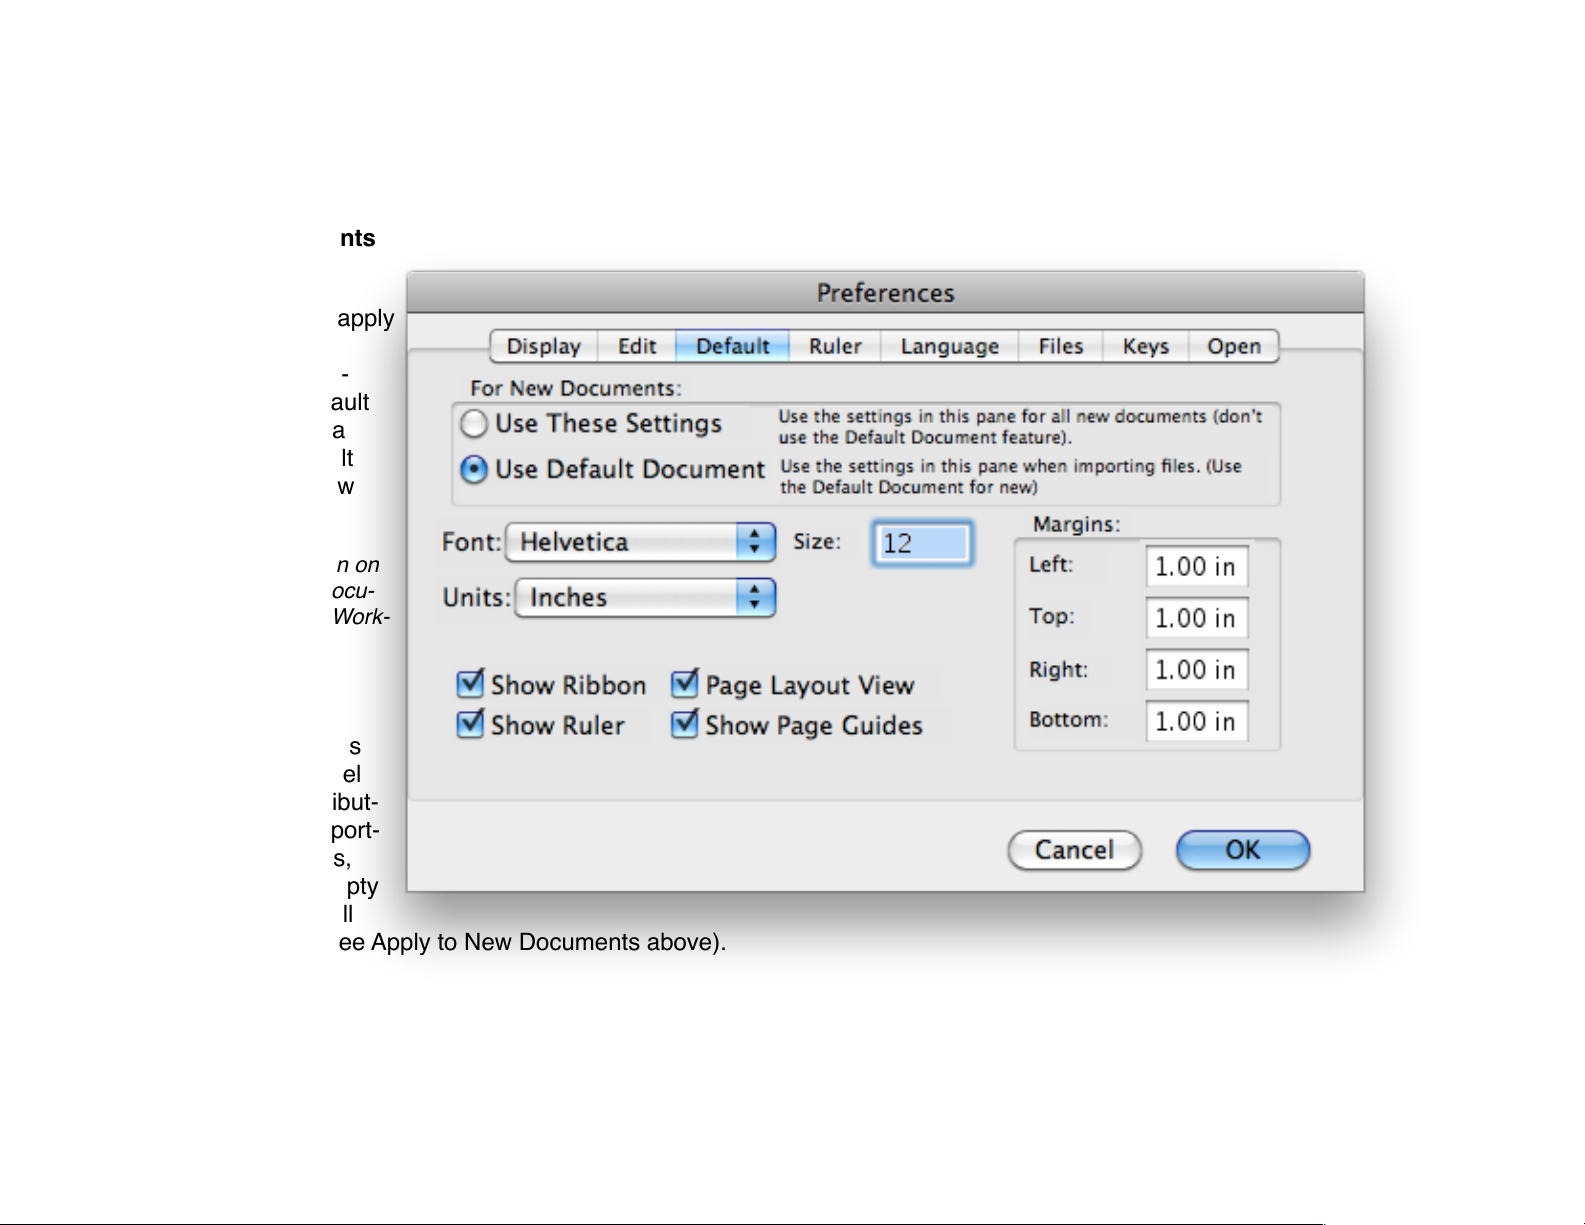
Default!
For New Documents!
Select either Use
These Settings to apply
the settings of this
pane to New Docu-
ments or Use Default
Document to use a
copy of your default
document for a new
document.!
For more information on
making a Default Docu-
ment, see Chapter Work-
ing with Documents !
Attributes!
The remaining items
on the Default Panel
are document attribut-
es, used when import-
ing text documents,
creating a New Empty
Document, or for all
new documents (see Apply to New Documents above).!
Font, Size, Units, Show Ribbon, Page Layout View, Show Ruler, Show Page Guides, Margins (Left, Top, Right, Bottom)$
of 35 165
Page 36
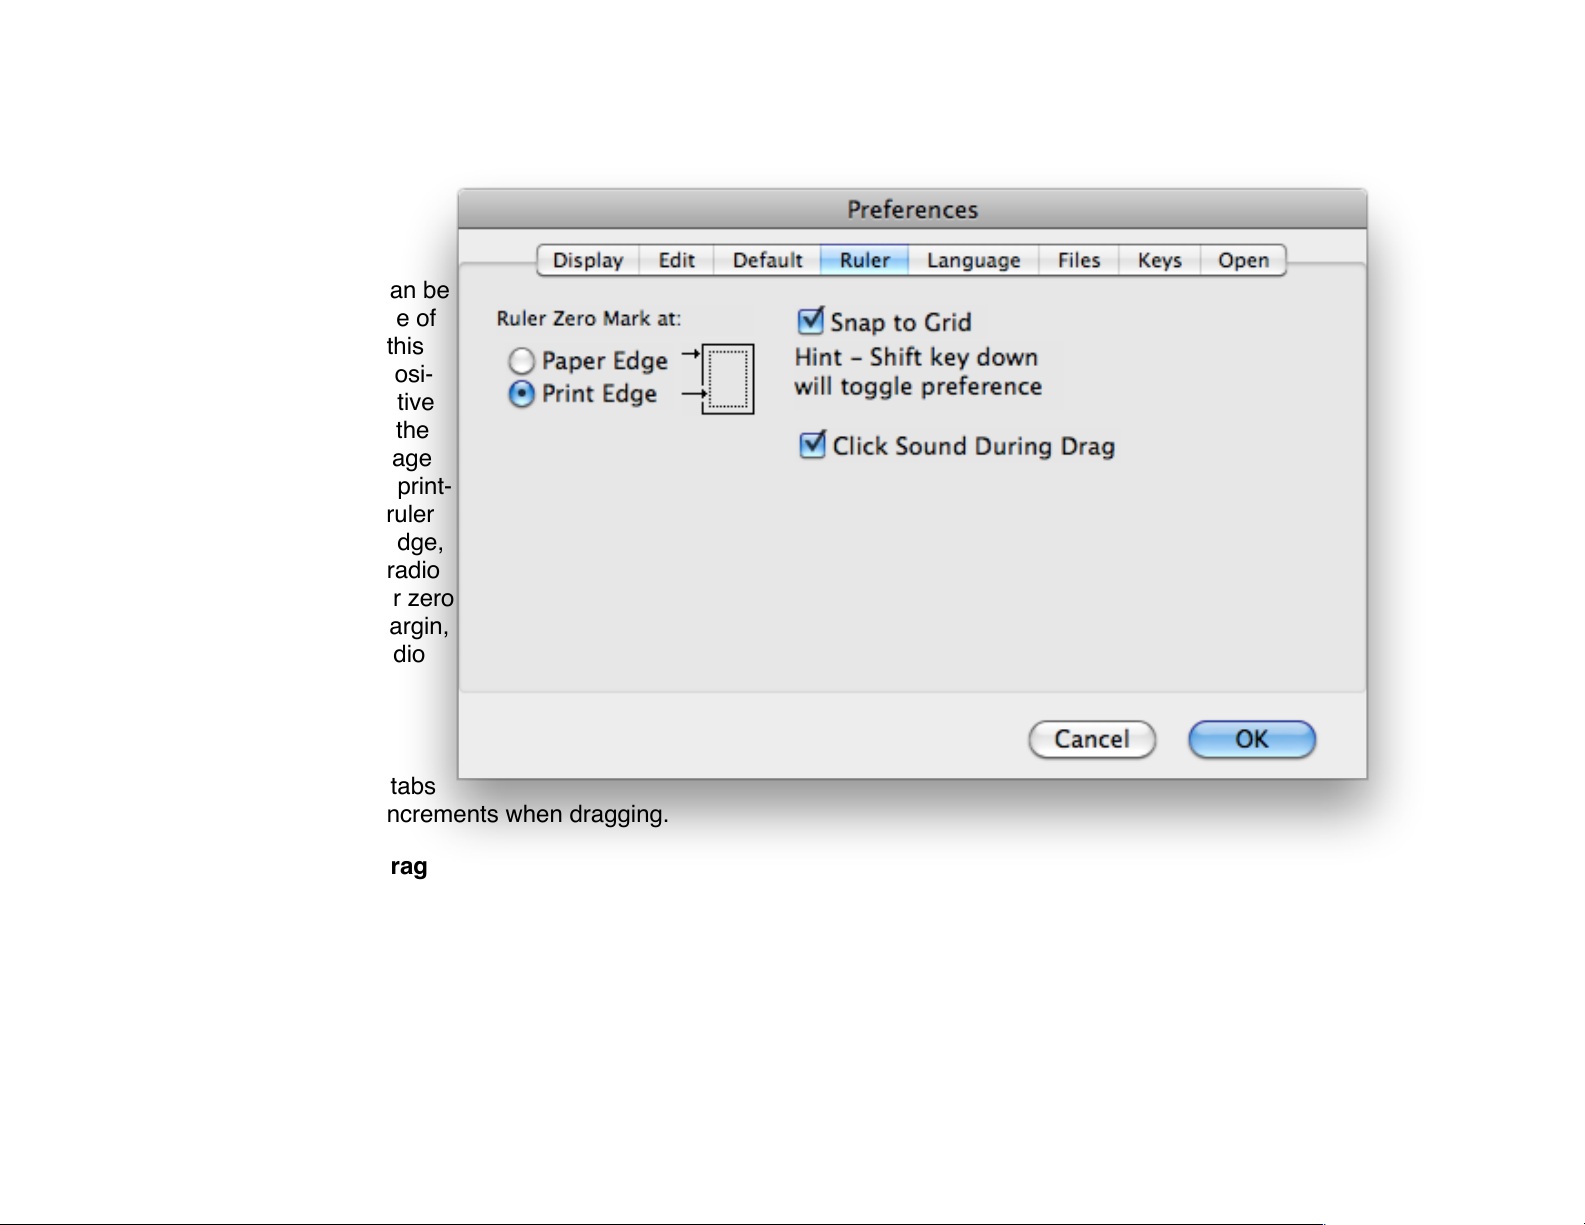
Ruler!
Ruler Zero Mark!
The ruler’s zero mark can be
aligned with the left edge of
the printable area. But this
can make it difficult to posi-
tion a tab or margin relative
to the page edge. Align the
ruler zero mark to the page
edge or left edge of the print-
able area. To align the ruler
zero mark to the page edge,
select the Paper Edge radio
button. To align the ruler zero
mark to the left page margin,
select the Print Edge radio
button.!
Snap To Grid!
Forces ruler elements (tabs
or indents) to 1/8 inch increments when dragging.!
Click Sound During Drag!
Select the “Click Sound During Drag” check box to play a click sound when dragging a ruler element (tab or indent)."
of 36 165
Page 37
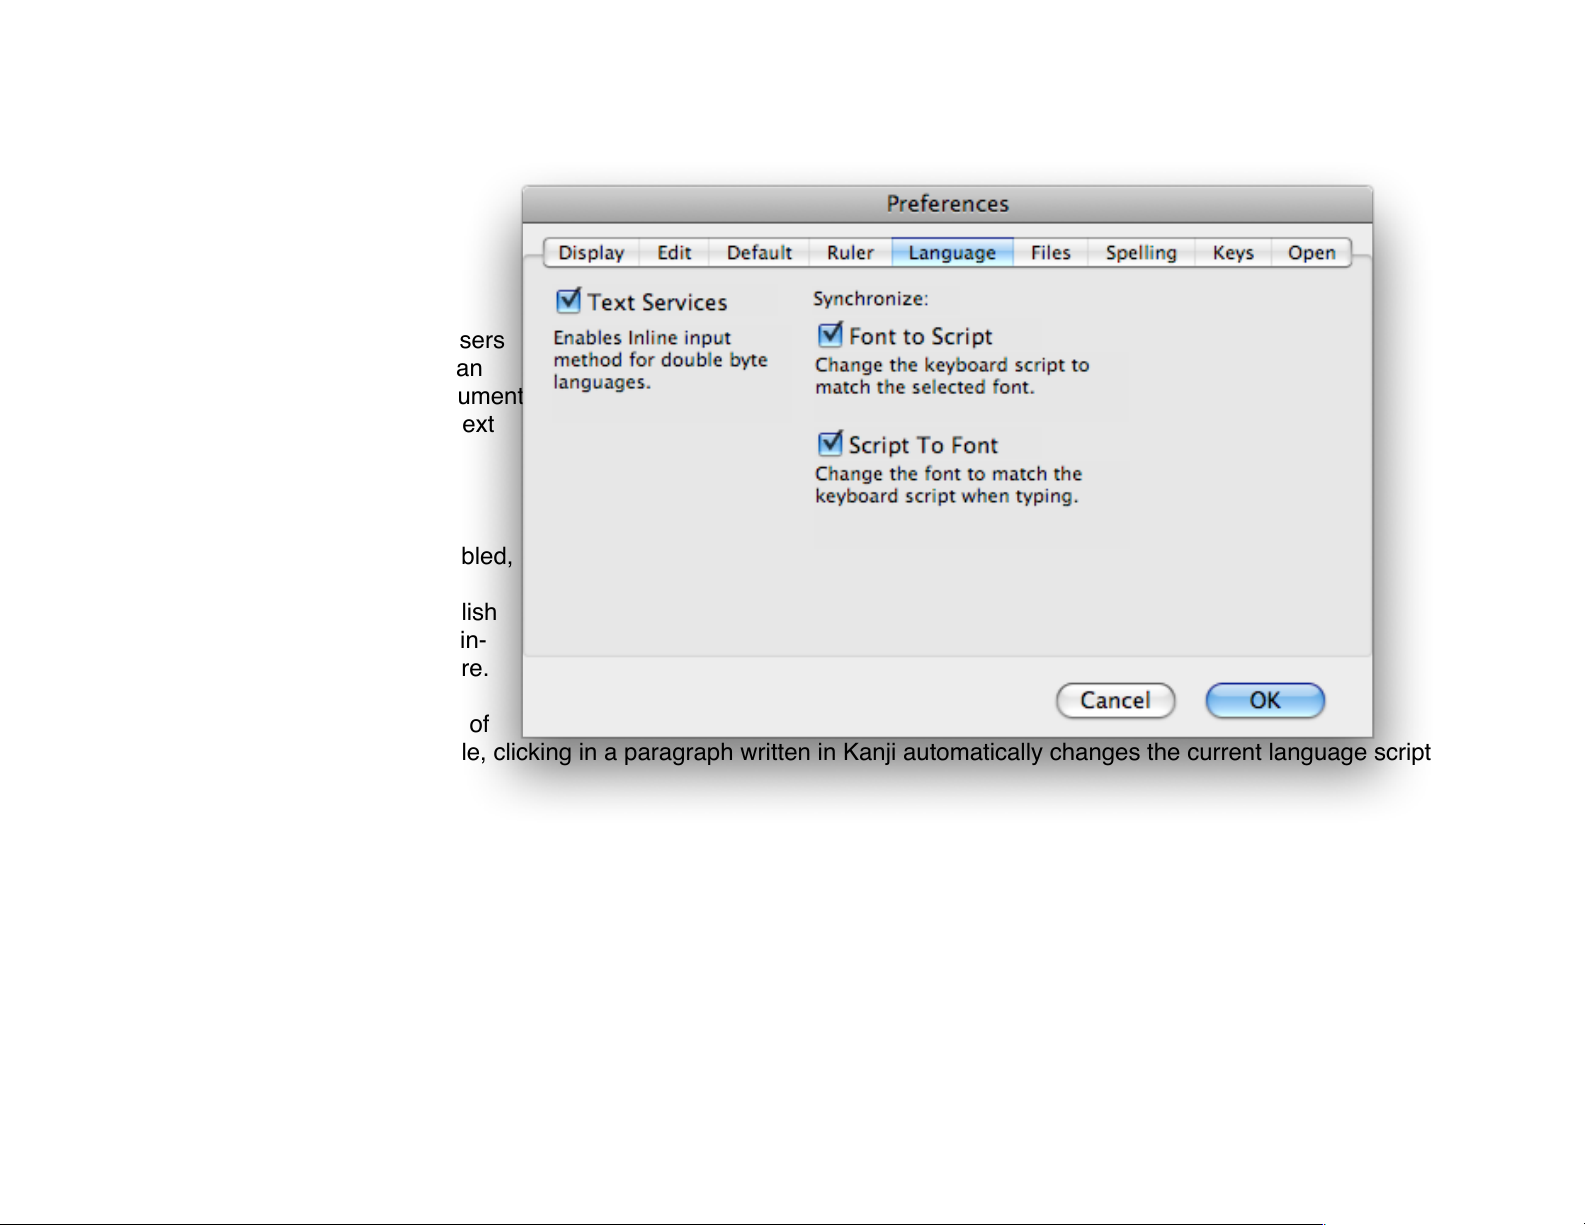
Language!
Using Text Services!
(Non-English Languages Only)"
With Text Services enabled, users
with non-English languages can
enter text directly into the document
window in place of using the Text
Services conversion window.!
Syncing Script to Font!
With Synch Script to Font enabled,
users with non-English system
software can enter text in English
or any other language scripts in-
stalled with the system software.
The current language script
changes to reflect the location of
the insertion point. For example, clicking in a paragraph written in Kanji automatically changes the current language script
to Kanji.!
Regardless of the setting of the Synch Script to Font control, choosing an English font from the Font menu automatically
changes the script to English.!
Note: International language scripts also contain a Roman character set. As a result, placing the intersection point within text that appears to be Roman may not change the script to English. Instead, the script changes to the language script used to create the text.!
of 37 165
Page 38

Syncing Font to Script!
Mariner Write saves the last font and text size used when the current International language script changes. To restore the
last font and size used when the script is re-selected, enable the Synch Font to Script command.!
The following defaults are used when the language script is selected for the first time:!
! Script! ! ! Font!
! Roman! ! Geneva!
! Kanji (Japanese)! Osaka!
! Simplified Chinese! Beijing!
! Traditional Chinese! Taipei!
The default font for scripts not listed is the first default application font of the script. The default font size is the last size
selected by the user or the default system font.!
Note: With Synch Font to Script enabled, you cannot enter Roman characters using a non-Roman script. Upon typing English characters, the font and size will change to Geneva or the last font and size settings selected.!
of 38 165
Page 39
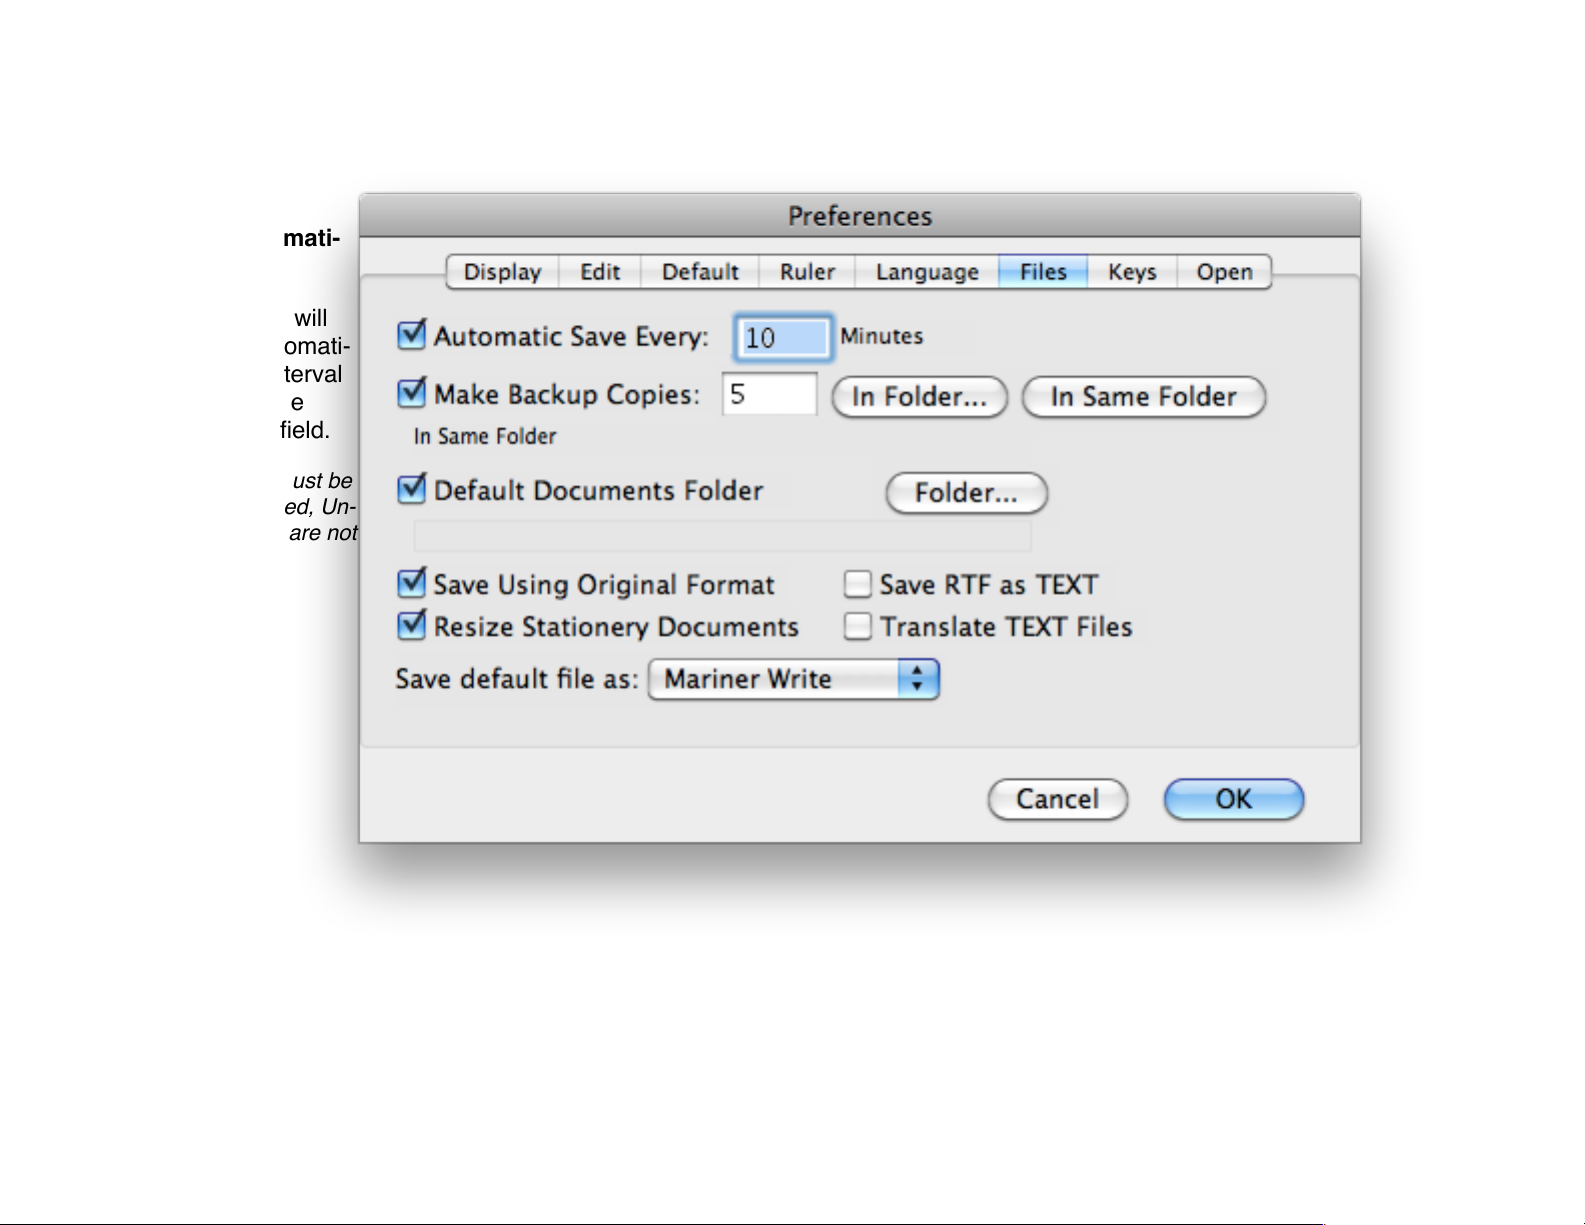
Files!
Saving Automati-
cally!
Mariner Write will
save files automati-
cally at the interval
specified in the
Minutes edit field.!
Note: the file must be
previously saved, Un-
titled new files are not
auto-saved.!
of 39 165
Page 40
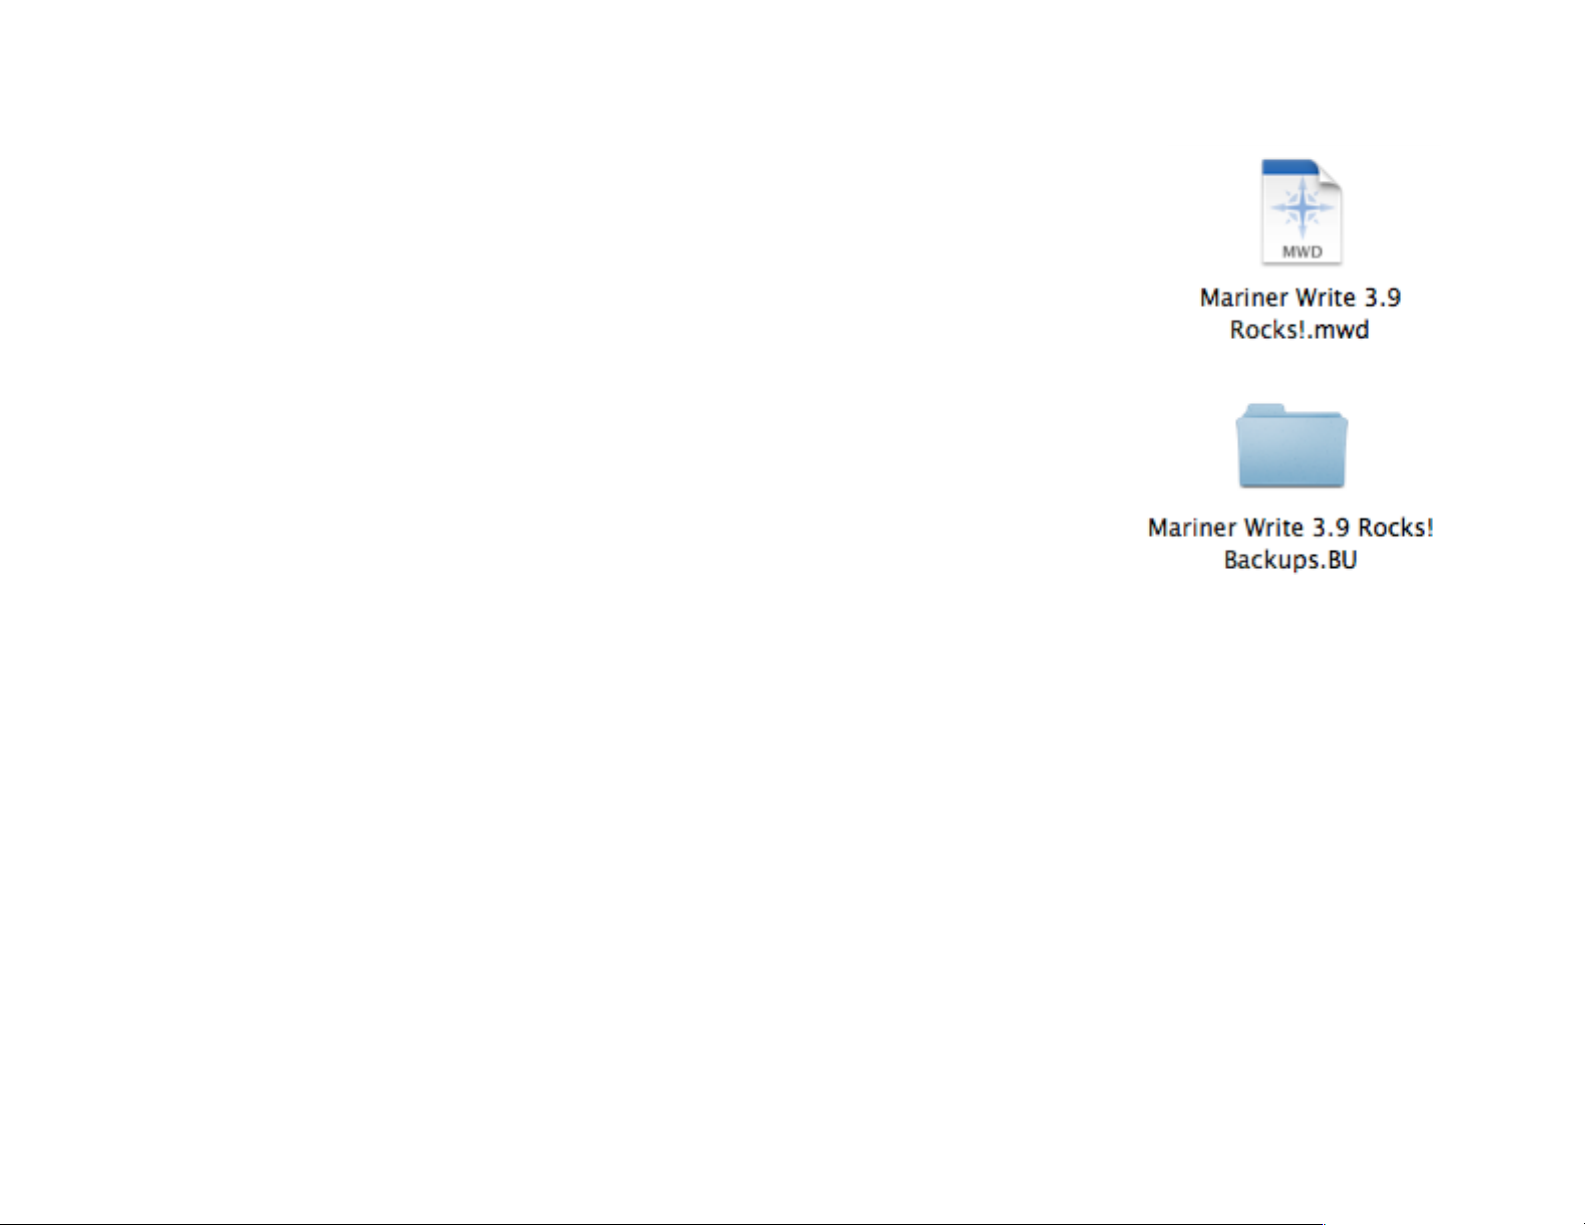
Making Backup Copies!
When saving an existing file, Make Backup Copy retains a copy appending the time and date
on the end of the file name. Click the Backup Folder... button to specify a folder location to
place backup copies, or click In Same Folder to place copies located in the same folder as the
original file.!
Specify how many backup copies you want to keep in the edit field.!
Warning: if you choose to place backups in a single folder, documents using identical names will
overwrite each other and backup copies may be lost."
Saving Using Original Format!
Mariner Write normally will prompt you with the save dialog when you save an imported
file. This action verifies that the format and location are correct. Choose Save Using Original Format to save imported files (for example TEXT or RTF) in their original format, without displaying the save dialog.!
Saving RTF as TEXT!
Mariner Write normally will save rtf format files using the system defined RTF filetype. Older programs may not recognize
this filetype, choose this option to save rtf files as TEXT documents.!
Note - Mariner Write reads rtf files using either filetype.!
of 40 165
Page 41
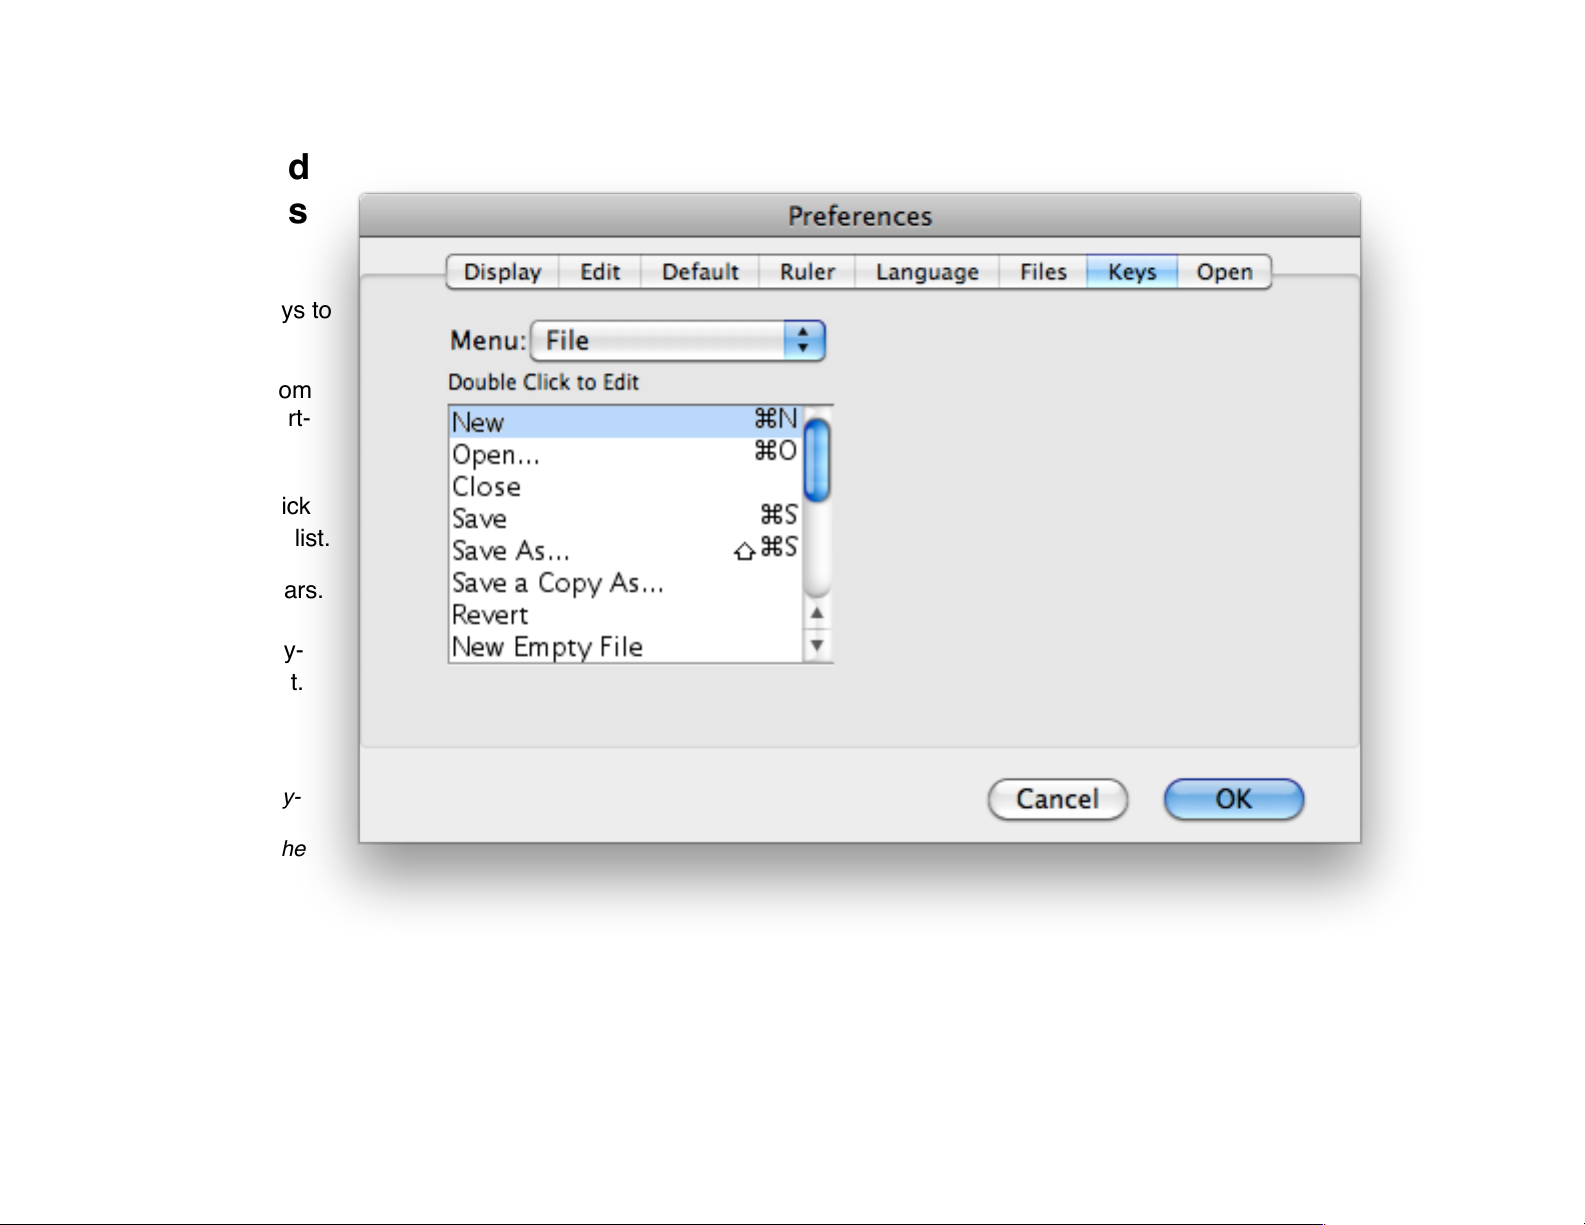
Keyboard
shortcuts!
Allows custom
command keys to
be set. !
To set a custom
keyboard short-
cut:!
1 Double-click
an item in the list.!
A sheet appears.!
2 Type a key-
board shortcut.!
3 Click OK.!
Note: Each key-
board shortcut
must contain the
command key.!
of 41 165
Page 42
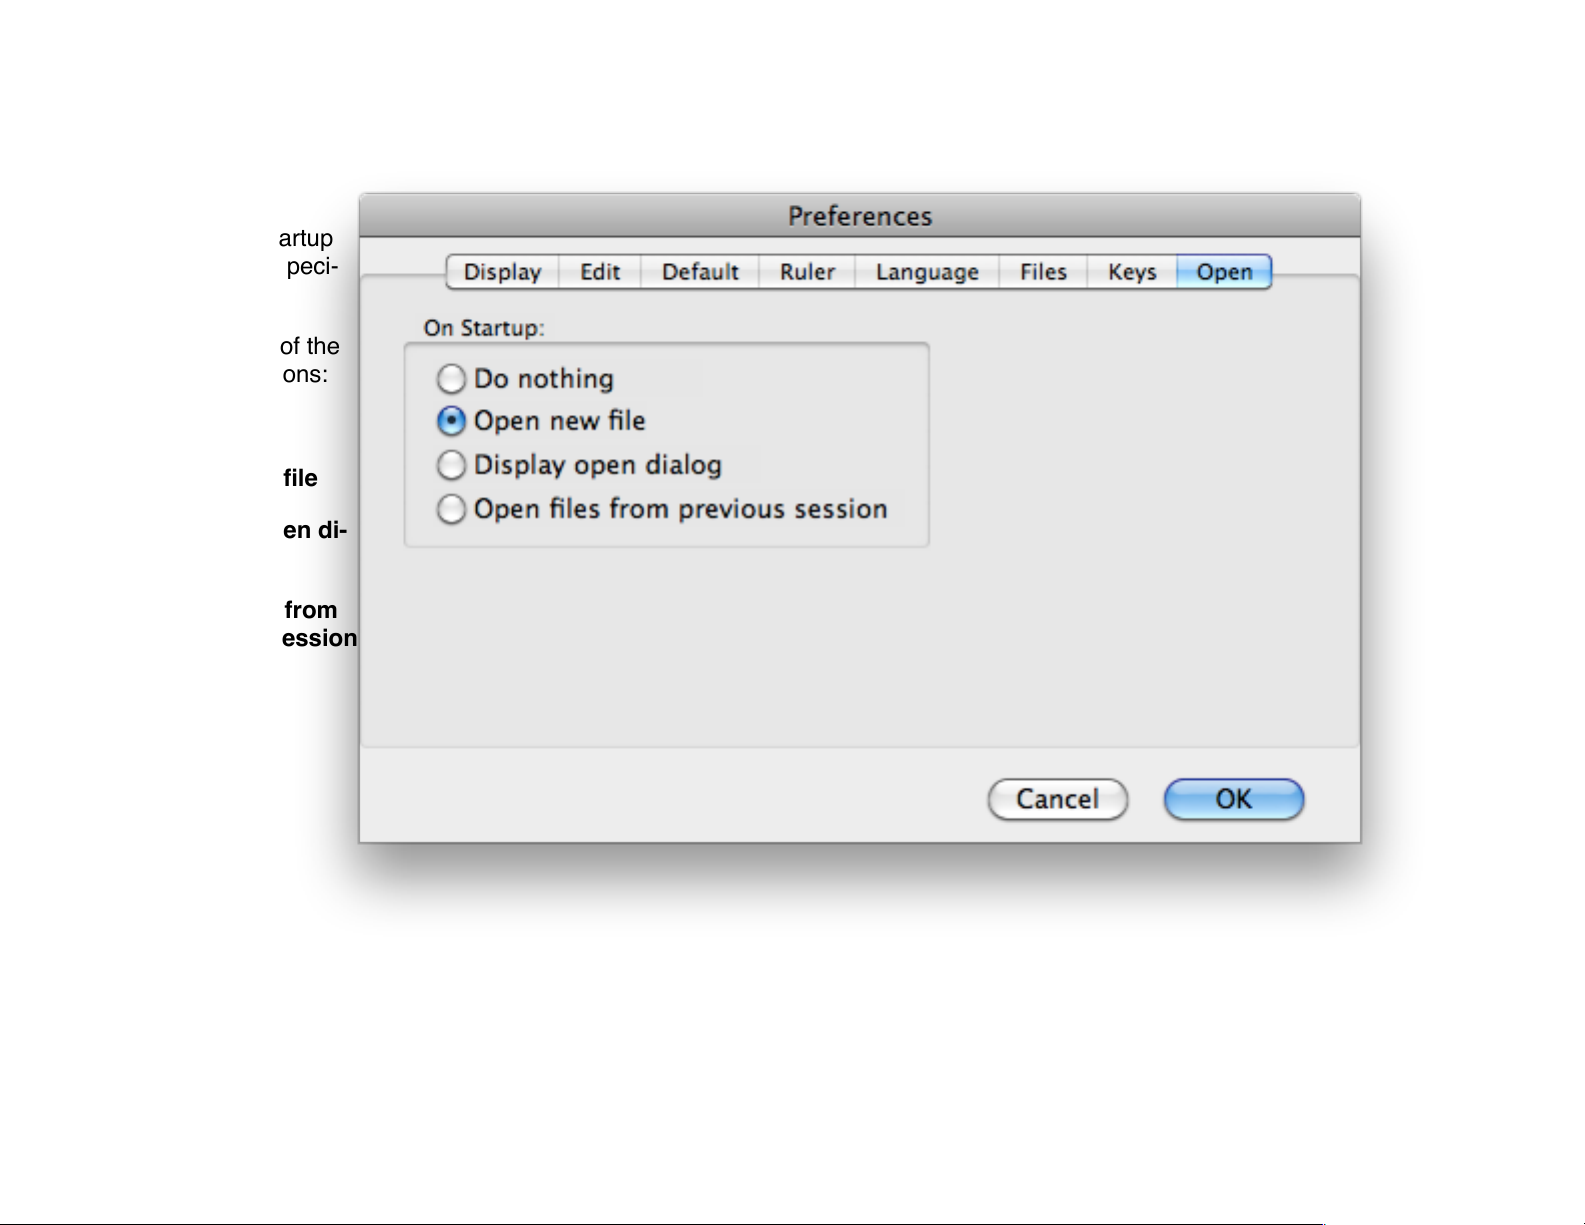
Open!
Allows the startup
action to be speci-
fied.!
Choose one of the
following options:!
•
Do nothing!
•
Open new file!
•
Display open di-
alog!
•
Open files from
previous session!
Click OK.$
of 42 165
Page 43
Document Display Options!
Line Numbers!
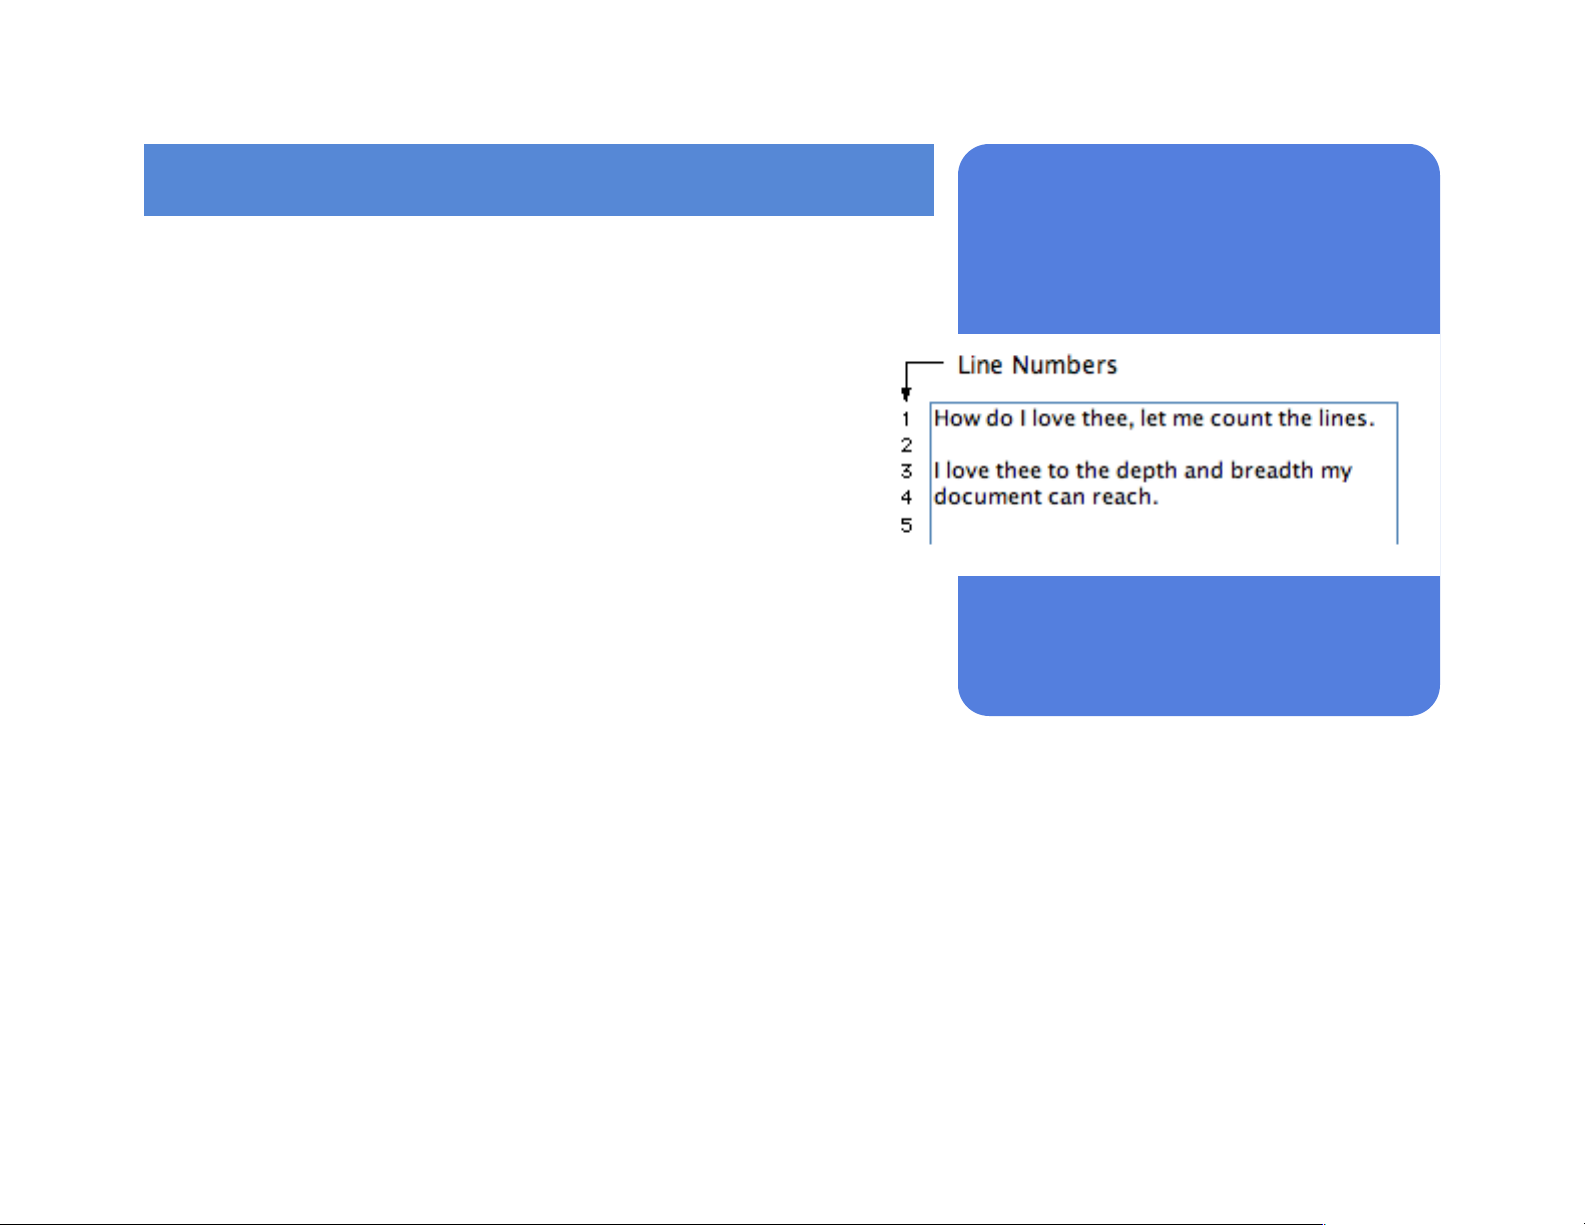
Line numbers let you easily reference important portions of your document.!
To display lines numbers, choose Line Numbers from the Show|Hide
menu. Line numbers are shown for each line containing a character, including non-printing characters such as Tab and Return.!
Line numbers display to the left of the left page margin in 9-point Geneva
text and automatically print if there is enough space between the page
margin and the left side of the page.!
Note: Line numbers don’t display in header, footer, or footnote windows."
To see if there is enough room to print line numbers, choose Print Preview from the File menu. If line numbers are not visible in Print Preview, increase the printable page area by:!
• Increasing the page margins through the Margins command.!
• Increase the printable page area through the Page Setup dialog.!
Note: The Printer and Page Setup dialogs are specific to the output device and may not contain controls for changing the printable
page area."
of 43 165
!
!
In this chapter:!
!
•
Line Numbers!
•
Background Color!
•
Page Margins!
•
Page Guides!
•
Document View Modes!
•
Split Pane View!
Page 44

• Move the left margin through the Ruler or Paragraph command.!
For detailed information about the Print Preview feature, see the Print Preview section later in this chapter.!
For detailed information about Line Number Options, see the Document Options section in Chapter 4 (Formatting Text).$
of 44 165
Page 45

Background Color!
Most of the time, you’ll type black text on a white background. To change the background color of your document choose
Document Options in the Format menu. Choose one of 80 preset colors in the Color pop-up menu, or choose Other to
create a custom page color.!
Note: To change text color, use the Text Color command in the Style menu.!
of 45 165
Page 46
Working with Page Margins!
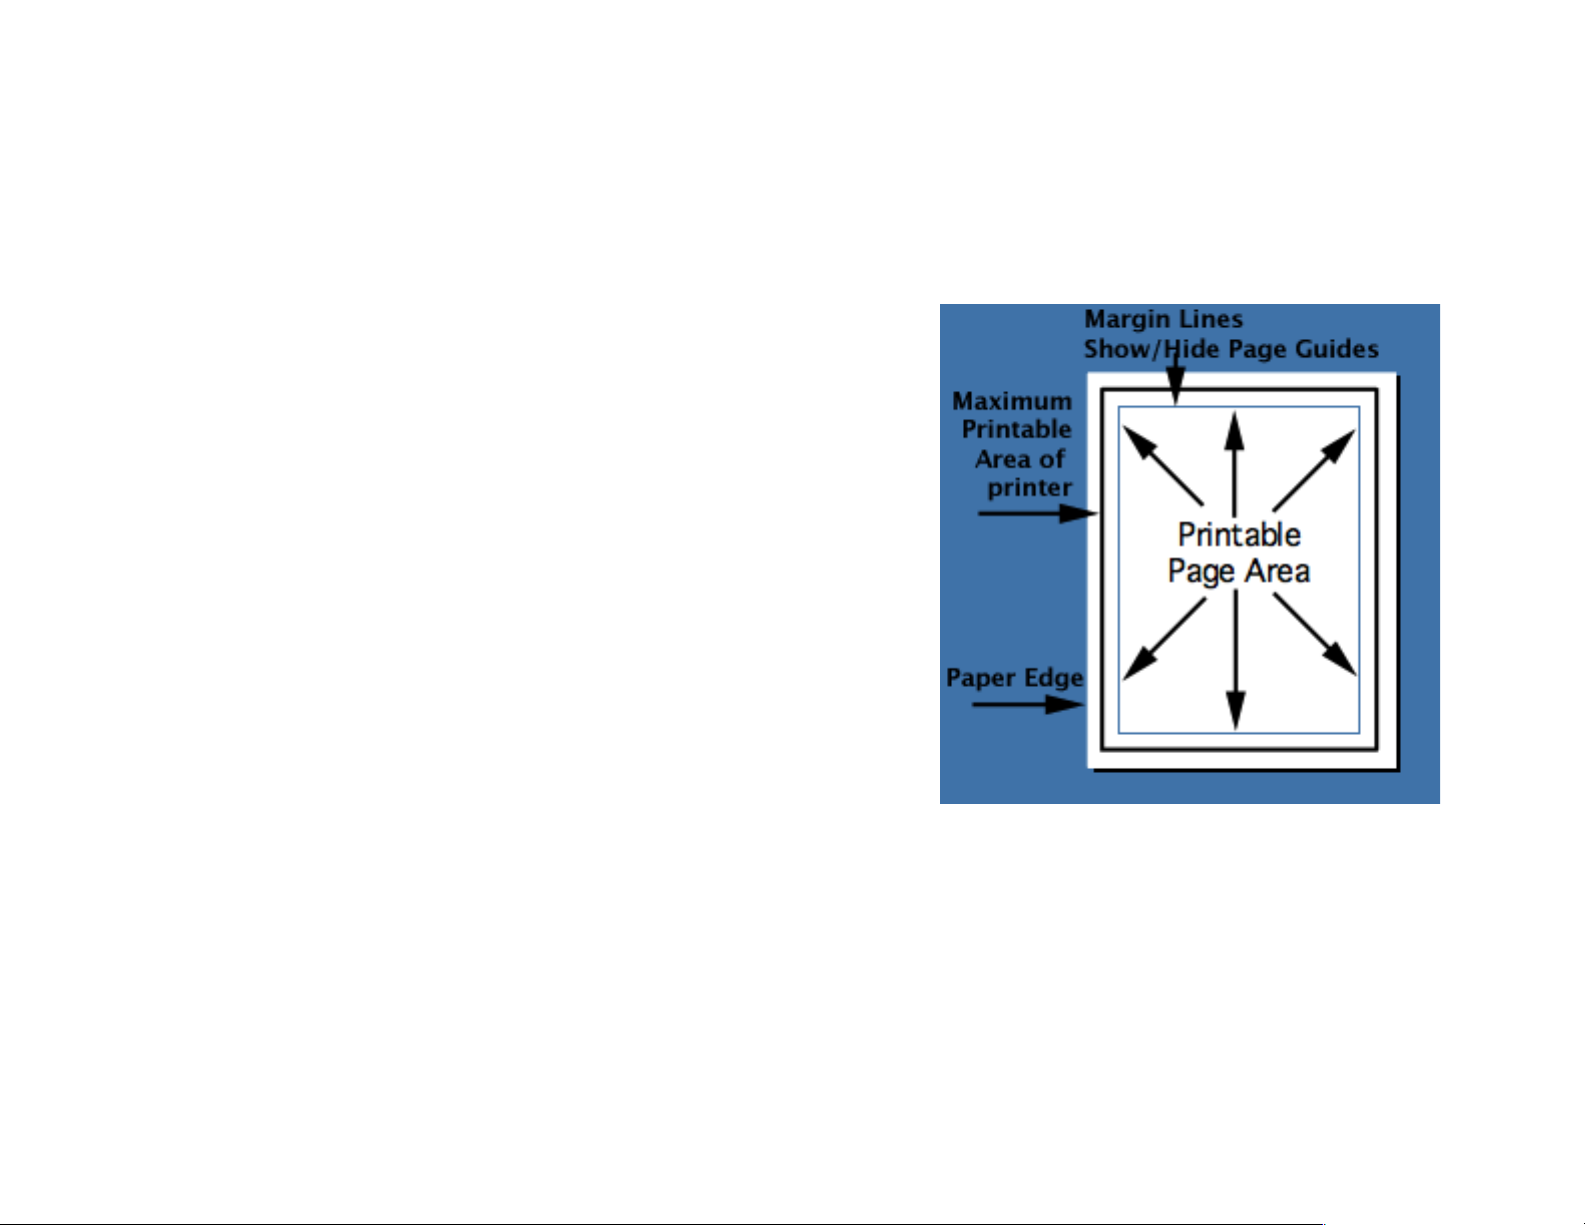
Because of common printer limitations, the area where you can enter type is usually not the same as the full page size.
The distances from the page edges to the respective edges of the printable area are called the page margins.!
!
Since the page margin can be only as large as the maximum printable
area, the values you can enter for each margin depend on the printer
selected in the Chooser. The size and orientation of the printable area
are controlled by the Page Setup command.!
To set the page margins:!
1. Choose the Margins command from the Format menu.!
2. Enter values for the top, left, bottom, and right margins. If you want
the area where you can type to be the same as the maximum printable area, click the Maximum Print Area button.!
Page Guides!
The page guide is the non-printing box that defines the document area.
The page guide appears as a light blue box.!
To show or hide the page guide, choose Show Page Guides from the Show|Hide sub-menu (View menu).$
of 46 165
Page 47
Document View Modes!
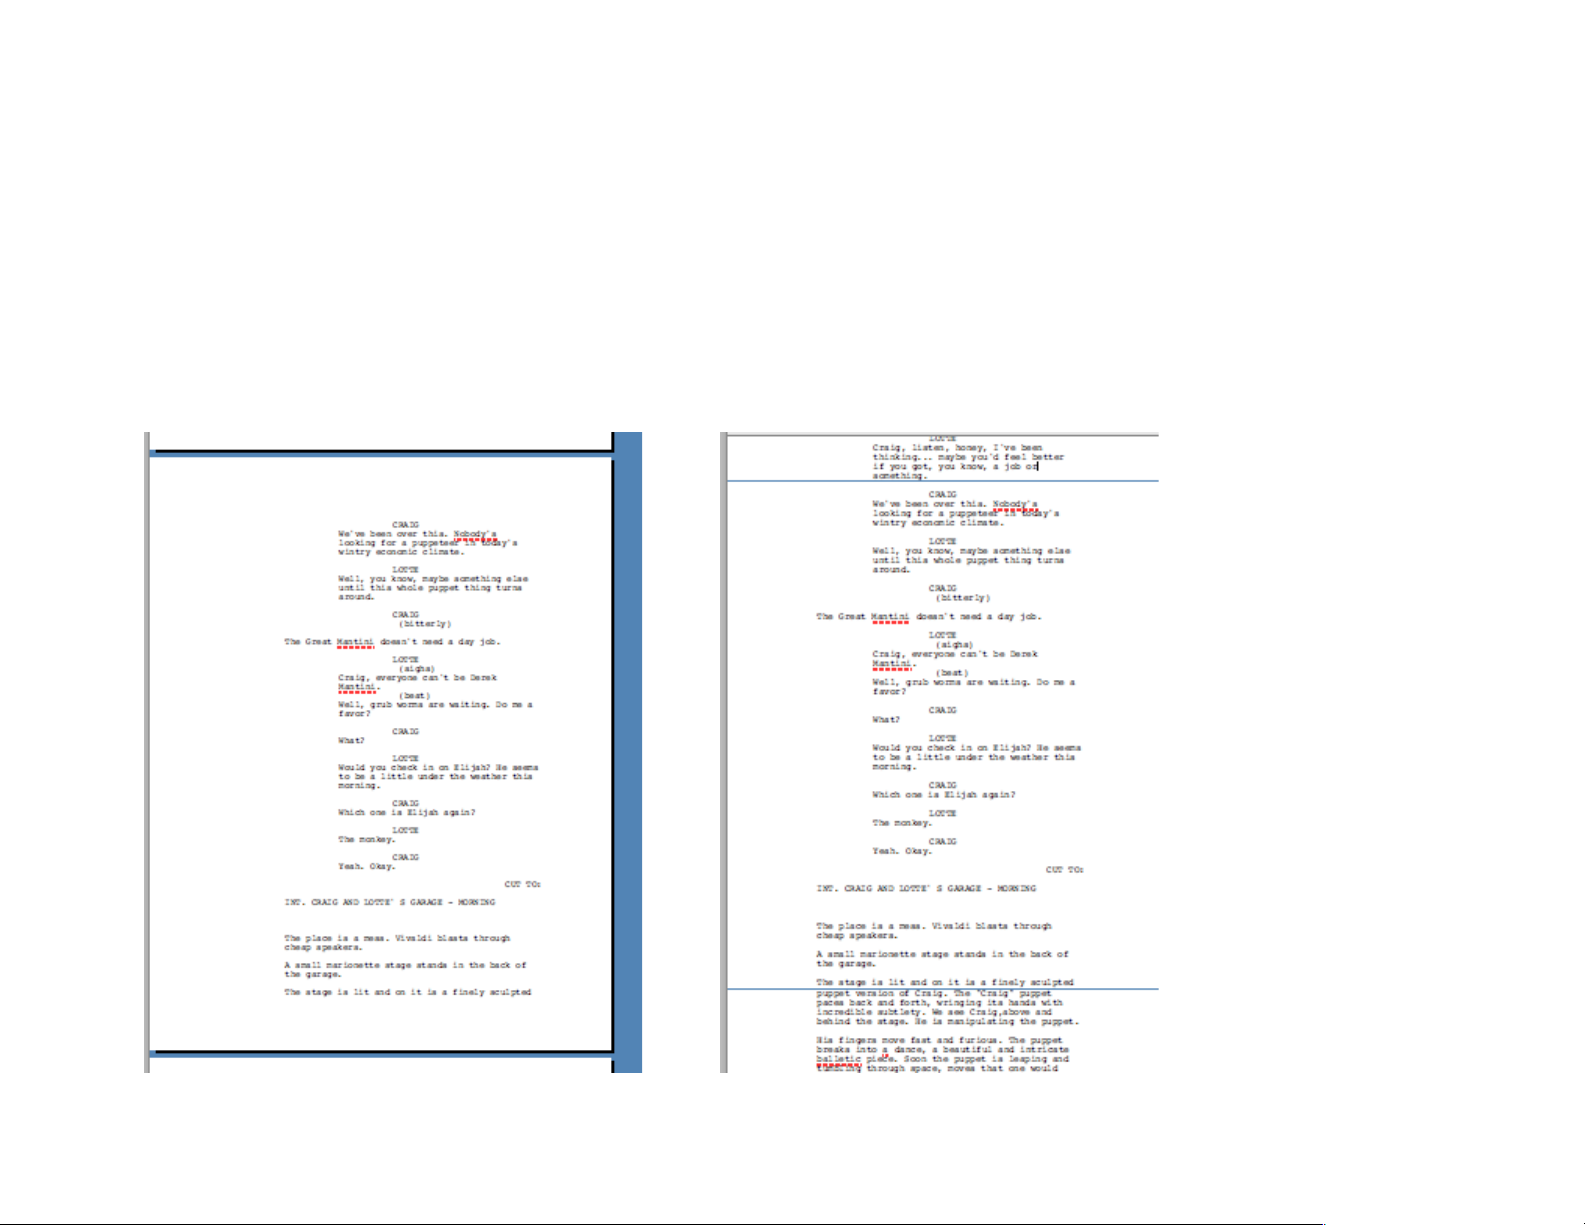
Mariner Write provides two ways to view your documents while you work.!
•
Page Layout View, or “WYSIWYG” (What You See Is What You Get) view, displays your document as it will be printed.!
•
Condensed View. Page margins, object graphics, headers, and footers do not display on-screen but appear in print.!
To switch between views, select either mode form the View menu.!
!! $
of 47 165
Page 48
Split Pane View!
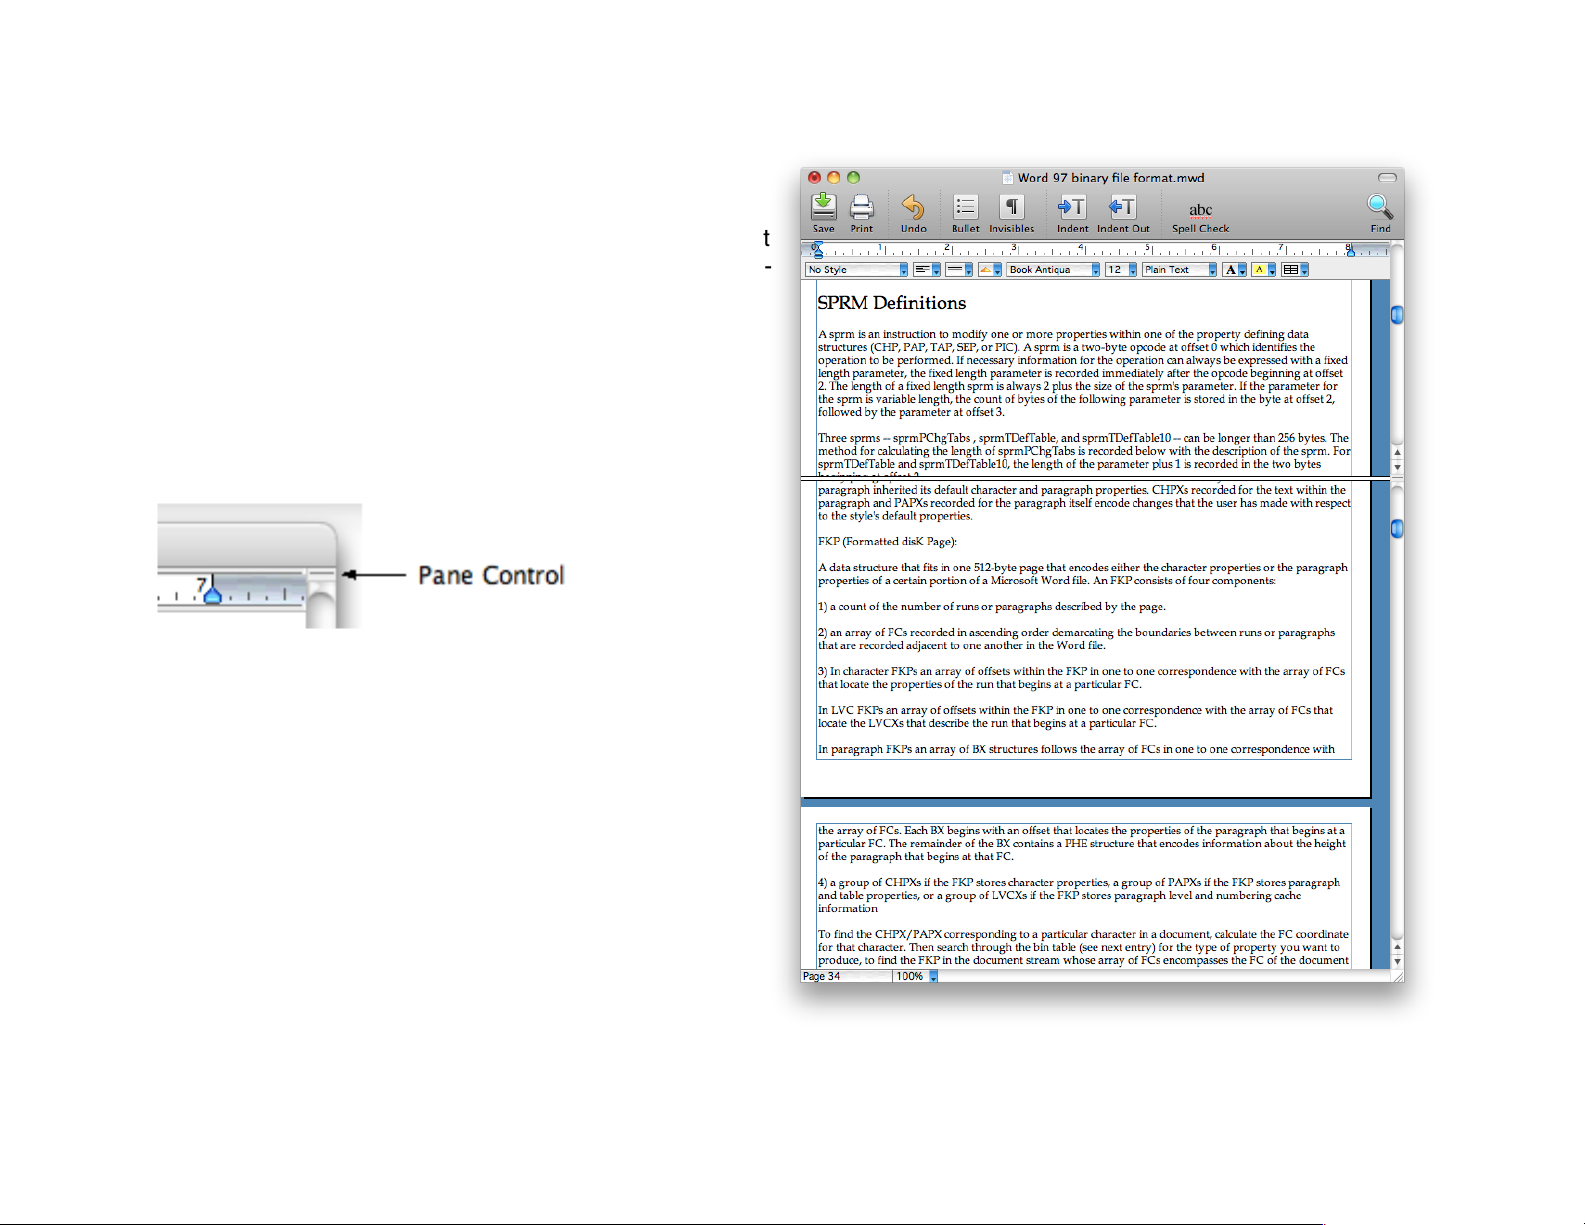
Mariner Write lets you view different parts of a document at
the same time by splitting the document window horizontal-
ly. Once split, you can scroll each window part independently. !
To split a window, drag the pane control located above the
topmost vertical scroll arrow.!
-or-!
Double-click the pane control to divide the window in half!
. !
To un-split the window either:!
! - Drag the pane control back above the upper scroll
arrow.!
! - Double-click the pane control."
of 48 165
Page 49
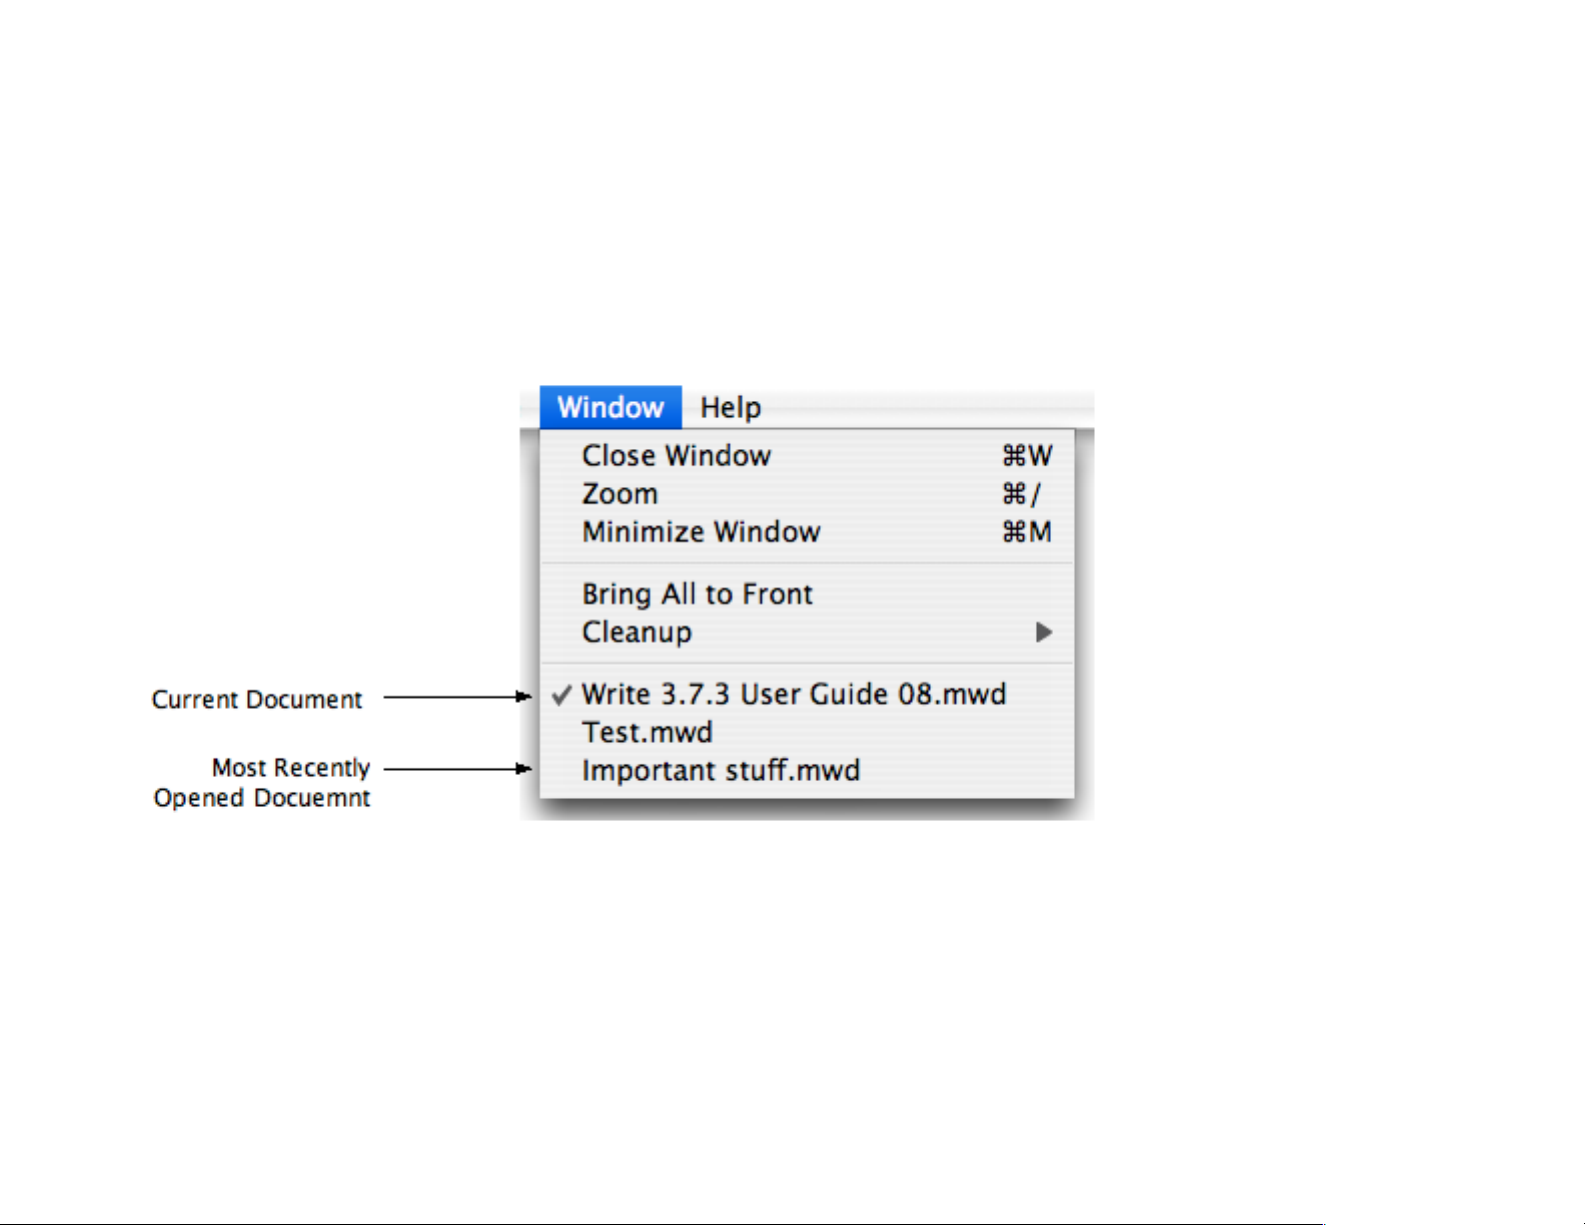
Selecting Documents!
To bring a document to the front, click any visible portion of the document or choose the document name from the Window
menu.!
The frontmost, sometimes called the active, document is marked with a check. Other documents are listed in the order in
which they were opened or created. The most recently opened document appears at the bottom of the list.!
" $
of 49 165
Page 50

Arranging Windows!
The arrange commands automatically move and resize your Mariner Write documents so a portion of each document is
always visible. The arrange commands don’t move the tool bar.!
The Clean Up Windows sub-menu (View) contains four arrange commands: Stack, Cascade, Tile Horizontal, and Tile Vertical.!
of 50 165
Page 51
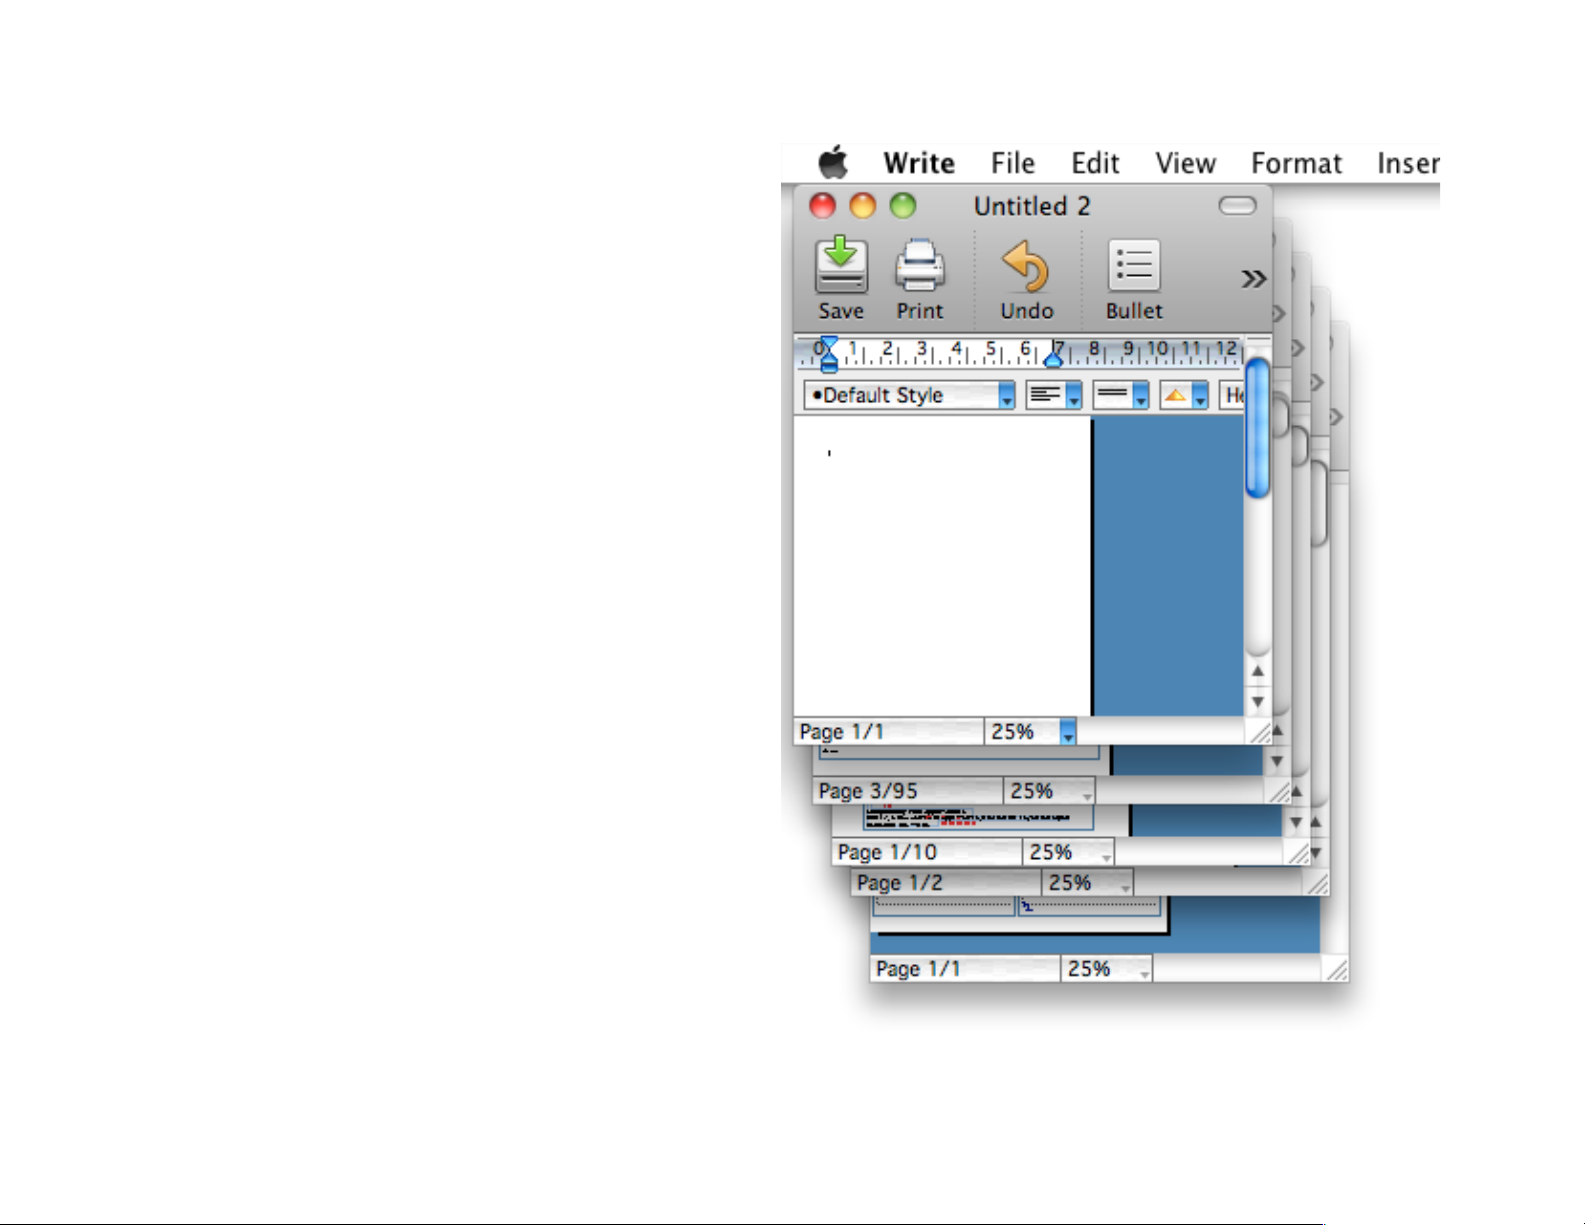
Stack!
The Stack command arranges all windows so you can
view the window titles at the same time. In addition, the
right sides of the document windows are aligned.!
Cascade!
The Cascade command is similar to Stack except the
right side document edges are offset.!
!
of 51 165
Page 52
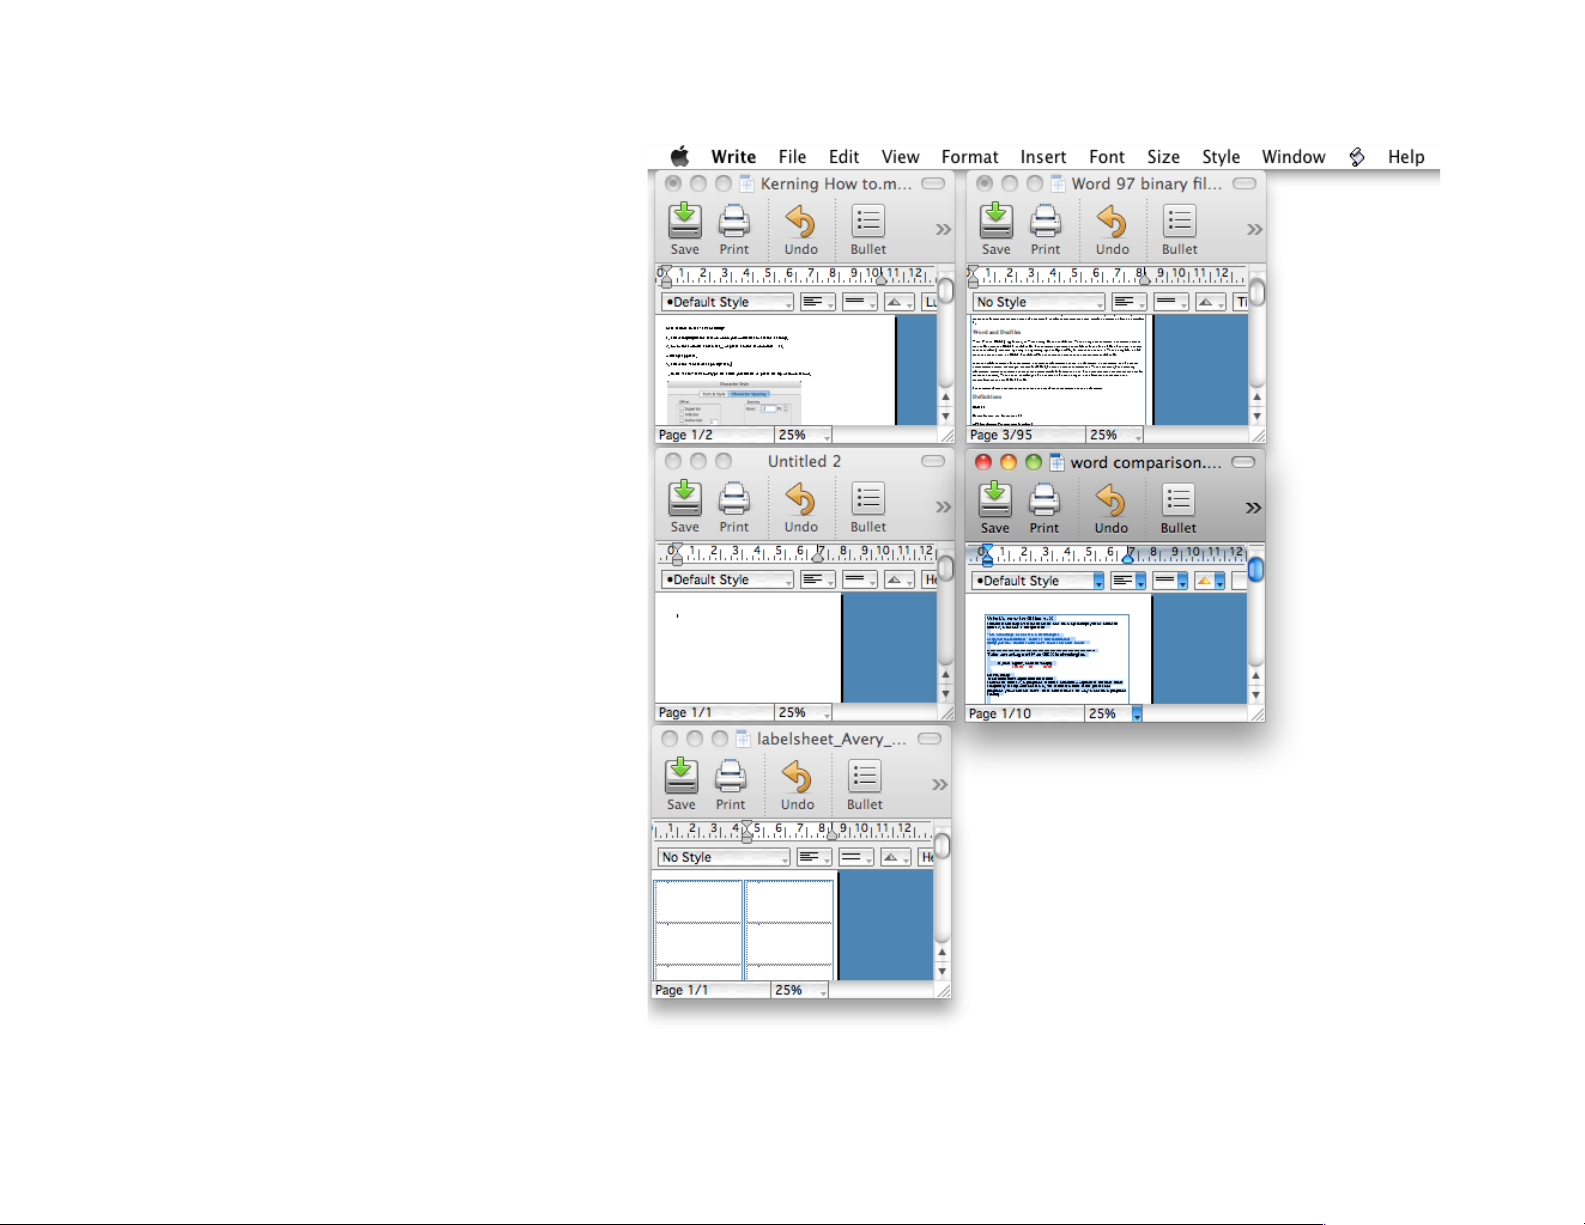
Tile Horizontal!
Tile Horizontal arranges windows lengthwise
so that each window is fully visible. The
frontmost window is positioned at the top of
the main monitor.$
of 52 165
Page 53
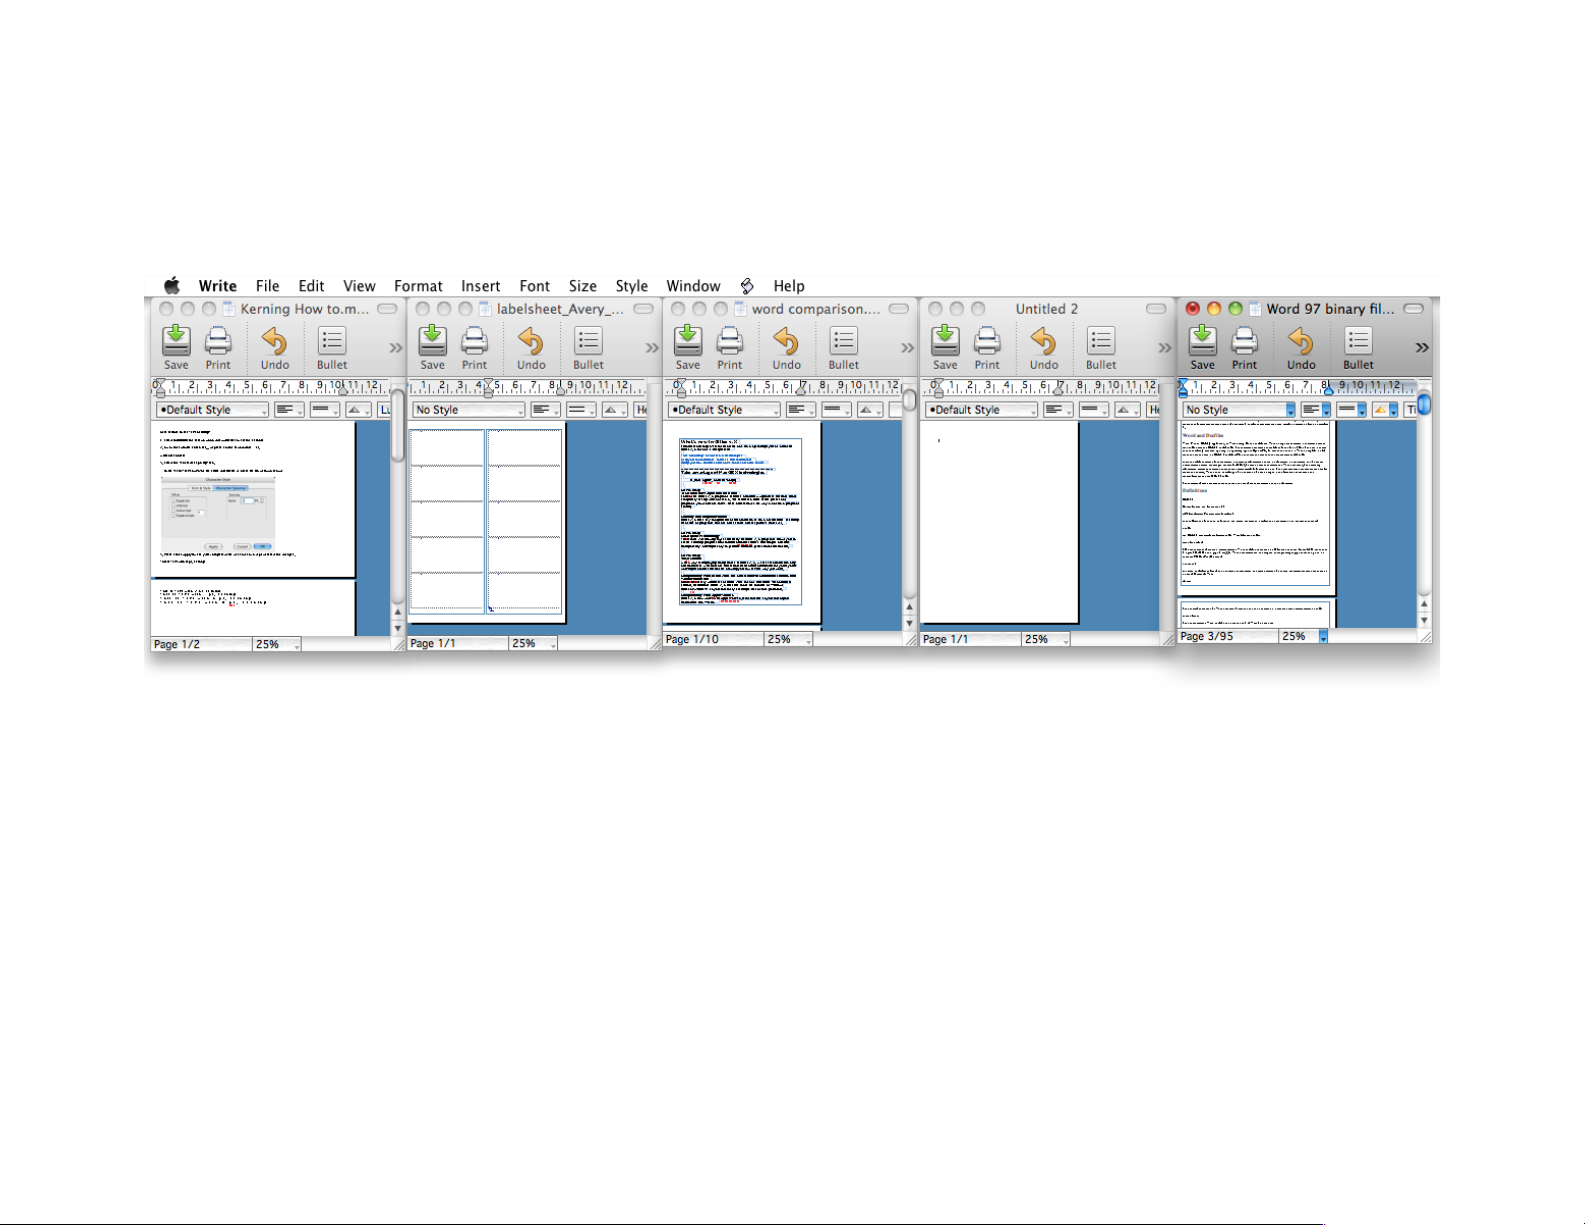
Tile Vertical!
Tile Vertical arranges windows by height so that each window is fully visible. The frontmost window is positioned at the left
size of the main monitor.!
!
of 53 165
Page 54
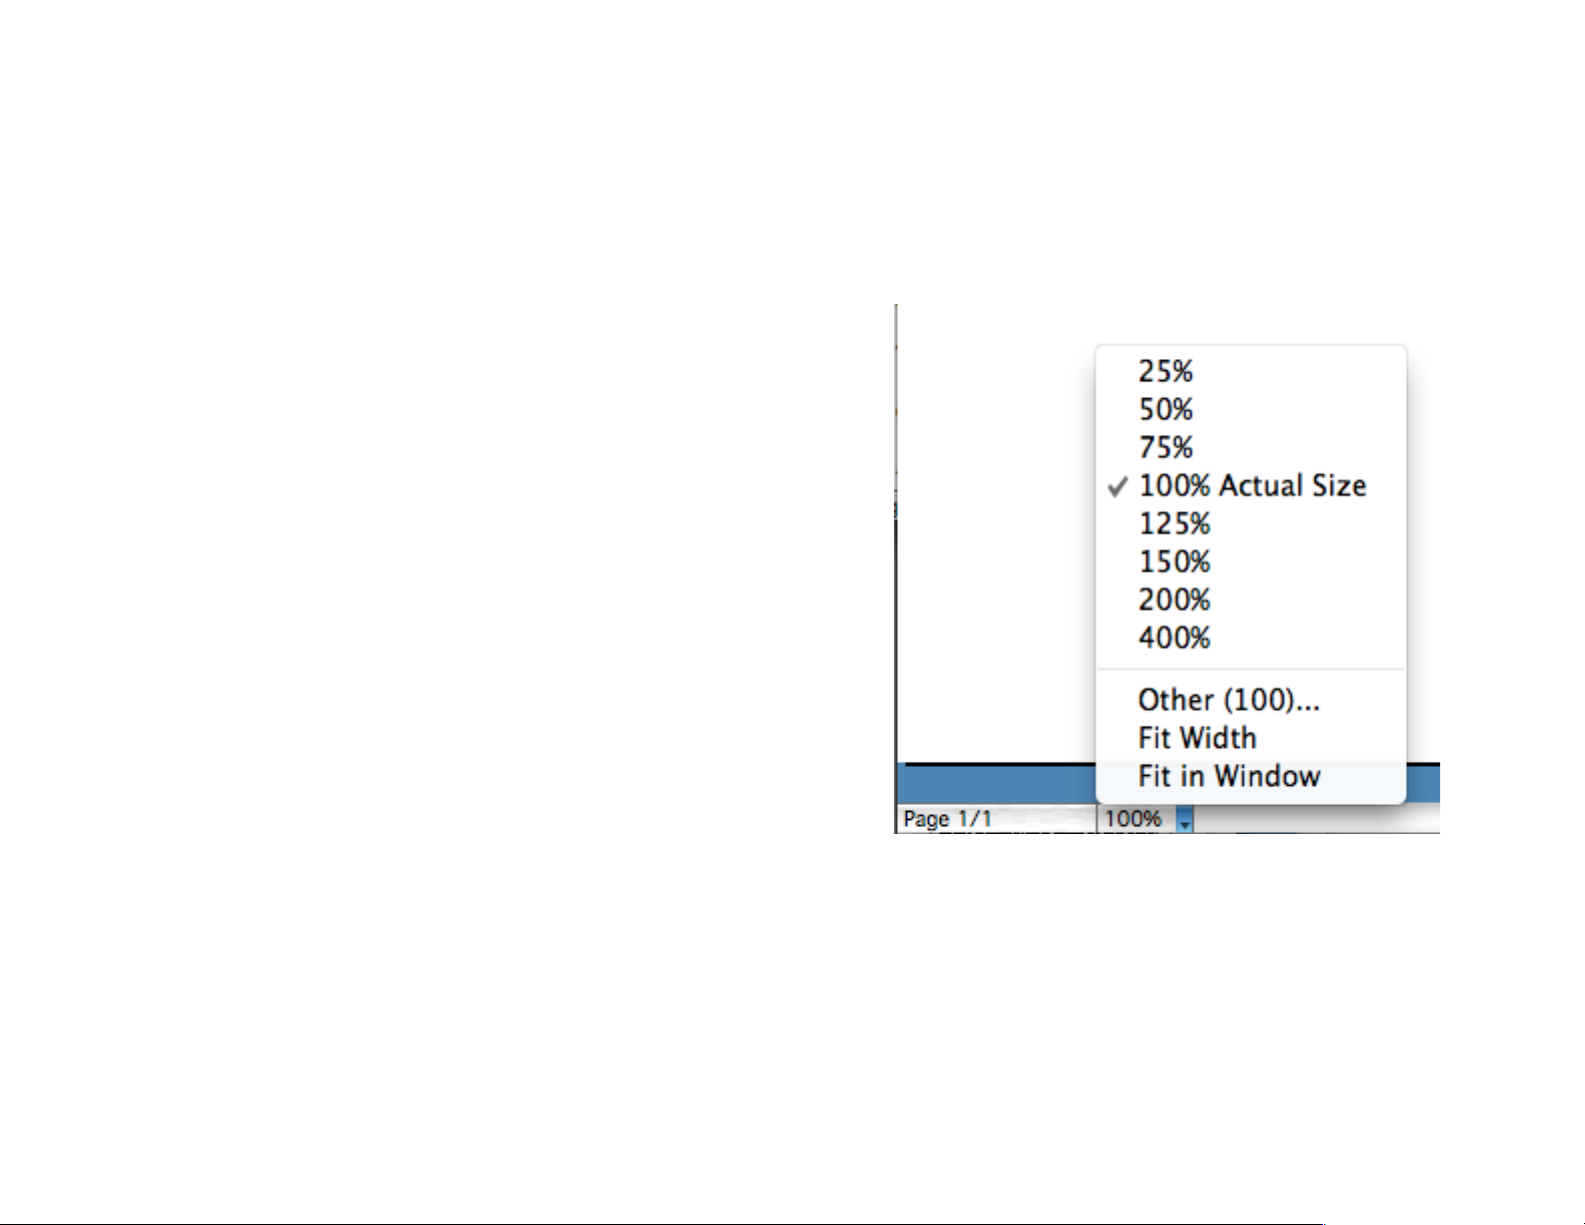
Setting Document Scale!
Use the Zoom pop-up menu at the bottom of each document window to view your document at different magnifications.
You can choose from seven different magnification levels ranging from 25% to 400%.!
Changing the magnification automatically scrolls the document to
display the insertion point or selected text range. If the entire selected text range can’t be displayed, the document is scrolled to display
the beginning of the selected text range.$
of 54 165
Page 55
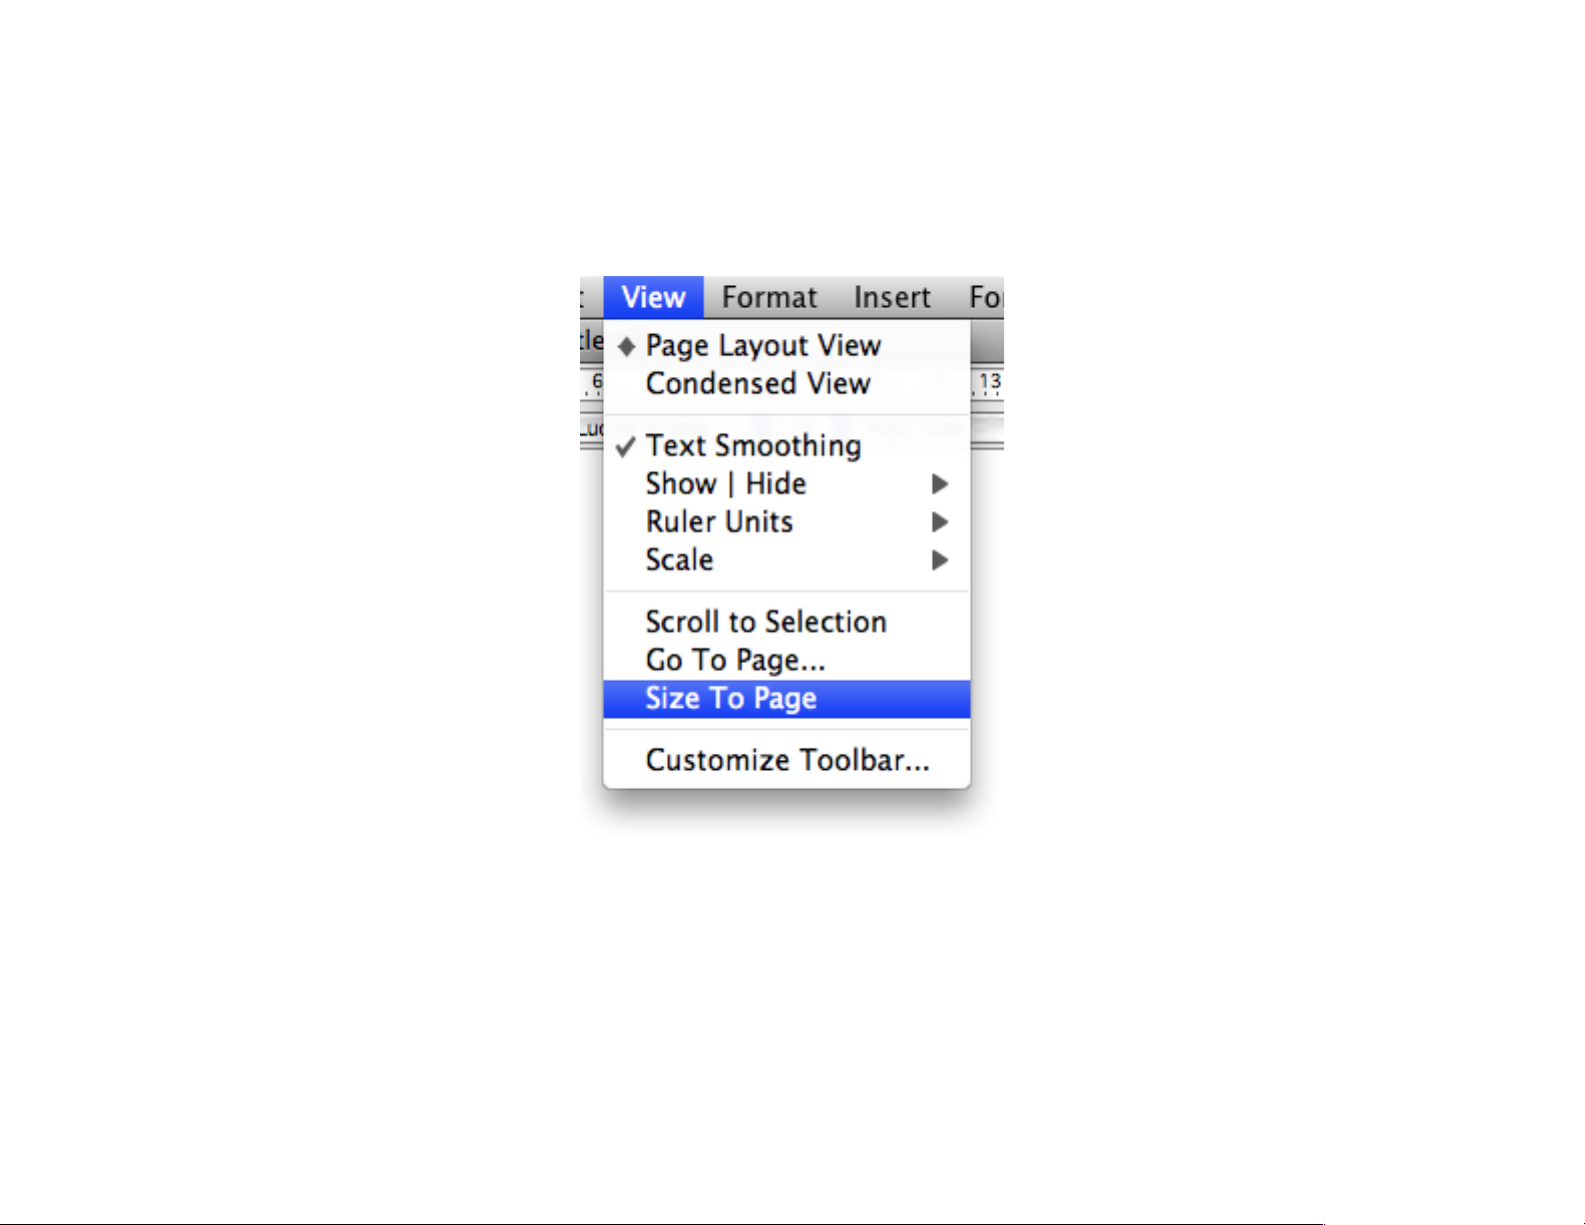
Resizing Windows!
To automatically size a document to show the page guides, choose the Size to Page command in the View menu.!
"
of 55 165
Page 56
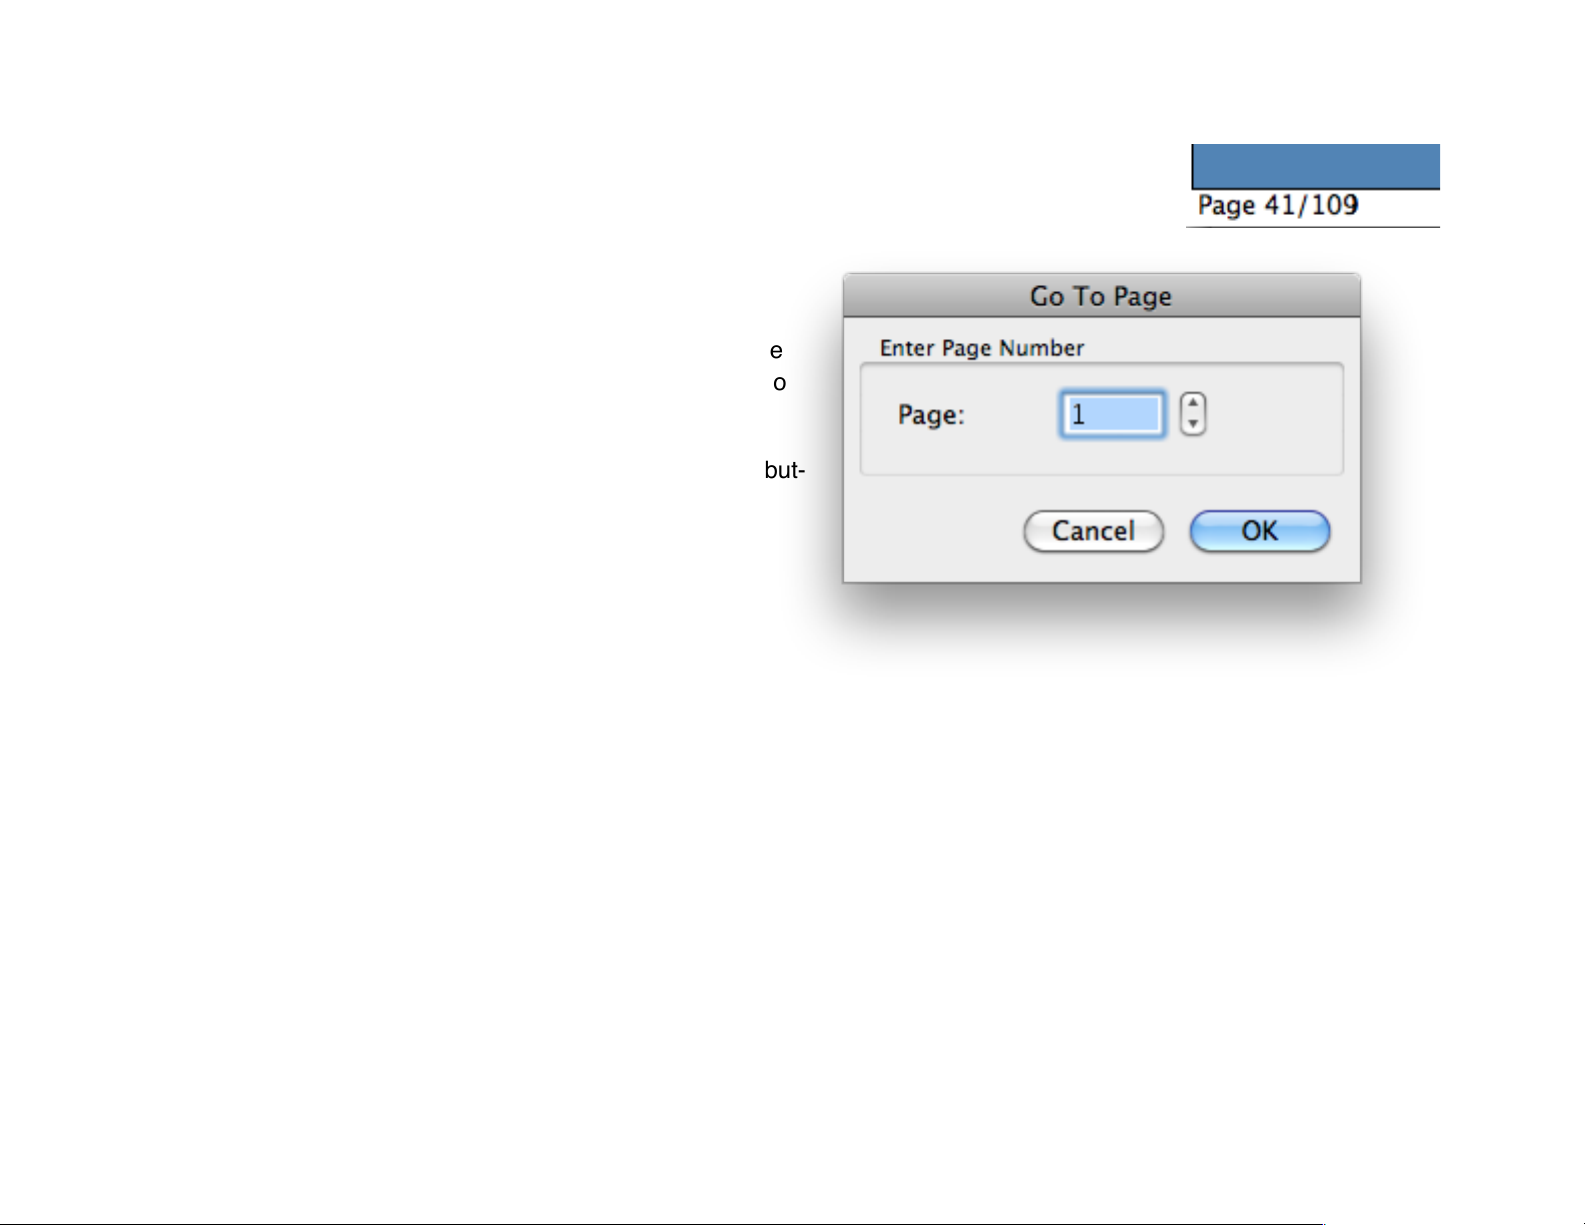
Go To page...!
Navigates between pages without scrolling.!
To change the current page:!
1 Click anywhere in the Page Number area located on the
bottom-left corner of the document window, or use the Go To
Page command in the View menu.!
2 Enter a page number and click OK or click the Cancel but-
ton to return to the document without changing the current
page.!
!
Navigating by Keyboard!
On an extended keyboard, press the Home and End keys to scroll to the top and bottom of the current document. Use the
Page Up and Page Down keys to scroll one page forward or backward.!
You can also use the arrow keys to move the insertion point. !
For detailed information on using the arrow keys, see the Entering Text section in Entering and Editing Text.!
of 56 165
Page 57
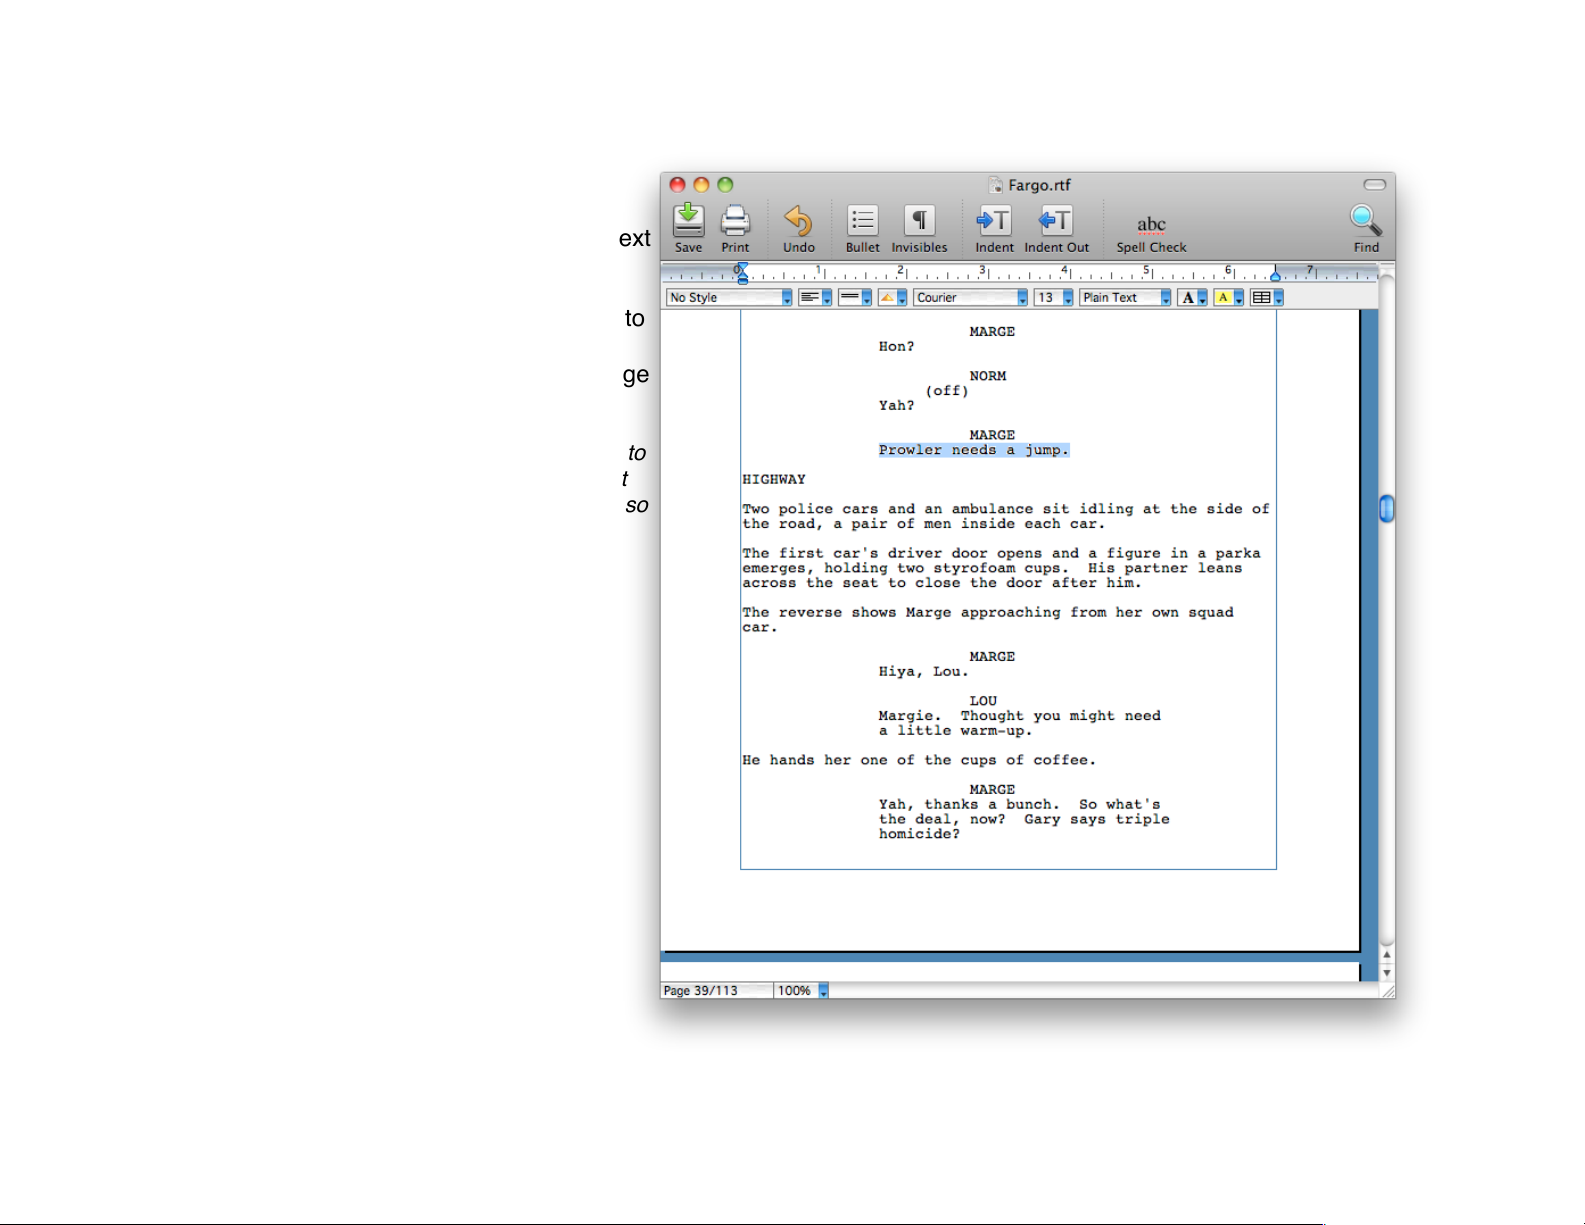
Showing the Selection!
As you scroll, the insertion point or range of text
you’ve selected may move out of view. !
Choose Show Selection from the View menu to
have Mariner Write automatically scroll the
document to display the insertion point or range
of selected text.!
Tip! Typing a character also scrolls the document to
display the insertion point. Mariner Write does not
insert a character when the enter key is pressed, so
will scroll to the insertion point without entering a
character."
!
of 57 165
Page 58
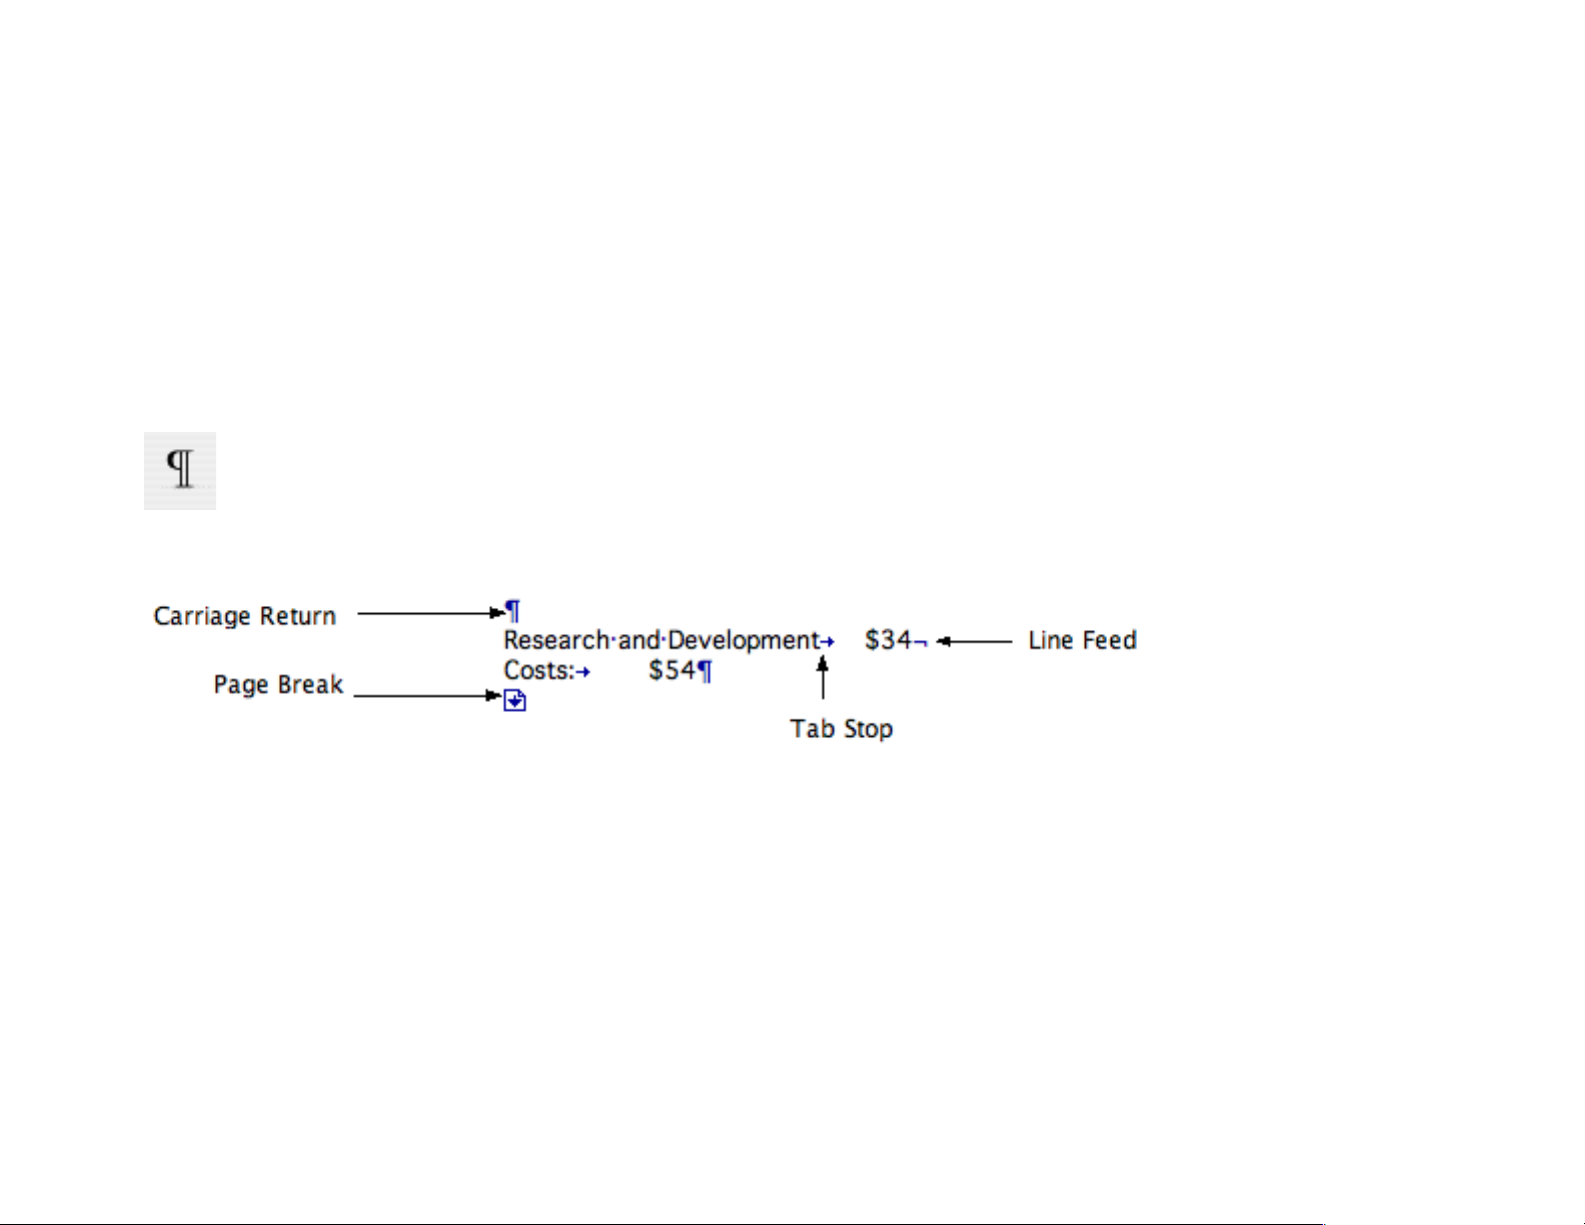
Invisible Characters!
Invisible characters are helpful to see formatting like page breaks, tabs, or carriage returns.!
To view non-printing characters such as tab, space, and return:!
!
1 Check the Show Invisible Characters in the Show|Hide menu or press the Invisible Characters button in the tool bar.!
!
Mariner Write uses the following symbols to represent invisible characters.!
!
Note: You can hide regular characters by using the Hidden text style. For detailed information about using text styles, see Chapter 4,
Formatting Text."
!
Tip! You can set the color of invisibles in the preferences under Display.!
of 58 165
Page 59
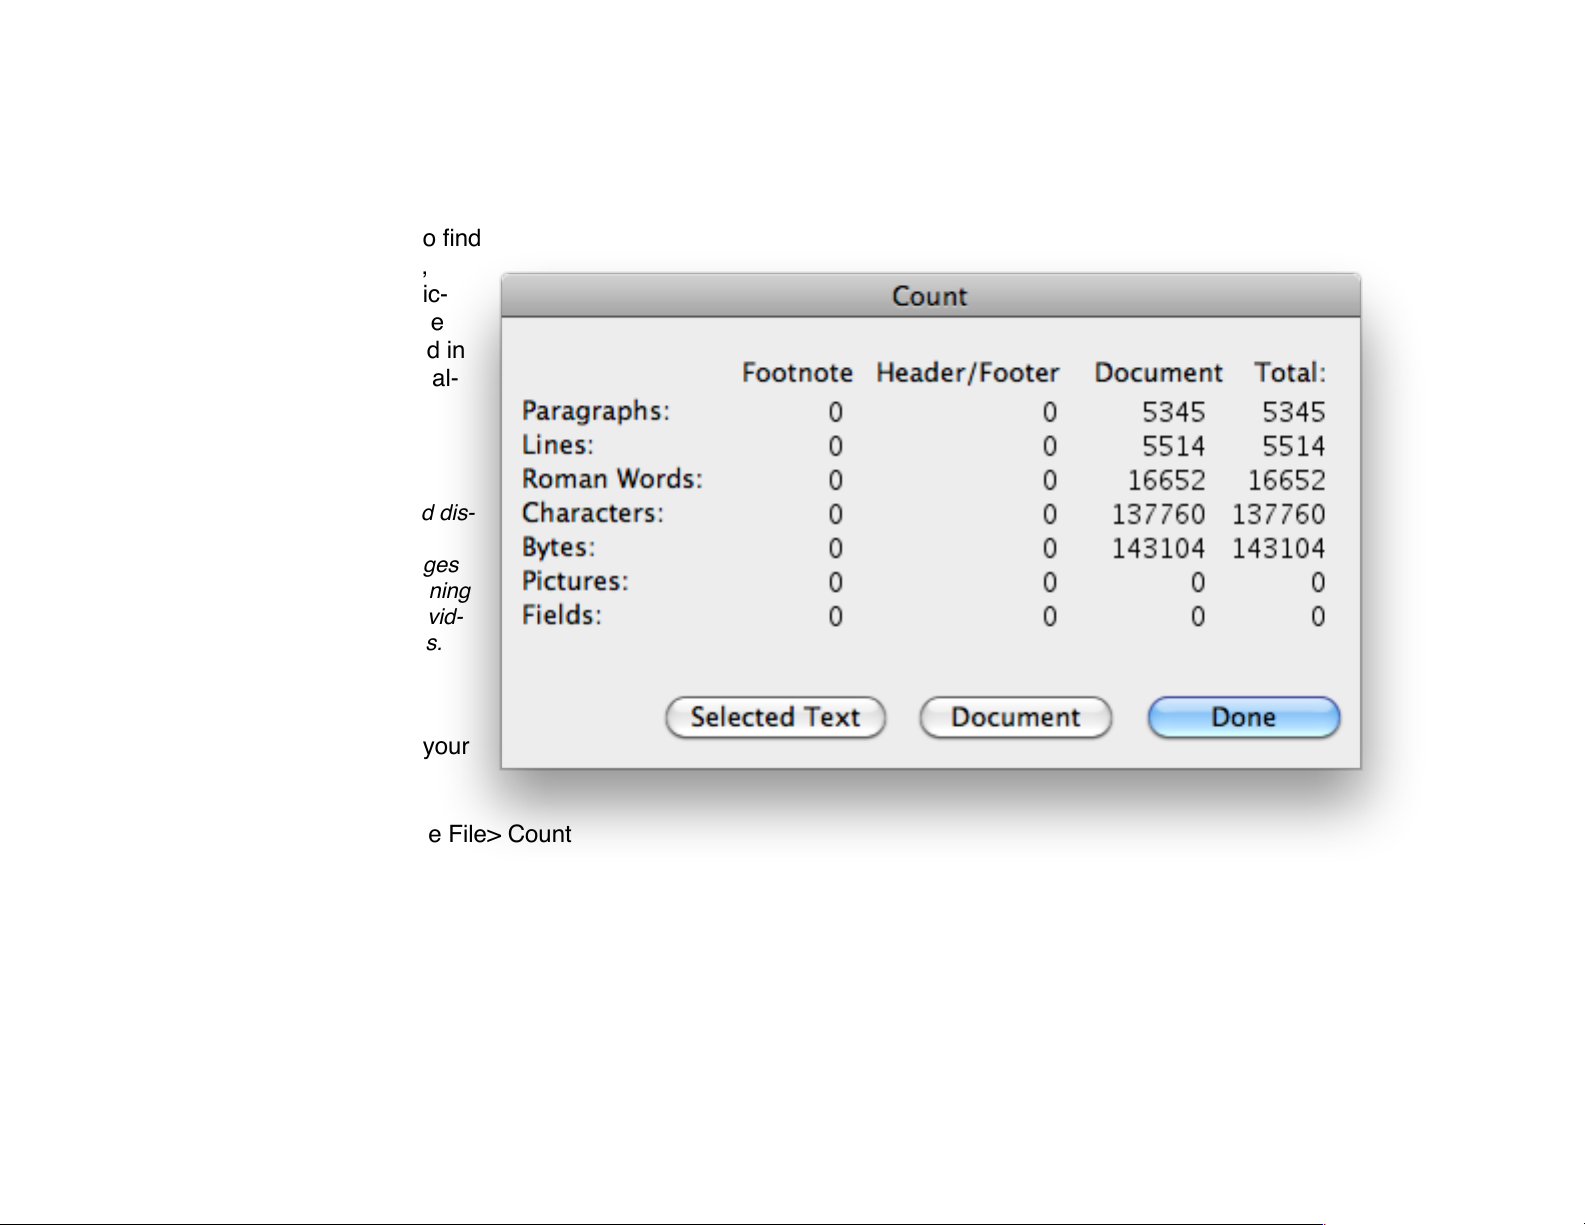
Showing Document Information!
Use the Count command to find
out how many paragraphs,
lines, words, characters, pic-
tures, and date/time or page
number fields are contained in
your document. Separate val-
ues are shown for the main
body, Header, Footer, and
Footnote.!
Note: The Roman Words field dis-
plays the number of standard
English words. Some languages
use a different criteria for defining
a word. The Bytes field is provid-
ed for 2 and 3-byte languages.
The Fields item counts page
number and date/time fields."
To view information about your
document or selected text:!
1 From the menu. choose File> Count!
A dialog appears.!
2 Click the Selected Text or Document button to view information about selected text or about your entire document.!
3 Choose the Done button to return to the document.!
of 59 165
Page 60
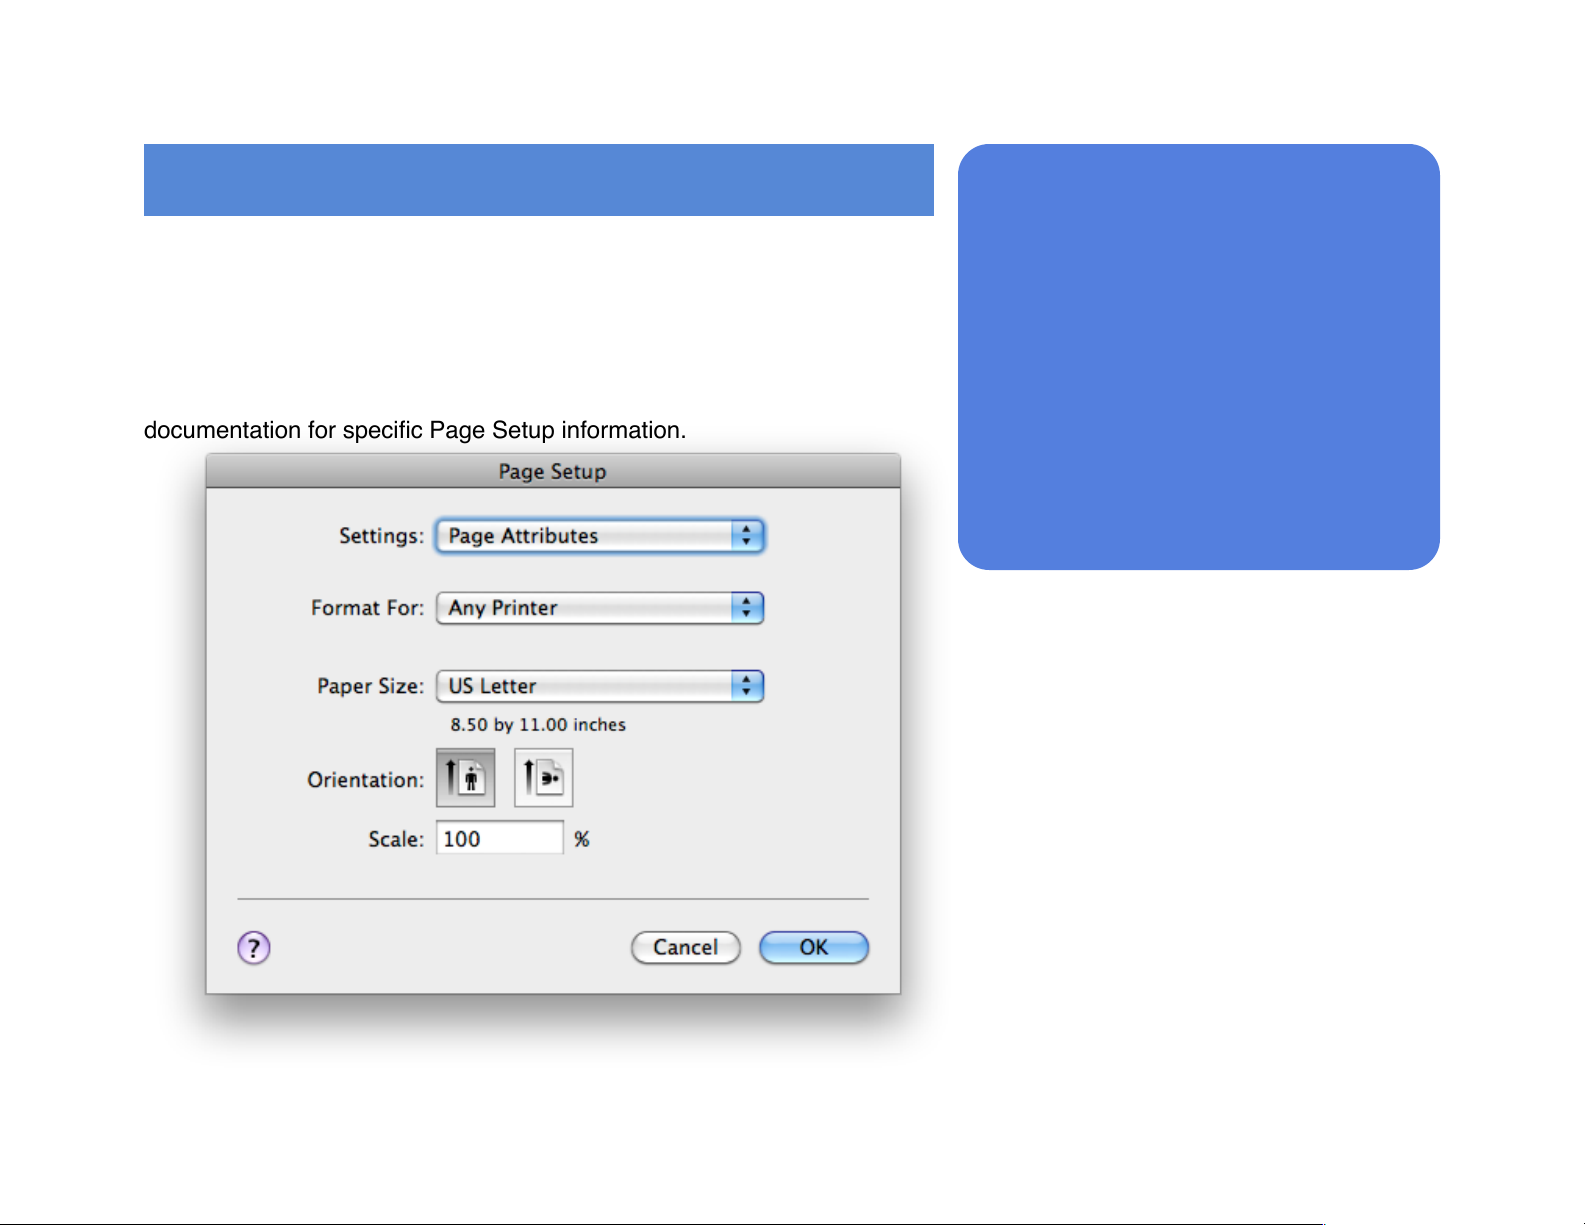
Printing Documents!
!
Page Setup!
The Page Setup command lets you change the page orientation, size, and
scale. As the Page Setup options are device specific, refer to your printer
documentation for specific Page Setup information.!
!
of 60 165
!
!
In this chapter:!
!
•
Page Setup!
•
Print Preview!
•
Printing!
•
Print Options!
•
Print One Copy!
•
Print Envelope
Page 61

Print Preview!
Print Preview is a helpful way to see how your document will look when printed.!
1 Choose Print Preview from the File menu !
2 To view the next page, click the Next button. !
3 To view the previous page, click the Previous button.!
4 If you know the number of the page you want to view, click the page number indicator at the bottom-left corner of the
Print Preview window. !
5 A Go to Page Number dialog appears. !
6 Enter the number of the page you wish to view.!
7 Press OK.!
!
To make changes to the page setup dialog while in print preview mode, click the Setup button.!
Note: EPS Graphics will not appear in the print Preview Window, they will print, however."
An alternative way to see a print preview is to use Mac OS X's built in Preview command when Printing. Select Print from
the Toolbar or from the File menu. A Print dialog appears. Press the Preview button. The Preview application appears and
your document is displayed as a pdf.$
of 61 165
Page 62
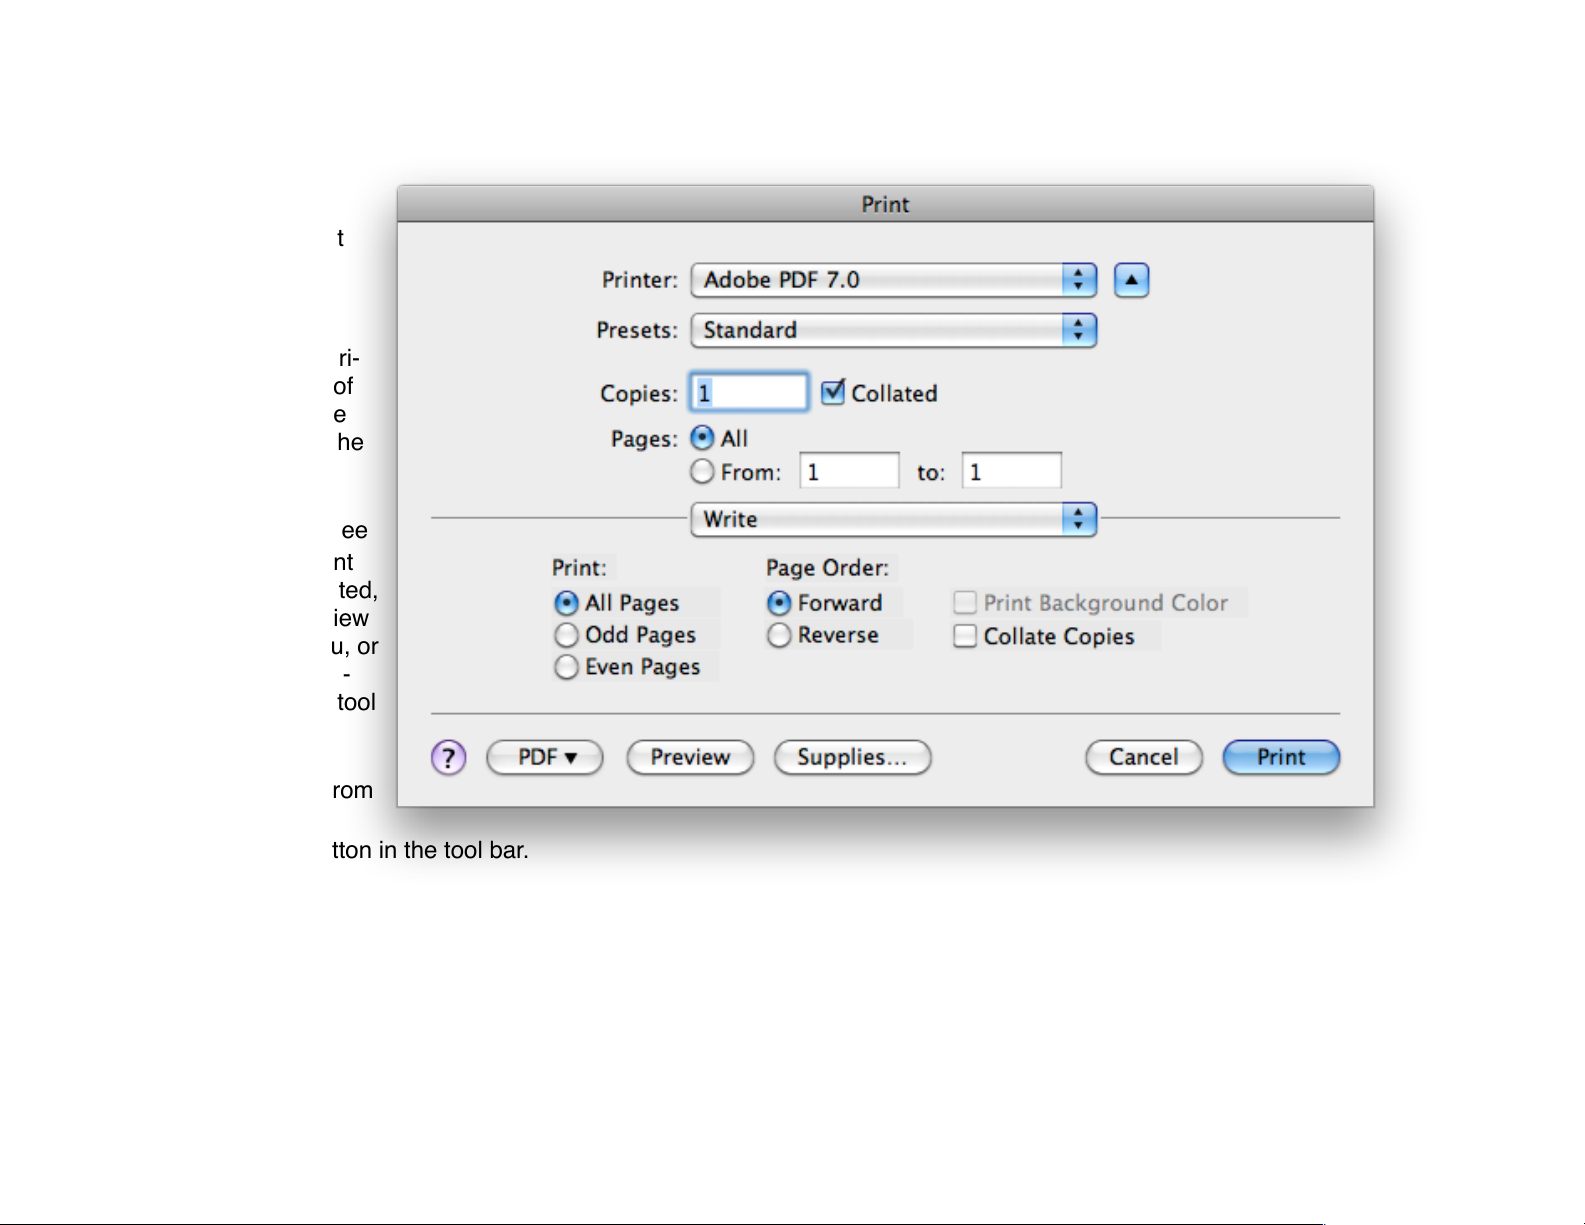
Printing!
To print the current
document:!
1 If you want to
change the size, ori-
entation, or scale of
each page, choose
Page Setup from the
File menu.!
2 If you want to see
how your document
will look when printed,
choose Print Preview
from the File menu, or
press the Print Pre-
view button in the tool
bar.!
3 Choose Print from
the File menu or
press the Print button in the tool bar.!
4 Select the desired options and press the OK button to Print or press the Cancel button to return to the document with-
out printing.!
The dialog box that appears when you select Print is printer specific. See your Macintosh or printer documentation for information on installing printer software and selecting printing options.$
of 62 165
Page 63

Print Options!
The following print features are available in the Print dialog.!
Print: All Pages / Odd Pages/Even Pages -Prints only odd or even numbered pages. This simplifies printing on
both sides of a page (duplex).!
Note: Print Odd Pages/Print Even Pages uses the actual page numbers, not page numbers inserted using the “Insert Page
Number” command."
Print Background Color - Enable to print the document background color.!
Note: The control is only active when a document background color is not white."
Collate Copies - Printing multiple copies of a document usually results in several copies of page one followed by
several copies of page two, which you must collate by hand. Instead, choose Collate to print one copy of the document in its entirety, then a second copy, etc. !
Note: Collated printing takes longer as the document must be re-processed for each copy requested."
Page Order: Forward/Reverse - Forward prints pages in 1, 2, 3 order while reverse prints pages in 3, 2, 1 order.!
!
Print One Copy!
Choose Print One Copy from the File menu to print one copy of your document. This is a shortcut to choosing the Print
command and pressing the Print button.$
of 63 165
Page 64
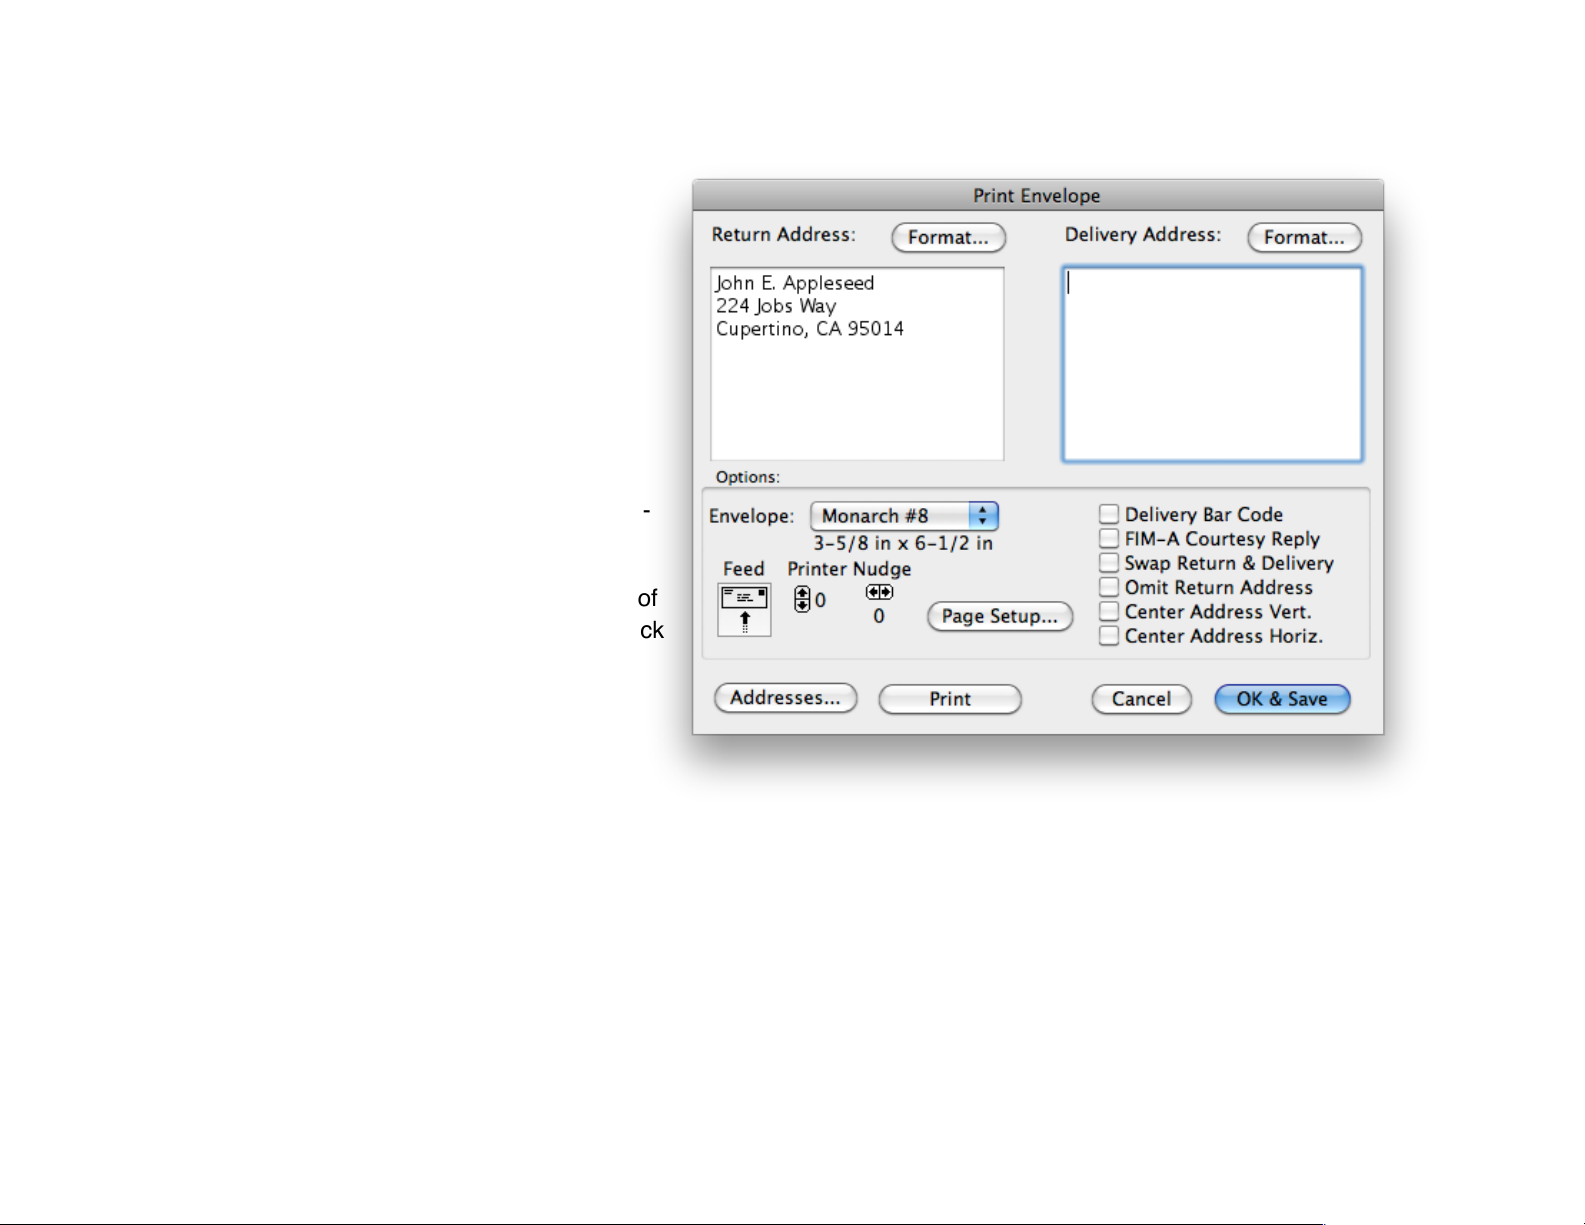
Printing Envelopes!
Here’s how to print an envelope:!
1 From the File menu select Print Envelope...!
A dialog appears.!
2 Enter a Delivery and Return Address.!
3 Set the format of the addresses (font, size,
style) by clicking the Format button near the ad-
dress you which to change.!
4 Select options (See the next page for a list of
the options and their descriptions.) and then click
Print.!
!
!
Note: The Return Address can be saved to automatically appear by entering the address and clicking the OK & Save button.!
of 64 165
Page 65

Envelope printing options!
Envelope: Sets the type of envelope you which to print.!
Feed - Determines the direction and orientation with which you insert the envelope into your printer.!
Printer Nudge - Moves the print alignment in tiny increments vertically or horizontally to finely adjust the result.!
Page Setup - Opens a dialog where you chose paper size and orientation.!
Delivery Bar Code - Prints a Code 3 of 9 bar code on the envelope which may reduce your cost to send the letter
(check with your local post office).!
FIM-A Courtesy Reply - Prepares a Courtesy Reply mail by printing a FIM A code (Postnet font required). !
Swap Return and Delivery - Juxtaposes the return address and the delivery address.!
Omit return Address - Omits the return address when printing. !
Center Address Vertically - Centers the delivery address on the envelope vertically.!
Center Address Horizontally - Centers the delivery address on the envelope horizontally.!
Addresses... - Opens a dialog where you can add or retrieve addresses you often use.!
Print... - Begins the printing operation.!
Cancel... - Cancels the changes you’ve made and dismisses the dialog.!
OK & Save... - (Default) Saves the addresses and dismisses the dialog $
of 65 165
Page 66
Entering Text and Editing!
Entering Text!
To enter text in a new document, simply type. The insertion point, a blinking vertical bar, marks where the next characters appear as you type. The
insertion point also marks where pasted text or a graphic is inserted.!
" !
To change where you want to type, simply click where you want to position
the insertion point. !
Note: You can position the insertion point only to the left or right of an existing character. As such, you may need to repeatedly press
the Return or Enter key to move the insertion point to a location that doesn’t already contain text."
You can also move the insertion point one character to the left or right by pressing the left or right arrow key. Pressing the
up arrow key moves the insertion point to the line above. Pressing the down arrow key moves it to the line below.!
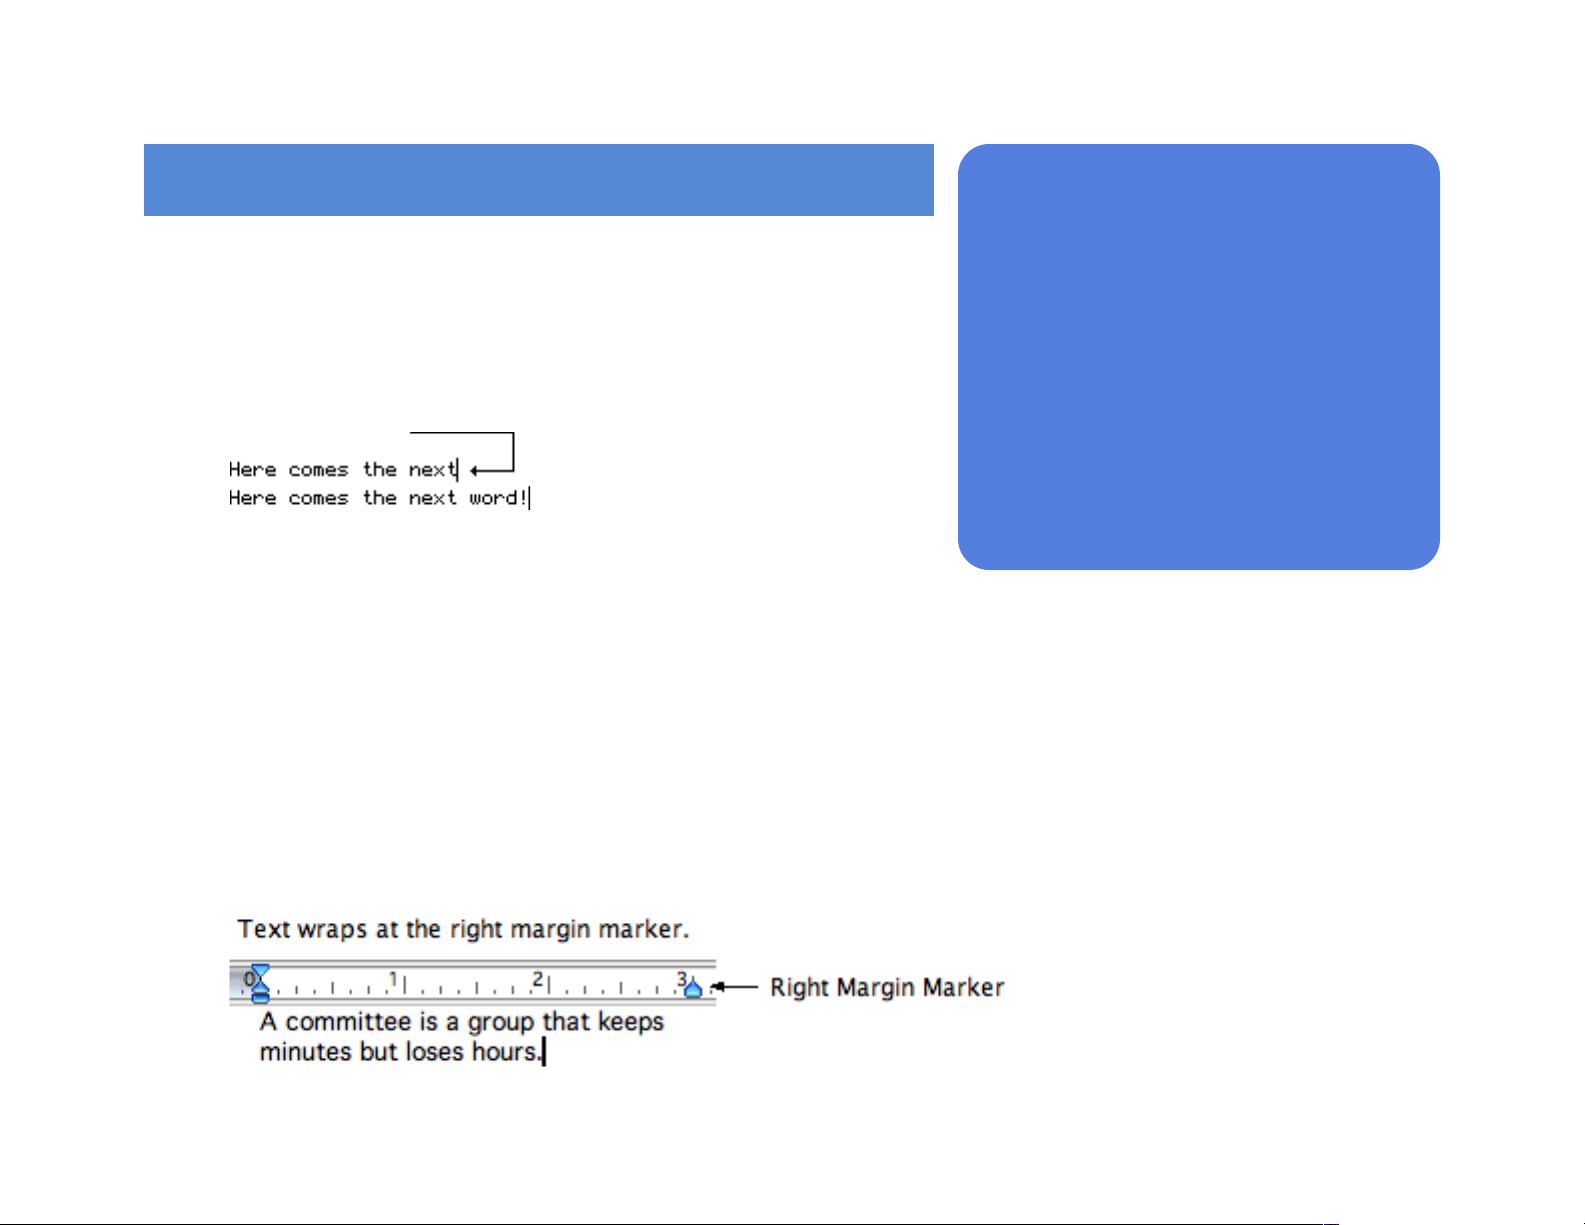
Word Wrap!
As you type, words automatically flow, or “break”, to the next line when you reach the right margin marker. This is called
word wrap.!
" !
The insertion point
of 66 165
!
!
In this chapter:!
!
•
Enter and select text!
•
Control word wrap!
•
Cut, copy, Drag and Drop, and paste
plain and styled text!
•
Insert a Date/Time or Page Number
stamp!
•
Use other related entering and editing features!
•
Working with hyperlinks
Page 67
Note: For detailed information about using and setting margins, see the Changing Margins section in Chapter 4, Formatting Text."
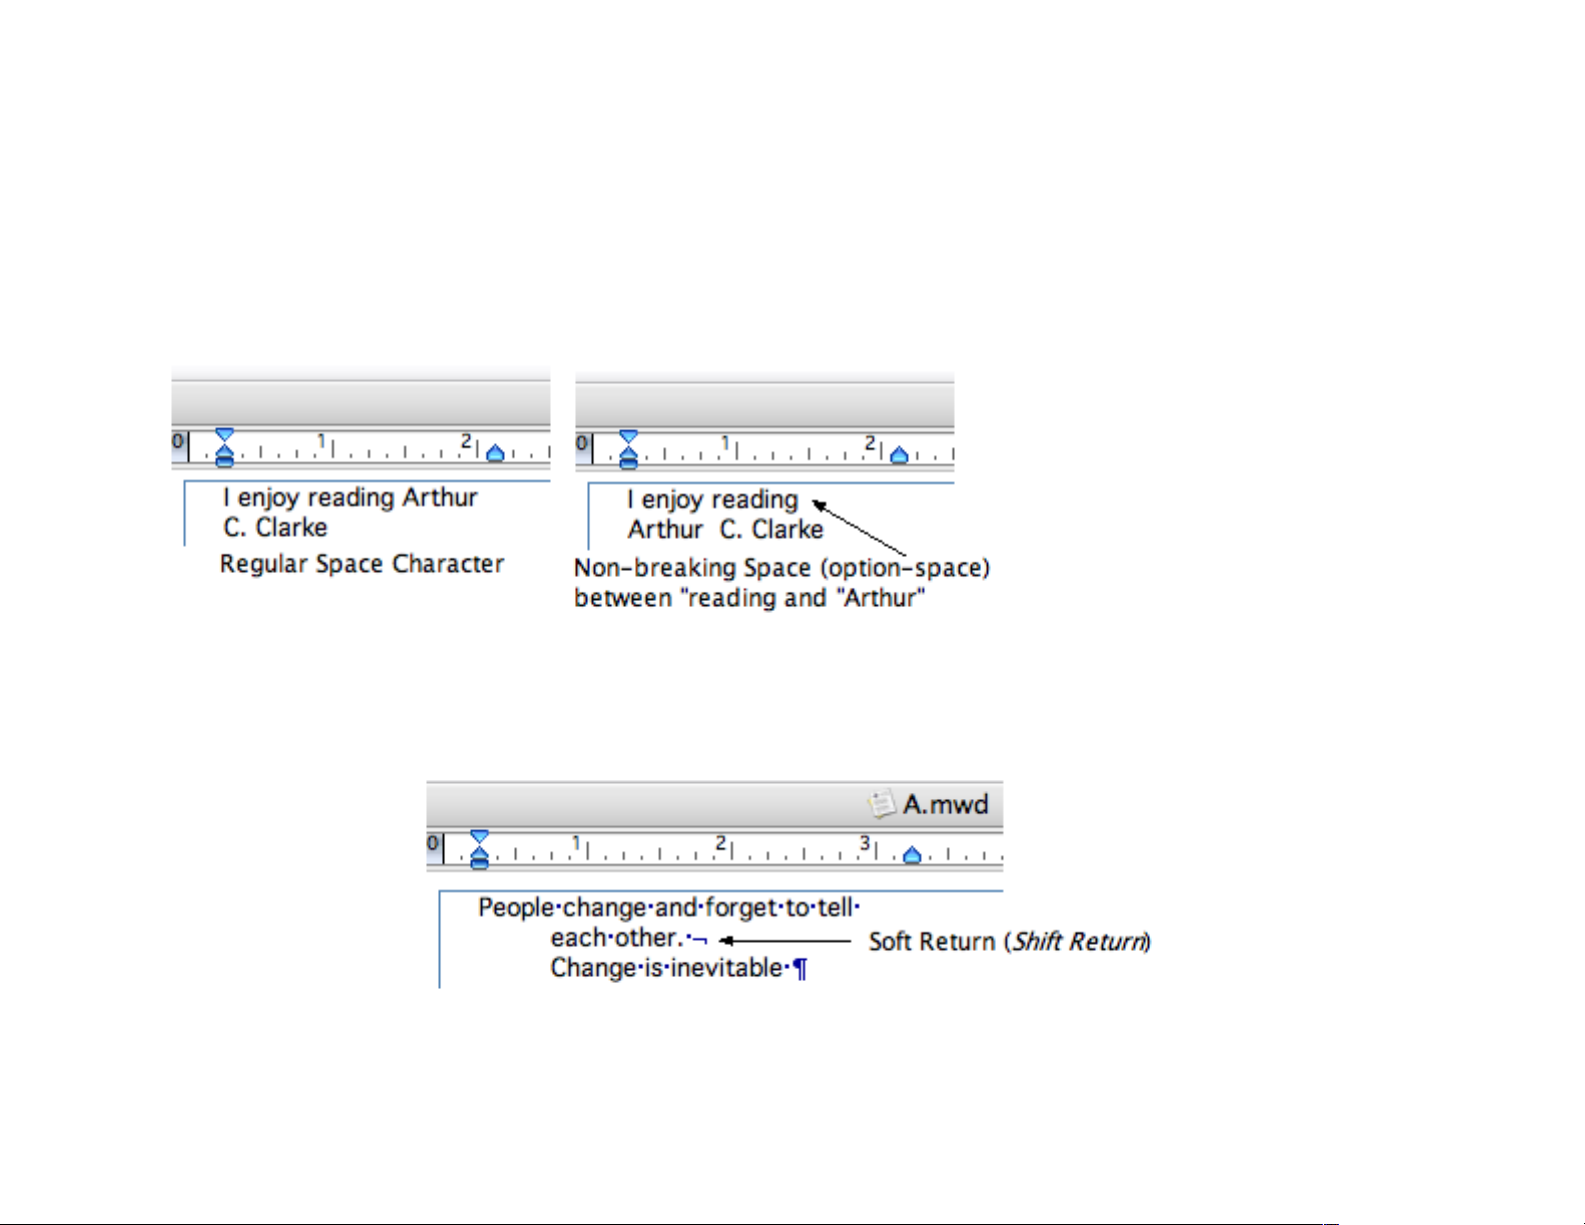
In addition to the space character, lines also wrap on the Soft Hyphen character. For detailed information about using the
Soft Hyphen, see the Soft Hyphens section that follows.!
If you don’t want a line to break between words, type a non-breaking space between them. To type a non-breaking space,
hold down the Option key and press the space bar.!
" " !
Using Soft Returns!
The left and right margin markers let you adjust the horizontal position of each paragraph. To move the text insertion point
to the next line without starting a new paragraph, press Shift + Return key. This is called a Soft Return or Line Feed.!
" !
Example: Using a soft return aligns the next line with the Left Indent, instead of starting a new paragraph and moving the text to the
First Indent location.!
of 67 165
Page 68
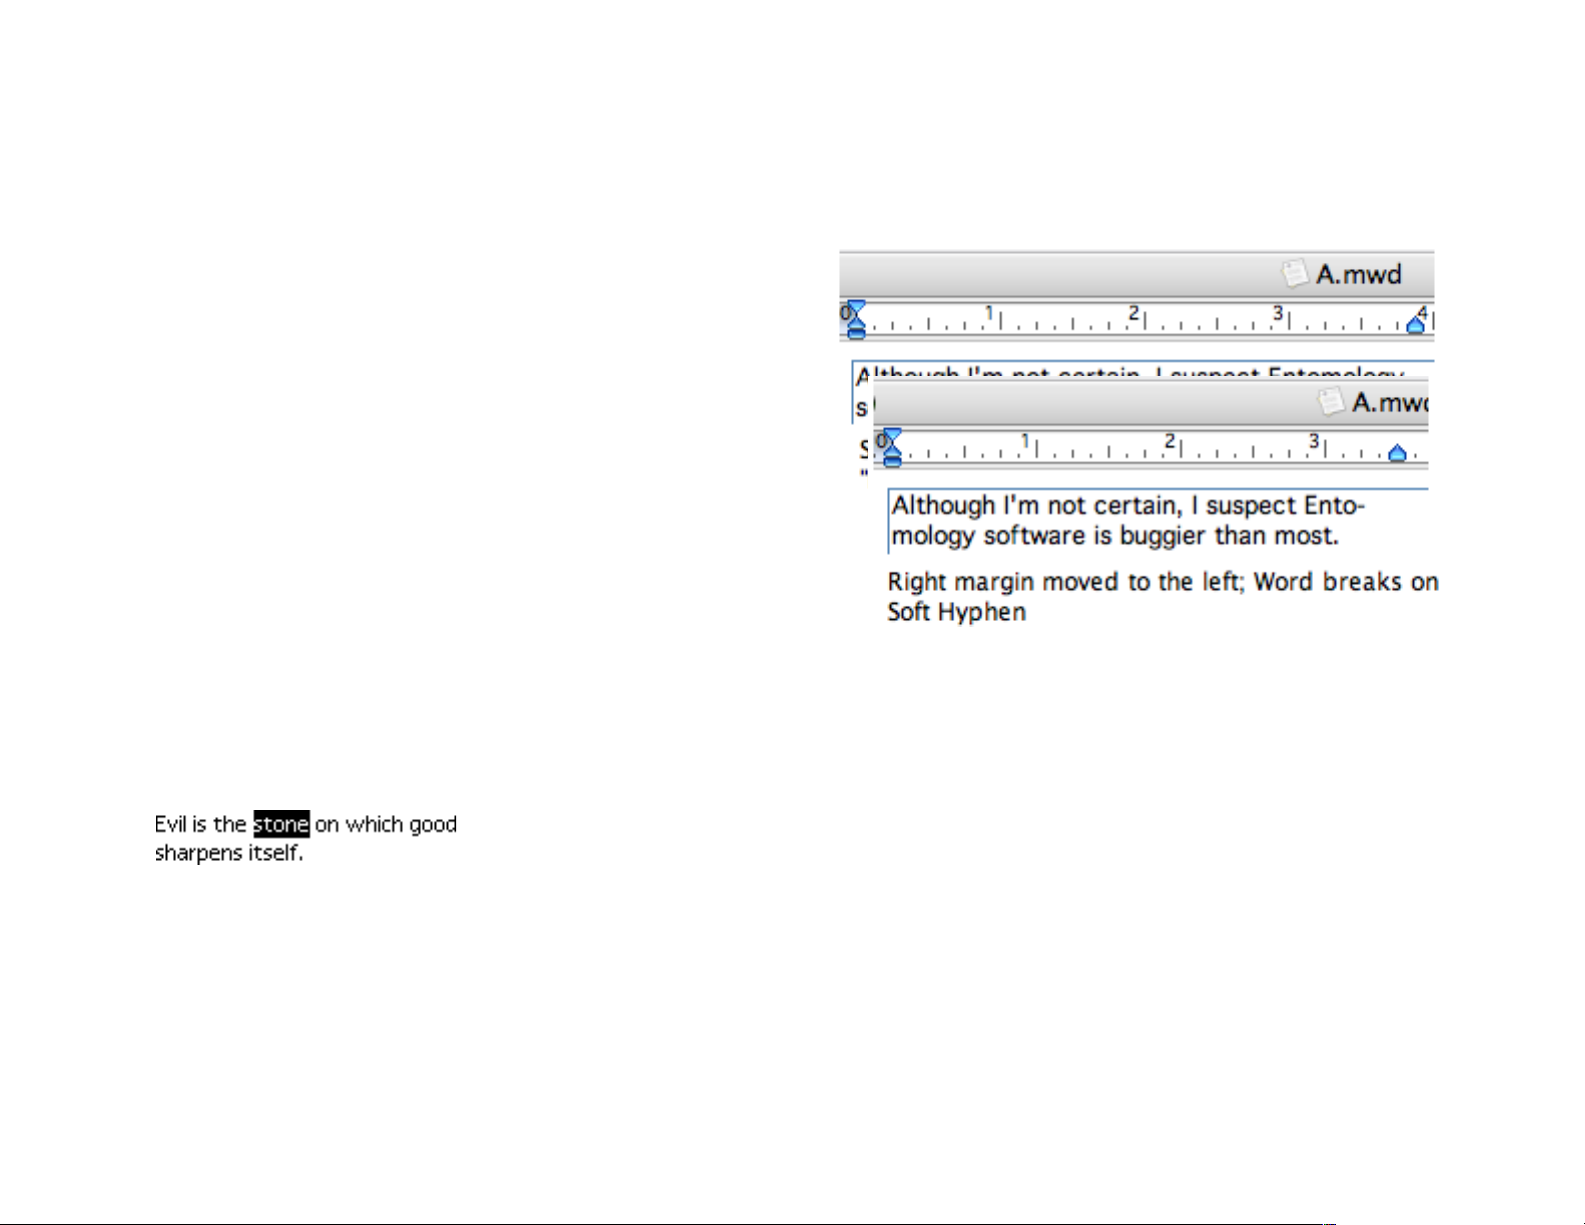
Soft Hyphens!
There may be situations where you want the option of having a line break within a word instead of between words. !
The Soft Hyphen character lets you split a word across lines.!
Note: Soft Hyphens are visible only when a word splits or when
showing invisibles."
To insert a Soft Hyphen, position the cursor where you want
the word to split and either:!
• Choose Soft Hyphen from the Insert menu.!
•
Type Command-Shift-Dash (or Command-ShiftMinus).!
To remove a Soft Hyphen, position the cursor to the right of the
Soft Hyphen and press the Delete key.!
Selecting Text!
You must select text before you can edit it or change its appearance.!
" !
You can use the mouse, keyboard, or a combination of both to select a continuous range of text. The simplest method is
to drag across, or highlight the text you want to select.$
Selected Text
of 68 165
Page 69
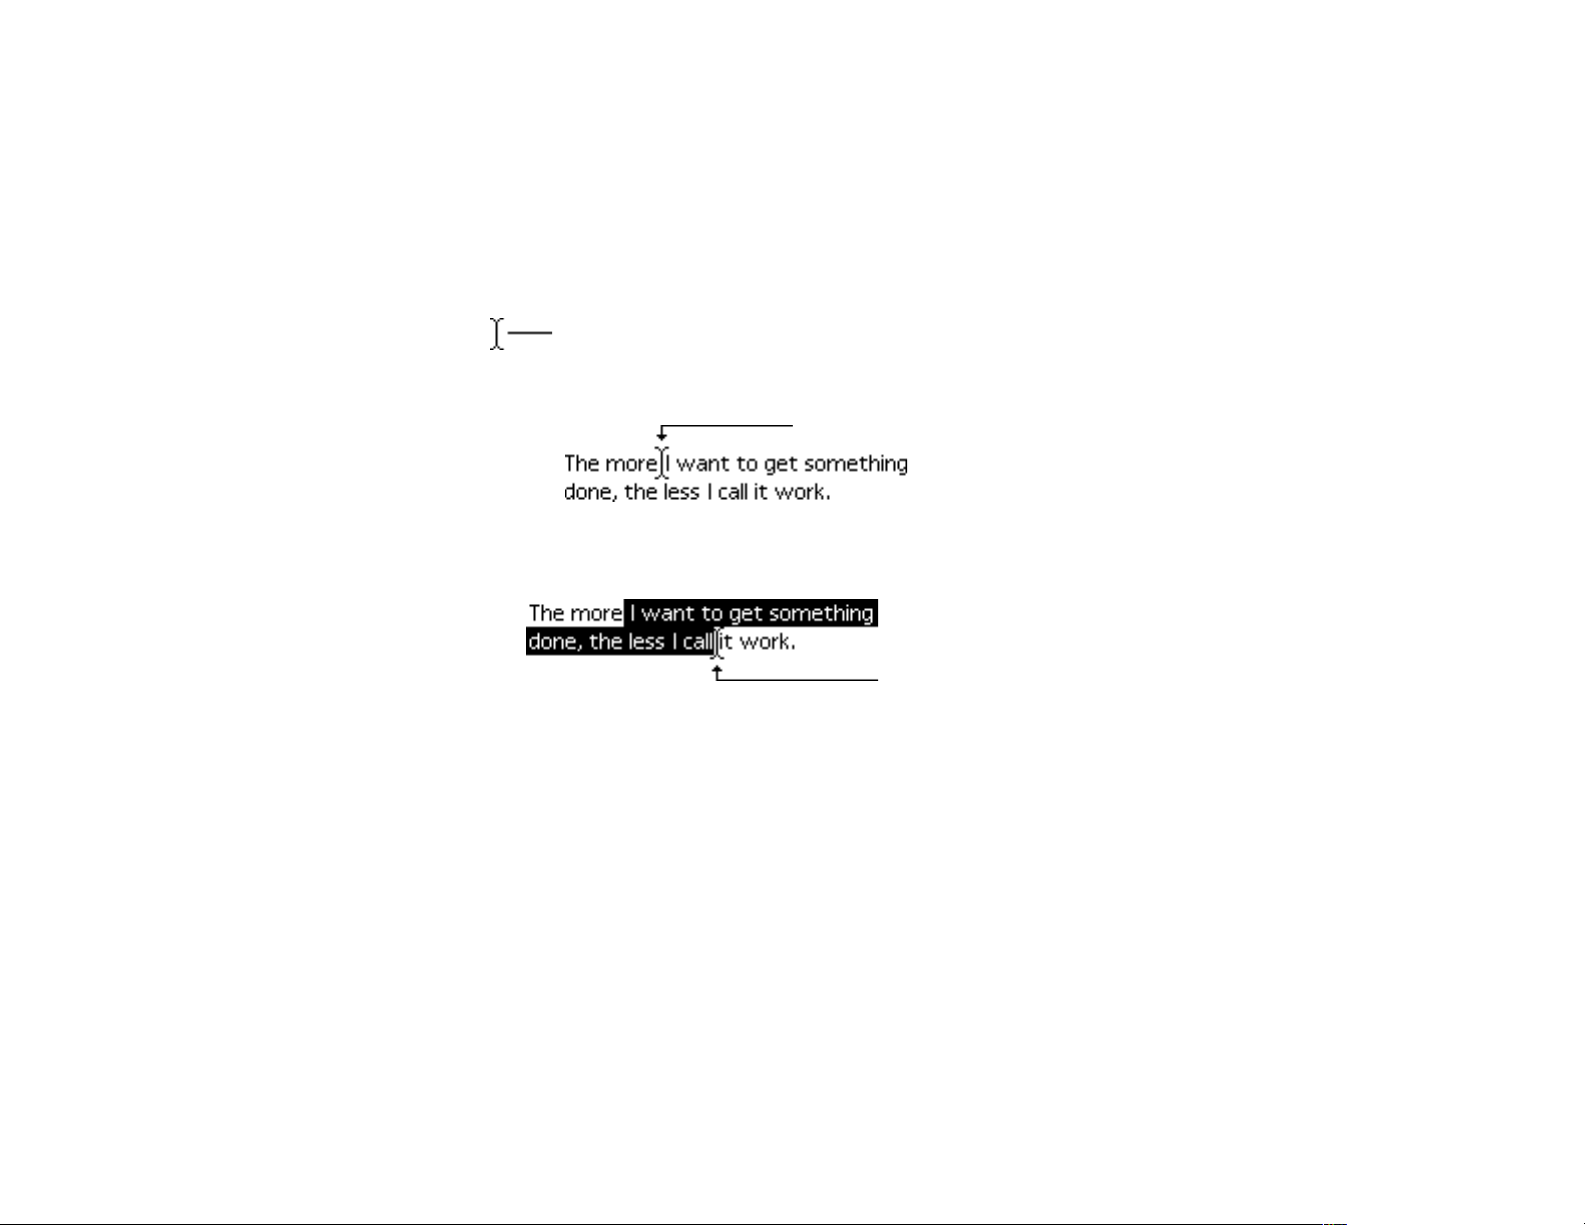
Selecting by Dragging!
To select text by dragging:!
1 Position the I-Beam cursor in front of the first character you want to select.!
" !
" !
2 Drag over the text, including the last character you want to select.!
" !
Dragging past the edge of the document window automatically scrolls the document in that direction.!
Selecting by Keyboard!
To select text by using the keyboard:!
1 Position the I-beam cursor in front of the first character you want to select.!
2 Hold down the Shift key.!
3 Press the Left or Right Arrow key to extend your selection by one character to the left or right.!
I-Beam Cursor
Position the I-Beam in
front of first character.
Drag to include
the last character.
of 69 165
Page 70
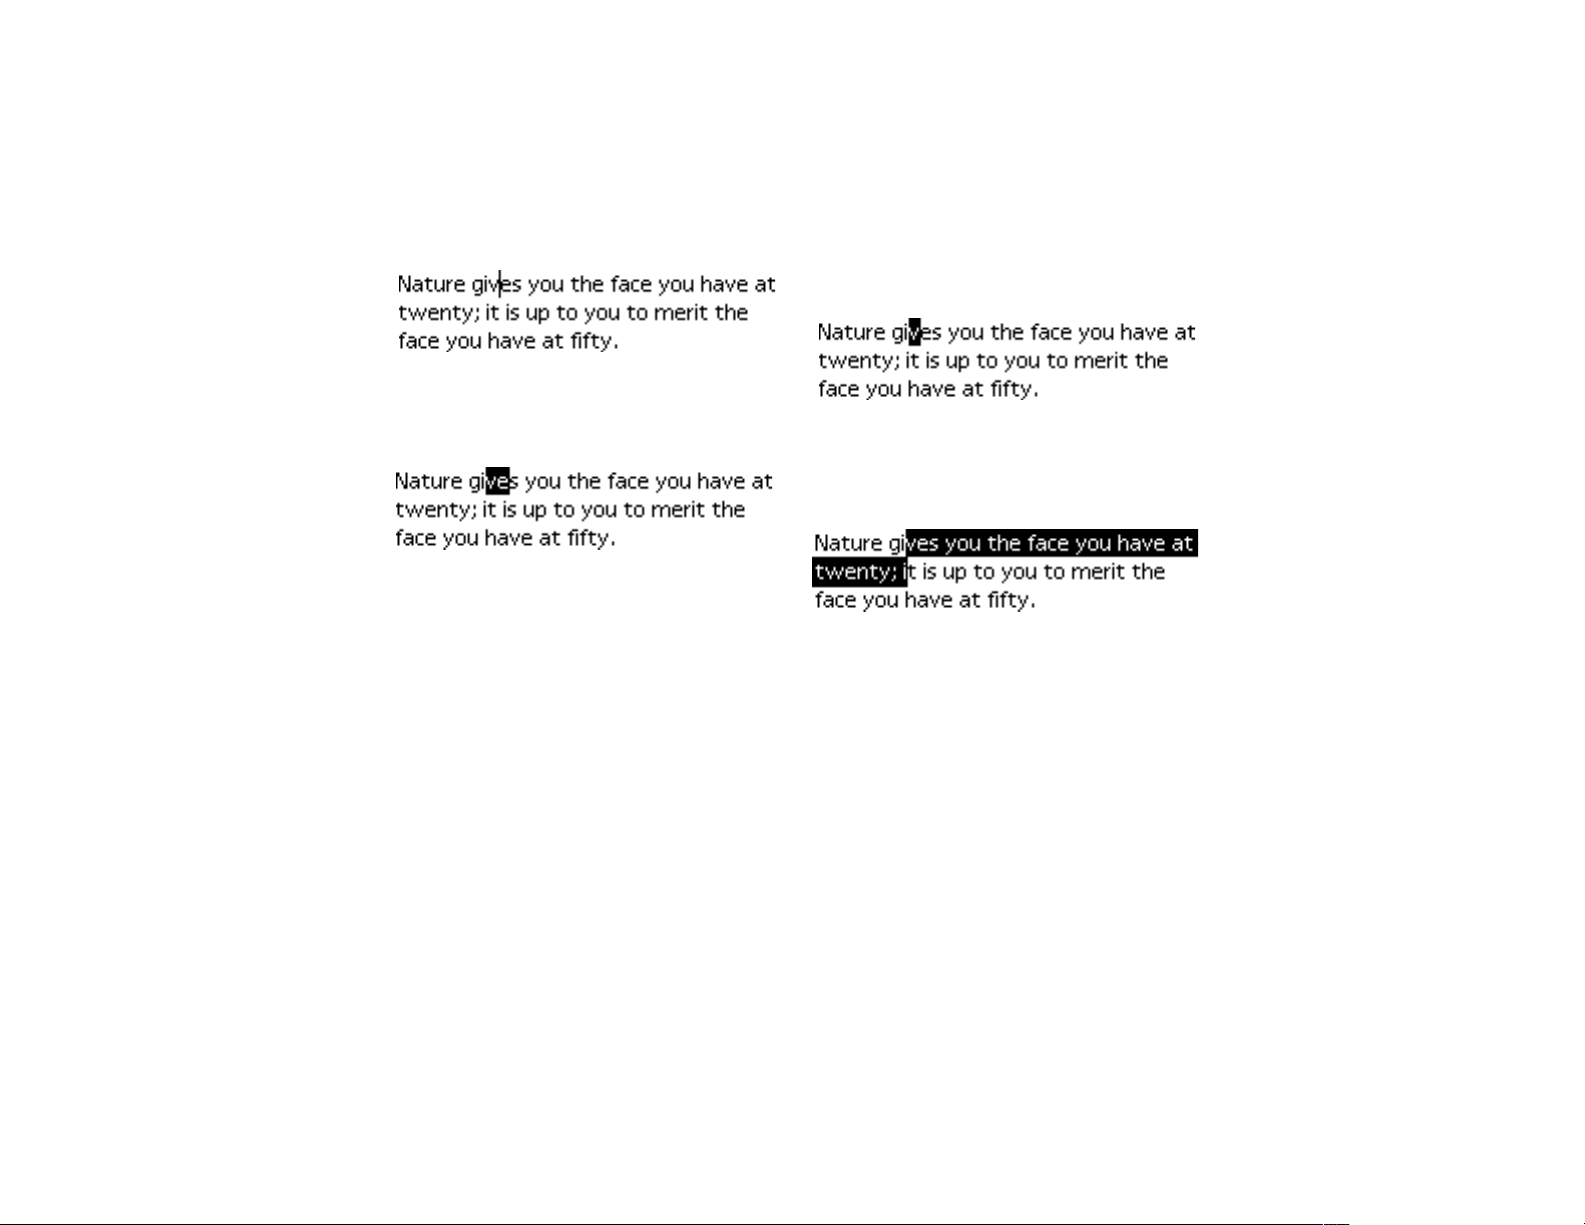
4 Press the Up or Down Arrow to extend your selection to the nearest character in the line above or below your insertion
point.!
" !
" !
When dragging is inconvenient, such as when you want to select all the text on multiple pages, use the Shift-click technique.!
To select text by Shift-clicking:!
1 Position the I-Beam cursor in front of the first character you want to select.!
2 Hold down the Shift key and click behind the last character you want to select. !
If the last character isn’t visible, use the scroll bars or Go To feature to change the visible page. For detailed information
about using the Go To feature, see the Go To section in Chapter 2, Working with Documents.!
To increase or decrease the size of your selection, repeat step 2 above or any of the selection techniques previously described.$
(1) Insertion point placed
(2) Shift-Left Arrow
(3) Shift-Right Arrow
(4) Shift-Down Arrow
of 70 165
Page 71
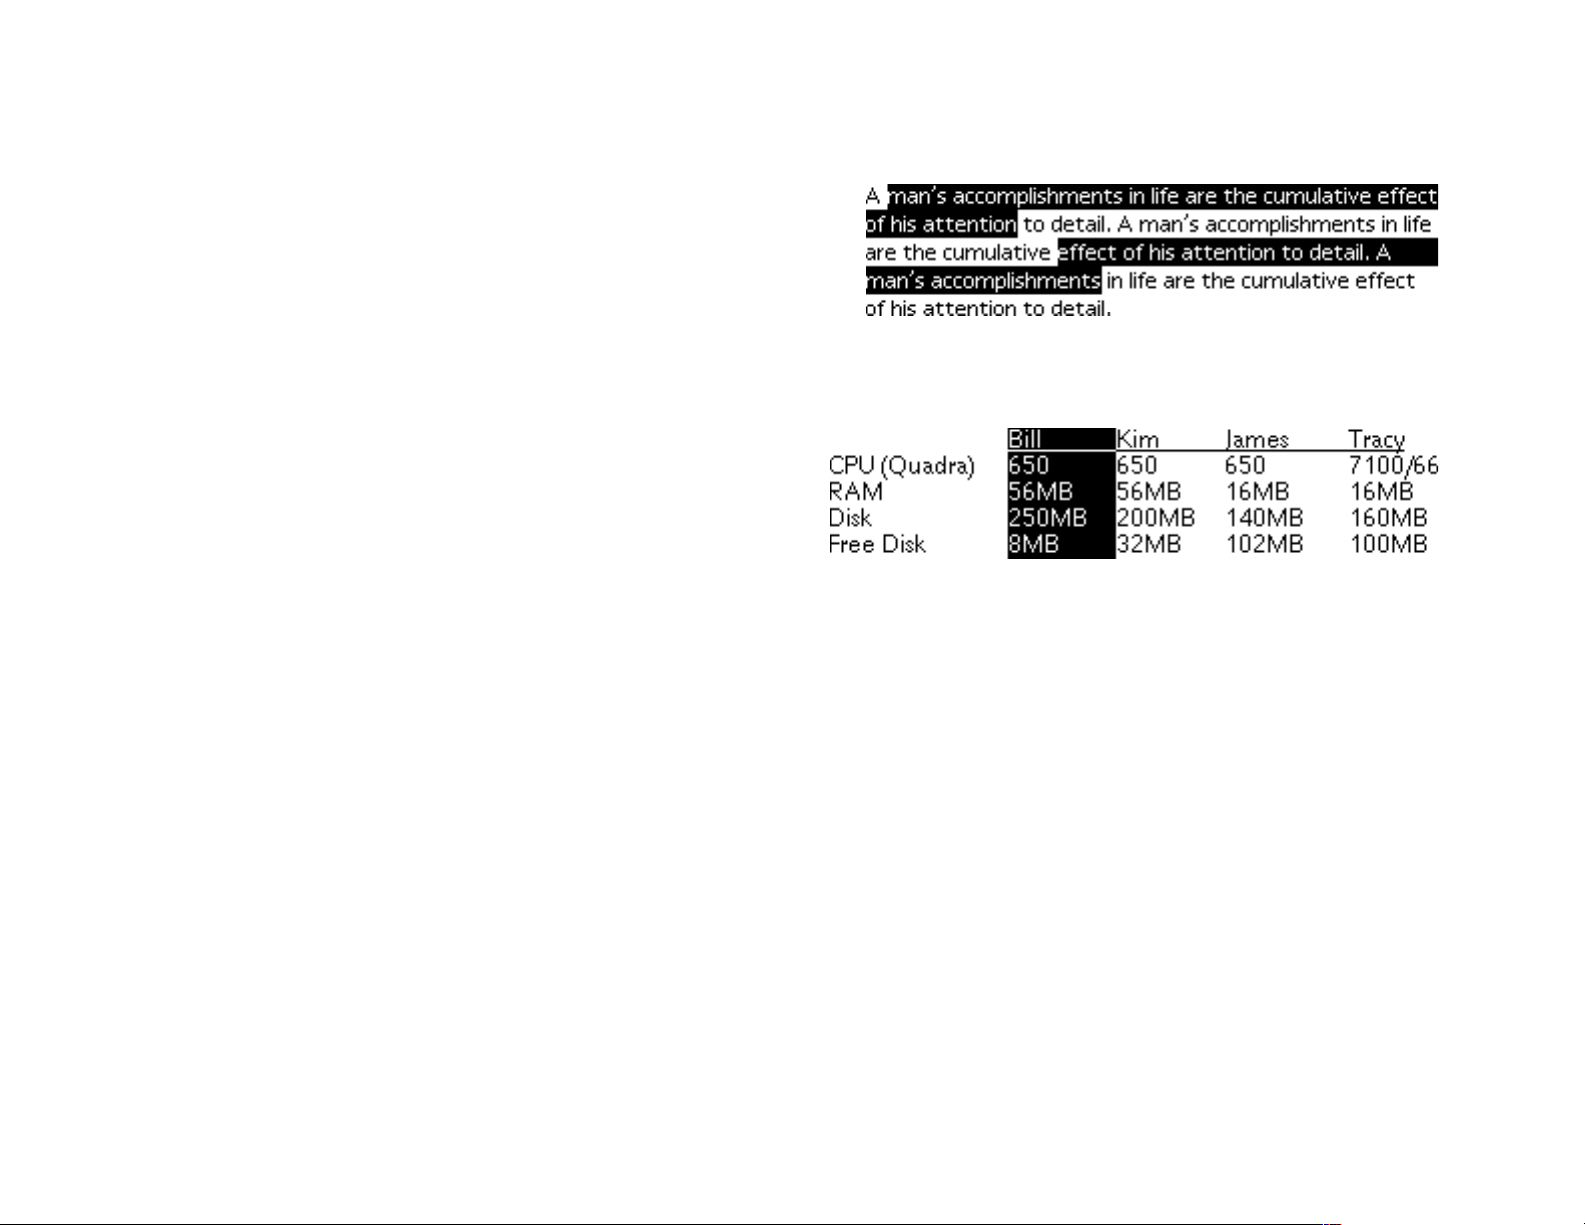
Multiple Text Selections!
Selecting multiple ranges of text is particularly useful for selecting single column of tabbed data arranged into columns.!
To select multiple text ranges:!
1 Select the first text range using one of the previously de-
scribed methods.!
2 Press the Shift and Option keys and select a second text
range. !
!
Text Selection Shortcuts!
Use the following shortcuts to select a word, sentence, or paragraph.!
•! Double-click to select a word.!
•! Triple-click to select a sentence.!
•
Quadruple-click to select a paragraph.$
of 71 165
Multiple text selections
Discontiguous text selection
Page 72

Editing Text!
Use the standard Macintosh Edit menu commands to cut, copy, paste, or clear selected text.!
Cutting!
Choose Cut (Command-X) from the Edit menu, or press the Cut button in the command bar, to remove your selection
from the document and place it on the Macintosh’s built-in Clipboard. The selection cut replaces the previous Clipboard
contents.!
Once on the Clipboard, you can paste the selection into another Mariner Write document or into another application’s
document.!
To delete a selection without placing it on the Clipboard, choose Clear from the Edit menu or press the Delete key or
Backspace key.!
Clearing!
To delete a selected range of text:!
•! Press the Delete, Backspace, or Forward Delete key.!
Note: The Forward Delete is available on extended style keyboards only. It is located below the Help key and to the left of the End
key."
To delete the character to the left of the insertion point:!
•! Press the Delete key!
To delete the character to the right of the insertion point:!
•! Press the Forward Delete key. The Forward Delete key is located below the help key on an extended keyboard.!
of 72 165
Page 73
Copying!
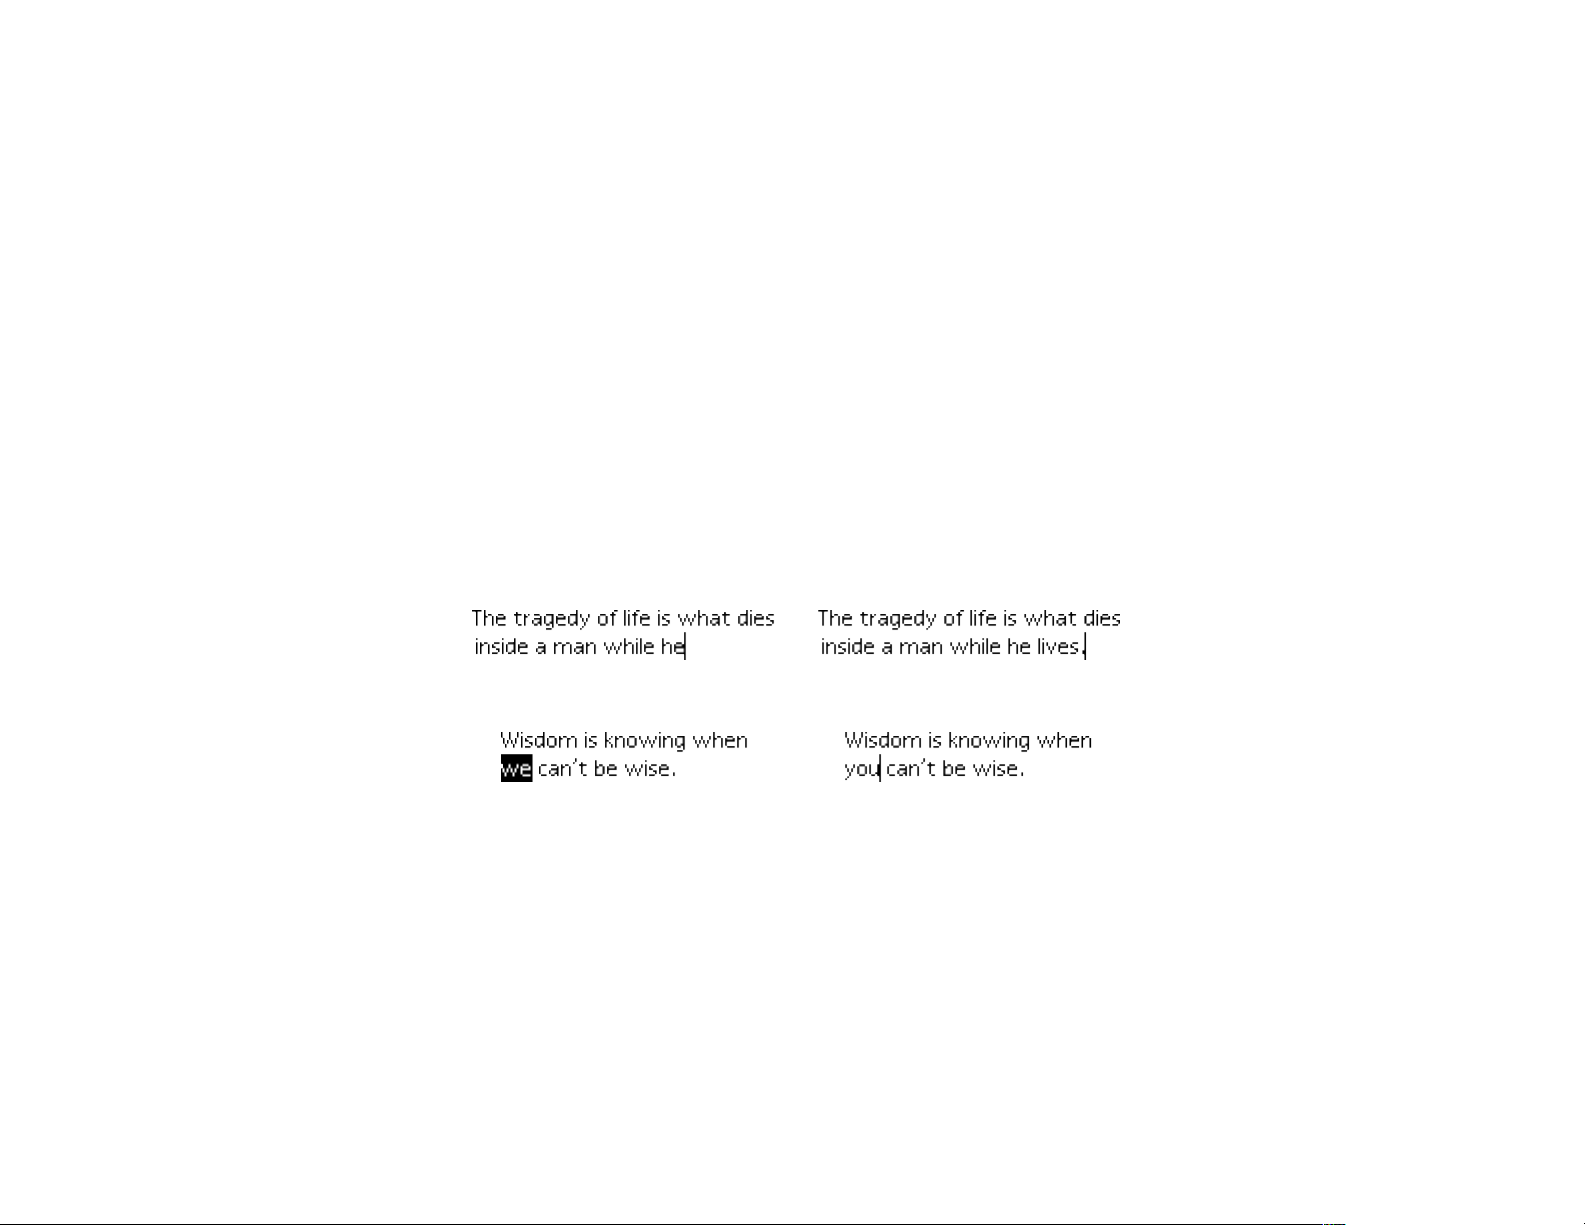
Choose Copy (Command-C) from the Edit menu, or press the Copy button in the command bar to place a copy of the selection on the Macintosh’s built-in Clipboard. The copied selection replaces the previous Clipboard contents.!
When you use the Copy command, the document doesn’t change. When you use the Cut command, the selection is removed from the document.!
Once on the Clipboard, you can paste the selection into another Mariner Write document or into another application’s
document.!
Pasting!
Choose Paste (Command-V) from the Edit menu, or press the Paste button in the command bar, to replace the current
selection with a copy of the Clipboard contents, or to insert the contents of the Clipboard at the insertion point.!
" !
" !
When you paste Mariner Write text into another Mariner Write document, the text maintains the same paragraph formatting and text style when it was cut or copied. Text formatting may be lost when Mariner Write is pasted into another application’s document.!
Pasting Plain Text!
When you copy or cut text, both the characters and character styles are placed on the Clipboard. !
To ignore all text styling and paste plain text only: !
Pasting at the insertion point
After paste
Pasting into a selection
After paste
of 73 165
Page 74
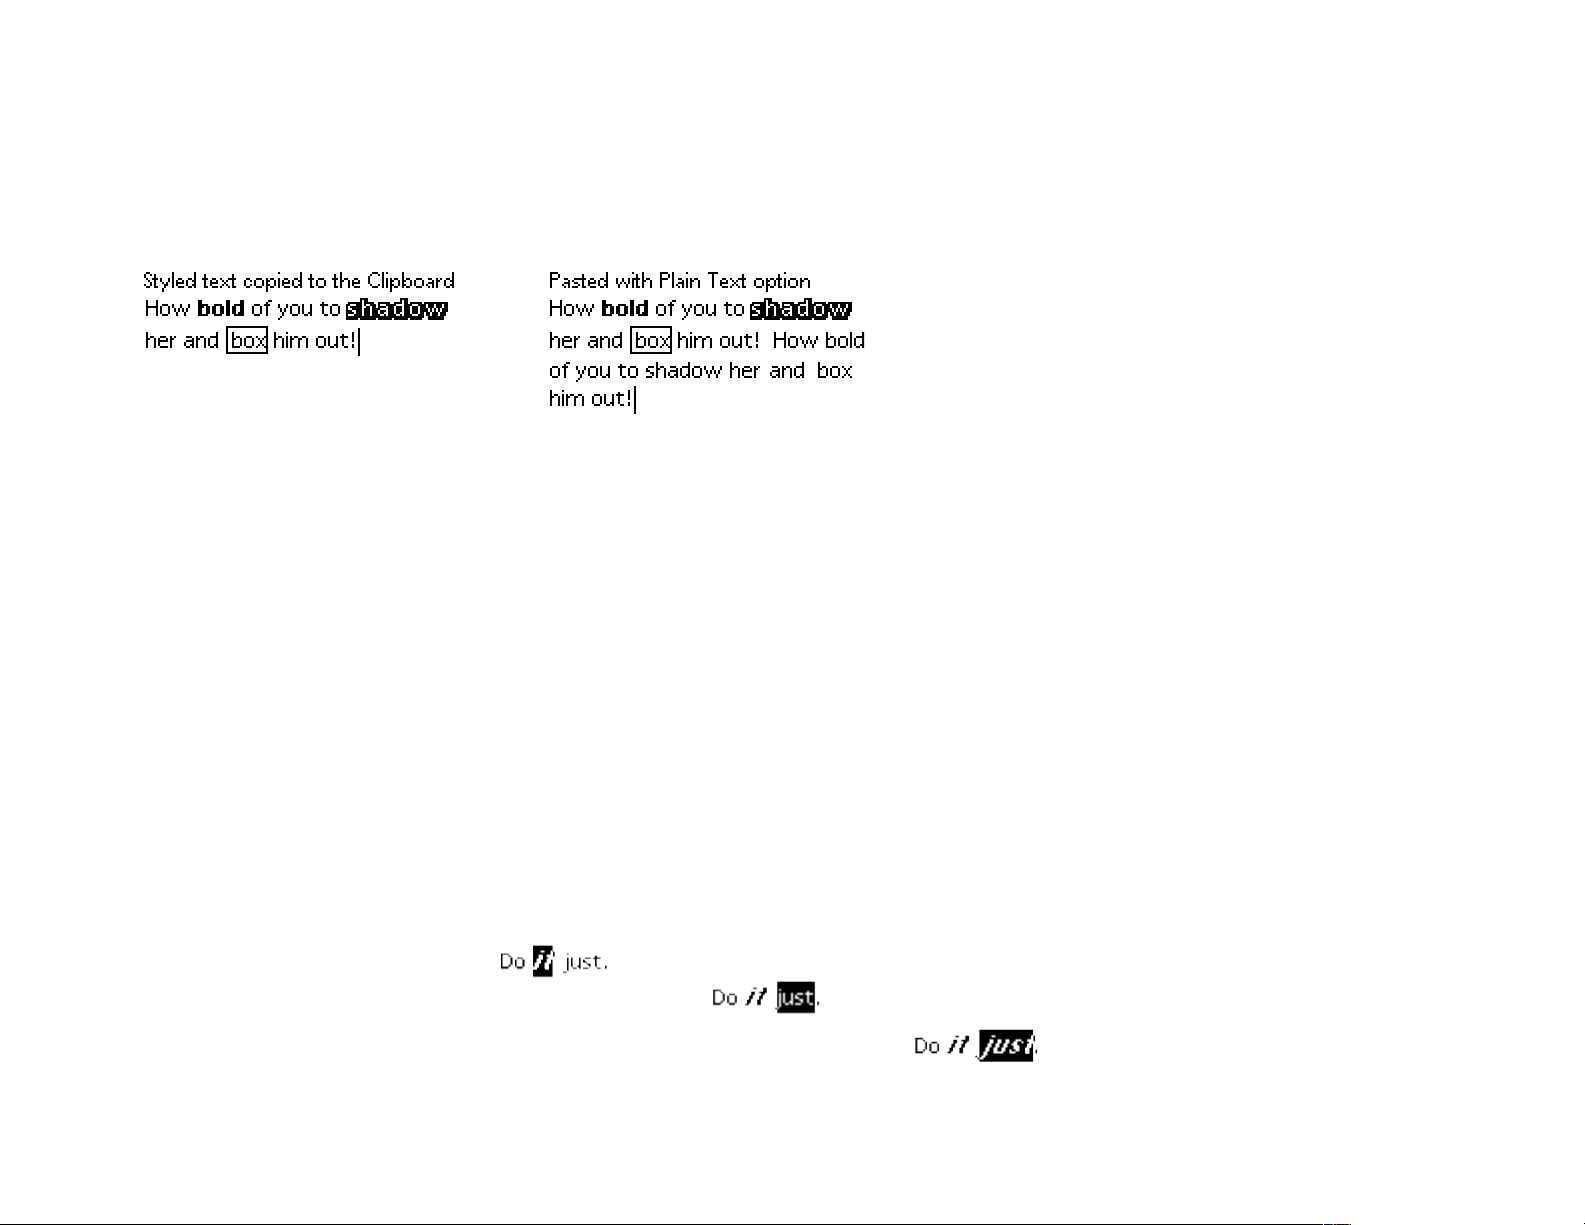
1 Choose Paste Special from the Edit menu.!
2 Select the Plain Text radio button in the dialog that appears.!
" !
Pasting Text Attributes!
When you copy or cut text, both the text characters and styles are copied to the Clipboard.!
To paste only the attributes of the Clipboard text:!
1 Select the text having the attributes you want to apply to another text selection. If a range of text is selected, only the
attributes of the first character in the selection is pasted.!
2 Choose Cut or Copy from the File menu, whichever is appropriate.!
3 Select the text to which you want to apply the attributes. If no text is selected, the attributes are applied to text entered
at the insertion point. !
4 Choose Paste Special from the Edit menu. Select the Attributes Only radio button.!
" !
Styled text selected
and copied
New text selection
Paste Special,
Apply Style option
of 74 165
Page 75
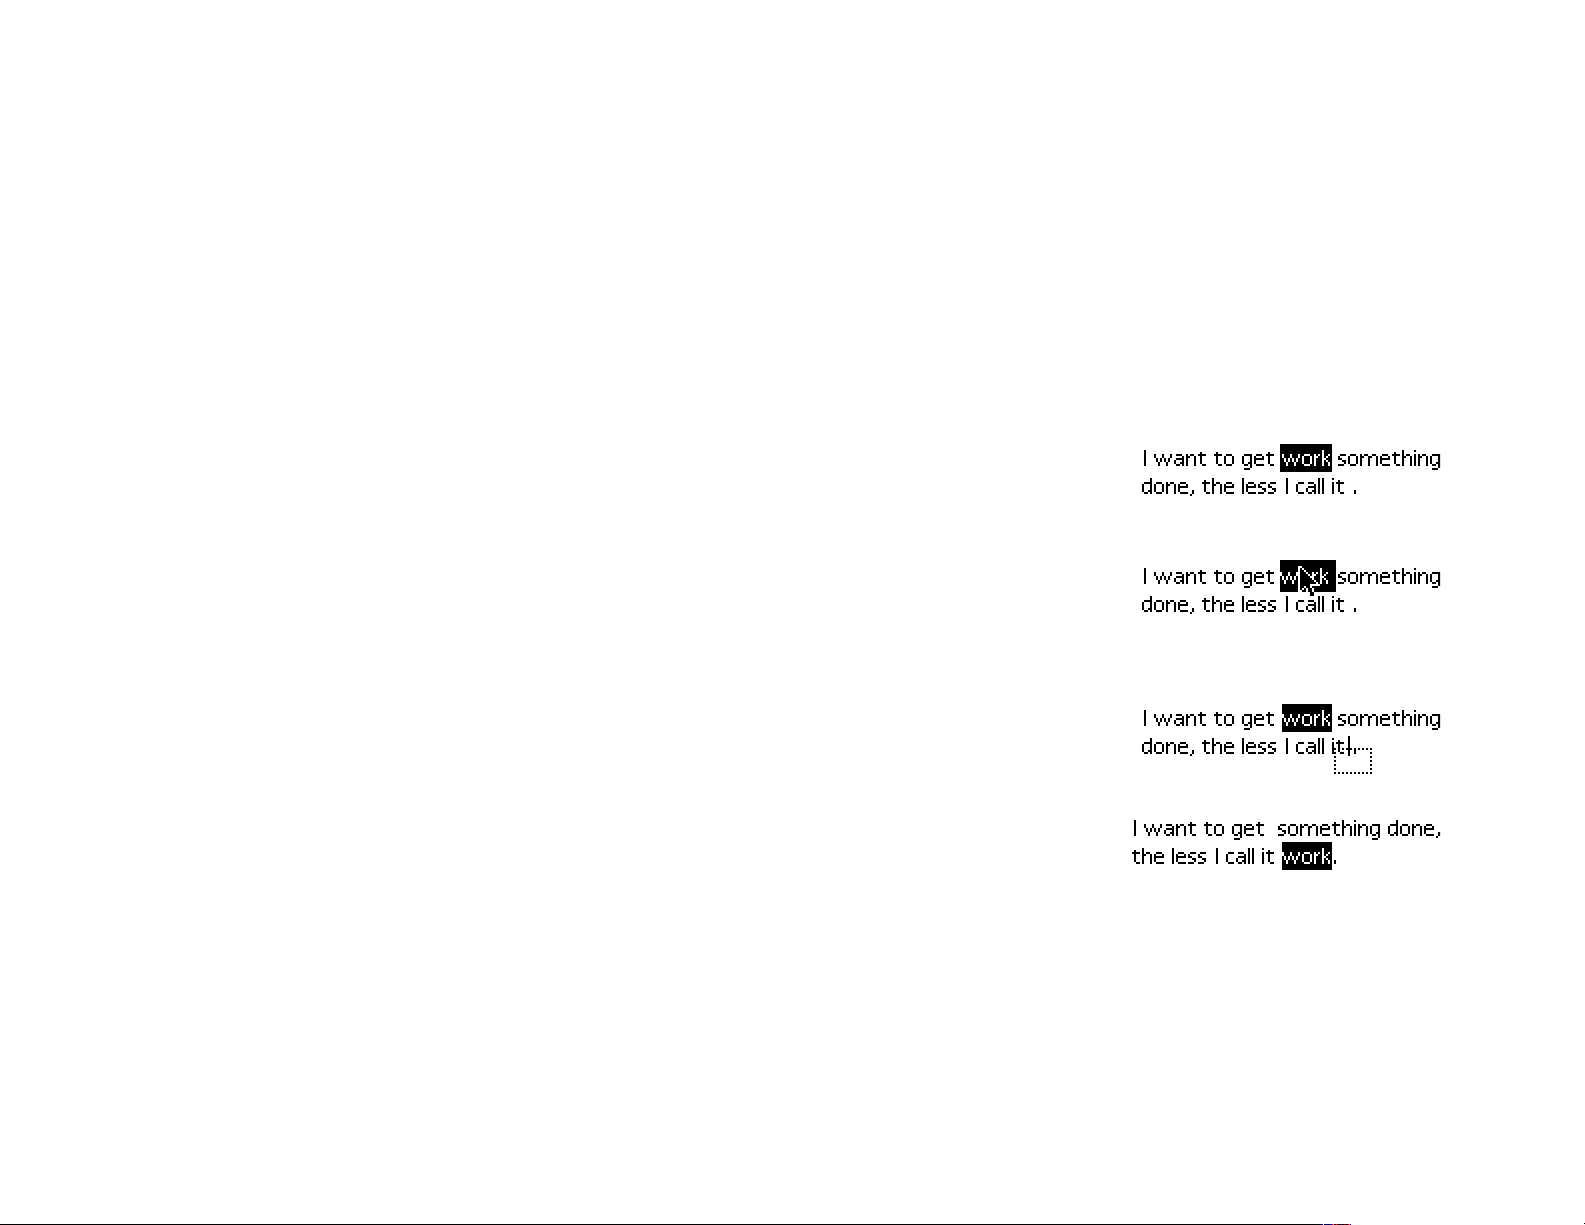
Drag and Drop!
You can Drag and Drop text instead of cutting, copying, and pasting.!
To activate Drag and Drop, select Drag and Drop in the Application Preferences dialog. To display the Application Preferences dialog, choose Options from the Preferences sub-menu. The Preferences sub-menu is located in the File menu.!
To move text using Drag and Drop:!
1 Select the text you want to move.!
!
2 Position the cursor over the text selection.!
!
3 Drag the text to the new location. As you drag, the text insertion point marks where the
text will be inserted when you release the mouse. !
!
4 Release the mouse button.!
!
To copy text using Drag and Drop, follow the same steps as above while holding down the
Option key.!
You can also Drag and Drop text between Mariner Write windows – even from an inactive to an active window.$
of 75 165
Page 76
Desktop Drag & Drop!
Want to easily insert a text file or graphic into a document? Just drag the icon into the document window from the Finder
to insert the item at the insertion point.!
To drag-insert a graphic as an object, hold the command key while you drag the graphic icon into the document window.!
Undo!
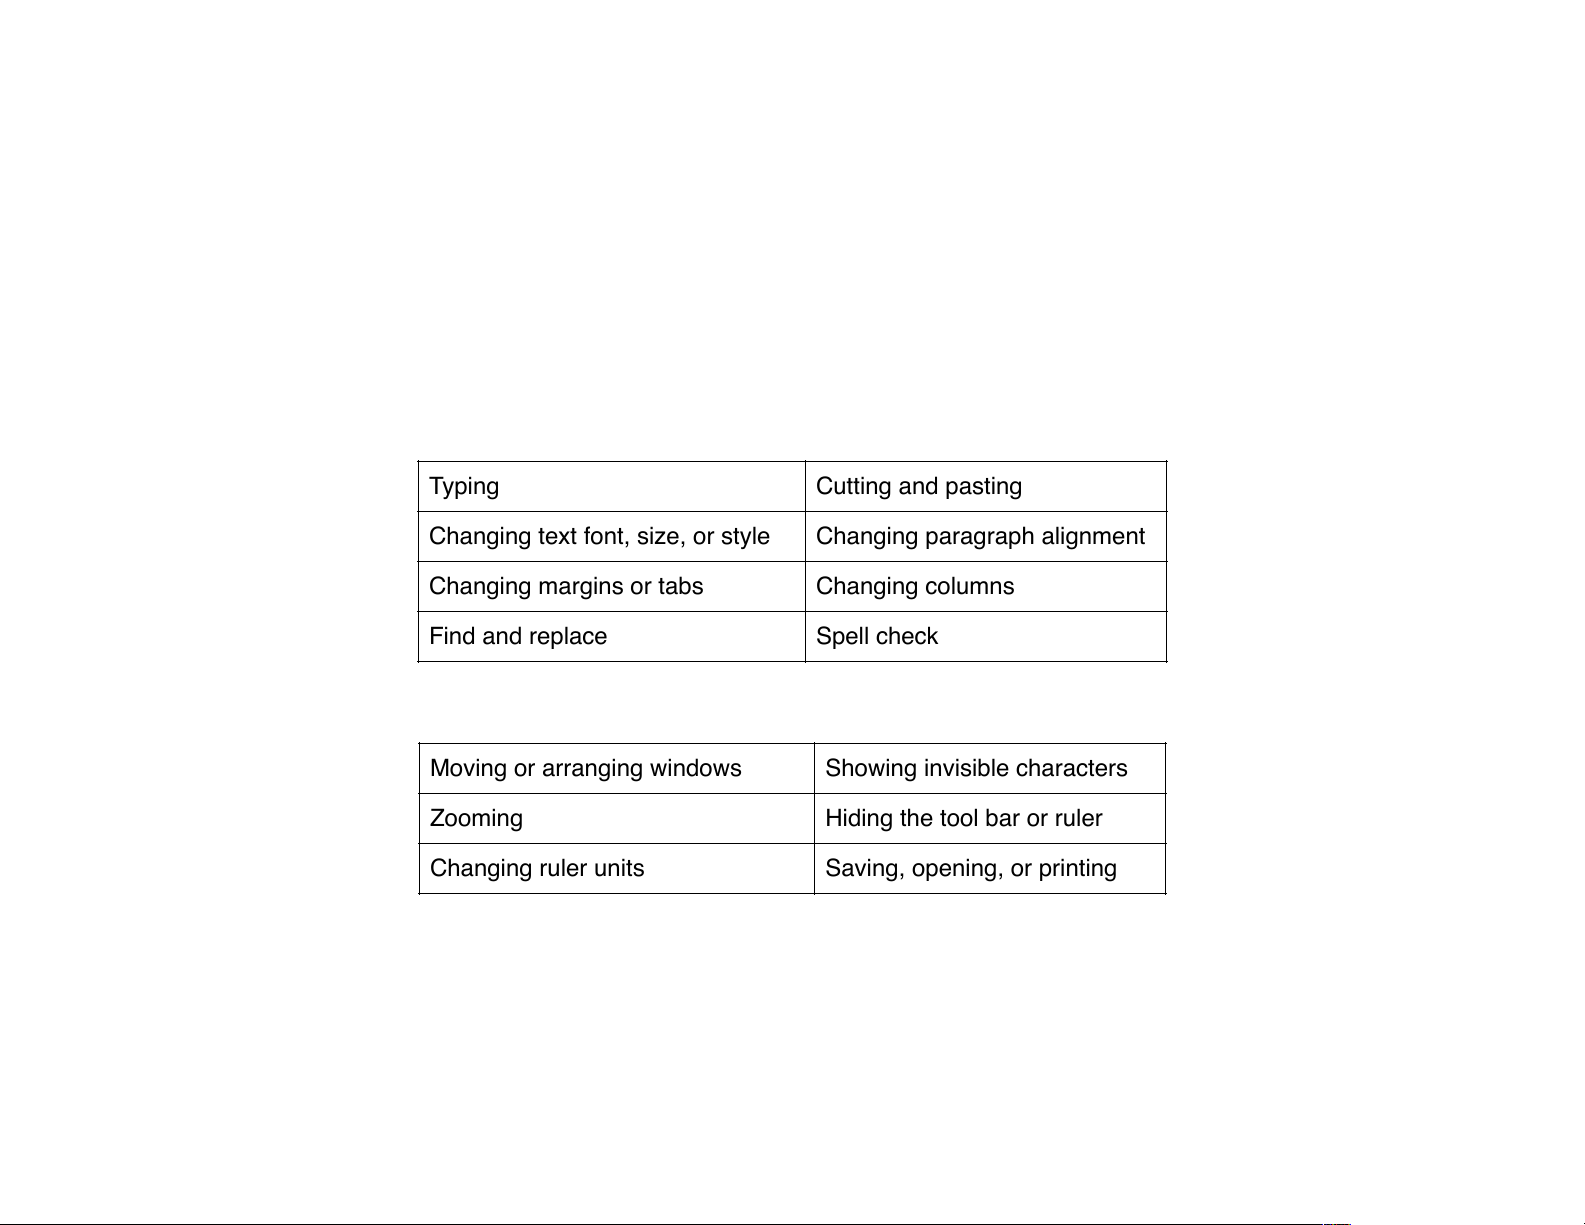
The Undo command reverses the last action that changed the document contents or formatting. !
Some of the actions you can undo include:!
Examples of actions you can’t undo include: !
To undo an action, choose Undo (Command-Z) from the Edit menu or click the Undo button in the tool bar.!
You can change the number of actions you can undo, up to ten, by choosing Options from the Preferences sub-menu. The
Preferences sub-menu is located in the File menu.!
Typing
Cutting and pasting
Changing text font, size, or style
Changing paragraph alignment
Changing margins or tabs
Changing columns
Find and replace
Spell check
Moving or arranging windows
Showing invisible characters
Zooming
Hiding the tool bar or ruler
Changing ruler units
Saving, opening, or printing
of 76 165
Page 77
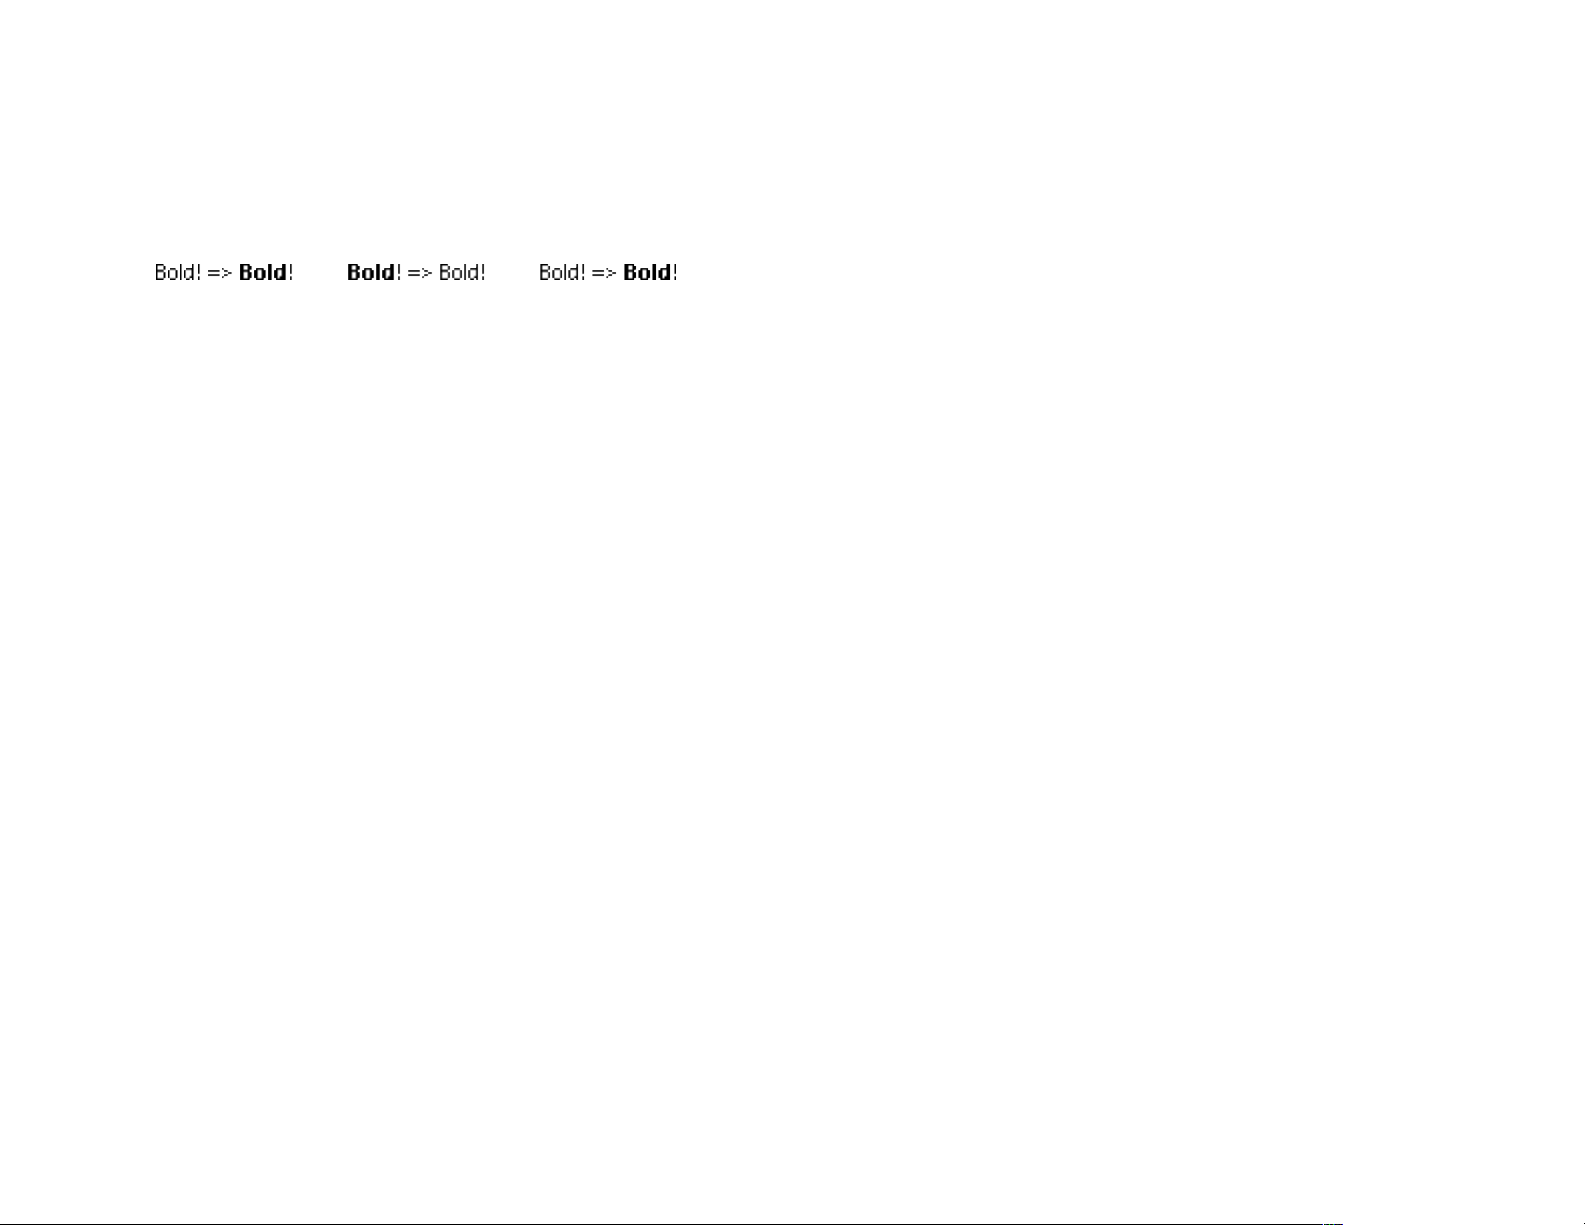
If you find that you preferred how the document looked before you selected the Undo command, choose Redo (Command-Y) from the Edit menu or click the Redo button in the tool bar.!
!
Inserting Dates and Times!
The Date/Time command lets you easily insert the current date or time, as editable text or as an updating field, in your
document.!
To insert the date or time:!
1 Position the insertion point where you want to insert the date or time.!
2 Select Date/Time from the Insert menu.!
3 Select the Date or Time radio button and the format of the date or time from the pop-up menu.!
4 Select either the Text or Updating Field radio button.!
The Updating Field option inserts the date or time as a non-editable field. While the field appears as a string of text, it behaves as though it were a single character. Each time you open your document, the field updates to the current date or
time. !
The Text option inserts the current date or time as editable text using the current style. Dates and times inserted as text
don’t update when the document is re-opened.!
Note: some date formats may be duplicated, the bottom 3 examples in the pop-up menu follow the Date & Time control panel settings. Mariner Write may offer a duplicate in an unchanging format above."
Make a word bold
Undo
Redo
of 77 165
Page 78

Inserting Page Numbers!
For simple repeating page numbers, see Document Options (page 61).!
The Page Number command in the Insert menu pastes the current page number, or number of document pages, as a
non-editable field. The field automatically updates if moved to a different page or if the number of pages change. Enter the
page number field in a header or footer to display it on all pages.!
Most often, Page Numbers are inserted into a header or footer so that they may automatically repeat on each page.!
To insert a page number or total pages field:!
1 Create a header or Footer for your document, select Format>Header/Footer... from the menu.!
2 Choose Page Number from the Insert menu.!
3 Choose page number, or total pages, in Arabic or Roman styles from the Format pop-up menu.!
! Arabic (1, 2, 3,…9, 10,…)!
! Lowercase Roman (i, ii, iii,…x, xi,…)!
! UPPERCASE Roman (I, II, III,…X, XI,…)!
! If your document contains a cover page, table of contents, or other pages preceding the main text, you may want
your page number fields to begin with a different value.!
To assign a custom page number:!
1. Choose Page Setup from the File menu.!
2. Enter an integer in the Starting Page Number field.!
The custom page number starts with the first occurrence of a page number field.!
of 78 165
Page 79
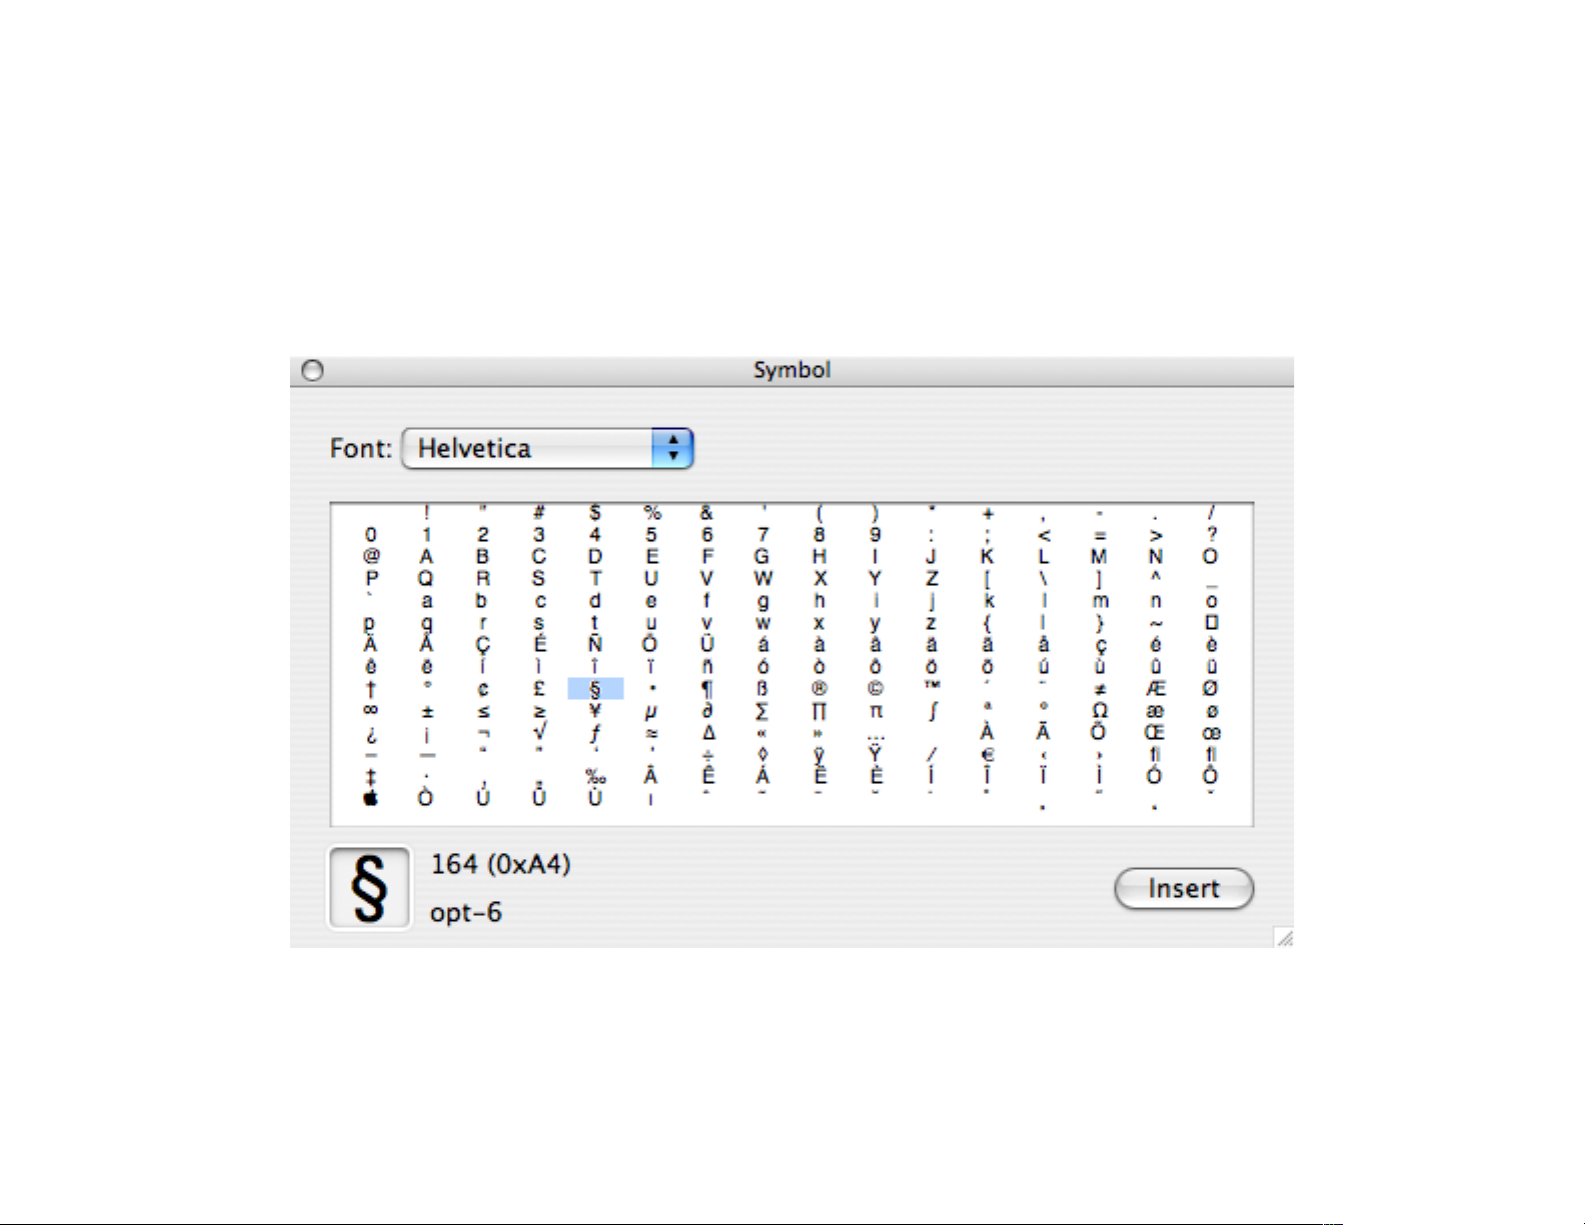
Inserting Symbols!
Use the Symbol command to display all the keyboard characters of the current font. The Symbol command is located in
the Insert menu.!
•
Select a character in the Insert Symbol dialog by clicking on it. The selection is displayed in large scale in the lower left
corner of the dialog.!
" !
•
Click the Insert button to input the selected character into the current document.!
•
Click on the Done button to exit the dialog.$
of 79 165
Page 80
Headers and Footers!
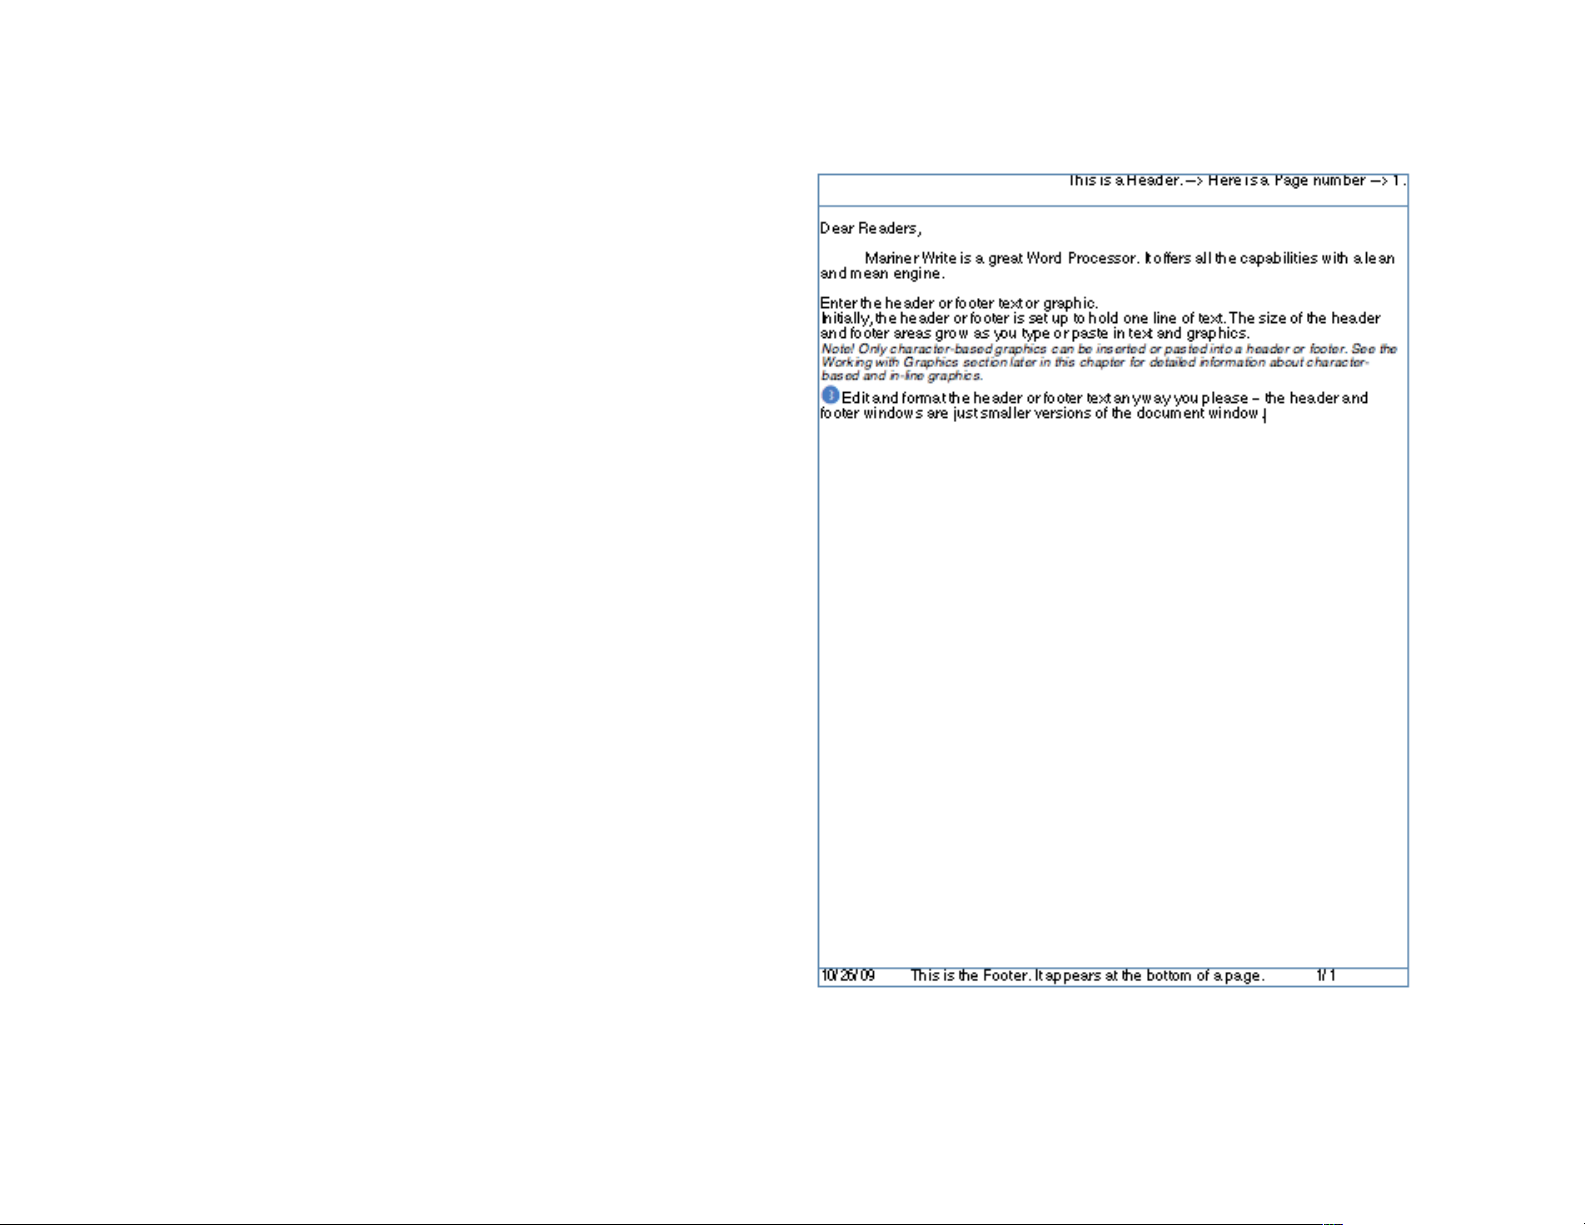
A header contains text or graphics you want to repeat at the
top of each page, such as a document title. A footer contains text or graphics you want to position at the bottom of
each page, such as the page number, Date or Time. Some
fields added can be static text or can update each time you
open the document.!
There are several types/options for headers. !
!
Main headers/footers will appear on all pages unless the
Different First Page or Different Left/Right options are applied.!
Left headers/footers appear on odd page numbers, right
headers/footers appear on even page numbers.!
Different First Page. Use this option to use a different
header/footer on the first page or to leave the first page
blank (no header/footer).$
of 80 165
Page 81
Creating a Header or Footer!
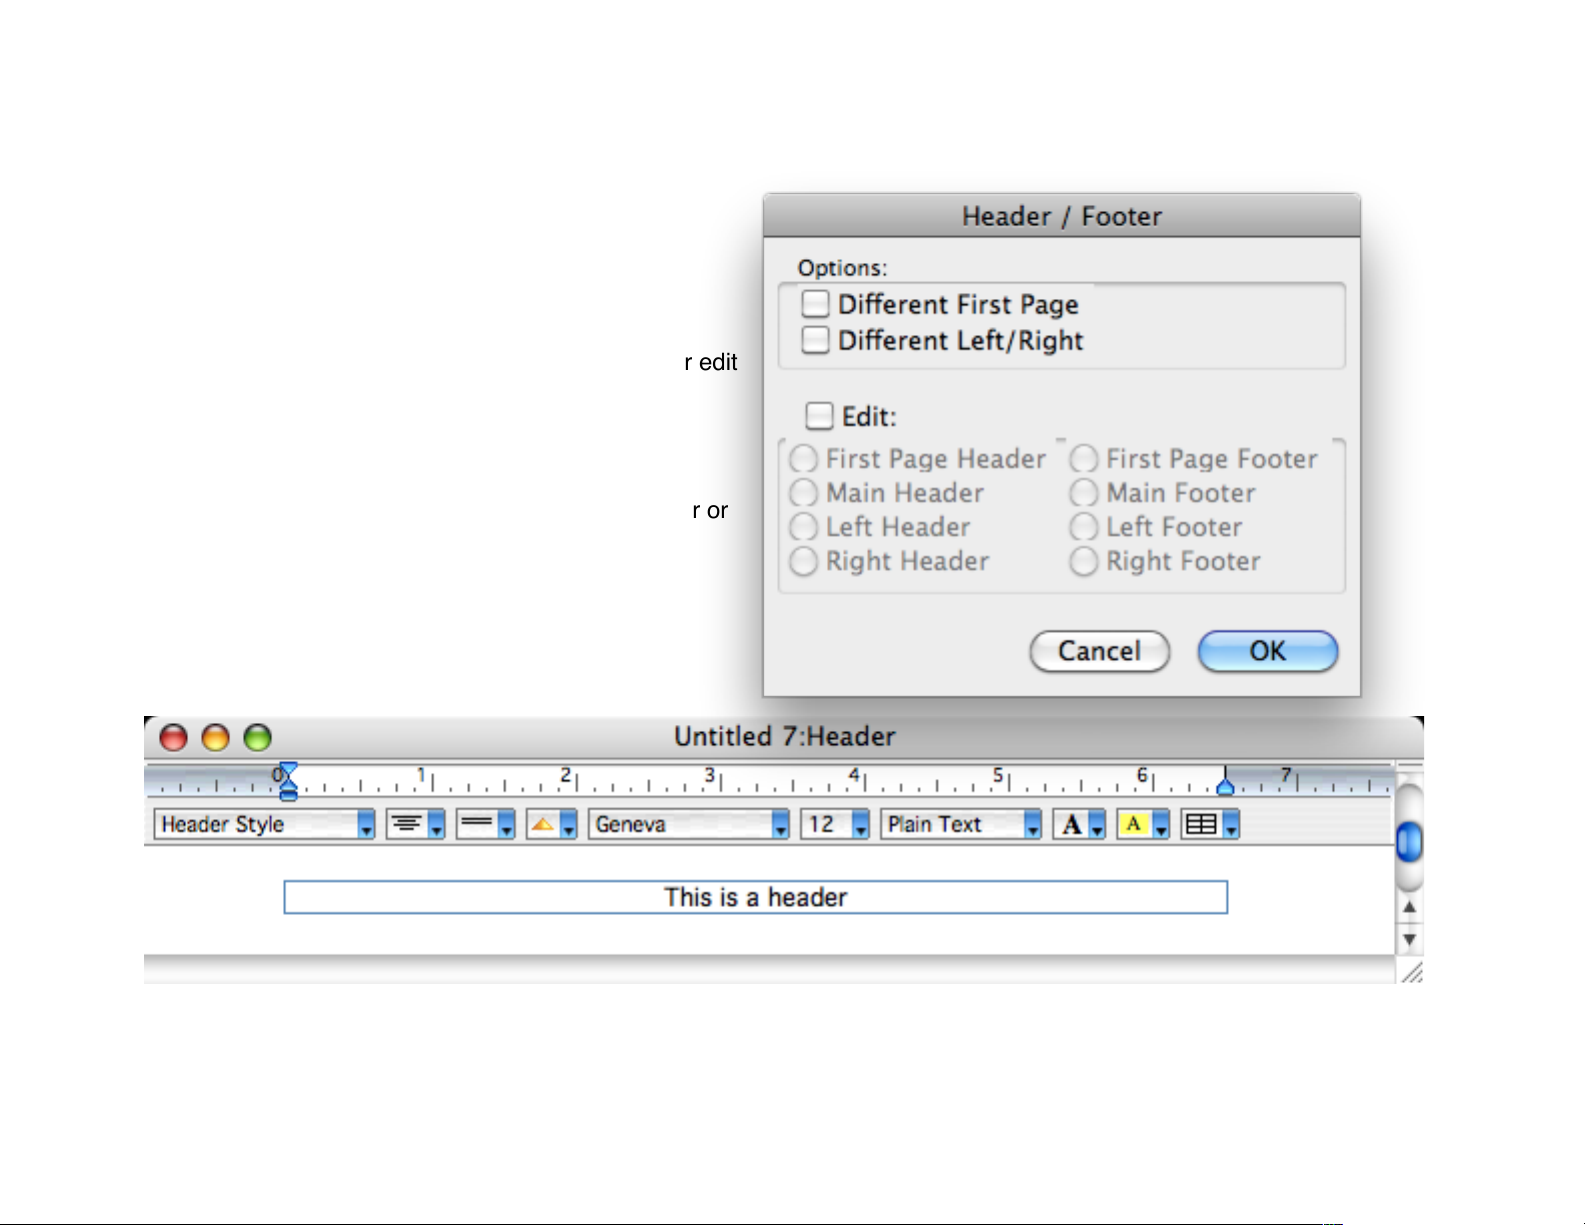
To insert a header or footer:!
1 Select Headers/Footers from the Format menu.!
A dialog appears.!
2 Choose the Header/Footer you wish to create or edit
from the Dialog.!
3 Click OK!
A separate window, titled <document name>:Header or
<document name>:Footer is displayed.!
" !
!
of 81 165
Page 82

4 Enter the header or footer text or graphic.!
Initially, the header or footer is set up to hold one line of text. The size of the header and footer areas grow as you type or
paste in text and graphics.!
Note: Only inline graphics can be inserted or pasted into a header or footer. See the Working with Graphics section later in this chapter for detailed information about object-and inline graphics."
5 Edit and format the header or footer text any way you please – the header and footer windows are just smaller ver-
sions of the document window.!
Note: You can insert the current date or time or page number by choosing Insert Date/Time or Insert Page Number from the Format
menu."
6 Close the header or footer window.!
The header and footer text appear at the top or bottom of each document page.!
Editing a Header or Footer!
To change a header or footer, double-click the respective header or footer area or select Headers/Footers from the Format
menu.. Changes are not visible until the header or footer window is closed.!
Deleting a Header or Footer!
To remove a header or footer, choose Delete Headers/Footers from the Format menu."
of 82 165
Page 83
Footnotes and Endnotes!
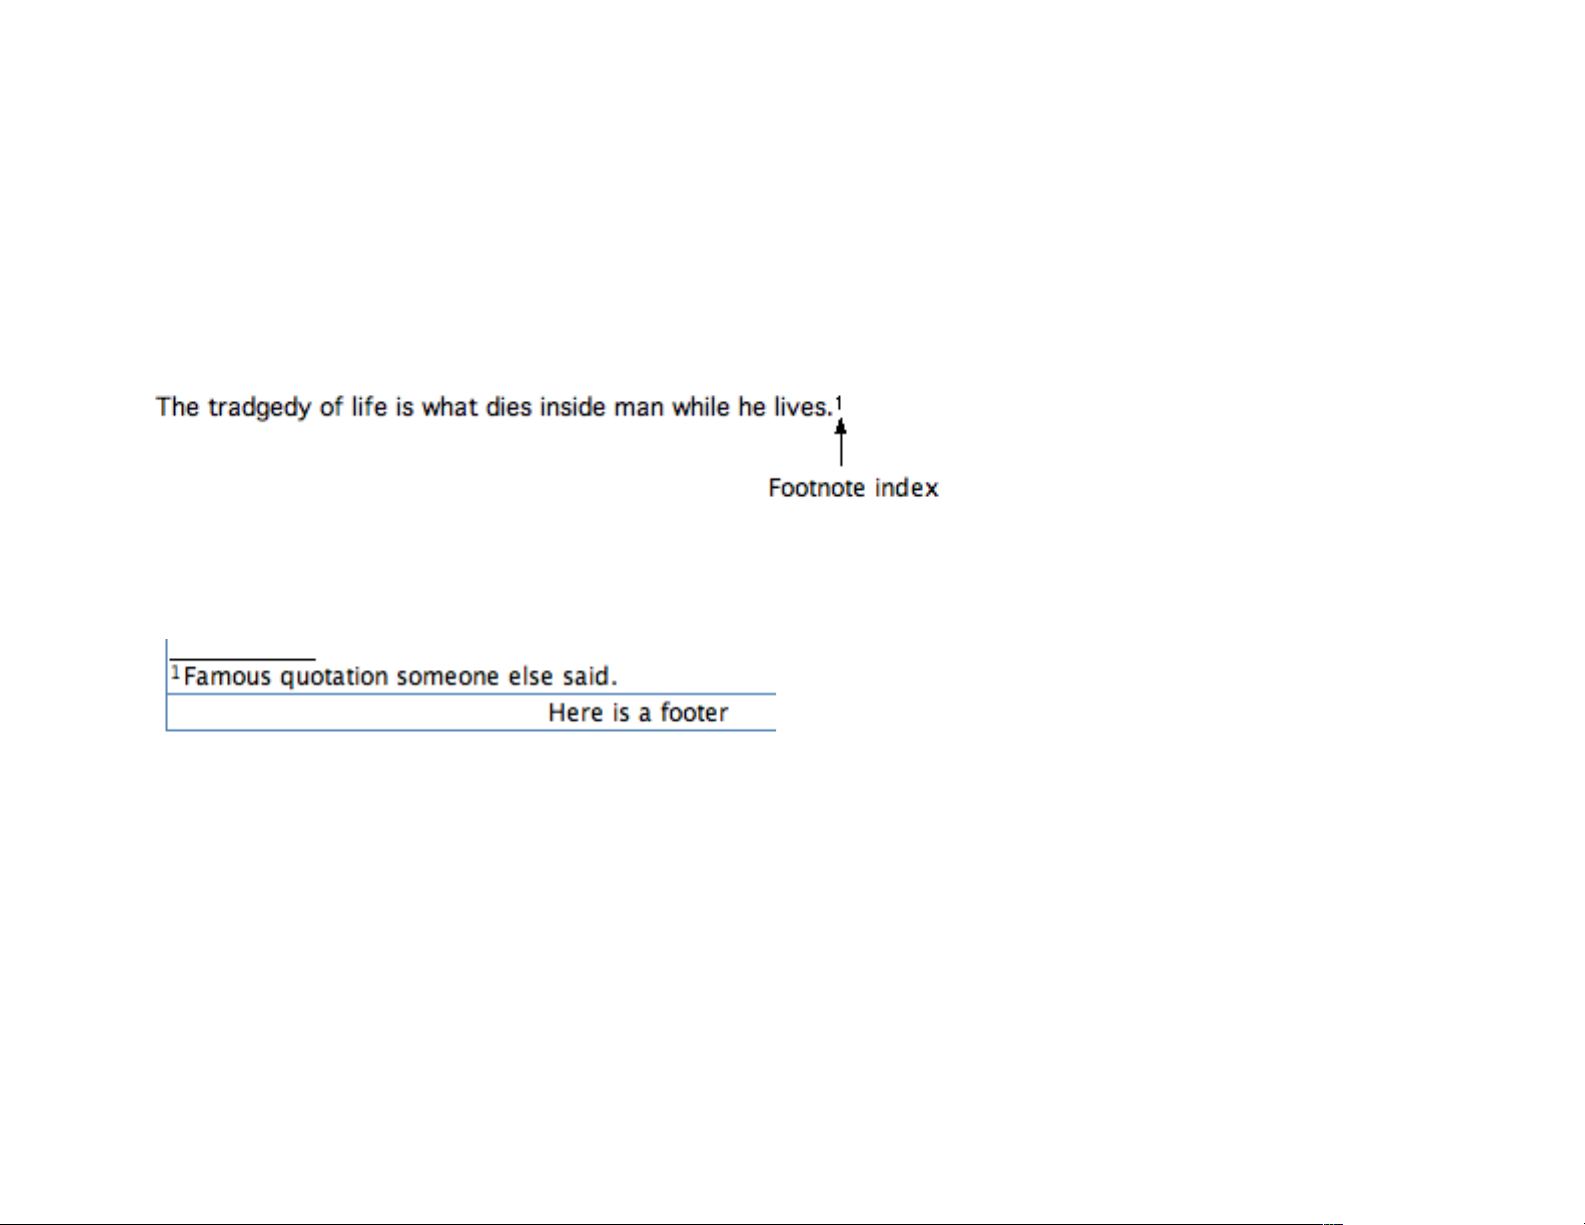
Footnotes and endnotes are numbered references providing an easy way to cite information sources within your document. !
Each footnote has two parts: the index and the content. The index, the actual footnote number, is inserted in the main
body text. The text style of the index is the text style at the insertion point plus the Superior text style. The Superior text
style raises the footnote index above the body text.!
!
The content of the footnote is positioned at the bottom of the page and separated from the body text by a short horizontal
line. Mariner Write will always try to position the footnote content on the same page as the index. As a result, pages may
repaginate as you add information to the footnote.!
!
Endnotes are positioned at the end of the document. Footnotes and endnotes are numbered separately, different number
styles can be specified in the Document Options dialog.!
To insert a footnote:!
1 Position the cursor where you want to insert a footnote.!
2 Select Insert Footnote from the Insert menu.!
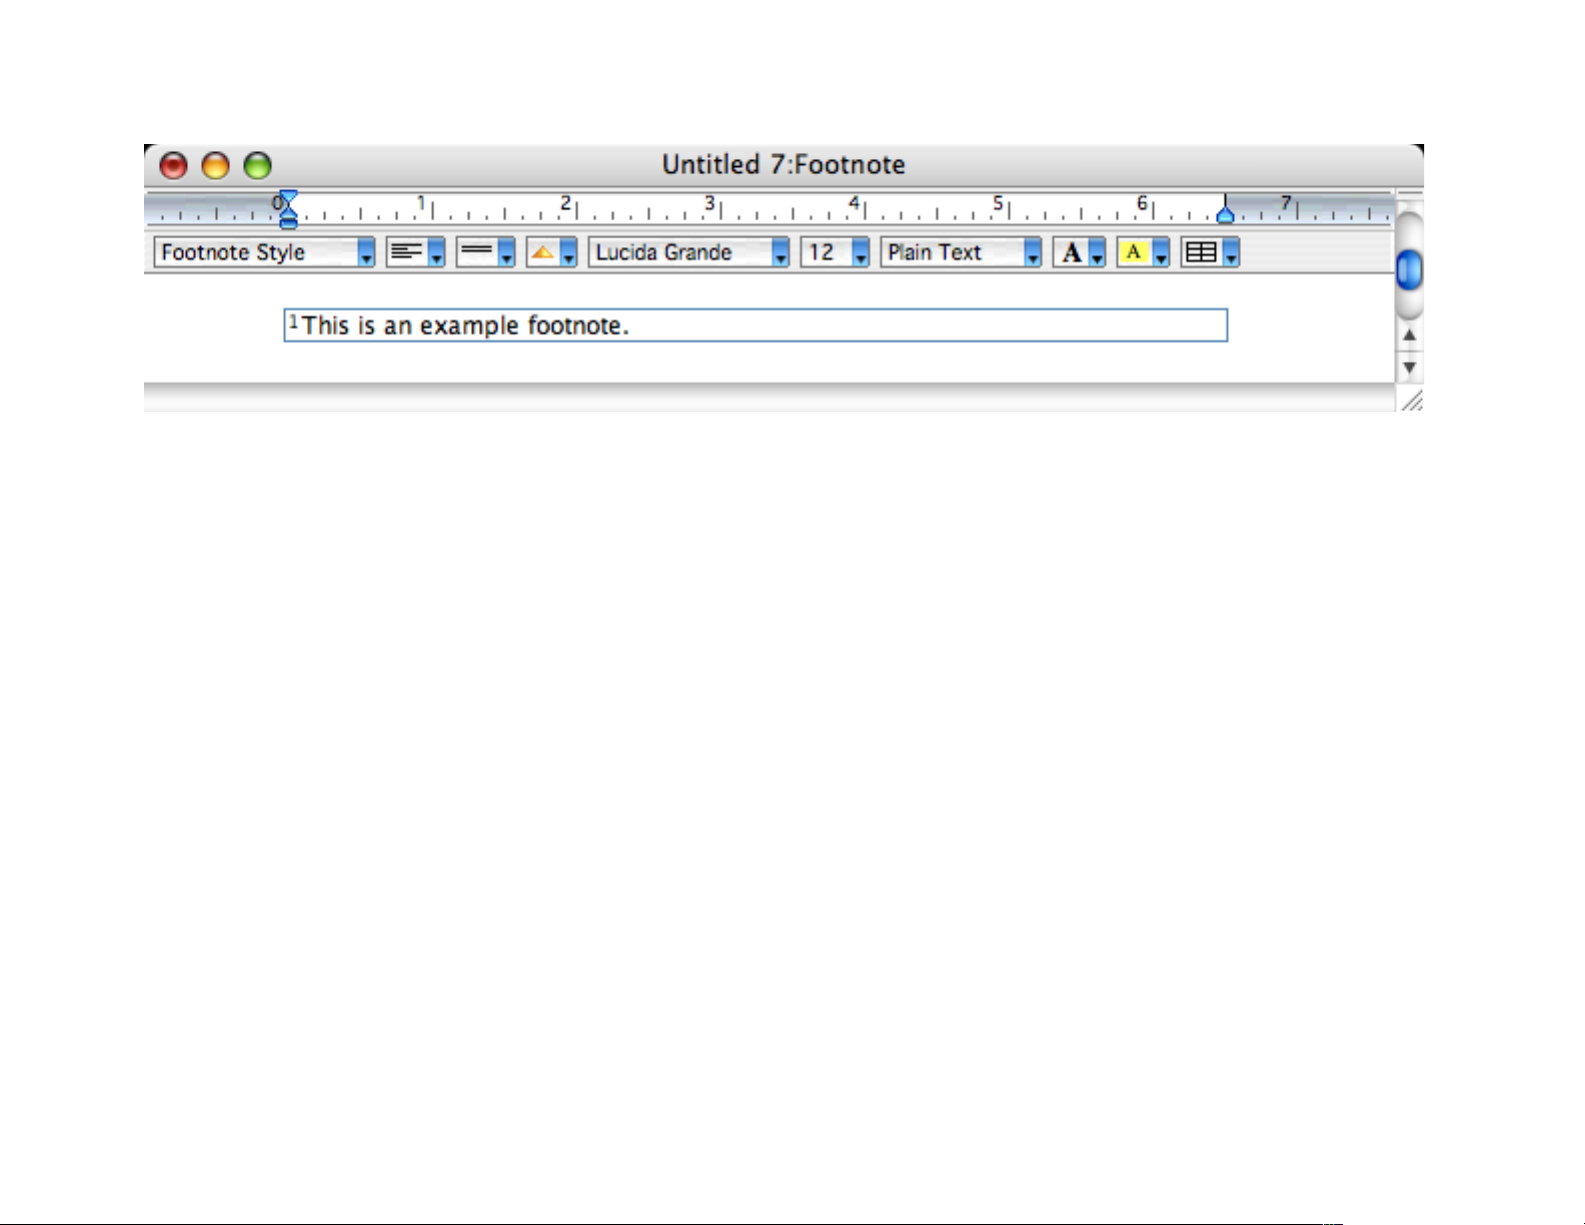
! A separate window, titled <document name>:Footnote, is displayed.!
of 83 165
Page 84
!
3 Enter the footnote text or graphic.!
" The default text style for footnotes is single-spaced, plain, 9-point Geneva text."
Note: Only character-based graphics can be inserted or pasted into a footnote. See the Working with Graphics section
earlier in this chapter for detailed information about character-based and object-based graphics.!
4 Edit and format the footnote text any way you please–the footnote window is a smaller version of the main document
window.!
5 Close the footnote window. !
Editing a Footnote or Endnote!
To change a note, double-click the content or the reference number within the document text. The edit window appears.
Changes are not visible until the edit window is closed.!
Deleting a Footnote or Endnote!
To remove the footnote content, but not the footnote index, open the footnote and delete the footnote text. To remove both
the footnote content and the footnote index, delete the footnote index.!
!
of 84 165
Page 85
Working with Graphics!
You can embellish documents with graphics by importing or pasting graphics into a document.!
Mariner Write can import PNG, PICT, EPS, JPEG, TIF, and GIF files as well as several other graphic formats.!
To import a graphic:!
•! Choose Insert File/Graphic from the Insert menu or, paste the graphic from the Clipboard.!
Select a file in the open dialog, a second dialog prompts you to insert the graphic as inline or as a floating object.!
Note: Only inline graphics can be pasted into header, footer, or footnote windows. As such, the Picture Paste dialog is ignored when
importing graphics into those windows."
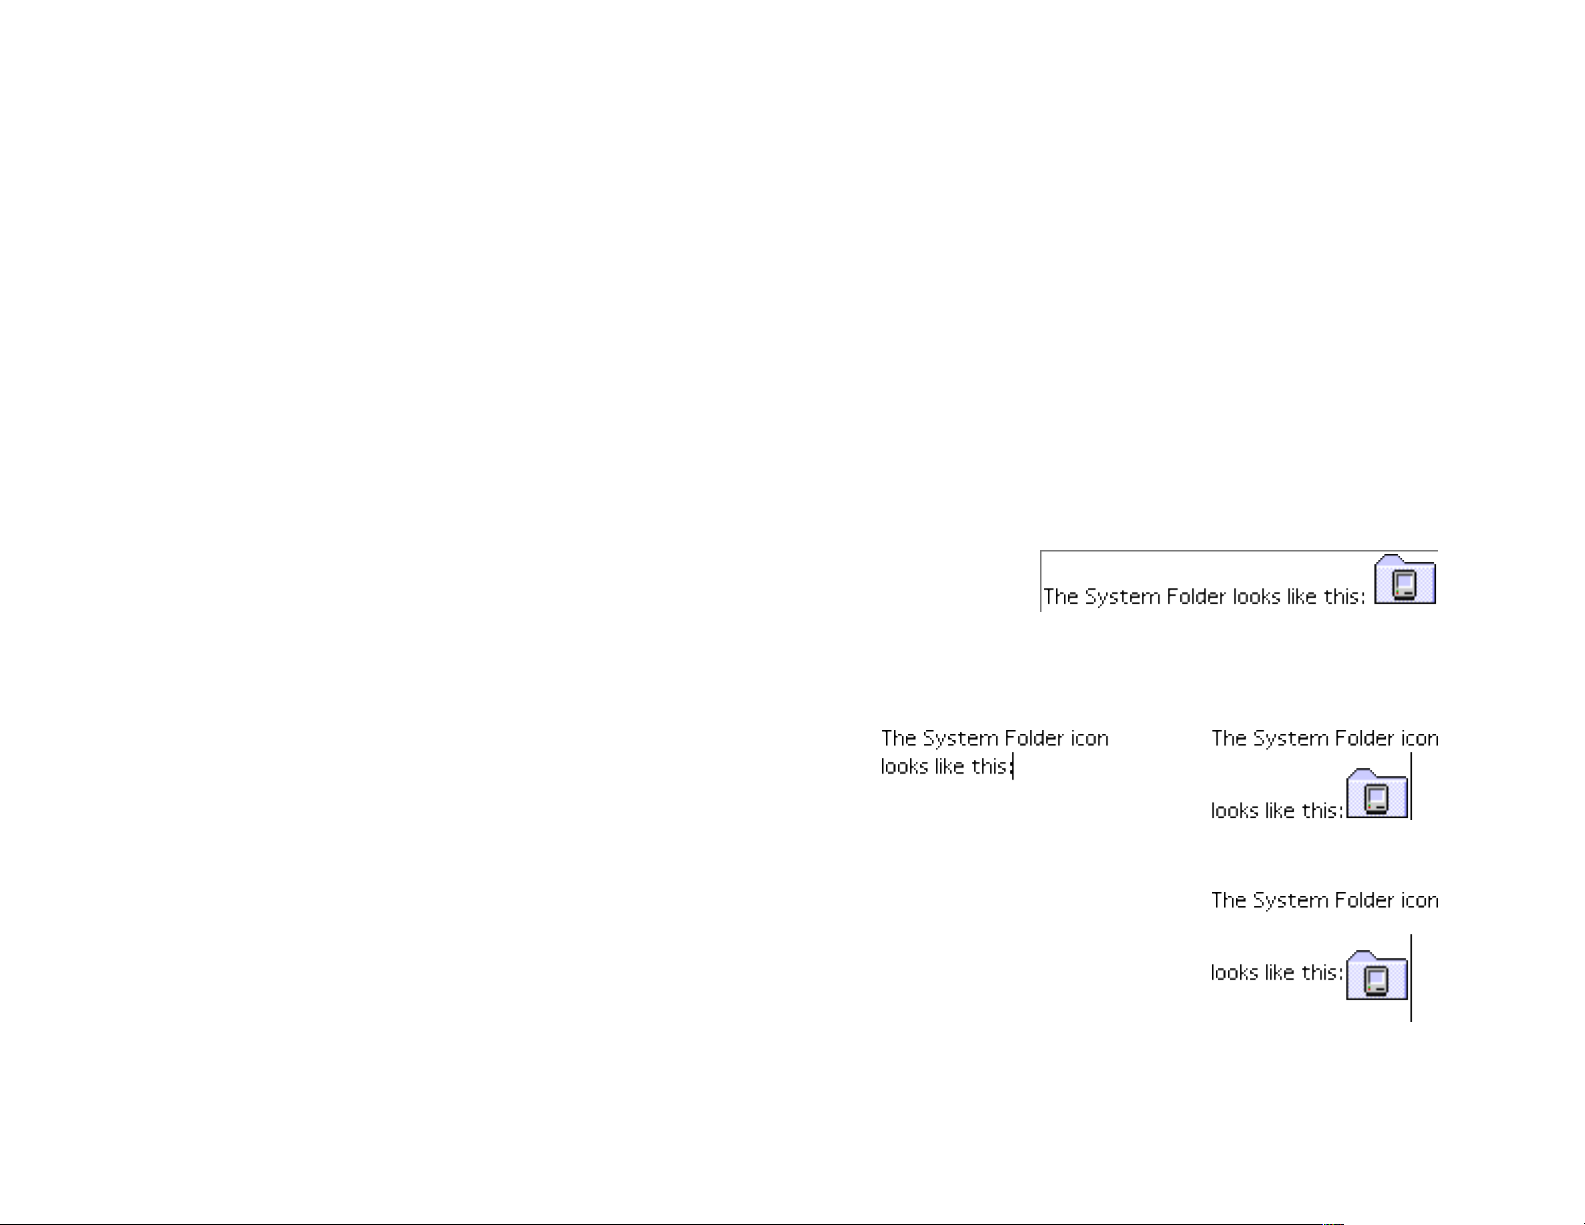
Inline Graphics!
Inline graphics are inserted anchored within text.!
The vertical distance between lines adjusts to accommodate an inline graphic just as it would a large sized character. !
To select an object graphic:!
•! Drag over it as you would a text character.!
•! Click it.!
You can raise or lower a PICT graphic by selecting superscript or subscript from the Style menu.!
If the character is wider than a page or column margin, the portion wider than the margin is hidden.$
of 85 165
Graphic inserted as a character
The distance between text baselines changes to
accomodate in-line graphics.
Subscripted graphic
Page 86
Object Graphics!
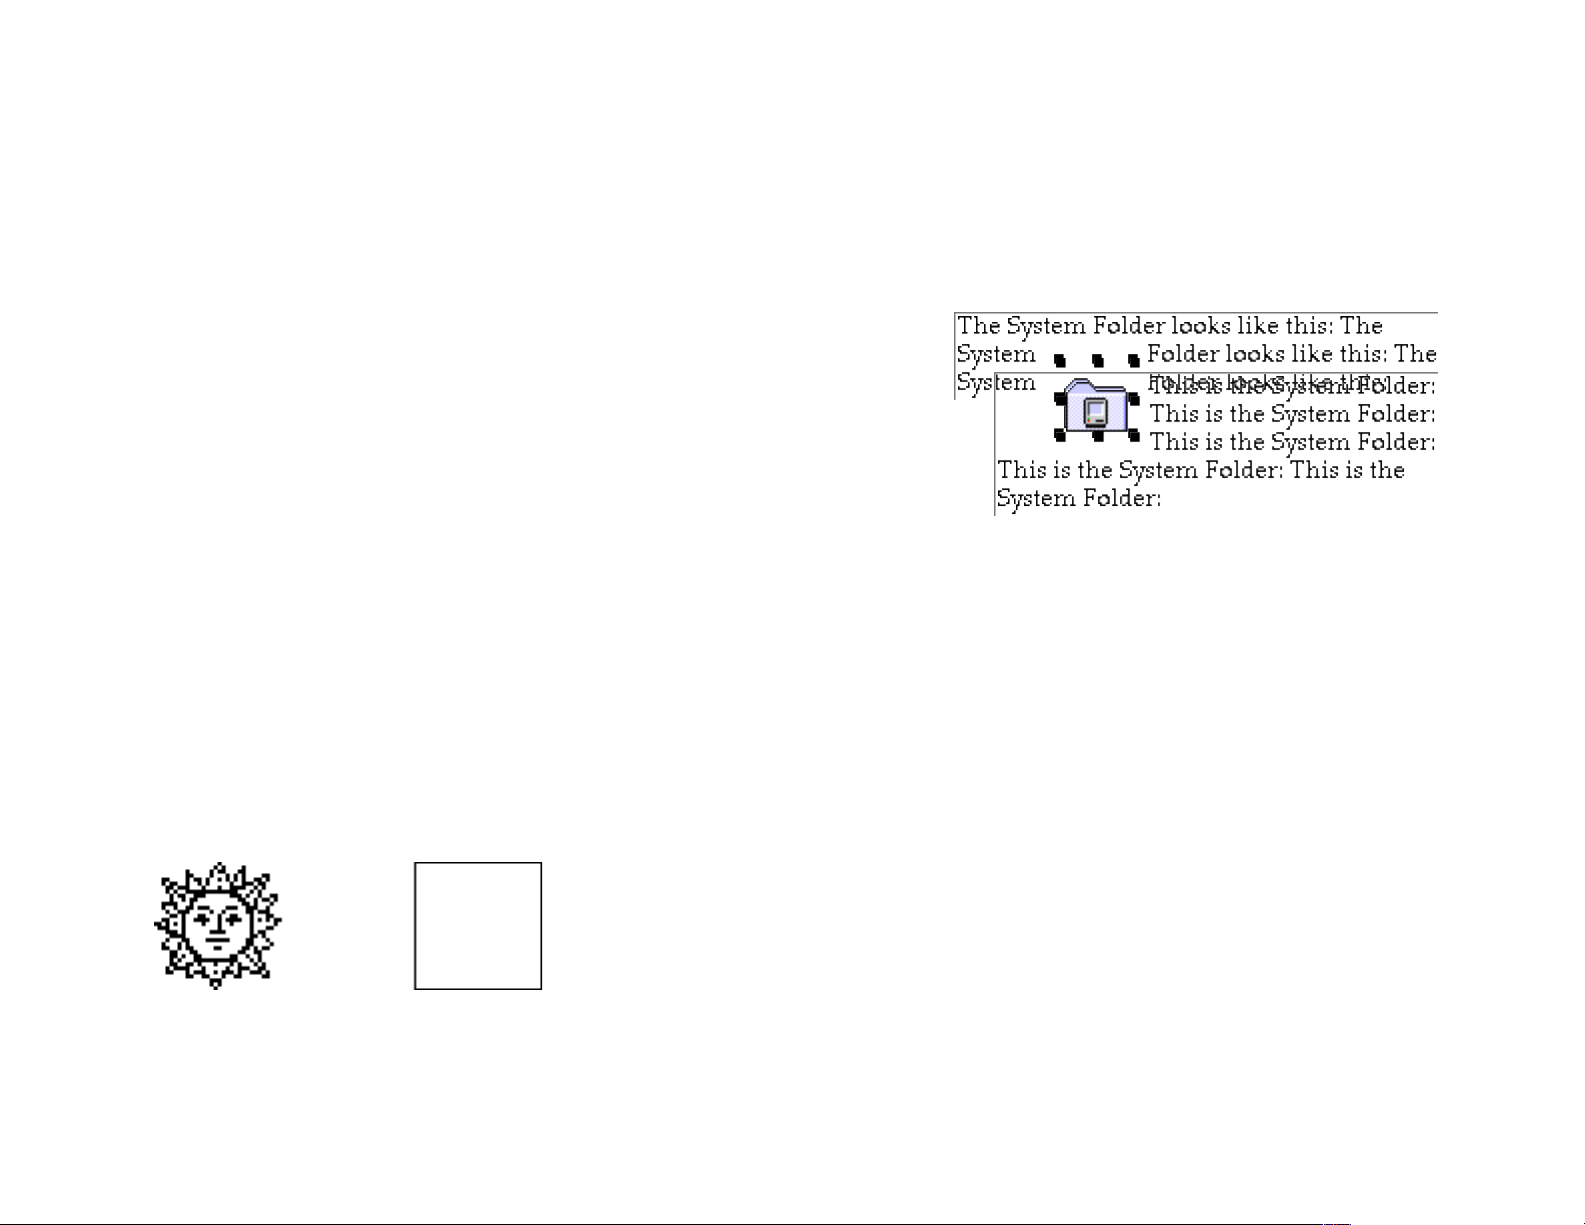
A graphic inserted as an object “floats” above the document text and cannot cover existing document text. Instead, document text automatically “wraps” around the graphic.!
You can drag an object outside the page margin, or across pages, to
create interesting text wrap effects.!
Click an object-based graphic to select it. Selecting a PICT object deselects document text. %
As a result, selecting a PICT object disables all text editing commands.!
Scaling Graphics!
To scale a graphic, select it so the selection handles are visible and either:!
Double-click the graphic to display the graphic scale dialog.!
-or-!
Interactively scale the object by dragging one of the eight selection handles.!
Showing/Hiding Graphics!
To hide graphics placed into the document as an object, choose Show Graphic from the Show|Hide menu. This may improve screen redraw speed if the graphic is large.!
" !
Graphics displayed
Hidden graphics
of 86 165
Text wraps around PICT objects
Page 87
Modify!
The Modify menu contains commands to
quickly clean up text.!
To modify text:!
1 Highlight the text you want to change. If
no text is highlighted, the commands are not available.!
! For detailed information on selecting text, see Chapter: Entering Text and Editing!
2 Choose the desired modify command from the Modify menu.!
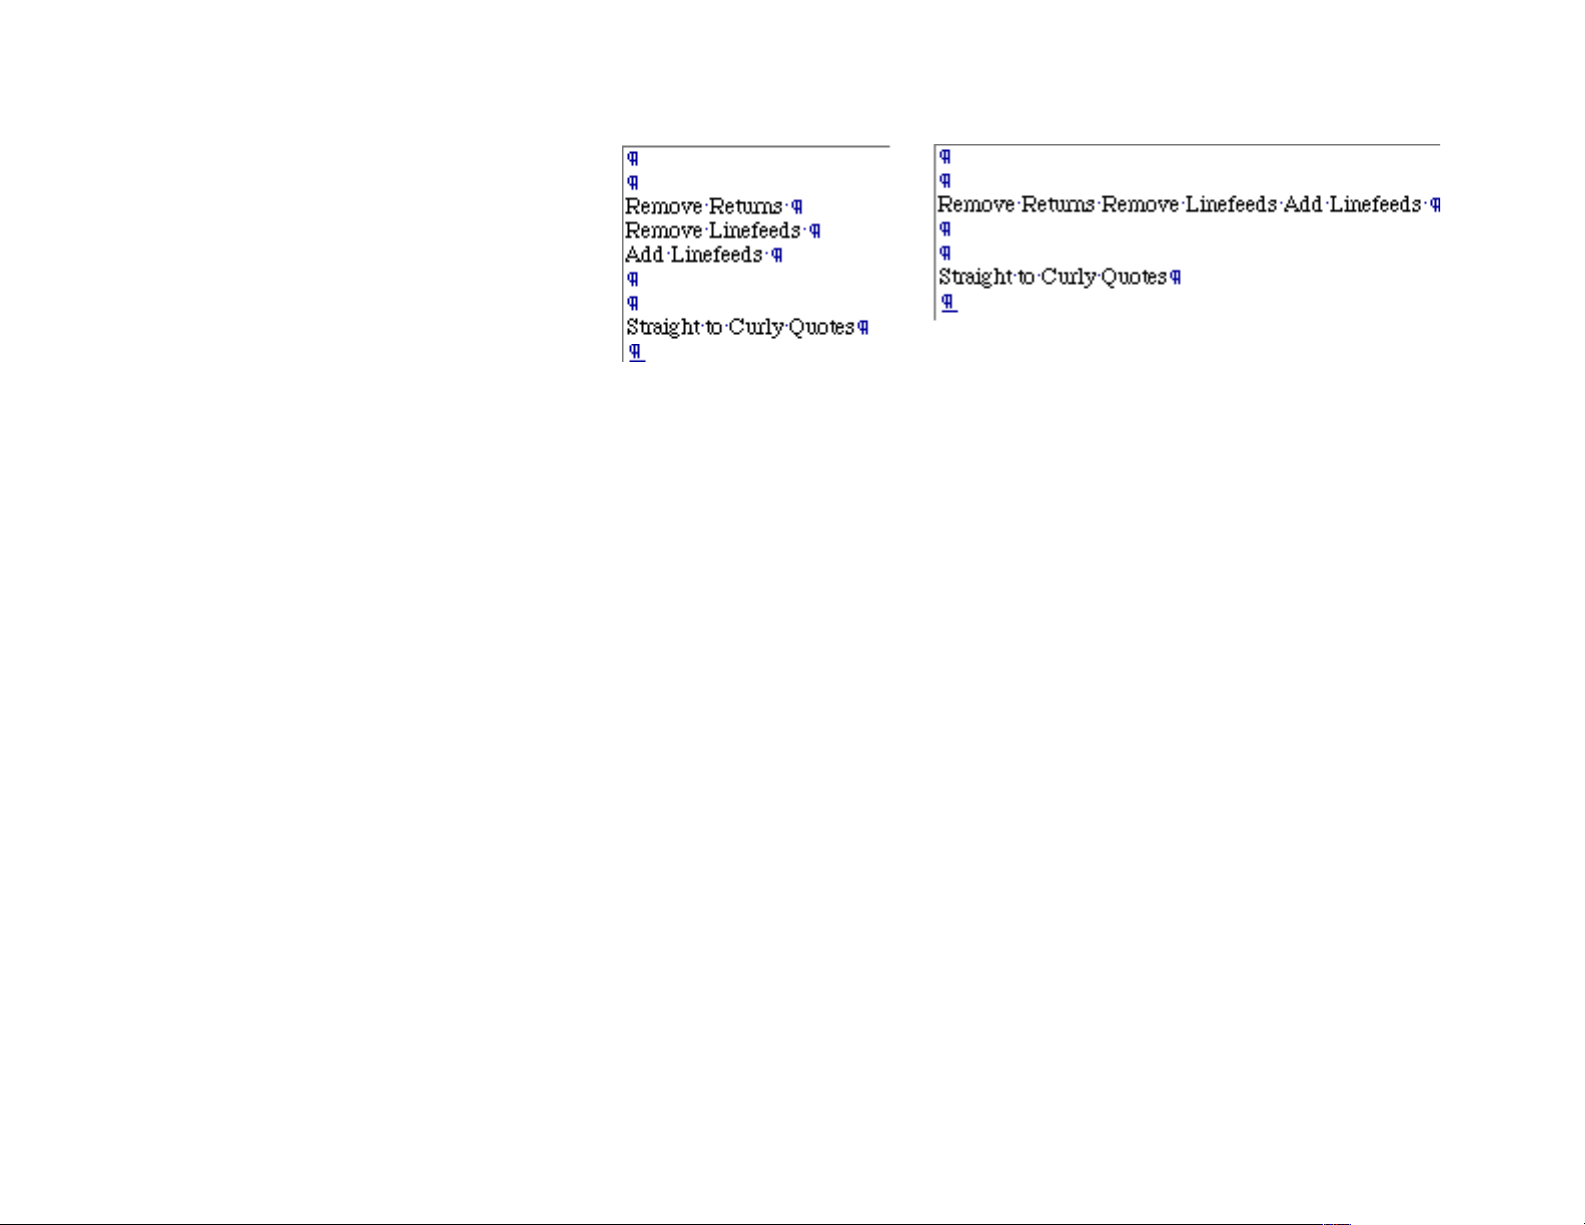
Form Paragraphs - Removes single return characters. Return characters runs are ignored.%
For example:!
Remove Returns - Removes all return characters.!
Remove Linefeeds - Removes all linefeed characters.!
Add Linefeeds - Adds a linefeed character after each return character.!
Straight to Curly Quotes - Changes straight quote characters to curly quotes.!
Curly to Straight Quotes - Changes curly quote characters to straight quotes.!
Space Runs to Space - Changes multiple space characters to a single space character.!
Space Runs to Tab - Changes multiple space characters to a single tab character.!
Spaces to Tab - Changes each space character to a tab character.!
Tabs to Spaces - Changes each tab character to a space character.$
of 87 165
Page 88

Change Case!
The Change Case menu contains commands to change the case of document text. Unlike the uppercase, lowercase and
small cap styles (see Chapter 4: Formatting), the actual document text is changed.!
To modify text case:!
1 Highlight the text you want to change. If no text is highlighted, the commands are not available.!
! For detailed information on selecting text, see Chapter 3, Selecting and Entering.!
2 Choose the desired modify command from the Change Case menu.!
Sentence Case - Capitalizes the first letter at the beginning of a sentence.!
Force Sentence Case - performs the lowercase command, then the Sentence Case command.!
UPPERCASE - forces text to CAPITAL letters.!
lowercase - forces text to small or lowercase letters.!
Title Case - Capitalizes the first letter of each word.!
Force Title Case - performs the lowercase command, then the Title Case command.!
Toggle Case - reverses each characters case, for example “Toggle Case” becomes “tOGGLE cASE”.$
of 88 165
Page 89
Working with Hyperlinks!
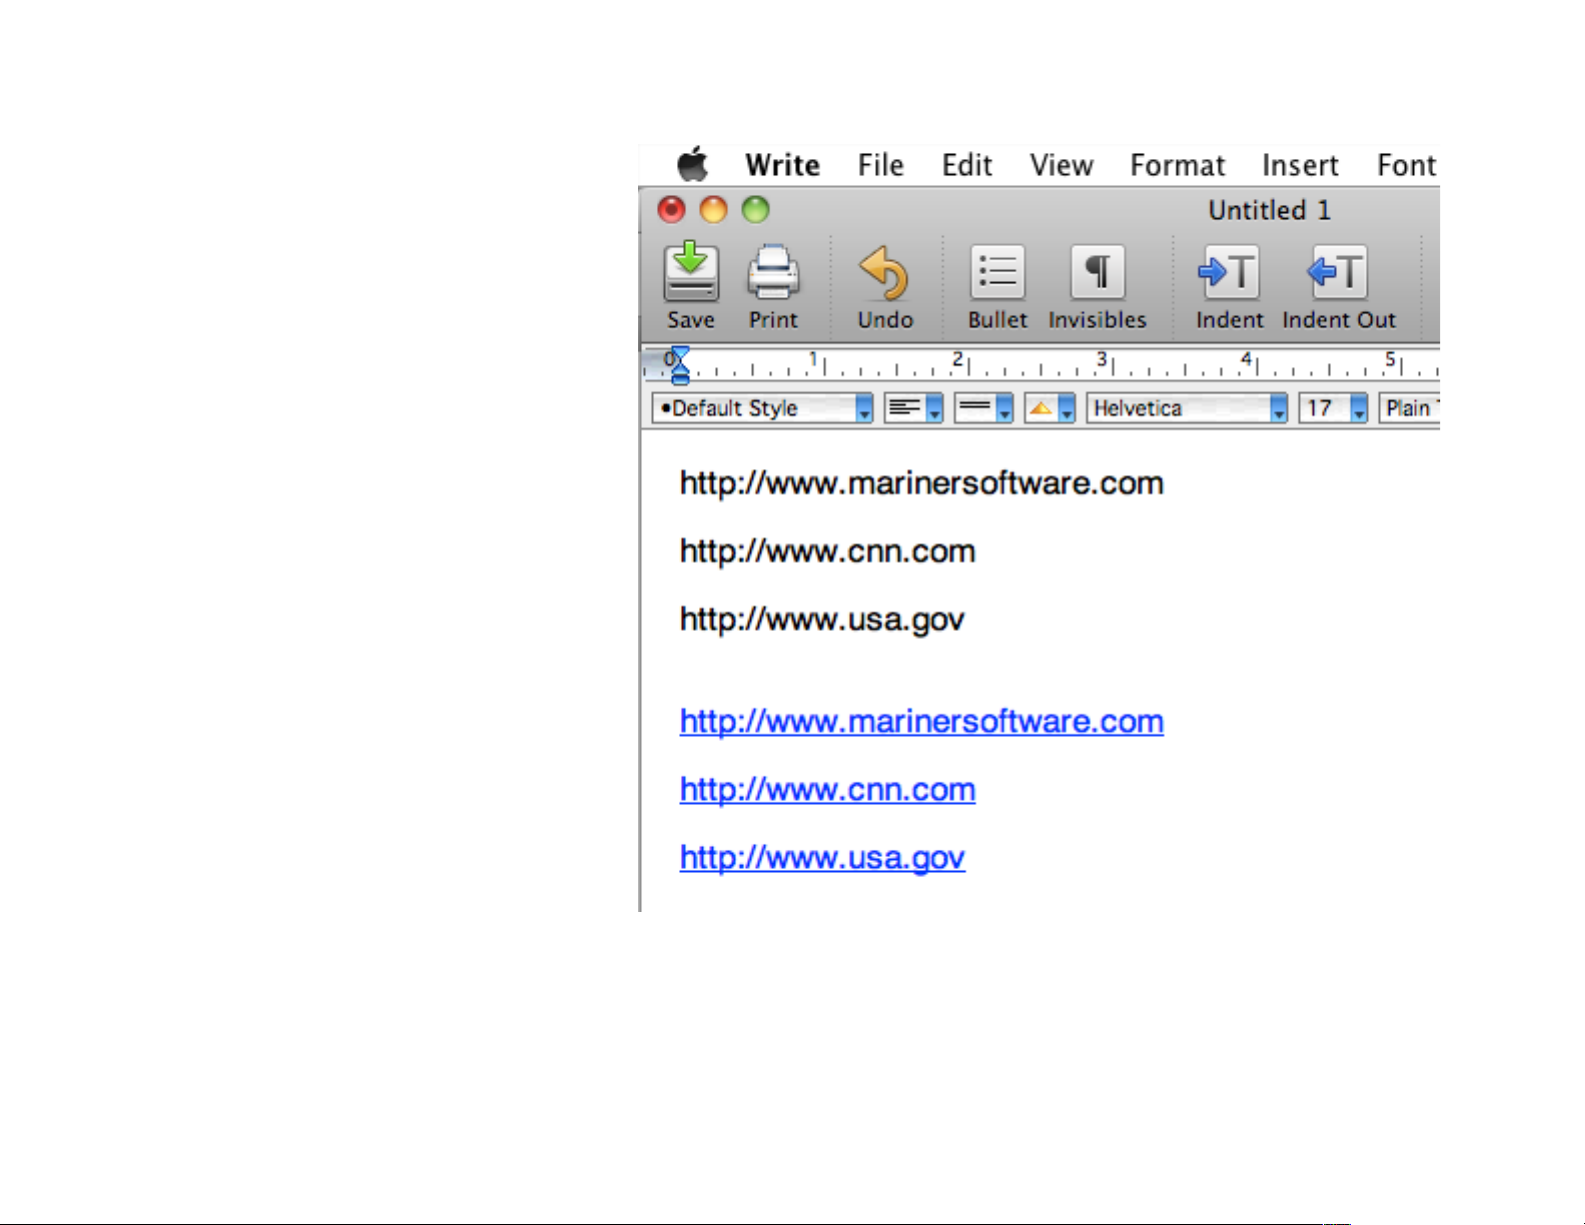
Hyperlinks or URL’s in documents are not
treated in any special manner. Here is how
to work with hyperlinks in documents.!
1 Position your mouse pointer somewhere
over the link!
2 Command-click the link to launch the associated application (usually a web browser).!
The associated link appears in that application.!
Note: Hyperlinks (URL’s) appear in the text
style of the document and not in the familiar
blue underline as shown to the right. You
can format the hyperlink to be blue and underlined but this will not happen automatically, rather the text style of the paragraph
or document is used.$
of 89 165
Page 90
Formatting Text!
!
The Ruler!
Use the ruler to:!
•
Position text!
•
Change paragraph margins!
•
Adjust tabs!
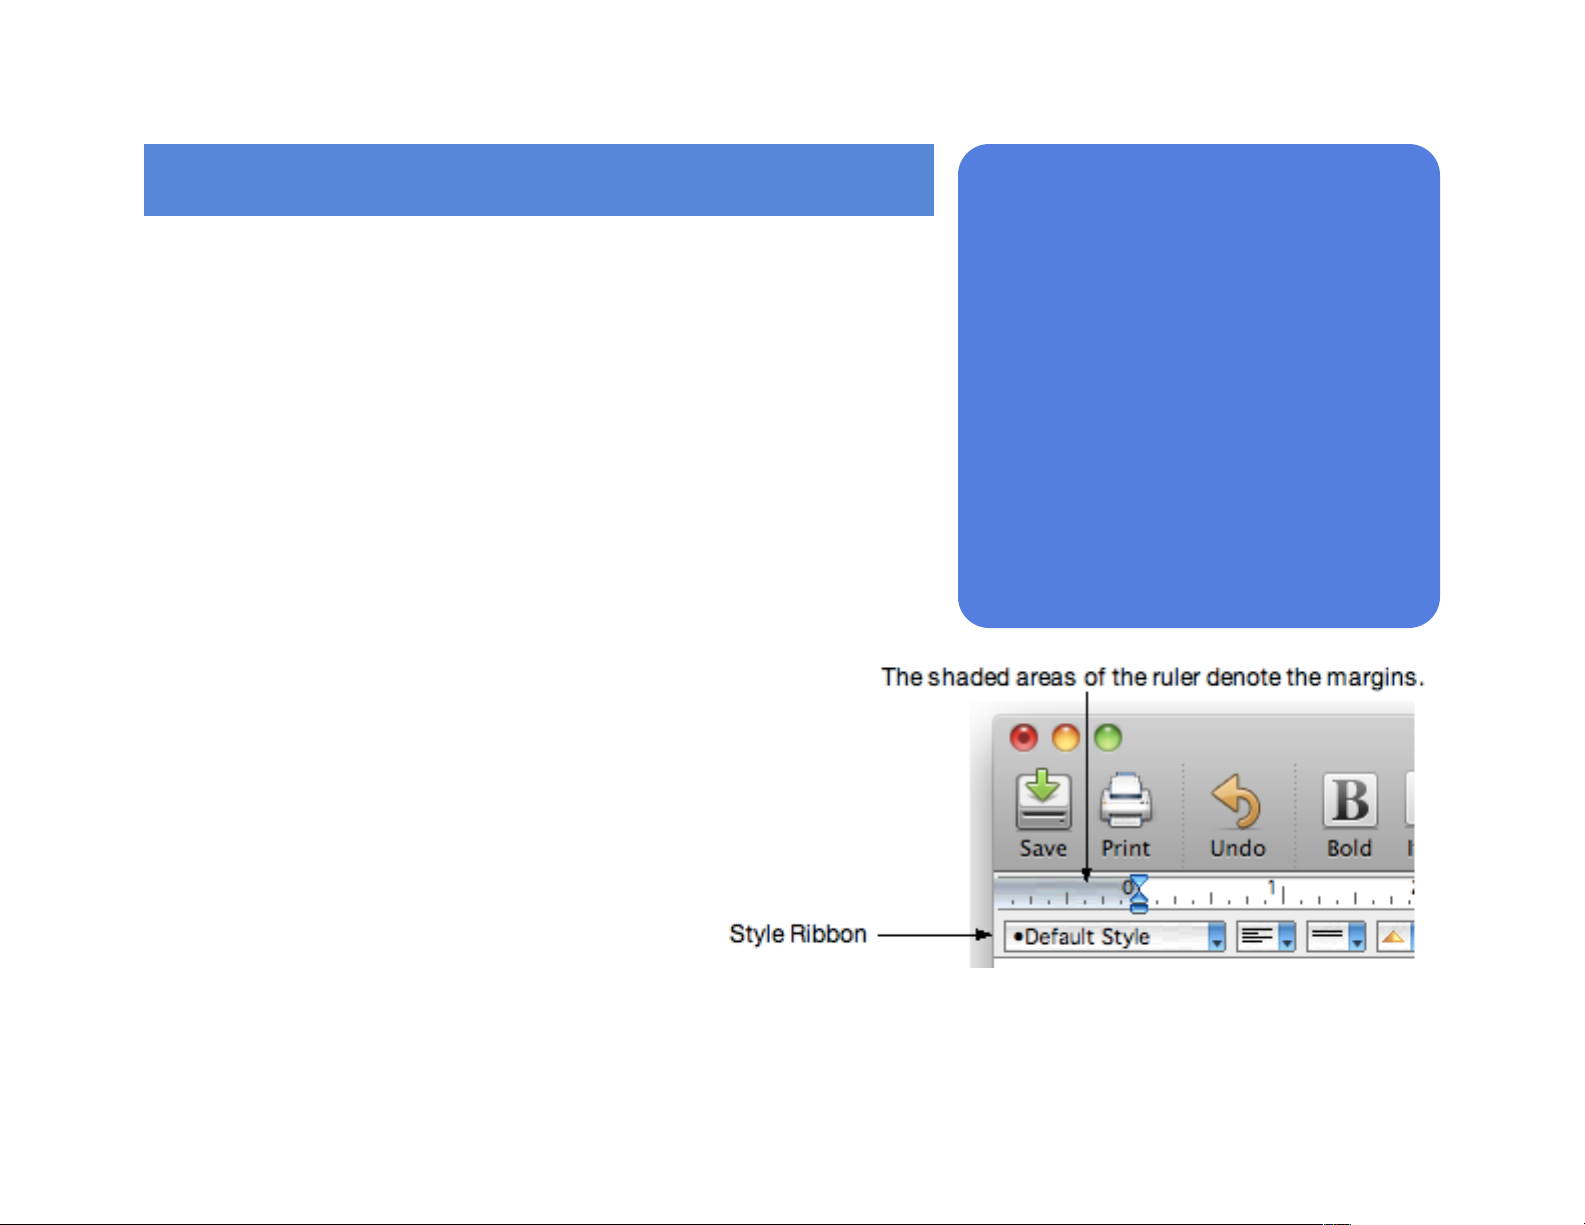
To display the ruler, choose Show Ruler from the Show|Hide menu. To
hide the ruler, choose Show Ruler a second time.!
The ruler’s default measurement unit is inches. To
change the measurement unit, choose a new
measurement unit from the Ruler Units sub-menu
in the View menu.!
The gray ruler areas mark the document’s left and
right page margins.!
!
Note: The area where you can type is controlled
through the Margins command. For detailed information
about changing margins, see the Page Margins section
in Working with Documents.!
of 90 165
!
!
In this chapter:!
!
•
Use the ruler to set margins, indents,
and tabs!
•
Use the style ribbon and menus to
change text font, size, and style!
•
Adjust alignment, line spacing, and
kerning!
•
Use style sheets!
•
Create multiple columns!
•
Adjust orphan and widow values!
•
Use other related formatting features
Page 91
The Style Ribbon!
!
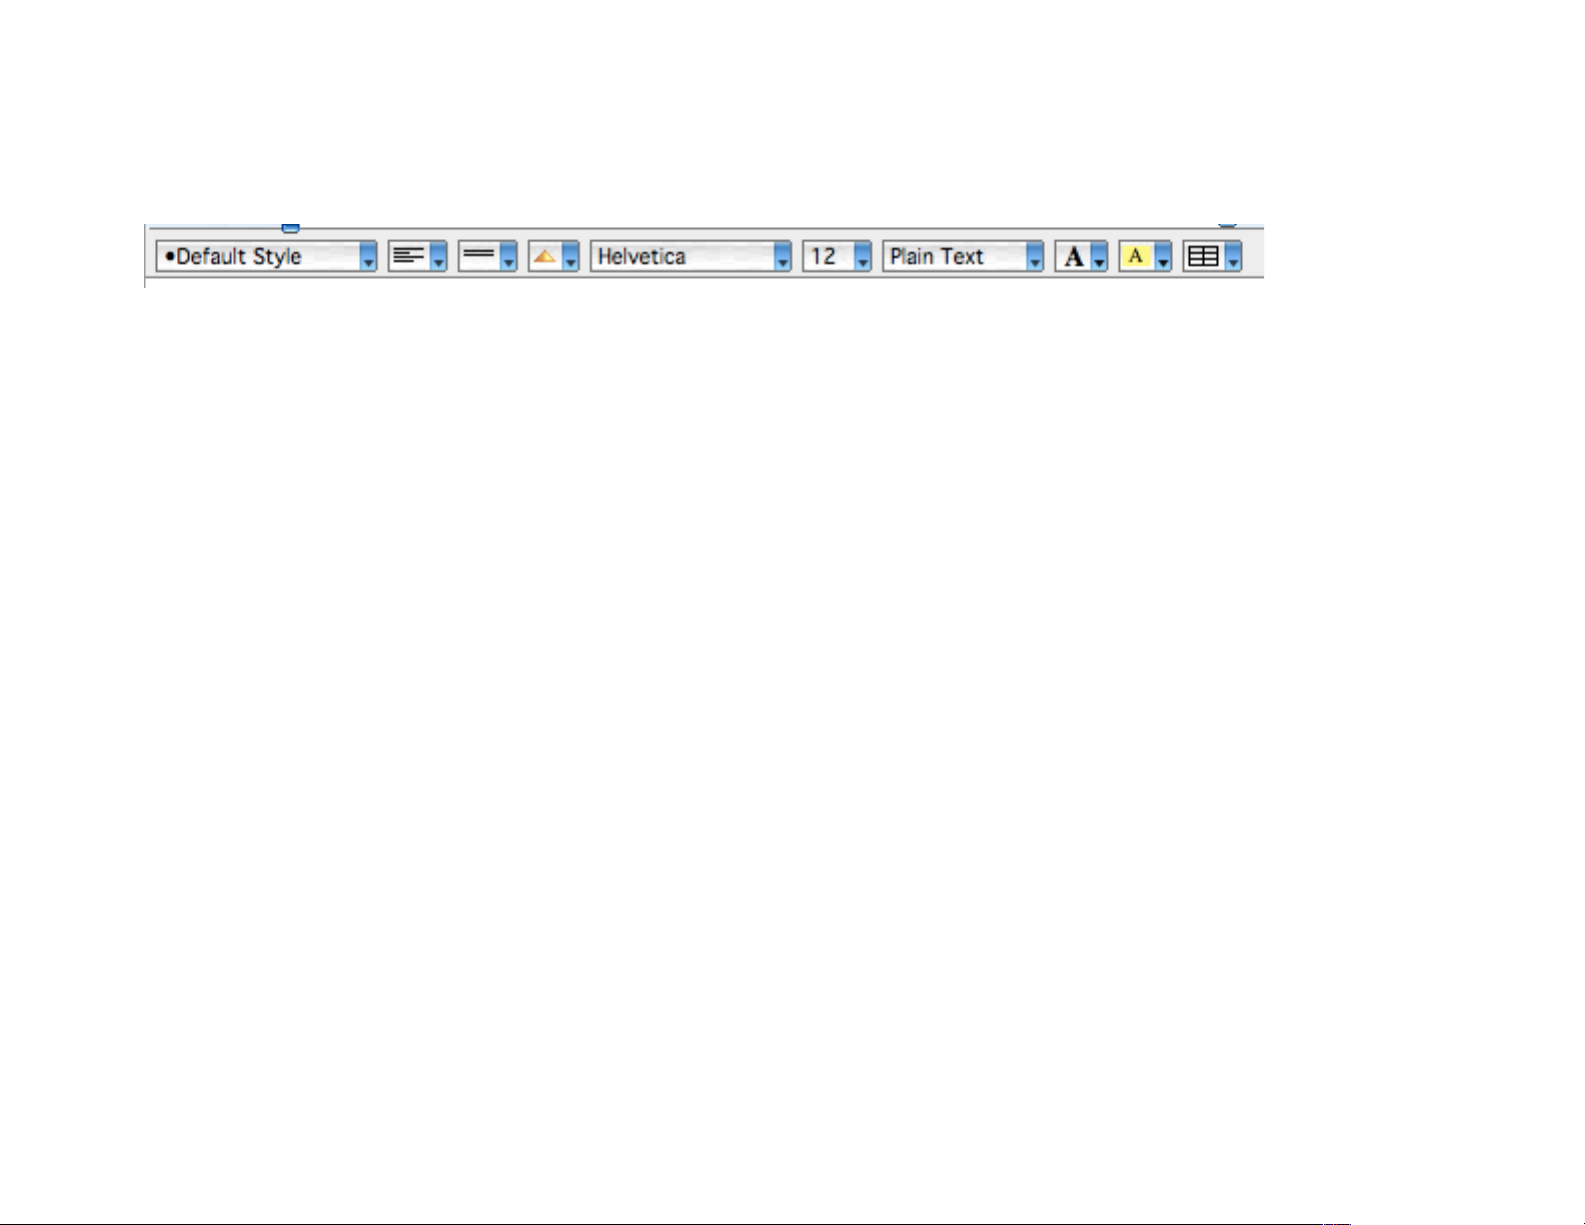
Use the style ribbon to:!
•
Create tabs in conjunction with the ruler!
•
Set font, size, and style!
•
Set paragraph alignment!
•
Create and set style sheets.!
•
Create and modify Tables.!
Each style ribbon feature is described in its respective section.!
To display the style ribbon, choose Show Style Ribbon from the Show|Hide menu.!
To hide the style ribbon, choose Show Style Ribbon a second time.$
of 91 165
Page 92
Working with Margins!
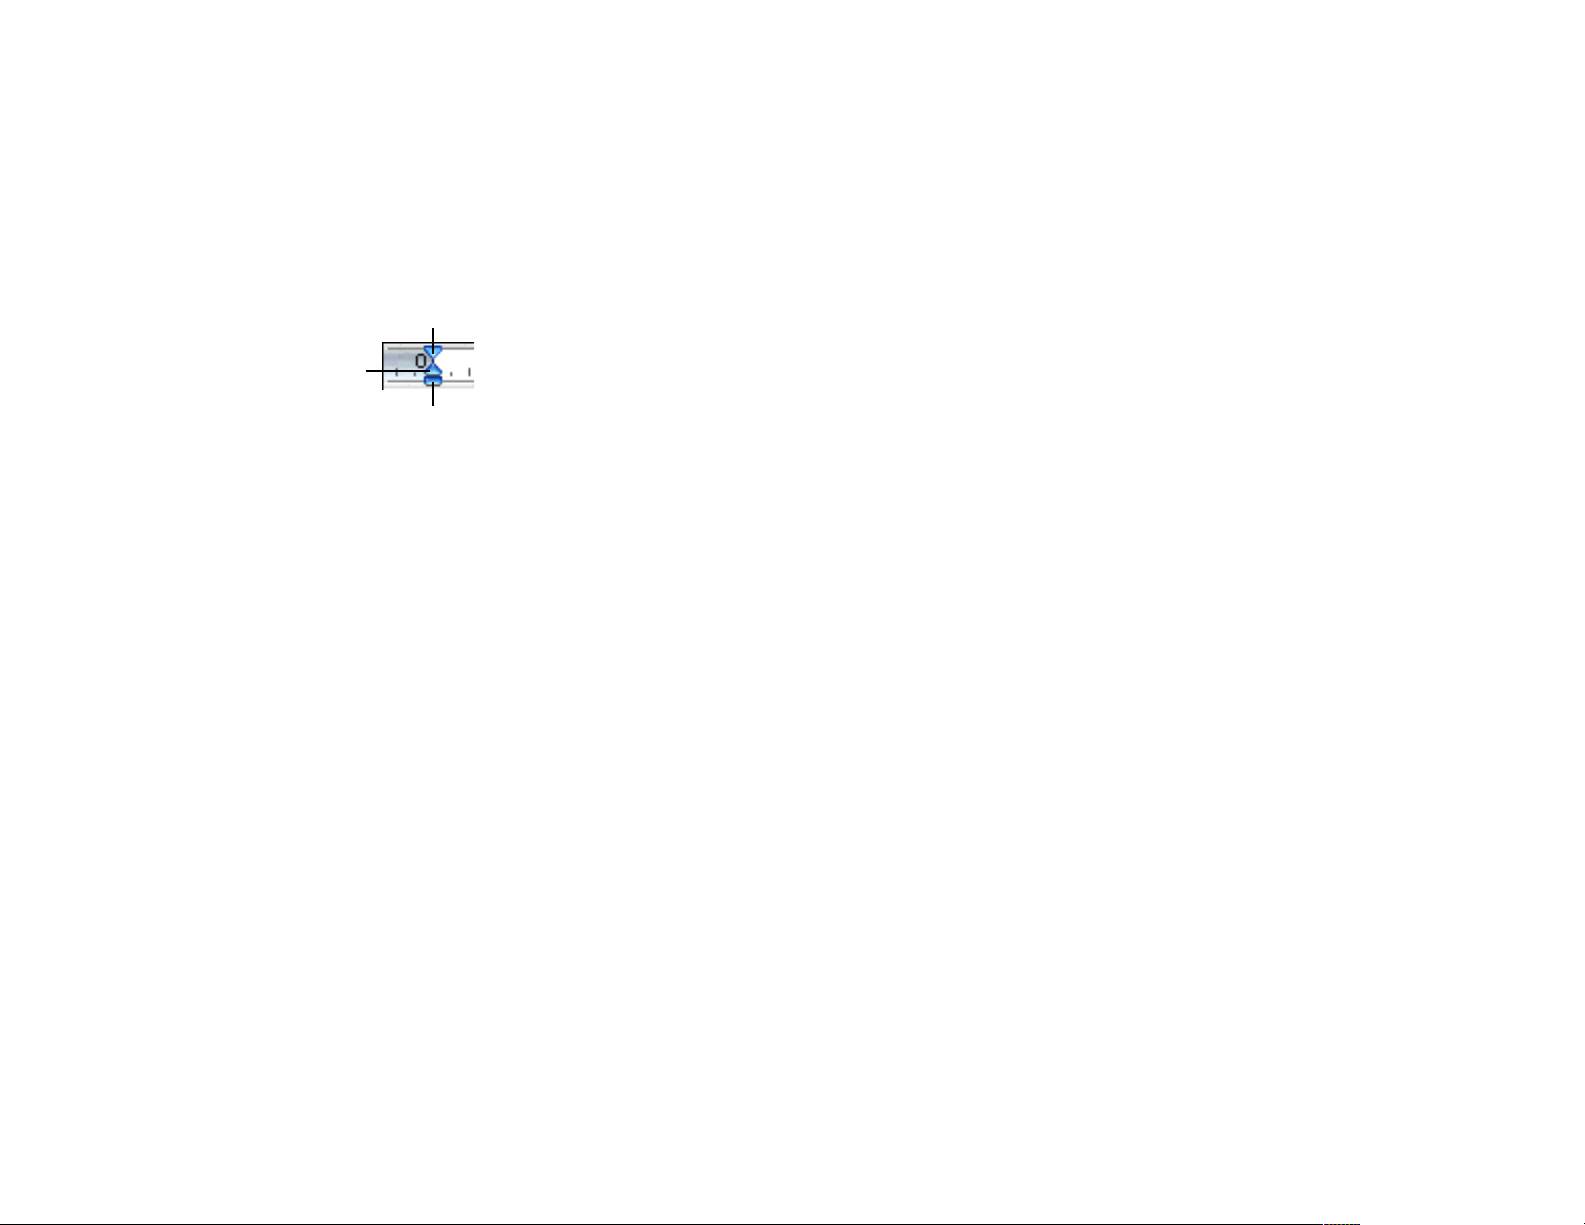
Three ruler controls, the left and right margin markers and the first-line indent marker, let you adjust the horizontal position
of each paragraph.!
!
As you type, text flows to the right. When the text reaches the right margin, it moves to the next line. This is called word
wrap.!
To change a paragraph’s left or right margin, click anywhere in the paragraph to display the margins for that paragraph.
Then drag the left or right margin to a new position.!
As you drag the left margin its distance from the ruler zero mark is displayed in the tool bar.$
Left Only-click and drag
here to move the left
indent without moving
the first indent
First Indent Marker
Left Indent Marker
of 92 165
Page 93
Indenting Paragraphs!
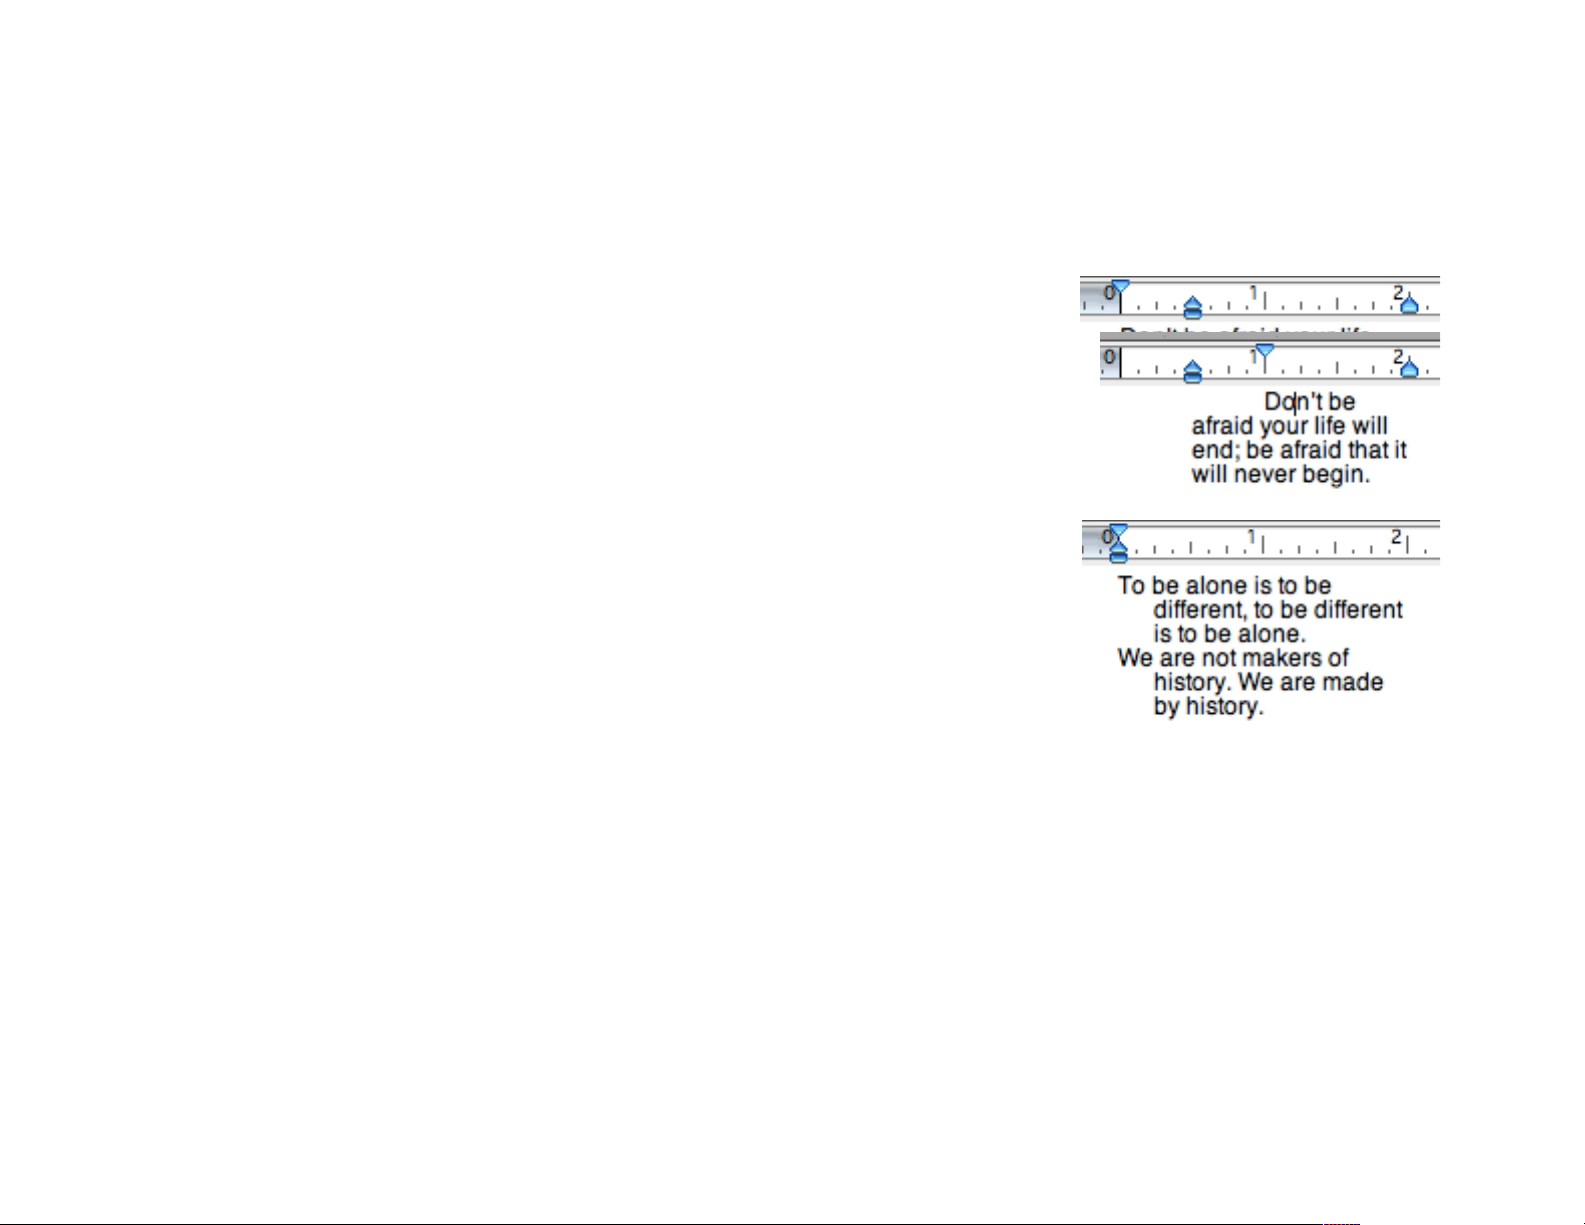
Just above the left margin marker is the first-line indent marker. The first-line indent lets you create an indented or “hanging” paragraph by offsetting the paragraph’s first line to the right or left of the left margin.!
Dragging the left margin marker moves the first-line marker by the same distance. As
a result, the same indentation is maintained when you change the left margin. To
move only the left margin marker, drag the Left Only marker. (See example in “Working with Margins”)!
Each time you press the Return key, you create a new paragraph. The margins of the
new paragraph are the same as the previous paragraph.!
You can also change paragraph margins and first-line indent settings through the
Paragraph dialog.!
!
of 93 165
Page 94
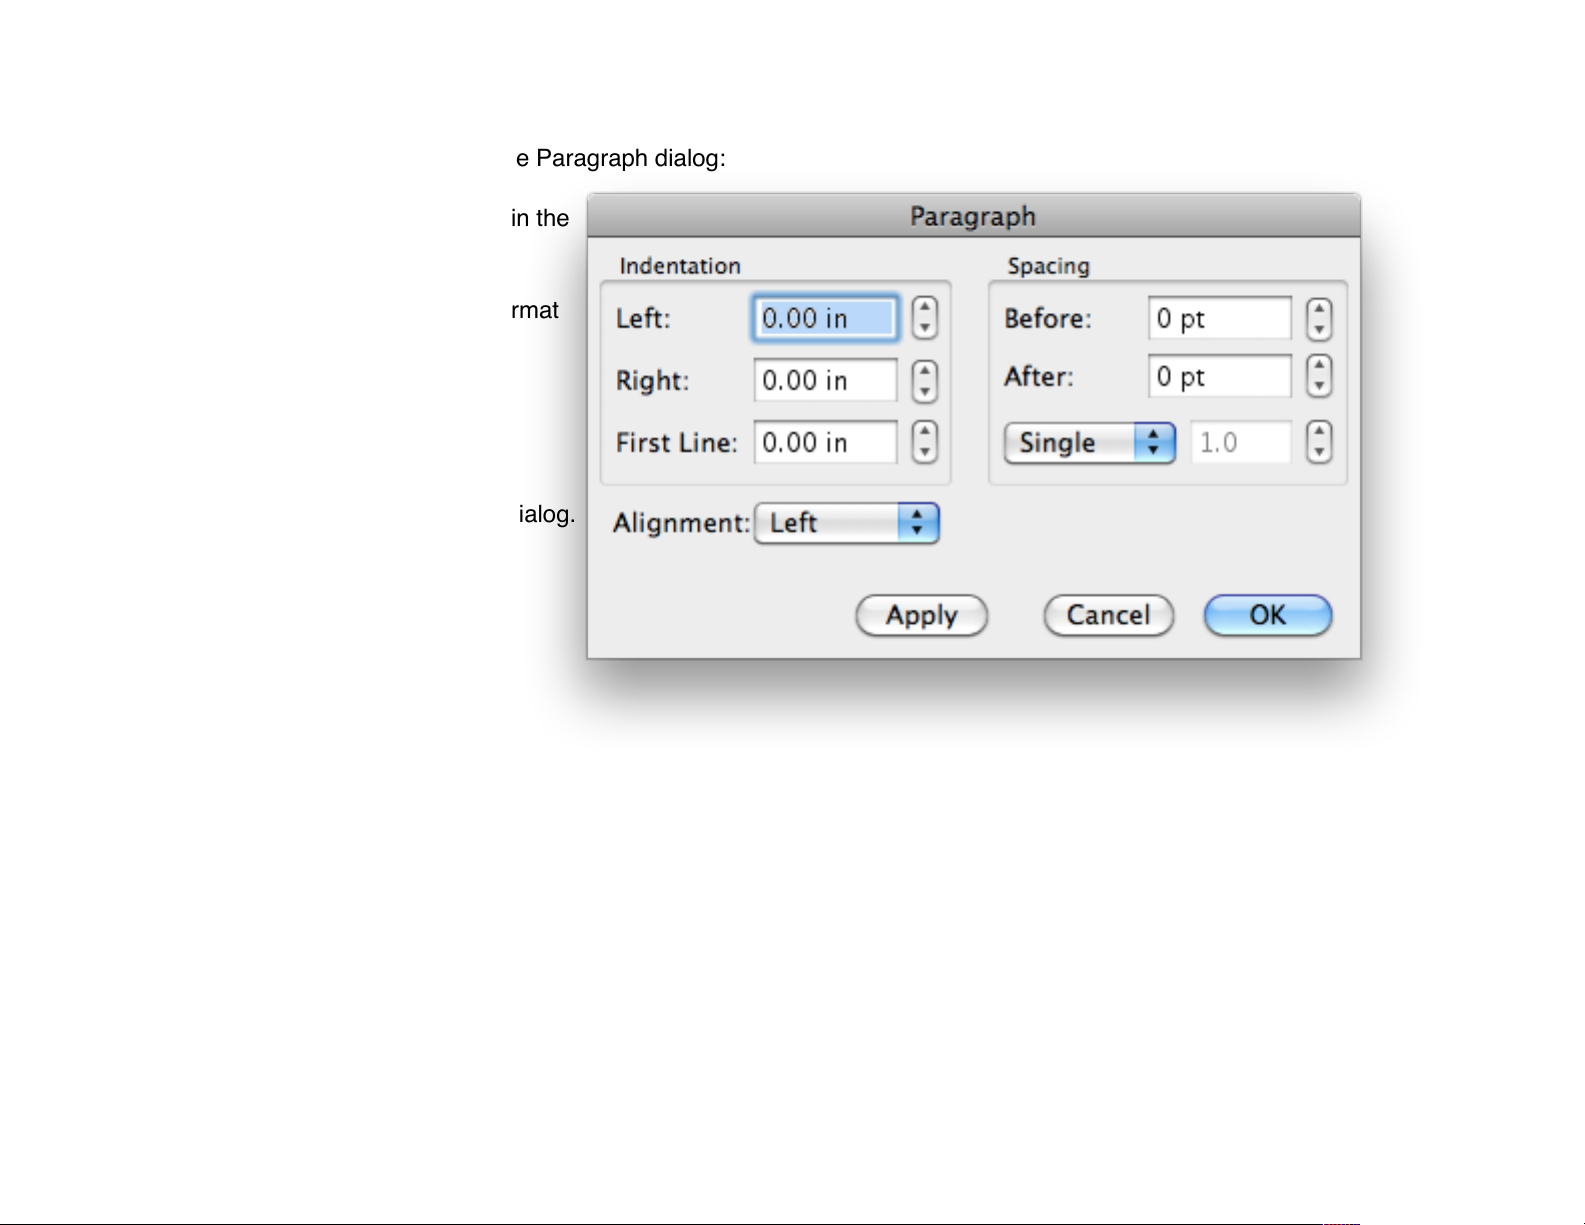
To change ruler margins through the Paragraph dialog:!
1 Position the insertion point within the
paragraph you want to change.!
2 Choose Paragraph from the Format
menu.!
A dialog appears.!
3 Enter values for Left, Right, and
First-Line spacing in the Paragraph
Spacing section of the Paragraph dialog.!
!
of 94 165
Page 95
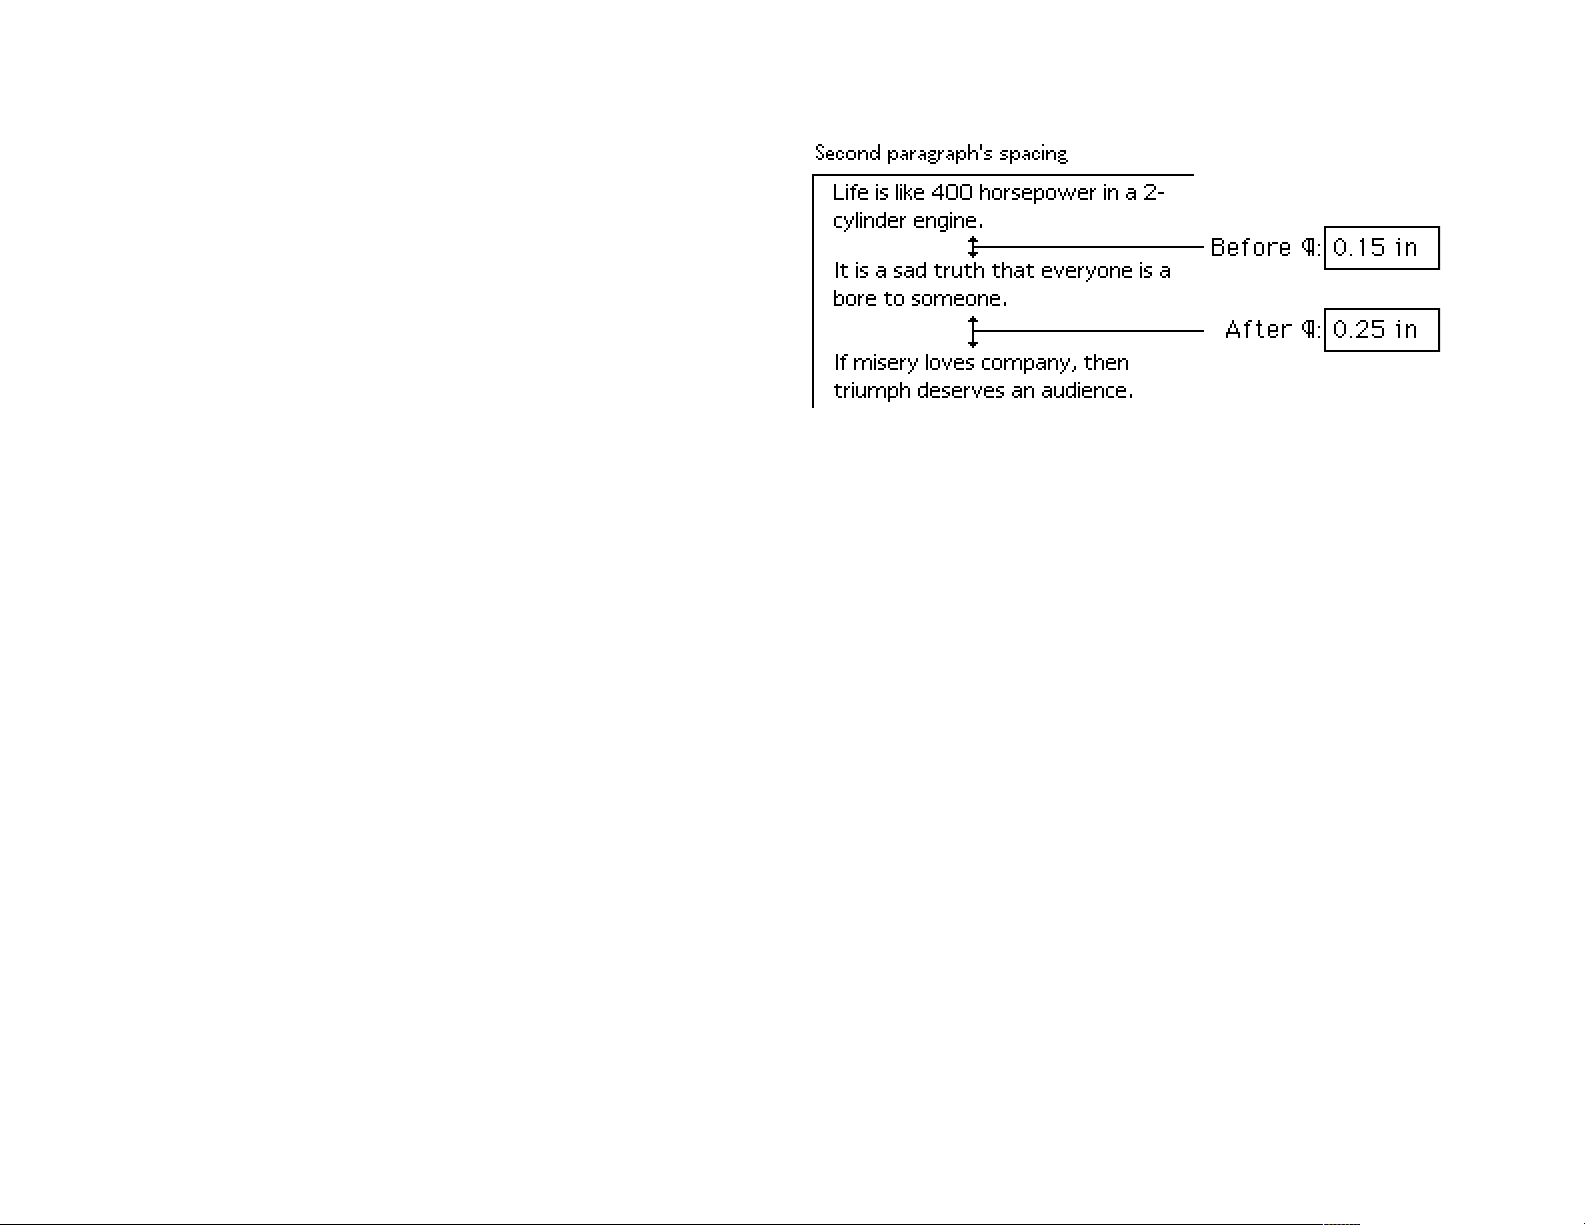
Space Before and After a Paragraph!
Instead of pressing the Return key repeatedly to increase the
space between paragraphs, use the Paragraph command to
digitally control the vertical spacing between paragraphs.!
To change paragraph spacing:!
1 Position the cursor within the paragraph you want to
change.!
2 Choose Paragraph from the Format menu.!
3 Enter values for Before Paragraph and After Paragraph spacing in the Paragraph Spacing section of the Paragraph
dialog.!
Changing Margins for Paragraphs!
To see the margin settings for a single paragraph, simply click anywhere in the paragraph. You don’t have to select the
entire paragraph.!
If your selection includes text from paragraphs having different margins, the ruler displays the margin markers and tabs for
the top-most paragraph of the selection.!
! • Changing a margin marker aligns the left or right sides of all the paragraphs in the selection.$
of 95 165
Page 96
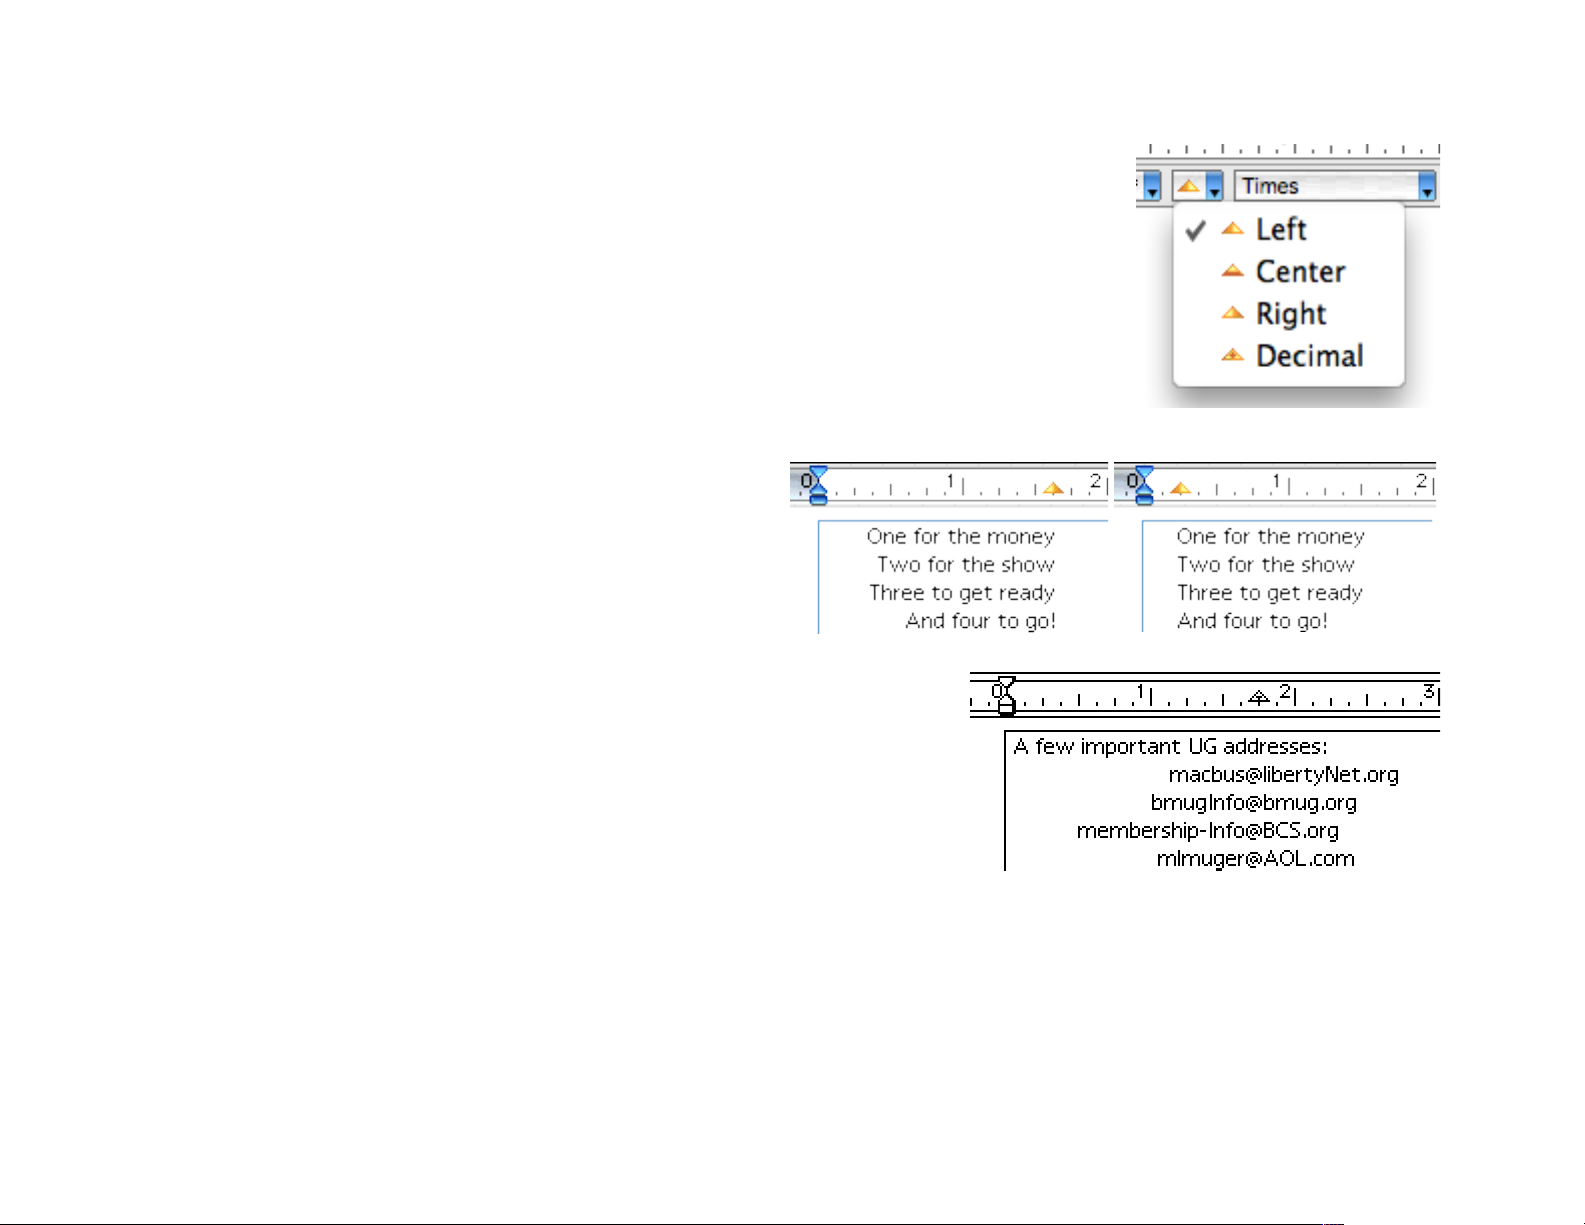
Tabs!
A tab is a non-printing character that’s typed each time you press the Tab key. Pressing tab
moves the insertion point to the next tab stop. !
Note: To see tabs and all other invisible characters, choose Show Invisible Characters from the
Document window or press the Show Invisible Characters button in the tool bar."
There are four kinds of tabs: left, center, right, and decimal. !
When you move the insertion point to a left tab and type,
text aligns on the left and flows to the right.!
When you move the insertion point to a right tab and type,
text aligns on the right and flows to the left.!
When you move the insertion point to a center tab and
type, the center of the text aligns with the tab and text
flows to the left and right.!
When you move the insertion point to a decimal tab and type, text flows to
the left until you type a decimal, period, or soft hyphen. Then text flows to
the right. Decimal tabs are particularly useful for aligning currency or other
decimal numbers.$
of 96 165
Text aligned to the left tab
Text aligned to the right tab
Page 97
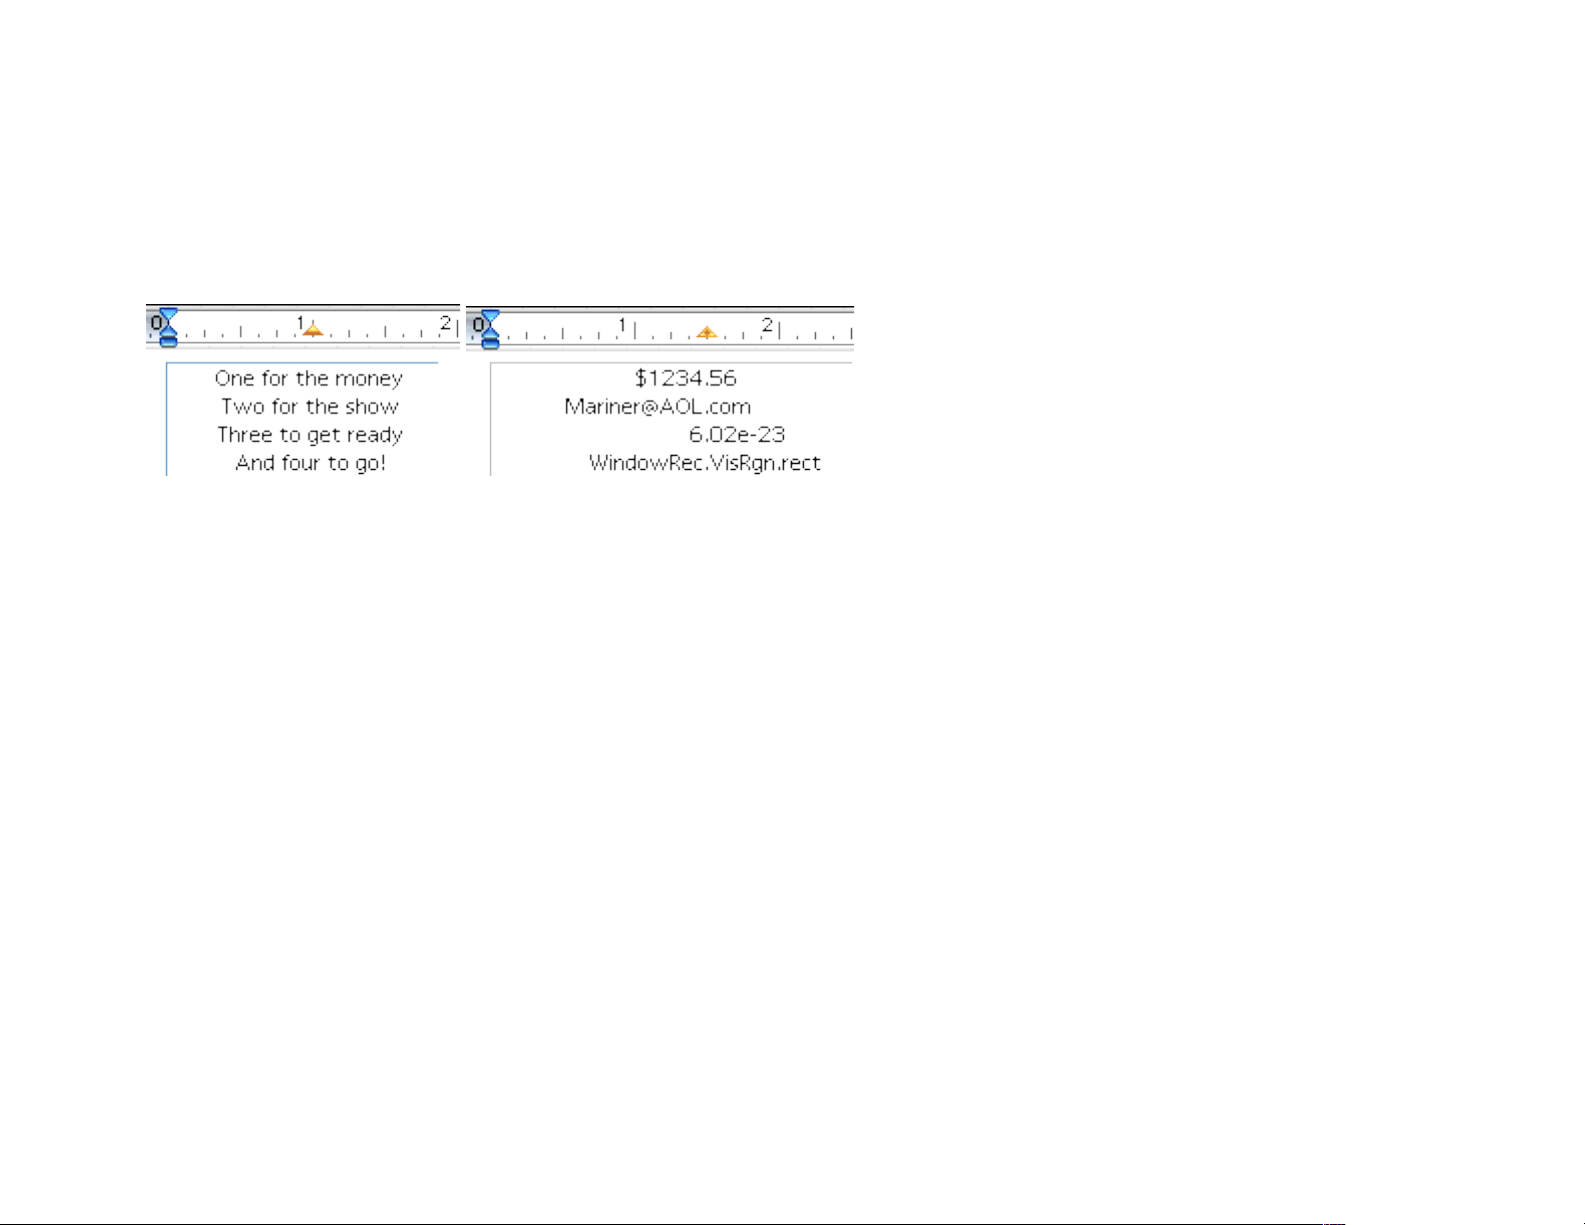
Aligning Specific Characters!
You can use the soft hyphen character or the decimal tab to align paragraphs on any character. Simply insert a soft hyphen after each character you want to align with the decimal tab.!
!
Each time you press the Return key to create a new paragraph, the tabs of the new paragraph are the same as the previous paragraph.!
Creating Tabs!
By default, left tab stops are set about every half inch but aren’t displayed in the ruler. %
You can override the default tab stops by setting your own tabs.!
When you set your own tabs, default tabs to the left of the tab you set are ignored. As a result, pressing the Tab key once
moves the insertion point to your first custom tab. Pressing the Tab key again either moves the cursor to the next default
tab or custom tab.!
You can create your own tabs interactively or via the Tab dialog box.$
Text aligned to the center tab
Text aligned to the decimal tab
of 97 165
Page 98
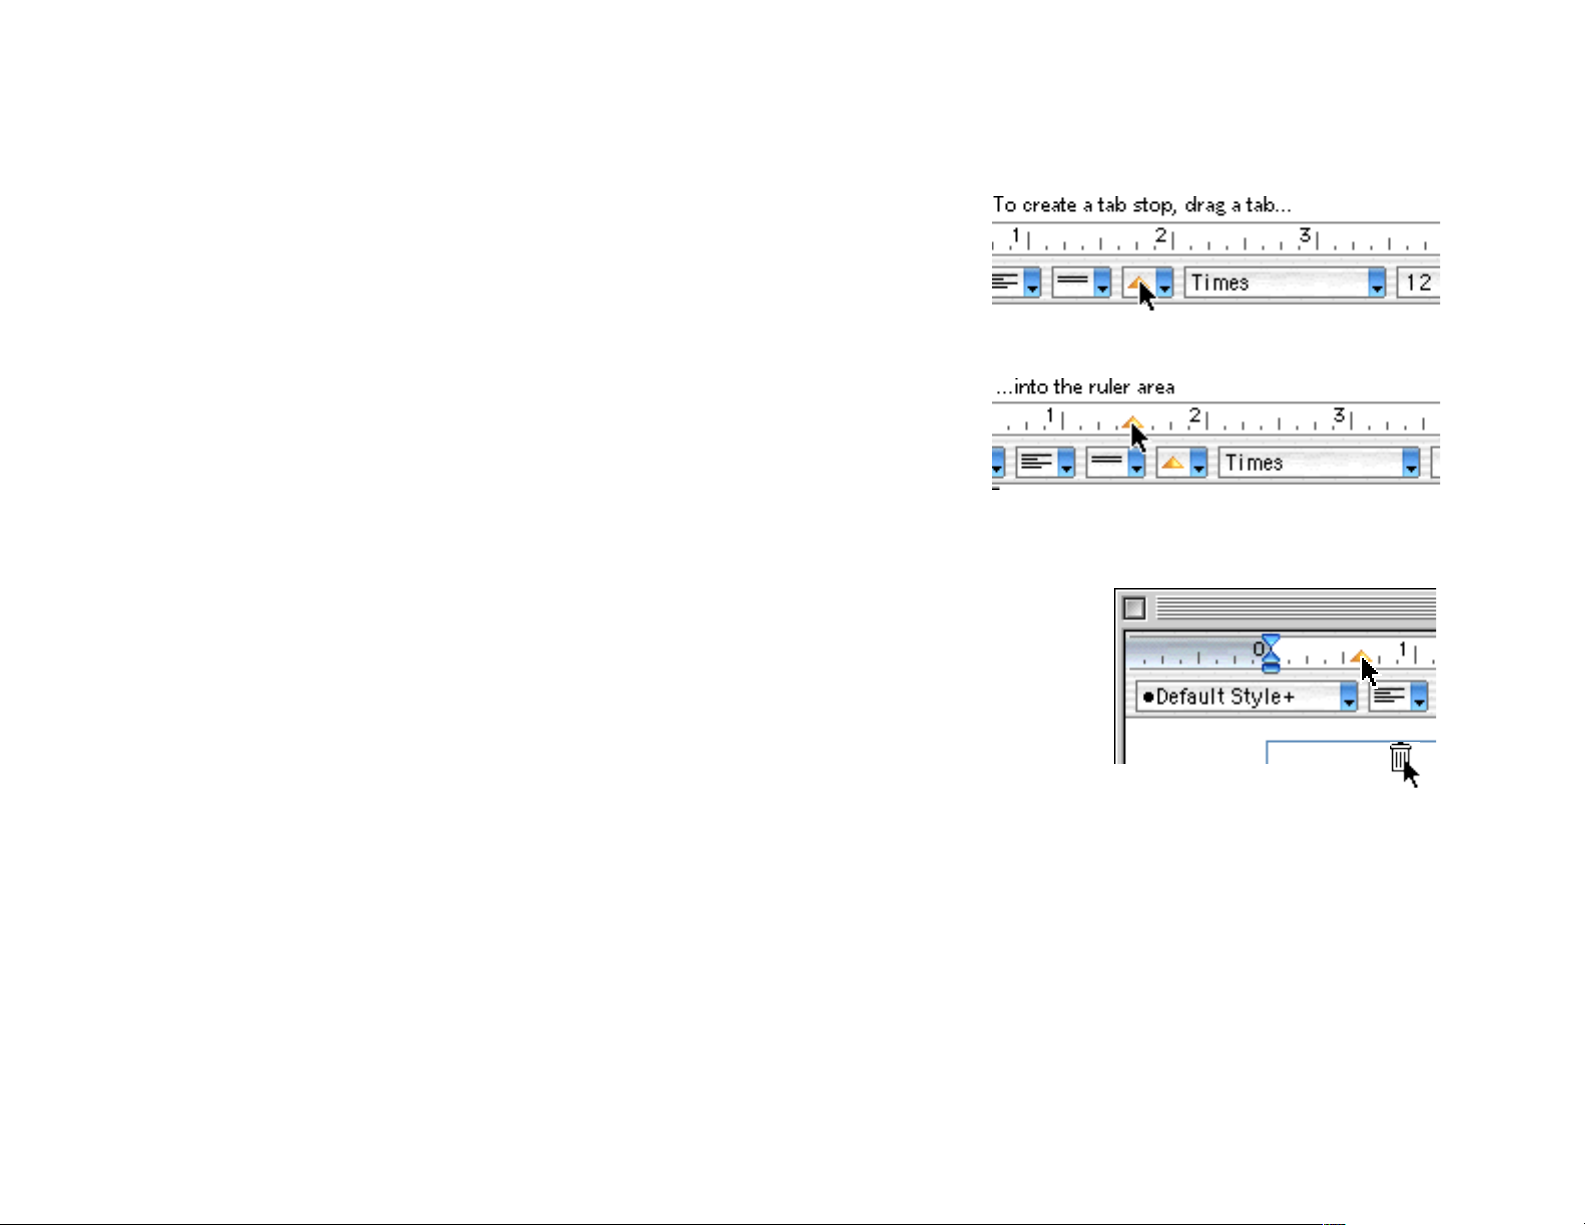
Creating Tabs by Dragging!
To interactively create a custom tab, drag the tab from the style ribbon into
the ruler area.!
Note: To set tabs by dragging, both the ruler and style ribbon must be visible. To display the ruler and style ribbon, select Show Ruler and Show Style Ribbon from the
Document window respectively."
Moving Tabs!
To move a tab, simply drag it to the new position. !
Deleting Tabs!
To remove a tab, drag the tab toward the document area until the cursor changes to a little trash can. Then release the
mouse and the tab is deleted.!
!
of 98 165
Page 99
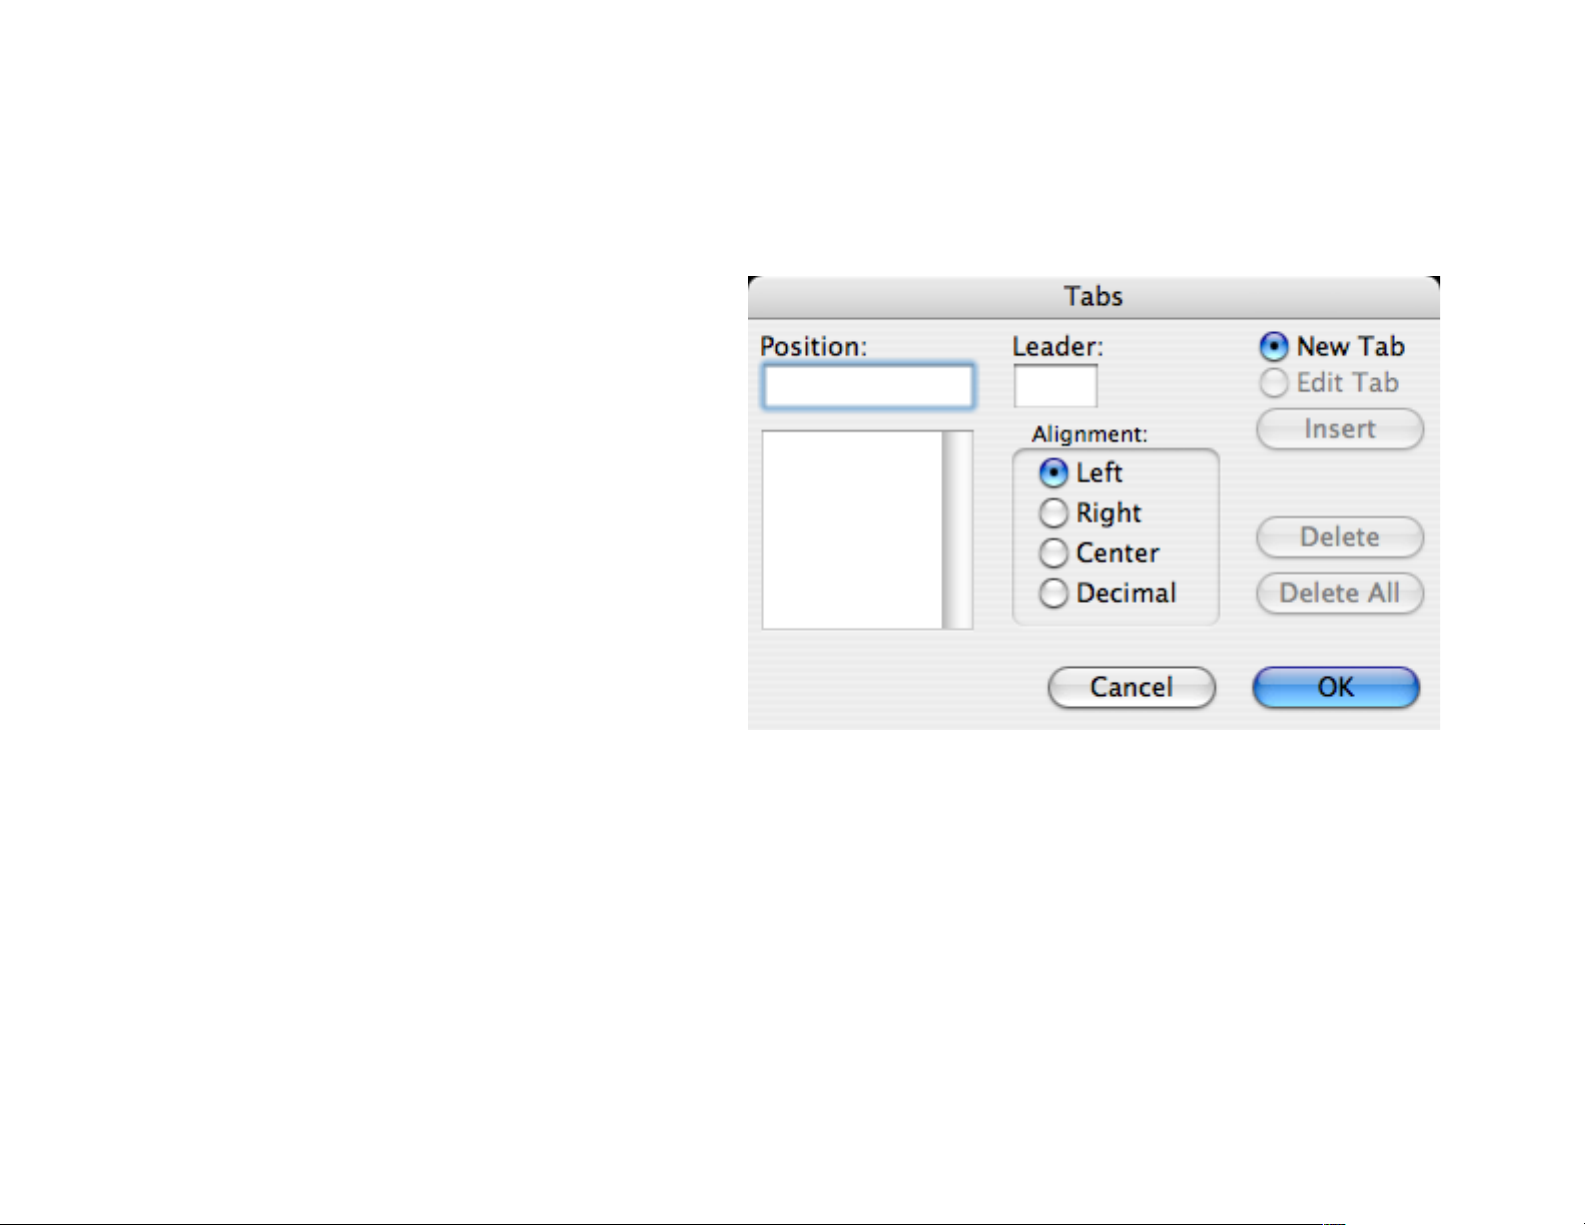
Tabs Dia log!
Instead of dragging a tab from the style ribbon into the ruler area, you can create, change, and remove tabs using the
Tabs dialog. The Tabs dialog is useful when creating or changing a tab via the mouse is cumbersome, such as, adjusting
the position of a tab that’s close to other tabs, removing a tab without having to scroll, or removing all tabs.!
To create a new tab using the Tabs dialog:!
1 Select the paragraph(s) for which you want to cre-
ate a tab stop.!
2 Select Format>Tabs...!
The Tabs dialog appears.!
3 Click the New Tab radio button.!
4 In the Position field, enter the ruler location where
you want to insert the new tab.!
5 Optionally, enter a tab leader character in the
Leader field.!
" A tab leader is a single character that repeats itself between the location where you typed a Tab and the tab itself."
6 Choose a tab alignment: right, left, center, or decimal.!
7 Click the Insert button. The new tab is added to the list of current tab stops.!
Create additional tabs by repeating steps 4 through 7"
9 Press OK to insert the new tabs in your document. Press Cancel to return to the document without inserting new tabs.$
of 99 165
Page 100

Changing Tabs!
1 Place the insertion point within the paragraph(s) containing the tabs you want to edit.!
2 Choose Tabs from the Format menu.!
3 Click the Edit Tab radio button.!
4 Select the tab you want to edit from the list of current tabs.!
5 Enter a new position for the tab.!
6 Change the tab alignment (right, left, center, or decimal) or enter a tab leader if desired.!
7 Click the Change button. The tab is added to the list of current tabs.!
8 Edit other tabs by repeating steps 4 through 7!
9 Press OK to accept the any changes you’ve made. Press Cancel to return to the document without changing any tabs.$
of 100 165
 Loading...