

Page 1
!
!
MacGourmet
User Guide
Page 2

!
!
!!
©2013 Mariner Software Inc.. All Rights reserved.
Under the copyright laws, this manual may not be copied, in whole or in part,
without the written consent of Mariner Software Inc. Your rights to the software
are governed by the accompanying software license agreement.
MacGourmet is a trademark of Mariner Software, Inc.
MacGourmet Deluxe is a trademark of Mariner Software, Inc.
Gourmet iOS is a pending trademark of Mariner Software, Inc.
Mac and the Mac logo are trademarks of Apple Computer, Inc., registered in the
U.S. and other countries. Apple, the Apple logo, AppleScript, and Macintosh are
trademarks of Apple Computer, Inc., registered in the U.S. and other countries.
All other products and company names mentioned in this document may be
trademarks of their respective owners.
Mariner Software
PO Box 1912
Minneapolis, MN 55311
Phone - 800-240-6562
Email - [email protected]
Page 3

1. Getting Started! 7
Upgrading from MacGourmet 1 and newer versions! 7
Creating your MacGourmet library! 7
Loading the sample recipes and notes! 8
Feature Overview! 9
To create a new Recipe Smart List:! 12
Creating a new User List! 13
Recipe Box Widescreen and Normal Display Modes! 13
Customizing Table Columns! 14
Accessing the list of columns to display! 14
Rearranging the columns! 14
Creating and Editing! 15
The Chef View - Your Kitchen Cooking Helper! 16
Viewing More than One List at a Time! 16
Changing the Display of Recipes and Notes! 17
Viewing Larger Versions of Your Images! 17
2. Creating and Editing Recipes! 20
Creating Recipes! 20
Editing Recipes! 20
The Info Tab! 20
The Ingredients Tab! 22
The Directions Tab! 23
The Preparation Tab! 24
3
Page 4

The Notes Tab! 25
The Picture Tab! 26
3. Creating and Editing Wine, Beer and Cheese
Notes! 27
Creating Wine, Beer, and Cheese Notes! 27
Editing Wine, Beer, and Cheese Notes! 27
The Info Tab! 27
The Tasting Notes Tab! 29
The Winemaker, Brewery, and Dairy Notes Tab! 29
The Label Tab! 30
The Cellar (Wine Notes) and More Info (Beer and Cheese Notes) Tab!31
4. Creating and Editing Cooking Notes! 32
Creating Cooking Notes! 32
Editing Cooking Notes! 32
The Info Tab! 32
The Picture Tab! 33
5. Searching! 34
The Search Field! 34
Using Basic Search! 35
Using “Ingredient Search”! 35
Displaying the Cupboard Find window! 36
Creating and Using Smart Lists! 37
Creating a new Smart Recipe List! 38
4
Page 5

Doing a Suggest Recipe Search! 39
Finding Recipes, Wine, Beer, Cheese, and Cooking Notes! 39
Finding recipes! 39
Finding wine notes! 39
Finding beer notes! 39
Finding cheese notes! 39
Finding cooking notes! 39
Finding duplicate recipes! 39
Creating Smart Lists from Find Results! 40
6. Importing and Exporting! 41
Using the MacGourmet Clipping Service! 41
Making clippings (Alternate options)! 44
Using the MacGourmet Recipe Web Page Import Service! 45
Using File Import and Export! 46
Importing Recipes:! 46
Exporting Recipes and Notes! 48
Creating text versions of your recipes and notes! 49
Exporting the names of items in a list! 49
7. Publishing Recipes and Notes to the Web! 50
Posting to your blog! 52
7.5. Syncing your MacGourmet Data with the
MacGourmet cloud server! 53
8. Using the Lists Editor! 56
5
Page 6

Adding a New Piece of Equipment! 57
Adding a New Category! 58
9. Relating Recipes and Notes! 59
Linking Recipes and Notes! 59
Creating relationships between two things! 59
10. Creating and Using Shopping Lists! 61
Creating a Shopping List! 61
Creating a new shopping list! 61
Editing Your Shopping Lists! 62
Maintaining the Shopping List Favorites List! 63
Exporting a Shopping List as a Text File! 63
11. Printing Recipes and Notes! 64
Appendix A! 66
Backing Up Your MacGourmet Data! 66
The MacGourmet4Database.mgdatabase file! 66
The MacGourmet Application Support folder! 66
Changing the Location of Your MacGourmet Data! 66
Changing your database location at launch! 67
6
Page 7

1
1. Getting Started
Welcome to MacGourmet! In this chapter you will be introduced to the basics of
MacGourmet, one of the most popular recipe management app for the Mac.
Running MacGourmet for the First Time
Assuming that you have installed MacGourmet (in either trial form or as a registered copy) and upon your first launch, you will be asked a few questions to get
you started:
Upgrading from MacGourmet 1 and newer versions
If you are upgrading from MacGourmet 1, please contact
[email protected] and we’ll help you migrate your data to the lat-
est version.
If you are upgrading from MacGourmet 2, MacGourmet 3, please follow the upgrade steps within the app.
If you are installing a new copy, follow the directions below.
Creating your MacGourmet library
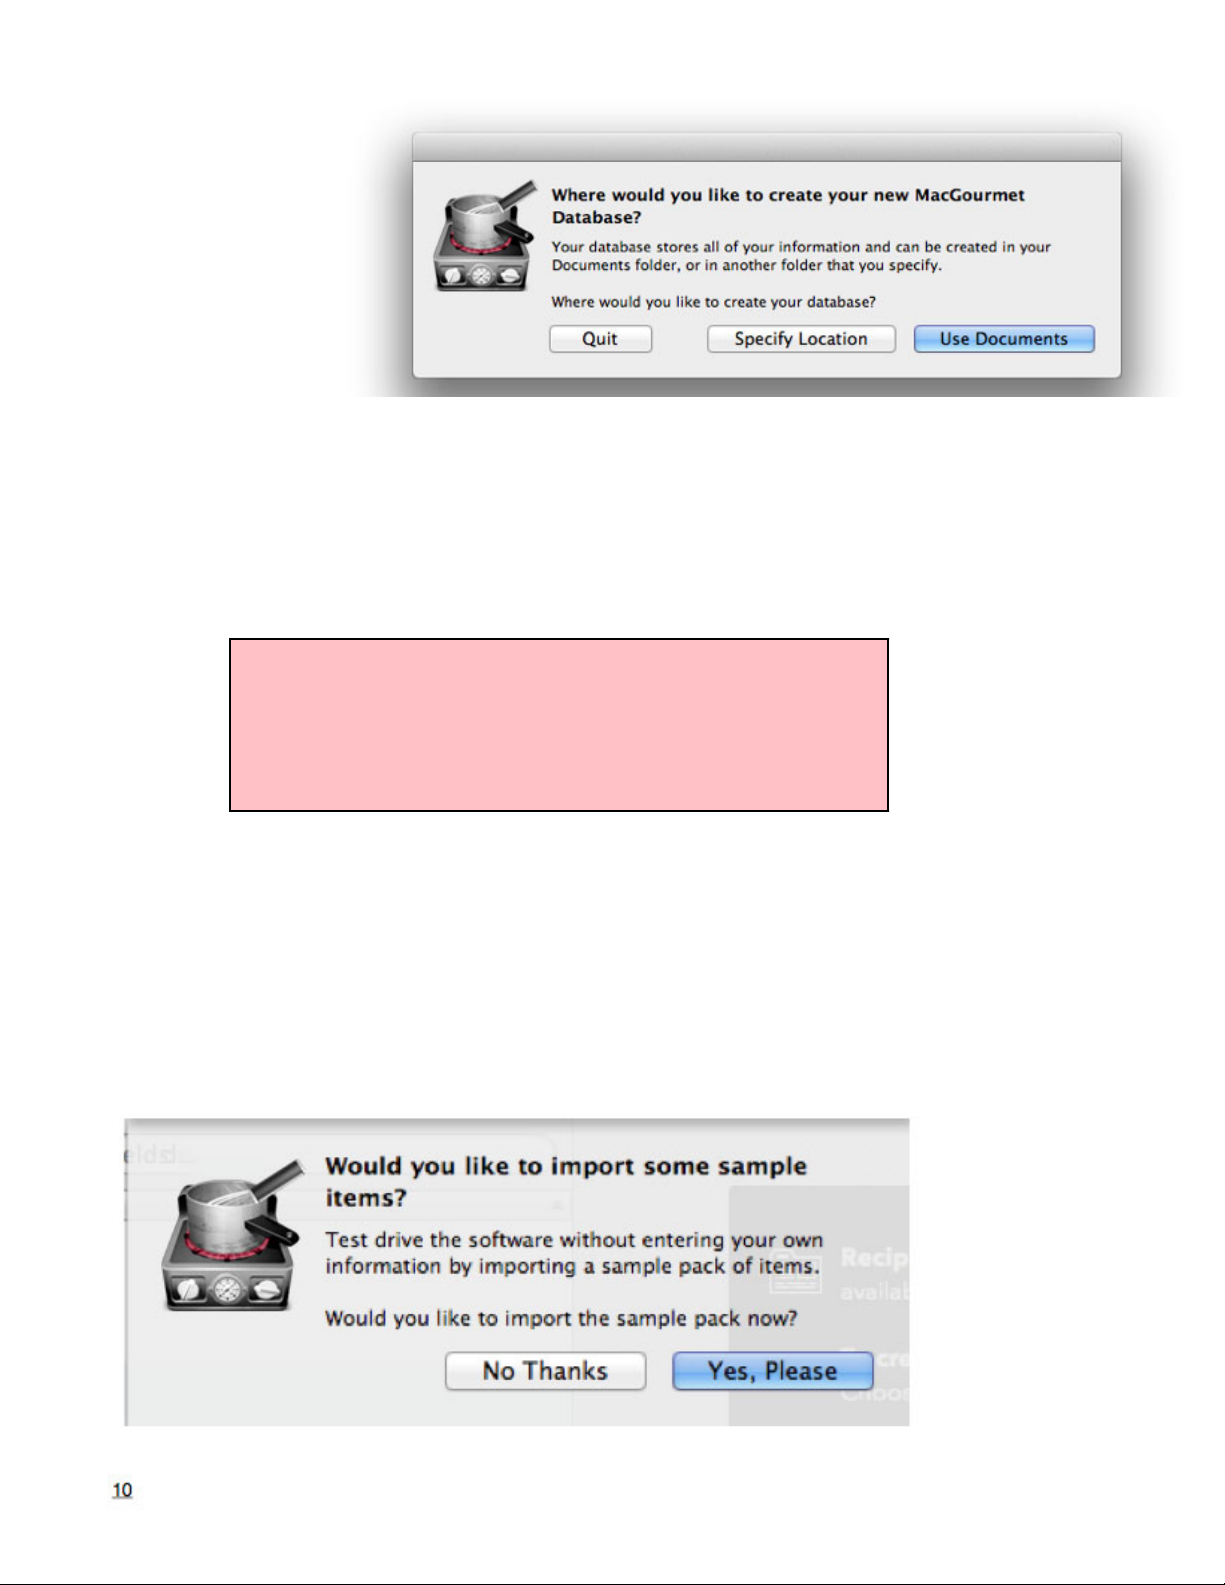
The next prompt will ask you where you’d like to store your library. Press the
“Use Documents” button to keep your library in your Documents folder. Press
the “Specify Location” button to specify a di"erent folder for your library.
7
Page 8
This data-
L
TIP: Wherever you decide to create your database,
all of your information will be stored in a file
named MacGourmet4Database.mgdatabase. Don’t
forget to back up this library file from time to
time.
base file
cannot be
moved
(without
changing the
location in
Advanced
preferences) or renamed. If this occurs, MacGourmet will think that it needs to
create a new database upon your next launch. You can restore your information
by just moving your MacGourmet 4 Database file back to the original location or
by changing the name back to its original title.
Loading the sample recipes and notes
If you want to add some sample recipes, press the “Yes, Please” button to add
them to your initial library. If you’d rather start with an empty library, just press
the “No Thanks” button.
8
Page 9
Feature Overview
L
TIP: If you delete an item in one of your lists, it is
removed from your list. It is not removed from
your database unless you explicitly delete it, or
you delete it from one of your “MY” lists.
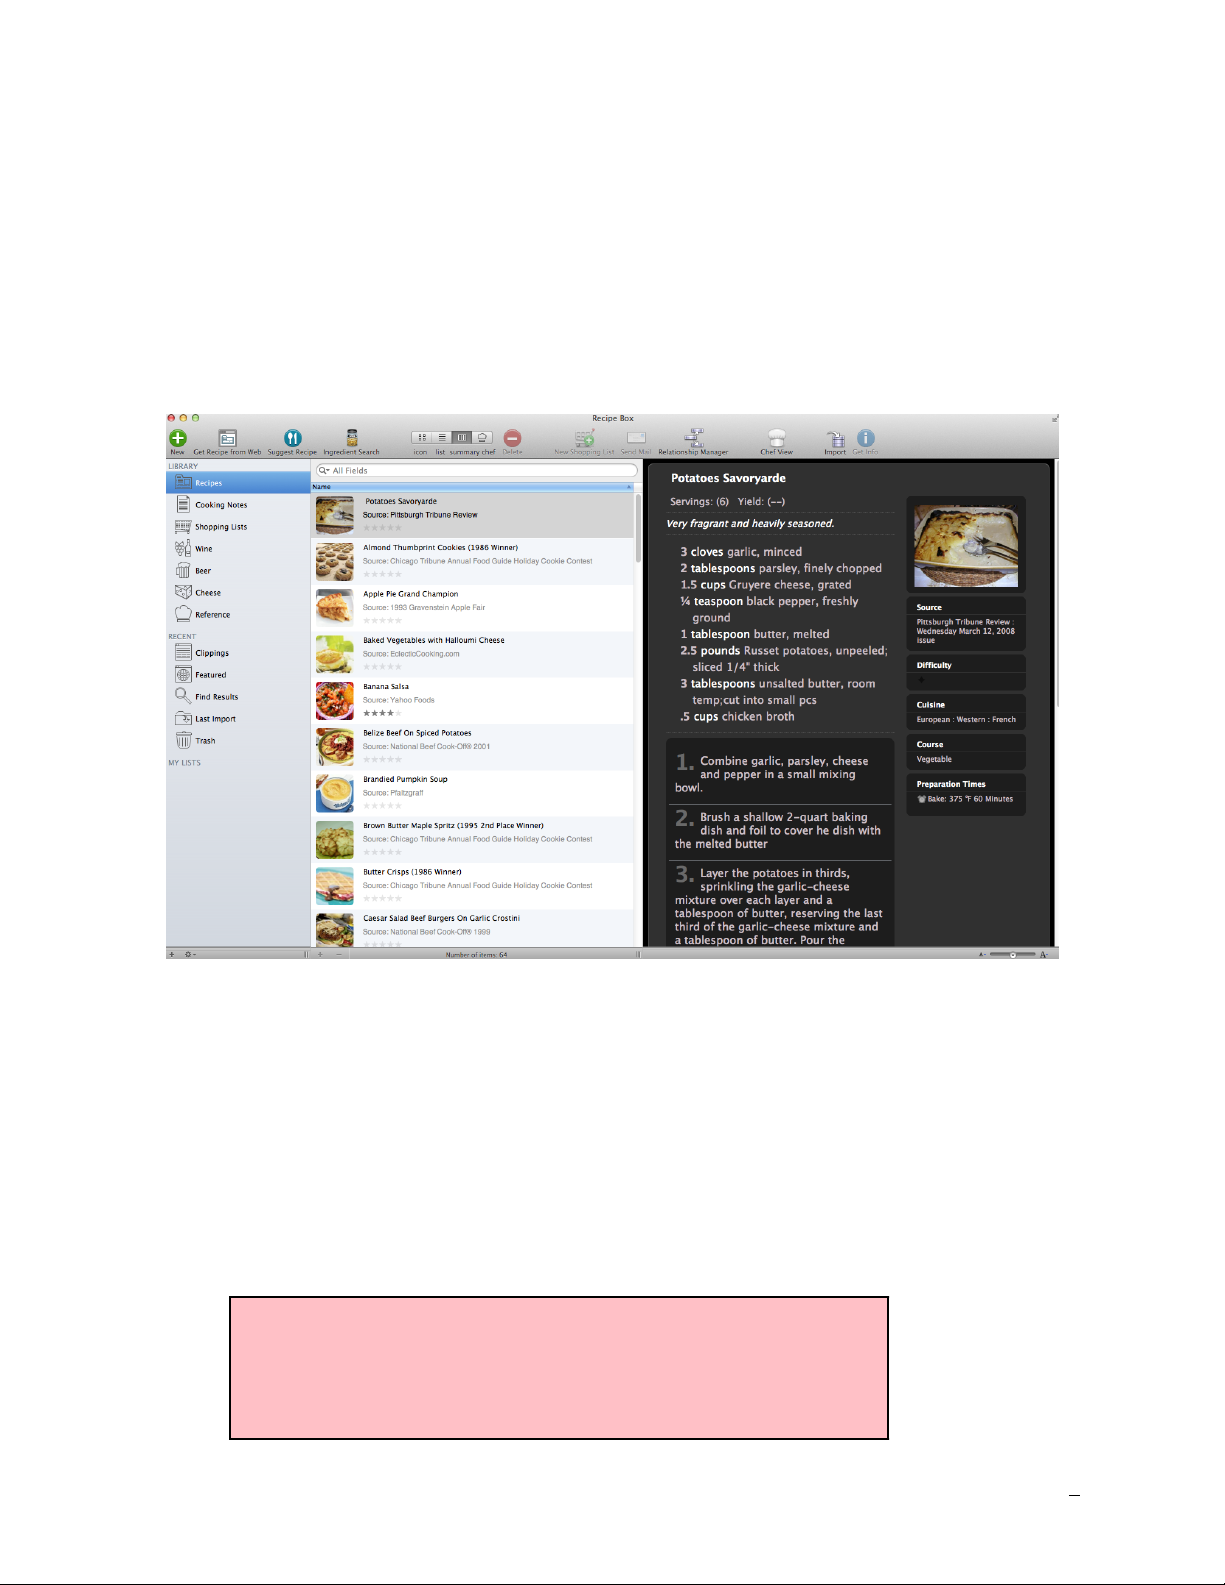
Your recipe box has 6 main lists for cataloging and storing your items. This list
is located on the left side navigation bar: Recipes, Cooking Notes, Shopping
Lists, Wine, Beer, Cheese. Each of these lists holds the master copy of each respective item type in your database. You can easily put items in lists that you
create, but they really just refer back to the master copy.
For instance, if you create three of your own lists and then drag a recipe from
your “Recipes” list to each of these three lists, you will see four copies of your
recipe in di"erent locations. There will, however, only be one ORIGINAL copy.
The other three recipes that you see in the lists that you created are really just
pointers back to the master copy. This means that modifying that recipe anywhere will change all the instances of that recipe, no matter where you put it.
9
Page 10

Recipes
Your “Recipes” list shows you all of the recipes in your database. This list can
Cooking Notes
Shopping Lists
Wine
Beer
only contain recipes. If you delete a recipe from this list, it will get deleted from
your database.
Your “Cooking Notes” list are a lot like your “Recipes” list in that it shows all of
your notes. Deleting and copying notes from this list works like deleting and
copying recipes from your “Recipes” list.
This list shows you all of your current shopping lists. Unlike recipes, wine, beer,
cheese, and cooking notes, shopping lists can only exist in this list. When you
create a shopping list from one or many recipes, it will get added to this list.
Deleting a shopping list from this list will delete it from your database, but only
as a shopping list. You can add a new shopping list by dragging one or more
recipes to this list, in addition to the normal ways of creating new items. For
more information on shopping lists, please see section 10.
Your “Wine” list shows all of your wine notes. Deleting and copying notes from
this list works like deleting and copying recipes from your “Recipes” list.
Your “Beer” list is similar to your “Wine” list, in that it shows all of your beer
notes. Deleting and copying notes from this list works like deleting and copying
recipes from your “Recipes” list.
10
Page 11

Cheese
Your “Cheese” list is similar to your “Wine and Beer” list, in that it shows all of
Reference
Clippings
Featured
your cheese notes. Deleting and copying notes from this list works like deleting
and copying recipes from your “Recipes” list.
The “Reference” icon contains reference items and pairing guides to help you
with cooking, wine, beer, cheese, meat, and other food and drink-related questions. The Reference lists are “read only” lists and cannot be deleted or edited.
Also on the left side navigation panel you will find the “Recent” and “My Lists”
sections. The Recent section includes: Clippings, Featured, Find Results, Last
Import, and Trash. My Lists will include specific lists that you create on your
own.
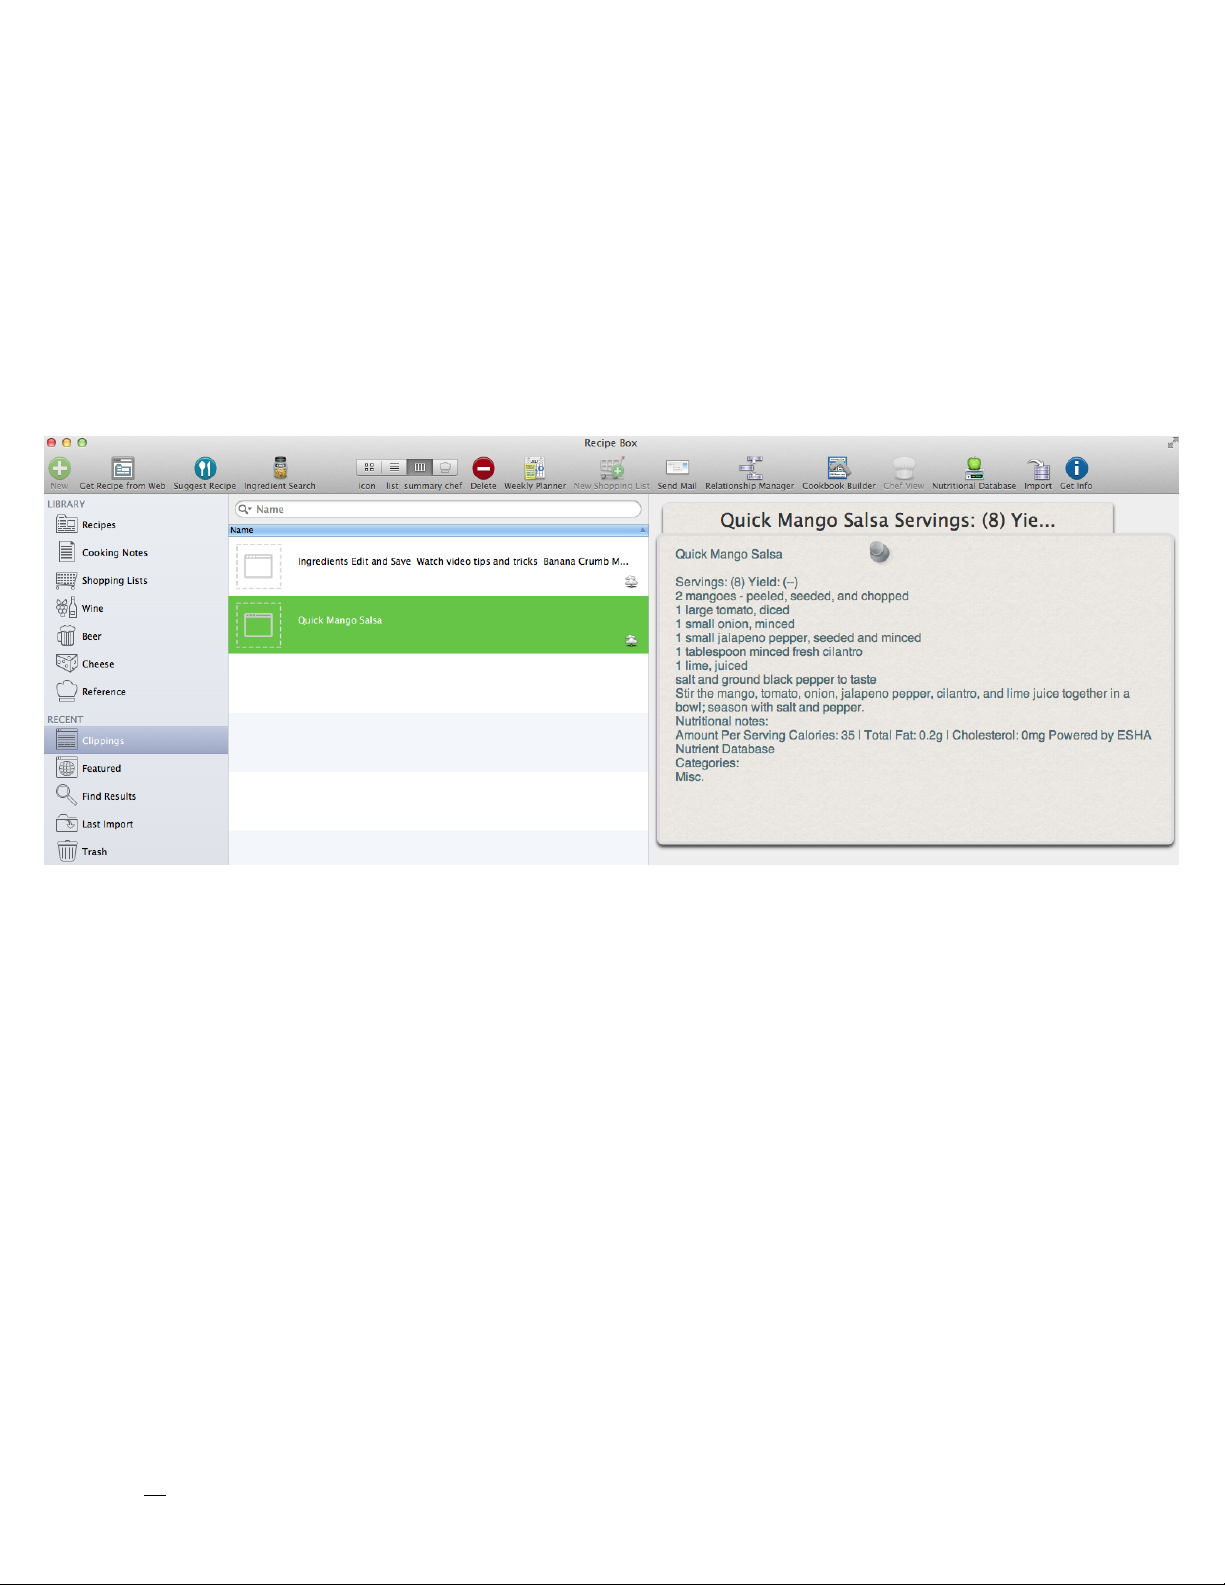
The Clippings list contains selections of text “clipped” from web sites, using the
“Text Clipping” menu item in the Services menu, by dragging text from other
applications to this list, or by pasting text into this list. Clippings can be
double-clicked and imported using the Recipe Import Assistant.
Featured lists are lists of recipes, etc., that are published on the Mariner Software website and displayed within MacGourmet. This list is retrieved from the
web and includes lots of recipe packages put together for MacGourmet users.
Importing them is as simple as finding the packages or recipes that you want to
try and dragging the package or recipe image to a list in your Recipe Box, or by
clicking on the image for a package or recipe. This content is updated regularly
and will o"er users a quick and easy way to add great recipes to their collections.
11
Page 12

Find Results
The results of specific criteria searches you’ve done using the Find menu ap-
Last Import
Trash
Smart Lists
pear in this list.
The "Last Import" list displays the items that were added to your database the
last time you imported something. Every time you do an import, the current list
items are replaced with any newly imported items. Don't worry though, because
even though the items were removed from your "Last Import" list, you will still
be able to find them in your appropriate "My Lists” and anywhere you might
have copied them.
The trash can gives you a convenient location to drag recipes, search results or
anything else from within MacGourmet.
Smart Lists allow you to create lists of items that match criteria you specify. Once created, they can be configured to keep themselves up-to-date as you make changes to
your database, like imports, changes to ratings, etc.
To create a new Recipe Smart List:
1. Click on the view that holds all of your lists.
2. Right-click or Ctrl-click on the list and choose New > Smart Recipe List from
the menu.
3. Alternatively, choose File > New > Smart Recipe List.
12
Page 13

User Lists
User lists, unlike your master lists, can contain sub-lists, and any kind of item.
Also, unlike your master lists, deleting an item from a user list doesn't remove
it from your database. It only removes it from its user list. An item can be
added to and deleted from any user list, or moved and copied to any location
that you would like without fear of having it deleted from a master list. Removing an item from its master list however, will also remove it from any list that
contains it. This means that if you remove a recipe from your “Recipes” master
list, it will also be removed from all of your user lists that contain it.
Creating a new User List
1. Click on the left-hand view that holds all of your lists.
2. Press the “+” button at the bottom left of your recipe box.Creating a sub-list
within a list
1. Select the list you want to add the new sub-list to.
2. Right-click or Ctrl-click on the list and choose New > List from the menu.
3. Alternatively, choose File > New > List or ⇧⌘G (shift-⌘-G).
Recipe Box Widescreen and Normal Display Modes
Your recipe box is able to display your information in two di"erent modes,
widescreen and normal. Widescreen mode stacks your columns side-by-side
and can better take advantage of more recent Apple widescreen displays. Normal mode uses a display similar to that used by Apple’s Mail application. The
mode used can be set in Preferences.
In addition to these modes, the column that displays the items in the main selected list can also be shown using either the normal multi-column “list”, or using a “summary” version of the list, which are more suited to widescreen mode.
When displayed using summaries, the items in the list will be displayed in a
single column, with taller rows that contain a summary of information for the
selected item, including its image, etc. To toggle between list and summary
lists, press the button at the bottom right of the main list column resize handle.
13
Page 14

Customizing Table Columns
The table columns of each type of recipe box list is customizable. This lets you
show only the columns you are interested in. It also allows you to display them
in the order you desire.
Accessing the list of columns to display
Hold the right mouse button down (or press the ctrl key on your keyboard and
hold down the mouse button) and click on any table column. When you do this,
a menu with all of the available columns is displayed, with a check mark next to
all of the columns that are set to display. If you want to hide a column, just select a checked column name from the list, the checkbox next to the item will no
longer appear, and the column will be hidden in your recipe box. To show column, select an unchecked column from the list to add a checkbox, and the column will be then displayed.
Rearranging the columns
Click on a column header and drag it to a new position. Note that there are different columns for di"erent list types. For instance, selecting a list that only
displays recipes will have recipe-related columns available, selecting a wine
note will have wine-note related, etc. User lists, because they can contain any
type of item, will only display columns that are common to all of the items it
can contain.
14
Page 15

Creating and Editing
L
TIP: You can display editors as both dialog windows and sheets, which are attached to the main
window. To specify the editor style you’d like to
use, change the “Display editors as sheets” option
in Preferences.
Edit and view recipes and notes by double-clicking on an item in a list to open
the editor.
Creating an item is done by selecting the appropriate menu item from the File
> New submenu. You can also use the “New” toolbar item, which will create a
new item for the selected list. If you are in one of your user lists, which can
contain di"erent kinds of items, you will be prompted for the type of item to
create.
Double-clicking on a recipe opens the recipe editor. The editor allows you to
view and change the item’s information, including adding notes and pictures.
15
Page 16
The Chef View - Your Kitchen Cooking Helper
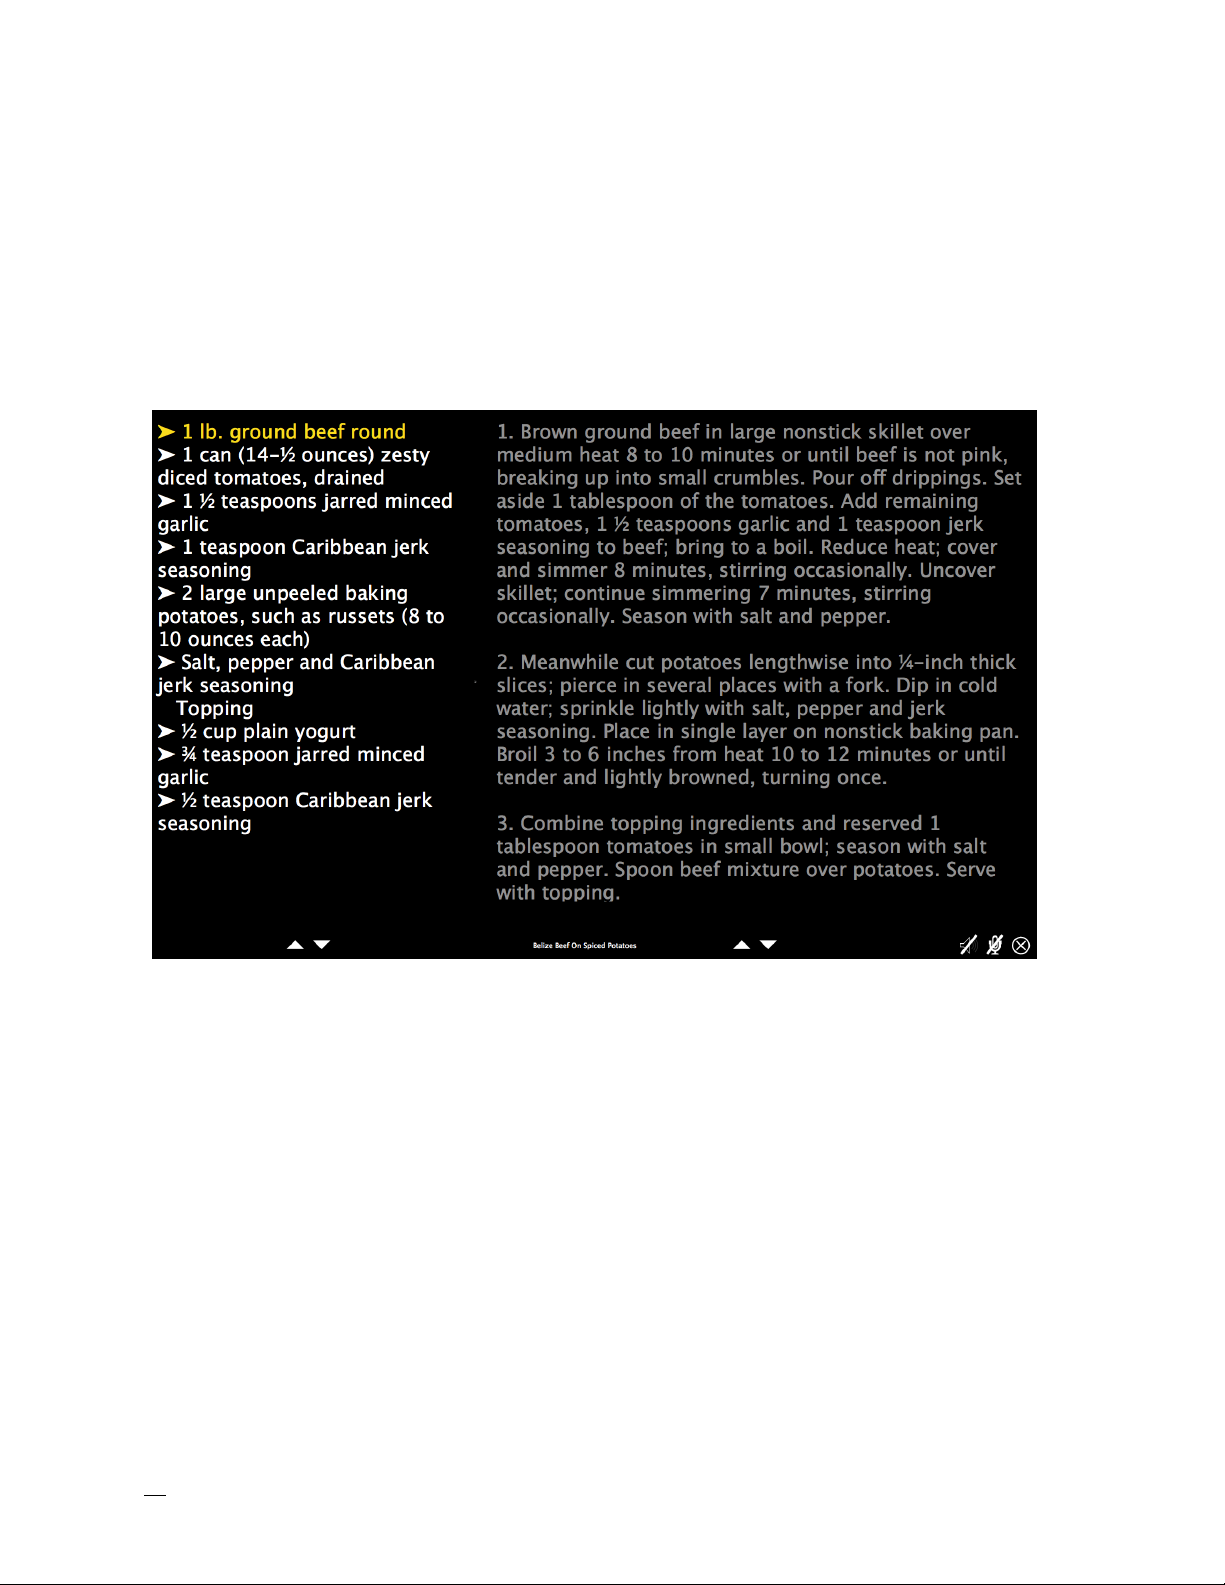
If you prefer to have your laptop or computer in the kitchen while you cook (instead of Mariner’s Gourmet iOS), you can display any recipes you are working
on in a Chef View. Chef Views are windows containing a view of your recipe that
is optimized for use while cooking. The text is large enough so that you can
read the ingredients and directions from a distance. This view displays only
what you need to see while cooking-the list of ingredients and the directions.
Viewing More than One List at a Time
Not content with just viewing and organizing your recipes and notes in your
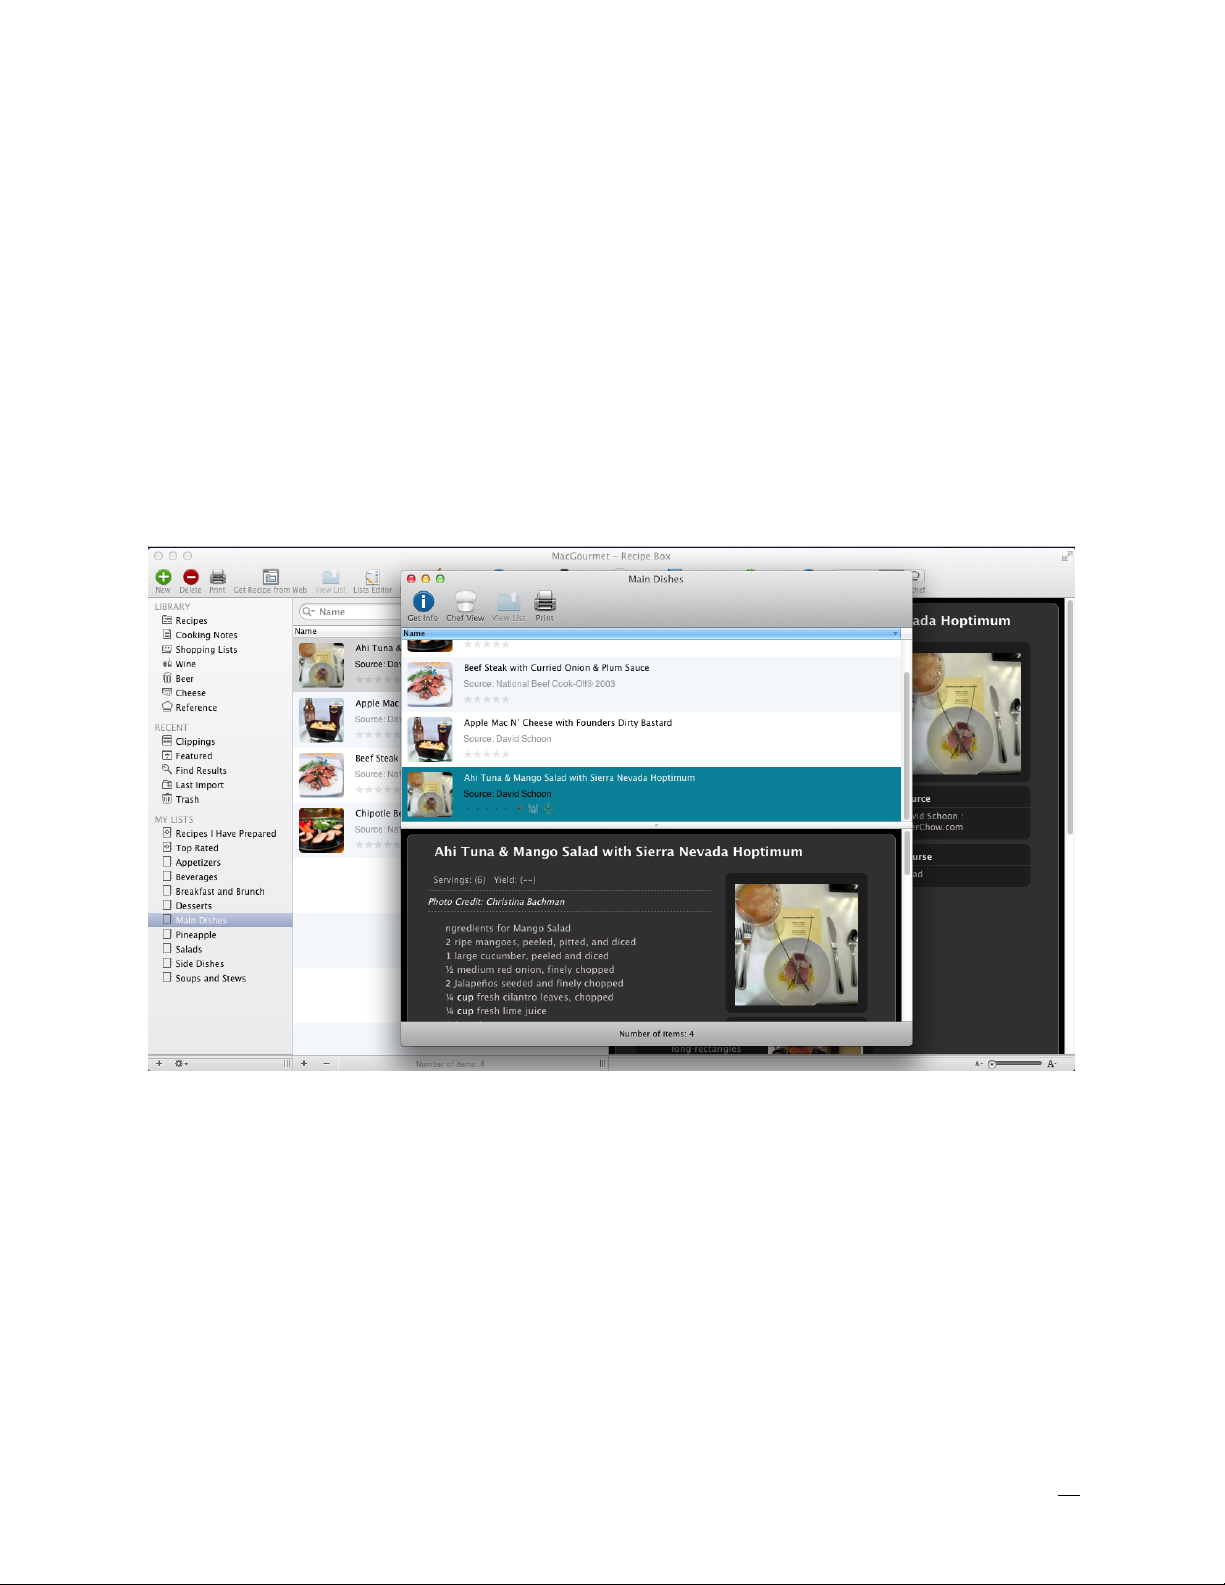
recipe box? No problem. MacGourmet allows you to open lists in their own windows, with their own item views, for extra flexibility. This allows you to see one
of your lists in its own “recipe box” like window, without a view on the left side.
In addition, updating or adding anything to a list when viewed in its own window will also cause the update to happen in your main recipe box, keeping everything synchronized for you.
To view a list in its own window, select a list and either press the “View List”
toolbar item, or choose “View List” from the File menu.
16
Page 17
Changing the Display of Recipes and Notes
MacGourmet o"ers a wide variety of themes for displaying your recipes and
notes. Just go to the General Preferences tab and select a theme. With a recipe
selected, you can see how your recipe looks with di"erent themes.
Viewing Larger Versions of Your Images
If the image for a selected item is too small to see, you can increase the size by
clicking on the image in your recipe box (if there is one).
17
Page 18
Recipe Box Toolbar Icons
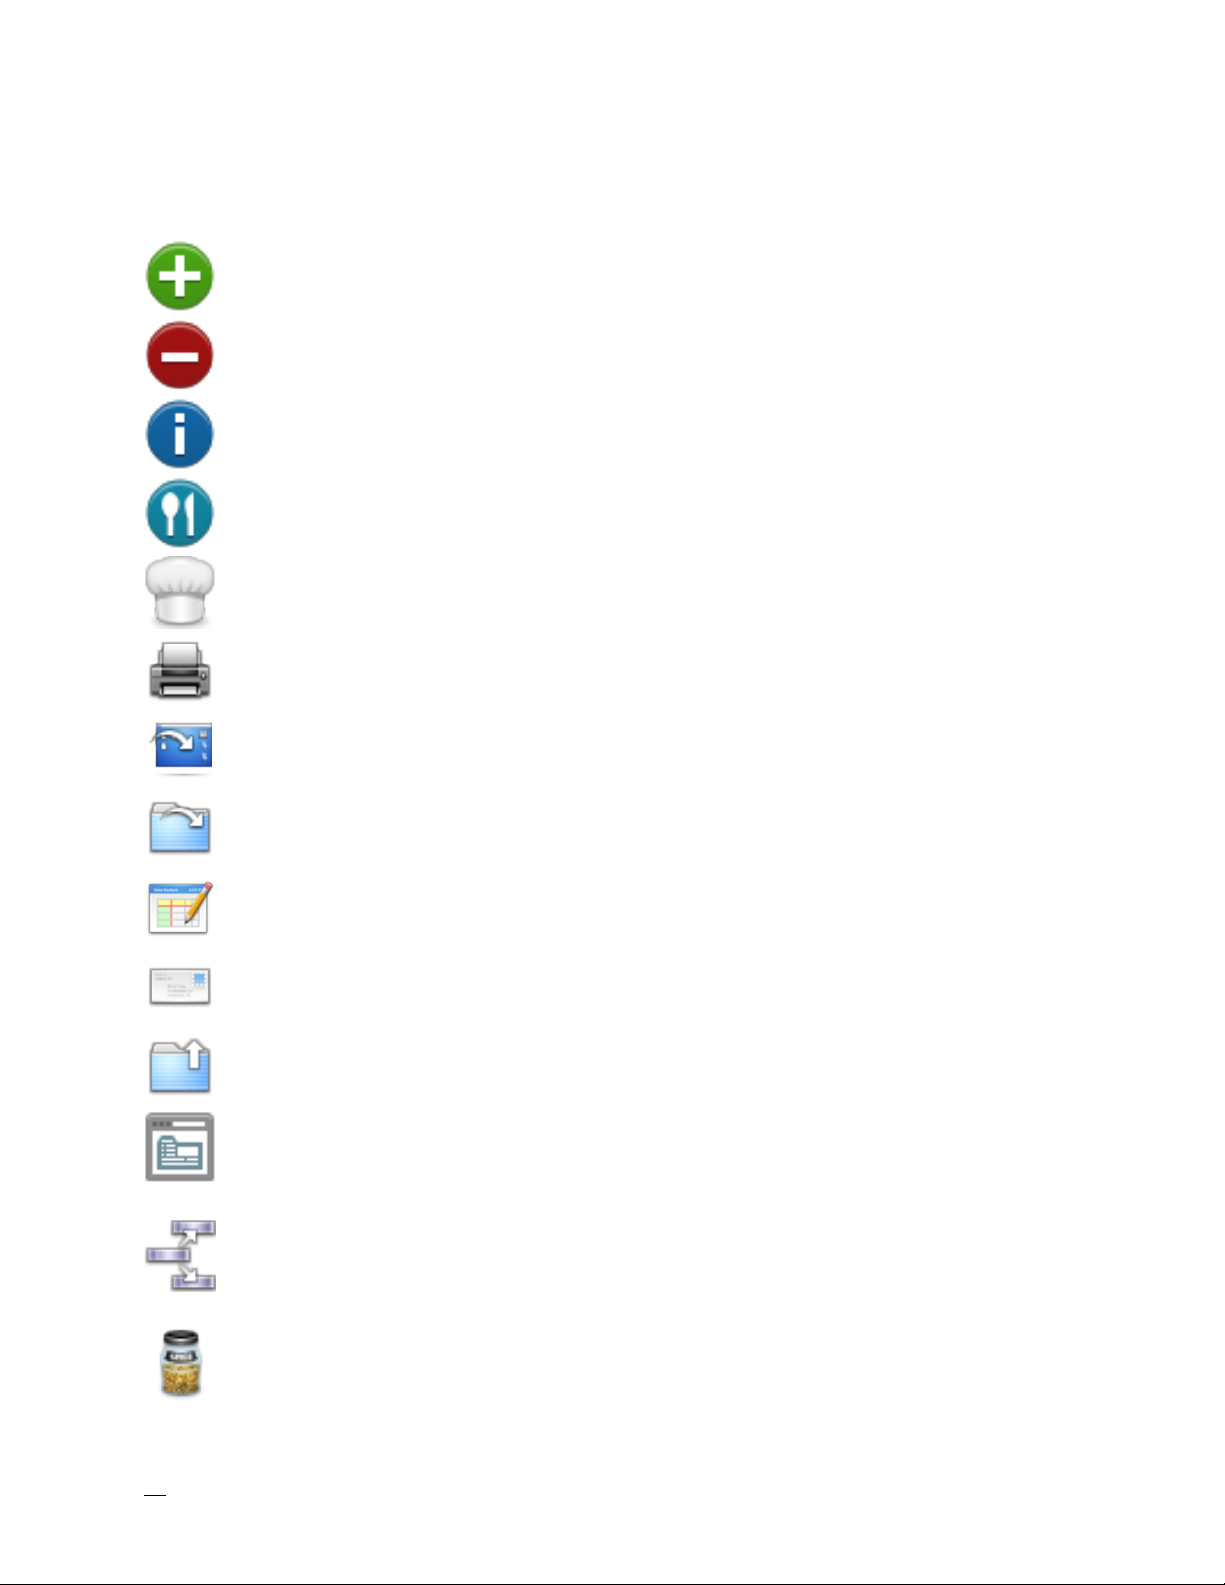
New - Add a new item
Delete - Delete the selected item or items
Get Info - Display the editor for the item
Suggest Recipe - Displays random recipes to consider preparing
Chef View - Display the chef’s view for the selected items
Print - Print the selected items
Export - Export the selected items
Import - Import items into your library
Library Browser - Browse the information in your library
Send Mail - Email the selected items
View List - Display the selected list in a separate window
Get Recipe from Web - Searches for recipes from supported recipe sites
Relationship Manager - Link recipes and notes to remember recipes that go
well together
Ingredient Search - Searches for ingredient criteria from your recipes
18
Page 19

This page is intentionally blank.
19
Page 20
2
2. Creating and Editing Recipes
This section describes creating and editing recipes.
Creating Recipes
To create a new recipe:
1. Choose File > New > Recipe (⌘-N).
A new empty recipe in the currently selected list is created and the info window
is displayed.
Editing Recipes
You can edit and view
recipes simply by
double-clicking on one
in one of your lists or by
selecting something in
your recipe box and
choosing File > Get Info.
The Info Tab
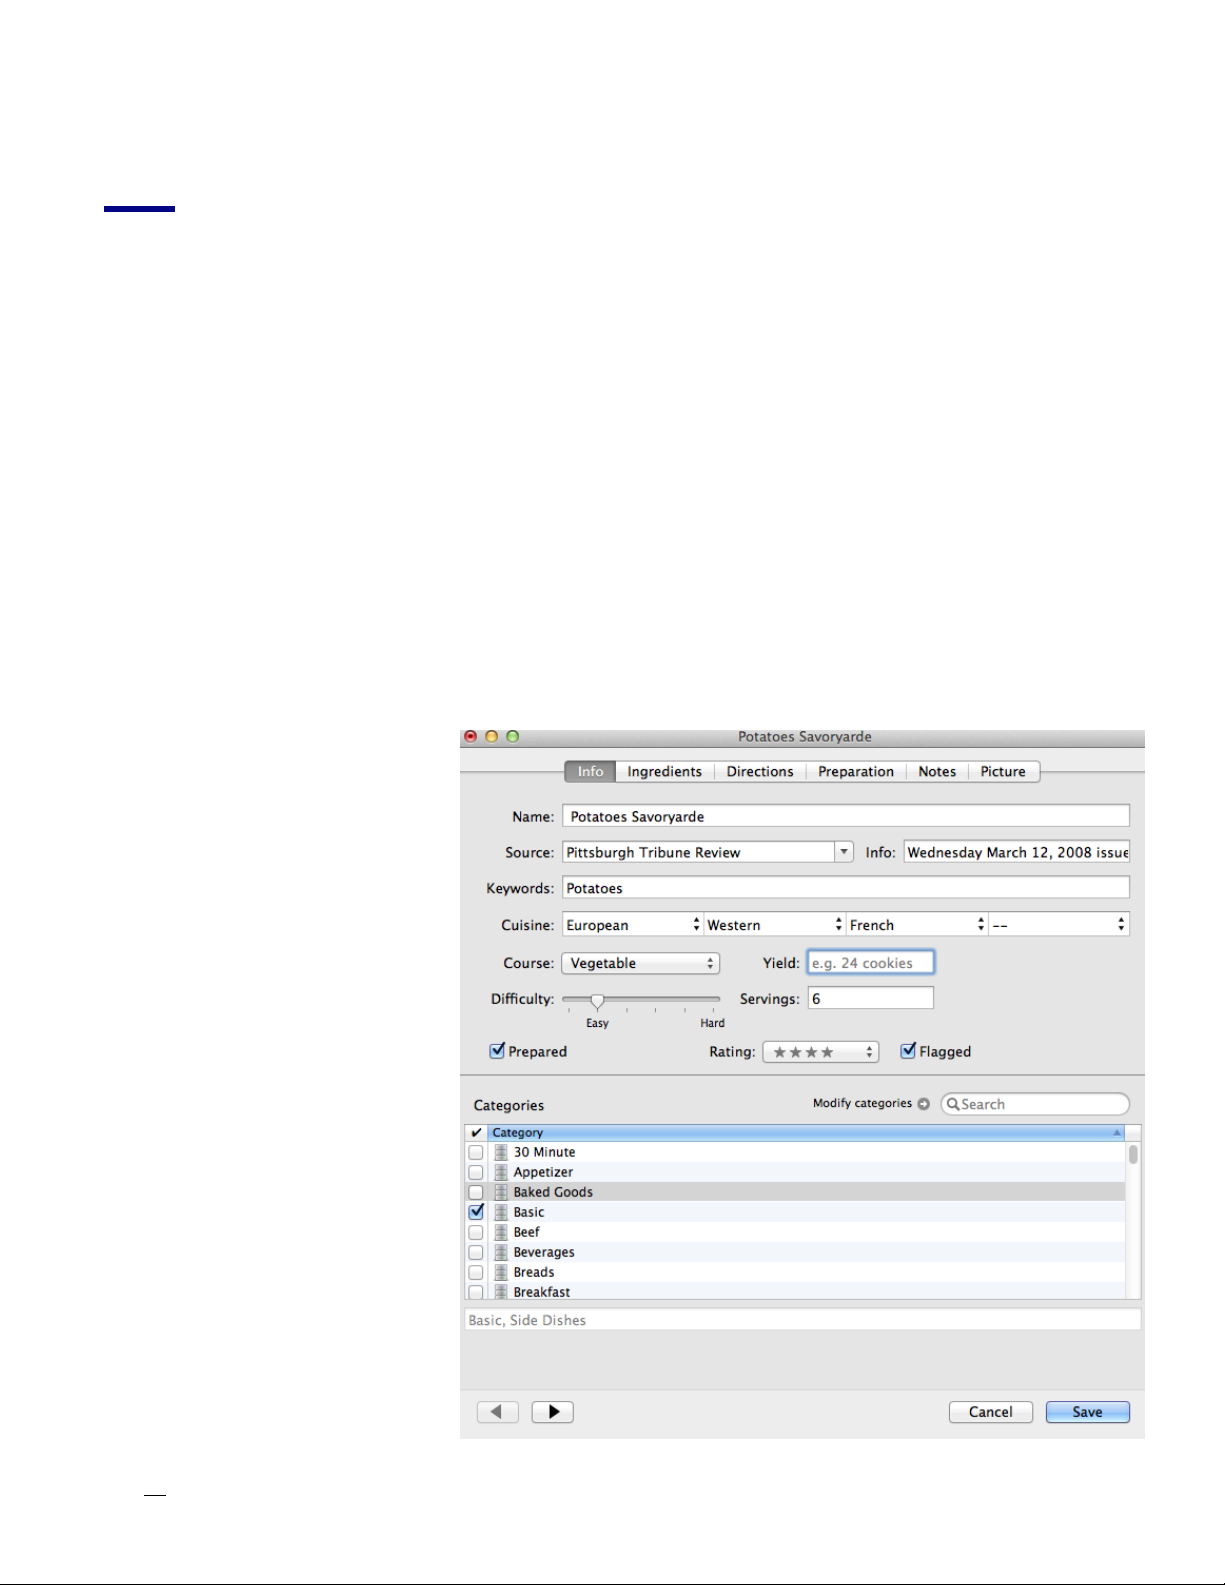
1. The recipe name.
2. The source of the
recipe. This is where
the recipe came from.
3. Any additional source
info you’d like to
note, like the author
or a cookbook.
4. Free-form area where
20
Page 21

you can enter any keywords or text that you’d like associated with the recipe.
5. The cuisine for the recipe, with up to 3 levels of specification. For example:
Asian, East Asian, or Hunan.
6. The course in which the recipe would normally be served.
7. The yield of the recipe, such as 24 cookies. This is di"erent from servings,
which are used for nutritional calculation and which can only be a number.
8. The actual number of servings the recipe makes.
9. The di%culty level of the recipe, from easy to hard.
10. Any categories for the recipe. Categories are great for searching and organ-
izing your recipes. Fields marked with a are categories you’ve added.
Fields marked with a are system categories and categories marked with a
are locked and can’t be deleted.
21
Page 22
The Ingredients Tab
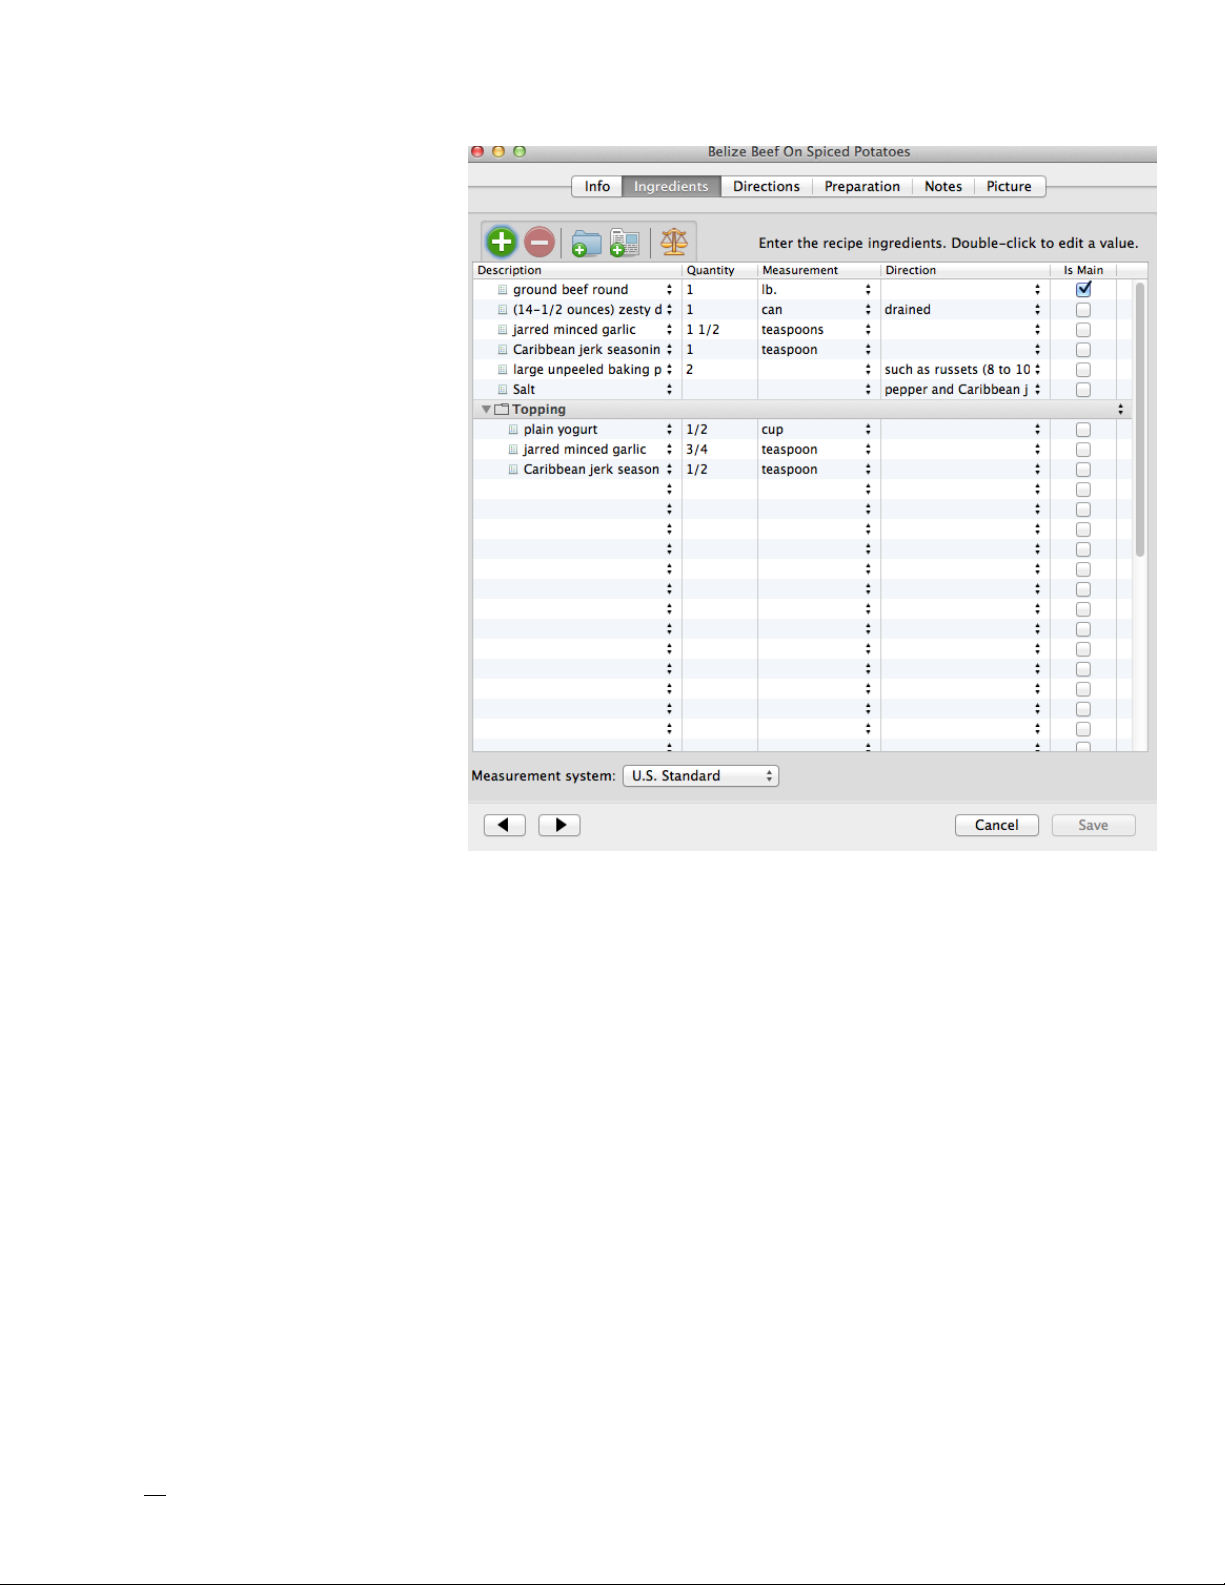
1. The quantity needed
for an ingredient.
2. The measurement of
the ingredient.
3. What the ingredient
actually is.
4. Any directions associated with the ingredient, like “chopped” or
“diced.”
5. Whether or not an ingredient is a divider.
A divider ingredient is
one used only to
separate ingredient
groups from each
other.
6. Whether or not an ingredient is one of the main recipe ingredients. Marking an ingredient as a
“main” ingredient makes it easier to search.
7. Add a new ingredient, or delete any selected ingredients.
8. Change the scale of the recipe. Enter any number you want here and the ingredients will change to reflect the new amount.
9. The measurement system used by the ingredient, U.S. Standard or metric.
22
Page 23
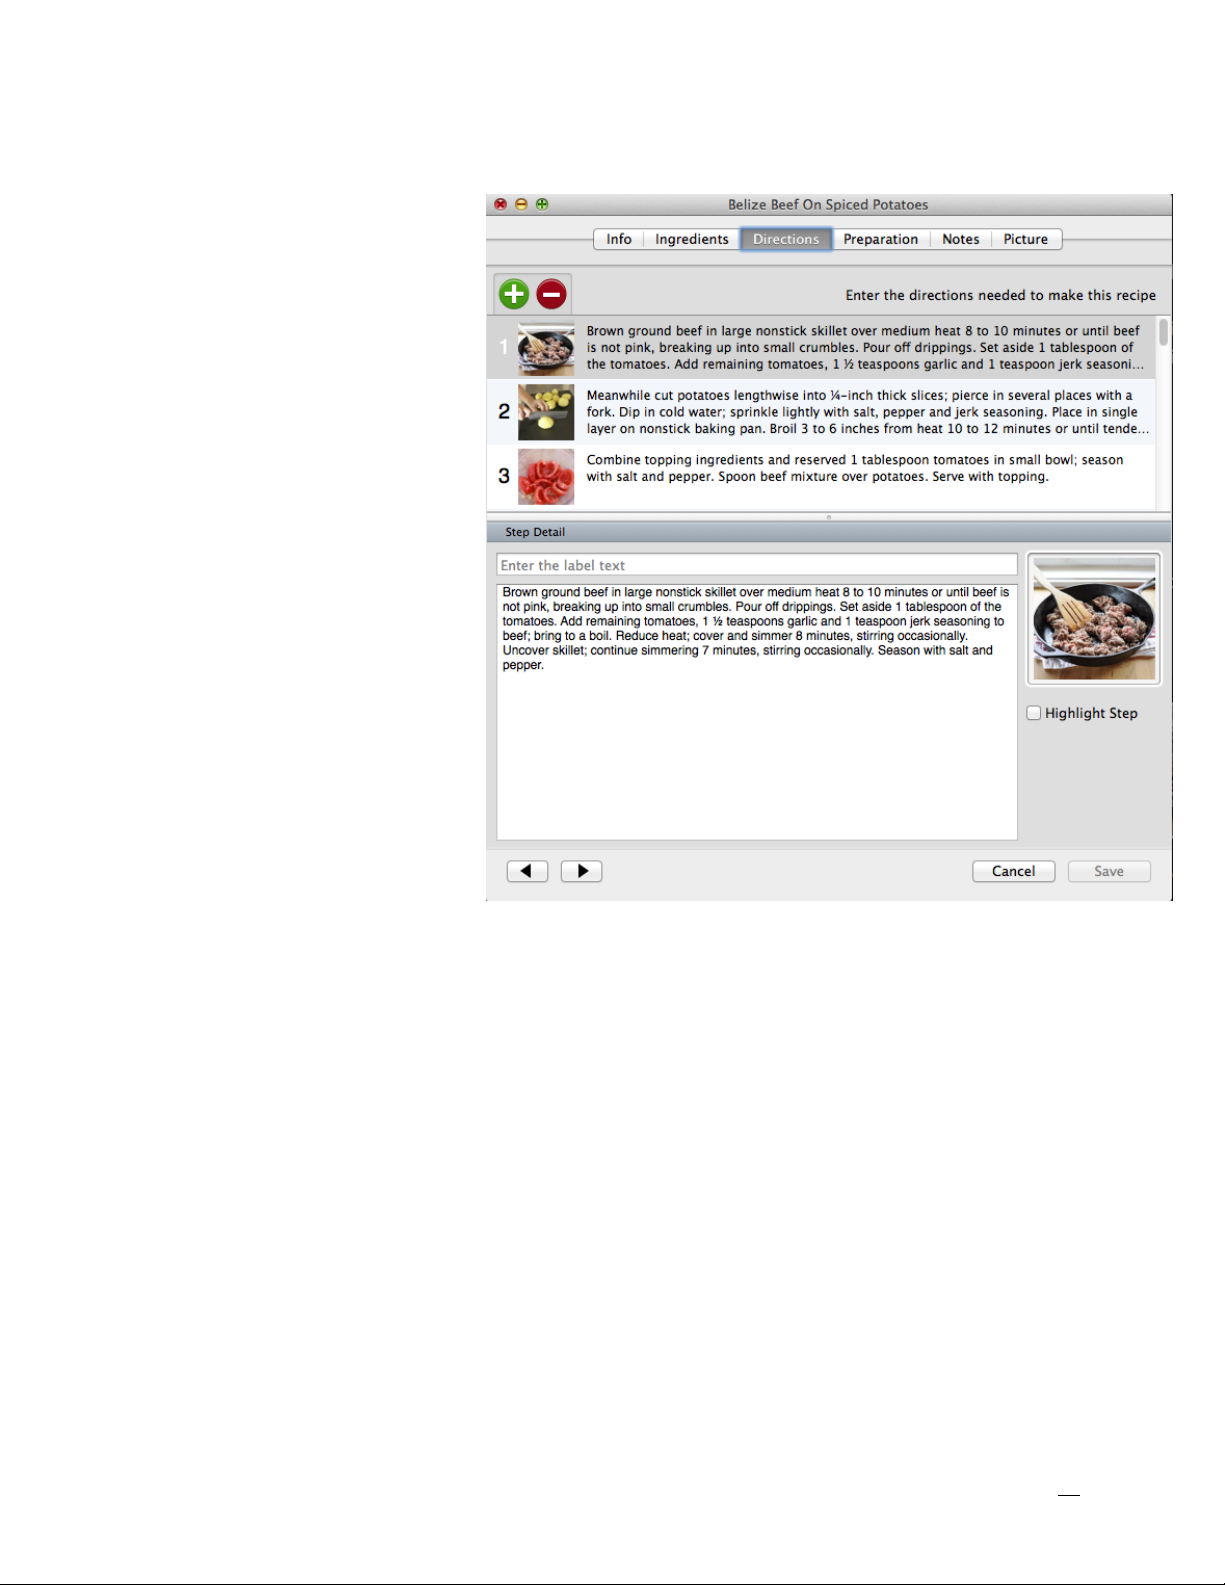
The Directions Tab
The directions tab provides a place for the stepby-step how-to information about preparing the
recipe.
You can also add label
text, notes, images, as well
as an option to “highlight a
step” so as it stands out
from the other steps in
your recipe.
Press the Previous button
arrow to go to the last recipe and Next arrow to go
to the following button.
23
Page 24
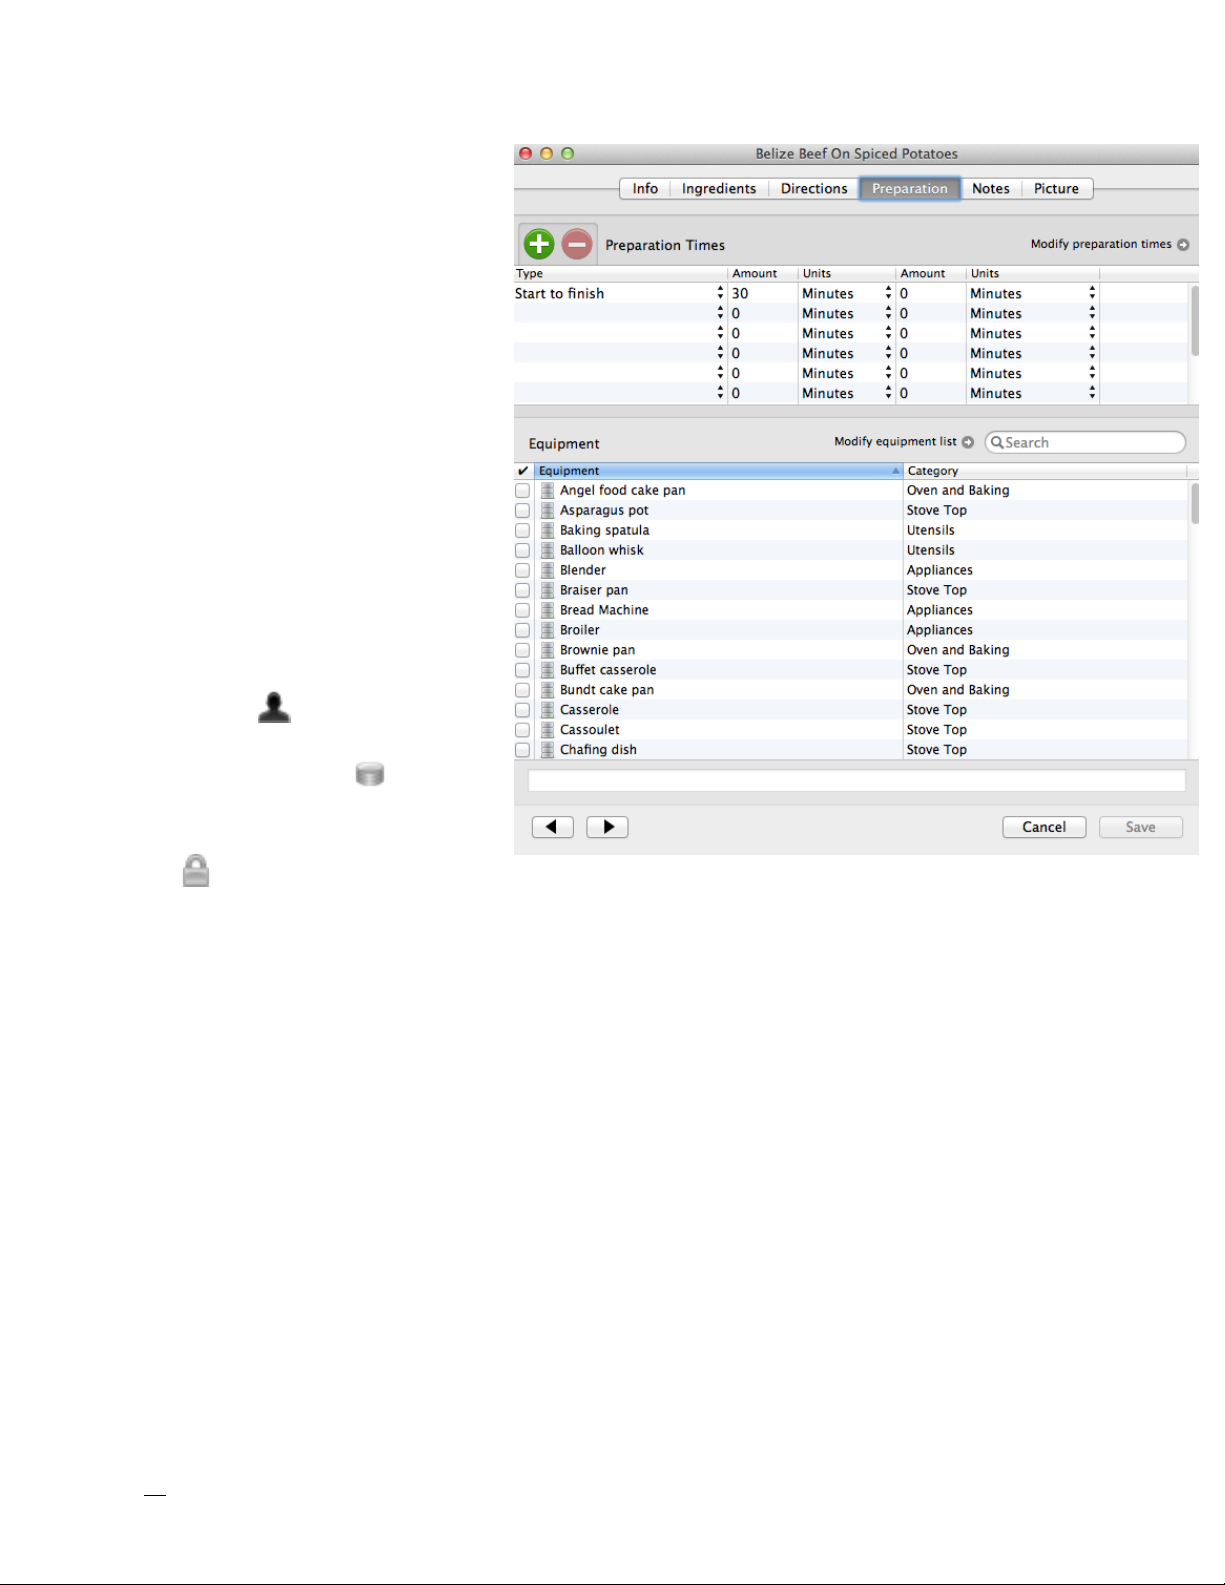
The Preparation Tab
This tab defines the type of
time, like “Start to Finish” or
“Prep.”
1. The amount and units, for
instance 25 Minutes, or 1
Hour 30 Minutes.
2. Add a new preparation
time, or delete any selected times.
3. Any special equipment
that is required by the
recipe. Check any that are
needed. Fields marked
with a are equipment
you’ve added. Fields
marked with a are system equipment and
equipment marked with a
are locked and can’t
be deleted.
24
Page 25
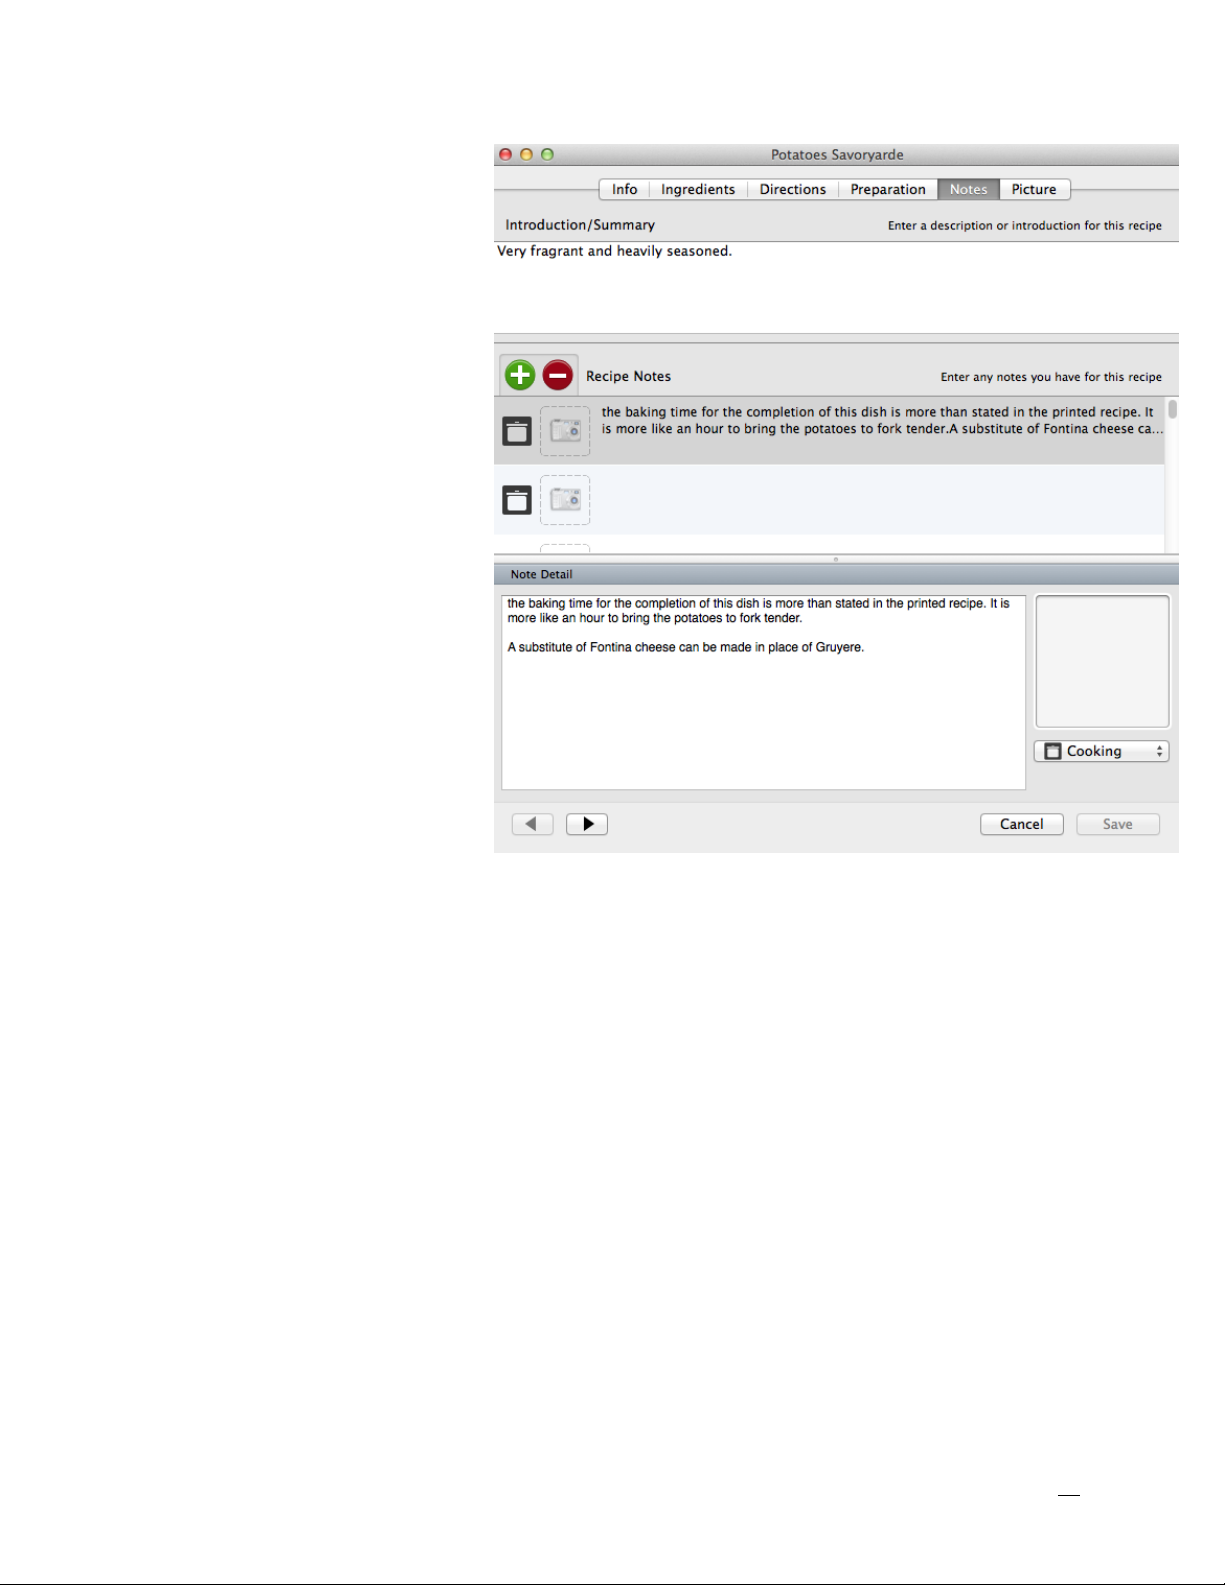
The Notes Tab
1. Enter an introduction or
summary here. This can
be an introduction to
the recipe, why it’s
great, a little story associated with it, etc.
2. Enter any notes that
would be helpful when
making the recipe.
3. The Note details give
you a section to drill
down on specific areas
of the recipe you want
to showcase.
4. If you choose to, you
can add an image here.
5. The drop down menu
lets you link a recipe
note as a specific category such as Chef, Cooking, Pairing, Prep, Serving, or Private.
25
Page 26
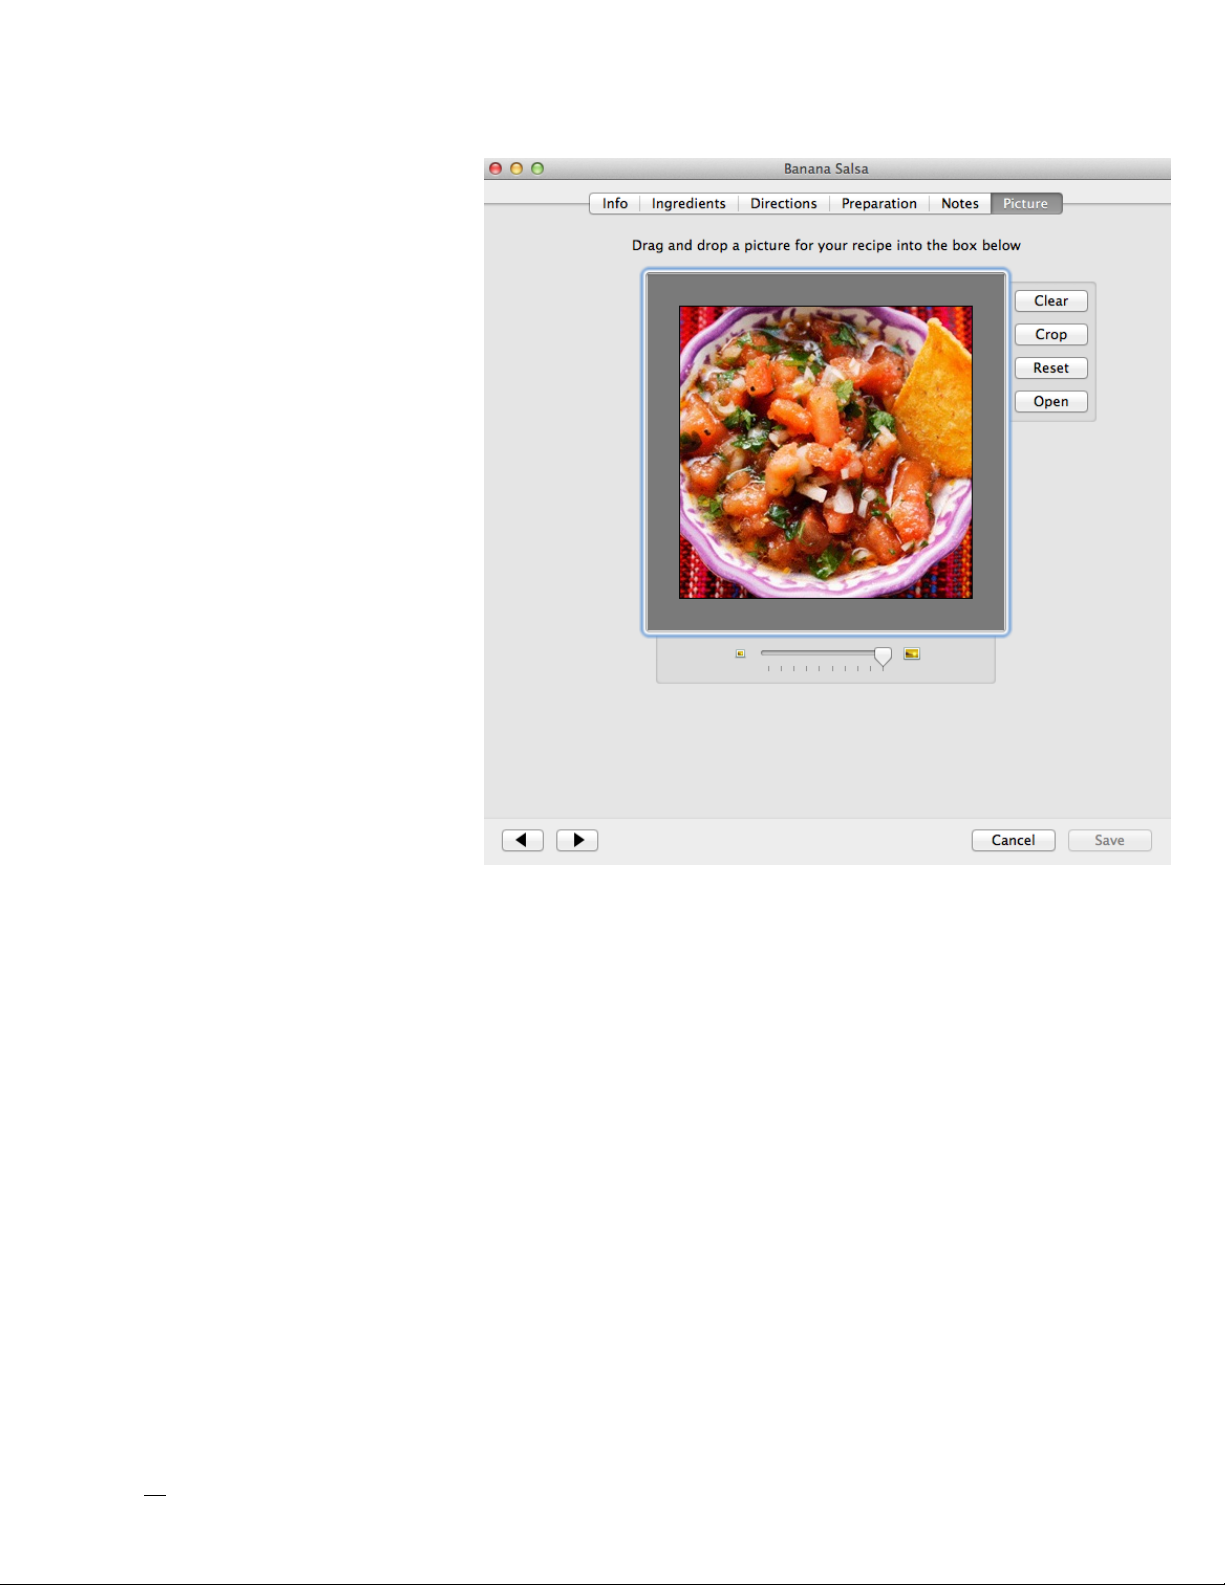
The Picture Tab
The area that displays the
primary image for the recipe. You can drag and
drop an image to this area
to change the picture, or
select it and choose Edit >
Paste.
1. The Crop Box. Dragging this box around
and pressing the “Crop”
button allows you to
save only part of the
image as the primary
image for the recipe.
2. The picture field.. In
this example, Belize
Beef on Spiced Potatoes, which is from the
sample recipes included with MacGourmet.
3. Clears the current picture, making it so that the recipe no longer has a picture.
4. Uses the area surrounded by the “Crop box” to specify a smaller, more focused version of an image as the primary image.
5. Resets a cropped image to the original version.
6. Allows an image for the recipe to be opened from your computer’s disk
drive.
7. Changes the size of the crop box.
26
Page 27
3
3. Creating and Editing Wine, Beer and Cheese
Notes
This section describes creating and editing wine, beer and
cheese notes.
Creating Wine, Beer, and Cheese Notes
To create a new wine, beer, or cheese note, choose File > New > Wine/Beer/
Cheese Note. This will create a new empty wine/beer/cheese note in the currently selected list, provided it is editable and can contain wine/beer/cheese
notes.
Editing Wine, Beer, and Cheese Notes
To edit and view notes by double-clicking on one in a list or by selecting something in your recipe box and
choosing File >
Get Info.
The Info Tab
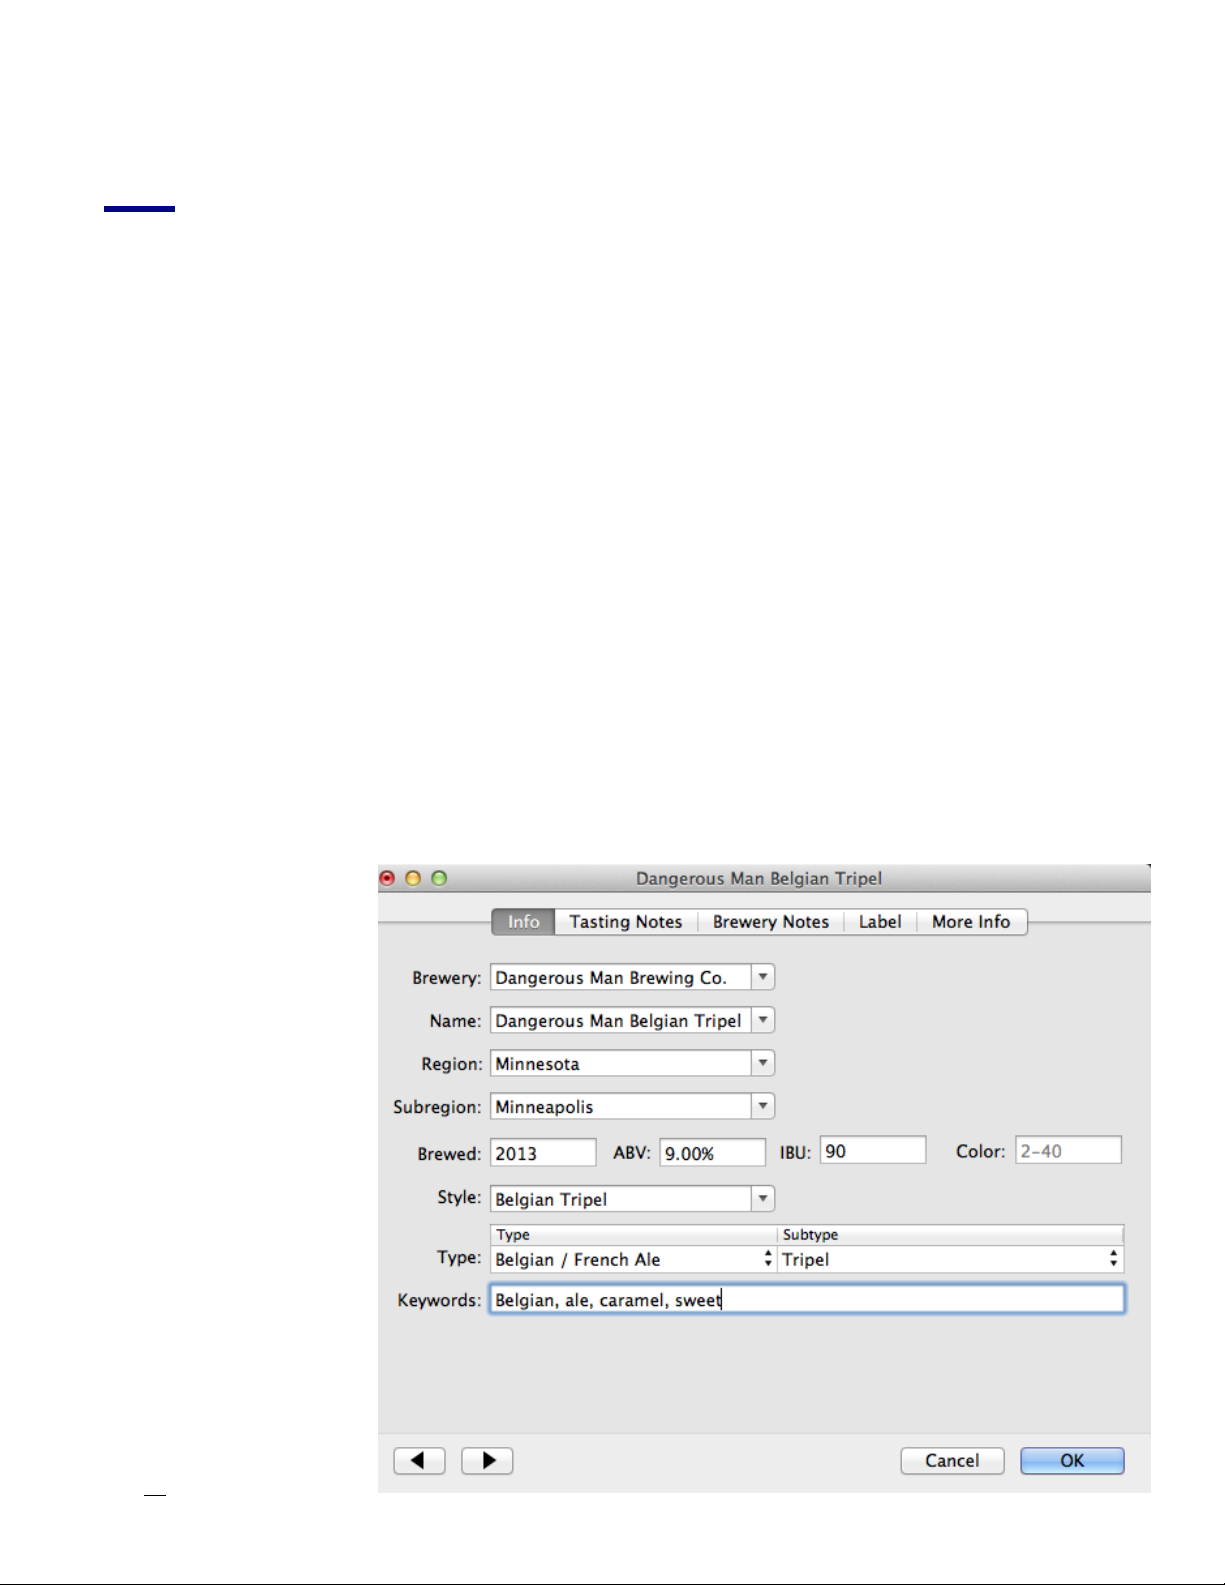
1. The name of
the winery,
brewery, or
dairy that produces the
wine, beer, or
cheese.
2. The name of
the wine, beer,
or cheese.
3. The region the
27
Page 28

wine, beer, or cheese comes from.
4. Any subregion for the wine, beer, or cheese.
5. The wine vintage, the year brewed, or the date of the production of the
cheese.
6. The wine, beer, or cheese style. For example: light, medium, full-bodied for
wine, IPA or hoppy for beer, and soft or semi-soft for cheese.
7. The wine, beer, or cheese type, such as Red: Cabernet Sauvignon, German
Ale: Hefeweizen, or Goat Milk: Blue.
8. Free-form area where you can enter any keywords or text that you’d like associated with a the note.
28
Page 29
The Tasting Notes
Tab
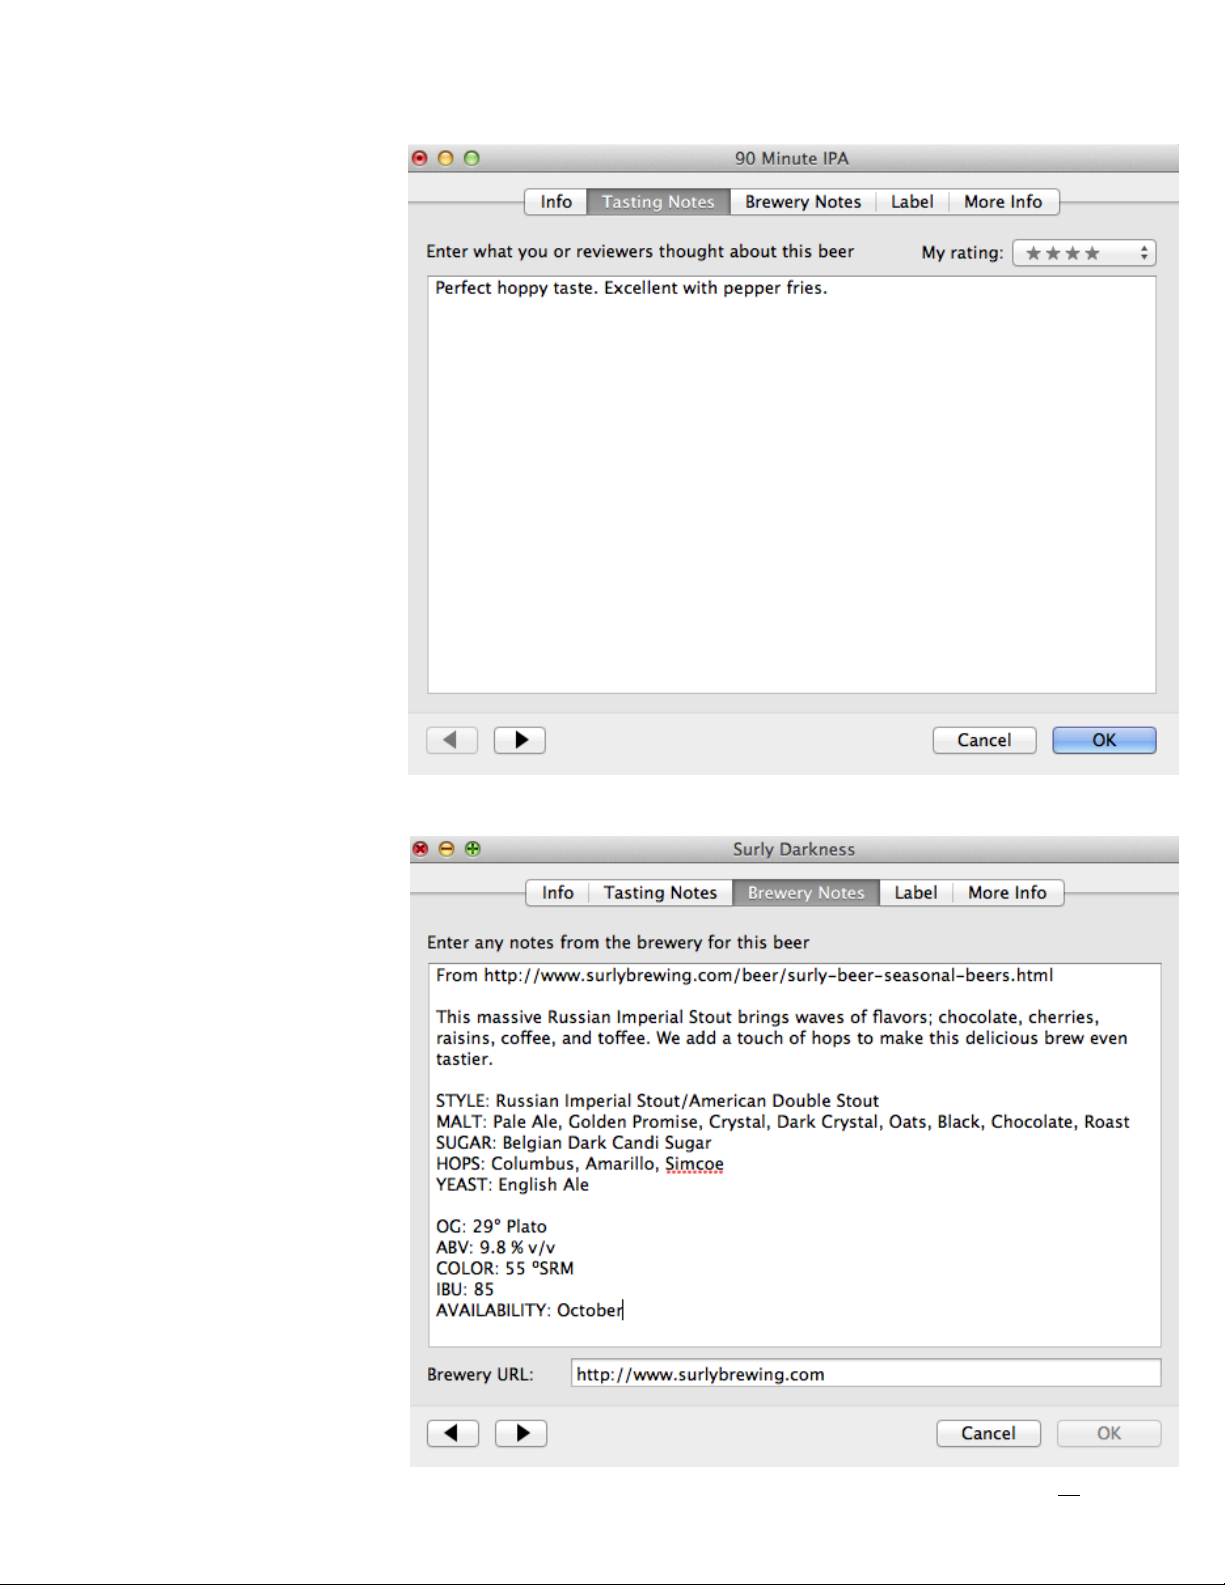
1. My Rating - A
rating of how
much you enjoyed the wine,
beer, or cheese.
2. Notes area - Any
notes or
thoughts that
you had about
the wine, beer,
or cheese - after
you’ve tasted it.
The Winemaker,
Brewery, and Dairy
Notes Tab
1. Record notes
from the winemaker, brewery,
or dairy about
their product.
2. Enter the web
address of the
winemaker in the
winemaker,
brewery, or dairy
URL field. This
will be useful for
future reference
of the item.
29
Page 30
The Label Tab
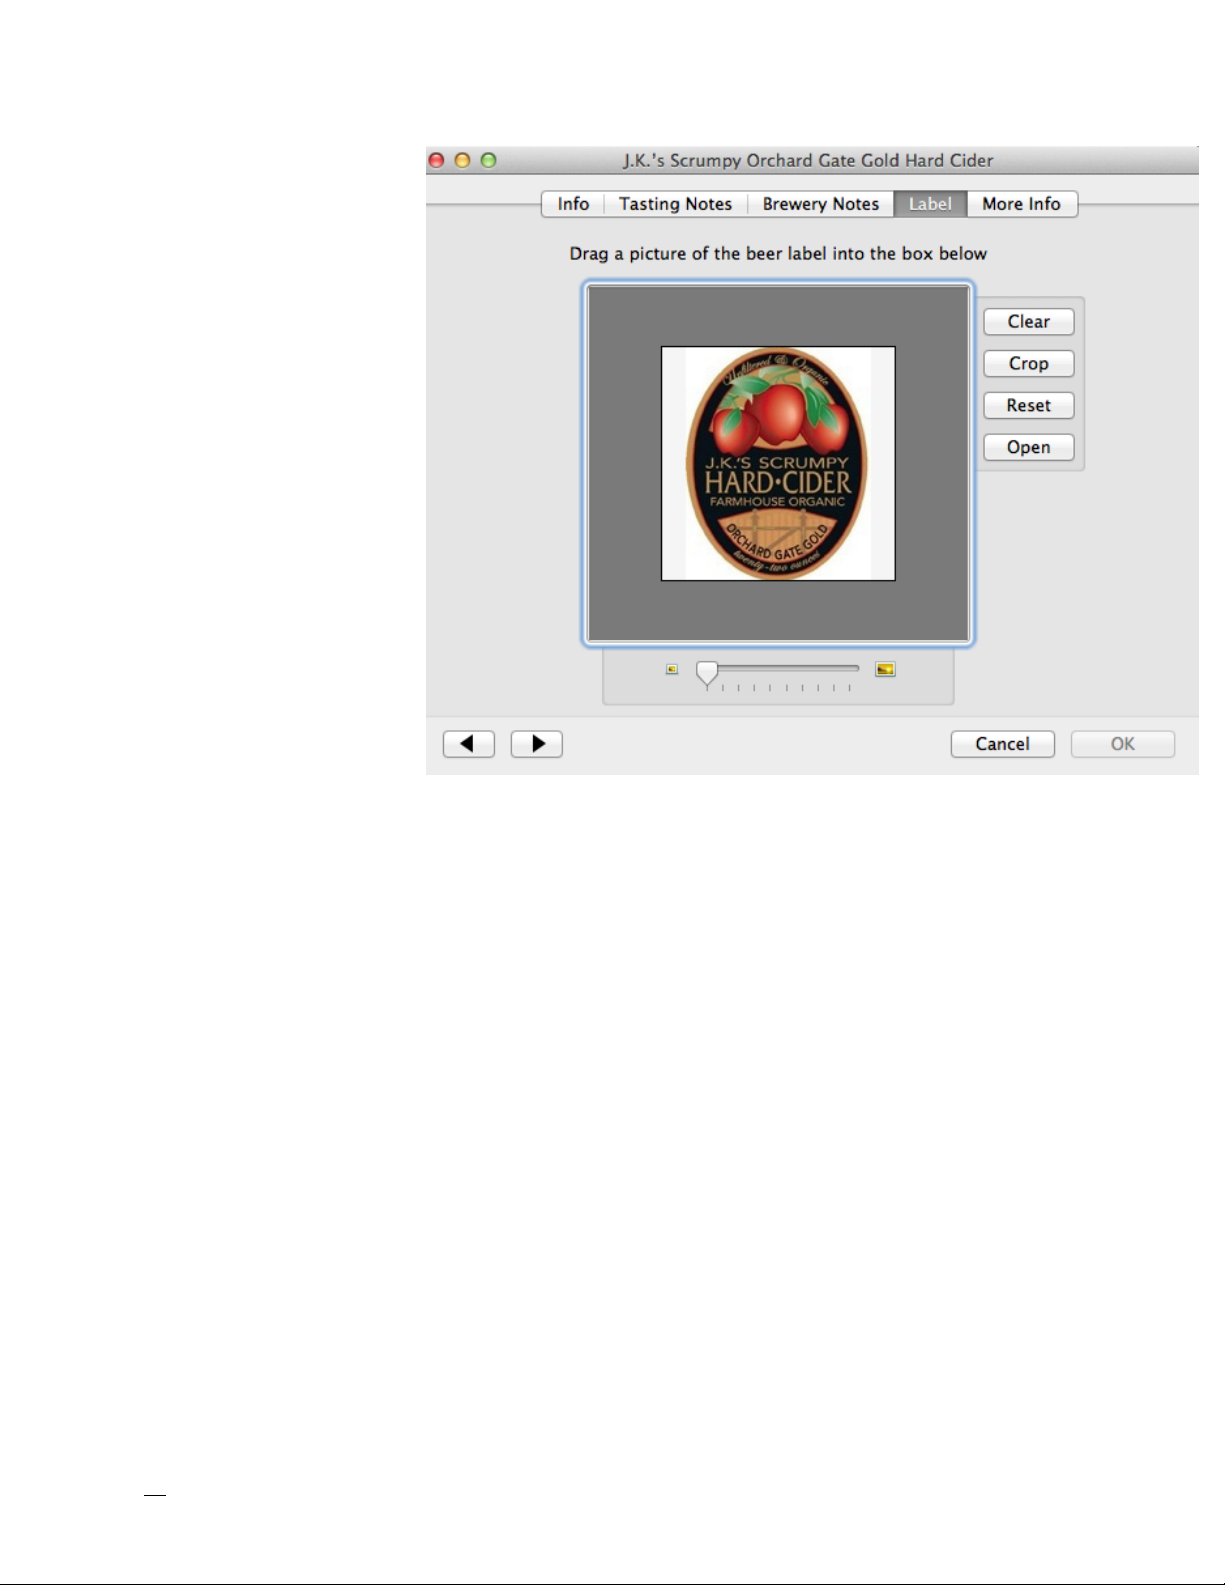
The area that displays
the primary image for
the wine, beer, or
cheese note. You can
drag and drop an image to this area to
change the picture, or
select it and choose
Edit > Paste.
1. The Crop Box
area- Dragging
this box around
and pressing the
“Crop” button allows you to save
only part of the
image as the primary image for
the recipe.
2. Clear button - deletes the current picture, making it so that the recipe no
longer has a picture.
3. Crop button - Uses the area surrounded by the “Crop box” to specify a
smaller, more focused version of an image as the primary image.
4. Reset button - Reverts a cropped image to the original version.
5. Open button -Allows an image for the recipe to be opened from your computer’s disk drive.
6. Size Slider - Changes the size of the crop box.
30
Page 31
The Cellar (Wine
Notes) and More
Info (Beer and
Cheese Notes) Tab
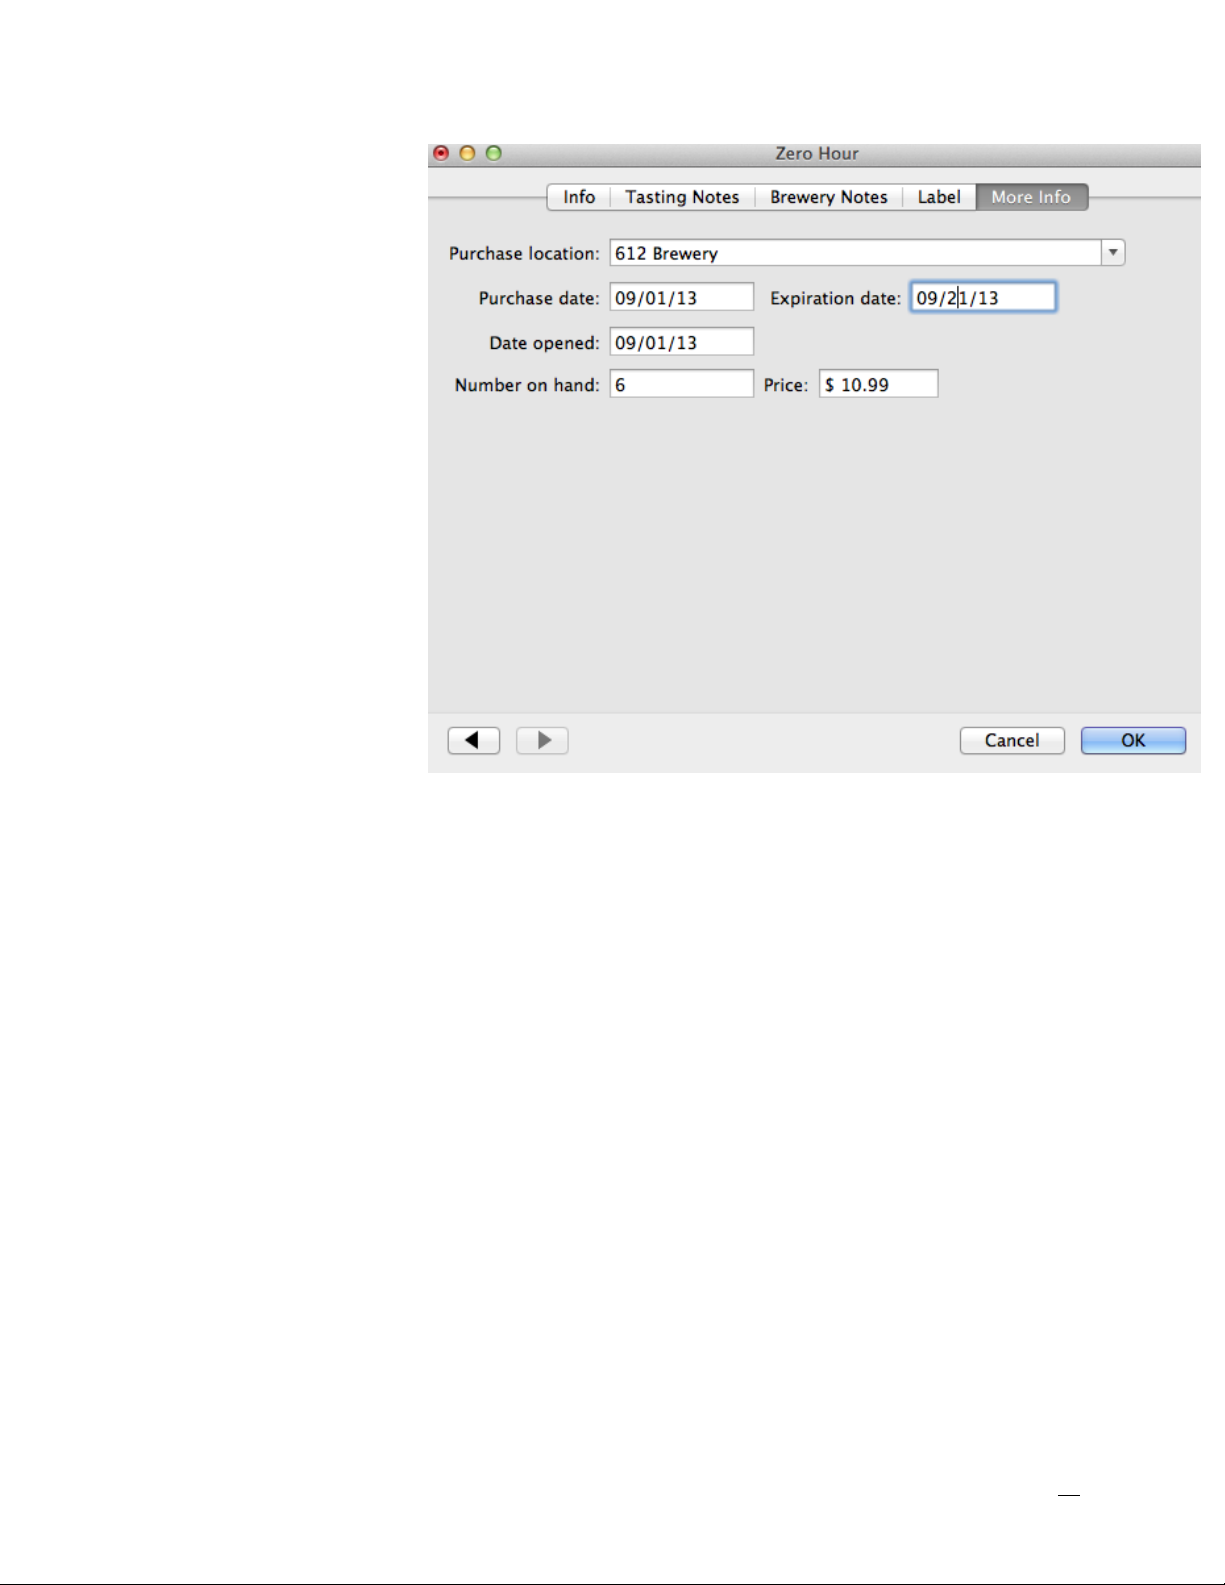
Here is a spot for info
about the purchase
and storage of the
wine, beer, and
cheese.
1. Purchase location
- The location
where you purchased the wine,
beer, and cheese.
2. Purchase date
-The date you
purchased the
wine, beer, and
cheese.
3. Maturation date - The date the wine, beer, and cheese matures.
4. Date opened - The date you opened the wine, beer, or cheese.
5. Number on hand - The number of bottles of the wine or quantity of beer or
cheese that you have on hand.
6. Price - The price you paid for each bottle of wine, quantity of beer, or block
of cheese.
31
Page 32
4
4. Creating and Editing Cooking Notes
This section describes creating and editing your cooking
notes.
Creating Cooking Notes
To create a cooking note, choose File > New > Note (⇧-⌘-N). This will create
an empty cooking note in the currently selected list, provided it is editable and
can contain cooking notes.
Editing Cooking Notes
You can edit and view notes simply by double-clicking on one in a list or by selecting something in your recipe box and choosing File > Get Info.
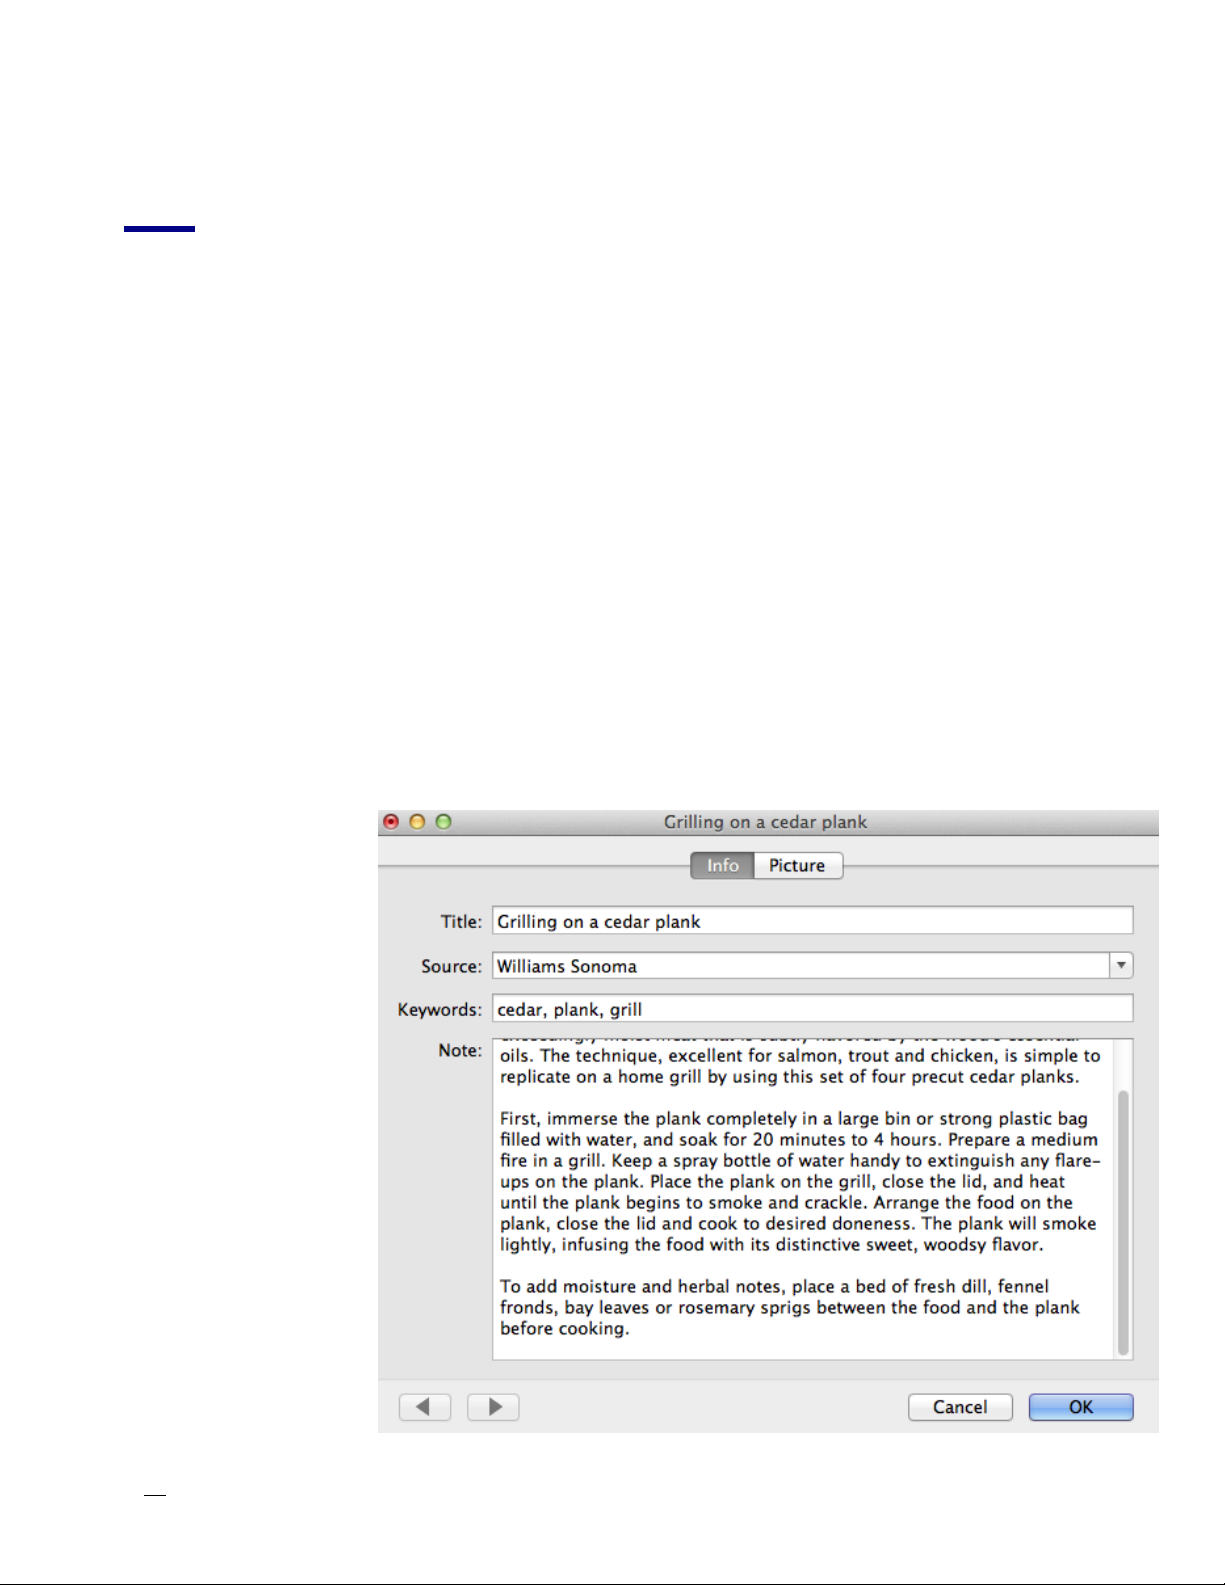
The Info Tab
1. The cooking
note title.
2. The source of
the cooking
note.
3. Free-form
area where
you can enter
any keywords
or text that
you’d like associated with
the cooking
note.
4. The text of the
cooking note.
32
Page 33
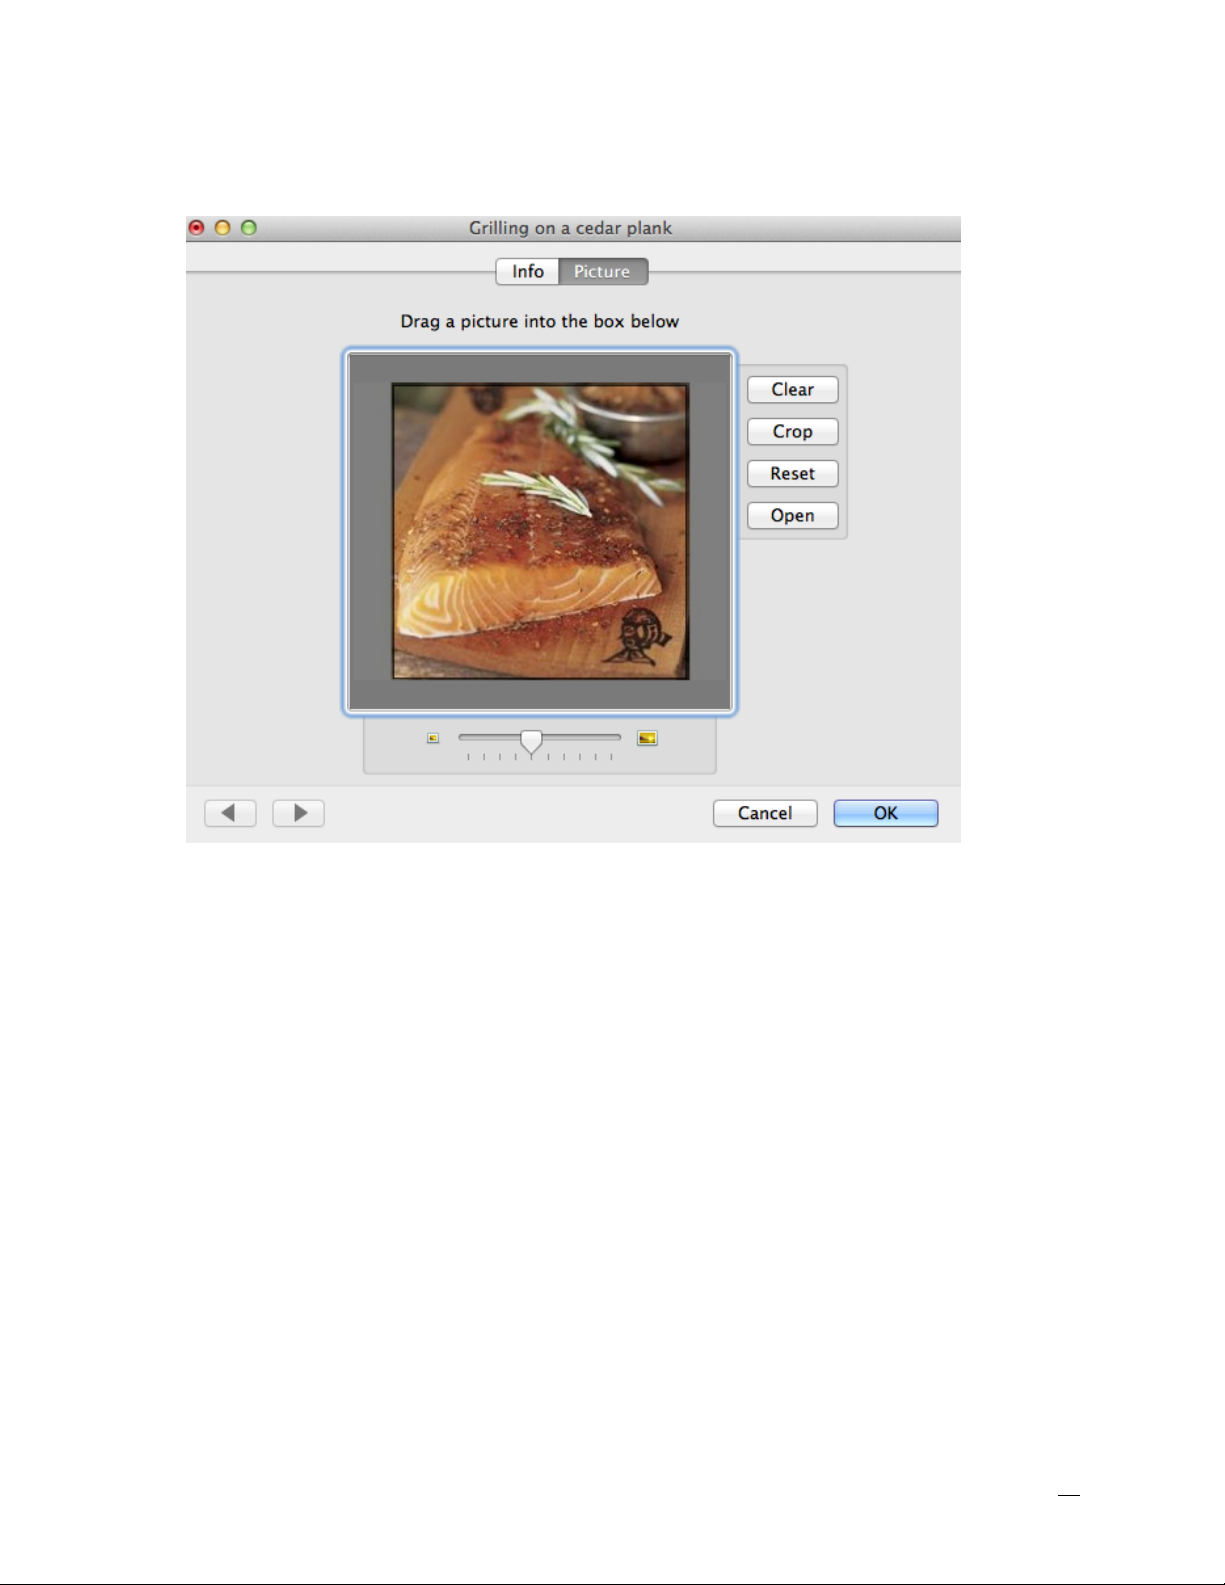
The Picture Tab
1. For a description of each component, see the Picture tab of the recipe edi-
tor.
2. Drag and drop image into box and edit to preference.
33
Page 34
5
5. Searching
This chapter describes ways you can find recipes and notes
There are a variety of ways to find things in MacGourmet. You can quickly filter
on certain fields, or all fields in your recipe box using the Search Field. You can
search for recipes, wine, beer, cheese and cooking notes using the basic search
functionality. You can create Smart Lists that search for items based on criteria
you specify: lists that keep themselves updated as you add and delete items.
You can search for recipes based on ingredients you have and ingredients you
do not have. Finally, you can do "Suggest Recipe" searches that return random
selections from your recipe collection. This is great if you can't decide what to
make!
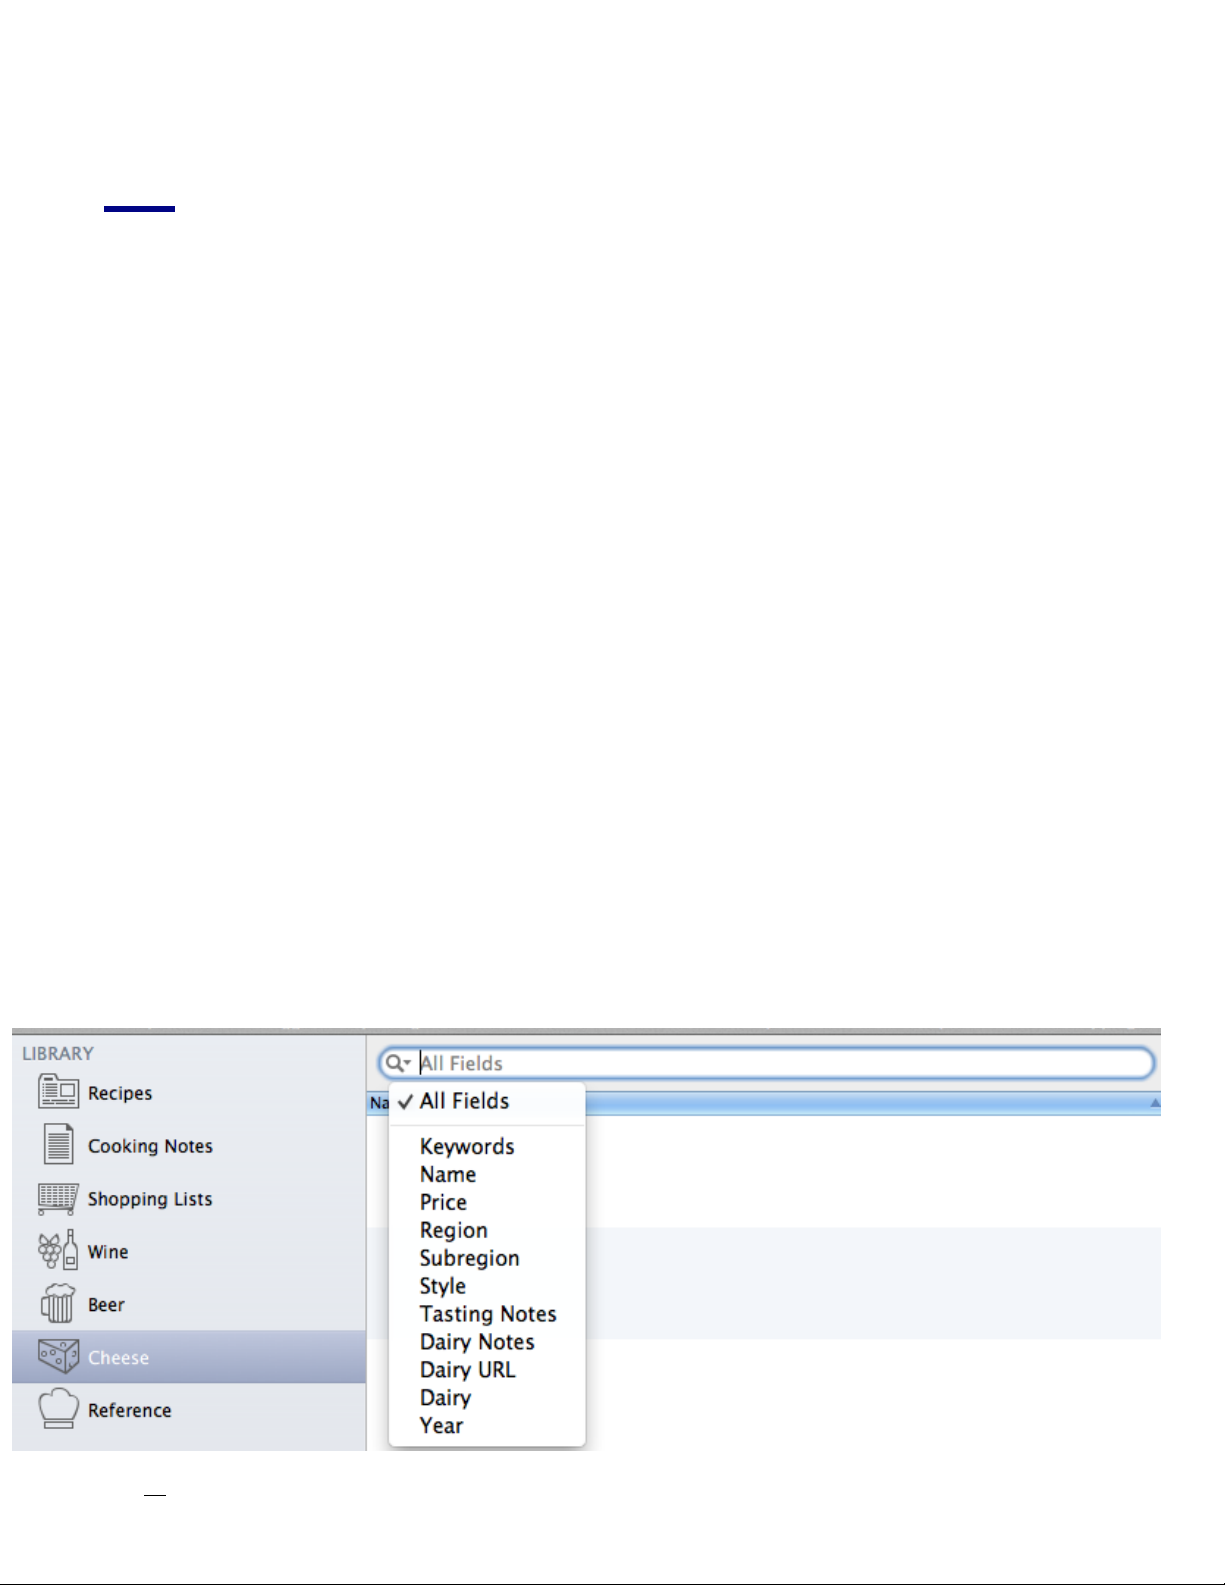
The Search Field
The ingredient search field is found on the toolbar of your recipe box and your
list views. It allows you to pick a field to search on and quickly filter the selected list based on whatever you type into this field.
34
Page 35
Using Basic Search
L
TIP: You can move the cursor to the search field by
pressing ⌥⌘F (option-⌘-F).
Basic search allows you to search for recipes, wine, beer, cheese notes and
cooking notes using the fields that correspond to each of those items. For instance, you can search for recipes using name, keywords, source, etc. You can
search for wine notes using vintage, the region, or comments in a winemaker's
note. You can even search for beer notes using brewery notes. When you
search, your results are displayed in the “Find Results” list in your recipe box.
Your find results will be saved for your current MacGourmet session, but quitting the application and restarting it later will clear the “Find Results” list, so
that it does not get too cluttered with old searches.
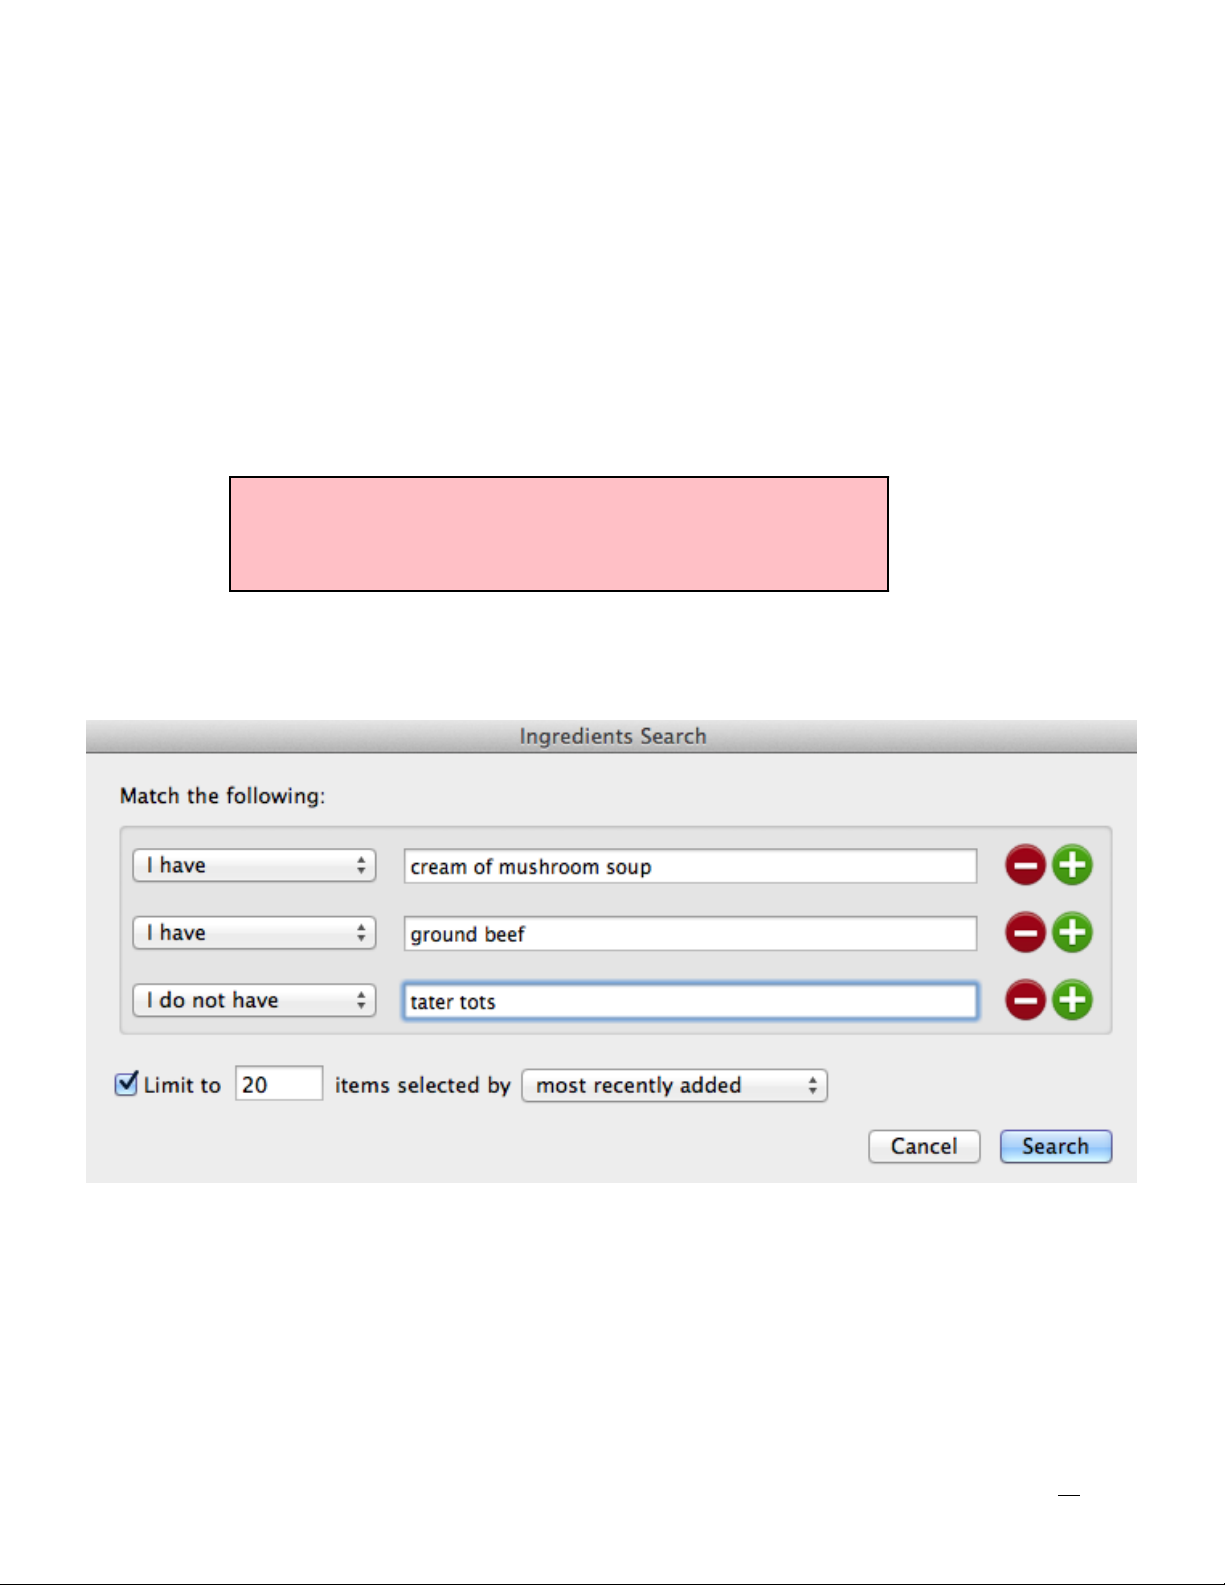
Using “Ingredient Search”
Ingredient Search is an easy and quick way to find recipes based on ingredients
you have and ingredients you do not have. For instance, the screenshot above
shows a recipe search that calls for chicken and potatoes, but not garlic, be-
35
Page 36
cause you don’t have any garlic. When your search is complete, your results are
displayed in the Find Results list of your recipe box.
Displaying the Cupboard Find window
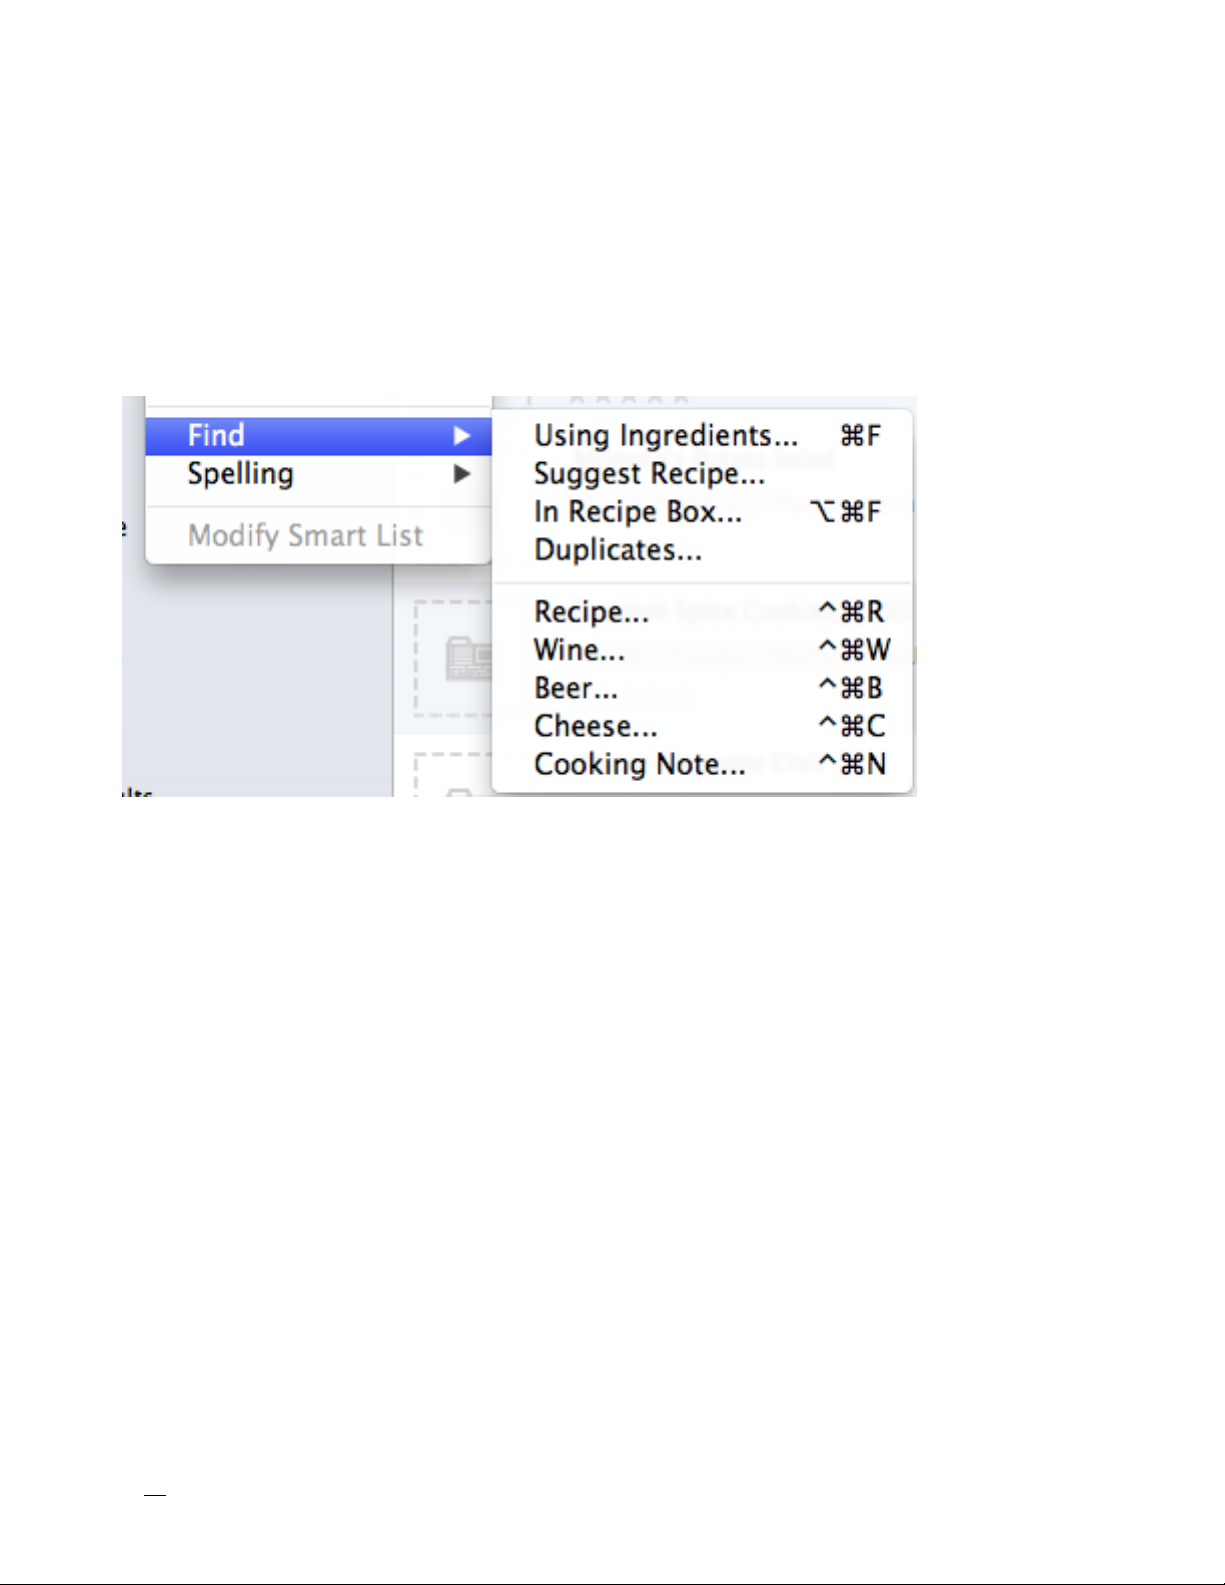
Choose Edit > Find > Suggest Recipe... (You can also press ⌘-F).
36
Page 37
Creating and Using Smart Lists
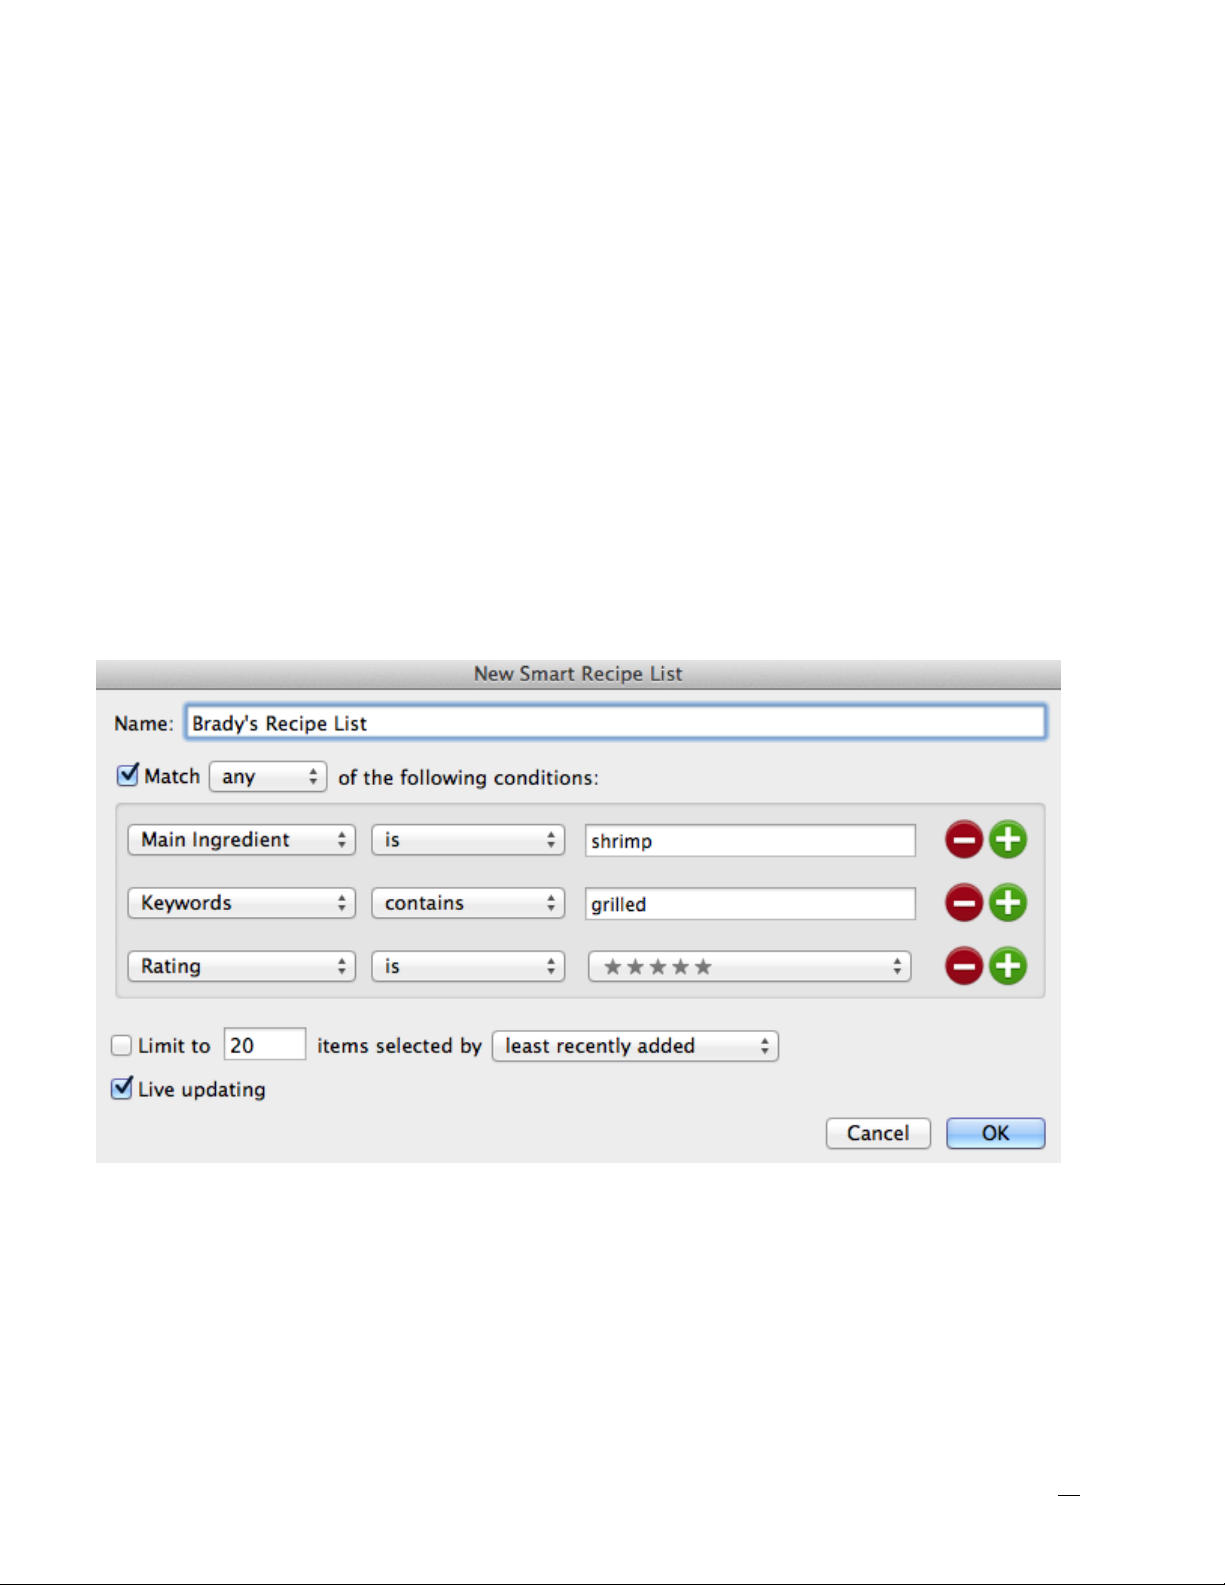
Let MacGourmet create recipe, note, wine, beer, and cheese lists for you automatically with Smart Lists. Simply specify your criteria — like recipes you have
prepared or recipes with a rating greater than 3 or wine from the region of
France — and MacGourmet will do the rest. MacGourmet finds the items that
match the things you specify and creates a list that updates itself automatically.
If you were to create a Smart List for recipes, using the values shown with the
recipe example below, a new list would be created for you that displayed recipes that you have prepared with a rating that is greater than 4. As you mark
more recipes as prepared, and rated others, this list would be updated to reflect
these changes, provided you had the "Live updating" box checked. Checking the
“Limit to” check box would allow the Smart list to show only 20 of the recipes in
the database that matched your list settings instead of all of them.
37
Page 38

L
TIP: Because Smart Lists are updated each time something in the database changes, adding more and more
lists can slow response times in large databases. Large
databases will respond more quickly when there are
fewer lists that need updating.
Creating a new Smart Recipe List
1. Click on the view that holds all of your lists.
2. Choose File > New > Smart Recipe List. You can also right-click (or ctrl-click
for one button mouse users) on the view that holds all of your lists and
choose New > Smart Recipe List in the menu that pops up.
3. A new list will be added, which you can rename by double clicking on it. To
edit a list, select it and choose Edit > Modify Smart List. You can also select
it and right-click (or ctrl-click for one button mouse users) on it to display a
menu, from which you can then choose “Modify Smart List.”
38
Page 39

Doing a Suggest Recipe Search
Can't decide on what to make? Not a problem. Suggest Recipe is a fun way to
search for 5 random recipes from your collection. To do a new Suggest Recipe
search:
Choose Edit > Find > Suggest Recipe.
Suggest Recipe can be used as often as you want, returning a new, di"erent list
of recipes each time you use it.
Finding Recipes, Wine, Beer, Cheese, and Cooking Notes
You can search for each item type by selecting the appropriate command from
the Find menu.
Finding recipes
Choose Edit > Find > Find Recipes..., or press ⌃⌘R (ctrl-⌘-R).
Finding wine notes
Choose Edit > Find > Find Wine Notes..., or press ⌃⌘W (ctrl-⌘-W).
Finding beer notes
Choose Edit > Find > Find Wine Notes..., or press ⌃⌘W (ctrl-⌘-B).
Finding cheese notes
Choose Edit > Find > Find Wine Notes..., or press ⌃⌘W (ctrl-⌘-W).
Finding cooking notes
Choose Edit > Find > Find Cooking Notes..., or press ⌃⌘R (ctrl-⌘-N).
When you use any of these commands, a Find window appropriate for the type
of item you are searching for will be displayed, so that only the information appropriate to the type of item will be available for your search.
You can also search your library for potential duplicate recipes. Find Dupli-
cates looks at the directions of each of your recipes and compares them to
those of all of your other recipes to see if there are any that might be the same.
The ones that look like duplicates are returned in a Find result, and added to
the Find Results list in your recipe box.
Finding duplicate recipes
Choose Edit > Find > Find Duplicates
39
Page 40

Creating Smart Lists from Find Results
You can easily turn your find results into smart lists:
1. Select the Find result in the list
2. Choose File > New > Smart List From Find, to turn it into a Smart List.
This will create a new Smart List that uses the criteria in the selected Find result.
40
Page 41

L
TIP: If you do not see the “Clip Recipe” menu item in
the Services menu, try copying MacGourmet to the
system Applications folder. You can also try logging
out, and rebooting if that still doesn’t work. In rare
cases you might have to reboot twice.
6
6. Importing and Exporting
This chapter describes ways of importing and exporting
your information.
MacGourmet provides a variety of ways to get information into and out of your
recipe box.
Using the MacGourmet Clipping Service
Getting recipes into MacGourmet is as easy as 1-2-3:
1. Go to your favorite recipe web site in your web browser and select the text
of a recipe.
Hint: It’s often easier to clip from a “Print” version of a recipe, which will
usually display a recipe without ads and web site navigation.
41
Page 42
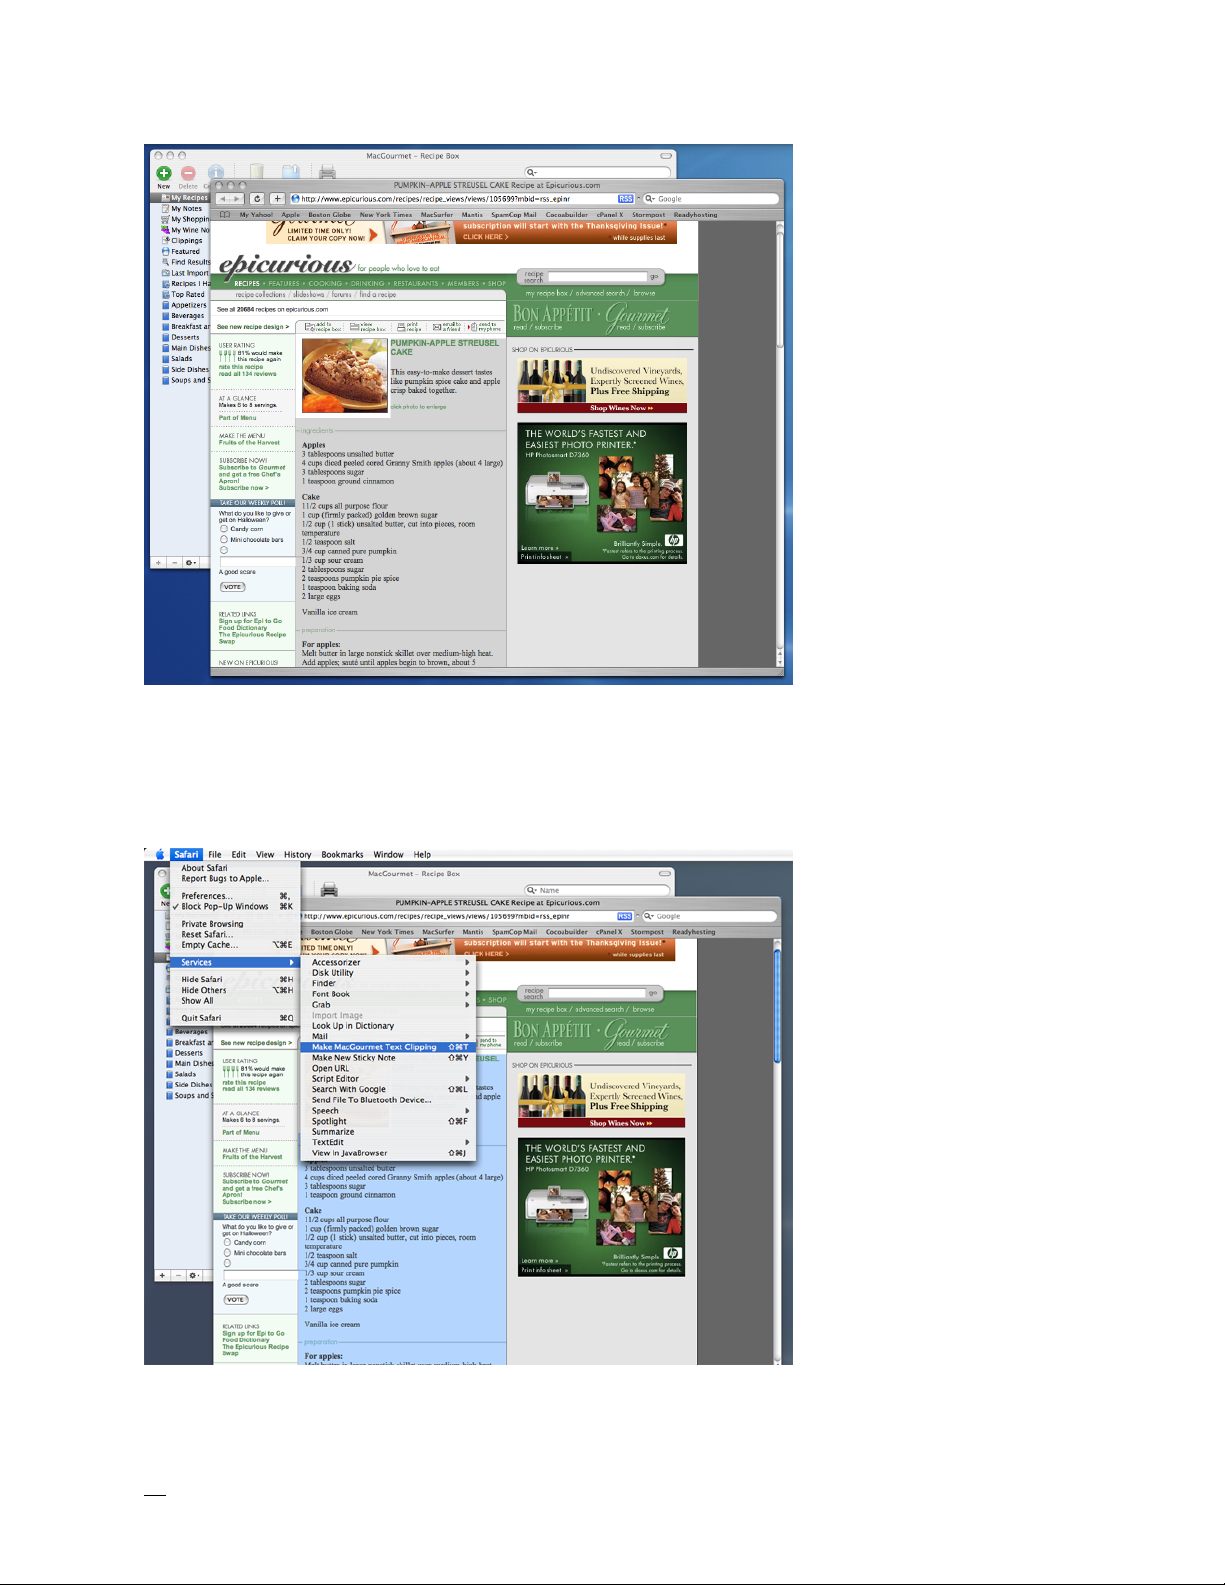
2. With the text of the recipe selected, and your browser the front-most application, select "Clip Recipe" from the Services menu, or press ⇧⌘T
42
Page 43
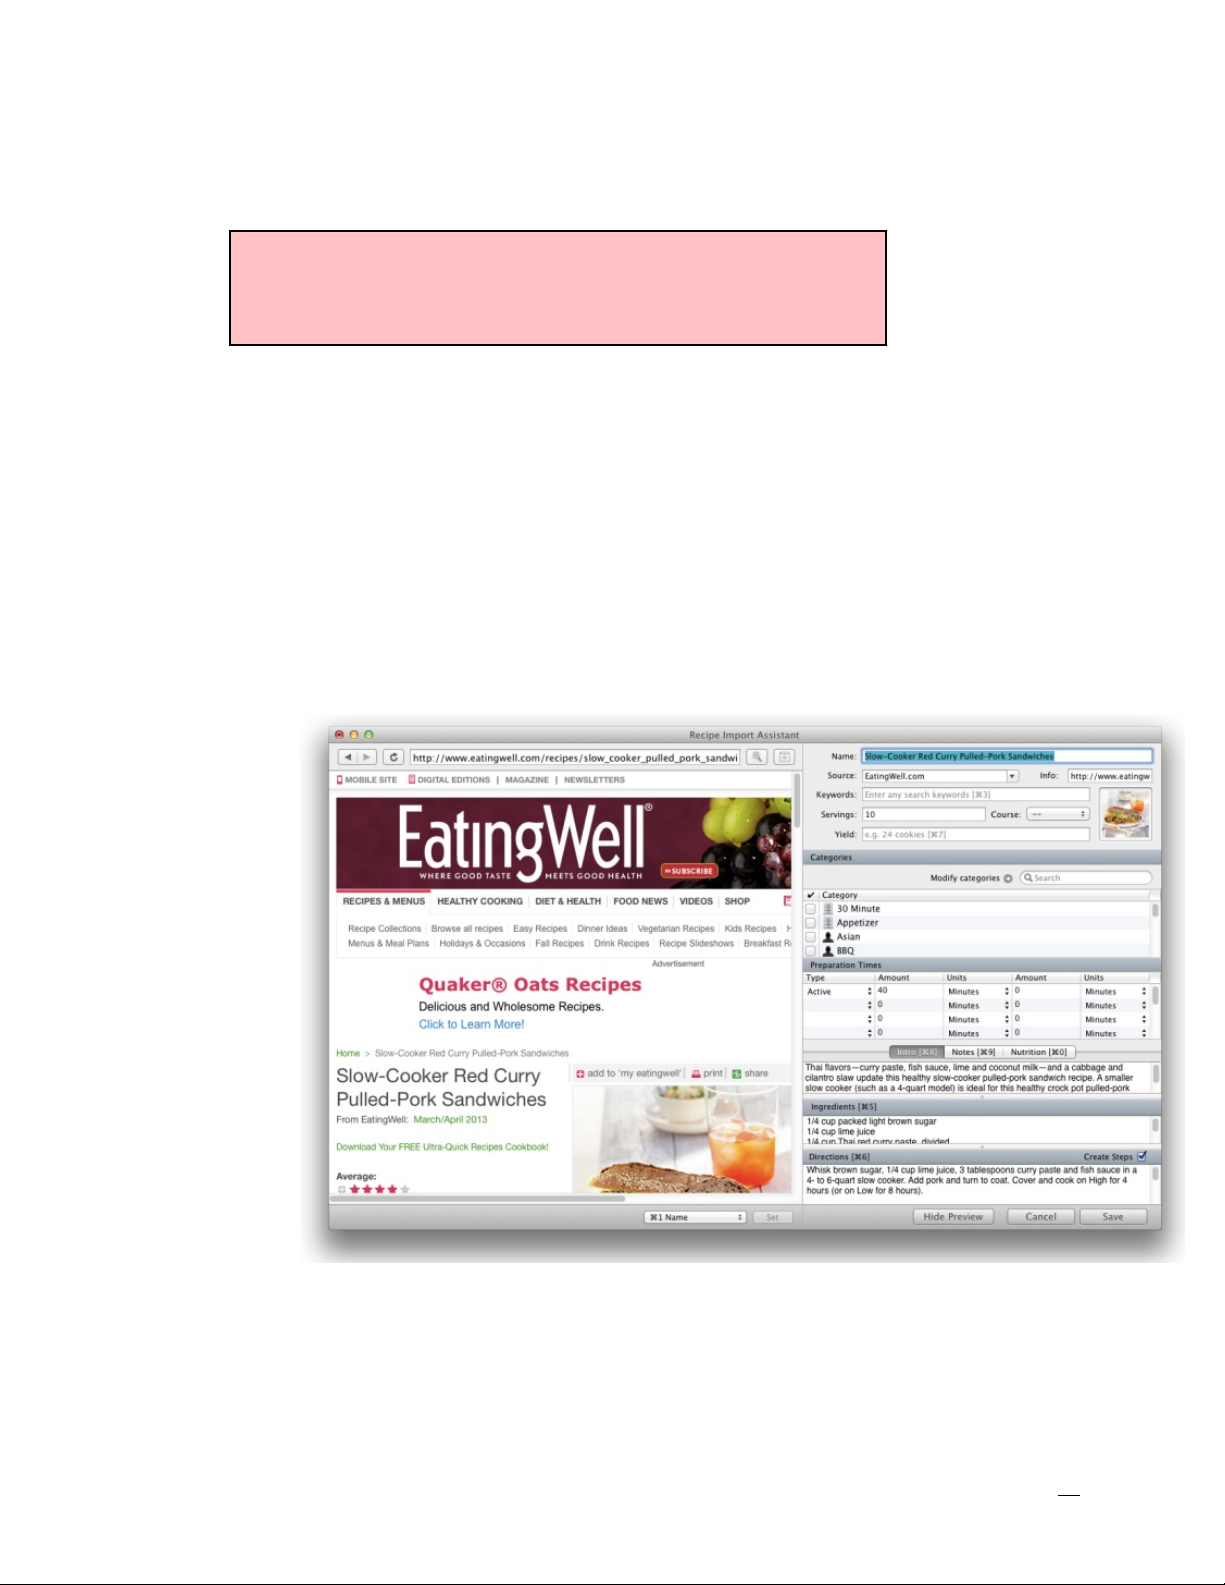
(shift-⌘-T). Doing this will add a text clipping of the recipe to the Clippings list
L
TIP: Not all web browsers support the Services menu.
Safari, Firefox, Chrome, and Opera all support the
Services menu.
in your Recipe Box.
3. Double click your new clipping to bring up the Recipe Import Assistant. Copy
or drag the text from the top text area into the appropriate fields and text
areas. Make any corrections or modifications you desire. Text can also be
copied to import fields by selecting text in the area at the top of the assistant and choosing the desired target from the popup menu below the top
text area, and pressing the Set button. Alternatively, each menu item has an
associated keyboard shortcut. If your recipe is in the simple format: Title,
summary, ingredients, directions, you can also choose Quick Fill, which will
attempt to auto fill the fields for you. Tabs can be changed by pressing the
⌘-← (⌘-left arrow) or ⌘-→ (⌘-right arrow).
Before
committing your
new recipe, you
can see
what it will
look like
when it's
imported
in the import preview.
43
Page 44
Making clippings (Alternate options)
In addition to using the Services menu item to create and add clippings to your
recipe box, you can also create clippings by either dragging and dropping text
from another application to the Clippings list, or by copying text from another
application, selecting the clippings list in MacGourmet and choosing Edit >
Paste. Once you’ve made a clipping, you can import it using the Assistant, the
same as you would a web clipping, which is described above.
44
Page 45

Using the MacGourmet Recipe Web Page Import Service
L
TIP: MacGourmet can import files that have been saved
in the following formats:
Paprika, SousChef, MasterCook, MasterCook Mac,
Meal-Master, CookWare Deluxe, Cook’n text, RecipeML,
Yum XML, plus many more!
MacGourmet makes it super easy to import recipes from certain, supported web
sites including allrecipes.com, epicurious.com, foodnetwork.com,
williams-sonoma.com, cookinglight.com, food.yahoo.com, plus many more.
1. Go to the recipe page on your favorite, supported web site. Note that you
have to go to one of their standard recipe pages for the importer to work.
Recipes on featured pages, special pages, etc. are not usually supported by
the importer.
2. Select the entire URL in the address bar of your web browser.
3. Choose Services > MacGourmet > Import Recipe From Web Page, or press
⇧⌘R
4. After a moment, a Recipe Import Assistant window (described above) will
open with all of the recipe information already filled in. Verify that your information is correct, make any desired changes, and Save. Note: Occasionally, because of the many variations of information, sometimes the information will not be retrieved in its entirety. When this happens, you can still
make a web clipping and import the recipe that way.
Note: MacGourmet uses web page “scraping” to get recipe information. Recipe
web sites tend to change their code often, and this will sometimes break the
web page import service for that site. If this happens, while waiting for a fix,
you can still import a recipe using the web clipping service.
45
Page 46
Using File Import and Export
You can choose to import existing files in various formats, described below:
Importing Recipes:
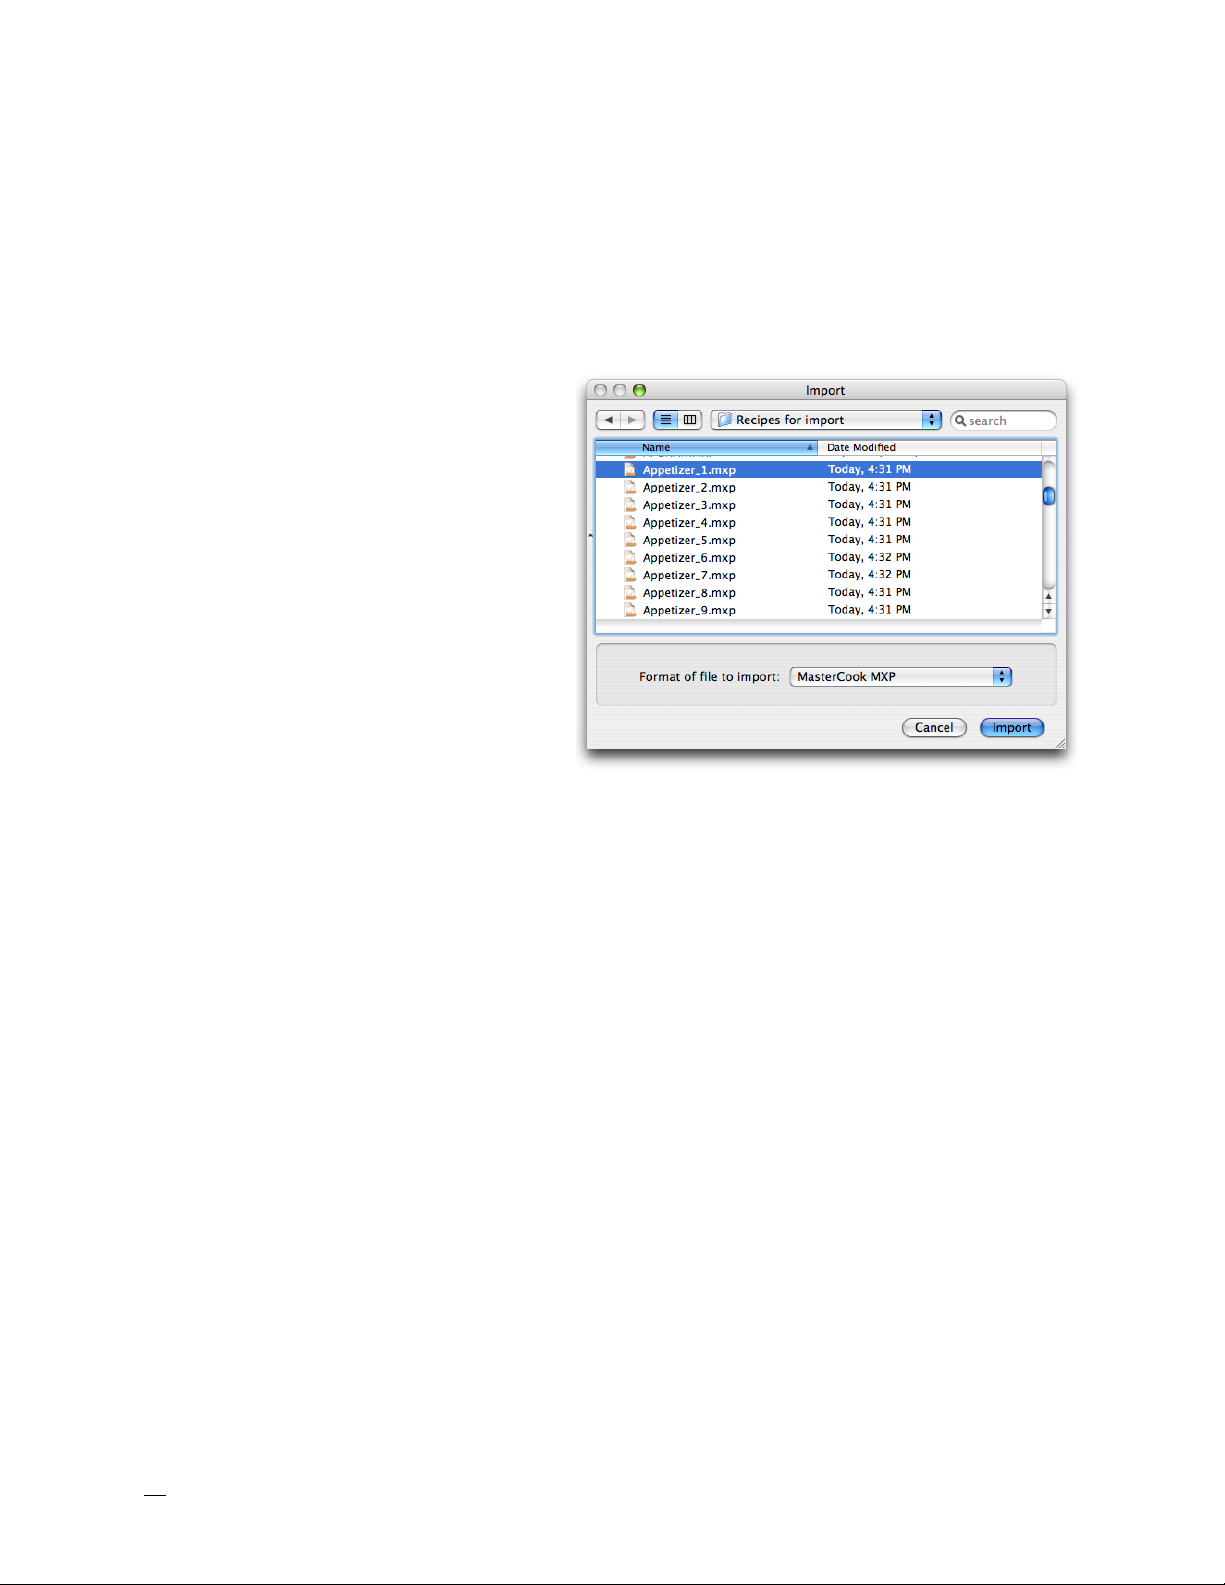
The image below shows a MasterCook import file selected.
While you should make sure that
you select the correct file format
for your import, MacGourmet will
verify that the file you selected
matches the selected format before your import starts.
To import CookWare Deluxe
files:
1. Choose File > Export from the
menu bar.
2. Choose export type: Tab-Separated Text.
3. Click Save.
4. Choose the fields to export in the next window that is displayed. Just use all
of them.
5. Using MacGourmet, choose File > Import...
6. Choose the text file you created, and select CookWare Deluxe for the format
of the file to import.
To import Yum XML files:
1. Choose File > Export All Recipes > As XML Text...
2. Save the file to your hard drive.
3. Using MacGourmet, choose File > Import...
46
Page 47

4. Choose the XML file you created, and select Yum XML for the format of the
L
TIP: To import recipe collections from MasterCook 4.06
for Macintosh you need to take the collections files and
convert them to MasterCook export files
file to import.
To import Cook’n text files:
1. Export
2. Using MacGourmet, choose File > Import...
3. Choose the text file you created, and select Cook’n for the format of the file
to import.
To import Recipe ML, MasterCook MXP and Meal-Master files:
1. Using MacGourmet, choose File > Import...
2. Choose the file you want to import and choose the appropriate file format,
RecipeML, MasterCook MXP or Meal-Master.
To import MasterCook Mac files:
1. You need to open a collection, say "15-minute Meals"
2. Go to the index, and select all of the recipes, or just the recipes that you
want to export.
3. Select the "Export Selected Recipe(s)" menu item from the Recipe menu, and
choose the "Mac Format" menu item in the save dialog.
This will create a file that is in the correct format for import into MacGourmet, a
MasterCook Mac file. After saving the file as a "Mac Format" file, you can then
import that file into MacGourmet.
47
Page 48

You can also drag and drop an import file into your Recipe Box! Just select an
import file in the Finder and drag it into one of your lists, or onto one of your
lists. That's all there is to it.
Once imported, your new items can be found in both your appropriate "My" list,
and in your "Last Import" list.
Exporting Recipes and Notes
Exporting items is as easy as importing them. You can export recipes in a variety of formats, described below:
MacGourmet Export Files
The MacGourmet file export types include two di"erent ways to export both
text and binary versions of recipes, wine notes and notes. The formats with the
word “Personal’ appended to them will create export files that include both your
personal ratings and whether you have prepared the recipe or not. Those
MacGourmet formats not marked as personal will not include this information.
This allows you to make export files that will preserve your own information,
and files that are more generic, which is preferable when sharing your items
with others.
When you choose to export MacGourmet Binary files, any embedded images will
be saved in a format that is smaller and faster to import later. The text format
is useful when putting your export files on a web site or sending them through
email. In the text version of the format, any embedded images are converted to
text, making them easier to share across di"erent mail and web servers, but
also making them larger.
Text and Rich Text
1. Choose the list or set of recipes in your recipe box that you’d like to export.
2. Choose File > Export... and choose either Text File or RTF File as the format.
48
Page 49

MasterCook, MasterCook Mac and Meal-Master
1. Choose the list or set of recipes in your recipe box that you’d like to export.
2. Choose File > Export... and choose MasterCook MXP, MasterCook Mac or
Meal-Master as the format.
Note that you can only export recipes when a format other than one of the
MacGourmet formats is selected. Wine and general notes will be ignored.
Creating text versions of your recipes and notes
Additionally, you can select one or more items and choose Edit > Copy. Doing
this will place text versions of the selected items into the Mac OS X Pasteboard,
letting you then paste the text into other applications like Mail, TextEdit, Entourage, etc.
Exporting the names of items in a list
To export the names of all of the items in one of your recipe box lists, select
the list, and choose Edit > Copy. This will add a text-based list of all of the
item names in the list to your pasteboard, which you can then paste into any
application you’d like.
49
Page 50
7
7. Publishing Recipes and Notes to the Web
This chapter describes using the Web Publishing features.
MacGourmet allows you to publish your recipes, wine, beer, or cheese notes
and general notes to the web, or to your local file system. This allows you to
easily share what you've created, entered, etc. with others. You create and
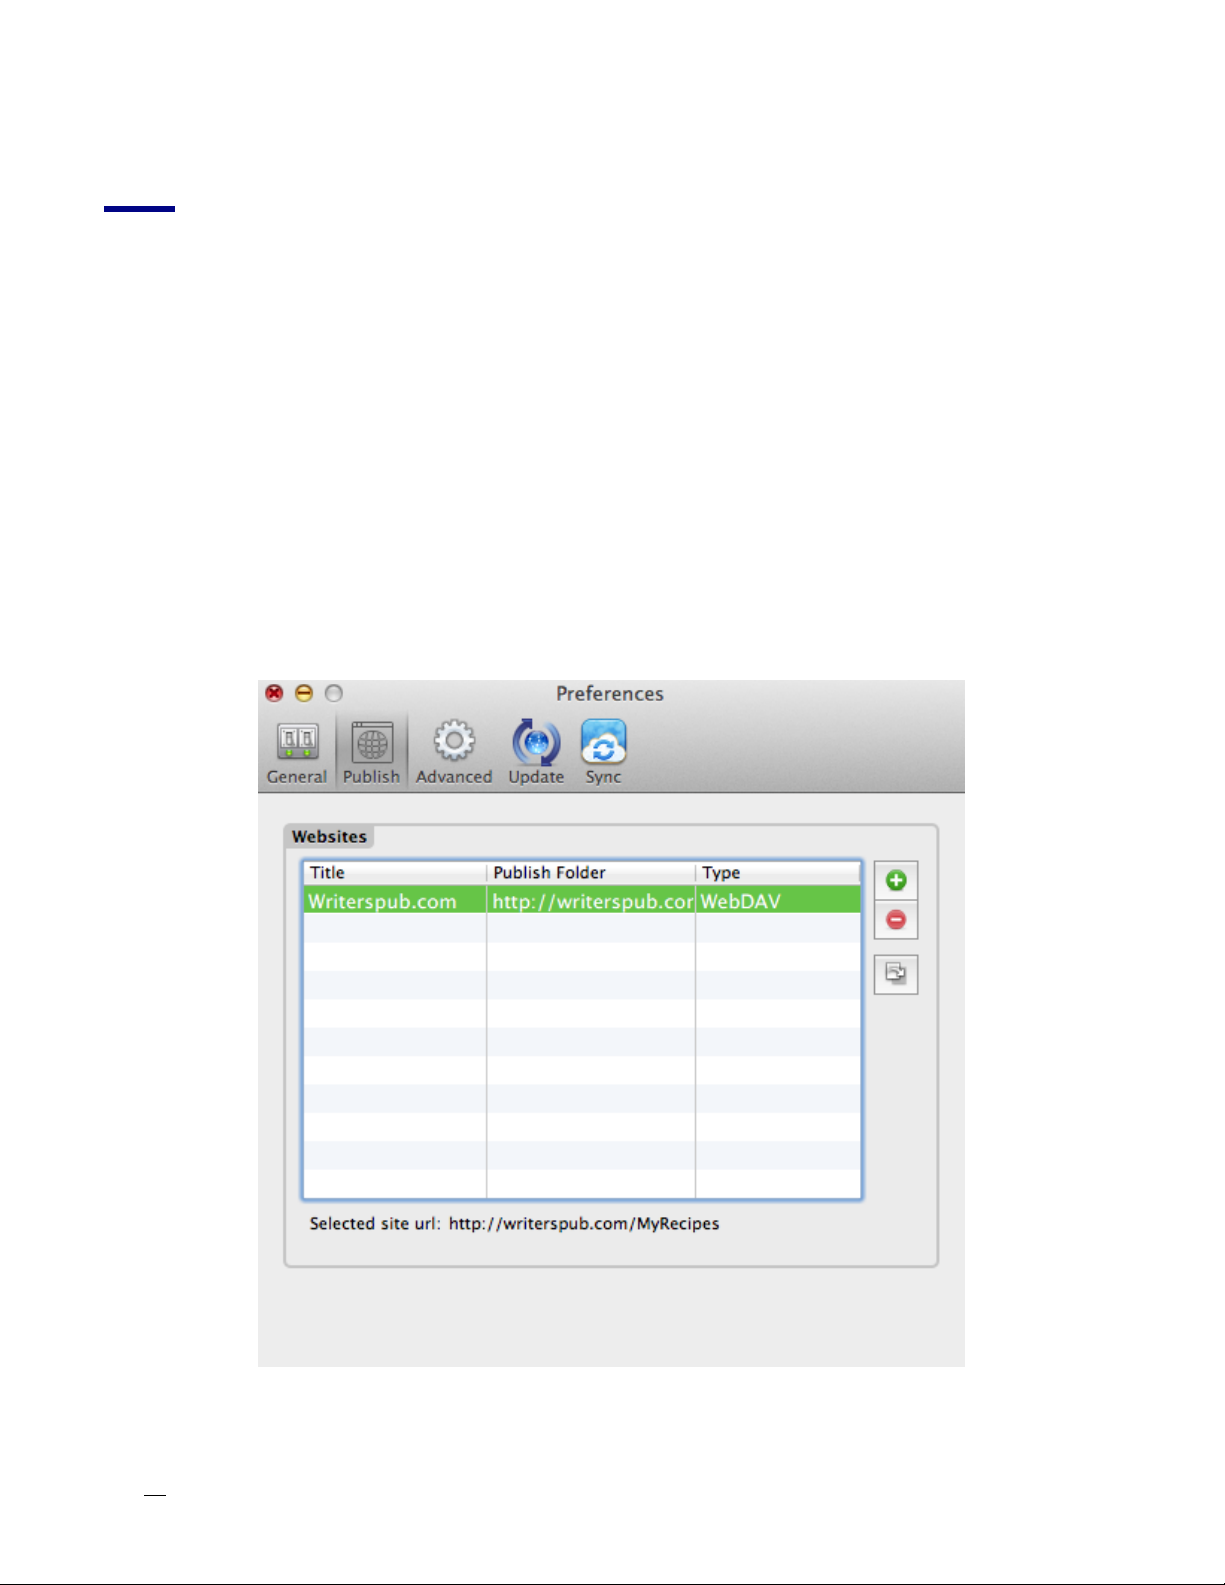
modify web site publications by going to the Publish panel in Preferences, and
selecting the Sites tab.
50
Page 51
Create export files for published items - Checkbox that allows you to create
MacGourmet export files as part of your publication, so that importing your
recipes by other users can be as simple as just dragging the image of an export
file from a web page into MacGourmet.
Finally, the Template and Style pop up menus allow you to pick one of the included MacGourmet themes for your publication.
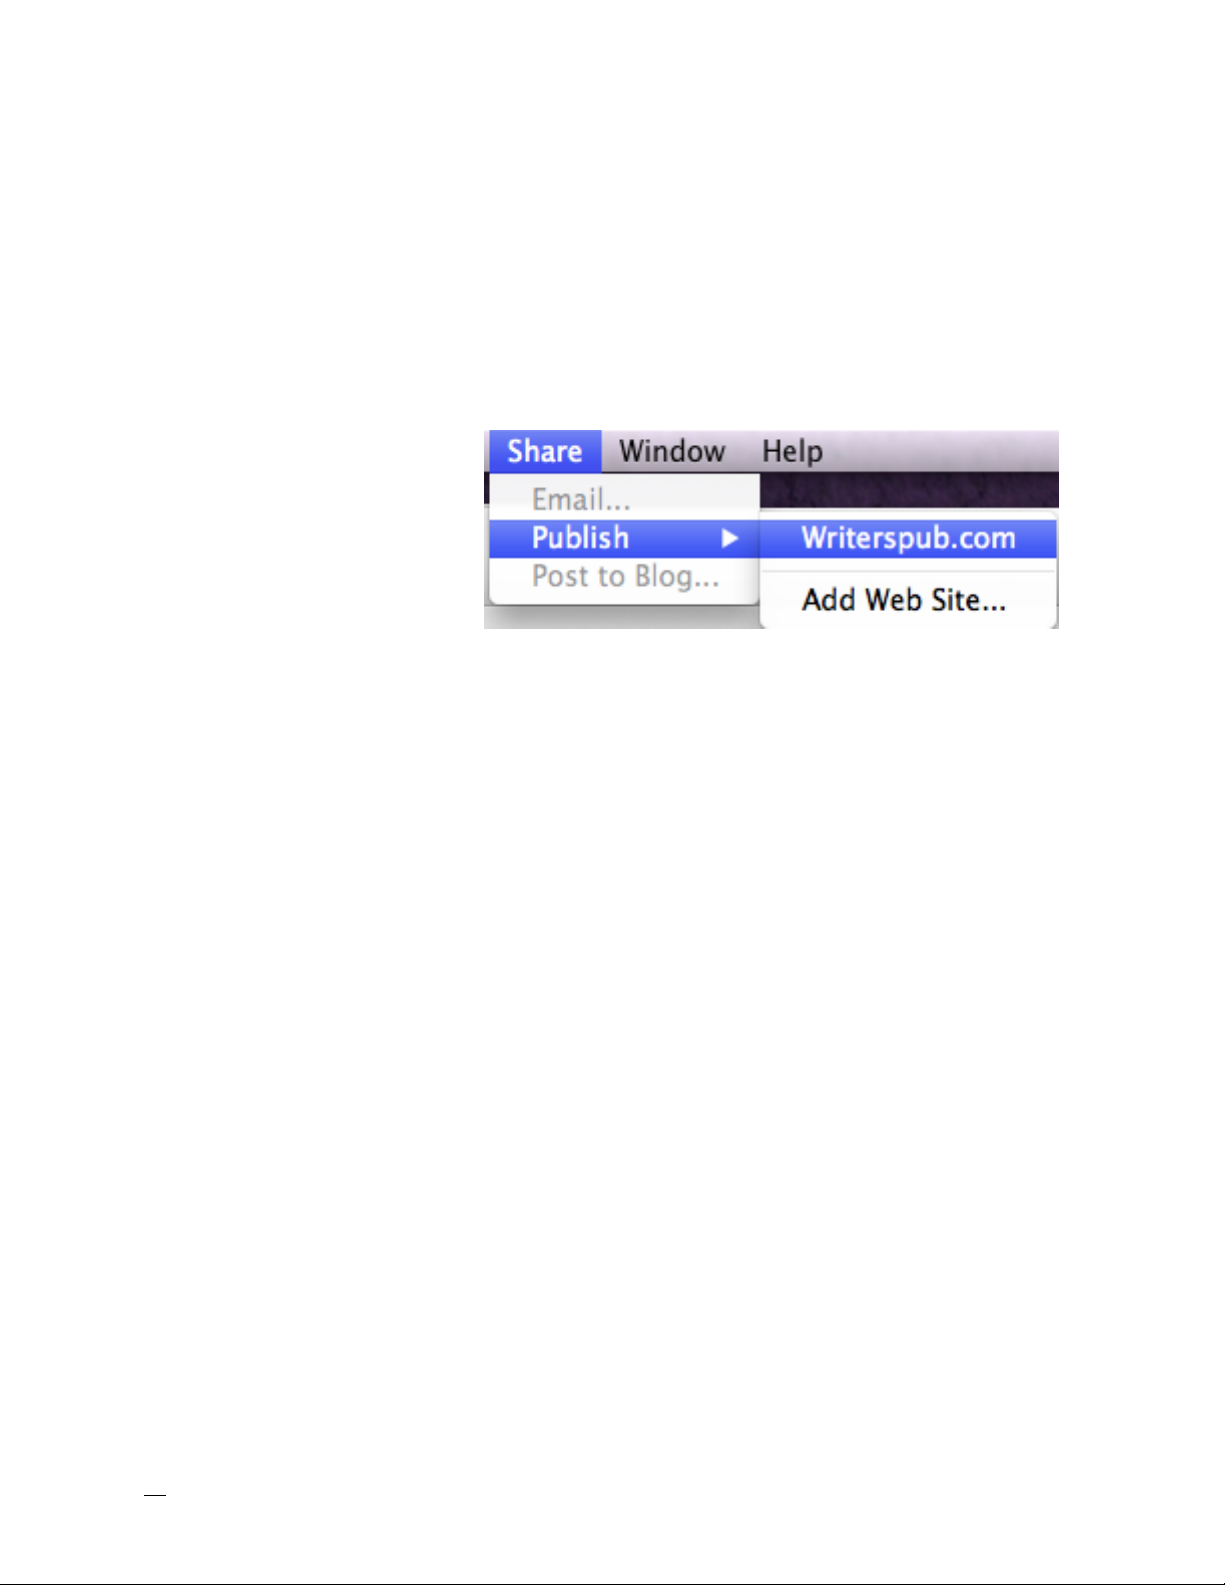
After creating the specification for your publication, you can publish it by
choosing Share > Publish.
The Publish menu contains
your publications, listed by
their titles. Selecting a
publication from the menu will create all of the files necessary for your site, in
the location you specified. Once the publication is complete, you can access it
using the URL displayed in the field labeled "This site's address is:" when your
publication is selected in the Publish preferences table.
51
Page 52

Publishing Your Recipes and Notes to your Blog
In addition to being able to use MacGourmet to create websites for your recipes
and notes, you can also publish them to your blog, if you have one. To do that
you first need to create a new blog definition. To do this go to the Publish panel
in Preferences.
Title - The title of your weblog settings.
Service - The service that your weblog uses. Currently supported are Blogger,
Blojsom, MovableType and TypePad.
URL - The URL to the atom.xml file on your server. For example:
http://www.mycoolblog.com/atom.xml
Title of Blog - The title of the blog on your server that you want to post to. To
refresh this list, press the button next to this popup menu.
Image URL - The URL to the images folder on your server. This is where your
images will be uploaded, or where they are found if you upload them yourself
(when using Blogger, which doesn’t support file uploads).
Recipe URL - The URL to the recipes folder on your server. This is where your
recipes will be uploaded, or where they are found if you upload them yourself
(when using Blogger, which doesn’t support file uploads).
Template - The template to use when publishing your blog.
Publish immediately - Publish your new entry immediately, bypassing any
draft phase.
Generate MacGourmet file - Create and upload (if supported) a file for each
posted item. If upload is not supported, you will be prompted for a location to
save the file so that you can upload it manually.
Include image file - Generate and upload (if supported) an image for each
posted item. If upload is not supported, you will be prompted for a location to
save the image so that you can upload it manually.
Posting to your blog
To create a new post, select an item in your recipe box, and choose “Post to
blog...” from the Share menu. In the window that is displayed, select the blog
you want to publish to at the top left, make any changes to the post text, and
press the Post button.
52
Page 53
7.5. Syncing your MacGourmet Data with the
MacGourmet cloud server
This chapter describes how to configure MacGourmet settings to connect to the cloud server and sync your data to
the server where it can be read by other Macs and iOS devices.
MacGourmet allows you to create an account on the MacGourmet cloud server.
Once you signup for an account, you will be able to sync your MacGourmet data
from MacGourmet to the server, where the data can then be read by other Macs
and iOS devices on which you sign into the same account. You will also be able
to access new content creates on other Macs and iOS devices, as well as edits
made on other Macs and iOS devices.
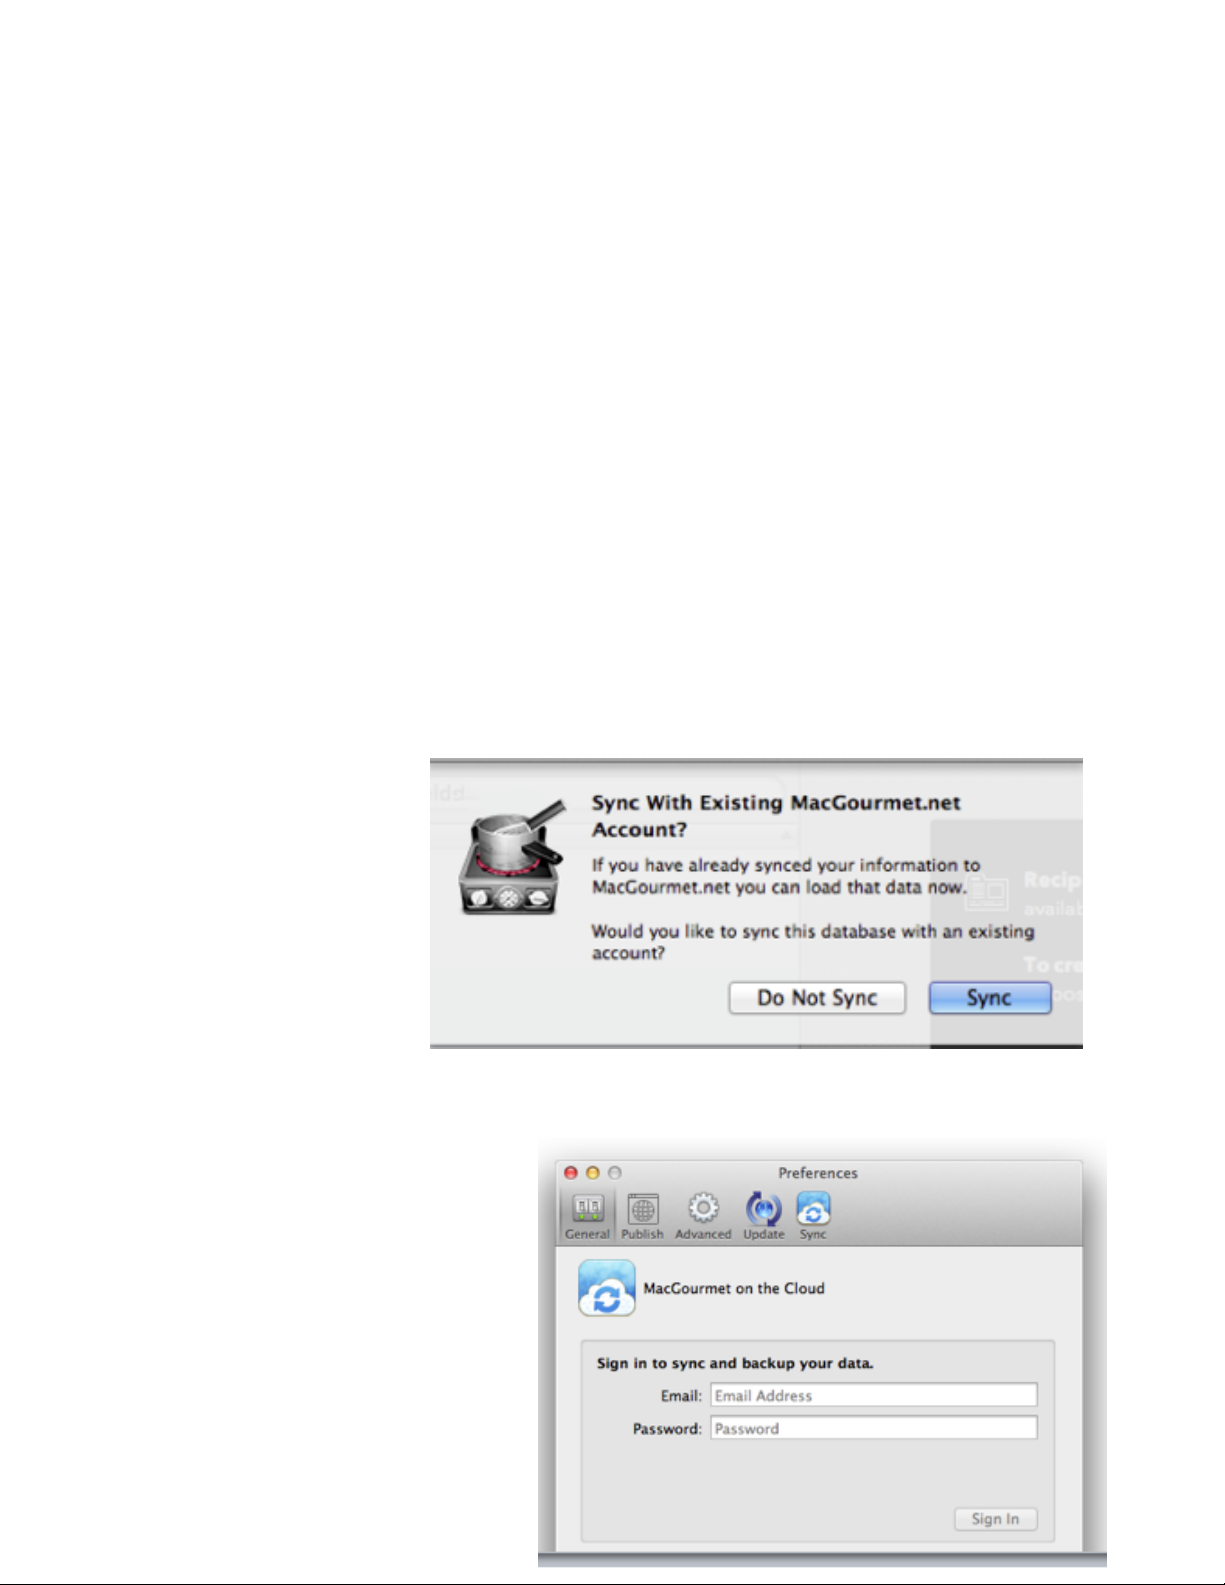
1. When you first
launch the app, you
will be asked if you
want to sync your
MacGourmet Data
with an existing
account: If you already have a sync
account setup, or
you would like to
set one up, click
the Sync button. If
not, click Do Not Sync and you can set one up later.
2. After clicking on the Sync
button, you will be
prompted to sign in to your
existing account, or sign up
for a new account. If you
are signing up for a new account, please remember to
write down the email address and password you’ve
used to create the account,
53
Page 54
as you will need that information
later.
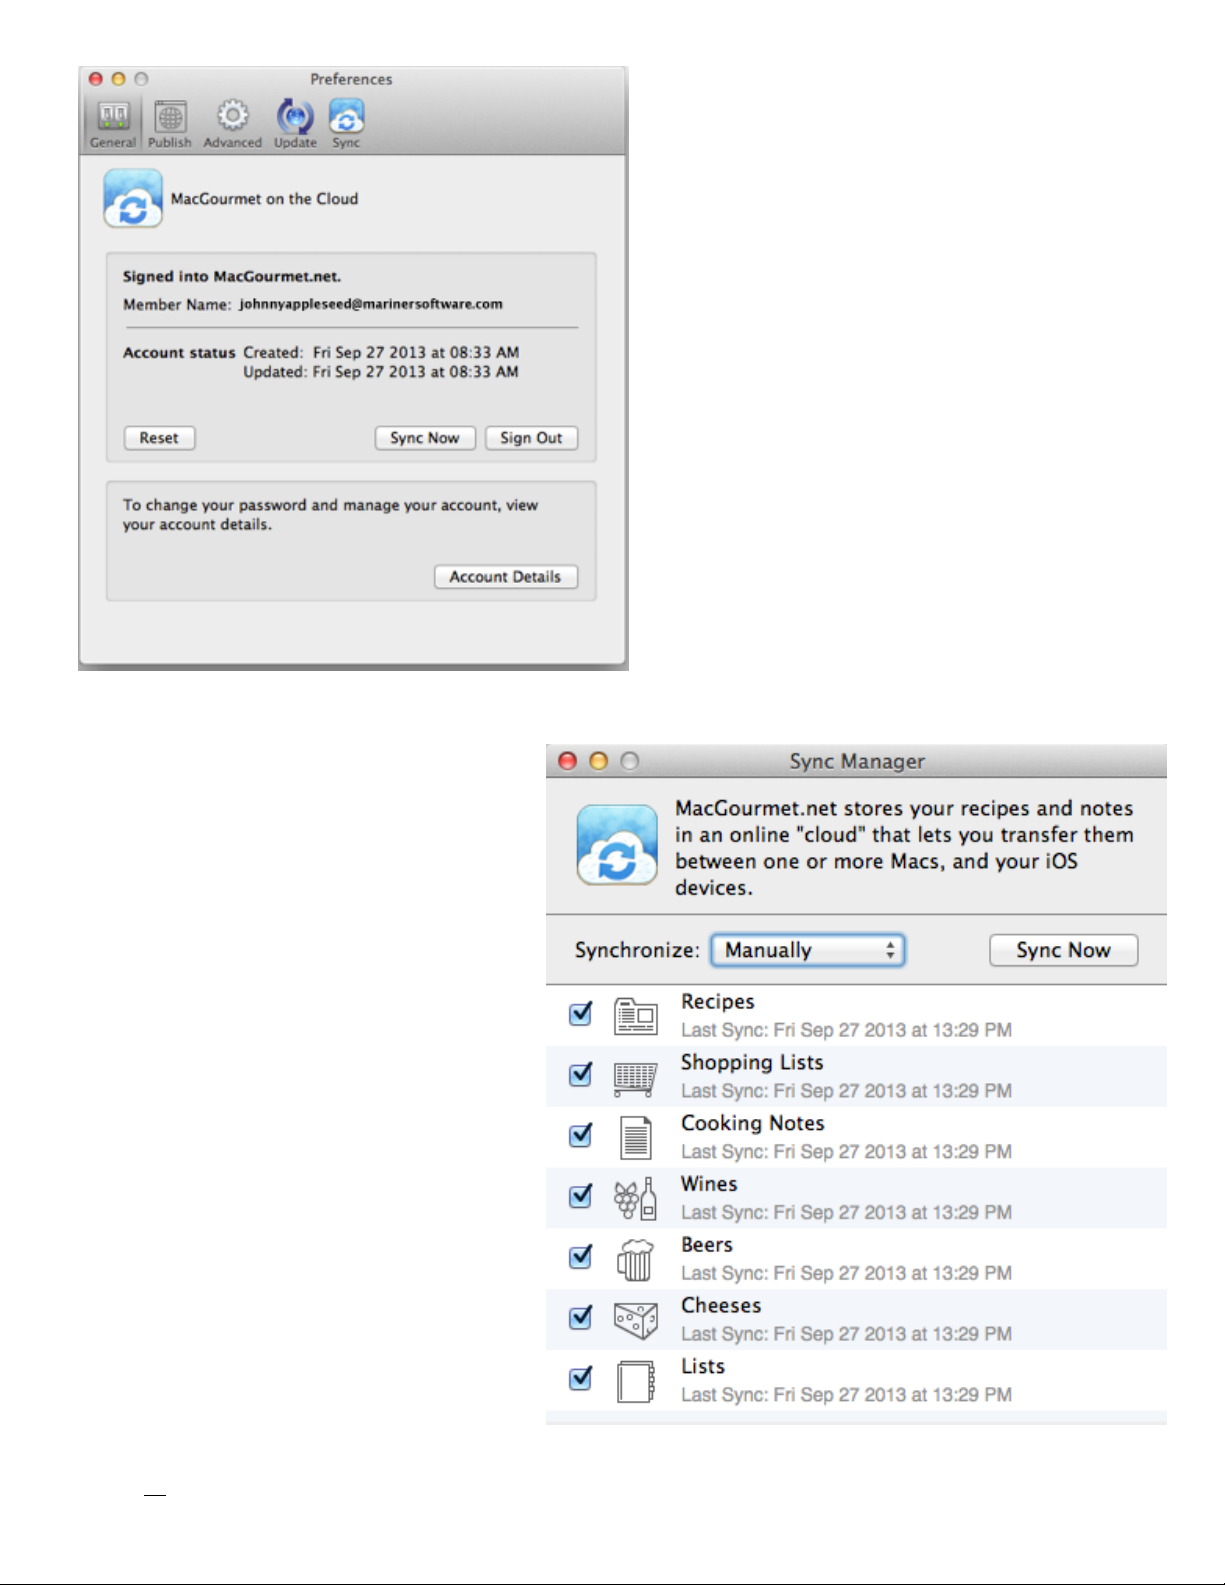
3. After signing up for a new account or signing into an existing
account, you’ll see the following. At
this point, you can click Sync Now to
sync your data to the server.
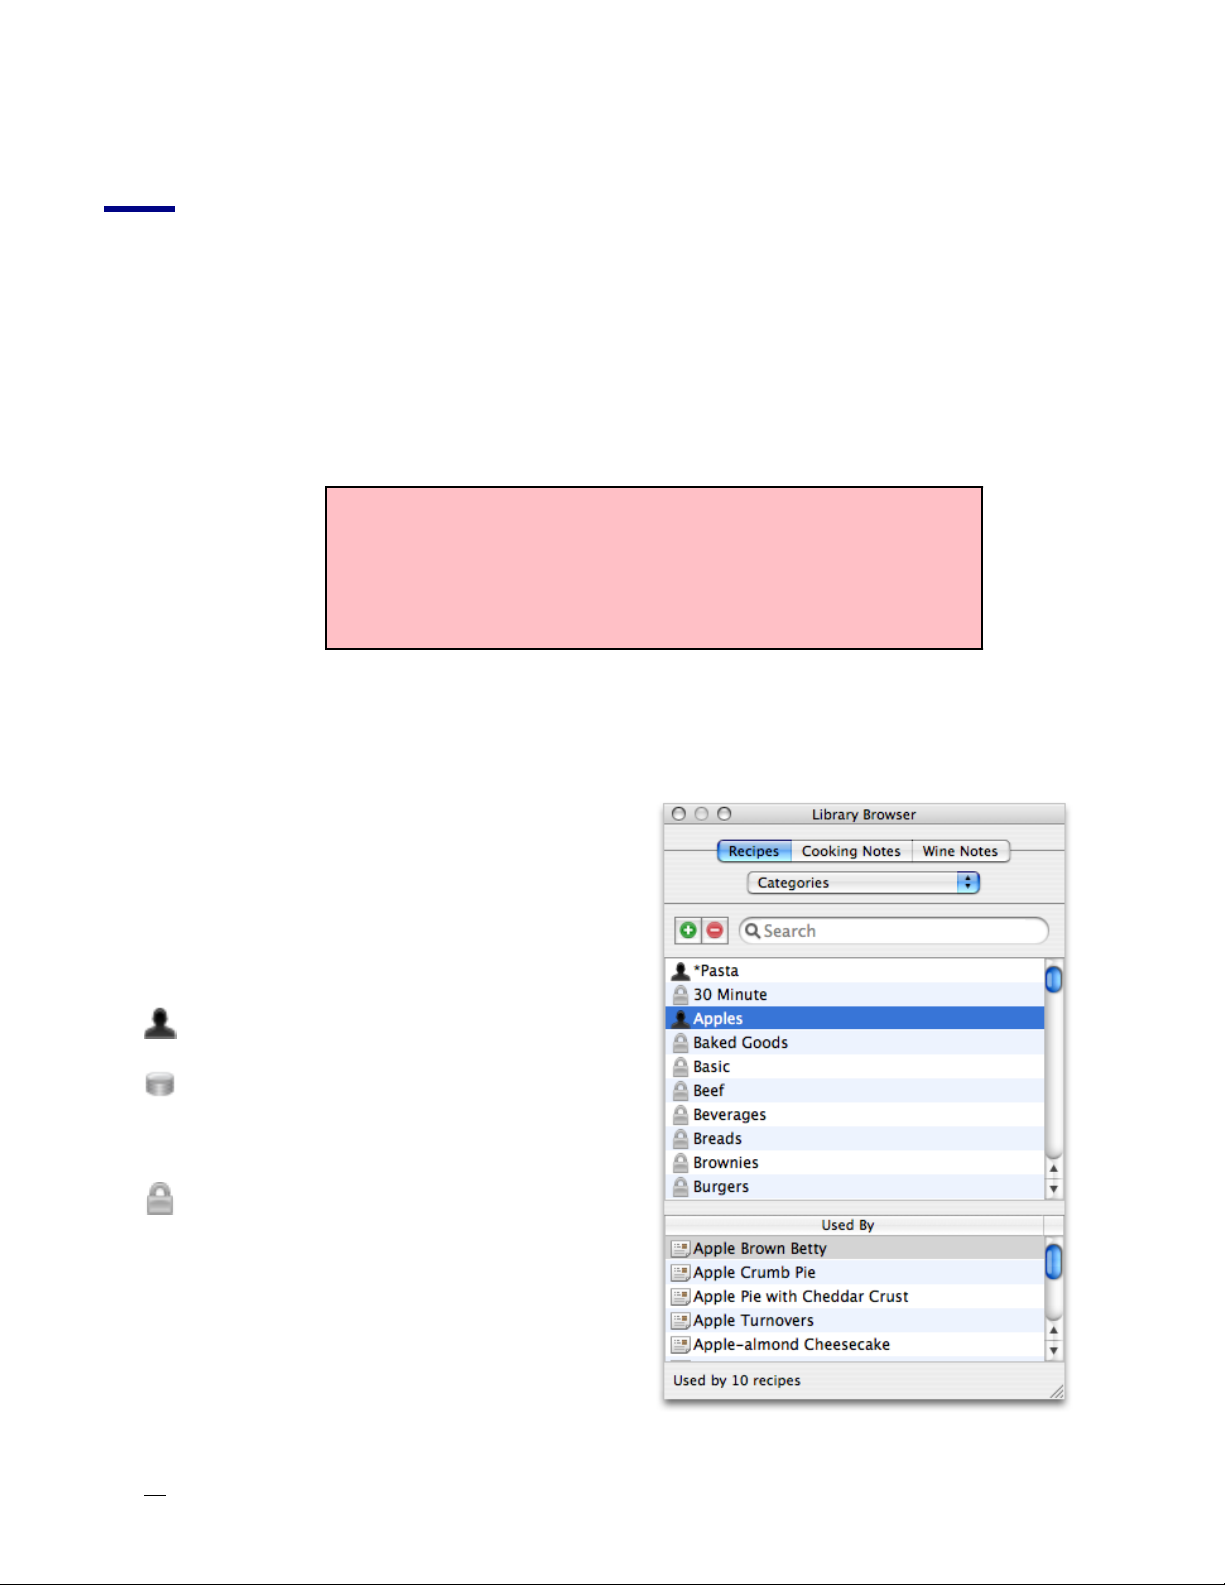
4. When you sync, you will see
the Sync Manager window.
You can also access this any
time by selecting Sync Manager from the Window menu.
54
Page 55

SyncManager
The Sync Manager shows the current sync status of your data, and provides you
with a few options,
Synchronize Manually/Automatically - If you opt to synchronize manually,
then none of the new or edited content will be sent to the sync server, and no
new and edited content on the sync server (for example, changes or additions
you have made on your other Macs or iOS devices) will not be read from the
sync server unless you manually sync it by clicking the Sync Now button. If you
opt to synchronize automatically, then new and edited content will be synced to
the server automatically.
Sync Now - Clicking this button will send new and edited content from your
Mac to the sync servers for other Macs and iOS devices to read, and will deliver
new and edited content on the sync server to your Mac.
Status List - In the status list, you can find out when your data was last synced
to the server. You can also check and uncheck the items you want to sync to
and from the server.
55
Page 56
L
TIP: The Lists Editor is a VERY powerful tool and caution should be exercised when using it to modify your
information. Make sure you check your changes before
pressing “Yes” when you are asked to confirm your
change.
8
8. Using the Lists Editor
This chapter describes adding, modifying, and searching
your information, like categories, equipment and recipe ingredients.
The Lists Editor allows you to view and edit information in your database. The
library browser has six tabs: Recipes, Cooking Notes, Wines, Beers, Cheeses,
and Shopping Lists.
Each tab has a popup menu that displays
the fields that can be browsed and edited. Select a field in the popup to display
the information associated with the selected field in the list below.
= User created field
= Default MacGourmet field
Either can be changed or deleted.
= Locked field and can’t be changed.
To change a field’s value, double-click on
it, change the value and press Return
when finished.
Selecting an item from the list updates
the “Used By” table at the bottom of the
56
Page 57
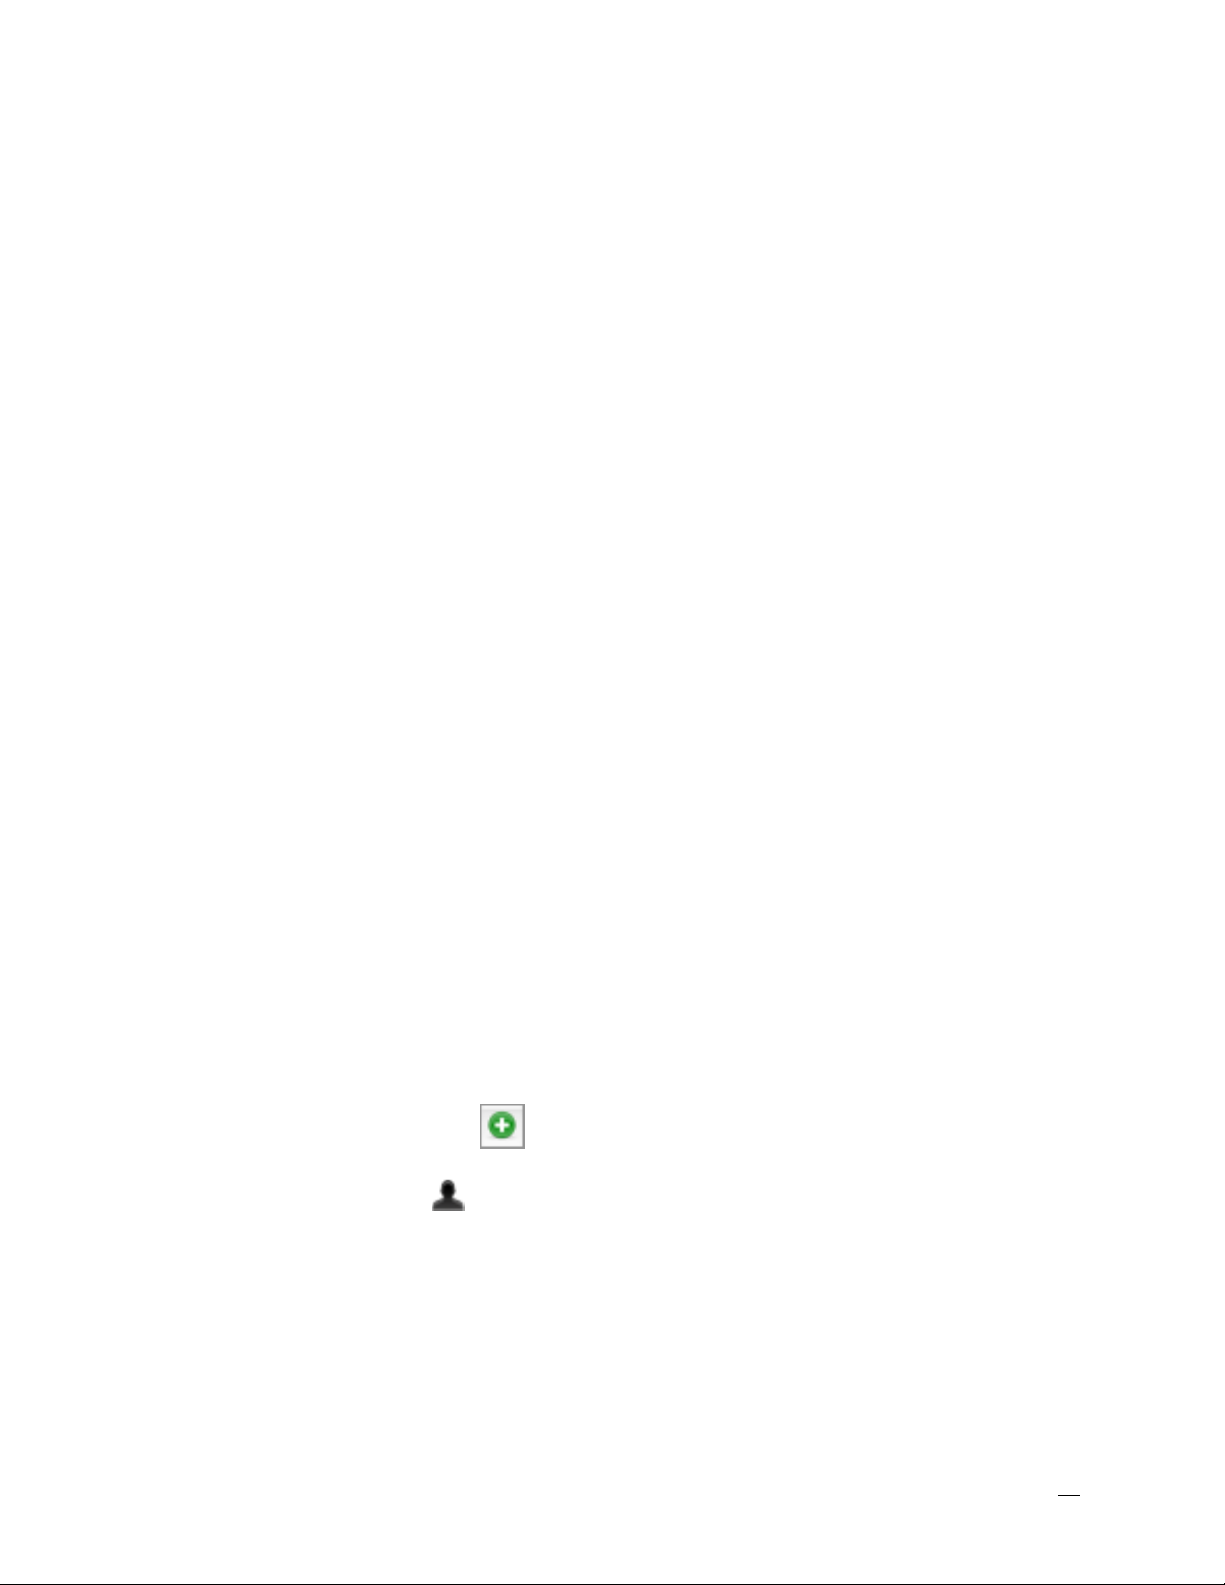
library browser to display items that use the selected value. To go to the item in
your recipe box, double-click on the item in the “Used By” table.
Some lists, like categories, are lists you can directly modify, and some, like Ingredient Descriptions, are built from the information you have entered into your
database. Because of this, items in a list like “Ingredient Descriptions” can only
be “deleted” by removing the values from any items that are using them. If you
change one of these values in the middle table, all of the items that use the
value will be updated with the new value. When nothing uses a value, it is removed from the list.
To search for an item:
Click in the search field.
Enter the desired search text. Example: “Macaroni”.
As you type, the list below is filtered.
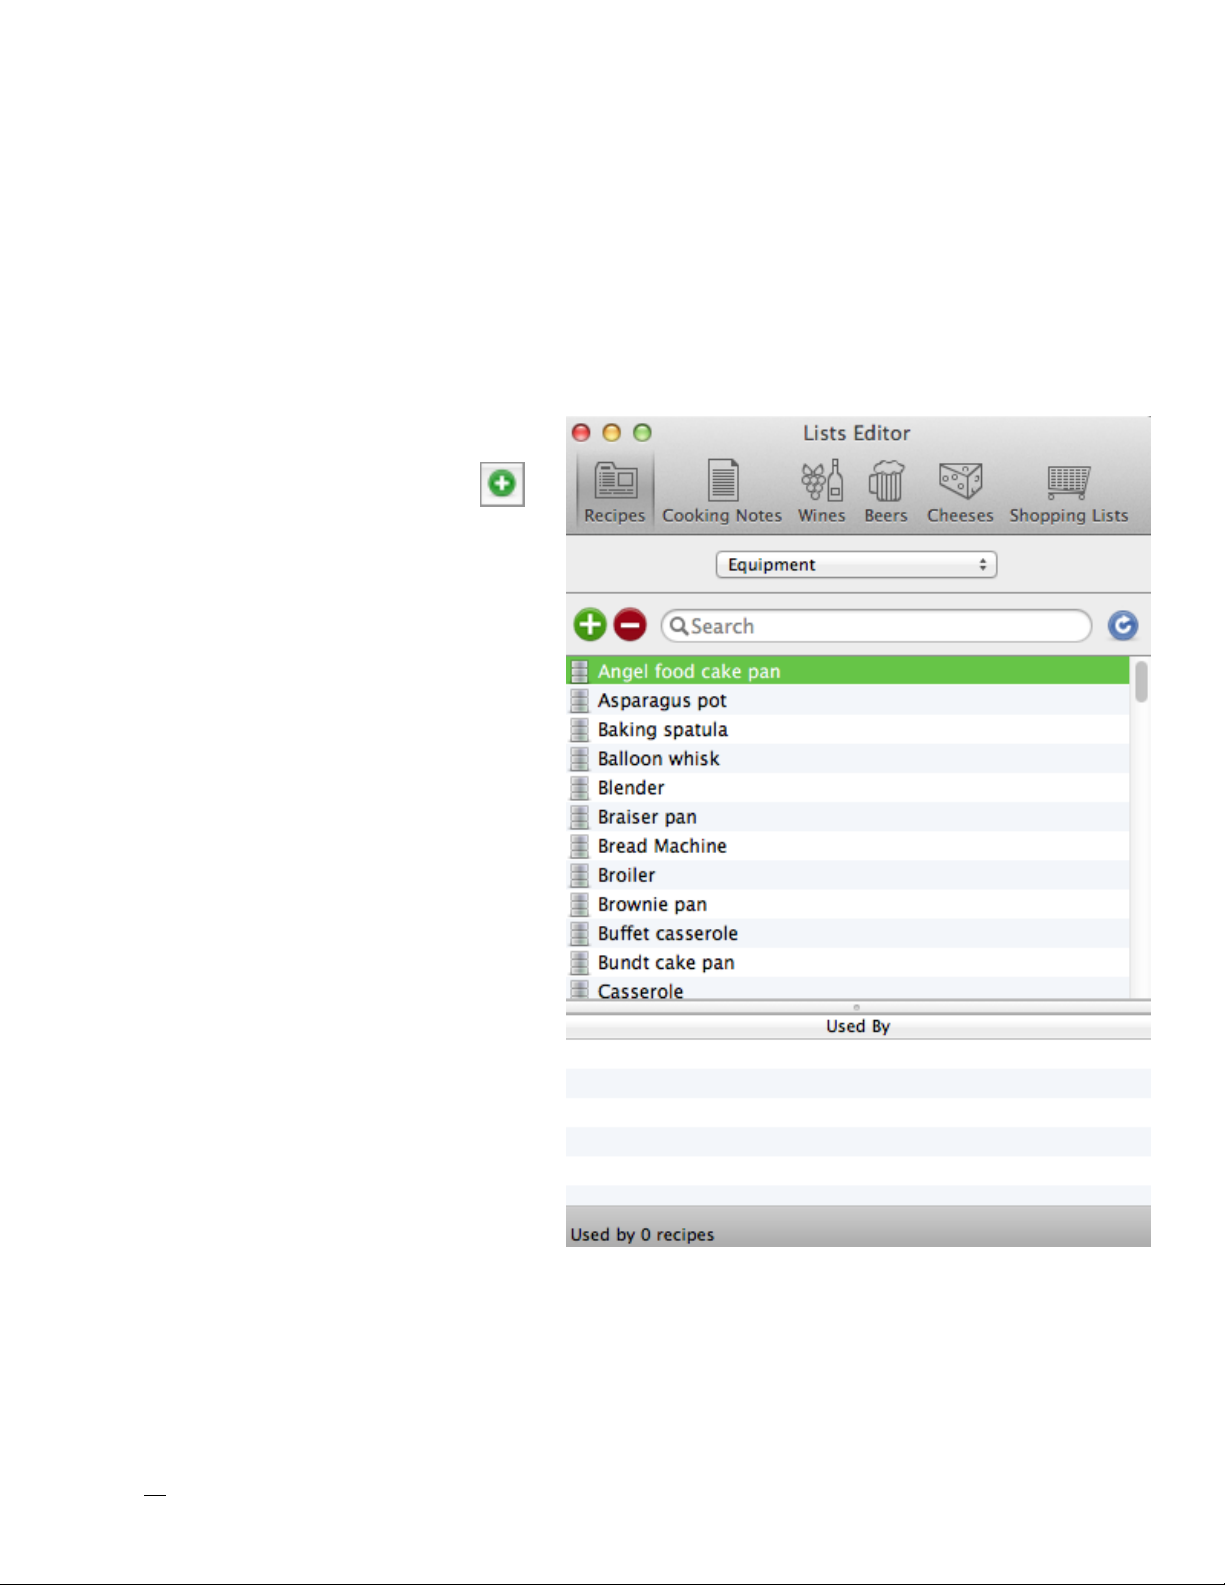
Adding Equipment
Sometimes you’ll find that the provided equipment list doesn’t have your favorite item or tool like a mandolin slicer or a wire rack for cooling a cake. In these
instances, you can add new equipment to your database.
Adding a New Piece of Equipment
To add a new piece of kitchen hardware or equipment, from the library
browser, select the Recipes tab and choose Equipment from the pop-down list.
A list of equipment appears.
To add a new item, click the (Plus) button and type the name of the item.
The item appears with a (person) icon next to it to denote it being a usercreated item.
The area below the list displays any recipes that use that item and provides an
easy way to jump to that recipe.
The very bottom of the window displays a count of how many recipes use that
item.
57
Page 58
Adding Categories
Sometimes you’ll find that the provided category list doesn’t have every category to suit your needs. In these instances, you can add new categories to your
database.
Adding a New Category
To add a new category, from the library browser, select the Recipes tab and
choose Category from the pop-down list.
A list of categories appears.
To add a new item, click the
(Plus) button and type the name
of the item. The area below the
list displays any recipes that use
that item and provides an easy
way to jump to that recipe.
58
Page 59
9
9. Relating Recipes and Notes
This chapter describes making links between recipes and
notes.
Linking Recipes and Notes
Link recipes and notes to remember recipes that go well together, wines, beers,
or cheeses that go well with recipes, and
notes that are useful when preparing
certain recipes.
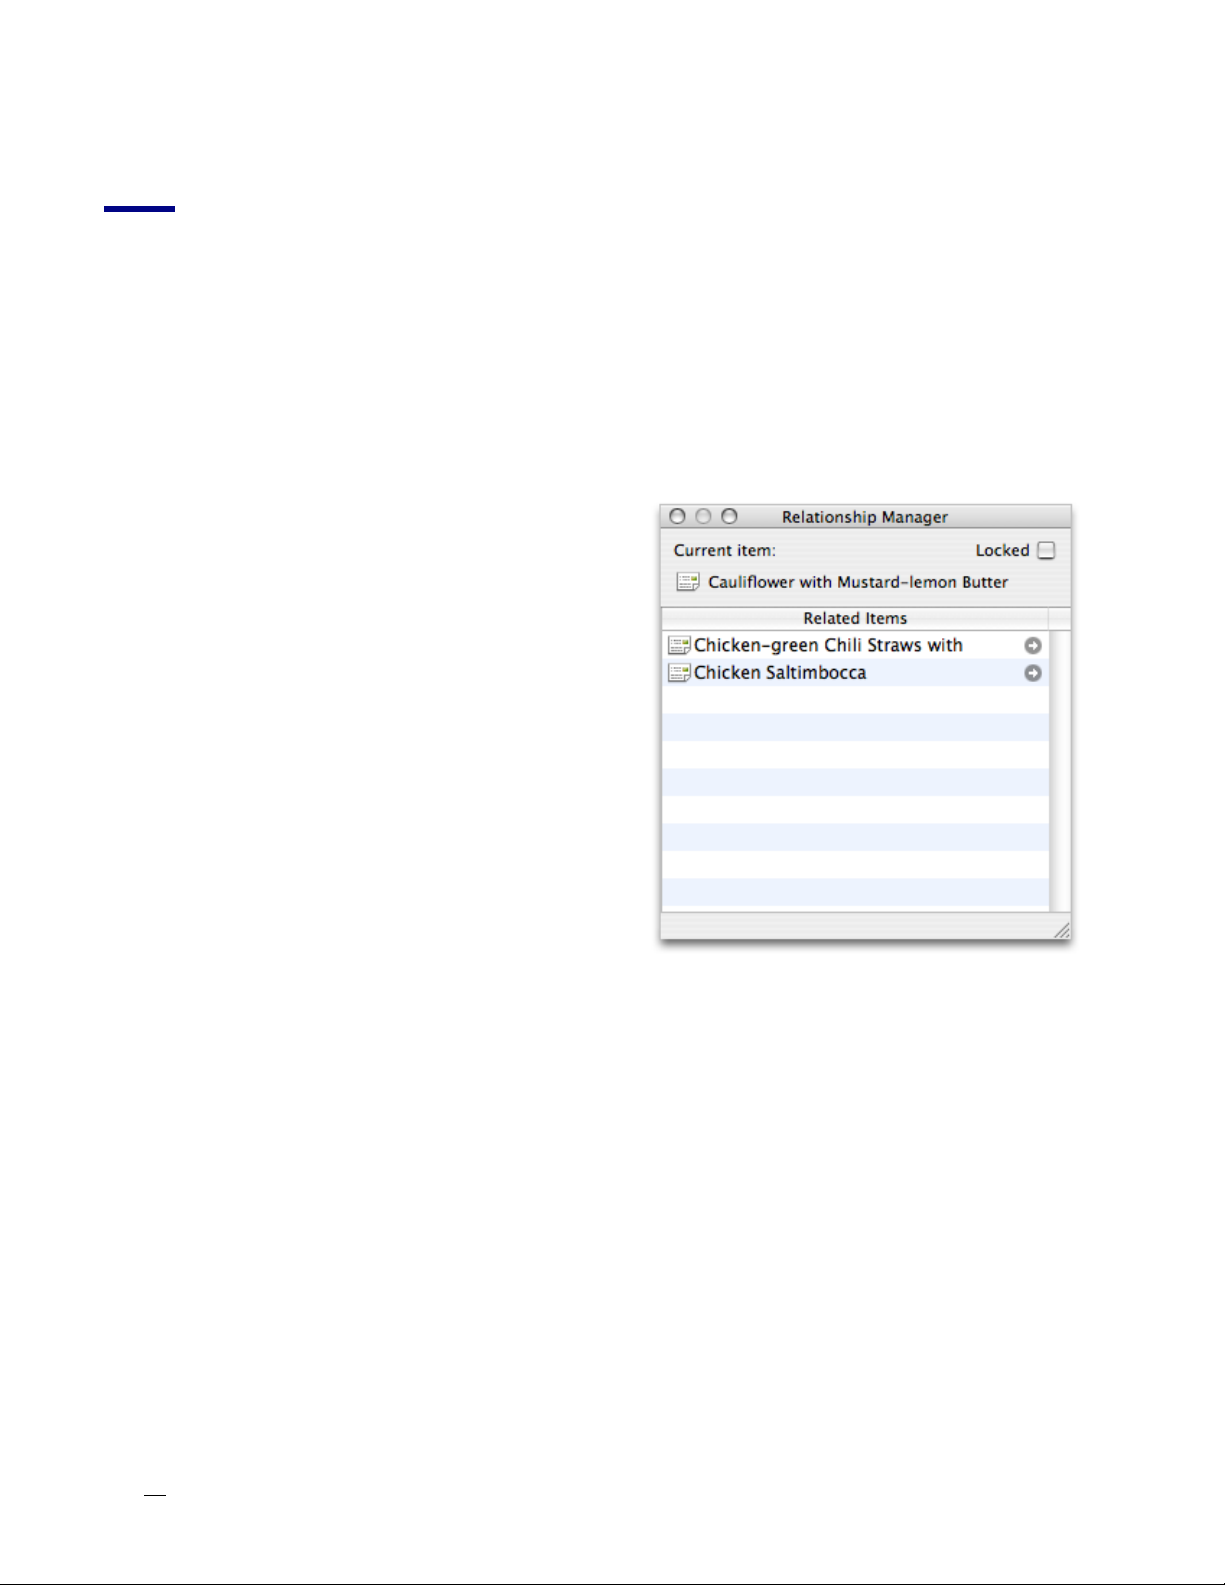
Creating relationships between two
things
1. Select an item in your Recipe Box and
select Window>Relationship Manager... The item shown at the top of
the Relationship Manager is the name
of the currently selected item. To
keep the selection from changing as
you select items in your recipe box,
press the “Locked” checkbox.
2. Find an item in one of your recipe box lists that you want to link to the currently selected item and drag it to the Relationship Manager table. Selecting
a new item changes the selected item in the Relationship Manager unless
you’ve checked the lock checkbox. Note that it is possible to drag an item
without selecting it by quickly clicking and dragging the item, in one motion.
3. Drop the item. A new relationship between the selected manager item and
the dropped item will be created. This relationship is in both directions,
which means, if you make a relationship between a “Roasted Lemon
Chicken” recipe and a “How to roast a chicken” cooking note, you will see
that relationship when viewing either item in your recipe box.
59
Page 60

You can add more relationships or delete relationships by selecting the relationship in the "Related Items" table of the Relationship Manager and pressing
the Delete key.
Double-clicking on an item in the relationship manager will select that item in
your recipe box.
60
Page 61

10
10. Creating and Using Shopping Lists
This chapter describes ways to create, use and export
shopping lists.
Creating a Shopping List
MacGourmet allows you easily to create shopping lists.
Creating a new shopping list
1. Select one or more recipes.
2. Next select “Shopping List From Selection” from the File > New menu. You
can also select “Shopping List From Selection” from the “New” contextual
menu by right clicking or command clicking on one of your selected recipes.
Additionally, you can create a new, blank shopping list by selecting the “Shopping List...” item from the File > New menu when you have your “My Shopping
Lists” list selected in your recipe box.
Alternatively, you can also create a new shopping list by selecting one or more
recipes and dragging and dropping the selection on the “My Shopping Lists” list
on the left side of your recipe box.
Combining Shopping Lists
Two shopping lists can be merged by dragging one shopping list and dropping
it onto another one. When shopping lists are merged, the ingredients in the list
are combined, assuming they are spelled exactly the same.
61
Page 62
Editing Your Shopping Lists
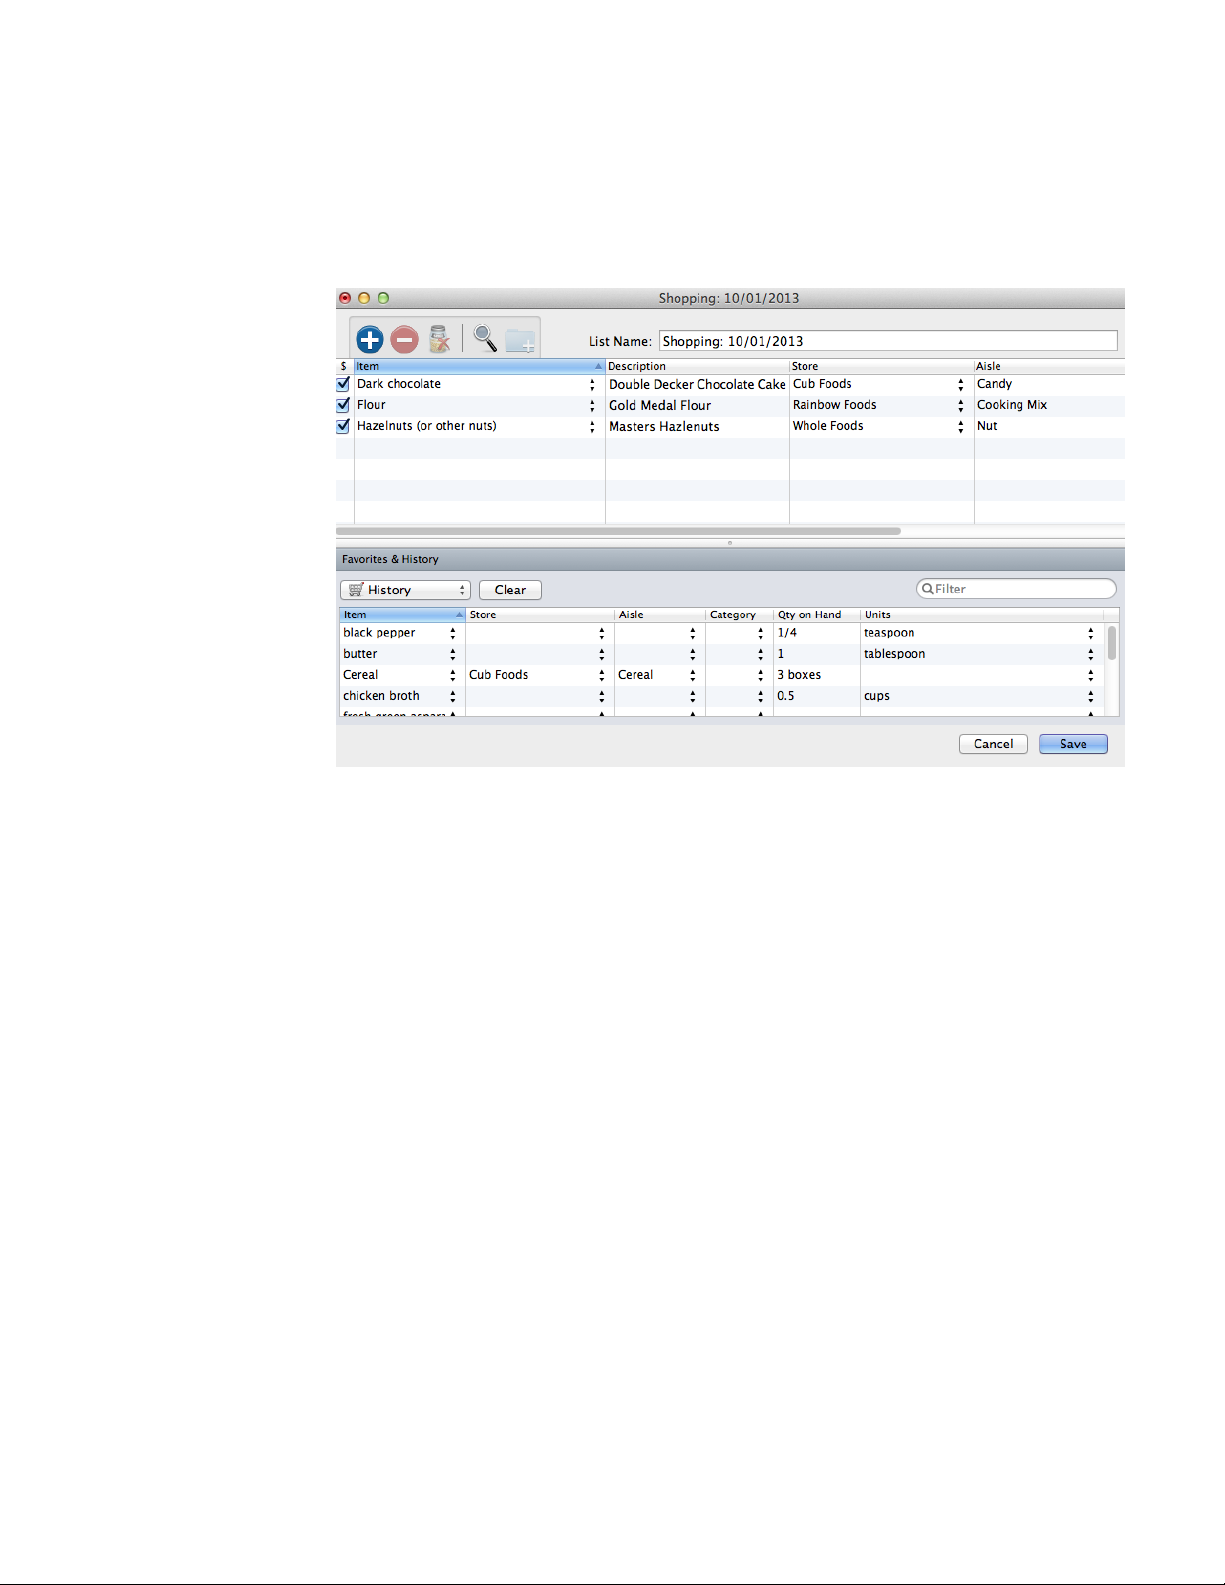
Like recipes, wine, beer, and cheese notes, you can edit and view shopping lists
simply by double-clicking on one in a list. Double-clicking on a shopping list
will open the
shopping list
editor which
allows you to
specify the
name, and the
items for a
shopping list.
The editor allows you to
also specify
fields like
aisle and
store for each
item on your
list. The editor also allows you to
add nonrecipe items to your list.
To edit values in the editor table, just double-click on the column of the row
you’d like to change. To add or remove a row, just press the appropriate button
located above the table. The button marked with a “+” will add a new row, the
button marked with the “-” will delete the current selected rows.
62
Page 63

Maintaining the Shopping List Favorites List
Every shopping list displays a master Favorites list, shown above in the bottom
section of the shopping list editor window. The favorites list is a place to keep
often used items, such as pantry staples, so that they can be quickly added to
any shopping list. To add one or more favorite items to a shopping list, just
drag and drop the rows from the favorites list to the shopping list. The favorites
list can also be used to store pantry quantities, if desired, as well.
The favorites list can be hidden by dragging the window splitter to the bottom
of the window, or by double-clicking on it.
Items in the favorites list are also used to set the aisles, stores and categories
for items whenever a new shopping list is created. For instance, if the favorites
list has a row for “all-purpose flour” and a shopping list gets created that uses
this ingredient, the values for the “all-purpose flour” favorite item are used to
fill in the data for this item in the new shopping list.
Alternatively, if there are no favorites found, existing shopping lists are
searched for this information and the items in a new shopping list are filled in
using the values from existing shopping lists, so it’s also possible to keep a
“master” shopping list that is used to fill in information automatically.
Exporting a Shopping List as a Text File
MacGourmet lets you easily export your shopping lists as a text file. To export
a shopping list, select it in your recipe box. Next choose Export... from the File
menu. Finally choose a name, location and format for your exported shopping
list. MacGourmet also supports HandyShopper and SplashShopper, and plain
text export formats.
63
Page 64

L
TIP: You can only print one type of item at a time. This
means that if you are in your recipe list, you can select
as many recipes as you want and print them. However,
if you are in a user list, you can only select multiple
items of the same type.
11
11. Printing Recipes and Notes
This chapter describes how to print on regular paper.
MacGourmet o"ers you many printing options. You can print one item or many
items. You can print one item per page or many to a page.
To print, you just need to select one or many items in your recipe box and
press the Print toolbar item, or select Print... from the File menu. Either action
will cause the Print window to be displayed. The Print window allows you to
choose the template you’d like to use for printing and gives you an approximate preview of what your recipes or items will look like when printed. Note
that this is only approximate. To really see what your print out will look like,
press the “Print” button at the bottom of the Print window, which will display
the Print Settings sheet, and press the “Preview” button found at the bottom left
of the sheet.
It should be noted that dynamic templates are printed on normal printer paper,
and can be printed all at once.
To print each of your selected recipes on a separate page, check the “Print one
item per page” check box. To change the print margins, press the “Set Margins”
64
Page 65
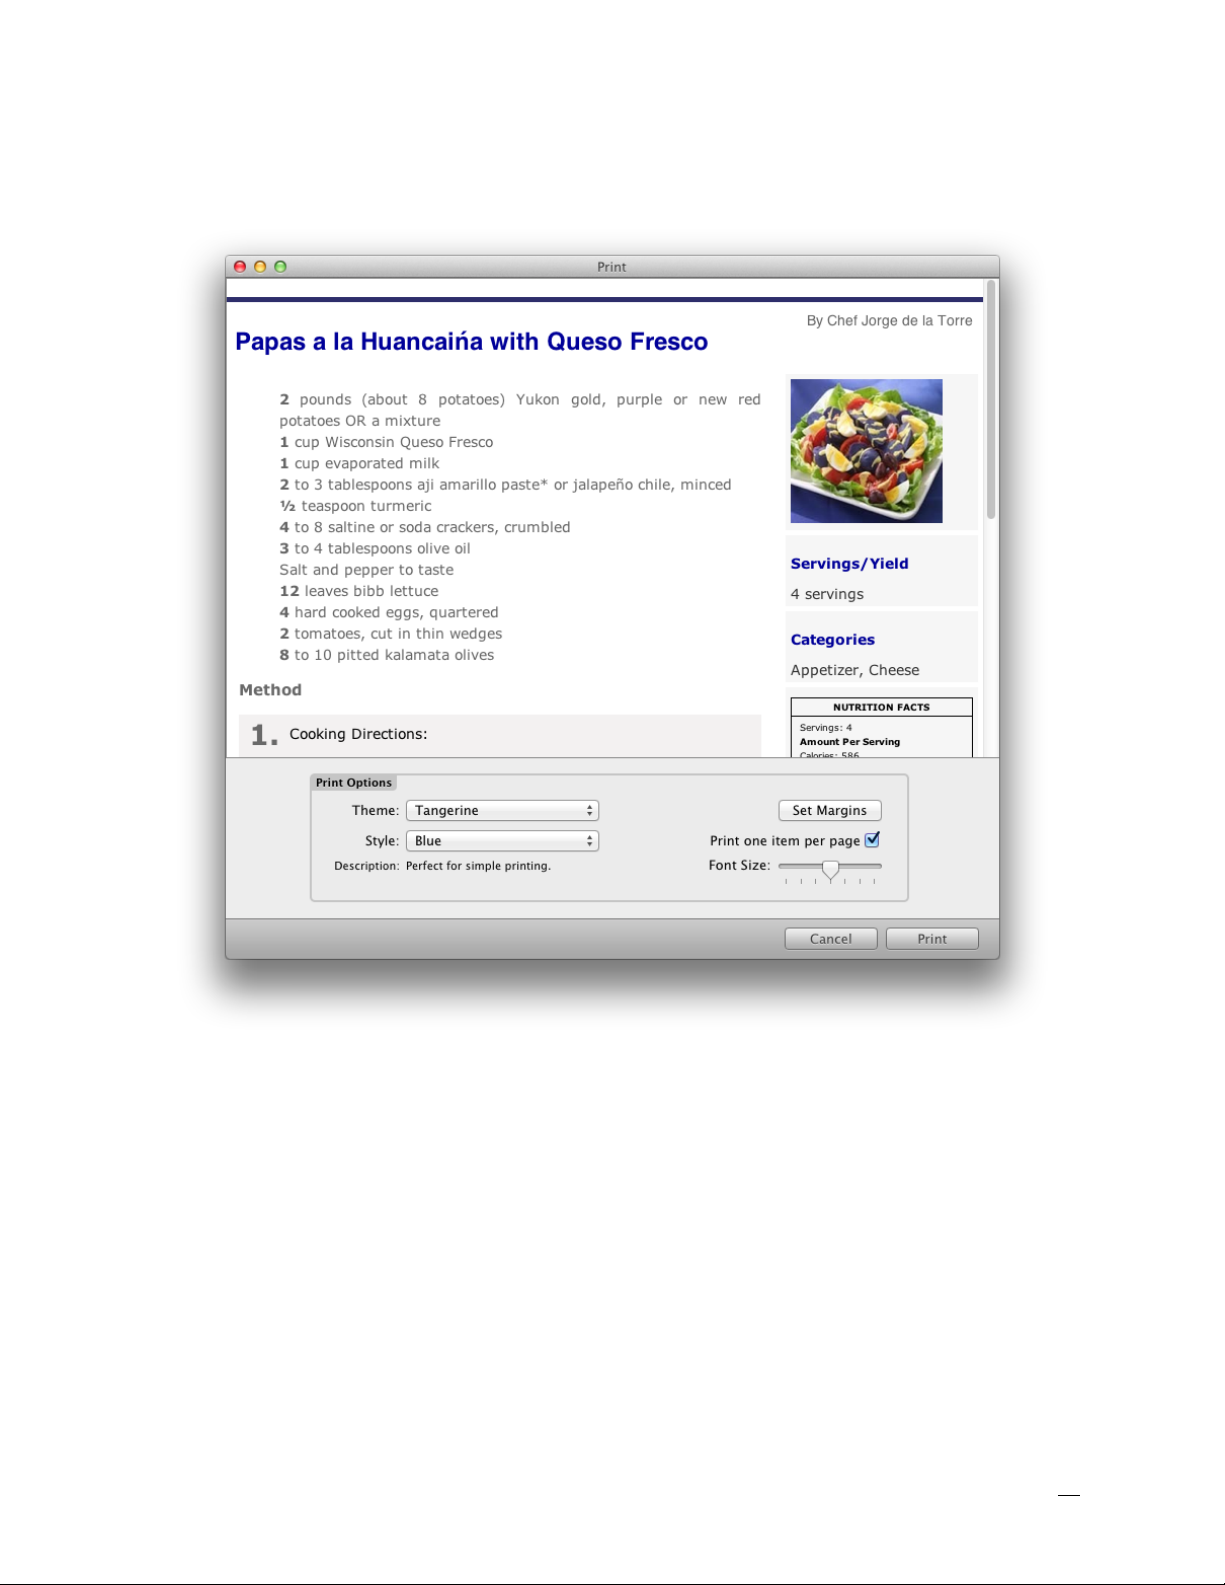
button. This will bring up up a sheet that allows you do set the top, bottom, left
and right margins.
65
Page 66

A
Appendix A
Backing Up Your MacGourmet Data
We can’t stress how critical it is to have a backup plan. While we can retrieve
lost serial numbers, we can’t retrieve lost data due to hard drive failures or
other such catastrophes. Files can be accidentally deleted, or corrupted too, so
it’s always a good idea to make copies of your information from time to time. If
you are someone who updates your recipes daily, you may want to consider
backing up your data even more frequently. There are two components of
MacGourmet that should be backed up:
The MacGourmet4Database.mgdatabase file
This is the file you created the first time you ran MacGourmet 4. If you chose to
put it in Documents, and you regularly back up that folder using something like
the Apple Backup application, your information will get saved. If you put it
somewhere else, make sure you add this file to whatever backup plan you have.
The MacGourmet Application Support folder
This folder stores things you’ve added to MacGourmet, like themes, etc. If you
don’t use something like Backup, make sure you add the folder Library/
Application Support/MacGourmet in your home directory to your backup plan.
The application file itself will always be available from our servers, so you can
back that up, but it’s not critical.
Changing the Location of Your MacGourmet Data
By default, your library is found in the “Documents” location on your hard drive.
To change this location (not recommended), open Preferences and navigate to
the Advanced tab. Next press the “Change...” button and select the folder that
you would like to use to store your MacGourmet4Database.mgdatabase file.
Make sure that this folder is read/write for any user that will be using
MacGourmet. Note that this location is the folder that will CONTAIN the database file. Note: The Mac App Store Version default location for the MacGourmet
database is: ~/Library/Containers
To reset the location to the default, press the “Reset” button.
66
Page 67

Note that you need to quit and restart MacGourmet for this change to take effect.
Changing your database location at launch
You can select an existing library other than your default library at application
launch time by holding down the option key while the application is starting up.
This will display an open dialog that lets you choose an existing MacGourmet
Database file to load. This feature allows you to have multiple recipe libraries if
you desire.
Note: When starting MacGourmet without holding down the option key, it will
go back to loading the default library specified in Advanced preferences.
Happy Cooking from all of
us at Mariner Software!
67
 Loading...