

MARIAN UCON CX User Manual

UCON CX
User’s Guide

© December 2004, v1.0 MARIAN.
Hardware Design by MARIAN
All rights reserved. No part of this User's Guide may be reproduced or transmitted in any form or by any
means, electronically or mechanical, including photocopy, translation, recording, or any information storage
and retrieval system, without permission in writing from MARIAN.
All trademarks are the property of the respective owners.
MARIAN is not liable for any damage to the software, hardware and data and costs resulting from it, which
are caused by improper handling or installation of the hardware.
Technical changes are reserved.

TABLE OF CONTENTS
Welcome 5
Features 7
Installation 8
Scope of Supply 8
System-Requirements 8
Connectors 10
Spot on the UCON CX 12
The First Contact 12
The Mixer 13
What is it all about? 13
The channels 14
The master channel 17
Adaptable – changing the view of the UCON Mixer 17
The Outputcontrol 19
What is it all about? 20
Adaptable – changing the view of the Outputcontrol 21
Saving and Loading Setups 22
The Settings 23
Operation Modes 24
Clock settings 25
USB 32
Audio Options 34
MIDI filter 35
ASIO Device Setup 38

2
Hands on the UCON 40
Setting up the Latency of the UCON 40
Background 40
Setting up the “USB Audio Latency” 41
Setting up the audio driver latency 42
Sounding Good 43
Background 43
How to do it? 43
The UCON in a Project Studio 44
Situation 44
Hardware routing 44
Software routing 44
Volume settings 45
Finalizing 45
The UCON in a Live Session 46
Situation 46
Hardware routing 46
Setting up the monitors 47
Software routing 47
Setting up the monitor volumes 47
Finalizing 47
The UCON as Hard-Disk-Recording-System 48
Situation 48
What’s there to care about? 48
The UCON in the “Orchestra” of Digital Devices 52
Background 52
What is a clock? 52
The rules in the digital audio world 53
The UCON in Stand Alone Operation 56
What in the world is “stand alone”? 56
Situation 56
Solution 56
Finalizing 56

3
Glossary 58
Technical Facts 63
Service and Support 64
Warranty 64
Care and maintenance 64
Contact 65

4

5
Welcome
Congratulations and thank you very much that you decided for a product of
MARIAN. Your decision was placed on one of the most innovative and
powerful sound systems ever created. We proudly present to you: the
UCON CX.
On minimal space this high quality device combines plenty of functions,
which will give you almost unlimited possibilities of working with digital
and analog audio signals.
The UCON CX is not just simply a recording system with many
professional connections in high resolution audio quality of 24 bit and 96
kHz – once installed it will upgrade your computer to a mighty 32 channel
mixing device.
As a professional music producer but also as a hobby musician you
repeatedly encounter new challenges. It’s all about capturing musical ideas
quickly and easily, but also about letting musicians not wait too long until a
recording can start. The intuitive user interface of the UCON Mixer is to
help you mastering all thinkable recording- and playback situations. You
need latency-free headphone mixes for your musicians? You demand full
control of pan regulation, mute- and solo functions? You want to quickly
switch between different mixer setups? – The UCON Mixer offers all of
that in a so far unreached simplicity and flexibility.
But that’s not all. In order to enable a completely free and creative handling
on assigning audio signals, we have given the Mixer an Output Control to
its side. With this, all audio signals, from an input of the UCON, a playback
signal of a software or the 3 stereo sums, can be routed freely to the
different physical outputs of the UCON. This way you avoid burdensome
cable replugging and save on investing in a patch bay. Because: all
configurations can be made with a simply mouse click and of course be
saved equally fast.
While developing the UCON CX we have especially taken care on a robust
and solid construction of the unit, so you get the full delight of the mobility
of your new recording partner. Thanks to the comfortable USB port, the
UCON quickly finds connection to your computer or notebook and is
prepared perfectly for the hard demands of daily studio work and also for

6
spontaneous producing “on the road”. No matter if you want to record one
single microphone or a complete band with up to 16 signals simultaneously
– all channels are available any time - in full resolution. The highdeveloped driver structure supporting all commonly used interfaces
guarantees stress-free and reliable operation, also in full-time use.
Take your time to also go through the next pages of this manual. Besides
the helpful installation- and setup explanations, it offers many valuable
hints on how you can use the Mixer and the Output Control effectively and
profitably. If you run in on technical terms while reading, which are
unknown to you, the glossary at the end of this manual will helpfully serve
you for their clearance.
Now, we do wish you lots of success in your work with the UCON CX. We
hope it will bring you just as much fun, as we had during the development.
Your MARIAN Team

7
Features
Your UCON CX comes with a lot of great functions. Here you can find a
small list of properties and capabilities.
9 4 high-quality microphone connectors with pre-amplification;
usable as Hi-Z instrument inputs (guitar; bass);
9 Connection of up to 8 analog line signals (e.g. keyboards, sound
expander and many more)
9 8 analog line outputs
9 Stereo headphone output with separate volume control
9 dedicated stereo mix output
9 All analog inputs with automatic level adjustment for balanced and
unbalanced signals
9 Comfortable level control of the inputs and level regulation of the
outputs remote controlled via the computer
9 1 stereo digital I/O S/PDIF format for digital devices (e.g. CD-
Player; DAT-Recorder)
9 8 channel digital I/O ADAT format
9 1 MIDI in; 2 MIDI out
9 Fast MIDI data transmission through MIDI stream optimizing
9 Free-configurable MIDI filter
9 32 channel DSP Mixer; hardware-based; latency-free
9 Flexible and extensive mix-, monitor- and routing possibilities
9 DAT-marker support
9 Wordclock/Superclock input with switchable termination
9 Synchronization as clock master (output of internal clock on
S/PDIF or ADAT)
9 Synchronization as clock slave (using external clock on
wordclock-, superclock-, S/PDIF- or ADAT input)
9 “stand alone”-mode as 8 channel I/O ADAT AD/DA converter
9 highly-developed multi-client driver for Windows™ XP: MME,
ASIO 2.0, GSIF, WDM-Audio, DirectSound

8
Installation
In the quickstart guide you will find all important installation steps
graphically listed. If you encounter problems while installing, please
consult our support service. In the appendix you can find different ways of
how to contact the support service.
Scope of Supply
After opening the package of the UCON CX, please check if the following
components are to be found completely and undamaged.
9 1 x UCON CX
9 1 x UCON CX power plug
9 1 x USB cord
9 4 rubber-feet
9 1 x CD-ROM with driver software
9 1 x CD-ROM with bundle software
9 this manual with quick installation guide
System-Requirements
For successful and orderly operation of the UCON CX, the following basic
requirements have to be met.
9 A computer with:
Intel Pentium-, or AMD CPU with at least 1 GHz
The operating system Windows
™
XP Home or Professional with
service pack 1a or 2 installed
A free USB 2.0 port
9 An electrical outlet for the power plug of the UCON CX

9
Furthermore, we would like to point out to you these important issues when
using the USB interface for audio purposes:
For the operation of the UCON CX, the installation of the
Microsoft USB patch „WinXP-KB822603-X86-ENU.exe“ is
urgently requested, if Microsoft Windows
™
XP including service
pack 1a is installed on the computer.
The operation of the UCON CX with small latencies is
unfortunately hindered by certain types of USB-host-controllers.
Please check, prior to setting up the unit, if the USB-host-controller
present in your computer harmonizes with the UCON CX.
Other components of the computer may disturb the operation of the
UCON CX with small latencies. This applies to certain graphic
cards; networking cards or other components.
Information on tested USB-host-controllers and other system components
you can find on our website
http://www.marian.de.
Connectors
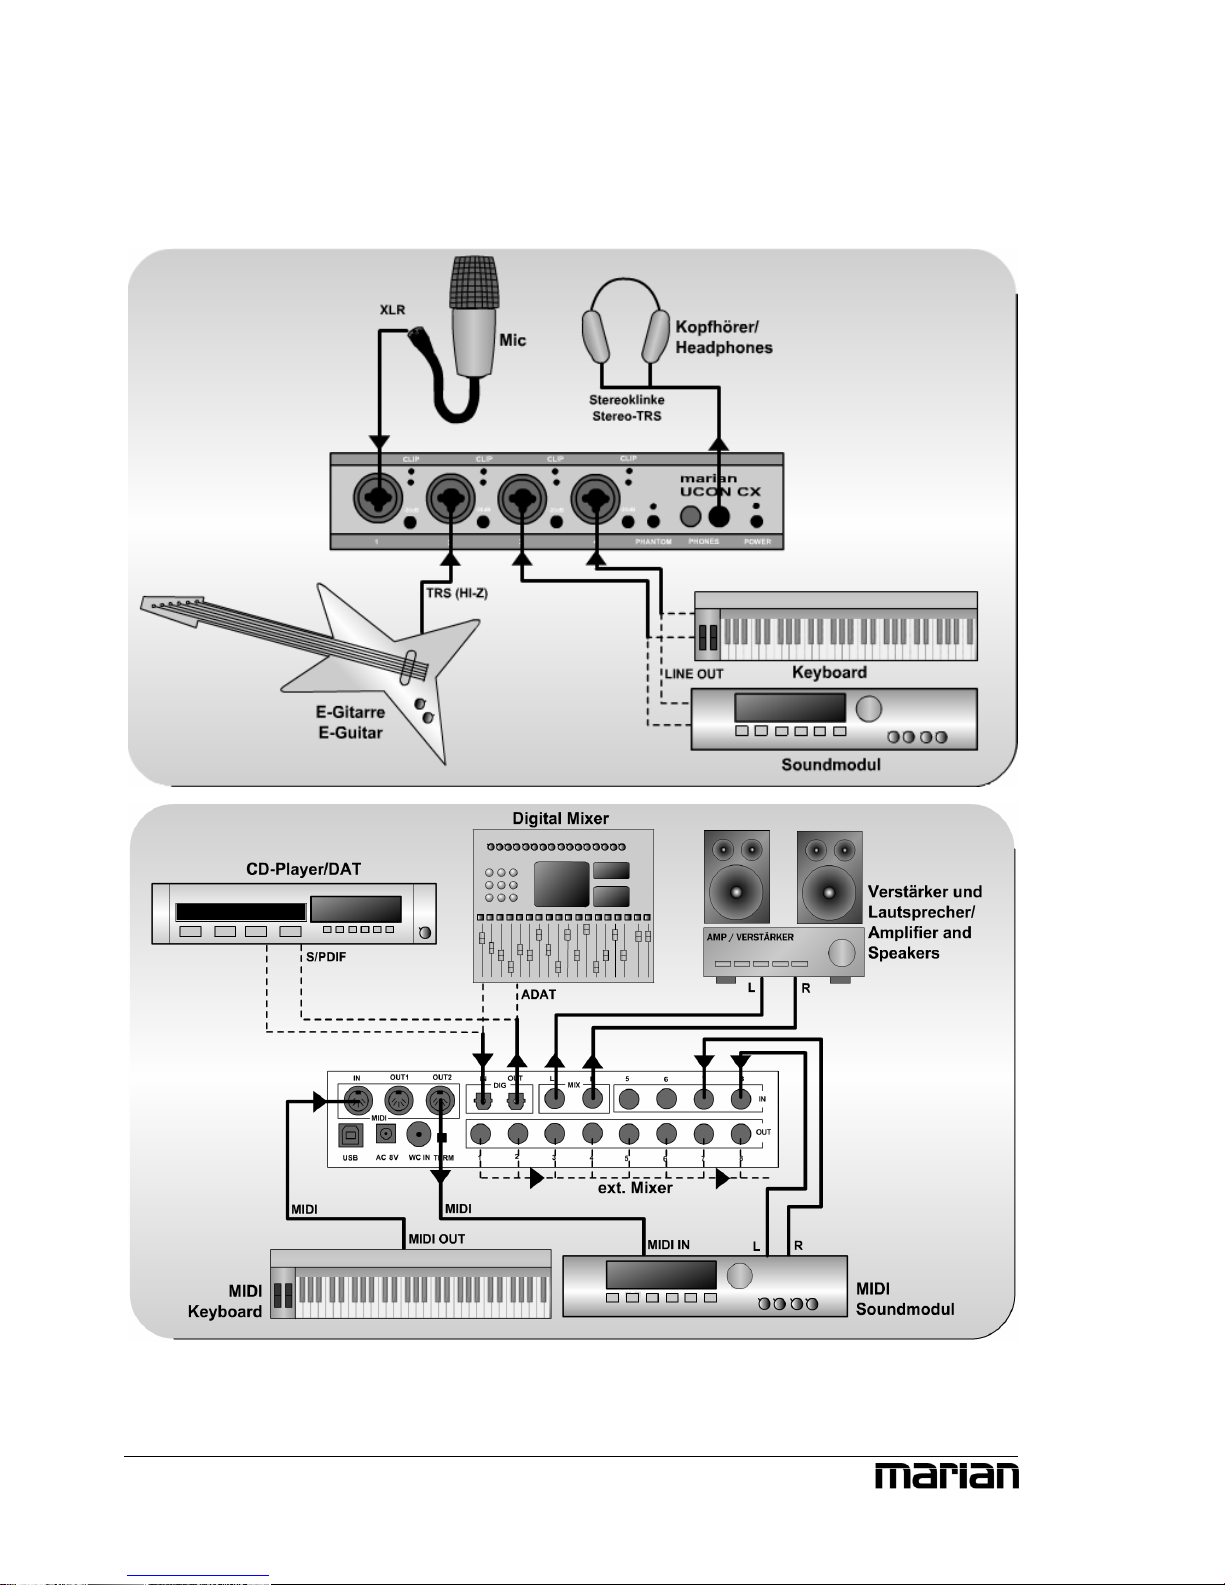
Here is one example of how the UCON can be set up in a music-studioenvironment.
10

11
If you intend to connect a condenser-microphone
to the UCON CX, you may turn on the needed
phantom-power with the “PHATOM”-button, on
the front of the UCON. Though turned on,
dynamic microphones can be connected parallel
to condenser microphones. Next to each
microphone plug there is a ”-20dB”-switch.
Pushing it will lower the level of a connected
signal prior the pre-amp by 20dB. This is mostly
needed for line signals and if an input signal is
still distorted, even though the gain knob within
the Mixer is pulled down completely. On the
front of the UCON CX there is also the knob
“Phones” for adjusting the volume of the
headphone output.
Z When connecting an
unbalanced signal, the
level decrease will be
only 10 dB.
Spot on the UCON CX
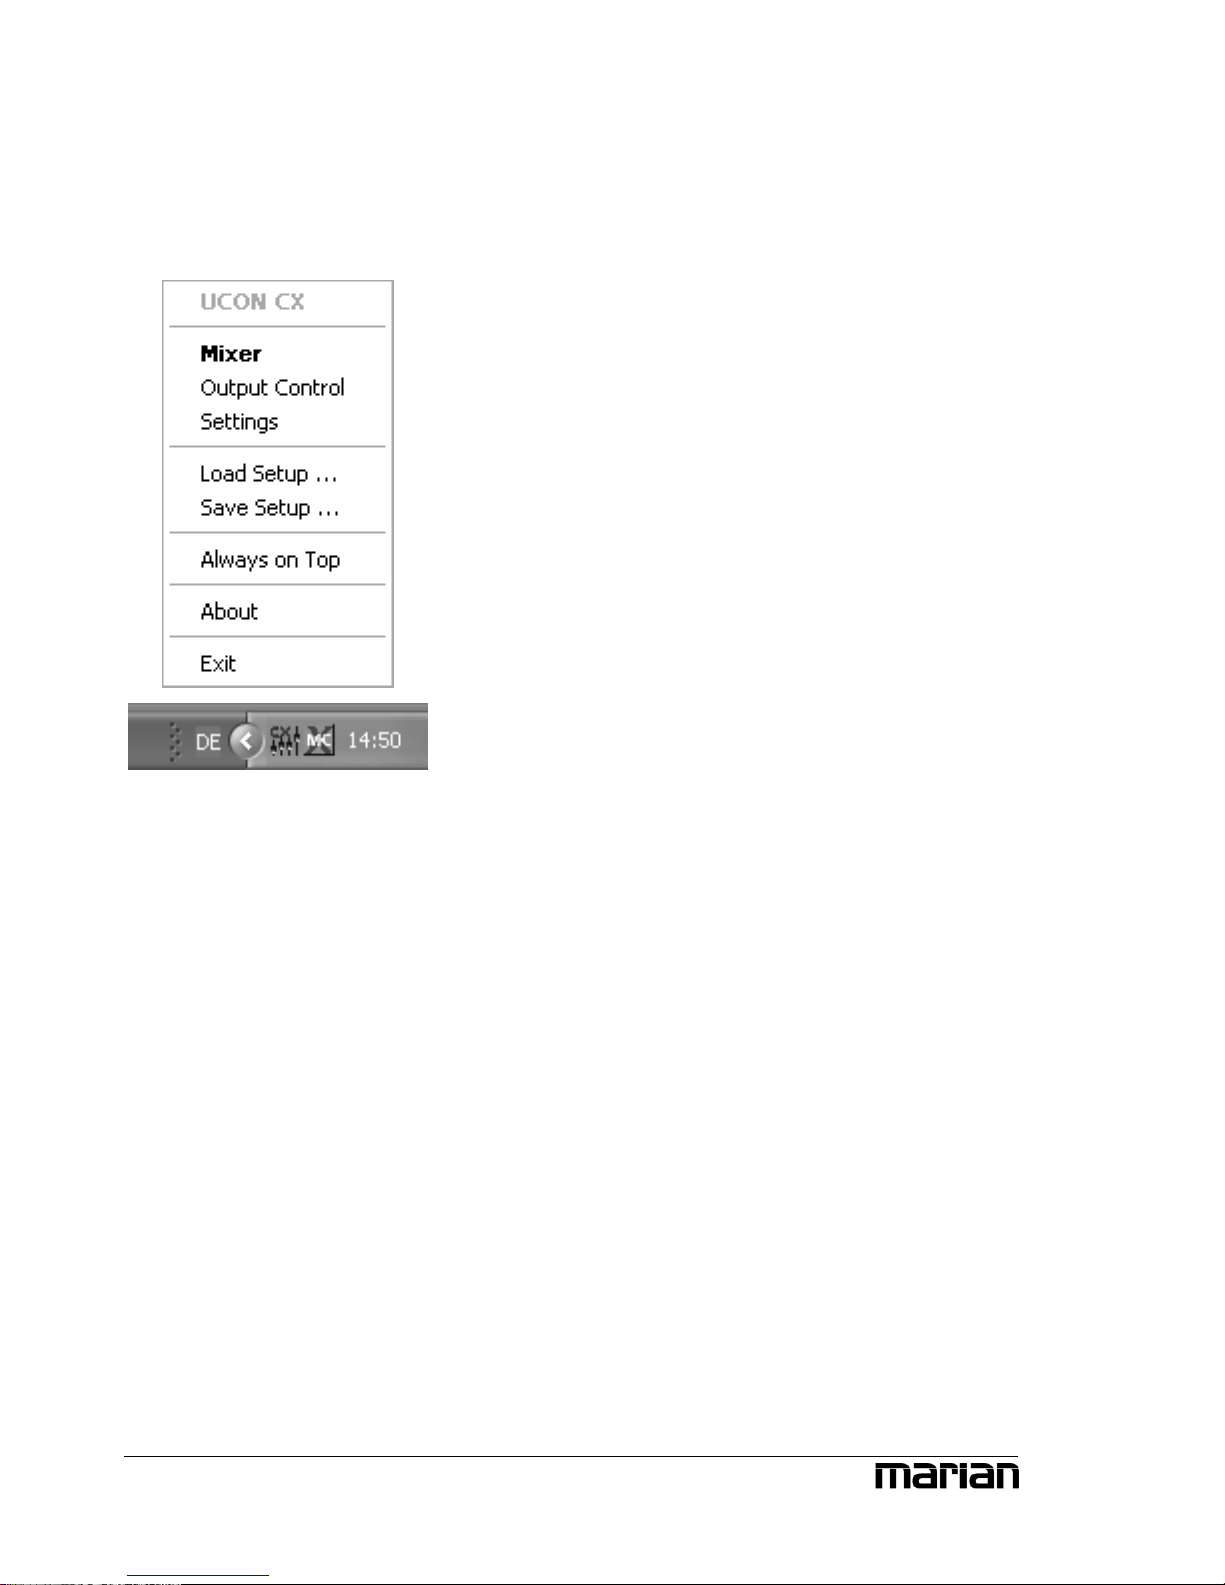
The First Contact
After the successful installation the symbol of
the UCON manager appears in the Windows™
taskbar of your computer. It offers you direct
access to important driver settings, the DSPbased 32 channel Mixer and the Output
Control of the UCON CX. Furthermore, you
can save and load the setups for Mixer and
Output Control. “Info” shows the current
driver version of the UCON CX. This is
needed when consulting our support service
with certain questions. The menu is opened
with a single mouse click, with another on the
corresponding entry the window of it is being
opened. Via clicking the option “Always on
Top” it is prevented that any other window can
cover the Mixer or the Output Control. This
option is helpful, when working
simultaneously with other windows, while
constantly wanting direct access on Mixer and
Output Control.
12
The Mixer
What is it all about?
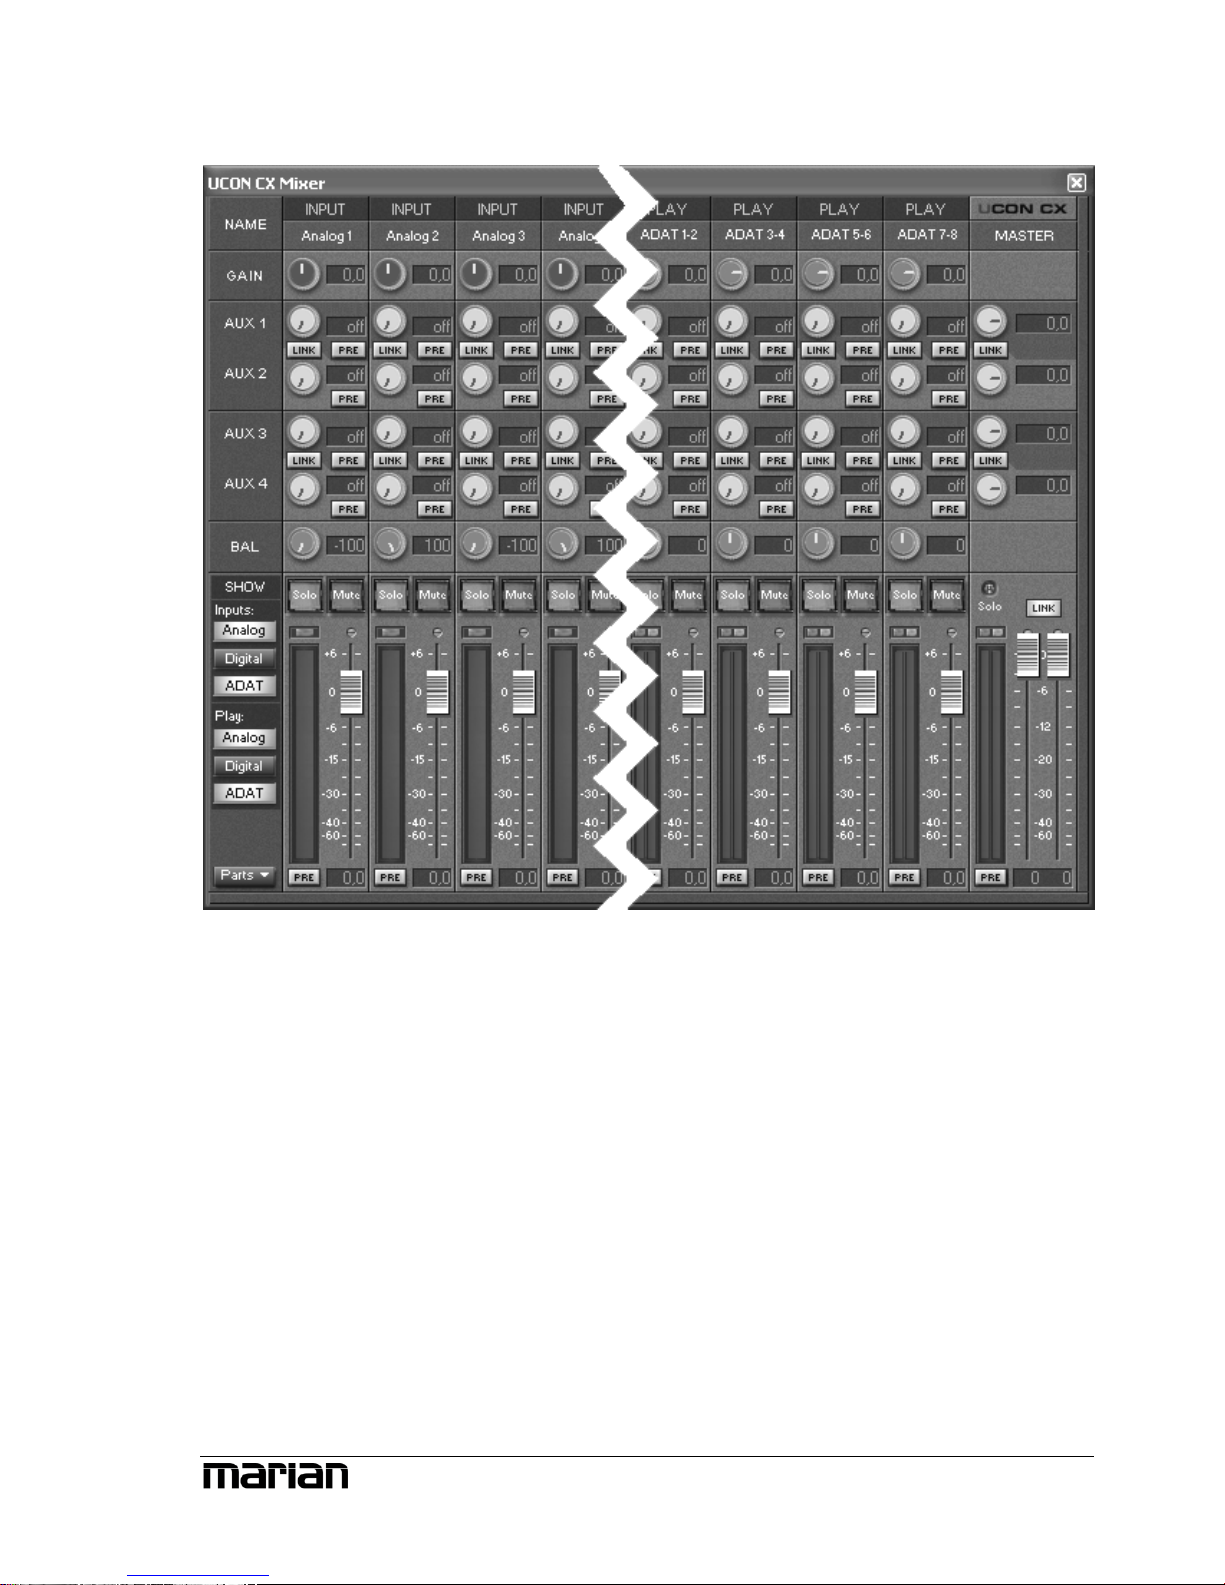
In this window all input channels and the master section of the UCON
manager are shown. 2 input channel types can be distinguished. In the
upper part of the window you can read the labels “INPUT” and “PLAY”
for the different channel types. “INPUT”-channels are physical inputs.
These are the 8 analog inputs and the ADAT- or S/PDIF-input on the case
of the UCON. As opposed to “PLAY”-channels, which are virtual inputs.
On those, audio signals land up, coming from an audio application within
your computer. The Mixer is democratic: it treats both channel types
equally.
13
The channels
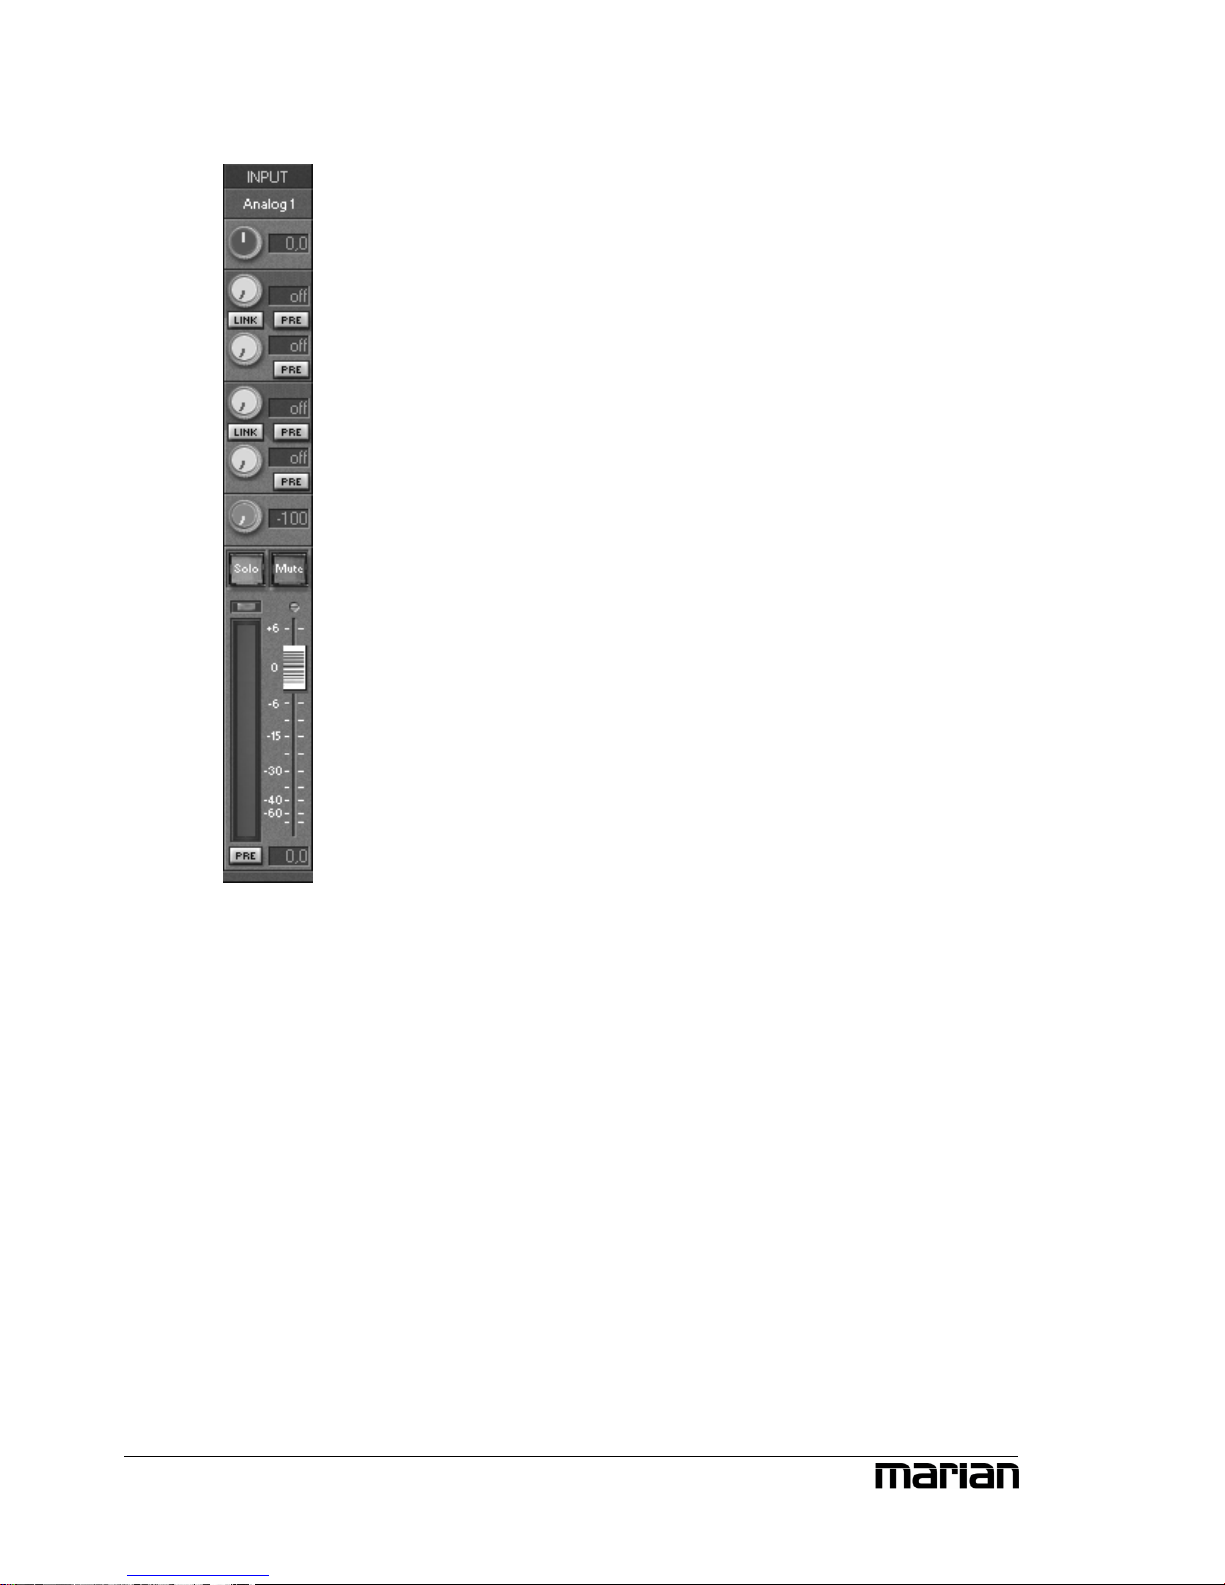
All channels can basically appear in 2 forms, as
stereo- or mono channel. Inputs “Analog 1” to
“Analog 4” are predefined mono channels.
So, as an example for all, let’s take a look at
input channel “analog 1” from top to bottom.
First we have the “GAIN”-knob. It serves for
adjusting the audio level directly at the input of a
channel. Especially on analog input channels,
this level adjustment is executed within the
analog digital converter of the UCON. This
changes the level for all software applications
recording from this input!
This is why gain knobs of analog input channels
are pictured in another color. For all other
channels this pre-amplification of the audio
signal done by the gain knob, is only relevant
within the Mixer.
Beneath “GAIN”, “AUX 1” and “AUX 2” are
placed. Pulling up knob “AUX 1” will result in a
volume increase of the signal in the signal sum
aux 1, pulling up knob “AUX 2” increases the
volume of the signal in signal sum aux 2 and so
forth. Hence the aux knobs have the same
function like the faders at the end of the channel,
ept: not for the master sum, but for each
signal sum aux 1 to aux 4.
exc
14
Besides the aux knobs the “PRE”-button is
located. If it is activated with a mouse click, the
fader at the end of the channel looses its
influence on the corresponding aux knob. Thus,
the fader can, for example, be placed on position
“-60” while still a signal reaches the Output
Control via the affected aux knob. Between
“AUX 1” and “AUX 2” as well as “AUX 3” and
“AUX 4” a “LINK”-button is situated. If clicked
on, aux volume and pre buttons for aux 1 and 2
Z For explanations on
how to record analog
audio signals correctly,
please refer to the “hands
on”-part “sounding
good”.
Z Instructions on how to
monitor these aux sums
on the UCON CX, you
will find in section “The
Output Control”.

Z Examples on how to
use pre switches and aux
sums correctly please
refer to the “hands on”part.
Z If you set up different
volumes for “AUX 1”
and “AUX 2” without the
“LINK”-button activated,
this relation remains with
the “LINK”-button
pushed.
Z The solo button does
not influence the aux
sums!
or aux 3 and 4 are connected functionally. That
means: when opening up “AUX 1” “AUX 2” is
equally pulled up. Just like that, “PRE”-button of
“AUX 2” is activated when pushing “PRE”button of “AUX 1”.
Now here comes the balance knob “BAL”. It
regulates the volume relation between left and
right channel of the signal, the way it shall
appear in the master sum.
If the “Solo”-button is active in one or more
channels, the mix out of the UCON provides
only the signal of these channels.
If the “Mute”-button is active in one or more
channels, the mix out of the UCON and the
affected aux sums do not carry these signals. The
aux busses of these channels are not muted if
their “PRE”-button is active.
15
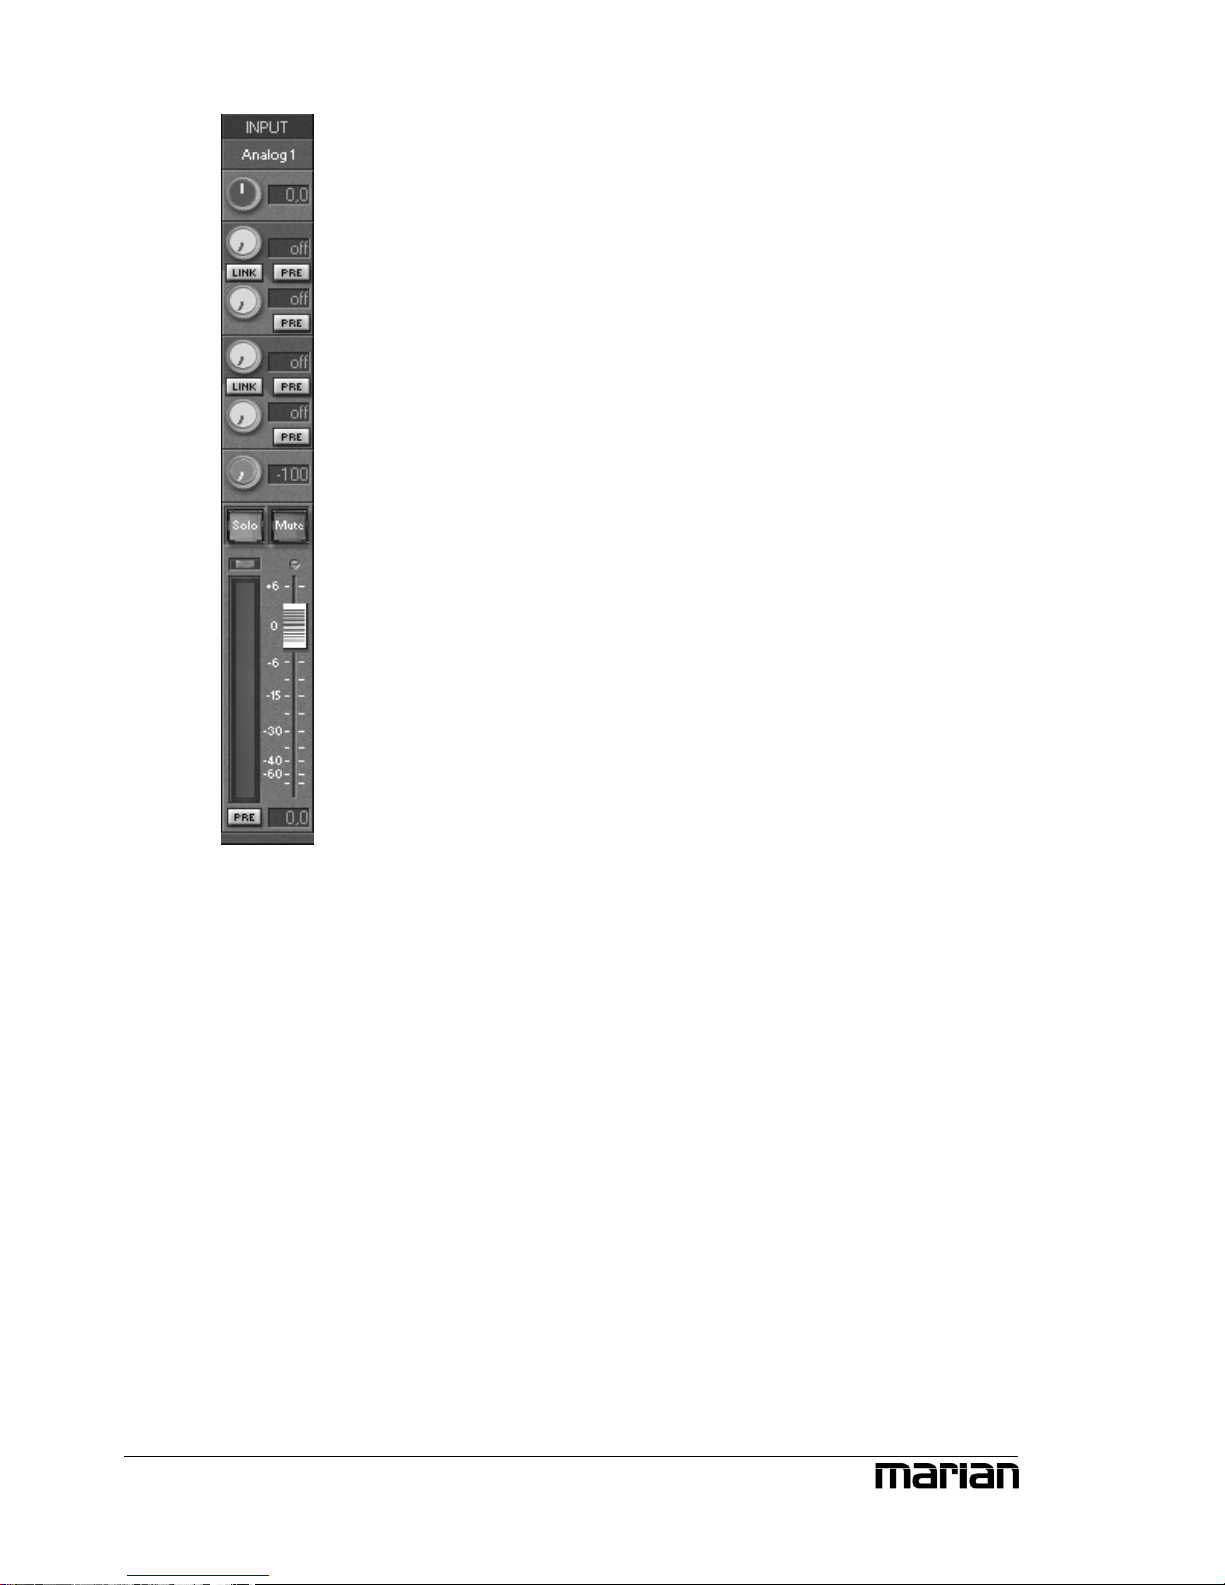
With the help of the fader at the end of the
channel strip, the portion of volume of the
channel on the master sum is regulated, which
ends up at the mix out of the UCON. Next to it,
the level meter with clipping LED (up) and
“PRE”-button (down) are located. If “PRE” is
active, the level of the signal is shown
independently of the position or before the gain
knob. The only exception made is for the analog
inputs. Here, the level is captured after the gain
knob but before the fader. If “PRE” is not active,
it is measured and shown “post” – that means
after the fader. This applies to all channel types.
This ends our little overview on the input
channels of the UCON Mixer. Now, you know
how to set up the volume of a channel on the
master sum or the 4 aux sums. The only thing
that’s missing is a possibility to control the level
of all of these sum signals. That’s what the
master channel on the right side of the Mixer is
all about.
16
Z If you set up different
volumes for “AUX 1”
and “AUX 2” or the right
and the left fader without
the „LINK”-button
activated, this relation
remains with the
“LINK”-button pushed.
Z In „ The UCON
Settings „ you get to
know how to switch
between these modes, and
what the outcome will be.
The master channel
The upper knobs regulate the volume of the aux
sums. Between “AUX 1” and “AUX 2” as well
as “AUX 3” and “AUX 4” a “LINK”-button is
situated. If clicked on, aux volume and pre
buttons for aux 1 and 2 or aux 3 and 4 are
connected functionally. That means: when
opening up “AUX 1”, “AUX 2” is equally pulled
up.
The master faders serve as regulators for the
volume of the main sum which comes out at the
mix out and the headphone out of the UCON
CX. They are assigned either to the left or the
right channel. As long as “LINK” is pushed,
they are moved synchronously.
Adaptable – changing the view of
the UCON Mixer
The UCON CX can be operated in two different
modes: ADAT Mode and Non ADAT Mode. If
the UCON runs in ADAT mode, an input- and a
play channel will appear for every ADAT input
besides the analog input- and play channels. If
the UCON runs in Non ADAT Mode, all ADAT
input- and play channels are hid. In exchange an
input- and play channel appears for the optical
digital input.
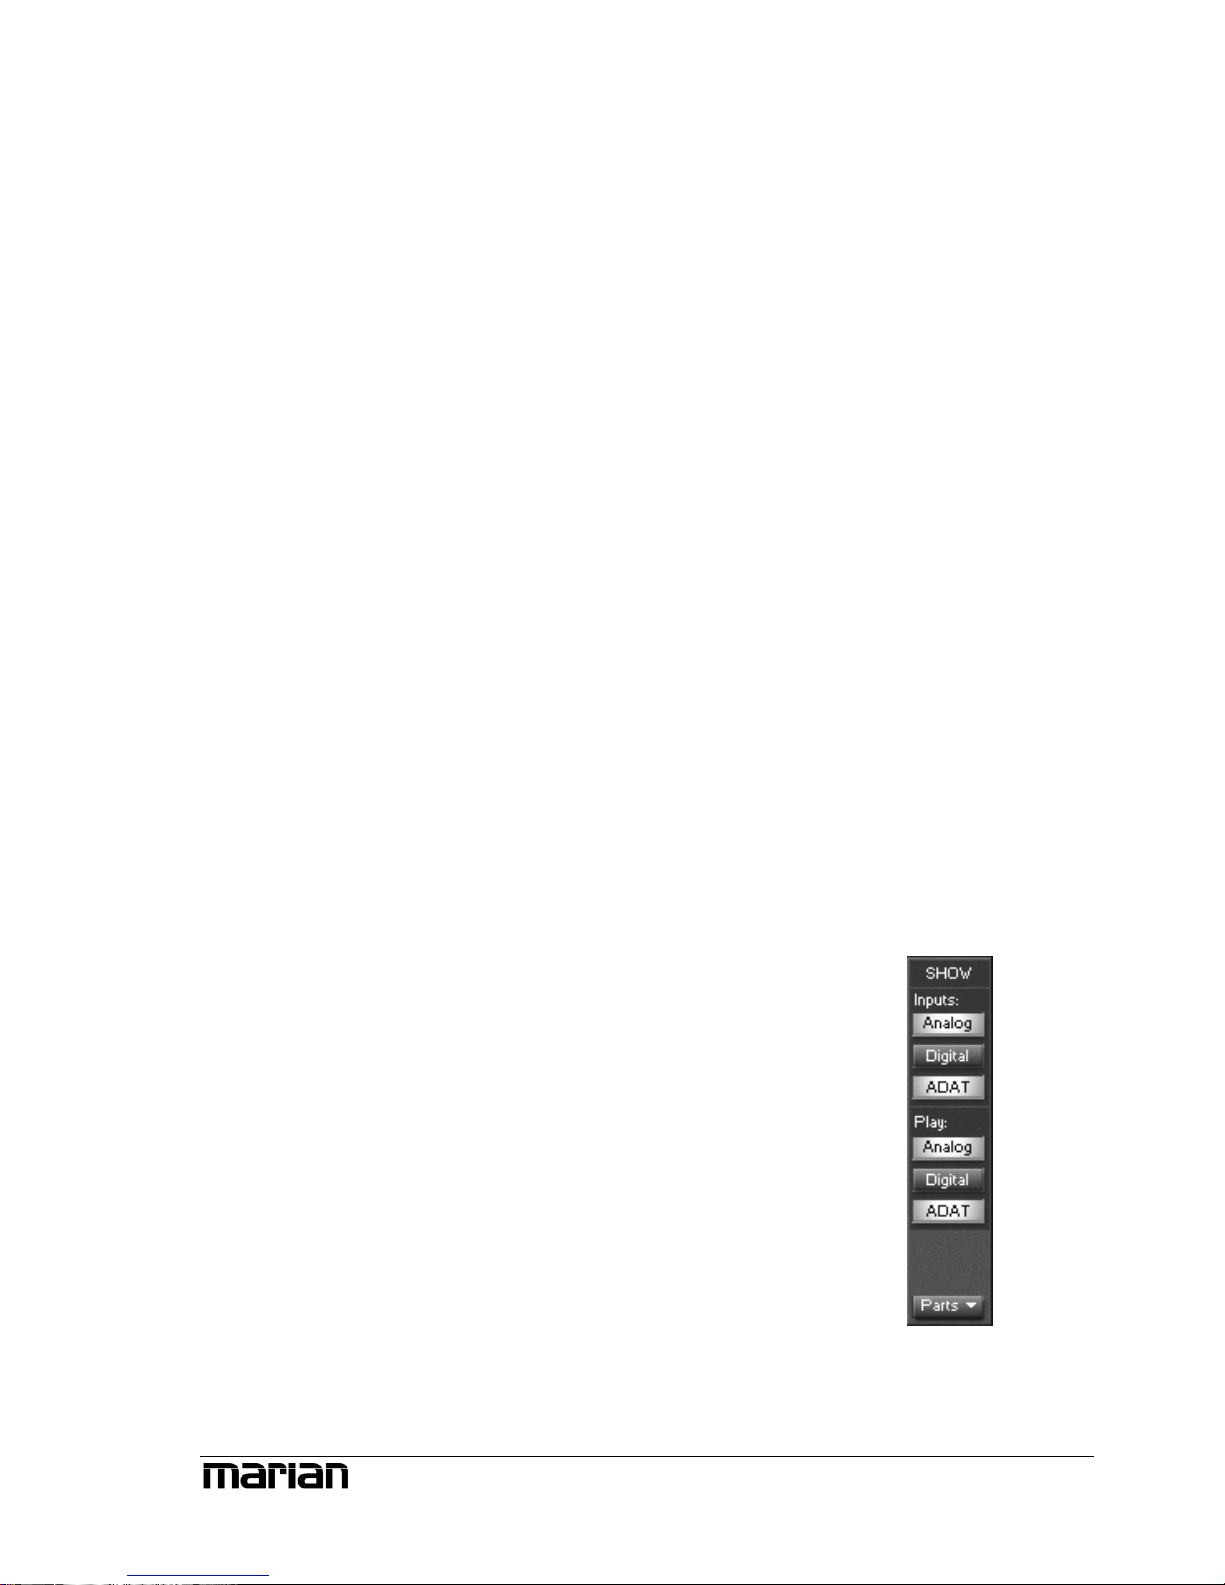
Furthermore, you can find the section “Show” in
the bottom right corner of the Mixer. This
allows, with a click on the buttons “Analog”,
“ADAT” or “Digital”, to hide or show the
affected channels, separately either for the inputor play section.
17

Z
Note: Hidden channels
are still active, just like
they were shown.
But that’s not all. In order to further adjust the
look of the Mixer according to your needs,
single rows of control elements can be hid or
shown with the help of “Parts”. This applies to
all gain-, aux- or bal knobs. All these functions
can be very handy for saving precious space on
your computer screen. But it's also useful if you
wish to secure certain setups of faders or knobs
from accidentally being changed. Of course,
apart from all these functions, the window can
be changed in horizontal size.
Congratulations! You just gained all necessary
knowledge, in order to successfully mix audio
signals with the UCON Mixer. Since we have
had a look at common mixer concepts when
designing the UCON Mixer, you should now be
able to work at any other professional mixing
console. If you have already been working with
mixing consoles, you probably found a known
user surface.
But we claimed that the UCON would be more,
than just a mixer within the computer. So let’s
hop on to the next chapter to see what else the
UCON CX is capable of.
18
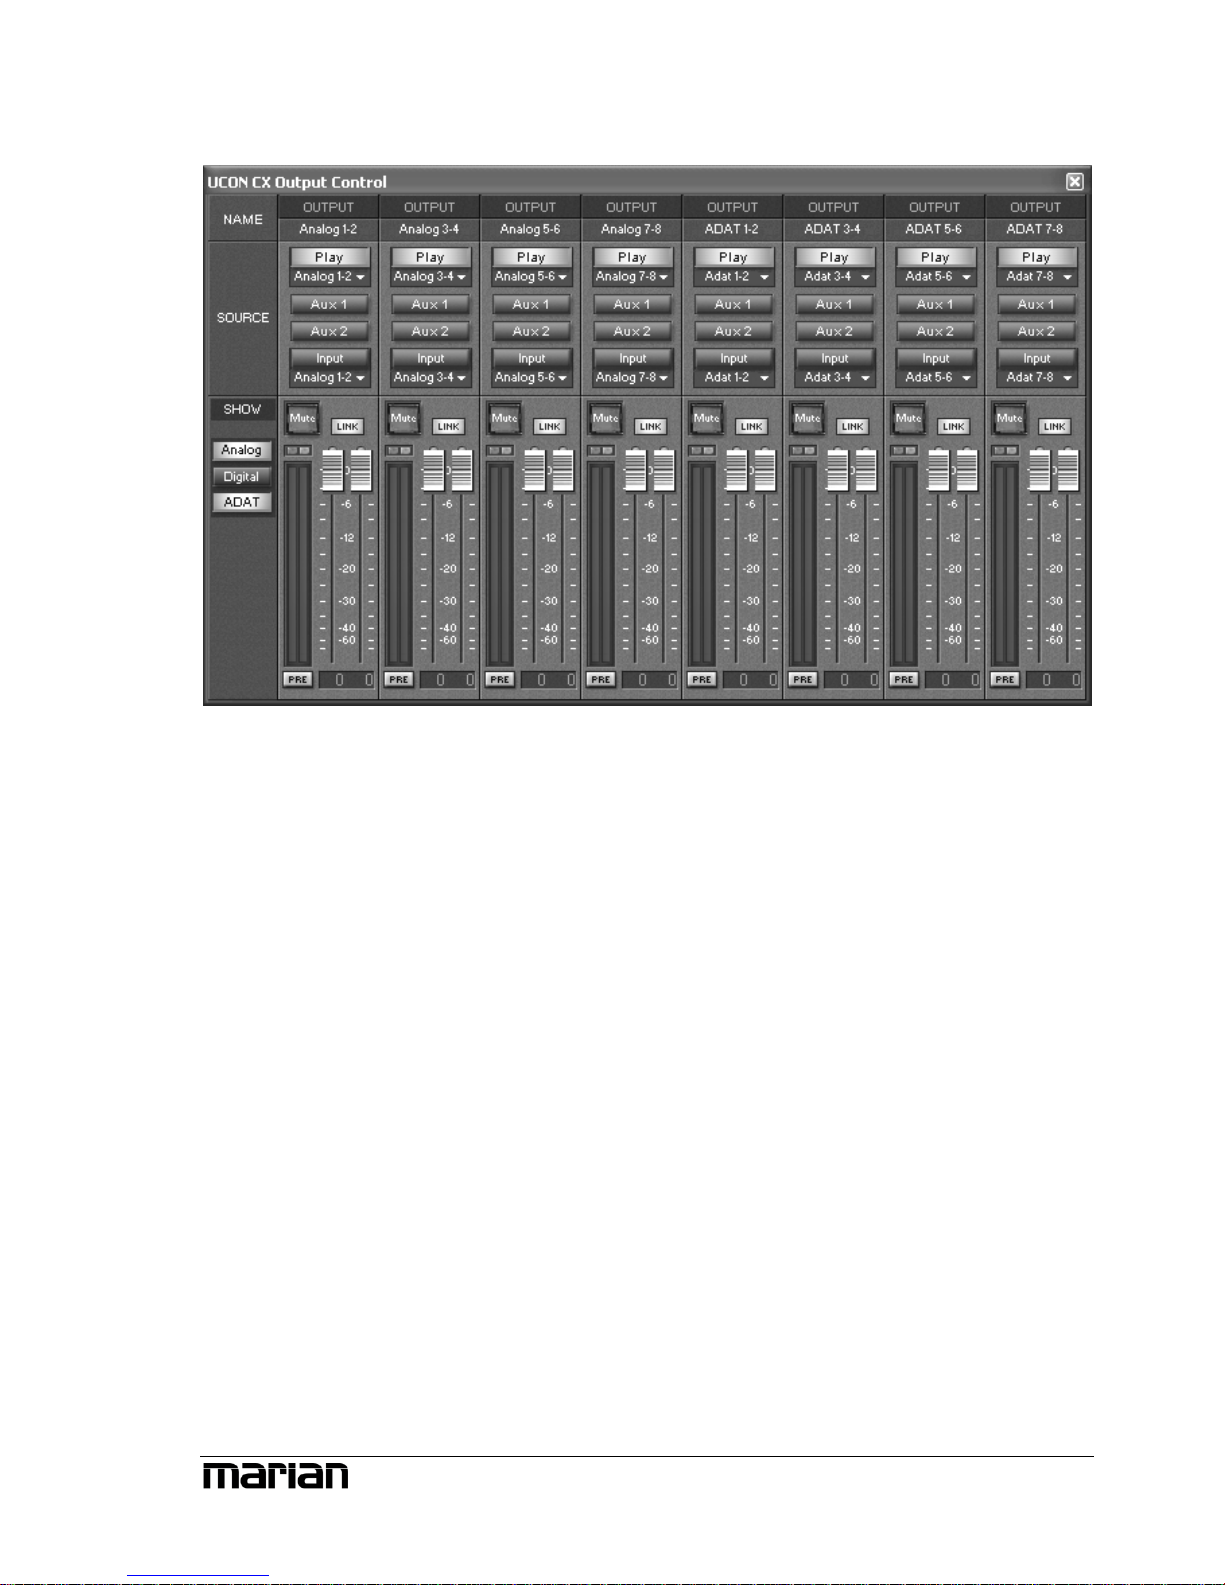
The Output Control
So far, we have taken a look at signals, which either entered the UCON via
a physical input or as a playback signal of a software.
The Output Control controls all signals, leaving the UCON CX. It is
opened with single click on “Output Control” via the UCON symbol on the
Windows™ taskbar.
You probably figure, that this window looks pretty much like the Mixer
window, save it doesn’t have gain-, aux and bal knobs, but routing buttons
instead.
19
 Loading...