

Page 1

Page 2

02
Page 3

ACCEPTABLE VENT PRODUCTS
START UP AND TESTING
INITIAL START UP
REFERENCE
SYSTEM SPECIFICATIONS
DIMENSIONS
NAMES OF MAJOR PARTS AND COMPONENTS
TEMPERATURE INCREASE CHART
CUSTOMER SERVICE
OTHER PRODUCTS
45
45
46
47
50
51
53
53
54
55
WARNING: If the information in these instructions is not followed exactly, a fire or
explosion may result causing property damage, personal injury or death.Do not
store or use gasoline or other flammable vapors and liquids in the vicinity of this or
any other appliance.
WHAT TO DO IF YOU SMELL GAS:
- Do not try to light any appliance.
- Do not touch any electrical switch; do not use any phone in your building.
- Immediately call your gas supplier from a neighbor's phone.
- Follow the gas supplier's instructions.
- If you cannot reach your gas supplier, call the fire department.
- Installation and service must be performed by a qualified installer, service agency
or the gas supplier.
- Water heater for other than recreational vehicle installation only.
IMPORTANT WARNING! There is water contained in the coils of your water heater
at all times. If your water heater is exposed to freezing temperatures, the water in the
coils could freeze, causing a break in the heat exchanger of the unit, or the supply
and return lines. This kind of damage will result in water running freely into the space
where the water heater is located, with can cause flooding. If your water heater is
installed in a geographic location that sees very low sustained temperatures, you
MUST install a backflow preventer on your heater's vent pipe. This will ensure that
cold air cannot fall down into the water heater and cause freezing damage. DO NOT
install this water heater where it may be subjected to a freeze. If your water heater is
in an area where freezing is a possibility, you must turn off the water to the heater
and drain it of any water by using the valve stem at the bottom of the unit and
disconnecting the warm water line. Leave the valve stem and the warm water line
disconnected until you intend to use the water heater.
Thank you for purchasing a GA16ETL Gas Tankless Water Heater. In order to
ensure proper installation, safe operation, and long life, please carefully read these
instructions. Installation should only be completed by licensed professionals. The
use of professionals ensures the installation is in full compliance with all required
building, plumbing and electrical codes.
KEEP THIS MANUAL for future reference. This booklet includes useful information
about the product, maintenance requirements and the details of your product
warranty.
0504
Page 4

READ AND FOLLOW ALL INSTRUCTIONS.
When using this equipment, basic precautions should always be followed.
Safety Definitions
This symbol is the safety alert symbol which is used to alert you to
potential hazards that can kill or hurt you and/or others.
Indicates an imminently hazardous situation which if not avoided will
result in death or serious injury.
Indicates a potentially hazardous situation which if not avoided
could result in death or serious injury.
Indicates a potentially hazardous situation which if not avoided
could result in minor or moderate injury. It may also be used to alert
against unsafe practices.
- This heater is designed only for the heating of water and should not be used for
other applications or used to heat any other media.
- Never use a fuel gas that is not listed on the nameplate as compatible with the
water heater. Abnormal combustion or a deflagration may occur which can cause a
serious accident including damage to the heater.
- Do not use this appliance if any part has been under water. Consult a qualified
service technician to inspect the appliance and make any required repairs prior to
installation and operation.
- This water heater is designed for indoor mounting. Never mount it outdoors.
- This equipment should be installed in an area where water leakage from the unit or
connections will not result in damage.The manufacturer is not responsible for any
damages resulting from leaks.
- Only connect gas and water as instructed. Incorrect or reversed connections will
cause equipment damage.
- Do not over tighten connections or equipment may be damaged.
DO NOT use a fuel gas that is not listed on the nameplate as
compatible with the water heater. Abnormal combustion or a
deflagration may occur which can cause a serious accident.
DO NOT use the unit if the vent piping has been damaged or
altered in any way including cracking, separation, rusting,
melting, etc. Improper venting may cause a buildup of Carbon
Monoxide (CO) which can cause brain damage or death.
·If the water heater needs to be installed, moved, or serviced only utilize licensed
professionals. The use of professionals ensures all work is in full compliance with
required building, plumbing and electrical codes.
·
- Keep the area around the appliance clear and free of flammable materials such as
cloth, wood, aerosol cans, paper, gasoline, etc.
- When using hot water for a shower or bath always check the water temperature
before entry to avoid being scalded. Obey local codes for the maximum water
temperature setting allowed. Water temperatures over 125ºF (52ºC) can cause
severe burns or death from scalds. Households with small children, disabled or
elderly persons may require a setting of 120ºF (49ºC) or lower.
- Do not install in areas that are subject to vibration.
- This equipment may not be operated without the vent pipe properly connected. The
exhaust pipe must not terminate in an area where the exhausting vapor or collecting
condensate could create a hazardous situation or cause property damage. Exhaust
gases must be vented out of the building in compliance with all building codes.
- The exhaust piping is very hot during and for a period after use. Do not touch the
pipe.
- Ensure that snow, ice or other debris does not block the inlet or exhaust pipes.
- Regular housekeeping should be done in areas around the heaters to prevent
insect intrusion and possible equipment malfunction.
- The unit should be serviced on a routine basis to ensure optimum performance.
Service needs will vary based on local water conditions including acidity, alkalinity,
hardness, etc.
- Freezing temperatures will cause damage to the heater. Install in locations where
freezing temperatures are not reached and follow procedures to drain the unit if it will
be out of service for a period of time.
0706
Page 5

- A 120 V / 60 Hz power source should be used. Fire, electrical shock or damage to
the water heater may occur if an incorrect power supply is used.
- This appliance is equipped with a three-prong grounded plug for increased
protection against electrical shock. Ensure the plug is properly inserted into a clean,
dry outlet that complies with all electrical codes. Only insert and remove the plug
using the plug head and never use a wet hand to plug or unplug the power plug.
- Any alterations to the appliance will void the warranty.
Normal Operation
This section of the manual instructs an owner on routine operating procedures and
assumes that the water heater has already been installed, tested, and approved for
operation. Initial start up requirements is detailed in the “Installation” section of this
manual.
Routine Start Up
Follow this procedure for a heater that has been out of service.
1. Ensure all drain plugs are installed in unit.
- GAS16LPETL gas tankless water heaters provide an efficient reliable supply of hot
water.
- The temperature can be adjusted between 95ºF and 149ºF (35ºC - 65ºC).
- Only a small amount of water and a low water pressure (15psi) are required for the
unit. Unit requires 0.67 gpm (2.5 l/min) to enable the unit. Unit stays in operation until
the flow drops below 0.53 gpm (2 l/min).
- The burner ignition is electronic. The unit has no pilot light and consumes no gas
when the heater is not being used.
- Air is brought into the unit from outside, efficiently burned with the appropriate
source of fuel and then exhausted externally.
- The unit's integrated control system constantly monitors the temperature of the
water being produced and adjusts the burner accordingly to deliver a stable supply
of hot water.
- The unit is highly flexible and provides hot water over a wide range of flow rates and
incoming water temperatures across the capacity range of the unit.
- GA16ETL heaters include a digital functionality that allows owners to control hot
water consumption and conserve water.
- Multiple protective functions are included such as no-load heating prevention,
automatic shutdown in case of accidental flame out, automatic pressure relief, etc.
to make the appliance both safe and reliable
2. Ensure all hot water use points (faucets, etc) are closed.
3. Open the water inlet valve.
4. Open a hot water faucet to confirm water flow and then close the faucet.
5. Open the fuel gas valve.
6. Plug in the unit, The message “CL” will be displayed indicating “Cold” state.
7. Press the “ON/OFF” key to turn on the unit.
8. Set temperature (see “Temperature Control” section of this manual).
- In the event of a disruption in operation, a failure code is displayed and an alarm
sounds an alert.
0908
Page 6

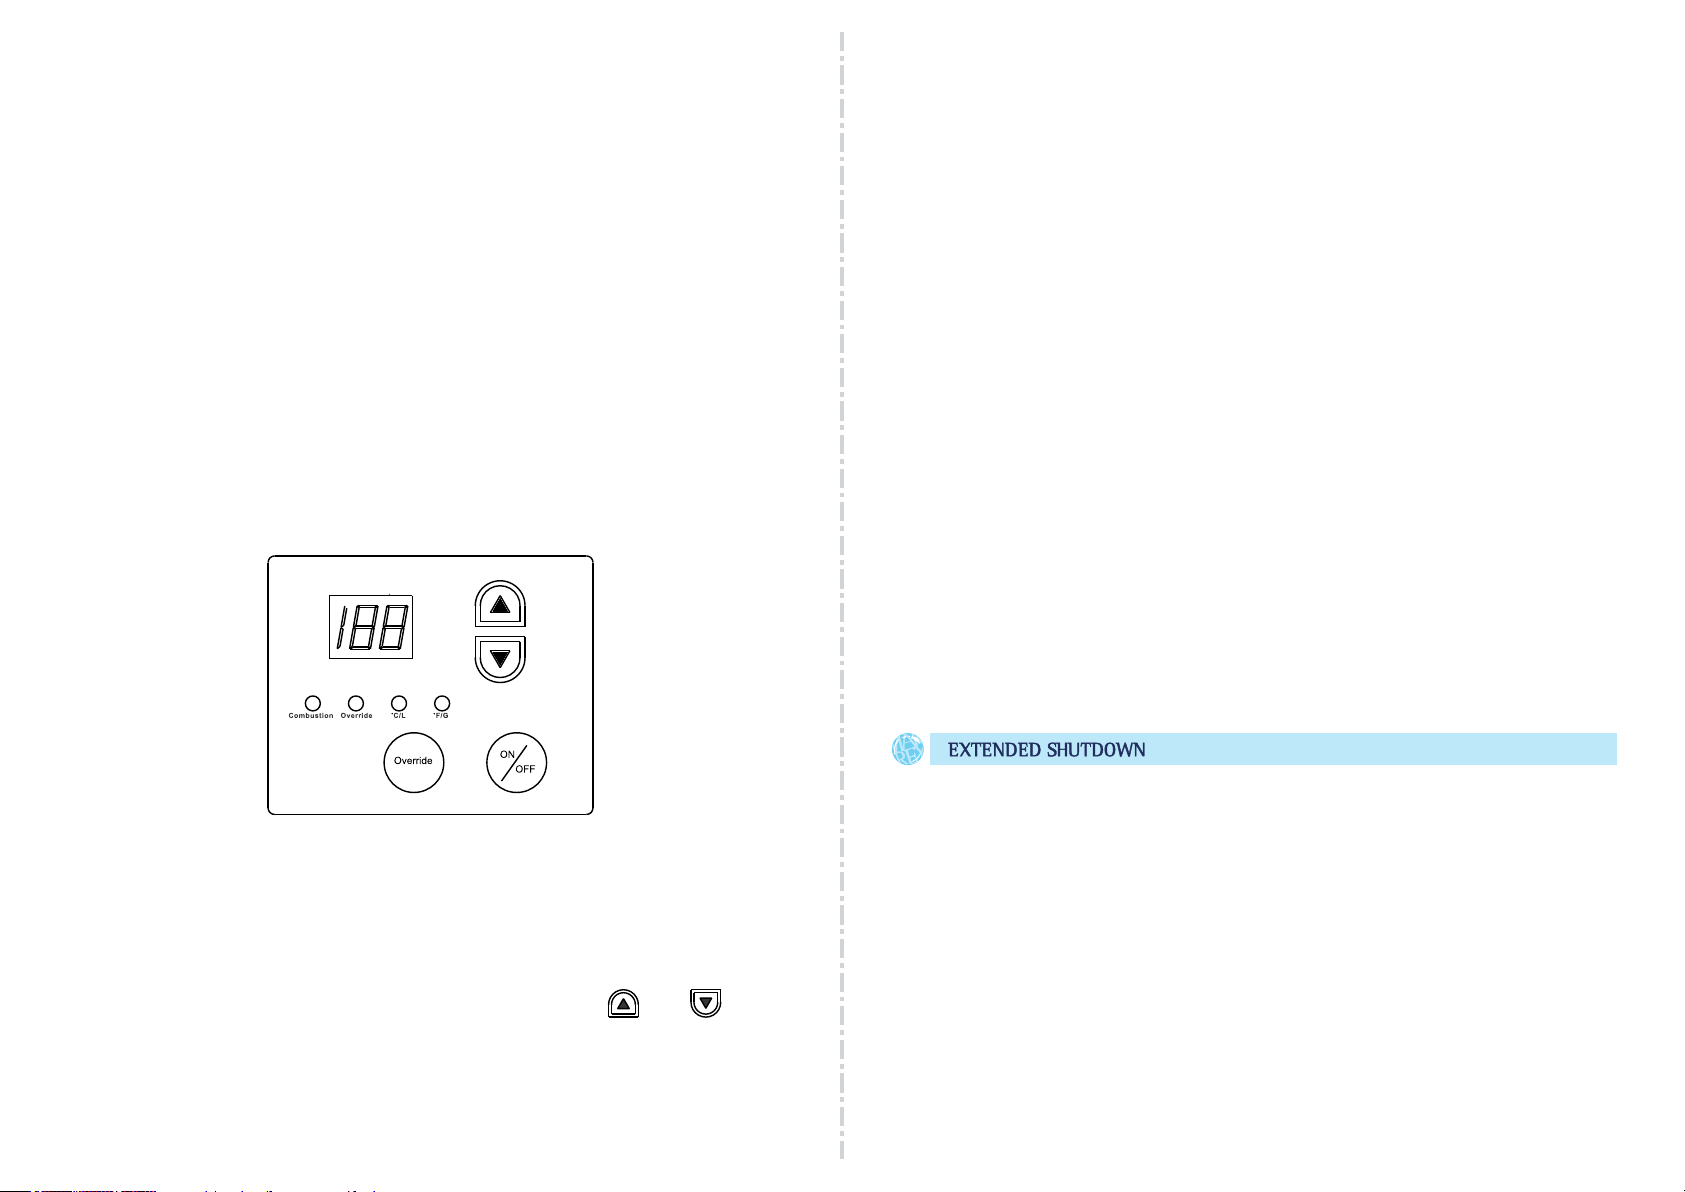
Control Panel
“Water valve” - Indicates one of the following three states:
The Control Panel and display are used to adjust the operational settings of the unit
as well as give information about the current state of operation. The following
illustration shows all possible symbols and signs that may appear in various states
of operation. In operation only the symbol or sign corresponding to the actual state
will appear on the control panel display. The water heater is in an operating state
when the hot water temperature is shown.
Failure mode displays
when a failure occurs,
When the water
temperature is above
95° F (35° C) the
lamps are lit one by
one from bottom to
top.
temperature display
mode is switched to
failure display mode.
Switch between
metric and English
units: Press and hold
the “+” and “-”keys at
the same time for
about 3 seconds.
Description of the
mode key F3 current
water quantity F4
preset water quantity
1. No light indicates water heater is operating normally.
2. Blinking: Indicates there is no water flow through the water heater or the water
flow is less than 0.66 gallons per minute (2.5 liters per minute)
3. When on and remaining lit, the firepower of the water heater is operating at either
the minimum or maximum operating point. The actual water temperature may not
reach the preset temperature. The water flow rate needs to be adjusted so the unit is
operating within its capacity range. This will allow the desired temperature to be
reached.
“ºC/L” - Indicates metric units are being displayed (degrees Celsius, liters)
“ºF/G” - Indicates English units are being displayed (degrees Fahrenheit, gallons)
“Up + / Down ” keys - Used for setting the water temperature and water quantity.
“Mode” key - Used to Set (F4) the water quantity or Display (F3) the water volume
already delivered.
“ON /OFF” key: This button enables or disables the water heater. In the “ON” mode,
the temperature set point is displayed. The factory default temperature setting is
107ºF (42ºC). In the “OFF” mode, “CL” (Cold) is displayed.
TEMPERATURE CONTROL
Set the Desired Temperature
CONTROL PANEL INDICATIONS
LED display
1. Indicates the “Temperature Set Point” when blinking. Displays the “Actual
Temperature” when the display remains lit.
2. It displays both the “Preset Water Quantity” and the “Actual Water Quantity”.
“Combustion” - When lit indicates that the water heater is operating and burning gas.
1. The temperature adjustment range is 95ºF - 149ºF (35ºC – 65ºC).
2. Press the “ON/ OFF” key. The temperature display unit lights up and displays the
current temperature set point. The factory default set point is 107ºF (42ºC).
3. Press the “UP” or “DOWN” key to set any desired temperature between 95ºF
(35ºC) and 122ºF (50ºC). The temperature set point goes up or down by one degree
with each press.
4. To set a temperature above 122ºF (50ºC): Press and hold the “UP” key
continuously for about 4 seconds until 131ºF (55ºC) is displayed.
5. Note: When the temperature is above 122ºF (50ºC), each press of the “UP
(DOWN)” key causes the temperature to go up (down) by 9ºF (5ºC).
1110
Page 7

6. When the desired temperature is set above 122ºF (50ºC), the temperature
display blinks for approximately 4 seconds before the display switches to show
actual water temperature.
3. Displayed volume: Please note that the readout indicates the water quantity
divided by ten (10). Example – if the display shows “10”, this correlates to a volume
of 10x10 = 100 gallons (English unit mode) or 100 liters (metric unit mode).
7. Along the left side of the temperature display, a series of bars indicates the level of
the temperature set point. At each 9ºF (5ºC) increment, an additional bar lights.
When the set point is above 122ºF (50ºC), the first red bar appears indicating the set
point is in a zone where a scalding hazard exists.
8. The heater will retain the temperature set point unless there is a loss of power.
9. After the temperature is set, open the water valve and observe. The “Combustion”
indicator should light indicating the unit is operating normally.
SCALD PREVENTION
- Water temperatures over 125ºF will scald and
can instantly cause severe burns or death!
- Children, disabled and elderly are at highest
risk of being scalded
- Always test the water temperature by feeling
the water prior to entering a shower, bath, etc.
- Obey all codes regarding temperature set
point. Contact a licensed plumber or local
plumbing authority for clarification or additional
information.
4. Adjust the “Volume Set Point” by pressing the “UP” or “DOWN” key briefly. Each
press corresponds to a change of 10 gallons of volume (English unit mode) or a
change of 50 liter (metric mode).
Example 1: English unit mode: The digit 7 is currently being displayed. This
indicates a set point of 70 gallons. Pressing the “UP” key once changes the
set point to “8” indicating a water quantity of 8×10 = 80 gallons as the new set
point.
Example 2: Metric unit mode: The digit 25 is displayed. This indicates a set
point of 250 liters. Pressing the “UP” key once changes the display to “30”
indicating a water quantity of 30x10 = 300 liters as the new set point.
5. When the water heater is discharging water to the bathtub and the volume set
point is reached, the alarm on the remote controller will sound an alert for about 10
seconds.
Note: The output of hot water will not stop automatically.
IMPORTANT! The volume measurement only keeps track of the
water volume that passes through the water heater. For example, if hot water going
to a tub is combined with cold water, the volume computed would not be
representative of the total amount that may have filled the tub. This could lead to an
overflow or damage!
Monitoring the Volume Delivered
Press the “MODE” key. The message “F3” will be displayed. Press the “UP” (or
DOWN) key briefly. The mode will switch from temperature display mode to water
quantity display mode. The water volume already delivered is displayed. Example:
“5” = 5×10 (50L or 50G).
Set a Desired Volume
1. The volume display range is 0-250 gallons when system is set to use English units
or 0-950 liters when in metric mode.
2. Press the “MODE” key briefly to display the message “F4”, then press the “UP” (or
“DOWN”) key. The mode will switch from temperature display mode to water
quantity display mode.
Power Outage
In the event of a power outage or if the unit is unplugged, settings are restored to
their factory default values.
1312
Page 8
OPTIONAL WIRED REMOTE CONTROL PANEL (GA16ETL)
The heater may be controlled by a wired remote control (optional). The controller
can be located near a bath, shower or other location. Figure - Wired Remote Control
Panel
to the system. At any given time, one of the control panels can become the “priority”
controller. The priority controller becomes the master temperature control device for
the system. To set priority:
Method A:
Remote Control Panel Indications
“Combustion” - When lit indicates that the water heater is operating and burning gas.
“Override” - When this indicator light is on. The wired control panel can change the
temperature set point.
“ºC/L” - Indicates metric units are being displayed (degrees Celsius, liters).
“ºF/G” - Indicates English units are being displayed (degrees Fahrenheit, gallons)
Remote Control Panel Functions (GASETL)
1. Turn off the override if it is set on another controller. Press the “Override” key to
release priority. The Override indicator light will go out.
2. Select the new controller to take control. Press the “Override” key on the wired
operation panel which should have priority. The “Override” indicator will turn on and
the temperature set point may be adjusted from this controller.
Method B:
Another way to gain priority is to press the “ON/OFF” key twice on the units
operation panel. The first press will shut the unit off, which will invalidate the
Override ownership of the remote, and the second press will reactivate the unit
which will reinstall factory defaults and set the unit's panel the Override position, the
“Override” indicator will turn on. When unit is in standby, the first wired controller to
activate the unit will have priority and the Override indicator will turn on.
- Change the Temperature Set Point: First, enable “Override” or priority control for
this remote control. Adjust the temperature using the “Up” and “Down” arrows.
- The temperature may be adjusted in one degree increments between 95ºF (35ºC)
and 122ºF (50ºC).
Extended Outage Procedure
- Remote shut down: If the water heater needs to be stopped when it is operating,
press the “ON/ OFF” key. The displayed hot water temperature disappears. The
water heater has stopped operating. The “Combustion” indicating light will go out.
The water flow is not controlled by the remote. The water flow will continue until the
faucet or shower is turned off.
Switch between metric and English units: Press and hold the and keys at
the same time for about three seconds.
- Override (Priority) Control: Up to three remote control panels may be connected
14
If a heater will be out of service for an extended amount of time, use the following
procedure to protect the unit.
NOTES
- Cold air may enter the unit through the air intake or the exhaust system. Take
precaution for extended shutdowns even if unit is installed indoors in an area that
does not allow direct exposure to freezing temperatures.
- Temperatures at or below 32ºF (0ºC) can cause permanent damage the unit and/or
the piping system due to freezing.
15
Page 9
- After a power outage, all settings return to their factory default values.
The heater and water within the unit may be very hot. Allow time for
the system to cool and use caution when draining to minimize risk of
injury.
1. Shut down the water heater by pressing the “ON/OFF” button. “CL” will appear
indicating “Cold” state.
2. Close the fuel gas valve (1).
3. Unplug the power cord (3). Use dry hands. Exercise caution and only unplug by
grasping the plug head and pulling. Note, all factory settings will be restored next
time unit is re-powered.
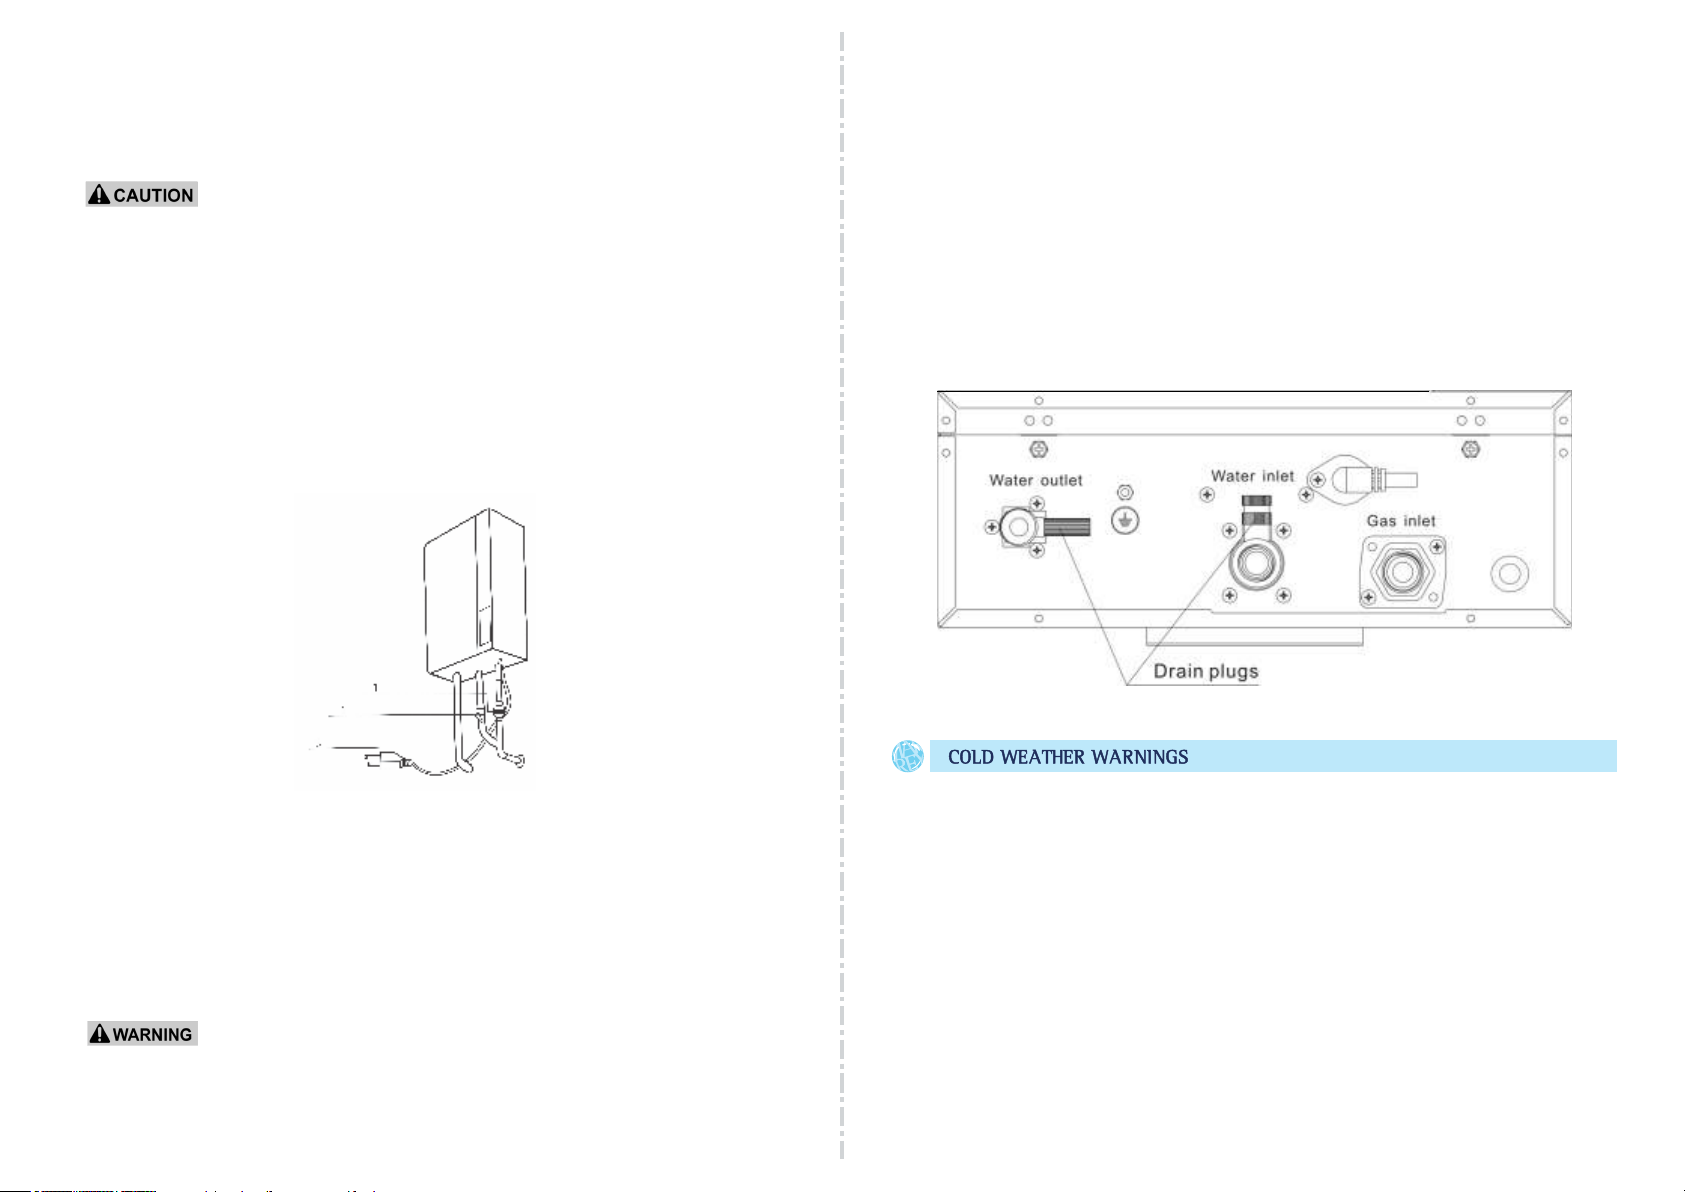
7. Open the drain valve plugs and completely drain the water heater.
8. Continue draining to empty the whole hot water system.
Note: Freezing temperatures below 32ºF (0ºC) can cause permanent damage to
the heater and/or the piping system.
9. Reinstall the drain valve plugs and close the hot water faucets.
10. To return a unit to operation, please refer to “Routine Start Up” found in the
Operating Instructions section of this manual.
4. Close the water inlet valve. (4)
5. Open all hot water faucets.
6. Obtain an appropriate container to collect the residual water from the system.
Prevent water from being discharged on the floor to avoid damage.
Prevent water contact with any electrical source in the vicinity
Freezing Damage Potential and Precautions
Freezing temperatures can damage the water heater and/or water piping. Freezing
water expands rapidly and can create tremendous mechanical forces. Mechanical
damage and pipe ruptures can result from only brief exposure to freezing
temperatures.
For best results, completely shut down the system by following the Extended
Outage Procedure section of this manual.
In cold regions, insulating material or heat tracing can be used to protect pipes and
fittings. Please consult your dealer if necessary.
1716
Page 10

Cold Weather with Potential Freezing Temperatures
Keep water flowing through the system to guard against freezing.
Follow these steps:
1. Close the fuel gas valve.
Routine Inspection
The heater and exhaust piping will be hot during and shortly after
use. Use caution when working in the area around the
heater.
2. Turn off the power by pressing the “ON/OFF” button. “CL” will be displayed when
off.
3. Open the hot water faucet at one or more points of use (sink, upstairs bathtub,
etc.) Maintain a constant trickle. Monitor the stream of water to ensure it is still
flowing.
No Flow Due to Expected Frozen Heater
1. Close both the fuel gas valve and the water inlet valve.
2. Turn off the power switch.
3. Open a hot water faucet.
4. Open the water inlet valve now and then to check for a water flow.
5. If no flow, attempt to thaw heater by using a portable heat source such as a hair
dryer or portable electric heater.
6. Check occasionally to see if water flow has started.
7. When water flow resumes, carefully check for any signs of water leakage.
8. Resume normal operation.
To keep your water heater operating optimally please refer to the below
recommended inspection and maintenance checklists. We recommend a periodic
inspection performed by a qualified service technician. An annual inspection is
normally sufficient. Frequent visual inspections by the owner are also
recommended. Any repairs should be performed by a qualified service technician
using only factory authorized components. Contact qualified technician for
assistance.
Routine Inspection Checklist
Any flammable materials in the vicinity of the water heater or exhaust piping?
Any unusual noises coming from the heater while in operation?
Are the air intake and exhaust free from any blockage or foreign objects?
Any signs of water leaking near heater or pipes?
Any abnormal appearance to unit casing?
Any Discharge from Relief Valve?
Maintenance Checklist
Clean outside of unit and control panel.
To prevent damage, NEVER force a heater to operate while in a
frozen state. NEVER bypass any safety feature.
Warranty
Damage caused by freezing is NOT covered by Warranty.
- Use a wet cloth to remove any surface dirt. Use a dry cloth to wipe it dry.
- A very mild detergent may be used if unit is very dirty.
- Never use any petroleum based cleaners or solvents. These solvents can
damage the panel.
Check and clear Air Intake of any debris that might impede air flow.
Clean inlet water screen.
1918
Page 11

Examine venting system to insure system is clear of blockages, debris, and
damage.
Clean inside of unit by vacuuming or blowing out dust that collects in the unit.
The burner and heat exchange are sealed units and should not be opened.
Visual flame inspection
Lime scale cleaning (if required), see procedure in Maintenance Procedures
that follow.
- Four gallons of virgin food grade white vinegar or virgin food grade citric acid.
- Small inline recirculation pump capable of circulating 2 - 4 gpm (8 – 16 l/m).
- Set of hoses for connecting recirculation pump to and from the pump and the five
gallon container.
Refer to the figure on following page while performing this procedure.
1. Disconnect electrical power to the water heater.
MAINTENANCE PROCEDURES
BURNER INSPECTION AND CLEANING
1. The burner must flame evenly over the entire surface of the burner head when
operating correctly.
2. The flame should burn with a clear, blue, stable flame.
3. Presence of a yellow flame or of black deposits on the burner head indicates
cleaning and/or burner replacement should occur. THIS MUST BE DONE BY A
TRAINED SERVICE PROFESSIONAL ONLY.
BLOWER MOTOR MAINTENANCE
1. The Blower Motor is permanently lubricated and does not need periodic
lubrication.
2. If Blower Motor fails it should only be replaced by trained service professionals
only.
RELIEF VALVE DISCHARGE
If a relief valve discharges periodically, this may be due to thermal expansion in a
closed water supply system. Contact the water supplier or local plumbing inspector
on how to correct this situation. Do not plug the relief valve.
2. Close the shutoff valves V3 and V4 on both the hot water and cold water lines.
3. Connect a hose H1 form the pump outlet to the cold water line V2 into the heater.
4. Connect drain hose H2 from the hot water outlet line V1 and route into five gallon
recirculation container.
5. Pour approx. four (4) gallons of virgin, food grade, white vinegar or citric acid into
pail.
6. Place the pump suction hose H2 into the cleaning solution
LIME SCALE CLEANING PROCEDURE
Materials required:
- Five gallon container .
2120
Page 12

7. Open valves V1 and V2 into the water heater.
Trouble Possible Cause Remedy
8. Operate the pump. Circulate the cleaning solution through the water heater for at
least 45 minutes.
9. Turn off the pump.
10. Rinse the cleaning solution from the water heater by closing valve V2 and
opening valve V4, flow water through the heater and into a container or drain for at
least five minutes.
11. Close Valve V1 and Open Valve V3 this places the house back online.
12. Disconnect all hoses.
13. It is also wise to clean the water inlet screen at this time. Close Valve V3 and V4
to do so. Clean the water inlet screen and remove any debris.
14. Replace the screen and open valves V3 and V4 once more. Checks for leaks.
15. Return heater to operation by following start up instructions.
ELECTRICAL MAINTENANCE WARNINGS
Label all wires prior to disconnection when serving controls. Wiring
errors can cause improper and dangerous operation. Always verify
proper operation after servicing.
No “CL”
displaying.
There is no hot
water flow when
a hot water faucet
is opened.
Power outage.
Unit is unplugged.
No/empty fuel source.
Water valve closed.
Power outage.
Flow is too low or
became too low. (less
than 0.66 gallons per
minute (gpm) or 2.5
liters per minute (l/m).
Unit requires 120V power. Use
unit when power is restored.
Check circuit breaker and reset if
needed. Check ground fault
circuit interrupter (GFCI) if circuit
includes one and reset if
necessary.
Check power plug and ensure
properly plugged. Plug the power
plug properly.
Fuel gas valve needs to be open.
Refill source tank (if applicable).
Open the water inlet valve.
Unit requires 120V power to
operate.
Flow is below the lower limit
necessary for stable burner
operation and proper temperature control. Increase the hot
water flow to enable system.
For operating difficulties with your unit, please consult the following table for
guidance. If you need further assistance, call qualified technician. Please have
product information ready when you call including serial number, date of purchase
and error code if shown on the control panel.
Note: Please check water heater for an error code and respond according to
recommendations found in “Error Codes” portion of this manual.
Freezing
temperatures may
have frozen water in
the heater or hot
water system.
Fuel gas meter
special control
restrictions.
Distance from heater
to source is long.
See “No Flow Due to Expected
Frozen Heater” section of this
manual for procedure to thaw
unit.
Some fuel gas valves may have
special restrictions or digital
controls that use. Consult your
gas supplier and/or a service
professional for assistance.
Allow time for hot water to travel
through system to reach the point
of use.
2322
Page 13

Trouble Possible Cause Remedy
Trouble Possible Cause Remedy
Hot water is not
the right
temperature
(too hot or too
cold).
Temperature set
point was reset due
to power outage.
Temperature set
point incorrect.
Flow is beyond
capacity.
Incoming water is
too warm.
Power outage restores default
settings and custom set points
must be re-entered to unit
A remote wired controller is
controlling temperature set
point. Release override control
of this remote (see “Remote
Control Panel Functions”) or
change set point to desired
temperature with that remote.
Desired water flow is above
maximum capacity of unit.
Reduce user flows to reestablish control of temperature
If incoming water to unit is very
warm and the flow is just above
minimum requirements, the heat
generated by the burner while
operating at minimum capacity
can make the water hotter than
desired. Increase the hot water
user flow so that the burner
system can control the
temperature.
The hot water
coming appears
white and turbid.
Vent system
trouble.
“Smoke” observed
coming from
exhaust system
during cold
temperatures.
mall bubbles may
S
appear when water
is heated. Air
dissolved in water
may evolve when
water is heated.
Vent system is
restricted in some
manner.
Water vapor
produced during
combustion is
condensed in the
exhaust as the hot
gas is cooled by the
outside air.
Although the amount of heat
output from the unit is still at full
capacity, you must reduce the
user flow and operate within the
capacity range of the heater.
None. Normal operation.
Check air intake and exhaust
ducts to ensure they are not
damaged, corroded, blocked,
etc.
None. Normal operation.
Hot water flow
produced is lower
than expected.
Water source is
restricted.
Heat exchanger in
unit is scaled.
Incoming water
temperature is
colder than
expected.
Check and fully open water inlet
valve(s)
Check and clean inlet water filter
Clean heat exchanger by flushing
per maintenance procedure.
Colder than normal incoming
supply water will reduce the
amount of hot water than can be
produced.
Water leaking from
safety valve outlet.
Blower fan noise
can be heard for
some time after
operation stops.
Water system is
operating above
design pressure.
Safety valve is
damaged.
The blower is
designed to run for
30 seconds after
burner shuts off.
Consult professional for system
review.
Replace safety valve. Consult
professional as required.
None. Normal operation.
2524
Page 14

Trouble Possible Cause Remedy
Code Indication
Remedy
The volume alarm
does not sound
even though the
volume appears to
be adequate.
Units incorrect
during input
Refer to “Set a Desired
Volume” section to ensure units
(metric vs. English) and volume
(displayed volume number
represents 1/10th of the actual
total flow) is correctly set.
The volume measurement only
Measuring flow of
only hot water
instead of hot water
and cold water
combined
keeps track of the water volume
that passes through the water
heater. If hot water going to a tub
is combined with cold water, the
volume computed would not be
representative of the total
amount that may have been
dispensed.
Unresolved
problem.
Other assistance
required.
Consult qualified technician or
contact an authorized service
professional.
Whenever a failure occurs, an alert sounds and a
diagnostic code is displayed to indicate the failure mode
at the time of occurrence.
The following table includes a list of diagnostic codes that
can be displayed as well as recommended remedies to
address the problem.
Combustion
UP
Water
valve
o
C L
DOWN
E0 Blower system problem
occurred.
1. The blower jammed or
stopped operating because of a
foreign object.
2. The blower fan suffered a
1. Check to see if fan turns freely.
Remove any foreign objects
jamming the fan.
2. Replace the blower fan.
mechanical breakdown.
3. The fan power control module
3. Replace the control module.
has broken down.
4. Wiring harness or wiring
4. Reconnect as required.
connection somewhere in fan
connection has come loose.
E1 Outlet water temperature
sensor error.
1. The sensor plug has come
1. Plug in the element properly.
loose or failed to connect
properly to the circuit board.
2. The sensor broke down (A
2. Replace the temperature sensor.
short circuit, open circuit, or
accidental contact with the
casing occurred.)
3.The circuit board of the
3. Replace the controller
controller malfunctioned.
o
F G
4. Sensor is scaled
4. Clean sensor
Control Panel Example - Displaying Error Code E2
ONOFF
E2 Flame detection error.
1. The detection circuitry for
ignition and flame detection has
come loose or failed to
connect.
1. Connect the relevant circuit
properly and eliminate the bad
connection.
Replace any failed circuit elements.
2726
Page 15

Code
Indication Remedy
Code Indication
Remedy
2.Ignition sequence was
unsuccessful.
3.An accidental flameout
occurred.
4.The ignition and flame
detection circuitry malfunctioned
or broke down. Igniter is not
activating.
5. Wrong gas type is used.
E3
E4 High temperature automatic
Inlet water temperature
sensor problem.
Same possible causes
described in Section E1.
shutdown.
2. Check fuel gas supply (especially
when first installed as air pockets
might exist in the gas line. Retry the
ignition process several times).
3. Check if the fuel gas pressure is
too high or too low
4. Replace or repair igniter or flame
detection system.
5.Check the gas type, if the gas type
that the building is supplied with is
not the one indicated in rating plate
on unit, contact the dealer for the
proper unit to match the gas type
Same troubleshooting methods
described in E1.
sudden event such as
excessively low pressure in
water supply or excessively high
gas supply pressure.
2. The temperature controller or
the high temperature fusible
protection wire has separated.
E6 Solenoid valve error.
1. The wiring is loose or a bad
connection occurred.
2. The solenoid valve is faulty.
3. Controller has failed.
E8 Exhaust system error.
1. Wiring harness or wiring
connection somewhere in air
pressure switch connection has
come loose.
2. Replace the fusible protection
wire.
1. Mount plug-in wiring properly and
replace bad elements.
2. Replace solenoid valve.
3. Repair or replace the controller.
1. Plug the plug-in element in place,
or replace the bad element.
For ten (10) seconds a water
temperature above 185ºF
(85ºC) was detected. The
controller has automatically
closed the electromagnetic
valve and unit shut down.
E5 Overheating occurred
1. Overheating occurred.
Possible causes include
operating at a very high load for
a long period and then there is a
Normal safety precaution to protect
against a rare occurrence in which
unit is enabled and then the water
flow is dramatically reduced
causing a small slug of very hot
water.
1. Normal system function. This
should be a very infrequent event.
Correct gas or water supply issues
if there are frequent reoccurrence.
2. Exhaust(air intake) ducts is
jammed.
3. The pressure vent is jammed.
4. The wind pressure switch is
damaged.
5. Too many elbows or too long
vent pipes caused excessive
exhausting resistance.
2.Replace and/or clean Exhaust(air
intake) ducts.
3. Replace and/or clean the vent.
4.Replace the wind pressure
switch.
5.Choose proper location for
terminal installation, and follow the
instruction about Max Vent length to
choose right number of elbows and
length of total vent pipes.
2928
Page 16

Only properly qualified personnel should install this equipment. Improper
installation or installation by a non-qualified installer may void warranty. Failure to
comply with state and local codes pertaining to water heater installations may void
also warranty.
GA16ETL water heaters are suitable for installation as a single standalone unit or in
installations involving combinations of multiple units (i.e. parallel or series). These
guidelines are for the installation of a single unit. Please contact authorized service
center for multiple device connection assistance.
This appliance shall NOT be installed outdoors.
A qualified installer or service technician should inspect and leak test system before
use.
The installation must comply with local codes. In the absence of local codes the
National Fuel Gas Code, ANSI Z223.1/NFPA 54, or the Natural Gas and Propane
Installation Code, CSA B149.1 shall prevail.
The following contents are included. If any items are missing contact authorized
after sales service.
Item
Water Heater
Installation and Operation Manual
Expansion Bolts
Seal Ring
Self-tapping Screw
Item #
A
B
C
D
E
Quantity
1
1
5
5
4
The appliance must be electrically grounded in accordance with local codes. In the
event there are no local codes, the National Electrical Code, ANSI/NFPA 70, or the
Canadian Electrical Code, CSA C22.1 shall prevail.
Maximum inlet gas pressure must not exceed the value specified by the
manufacturer and that the minimum value listed is for purposes of input adjustment.
Disconnect the heater and the heater main gas valve from the gas supply piping
system during any pressure testing. Isolate the heater from the gas supply piping
system by closing the inlet manual shutoff valve. The gas pressure will be between
these values 3.5 in W.C. (870 Pa) 10.5 in W.C. (2610 Pa) for Natural Gas and 8.0 in
W.C. (1990 Pa) 13.0 in W.C. (3230 Pa) for Liquid Propane.
The appliance should be located in an area where water leakage of the unit or
connections will not result in damage. Take precaution by properly installing a drain
pan under the heater if required to protect area where leakage would travel.
Do not obstruct the combustion air intake or heater exhaust and ensure air intake is
not near an area that will allow chemical fumes to enter the combustion air system.
Do not use to heat pools or spas (hot tubs) that uses chemically treated water.
If a water heater is installed in a closed water supply system, special precautions are
required such as installation of a backflow preventer and allowance for thermal
expansion. Consult an authorized professional for proper installation requirements.
Expansion Anchors F 4
Vent Adaptor (AL-0303A) G 1
Vent Adaptor (AL-0303B)
A. Water Heater
B. Installation and
Operation Manual
C. Expansion Bolts
D. Seal Ring
H
E. Self-tapping Screw
F. Expansion Anchors
G. Vent Adaptor
(AL-0303A)
H. Vent Adaptor
(AL-0303B)
2
3130
Page 17

- Ventilation requirements must be considered when choosing installation location.
- Minimizing vent piping will reduce installation costs and maximize efficiency. We
recommend that a service valve kit be used for the installation as it will reduce
installation costs and make servicing the water heater easier. The Webstone
44043PR or similar service valve kit. These kits include the Service Valves, Unions,
Ball Valves and Temperature / Pressure relief valves specified in the Typical
Installation Figure above in one convenient easy to install kit.
CLEARANCE REQUIREMENTS
ADJACENT MATERIAL COMPOSITION
NON-COMBUSTIBLE COMBUSTIBLE
SIDE: 2 inches (50 mm) 2 inches (50 mm)
TOP: 2 inches (50 mm) 6 inches (300 mm)
FLOOR: 12 inches (300 mm) 12 inches (300 mm)
FRONT: 24 inches (600 mm) 24 inches(600 mm)
BACK: zero (zero) 1 inch (25 mm) fireproof
Insulating panel required.
LOCATION
Choose a location for unit installation taking into account the following guidelines.
- Unit must be installed indoors. Installation is not recommended in bathrooms,
bedrooms or occupied rooms that are normally kept closed.
- Unit should have proper clearance as indicated below including ample clearance in
front of unit for proper service access.
Installation is recommended to be at a height that will allow easy viewing and
operation of the control panel.
- Heater requires a standard three prong, 120 V /60 Hz grounded AC power outlet
within 5 feet (1.6 meters) of installation location.
- Heater requires a ½” gas supply line (12mm).
The heater MUST be installed in a vertical position with fuel gas inlet
at the bottom and exhaust vent positioned at the top. Installation in
any other orientation will result in damage and will void warranty.
1. Identify a suitable location per the “Location and Clearance Guidelines”. Ensure
that the heater will be attached in a manner that is sufficient to support the weight of
the heater in operation.
2. The system should only be mounted on a fire rated wall or piece of fire rated board
that is mounted with spacers 1/3in (10mm) off the wall and protrudes at least 4in
(100mm) beyond the sides of the water heater will have to be mounted. (Check with
local codes).
3332
Page 18

3. Measure and mark the center locations for three (3) holes according to the
installation measurements below.
Ensure compliance with applicable electrical codes during
installation including the U.S. National Electric Code (NFPA 70) or
the Canadian Electrical Code – Part 1 (CGAS C22.1) depending on
location.
1. Ensure that a properly grounded 120 V/ 60 Hz three prong outlet is available. DO
NOT PLUG IN THE UNIT UNTIL INSTALLATION IS COMPLETE, TESTED, AND
READY FOR INITIAL START UP.
Optional WIRED REMOTE CONTROL
Choose a location for the optional wired controller to be installed per the following
specifications and in compliance with all local code requirements.
1. The controller should be located out of the reach of small children.
2. Avoid installing in an area where set point can be adjusted by non-authorized
personnel.
3. Avoid locations where the controller can become wet or be splashed.
4. The cable for the temperature controller shall be 18/2 Thermostat Wire. The
maximum recommended cable length is 328' (100 m).
5. Pull wire from remote location to water heater location.
4. (For installation on Concrete or Block) Drill three each 5/16” (or 8 mm) holes at the
marked locations. Insert the supplied ¼” (6 mm) Steel expansion bolts into the
holes.
5. (For wall installation) Locate a stud and use supplied mounting screws or hollow
Wall Anchors. To use the hollow wall anchors, drill 5/16” holes at marked locations
and insert the anchors into the hole. A combination of mounting screws and anchors
is acceptable.
6. Remove the cover of water heater from carton.
7. Position the water heater into place. Fasten to the wall.
6. ENSURE POWER TO WATER HEATER IS DISCONNECTED! Remove cover
from unit.
7. Terminate wires at the Remote Control Terminals as shown threading the wire
through wire guides.
3534
Page 19

8. Attach the wires to the terminal connectors using Y shaped crimp connections or
wrap the thermostat wires around the screws then fasten the screws to secure the
terminal connectors. Inspect and insure that the Y connectors or the thermostat
wires are not touching each other.
5. Reinstall the PCB controller and replace the front cover of unit.
9. Mount controller to wall by drilling 2) 6mm holes 92mm (4") apart at installation
location, and insert the Expansion Anchors supplied.
10. Remove the panel cover from the remote base, secure remote base to wall with
(provided) screws.
11. Replace front cover.
12. Attach remote wires to the UNIT as follows:
1. Remove the front cover of unit.
2. Thread the cable through the access hole and wire bushing at bottom
cover of unit and reinsert the wire bushing into the hole.
3. Remove the PCB and lift out of unit slightly to access wire terminal screws.
4. Insert the wire into terminals ② on PCB controller and tighten using a
screw driver. If using Thermostat Wire proceed to step 5a.
Gas piping should be sized, installed, and tested only by a licensed
professional! Improper installation can result in improper equipment
performance or a hazardous situation.
1. Check the fuel gas type before installation. DO NOT connect a unit if the gas type
is not compatible. Contact your dealer for the proper unit to match the gas type.
2. Check the gas inlet pressure immediately upstream at a location provided by the
gas company. Ensure the gas pressure is within the limits shown in the
Specifications section.
3. Review the installation location taking into account all gas users on site. Calculate
the gas piping that will be required to service the installation. The gas supply line
shall be sized and installed to provide a supply of gas sufficient to meet the
maximum demand of the heater and all other gas consuming appliances at the
location.
Note: Reference the National Fuel Gas Code, NFPA 54, for proper line sizing.
4. Ensure any compound used on the threaded joints of the gas piping is compatible
with LPG/Propane or Natural Gas.
5. Use only approved materials to connect the unit to the gas line.
6. Install a manual gas valve in the gas supply line to the water heater. For best
performance the water heater should be the first user downstream from the gas
supply meter. A union can be used on the heater sized of the valve to allow for future
servicing or disconnection of the unit.
②
7. Manufacturer recommends installation of gas pressure regulator (ex. Maxitrol
325-5A or equivalent) on gas line to ensure gas pressure is at optimum level for
proper unit operation.
②
8. Purge the gas line of any debris and liquid before connection to the water heater.
9. Connect to the water heater.
10. Leak check all joints including the heater for gas tightness. Use a leak detection
solution, soap and water, or an equivalent nonflammable solution, as applicable.
3736
Page 20

Ensure any leak check solution is non-corrosive and is completely
rinsed from the piping after leak check is complete.
Corrosion of the gas piping and subsequent leaks could occur.
Never use flammable solutions or an open flame to test for gas leaks!
1. All piping, including soldering material, and components connected to this heater
shall be approved for use in potable water systems.
Install proper drainage for discharge of temperature and pressure relief valves per
local code when relief occurs and do not reduce or restrict line. Discharge line shall
be installed to allow complete drainage of both valve and line. See the page for relief
valve discharge.
Do not place a valve between the combination temperature and pressure relief
valve and the water heater.
2. If the heater has ever been previously used for heating non-potable water, never
install the heater later into a potable water system.
3. The installation of manual shutoff valves, drain valves and unions are
recommended. A professional should review each installation and ensure adequate
ability to isolate, drain, and disconnect heater for service needs.
4. Connect suitable piping from water supply to the water heater. Note, water heater
connections are ½” NPT.
5. Purge the water line to remove debris and air. Debris can plug and damage the
heater.
6. Test water connections for leaks. Turn on water and purge water through the
water heater and system. Flow for 1-2 minutes. Ensure all air is eliminated.
7. After filling and flushing the system, check the inlet water filter for debris and clean
as required.
8. Consider insulation on hot water piping for energy conservation and personal
protection. Do not insulate the pressure relief valve!
This unit requires an approved temperature and pressure relief
valve. For protection against excessive temperatures and pressure,
install temperature and pressure protective equipment required by
local codes. The relief valve must be installed near the hot water
outlet and must comply with Standard for Relief Valves for Hot Water
Supply Systems, ANSI Z21.22 CSA 4.4.
Improper venting of a water heater can result in excessive levels of
Carbon Monoxide which can result in severe injury or death!
This water heater must be vented in accordance with the “Venting of
Equipment” section of ANSI Z223.1 / NFPA 54 National Fuel Gas
Code – latest versions, or in Canada, the most recent version of
CAN/CGA B149.1 Natural Gas and Propane Installation Code. In
additional, all installations must completely comply with all
applicable local building codes.Failure to comply can result in
equipment failure, fire, personal injury or death!
Use only stainless steel vent materials with this model! Plastic vent
systems are not compatible and the failure of the vent system could
result indamage, equipment failure, personal injury or death.
- For best results always minimize the length of the vent system. Keep the vent pipe
routing as short and straight as possible.
- The water heater vent must not be combined with the vent from any other gas
appliance or vent stack.
- The water heater vent must not be connected to a chimney.
- You must use vent components that are certified for use with this water heater as
indicated within this manual. Do not combine components from multiple
manufacturers.
3938
Page 21

- Air intake pipe may be ABS, PVC, galvanized steel, corrugated aluminum or other
materials acceptable to local codes.
- The heater requires a direct vent. Exhaust vent must be of AL 29-4C® Stainless
Steel vent directly to the outside of the building.
- The exhaust vent will have been tested to meet Underwriters Laboratories, Inc. to
UL 1738 and ULC-S636.
- The system must use outside air for combustion. Ensure the incoming air is not
contaminated by any potential source of fumes or chemicals.
- Avoid any dips or sags in horizontal pipe runs.
- Ensure vent piping is supported every four (4) feet (horizontal runs) or six (6) feet
(vertical runs) or in accordance with local code requirements.
The exhaust pipe must maintain adequate clearances and be insulated with a
fireproof material if it passes through walls made of flammable materials. Consult
local codes and vent pipe manufacture documentation for proper material selection
and installation requirements.
If the heater will be installed in a building that has a system that
maintains a negative pressure, it is possible for a back-draft to allow
outside air to be pulled into the heater while not in operation. This
can create a situation where freezing might occur within the heater.
Please consult a professional for a properly designed venting
solution or contact qualified technician for guidance.
AIR INTAKE PIPE ASSEMBLY
1. Drill 2 small holes at the end of the air intake pipe.
- Do not reduce the diameter of the vent piping.
- Ensure all vent connections are installed, properly connected, and sealed air tight
per manufacturer's instructions.
- Any vent pipe seams should be installed so they are oriented on the top of
horizontal pipe runs.
- Slope exhaust piping towards the exhaust terminal with a 2% slope (1/4 inch per
foot; 19 mm/ m) to ensure rain or any accumulating condensate near termination are
drained.
- A condensate collector is required for this system when there is a vertical vent
configuration. A condensate collection point should be installed on the vertical run of
piping just prior to the heater to ensure proper condensate drainage. Check with
local codes for proper disposition and handling of condensate water, an air gaped
drain is usually required and in some cases a condensate neutralization system is
also required.
- Do not store hazardous or combustible materials near the vent piping
- Ensure the air intake and vent termination points are at least 12” (300 mm) above
any possible snow accumulation level. The flows must not be impeded by snow or
debris.
- Ensure the air intake and vent termination points are at least 24” (600 mm) from
any obstruction or other objects.
2. Slide the pipe over the air intake terminal.
3. Using a level, ensure the pipe is straight up and down.
4. With self tapping screws, attach the pipe to the air intake terminal.
5. Apply a bead of silicone around the pipe and air intake terminal, ensuring an air
tight connection.
1. Use manufactures universal Adapter to connect the vent pipe to the unit.
2. Then follow the Manufactures vent pipe assembly guidelines and standard vent
pipe location selection diagram below.
4140
Page 22

Ref. Clearance Description US Install Canada InstalI
A Above grade, veranda, porch, deck, or
balcony.
B To window or door that may be opened. 12 inches (300
C Permanently closed window. * *
12 inches
(300 mm)
mm)
12 inches
(300 mm)
36 (910 mm)
THIS TABLE IS PROVIDED FOR REFERENCE ONLY.
Please consult latest version of these standards to ensure installation is in
compliance with current guidelines.
* For clearances not specified in ANS Z223.1/NFPA 54 or CSA B149.1, clearances
are in accordance with local installation codes and the requirements of the gas
supplier.
D Vertical to ventilated soffit, located
above the terminal within a horizontal
distance of 2 feet (61 cm) from the
center line of the terminal.
E
To unventilated soffit. *
F To outside corner. * *
G To inside corner. * *
H
To each side of center line extended
above meter regulator assembly.
I To service regulator vent outlet. * 36 inches
J
To non-mechanical air supply inlet to
building or the combustion air inlet to
any other appliance.
K To a mechanical air supply inlet. 3 feet (91cm)
* *
*
12 inches
(300 mm)
above if within
10 feet (3000
mm)
horizontally
*
3 feet (910
mm) within a
height 15 feet
(4.5 m) above
the meter/
regulator
assembly
(910 mm)
36 inches
(910 mm)
6 feet (1.83 m)
** A vent shall not terminate directly above a sidewalk or paved driveway that is
located between two single family dwellings and serves both dwellings.
*** Permitted only if veranda, porch, deck, or balcony is fully open on a minimum of
two sides beneath the floor.
Maximum Vent Length
1. Determine the number of 90 degree elbows in the vent system (Two 45 degree
elbows count as one 90 degree elbow).
2. Refer to below table to find the maximum vent length based on the number of
elbows
Example: If you have one elbow, then your maximum vent length is 35ft (10.7m)
Number of 900 elbows
0 1 2 3 4 5 6
41 feet
(12.5m)
]
Vertical Terminations
35 feet
(10.7m)
29 feet
(8.8m)
23 feet
(7.0m)
17 feet
(5.2m)
11 feet
(3.4m)
5 feet
(1.5m)
L Above paved sidewalk or paved
driveway located on public property.
M Under veranda, porch, deck, or
balcony.
* 7 feet (2.13 m)
**
* 12 inches
(300 mm)
The air intake requires a return bend or tow 90º elbows to prevent entry of rain.
The vent termination and air intake must be in the same pressure zone.
4342
Page 23

Manufacture Product
Appliance
Adapter
Horizontal
Termination
Vertical
Termination
Horizontal
Concentric
Termination
Vertical
Concentric
Termination
Horizontal Terminations
The air intake must be located in relation to the exhaust as shown below.
The air intake must 1/4 inch per foot to the termination to prevent entry of rain.
Z-Flex
Hart & Cooley Model
Centrotherm
Eco System
Z-Vent
SW
InnoFlue
SW Vent
System
2SVSNA03.
5 with ALV0303B
above and
expander
2SVSIO304
Use
another AL-
V303B for
PVC air
intake
3SUTI with
AL-V0304A
above and
expander
3SI4
Alternately
use
3SANID
with
expander
3SI4 for
intake air
use AL-
V303B for
PVC air
intake
For Air
intake only
this 3 inch
system pipe
can be
used.
2SVSTPX04 2SVSRCF04
4STWP
4SRC
2SVSHTC43 NA
4STM, 4CHT,
4C12, 4CTAI
4STM, 4CVT,
4CF(A,B,C),
7SSC, 4C36,
4CRC
If the information in these instructions is not followed exactly, a fire or
explosion may result causing property damage, personal injury or
death.
4544
Page 24

Do not store or use gasoline or other flammable vapors and liquids
in the vicinity of this or any other appliance.
WHAT TO DO IF YOU SMELL GAS:
- Do not try to light any appliance.
7. If no gas is detected, proceed.
8. Open the water supply valve to the unit. Inspect for any leaks.
9. Visually inspect air intake inlet and exhaust piping to ensure they are not
obstructed.
- Do not touch any electrical switch; do not use any phone in your building.
- Immediately call your gas supplier from a neighbor's phone.
- Follow the gas supplier's instructions.
- If you cannot reach your gas supplier, call the fire department.
- This appliance does not have a pilot. A built in ignition device will automatically light
the burner. Do not try to light the burner by hand.
- Use only your hand to push in or turn the gas control knob. Never use tools. If the
knob will not push in or turn by hand, do not try to repair it, call a qualified service
technician. Force or attempted repair may result in a fire or explosion.
- Do not use this appliance if any part has been under water. Immediately call a
qualified service technician to inspect the appliance and to replace any part of the
control system and any gas control that has been under water.
1. STOP! Read the safety information from the previous page.
2. Ensure unit is unplugged and all electric power to the appliance is off.
10. Plug in the unit. “CL” is displayed indicated “cold”.
11. Press the “ON” button to turn on the unit.
12. Adjust the temperature set point per “Temperature Control” Section of this
manual.
13. This appliance is equipped with an ignition device that automatically lights the
burner. Do not try to light the burner by hand.
14. Open a hot water tap to a flow above the minimum flow point (0.66 gpm/ 2.5
l/min).
15. The burner control system will fire the igniter, the burner will light, and hot water
will be produced.
16. If the heater will not operate, follow the shut down instructions. Wait 5 minutes
and attempt to repeat this start up procedure.
17. If system does not operate, begin troubleshooting per “Trouble Shooting”
section of this manual. Contact qualified technician for assistance.
3. Locate the manual gas valve to the heater. Open the manual gas valve for 15-30
seconds.
4. Turn the manual valve clockwise to the full OFF position.
5. Carefully check for any sign or smell of gas. If gas is detected, wait five (5) minutes
for it to clear. STOP and go no further until gas leak point is detected.
6. If no gas is detected, open the manual gas valve for five (5) minutes and again
check area for any signs of gas. At any sign of gas, STOP and go no further. Follow
the safety precautions from the previous page.
WIRING DIAGRAMS
GASETL wiring diagram (without wired remote)
4746
Page 25

GASETL wiring diagram (with wired remote)
4948
Page 26

TECHNICAL SPECIFICATIONS
Type of Appliance
Operation
Flue System
Available default Temperatures
Rated gas
pressure
Temperature Range
Width x Height x Depth
Weight
Connections
Ignition System
Max./Min. Gas
Consumption
Hot Water Delivery Capacity Max
Noise level
Thermal efficiency
NOXaf
Minimum Operating Water Flow 0.66 GPM (2.5 L/min)
Minimum Operating Pressure
Power Supply
Water temperature control
Water flow control
Safety Device
Remote Control
Cable Optional
Electrical Consumption( Normal)
Natural Gas
Propane (LPG) 11 inch W.C.(2 740Pa)
Gas
Cold Water Supply
Hot Water Supply
Natural Gas
Propane Gas
Flame Failure Flame rod
Boil dry
Over temperature
Fusible link
Pressure relief
valve
Combustion fan
rpm check
Over current
Bathroom,
Second Bathroom,
Kitchen,
(universal / Up to
3 Controllers )
GA16ETL
Temp. controlled continuous Flow Gas Hot Water Unit
With/without remote controls, mounted in kitchen,
bathroom, etc
Room Sealed-Forced Draught Flue
Factory setting 107ºF
7 inch W.C.(1 740Pa)
Within 95ºF~149ºF(35ºC~65ºC)
14" x 22" x 6" (353mm x 568mm x 142mm)
35lbs (16kg)
½ in.NPT
½ in.NPT
½ in.NPT
Direct Electronic Ignition
110,000 Btu/h-20,000 Btu/h
107,000 Btu/h-20,000 Btu/h
4.2 GPM (45ºF rise)
5.4 GPM (35ºF rise)
70 dB(A)
0.82
40 ppm Max
1.45 PSI (0.1 bar)
120 Volts ~ 60Hz
Input and output water temperature signals
Electronic Water flow sensor
Water flow sensor /194ºF thermistor
185ºF (Integrated circuit system)
320ºF Thermal Fuse
Opens 145 PSI
Integrated circuit system
Glass fuse (5 Amp/3Amp)
Kitchen/Bathroom/Second Bathroom
(universal / Up to 3 Controllers)
55W
5150
Page 27

DIM DESCRIPTION Inches (mm)
A Width 13.90 (353)
B Depth 5.59 (142)
C Height-Unit 22.37 (568.2)
D Height-with brackets 25.43 (646)
E Hot Water Outlet-from wall 2.59 (65.8)
F Hot Water Outlet-from center 5.16 (131)
G Cold Water Inlet-from wall 1.80 (45.8)
(H) Cold Water Inlet-from center 0.04 (1)
I Gas Connection-from wall 1.57 (39.8)
J Gas Connection -from center 3.15 (80)
K From base to gas valve connection 1.78 (45.2)
From base to cold water inlet
2.38 (60.4)
connection
From base to hot water outlet
1.24 (31.4)
connection
L Air intake center to gas exhaust center 3.82 (97)
M Gas exhaust center to unit center 0.75 (19)
N Air intake center to wall 2.82 (72)
Gas exhaust center to wall 3.04 (77.3)
Points
of Use
For incoming
water
temperatures
below 68ºF
For incoming
water
temperatures
above 68ºF
*Typical flow rates are based on 40 PSI to the home and faucets with standard flow restrictors. Higher PSI and
unrestricted faucets may result in higher flow rates, which may result in a maximum temperature increase of 72ºF.
**Incoming flow rates lower than 1 GPM through the water heater, or incoming water temperatures higher than 80ºF,
may result in water heating to higher than its set point. Avoid scalds!! Always test the water with your hand before using it
to be sure that cold water doesn't need to be mixed in first.
1 100 (1 GPM Typical)** 72 2.25 GPM
2 90 (.75 GPM Typical) 72 1.15 GPM
3 85 (.6 GPM Typical) 72 .75 GPM
4 80 (.5 GPM Typical) 72 .6 GPM
5 72 (.45 GPM Typical) 72 .45 GPM
1 100 (1 GPM Typical)** 72 4 GPM
2 90 (1 GPM Typical) 72 2 GPM
3 85 (1 GPM Typical) 72 1.3 GPM
4 80 (.75 GPM Typical) 72 1 GPM
5 72 (.65 GPM Typical) 72 .8 GPM
Temp. Increase at
Typical per Faucet
Flow Rate (Hot Side)*
Temp. Increase
at Max Posible
Flow Rate
Max Posible
Flow Rate per
Faucet
5352
Page 28

At Marey, we pride ourselves on the excellence of our customer service and support
team.
Please feel free to contact us if you have any questions about our products, warranty
service, or if you need assistance installing a unit. We also strive for continuous
improvement, so we welcome your comments, feedback and suggestions.
Marey proudly manufactures water heaters and accessories for use in almost any
application. Please visit our website to learn more about other Marey products.
1-855-MAREY-55
customerservice@marey.com
ECO110
GAS PORTABLE
POWER PAK
POWER GAS
ECO126
POWER GAS
16L ETL
Marey:
1924 HWY 95 North
Bastrop, TX 78602
Toll Free: 1-855-627-3955
1-855-MAREY-55
www.marey.com
5554
 Loading...