

Page 1
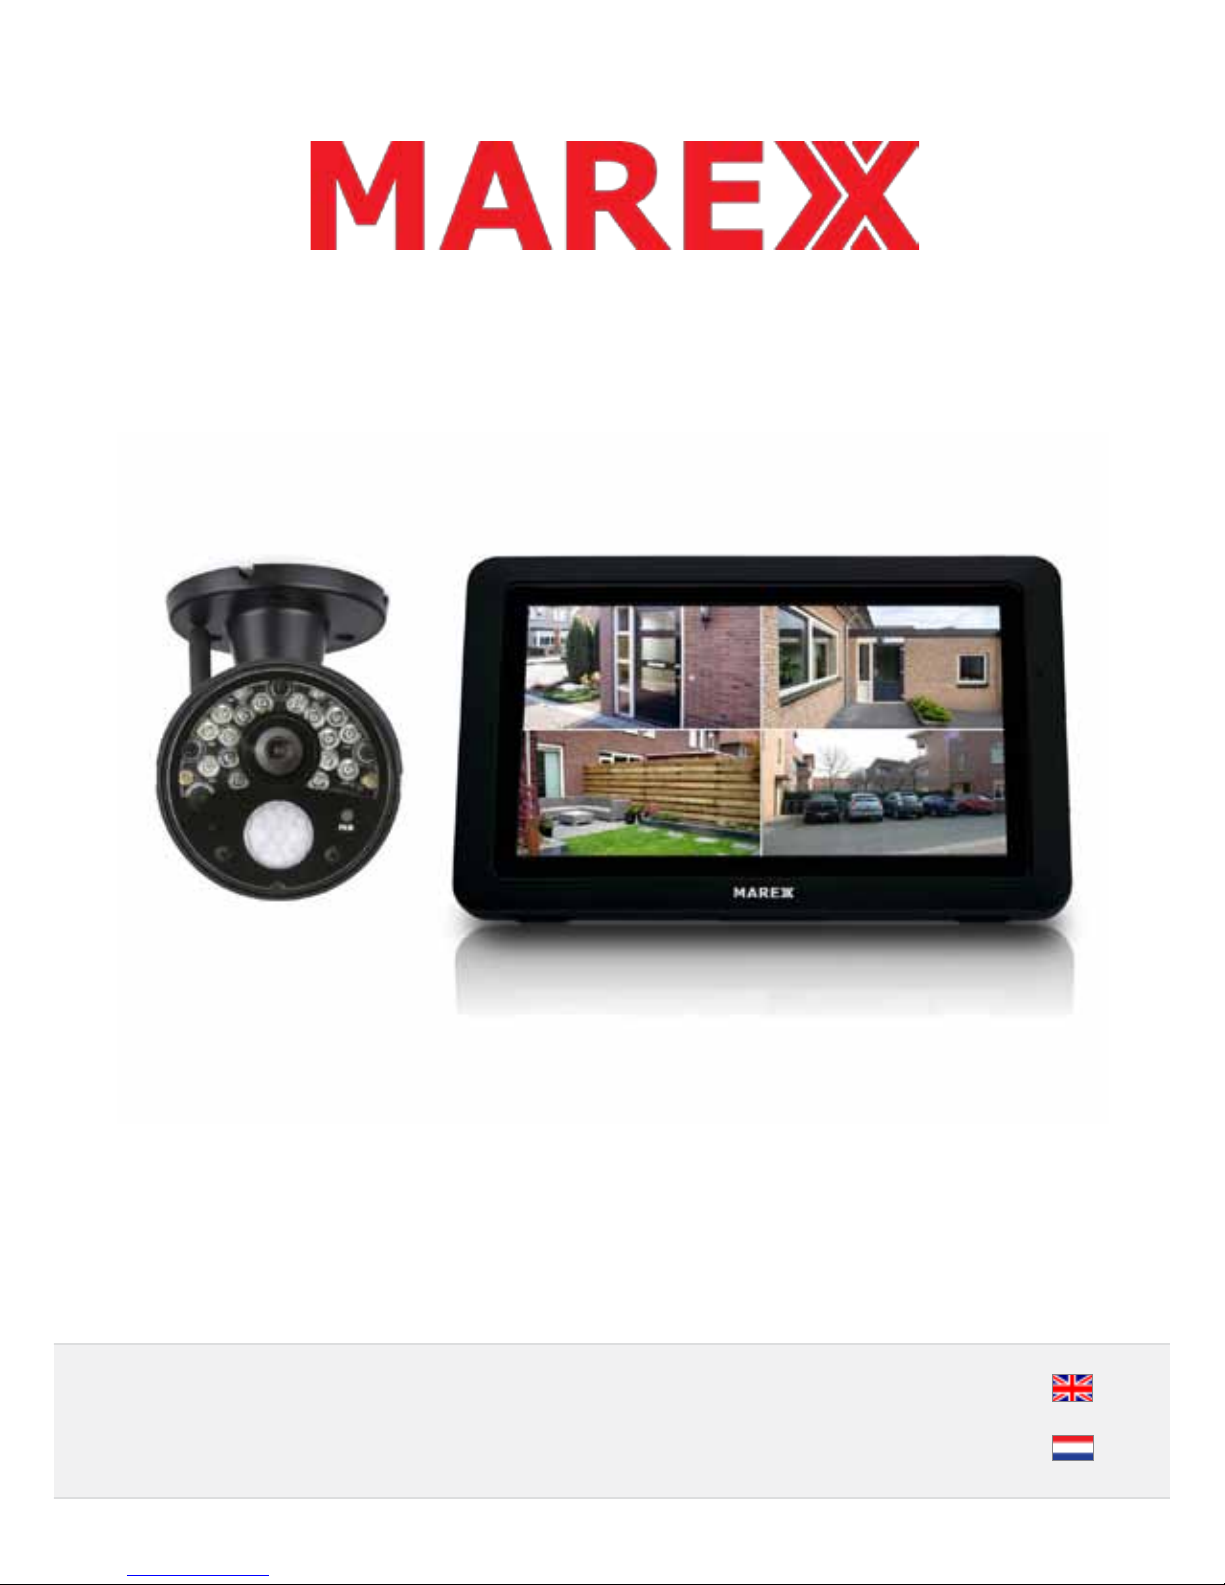
HANDLEIDING
INSTRUCTION MANUAL
Page 2

Page 3
- 3
ENGLISH .......................................................................................................................................................................... 4
NEDERLANDS ............................................................................................................................................................... 37
Page 4
- 4
TABLE OF CONTENTS
Getting started. This section describes your hardware and how to physically set it up.
LIST OF FEATURES 5
CAMERA FEATURES 5
MONITOR FEATURES 5
GETTING STARTED 6
GETTING TO KNOW THE SYSTEM 7
WIRELESS CAMERA 8
SET UP THE HARDWARE 8
Software Operation Overview This section lists basic operations in an abbreviated format. if references screen
details in the third section.
MONITOR SCREEN 9
SYSTEM OPERATION 10
Screen Descriptions Here you will nd detailed descriptions of each screen and how it is used.
PLAYBACK 13
ALARM 14
BRIGHTNESS 15
GENERAL SETTINGS 16
CAMERA SETUP MENU 18
FILE OVERWRITE 21
SYSTEM SETTINGS MENU 22
TIME ZONE 23
LANGUAGE 23
DEFAULT SETTINGS 24
FORMAT SD CARD 24
SYSTEM SETTINGS 25
MOTION DETECTION SETTINGS MENU 25
NETWORK SETUP MENU 27
FIRMWARE UPGRADE MENU 29
Remote Access This section tells you how to connect your surveillance system to the internet and access it from
your iOS and Android smartphone or tablet.
MYCAM VIEW ANDROID AND IOS APP 31
TROUBLESHOOTING 36
EN
ENGLISH
Page 5
- 5
LIST OF FEATURES
• 850nm IR Led distance up to 15m
• 7” TFT LCD Digital panel (800 TGB x 480)
• Two-way audio z Scan function
• PIR- or motion detection- triggered recording
• Manual recording
• Touch screen operation
• Schedule recordings from Sunday to Saturday
• SD card external storage, up to 128GB supported
• One LCD monitor can pair four cameras
• LCD: 5v DC 2A Power adaptor (+/-5%)
• Camera: 9v DC 600mA (+/-5%)
• RF range: 250 meter (Line of sight)
• New recording indicator/ Memory card full indicator
• Quad view z PIR trigger and Video motion detect alert
• Night vision up to 40 feet
• Direct connection to router for remote access to live and recorded video
CAMERA FEATURES
• Color1/4 CMOS sensor
• 2400 Mhz - 2483,5 Mhz
• 4 Mbps data rate
• 16 dBm (TYP) transmitting power
• 1280 x 720 pixels
• MPEG 4
• 3.6 mm / F 1.9 (IR cut lter)
• 68 degree angle
• 16 IR leds
• Up to 15m Nightvision
• IP65 waterproof
• Two way audio (talkback)
• 650 mA max power consumption
• Adapter: DC 5V 2A
MONITOR FEATURES
• 7 inch LCD screen
• 2400~2483 Mhz receiver frequenty
• 85 dBm receiver sensitivity
• 800 (W) x RGB x 480 (H) screen resolution
EN
Page 6
- 6
• AVI video format
• MJPEG4 video compression
• 128 GB SD card supported
• +/- 1h video with 1 camera on 1 GB SD card
• HD, 1280 x 720 pixels recording resolution
• 25 frames per second (FPS)
• 5 seconds auto switching
• LAN cable connector
• Live view iPhone & Android smartphone (QR code)
• Rechargeable li-ion batterij
• Touchscreen
• Two way audio
• Adapter: DC 5V 1.5 A
• Power consumption: 4W max
• Dimensions: 191 x 133 x 19 mm
• Weight: 572 gram
GETTING STARTED
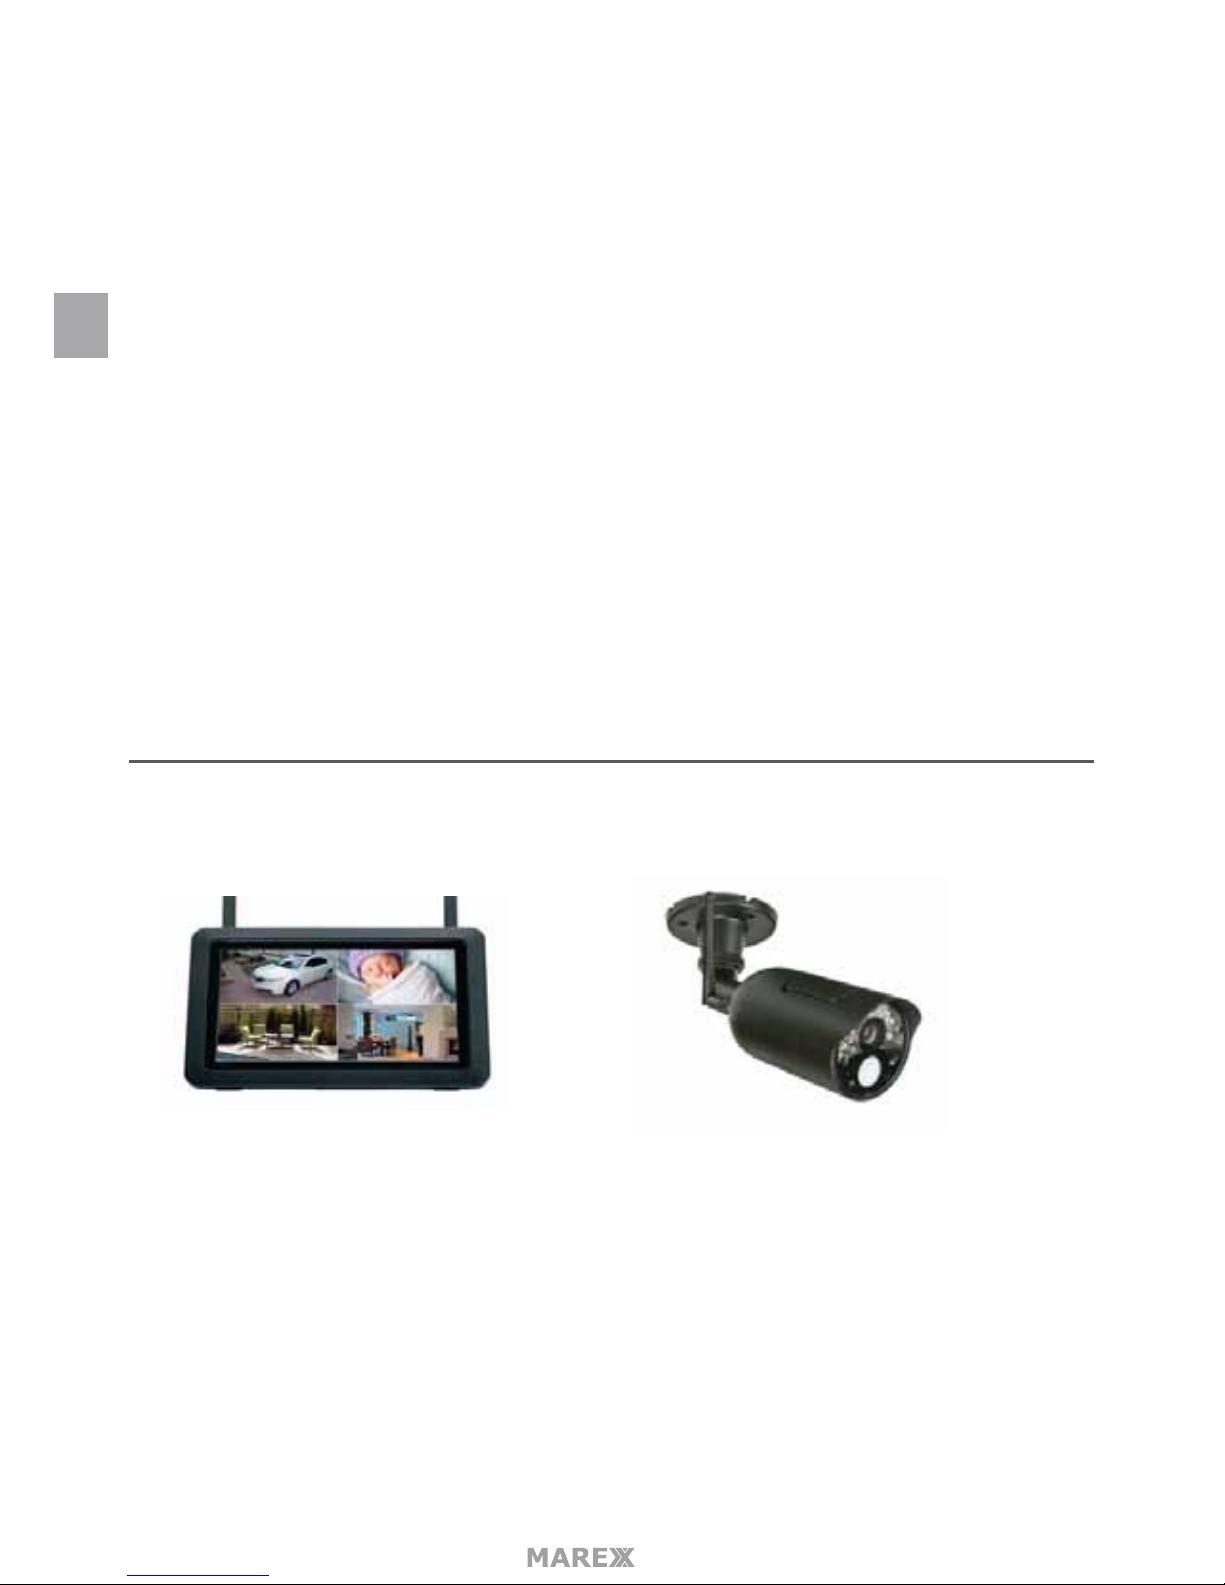
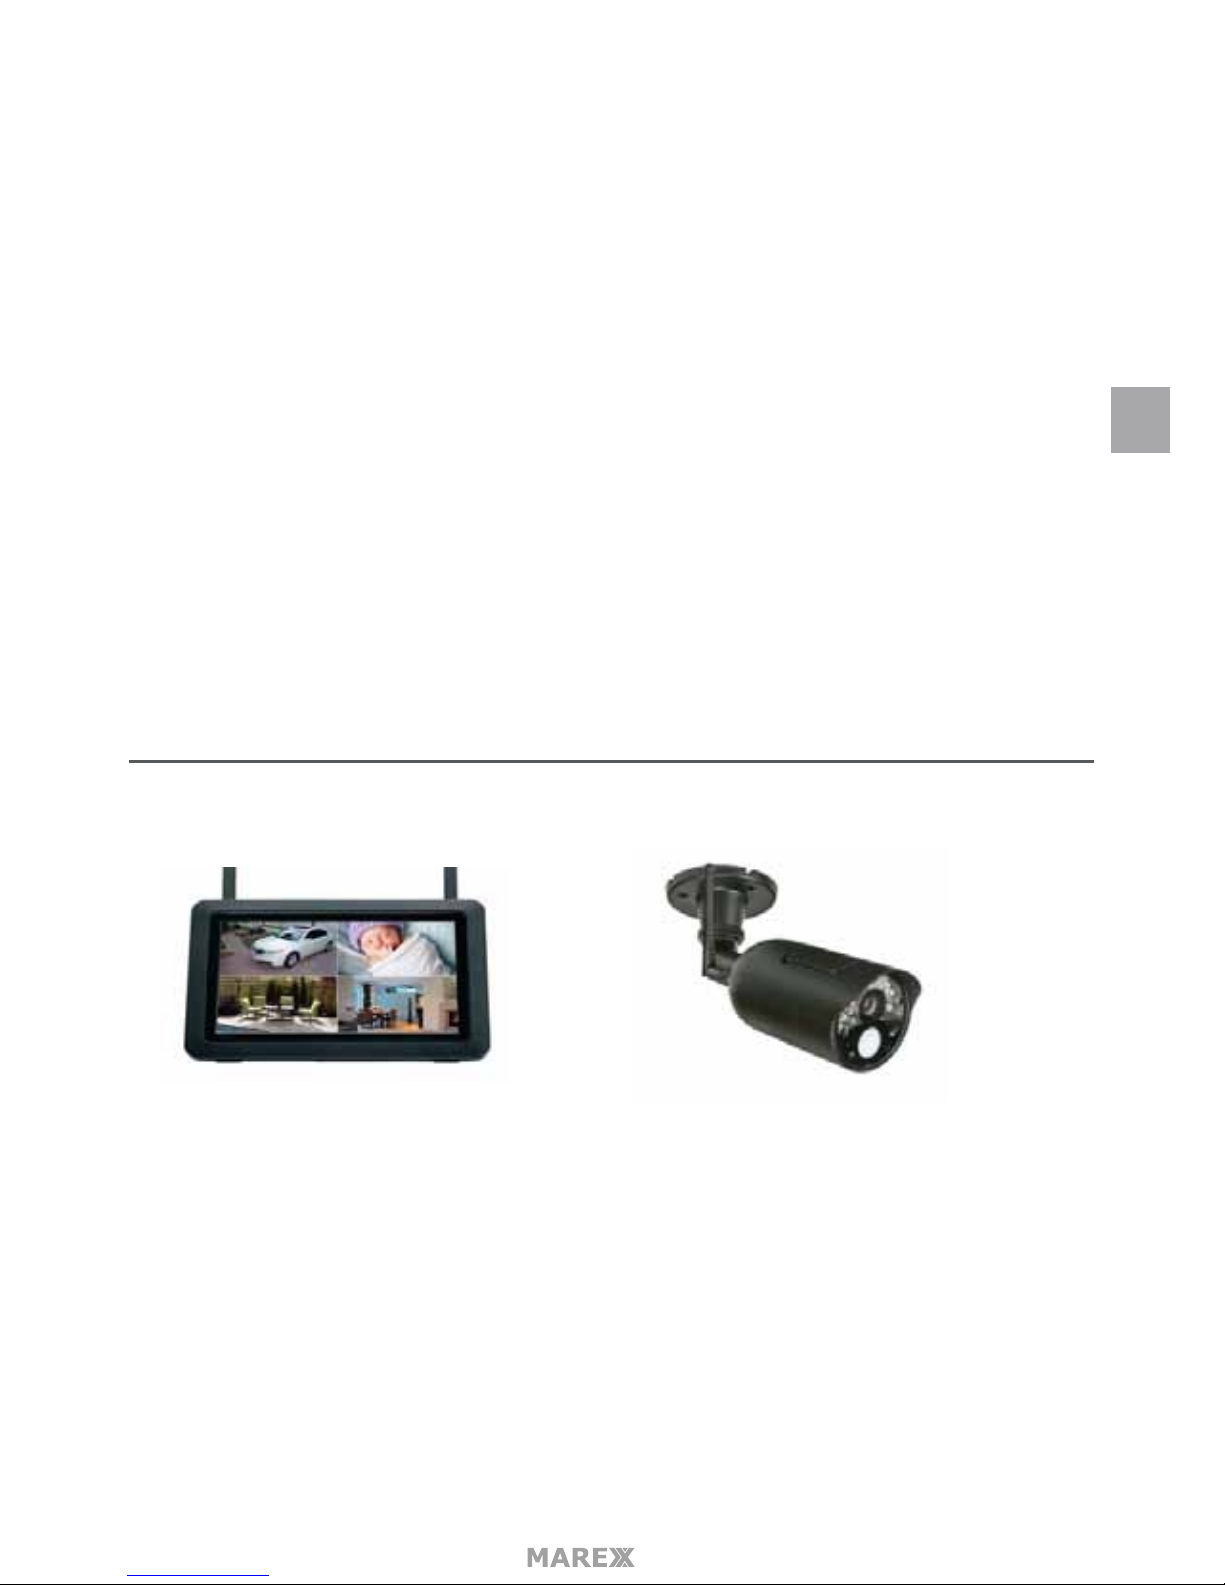
The system comes with the following components:
7” LCD Monitor
Camera
Not Shown:
5V 2A Power Adaptor (Monitor)
Ethernet (RJ45) Cable
2000mAh Battery (Monitor)
Antenna (attached to camera) 9v 600mA
Power Adapter (camera)
User Manual
Mounting Hardware (1 set)
EN
Page 7
- 7
Check your package to conrm that you have received the complete system, including all components
shown on the previous page.
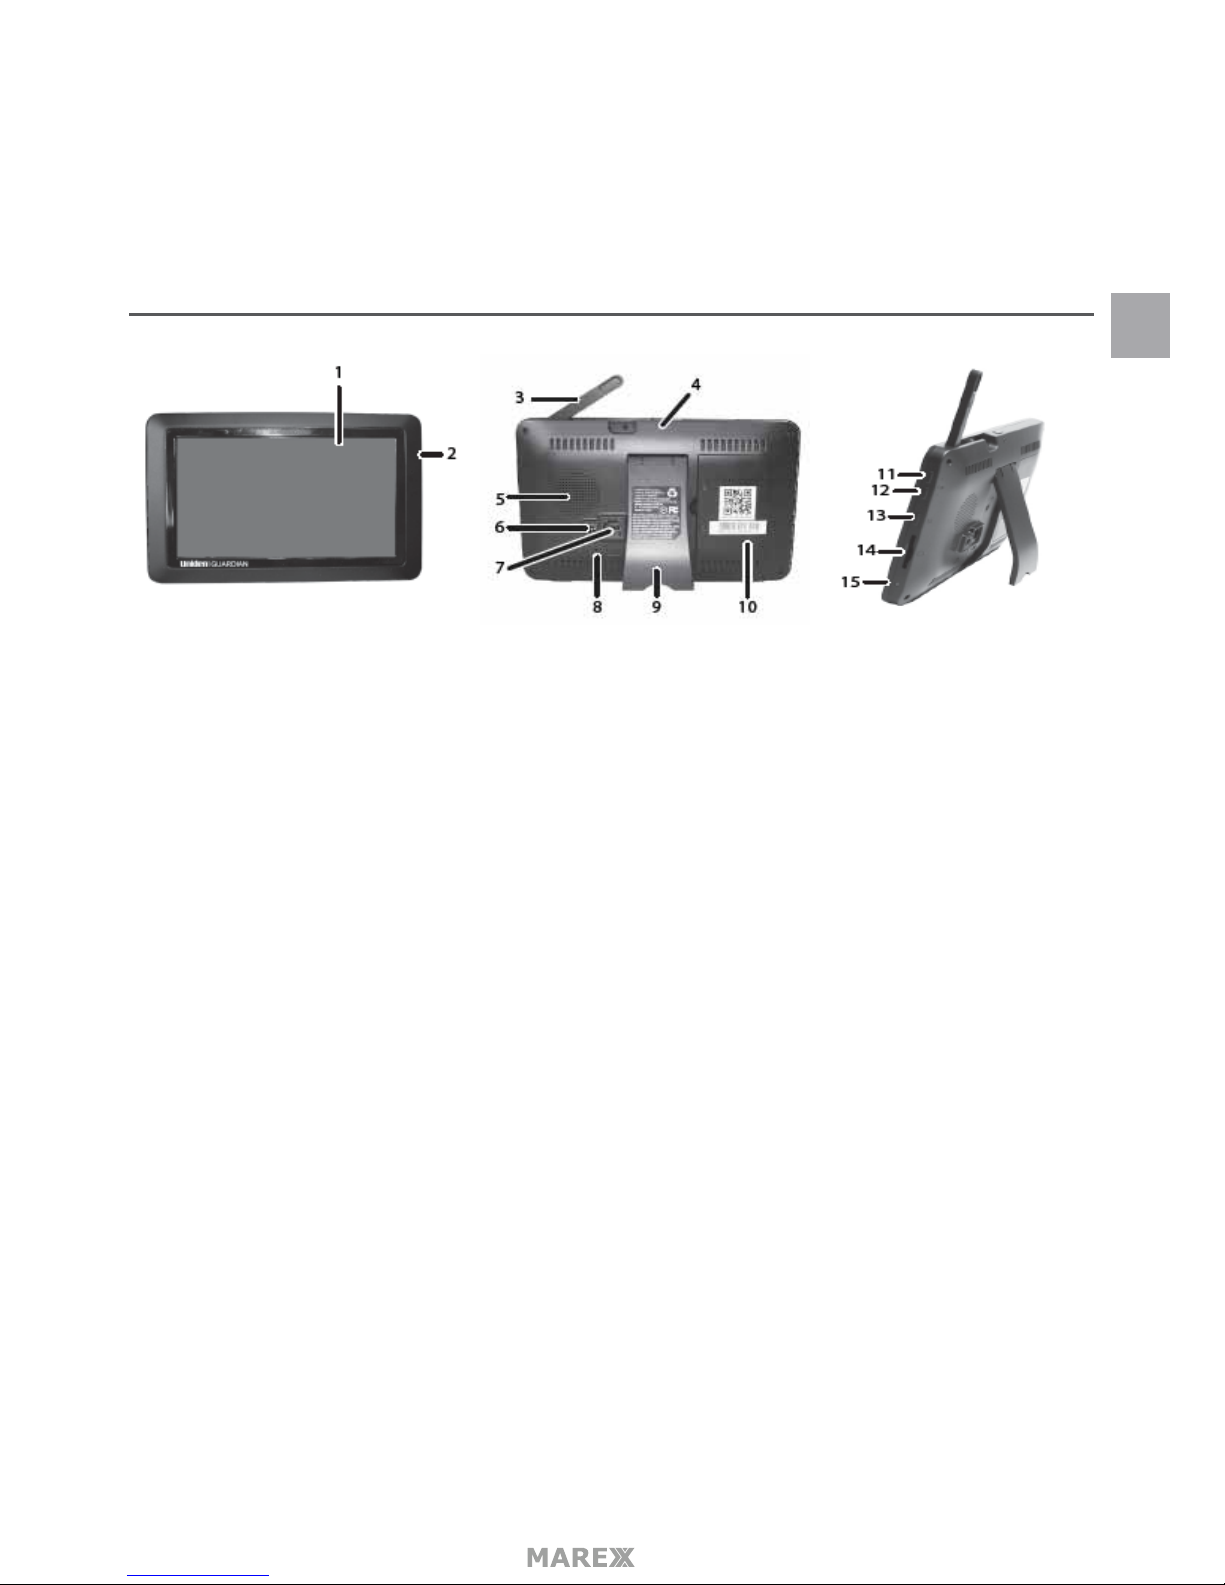
GETING TO KNOW THE SYSTEM
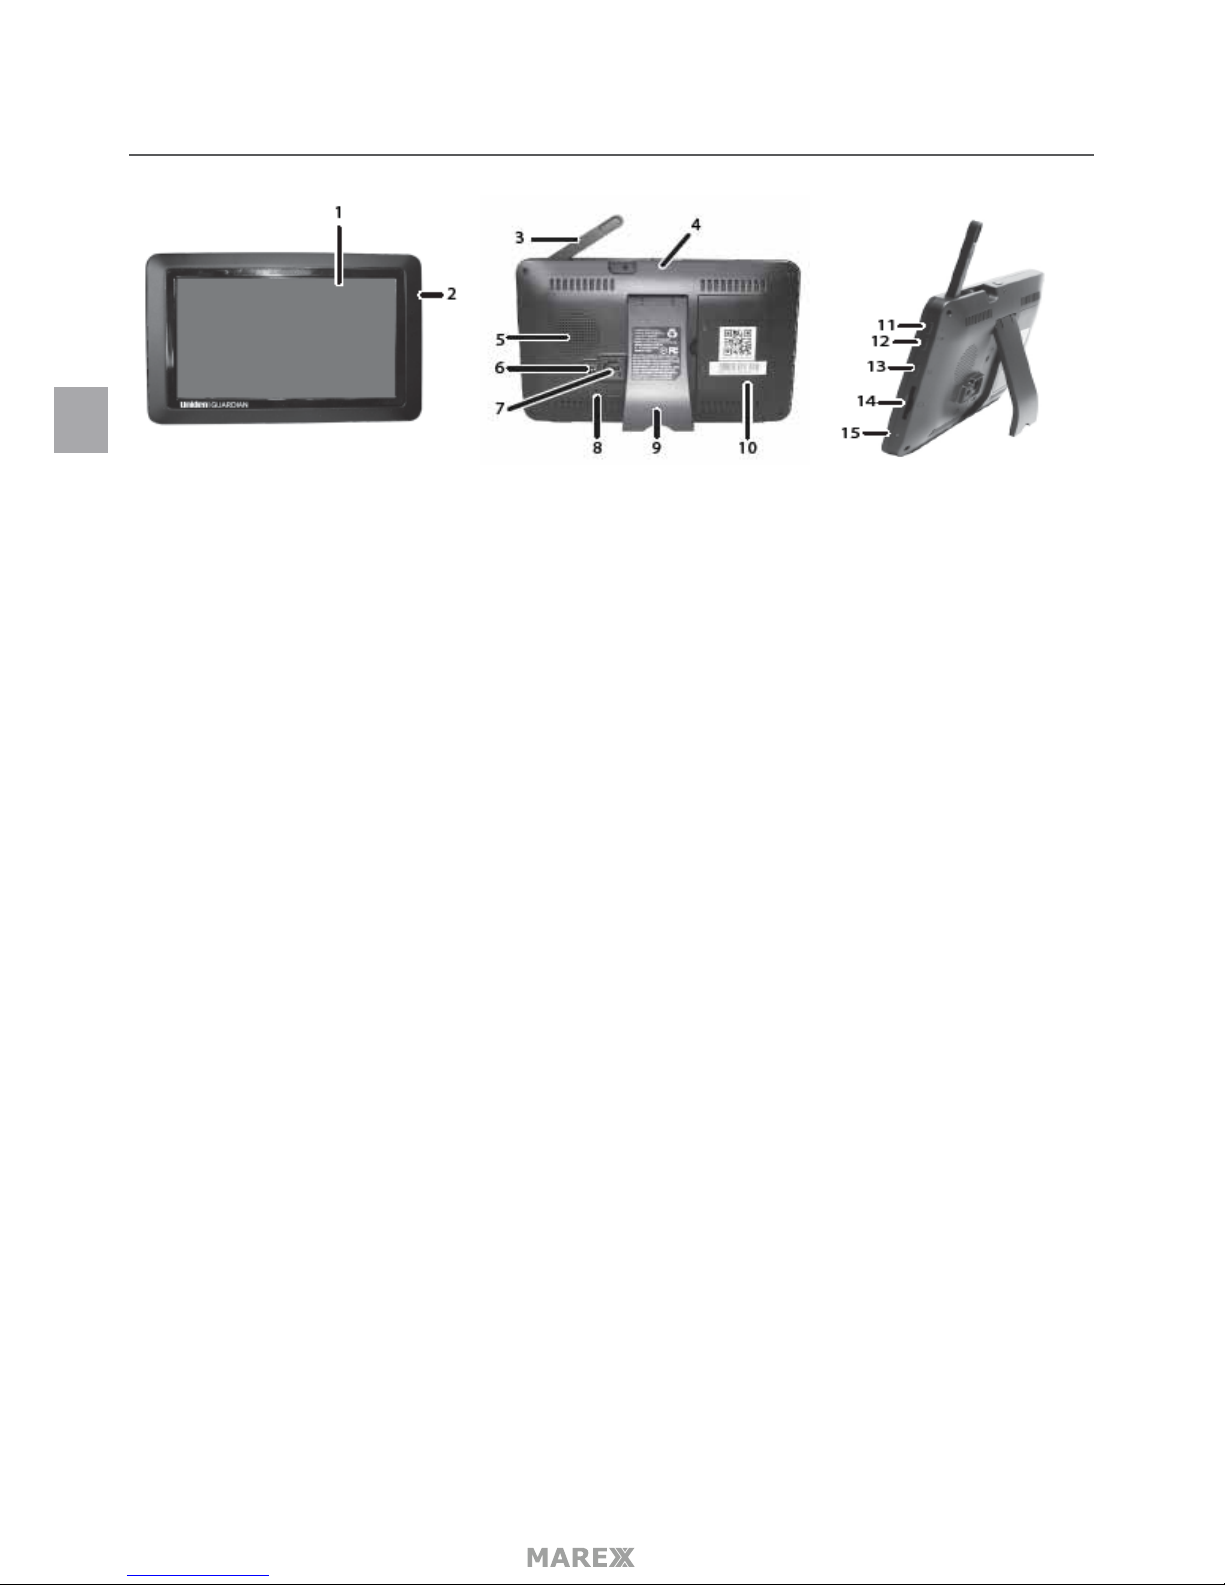
1. LCD Screen: Displays video from the camera(s)or system operation interface.
2. Microphone
3. Wireless Antenna
4. Power Button/ Scan Button: Press and hold to turn the receiver on/o. Press and release while the unit is
powered on to turn Scan mode on/ o.
5. Speaker
6. Power Port: Connect to a local power outlet using the included power adapter
7. Ethernet Port (RJ45): Connect the receiver to your router using the included Ethernet cable to enable
smartphone / tablet connectivity
8. Reset: Using a paper clip or other thin object, push the reset button to restore the system to its default
settings.
9. Receiver Stand.
10. Battery Cover
11. Volume Up
12. Volume Down
13. Talk. Press and hold to talk through the camera. Release to listen for a response.
14. SD Card Slot. Insert SD card for recording videos.
15. Blue LED On - Monitor is in Scan mode. Flasing - Battery power is low
EN
Page 8
- 8
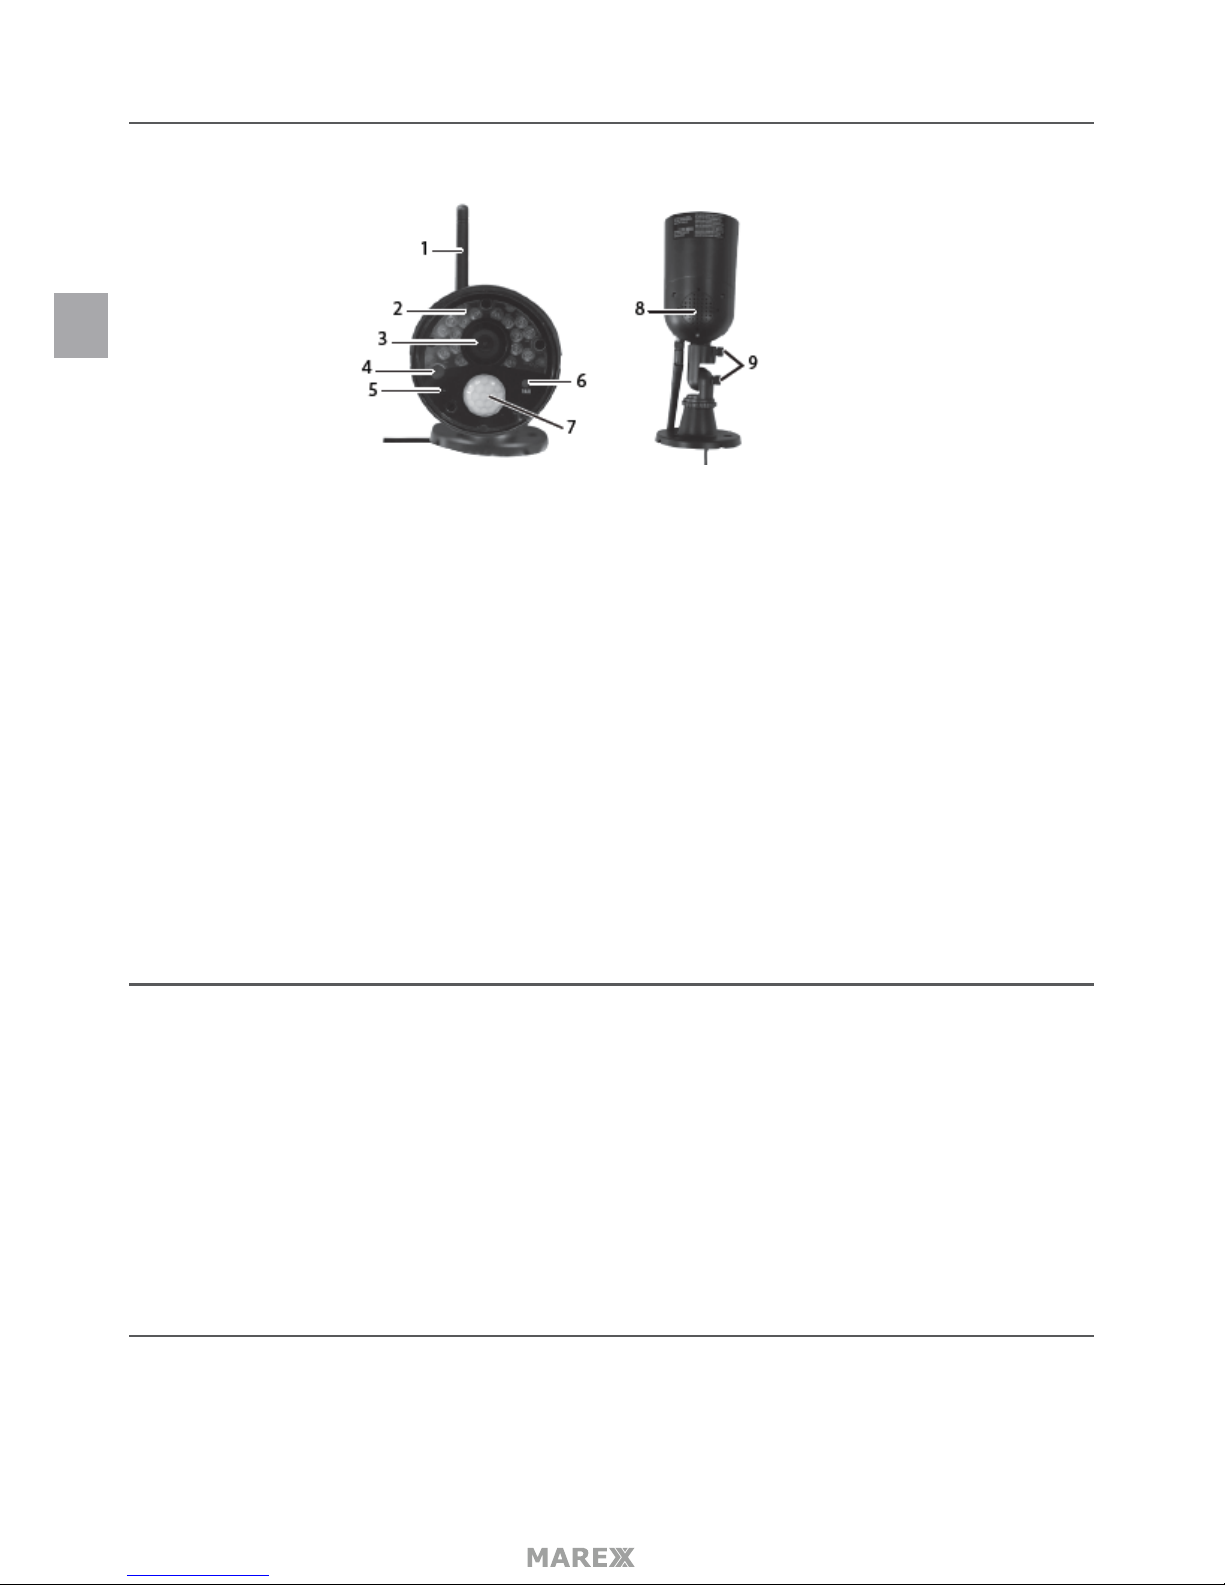
WIRELESS CAMERA
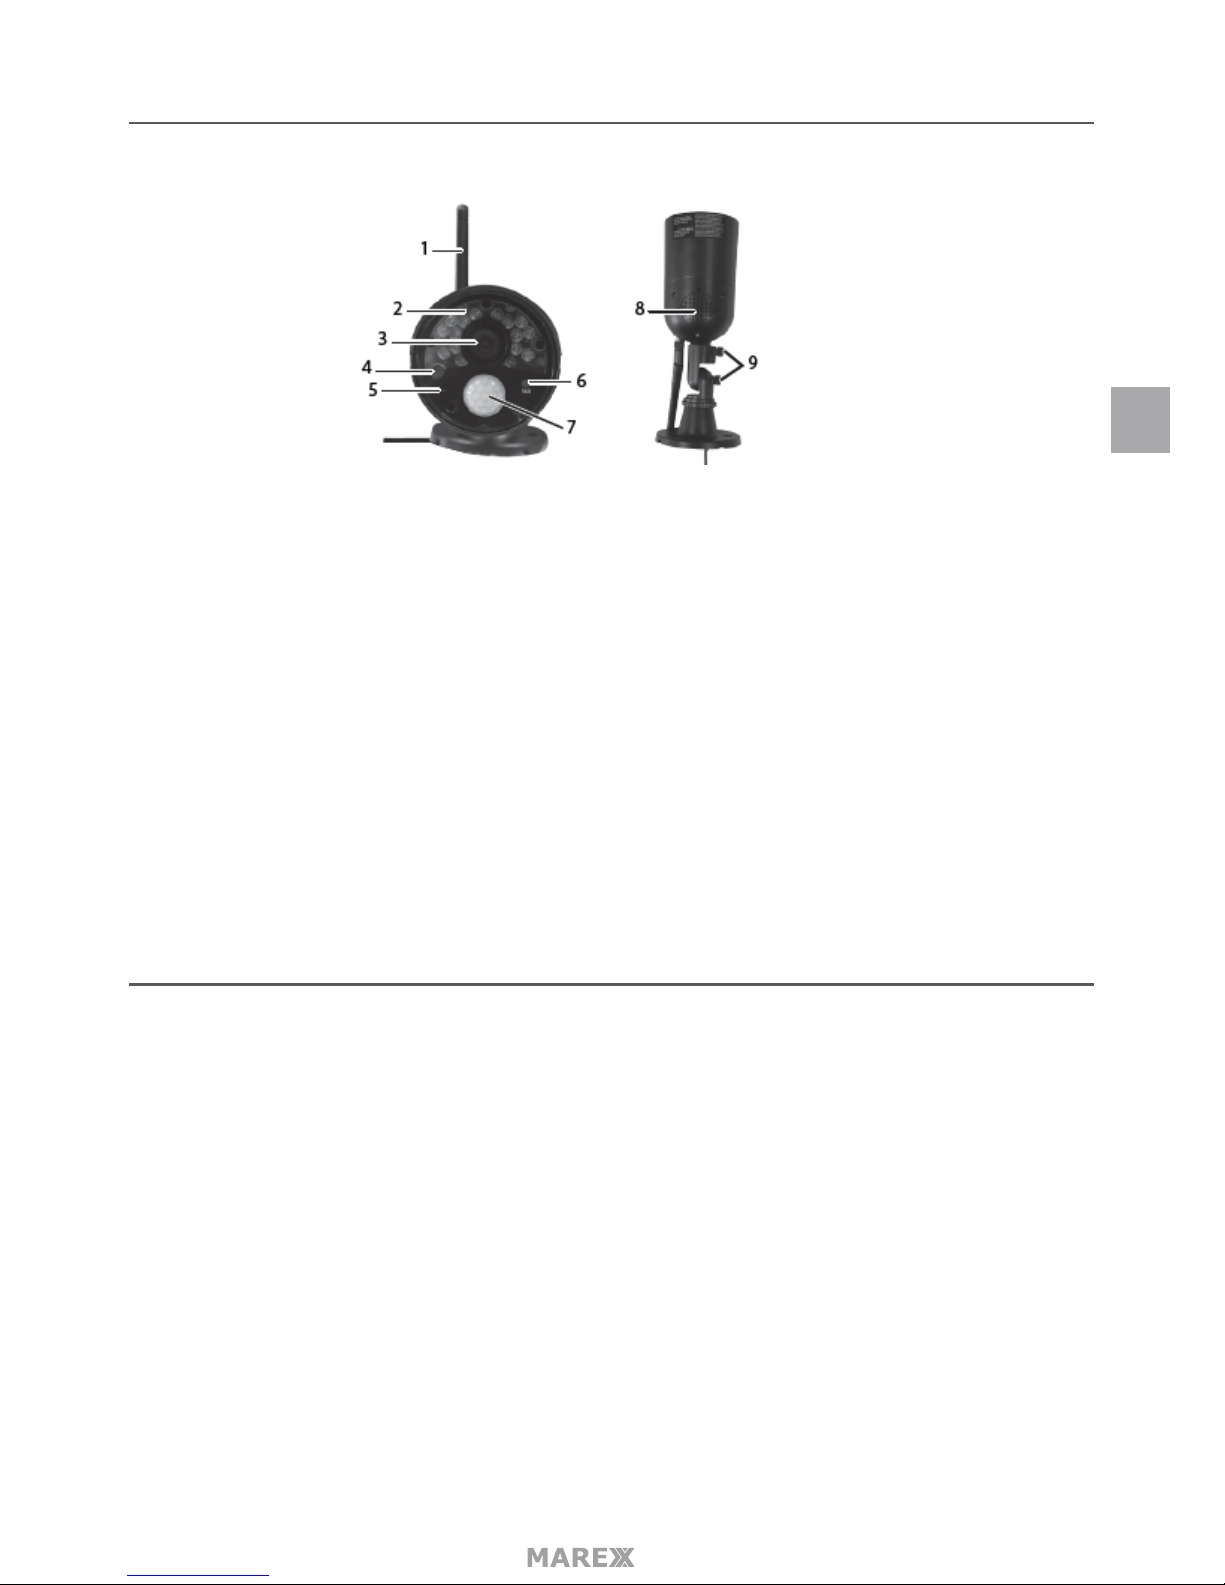
1. Camera Antenna: Sends and receives signals to/from the monitor.
2. IR LEDs. Infrared LEDs provide viewing in low/ no light conditions.
3. Camera Lens: Catches the video in front of the lens and transmits video from camera to monitor.
4. Light Sensor: Sense brightness for changing between daytime and nighttime vision.
5. Microphone: Transmit audio to receiver.
6. Pair Button: The pair button is located on the front of the camera. It is used to pair the camera with
receiver.
7. PIR Sensor: Detects motion in front of the lens and emits detection signal to transmitter.
8. Speaker: Produces the sound transmitted from the receiver.
9. Adjustment screws: Adjusts the camera up/down and clockwise/counterclockwise.
SET UP THE HARDWARE
MONITOR
1. Flip out the stand on the back of the monitor; and position the antenna.
2. Connect an AC adaptor to the power input on the side of the monitor. Connect the other end of the
adapter to a 120 volt AC (standard indoor) power outlet.
3. Press and hold the POWER button on the top of the monitor for 3 – 4 seconds to power it up.
4. The monitor displays the start up UI for a few seconds and then transitions to the LIVE view.
The screen remains dark until the cameras are powered up.
CAMERA
General
The camera included with your monitor is weatherproof and have an IP65 rating. Water can be sprayed on
them and they will still work; however, the cameras cannot be submerged.
EN
Page 9
- 9
Although the cameras can be exposed directly to the rain, it is recommended that, if they are used
outdoors, they be mounted under some type of cover like a patio overhang or eave. As rainwater drops
start to dry on the camera glass, it can create spots that will reect the light from the infrared LEDs used for
night vision, thus causing lower quality video.
Also, as dust, grime, and cobwebs accumulate on the camera glass, they can reect light from the infrared
LED and might lower video quality. Periodically clean the lens glass with a soft cloth.
Placement Considerations
Consider the following when placing cameras:
• The clearest line-of-sight between the camera and monitor is best.
- Walls, especially brick and concrete, shorten the transmission distance.
- Placement next to windows allows better transmission.
• Optimized motion detection range is 6~18 feet for the camera. The farther away an object is, the less
accurate the motion detection.
• Avoid having a direct light source in the view of the camera, including street lights, ceiling or oor
lamps, spotlights in the driveway, etc.
• Rainfall, pool water ripples/reections, tree/shrub leaves blowing in the wind
– and the shadows they create
– can generate motion detection false alarms.
When you are positioning the camera, bring the monitor along; it’s much easier to get the
camera into the right position when you have the display handy.
1. Position the camera where you want it, plug it into power, and check video on the monitor. Move the
camera if the view is not what you want.
2. Hold the base of the camera stand where you want to mount it and mark the location of the screw
holes.
3. Use the included screws and anchors to attach the base to the wall or ceiling.
4. Tug gently on the stand to make sure it is securely in place.
MONITOR SCREEN
The monitor’s screen has 3 main parts:
• Live View area. The main screen area displays live video from the camera(s).
• Pop Out Menu Tab. Tap this tab to display 4 menus that let you manage the system.
• Icon bars. Icons display on the top and bottom of the monitor screen.
Viewing Modes
The Live View area displays live video from the cameras. Each camera can display in its own section of the
screen (quadrant) or on the full screen.
EN
Page 10
- 10
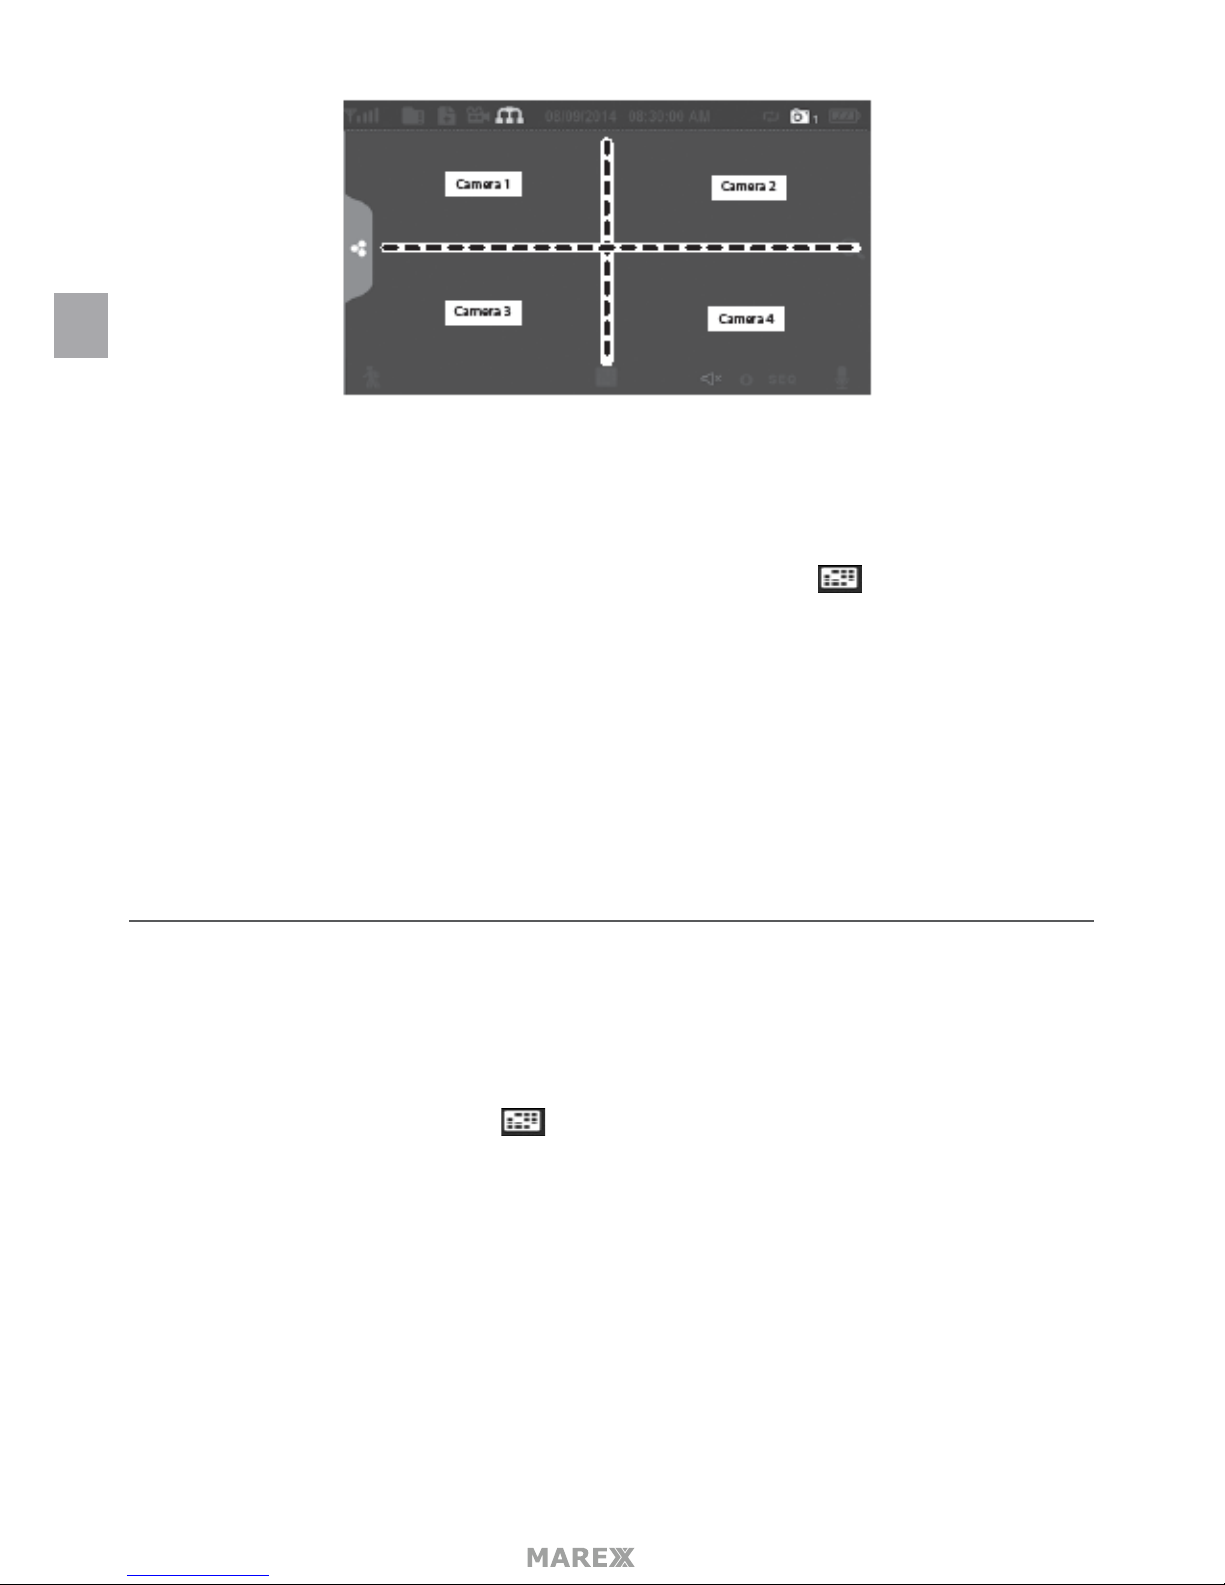
There are 4 viewing modes:
• Quad mode splits the screen’s image area into 4 quadrants and displays active camera video in each
quadrant. Tap the center of the quadrant to enter Single Channel mode.
• Single Channel mode displays one camera at a time on full screen. Press to change between the
channels. Tap the center of the image to return to Quad mode.
• With Scan mode, the monitor’s screen and speakers are o until a camera detects motion. That camera
then displays at full screen (sound and video on) until there has been no motion for 15 seconds. After
that, the o.monitor screen turns o again. Press and release POWER to to turn Scan mode on and
• Auto Sequence. Displays each channel automatically in sequence in full screen display. The system
defaults to Auto Sequence mode when Scan mode is turned o. Tap SEQ to turn Auto Sequence mode
o and return to Quad mode.
SYSTEM OPERATION
Your monitor operates through a series of screens that let you choose groups of operations.
LIVE VIEW SCREEN
The Live View screen is the monitor’s main screen that displays video from your camera(s). You can have the
system display a single camera or you can set the screen to display all of them. You can also set the screen to
cycle between all live video feeds. Tap the icon to change the Live screen video displays.
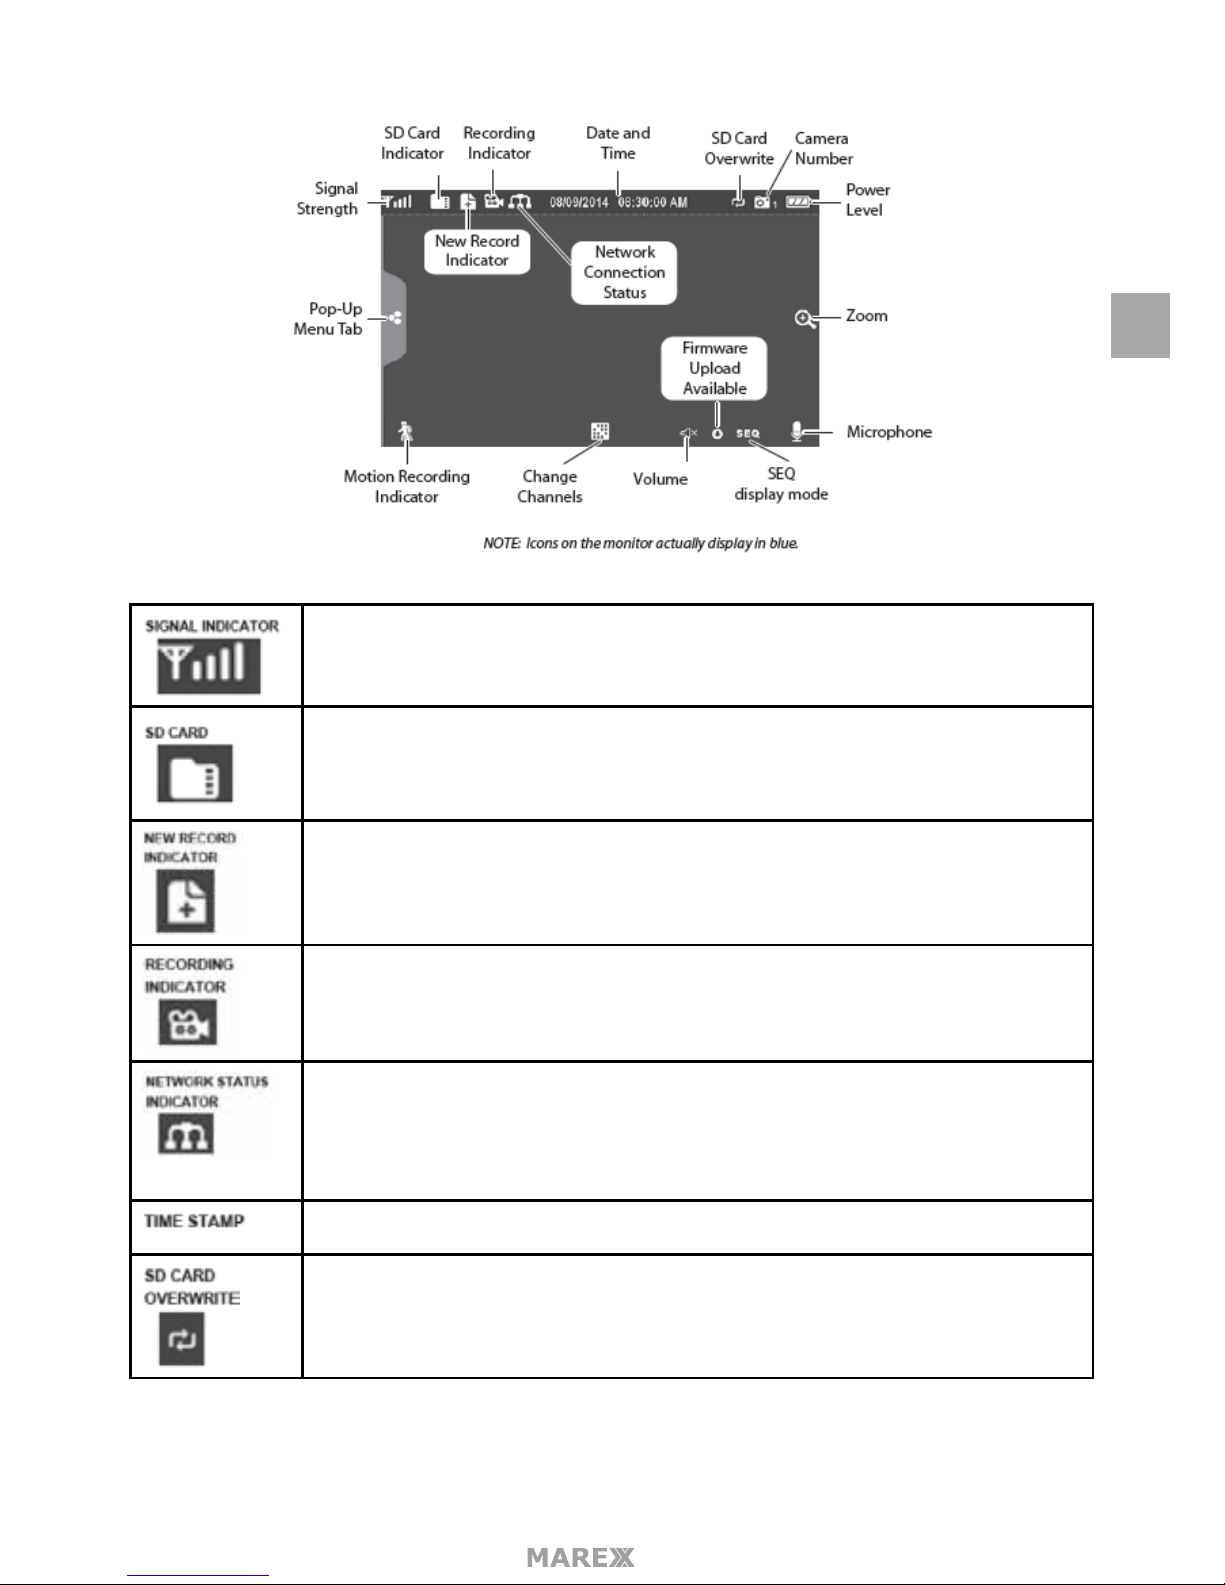
LIVE VIEW SCREEN ICONS
Dierent icons display on the monitor screen depending on what is going on with your cameras. This image
shows an example of what could be on your screen (the video image is removed to make it easier to see the
icons). A table follows of possible icons and their denitions.
EN
Page 11
- 11
Shows how strong the camera’s signal is. Signal ranges from 4 bars down to 0 bars (out
of range).
This graphic displays if an SD card is inserted into the monitor.
• If blue, recording space is available.
• If red, the SD card is full.
Tap this icon to view recorded les.
New recordings are saved on the SD card.
When this icon ashes red, it indicates that recording is in progress.
• Green, system is connected to the internet and the monitor is connected with
internet mode.
• Yellow, system is connected to internet and the monitor is connected with
intranet mode.
• Red, connection has failed or system is not connected to a network.
Current date/time in month/day/year, hour/minute/second format.
Displays if the SD card is allowed to overwrite les when it is full.
EN
Page 12
- 12
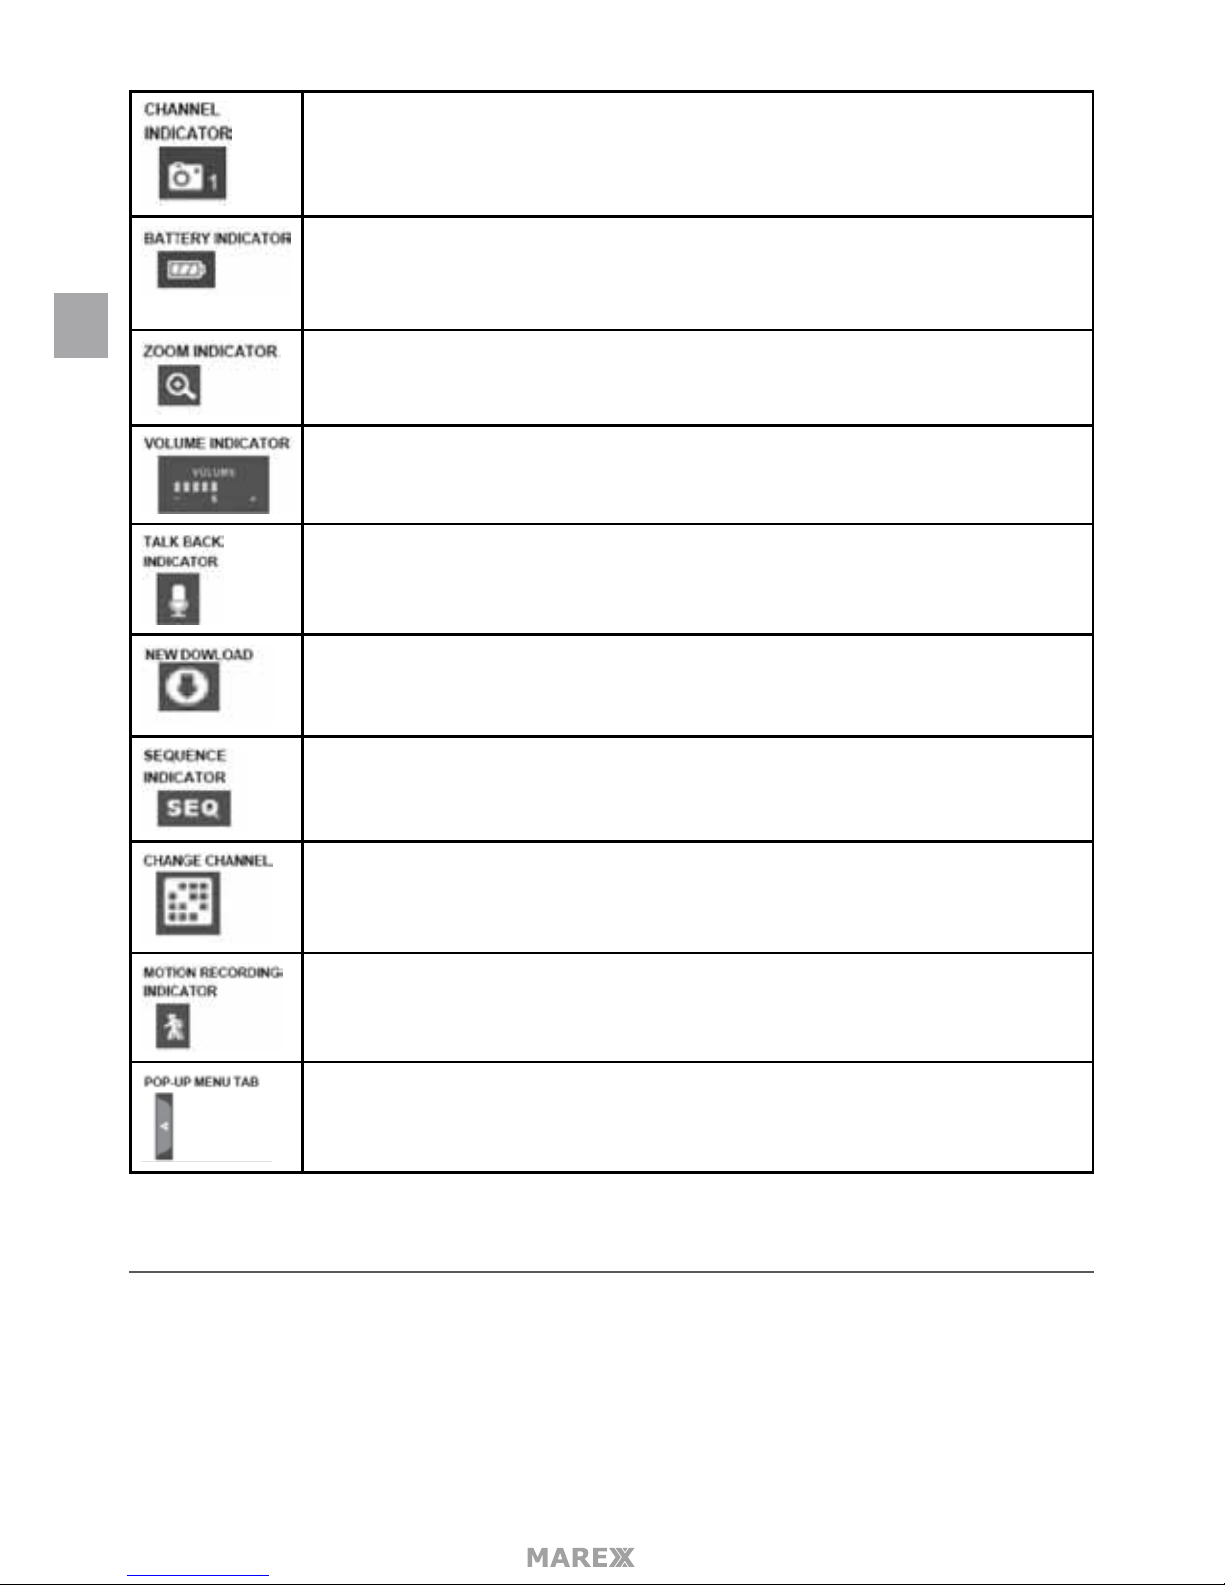
Displays the current channel number you are currently viewing. If viewing multiple
cameras at once, the camera indicator will appear above each video display.
Indicates the monitor’s battery life:
• Flashing Red – Low battery
• Green – Full battery
• Flashing Green – Charging
When you tap this icon on the screen, the monitor breaks the screen image into 5
areas. Tap the area you want to see in Zoom. That area displays in 2x size. Tap the icon
again to exit Zoom mode.
Indicates current audio volume. You must be in single channel viewing mode to
change volume. Tap + or – to raise or lower the volume.
Displays when TALK is pressed. Press and hold TALK on the side of the monitor to talk
back through the camera. Release TALK to wait for a reply.
Displays if new rmware is available.
Displays when the monitor is in auto switch mode; it will change channels automatically.
Tap this icon to manually change channels.
Indicates motion detection status
• Blue – Automatic recording is OFF
• Red – Automatic recording is ON.
Tap to access the pop up menu system.
MENU
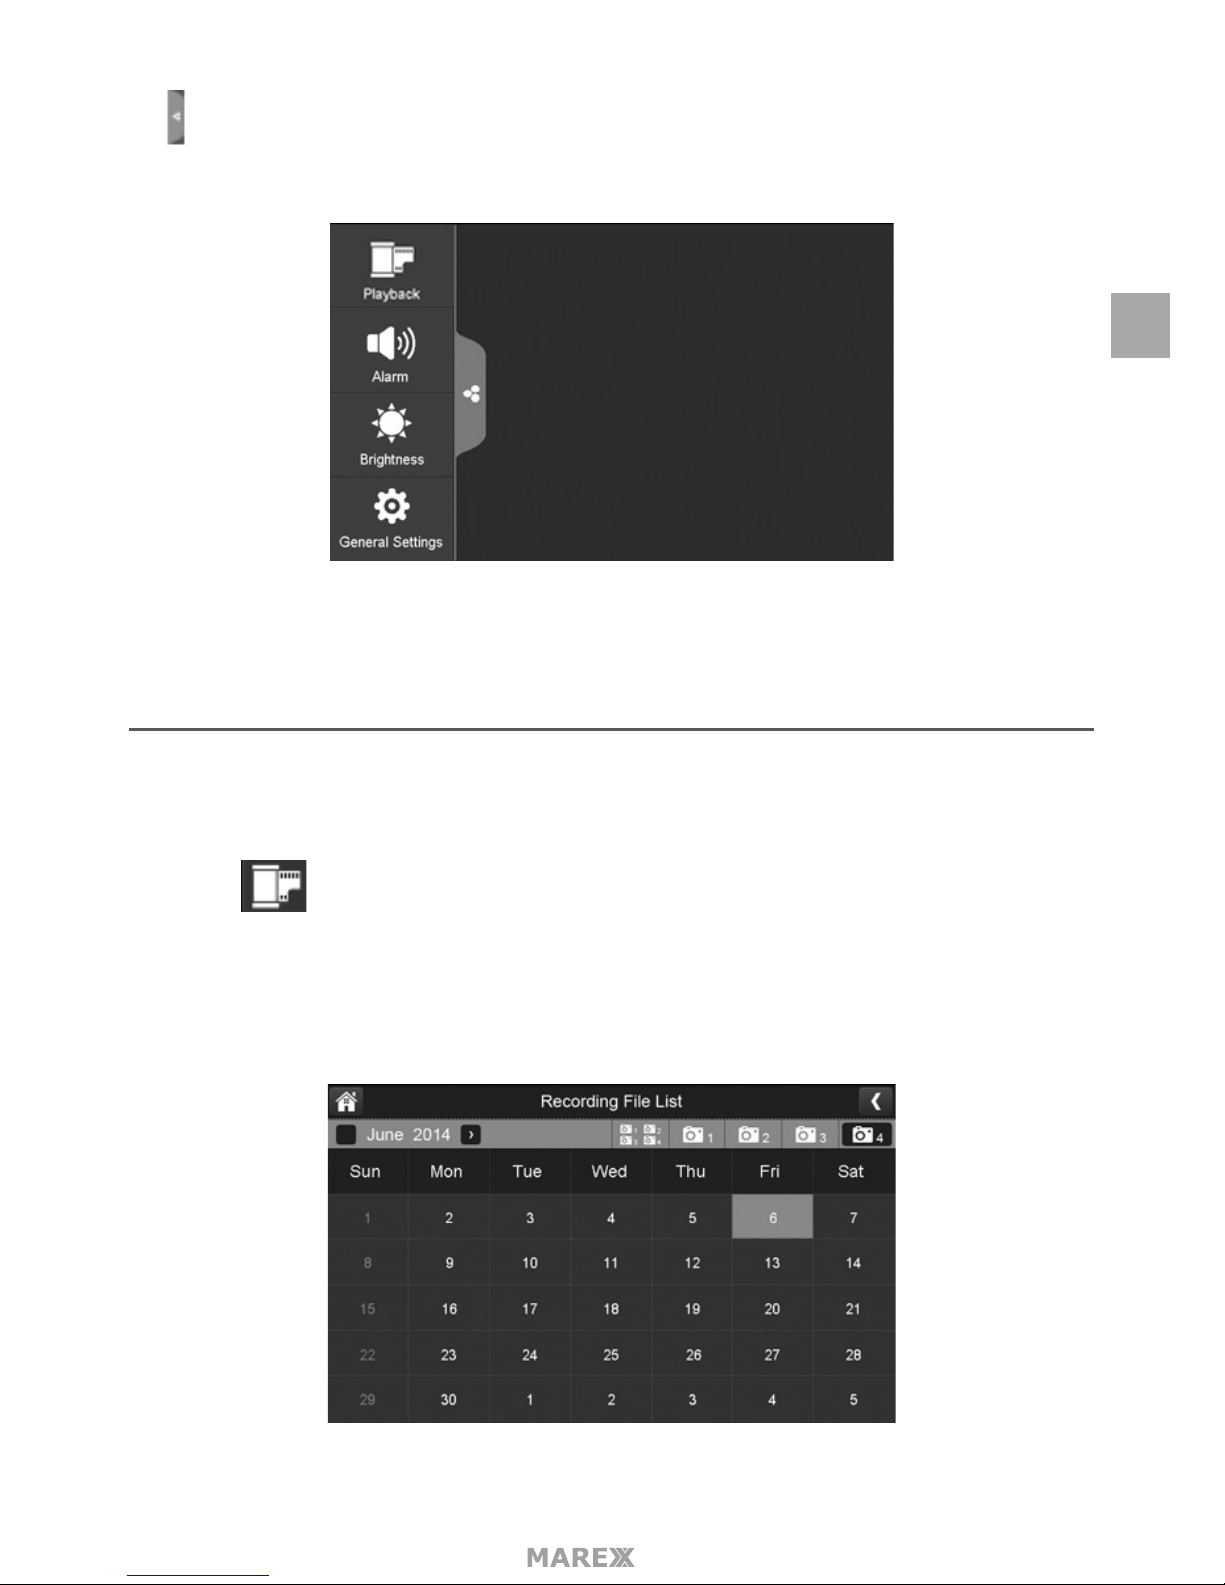
This section describes the Marex pop-up menu screens in detail. These pop-up menus enable you to:
• Play back recorded video les
• Set alarms
• Set the brightness level for each camera connected (single channel display only)
• Set up cameras for recording, motion detection, and other system and network requirements.
EN
Page 13
- 13
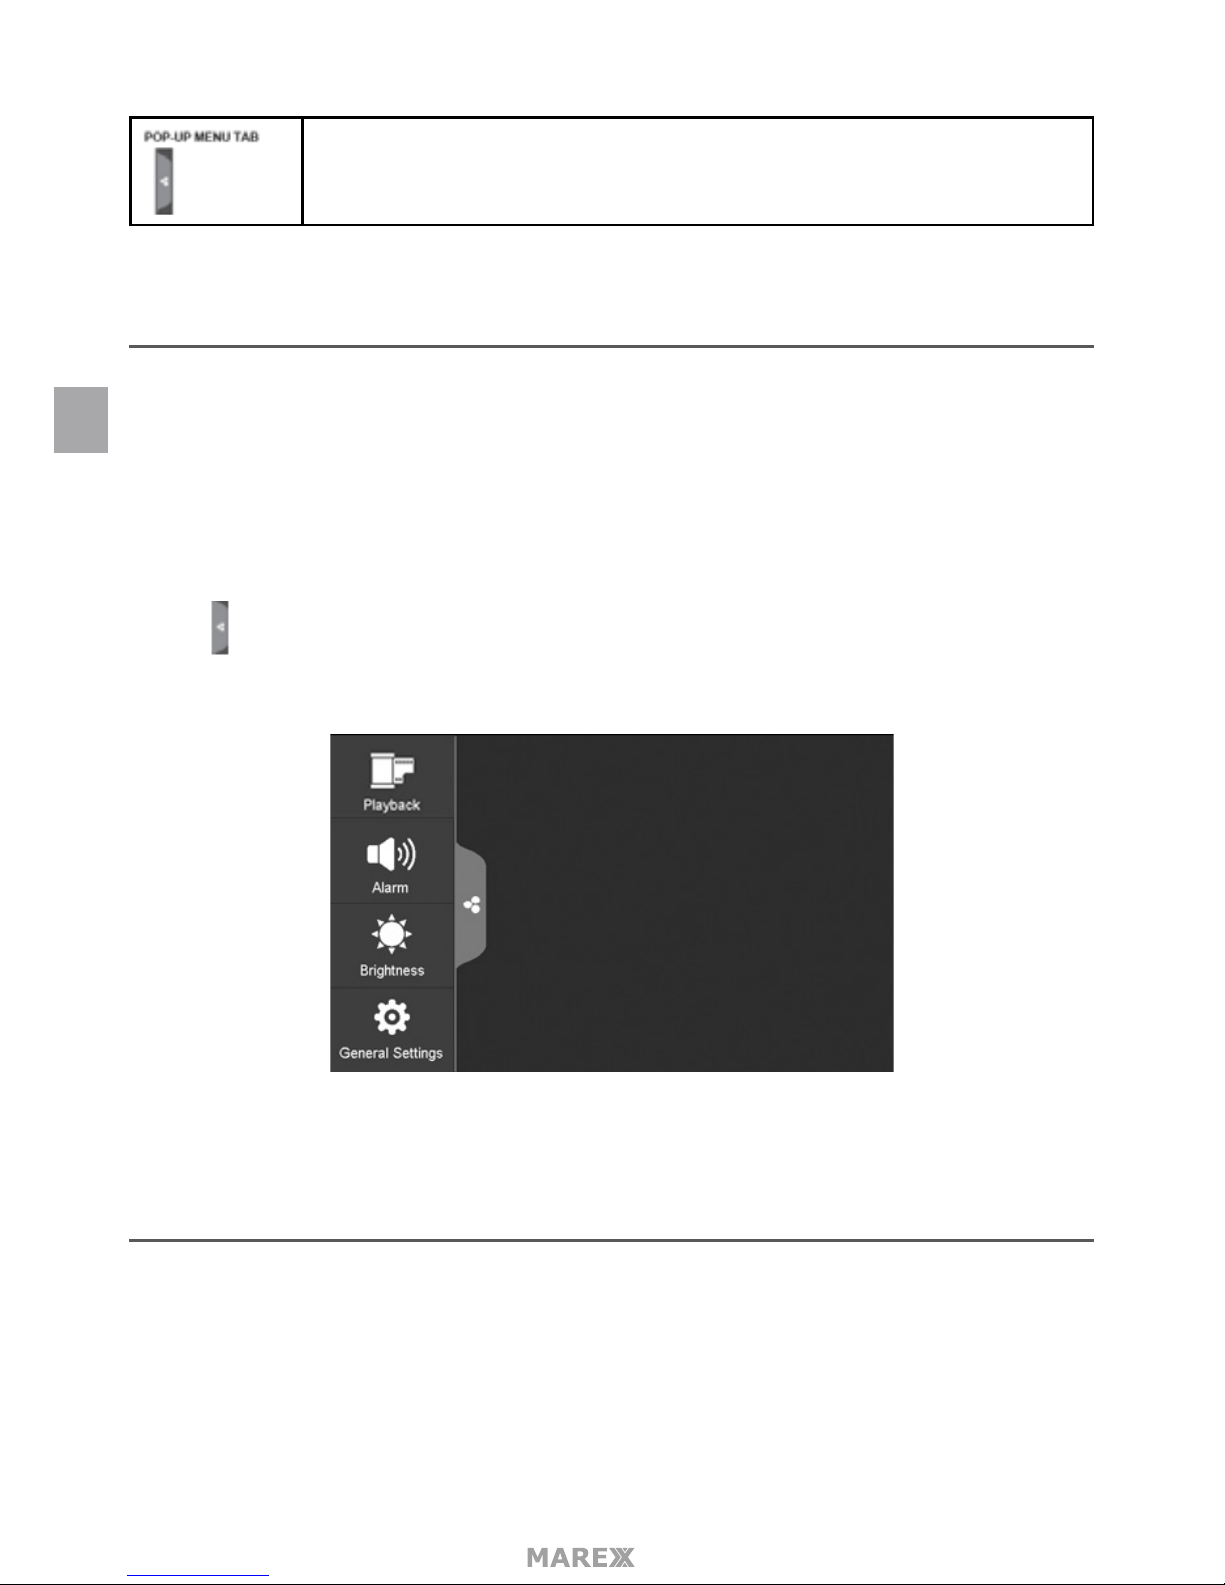
Tap and the pop-up menu will appear:
PLAYBACK
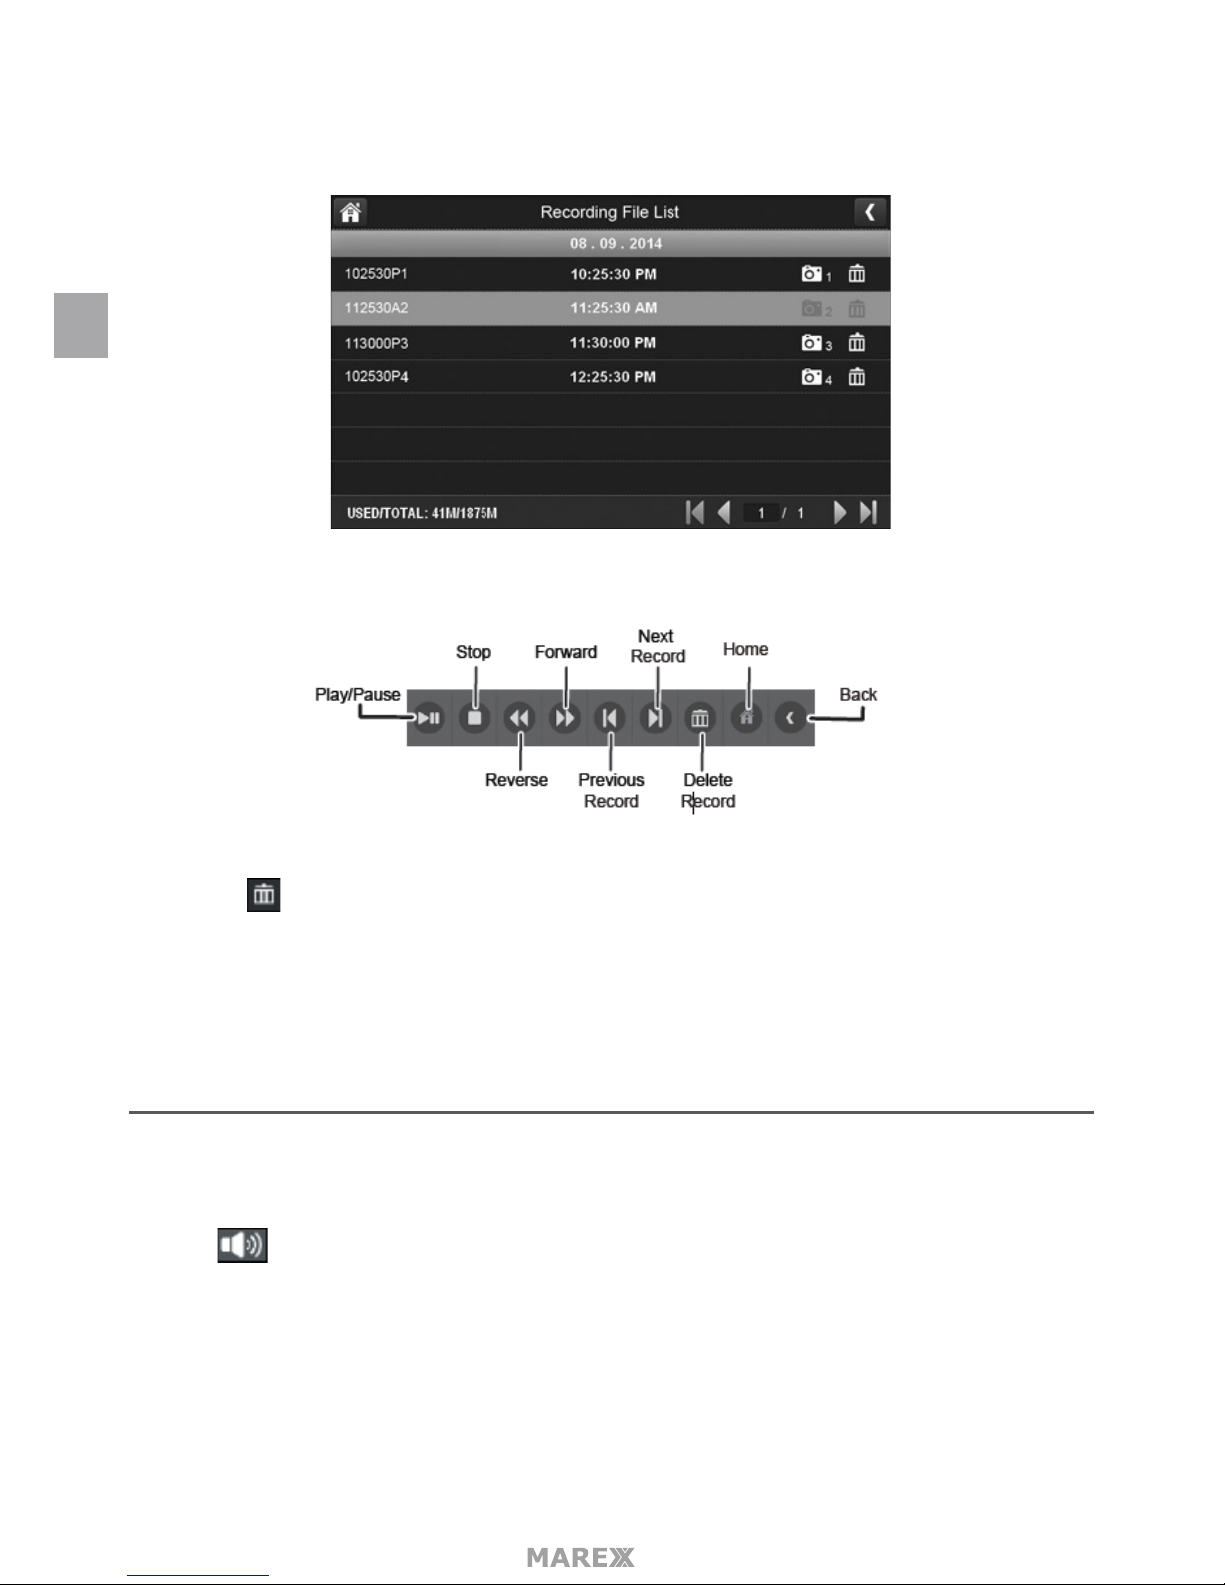
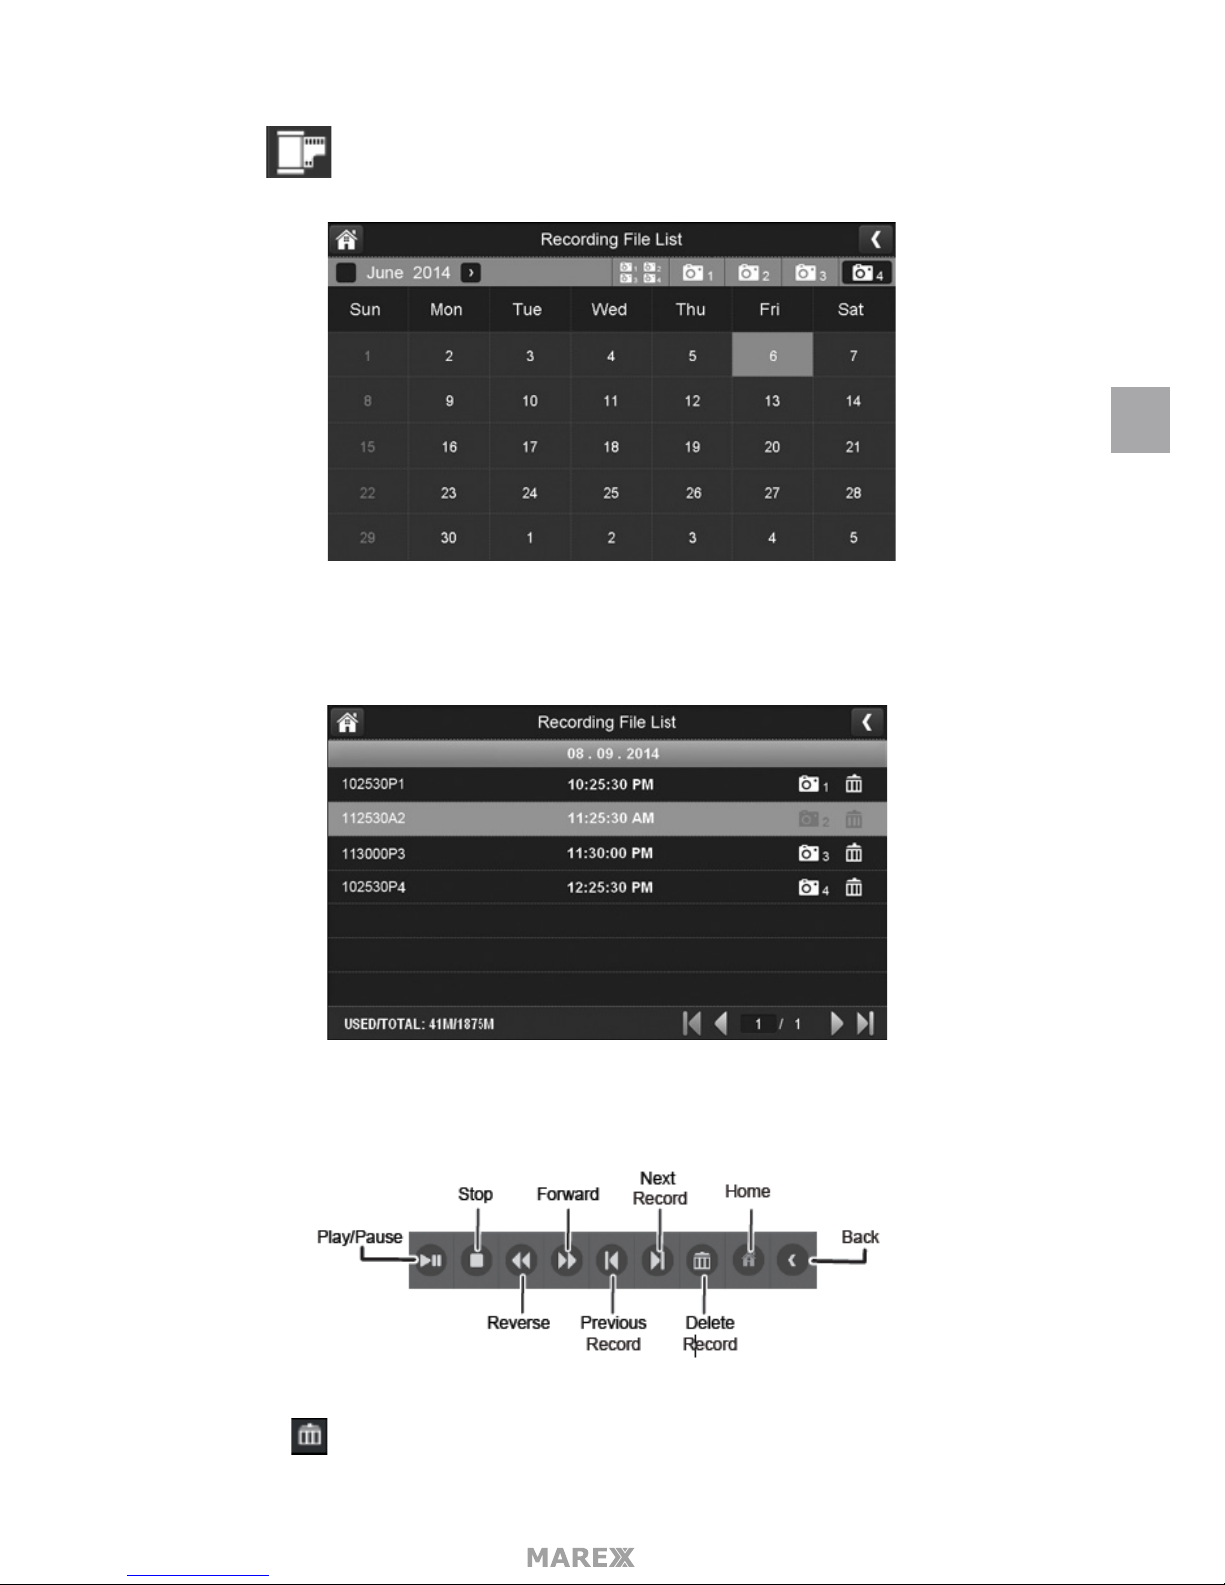
Manage recorded les with this screen. You can see what recorded les you have, play them, and delete
them.
• 1. Tap The following menu displays:
EN
Page 14
- 14
• Days that are highlighted have recorded les. Tap the day you want to review and a list of recordings for
that day displays.
• Tap the record you want and it plays, with a control bar across the bottom of the screen.
• When the le nishes, the monitor displays the Recording File List screen again.
• Tap the icon to delete the record if desired.
ALARM
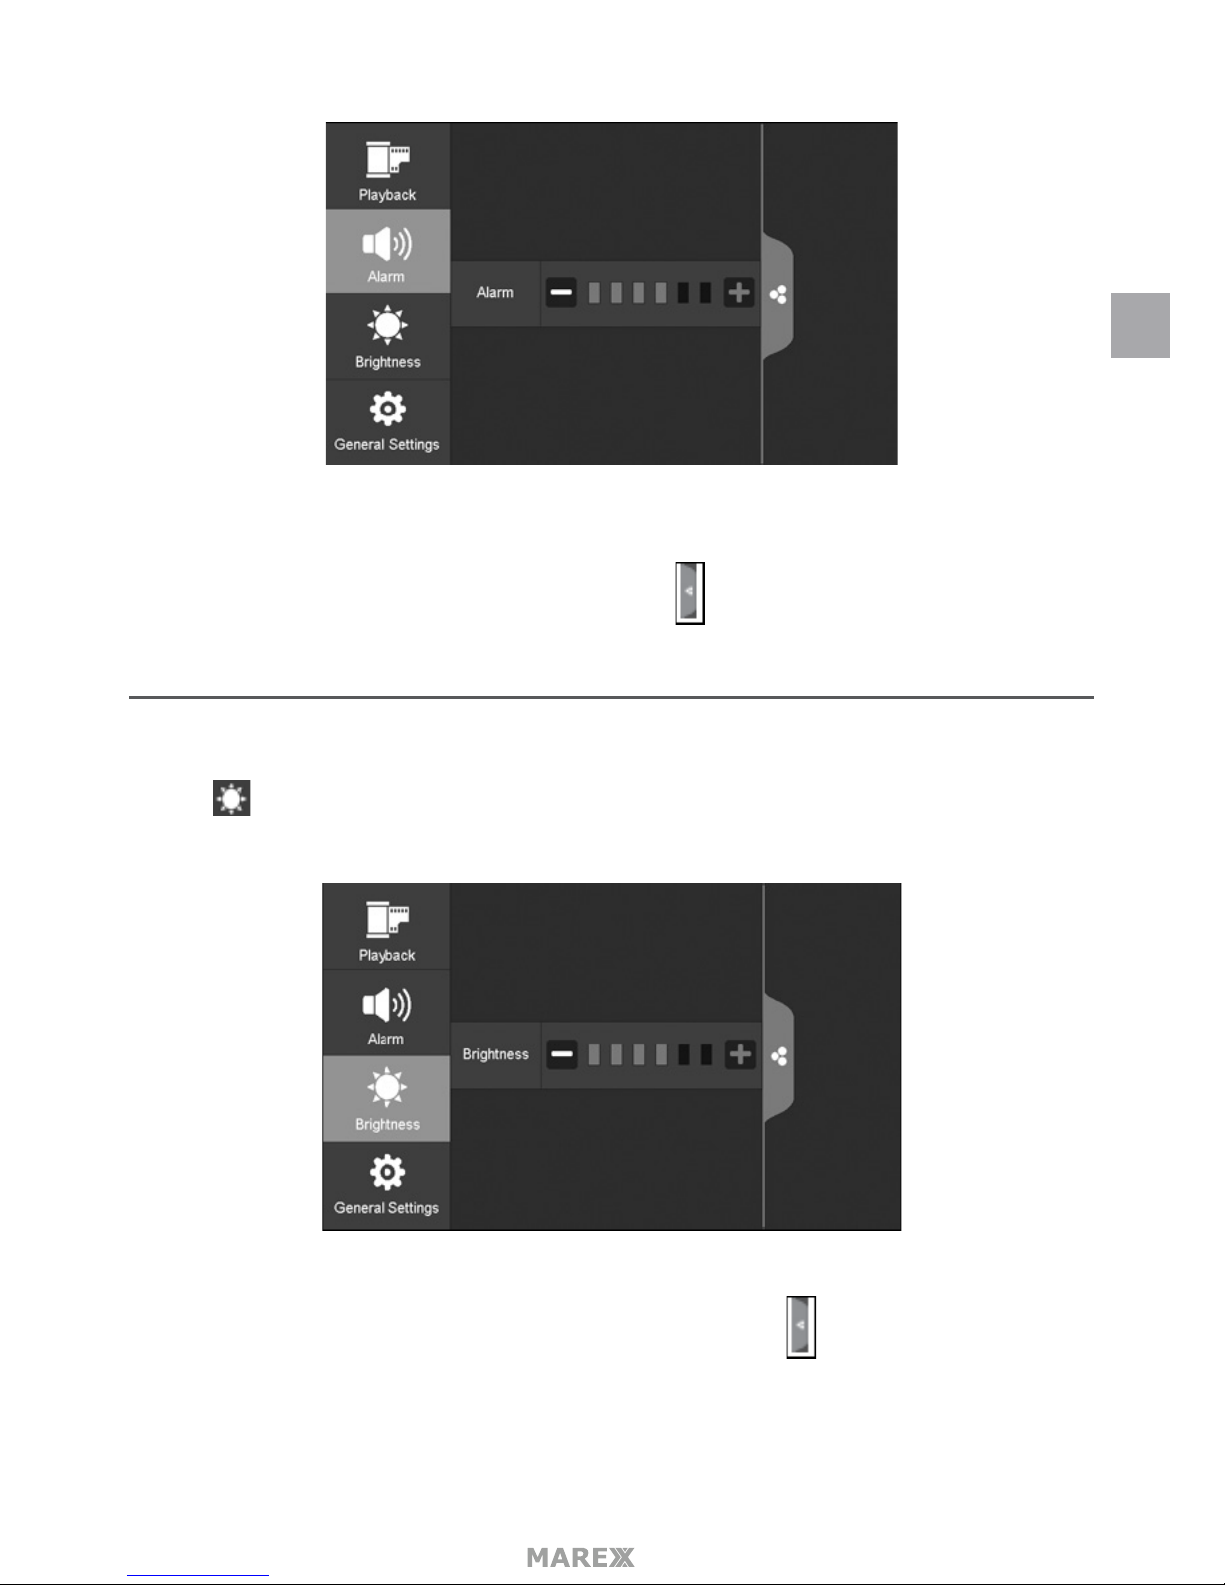
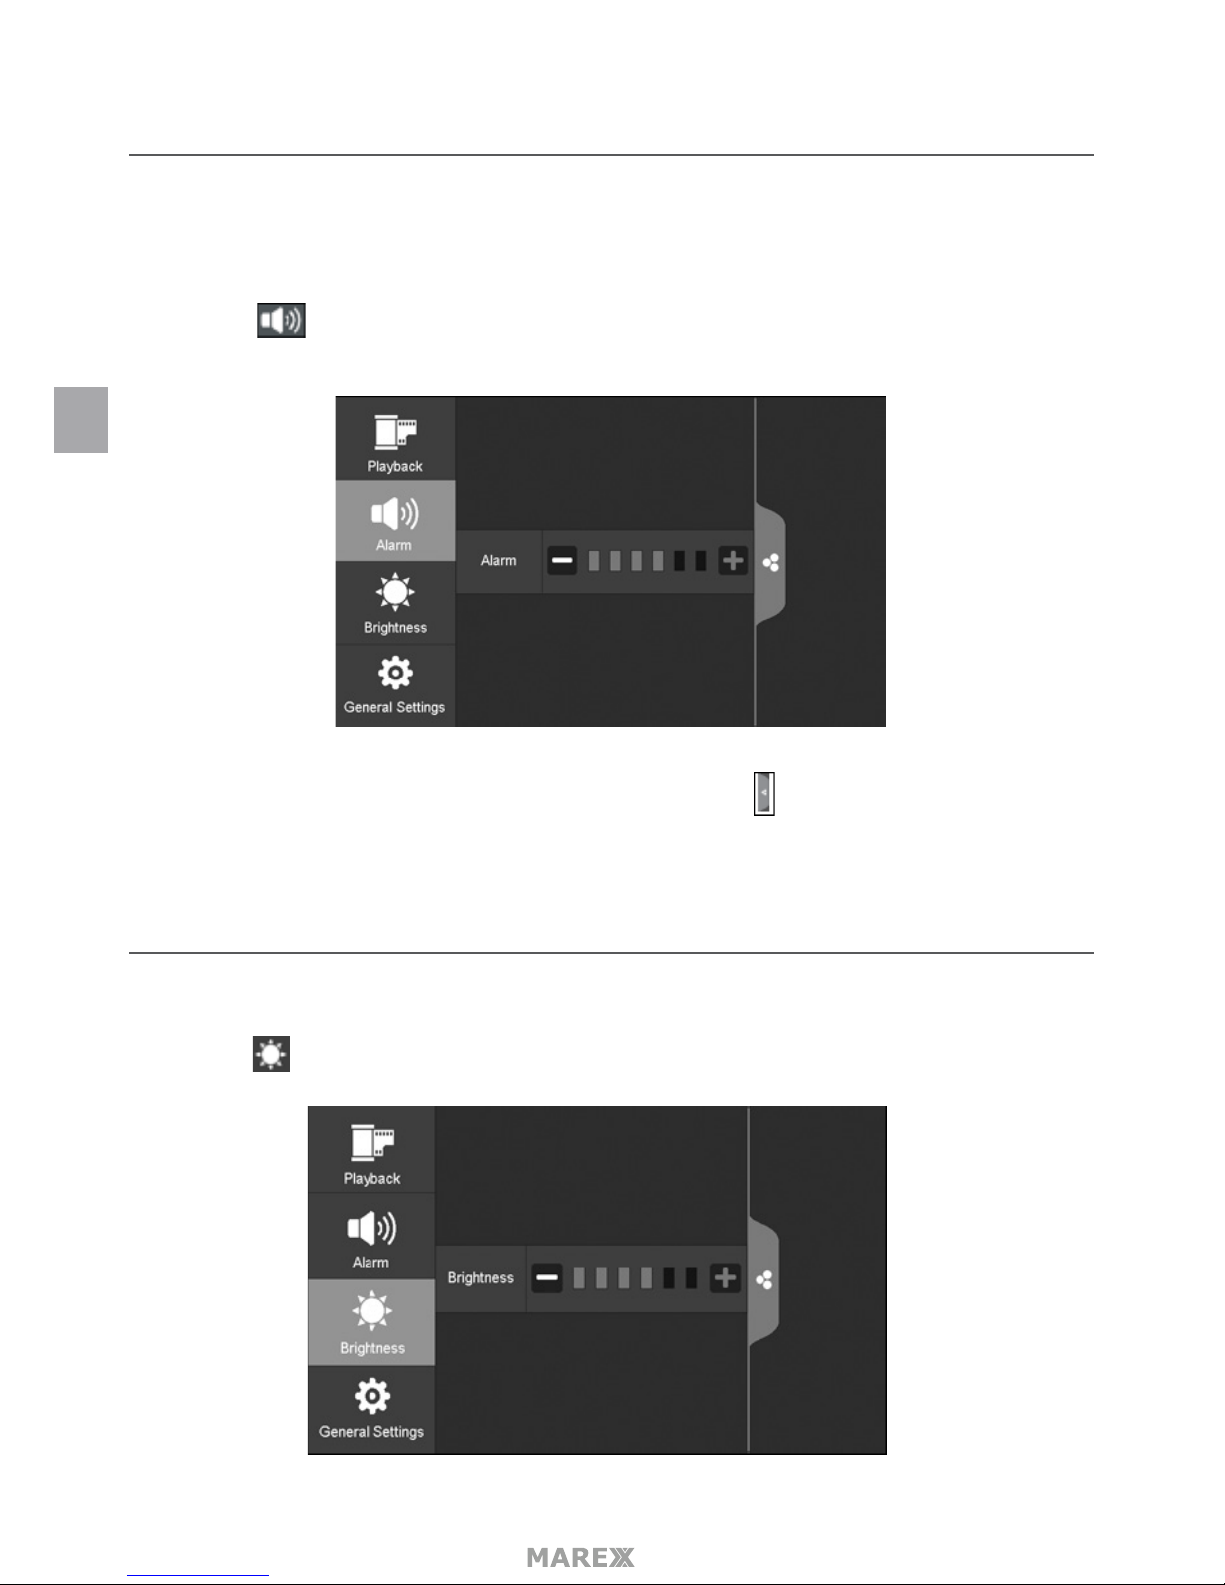
When motion triggers the camera to begin recording, the monitor will play an alarm tone. This menu lets you
determine how loud that tone will be.
• Tap The following menu will appear:
EN
Page 15
- 15
• Tap + or – to increase or decrease the alarm volume. Tap when you are nished.
BRIGHTNESS
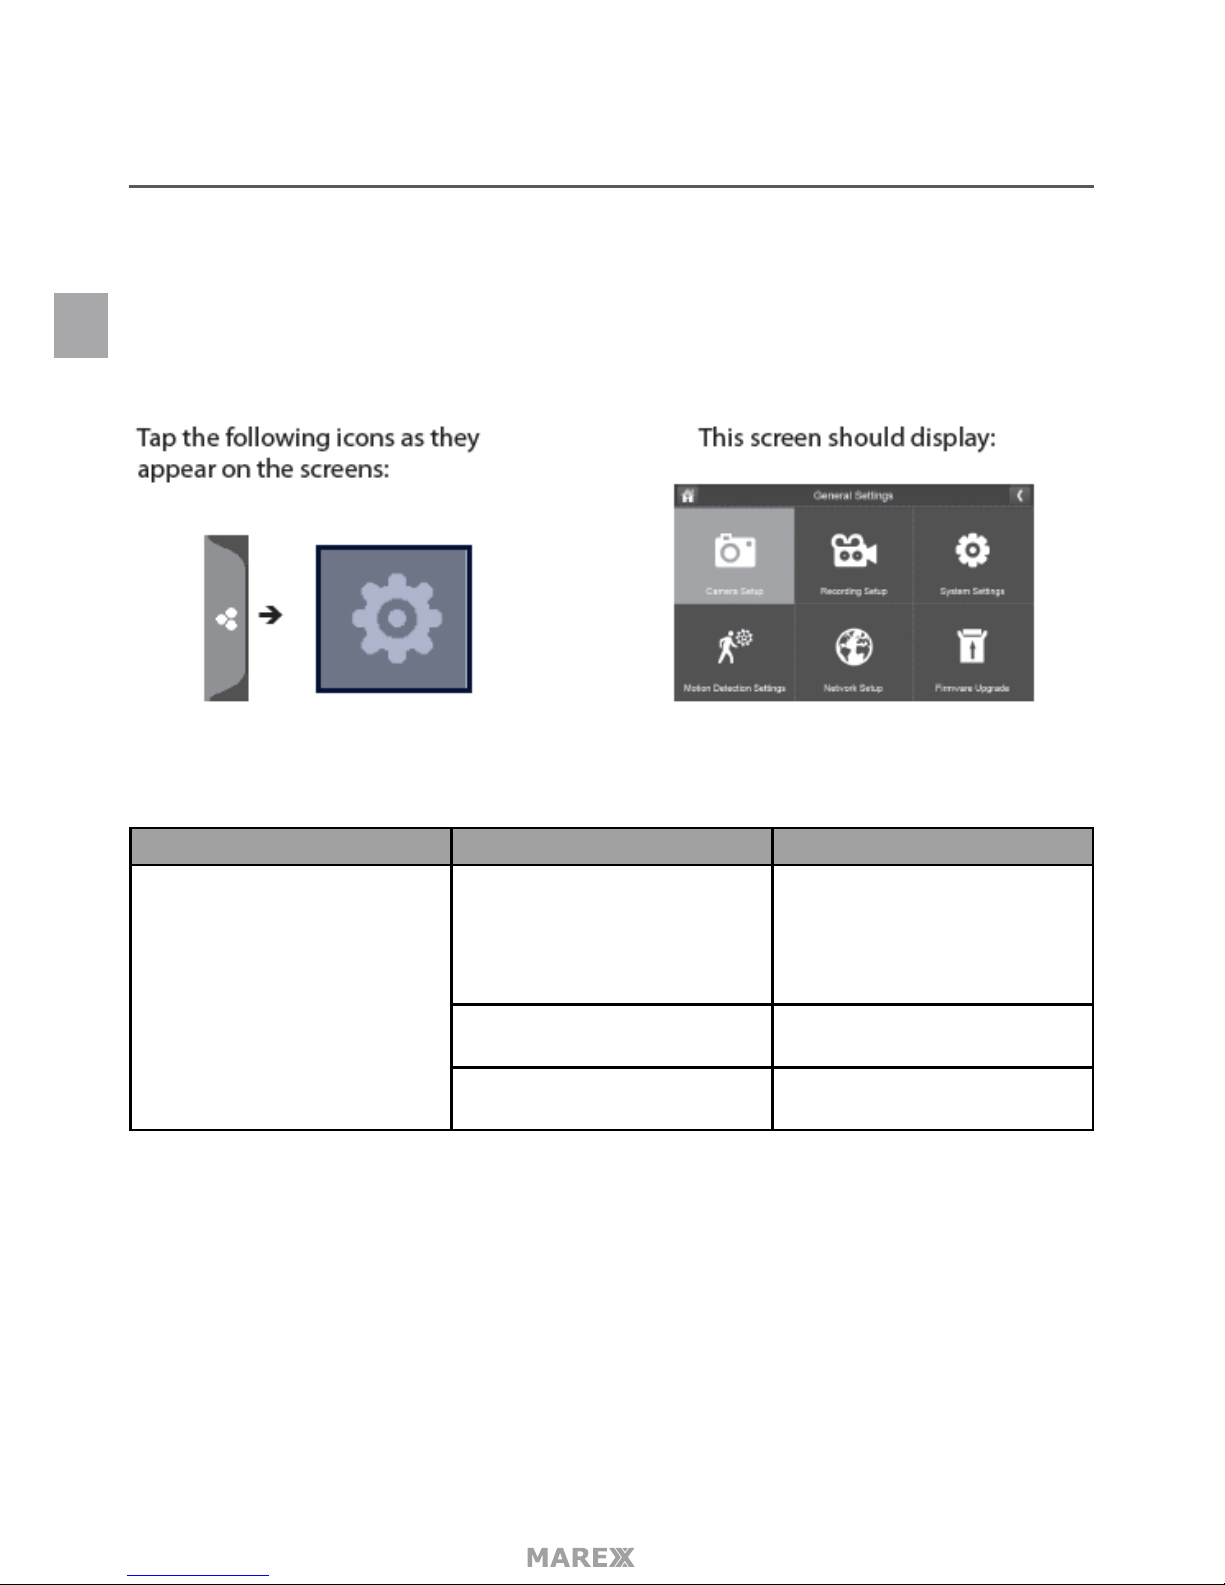
This feature allows you to set each camera’s brightness level.
• Tap The following menu will appear:
• Tap + or – to increase or decrease the monitor screen brightness. Tap when you are nished.
EN
Page 16
- 16
GENERAL SETTINGS
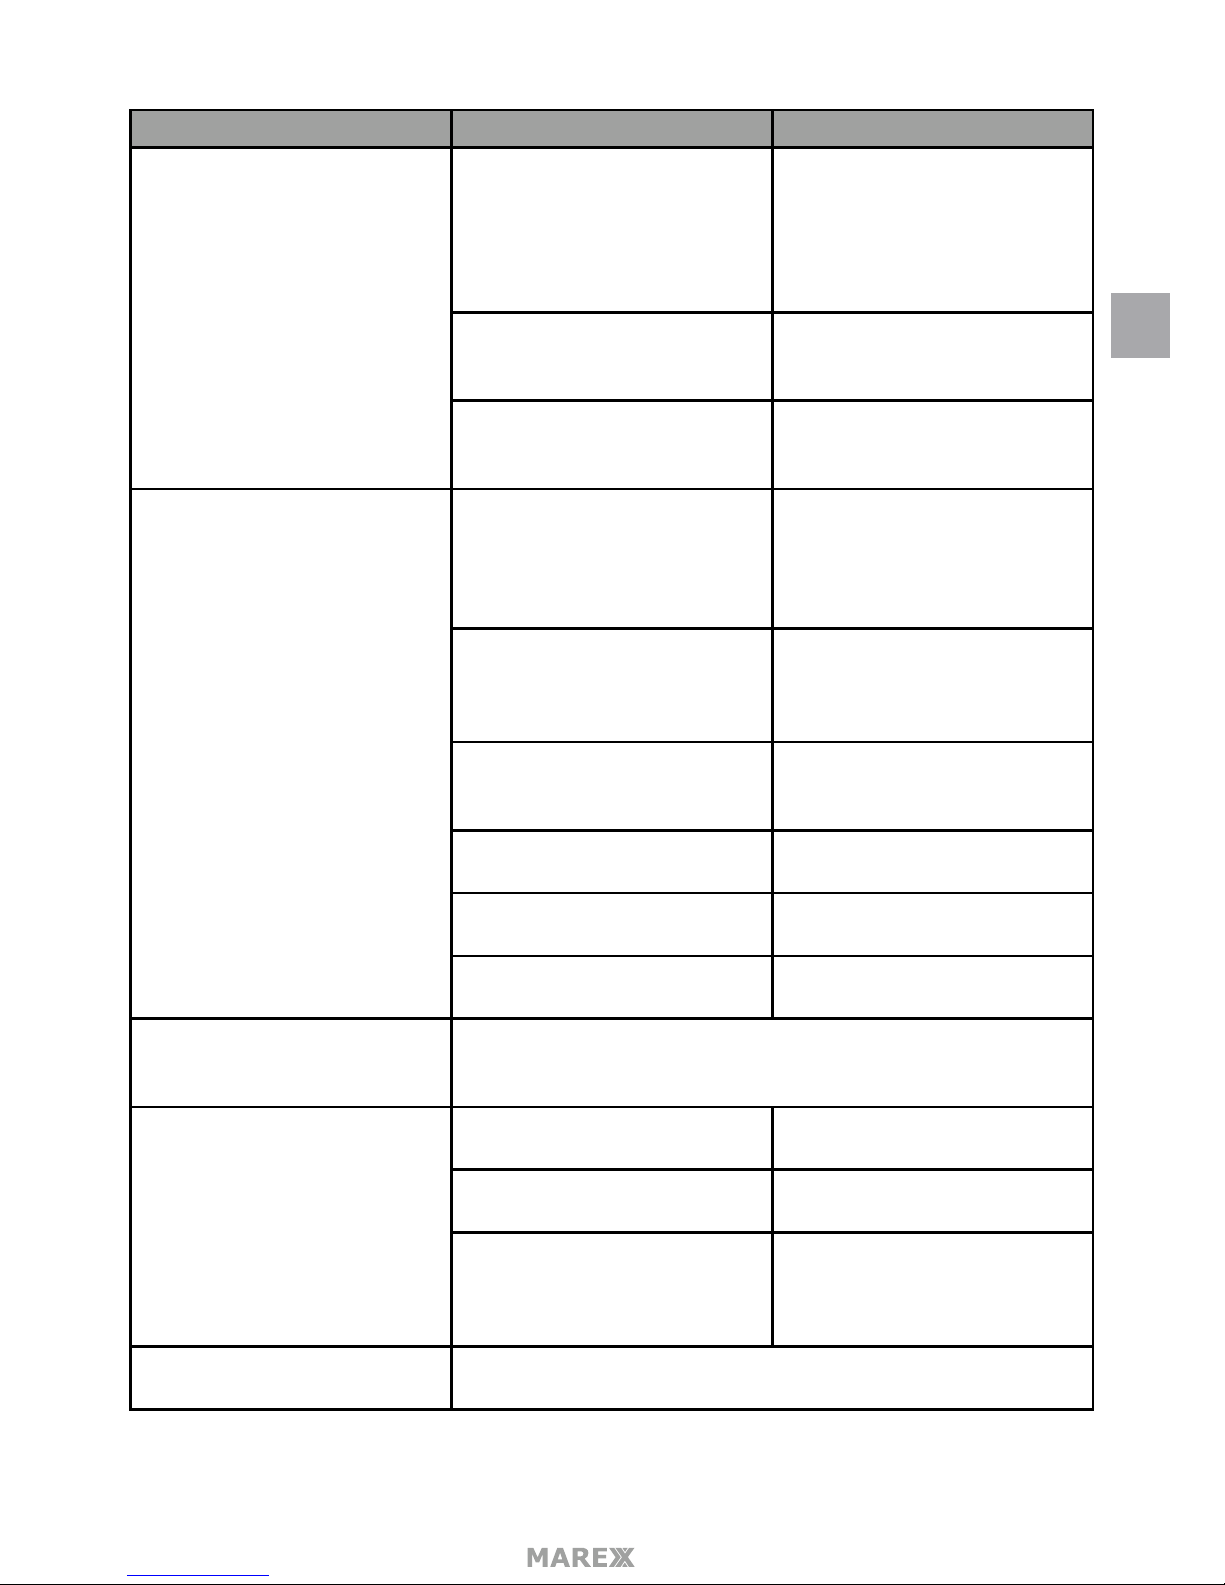
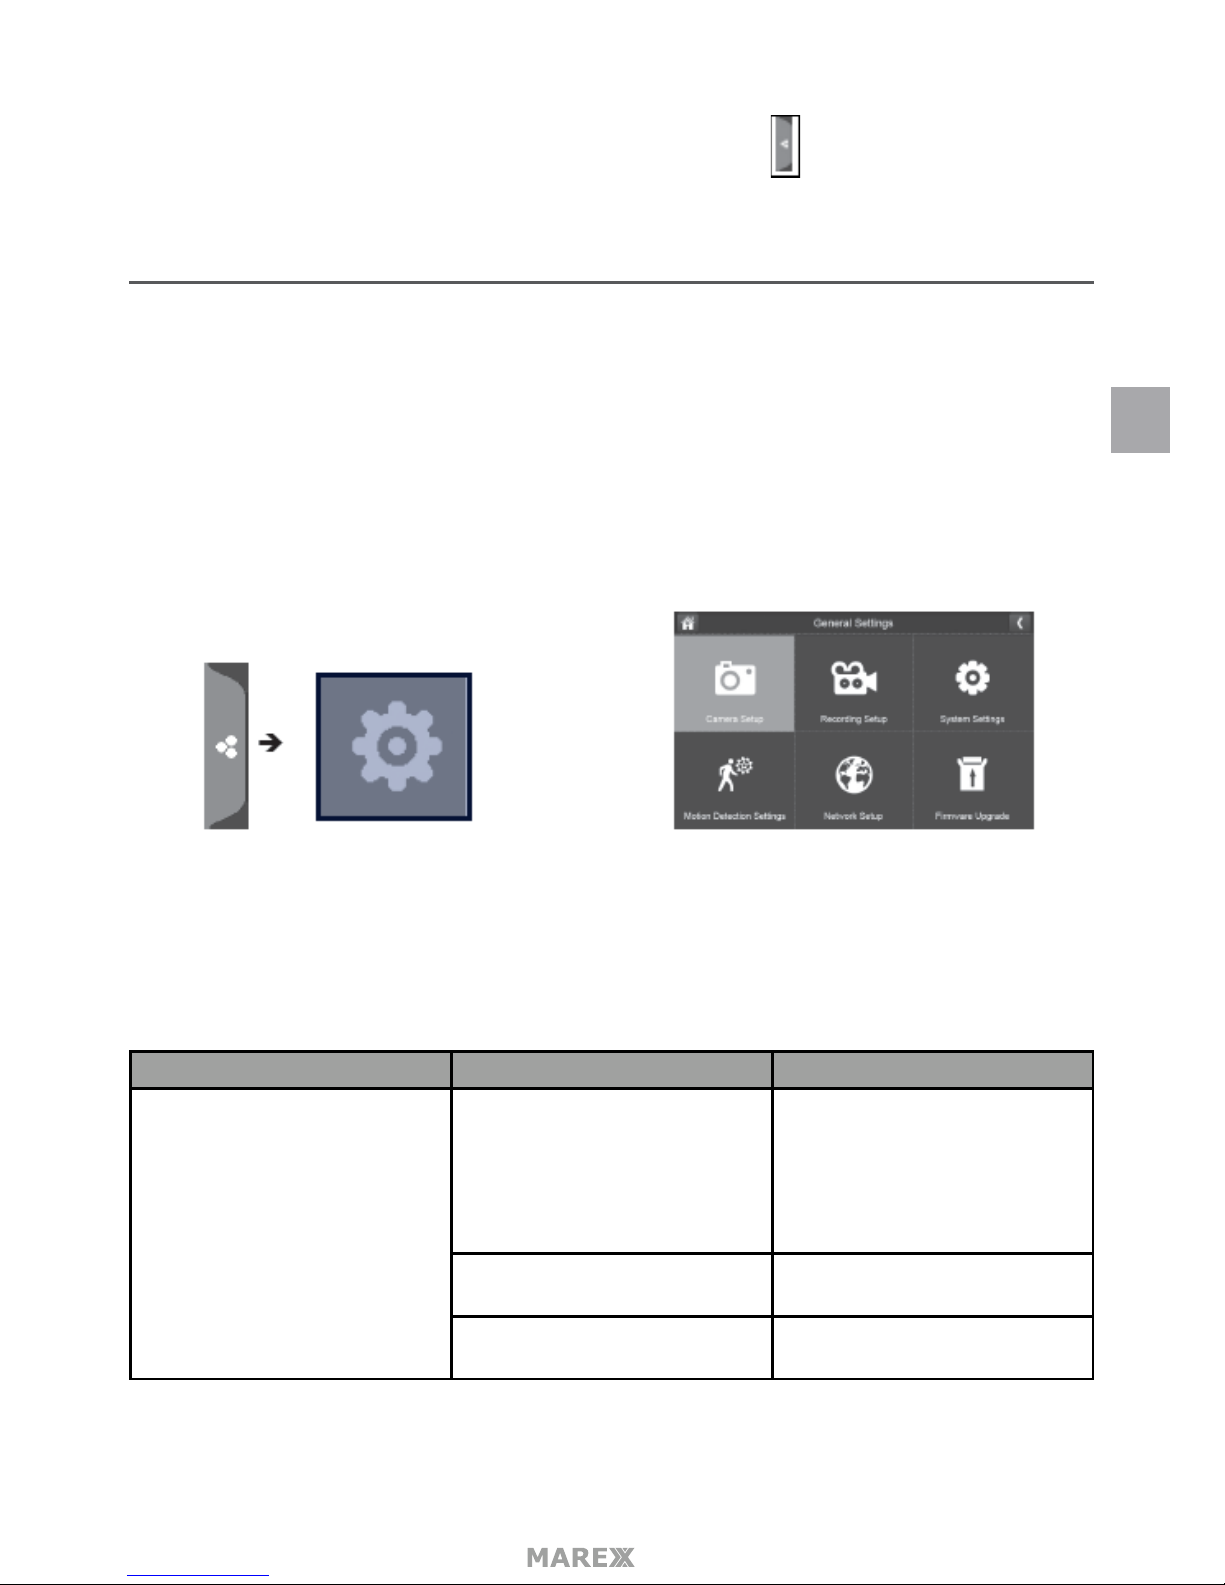
The General Settings menu contains 6 subsections, each of which may contain sub-menus. These sub-menus
let you set features about your system. You can turn cameras on and o, establish a specic schedule for
specic cameras to record, set the date and time, and motion detection sensitivity, among other features. The
rest of this section provides details using these menus.
Main Screen Sub-Screen What it Does
Camera Setup Paring This system comes with cameras
already paired. Use Pairing to
assign these cameras to dierent
channels or to pair additional
new cameras to the monitor.
ON/OFF Makes the cameras visible to the
monitor.
Resolution Adjusts the video quality of each
camera.
EN
Page 17
- 17
Main Screen Sub-Screen What it Does
Recording Setup Duration Set the length of time the camera
records once motion sensitivity
triggers the camera to record.
Choices are 15 seconds, 30
seconds, or 1 minute (Default - 15
seconds)
Schedule Recording Set up a schedule for pre-
determined recording times and
lengths.
File Overwrite Overwrites the oldest recorded
data on the SD card once the card
is full.
System Settings Date & Time • Time Setting. Set the current
time (including Daylight
Savings Time).
• Time Zone. Set the time
zone for your system.
Time Zone • Set the time zone for your
system.
• Enable/Disable Daylight
Savings Time.
Lanuage Changes languages setting for
the montior (English, French or
Spanish)
Default Settings Restores the system to default
settings.
Format SD Card Reformats the SD card and de-
letes all existing data.
Information Displays rmware information for
the monitor and each camera.
Motion Detection Settings A single screen lets you set motion detection sensitivity for each cam-
era. It also lets you determine which viewing areas for each camera
should be masked from motion detection.
Network Setup Advanced Setup Set up Dynamic or Static IP ad-
dress.
Reset Password Reset app password to the
default (000000).
Information Displays and allows you to
change information about your
network and the monitor’s
unique UID number.
Firmware Upgrade Lets you select how you want to upgrade your rmware (from SD card
or from server).
EN
Page 18
- 18
CAMERA SETUP MENU
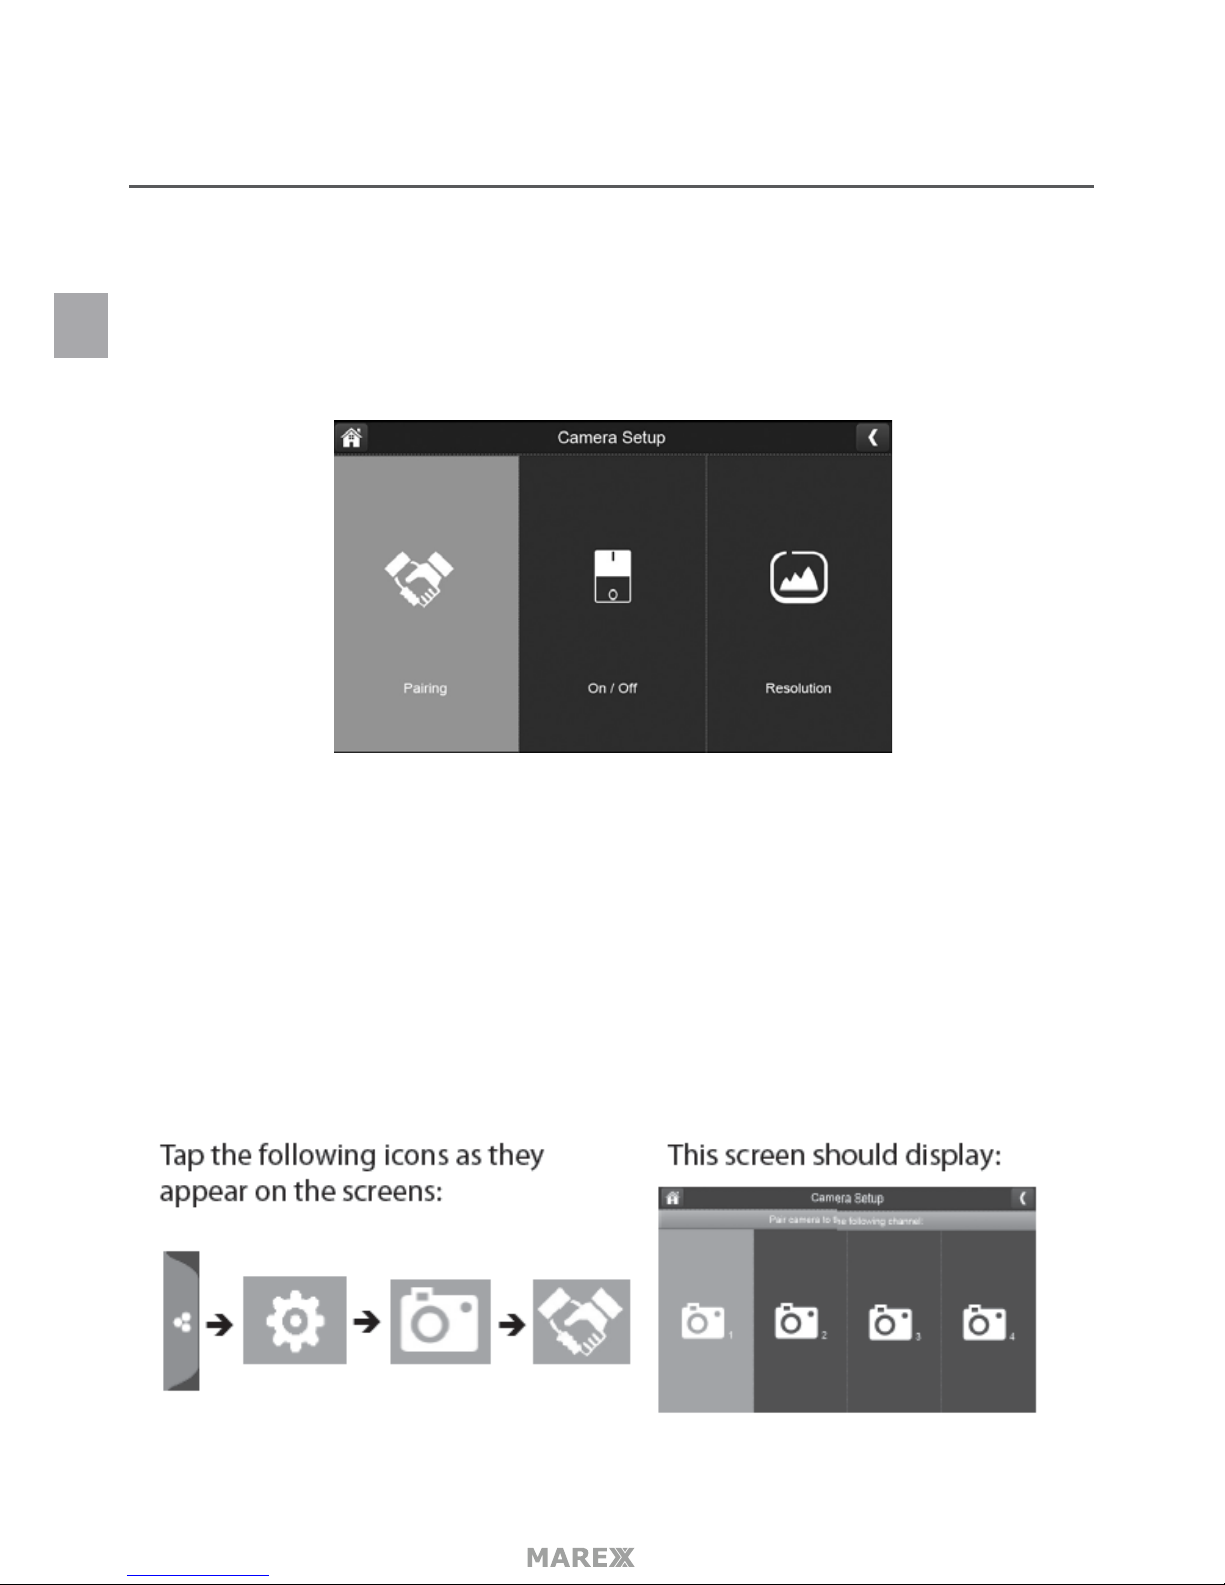
The Camera Setup screen lets you:
• Pair cameras
• Turn cameras on and o
• Adjust the resolution
PAIRING
New cameras are not yet paired to the monitor. When you add a new camera to your system, you have to
“introduce” the camera and monitor to each other so they can communicate.
• If a camera is already assigned to the selected channel, the pairing operation overwrites that camera
link with the new one.
• Only pair one camera at a time! The monitor links to the rst camera it detects. If two or more cameras
are in pairing mode, you can’t control which camera the monitor will detect rst.
EN
Page 19
- 19
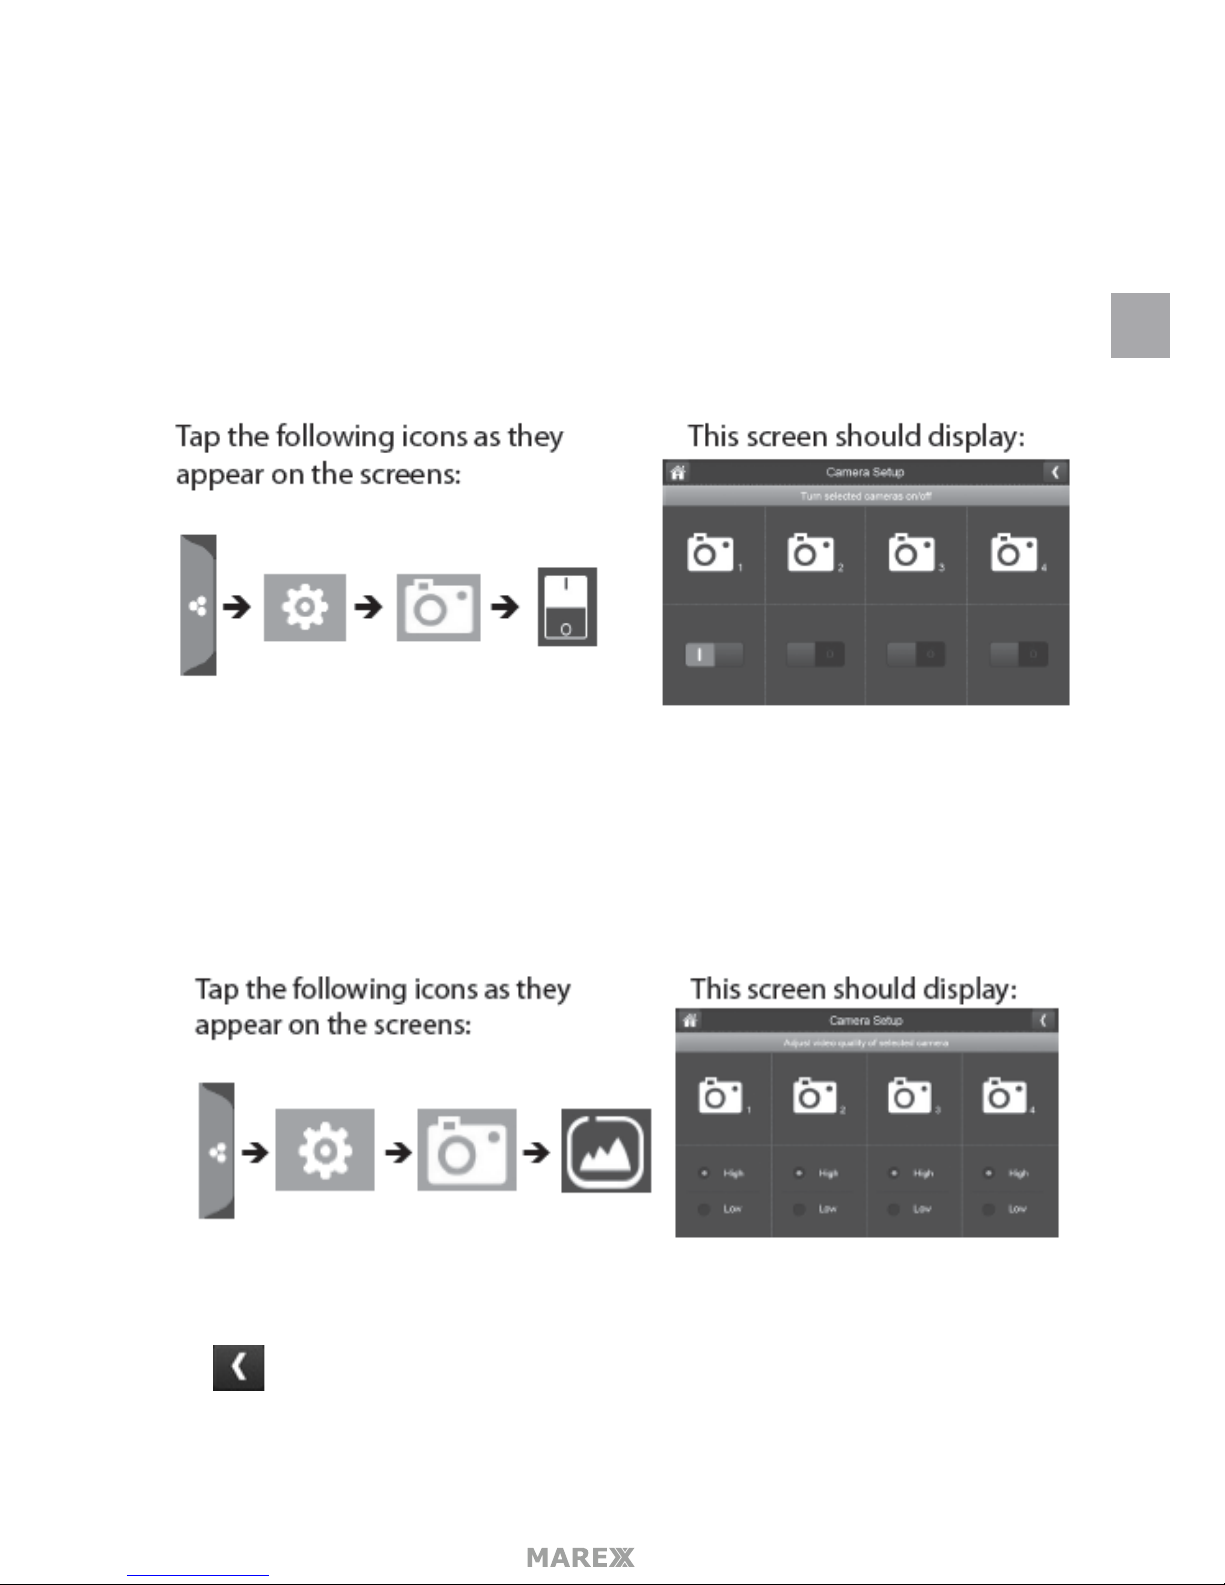
1. Tap Paring on the Camera Setup screen.
2. Tap the channel number you want to pair the camera to.
3. A message displays with instructions to press the PAIR button on the camera. Press and release the PAIR
button on the front of the camera. A 30-second countdown begins.
4. The system displays live video 3 seconds after the camera is successfully paired.
ON/OFF
When you add a camera to your system, pair up the camera with the monitor and the system will automati-
cally turn it on.
1. Tap the switch bar under the camera you want to turn on or o.
2. The switch bar indicator turns green when the camera is on. It is greyed out when the camera is o.
3. Tap to return to the previous screen.
RESOLUTION
1. Tap High or Low to set the frame rate for each camera.
2. Tap to return to the previous screen.
EN
Page 20
- 20
RECORDING SETUP MENU
Use the Recording Setup menu to:
• Set the length of time the system will automatically record when something triggers motion sensitivity.
• Schedule a set time and duration to automatically record when something triggers motion sensitivity.
• Schedule a set time and duration to automatically record from a specic camera.
• Set up le retention requirements.
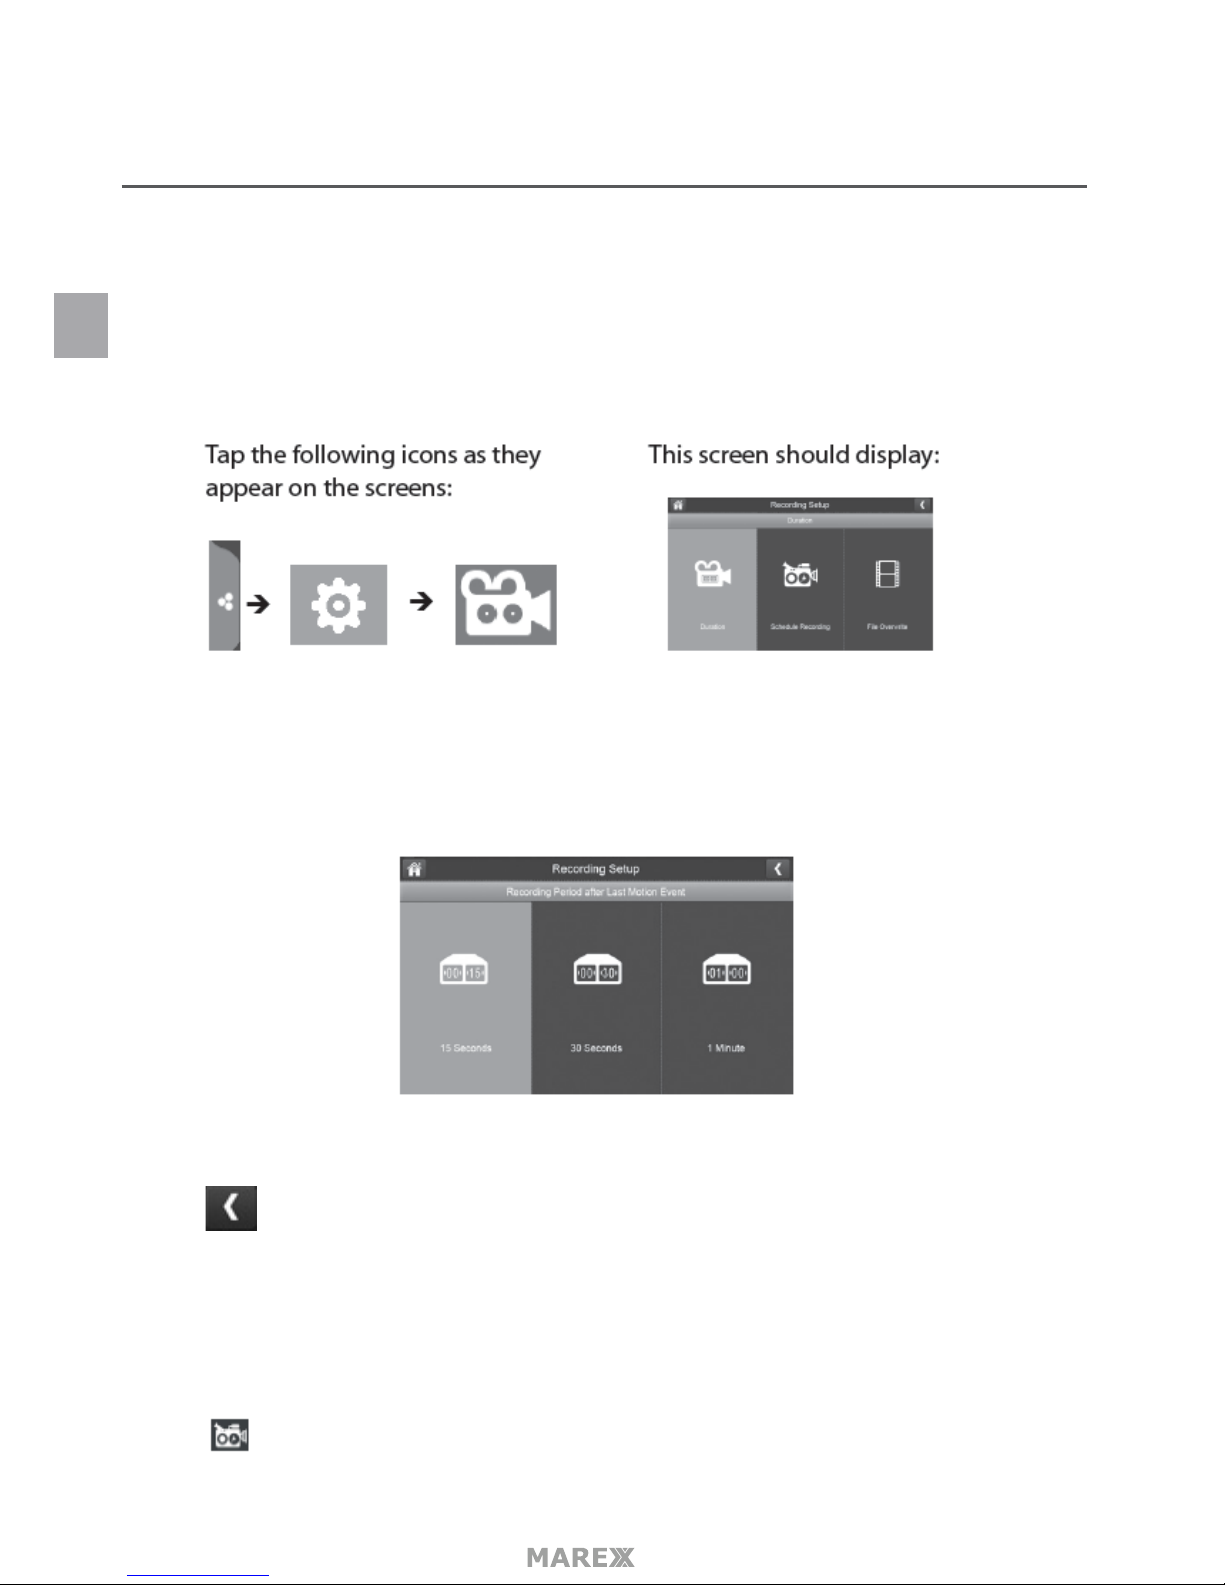
DURATION
You can set how long the camera keeps recording after motion detection triggers it. The options are 15 sec-
onds, 30 seconds, or 1 minute. (Default = 15 seconds).
1. Tap the duration you wish to set.
2. Tap to return to the previous screen.
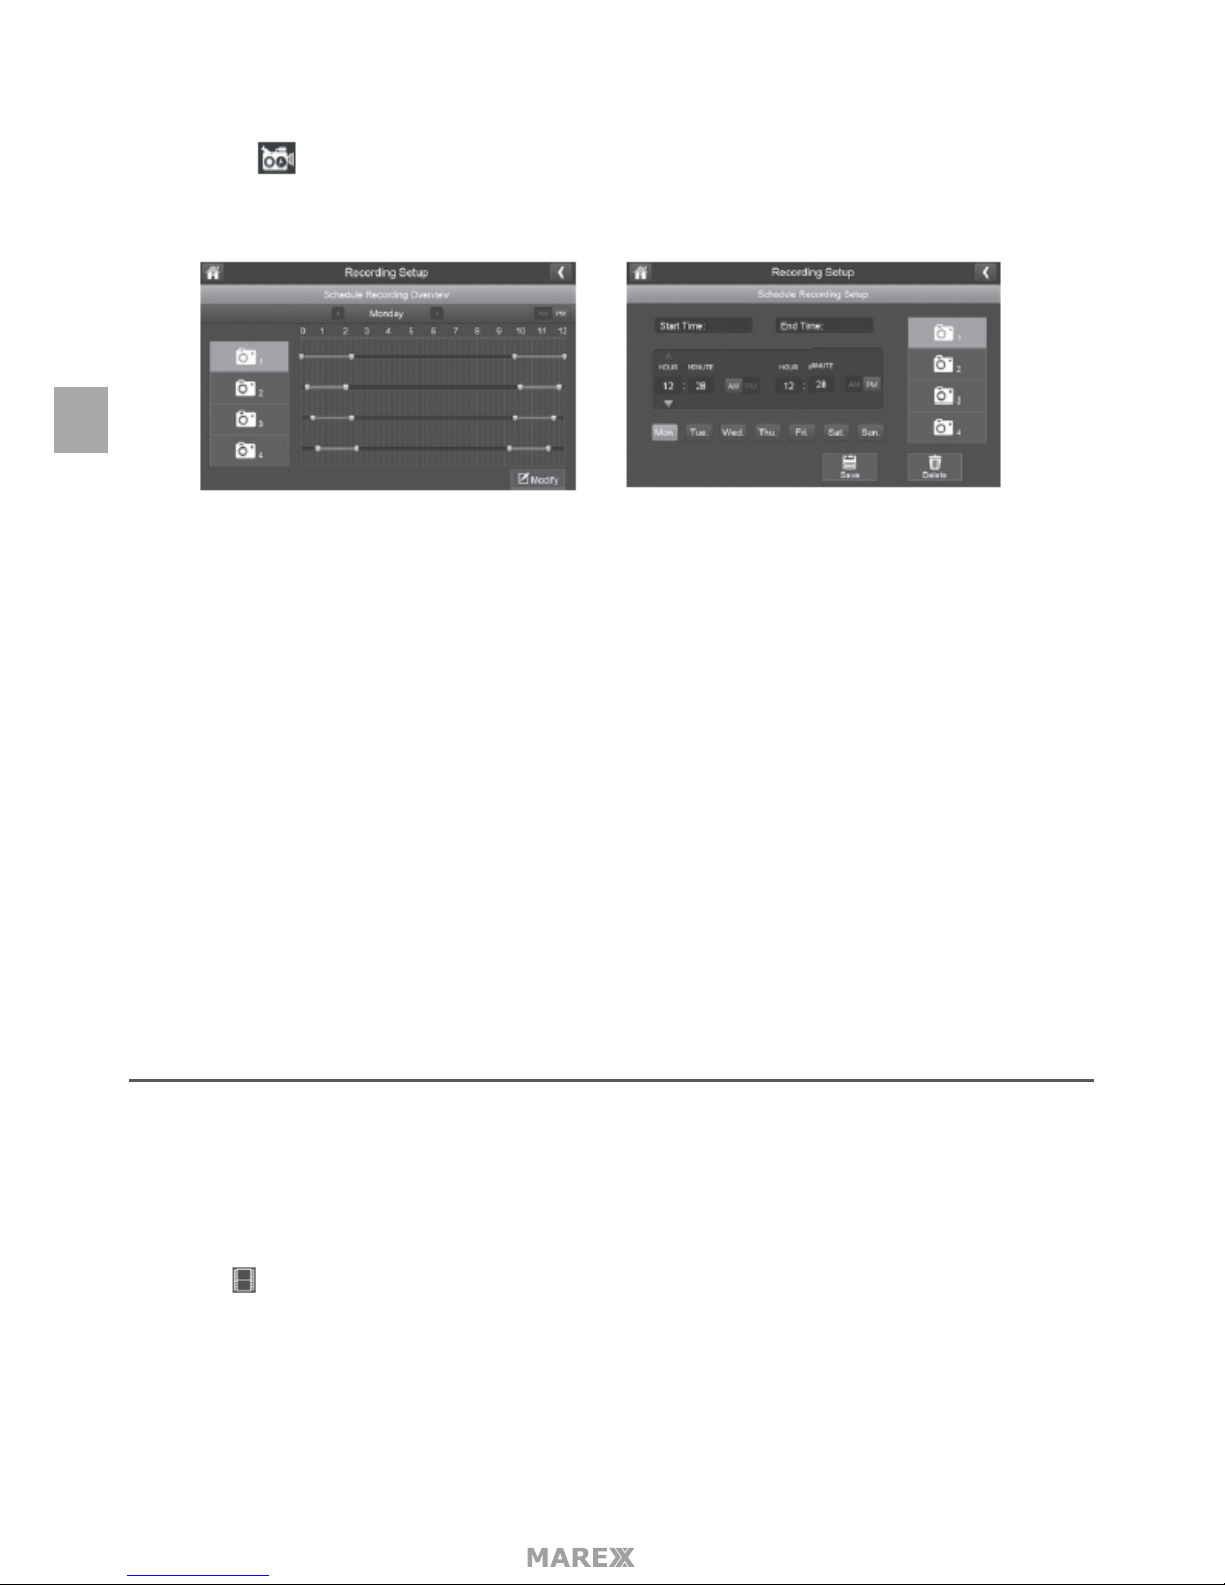
SCHEDULE RECORDING
This feature lets you set up a block of time for a camera to record on a weekly schedule. You can set up multi-
ple cameras to record at the same time and the recording times can overlap between cameras.
1. Tap the Schedule Recording Overview menu will appear.
EN
Page 21
- 21
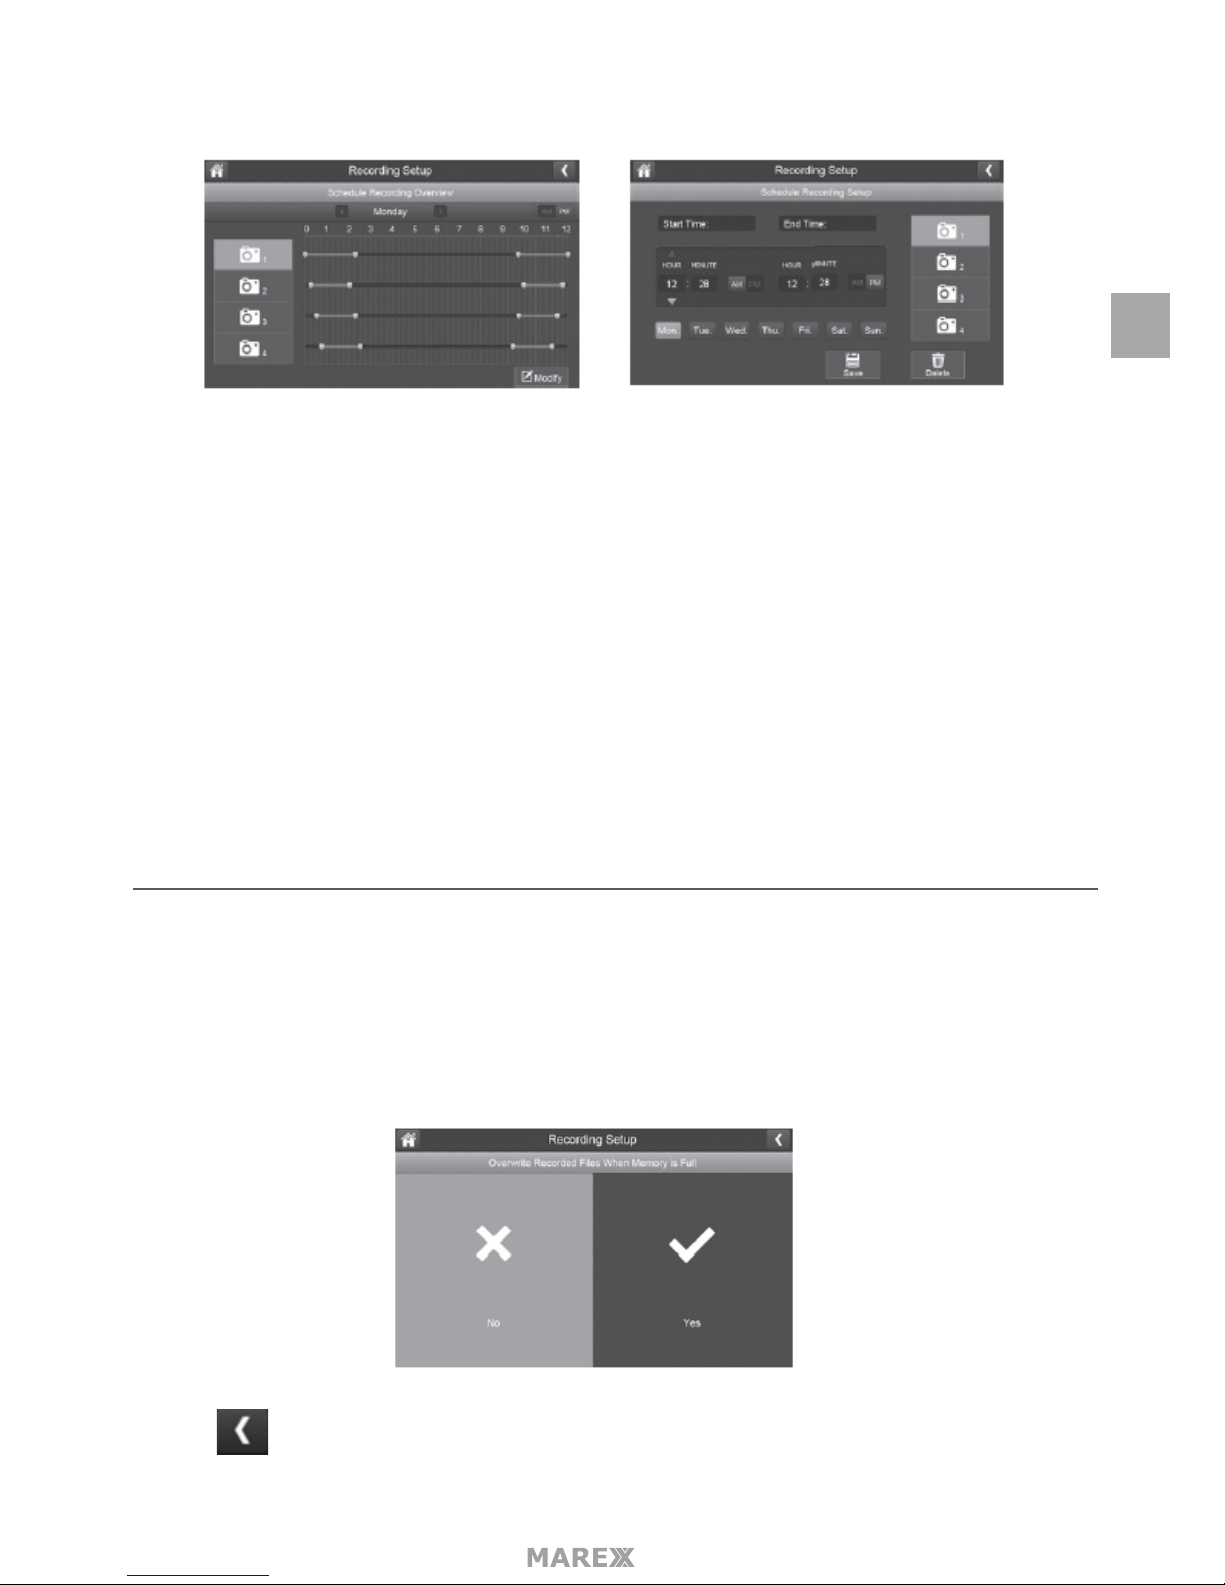
2. Tap MODIFY in the lower right corner. The Schedule Recording Setup menu will appear.
3. Select a camera. If you want more than one camera to record at the same time, select both camera’s.
4. Set the recording start time.
- Tap the AM/PM block to toggle between them.
- Tap the hour and number boxes separately and tap the up and down arrows to set the time in
HH:MM format.
- Tap the return arrow to save the number and move to the next setting
5. Tap SAVE the system returns to the Schedule Recording Overview screen with the recording period
indicated.
6. Top MODIFY again to set up another recording seesion to schedule.
Scheduled recordings are broken into 10 minute le sizes. For example, if you record a 25 minute event,
you will have two 10-minute recordings plus one 5-minute recording.
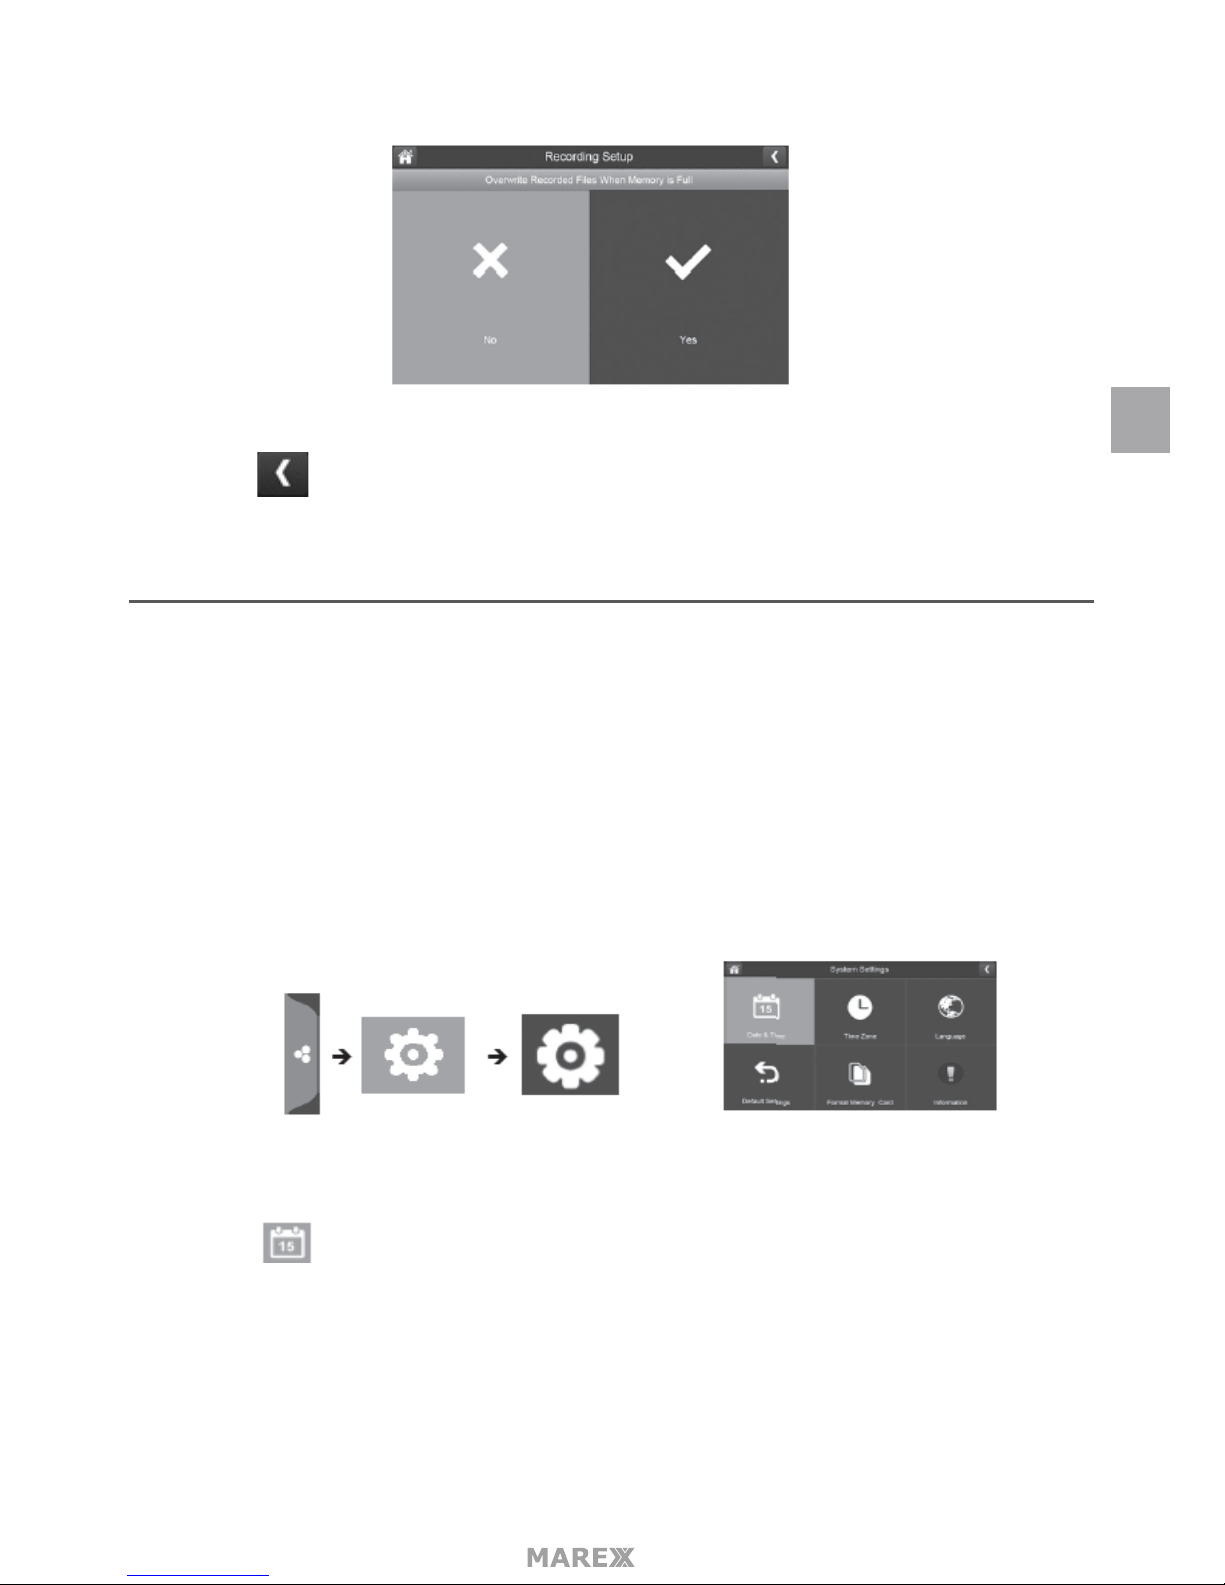
FILE OVERWRITE
This feature lets you set the system to automatically overwrite the oldest les once the SD card is full. This will
allow you to continue recording. If you do not allow overwrite, recording stops when the SD card is full.
1. Tap to access the File Overwrite function. The following screen gives you the option of allowing File
Overwrite (tap YES) or, if File Overwrite is on, cancelling it (tap NO).
2. Tap to return to the previous screen.
EN
Page 22
- 22
SYSTEM SETTINGS MENU
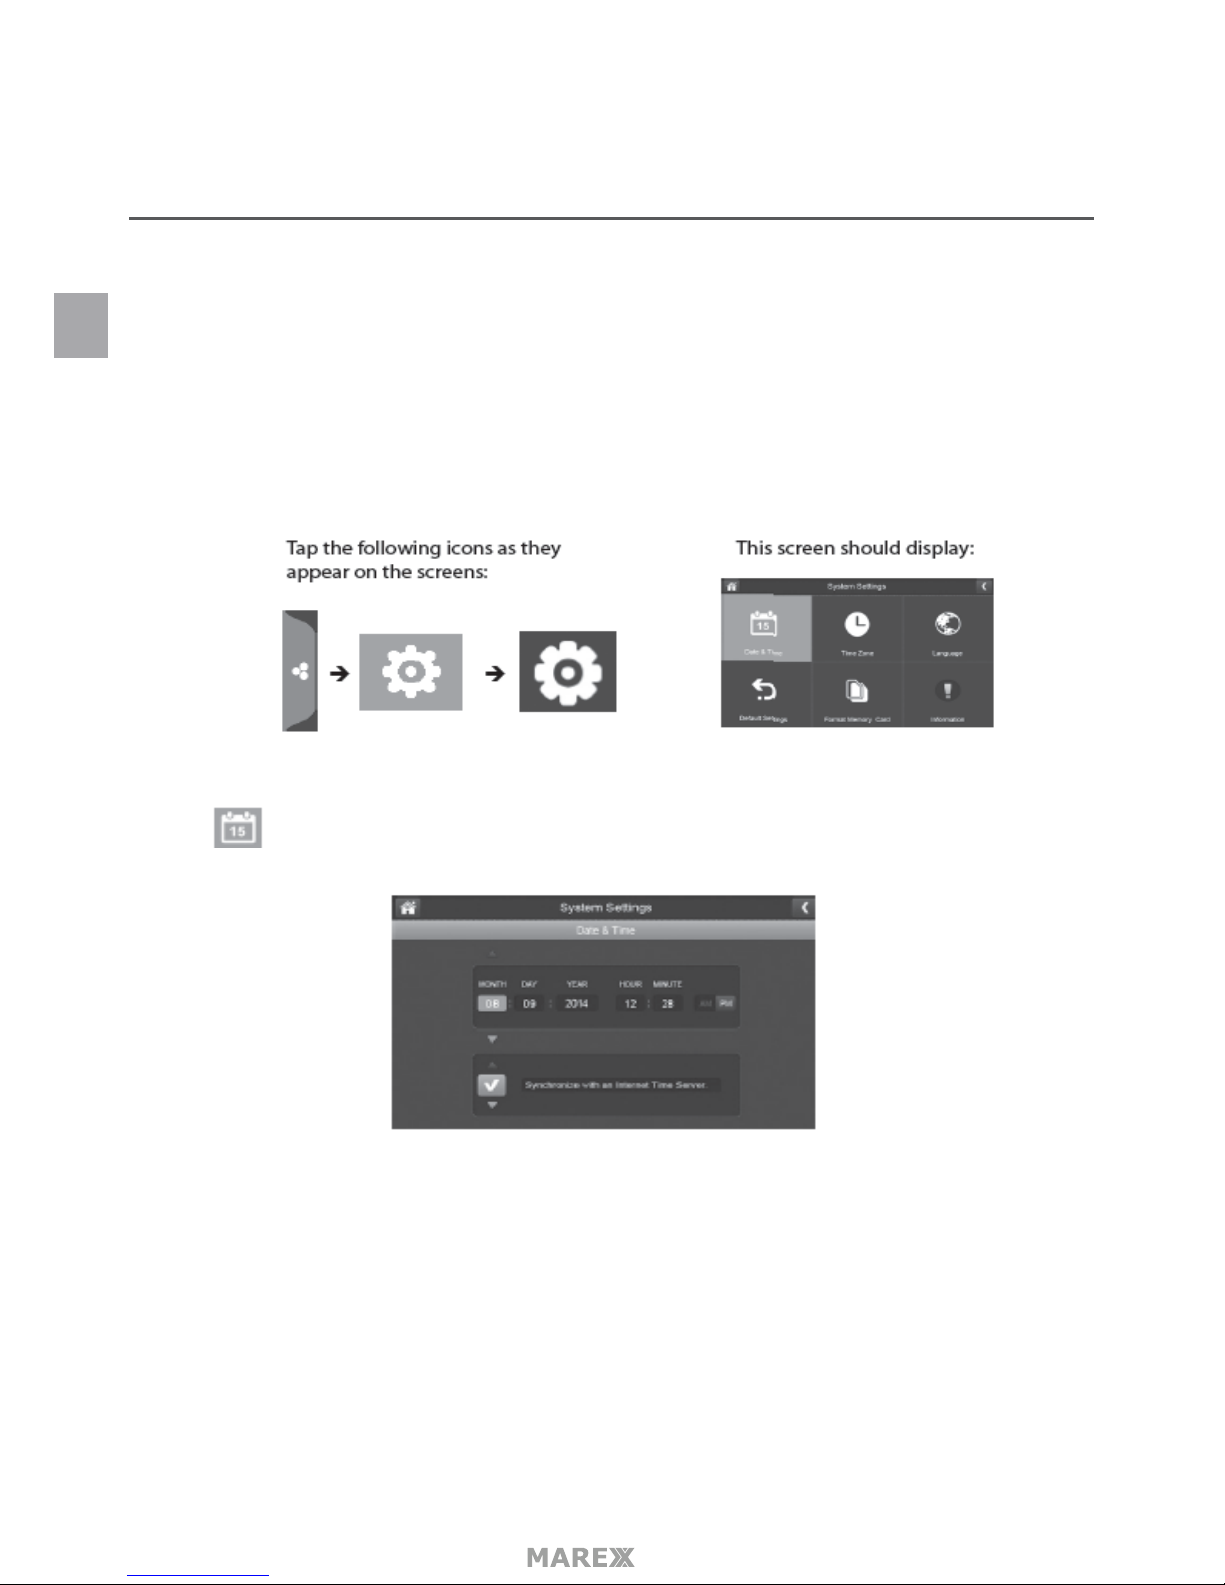
Use these setting options to congure your system:
• Date and Time
• Time Zone
• Language
• Default Settings
• Format Memory Card
• Information
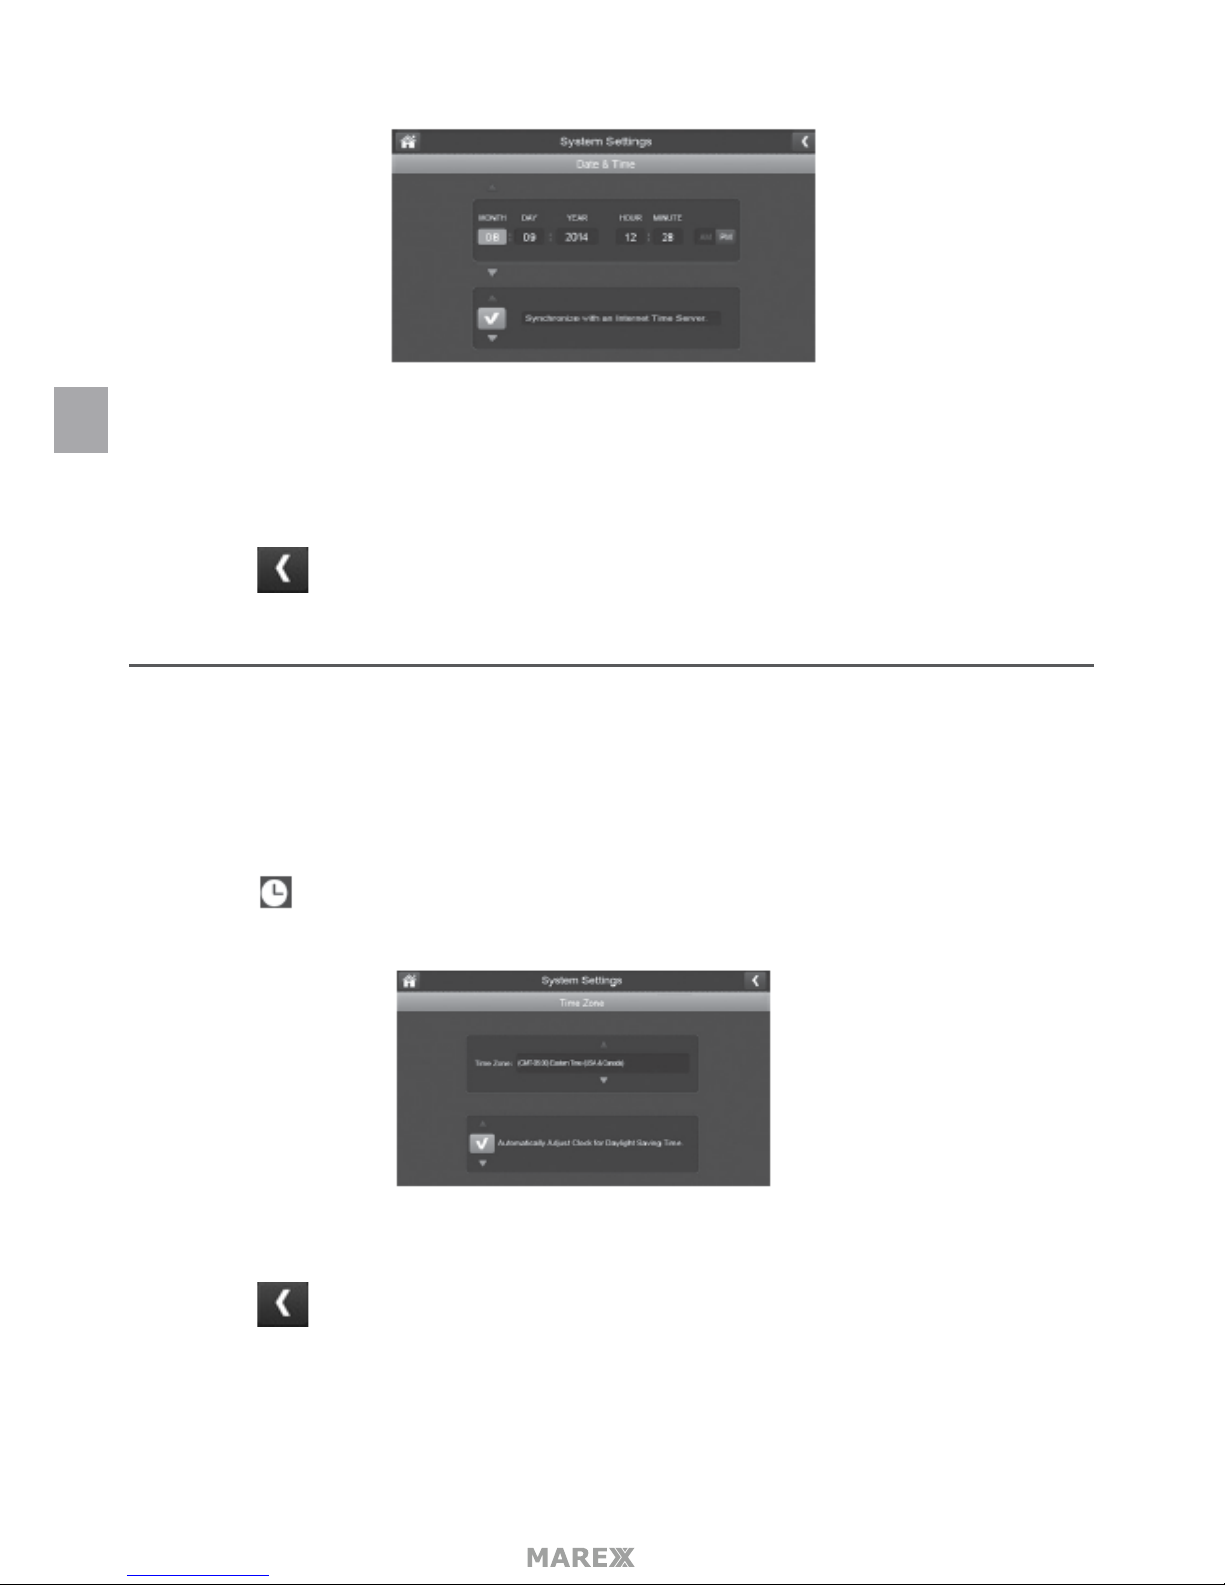
DATE AND TIME
1. Tap to acces the Date & Time screen.
2. Tap the up or down arrow to set the month, day, and date.
3. Tap the up or down arrow to set the time
- Tap the AM/PM block to toggle between them
- Tap the up or down arrows to set the correct hour and minute.
4. Tap synchronize with an internet time server if you want the internet clock to set your time
automatically.
You must keep your system connected to your wireless network using the ethernet cable in order to
synchronize with the internet time server.
EN
Page 23
- 23
5. Tap to return to the previous screen.
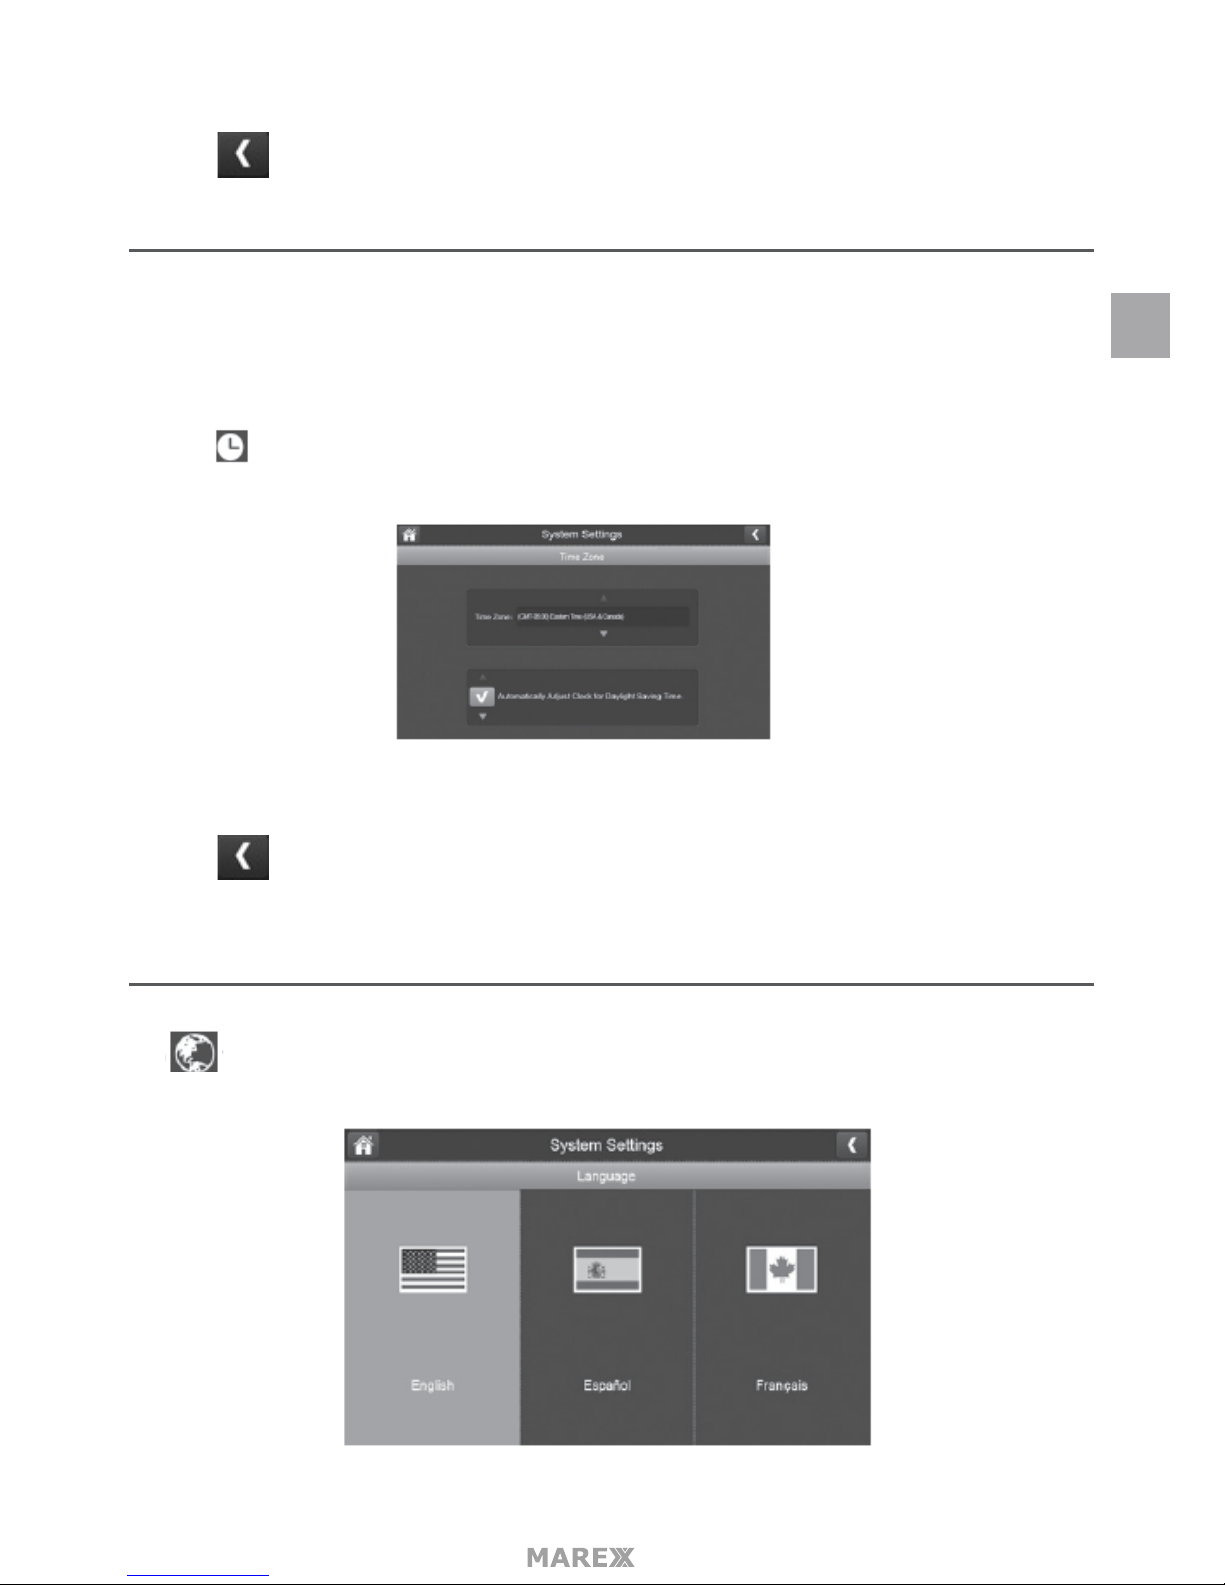
TIME ZONE
Time Zone allows you to set the time zone your monitor is in. This is especially useful if you are using the app
in another time zone and you want to remotely acces your recorded les. Your sysem will know that your
request refers to the time zone the monitor is in. [Default = (GMT - 5:00) Eastern Time (USA & Canada)]
1. Tap The Time Zone screen will appear.
2. Scroll up and down to your camera’s time zone and then tap it.
3. Tap the next option to turn Daylight Savings Time on or o.
4. Tap to return to the previous screen.
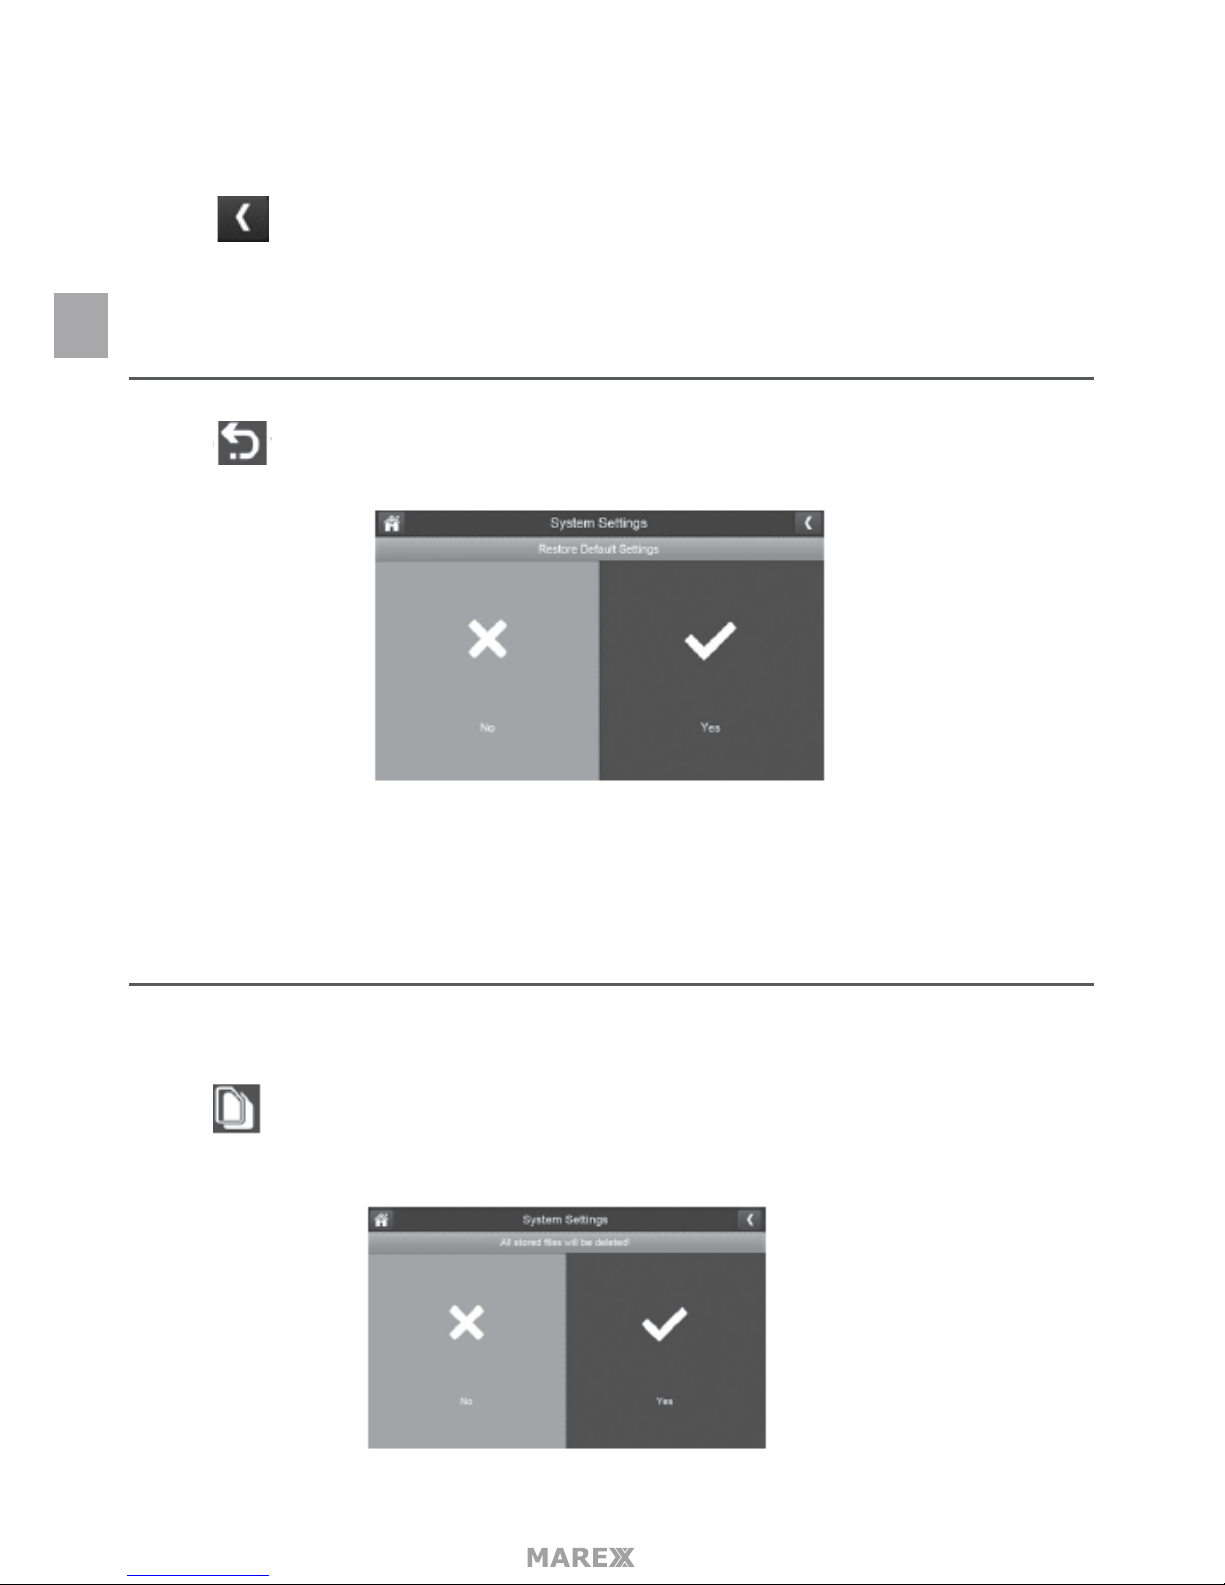
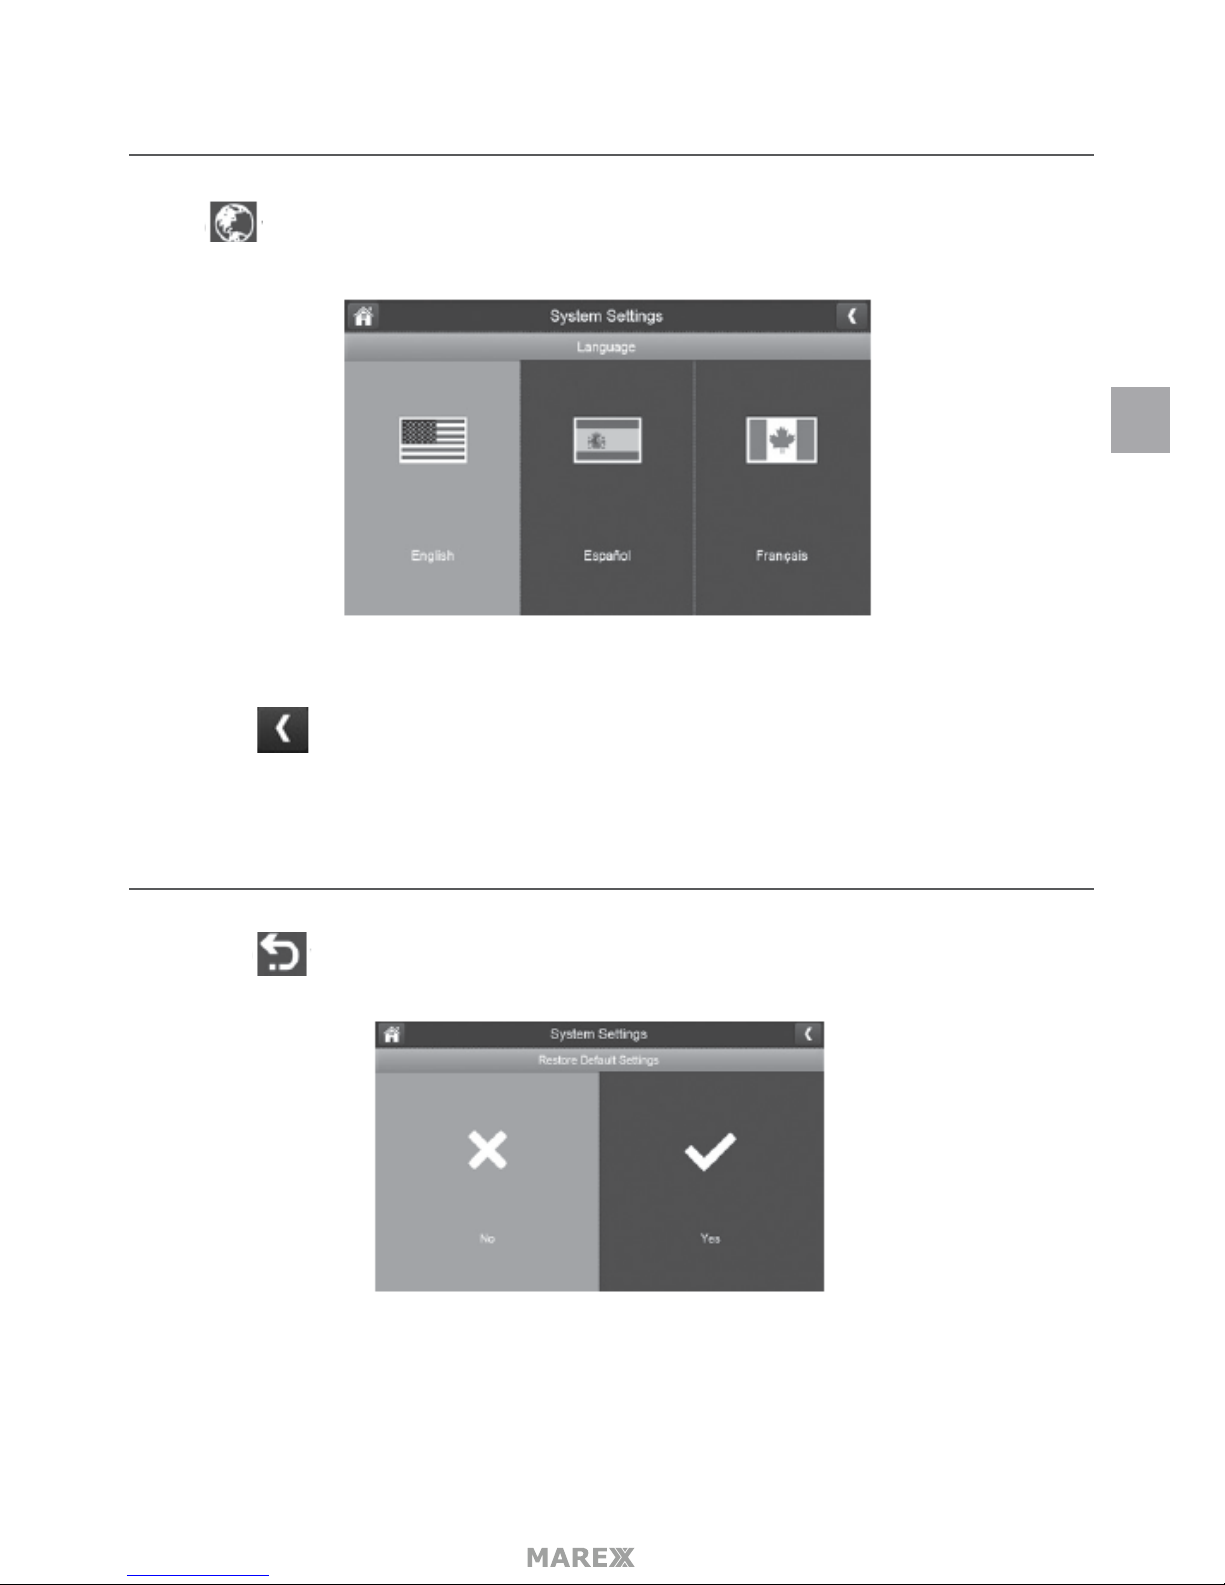
LANGUAGE
Tap to set the language used on your system. Options are English, Spanish and French.
EN
Page 24
- 24
1. Tap the language you wantyour system to use.
2. Tap your system returns to the previous screen and automatically changes over to the
requested language; no reboot is necessary.
DEFAULT SETTINGS
1. Tap to return your system to the originial default settings.
2. Tap YES on the Restore Default Settings screen.
3. Tap OK to conrm the reset.
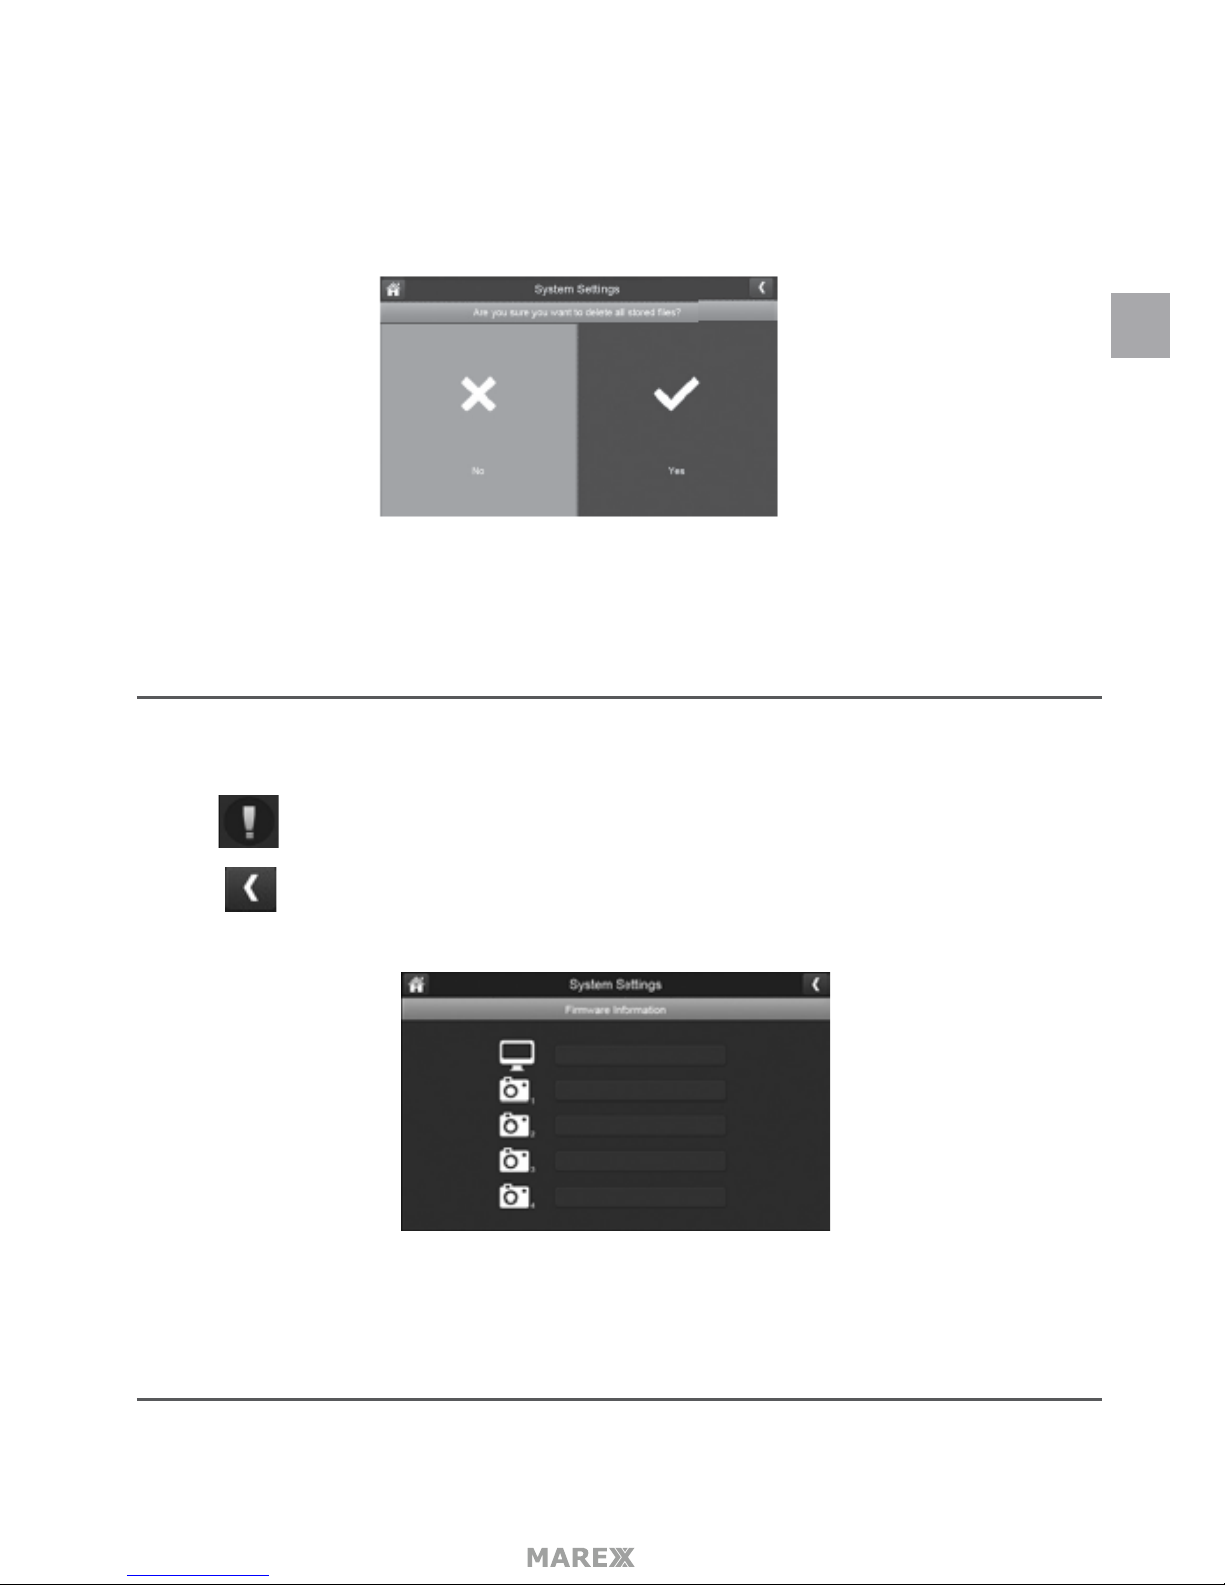
FORMAT SD CARD
Formatting the SD card erases all data stored on the card. (Default = NO)
1. Tap to format your SD card.
EN
Page 25
- 25
2. Tap YES on the All stored les will be deleted! screen (Default = NO). A conrmation screen appears. Tap
YES to it.
3. A progress bar displays on the screen. After formating is complete, a Format OK message will appear.
SYSTEM SETTINGS
This screen lists the rmware information of the montior and all cameras paired to it.
1. tap to display the screen.
2. Tap to return to the previous screen.
MOTION DETECTION SETTINGS MENU
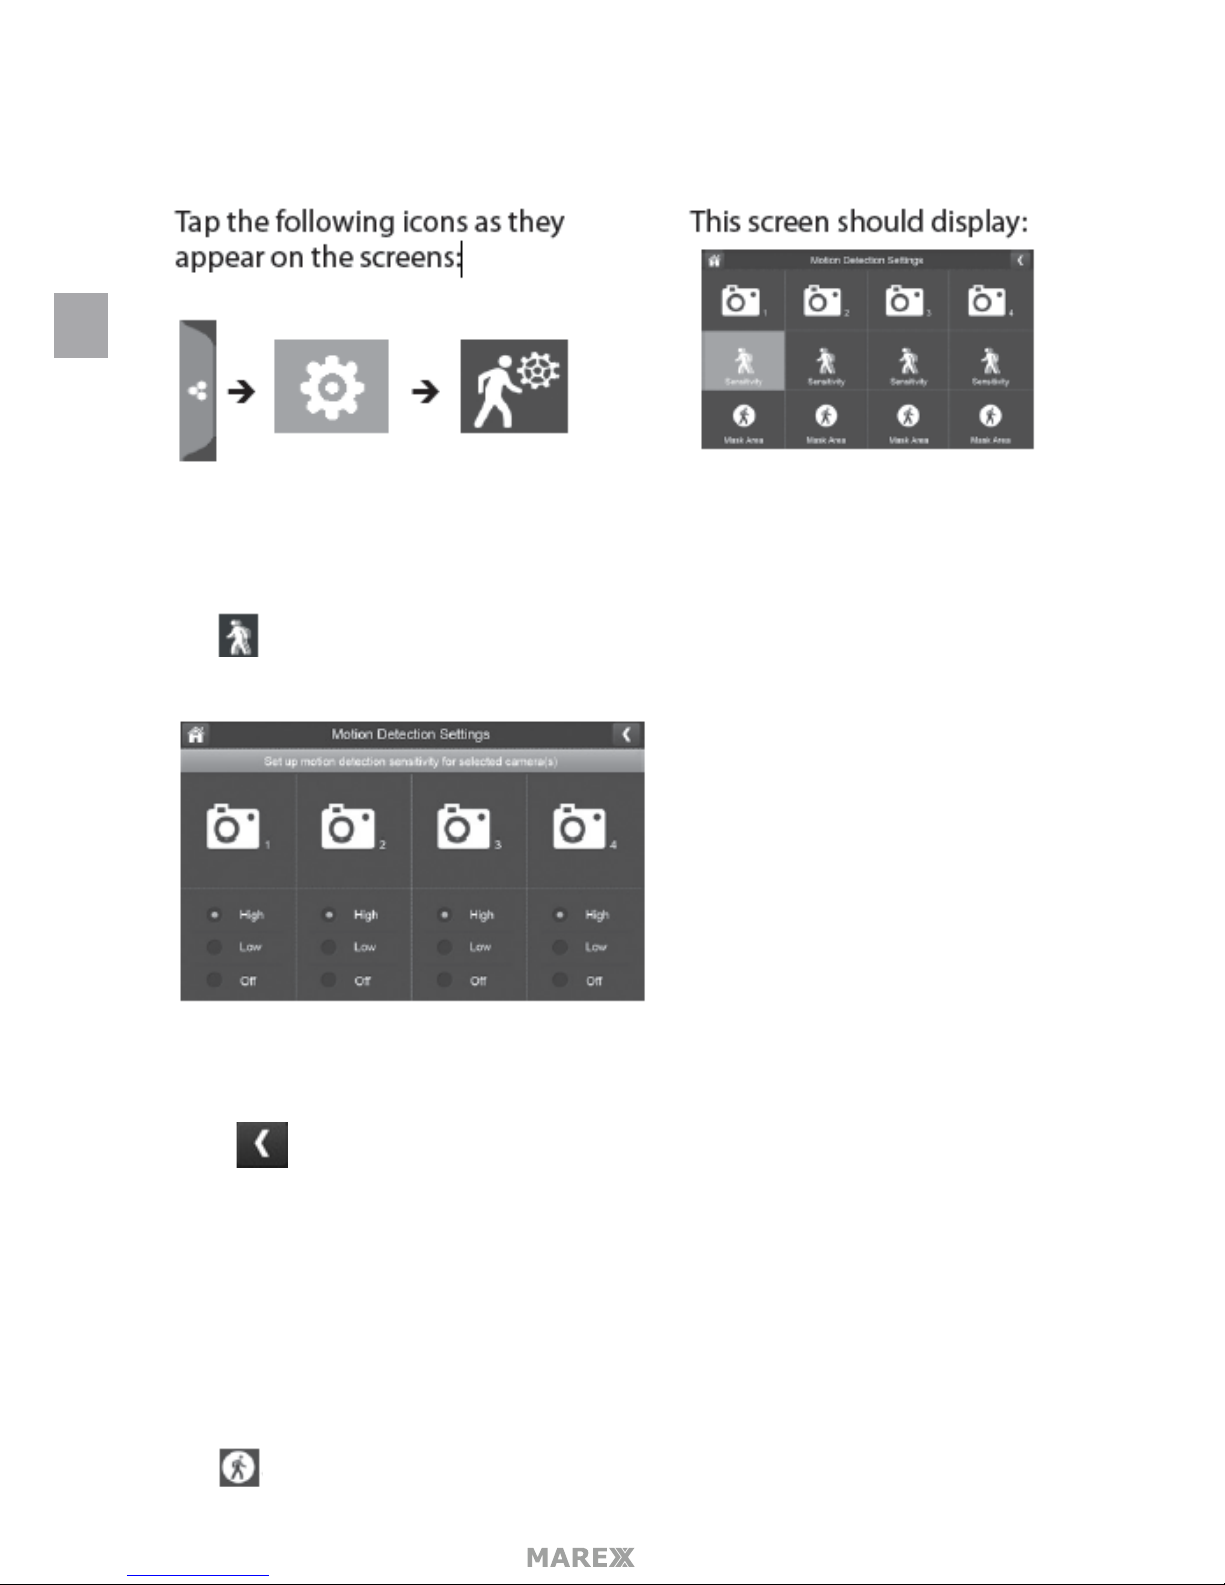
Motion detection settings control how strong the motion needs to be to trigger recording. This settings
EN
Page 26
- 26
menu also lets you mask o any areas in the image for the camera to ignore. For example, you may have trees
in the image area that would set o motion detection if there is a breeze.
SENSITIVITY
this selection allows you to set the camera’s motion detection sensitivity levels to High, Low or O.
1. Tap The following screen displays.
2. Tap High, Low or O to set sensitivity.
3. 3. Tap to return to the previous screen.
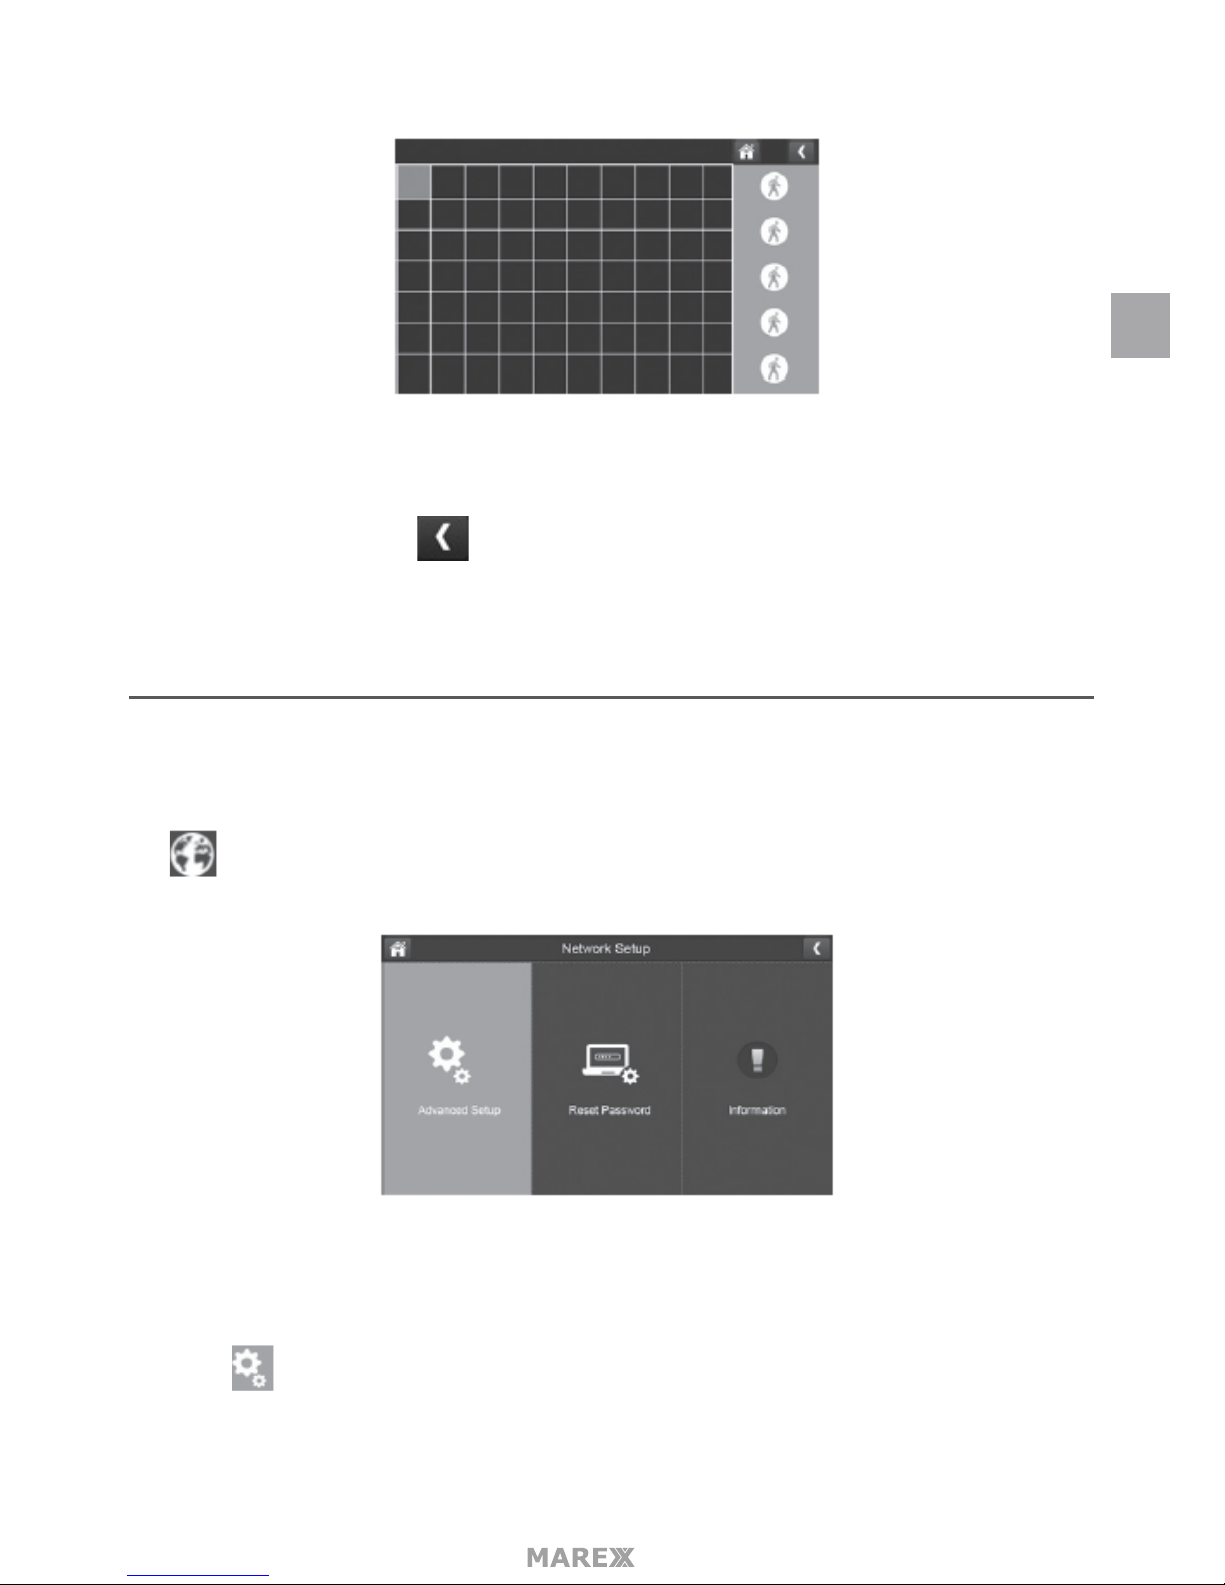
MASK AREA
Use this selection to mask o any parts of the viewing area you do NOT want to be included for motion
detection.
Note: the video image is removed to make it easier to see the masking grid.
1. Tap The Mask Area menu displays, superimposed over the image from that camera.
EN
Page 27
- 27
2. Tap the squares that cover the areas of the image you do not want aected by motion detection.
3. When you are nished tap to return to the Motion Detection Settings screen.
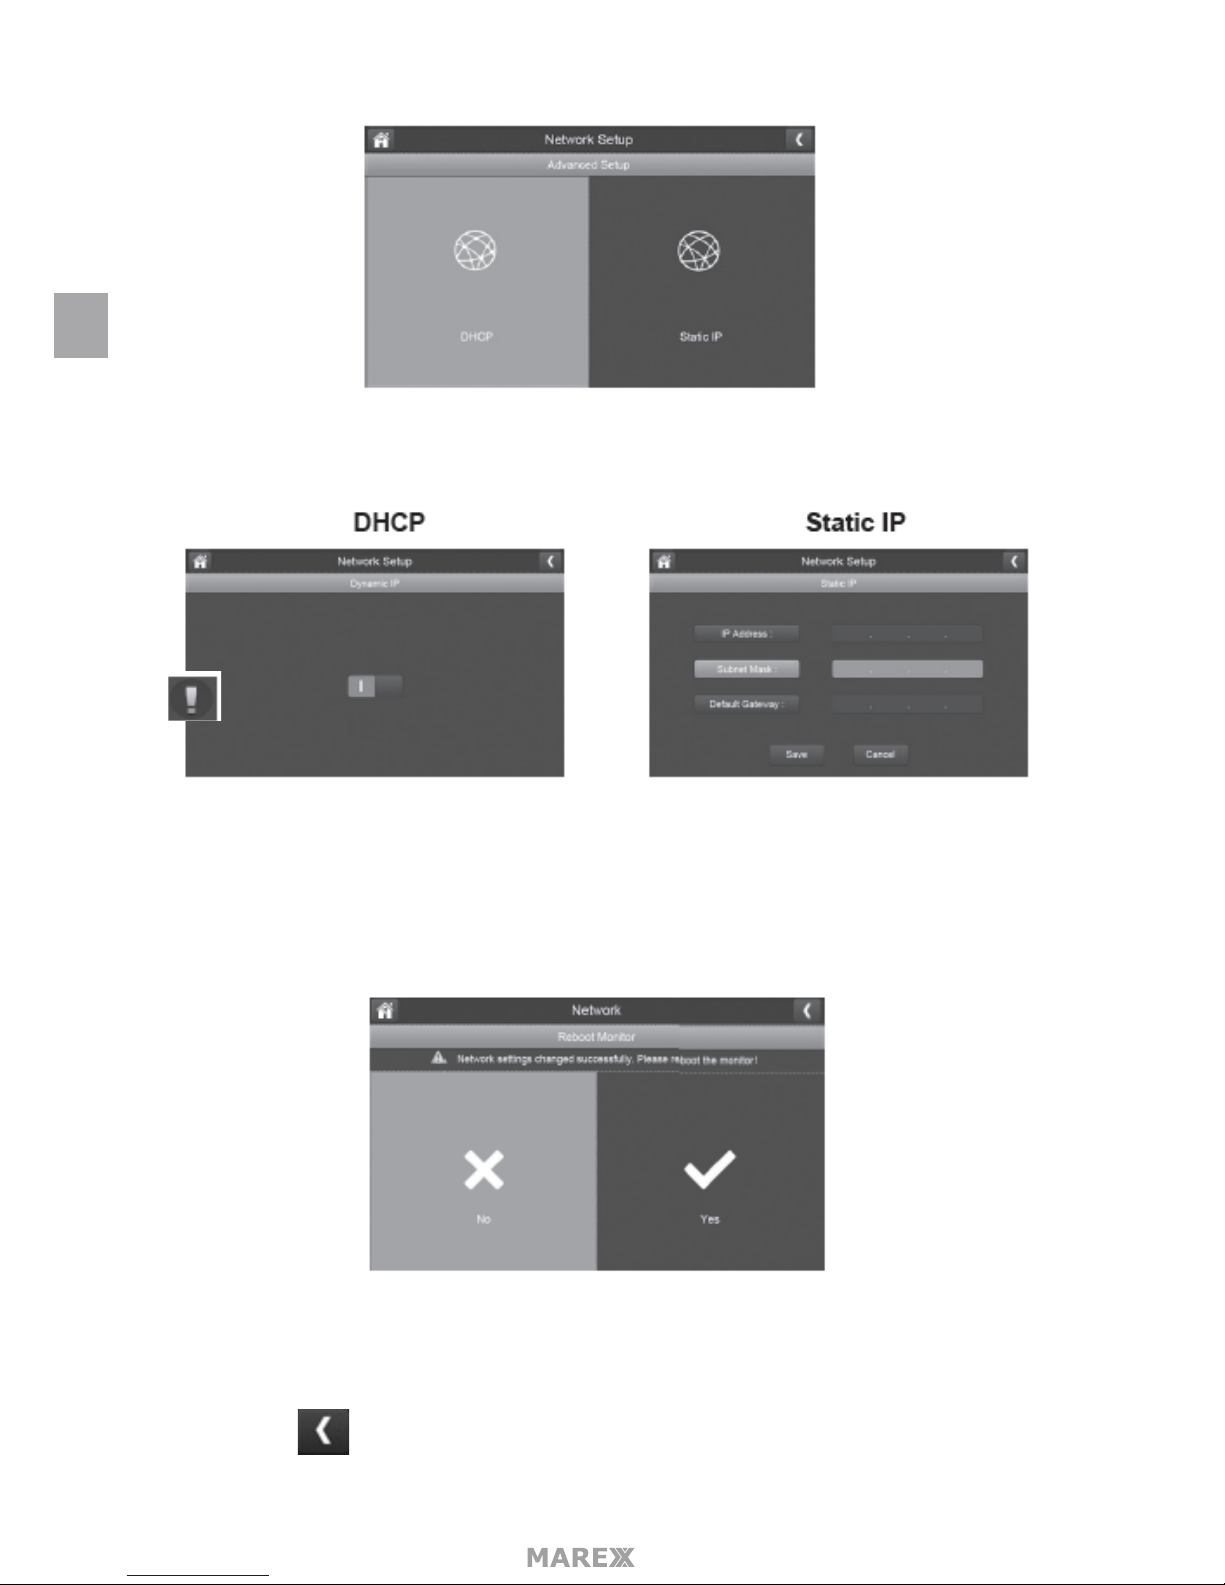
NETWORK SETUP SCREEN
This selection lets you determine your network connection type, reset the APP password, and review your
network details.
Tap to see the Network Setup screen and option.
ADVANCED SETUP
1. 1. Tap to display the Advanced Setup screen.
EN
Page 28
- 28
2. Tap on your selection and ll in the elds requested. Tap SAVE.
3. Tap on your selection and ll in the elds requested.
DCHP is the most common connection. Your routerwill automatically assign an IP address to your Marex
System. Static IP is for those that have the ability to specify an IP address for their system.
4. Reboot the monitor when prompted.
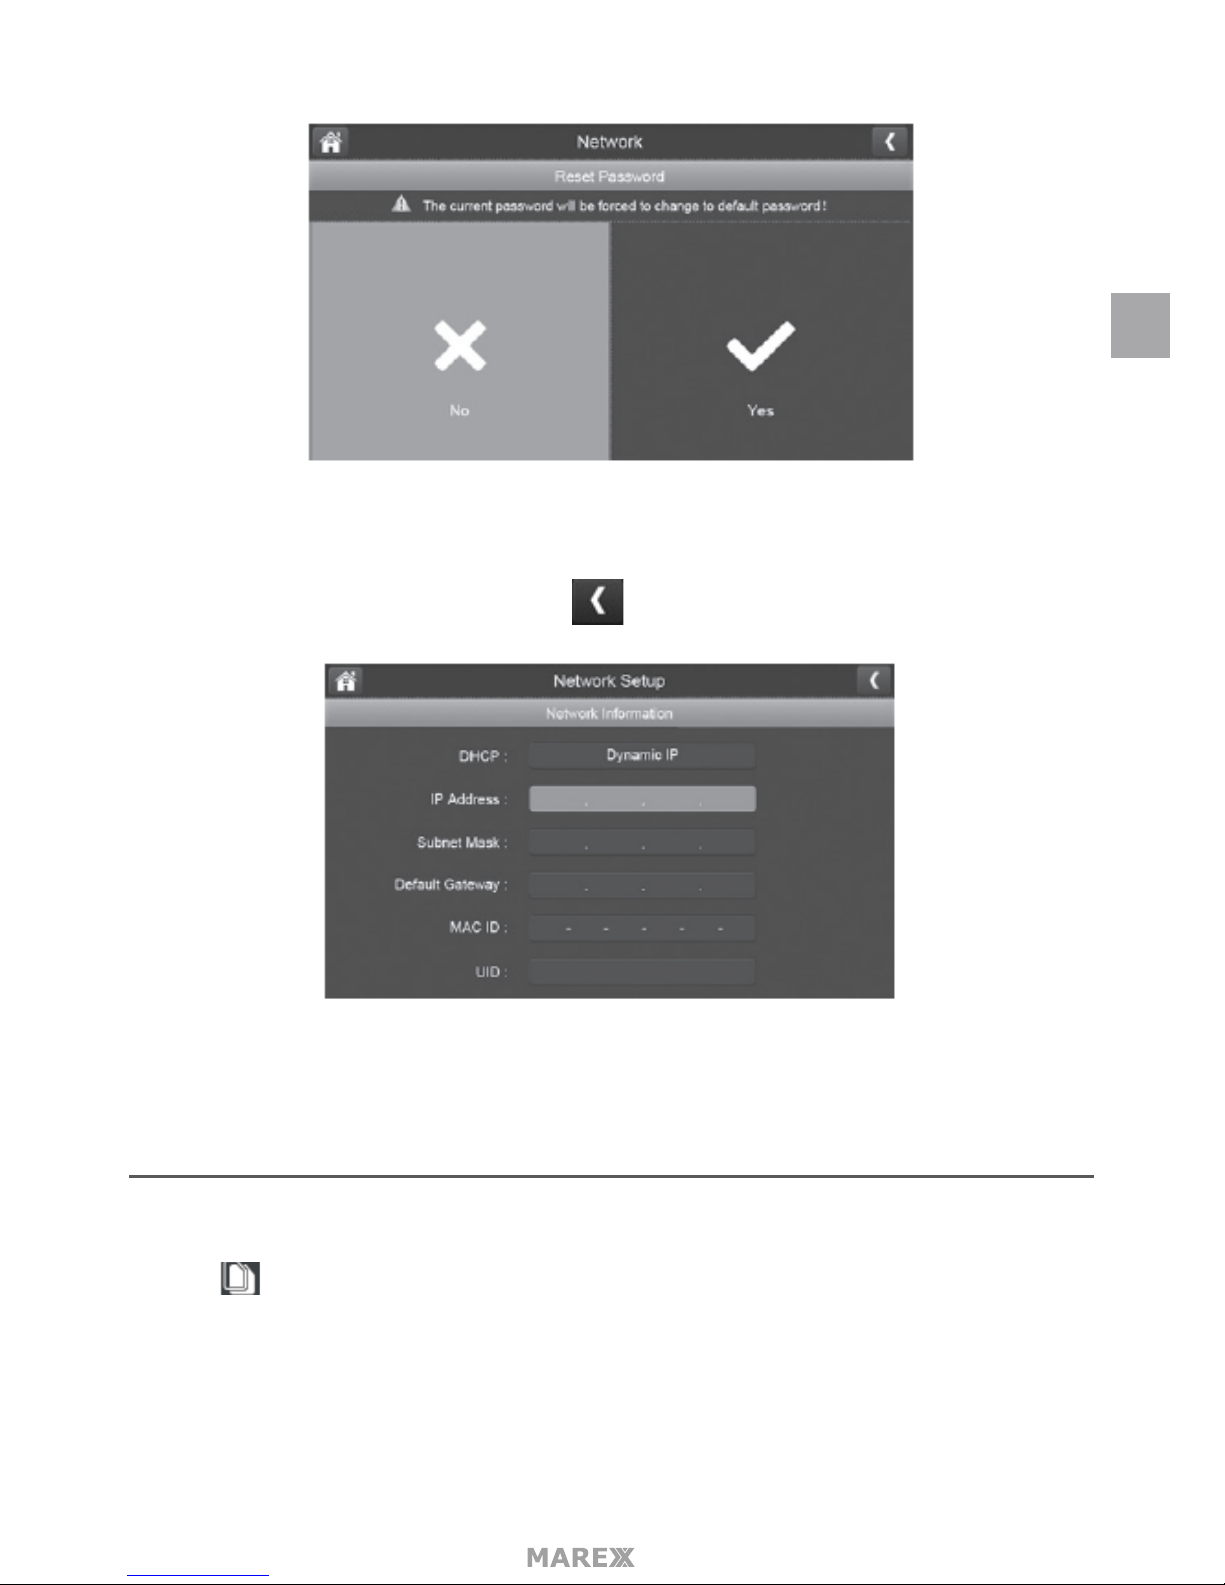
RESET PASSWORD
The Reset Password feature resets the Uniden U Guard app’s password to the default (000000).
Tap YES, than tap to return to the Reset Password screen.
EN
Page 29
- 29
INFORMATION
This screen displays current IP information when the system is connected to the internet.
Tap to display the Information screen, tap to return to the previous screen.
FIRMWARE UPGRADE SCREEN
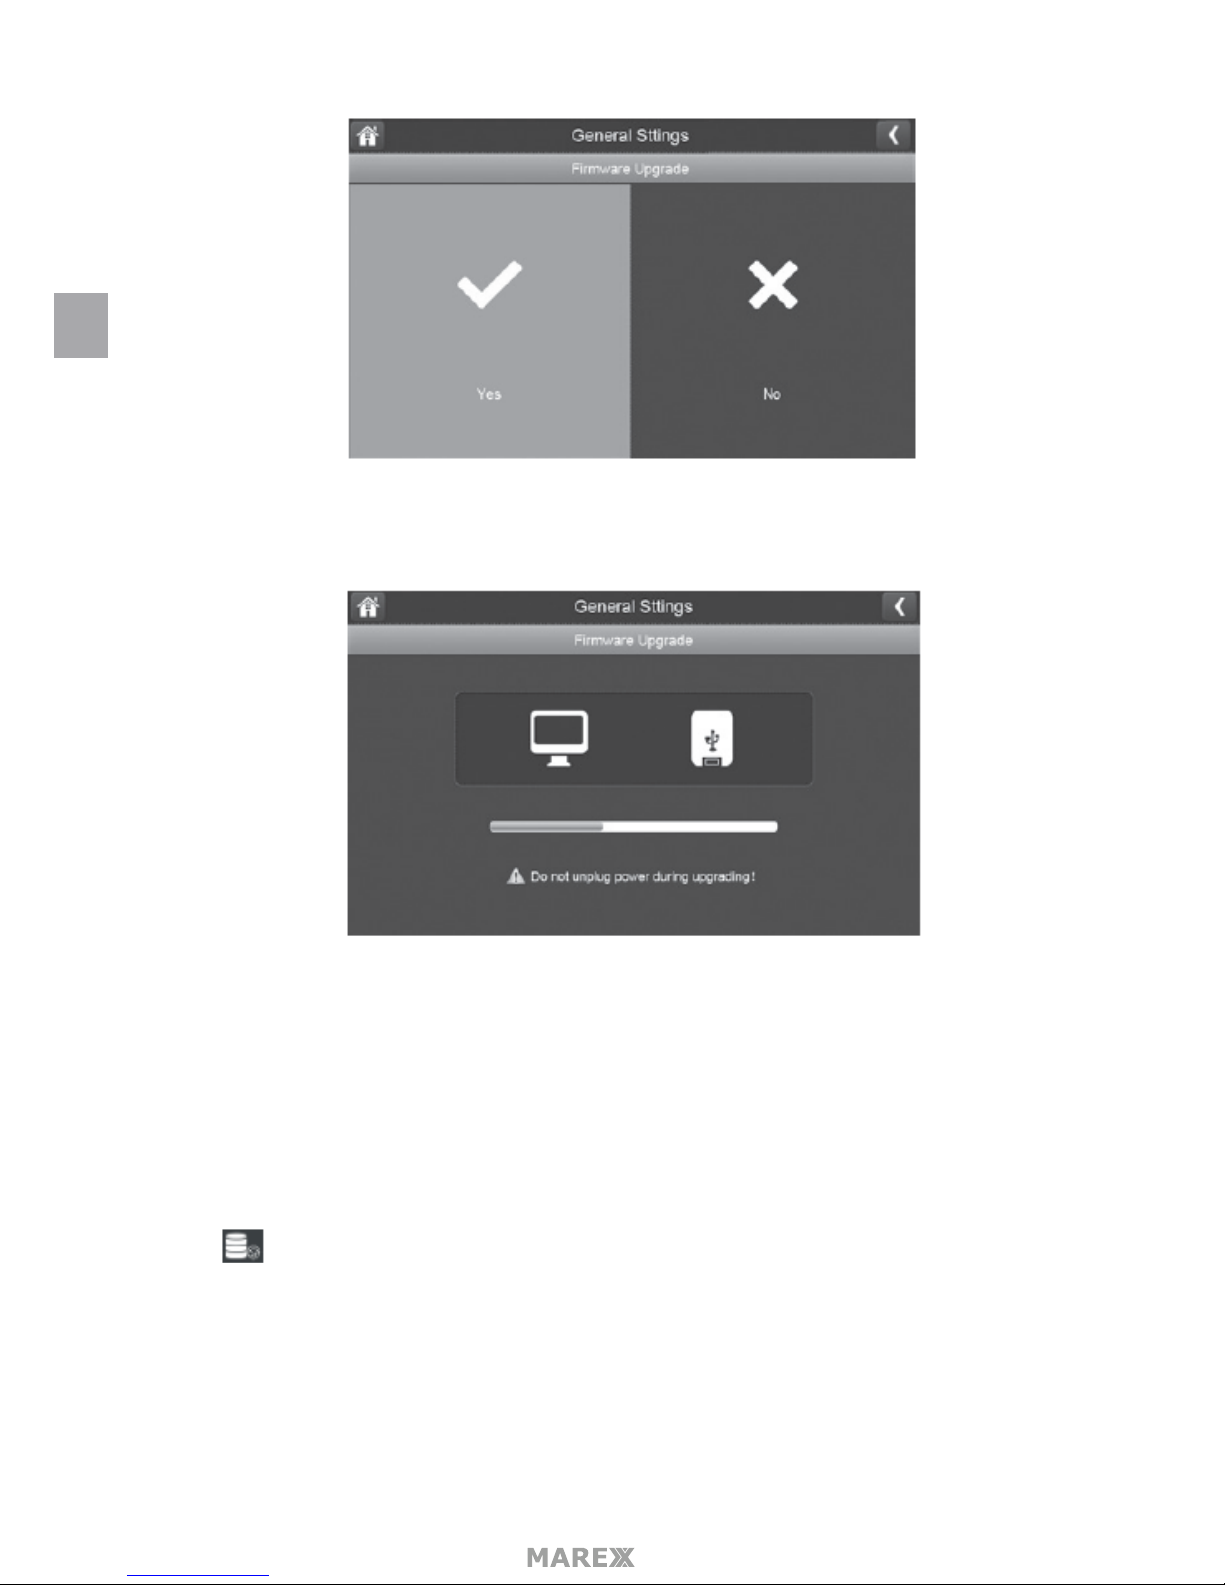
Upgrade from SD Card
1. Tap to upgrade the rmware through the SD card. A conrmation screen displays. Tap YES.
EN
Page 30
- 30
2. A progress screen displays.
3. When the update is complete, the monitor displays Firmware Upgrade Succesful and will automatically
reboot.
Upgrade from Server
1. Use the Ethernet cable (provided) to connect your monitor to your router.
2. Tap to upgrade the rmware through the Server.
3. A conrmation screen displays. Tap YES.
4. The system checks to see if new rmware is available. If new rmware is available, the monitor installs it
and automatically reboots.
EN
Page 31
- 31
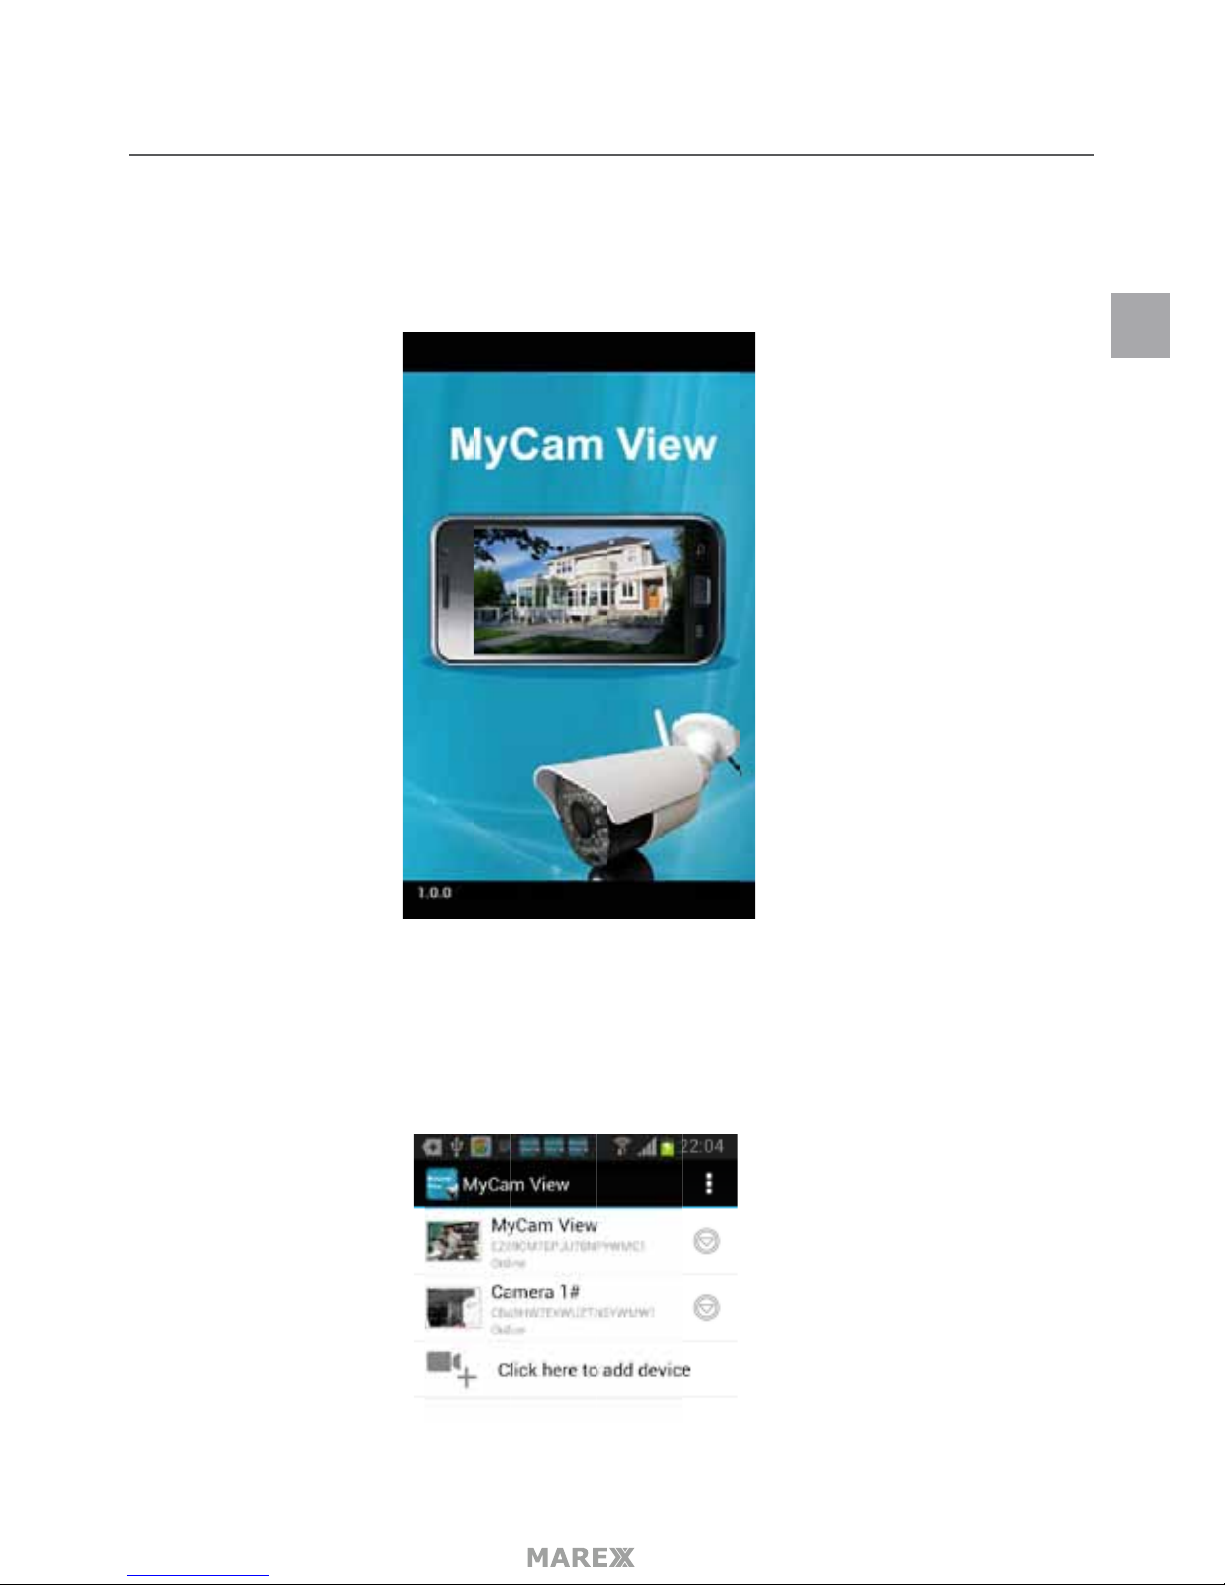
ANDROID AND IOS APP REMOTE VIEW
1. 1. Downloadthefree MyCam View 1.0.0.apk app from the App Store or the Google player store on your
smart phone or tablet.
Make sure your phone is connected to internet.
2. Connect the 7” monitor to your home router with the RJ45 cable.
3. Add camera
Tap the MyCam View App icon to launch the app, Tap Click here to add device
EN
Page 32
- 32
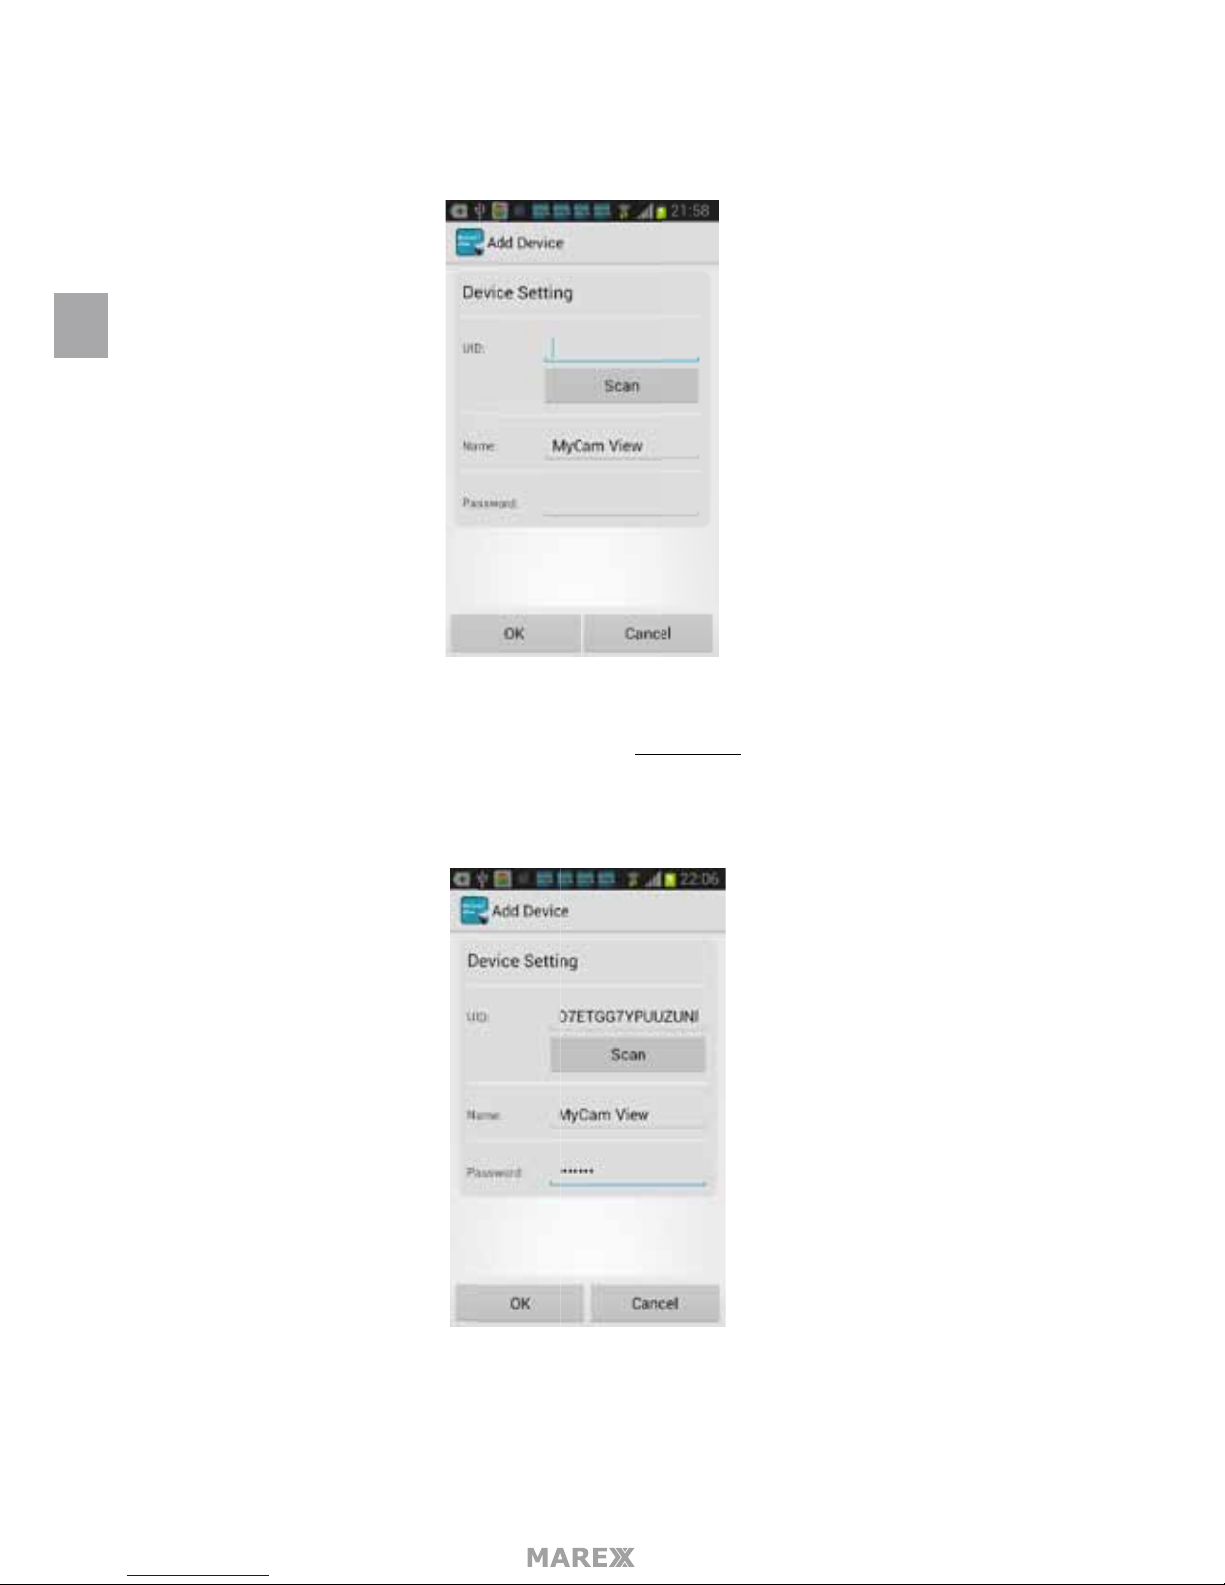
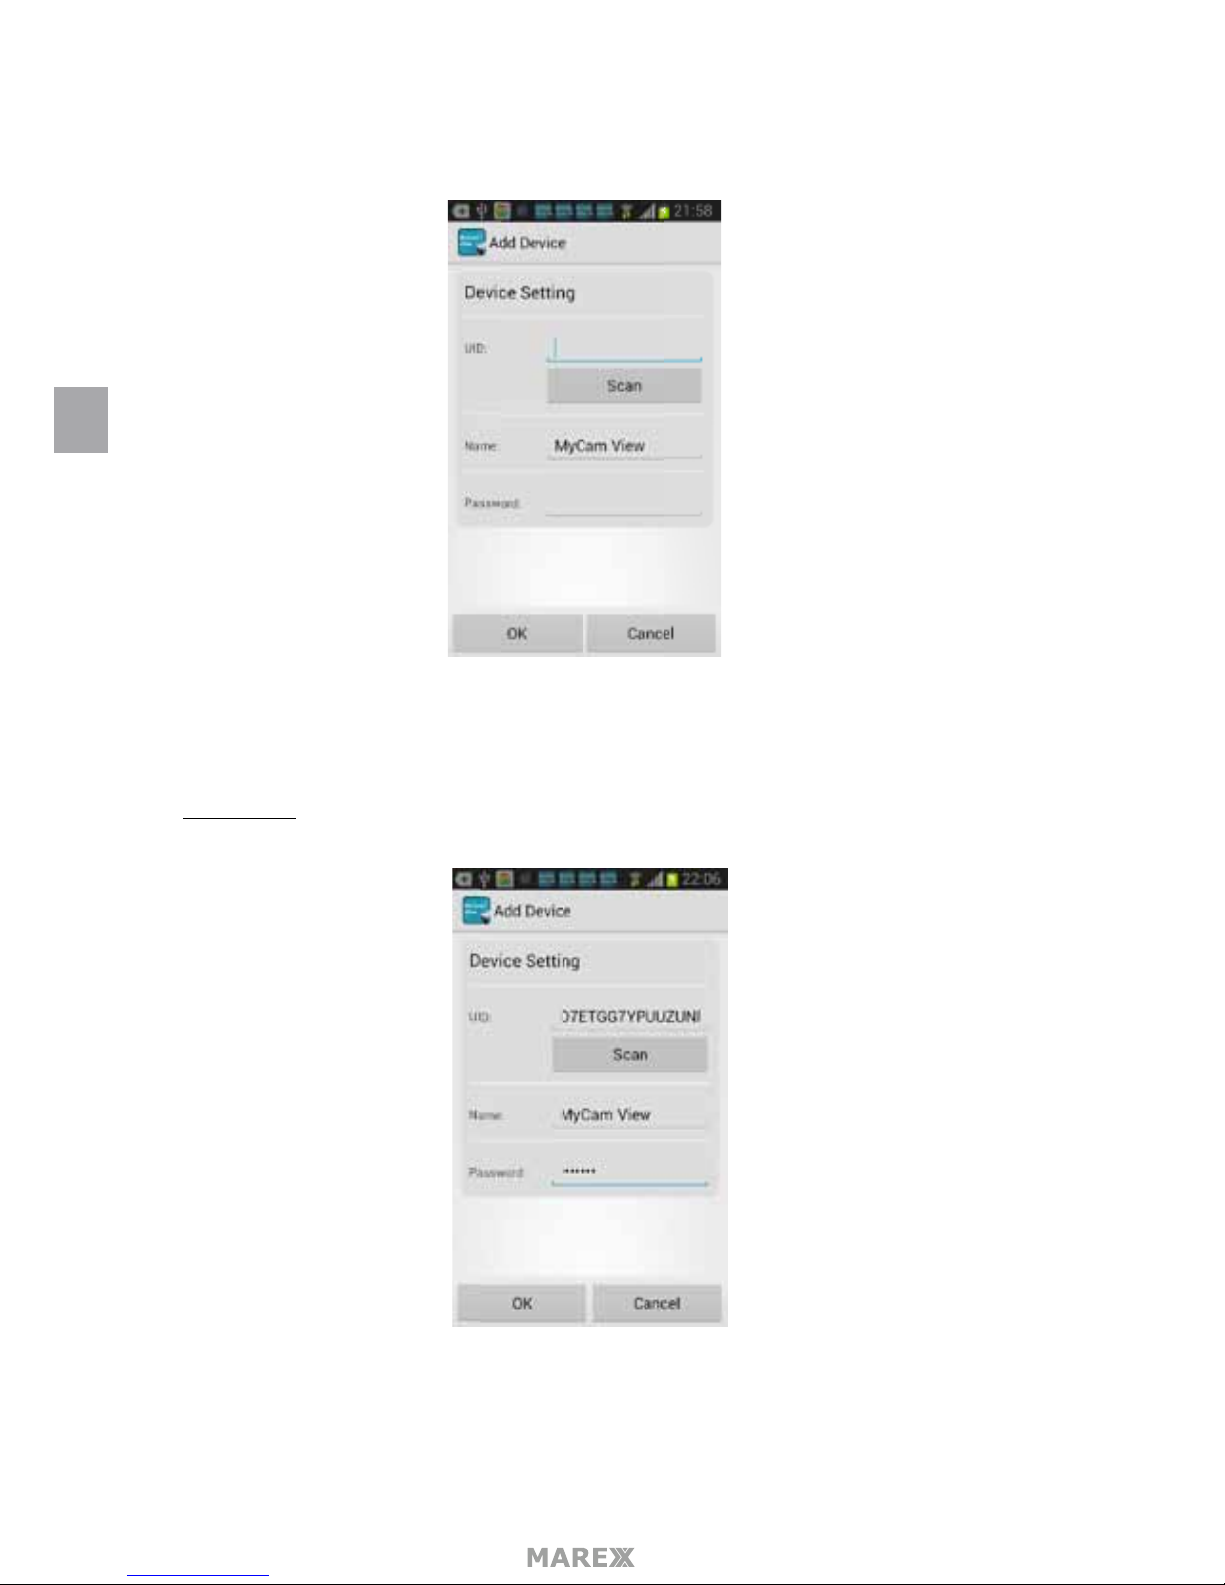
The following screen will appear.
There are 2 options to get the UID from the monitor.
Option A: Enter the UID printed below the QRcode (for example: D7ETGG7YPUUZUNPYWM4J) as it is
shown on the back of the monitor.
Option B: Tap the Scan button to scan the QRcode on the back of the monitor.
Name: Tap to rename the camera (the default name is MyCam View) Enter the Password (default setting
is: 000000) Tap OK to conrm it.
EN
Page 33
- 33
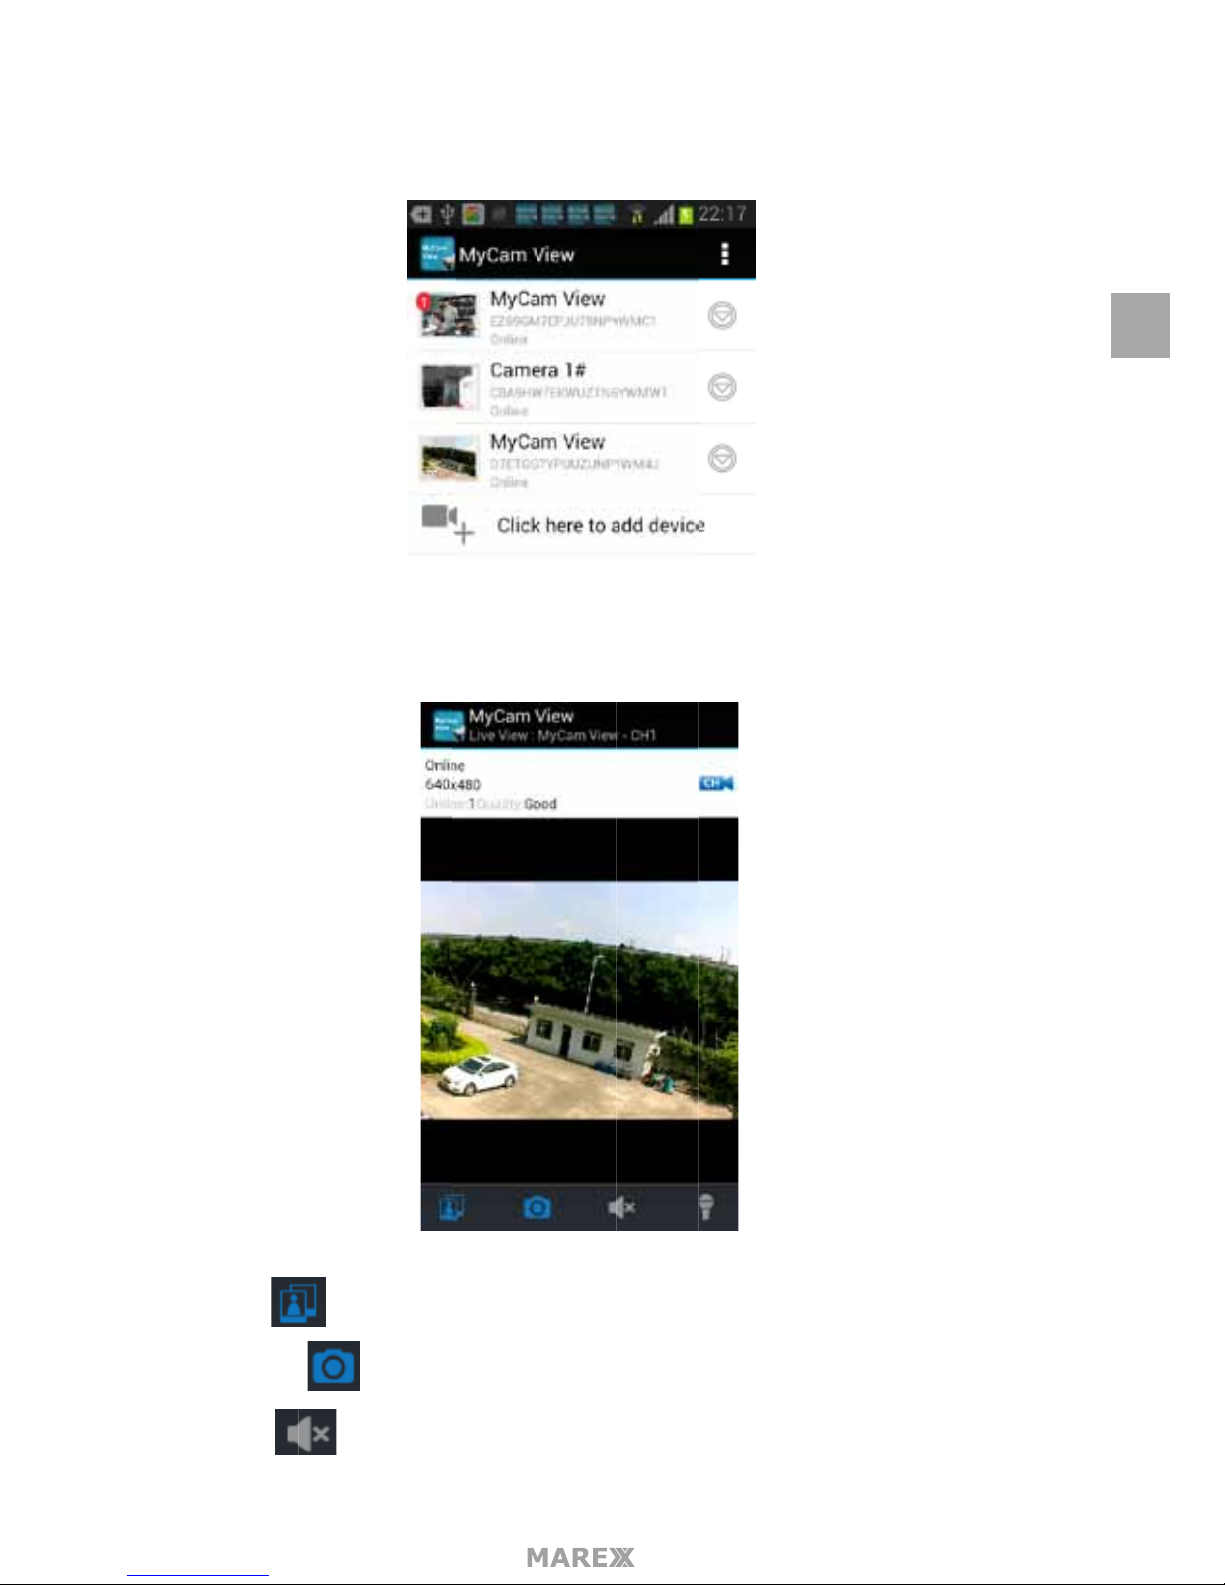
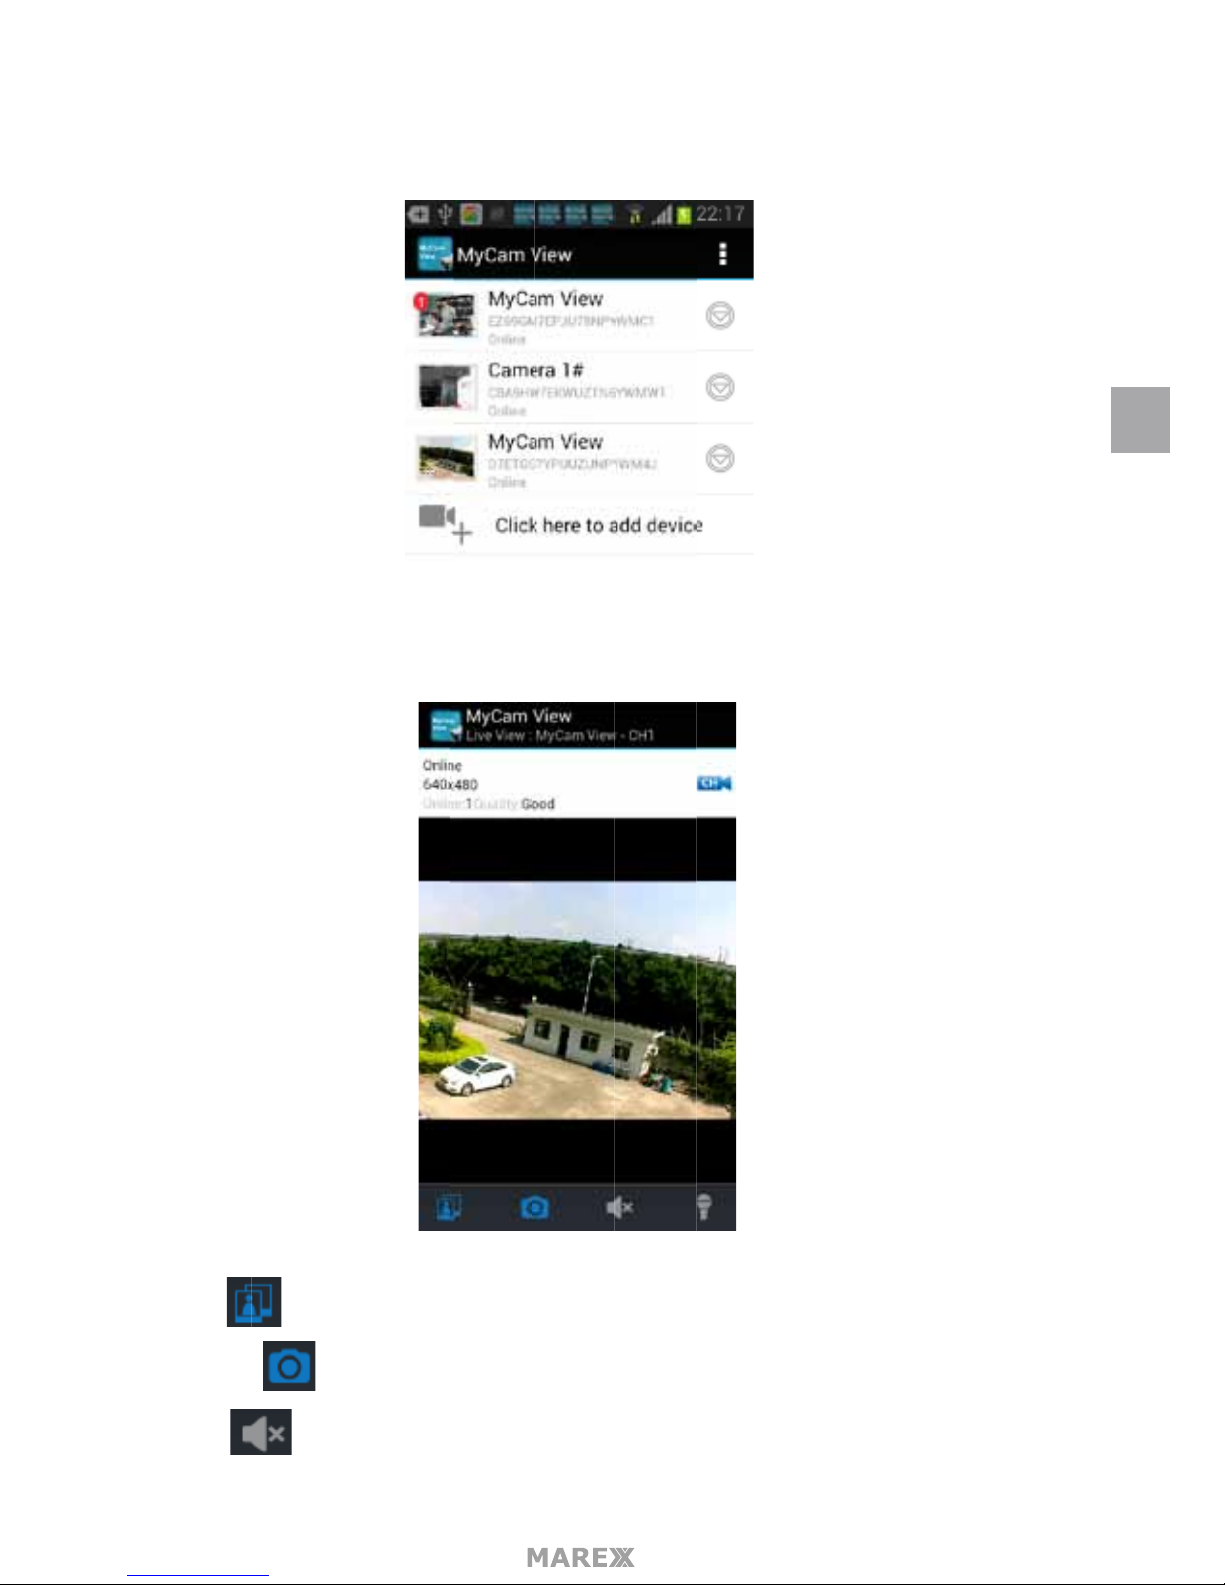
4. The new camera will be shown in your device list as shown below.
5. Tap the camera in the device list to view the live video from this camera in either portrait or landscape
mode.
View icon Tap this icon to view Snapshot photos already taken.
Snapshot icon Tap this icon to make a snapshot from the current video image
Mute Icon Tap this icon to switch of the sound of the camera.
EN
Page 34
- 34
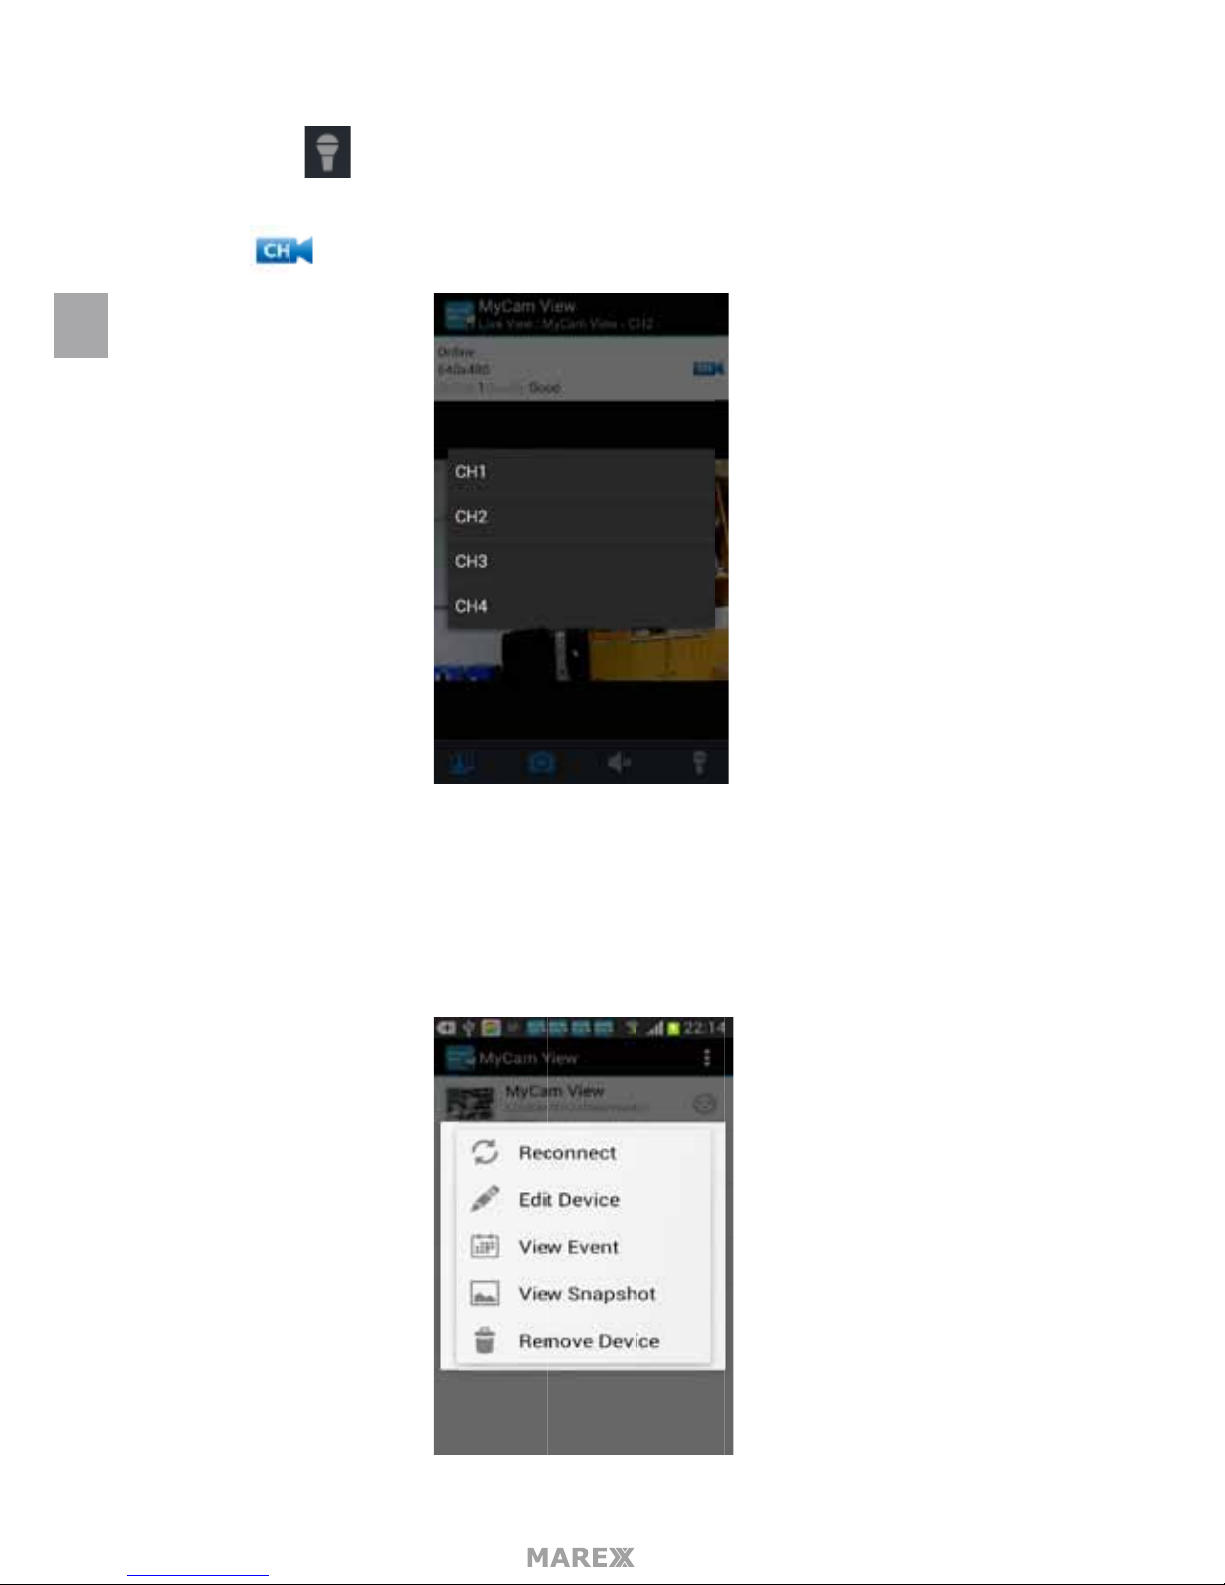
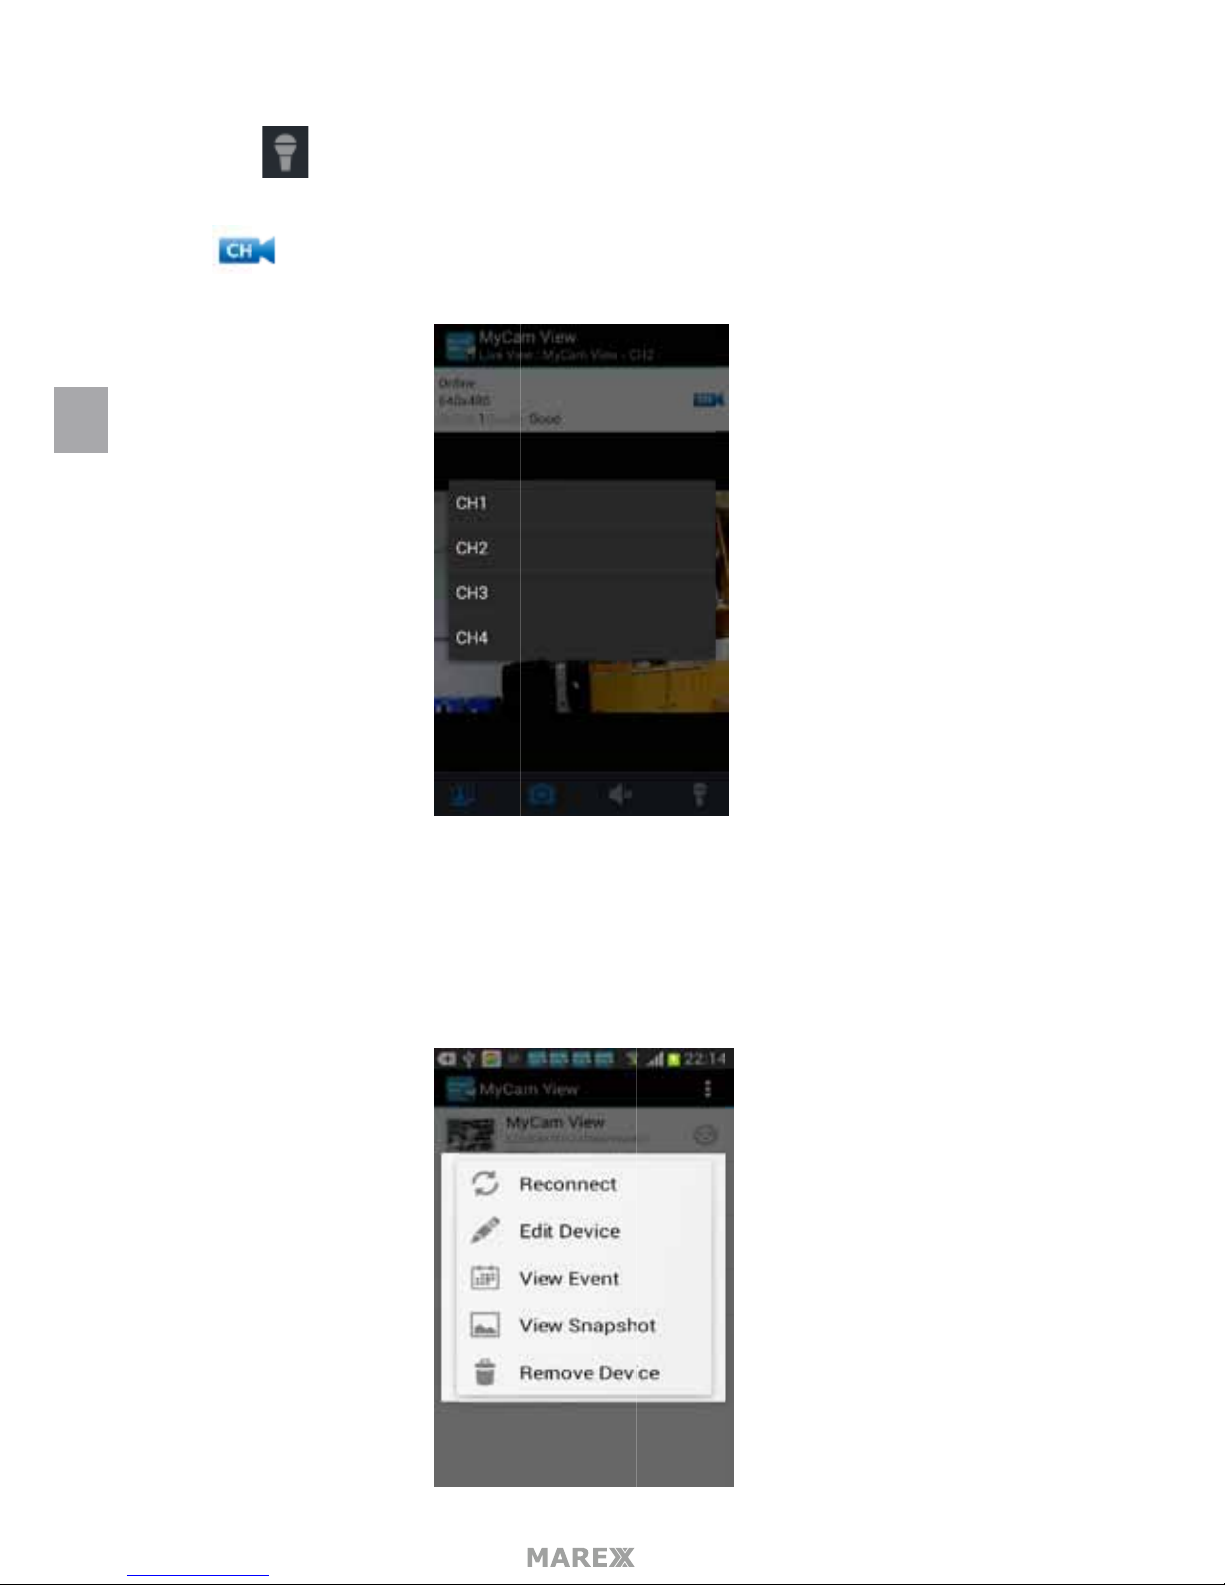
Talk back Icon Tap this icon to talk back through the camera currently being displayed on your
phone or tablet.
CH Icon Tap this icon to switch to the channel which you want to watch.
Online Displays the number of current visitors, the Marex system supports up to 4 remote visitors at
the same time.
Quality shows the network quality.
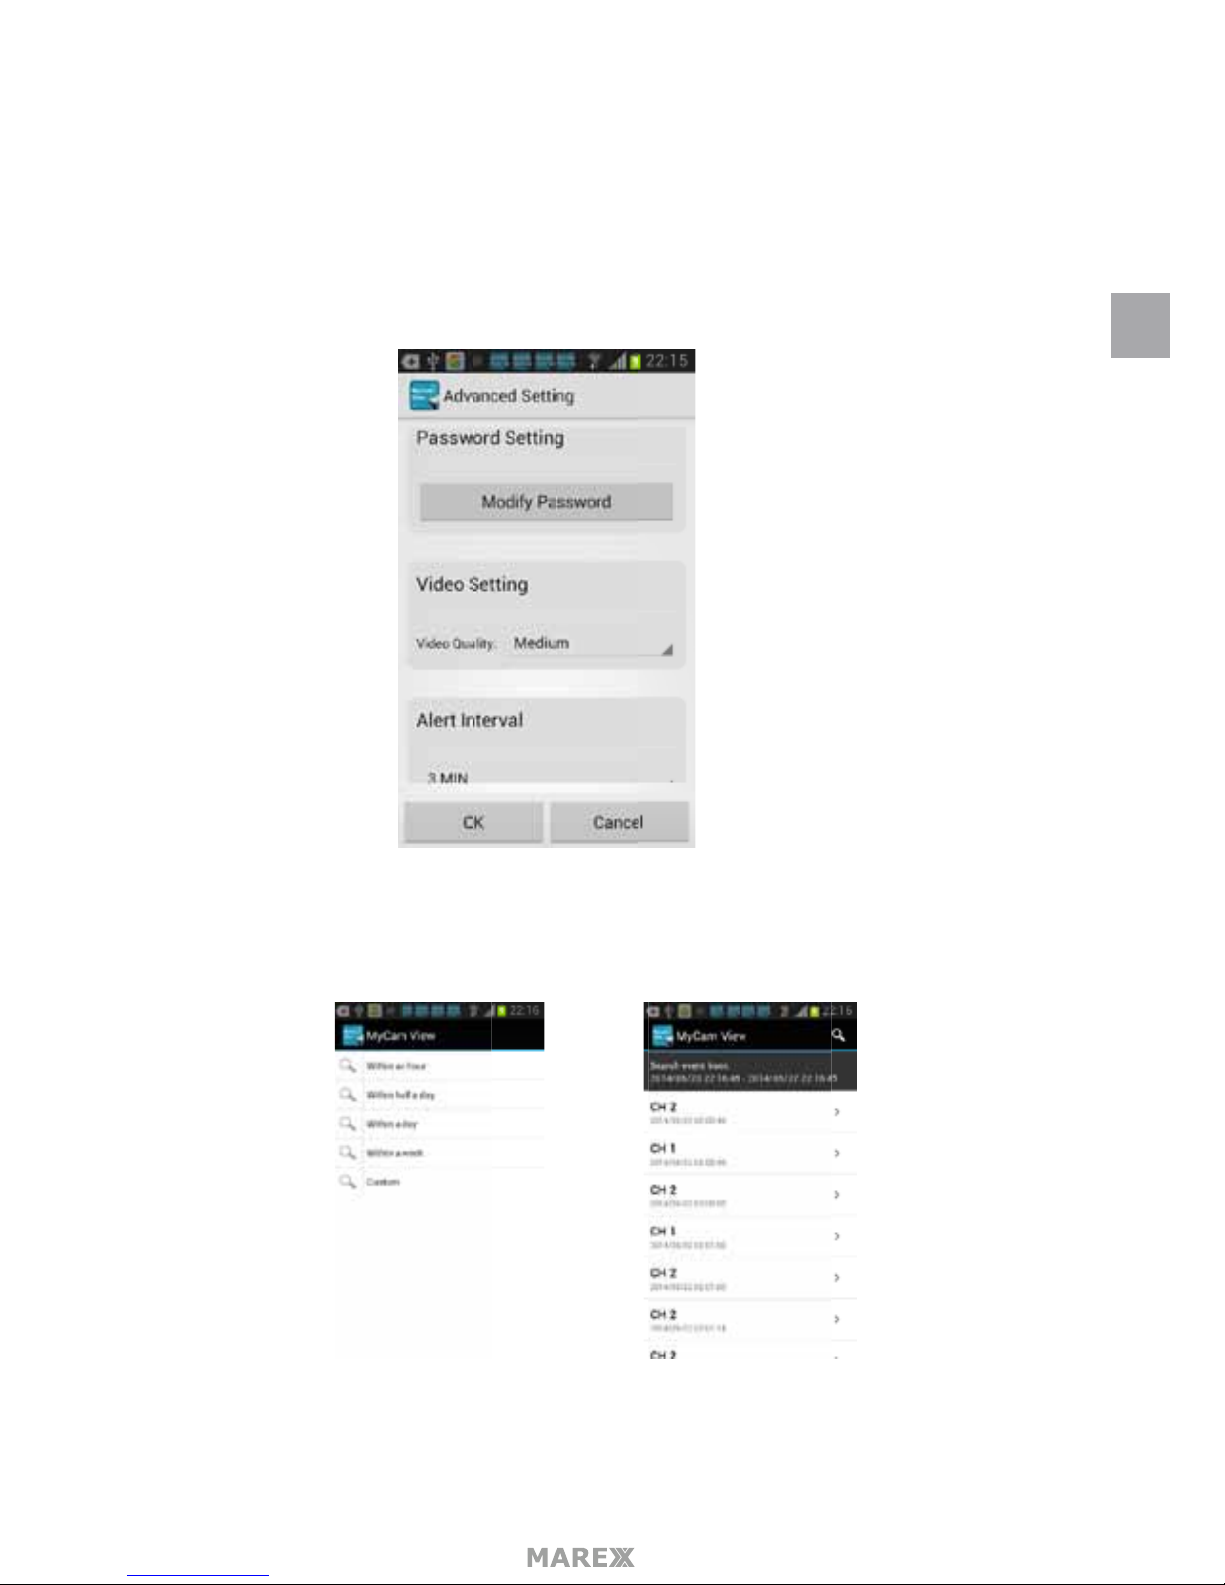
6. Press the down arrow, in the device list to open a pop-up menu.
EN
Page 35
- 35
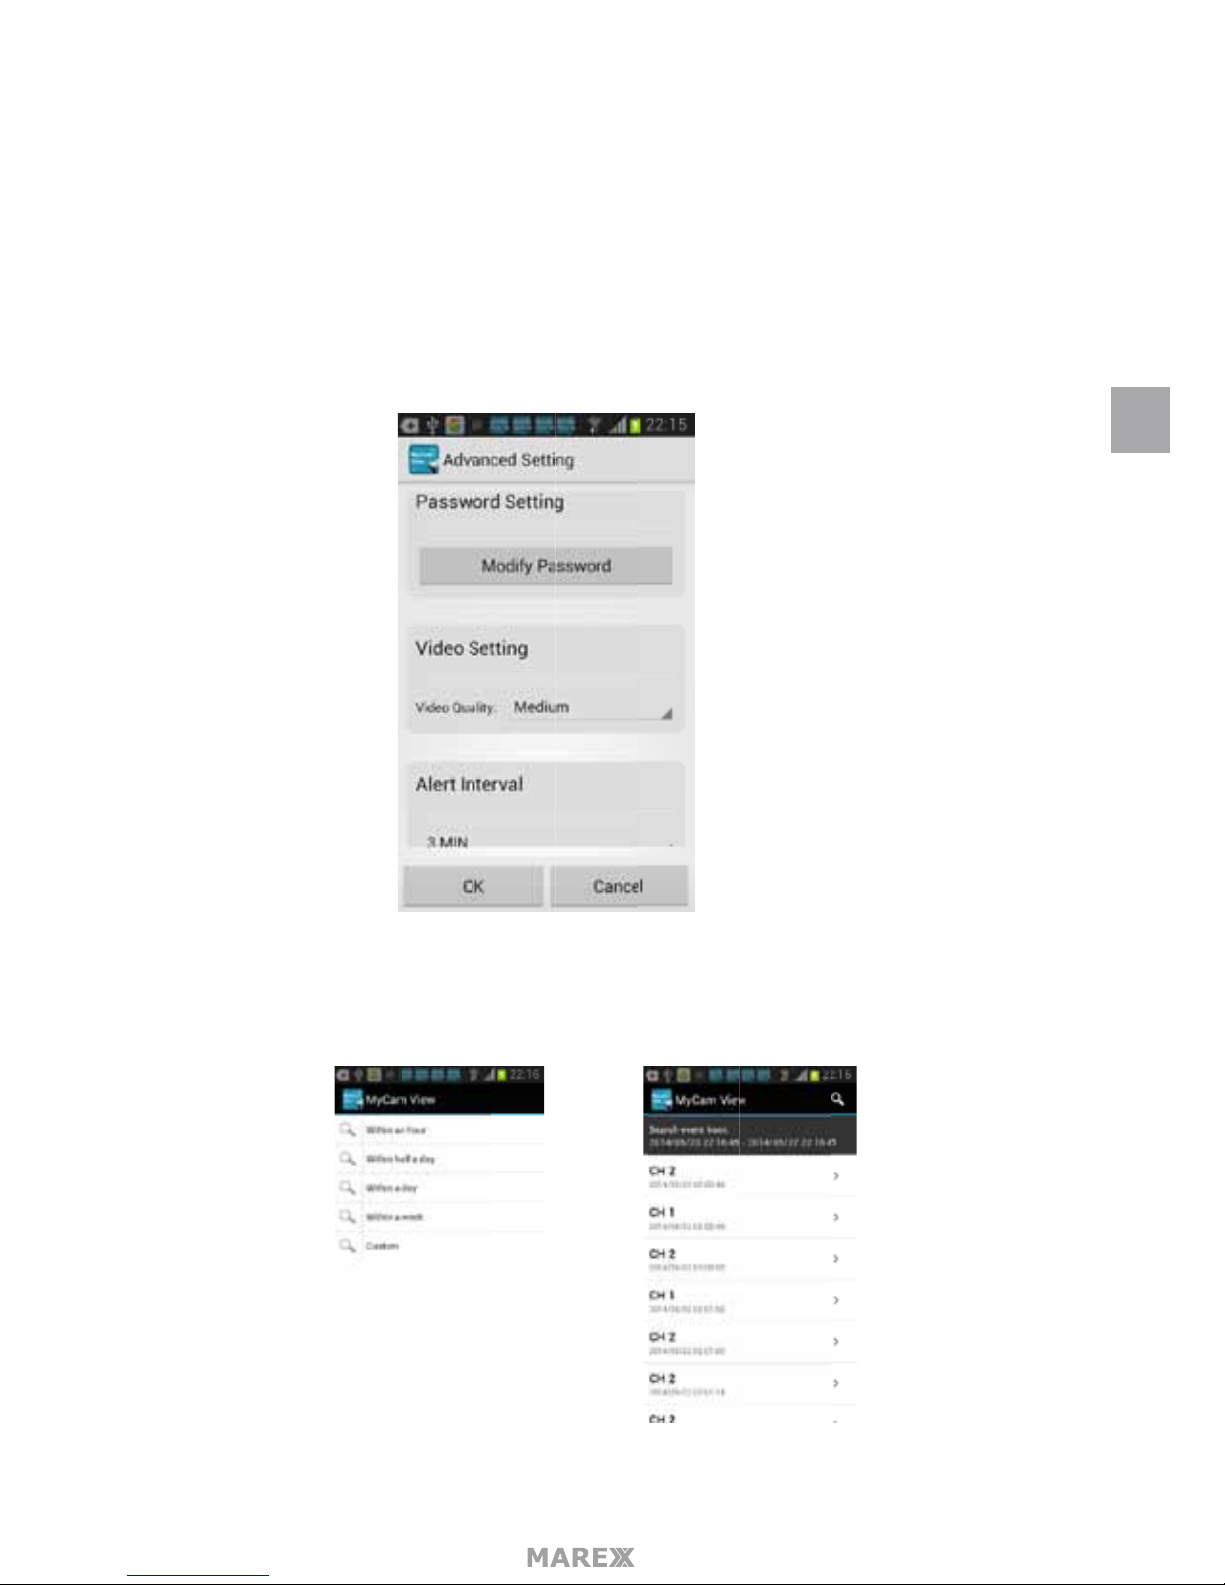
Reconnect Tap this icon to reconnect when the connection between your camera system and the app
fails.
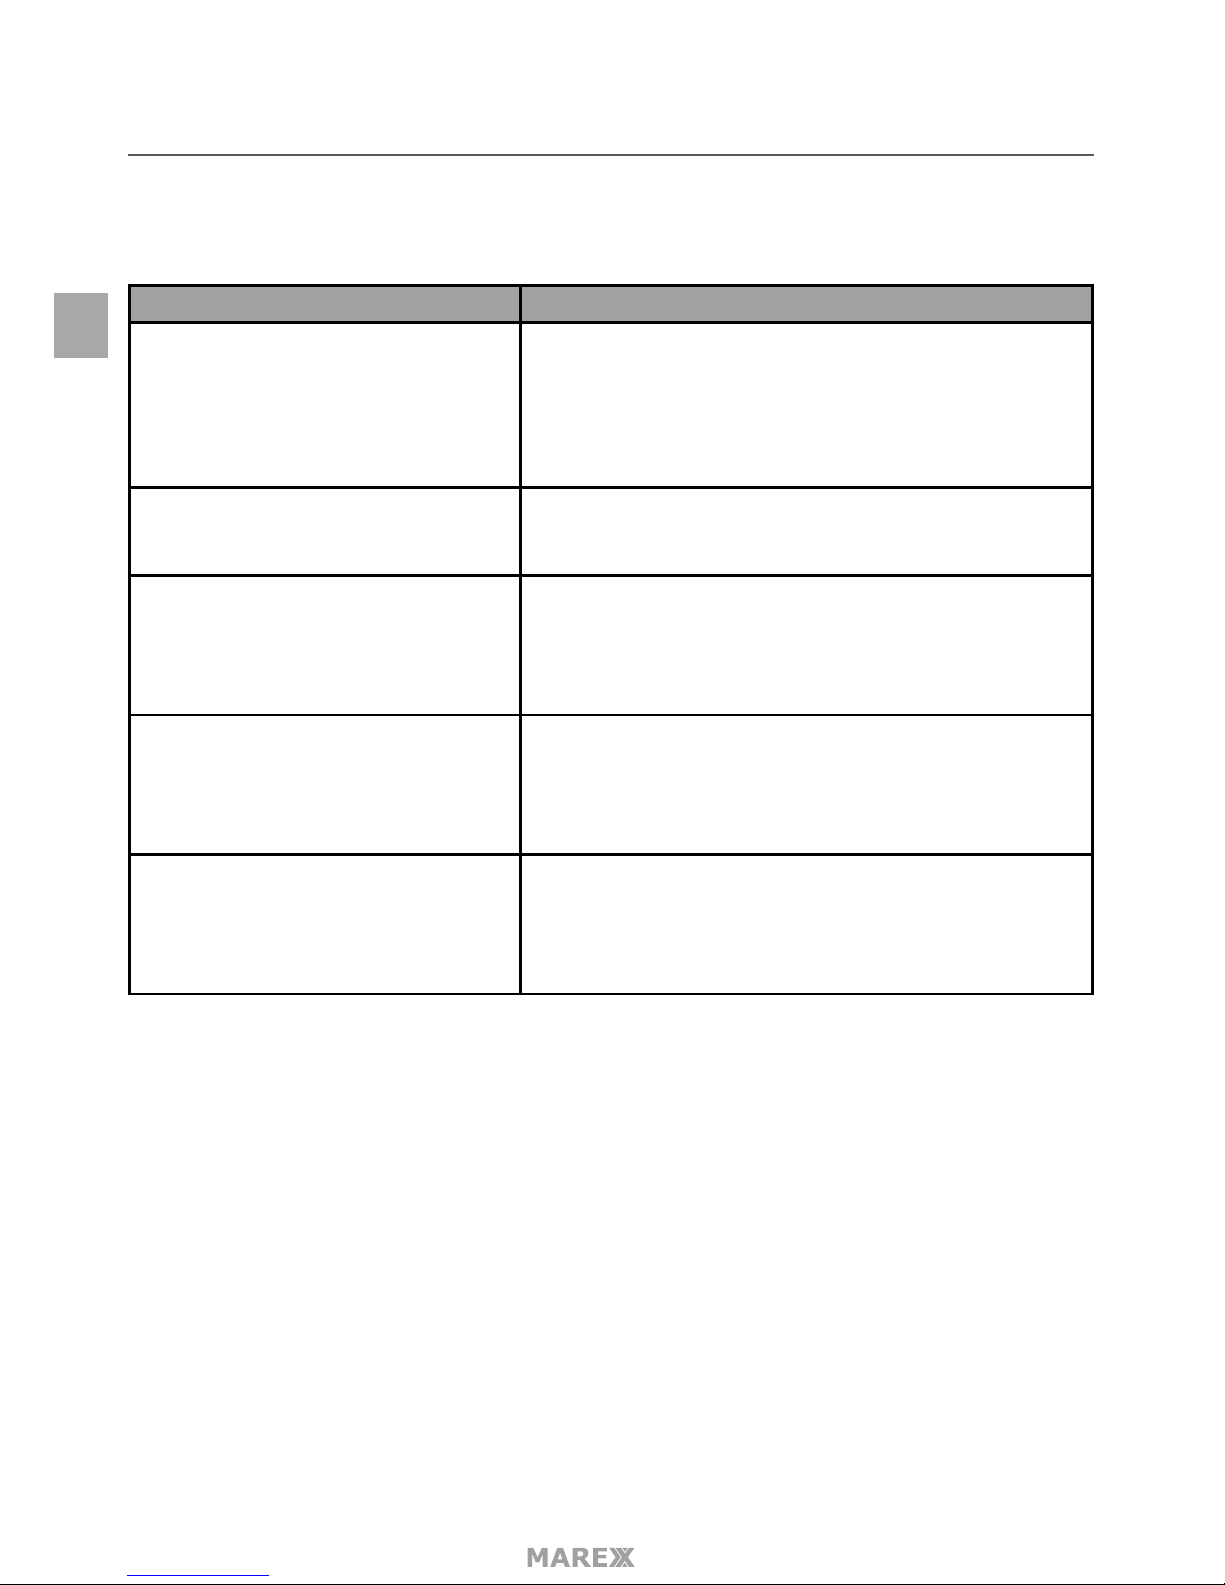
Edit Device Device setting and Advanced setting are under this menu. You can see the camera’s details
under Device Setting. You can modify Passwrd setting (default: 000000), video quality (default Min) and
Alert interval (default 3 MIN) under Advance setting.
View Event Select it to playback the video on your phone. You can tap icon to view live video by select-
ing a period of time (within an hour, within half a day, within a day and within a week) or by selecting a
Custom period of time.
View Snapshot Select this to view the snapshots you have taken.
Remove Device Delete this camera from your phone.
EN
Page 36
- 36
TROUBLESHOOTING
If you have problems with the system, there is often a quick and simple solution. Please try the following:
Problem Solution
No video from a camera
1. Check all connections to the camera. Make sure the adaptor
is plugged in.
2. Make sure that the receiver is ON.
3. Make sure that the camera is in range of the receiver.
4. Make sure that the camera and the monitor are paired. (see
page 18)
The video is dropping
1. Move the camera closer to the receiver.
2. Try repositioning the camera, receiver or both to improve
the reception.
Audio problems
1. Increase the volume when there is no sound.
2. Make sure that there is sound within range of the camera
microphone.
3. If the monitor emits a loud screeching noise (audio
feedback), move the camera and monitor further apart.
The picture is or has become choppy The picture may become choppy when experiencing a lower
frame rate (i.e. 10 frames per second vs. a higher 25 frames per
second).
Try moving the camera closer to the receiver. Remove
obstructions between the receiver and camera.
Recording Problems 1. Make sure the SD card is correctly inserted in the SD card
slot.
2. Make sure the SD card’s memory is not full.
3. Make sure the size of the SD card is compatible with the
system. The system can support SD cards up to 128GB.
EN
Page 37
- 37
INHOUDSOPGAVE
Eerste gebruik, dit gedeelte beschrijft uw Marex set en hoe u deze set moet installeren
SPECIFICATIES 38
EIGENSCHAPPEN VAN DE CAMERA 38
WAT IS INBEGREPEN 39
BESCHRIJVING MONITOR 40
BESCHRIJVING CAMERA 41
KLAARMAKEN VOOR GEBRUIK 41
INDELING BEELDSCHERM 6
Gebruiksaanwijzing, dit gedeelte behandeld het basis gebruik in een beknopt formaat
GEBRUIKSAANWIJZING 43
Gebruik van het menu, hier vind u gedetailleerde beschrijvingen van ieder (sub)menu en hoe het wordt gebruikt.
OPNAMES BEKIJKEN 46
ALARM 48
HELDERHEID 48
ALGEMENE INSTELLINGEN 49
CAMERA INSTELLINGEN MENU 51
OPNAME INSTELLINGEN 53
FILE OVERWRITE 54
SYSTEM SETTINGS MENU 55
LANGUAGE 57
DEFAULT SETTINGS 57
FORMAT SD CARD 58
SYSTEM SETTINGS 58
MOTION DETECTION SETTINGS MENU 59
NETWORK SETUP MENU 61
FIRMWARE UPGRADE MENU 63
Kijken op afstand, deze sectie behandeld hoe u uw Marex systeem op het internet aan kan sluiten en hoe u de
beelden kan bekijken via iPhone, Ipad en Android smartphone en tablet.
OP AFSTAND KIJKEN MET DE ANDROID EN IOS APP 65
PROBLEEM & OPLOSSING 70
NL
NEDERLANDS
Page 38
- 38
SPECIFICATIES
• 850nm IR LED nachtzicht tot 15m
• 7” TFT LCD Digitale monitor (800 TGB x 480)
• Audio in twee richtingen (terugspreek functie)
• Scan functie
• PIR of door bewegingsdetectie getriggerde opname
• Handmatige opname
• Touchscreen besturing
• Geplande opname van Zondag tot Zaterdag
• SD kaart opname, tot 128GB ondersteund
• Eén LCD monitor kan gekoppeld worden met 4 camera’s
• Monitor verbruik: 5v DC 2A netstroom adapter (+/- 5%)
• Camera verbruik: 9v DC 600mA (+/- 5%)
• Bereik: 250m in open veld
• Nieuwe opname indicatie / Volle geheugenkaart indicatie
• Quad view
• PIR trigger en Video bewegingsdetectie waarschuwing
• Nachtzicht tot 15m
EIGENSCHAPPEN VAN DE CAMERA
• Kleuren 1/4 CMOS sensor
• 2400 Mhz - 2483,5 Mhz
• 4 Mbps data rate
• 16 dBm (TYP) zendvermogen
• 1280 x 720 pixels
• MPEG 4
• 3.6 mm / F 1.9 (IR cut lter)
• 68 graden lenshoek
• 16 Infrarood leds
• Tot 15m Nachtzicht
• IP65 waterdicht
• Audio in twee richtingen (terug spreek functie)
• 650 mA max energieverbruik
• Adapter: DC 5V 2A
EIGENSCHAPPEN VAN DE MONITOR
• 7 inch LCD scherm
• 2400~2483 Mhz ontvanger frequentie
• 85 dBm gevoeligheid van de ontvanger
NL
Page 39
- 39
• 800 (W) x RGB x 480 (H) beeldscherm resolutie
• AVI video formaat
• MJPEG4 video compressie
• Tot 128 GB SD kaart ondersteund
• +/- 1 uur video met 1 camera op 1GB SD kaart
• HD, 1280 x 720 pixels opname resolutie
• 25 frames per seconde (FPS)
• Per 5 seconden automatisch schakelen tussen camera kanalen
• LAN kabelconnector
• Live view iPhone & Android smartphone App (QR code)
• Oplaadbare li-ion batterij (optioneel)
• Touchscreen
• Audio in twee richtingen (terugspreek functie)
• Adapter: DC 5V 1.5 A
• Energieverbruik: 4W max
• Afmetingen: 191 x 133 x 19 mm
• Gewicht: 572 gram
WAT IS INBEGREPEN
De Marex set wordt geleverd met de volgende onderdelen:
Controleer uw Marex set om er zeker van te zijn dat u het complete systeem, inclusief alle hierboven
weergegeven componenten heeft ontvangen.
7” LCD Monitor
Camera
Niet afgebeeld:
5V 2A Netstroomadapter (Monitor)
Ethernet (RJ45) Kabel
2000mAh Batterij (Monitor) (optioneel)
Antenne (bevestigd aan de camera)
9v 600mA Netstroomadapter (camera)
Handleiding
Montagemateriaal (1 set)
NL
Page 40
- 40
BESCHRIJVING MONITOR
1. LCD scherm, geeft video weer van de camera’s of het instellingen menu
2. Microfoon
3. Draadloze antenne
4. Aan/uit knop / scan knop. Houdt deze ingedrukt om de ontvanger aan/uit te zetten. Druk kort in als de
monitor aan staat om de scan mode aan of uit te zetten.
5. Luidspreker
6. Adapter aansluiting, gebruik de meegeleverde adapter om de monitor op een stopcontact aan te
sluiten.
7. Ethernetkabel aansluiting
8. Resetknop, gebruik een paperclip of een ander dun object om de resetknop in te drukken, waardoor
het systeem terug gaat naar de fabrieksinstellingen.
9. Monitor standaard
10. Batterij klepje
11. Volume verhogen
12. Volume verlagen
13. Talk, houdt deze knop ingedrukt om door via camera te spreken. Laat deze knop los om een reactie te
kunnen horen.
14. SD-kaartsleuf – Plaats SD kaart voor opname van videos
15. Blauwe LED, als deze constant brand staat de monitor in de Scan mode. Knippert deze dan is de batterij
bijna leeg.
NL
Page 41
- 41
BESCHRIJVING DRAADLOZE CAMERA
1. Camera antenne, zend en ontvangt signalen naar/van de monitor.
2. Infrarood LED’s maken goed zicht in het donker mogelijk.
3. Camera lens, neemt de beelden in het blikveld van de camera waar en verzend deze naar de monitor.
4. Licht sensor, neemt de lichtsterkte waar voor het schakelen tussen zicht overdag en nachtzicht.
5. Microfoon verzend waargenomen geluid naar de monitor.
6. Pair knop. De pair knop zit voorop de camera, deze wordt gebruikt om de camera met de monitor te
pairen.
7. Bewegingssensor, neemt beweging waar voor de lens en stuurt een signaal naar de monitor
8. Luidspreker, geeft het geluid weer dat wordt verzonden van de monitor (terugspreek functie).
9. Verstelschroeven, verstel de camera om hoog, omlaag en met de klok mee / tegen de klok in.
KLAARMAKEN VOOR GEBRUIK
MONITOR
1. Klap het standaard achterop de monitor uit, en positioneer de antenne.
2. Sluit de adapter aan op de adapter aansluiting aan de zijkant van de monitor en sluit het andere
uiteinde van de adapter aan op het stopcontact.
3. Houdt de Aan/Uit knop gedurende 3-4 seconden ingedrukt om de monitor aan te zetten.
4. De Monitor geeft het opstart scherm weer gedurende enkele seconden en schakelt dan naar de Live-
weergave.
Het scherm blijft zwart tot de camera’s ingeschakeld zijn.
CAMERA
De camera is weerbestendig en heeft een IP65 waarde (stofdicht en bestand tegen waterstralen, echter niet
bestand tegen onderdompeling in water).
Ondanks dat de camera’s blootgesteld kunnen worden aan regen, is het aanbevolen dat indien de
camera’s buiten gebruikt worden, ze beschermd opgehangen worden onder een afdakje of een patio.
NL
Page 42
- 42
Als regendruppels opdrogen op de camera lens kunnen vlekken ontstaan die het licht van de infrarood LEDs,
die gebruikt worden voor het nachtzicht, reecteren. Dit veroorzaakt slechtere video kwaliteit.
Ook als stof, vuil en spinnenwebben zich ophopen op de camera lens kan dit leiden tot reectie van het licht
van de infrarood LED’s, waardoor de video kwaliteit achteruit gaat.
Maak de lens van de camera regelmatig schoon met een zachte doek.
Overwegingen bij het plaatsen van Camera’s
Denk aan het volgende bij het plaatsen van camera’s:
• De meest ononderbroken lijn tussen de camera en de monitor is het beste.
- Muren, vooral baksteen en beton, verkorten het bereik.
- Plaatsing naast de ramen zorgt voor een groter bereik.
• De geoptimaliseerde bewegingsdetectie afstand is 2m tot 6m recht voor de camera, hoe verder de
beweging van de camera plaats vindt, hoe minder precies de bewegingsdetectie zal zijn.
• Vermijd directe lichtbronnen binnen het blikveld van de camera. Dit geld ook voor lantaarnpalen,
plafonnieres, staande lampen, buitenverlichting etc.
• Regen, rimpels of reectie in plassen water, boomtakken/struiken die door de wind bewogen worden
en de schaduwen die ze werpen kunnen ook valse bewegingsdetectie alarmen veroorzaken.
Neem de monitor mee bij het positioneren van de camera. Het is veel makkelijker om de camera in de juiste
positie te plaatsen als u de monitor bij de hand hebt.
1. Plaats de camera op de juiste plaats en in de juiste positie. Sluit camera met de adapter aan op het
lichtnet en bekijk het beeld op de monitor, verstel of verplaats de camera als het beeld niet naar uw zin
is.
2. Houdt de camera op de juiste plaats waar u de camera wil bevestigen en markeer de schroefgaten.
3. Gebruik de meegeleverde schroeven en pluggen om de camera te bevestigen aan de muur of het
plafond
4. Controleer of de camera goed vast zit.
INDELING BEELDSCHERM
Het beeldscherm van de monitor heeft 3 hoofdgedeeltes.
• Camera weergave. Het hoofd gedeelte van het scherm geeft de live video van de camera’s weer.
• Uitschuif menu tab. Druk op dit tabje voor weergave van de 4 menu’s waarmee u het systeem kunt
instellen.
• Icoon balken. Aan de bovenkant en onderkant van het beeldscherm worden de iconen (pictogrammen)
weergegeven.
NL
Page 43
- 43
Weergave modes.
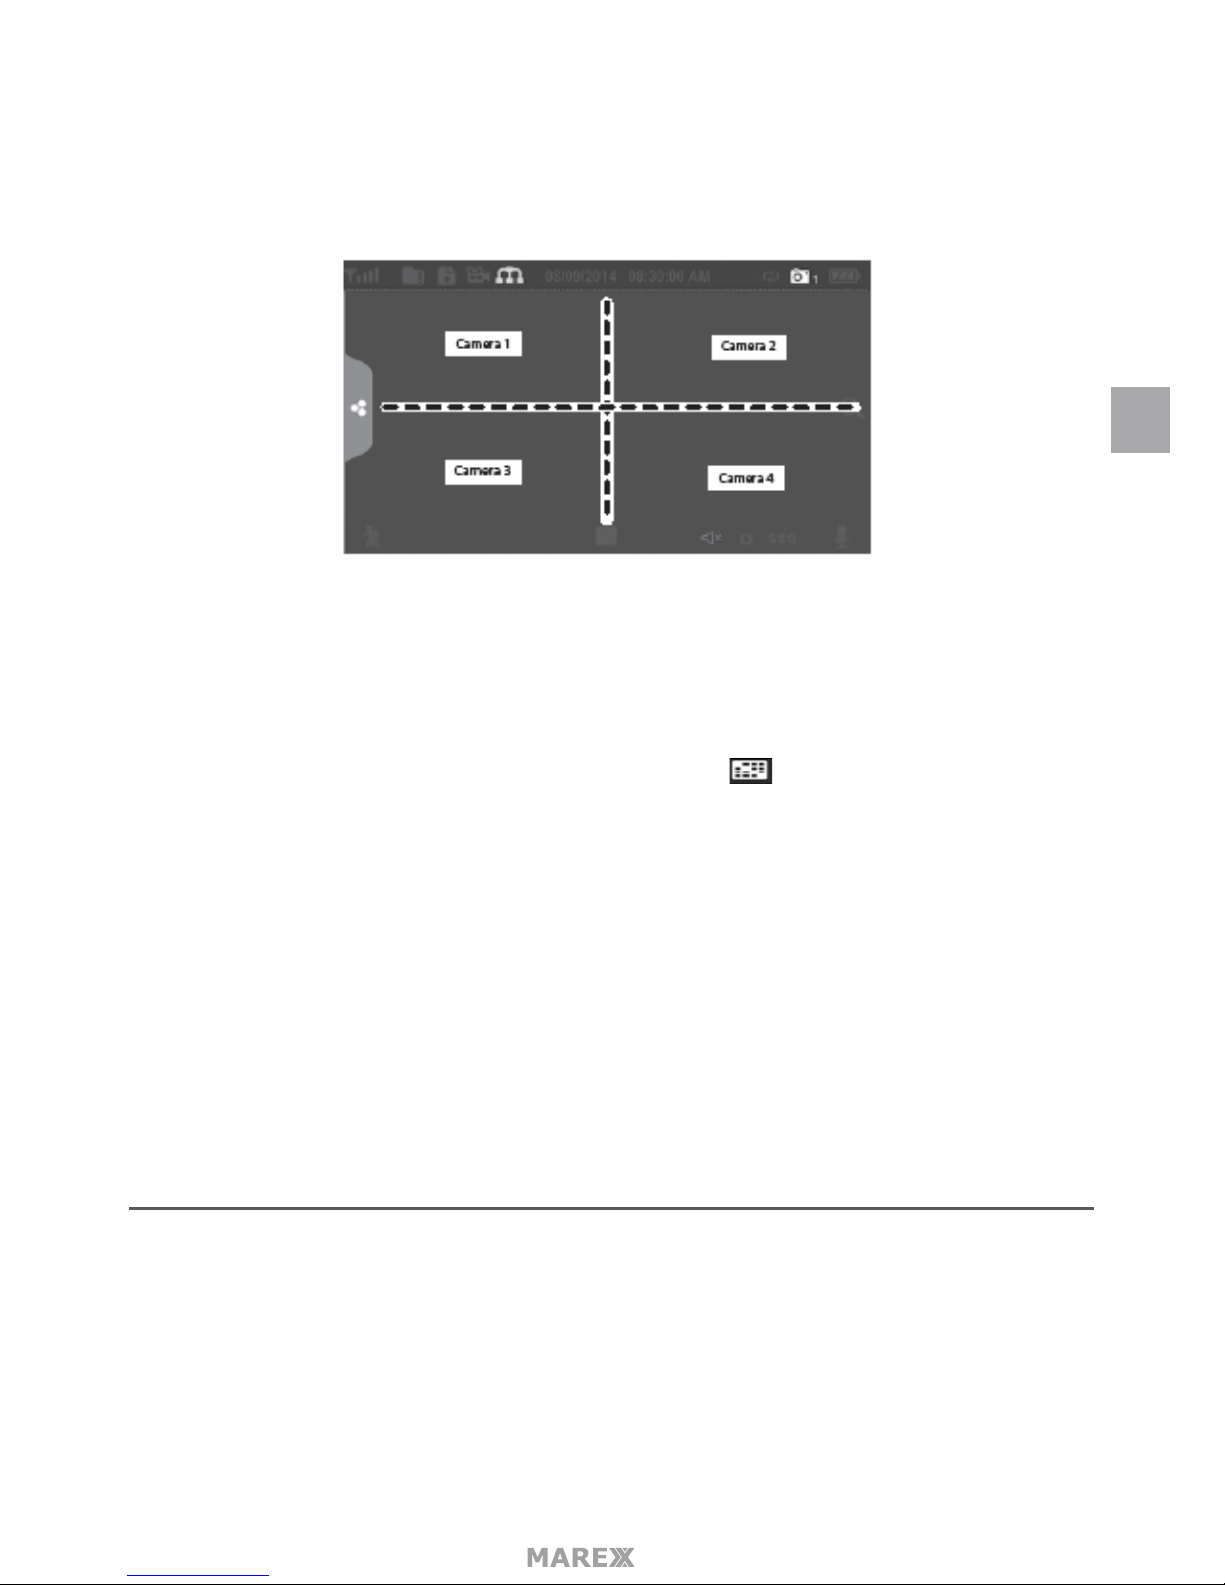
Het camera weergave gedeelte geeft de live beelden van de camera’s weer. Iedere camera kan in het hele
gedeelte weergegeven worden of in een gedeelte (kwart) van dit beeld.
Er zijn 4 weergave modes:
• Quad mode verdeeld het scherm in 4 gedeeltes en geeft het live beeld van iedere actieve camera weer
in één van de 4 gedeeltes. Druk in het midden van het weergegeven beeld om het beeld van deze
camera volledig in beeld te krijgen. (1 kanaals mode)
• 1 kanaals mode geeft één camera beeldvullend weer, druk op om tussen de kanalen te switchen,
druk midden op het beeld om terug te keren naar Quad mode.
• In Scan mode zijn het beeldscherm en de luidsprekers uitgeschakeld tot een camera beweging
waarneemt. Het beeld van de camera die beweging waarneemt zal daarna beeldvullend weergeven
worden (met het geluid aan) tot er gedurende 15 seconden geen beweging meer wordt waargenomen.
Daarna wordt het beeldscherm en geluid weer uitgeschakeld. Druk kort op de POWER knop om de
Scan functie aan of uit te zetten.
• Auto sequence. Geeft iedere camera automatisch om de beurt weer in volledig scherm mode. Het
systeem schakelt automatisch naar Auto sequence mode als de scan mode wordt uitgeschakeld. Druk
op SEQ om de Auto Sequence mode uit te schakelen en terug te keren naar de Quad mode.
GEBRUIKSAANWIJZING
Uw monitor is in te stellen door middel van een aantal menu’s, waarin u kunt kiezen tussen verschillende
instellingen.
LIVE WEERGAVE SCHERM
Het Live weergave scherm is het hoofd gedeelte van het beeldscherm waar weergegeven wordt wat uw
camera’s waarnemen. U kunt hier het beeld van één camera beeldvullend laten tonen of de beelden
van alle camera’s tegelijkertijd laten tonen. U kunt ook de monitor automatisch laten schakelen tussen
NL
Page 44
- 44
de verschillende camera’s. Druk op het icoontje om de instelling van het Video weergave scherm te
veranderen.
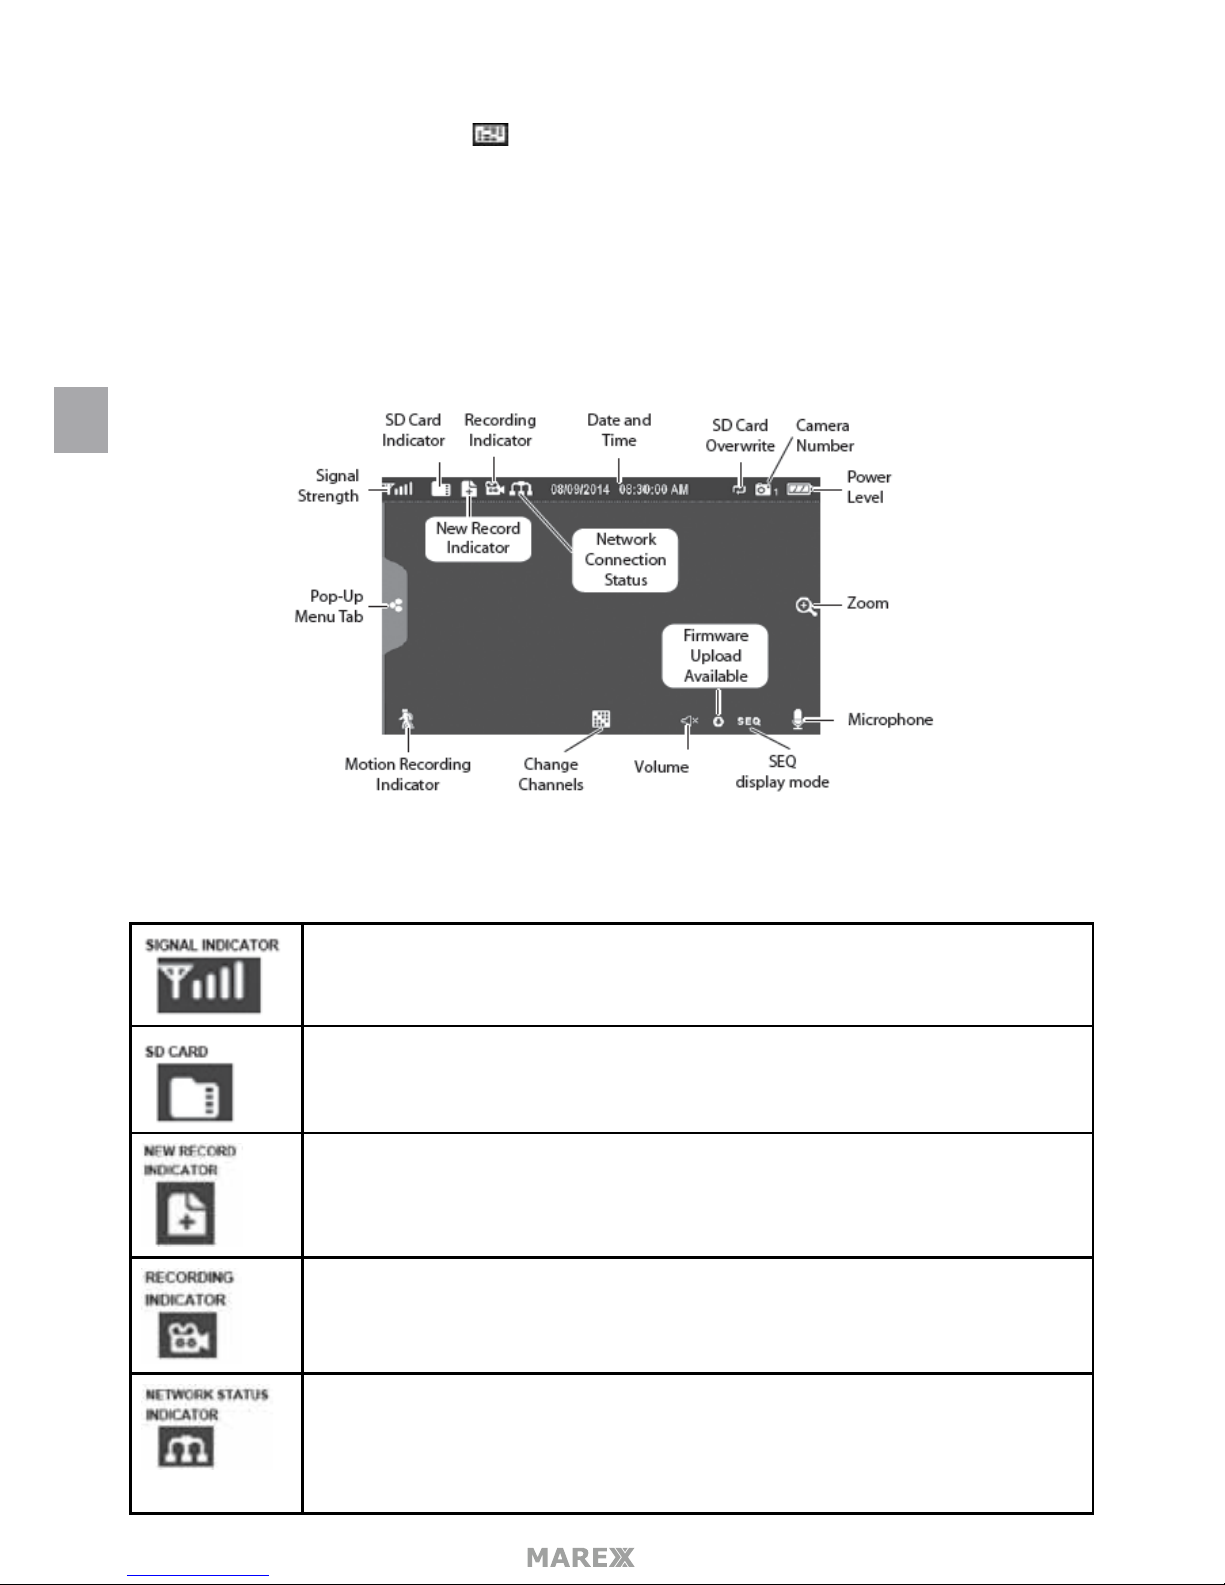
VIDEO WEERGAVE ICONEN
Verschillende iconen kunnen worden weergegeven op het scherm van uw monitor, afhankelijk van de
gebeurtenissen en instellingen van uw monitor.
Onderstaande afbeelding laat zien welke iconen waar op uw beeldscherm weergegeven kunnen worden.
Iconen op de monitor worden in werkelijkheid in blauw weergegeven
Laat zien hoe sterk het camera signaal is. Signaal varieert van 4 balkjes tot 0 balkjes
(buiten bereik)
Dit icoon laat zien of de monitor is voorzien van een sd kaart. Als dit icoon blauw is is er
nog ruimte op de SD kaart aanwezig voor nieuwe opnames. Als dit icoon rood is, is de
SD kaart vol.
Nieuwe opnames zijn bewaard op de SD kaart
Als dit icoon rood knippert wordt er op dit moment opgenomen.
• Groen, het systeem is aangesloten op het internet en de monitor is aangesloten
met internet mode.
• Geel, Systeem is aangesloten op internet en de monitor is aangesloten met
intranet mode.
• Rood, Verbinding is verbroken of het systeem is niet aangesloten op een netwerk
NL
Page 45
- 45
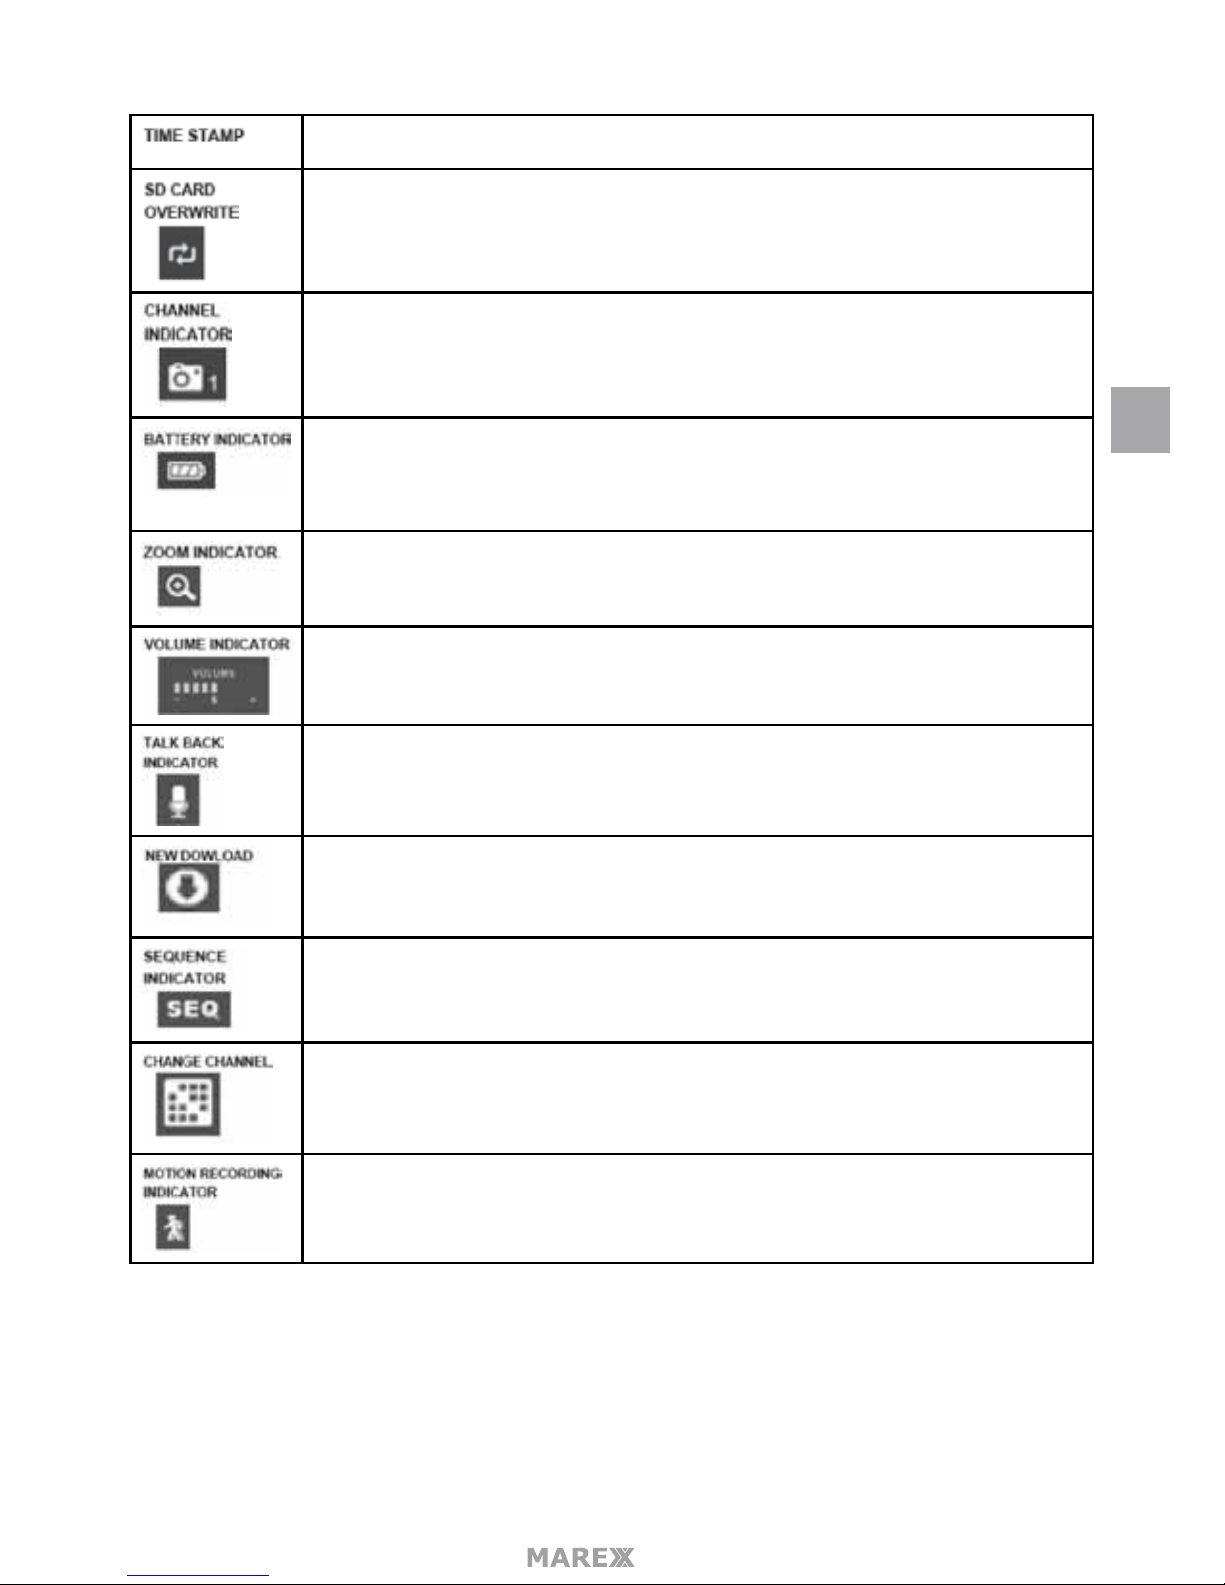
Huidige datum/tijd in maand/dag/jaar, uur/minuut/seconde formaat.
Geeft aan of de oudste opnames overschreven mogen worden als de SD kaart vol is.
Geeft het huidige camera kanaal weer dat u op dat moment bekijkt. Als u meerdere
camera’s tegelijkertijd bekijkt zal de camera indicator verschijnen boven ieder camera
beeld.
Geeft de staat van de batterij weer:
• Knipperend rood – Lege batterij
• Groen – volle batterij
• Knipperend groen – batterij wordt opgeladen
Als u op dit icoon drukt wordt het beeld onderverdeeld in 5 gedeeltes. Druk op het
gedeelte dat u wil zien in 2x vergroting. Druk nogmaals op het icoon om de zoom
mode te verlaten.
Geeft het huidige volume weer. U kunt het volume alleen wijzigen in de 1 kanaals
mode. Druk op + en – om het volume te verhogen of verlagen. Wordt weergegeven
zodra het volume uit staat.
Wordt weergegeven als de TALK (spreek) knop is ingedrukt. Houdt deze knop ingedrukt om via de camera (terug) te spreken. Laat de Talk knop los om een antwoord te
kunnen horen.
Geeft weer of er een rmware update beschikbaar is.
Geeft weer of de monitor ingesteld staat op automatisch schakelen tussen de video
kanalen.
Druk op deze knop om handmatig tussen de kanalen te schakelen.
Geeft de bewegingsdetectie status weer.
• Blauw, automatische opname na bewegingsdetectie staat uit.
• Rood, automatische opname na bewegingsdetectie staat aan.
NL
Page 46
- 46
Druk op dit icoon om toegang te krijgen tot het menu
MENU
Dit gedeelte gaat dieper in op het menu. Via het menu kunt u:
• Opgenomen video’s terug kijken
• Alarmen instellen
• De helderheid instellen per aangesloten camera (alleen in 1 kanaals weergave)
• Camera’s instellen voor opname en bewegingsdetectie
• Andere systeem en netwerk instellingen wijzigen.
Druk op om het menu weer te geven:
OPNAMES BEKIJKEN
Beheer opgenomen video’s in dit menu. U kunt hier zien wat en wanneer u heeft opgenomen, de video’s
bekijken en verwijderen.
NL
Page 47
- 47
• Druk op Het volgende scherm verschijnt:
• Gemarkeerde dagen hebben opgenomen bestanden Druk op de dag die u wil bekijken voor een
overzicht van opnames van die dag.
• Druk op de opname die u wil bekijken, de opname zal worden afgespeeld met de video controle
knoppen aan de onderkant van het scherm.
• Zodra de video is afgespeeld keert de monitor terug naar het opname overzicht
• Druk op het icoon om de opname te verwijderen indien gewenst.
NL
Page 48
- 48
ALARM
Zodra de camera geactiveerd wordt om op te nemen door door waargenomen beweging, zal de monitor een
geluidssignaal afgeven. In dit menu kunt u het volume instellen van deze geluidstoon.
• Druk op het volgende menu zal verschijnen:
Druk op + of – om het volume te verhogen of verlagen. Druk op om het menu weer te sluiten.
HELDERHEID
In dit menu kunt u de helderheid van iedere camera instellen.
• Druk op Het volgende scherm zal verschijnen:
•
NL
Page 49
- 49
• Druk op + of – om de helderheid te verhogen of verlagen. Druk op om dit menu weer te sluiten.
ALGEMENE INSTELLINGEN
Het Algemene instellingen menu bestaat uit 6 submenu’s. Welke ook weer in verschillende submenu’s zijn
onderverdeeld.
In deze submenu’s kunt u uw systeem instellen. U kunt onder andere camera’s aan en uit zetten. Een
schema instellen voor opnames door specieke camera’s. De datum en tijd instellen, de bewegingsdetectie
gevoeligheid instellen.
Druk op de volgende iconen om het General Settings (Algemene Instellingen) menu te openen:
Hoofd menu Sub-Menu Beschrijving
Camera Settings
Paring
De camera’s van deze set zijn al
gekoppeld (paired). Gebruik Pairing om de camera’s aan nieuwe
kanalen toe te wijzen of om
nieuwe camera’s te koppelen aan
de monitor.
ON/OFF
Zorgt ervoor dat de camera’s wel
of niet weergegeven worden.
Resolution
Stelt de video kwaliteit van iedere
camera in.
NL
Page 50
- 50
Main Menu Sub-Menu Beschrijving
Recording Setup
Duration
Stelt de duur van de opname
in zodra beweging wordt
waargenomen door een camera.
U kunt kiezen tussen 15 seconden, 30 seconden of 1 minuut
(standaard is 15 seconden).
Schedule Recording
Stelt een schema in voor geplande opnames.
File Overwrite
Overschrijft de oudste opgenomen video’s op de SD kaart zodra
de kaart vol is.
System Settings
Date & Time
Tijd instellingen, Stel de huidige
tijd in, (ook zomertijd/wintertijd)
Time Zone
• Stel de tijdszone in voor uw
systeem
• Schakel zomertijd/wintertijd
in en uit.
Lanuage
Stel de taal in voor de menu’s
(Engels, Frans en Spaans).
Default Settings Herstelt de fabrieksinstellingen.
Format SD Card
Formatteert de SD kaart en verwijderd alle opnames.
Information
Geeft de geïnstalleerde rmware
weer voor de monitor en iedere
camera.
Motion Detection Settings
In dit menu kunt u de bewegingsdetectie gevoeligheid instellen voor
iedere camera. Hier kunt u ook instellen welke gebieden van het
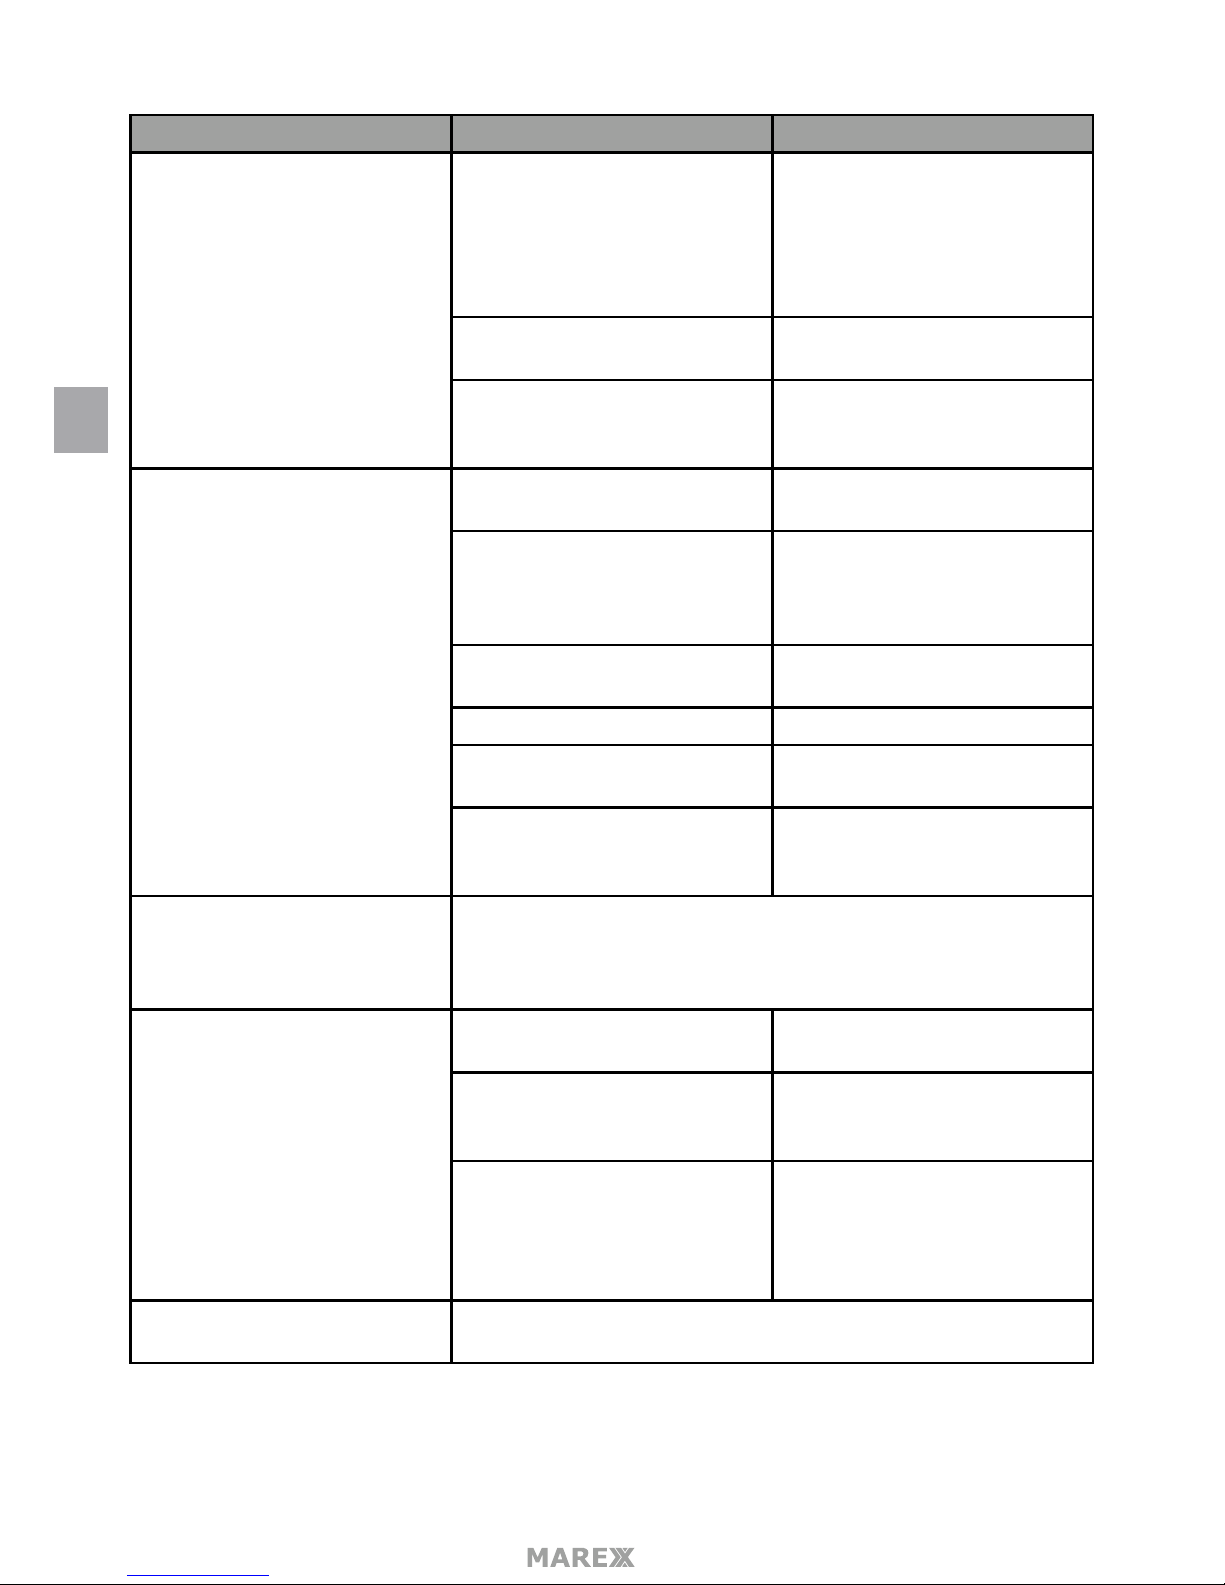
beeld van iedere camera uitgesloten moeten worden van bewegingsdetectie.
Network Setup
Advanced Setup
Instellen van een Dynamisch of
Statisch IP adres.
Reset Password
Reset het password van de app
naar het standaard password
(000000).
Information
Geeft informatie weer, hier kunt
u ook de informatie over uw
netwerk aanpassen en het unieke
UID nummer van de monitor
aanpassen.
Firmware Upgrade
Hier kunt u selecteren hoe u de rmware wil updaten, via SD kaart of
via de server.
NL
Page 51
- 51
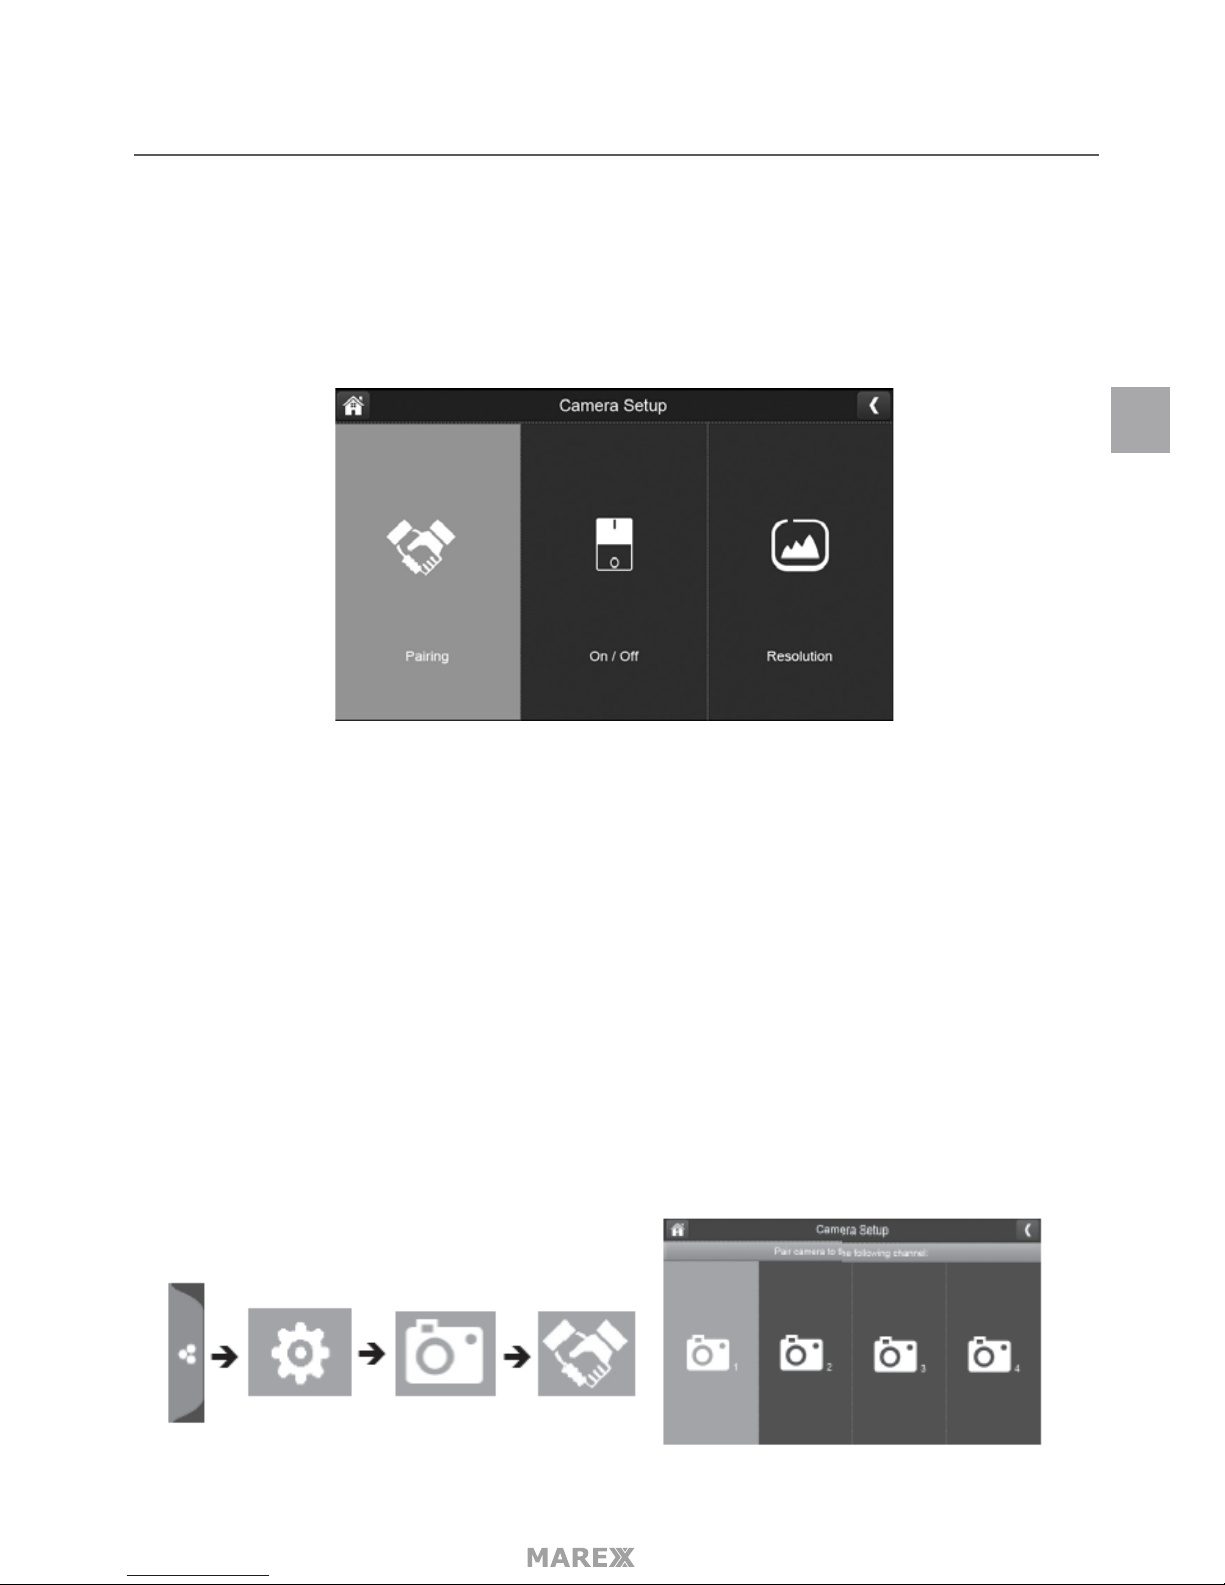
CAMERA INSTELLINGEN MENU
In het camera Setup menu kunt u:
• Camera’s pairen (koppelen)
• Camera’s aan en uit zetten
• De resolutie instellen
PAIRING
Nieuwe camera’s zijn nog niet gekoppeld met uw monitor, als u nieuwe camera’s aan uw systeem wil toevoe-
gen, moet u de monitor en camera ‘aan elkaar voorstellen’ zodat ze met elkaar kunnen communiceren.
• Als er al een camera is toegewezen aan het geselecteerde kanaal zal pairen met een andere camera de
bestaande link met een camera overschrijven met de link met de nieuwe camera.
• Pair alleen 1 camera tegelijkertijd! De monitor koppelt met de eerste camera die gedetecteerd wordt,
als 2 camera’s in de pairing mode staan heeft u geen controle over welke camera als eerste door de
monitor zal worden gedetecteerd.
Druk op de volgende iconen, het volgende menu wordt weergegeven:
NL
Page 52
- 52
1. Druk op Pairing in het camera Setup scherm.
2. Druk op het kanaal nummer waarmee u de camera wil koppelen.
3. Een instructieboodschap, waarin gevraagd wordt om op de PAIR knop op de camera te drukken,
verschijnt op het scherm. U heeft nu 30 seconden de tijd om een keer kort op de pair knop voorop de
camera te drukken.
4. Het beeld van de camera verschijnt 3 seconden na dat de camera en monitor succesvol gekoppeld zijn.
ON/OFF
Zodra u een camera toevoegt aan uw systeem, zal de camera automatisch ingeschakeld worden. U kunt een
gekoppelde camera ook uitschakelen.
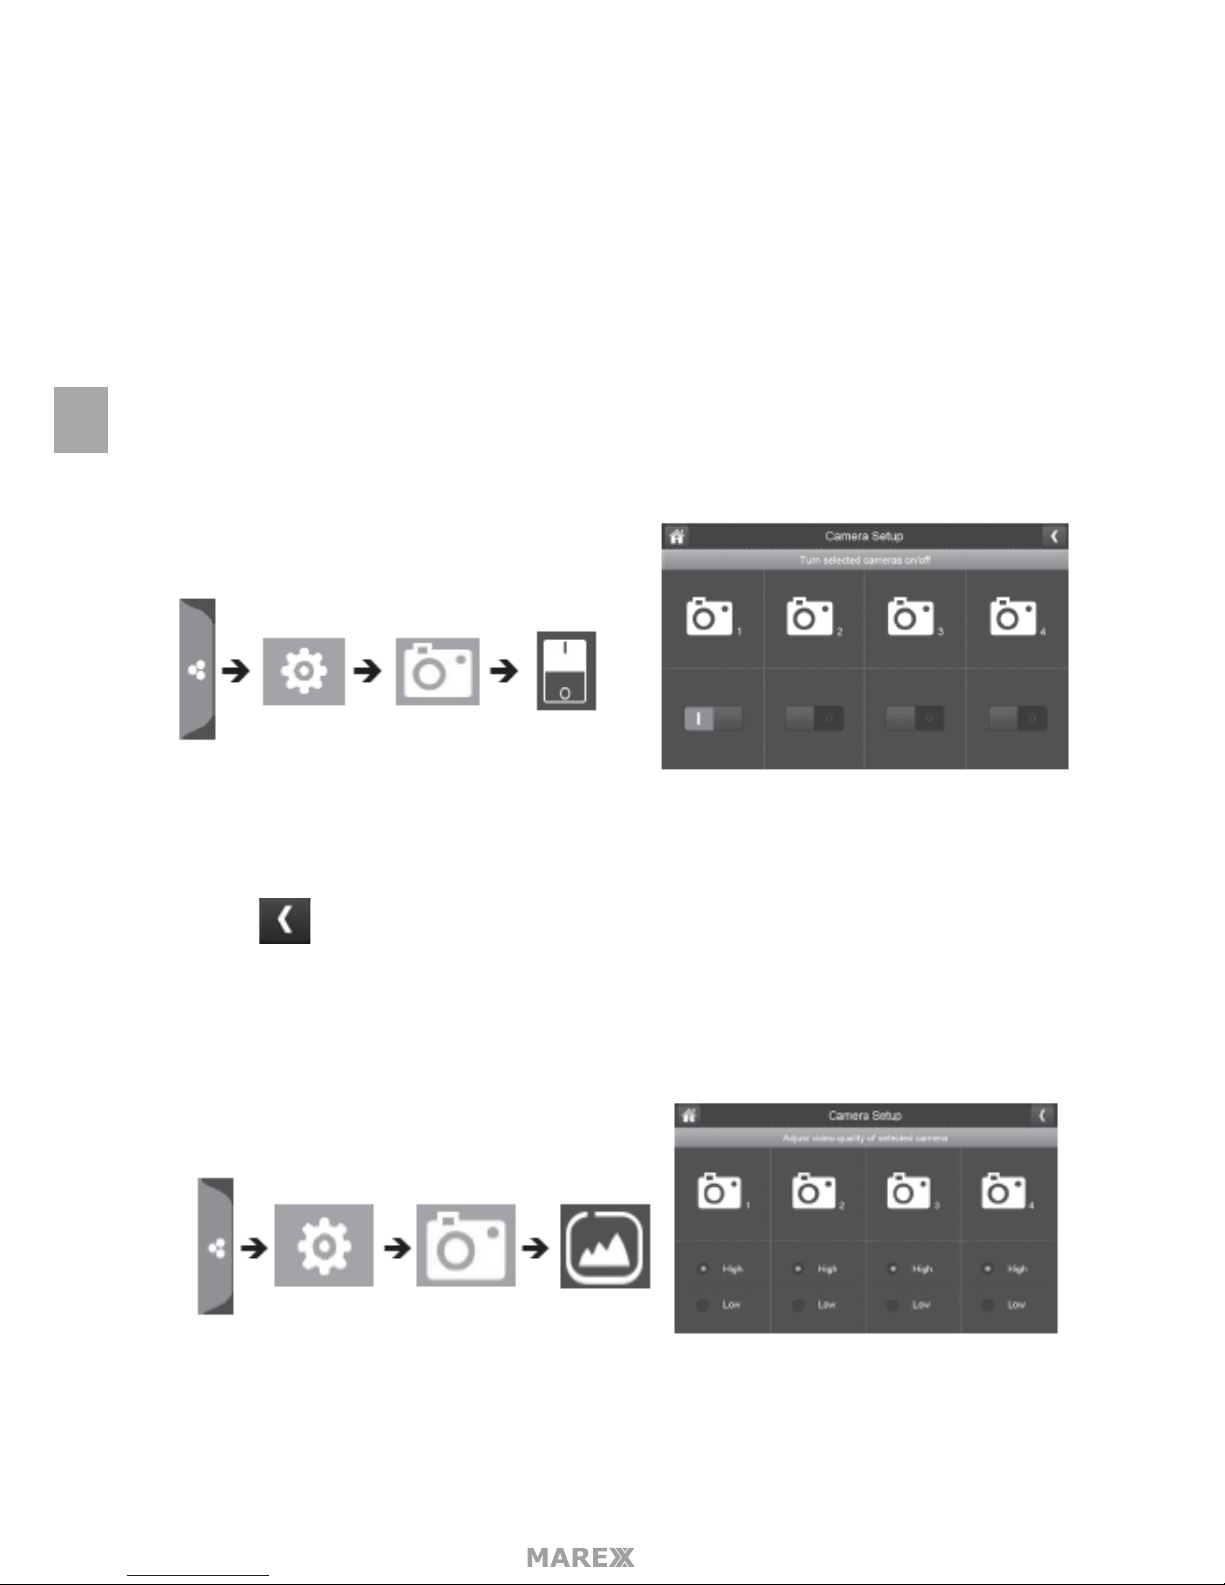
Druk op de volgende iconen, het volgende menu wordt weergegeven:
1. Druk op de schuifknop onder de camera die u in of uit wil schakelen.
2. De schuifknop wordt groen als de camera ingeschakeld is, en grijs als de camera uitgeschakeld is.
3. Druk op om terug te keren naar het vorige menu.
FRAME RATE
Druk op de volgende iconen, het volgende menu wordt weergegeven:
1. Druk op High of Low om de Frame Rate per camera in te stellen.
NL
Page 53
- 53
2. Druk op om terug te keren naar het vorige menu. .
OPNAME INSTELLINGEN
Gebruik het Recording Setup scherm om:
• De duur van de opname na bewegingsdetectie in te stellen.
• Een tijdstip en duur van opname in te stellen voor een specieke camera.
• Het bewaren van opnames in te stellen.
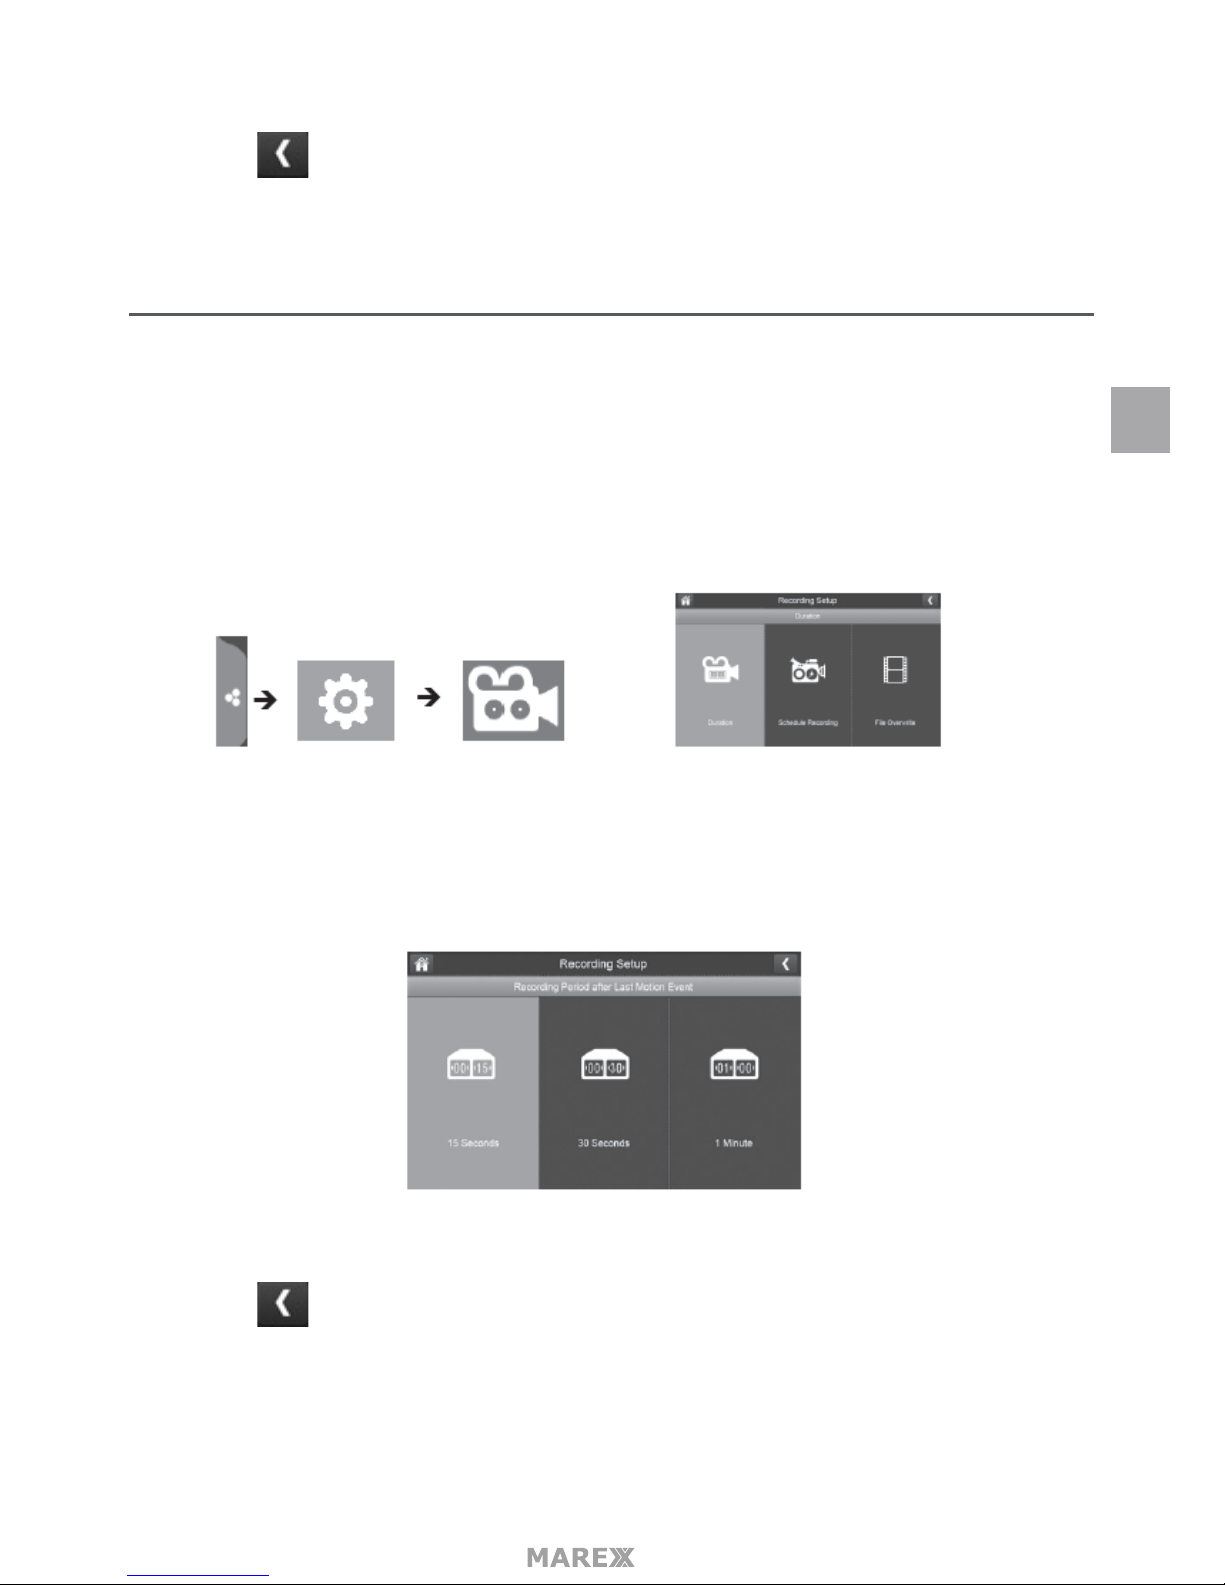
Druk op de volgende iconen, het volgende menu wordt weergegeven:
DURATION
U kunt hier instellen hoe lang de camera op blijft nemen na waarnemen van beweging. De opties zijn 15
seconden, 30 seconden of 1 minuut. Standaard is 15 seconden.
1. Kies de gewenste duur van opname.
2. Druk op om terug te keren naar het vorige menu.
SCHEDULE RECORDING
Met deze functie kunt u per week tijdsperiodes instellen waarin een camera op moet nemen. Meerdere cam-
era’s kunnen tegelijkertijd opnemen, en opname tijdstippen mogen elkaar overlappen.
NL
Page 54
- 54
1. Druk op het Schedule Recording Overview menu zal verschijnen.
2. Druk op MODIFY rechtsonder. Het Schedule Recording Setup menu verschijnt.
3. Selecteer een camera. Als je meer dan 1 camera wil laten opnemen op hetzelfde tijdstip selecteer dan
beide camera’s.
4. Stel de opname tijd in
- Druk op het am/pm blokje om am of pm te selecteren.
- Druk op de uren en minuten om met de pijlen omhoog en omlaag de juiste tijd in te stellen in
UU:MM formaat.
- Druk op de terugkeer knop om de juiste tijd te bewaren en om door te gaan met de volgende
instelling.
5. Druk op SAVE, de monitor keert terug naar het Schedule Recording Overview menu met de opname
periode aangegeven.
6. Druk opnieuw op MODIFY om een andere opname sessie in te plannen.
Ingeplande opnames worden opgesplitst in opnames van 10 minuten. Bijvoorbeeld als u 25 minuten
opneemt, krijgt u 2 opnames van 10 minuten en 1 opname van 5 minuten
FILE OVERWRITE
Met deze functie kunt u de monitor instellen om automatisch de oudste (eerst opgenomen) opnames te
overschrijven. Dit maakt het mogelijk om continue op te blijven nemen. Als u niet toestaat om opnames te
overschrijven zal de monitor stoppen met opnemen zodra de SD kaart vol is.
1. Druk om toegang te krijgen tot het File overwrite (opname overschrijven) menu. In het volgende
scherm kunt u een keuze maken tussen opnames overschrijven (druk op YES), of opnames niet over-
schrijven (druk op NO).
NL
Page 55
- 55
2. Druk op om terug te keren naar het vorige menu.
SYSTEM SETTINGS MENU
Gebruik dit menu om de volgende instellingen aan te passen:
• Datum en tijd
• Tijdszone
• Taal
• Fabrieksinstellingen
• SD-kaart formateren
• Informatie.
Druk op de volgende iconen, het volgende menu wordt weergegeven:
DATE AND TIME
1. Druk op om naar het Datum en Tijd submenu te gaan.
2. Gebruik de omhoog en omlaag pijlen om de juiste datum en dag in te stellen.
NL
Page 56
- 56
3. Gebruik de omhoog en omlaag pijlen om de juiste tijd in te stellen, en stel met de schuifknop AM of PM
in.
4. Druk op synchroniseer met een internet tijd server als u wil dat uw tijd automatisch wordt ingesteld..
Om gebruik te maken van de internet tijd server moet uw systeem verbonden blijven met internet.
5. Druk op om terug te keren naar het vorige menu.
TIME ZONE
Met Time Zone kunt u de plaatselijke tijdszone instellen. Dit is met name praktisch als u de app in een andere
tijdszone gebruikt en u op afstand toegang bij uw opnames wil hebben.
Uw Marex systeem zal begrijpen dat uw zoekopdracht refereert aan de tijdszone waarin uw monitor zich
bevindt. [Standaard tijdszone = GMT-5:00) Eastern Time (USA & Canada).
1. Druk op Het tijdszone menu zal verschijnen.
2. Scroll omhoog of omlaag naar uw tijdszone en druk erop.
3. Druk op de volgende optie om Daylight Savings (Zomertijd/wintertijd) aan of uit te zetten.
4. Druk op om terug te keren naar het vorige menu.
NL
Page 57
- 57
LANGUAGE
Druk op om de taalinstellingen van het menu te wijzigen. Mogelijke talen zijn: Engels, Spaans en Frans.
1. Druk op de gewenste taal.
2. Druk op u gaat nu terug naar het vorige menu dat nu automatisch wordt weergegeven in de
door u gewenste taal, u hoeft de monitor niet opnieuw op te starten.
DEFAULT SETTINGS
1. Druk op om terug te keren naar de originele fabrieksinstellingen.
2. Druk op YES om de originele instellingen te herstellen.
3. Druk op OK om het resetten van de instellingen van uw Marex systeem te bevestigen.
NL
Page 58
- 58
FORMAT SD CARD
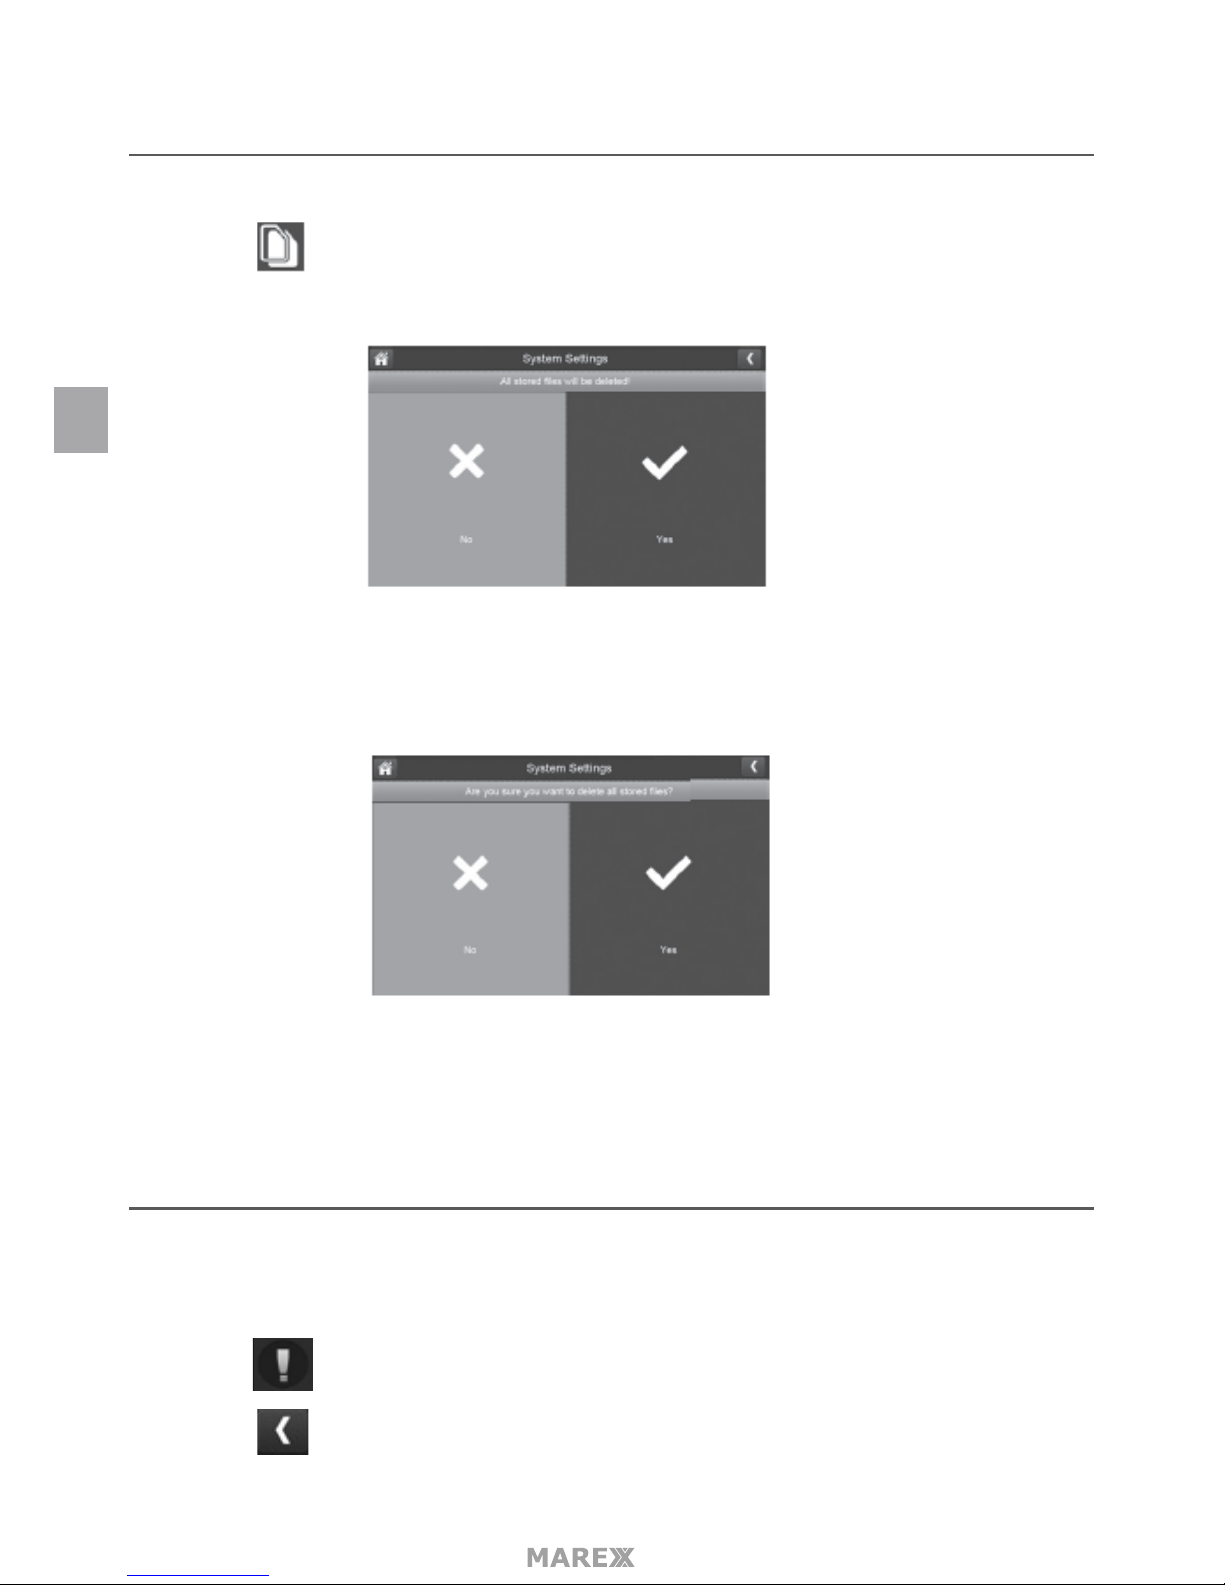
Bij het formateren van de SD kaart worden alle bestanden op de SD kaart verwijderd.
1. Druk op om uw SD kaart te formateren.
2. Druk op YES in het All stored les will be deleted (alle bewaarde bestanden zullen worden verwijderd)
scherm. Druk nogmaals op YES om te bevestigen.
3. De voortgang wordt weergegeven in een balk op het scherm. Nadat de SD kaart is geformatteerd wordt
er een ‘Format OK’ melding weergegeven.
SYSTEM SETTINGS
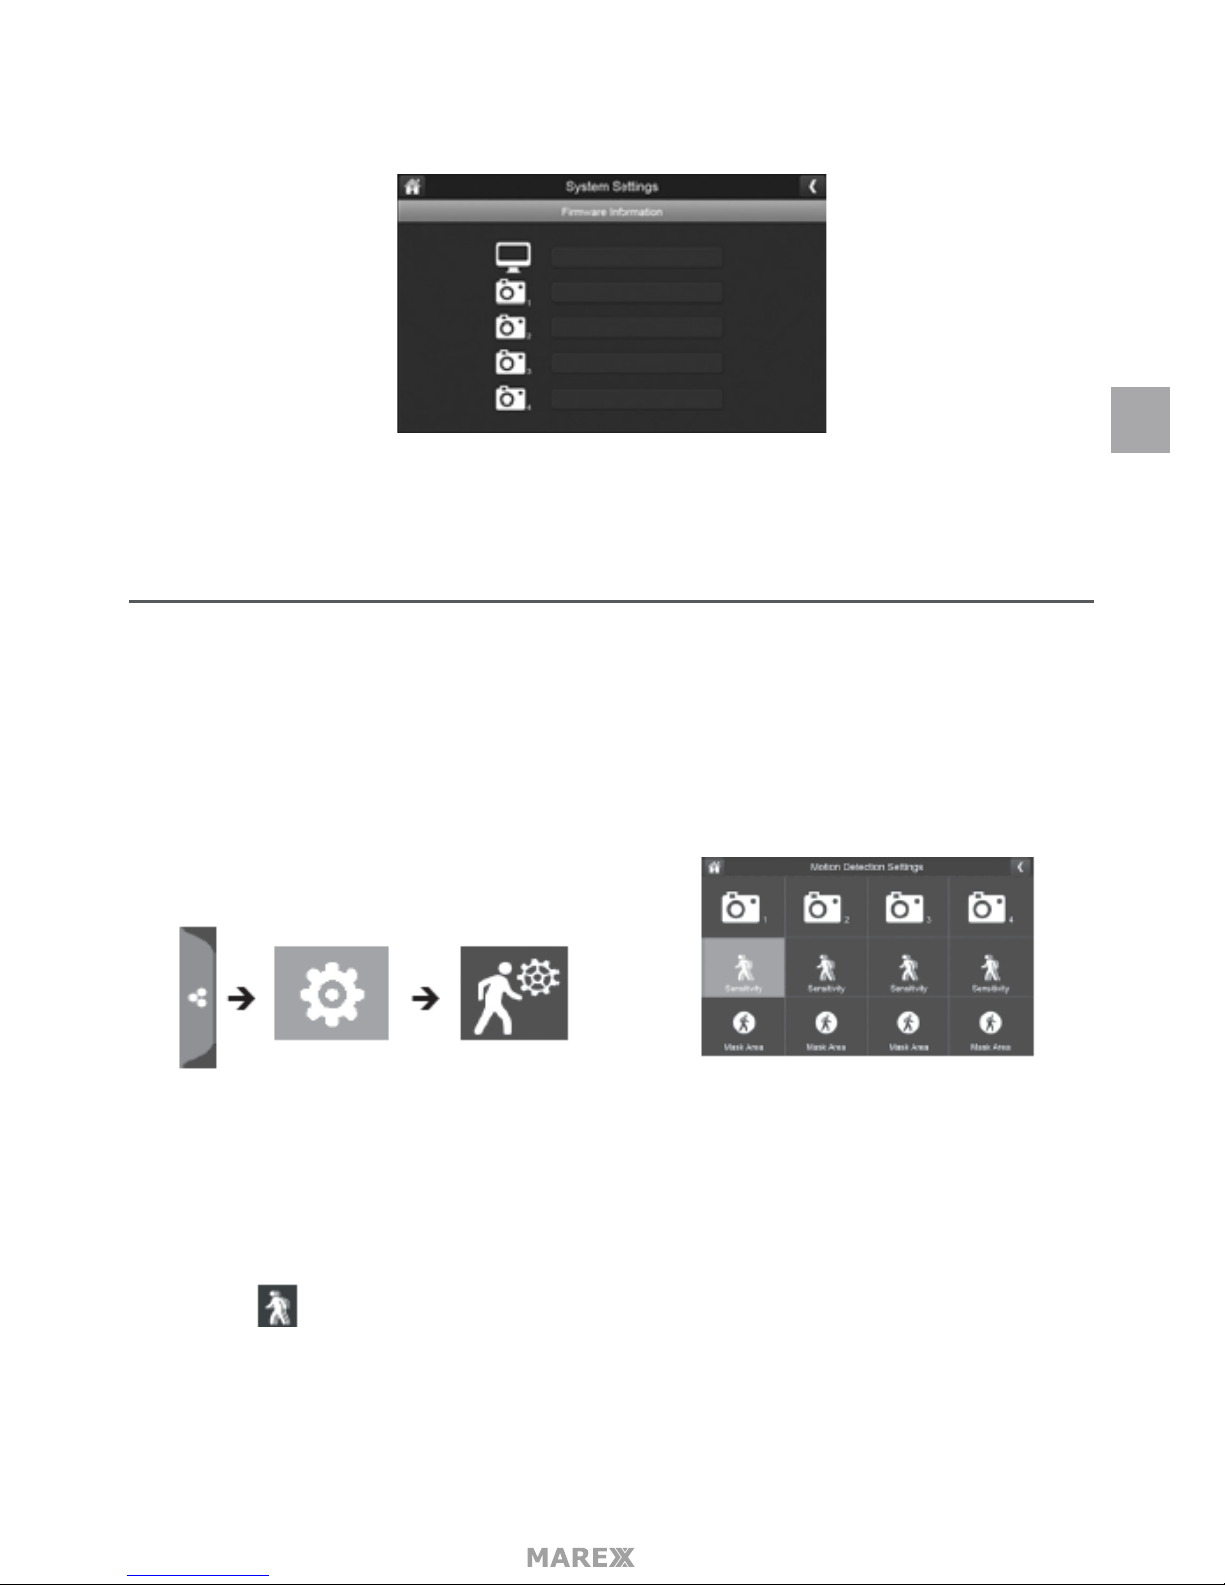
In dit menu krijgt u een overzicht van de geïnstalleerde software op de monitor en alle camera’s die gekop-
peld zijn met de monitor.
1. Druk op om het menu weer te geven.
2. Druk op om terug te keren naar het vorige menu.
NL
Page 59
- 59
MOTION DETECTION SETTINGS MENU
Hier kunt u instellen hoeveel beweging er nodig is om een opname te starten. Hier kunt u ook instellen welke
gebieden in het beeld buiten beschouwing moeten worden gelaten. Als u bijvoorbeeld een rij bomen links-
boven in beeld heeft die door de wind bewogen worden, kunt u de bewegingsdetectie voor het gedeelte
links boven van het scherm uit zetten.
Druk op de volgende iconen, het volgende menu wordt weergegeven:
SENSITIVITY
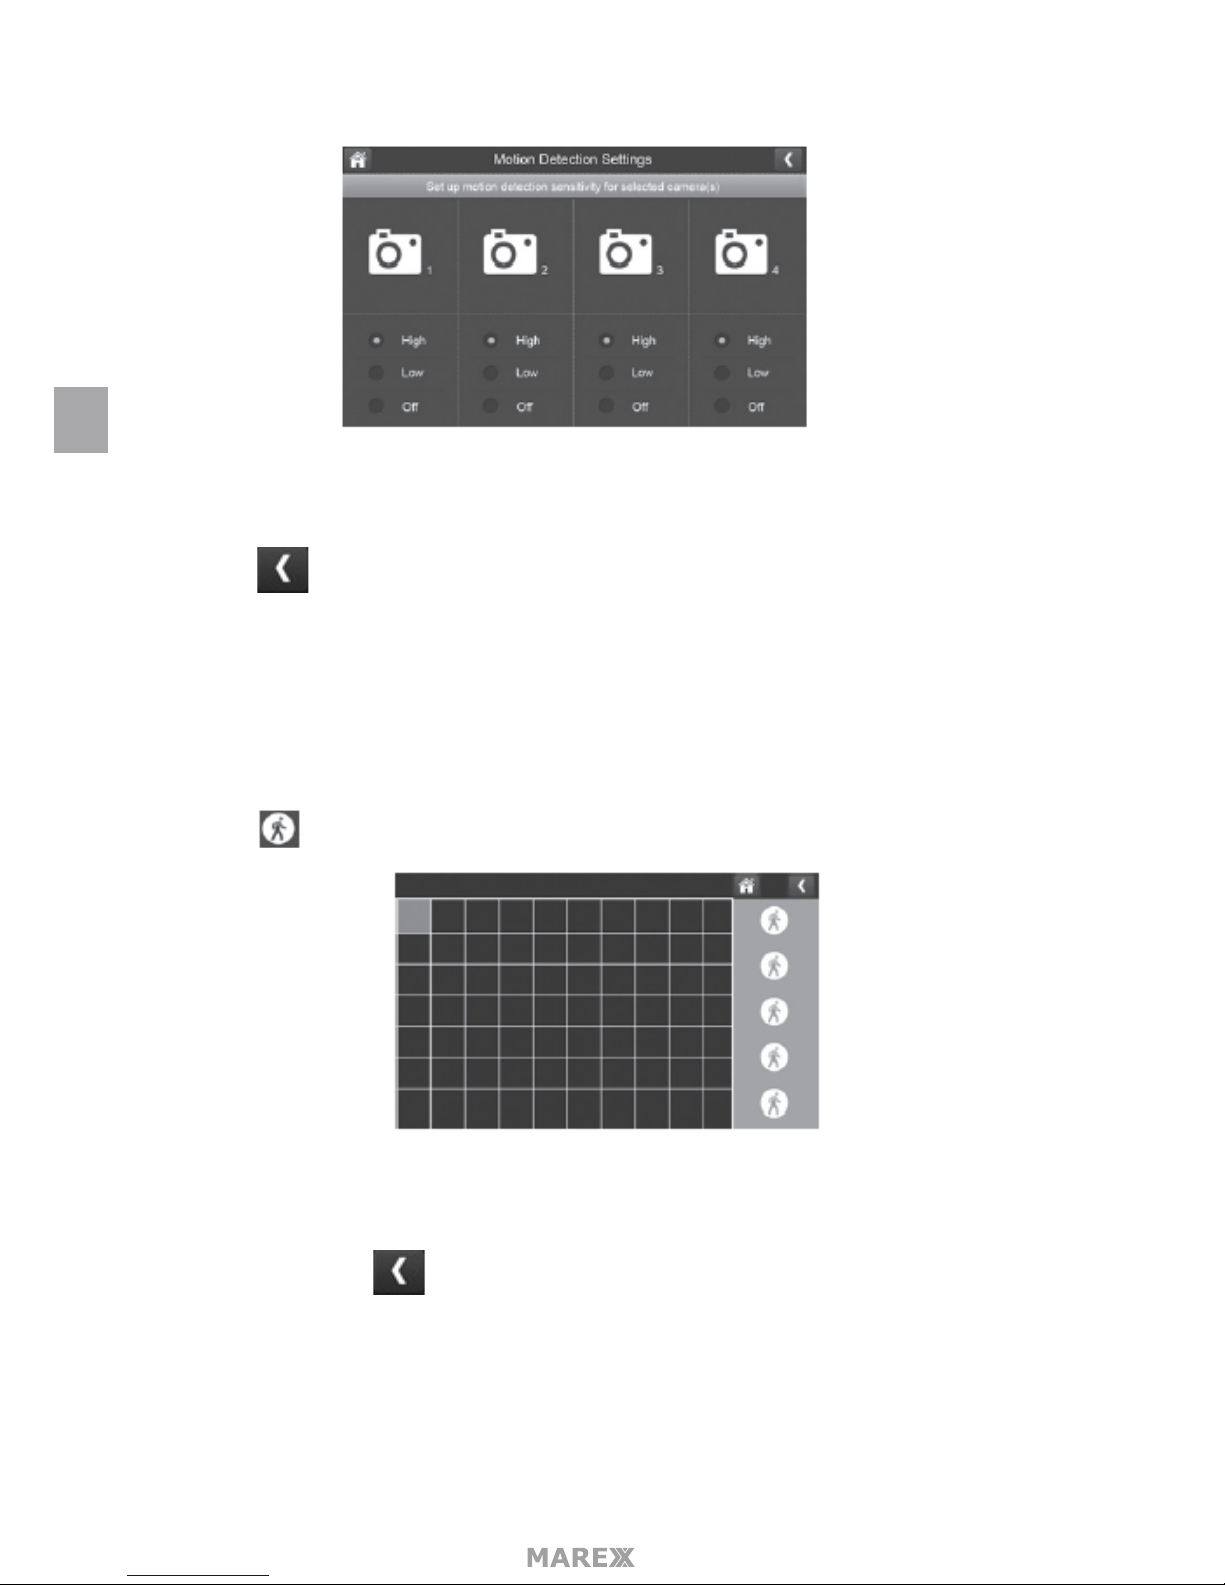
Hier kunt u de gevoeligheid van de bewegingsdetectie instellen in High (hoog), Low (laag) or O (uit).
1. Druk op het volgende menu verschijnt:.
NL
Page 60
- 60
2. Druk op High (hoog), Low (laag) of O (uit) om de gevoeligheid in te stellen.
3. Druk op om terug te keren naar het vorige menu.
MASK AREA
Gebruik deze functie om gebieden te markeren waarvan u NIET wil dat ze deel uit maken van het bewegings-
detectie gebied.
1. Druk op Het Mask Area menu verschijnt, over het beeld van de camera.
2. Druk op de vierkantjes die het gebied beslaan dat u wil uitsluiten van de bewegingsdetectie.
Druk zodra u klaar bent op om terug te keren naar het vorige menu.
NL
Page 61
- 61
NETWORK SETUP MENU
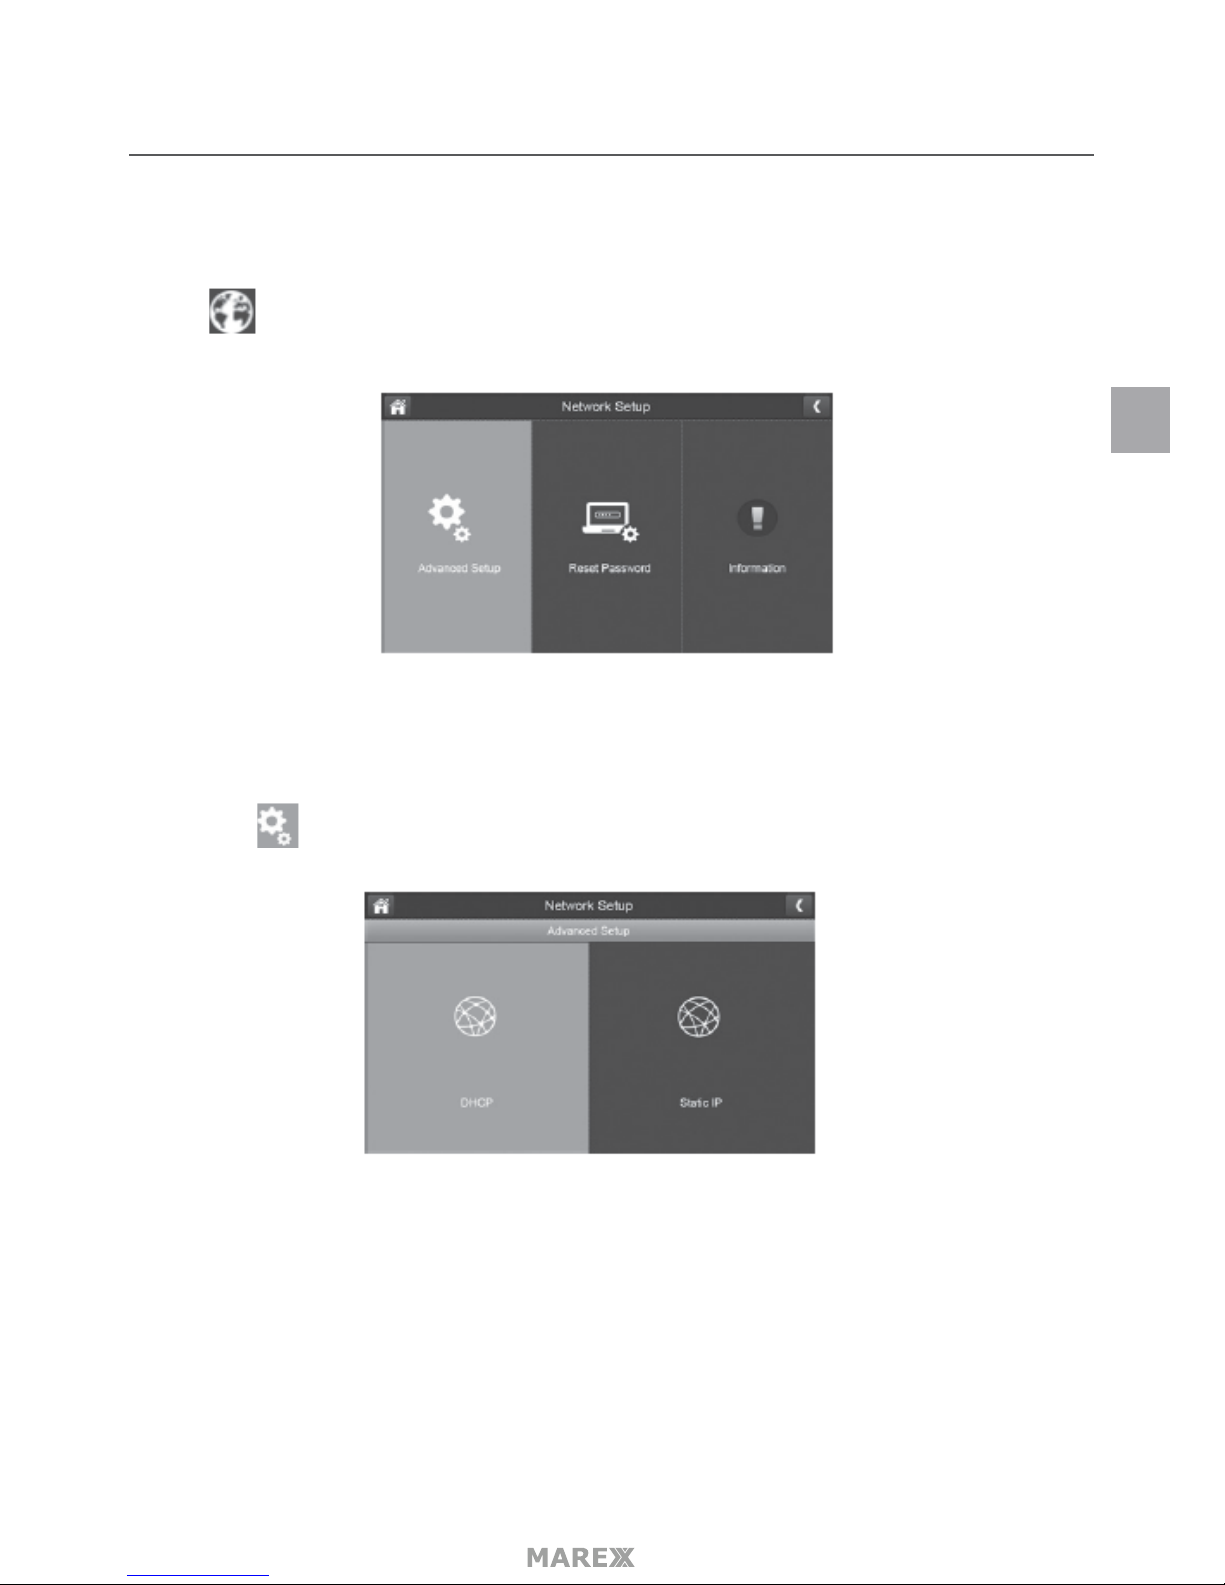
In dit menu kunt u een keuze maken tussen uw netwerk connectie type, het App password instellen en de
netwerk instellingen bekijken.
Druk op om het Network Setup menu te openen.
ADVANCED SETUP
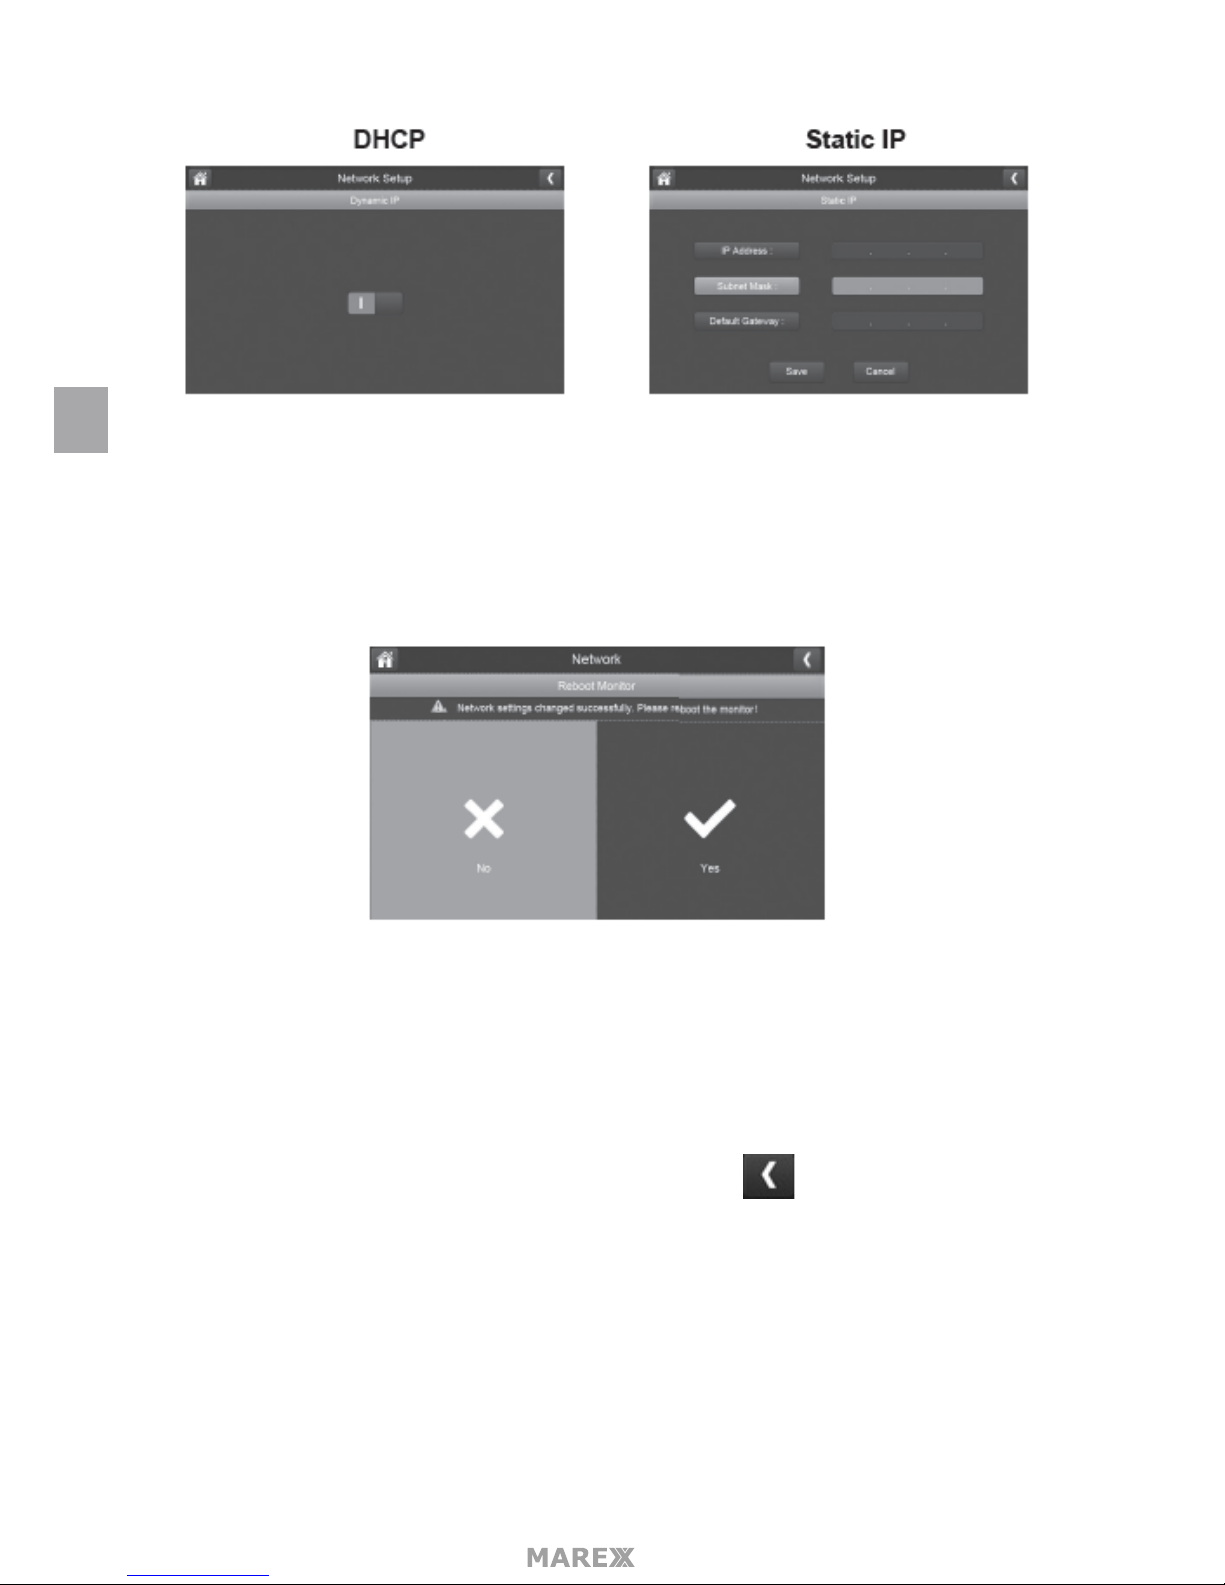
1. Druk op om het geavanceerde instellingen menu weer te geven.
2. Druk op uw selectie en vul de gevraagde velden in, druk op SAVE.
NL
Page 62
- 62
3. Druk op uw selectie en vul de gevraagde velden in.
DCHP is de meest gebruikte verbinding, uw router zal automatisch een IP adres toewijzen aan uw Marex
systeem. Static IP is bedoeld voor diegene die de mogelijkheid hebben om een IP adres te speciceren
voor hun systeem.
4. Herstart de monitor zodra hierom gevraagd wordt.
RESET PASSWORD
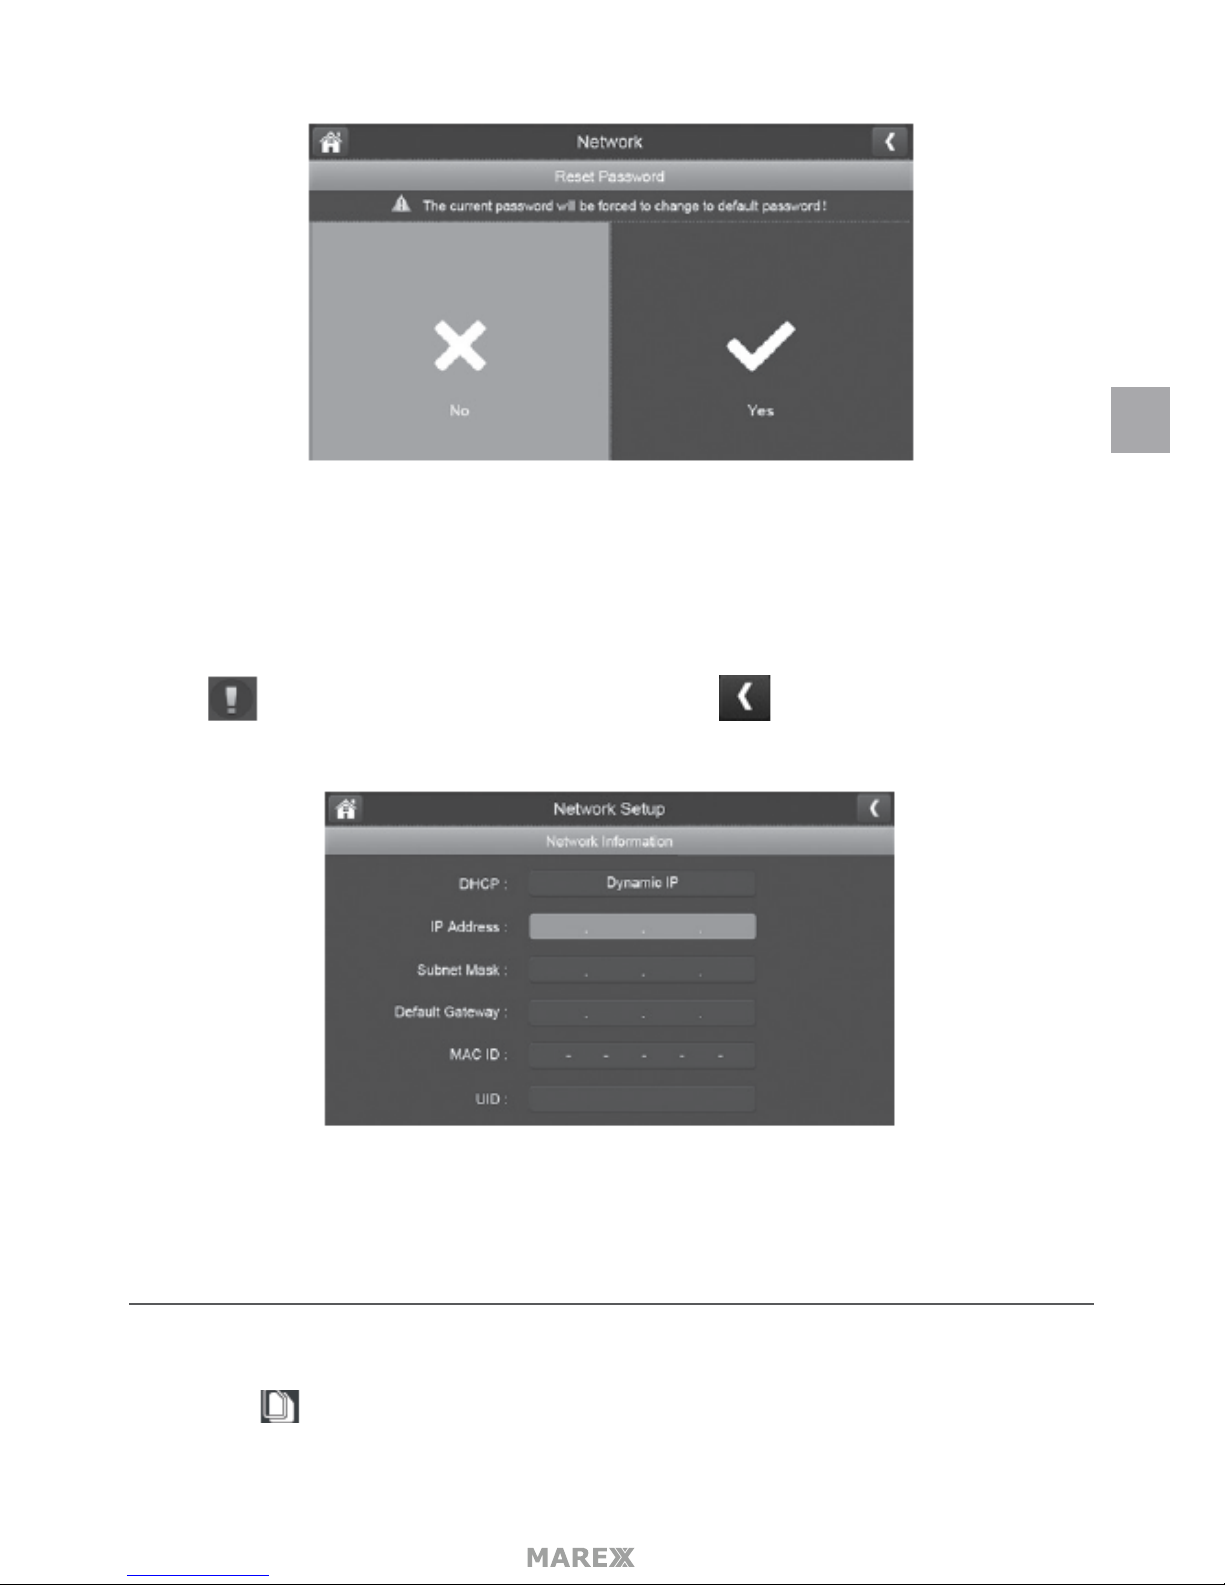
De Reset password functie zet het password van de MyCam View App terug naar het standaard password
(000000).
• Druk op YES om het password te resetten, druk vervolgens op om terug te keren naar het
vorige menu.
NL
Page 63
- 63
INFORMATION
Dit scherm geeft de IP informatie weer als de Marex set is aangesloten op het internet.
Druk op om het informatie scherm weer te geven, druk op om terug te keren naar het vorige
menu.
FIRMWARE UPGRADE MENU
Upgrade van SD kaart
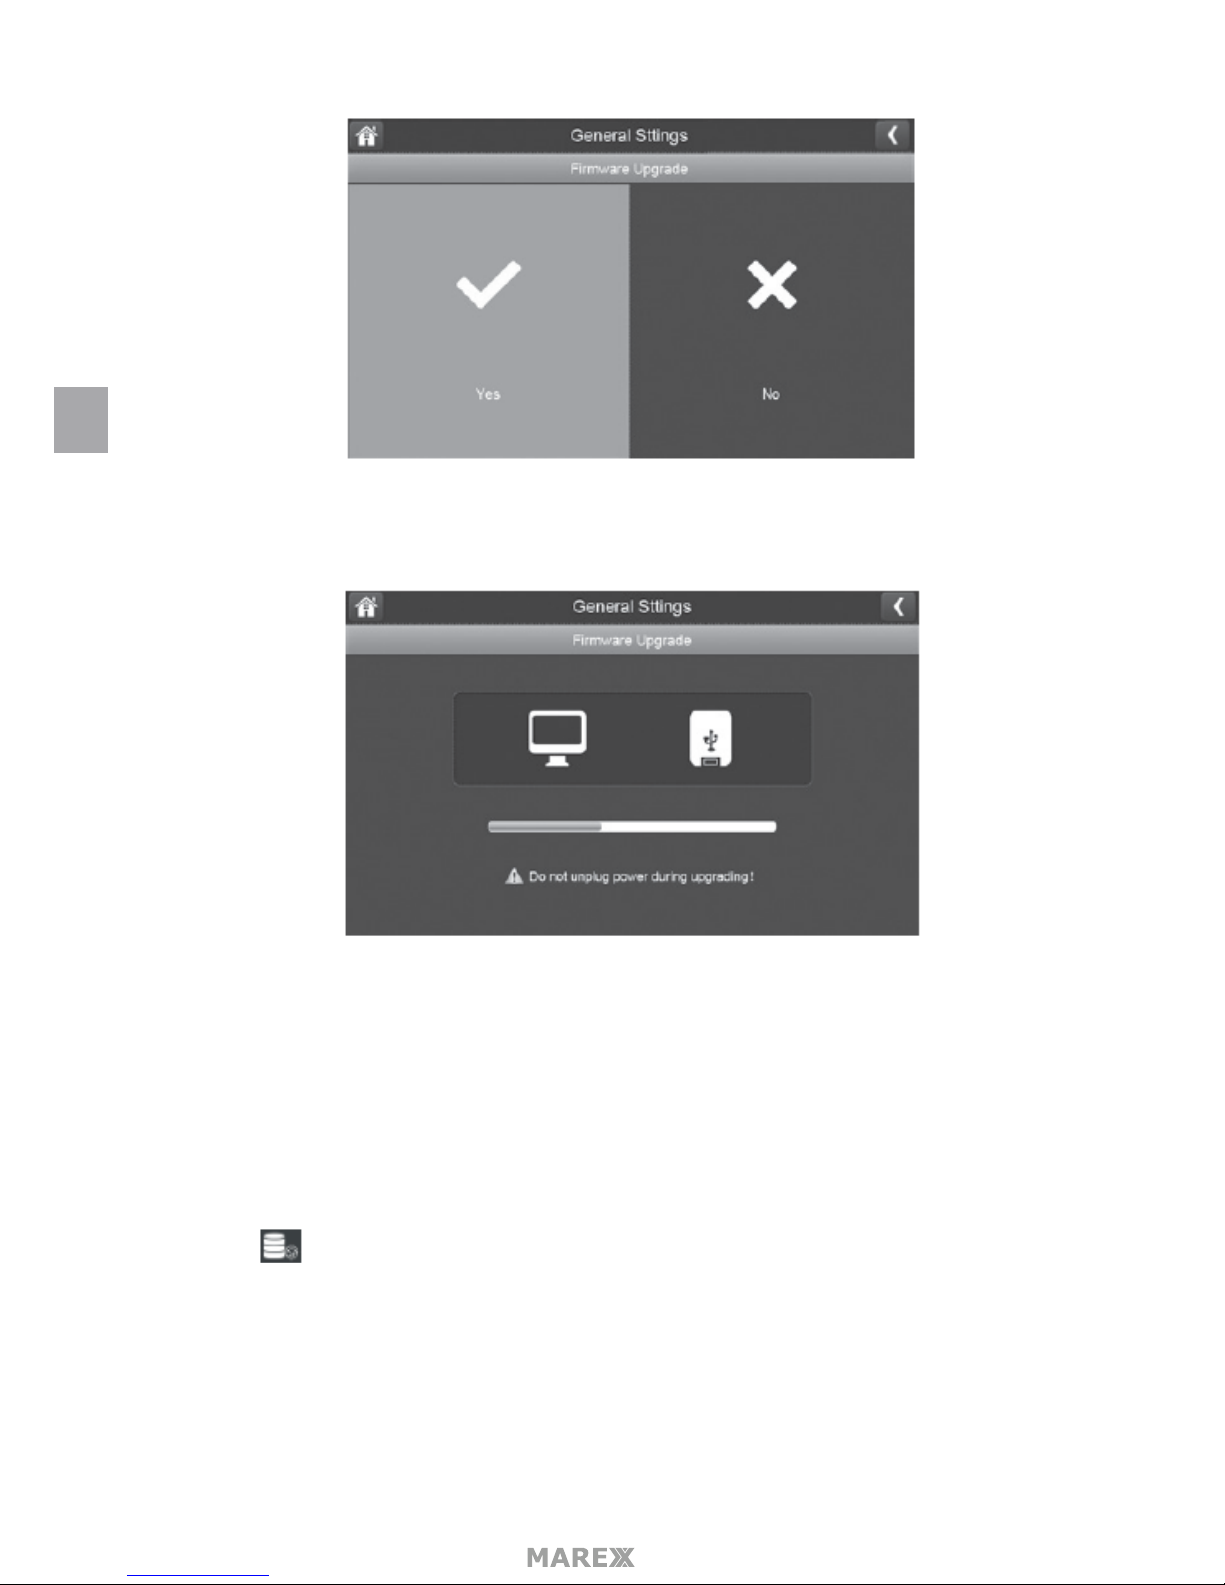
1. Druk op om de rmware upgrade vanaf een SD kaart te doen. Druk op YES om te bevestigen.
NL
Page 64
- 64
2. De voortgang zal worden weergegeven.
3. Zodra de update klaar is zal de monitor ‘Firmware Upgrade Succesful weergeven en automatisch
opnieuw opstarten.
Upgrade van Server
1. Gebruik de ethernet kabel (meegeleverd) om uw monitor te verbinden met uw router.
2. Druk op om de rmware te upgraden via de server.
3. Een bevestigingsscherm wordt weergegeven, druk op YES.
4. Uw Marex monitor zal controleren of er nieuwe rmware beschikbaar is. Als er nieuwe rmware bes-
chikbaar is zal uw Marex monitor deze installeren en automatisch opnieuw opstarten.
NL
Page 65
- 65
ANDROID AND IOS APP REMOTE VIEW
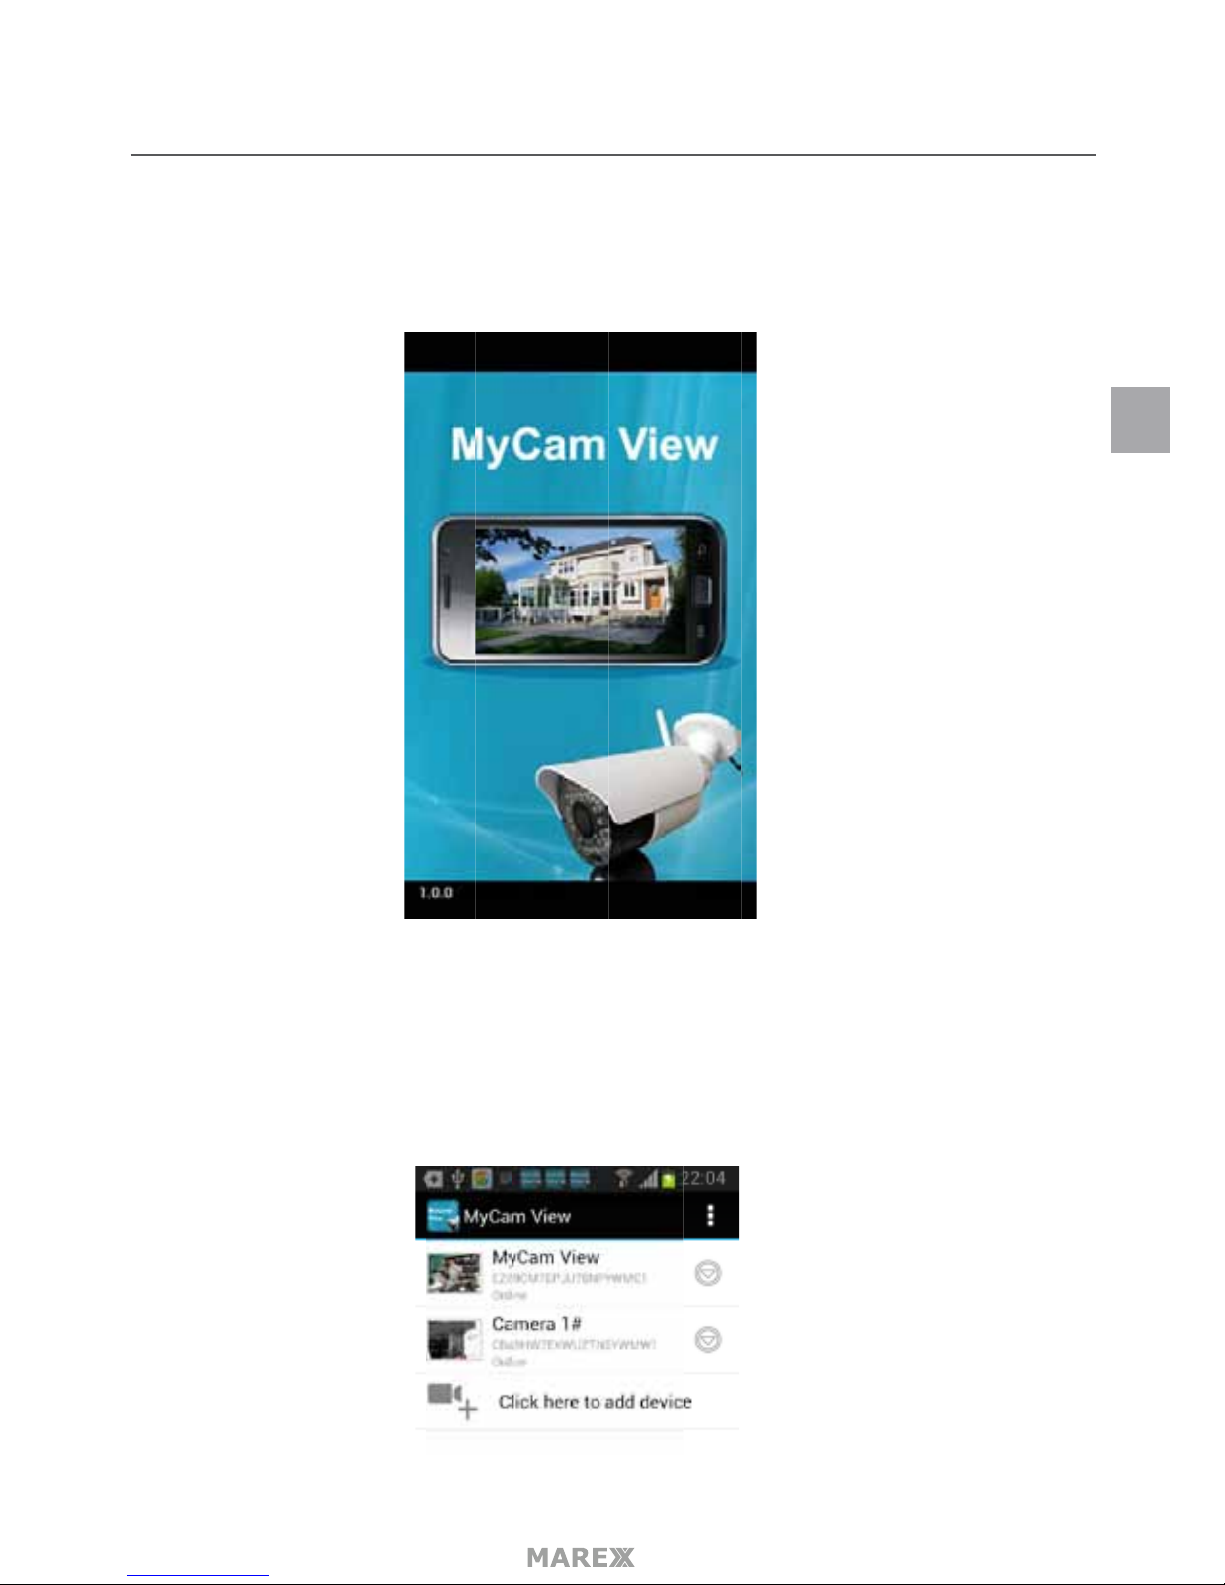
1. Download the app MyCam View 1.0.0.apk gratis van de App store of de Google Play store op uw
smartphone of tablet.
Zorg ervoor dat uw smartphone of tablet is verbonden met internet.
2. Sluit uw Marex monitor aan op uw router met de meegeleverde ethernetkabel.
3. Uw Marex systeem koppelen met de MyCam View App:
Druk op het MyCam View App icoon om de app te starten, druk vervolgens in de App op
Click here to add device.
NL
Page 66
- 66
Het volgende scherm verschijnt:
Er zijn 2 mogelijkheden om uw Marex set te registreren bij uw MyCam View App.
Optie A: Druk op de Scan knop en scan de QRcode achterop de monitor.
Optie B: Vul de UID code die onder de QRcode aan de achterzijde van uw monitor staat in,
(bijvoorbeeld: D7ETGG7YPUUZUNPYWM4J).
Name: Druk op naam om de camera te hernoemen (standaard naam is MyCam View). Voer het pass-
word in: 000000 (standaard instelling). Druk op OK om te bevestigen.
NL
Page 67
- 67
1. Uw Marex systeem zal in de lijst van geïnstalleerde systemen verschijnen zoals hieronder weergegeven.
2. Druk op het Marex systeem dat u heeft toegevoegd aan uw MyCam View App. U kunt nu de live
beelden van uw camera bekijken in portrait (staand) of landscape (liggend) mode.
View Druk hierop om eerder genomen Snapshot foto’s te bekijken.
Snapshot Druk hierop om een foto van het weergegeven beeld te maken
Mute Druk hierop om het geluid van de weergegeven camera uit of aan te zetten.
NL
Page 68
- 68
Talk back Druk hierop om (terug) te spreken via de weergegeven camera
CH Druk hierop om het camera kanaal te selecteren dat u wil zien.
Online Geeft het aantal bezoekers aan die op dit moment via de MyCam View app dit Marex systeem
bekijken, het Marex systeem staat tot 4 bezoeken op afstand via de App op hetzelfde tijdstip toe.
Quality Geeft de kwaliteit van het netwerk weer.
3. Druk op de omlaag knop naast een camera systeem in de lijst van geïnstalleerde systemen om een
nieuw menu te openen.
NL
Page 69
- 69
1. Reconnect Als de app geen verbinding (meer) heeft met uw Marex systeem kunt u hierop drukken om
de verbinding te herstellen.
Edit Device: Marex systeem instellingen en de geavanceerde instellingen kunt u in dit menu vinden. U
kunt de instellingen van uw Marex systeem zien met Device settings.
U kunt het password wijzigen (standaard: 000000), de video kwaliteit aanpassen (standaard: Min), en
de Waarschuwingsinterval (standaard: 3 min) aanpassen in het Advanced Settings (Geavanceerde instel-
lingen) menu.
View Event Selecteer dit om eerder opgenomen video’s te bekijken op uw smartphone of tablet. U
kunt naar opnames zoeken door een tijdsperiode te selecteren (binnen een uur, binnen een halve dag,
binnen een dag en binnen een week), of binnen een zelf gekozen periode.
NL
Page 70
- 70
View Snapshot: Selecteer dit om afbeeldingen te bekijken die u heeft genomen met de Snapshot
knop.
Remove Device Hiermee kunt u dit Marex systeem van de MyCam View app op uw smartphone of
tablet verwijderen
PROBLEEM & OPLOSSING
Er is vaak een simpele oplossing voor uw probleem. Probeer de volgende oplossingen:
Probleem Oplossing
Geen camerabeeld
1. Controleer of alle voedingsadapters zijn aangesloten.
2. Controleer of zowel de camera als ontvanger zijn
ingeschakeld.
3. Controleer of de ontvanger binnen het bereik is van de
camera.
4. Probeer de camera opnieuw te pairen met de monitor (zie
pagina 51).
Het camerabeeld valt weg
1. Plaats de ontvanger dichter bij de camera.
2. Probeer de camera, monitor of beiden te herpositioneren
om de ontvangst te verbeteren.
Problemen met het geluid
1. Verhoog het volume als er geen geluid is.
2. Controleer of er, binnen het bereik van de camera, geluid is.
3. Als de monitor erg ruist of piept, plaats deze dan verder van
de camera af.
Het beeld is schokkerig
Het beeld kan schokkerig worden wanneer er een lagere
framerate is (bijvoorbeeld 10 beelden per seconde in plaats
van de normale 25 beelden per seconde).
Plaats de monitor dichter bij de camera, probeer de camera of
monitor te herpositioneren om de ontvangst te verbeteren.
Opname problemen
1. Zorg dat de SD kaart correct geplaatst is in de SD kaart
opening.
2. Zorg dat er voldoende geheugen vrij is.
3. Zorg dat de capaciteit van de SD kaart compatibel is met
het systeem. Het systeem ondersteunt SD kaarten met een
geheugen tot en met 128GB.
NL
Page 71

Page 72
 Loading...